封面/封底背面不印刷内容
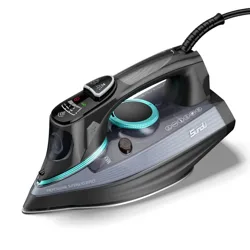
User Manual
1700W Steam Iron
TEMP
Thank you for purchasing the 1700w Steam lron. Please read this user
manual carefully and keep it for future reference. lf you need any assistance,
please contact our support team [email protected] with your product
model number and Amazon order number.
PACKAGE CONTENTS
SPECIFICATIONS
Sundu 1700W Steam lron
Cup
User Manual
Model
Voltage
Power
Watertank Capacity
Weight
Power Cord Length
Anti-Drip System
Anti-Calc System
LE-IR001
120V 60Hz
1700W
300ML
1.8kg
2.5m/8.2ft
Yes
Yes
- 01 -
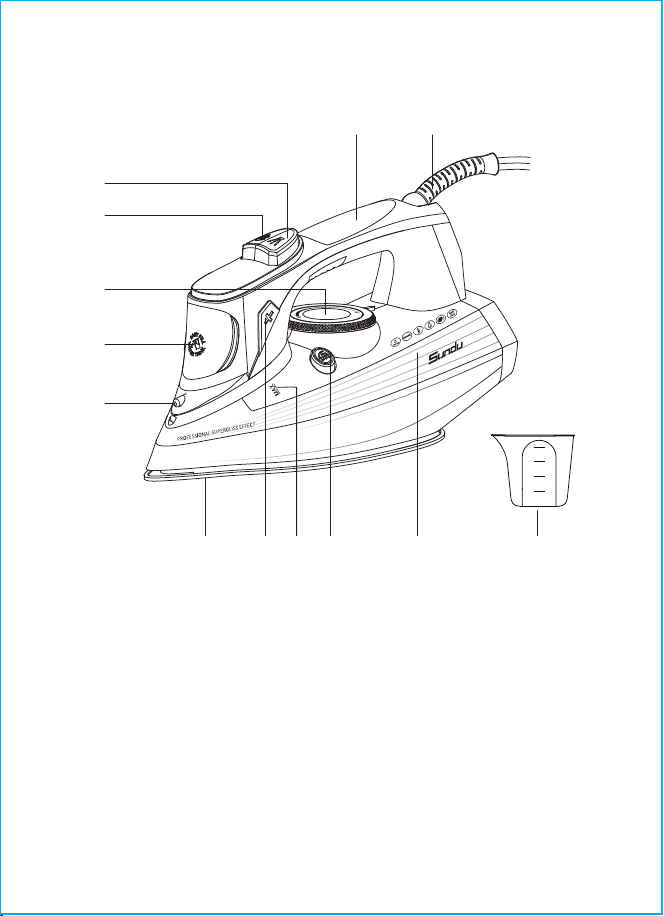
PRODUCT DIAGRAM
1.Water Spray Nozzle
2. Water Inlet Lid
3. Continuous Steam Supply Knob
4. Burst of Steam Button
5. Water Spray Button
6. Easy-grip Handle
7. Power Cord
8. Water Tank
9. Self-cleaning Button
10. "MAX" Water Level Mark
11. Temperature Control Button "+" "-"
12. Ceramic Soleplate
13. Measuring Cup
- 02 -
76
5
4
3
2
1
200ml
150ml
100ml
50ml
TEMP
8 131011 912
THE TEMPERATURE RANGES OF EACH GEAR ARE AS
FOLLOWS
"•": 70-120°C/158-248°F
"••": 100-160°C/212-320°F
"•••": 140-200°C/284-392°F
"MAX": 175-215°C/347-419°F
SAFETY MEASURES
Before using the unit, read this instruction manual carefully and keep it for future
reference.
Use the unit for its intended purpose only, as specified in this manual. Mishandling
the unit can lead to its breakage and cause harm to the user or damage to
his/her property.
Before switching the unit on, make sure that your home mains voltage
corresponds to the iron operating voltage.
The power cord is equipped with a plug and plugs into the socket with a
reliable grounding contact.
To avoid fire, do not use adapters for plugging the unit in.
To avoid mains overloading, do not switch on several electrical appliances with
high power consumption at a time.
●
●
●
●
OFF
MAX
MAX
Temperature Controller
OFF
Ready for Work Auto-shut off Dot 1
Dot 2 Dot 3 Max
- 03 -

Do not use the iron outdoors and in rooms with high humidity.
Place the iron on a flat stable surface or use a stable ironing board.
●
Do not use the iron after dropping, in case of visible damage or leakage.
This unit is not intended for usage by children under 8 years of age. Place the
unit out of reach of children under 8 years of age during the iron operation and
cooling down.
There may be water residue in the tank, this is normal, as the iron has
undergone factory quality control.
If the power cord is damaged, it should be replaced by the manufacturer a
maintenance service or similar qualified personnel to avoid danger.
Do not attempt to repair the unit. Do not disassemble the unit by yourself.
Transport the unit in the original package only.
Keep the unit out of reach of children and disabled persons.
●
●
●
●
●
●
●
●
●
●
●
●
●
●
●
●
●
●
●
●
●
●
Do not fill the water tank with scented liquids vinegar, starch solution, descaling
reagents chemicals etc.
Provide that the power cord is not on the ironing board and make sure that it
does not touch hot surfaces or sharp edges.
Do not leave the unit unattended. During breaks in operation put the iron in
vertical position.
Before plugging/unplugging the iron, set the temperature control to the
minimum position and switch the continuous steam supply off.
Always unplug the iron when you are not using it. Always take the power plug
out of the main socket before filling the water tank.
The water inlet lid should be closed during ironing.
To unplug the iron, always hold the power plug; do not pull the power cord.
To avoid electric shock, do not immerse the iron the power cord and the plug
into water or any other liquids.
Before taking the iron away, let it cool down completely and pour out the
remaining water. Pour out water from the water tank only after unplugging the iron.
Never leave the plugged-in iron unattended.
Clean the unit regularly.
Do not touch the unit body and the power plug with wet hands.
Do not allow children to touch the unit body and the power cord during the iron
operation.
Do not leave children unattended to prevent using the unit as a toy.
For children safety reasons do not leave polyethylene bags used as packaging
unattended.
Attention! The surfaces of the iron get hot during operation. Keep open skin
areas away from iron hot surfaces or outgoing steam to avoid burns.
Attention! Do not allow children to play with polyethylene bags or packaging film.
Danger of suffocation!
- 04 -
THE UNIT IS INTENDED FOR HOUSEHOLD USE ONLY, ITS COMMERCIAL
USAGE AND USAGE IN PRODUCTION AREAS AND WORKSPACES ARE
PROHIBITED.
Check the unit for damages; do not use the iron in case of damages.
Before switching the unit on, make sure that your home mains voltage
corresponds to the iron operating voltage.
Avoid contact of the iron soleplate with sharp objects.
There may be water residue in the tank, this is normal, as the iron has
undergone factory quality control.
Note:
While the first switching on the heating element of the iron burns, therefore
occurrence of foreign smell and a small amount of smoke is possible, it is normal.
●
●
●
●
Set the temperature control to the
OFF position and the continuous
steam supply knob to the leftmost
position—steam supply is off.
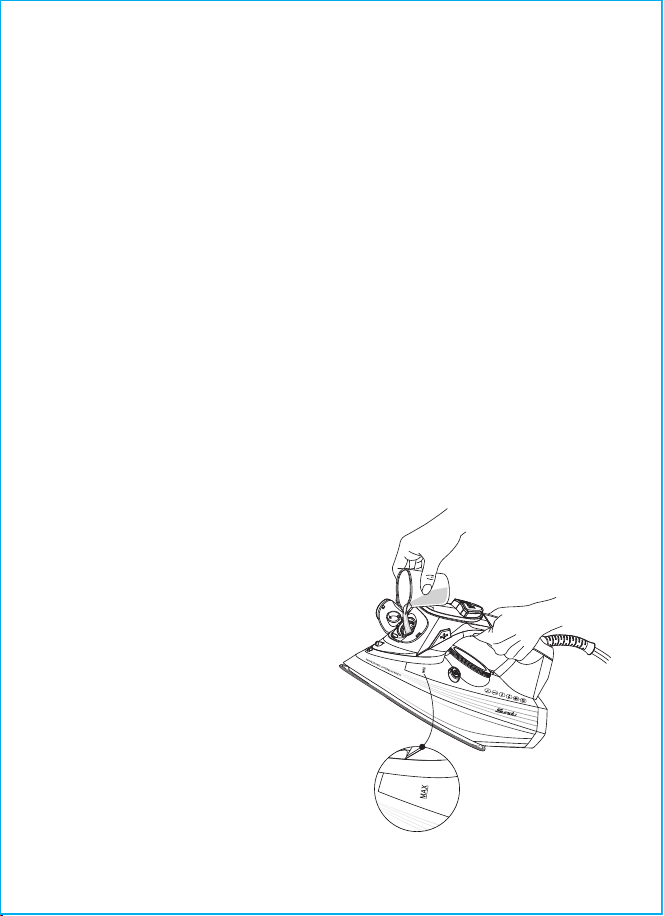
Open the water inlet lid.
Pour water into the water tank using
the cup and then close the lid tight.
Notes:
Do not exceed the"MAX" mark.
If you need to refill water during ironing,
switch the iron off and unplug it.
After you finish ironing, switch the
iron off, wait until it cools down
completely, then open the water inlet
lid, turn the iron over and drain the
remaining water.
●
●
●
●
●
●
- 05 -
BEFORE THE FIRST USE
After unit transportation or storage under cold(winter) conditions, it is necessary
to keep it for at least three hours at room temperature before switching on.
WATER SELECTION
Use tap water to fill the tank. If tap water is hard it is recommended to mix it with
distilled water in proportion 1:1, if tap water is too hard, mix it with distilled water
in proportion 1:2 or use distilled water only.
Note:
Do not fill the water tank with scented liquids, vinegar, starch solution, descaling
reagents, chemical agents etc.
FILLING THE WATER TANK
Before filling the iron with water make
sure that it is unplugged.
TEMP
TEMP
- 06 -
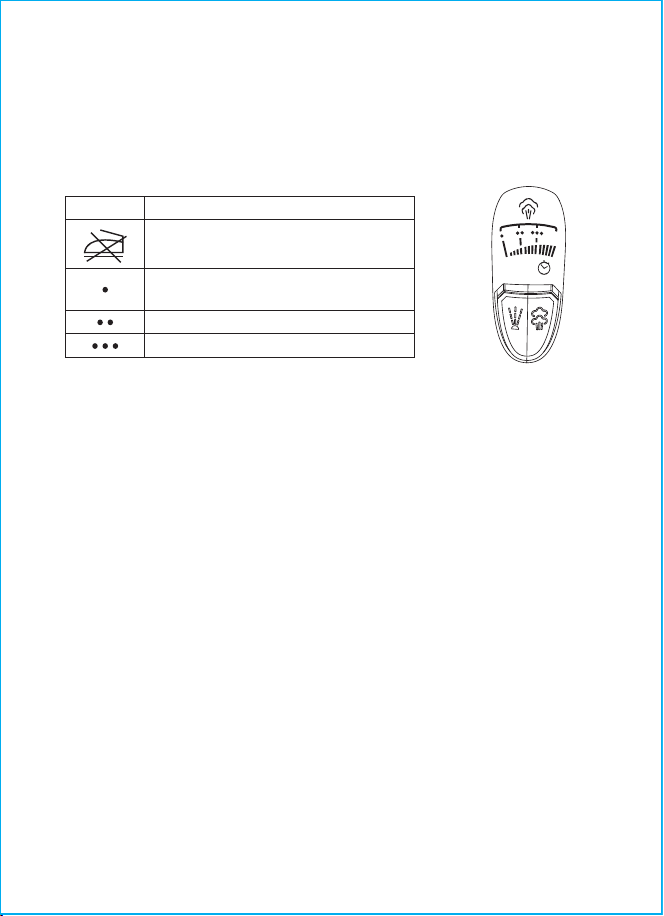
Always check the recommended ironing temperature indicated on the tag
before ironing.
If there is no tag with recommendations for ironing, but you know the type of
fabric, use the following table to determine the proper temperature.
●
●
This table is only valid for smooth materials Fabrics of other types(crimped,
raised) are best ironed at low temperature.
Sort items by ironing temperature first: synthetics to synthetics, wool to wool,
cotton to cotton etc.
The iron heats up faster than it cools down. For this reason, it is recommended
to begin ironing at low temperatures (for instance, synthetic fabrics). After that,
start ironing at higher temperatures (silk/wool). Cotton and linen items should
be ironed last.
If an item is made of mixed fabrics, the iron should be set to the lowest
temperature(for instance, if an item is 60% polyester and 40% cotton, it should
be ironed at the temperature used for polyester ironing "•".
If you cannot define the fabric structure, find a spot that is inconspicuous when
the item is being worn and selects the ironing temperature experimentally
(always start with the lowest temperature and raise it gradually until you get the
desired result).
Corduroy and other fabrics that become glossy quickly should be ironed strictly
in one direction (in the direction of the pile) with slight pressure.
To avoid the appearance of glossy spots on synthetic and silk fabrics, iron them
from backside.
●
●
●
●
●
●
●
IRONING TEMPERATURE
●
●
●
●
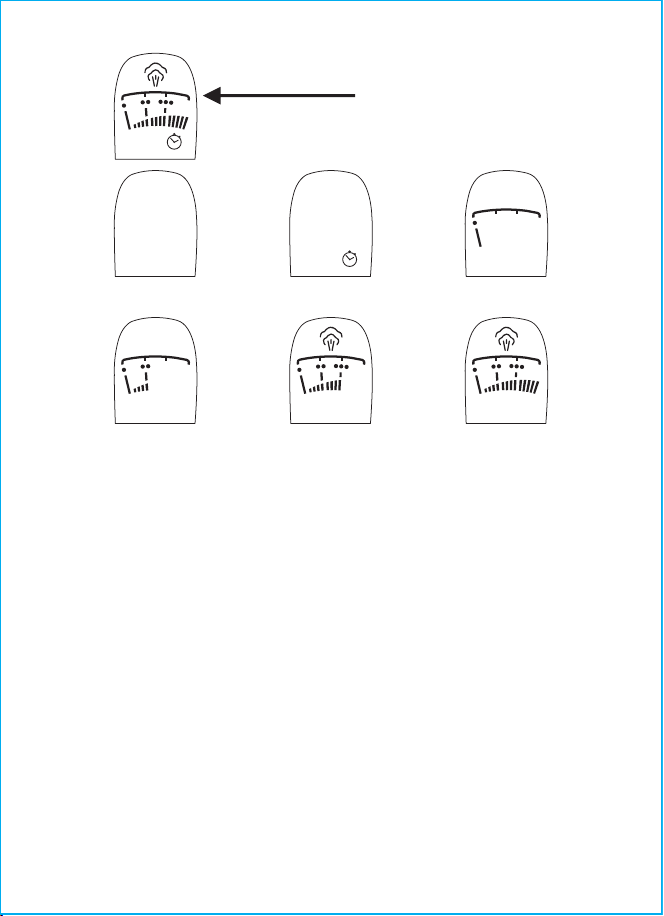
Place the iron vertically.
Insert the power plug into the main socket.
Press the "+" or "-" button to set the required ironing temperature "•", "••", "•••",
"MAX", depending on the type of fabric, the corresponding icon on the
temperature control display will flash.
Once the soleplate reaches the set temperature, the icon will keep lighting and
you can start ironing.
SETTING THE IRONING TEMPERATURE
Before operation test the heated iron on a piece of cloth to be sure that the iron
soleplate and the water tank are clean.
Signs Fabric type(temperature)
do not iron
synthetics,nylon, acryl, polyester
(low temperature)
silk/wool(medium temperature)
cotton/linen(high temperature)
OFF
MAX
●
●
You can dampen the fabric by pressing the spray button several times.
Make sure that there is enough water in the water tank.
WATER SPRAY
Place the iron on its vertically.
Set the continuous steam supply knob to the leftmost position- continuous
steam supply is off.
Insert the power plug into the main socket.
Make sure that there is enough water in the water tank.
Press the "+" button to set the required ironing temperature "MAX" or "...",
depending on the type of fabric, the corresponding icon on the temperature
control display will flash.
Once the soleplate reaches the set temperature, and the icon will keep lighting
and you can start ironing.
Turn the continuous steam supply knob to set the steam generation rate, steam
will start going out from the soleplate openings. The knob has two fixed positions
which allow controlling steam supply intensity. Move the knob to the right to
switch the steam supply on.
After you finish ironing, set it to the"OFF" position, and the continuous steam
supply knob to the leftmost position - steam supply is off.
Pull the power plug out of the main socket and let the iron cool down completely.
●
●
●
●
●
●
●
●
●
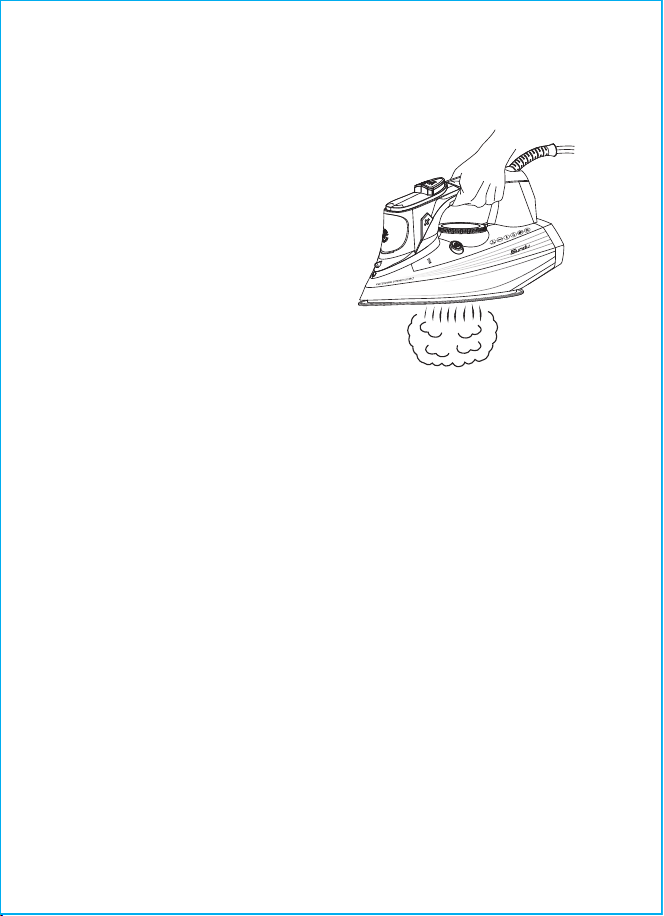
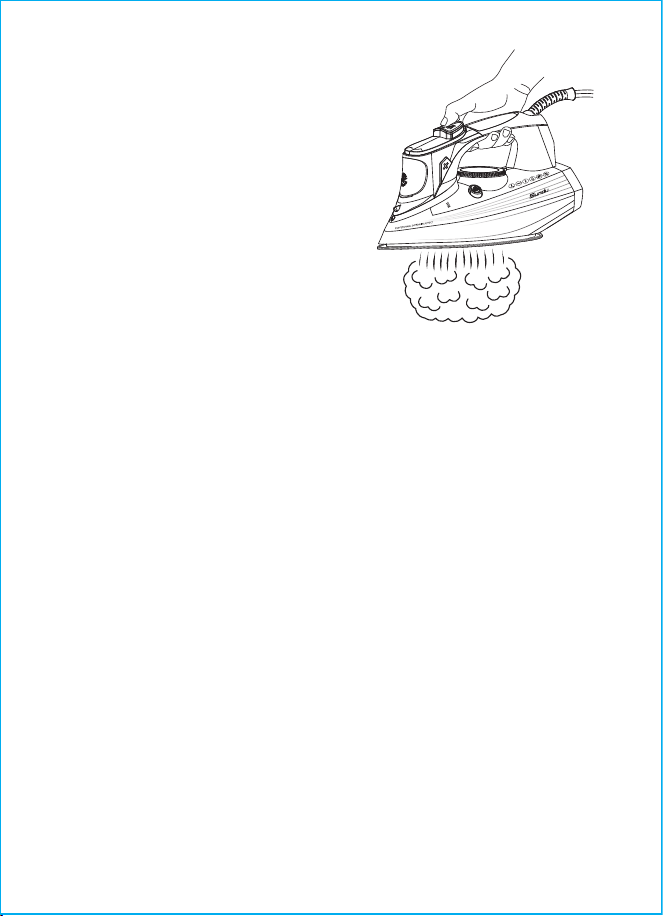
STEAM IRONING
While steam ironing, set the ironing
temperature "MAX" or "...", the steam
ironing section is marked with corres-
ponding symbols on the temperature
control display. The iron is designed
with an anti-drip function that stops
water supply if the soleplate
temperature is too low; this prevents
dripping from the soleplate
openings.
- 07 -
ATTENTION!
If steam is not supplied constantly during the operation, check whether the
temperature control is set properly and whether there is water in the water tank.
TEMP
With the anti-drip system, you can perfectly iron even the most delicate fabrics.
Always iron these fabrics at low temperatures. The plate may cool down to the
point where no more steam comes out, but rather drops of boiling water that can
leave marks or stains. In these cases, the Anti-drip system automatically
activates to prevent vaporization, so that you can iron the most delicate fabrics
without the risk of spoiling or staining them.
ANTI-DRIP SYSTEM
●
●
When pressing the burst of steam button,
steam will go out of the iron soleplate
more intensively.
Note:
To avoid water leakage from steam
openings, press the burst of steam
button with a 4s-5s interval. To avoid
dripping, do not hold the burst of steam
button longer than 3 seconds.
BURST OF STEAM
Do not use chemical additives, scented substances or decalcifiers. Failure to
comply with the above-mentioned regulations leads to the loss of guarantee.
●
ANTI-CALC SYSTEM
A special resin filter inside the water reservoir softens the water and prevents scale
build-up in the plate. The resin filter is permanent and does not need replacing.
Note:
- 08 -
The burst of steam function is useful for
ironing folds and can only be used at high
ironing temperatures (when the temperature
control display is set to the position "MAX").
TEMP
If the iron is left unused in upright position for 8 minutes, the red icon on LED
display will light, signaling that the iron has automatically shut off.
If the iron is left flatwise unused for 30 seconds, the iron will automatically shut off.
Move the iron back and forth on the fabrics to auto restart. The red icon will
light off and after achieving the sufficient temperature for you to continue ironing.
1.
2.
3.
AUTO SHUT OFF
●
●
●
●
●
●
●
●
●
●
●
●
Set the continuous steam supply knob to the
leftmost position—continuous steam supply is off.
Fill the water tank until it's filled.
Place the iron vertically.
Insert the power plug into the main socket.
Press the "+" button to set the maximum
soleplate temperature "•••", "MAX", and then the
corresponding icon on the temperature control
display will flash. Once the soleplate reaches the
set temperature, the icon will keep lighting and
you can start cleaning.
Hold the iron above the sink horizontally, press
CLEANING FUNCTION
To prolong service life of the iron, we recommend
cleaning the steam chamber regularly, especially in
regions with hard tap water.
- 09 -
TEMP
TEMP
TEMP
and hold down the clean button.
Boiling water and steam with scale will be released from the iron soleplate
openings.
Unplug the unit.
Slightly sway the iron back and forth, until water goes out of the water tank
completely. After some minutes release the cleaning button.
Place the iron vertically and let it cool down completely.
Once the soleplate cools down completely, wipe it with a dry cloth.
Plugin the power supply, select the "MAX" temperature, steam the remaining
water stains inside the solepalte and wait for no steam to emerge and the
cleaning is completed.

Before cleaning the iron, make sure that it is unplugged and has cooled down
completely
Clean the iron body with a slightly damp cloth and then wipe it dry.
Scale on the iron soleplate can be removed with a cloth soaked in vinegar-water
solution.
After removing scale, polish the soleplate sur-face with a dry cloth.
Do not use abrasive substances to clean the iron soleplate and body.
Avoid contact of the iron soleplate with sharp metal objects.
●
●
●
●
●
●
CLEANING AND CARE
Press the“-” button to the"OFF" position, and set the continuous steam supply
knob to the leftmost position- steam supply is off.
Unplug the unit.
Open the water inlet lid, turn the iron over and drain any remaining water from
the water tank.
Close the lid.
Put the iron vertically and let it cool down completely.
Keep the unit in a proper place.
●
●
●
●
●
●
STORAGE
For questions, support, or warranty claims, please contact our support team with
your product model number and order number.
Amazon US Orders: [email protected]
Please note, can only provide after-sales service for products purchased directly.
If you have purchased from a different seller, please contact them directly for
service or warranty issues.
WARRANTY & CUSTOMER SUPPORT
- 10 -
Model: LE-IR001
Shenzhen Lepower Electronic Co., Ltd.
3rd Floor, Building C, Shenli Industrial Park, Huaqing
Avenue, Qinghua Community, Longhua Street,
Longhua District, Shenzhen, China
5023693
