
Catalog language
English-------------------------------------------- 01
日本語-------------------------------------------- 09
Deutsch------------------------------------------- 17
Franpais-------------------------------------------25
Espana---------------------------------------------33
Italiano-------------------------------------------- 41

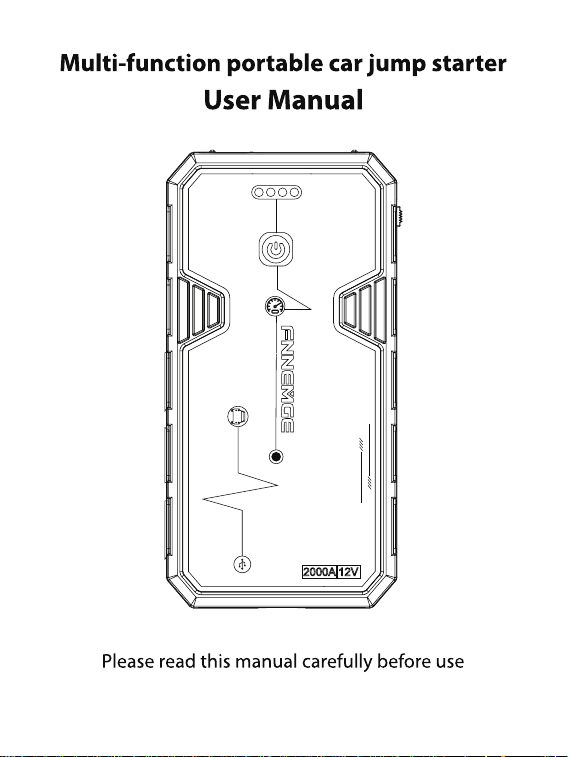
1

—
2
—
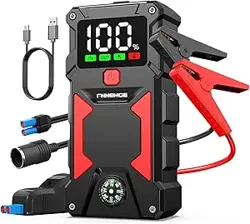
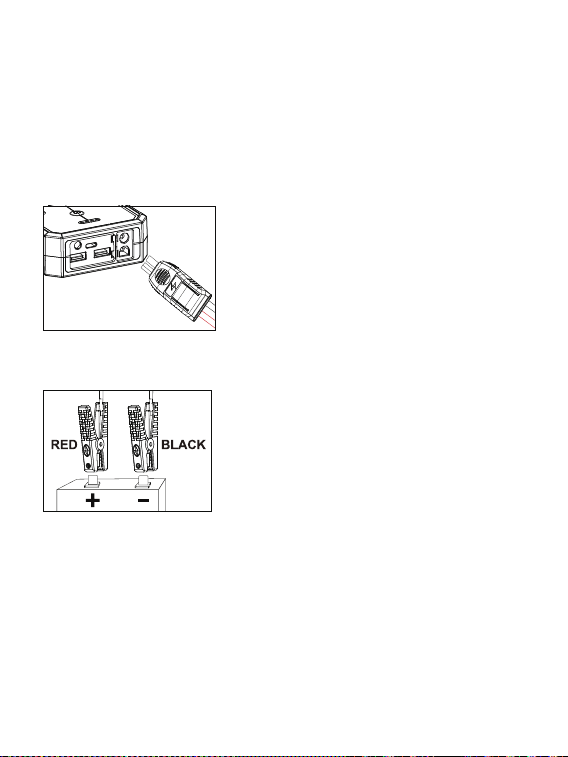
Function
Operation
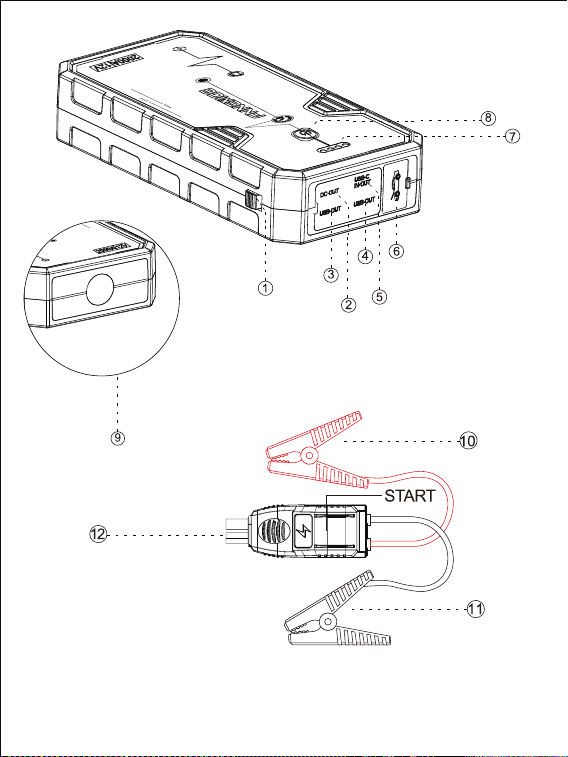
1
Power supply
Start ON/OFF
2
DC 12V/10A output
Charge the device
3 USB output port 1
It can correspond to the electronic devices such as
t
he Mobile phone, camera, tablet,etc.
4
USB output port 2
It can correspond to the electronic devices such as
the Mobile phone, camera, tablet, etc.
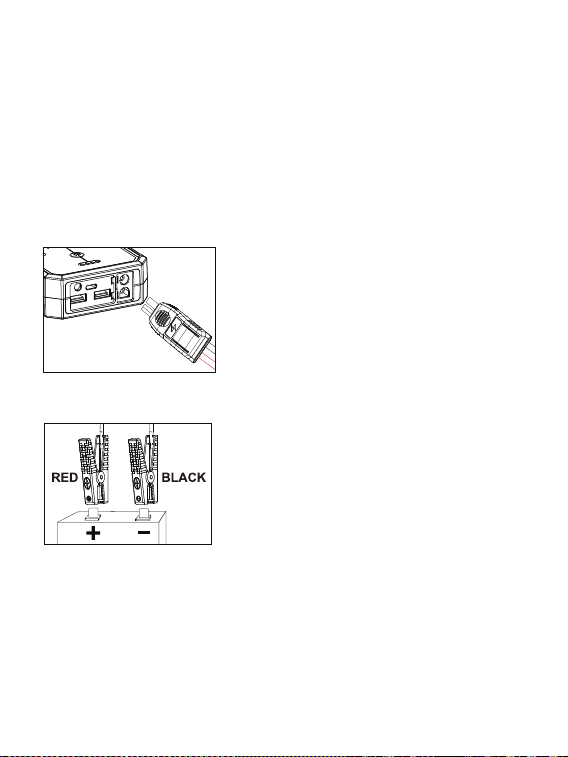
5
Type-C input port
Charge the jump starter
6
EC5 output port
Insert the plug into this port for connecting jump
starter(the terminal of the jump starter)
7
Battery power
indicator
Four LED lights indicate the battery power.
single lighting (25% remaining) , two lightings
(50% remaining ) , three lightings (75% remaining),
four lightings (100% remaining)
8
Power button
(also LED light switch)
• If you press this button, the remaining capacity
will be displayed
• Press this button to turn the flashlight on / off
• Once flashlight turns on, you can press the power
button to turn to another flashlight mode.
9
LED light
Lighting ,Strobe, SOS, warning
10
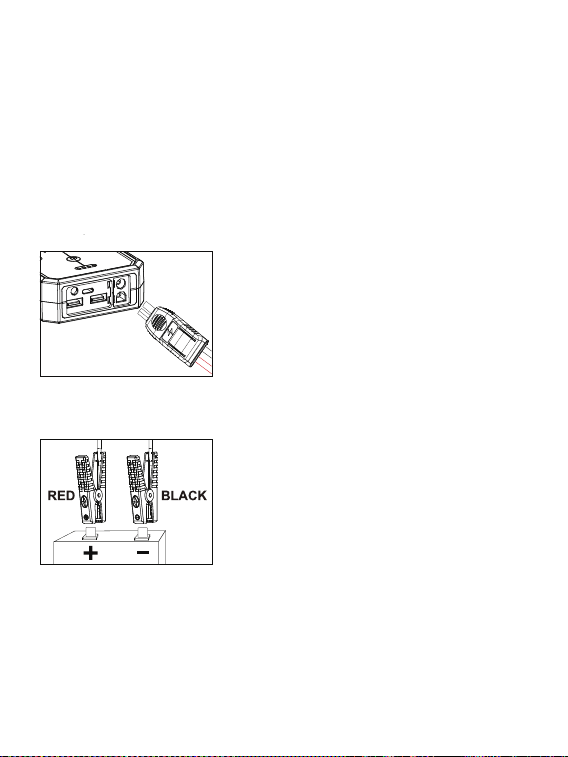
Red clip
Can connected to the positive electrode of the car
battery
11
Black clip
Can connect to the negative electrode of the car
battery
12
Smart IC cable
You can connect the jump starter by this plug

—
3
—
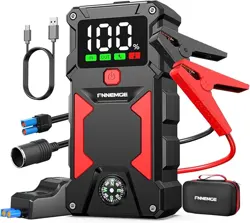
Specification:
Battery capacity
21800mAh,80.6Wh
Battery cycle life More than 500 times
Peak current 2000A
Starting current
100000 A
Starting output voltage 12V
DC output voltage 12V/10A
Type-C input voltage 5V/2A,9V/2A,12V/1.5A
USB terminal 1 output voltage 5V/3A,9V/2A,12V/1.5A
USB terminal 2 output voltage
5V/2.4A
Gas engine rating
up to 8.0L
Diesel engine rating
up to 6.5L
Working temperature -20℃~+70℃
LED power White: 1W
Charging time Type-C input: 4h-4.5h
Dimension 170
mm*86mm*34mm
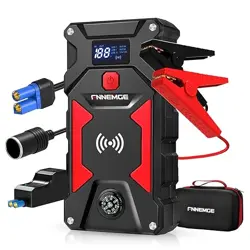
Battery Instruction
A remaining battery power display bar on the top
You can press the power button to know the remaining power.Percentage represents
the remaining battery
LED lighting 1 light 2 lights 3 lights
4 lights
Battery remaining
25%
50%
75%
100%

LED light instruction
1.Press the power button continuously for 3 seconds to turn on / off the flashlight.
2. In flashlight mode, you can press the power button to select from four modes
(usually flash, SOS, warning, lighting).
• The manufacturer has specific procedures and precautions related to the vehicle.
Please read the automatic manual first
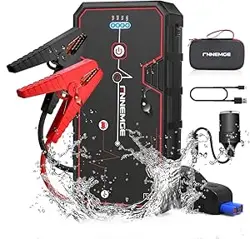
Precautions forUse:
When the emergency starting power supply of a car malfunctions, the
following are some possible troubleshooting steps::
.
• Before starting, ple
ase make sure to cut off the power supply of all electronic
equipments (radio, lighting, etc.) in the vehicle.
• Please make sure it is in a well ventilated place. Please do not start the vehicle in a
closed environment.
• Remove the moisture from the device, accessory and vehicle battery of the product
body. Never start the vehicle when it is wet.
• Ensure the battery port of the vehicle is not dirty and ensure the best electrical
conductivity.
• Before connecting the jump starte
r power supply, correctly identify the positive (+,
red) negative (-, black) of the vehicle battery.
• When using the jump starter cable, be careful that the metal teeth of the black clip
do not touch the red clip metal teeth.
— 4
• Please do not reverse the positive and negative electrode, if connected wrong, the
product or car will be damaged.
After sales service method:
If there are any abnormalities during the use of the product, please immediately
contact the following email address( [email protected]
)Contact us and our technical personnel will communicate with you in a timely
and patient manner. thanks
—
—5 —
When connecting the clamp to the battery terminal, please make sure the copper teeth
on both sides of the clamp are contact with the terminal well. The better the
connection, the smoother the start of the vehicle.
Tip:
If you want to adjust the dip, Please remove the jump starter first. This can
prevent spark.
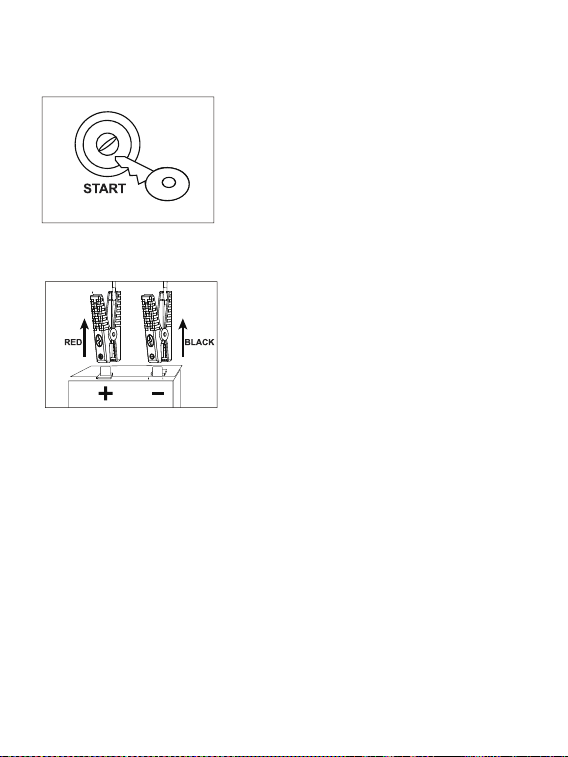
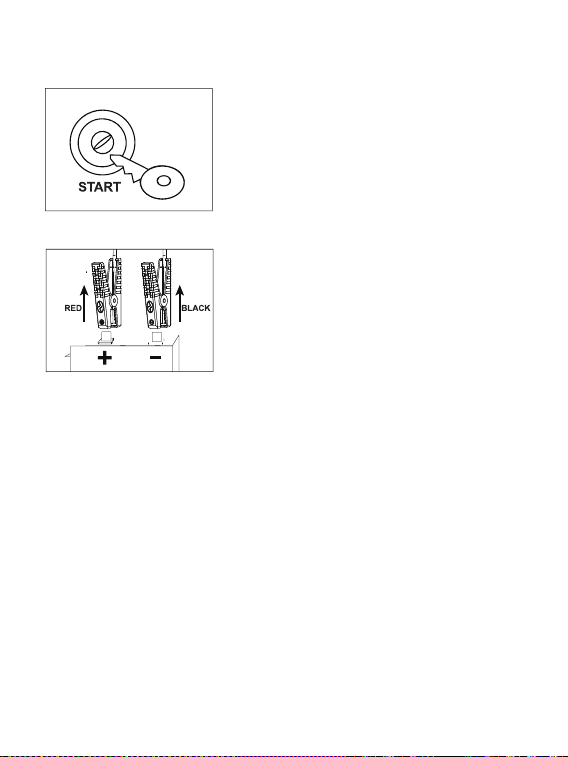
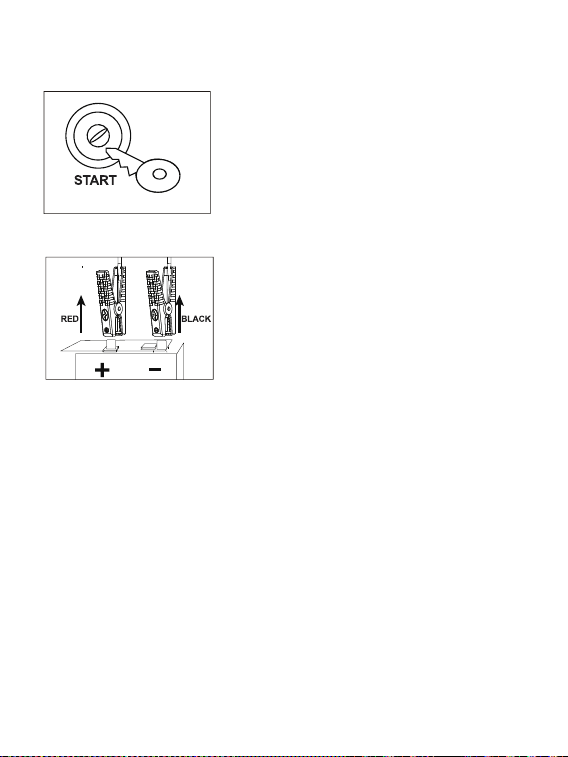
How to start :
1. After the battery clamp plug is fully inserted in and connected, The red and green
lights will flash alternately.
2. Connect the red clip to the positive
ele
ctrode of the car battery and the black clip to
the negative electrode. The green light is always on.
—
6
—
3. Start jumping. If the engine can not be started on the first try, please remove the
jumper from the battery on the vehicle, and re-try at least 20 seconds later.
4.Once the engine been started, please remove the clip within 30 seconds.

—
7
—
LED indicator :
LED status
working condition
The (traffic)red/green light
flash alternately
Discharge preparation
gThe reen light is always on
Jump starter is quickly discharging
The red light is always
on(warning)
•Please confirm whether both red and black
clips are connected well (short circuit).
•Please check if the positive (red) electrode
and negative (black) electrode connection are
reversed.
The red light flashes
The jumper starter is in low power and
needs to be charged in time

—
8
—
C
Warranty& Contact US
E-Mail: [email protected]
aution
Please read the manual before using this product. If the product is not used
properly, It may cause product damage, overheating, toxic diffusion,fire or
explosion, and our company will not responsible for it.
•Please don’t immerse the jump starter in water or put in rain or humid place.
•Do not open or remove the jump starter. May be damaged.
•Do not contact with fire, hot or flammable liquids.
•It can be used in hot summers and cold winters. The working temp
erature is
-20 ° C to
+ 70
0
C.
•Do not reverse the positive and negative electrode.Otherwise, the product and car may
damaged.
•After use, please disconnect the cable from the jump starter.
•Please confirm that the battery capacity of the jump starter exceeds 75% before starting
the car.
•Please keep it out of the children's reach.
•Do not insert foreign things into the input or output port.
•Please do not let the red and black clips touched, it will leads to short circuit.
•The p
roduct sto
rage time is more than 3 months. If it is not used for a long time,please
f
Our company provides customers with warranty of 24 months from the date of purchase.
For additional assistance or warranty cover claim, please contact us.
ull charge it at least one time within 3 months.
—9 —

—10 —
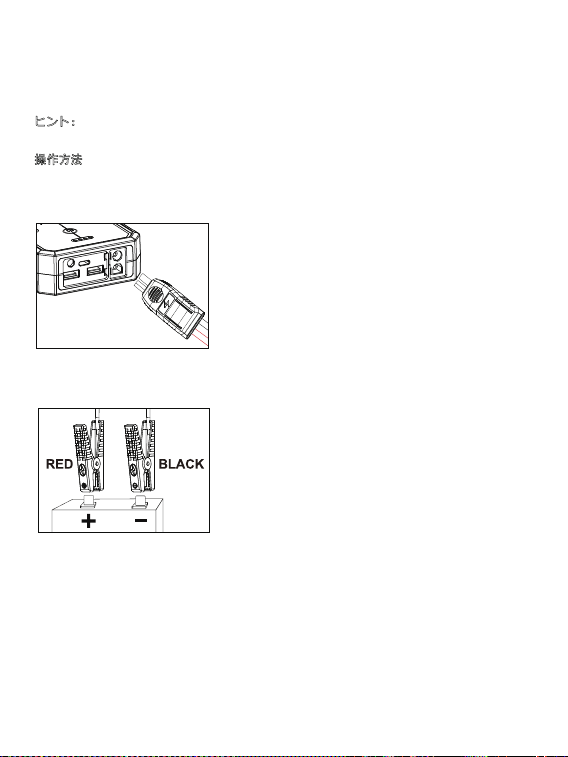
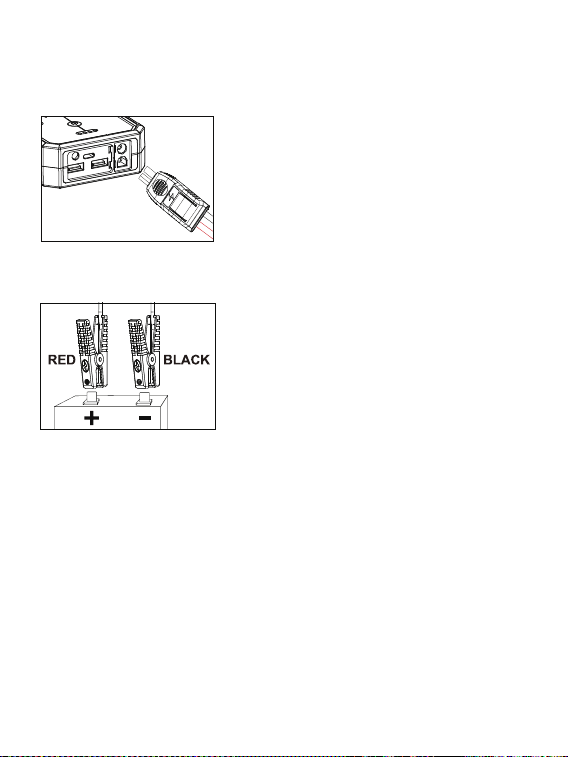
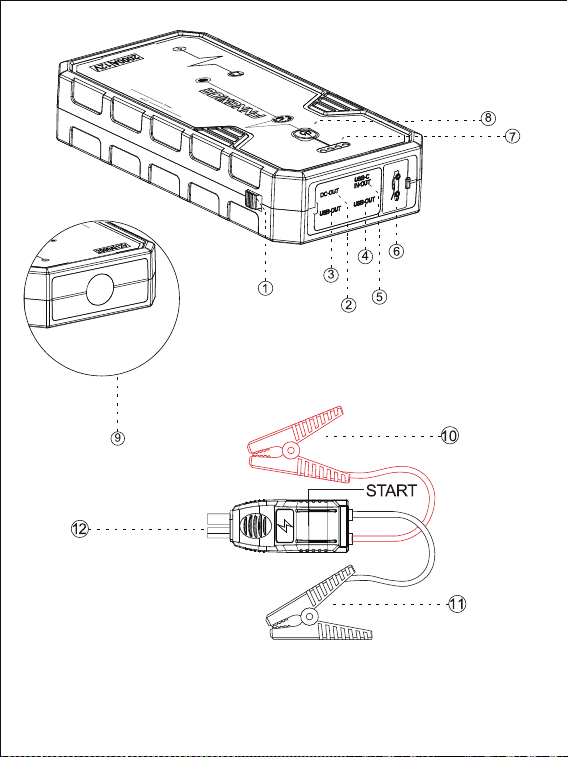
機能
オペレーティング
1
電源
起動
ON/OFF
2
DC 12V / 10A 出力
デバイスを充電する
3
USB 出力ポート 1
携帯電話、カメラ、タブレットなどの電子機器に対
応できます。
4
USB
出力ポート
2
携帯電話、カメラ、タブレットなどの電子機器に対
応できます。
5
Type-C
入力ポート ジャンプスターターを充電する
6
EC5
出力ポート
ジャンプスターター(ジャンプスタ ーターの端子)
を接続するために、この ポートにプ ラグを挿入しま
す
7
バッテリー電源イン
ジケーター
4 つの LED ライトはバッテリー電源を示します。
1 つの照明(残り25%)、2 つの照明(残り50%)、
3 つの照明(残り75%)、4つの照明(残り100%)
8
電源スイッチ
(
LED
ライトスイッ
チでもあります)
•このボタンを押すと、残り容量が表示されます
•このボタンを押して、懐中電灯をオン/オフにしま
す
•
懐中電灯がオンになったら、電源ボタンを押して別
の懐中電灯モードに切り替えることができます。
9
LED ライト
照明、ストロボ、SOS、警告
10
赤いワイヤークリップ カーバッテリーの正極に接続可能
11
黒のクリップ カーバッテリーの負極に接続できます
12 スマート IC ケーブル このプラグでジャンプスターターを接続できます

—11—
商品特徴
電池容量
21800mAh,80.6wh
電池循環利用寿命
500 回以上
ピーク電流 2000A
起
動電流
100000 A
始
動出力電圧
12V
DC
出力電圧
12V/10A
Type-C 入力電圧
5V/2A,9V/
2A,12V/1.5A
USB
端子
1
出力電圧
5V/3A,9V/2A,12V/1.5A
USB
端子
2
出力電圧
5V/2.4A
ガ
スエンジンの評価 最大 8.0L
デ
ィーゼルエンジンの評価 最大 6.5L
使用温度
-20°C~+70°C
LED 電源
白:1W
充電時間
Type-
C
入力:4h~4.5h
寸法 170mm* 86mm *34 mm
バッテリーの説明
上部のバッテリー残量表示バー
電源ボタンを押すと、残りの電力を確認できます。 パーセンテージはバッテリーの
残量を表 します
LED ライト
1
灯
2
灯
3
灯
4
灯
電池残量
25%
50%
75%
100%

—12 —
LED ライトの指示
1.電源ボタンを 3 秒間押し続けて、懐中電灯のオン/オフを切り替えます。
2.懐中電灯モードでは、電源ボタンを押して 4 つのモード(通常はフラッシュ、SOS、警告、
照明)から選択できます。
使
用上の注意
:
スムーズに発進するために、以下の点にご注意ください。
•メーカーには、車両に関連する特定の手順と予防措置があります。 まずは車両マニュアル
をお読みください。
•始動する前に、車両内のすべての電子機器(ラジオ、照明など)の電源を必ず遮断してくだ
さい。
•換気の良い場所にあることを確認してください。 密閉された環境で車両を始動しないでく
ださい。
•製品本体のデバイス、アクセサリ、および車両のバッテリーから水分を取り除きます。 濡
れた状態で車両を始動しないでください。
•車両のバッテリーポートが汚れていないことを確認し、最高の電気伝導率を確保します。
•ジャンプスターター電源を接続する前に、車両バッテリーのプラス(+、赤)、マイナス(-、
黒)を正しく識別してください。
•ジャンプスターターケーブルを使用するときは、黒いクリップの金属の歯が赤いクリップの
金属の歯に触れないように注意してください。
•正極と負極を逆にし
ないでください。接続を間違えると、製品や車が破損します。
—13 —
クランプをバッテリー端子に接続するときは、クランプの両側の銅の歯が端子にしっかりと
接触していることを確認してください。 接続が良好であればあるほど、車両の始動はスムー
ズになります。
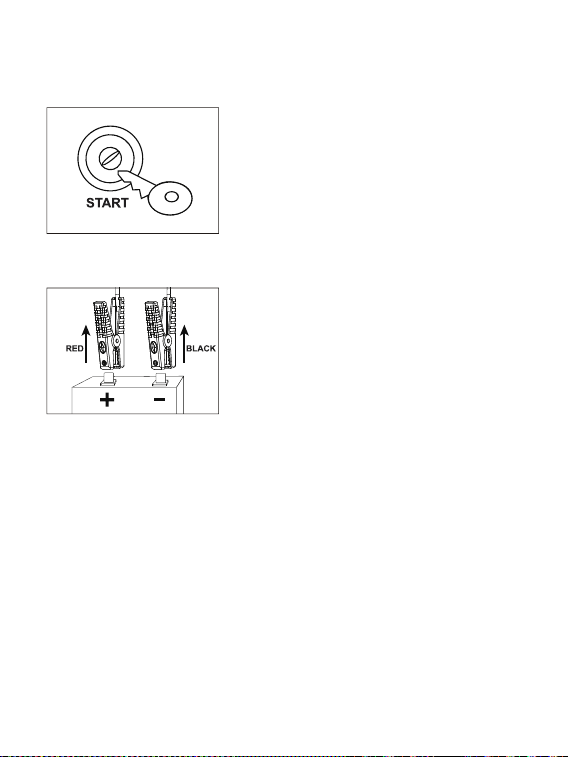
ヒ
ント:ディップを調整する場合は、最初にジャンプスターターを取り外してください。 こ
れにより、火花を防ぐことができます。
操
作方法
1.バッテリークリッププラグを完全に挿入して接続すると、赤と緑のインジケ
ーターライトが交互に点滅します。
2.赤いクリップをカーバッテリーの正極に接続し 、黒いクリップを負極に接続
します。 緑色のライトは常に点灯しています。

—14 —
3.ジャンプを開始します。 最初の試行でエンジンを始動できない場合は、車両
のバッテリーからジャンパーを取り外し、少なくとも 20 秒後に再試行してく
ださい。
4.エンジンが始動したら、30 秒以内にクリップを取り外してください。

—15 —
LED インジケータ :
LED ステータス
労
働条件
(トラフィック)赤/緑のライト
が交互に点滅します
放
電準備
緑色のライトは常に点灯してい
ます
ジ
ャンプスターターが急速に放電している
赤信号は常に点灯しています
(警告)
•赤と黒のクリップが正しく接続されているかどうか
を確認してください(短絡)。
•正極(赤)と負極(黒)の接続が逆になっていない
か確認してください。
赤いライトが点滅します
ジ
ャンパースターターは低電力であり、時間内に充電
す
る必要があります

—16 —
注意
本製品を使用する前に、取扱説明書をお読みください。本製品を正しく使用し
ないと、製品の損傷、過熱。
・初回起動前に、ジャンプスターターのバッテリー容量が80%以上であることを
確認してください。もし初回起動に失敗した場合は、ジャンプスターターのバッ
テリー容量を確認し、90%以上に充電してください。
・ジャンプスターターを水に浸したり、雨や湿気の多い場所に置かないでください。
・ジャンプスターターを開いたり、取り外したりしないでください。破損する
恐れがあります。
・火、高温または可燃性の液体に触れないでください。
・暑い夏と寒い冬に使用できます。使用温度は-20℃から+70℃です。
・正極と負極を逆にしないでください。逆にすると、製品や破損する恐れがあります。
・使用後は、ジャンプスターターからケーブルを外してください。
・お子様の手の届かない場所に保管してください。
・入力ポートまたは出力ポートに異物を挿入しないでください。
・赤と黒のクリップに触れないでください。短絡の原因になります。
・製品の保管期間は3ヶ月以上です。長期間使用しない場合は、3ヶ月以内に1回
以上フル充電してください。
保証とお問い合わせ
当社では、ご購入日より24ヶ月の保証をお客様に提供しています。追加のサポー
トまたは保証カバーの請求については、当社までお問い合わせください。
Eメール:[email protected]

—17—

—18 —
Funktion Betrieb
1
Stromversorgung Start EIN / AUS
2
DC 12V/10A Ausgang Laden Sie das Gerät auf
3
USB Ausgang 1
Es kann den elektronischen Geräten wie
Mobiltelefon, Kamera, Tablet usw. Entsprechen.
4
USB Ausgang 2
Er kann den elektronischen Geräten wie
Mobiltelefon, Kamera, Tablet usw. entsprechen.
5
Eingang Typ C Laden Sie den Starthilfe auf
6
Ausgang EC5
Stecken Sie den Stecker in die Klemme des
Sprungstarters
7
Durchgang der
Batterieladung
Vier LED-Leuchten deuten auf
die verbliebene
Batterie hin.Einzellicht(25% Restlicht)
Zweilicht(50% Restlicht)drei Leuchten(75%
Restlicht) ), vier Beleuchtung(100% Restlicht
8
Schaltknopf (auch
LED-Lichtschalter)
• Wenn Sie diesen Knopf drucken, wird die
verbleibende Kapazitat angezeigt.
• Drucken Sie diesen Knopf, um die
Taschenlampe auszuschalten
• Wenn die Taschenlampe eingeschaltet ist,
drucken Sie die Taste, um eine Taschenlampe
zu werden
9
LED Licht
Beleuchtung, Blitz, SOS, Warnung
10
Roter clip
Kann an die positive Terme der Autobatterie
angeschlossen werden
11
Schwarzer clip
Kann an die negative Elektrode der Autobatterie
angeschlossen werden
12
Smart IC Kabel
Sie konnen diesen Stecker an den Sprungstarter
anschlieBen

—
19
—
Spezifikation:
Kapazitat der Batterie
21800mAh,80.6Wh
Lebensdauer der Batterie
Mehr als 500-mal
peak current
2000A
Strom starten
100000 A
Ausgangsspannung starten
12V
Ausgangsspannung DC
12V/10A
Typ Eingangsspannung
5V/2A,
9V
/2A,12V/1.5A
USB-Anschluss 1 Outout Spannung
5V/3A,9V/2A,12V/1.5A
USB-Anschluss 2 Outout Spannung
5V/2.4A
Rating der Gasmotoren
Bis 8.0L
Rating des Dieselmotors
Bis 6.5L
Temperatur der Arbeit
-20 ℃ ~ + 70 ℃
LED Leistung
Weifi: 1W
Zeit des Ladens
PEC Eingang: 4h-4.5h
Abmessungen
170mm*86mm*34mm
Batterieanleitung
Eine verbleibende Batterieleistungsanzeige oben
Sie können den Netzschalter drücken, um die verbleibende Leistung zu ermitteln. Der
Prozentsatz entspricht der verbleibenden Batterie
LED Beleuchtung
1 Licht
2 Lichter
3 Lichter
4 Lichter
Zulage fur Batterien
25%
50%
75%
100%

—20 —
LED-Lichtanweisung
1. Drücken Sie den Netzschalter 3 Sekunden lang ununter brochen, um die
Taschenlampe ein- und auszuschalten.
2. Im Taschenlampenmodus können Sie den Netzschalter dr ücken, um
zwischen vier Modi zu wählen (normalerweise Blitz, SOS, War nung,
Beleuchtung).
Vorsichtsmaßnahmen für die Verwendung:
Umdas Auto reibungslos zu starten, beachten Sie bitte folgende Punkte:
• Der Hersteller verfügt über spezifische Verfahren und vorbeugende Maßnahmen in
Bezug auf das Fahrzeug. Bitte lesen Sie zuerst das Fahrzeughandbuch.
• Stellen Sie vor dem Start sicher, dass die Stromversorgung aller elektronischen
Geräte (Radio, Beleuchtung usw.) im Fahrzeug unterbrochen ist.
• Bitte stellen Sie sicher, dass es an einem gut belüfteten Ort ist. Bitte starten Sie das
Fahrzeug nicht in einer geschlossenen Umgebung.
• Entfernen Sie die Feuchtigkeit von Gerät, Zubehör und Fahrzeugbatterie der
Produktkarosserie. Starten Sie das F
ahrzeug niemals, wenn es nass ist.
• Stellen Sie sicher, dass der Batterieanschluss des Fahrzeugs nicht verschmutzt ist
und sorgen Sie für die beste elektrische Leitfähigkeit.
• Identifizieren Sie vor dem Anschließen der Starthilfe das positive (+, rote) Minus (-,
schwarz) der Fahrzeugbatterie korrekt.
• Achten Sie bei Verwendung des Starthilfekabels darauf, dass die Metallzähne des
schwarzen Clips die Metallzähne des roten Clips nicht berühren.
• Bitte vertausch
en Sie die positive und negative Elektrode nicht. Wenn sie falsch
angeschlossen sind, wird das Produkt oder das Auto beschädigt.
Stellen Sie beim Anschließen der Klemme an die Batterieklemme sicher, dass die
Kupferzähne auf beiden Seiten der Klemme Kontakt mit der Klemmenvertiefung
haben. Je besser die Verbindung, desto reibungsloser der Start des Fahrzeugs.
Tipp: Wenn Sie die Neigung einstellen möchten, entfernen Sie bitte zuerst den
Starthilfe. Dies kann Funkenb
ildung verhindern.
—21 —
Verfahren der Verwendung
1. Nachdem der Batterieclip-Stecker vollständig eingesteckt und angeschlossen ist,
blinken die roten und grünen Anzeigelampen abwechselnd.
2. Verbinden Sie den roten Clip mit der positiven Elektrode der Autobatterie und den
schwarzen Clip mit der negativen Elektrode. Das grüne Licht ist immer an.
—22 —
3. Beginnen Sie zu springen. Wenn Sie den Motor beim ersten Versuch nicht starten
können, entfernen Sie die Brücke aus der Fahrzeugbatterie und versuchen Sie es nach
mindestens 20 Sekunden erneut.
4. Entfernen Sie nach dem Starten des Motors den Clip innerhalb von 30 Sekunden.

—
23
—
LED-Anzeige fur die Stromversorgung:
Status der LED
Zustand der Arbeit
Das (Verkehrs-) rot / grüne
Licht blinkt abwechselnd
Vorbereitung der Entladung
Das griine Licht schaltet
sich
immer ein
Starthilfe entlädt sich schnell
Das rote Licht ist immer an
(Warnung)
• Bitte überprüfen Sie, ob sowohl rote als auch
schwarze Clips richtig angeschlossen sind
(Kurzschluss).
• Überprüfen Sie, ob die positive (rote)
Elektrode
und die negative (schwarze)
Elektrodenverbindung vertauscht sind.
Das rote Licht blinkt
Der Jumper-Starter befindet sich in einem
Energiesparmodus und muss rechtzeitig
aufgeladen werden

—24 —
V
Garantie & Kontakt
orsicht
Bitte lesen Sie das Handbuch, bevor Sie dieses Produkt verwenden. Wenn das
Produkt nicht ordnungsgemäß verwendet wird, kann es zu Produktschäden,
Überhitzung, giftiger Diffusion, Feuer oder Explosion führen, und unser
Unternehmen ist nicht dafür verantwortlich.
• Bitte tauchen Sie den Starthilfe nicht in Wasser und stellen Sie ihn nicht an einen
regnerischen oder feuchten Ort.
• Öffnen oder entfernen Sie den Starthilfe nicht. Kann beschädigt werden.
• Nic
ht mit Feuer, heißen oder brennbaren Flüssigkeiten in Berührung kommen.
• Es kann in heißen Sommern und kalten Wintern verwendet werden. Die
Arbeitstemperatur beträgt -20 ° C bis + 70 ° C.
• Die positive und negative Elektrode nicht umkehren. Andernfalls können das Produkt
und das Fahrzeug beschädigt werden.
• Trennen Sie nach Gebrauch das Kabel vom Starthilfe.
• Bitte bestätigen Sie vor dem Starten des Fahrzeugs, dass die Batteriekapazität des
Starthilfes 75% übersch
r
eitet.
• Bitte bewahren Sie es außerhalb der Reichweite von Kindern auf.
• Stecken Sie keine Fremdkörper in den Eingangs- oder Ausgangsanschluss.
• Bitte lassen Sie die roten und schwarzen Clips nicht berühren, da dies zu einem
Kurzschluss führen kann.
• Die Produktlagerzeit beträgt mehr als 3 Monate. Wenn es längere Zeit nicht verwendet
wird, la
Wir bieten Kunden eine Garantie von 24 Monaten ab Kaufdatum . Für weitere
Unterstützung oder Garantieansprüche wenden Sie sich bitte an uns.
E-Mail : [email protected]
den Sie es bitte mindestens einmal innerhalb von 3 Monaten vollständig auf.
—25 —

—26 —
Fonctions Manipuler
1
Alimentation electrique D6marrage / fermeture
2
DC 12V/10A output Recharger un appareil
3
Port de sortie USB 1
Il peut correspondre aux appareils
électroniques
tels que le téléphone portable,
l'appareil
photo, la
tablette, etc.
4
Port de sortie USB 2
Il peut correspondre aux appareils
électroniques
tels que le téléphone portable,
l'appareil photo, la tablette, etc.
5
Port d'entrée de type C Chargez le démarreur de saut
6
Port de sortie ec5
Insertion
d 'une fiche dans une bome d' un
demarreur a jonction
7
Indicateur de puissance
de
la batterie
Quatre voyants LED indiquent la puissance
de la
batterie.
éclairage unique(25% restants),deux éclairages
(50% restants), trois éclairages (75% restants),
quatre éclairages (100% restants)
8
Bouton d'alimentation
(Interrupteur d'éclairage à
LED)
•Si vous appuyez sur ce bouton, la capacit6
restante sera affich6e.
•Appuie sur ce bouton pour allumer/ 6teindre la
lampe de poch
e
• Une fois la lampe de poche allumée, vous
pouvez appuyer sur le bouton d'alimentation
pour passer à un autre mode de lampe de
poche.
9
Lumière LED
Éclairage, stroboscope, SOS, avertissement
10
Pince rouge
Peut être connecté à l'électrode positive de la
batterie de voiture
11
Pince noire
Peut se connecter à l'électrode négative de la
batterie de voiture
12 Câble IC intelligent
Vous pouvez connecter le démarreur de saut par
cette prise

—
27
—
Spécification:
Capacity de batterie
21800mAh,80.6Wh
Dur6e de vie des batteries
Plus de 500 fois
Courant de pointe
2000A
Courant de d6marrage
100000
A
Tension de dOmarrage
12V
DC output voltage
12V/10A
Tension d 'entree de type C
5V/2A,9V/2A,12V/1.5A
Tension de sortie de la borne USB 1
5V/3A.9V/2A.12V/1.5A
Tension de sortie de la borne USB2
5V/2.4A
Valeur nominale d 'un moteur a gaz
jusqu'à 8.0L
Valeur nominale d 'un moteur diesel
jusqu'à 6.5L
Temperature de fonctionnement
-20℃~+70℃
Alimentation a del
Blanc: 1W
Temps de charge
Entrée de type C: 4h-
4.5h
Dimension
170mm*86mm*34mm
Instruction de la batterie
Une barre d'affichage de la puissance restante de la batterie sur le dessus
Vous pouvez appuyer sur le bouton d'alimentation pour connaître la puissance
restante. Le pourcentage représente la batterie restante
Éclairage LED
1 lumière
2 lumières
3 lumières
4 lumières
Batterie restante
25%
50%
75%
100%

—
2
8
—
Instructiondelumière LED
1. Appuyez sur le bouton d'alimentation en continu pendant 3 secondes pour allumer /
éteindre la lampe de poche.
2. En mode lampe de poche, vous pouvez appuyer sur le bouton d'alimentation pour
sélectionner parmi quatre modes (généralement flash, SOS, avertissement, éclairage).
Précautions d'emploi:
Afin de démarrer la voiture en douceur, veuillez prêter attention aux
points suivants
:
• Le constructeur dispose de procédures spécifiques et de mesures préventives liées au
véhicule. Veuillez d'abord lire le manuel du véhicule.
• Avant de démarrer, assurez-vous de couper l'alimentation électrique de tous les
équipements électroniques (radio, éclairage, etc.) du véhicule.
• Veuillez vous assurer qu'il se trouve dans un endroit bien ventilé. Veuillez ne pas
démarrer le véhicule dans un environnement fermé.
• Éliminez l'humidité de l'appareil, de l'accessoire et de la batterie du véhicule de la
carros
serie du produit. Ne démarrez jamais le véhicule lorsqu'il est mouillé.
• Assurez-vous que le port de batterie du véhicule n'est pas sale et assurez la meilleure
conductivité électrique.
• Avant de connecter l'alimentation du démarreur de saut, identifiez correctement le
négatif positif (+, rouge) (-, noir) de la batterie du véhicule.
• Lorsque vous utilisez le câble de démarrage, veillez à ce que les dents métalliques du
clip noir ne touchent pas les dents métalliques du
clip rouge.
• Veuillez ne pas inverser l'électrode positive et négative, si elle est mal connectée, le
produit ou la voiture sera endommagé.
Lors de la connexion du clip de fil à la borne de la batterie, assurez-vous que les dents en
cuivre des deux côtés du clip de fil sont en bon contact avec la borne. Plus la
connectivité est bonne, plus le démarrage du véhicule est fluide.
Conseil: si vous souhaitez régler l'angle d'inclinaison, veuillez d'abord retirer le
démarreur. Cela évitera les étincelles.
Methode d 'utilisation
1.Une fois que la fiche du clip de batterie est complètement insérée et connectée, les
voyant
s rouges et verts clignotent en alternance.
2. Connectez le clip rouge à l'électrode positive de la batterie du véhicule et le clip noir à
l'électrode négative. Le feu vert est toujours allumé.
—
29
—
—30—
3. Commencez à sauter. Si le moteur ne peut pas être démarré du premier coup, veuillez
retirer le cavalier de la batterie du véhicule et réessayer au moins 20 secondes plus tard.
4. Une fois le moteur démarré, veuillez retirer le clip dans les 30 secondes.

—31—
Indicateur LED:
État de la LED
Condition de travail
Le voyant rouge / vert
(trafic)
clignote en alternance
Preparation de decharge
Le feu vert est toujours
a
llume.
Le démarreur de saut se décharge rapidement
L
e voyant rouge est toujours
a
llumé (avertissement)
• Veuillez confirmer si les clips rouge et noir
sont
bien connectés (court-circuit).
• Veuillez vérifier si l'électrode positive (rouge)
et
la connexion d'électrode négative (noire) sont
inversées.
Le voyant rouge clignote
Le démarreur de batterie de voiture est dans un
état de faible puissance et doit être chargé à
temps

—32 —
A
Garantie& Nous contacter
ttention a I 'utilisation
Pourboire:
avant d utiliser ce produit, lisez les specificationa La
soc16t6n' est pas responsable des dommages causes au pro dude
la sureau fede la diffusion de substances toxiques , de l incendieou
de ( explosion peuvent résulter d ' une mauvaise utilisationdu produit.)
• Veuillez ne pas plonger le démarreur de saut dans l'eau ou le mettre sous la pluie ou
dans un endroit humide.
• N'ouvrez pas et ne retirez pas le démarreur de sau
t. Peut être endommagé.
• Ne pas entrer en contact avec le feu, les liquides chauds ou inflammables.
• Il peut être utilisé pendant les étés chauds et les hivers froids. La température de
f
onctionnement est de -20 ° C à + 70 ° C à.
• N'inversez pas l'électrode positive et négative. Sinon, le produit et la voiture
pourraient être endommagés.
• Après utilisation, veuillez déconnecter le câble du démarreur de saut.
• Veuillez confirmer que la capacité de la batterie du démarreur de saut dépasse 75%
avant de démarrer la voiture.
• Veuillez le garder hors de la portée des enfants.
• N'insérez pas d'objets étrangers dans le port d'entrée ou de sortie.
• Veuillez ne pas laisser les clips rouge et noir toucher, cela entraînera un
court-circuit.
• La
Notre socie
te offre a ses clients une garantie de 24 mois a compter de la date d'achat.
Pour plus d'assistance ou demande de garantie, veuillez nous contacter.
E-Mail: [email protected]
durée de stockage du produit est supérieure à 3 mois. S'il n'est pas utilisé pendant
une longue période, veuillez le charger complètement au moins une fois dans
les 3 mois.

—33—

—34 —
Funciones
Operacibn
1
Fuente de alimentación
Iniciar ON / OFF
2
Salida DC 12V / 10A
Carga el dispositive
3
Puerto de salida USB 1
Puede corresponder a los dispositivos electrónicos
como el teléfono móvil, la cámara, la tableta, etc.
4
Puerto de salida USB 2
Puede corresponder a los dispositivos electrónicos
como el teléfono móvil, cámara, tableta, etc.
5
puerto de entrada detipoc
Cargue el arrancador de salto
6
Puerto de salida EC5
Inserte el enchufe en este puerto para conectar el
arrancador auxiliar (el terminal del arrancador
auxiliar)
7
Indicador de nivel de
batería
Cuatro indicadores LED indican el nivel de la
batería.
Iluminación única (25% restante), dos luces (50%
restante), tres luces (75% restante), cuatro luces
(100% restante)
8
Botones de alimentacidn
(
y
interruptores de LED)
• Si presiona este botón, se mostrará la capacidad
restante
• Presione este botón para encender / apagar la
linterna
• Una vez que se enciende la linterna, puede
presionar el botón de encendido para cambiar a otr
o
modo de linterna.
9
Luz LED
Iluminación, estroboscópico, SOS, advertencia
10
Clip rojo
Se puede conectar al electrodo positivo de la batería
del coche.
11 Clip negro
Se puede conectar al electrodo negativo de la batería
del coche.
12
Cable IC inteligente
Puede conectar el arrancador de la batería del
automóvil a través de este enchufe

—
35
—
Especificación:
Capacidad de baterfa 21800mAh,80.6Wh
Ciclo de vida
Más de 500 veces
Corriente maxima
2000A
Corriente de arranque
1000A
Voltaje de salida de arranque
12V
Voltaje de salida DC 12V/10A
Voltaje de entrada tipo C
5V/2A,9V/2A,12V/1.5A
Tensión de salida del terminal USB 1
5V/3A.9V/2A.12V/1.5A
Tensión de salida del terminal USB 2
5V/2.4A
Valor nominal del motor de gas
hasta 8.0L
Valor nominal del motor diesel
hasta 6.5L
Temperatura de funcionamiento
-20 ℃ ~ + 70 ℃
Luz LED
Blanco: 1w
Tiempo de recarga
Entrada tipo C: 4h-4.5h
Dimensión
170mm*86mm*34mm
Instrucción de la batería
Una barra de visualización de carga de batería restante en la parte superior
Puede presionar el botón de encendido para conocer la energía restante. El
porcentaje representa la batería restante
Luz LED
1 luz
2 luces
3 luces
4 luces
Batería restante
25%
50%
75%
100%

—36 —
Instruccióndeluz LED
1. Presione el botón de encendido continuamente durante 3 segundos para encender /
apagar la linterna.
2. En el modo de linterna, puede presionar el botón de encendido para seleccionar entre
cuatro modos (generalmente flash, SOS, advertencia, iluminación).
Precaucionesdeuso:
Paraarrancarel coche sinproblemas, preste atenciónalos siguientes puntos:
• El fabricante tiene procedimientos específicos y medidas preventivas relacionadas con
el vehículo. Lea primero el manual del vehículo.
• Antes de arrancar, asegúrese de cortar la alimentación de todos los equipos
electrónicos (radio, iluminación, etc.) del vehículo.
• Asegúrese de que esté en un lugar bien ventilado. No arranque el vehículo en un
entorno cerrado.
• Elimine el agua del equipo principal, los accesorios y las baterías del vehículo del
producto. No arranque el vehículo cuando esté mojado.
• Asegúrese de que el puerto de la batería del vehículo no
esté sucio y asegure la mejor
conductividad.
• Antes de conectar la fuente de alimentación del arrancador, identifique correctamente
el polo positivo (+, rojo) y el polo negativo (-, negro) de la batería del vehículo.
• Cuando utilice el cable de arranque, tenga cuidado de que los dientes metálicos del clip
negro no toquen los dientes metálicos del clip rojo.
• No conecte los polos positivo y negativo a la inversa, si la conexión es incorrecta, el
producto o el automóvil se dañ
arán.
—
37
—
Cuando conecte la abrazadera al terminal de la batería, asegúrese de que los
dientes de cobre en ambos lados de la abrazadera estén en contacto con el terminal.
Cuanto mejor sea la conexión, más suave será el arranque del vehículo.
Consejo: si desea ajustar el ángulo de inclinación, primero retire el motor de
arranque. Esto evitará las chispas.
Metodo de uso
1.Después de que el enchufe de la abrazadera de la batería esté completamente insertado
y conectado, las luces roja y ve
rde parpadearán alternativamente.
2.Conecte el clip rojo al electrodo positivo de la batería del automóvil y el clip negro al
electrodo negativo. La luz verde está siempre encendida.
—
38
—
3. Empiece a saltar. Si el motor no se puede arrancar en el primer intento, retire el puente
de la batería del vehículo y vuelva a intentarlo al menos 20 segundos después.
4. Una vez que haya arrancado el motor, retire el clip en 30 segundos.

—
39
—
Indicador LED :
stado del LED
condiciones de trabajo
La luz (tráfico) roja / verde
parpadea alternativamente
P
reparacion electrica.
Siempre hay luz verde
I
nicio r pido durante la descarga.
La luz roja siempre está
encendida (advertencia)
• Confirme si los clips rojo y negro están bien
c
onectados (cortocircuito).
•
Compruebe si la conexión del electrodo positivo
(
rojo) y del electrodo negativo (negro) está
i
nvertida.
La luz roja parpadea
El arrancador de batería del automóvil está en un
e
stado de batería baja y debe cargarse a tiempo

—
40
—
P
Garantia&Contactenos
recauciones en la utilizacion
Propina:
Lea el manual antes de usar este producto. Si el producto no se usa
correctamente, puede causar daños al producto, sobrecalentamiento,
difusión tóxica, incendio o explosión, y nuestra empresa no se hará
responsable de ello.
• Por favor, no sumerja el arrancador en agua ni lo ponga bajo la lluvia o en un lugar
húmedo.
• No abra ni retire el arrancador auxiliar. Puede dañarse.
• No entre en contacto con el fuego, líquidos calientes o infl
a
mables.
• Puede utilizarse en veranos calurosos e inviernos fríos. La temperatura de trabajo es de
-20 ° C a + 70° C.
• No invierta el electrodo positivo y negativo. De lo contrario, el producto y el
automóvil pueden dañarse.
• Después de su uso, desconecte el cable del arrancador auxiliar.
• Confirme que la capacidad de la batería del arrancador de batería excede el 75% antes
de arrancar el automóvil.
• Manténgalo fuera del alcance de los niños.
• No inserte objetos extraños en e
l
puerto de entrada o salida.
• No permita que los clips rojos y negros se toquen, esto provocará un cortocircuito.
• El tiempo de almacenamiento del producto es superior a 3 meses. Si no se usa durante
m
Nuestra empresa ofrece a los clientes una garantia de 24 meses a partir de la fecha de
compra.Para cualquier consulta o comentario sobre nuestros productos, envie un correo
electrenico, y le responderemos lo antes posible.
E-Mail: [email protected]
ucho tiempo, cárguelo por completo al menos una vez dentro de los 3 meses.

— 41—

—42
—
funzione
operazione
1
Alimentazione elettrica
Awio/spegnimento
2
DC 12V/10A output
Carica il dispositivo
3
Porta di uscita USB 1
Può corrispondere ai dispositivi elettronici come il
telefono cellulare, la fotocamera, il tablet, ecc.
4
Porta di output USB 2
Può corrispondere ai dispositivi elettronici come il
telefono cellulare, la fotocamera, il tablet, ecc.
5 Porta di ingresso di tipo C
Carica il dispositivo d'avviamento di emergenza
6
Porta di uscita EC5
Inserire la spina in questa porta per collegare
l'avviatore di salto (il terminale dell'avviatore di
salto)
7
Indicatore del livello della
batteria
Quattro indicatori LED indicano il livello della
batteria.
Illuminazione singola (25% rimanente), due luci
(50% rimanente), tre luci (75% rimanente), quattro
luci (100% rimanente)
8
Pulsante di alimentazione
(anche interruttore di luce
guidato)
• Se si preme questo pulsante, verrà visualizzata la
capacità rimanente
• Premere questo pulsante per accendere / spegnere
la torcia
• Una volta che la torcia si accende, è possibile
premere il pulsante di accensione per passare a
un'altra modalità di torcia.
9
Luce LED
Illuminazione, strobo, SOS, avvertimento
10
Clip rossa
Può essere collegato all'elettrodo positivo della
batteria dell'auto
11 Clip nera
Può connettersi all'elettrodo negativo della batteria
dell'auto
12 Cavo Smart IC
È possibile collegare l'avviatore di emergenza
tramite questa spina

—
43 —
Specificazione:
Capacity della batteria
21800mAh,80.6wh
Du rata della batteria
Piu di 500 volte
Corrente di picco
2000A
Inizio corrente
1000
A
Tensione di uscita iniziale
12V
Tensions di corrente continua
12V/10A
Tensione di ingresso della tipologia
5V/2A,9V/2A,12V/1.5A
USB terminale 1 tensione di uscita
5V/3A.9V/2A.12V/1.5A
USB terminals 2 tensione di uscita
5V/2.4A
Valutazione del motore a gas
fino a 8.0L
Rating del motore diesel
fino a 6.5L
Temperatura di funzionamento
-20℃~+70℃
LED potenza
Bianco: 1W
Tempo di ricarica
TPC: 4h-4.5h
Dimensioni
170mm*86mm*34mm
Istruzioni per la batteria
Una barra di visualizzazione della carica residua della batteria in alto
È possibile premere il pulsante di accensione per conoscere la carica rimanente. La
percentuale rappresenta la batteria rimanente
llluminazione LED
1 luce
2 luci
3 luci
4 luci
Batteria rimanente
25%
50%
75%
100%

—
44
—
Istruzioni luminose a LED
1. Premere il pulsante di accensione continuamente per 3 secondi per
accendere / spegner e la torcia.
2. In modalità tor cia, è possibile pr emere il pulsante di accensione per
selezionare tra quattro modalità (solitamente flash, SOS, avviso,
illuminazione).
Precauzioni perl'uso:
Per avviare il veicolo senza problemi, prestare attenzione ai seguenti punti:
• Il produttore dispone di procedure e misure preventive specifiche relative al veic
olo. Si
prega di leggere prima il manuale del veicolo.
• Prima di iniziare, assicurarsi di interrompere l'alimentazione di tutte le apparecchiature
elettroniche (radio, illuminazione, ecc.) Del veicolo.
• Assicurarsi che sia in un luogo ben ventilato. Si prega di non avviare il veicolo in un
ambiente chiuso.
• Rimuovere l'umidità dal dispositivo, dagli accessori e dalla batteria del veicolo del
corpo del prodotto. Non avviare mai il veicolo quando è bagnato.
• Verifica
re che la porta della batteria del veicolo non sia sporca e garantire la migliore
conduttività elettrica.
• Prima di collegare l'alimentazione del jump starter, identificare correttamente il
positivo (+, rosso) negativo (-, nero) della batteria del veicolo.
• Quando si utilizza il cavo di avviamento di emergenza, fare attenzione che i denti di
metallo della clip nera non tocchino i denti di metallo della clip rossa.
• Si prega di non invertire l'elettrodo positivo e negat
ivo, se collegato in modo errato, il
prodotto o l'auto saranno danneggiati.
—
45
—
Quando si collega il morsetto al terminale della batteria, assicurarsi che i denti di rame
su entrambi i lati del morsetto siano a contatto con il terminale. Migliore è la
connessione, più agevole è l'avviamento del veicolo.
Suggerimento: se si desidera regolare il dip, rimuovere prima l'avviamento di
emergenza. Questo può prevenire la scintilla.
Metodo di utilizzo
1.Dopo che la spina del morsetto della batteria è completamente inserita e collegata, le
luci rossa e verd
e lampeggeranno alternativamente.
2.Collegare la clip rossa all'elettrodo positivo della batteria dell'auto e la clip nera
all'elettrodo negativo. La luce verde è sempre accesa.
— 46—
3. Inizia a saltare. Se il motore non può essere avviato al primo tentativo, rimuovere il
ponticello dalla batteria del veicolo e riprovare almeno 20 secondi dopo.
4. Una volta avviato il motore, rimuovere la clip entro 30 secondi.

—
47
—
Indicatore LED:
LED stato
condizioni di lavoro.
La luce rossa / verde (traffico)
lampeggia alternativamente
Preparazione alla dimissione
La luce verde d sempre accesa
L'avviatore di emergenza si scarica rapidamente
La luce rossa è sempre accesa
(avvertimento)
• Si prega di confermare se entrambe le clip rosse e nere
sono collegate correttamente (cortocircuito).
• Controllare se il collegamento dell'elettrodo positivo
(rosso) e dell'elettrodo negativo (nero) sono invertiti.
La luce rossa lampeggia
L'avviamento della batteria dell'auto è in uno stato di
batteria scarica e deve essere ricaricato in tempo

—48—
P
Garanzia e Contattaci
recautions in use
Suggerimento: leggi il manuale prima di usare questo prodotto Se II
prodotto non
B utlllzzato correttamente,pud causare dannl al
prodotto,surTiscaldamento,diffusione tossicajncendio o esploslone
el'azlenda non ne 3 responsablle.
• Non immergere il dispositivo di avviamento della batteria dell'auto in acqua, né
metterlo sotto la pioggia o in luoghi umidi.
• Non aprire o rimuovere il dispositivo di avviamento della batteria dell'auto.
Potrebb
e essere danneggiato.
• Non toccare il fuoco, il calore o i liquidi infiammabili.
• Può essere utilizzato nella calda estate e nel freddo inverno. La temperatura di
esercizio è compresa tra -20 ° C e +70° C.
• Non invertire i poli positivo e negativo. In caso contrario, il prodotto e l'auto
potrebbero subire danni.
• Dopo l'uso, scollegare il cavo di avvio rapido.
• Prima di mettersi alla guida, assicurarsi che la capacità della batteria
dell'avviatore di emergenza sia superio
re al 75%.
• Tenere fuori dalla portata dei bambini.
• Non inserire oggetti estranei nell'ingresso o nell'uscita.
• Non lasciare che le clip rosse e nere si tocchino, altrimenti si provocherà un
cortocircuito.
• La
La nostra azienda offre ai clienti una garanzia di 24 mesi dalla data di acquisto.
Per ulteriore assistenza o richiesta di copertura in garanzia, non esitate a contattarci.
E-Mail: [email protected]
durata di conservazione del prodotto è superiore a 3 mesi. Se non lo si
utilizza per un lungo periodo, caricarlo completamente almeno una volta entro 3
me
si.