Model: FG301 (4000A Peak Current)
1. Overview
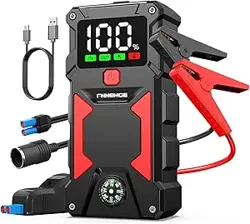
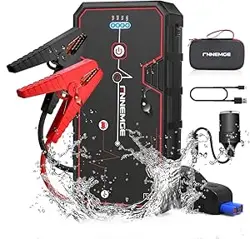
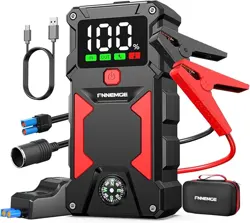
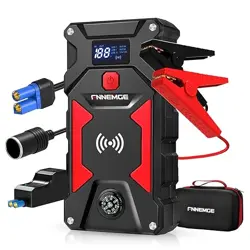
The FNNEMGE Booster Battery is a portable 12V jump starter designed to start vehicles with petrol engines up to 8.0L or diesel engines up to 6.5L. It incorporates a high-capacity lithium polymer battery, an LCD screen, a multi-mode LED light, and USB charging ports.

The device is intended for use as an emergency power source for starting vehicles and as a portable power bank for electronic devices.
2. Package Contents
- 1 x Portable Jump Starter (Main Unit)
- 1 x Smart Jump Lead (Cable with Clamps)
- 1 x USB-C Charging Cable
- 1 x Storage Bag
- 1 x User Manual (this document)

3. Key Features and Components
3.1. Power and Capacity
- Peak Current: 4000A
- Rated Voltage: 12V DC
- Battery Type: Lithium Polymer
- Vehicle Compatibility: Cars, trucks, motorcycles, boats, lawnmowers, snowmobiles, and other 12V vehicles.
3.2. HD LCD Display
The unit features a digital LCD screen that shows operational status.

The display typically shows:
- Battery charge level (percentage)
- Input/Output status (when charging or discharging)
- Temperature warnings (high/low operating temperature alerts)
- Error or protection mode indicators
3.3. LED Light
The built-in LED light has three modes:
- Flashlight: Steady beam (400 lumens).
- Strobe Light: Flashing light for signaling.
- SOS Light: Flashes in the international distress signal pattern.

3.4. USB Power Bank Function
The device has two USB output ports and a USB-C charging input port, allowing it to charge phones, tablets, and other USB-powered devices.

3.5. Safety Protections
The jump starter includes 10 intelligent safety mechanisms designed to protect against:
- Overload
- Short Circuit
- Reverse Polarity (incorrect connection)
- Over-voltage / Surge
- Sparks
The smart jump lead clamps provide visual indication lights and audible beeps to signal connection status and errors.

4. Use Guide
4.1. Charging the Jump Starter
- Connect the provided USB-C cable to the charging port on the jump starter.
- Connect the other end of the cable to a standard USB power adapter (not included) or a computer USB port.
- The LCD display will show the charging status and battery level. Charge the unit fully before first use and after each use.
4.2. Jump Starting a Vehicle
WARNING: Always read the vehicle's owner manual for specific instructions and safety warnings before attempting a jump start. Ensure the jump starter and clamps are away from engine moving parts and battery acid.

- Prepare the Vehicle: Turn off the vehicle's ignition and all electrical accessories (lights, radio, etc.).
- Connect the Smart Jump Lead:
- Plug the jump lead connector firmly into the output port on the jump starter.
- Connect the RED positive (+) clamp to the positive (+) terminal of the vehicle's dead battery.
- Connect the BLACK negative (-) clamp to a clean, unpainted metal part of the vehicle's engine block or chassis (a ground point), away from the battery and fuel lines.
- Check Connections: The smart clamps will indicate a correct connection. Listen for beeps and observe the indicator lights on the clamps. If an error is indicated (e.g., rapid beeping or red light), disconnect immediately and check the connections.
- Start the Vehicle:
- Ensure the jump starter is powered on.
- Start the vehicle's engine. It should start within a few seconds.
- If the vehicle does not start after 3-5 seconds, wait 30 seconds before attempting again.
- Disconnect the Clamps: Once the vehicle is running:
- Disconnect the BLACK negative (-) clamp from the vehicle.
- Disconnect the RED positive (+) clamp from the vehicle battery.
- Unplug the jump lead from the jump starter.
- Recharge the Jump Starter: Recharge the unit as soon as possible after use to ensure it is ready for the next emergency.
4.3. Using the LED Light
- Locate the light button on the jump starter.
- Press the button repeatedly to cycle through the modes: Flashlight -> Strobe -> SOS -> Off.
- Press and hold the button to turn the light off directly.
4.4. Using the USB Power Bank
- Ensure the jump starter has sufficient charge (check the LCD display).
- Connect your device (phone, tablet, etc.) to one of the USB output ports using your own USB cable.
- Charging will begin automatically. The LCD may show an output indicator.
5. Maintenance and Storage
- Recharge the jump starter at least once every three months if not used, to maintain battery health.
- Store the device in the provided storage bag in a cool, dry place, away from direct sunlight and extreme temperatures.
- Keep the unit and clamps clean and dry. Wipe with a dry cloth if necessary.
- Do not disassemble or attempt to repair the unit.
6. Troubleshooting
| Problem |
Possible Cause |
Solution |
| Jump starter does not power on. |
Battery is completely depleted. |
Connect the USB-C cable and charge the unit for several hours. |
| Smart clamps beep continuously or show red light. |
Reverse polarity, poor connection, or short circuit detected. |
Disconnect clamps immediately. Verify correct connection order: Red to battery positive (+), Black to vehicle ground (NOT battery negative). Ensure clamps have solid metal contact. |
| Vehicle does not start. |
Jump starter battery low; vehicle battery severely depleted; clamps not making good contact; vehicle issue not related to battery. |
Recharge jump starter. Clean battery terminals and ensure solid clamp connection. If problem persists, the vehicle may require professional service. |
| LCD shows a high/low temperature warning. |
Device is operating outside its safe temperature range. |
Move the device to a location with a moderate ambient temperature (refer to specifications) before using or charging. |
| USB ports not charging devices. |
Jump starter battery is low; USB cable is faulty. |
Recharge the jump starter. Try a different USB cable. |
7. Specifications
- Model: FG301
- Peak Current: 4000A
- Rated Voltage: 12V
- Battery Capacity: Not specified in provided data.
- Battery Type: Lithium Polymer
- USB Output: 5V DC
- LED Light: 400 Lumens
- Item Weight: 0.75 kg
- Dimensions: 26.9 x 23.4 x 6.9 cm
- Operating Temperature: Refer to LCD display for alerts. (Specific range not provided in source).
8. Warranty and Support
This product is covered by a 2-year warranty from the date of purchase. The manufacturer offers lifetime technical support.
For product support or warranty claims: Please use the contact email address provided in the printed user manual included in the box.