© 2026 Samsung Electronics Co., Ltd. All rights reserved.
USER GUIDE
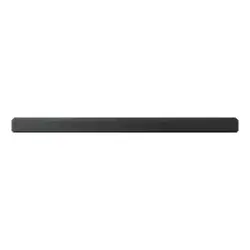
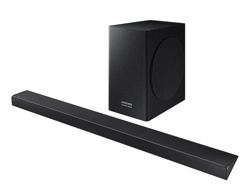
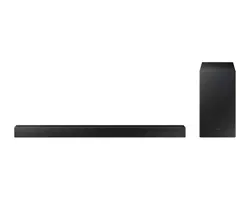
HW-QS90H / HW-QS95H
HW-QS95GH
To receive more complete service, please register your product at
www.samsung.com
Figures and illustrations in this User Manual are provided for
reference only and may differ from actual product appearance.

English - 2
Contents
01 SafetyInformation 3
SAFETY WARNINGS . . . . . . . . . . . . . . . . . . . . . . . . . . . . . . . . . . . . . 3
Important Safety Instructions. . . . . . . . . . . . . . . . . . . . . . . . . . . . 3
Precautions . . . . . . . . . . . . . . . . . . . . . . . . . . . . . . . . . . . . . . . . . . . . 4
02 CheckingtheComponents 4
03 ProductOverview 5
Front side . . . . . . . . . . . . . . . . . . . . . . . . . . . . . . . . . . . . . . . . . . . . . . 5
Rear side. . . . . . . . . . . . . . . . . . . . . . . . . . . . . . . . . . . . . . . . . . . . . . . 5
04 UsingtheRemoteControl 6
How to use the Remote Control . . . . . . . . . . . . . . . . . . . . . . . . . . 6
Setting the (Sound Control) . . . . . . . . . . . . . . . . . . . . . . . . . . 8
Output specifications for each sound mode . . . . . . . . . . . . . . . 8
- For using the soundbar . . . . . . . . . . . . . . . . . . . . . . . . . . . . . . . 8
- For using the surround speaker (SWA-9500S, optional)
together . . . . . . . . . . . . . . . . . . . . . . . . . . . . . . . . . . . . . . . . . . . . 8
Adjusting the Soundbar Volume with the TV Remote
Control . . . . . . . . . . . . . . . . . . . . . . . . . . . . . . . . . . . . . . . . . . . . . . . . 9
05 Connecting the Soundbar to Other
Units 9
Connecting the Power and Devices . . . . . . . . . . . . . . . . . . . . . . . 9
Connecting an Samsung Wireless Rear Speaker Kit (Sold
Separately) to your Soundbar. . . . . . . . . . . . . . . . . . . . . . . . . . . . 9
06 ConnectingtoaTV 10
Connect to a TV that supports HDMI ARC (Audio Return
Channel) . . . . . . . . . . . . . . . . . . . . . . . . . . . . . . . . . . . . . . . . . . . . . . 10
Connecting Using an Optical Cable . . . . . . . . . . . . . . . . . . . . . . 10
Connecting by Bluetooth. . . . . . . . . . . . . . . . . . . . . . . . . . . . . . . 11
Connecting by Wi-Fi (Wireless Network). . . . . . . . . . . . . . . . . 12
Using the Q-Symphony Feature . . . . . . . . . . . . . . . . . . . . . . . . . 12
Using SpaceFit Sound Pro . . . . . . . . . . . . . . . . . . . . . . . . . . . . . . 13
07 ConnectinganExternalDevice 13
Connecting by HDMI Cable . . . . . . . . . . . . . . . . . . . . . . . . . . . . . 13
Connecting using an Optical Cable . . . . . . . . . . . . . . . . . . . . . . 14
08 ConnectingaMobileDevice 14
Connecting by Bluetooth. . . . . . . . . . . . . . . . . . . . . . . . . . . . . . . 14
Connecting by Wi-Fi (Wireless Network). . . . . . . . . . . . . . . . . 15
Using Group Play . . . . . . . . . . . . . . . . . . . . . . . . . . . . . . . . . . . . . . 16
Connecting to Apple AirPlay® . . . . . . . . . . . . . . . . . . . . . . . . . . 16
09 InstallingtheSoundbaronaWall 16
Precautions when installing . . . . . . . . . . . . . . . . . . . . . . . . . . . . 16
Wall Mount Components . . . . . . . . . . . . . . . . . . . . . . . . . . . . . . . 16
10 Installing the Soundbar on top of the TV
Stand 18
Components . . . . . . . . . . . . . . . . . . . . . . . . . . . . . . . . . . . . . . . . . . 18
11 SoftwareUpdate 18
Automatic update . . . . . . . . . . . . . . . . . . . . . . . . . . . . . . . . . . . . . 18
USB update . . . . . . . . . . . . . . . . . . . . . . . . . . . . . . . . . . . . . . . . . . . 18
Reset . . . . . . . . . . . . . . . . . . . . . . . . . . . . . . . . . . . . . . . . . . . . . . . . . 19
Security updates information . . . . . . . . . . . . . . . . . . . . . . . . . . . 19
12 Troubleshooting 19
13 Licenses&OtherInformation 21
English - 3
01 Safety Information
The following also applies to the Subwoofer and Surround Speaker
SET.
SAFETY WARNINGS
TO REDUCE THE RISK OF ELECTRIC SHOCK, DO NOT REMOVE THE
COVER (OR BACK).
NO USER-SERVICEABLE PARTS ARE INSIDE. REFER SERVICING TO
QUALIFIED SERVICE PERSONNEL.
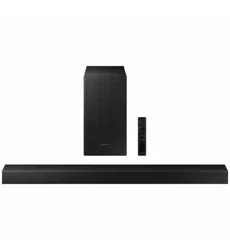
Refer to the table below for an explanation of symbols which may be
on your Samsung product.
RISK OF ELECTRIC SHOCK.
DO NOT OPEN.
CAUTION
This symbol indicates that high voltage is present
inside. It is dangerous to make any kind of contact
with any internal part of this product.
This symbol indicates that this product has included
important literature concerning operation and
maintenance.
Class II product : This symbol indicates that a safety
connection to electrical earth (ground) is not required.
If this symbol is not present on a product with a power
cord, the product MUST have a reliable connection to
protective earth (ground).
AC voltage : Rated voltage marked with this symbol is
AC voltage.
DC voltage : Rated voltage marked with this symbol is
DC voltage.
Caution. Consult Instructions for use : This symbol
instructs the user to consult the user manual for
further safety related information.
WARNING
• To reduce the risk of fire or electric shock, do not expose this
appliance to rain or moisture.
• To prevent injury, this apparatus must be securely attached to the
floor/wall in accordance with the installation instructions.
• This product contains chemicals known to the State of California to
cause cancer and birth defects or other reproductive harm.
• Do not use liquid fumigators containing chemicals, such as
mosquito repellent or air freshener, around the product. If steam
comes in contact with the product surface or enters the product, it
may cause stains or malfunction.
• For crevices or other areas that cannot be thoroughly cleaned with a
cloth, use a soft cotton swab, brush, or air blower to remove dirt.
CAUTION
• Do not expose this apparatus to dripping or splashing. Do not put
objects filled with liquids, such as vases, on the apparatus.
• To turn this apparatus off completely, you must pull the power plug
out of the wall socket. Consequently, the power plug must be easily
and readily accessible at all times.
Important Safety Instructions
Read these operating instructions carefully before using the unit.
Follow all the safety instructions listed below. Keep these operating
instructions handy for future reference.
1. Read these instructions.
2. Keep these Instructions.
3. Heed all warnings.
4. Follow all instructions.
5. Do not use this apparatus near water.
6. Clean only with dry cloth.
7. Do not block any ventilation openings.
Install in accordance with the manufacturer’s instructions.
8. Do not install near any heat sources such as radiators, heat
registers, stoves, or other apparatus (including amplifiers) that
produce heat.
9. Do not hinder in any way the safety purpose of the polarized or
grounding-type plug.
A polarized plug has two blades with one wider than the other. A
grounding type plug has two blades and a third grounding prong.
The wide blade or the third prong are provided for your safety. If the
provided plug does not fit into your outlet, consult an electrician for
replacement of the obsolete outlet.
10. Protect the power cord from being walked on or pinched
particularly at plugs, convenience receptacles, and the point where
they exit from the apparatus.
11. Only use attachments/accessories specified by the manufacturer.
12. Use only with the cart, stand, tripod, bracket, or table specified by
the manufacturer, or sold with the apparatus. When a cart is used,
use caution when moving the cart/apparatus combination to avoid
injury from tip-over.
13. Unplug this apparatus during lightning storms or when unused for
long periods of time.
14. Refer all servicing to qualified service personnel. Servicing is
required when the apparatus has been damaged in any way, such
as power-supply cord or plug is damaged, liquid has been spilled
or objects have fallen into the apparatus, the apparatus has been
exposed to rain or moisture, does not operate normally, or has been
dropped.
English - 4
Precautions
1. Ensure that the AC power supply in your house complies with the
power requirements listed on the identification sticker located
on the bottom of your product. Install your product horizontally,
on a suitable base (furniture), with enough space around it for
ventilation (3~4 inches). Make sure the ventilation slots are not
covered. Do not place the unit on amplifiers or other equipment
which may become hot. This unit is designed for continuous use.
To fully turn off the unit, disconnect the AC plug from the wall
outlet. Unplug the unit if you intend to leave it unused for a long
period of time.
2. During thunderstorms, disconnect the AC plug from the wall outlet.
Voltage peaks due to lightning could damage the unit.
3. Do not expose the unit to direct sunlight or other heat sources. This
could lead to overheating and cause the unit to malfunction.
4. Protect the product from moisture (i.e. vases), and excess heat
(e.g. a fireplace) or equipment creating strong magnetic or electric
fields. Unplug the power cable from the AC wall socket if the unit
malfunctions. Your product is not intended for industrial use. It is
for personal use only. Condensation may occur if your product has
been stored in cold temperatures. If transporting the unit during
the winter, wait approximately 2 hours until the unit has reached
room temperature before using.
5. The battery used with this product contains chemicals that are
harmful to the environment. Do not dispose of the battery in the
general household trash. Do not expose the battery to excess heat,
direct sunlight, or fire. Do not short circuit, disassemble, or overheat
the battery.
CAUTION : Danger of explosion if the battery is replaced incorrectly.
Replace only with the same or equivalent type.
02 Checking the
Components
SOUNDBAR
Soundbar Remote Control (AH81-15047A)
/ Battery (May not be provided
in some regions)
Power cable
( 3903-001117 )
HDMI Cable
(May not be provided in some
regions) / ( BN39-02661A )
Wall-mounting Guide
( AH85-01091B )
Holder Screw
( AH61-03164A )
Screw (M4 x L10) x 2
( 6001-001202 )
Wall-mounting Bracket
( AH61-04313A )
Holder Anchor x 2
( BN61-17904A )
Screw for mounting on wall
(M5 x L55) x 2
( 6011-008215 )
Rubber Foot x 4
( BN67-00398L )
• Some components may differ by model and region, and may not be
provided. (e.g., HDMI cable, batteries, etc.)
• Refer to the information label located on the bottom or rear of
the product for details about power consumption and supply
specifications.
• To purchase additional components or optional cables, contact a
Samsung Service Center or Samsung Customer Care.
• For more details about the wall mount and rubber foot, See the
"Installing the Soundbar on a Wall " section.
• To enhance the product, product design, specifications, and app
interface may change without prior notice.
• The color and shape of parts may vary from what is depicted.
English - 5
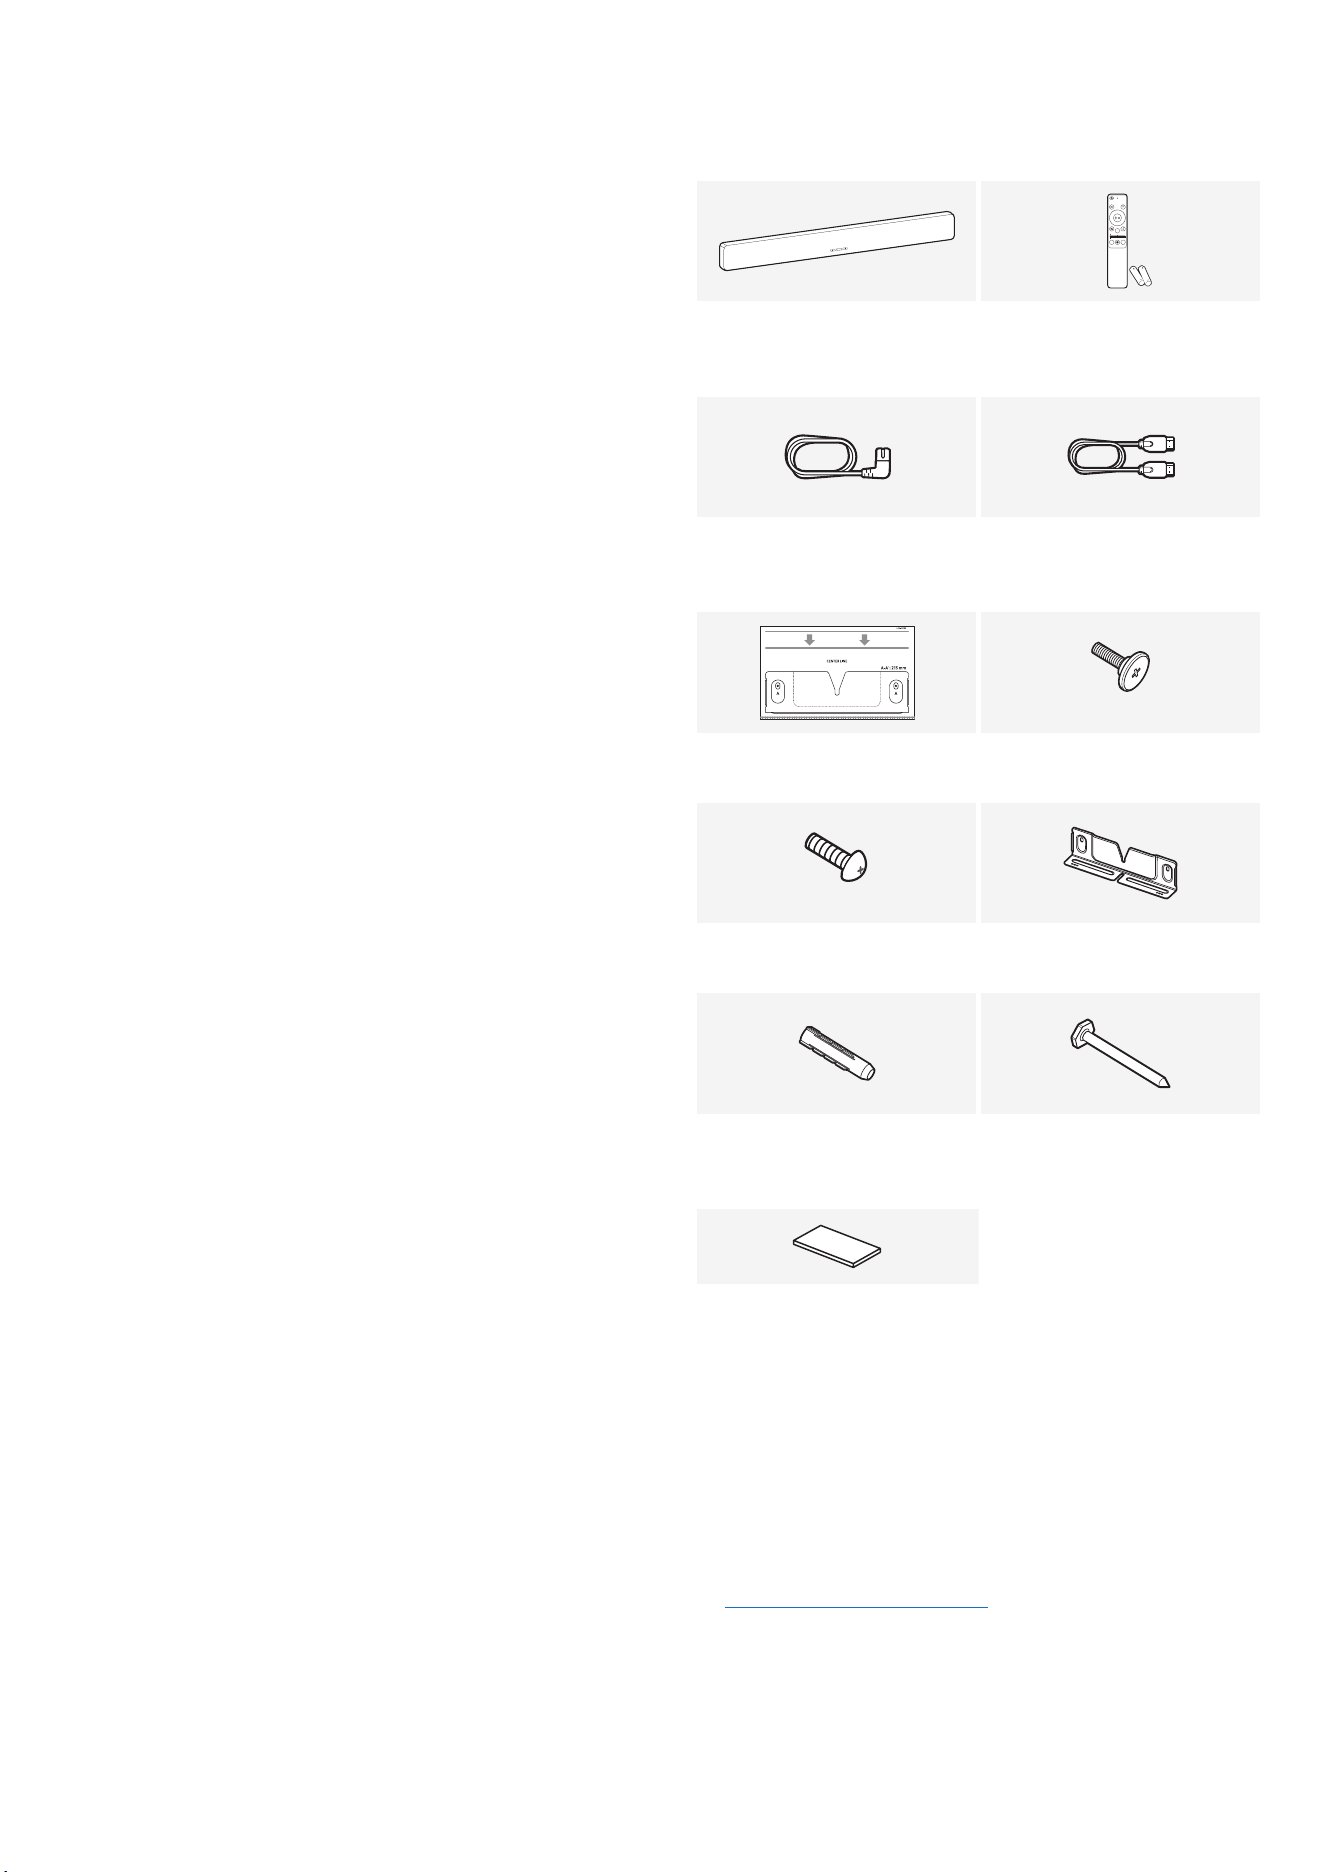
03 Product Overview
Front side
1
* The orientation of the product image is based on the standard for
wall-mounted installation.
1
LED indicator
• The LED indicator may blink, turn on, or change color,
depending on the current mode or state. The color and
number of LED indicators represent the active modes
as follows.
• Multi-color LED changes to white, turquoise, green, red,
or blue, depending on the mode or status.
W
W
M
W
W
White
LED
White
LED
Multi-
color
LED
White
LED
White
LED
• The LED indicator may light up on only one side,
depending on the installation direction.
[ When wall-mounted ]
[ When table-mounted ]
( Volume ) Button
Adjusts the volume.
( Multi ) Button
• In Standby mode, you can turn on the soundbar by
pressing the ( Multi ) button.
• You can switch the input source by pressing the
( Multi ) button.
LED indicator
White On → Off
TV ARC or eARC
White On → Off
HDMI
White On → Off
Bluetooth
( Microphone ) Button
• Press the ( Microphone ) button to turn the
microphone on or off.
• When the microphone is off, the LED indicator will turn
red.
• Press and hold the ( Microphone ) button on the top
of the soundbar for 3 seconds or longer to switch to
Bluetooth mode.
LED indicator
Red On
Microphone Off
Red Off
Microphone On
• When you turn on the soundbar, it may take 4 to 5 seconds for the
sound to start.
• If audio plays from both the TV and soundbar, open the TV's Audio
Settings menu, then select External Speaker instead of TV Speaker.
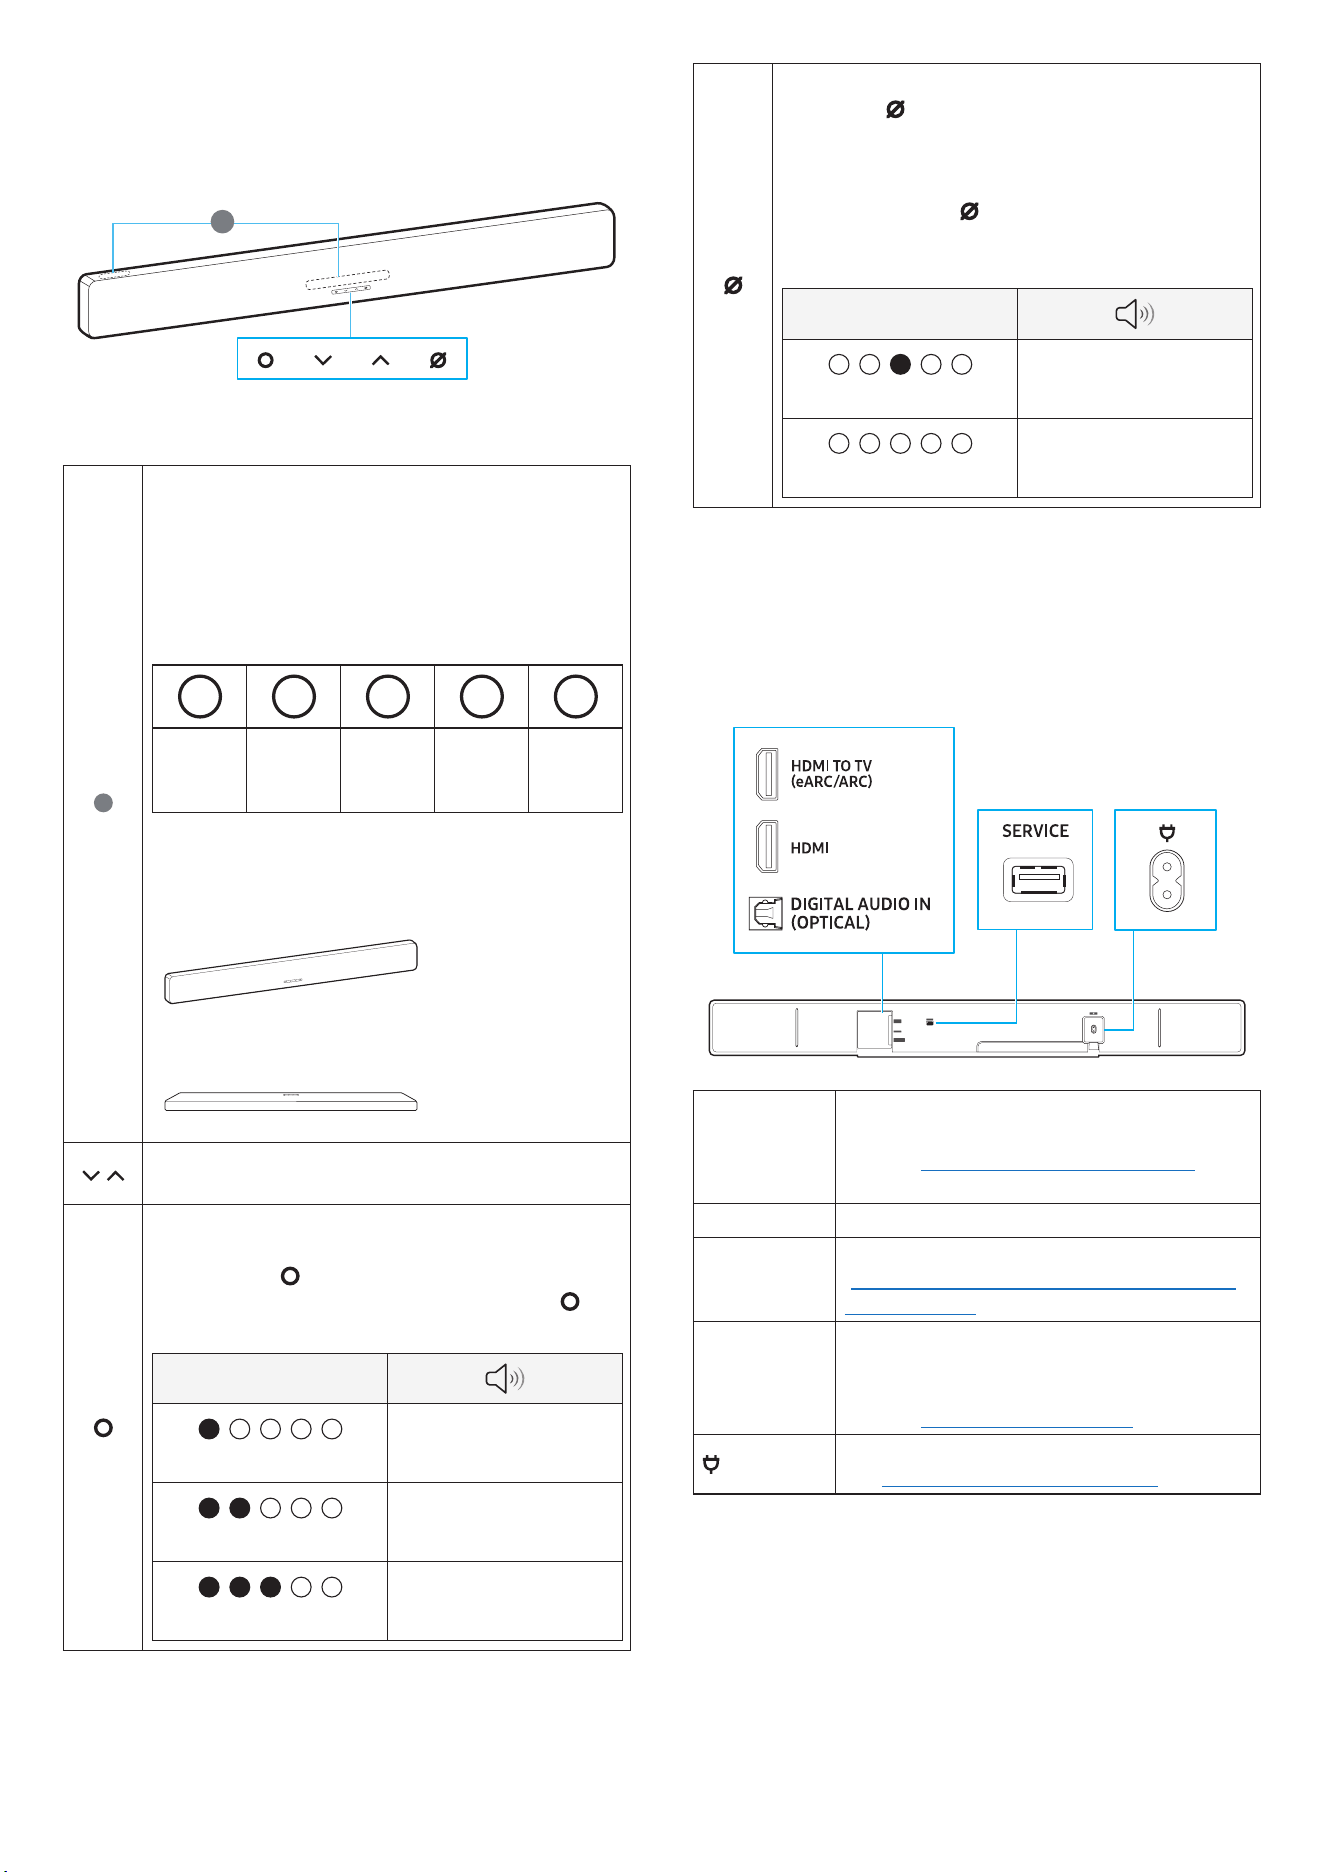
Rear side
SERVICE
HDMI TO TV
(eARC/ARC)
HDMI
DIGITAL AUDIO IN
(OPTICAL)
DIGITAL AUDIO
IN (OPTICAL)
Connect to a digital (optical) output terminal of a
TV or external device.
(See the "Connecting using an Optical Cable "
section.)
SERVICE Use this port to update firmware through USB.
HDMI TO TV
(eARC/ARC)
Use this HDMI port to connect to a TV. (See the
"Connect to a TV that supports HDMI ARC (Audio
Return Channel) " section.)
HDMI
This port is used for connecting an HDMI cable to
transmit digital video and audio simultaneously.
Connect to an HDMI output of external devices.
(See the "Connecting by HDMI Cable " section.)
Connect the power cable to this power port. (See
the "Connecting the Power and Devices " section.)
English - 6
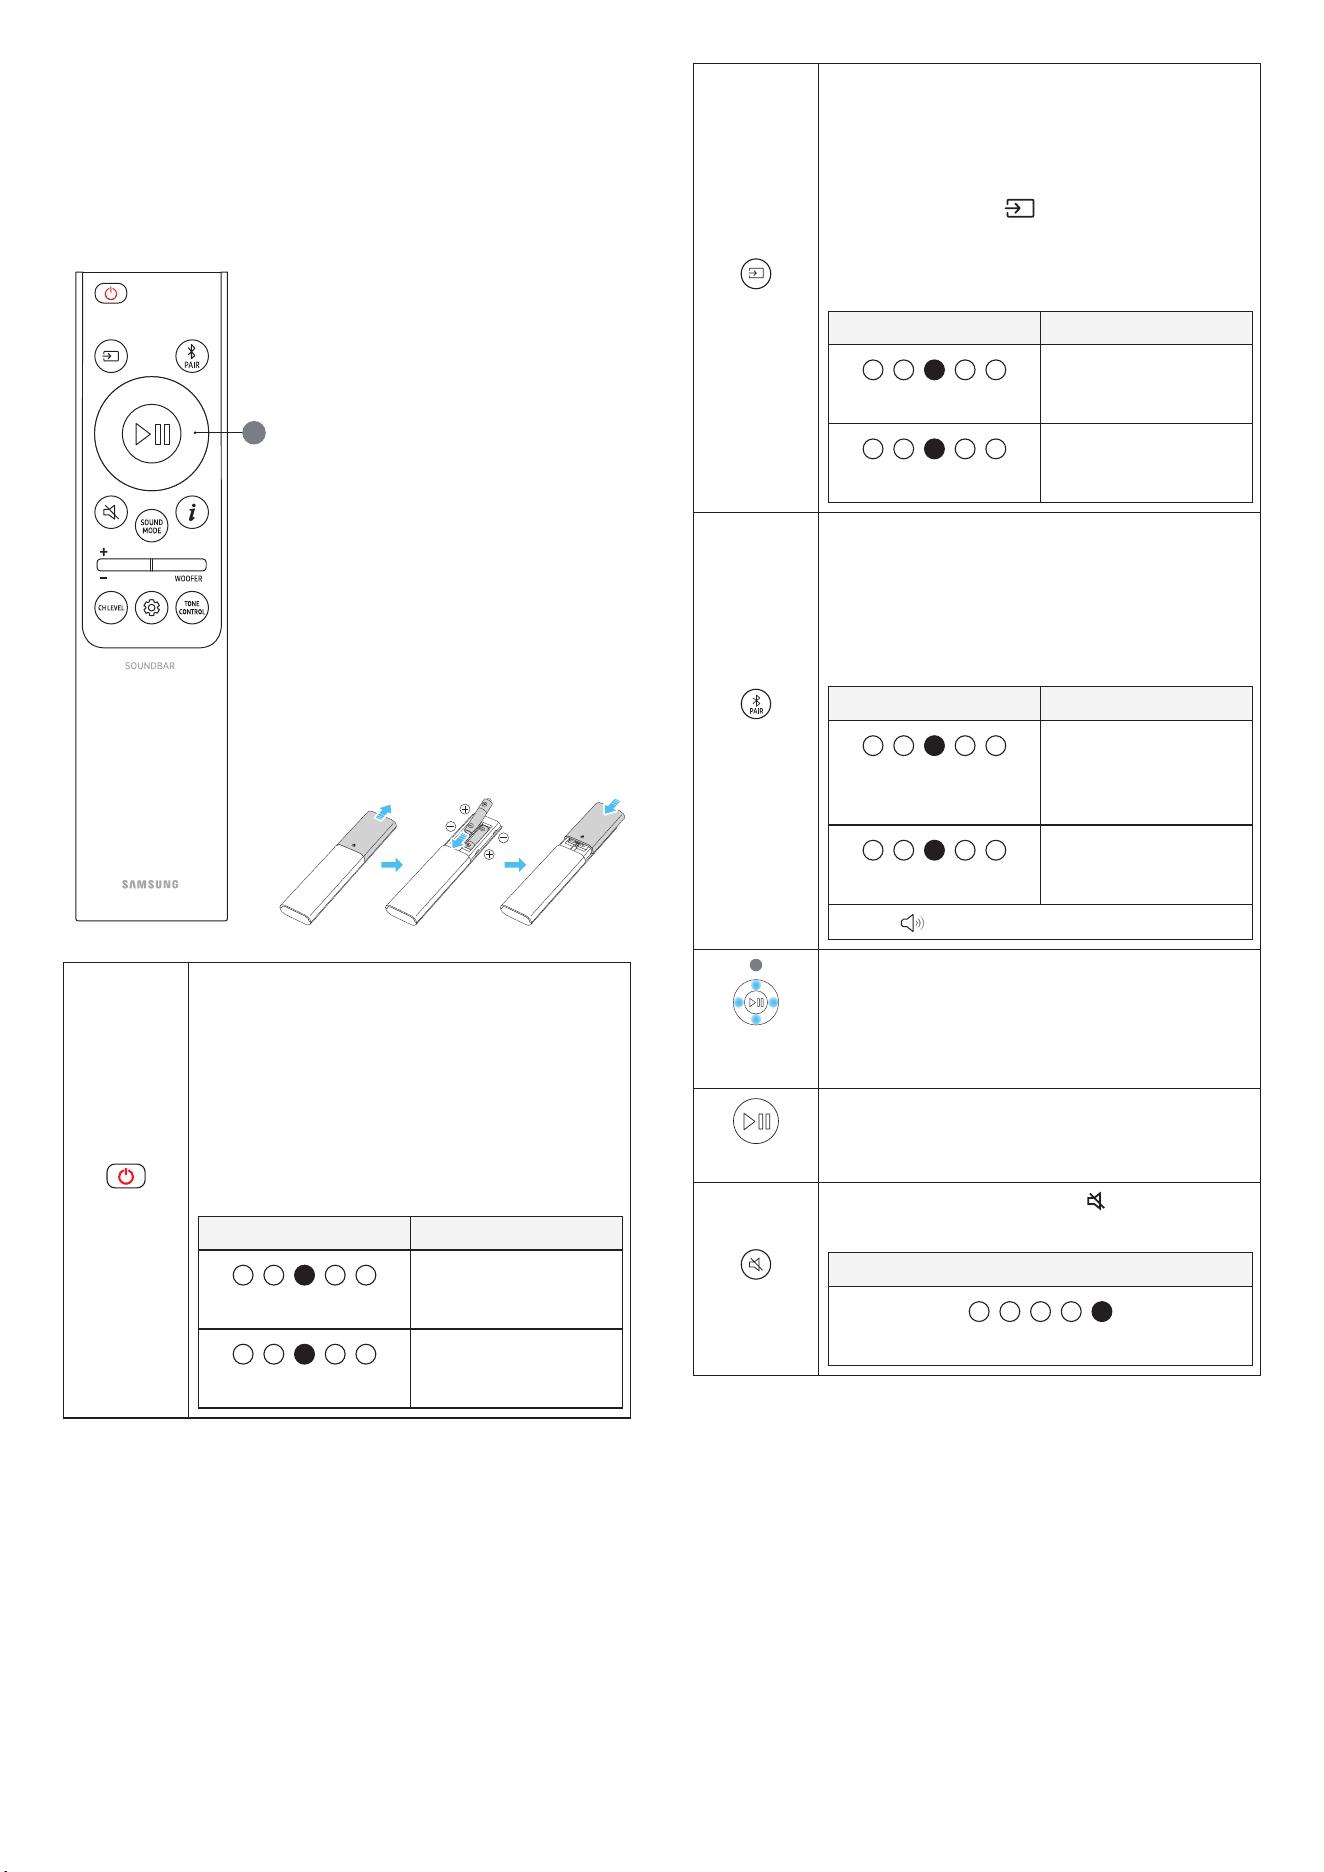
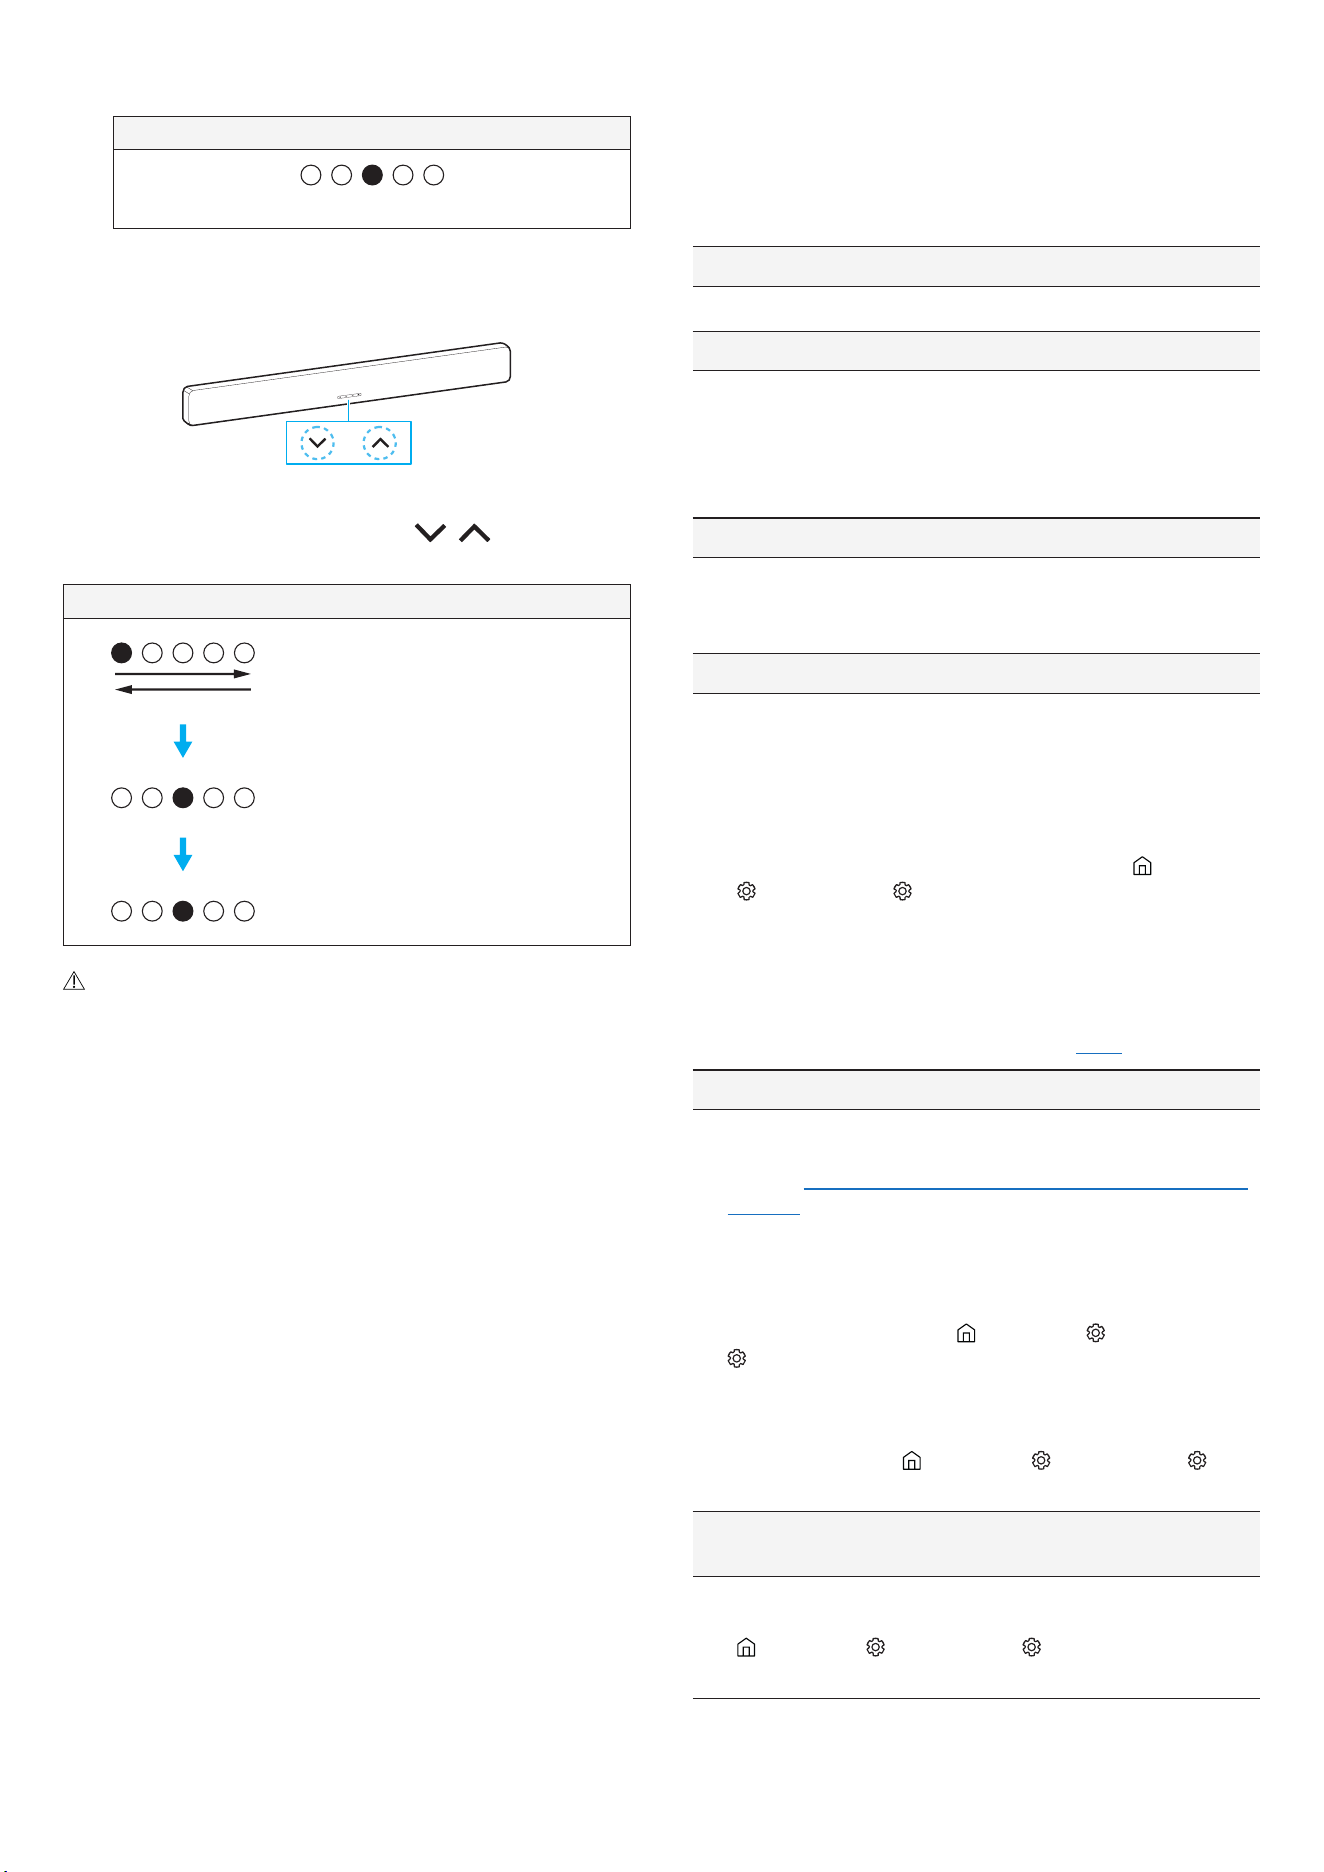
04 Using the Remote
Control
How to use the Remote Control
1
Install Batteries (AAA battery X 2)
Slide the battery cover in the direction of
the arrow until it is fully removed. After
inserting the batteries (1.5V, AAA) in the
correct direction, slide the back cover onto
the remote control in the direction of the
arrow.
(Power)
Turns the soundbar on or off.
The soundbar will automatically turn off in the
following situations. (Power saving mode)
• TV ARC , HDMI , Wi-Fi , Bluetooth , DIGITAL AUDIO
IN Mode: No audio signal input for 18 minutes or
longer
• In the case of Bluetooth , it won't work if it is
connected to another device, even if there is no
audio signal input.
LED indicator Status
Cyan blinking x1
On
Red blinking x3
Off
(Source)
• You can choose the device connected to the
soundbar.
• Turn voice feedback on or off
You can turn voice feedback on or off.
With the soundbar turned off (in Standby mode),
press and hold the ( Source ) button on the
remote control for 5 seconds.
Whenever you change the voice feedback
settings, the LED indicator will change.
LED indicator Status
Cyan blinking x1
On
White blinking x1
Off
(Bluetooth
connection)
Puts the soundbar into the Bluetooth pairing mode.
Press this button to change the LED indicator as
below:
• The multi-color LED will sequentially change
from Red → Green → Blue until the pairing is
complete.
LED indicator Status
Red → Green → Blue
blinking
Pairing
Cyan blinking x3
Connection successful
Ready to connect by Bluetooth.
1
(Up/Down/
Left/Right)
Use the Up / Down / Left / Right buttons to make fine
adjustments.
• Skip a song
Press the Right button to skip to the next song.
Press the Left button to go to the previous song.
(Play/Pause)
Starts or pauses playback.
(Mute)
To mute the soundbar, press the Mute button.
Press it again to unmute.
LED indicator
White blinking
English - 7
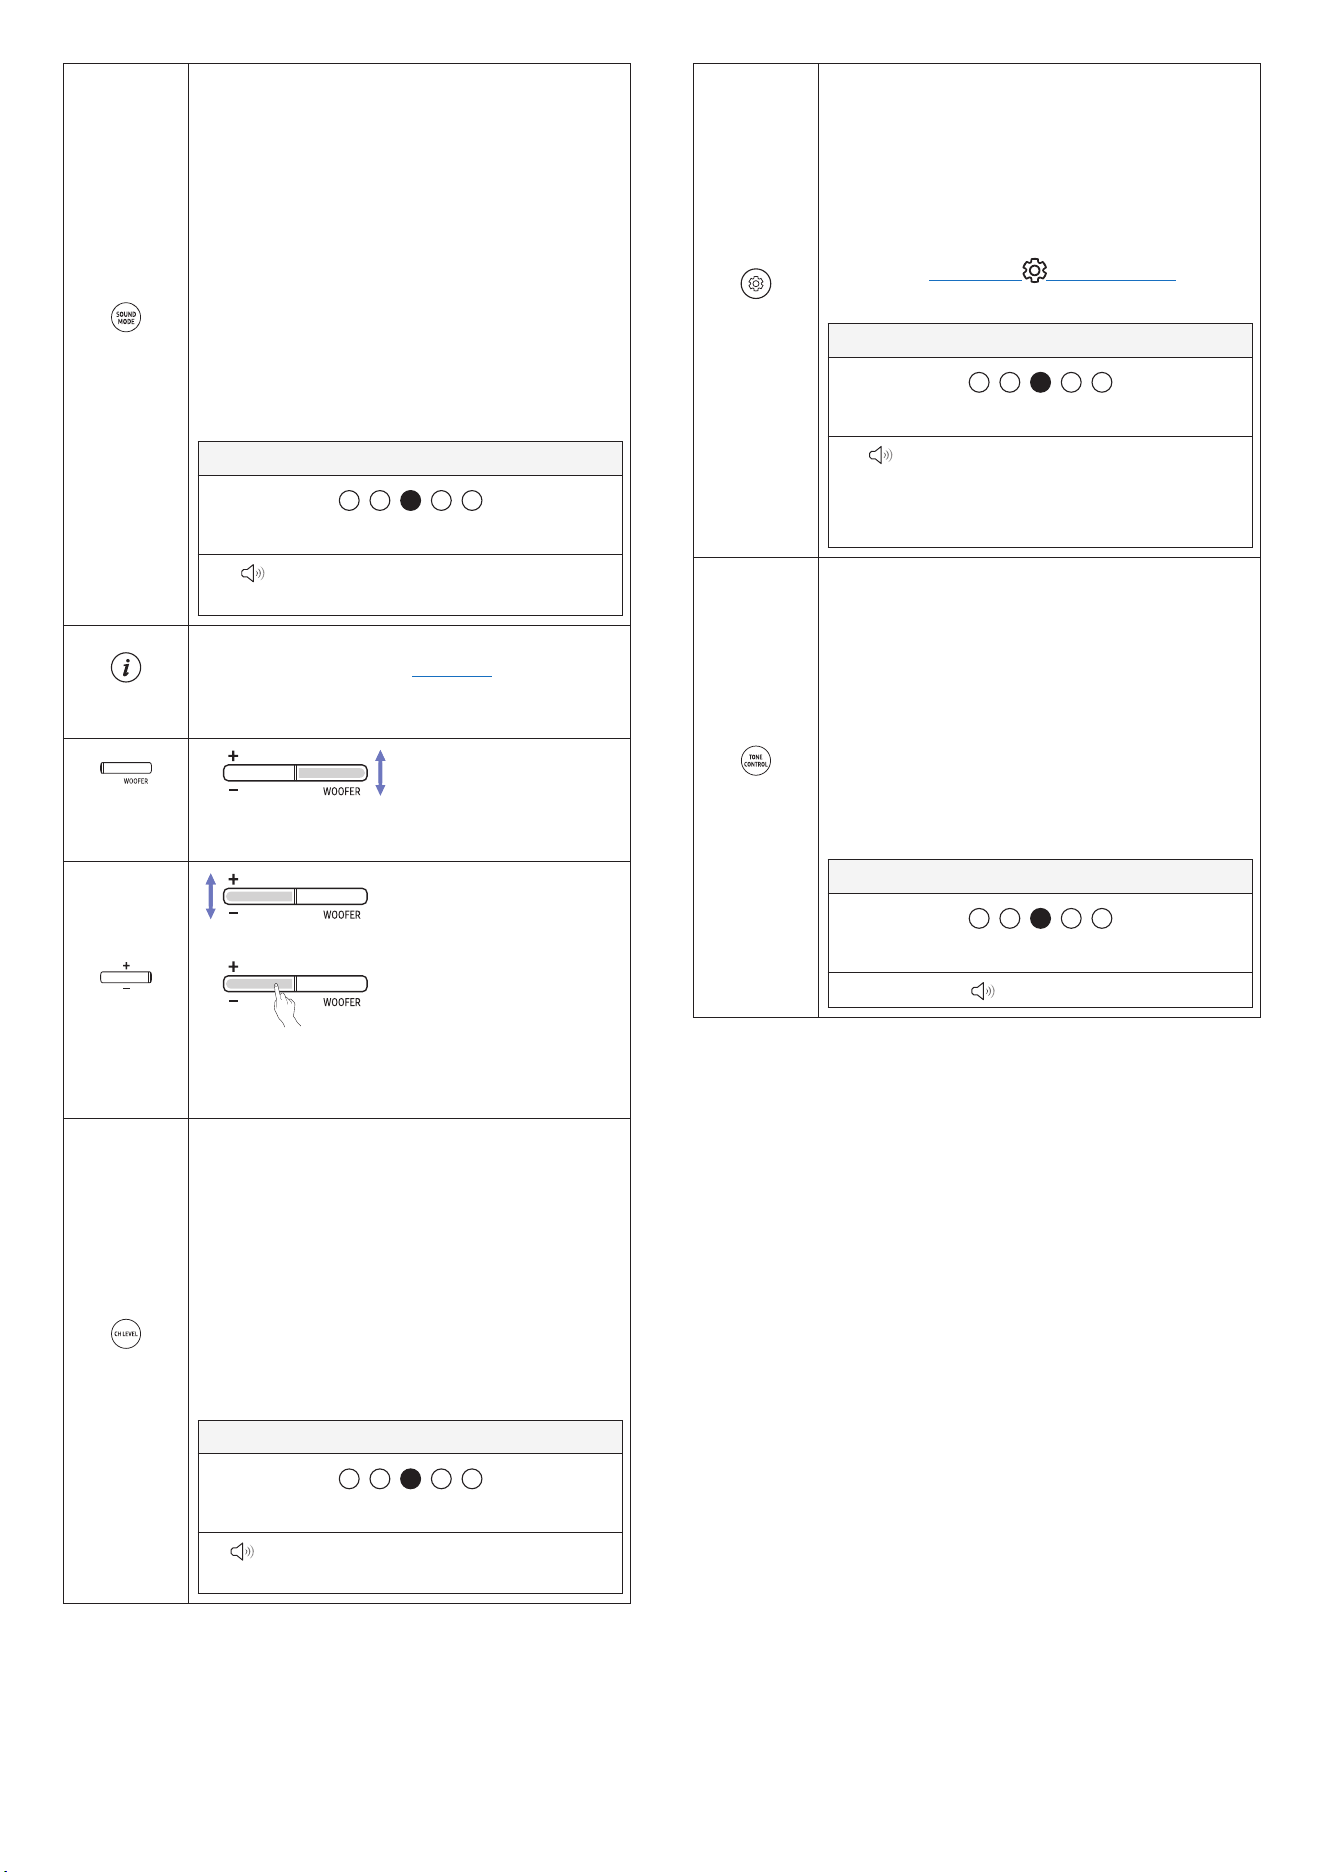
(Sound
mode)
Select the desired sound mode from among
Surround , Game pro , Standard , and AI Adaptive
Sound .
• Surround
Surround sound will be activated.
• Game pro
This mode is optimized for gaming, providing a
more immersive sound experience.
• Standard
The original sound will be played back.
• AI Adaptive Sound
In this mode, content is analyzed in real time and
optimal sound is played based on the type of
content.
LED indicator
White blinking X1
Surround → Game pro → Standard → AI
Adaptive Sound
(Info)
Press the button to display information about the
current function. (See the "Front side " section.)
When connected to Dolby Atmos®, the LED indicator
blinks cyan 3 times.
(Woofer
(bass) Level)
You can adjust the Woofer (bass) Level by sliding the
button up or down.
(Volume)
Press the Up or Down button to adjust the volume.
• Mute
Press the Volume button. Press it again to
unmute.
(Channel
level)
You can adjust the volume of each speaker, including
the Center , Side , Wide , Front top , Rear and Rear top
speakers.
• To adjust the volume of each speaker, select the
Center Level , Side Level , Wide Level , or Front
Top Level in the sound settings, then use the
Up / Down buttons to adjust the volume between
-6 and +6.
• The Rear Level or Rear Top Level can be selected
when connected to the SWA-9500S (Surround
speaker, sold separately).
LED indicator
White blinking X1
Center Level → Side Level → Wide Level →
Front Top Level → Rear Level → Rear Top Level
(Sound
Control)
You can select audio features such as SpaceFit
Sound Pro , AVA Pro , Sound Elevation , Auto Volume ,
Bass enhancement , Voice enhancement , Night
mode , Sync , Sound Grouping , Private rear sound ,
and Virtual .
To adjust a sound setting, press the Up or Down
button to select your desired option.
• (See the "Setting the (Sound Control) "
section.)
LED indicator
White blinking X1
SpaceFit Sound Pro → AVA Pro → Sound
Elevation → Auto Volume → Bass enhancement
→ Voice enhancement → Night mode → Sync →
Sound Grouping → Private rear sound → Virtual
(Tone
control)
Adjust the treble and bass levels by pressing the
respective buttons. After selecting an option, use the
Up / Down buttons to adjust the settings.
• This feature is available in all sound modes
except Standard mode.
• Adjust the treble or bass levels by selecting
Treble or Bass in the Sound Control . Then, use
the Up / Down buttons to adjust the volume level
within the range of -6 to +6.
• When adjusting the Bass levels, the woofer levels
will also be affected.
LED indicator
White blinking X1
Treble → Bass
English - 8
Setting the (Sound Control)
• SpaceFit Sound Pro : This feature analyzes your listening space
using the soundbar's microphone to deliver optimal audio quality.
Sound optimization runs automatically.
• AVA Pro (Active Voice Amplifier Pro) : This feature analyzes external
noise to ensure clear voice quality. No data is collected or stored
during analysis.
• Sound Elevation : When the soundbar is placed below the TV, this
feature compensates for the mismatch between the sound output
position and the visual position on the screen.
- When this feature is set to ON , you can experience the effect of
the sound coming directly from the TV screen.
- This feature is available only when Sound Grouping or Private
Rear is set to OFF .
- When Sound Grouping or Private Rear is set to ON , this feature
is not supported.
• Auto Volume : This feature automatically adjusts the volume to
maintain a consistent level when changing content or switching to
another external input.
- This function is available only when Q-Symphony is set to OFF .
- When Q-Symphony is set to ON , this feature is not supported.
• Bass enhancement : Emphasizes low-frequency signals.
• Voice enhancement : Improves the dialogue quality in videos and TV
shows, making it easier to hear.
• Night mode : Optimizes the listening experience at night by
lowering the volume while keeping spoken dialog clear.
• Sound Grouping : The full sound is played through both the
soundbar and rear speakers, making it ideal for a group of people in
a large space.
- When the rear speakers are connected for the first time, the
Sound Grouping menu will be available. After that, the menu will
remain available, regardless of whether the rear speakers are
connected.
- In Sound Grouping mode, sound modes won't affect the audio.
- Sound will only come from specific speakers, not from the
soundbar and all rear speakers. This may vary by model.
• Private Rear : This feature allows you to send audio to only the rear
speakers, so you can listen without being disturbed.
- In this mode, no sound will come from the soundbar or
subwoofer. Only the front channels of the rear speakers will
produce sound.
- In Private Rear mode, sound modes won't affect the audio.
- When the soundbar is turned off or the connection to the rear
speakers is lost, the mode will turn off.
- The Private Rear will only be available when a rear speaker is
connected.
- When connecting Q-Symphony , the Private Rear mode will
automatically turn off and can't be turned back on.
• Sync : If the video and audio are out of sync when played through
the TV and soundbar, go to the Sound Control and select Sync .
Then, use the Up / Down buttons to adjust the audio delay between
0 and 300 milliseconds.
- Sync is supported only in certain functions.
• Virtual : While Surround mode is on, it provides extended sound
effects when playing Dolby/DTS content.
This feature can be turned On/Off by using the Up / Down buttons.
• To adjust the sound of each frequency, press and hold the ( Sound
Control ) button for about 5 seconds. You can select 150Hz, 300Hz,
600Hz, 1.2kHz, 2.5kHz, 5kHz, or 10kHz with the Left / Right buttons,
and make adjustments within the range of -6 to +6 using the
Up / Down buttons.
(This feature only works when the sound mode is set to Standard .)
Output specifications for each sound
mode
For using the soundbar
Effect Input Output
Standard
2.0 Channel 2.1 Channel
5.1 Channel 5.1 Channel
7.1 Channel 7.1 Channel
Dolby Atmos®, DTS:X 7.1.2 Channel
Surround
Game pro
AI Adaptive
Sound
2.0 Channel 7.1.2 Channel
5.1 Channel 7.1.2 Channel
7.1 Channel 7.1.2 Channel
Dolby Atmos®, DTS:X 7.1.2 Channel
For using the surround speaker ( SWA-9500S , optional)
together
Effect Input Output
Standard
2.0 Channel 2.1 Channel
5.1 Channel 5.1 Channel
7.1 Channel 7.1 Channel
Dolby Atmos®, DTS:X 9.1.4 Channel
Surround
Game pro
AI Adaptive
Sound
2.0 Channel 9.1.4 Channel
5.1 Channel 9.1.4 Channel
7.1 Channel 9.1.4 Channel
Dolby Atmos®, DTS:X 9.1.4 Channel
The surround speakers won't produce sound for 2-channel output
while Standard effect mode is active. To turn on sound for the
surround speakers, change the effect mode to Surround .
English - 9
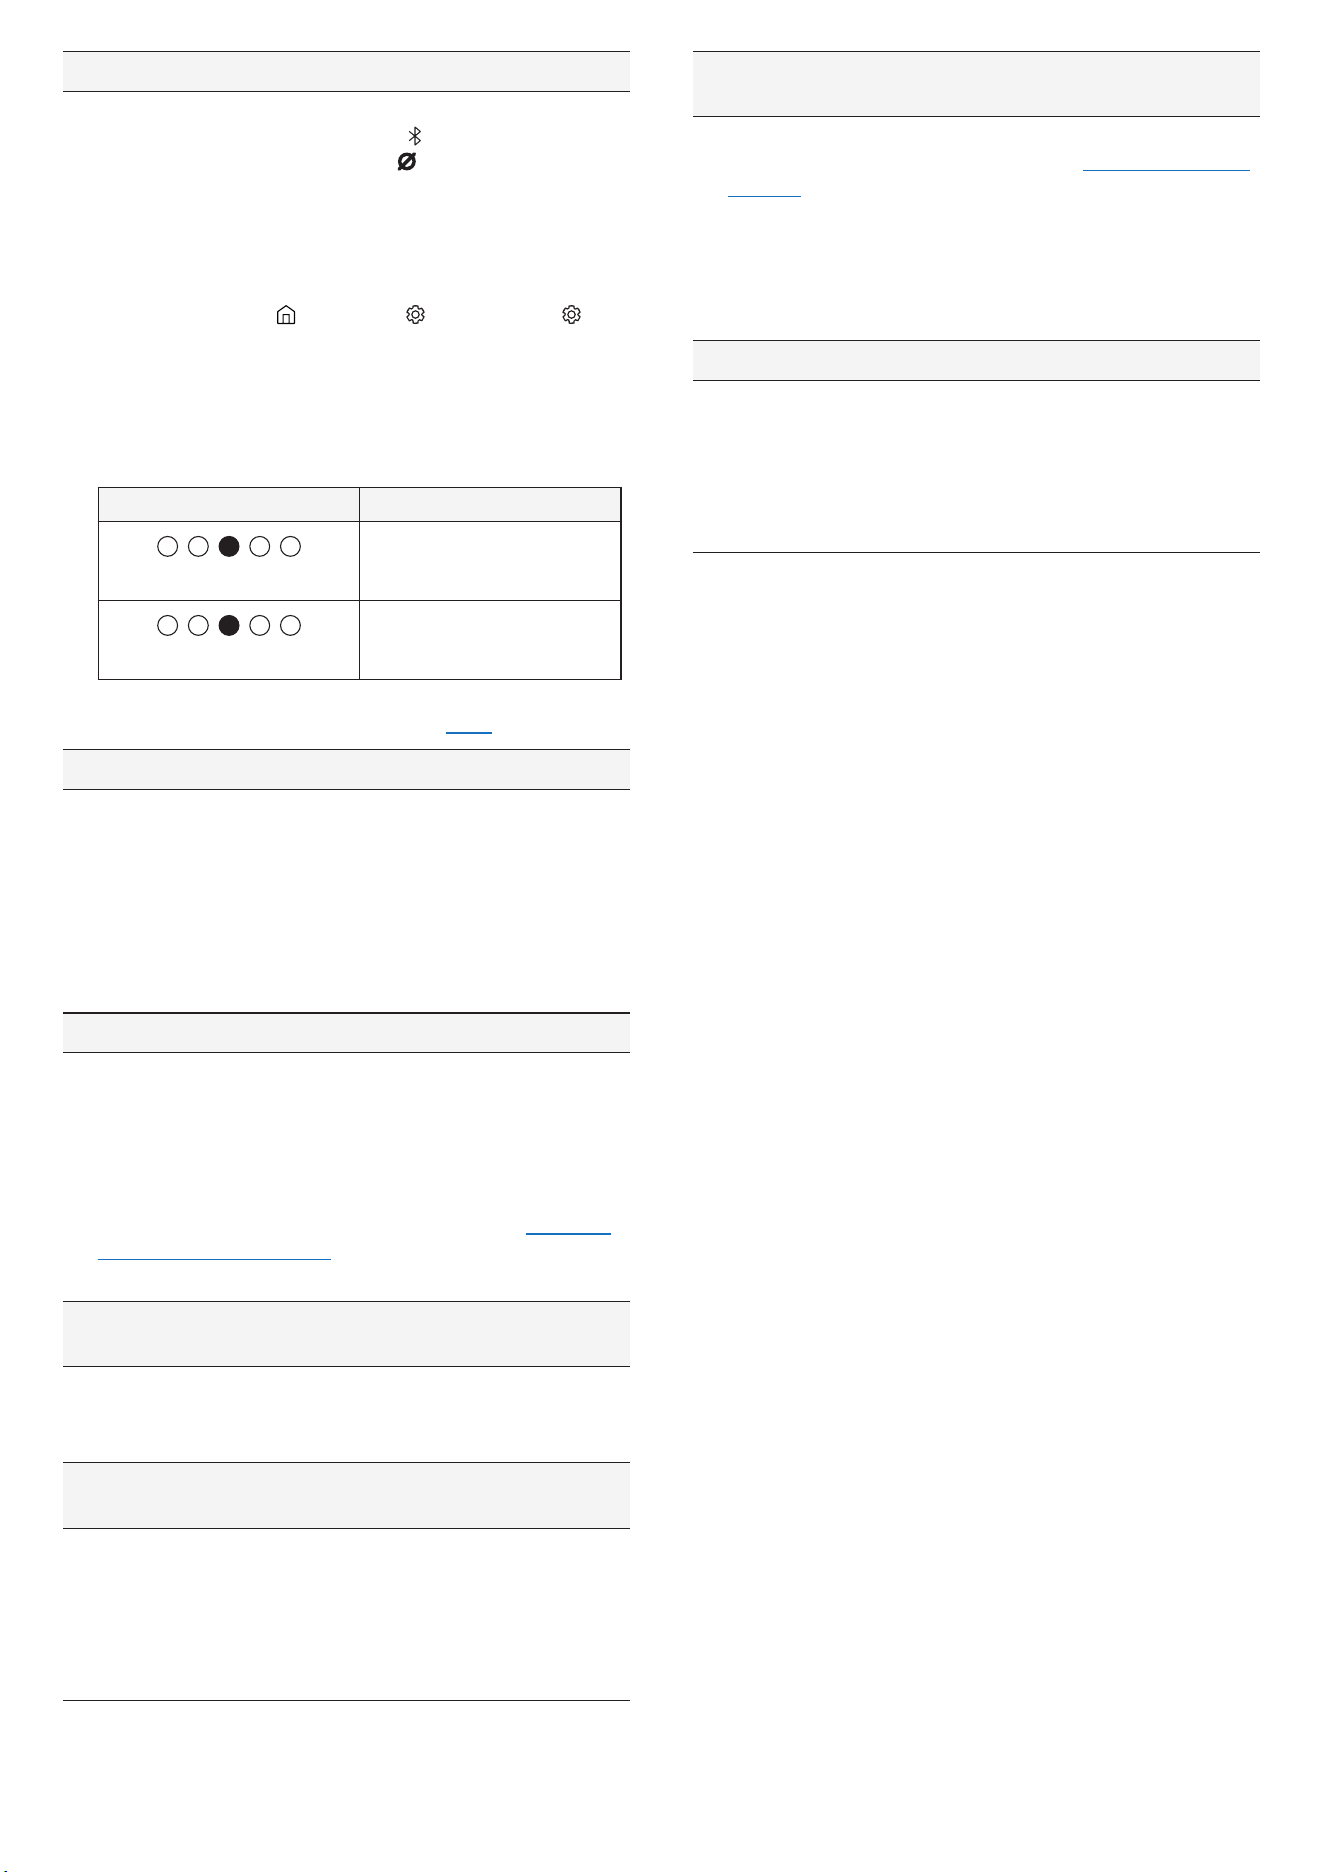
Adjusting the Soundbar Volume with the
TV Remote Control
This feature allows you to adjust the soundbar volume using the TV’s
remote control.
• This function can only be used with an IR remote control.
Bluetooth remote controls (those that need pairing) aren't
supported.
• The above item only operates in certain input modes of the
soundbar.
• Manufacturers that support this feature
Samsung, VIZIO, LG, Sony, Sharp, PHILIPS, PANASONIC, TOSHIBA,
Hisense, RCA
1. Turn off the soundbar.
2. Push the Woofer (bass) Level button up and hold for 5 seconds.
When you press and hold the Woofer (bass) Level button for up
to 5 seconds, the mode will change in the following sequence:
OFF-TV REMOTE , (default) SAMSUNG-TV REMOTE , and then ALL-TV
REMOTE .
Remote control button
Display
Status
5 seconds
Red blinking X1
OFF-TV REMOTE
(Default)
Disables the TV
remote control.
5 seconds
Cyan blinking X1
SAMSUNG-TV
REMOTE
Controls the
soundbar with a
Samsung TV IR
remote control.
5 seconds
Blue blinking X1
ALL-TV REMOTE
Controls the
soundbar with
a different TV
manufacturer's
and Samsung TV IR
remote control.
05 Connecting the Soundbar
to Other Units
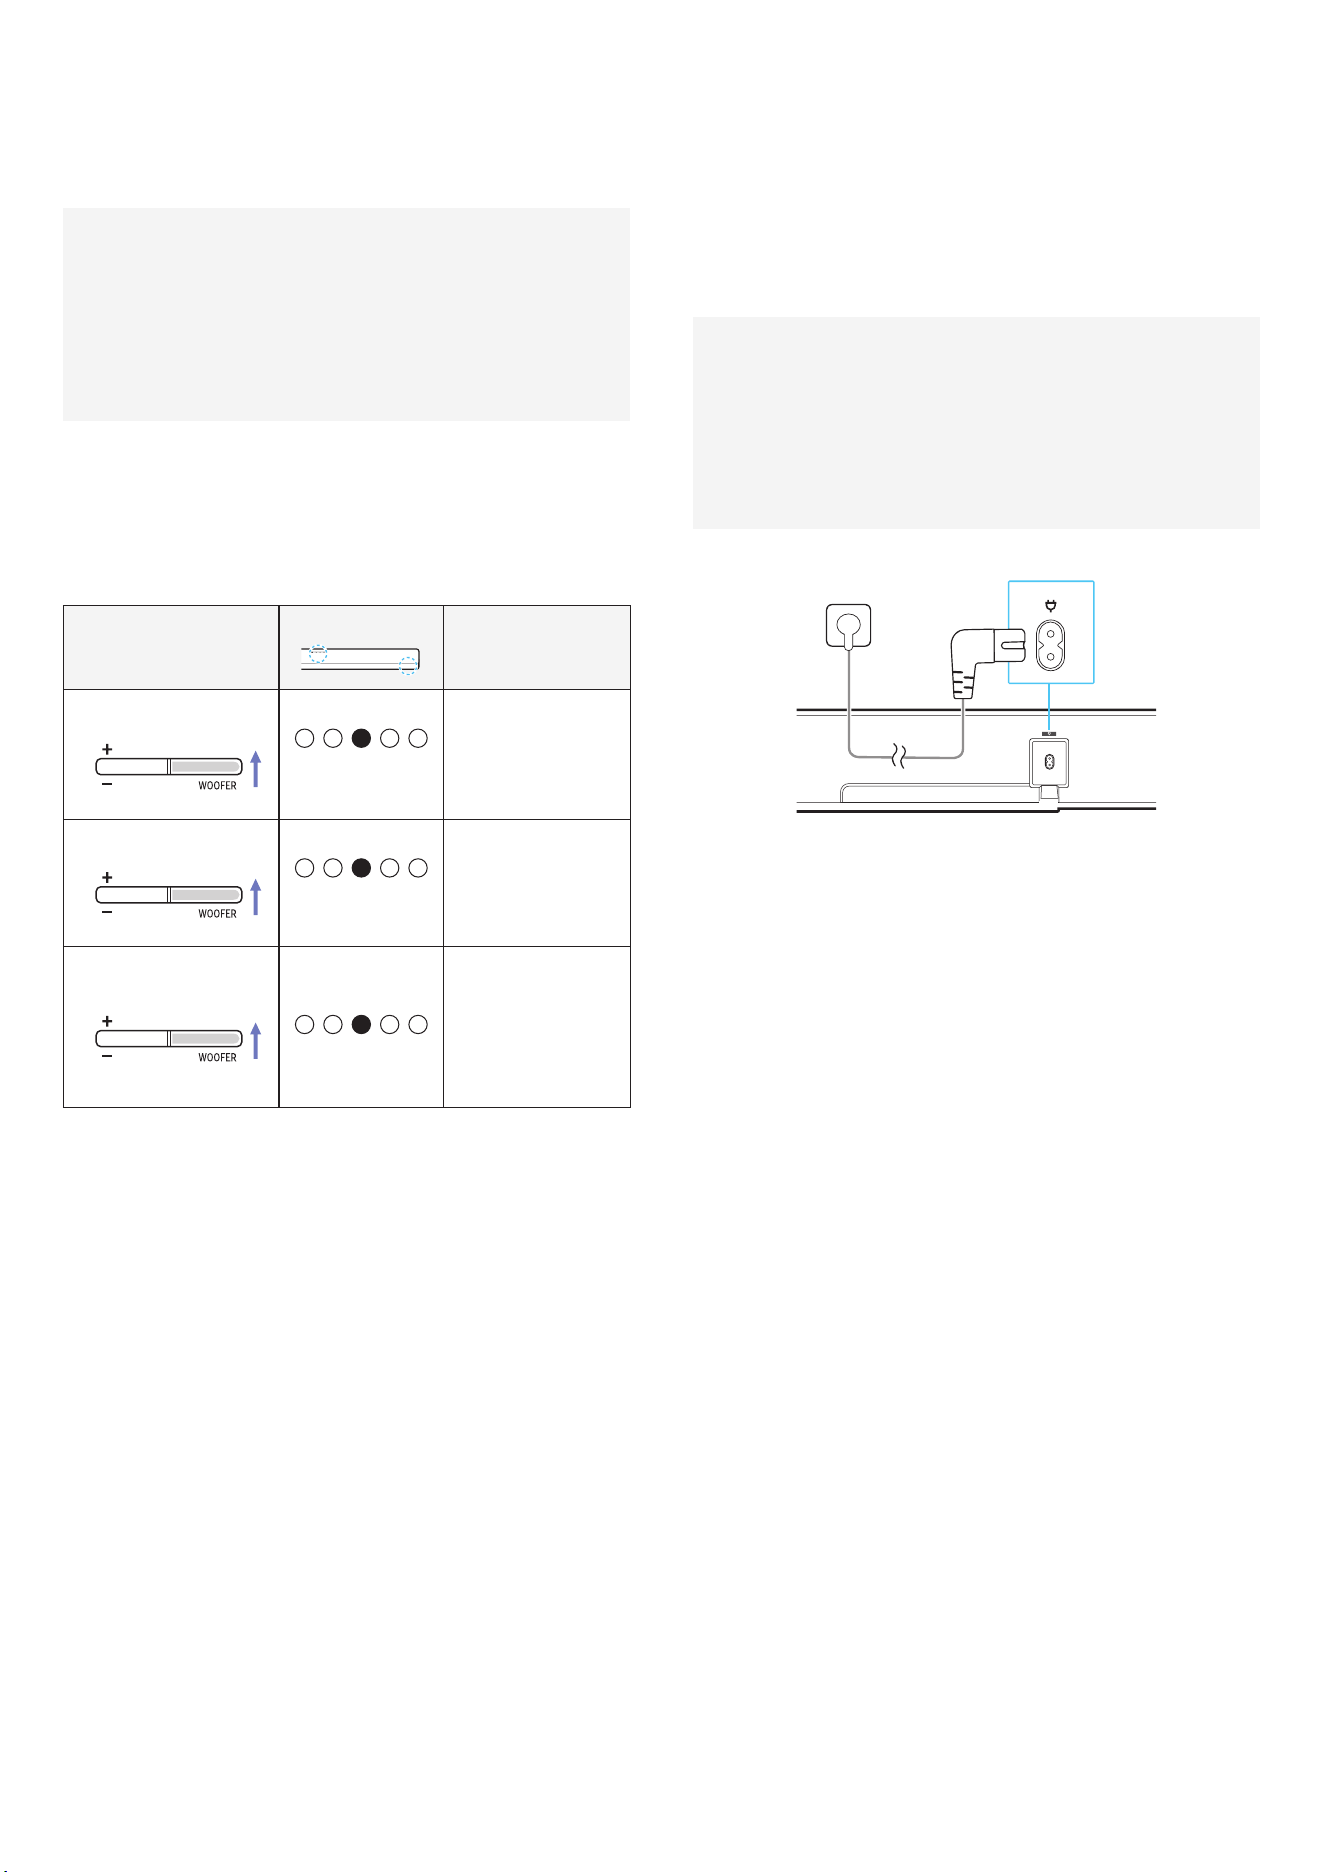
Connecting the Power and Devices
Using the power cords, connect the soundbar to an electrical outlet in
the following order:
• Refer to the information label located on the bottom or rear of
the product for details about power consumption and supply
specifications.
• Always grip the plug firmly and pull it directly when
disconnecting the power cord from the wall outlet. Do not pull on
the power cord itself.
• Once all devices are connected, connect the soundbar and other
devices to an electrical power outlet.
Connect the power cord to the soundbar.
Power cable
Rear side of Soundbar
NOTE
• If you disconnect the power cord while the soundbar is on, and
reconnect it to a power outlet, the soundbar will automatically turn
on.
Connecting an Samsung Wireless Rear
Speaker Kit (Sold Separately) to your
Soundbar
Expand to true wireless surround sound by connecting the Samsung
Wireless Rear Speaker Kit(sold separately) to your Soundbar.
For detailed information on connections, see the Samsung Wireless
Rear Speaker Kit manual.
English - 10
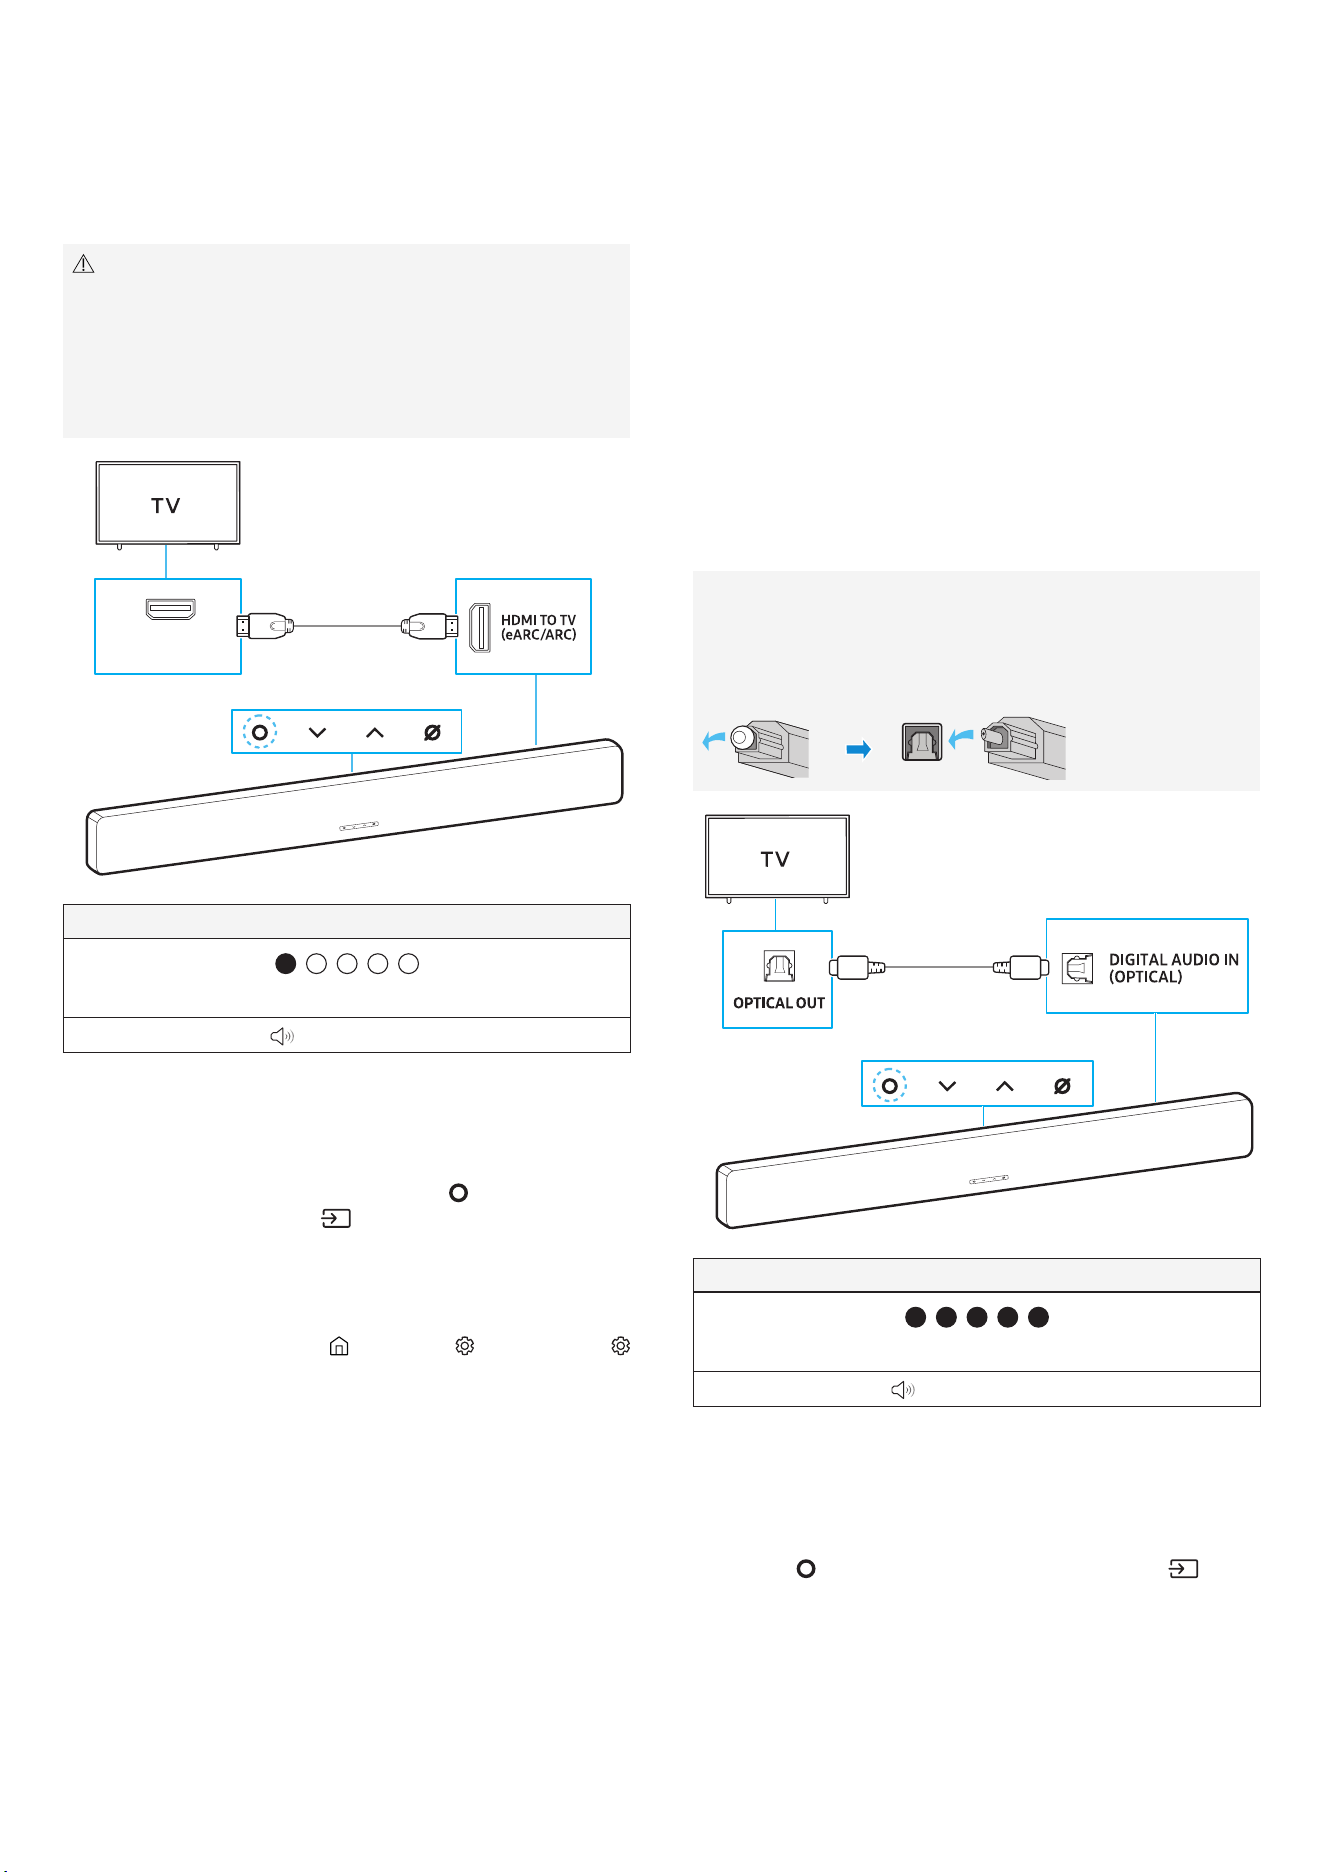
06 Connecting to a TV
Connect to a TV that supports HDMI ARC
(Audio Return Channel)
CAUTION
• If both an HDMI cable and an optical cable are connected, the
HDMI cable signal will take priority.
• When connecting the TV and soundbar with an HDMI cable, make
sure to connect the ports labeled eARC or ARC. If the correct port
isn't used, the TV won't make any sound.
• Using HDMI cables certified by HDMI.org is recommended.
HDMI cable
(Included in box)
Front of soundbar
Rear of soundbar
HDMI IN
(eARC) or (ARC)
LED indicator
White ON → OFF
TV ARC or eARC
1. While the soundbar and TV are turned off, connect the HDMI cable
as shown in the diagram above.
2. Turn on the soundbar and TV.
3. TV sound will play through the soundbar.
- If there is no sound from the TV, press the ( Multi ) button on
the soundbar or press the ( Source ) button on the remote
control to switch to the appropriate connected mode.
- To connect with eARC, the eARC function in the TV menu should
be turned on. Refer to the TV user manual for details about how
to configure the settings.
(e.g.) Samsung TV : Home ( ) → Settings ( ) → All Settings (
) → Sound → Expert Settings → HDMI-eARC Mode (Auto) )
- You can use the volume buttons on your TV remote control to
adjust the soundbar volume.
NOTE
• When connecting a TV and soundbar that support HDMI ARC (Audio
Return Channel) using an HDMI cable, digital video and audio data
can be transmitted without a separate optical cable.
• Using a coreless HDMI cable is recommended whenever possible. If
using a cored HDMI cable, ensure its diameter is less than 14 mm.
• This function won't work if the HDMI cable doesn't support ARC.
• If the broadcast audio is encoded in Dolby and the "Digital Output
Audio Format" in your TV is set to PCM, changing the settings to
Dolby Digital, Dolby Digital+, or Auto is recommended for optimal
sound.
Changing the setting will provide better sound quality. (The
TV menu may use different terms for Dolby Digital and PCM,
depending on the manufacturer.)
• ARC/eARC protocol supports Dolby Atmos®.
• Check if the content you want to use support Dolby Atmos®.
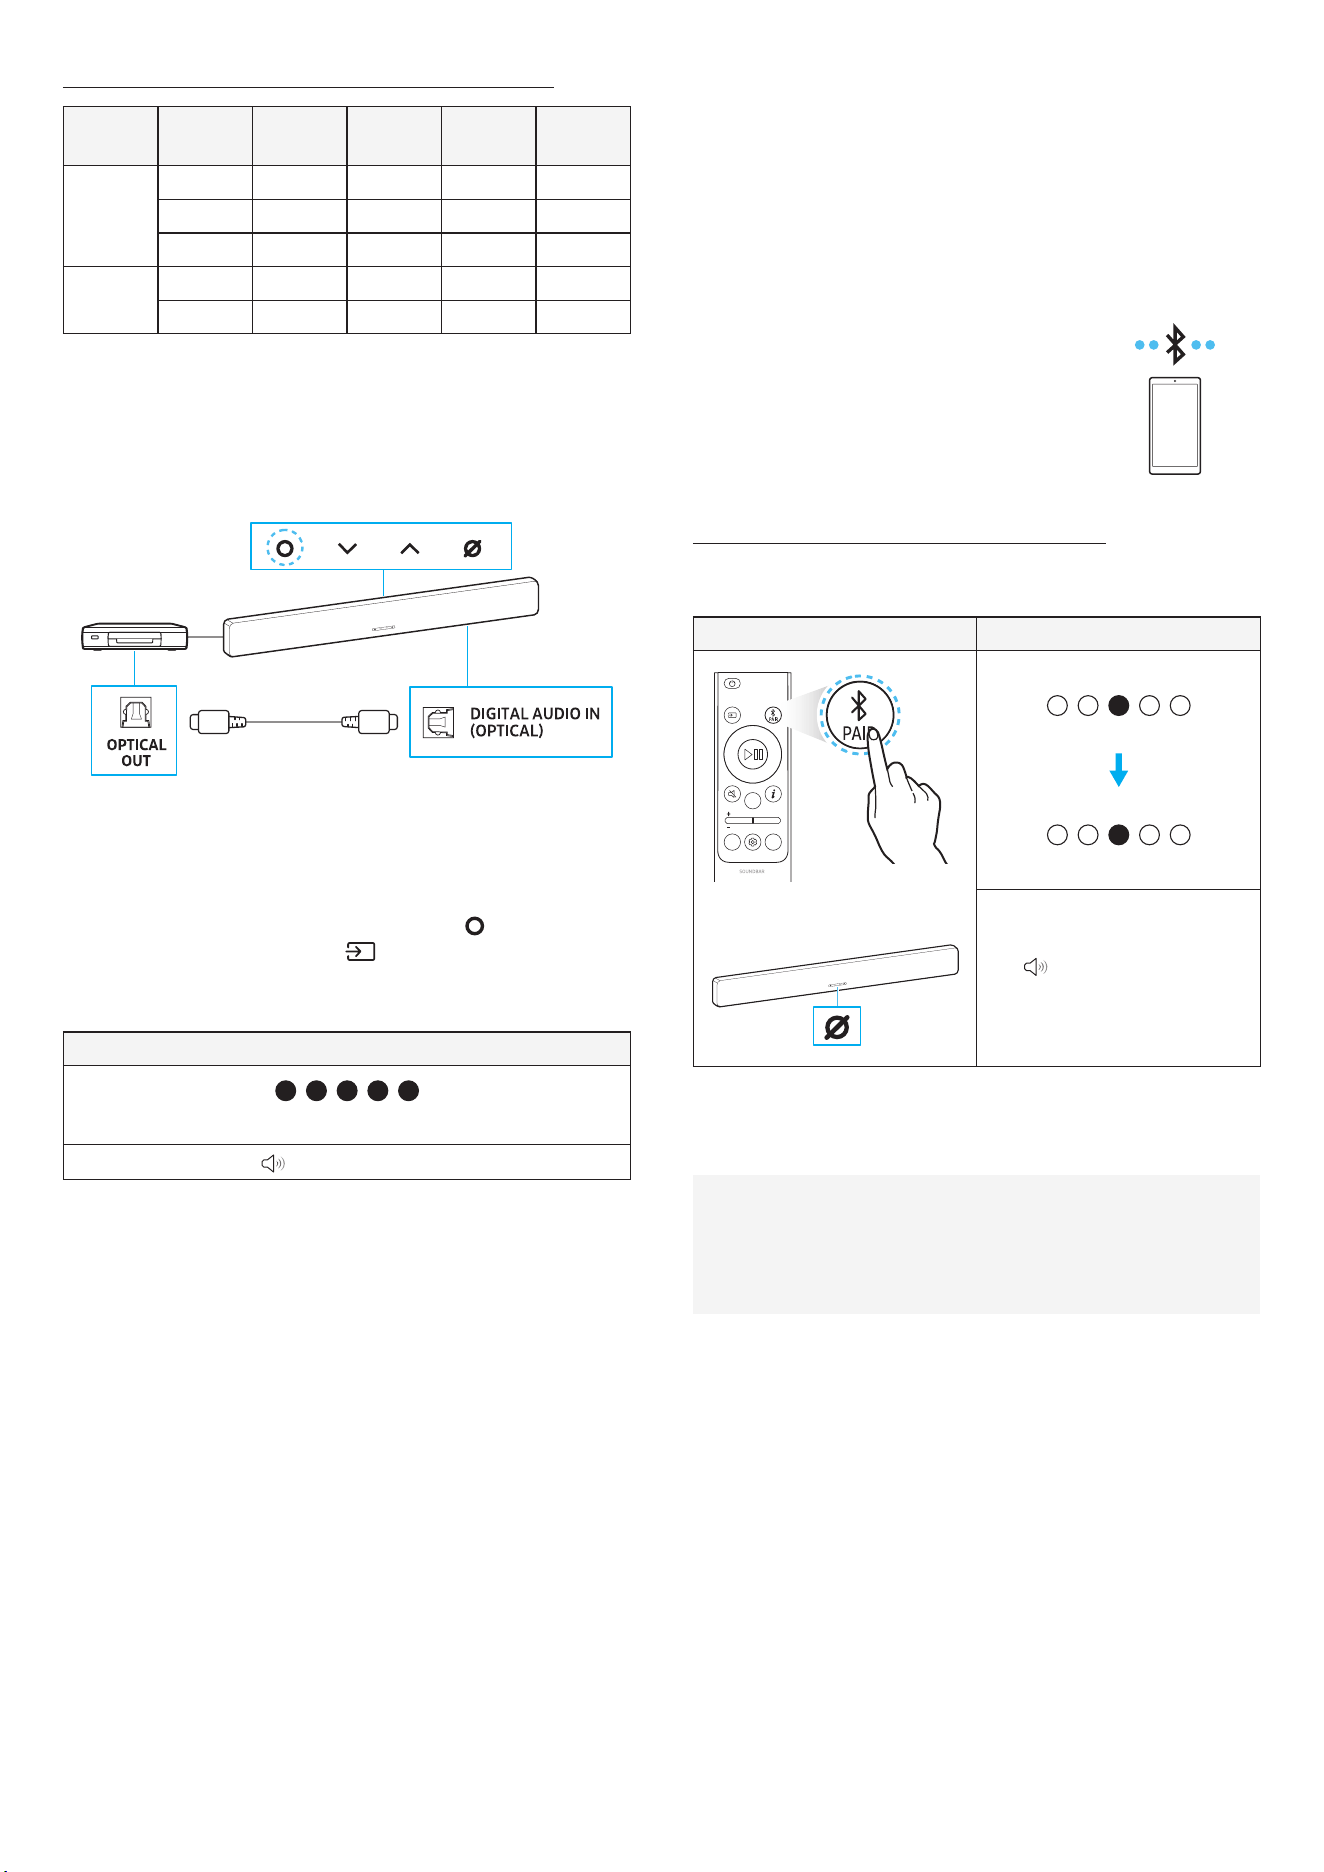
Connecting Using an Optical Cable
Pre-connection Checklist
• If both an HDMI cable and an optical cable are connected, the
HDMI cable signal will take priority.
• When using an optical cable, make sure to remove the cap from
the optical cable before use.
Optical cable
(sold separately)
Front of soundbar
Rear of soundbar
LED indicator
White ON → OFF
DIGITAL AUDIO IN
1. While the TV and soundbar are turned off, connect the DIGITAL
AUDIO IN (OPTICAL) on the soundbar to the OPTICAL OUT port
on the external device using an optical cable (sold separately), as
shown in the above diagram.
2. Turn on the soundbar and TV.
3. Press the ( Multi ) button on the soundbar or press the
( Source ) button on the remote control to switch to DIGITAL AUDIO
IN mode.
TV sound will play through the soundbar.
English - 11
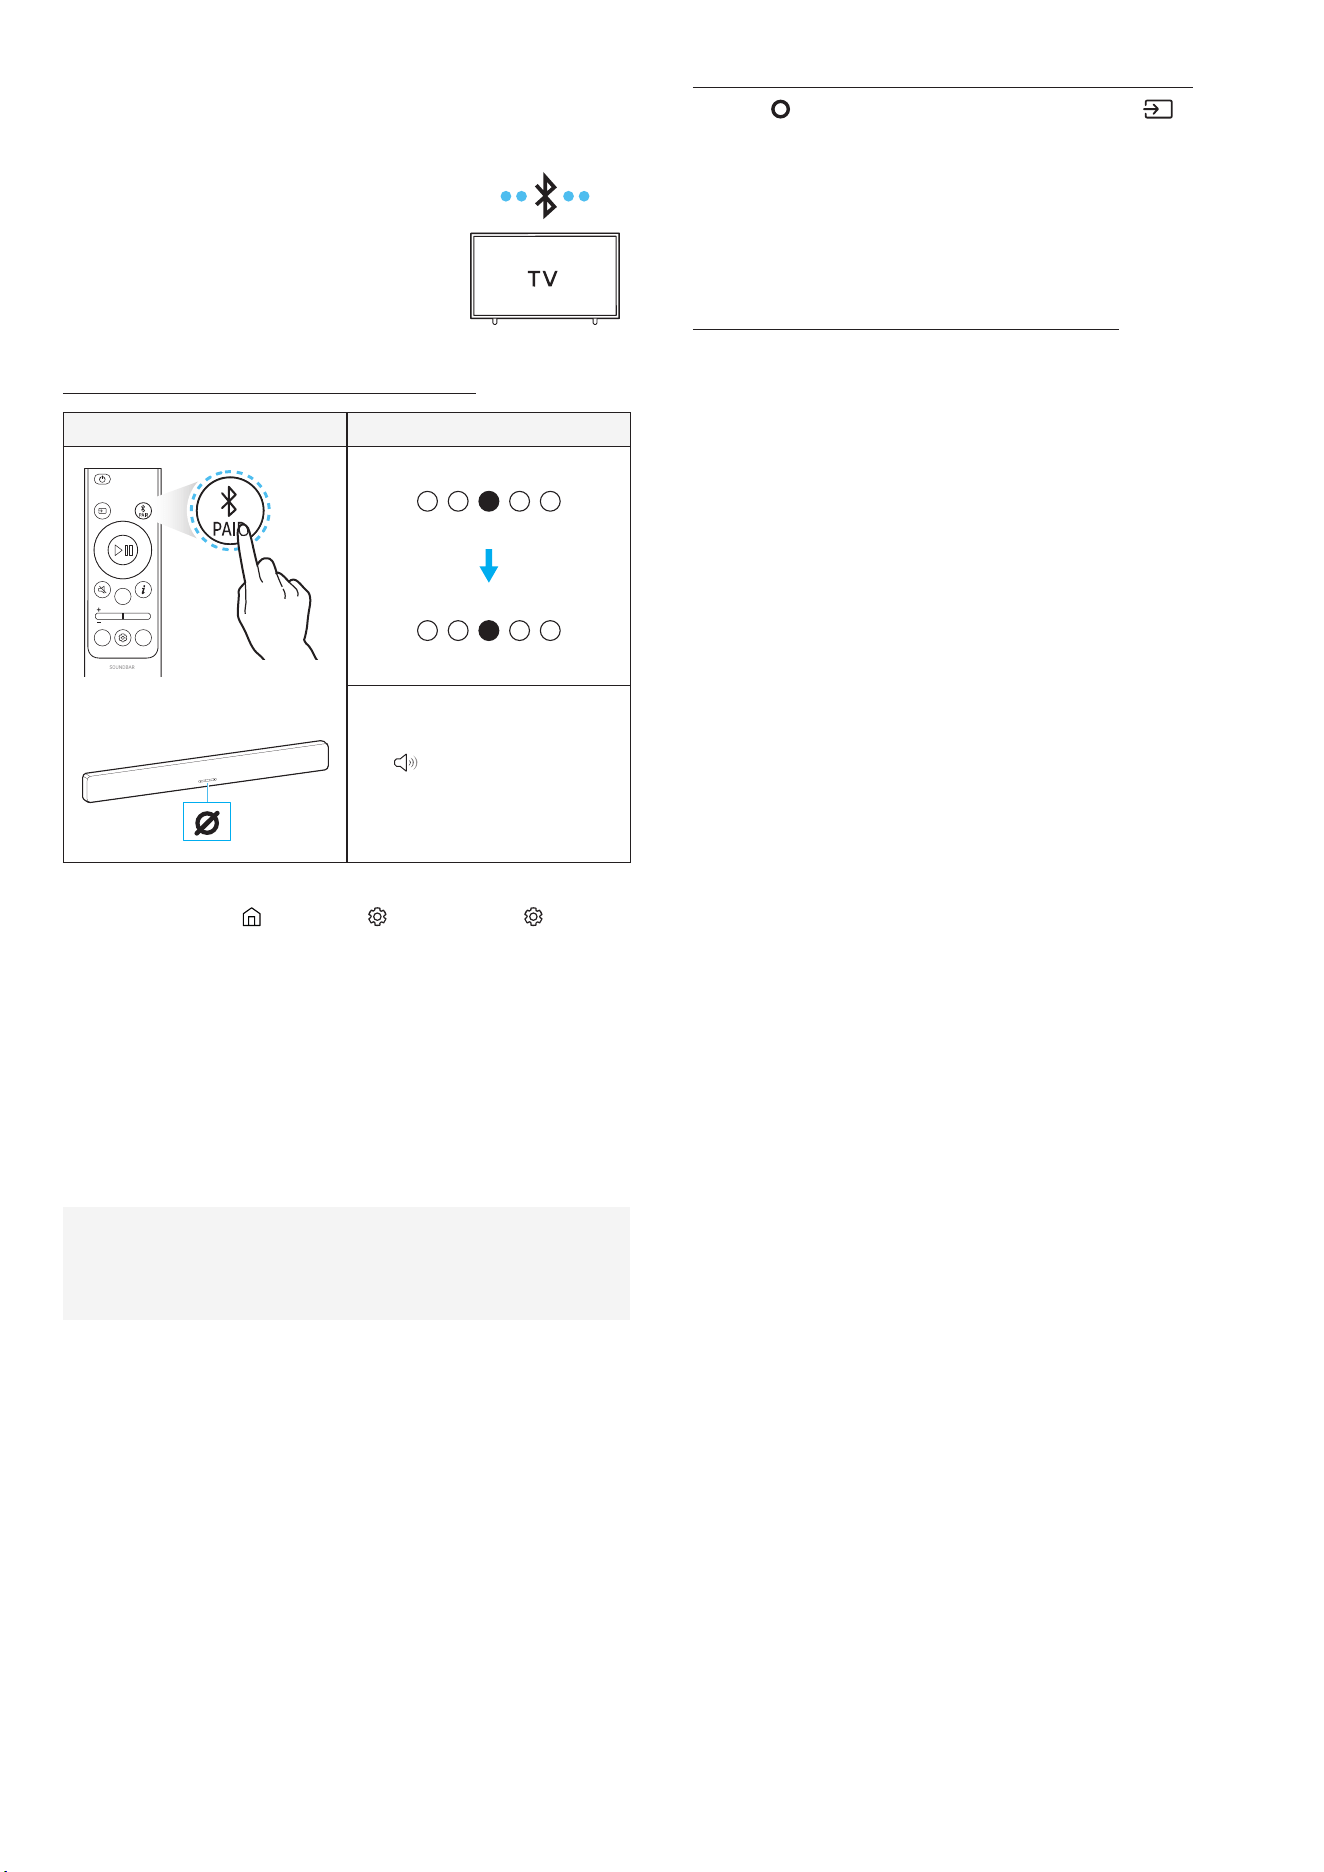
Connecting by Bluetooth
Connecting your Samsung TV to the soundbar by Bluetooth allows you
to enjoy stereo sound without the need for cables.
• Only one Samsung TV can be connected by
Bluetooth at a time.
• You can connect to a Samsung TV with
Bluetooth support. Make sure to check your
TV’s specifications.
Connecting to Bluetooth for the first time
Bluetooth pairing button LED indicator
(Or)
3 seconds
or longer
[Pairing]
[Connection successful]
Red → Green → Blue blinking
Cyan blinking x3
Ready to connect by
Bluetooth.
1. Open the Bluetooth menu on the Samsung TV you want to connect.
(Examples: Home ( ) → Settings ( ) → All Settings ( ) → Sound
→ Sound Output → Bluetooth Speaker List → Soundbar Q-series
(Bluetooth) )
2. Select “ Q-series Soundbar ” from the list on the TV screen.
On the Samsung TV Bluetooth device list, “ Need Pairing ” or “ Paired ”
will appear for a device. To connect Samsung TV to the soundbar,
select the corresponding message to establish the connection.
3. You can now enjoy Samsung TV audio through the soundbar.
- If there is a connection log between the Soundbar and Samsung
TV, the Soundbar is automatically connected by changing its
mode to " Bluetooth ".
If the Device Fails to Connect
• When a previously connected soundbar (e.g., If Q-series
Soundbar ) appears in the Samsung TV speaker list, delete it.
• Repeat steps 1 through 3.
Disconnecting the Soundbar from the Samsung TV
Press the ( Multi ) button on the soundbar or press the ( Source )
button on the remote control and switch to any other mode besides
Bluetooth .
• Ending the connection may take a few seconds as the TV waits for a
response from the soundbar.
(The disconnection time may vary, depending on the Samsung TV
model.)
Precautions when connecting to Bluetooth
• Position the device you are connecting to the soundbar by
Bluetooth within 1 meter.
• If prompted for a PIN code when connecting to a Bluetooth device,
enter <0000>.
• The soundbar will automatically turn off after 18 minutes of
inactivity in Standby mode.
• The soundbar may have difficulty scanning for available Bluetooth
devices or connecting properly under the following conditions:
- If there are nearby electronic devices or equipment causing
radio interference.
- If multiple Bluetooth devices are simultaneously paired with the
soundbar.
- If the Bluetooth device is turned off, out of range, or
experiencing a malfunction.
• Electronic devices may cause radio interference. Keep any device
that generates electromagnetic waves away from the soundbar.
(e.g., microwave oven, wireless LAN, etc.)
• Press and hold the TONE CONTROL button on the remote control
for 30 seconds or longer to turn Bluetooth on or off.
When you turn Bluetooth on or off, the soundbar will automatically
restart.
English - 12
Connecting by Wi-Fi (Wireless Network)
Pre-connection Checklist
• Wi-Fi connection is only available on a Samsung TV.
• Check if the wireless router (Wi-Fi) is turned on and the TV is
connected to the wireless router.
• Connect the soundbar and TV to the same Wi-Fi network.
• If your wireless router (Wi-Fi) uses a DFS channel, you won't
be able to connect the TV and soundbar by Wi-Fi. Contact your
Internet Service Provider for more details.
• Check your TV's manual since the menu may vary, depending on
the year of manufacture.
• Connect the soundbar to the wireless router first so that you can
connect the soundbar and TV by Wi-Fi. (See the "Connecting by
Wi-Fi (Wireless Network) " section.)
1. For more information on how to connect your soundbar to a Wi-Fi
network, see the "Connecting by Wi-Fi (Wireless Network) " section.
2. On the TV Sound menu, change the input source to soundbar.
- For Samsung TVs released in 2017 or later
Home ( ) → Settings ( ) → All Settings ( ) → Sound →
Sound Output → Q-series Soundbar (Wi-Fi)
NOTE
• Wi-Fi Dolby Atmos connectivity is only available on some Samsung
TVs and soundbar.
• To ensure safe and secure use of the product, connect to the
network using a securely managed router.
• When the network is connected, it enables casting YouTube
content, Connecting by Wi-Fi, Apple Airplay, Spotify, Alexa,
SmartThings, Tidal, ChromeCast and Roon Ready. Services
supported by software updates are subject to change.
• To use Wi-Fi Direct, the Soundbar and your Smart TV must be
connected to each other on the same network.
• Press and hold the CH LEVEL button on the Remote Control for 30
seconds or longer to turn Wi-Fi on or off.
When you turn Wi-Fi on or off, the soundbar will automatically
restart.
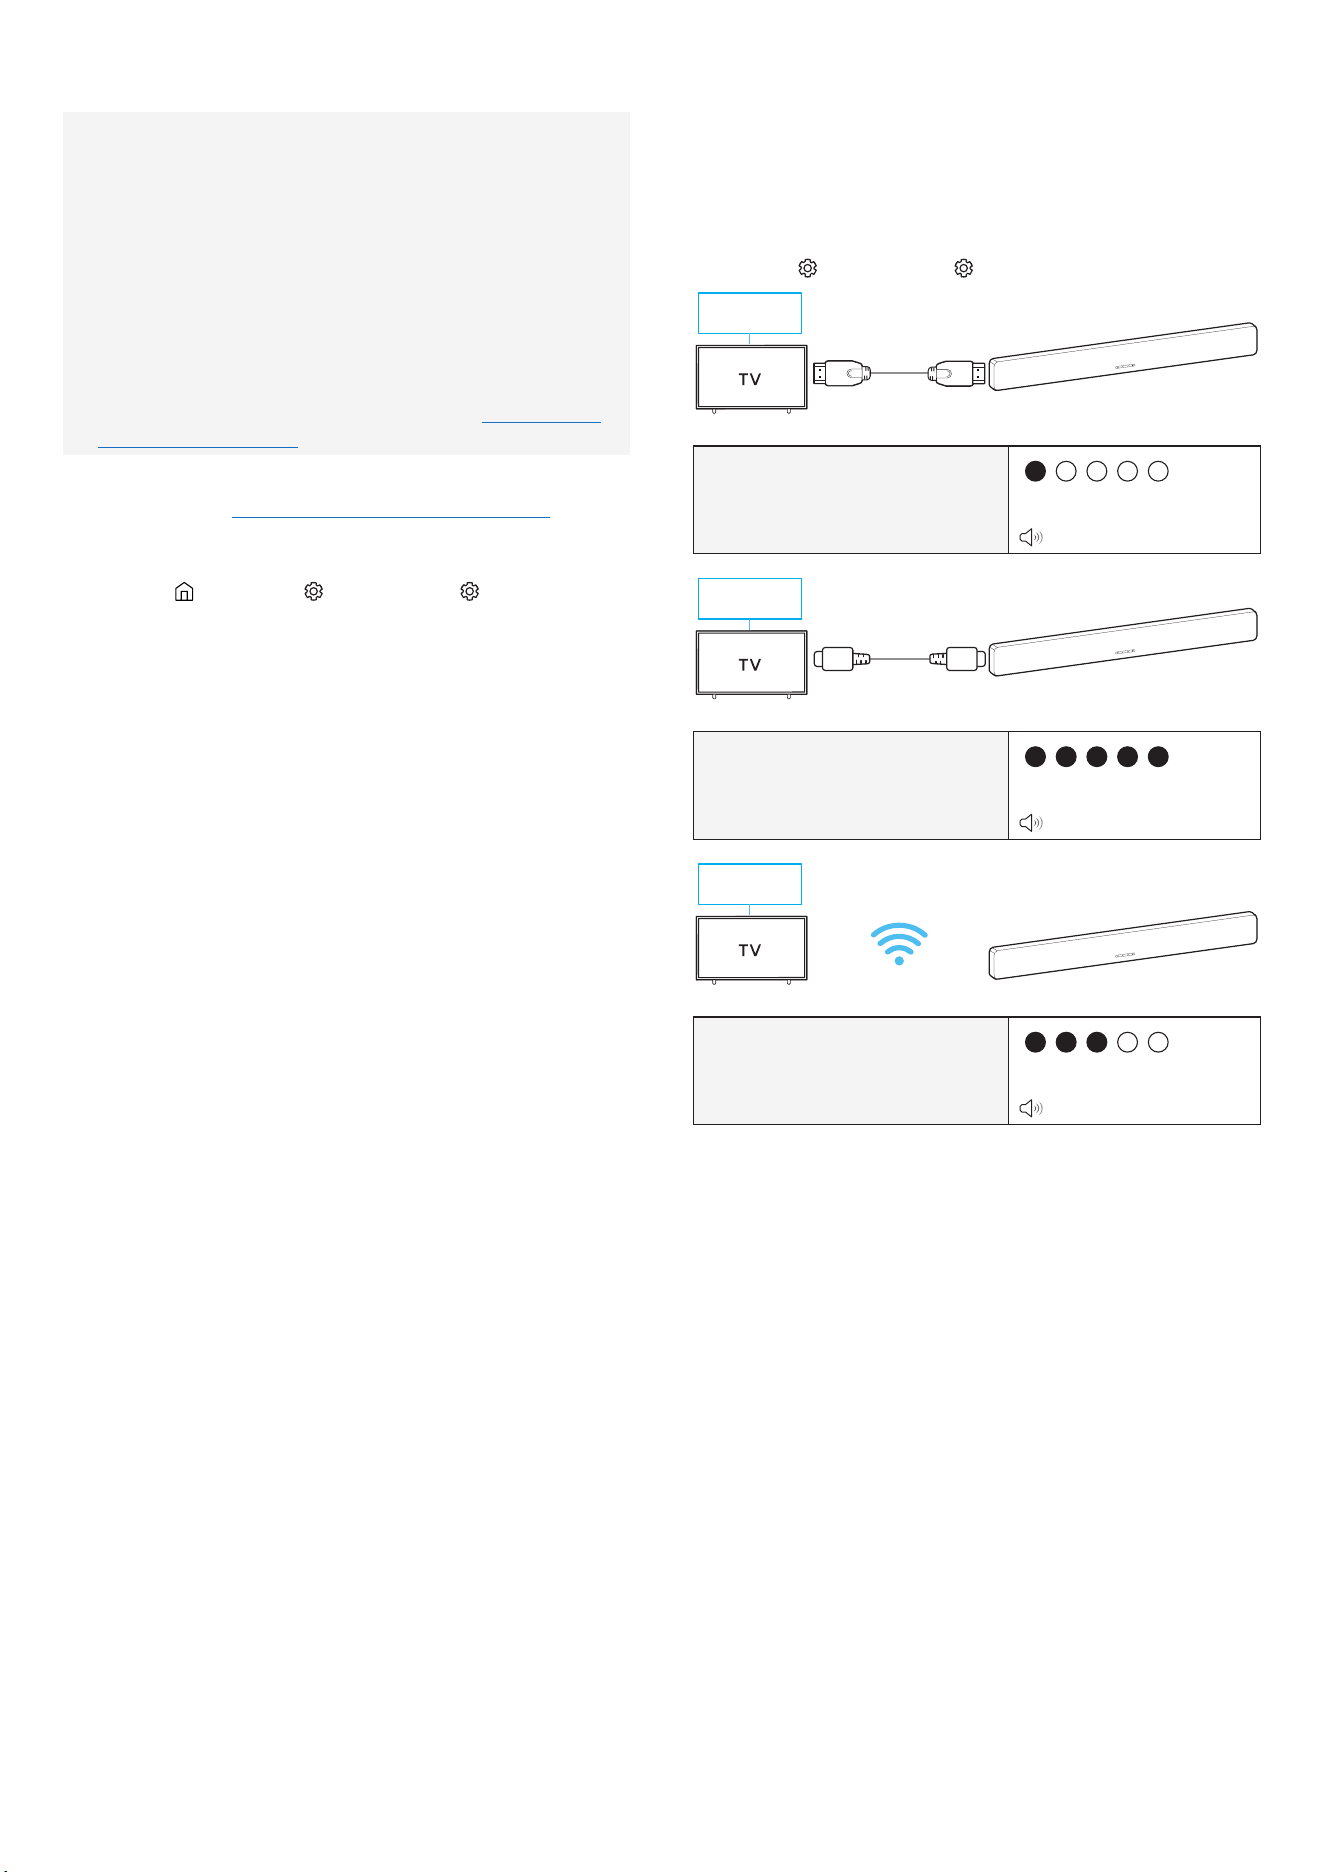
Using the Q-Symphony Feature
• If you connect the soundbar to a Samsung TV that supports
Q-Symphony, sound will play from both the soundbar and TV at the
same time. You can enjoy a richer, more immersive sound with the
TV's surround sound.
• When the soundbar is connected to your TV, “ Q-Symphony ” will
appear on your TV.
Settings ( ) → All Settings ( ) → Sound → Sound Output
*"+2
HDMI Cable
LED indicator
White ON → OFF
TV ARC or eARC
*"+2
Optical cable
(sold separately)
LED indicator
White ON → OFF
DIGITAL AUDIO IN
*"+2
Wi-Fi
LED indicator
White ON → OFF
Wi-Fi
NOTE
• It will work with the codec supported by the TV.
• This feature is only supported when connected by HDMI cable,
optical cable (sold separately), or Wi-Fi.
• The messages displayed on the TV may vary, depending on the
model.
• Check and see if your soundbar and TV are connected to the same
Wi-Fi network/frequency.
• This function is only available on some Samsung TVs and soundbar.
English - 13
Using SpaceFit Sound Pro
SpaceFit Sound Pro analyzes the listening environment through the
soundbar’s microphone and provides optimized sound quality tailored
to the space. Sound optimization is performed automatically.
1. Soundbar Connection
To use this feature, enable the SpaceFit Sound Pro mode using the
soundbar’s remote control.
( ( Sound Control ) → SpaceFit Sound Off → ( Up ) → SpaceFit Sound
On )
This feature can be used in all sound modes.
2. TV Connection
To use this feature, enable the AI Adaptive Sound+ mode from the
Samsung TV menu.
( Home ( ) → Settings ( ) → All Settings ( ) → General →
Intelligent Mode Settings → AI Adaptive Sound+ )
• When AI Adaptive Sound+ mode is enabled in the TV menu, the
soundbar’s sound mode will automatically switch to AI Adaptive
Sound+ .
NOTE
This feature operates only when certain Samsung TVs are connected
with the soundbar.
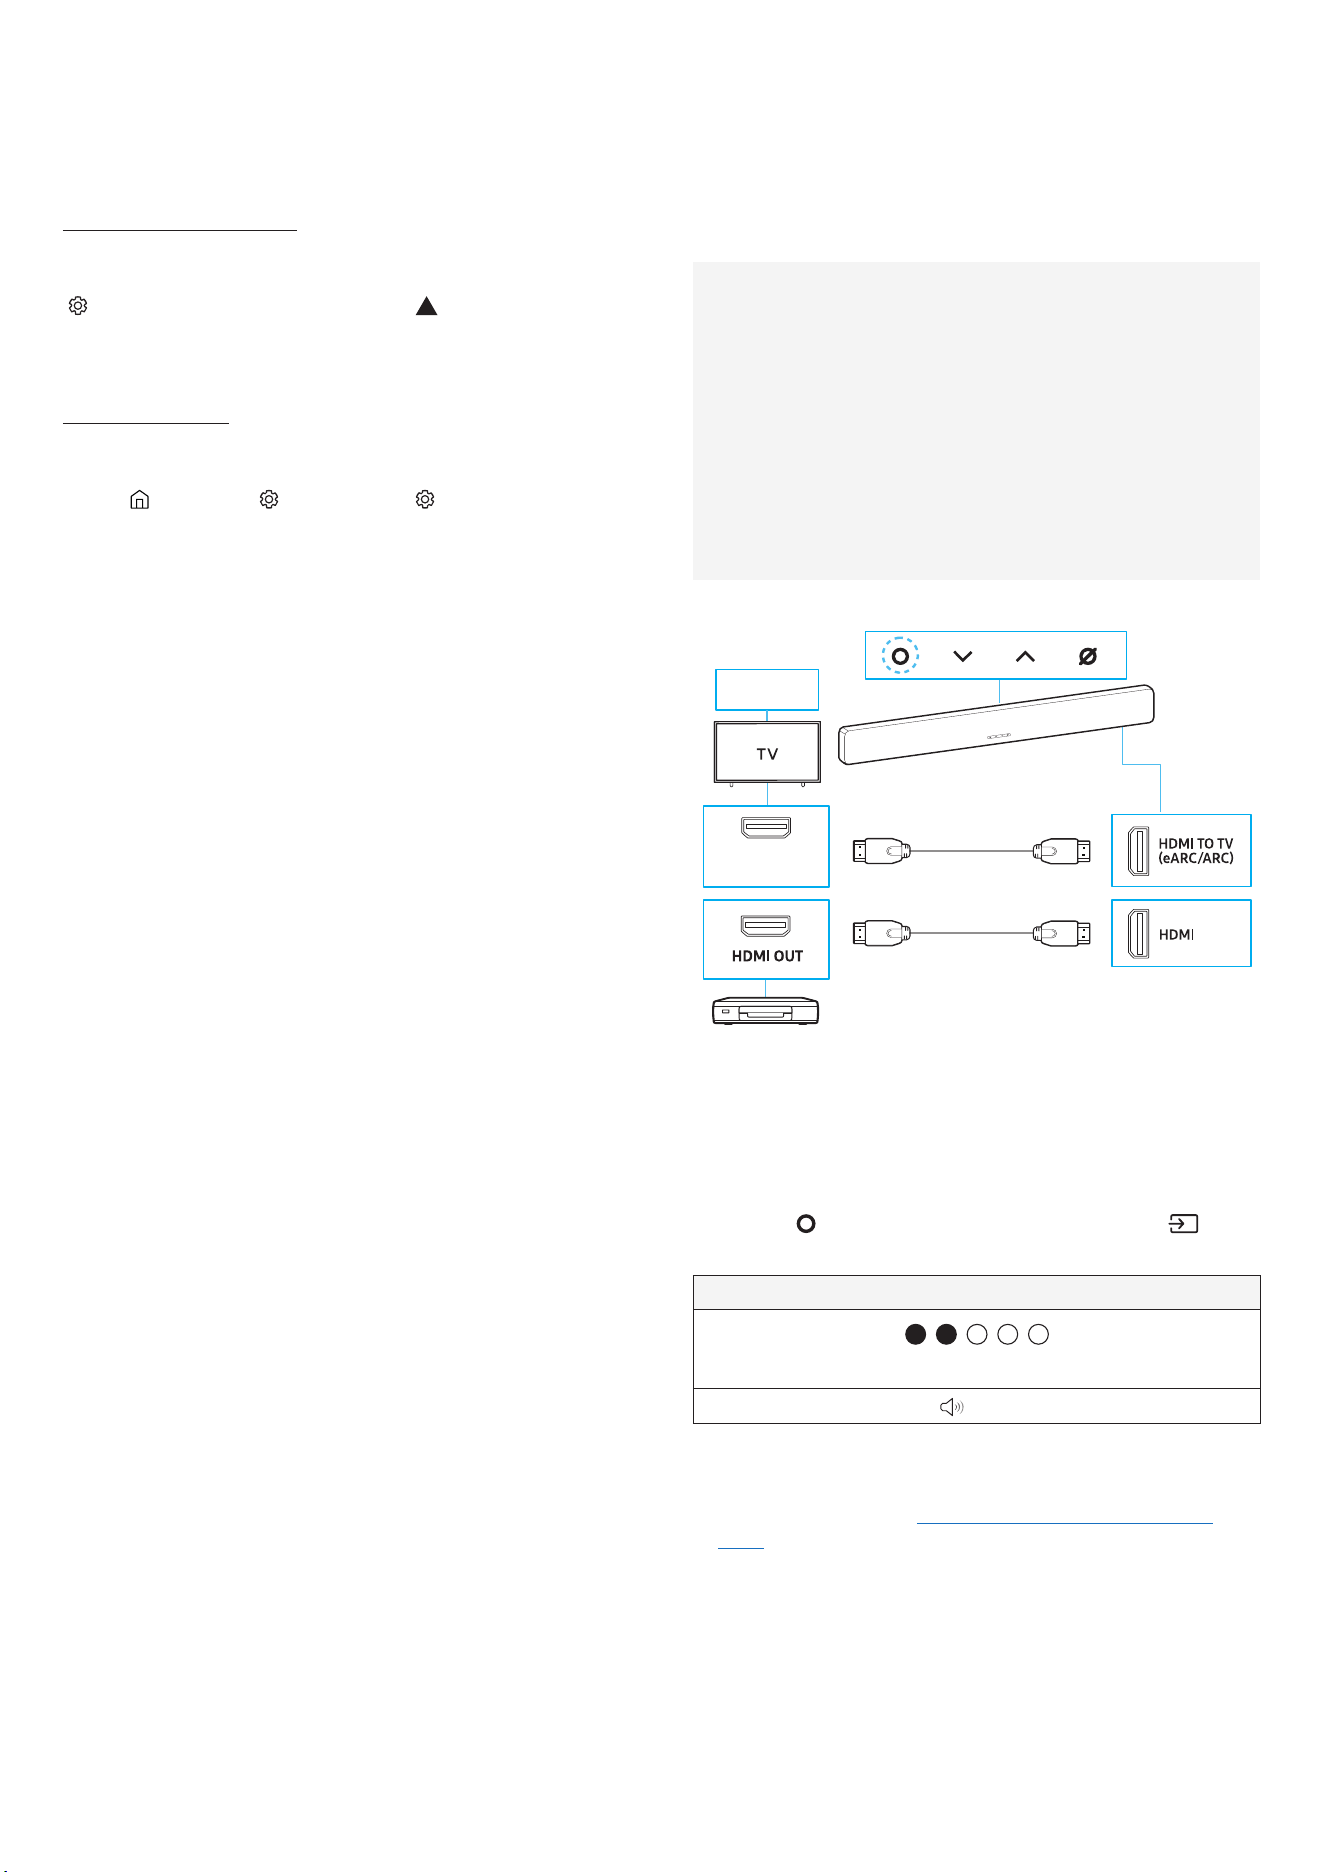
07 Connecting an External
Device
Connecting by HDMI Cable
Pre-connection Checklist
• If any secondary audio settings are on, turn them off in your
audio output options.
• Check if the content you want to use support Dolby Atmos®.
• Choose an HDMI cable that meets the required HDMI input/
output specifications.
• To receive UHD signals, you must use an HDMI cable certified by
HDMI.org.
• To receive UHD signals, check the video playback specifications
of your TV and external device and also the settings of the device
in use.
• Refer to your TV or external device manual for more details.
Front panel of soundbar
TV menu
HDMI Cable
HDMI Cable
External Device
Rear panel of
soundbar
HDMI IN
(eARC) or (ARC)
1. Use an HDMI cable to connect the HDMI OUT port on the external
device to the HDMI port at the rear of the soundbar.
2. Use an HDMI cable (included) to connect the HDMI IN port of the TV
to the HDMI TO TV (eARC/ARC) port at the rear of the soundbar.
3. Turn on the soundbar, TV, and external device.
4. Press the ( Multi ) button on the soundbar or press the
( Source ) button on the remote control to switch to HDMI mode.
LED indicator
White ON → OFF
HDMI
NOTE
• When using Dolby Atmos®/DTS:X: If the inputted source is Dolby
Atmos®/DTS:X, see the "Output specifications for each sound
mode " section.
• Configuring Dolby Atmos® in BD Player or Other Devices
Check the audio output options in the settings menu on the
BD player or other device. "No Encoding" should be selected for
bitstream in the audio output options.
Example) When using a Samsung BD Player: go to Home → Menu →
Sound → Digital Output and then select Bitstream (Unprocessed)
English - 14
UHD signal support specifications (3840 x 2160p)
Frame
rate (fps)
Color
depth
RGB
4:4:4
YCbCr
4:4:4
YCbCr
4:2:2
YCbCr
4:2:0
< 60
8 bit O O O O
10 bit - - O O
12 bit - - - -
120
8 bit - - - -
10 bit - - - -
• Supported specifications may vary based on the external device
connected to the soundbar or the usage conditions.
Connecting using an Optical Cable
Front panel of soundbar
Rear panel of soundbar
Optical cable
(Sold separately)
BD / DVD player/
set-top box /
game console
1. Use an optical cable (sold separately) to connect the DIGITAL
AUDIO IN (OPTICAL) port on the soundbar to the OPTICAL OUT port
on the external device.
2. Turn on the soundbar and external device.
3. Select DIGITAL AUDIO IN mode by pressing the ( Multi ) button
on the soundbar or pressing the ( Source ) button on the remote
control.
4. Your soundbar will play audio from the external device.
LED indicator
White ON → OFF
DIGITAL AUDIO IN
08 Connecting a Mobile
Device
Connecting by Bluetooth
Connecting your mobile device to the soundbar by Bluetooth allows
you to enjoy stereo sound without the need for cables.
• The soundbar will turn on if you try to connect
a previously paired Bluetooth device while the
soundbar is turned off.
Connecting to Bluetooth for the first time
• Position the device you are connecting to the soundbar by
Bluetooth within 1 meter (3.28 feet).
Bluetooth pairing button LED indicator
(Or)
3 seconds
or longer
[Pairing]
[Connection successful]
Red → Green → Blue blinking
Cyan blinking x3
Ready to connect by
Bluetooth.
1. Select “ Q-series Soundbar ” when it appears on the list in the device.
2. Enjoy music from your mobile device connected by Bluetooth
through the soundbar.
If the Device Fails to Connect
• When a previously connected soundbar (e.g., " Q-series
Soundbar ") appears in the speaker list of your mobile device,
delete it.
• Repeat steps 1 through 2.
English - 15
Precautions when connecting to Bluetooth
• Position the device you are connecting to the soundbar by
Bluetooth within 1 meter.
• If prompted for a PIN code when connecting to a Bluetooth device,
enter <0000>.
• The soundbar will automatically turn off after 18 minutes of
inactivity in Standby mode.
• The soundbar may have difficulty scanning for available Bluetooth
devices or connecting properly under the following conditions:
- In case there are nearby electronic devices or equipment causing
radio interference.
- If multiple Bluetooth devices are simultaneously paired with the
soundbar.
- If the Bluetooth device is turned off, out of range, or
experiencing a malfunction.
• Electronic devices may cause radio interference. Keep any device
that generates electromagnetic waves away from the soundbar.
(e.g., microwave oven, wireless LAN, etc.)
• The soundbar supports SBC data (44.1kHz, 48kHz).
• Only connect to Bluetooth devices that support A2DP (AV).
• When connecting the soundbar to a Bluetooth device, keep them as
close to each other as possible.
• The greater the distance between the soundbar and Bluetooth
device, the lower the audio quality will be.
The Bluetooth connection may be lost if the devices are out of
range.
• The Bluetooth connection may not work properly in areas with
weak signal reception.
• A Bluetooth device may experience noise or malfunction under the
following conditions:
- If a part of your body comes in contact with the signal
transceiver of the Bluetooth device or soundbar
- In corners or when there is an obstacle in proximity, such as a
wall or partition, where electrical changes may occur.
- When exposed to radio interferences by other products
operating on the same frequency ranges, such as medical
equipment, microwave ovens, and wireless LAN devices.
- Obstacles such as doors and walls may degrade audio quality
even if the devices are within operational range.
• Note that your soundbar can't be paired with other Bluetooth
devices while Bluetooth audio is being played.
• This wireless device may cause electrical interference during
operation.
Disconnecting a connected Bluetooth device
Refer to the Bluetooth device's user manual for more details.
• The connection with the soundbar is disconnected.
• If the soundbar is disconnected from the Bluetooth device, the
multi-color LED indicator on the soundbar blinks red three times.
Disconnecting the soundbar from the Bluetooth device
Press the ( Multi ) button on the soundbar or press the ( Source )
button on the remote control and switch to any other mode besides
Bluetooth .
• Ending the connection may take a few seconds as the Bluetooth
device waits for a response from the soundbar. (The disconnection
time may vary, depending on the Bluetooth device.)
Connecting by Wi-Fi (Wireless Network)
For Samsung Sound to work properly, a specific or higher version of the
OS is required.
For more information on OS versions, please see the Samsung Sound
App description in the app marketplace for your OS.
1 - Installing app
You can control the soundbar and adjust settings using
the Samsung Sound app.
Download the Samsung Sound app from your mobile
device’s app store (App Store, Play Store) or scan the
provided QR code.
2 - Registering a device
1. On your mobile device, run the Samsung Sound app.
2. Follow the instructions displayed to register the product to your
mobile device.
- If a pop-up window doesn't appear, go to the app's home screen,
then tap the ( ) button to register the product.
NOTE
You can also register your soundbar to the Samsung Sound app by
scanning the QR code on the soundbar.
If the device isn't found
1. Connect the mobile device to the soundbar by Bluetooth.
2. Tap Connected Devices in the Samsung Sound App.
3. Slide left on the screen to select the soundbar card on your
mobile device. Then, tap Register device to Samsung account to
register the device.
3 - Controlling the Soundbar with Samsung Sound
1. Open the Samsung Sound app on your mobile device and then
select the soundbar you registered.
2. The settings menu will appear for the soundbar. You can adjust the
settings such as Volume , Sound Mode , and Equalizer .
- If another user wants to control the soundbar,
- Make sure the mobile device is connected to the same Wi-Fi
network as the soundbar.
- Open the Samsung Sound app and follow the on-screen
instructions to complete the setup. Once the setup is
finished, the soundbar can be controlled through the app.
To change your Wi-Fi (wireless network)
1. On your mobile device (smartphone or tablet), run the Samsung
Sound app.
2. After tapping the soundbar card, tap the ( ) icon.
3. Tap Device settings > Network status > Change Wi-Fi network , then
follow the on-screen instructions.

English - 16
Using Group Play
• To use this feature, register your soundbar to the Samsung Sound
app.
• This feature is only available on soundbar models released in 2024
or later.
• To turn on this feature, connect two or more devices to the same
5GHz Wi-Fi network.
• Menu names and settings may differ depending on the version of
the Samsung Sound app.
Configuring Group Play
1. On your mobile device, run the Samsung Sound app.
2. To register your soundbar to the Samsung Sound app, refer to the
"Connecting by Wi-Fi (Wireless Network) " section.
3. Tap on the soundbar card.
4. Set the soundbar source to Wi-Fi or Bluetooth.
5. On your mobile device, tap Group Play Settings under the audio
device icon.
6. Turn on Group Play .
7. Select a device from the list and tap Apply .
- You can add a maximum of 9 devices.
- In Group Play , audio from mobile devices connected to the host
device will be output through the speakers connected in the
group.
- When the soundbar is connected to the TV by Wi-Fi, TV audio will
be switched to the TV speakers.
- If a device connected to the host device switches to another
source, then that device is removed from the group.
- When you connect a host device to the TV, the group that was
created is deleted.
Disabling Group Play
1. Tap on the soundbar card.
2. On your mobile device, tap Group Play Settings under the audio
device icon.
3. Turn off Group Play .
- To remove several devices, deselect (unmark) them in the list
and tap Apply .
Connecting to Apple AirPlay®
• This feature may not be available in some countries.
• The latest version of iOS, iPadOS, or macOS is recommended.
• To enable AirPlay® in your Soundbar, you must first register the
device with the Samsung Sound app by agreeing with the app’s
terms and conditions.
• Make sure the Soundbar is powered on and connected to the
same Wi-Fi network as your Apple® device.
• Apple®, AirPlay®, iPad®, iPhone®, and Mac® are trademarks of
Apple Inc., registered in the U.S. and other countries and regions.
With AirPlay® , you can enjoy music, podcasts, and other audio on the
Samsung Soundbar right from your Apple® devices.
• Select from an AirPlay-supported app or Control Center on your
iPhone®, iPad®, or Mac®.
• Select the Soundbar from the list of available devices to play the
current audio to.
09 Installing the Soundbar
on a Wall
Precautions when installing
• Mount the soundbar only on a vertical wall.
• Avoid installing the soundbar system in areas with high
temperatures or humidity.
• Install the system on a sturdy wall capable of supporting the
soundbar's weight. If the wall can't support the soundbar's weight,
reinforce it before installation. If reinforcement isn't possible,
choose a different wall that can support the soundbar.
• Use screws or anchors suitable for the wall where the soundbar is
being installed.
(Gypsum board/steel/wood, etc.)
If possible, install the screws directly into the wall.
• Turn off the power and disconnect the soundbar before mounting it
on the wall.
Failure to do so may result in electric shock.
• Connect all cables from external devices before mounting the
soundbar on the wall.
Wall Mount Components
Wall-mounting Guide Wall-mounting bracket
Screw for mounting on wall
(M5 x L55) x 2
Holder anchor x 2
Holder screw Screw (M4 x L10) x 2
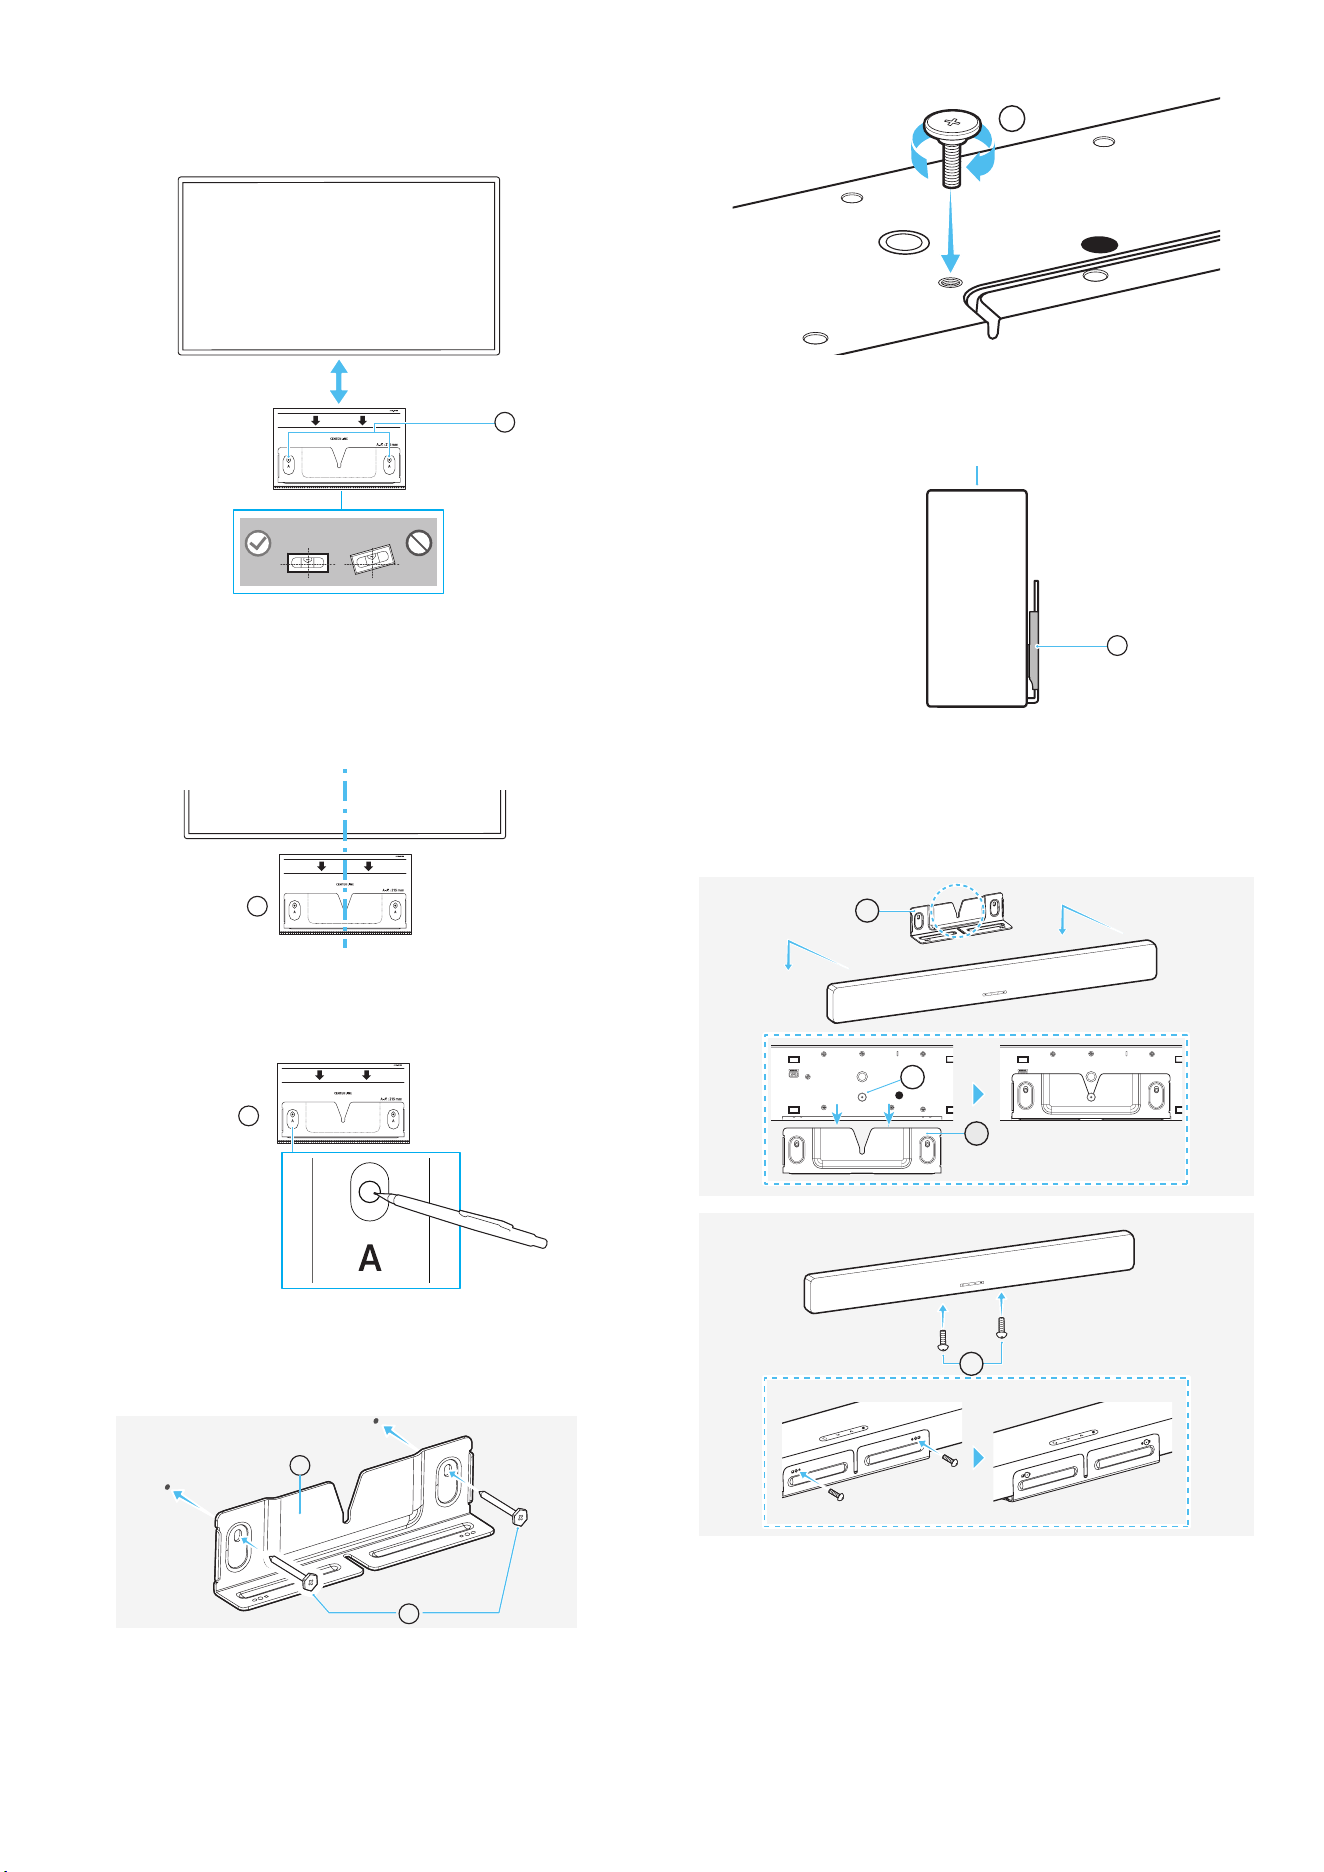
English - 17
1. Attach the Wall-mounting Guide to the wall.
- Attach the Wall-mounting Guide parallel to the wall.
- If your TV is mounted on a wall, install it at least 1.5 cm
(0.59 inches) or longer from the bottom of the TV.
A
1.5 cm (0.59 Inches) or longer
2. Align the Wall-mounting Guide's center line with the center of the
TV on the wall (If you are mounting the soundbar below the TV), and
then use tape to secure the Wall-mounting Guide.
- If you aren't mounting below a TV, place the Center line in the
center of the installation area.
A
Center alignment
3. Use a pen or pencil to mark the center of the A-TYPE hole, and then
remove the Wall-mounting Guide.
A
4. Using an appropriately sized drill bit, drill a hole where you marked
on the wall.
5. Fasten the Screw for mounting on the wall into the marked spot.
C
B
6. Fasten the holder screw to the rear of the soundbar.
E
• When assembling, make sure the hanger part of the Wall-
mounting brackets are located behind the rear of the soundbar.
B
Top panel of soundbar
Right side of soundbar
7. Mount the soundbar onto the Wall-mounting Bracket.
- To ensure the soundbar is securely attached to the Wall-
mounting Bracket, insert the Holder screw into the center of the
Wall-mounting Bracket and push the soundbar downward.
B
F
E
B
English - 18
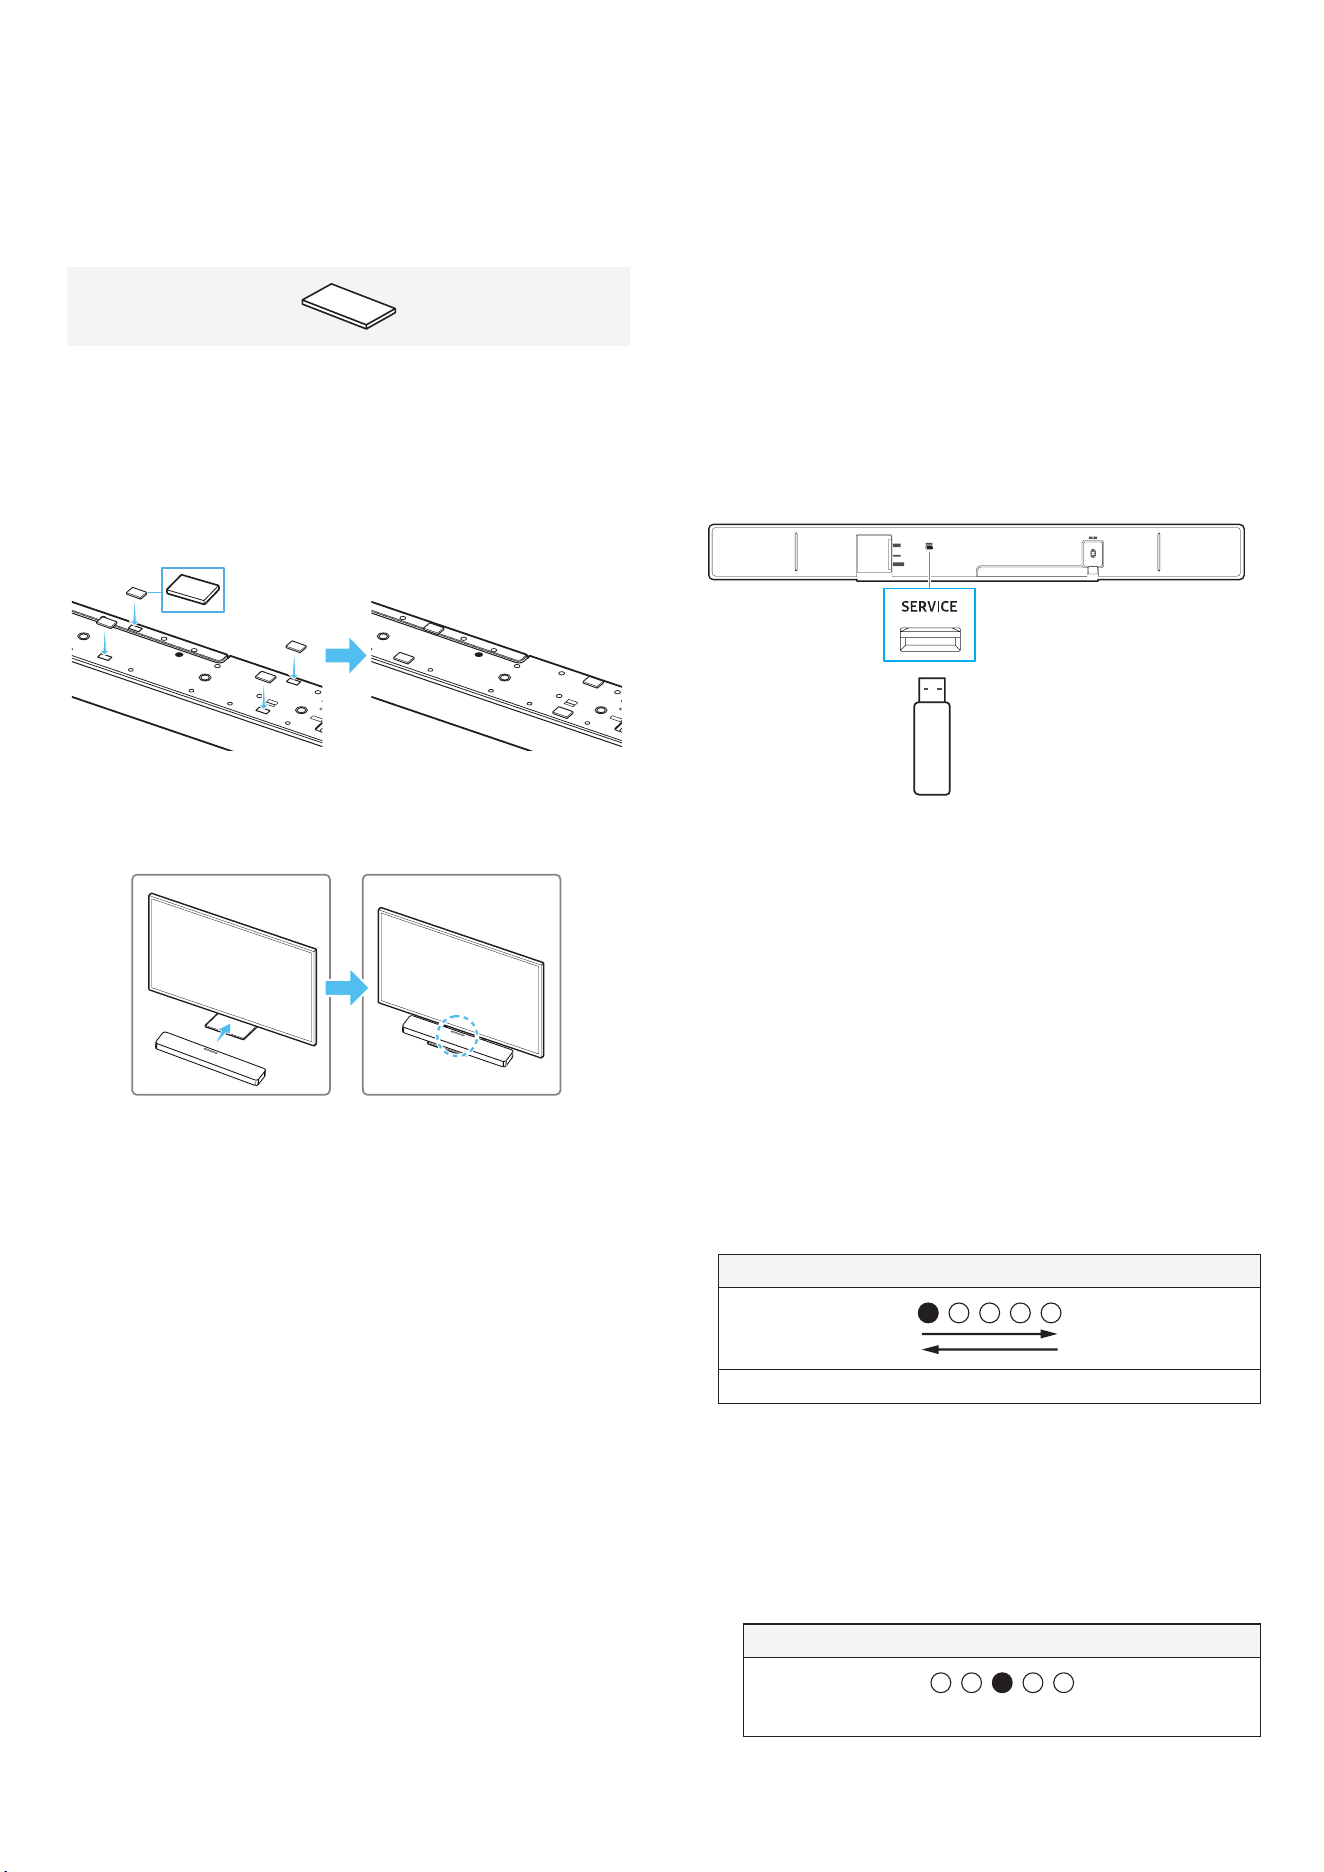
10 Installing the Soundbar
on top of the TV Stand
Components
Rubber Foot x 4
1. Attach the rubber foot to the rear of the soundbar before placing
it on top of the TV stand. The rubber foot should not be placed in
a way that it extends beyond the TV stand's width. Please see the
diagram below.
Rubber Foot
2. Install the soundbar on your TV.
As shown in the image, align the center of the TV with the center of
the soundbar, then carefully place the soundbar into the TV stand.
NOTE
• Make sure the soundbar is placed on a flat and solid surface.
• The actual product may vary in appearance from the image above,
depending on the model.
11 Software Update
Automatic update
If your soundbar is connected to the internet, the software will
automatically update even, while the soundbar is turned off.
• To use the automatic update feature, the soundbar must be
connected to the internet.
If power to the soundbar is cut off or disconnected, the Wi-Fi
connection will be lost. If power is cut off, turn the soundbar back
on, or disconnect the power cord and then connect it again. Then,
turn on the soundbar, and reconnect it to the internet.
USB update
SERVICE
HDMI TO TV
(eARC/ARC)
HDMI
DIGITAL AUDIO IN
(OPTICAL)
Rear panel of soundbar
Samsung may provide firmware updates in the future for performance
enhancements to the soundbar system.
If a new update is available, you can update the soundbar by
connecting a USB storage device containing the firmware update to
the SERVICE port on the soundbar.
1. Go to the Samsung website ( www.samsung.com ) → Go to Customer
Support and search for your soundbar model name.
- For more information on firmware updates, see the upgrade
guide.
2. Download the Upgrade File (USB Type).
3. Unzip the downloaded compressed file into a folder created with an
identical name to the compressed file.
4. Save the created folder to a USB thumb drive and connect it to the
soundbar.
5. Turn on the soundbar. The product will be updated within 3
minutes.
LED indicator
The White moves from left to right, then from right to left.
- Do not turn off the power or disconnect the USB thumb drive
while the update is in progress.
- If your soundbar has the latest firmware installed, the update
won't run.
- The update may not run, depending on the type of USB thumb
drive.
- If there are no available update files, the indicator will blink red
three times.
LED indicator
Red blinking x3
English - 19
- If the version of the update file is the same as or lower than the
current version, the indicator will blink cyan three times.
LED indicator
Cyan blinking x3
Reset
Front panel of soundbar
5 seconds
While the soundbar is turned on, press both ( Volume )
buttons on the soundbar for 5 seconds or longer.
LED indicator
The white moves from left to right, then
from right to left.
Cyan blinking x3
Red blinking x3 → OFF
CAUTION
This will reset all settings of the soundbar. Reset the soundbar only
when needed.
Security updates information
Security updates are provided to strengthen the security of your
device and protect your personal information. For more information on
security updates, visit https://security.samsungtv.com .
• The website supports only some languages.
12 Troubleshooting
Refer to the instructions below if this product does not function
properly. If the problem you are experiencing is not listed below or if
the instructions below do not help, turn off the product, disconnect
the power cord, and contact Samsung Electronics at 1-800-SAMSUNG
(1-800-726-7864).
When the power doesn't turn on
• Check if the power cord is securely connected to the soundbar.
When some functions aren't working properly
• Disconnect the power cord, then connect it again.
• Turn off the connected external device, and then turn it back on.
• If there is no signal input, the soundbar will automatically turn
off after a certain period.
Turn on the power.
If the remote control isn't working properly
• Bring the remote control closer to the soundbar and point it
directly at the soundbar to select inputs.
• Replace the batteries with new ones.
If there is no sound coming from the soundbar
• The soundbar volume may be low, or the soundbar may be set to
mute. Adjust the volume levels.
• When using external devices (STB, Bluetooth device, mobile
device, etc.) connected to the soundbar, adjust the volume on
each device.
• The sound output may be set to the TV. Select the soundbar as
the sound output for the TV. (Samsung TV : Home ( ) → Settings
( ) → All Settings ( ) → Sound → Sound Output → Select
Soundbar )
• The cable connected to the soundbar may be loose. Disconnect
the cable from the soundbar and then connect it again.
• Disconnect the power cord, connect it again, and then turn the
soundbar on.
• Reset the soundbar and try again. (See the "Reset " section.)
When the TV can't connect to the HDMI TO TV (eARC/ARC)
• Make sure the HDMI cable is securely connected to the ARC or
eARC port.
(See the "Connect to a TV that supports HDMI ARC (Audio Return
Channel) " section.)
• The soundbar connection may not work due to other devices
(such as set-top boxes, game consoles, etc.) connected to the TV.
Connect only the soundbar to the TV, without any other devices.
• HDMI-CEC may not be turned on for the TV. Enable CEC in the TV
menu. (Samsung TV: Home ( ) → Settings ( ) → All Settings (
) → Connection → External Device Manager → Anynet+ (HDMI-
CEC) ON )
• To connect with eARC, the eARC function in the TV menu should
be turned on.
(Samsung TV: Home ( ) → Settings ( ) → All Settings ( ) →
Sound → Expert Settings → HDMI-eARC Mode (Auto) )
There is no audio when the TV is connected in HDMI TO TV (eARC/
ARC) mode
• The soundbar can't reproduce the inputted signal. Change the
TV’s audio output to PCM or Dolby Digital. (Samsung TV: Home
( ) → Settings ( ) → All Settings ( ) → Sound → Expert
Settings → Digital Output Audio Format )
English - 20
When a Bluetooth connection can't be established
• When connecting a new device to the soundbar, switch to
Bluetooth mode to connect. (Press the PAIR button on the
remote control, or press and hold the ( Microphone ) button on
the soundbar for 3 seconds or longer.)
• If the soundbar is connected to another device, disconnect that
device first to switch to another device.
• Remove the speaker from the Bluetooth speaker list in the
device, then reconnect.
(Samsung TV : Home ( ) → Settings ( ) → All Settings ( ) →
Sound → Sound Output → Bluetooth Speaker List )
• The TV CONNECT feature may be turned off. While the soundbar
is in “ BT READY ”, press and hold the Left button on the Soundbar
Remote Control for 5 seconds to select ON-TV CONNECT . If
you see OFF-TV CONNECT , press and hold the Left button for
5 seconds to switch the selection.
LED indicator Status
Cyan blinking x1
ON-TV CONNECT
Red blinking x1
OFF-TV CONNECT
• Disconnect the power plug, connect it again, and then try again.
• Reset the soundbar and try again. (See the "Reset " section.)
When the audio stutters due to a weak Bluetooth connection
• Audio may stutter if the soundbar is placed near an electronic
device or appliance that causes radio interference.
(e.g., microwave oven, wireless router, etc.)
• The sound may cut out if the connected device is too far from the
soundbar. Please move the device closer to the soundbar.
• If your body is in contact with the Bluetooth transceiver or the
soundbar is placed on metal furniture, the audio may stutter.
Check the installation environment and conditions.
When a Wi-Fi connection can't be established
• Check whether your wireless router is on.
• Turn off the router, turn it back on, and then try to reconnect.
• If the wireless router signal is weak, a Wi-Fi connection may not
be possible. Move the wireless router closer to the soundbar or
place it in an unobstructed location.
• If you have installed a new wireless router, you'll need to
reconfigure the speaker’s network settings. (See the "To change
your Wi-Fi (wireless network) " section.)
• The soundbar doesn't support Wi-Fi 6.
When the TV is powered on, but the soundbar doesn't turn on
together with it
• When you turn off the soundbar first while watching TV, the Auto
Power Link on the soundbar will also be turned off. Power off the
TV first.
My TV and soundbar are connected, but when I switch to soundbar
mode, no audio is played through the TV speakers.
• If you connect your mobile device to the soundbar while it is
connected to a TV and audio is playing, the audio output will
switch to your mobile device's, but the soundbar will remain
connected to the TV.
• When you end the connection between your mobile device, the
soundbar will play the TV audio.
If the soundbar does not appear in the list of AirPlay® -compatible
devices
• Ensure that you have agreed to the terms of use for the Samsung
Sound app and register the device. (See the "Connecting to Apple
AirPlay® " section.)
• Ensure that the soundbar is not deleted from the Samsung
Sound app.
• Check and see if your soundbar and your Apple devices are
connected to the same Wi-Fi network.
• Note that iOS version 13.4 or later is required.
Group Play isn't activated.
• Check that your audio device is a new model released in 2024 or
later.
• Check to make sure that the host device, which is the source, is
connected to the Wi-Fi network.
• The audio devices must be connected to the same Wi-Fi network
(5GHz).

English - 21
13 Licenses & Other
Information
Dolby, Dolby Atmos, and the double-D symbol are registered
trademarks of Dolby Laboratories Licensing Corporation.
Manufactured under license from Dolby Laboratories. Confidential
unpublished works.
Copyright © 2012-2026 Dolby Laboratories. All rights reserved.
Manufactured under license from DTS, Inc. and/or its affiliates. For
patents, see https://xperi.com/dts-patents/. DTS, the DTS logo, DTS:X,
and the DTS:X logo are trademarks or registered trademarks of DTS,
Inc. and/or its affiliates in the U.S. and/or other countries. © DTS, Inc.
and/or its affiliates. All rights reserved.
• This license may not be supported depending on the model or
geographical area.
The terms HDMI, HDMI High-Definition Multimedia Interface, HDMI
Trade dress and the HDMI Logos are trademarks or registered
trademarks of HDMI Licensing Administrator, Inc.
Apple®, AirPlay®, iPad®, iPhone®, and Mac® are trademarks of Apple
Inc., registered in the U.S. and other countries and regions.
• Use your phone, tablet or PC as a remote control for Spotify. Go to
spotify.com/connect to learn how.
• The Spotify software is subject to third party licenses found here.
https://www.spotify.com/connect/third-party-licenses
Being Roon Ready means that Samsung and Roon streaming
technology can be used together for an incredible user interface,
simple setup, rock-solid daily reliability, and the highest levels of audio
performance without compromise.
Open Source License notice
To learn more about the open source code used in this product, go to
the following website ( http://opensource.samsung.com ).