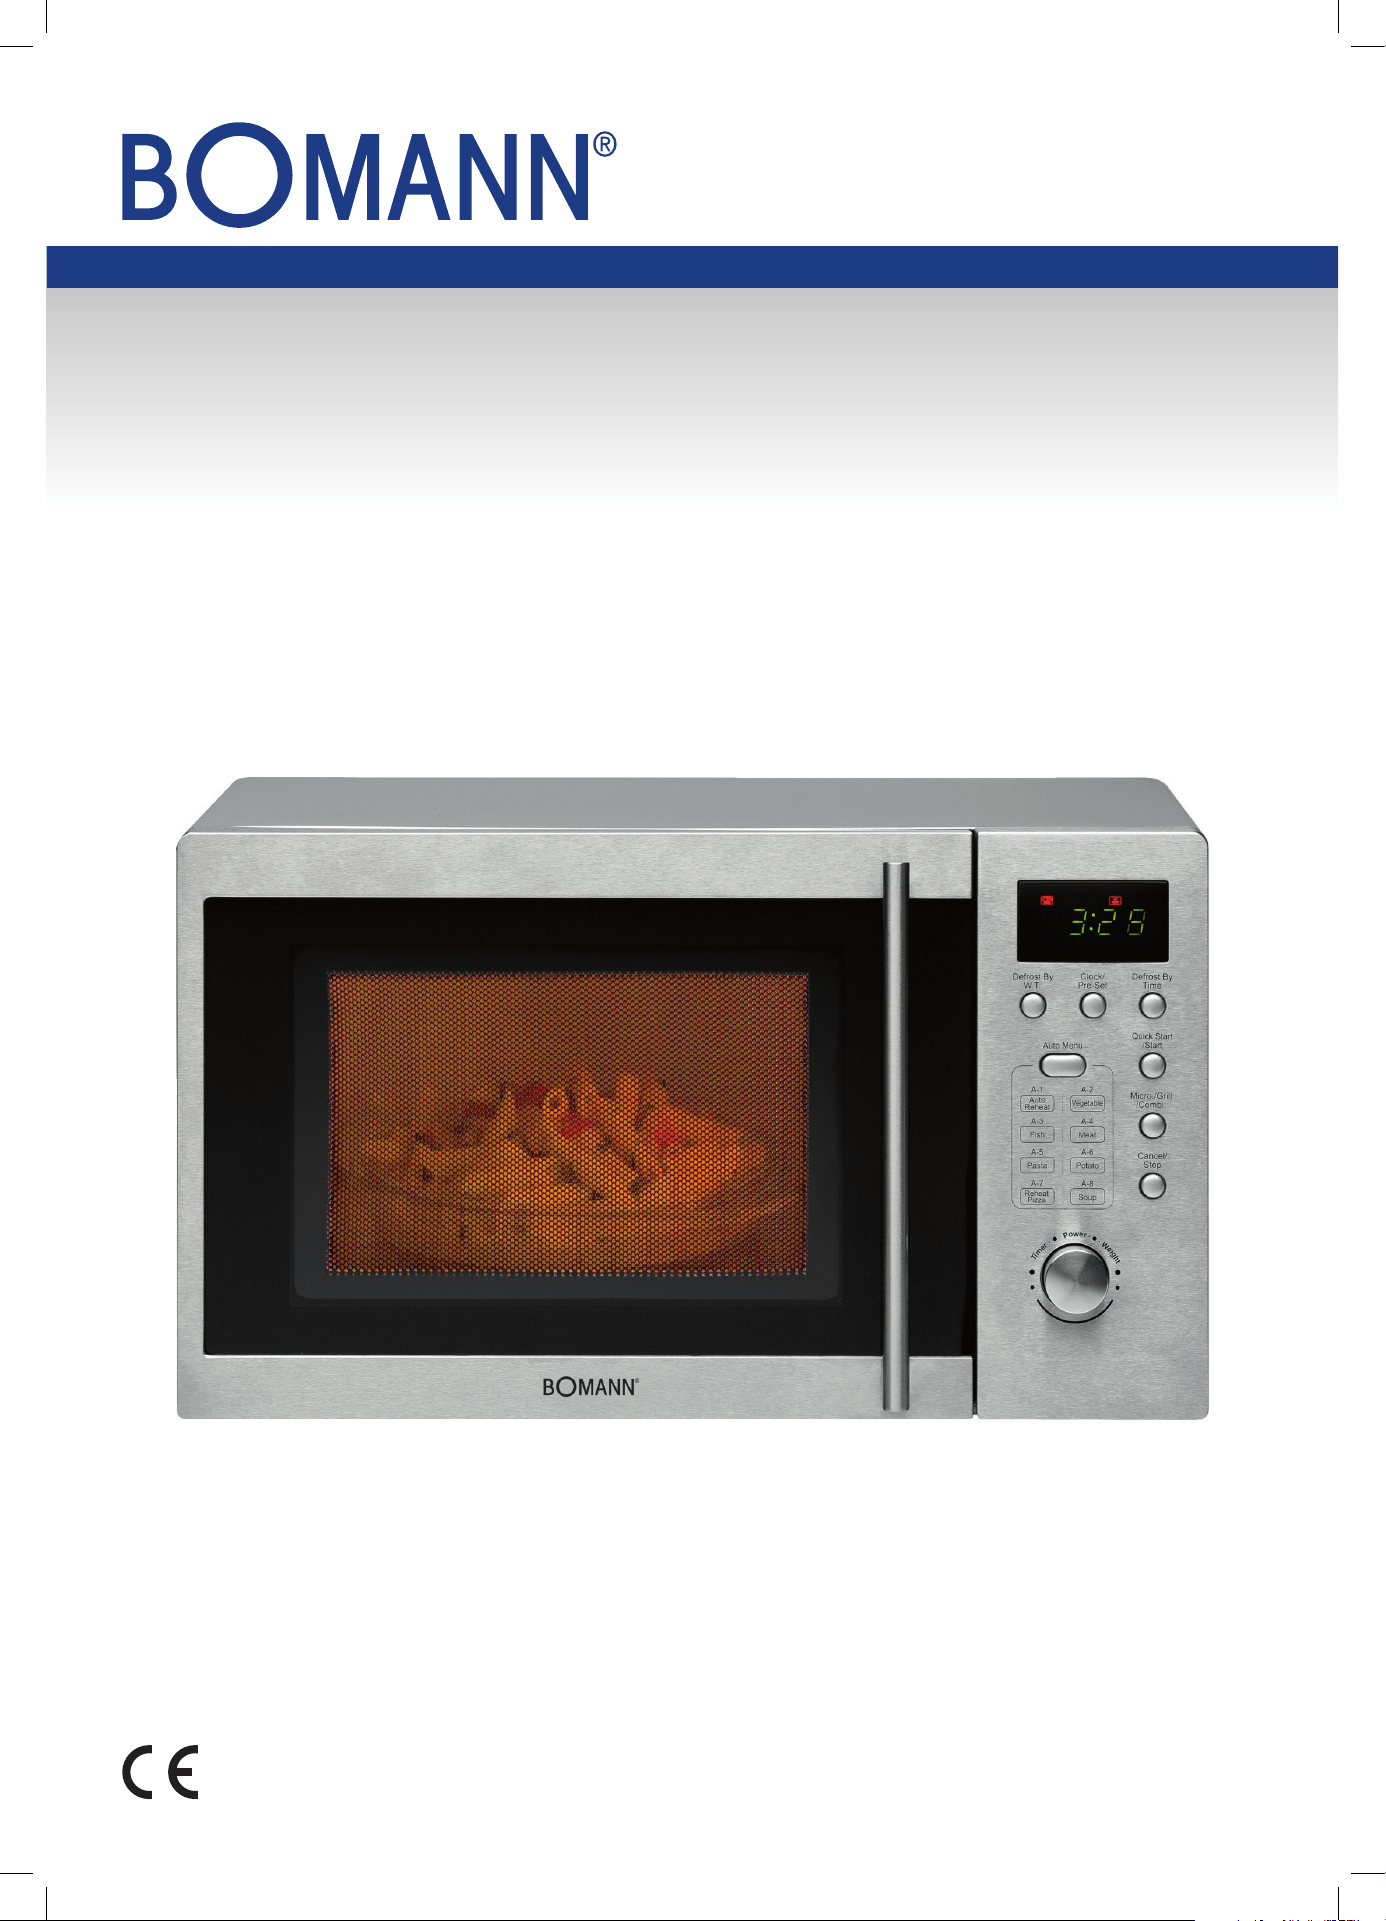
MIKROWELLE MIT GRILL
Micro-ondes avec grill
Microonde con griglia
Microwave with Grill
MWG 2211 U CB
Bedienungsanleitung / Garantie
Mode d’emploi • Istruzioni per l’uso • Instruction Manual
Bedienungsanleitung ......................................................................................................................Seite 4
Mode d’emploi .................................................................................................................................Page 16
Istruzioni per l’uso ........................................................................................................................ Pagina 27
Instruction Manual ...........................................................................................................................Page 38
2
3
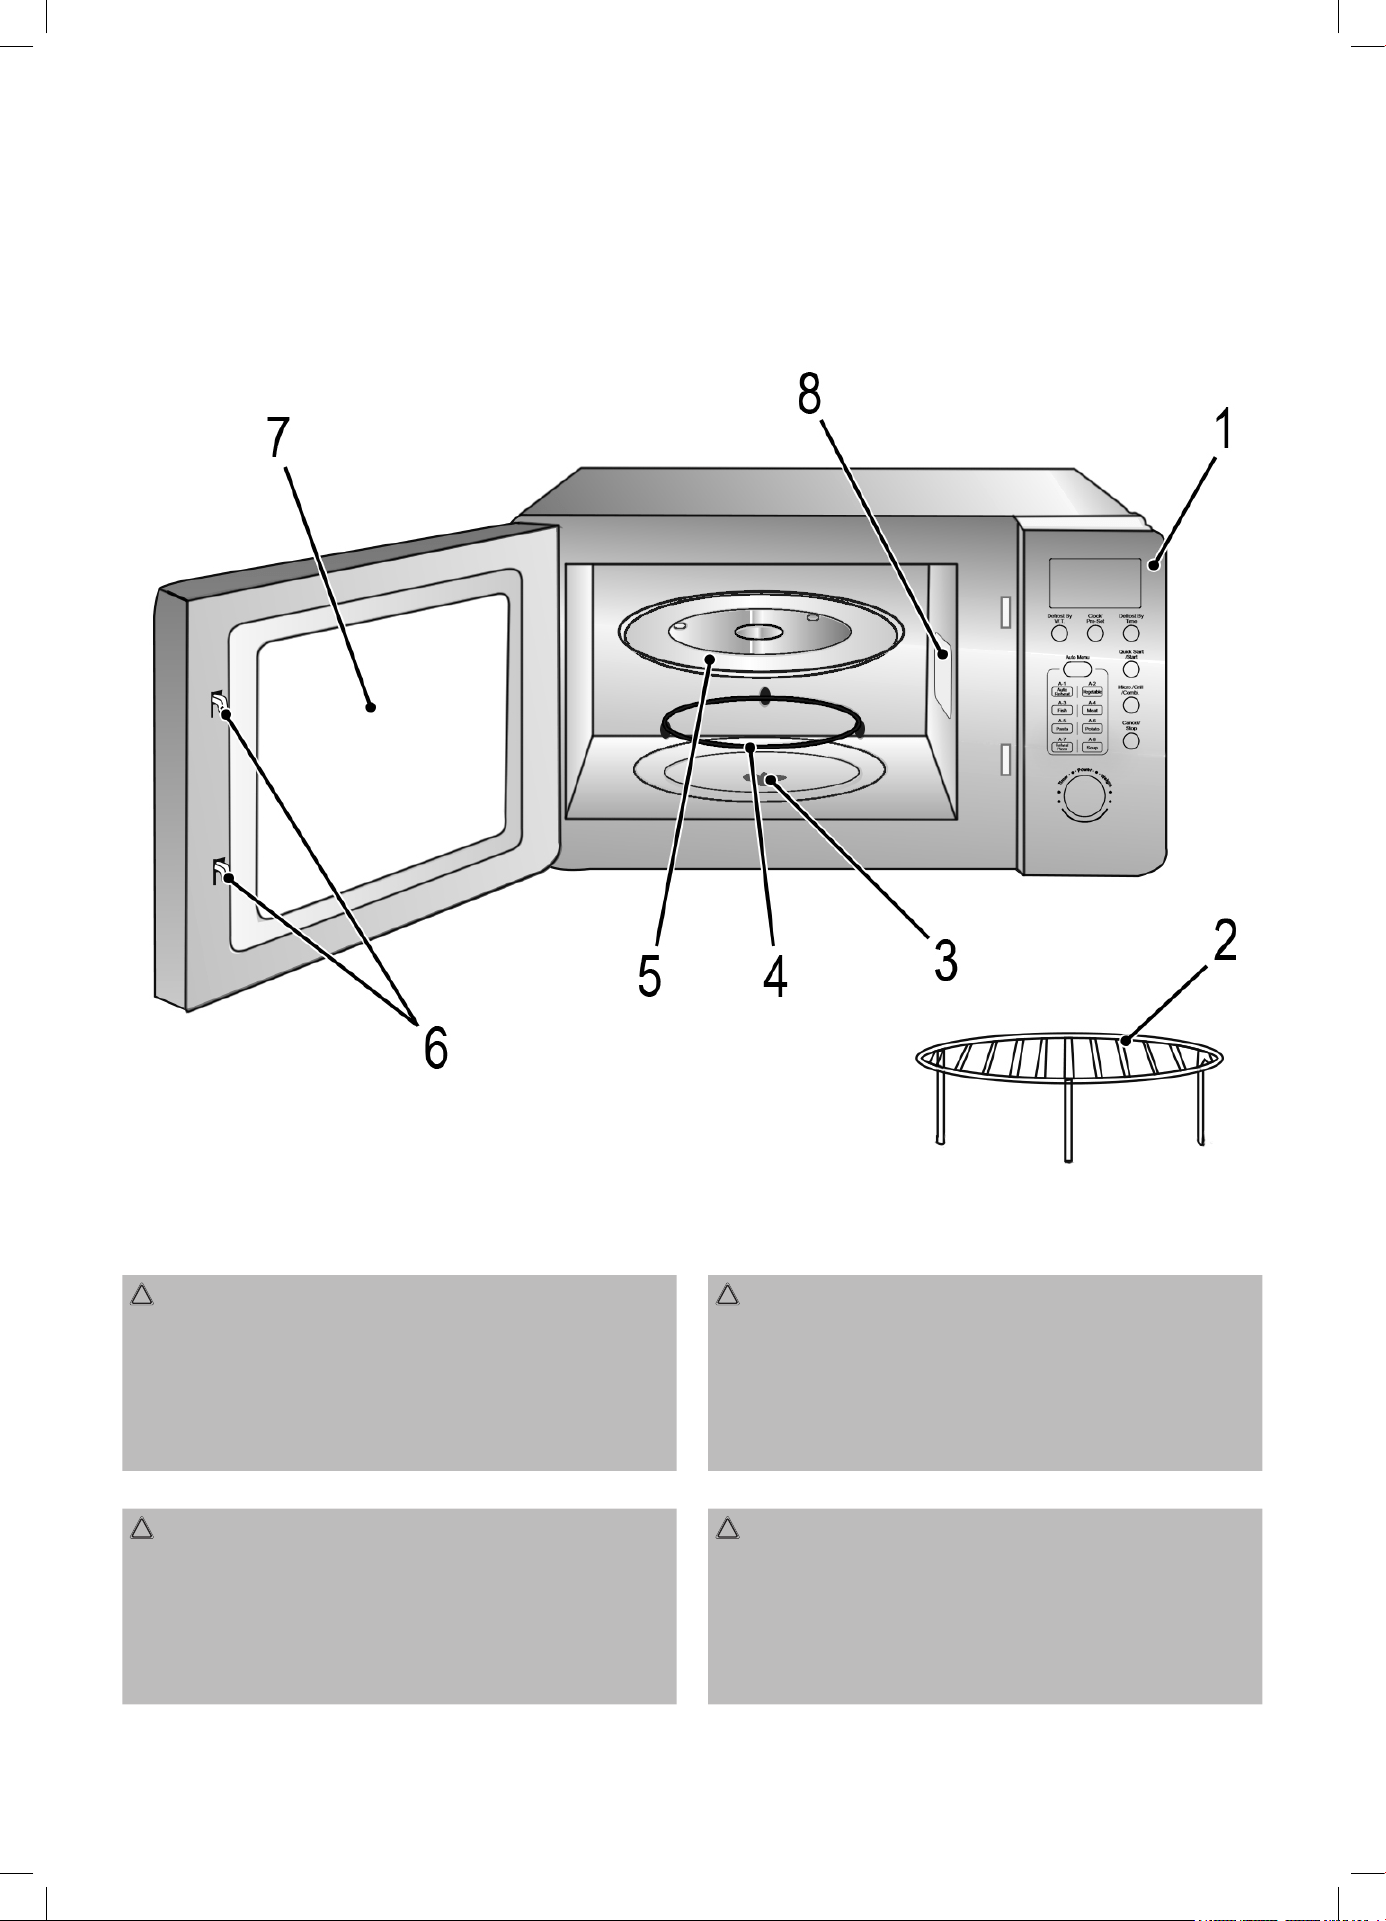
Übersicht der Bedienelemente
Liste des différents éléments de commande • Elementi di comando
Overview of the Components
ACHTUNG:
• Entfernen Sie keine montierten Teile aus dem Garraum und von
der Innenseite der Tür!
• Entfernen Sie in keinem Fall Folien auf der Innenseite der Tür!
• Auch die Glimmerscheibe (8) im Garraum ist Bestandteil des
Gerätes und darf nicht entfernt werden. Sie schützt das dahinter
bendliche elektronische Bauteil vor Verschmutzungen.
ATTENTION :
• Ne démontez jamais aucun pièce de l’intérieur de l’appareil ni de
l’intérieur de la porte !
• N’enlevez en aucun cas les feuilles du côté intérieur de la porte !
• La feuille micacée (8) fait également partie de l’appareil et ne
doit pas être enlevée. Elle protège de la poussière le composant
électronique situé derrière elle.
ATTENZIONE:
• Non togliere pezzi montati nella camera di cottura e dal lato
interno dello sportello!
• Non togliere mai pellicole dall’interno dello sportello!
• Il foglio mica (8) è parte del dispositivo e non deve essere
rimosso. Protegge da sporco il componente elettronico situato
dietro.
CAUTION:
• Do not remove any installed parts from inside the oven or any-
thing from the inside of the door!
• The foils on the inside of the door must not be removed!
• The mica sheet (8) is also part of the appliance and must not be
removed. It protects the electronic component located behind it
from dirt.
4
Bedienungsanleitung
Vielen Dank, dass Sie sich für unser Produkt entschieden haben. Wir
wünschen Ihnen viel Freude mit dem Gerät.
Symbole in dieser Bedienungsanleitung
Wichtige Hinweise für Ihre Sicherheit sind besonders gekennzeichnet.
Beachten Sie diese Hinweise unbedingt, um Unfälle und Schäden am
Gerät zu vermeiden:
WARNUNG:
Warnt vor Gefahren für Ihre Gesundheit und zeigt mögliche Ver-
letzungsrisiken auf.
ACHTUNG:
Weist auf mögliche Gefährdungen für das Gerät oder andere
Gegenstände hin.
HINWEIS:
Hebt Tipps und Informationen für Sie hervor.
Inhalt
Übersicht der Bedienelemente ............................................................. 3
Allgemeine Hinweise.............................................................................4
ANMERKUNG WICHTIGE SICHERHEITSANWEISUNGEN .............4
Hinweisschilder und Symbole auf dem Gerät ...................................... 6
Beschreibung der Bedienelemente ......................................................6
Tasten und Regler am Bedienfeld ........................................................ 7
Symbole im Bedienfeld ......................................................................... 7
Brandgefahren bei Montage als Unterbaugerät vermeiden .................7
Montageanleitung bei Unterbaugeräten ...............................................7
Hinweise zum Grill- und Kombibetrieb ................................................. 8
Geeignetes Mikrowellengeschirr ..........................................................8
Hinweise zur Funktion und Benutzung des Gerätes ............................ 8
Inbetriebnahme ..................................................................................... 8
Bedienung Mikrowelle ...........................................................................9
Erwärmen .............................................................................................. 9
Garen ..................................................................................................10
Schnellstart ......................................................................................... 11
Grillen .................................................................................................. 11
Kombination aus Mikrowellen- und Grillbetrieb .................................. 11
Automatikprogramme ......................................................................... 11
Auftauen ..............................................................................................12
Kochen in mehreren Schritten ............................................................ 12
Sonderfunktionen ................................................................................12
Reinigung ............................................................................................13
Störungsbehebung .............................................................................14
Technische Daten ............................................................................... 14
Garantie ..............................................................................................14
Entsorgung ..........................................................................................15
Allgemeine Hinweise
Lesen Sie vor Inbetriebnahme dieses Gerätes die Bedienungsan-
leitung sehr sorgfältig durch und bewahren Sie diese inkl. Garantie-
schein, Kassenbon und nach Möglichkeit den Karton mit Innenver-
packung gut auf. Falls Sie das Gerät an Dritte weitergeben, geben Sie
auch die Bedienungsanleitung mit.
• Benutzen Sie das Gerät ausschließlich für den privaten und den
dafür vorgesehenen Zweck. Dieses Gerät ist nicht für den gewerb-
lichen Gebrauch bestimmt.
• Benutzen Sie das Gerät nicht im Freien. Halten Sie es vor Hitze,
direkter Sonneneinstrahlung, Feuchtigkeit (auf keinen Fall in Flüs-
sigkeiten tauchen) und scharfen Kanten fern. Benutzen Sie das Ge-
rät nicht mit feuchten Händen. Bei feucht oder nass gewordenem
Gerät sofort den Netzstecker ziehen.
• Schalten Sie das Gerät aus und ziehen Sie immer den Netzstecker
aus der Steckdose (ziehen Sie am Netzstecker, nicht am Kabel),
wenn Sie das Gerät nicht benutzen, Zubehörteile anbringen, zur
Reinigung oder bei Störung.
• Betreiben Sie das Gerät nicht unbeaufsichtigt. Sollten Sie den
Raum verlassen, schalten Sie das Gerät immer aus. Ziehen Sie
den Netzstecker aus der Steckdose.
• Das Gerät und das Netzkabel müssen regelmäßig auf Zeichen von
Beschädigungen untersucht werden. Wird eine Beschädigung fest-
gestellt, darf das Gerät nicht mehr benutzt werden.
• Verwenden Sie nur Original-Zubehör.
• Zur Sicherheit Ihrer Kinder lassen Sie keine Verpackungsteile
(Plastikbeutel, Karton, Styropor, etc.) erreichbar liegen.
WARNUNG:
Lassen Sie kleine Kinder nicht mit Folie spielen. Es besteht Er-
stickungsgefahr!
ANMERKUNG
WICHTIGE SICHERHEITSANWEISUNGEN
SORGFÄLTIG LESEN UND FÜR DEN WEITEREN
GEBRAUCH AUFBEWAHREN.
WARNUNG:
• Das Mikrowellenkochgerät ist für die Erwärmung
von Speisen und Getränken bestimmt. Trocknen
von Speisen oder Kleidung und Erwärmung von
Heizkissen, Hausschuhen, Schwämmen, feuchten
Putzlappen und Ähnlichem kann zu Verletzungen,
Entzündungen oder Feuer führen.
• Das Mikrowellengerät ist nicht zum Erwärmen /
Erhitzen von lebenden Tieren vorgesehen.
• Wenn die Tür oder die Türdichtungen beschädigt
sind, darf das Kochgerät nicht betrieben werden,
bevor es von einer dafür ausgebildeten Person
repariert worden ist.
• Reparieren Sie das Gerät auf keinen Fall selbst,
sondern suchen Sie einen autorisierten Fachmann
auf. Es ist für alle anderen, außer für einen Fach-
mann, gefährlich, irgendwelche Wartungs- oder
Reparaturarbeiten auszuführen, die die Entfer-
nung einer Abdeckung erfordern, die den Schutz
gegen Strahlenbelastung durch Mikrowellenener-
gie sicherstellt.
• Vor dem Auswechseln der Lampe sicherstellen,
dass das Gerät abgeschaltet ist, um einen mög-
lichen elektrischen Schlag zu vermeiden.
5
WARNUNG:
• Wenn die Netzanschlussleitung dieses Gerätes
beschädigt wird, muss sie durch den Hersteller
oder seinen Kundendienst oder eine ähnlich quali-
zierte Person ersetzt werden, um Gefährdungen
zu vermeiden.
• Flüssigkeiten oder andere Nahrungsmittel dürfen
nicht in verschlossenen Behältern erwärmt wer-
den, da sie leicht explodieren können.
• Stellen Sie Ihre Mikrowelle nicht in einen Schrank.
• Für den ordnungsgemäßen Betrieb muss das Ge-
rät genügend Freiraum zur Luftzirkulation haben.
Achten Sie darauf, dass Sie an allen Seiten des
Gerätes mindestens 10 cm Ventilationsabstand
zu Schränken, Wänden u. a. einhalten. Blockieren
Sie keine Öffnungen am Gerät. Die Füße dürfen
nicht entfernt werden.
• Stellen Sie das Gerät mit der Rückseite vor eine
Wand.
• Während des Gebrauchs werden das Gerät und
seine berührbaren Teile heiß. Vorsicht ist geboten,
um das Berühren von Heizelementen zu ver-
meiden. Kinder jünger als 8 Jahre müssen fern-
gehalten werden, es sei denn, sie werden ständig
beaufsichtigt.
• Es darf nur Geschirr benutzt werden, das für den
Gebrauch in Mikrowellenkochgeräten geeignet ist.
• Metallene Behälter für Lebensmittel und Getränke
sind für das Kochen mit Mikrowellen nicht erlaubt.
Verwenden Sie nur geeignetes Geschirr. Be-
achten Sie die Hinweise im Kapitel „ Geeignetes
Mikrowellengeschirr “.
• Beim Erwärmen von Speisen in brennbaren
Materialien, wie Kunststoff- oder Papierbehälter,
muss das Kochgerät häug wegen der Möglichkeit
einer Entzündung überwacht werden.
• Wenn Rauch festgestellt wird, ist das Gerät abzu-
schalten oder der Netzstecker zu ziehen und die
Tür geschlossen zu halten, um gegebenenfalls
auftretende Flammen zu ersticken.
• Der Inhalt von Babyfläschchen und Gläsern mit
Kindernahrung muss umgerührt oder geschüttelt
werden und die Temperatur vor dem Verbrauch
überprüft werden, um Verbrennungen zu vermei-
den.
WARNUNG:
• Verwenden Sie Topflappen oder Küchenhand-
schuhe, wenn Sie die Gefäße entnehmen. Ver-
brennungsgefahr!
• Eier mit Schale oder ganze hartgekochte Eier
dürfen nicht in Mikrowellenkochgeräten erwärmt
werden, da sie explodieren können, selbst wenn
die Erwärmung durch Mikrowellen beendet ist.
Dies gilt auch für Lebensmittel mit Schale, wie
z. B. Würste, verschlossene Glaskonserven usw.
WARNUNG: Siedeverzug!
Beim Kochen, insbesondere beim Nacherhitzen von
Flüssigkeiten (Wasser) kann es vorkommen, dass
die Siedetemperatur zwar erreicht ist, die typischen
Dampfblasen aber noch nicht aufsteigen. Die Flüs-
sigkeit siedet nicht gleichmäßig. Dieser sogenannte
Siedeverzug kann beim Entnehmen des Gefäßes
durch leichte Erschütterung zu einer plötzlichen
Dampfblasenbildung und damit zum Überkochen
führen. Deshalb ist bei dem Hantieren mit dem Be-
hälter Vorsicht geboten. Verbrennungsgefahr!
Um ein gleichmäßiges Sieden zu erreichen, stellen
Sie bitte einen Glasstab oder etwas Ähnliches, nicht
Metallisches in das Gefäß.
• Achten Sie bei der Entnahme von Behältern darauf,
dass sich der Drehteller nicht verschiebt.
• Dieses Gerät kann von Kindern ab 8 Jahren und
darüber sowie von Personen mit verringerten physi-
schen, sensorischen oder mentalen Fähigkeiten oder
Mangel an Erfahrung und Wissen benutzt werden,
wenn sie beaufsichtigt werden oder bezüglich des si-
cheren Gebrauchs des Gerätes unterwiesen wurden
und die daraus resultierenden Gefahren verstehen.
• Kinder dürfen nicht mit dem Gerät spielen.
• Reinigung und Benutzer-Wartung dürfen nicht von
Kindern ohne Beaufsichtigung durchgeführt werden.
• Türrahmen / Türdichtung und benachbarte Teile
müssen bei Verschmutzung sorgfältig mit einem
feuchten Tuch gereinigt werden.
• Reinigen Sie das Mikrowellenkochgerät regelmäßig
und entfernen Sie Nahrungsmittelreste aus dem
Innenraum.
• Mangelhafte Sauberkeit des Kochgerätes kann zu
einer Alterung der Oberäche führen, die ihrerseits
die Gebrauchsdauer nachteilig beeinusst und mög-
licherweise zu einer Gefährdungssituation führt.
6
• Keine scharfen abrasiven Reiniger oder scharfe Me-
tallschaber für die Reinigung der Glastür benutzen,
da sie die Oberäche zerkratzen können. Dies kann
das Glas zerstören.
• Das Gerät darf nicht mit einem Dampfreiniger ge-
reinigt werden.
• Beachten Sie auch die Anweisungen, die wir Ihnen
im Kapitel „Reinigung“ geben.
• Dieses Mikrowellenkochgerät können Sie sowohl
als Unterbau- als auch als freistehendes Gerät ver-
wenden. Es darf nicht in Einbaumöbeln eingesetzt
werden.
• Dieses Gerät dient
- zum Erwärmen und Garen von festen oder flüssi-
gen Nahrungsmitteln;
- zum Überbacken und Grillen von festen Nahrungs-
mitteln.
• Dieses Gerät ist für den Hausgebrauch und ähnliche
Anwendungen bestimmt, wie zum Beispiel:
- Personalküchenbereichen in Läden, Büros und
anderen Arbeitsumgebungen;
- i n landwirtschaftlichen Anwesen;
- von Kunden in Hotels, Motels und anderen Wohn-
einrichtungen;
- in Frühstückspensionen.
Hinweisschilder und Symbole
auf dem Gerät
Anweisungen lesen!
Auf der Oberseite der Mikrowelle ist ein Symbol mit
Warncharakter angebracht:
WARNUNG:
Heiße Oberfläche!
Verbrennungsgefahr!
Die Oberflächen können während des Ge-
brauchs heiß werden!
Auf der Rückseite der Mikrowelle ist ein Hinweisschild
mit folgendem Text angebracht:
WARNING
• MICROWAVE AND HIGH VOLTAGE INSIDE. BE
SURE NOT TO REMOVE THE ENCLOSURE.
• THIS APPLIANCE IS EQUIPPED WITH A
GROUNDED PLUG FOR YOUR PROTECTION
AGAINST POSSIBLE SHOCK HAZARDS AND
SHOULD BE CONNECTED TO A PROPERLY
GROUNDED OUTLET.
• THIS DEVICE IS TO BE SERVICED ONLY BY
PROPERLY QUALIFIED SERVICE PERSONNEL.
• DISCONNECT POWER PLUG BEFORE
SERVICING. REMOVAL OF THE ENCLOSURE
WITH PRODUCT ENERGIZED COULD EXPOSE
SERVICEMEN TO HAZARDOUS HIGH VOLTAGE
POTENTIAL.
Übersetzung:
Warnung
• Dieses Gerät erzeugt Hochspannung und Mikrowel-
len. Bitte entfernen Sie niemals das Gehäuse.
• Dieses Gerät ist zu Ihrer Sicherheit mit einem geer-
deten Stecker ausgerüstet, der Sie vor elektrischen
Schlägen schützen soll, und deshalb auch an eine
geerdete Steckdose angeschlossen werden muss.
• Dieses Gerät darf nur von qualifiziertem Fachperso-
nal gewartet werden.
• Bitte ziehen Sie den Netzstecker vor der Wartung.
Das Abnehmen des Gehäuses mit eingesteckter
Stromverbindung kann dazu führen, dass gefährlich
hohe Spannungen freigesetzt werden.
An der Tür ist seitlich folgender Text eingeprägt:
PRECAUTIONS FOR SAFE USE TO AVOID
POSSIBLE EXPOSURE TO EXCESSIVE
MICROWAVE ENERGY
DO NOT ATTEMPT TO OPERATE THIS OVEN WITH.
(A) OBJECT CAUGHT IN DOOR (B) DOOR THAT
DOES NOT CLOSE PROPERLY (C) DAMAGED
DOOR, HINGE, LATCH, OR SEALING SURFACE
Übersetzung:
Vorsichtsmaßnahmen für den sicheren Gebrauch, um
mögliche Gefährdung durch erhöhte Mikrowellenergie
zu vermeiden. Versuchen Sie nicht diesen Ofen zu be-
treiben mit (A) Verklemmtes Objekt in Tür (B) Tür, die
nicht richtig schließt (C) Beschädigte Tür, Scharnier,
Verriegelung oder Dichtfläche
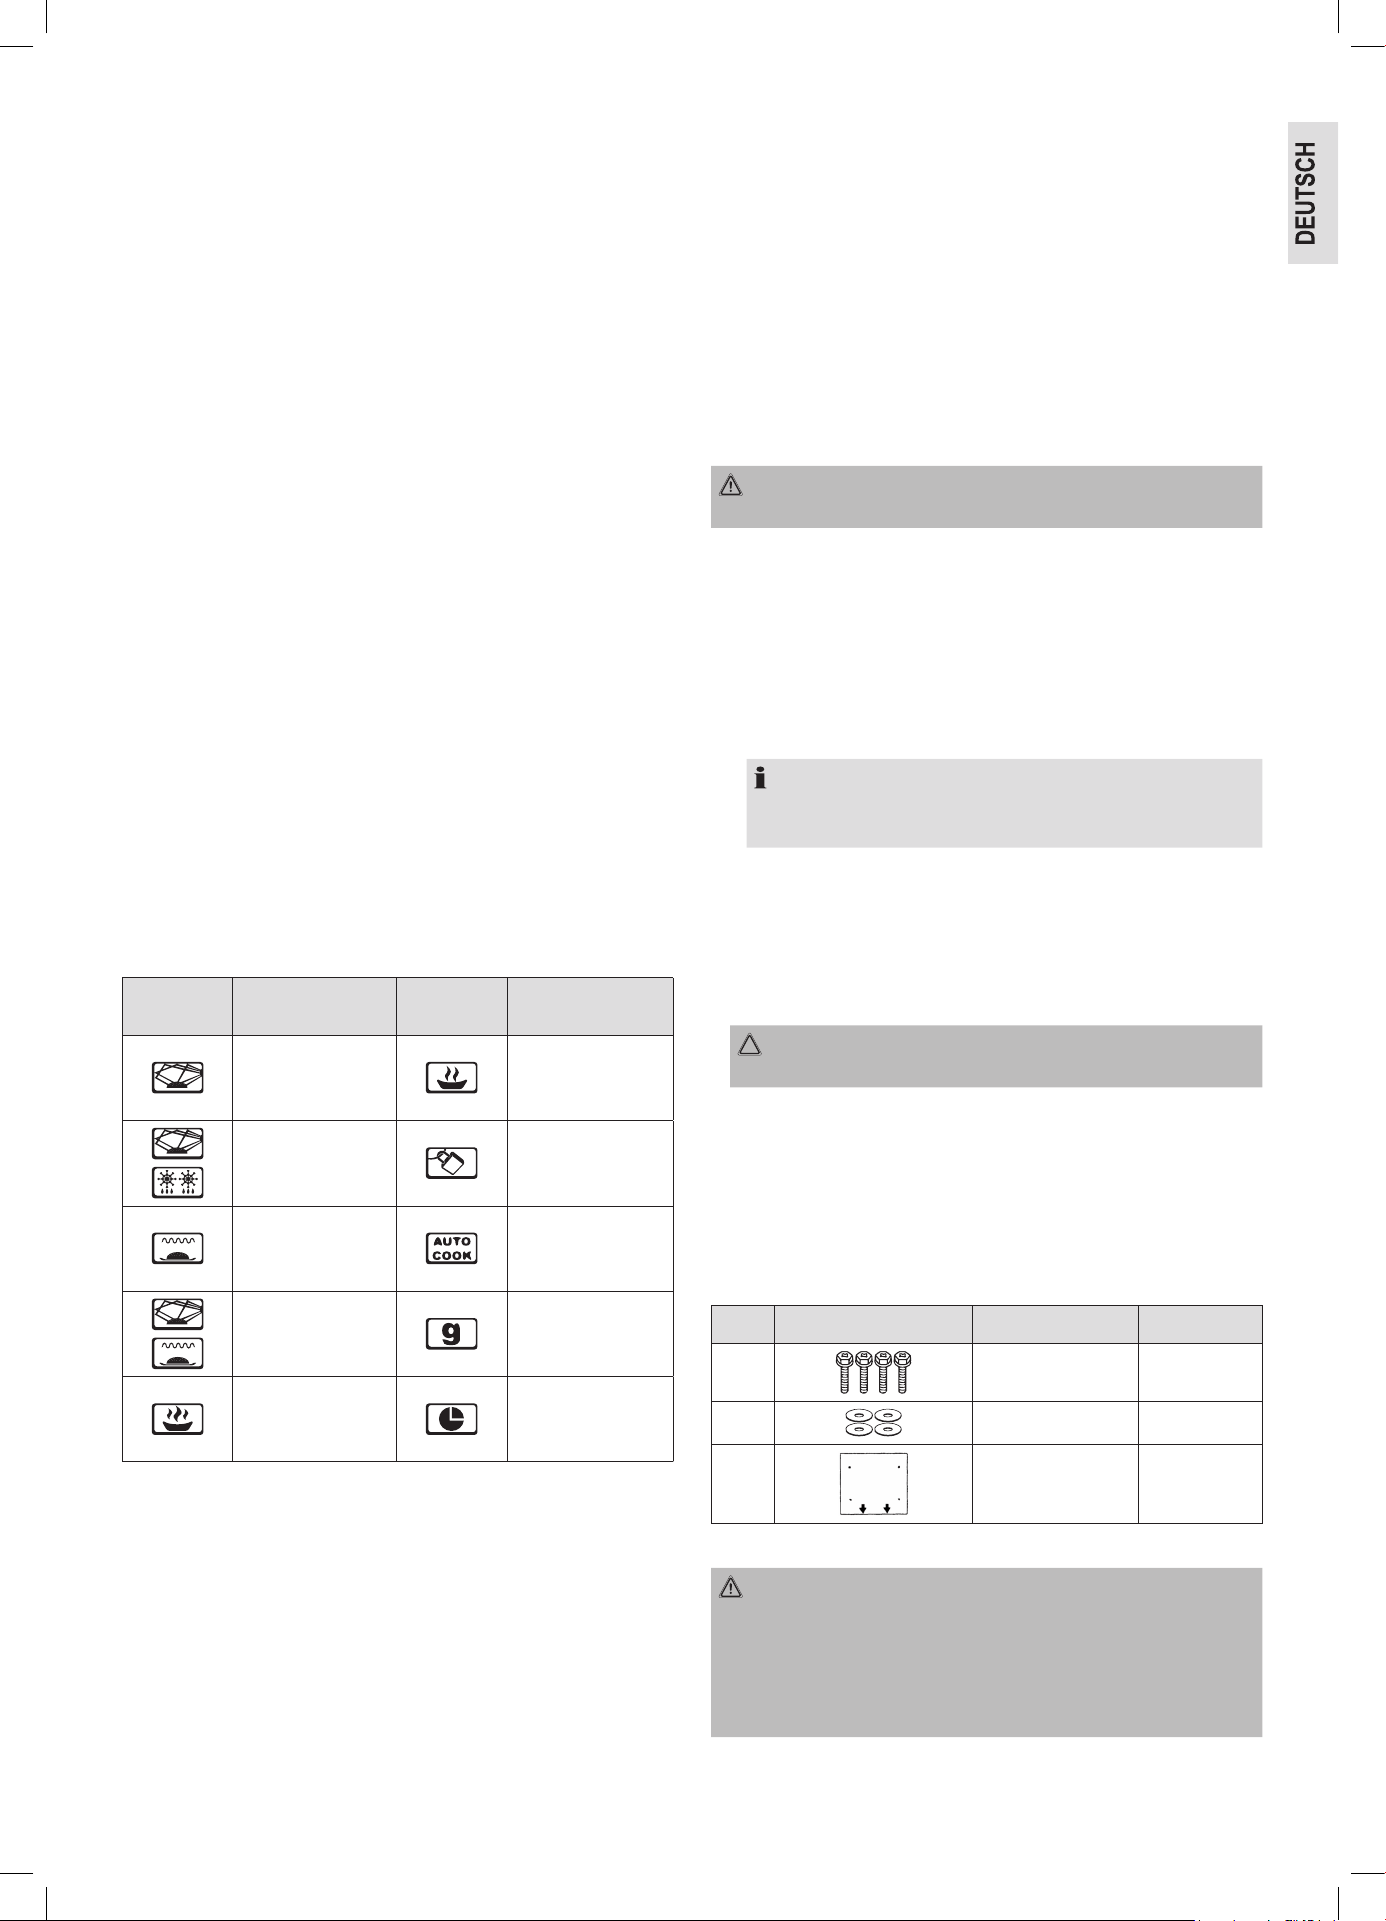
Beschreibung der Bedienelemente
1 Bedienfeld
2 Grillrost
3 Antriebsachse
4 Gleitring
5 Drehteller
6 Türverschluss
7 Sichtfenster
8 Glimmerscheibe
7
Tasten und Regler am Bedienfeld
Defrost By W.T. Auftauen nach Gewicht
Clock / Pre-Set In Verbindung mit dem Drehknopf zum Ein-
stellen der Uhrzeit oder einer Startzeit
Defrost By Time Auftauen nach Zeit
Quick Start / Start - Start des Programms
- Schnellstart der Mikrowelle (immer
+ 60 Sekunden bei 100 % Leistung)
Micro. / Grill / Combi.
Mikrowelle: Wahl der Leistungsstufen der Mikrowelle
Grill: Zum Grillen und Überbacken
Grill / Combi: Grill und Mikrowelle arbeiten abwechselnd
Cancel / Stop
Stopp: Einmal drücken zum Stoppen des Garvor-
gangs
Löschen: Zweimal drücken zum Löschen des Pro-
gramms
Sperren: Drücken Sie die CANCEL / STOP Taste für
3 Sekunden, um das Bedienfeld zu sperren
(Kindersicherung) oder um die Sperre wie-
der aufzuheben
Auto Menu Wahl der Automatikprogramme
Timer • Power • Weight Drehknopf zum Einstellen der Uhrzeit,
Gar- oder Auftauzeit, von Leistungsstufen,
Kombinationen, Automatikprogrammen
oder Gewichtswerten
Symbole im Bedienfeld
Symbol
Bedeutung /
Funktion
Symbol
Bedeutung /
Funktion
Mikrowelle Leistung klein
Auftauen
Kindersicherung
aktiv
Grill
Automatik-
programm
Mikrowelle + Grill Gewicht in Gramm
Leistung groß
Programmierter
Start
Brandgefahren bei Montage
als Unterbaugerät vermeiden
Wenn Sie die Mikrowelle als Unterbaugerät an beispielsweise einem
Schrank oder Regal montieren wollen, beachten Sie die Hinweise im
Abschnitt „Montageanleitung bei Unterbaugeräten“.
• Entfernen Sie nicht die Füße an der Unterseite des Gerätes.
• Verwenden Sie nur das mitgelieferte Befestigungsmaterial, wenn
Sie die Mikrowelle unterhalb eines Schranks montieren wollen.
• Halten Sie beim Einbau der Mikrowelle die folgenden Abstände
zwischen den Geräteseiten und den Möbeln ein:
- mindestens 4 cm zur rechten Seite
- von mindestens 10 cm zu den Entlüftungsschlitzen auf der linken
Seite.
- Decken Sie keine Öffnungen ab! Anderenfalls ist eine ausrei-
chende Belüftung nicht sichergestellt.
- Der Abstand zur Rückwand wird durch einen Abstandshalter vor-
gegeben.
• Die Rückwand muss feuerfest sein (z. B. Fliesen).
Montageanleitung bei Unterbaugeräten
WARNUNG:
Wichtig! Das Gerät erst nach der Montage anschließen!
• Entnehmen Sie dem Oberschrank alle Gegenstände, sowie den
angrenzenden Schränken alles Zerbrechliche.
• Für die Montage muss der Oberschrank folgende Voraussetzungen
erfüllen:
- Stärke des Schrankbodens von 16 mm bis 19 mm
- Schrankbreite mindestens 500 mm.
- Die Montagetiefe unterhalb des Schrankes bis zur Wand muss
mindestens 320 mm betragen.
HINWEIS:
Soll die Mikrowelle mit der Türvorderkante abschließen, ist eine
Montagetiefe von 350 mm nötig.
- Der Schrank darf keine Risse, Splitter oder andere Beschädigun-
gen aufweisen. Alle Verbindungen müssen stabil sein.
- Der Schrank muss für eine Mindestbelastung von 40 kg aus-
gelegt sein.
• Die Wandaufhängung des Oberschrankes muss stabil und mit min-
destens 2 Schrauben fest in der Wand verankert sein.
ACHTUNG:
Montieren Sie das Gerät nicht über einer Kochstelle!
• Zur Montage des Gerätes muss sichergestellt sein, dass eine
Steckdose in Reichweite der Zuleitung vorhanden ist.
• Die Steckdose muss gut erreichbar sein, so dass man im Notfall
schnell den Netzstecker ziehen kann.
• Das Gerät kann nicht unter Oberschränke montiert werden, die
nach unten mit einer Lichtleiste abschließen.
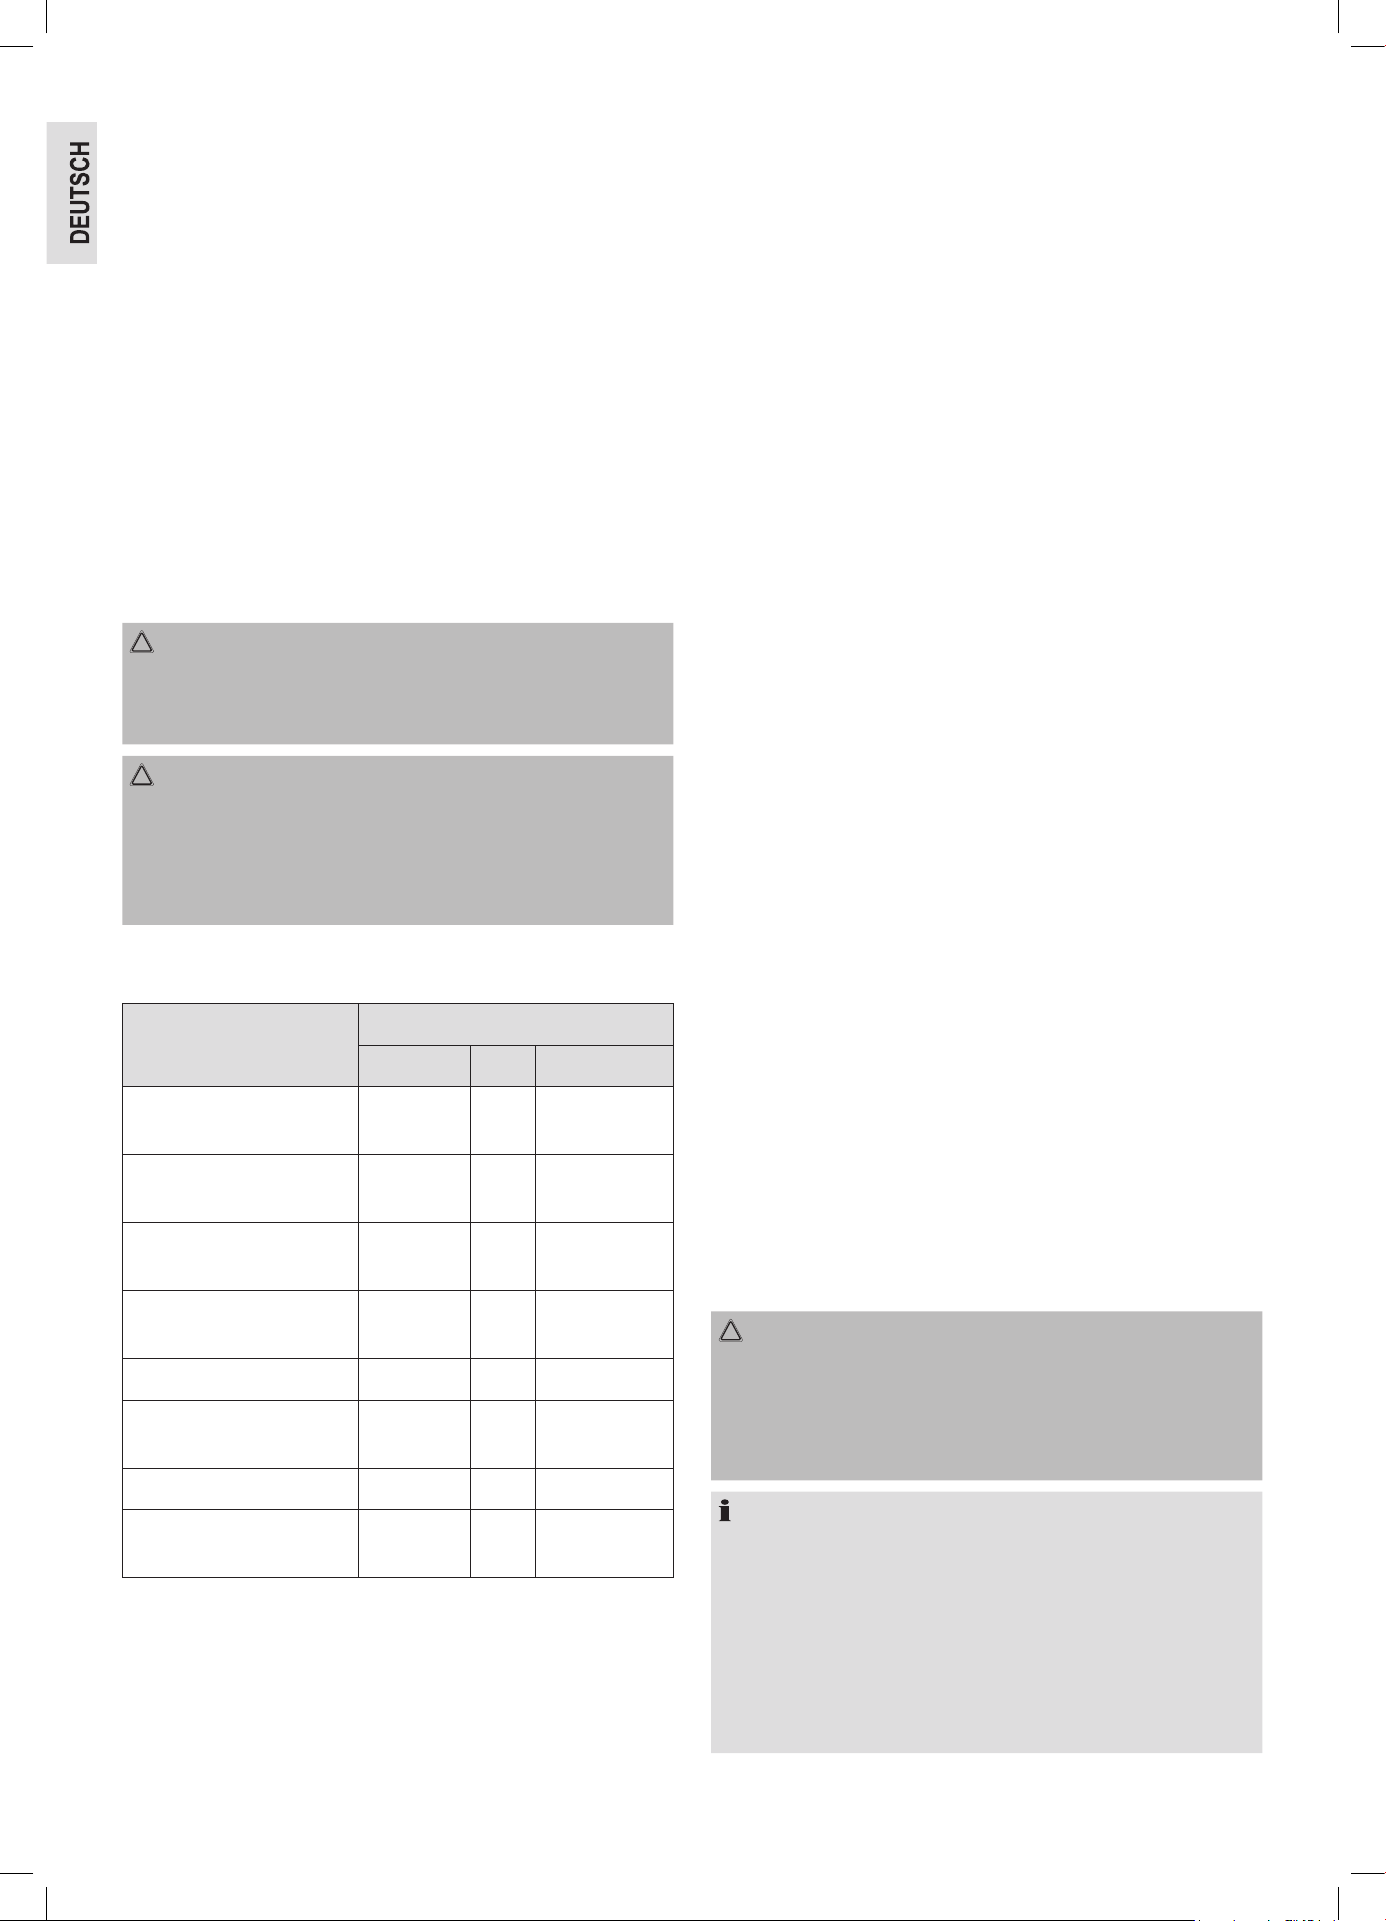
Montage-Zubehör
Pos. Bezeichnung Anzahl
1 Schrauben 4
2 Unterlegscheiben 4
3 Bohrschablone 1
Die Montageanleitung finden Sie auf der beiliegenden Bohrschablone.
WARNUNG:
• Halten Sie sich an die in der Montageanleitung angegeben Maße.
• Verwenden Sie nur das mitgelieferte Montagezubehör.
• Zu tief eingedrehte Schrauben (zu lange Schrauben) können
das Gerät beschädigen oder zu einer Gefahr für Leib und Leben
werden.
8
Hinweise zum Grill- und Kombibetrieb
• Da im Grill- und Kombibetrieb Strahlungshitze benutzt wird, ver-
wenden Sie nur hitzebeständiges Geschirr.
• Im reinen Grillbetrieb dürfen Sie auch Metall- oder Aluminium-
geschirr benutzen, nicht jedoch im reinen oder kombinierten Mikro-
wellenbetrieb.
• Für die Betriebsart COMBI ist nur der Grillrost geeignet.
• Stellen Sie nichts auf die Oberseite des Gehäuses. Diese wird heiß.
• Lassen Sie die Lüftungsschlitze immer frei.
• Verwenden Sie den Grillrost, um das Gargut näher an das Heiz-
element heranzuführen.
Geeignetes Mikrowellengeschirr
• Das ideale Material für den Gebrauch in einer Mikrowelle ist durch-
sichtig und erlaubt der Mikrowellenstrahlung die Speisen gleich-
mäßig zu erhitzen.
• Runde / ovale Schalen und Teller sind besser geeignet als eckige,
denn die Speisen in den Ecken könnten überkochen.
ACHTUNG:
Explosionsgefahr durch dicht verschlossenes Kochgeschirr.
• Öffnen Sie verschlossene Behälter vor dem Garen oder Erhitzen.
• Stechen Sie Plastikschutzfolien mehrfach mit einer Gabel durch.
ACHTUNG: Funkenschlag und Brandgefahr!
• Mikrowellenstrahlen können kein Metall durchdringen, deshalb
sollten Metallbehälter oder -teller nicht verwendet werden.
• Benutzen Sie keine Papierschalen aus recyceltem Material, denn
sie können geringe Anteile an Metall enthalten, was zu Funken-
schlag oder Bränden führen kann.
Mit der unten aufgeführten Liste wird Ihnen die Auswahl von geeigne-
tem Mikrowellengeschirr erleichtert:
Material
Geeignet für
Mikrowelle Grill Kombination *
Hitzebeständiger
Glasbehälter
ja ja ja
Nicht hitzebeständiger
Glasbehälter
nein nein nein
Hitzebeständiger Keramik-
behälter / -teller
ja ja ja
Mikrowellengeeigneter
Plastikbehälter
ja nein nein
Küchenpapier ja nein nein
Metall- oder
Aluminiumgeschirr
nein ja nein
Grillrost nein ja nein
Aluminiumfolie und
Folienbehälter
nein ja nein
* Kombination von Mikrowelle mit Grill.
Hinweise zur Funktion und Benutzung des Gerätes
Wissenswertes zum Mikrowellenbetrieb
• Ihr Gerät arbeitet mit Mikrowellenstrahlung, welche Wasserteilchen
in Speisen in sehr kurzer Zeit erhitzt. Hier gibt es keine Wärme-
strahlung und somit auch kaum Bräunung.
• Erwärmen Sie mit diesem Gerät nur Lebensmittel.
• Das Gerät ist nicht zum Backen in schwimmendem Fett geeignet.
• Erhitzen Sie nur 1 – 2 Portionen auf einmal. Das Gerät verliert sonst
an Efzienz.
• Mikrowellen liefern sofort volle Energie. Ein Vorheizen ist somit
nicht erforderlich.
• Betreiben Sie das Gerät im Mikrowellenbetrieb niemals leer.
• Der Mikrowellenherd ersetzt nicht Ihren herkömmlichen Herd. Er
dient hauptsächlich zum:
- Auftauen von Tiefgekühltem / Gefrorenem
- schnellen Erhitzen / Aufwärmen von Speisen oder Getränken
- Garen von Speisen
Hinweise zur Funktion dieses Gerätes
• Ihre Auswahl durch Drücken der Tasten wird mit einem Signalton
bestätigt. Geschieht dies nicht, haben Sie nicht richtig gedrückt.
• Danach ertönt beim ersten Drehen des Drehknopfes ein Signalton.
• Wurde ein Programm gewählt und nicht innerhalb von 5 Minuten
die QUICK START / START Taste gedrückt, wird die Einstellung
aufgehoben. Es erscheint wieder die aktuelle Uhrzeit im Display.
• Wenn die Tür geöffnet wurde, brennt die Beleuchtung im Ofen.
Wird sie nicht innerhalb von 10 Minuten geschlossen, erlischt die
Beleuchtung.
• Nach Starten eines Programms wird die Restlaufzeit angezeigt. Ein
Countdown läuft.
• Es ertönen 5 Signale, um das Ende eines Programms mitzuteilen.
Entnehmen Sie dann die Speise.
Inbetriebnahme
Vorbereitung
1. Entnehmen Sie alles im Garraum befindliche Zubehör, packen Sie
es aus und legen Sie den Gleitring in die Mitte.
2. Positionieren Sie den Glasteller so auf der Antriebsachse, dass die-
ser in die Ausbuchtungen der Antriebswelle einrastet und gerade
auiegt.
3. Kontrollieren Sie das Gerät auf sichtbare Schäden, besonders
im Bereich der Tür. Bei Schäden jeglicher Art darf das Gerät auf
keinen Fall in Betrieb genommen werden.
4. Um beim Betrieb Störungen anderer Geräte zu vermeiden, stellen
Sie Ihr Gerät nicht in unmittelbarer Nähe von anderen elektroni-
schen Geräten auf.
5. Entfernen Sie evtl. auf dem Gehäuse haftende Schutzfolien.
6. Stecken Sie den Netzstecker in eine korrekt installierte Schutz-
kontaktsteckdose.
ACHTUNG:
• Entfernen Sie keine montierten Teile aus dem Garraum und von
der Innenseite der Tür!
• Auch die Glimmerscheibe (8) im Garraum ist Bestandteil des
Gerätes und darf nicht entfernt werden. Sie schützt das dahinter
bendliche elektronische Bauteil vor Verschmutzungen.
HINWEIS:
Sollten sich Fertigungs- oder Ölrückstände am Gehäuse oder auf
dem Heizelement benden, kann es im Anfang zu Rauch- oder Ge-
ruchsentwicklung kommen. Dies ist ein normaler Vorgang und wird
nach wiederholtem Gebrauch nicht mehr auftreten.
Es wird dringend geraten, wie folgt zu verfahren:
• Stellen Sie das Gerät auf Grillfunktion und lassen Sie es mehr-
mals ohne Gargut laufen (je max. 5 Minuten).
• Sorgen Sie für ausreichende Belüftung.
9
Einstellen der Uhrzeit
HINWEIS:
Beim ersten Einschalten ertönt ein Signal und im Display erscheint
„ “ .
1. Drücken Sie die CLOCK / PRE-SET Taste. Das Symbol „ “
leuchtet im Display auf. Die Stunden-Ziffer blinkt.
2. Mit Hilfe des Drehknopfs stellen Sie die gewünschte Stunde ein.
3. Drücken Sie die CLOCK / PRE-SET Taste. Die Minuten-Ziffern
blinken.
4. Mit Hilfe des Drehknopfs stellen Sie die gewünschten Minuten ein.
5. Drücken Sie erneut die CLOCK / PRE-SET Taste, die neue Uhrzeit
wird aktiviert. Das Trennzeichen der digitalen Uhrzeitanzeige „ “ im
Display blinkt. Das Symbol „ “ erlischt.
Bedienung Mikrowelle
1. Geben Sie die zu erhitzende Speise in ein geeignetes Geschirr.
2. Öffnen Sie die Tür und stellen Sie das Gefäß mittig auf den Glas-
teller. Tür bitte schließen. (Das Gerät arbeitet aus Sicherheitsgrün-
den nur mit fest geschlossener Tür.)
3. Drücken Sie die MICRO. / GRILL / COMBI. Taste einmal. Wählen
Sie anschließend mit dem Drehknopf die gewünschte Leistung
( bis ).
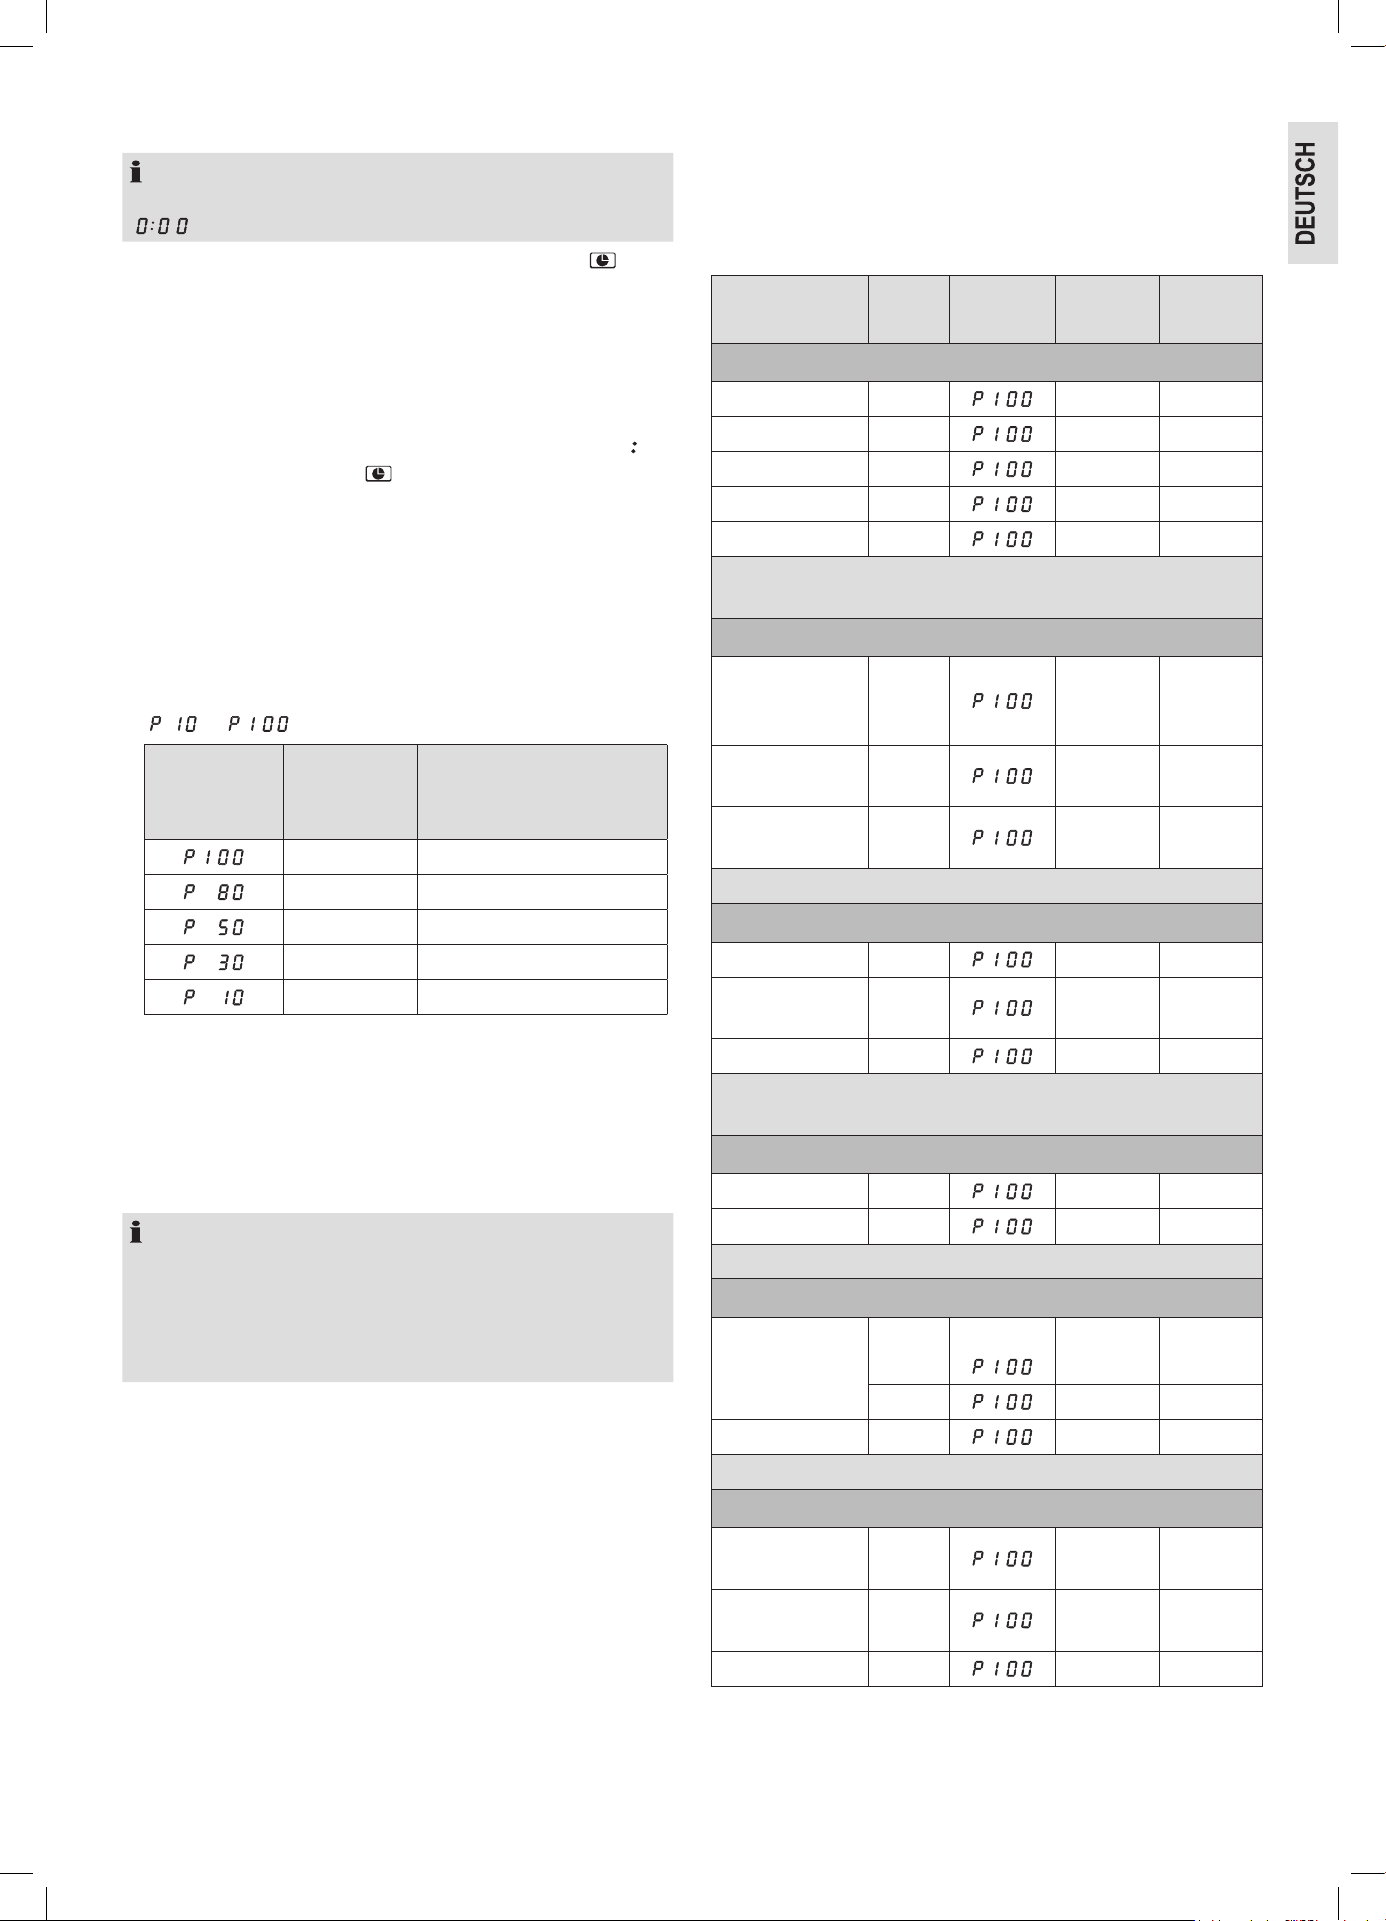
Leistung im
Display wie
gewählt in %
Leistung in
Watt (ca.)
Anwendungsgebiet
800 Schnelles Erhitzen
640 Garen
400 Fortkochen
240 Auftauen von Gefrorenem
80 Schmelzen von Käse usw.
4. Bestätigen Sie Ihre Einstellung mit der MICRO. / GRILL / COMBI.
Taste.
5. Stellen Sie mit dem Drehknopf die gewünschte Gardauer zwischen
5 Sekunden und 95 Minuten ein.
6. Drücken Sie zum Starten die QUICK START / START Taste. Die
Gardauer richtet sich nach Menge und Beschaffenheit des Inhaltes.
Bei etwas Übung lernen Sie schnell, die Gardauer einzuschätzen.
HINWEIS:
• Die Bereitung im Mikrowellenherd geschieht sehr viel schneller
als in einem Wärmeherd. Stellen Sie die Gardauer, wenn Sie sich
nicht sicher sind, gering ein und garen Sie ggf. nach.
• Bitte beachten Sie: Legen Sie beim reinen Mikrowellenbetrieb
eine Abdeckhaube über die Lebensmittel.
Garvorgang unterbrechen oder abbrechen
• Möchten Sie den Garvorgang unterbrechen, drücken Sie einmal die
CANCEL / STOP Taste oder öffnen Sie einfach die Tür.
• Soll der Garvorgang dann fortgesetzt werden, müssen Sie die Tür
schließen und die QUICK START / START Taste drücken.
• Möchten Sie den Garvorgang ganz abbrechen, drücken Sie zwei-
mal die CANCEL / STOP Taste.
Erwärmen
Das Erwärmen und Erhitzen ist eine besondere Stärke der Mikro-
welle. Kühlschrankkalte Flüssigkeiten und Speisen lassen sich sehr
leicht auf Zimmertemperatur oder Verzehrtemperatur bringen, ohne
viele Töpfe benutzen zu müssen.
Die in der folgenden Tabelle angegebenen Erhitzungszeiten können
nur Richtwerte sein, da die Zeit sehr stark von der Ausgangstemperatur
und der Zusammensetzung der Speise abhängt. Es empehlt sich des-
halb, ab und zu nachzusehen, ob das Gericht schon heiß genug ist.
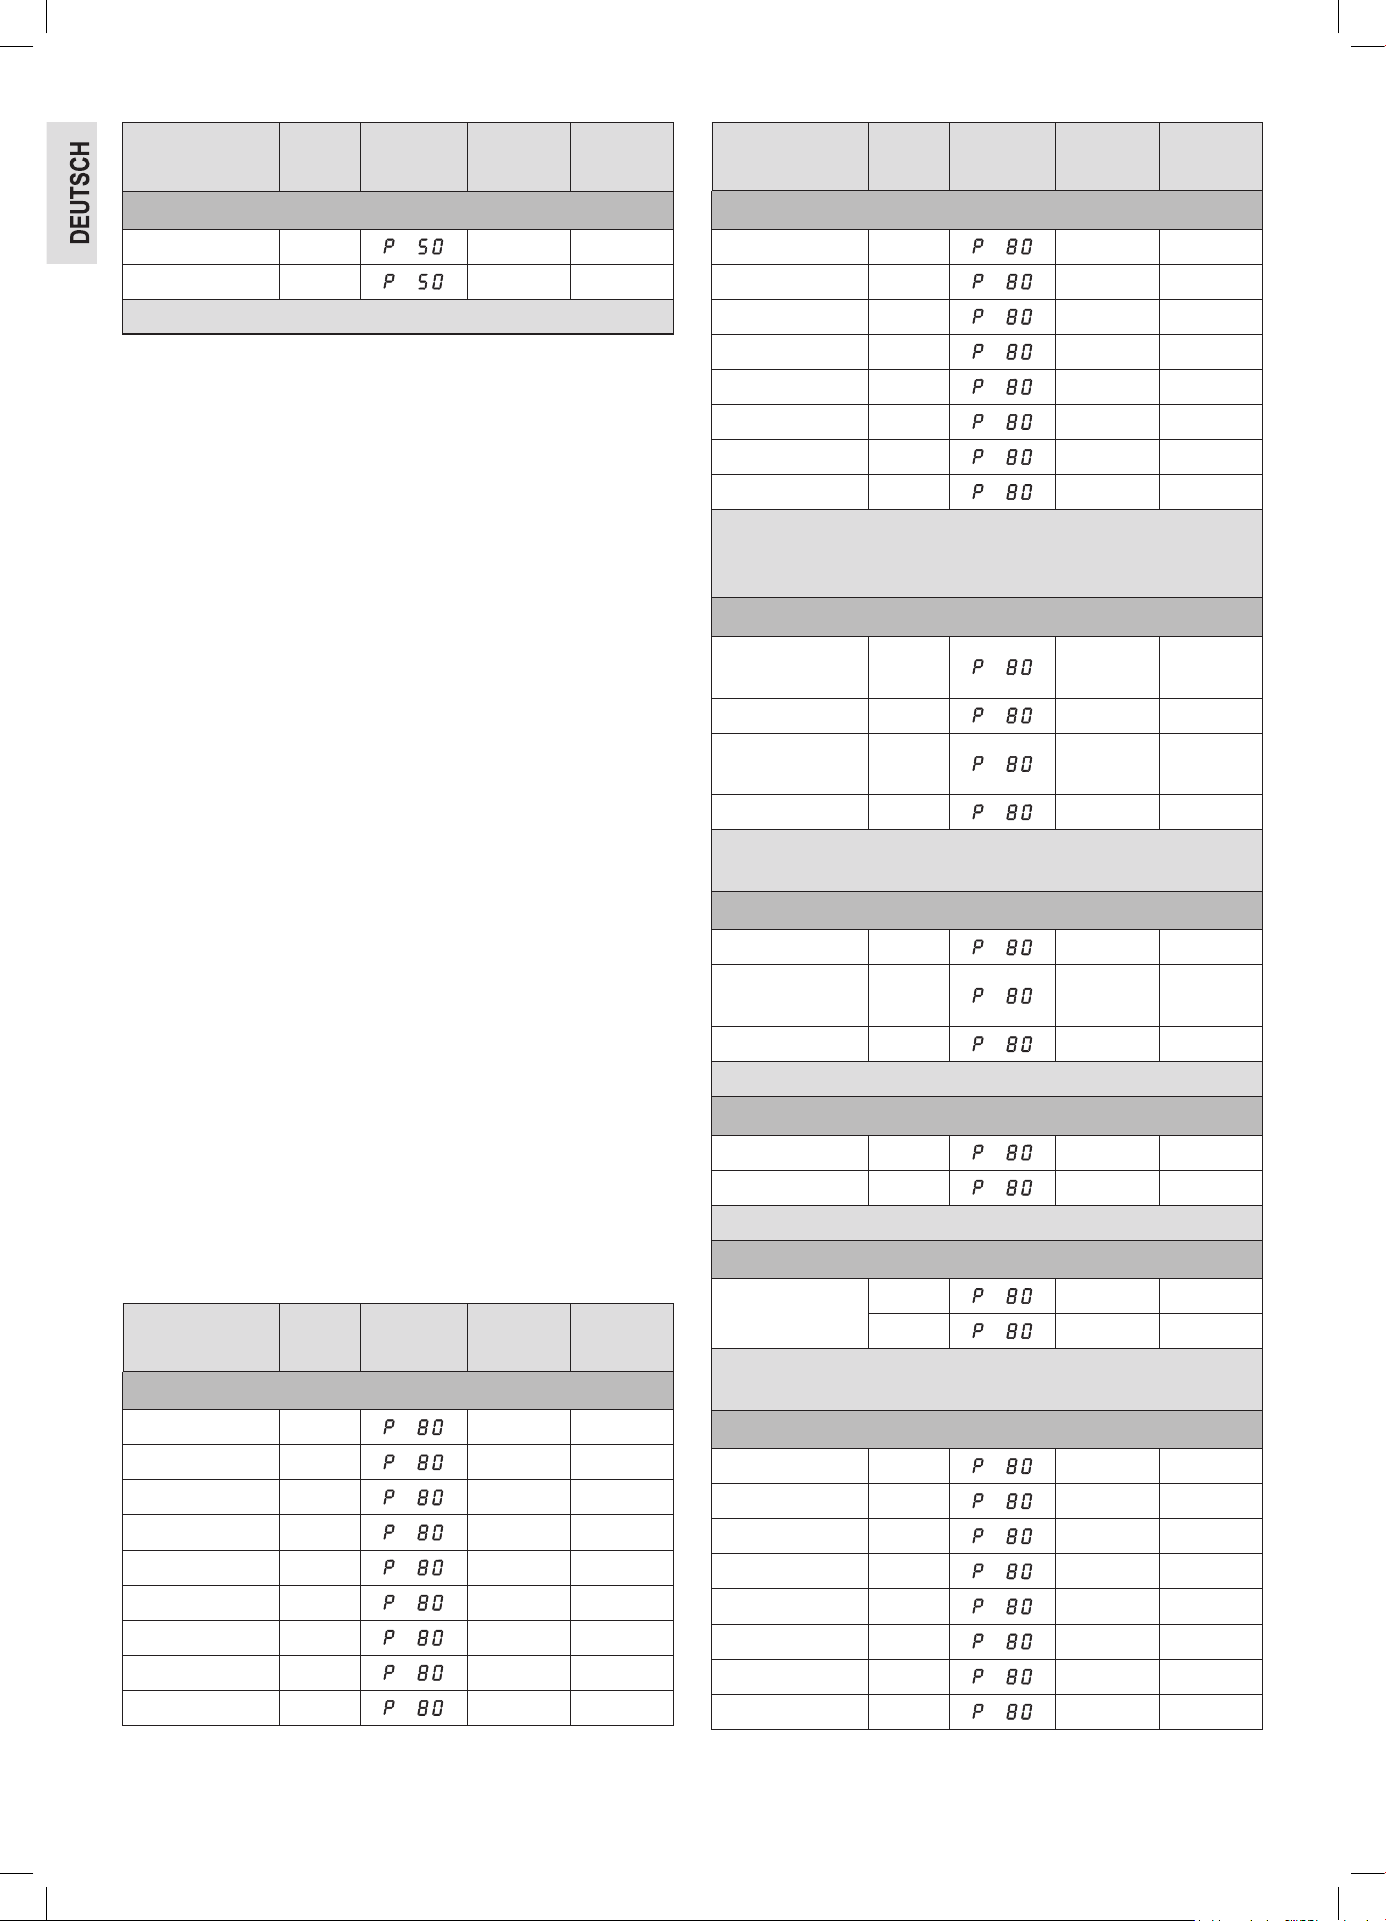
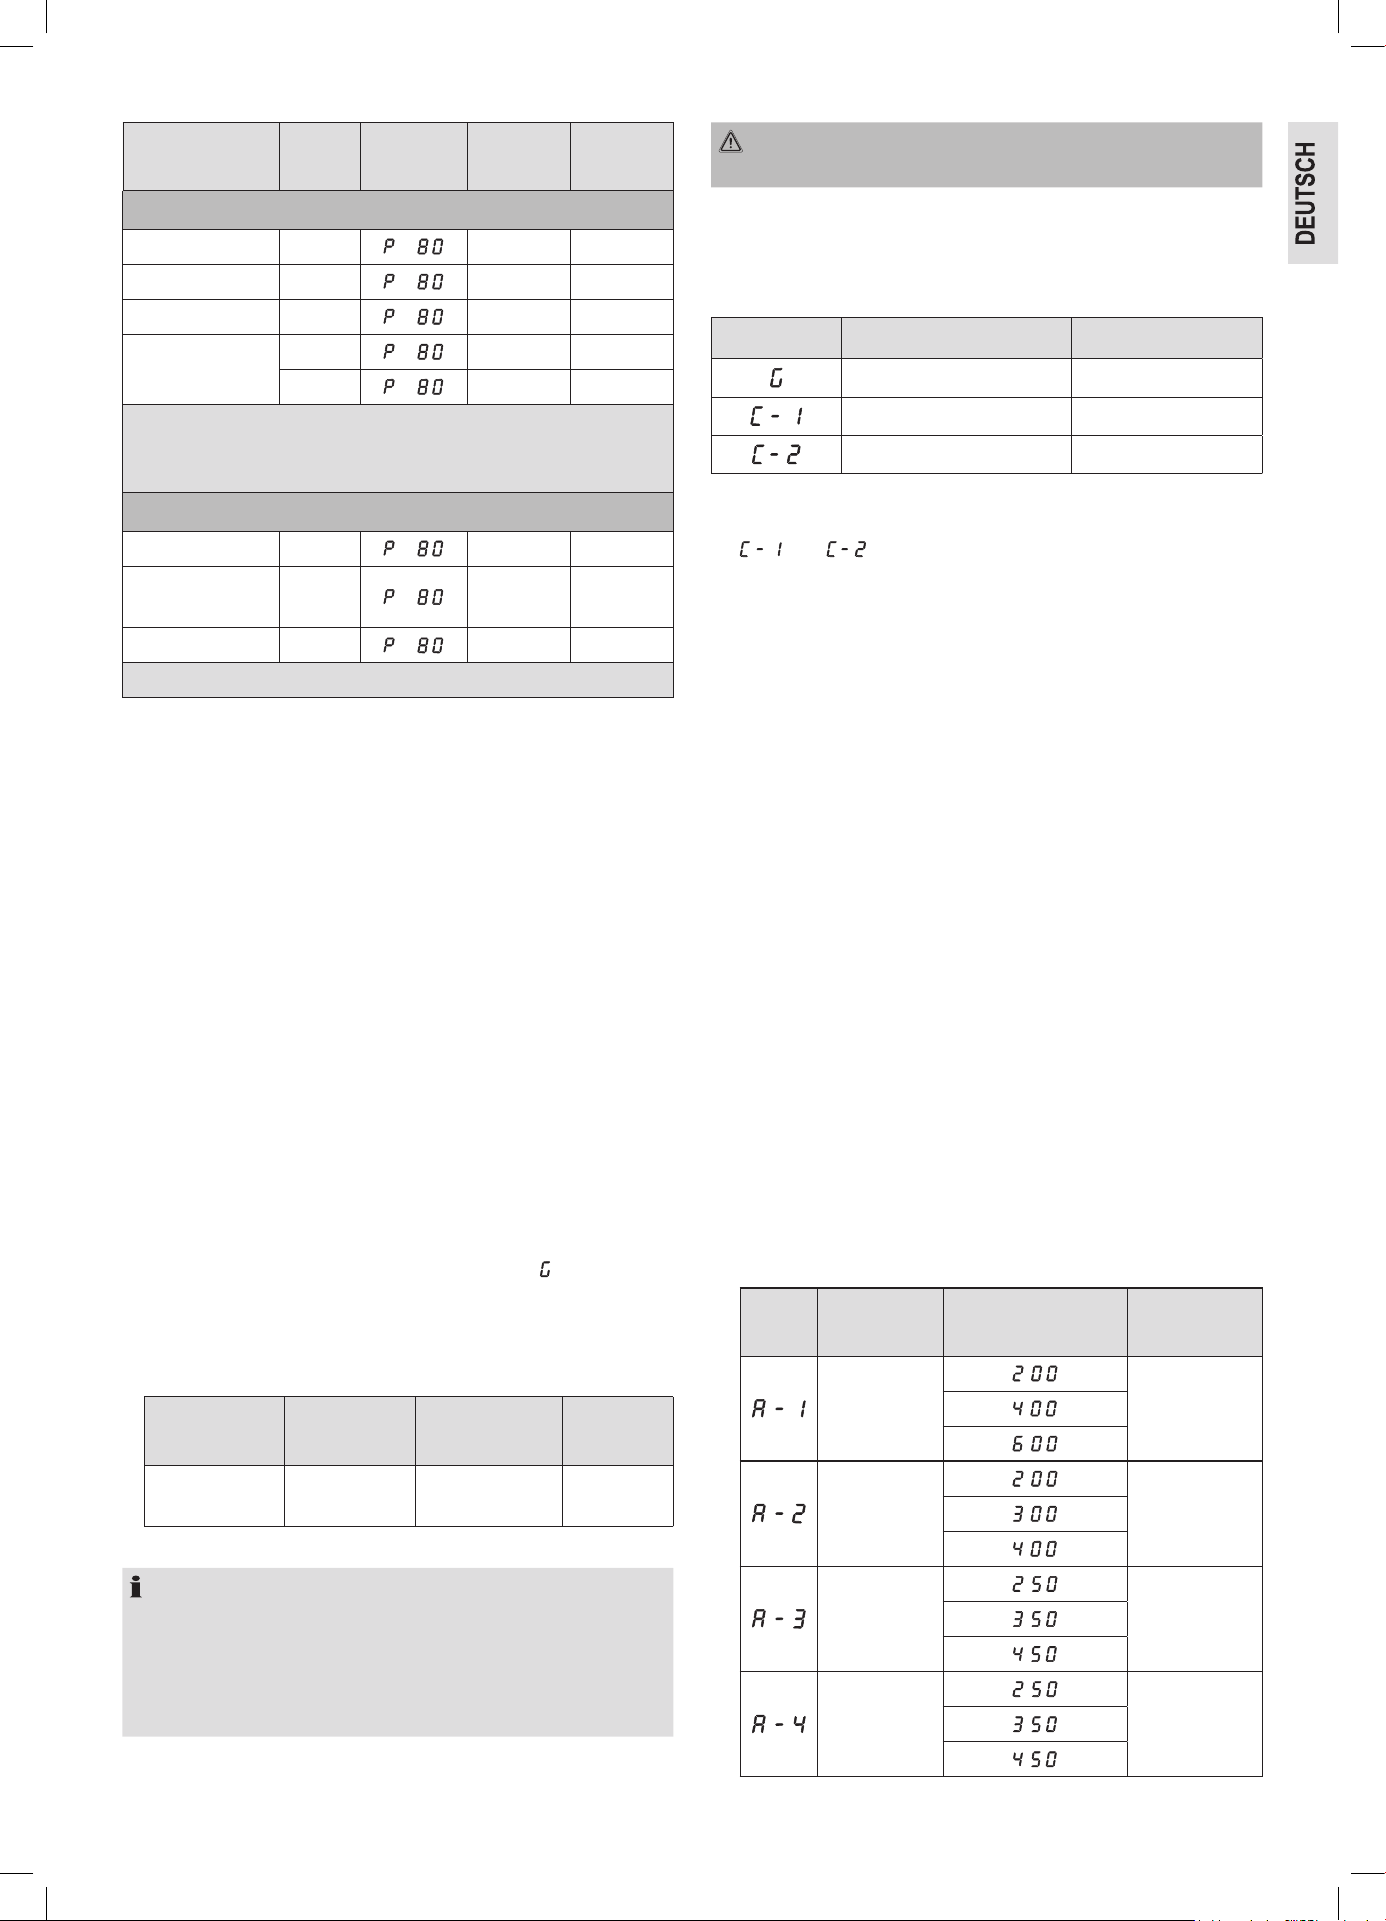
Tabelle Erwärmen
Lebensmittel /
Speise
Menge
Leistung
in %
Zeit
ca. Min.
Abdecken
Flüssigkeiten
Wasser, 1 Tasse 150 g 0,5 – 1 nein
Wasser, 0,5 ℓ 500 g 3 , 5 – 5 nein
Wasser, 0,75 ℓ 750 g 5 – 7 nein
Kaffee, 1 Tasse 150 g 0,5 – 1 nein
Milch, 1 Tasse 150 g 0,5 – 1 nein
Achtung: Einen Glasstab o. ä. (nichts metallisches) gegen Siede-
verzug in das Gefäß geben, vor dem Trinken gut umrühren.
Tellergerichte
Schnitzel +
Kartoffeln und
Gemüse
450 g 2,5 – 3,5 ja
Gulasch mit
Nudeln
450 g 2 – 2,5 ja
Fleisch + Kloß +
Soße
450 g 2,5 – 3,5 ja
Tipp: Vorher leicht anfeuchten, zwischendurch umrühren.
Fleisch
Schnitzel, paniert 200 g 1 – 2 nein
Frikadellen,
4 Stück
500 g 3 – 4 nein
Bratenstück 250 g 2 – 3 nein
Tipp: Mit Öl bepinseln, damit die Panade bzw. die Kruste nicht auf-
weicht.
Geügel
½ Hähnchen 450 g 3 , 5 – 5 nein
Hühnerfrikassee 400 g 3 – 4 , 5 ja
Tipp: Mit Öl bepinseln, zwischendurch umrühren.
Beilagen
Nudeln, Reis
1 Portion 150 g 1 – 2 ja
2 Portionen 300 g 2,5 – 3,5 ja
Kartoffeln 500 g 3 – 4 ja
Tipp: Vorher leicht anfeuchten.
Suppen / Soßen
Klare Brühe,
1 Teller
250 g 1 – 1,5 ja
Suppe mit
Einlagen
250 g 1,5 – 2 ja
Soße 250 g 1 – 2 ja
10
Lebensmittel /
Speise
Menge
Leistung
in %
Zeit
ca. Min.
Abdecken
Babykost
Milch 100 ml 0,5 – 1,5 nein
Brei 200 g 1 – 1,5 nein
Tipp: Gut durchschütteln oder umrühren. Temperatur überprüfen!
Garen
Praktische Tipps zum Garen
Halten Sie sich an die Richtwerte in der Gartabelle und den Rezepten.
Beobachten Sie den Kochvorgang, solange Sie noch nicht so viel
Übung haben.
Die Tür des Gerätes können Sie jederzeit öffnen. Das Gerät schaltet
automatisch ab.
Es arbeitet erst wieder, wenn die Tür geschlossen ist und die
QUICK START / START Taste erneut betätigt wurde.
Lebensmittel aus dem Kühlschrank, benötigen eine etwas längere
Garzeit als solche mit Raumtemperatur.
Je kompakter eine Speise ist, desto länger ist die Garzeit. So benötigt
z. B. ein größeres Stück Fleisch eine längere Garzeit als geschnetzel-
tes Fleisch gleicher Menge. Es empfiehlt sich, größere Mengen bei
maximaler Leistung anzukochen und für ein gleichmäßiges Garen auf
mittlerer Leistung fortzukochen.
Flache Speisen garen schneller als hohe, die Lebensmittel daher
möglichst flach verteilen. Dünnere Teile, z. B. Hähnchenschenkel oder
Fischfilet, nach innen legen oder überlappen lassen.
Kleinere Mengen garen schneller als große. Es gilt die Faustregel:
Doppelte Menge = fast doppelte Zeit
Halbe Menge = halbe Zeit
Wenn Sie für ein Gericht keine passende Zeitangabe nden können,
gilt die Regel:
pro 100 g ca. 1 Minute Garzeit
Alle Speisen, die Sie am Herd abdecken, sollten Sie auch im Mikro-
wellengerät abdecken.
Ein Deckel verhindert, dass die Speisen austrocknen. Zum Abdecken
eignen sich ein umgedrehter Teller, Pergamentpapier oder Mikrowel-
lenfolie. Speisen, die eine Kruste erhalten sollen, offen garen.
Tabelle Garen
Lebensmittel /
Speise
Menge
Leistung
in %
Zeit
ca. Min.
Abdecken
Gemüse
Auberginen 500 g 7 – 10 ja
Blumenkohl 500 g 13 – 15 ja
Brokkoli 500 g 6 – 9 ja
Chicorée 500 g 6 – 7 ja
Erbsen 500 g 6 – 7 ja
Fenchel 500 g 8 – 11 ja
Grüne Bohnen 300 g 13 – 15 ja
Kartoffeln 500 g 9 – 12 ja
Kohlrabi 500 g 8 – 10 ja
Lebensmittel /
Speise
Menge
Leistung
in %
Zeit
ca. Min.
Abdecken
Gemüse
Lauch 500 g 7 – 9 ja
Maiskolben 250 g 7 – 9 ja
Möhren 500 g 8 – 10 ja
Paprika 500 g 6 – 9 ja
Rosenkohl 300 g 7 – 10 ja
Spargel 300 g 6 – 9 ja
Tomaten 500 g 6 – 7 ja
Zucchini 500 g 9 – 10 ja
Tipp: Gemüse klein schneiden und mit 2 – 3 EL Flüssigkeit garen,
zwischendurch umrühren, 3 – 5 Minuten nachgaren lassen, erst vor
dem Servieren würzen.
Obst
Apfel-,
Birnenkompott
500 g 5 – 8 ja
Paumenmus 250 g 4 – 6 nein
Rhabarber-
kompott
250 g 5 – 8 ja
Bratäpfel, 4 Stück 500 g 7 – 9 ja
Tipp: 125 ml Wasser zufügen. Zitronensaft verhindert, dass das
Obst sich verfärbt, 3 – 5 Minuten nachgaren lassen.
Fleisch *
Fleisch mit Soße 400 g 10 – 12 ja
Gulasch,
Geschnetzeltes
500 g 10 – 15 ja
Rindsrouladen 250 g 7 – 8 ja
Tipp: Zwischendurch umrühren, 3 – 5 Minuten ruhen lassen.
Geügel *
Hühnerfrikassee 250 g 6 – 7 ja
Geügelsuppe 200 g 5 – 6 ja
Tipp: Zwischendurch umrühren, 3 – 5 Minuten ruhen lassen.
Fisch
Fischlet
300 g 7 – 8 ja
400 g 8 – 9 ja
Tipp: Nach der Hälfte der Zeit wenden, 3 – 5 Minuten nachgaren
lassen.
Gemüse auftauen und garen
Apfelrotkohl 450 g 14 – 16 ja
Blattspinat 300 g 11 – 13 ja
Blumenkohl 200 g 7 – 9 ja
Brechbohnen 200 g 8 – 10 ja
Brokkoli 300 g 8 – 9 ja
Erbsen 300 g 7 – 8 ja
Kohlrabi 300 g 13 – 15 ja
Lauch 200 g 10 – 11 ja
11
Lebensmittel /
Speise
Menge
Leistung
in %
Zeit
ca. Min.
Abdecken
Gemüse auftauen und garen
Mais 200 g 4 – 6 ja
Möhren 200 g 5 – 6 ja
Rosenkohl 300 g 7 – 8 ja
Spinat
450 g 12 – 13 ja
600 g 15 – 17 ja
Tipp: Mit 1 – 2 EL Flüssigkeit garen, zwischendurch umrühren bzw.
vorsichtig zerteilen, 2 – 3 Minuten nachgaren lassen, erst vor dem
Servieren würzen.
Suppen / Eintöpfe *
Eintopf 500 g 13 – 15 ja
Suppe mit
Einlage
300 g 7 – 18 ja
Cremesuppe 500 g 13 – 15 ja
Tipp: Zwischendurch umrühren, 3 – 5 Minuten ruhen lassen.
* Bereits vorgefertigte Speisen.
Schnellstart
Sie möchten eine Speise oder ein Getränk kurz auf höchster Mikro-
wellenleistung erhitzen?
1. Starten Sie die Mikrowelle sofort, indem Sie direkt die Taste
QUICK START / START drücken.
2. Der Garvorgang beginnt sofort, wobei jedes weitere Drücken der
Taste die Garzeit um 60 Sekunden verlängert. Die Leistung der
Mikrowelle beträgt dabei 100 %.
Grillen
Zum Grillen benutzen Sie den Grillrost. Verwenden Sie ein geeignetes
hitzebeständiges Geschirr oder legen Sie das Grillgut direkt auf den
Grillrost.
Ein „Vorheizen“ des Grills ist nicht erforderlich, da der Grill unmittelbar
Strahlungshitze erzeugt.
Zum Grillen und Überbacken gehen Sie wie folgt vor:
1. Drücken Sie die MICRO. / GRILL / COMBI. Taste einmal. Wählen
Sie anschließend mit dem Drehknopf den Modus ( ).
2. Bestätigen Sie Ihre Einstellung mit der MICRO. / GRILL / COMBI.
Taste.
3. Stellen Sie mit dem Drehknopf die gewünschte Grilldauer zwischen
5 Sekunden und 95 Minuten ein. Zum Beispiel:
Lebensmittel /
Speise
Menge Zeit ca. Min. Abdecken
Toast mit Käse
überbacken
2 – 3 3 – 4 nein
4. Drücken Sie zum Starten die QUICK START / START Taste.
HINWEIS:
Nach der Hälfte der Zeit werden Sie durch Signaltöne daran erin-
nert, Grillgut wie z. B. Fleisch oder Wurst zu wenden. Bleibt die Tür
geschlossen, nimmt das Gerät nach ca. 60 Sekunden den Betrieb
wieder auf. Zum vorzeitigen Fortsetzen des Betriebs drücken Sie
die QUICK START / START Taste.
WARNUNG: Verbrennungsgefahr!
Öffnen und Schließen Sie die Tür nur am Griff.
Kombination aus Mikrowellen- und Grillbetrieb
In diesen Einstellungen arbeiten Mikrowelle und Grill abwechselnd
innerhalb der vorgewählten Zeit nach dem Verhältnis:
Display Mikrowellen-Leistung Grill-Leistung
0 % 100 %
55 % 45 %
36 % 64 %
1. Drücken Sie die MICRO. / GRILL / COMBI. Taste einmal. Wählen
Sie anschließend mit dem Drehknopf die gewünschte Leistung
( oder ).
2. Bestätigen Sie Ihre Einstellung mit der MICRO. / GRILL / COMBI.
Taste.
3. Stellen Sie mit dem Drehknopf die gewünschte Gardauer zwischen
5 Sekunden und 95 Minuten ein.
4. Drücken Sie zum Starten die QUICK START / START Taste.
Tipps zum Kombibetrieb
Wenn Sie Speisen im Kombibetrieb Mikrowelle-Grill zubereiten, soll-
ten Sie folgendes beachten:
Für große, dicke Lebensmittel, wie z. B. Schweinebraten, ist die
Mikrowellenzeit entsprechend länger als für kleine, ache Lebens-
mittel. Beim Grill verhält es sich jedoch umgekehrt. Je näher das
Lebensmittel an den Grill gelangt, desto schneller wird es braun.
Das heißt, wenn Sie große Bratenstücke im Kombibetrieb zubereiten,
ist die Grillzeit gegebenenfalls kürzer als für kleinere Bratenstücke.
Für das Grillen benutzen Sie den Grillrost, um eine schnelle und
gleichmäßige Bräunung zu erzielen. (Ausnahme: große, dicke Le-
bensmittel werden direkt auf dem Drehteller gegrillt!)
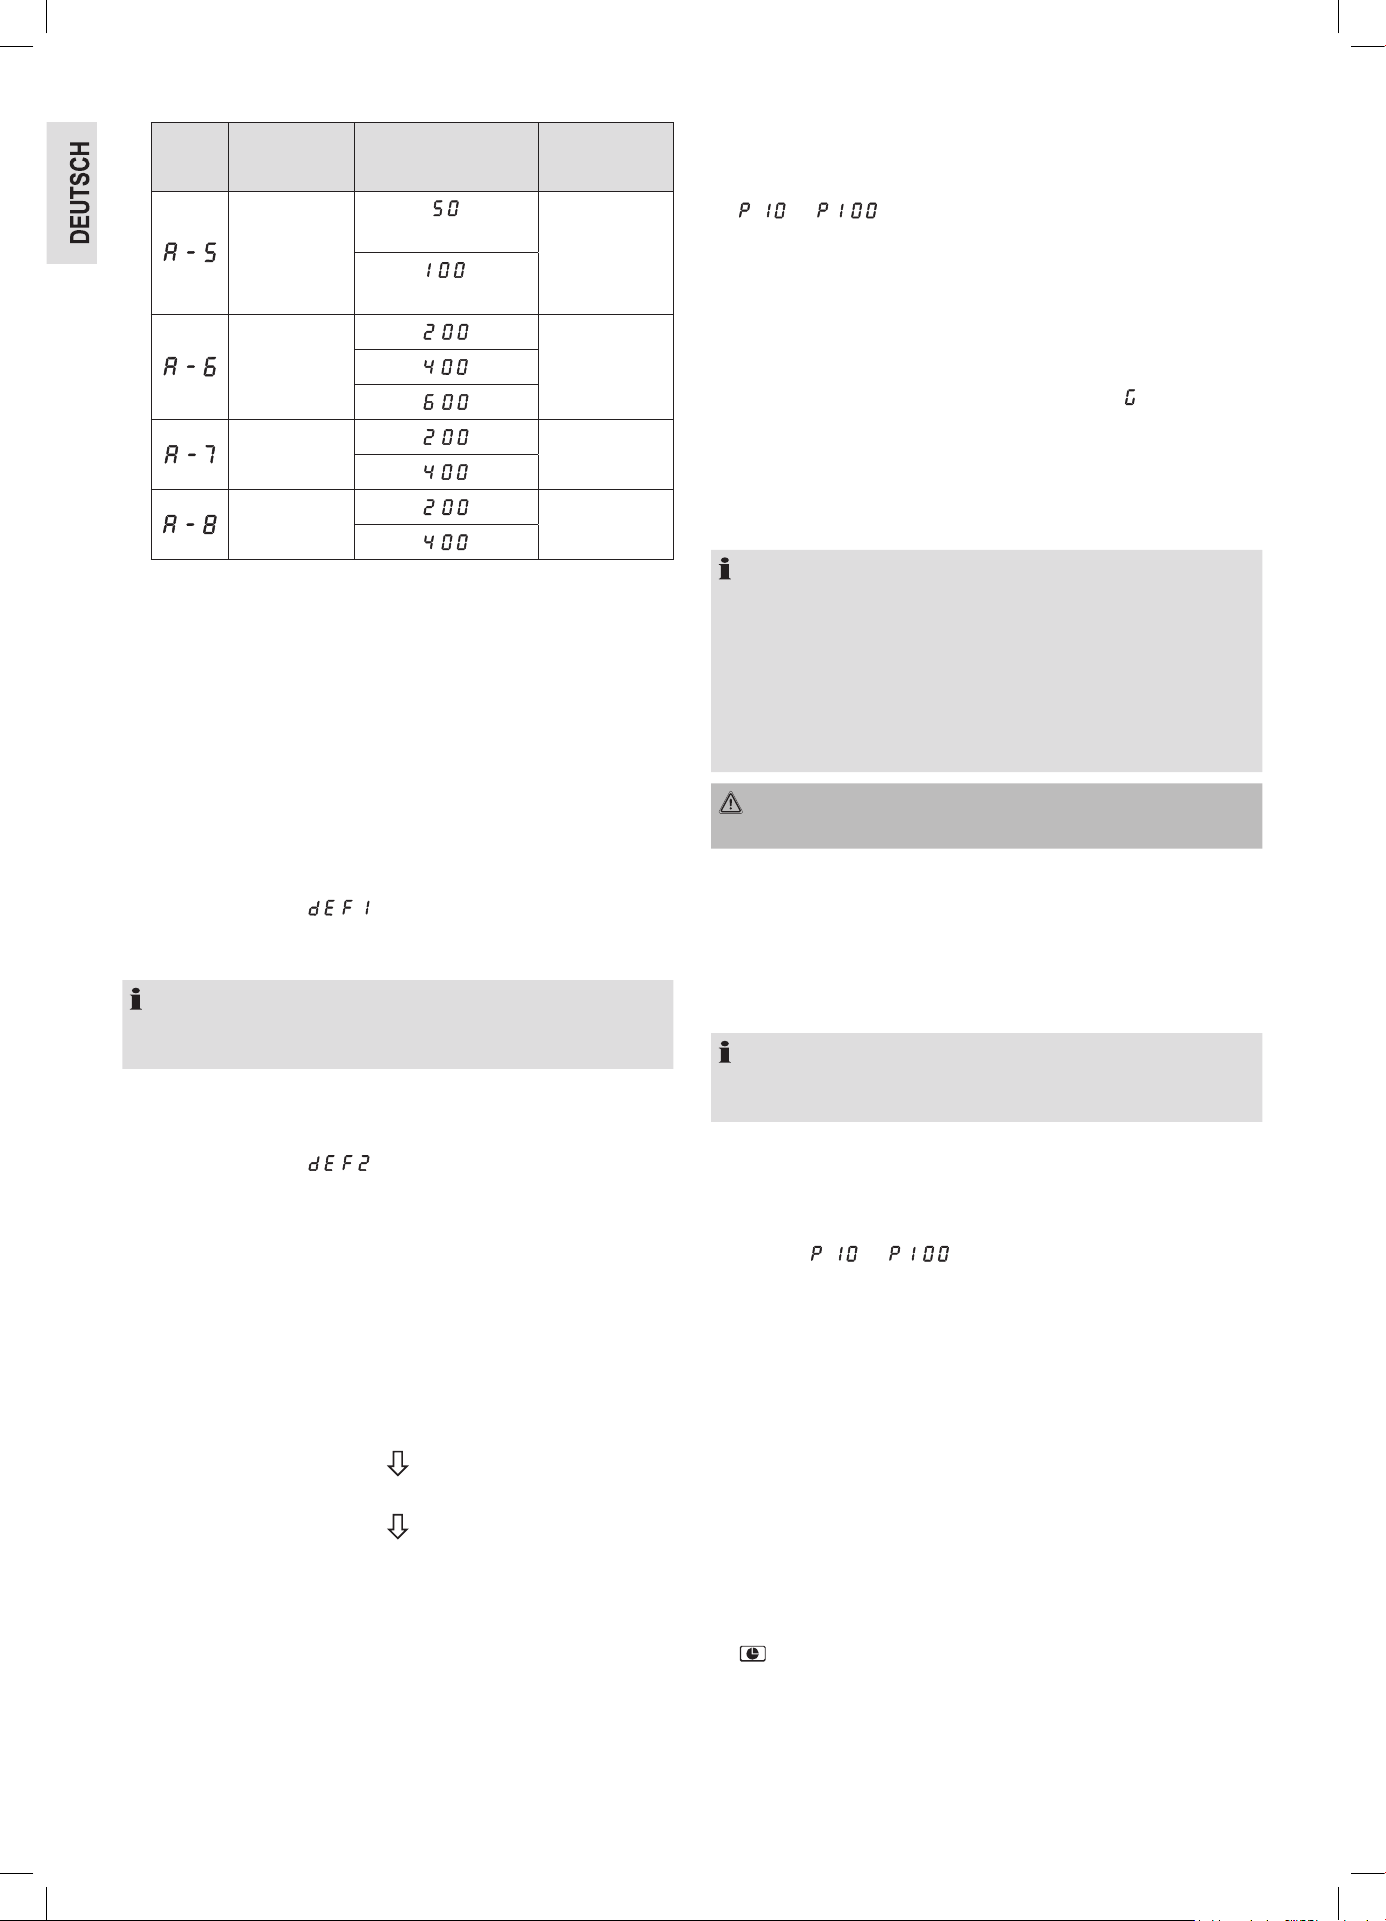
Automatikprogramme
Mit Hilfe der Automatik können Sie bestimmte Mengen von Speisen
automatisch fertig garen lassen. Gehen Sie dazu wie folgt vor:
1. Drücken Sie die AUTO MENU Taste einmal. Wählen Sie anschlie-
ßend mit dem Drehknopf das gewünschte Automatik-Programm
aus. Die möglichen Einstellungen entnehmen Sie bitte der nach-
folgenden Tabelle:
Code Programm
Anzeige /
Gewicht in Gramm
Leistung
Erwärmen
Mikrowelle
100 %
Gemüse
Mikrowelle
100 %
Fisch
Mikrowelle
80 %
Fleisch
Mikrowelle
100 %
12
Code Programm
Anzeige /
Gewicht in Gramm
Leistung
Pasta
(mit 450 g Wasser)
Mikrowelle
80 %
(mit 800 g Wasser)
Kartoffeln
Mikrowelle
100 %
Erwärmen
Pizza
Mikrowelle
100 %
Suppe
Mikrowelle
100 %
2. Drücken Sie die AUTO MENU Taste, um Ihre Auswahl zu bestäti-
gen.
3. Stellen Sie mit dem Drehknopf das gewünschte Gewicht ein.
4. Drücken Sie zum Starten die QUICK START / START Taste.
Auftauen
Dank des Auftauprogramms können Sie Ihre Ware auf zwei Arten
automatisch auftauen. Wählen Sie Auftauen nach Gewicht oder nach
Zeit aus.
Auftauen nach Gewicht
1. Drücken Sie die DEFROST BY W.T. Taste einmal. Im Display er-
scheint die Anzeige „ “ .
2. Stellen Sie mit dem Drehknopf das Gewicht von 0,1 – 2,0 kg ein.
3. Drücken Sie zum Starten die QUICK START / START Taste.
HINWEIS:
Ist das Gewicht der Ware kleiner als 200 g, legen Sie diese nicht in
die Mitte sondern an den Rand des Glastellers.
Auftauen nach Zeit
1. Drücken Sie die DEFROST BY TIME Taste einmal. Im Display er-
scheint die Anzeige „ “ .
2. Stellen Sie mit dem Drehknopf die gewünschte Zeit zwischen 5 Se-
kunden und 95 Minuten ein.
3. Drücken Sie zum Starten die QUICK START / START Taste.
Kochen in mehreren Schritten
Sie können die Programme so einstellen, dass bis zu 3 verschiedene
Funktionen nacheinander ausgeführt werden.
Nehmen wir an, Sie wählen folgende Programme:
Auftauen
Garen
Grillen
1. Wählen Sie die 1. Funktion:
Drücken Sie die DEFROST BY W.T. oder die DEFROST BY TIME
Taste.
2. Stellen Sie mit dem Drehknopf das Gewicht oder die gewünschte
Zeit ein.
3. Auswahl der 2. Funktion:
Drücken Sie die MICRO. / GRILL / COMBI. Taste einmal. Wählen
Sie anschließend mit dem Drehknopf die gewünschte Leistung
( bis ).
4. Bestätigen Sie Ihre Einstellung mit der MICRO. / GRILL / COMBI.
Taste.
5. Stellen Sie mit dem Drehknopf die gewünschte Gardauer zwischen
5 Sekunden und 95 Minuten ein.
6. Auswahl der 3. Funktion:
Drücken Sie die MICRO. / GRILL / COMBI. Taste einmal. Wählen
Sie anschließend mit dem Drehknopf den Modus ( ).
7. Bestätigen Sie Ihre Einstellung mit der MICRO. / GRILL / COMBI.
Taste.
8. Stellen Sie mit dem Drehknopf die gewünschte Grilldauer zwischen
5 Sekunden und 95 Minuten ein.
9. Drücken Sie zum Starten die QUICK START / START Taste.
HINWEIS:
• Der Programmwechsel wird Ihnen durch einen Signalton mit-
geteilt.
• Beim Grillen werden Sie nach der Hälfte der Zeit durch zwei
Signaltöne aufgefordert, die Ware umzudrehen. Bleibt die Tür ge-
schlossen, nimmt das Gerät nach ca. 60 Sekunden den Betrieb
wieder auf. Zum vorzeitigen Fortsetzen des Betriebs drücken Sie
die QUICK START / START Taste.
WARNUNG: Verbrennungsgefahr!
Öffnen und Schließen Sie die Tür nur am Griff.
Sonderfunktionen
Automatischer Start
Sie können alle Programme oder auch eine kombinierte Einstellung in
mehreren Schritten zeitverzögert starten. Sie können die Startzeit um
max. 23 Stunden und 59 Minuten verzögern.
HINWEIS:
Stellen Sie dazu erst die Uhrzeit ein! Sie können diese Funktion
sonst nicht nutzen.
Beispiel: Um die Mikrowelle automatisch zu starten gehen Sie wie
folgt vor:
1. Drücken Sie die MICRO. / GRILL / COMBI. Taste einmal.
2. Wählen Sie anschließend mit dem Drehknopf die gewünschte
Leistung
( bis ).
3. Bestätigen Sie Ihre Einstellung mit der MICRO. / GRILL / COMBI.
Taste.
4. Stellen Sie mit dem Drehknopf die gewünschte Gardauer zwischen
5 Sekunden und 95 Minuten ein.
5. Drücken Sie die CLOCK / PRE-SET Taste. Ein Signal ertönt und
die Anzeige wechselt auf die aktuelle Uhrzeit. Die Stunden-Ziffer
blinkt.
6. Stellen Sie nun mit Hilfe des Drehknopfs die Stundenanzeige der
gewünschten Startzeit ein.
7. Drücken Sie nun die CLOCK / PRE-SET Taste. Ein Signal ertönt
und in der Anzeige blinken die Minuten.
8. Mit Hilfe des Drehknopfs stellen Sie nun die gewünschten Minuten
der Startzeit ein.
9. Betätigen Sie nun die QUICK START / START Taste. Das Symbol
„ “ im Display blinkt.
13
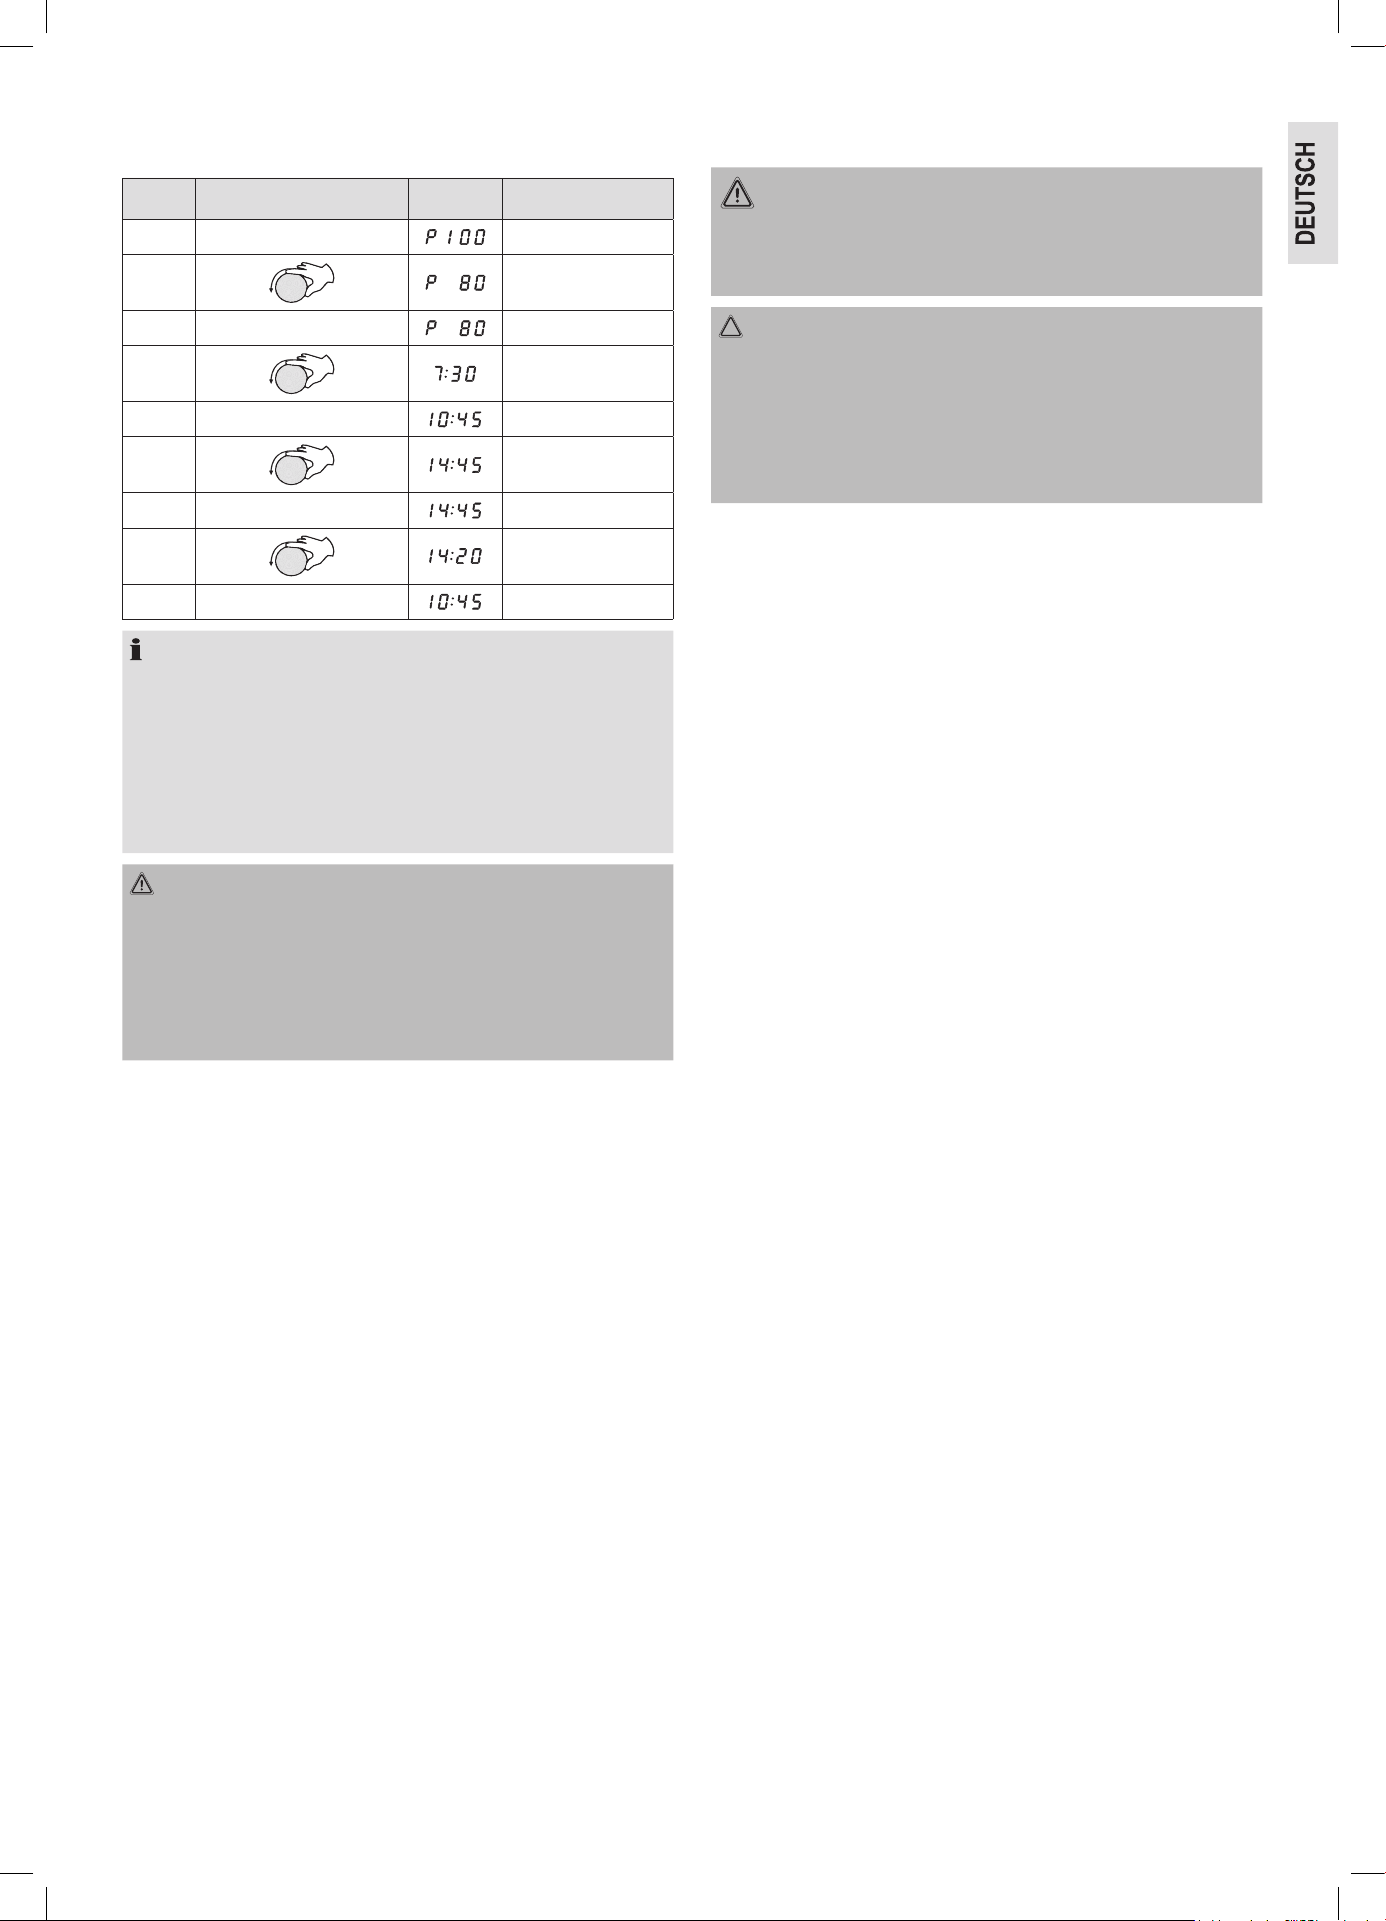
Zum Beispiel: 7:30 Minuten Gardauer bei 80 % Leistung, Startzeit
14:20 Uhr
Schritt Taste / Drehknopf Anzeige
1 MICRO. / GRILL / COMBI. (Auswahl)
2 (Leistung)
3 MICRO. / GRILL / COMBI. (Bestätigung)
4 (Gardauer)
5 CLOCK / PRE-SET (Aktuelle Uhrzeit)
6 (Stunde einstellen)
7 CLOCK / PRE-SET
8 (Minute einstellen)
9 QUICK START / START (Aktuelle Uhrzeit)
HINWEIS:
• Während dieser programmierten Einstellung ist die Funktion
der Bedienelemente blockiert (außer: CLOCK / PRE-SET und
CANCEL / STOP).
• Möchten Sie sich die Startzeit noch einmal ansehen, drücken Sie
die CLOCK / PRE-SET Taste.
• Zur voreingestellten Zeit beginnt der Betrieb der Mikrowelle. Zwei
Signaltöne kündigen Ihnen den Start an.
WARNUNG: BRANDGEFAHR!
• Betreiben Sie das Gerät grundsätzlich nur unter Aufsicht.
• Stellen Sie beim zeitversetzten Garen die Zeit immer so ein, dass
das Gerät während des Betriebes unter geeigneter Aufsicht steht.
• Betreiben Sie die Mikrowelle nicht leer.
• Sollten Sie das Gargut vorzeitig entnehmen, müssen Sie das
Programm durch die CANCEL / STOP Taste stornieren.
Sperren (Kindersicherung)
Drücken Sie die CANCEL / STOP Taste länger als 3 Sekunden,
um das Gerät zu sperren. Die Sperrung wird im Display angezeigt.
Die Funktion der Bedienelemente ist blockiert. Drücken Sie die
CANCEL / STOP Taste erneut länger als 3 Sekunden, um die Sper-
rung aufzuheben.
Abfrage-Funktion
• Während des Mikrowellen-, Grill-, oder Kombinationsbetriebs wird
durch Drücken der Taste MICRO. / GRILL / COMBI. für 2 – 3 Sekun-
den die aktuelle Leistung angezeigt.
• Unabhängig vom Betriebsmodus können Sie sich durch Drücken
der Taste CLOCK / PRE-SET die aktuelle Uhrzeit für 2 – 3 Sekunden
anzeigen lassen.
• Drücken Sie im programmierten automatischen Startmodus die
Taste CLOCK / PRE-SET, wird Ihnen die Startzeit anzeigt.
Reinigung
WARNUNG:
Schalten Sie die Mikrowelle aus und ziehen
Sie den Netzstecker.
ACHTUNG:
• Benutzen Sie keine Drahtbürste oder andere scheuernde Gegen-
stände.
• Benutzen Sie keine scharfen oder scheuernden Reinigungsmittel.
• Benutzen Sie keinen Metallschaber, um das Sichtfenster zu
reinigen. Die Oberäche könnte zerkratzt werden und das Glas
möglicherweise zerbrechen.
Innenraum
• Halten Sie das Ofeninnere sauber. Spritzer und übergelaufene
Flüssigkeiten an den Ofenwänden können mit einem feuchten
Tuch entfernt werden. Ist der Ofen sehr verschmutzt, kann auch ein
mildes Reinigungsmittel verwendet werden.
• Wischen Sie das Sichtfenster innen und außen mit einem feuchten
Tuch ab und entfernen Sie regelmäßig Spritzer und Flecken von
übergelaufenen Flüssigkeiten.
Außenwände
• Die Außenwände des Gehäuses sollten nur mit einem feuchten
Tuch gereinigt werden. Achten Sie darauf, dass kein Wasser in die
Gehäuseöffnungen und damit in das Geräteinnere gelangt.
• Zur Reinigung des Bedienfeldes öffnen Sie vorher die Mikrowellen-
tür, um ein versehentliches Einschalten des Gerätes zu vermeiden.
Zubehör
• Reinigen Sie den Glasteller in einem warmen Spülbad oder in der
Geschirrspülmaschine. Trocknen Sie ihn ab, bevor Sie ihn wieder in
die Mikrowelle einsetzen.
• Der Gleitring und der innere Ofenboden sollten regelmäßig ge-
reinigt werden. Den Gleitring können Sie herausnehmen und von
Hand spülen. Hier können Sie mildes Reinigungsmittel oder Fens-
terreiniger benutzen. Trocknen Sie gut nach. Achten Sie darauf,
den Ring nachher wieder richtig einzusetzen.
• Reinigen Sie den Grillrost nach jedem Gebrauch mit einem Ge-
schirrspülmittel oder in der Geschirrspülmaschine.
Geruch
Um unangenehme Gerüche aus der Mikrowelle zu beseitigen, stellen
Sie eine mit Wasser und Zitronensaft gefüllte mikrowellengeeignete
Schale in den Ofen und erhitzen Sie diese für ca. 5 Minuten. Wischen
Sie danach den Ofen mit einem weichen Tuch aus.
Ofenbeleuchtung
Zum Auswechseln der Ofenbeleuchtung wenden Sie sich bitte an eine
Fachwerkstatt in Ihrer Nähe.
14
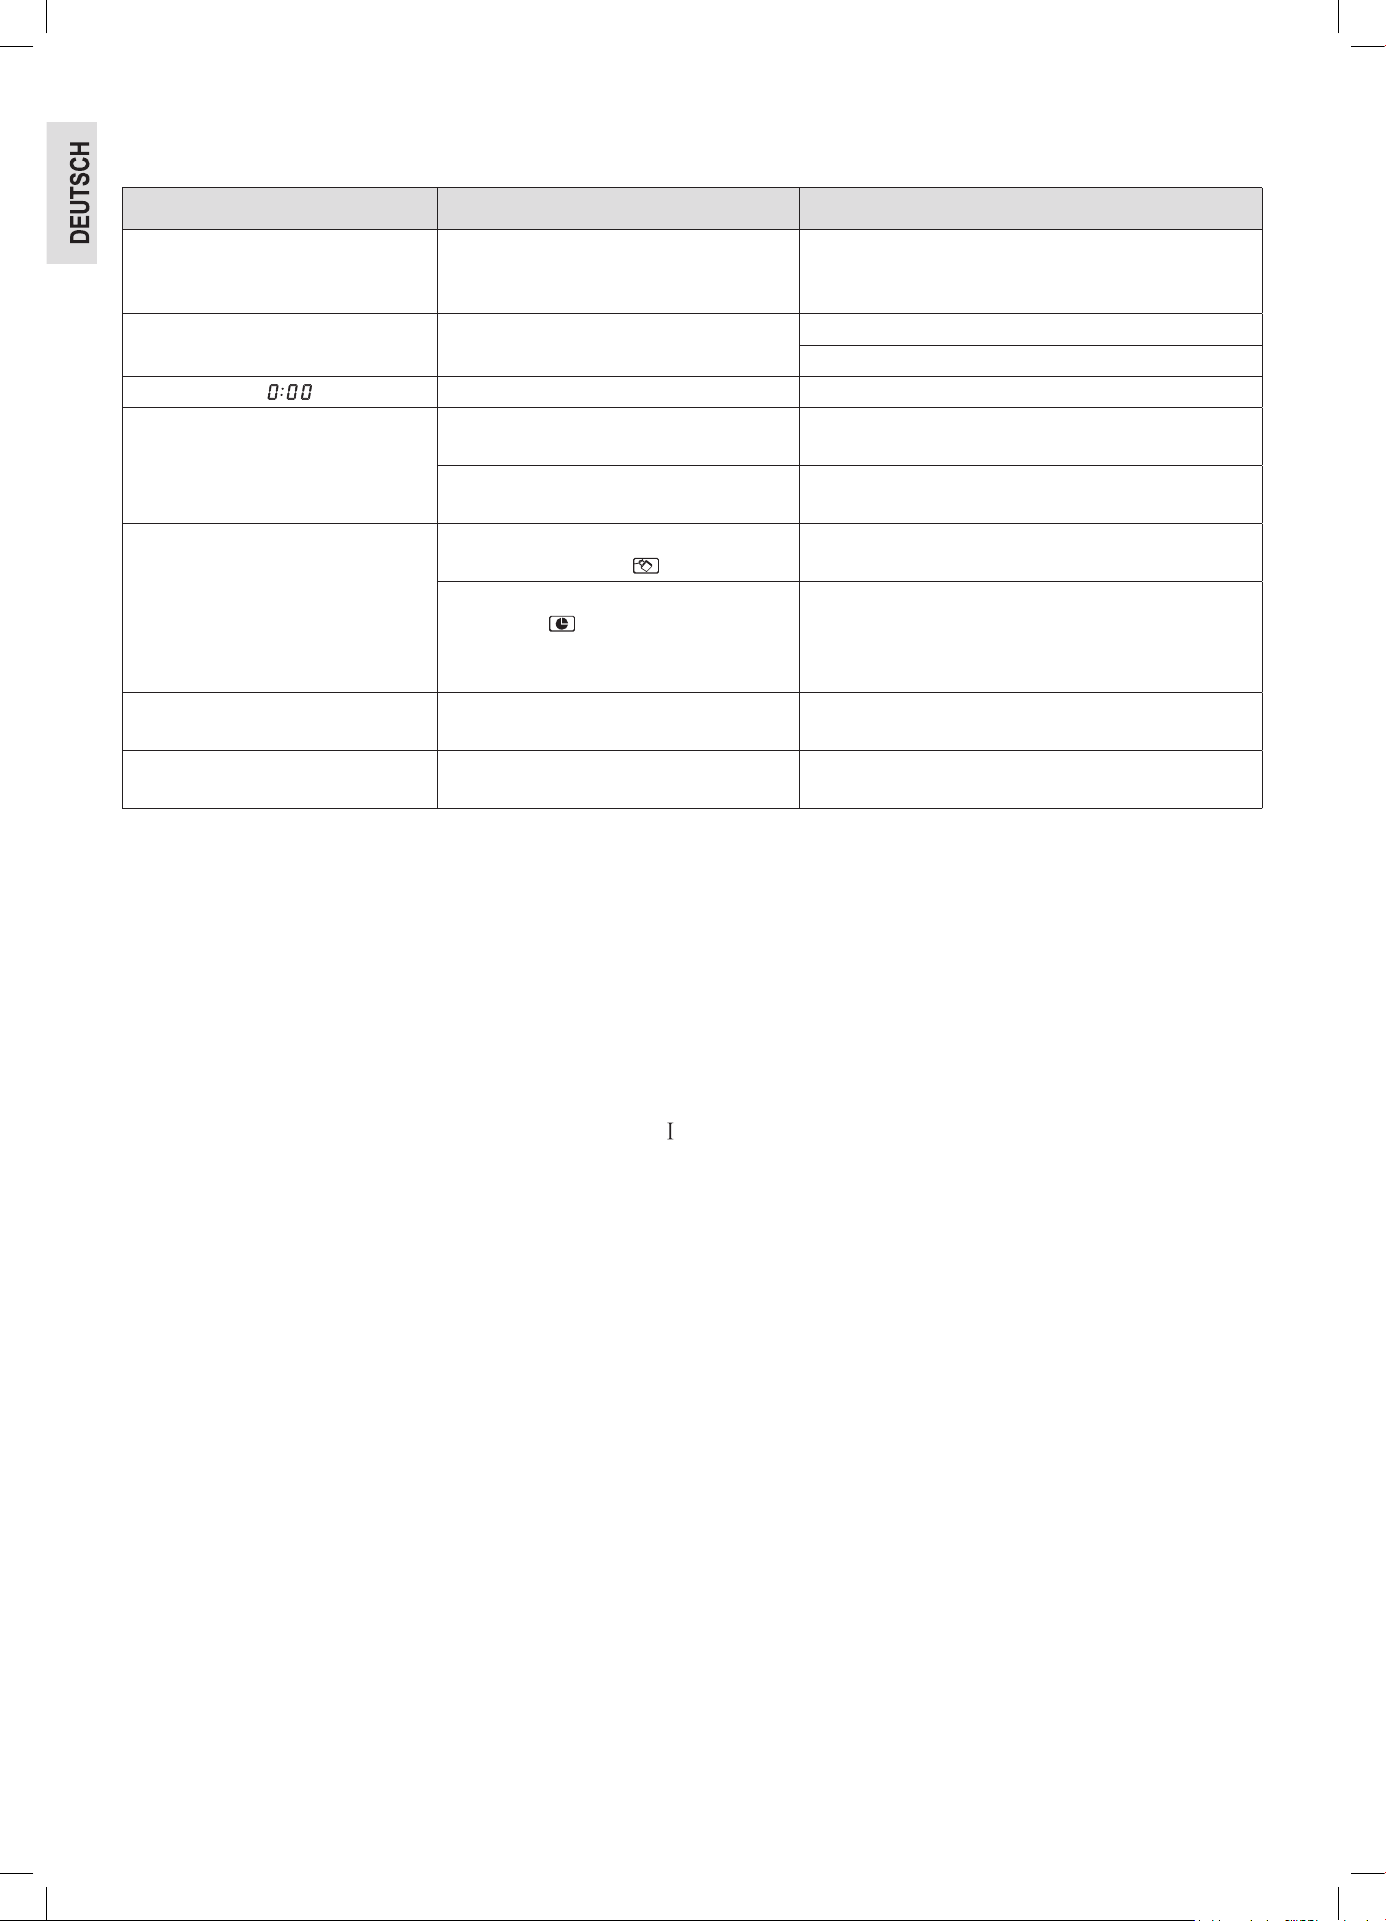
Störungsbehebung
Tritt eine Störung auf, liegt es oft nur an einer Kleinigkeit. Bevor Sie sich an unseren Service wenden, beachten Sie bitte folgende Hinweise:
Störung Mögliche Ursache Hinweise / Abhilfe
Ihr Radio- oder TV-Empfang ist
gestört, wenn die Mikrowelle arbeitet.
Die elektromagnetischen Felder dieses
Gerätes können Bild und Ton spezieller
Frequenzen beeinussen.
Dies ist normal und kein Fehler. Stellen Sie die Geräte
weiter auseinander.
Das Gerät bekommt keinen Strom,
das Display ist schwarz.
Defekte Netzsteckdose. Probieren Sie eine andere Steckdose aus.
Kontrollieren Sie die Haussicherung.
Im Display steht „ “ . Sie hatten Stromausfall. Stellen Sie die Uhrzeit neu ein.
Das Gerät startet nicht. Im Display
steht eine andere Anzeige als die
aktuelle Uhrzeit.
Die Tür wurde nicht richtig geschlossen. Prüfen Sie, ob Speisereste oder Fremdkörper in der Tür
klemmen.
Nach der Programmwahl wurde die Taste
QUICK START / START nicht gedrückt.
Drücken Sie die QUICK START / START Taste oder bre-
chen Sie den Vorgang mit der CANCEL / STOP Taste ab.
Alle Bedienelemente sind blockiert. Die Kindersicherung ist aktiviert. Im Display
sehen Sie das Symbol „ “ .
Drücken Sie die CANCEL / STOP Taste länger als 3 Se-
kunden, um die Sperrung aufzuheben.
Im Display werden die aktuelle Uhrzeit und
das Symbol „ “ angezeigt.
Ein automatischer Startmodus ist programmiert. Durch
Drücken der CLOCK / PRE-SET Taste sehen Sie die
Startzeit. Zum Stornieren des Programms drücken Sie
die CANCEL / STOP Taste.
Der Drehteller gibt ein kratzendes
oder schleifendes Geräusch von sich.
Es sind Schmutz oder Fremdkörper im
Bereich des Drehtellerantriebs.
Entfernen Sie evtl. Fremdkörper und Speisereste wie
unter „ Reinigung“ beschrieben.
Der Betrieb wird ohne erkennbaren
Grund abgebrochen.
Das Gerät ist defekt. Wenden Sie sich an unseren Service.
Technische Daten
Modell: .........................................................................MWG 2211 U CB
Spannungsversorgung: .....................................................230 V~, 50 Hz
Leistungsaufnahme:
Mikrowelle: ............................................................................. 1250 W
Grill: ........................................................................................1000 W
Deklarierte Leistungsaufnahme im Bereitschaftszustand: .........≤ 0,8 W
Abschaltung in den Bereitschaftszustand: ........................ ≤ 20 Minuten
Bemessungs-Mikrowellenausgangsleistung: .............800 W / 2450 MHz
Garraumvolumen: ................................................................. ca. 20 Liter
Schutzklasse: .........................................................................................
Nettogewicht: .........................................................................ca. 12,5 kg
Technische und gestalterische Änderungen im Zuge stetiger Produkt-
entwicklungen vorbehalten.
Garantie
Garantiebedingungen
1. Gegenüber Verbrauchern gewähren wir bei privater Nutzung des
Geräts eine Garantie von 24 Monaten ab Kaufdatum.
Ist das Gerät zur gewerblichen Nutzung geeignet, gewähren wir
beim Kauf durch Unternehmer für das Gerät eine Garantie von
12 Monaten.
Die Garantiezeit für Verbraucher reduziert sich auf 12 Monate,
sofern sie ein zur gewerblichen Nutzung geeignetes Gerät – auch
teilweise – gewerblich nutzen.
2. Voraussetzung für unsere Garantieleistungen sind der Kauf des
Geräts in Deutschland sowie die elektronische Übersendung einer
Kopie des Kaufbelegs (wird bei der Anmeldung zur Garantieab-
wicklung automatisch abgefragt, siehe Punkt Garantieabwicklung).
Befindet sich das Gerät zum Zeitpunkt des Garantiefalls im Aus-
land, muss es auf Kosten des Käufers uns zur Erbringung der
Garantieleistungen zur Verfügung gestellt werden.
3. Mängel müssen innerhalb von 14 Tagen nach Erkennbarkeit uns
gegenüber schriftlich angezeigt werden. Besteht der Garantie-
anspruch zu Recht, entscheiden wir, auf welche Art der Scha-
den / Mangel behoben werden soll, ob durch Reparatur oder durch
Austausch eines gleichwertigen Gerätes.
4. Garantieleistungen werden nicht für Mängel erbracht, die auf
der Nichtbeachtung der Gebrauchsanweisung, unsachgemäßer
Behandlung oder normaler Abnutzung des Geräts beruhen. Garan-
tieansprüche sind ferner ausgeschlossen für leicht zerbrechliche
Teile, wie zum Beispiel Glas oder Kunststoff. Schließlich sind Ga-
rantieansprüche ausgeschlossen, wenn nicht von uns autorisierte
Stellen Arbeiten an dem Gerät vornehmen.
5. Durch Garantieleistungen wird die Garantiezeit nicht verlängert. Es
besteht auch kein Anspruch auf neue Garantieleistungen. Diese
Garantieerklärung ist eine freiwillige Leistung von uns als Inver-
kehrbringer des Gerätes. Die gesetzlichen Gewährleistungsrechte
(Nacherfüllung, Rücktritt, Schadensersatz und Minderung) werden
durch diese Garantie nicht berührt.
Stand 08 2021
Garantieabwicklung
Sollte Ihr Gerät innerhalb der Garantiezeit einen Mangel aufweisen,
lässt es sich in unserem Serviceportal zur kostenlosen Garantieab-
wicklung anmelden.
Bitte besuchen Sie hierzu unsere Service-Seite www. bomann.de /
service und klicken Sie auf Kundenservice. Bitte folgen Sie den An-
weisungen zur Garantieabwicklung.
Sie erhalten nach Abschluss der Anmeldung ein Versandticket per
E-Mail sowie weitere Informationen rund um die Abwicklung Ihrer
Reklamation.
Das Versandticket kleben Sie bitte auf den Karton Ihres gut verpack-
ten Gerätes und geben ihn bei der nächsten Annahmestelle unseres
Paketdienstleisters ab.
15
Bitte achten Sie darauf, eine Kopie Ihres Kaufbeleges (Kassenbon,
Rechnung, Lieferschein) als Garantienachweis bei der Anmeldung
zur Garantieabwicklung hochzuladen, da wir sonst keine kostenlosen
Garantieleistungen erbringen können.
Weiter finden Sie unter
www. bomann.de / service
• einen Downloadbereich für Bedienungsanleitungen, Kataloge
sowie Produktspezische Downloads (z. B. EU-Datenblätter)
• einen Zugang zu unserem Ersatzteile- und Zubehör-Shop
• eine Übersicht über aktuelle Kundeninformationen
Stand 08 2021
Entsorgung
Bedeutung des Symbols „Mülltonne“
Schonen Sie unsere Umwelt, Elektrogeräte gehören nicht in
den Hausmüll.
Nutzen Sie die für die Entsorgung von Elektrogeräten
vorgesehenen Sammelstellen und geben dort Ihre Elektro-
geräte ab, die Sie nicht mehr benutzen werden.
Sie helfen damit die potenziellen Auswirkungen, durch falsche Entsor-
gung, auf die Umwelt und die menschliche Gesundheit zu vermeiden.
Sie leisten damit Ihren Beitrag zur Wiederverwertung, zum Recycling
und zu anderen Formen der Verwertung von Elektro- und Elektronik-
Altgeräten.
Informationen, wo die Geräte zu entsorgen sind, erhalten Sie über
Ihre Kommunen oder die Gemeindeverwaltungen. Ihr Händler und
Vertragspartner ist ebenfalls zur kostenfreien Rücknahme des Alt-
gerätes verpflichtet.
16
Mode d’emploi
Merci d’avoir choisi notre produit. Nous espérons que vous saurez
profiter votre appareil.
Symboles de ce mode d’emploi
Les informations importantes pour votre sécurité sont particulièrement
indiquées. Veillez à bien respecter ces indications afin d’éviter tout
risque d’accident ou d’endommagement de l’appareil :
AVERTISSEMENT :
Prévient des risques pour votre santé et des risques éventuels de
blessure.
ATTENTION :
Indique les risques pour l’appareil ou tout autre appareil.
NOTE :
Attire votre attention sur des conseils et informations.
Sommaire
Liste des différents éléments de commande ........................................3
Notes générales ..................................................................................16
CONSIGNES DE SÉCURITÉ IMPORTANTES .................................16
Signes et symboles sur l’appareil ....................................................... 18
Liste des différents éléments de commande ......................................18
Boutons et commandes du tableau de commande............................19
Symboles de la zone de commande .................................................. 19
Éviter les risques d’incendie lors du montage
lors de l’encastrement de l’appareil .................................................... 19
Notice de montage pour les appareils encastrables .......................... 19
Notes sur le service de grill et combiné ..............................................20
Vaisselle allant au four à micro-ondes ................................................20
Notes sur le fonctionnement et l’utilisation de l’appareil ....................20
Mise en service ................................................................................... 20
Comment procéder ............................................................................. 21
Chauffer ...............................................................................................21
Cuisson ............................................................................................... 22
Démarrage rapide ...............................................................................23
Griller ...................................................................................................23
Combinaison entre le fonctionnement en micro-ondes et en gril .......23
Fonctions automatiques ......................................................................24
Décongélation ..................................................................................... 24
Cuisson progressive ...........................................................................24
Fonctions particulières ........................................................................25
Nettoyage ............................................................................................25
Dépannage..........................................................................................26
Données techniques ........................................................................... 26
Élimination ...........................................................................................26
Notes générales
Lisez attentivement ce mode d’emploi avant de mettre l’appareil en
marche pour la première fois. Conservez le mode d’emploi ainsi que
le bon de garantie, votre ticket de caisse et si possible, le carton avec
l’emballage se trouvant à l’intérieur. Si vous remettez l’appareil à des
tiers, veuillez-le remettre avec son mode d’emploi.
• N’utilisez cet appareil que pour un usage privé et pour les taches
auxquelles il est destiné. Cet appareil n’est pas prévu pour une
utilisation professionnelle.
• Ne l’utilisez pas en plein air. Protégez-le de la chaleur, des rayons
directs du soleil, de l’humidité (ne le plongez en aucun cas dans
l’eau) et des objets tranchants. N’utilisez pas cet appareil avec des
mains humides. S’il arrive que de l’humidité ou de l’eau atteignent
l’appareil, débranchez aussitôt le câble d’alimentation.
• Arrêtez l’appareil et débranchez toujours le câble d’alimentation de
la prise de courant (en tirant sur la che et non pas sur le câble) si
vous n’utilisez pas l’appareil, si vous installez les accessoires, pour
le nettoyage ou en cas de panne.
• Ne laissez jamais fonctionner l’appareil sans surveillance. Lorsque
vous quittez la pièce, toujours arrêter l’appareil. Débranchez la
che de la prise.
• Il y a lieu d’inspecter l’appareil et le bloc d’alimentation régulière-
ment en vue d’éventuels signes d’endommagements. Lorsqu’un
endommagement est détecté, l’appareil ne doit plus être utilisé.
• N’utilisez que les accessoires d’origine.
• Par mesure de sécurité vis-à-vis des enfants, ne laissez pas les
emballages (sac en plastique, carton, polystyrène) à leur portée.
AVERTISSEMENT :
Ne pas laisser les jeunes enfants jouer avec le film plastique. Il y
a risque d’étouffement !
CONSIGNES DE SÉCURITÉ IMPORTANTES
LIRE ATTENTIVEMENT ET CONSERVER POUR
RÉFÉRENCE ULTÉRIEURE.
AVERTISSEMENT :
• Le four à micro-ondes est destiné à chauffer des
aliments et des boissons. Le séchage d’aliments
ou de vêtements et le chauffage de coussins
chauffants, de pantoues, d’éponges, de tissus
humides et autres peuvent entraîner un risque de
blessure, d’inammation ou d’incendie.
• Le four à micro-ondes n’est pas prévu pour
chauffer / réchauffer des animaux vivants.
• L’appareil ne doit en aucun cas être utilisé lorsque
la porte ou le joint de la porte sont détériorés. L’ap-
pareil doit alors impérativement être réparé par
une personne qualiée.
• Ne réparez jamais l’appareil vous-même. Adres-
sez-vous plutôt à un spécialiste. Il est dangereux
pour toute personne non qualiée d’effectuer des
travaux d’entretien ou des réparations nécessitant
le démontage du cache de l’appareil qui lui-même
est une protection contre les irradiations des
micro-ondes.
• Veillez à ce que l’appareil soit éteint avant de
remplacer la lampe an d’éviter tout risque d’élec-
trocution.
• Si le câble d’alimentation est endommagé, il doit
être remplacé par le fabricant, son service après-
vente ou toute personne de qualication similaire
pour éviter un risque.
17
AVERTISSEMENT :
• Les liquides ou autres aliments ne doivent pas
être chauffés dans des récipients hermétiques, car
ils risquent d’exploser.
• Ne placez pas votre four à micro-ondes dans un
placard.
• L’appareil nécessite un espace suffisant pour la
circulation de l’air an d’assurer un bon fonction-
nement. Veillez à avoir une distance de ventilation
d’au moins 10 cm entre toutes les parois de
l’appareil et les placards, murs, etc. environnants.
Ne bloquez jamais les ouvertures de l’appareil. Ne
retirez pas les pieds.
• Placez l’appareil dos face à un mur.
• L’appareil et ses pièces accessibles deviennent
chauds pendant l’utilisation. Il convient de veiller à
ne pas toucher les éléments chauffants. Les en-
fants de moins de 8 ans doivent se tenir éloignés
sauf s’ils sont surveillés en permanence.
• Seule la vaisselle adaptée aux fours à micro-ondes
peut être utilisée.
• Les récipients métalliques pour les aliments et les
boissons ne sont pas autorisés pour la cuisson
aux micro-ondes. N’utilisez que de la vaisselle
adaptée. Observez les remarques dans le chapitre
« Vaisselle allant au four à micro-ondes ».
• Lorsque vous réchauffez des aliments dans des
matériaux inammables, tels que des récipients
en plastique ou en papier, surveillez le four en
raison du risque d’inammation.
• En cas de fumée, éteignez ou débranchez l’appa-
reil et gardez la porte fermée an d’étouffer toute
amme.
• Le contenu des petits biberons et petits pots
de bébé avec des aliments pour bébé doit être
mélangé et secoué et leur température doit être
contrôlée avant qu’ils soient consommés, an
d’éviter les brûlures.
• Utilisez des maniques ou des gants de cuisine
lorsque vous retirez des récipients. Danger de
brûlures !
AVERTISSEMENT :
• Les œufs dans leur coquille et les œufs durs en-
tiers ne doivent pas être chauffés dans des fours
à micro-ondes, car ils peuvent exploser, même
après la n du chauffage au micro-ondes. Il en
va de même pour les aliments dotés d’une peau,
tels que les saucisses, les boîtes de conserve
scellées, etc.
AVERTISSEMENT : Risques de surchauffe !
Lors de la cuisson, en particulier lors de la chauffe
de liquides (eau), il peut arriver que la température
d’ébullition soit atteinte, mais que les bulles de vapeur
typiques ne remontent pas encore à la surface. Le
liquide n’arrive pas à ébullition régulièrement. Ce
décalage d’ébullition peut lors du retrait du récipient
entraîner une formation soudaine de bulles de vapeur
en raison d’une légère secousse et ainsi un déborde-
ment en bouillant. Par conséquent, des précautions
doivent être prises lors de la manipulation du conte-
neur. Risque de brûlure !
Afin de parvenir à une ébullition régulière, placez un
bâton en verre ou un objet similaire non métallique
dans le récipient.
• Lors du retrait des conteneurs, assurez-vous que le
plateau tournant ne bouge pas.
• Cet appareil peut être utilisé par les enfants d’âge
supérieur à 8 ans et par les personnes aux capaci-
tés sensorielles, physiques ou mentales réduites,
ainsi que par les personnes sans expérience ou
connaissances, tant qu’elles sont supervisées et
instruites à l’utilisation de l’appareil en sécurité et
tant qu’elles en comprennent les risques.
• Les enfants ne doivent pas jouer avec l’appareil.
• Le nettoyage et l’entretien utilisateur ne doivent pas
être effectués par les enfants sans supervision.
• L’encadrement, le joint de la porte et toute pièce
avoisinante doivent, s’ils sont sales, être nettoyés
soigneusement avec un torchon humide.
• Nettoyez régulièrement l’appareil et retirez les
dépôts de nourriture se trouvant à l’intérieur de
l’appareil.
• Si le four n’est pas maintenu en bon état de pro-
preté, la surface risque de se détériorer, ce qui pour-
rait nuire à la durée de vie de l’appareil et entraîner
une situation dangereuse.
18
• N’utilisez pas de produits de nettoyage agressifs ou
abrasifs, ni de grattoirs métalliques tranchants pour
nettoyer la porte en verre. Ces produits peuvent
rayer la surface. Cela peut détruire le verre.
• L’appareil ne doit pas être nettoyé avec un nettoyeur
à vapeur.
• Suivez également les instructions fournies au cha-
pitre « Nettoyage ».
• Vous pouvez utiliser ce four à micro-ondes en tant
qu’unité structure portante ou autonome. Elle ne doit
pas être utilisée dans une armoire.
• Cet appareil sert
- à chauffer et à cuire des denrées alimentaires
solides ou liquides ;
- à gratiner et à griller des denrées alimentaires
solides.
• Cet appareil est destiné à être utilisé dans des appli-
cations domestiques et similaires telles que :
- les cuisines du personnel dans les magasins, les
bureaux et autres environnements de travail ;
- les fermes ;
- par les clients dans les hôtels, les motels et autres
environnements de type résidentiel ;
- les chambres d’hôtes.
Signes et symboles sur l’appareil
Lisez les instructions !
Un symbole d’avertissement est fixé sur la surface
supérieure du four à micro-ondes :
AVERTISSEMENT :
Surface chaude !
Risque de brûlures !
Les surfaces peuvent devenir chaudes pen-
dant l’utilisation !
La face arrière du four à micro-ondes porte une plaque
d’information au texte suivant :
WARNING
• MICROWAVE AND HIGH VOLTAGE INSIDE. BE
SURE NOT TO REMOVE THE ENCLOSURE.
• THIS APPLIANCE IS EQUIPPED WITH A
GROUNDED PLUG FOR YOUR PROTECTION
AGAINST POSSIBLE SHOCK HAZARDS AND
SHOULD BE CONNECTED TO A PROPERLY
GROUNDED OUTLET.
• THIS DEVICE IS TO BE SERVICED ONLY BY
PROPERLY QUALIFIED SERVICE PERSONNEL.
• DISCONNECT POWER PLUG BEFORE
SERVICING. REMOVAL OF THE ENCLOSURE
WITH PRODUCT ENERGIZED COULD EXPOSE
SERVICEMEN TO HAZARDOUS HIGH VOLTAGE
POTENTIAL.
Traduction :
Avertissement
• Micro-ondes et haute tension à l’intérieur. Assu-
rez-vous de ne pas retirer l’enceinte.
• Cet appareil est équipé d’une fiche de terre pour
vous protéger de tout risque éventuel de choc élec-
trique et doit être connecté à une prise correctement
reliée à la terre.
• Cet appareil doit être réparé uniquement par un
personnel qualié.
• Débranchez la fiche électrique avant toute répa-
ration. Retirer l’enceinte avec un produit alimenté
pourrait exposer les réparateurs à un risque poten-
tiel de haute tension.
Le texte suivant est graver sur le côté de la porte :
PRECAUTIONS FOR SAFE USE TO AVOID
POSSIBLE EXPOSURE TO EXCESSIVE
MICROWAVE ENERGY
DO NOT ATTEMPT TO OPERATE THIS OVEN WITH.
(A) OBJECT CAUGHT IN DOOR (B) DOOR THAT
DOES NOT CLOSE PROPERLY (C) DAMAGED
DOOR, HINGE, LATCH, OR SEALING SURFACE
Traduction :
Précautions à prendre pour une utilisation en toute
sécurité afin d’éviter les dangers possibles liés à l’aug-
mentation de l’énergie des micro-ondes. N’essayez
pas de faire fonctionner ce four avec (A) un objet
coincé dans la porte (B) une porte qui ne se ferme pas
correctement (C) une porte, une charnière, un loquet
ou une surface d’étanchéité endommagés
Liste des différents éléments de commande
1 Panneau de commandes
2 Grill
3 Axe d’entraînement
4 Anneau de guidage
5 Plateau tournant
6 Verrouillage de la porte
7 Porte panoramique
8 Feuille micacée
19
Boutons et commandes du tableau de commande
Defrost By W.T. Décongeler en fonction du poids
Clock / Pre-Set Combiné avec le bouton tournant permet de
régler l’heure ou l’heure de démarrage
Defrost By Time Décongeler en fonction du temps
Quick Start / Start - Démarrer la fonction
- Démarrage rapide du micro-ondes (tou-
jours + 60 secondes à une puissance de
100 %)
Micro. / Grill / Combi.
Micro-ondes : Sélectionnez le réglage de puissance du
micro-ondes
Grill : Pour la cuisson au grill et la cuisson de
gratins
Grill / Combinaison : Le grill et le four à micro-ondes travaillent
en alternance
Cancel / Stop
Arrêter : Appuyez une fois pour arrêter la cuisson
Annuler : Appuyez deux fois pour annuler une fonc-
tion
Verrouiller : Maintenez le bouton CANCEL / STOP
pendant 3 secondes pour verrouiller (ver-
rouillage de sécurité enfant) ou débloquer le
panneau de commandes
Auto Menu Sélection des programmes automatiques
Timer • Power • Weight Bouton tournant pour régler l’heure, l’heure
de cuisson ou de décongélation, les ni-
veaux de puissance, les combinaisons, les
programmes automatiques ou les poids
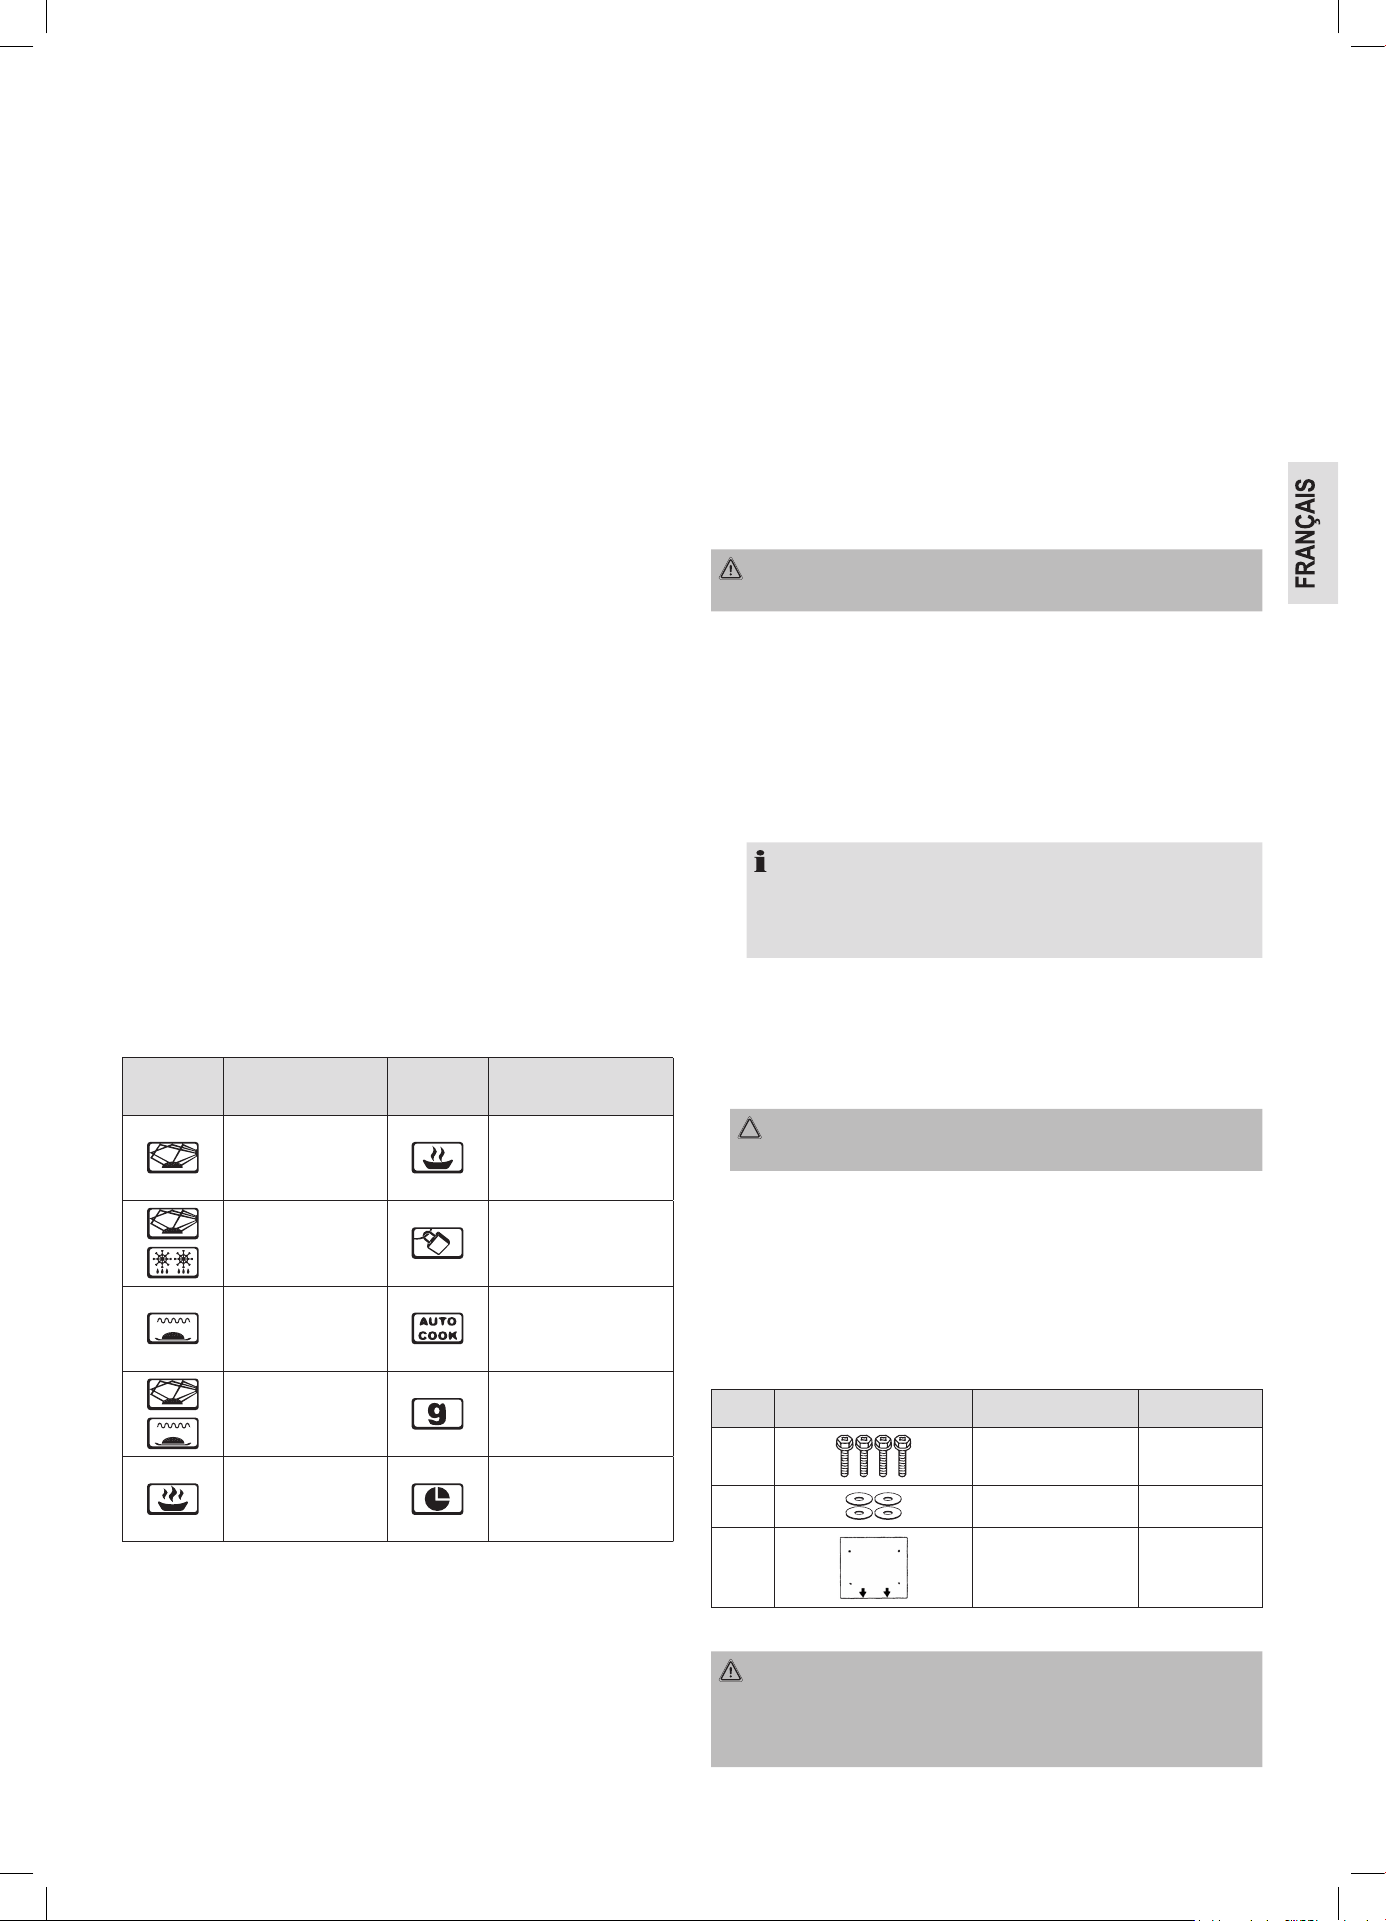
Symboles de la zone de commande
Symbole
Signification /
fonction
Symbole
Signication /
fonction
Micro-ondes Puissance faible
Décongeler
Verrouillage
protège-enfants actif
Grill
Programme
automatique
Micro-ondes + grill
Poids en grammes
Puissance haute
Démarrage pro-
grammé
Éviter les risques d’incendie lors du montage
lors de l’encastrement de l’appareil
Si vous souhaitez monter le four à micro-ondes en tant qu’appareil
encastrable p. ex. dans un élément de cuisine ou une étagère,
conformez-vous aux instructions données au paragraphe « Notice de
montage pour les appareils encastrables ».
• Ne pas retirer les pieds sur la face inférieure de l’appareil.
• Utiliser exclusivement le matériel de fixation fourni, si vous sou-
haitez monter le four à micro-ondes en dessous d’un élément de
cuisine.
• Pour l’intégration du four à micro-ondes, respecter les distances
suivantes entre les faces de l’appareil et les meubles :
- un minimum de 4 cm sur le côté droit
- un minimum de 10 cm vers les fentes d’aération sur le côté
gauche.
- Ne jamais couvrir d’ouvertures ! Sinon, une aération suffisante ne
saurait être garantie.
- La distance vers la paroi arrière est imposée par une entretoise.
• La paroi arrière doit être réfractaire (p. ex. des carrelages).
Notice de montage pour les
appareils encastrables
AVERTISSEMENT :
Important ! Ne brancher l’appareil qu’après le montage !
• Enlevez du placard au-dessus tous les objets et tous les objets
fragiles des placards adjacents.
• Le placard au-dessus doit remplir les conditions suivantes pour le
montage :
- Épaisseur du fond du placard 16 mm à 19 mm
- Largeur mini du placard 500 mm.
- La profondeur de montage sous l’élément de cuisine jusqu’au
mur doit être de 320 mm au minimum.
NOTE :
Lorsque le four à micro-ondes doit être affleurant avec l’arête
avant de la porte, une profondeur de montage de 350 mm est
nécessaire.
- Le placard ne doit présenter aucune fissure, écaille ou autre
endommagement. Toutes les jointures doivent être stables.
- Le placard doit être conçu pour une charge mini de 40 kg.
• Le support mural du placard au-dessus doit être stable et solide-
ment ancré au mur à l’aide de 2 vis minimum.
ATTENTION :
Ne pas monter l’appareil au-dessus d’une plaque de cuisine !
• Pour le montage de l’appareil, il faut s’assurer de l’existence d’une
prise électrique à proximité du conducteur d’amenée.
• La prise électrique doit être facile d’accès pour permettre un dé-
branchement rapide du câble en cas d’urgence.
• Ne pas monter l’appareil sous des placards présentant une barre
d’éclairage sur la face inférieure.
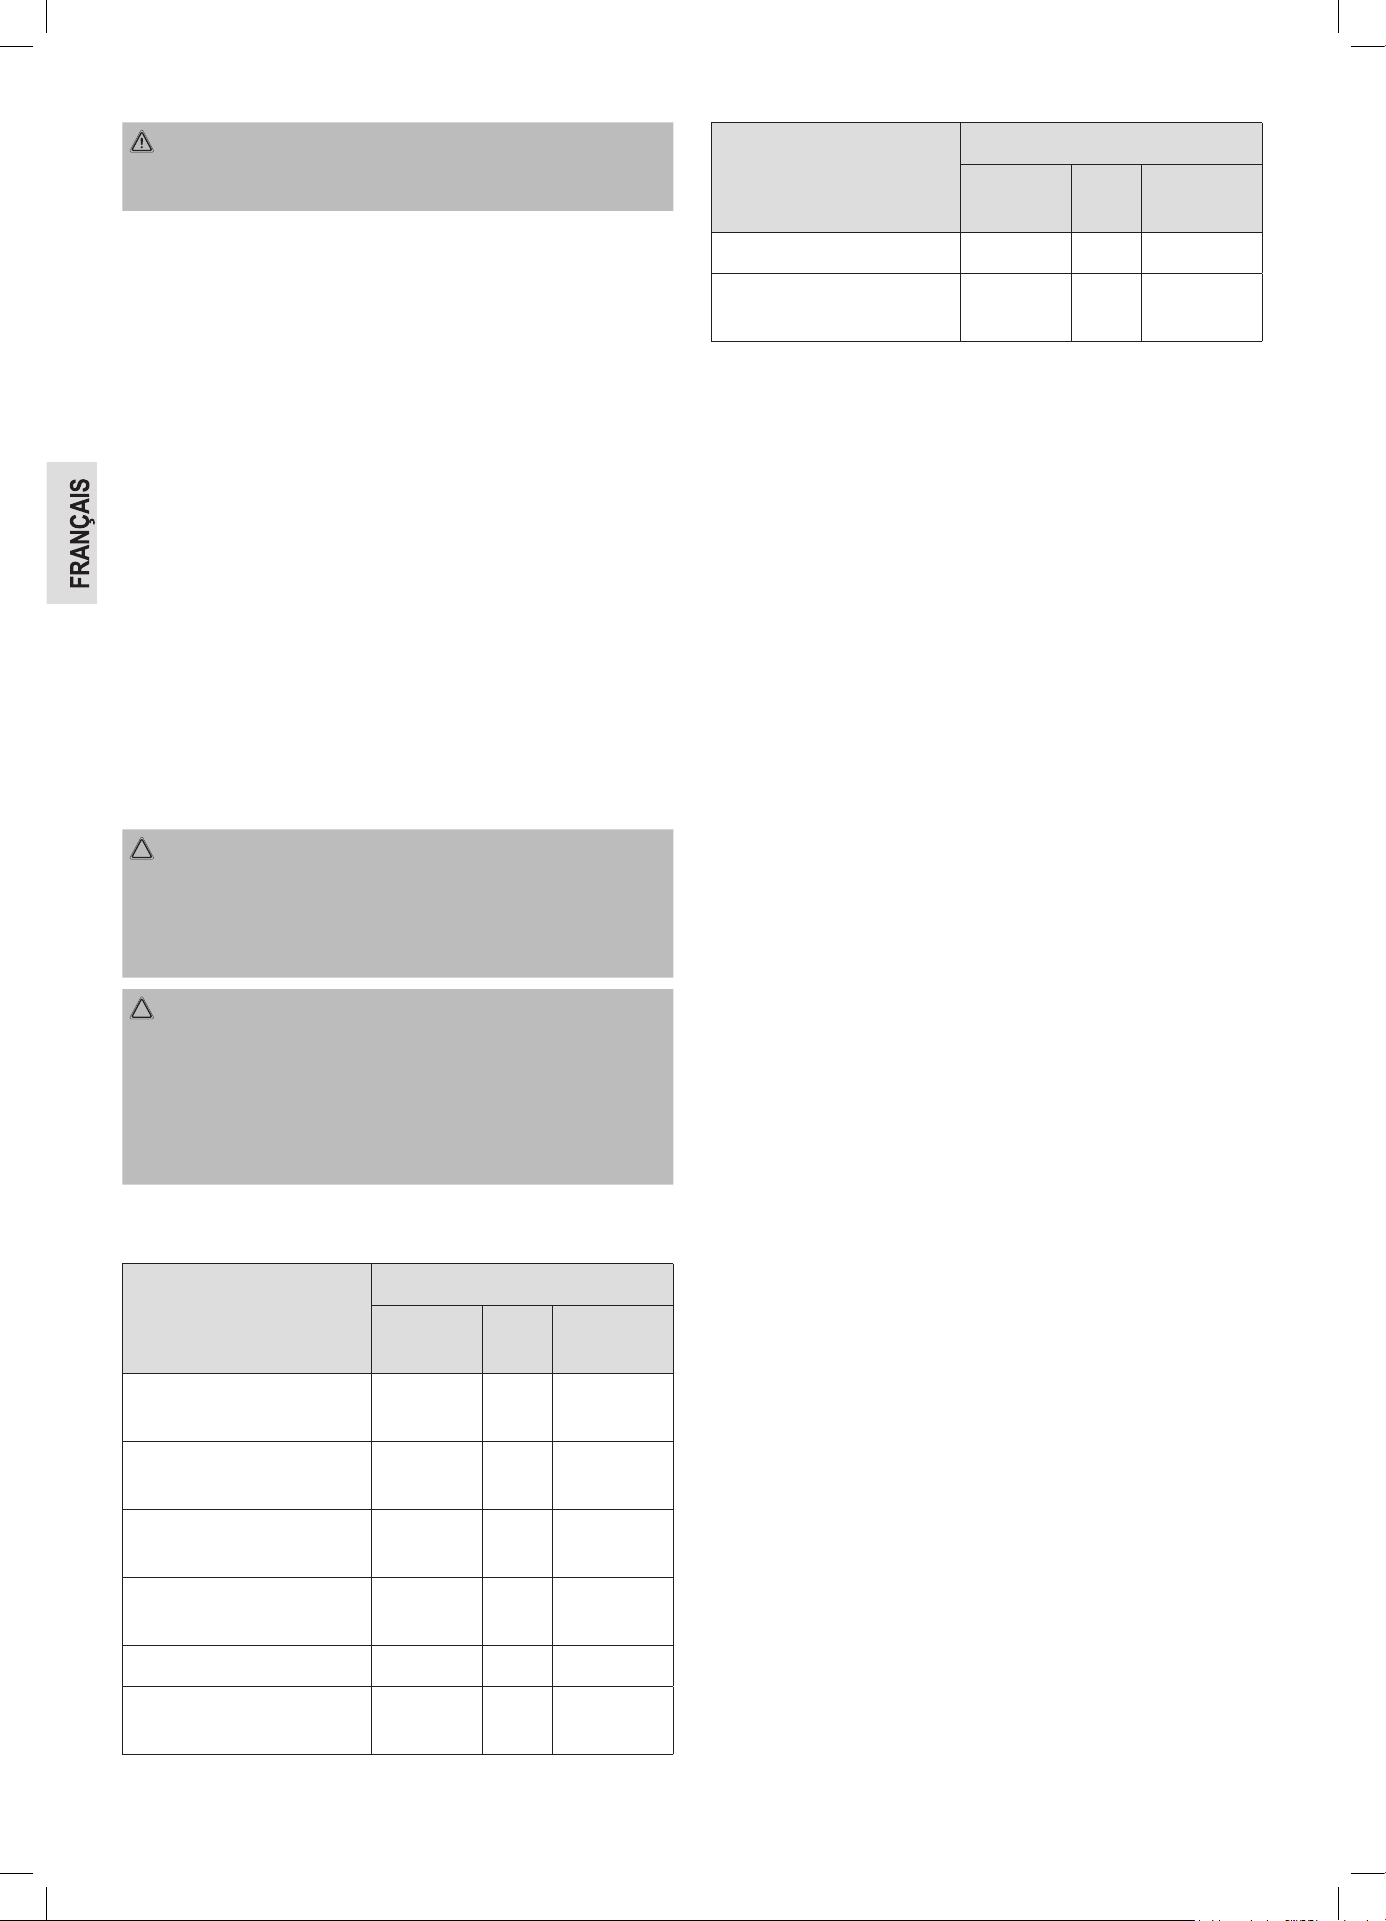
Accessoires de montage
Pos. Désignation Nombre
1 Vis 4
2 Rondelle 4
3 Gabarit de
perçage
1
Vous trouverez la notice de montage sur le gabarit de perçage joint.
AVERTISSEMENT :
• Conformez-vous aux dimensions indiquées dans la notice de
montage.
• Utilisez les accessoires de montage fournis.
20
AVERTISSEMENT :
• Les vis trop enfoncées (trop longues) peuvent endommager l’ap-
pareil ou constituer un danger de mort.
Notes sur le service de grill et combiné
• Du fait qu’en service de grill et combiné de la chaleur de rayon-
nement est utilisée, n’utilisez que de la vaisselle résistante à la
chaleur.
• En pur service de grill, vous pouvez aussi utiliser de la vaisselle en
métal et en aluminium – toutefois pas dans le service combiné ou
micro-ondes.
• Pour le mode de fonctionnement COMBI, il n’est possible d’utiliser
que la grille.
• Ne placer rien sur la partie supérieure du boîtier. Celui-ci chauffe.
• Laissez les fentes d’aération toujours dégagées.
• Utilisez la grille de cuisson pour approcher les aliments à cuire près
de l’élément de chauffe.
Vaisselle allant au four à micro-ondes
• Le matériel idéal à utiliser dans un four à micro-ondes est trans-
parent et permet aux micro-ondes de chauffer équitablement les
aliments.
• Les bols et les assiettes ronds / ovales conviennent mieux que les
bols et assiettes carrés, car les aliments dans les coins risqueraient
de déborder.
ATTENTION :
Risque d’explosion si vous utilisez un récipient fermé.
• Ouvrez les récipients avant la cuisson ou le chauffage.
• Percez le film plastique de protection à plusieurs endroits avec
une fourchette.
ATTENTION : Risque d’étincelle et d’incendie !
• Les micro-ondes ne peuvent pas pénétrer le métal. Par consé-
quent, il ne faut jamais placer de conteneur ou d’assiette en métal
dans le four quand les micro-ondes sont actives.
• Ne pas utiliser de barquettes en carton recyclé, car elles pour-
raient contenir de faibles pourcentages de métal ce qui risquerait
alors de provoquer des étincelles ou des incendies.
La liste ci-dessous vous facilite le choix de la vaisselle convenant au
four à micro-ondes :
Matériel
Convient au
Micro-
ondes
Grill
Fonction
combinée *
Récipient en verre résistant à
la chaleur
oui oui oui
Récipient en verre ne
résistant pas à la chaleur
non non non
Récipient / assiette en céra-
mique résistant à la chaleur
oui oui oui
Récipient en plastique conve-
nant au four à micro-ondes
oui non non
Papier de cuisine oui non non
Plat à four en métal ou
aluminium
non oui non
Matériel
Convient au
Micro-
ondes
Grill
Fonction
combinée *
Grille non oui non
Aluminium ou récipient en
film d’aluminium
non oui non
* Fonction micro-ondes combinée avec gril.
Notes sur le fonctionnement et l’utilisation de l’appareil
Ce qu’il faut savoir sur le service du micro-ondes
• Votre appareil fonctionne par rayonnement de micro-ondes qui
chauffent très rapidement les particules d’eau dans les aliments.
Vous n’avez ici pas de rayons de chaleur et donc pas de coloration
brune.
• Ne faites chauffer avec cet appareil que des aliments.
• L’appareil n’est pas approprié pour la cuisson de graisse flottante.
• Ne faites chauffer qu’1 ou 2 portions à la fois. L’appareil est autre-
ment moins efcient.
• Les micro-ondes fournissent immédiatement une pleine énergie. Il
n’est ainsi pas nécessaire de préchauffer.
• N’utilisez jamais l’appareil à vide en position micro-ondes.
• Le four micro-ondes ne remplace pas le four traditionnel. Il sert
uniquement à :
- décongeler les aliments surgelés/congelés
- faire chauffer / réchauffer rapidement les aliments ou les boissons
- cuire des mets
Notes sur le fonctionnement de l’appareil
• En appuyant sur les boutons pour effectuer votre sélection, un si-
gnal sonore retentit. Sinon, vous n’avez pas appuyé correctement.
• Ensuite, une alarme sonore retentit lors de la première rotation du
bouton tournant.
• Si vous réglez un programme sans appuyer sur le bouton
QUICK START / START au bout de 5 minutes, le réglage sera
annulé. L’heure en cours s’afchera encore.
• Les lumières à l’intérieur du four s’allument lorsque la porte s’ouvre.
Si la porte n’est pas fermée au bout de 10 minutes, les lumières
s’éteignent.
• Lorsque vous démarrez un programme, la durée de fonctionnement
qui reste s’afchera. Le compte à rebours commence.
• 5 signaux sonores indiqueront la fin du programme. Retirez les
aliments de l’appareil.
Mise en service
Préparation
1. Retirez tous les accessoires se trouvant dans l’espace de cuisson,
déballez-les et placez la bague glissante au milieu.
2. Positionnez l’assiette en verre sur l’axe d’entraînement de sorte
que celle-ci s’enclenche dans les courbures de l’arbre d’entraîne-
ment et ne soit pas de travers.
3. Vérifiez que l’appareil ne présente pas de dommages apparents,
particulièrement dans la zone de la porte. L’appareil ne doit en
aucun cas être mis en service s’il présente un endommagement
quelconque.
4. Afin d’éviter lors du service l’endommagement d’autres appareils,
ne placez pas votre appareil à proximité directe d’autres appareils
électroniques.
5. Enlevez les éventuelles feuilles collantes sur le boîtier.
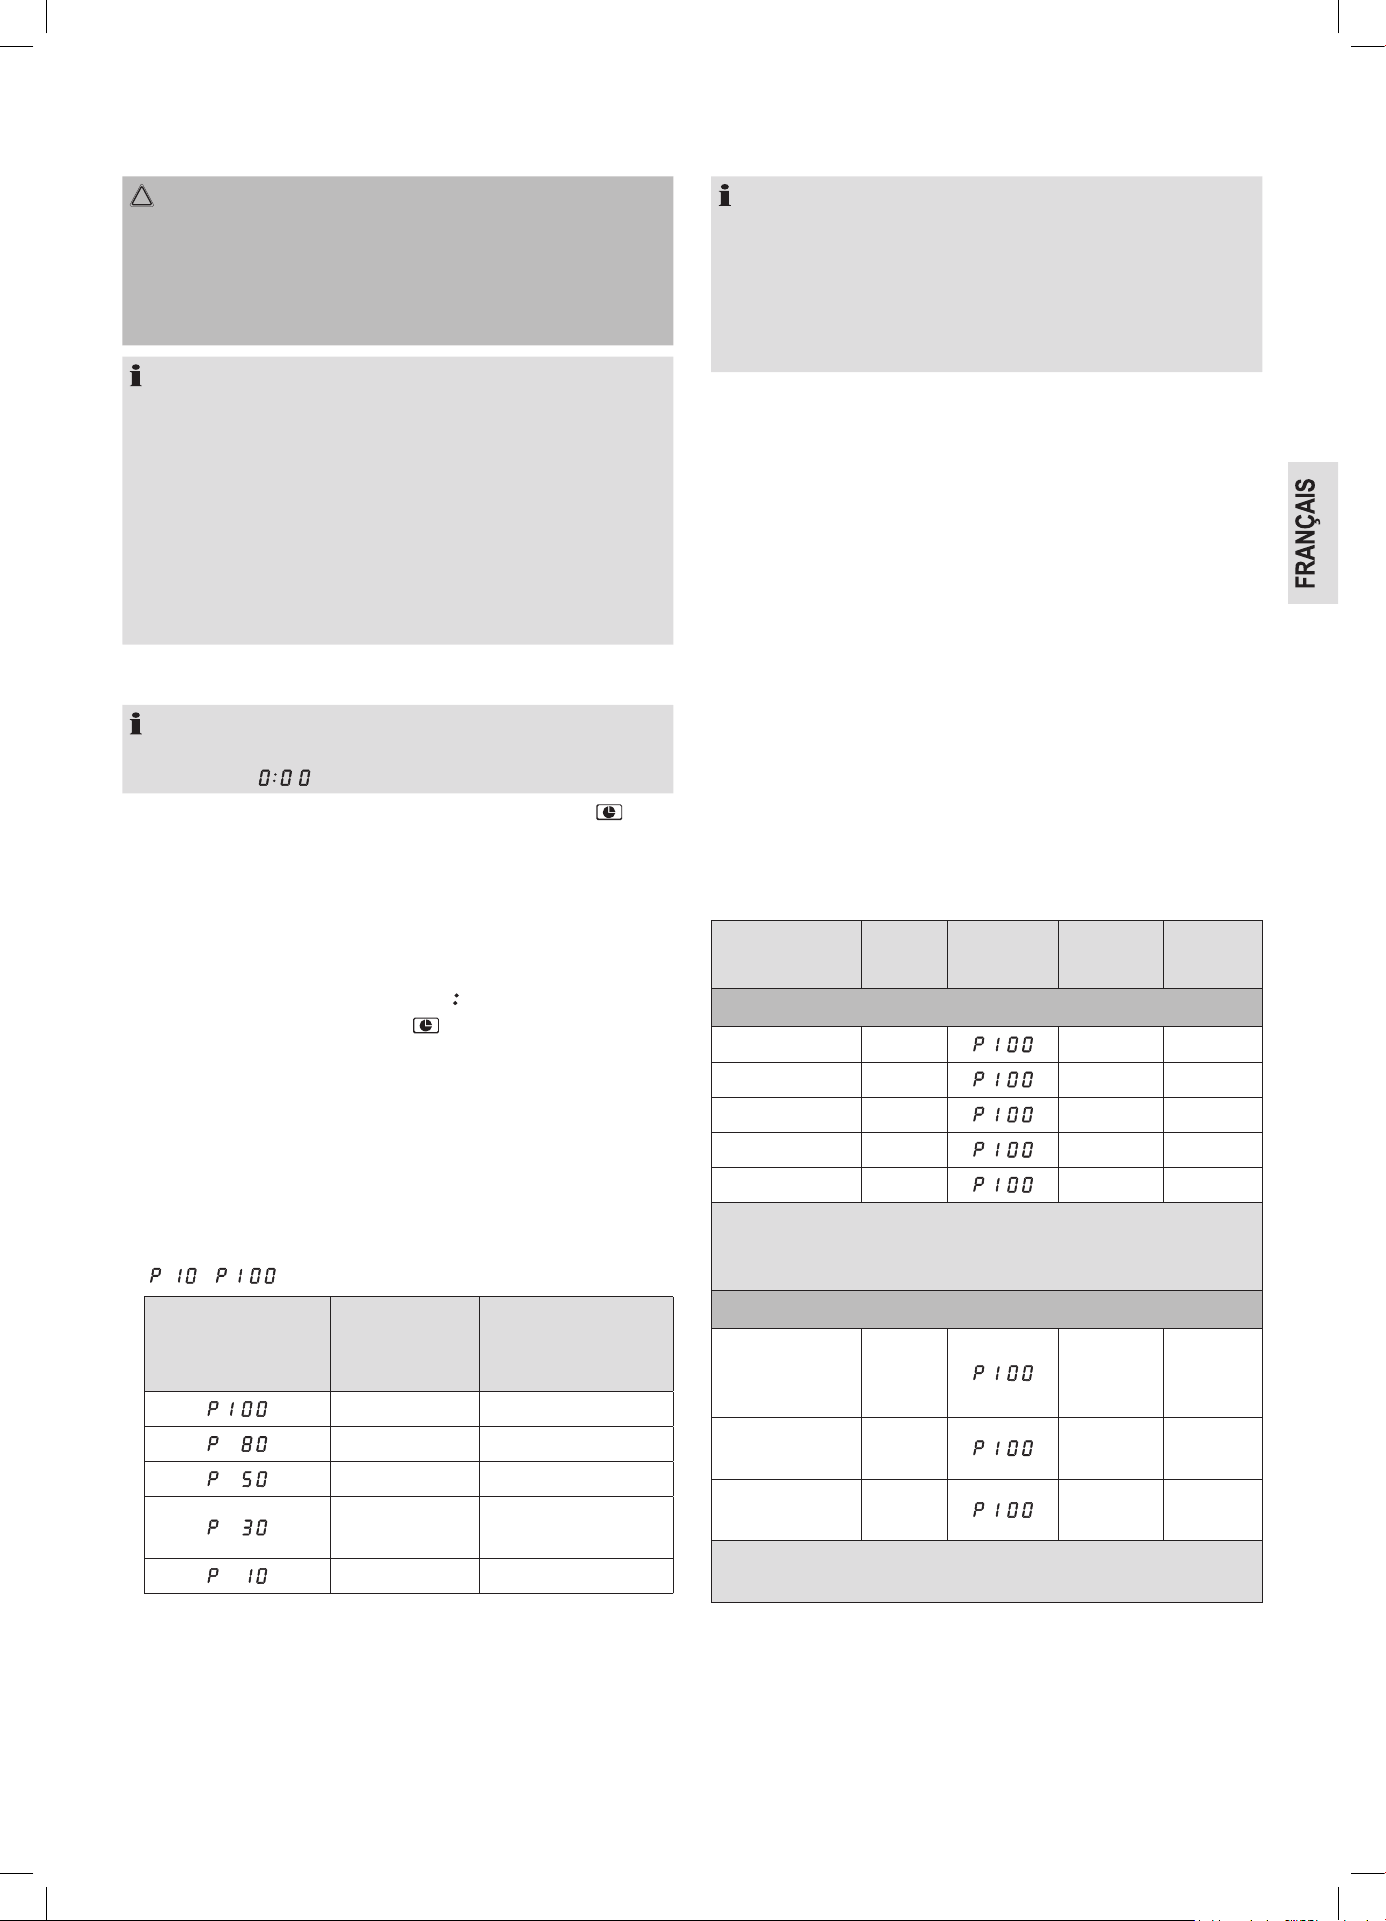
21
6. Connectez la fiche dans une prise de courant de sécurité correcte-
ment installée.
ATTENTION :
• N’enlevez aucune pièce montée de l’espace de cuisson et du
côté inférieur de la porte !
• La feuille micacée (8) fait également partie de l’appareil et ne
doit pas être enlevée. Elle protège de la poussière le composant
électronique situé derrière elle.
NOTE :
Si des dépôts d’huile ou dus à la production se trouvent sur les
parois de l’appareil ou sur la résistance, une émanation de fumée
et d’odeur est au début possible. Ceci est tout à fait normal et ne se
reproduira plus après quelques utilisations.
Il est vivement conseillé de procéder de la façon suivante :
• Réglez l’appareil sur la fonction grill et faites-le fonctionner
plusieurs fois sans articles à griller (respectivement 5 minutes au
maximum).
• Prière de veiller à une aération suffisante.
Réglage de l’heure
NOTE :
Lors de la première mise en marche, un signal sonore retentit et
l’écran afche « ».
1. Appuyez sur la touche CLOCK / PRE-SET. Le symbole « »
s’allume à l’écran. De l’heure chiffre clignote.
2. Le bouton tournant vous permet de régler l’heure désirée.
3. Appuyez sur la touche CLOCK / PRE-SET. Les minutes chiffres
clignotent.
4. Le bouton tournant vous permet de régler les minutes désirées.
5. Appuyez de nouveau sur la touche CLOCK / PRE-SET, la nouvelle
heure est alors activée. Le délimiteur « » de l’heure numérique
clignotera à l’écran. Le symbole « » s’éteint.
Comment procéder
1. Versez les aliments à réchauffer dans un récipient adéquat.
2. Ouvrez la porte du four et placez le récipient au milieu du plateau
tournant. Fermez la porte (L’appareil ne fonctionne, pour des rai-
sons techniques, que lorsque la porte est fermée).
3. Appuyer une fois sur la touche MICRO. / GRILL / COMBI.. À l’aide
du bouton tournant, sélectionner ensuite la puissance désirée
( à ).
Réglage de la
puissance à l’écran
exprimée en %
Puissance en
Watt (env.)
Application
800 Chauffage rapide
640 Cuisson
400 Mijotage
240
Décongélation d’ali-
ments congelés
80 Fromage fondu etc.
4. Appuyez sur le bouton MICRO. / GRILL / COMBI. pour confirmer
vos réglages.
5. Utilisez le bouton tournant pour régler la durée de cuisson souhai-
tée entre 5 secondes et 95 minutes.
6. Appuyez sur le bouton QUICK START / START pour commencer
l’opération. La durée de cuisson dépend de la quantité et de la
texture des aliments. Après plusieurs tentatives, vous apprendrez
rapidement à évaluer la durée de cuisson.
NOTE :
• La préparation est beaucoup plus rapide dans un four à mi-
cro-ondes que dans un four traditionnel. Si vous n’êtes pas sûr,
programmez plutôt un temps de cuisson plus court et renouvelez
l’opération le cas échéant.
• Attention : En fonctionnement micro-ondes seulement, placez
un couvercle de protection sur la nourriture.
Arrêter ou mettre la cuisson en pause
• Si vous souhaitez mettre la cuisson en pause, appuyez une fois sur
le bouton CANCEL / STOP et ouvrez la porte.
• Si vous souhaitez poursuivre la cuisson, fermez la porte et appuyez
sur le bouton QUICK START / START.
• Si vous souhaitez arrêter complètement le fonctionnement de l’ap-
pareil, appuyez deux fois sur le bouton CANCEL / STOP.
Chauffer
La chauffe est une force particulière du micro-ondes. Les liquides et
les aliments à la température du réfrigérateur peuvent être facilement
chauffés à la température ambiante ou de consommation, sans avoir
à utiliser beaucoup de casseroles.
Les durées de chauffe indiquées dans le tableau suivant ne peuvent
constituer que des valeurs de référence, car la durée dépend fortement
de la température de départ et de la composition des mets. Il est donc
recommandé de vérifier de temps en temps si le mets est assez chaud.
Tableau de chauffe
Aliments / mets Quantité
Puissance
en %
Durée env.
en min.
Recouvrir
Liquides
Eau, 1 tasse 150 g 0,5 – 1 non
Eau, 0,5 l 500 g 3 , 5 – 5 non
Eau, 0,75 l 750 g 5 – 7 non
Café, 1 tasse 150 g 0,5 – 1 non
Lait, 1 tasse 150 g 0,5 – 1 non
Attention : Placez une baguette en verre ou autre. (pas d’ustensile
métallique) dans le récipient pour éviter une surchauffe. Mélangez
avant de boire.
Mets
Escalopes,
pommes de terre
et légumes
450 g 2,5 – 3,5 oui
Goulache avec
nouilles
450 g 2 – 2,5 oui
Viande, boulette
et sauce
450 g 2,5 – 3,5 oui
Conseil : Humidier légèrement auparavant, tourner de temps à
autre.
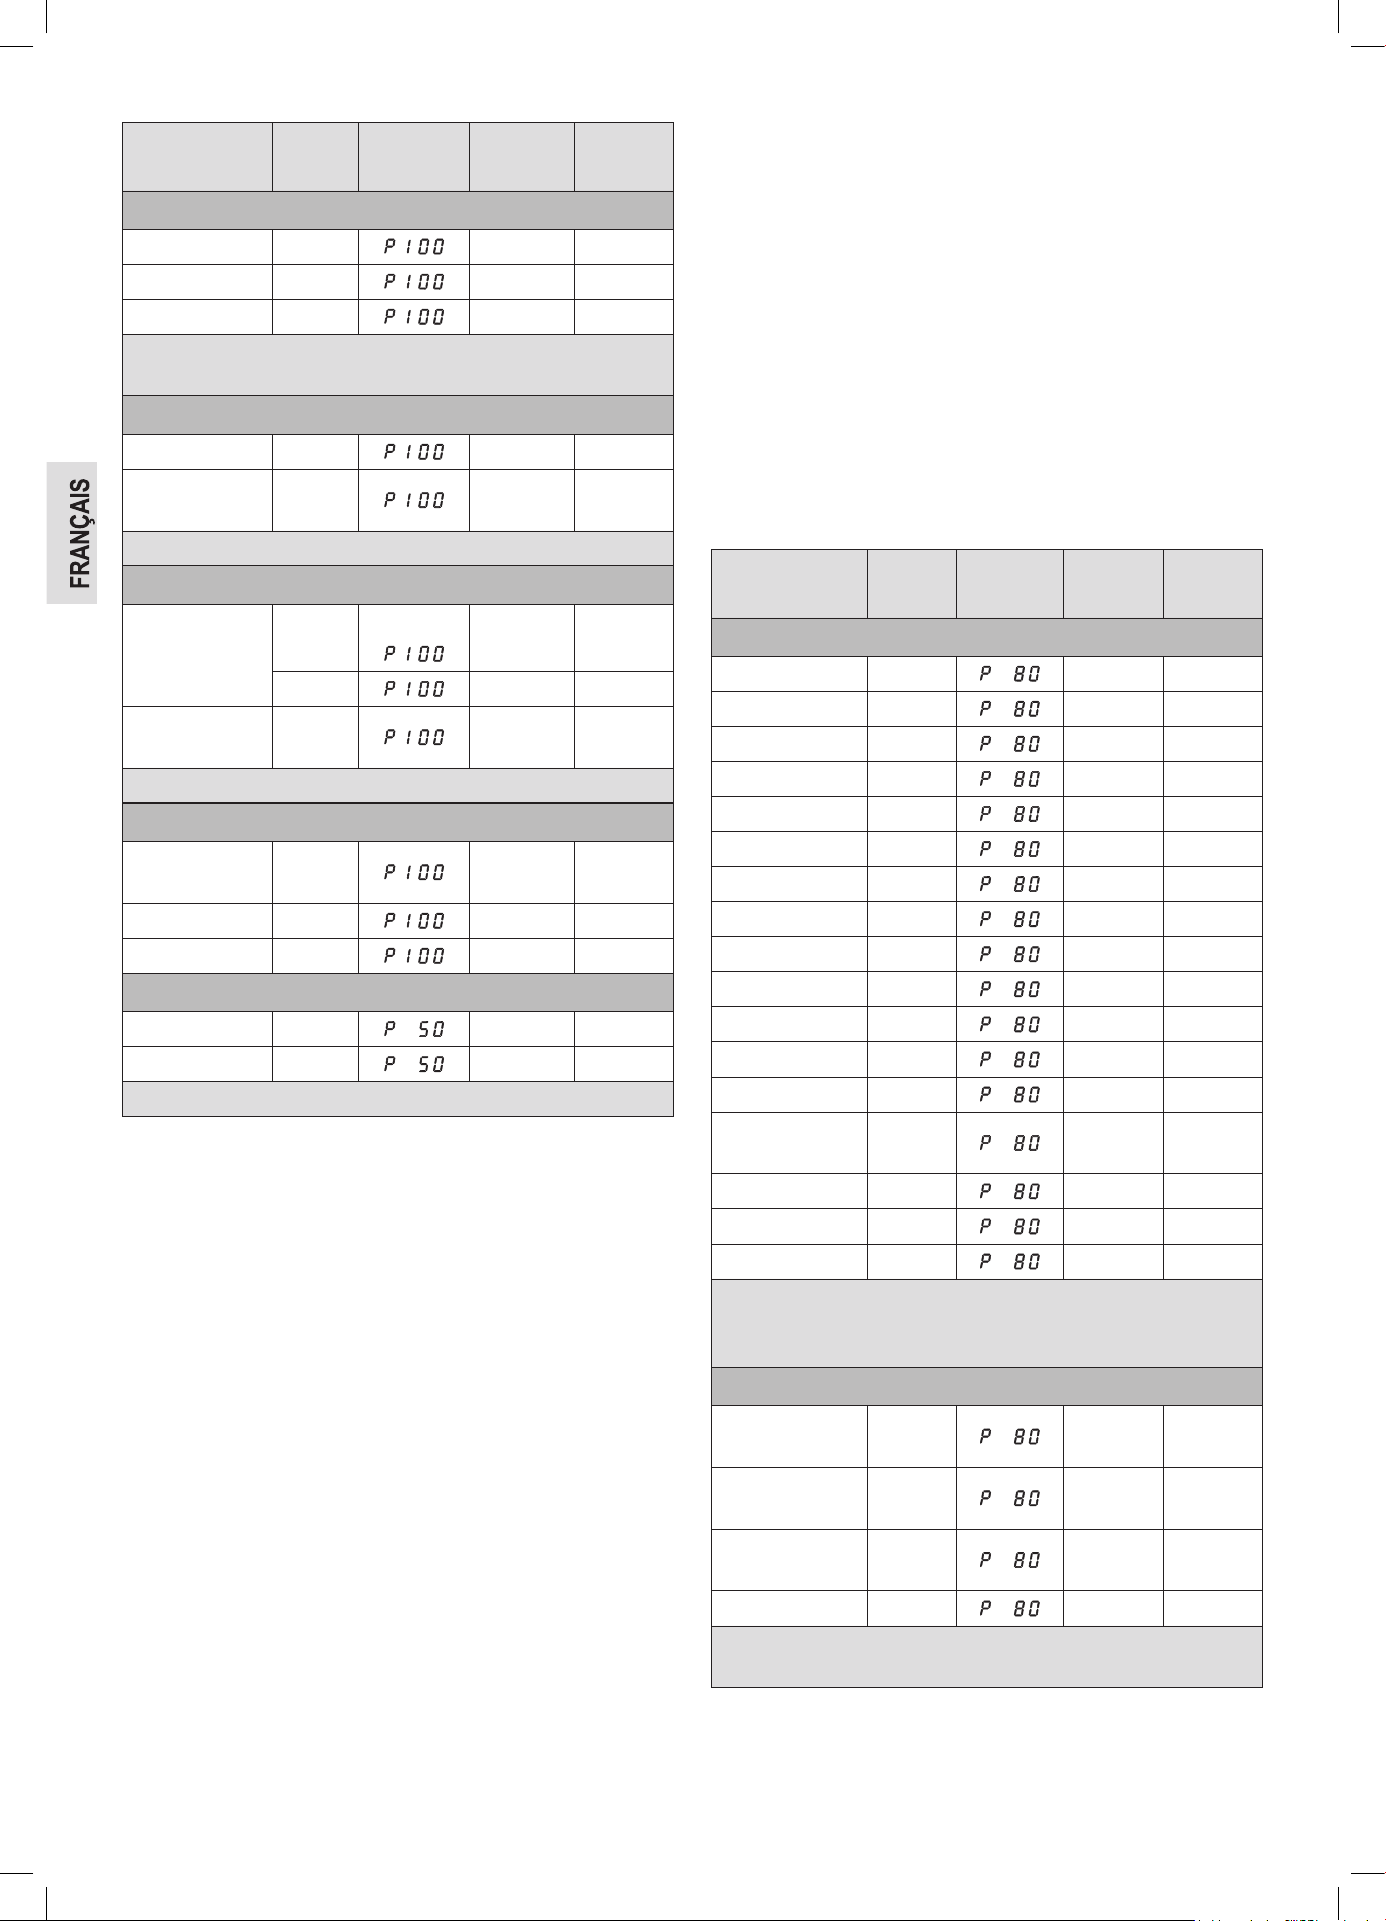
22
Aliments / mets Quantité
Puissance
en %
Durée env.
en min.
Recouvrir
Viande
Escalope, panée 200 g 1 – 2 non
Fricadelles, 4 500 g 3 – 4 non
Rôti 250 g 2 – 3 non
Conseil : Enduire d’huile au pinceau, an que la panure ou la
croûte ne s’amollisse pas.
Volaille
½ poulet 450 g 3 , 5 – 5 non
Fricassée de
poulet
400 g 3 – 4 , 5 oui
Conseil : Enduire d’huile au pinceau, tourner de temps en temps.
Accompagnements
Pâtes, riz
1 portion 150 g 1 – 2 oui
2 portions 300 g 2,5 – 3,5 oui
Pommes de
terre
500 g 3 – 4 oui
Conseil : Humidier légèrement auparavant.
Soupes / sauces
Bouillon,
1 assiette
250 g 1 – 1,5 oui
Soupe épaisses 250 g 1,5 – 2 oui
Sauce 250 g 1 – 2 oui
Aliments pour bébé
Lait 100 ml 0,5 – 1,5 non
Bouillie 200 g 1 – 1,5 non
Conseil : Bien secouer ou remuer. Contrôler la température !
Cuisson
Conseils pratiques de cuisson
Respectez les valeurs de référence données dans le tableau de
cuisson et dans les recettes. Observez l’opération de cuisson tant que
vous n’avez pas encore beaucoup d’entraînement.
Vous pouvez ouvrir à tout moment la porte de l’appareil. L’appareil,
s’arrête automatiquement.
Le fonctionnement se poursuivra à la fermeture de la porte et lorsque
vous appuyez à nouveau sur le bouton QUICK START / START.
Les aliments sortant du réfrigérateur demandent une durée de cuis-
son un peu plus longue que ceux à température ambiante.
Plus le mets est compact, plus la durée de cuisson est longue. Un
gros morceau de viande demande par ex. une plus longue durée de
cuisson que de la viande coupée en languettes d’une même quantité
e. Il est conseillé de faire cuire les grandes quantités à la puissance
maximale et de poursuivre la cuisson à une puissance moyenne.
Les mets plats cuisent plus rapidement que les aliments hauts, donc
répartissez le plus possible en largeur. Placez les pièces plus minces,
comme par ex. les cuisses de poulet ou les filets de poisson vers
l’intérieur ou les faisant se chevaucher.
Les plus petites quantités cuisent plus rapidement que les grandes
qualités. On applique les règles suivantes :
Quantité double = presque durée double
Moitié de la quantité = moitié du temps
Si vous ne trouvez pas d’indication de temps adaptée pour un mets,
appliquez la règle suivante :
Environ 1 minute de temps de cuisson pour 100 g
Tous les mets que vous recouvrez sur la cuisinière, sont également à
recouvrir dans le micro-ondes.
Un couvercle empêche que les mets se dessèchent. Une assiette
retournée, du parchemin ou de la feuille micro-ondes sont appropriés
à cet effet. Cuire sans couvercle les mets qui doivent obtenir une
croûte.
Tableau de cuisson
Aliments / mets Quantité
Puissance
en %
Durée env.
en min.
Recouvrir
Légumes
Aubergines 500 g 7 – 10 oui
Chou-fleur 500 g 13 – 15 oui
Brocoli 500 g 6 – 9 oui
Chicorées endive 500 g 6 – 7 oui
Petits poix 500 g 6 – 7 oui
Fenouil 500 g 8 – 11 oui
Haricots verts 300 g 13 – 15 oui
Pommes de terre 500 g 9 – 12 oui
Chou-rave 500 g 8 – 10 oui
Poireau 500 g 7 – 9 oui
Épis de maïs 250 g 7 – 9 oui
Carottes 500 g 8 – 10 oui
Poivrons 500 g 6 – 9 oui
Choux de
Bruxelles
300 g 7 – 10 oui
Asperges 300 g 6 – 9 oui
Tomates 500 g 6 – 7 oui
Courgette 500 g 9 – 10 oui
Conseil : Couper les légumes en petits morceaux et faire cuire
avec 2 à 3 cuillers à soupe d’eau, tourner de temps en temps, faire
cuire ensuite 3 à 5 minutes, n’épicer qu’avant de servir.
Fruits
Compote de
pommes, poires
500 g 5 – 8 oui
Compote de
prunes
250 g 4 – 6 non
Compote de
rhubarbe
250 g 5 – 8 oui
Pommes cuites, 4
500 g 7 – 9 oui
Conseil : Ajouter 125 ml d’eau, le jus de citron empêche que les
fruits se décolorent, poursuivre la cuisson pendant 3 à 5 minutes.
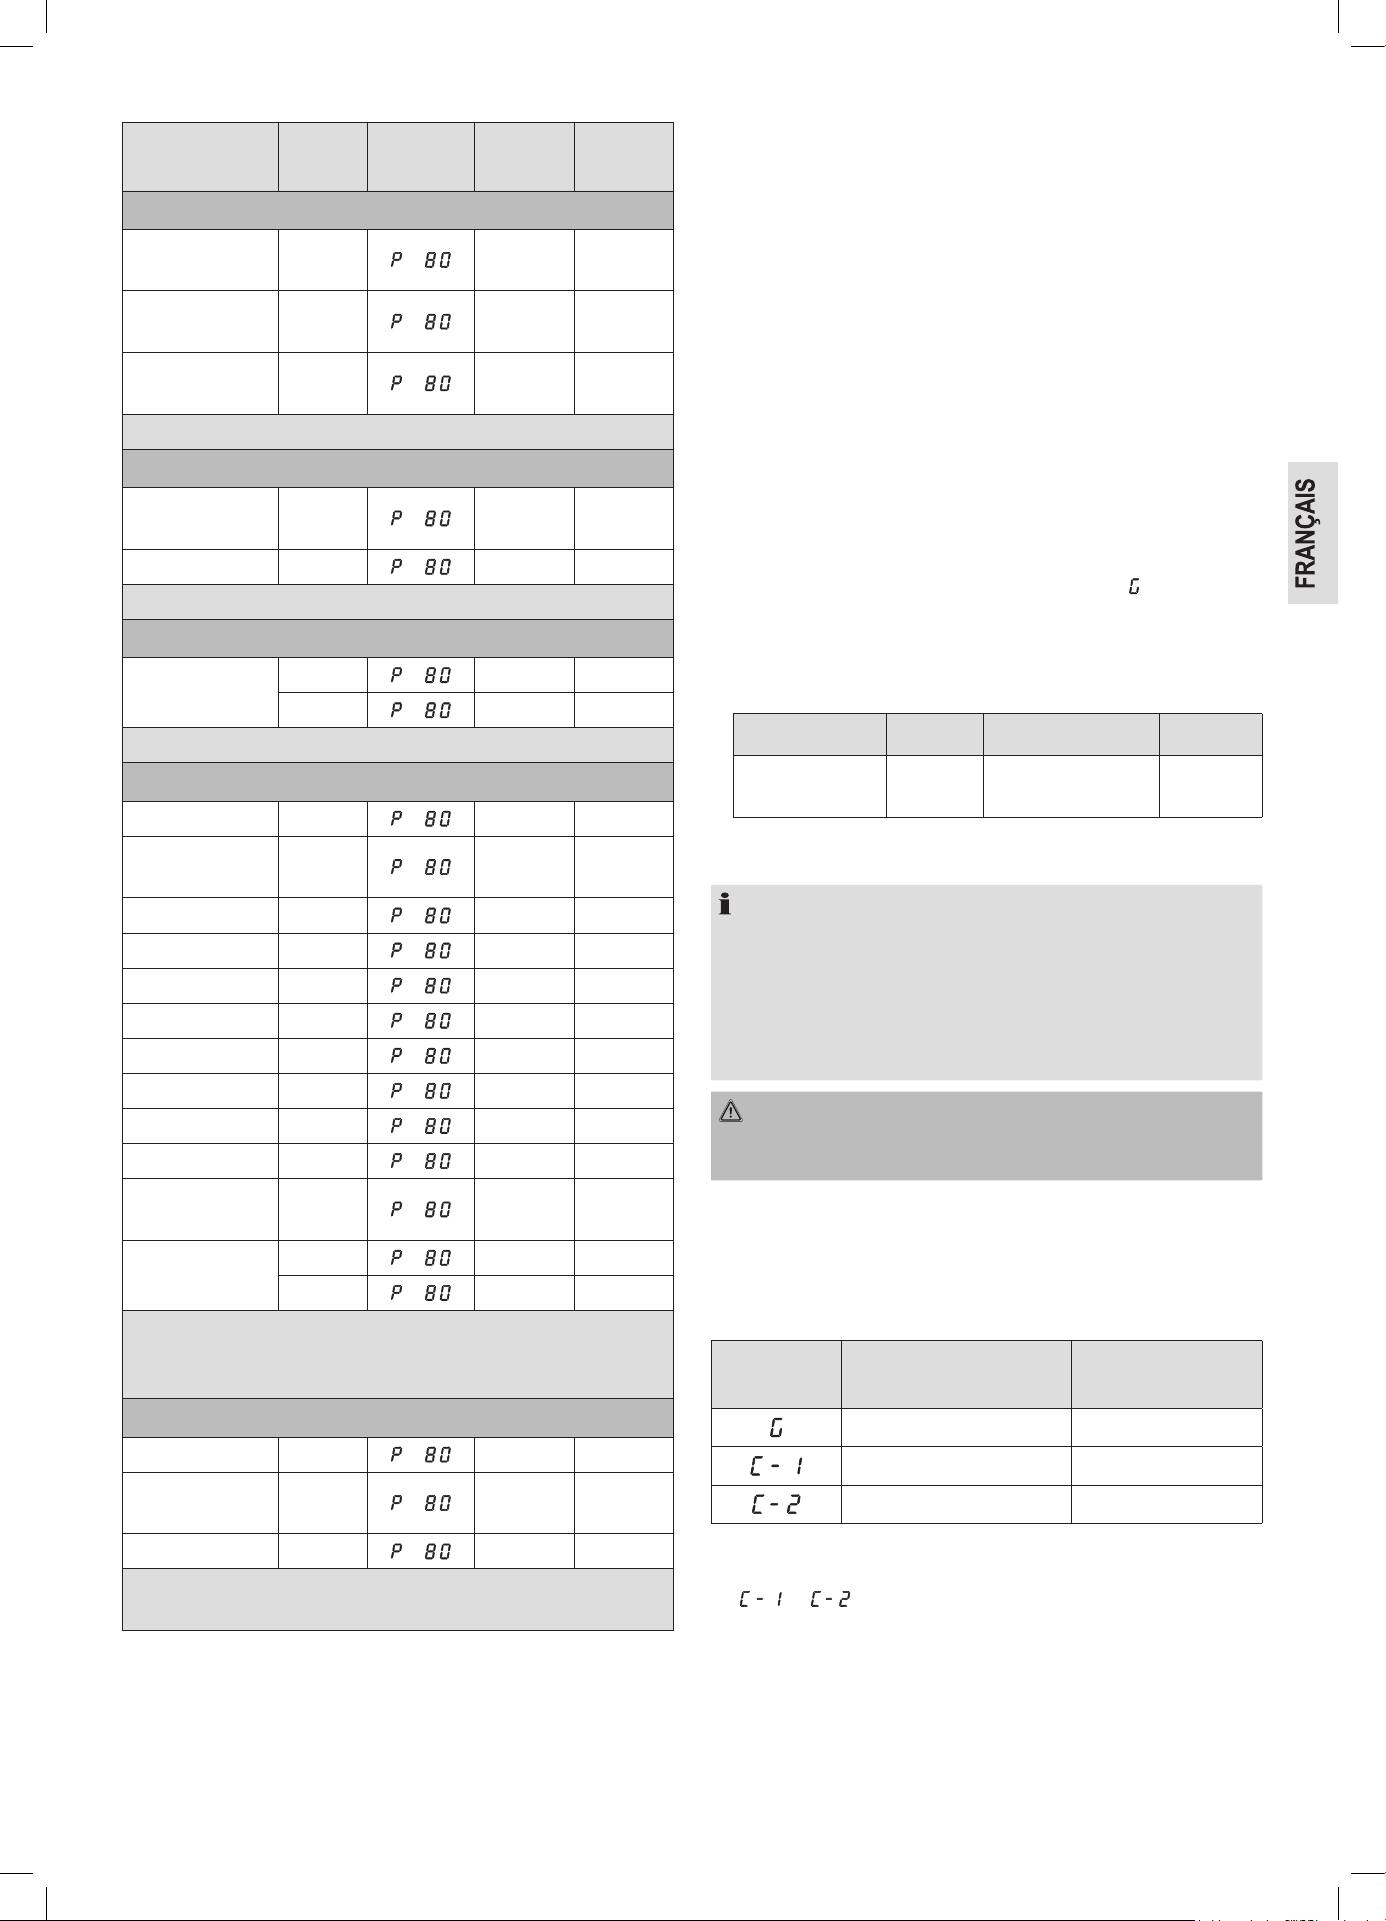
23
Aliments / mets Quantité
Puissance
en %
Durée env.
en min.
Recouvrir
Viande *
Viande avec de
la sauce
400 g 10 – 12 oui
Goulache, viande
en lamelles
500 g 10 – 15 oui
Rouleaux de
bœuf
250 g 7 – 8 oui
Conseil : Tourner de temps en temps, laisser reposer 3 à 5 minutes.
Volaille *
Fricassée de
poulet
250 g 6 – 7 oui
Soupe de volaille 200 g 5 – 6 oui
Conseil : Tourner de temps en temps, laisser reposer 3 à 5 minutes.
Poisson
Filet de poisson
300 g 7 – 8 oui
400 g 8 – 9 oui
Conseil : tourner de temps en temps, laisser reposer 3 à 5 minutes.
Décongélation et cuisson des légumes
Chou rouge 450 g 14 – 16 oui
Épinards en
branches
300 g 11 – 13 oui
Chou-fleur 200 g 7 – 9 oui
Haricots verts 200 g 8 – 10 oui
Brocoli 300 g 8 – 9 oui
Petits poix 300 g 7 – 8 oui
Chou-rave 300 g 13 – 15 oui
Poireau 200 g 10 – 11 oui
Maïs 200 g 4 – 6 oui
Carottes 200 g 5 – 6 oui
Chou de
Bruxelles
300 g 7 – 8 oui
Épinards
450 g 12 – 13 oui
600 g 15 – 17 oui
Conseil : Faire cuire avec 1 à 2 cuillers à soupe de liquide, tourner
de temps à autre ou répartir avec précaution, poursuivre la cuisson
pendant 2 à 3 minutes, n’épicer qu’avant de servir.
Potages / ragoûts *
Ragoût 500 g 13 – 15 oui
Potages
consistants
300 g 7 – 18 oui
Potage fondant 500 g 13 – 15 oui
Conseil : Remuer de temps à autre, poursuivre la cuisson pendant
3 à 5 minutes.
* Mets déjà précuits.
Démarrage rapide
Vous souhaitez chauffer des aliments ou des boissons très rapide-
ment à une puissance réglée au maximum?
1. Lancez le four à micro-ondes immédiatement en appuyant directe-
ment sur la touche QUICK START / START.
2. La cuisson démarre immédiatement, tout actionnement supplé-
mentaire de la touche prolongeant alors la durée de la cuisson de
60 secondes. Le four à micro-ondes fonctionne alors à 100 % de
sa puissance.
Griller
Pour griller, veuillez utiliser la plaque de grill. Utilisez de la vaisselle
résistante à la chaleur et placer l’aliment à griller directement sur la
plaque de grill.
Il n’est pas nécessaire de « préchauffer » le barbecue, étant donné
qu’il génère directement de la chaleur par ses rayons.
Suivez les consignes suivantes pour la cuisson au grill et la cuisson
de gratins :
1. Appuyer une fois sur la touche MICRO. / GRILL / COMBI.. À l’aide
du bouton tournant, sélectionner ensuite le mode ( ).
2. Appuyez sur le bouton MICRO. / GRILL / COMBI. pour confirmer
vos réglages.
3. Utilisez le bouton tournant pour régler la durée de cuisson souhai-
tée entre 5 secondes et 95 minutes. Exemple :
Aliments / mets Quantité Durée env. en min. Recouvrir
Toast gratiné au
fromage
2 – 3 3 – 4 non
4. Appuyez sur le bouton QUICK START / START pour commencer
l’opération.
NOTE :
Une fois la moitié du délai imparti écoulée, plusieurs signaux
sonores vous avertiront afin de retourner les aliments grillés
comme de la viande ou des saucisses. Lorsque la porte reste
fermée, l’appareil se remet en marche après env. 60 secondes.
Afin de continuer le service avant l’heure, appuyer sur la touche
QUICK START / START.
AVERTISSEMENT : Risque de brûlures !
Pour ouvrir ou fermer la porte, servez-vous uniquement de la poi-
gnée.
Combinaison entre le fonctionnement
en micro-ondes et en gril
Avec ces réglages, le micro-ondes et le grill fonctionnent en alter-
nance pendant la durée prédéfinie selon le rapport :
Écran
Réglage de la puissance
du micro-ondes
Réglage de la
puissance du grill
0 % 100 %
55 % 45 %
36 % 64 %
1. Appuyer une fois sur la touche MICRO. / GRILL / COMBI.. À l’aide
du bouton tournant, sélectionner ensuite la puissance désirée
( ou ).
2. Appuyez sur le bouton MICRO. / GRILL / COMBI. pour confirmer
vos réglages.
3. Utilisez le bouton tournant pour régler la durée de cuisson souhai-
tée entre 5 secondes et 95 minutes.
4. Appuyez sur le bouton QUICK START / START pour commencer
l’opération.
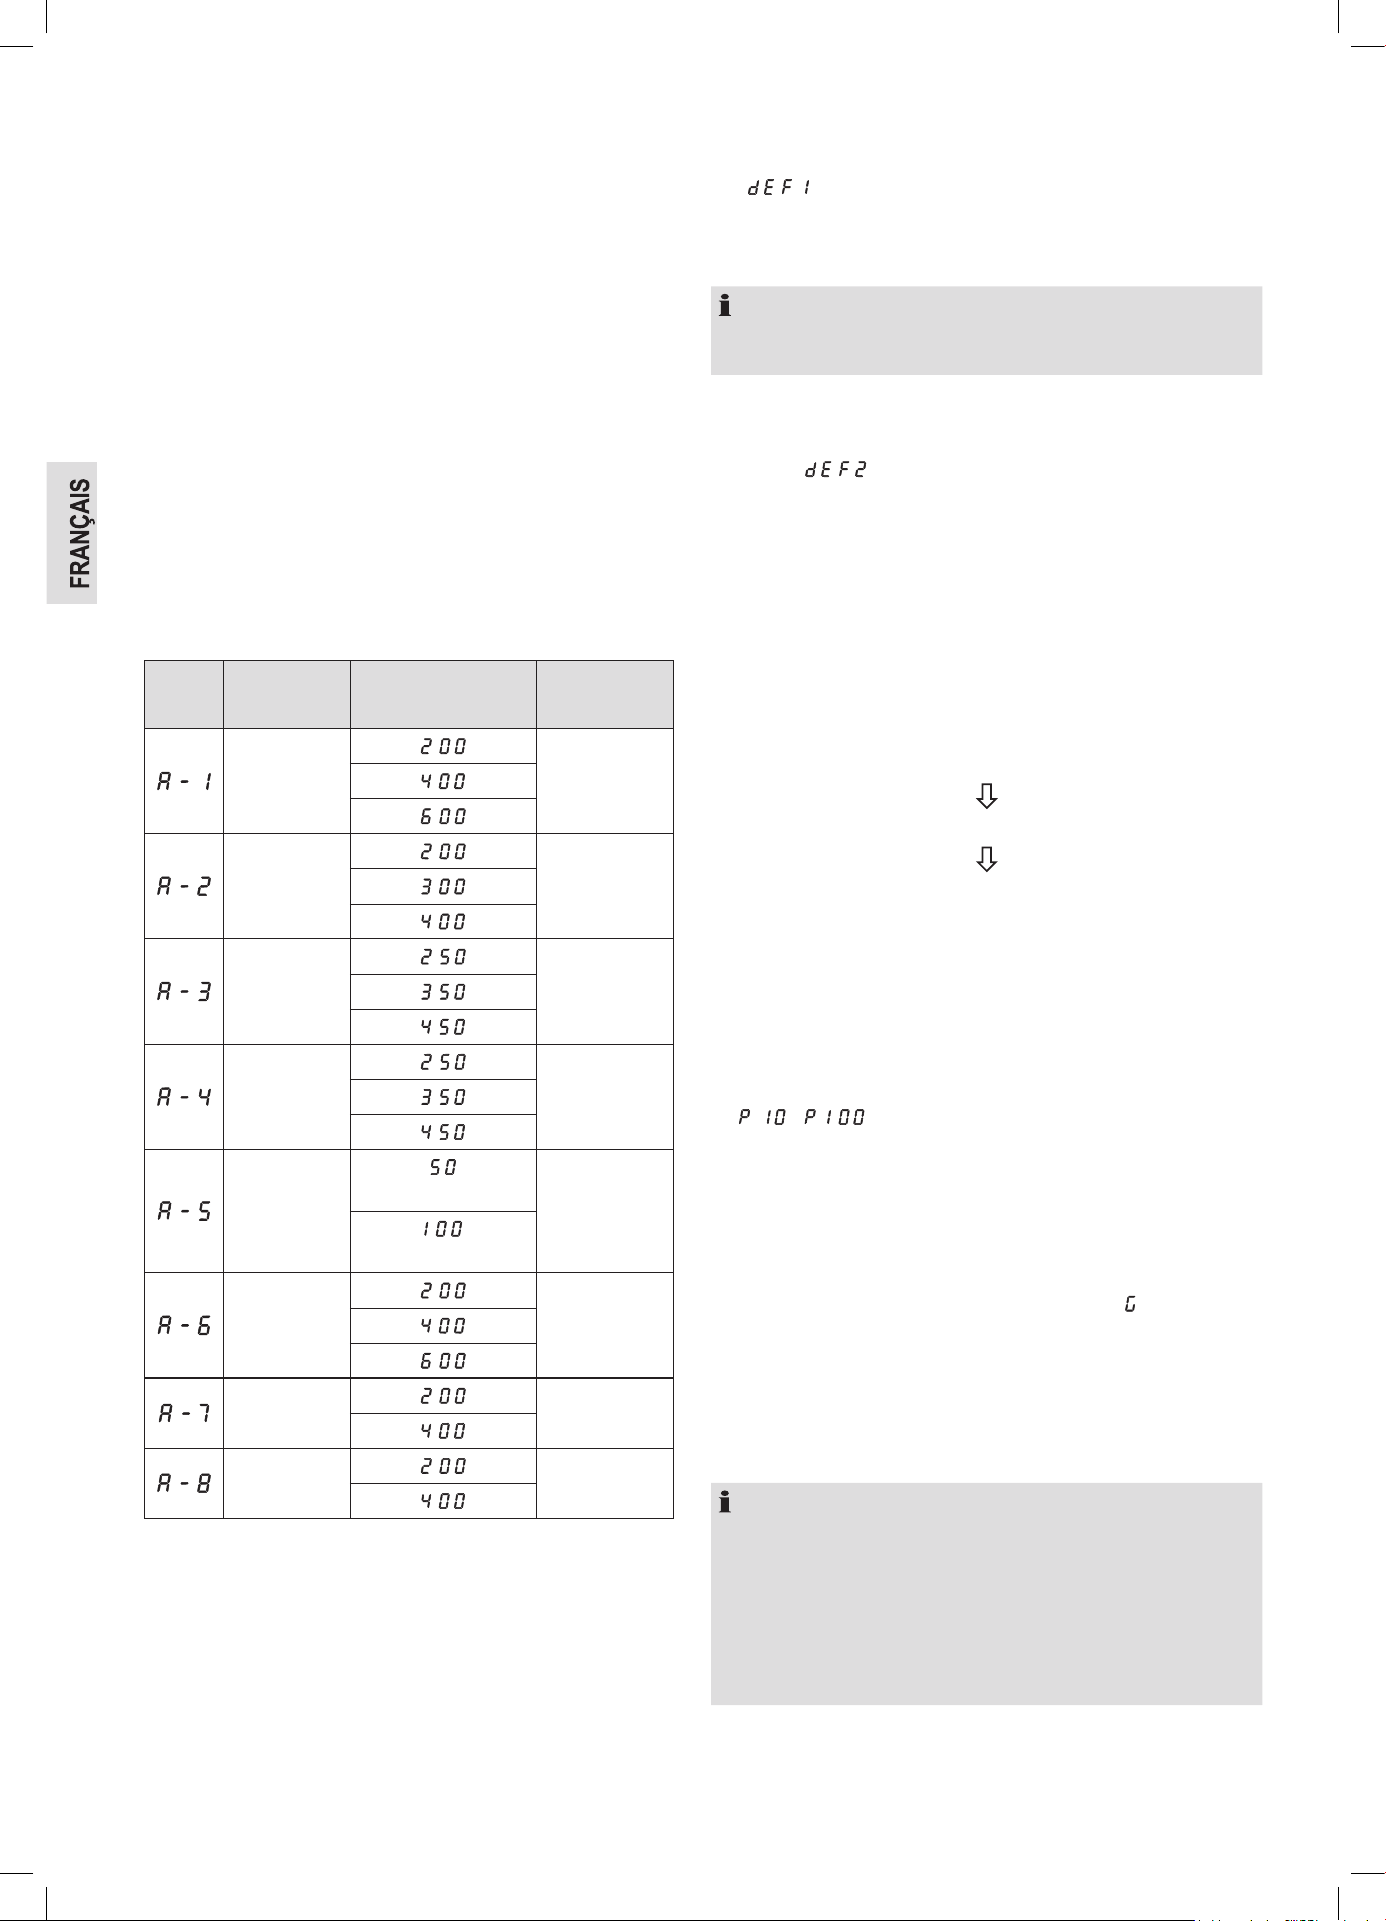
24
Conseils pour le service combiné
Si vous voulez préparer des mets en service combiné micro-ondes /
grill, vous devez respecter les points suivants :
Pour les aliments gros et épais, comme par ex. les rôtis de porc, la
durée au micro-ondes est par conséquent plus longue que pour les
aliments petits et minces. Pour le grill, le rapport est inverse. Plus
l’aliment est proche du grill, plus il dore rapidement. Cela signifie
que si vous préparez des gros rôtis en service combiné, la durée de
grill est éventuellement plus courte que pour les petits rôtis.
Pour griller, vous utilisez la grille afin de parvenir à un doré rapide et
régulier. (Exception : les aliments gros et épais sont grillés directe-
ment sur l’assiette tournante !)
Fonctions automatiques
Utilisez les fonctions automatiques pour cuire automatiquement cer-
taines quantités d’aliments. Respectez les instructions suivantes :
1. Appuyer une fois sur la touche AUTO MENU. À l’aide du bouton
tournant, sélectionner ensuite le programme automatique désiré.
Choisissez un des réglages indiqués dans le tableau ci-dessous :
Code Fonction
Affichage / poids
en grammes
Réglage de
puissance
Chauffage
Micro-ondes
100 %
Légumes
Micro-ondes
100 %
Poisson
Micro-ondes
80 %
Viande
Micro-ondes
100 %
Pâtes
(avec 450 g d’eau)
Micro-ondes
80 %
(avec 800 g d’eau)
Pommes de
terre
Micro-ondes
100 %
Chauffage
Pizza
Micro-ondes
100 %
Potage
Micro-ondes
100 %
2. Appuyez sur le bouton AUTO MENU pour confirmer vos réglages.
3. Utilisez le bouton tournant pour régler le poids souhaité.
4. Appuyez sur le bouton QUICK START / START pour commencer
l’opération.
Décongélation
En utilisant les réglages de décongélation, vous pouvez automatique-
ment décongeler vos aliments de deux façons différentes. Sélection-
nez la fonction de décongélation selon le poids et le temps.
Décongeler en fonction du poids
1. Appuyer une fois sur la touche DEFROST BY W.T.. L’écran affiche
« ».
2. À l’aide du bouton tournant, régler le poids de 0,1 – 2,0 kg.
3. Appuyez sur le bouton QUICK START / START pour commencer
l’opération.
NOTE :
Si les aliments pèsent moins de 200 g, placez-les au bord et non au
centre de plaque de verre.
Décongeler en fonction du temps
1. Appuyer une fois sur la touche DEFROST BY TIME. L’écran
afche « ».
2. À l’aide du bouton tournant, régler le temps désiré entre 5 se-
condes et 95 minutes.
3. Appuyez sur le bouton QUICK START / START pour commencer
l’opération.
Cuisson progressive
Vous pouvez régler les programmes de sorte à exécuter successive-
ment un maximum de 3 fonctions différentes.
Supposons que vous sélectionnez les programmes suivants :
Décongélation
Cuisson
Griller
1. Sélectionner la 1ère fonction :
Appuyer sur la touche DEFROST BY W.T. ou la touche
DEFROST BY TIME.
2. À l’aide du bouton tournant, régler le poids ou l’heure désiré(e).
3. Sélection de la 2e fonction :
Appuyer une fois sur la touche MICRO. / GRILL / COMBI.. À l’aide
du bouton tournant, sélectionner ensuite la puissance désirée
( à ).
4. Appuyez sur le bouton MICRO. / GRILL / COMBI. pour confirmer
vos réglages.
5. Utilisez le bouton tournant pour régler la durée de cuisson souhai-
tée entre 5 secondes et 95 minutes.
6. Sélection de la 3e fonction :
Appuyer une fois sur la touche MICRO. / GRILL / COMBI.. À l’aide
du bouton tournant, sélectionner ensuite le mode ( ).
7. Appuyez sur le bouton MICRO. / GRILL / COMBI. pour confirmer
vos réglages.
8. Utilisez le bouton tournant pour régler la durée de cuisson souhai-
tée entre 5 secondes et 95 minutes.
9. Appuyez sur le bouton QUICK START / START pour commencer
l’opération.
NOTE :
• C’est l’alarme sonore qui vous informe d’un changement de
programme.
• En mode barbecue, deux alarmes sonores vous invitent après
écoulement de la moitié du temps de tourner l’article. Lorsque la
porte reste fermée, l’appareil se remet en marche après env. 60
secondes. An de continuer le service avant l’heure, appuyer sur
la touche QUICK START / START.
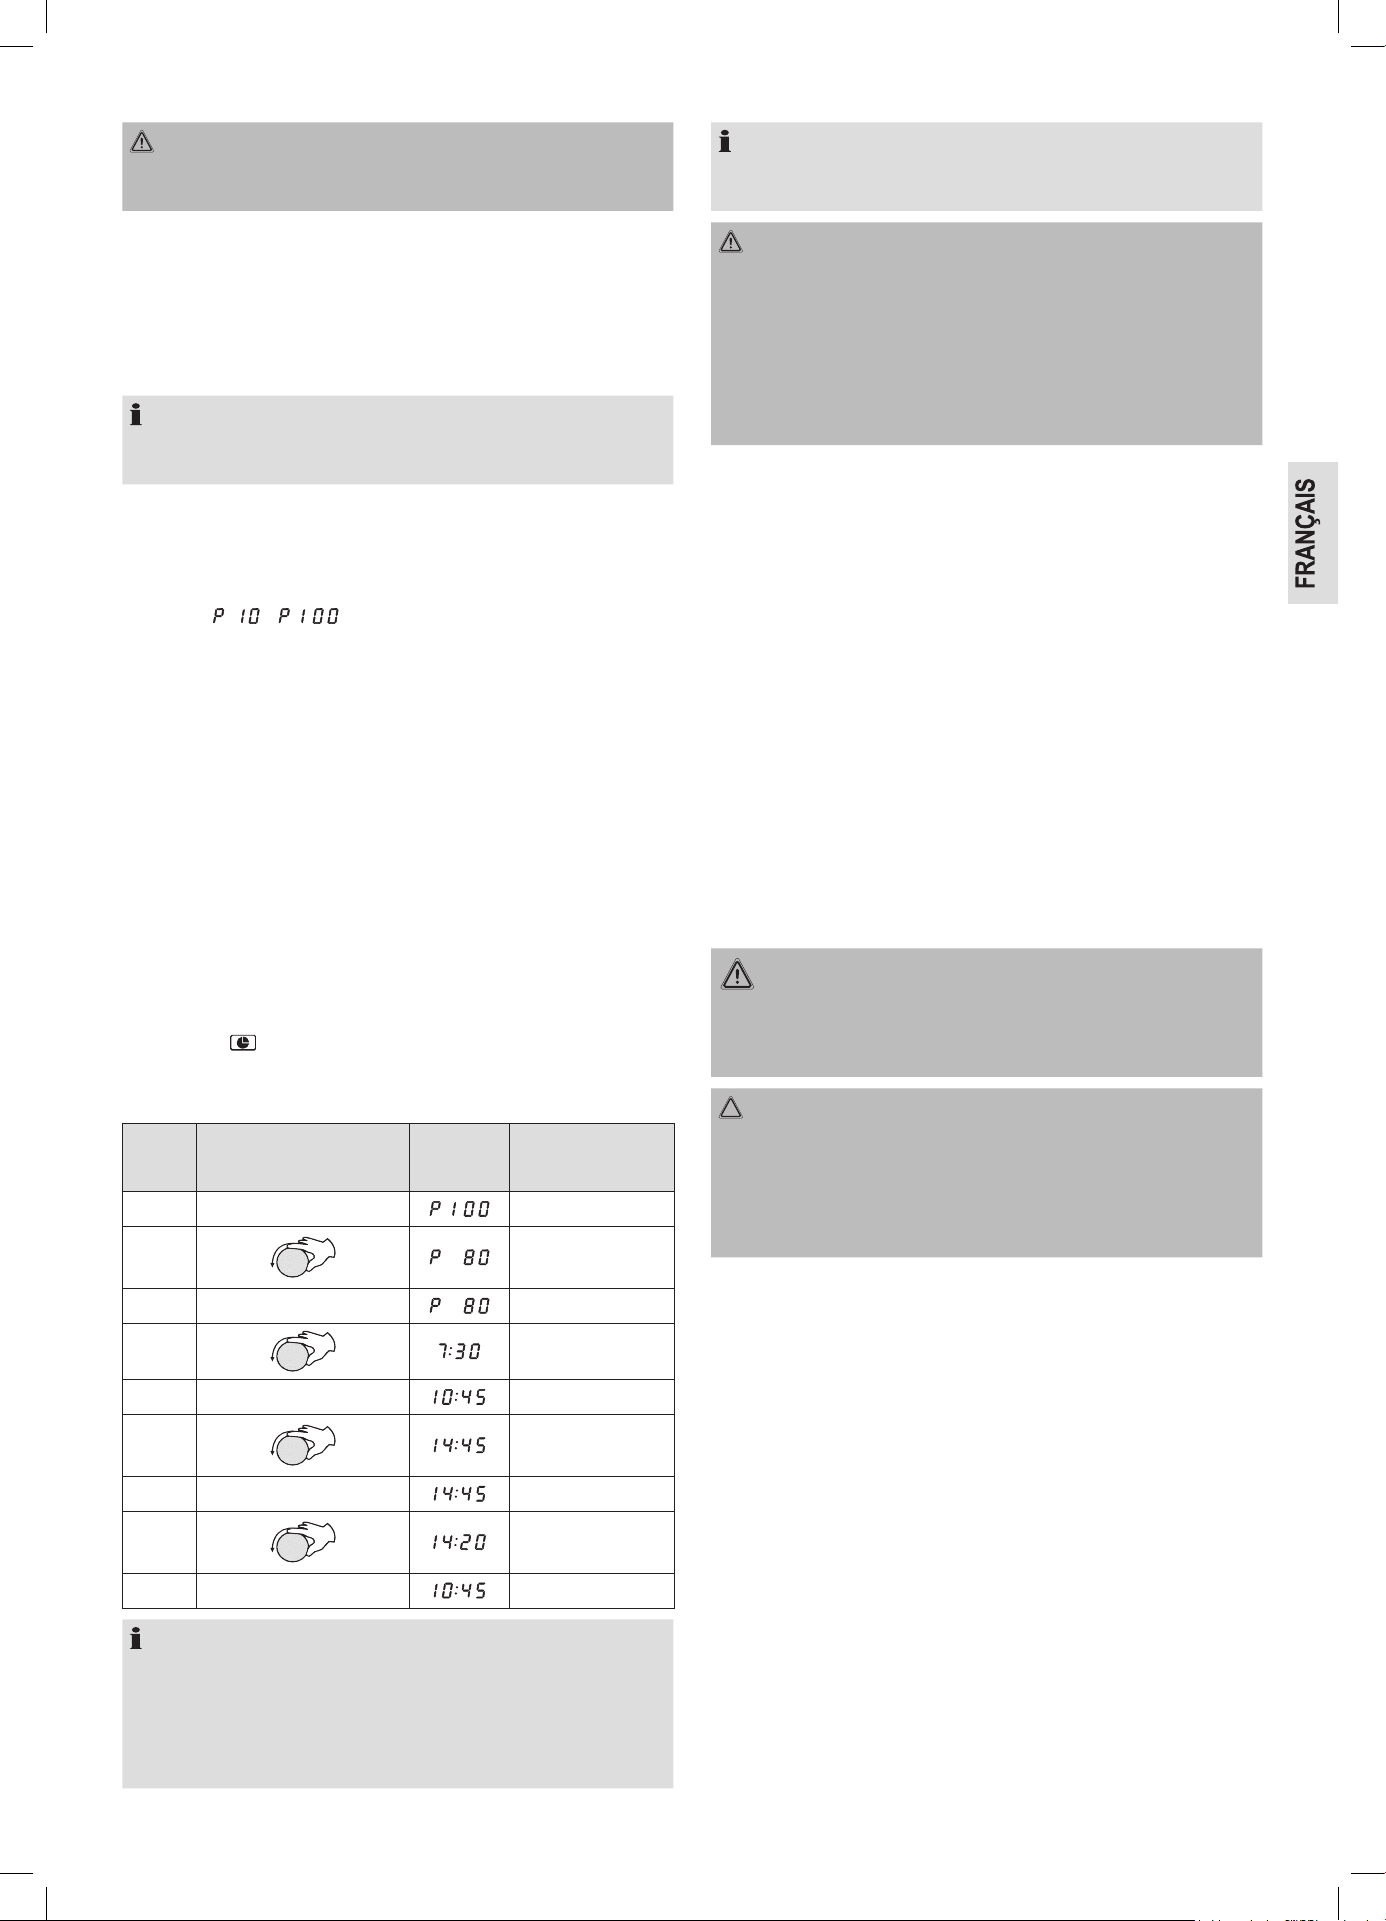
25
AVERTISSEMENT : Risque de brûlures !
Pour ouvrir ou fermer la porte, servez-vous uniquement de la poi-
gnée.
Fonctions particulières
Démarrage automatique
Vous avez la possibilité de démarrer tous les programmes ou encore
un réglage combiné en plusieurs étapes de manière retardée. Le
retard maximum est de 23 heures et 59 minutes.
NOTE :
Réglez tout d’abord l’heure ! Sinon, vous ne pouvez pas utiliser
cette fonction.
Exemple : Respectez les instructions suivantes pour démarrer auto-
matiquement le micro-ondes :
1. Appuyer une fois sur la touche MICRO. / GRILL / COMBI..
2. À l’aide du bouton tournant, sélectionner ensuite la puissance
désirée
( à ).
3. Appuyez sur le bouton MICRO. / GRILL / COMBI. pour confirmer
vos réglages.
4. Utilisez le bouton tournant pour régler la durée de cuisson souhai-
tée entre 5 secondes et 95 minutes.
5. Appuyez sur le bouton CLOCK / PRE-SET. Vous entendez un si-
gnal sonore et l’écran indiquera l’heure en cours. De l’heure chiffre
clignote.
6. Utilisez le bouton tournant pour régler l’heure de démarrage sou-
haitée.
7. Appuyez sur le bouton CLOCK / PRE-SET. Vous entendez un
signal sonore et l’écran indiquera l’heure en cours et les minutes
clignoteront.
8. Utilisez le bouton tournant pour régler les minutes souhaitées de
l’heure de démarrage.
9. Appuyez sur le bouton QUICK START / START pour confirmer. Le
symbole « » clignote à l’écran.
Exemple : Durée de cuisson de 7:30 minutes à une puissance de
80% ; heure de démarrage 14:20 heures
Etapes
Boutons /
bouton tournant
Affichage
1 MICRO. / GRILL / COMBI. (Sélection)
2
(Réglage de
puissance)
3 MICRO. / GRILL / COMBI. (Validation)
4 (Durée de cuisson)
5 CLOCK / PRE-SET (Heure en cours)
6
(Réglage de
l’heure)
7 CLOCK / PRE-SET
8
(Réglage des
minutes)
9 QUICK START / START (Heure en cours)
NOTE :
• Pendant ce réglage programmé, les fonctions de commandes
sont bloquées (à l’exception de : CLOCK / PRE-SET et CANCEL /
STOP).
• Si vous souhaitez à nouveau afficher l’heure de démarrage,
appuyez sur le bouton CLOCK / PRE-SET.
NOTE :
• Une fois le temps préréglé atteint, le micro-ondes commencera à
fonctionner. Deux signaux sonores indiqueront le démarrage.
AVERTISSEMENT : RISQUE D’INCENDIE !
• Surveillez toujours l’appareil pendant son fonctionnement.
• Lorsque vous utilisez la fonction de retardement, réglez le temps
de telle manière que l’appareil fonctionnera sous bonne surveil-
lance.
• N’utilisez pas le micro-ondes vide.
• Si vous retirez les aliments plus tôt de l’appareil, vous devez ter-
miner la fonction en appuyant sur le bouton CANCEL / STOP.
Verrouillage (verrouillage de sécurité enfant)
Maintenez le bouton CANCEL / STOP enfoncé plus de 3 secondes
pour verrouiller l’appareil. L’écran indiquera le mode verrouillé. Les
fonctions des commandes sont bloquées. Maintenez à nouveau le bou-
ton CANCEL / STOP enfoncé plus de 3 secondes pour déverrouiller.
Fonction d’affichage
• Un actionnement de la touche MICRO. / GRILL / COMBI. pendant
2 à 3 secondes fait afcher la puissance en cours pendant le fonc-
tionnement en four à micro-ondes, barbecue ou appareil combiné.
• En ne tenant pas compte du mode de fonctionnement, l’écran
indiquera l’heure en cours pendant 2 à 3 secondes lorsque vous
appuyez sur le bouton CLOCK / PRE-SET.
• En mode de retardement, appuyez sur le bouton CLOCK / PRE-SET
pour afcher l’heure de démarrage.
Nettoyage
AVERTISSEMENT :
Arrêtez le four à micro-ondes et débranchez
la fiche du secteur.
ATTENTION :
• N’utilisez jamais de brosse métallique ni d’ustensile abrasif.
• N’utilisez jamais de détergent abrasif.
• N’utilisez pas un grattoir métallique pour nettoyer la fenêtre
d’observation. La surface pourrait se rayer et la vitre pourrait
éventuellement se briser.
Espace intérieur
• Maintenez l’intérieur du four propre. Les éclaboussures et les
liquides ayant débordé sur les parois du four peuvent être enlevés
à l’aide d’un chiffon mouillé. Lorsque le four est très encrassé, on
peut aussi se servir d’un détergent doux.
• Essuyez la fenêtre à l’intérieur et à l’extérieur avec un chiffon
mouillé et enlevez régulièrement les éclaboussures et les taches en
provenance de liquides débordés.
Parois extérieurs
• Les parois extérieures du four ne doivent être nettoyées qu’avec un
chiffon mouillé. Veillez à ce qu’il n’y a pas d’eau qui pénètre par les
ouvertures dans le four.
• Ouvrez la porte du micro-ondes avant de nettoyer le panneau de
commande pour éviter d’allumer accidentellement l’appareil.
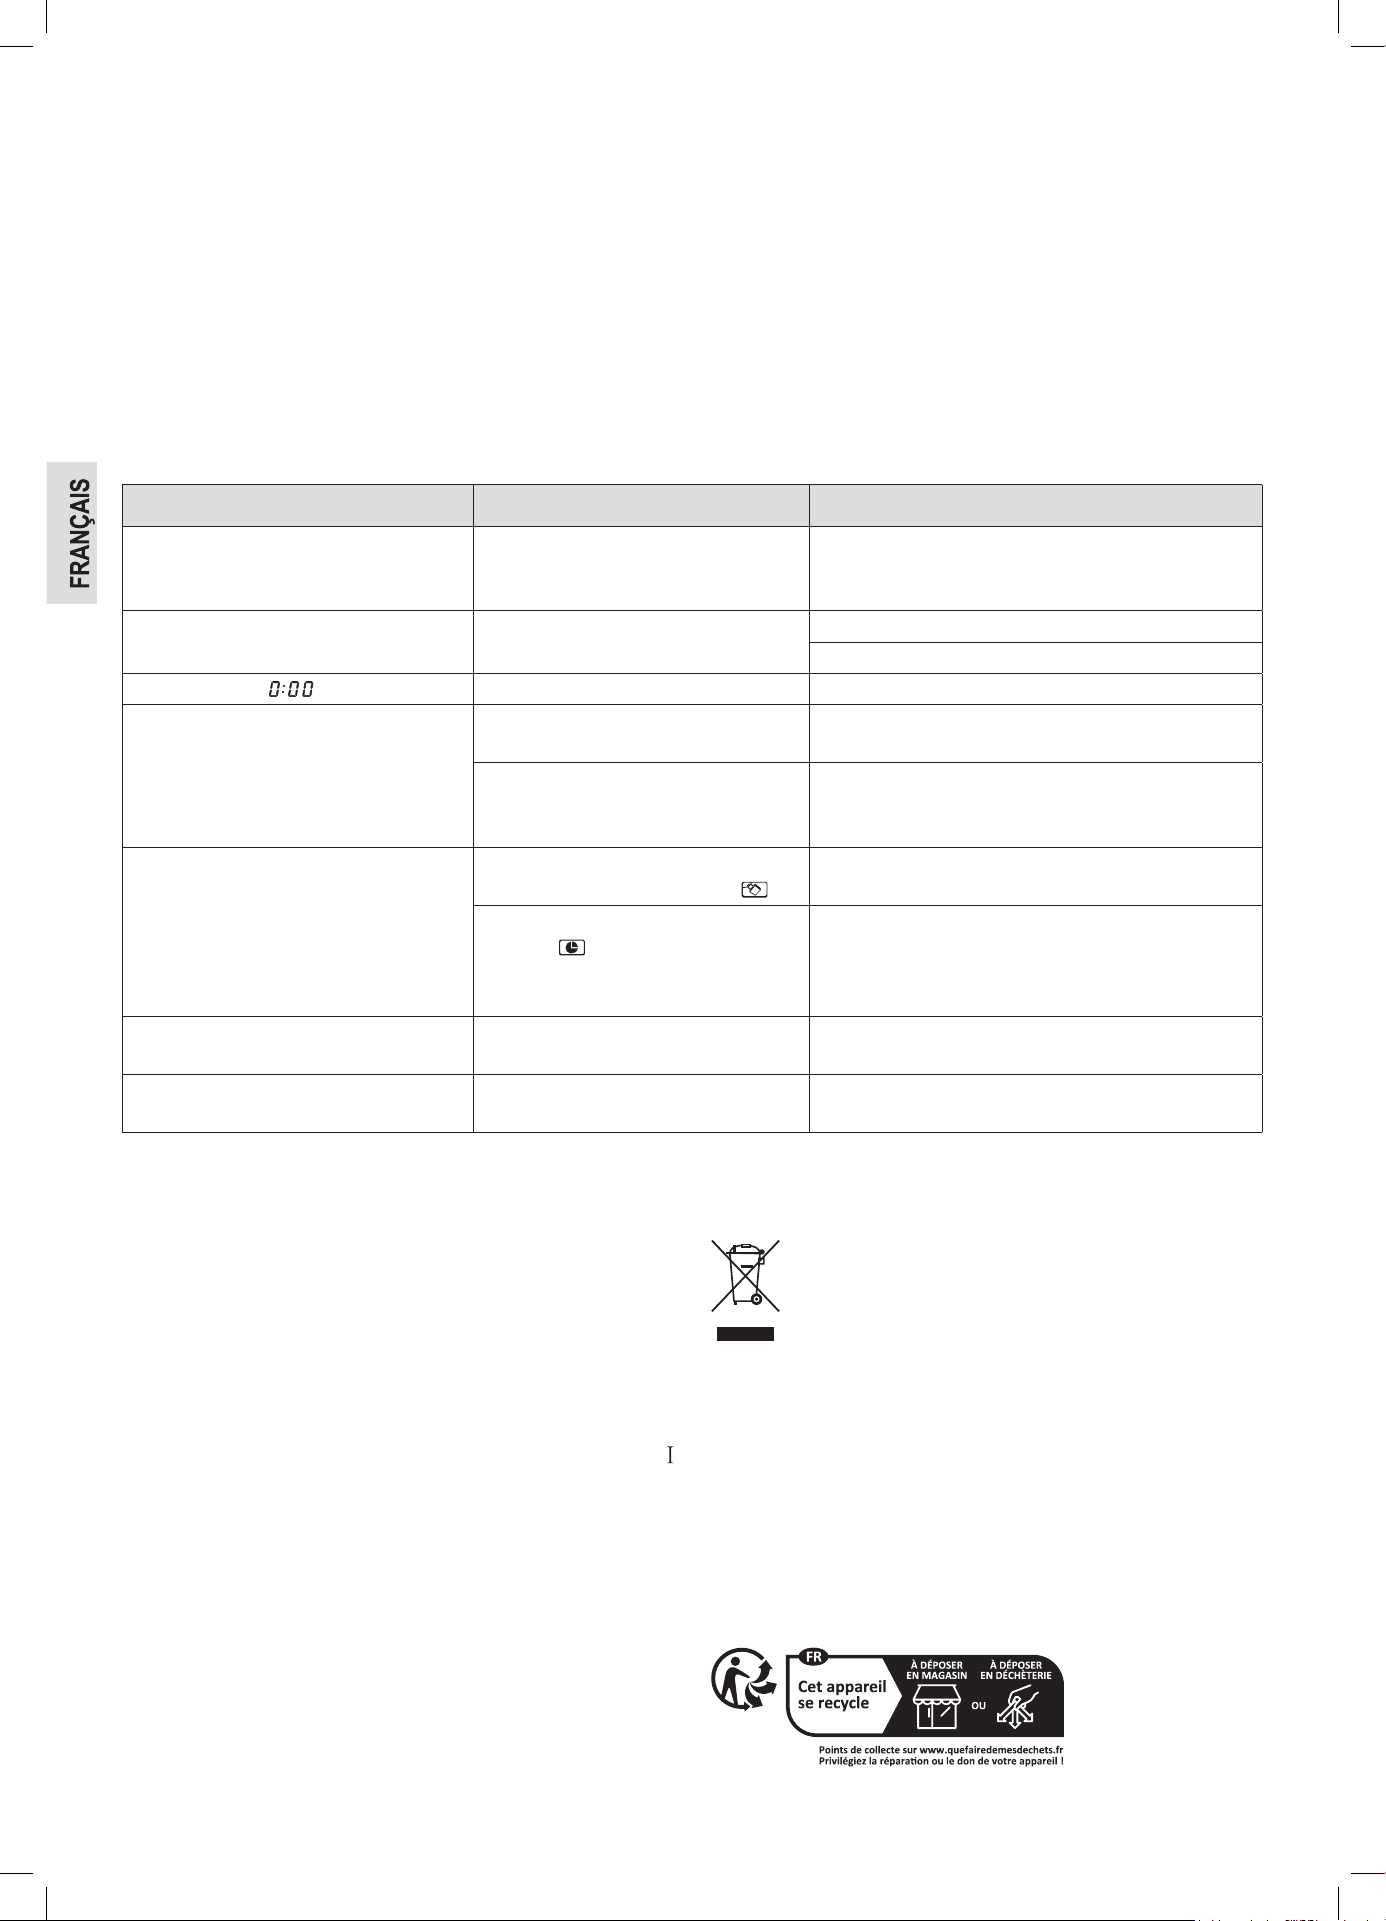
26
Accessoires
• Nettoyez l’assiette en verre dans de l’eau chaude savonneuse ou
dans le lave-vaisselle. Séchez-la avant de la réinstaller dans le
micro-ondes.
• Nettoyez régulièrement l’anneau de guidage et la surface du fond.
Vous pouvez retirer l’anneau de guidage et le nettoyer à la main.
Utilisez un détergent doux ou un nettoyant pour vitres. Séchez bien.
Puis, assurez-vous de replacer l’anneau correctement.
• Nettoyez le gril après chaque utilisation avec un liquide pour vais-
selle ou placez-le dans un lave-vaisselle pour le nettoyer.
Odeur
Pour enlever les odeurs désagréables du four à micro-ondes,
placez une écuelle remplie d’eau et de jus de citron allant au four
à micro-ondes dans le four et chauffez-la pendant env. 5 minutes.
Essuyez ensuite le four avec un chiffon mouillé.
Éclairage four
Pour remplacer l’éclairage du four, veuillez-vous adresser à un maga-
sin spécialisé près de chez vous.
Dépannage
Une défaillance est souvent due à de légers problèmes. Avant de contacter notre service à la clientèle, veuillez vérifier le tableau ci-dessous :
Problèmes Cause possible Note / solution
La réception radio ou TV s’interrompt pen-
dant que le micro-ondes fonctionne.
Le champ électromagnétique de l’appa-
reil peut interférer avec les images et les
sons de fréquences particulières.
Cette situation est normale et ne résulte pas d’une
défaillance. Éloignez les appareils.
L’appareil n’est pas alimenté en électricité. Prise du secteur défectueuse. Essayez une autre prise.
Contrôlez le fusible chez vous.
L’écran indique « ». Il y avait une coupure de courant. Réglez à nouveau l’heure.
L’appareil ne fonctionne pas. L’écran
affiche des indications autres que l’heure
en cours.
La porte n’est pas correctement fermée. Vérifiez si des objets ou des restes d’aliments sont
coincés dans la porte.
Après avoir sélectionné la fonction, vous
n’avez pas appuyé sur le bouton QUICK
START / START.
Appuyez sur le bouton QUICK START / START ou
CANCEL / STOP pour annuler la fonction.
Toutes les commandes sont verrouillées. Le verrouillage de sécurité enfant est ac-
tivé. L’écran affiche le symbole « ».
Maintenez le bouton CANCEL / STOP pendant plus de
3 secondes pour déverrouiller.
L’écran afche l’heure actuelle et le
symbole „ “ .
La fonction de retardement est activée. Appuyez sur le
bouton CLOCK / PRE-SET our afficher l’heure de dé-
marrage. Appuyez sur le bouton CANCEL / STOP pour
annuler la fonction.
Le plateau tournant provoque un bruit
abradant ou de grattement.
Présence d’objets étrangers ou sales
vers la pièce du plateau tournant.
Retirez d’éventuels objets et des restes d’aliments
comme il est décrit dans le chapitre « Nettoyage ».
L’appareil s’est arrêté de fonctionner sans
raison apparente.
L’appareil est défectueux. Merci de bien vouloir vous adresser à notre service.
Données techniques
Modèle : ......................................................................MWG 2211 U CB
Alimentation : ....................................................................230 V~, 50 Hz
Consommation :
Micro-ondes : ......................................................................... 1250 W
Gril : ........................................................................................1000 W
Puissance déclarée en mode veille : ..........................................≤ 0,8 W
Passage en mode veille : ....................................................≤ 20 minutes
Puissance micro-ondes : ............................................800 W / 2450 MHz
Volume du four : ....................................................................env. 20 litre
Classe de protection : ............................................................................
Poids net : ............................................................................env. 12,5 kg
Nous nous réservons le droit d’apporter des modifications techniques
ainsi que des modifications de conception dans le cadre du dévelop-
pement continu de nos produits.
Cet appareil est conforme à toutes les directives CE en vigueur, telles
que les directives sur la compatibilité électromagnétique et les faibles
tensions et a été fabriqué selon les derniers règlements de sécurité.
Élimination
Signification du symbole « Poubelle »
Protégez votre environnement, ne jetez pas vos appareils
électriques avec les ordures ménagères.
Utilisez, pour l’élimination de vos appareils électriques, les
bornes de collecte prévues à cet effet où vous pouvez vous
débarrasser des appareils que vous n’utilisez plus.
Vous contribuez ainsi à éviter les impacts potentiels dans l’environne-
ment et sur la santé de chacun, causés par une mauvaise élimination
de ces déchets.
Vous contribuez aussi au recyclage sous toutes ses formes des appa-
reils électriques et électroniques usagés.
Vous trouverez toutes les informations sur les bornes d’élimination
des appareils auprès de votre commune ou de l’administration de
votre communauté. Votre revendeur et partenaire contractuel est éga-
lement tenu de reprendre gratuitement l’ancien appareil.
27
Istruzioni per l’uso
Grazie per aver scelto il nostro prodotto. Vi auguriamo un buon uti-
lizzo del dispositivo.
Simboli per questo manuale di istruzioni per l’uso
Le indicazioni importanti per la propria sicurezza sono indicati appro-
priatamente. Osservare assolutamente queste indicazioni, per evitare
incidenti e danni all’apparecchio:
AVVISO:
Previene i rischi della propria salute ed indica possibili rischi di ferite.
ATTENZIONE:
Indica possibili pericoli per l’apparecchio o altri oggetti.
NOTA:
Mette in risalto consigli ed informazioni.
Indice
Elementi di comando ............................................................................ 3
Note generali .......................................................................................27
IMPORTANTI ISTRUZIONI DI SICUREZZA ......................................27
Indicazioni e simboli presenti sull’apparecchio ...................................29
Elementi di comando ..........................................................................29
Tasti e controlli del pannello di controllo ............................................. 29
Simboli sul pannello di controllo .........................................................30
Pericolo di incendio durante il montaggio evitare
di usare come apparecchio base ........................................................30
Istruzioni per il montaggio di apparecchi incorporabili .......................30
Avvertenze per l’uso grill e combinato ................................................30
Stoviglie adatte alla microonde ...........................................................30
Note sul funzionamento e sull’uso del dispositivo ..............................31
Messa in funzione ...............................................................................31
Utilizzo del microonde .........................................................................32
Riscaldare ........................................................................................... 32
Cuocere ...............................................................................................33
Avvio rapido ........................................................................................34
Grigliare ...............................................................................................34
Combinazione del funzionamento a grill e microonde ....................... 34
Funzioni automatiche ..........................................................................34
Scongelamento ...................................................................................35
Cottura graduale .................................................................................35
Funzioni speciali..................................................................................35
Pulizia ..................................................................................................36
Rimozione guasti ................................................................................36
Dati tecnici ...........................................................................................37
Smaltimento ........................................................................................ 37
Note generali
Prima di mettere in funzione questo apparecchio, leggere molto
attentamente le istruzioni per l’uso e conservarle con cura unitamente
al certificato di garanzia, allo scontrino e, se possibile, alla scatola di
cartone con la confezione interna. Se passate l’apparecchio a terzi,
consegnate anche le istruzioni per l’uso.
• Utilizzare l’apparecchio esclusivamente per scopi privati e confor-
memente al tipo di applicazione previsto. Questo prodotto non è
stato concepito ai fini di un impiego in ambito industriale.
• Non utilizzarlo all’aperto. Proteggerlo dal calore, nonché dall’espo-
sizione diretta ai raggi solari e dall’umidità (non immergerlo mai in
sostanze liquide) e tenerlo a distanza da oggetti con spigoli affilati.
• Non utilizzare l’apparecchio con le mani umide. Nel caso in cui si
bagni o si inumidisca l’apparecchio, staccare immediatamente la
spina.
• Disattivare l’apparecchio e staccare sempre la spina dalla relativa
presa (prendendo in mano la spina, non tirando il cavo) allorché
non si utilizza l’apparecchio, quando si applicano degli accessori
oppure nel caso in cui lo si debba pulire o si siano manifestate
anomalie.
• Non mettere in funzione l’apparecchio senza sorveglianza. Spe-
gnere sempre l’apparecchio, se si desidera uscire dalla stanza.
Estrarre la spina dalla presa.
• Controllare regolarmente che l’apparecchio e il cavo non presentino
tracce di danneggiamento. In tal caso l’apparecchio non deve più
essere utilizzato.
• Utilizzare esclusivamente accessori originali.
• Per sicurezza tenere l’imballaggio (sacchetto di plastica, scatola,
polistirolo, ecc.) fuori dalla portata dei bambini.
AVVISO:
Non lasciar giocare i bambini piccoli con la pellicola di plastica.
Pericolo di soffocamento!
IMPORTANTI ISTRUZIONI DI SICUREZZA
LEGGERE ATTENTAMENTE E CONSERVARE PER
RIFERIMENTO FUTURO.
AVVISO:
• Il forno a microonde è destinato al riscaldamento
di cibi e bevande. L’asciugatura di alimenti o
indumenti e il riscaldamento di scaldavivande,
pantofole, spugne, panni umidi e simili possono
comportare il rischio di lesioni, accensione o in-
cendio.
• La microonde non è adatta per riscaldare animali
vivi.
• Se lo sportello o le guarnizioni dello sportello sono
danneggiate, il forno non può essere usato prima
che siano state effettuate riparazioni da una per-
sona addestrata allo scopo.
• Non riparare mai il forno direttamente, contattare
un esperto autorizzato. Tranne che per l’esperto,
per tutti è pericoloso eseguire lavori di manuten-
zione o riparazione che richiedano la rimozione di
un coperchio che garantisce la protezione contro
le radiazioni dell’energia microonde.
• Assicurarsi che l’apparecchio sia spento prima di
sostituire la lampada per evitare il rischio di scosse
elettriche.
• Se il cavo di corrente è danneggiato, farlo sostitu-
ire del produttore, agente di assistenza o persona
qualificata al fine di evitare pericoli.
28
AVVISO:
• Liquidi o altri alimenti non devono essere riscaldati
in contenitori sigillati, poiché potrebbero esplodere.
• Non poggiare la microonde in un armadio.
• Il dispositivo necessita di spazio sufficiente per la
circolazione dell’aria al fine di farlo funzionare cor-
rettamente. Osservare che l’apparecchio abbia al
minimo 10 cm di distanza dovuta alla ventilazione,
da tutti i lati da armadi, pareti, eccetera. Non
bloccare le aperture del dispositivo. Non togliere i
piedi.
• Mettere il dispositivo con il retro rivolto verso il
muro.
• Il dispositivo e i suoi accessori possono diventare
molto caldi durante l’uso. Fare attenzione a non
toccare gli elementi termici. I bambini di età infe-
riore agli 8 anni devono essere tenuti lontani a non
sorvegliati.
• Si possono utilizzare solo stoviglie adatte all’uso
nei forni a microonde.
• I contenitori metallici per alimenti e bevande non
sono ammessi durante la cottura a microonde.
Utilizzare solo stoviglie idonee. Osservare le av-
vertenze riportate nel capitolo “Stoviglie adatte alla
microonde”.
• Quando si riscaldano alimenti in materiali infiam-
mabili, come contenitori di plastica o di carta,
tenere d’occhio il forno a causa della possibilità di
accensione.
• Se si nota del fumo, spegnere o scollegare l’appa-
recchio e tenere lo sportello chiuso per soffocare
eventuali fiamme.
• Mescolare o scuotere il contenuto di biberon
e contenitori in vetro di alimenti per neonati e
verificare la temperatura prima dell’uso, al fine di
evitare ustioni.
• Usare indumenti o guanti da cucina quando si
tolgono i contenitori. Pericolo di ustioni!
• Le uova con il guscio e le uova sode intere non
devono essere riscaldate nei forni a microonde,
poiché potrebbero esplodere, anche dopo la
fine del riscaldamento a microonde. Questo vale
anche per gli alimenti con la buccia, come le sal-
sicce, i barattoli di latta sigillati, ecc.
AVVISO: Ebollizione rallentata!
Durante la cottura, soprattutto quando si riscaldano
liquidi (acqua) può accadere che la temperatura di
ebollizione sia raggiunta ma che le tipiche bollicine
di vapore ancora non salgano. L’ebollizione non
è uniforme. Quando si toglie il recipiente, questo
fenomeno tramite una scossa leggera può dar luogo
ad un’ebollizione rallentata, provocando quindi una
formazione improvvisa di bollicine di vapore, perciò
il liquido può traboccare. Pertanto, è necessario pre-
stare attenzione quando si maneggia il contenitore.
Pericolo di ustione!
Per ottenere un’ebollizione uniforme, mettere nel
recipiente una barra di vetro o qualcosa di simile, ma
non metallo.
• Quando si rimuovono i contenitori, assicurarsi che il
piatto rotante non si sposti.
• Il apparecchio può essere utilizzato dai bambini da
8 anni in su e dalle persone con ridotte abilità fisi-
che, sensoriali o mentali o mancanza di esperienza
e conoscenza sotto la diretta supervisione o dietro
istruzioni sull’uso sicuro dell’apparecchio e sui possi-
bili pericoli derivanti dal suo utilizzo.
• I bambini non devono giocare con l’apparecchio.
• Pulizia e manutenzione non devono essere eseguiti
da bambini senza supervisione.
• In presenza di sporco il telaio dello sportello, la
guarnizione e le parti limitrofe devono essere ripuliti
accuratamente con un panno umido.
• Pulire accuratamente il forno microonde e togliere
residui di sporco dall’interno.
• Il mancato mantenimento del forno in condizioni di
pulizia può causare il deterioramento della superficie
che potrebbe influire negativamente sulla durata
dell’apparecchio e causare situazioni di pericolo.
• Non utilizzare detergenti aggressivi e abrasivi o
raschietti metallici affilati per pulire lo sportello in
vetro. Questi possono graffiare la superficie. Ciò può
distruggere il vetro.
• L’apparecchio non deve essere pulito con un puli-
tore a vapore.
• Seguire le istruzioni che sono presenti nel capitolo
“Pulizia”.
• Puoi utilizzare questo forno a microonde come unità
da sottostruttura o indipendente. Non deve essere
utilizzato in un armadio.
29
• Questo apparecchio serve
- per riscaldare e cuocere cibi solidi o liquidi;
- per gratinare e e cuocere al grill cibi solidi.
• Questo apparecchio è destinato a essere utilizzato
in applicazioni domestiche e simili, quali:
- aree di cucina per il personale in negozi, uffici e
altri ambienti di lavoro;
- case coloniche;
- da parte dei clienti di alberghi, motel e altri am-
bienti di tipo residenziale;
- ambienti di tipo bed & breakfast.
Indicazioni e simboli presenti
sull’apparecchio
Leggere le istruzioni!
C’è un simbolo di avviso applicato sulla superficie
superiore del forno a microonde:
AVVISO: Superficie calda!
Rischio di ustioni!
Le superfici possono diventare calde durante
l’uso!
Sul retro del forno a microonde è applicata un’avver-
tenza con il seguente testo:
WARNING
• MICROWAVE AND HIGH VOLTAGE INSIDE. BE
SURE NOT TO REMOVE THE ENCLOSURE.
• THIS APPLIANCE IS EQUIPPED WITH A
GROUNDED PLUG FOR YOUR PROTECTION
AGAINST POSSIBLE SHOCK HAZARDS AND
SHOULD BE CONNECTED TO A PROPERLY
GROUNDED OUTLET.
• THIS DEVICE IS TO BE SERVICED ONLY BY
PROPERLY QUALIFIED SERVICE PERSONNEL.
• DISCONNECT POWER PLUG BEFORE
SERVICING. REMOVAL OF THE ENCLOSURE
WITH PRODUCT ENERGIZED COULD EXPOSE
SERVICEMEN TO HAZARDOUS HIGH VOLTAGE
POTENTIAL.
Traduzione:
Avviso
• Microonde e alto voltaggio all’interno. Far attenzione
a non rimuovere l’alloggiamento.
• Questo dispositivo e’ dotato di una spina di terra per
protezione contro possibili pericoli di scosse e deve
essere collegato ad una presa messa a terra in
modo corretto.
• Questo dispositivo deve essere controllato per ma-
nutenzione solo da personale qualificato.
• Scollegare la spina prima di eseguire lavori di assi-
stenza. La rimozione dell’alloggiamento col prodotto
sotto tensione determina l’esposizione del personale
di assistenza a potenziale alta tensione.
Il testo seguente è in rilievo sul lato della porta:
PRECAUTIONS FOR SAFE USE TO AVOID
POSSIBLE EXPOSURE TO EXCESSIVE
MICROWAVE ENERGY
DO NOT ATTEMPT TO OPERATE THIS OVEN WITH.
(A) OBJECT CAUGHT IN DOOR (B) DOOR THAT
DOES NOT CLOSE PROPERLY (C) DAMAGED
DOOR, HINGE, LATCH, OR SEALING SURFACE
Traduzione:
Precauzioni per un utilizzo sicuro per evitare possibili
esposizioni ad eccessiva energia a microonde.
Non tentare di far funzionare questo forno con. (A)
Oggetto fermo nella porta (B) Porta che non si chiude
correttamente (C) Porta, cerniera, chiusura o superfi-
cie di tenuta danneggiata
Elementi di comando
1 Pannello di controllo
2 Grill
3 Asse di guida
4 Anello guida
5 Piatto girevole
6 Chiavistelli
7 Oblò di visualizzazione
8 Foglio mica
Tasti e controlli del pannello di controllo
Defrost By W.T. Scongelare secondo il peso
Clock / Pre-Set In combinazione con la manopola girevole
per impostare l’orologio o un orario di
partenza
Defrost By Time Scongelare secondo il tempo
Quick Start / Start - Attivare la funzione
- Avvio rapido del microonde (sempre
60 secondi in più con potenza al 100 %)
Micro. / Grill / Combi.
Microonde: Selezionare l’impostazione di potenza del
microonde
Grill: Per arrostire e gratinare
Grill / Combi: Grill e microonde funzionano a turno
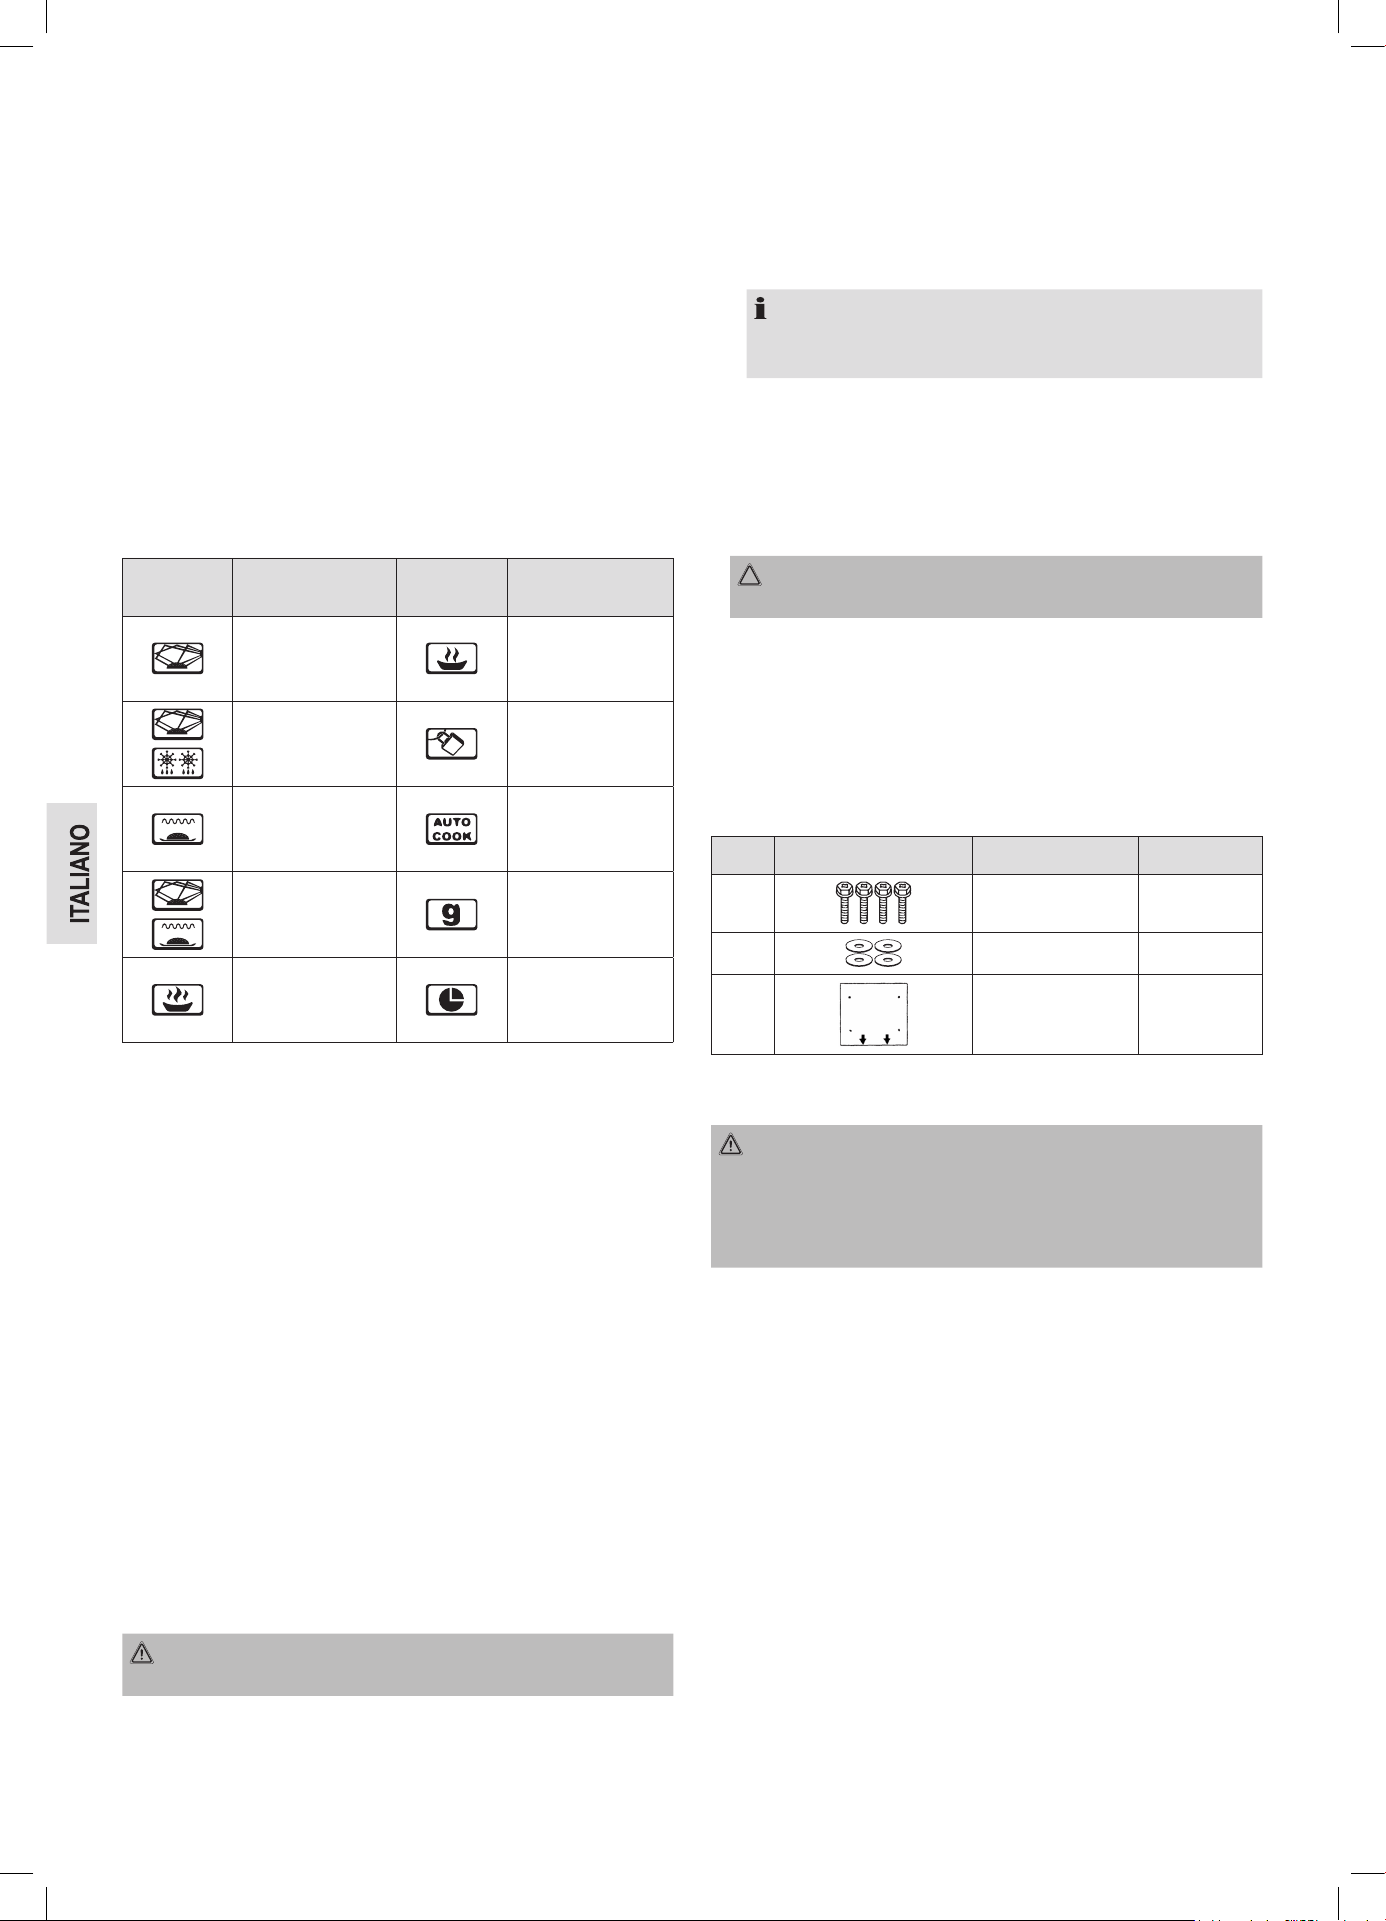
30
Cancel / Stop
Fermarsi: Premere una volta per arrestare la cottura
Cancella: Premere due volte per cancellare la fun-
zione
Blocca: Premere e tenere premuto il tasto
CANCEL / STOP per 3 secondi per bloc-
care (blocco di sicurezza per i bambini) o
sbloccare il pannello di controllo
Auto Menu Scelta dei programmi automatici
Timer • Power • Weight Manopola per impostare l’ora, il tempo di
cottura o scongelamento, livelli di potenza,
combinazioni, programmi automatici o valori
di peso
Simboli sul pannello di controllo
Simbolo
Significato /
funzione
Simbolo
Significato /
funzione
Microonde Potenza bassa
Scongelamento
Blocco di
sicurezza per i
bambini attivato
Grill
Funzione
automatica
Microonde + grill Peso in grammi
Potenza alta Avvio automatico
Pericolo di incendio durante il montaggio
evitare di usare come apparecchio base
Se si desidera montare il forno a microonde come base, per esempio
in un armadio o in uno scaffale, osservare le avvertenze contenute nel
capitolo “Istruzioni di montaggio per basi”.
• Non rimuovere i piedi di appoggio sul lato inferiore dell’apparecchio.
• Se si desidera montare il microonde sotto un pensile, utilizzare
solo il materiale di fissaggio accluso.
• Durante il montaggio del forno a microonde mantenere le seguenti
distanze tra i lati dell’apparecchio e i mobili:
- min. 4 cm sul lato destro
- min. 10 cm dalle fessure di ventilazione sul lato sinistro.
- Non coprire mai le aperture, altrimenti non è più garantita una
ventilazione sufficiente.
- La distanza dalla parete posteriore è stabilita da un distanziatore.
• La parete posteriore deve essere ignifuga (per esempio piastrelle).
Istruzioni per il montaggio di
apparecchi incorporabili
AVVISO:
Importante! Collegare l’apparecchio solo dopo il montaggio!
• Estrarre tutti gli oggetti dall’armadio pensile e togliere qualsiasi
oggetto fragile dagli armadi in vicinanza.
• Per il montaggio è necessario che l’armadio pensile risponda ai
requisiti seguenti:
- Spessore del suolo dell’armadio da 16 mm a 19 mm
- Larghezza dell’armadio di minimo 500 mm.
- La profondità di montaggio sotto il pensile fino alla parete deve
essere di almeno 320 mm.
NOTA:
Se il forno a microonde si ritrova a filo del bordo anteriore dello
sportello, prevedere una profondità di montaggio di 350 mm.
- L’armadio non deve avere scheggiature, scaglie ed altre imperfe-
zioni. Tutti i collegamenti devono essere stabili.
- L’armadio deve essere concepito per poter sopportare al minimo
40 kg.
• Il supporto per pareti dell’armadio pensile deve essere stabile e ben
avvitato con al minimo 2 viti nella parete.
ATTENZIONE:
Non montare l’apparecchio al di sopra dei fornelli!
• Per il montaggio dell’apparecchio, assicurarsi che ci sia una presa
in vicinanza della condotta d’immissione.
• La presa deve essere raggiungibile, per poter estrarre velocemente
la spina in caso d’emergenza.
• L’apparecchio non può essere montato sotto armadi pensili che
hanno come profilo una bordatura luminosa.
Accessori da montaggio
Pos. Denominazione Numero
1 Viti 4
2 Rondelle 4
3 Maschera di
foratura
1
Le istruzioni per il montaggio sono riportate sulla mascherina per la
foratura acclusa.
AVVISO:
• Osservare le misure indicate nelle istruzioni di montaggio.
• Fare uso degli accessori di montaggio forniti.
• Le viti troppo avvitate, oppure troppo lunghe possono danneg-
giare l’apparecchio oppure causare serie ferite.
Avvertenze per l’uso grill e combinato
• Nella funzione grill e combinata si sfrutta calore di radiazione, usare
dunque solo stoviglie resistenti.
• Nella funzione solo grill si possono usare anche stoviglie in metallo
o alluminio, ma non nella funzione combinata o microonde.
• Solo il grill è adatto per il funzionamento COMBI.
• Non appoggiare nulla sul piano superiore della custodia. Diventa
molto caldo.
• Lasciare sempre libere le fessure per la ventilazione.
• Per avvicinare i cibi all’elemento radiante usare la griglia.
Stoviglie adatte alla microonde
• Il materiale ideale per l’uso della microonde è trasparente e per-
mette perciò ai raggi di riscaldare i cibi in modo uniforme.
• Ciotole rotonde o ovali sono più adatte di quelle angolari, perché
i cibi che si accumulano negli angoli potrebbero eventualmente
ribollire.
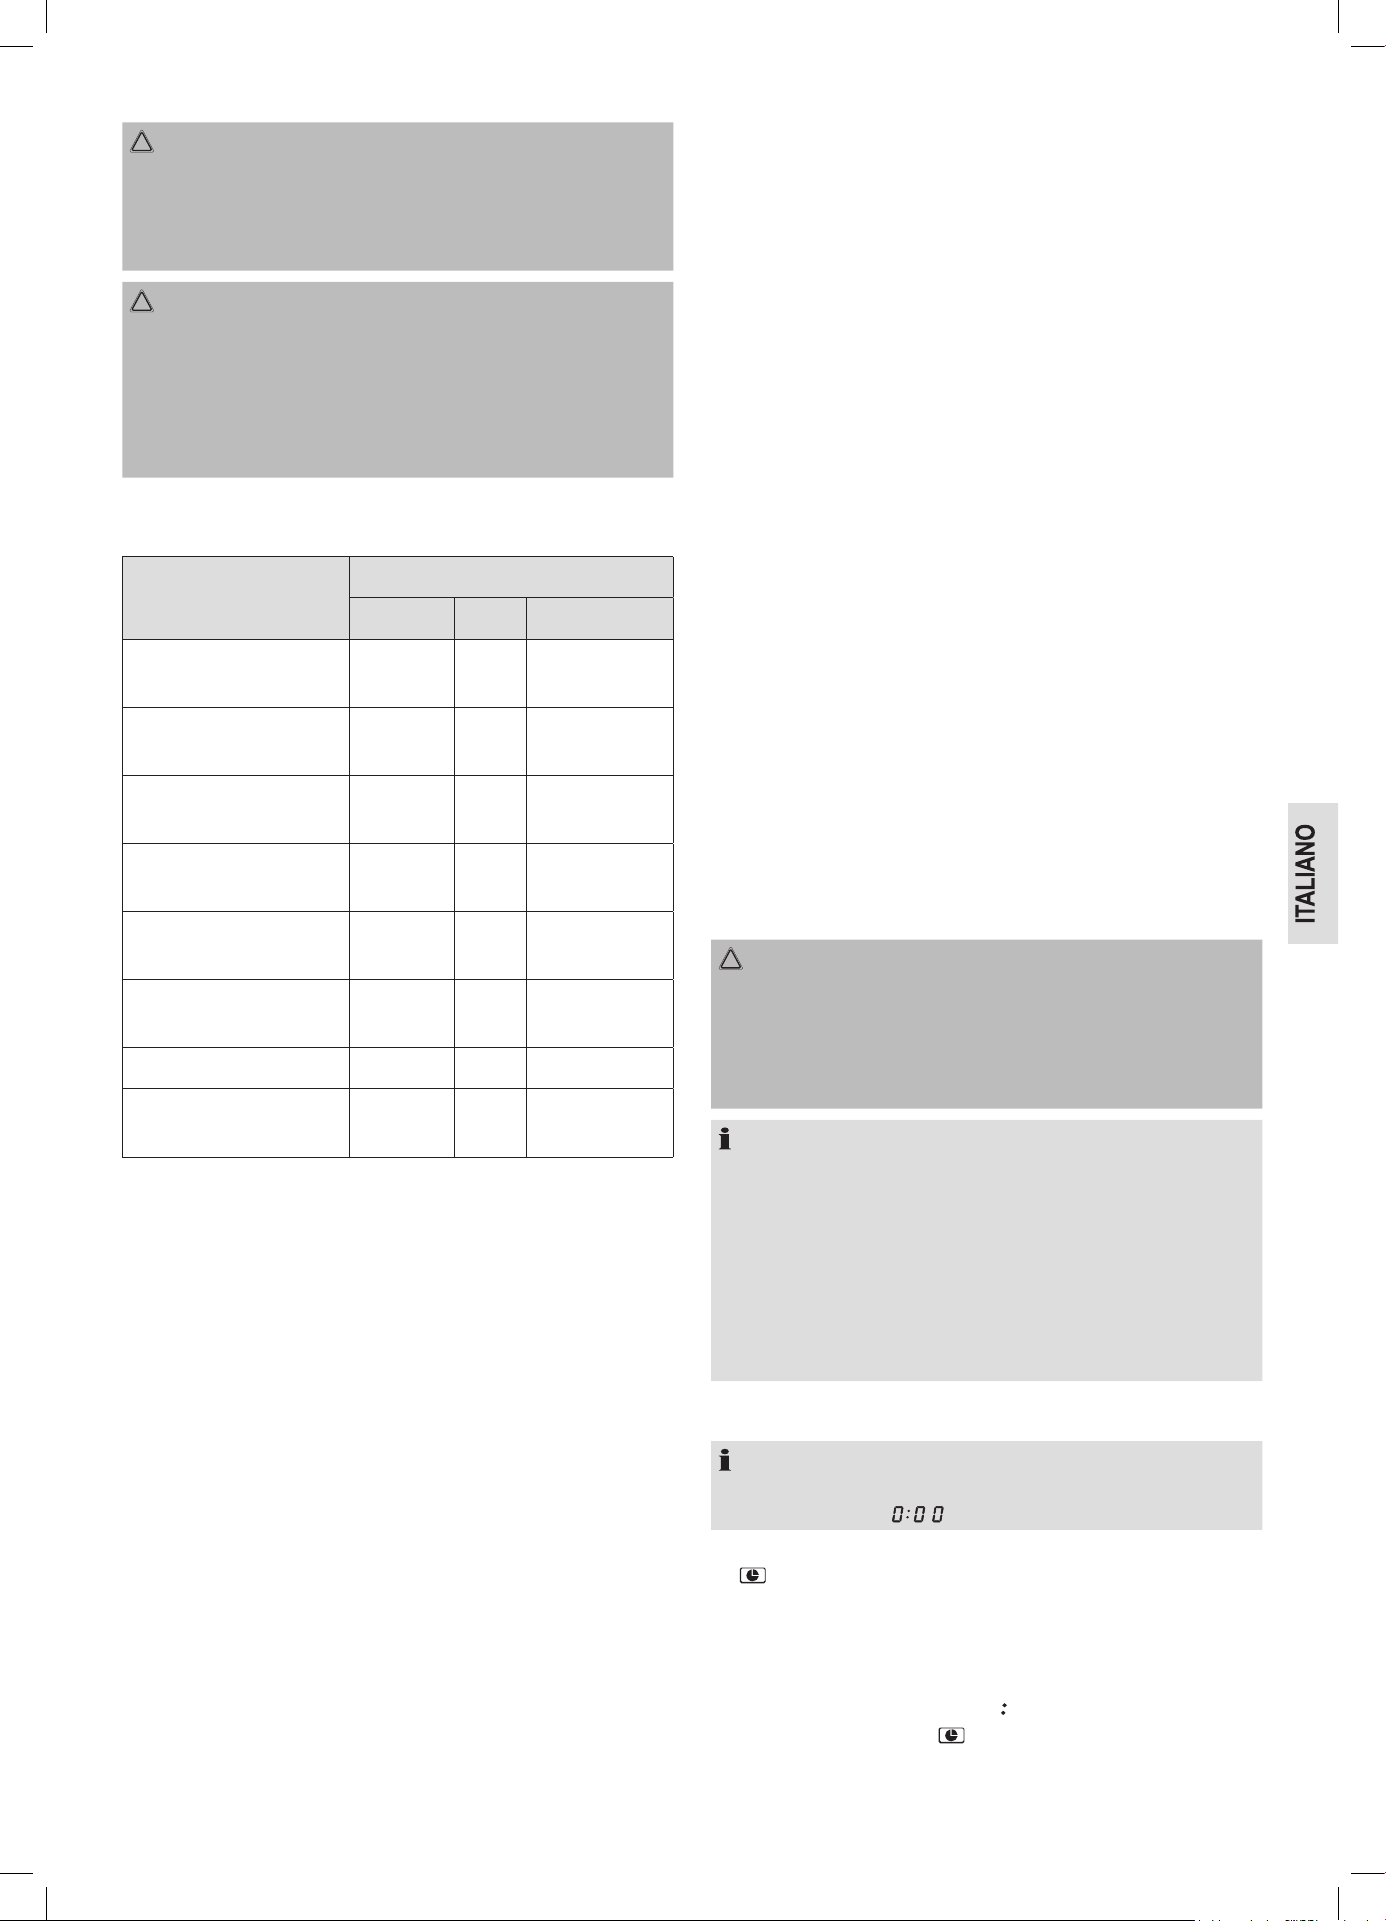
31
ATTENZIONE:
Rischio di esplosione nel caso di materiali sigillati.
• Aprire i contenitori chiusi prima della cottura o del riscaldamento.
• Forare i fogli di plastica protettiva diverse volte usando una
forchetta.
ATTENZIONE: Pericolo di scintille e fuoco!
• I forni a microonde non può penetrare il metallo. Di conseguenza,
nessun contenitore o piatti metallici possono essere utilizzati
durante il funzionamento del microonde.
• Non usare mai ciotole di cartone riciclabile, perché questi pos-
sono contenere parti minime di metallo, ciò che può causare
scintille o incendi.
La lista qui sotto indicata facilita la scelta di stoviglie adatte all’uso
della microonde:
Materiale
Adatto per
Microonde Griglia Combinazione *
Contenitore di vetro
resistente al calore
si si si
Contenitore di vetro non
resistente al calore
no no no
Contenitore / piatto di cera-
mica resistente al calore
si si si
Contenitore di plastica
adatto alla microonde
si no no
Carta assorbente da
cucina
si no no
Stoviglie in metallo o
alluminio
no si no
Griglia no si no
Carta argentata e
contenitore della carta
no si no
* Combinazione forno microonde con griglia.
Note sul funzionamento e sull’uso del dispositivo
Cosa si deve sapere sull’uso del microonde
• Il forno microonde lavora con una radiazione di microonde che
riscalda in brevissimo tempo le particelle d’acqua nei cibi. Qui non
c’è nessuna radiazione di calore e quindi nemmeno doratura.
• Usare questo apparecchio solo per riscaldare generi alimentari.
• L’apparecchio non si presta per la cottura al forno di alimenti che
galleggiano nel grasso.
• Riscaldare solo 1 – 2 porzioni alla volta, altrimenti l’apparecchio
perde la sua efficacia.
• Le microonde forniscono subito il massimo di energia, quindi non è
necessario preriscaldare.
• Non mettere mai in funzione la microonde senza contenuto.
• Il forno microonde non sostituisce il forno tradizionale. Esso serve
principalmente per:
- scongelare alimenti surgelati / congelati
- riscaldare rapidamente alimenti solidi o liquidi
- finire di cuocere alimenti
Note sul funzionamento del dispositivo
• La vostra selezione tramite la pressione di un tasto è confermata da
un segnale sonoro. Altrimenti, non avete premuto adeguatamente.
• Poi, quando si gira la manopola per la prima volta, risuona un
segnale acustico.
• Se impostate un programma ma non premete il tasto
QUICK START / START entro 5 minuti, l’impostazione verrà cancel-
lata. Lo schermo mostrerà quindi l’orario attuale di nuovo.
• Quando la porta è aperta, la luce nel forno è accesa. Se la porta
non è chiusa, dopo 10 minuti, le luci si spengono.
• Quando inizia un programma, il tempo operativo rimanente verrà
visualizzato. Il conto alla rovescia continua.
• 5 segnali sonori indicheranno la fine del programma. Estrarre il cibo
dal dispositivo.
Messa in funzione
Preparazione
1. Estrarre tutti gli accessori che si trovano nella camera di cottura,
toglierli dall’imballaggio e porre al centro l’anello scorrevole.
2. Posizionate il piatto di vetro sull’asse di azionamento in modo che
si incassi nelle convessità dell’albero e poggi dritto.
3. Controllare che l’apparecchio non presenti danni visibili, soprattutto
in prossimità dello sportello. In presenza di danni di qualsiasi
genere l’apparecchio non deve assolutamente essere messo in
funzione.
4. Per evitare danni ad altri apparecchi durante il funzionamento, non
porre il forno in prossimità di altri apparecchi elettronici.
5. Rimuovere eventuali pellicole protettive incollate sulla custodia.
6. Infilate la spina in una presa correttamente installata con contatto
di terra.
ATTENZIONE:
• Non rimuovere pezzi montati dalla camera di cottura e dall’interno
dello sportello!
• Il foglio mica (8) è parte del dispositivo e non deve essere
rimosso. Protegge da sporco il componente elettronico situato
dietro.
NOTA:
Se si dovessero trovare residui di olio o di fabbricazione nella custo-
dia oppure sugli elementi riscaldanti, può succedere che all’inizio si
formino fumo e odore. Questo è un procedimento normale che non
si ripeterà più dopo un uso ripetuto.
Si consiglia urgentemente di procedere come segue:
• Impostare l’apparecchio sulla funzione grill e metterlo in funzione
più volte senza alimenti (risp. max 5 minuti).
• Fare in modo che ci sia ventilazione sufficiente.
Impostare l’orologio
NOTA:
Durante la prima impostazione verrà emesso un segnale sonoro e
lo schermo mostrerà “ ”.
1. Premere il tasto CLOCK / PRE-SET. Nel display appare il simbolo
“ ”. La prima cifra lampeggiante.
2. Usare la manopola ruotabile per impostare l’ora desiderata.
3. Premere il tasto CLOCK / PRE-SET. La seconda cifra lampeggerà.
4. Usare la manopola ruotabile per impostare i minuti desiderati.
5. Premere di nuovo il tasto CLOCK / PRE-SET per attivare il nuovo
orario. Il simbolo di delimitazione “ ” dell’orario digitale lampeggerà
sullo schermo. Il simbolo “ ” si cancella.
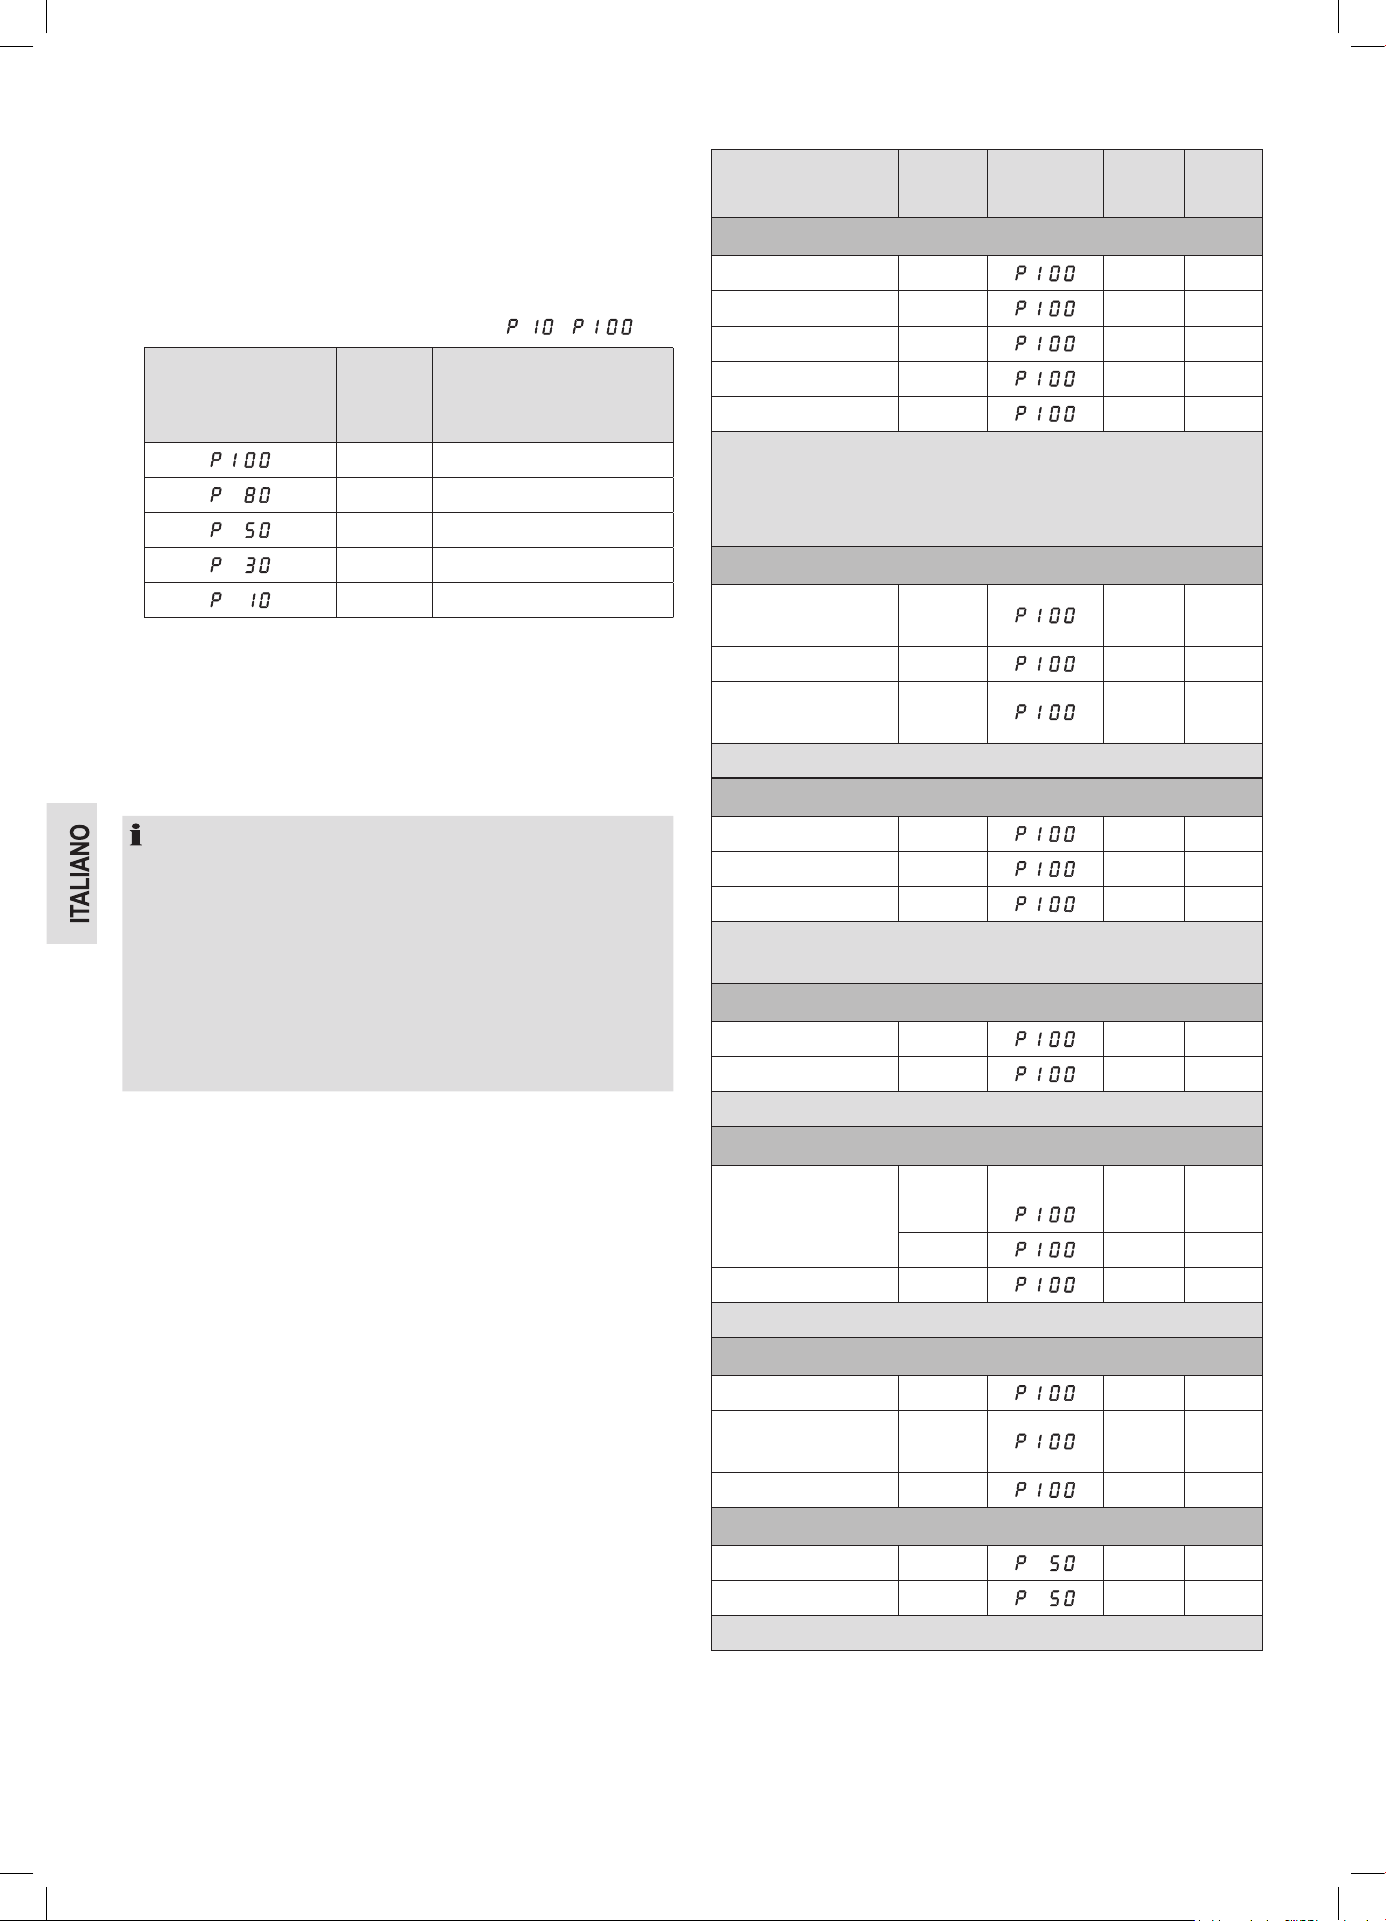
32
Utilizzo del microonde
1. Mettere gli alimenti da cuocere in un tipo di contenitore appropriato.
2. Aprire la porta dell’apparecchio e posizionare il contenitore al cen-
tro del piatto in vetro. Chiudere la porta. (Per motivi di sicurezza,
l’apparecchio può funzionare esclusivamente nel caso in cui la
porta sia stata chiusa correttamente).
3. Premere una volta il tasto MICRO. / GRILL / COMBI.. Selezionare
infine con la manopola la potenza desiderata ( – ).
Impostazione di po-
tenza sullo schermo
selezionata in %
Potenza
in Watt
(circa)
Applicazione
800 Riscaldamento veloce
640 Cottura
400 Bollore
240 Scongelare cibo congelato
80 Per fondere formaggio ecc.
4. Premere il tasto MICRO. / GRILL / COMBI. per confermare le vostre
impostazioni.
5. Usare il controllo per selezionare un tempo di cottura tra 5 secondi
e 95 minuti.
6. Premere il tasto QUICK START / START. Dopo un po’ di esercizio,
si imparerà rapidamente a valutare correttamente l’esatta durata di
cottura necessaria.
NOTA:
• La preparazione del cibo in un forno a microonde avviene molto
più rapidamente rispetto a quanto non accada nel caso di un
tradizionale forno. Nel caso in cui non si sia sicuri circa l’esatta
durata di cottura, si consiglia pertanto di impostare un intervallo
di tempo limitato e, se necessario, di ultimare successivamente
la cottura.
• Attenzione: Quando si utilizza soltanto la modalità di funzio-
namento a microonde, applicare una cappa di copertura sugli
alimenti.
Pausa o arresto della cottura
• Se desiderate mettere in pausa l’operazione di cottura, premere
una volta il tasto CANCEL / STOP e aprire la porta.
• Se desiderate continuare l’operazione di cottura, chiudete la porta e
premete il tasto QUICK START / START.
• Se desiderate arrestare completamente l’operazione, premere due
volte il tasto CANCEL / STOP.
Riscaldare
Riscaldare è uno dei punti forti del forno microonde. È ideale per
portare a temperatura ambiente o da consumo liquidi e alimenti dal
frigorifero senza dover usare pentole.
I tempi di riscaldamento riportati nella seguente tabella sono solo
valori indicativi perché il tempo dipende molto dalla temperatura di
partenza e dalla composizione degli alimenti. Si consiglia perciò di
controllare se gli alimenti sono già abbastanza caldi.
Tabella tempi di riscaldamento
Generi alimentari /
Cibo
Quantità
Potenza
in %
Tempo
ca. min.
Coprire
Liquidi
Acqua, 1 tazza 150 g 0,5 – 1 no
Acqua, 0,5 l 500 g 3 , 5 – 5 no
Acqua, 0,75 l 750 g 5 – 7 no
Caffè, 1 tazza 150 g 0,5 – 1 no
Latte, 1 tazza 150 g 0,5 – 1 no
Attenzione: Mettere nel contenitore una bacchetta di vetro o simile
(non utilizzare a tale scopo oggetti in metallo) al fine di evitare che si
verifichino ritardi di ebollizione. Successivamente, mescolare prima
di bere.
Pietanze
Bistecche, patate e
verdura
450 g 2,5 – 3,5 sì
Gulasch con pasta 450 g 2 – 2,5 sì
Carne, gnocchi e
salsa
450 g 2,5 – 3,5 sì
Consiglio: Prima inumidire leggermente, ogni tanto mescolare.
Carne
Cotoletta, impanata 200 g 1 – 2 no
Polpette, 4 pezzi 500 g 3 – 4 no
Arrosto, un pezzo 250 g 2 – 3 no
Consiglio: Spennellare con olio affinché la panata o la crosta non
si ammorbidiscano.
Volatili
½ pollo 450 g 3 , 5 – 5 no
Fricassea di pollo 400 g 3 – 4 , 5 sì
Consiglio: Spennellare con olio, ogni tanto girare.
Contorni
Pasta, riso
1 porzione 150 g 1 – 2 sì
2 porzioni 300 g 2,5 – 3,5 sì
Patate 500 g 3 – 4 sì
Consiglio: Prima inumidire leggermente.
Minestre / Salse
Brodo, 1 piatto 250 g 1 – 1,5 sì
Minestra con pastina
o simili
250 g 1,5 – 2 sì
Salsa 250 g 1 – 2 sì
Alimenti per la prima infanzia
Latte 100 ml 0,5 – 1,5 no
Pappa 200 g 1 – 1,5 no
Consiglio: Scuotere o mescolare bene. Controllare la temperatura!
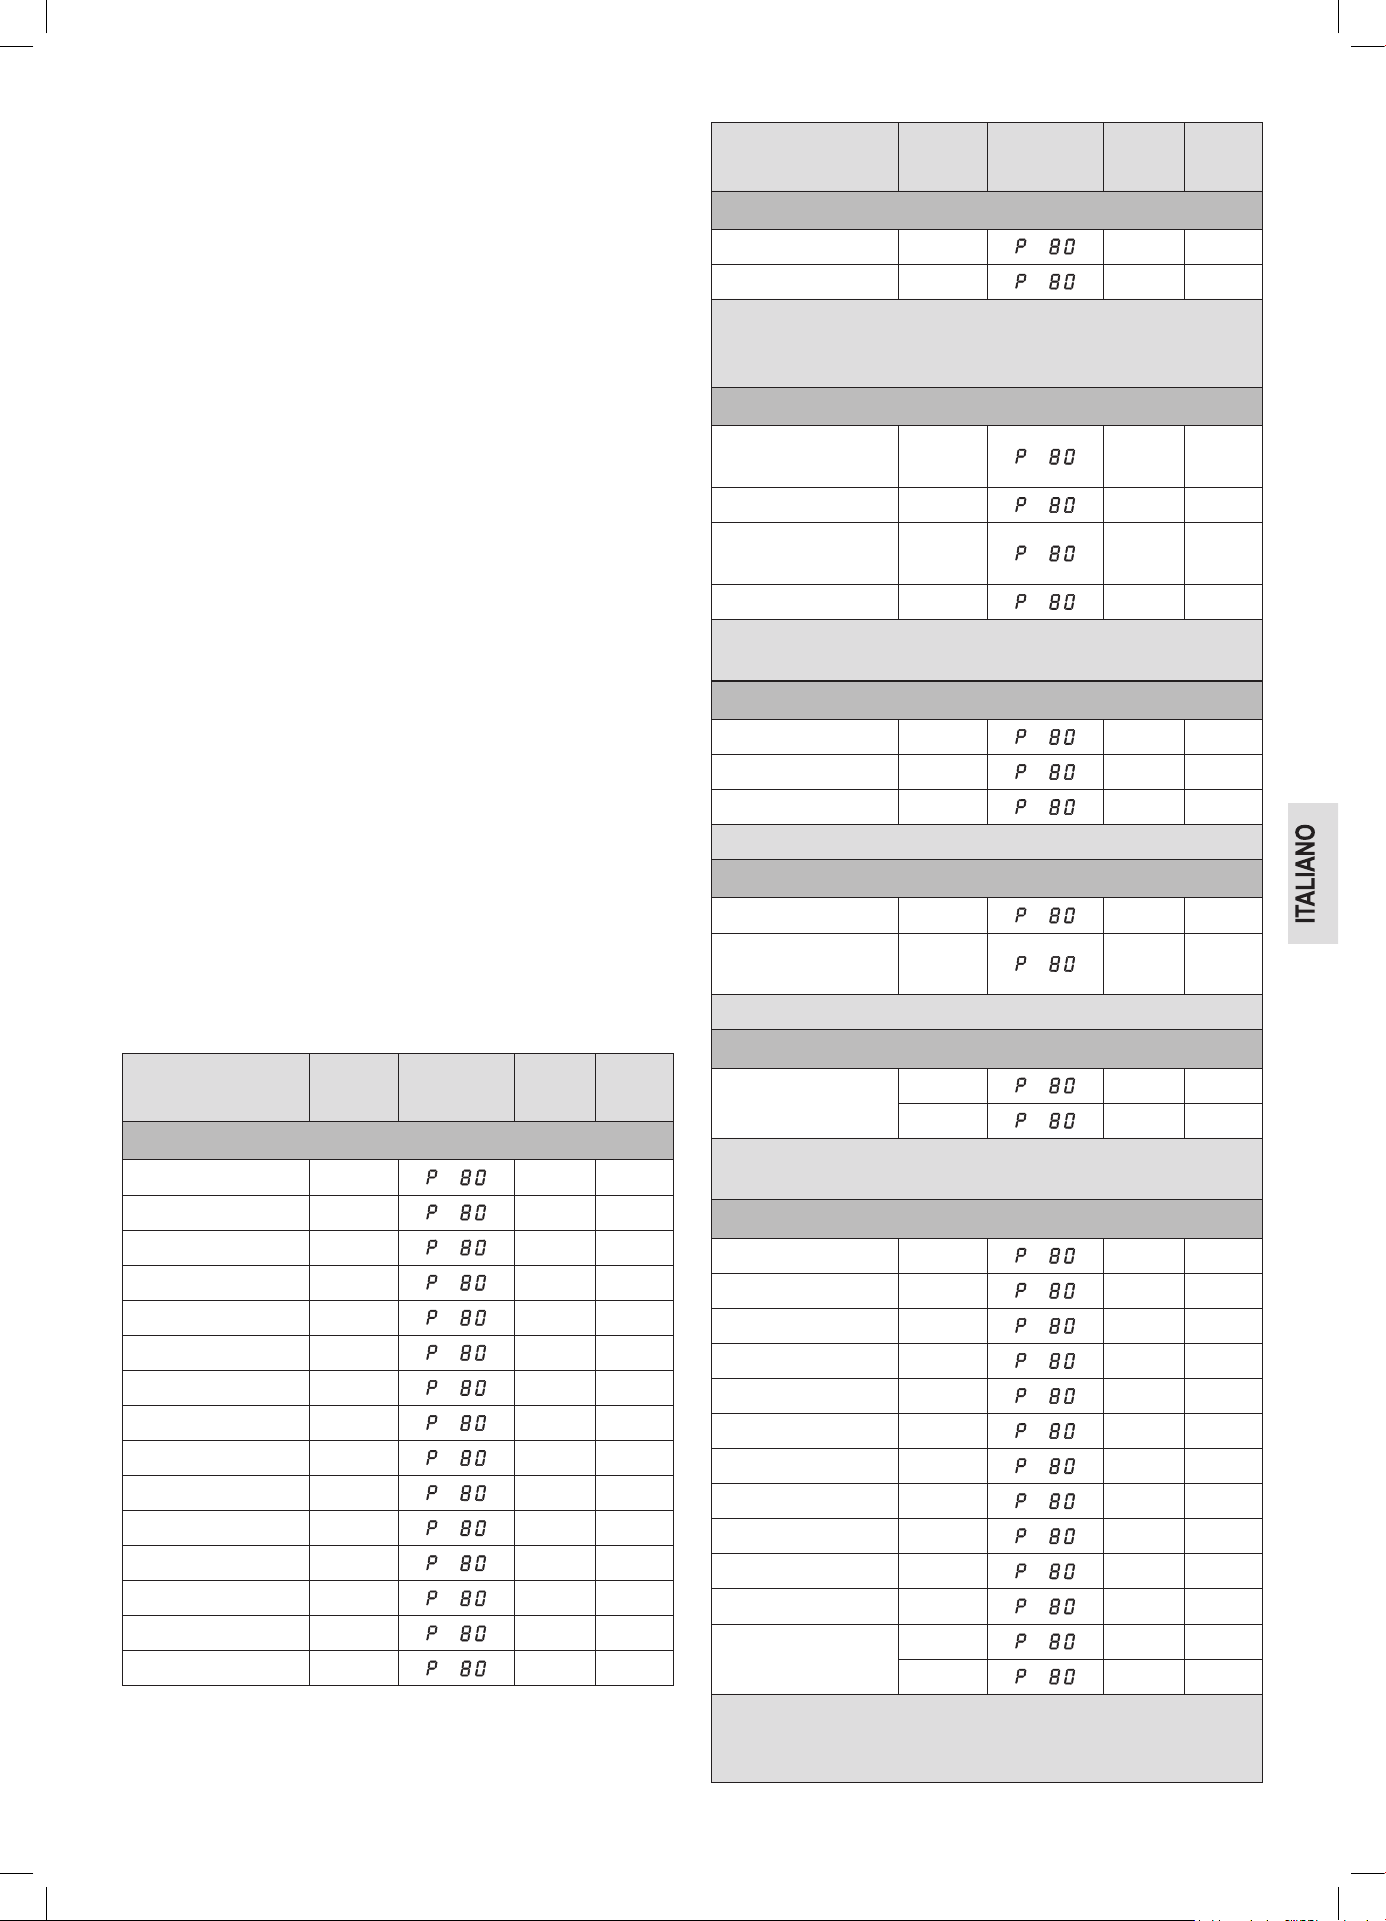
33
Cuocere
Consigli pratici per cuocere
Orientarsi ai valori indicativi nella tabella di cottura e nelle ricette.
Osservare la cottura finché non avete molta esperienza.
Lo sportello dell’apparecchio si può aprire in qualsiasi momento. L’ap-
parecchio si spegne automaticamente.
Il funzionamento continuerà solo dopo che la porta è stata chiusa e il
tasto QUICK START / START viene premuto di nuovo.
Generi alimentari provenienti dal frigorifero hanno bisogno di tempi di
cottura un po’più lunghi rispetto agli alimenti a temperatura ambiente.
Se gli alimenti sono più compatti, i tempi di cottura sono più sono lun-
ghi. Un pezzo di carne grosso richiede una cottura più lunga rispetto
alla stessa quantità di carne sotto forma di spezzatino. Per quantità
di carne più grosse si consiglia quindi una precottura alla potenza
massima, proseguendo poi cottura a potenza media per ottenere un
risultato uniforme.
I cibi piatti cuociono più rapidamente di quelli spessi, quindi distribuire
i generi alimentari possibilmente piatti. Disporre all’interno o sovrap-
porre i pezzi più sottili, per esempio cosce di pollo o filetto di pesce.
Quantità di carne più piccole cuociono più rapidamente di quantità
grandi. Vale la regola:
Quantità doppia = tempo quasi doppio
Quantità dimezzata = tempo dimezzato
Se per una pietanza non trovate un’indicazione adatta, vale la regola:
Per circa 100 g 1 minuto di cottura
Tutti gli alimenti sopra i quali viene posto un coperchio durante la cot-
tura tradizionale, devono essere coperti anche nel microonde.
Il coperchio impedisce che i cibi si asciughino. Per coprire si può
usare un piatto girato, carta pergamenata o carta per microonde.
Cucinare senza coperchio se si desidera una crosta.
Tabella cottura
Generi alimentari /
Cibo
Quantità
Potenza
in %
Tempo
ca. min.
Coprire
Verdura
Melanzane 500 g 7 – 10 sì
Cavolo 500 g 13 – 15 sì
Broccoli 500 g 6 – 9 sì
Cicoria 500 g 6 – 7 sì
Piselli 500 g 6 – 7 sì
Finocchio 500 g 8 – 11 sì
Fagiolini 300 g 13 – 15 sì
Patate 500 g 9 – 12 sì
Cavolo rapa 500 g 8 – 10 sì
Porro 500 g 7 – 9 sì
Pannocchie di mais 250 g 7 – 9 sì
Carote 500 g 8 – 10 sì
Peperoni 500 g 6 – 9 sì
Cavolino di Bruxelles 300 g 7 – 10 sì
Asparagi 300 g 6 – 9 sì
Generi alimentari /
Cibo
Quantità
Potenza
in %
Tempo
ca. min.
Coprire
Verdura
Pomodori 500 g 6 – 7 sì
Zucchini 500 g 9 – 10 sì
Consiglio: Tagliare la verdura a pezzi e cuocere con 2 – 3 cucchiai
di liquido, ogni tanto mescolare, lasciar cuocere 3 – 5 minuti, insapo-
rire solo prima di servire.
Frutta
Composta di mele,
pere
500 g 5 – 8 sì
Marmellata di prugne 250 g 4 – 6 no
Composta di
rabarbaro
250 g 5 – 8 sì
Mele al forno, 4 pezzi 500 g 7 – 9 sì
Consiglio: Aggiungere 125 ml di acqua, il succo di limone impedi-
sce che la frutta perda il suo colore, lasciar cuocere altri 3 – 5 minuti.
Carne *
Carne con salsa 400 g 10 – 12 sì
Gulasch, spezzatino 500 g 10 – 15 sì
Involtini di manzo 250 g 7 – 8 sì
Consiglio: Di tanto in tanto girare, lasciar riposare 3 – 5 minuti.
Volatili *
Fricassea di pollo 250 g 6 – 7 sì
Brodo con carni
bianche
200 g 5 – 6 sì
Consiglio: Di tanto in tanto girare, lasciar riposare 3 – 5 minuti.
Pesce
Filetto di pesce
300 g 7 – 8 sì
400 g 8 – 9 sì
Consiglio: Trascorsa la metà del tempo girare, lasciar cuocere altri,
3 – 5 minuti.
Scongelare e cuocere verdura
Cavolo rosso-mela 450 g 14 – 16 sì
Spinaci in foglia 300 g 11 – 13 sì
Cavolo 200 g 7 – 9 sì
Fagiolini 200 g 8 – 10 sì
Broccoli 300 g 8 – 9 sì
Piselli 300 g 7 – 8 sì
Cavolo rapa 300 g 13 – 15 sì
Porri 200 g 10 – 11 sì
Mais 200 g 4 – 6 sì
Carote 200 g 5 – 6 sì
Cavolino di Bruxelles 300 g 7 – 8 sì
Spinaci
450 g 12 – 13 sì
600 g 15 – 17 sì
Consiglio: Cuocere con 1 – 2 cucchiai di liquido, di tanto in tanto
girare o dividere con cautela, lasciar cuocere altri 2 – 3 minuti insa-
porire prima di servire.
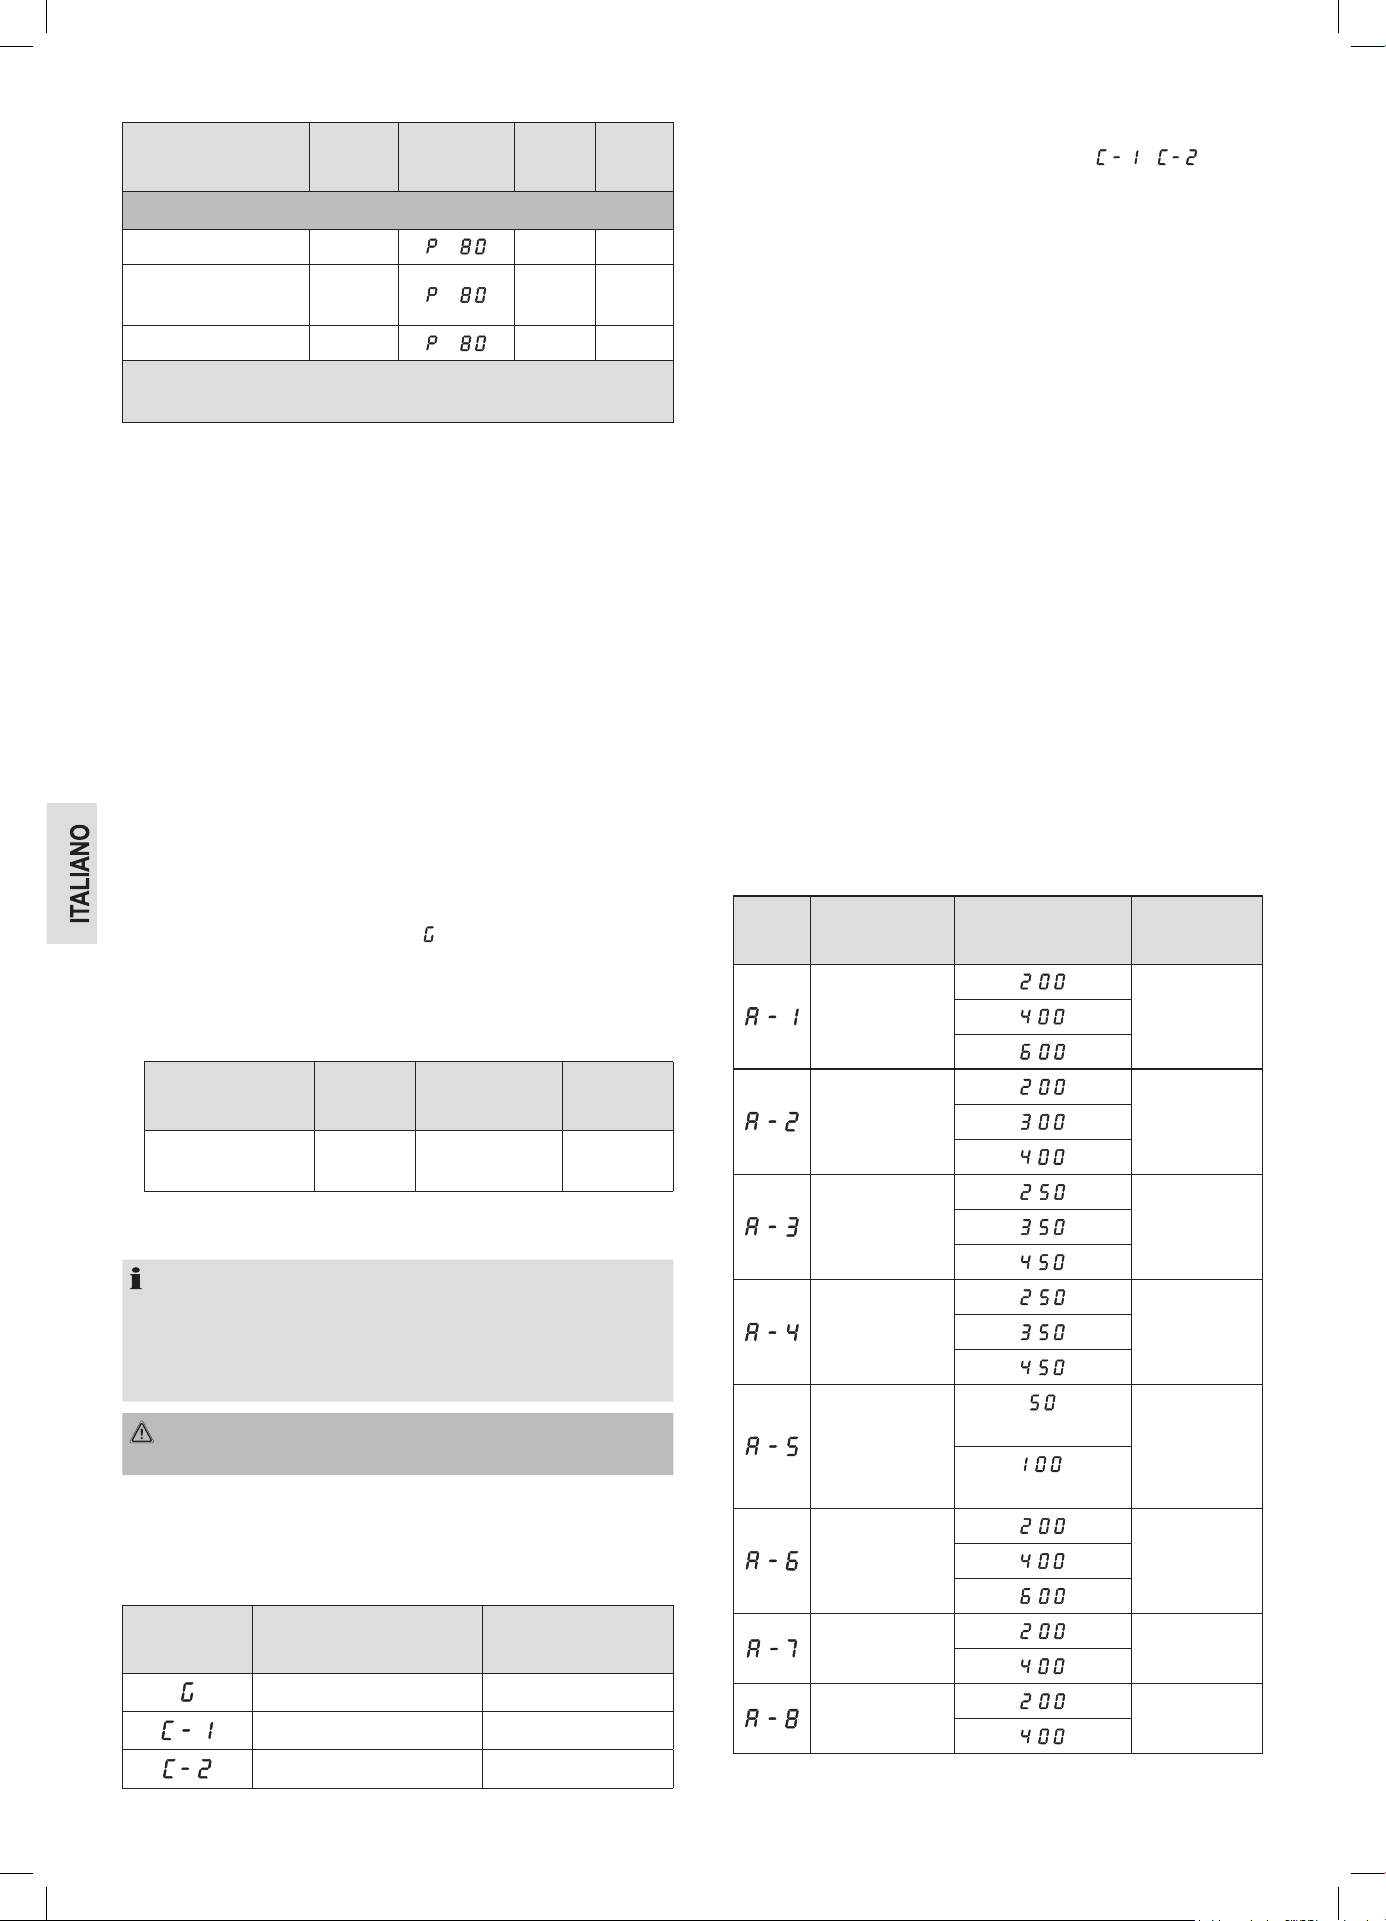
34
Generi alimentari /
Cibo
Quantità
Potenza
in %
Tempo
ca. min.
Coprire
Minestre / Piatti unici *
Piatto unico 500 g 13 – 15 sì
Minestra con pastina
o simili
300 g 7 – 18 sì
Vellutata 500 g 13 – 15 sì
Consiglio: Di tanto in tanto mescolare, lasciar cuocere altri 3 – 5 mi-
nuti.
* Alimenti precotti.
Avvio rapido
Desiderate scaldare cibo o bevande in breve tempo alla massima
potenza?
1. Avviare subito il microonde premendo direttamente il tasto
QUICK START / START.
2. La cottura inizia subito e, ogni volta che si preme di nuovo il tasto,
il tempo di cottura si prolunga di 60 secondi. Durante questa opera-
zione la potenza del microonde è al 100 %.
Grigliare
Per grigliare usare la griglia. Usare stoviglie idonee resistenti al calore
o porre gli alimenti direttamente sulla griglia.
Non è necessario preriscaldare perché il grill produce calore subito.
Procedere come segue per arrostire e gratinare:
1. Premere una volta il tasto MICRO. / GRILL / COMBI.. Selezionare
infine con la manopola la modalità ( ).
2. Premere il tasto MICRO. / GRILL / COMBI. per confermare le vostre
impostazioni.
3. Usare la manopola ruotabile per impostare il tempo di arrostimento
desiderato tra 5 secondi e 95 minuti. Esempio:
Generi alimentari /
Cibo
Quantità Tempo ca. min. Coprire
Gratinare toast con
il formaggio
2 – 3 3 – 4 no
4. Premere il tasto QUICK START / START per iniziare il funziona-
mento.
NOTA:
A metà del tempo trascorso, sono emessi diversi segnali sonori che
indicano di girare alimenti come carne e salsicce. Se lo sportello
rimane chiuso, l’apparecchio ha bisogno di 60 secondi ca. per riav-
viarsi. Per riavviarlo prima premere il tasto QUICK START / START.
AVVISO: Rischio di scottature!
Aprire e chiudere la porta solo con la maniglia.
Combinazione del funzionamento a grill e microonde
Quando si usano queste impostazioni, il microonde e il grill operano a
turno durante l’orario preimpostato con il seguente rapporto:
Display
Impostazione
potenza microonde
Impostazione
potenza Grill
0 % 100 %
55 % 45 %
36 % 64 %
1. Premere una volta il tasto MICRO. / GRILL / COMBI.. Selezionare
infine con la manopola la potenza desiderata ( o ).
2. Premere il tasto MICRO. / GRILL / COMBI. per confermare le vostre
impostazioni.
3. Usare la manopola ruotabile per impostare il tempo di arrostimento
desiderato tra 5 secondi e 95 minuti.
4. Premere il tasto QUICK START / START per iniziare il funziona-
mento.
Consigli per la funzione combinata
Quando si preparano alimenti nella funzione combinata microon-
de-grill, ricordare che:
Per cibi in pezzi grandi e spessi, come per esempio arrosto di maiale,
il tempo del microonde è più lungo che per cibi piccoli e piatti. Nel
grill è viceversa, quanto più vicino è il cibo al grill, tanto più ra-
pidamente diventa dorato. Questo significa che se preparate arrosti
grossi nella funzione combinata, la durata del grill è più breve che per
arrosti piccoli.
Nella funzione grill usare la griglia, per ottenere una doratura rapida
e uniforme. (Eccezione: generi alimentari grossi e spessi vengono
grigliati direttamente sul piatto girevole!).
Funzioni automatiche
Usare le funzioni automatiche per cuocere alcune quantità di cibo
automaticamente. Procedere come segue:
1. Premere una volta il tasto AUTO MENU. Selezionare infine con la
manopola il programma automatico desiderato. Scegliere una delle
impostazioni date nella tabella sottostante:
Codice Funzione
Schermo /
peso in grammi
Impostazione
di potenza
Riscaldamento
Microonde
100 %
Verdure
Microonde
100 %
Pesce
Microonde
80 %
Carne
Microonde
100 %
Pasta
(con 450 g di acqua)
Microonde
80 %
(con 800 g di acqua)
Patate
Microonde
100 %
Riscaldamento
Pizza
Microonde
100 %
Zuppa
Microonde
100 %
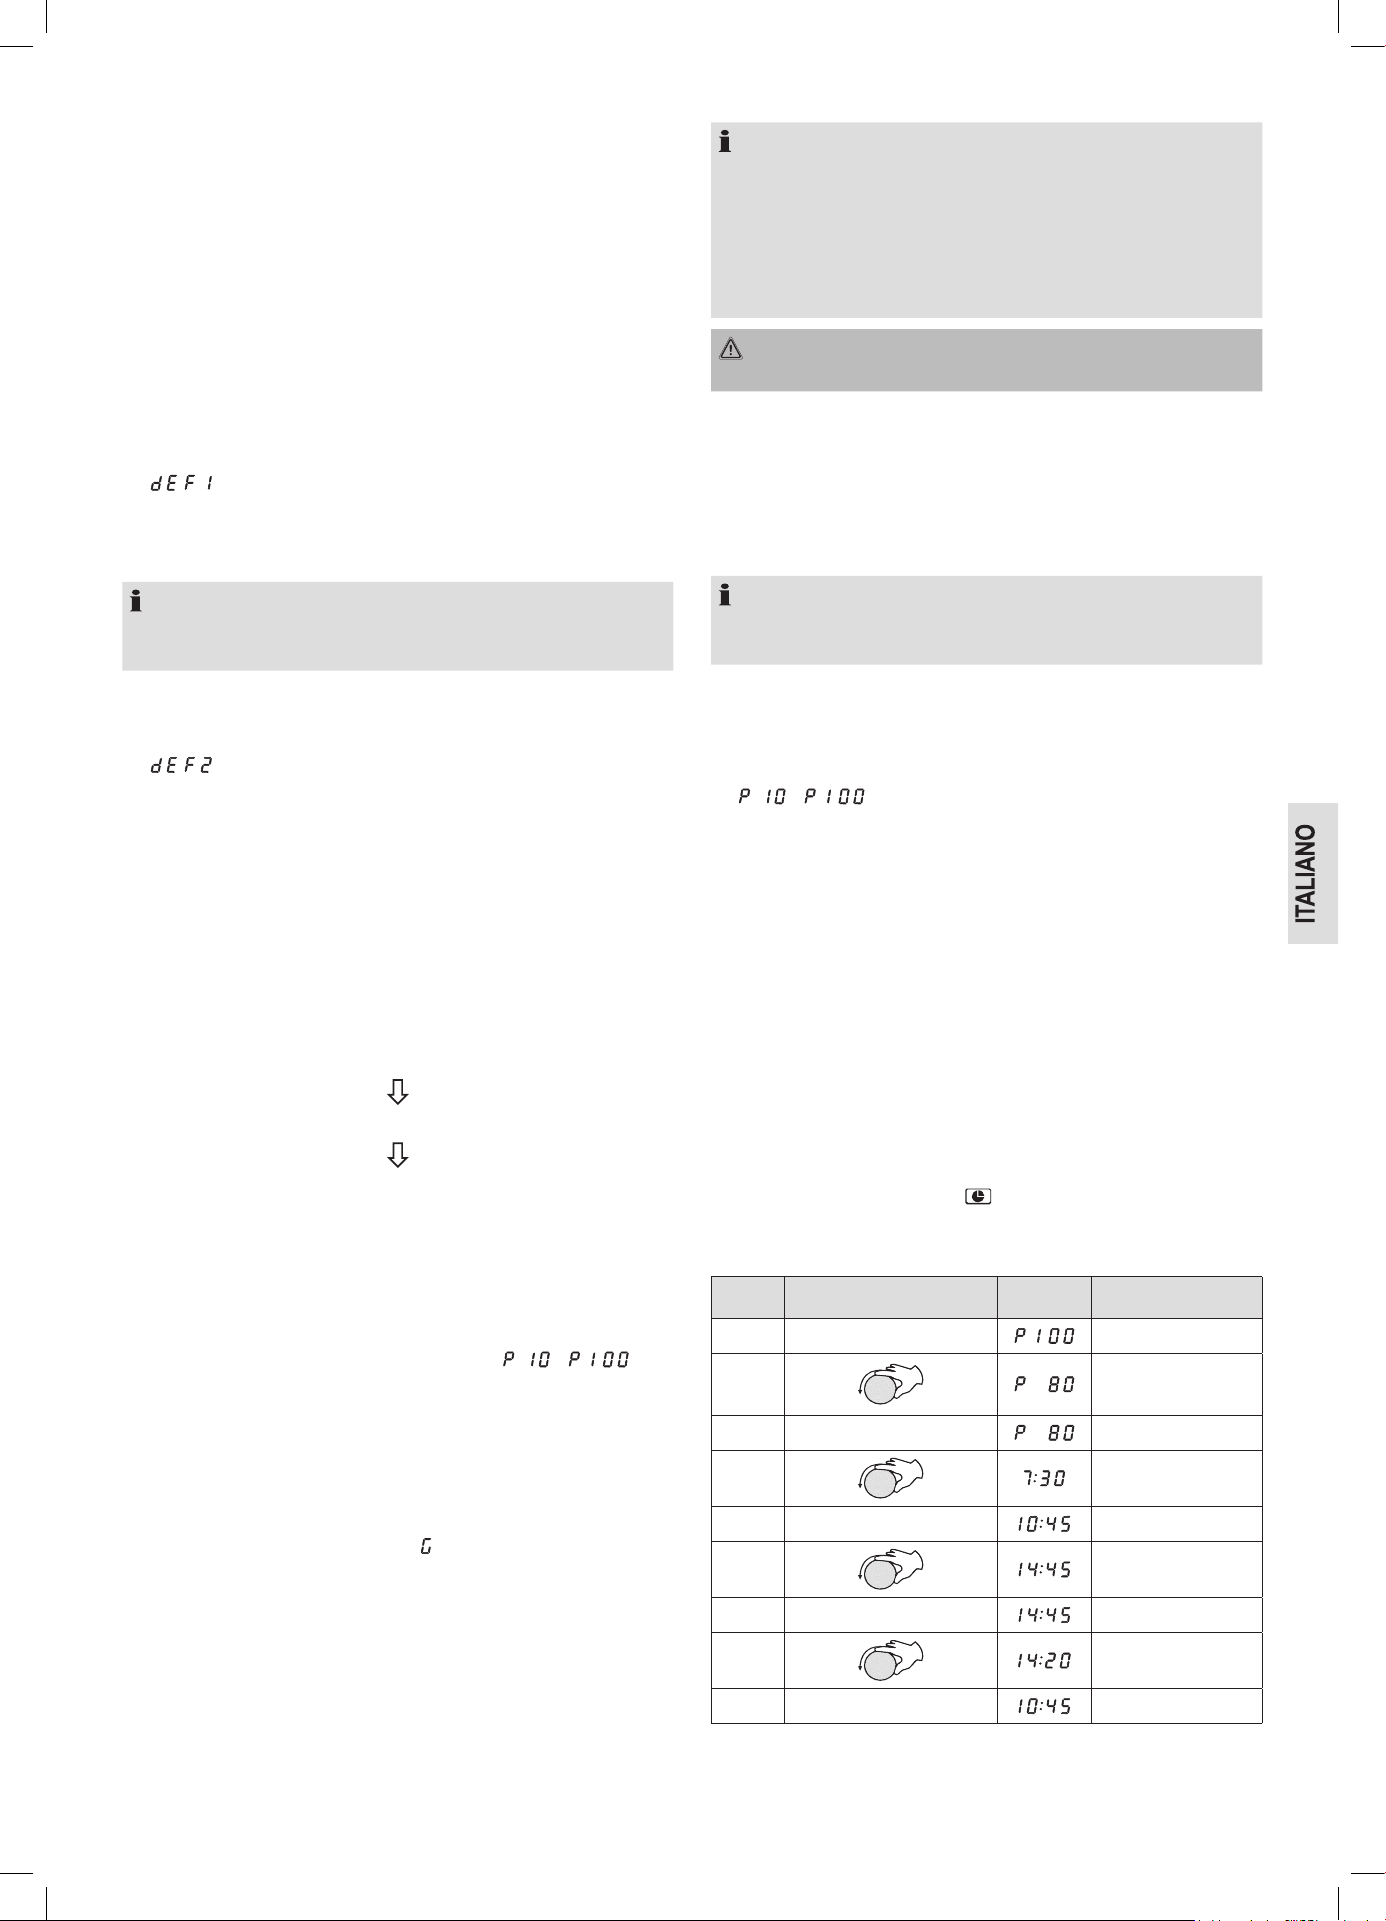
35
2. Premere il tasto AUTO MENU per confermare le vostre imposta-
zioni.
3. Usare la manopola ruotabile per impostare il peso desiderato.
4. Premere il tasto QUICK START / START per iniziare il funziona-
mento.
Scongelamento
Usando le impostazioni di scongelamento scongelerete automati-
camente il vostro cibo in due modi diversi. Selezionare la funzione
scongelamento per peso e tempo.
Scongelare secondo il peso
1. Premere una volta il tasto DEFROST BY W.T.. Il display indica
“ ”.
2. Con la manopola impostare il peso da 0,1 – 2,0 kg.
3. Premere il tasto QUICK START / START per iniziare il funziona-
mento.
NOTA:
Nel caso in cui il peso del cibo sia inferiore a 200 g, posizionarlo sul
bordo e non al centro del vassoio di vetro.
Scongelare secondo il tempo
1. Premere una volta il tasto DEFROST BY TIME. Il display indica
“ ”.
2. Con la manopola impostare il tempo desiderato tra 5 secondi e
95 minuti.
3. Premere il tasto QUICK START / START per iniziare il funziona-
mento.
Cottura graduale
Si possono impostare i programmi in modo da eseguire 3 diverse
funzioni in ordine successivo.
Supponiamo che voi scegliate i seguenti programmi:
Scongelamento
Cuocere
Grigliare
1. Selezionare la 1a funzione:
Premere il tasto DEFROST BY W.T. o DEFROST BY TIME.
2. Con la manopola impostare il peso o il tempo desiderato.
3. Scelta della 2a funzione:
Premere una volta il tasto MICRO. / GRILL / COMBI.. Selezionare
infine con la manopola la potenza desiderata ( – ).
4. Premere il tasto
MICRO. / GRILL / COMBI.
per iniziare il funziona-
mento.
5. Con la manopola impostare il tempo desiderato tra 5 secondi e
95 minuti.
6. Scelta della 3a funzione:
Premere una volta il tasto MICRO. / GRILL / COMBI.. Selezionare
infine con la manopola la modalità ( ).
7. Premere il tasto
MICRO. / GRILL / COMBI.
per iniziare il funziona-
mento.
8. Con la manopola impostare il tempo desiderato tra 5 secondi e
95 minuti.
9. Premere il tasto QUICK START / START per iniziare il funziona-
mento.
NOTA:
• Il cambio del programma viene comunicato con un segnale
acustico.
• Trascorsa la metà del tempo, due segnali acustici invitano a
girare gli alimenti. Se lo sportello rimane chiuso, l’apparecchio
ha bisogno di 60 secondi ca. per riavviarsi. Per riavviarlo prima
premere il tasto QUICK START / START.
AVVISO: Rischio di scottature!
Aprire e chiudere la porta solo con la maniglia.
Funzioni speciali
Avvio automatico
Tutti i programmi - o anche un’impostazione combinata - possono
essere riavviati in più sequenze differite. Il massimo ritardo è di 23 ore
e 59 minuti.
NOTA:
Impostare per prima cosa l’orologio! Altrimenti non potrete usare
questa funzione.
Esempio: Procedere come segue per attivare automaticamente il
microonde:
1. Premere una volta il tasto MICRO. / GRILL / COMBI..
2. Selezionare infine con la manopola la potenza desiderata
( – ).
3. Premere il tasto
MICRO. / GRILL / COMBI.
per iniziare il funziona-
mento.
4. Con la manopola impostare il tempo desiderato tra 5 secondi e
95 minuti.
5. Premere il pulsante CLOCK / PRE-SET. Un segnale sonoro
suonerà e lo schermo mostrerà l’ora attuale, con la prima cifra
lampeggiante.
6. Usare la manopola ruotabile per impostare l’ora desiderata di
avvio.
7. Premere il tasto CLOCK / PRE-SET. Un segnale sonoro suonerà e
i minuti lampeggeranno sullo schermo.
8. Usare la manopola ruotabile per impostare i minuti desiderati di
avvio.
9. Premere il tasto QUICK START / START per confermare. Nel
display lampeggia il simbolo “ ”.
Esempio: 7:30 minuti di cottura al 80 % della potenza; ora di inizio
14:20
Fase Tasto / manopola Schermo
1 MICRO. / GRILL / COMBI. (Scelta)
2
(Impostazione di
potenza)
3 MICRO. / GRILL / COMBI. (Conferma)
4 (Tempo di cottura)
5 CLOCK / PRE-SET (Ora attuale)
6 (Imposta ora)
7 CLOCK / PRE-SET
8 (Imposta minuti)
9 QUICK START / START (Ora attuale)
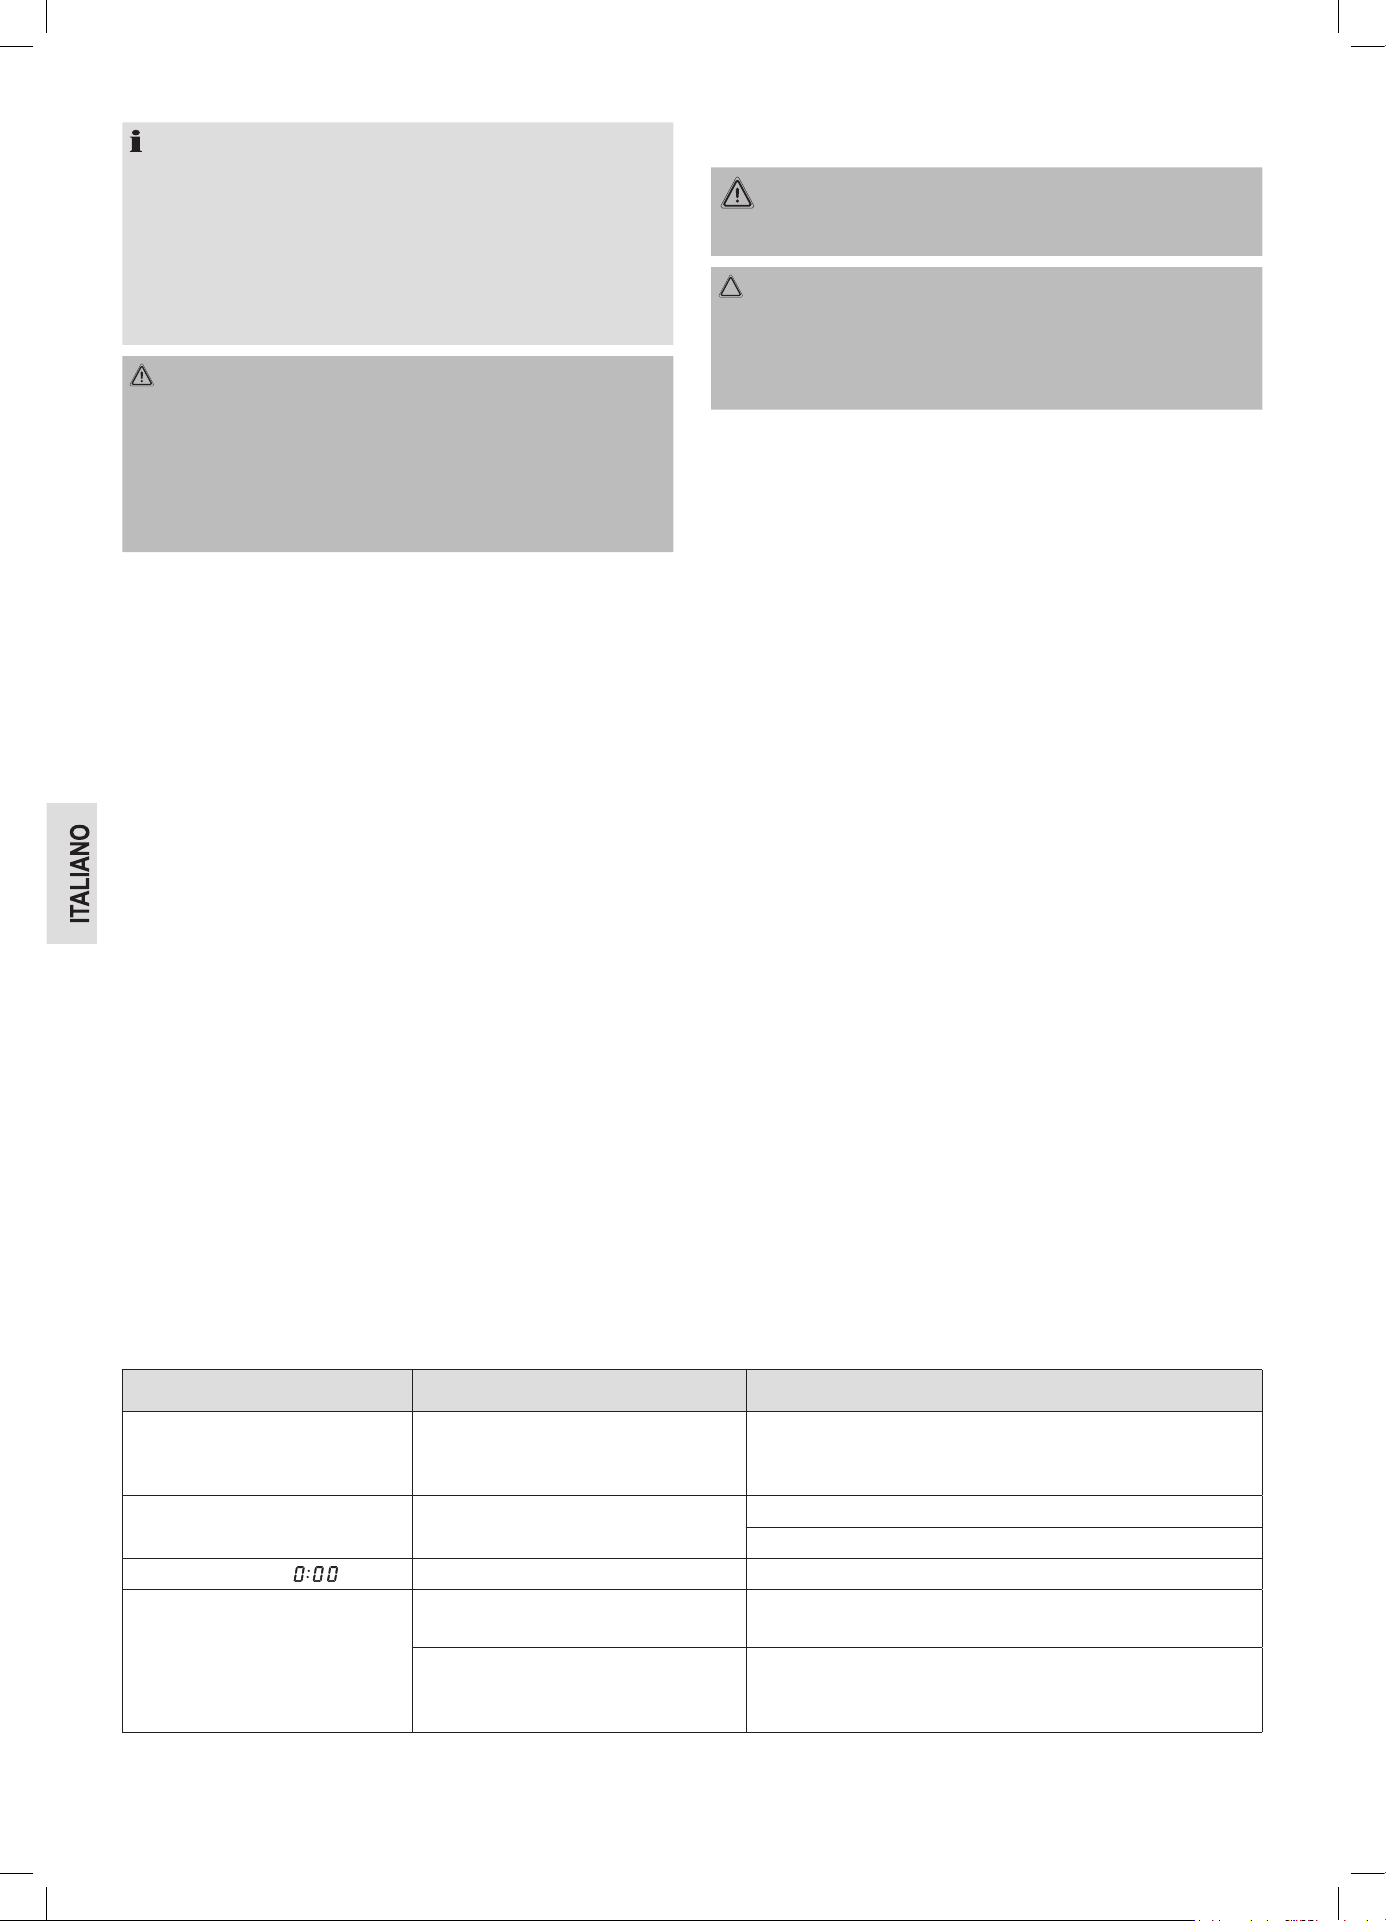
36
NOTA:
• Durante questa impostazione programmata le funzioni dei
comandi sono bloccate (tranne: CLOCK / PRE-SET e CANCEL /
STOP).
• Se desiderate visualizzare di nuovo l’ora di inizio, premere il tasto
CLOCK / PRE-SET.
• Dopo che l’ora preimpostata è giunta, il microonde inizierà ad
operare. Due segnali sonori indicheranno l’inizio.
AVVISO: PERICOLO DI INCENDIO!
• Supervisionare sempre il dispositivo durante il funzionamento.
• Quando si usa la funzione tempo-ritardo, impostare l’ora in modo
tale che il dispositivo operi sotto supervisione adeguata.
• Non attivare il dispositivo vuoto.
• Se togliete il cibo dal dispositivo troppo presto, dovrete terminare
la funzione premendo il tasto CANCEL / STOP.
Blocco (blocco di sicurezza per bambini)
Premere e tenere il tasto CANCEL / STOP per più di 3 secondi per
bloccare il dispositivo. Lo schermo mostrerà l’impostazione di blocco.
Le funzioni dei comandi sono bloccate. Premere e tenere il tasto
CANCEL / STOP di nuovo per più di 3 secondi per sbloccare.
Funzione dello schermo
• Premere il tasto MICRO. / GRILL / COMBI. per visualizzare la
potenza attuale per 2 – 3 secondi quando il microonde, il grill o la
funzione combinata sono in funzione.
• Non considerando la modalità di operazione, lo schermo mostrerà
l’ora attuale per 2 – 3 secondi quando si preme il tasto CLOCK /
PRE-SET.
• Durante la modalità tempo/ritardo, premere il tasto
CLOCK / PRE-SET per visualizzare il tempo di avvio.
Pulizia
AVVISO:
Spegnere la microonde e estrarre la spina.
ATTENZIONE:
• Non usare spazzole di ferro o altri oggetti abrasivi.
• Non usare detergenti forti o abrasivi.
• Non utilizzare raschietti metallici per pulire la vetro spia per non
danneggiare la superficie e non rompere il vetro.
Spazio interno
• Tenere pulito l’interno del forno. Eliminare gli spruzzi ed i liquidi tra-
boccati sulle pareti del forno con un panno umido. Se il forno risulta
molto sporco, è possibile usare anche un detergente.
• Pulire il finestrino dentro e fuori con un panno umido e togliere
regolarmente spruzzi e liquidi traboccati.
Pareti esterne
• Le pareti esterne del supporto devono essere pulite con un panno
umido. Fare attenzione che non subentri mai acqua nelle fessure
del supporto e quindi nell’interno dell’apparecchio.
• Aprire la porta del microonde prima di pulire il pannello di controllo
al fine di evitare l’accensione accidentale del dispositivo.
Accessori
• Pulire il piatto in vetro in acqua calda insaponata o lavastoviglie.
Asciugare prima reinstallare nel microonde.
• Pulire l’anello ruote e la superficie interna regolarmente. Togliere
l’anello ruote e pulire manualmente usando un detersivo delicato.
Pulire l’anello ruote per bene e poi installarlo nuovamente alla base
della camera di cottura.
• Pulire la griglia dopo ogni uso con un detersivo per piatti o metterlo
in lavastoviglie per la pulizia.
Odore
Per eliminare odori sgradevoli dalla microonde, poggiare nel forno
una ciotola adatta alla microonde riempita di acqua e succo di limone
e riscaldare per ca. 5 minuti. In seguito lavare con un panno morbido.
Illuminazione per forno
Per eseguire un ricambio dell’illuminazione del forno, rivolgersi ad
un’officina specializzata nelle vicinanze.
Rimozione guasti
I malfunzionamenti sono spesso causati da problemi lievi. Prima di contattare il servizio assistenza, si prega di verificare la seguente tabella:
Problema Possibile causa Note / rimedio
La ricezione radio o TV è interrotta
durante il funzionamento del
microonde.
I campi elettromagnetici di questo dispo-
sitivo possono interferire con le imma-
gini e il suono a frequenze speciali.
Questo è normale e non rappresenta un malfunzionamento.
Posizionare i dispositivi più distanti gli uni dagli altri.
Il dispositivo non dispone di elet-
tricità.
Presa di rete guasta. Provare con un’altra presa.
Controllare la sicura generale.
Lo schermo mostra “ ”. E’ mancata la corrente. Impostare di nuovo l’ora.
Il dispositivo non si avvia. Lo
schermo mostra un orario diverso
da quello attuale.
La porta non è chiusa adeguatamente. Controllare che non vi siano oggetti o residui di cibo incastrati
nella porta.
Il tasto QUICK START / START non è
stato premuto dopo aver selezionato la
funzione.
Premere il tasto QUICK START / START o premere il tasto
CANCEL / STOP per cancellare la funzione.
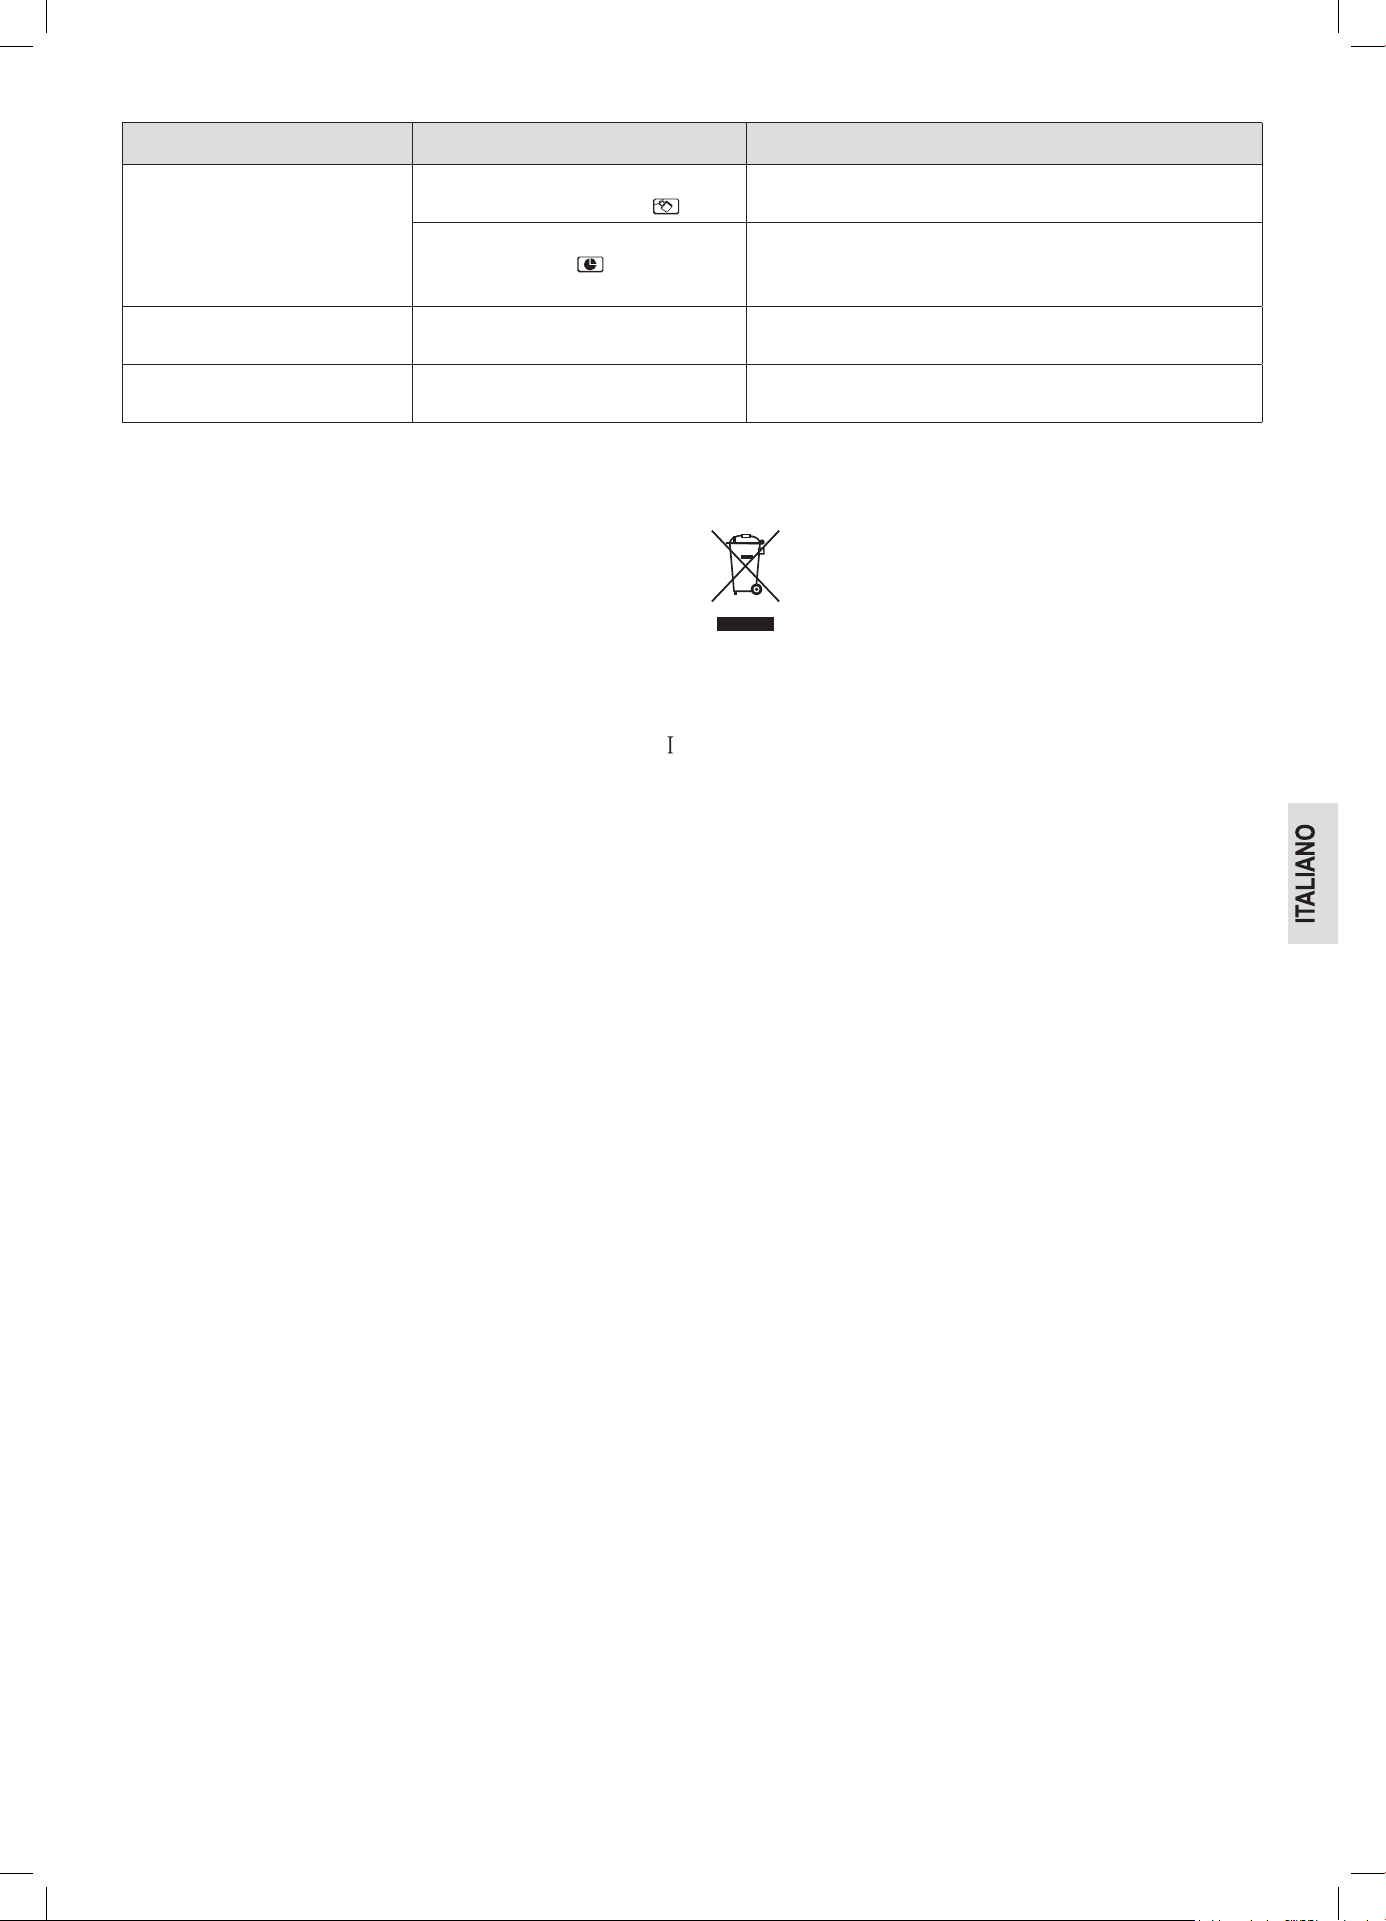
37
Problema Possibile causa Note / rimedio
Tutti i comandi sono bloccati. È attivato il blocco per la sicurezza dei
bambini. Il display visualizza “ ”.
Premere e tenere il tasto CANCEL / STOP per più di 3 secondi
per sbloccare.
Nel display vengono visualizzate l’ora
attuale e il simbolo “ ”.
La funzione tempo / ritardo è attivata. Premere il tasto
CLOCK / PRE-SET per visualizzare l’ora di avvio. Premere il
tasto CANCEL / STOP per terminare la funzione.
Il girevole provoca un rumore di
graffi e fruscio.
C’è della sporcizia o ci sono oggetti
estranei nella zona dell’albero girevole.
Rimuovere i possibili oggetti e residui di cibo come descritto in
“Pulizia”.
L’operazione è terminata senza
alcuna ovvia ragione.
L’apparecchio è guasto. Rivolgersi al nostro servizio.
Dati tecnici
Modello: .......................................................................MWG 2211 U CB
Alimentazione rete: ...........................................................230 V~, 50 Hz
Consumo di energia:
Microonde: .............................................................................1250 W
Griglia: ....................................................................................1000 W
Potenza dichiarata in modalità standby: .....................................≤ 0,8 W
Spegnimento in modalità standby: ........................................≤ 20 minuti
Potenza di uscita dimensionale della microonde: ......800 W / 2450 MHz
Volume dello spazio di cottura: ................................................ca. 20 litri
Classe di protezione: .............................................................................
Peso netto: .............................................................................ca. 12,5 kg
Si riserva il diritto di apportare modifiche tecniche e di design nel
corso dello sviluppo del prodotto.
Questo dispositivo risponde a tutte le direttive della CE, come la diret-
tiva sulla compatibilità elettromagnetica e quella sul basso voltaggio
ed è prodotto secondo le più recenti norme di sicurezza.
Smaltimento
Significato del simbolo “Eliminazione”
Salvaguardare l’ambiente, gli elettrodomestici non vanno
eliminati come rifiuti domestici.
Per l’eliminazione degli elettrodomestici, fare uso dei posti di
raccolta previsti per questo tipo e porre quegli elettrodome-
stici che non sono più in uso.
Si contribuisce così ad evitare un effetto potenziale sull’ambiente e
sulla salute, dovuto magari ad una eliminazione sbagliata.
Questo significa un contributo personale alla riutilizzazione, al rici-
claggio e altre forme di utilizzazione di elettrodomestici ed apparecchi
elettronici usati.
Si possono trovare le corrispondenti informazioni sugli appositi luoghi
di raccolta, nelle amministrazioni dei comuni. Il vostro rivenditore e
partner contrattuale è anche obbligato a riprendere gratuitamente il
vecchio apparecchio.
38
Instruction Manual
Thank you for choosing our product. We hope you will enjoy using the
appliance.
Symbols in this Instruction Manual
Important information for your safety is specially marked. It is essential
to comply with these instructions in order to avoid accidents and pre-
vent damage to the appliance:
WARNING:
This warns you of dangers to your health and indicates possible
injury risks.
CAUTION:
This refers to possible hazards to the appliance or other objects.
NOTE:
This highlights tips and information.
Contents
Overview of the Components ............................................................... 3
General Notes .....................................................................................38
IMPORTANT SAFETY INSTRUCTIONS ........................................... 38
Signs and Symbols on the Appliance .................................................40
Overview of the Components ............................................................. 40
Buttons and Controls on the Control Panel ........................................40
Symbols on the Control Panel ............................................................ 40
Avoiding the Danger of Fire when Installing as a
Bottom-Mounted Appliance ................................................................40
Installation Instructions for Bottom-Mounted Appliances ................... 41
Information on Grilling and Combined Operation ...............................41
Suitable Microwave Tableware ........................................................... 41
Notes on Operating and Using the Appliance ....................................41
Initial Operation ...................................................................................42
Operating the Microwave ....................................................................42
Warming ..............................................................................................42
Cooking ............................................................................................... 43
Quick Start ..........................................................................................44
Grilling ................................................................................................. 44
Combination of Grill and Microwave Operation ..................................44
Auto Functions .................................................................................... 45
Defrosting ............................................................................................45
Gradual Cooking ................................................................................. 45
Special Functions ................................................................................46
Cleaning .............................................................................................. 46
Troubleshooting ..................................................................................47
Technical Data..................................................................................... 47
Disposal ..............................................................................................47
General Notes
Read the operating instructions carefully before putting the appliance
into operation and keep the instructions including the warranty, the
receipt and, if possible, the box with the internal packing. If you give
this appliance to other people, please also pass on the operating
instructions.
• The appliance is designed exclusively for private use and for the
envisaged purpose. This appliance is not t for commercial use.
• Do not use it outdoors. Keep it away from sources of heat, direct
sunlight, humidity (never dip it into any liquid) and sharp edges. Do
not use the appliance with wet hands. If the appliance is humid or
wet, unplug it immediately.
• When cleaning or putting it away, switch off the appliance and
always pull out the plug from the socket (pull the plug itself, not the
lead) if the appliance is not being used and remove the attached
accessories.
• Do not operate the appliance without supervision. If you leave the
room you should always turn the appliance off. Remove the plug
from the socket.
• The appliance and the mains lead have to be checked regularly
for signs of damage. If damage is found the appliance must not be
used.
• Use only original spare parts.
• In order to ensure your children’s safety, please keep all packaging
(plastic bags, boxes, polystyrene etc.) out of their reach.
WARNING:
Do not allow small children to play with the plastic foil. There is a
danger of suffocation!
IMPORTANT SAFETY INSTRUCTIONS
READ CAREFULLY AND KEEP FOR FUTURE
REFERENCE.
WARNING:
• Microwave oven is intended for heating food and
beverages. Drying of food or clothing and heating
of warming pads, slippers, sponges, damp cloth
and similar may lead to risk of injury, ignition or
fire.
• The microwave oven is not suitable for warming /
heating up living animals.
• When the door or the door seals are damaged,
the microwave oven must not be used until it has
been repaired by a qualied specialist.
• Please do not repair the appliance yourself,
but have it repaired by an authorised specialist.
Carrying out maintenance or repair work which
involves removal of the cover that protects the sur-
roundings from microwave radiation is dangerous
unless carried out by an expert.
• Ensure that the appliance is switched off before
replacing the lamp to avoid the possibility of elec-
tric shock.
• If the supply cord is damaged, it must be replaced
by the manufacturer, its service agent or similarly
qualied persons in order to avoid a hazard.
• Liquids or other foods must not be heated in
sealed containers since they are liable to explode.
• Do not place your microwave in a cupboard.
39
WARNING:
• The appliance requires sufficient space for air
circulation in order to function properly. Please
ensure that there is a minimum ventilation gap of
10 cm from cupboards, walls etc. on all sides of
the appliance. Never block the openings of the
appliance. Do not remove the feet.
• Place the appliance with the back facing a wall.
• The appliance and its accessible parts become
hot during use. Care should be taken to avoid
touching heating elements. Children less than
8 years of age shall be kept away unless they are
continuously supervised.
• Only use utensils that are suitable for use in micro-
wave ovens.
• Metallic containers for food and beverages are not
allowed during microwave cooking. Only use suit-
able crockery. Observe the notes in the chapter
“Suitable Microwave Tableware”.
• When heating food in flammable materials, such
as plastic or paper containers, keep an eye on the
oven due to the possibility of ignition.
• If smoke is observed, switch off or unplug the ap-
pliance and keep the door closed in order to stie
any ames.
• Contents of feeding bottles and baby food jars shall
be stirred or shaken and the temperature checked
before consumption, in order to avoid burns.
• Use oven cloths or kitchen gloves when removing
the containers. Danger of burns!
• Eggs in their shell and whole hard-boiled eggs
should not be heated in microwave ovens since
they may explode, even after microwave heating
has ended. This also applies to food with a skin,
such as sausages, sealed tinned jars, etc.
WARNING: Delay in Boiling!
During boiling, particularly during the reheating of
liquids (water), it may happen that the boiling temper-
ature has been reached but the typical bubbles have
not yet started to rise. The liquid does not boil evenly.
When the vessel is removed this so-called delay in
boiling may result in the sudden formation of bubbles
when the vessel is knocked, causing the water to boil
over. Therefore care must be taken when handling
the container. There is a serious danger of burns!
In order to achieve even boiling, please place a glass
rod or similar item, but nothing metallic, in the vessel.
• Take care not to displace the turntable when remov-
ing containers from the appliance.
• This appliance can be used by children aged from
8 years and above and persons with reduced phys-
ical, sensory or mental capabilities or lack of experi-
ence and knowledge if they have been given supervi-
sion or instruction concerning use of the appliance in
a safe way and understand the hazards involved.
• Children shall not play with the appliance.
• Cleaning and user maintenance shall not be made
by children without supervision.
• Any dirt on the door frame / door seal and neigh-
bouring parts must be carefully cleaned with a damp
cloth.
• Clean the microwave oven regularly and remove
any food residues from the interior.
• Failure to maintain the oven in a clean condition
could lead to deterioration of the surface that could
adversely affect the life of the appliance and possi-
bly result in a hazardous situation.
• Do not use harsh abrasive cleaners or sharp metal
scrapers to clean the glass door since they can
scratch the surface, which may result in shattering
the glass.
• The appliance shall not be cleaned with a steam
cleaner.
• Also follow the instructions which are given in the
“Cleaning” chapter.
• You can use this microwave oven as a under cabi-
net built-in or as a free-standing appliance. It must
not be used in a cabinet.
• This appliance is used
- for heating up and cooking solid or liquid foods;
- for browning and grilling solid foods.
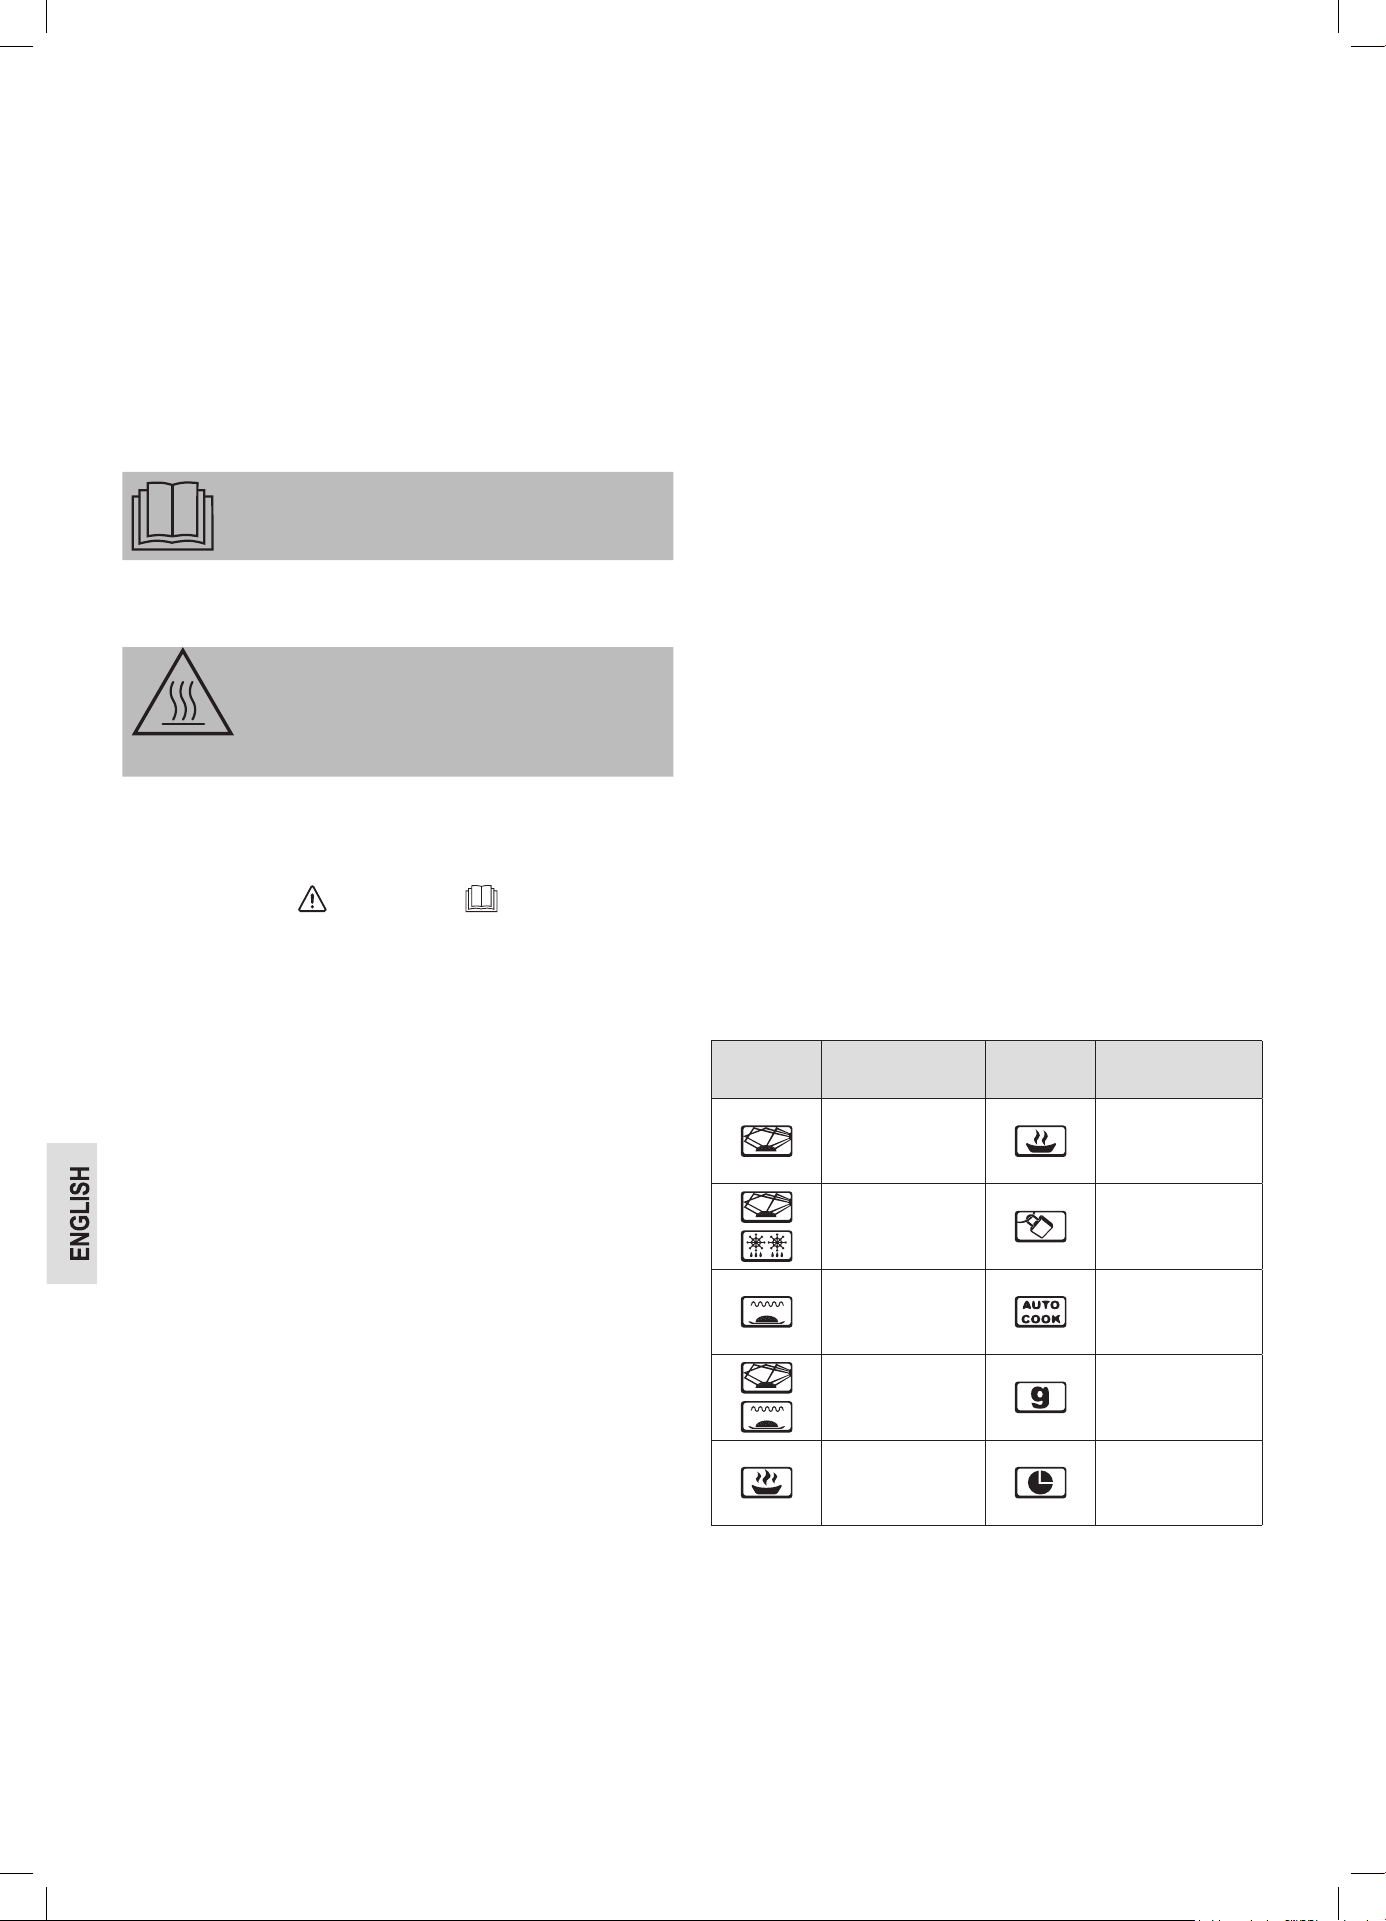
40
• This appliance is intended to be used in household
and similar applications such as:
- staff kitchen areas in shops, offices and other
working environments;
- farm houses;
- by clients in hotels, motels and other residential
type environments;
- bed and breakfast type environments.
Signs and Symbols on the Appliance
Read the Instructions!
There is a warning symbol attached to the top surface
of the microwave oven:
WARNING: Hot Surface!
Risk of Burns!
The surfaces may become hot during use!
On the back of the microwave there is an information
plate with the following text:
WARNING
• MICROWAVE AND HIGH VOLTAGE INSIDE. BE
SURE NOT TO REMOVE THE ENCLOSURE.
• THIS APPLIANCE IS EQUIPPED WITH A
GROUNDED PLUG FOR YOUR PROTECTION
AGAINST POSSIBLE SHOCK HAZARDS AND
SHOULD BE CONNECTED TO A PROPERLY
GROUNDED OUTLET.
• THIS DEVICE IS TO BE SERVICED ONLY BY
PROPERLY QUALIFIED SERVICE PERSONNEL.
• DISCONNECT POWER PLUG BEFORE
SERVICING. REMOVAL OF THE ENCLOSURE
WITH PRODUCT ENERGIZED COULD EXPOSE
SERVICEMEN TO HAZARDOUS HIGH VOLTAGE
POTENTIAL.
The following text is embossed on the side of the door:
PRECAUTIONS FOR SAFE USE TO AVOID POSSIBLE
EXPOSURE TO EXCESSIVE MICROWAVE ENERGY
DO NOT ATTEMPT TO OPERATE THIS OVEN WITH.
(A) OBJECT CAUGHT IN DOOR (B) DOOR THAT
DOES NOT CLOSE PROPERLY (C) DAMAGED
DOOR, HINGE, LATCH, OR SEALING SURFACE
Overview of the Components
1 Control panel
2 Grill grate
3 Drive axle
4 Guide ring
5 Turntable
6 Door latches
7 Viewing window
8 Mica sheet
Buttons and Controls on the Control Panel
Defrost By W.T. Defrosting according to weight
Clock / Pre-Set In combination with the rotary knob for
setting the clock or a starting time
Defrost By Time Defrosting according to time
Quick Start / Start - Starting the function
- Quick start of the microwave (always
+ 60 seconds at 100 % power)
Micro. / Grill / Combi.
Microwave: Select power setting of the microwave
Grill: For roasting and scalloping
Grill / Combi: Grill and microwave operate in turns
Cancel / Stop
Stop: Press once to stop cooking
Delete: Press twice to delete function
Lock: Press and hold the CANCEL / STOP button
for 3 seconds in order to lock (child-proof
lock) or unlock the control panel
Auto Menu Selection of the automatic programs
Timer • Power • Weight Rotary knob for setting the time, cooking or
defrosting time, power levels, combinations,
automatic programs or weights
Symbols on the Control Panel
Symbol
Meaning /
Function
Symbol
Meaning /
Function
Microwave Power low
Defrosting
Child-proof lock
activated
Grill Auto function
Microwave + grill Weight in grams
Power high Programmed start
Avoiding the Danger of Fire when Installing
as a Bottom-Mounted Appliance
If you would like to install the microwave as a bottom-mounted device
on a cupboard or shelf, for example, please note the information in the
section “Installation Instructions for Bottom-Mounted Appliances”.
• Do not remove the feet on the underside of the appliance.
• Please use only the attachment materials supplied if you want to
install the microwave under a cupboard.
41
• Maintain the following distances between the sides of the appliance
and the furniture when installing the microwave:
- at least 4 cm to the right-hand side
- at least 10 cm to the ventilation slits on the left-hand side.
- To not cover any openings! Otherwise ventilation of the appliance
will not be sufcient.
- The distance to the back wall is guaranteed by means of a spacer.
• The back wall has to be fireproof (e. g. tiles).
Installation Instructions
for Bottom-Mounted Appliances
WARNING:
Important! Do not connect the appliance to the mains power supply
until after installation!
• Remove all objects from the cupboard and anything which is fragile
in the adjacent cupboards.
• For the installation the cupboard must fulfil the following conditions:
- Thickness of the cupboard floor between 16 mm and 19 mm
- Cupboard width at least 500 mm.
- The installation depth below the cupboard to the wall has to be at
least 320 mm.
NOTE:
If you would like the microwave to close with the front edge of
the door, an installation depth of 350 mm is necessary.
- The cupboard must not contain any cracks, splinters or other
damage. All connections must be stable.
- The cupboard must be designed for a minimum load of 40 kg.
• The wall mounting of the cupboard must be stable and anchored
rmly in the wall with at least 2 screws.
CAUTION:
Do not install the appliance above a cooker!
• When installing the appliance it must be ensured that there is a
power socket within reach.
• The mains socket must be within easy reach, so that the plug can
be quickly removed in an emergency.
• The appliance cannot be installed under cupboards under which
there is a lighting strip.
Installation Accessories
Item Designation Number
1 Screws 4
2 Washers 4
3 Drilling template 1
The installation instructions are to be found on the accompanying
drilling template.
WARNING:
• Please adhere to the dimensions stated in the installation instruc-
tions.
• The installation accessories supplied should be used.
• If screws are inserted too deeply (screws too long) this may dam-
age the appliance or represent a hazard to the user or others.
Information on Grilling and Combined Operation
• As heat radiation is used during grilling and combined operation,
please use only heat-resistant tableware.
• When food is only being grilled, metal or aluminium tableware may
also be used -but not during combined or microwave operation.
• Only the grill is suitable for COMBI operation.
• Do not place anything on top of the housing as this becomes hot.
• Always leave the ventilation slits uncovered.
• Please use the grilling grid to move the food to be cooked nearer to
the heating element.
Suitable Microwave Tableware
• The ideal material for use in a microwave is transparent and allows
the microwave radiation to heat the food evenly.
• Round / oval dishes and plates are more suitable than rectangular
ones as the food in the corners may overcook.
CAUTION:
Risk of explosion by sealed tableware.
• Open closed containers before cooking or heating.
• Pierce protective plastic foil several times using a fork.
CAUTION: Sparking and Fire Hazard!
• Microwaves cannot penetrate metal. Accordingly, no metal con-
tainers or plates may be used in microwave operation.
• Do not use any paper dishes made of recycled material as these
may contain small amounts of metal, which may result in sparks
or res.
The list below is intended to help you select suitable microwave
tableware:
Material
Suitable for
Microwave Grill Combination *
Heat-resistant glass vessel yes yes yes
Non-heat-resistant glass
vessel
no no no
Heat-resistant ceramic
vessel / plate
yes yes yes
Plastic vessels suitable for
microwave use
yes no no
Kitchen roll yes no no
Metal or aluminium
ovenware
no yes no
Grilling grid no yes no
Aluminium foil and
foil containers
no yes no
* Combination of microwave with grill.
Notes on Operating and Using the Appliance
What you Should Know about Microwave Operation
• Your appliance works with microwave radiation, which heats up wa-
ter particles in food in a very short time. There is no heat radiation
and therefore hardly any browning.
• Only food should be heated up with this appliance.
• The appliance is not suitable for baking in floating fat.
42
• Only 1 – 2 portions should be heated up at the same time. Otherwise
the appliance will become less efficient.
• Microwaves provide their full energy levels immediately. Pre-heat-
ing is therefore not necessary.
• Never operate the microwave function when the oven is empty.
• The microwave oven does not replace your traditional cooker. It is
used mainly for:
- defrosting deep-frozen food
- rapid warming/heating of food or drinks
- cooking meals
Notes on Operating the Appliance
• Your selection by pressing buttons is confirmed by a signal tone. If
not, you did not press properly.
• Then an acoustic signal is heard when the rotary knob is turned for
the rst time.
• If you set a program but do not press the QUICK START / START
button within 5 minutes, the setting will be cancelled. The display
will then show the current time again.
• When the door is open, the lights in the oven are on. If the door is
not closed after 10 minutes, the lights turn off.
• When starting a program, the remaining operating time will be dis-
played. The countdown runs.
• 5 signal tones will indicate the end of the program. Take the food
from the appliance.
Initial Operation
Preparation
1. After removing all the accessories from inside the oven, unpack
them and place the sliding ring in the middle.
2. Position the glass plate on the drive axle in such a way that it locks
into the dents of the drive shafts and is lying at.
3. Check the appliance for any visible damage, particularly in the
area of the door. If any damage is found, the appliance must not be
used.
4. In order to avoid interference to other appliances when the micro-
wave oven is operated, do not place it in the direct vicinity of other
electronic devices.
5. Remove any protective foils that may be adhered to the housing.
6. Insert the mains plug into a properly installed power socket.
CAUTION:
• Do not remove any installed parts from inside the oven or from
inside the door!
• The mica sheet (8) is also part of the appliance and must not be
removed. It protects the electronic component located behind it
from dirt.
NOTE:
If there are any oil or other residues from the manufacturing process
on the housing or heating element, smoke or odours may initially be
produced. This is normal and will not occur after the oven has been
used a few times.
The following procedure is strongly recommended:
• Turn the appliance to the grill function and allow it to run several
times without any food inside (max. 5 minutes each time).
• Please ensure sufficient ventilation.
Setting the Clock
NOTE:
During the rst setting a signal tone will sound and the display will
show “ ”.
1. Press the CLOCK / PRE-SET button. The symbol “ ” lights up in
the display. The hour digit is ashing.
2. Use the rotary knob to set the desired hour.
3. Press the CLOCK / PRE-SET button. The minute digits will be
ashing.
4. Use the rotary knob to set the desired minutes.
5. Press the CLOCK / PRE-SET button again to activate the new
time. The delimiter symbol “ ” of the digital time will be ashing on
the display. The symbol “ ” goes off.
Operating the Microwave
1. Place the food to be heated in a suitable piece of tableware.
2. Open the door and place the vessel in the middle of the glass plate.
Then close the door. (For safety reasons the oven only operates
when the door is tightly closed.)
3. Press the MICRO. / GRILL / COMBI. button once. Then use the
rotary knob to select the desired power level ( to ).
Power Setting
on the Display
as Selected in %
Power in Watt
(approx.)
Application
800 Quick heating
640 Cooking
400 Simmering
240 Defrosting frozen food
80 Melting cheese etc.
4. Press the MICRO. / GRILL / COMBI. button to confirm your settings.
5. Use the rotary knob to set the desired cooking time between 5 sec-
onds and 95 minutes.
6. Press the QUICK START / START button to start operation. The
cooking time depends on the quantity and texture of the food. After
a few times trying you will quickly learn to estimate the cooking
time.
NOTE:
• Preparation of food in a microwave oven is very much faster than
in a conventional cooker. Set the cooking time to a low level if you
are not sure and continue cooking again if necessary.
• Please note: A cover should be placed over the food when oper-
ating the microwave.
Pause or Stop Cooking
• If you wish to pause the cooking operation, press the button
CANCEL / STOP once and open the door.
• If you wish to continue the cooking operation, close the door and
press the QUICK START / START button.
• If you wish to completely stop operation, press the CANCEL / STOP
button twice.
Warming
The warming and heating of food is a particular strength of the mi-
crowave. Liquids and foods that are in the refrigerator can be easily
brought up to room temperature or the right temperature for consump-
tion without the need for many pots.
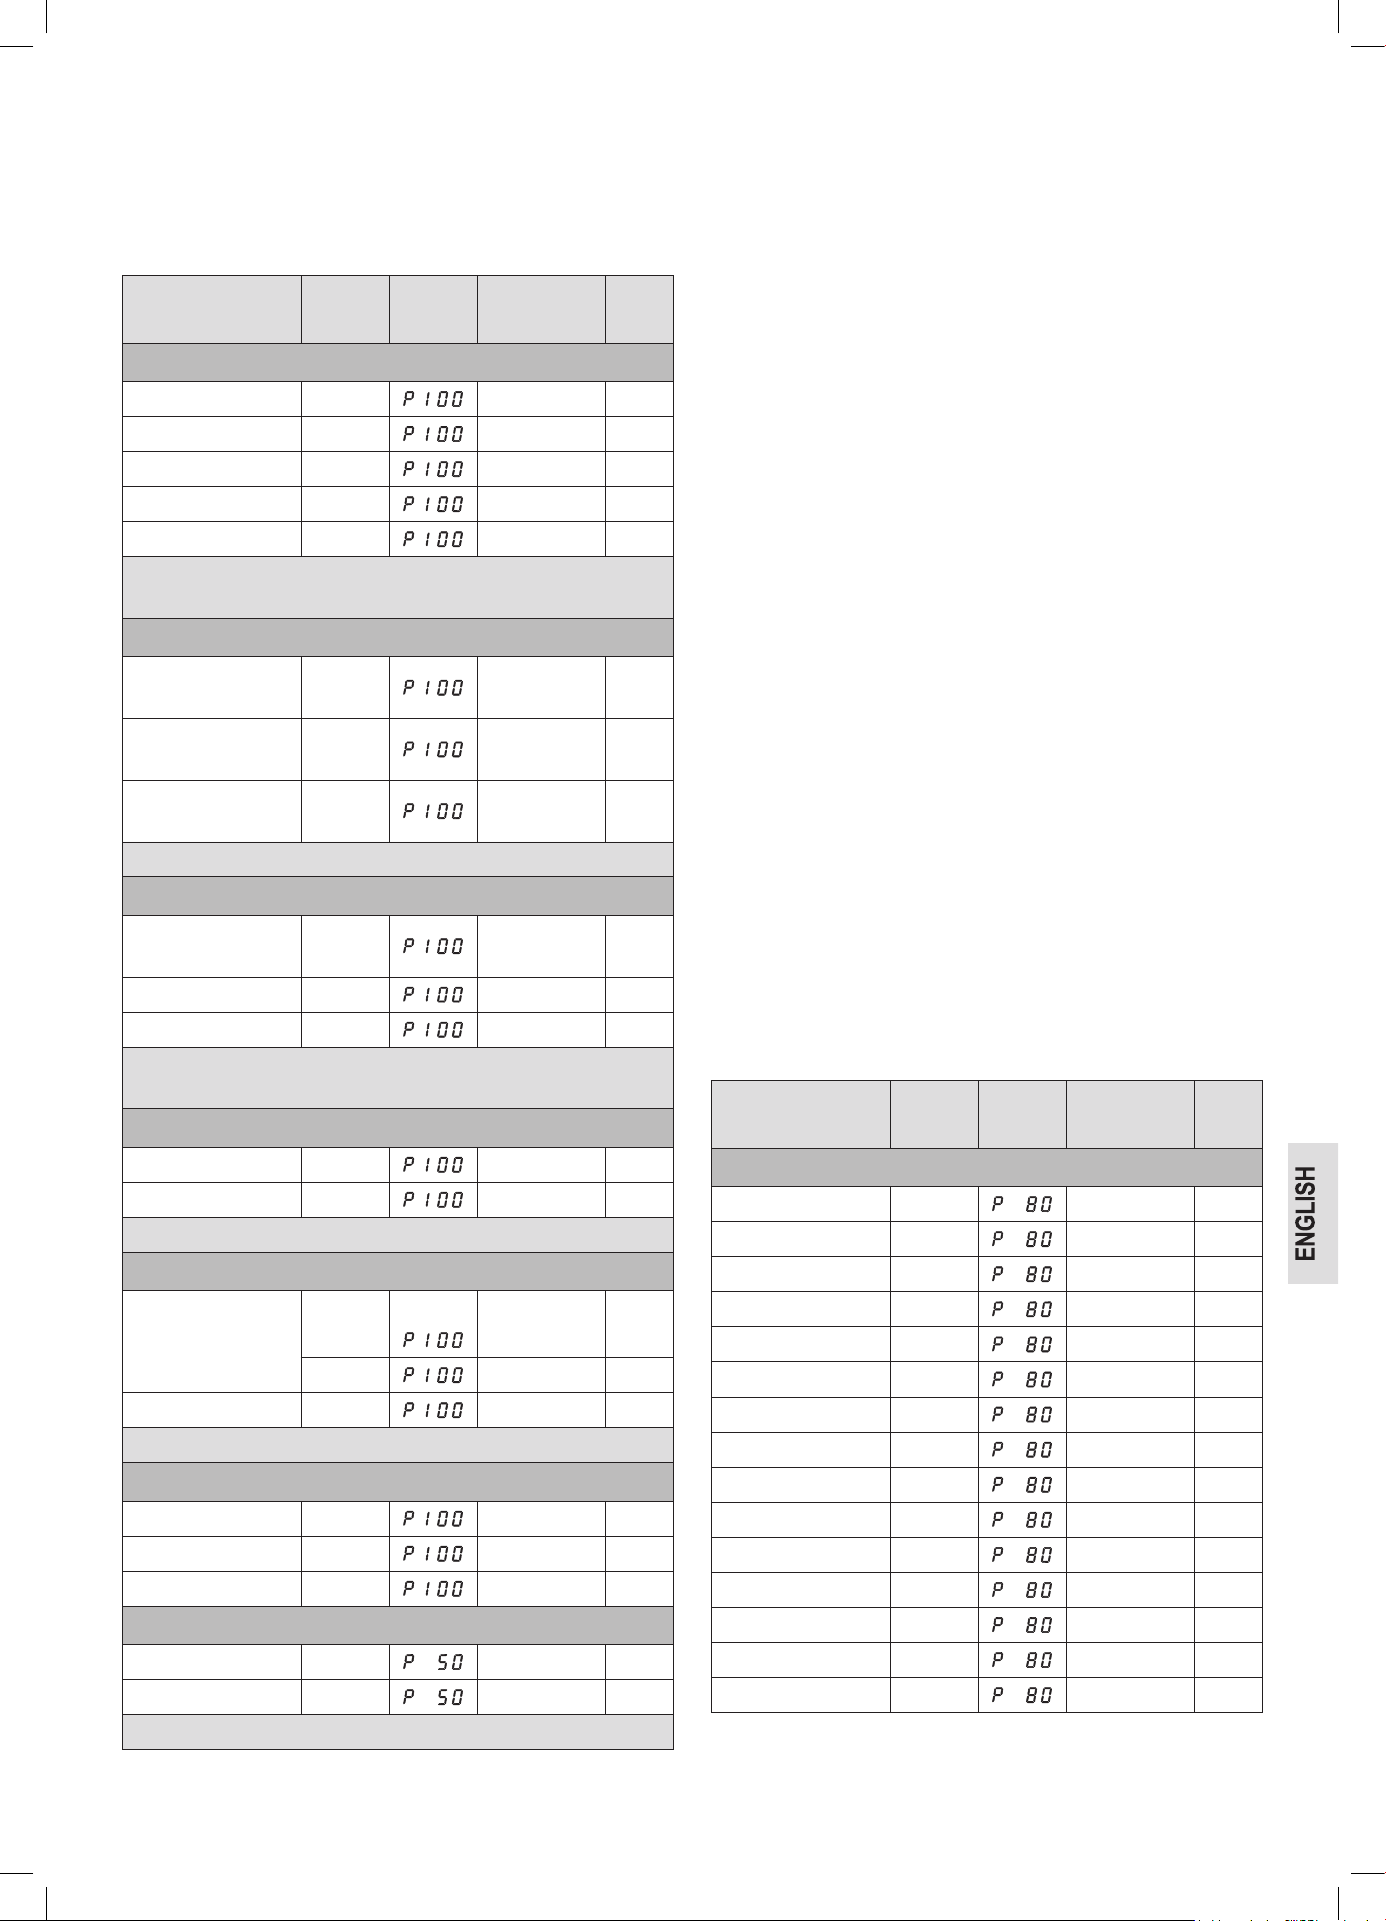
43
The heating times contained in the following table are only rough
guides as the time depends very much on the starting temperature
and the composition of the food. You are therefore advised to check
from time to time whether the dish is already hot enough.
Heating Table
Food / Dish Quantity
Power
in %
Approx. Time
in Minutes
Cover
Liquids
Water, 1 cup 150 g 0.5 – 1 no
Water, 0.5 l 500 g 3.5 – 5 no
Water, 0.75 l 750 g 5 – 7 no
Coffee, 1 cup 150 g 0.5 – 1 no
Milk, 1 cup 150 g 0.5 – 1 no
Caution: Place a glass rod or similar item (nothing metal) into the
vessel in order to prevent delayed boiling. Stir well before drinking.
One-Course Meals
Schnitzel, potatoes
and vegetables
450 g 2.5 – 3.5 yes
Goulash with
noodles
450 g 2 – 2.5 yes
Meat, dumpling and
sauce
450 g 2.5 – 3.5 yes
Tip: Moisten slightly beforehand, stir from time to time.
Meat
Schnitzel, coated
with breadcrumbs
200 g 1 – 2 no
Meatballs, 4 in total 500 g 3 – 4 no
Joint 250 g 2 – 3 no
Tip: Brush with oil so that the breadcrumbs or crust do not become
soft.
Poultry
Half a chicken 450 g 3.5 – 5 no
Chicken fricassee 400 g 3 – 4.5 yes
Tip: Brush with oil, stir from time to time.
Extras
Noodles, rice
1 portion 150 g 1 – 2 yes
2 portions 300 g 2.5 – 3.5 yes
Potatoes 500 g 3 – 4 yes
Tip: Moisten slightly beforehand.
Soups / Sauces
Clear soup, 1 plate 250 g 1 – 1.5 yes
Soup with garnish 250 g 1.5 – 2 yes
Sauce 250 g 1 – 2 yes
Infant Food
Milk 100 ml 0.5 – 1.5 no
Mash 200 g 1 – 1.5 no
Tip: Shake well or stir. Check the temperature!
Cooking
Practical Cooking Tips
Please keep to the recommended values in the cooking table and
the recipes. Keep an eye on the cooking process until you have more
experience.
The door of the appliance can be opened at any time. The appliance
switches off automatically.
It will only continue operation when the door is closed and the
QUICK START / START button pressed again.
Foods taken directly from the refrigerator require a slightly longer
cooking time than those at room temperature.
The more compact a food is, the longer is the cooking time. For
example, a large piece of meat has to be cooked longer than the
same quantity of sliced meat. It is advisable to start cooking sizeable
quantities on maximum power and then to continue cooking evenly on
medium power.
Flat dishes cook faster than thick ones. Therefore it is advisable to
spread the food as thinly as possible. Thinner pieces, e. g. chicken legs
or sh llets should be placed towards the inside or allowed to overlap.
Smaller quantities cook faster than large ones. The following rule of
thumb applies:
Double the quantity = almost double the time
Half the quantity = half the time
If you are not able to nd a suitable time for a dish, the following rule
applies:
approx. 1 minute cooking time for each 100 g
All dishes which are covered up on a normal cooker should also be
covered in the microwave oven.
A lid prevents the food from drying out. Suitable covers are an in-
verted plate, parchment paper or microwave foil. Dishes which are to
be given a crust should not be covered when cooked.
Cooking Table
Food / Dish Quantity
Power
in %
Approx. Time
in Minutes
Cover
Vegetables
Aubergines 500 g 7 – 10 yes
Cauliower 500 g 13 – 15 yes
Broccoli 500 g 6 – 9 yes
Chicory 500 g 6 – 7 yes
Peas 500 g 6 – 7 yes
Fennel 500 g 8 – 11 yes
Green beans 300 g 13 – 15 yes
Potatoes 500 g 9 – 12 yes
Turnip cabbage 500 g 8 – 10 yes
Leek 500 g 7 – 9 yes
Maize cob 250 g 7 – 9 yes
Carrots 500 g 8 – 10 yes
Bell pepper 500 g 6 – 9 yes
Brussels sprouts 300 g 7 – 10 yes
Asparagus 300 g 6 – 9 yes
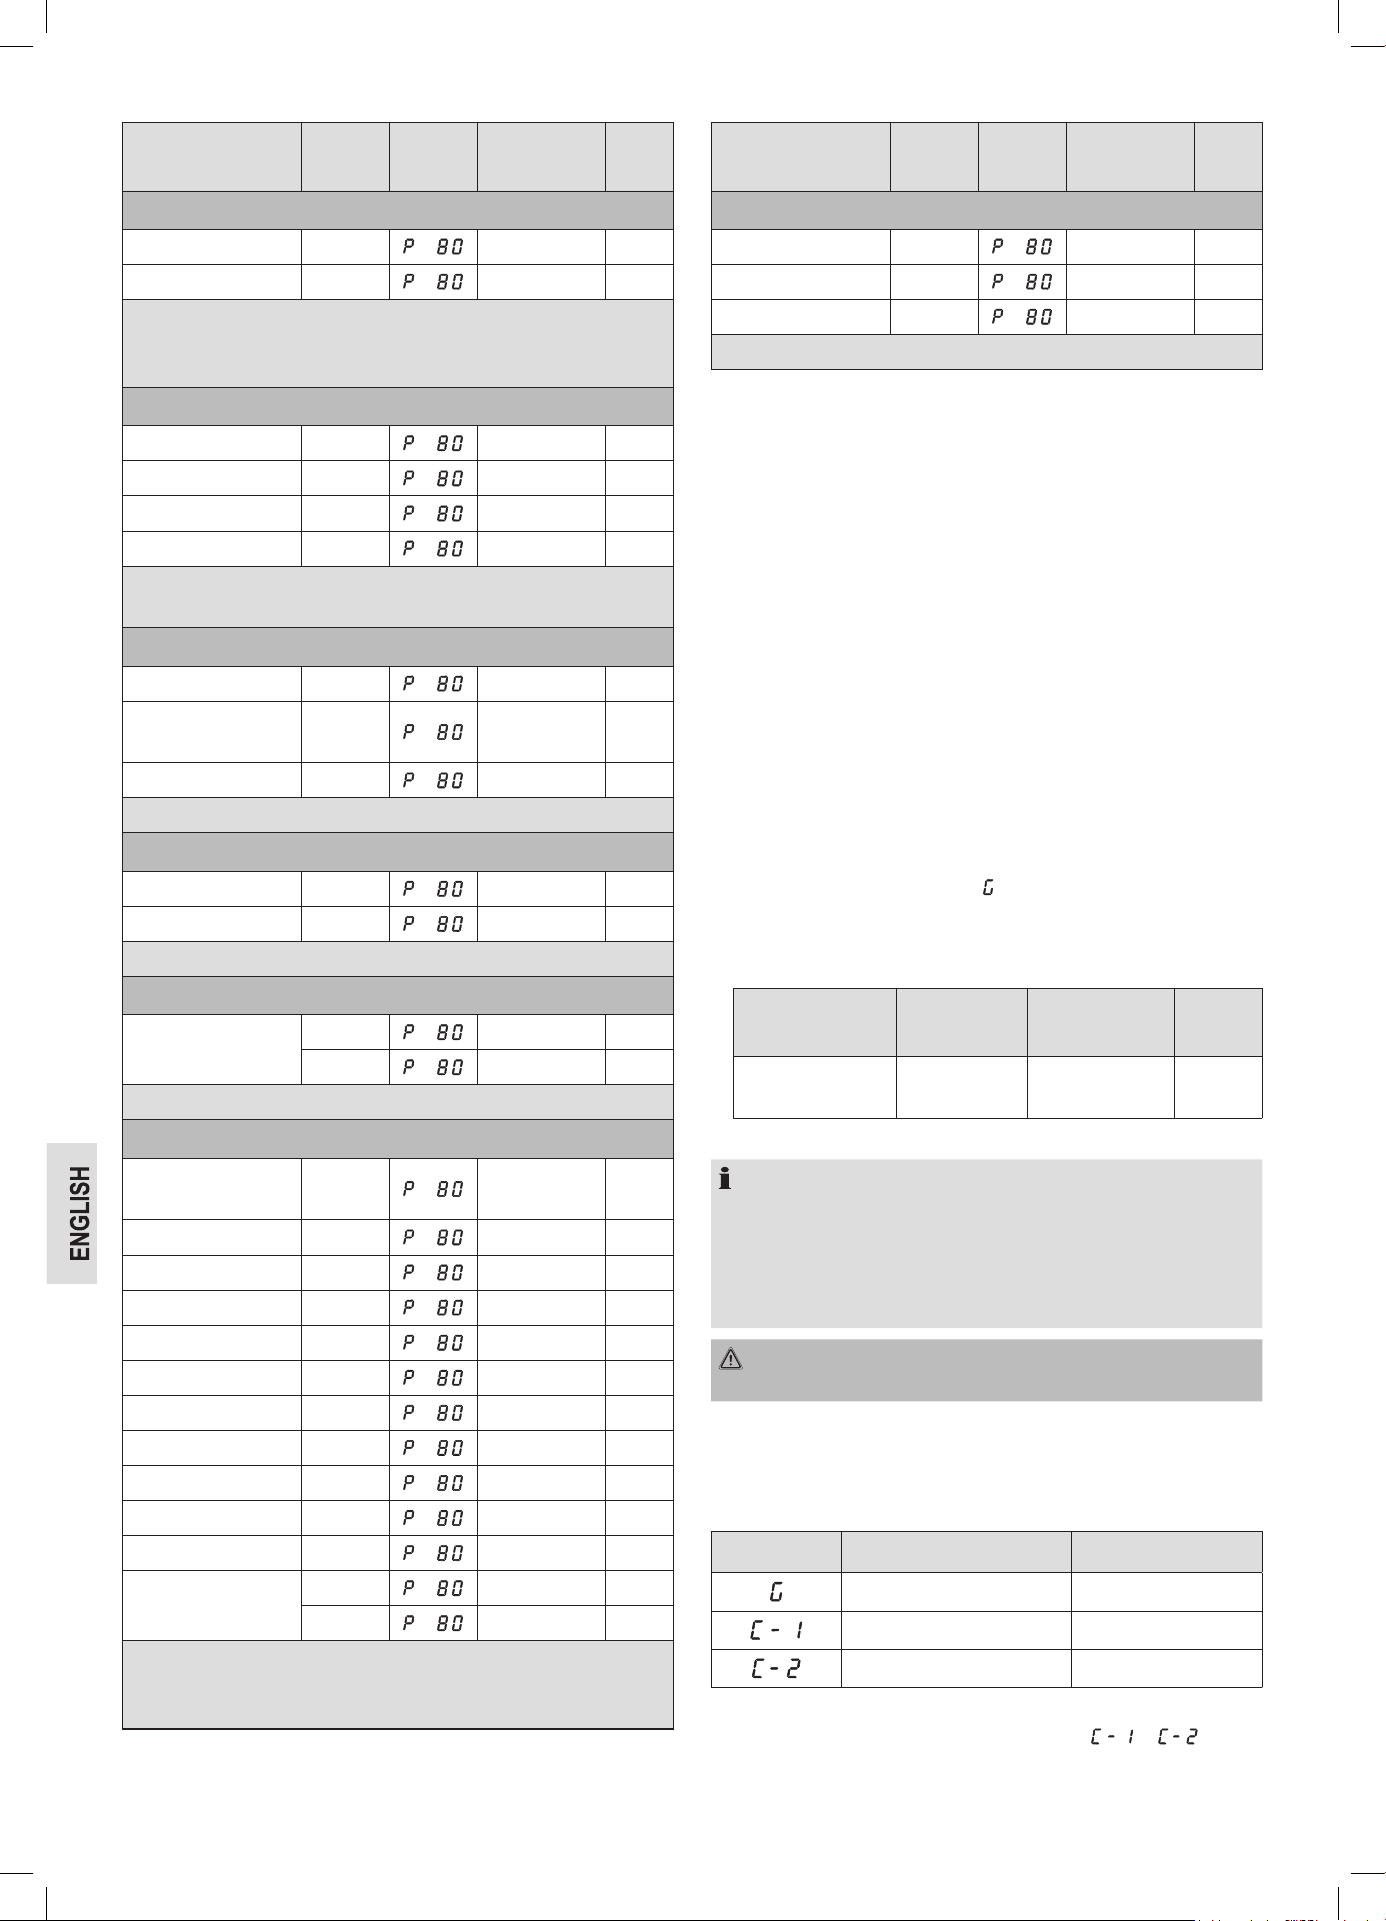
44
Food / Dish Quantity
Power
in %
Approx. Time
in Minutes
Cover
Vegetables
Tomatoes 500 g 6 – 7 yes
Courgettes 500 g 9 – 10 yes
Tip: Cut the vegetables into small pieces and cook with 2 – 3 ta-
blespoons of liquid, stir from time to time, continue cooking for
3 – 5 minutes, season just before serving.
Fruit
Stewed apple, pear 500 g 5 – 8 yes
Plum jam 250 g 4 – 6 no
Stewed rhubarb 250 g 5 – 8 yes
4 baked apples 500 g 7 – 9 yes
Tip: Add 125 ml water. Lemon juice prevents the fruit from changing
colour. Cook for a further 3 – 5 minutes.
Meat *
Meat with sauce 400 g 10 – 12 yes
Goulash, stewed
strips of meat
500 g 10 – 15 yes
Roulade of beef 250 g 7 – 8 yes
Tip: Stir from time to time, allow to stand for 3 – 5 minutes.
Poultry *
Chicken fricassee 250 g 6 – 7 yes
Poultry soup 200 g 5 – 6 yes
Tip: Stir from time to time, allow to stand for 3 – 5 minutes.
Fish
Fish llet
300 g 7 – 8 yes
400 g 8 – 9 yes
Tip: Turn halfway through, continue cooking for 3 – 5 minutes.
Defrosting and Cooking Vegetables
Apple and red
cabbage
450 g 14 – 16 yes
Leaf spinach 300 g 11 – 13 yes
Cauliower 200 g 7 – 9 yes
French beans 200 g 8 – 10 yes
Broccoli 300 g 8 – 9 yes
Peas 300 g 7 – 8 yes
Turnip cabbage 300 g 13 – 15 yes
Leek 200 g 10 – 11 yes
Maize 200 g 4 – 6 yes
Carrots 200 g 5 – 6 yes
Brussels sprouts 300 g 7 – 8 yes
Spinach
450 g 12 – 13 yes
600 g 15 – 17 yes
Tip: cook in 1 – 2 tablespoons of liquid, stir from time to time or
divide carefully into pieces. Continue cooking for 2 – 3 minutes and
season just before serving.
Food / Dish Quantity
Power
in %
Approx. Time
in Minutes
Cover
Soups / Stews *
Stew 500 g 13 – 15 yes
Soup with garnish 300 g 7 – 18 yes
Crème soup 500 g 13 – 15 yes
Tip: Stir from time to time and continue cooking for 3 – 5 minutes.
* Ready-made meals
Quick Start
You wish to heat food or drinks shortly at the highest power setting?
1. Start the microwave immediately by pressing the button
QUICK START / START.
2. Cooking starts immediately, with every press of the button increas-
ing the cooking time by 60 seconds. The microwave works at
100 % power.
Grilling
For grilling please use the grilling grid. Use suitable heat-resistant
tableware or place the food to be grilled directly on the grid.
“Preheating” the grill is not necessary, as the grill produces radiant
heat immediately.
Proceed as follows for roasting and scalloping:
1. Press the MICRO. / GRILL / COMBI. button once. Then use the
rotary knob to select the mode ( ).
2. Press the MICRO. / GRILL / COMBI. button to confirm your settings.
3. Use the rotary knob to set the desired cooking time between 5 sec-
onds and 95 minutes. Example:
Food / Dish Quantity
Approx. Time
in Minutes
Cover
Toast au gratin
with cheese
2 – 3 3 – 4 no
4. Press the QUICK START / START button to start operation.
NOTE:
After half of the time has elapsed, several signal sounds will alert
you to turn the grilled food such as meat or sausages. If the door
remains closed, the appliance starts again after approximately
60 seconds. If you would like the appliance to continue operation
sooner, press the QUICK START / START button.
WARNING: Risk of Burns!
Open and close the door at its handle only.
Combination of Grill and Microwave Operation
When using these settings, microwave and grill operate in turns dur-
ing the pre-set time with the following ratio:
Display Microwave Power Setting Grill Power Setting
0 % 100 %
55 % 45 %
36 % 64 %
1. Press the MICRO. / GRILL / COMBI. button once. Then use the
rotary knob to select the desired power level ( or ).
2. Press the MICRO. / GRILL / COMBI. button to confirm your settings.
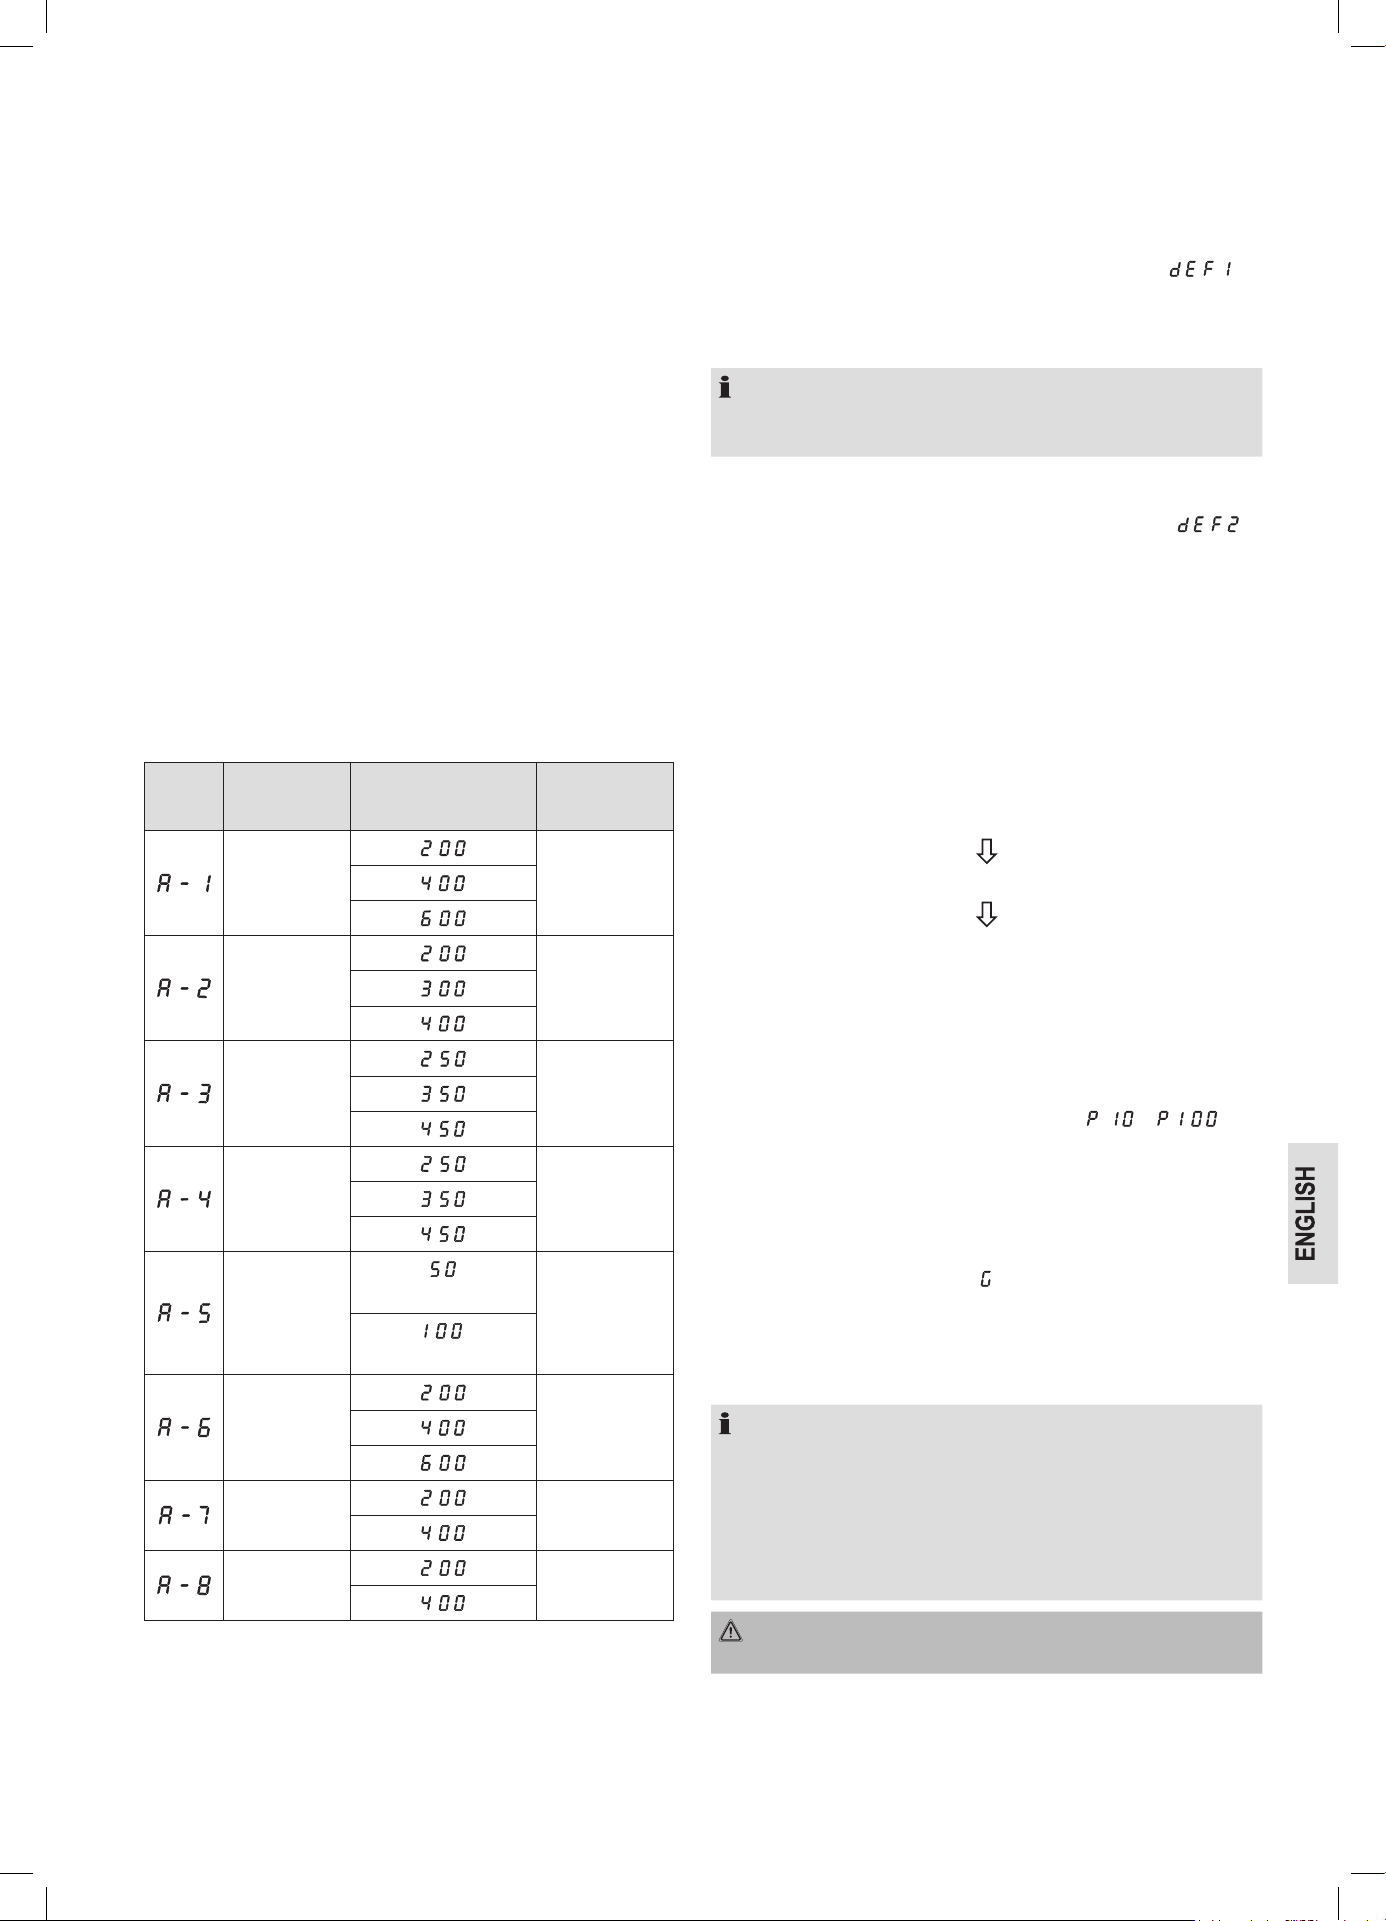
45
3. Use the rotary knob to set the desired cooking time between 5 sec-
onds and 95 minutes.
4. Press the QUICK START / START button to start operation.
Tips on Combined Operation
If you prepare food using the combined microwave-grill functions you
should note the following:
For large, thick foods such as roast pork the microwave time is cor-
respondingly longer than for small, at foods. However, in the case
of the grill it is the other way round. The closer the food is to the
grill, the faster it turns brown. This means that when large joints are
prepared using combined operation the grilling time may be shorter
than for smaller joints.
Please use the grid for grilling in order to achieve rapid and even
browning. (Exception: large, thick items of food are grilled directly on
the rotating plate!)
Auto Functions
Use the auto functions to cook certain amounts of foods automatically.
Proceed as follows:
1. Press the AUTO MENU button once. Then use the rotary knob to
select the desired automatic program. Choose one of the settings
given in the table below:
Code Program
Display /
Weight in Grams
Power Setting
Auto
Reheat
Microwave
100 %
Vegetable
Microwave
100 %
Fish
Microwave
80 %
Meat
Microwave
100 %
Pasta
(with 450 g water)
Microwave
80 %
(with 800 g water)
Potato
Microwave
100 %
Reheat
Pizza
Microwave
100 %
Soup
Microwave
100 %
2. Press the AUTO MENU button to confirm your settings.
3. Use the rotary knob to set the desired weight.
4. Press the QUICK START / START button to start operation.
Defrosting
Using the defrost settings you may automatically defrost your food in
two different ways. Select the defrost function by weight and time.
Defrosting According to Weight
1. Press the DEFROST BY W.T. button once. The letters “ ”
appear in the display.
2. Use the rotary knob to set the weight to between 0.1 – 2.0 kg.
3. Press the QUICK START / START button to start operation.
NOTE:
In case the weight of the food is less than 200 g, place it on the edge
and not in the centre of the glass tray.
Defrosting According to Time
1. Press the DEFROST BY TIME button once. The letters “ ”
appear in the display.
2. Use the rotary knob to set the desired time between 5 seconds and
95 minutes.
3. Press the QUICK START / START button to start operation.
Gradual Cooking
You can set the programs in such a way that up to 3 different func-
tions are performed one after the other.
Let us assume that you select the following programs:
Defrosting
Cooking
Grilling
1. Select the first function:
Press the DEFROST BY W.T. or the DEFROST BY TIME button.
2. Use the rotary knob to set the weight or the desired time.
3. Select the second function:
Press the MICRO. / GRILL / COMBI. button once. Then use the
rotary knob to select the desired power level ( to ).
4. Press the MICRO. / GRILL / COMBI. button to confirm your settings.
5. Use the rotary knob to set the desired cooking time between 5 sec-
onds and 95 minutes.
6. Select the third function:
Press the MICRO. / GRILL / COMBI. button once. Then use the
rotary knob to select the mode ( ).
7. Press the MICRO. / GRILL / COMBI. button to confirm your settings.
8. Use the rotary knob to set the desired cooking time between 5 sec-
onds and 95 minutes.
9. Press the QUICK START / START button to start operation.
NOTE:
• The change of program is indicated by an acoustic signal.
• When half of the grilling time has passed two acoustic signals
are heard to remind you to turn the food over. If the door re-
mains closed, the appliance starts again after approximately
60 seconds. If you would like the appliance to continue operation
sooner, press the QUICK START / START button.
WARNING: Risk of Burns!
Open and close the door at its handle only.
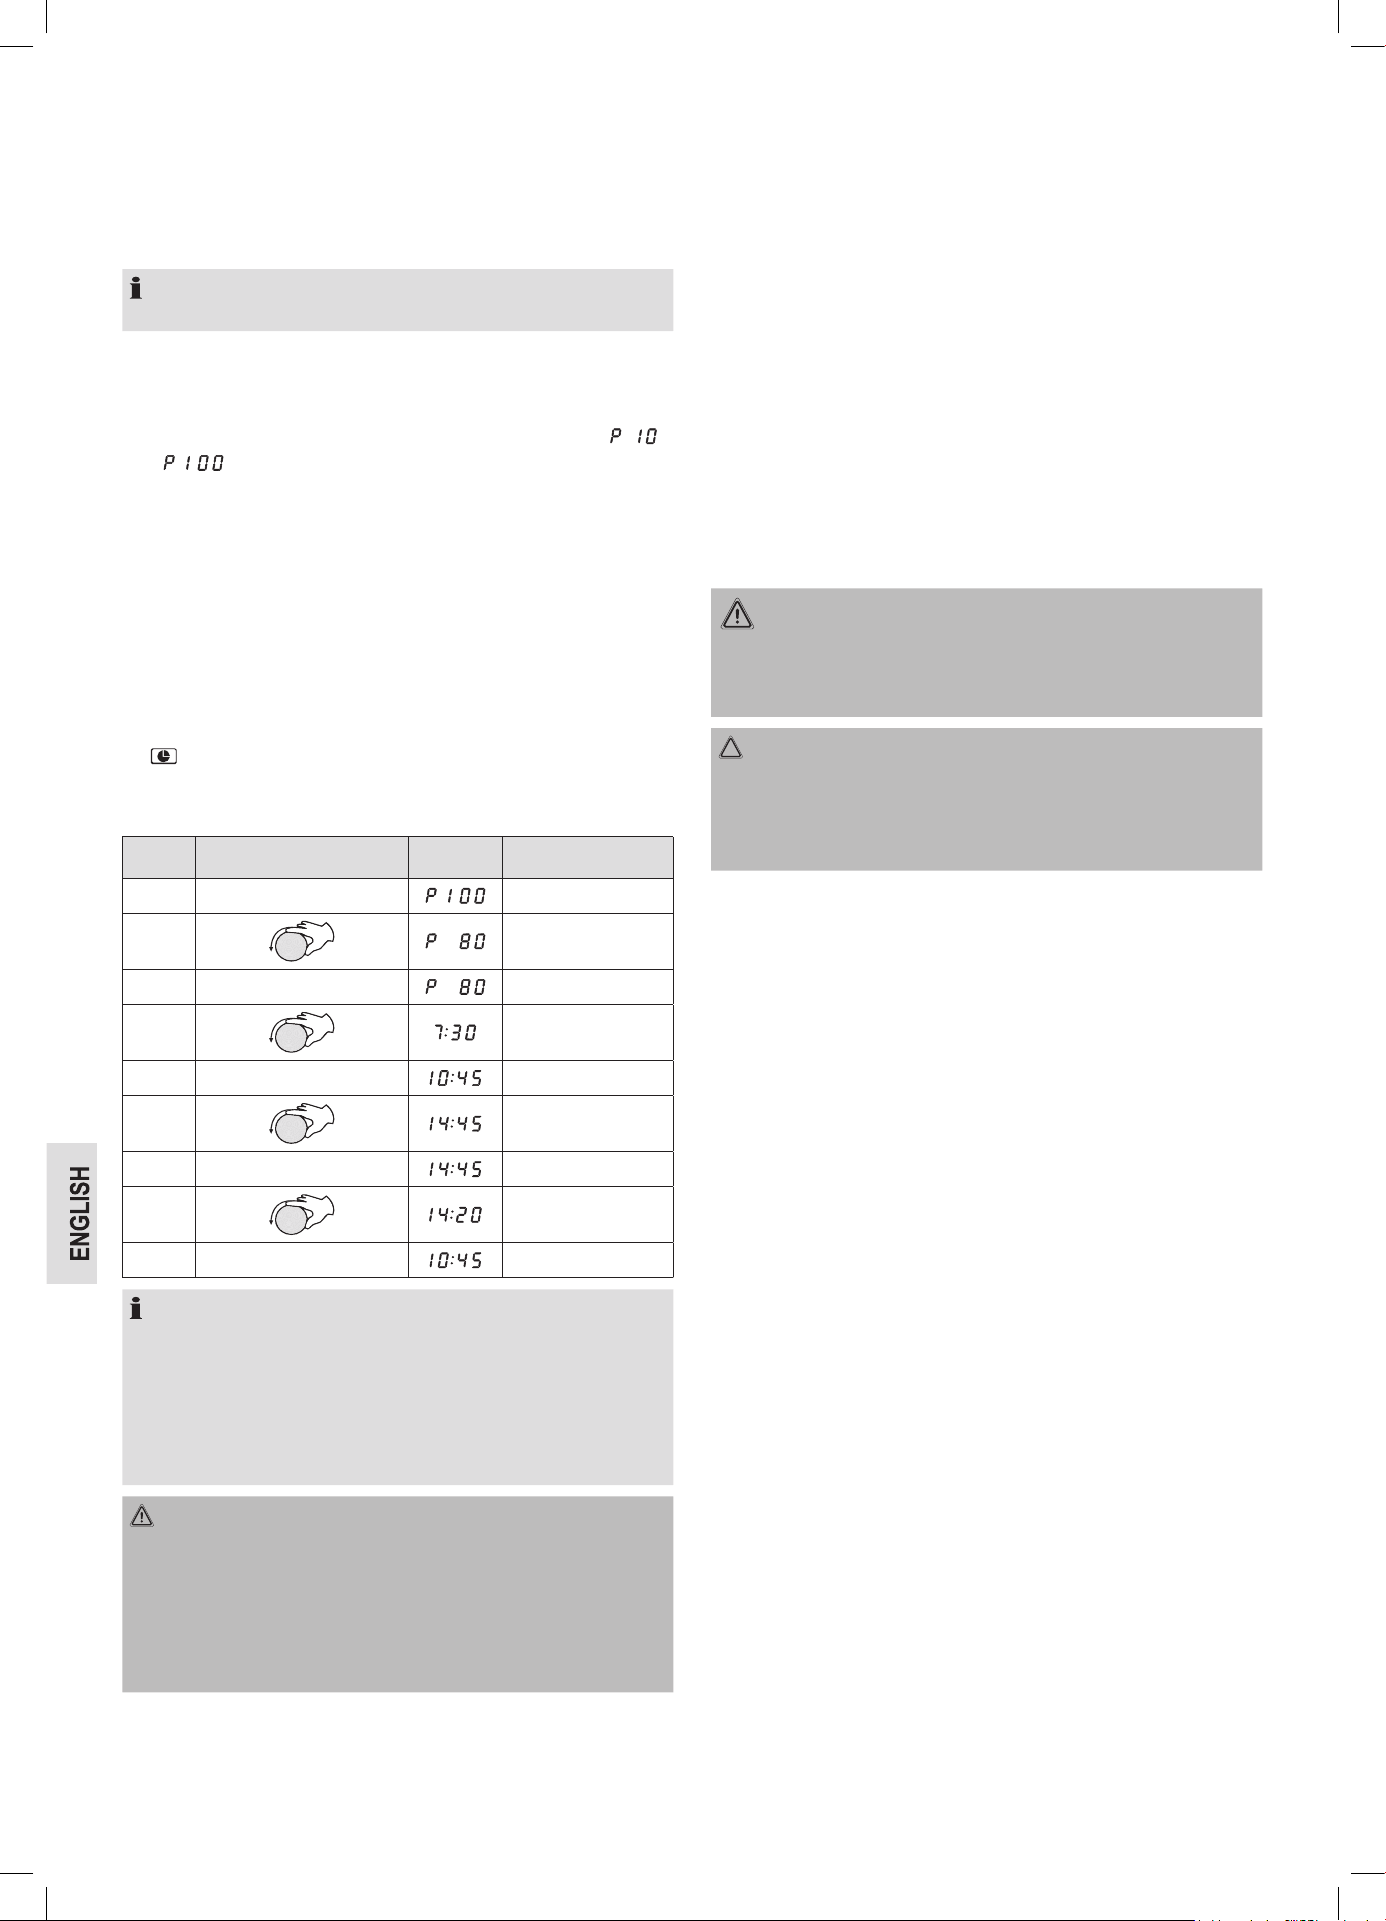
46
Special Functions
Auto Start
You can start all of the programs or even a combined setting in
several steps with a delay. The maximum time-delay is 23 hours and
59 minutes.
NOTE:
First set the clock! Otherwise you cannot use this function.
Example: Proceed as follows for automatically starting the micro-
wave:
1. Press the MICRO. / GRILL / COMBI. button once.
2. Then use the rotary knob to select the desired power level
(
to ).
3. Press the MICRO. / GRILL / COMBI. button to confirm your settings.
4. Use the turning knob to set the desired cooking time between
5 seconds and 95 minutes.
5. Press the CLOCK / PRE-SET button. A signal tone sounds and the
display will show the current time, with the hour digit ashing.
6. Use the rotary knob to set the hour of the desired start time.
7. Press the CLOCK / PRE-SET button. A signal tone sounds and the
minutes will be ashing on the display.
8. Use the rotary knob to set the minutes of the desired start time.
9. Press the QUICK START / START button to confirm. The symbol
“ ” ashes in the display.
Example: 7:30 minutes cooking time at 80 % power; start time
14:20 o’clock
Step Button / Rotary Knob Display
1 MICRO. / GRILL / COMBI. (Selection)
2 (Power setting)
3 MICRO. / GRILL / COMBI. (Conrmation)
4 (Cooking time)
5 CLOCK / PRE-SET (Current time)
6 (Set hour)
7 CLOCK / PRE-SET
8 (Set minutes)
9 QUICK START / START (Current time)
NOTE:
• During this programmed setting the functions of the controls are
blocked (except: CLOCK / PRE-SET and CANCEL / STOP).
• If you wish to display the start time again, press the button
CLOCK / PRE-SET.
• When the pre-set time has been reached, the microwave will start
operation. Two signal tones will indicate the start.
WARNING: RISK OF FIRE!
• Always supervise the appliance during operation.
• When using the time-delay function, set the time in such a way
that the appliance will be operating under proper supervision.
• Do not operate the microwave empty.
• If you take the food earlier from the appliance, you will have to
terminate the function by pressing the CANCEL / STOP button.
Locking (Child-Proof Lock)
Press and hold the CANCEL / STOP button for more than 3 seconds
to lock the appliance. The display will show the locked setting.
The functions of the controls are blocked. Press and hold the
CANCEL / STOP button again for more than 3 seconds to unlock.
Display Function
• During microwave, grilling or combined operation you can press the
MICRO. / GRILL / COMBI. button for 2 – 3 seconds in order to show
the current power level.
• In disregard to the operation mode, the display will be showing the
current time for 2 – 3 seconds when pressing the CLOCK / PRE-SET
button.
• During time-delay mode, press the CLOCK / PRE-SET button to
display the start time.
Cleaning
WARNING:
Turn the microwave off and remove the
mains plug.
CAUTION:
• Do not use any wire brush or other abrasive objects.
• Do not use any acidic or abrasive detergents.
• Do not use a metal scraper to clean the viewing window. The
surface could be scratched and the glass could possibly break.
Interior
• Keep the interior of the oven clean. Splashes and overflowing liq-
uids on the walls of the oven can be removed with a damp cloth. If
the oven is very dirty a mild detergent can also be used.
• Wipe off the viewing window on the inside and outside with a damp
cloth and remove splashes and stains from overflowing liquids
regularly.
External Walls
• The external walls of the microwave should only be cleaned with a
damp cloth. Please ensure that no water enters the openings in the
housing and therefore inside the appliance.
• Open the microwave door before cleaning the control panel in order
to avoid accidentally switching on the appliance.
Accessories
• Clean the glass plate in warm soapy water or in the dishwasher.
Dry it before reinstalling it in the microwave.
• Regularly clean the guide ring and the inside of the bottom. You
may remove the guide ring and manually clean it. Use a mild deter-
gent or glass cleaner. Dry thoroughly. Make sure to position the ring
properly afterwards.
• Clean the grill after each use with a dishwashing detergent or place
it in a dishwasher for cleaning.
Odours
In order to remove any unpleasant odours that may emanate from
the microwave, place a dish filled with water and lemon juice that is
suitable for microwave use in the oven and heat it for approximately
5 minutes. Then wipe out the oven with a soft cloth.
Oven Light
If you need to replace the lighting in the oven, please contact a spe-
cialist workshop near you.
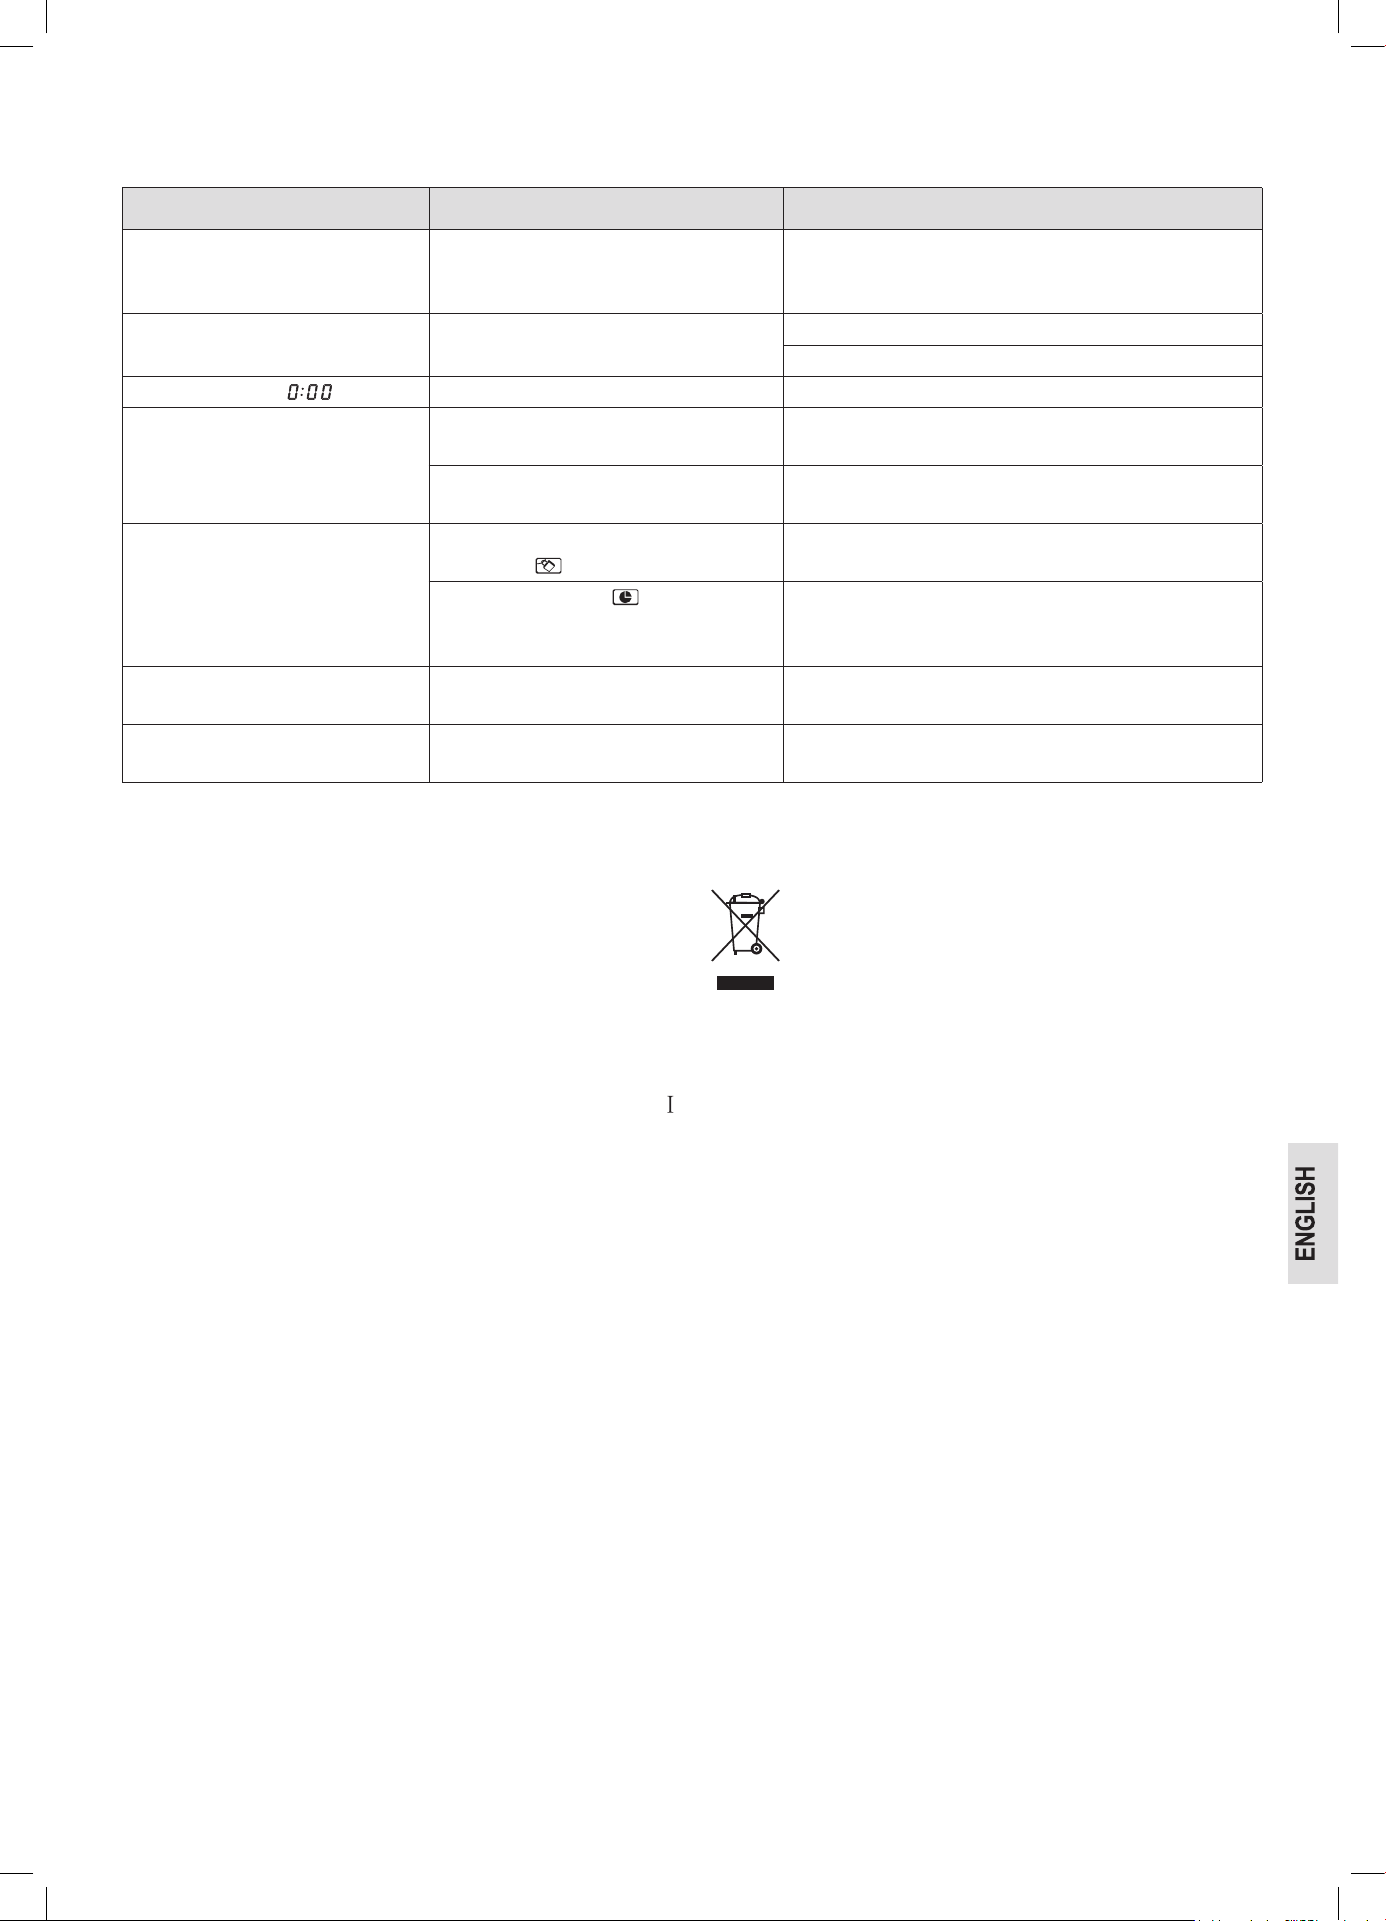
47
Troubleshooting
Malfunctions are often just caused due to minor problems. Before contacting our customer service, please check the table below:
Problem Possible Cause Notes / Solution
Radio or TV reception is interrupted
during microwave operation.
The electromagnetic fields of this appliance
might interfere with the pictures and sound
of special frequencies.
This is normal and not a malfunction. Position the appli-
ances further away from each other.
The appliance is not supplied with
electricity.
Faulty mains socket. Try another socket.
Check the house fuse.
The display shows “ ”. There was a power failure. Set the clock again.
The appliance does not start oper-
ation. The display shows a readout
other than the current time.
The door is not properly closed. Check if there are objects or food remains jammed in the
door.
The QUICK START / START button was
not pressed after selecting the function.
Press the QUICK START / START button, or press the
CANCEL / STOP button to cancel the function.
All controls are locked. The child-proof lock is activated. The dis-
play shows “ ”.
Press and hold the CANCEL / STOP button for more than
3 seconds to unlock.
The time and symbol “ ” are shown in
the display.
The time-delay function is activated. Press the CLOCK /
PRE-SET button to display the start time. Press CAN-
CEL / STOP button to terminate the function.
The turntable causes a scratching or
abradant noise.
There are dirt or foreign objects in the area
of the turntable shaft.
Remove possible objects and food remains as described
under “ Cleaning”.
The operation is terminated without
any obvious reason.
The appliance is broken. Please contact our service department.
Technical Data
Model:..........................................................................MWG 2211 U CB
Power supply::...................................................................230 V~, 50 Hz
Power consumption:
Microwave: .............................................................................1250 W
Grill: ........................................................................................1000 W
Declared standby mode power: ..................................................≤ 0.8 W
Switch-off to standby mode: ..............................................≤ 20 minutes
Rated microwave power output: .................................800 W / 2450 MHz
Cavity volume:............................................................... approx. 20 litres
Protection class:: ....................................................................................
Net weight: ..................................................................... approx. 12.5 kg
The right to make technical and design modifications in the course of
continuous product development remains reserved.
This appliance has been tested according to all relevant current CE
guidelines, such as electromagnetic compatibility and low voltage
directives, and is manufactured according to the latest safety regula-
tions.
Disposal
Meaning of the “Dustbin” Symbol
Protect our environment: do not dispose of electrical equip-
ment in the domestic waste.
Please return any electrical equipment that you will no
longer use to the collection points provided for their dis-
posal.
This helps avoid the potential effects of incorrect disposal on the envi-
ronment and human health.
This will contribute to the recycling and other forms of re-utilisation of
electrical and electronic equipment.
Information concerning where the equipment can be disposed of can
be obtained from your local authority. Your dealer and contractual
partner is also obliged to take back the old appliance free of charge.


MWG 2211 U CB
C. Bomann GmbH
Heinrich-Horten-Straße 17 • 47906 Kempen
Internet: www.bomann-germany.de
E-Mail: [email protected]
Made in P.R.C.
Stand 05 / 2025