
1
MR7 Pro User manual
Content
1. Safety Instructions ···································· 2
Warning ············································································2
Cautions············································································2
Notes for battery ·································································3
2. Product overview ······································ 5
Box content········································································5
Anatomy············································································6
3. Installation··············································· 8
Self-cleaning base installation················································8
Clean water tank installation··················································7
4. APP download·········································· 9
5. Operation ················································ 9
Buttons ·············································································9
Functions ········································································ 10
First clean········································································ 10
6. Maintenance ···········································11
7. Common Issues ······································17
8. Technical specification ······························18
Robotic Vacuum Cleaner

2
1. Safety Instructions
Warning
· Power robot OFF and remove it from a power source when you
are not using it and before conducting maintenance.Robot is not
intended for use by persons (including children) with reduced physi-
cal or mental capabilities, or lack of experience and knowledge,
unless under the close supervision of a person responsible for their
safety.
· Leaks from the battery cells can occur under extreme usage or
temperature conditions. If the liquid gets on the skin, wash quickly
with water. lf the liquid gets into the eyes, flush them immediately
with clean water for a minimum of 10 minutes, and seek medical
attention.
· Robot is composed of electronic components that in rare and
unintended cases can cause hazards of heating, fire, and other
malfunctions.Furthermore, because robot is capable of autonomous
movement, it's use poses the risk of collision with property, pets,
and persons.Unintended removal of articles-such as small valu-
ables, jewelry, or hair of persons or pets lying on the floor may also
occur.
· If robot or it's charging station has been damaged in any way, do
not operate them. Contact our support team for further assistance.
Cautions
· Do not handle robot or it's charging station with wet hands; use
only on dry surfaces.
· Do not pull or carry the charging station by the cord, close a door
on the cord, or pull the cord around sharp edges or corners. Keep
the cord away from heated surfaces. To unplug the cord, grasp the
plug, not the cord.
· Make sure dustbin, filter, dust bag, side brush, mop attachments,
main brush are installed in place before cleaning.
· Do not expose robot's SLAM LiDAR to direct sun light or infrared
light.
· Do not let robot drop. The impact from a drop can damage the
SLAM LiDAR.

3
· Do not let robot drop. The impact from a drop can damage the
SLAM LiDAR.
· Do not look directly into the rotating transmitting part (laser) of the
SLAM LiDAR.
· For your safety, do not insert tools, fingers, or other items into the
rotating part of the SLAM LiDAR.
· Do not attempt to open the charging station. Repairs on the station
should only be carried out by our qualified technicians.
· With the exception of the wet mop attachment do not immerse any
part of robot into water or other liquids.
· Do not mutilate or incinerate the battery, as it will explode at high
temperatures.
· Do not use robot outdoors.
· Do not store robot in a car.
· Do not expose robot or it's charging station to temperatures higher
than 113° F(45° C),moisture, or humidity.
· Do not dispose of your battery in fire. Old batteries should be recy-
cled safely through your local recycler.
· Do not let robot pick up anything that is burning or smoking, such as
cigarettes, matches, or hot ashes.
· The product is a house-ware. Please do not use it outdoors.
Notes for battery
· Always use a dedicated battery pack and docking station to avoid
leakage,heating or explosion.
· Do not short-circuit the battery or remove the battery; doing so may
cause leakage, heating or explosion.
· Do not transport or preserve with necklaces, hairpins, and other
metal objects; doing so may lead to short circuit, resulting in leakage,
heating or explosion.
· Do not burn or heat the battery; doing so may cause leakage, heat-
ing or explosion.
4
2. Product overview
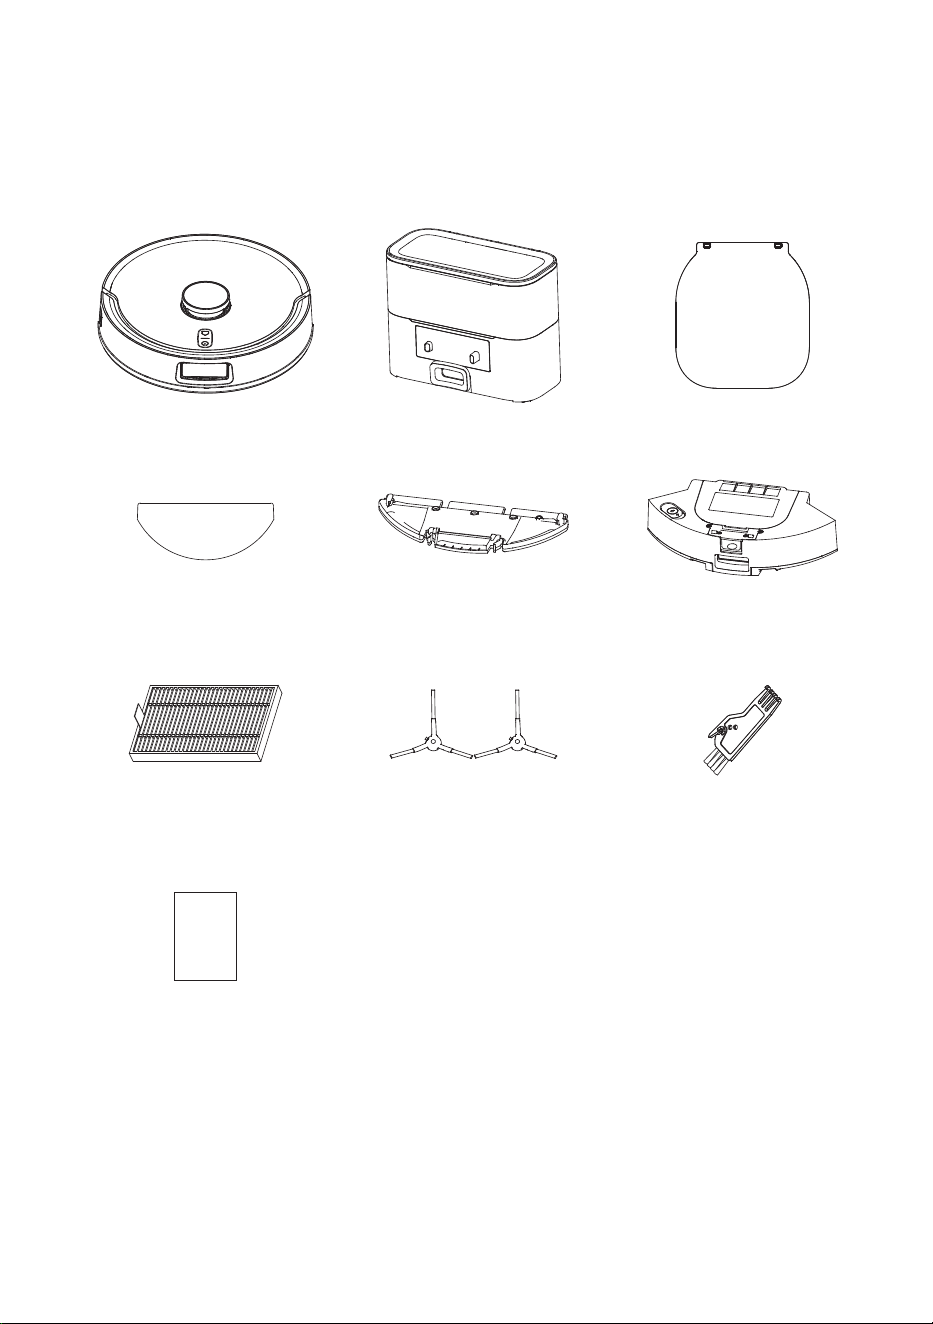
Box content
Robot Dust collecon staon
Side brush x 2
Dustbin
Mop
Filter
Docking pad
User manual
Cleaning brush
User manual
Mop aachment
5
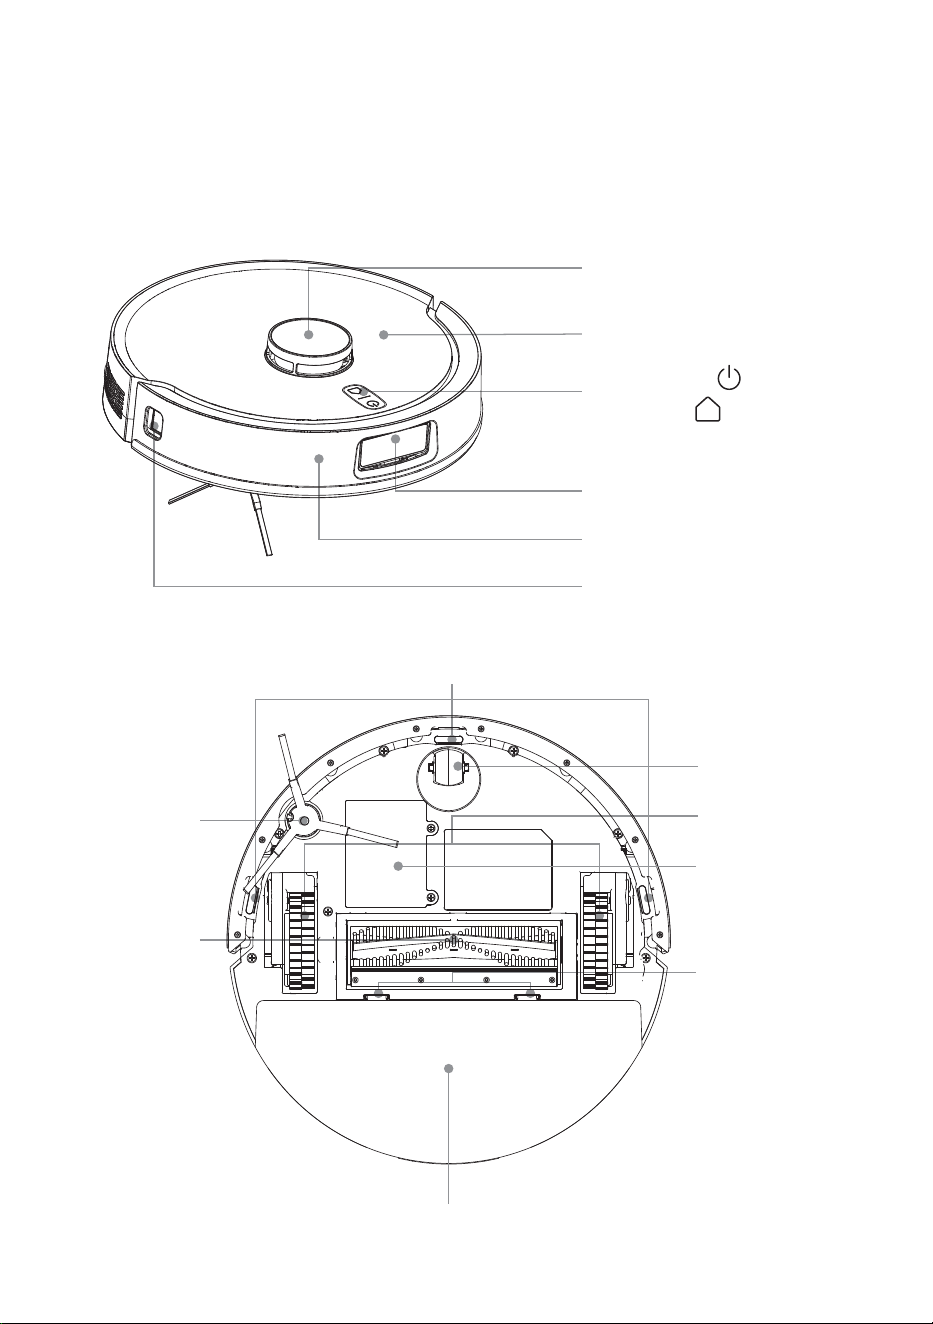
Anatomy
Robot (Bottom View)
Top cover
Laser
Back home
Power on/off
Object recognion sensor
Wall sensor
Bumper
An-collision sensors
Side brush
Omnidireconal wheel
Drive wheels
Main brush
Main brush cover latch
Mop
Baery
Robot (Top View)
6
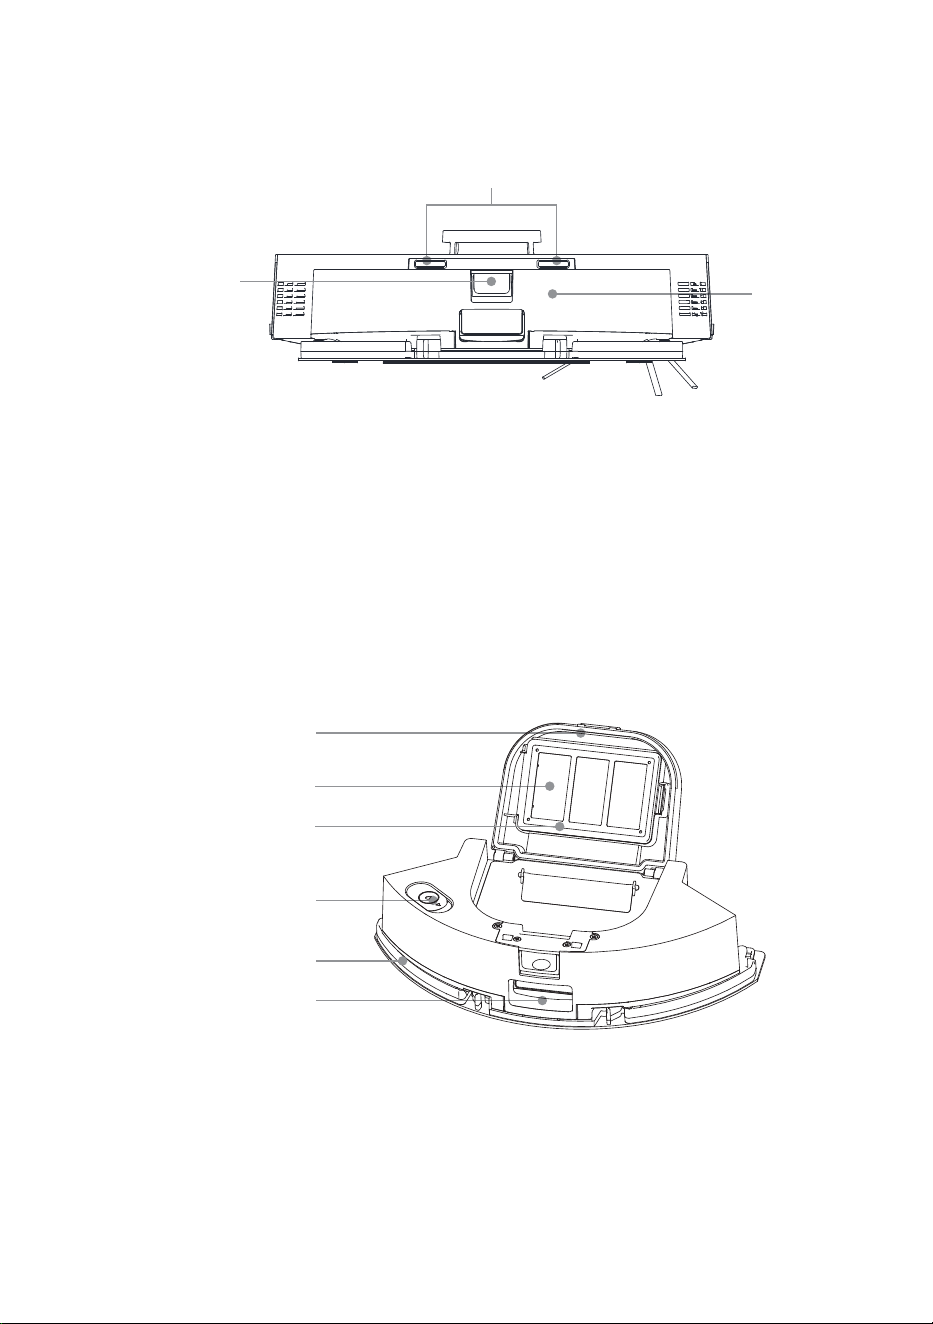
Charging electrode plate
Dustbin
Dustbin
release buon
Dust tank cover
HEPA filter
Water inlet
Sucon Inlet
HEPA filter cover
Mop aachment
7
3. Installation
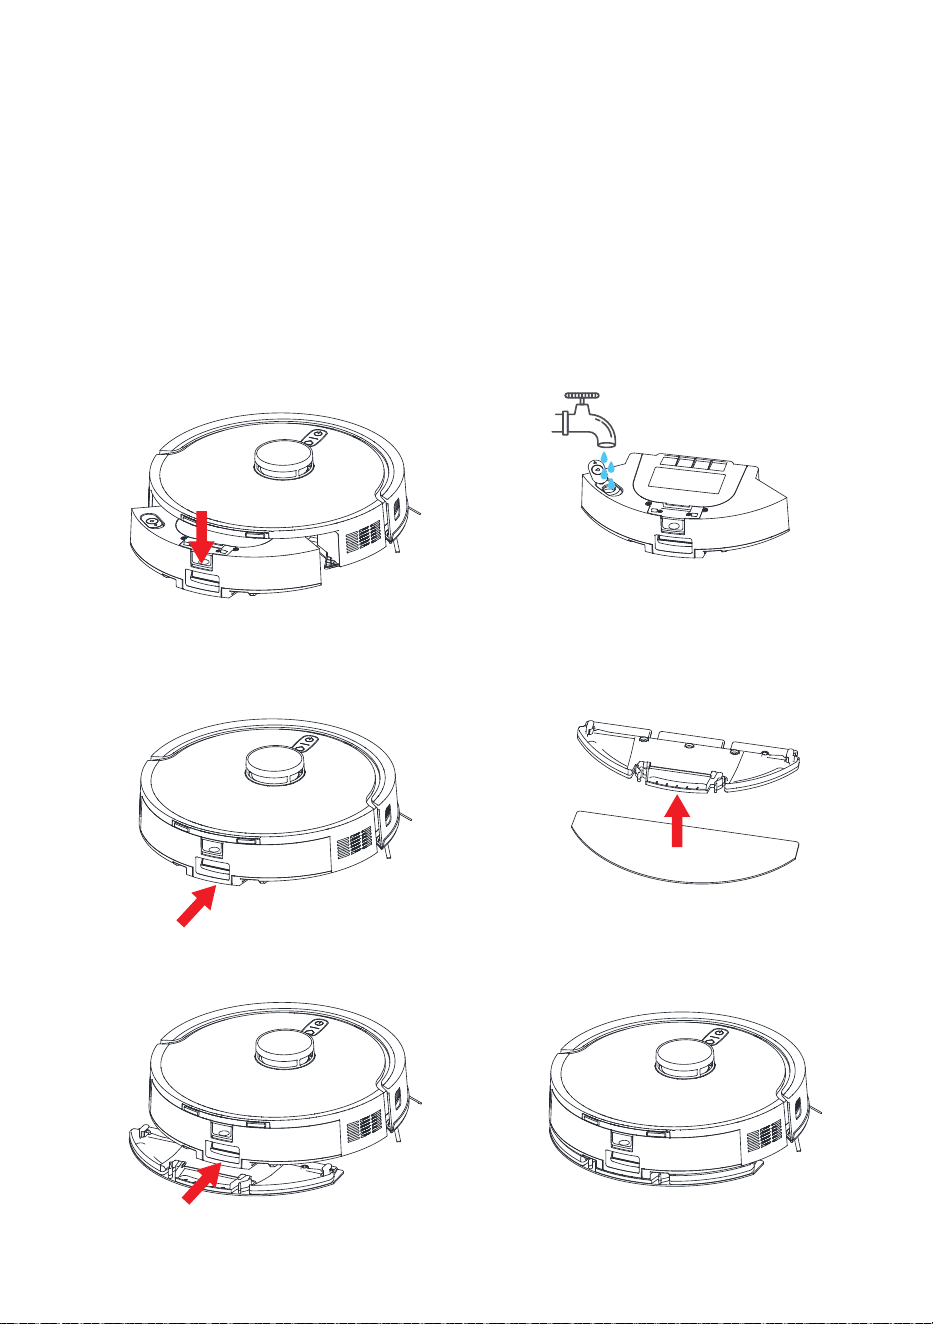
Flat mop installation
1. Remove the dustbin and open the tab and fill the reservoir with
water.
2. Reinstall the water tank.
3. Stick the mop cloth on the mount in position and firmly.
4. Align and install the mop pad on the robot in place until you hear
a click.
8
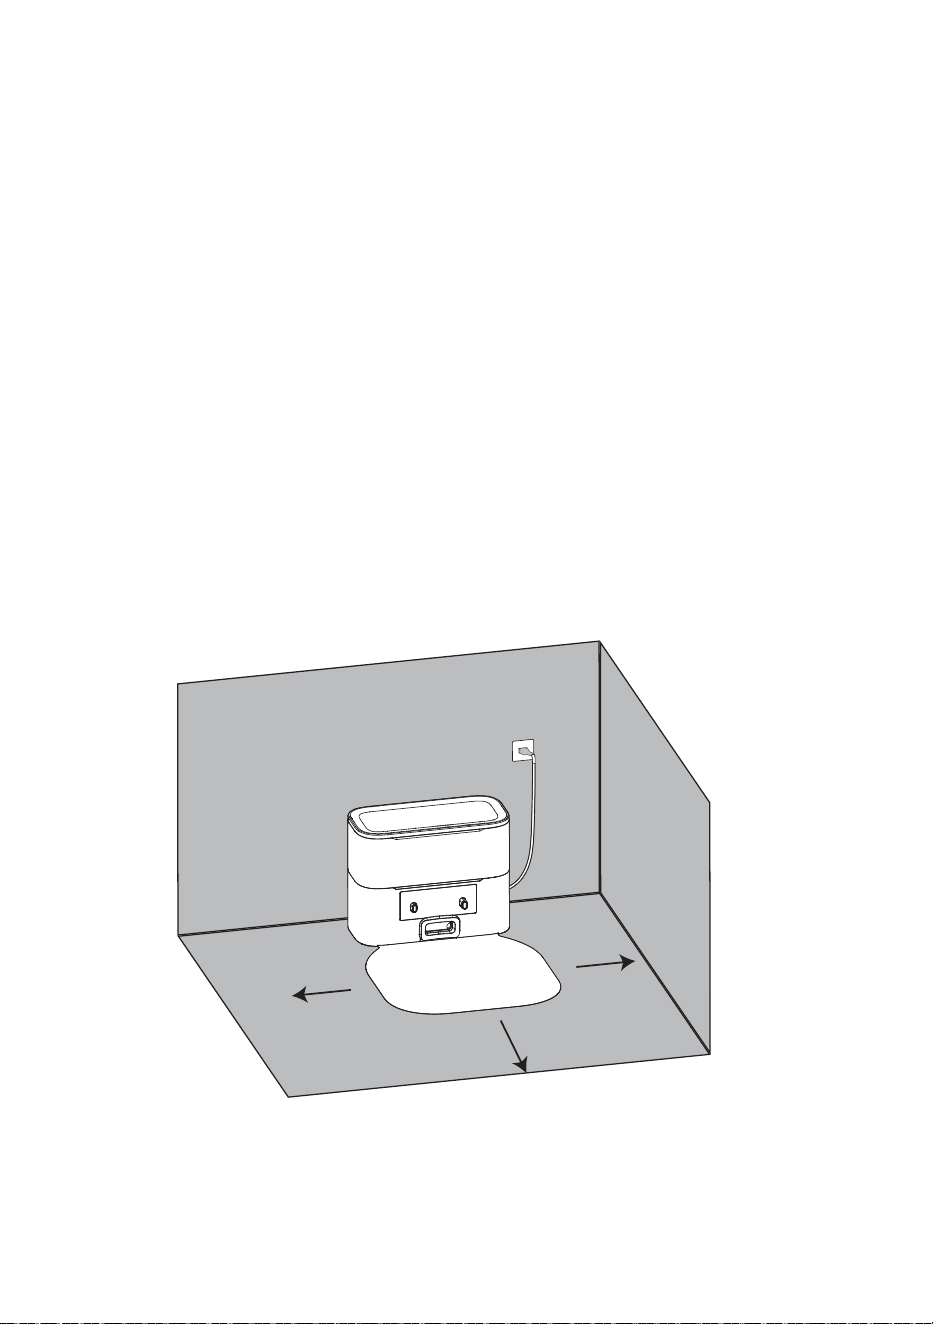
Self-empty charging station installation
1. Reserve a space of at least 0.6m in width at both left&right side
and 1.5m in depth. Make sure that the location has good WiFi
access for a better experience with the mobile app. Plug in and
make sure that the status indicator light is on.
Note:
· Place the dock against a wall on a hard, flat floor (wood/tile etc.).
· Tidy cords, hard or sharp objects (such as nails and glass), and
loose items from the ground and move any unstable, fragile,
precious, or dangerous items which may block or slow down the
operation of the robot vacuum cleaner.
. When using the robot in a raised area, always use a physical
security barrier to prevent accidental falls that may result in personal
injury or property damage.
2 feet
(0,6m)
5 feet
(1,5m)
2 feet
(0,6m)

9
4. APP download
Download App for your iOS or Android device.Create your account
and connect your robot.
5. Operation
Turning On/Off
Press and hold to turn on/off the robot. The power indicator light
will come on when robot is turned on.
Note:
To ensure all functions operate properly and achieve the best clean-
ing results:
*Fully charge the robot before first use.
*Fill the clean water tank with water prior to initial operation.
Pause
When the robot is running, press any button to pause it, press to
resume cleaning. Press to send it back to the dock.
Note: Placing a paused robot on the dock manually will end the
current cleanup.
Charging
After cleaning, the robot will automatically return to the dock to
charge. In Pause mode, press the button to send the robot back to
the dock.
Start cleaning
Press the button to start cleaning. The robot will plan its cleaning
route according to its scan of the room. It splits a room into zones,
first draws out zone edges, and then fills the zone in a zigzag pattern.
In so doing, the robot cleans all zones one by one, efficiently cleaning
the house. cloths have been properly installed.

10
Notes:
• To allow the robot to automatically vacuum and return to the dock,
start the robot from the dock. Do not move the dock during cleaning.
• Cleaning cannot start if the battery level is too low. Allow the robot
to charge before starting the cleanup.
• Before cleaning, tidy cords (including the power cord of the dock)
and valuables from the floor. Loose items may be dragged by the
robot, resulting in the disconnection of electrical appliances or
damage of cords and property.
• If the battery runs low during a cleaning cycle, the robot will auto-
matically return to the dock. After charging, the robot will resume
where it left off.
• Before starting each cleaning task, make sure that the mop cloths
have been properly installed.
Customized suction power and mopping water volume:
Switch on ‘Customize mode’ button on the app and then selecting the
mode:
Five suction power levels: Closed, Quiet, Standard, Strong, Max.
Four water volume mode: Closed, Low, Middle, High
Manual mode
The robot vacuum cleaner can be moved manually by selecting
manual mode in the app and using the arrow keys.
Restricted Area mode
Mark out specific areas on the map that you do not want the robot
vacuum cleaner to clean.
Selected zone cleaning
Mark out specific areas on the map that you want the robot vacuum
cleaner to clean.
11
Sleep mode
If no operation is performed beyond 10 minutes, robot will enter the
sleep mode automatically, and the power indicator will be off. In sleep
mode, users can press any button to wake up the robot.
If no operation is performed beyond 13 hours, robot will powers off
automatically.
Do not Disturb(DND) mode
It can be modified or canceled from the app. When DND is on, the
robot will not automatically resume cleanup and will not perform dust
collection after cleaning, the power indicator light and voice will be off.
For more details about robot use, please try out.
6. Maintenance
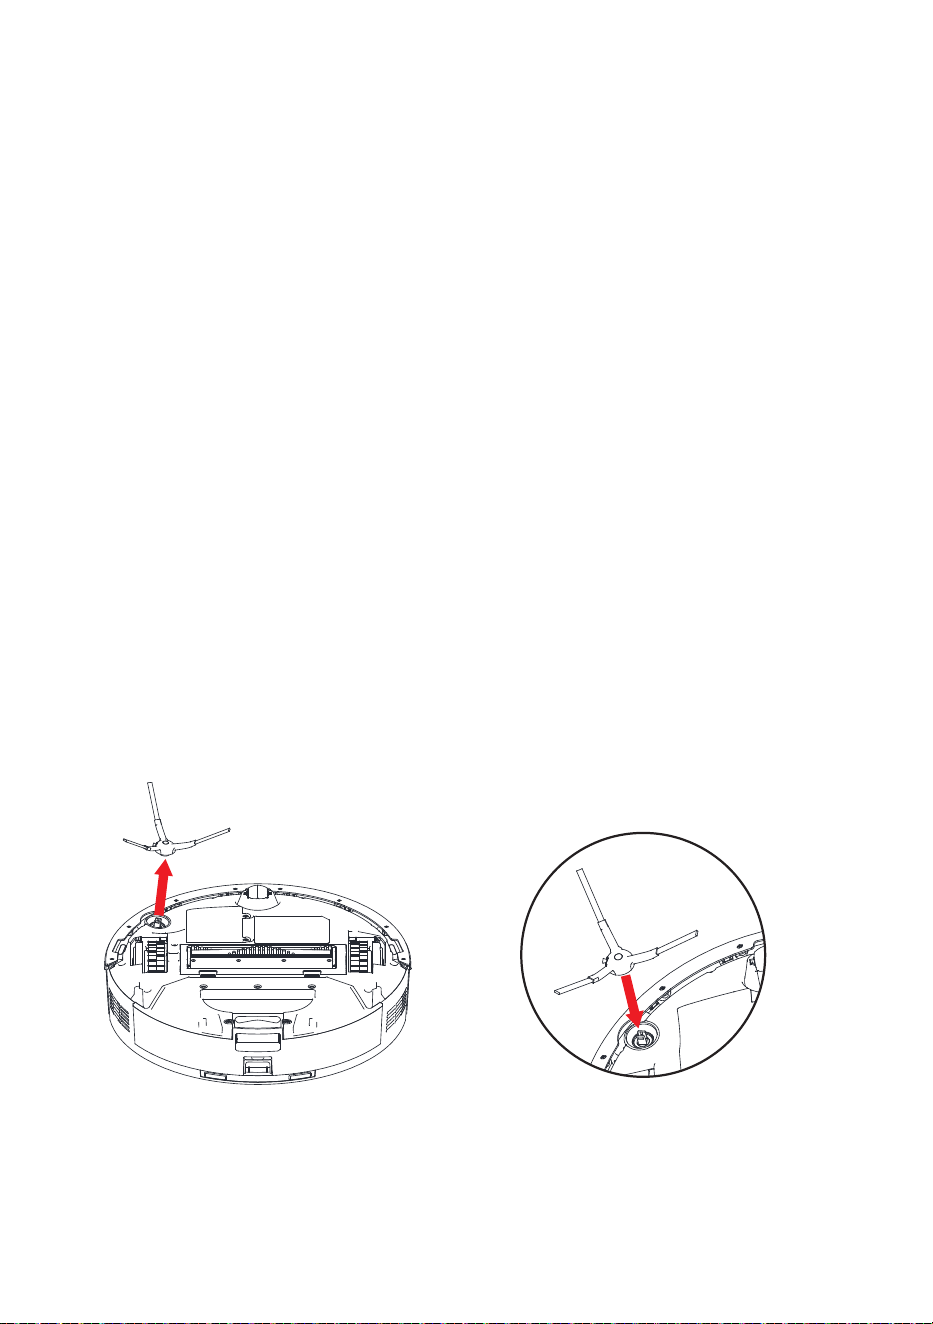
Side brush
1. Pull up to remove the side brush.
2. Remove debris from the brush and brush sockets.
3. Reinstall the side brush
“Click”
12
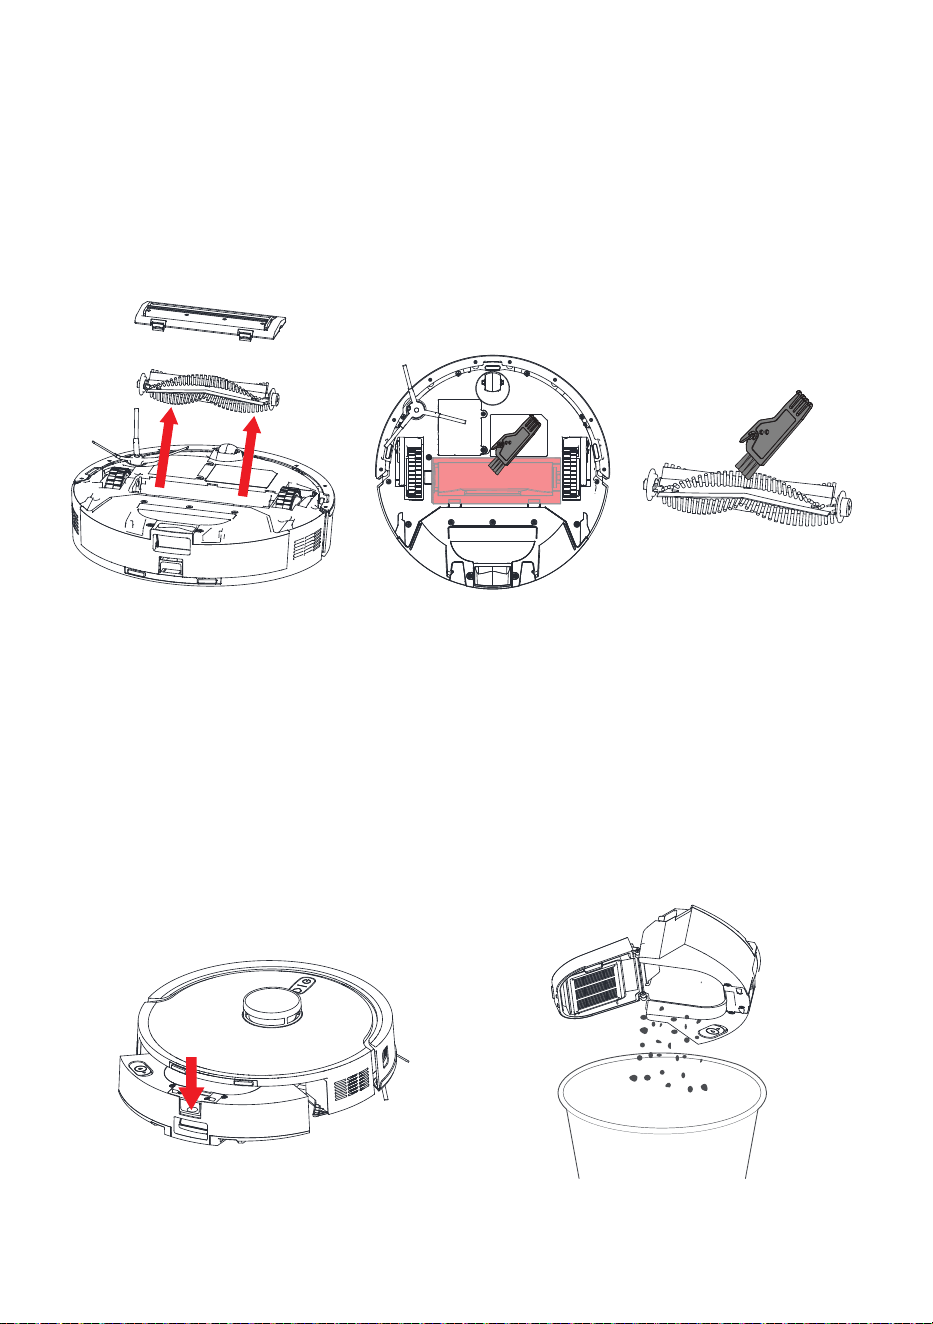
Main brush
1. Softly press the main brush cover’s two latches inwards to remove
the main brush cover.
2. Pull out the main brushes and remove any entangled hair or dirt on
brush or fixed end of the main brush.
3. Reinstall the main brush and it’s cover.
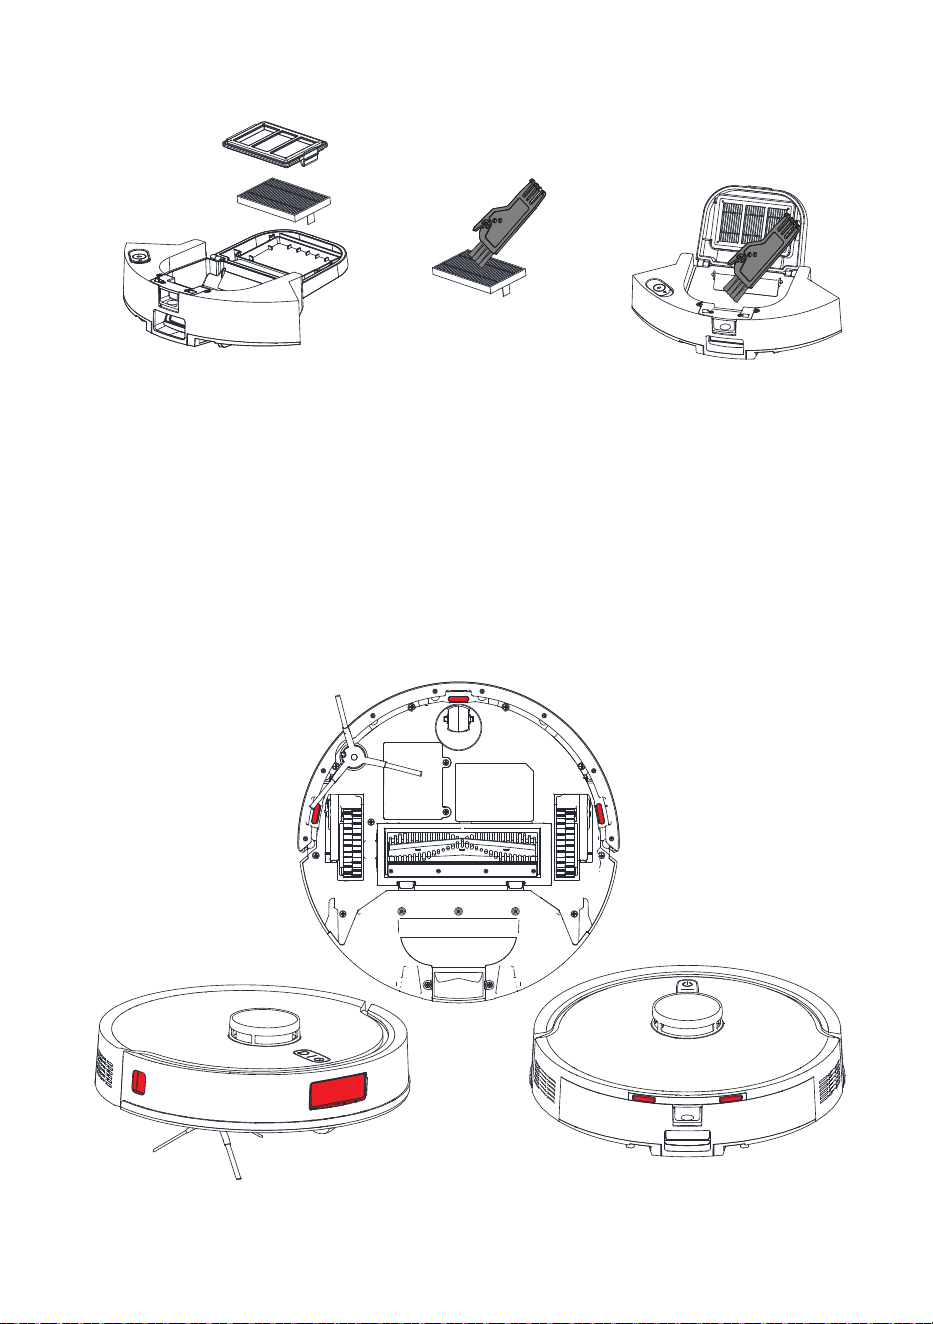
Dustbin and filter
1. Remove the dustbin.
2. Open the dustbin and dump its contents.
3. Use the self-cleaning brush to clean the inside of the mixed tank.
4. Remove the filter and tap it to remove as much dirt as possible,
and then reinstall it.
5. Reinstall the dusk tank on the robot vacuum cleaner.
13
Note:Do not touch the surface of the filter with hands, brush, or hard
objects to avoid potential damage.
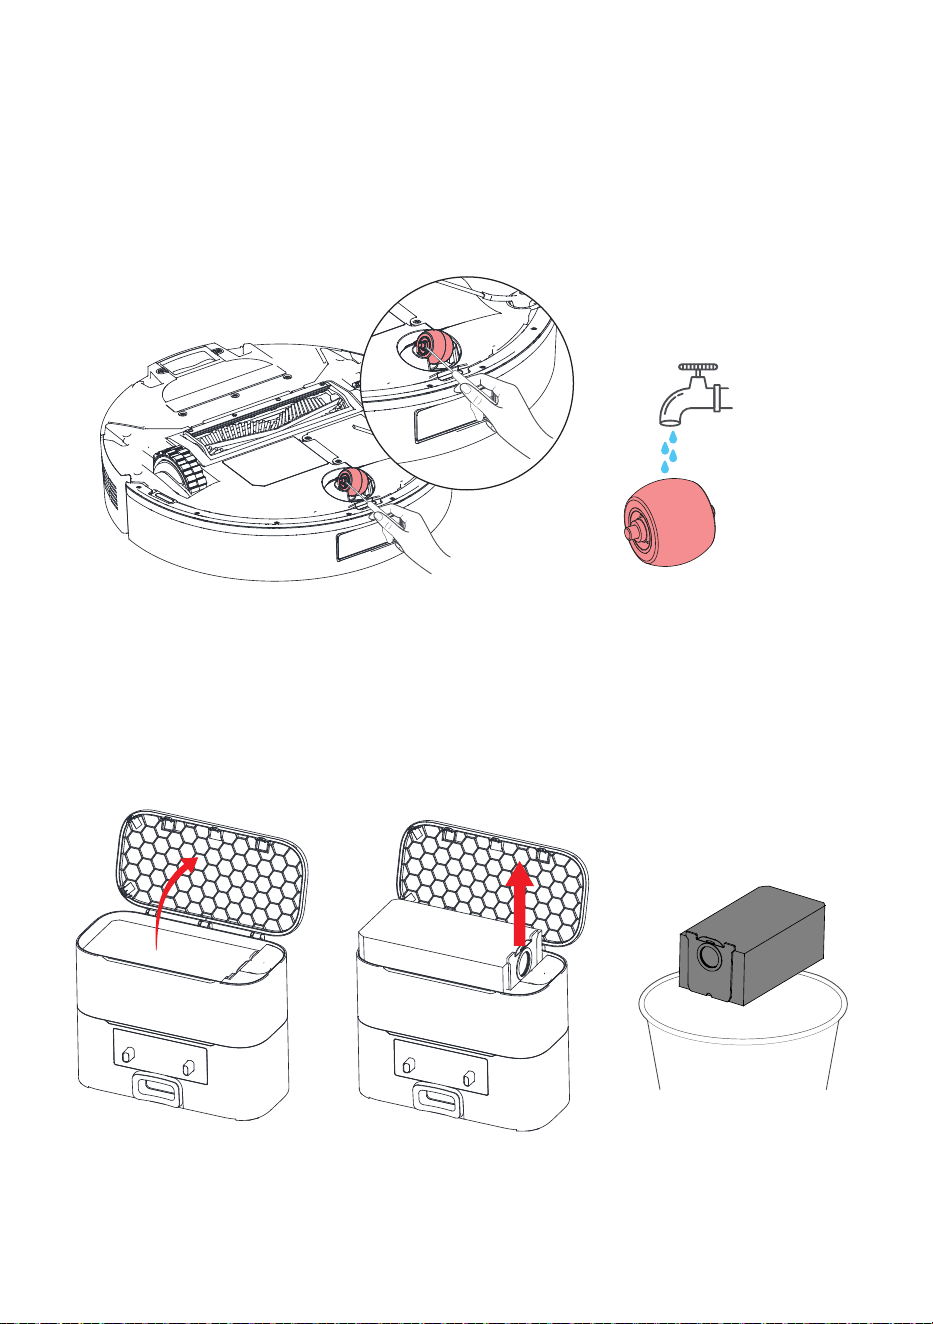
Sensors
Use a soft, dry cloth to wipe and clean all sensors.
Note: Robot's LiDAR is a sensitive sensor. Do not apply force, insert
objects, or adjust the LiDAR. Do not sit or place items on top of
robot.
14
Front wheel
1. Using a flat head screwdriver for leverage, grip the wheel firmly
and pull.
2. Clean the wheel and all its components,including the assembly
and wheel socket.
3. Push down the wheel to lock it into place.
Replacing the Disposable Dust Bag
To change the dirt-disposal bag, open the base cover, pull the
handle, remove the bag and discard it.
15
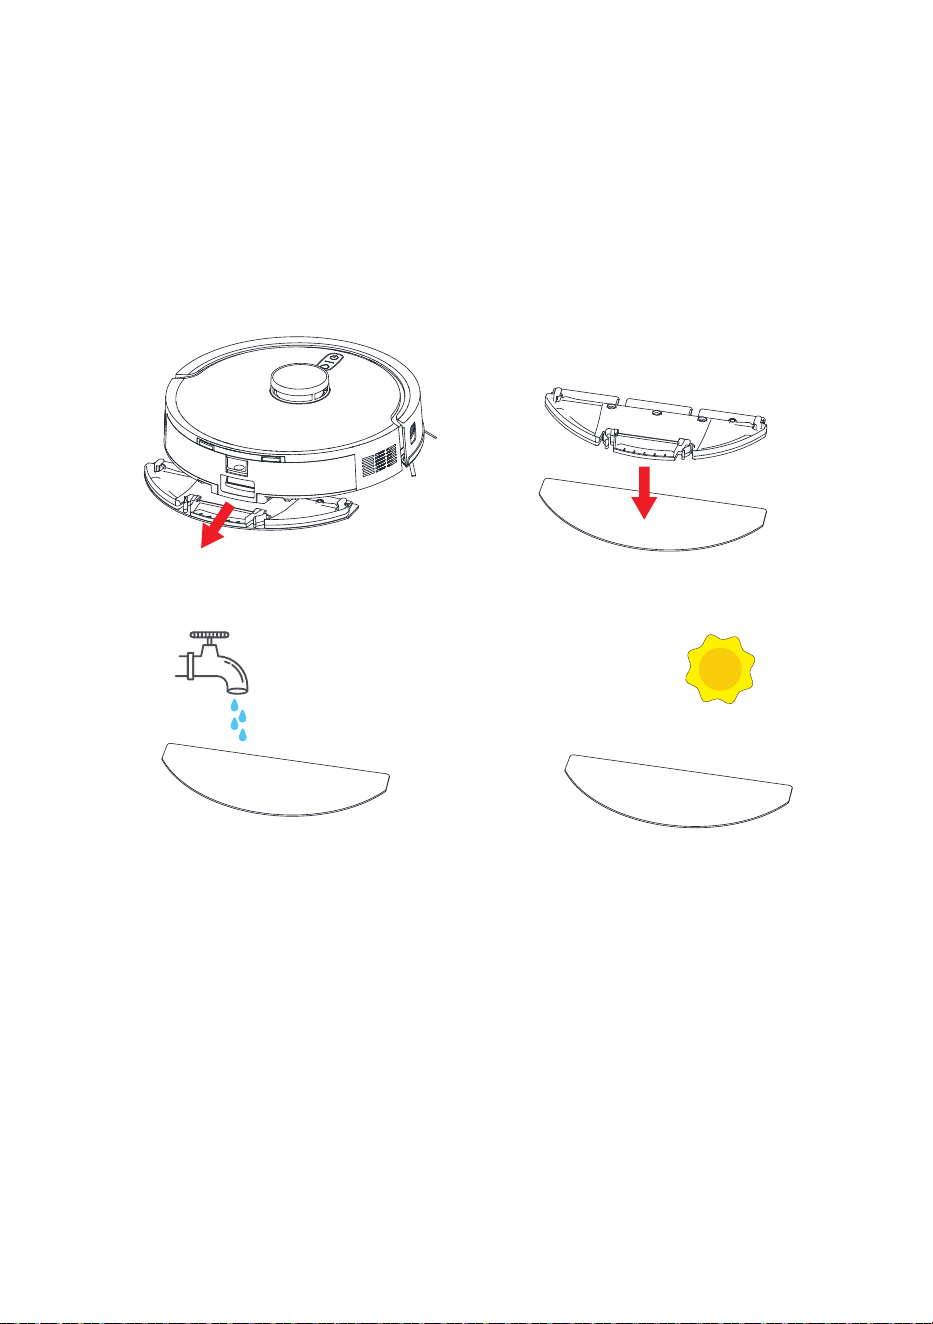
Wet Mop Attachment Maintenance
1. Remove the mop attachment.
2. Pull open the tab and empty the reservoir.
3. Tap any debris that may have collected inside the attachment.
4. Wash the mopping cloth. Air-dry all parts when done.
Note: The reservoir should be drained after use to avoid possible
water damage.
24H
16
Recommend maintenance frequency
Part
Maintenance
Frequency
Replacement
Frequency
Dustbin Daily
Filter Weekly
Every 3~6 months
Side Brush Weekly
Every 3~6 months
Main Brush Weekly
Every 3~6 months
Sensors Weekly
Front wheel Weekly
shtnom42-21yrevEyrettaB
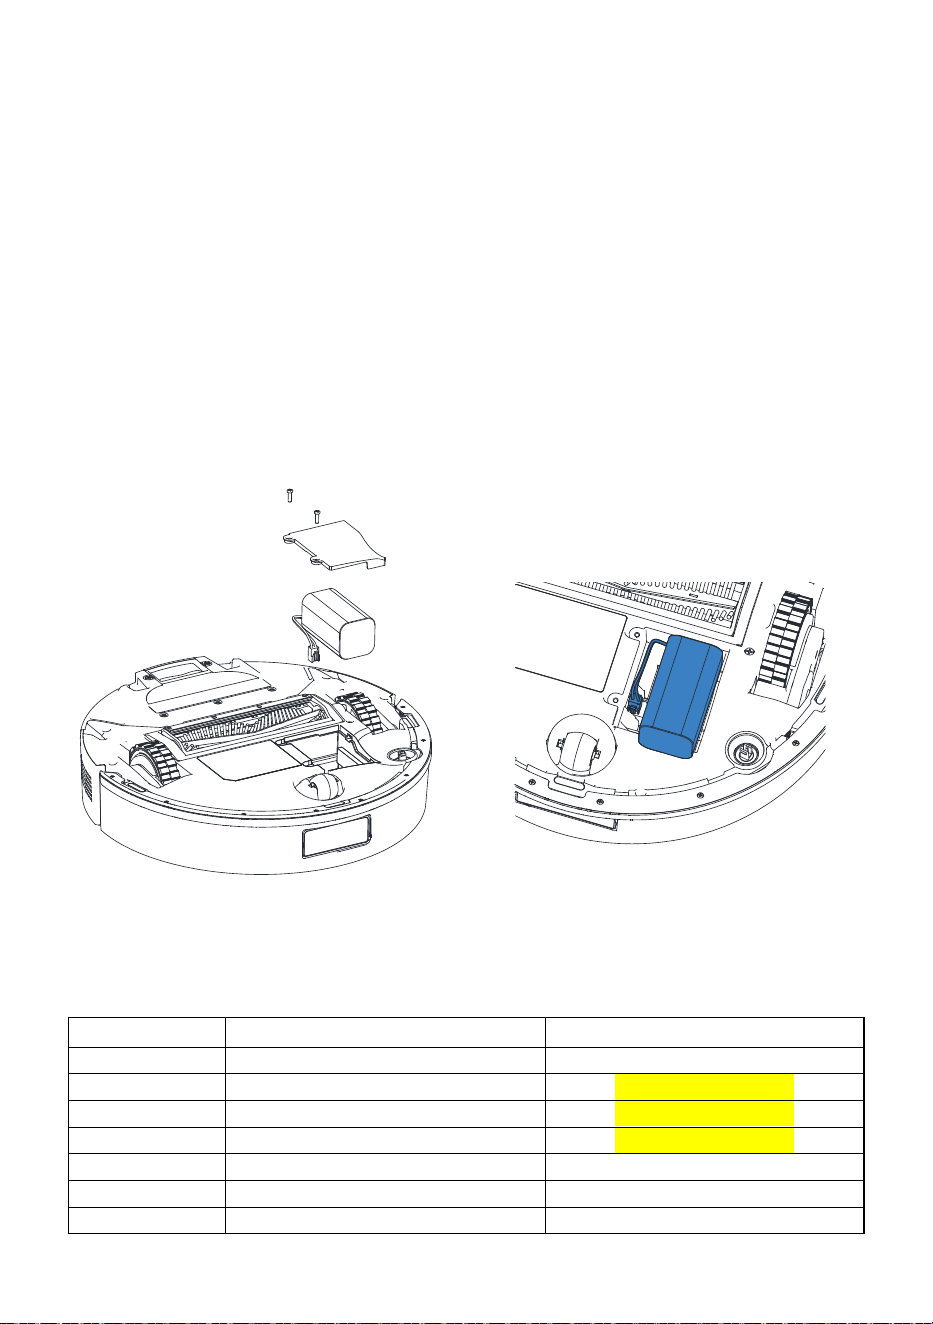
Charging and replacing the battery
1. Use a Phillips head screwdriver to open the battery compartment.
2. Unplug the old battery and plugin your new one and refasten the
battery cover.
Note:
·To extend battery life, leave the robot vacuum cleaner charging on
the self-emptying base whenever not in use.
·Remove the battery and store it in a safe, dry place if the robot
vacuum cleaner will not be used for a long period of time.
·Do not use the rechargeable battery of this product in other devic-
es.
17
Trouble
Solution
Unable to power on
• Battery low. Put the robot on the charging dock
and charge it before use.
• Battery temperature too low or too high. Only use
the robot within the range of 0-40°C.
Unable to charge.
• Dock not connected to power. Check whether
both ends of the power cord are properly
connected.
• Poor contact. Clean the charging contacts of the
dock and the robot.
• Confirm that the dock indicator light is on.
Unable to dock.
• Too many obstacles near the dock. Move it to an
open area.
• The robot is t
oo far from the cha
rging dock. Place
it closer and retry.
• The dock locator may be dirty. Wipe them with a
dry cloth.
Unable to connect to
WiFi.
• WiFi disabled. Reset the WiFi and try again.
• Poor WiFi signal. Move the robot to an area with
good WiFi reception.
• Abnormal WiFi connection. Reset the WiFi,
download the latest mobile app and retry.
• The Wi-Fi connection is unstable. Reset the
router, check if there are any App updates, and try
again.
Noise during cleaning.
• The main brush, side brush, drive wheels or front
wheel may be jammed. Turn off the robot and
clean
them.
Cleaning does not
resume after recharging.
• Make sure that the robot is not in Do not Disturb
mode.
• Carpet ignorance is switched on in app. Check
in-App setting.
Schedules are not
effective.
• Make sure that the robot is not in Do not Disturb
mode.
• Schedules will only take effect when the battery is
higher
than
20%.
Unable to
auto-empty.
• Auto-emptying is disabled. Check in-app settings
• Dust bad is not installed correctly. Check and
install.
• Auto-emptying will not be triggered if the robot
returns to the dock without cleaning.
7. Common Issues
18
Trouble Solution
Reduced emptying
performance or unusual
noise when emptying.
• The main brush or main brush cover is not
properly installed. Check and install in place.
• The filter, air duct, suction inlet, air inlet, dustbin
or dust bag is blocked. Clean to remove blockages.
Wet mopping is not
effective
• Check water volume adjustment setting in app.
• Check that robot water tank has been refilled as
required.
Unable to
auto-empty.
• The robot will not auto-emptying after returning to
the dock in the Do Not Disturb (DND) mode. Adjust
cleaning or DND duration, or start emptying
manually
8. Technical specification
Product: MR7 Pro
Voltage: 14.4 V DC
Rechargeable Li-ion battery
Rated capacity: 14.4 V ⎓ 2600 mAh
Wi-Fi connection: Wi-Fi IEEE802.11b/g/n/ax 2.4Ghz/ Bluetooth
Self-empty station
Input: 100 - 120 V ~ 50/60 Hz
Output: 19 V ⎓ 0.6A
Power: 1000 W
NOTE:
The graphics in this manual are schematic representations and may
not exactly match the device.

FCC Statement
This equipment has been tested and found to comply with the limits for a Class B digital device, pursuant to
Part 15 of the FCC Rules. These limits are designed to provide reasonable protection against harmful
interference in a residential installation. This equipment generates uses and can radiate radio frequency
energy and, if not installed and used in accordance with the instructions, may cause harmful interference to
radio communications. However, there is no guarantee that interference will not occur in a particular
installation. If this equipment does cause harmful interference to radio or television reception, which can be
determined by turning the equipment off and on, the user is encouraged to try to correct the interference by
one or more of the following measures:
-- Reorient or relocate the receiving antenna.
-- Increase the separation between the equipment and receiver.
-- Connect the equipment into an outlet on a circuit different from that to which the receiver is connected.
-- Consult the dealer or an experienced radio/TV technician for help.
This device complies with part 15 of the FCC Rules. Operation is subject to the following two conditions: (1)
This device may not cause harmful interference, and (2) this device must accept any interference received,
including interference that may cause undesired operation.
Changes or modifications not expressly approved by the party responsible for compliance could void the
user's authority to operate the equipment.
This equipment complies with FCC&ISED radiation exposure limits set forth for an
uncontrolled environment. This equipment should be installed and operated with
minimum distance 20cm between the radiator & your body.
Cet équipement est conforme aux limites d'exposition aux rayonnements FCC&ISED définies
pour un environnement non contrôlé. Cet équipement doit être installé et utilisé avec une
distance minimale de 20 cm entre le radiateur et votre corps.
- The device contains licence-exempt transmitter(s)/receiver(s) that comply with Innovation,
Science and Economic Development Canada’s licence-exempt RSS(s). Operation is subject to the
following two conditions:
- (1) This device may not cause interference.
- (2) This device must accept any interference, including interference that may cause undesired
operation of the device.
- L’émetteur/récepteur exempt de licence contenu dans le présent appareil est conforme aux CNR
d’Innovation, Sciences et Développement économique Canada applicables aux appareils radio
exempts de licence. L’exploitation est autorisée aux deux conditions suivantes :
- 1. L’appareil ne doit pas produire de brouillage;
- 2. L’appareil doit accepter tout brouillage radioélectrique subi, même si le brouillage est
susceptible d’en compromettre le fonctionnement.