䙰㦰⠻䷰
⋟⣯⮳⠥
䙰㦰匔⠥
䙏㼲
.睤忦㨥⊞琿囫㦞瑀
-FGBOU.睤
7睟
徰従睜
㧼㬳睡睟睡睤睠睟睠睡
㊐歎➟♫⣯Ⱑ㭀㚜㭃嵲䁔
㭤愗睜睠睟睟H⟻棋劶
➟♫沅噬睜➆噬➟♫
岴徔㧐㌬睜湺湕桸岴
汞㦇睜
ぜ〚睠督睟睠睟睤NN
䈁⭛㈡⋉嶷㭎珨⋲㬞樾▤⠦
㿦⏃睜睠睠
⠇㬊徢㍲睜
."/6"-
*/4536$5*0/
Self-cleaning Smart Vacuum Cleaner with Integrated
Sweeping and Mopping Functions
Lefant M5 Series User Manual

1
Please read this instruction manual carefully before using the product, and keep it in a safe place for future reference.
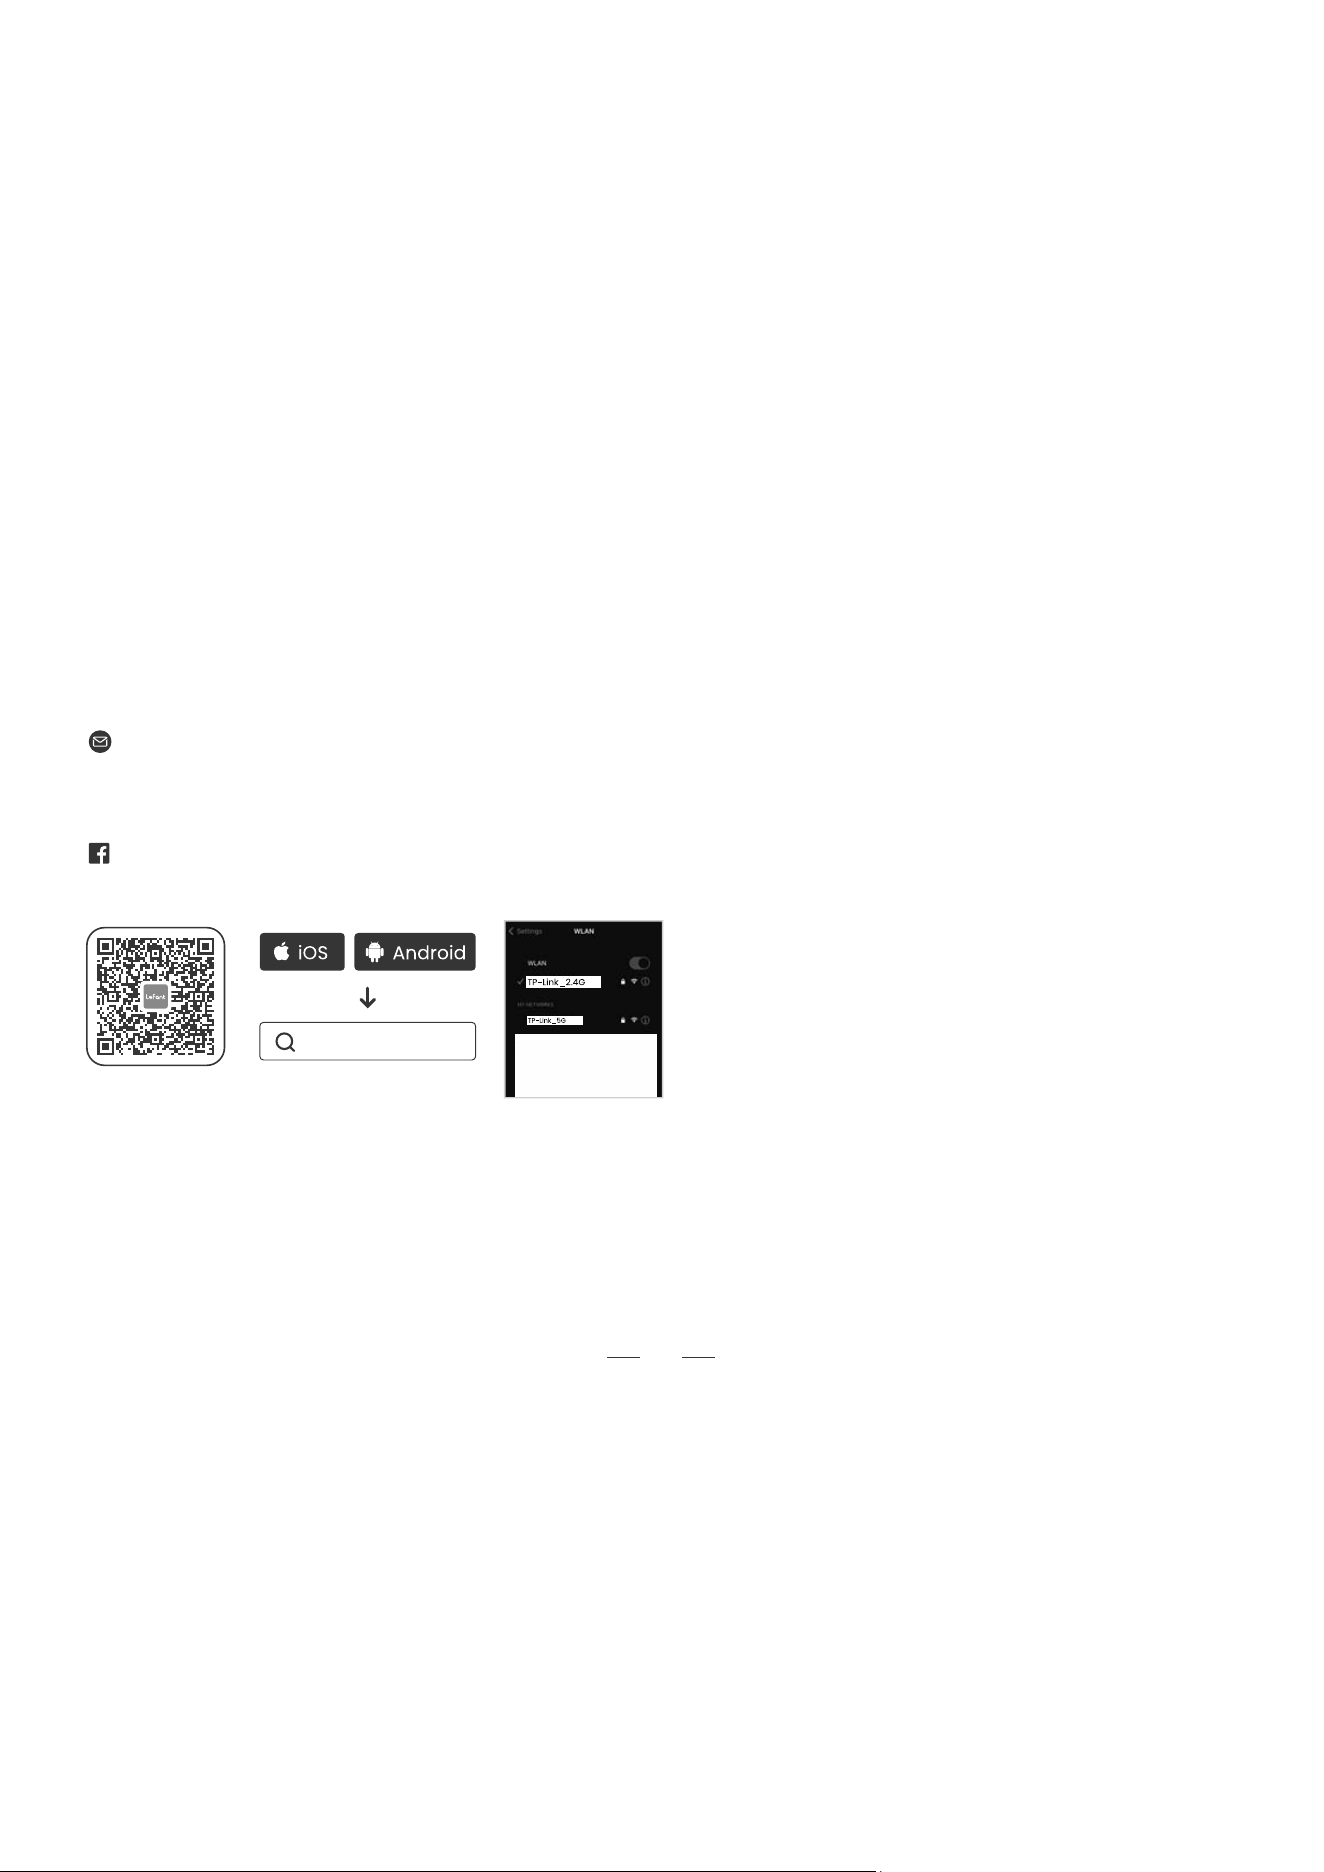
You can scan the QR code or download the "Lefant" app from the app store to connect to the robot and unlock more features.
Thank you for choosing Lefant.
This manual will guide you to fully understand and quickly install the robotic vacuum cleaner (hereinafter referred to as "the
robot"). It will also provide detailed information on usage and maintenance to help you have the best product experience.
If you encounter situations not properly addressed in this user manual, please contact our after-sales service. We'll solve your
specific problems. For more information, please visit the official website of Lefant ROBOTICS: www.lefant.com, or send an email
to the following email address:
The product shown in the illustrations may differ from the actual appearance. Please refer to the physical product for details.
Kind Reminder:
լAfter the installation of the robot, please follow the instructions on the mobile app to complete registration, logging in,
and network configuration.
լBefore configuring the network, please ensure that your phone and home network are connected.
լThis product’s WiFi wireless connection supports the 2.4GHz frequency band network only.
Lefant
Other countries: [email protected]
Facebook: @LEFANTOFFICIAL

Safety Information
Precautions
• This product is only used for floor cleaning in home environments. Do not use it outdoors (such as on an open balcony), on
non-floor surfaces (such as sofas), or in commercial or industrial environments.
• Please clean or maintain the self-cleaning dust collection charging base station (hereinafter referred to as the "base station")
and the robot when the base station is powered off and the robot is turned off.
• Do not use the robot and the base station as toys, or ride or stand on them. When the robot or the base station is in operation,
please supervise children and pets and keep them as far away as possible.
• Do not use this product in a room where infants or young children are sleeping.
• Do not allow children, or people with physical, mental or sensory impairments to use or operate this product.
• If using it in a suspended environment (such as a duplex floor), be sure to use a sturdy physical barrier to prevent personal
injury or property damage caused by the accidental fall of the robot.
• Do not let the limbs or other body parts of people or pets get close to the rotating position of the robot's brush head or put
them into the gaps of the machine to avoid injury.
• Before use, please clean up scattered wires and other sundries on the floor, and move away objects that are easy to tip over,
fragile, valuable, and potentially dangerous to avoid being entangled, stuck, dragged, or knocked over by the robot, which may
cause personal injury or property damage.
• Please ensure that there is no standing water on the floor where the robot operates, otherwise it may cause the robot to get
water damaged.
• Do not use it to clean any burning objects (such as unextinguished cigarette butts, matches, ashes, etc.) or any flammable or
explosive items (such as lighters, gasoline, toner and powder used in printers or copiers, etc.).
• Before use, please ensure that components such as the dust bin, filter, dust bag, side brush, mop, main brush, and main brush
cover are installed in place.
• Do not use the product without a dust bag.
• Be careful of scalding by hot water. Do not touch the water outlet of the base station.
• Do not use any liquid to douse the robot and the base station.
• Do not use it to clean long-haired carpets (some dark-colored carpets may not be cleaned properly).
• If the product is damaged in any way, do not use it and contact the official after-sales service in a timely manner for a solution.
2
• Do not store or use it in an environment with a temperature
higher than 40°C, lower than 0°C, or where there is any liquid
or viscous substance on the floor.
• Do not use any disinfectants or cleaning solutions other
than the official ones, otherwise it may cause serious
damage to the robot and the base station.
• Do not place any objects on the robot, the base station, or
at the dust collection port of the base station, and do not
cover or block them with any items (including dust covers).
• Please avoid having hard or sharp objects (such as
renovation waste, glass, nails, etc.) on the floor where the
robot operates, otherwise it may scratch the robot and the
floor.
• Be sure to place the base station on a horizontal hard floor
indoors, and keep the robot, the base station, and the power
cord away from open flames, heat sources (such as
radiators), and areas that are wet, have water, are narrow, or
may leave the robot suspended.
• Please put away fragile items and sundries placed on the
floor (such as vases, mirrors, plastic bags, etc.) to avoid
damage to valuable items in the home when the robot is
blocked during operation or slightly touched.
• Do not place low objects such as floor mats and shoes at
positions like the stairway that may cause the robot to fall,
otherwise it may interfere with the normal operation of the
robot's anti-fall sensor and cause the robot to fall.
• Please use this product in accordance with the instructions
in the manual. Any losses and damages caused by improper
use, or any indirect losses caused by the use, misuse, or
inability to use this product shall be borne by the user.
SAVE THESE INSTRUCTIONS
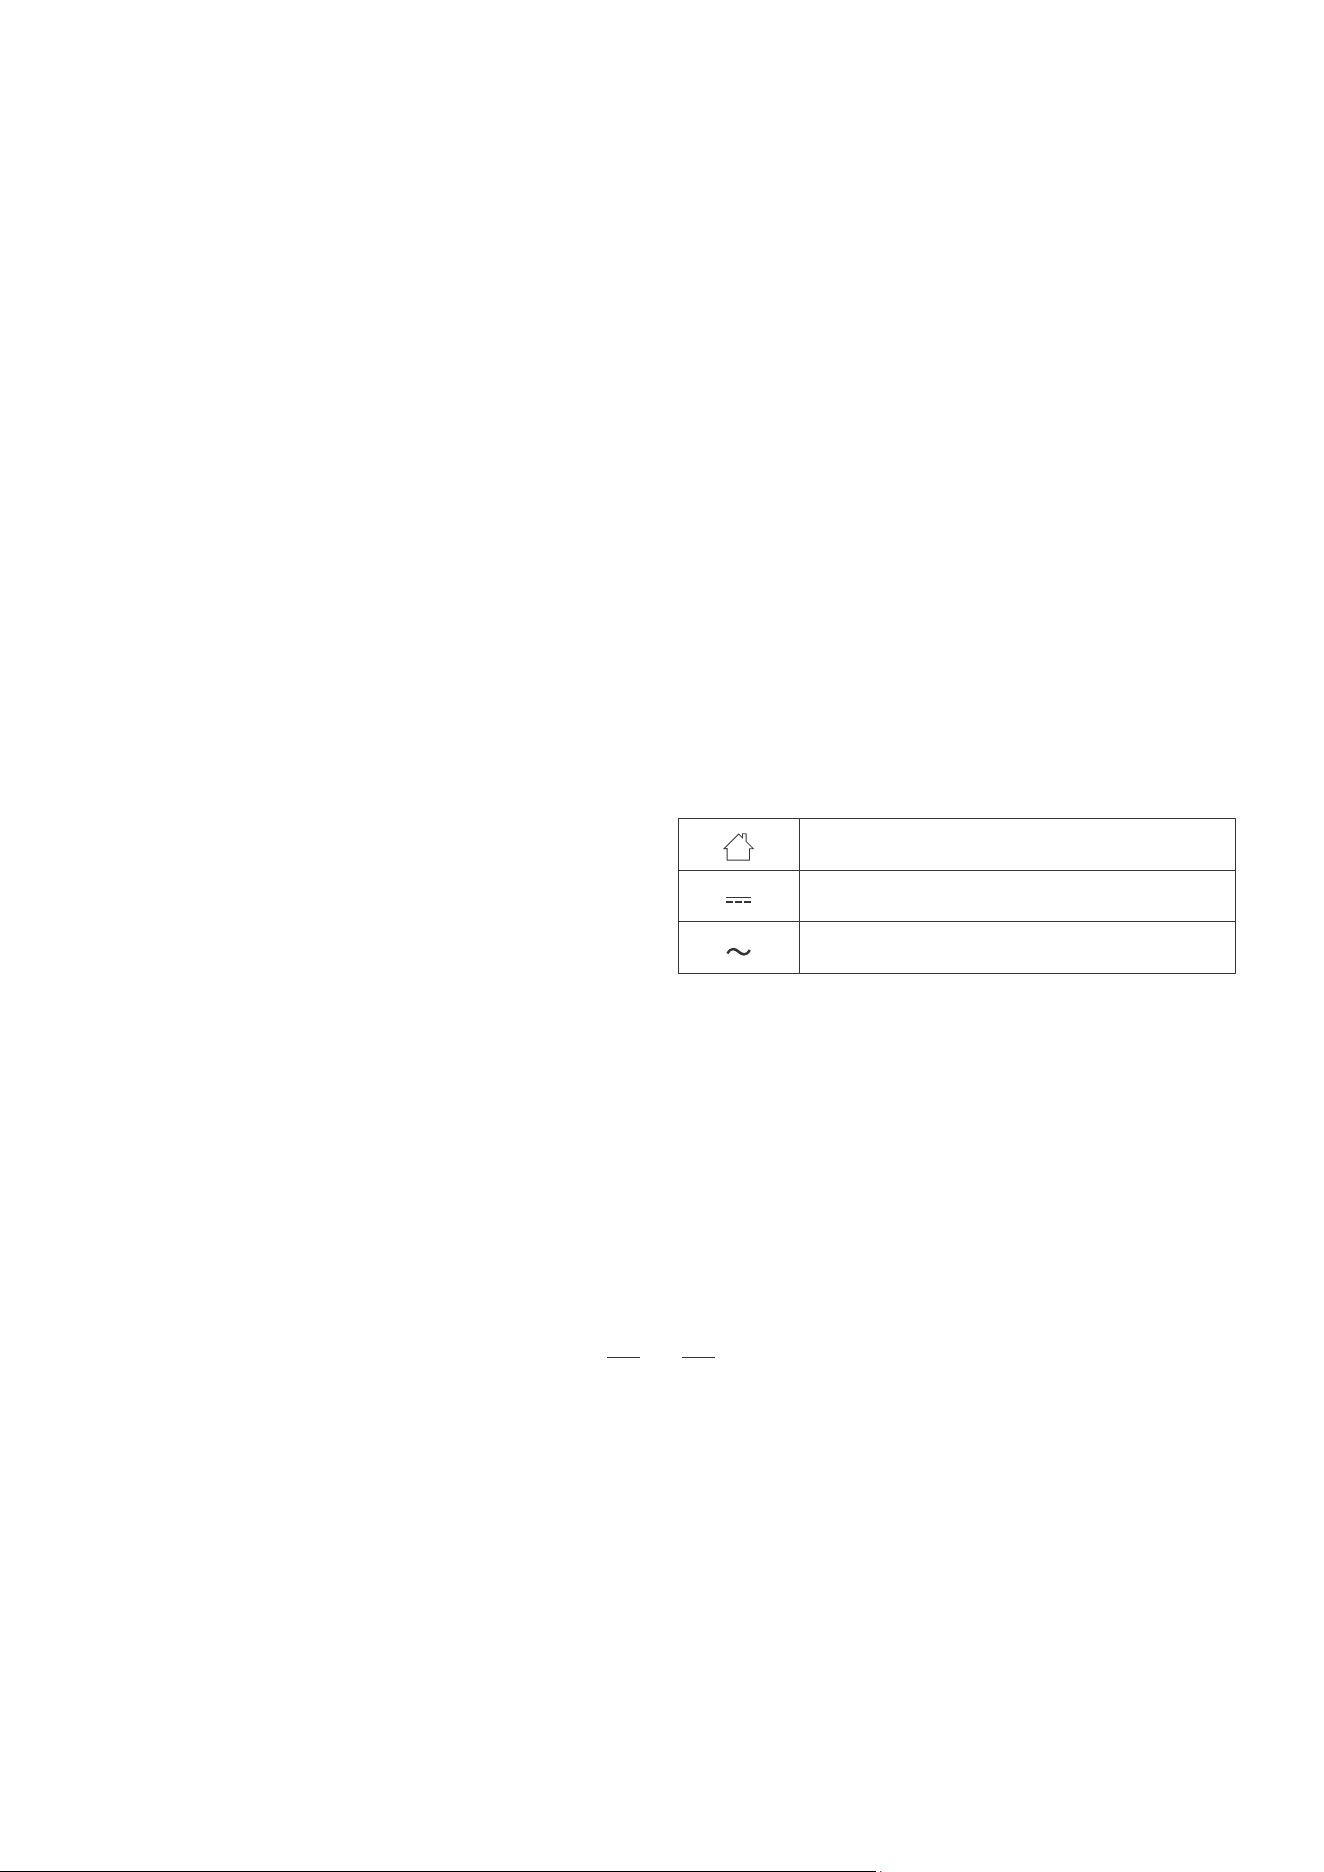
For indoor use only
Direct current
Alternating current
To satisfy RF exposure requirements, a separation
distance of 20 cm or more should be maintained
between this device and persons during device
operation.
To ensure compliance, operations at closer than this
distance is not recommended. The antenna used for this
transmitter must not be co-located in conjunction with
any other antenna or transmitter.
3
This marking indicates that this product should not be disposed of with other household waste throughout the EU.
To prevent possible harm to the environment or human health from uncontrolled waste disposal, recycle it
responsibly to promote the sustainable reuse of material resources. To recycle your used device, please use the
return and collection systems or contact the retailer where the product was purchased. They can safely recycle
this product.
Correct Disposal of this Product
Federal Communications Commission (FCC) Interference Statement
This device complies with Part 15 of the FCC Rules.
Operation is subject to the following two conditions:
(1) This device may not cause harmful interference,
and (2) this device must accept any interference received,
including interference that may cause undesired operation.
FCC Caution:
ʴˡˬ˖˛˔ˡ˚˘˦ˢ˥ˠˢ˗˜Ѓ˖˔˧˜ˢˡ˦ˡˢ˧˘˫ˣ˥˘˦˦˟ˬ˔ˣˣ˥ˢ˩˘˗˕ˬ˧˛˘
party responsible for compliance could void the user 5s
authority to operate this equipment.
RF exposure warning
This equipment complies with FCC radiation exposure limits
set forth for an uncontrolled environment.This equipment
must be installed and operated in accordance with provided
instructions and the antenna(s) used for this transmitter
must be installed antenna(s) used for this transmitter must
be installed to provide a separation distance of at least 20
cm from all persons and must not be collocated or operating
in conjunction with any other antenna or transmitter.
This equipment has been tested and found to comply with
the limits for a Class B digital device, pursuant to Part 15 of the
FCC Rules.
These limits are designed to provide reasonable protection
against harmful interference in a residential installation. This
equipment generate, uses and can radiate radio frequency
energy and, if not installed and used in accordance with the
instructions, may cause harmful interference to radio
communications.
However, there is no guarantee that interference will not
occur in a particular installation. If this equipment does cause
harmful interference to radio or television reception, which
can be determined by turning the equipment off and on, the
user is encouraged to try to correct the interference by one of
the following measures:
• Reorient or relocate the receiving antenna.
• Increase the separation between the equipment and
receiver.
• Connect the equipment into an outlet on a circuit different
from that to which the receiver is connected.
• Consult the dealer or an experienced radio/TV technician
for help.
4

- English:
This device contains licence-exempt transmitter(s)/receiver(s) that comply with Innovation, Science and Economic
Development Canada’s licence-exempt RSS(s). Operation is subject to the following two conditions:
(1) This device may not cause interference.
(2) This device must accept any interference, including interference that may cause undesired operation of the device.
Any changes or modifications not expressly approved by the party responsible for compliance could void the user's authority
to operate the equipment.
RF exposure statement:
The equipment complies with IC Radiation exposure limit set forth for uncontrolled environment. This equipment should be
installed and operated with minimum distance 20cm between the radiator and your body.
- French:
Cet appareil contient des émetteurs / récepteurs exemptés de licence conformes aux RSS (RSS) d'Innovation, Sciences et
Développement économique Canada. Le fonctionnement est soumis aux deux conditions suivantes:
(1) Cet appareil ne doit pas causer d'interférences.
(2) Cet appareil doit accepter toutes les interférences, y compris celles susceptibles de provoquer un fonctionnement
indésirable de l'appareil.
Tout changement ou modification non expressément approuvé par la partie responsable de la conformité pourrait annuler
l'autorité de l'utilisateur à utiliser l'équipement.
Déclaration d'exposition RF:
L'équipement est conforme à la limite d'exposition aux radiations de la IC établie pour un environnement non contrôlé. Cet
équipement doit être installé et utilisé avec une distance minimale de 20cm entre le radiateur et votre corps.
IC Caution:
5
-CE DOC
Hereby, Shenzhen USEER Robotics Co., Ltd. declares that the radio equipment type M2 Pro is in compliance with Directive
2014/53/EU. The full text of the EU declaration of conformity is available at the following internet address: cn.useerobot.com.

Battery and Charging
6
• This product is only compatible with the charging base station specially provided by the manufacturer.
• Be sure to confirm and use a qualified power source with reliable grounding. Otherwise, there is a risk of electric shock and
other hazards.
• If there is no power source with reliable grounding, please have a professional electrician rectify it before using this product.
• Do not disassemble, repair, or modify the battery and the charging base station without authorization.
• If the charging base station is not going to be used for an extended period, unplug the power plug.
• Do not dispose of used batteries with household waste. To prevent environmental pollution, hand them over to a certified
battery recycling institution for proper disposal.
• Do not use any third-party batteries, chargers, charging cables, or charging docks, etc.
• Do not wipe or clean the charging pins of the charging base station with wet wipes, damp cloths, or wet hands.
• Use this product in an environment where the power supply voltage matches the voltage marked on the base station.
• When transporting the product, ensure it is powered off and it is recommended to use the original packaging box for
packaging.
• Do not use a power cord that is not included with the product. Otherwise, it may cause smoking, overheating, or even a fire.
• If the usage area is prone to thunderstorms or the power supply voltage is unstable, etc., it is advisable to take appropriate
protective measures.
• Using this product with any type of power converter is prohibited. Otherwise, the warranty will become invalid immediately,
and there may be potential dangers.
• Do not use a damaged power cord. If the power cord is damaged (including breakage, fracture, etc.), stop using it
immediately and contact the customer service promptly.
• If the robot will not be used for a long time, fully charge it, turn it off, and store it in a cool, dry place. Charge it at least once
every month to prevent the battery from being over-discharged.
Product Introduction
A
7
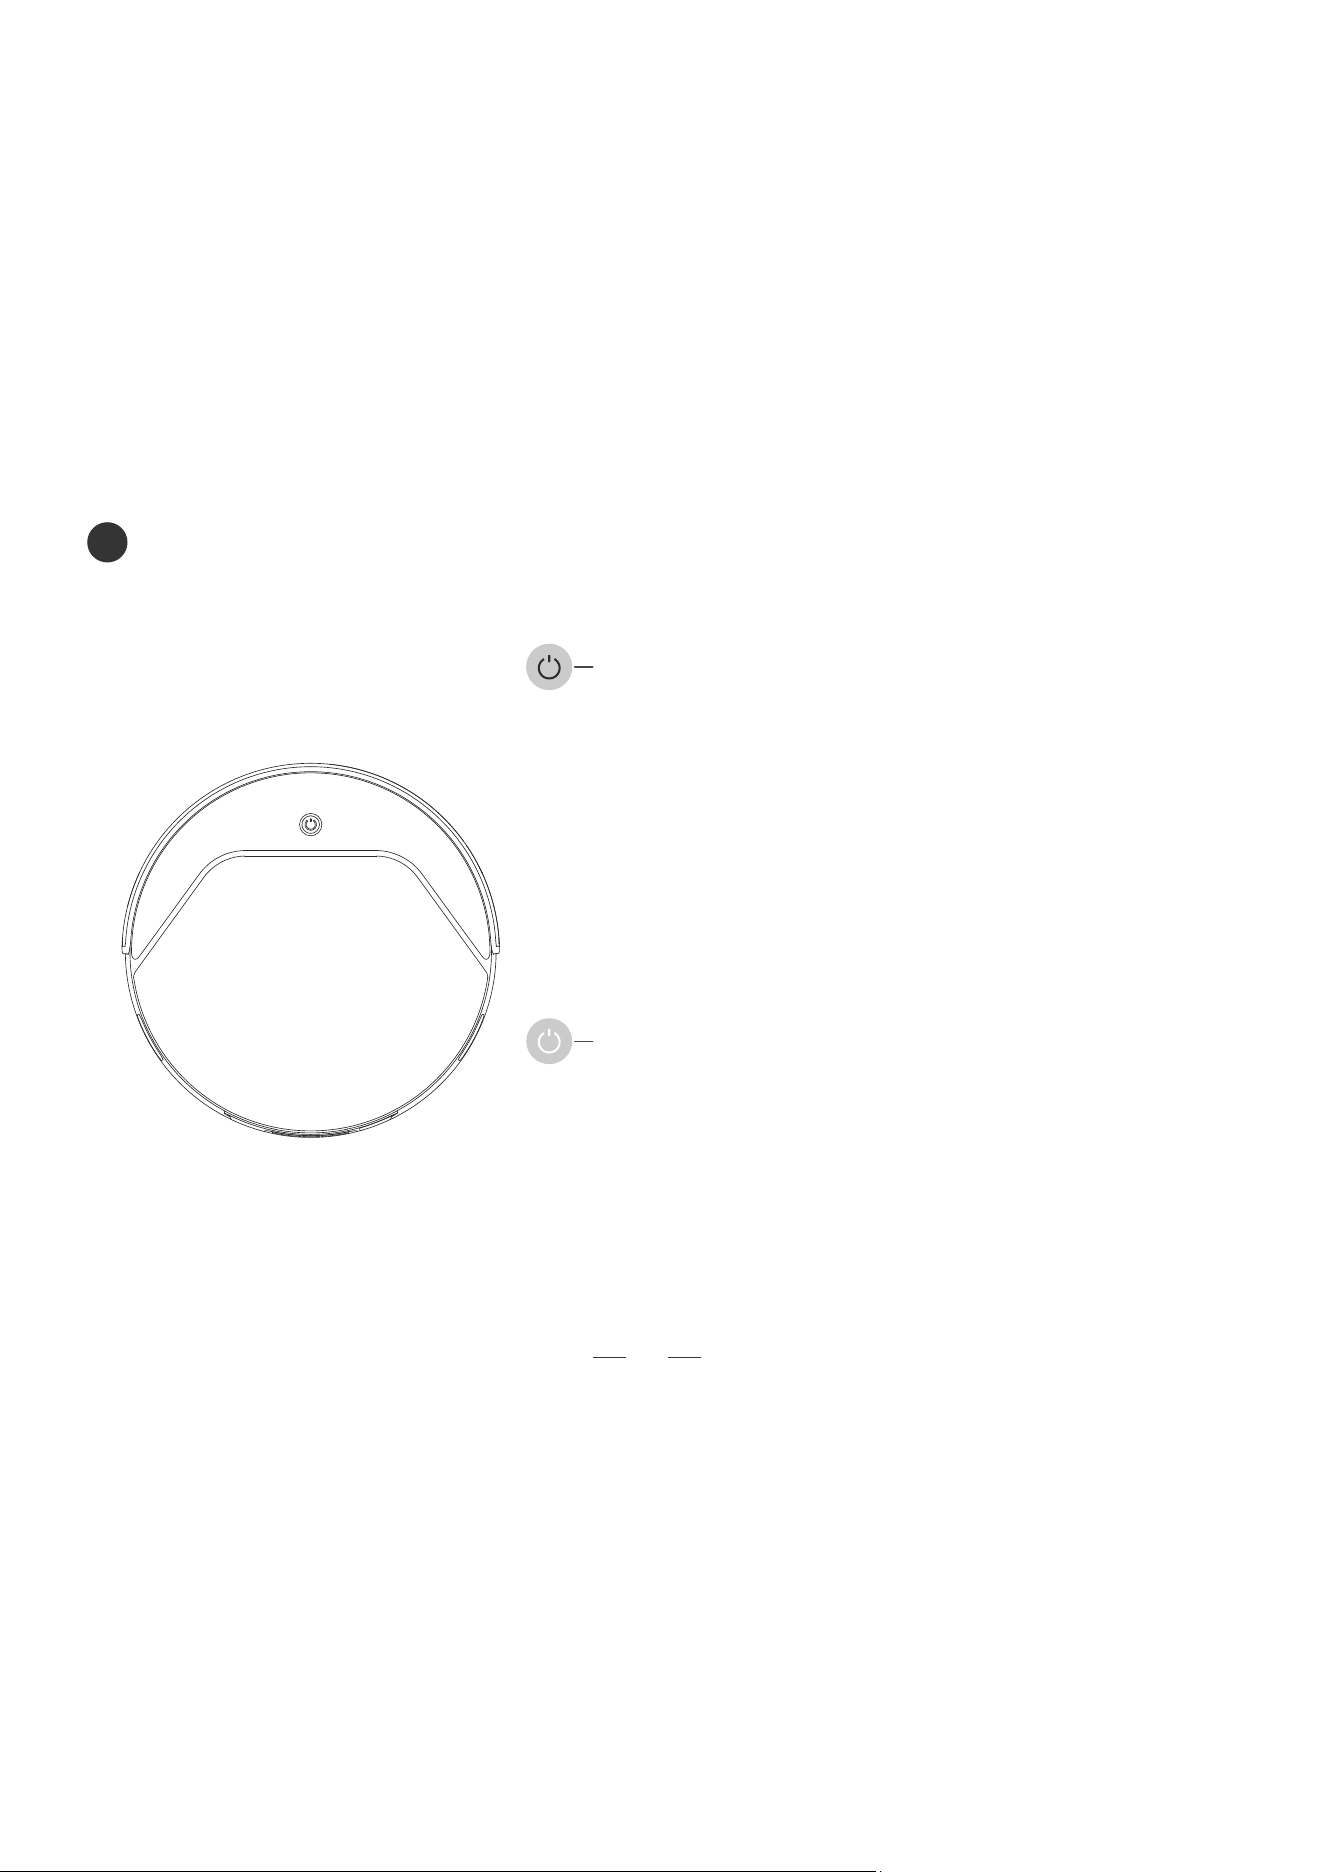
1. Press and hold for 3 seconds: Power on
(The robot will automatically power on when charging.)
2. Single click: Start or pause
3. Double click: Automatically return for charging
4. Press and hold for 6 seconds: Enter the network configuration state
5. Press and hold for 12 seconds: Power off
Button Operation
Explanation of Button Light Effects
1. Purple light breathing: Charging (Battery level < 50%)
2. Blue light breathing: Charging (Battery level> 50%)
3. Blue light flashing: The robot enters the network configuration state
4. Red light staying on: The robot automatically returns for charging
due to low battery level
(
Network Configuration Operation: Open the app, select "Add
Device
"
, then
p
ress and hold for 6 seconds until you hear the
v
oice
p
rom
p
t. Wait for the a
pp
to scan the device, then follow the
network connection instructions to complete the pairing.)
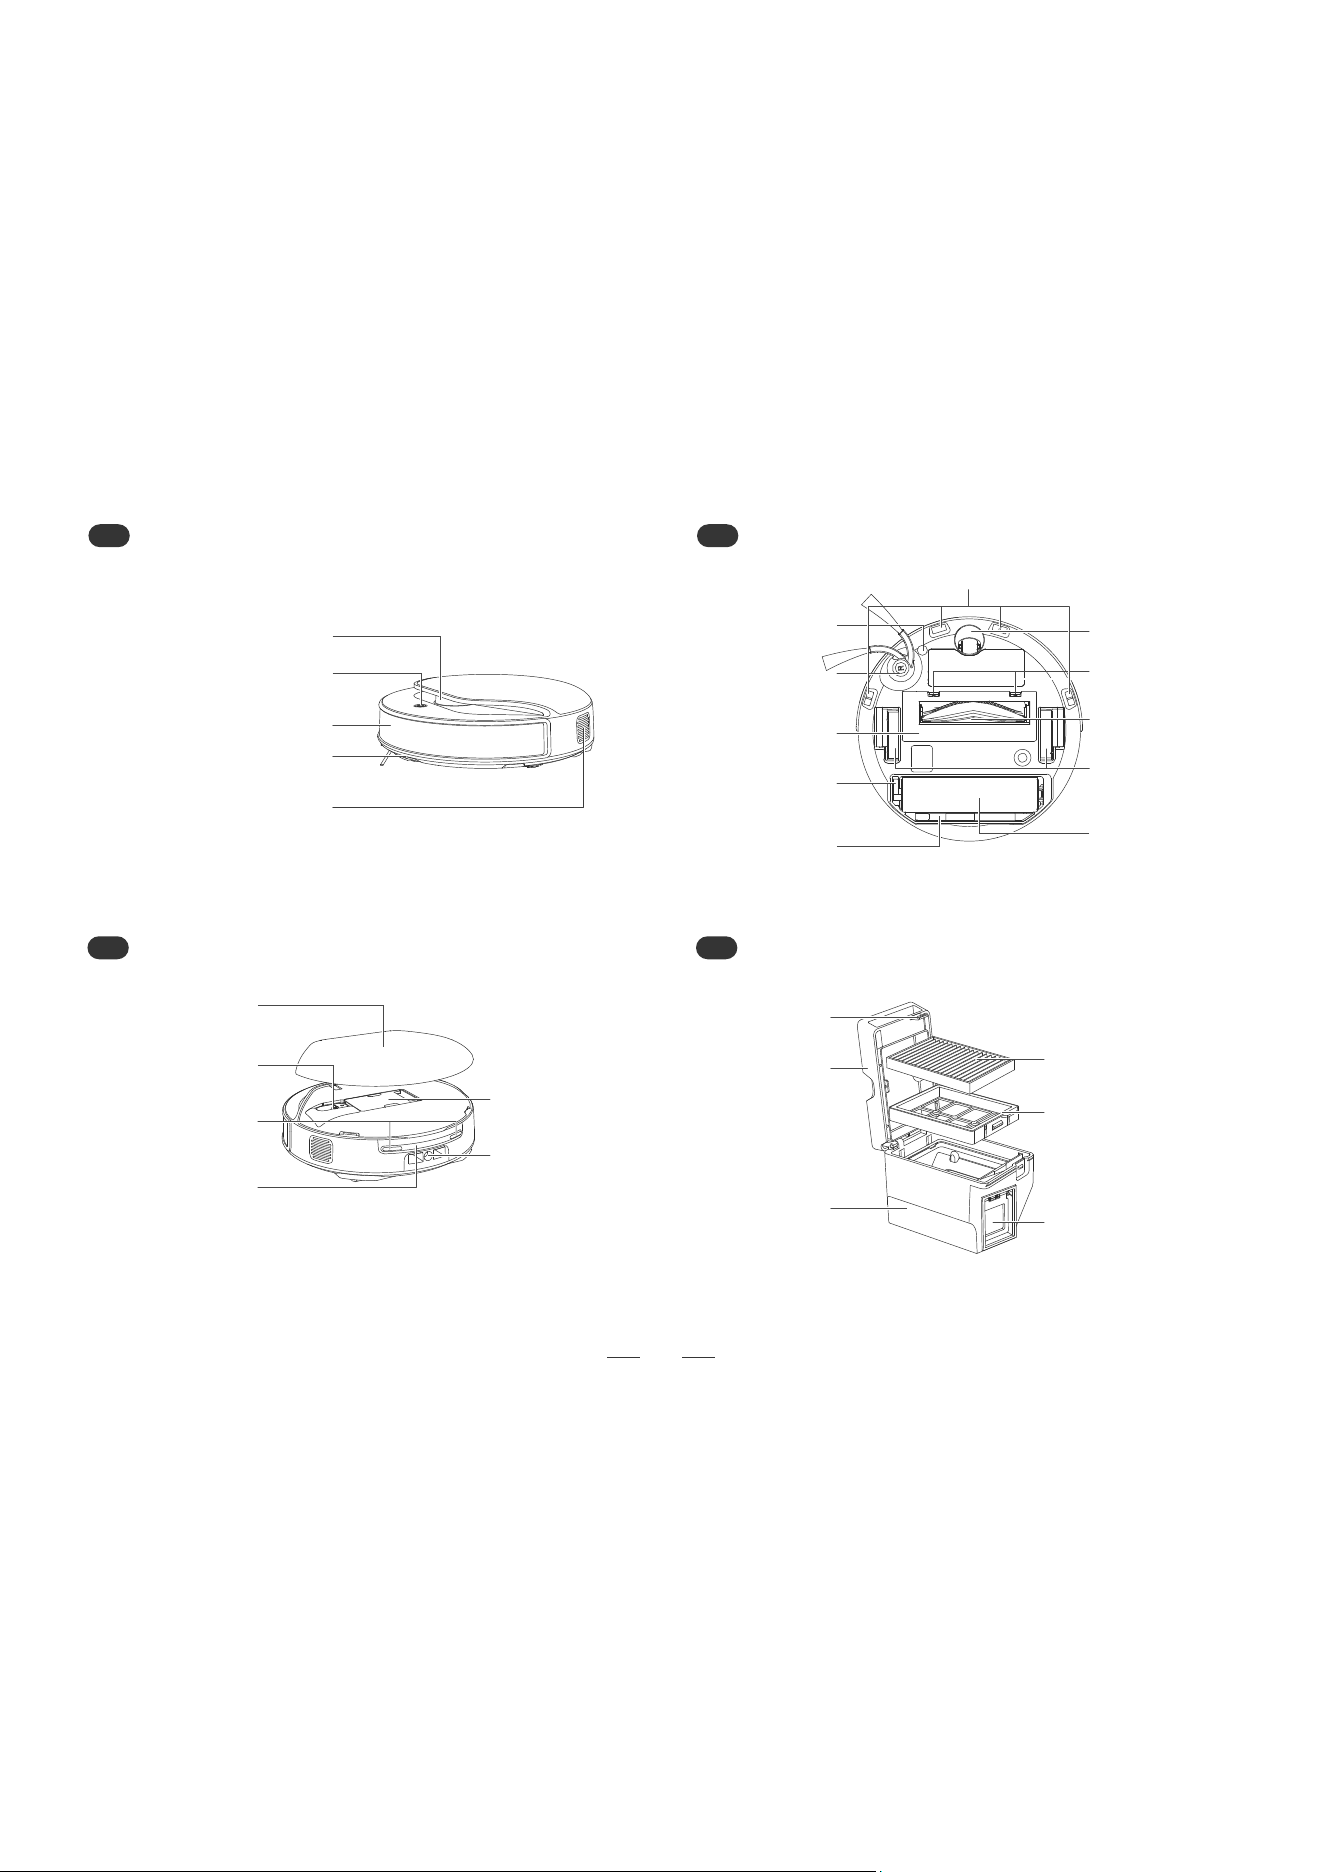
Start/Pause Button
Obstacle Avoidance Sensor
Collision Avoidance Strip
Laser Navigation Sensor
Anti-fall Sensor
Universal Wheel
Side Brush
Carpet Detection
Component
Driving Wheel
Roller Mop
Main Brush
Cover Clip
Main Brush Cover
Roller Side
Support Assembly
Dirty Water
Collection Trough
Main Brush
Air Exhaust Outlet
Robot (Bottom View)
A2
Robot (Top View)
A1
Robot (Below the Face Cover)
A3 A4 Dustbin
8
Rear - facing
Perception
Charging Contact
Dirty Water Tank
Dustbin
Water Fill Port
Top Cover
High-efficiency
Filter Screen
Filter Screen Bracket
Dustbin Body
Upper Cover
of the Dustbin
Dust Collection Outlet
Dustbin Buckle
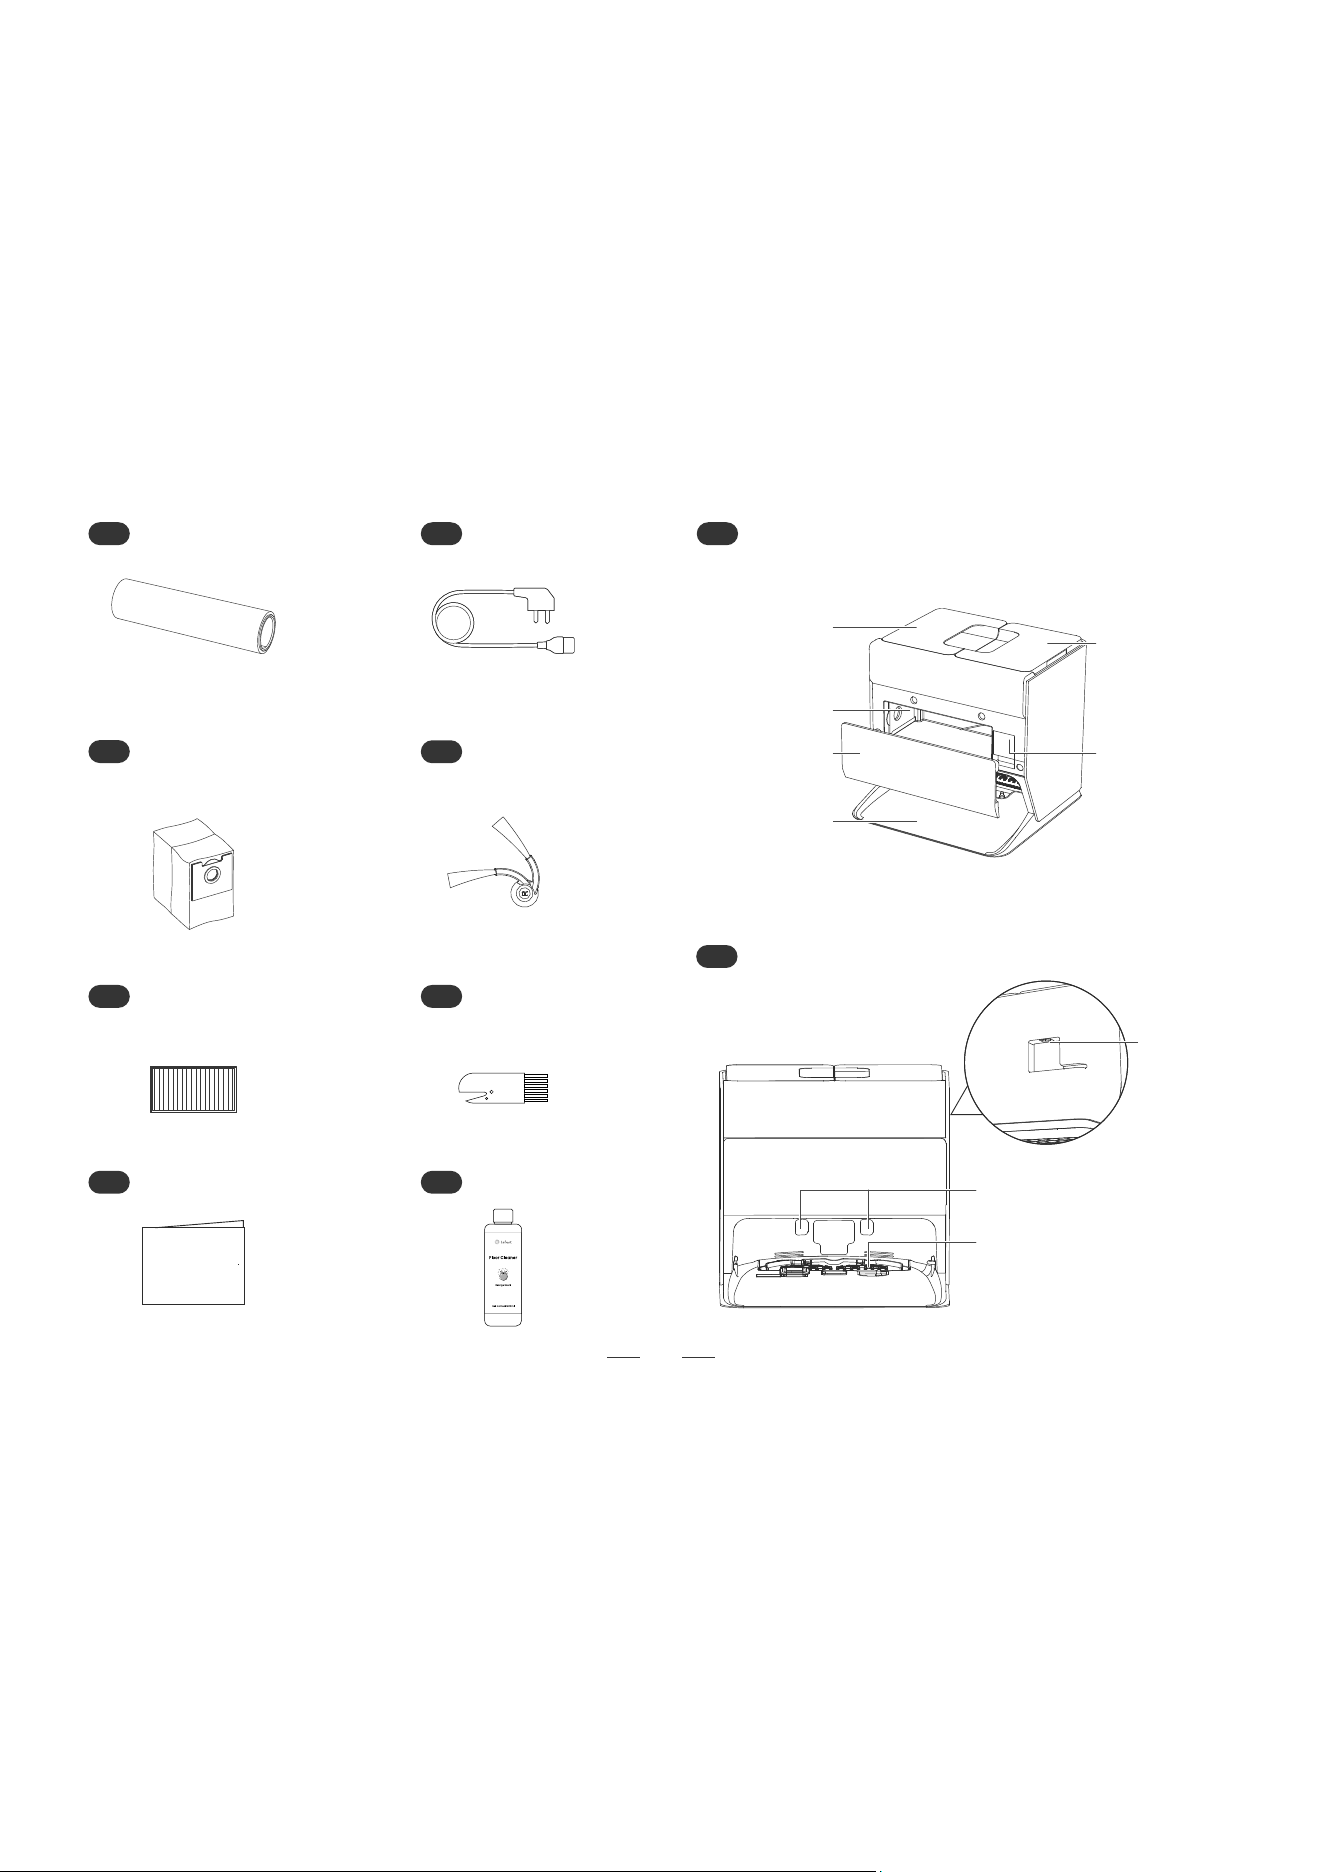
A13
Base Station
A14
Base Station
9
A6 Power Cord
A7
Disposable Dust
Collection Bag
A8
Side Brush
A12
Cleaning Fluid
A10 Cleaning Brush
A11
User Manual
A5
Roller Mop
A9
High-efficiency
Filter Screen
Dirty Water Tank
Clean Water Tank
Dust Bin Cover
Dust Bag Slot
Base Station
Baseplate
Cleaning
Solution Box
Power Port
Cleaning Disc
Charging Contact
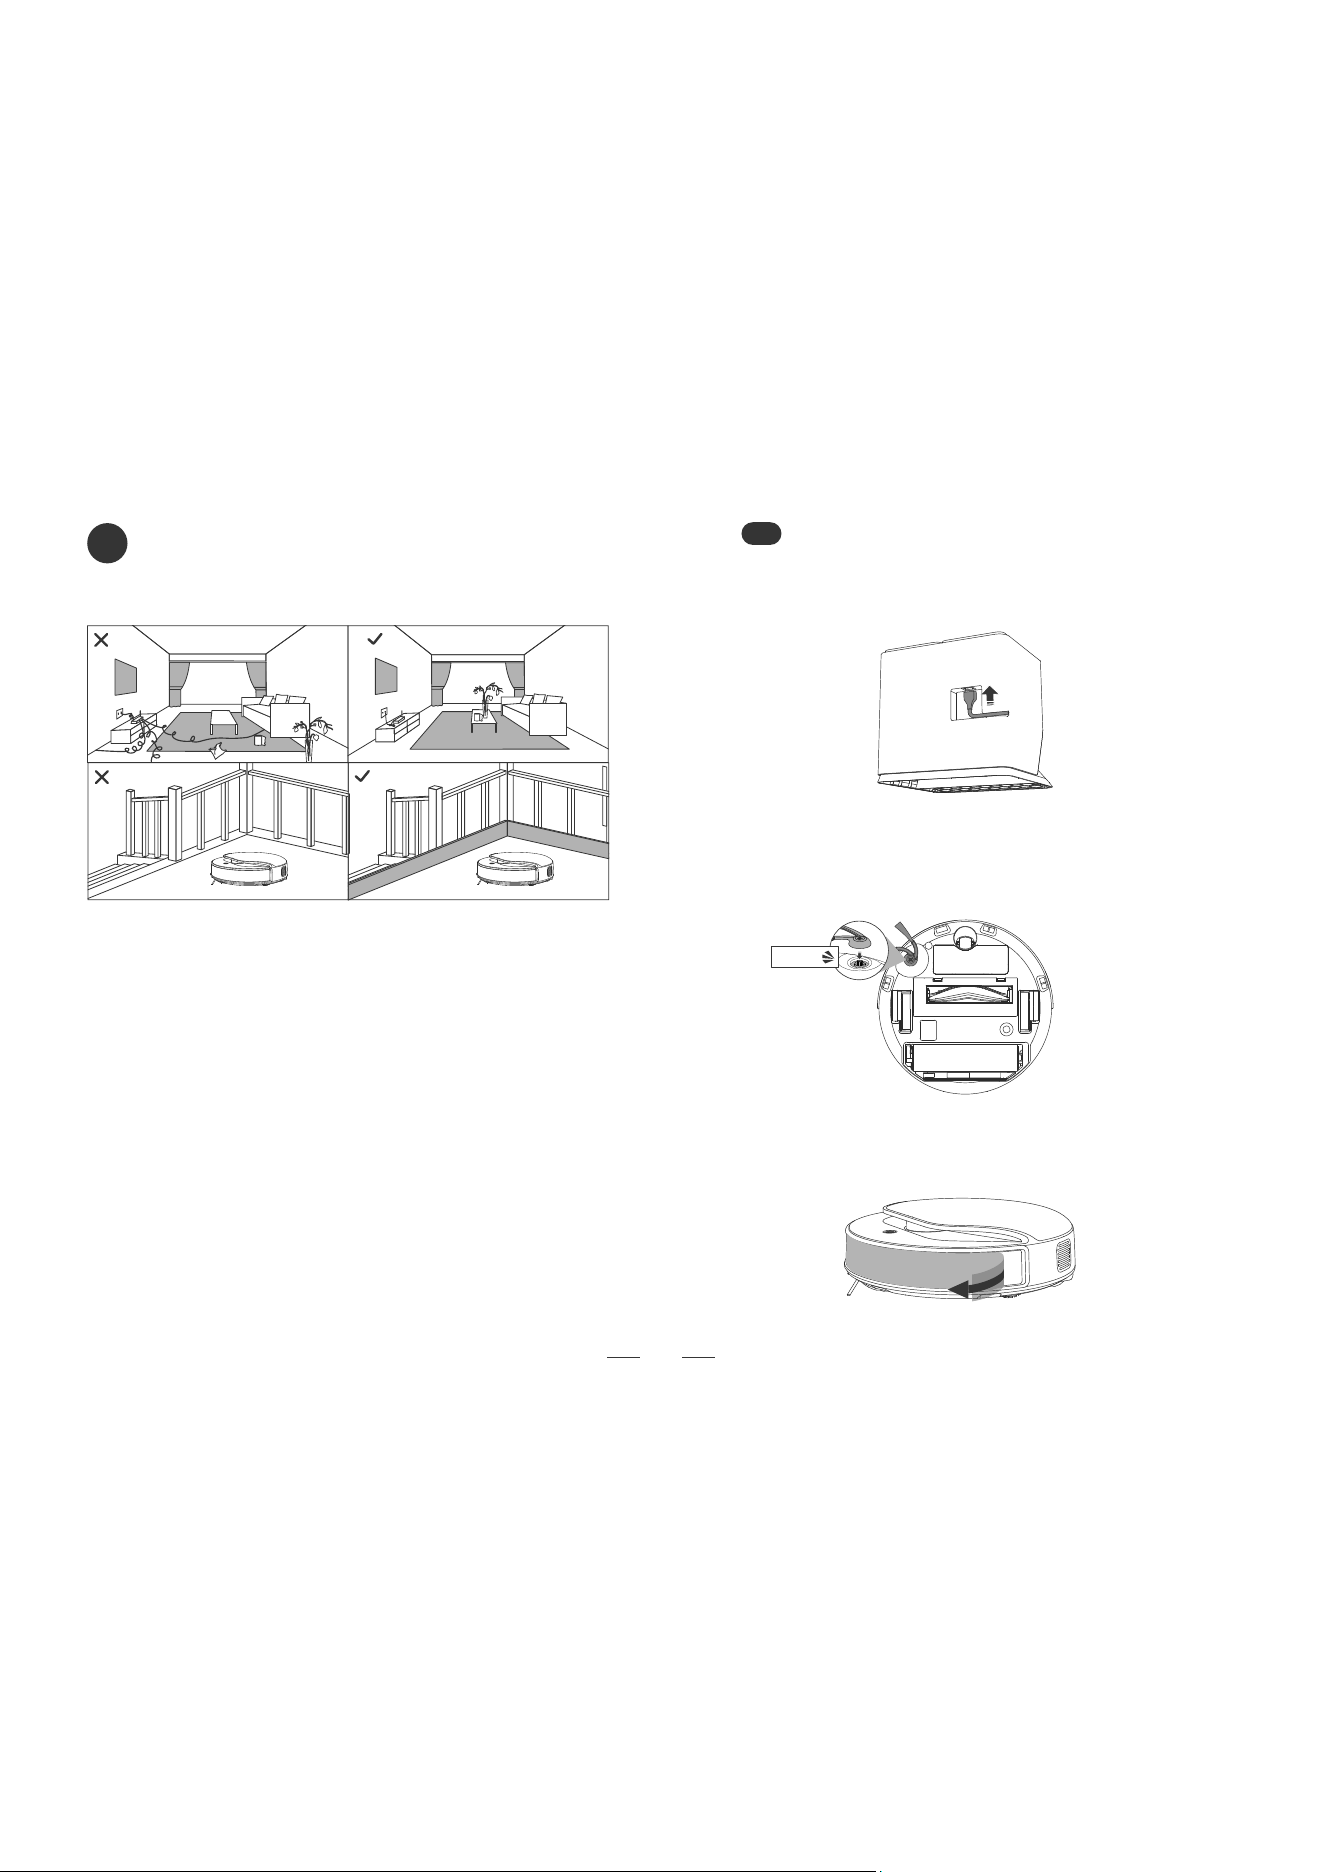
Product Installation
B
Special Tip
1. Please clean up the sundries such as scattered wires, hard
objects and sharp objects (such as iron nails and glass) on the
floor before starting, and move away the items that are easy to tip
over, fragile, valuable and those that may cause danger. Avoid the
robot from getting entangled, stuck, dragged or knocked over,
which may lead to personal injury or property damage.
2. If using this product in a suspended environment, make sure to
use a firm physical barrier to prevent personal injury or property
damage caused by the accidental fall of the robot.
3. Before use, ensure that there is no accumulated water on the
floor, and do not wash the main unit with water to prevent the
robot from being damaged due to water penetration.
Tips:
* It is recommended to follow the robot throughout the first cleaning process and
assist in handling some possible minor problems. After dealing with these problems,
the robot can smoothly carry out autonomous cleaning in subsequent cleanings.
* Do not let the robot suck up hard objects or sharp objects (such as decoration
waste, glass, iron nails, etc.), otherwise it may scratch the robot and the floor.
B1 Preparation Work
1. Press the power cord firmly into place as shown
in the illustration.
3. Remove the protective film of the robot.
2. Align the side brush with the robot and install it.
A "click" sound indicates that the side brush is properly
installed.
10
click
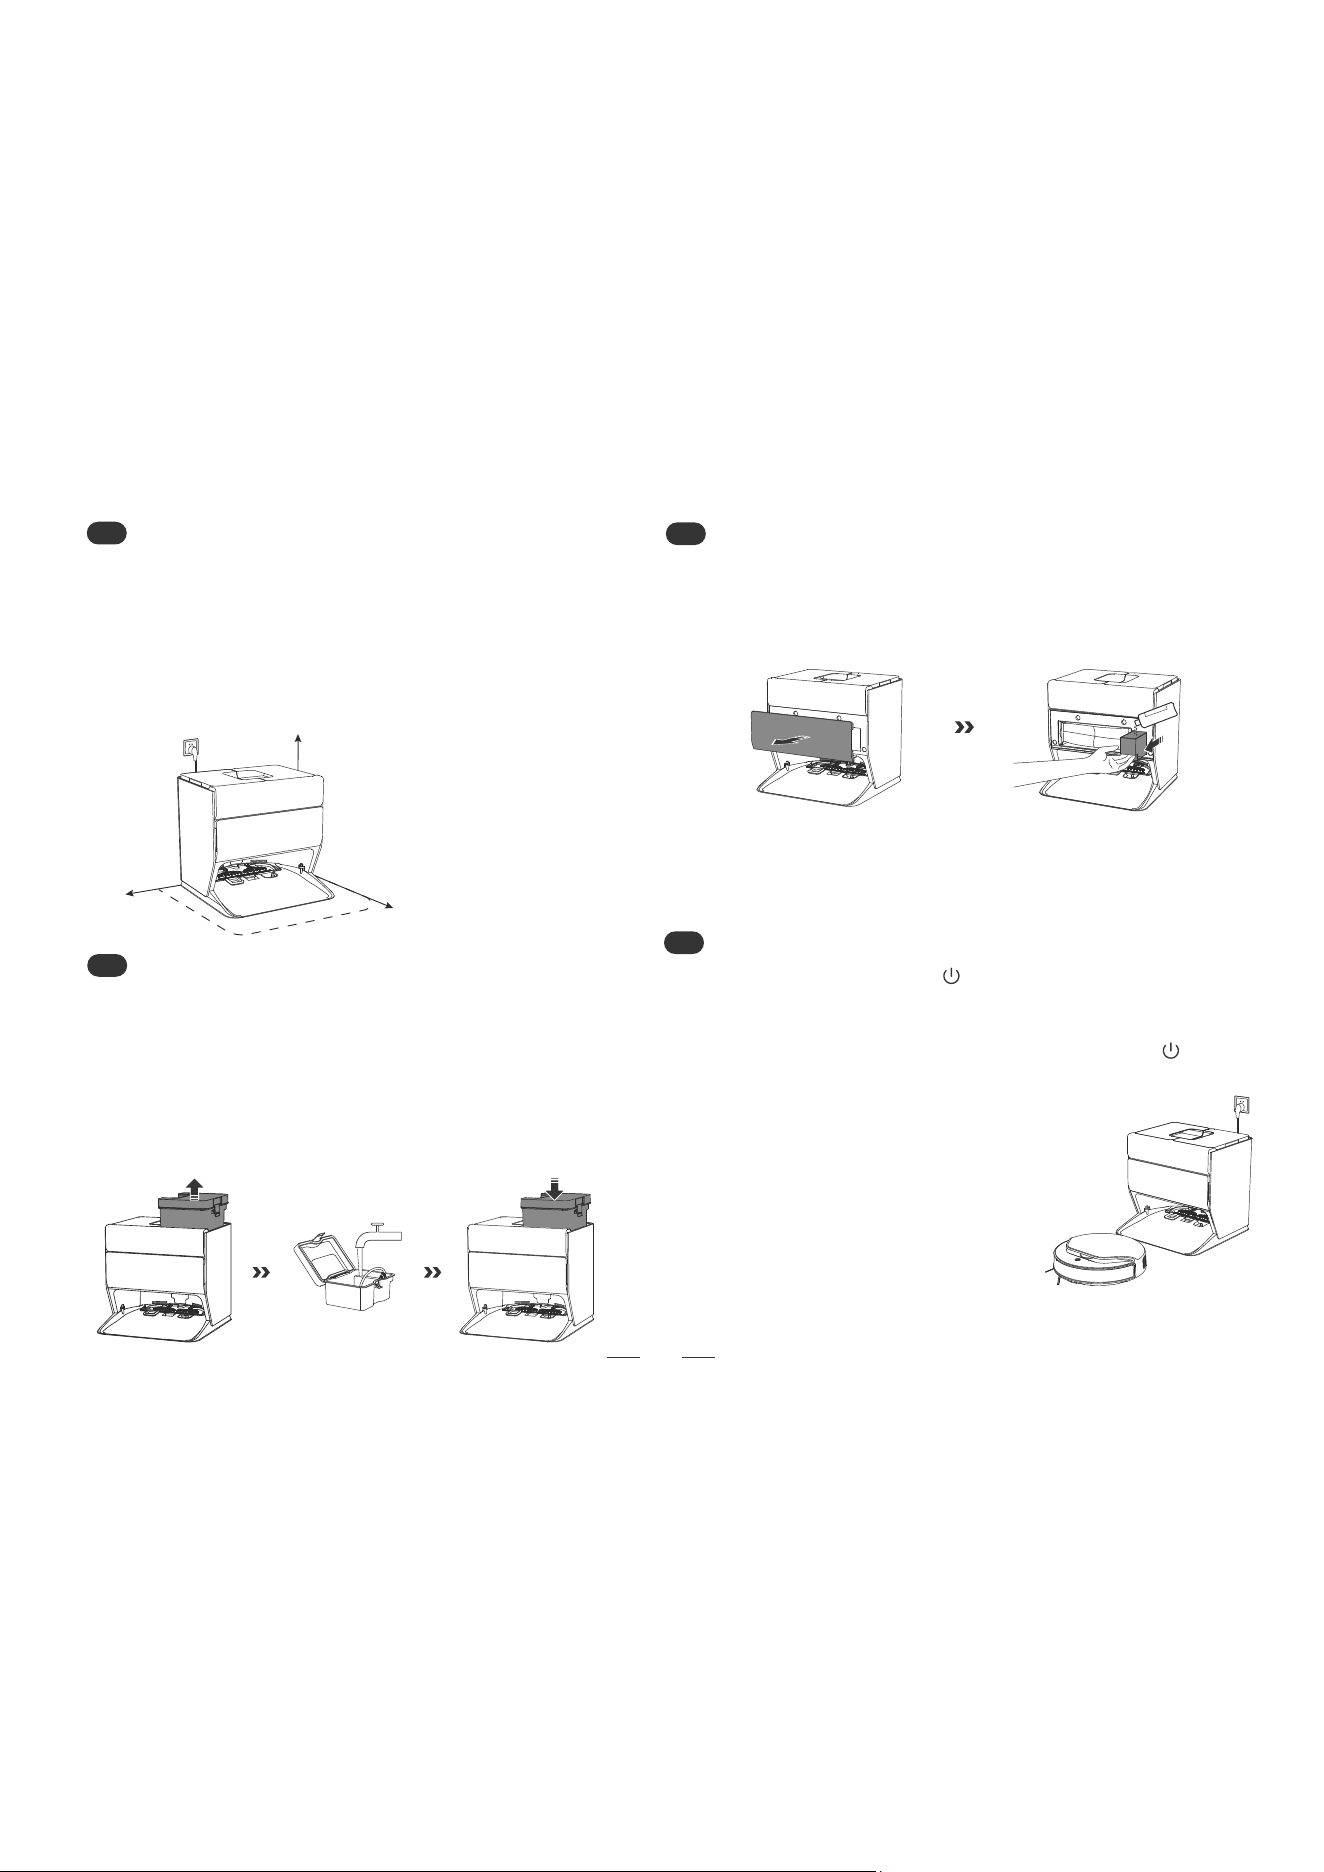
B2
Base Station Installation
B3
Watering The Clean Water Tank
B4 Add The Cleaning Solution
Lift the clean water tank upward, open the upper cover of the
water tank and add clean water. After adding water, tightly close
the upper cover of the water tank and install the clean water tank
back into the base station. Please ensure that the water tank is
fully installed in place.
*Do not pour hot water into the tank, as it may cause the tank to deform. Do
not add cleaning solution to the tank, as it may result in an excessively high
concentration of the cleaning solution, affecting the normal use of the robot.
Please place the base station on a flat surface and insert the
power cord to connect it to the power socket.Ensure that there
are no objects within a range of 0.5 meters on both sides of the
charging station and within a range of 1.5 meters in front of it to
prevent the signal from being blocked. Do not place reflective
objects such as floor mirrors around the charging station to avoid
the influence of signal reflection on the use of the product.
Remove the dust compartment cover. Pull out the cleaning solution box,
then pour the cleaning fluid into it. After filling, push the cleaning solution
box all the way back into place. Reattach the dust compartment cover,
ensuring it fits tightly to seal the dust compartment properly.
B5
Power On And Charge
Press and hold the power button ( ) to turn on the device. After
waiting for the power indicator light to stay constantly on and for the
voice prompt, place the robot in front of the base station. Make sure
that the base station is powered on. Press the power button ( )
twice briefly, and the robot will automatically return to the base
station for charging. For daily use, keep the robot in a charged state
to maintain the battery performance.
During charging:
* When the battery level is less than 50%, the purple light breathes.
* When the battery level is greater than 50%, the blue light breathes.
Tips:
* When the robot is charged while it is turned off,
it will automatically turn on during the charging process.
* It may not be possible to turn on the robot when the battery is low.
Please place the robot directly into the base station for charging.
11
Attention:
* Do not add any non-official cleaning solutions or disinfectants, otherwise it may
cause damage to the product.
* If there is no need to use the floor cleaning solution in daily use, this step can be
skipped.
>0.5m
(1.64’)
>0.5m
(1.64’)
>1.5m
(4.92’)
1. Press and hold the power button ( ) for 3 seconds to power on.
The power indicator light will turn on, and the robot will enter the
standby state.
2. Press and hold the power button ( ) for 12 seconds to power
off, and this task will come to an end.
C3
C2
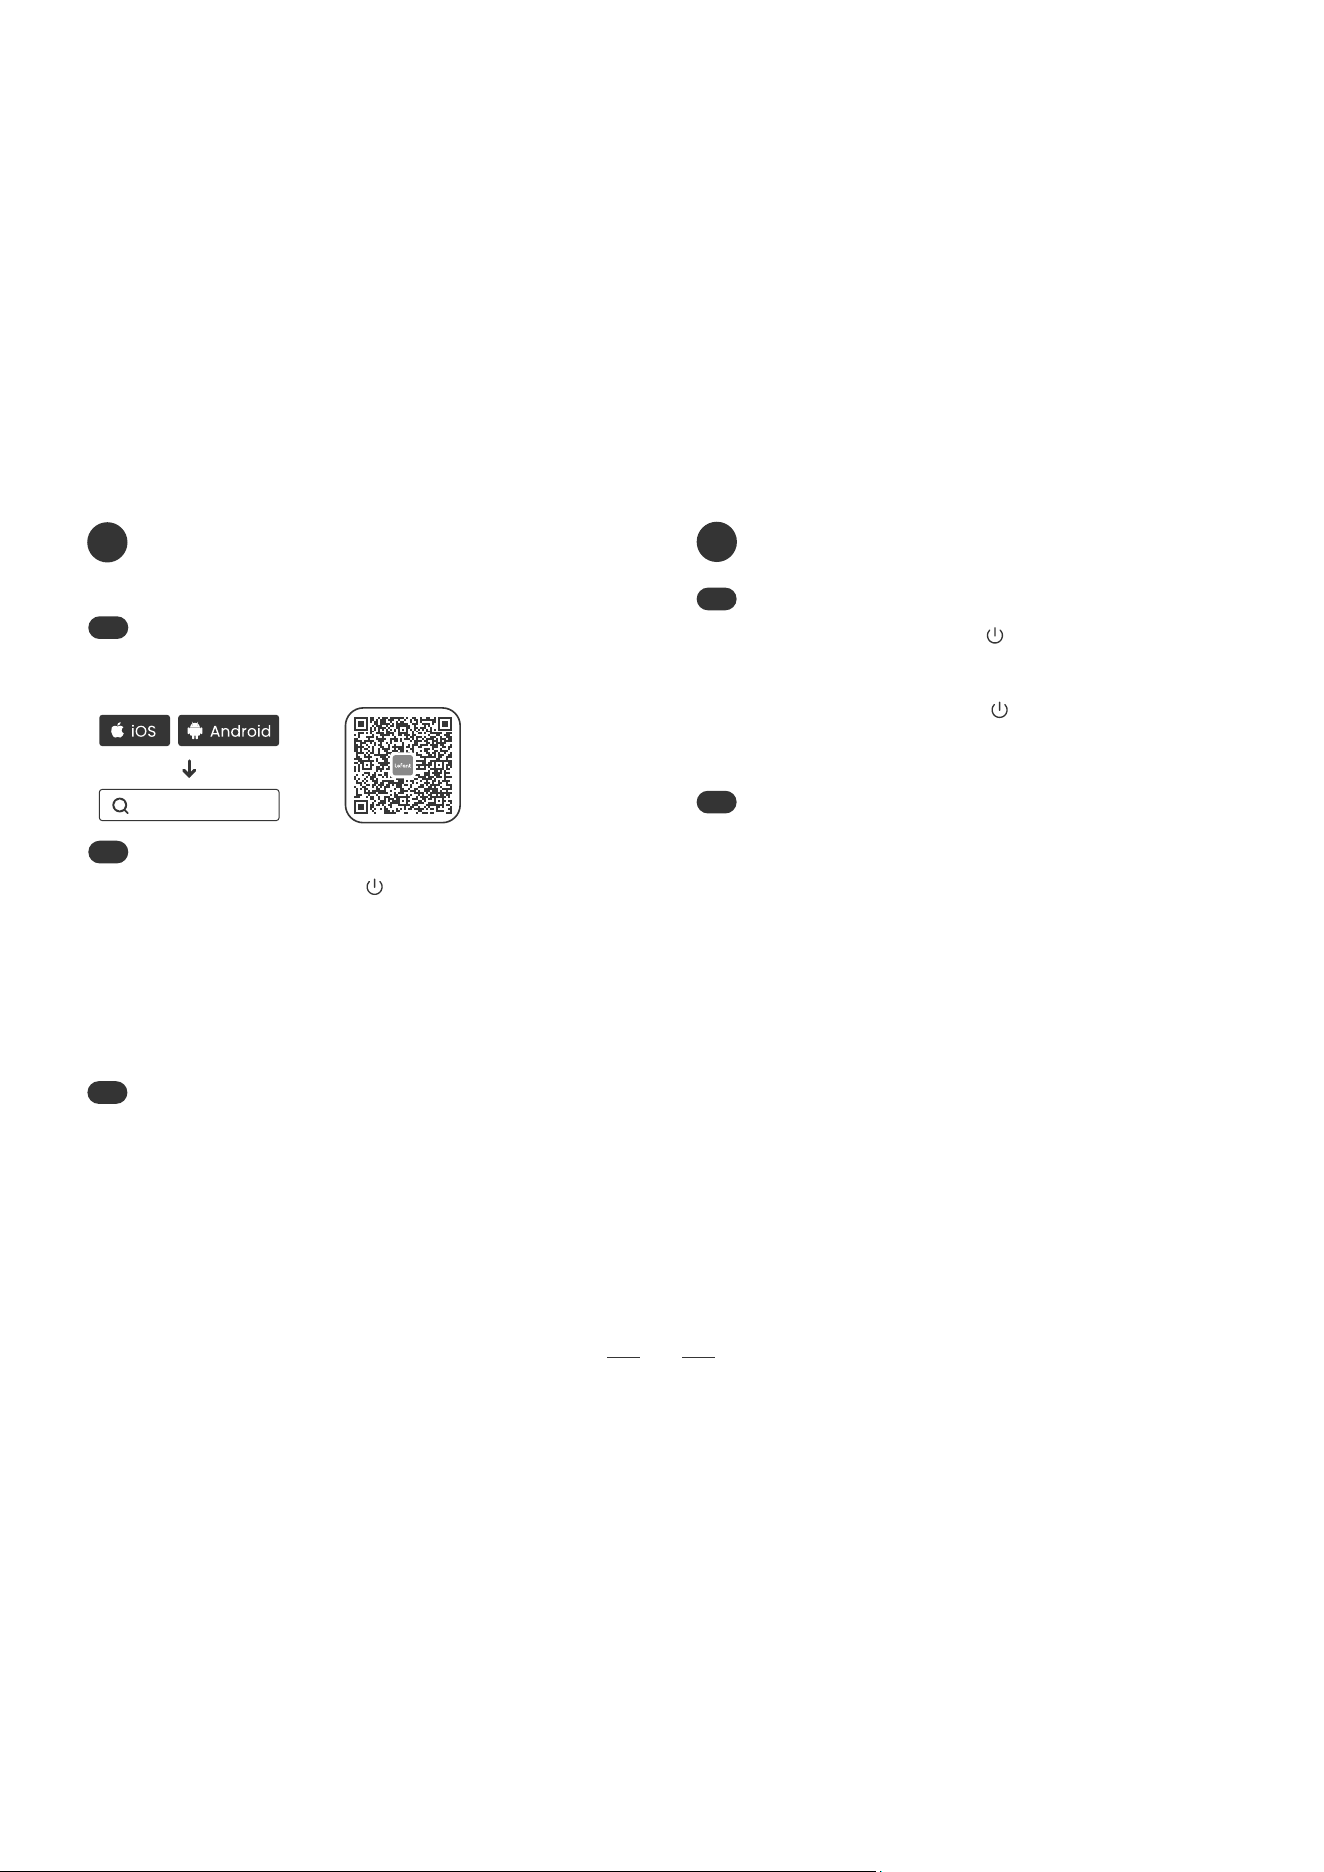
Download and
Connect The APP
C
Product Use Instructions
D
1. Search for "Lefant" in the app store.
2. Scan the QR code to download and install the Lefant app.
C1
Download The App
Enter The Network Configuration Mode
Open the home page of the mobile app, then click the "Add Device"
button or the "
+" button. Add your device as prompted on the page.
Add Device
Lefant
Press and hold the power button ( ) for 6 seconds until you hear
the voice prompt "Entering network configuration mode".
At the same time, the power indicator light starts to flash slowly
in blue, indicating that the robot has entered the network
configuration mode.
Note: When the router's configuration is modified, the password is forgotten, or
for other reasons that cause the mobile phone to be unable to connect to the
robot, you can repeat this step to re - add the device.
Note:
* Due to the upgrade and update of the mobile app, there may be slight
differences between the actual operation and the above description.
Please follow the guidance in the mobile app for operation.
* If the robot is in the waiting - to - connect state for more than 3 minutes,
the WiFi function will be automatically turned off. To connect again, please
re - enter the network - configuration mode.
Note: The robot cannot be powered off while it is being charged.
D1
Power On/Power Off
D2
Start Cleaning
12
Briefly press the power button to start the cleaning, and the robot will
dynamically plan the cleaning route. By default, after mapping along
the walls, it will adopt the method of filling in a zigzag (bow-shaped)
path to efficiently cover and clean each room one by one.
Notes:
* To ensure that the robot can return to the base station smoothly, it is
recommended to let the robot start automatically from the charging state.
During the cleaning process, do not move the base station.
* If the robot's battery level is too low, please charge it first before starting the
cleaning.
* Before cleaning, please tidy up all kinds of wires on the floor (including the*
power cord of the base station) and valuable items to avoid electrical power
outages, damage to items, or wire entanglement caused by the robot
dragging during cleaning.
* If the cleaning time is less than 5 minutes, a new map will not be created, nor
will it overwrite the original map.
* When the battery level is insufficient during the cleaning process, the robot
will automatically return to the base station for charging. After the battery level
reaches 80%, it will automatically return to the interruption point to continue
cleaning.
* When the robot is cleaning, the mop will rise by default and only vacuum the
carpet. If you need to avoid the carpet, you can set it in the mobile app.
* Before starting each cleaning task, you can select the pure sweeping or
sweeping and mopping mode on the app.

Note: If the robot fails to locate the base station, it will automatically return to its
starting position. Please manually place the robot in front of the base station and
press the ( ) button twice briefly to start automatic return for charging, or
manually place the robot back into the base station. Meanwhile, the indicator
light on the robot’s main button will flash to indicate that it is charging.
D5
Do Not Disturb Mode
D6
Air Dry
D9
Clean The Roller Mop
D7
Auto-sleep Mode
D8
Charging
D3
Pause
D4
Dust Collection
13
When the robot is in operation, press the power button ( ) briefly
once to pause. Press the power button ( ) briefly twice to make
the robot return to the charging dock for charging. In the paused
state, press the power button ( ) briefly once to resume
cleaning. Alternatively, place the paused robot back onto the
base station (ensuring alignment with the charging contacts) to
terminate the cleaning task.
If the robot remains unoperated for more than 5 minutes, it will
automatically enter dormant mode, which can be deactivated by
pressing any key. Additionally, if the battery level drops below 70%,
the robot will shut down after 24 hours of standby; if the battery level
is below 30%, it will shut down 10 minutes after entering dormancy.
The factory default active period is 22:00–08:00. You can use the
mobile app to modify the Do Not Disturb period or turn it off. You
can also separately set whether the robot starts cleaning tasks,
automatic resumption of cleaning, dust collection, mop cleaning
and mop drying during the Do Not Disturb period, as well as turn
the voice broadcast on or off.
When starting a cleaning task in the sweep-mop mode, the robot will
first clean the roller mop before departing to begin cleaning.
The interval for the roller mop’s return cleaning can be set to your
desired duration via the app. After the roller mop is cleaned, the robot
will automatically return to the relay point to resume cleaning. You
can manually control the robot to return and clean the roller mop
through the mobile app. Additionally, you can stop the roller mop
cleaning process in the app’s device settings while it is being cleaned.
After the cleaning is completed, the robot will automatically return
to the base station for charging. Press the power button ( ) twice
briefly, and the robot will automatically return to the base station
for charging. When the robot is charging, the indicator light on the
button will flash in a breathing pattern and turn off once the robot
is fully charged.
After the robot finishes cleaning, it will return to the base station
and automatically start dust collection. Alternatively, you can
manually start or stop dust collection via the mobile app.
Note:
* Do not manually start dust collection frequently or consecutively multiple
times.
* Ensure the dust compartment cover and disposable dust bag are properly
installed before using the dust collection function.
After the robot completes the cleaning task, it will return to the
base station to clean the mop and then air-dry it automatically.
Note:
* To ensure the robot can return to the base station normally for roller mop cleaning, it
is recommended to let the robot start cleaning automatically from the charging state.
* Do not move the base station during the cleaning process, as this may affect the
robot’s ability to return to the base station.
Maintenance
E
E1
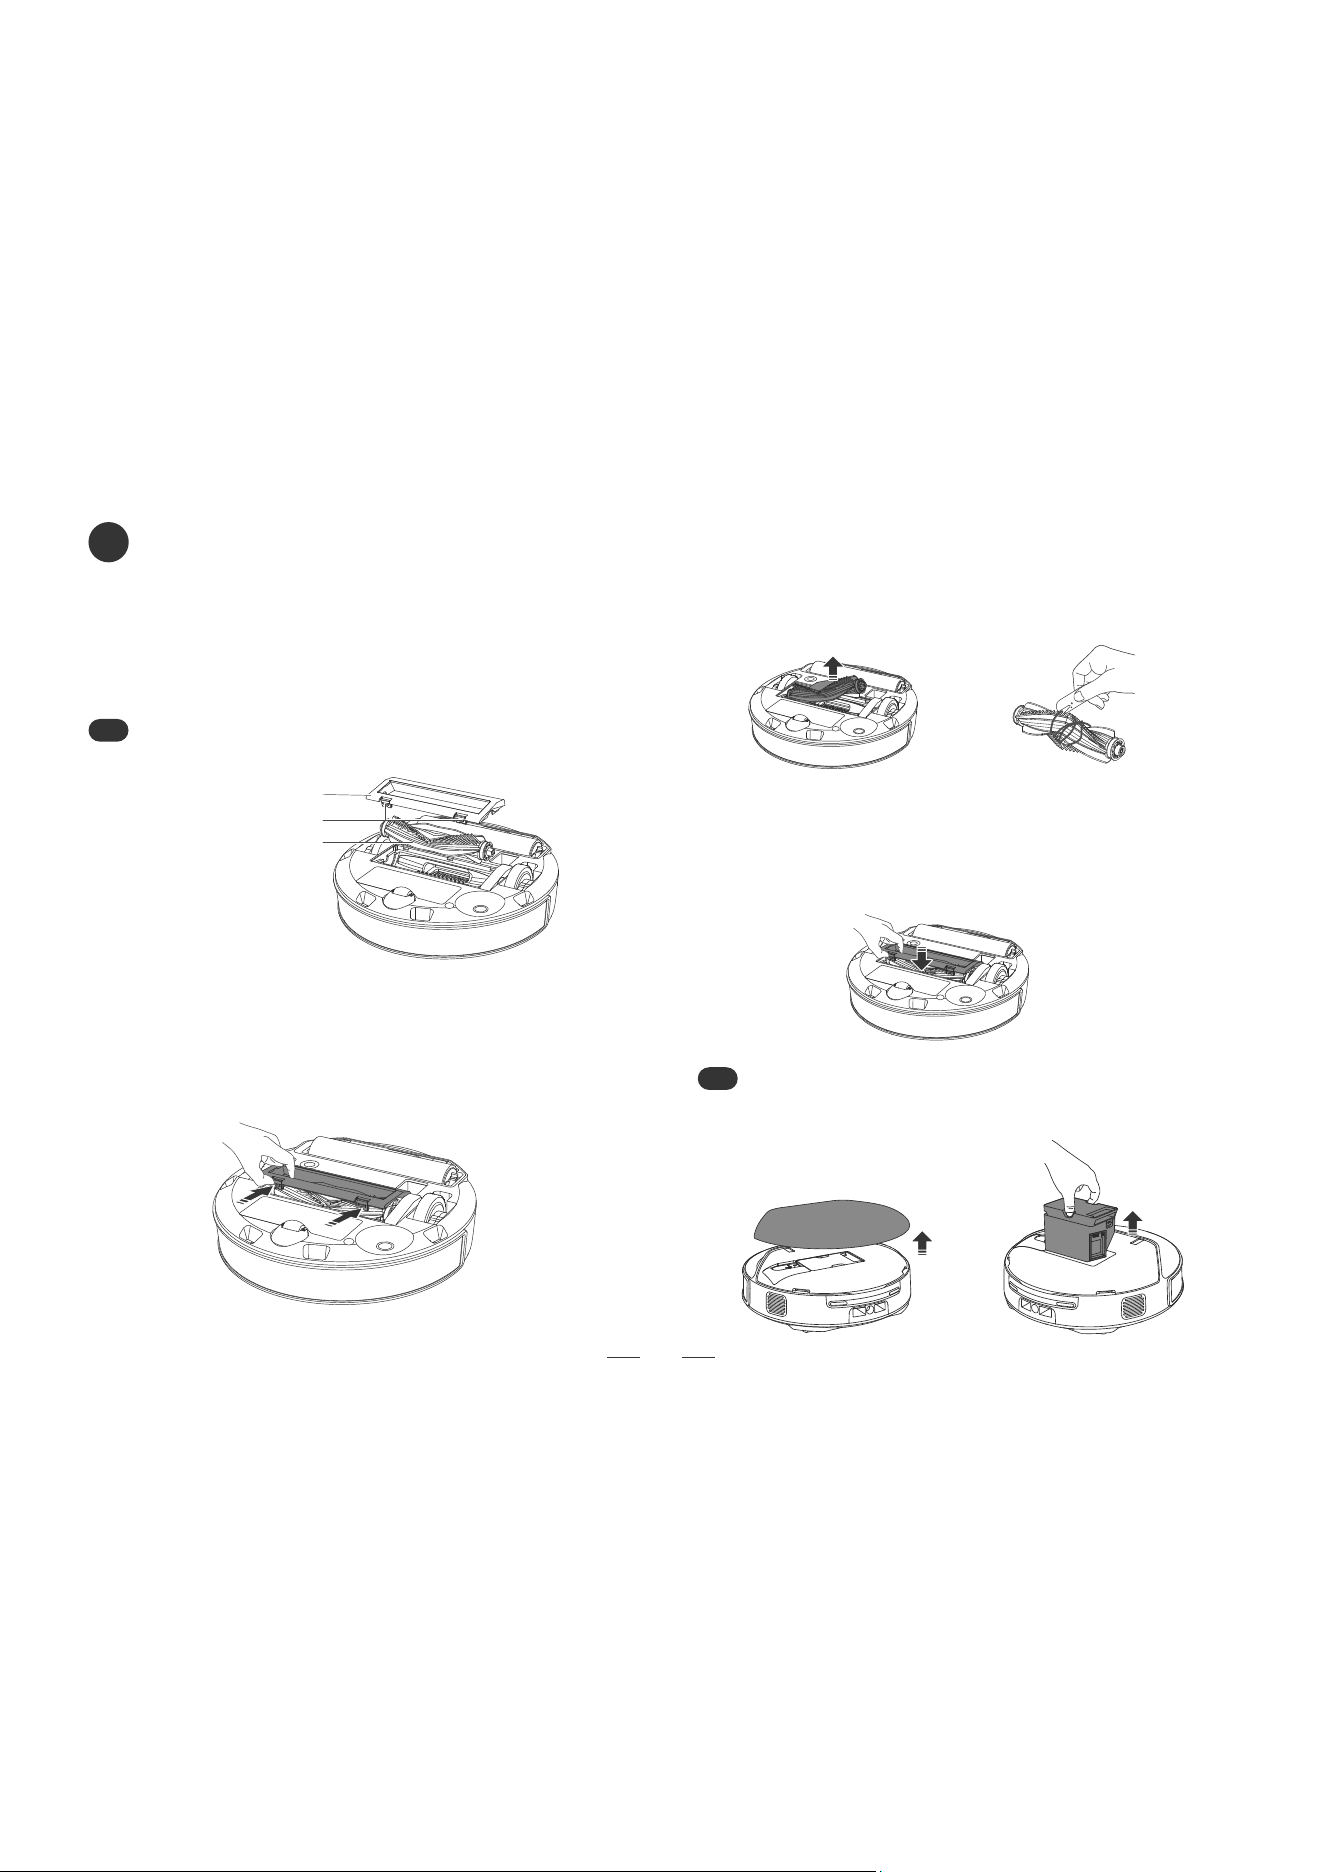
Main Brush
1. First, remove the robot's top cover, then lift upward to take
out the dustbin.
E2
Dustbin
Note:
* Before cleaning or maintaining the base station and the robot, make sure to
power off the base station and turn off the robot.
* The frequency of component replacement is determined by the actual
usage situation. In case of abnormal wear, the components should be
replaced in a timely manner to avoid affecting the cleaning effect.
1. Press the main brush cover latch inward to release it, then
lift the main brush cover upward to remove it.
2. Lift the main brush upward as shown in the diagram to
remove it. Then, clear any hair or debris tangled around the
main brush.
After cleaning, place the main brush back into the robot and
ensure it is properly installed.
3. Install the main brush cover back onto the robot. Ensure that
the main brush cover is inserted into the corresponding slot, and
then press the main brush cover down firmly. When you hear a
"click" sound, it indicates that the installation is in place.
14
Main Brush Cover
Main Brush Cover Clip
Main Brush
E3
Side Brush
E4
Roller Mop
15
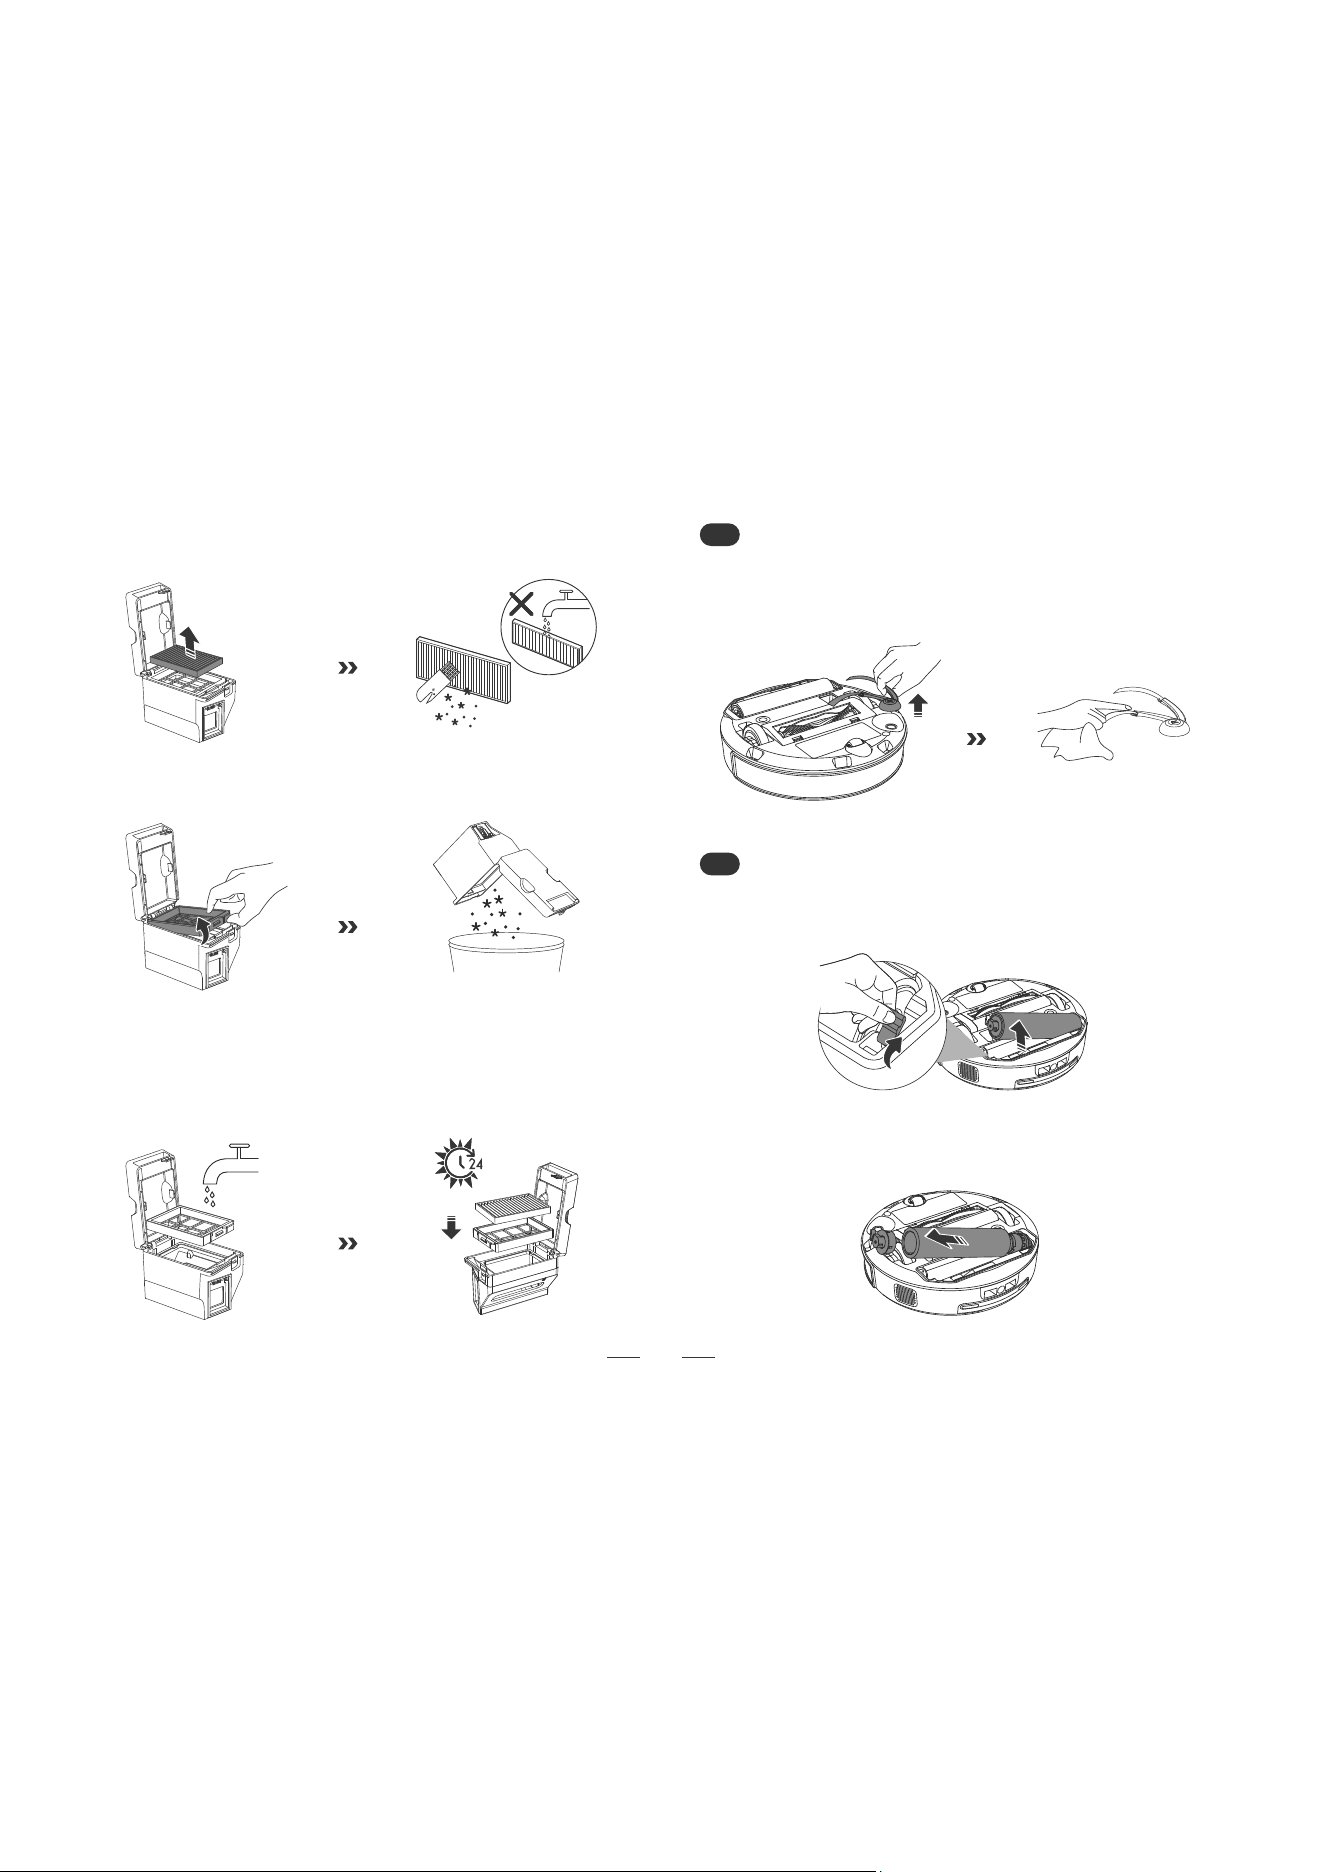
2. Take out the filter bracket assembly and dump the garbage
in the dustbin.
3. Remove the filter holder, then clean the dustbin.
4. The main body of the dust box and the filter holder can be
washed with water. After cleaning, air-dry them for at least 24
hours to ensure they are completely dry, then reinstall them in
sequence for use.
Pull the side brush upward firmly to remove it. After cleaning the
side brush, reinstall it. Replace the side brush with a new one
according to its actual wear and tear.
1. Open the side support latches of the roller, then lift the roller mop
assembly upward.
2. Remove the roller side support assembly and the roller mop in
sequence.
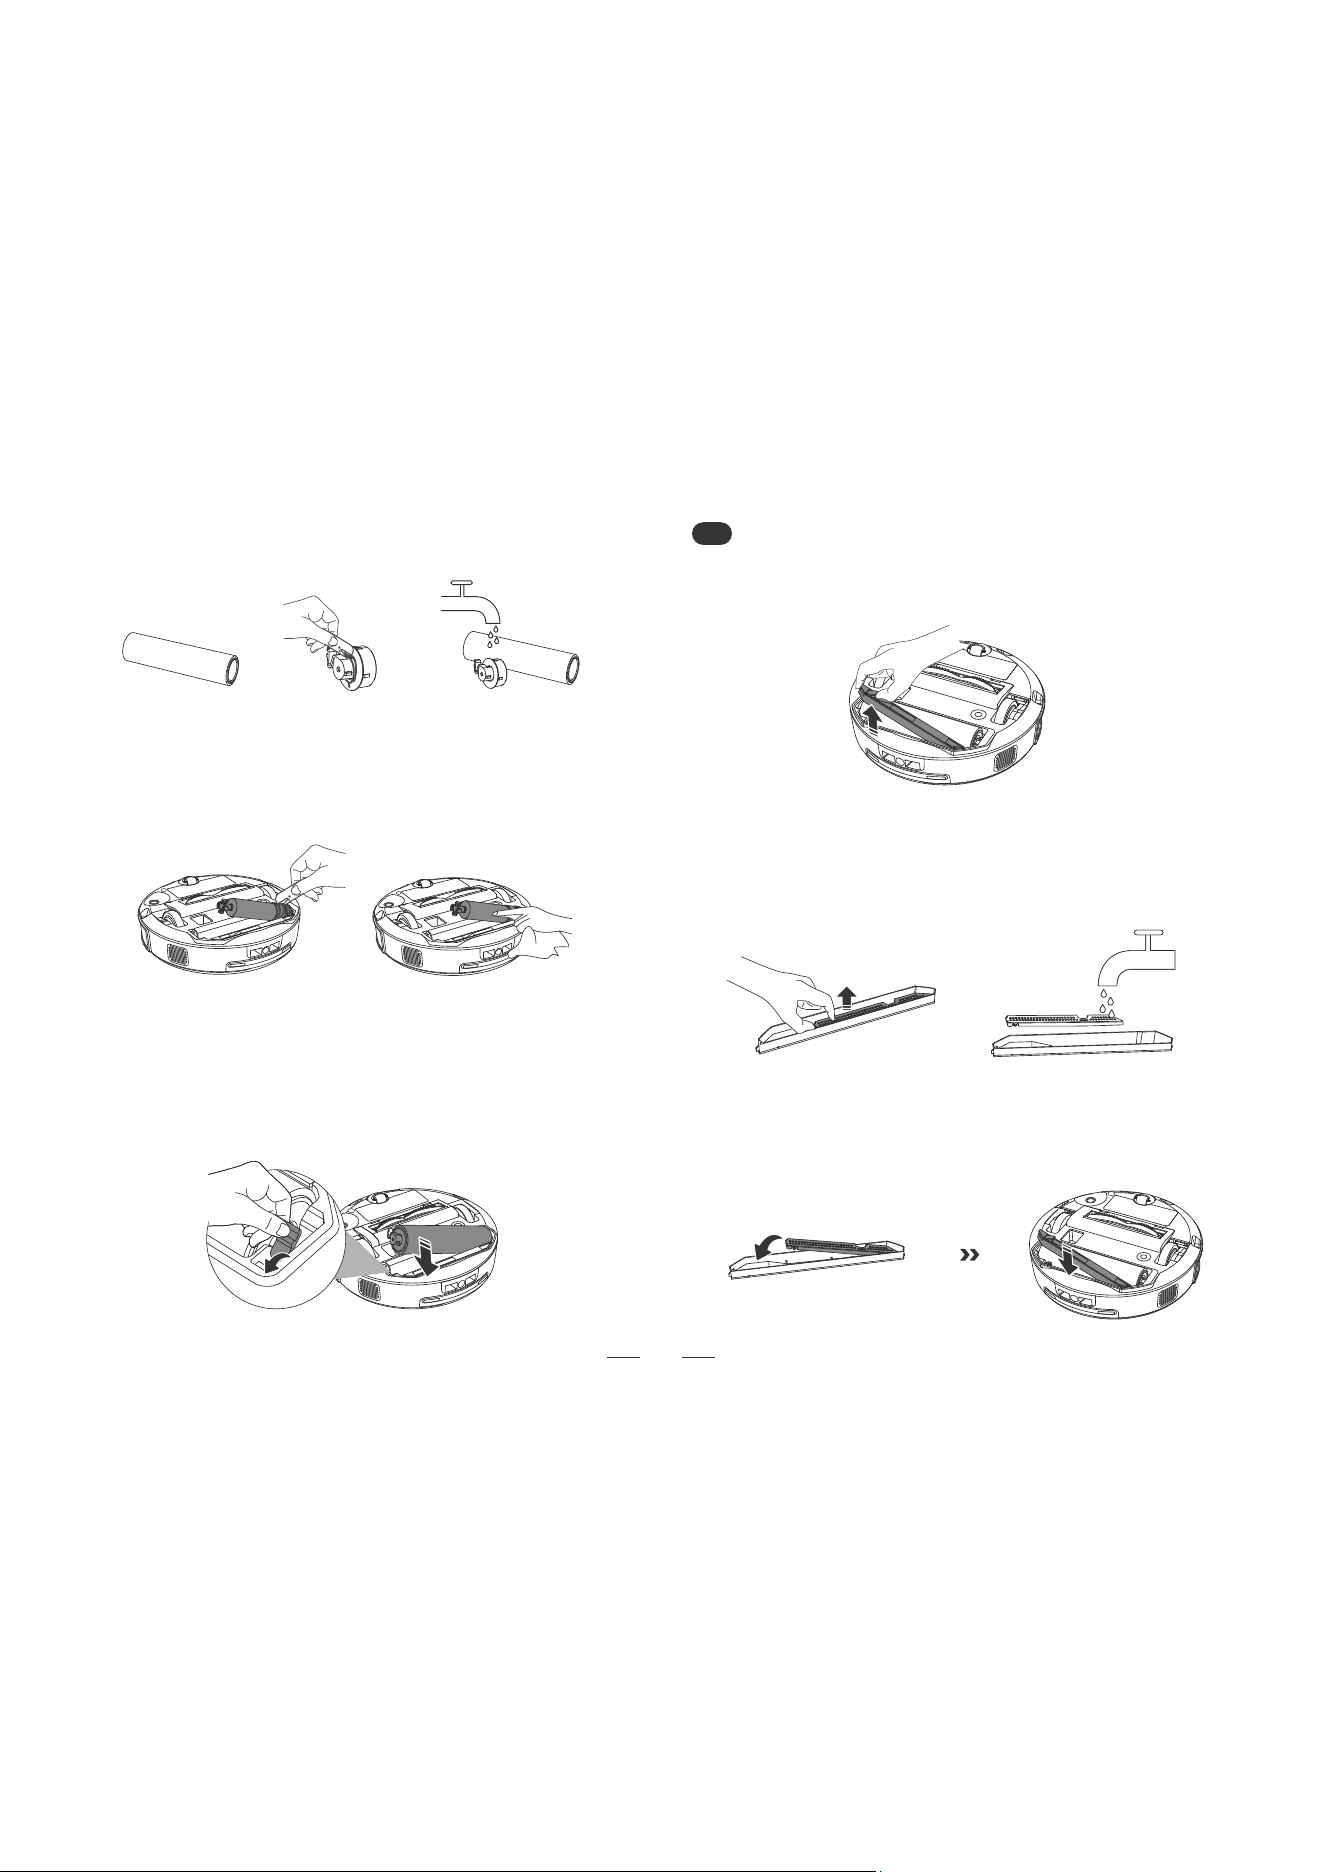
16
3. Clean the roller mop and the roller side support assembly.
4. Clean the roller cavity. Do not wash the body of the robot with
water.
5. After completing cleaning and maintenance, reinstall all
components in sequence. Ensure the roller side support assembly
is properly fitted in place, and push down the roller side support
latches to lock them securely.
E5
Dirty Water Collection Trough
1. Open the buckle of the Dirty Water Collection Trough, then lift
upward to take out the Dirty Water Collection Trough.
2. Take out the filter bracket of the Dirty Water Collection Trough,
clean the Dirty Water Collection Trough components with clean
water, and wipe off the surface water stains with a dry cloth after
cleaning.
3. Install the filter assembly of the Dirty Water Collection Trough
according to the diagram, then fit the Dirty Water Collection
Trough back into the robot.
E6
Dirty Water Tank
E7
Metal Scraper Strip
17
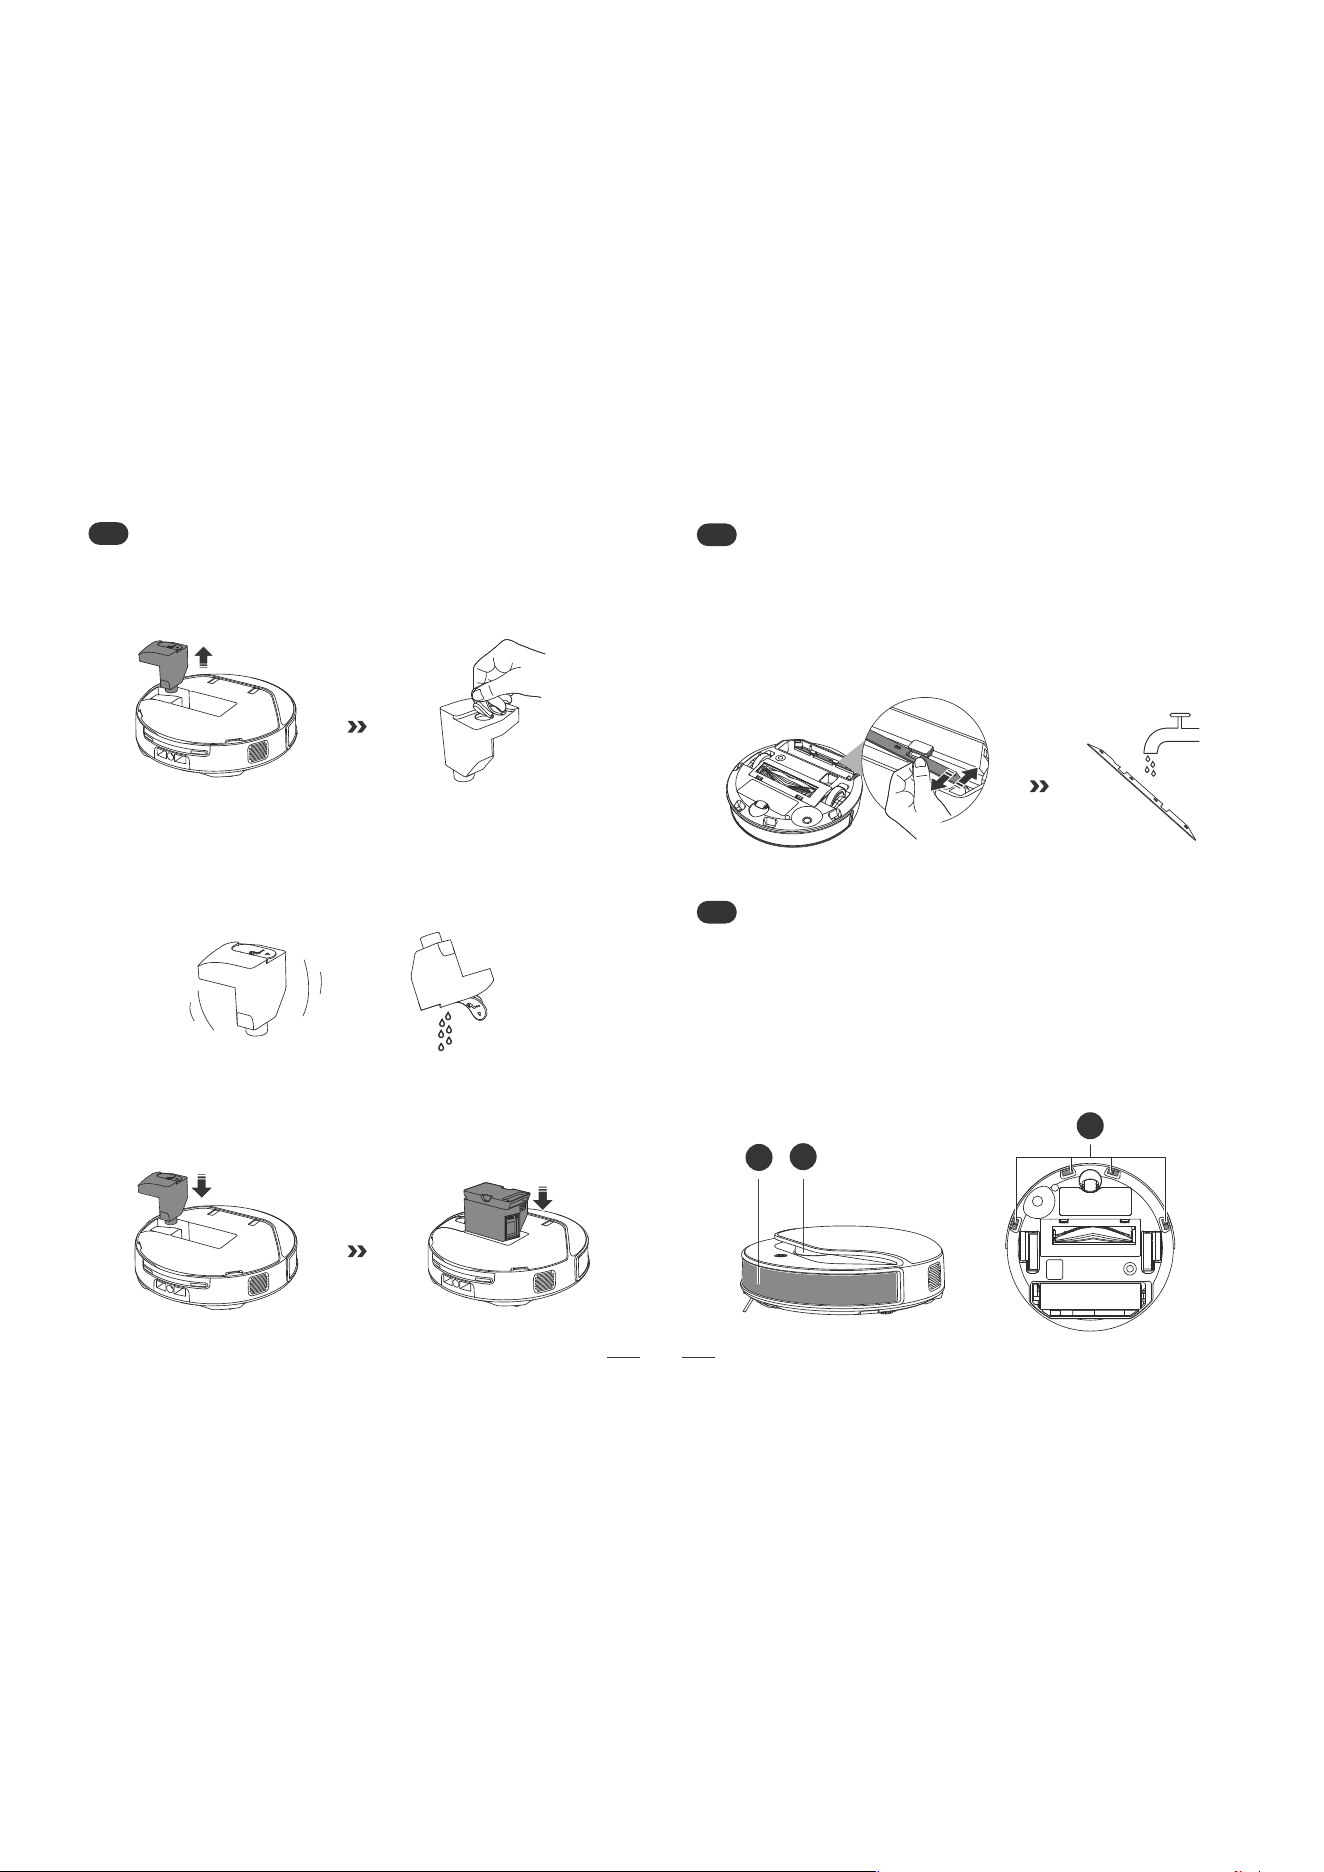
1. Remove the dust box first, then lift upward to take out the
sewage tank. Open the sealing plug and clean the sewage tank.
2. Pour an appropriate amount of clean water into the sewage
tank, shake the tank to clean its interior, and pour out the dirty
water after cleaning.
3. After cleaning, install the sewage tank first, then the dust box.
Ensure both are fully inserted into place.
Pull the metal scraper strip outward to remove it. After cleaning,
reinstall it into the scraper holder slot according to the diagram.
Note: When reinstalling the metal scraper strip after removal, it
must be fully snapped into the holder. Failure to do so will affect
the normal operation of the robot.
E8
Robot Sensors
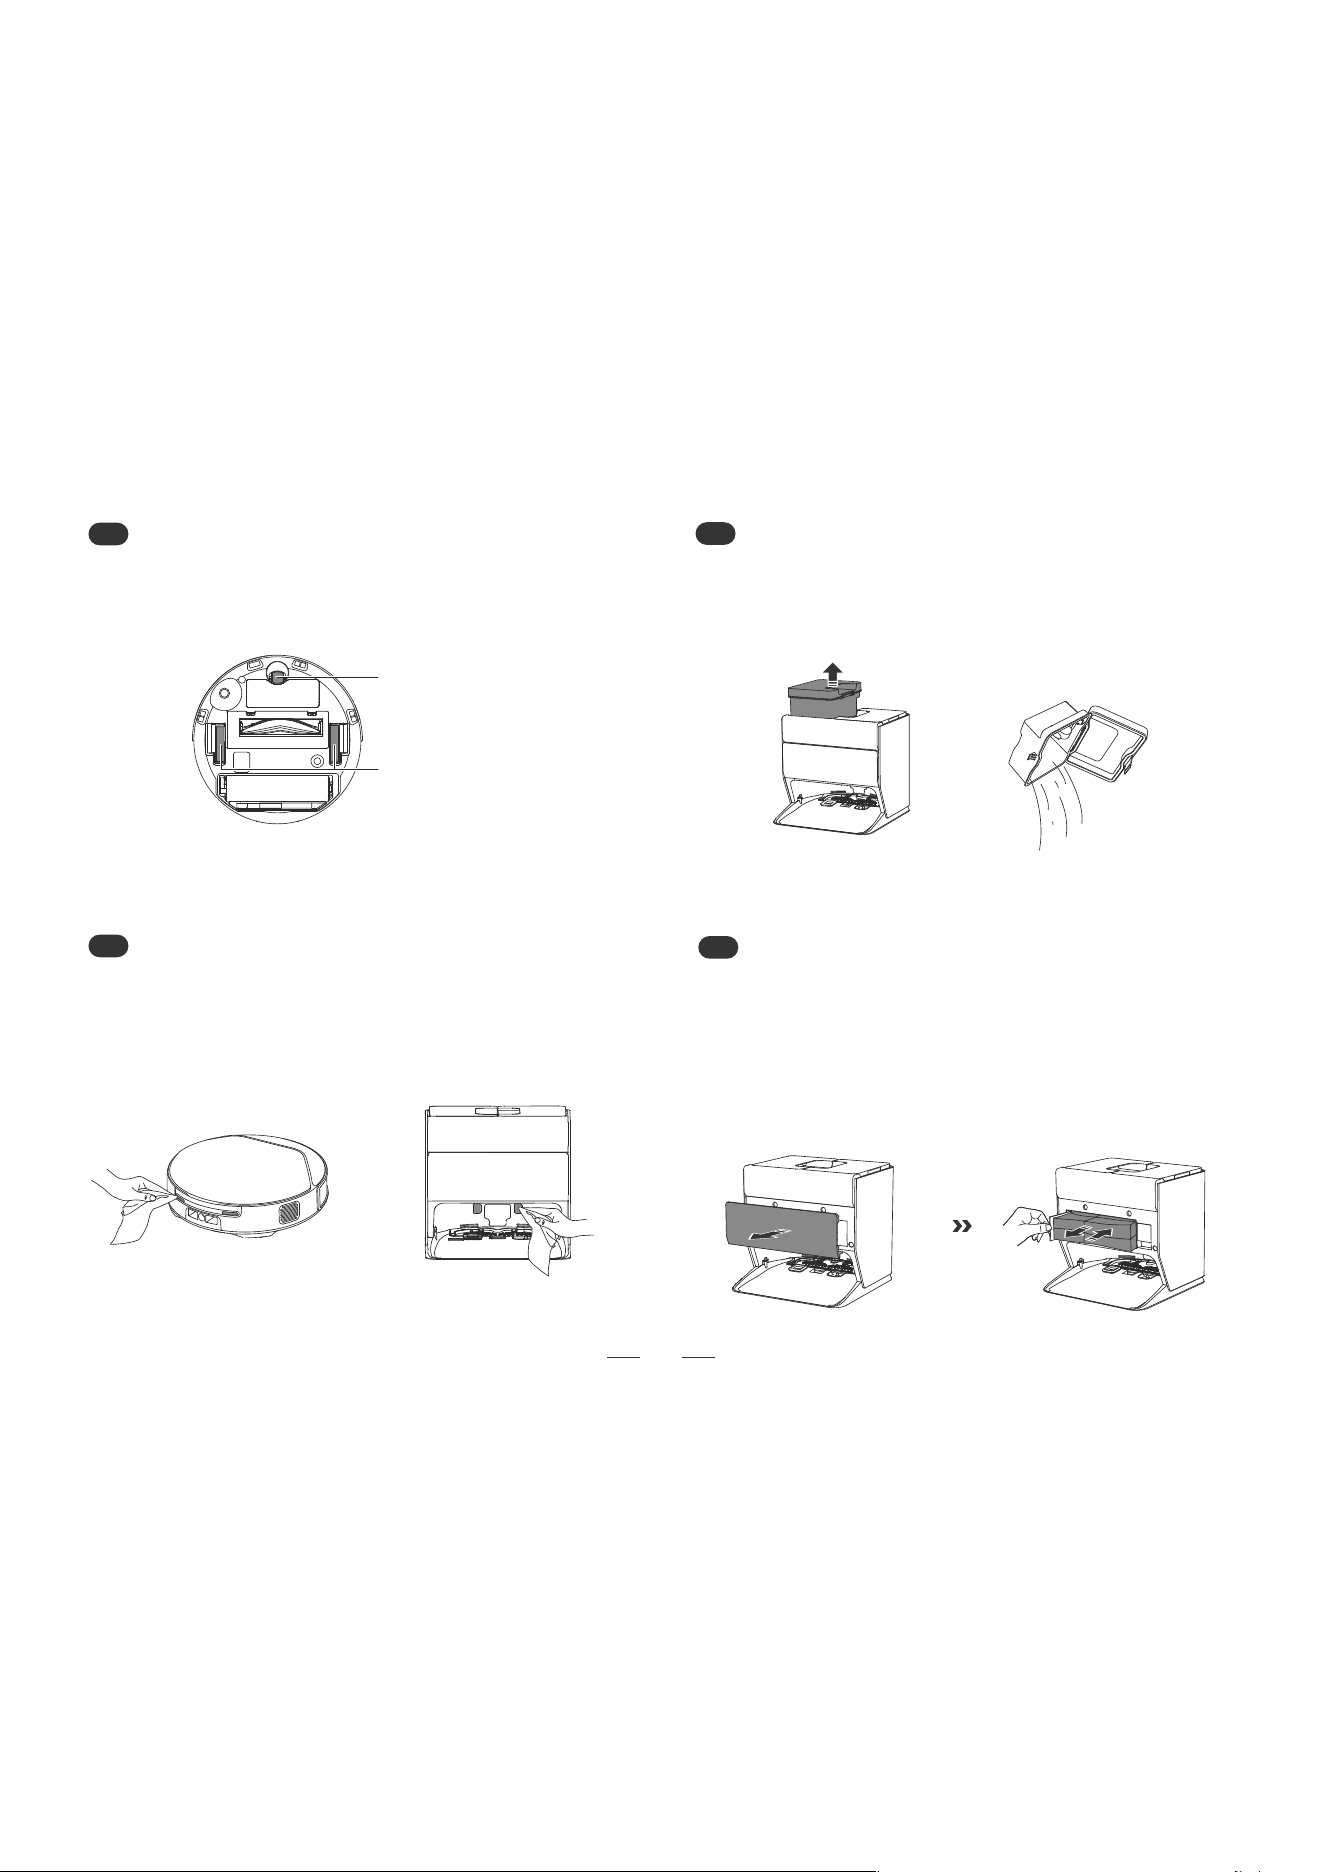
Wipe and clean all sensors on the main unit with a soft, dry cloth,
including:
ʖ Laser Navigation Sensor
ʗ Collision Avoidance Strip
ʘ Anti-fall Sensor(It is recommended to clean the anti-drop
sensor once a week to prevent dust from blocking it and affecting
the signal.)
2
1
3
18
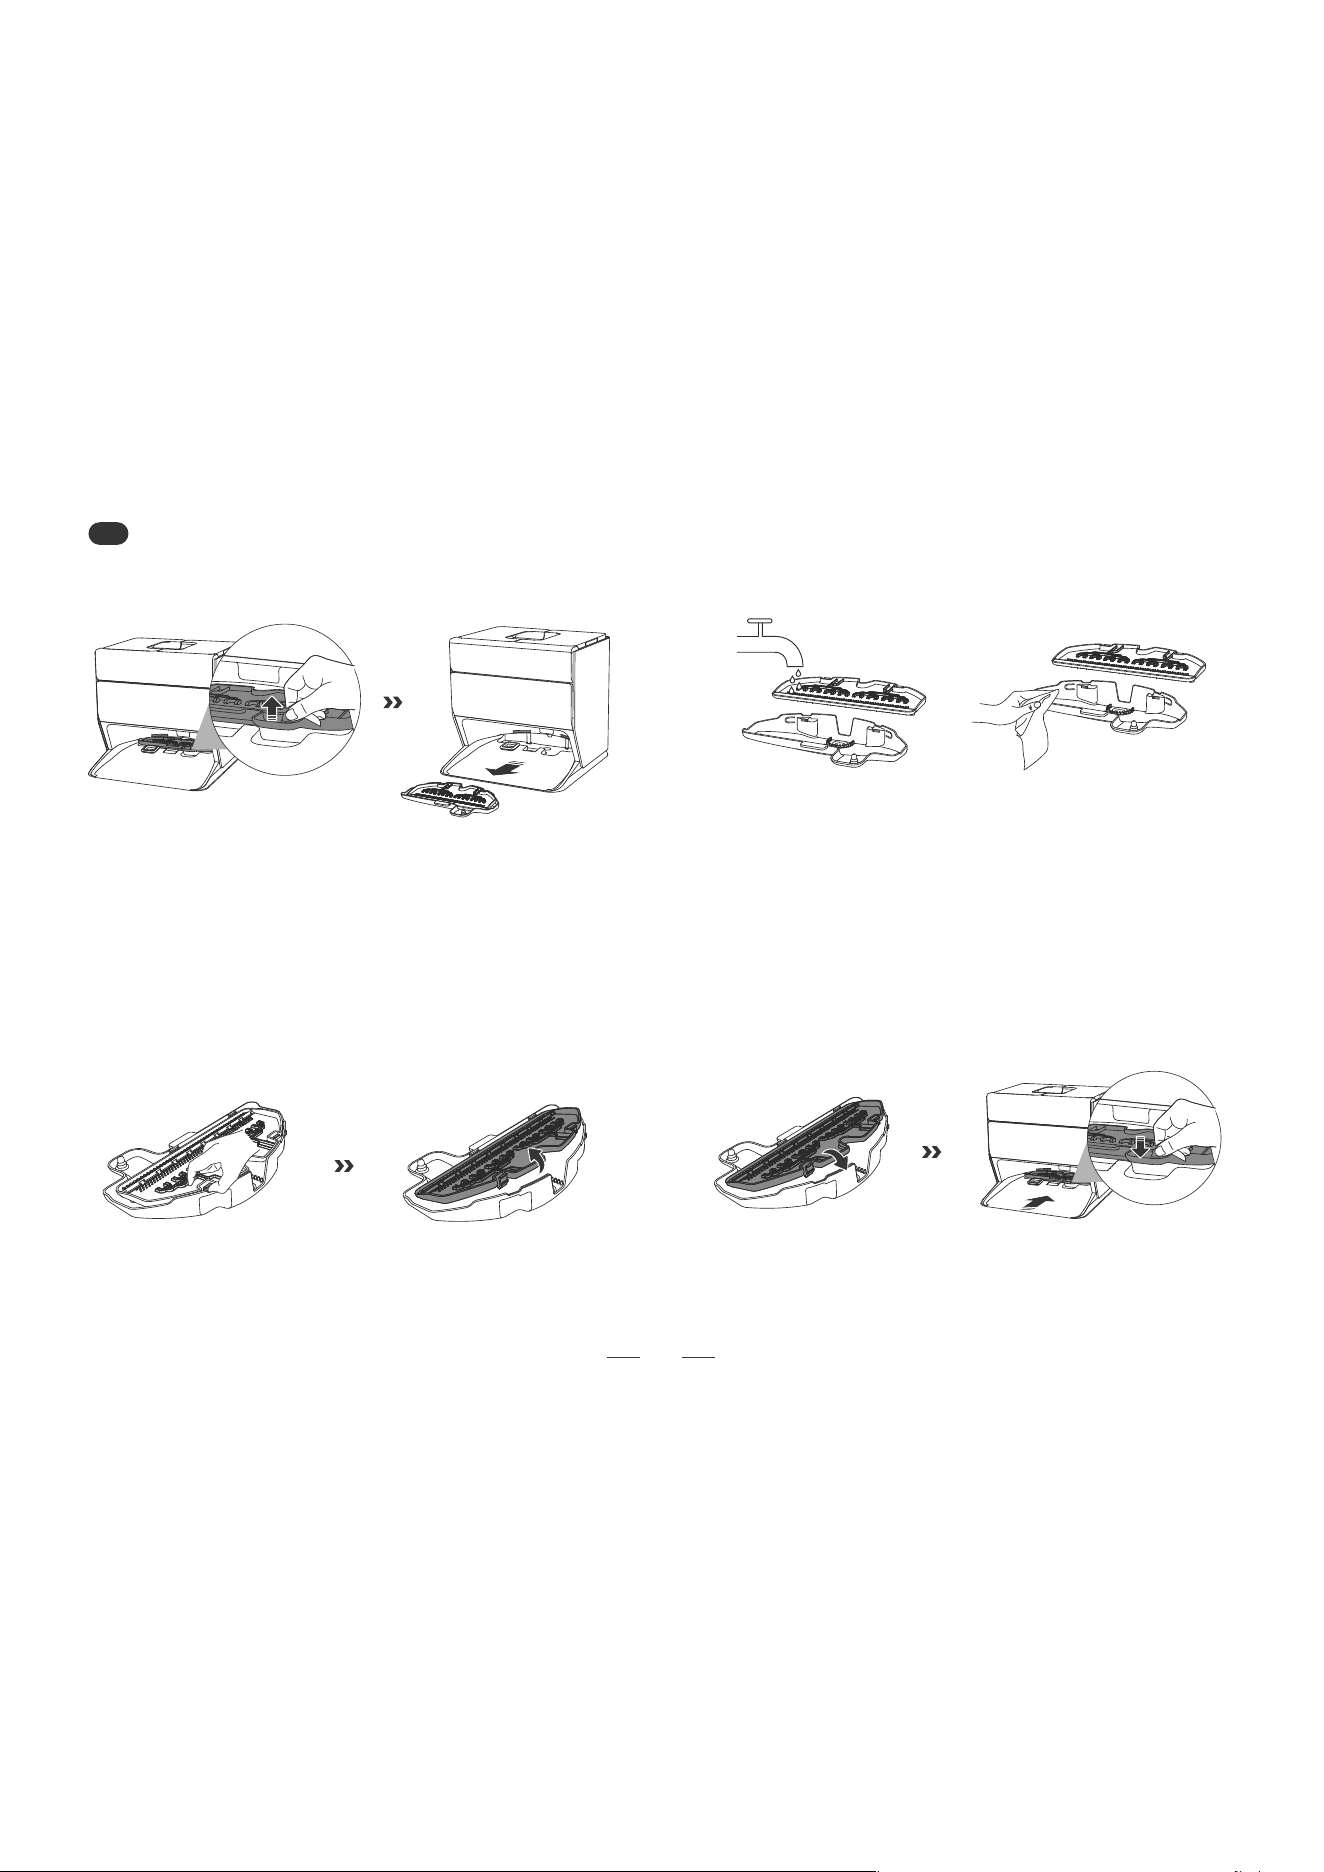
E9
Robot Components
Clean as needed based on actual usage. When cleaning, wipe
the robot's universal wheel and driving wheel with a soft, dry cloth.
E10
Charging Contact
Ensure the robot is turned off and the base station’s power plug is
unplugged first. Then, wipe and clean the charging contacts on
the main unit and the base station with a soft, dry cloth to avoid
the risk of electric shock.
E11
Dirty Water Tank
E12
Replace the Disposable Dust Collection Bag
Remove the sewage tank, empty the dirty water, then rinse it
thoroughly with tap water. After cleaning, wipe off surface water
stains with a soft, dry cloth and reinstall it into the base station.
Ensure the tank is fully installed in place.
Remove the dust collection compartment cover, pull out the
Disposable Dust Collection Bag outward and discard it, then
insert a new one. When installing, ensure the Disposable Dust
Collection Bag is fully inserted into place. After installation, put the
dust collection compartment cover back to its original position
and secure it. Failure to do so may affect the normal operation of
the base station.
Universal Wheel
Driving Wheel
19
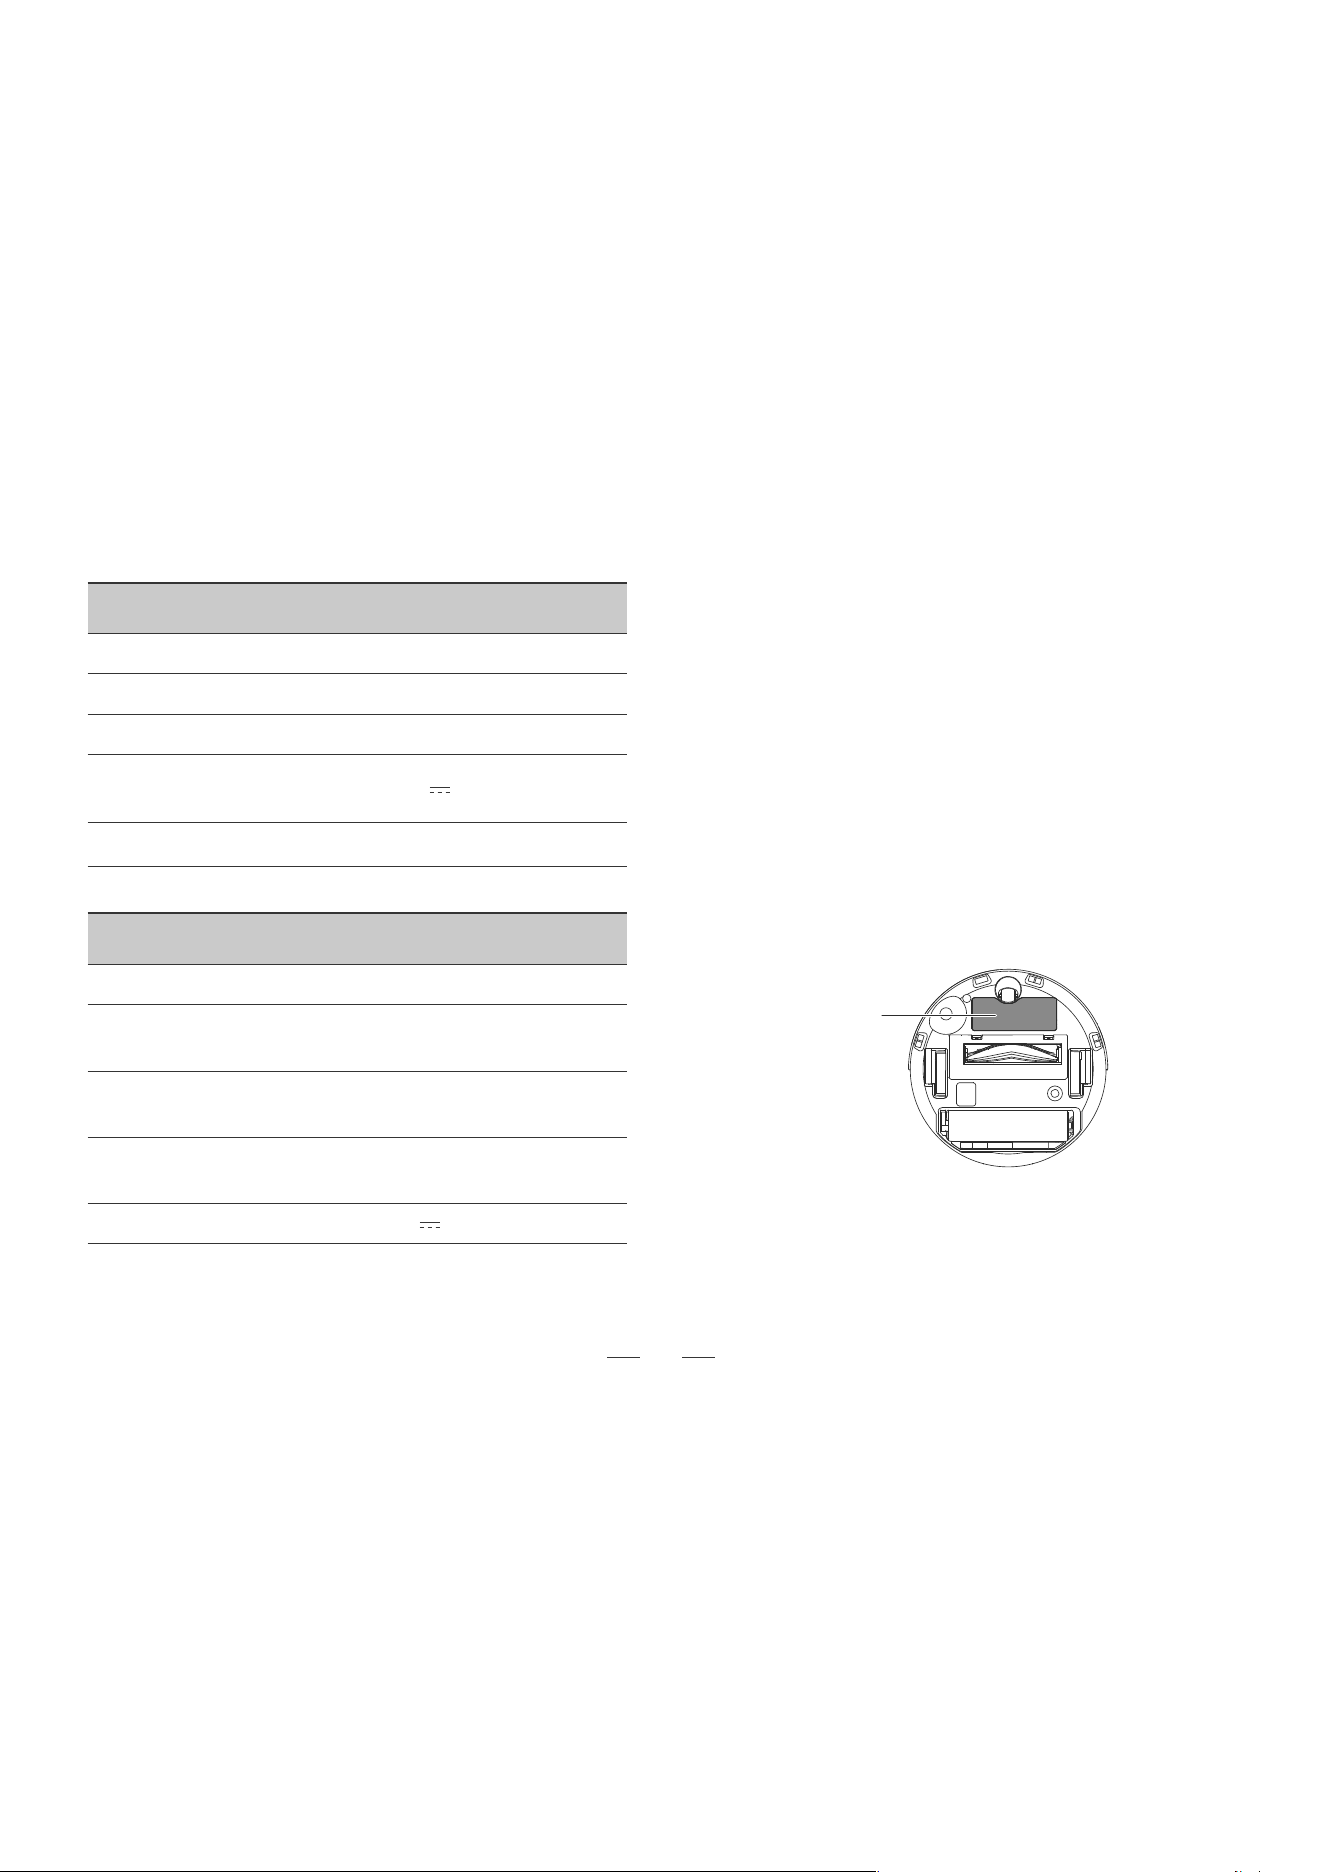
E13
Washing Tray Assembly
1. Pinch the front edge of the washing tray assembly, lift it to
loosen, then pull outward to remove it.
2. Press to open the washing tray latch, then lift the washing tray
upward.
3. After cleaning the washing tray assembly, wipe off the water
stains on its surface with a soft, dry cloth.
4. Reassemble the washing tray assembly as shown in the diagram
and install it into the base station. After installation, ensure the
surface of the assembly is level with the surrounding parts and has
no protrusions — this indicates that it is properly installed.
20
Input
US/CA/MX/JP Version:100-127V,50-60Hz
EU/UK/AU/SG/KR/MEA Version:220-240V,50-60Hz
Basic Parameters
Environmental Protection Instructions
Robotic Vacuum Cleaner
Product Model M5 Series
Wireless Connection WiFi Smart Quick Connection
Rated Power of the Main Unit
14.4V
Operating Voltage
of the Main Unit
85W
Charging Time 瑓 5.5 hours
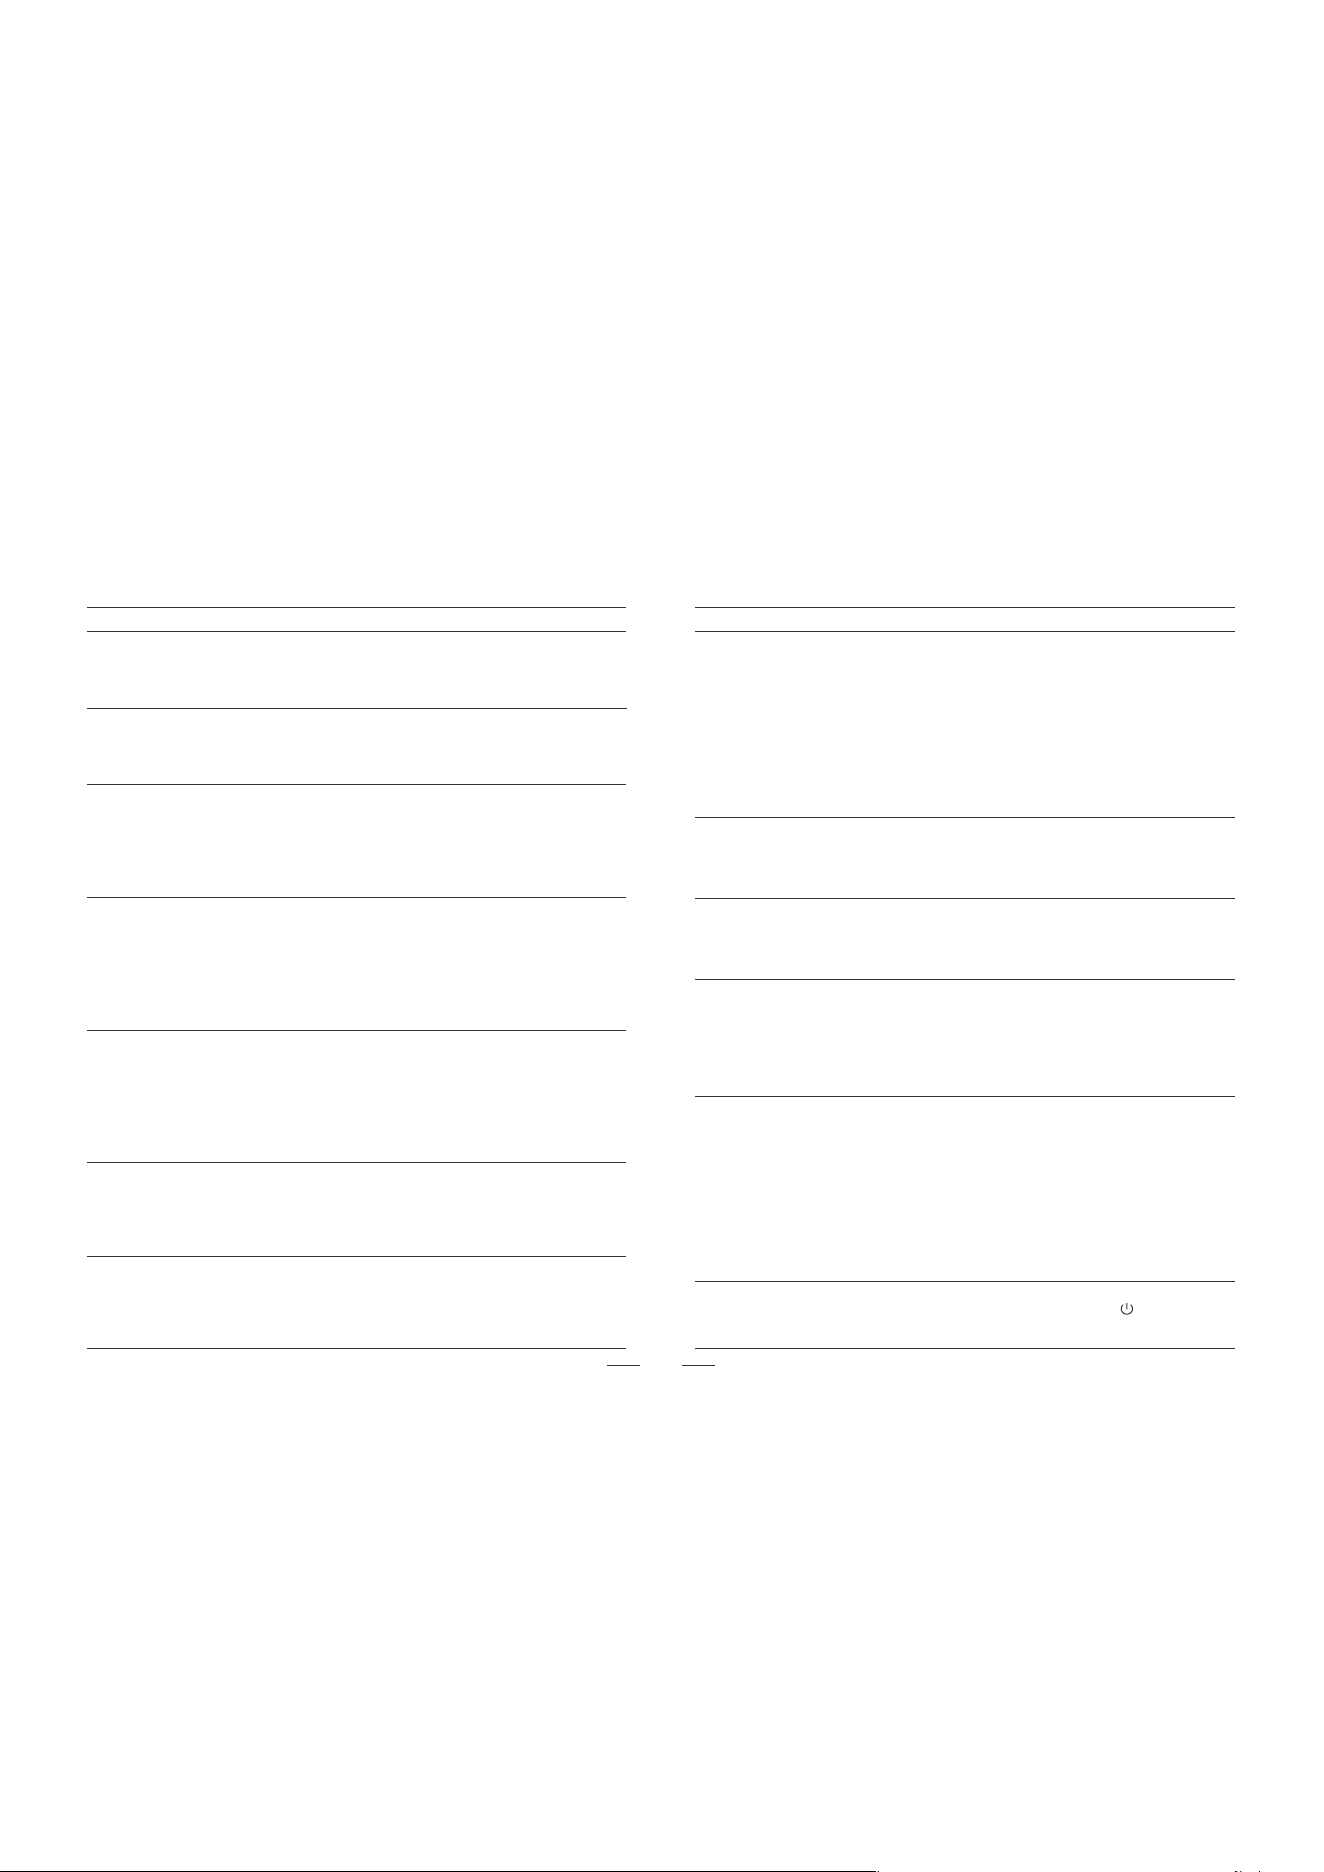
Steps to Remove the Battery
* The following information is only applicable when disposing of this robot
and is not a part of the daily operation instructions.
Reminders:
• When disassembling the battery, make sure the battery is fully depleted and
the robot is disconnected from the charging dock.
• Please remove the entire battery pack at once. Do not damage the battery
pack casing to avoid short - circuits or leakage of hazardous substances.
• If the battery has exudate and you accidentally come into contact with it,
rinse the affected area with plenty of clean water and seek medical attention
immediately.
Battery Cover
Product Model J7
Rated Input Power
(Charging + Air-drying State)
100W
Rated Input Power
(Dust Collection State)
600W
Rated Output
20V
1.5A
Self-Cleaning Dust Collection Charging Base Station
The chemical substances contained in the lithium-ion battery
built into this product may cause environmental pollution.
Please remove the battery before scrapping the product and
hand it over to a professional battery recycling station for
centralized disposal.
1. Let the robot run until it is completely out of power and
automatically shuts down without charging.
2. Make sure the robot is turned off.
3. Remove the screws of the battery cover on the bottom shell of
the robot.
4. Open the battery cover.
5. After taking out the battery, pull out the connector plug of the
battery.
- The obstacle - avoidance sensor, anti - fall sensor and
other main unit sensors may be dirty. Please wipe them clean
with a soft dry cloth to ensure that the surfaces of the sensors
are clean and unobstructed.
- Check whether the doors of the rooms are open. Please
make sure that the doors of the rooms to be cleaned are
open before starting the cleaning.
- Please check for steps or thresholds in the cleaning area.
The robot cannot climb over high steps.
Frequently Asked Questions
During the use of the product, if the following problems arise, you can check and refer to the relevant information to solve the malfunction issues.
If you can't eliminate the malfunctions according to the operations in the table, you can contact the official after-sales service.
Solutions
Problem Type
Solutions
Problem Type
21
The dust collection
effect is poor or there
is an abnormal noise
during dust collection.
It cannot automatically
collect dust.
It is unable to
clean the mop.
Unable to Power On
Unable to Charge
Unable to Return
to Base Station
Unusual Noise
During Cleaning
Robot Misses
Areas During Cleaning
Robot Returns to
Base Station with
Insufficient Battery
but Doesn't
Resume Cleaning
Unable to
Connect to WiFi
Reduced Cleaning
Performance or
Dust Shedding
- Battery power is insufficient. Please dock with the base station to
charge before use.
- Battery temperature is too low or too high. Please use it in an
environment of 0 - 40°C (32°F - 104°F).
- The base station is not powered. Please confirm that both ends of
the base station power cord are properly plugged in.
- Poor contact. Please clean the charging contacts of the base
station and the robot.
- The robot did not start cleaning from the base station.
- There are too many obstacles near the base station, which affect
the robot's return. Please clear the surrounding obstacles.
- If the base station was moved or lost power while the robot was
performing a cleaning task, manually place the robot back on the
base station or check if the base station is powered on.
- The dustbin is full. Please clean the dustbin
- The filter is clogged. Please clean the filter or replace it with a
new one.
- The main brush is entangled with foreign objects. Please clean
the main brush.
- The mop is not pasted smoothly. Please paste it smoothly again.
- The environment is relatively dirty. It is recommended to use the
mobile phone app to switch the mop washing interval to improve
the cleaning effect.
- The filter screen, dust collection air duct, dust collection
port, dust collection air inlet, dust bin and dust bag are
blocked. Please clean them.
- The cover plate of the dust collection chamber is not
properly installed. Please confirm that it is installed in place.
- The robot will not actively collect dust when it automatically
returns to the base station during the Do Not Disturb period. It
is recommended to adjust the cleaning time, the time of the
Do Not Disturb mode, or manually start the dust collection.
- There is no water in the clean water tank or it is not installed
properly. Please check and deal with it.
- The sewage tank is full or not installed properly. Please check
and deal with it.
- The cleaning tray assembly or the cleaning tray is not
installed or not installed in place. Please check and deal with it.
- The robot will not actively collect dust when it automatically
returns to the base station during the Do Not Disturb period. It
is recommended to adjust the cleaning time, the time of the
Do Not Disturb mode, or manually start the dust collection.
- Please press and hold the power button ( ) for 12 seconds
to turn off the device, and then turn it on again.
- The WiFi network password is incorrect. Please ensure that the
password of the connected WiFi network is correct.
- The WiFi signal is weak. Please make sure the robot is within an area
with good WiFi signal coverage.
- The WiFi connection is abnormal. Please long - press the robot's
power button for 6 seconds to re - enter the network - configuration
mode, and use the latest version of the mobile app to connect again.
- The omnidirectional wheel has accumulated dust or been
entangled by fine substances like hair during cleaning. It is
recommended to use a screwdriver to pry out and clean it thoroughly.
- Foreign objects may be entangled on the main brush, side brush or
drive wheel. Please pause the robot, check and clean.
- Hard objects may have entered the dustbin. Please check the
dustbin and its opening and clean the foreign objects.
- Please confirm that the robot is not in the Do Not Disturb mode, as
it will not automatically resume cleaning in this mode.
- Manually charging the robot or placing it back on the base
station will not trigger it to resume cleaning.
The robot has an
abnormal cleaning
performance.
The self-cleaning
effect of the mop
is not good.


Warranty
This warranty covers the repair or replacement of the malfunction device at our company’s discretion for a period of
1-year. In addition this certificate is void if altered. The serial number must be provided as well as all accessories to be
eligible for warranty coverage. Please kindly fill in below form accurately and completely.
Important:
• The warranty period starts from the date of purchase
• When returning this device, carefully pack the product to avoid damage in shipping. Damage in shipping is not covered by the Warranty and
shall be the sole responsibility of Buyer. Damage or loss not covered by this Warranty or occurring outside the warranty period will require a fee
to cover the cost of handling and shipping. All such fees and costs shall be the sole responsibility of Buyer.
Exclusion
Unless agreed in writing, the warranty will not apply if the defects relate to:
• Consumable parts such as filters, or brushes etc, that are subject to normal wear and tear, and require regular maintenance and/or
replacement to ensure the proper functioning of your unit.
• Defects caused by rough or inappropriate handling or use or damage caused by accident, misuse, neglect, fire, water, lighting or other acts
of nature, external sources such as weather, electrical outages or power surges.
• Improper operation or maintenance, use not in accordance with the product instructions or connection to improper voltage supply.
• Accident, abuse, misapplication, or any unauthorized repair, modification, or disassembly of the product.
• Any failure to adequately package the product for transportation.
• Use of parts not in accordance with the product instructions.
• Use of parts and accessories other than those produced or recommended by our company.
• Use in a commercial environment as the product is designed for residential use only.
• Consequential and incidental damages.
• Any product(s) purchased from unauthorized dealers/resellers.
• Products used outside the country of purchase.
• Lost and/or stolen products.
Order Number:
Serial Number:
Date of Purchase:


Building 2, Fashion Brand Industrial Park, E'Bu Town,
Shenzhen-Shanwei Special Cooperation Zone, Shenzhen, Guangdong, China.
Shenzhen USEER Robotics Co., Ltd.
Website:
Email:
Facebook:
Community:
www.lefant.com
@LEFANTOFFICIAL
facebook.com/groups/Lefantofficalcommunity
Official website