
User Manual


1
Content
1
.
PRECAUTIONS: ············································· 2
2. PREPARATION BEFORE USE ··························3
PARTS OF THE ASTRONOMICAL TELESCOPE: ·············· 3
DESCRIPTION OF BUTTON ·······································4
3. INSTALLATION GUIDE: ··································· 5
HOW TO CHARGE THE BATTERY: ····························· 5
HOW TO INSERT THE MEMORY CARD: ·······················5
HOW TO FORMAT THE MEMORY CARD: ····················· 6
HOW TO SELECT A LANGUAGE: ······························· 6
HOW TO SET THE DATE AND TIME: ·························· 7
4. HOW TO USE THE TELESCOPE: ····················· 7
HOW TO TURN THE ASTRONOMICAL TELESCOPE ON AND
OFF: ··································································7
HOW TO FOCUS CLEARLY: ······································8
HOW TO CHANGE THE RECORD MODE: ·····················8
HOW TO TAKE STILL IMAGES: ··································9
HOW TO RECORD A VIDEO CLIP: ··························· 10
HOW TO TAKE TIME-LAPSE VIDEO: ························· 11
HOW TO ADJUST THE EYEPIECE ···························· 12
HOW TO ADJUST THE DISPLAY ANGLE ······················ 13
5. HOW TO USE THE MENU IN RECORD MODE · 13
6
.
REMOTE CONTROL(OPTIONAL ) OPERATION 20
7
.
APP INSTALLATION & DEVICE WI-FI ·············· 20
8. HOW TO CONNECT AN ASTRONOMICAL

2
TELESCOPE TO A COMPUTER ···························· 26
9. TECHNICAL SPECIFICATIONS ·······················27
10. CLEANING AND MAINTENANCE ·················· 29
11
.
TROUBLESHOOTING ·································· 30
12. IMPORTANT NOTE ······································31
13. FCC WARNING ········································· 33
Please read these instructions carefully so that you can
use the Astronomical telescope correctly. Keep the
instructions in a safe place after reading them for your
future reference.
1
.
PRECAUTIONS:
Before using the astronomical telescope, make sure you
read and understand the safety precautions described
below.
• If there is any malfunction in the telescope, do not try to
fix it yourself. Maintenance and repair can only be
carried out by authorized service providers.
• This digital astronomical telescope is touch button, just
touch with fingers (wet hands will cause insensitive
touch function), avoid excessive press.
• Use only recommended power accessories. Use of a
power supply not specifically recommended for this
device may result in overheating, device distortion, fire,
electric shock, or other hazards.
3
2
.
PREPARATION BEFORE USE
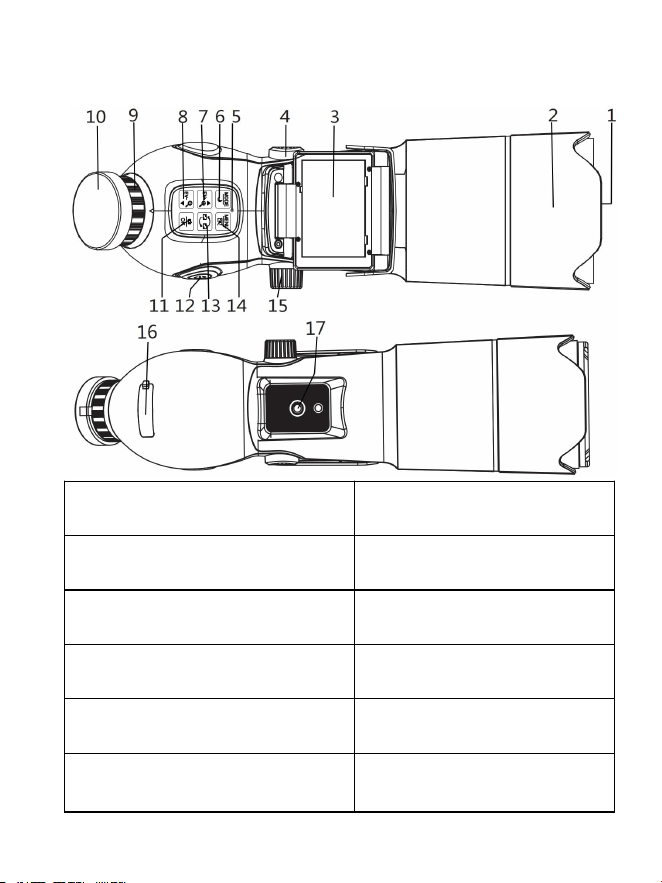
Parts Of The Astronomical Telescope:
1.Objective/ protective
cover
2. Lens hood
(retractable)
3.Display (external
screen)
4.Microphone
5
.
Status indicator light
6
.
Mode/ Moon viewing
button
7
.
Up /EV+/ zoom button
8
.
Down /EV-/ zoom out
button
9
.
Eyepiece diopter
adjusting wheel
10
.
Eyepiece (Internal
screen)
11
.
Shutter/OK button
12
.
Power button /
Wi-Fi switch

4
13.Internal and external
screen conversion button
14.Menu/ color effect
button
15.Objective focus wheel
17.Tripod screws
16
.
USB port /Micro SD card slot/reset hole
Description of Button
Power button/WiFi switch: Long press the Power
button/WiFi switch for 3 seconds to power on or power
off;Short press Power button/WiFi switch when powered
on to enter or exit Wi-Fi mode.
MODE/ Moon viewing button: short press
(photo/video/ playback mode cycle switch); Long
press(normal/moon/ Universe mode cycle switch).
Up /EV+/ Zoom button: short press (up , EV+); Long
press (digital zoom in).
Down /EV-/ Zoom button: short press (down , EV-);
Long press (digital zoom out).
MENU/ Color effects button: short press (to enter and
exit the menu Settings); long press (Color effects loop
switch:normal/ black and white/green/film).
Internal and external screen conversion button:
short press (external /internal screen cycle switch).
Shutter /OK button: short press (take photo/video /
confirm).

5
3
.
INSTALLATION GUIDE:
How To Charge The Battery:
This device has a built-in rechargeable battery, please
fully charge it before first use.
A. Power off and charge the device using a universal
USB power adapter *(DC 5V/2A) (* not included) and
the included Type-C USB cable.
B. When charging, the charging indicator will be red;
When fully charged, the charging indicator turns blue.
C. Disconnect the telescope charging connection after
full charge.
How To Insert The Memory Card:
This astronomical telescope has no memory and needs
to insert a memory card to use it. The memory card is
not included in the package, please prepare it separately.
Supports external TF card with a maximum capacity of
512 GB. It is recommended that users use high-speed
cards of Class 10 or above.
Turn off the astronomical telescope before inserting or
removing the memory card. Be sure to align and position
the card correctly when inserting. Do not try to force the
memory card into the slot if you feel resistance.

6
The card insertion steps are as follows:
1. Turn off the telescope.
2. Find the rubber cover at the bottom of the telescope
and open it, then you will see the Micro SD card slot.
3. Insert the memory card and close the rubber cover.
4. To remove the memory card, tap the edge of the card.
How To Format The Memory Card:
It is important to format the memory card when using this
astronomical telescope for the first time. All data will be
deleted, including protected files. Be sure to download
important files to your computer before formatting.
1: Turn on the device, in the photo/video mode, tap the
MENU button to enter the settings menu.
2: Tap the up or down button to select [Format].
3: Tap the up or down button to select [Yes], then tap the
Shutter/OK button to confirm formatting memory card.
How To Select a Language:
Before using the telescope for the first time, be sure to
select a language and set the date and time.
1: Turn on the Power button/WiFi switch. In the
photo/video mode, tap the MENU button to enter the
settings menu.

7
2: Tap the up/down button to select [Language], tap the
Shutter/OK button to start the sub-menu.
3: Tap the up/down button to select the desired language,
tap the Shutter/OK button to confirm and tap the MENU
button to exit the menu.
How To Set The Date And Time:
1: Turn on the device, in the photo/video mode, tap the
MENU button to enter the settings menu.
2: Tap the Up / Down button to select [Date and Time],
then tap the OK button to enter the sub-menu.
3: Tap Up / Down button to change the highlighted value.
Tap MODE button to move the cursor between settings.
4: Tap the Shutter/OK button to confirm the setting and
close the menu.
Please note: After setting, it is best to press the Power
button/WiFi switch to turn off once and the settings will
be saved without powering off.
4
.
HOW TO USE THE TELESCOPE:
How To Turn The Astronomical Telescope On
And Off:
Long press the Power button/WiFi switch to turn on the

8
device, the green status indicator lights up and then
press Power button/WiFi switch again for 3 seconds to
turn it off.
To save battery power, you can set the "Power Save"
function in the menu to change the shutdown time.
How To Focus Clearly:
Mount the Astronomical telescope on the included tripod
or a self-purchased professional tripod with good stability.
Press the Power button/WiFi switch to turn on the
Astronomical telescope. Aim the objective lens at the
target to be viewed. Then gently pinch the objective lens
focusing wheel between your thumb and index finger. Be
gentle and turn the wheel slowly to adjust the focus.
After tuning, release your fingers. Let the device stand
still for a while and then tuning again. Watch the display
and eyepiece until the target is clearest. Avoid shaking
due to strong force.
How To Change The Record Mode:
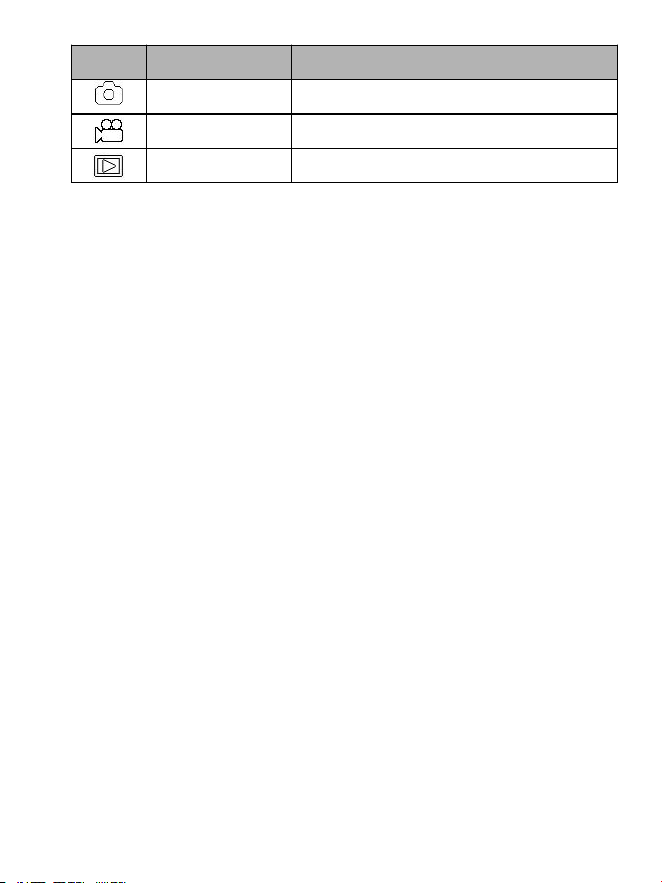
There are three modes of telescopes. Tap the mode
button to change the mode.
9
♦ Photo mode: Tap the MODE button to switch to the
photo mode. Tap the Shutter/OK button to take a photo.
♦ Video mode: Tap the MODE button to switch to the
video mode. Tap the Shutter/OK button to start recording,
and tap the Shutter/OK button again to stop recording.
♦ Playback: Tap the MODE button to switch to the
playback mode and tap the Up/Down button to browse
the saved photos and videos. When playback a video,
tap the Shutter/OK button to play, tap the Shutter/OK
button again to pause and tap the MODE button to stop
playing. Tap the MODE button again to exit the playback
mode.
How To Take Still Images:
1.Turn on the telescope, the default mode is Video ,
tap the MODE button to switch it to Photo mode.
2.Zoom: Long press the "Up/EV+/Zoom In" or "Down/
EV-/ Zoom Out" button to zoom in or out. The zoom
factor value will be displayed on the LCD screen.
Icon
Mode
Description
Photo mode
Take still pictures
Video mode
Recording Video
Playback
Playback image/video files
10
3.Keep the telescope steady, then tap the Shutter/OK
button to take a photo.
The number of photos that can be taken will be
displayed on the LCD screen.
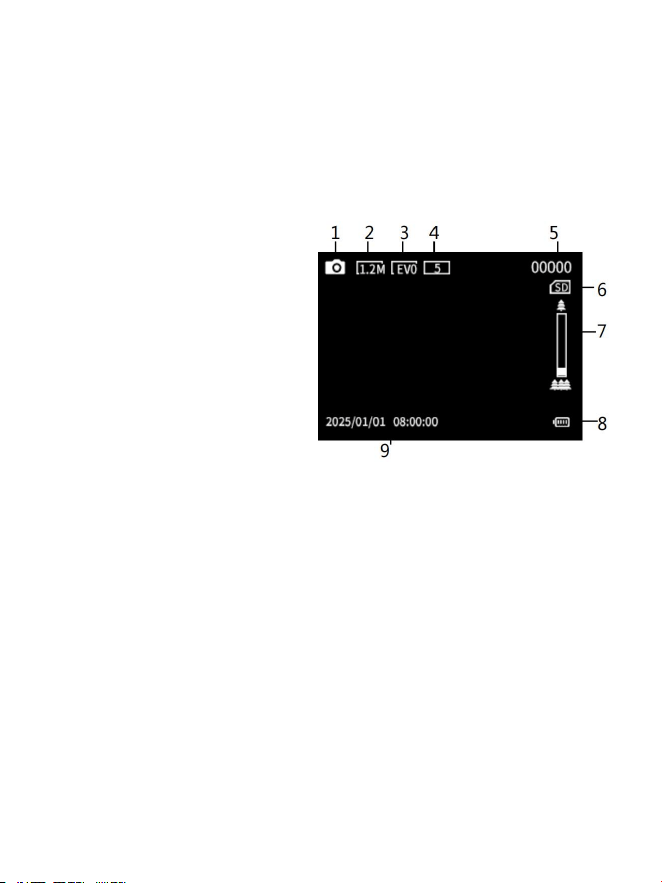
Photo mode display screen display instructions:
1. Camera icon
2. Resolution
3. Exposure
4. LCD brightness
5. Display of the number
of photos available:
6. Memory card inserted
7. Zoom value
8. Battery display
9. Date Stamp
How To Record A Video Clip:
1.Turn on the telescope, the default mode is Video , if
not,tap the MODE button to switch it to video mode.
2.Zoom: Long press the "Up/EV+/Zoom In" or "Down/
EV-/ Zoom Out" button to zoom in or out. The zoom
factor value will be displayed on the LCD screen.
3.Tap the Shutter /OK button to start recording.
11
4.Tap the Shutter/OK button again to stop recording.
If the memory is full, the deviece will automatically stop
recording when the card is full.
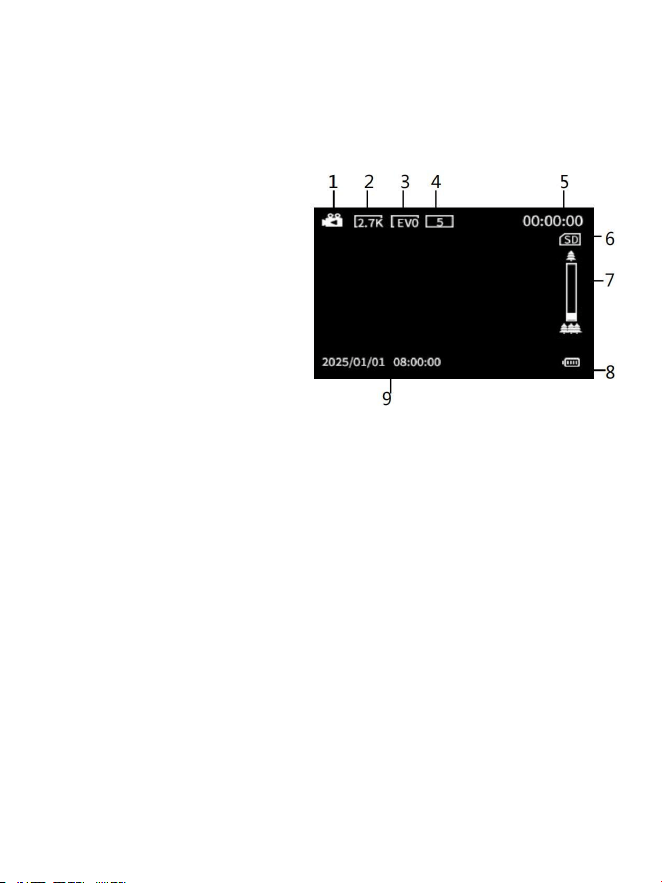
Video mode display screen display instructions:
1. Video icon
2. Movie size
3. Exposure
4. LCD brightness
5. Recordable time
6. Memory card inserted
7. Zoom value
8. Battery display
9. Date Stamp
How To Take Time-Lapse Video:
1.Turn on the telescope, the default mode is Video , if
not,tap the MODE button to switch it to video mode.
2.Tap the MENU button to find the Movie Options in
the menu and select Time Lapse Recording. Tap the
Shutter /OK button to confirm and exit. Then select the
Time Lapse Setting, tap the Up/Down button to browse
the sub-menu and tap the Shutter /OK button to enter
the selected sub-menu. Select the Size you want to set,
and tap the Shutter /OK button to exit. Select the Time in

12
the sub-menu ,tap the Up/Down button to choose the
interval time you need. Tap the MODE button to move
the cursor. Tap the Shutter /OK button to confirm.
3.After you tap the Shutter /OK button and then
countdown 5 seconds,the screen will goes off to start
shooting Time-lapse video.
4
.
Press the Power button/WiFi switch to stop the
time-lapse recording and turn on the device.
How To Adjust The Eyepiece
After turning on the device, check whether the display
shows the internal screen or the external screen. If it
shows the external screen, please press the Internal and
external screen conversion button to switch the display
to the eyepiece (internal screen) display.When you in
any mode,tap the MENU button to enter the MENU.
Check the eyepiece (internal screen). If the menu font is
not clear enough, adjust the eyepiece diopter adjustment
wheel until the menu font appears clear. Press the Menu
button again to exit the menu. Then, slowly adjust the
objective lens focusing wheel according to the actual
distance of the viewed object to focus until the screen
display is clear.

13
How to adjust the display Angle
The display screen is divided into an internal screen and
an external screen. You can press the Internal and
external screen conversion button to switch . The outer
screen can be freely rotated by 90° and the Angle can be
adjusted as you needed.
5
.
HOW TO USE THE MENU IN RECORD
MODE:
When the menu display, use the Up /Down to browse
and OK button to select the desired setting.
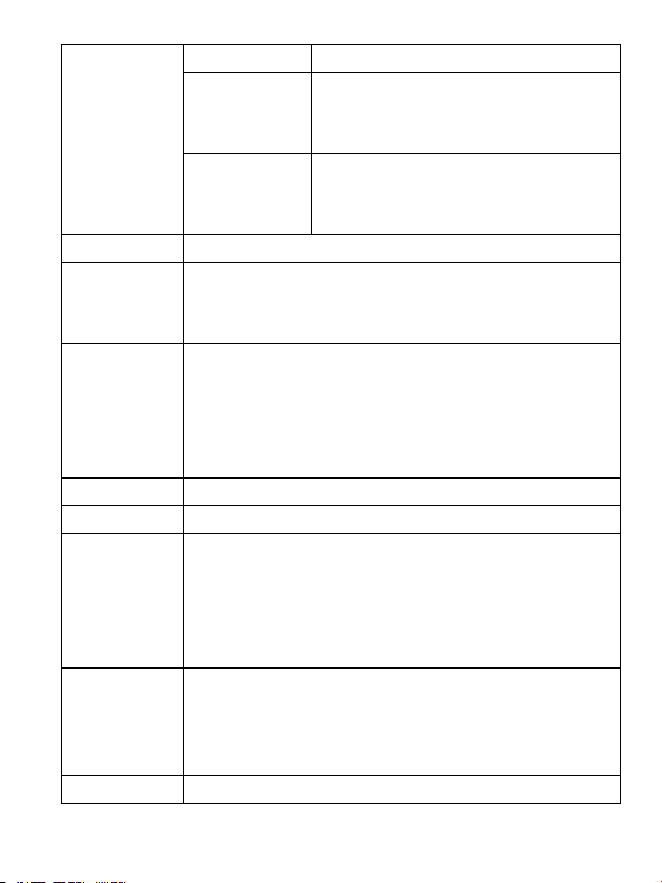
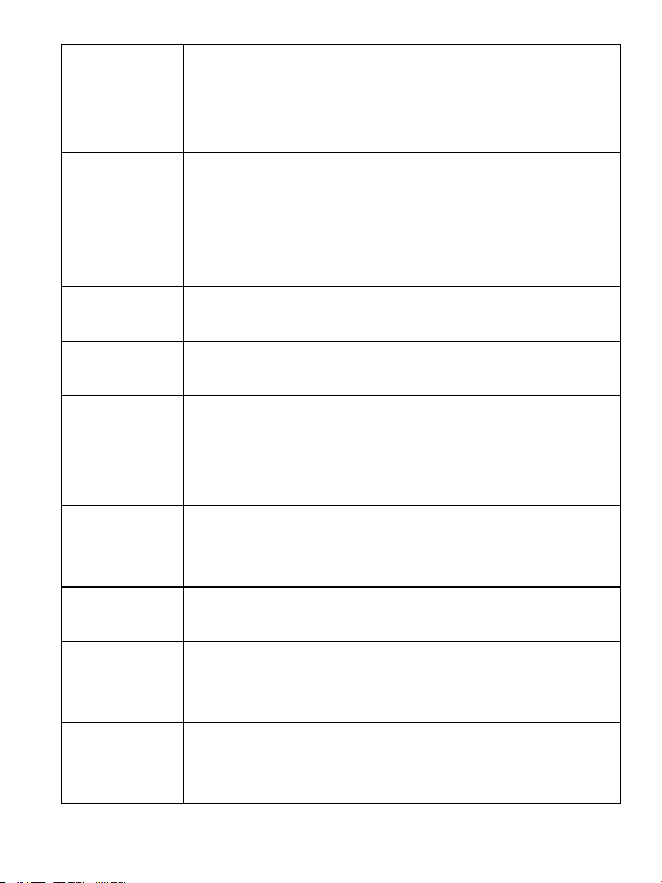
Menu in photo mode:
1: Turn on the telescope and set it to photo mode.
2: Tap the MENU button to display the menu and tap the
Up/Down button to browse the desired menu.
3: Tap the OK button to enter the sub-menu.
4: Tap Up/Down button to browse the desired sub-item.
5: Tap the OK button to confirm the Settings and close
the menu.
Menu
Function
Resolution
Set the resolution of the picture.
Options:30MP 1.5°x1.1°,24MP 1.5°x1.1°,
16MP 1.5°x1.1°,8MP 1.5°x1.1°,5MP 1.5°
x1.1°,1.2MP Moon viewing,VGA View of
Universe
14
Shooting
Single
Take a single photo
Continuous
Take multiple pictures in a row.
Options:
3 Photos/ 5 Photos/ 10
Photo
Self Timer
Automatic photo taking,
Options: off /2 seconds /5
seconds /10 seconds
Anti-Shake
Options:On/Off/Cancel
Effect
Set the color effect and add tones to the
picture. Options: Normal/Black and White /
Green/Negative
Sharpness
The clarity of the images taken by the
camera can be set; The level of clarity
determines whether the edges of objects in
the image are clear.
Options: Sharp/Normal/Soft
Contrast
Options: High/Normal/Low
ISO
Options: Auto/100/200/400/800/1600/3200
Exposure
Manually set the exposure value to
compensate for the light in different
shooting environments.Exposure
compensation ranged from -3.0 to +3.0 with
an increment of 1.
LCD
Brightness
The screen brightness can be adjusted as
needed. Options: Backlight 1/ Backlight 2/
Backlight 3/ Backlight 4/ Backlight 5/
Backlight 6/ Backlight 7
Language
Select the screen display language.
15
Option:[English]/[Deutsch]/ [Français]/
[Español]/ [Italiano]/[Türkiye]/[P
усский
]/
[Portugués]/[Nederlands]/[
简体中文
] /[
繁体
中文
]/[
日本语
]/[Polski]
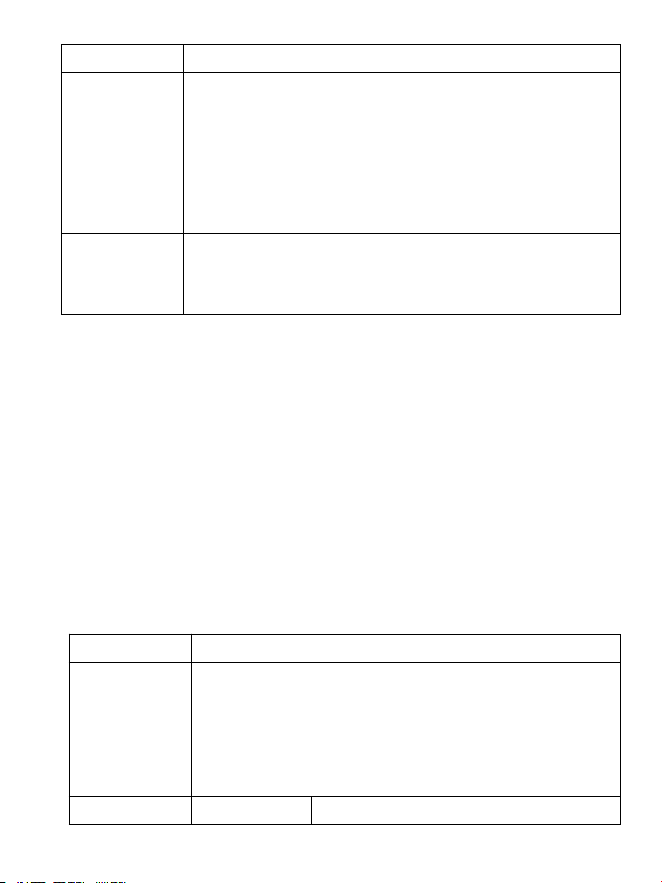
Set Date
Set the time and date of the deviece. Press
the Up /Down button to adjust the time,
press the MODE button to move the cursor
between Settings, tap the OK button to
confirm and exit the editing.
Date
Stamp
Add a date tag to a photo or video file.
Options :[Off]/[Date]/[Date & Time].
Split
Selection
Various cross sight lines.Options :Split 1/
Split 2/Split 3/Split 4/Split 5/Frame Off
OSD auto
clear
Automatically clear all icons on the display
screen, only showing the viewed image.
After clearing, press any button to restore it.
Options: Off/10 Sec./20 Sec./30 Sec./60 Sec.
Power
Save
To save power, if not operated, the camera
will automatically shut down after a period
of time. Options :Off/ 1 Min./ 3 Min./ 5 Min.
Beep
The sound when you operate the buttons.
Option: On/Off
Power
indicator
light
Option: On/Off
Frequency
Set the frequency of the light source to
match the local power supply frequency to
prevent interference. Options: 60Hz/
16
50Hz/Cancel.
Format
All data stored on the memory card (if you
are using the memory card) will be deleted,
including protected files. Be sure to
download the important files to your
computer before formatting.
Options: [Yes]/[No].
Default
Reset the entire menu and button operation
settings to the initial default values.
Options: [Yes]/[No].
Menu in video mode:
1: Turn on the telescope and set it to Video mode.
2: Tap the MENU button to display the menu and tap the
Up/Down button to browse the desired menu.
3: Tap the OK button to enter the sub-menu.
4: Tap the Up/Down button to browse the desired
sub-item.
5: Tap the OK button to confirm the Settings and close
the menu.
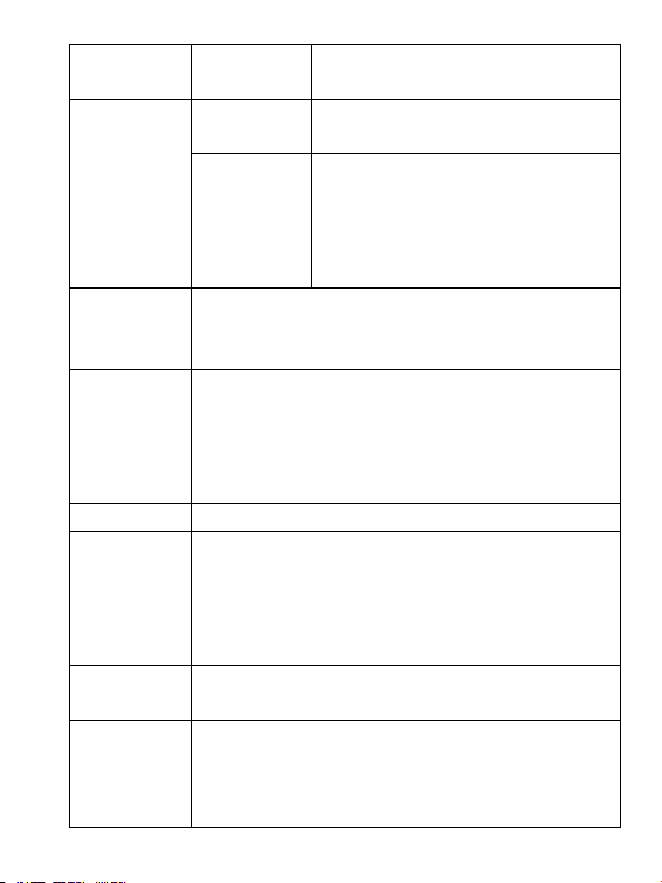
Menu
Function
Movie Size
Set the video resolution.
Options: 4K 1.5°X0.9°/ 2.7 K 1.4° X 0.9°/
FHD 1.3° X0.8° / 1080 p 1.5° X1.1° / HD
1.5° X0.9° / HD 60 FPS 1.5° X0.9° /
HD Moon Viewing/VGA view of Universe
Movie
Normal
Take the normal video
17
Options
Time Lapse
Recording
Take time-lapse video
Time
Lapse
Setting
size
Options:5MP 1.5
°
X1.1
°
/8MP
1.5
°
X1.1
°
Time
Tap the Up/Down button to
choose the interval time you
need. Tap the MODE button to
move the cursor. Tap the
Shutter /OK button to confirm.
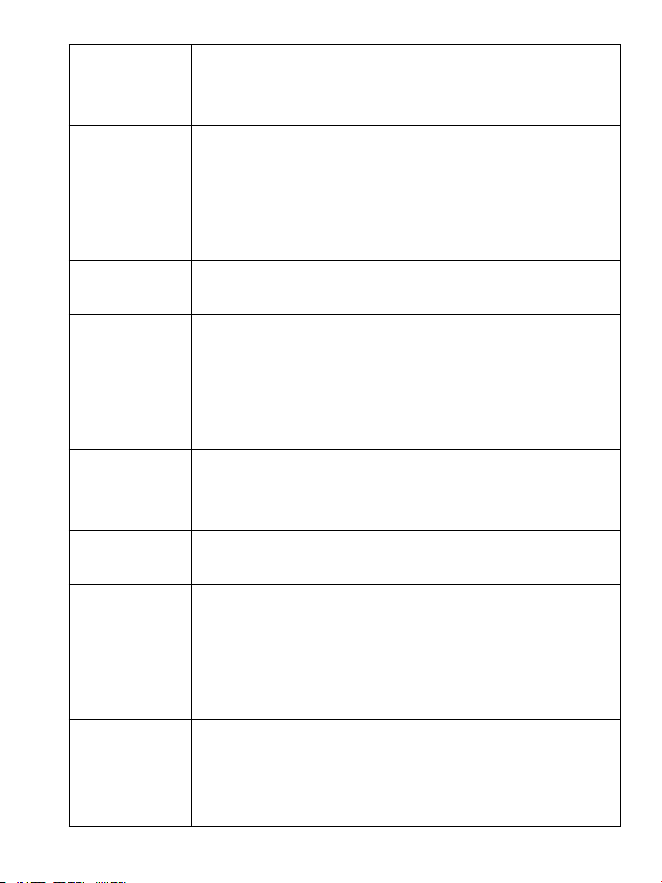
Effect
Set the color effect and add tones to the
picture. Options: Normal/Black and White /
Green/Negative
Sharpness
The clarity of the images taken by the
camera can be set; The level of clarity
determines whether the edges of objects
in the image are clear.
Options: Sharp/Normal/Soft
Contrast
Options: High/Normal/Low
Exposure
Manually set the exposure value to
compensate for the light in different
shooting environments.Exposure
compensation ranged from -3.0 to +3.0
with an increment of 1.
Display
Mode
Options: Full-screen display/Normal
LCD
Brightness
The screen brightness can be adjusted as
needed. Options: Backlight 1/ Backlight 2/
Backlight 3/ Backlight 4/ Backlight 5/
Backlight 6/ Backlight 7
18
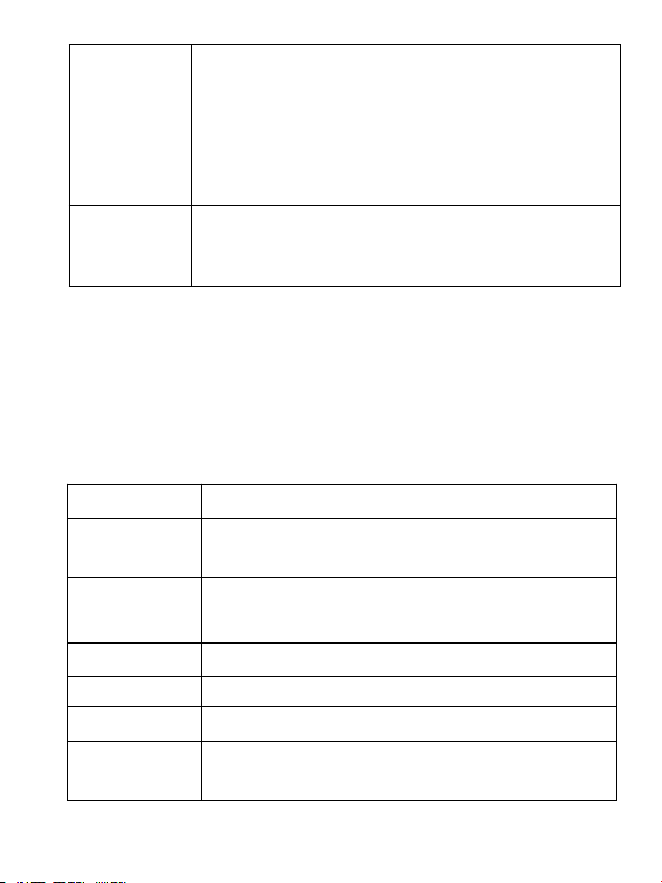
Power
indicator
light
Option: On/Off
Set Date
Set the time and date of the deviece.
Press the Up /Down button to adjust the
time, press the MODE button to move the
cursor between Settings, tap the OK
button to confirm and exit the editing.
Date
Stamp
Add a date tag to a photo or video file.
Options :[Off]/[Date]/[Date & Time].
OSD auto
clear
Automatically clear all icons on the display
screen, only showing the viewed image.
After clearing, press any button to restore
it. Options: Off /10 Sec. /20 Sec. /30 Sec.
/60 Sec.
Power
Save
To save power, if not operated, the camera
will automatically shut down after a period
of time. Options :Off/ 1 Min./ 3 Min./ 5 Min.
Beep
The sound when you operate the buttons.
Option: On/Off
Language
Select the screen display language.
Option:[English]/[Deutsch]/ [Français]/
[Español]/ [Italiano]/[Türkiye]/[P
усский
]/
[Portugués]/[Nederlands]/[
简体中文
] /[
繁体
中文
]/[
日本语
]/[Polski]
Frequency
Set the frequency of the light source to
match the local power supply frequency to
prevent interference.
Options: [60Hz]/ [50Hz]/ [Cancel].
19
Format
All data stored on the memory card (if you
are using the memory card) will be
deleted, including protected files. Be sure
to download the important files to your
computer before formatting.
Options: [Yes]/[No].
Default
Reset the entire menu and button
operation settings to the initial default
values. Options: [Yes]/[No].
Menu in playback mode:
1:After turning on the telescope, set it to playback mode.
2: Tap the MENU button to display the menu. Tap the
Up/Down button to browse the desired menu. Tap the
OK button to confirm the Settings and exit the menu.
Menu
Function
This Image/
Video
Delete the current file in memory card.
Options:Yes/No.
All
Delete all files in memory card.
Options:Yes/No.
Lock This
Lock the current file in memory card.
Unlock This
Unlock the current file in memory card.
Unlock All
Unlock the all files in memory card.
Format
Format the memory card.
Options:Yes/No.
20
6
.
Remote Control(Optional ) Operation
Follow the specifications below to operate the remote
control for normal device performance.
1. Before using the remote control, open the battery
cover on its rear side, insert the supplied AAA alkaline
batteries in correct polarity, then the remote will be
powered on properly.
2. Turn on the device before the remote operation.
Ensure there are no obstructions between the remote
control and the device. Press corresponding buttons on
the remote to activate matching functions of the device.
7
.
APP Installation & Device Wi-Fi
1.Connection Scan this QR code to
download the APP and install it on your
smartphone or tablet.
2.After the installation is completed, open "OMG Cam"
APP on your mobile device first. On the main page of the
APP, tap the "Digital Telescope" button. Then find the
digital telescope and long press the Power button/WiFi
switch on the device to turn on the device. Once the
device is powered on, short press the Power button/WiFi
switch to enable the device's WiFi. A Wi-Fi connection

21
QR code will automatically display on the device screen.
Users can directly scan this QR code with their mobile
phones to complete the network pairing. No manual
Wi-Fi password entry is required for QR code
connection,the operation is convenient and efficient.
3.Once your mobile device is successfully connected
to the device's Wi-Fi hotspot, return to the main interface
of the OMGCam APP to access all supporting functions.
Then you can use all the accompanying functions of the
APP. The core operational contents include viewing files
stored on the device's TF card, Settings, Device
information preview, checking device information, and
managing the exclusive APP photo album. It fully meets
your demands for device control, real-time preview and
footage management.
4.After completing all APP operations, parameter
configuration, material preview and shooting tasks,
return to the main interface of the APP. Tap the power-off
button in the upper right corner of the interface to shut
down the device. Meanwhile, the Wi-Fi connection
between the mobile terminal and the device will be
automatically disconnected and the device's linkage
state will be exited.
22
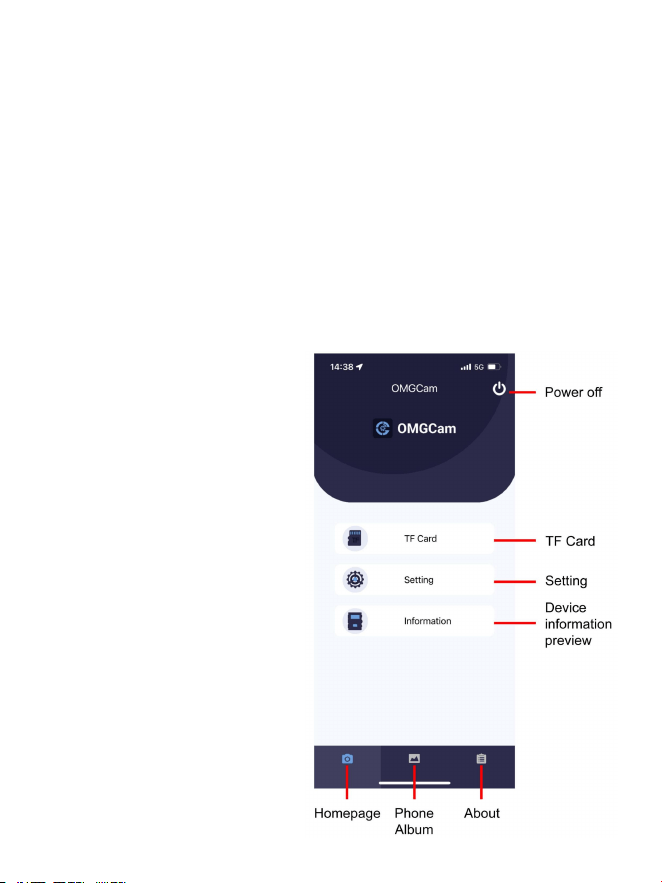
Camera APP Interface Function Introduction
1. After the WIFI hotspot connection is successful, return
to the APP interface and you can perform the
corresponding functions within the APP (viewing files on
the TF card, settings, preview of device information,
photo album, etc.);
2. After completing the operation settings of the APP, you
can return to the main interface and tap the power-off
button at the top right corner to shut down (disconnect
from WIFI connection)
3. The functions of the
camera app interface
are as follows:
23
TF Card
Tap the TF Card to view photos and video files saved on
the TF card.tap the icon on the upper right corner to
perform editing. You can select to download or delete the
pictures or videos and the select-all option is available.
Setting
Tap the Setting to bring up the full settings menu list.
Users can customize and adjust all required parameters
directly on the APP.
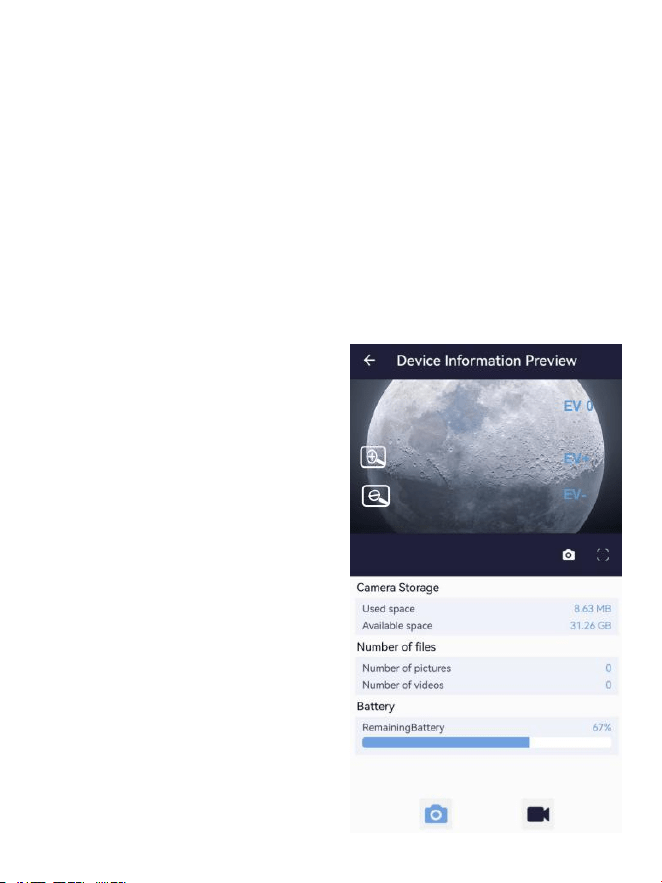
Device information
preview
Tap the Device information
preview button and
information about camera
storage, file quantity and
battery status will be
displayed on the lower
panel. This page supports
real-time live view. You can
check live footage
captured by the camera to
observe shooting scenes
24
and image effects in real time. Digital zoom is available,
and you can set appropriate EV values for different
target scenes on the fly to guarantee optimal image
quality.
Note: You can adjust the installation angle of the
telescope by slightly moving it, and position the
telescope at the optimal viewing angle.
Tap the button for the first time to enter the mode
conversion, and then tap again to take a photo;
Tap the button for the first time to enter the mode
conversion, and then tap again to record video.
Phone Album
Users can directly view photos and video files
downloaded from the device to your mobile phone or
tablet. This album function supports zooming in on
images to check picture details and playing back
recorded videos. It also supports single selection,
multi-selection, deletion and sharing of files, fully
meeting users' daily demands for browsing, sorting and
sharing captured materials.

25
Warm Reminders:
1. When connecting Wi-Fi, ensure there are no
obstructions between your phone and the device. The
closer the distance between them, the stronger, more
stable the Wi-Fi signal, and the faster the download
speed.
2. After finishing all operations in the APP, it is
recommended to tap the power-off button in the upper
right corner to shut down the device and save battery
power.
3. Once the device enters Wi-Fi mode, it will
automatically exit the Wi-Fi mode if your phone fails to
connect after 3 minutes.
4. After successful Wi-Fi connection, the device will
automatically disconnect and exit Wi-Fi mode if there is
no data exchange between the device and your phone
for 3 minutes.
5. After you add the device to the APP, you only need
to connect to the camera when reopening the APP,
then tap the target device to establish connection—no
need to re-add the network.

26
8
.
HOW TO CONNECT AN
ASTRONOMICAL TELESCOPE TO A
COMPUTER:
There are two ways to download files from the device to
a computer:
By inserting the memory card into a card reader.
By connecting the device to a computer using the
supplied TYPE-C USB cable.
Using a Card Reader
1. Eject the memory card from the device and insert it
into a card reader.Then connect the card reader to a
computer.
2. Open [My Computer] or [Windows Explorer] and
double-click the removable disk icon that represents the
memory card.
3. Copy images from the card into a directory of your
choice on the computer’s hard disk.
How To Connect Astronomical Telescope To
a Pc Using a Usb Cable:
1. Connect the astronomical telescope to the computer
using the included Type-C USB cable, then long press
27
the Power button/WiFi switch to turn it on. The telescope
screen will display the mode Settings "Portable Hard
Drive" and "PC Camera" interface, indicating a
successful connection.
2. Tap the Up /Down button to select "Portable Hard
Drive", then tap the OK button to confirm. Enter the
portable hard drive mode and open "My Computer" or
"File Explorer". Double-click the move disk icon
representing the memory card. Telescope image file
stored in the "DCIM" folder, check and copy telescope
image file.
3. Select "PC Camera" and tap the OK button to confirm,
then enter the computer camera mode. Open the video
tool on your computer and you can make a video
connection.
9
.
TECHNICAL SPECIFICATIONS:
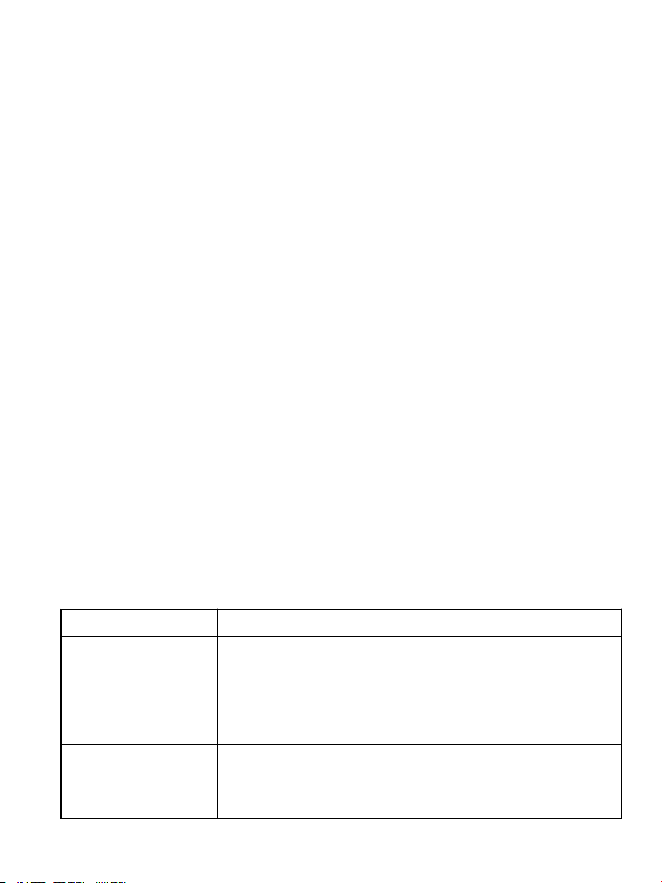
Image sensor
5MP superstarlight CMOS sensor chip
Resolution of
photo
30MP 1.5°x1.1°,24MP 1.5°x1.1°, 16MP
1.5 ° x1.1 ° ,8MP 1.5 ° x1.1 ° , 5MP 1.5 °
x1.1°,1.2MP Moon viewing,VGA View of
Universe
Video Clip
4 K 1.5 ° X0.9 °, 2.7 K 1.4 ° X0.9 ° and
1.3 ° FHD X0.8 °, 1080 p 1.5 ° X1.1 °,
HD 1.5 ° X0.9 °, 60 FPS HD 1.5 ° X0.9 °,
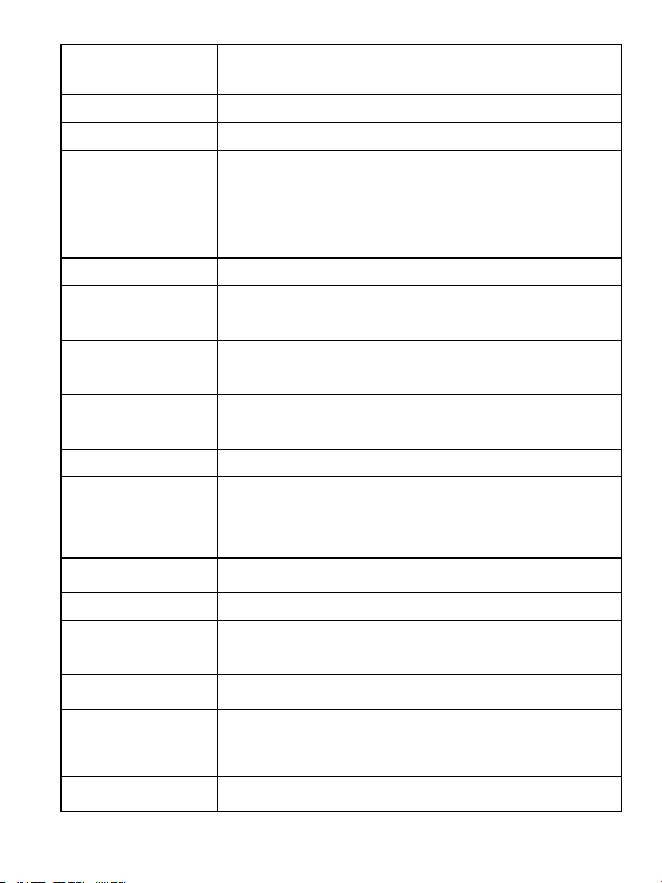
28
HD moongazing, VGA view of the
universe
Magnification
Up to 350x
Focus Mode
Manual focus adjustment
Eyepiece
Adjustable vision compensation
(refractive adjustment range plus/minus
+/-6, both short-sighted/far-sighted 600
adjustment compensation)
Aperture
F4.0
Focus
Distance
300mm
Primary mirror
caliber
78mm
Limiting
magnitude
11
Digital Zoom
18X
Display screen
IPS HD screen (3.0-inch external
screen, built-in 10-inch enlarged
display)
Button
Touch button anti-shake
Split Selection
Split 1/Split 2/Split 3/Split 4/Split 5
Continuous
shooting
2 /5 /10 sheets
Self Timer
3 seconds /5 seconds /10 seconds
Storage
medium
Micro SD card (up to 512GB, Class 10
or above recommended)
Power Save
1/3/5/10 minutes/Off
29
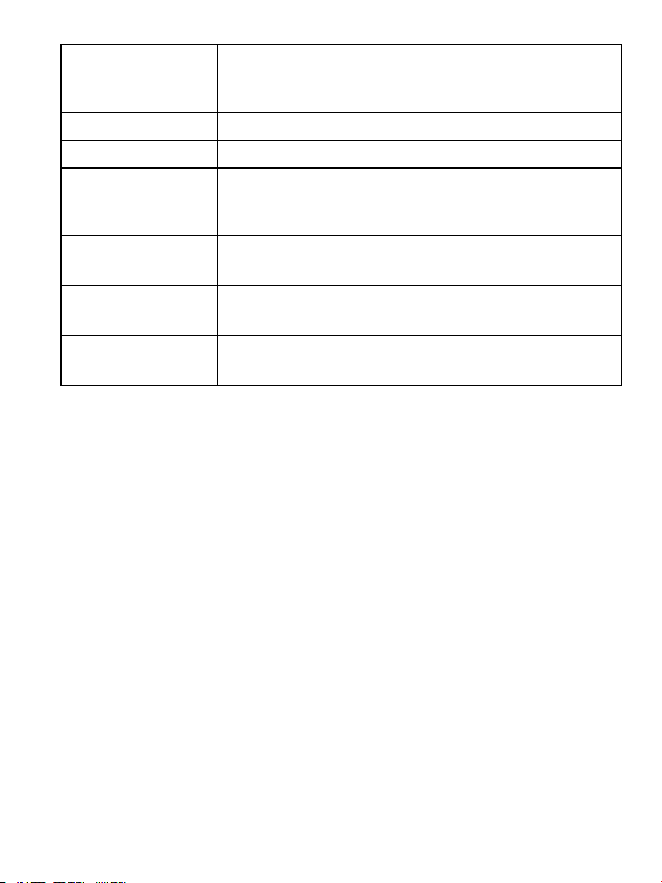
Power supply
Built-in 4500mAh lithium battery,
rechargeable
USB interface
TYPE-C
Language
Multiple languages are available
Microphone &
Speaker
Built-in
Operating
temperature
-20
℃
to +50
℃
Storage
Temperature
-30℃ to +60℃
Dimensions &
Weight
About. 370*93*138mm / 980g
10
.
CLEANING AND MAINTENANCE
1
.
If there is dust or dirt on the objective lens, eyepiece
or display screen, please gently wipe it with a clean and
soft lint-free cloth (such as a microfiber cloth).
2
.
Please fully charge and discharge the battery at
least once every three months.
3
.
This device is a precision device. Please do not drop
it or subject it to strong impact or vibration.
4
.
This digital astronomical telescope is equipped with
touch buttons. Just touch it lightly with your finger to
avoid excessive pressing.
5
.
It is a normal phenomenon that the body and screen

30
of a telescope will get hot after long-term use.
11
.
TROUBLESHOOTING
1. Failure to power on
a. Please check whether the battery is charged, or
connect the charger to see if it can be turned on.
b. Try to reset by gently inserting a paper clip into the
reset hole.
2. Failure to charge
a. If the charging indicator light does not light up, it
indicates that the charger is not plugged in. Please
check whether the charger is connected properly.
b. It is recommended that the battery be charged in an
environment with a temperature ranging from 10℃ to
30℃.
c. Please try replacing the charger or charging cable.
3. The battery life is too short
a. Check if the battery is fully charged.
b. If the ambient temperature drops below 10℃, the
battery power will be exhausted very quickly.
d. Battery life may vary depending on the usage mode.

31
4. Memory card cannot be recognizeda.
a. Please check whether the memory card conforms to
Micro SD card (level 10 or above).
b. Check whether the memory card is inserted
incorrectly.
c. The memory card is used on the camera for the first
time, unformatted.
d. You can try to format the Micro SD card on the
computer first, and then insert the camera to format it.
e. Replace the memory card.
5. Unable to connect to the computer
a. Check whether the USB cable is correctly
connected.
b. Check whether the USB port of the computer works
properly, or try to replace another USB port on the
computer.
c. Check the compatibility of your computer system.
12
.
IMPORTANT NOTE:
1.The objective lens Angle of the digital astronomical
telescope is very small. Even the slightest mechanical
shake can cause the viewing image to shake. It is

32
necessary to use a professional tripod with good stability
and try to use it in a sheltered place.
2.When focusing, gently hold the focusing wheel of
the objective lens with your fingers, move gently and
focus slowly. Make a slight adjustment and then release
your fingers. Let the camera stand still for a while and
then adjust again. Observe the display screen and
eyepiece until the target is the clearest. Avoid shaking
caused by excessive force.
3.It is recommended to use the automatic photo-taking
function for taking photos to avoid the camera shaking
and blurry photos caused by touching the buttons.
4.Setting appropriate EV parameters based on
different target scenarios will yield better results.
5.When used in strong outdoor light, the lens hood of
the objective lens needs to be pulled up and the outer
screen lens hood should be installed. It is recommended
to view through the inner screen of the eyepiece.
6.This telescope is equipped with touch buttons.
Occasional accidental touches during button operation
are normal phenomena.
7.Do not look directly at the sun with your naked eyes
or through a telescope, as it may harm your eyes.

33
13
.
FCC Warning
This device complies with part 15 of the FCC Rules.
Operation is subject to the following two conditions: (1)
this device may not cause harmful interference, and (2)
this device must accept any interference received,
including interference that may cause undesired
operation.
Any changes or modifications not expressly approved by
the party responsible for compliance could void the
user's authority to operate the equipment.
NOTE: This equipment has been tested and found to
comply with the limits for a Class B digital device,
pursuant to Part 15 of the FCC Rules. These limits are
designed to provide reasonable protection against
harmful interference in a residential installation. This
equipment generates, uses and can radiate radio
frequency energy and, if not installed and used in
accordance with the instructions, may cause harmful
interference to radio communications.
However, there is no guarantee that interference will not
occur in a particular installation.
If this equipment does cause harmful interference to
radio or television reception, which can be determined

34
by turning the equipment off and on, the user is
encouraged to try to correct the interference by one or
more of the following measures:
-- Reorient or relocate the receiving antenna.
-- Increase the separation between the equipment and
receiver.
-- Connect the equipment into an outlet on a circuit
different from that to which the receiver is connected.
-- Consult the dealer or an experienced radio/TV
technician for help.
To maintain compliance with FCC’s RF Exposure
guidelines, This equipment should be installed and
operated with minimum distance between 20cm the
radiator your body: Use only the supplied antenna.

35