Who
is this user guide for?
This guide is intended for all
members and users of the Unis-
tellar community, whether you are
a beginner, an experienced astro-
nomy enthusiast, or simply excited
about making new discoveries. This
guide will help you set up your te-
lescope correctly and observe the
sky under the proper conditions so
that you can get the most out of
your telescope and produce beau-
tiful images.
How
is it organized?
In this user guide, we will guide you
through each feature and setting,
step by step, to help you get the
most out of your telescope. You will
learn how to get the best possible
experience out of each observation
session. You will also learn more
about the Unistellar mission and
the scientic projects to which you
can contribute.
User guide | 1
English
Introduction: Unistellar’s mission........................................................................................................P4
Contents of the box
Before you begin: Getting to know the eVscope product line..............................
P7
Technical specifications.............................................................................................................................P8
1. eVscope 2
2. eQuinox
3. eQuinox 2
4. Accessories
Using your telescope | Prerequisites .....................................................................................
P12
1. Installing and adjusting the tripod
2. Installing and turning on the telescope
Downloading and installing the Unistellar app...................................................................
P14
Collimating your telescope ...................................................................................................................P16
Adjusting the focus .....................................................................................................................................P18
Observation tips ..............................................................................................................................................P20
1. Autonomous Field Detection (AFD)
2. Sensor calibration (or dark frame)
Software suite.......................................................................................................................................................
P21
1. Enhanced vision
2. GPS and location
3. Light pollution
4. Frame
5. Gain
6. Exposure time
7. Zoom
8. Storing the telescope
Additional battery information...........................................................................................................
P23
Storage and maintenance........................................................................................................................P24
1. Storing and maintaining the telescope
2. Maintaining the mirror
3. Storing the tripod
4. Traveling with the telescope
5. Warranty
Exploration & more..........................................................................................................................................
P25
1. Catalogue
2. Data
Actively contribute to science .............................................................................................................
P28
1. SETI Institute
2. Scientic campaigns
1
3
9
10
11
2
4
6
7
5
8
Contents
User Guide
User guide | 2
English
3. Planetary
4. Asteroid occultation
Troubleshooting..............................................................................................................................................
P29
1. Logging in
2. LED colors
3. Not powering on
4. Images
5. Stars are distorted
6. Stars are blue and red
7. Enhanced vision stops
8. Downloading data
Keeping in touch................................................................................................................................................
P32
Need help?
12
User guide | 3
English
Introduction
Unistellar's mission
Unistellar was founded in 2017 by two former laureates of the Nobel Prize
in Physics 2018, a visionary industrial engineer and a world-renowned as-
tronomer from California. The four of them are united by a common goal:
to make astronomy more accessible and exciting for everyone and, in ge-
neral, to bring the universe closer.
Unistellar is revolutionizing the astronomy industry by oering consu-
mer-level telescopes that are both simple to use and powerful enough to
reveal the wonders of the cosmos and lead to new scientic discoveries.
This fun and educational instrument provides access to thousands of ob-
jects. Whether you’re looking at the night sky from a balcony in the city or
out in the country, Unistellar telescopes are the most portable, fastest, and
most user-friendly option.
Our telescopes provide an unrivaled user experience. Not only are they
simple to use, but they also take just minutes to set up. They can even be
controlled through your smartphone and can automatically point to thou-
sands of objects in our catalog.
Our user community can easily upload and share data. This paves the way
for novel experiences like sending valuable scientic data to professional
astronomers or taking pictures of the sky with a large group of people at
the same time.
User guide | 4
English
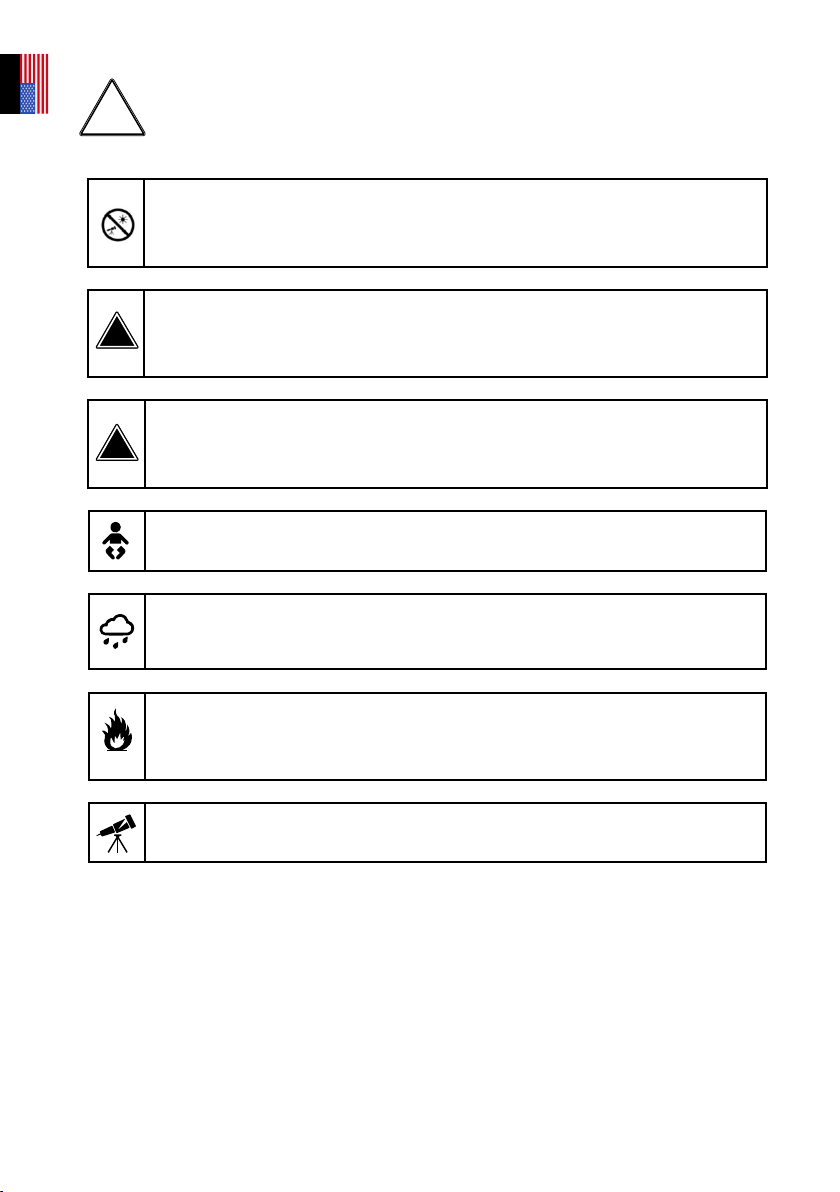
PROHIBITED!
Never use a telescope to look at the Sun without an appropriate lter!
Looking at the sun or getting close to it can cause irreversible damage to your
product. Do not point the telescope at or near the Sun.
Children must always be supervised by an adult when observing the sky.
WARNING!
Never charge the telescope at temperatures below 50°F.
This could cause irreversible damage to the telescope’s battery. Always charge it at a
temperature between 50°F and 104°F.
WARNING!
Never leave the telescope’s battery connected without using the telescope for more
than a month. This could cause irreversible damage to the battery.
Always remove the battery when storing the telescope for a prolonged
period of time
!
!
WARNING
!
Your telescope and its accessories are not toys. Allowing small children to play with them may
result in injury to themselves or others, as well as damage to your equipment. Keep your device,
including all its parts and accessories, out of the reach of young children.
Your telescope is not designed for use in a damp environment. As with any electronic
item (with the exception of waterproof items), your telescope can be permanently
damaged if water or any other liquid gets inside it. Turn it o immediately and dry it.
Do not look at the Sun without an appropriate lter. Your telescope can be permanently
damaged, even after a short exposure. There is also a signicant risk of re. Also, do not expose
your telescope to temperatures above 104°F or below 50°F; extreme temperatures may impair
its performance.
Your telescope is fragile and should not be dropped. If it is dropped, this may cause permanent
damage.
Specications
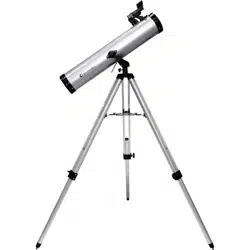
Model: eVscope telescope
Mirror specications: aperture 114 mm, focal length 450 mm, material BK7
Battery specications: Lithium-ion: (6 x 18650), capacity 15,000 mAh (55.5 Wh)
Power supply unit (PSU): 100-240V ~50/60 Hz 0.6A Max; Output: 5.0 VDC, 2.4 A
WiFi frequency and bandwidth: 2.4 GHz, 72.2 Mbps
WiFi range: 150ft unobstructed
Input/output: USB-C (PSU); USB-A (smartphone charger)
Tripod: aluminum, adjustable height; designed for the telescope
User guide | 5
English
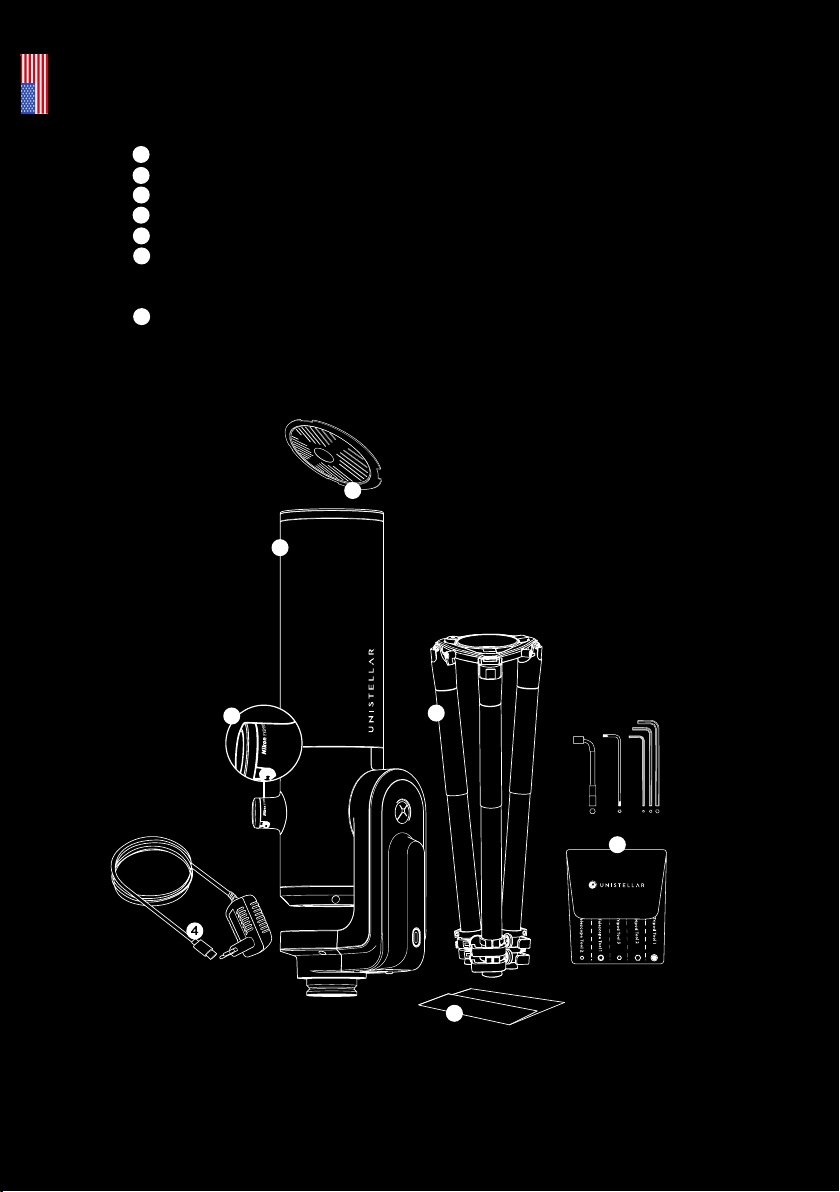
Contents of the box
1
2
3
4
5
6
7
Telescope
Bahtinov mask (located in the cap cover)
Tripod
Charger with adaptors (UE, USA, UK)
Ocial documentation
Box of accessories and tools
(Tripod tool 1 (8 mm socket wrench) / Tripod tool 2 (M5.5 Allen wrench) / Tripod tool 3 (M4 Allen wrench)
/ Telescope tool 1 (T20 Torx wrench) / Telescope tool 2 (M3 Allen wrench)
Eyepiece cover (eVscope 2 only)
6
8mm
7
5
3
1
2
User guide | 6
English
UJser Guide | 6
English

What is the eVscope?
Enhanced Vision
Enhanced Vision is a proprietary, patent-protected technology that makes it possible
to observe low-light objects in real time by accumulating the light we receive
from them. Galaxies, nebulae, and comets are now visible, colorful, and detailed.
Depending on the observation conditions (light pollution, moon phase, weather, etc.)
and the objects you’re viewing, it can take just a few seconds to begin seeing the
beautiful colors and shapes of galaxies and nebulae that are normally invisible, even
through the eyepiece of a large conventional telescope.
Smart Light Pollution Reduction
Light pollution, or the presence of excessive and unwanted articial lighting, renders
celestial objects invisible to the human eye. It even challenges cameras and computers
by blurring objects, distorting shapes, and adding noise to images. Unistellar’s
proprietary software quickly reduces the impact of light pollution and allows distant
objects to be observed in sharp detail, even in bright urban environments, delivering
the best possible image settings and results. Regardless of how bright the sky is,
users can enjoy more realistic images with enhanced contrast and color.
A powerful scientic device with a global community
Unistellar explorers can conduct valuable space science research in collaboration
with astronomers from the SETI Institute and other institutions, such as protecting
the Earth, detecting a dangerous asteroid, discovering and conrming the existence
of a celestial body around a distant star, or even unraveling the mystery of a comet
or supernova.
What makes the eVscope so easy to use?
Field recognition
With this telescope, you’ll spend less time setting up and calibrating the telescope
and more time observing space. Our system can instantly identify the objects in its
eld of view by comparing what it sees against a database with information on tens
of millions of stars. This enables the telescope’s automated tracking and pointing
system to be extremely accurate and simple to use, resulting in the most user-
friendly telescope on the market.
Dedicated app
With the touch of a button on the app, your Unistellar telescope can recommend
the most spectacular targets for deep space observation, all in a matter of minutes.
Use the app to learn about and identify cosmic objects, including the most relevant
objects to observe from your location, with a catalog of over 5,000 objects to choose
from. Through the use of our smart technology, you can capture and share your
experience with others, in person or remotely.
The Unistellar app oers engaging educational content and automates your
observing experience, allowing even beginners to enjoy their telescope right away.
The application also oers manual commands for advanced users.
Before you begin:
Getting to know the eVscope product line
User guide | 7
English
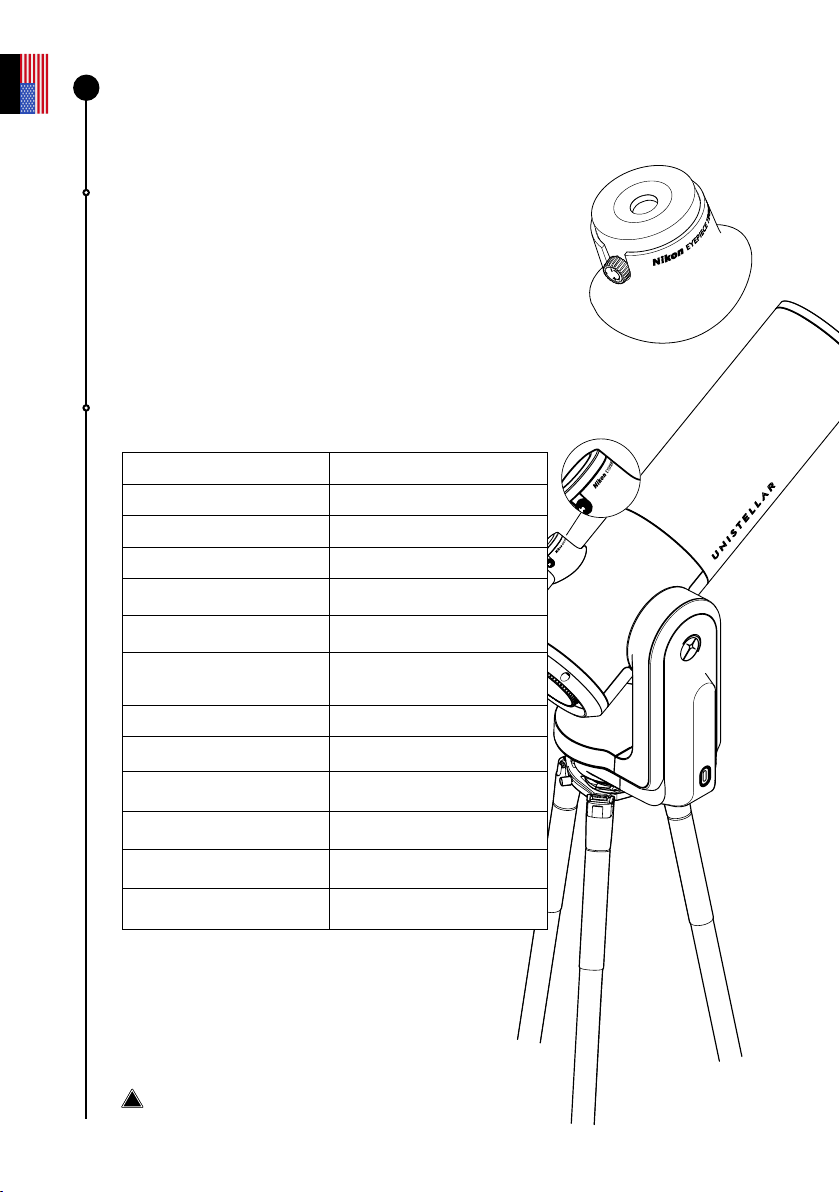
Eyepiece
The OLED screen features extremely high contrast and
deep blacks, as well as an optical conguration designed
to diuse the sensor view. The end result is a stunning
visual quality for your dark sky observations. By turning
the side dial, you can adjust the diopter and sharpen the
image to suit your eyesight, which is especially useful if
you wear glasses or contact lenses.
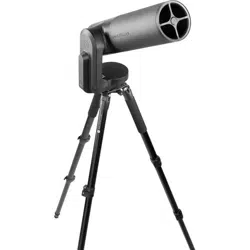
Telescope specications :
Aperture 4.5 inches
Focal Length 17.7 inches
Focal Ratio f/3.9
Mount Azimuth
Optical Design Newtonian
Image resolution 7,7 Mpx
Sensor's eld of view 0.75 x 0.56° (34x47 arcmin)
Weight 19.8 lbs
Maximum magnitude 18
Battery life 9h
Eyepiece
Nikon Viewer
Dimensions 2.13 ft x 0.75 ft
Storage capacity 64 Go
Warning: Do not mount the telescope on any other
tripod.
Technical specications :
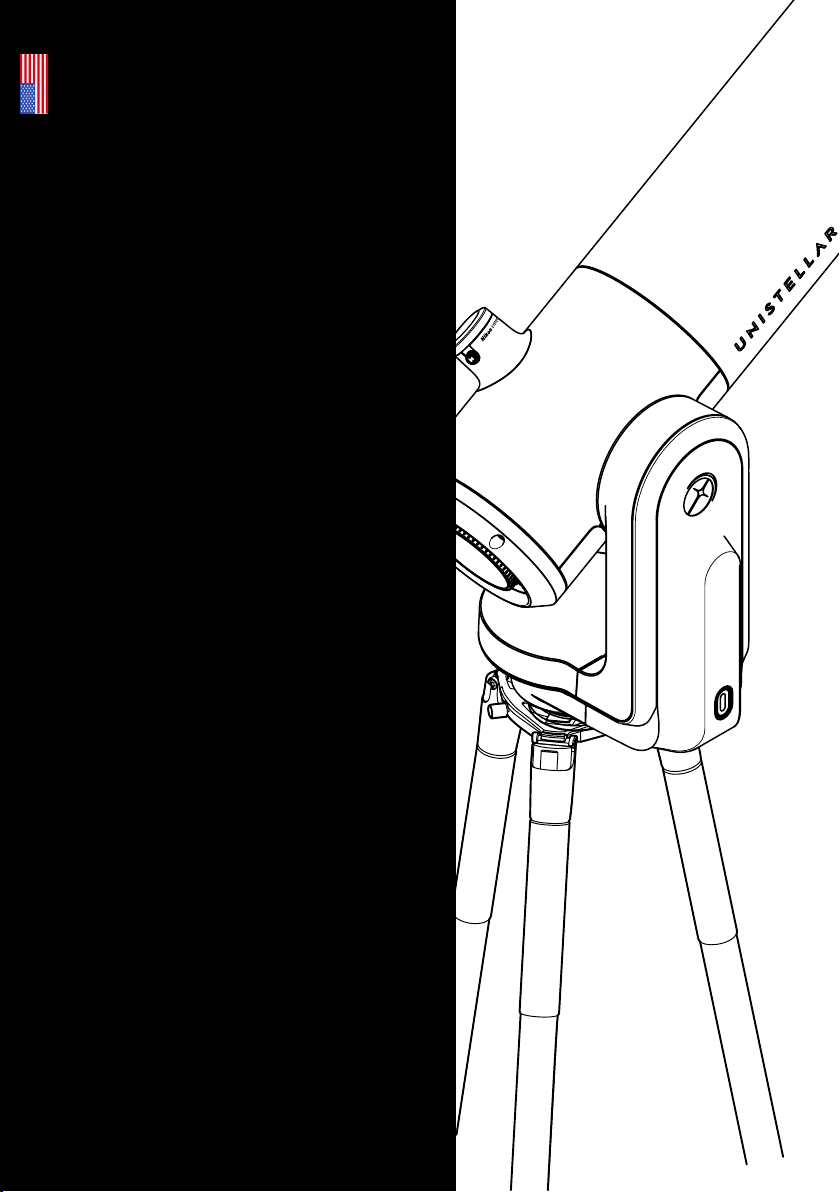
Getting to know the
eVscope 2
!
1
User guide | 8
English

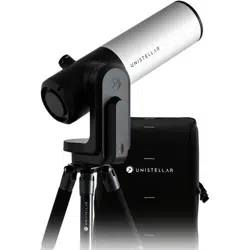
The eQuinox eVscope allows you to enjoy the beauty of deep space, protect the
planet from near-Earth asteroids, conduct hands-on science experiments, and
much more.
All of this with one smart, fast, portable, and connected device.
eQuinox specications:
Aperture 4.5 inches
Focal length 17.7 inches
Focal ratio f/3.9
Mount Azimuth
Optical design Newtonian
Image resolution 4.9 Mpx
Sensor's eld of view 30 arcmin
Maximum magnitude 18
Dimensions 2.13 ft x 0.75 ft
Storage capacity 64 Go
Weight 19.8 lbs
1
Technical specications:
Getting to know the
eQuinox
User guide | 9
English
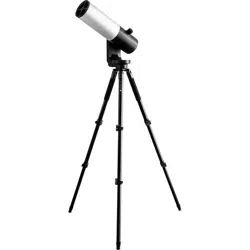
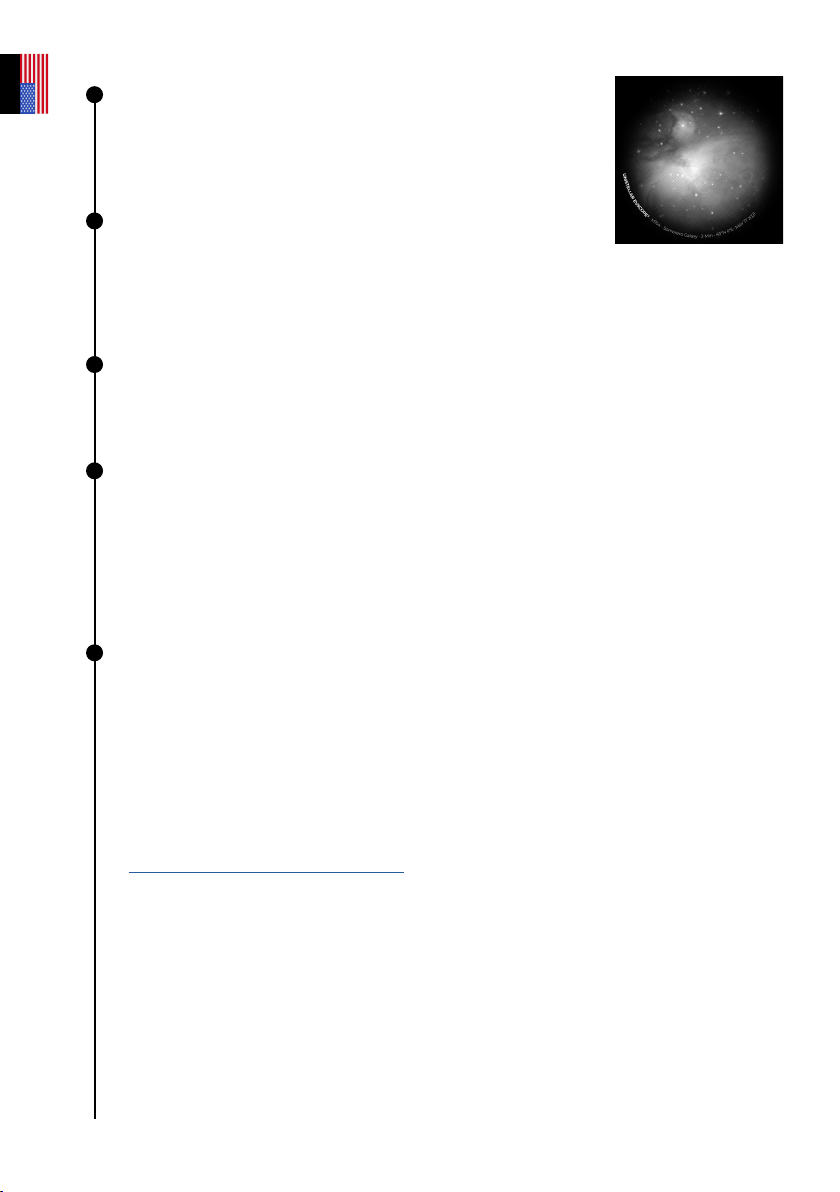
The improved eQuinox 2 sensor provides for more detailed observations, allowing
you to see everything from Jupiter’s big red spot to the inner details of the Orion
Nebula, our nearest stellar breeding ground.
The eQuinox 2 sensor has a higher resolution than that of the eQuinox. Your images
will now be 27% more detailed.
You will be able to observe the full Moon directly in your eyepiece, as well as the
three galaxies of the Leo Triplet, thanks to this new sensor and its wider eld of view.
eQuinox 2 specications:
Aperture 4.5 inches
Focal length 17.7 inches
Focal ratio f/3.9
Mount Azimuth
Optical design Newtonian
Image resolution 6.2 Mpx
Sensor's eld of view 0.75x0.56° (34x47 arcmin)
Maximum magnitude 18
Dimensions 2.13 ft x 0.75 ft
Storage capacity 64 Go
Weight 19.8 lbs
1
Technical specications:
Getting to know the
eQuinox 2
User guide | 10
English
Technical specications:
Accessories
Tripod:
Designed for deep sky observations, this tripod has a bubble level at the top of the three leg
locks that can be adjusted to dierent angles, next to where the telescope attaches. Your
observations might be slightly o if your tripod isn’t perfectly level.
IMPORTANT: Tighten the screws on your tripod, but don’t overtighten them, as this could
damage them and make the tripod unstable. Also, make sure that the legs are properly locked
before transferring your telescope to the tripod.
WARNING : The tripod must not be used for any purposes other than for holding your
telescope.
Tripod specications :
Dimensions : 1.93 ft x 0.42 ft - 4.1 ft max height and 3.2 ft max when opened
Weight : 4.41 lbs
!
!
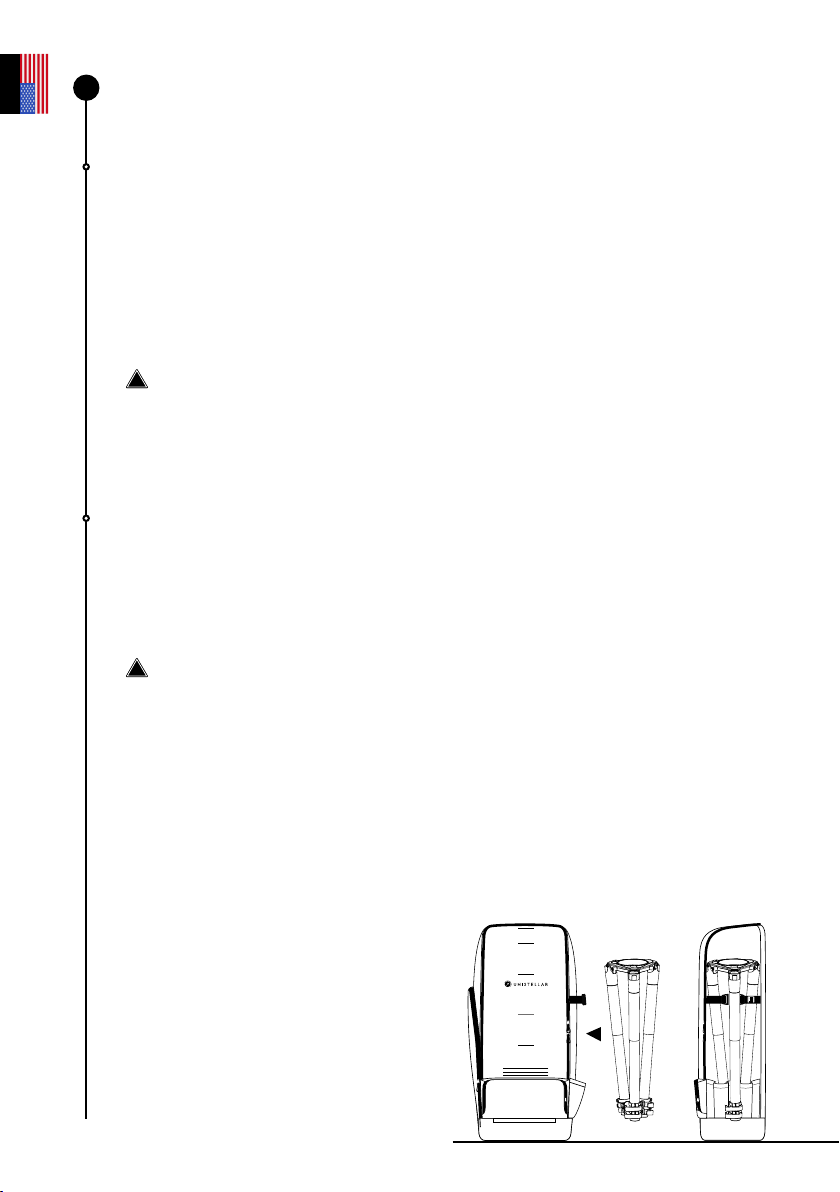
Backpack
The backpack is a separate accessory, not included with the telescope.
How is the telescope backpack made?
The telescope backpack is made using a durable fabric that has been reinforced and
padded with high density foam to protect your telescope..
WARNING: The backpack is not waterproof
Backpack specications :
• Integrated foam inserts that t the shape of your telescope.
• An inside strap to secure the instrument during transport.
• A removable rain cover (to protect against rain and moisture) located in the pocket of
the backpack.
• Adjustable padded shoulder straps and belt help distribute the load.
• 5 small inside pockets: 2 with zippers, 2 capable of holding the telescope’s cap
and the eyepiece cover.
• Ventilated back panel.
• 2 large outside pockets with zippers and 1 belt-level pocket with a zipper
Dimensions :
2.36 ft x 0.73 ft x 0.95 ft
(H x L x P)
Weight : 4.41 lbs
1
User guide | 11
English
Using your telescope
Prerequisites
WARNING : The screws in the legs of the tripod may loosen during transport or use.
Please verify that all the screws are in place. If they are not, tighten them with the tool
provided in the accessory kit.
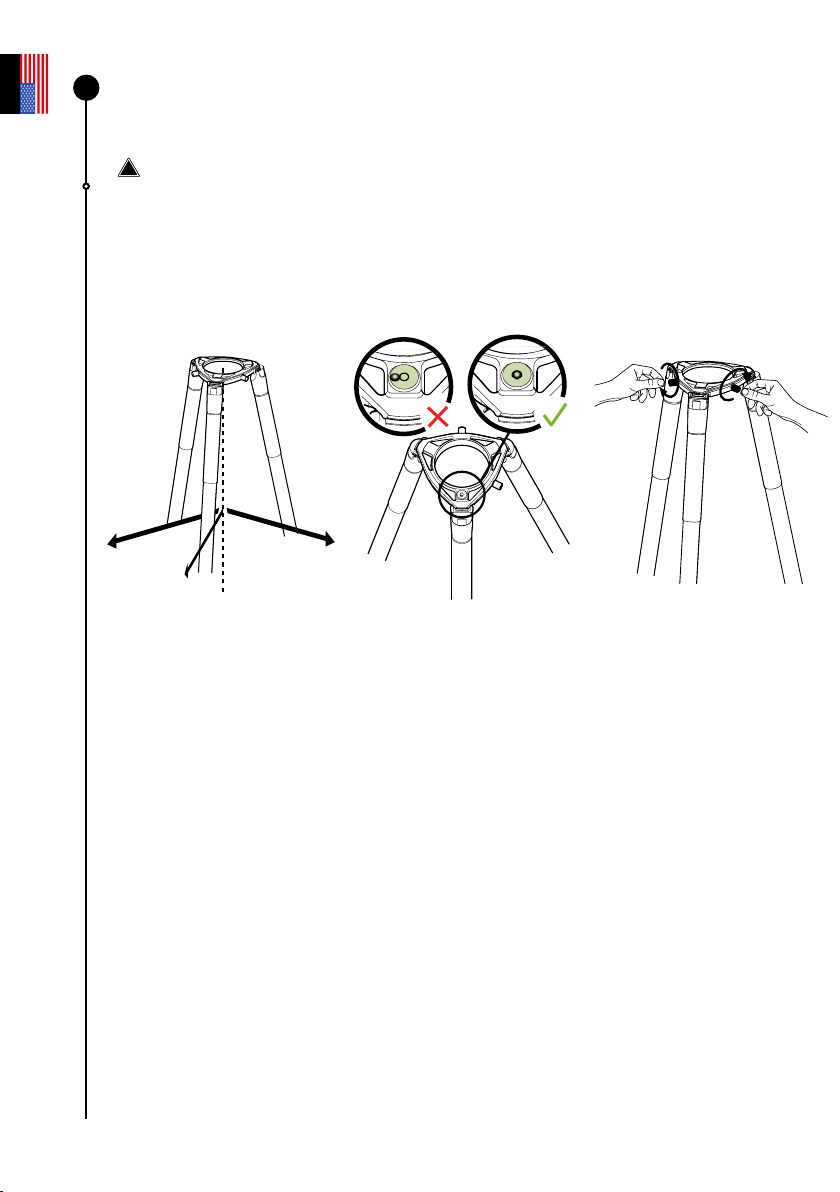
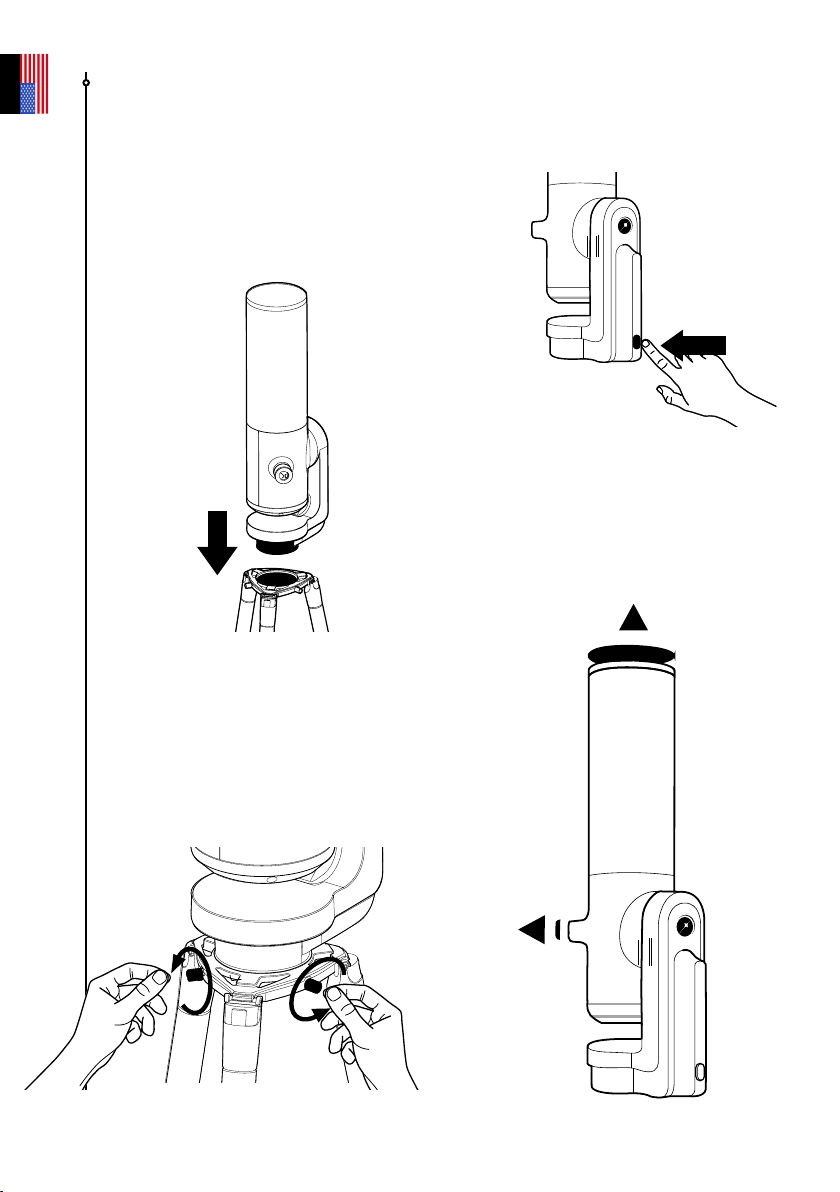
Installing and adjusting the tripod
Open the legs of the tripod
and adjust its height. Always
use your tripod on a rm
surface.
Locate the bubble level at
the top of one of the three
multi-angle tripod locks
(top). Adjust the legs so that
the bubble level is inside the
black circle.
Verify that the legs of the
tripod are secure.
Unscrew the two
screws on the crown of
the tripod.
IMPORTANT: TO ENSURE THE PRECISION AND ACCURACY OF YOUR OBSERVATIONS,
ALIGN AND RE-CENTER THE BUBBLE EVERY TIME YOU MOVE YOUR TELESCOPE.
Tighten the tripod screws with the tools included in the box to prevent the telescope
from falling, as they can loosen over time.
!
2
User guide | 12
English
Installing and turning on the
telescope
A - Install your telescope vertically on the
tripod. Check that the tripod base is properly
inserted and ts snugly into the tripod crown.
It should be stable—not loose or wobbly.
C - Turn the telescope on by pressing
the ON button for 2 seconds. The LED
turns purple, then red.
(You may not see the button light up when
using your telescope in daylight because
it is not very bright.)
D - Remove the caps from the
telescope’s optical tube and its
eyepiece.
B - Tighten the screws in the crown of
the tripod to secure your telescope. Be
careful not to overtighten the screws,
which can damage the threading.
PRESS
ON
2 sec
User guide | 13
English
Thermalization
What is thermalization?
Thermalization is the process of balancing the temperature of your telescope’s components
and its surrounding environment.
Why should I thermalize my telescope?
When the telescope’s mirror reaches thermal equilibrium, it performs at its best. This step
is critical to ensuring that the mirror and tube do not warp while in use, potentially causing
changes in focus and image quality.
How do I thermalize my eVscope?
If there is a temperature dierence between the outside and the room where your telescope
is stored, turn on your telescope and place it outside for 15 to 30 minutes before your
observation, depending on the temperature dierence.
Weather and temperature
If the sky is cloudy, you will not be able to observe with your telescope. The telescope is
highly sensitive to wind because it causes vibrations that can interfere with the enhanced
vision.
We recommend using your telescope within the following temperature range:
•O: 50°F to 104°F
•During use and charging: 50°F to 104°F
•During use: 32°F to 104°F
User guide | 14
English
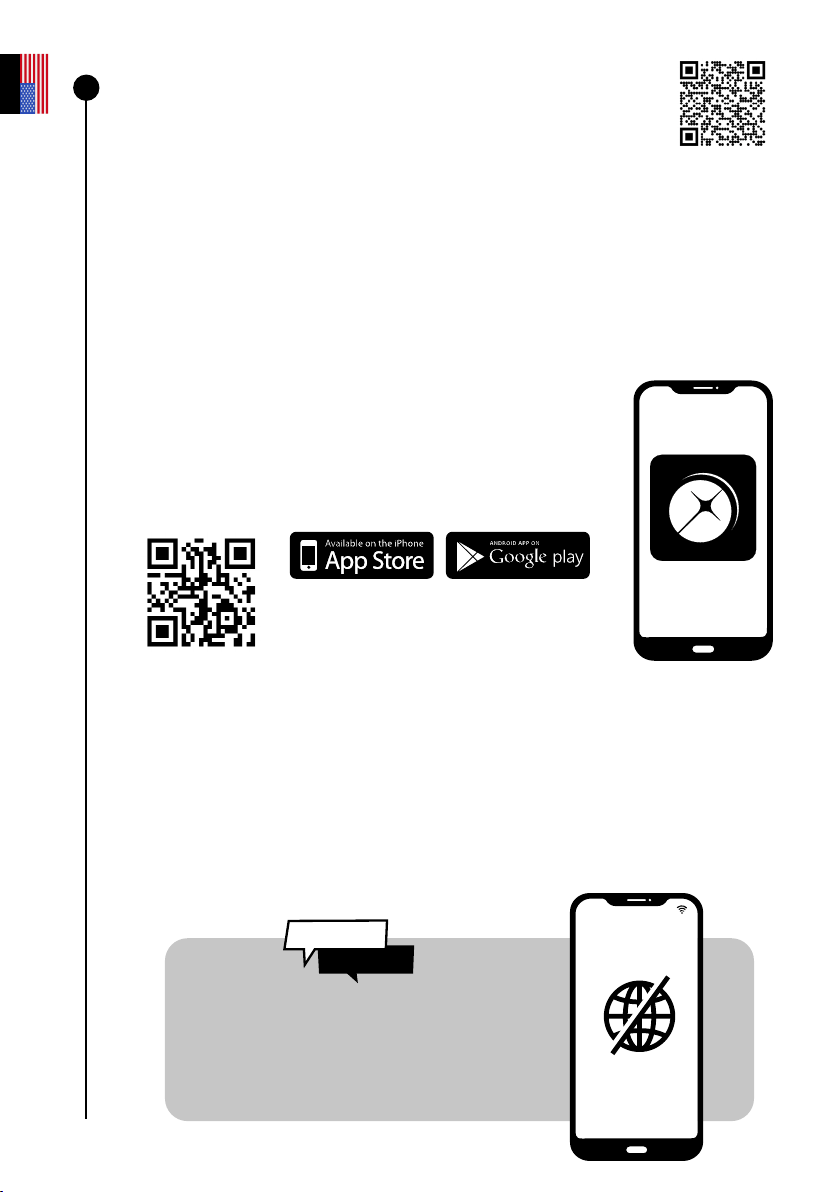
Downloading and installing
the Unistellar app
The Unistellar app is your portal to the Unistellar experience and our user community.
You can use the app to:
- Control the telescope.
- Discover recommended objects with your telescope.
- Share your observations with other members of the community and see theirs.
- Keep up with the latest news and scientic discoveries related to outer space.
- Contribute to scientic discoveries by participating in our observation missions.
ACTIVATE YOUR GPS BEFORE DOWNLOADING THE APP.
Where can I nd the Unisteller app?
In the Google® Play Store and the Apple® App Store (on
smartphones or tablets) by searching for Unistellar. The app lets you
control your wireless telescope over WiFi.
Minimum settings required to download the app:
• Android 6 or iOS 12 operating system
• Touch screen
• WiFi
• 140 MB available
The app is not supported on FireOS devices. If you are unable to download the app on your
smartphone, check your device’s operating system. Update the app whenever a new version
is available in the Apple® App Store (iPhone/iPad) or Google® Play Store (Android).
The telescope creates its own WiFi
network; it does not use your home’s
WiFi/internet. No internet connection
is needed for your telescope to work.
NO INTERNET
CONNECTION
3
Did You
Know ?
Scan the QR code to watch
a video tutorial.
User guide | 15
English
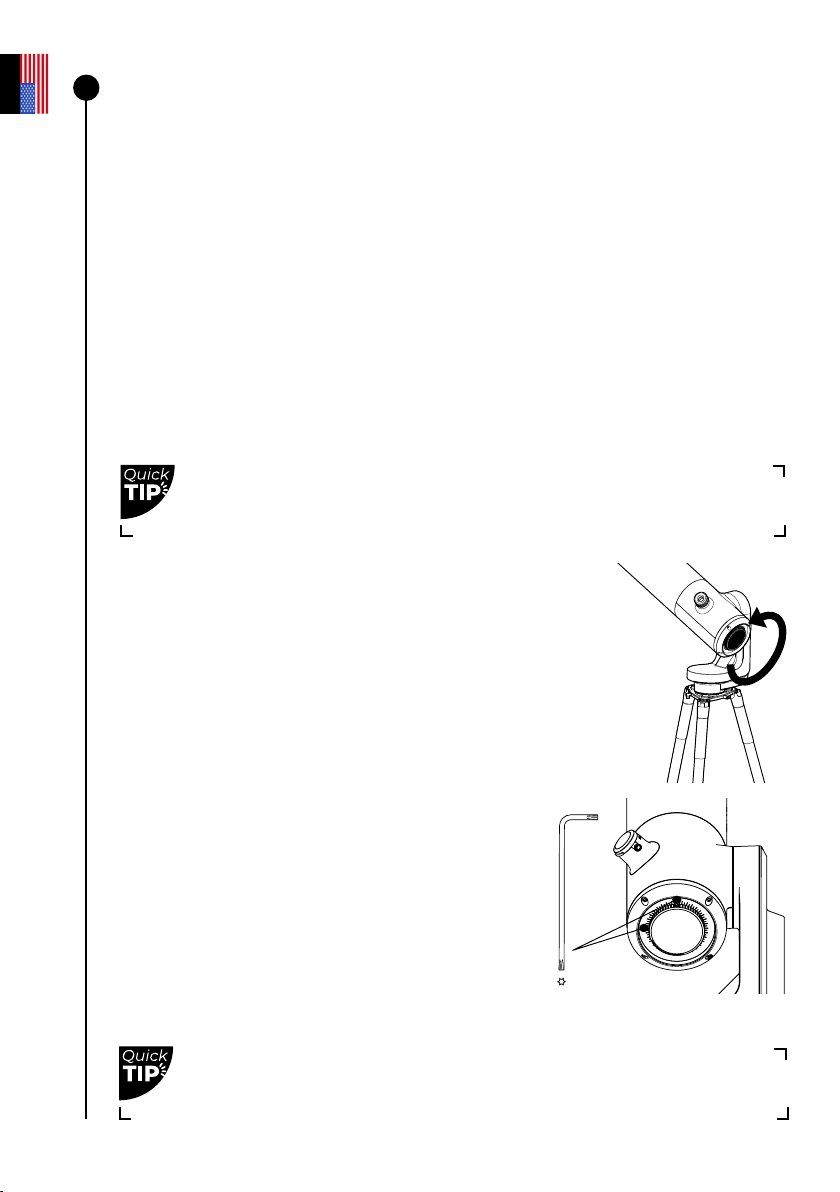
Collimating your telescope
What is collimation?
Collimation refers to the process of aligning the sensor and the mirror’s optical axis. You
do not need to carry out a collimation every time you use your telescope if it has not been
transported in a way that involves lots of movement, such as in the trunk of a car. We
recommend that you perform this operation once and then periodically check for shifts.
If you are having diculty focusing as described in the preceding sections or if you are having
diculty achieving high precision focus with your Bahtinov mask, your telescope may require
collimation.
How often should I collimate my telescope?
Collimation is rarely necessary. It should be done primarily when you transport your telescope in a
way that involves lots of movement, like after a trip in the trunk of a car.
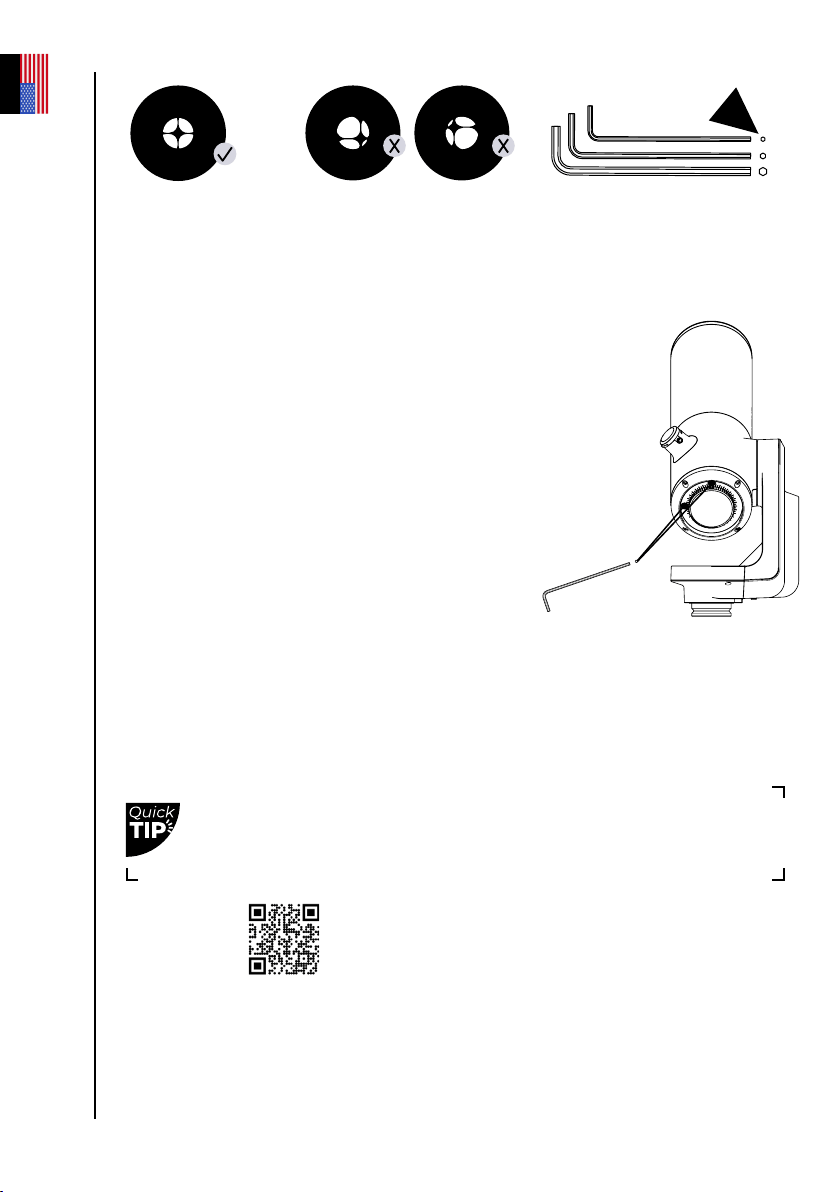
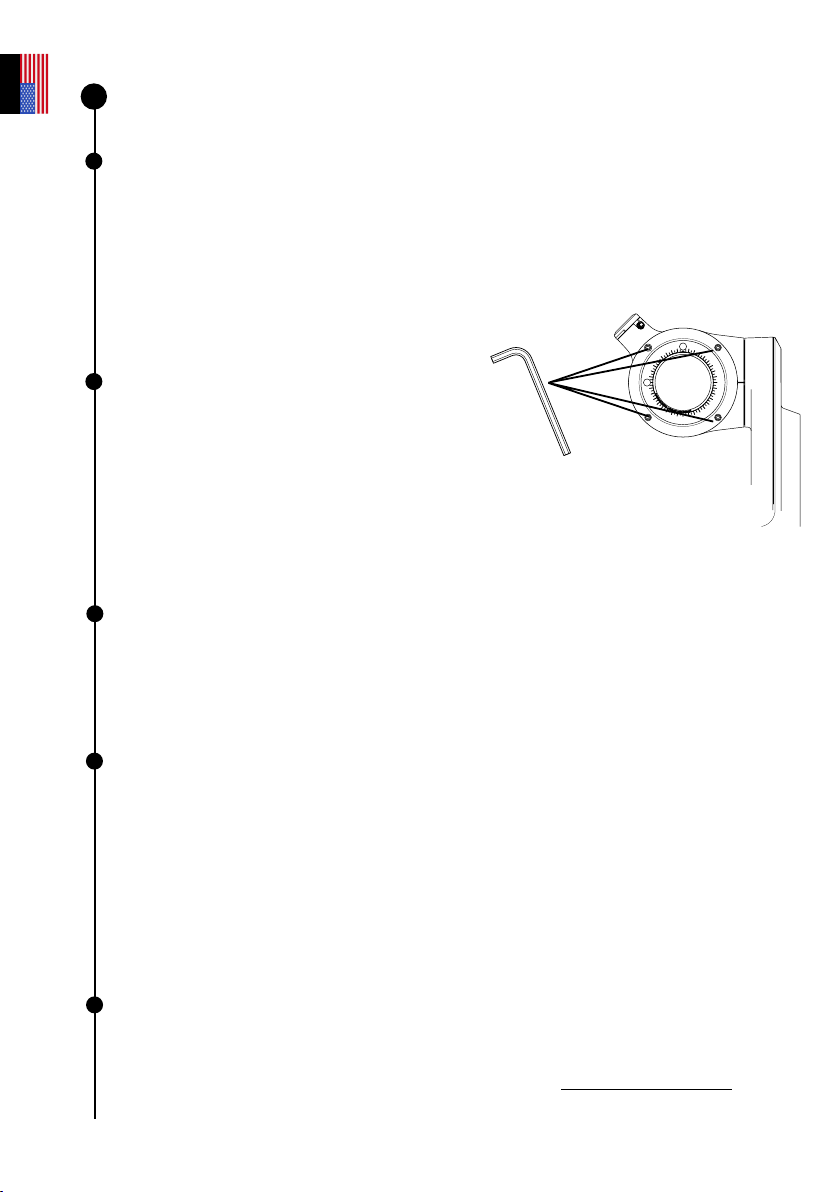
How do I collimate my telescope?
Collimate your telescope using the two screws located
on the bottom of the optical tube. Turning these screws
adjusts the position of the mirror. The top screw is used
to move the star vertically, while the left screw is used
to move it horizontally.
For this procedure, you will need:
1- The T20 Torx wrench (telescope tool 1) supplied in
the toolbox.
2- A clear sky with bright, fully visible stars.
Point your telescope toward a bright star, selecting the
rst star that is recommended in the catalog.
Center it using the joystick in the app.
# Tool 1 (T20 Torx)
Look directly into the eyepiece for this procedure.
Turn the wheel counterclockwise as far as it will go.
4
Check the collimation for the rst time right after receiving your
telescope.
User guide | 16
English
If the black cross ap-
pears as shown here,
your mirror is correctly
aligned.
If the black cross appears
as shown here, you need to
realign your mirror.
REPEAT THE PROCEDURE UNTIL THE CROSS IS CENTERED. SEVERAL ATTEMPTS MAY
BE REQUIRED.
Turn the focus wheel to align the visual mark. Orient the telescope toward a target and
enjoy the view.
Scan this QR code to be redirected to our
video on collimating your telescope.
Use the T20 Torx
wrench (telescope tool
1) in the toolbox.
Use the joystick arrows to move the telescope so that the star is at
the edge of your screen. Which edge depends on your cross. If the
cross is right of center, use the joystick to place the star on the right
edge of the screen; if the cross is left of center, place it on the left
edge, and so on.
Once the star is on the correct side, turn the vertical or horizontal mirror
mount screw with the T20 torx wrench (telescope tool 1) to adjust the
mirror and re-center the star on the screen and eyepiece.
Use caution with the screws. If you are a beginner, take your time and do not
skip any steps.
User guide | 17
English
Adjusting the focus
What is the focus?
The focus is the distance between the mirror and the sensor, which allows rays of light from
the object to converge correctly. The image will be blurry if the light rays converge before or
after the sensor.
How often should I adjust the focus?
Adjust the focus before any observation, including after leaving the telescope outdoors
to thermalize. You may need to readjust your focus during long nights of observation if the
temperature has dropped dramatically or if your other observation parameters have changed.
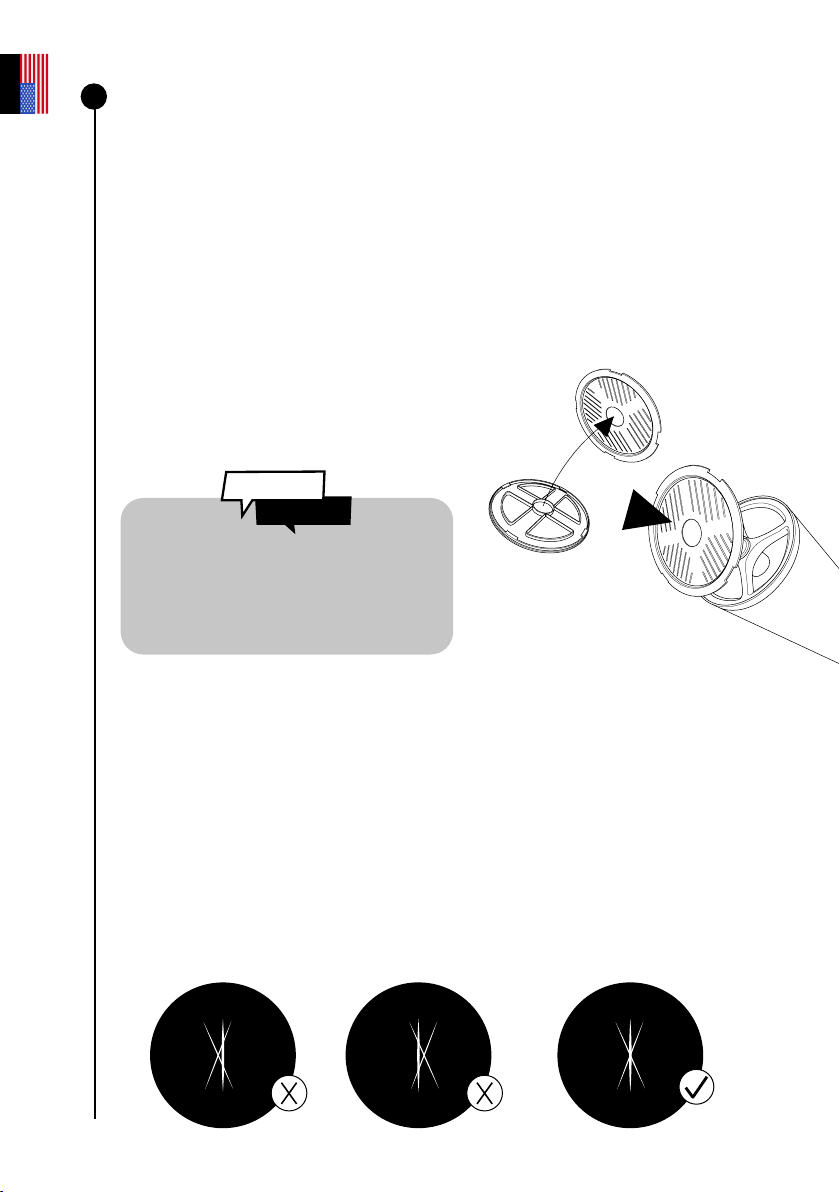
How do I use the Bahtinov mask for high-
precision focusing?
Go to the rst star recommended in the catalog because it will be the brightest star
available to you.
Separate the Bahtinov mask from the cover. Place it on the telescope’s tube, turning it
gently if necessary to t onto the tube.
This creates an X-shaped pattern visible in the eyepiece and on your screen. Pinch and
zoom on your device to see the X clearly.
If the pattern you see resembles the image below, your focus is complete.
Slowly turn the wheel until the line is centered in the X image.
The Bahtinov mask has three grills at
three dierent angles. It creates points of
diraction that allow for precise focusing.
5
Did You
Know ?
User guide | 18
English
DO NOT ACTIVATE ENHANCED VISION MODE WHILE ADJUSTING THE FOCUS.
Scan this QR code to be redirected to our video
on adjusting the focus with the Bahtinov mask.
The default “auto” settings are usually too bright. Adjust these
settings manually by deactivating “auto” mode.
REMEMBER TO REMOVE THE BAHTINOV MASK ONCE THE TELESCOPE HAS BEEN
FOCUSED.
User guide | 19
English
Orientation or Autonomous Field Detection (AFD)
What is AFD?
Autonomous Field Detection (AFD) is an algorithm that accurately identies any object in
the telescope’s eld of view by using an internal map containing tens of millions of star
coordinates.
What does AFD do?
AFD automatically points to objects in the night sky, making it easier to look for targets. It
also provides information about what you are observing, such as the distance from Earth,
the size, the age, and more.
Observation tips
Sensor calibration
(or dark frame)
What is the puprose of a dark frame ?
In digital photography, taking a dark
frame means recording an image
with no signal or noise. This process
improves your observations as well
as the quality of your images. A dark
frame enables the telescope’s onboard
computer to analyze and correct the
sensor’s inherent electronic noise.
How do I take a dark frame?
To take a dark frame, leave the cap on the telescope and make sure that you
are in a dark place. Do not expose the telescope to direct light.
Go to the user tab: My eVscope.
If an error message appears, try again later, ideally in a darker setting. It may be that too
much light was detected on the image.
Noise can occur during long exposures
or strong variations in temperature. The
appearance of hot pixels (red, blue or
green spots) on your images can reveal
the eects.
At what frequency should I take a dark frame?
Dark frames can be taken at any frequency you like. We recommend taking at least
one in the winter and one in the summer, as changes in temperature and altitude can
cause imperfections in the images. A dark frame should also be taken before each
scientic observation.
6
Did You
Know ?
User guide | 20
English
Software suite
The telescope’s software uses its onboard computer to stack and process images. It
produces an enhanced image and projects it in real time using an algorithm that adjusts
for the movement/rotation of the Earth. This makes it possible to get long exposure times
for observed objects.
Enhanced Vision
What is Enhanced Vision?
Enhanced vision is a system that uses a low-light sensor to continuously accumulate light
by stacking short exposure images. Enhanced Vision increases the brightness and detail
of the objects you observe over time.
It may take a few seconds to a few minutes to see the colors and shapes of objects using
Enhanced Vision, depending on the observation conditions (light pollution, moon phase,
weather, etc.) and the objects you are observing.
The telescope stacks images every 4 seconds.
Visible Sky Area
You can use the telescope on a balcony or in a garden, in the city or out in the
country. We recommend at least 45 degrees of open sky.
Depending on your location, various factors can aect the quality of your observations,
such as the quality of the night sky, the Bortle scale position, light pollution, atmospheric
interference, altitude, and your position relative to the equator.
Scan this QR code to be
redirected to our video on
observing a target that is not
included in the object catalog.
Light pollution
Even in areas with lots of light pollution, you will be astounded by the quality of your
observations with your telescope and what is visible in the night sky.
To lessen the impact of light pollution, avoid street lights (set up behind a building or
trees), building and security lights, and any other direct light sources. This will allow you
to appreciate objects like the Dumbbell Nebula, the Ring Nebula, and the Whirlpool
Galaxy.
7
Set your portion of the open
sky in the app so that the
catalog shows only objects
that are visible to you.
Did You
Know ?
User guide | 21
English
Frame
You can save images with or without frames by indicating your
preference in the app settings. The frame shows the object’s
name, its coordinates, the date, and the time.
Gain
Gain electronically increases the signal in “Live View”
mode. The lower the gain, the better the images; the higher the
gain, the brighter the image. Increasing the gain also increases noise. In other words, the
objects you see will be less bright, but they will be more distorted.
Exposure time
The exposure time is the amount of time during which the sensor is exposed to light
(between 1 ms and 4 s for a single exposure in Enhanced Vision mode).
Zoom
The zoom is set to x50, but it can be increased up to 8 times. Therefore, you can
zoom up to a maximum of x400.
A double-tap on the screen zooms in at x150. You can adjust this by swiping with two
ngers on your screen. Saving an image in “Live View” or “Enhanced Vision” mode while
zooming saves the original image, not the zoomed image.
Storing the telescope
After each observation, use your telescope’s “Store” function, available in
the “User” menu. This automatically moves it to the zenith position (i.e., the highest point in
the celestial sphere) and turns it o.
It is normal for your telescope to not be perfectly vertical when stored.
Put the telescope cover and eyepiece cover back in place before storing your telescope
in its backpack.
If you have any trouble with this procedure, please consult the troubleshooting section or visit
https://help.unistellar.com/hc/en-us.
User guide | 22
English
Additional battery information
8
Charging the battery
To charge the battery, use the supplied USB-C cable and adaptors to connect your
telescope to an electrical outlet. A power bank may also be used to charge your telescope.
(We recommend a USB 5V power bank.)
For an optimal battery charge, the maximum current used by the telescope is 2.4 A. Avoid
using a fast charger, which could fail to charge the battery as the charger might not be
detected.
The battery is estimated to last 2 to 10 years, depending on how often it is charged. A full
cycle equates to 10 charges of 90% to 100%.
Increasing the battery life
We do not recommend draining the battery (<20%).
Storing your telescope with a charge of 40% to 60% is essential for maximizing your battery
life. To avoid draining your battery completely, we recommend charging your battery at
least every 3 months. Keep your telescope away from light and moisture.
To increase your battery life, avoid using your telescope at low temperatures (<32°F) or
above 104°F, as this may cause damage. Very cold environments may increase battery
consumption.
Battery specications
– Lithium ion (6x1850)
– Capacity: 15 000 Ah (55,5 W.h)
– Normal use: *@~68°F : ~50% (5.5 hr)
– Charging time: 6.5 hr
The battery should not be removed by the user without prior inspection by Unistellar.
Lithium in airplanes
Lithium-ion batteries with a capacity of less than 100 Wh can be packed in checked
luggage like a portable electronic device.
User guide | 23
English
Storage and maintenance
Maintaining and storing the telescope
Store the telescope in its original packaging or in its backpack.
Store your telescope with the eyepiece cover and cap to prevent
dust from getting into the device.
Do not store the telescope with an empty battery.
Do not store the telescope in a damp location. Do
not store your telescope in temperatures below
50°F or above 104°F.
Do not store it in sunlight.
Maintaining the mirror
The mirror can be removed by unscrewing the 4
screws
located on the back of the adjustment mechanism
using the M3 Allen wrench (telescope tool 2).
It is important to use gloves when handling the mirror.
Once the system has been removed, the mirror
can be cleaned with dry compressed air.
Do not use liquid or a wet tissue to clean the mirror.
Maintaining and storing the tripod
The tripod screws may loosen with use. Verify that they are well tightened
prior to each use.
The tripod comes with three dierent tools for tightening the screws. Do not store the tripod
in sunlight.
Do not store the tripod in a damp location.
Traveling with the telescope
If you have to travel by plane, do not put your telescope in the checked backpack. It could
be damaged during transport, which would not be covered by the warranty. Use a hard case
to ensure that your telescope remains completely safe.
The telescope weighs 15.4 lbs, the tripod 4.41 lbs, and the backpack 4.41 lbs.
IMPORTANT: THE BACKPACK IS TOO LARGE TO BE USED AS A CARRY-ON FOR MOST
AIRLINES.
Lithium-ion batteries with less than 100 W capacity are allowed in checked bags if they are
attached to the device itself.
Warranty
The telescope is covered worldwide by a two-year warranty.
The warranty does not cover damages causes by dropping your telescope, even accidentally.
If you damage your telescope or need replacement parts, please refer to our FAQ.
9
User guide | 24
English
Exploration and more
Catalog
Our catalog recommends galaxies, nebulae, stars, and comets depending on the time and
your position. It lists thousands of objects, including:
• The main planets
• The Moon
• 110 Messier objects
• 2,500 new targets from the general catalog (CGN)
• Comets
• Thousands of small bodies in the solar system, including main belt asteroids, Jupiter,
Trojans, and the dwarf planets (V ≤ 15.5).
Source: NED - NASA/IPAC Extragalactic Database ned.ipac.caltech.edu
You can point to targets that are not yet in the catalog by entering the coordinates using
the Alt/Az or Ra/Rec button in the app’s Explore tab.
Objects like the Veil Nebula are dicult to observe and require a dark sky
to be visible. For beginning users, start with the brightest objects, like M51
or NGC 891.
10
Data
Why should I share my data with Unistellar?
HELPING TO IMPROVE THE OBSERVATION EXPERIENCE AND PARTICIPATING IN SCIENCE
(ACTIVELY OR PASSIVELY).
First of all, sharing your observation data is not mandatory—we have no access to it
if you choose not to share it with us.
The data collected by the telescope for each observation are stored in its memory and
includes raw data (images) of objects observed in Enhanced Vision mode or during scientic
missions, as well as metadata (geolocations and time stamps).
All data gathered by our users is securely stored in our database, allowing us to continuously
improve the observation experience.
By sharing your data, you can also help us make scientic discoveries. Visit our website for
more information about our active and passive scientic programs.
User guide | 25
English
BE CAREFUL WHEN ENTERING THIS INFORMATION. 8 TIMES OUT OF 10, A FAILED
DOWNLOAD IS CAUSED BY A TYPO IN EITHER OF THESE FIELDS.
Data storage information:
The SD card has a capacity of 64 GB. Do not change the SD card.
You can free up storage space by downloading your data on a regular basis. Your telescope
can download at a rate of 6 Mbps on a 2.4 GHz network and 8 Mbps on a 5 GHz network. It
will take at least 30 minutes to download 12 GB.
Your observation images are saved to your smartphone. You can always save images to
the gallery if your memory is full (100% data storage used). The telescope will continue to
work normally, but you will not be able to participate in community events or citizen science
campaigns.
How do I upload my data?
With your smartphone connected to your telescope, open the “User” tab in
the Unistellar app and go to “My eVscope”.
Tap the “Upload data” button. (The button will be grayed if there is no stored data.)
Enter your “Wi-Fi information” (your home WiFi network or your phone’s hotspot). Enter the
SSID (your network’s name) and your password. The password is case-sensitive and may
include special characters.
Start downloading your data after each night of observation. The telescope
will turn o once the transfer is nished.
- Click “OK”. The telescope’s LED will go from red to bright ashing yellow, indicating that the
telescope is trying to connect to the selected network.
Your device will no longer be connected to the telescope, and information like the name or
storage use will no longer be accessible in the app. The LED will ash steadily.
Once connected to the selected network, the light becomes:
- Green and ashing rapidly between 1 and 6 times, then steady green for one minute if
the download was successful.
- Steady orange for one minute, which means that an error occurred. If this happens, see
Section 9 – Troubleshooting in this user guide.
Once the transfer has nished, connect your phone to the telescope again and go back to
the “My eVscope” tab in the app. You should see “Storage: 1% used”. The remaining 1% is
used for dark frames and for internal les needed for the telescope to operate.
User guide | 26
English

The number of ashes indicates how much data is being transferred. The higher the
number of ashes, the more data there is to transfer.
Scan this QR code to be redirected to our FAQ for more
visual content, including a video on how to download
your data: help.unistellar.com
We are working to make RAW images accessible for post-processing.
Sign up for our newsletter to stay informed.
There is no USB or Ethernet port for reading images. Images can be saved and shared on
a smartphone connected to the telescope. They are in PNG format.
Did You
Know ?
User guide | 27
English
The SETI Institute is dedicated to scientic
research, education, and public outreach.
Its mission is to explore, understand, and
explain the origin and nature of life in the
universe and to apply the knowledge
gained for the purposes of inspiring and
guiding current and future generations.
Actively contribute to
science
SETI Insitute
In July 2017, the SETI Institute and Unistellar
joined forces to develop science applications
for the telescope network. You have the
potential to make a signicant contribution
to a wide range of research topics such
as planetary defense, exoplanets,
occultations, and the study of many
transient astronomical events.
Scientic campaigns
Subscribe to our citizen science emails or join our Slack group to interact with our community
on scientic observations.
You’ll soon become a citizen astronomer and contribute to scientic discoveries.
Planetary Defense
Our planet is not free from danger. Our solar system is home to other celestial bodies such
as asteroids and articial objects. Asteroids sometimes cross the Earth’s orbit. Some of these
near-Earth asteroids are “potentially hazardous asteroids,” meaning that they could crash
into the Earth. The Planetary Defense program aims to locate, track, and characterize these
near-Earth objects (NEOs) in our solar system. Each month, Unistellar scientists suggest
dierent targets to observe with your telescope.
Asteroid occultation
Asteroid occultation detection entails observing an asteroid pass between a bright star and
your location on Earth. The telescope’s recording of the star’s blinking provides valuable
data that astronomers can use to learn more about an asteroid’s trajectory, size, shape, and
composition.
When launching an observation campaign, scientists invite telescope users to join their search
by activating “Occultation Mode” on their device. Observe the sky with your telescope, send
this data to scientists, and help keep the world informed about and aware of asteroids. You will
then receive the results of your occultation.
No matter where you live in the world, there is probably an occultation that you can observe.
11
Did You
Know ?
User guide | 28
English
Troubleshooting
Logging in
Unable to log into the app
Verify whether you are logged into your telescope. WiFi should be enabled on your device,
and the telescope should be on and less than 5 m away. You can also log into your telescope
manually by selected the WiFi from the available networks. If the problem persists, reinstall
the app.
The WiFi connection may be disrupted for various reasons:
– Too much distance between you and your telescope
– The WiFi signal is blocked by a thick wall
– An insulating layer installed on the telescope
– Automatic locking of your device
– The WiFi preferences in your OS (If you have iOS, verify that local networks
are allowed and that private networks are o.)
– A communication error between the telescope and the phone
– Your telescope’s LED light is purple
There is no way to increase the telescope’s WiFi signal. You can try using an extender with
the same SSID as the telescope to extend its range. If you encounter connectivity problems,
disable the automatic connection options for unknown networks.
WiFi indicates “no internet connection”
Once connected, some WiFi networks indicate that there is no internet connection. This
means that you cannot access the app or use your telescope. Depending on your device’s
settings, you may not be able to have an external internet connection.
If you use your telescope far away from any internet network, you can use your app because
the telescope generates its own WiFi. The catalog will not receive updates, but you will be
able to observe without any problem.
LED COLORS
If everything is good, the ON button changes from purple to red after a being on for
a few seconds.
Red: Your telescope is on and ready for observing.
Flashing red: The telescope is in the process of pointing or in Enhanced Vision mode.
Flashing blue: The telescope is o and charging. It ashes between 1 (fully charged) and 6
(fully drained) times.
Flashing yellow: The telescope is updating.
Flashing green: Data is being transferred.
Green: The data transfer was successful.
Orange: The data transfer failed.
Purple: The onboard software is turning on or o. If the LED remains purple without changing
color, please contact support.
Flashing purple: The telescope is out of battery. Please charge it.
White: An error occurred. Please contact support.
12
User guide | 29
English
NOT POWERING ON
The telescope is not powering on
The push button is not working. Please contact support.
The telescope turns on but does not charge
1 - Your charger is defective or broken:
The charger uses a standard USB-C port. Please try using another compatible charger in
the USB-C port. If the telescope is o and the LED is ashing blue, the original charger is
defective or broken.
2 - The telescope does not charge even though the charger works ne:
Please turn on your telescope, insert the charger, and then turn o your telescope.
If the telescope still does not charge after following these steps, the USB-C port is defective
or damaged. Please contact support.
The telescope does not charge or turn on
Please keep the charger inserted for 3 days. If the telescope still does not charge,
please contact support.
Images
The stars are not round and dened.
The telescope is out of focus. Please refer to the section
USING YOUR TELESCOPE | Adjusting the focus
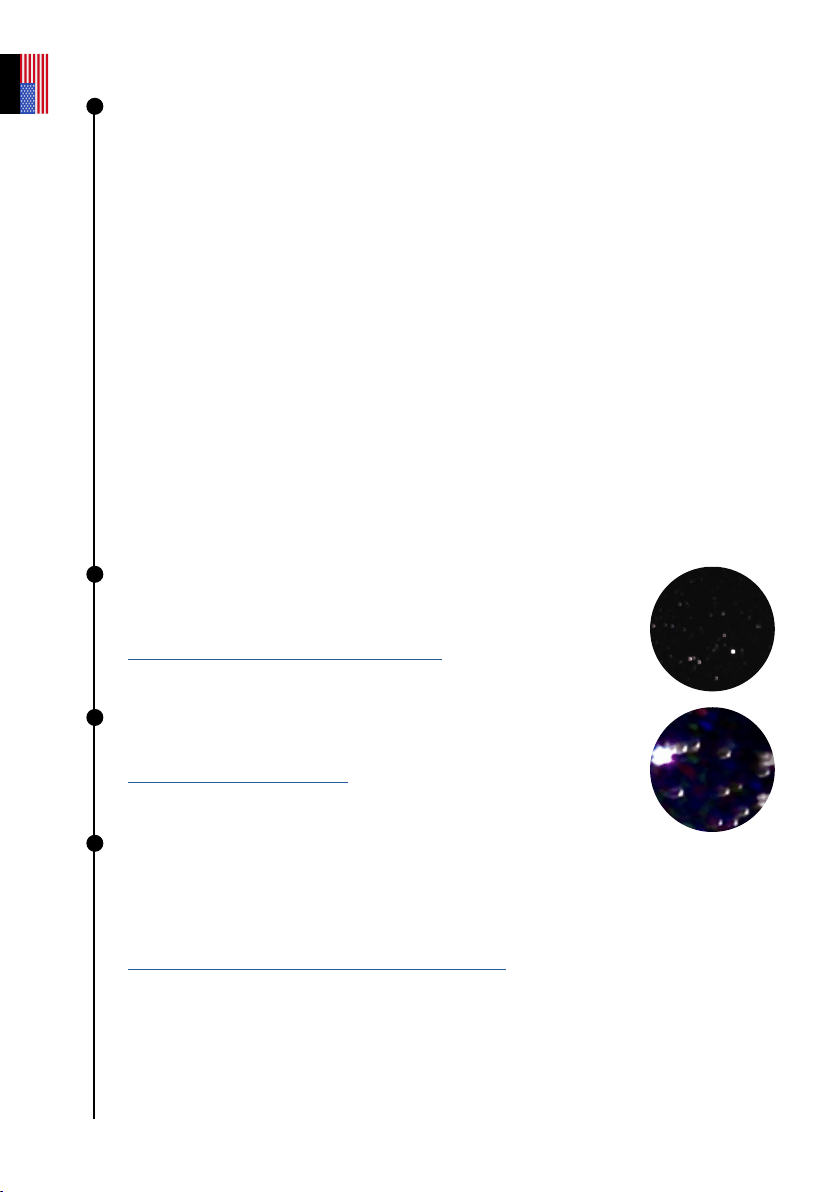
Stars are distorted
The collimation is not optimized. Please refer to the section
COLLIMATING YOUR TELESCOPE
Stars are blue and red
This is caused by electronic noise.
You should put the cover on top of the telescope and take a dark frame. This image
reveals the electronic noise that is inherent to the sensor. The noise will then be
subtracted from the final image, and you will no longer have colored pixels.
OBSERVATION TIPS | Sensor calibration (or dark frame)
User guide | 30
English
Enhanced Vision stops
The Enhanced Vision mode stops or does not work. You may receive one of the following
messages:
- “Major impact detected – Please check and realign the level.” A major impact has been
detected (e.g., a kick to the tripod). Readjust your bubble level and follow the focusing
procedure, as explained in the quick start guide.
- “Too close to zenith – Please realign to a lower altitude.” The telescope
is close to the zenith position. Follow the focusing procedure.
- During your observation, you may see the message “Enhanced Vision abandoned.” One of
the images cannot be saved due to its poor quality and should be disregarded in order to
preserve the quality of your observation.
Two specic messages may appear :
- “Enhanced Vision abandoned. Vibration detected.”: A minor impact was detected (e.g.,
bump to the eyepiece or a gust of wind).
- “Enhanced Vision was interrupted. Too bright.”: An image was polluted by
light (e.g., nearby ashlight or smartphone)
Data download failed
In 8 instances out of 10, there is a typo in the network name (SSID) or password, but there
may be other factors causing this problem. For example, the maximum number of devices
allowed on the network has been reached, there is MAC ltering in place, or there is a WiFi
channel incompatibility. In the case of a WiFi channel incompatibility, simply restart the WiFi
connection on your router/device to resolve the problem. For the other two problems, you
will need to log into your home WiFi network using another device to enable other devices
or add the eVscope’s MAC address to the list.
5 ashes: 81% - 100% remaining to download
4 ashes: 61% - 80% remaining to download
3 ashes: 41% - 60% remaining to download
2 ashes: 21% - 40% remaining to download
1 ashes: 1% - 20% remaining to download
User guide | 31
English
Keeping in touch
Need help ?
Website : help.unistellar.com (scan the QR code)
Contact support : support@unistellaroptics.com
FAQ : help.unistellar.com
@unistellar
@unistellar
@unistellarscope
@unistellarscope
v 1.1.6
User guide | 32
English
UJser Guide | 32
English