User Guide
eVscope 2
The Universe
Awaits.
Who is
this user guide for ?
This guide is for all Unistellar
community members and users,
whether you are a beginner
or experienced, an astronomy
enthusiast or simply excited
to make new discoveries. This
guide will ensure you properly
set up your telescope and ob-
serve in good conditions, to get
the most out of your eVscope 2,
including beautiful images.
How
Is it organized ?
In this user guide, we will walk
you through every feature and
setting, step by step, to optimize
the use of your telescope. You
will learn how to get the best
experience possible every time
you observe the sky. You will also
learn about Unistellar’s mission,
as well as the science projects
you can participate in.

Summary
User Guide
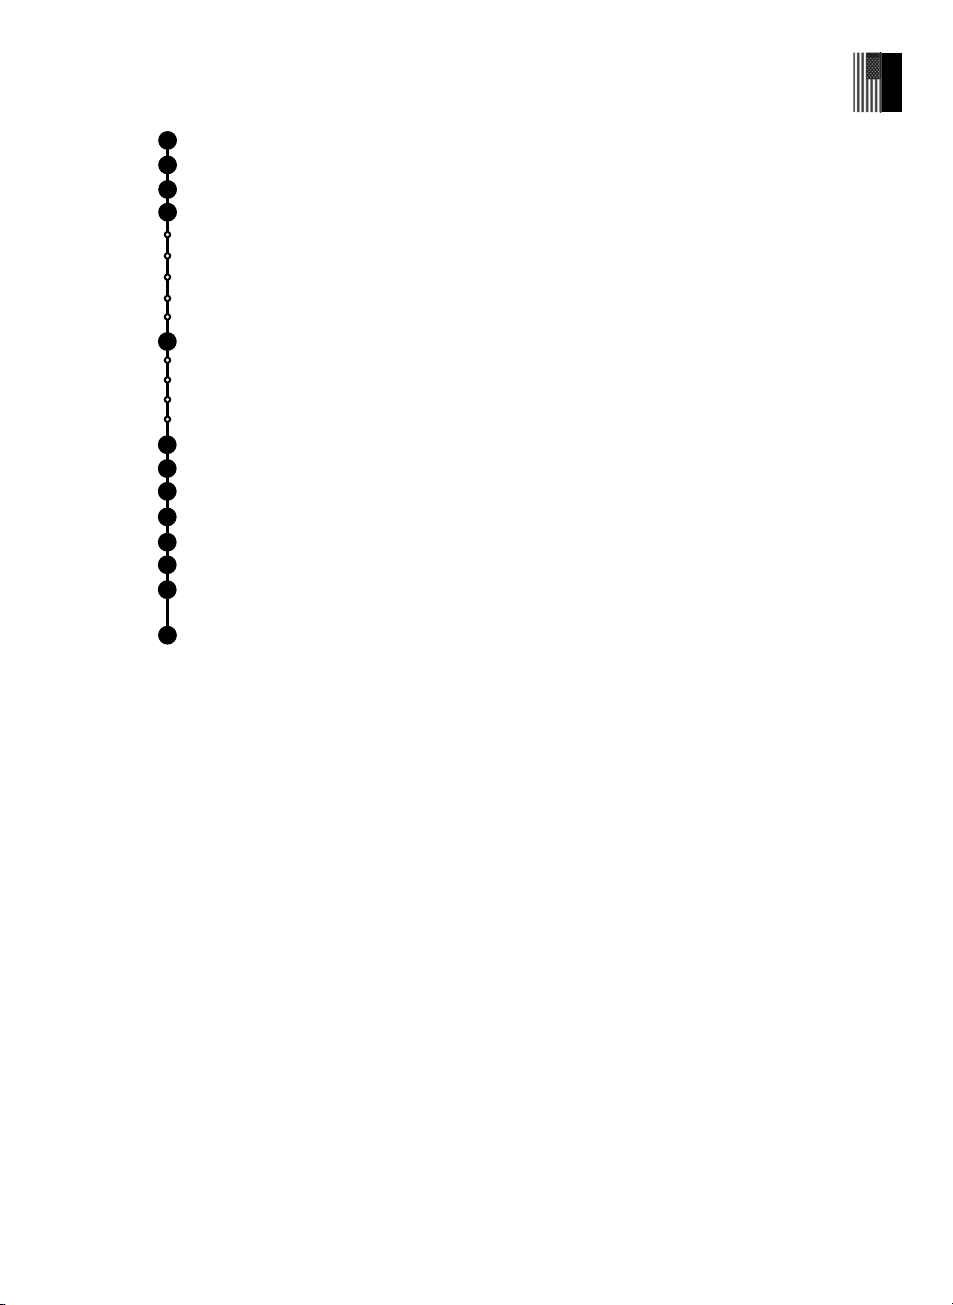
Introduction : Unistellar’s Mission
Before you start : Everything you need to know about the eVscope 2
Download and install the Unistellar App....................................................................................P14
Your fi rst deep-space exploration.....................................................................................................P15
1. Set up and level the tripod
2. Install the eVscope 2 and power it on
3. Connect your eVscope 2 to the Unistellar App, using WiFi
4. Explore the night sky
5. Park your eVscope 2
Best practices for your observations..............................................................................................P19
Thermalization
Focus adjustment
Dark frames
Collimation
Get the most out of your eVscope 2...................................................................................................P24
Data................................................................................................................................................................................P28
Contribute actively to Science..............................................................................................................P30
Share your observations...............................................................................................................................P31
Storage and maintenance.........................................................................................................................P32
Troubleshooting.................................................................................................................................................P33
Let’s keep in touch...........................................................................................................................................P35
Need help ?
Glossary
1
3
9
10
2
4
6
7
5
8
4 | User guide
English

User guide | 5
English

Introduction
Unistellar’s Mission
Unistellar was founded in 2017 by two former PhD students of the 2018
Physics Nobel Prize winner, a visionary industrial engineer, and a world-
famous Californian astronomer. All of them share one common
desire: to make astronomy more accessible and exciting for everyone
- and ultimately to bring the Universe closer.
Unistellar is disrupting the astronomy market with consumer telescopes
that are easy to use and powerful enough to allow you to experience
the beauty of space and make scientifi c discoveries. This fun and edu-
cational instrument gives access to thousands of targets, while tradi-
tional optical telescopes only allow for a few objects to be seen clear-
ly. Unistellar telescopes are the most portable, simplest and fastest to
operate, whether from an in-town balcony or the countryside.
Our telescopes provide an unparalleled user experience : they are very
easy to use, ready in a few minutes, controlled by your smartphone,
and able to automatically point at thousands of objects from our ca-
talog.
Unlike other telescopes, our community of users can easily upload
and share their data. This allows for new experiences such as crowd-
sourced pictures of the sky or the transmission of valuable scientifi c
data to professional astronomers.
6 | User guide
English
WARNING
!
User guide | 7
English
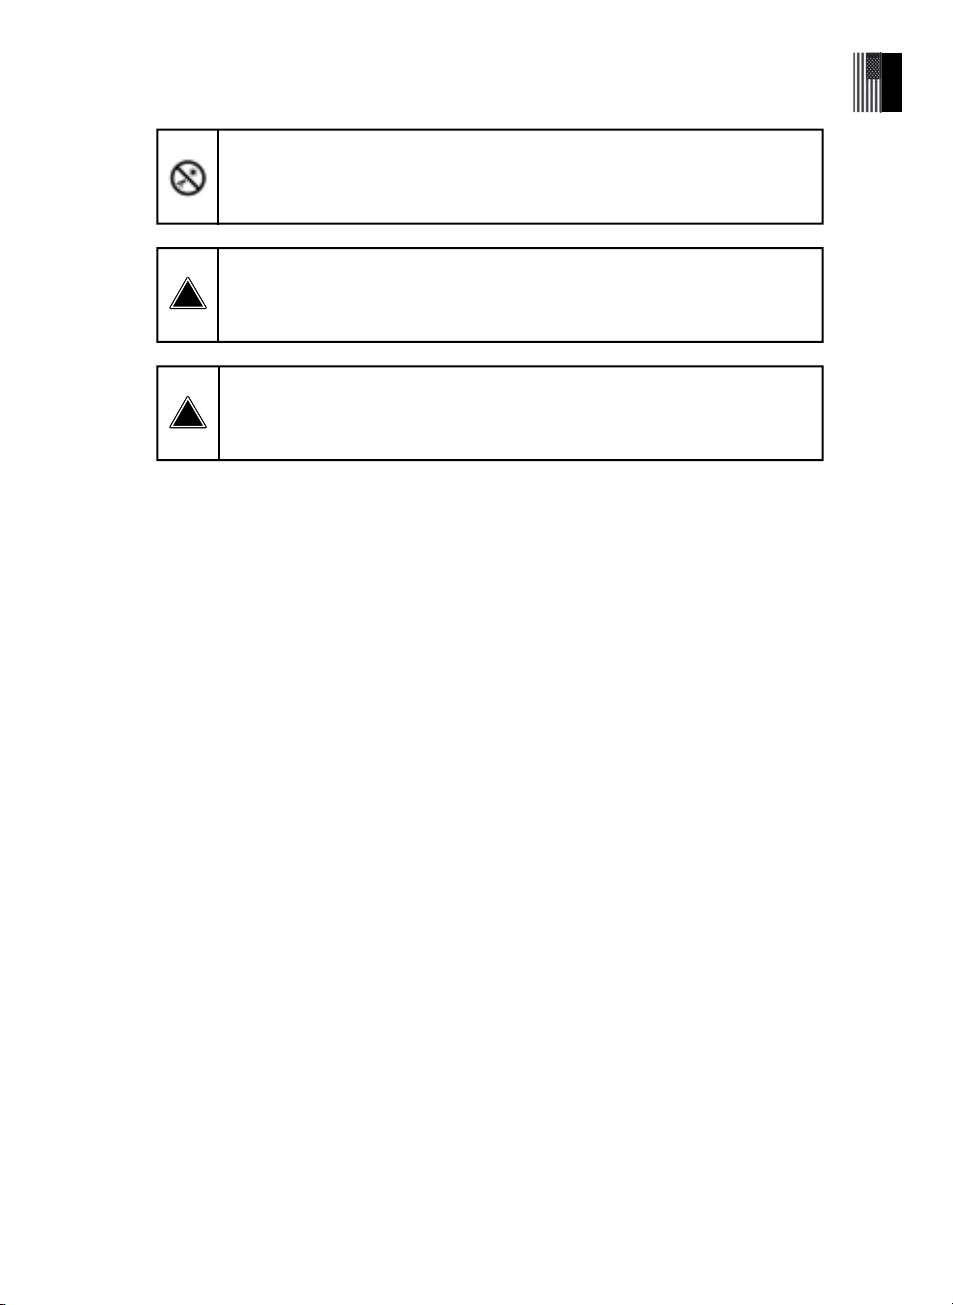
FORBIDDEN !
Never use an eVscope 2 to look at the Sun without an adapted fi lter !
Looking at or near the Sun will cause irreversible damage to your product.
Do not point the telescope at or near the Sun.
Children should always have adult supervision while observing.
WARNING !
Never charge the eVscope 2 if the temperature is under 10° Celsius.
It could cause irreversible damage to the eVscope 2’s battery.
Always charge it between 10°C and 40°C (40°F and 104°F).
WARNING !
Never let the eVscope 2 with the battery plugged in without using it for
more than a month. It could cause irreversible damage to the eVscope 2’s
battery. Always unplug the battery for long storage.
!
!
8 | User guide
English
8mm
1
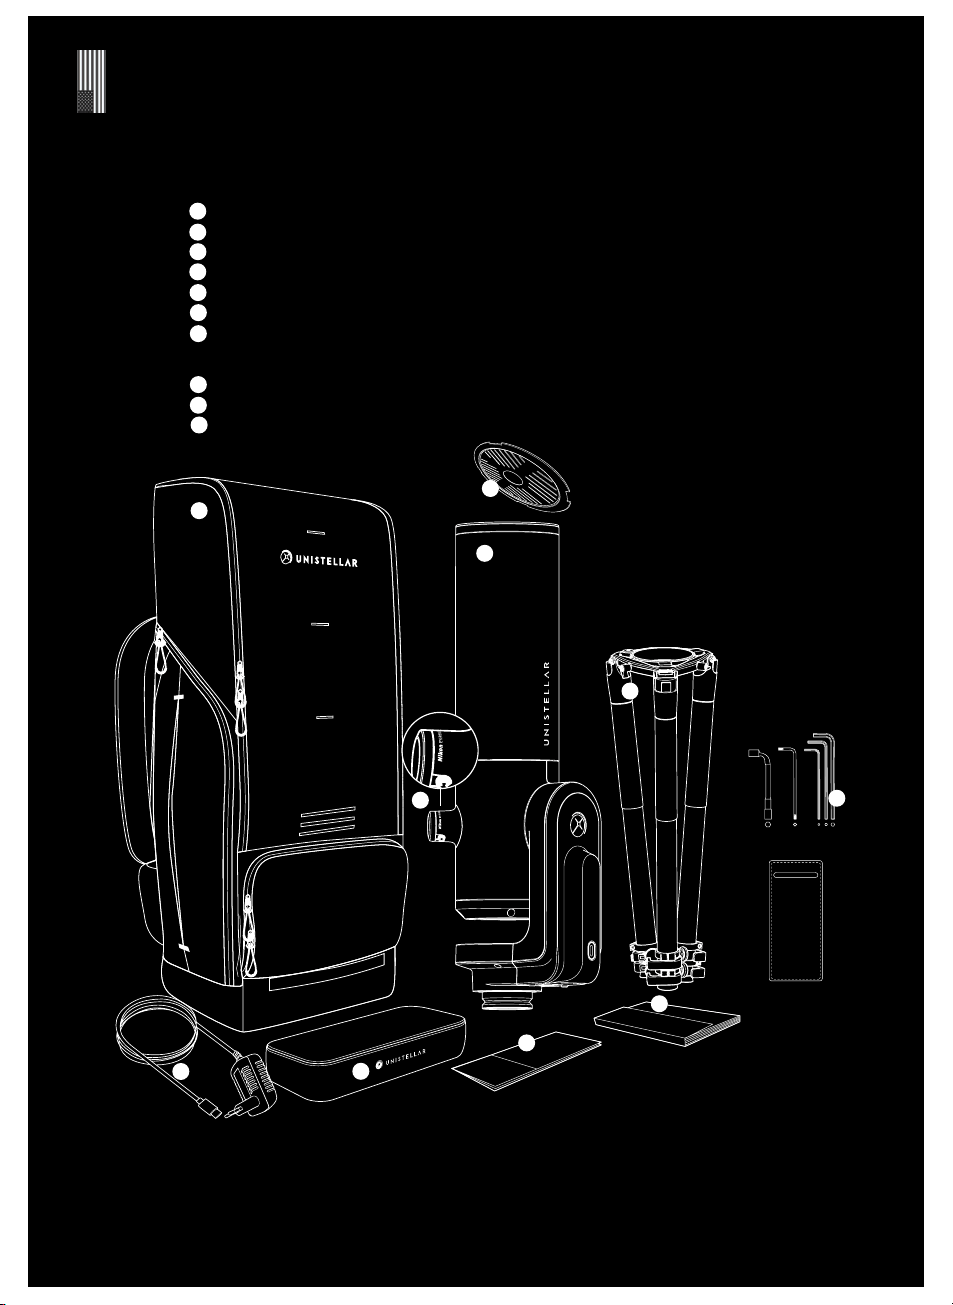
BOX CONTENT
2
6
7
8
4
3
5
1
10
2
3
4
5
6
7
8
9
9
eVscope 2
Bahtinov mask (located in the cap cover)
Tripod + cylindrical black foam to keep in case of return
Power supply with adaptable plugs (EU, USA, UK, JP)*
Quick start guide
User guide
Accessories box with tools
Tripod Tool 1 (Socket wrench 8mm) / Tripod Tool 2 (Allen Key M5.5) Tripod Tool 3 (Allen Key M4) /
Telescope Tool 1 (Torx Key T20) / Telescope Tool 2 (Allen Key M3)
Removable cover + 2 spare screws for the tripod
Backpack
Tube Dust cap & eyepiece cap
*Except for Australia, New Zealand, Hong Kong & Singapore (power cable only)
User guide | 9
English
10
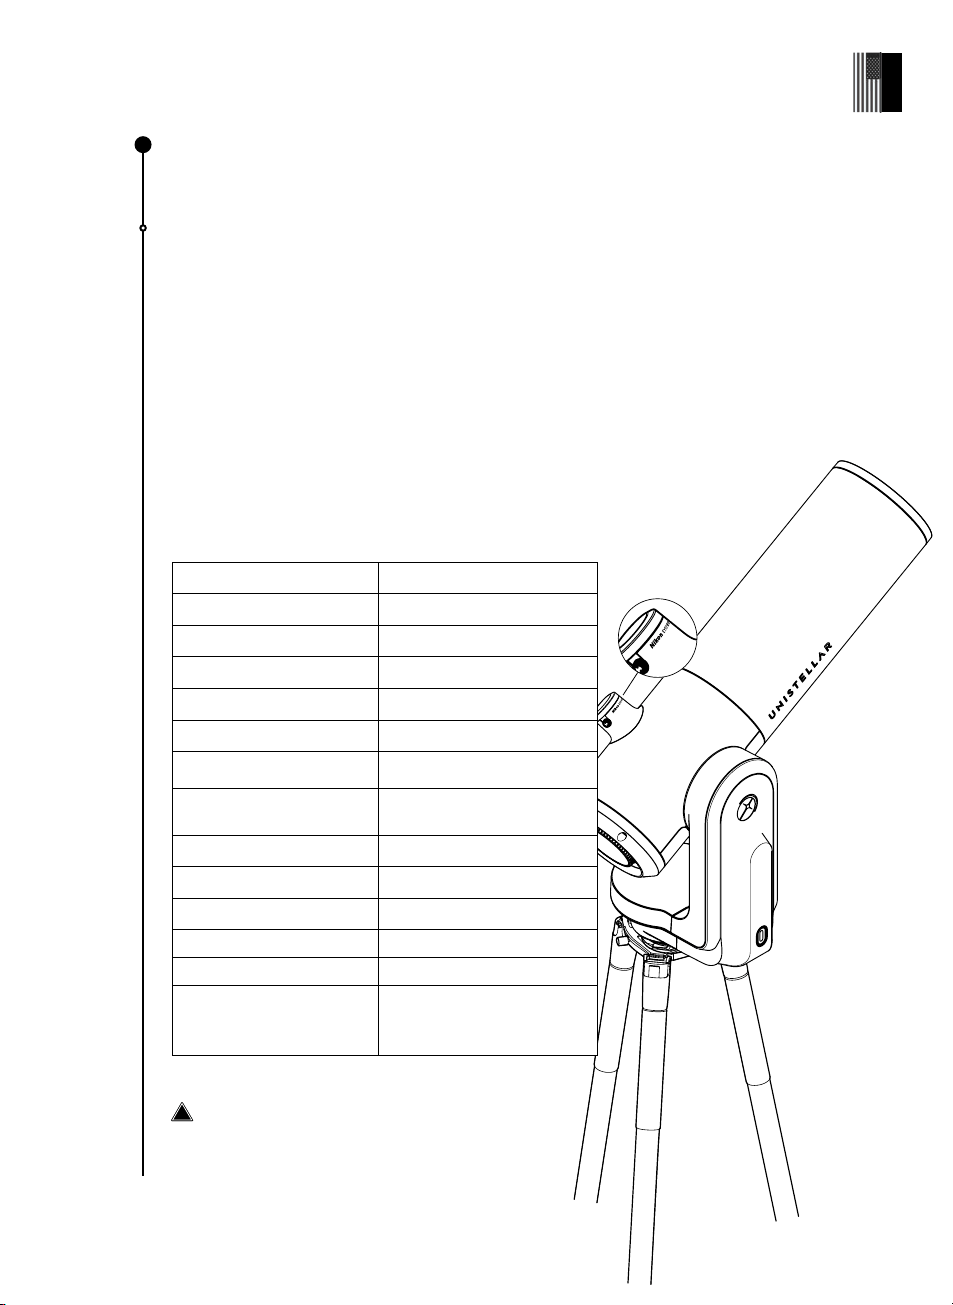
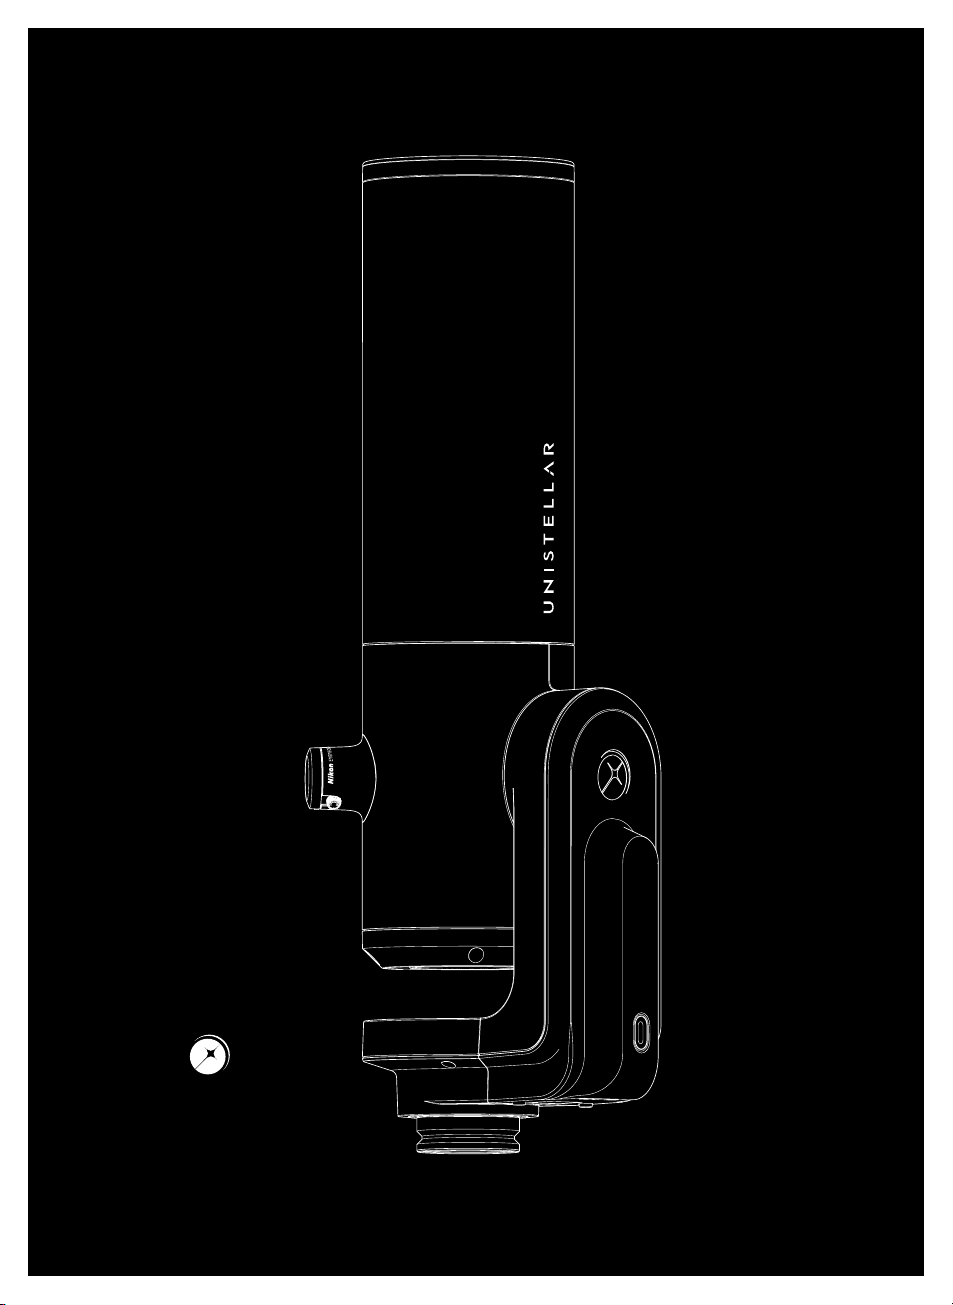
The eVscope 2
What is the eVscope 2 ?
User-friendly, smart and autonomous, the eVscope 2 is the perfect grab-and-go
telescope. Safely and easily transport the eVscope 2 and tripod in its backpack.
What makes the eVscope 2 user-friendly?
The Enhanced Vision (patented technology) and the Autonomous Field Detection.
Learn more about these features in section 4 - Get the most out of your eVscope 2.
When you receive your package and open it up, you will see a cylindrical black foam
with a red tape placed in between the mirror mount of your Unistellar telescope and
the onboard computer. The easiest way to do so is by pushing it out from the back and it
will slide on the side.
eVscope’s characteristics:
Aperture 114 mm (4.5 inches)
Computerized Yes
Resolving power 1.33 arcseconds
Focal Lenght 450 mm (17.7 inches)
Focal Ratio f/3.9
Mount Alt-Azimutale
Optical Design Newtonian
Sensor IMX347 low read noise 1 e-
(trademark of Sony®)
Sensor fi eld of view 0.75 x 0.56°
Weight 9 kg (19.8 lbs)
Mirror refl ectivity 92-96%
Max magnitude
16 (up to 18 in best conditions)
Eyepiece Nikon "Viewfi nder"
Measurements
65cm tall and 23cm wide
(25.5-inches tall and
9-inches wide)
Warning: the eVscope 2 cannot be mounted
on any other tripod
Before you start :
Everything you need to know about the eVscope 2
!
10 | User guide
English
User guide | 11
English
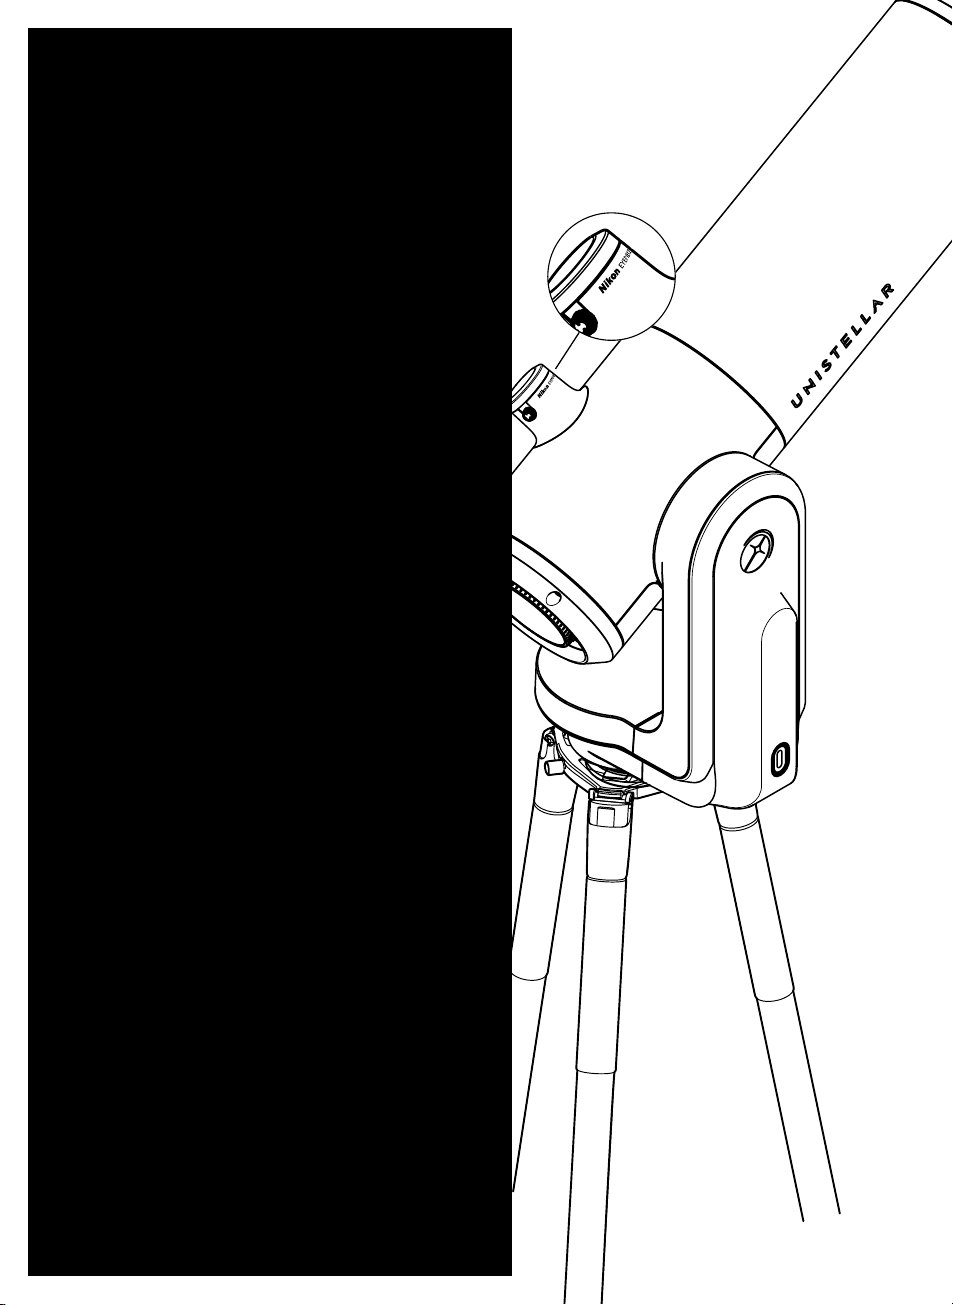
The eyepiece
What is the eVscope 2 eyepiece ?
The technology OLED display has extremely high-contrast with True black, with an
optical setup designed to stream the sensor's view. The result: mind-blowing visual
quality for your observations of the dark sky.
How to use it?
You can adjust the dioptry and sharpen the image based on your eyesight, especially
if you wear glasses or contact lenses by rotating the side knob counterclockwise
fully, followed by 3 to 4 clockwise turns until perfectly adjusted to your sight.
The fi eld of view cannot be changed, even with a Barlow lens.
The battery
The eVscope 2 comes fully charged and ready to use.
What is the eVscope 2 battery ?
Battery’s characteristics: Lithium-ion (6 x 18650, 15 Ah) - lasts up to 9 hours.
A rechargeable Lithium-ion internal battery is built into your eVscope 2. The battery can be
replaced in the event of malfunction or permanent damage.
How to charge the battery ?
Use the enclosed USB-C charging cable and power plug adapters to plug your eVscope
2 into a power outlet. A power bank can be used to charge your eVscope 2 as well (we
recommend a USB 5V).
For the most effi cient charge of the battery, the maximum current used by the eVscope 2 is
2.4 Amps. For the charge range we recommend >2A. 1A will also work but the charging time
will take longer.
What does the blue flashing light indicate ?
While charging, the LED located on the power button fl ashes blue. As the battery is charging,
the number of fl ashes will decrease. When the battery is fully charged, the LED is steady
blue. Your Unistellar App also indicates battery levels.
Avoid “fast charging” technology (9V, 12V); it may not charge the battery (and charger may
not be detected).
Partial battery discharges are healthier for your device than long discharges: high
discharge rates contribute to damage and strain on Lithium-ion batteries.
What if my power supply is damaged ?
If damaged, the charger is a standard one, you can use a USB-C USB cable. Use a good
quality power supply.
For long term storage, we recommend charging your battery to 70% and
charging it at least every six months. Keep your telescope disconnected, and
away from heat and moisture. Recharge your eVscope 2 fully before your next
observation.
Can I use my telescope while charging ?
Yes. The charging time may vary from 6.5 hours
on OFF mode to 8 hours while operating.
Warning: do not charge the battery if the
temperature is below 10°C (50°F).
Cold environments can reduce
the available battery capacity and
shorten duration of use. While
the eVscope 2 can function in
temperatures down to -20°C (-4°F),
we recommend you avoid using
your eVscope 2 below 0�°C (32°F) or
above 40°C (104°F) to enhance the
battery life.
Did You
Know ?
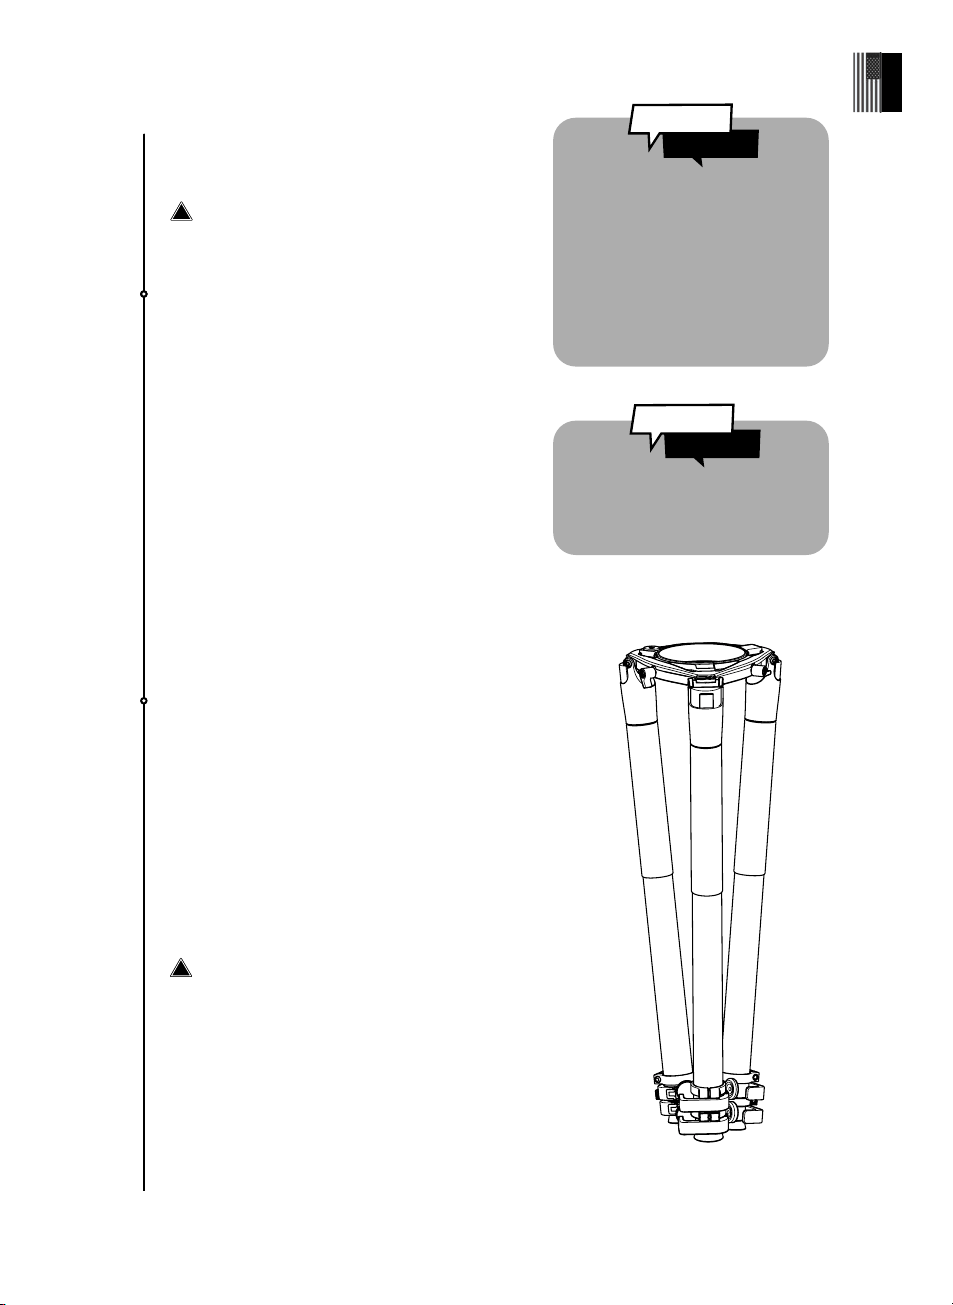
The tripod
Made for deep sky observations, it has a bubble
level at the top of one of three multi-angle leg
locks, near where the eVscope 2 is secured. Make
sure your tripod is accurately leveled or your
observations will be slightly inaccurate.
IMPORTANT: make sure to fully tighten the screws
on your tripod, but not overly-tighten them which
can strip the screws and make the tripod unstable.
Additionally, ensure the legs are properly locked
before transfering your eVscope 2 to the tripod.
Warning: the tripod cannot be used for any
other purpose than holding your eVscope 2.
Tripod’s characteristics :
Measurements : 59 cm x 13 cm (23,2 inches x 5,11
inches) - 125 cm of heights max & 98 cm wide open
(49.2 inches x 38.5 inches)
Weight : 2kg (4.4 lbs)
The LED
Where is the LED located on the eVscope 2 ?
The LED is on the Power / ON button.
What does each color mean?
Purple: eVscope 2 software ON or OFF (for a few
seconds)
Red : eVscope 2 ON, ready to use, operational
Purple and blinking 5 times: eVscope 2 OFF
with not enough charge to turn ON (charge it)
Blue and blinking : eVscope 2 OFF and charging
(will blink from 6 times: fully discharged to
steady blue : fully charged)
Yellow and blinking : eVscope 2 updates in
progress
Green and blinking : transfer in progress
Orange : data transfer has failed
White : an error has happened, reboot your eVscope.
We choose the color red to power
on the device so it won’t dazzle you
at night.
Did You
Know ?
!
!
12 | User guide
English
User guide | 13
English
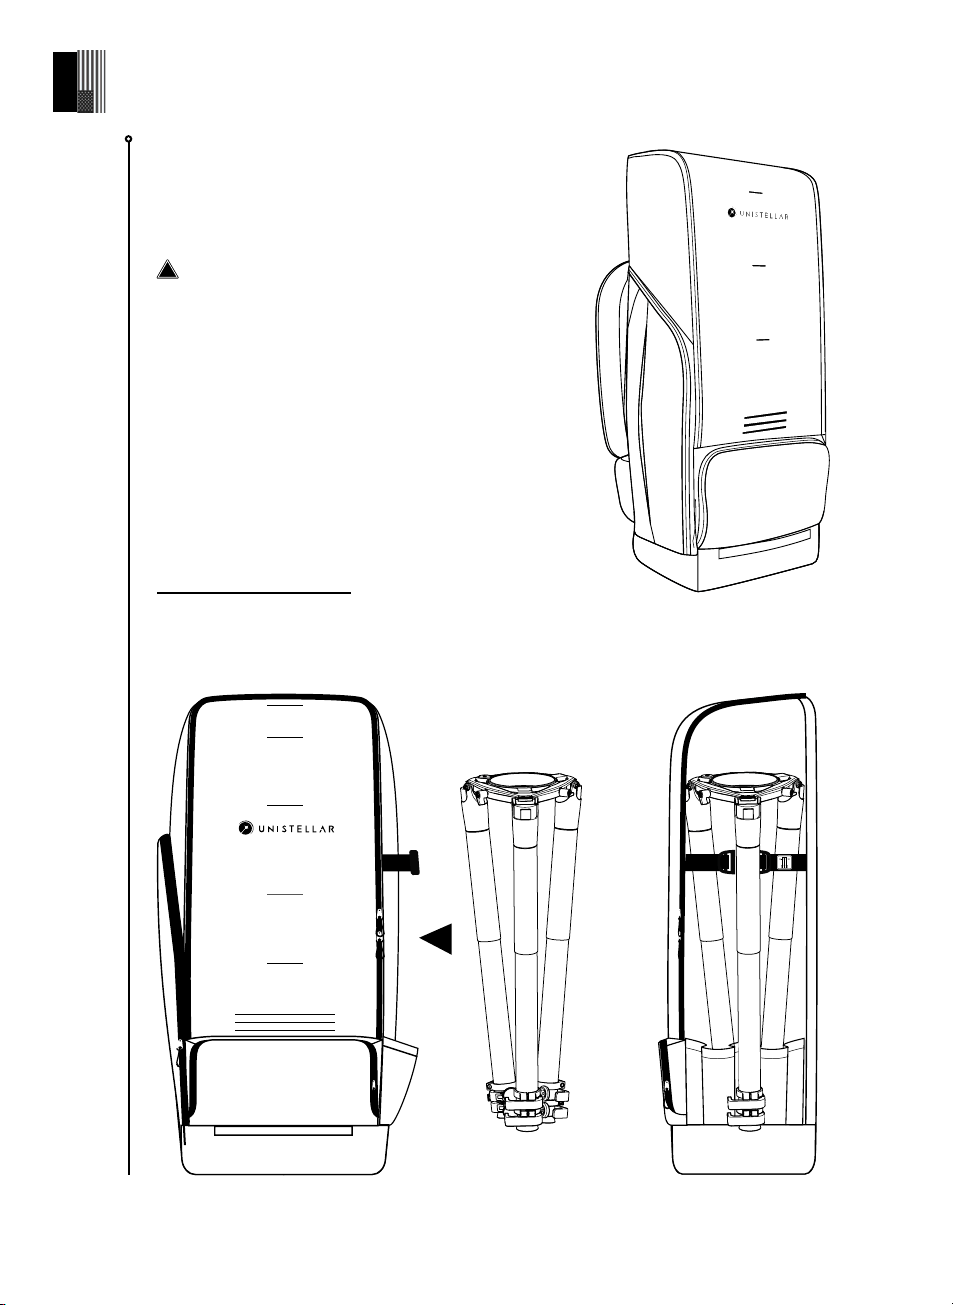
The backpack
What is the eVscope 2 Backpack ?
The eVscope 2 backpack is constructed with tough,
reinforced fabric and padded with high-density
foam to protect your eVscope 2.
Warning : The backpack is not waterproof.
Backpack’s characteristics :
• Made out of robust materials as similar to leading
camera or computer bags
• Built-in foam inserts match the shape of your
telescope
• Internal strap securely fastens the instrument
during transport
• Removable rain-shield (protects against rain and
humidity) located underneath the backpack.
• Padded adjustable shoulder straps & hip-belt help
to distribute the load weight
• 5 small internal pockets: 2 zipped, 2 to hold the
telescope cap and eyepiece cover
• Ventilated back-panel
• 2 large external and 1 hip-belt zipped pockets
Measurements : 72 cm x 22.5 cm x 29 cm (H x W x D) - 28.3 inches x 8.6 inches x 11.4 inches
Weight : 2 kg (4.5 lbs.)
!
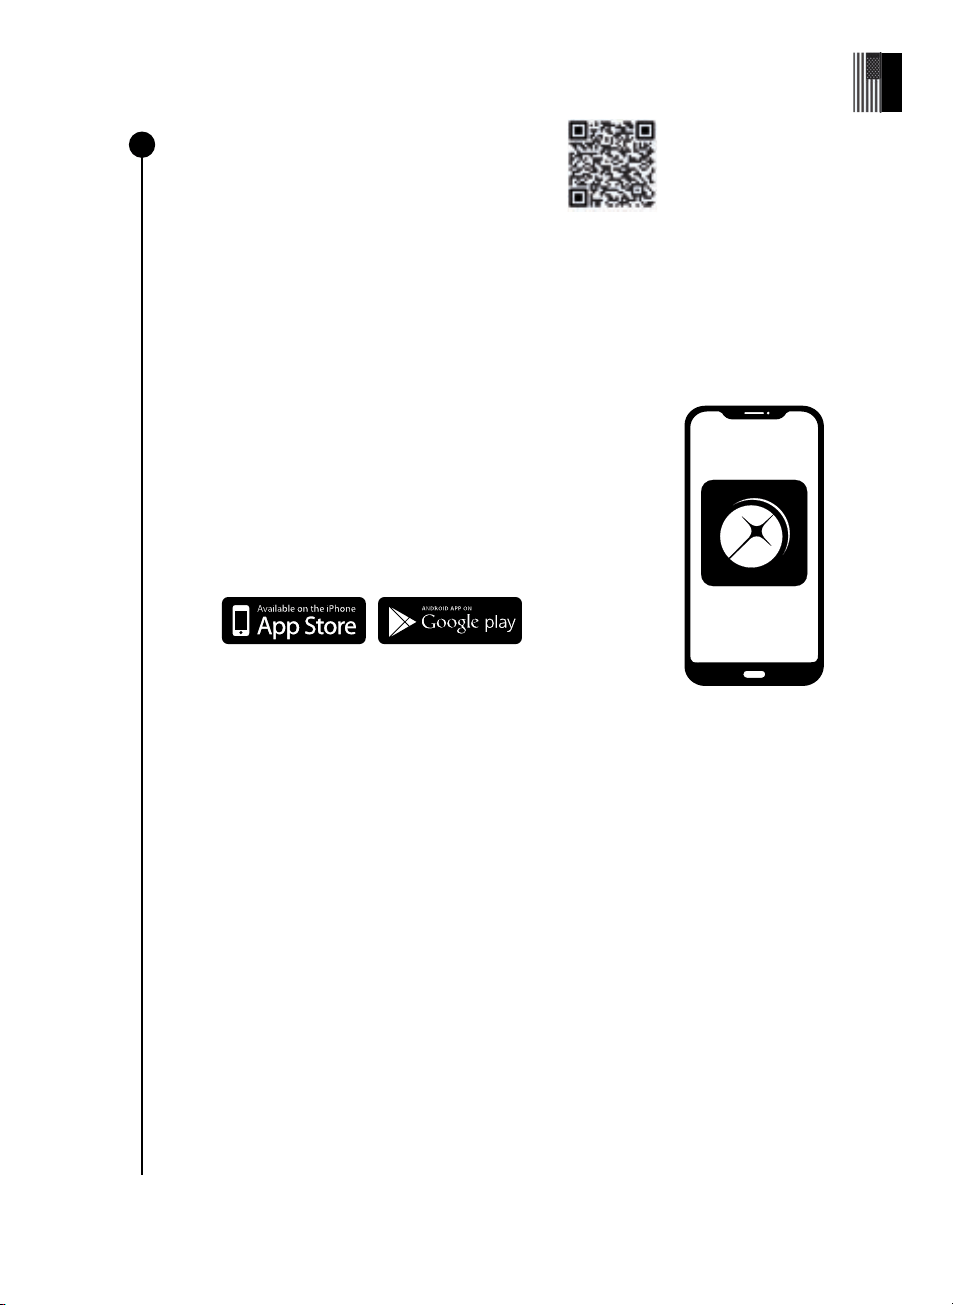
Download & install
the Unistellar App
The App is your portal to the Unistellar experience and the community of users.
You will be able to:
- Discover recommended objects for you to explore with your eVscope 2
- Share your observations with other members of the community, and discover theirs
- Stay informed of all the latest space-related news and scientifi c discoveries
- Contribute to the scientifi c discoveries yourself by taking part in our observation missions
ACTIVATE YOUR GPS BEFORE DOWNLOADING THE APP.
Where to fi nd the Unistellar App ?
On the Google® Play Store and the Apple® App Store (on
smartphones or tablets) under the name Unistellar. The App
enables you to wirelessly control your eVscope 2 with WiFi.
Minimum requirements to download our App :
• Android 6 or iOS 12 operating system
• Touch screen
• WiFi
• 140Mo of available memory
The App is not supported on FireOS devices. If you can’t download it on your smartphone, check
the operating system of your device. Update the App when a new version is available in the
the Apple® App Store (iPhone/iPad) or Google® Play Store (Android)
If you experience difficulties downloading, installing or using the App, please contact
our support platform at help.unistellar.com.
1
14 | User guide
English
User guide | 15
English
Your fi rst deep-space exploration
Follow this routine every time you set up your eVscope 2 to avoid
any potential damage as breakage due to mishandling is not
covered by warranty.
Scan this QR code to be redirected to a video on how to set up your eVscope 2
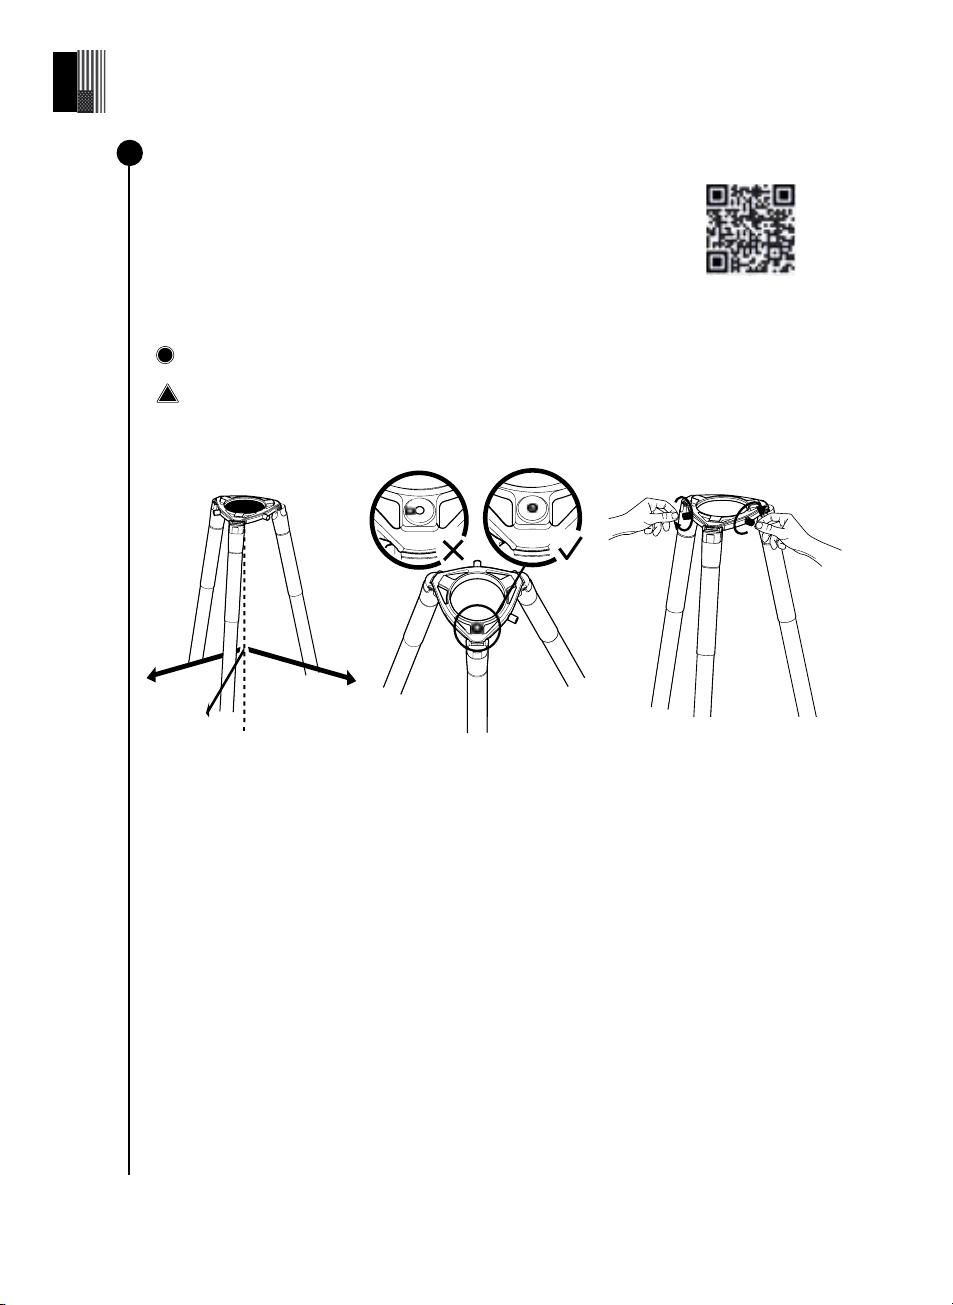
Set up and level the tripod
Warning : The tripod’s legs screws could have loosened during shipment or regular use.
Please check that all screws are tightened. If not, tighten them with the provided tool in the
accessories box.
Open the legs of the tripod
and adjust the height.
Always setup your tripod
on a solid surface.
Find the bubble level at the
top of one of the tripod’s
three multi-angle leg locks
(at the crown of the tripod).
Adjust the legs to put the
bubble level within the black
circle.
Check that the tripod legs
are properly secured.
Loosen the 2 tripod
screws at the crown of
the tripod.
IMPORTANT : ALIGN AND RE-CENTER THE BUBBLE LEVEL EVERY TIME YOU MOVE
YOUR EVSCOPE 2 TO ENSURE YOUR OBSERVATIONS ARE PRECISE AND ACCURATE.
Tighten the tripod screws with the tools included in the box to avoid dropping the
eVscope 2 as they can loosen over time.
1
2
!
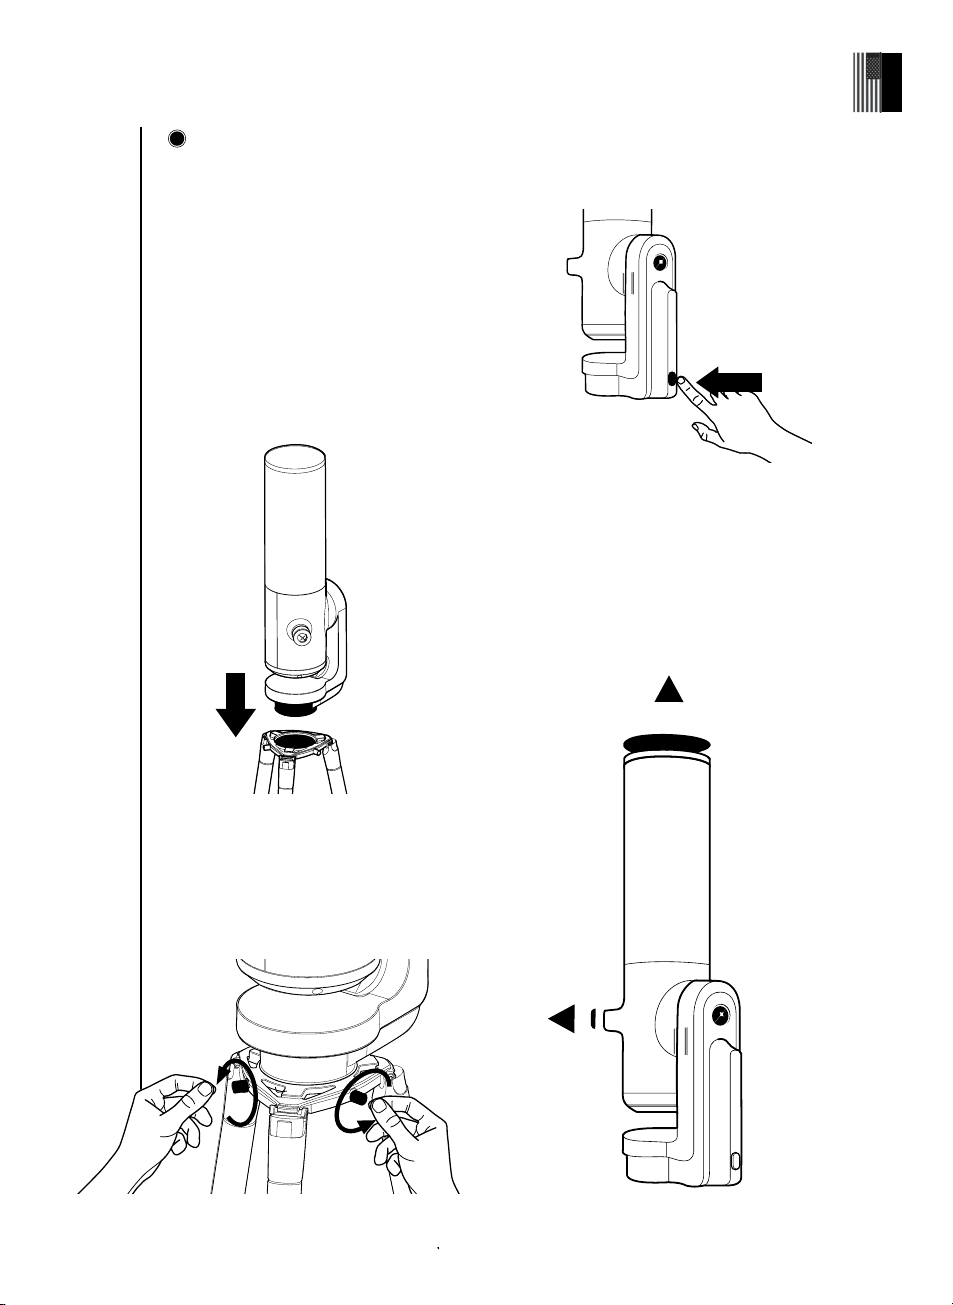
Install the eVscope 2 and
power it on
A - Pick up your eVscope 2, and cradle the
tube and base in your arms and hands.
Ensure the base of the eVscope 2 is fully
supported, to avoid dropping the telescope
during the installation process.
B - Install your eVscope 2 vertically on the
tripod.
Ensure that the base is properly inserted
into the crown of the tripod and fi ts in
perfectly. It should be stable, not loose
nor wiggly.
D - Start the eVscope 2 by pressing the ON
button for 2 seconds. The LED is fi rst purple
then red.
(You might not see the button light if you turn
on your eVscope 2 in daylight because of its
low intensity).
E - Remove the cap covers on both the
eVscope 2 tube and eyepiece.
C - Tighten the screws at the crown of
the tripod to secure your eVscope 2. Be
careful not to tighten too hard as it may
damage the thread.
PRESS
ON
2 sec
2
16 | User guide
English

User guide | 17
English
Did You
Know ?
Connect your eVscope 2 to the Unistellar App, using WiFi
Launch the Unistellar App, and authorize the App to access your WiFi settings (or acti-
vate your WiFi on your device). The App will automatically detect your nearby eVscope
2.
Select your eVscope 2 from the list of network
You are connected to your eVscope 2
If the App fails to detect your eVscope 2, check
section 9 Troubleshooting.
eVscope2-xxxxxx
The eVscope 2 creates its own WiFi
network ; it doesn't use your home/
internet WiFi. No internet connection
is required to operate your eVscope 2.
Network found :
NO INTERNET
CONNECTION
3
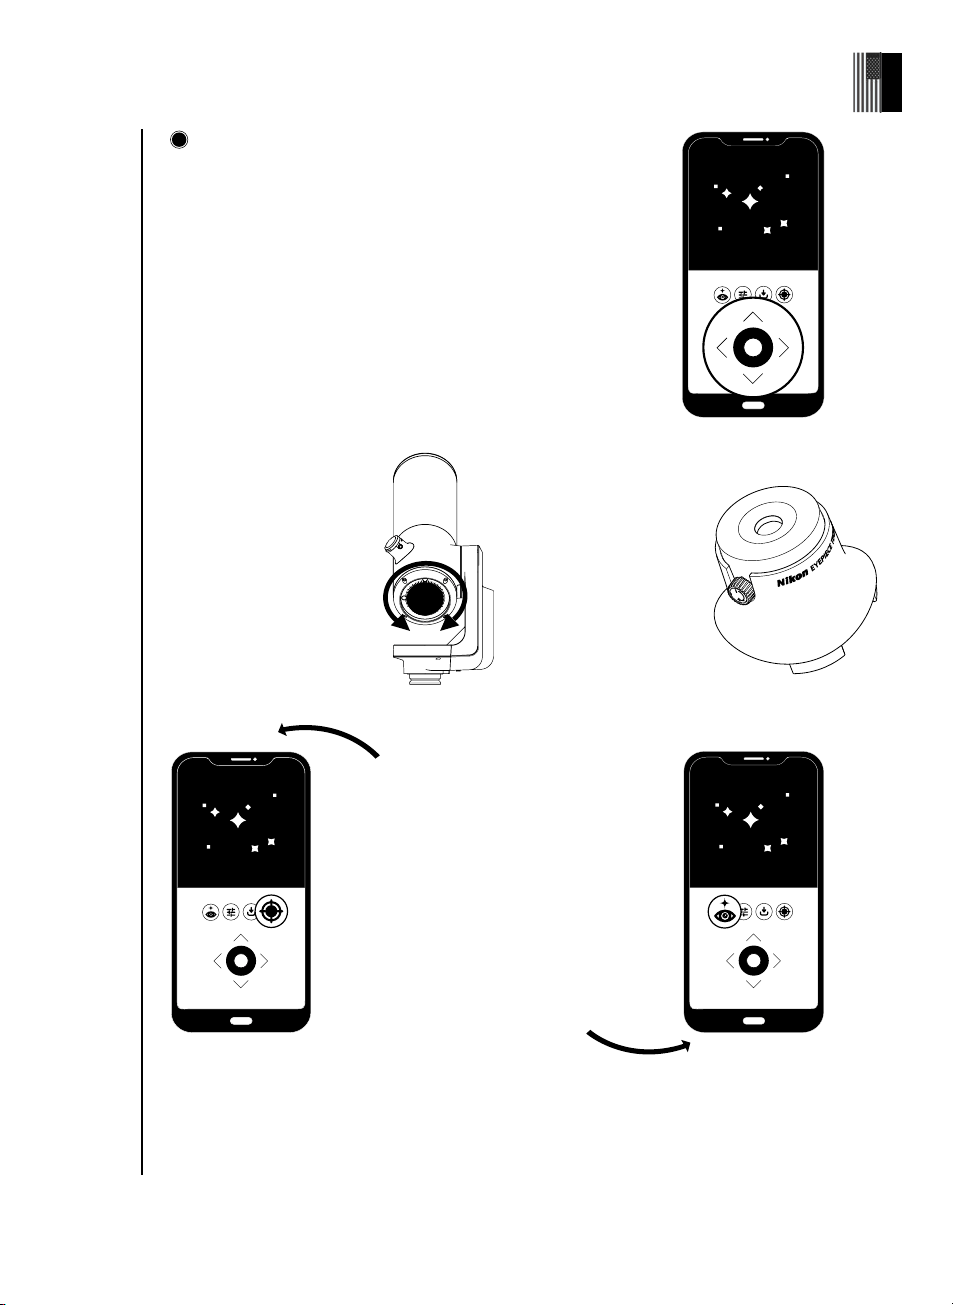
Explore the night sky
For best quality observations, the sky needs to be dark, with no-
to-limited cloud cover, and multiple bright stars should be visible.
To move the telescope press and drag the dot of the joystick
towards the arrows with your fi nger to point it in the direction you
want. or, pinch-and-pull on your screen to zoom in on the image.
Enjoy the live view ! You should be able to see stars through the
eyepiece and on your screen.
If what you see seems blurry, proceed with a fast focus (without
using the Bahtinov mask) - To learn how to get a high precision
focus with the Bahtinov, check section 3 - Best practices for
your observations - Focus adjustment.
Press the Autonomous Field Detection
(AFD) button and the eVscope 2 will instantly
recognize objects in its fi eld of view.
Choose the fi rst recommended object in the
catalog of the App and hit the Go to button, it will
take you directly to the object.
Once the telescope has reached its target,
switch to Enhanced Vision mode to start
revealing the details and colors of distant
deep-sky objects. The longer you leave the
Enhanced Vision active on an object, the
more details will appear.
On your smartphone or
tablet screen, adjust the
focus of the eVscope 2 by
turning the focus wheel
located at the base of the
eVscope 2 until the image
is clear.
In the eyepiece,
adjust the focus of
the eyepiece’s lens.
Turn the control knob
located next to the lens
until you fi nd the best
setting for your vision.
If you want to look at the Moon and other closer and brighter objects such as planets, please
see section Observation of the Moon & planets of this guide to get started.
4
18 | User guide
English
User guide | 19
English
Park your eVscope 2
After each observation, use the Park function of your eVscope 2, accessible from the User
> My eVscope menu. This will automatically move it to the zenith position and turn it off .
If your eVscope 2 doesn’t go perfectly into a vertical position when parked, it is normal.
Replace your telescope cover and eyepiece cover before storing your eVscope 2 in its
backpack.
If you run into challenges during this routine, please consult the troubleshooting section
or visit help.unistellar.com.
5
Best practices for
your observations
In this section we will explain a few recommended manipulations for any future observations.
Thermalization
What is thermalization?
Thermalization refers to the process of equalizing the temperature between the
components of your eVscope 2 and its external environment.
Why should I thermalize my eVscope 2 ?
The eVscope 2 performance will be optimized if the mirror reaches thermal balance.
This step is very important to ensure that the mirror and the tube will not fl ex during use,
resulting in potential changes in focus and image quality. Moreover, much like a hot road in
the sun, diff erences in temperature can create a blur eff ect due to air displacement - this
could aff ect the quality of your observations.
How to thermalize my eVscope 2 ?
If there is a diff erence in temperature between the outside and the room your eVscope
2 is stored in, turn on your eVscope 2 and put it outside about 15-30 minutes prior to your
observation, depending on the temperature diff erence.
Focus adjustment
What is the focus ?
The focus refers to the distance between the mirror and the sensor, causing the light rays
from the object to properly converge. If the rays converge after or before the sensor, the
image will be blurry.
How often should I adjust the focus ?
Adjust the focus before any observation including after leaving the eVscope 2 outside to
thermalize. You might have to re-adjust your focus during long observation nights if the
temperature has dropped dramatically or if other parameters of your observation have
changed.
3
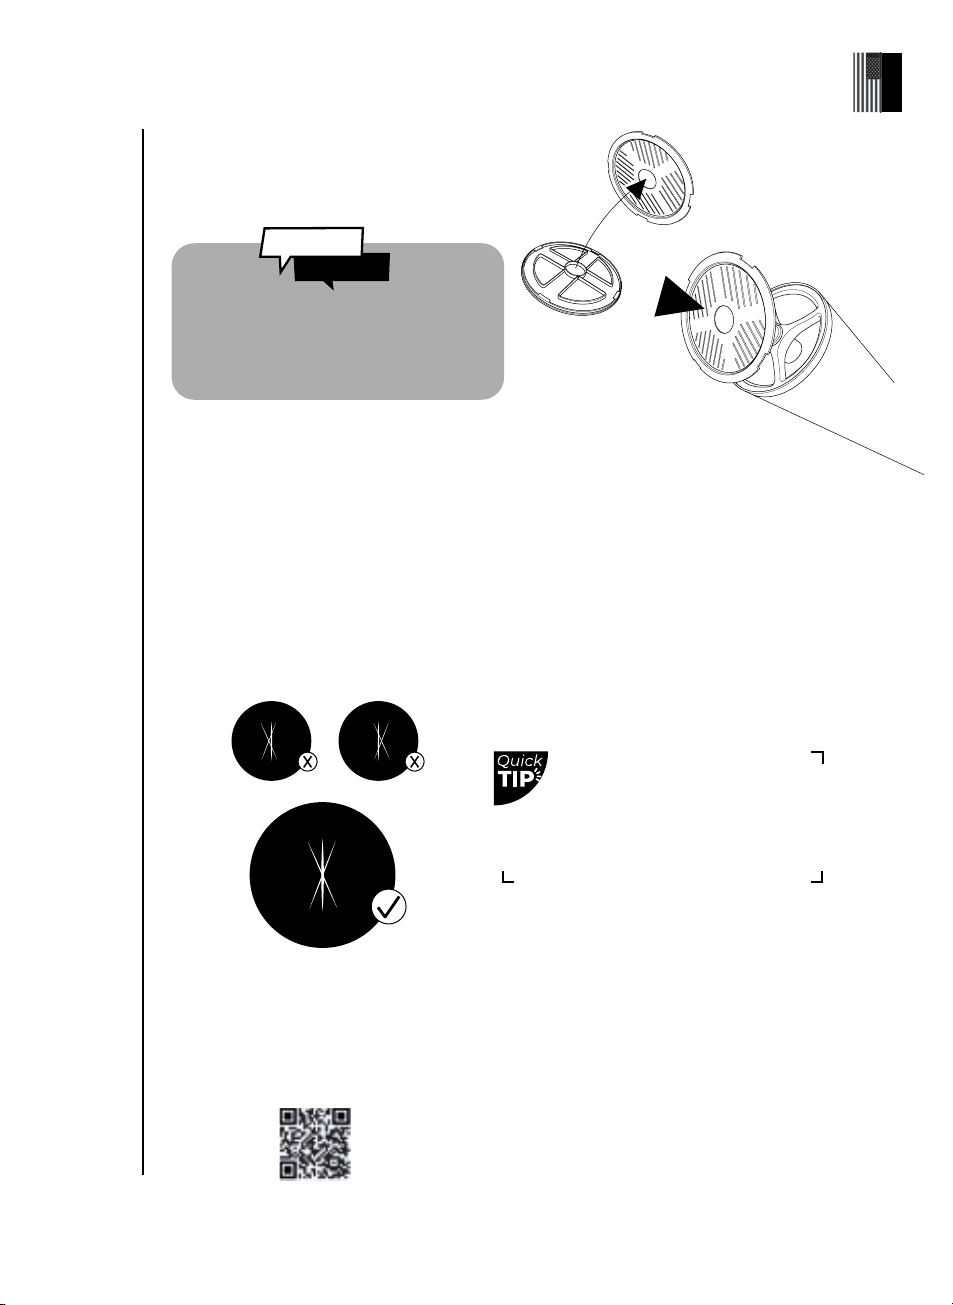
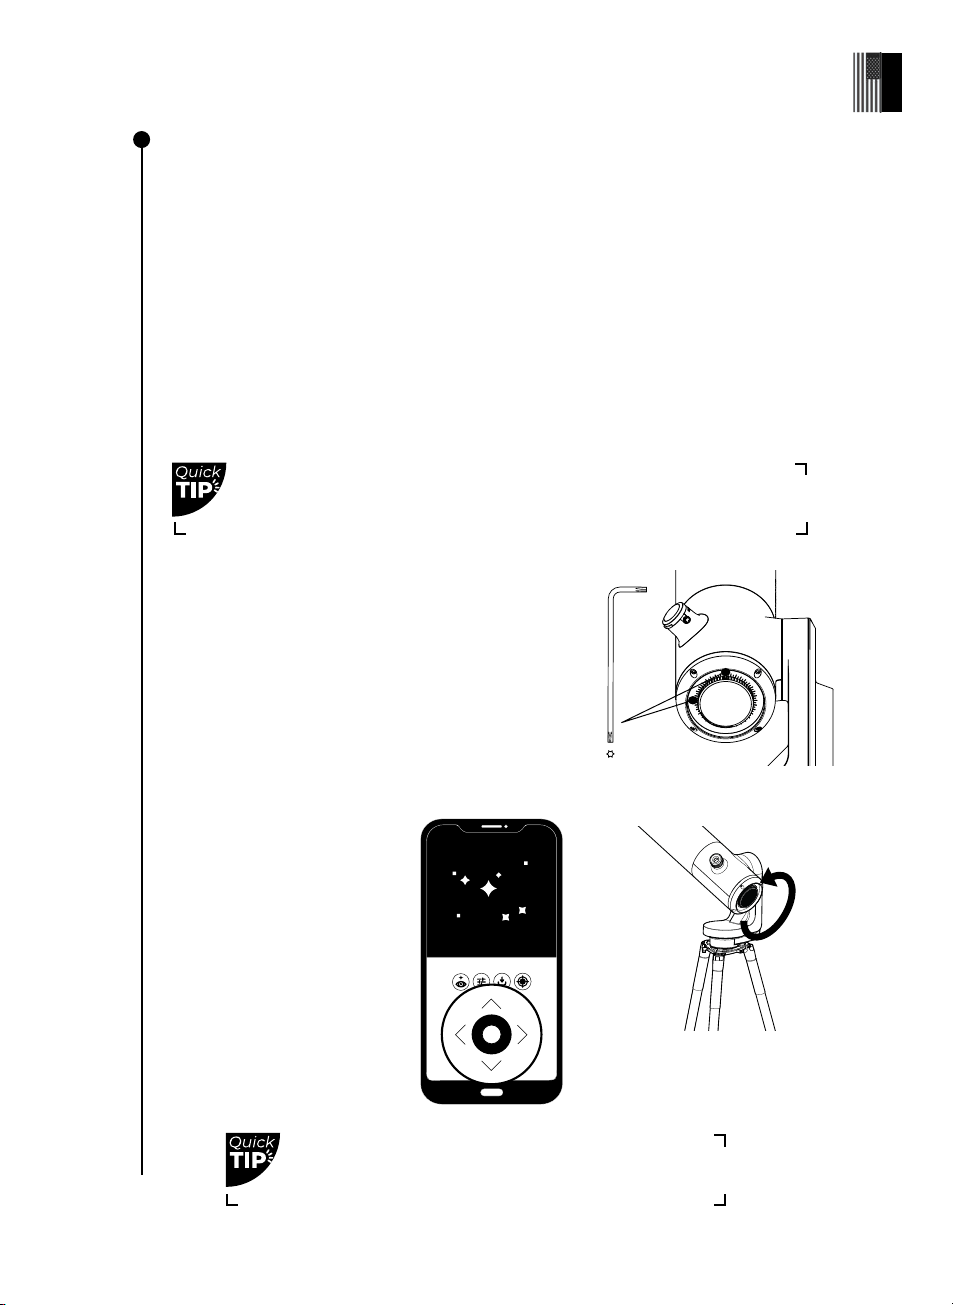
How to get a high-precision focus using the
Bahtinov mask ?
it is usually too bright on default
"auto" settings. Adjust those set-
tings manually by toggling "auto"
o ff .
DO NOT ACTIVATE THE ENHANCED VISION MODE WHEN ADJUSTING THE FOCUS
Slowly rotate the focusing wheel until the central line is centered in the X.
Go to the fi rst recommended star in the catalog as it will be the brightest available to you.
Separate the Bahtinov mask from the cap cover. Place it on top of the eVscope 2 tube, and
turn gently as needed to fi t it onto the tube.
This will create a specifi c pattern forming an X, visible in the eyepiece and on your screen.
Zoom in using pinch-and-pull on your device to clearly see the X.
Scan this QR code to be redirected to our video
on how to focus with the Bahtinov mask
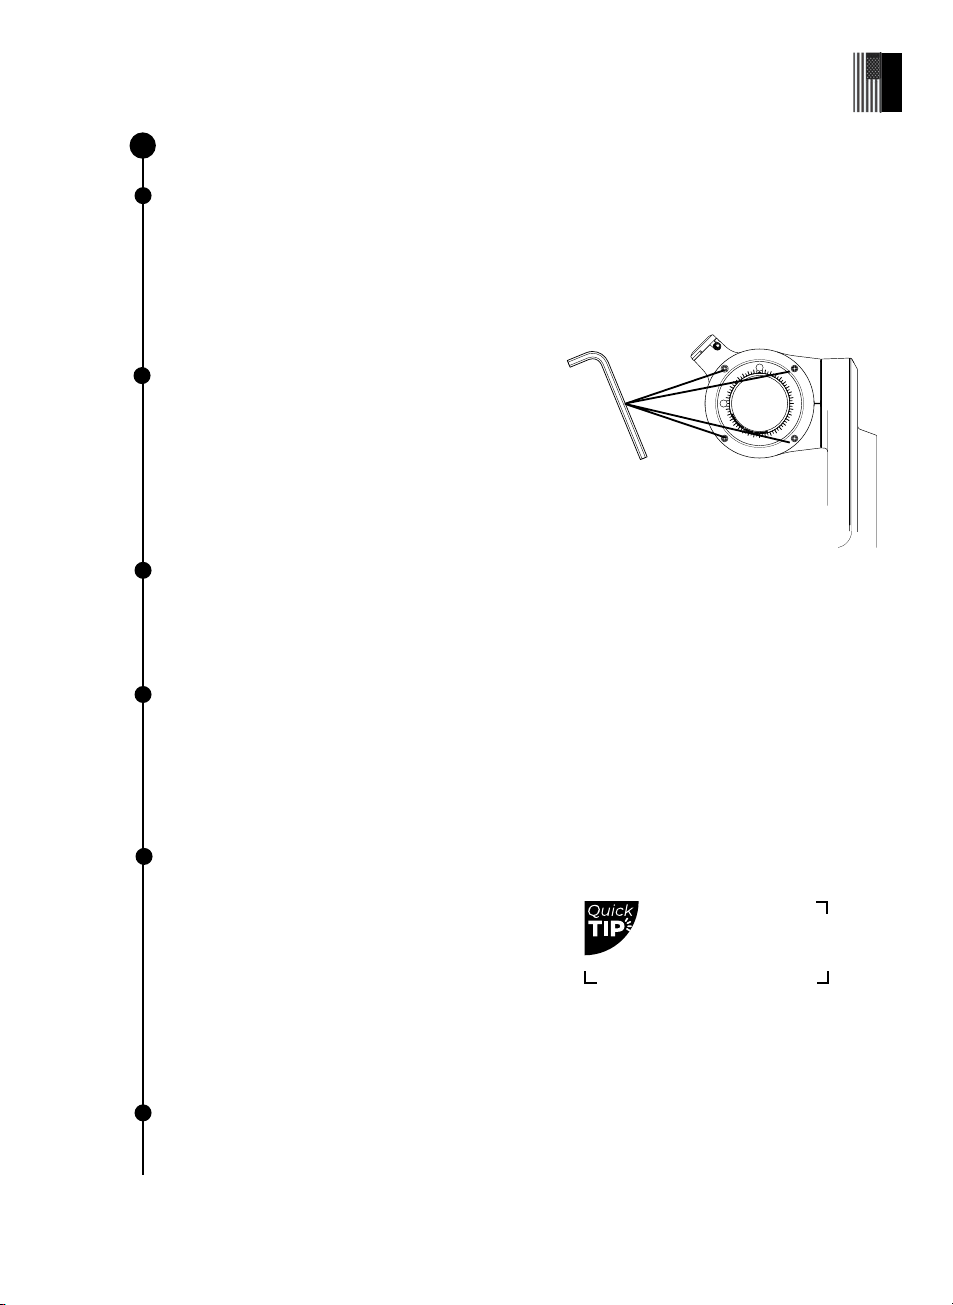
The Bahtinov mask consists of three grills
at three diff erent angles. It will create
diff raction spikes for an accurate focus.
Did You
Know ?
20 | User guide
English
User guide | 21
English
Dark frames
What does a dark frame do ?
In digital photography taking a dark
frame is the process of recording an
image without signal and noise. Doing
so improves your observations and the
quality of the images you save. A dark
frame allows the eVscope 2 on-board
computer to analyze and correct any hot
pixels or other image imperfections.
How to take a dark frame ?
To take a dark frame, keep the cap cover on the eVscope 2 and make sure you are in
dark surroundings. Don’t expose the eVscope 2 to direct streetlight.
Scan this QR code to be redirected to our FAQ
with more visual content on how to take a dark
frame
Open the User > My eVscope section, select "Take Dark Frame".
If successful, the message "New Dark Frame Created" should pop up at the bottom of
your smartphone screen. If an error message appears, try again later, possibly in a darker
environment (there might be too much light detected on the image).
Noise can occur during a long exposure
or with high temperature variations.
You may see the eff ects of it with
the emergence of hot pixels on your
images (red, blue or green spots).
Did You
Know ?
How often should you take a dark frame ?
Dark frames can be taken at any frequency you like. As a minimum we recommend
taking one in the winter and one in the summer (changes in temperature and altitude
can create conditions for imperfections in images). A dark frame should also be taken
prior to every scientifi c observation.
Collimation
If you are having diffi culty achieving focus as outlined in previous sections, or if you are
struggling to achieve a high-precision focus using your Bahtinov mask, your eVscope 2 may
require collimation.
What does collimation mean?
Collimation refers to the process of aligning the optical axis of the mirror (located at the bottom
of the tube) and the sensor (located at the top of the tube). This is a diff erent process than
focusing your eVscope 2 and does not need to be completed as frequently.
How often should I collimate my eVscope 2 ?
Collimation is required infrequently : mostly when you transport your eVscope with too much
agitation for instance after transporting it in the trunk of a car.
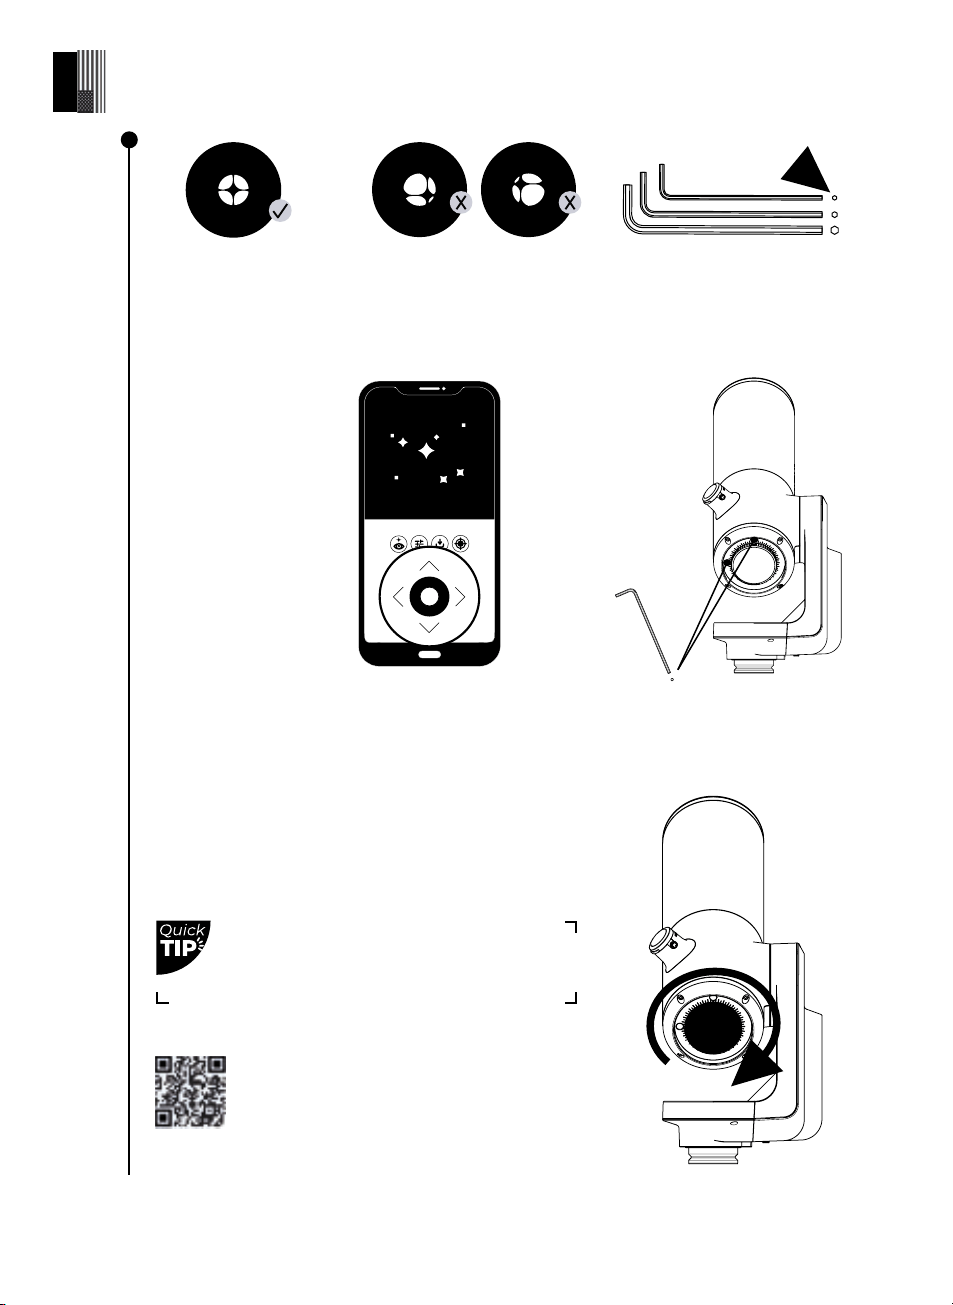
How to collimate my eVscope 2 ?
Collimate your eVscope 2 using the two screws located
at the bottom of the tube. When you turn these screws,
it adjusts the mirror position. The top screw will be used
to move the star vertically and the left screw will be
used to move the star horizontally.
For this procedure, you will need :
1 - The torx key (T20) provided in the toolbox,
2 - A clear sky with visible bright stars.
Point your eVscope 2 toward
a bright star by selecting the
fi rst recommended star in
the catalog.
Center the target using the
in-app joystick.
Defocus by turning the focus
wheel counterclockwise to
the maximum.
Check the collimation right after receiving your eVscope 2 for
the fi rst time.
Look directly through the eyepiece for this procedure.
#Tool 1
22 | User guide
English
User guide | 23
English
If the dark cross looks as
shown here, your mirror
alignment is correct
If the dark cross looks as shown
here, you need to realign your
mirror
REPEAT THE PROCEDURE UNTIL THE CROSS LOOKS CENTERED.
THIS MIGHT TAKE SEVERAL TRIES.
Rotate the focusing wheel to align the visual cue.
Move toward a target and enjoy the view.
Scan this QR code to be redirected to our
video on how to collimate your eVscope 2
Be careful with the screws. If you are a novice,
take your time and go step by step.
Take the torx key (T20) in
the toolbox (Telescope
Tool 1)
Move the telescope
with the joystick using
the arrows to put the
star at the edge of your
screen . Which edge ?
it all depends on your
cross : if you see the
off center cross on the
right you will place the
star on the right edge
of the screen with the
joystick, if the off center
cross is on the left you
will place the start on
the left edge etc.
Once the start is
on the correct side,
turn the vertical or
horizontal screw in
the mirror mount
with the torx key T20
(Telescope Tool 1) to
adjust the mirror and
recenter the star on
the screen and the
eyepiece.
Objects like the Veil Nebula are diffi cult to observe and require darker skies
to be visible. For beginner users, start with the brightest object like M51 or
NGC 891.
To activate the AFD, you need to have a clear and dark sky, as well as a
decent focus. A bright moon can inhibit the eVscope 2 ability to recognize
stars.
Get the most out of your eVscope 2
The powerful technology behind the eVscope 2
Catalog
Our catalog recommends galaxies, nebulae, stars, and comets based on your location
and time. It has thousands of objects, including:
• The main planets
• The Moon
• 110 Messier Objects
• 2500 New General Catalog targets (NGC)
• Comets
• Thousands of small solar-system bodies including main-belt asteroids, Jupiter, Trojans,
and dwarf planets (V ≤ 15.5)
Source : NED - NASA/IPAC Extragalactic Database ned.ipac.caltech.edu
You can point at targets not yet in the catalog by entering the desired coordinates in the
Alt/Az or Ra/Dec button in the Explore tab of the App.
Autonomous Field Detection
What is AFD ?
Autonomous Field Detection (AFD) is an algorithm that uses an internal map with tens of
millions of star coordinates to accurately identify any object in the eVscope 2 fi eld of view.
What does the AFD do ?
The AFD points at objects in the night sky automatically, making it easier to fi nd targets. It
also provides information about what you're observing, like distance from the Earth, size,
age, etc.
4
24 | User guide
English
User guide | 25
English
Enhanced Vision
What is Enhanced Vision ?
Enhanced Vision is a system that uses its low-light sensor to accumulate light
continuously through the live accumulation (stacking) of a series of short exposure
frames. Enhanced Vision improves the objects you see with time.
Depending on observing conditions (light pollution, moon phase, weather, etc.) and
the objects you are pointing at, it can take a few seconds to a few minutes to see their
colors and shapes using Enhanced Vision while using.
Software
The eVscope 2 software uses its on-board computer to stack and process frames (dark
and background removal, shift adding and stacking). It produces an improved image
and projects it in real time with a derivation algorithm that compensates for the earth
movement / rotation. This allows long exposures of objects the user is viewing.
Image Overlay
You can save images with or without an overlay by selecting your
preference in the Settings of the User tab. The overlay shows the
name of the object, coordinates, date and time.
Gain
What does the gain do ?
Gain electronically increases the signal in Live View mode. The lower the gain, the better
your images ; the higher the gain, the brighter the image. When you increase the gain,
you also increase the noise: you will see fainter objects, but they will be more noisy.
Exposure Time
What is exposure time ?
Exposure time is the length of time the sensor is exposed to light (between 1ms and 4s
for a single exposure in Enhanced Vision mode).
Magnifi cation
What does magnifi cation do ?
Magnifi cation is fi xed at 50x but can be increased it up to 8x. You can therefore zoom
up to 400x max.
How to change the magnifi cation ?
A double tap on your screen will zoom to 150x. You can adjust it by sliding two fi ngers
on your screen. Saving an image, in Live View or Enhanced Vision while the zoom is
applied will not save the zoomed image, it will save the original one.
The eVscope stacks images every 4 seconds
Did You
Know ?
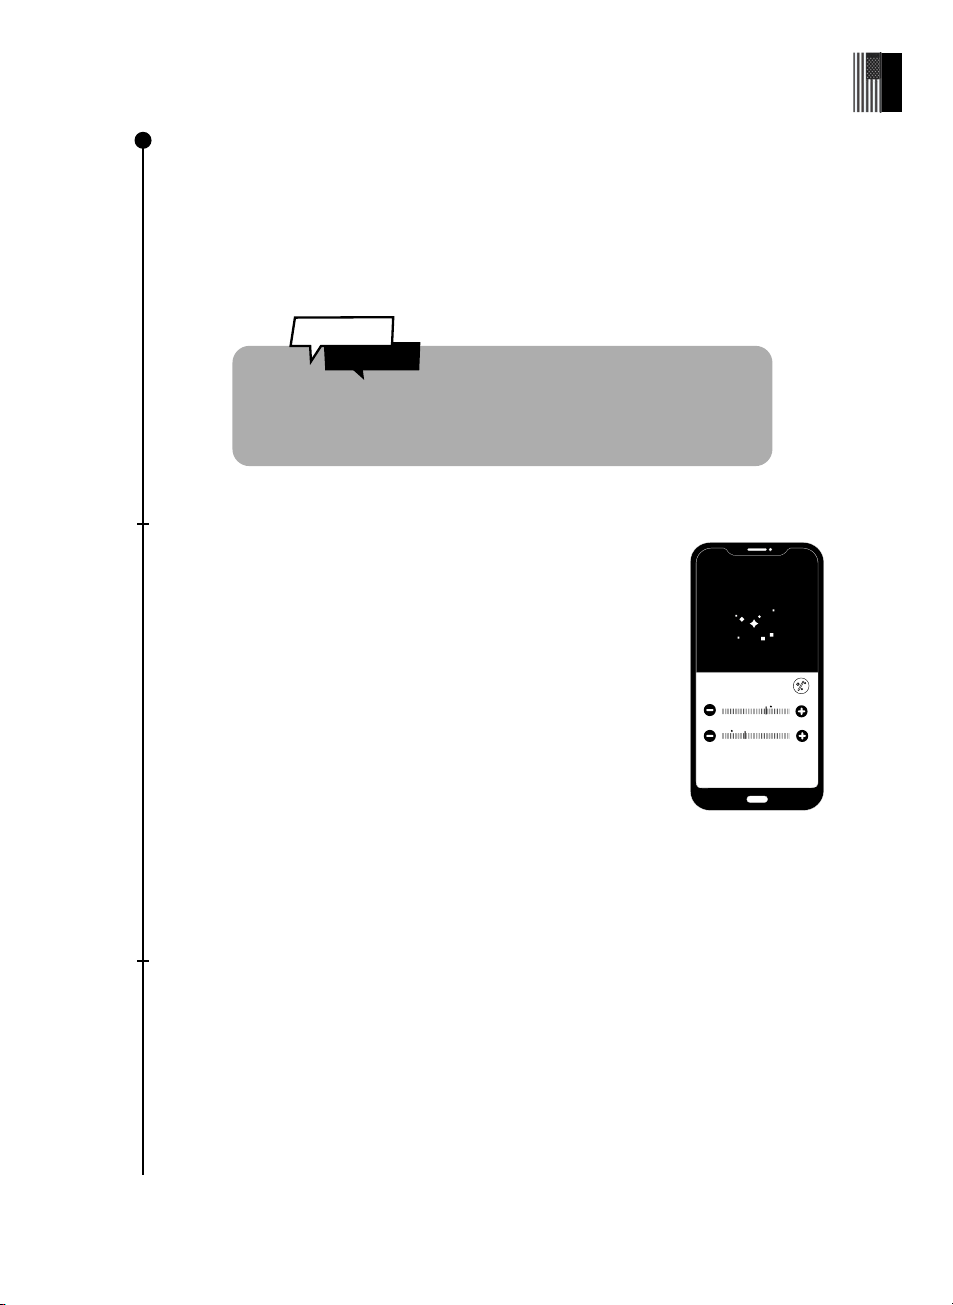
Observing the Moon :
Because of its brightness and proximity, a "Go to Moon" may not
center the Moon exactly in the eVscope 2 fi eld of view.
Follow these simple steps to get the best Moon observation :
After the Go to Moon, open the live view settings and make sure Gain (dB)
and Exposure Time (ms) are not set on «auto».
Gently reduce the Gain (dB) by dragging the control button to the left.
When your screen is almost dark, press the settings icon and with
the joystick move the telescope in direction of the light source.
Observation of the Moon & planets
You can observe the Moon and planets, like Jupiter and Saturn, but they are very bright.
They can’t be seen better than with a classical telescope, except for Neptune and Uranus
which are very far and fainter.
Use the Go to button to point the eVscope 2 at the celestial object. Gain (dB) and exposure
time (ms) will be automatically adjusted in order to view the Moon or planets.
The eVscope 2 was primarily created to observe the deep-sky
wonders of the Universe
REPEAT THIS OPERATION AS NECESSARY UNTIL THE MOON
COMES INTO FULL VIEW OF THE EVSCOPE 2.
Observing planets :
Most planets are too bright to use Enhanced Vision, and should be
observed using Live View mode.
After the Go to is validated on Venus, Mars, Jupiter or Saturn, the
eVscope 2 will automatically switch to planet mode, adjusting its
image parameters to the brightness of the object.
Did You
Know ?
Exposition
Gain
Cancel
Ok
Normal mode settings
26 | User guide
English
User guide | 27
English
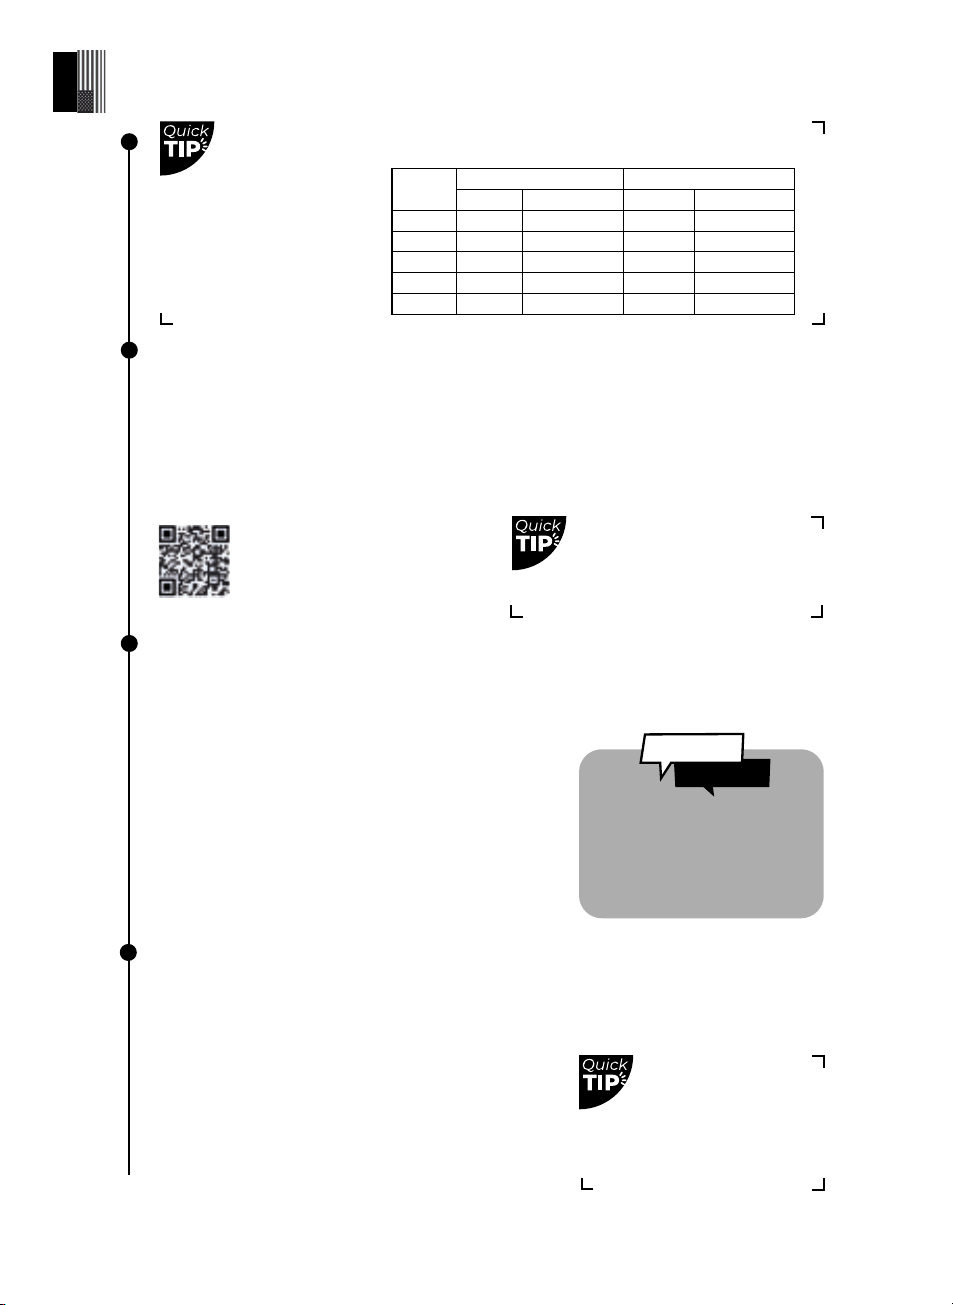
The planet mode sets
the gain at 0 to avoid
saturation. You can
adjust images with
our suggested values:
Planet Satellites
Gain (dB) Exposure (ms) Gain (dB) Exposure (ms)
Moon 0 5-20
Venus 0 0.3 -10
Mars 5 5 - 30
Saturn 5 10 - 30 25 100
Jupiter 5 5 - 20 25 100
GPS and Localization
You can use the eVscope 2 on a balcony or in a garden, in the city or in the country. We
recommend at least 45 degrees of open sky.
Diff erent factors come into play based on your location which can aff ect the quality of
observations, for example: quality of the night sky, position in the Bortle scale, light
pollution, atmospheric interference, altitude, and position compared to the equator.
Light Pollution
Your eVscope 2 can be used in highly light-polluted areas, and yet you will still be
amazed by the quality of your observations and what is visible in the night sky.
Weather and Temperatures
You will not be able to observe if you are under a cloudy sky. The eVscope 2 is highly
sensitive to wind as it creates vibration and can make the Enhanced Vision drop.
We recommend the following temperature range
for your eVscope 2 :
• Storage : 10°C (50°F) to 40°C (104°F)
• Observation and recharge : 10� °C (50 °�F) to 40 °�C (104 °�F)
• Observation : 0 °�C (14� °F) to 40� °C (104 °�F)
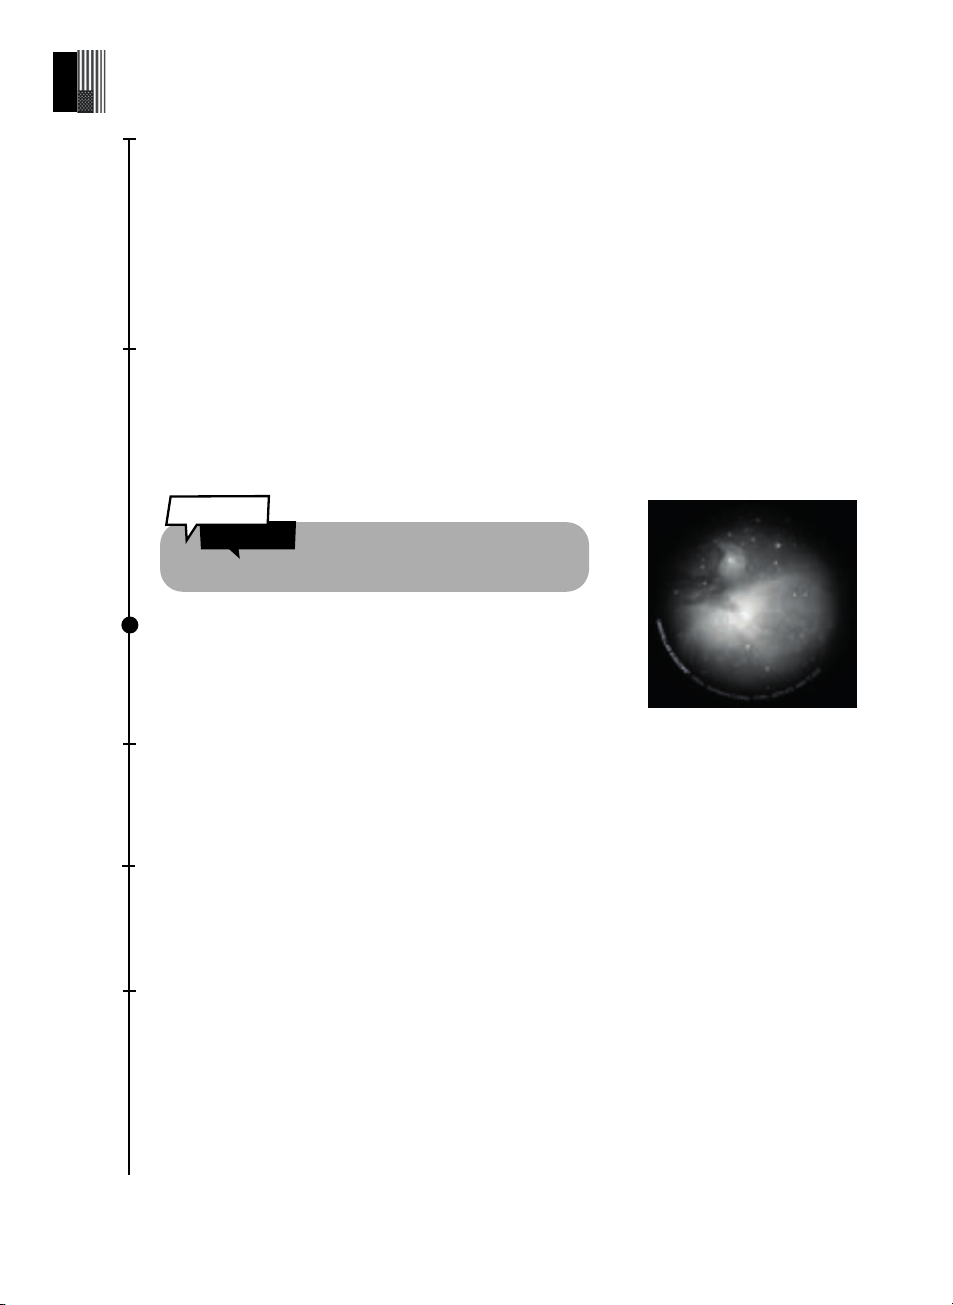
To reduce the impact of light pollution, stay away from
street lights (go behind a building or trees), building
and security lights, or other direct light sources that
may be shining toward you. This will enable you to
enjoy objects like the Dumbbell Nebula, Ring Nebula
or Whirlpool Galaxy.
Defi ne your portion of open
sky in the App to have
the catalog suggest only
objects in your visibility area.
Cover your eVscope 2
when using it in a very
cold environment,
to provide relative
insulation.
Scan this QR code to be
redirected to our video on how
to observe a target which is not
in the catalog of objects
The eVscope 2 uses a proprietary
combination of product design,
hardware and software to fi lter
through light pollution.
Did You
Know ?
Data
Why should I share my data with Unistellar ?
HELP IMPROVE THE OBSERVATION EXPERIENCE AND PARTICIPATE IN SCIENCE
(ACTIVELY OR PASSIVELY)
First of all, sharing your data is not mandatory for your observations - we do not access it if
you do not choose to share it with us.
The data collected by the eVscope 2 at each observation is stored in its memory and includes
raw data (frames) of the objects observed in Enhanced Vision or during Science Missions, as
well as metadata (geolocations, timestamps).
All the data collected by our users is gathered in our secure database and allows us to
continually improve the observing experience of our users.
By sharing your data, you can also help us make scientifi c discoveries.
Find out more about our science programs, both active and passive, on our website.
Things to know about the data storage :
The SD card has a capacity of 64GB. Do not switch to a diff erent SD card.
Uploading your data on a regular basis will free up some storage space. Your eVscope 2 can
upload at a speed of 6Mo/s on a 2.4Ghz network and 8Mo/s on a 5Ghz network. If you need
to upload 12Go, it will take at least 30 minutes.
Images of your observations are saved on your smartphone. You can still save pictures in
the gallery with a full memory (100% data storage used). The eVscope 2 will continue to
operate normally but you won’t be able to take part in community events or citizen science
campaigns.
5
How to upload ?
When your smartphone is connected to your eVscope 2, open the Unistellar App’s
“User” tab and navigate to “my eVscope”.
Tap on the “Upload data” button (it will be grayed out if there is no data stored).
Enter your ”WiFi information” ( your home WiFi network or your phone hotspot ). Enter the SSID
( the name of your network ) and enter your password. It is case sensitive.
PAY EXTRA ATTENTION WHEN ENTERING THIS ITEM: 8 TIMES OUT OF 10, THE UPLOAD
FAILS BECAUSE OF A TYPO IN ONE OF THESE TWO SETTINGS.
Start your data upload after each night of observation - the eVscope 2 will
shut down once the transfer is completed.
28 | User guide
English
User guide | 29
English
Click on ” Submit ” and the eVscope 2 LED will turn from red to a blinking bright yellow
( the eVscope 2 is trying to connect to the selected network ).
Your device will no longer be connected to the eVscope 2 and information like the
name or storage usage won’t be accessible in the app. The LED will blink in a regular
pattern.
Once connected to the selected network, the LED will either :
- Turn green and blink rapidly between 1 and 6 times and stay solid green for 1 minute
if the upload succeeds.
- Turn solid orange during 1 minute which means an error has occurred. In this case
see section 9 - Troubleshooting of the user guide.
Once the transfer is complete, reconnect your phone to the eVscope 2 and go back to
the User tab in the App. You should see “Storage: 1% used”. The remaining 1% is used
for dark frames and for internal fi les necessary for the operation of the eVscope 2.
We are working on making RAW images accessible for post processing. Subscribe to
our newsletter to stay informed: unistellaroptics.com
There is no USB or Ethernet port to read images. Images can be saved and shared on
the smartphone connected to the eVscope 2. They are in PNG format.
The number of blinks indicates how much data there is to transfer, the higher the
number of blinks the more data there is to upload.
Scan this QR code to be redirected to our FAQ
with more visual content including a video on
how to upload your data
Did You
Know ?
Contribute Actively to Science
The SETI Institute
In July 2017, the SETI Institute and Unistellar
partnered to develop scientifi c applications
for the eVscope 2 network as it can play
a major role in a wide range of research
topics linked to planetary defense,
exoplanets, occulations, and the study of
many transient astronomical events.
Scientifi c Campaigns
Sign up for our Citizen Science emails or join
our Slack group to exchange in dialogue
with our community about scientifi c
observations. To receive your invitation link
for Slack, contact us at citizenscience@unistellaroptics.com
You will soon become a citizen astronomer and contribute to scientifi c discoveries.
Planetary Defense
Our planet is not out of danger. Our solar system is home to other celestial bodies such
as asteroids or artifi cial objects. Sometimes, asteroids cross the orbit of the Earth: Among
these Near-Earth Asteroids, some are identifi ed as “Potentially Hazardous Asteroids,”
which could collide with Earth. The Planetary Defense program aims to fi nd, track and
characterize these near-Earth objects (NEOs) in our solar system. Unistellar scientists
provide diff erent targets to observe with your eVscope 2 every month.
To protect our planet, learn more here : unistellaroptics.com/citizen-science/planetary-
defense
Asteroid Occultation
Detecting an asteroid’s occultation entails observing an asteroid passing between a
bright star and your position on Earth. The blinking of the star recorded by the eVscope 2
provides valuable data so astronomers can learn more about the trajectory, size, shape and
composition of an asteroid.
Scientists who launch an observing campaign invite eVscope 2 users to join their research by
activating their device’s “Occultation Mode.” Watch it with your eVscope 2, send these data
to scientists, and make the world more informed and aware of asteroids. You will receive
results about your occultation afterwards.
Wherever you live in the world, it’s very likely that there will be an occultation for you to
observe.
To observe an asteroid occultation, learn more here :
unistellaroptics.com/citizen-science/asteroid-occultations
6
The SETI Institute is dedicated to scientifi c
research, education, and public outreach.
Its mission is to explore, understand, and
explain the origin and nature of life in the
universe, and to apply the knowledge
gained to inspire and guide present and
future generations.
30 | User guide
English
User guide | 31
English
Share your observations
Sharing with a crowd
Up to 10 people can gather around the eVscope 2 using their smartphones or tablets,
including you, Only the "Operator" can operate on the eVscope 2. Others will be
considered as "Watchers" and will not be able to control the eVscope 2. You can request
to become the Operator in the user tab of the App.
Remotely sharing your observations
Your smartphone needs to be connected to your eVscope 2 via WiFi ; you can use your
cellular connection (3G/4G/5G) to stream on the Internet at the same time. You can also
plug your smartphone to your computer to share your smartphone’s screen on it and to
use its WiFi connection to stream.
Use Apps like Zoom or Skype to share the screen with Unistellar community.
Scan this QR code to be redirected to our FAQ
with more visual content including a video on
how to stream your Unistellar app on Internet
7
Exoplanet Transit
Why observe them ?
For science; in the 90’s two scientists detected the fi rst exoplanet, since then, thousands
of planets have been detected, orbiting around stars, we also came to realize that each
star/planet system does not necessarily have the same confi guration as our solar system.
Moreover, observing exoplanets will perhaps allow us one day to discover another form of
life or a planet similar to Earth.
The easiest technique to observe them is the transit method: observe a bright star when
the exoplanet passes between the star and your position on Earth.
Unistellar scientists are providing a list of targets to observe with your eVscope 2 every
month.
We have identifi ed several scientifi c areas where the Unistellar/SETI network can make
important contributions to scientifi c research :
- Repetitive and coordinated observations of short period Jupiter-sized exoplanets to
accurately measure their size and orbit shortly after their discovery.
- Coordinated observations of transits to confi rm their existence and inspect the areas
surrounding these exoplanets to infer the presence of other objects (disks, other planets,
large moons).
To discover new exoplanets, learn more here:
unistellaroptics.com/citizen-science/exoplanets
Storage and maintenance
Maintenance and storage of the eVscope 2
Store the eVscope 2 in the original packaging or in its backpack.
Store the eVscope 2 with the cap cover and the eyepiece cover on, to prevent dust from
entering the device.
Do not store the eVscope 2 with an empty battery.
�Do not store the eVscope 2 in a wet or highly humid environment.
Do not store the eVscope 2 at temperatures below 10°C (50°F) or above 40°C (104°F).
Do not store under direct sunlight.
Maintenance of the mirror
The mirror can be removed by unfastening the 4
screws on the back of the adjustment mechanism.
Gloves must be used in order to manipulate the
mirror. Once the system is removed the mirror can be
cleaned with dry compressed air.
No liquids nor wet tissues should be used to clean
the mirror.
Maintenance and storage of the tripod
Tripod screws can become loose with usage. Please check the clamps before any use.
Three diff erent tripod tools are provided in order to tighten the screws of the tripod.
Do not store the tripod under direct sunlight.
Do not store the tripod in a wet or highly humid environment.
Maintenance of the battery
The battery is not meant to be removed by the user.
To maximize battery life, you should avoid high discharge while using your eVscope 2.
Avoid using your eVscope 2 at low temperature ≤ 0°��C or high temperature ≥ 40°��C (104°F), as this
can aff ect the Lithium-ion battery.
A very cold environment can increase the consumption of your battery. It will result in a shorter
duration of use.
Travelling with the eVscope 2
If you need to travel on a plane, do not put your eVscope 2 in the backpack as a checked
luggage ; it might be damaged and it won’t be covered
by the warranty. Use a rigid case to make sure your
eVscope 2 stays perfectly safe.
The eVscope 2 weighs 7 kg, (19.8 lbs), the tripod 2 kg
(4.4 lbs) and our backpack is 2kg (4.4 lbs).
IMPORTANT : THE BACKPACK IS TOO LARGE TO BE AUTHORIZED AS A CARRY-ON WITH
MOST AIRLINES.
Lithium-ion batteries under 100 W are allowed in checked bags as part of the device.
Warranty
The eVscope 2 comes with a 2-year warranty worldwide.
The warranty does not cover damages caused by dropping your telescope, even accidentally.
If you have damaged your eVscope 2 or need spare parts, contact us at :
support@unistellaroptics.com
8
Expert users recom-
mend hard cases for
travel purposes.
32 | User guide
English

User guide | 33
English
Troubleshooting
Unable to connect to the App : If you see the mention "You are not connected", check
if you are connected to the eVscope 2. Check that your WiFi is active on your device and
that the eVscope is turned on and within reach (ideally within 5 meters) of your device.
You can also manually connect to your eVscope 2 by selecting “eVscope2-xxxxxxx” in
the available WiFi networks. If the problem persists, reinstall the App.
The Go to is grey or doesn’t center the object on the screen : This can happen if the
object is really far from the eVscope 2 or if the object is close to the zenith. Recenter
the object with the joystick or press the AFD on another part of the sky. If the problem
persists, we recommend you reinstall the App.
The Enhanced Vision stopped or dropped : you can get one of these messages :
-“Important shock detected – Please check level and re-align”. An important
shock is detected (a kick on the tripod). Re-adjust your level bubble and go through
the focus & track procedure as explained in the Quick Start Guide.
-“Too close to zenith – Please re-align at a lower altitude”. The eVscope 2 is
getting near the zenith. Go through the focus & track procedure.
- “Your eVscope is stopping the Enhanced Vision. Do you want to save the
image?” The object disappeared behind an obstacle (tree / house).
While you observe, you might see “Enhanced Vision dropped”. One of the images
stacked by your eVscope 2 has an issue and is skipped to maintain the quality of your
observation.
Two specifi c messages can appear :
- “Enhanced Vision dropped. Vibration detected” : A minor shock has been
detected (someone bumped against the eyepiece or the result of wind).
- “Enhanced Vision dropped. Too bright”: An image has been polluted by light
(someone turned on his/her smartphone’s fl ashlight).
Fail to upload : The amount of devices allowed on a network can cause this or the MAC
address fi ltering in place. Connect to your home WiFi network with another device to
enable more devices or add the eVscope 2 MAC address to the list. This can also be an
issue if you are trying to upload from a secure network with multi-factor authentication,
like a university or a government offi ce. It can also fail due to WiFi channel incompatibility,
restarting your router / device WiFi connection will solve the issue.
WiFi drop : The WiFi can drop for diff erent reasons:
- The distance between you and the eVscope 2
- The wall thickness between the user and the eVscope 2
- The auto-lock
- Your OS that has WiFi preferences
- A communication error between the eVscope & the phone
There is no way to boost the WiFi signal of the eVscope 2. Try using an extender with the
same SSID as the eVscope 2 to extend the range.
9

If you experience connectivity issues, turn off the "auto-connect" options on the other
known networks.
Issue with the focus : If you do not see the diff raction pattern (the star symbol), manually
adjust the exposure time and gain using the Bahtinov mask.
Can’t take a dark frame : Try again in darker surroundings and make sure your telescope
was left outside for 15 minutes. Don’t forget to use the cap cover.
EXTERNAL RESOURCES
Sky map: stellarium-web.org
Light pollution map: lightpollutionmap.info
34 | User guide
English
User guide | 35
English
Let's keep in touch
Need help ?
Website : unistellar.com (scan this QR code)
Contact support : support@unistellaroptics.com
FAQ : help.unistellar.com
@unistellar
@unistellar
@unistellarscope
@unistellarscope
10
User guide | 35
English

Need help ?
Glossary
A
B
Altazimuth mount : Two-axis mount for supporting and rotating an instrument about a
vertical and a horizontal axis.
Asteroid : A small body made of rocks and metals with a size varying between cm and km.
Asteroids are the result of fragments of rocks that do not have to be agglomerated for an
ancient planet due to Jupiter’s infl uence and have an orbit around stars.
Barlow lens : Modern Barlow lenses are used in astronomy and astrophotography as op-
tical elements to increase the magnifi cation of a telescope.
Bahtinov mask : Device that facilitates the development of astronomical instruments. It
was named after its inventor Pavel Bahtinov.
Bortle scale : Defi nes the sky brightness using 9 classes and quantifi es the astronomical
observability of celestial objects and the interference caused by light pollution (1 : very
dark & 9 : very bright).
Celestial : Positioned in or relating to the sky, or outer space as observed in astronomy.
Collimation : The process of aligning the optical axis of the mirror.
Comet : Loosely packed balls of ice made out of gases, dust and rock that orbit the Sun.
Constellation : Group of apparent stars forming a recognizable shape.
Diff raction : Light diff raction is a physical phenomenon by which ray lights from a point
source are defl ected at the edge of a non transparent object.
Dwarf planets : Astronomical astre orbiting around a sun which is not a moon. It has suf-
fi cient mass so that its internal pressure outweighs the cohesive forces of the solid body
and maintains it in hydrostatic equilibrium (in an almost spherical form).
Exoplanet : Planet located outside the solar system.
Galaxy : Set of stars, dust, interstellar gas and dark matter whose cohesion is ensured by
gravity.
Light year : Astronomical units corresponding to the distance (and not the duration) trave-
led by the light in one year (9 461 billion km).
Magnitude : Measure of the brightness of a star as it appears from Earth.
Messier’s objects : The Catalog of Nebulae and Star Clusters, better known as the Messier
Catalog, is an astronomical catalog of 110 objects (with a diff use shape) created in 1774 by
Charles Messier. It lists the most beautiful deep sky objects accessible with the instru-
ments of amateur astronomers. The Messier catalog numbers, noted M1 to M110, continue
to be used for these objects, although other names are also widely used.
Near Earth Asteroid : Asteroid whose orbit intersects that of the earth.
Nebulae : gas and dust clusters formed by star explosion residue.
D
E
G
L
M
N
36 | User guide
English
User guide | 37
English
Newtonian telescope : Optical device with 2 mirrors with a "refl ective" lens (refl ects light).
Occultations : Phenomenon by which a star (planet, moon, star, asteroid) is totally or
partially masked by another star which passes between it and the observer.
Solar-system : The planetary system to which the Earth belongs. It is made up of stars,
the Sun, and celestial objects orbiting around it: 8 planets and their 205 known natural
satellites, the fi ve dwarf planets we know and their natural satellites, and billions of small
bodies (such as asteroids, comets, interplanetary dust, etc.).
Star : Celestial body which radiates its own light by nuclear fusion reactions or bodies
which have been in this state at some stage in their life cycle.
Supernova : Cataclysmic event signing the end of a star. A supernova can result from
two very diff erent types of events: the thermonuclear explosion of a white dwarf fol-
lowing accretion of material from a neighboring star or the gravitational collapse of a
massive star (a so-called core-collapse supernova).
Thermal balance : A system is said to be in thermal equilibrium with itself if the tempe-
rature inside the system is spatially uniform and temporally constant. In our case, that
means the telescope has to be at the same temperature as the environment.
Transient astronomical events : Phenomenon involving a celestial object whose dura-
tion can range from a few seconds to a few days, weeks or even years.
Trojans : On Jupiter's orbits, between 160,000–240,000 asteroids called Trojans are dis-
tributed in two elongated, curved regions at the stable point named Lagrangian points.
Zenith : The zenith is an imaginary point directly "above" a particular location, on the
imaginary celestial sphere.
S
O
T
Z
User guide | 38
English
Safety instructions
Everything you need to know about the telescope
Your eVscope 2 and its accessories are not toys. Do not allow small children to play
with them because children could hurt themselves or others or damage your device.
Keep your device and all its parts and accessories out of the reach of small children.
Your eVscope 2 is not meant to be used in a wet environment. As with every electronics
object (with the exception of the waterproof ones), if water or another liquid enters
the eVscope 2 it can be permanently damaged. You should immediately turn off the
power and dry it.
Do not look at the Sun without an adapted fi lter. Your eVscope 2 can be defi nitively
damaged also after a short exposure. There is also an important fi re hazard.
Furthermore, do not expose your eVscope 2 at temperatures above 40°C or below
10°C,the performances can be compromised by extreme temperatures.
Your eVscope 2 is fragile, do not let it drop or fall. In case of shocks, it can be perma-
nently damaged.
Specifi cations
Model: eVscope 2
Mirror specifi cations: diameter 114mm, focal length 450mm, material BK7
Battery specifi cations: Lithium-ion: (6 x 18650), 9 hours life (normal use @20°C), capacity
15 000mAh (55.5 Wh)
Power supply unit (PSU) input: 100-240V ~50/60 Hz 0.6A Max; Output: 5.0Vdc, 2,4A
WiFi frequency and bandwidth: 2.4 GHz, 72.2 Mbit/s
WiFi range: 50m in free space
Input/output: USB-C (PSU); USB-A (smartphone recharge)
Tripod: aluminum, adjustable height; designed for the eVscope
!
38 | User guide
English
User guide | 39
English
Declarations
Hereby, Unistellar SAS declares that the radio equipment type eVscope 2 is in compliance
with Directive 2014/53/EU, the FCC 47 CFR Part 15 and the ICES-003 / NMB-003 standards.
The full text of the declarations of conformity is available at the following internet address:
unistellar.com.
For Canadian users: A separation distance of 20cm or more is required between the user
and the device according to Canadian standard RSS-102 — Radio Frequency (RF) Exposure
Compliance of Radiocommunication Apparatus (All Frequency Bands)
(https://www.ic.gc.ca/eic/site/smt-gst.nsf/ eng/sf01904.html)
当該機器には電波法に基づく、技術基準適合証明等を受けた特定無線設備を装着している
To satisfy RF exposure requirements, a separation distance of 20 cm or more should be
maintained between this device and persons during device operation.
To ensure compliance, operations at closer than this distance is not recommended. The
antenna used for this transmitter must not be co-located in conjunction with any other
antenna or transmitter
The eVscope 2 is recommended to set up on the tripod along with the
telescope only. It can’t be set up on any other brand tripod, otherwise the
action will bring unexpected damage or hurt somebody.
Recycling
This device is compliant to the 2012/19/UE directive and should not be disposed
of in household waste. The special waste disposal varies according to local rules.
The correct recycling of electronic devices helps to preserve the environment
and health.
Unistellar SAS
19 rue Vacon
13001, Marseille France
N° SIRET 81233935600022
Designed in France – Made in China
Type of product : Telescope
Type designation : eVscope 2
Brand Name : Unistellar
Ratings : 5Vdc, 2,4A, Class III
v 1.1.4
!