User Manual
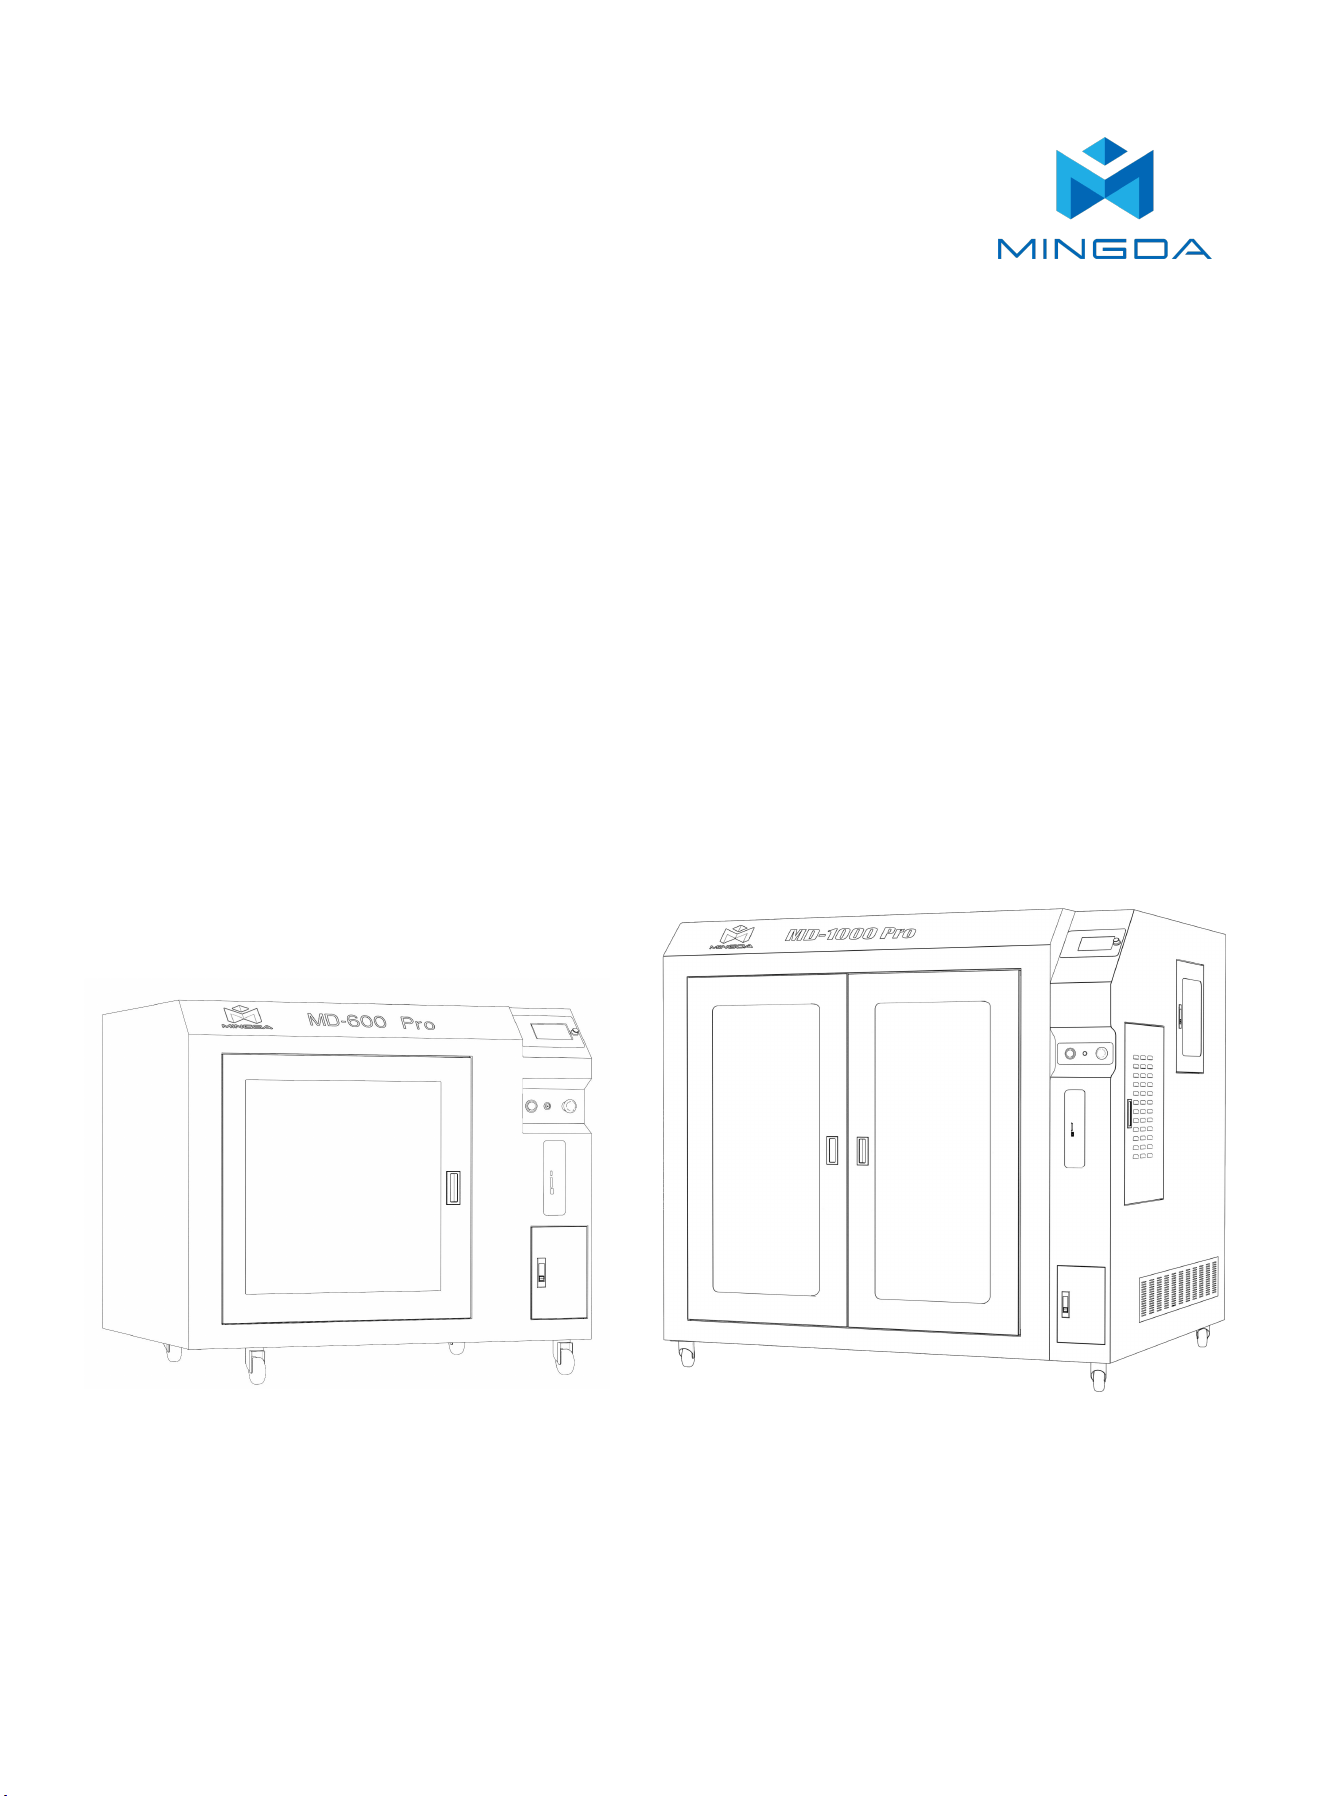
【MD-600 Pro & MD-1000 Pro 3D Printer】
Shenzhen MINGDA TECHNOLOGY CO.,LTD
V1.8

Contents
Notice ……………………………………………………………………………………………...................................
1 Brief Introduction …………………………………………………………………………………………………............
User-Guide Instructions ……………………………………………………………………………………………………………….................….
Learn More Information …………………………………………………………………………………………………………………………..…….
Safety Precautions ……………………………………………………………………………………………………………………………...............
2 Overview ……………………………………………………………………………………………….............................
View of 3D Printer ………………………………………………………………………………………………..............................................
Tool box accessories ………………………………………………………………………………………………...........................................
3 Installation ………………………………………………………………………………………………...........................
Take out the tool box …………………………………………………………………………………………….....….....................................
Plugged in ……………………………………………………………………………………….....…............................................................
Turn on the power switch ……………………………………………………………….....…............................................................
Install the filament (Take PLA filament as an example ) ……………………………………………………………........................
4 Auto Bed Leveling …………………………………………….....…............................................................
Printing the Test Files ……………………………………………………………….....….......…………………………………….…………......…
5 Software .....….......….....….......….....….......….....….......….....….......….....….......…......…........…....
Install CURA ….....….......….....….......….....….......….....….......….............................….......….....….......…......…..............
Add Printer ….....….......….....….......….....….......….....….......….............................….......….....….......…......…...............
Import Configuration file ….....….......….....….......….....................................................….......….....…........….........….
Slicing …..... ….....….......….....….......….....….......….....….......….....….......….....….......….....…...........…......…..................
Printing Process ….....….......….....….......….....…..….....….......…....….....….......….....…….....….......….....….........…..….....
Pause and Continue to Print ….....….......….....….......….....….......….....….......…...….......…...….......…...….........….........
Dismantle the Model ……………………………………………………………….....…...................................................................
6 General Maintenance ...….......…...….......…...….......…...….......…...….......…...….......…...…........…
Daily Preventive Maintenance ...…...…...…...…...…...…...…...…...…...…...…...…...…...…...…...…...…...…...…....….......…..
500 Hours Maintenance …...…...…...…...…...…...……...…...…...…...…...…...……...…...…...…...…...…...……...….....…....…..
Switch Between High Temperature and Ordinary Hot End ..…......…...…...…...…...…...…...…............…........…...…...
7 Trouble Removal …...…...…...…...…...…...……...…...…...…...…...…...……...…...…....…...…...............
8 Support …...…...…...…...…...…...……...…...…...…...…...…...……...…...…...…...…...…....……...…...…...
Customer Support …...…...…...…...…...…...……...…...…...…...…...…...……...…...…...…...…...…...……...…...…...….....…......
Working Computer Specifications …...…...…...…...…...…...……...…...…...…...…...…...……...…...…....…...…...…...….......
MINGDA Limited Warranty Statement …...…...…...…...…...…...……...…...…...…...…...…...……...…....…...…...…...….......
9 Quality Assurance ..…..........……...............……...............……............……..............................…...
1
3
3
3
3
4
5
6
7
7
7
7
7
9
10
11
11
11
14
16
17
17
17
18
18
18
19
19
20
20
20
20
21
Notice
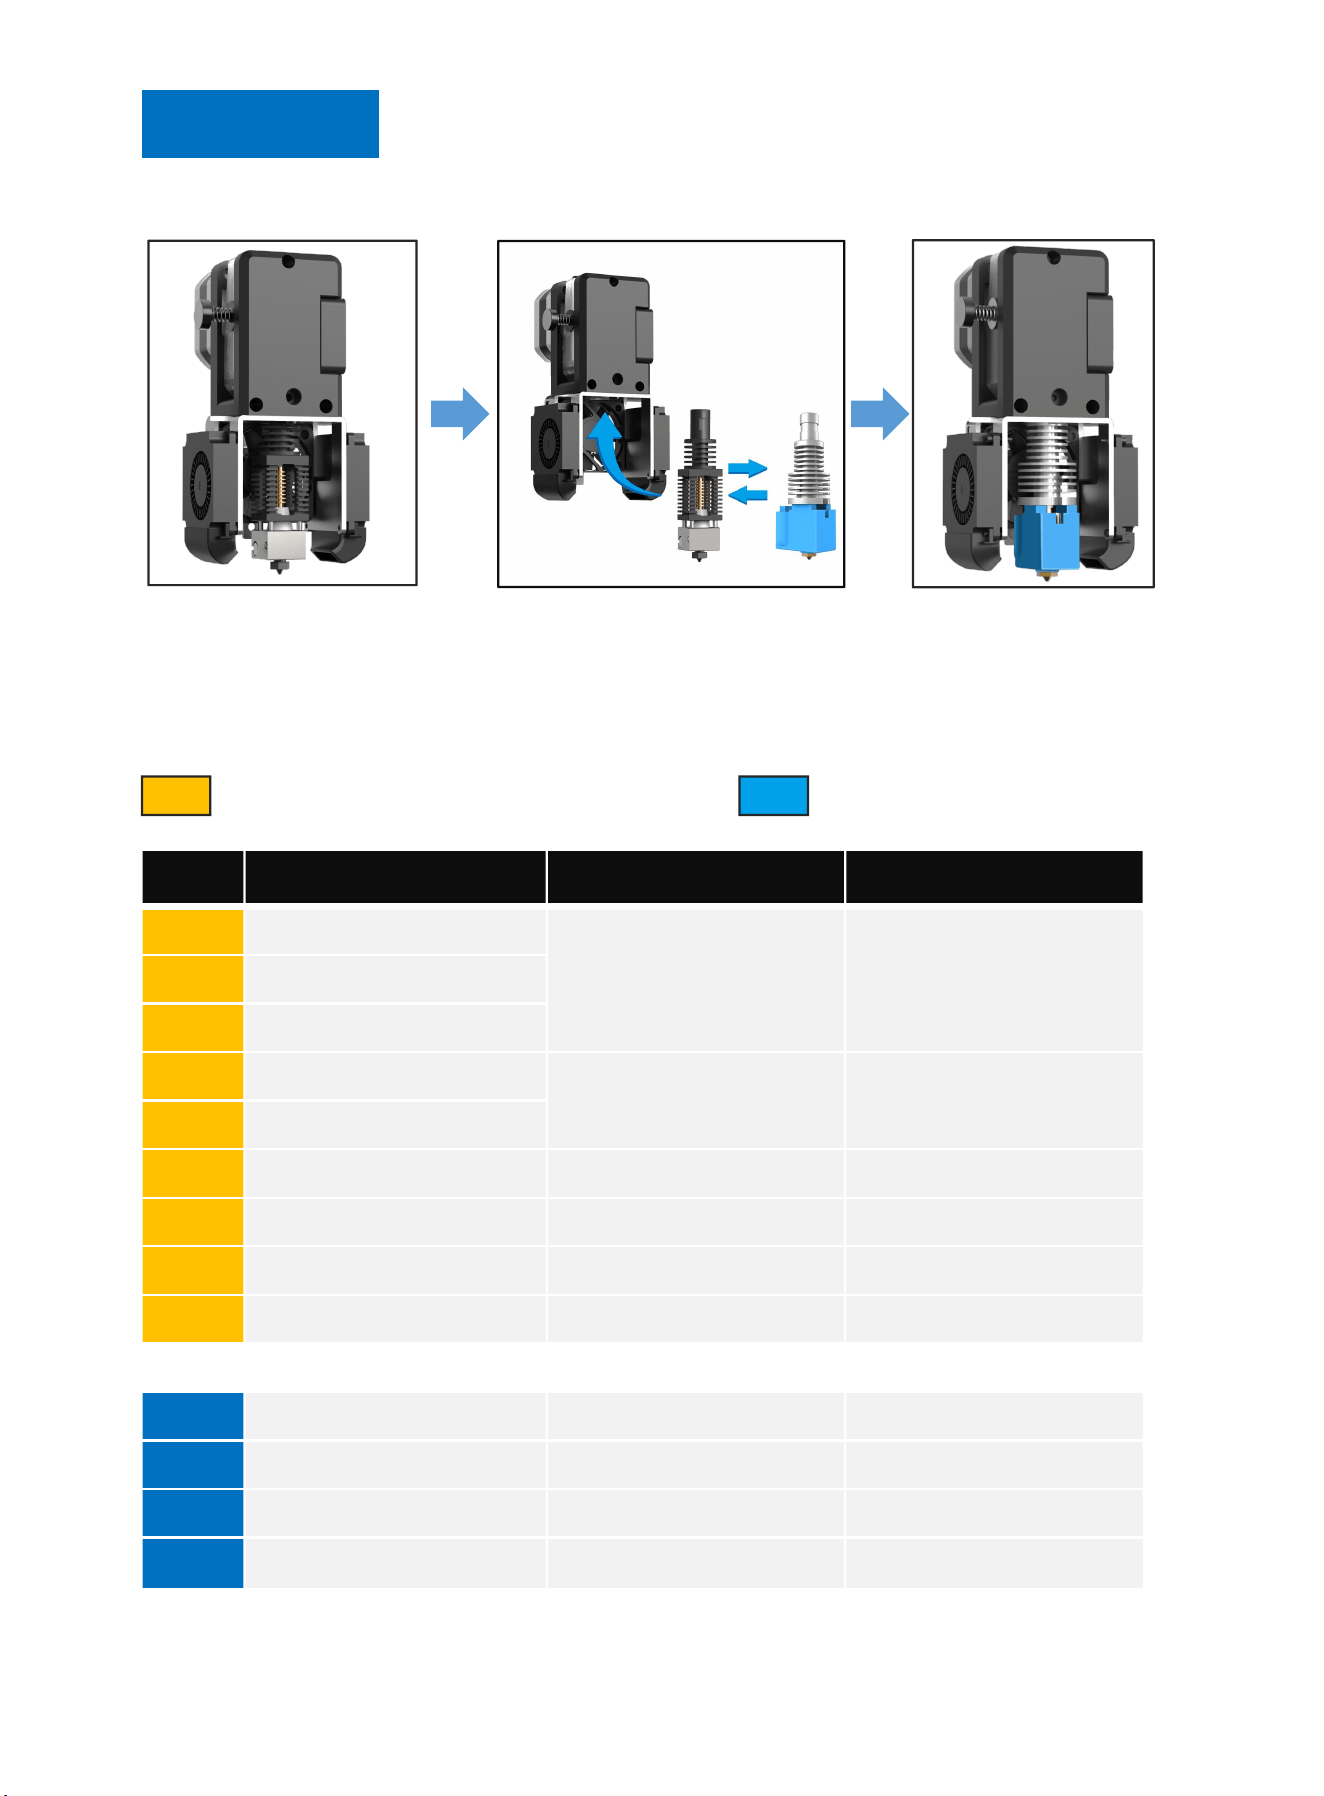
The printer is equipped with a high-temperature hot end, which can be replaced with a normal hot end
High-Temperature Hot End Normal Hot EndReplace the Hot End
This printer is suitable for printing filaments higher than 250 degrees (high temperature filament), and
filaments below 250 degrees.
1
high low
Filament
Print Temperature
Print Platform Temperature
1
PET-CF
280-320°C
60-80°C
2
PET-GF
3
PA12-CF
4
HtPA-GF
300-320°C
70-90°C
5
HtPA-CF
6
HtPA
280-320°C
70-80°C
7
ABS-GF25
250-270°C
90-110°C
8
S-Mulit
260-280°C
60-80°C
9
S-HtPA
270-280°C
60-80°C
10
PETG
230-250°C
80°C
11
TPU 95A
210-230°C
50°C
12
PVA
210-220°C
60-70°C
13
PLA
190°C
60°C
1-9 Recommend High Temperature
10-13 Recommend Normal
Reference video:
Operation video and after-sales video, please refer to the video in the SD card.
2
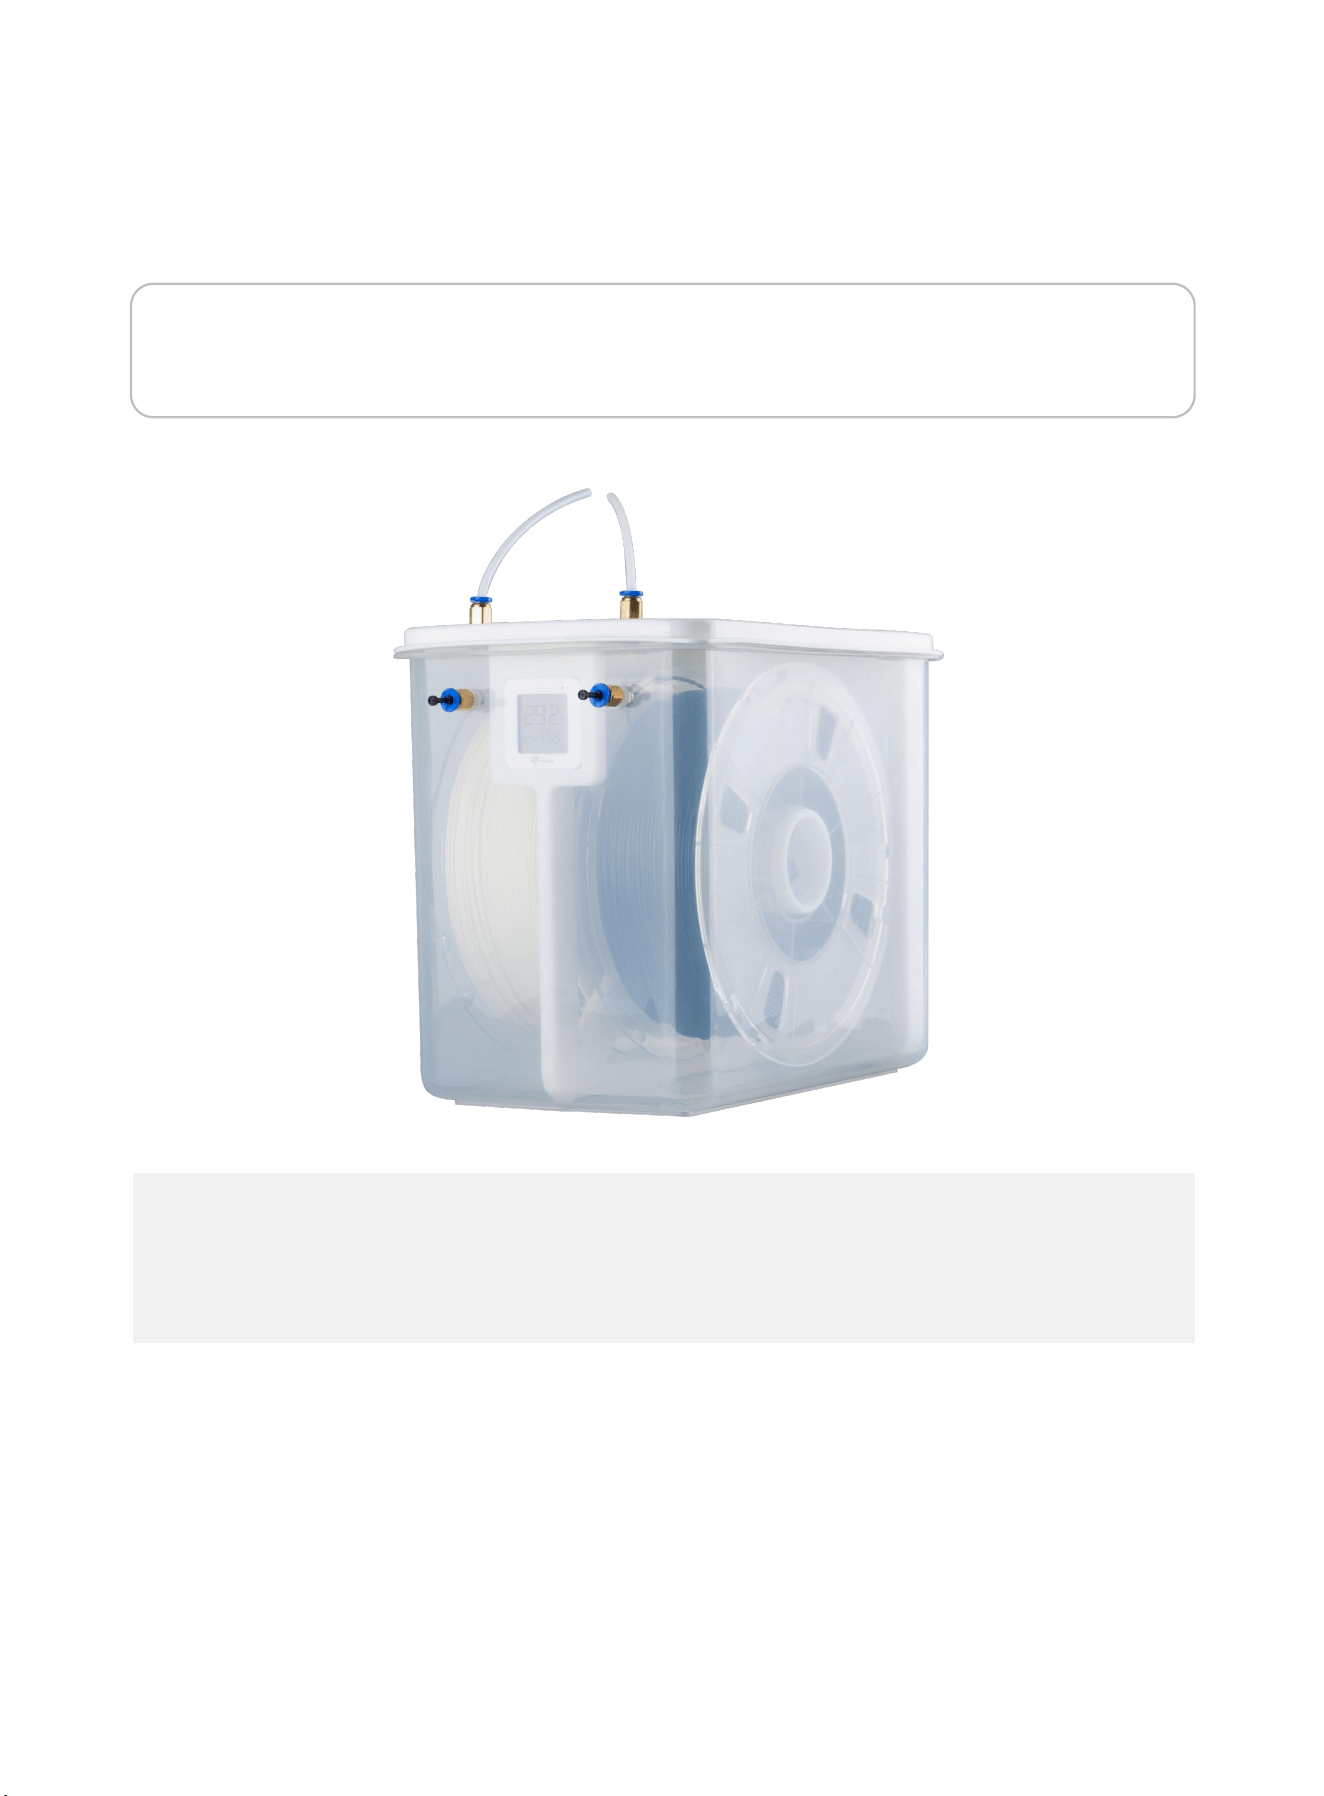
Note: Please put the high-temperature filaments in a dry box for printing, otherwise humidity
will affect the print quality.
Precautions for the Use of High Temperature Filament
If the high-temperature filament is not used up, put it in an aluminum foil bag in time. If
the filament is wet or the surface of the print has obvious drawing, it means that the
filament is damp, and it needs to be dried in an industrial oven before use.

1. Brief Introduction
MD Series Industrial 3D Printers adhere to the design concept of the simple to the extreme. It can print
product quickly and easily, even if you've never used a 3D Printer.
The printer prints the model with PLA, so the products will be strong and durable. You can make drilling,
tapping, grinding and painting on the PLA models. MD Series 3D Printers combine proprietary hardware,
software and filament technologies creatively.
Welcome to a new world of 3D printing!
User-Guide Instructions
This User Guide has been carefully organized into "Installation", "Operation", "Maintenance" and
"Troubleshooting" sections for client to read and understand. Be sure to read the sections carefully to get the
best use of your 3D printer.
Learn More Information
SD card provides the electronic user guide. This guide provides information as following topics:
1. Troubleshooting information
2. Important safety statements and regulatory information
3. Printing supplies related information
4. Detailed instructions for use
You can also find more information on the official website.
http://www.3dmingda.com
Safety Precautions
The following precautions ensure that the customer uses the printer correctly and protects the printer
from damage. Please always follow these precautions.
1. Use the specified power supply voltage. Do not connect multiple devices to the printer's power outlet
to avoid overload.
2. Make sure the printer is properly grounded, Or it may cause electric shock, fire or electromagnetic
interference.
3. Contact your after-sales or local service before disassembling or repairing the printer by yourself.
Check the "Support" section in the User Guide.
4. It is recommended to use the power cord that came with the printer. Do not damage, cut or repair
the power cord. Damaged power cords present a risk of fire or electric shock. Please replace the damaged
power cord with a quality-certified power cord. Do not allow metal or liquid to come into the printer and
contact with the internal parts of the printer. It may cause fire, electric shock or other serious accident.
5. Turn off the printer and unplug the power cord from the electrical outlet under the following
conditions:
1) The printer emits smoke or emits an abnormal smell.
2) The printer emits abnormal noise that has never occurred during normal operation.
3) Metal or liquid (not required for cleaning or routine maintenance) come into the printer.
4) Thunderstorm weather.
5) Power off
This guide contains the following categories.
Note: potentially dangerous situation, if not avoided, may result in minor or moderate injury.
Warning: potentially dangerous situation, if not avoided, may result in serious injury.
High temperature surface: The high temperature surface symbol indicates the presence of high
temperature equipment. When working near hot parts, be careful and wear safety gloves.
Gloves: When performing some maintenance procedures, the machine may be hot, so need to use
gloves to avoid burns.
Safety glasses: Please wear safety glasses to avoid eye injury.
Lifting hazard: Two or more people should cooperate when lifting, so as not to cause serious injury.
Recovery: Use the correct method for recovering materials and packaging materials.
ESD: Use standard electrostatic discharge (ESD) precautions when working with or near electronic
components.
3
2. Overview
The printing process of the MD series 3D printer is as follows: the slicing software CURA convert the .stl
document into a .gcode document, and 3D printer read the .gcode document and print the raw material into a 3D
product.
Cura is a slicing software that runs on Windows XP, Windows Vista, Windows 7, Windows 8, or Windows 10.
The product size and print size of MD series 3D printer are as follows. Each filament holder can hold at least
1kg of printed filament, 1 kg filament can continue to print for about 120 hours, you can also add a second roll of
filament for continuous printing.
Model
Product Size (W*D*H)mm
Printing Size(W*D*H)mm
MD-600 Pro
1212*932*1066
600*600*600
MD-1000 Pro
1612*1332*1465
1000*1000*1000
MD Series Industrial 3D Printers have Resume Printing Function and Filament sensor, which can greatly
save the client's losses.
Resume Printing Function: During the printing process, if the power is off, the machine will save the data.
After powering on, follow the on-screen prompts to continue unfinished print jobs.
Filament sensor: If the filament is not detected when printing, the machine will automatically pause
printing, install new filament, and click the Continue button on the screen to continue printing.
Below we will take MD-600 Pro as an example to introduce the function and use of the printer:
4
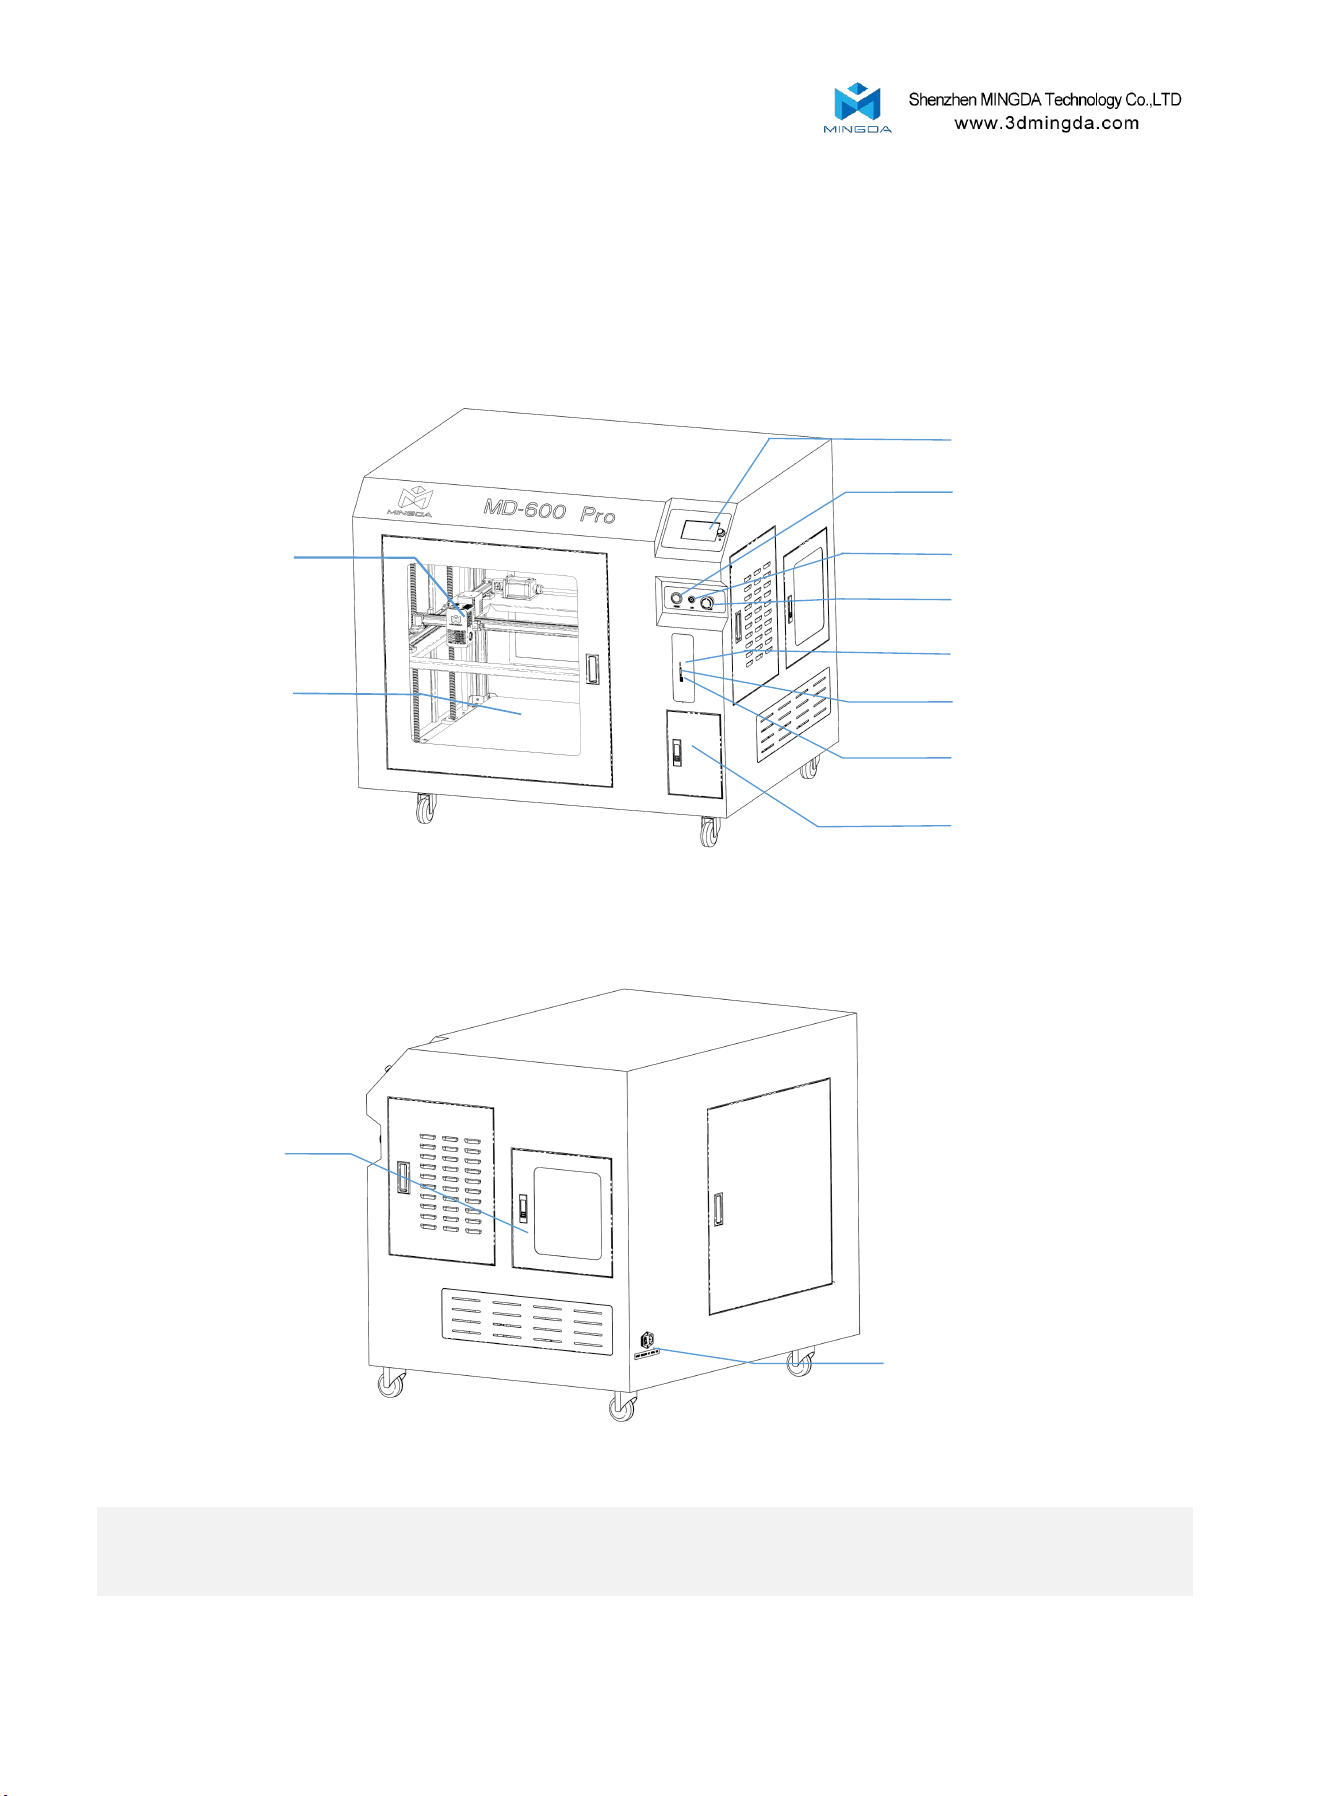
View of 3D Printer
Filament holder
Socket
In this 3D printer, the print head moves in the X-axis (left and right) and Y-axis (forward and backward) directions on the panel,
and the entire panel moves in the Z-axis (up and down) direction. The printing platform is fixed when the printer is working.
Touching screen
Printing head
Power switch
LED switch
Emergency stop button
Type-C
SD card port
Storage box
Platform
USB disk port
5
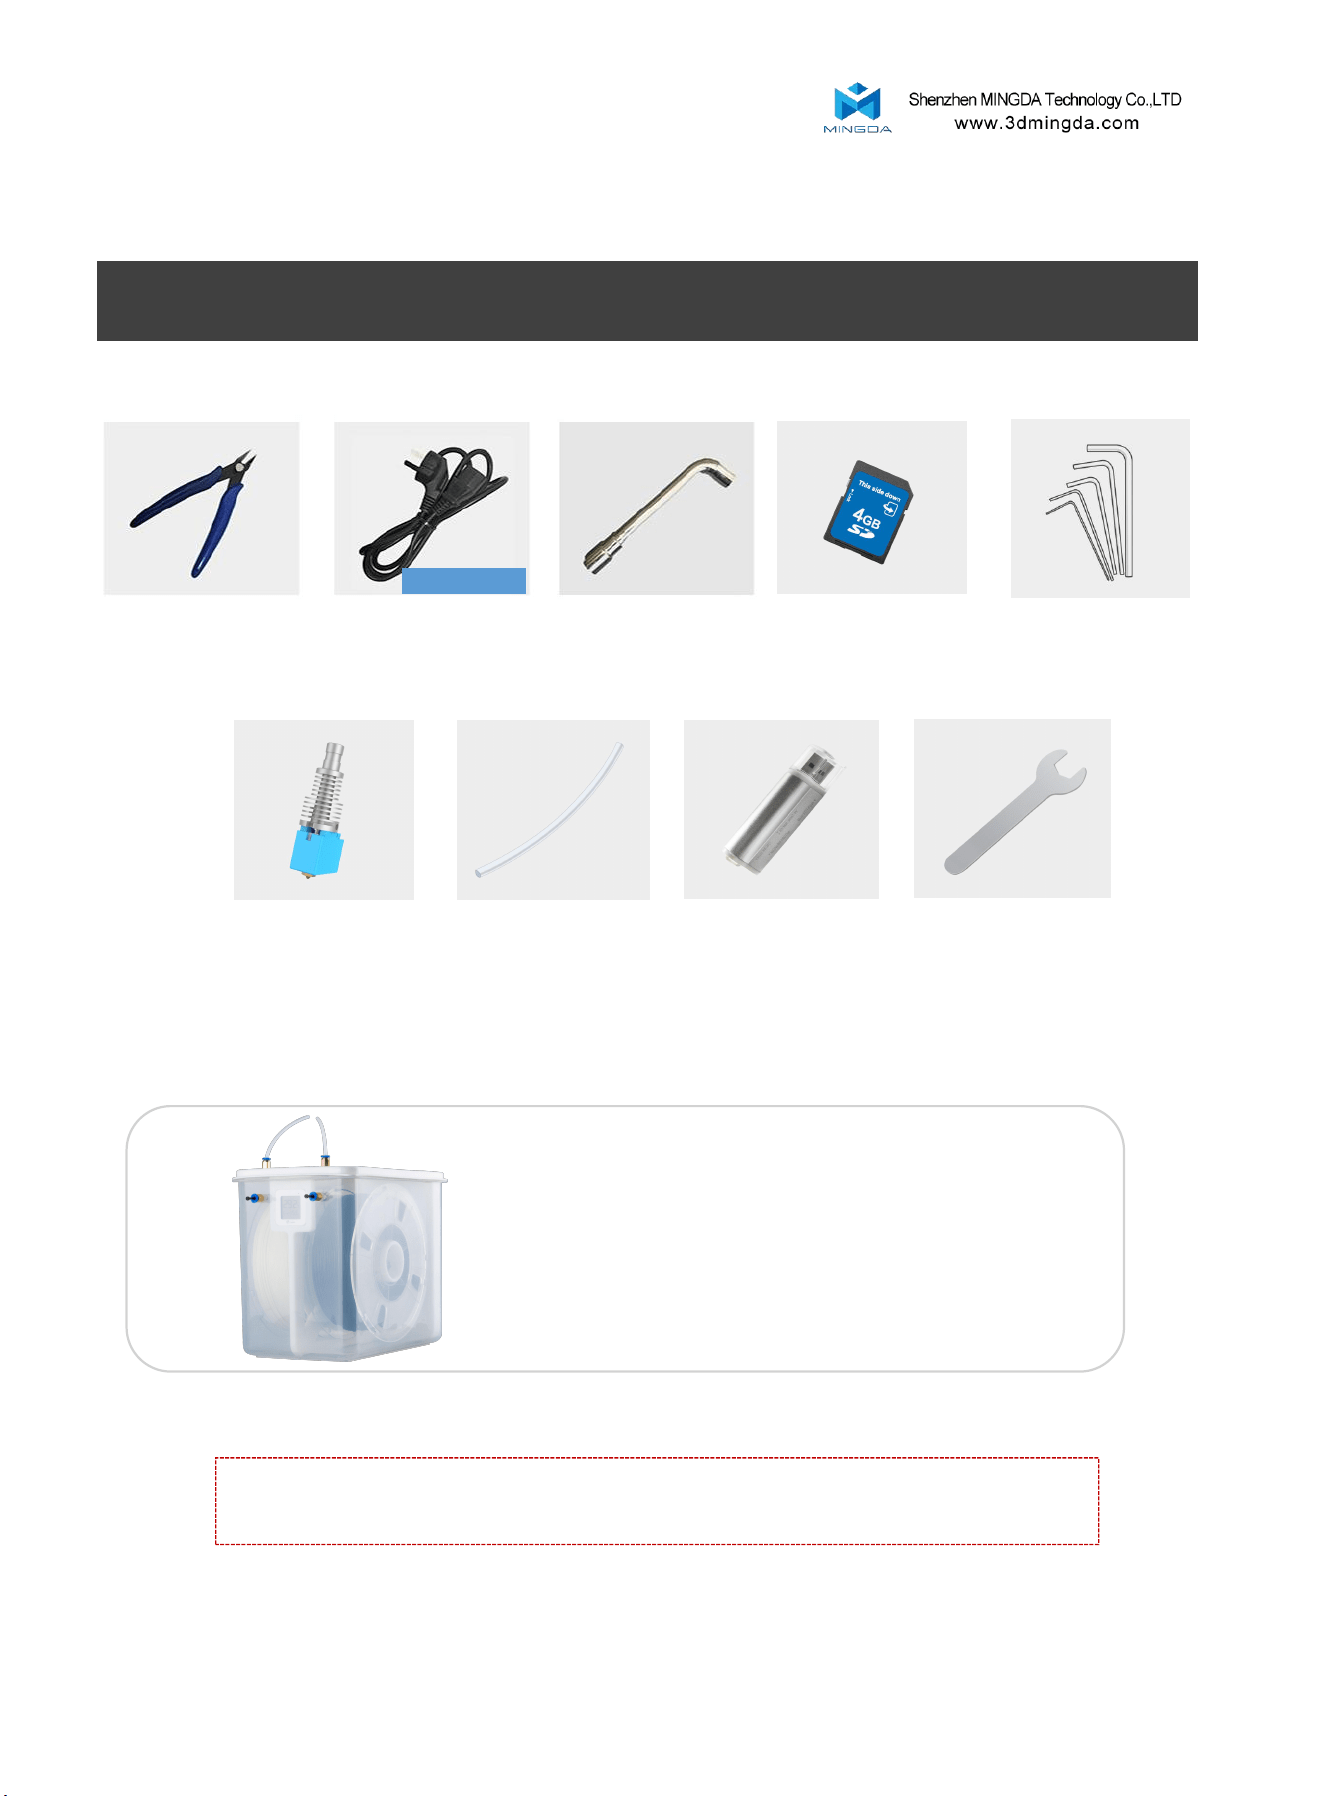
Tool Box Accessories
Diagonal pliers Power cable Sleeve
SD card
Teflon tube Card ReaderNormal hot end wrench
If you choose high temperature filament,
we will provide a drying box
6
MD-600 Pro
Note: The picture is for reference only. When the real thing is inconsistent with the
picture, the actual object shall prevail.
Allen wrench
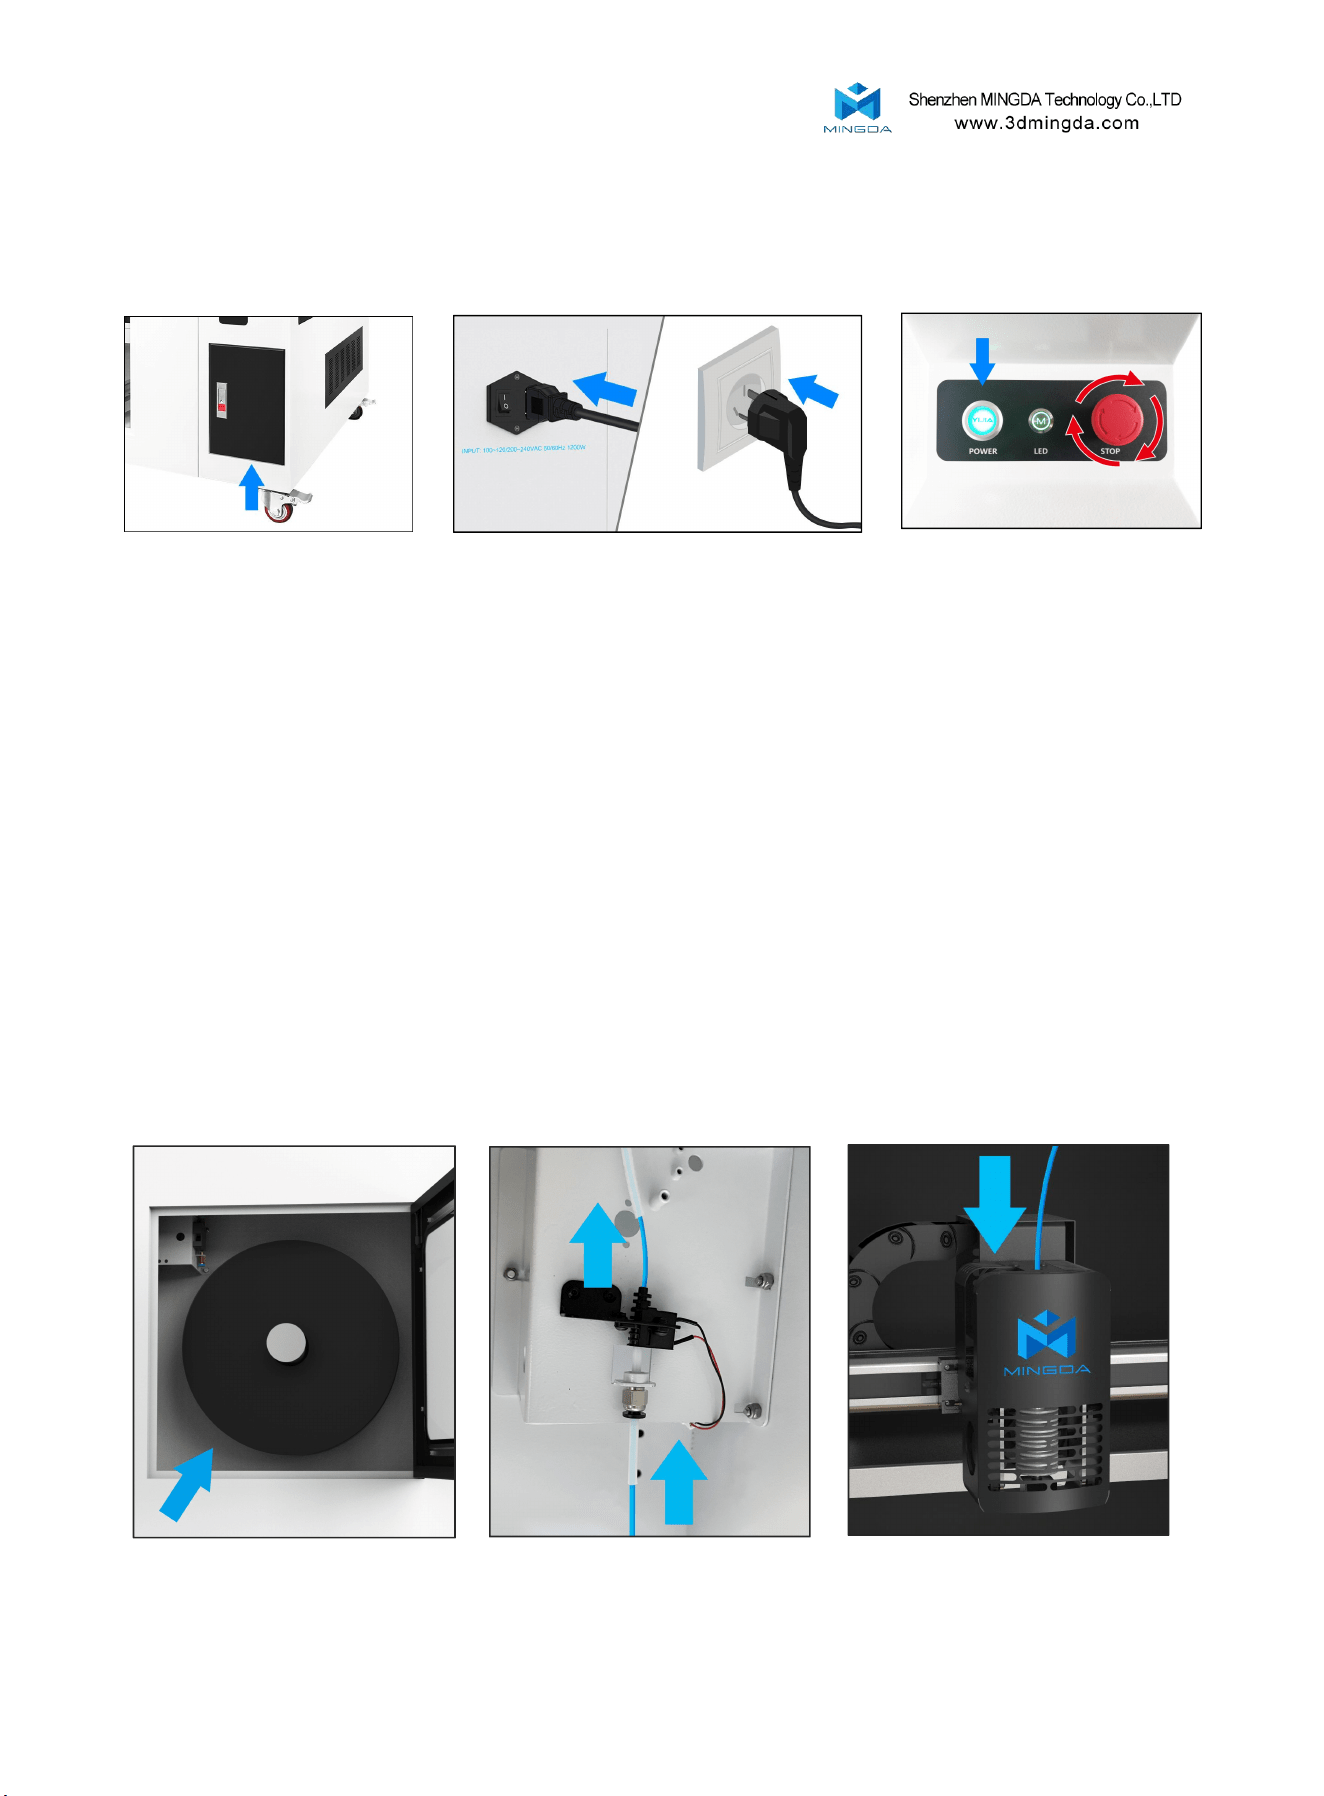
3. Installation
Take out the tool box Plugged in Turn on the power switch
Note: Tool boxes and other accessories
are in the cabinet storage room
7
Install the filament (Take PLA filament as an example )
1. Hung filament on the shelf, and insert the filament through the filament sensor.Then through
the auxiliary feeding gear and bearing, through the adjustment wrench with hand (red circle position),
and then through the square hole at the micro switch and the round hole on the middle baffle
2. Pull away the shrapnel at the filament inlet and insert the filament into the extruder inlet.
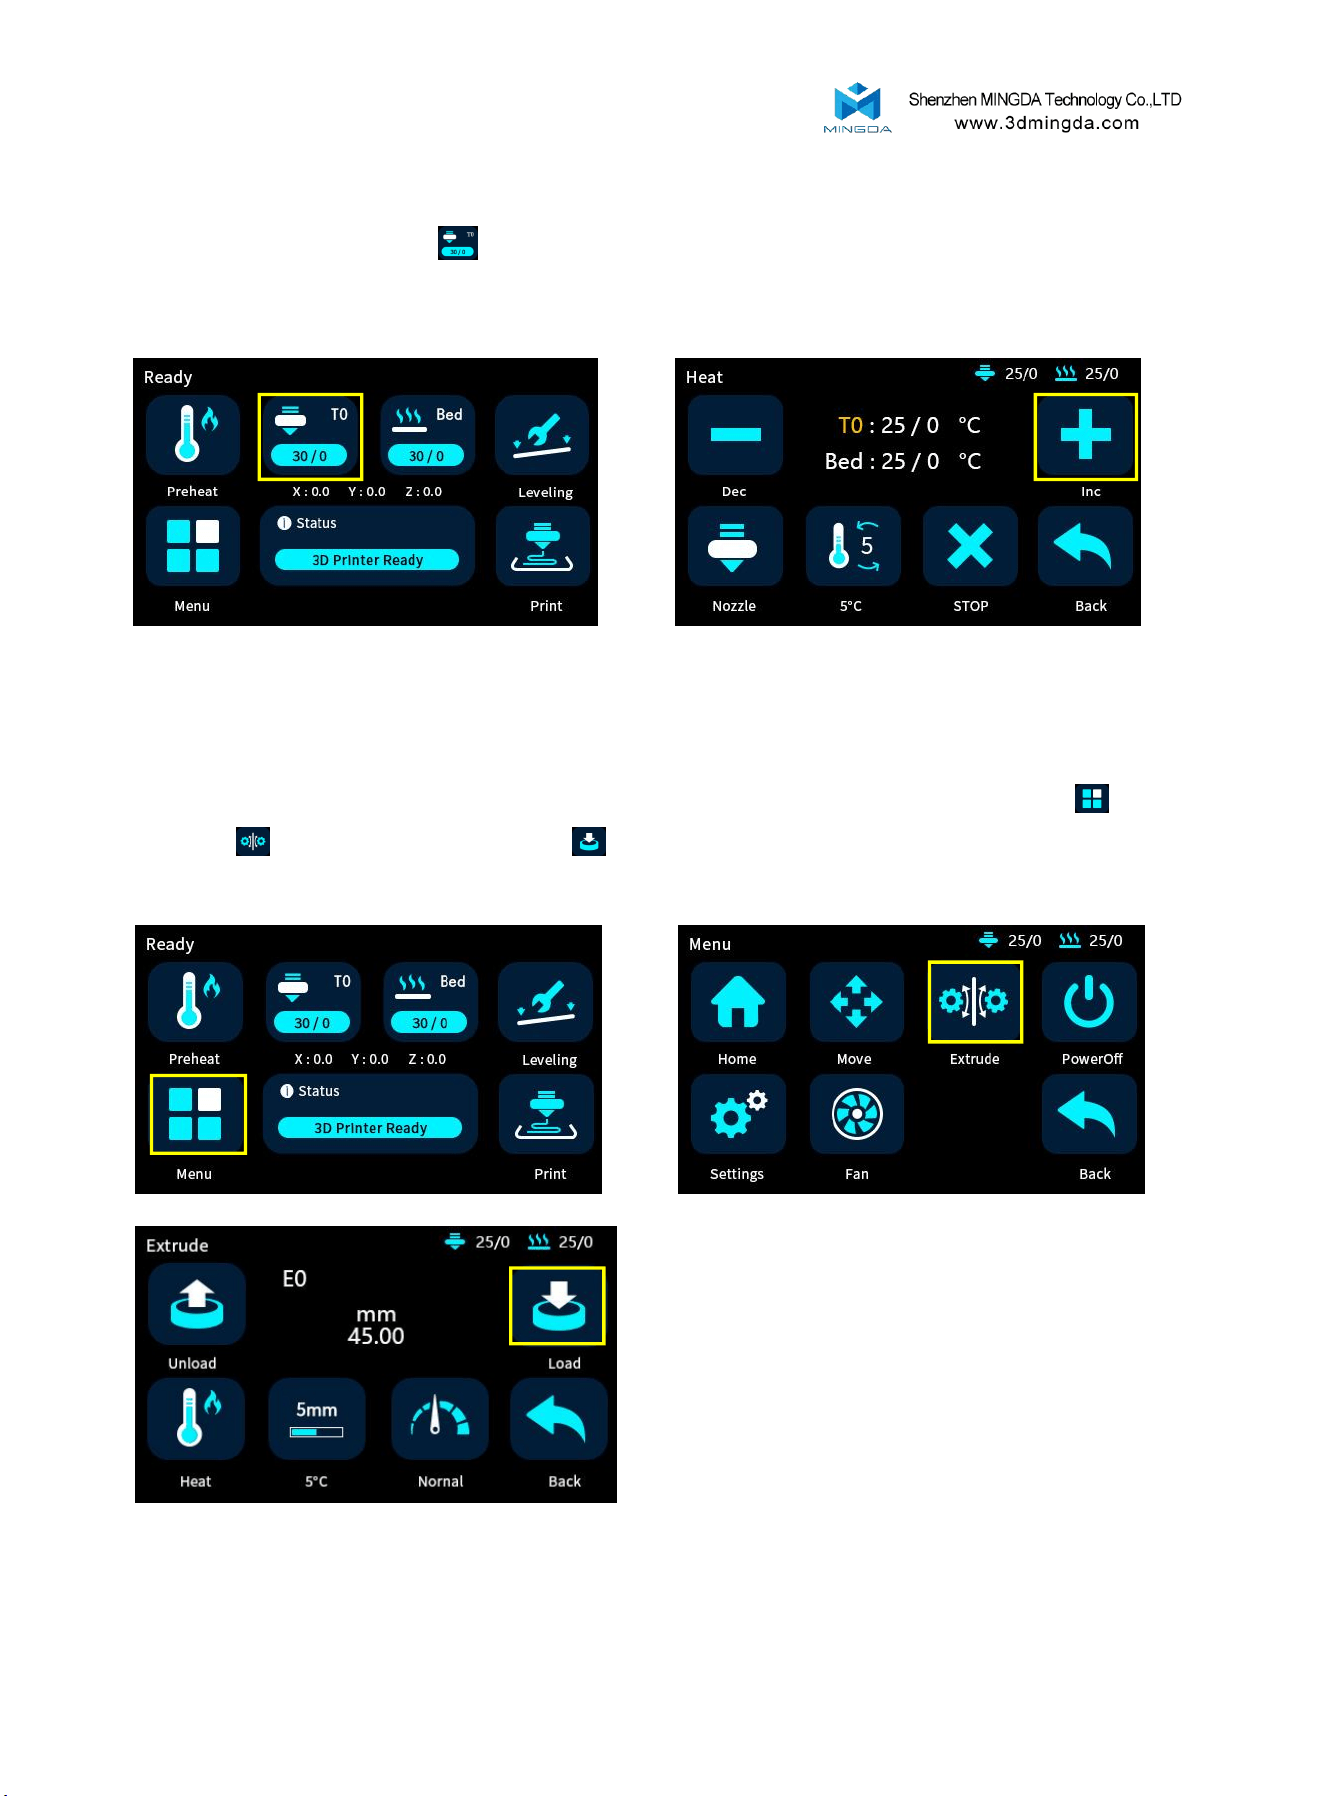
3.Click the heating button , select the nozzle, set the temperature to 200°C , and the nozzle will
automatically heat up to 200°C.
4. When the temperature rises to 200°C, insert the filament into the extruder, click "Menu" ,
"Extrude" , and click the extrude button to feed the filament.
8
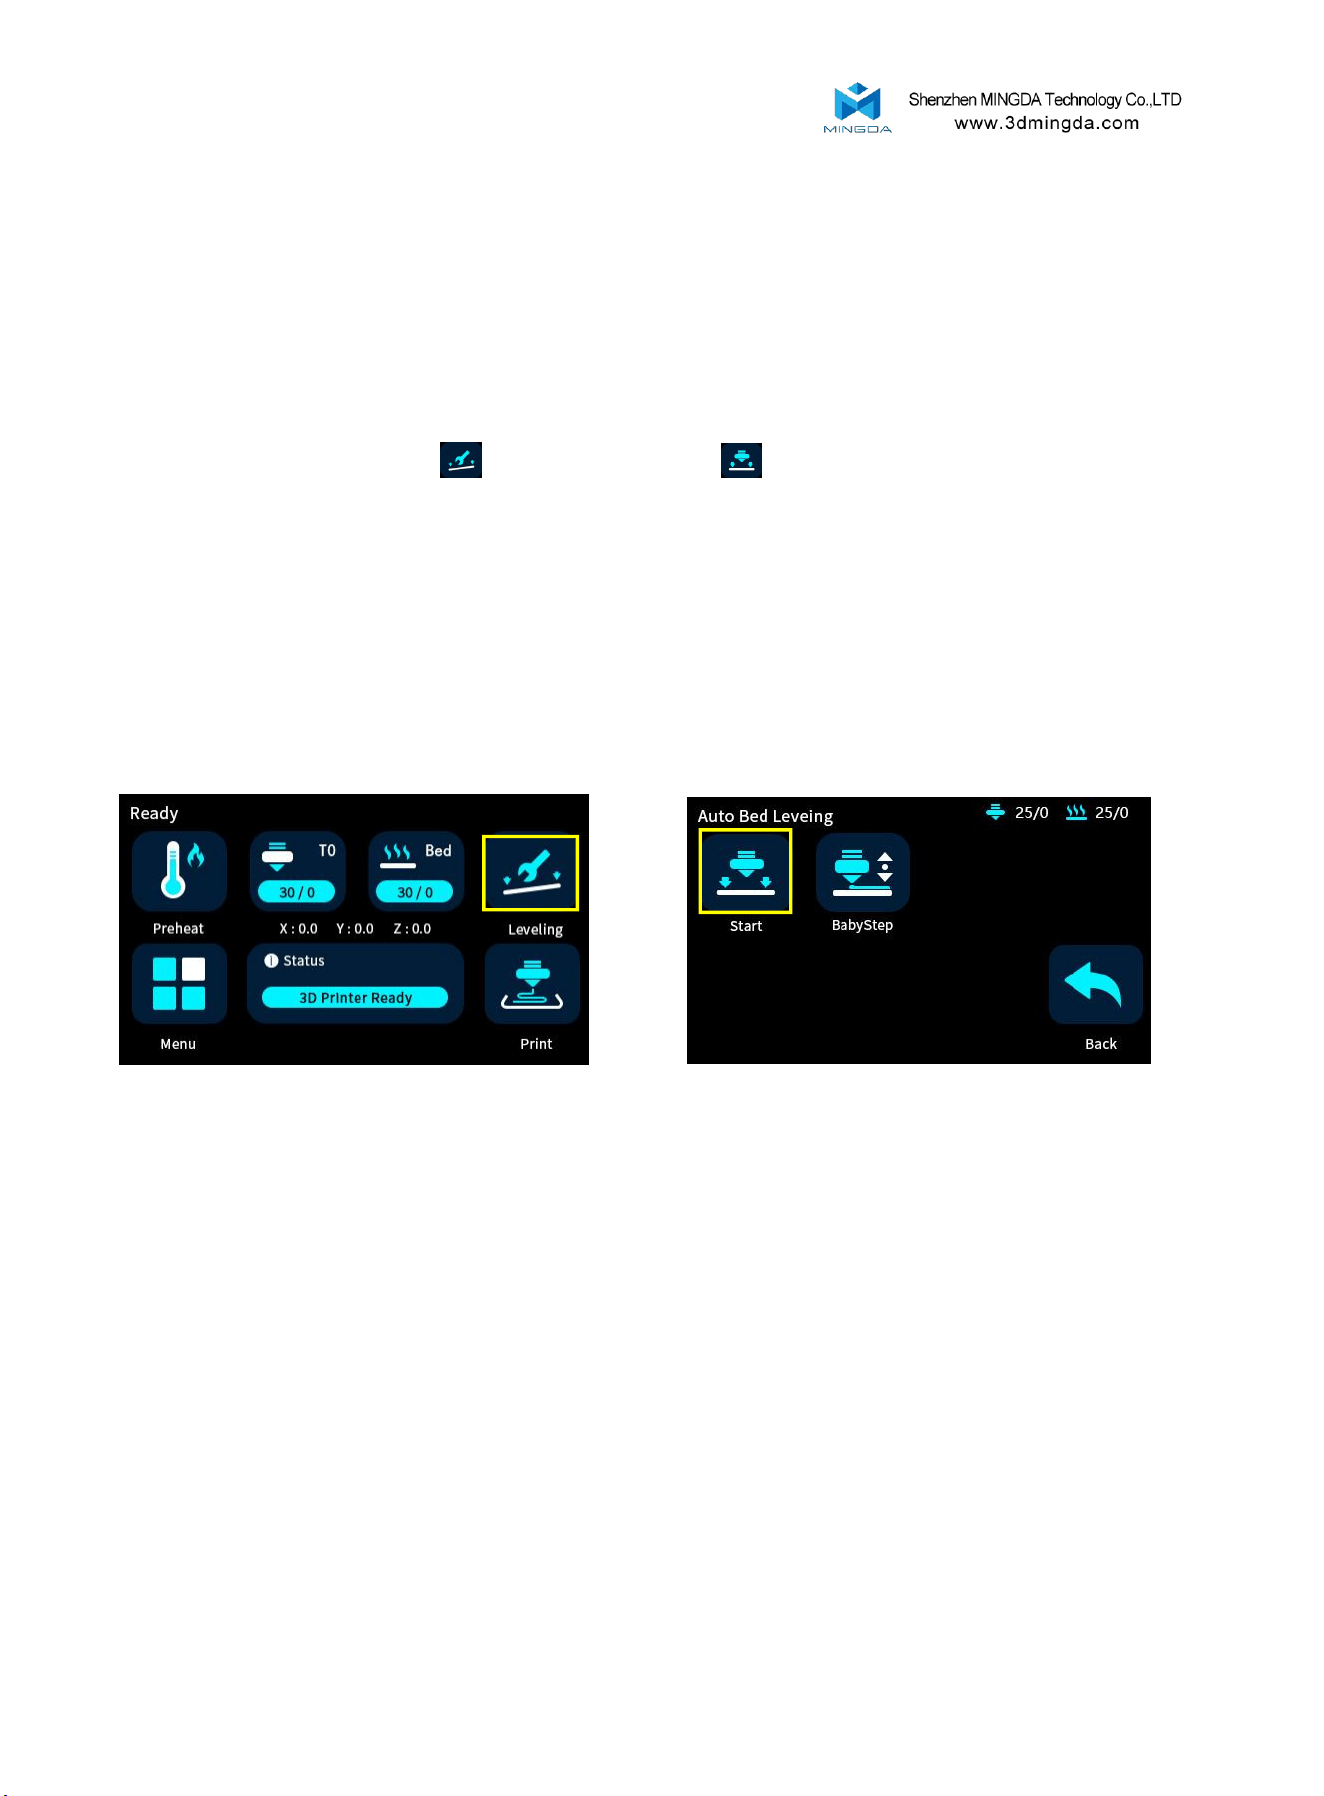
4. Auto Bed Leveling
Click the leveling button , Click the Start button , and the printer will automatically start
to run the leveling program.
(Note that if there is a collision during the leveling process, please press the emergency stop switch
immediately; During the reset and leveling process, please do not put your hand into the chassis to avoid
pinching)
9
Printing the Test Files
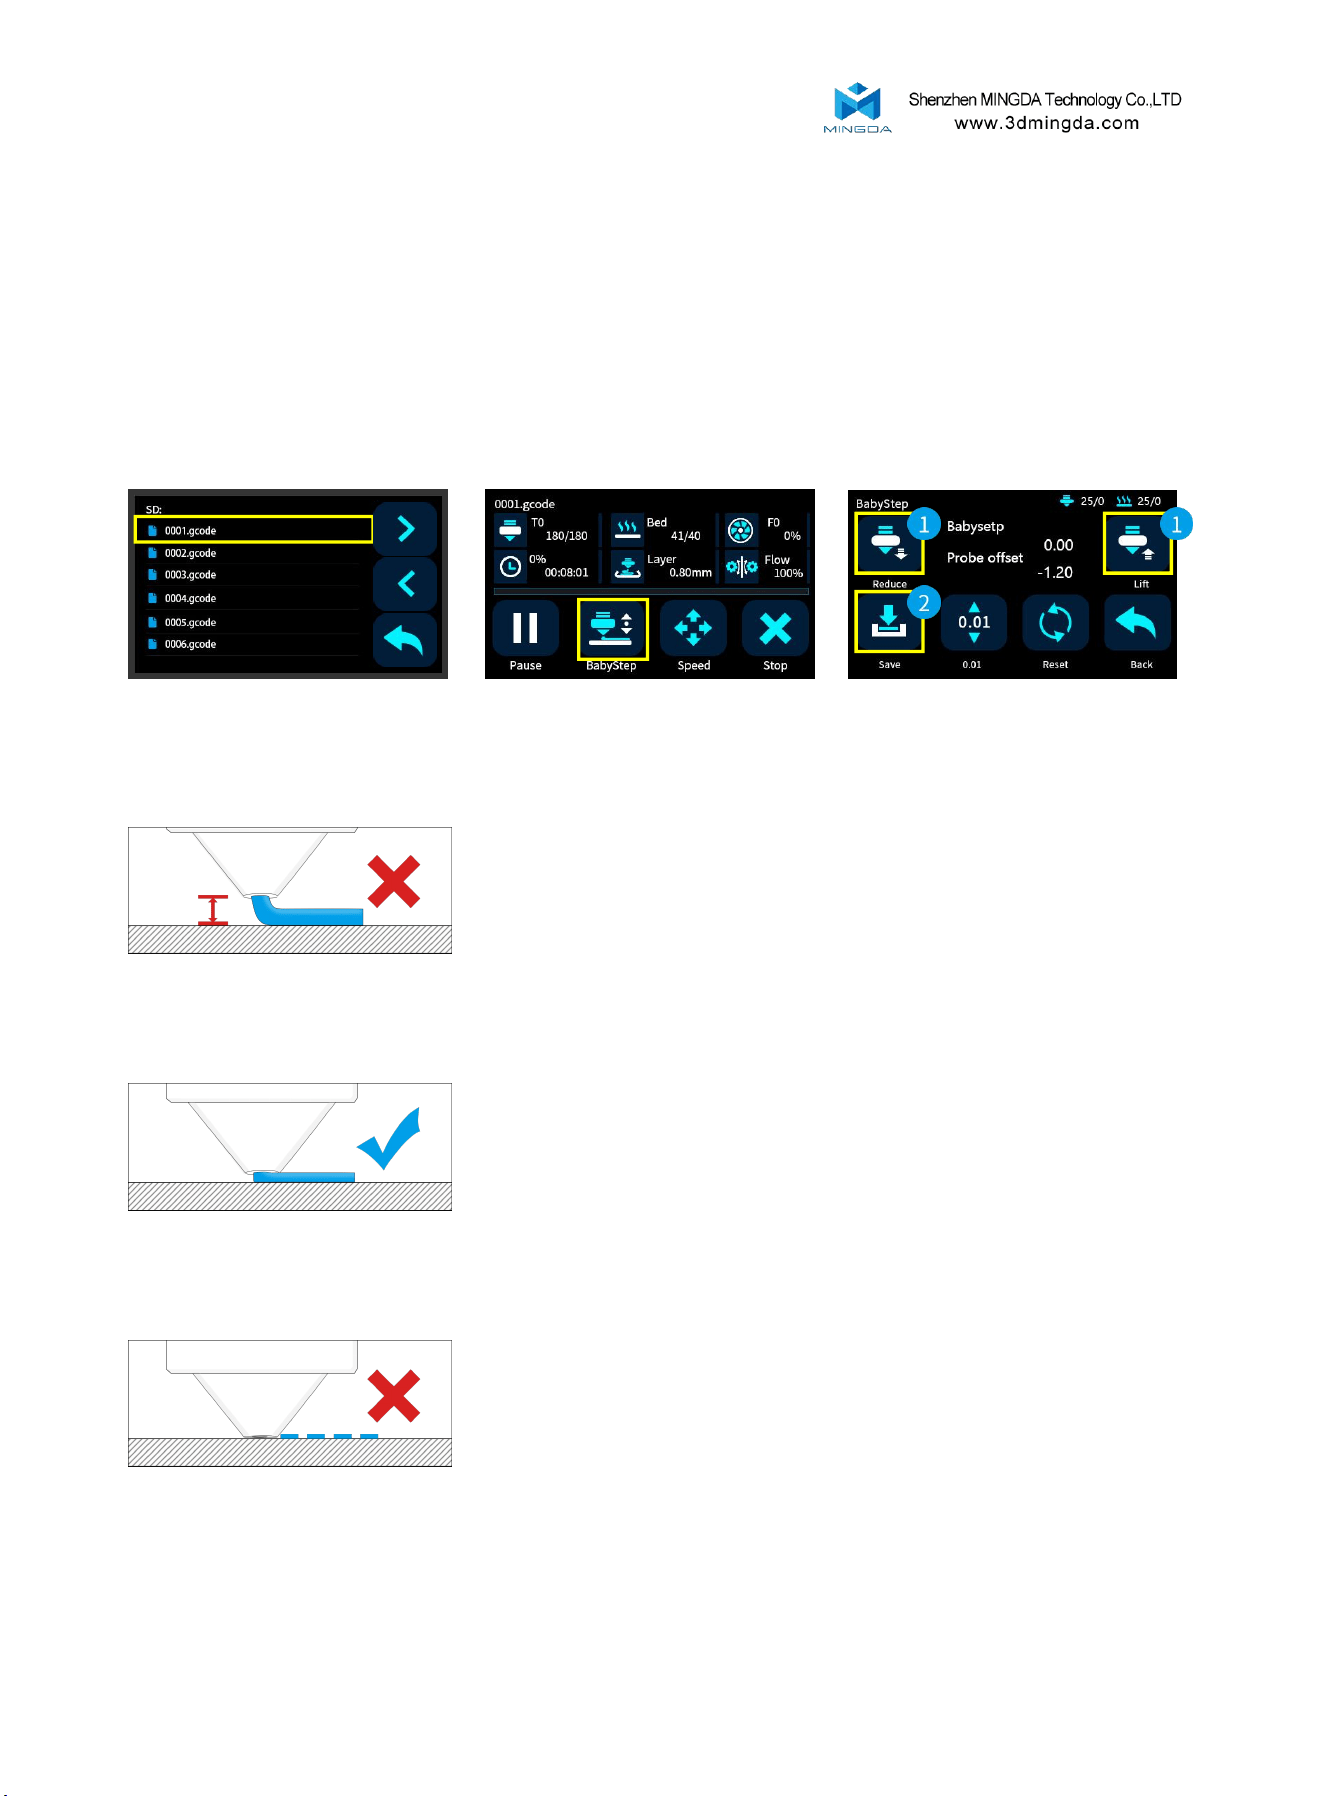
Click on the Print icon, choose a gcode file which you want to print.
Tip: You can adjust the babystep according to the adhesion of the first layer of filament. After the
adjustment is completed, click Save, then you can print directly next time without any adjustments.
If the distance between the nozzle and the platform is too high, the
filament will not easy to stick to the platform. Should click "Decrease"
until the distance is proper.
Keep a proper distance between the nozzle and the hot bed, so that
the filament stick to the hot bed evenly.
If the distance between the nozzle and the platform is too low, the
filament will be not easy to feed out smoothly . Should click
"Increase" until the distance is proper.
10
5. Software
MD series 3D printers work with a variety of slicing software, such as Cura, Simplify 3D, Repetier-Host
and so on. Now we will introduce CURA_x.xx.xx in detail, you can learn how to set the printing parameters,
which will help you to become more familiar with the slicing software and print the first sample successfully.
First, you can find the CURA_x.xx.xx from the SD card, and install it on your computer.
Install CURA
1. Double click Cura_x.xx.xx.exe to install
2. Install the software by default as follows.
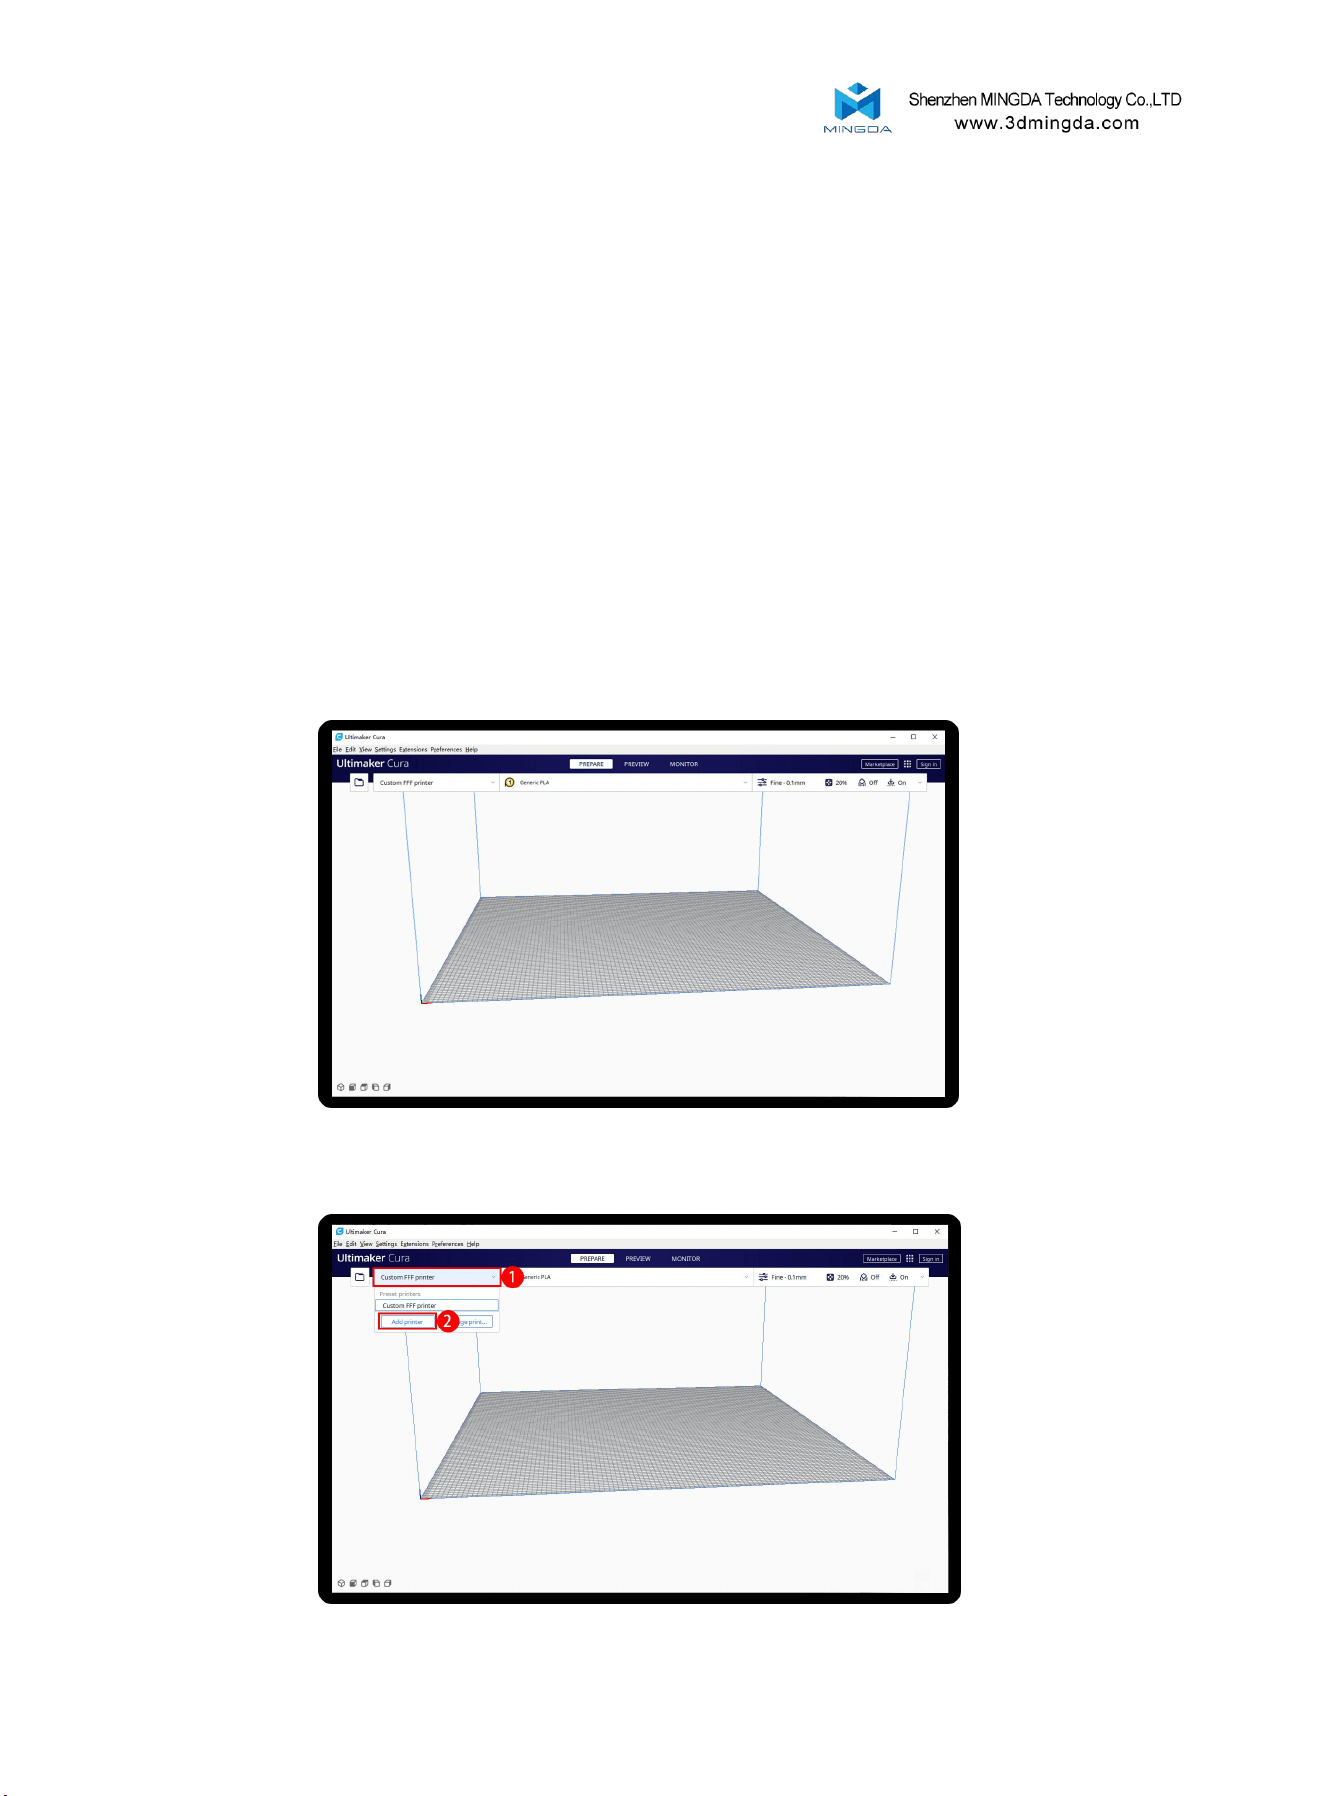
Click Add printer
11
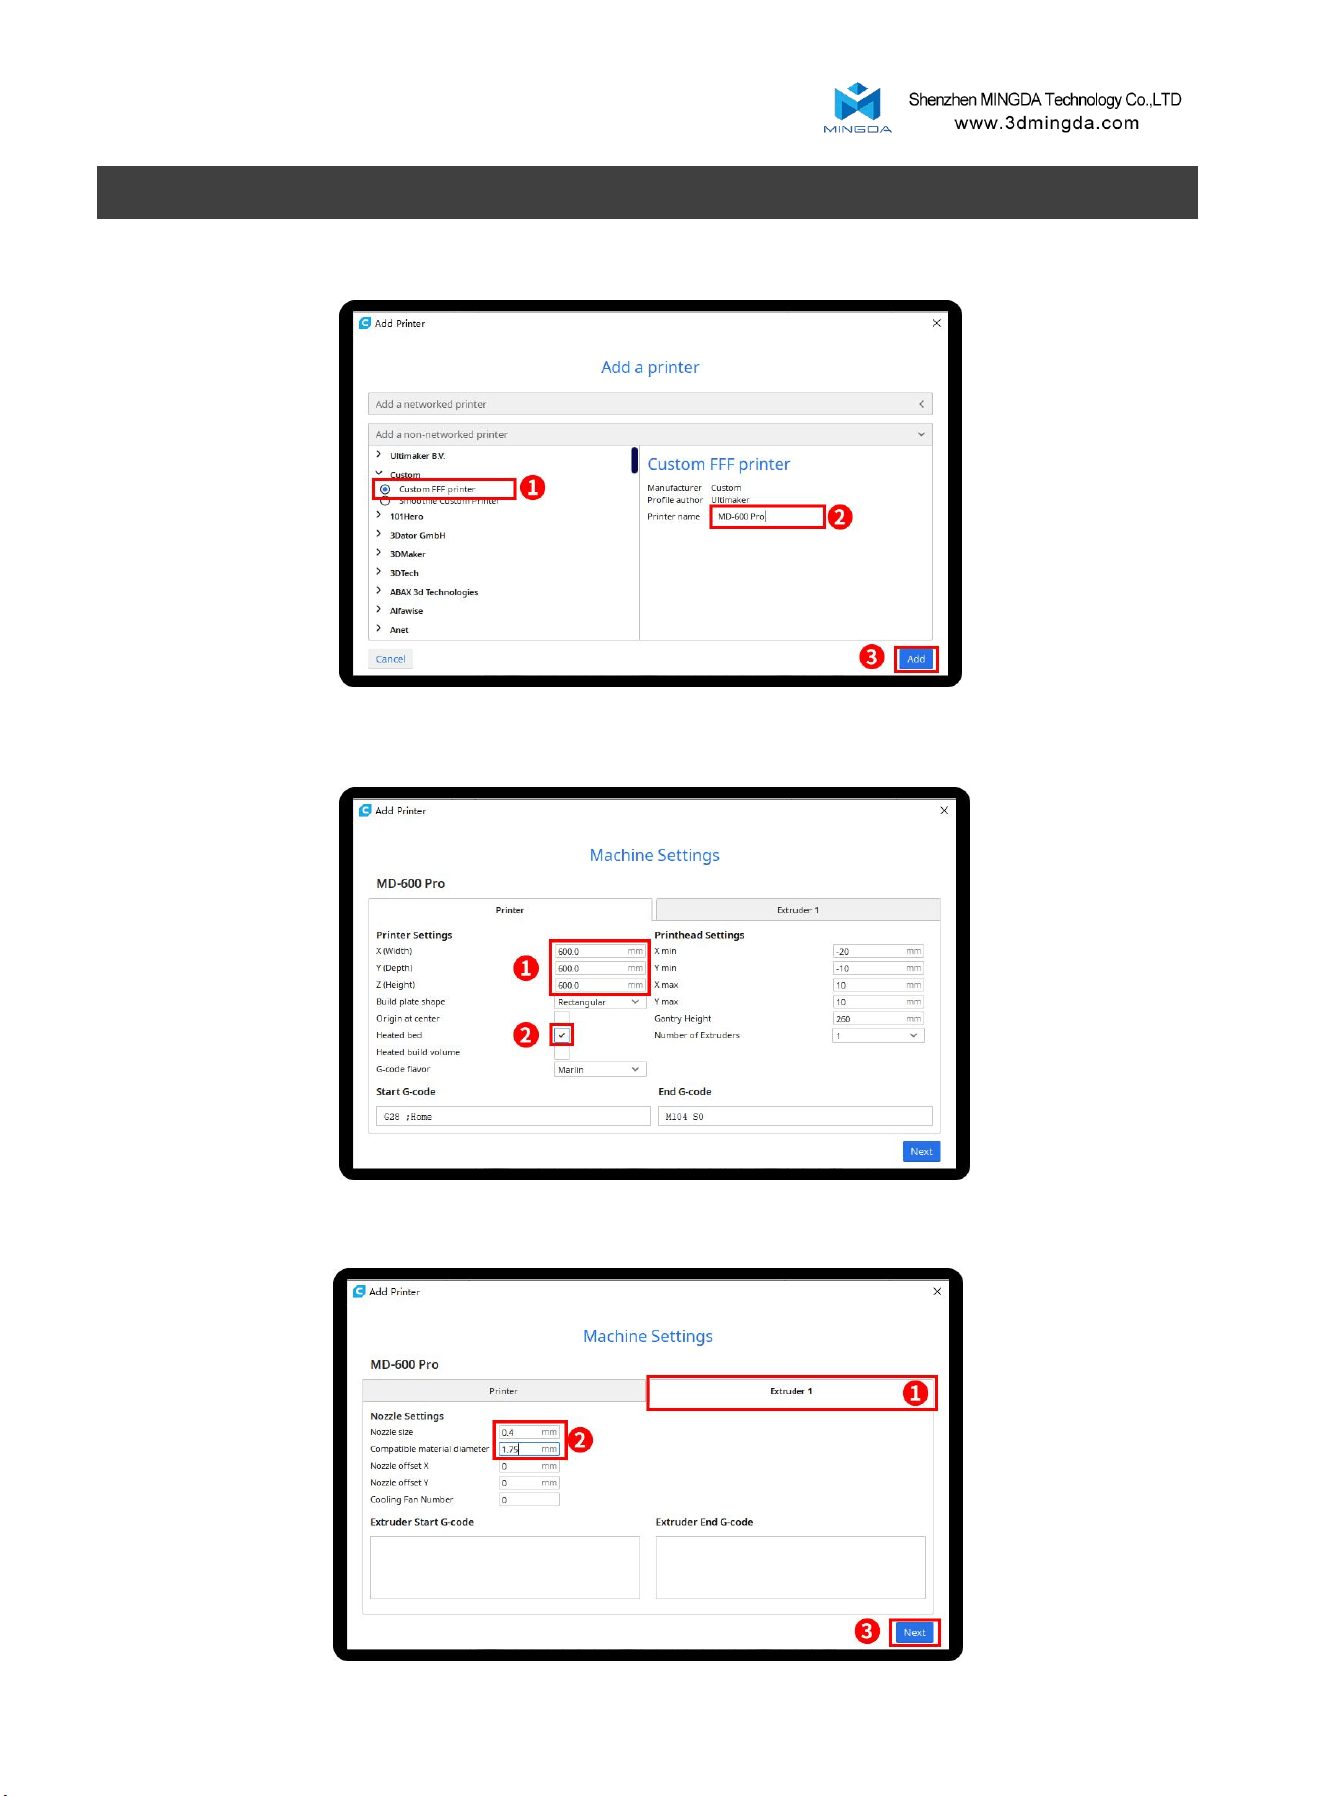
Choose Custom[Custom FFF printer ], insert Printer name for example MD-600 Pro, and Click Add
Insert print size, X600 Y600 Z600, select Heated Bed
Click Extruder 1, nozzle size 0.4mm, Compatible filament diameter 1.75mm, Click next
12
MD-600 Pro
13
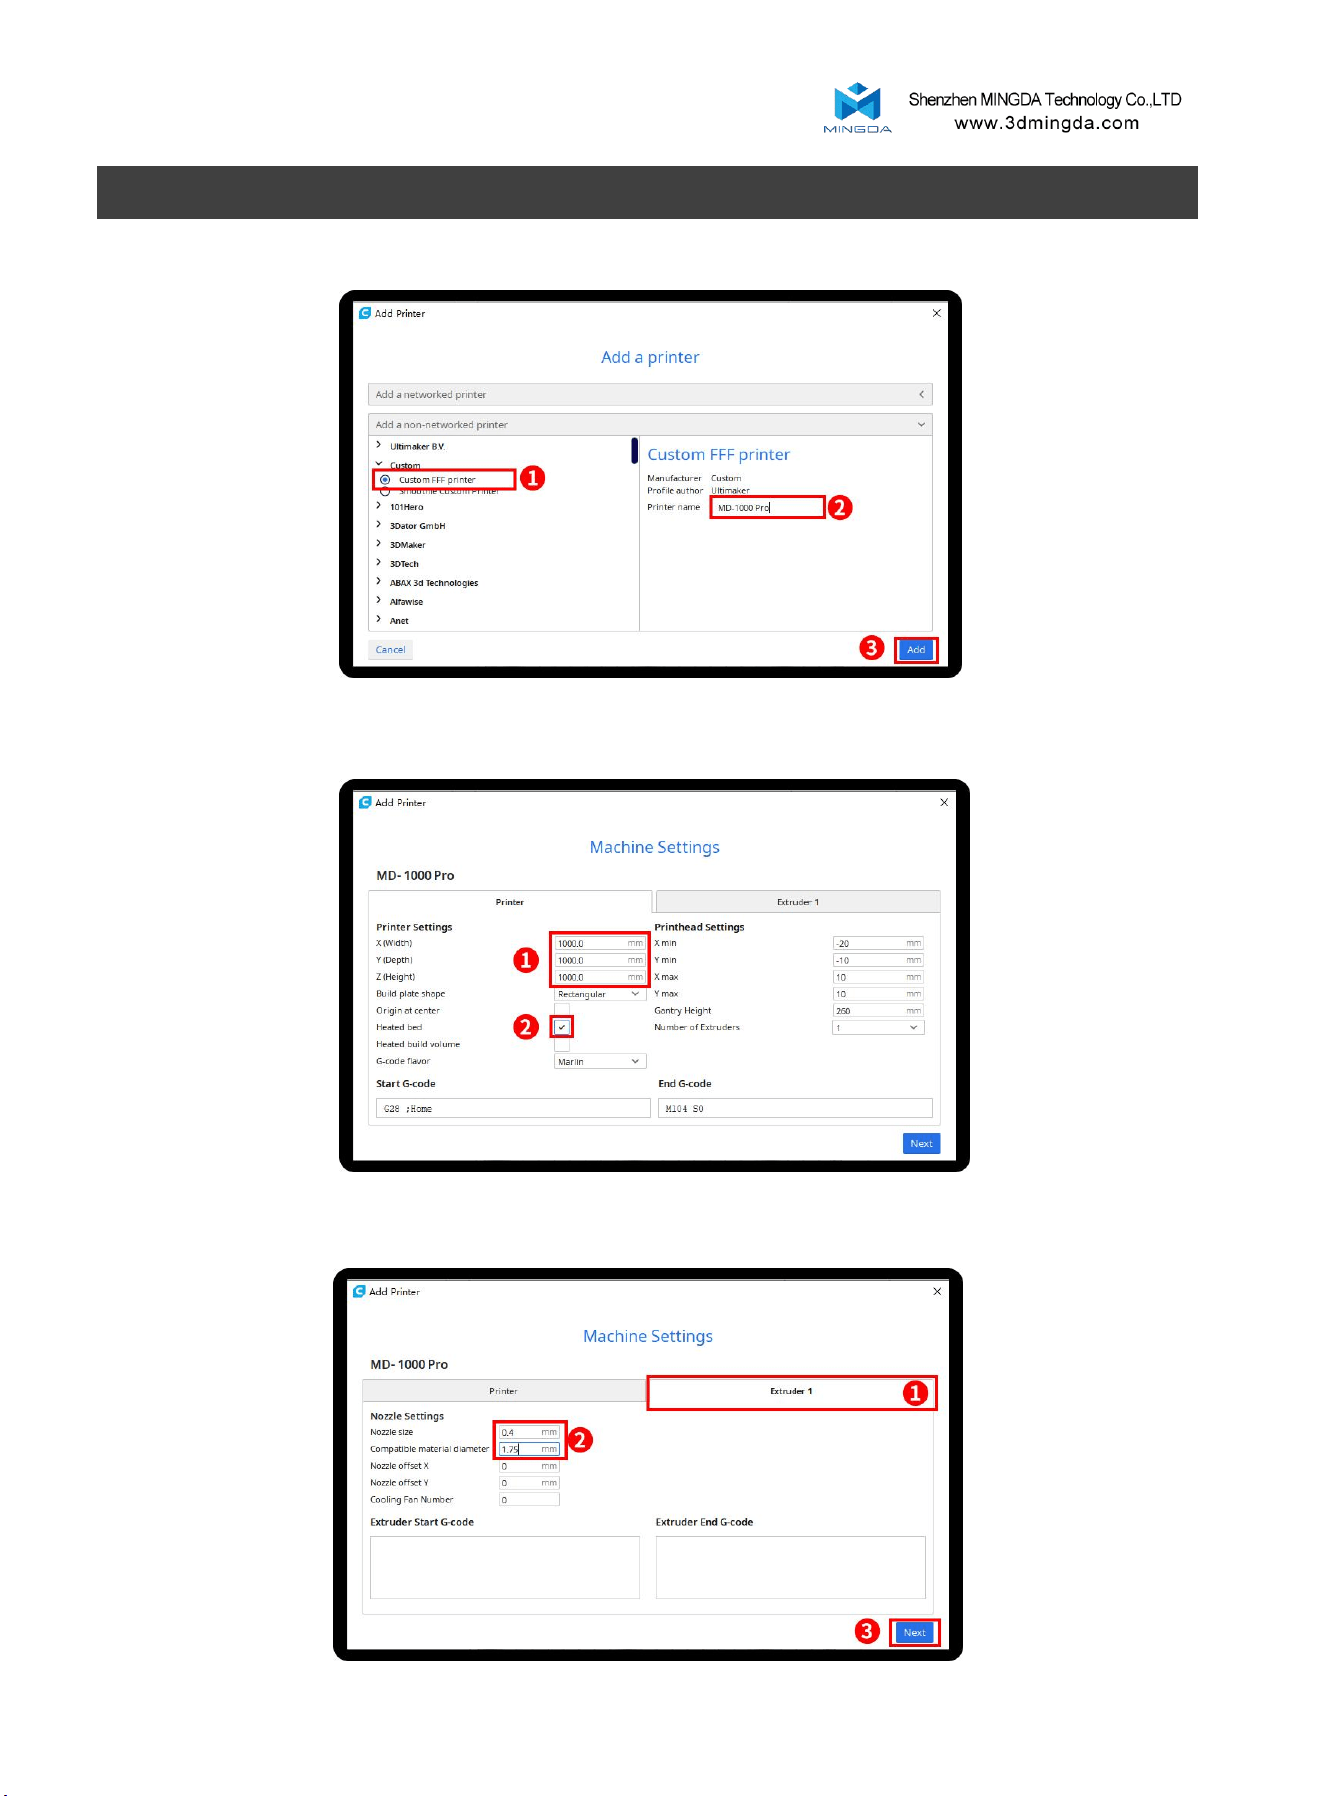
Choose Custom[Custom FFF printer ], insert Printer name for example MD-1000 Pro, and Click Add
Insert print size, X1000 Y1000 Z1000, select Heated bed
Click Extruder 1, nozzle size 0.4mm, Compatible filament diameter 1.75mm, Click next
MD-1000 Pro
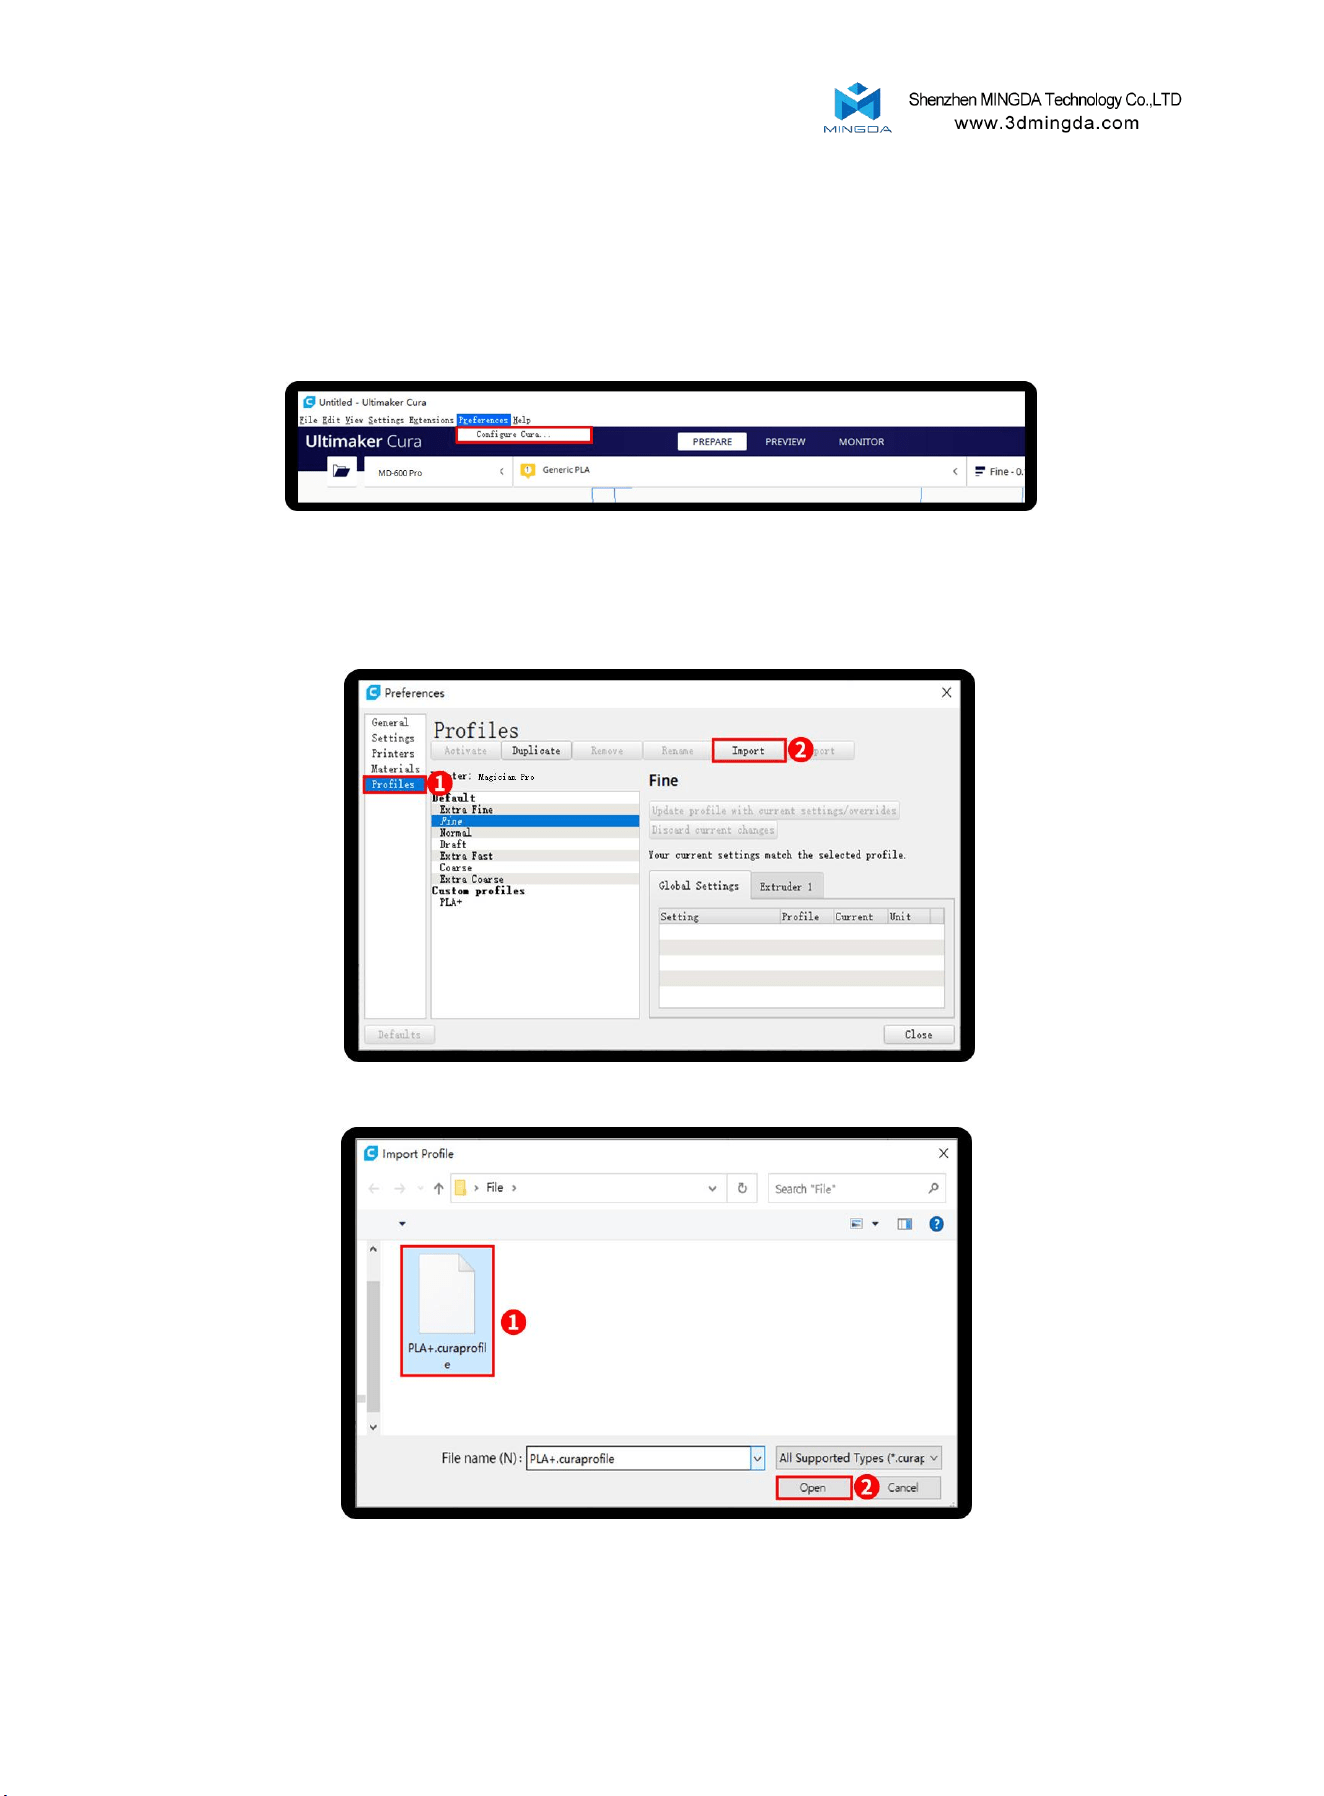
Import Configuration file
Click Preferences, Configure Cura…
Click Profiles, Import, Choose PLA+.curaprofile in SD card
14
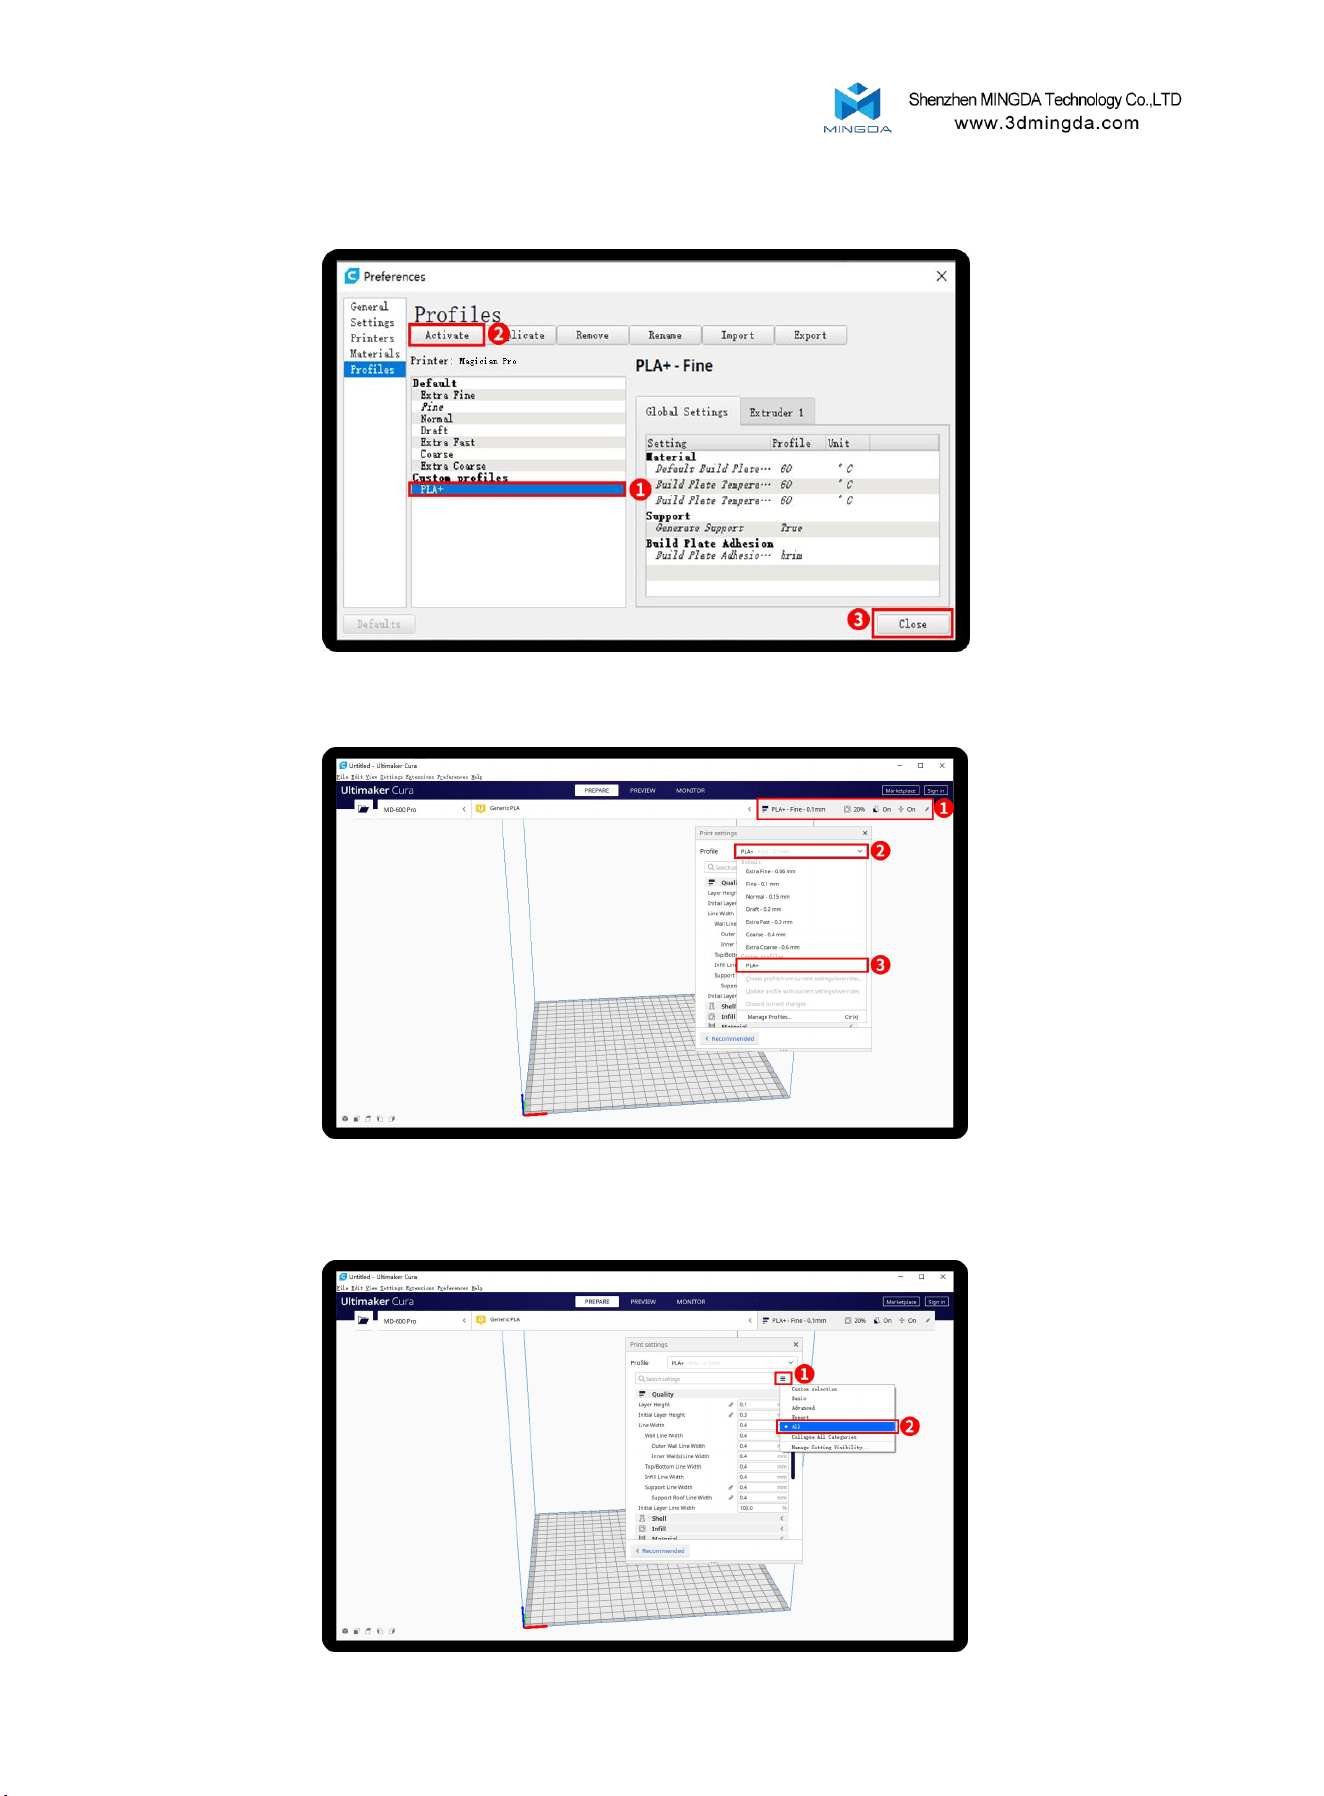
After Import the profile, you will see it below, choose PLA+, and click Activate
On the right side you can see PLA+ active
Click here, you can check all the parameter, when you move mouse on it will show the explanation
to help you under more clearly
15
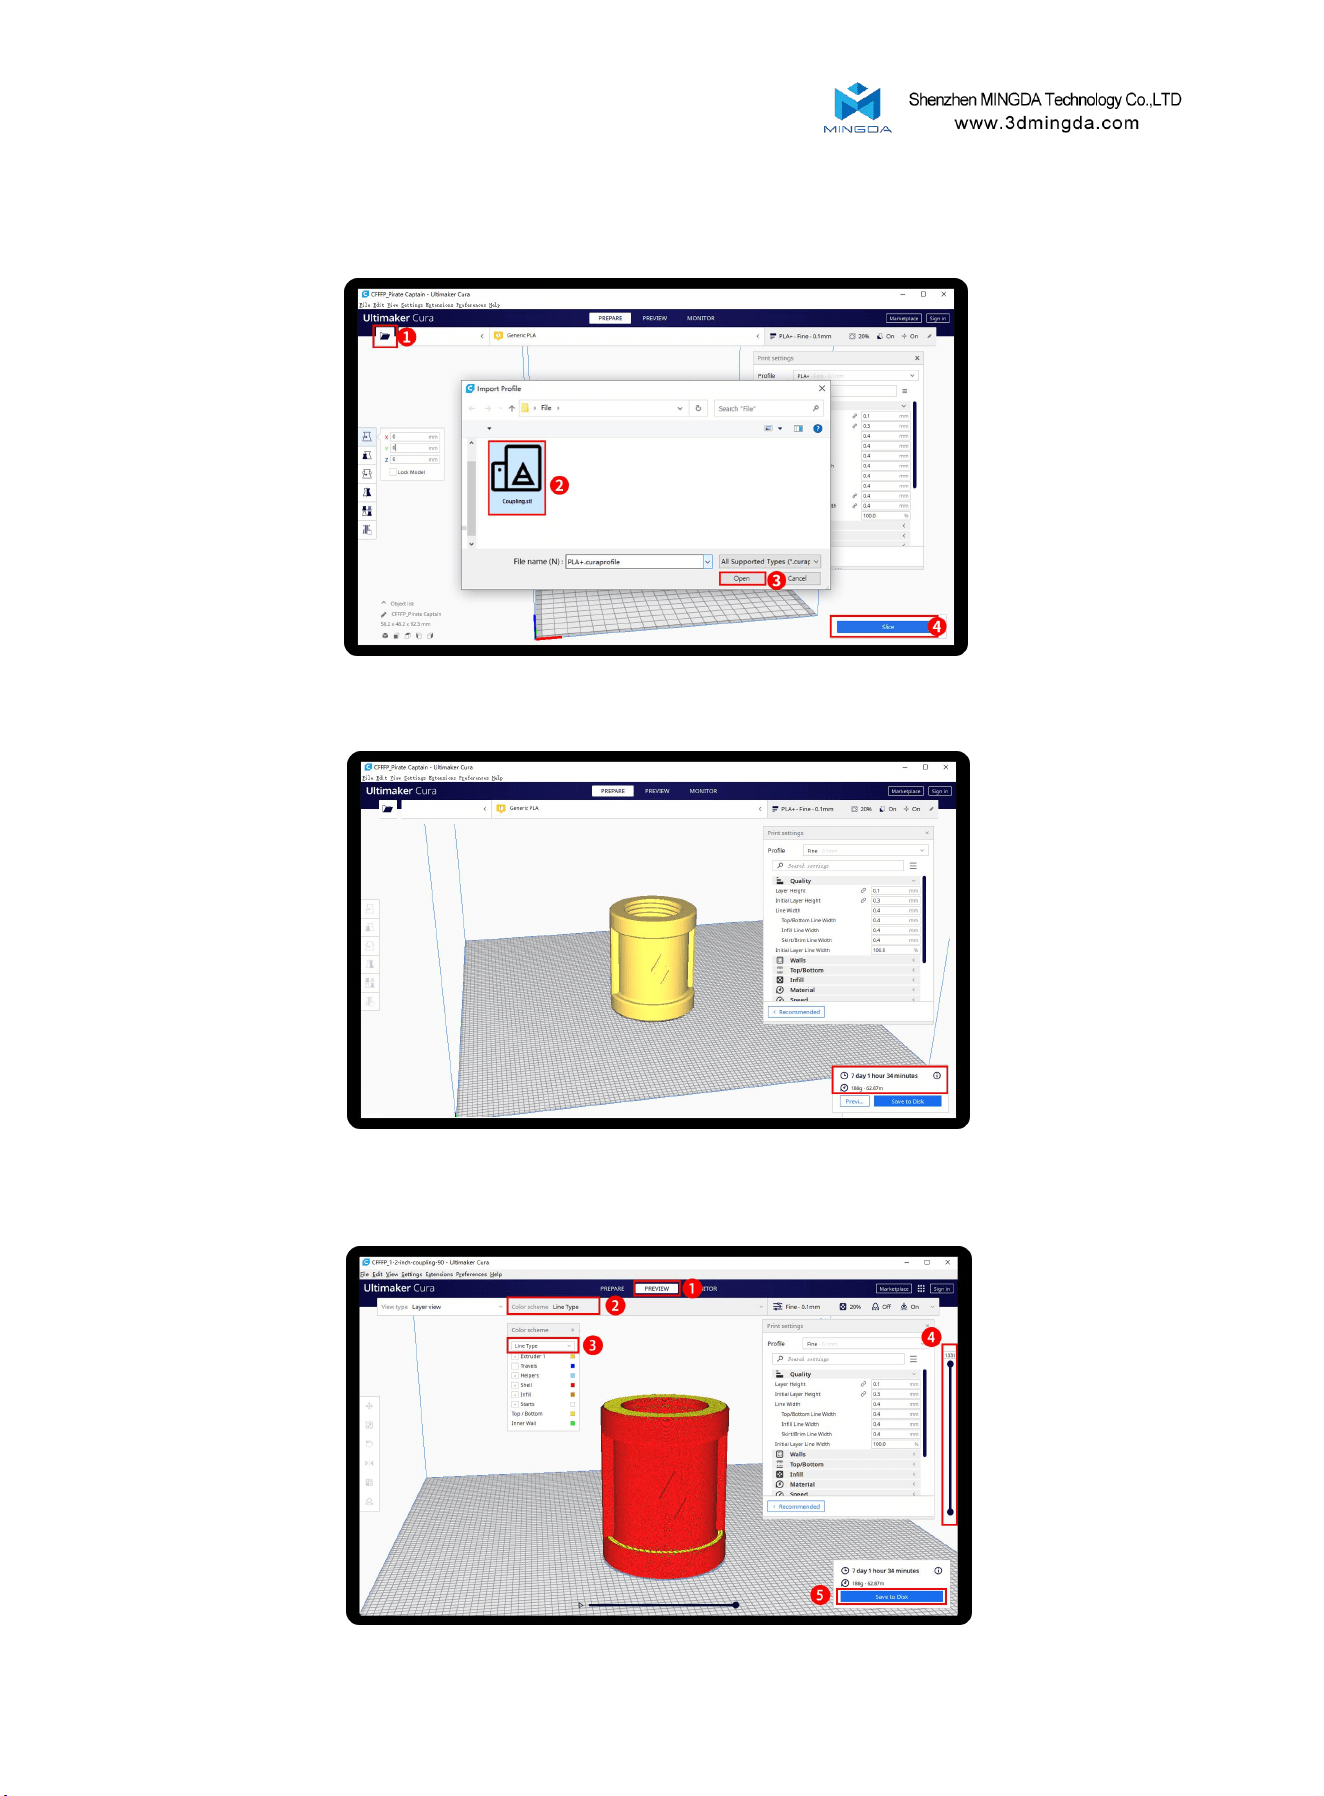
Slicing
After slice completed, you can see the time and weight of filament that the printing will take;
We suggest you click PREVIEW to check, you can choose line Type and Drag the slider on the right
side to see the printing process clearly. After that , you can save it in your SD card to print it out by
the printer.
Click load button you can load a stl file, you can move, rotate, and Zoom the model. Click Slice button.
16
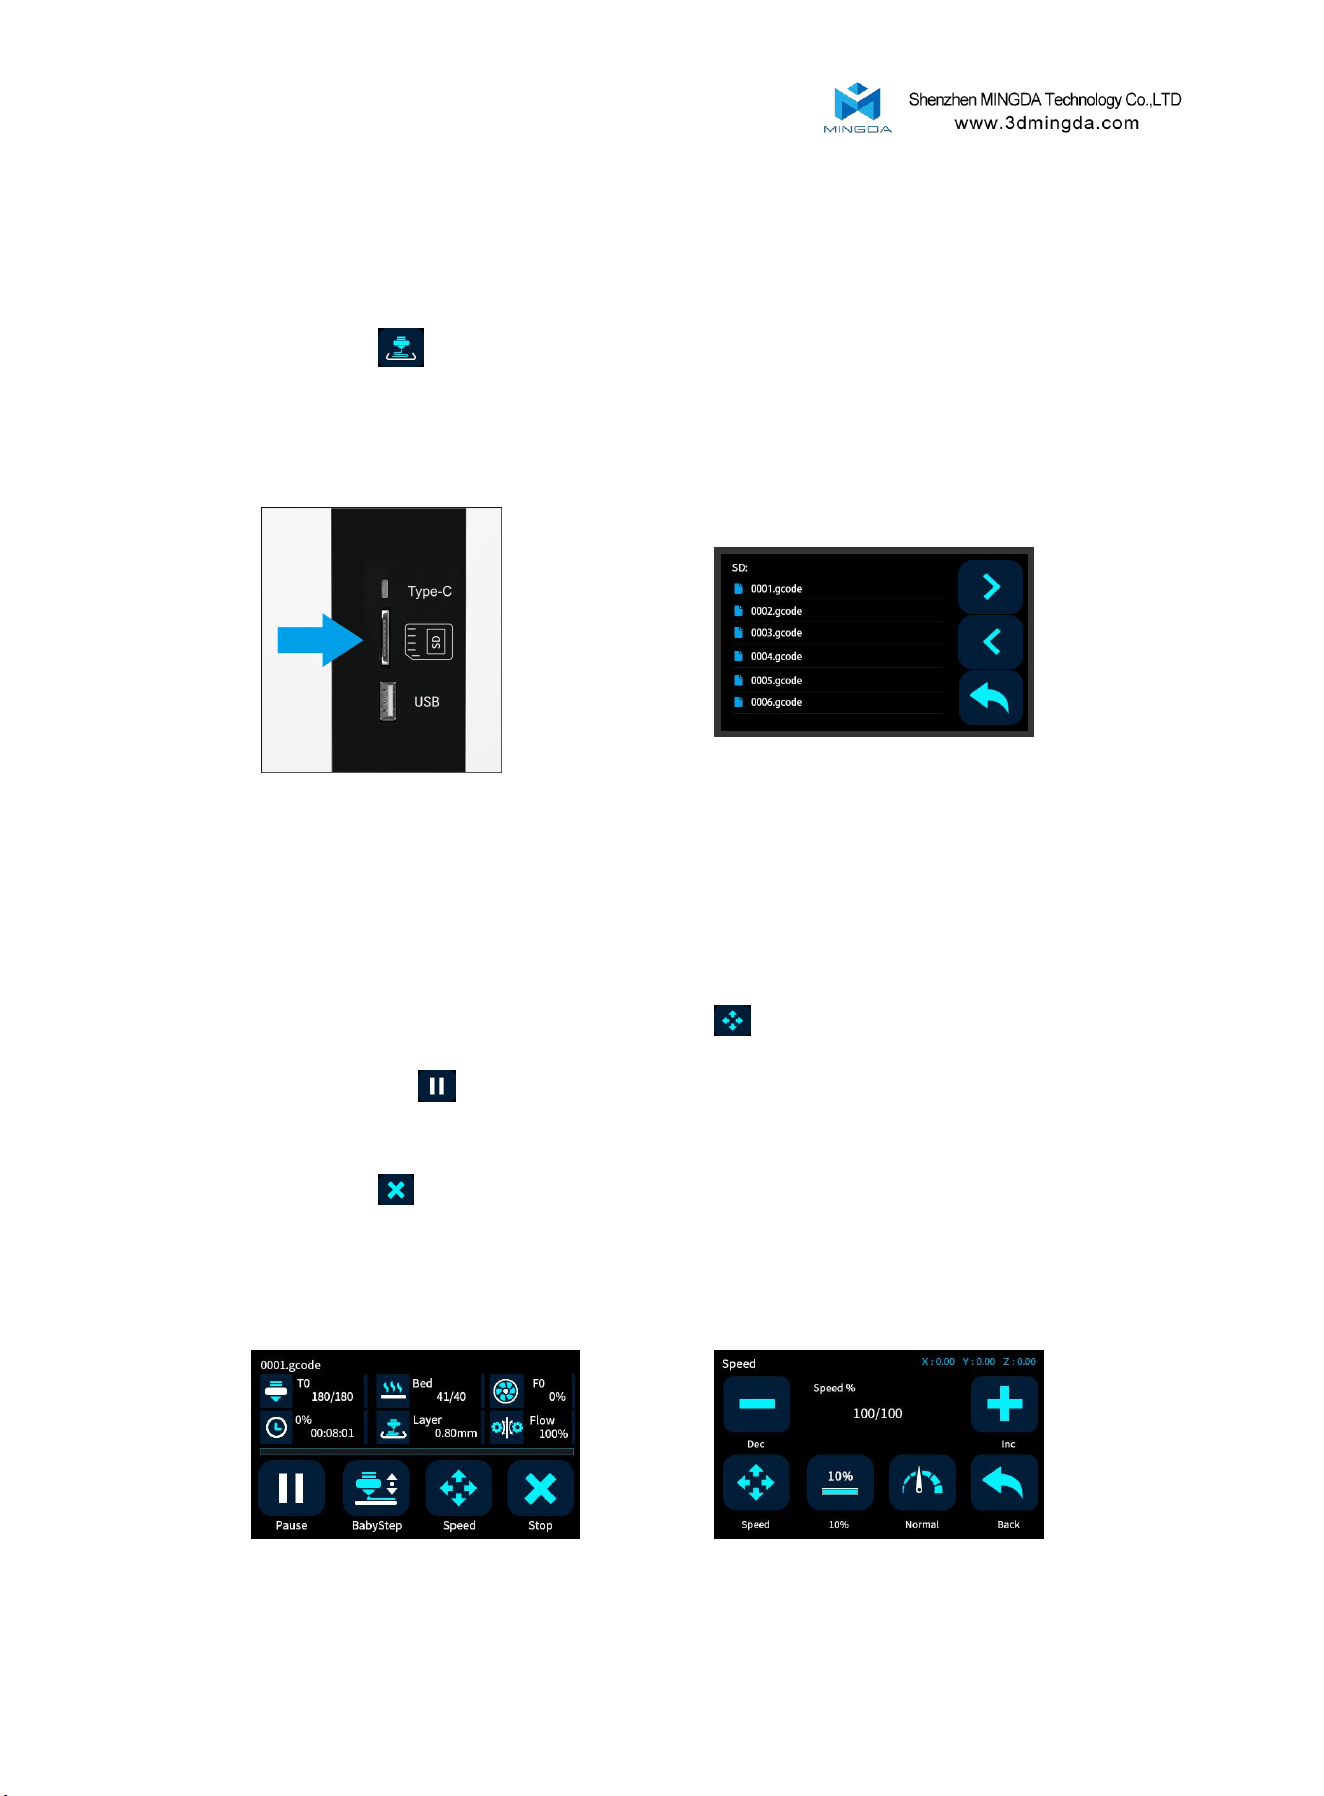
1. Insert the SD card.
2. If not leveled, run the auto-leveling procedure first.
3. Preheat the head and bed, check whether it feed smoothly.
4. Click "Print" icon on the display panel.
5. Choose the Gcode file to print.
6. After the printing is completed, Wait for the platform to cool down, then take out the model gently.
Printing Process
While printing files, you can pause it at any time.
1. When printing, you can click Percentage rate icon to adjust printing speed .And click icon to
change the printing speed by percent.
2. Press the pause icon on the display panel, the mprinter will be suspended to print, press again to
continue.
3. When printer pause, you can feed the filament and change another filament.
4. If press stop icon , the printer will stop printing.
5. The printer will automatically shut down after printing finished.
Pause and Continue to Print
17
6. General Maintenance
Daily Preventive Maintenance
500 Hours Maintenance
About every 500 hours you should clean up the printer.
1.Clean the door and do not use ammonia-containing cleaners to avoid damaging the window. An
ethanol cleaner can be used.
2. To clean the guide rails, first wipe the sides of the guide rails with anti-rust paint and re-add
lubricant.
3. Check the screws, check if the mounting screws such as the synchronous wheel, optical axis and
motor are loose. If it is loose, it should be tightened in time.
1. Before printing, reset the Z-axis to check the distance between the nozzle and the platform to prevent
the nozzle from scratching the platform.
2. Before printing, check the smoothness of the guide rails. Regular lubrication can ensure the printer
runs efficiently and stably.
3. Before printing, preheat the nozzle to check feeding. If it is not smooth, clean or replace the print
nozzle assembly.
4. After printing is completed, clean all the accumulated filament and stains on the printing platform, the
guide screw and the inside of the printer.
5. Filament that are not used for a long time should be sealed and stored. Excessive absorption of
moisture from the air can make the filament brittle.
18
Dismantle the Model
Warm prompt : The MD series 3D printer display is a full touch resistance screen, click to enter the content
item. We recommend to use your fingernails and do not press hard on the screen.
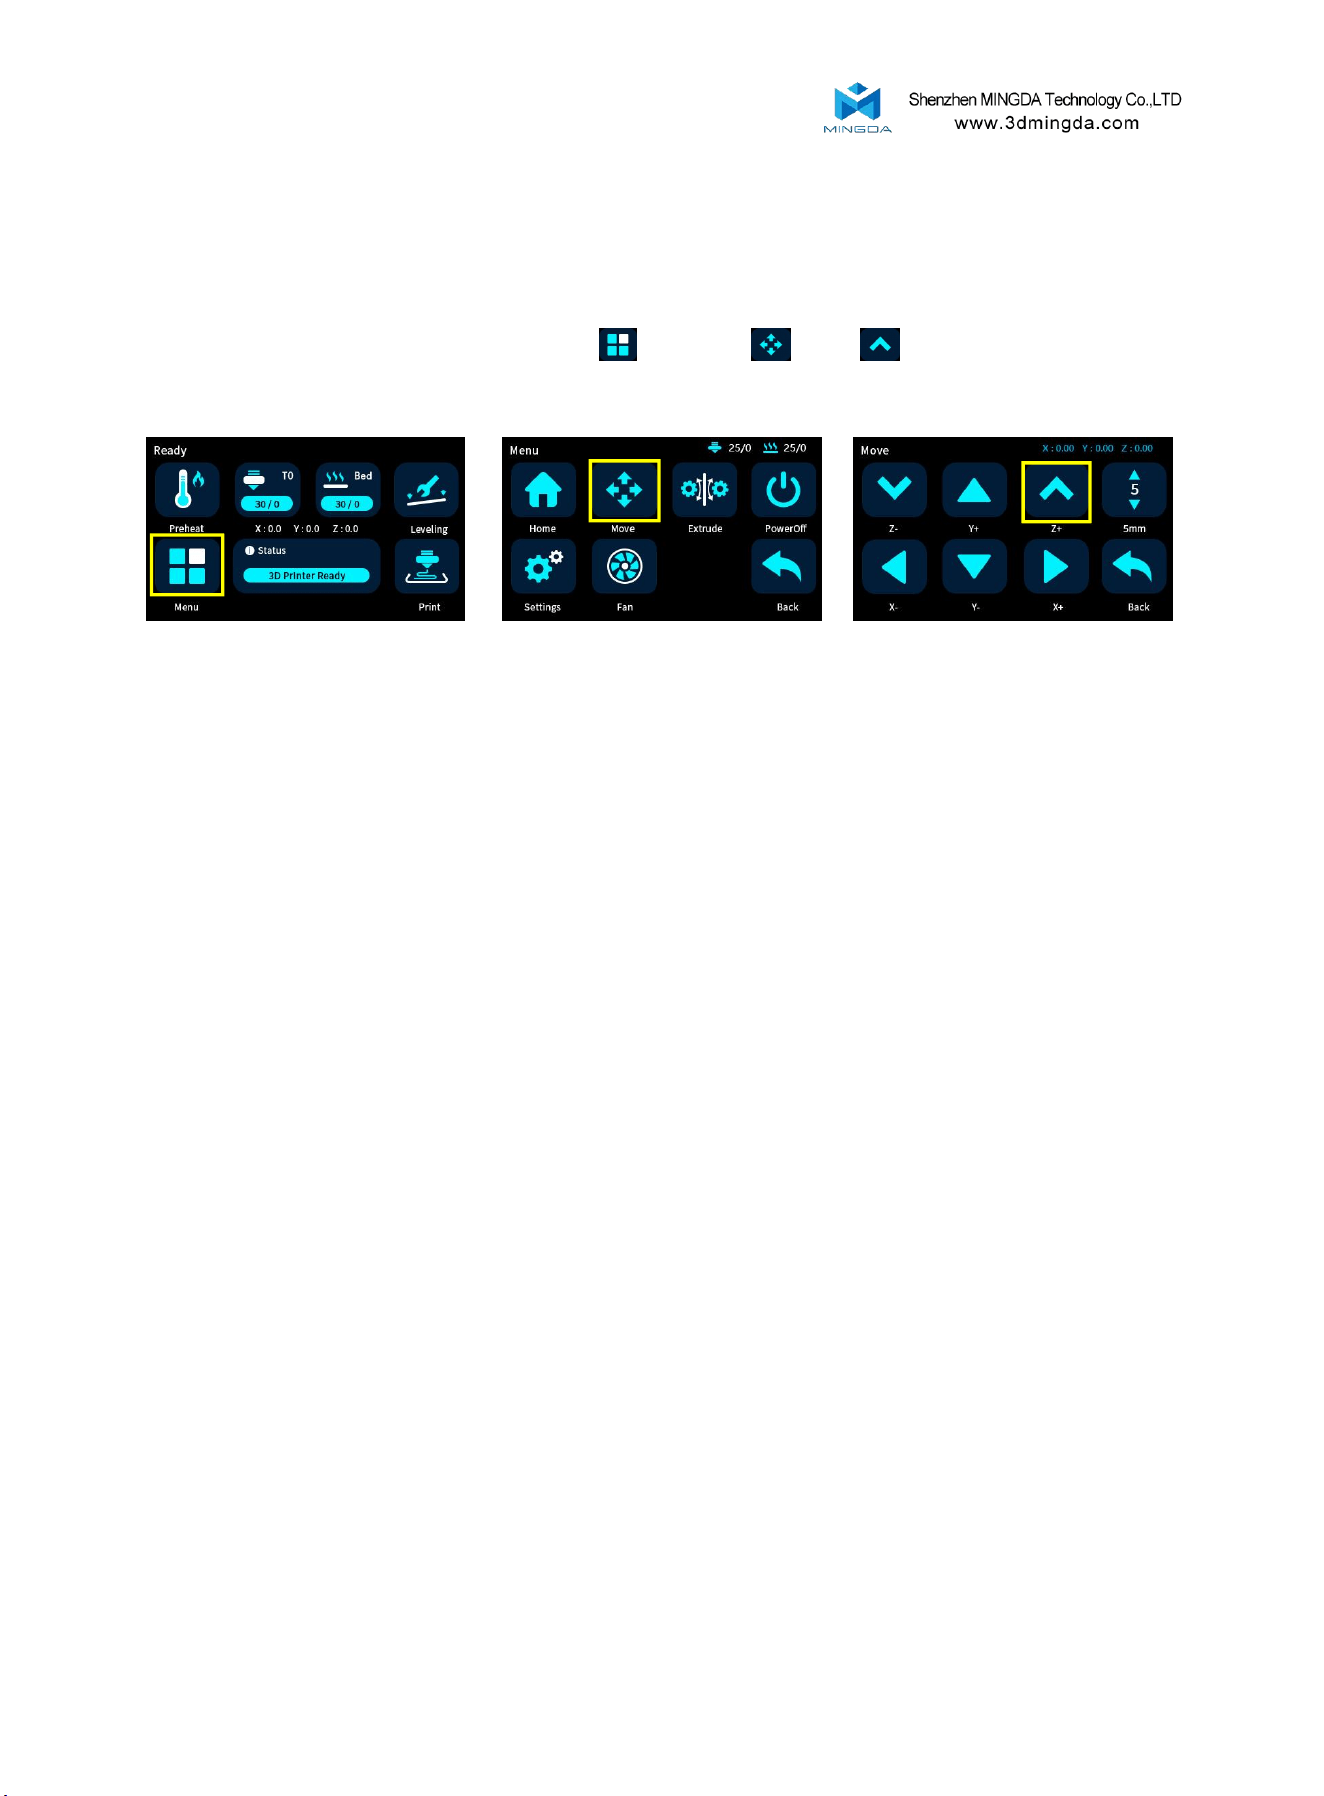
1. Move the print head up: Select "Menu" , "Move" , "Z+" to raise the print head to a
suitable height.
2. Take the model: After the platform has cooled, the model can be removed directly. If it cannot be
removed, the PEI platform can be removed and bent to take the model out.
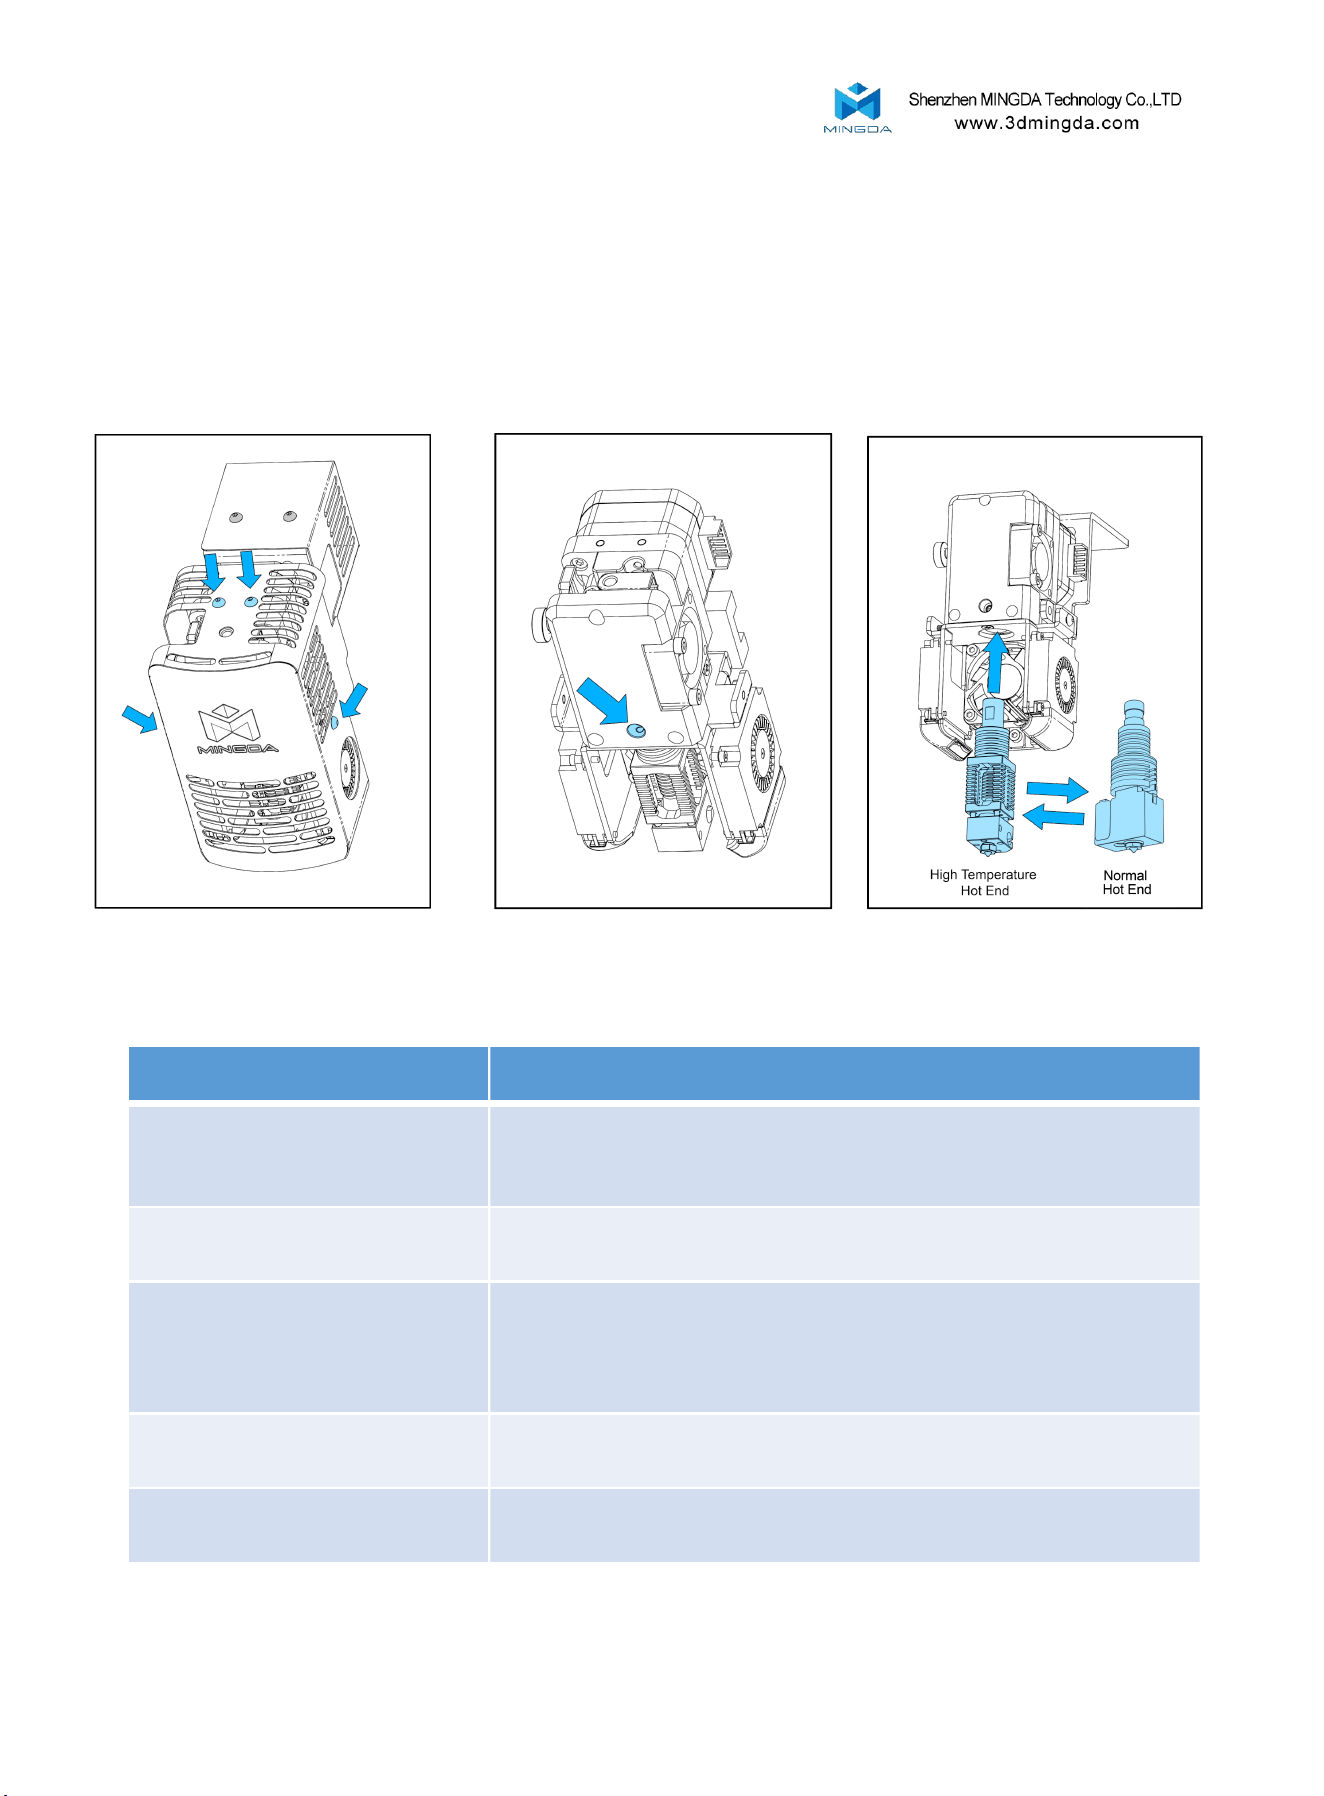
Switch Between High-Temperature and Normal Hot End
1. Remove the six screws as shown.
2. Remove the cable terminal on the hot end and loose the screw that secures the hot end.
3. replace a new hot end.
4. Insert the new hot end, tight the fixing screw, and connect the cable terminal.
5. Reinstall the two covers.
7. Trouble Removal
Problems
Suggestions
Without power
1. Check whether the power cord is inserted firmly
2. Check if the power switch is turned on
3. Confirm whether the socket has power
Not extruded filament
Filament may be stuck in the nozzle, please refer to
<1000 hours maintenance>
Print misplacement
Please check the lubricating condition, wipe oil on the optical axis and
evenly lubricate again.
Another possibly reason is rack affected by external force during transport
( At the moment you need to contact MINGDA after sales service)
SD card read abnormally
SD card damaged; SD card slot damaged; SD card inserted deep
insufficient; the slots line is loose.
Can't show temperature or heat
The temperature sensor the heater is in poor contact or damaged; the
main board is faulty.
19

8. Support
Customer Support
http://www.3dmingda.cc/single/request_after_sales_service.html
Working Computer Specifications
Operation system: MicrosoftWindowsXP、MicrosoftWindowsVista or MicrosoftWindows7
Processor minimum value : 2.4 GHz, faster processor could shorten the processing time
RAM minimum value: 1GB (WindowsVista or Windows7 is 2 GB)Recommendation:2 GB
(WindowsVista or Windows7 is 3 GB)
Hardware installation: 90 MB monitor graphics resolution minimum value: 1024x768
Recommendation: 1280x1024 ( can use the wide-screen )
Necessary video card: In line with OpenGL accelerated graphics card Recommendation: OpenGL
hardware support to recommend 128 MB graphics card memory
MINGDA Limited Warranty Statement
Besides limited warranty, within the maximum range allowed by law. MINGDA or any
authorized dealer have not made any other statements or implied guarantee, including
marketability and special-purpose applicability of implied warranties. MINGDA has not
supplied, undertake or provide, authorized to assume responsibility for it or any other
guarantee, including any authorized dealer or other express or implied warranties to the
independent third party.
20

9. Quality Assurance
1. We provide a 12-month warranty on 3D printers (excluding the nozzle assembly,
PEI pad) purchased on or after June 1, 2019 and a 3-month warranty on the nozzle
assembly.
2. The warranty period of each product starts from the date of production. Any
product with renewed warranty period is subject to the renewed warranty terms.
3. Within the warranty period, we will provide free accessories to replace those
damaged during the operation in accordance with the instructions for use which are not
caused by user negligence (determined by our professional assessment).
4. We will continue to provide warranty services for any product having been repaired
as long as its warranty period has not expired.
5. In case of any problem, you may find the solutions in the instructions for use or
search for the solutions on our official website (www.3dmingda.com) or contact us via
phone or email.
6. We provide free remote technical support for every consumer during the service
life of the product. You may request solutions from our after-sales team via phone or
email within working hours. For any request submitted beyond the normal working hours,
we will reply as soon as possible.
7. Please provide completed after-sales service card or S/N number when applying or
the warranty service. Otherwise, warranty services may be refused.
8. We are entitled to refuse warranty claims for any fault or damage due to failure to
follow instructions for use, including but not limited to (i) unauthorized modification; (ii)
incorrect installation or use; (iii) use of any third-party component; (iv) use of any non-
specified software;(v) use of low-quality filament; (vi) use under non-specified
environment; and (vii) misuse (overload) or improper maintenance (corrosion or
oxidation).
9. We are entitled to refuse to provide warranty services for any fault or damage due
to force majeure
21
Tel: 0086-13530306290
Email: suppo[email protected]
www.3dmingda.com
Address: 3 / F, No. 20, Dahe Industrial Zone, Longhua District,
Shenzhen, 518110, Guangdong Province, China.
Shenzhen MINGDA Technology Co., Ltd