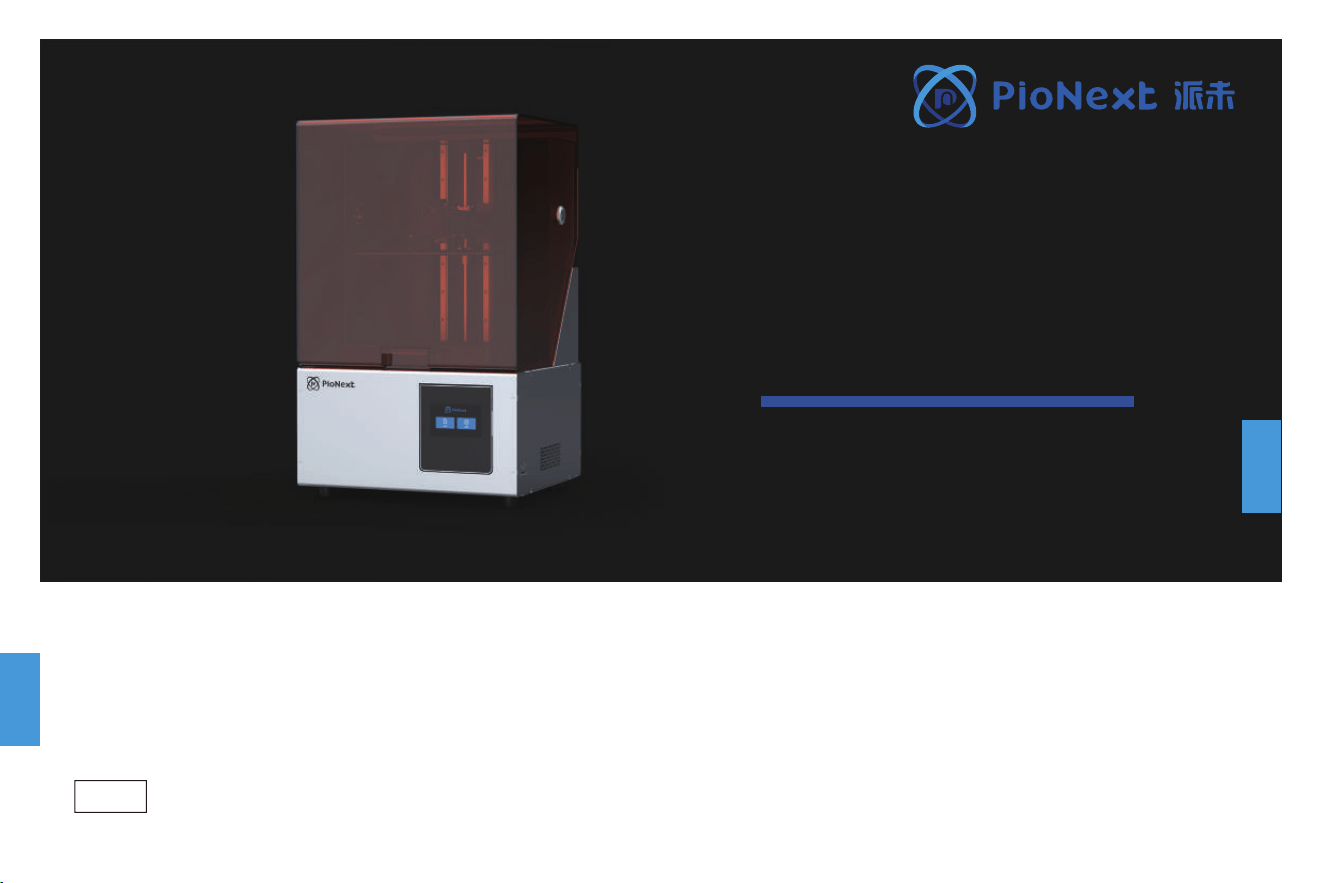
D136
3D打印机用户使用手册
3D Printer User Manual
V2.0


尊敬的用户:
感谢您选择派未的产品。为了您使用方便,请您在使用之前仔细阅读本说明书,并严格按照说明书的指示进行操作。
派未团队时刻准备为您提供优质的服务。在使用过程中无论遇到什么问题,请按照说明书结尾所提供的电话、邮箱与我们进行联系。为了
您能够更好地体验我们的产品,您还可以从随机使用说明中获取设备操作知识。
*( 随机使用说明:您可以在U盘内找到相关使用说明及视频。)
Dear Consumers,
Thank you for choosing our products.For your convenience, please read the instructions before operating your printer.
Our teams will always be happy to provide the best service to you. Please contact us via the phone number or e-mail address
provided if you have any question with the printer. For a better using experience, you can also learn how to use the printer in
the attached instructions and videos in the U disk.
NOTES 使用须知
请勿尝试任何使用说明中没有描述的方法来使用本机,避免造成意外的人身伤害和财产损失;
请勿将打印机放置在振动较大或者其他不稳定的环境内,机器晃动会影响打印机打印质量;
建议使用厂家推荐耗材,以免造成机器损坏;
请勿将本机放置在易燃易爆物中或高热源附近,请将本机放置在通风、阴凉、少尘的环境内;
请勿在安装过程中使用其他产品电源线代替,请使用本机附带的电源线,电源插头需接插在带有地线的三孔插座;
请勿在操作打印机工作时打开打印机面盖,以免影响打印;
请勿在操作打印机时戴棉手套,以防可动部件对人身造成卷入挤压和切割伤害;
在打印完毕后稍等片刻,带上手套后再取下打印平台,借助工具将平台上的模型取下,清理时请勿直接用手触摸;
常做产品维护,定期在断电的情况下,用干布对打印机做机身清洁,拭去灰尘和粘结的打印材料、导轨上的异物;
年龄在10岁以下的儿童,请勿在没有人员监督的情况下使用本机,以免造成人身伤害;
本机设有安全保护机制,请勿在开机状态下手动快速移动喷头或打印平台机构,否则设备会自动断电关机保护;
Do not use the printer any way other than described herein in order to avoid personal injury or property damage.
Do not place the printer near any heat source or flammable or explosive objects. We suggest placing it in a well-ventilated, low-dust environment.
Do not expose the printer to violent vibration or any unstable environment, as this may cause poor print quality.
Please use recommended resin to in case damage of machine.
Do not use any other power cable except the one supplied. Always use a grounded three-prong power outlet.
Please do not open the plastic cover during usage, otherwise the printing will be interrupted.
Do not wear cotton gloves when operating the printer. Such cloths may become tangled in the printers moving parts leading to burns, possible bodily injury, or printer damage.
Please wait a moment after the print is finished. And please wear gloves to take out the print by tools.
Children under 10 years should not use the printer without supervision.
1
2
3
4
5
6
7
8
9
10
12
11
1
2
3
4
5
6
7
8
9
10
11
12
This machine is equipped with a security protection mechanism. Do not manually move the nozzle or printing platform mechanism manually while booting
up, otherwise the device will automatically power off for safety.
Clean the printer frequently. Always turn the power off when cleaning, and wipe with a dry cloth to remove dust, adhered printing plastics or any other material off the frame,
guide rails, or wheels. Use glass cleaner or isopropyl alcohol to clean the print surface.
使用者应遵守设备所在地(使用地)相应国家、地区法律法规,恪守职业道德,注意安全义务,严禁将我司的产品或设备使用在任何非法用途上。
如有违反者所应承担的相关法律责任我司概不负责。
Users should comply with the laws and regulations of the corresponding countries and regions where the equipment is located (used), abide by professional ethics, pay attention to
safety obligations, and strictly prohibit the use of our products or equipment for any illegal purposes. Piocreat will not be responsible for any violators' legal liability under any circustance.
Introduction 设备简介 01-01
Parameters 设备参数
02-02
Parts List 零部件清单 03-03
04-04
10-10
05-09
11-11
12-16
17-18
WIFI Print 无线打印
Contents目录
Interface Information 界面信息
Level Platform 调平平台
Load Resin 装料
Release Film Instructions 离型膜安装说明
Start Printing U盘打印
19-19
20-21
Wiring Connection电路接线
Troubleshooting 故障检修
22-24
After-Sales Service Card 售后服务卡
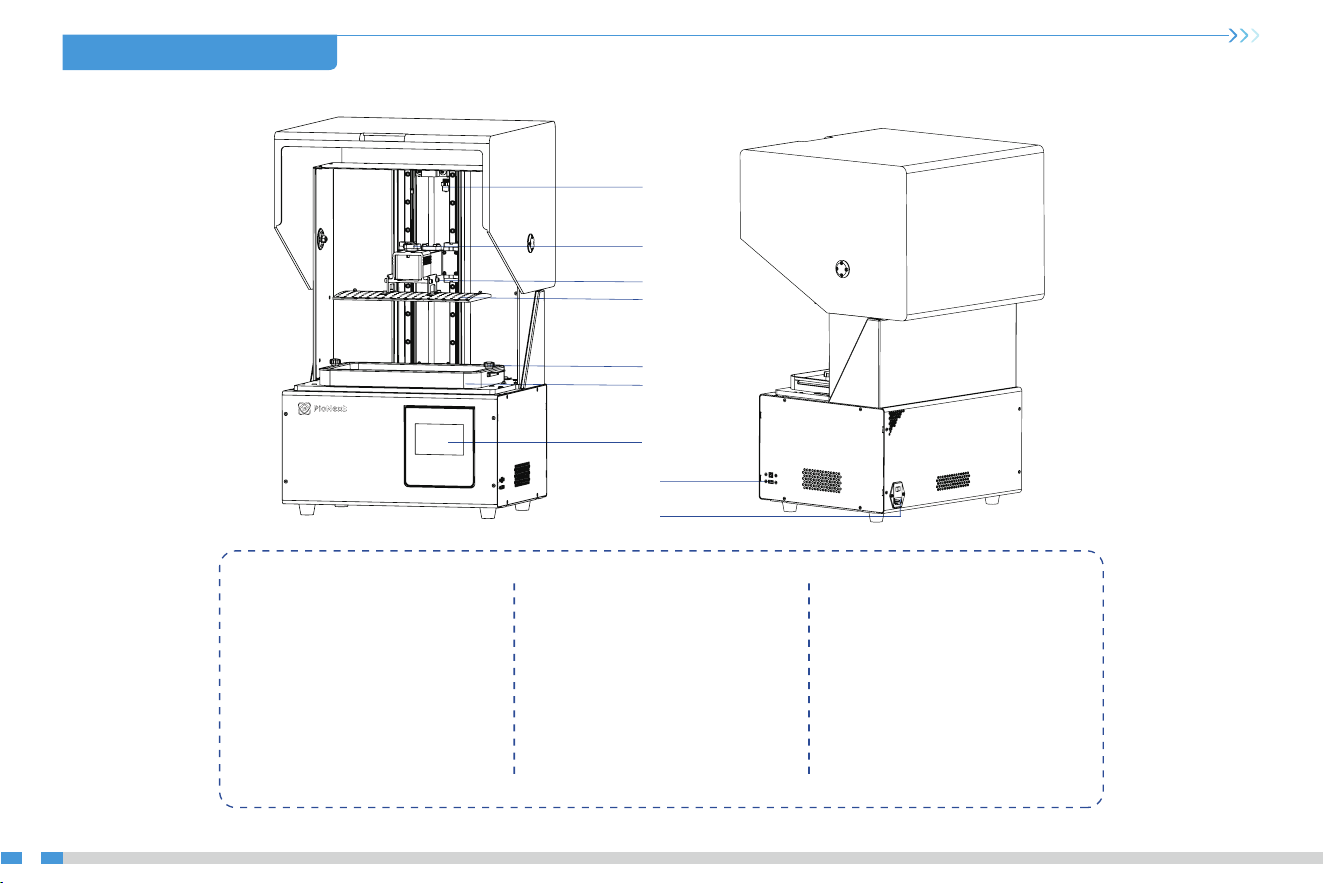
1. Introduction 设备简介
01
8
9
1
2
3
4
5
6
7
Resin vat
料盘
Metal screw
料槽手拧螺丝
Touch screen
显示屏
5
6
7
8
Power socket
电源接口
USB port
USB接口
9
Limit switch
限位开关
Metal screw
平台手拧螺丝
Leveling screw
调平螺钉
成型平台
Buliding platform
1
2
3
4
2. Equipment parameters 设备参数
02
Model | 型号 D136
English | 中文
U disk | U盘 / WIFI
7K13.6寸黑白屏(6480*3600 像素)
0.01-0.1mm
500W
480 x 376 x 770mm
630 x 530 x 1025mm
UV integrated lamp bead (wavelength 405nm) | 紫外线集成灯珠(波长405nm)
Windows 7 and above systems, mac systems | windows 7以上系统,mac系统Operation system | 操作系统
Nominal power | 额定功率
Print size | 成型尺寸
Package size | 包装尺寸
5inch | 5英寸Display screen | 显示屏幕
Machine size | 设备尺寸
Software language | 中英切换
Print method | 打印方式
Lifting speed | 抬升速度
Support resin | 支持树脂
Light source configuration | 光源配置
Resolution | 分辨率
Printing layer thickness | 打印层厚
Basic Parameters 基本参数
60-180mm/min
XY-axis precision | XY轴精度 0.046mm
298 x 165 x 300mm (length x width x height) | 298x165x300mm(长 x 宽 x 高)
Common rigid photosensivie resin, Standard resin, Hight hardness, High toughness,
Biocompatible Resin, Castable Wax Resin, Dental model resin.
普通刚性光敏树脂、标准树脂、弹性树脂、高硬度、高韧性树脂、生物相容性树脂、铸造蜡树脂、牙模树脂
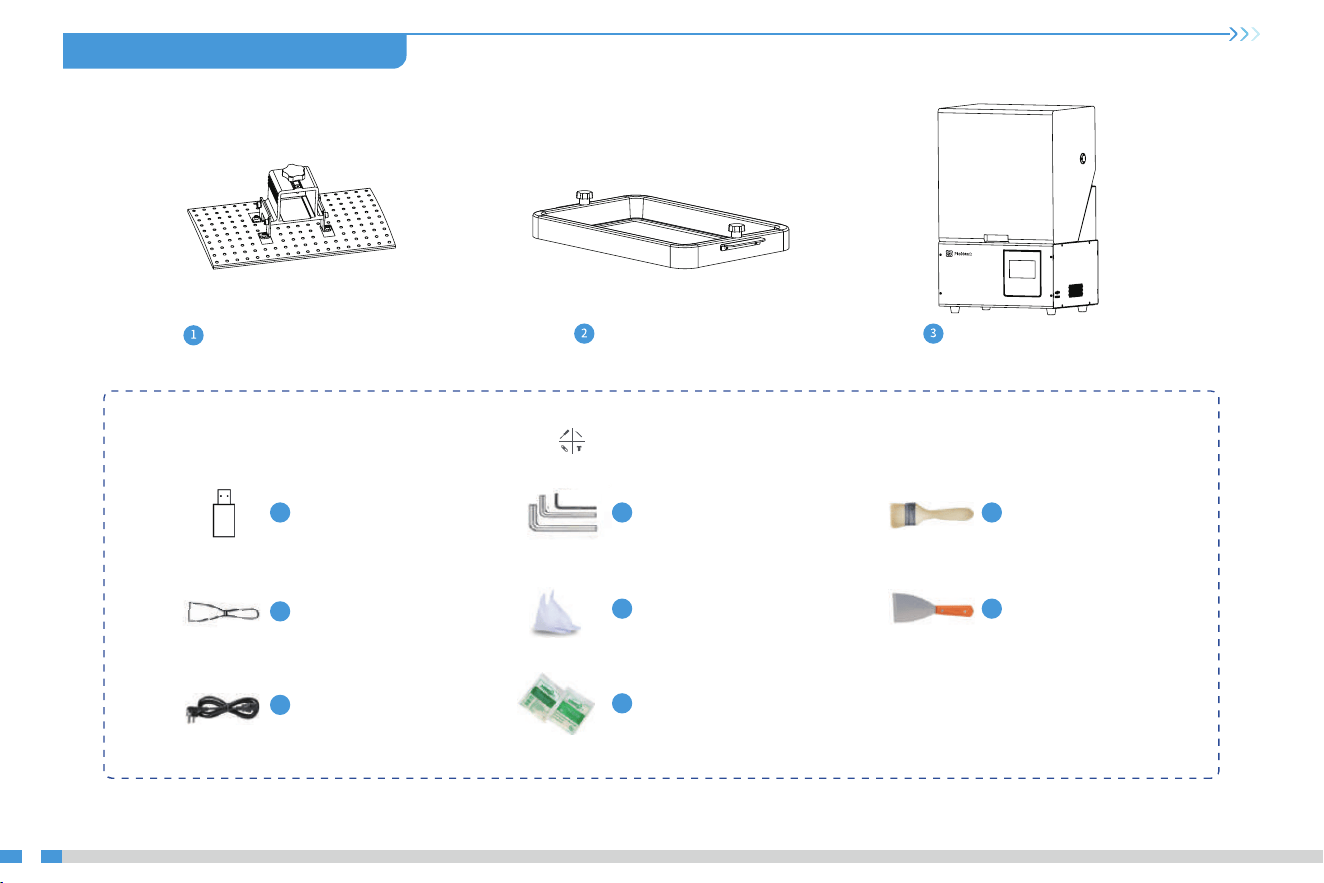
03
3. Package Content 零部件清单
Print platform | 打印平台 x 1
Resin vat | 料盘 x 1 3D printer | 打印机 x 1
Tool list 工具包清单
U disk x 1
U盘
1
Plastic blade x 1
塑胶铲刀
4
Brush x 1
油漆刷
3
Metal blade x 1
金属铲刀
6
Screwdrivers x 1set
螺丝刀工具包
2
5
纸漏斗
Resin filter x 4
7
Power cord x 1
电源线
Tips: the above accessories are for reference only, in kind prevail! 注意:以上配件仅供参考,请以实物为准!
一次性乳胶手套
Disposable latex
gloves x 1
8
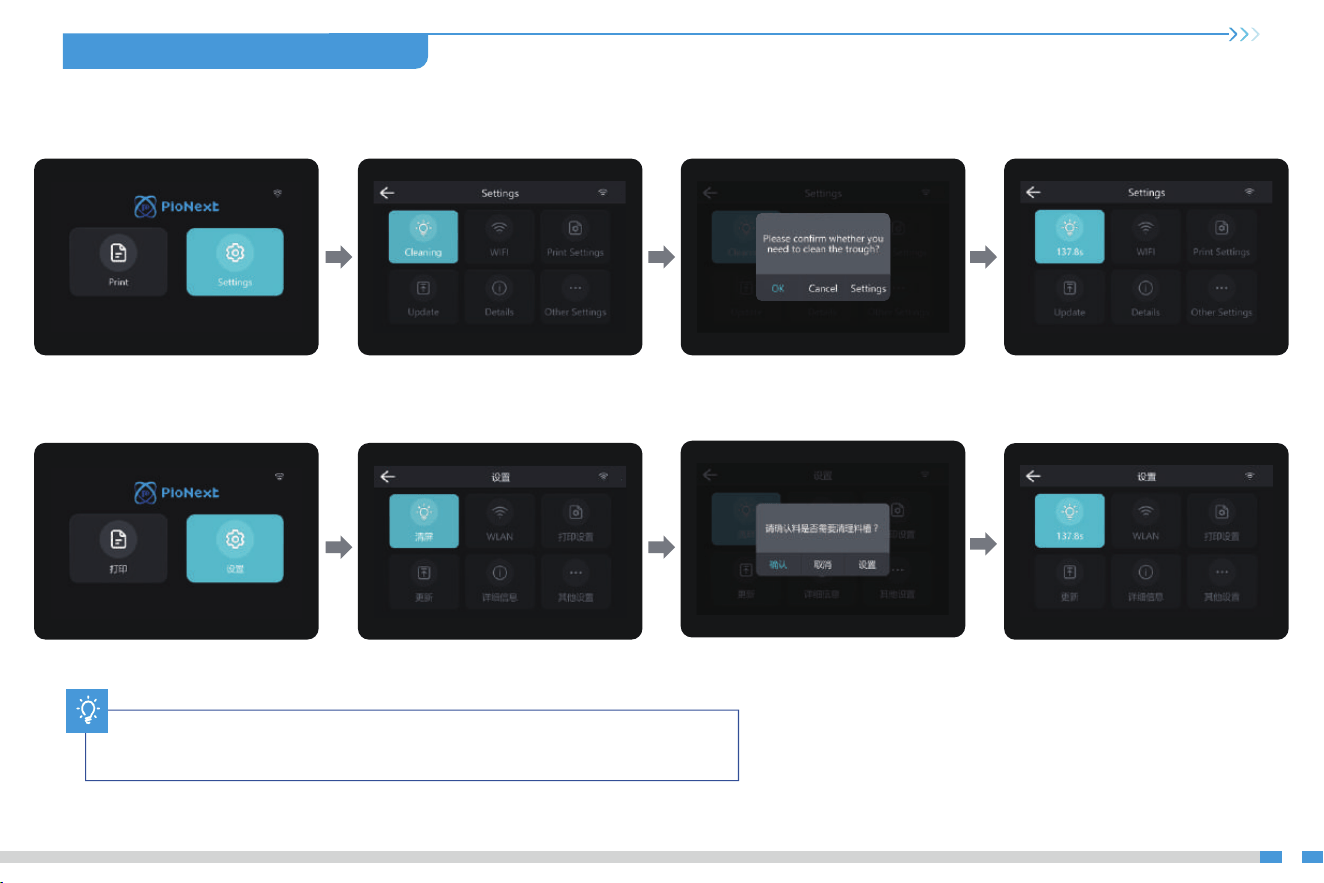
4. Interface Information 界面信息
04
Note: The UI information is only for reference, the actual UI may be different.
注意:界面仅供参考,实际以UI为准。
设置
Setting
5. Level Platform 调平平台
Note: The printing platform has been leveled at the factory. If it needs leveling due to transportation or other reasons, please follow the steps above to
adjust the printing platform.
注意:打印平台出厂时已调平,若因运输或其他原因需要调平,可以进行以下步骤进行打印平台调平。
05
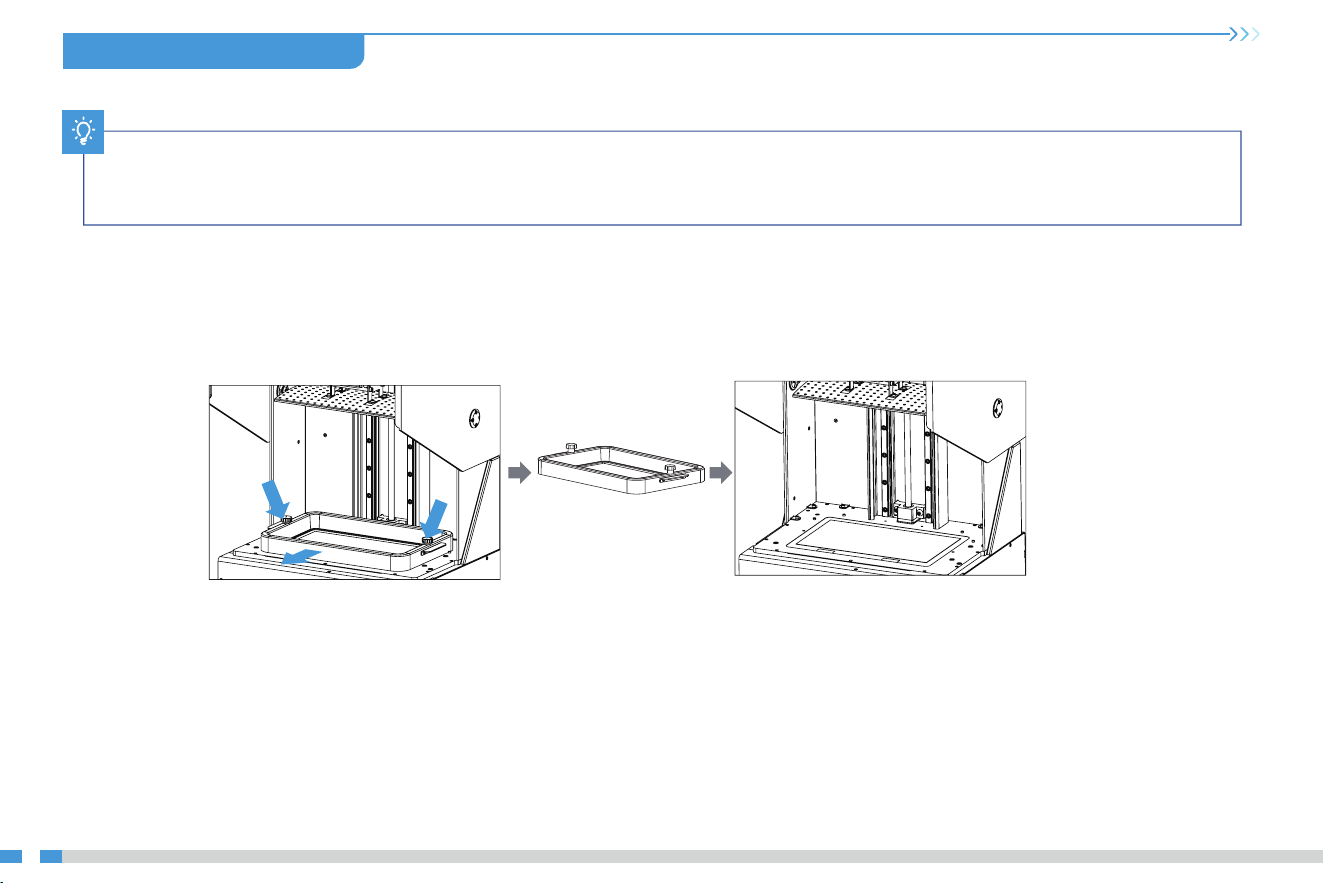
1. First raise the platform, then loosen rubber screws on the left
and right sides of the resin vat, and take out the resin vat.
进行打印平台的校准,首先上升平台,拧松料槽左右两侧胶头手拧螺
丝,将料槽取出。
2. As shown above.
如上图所示
06
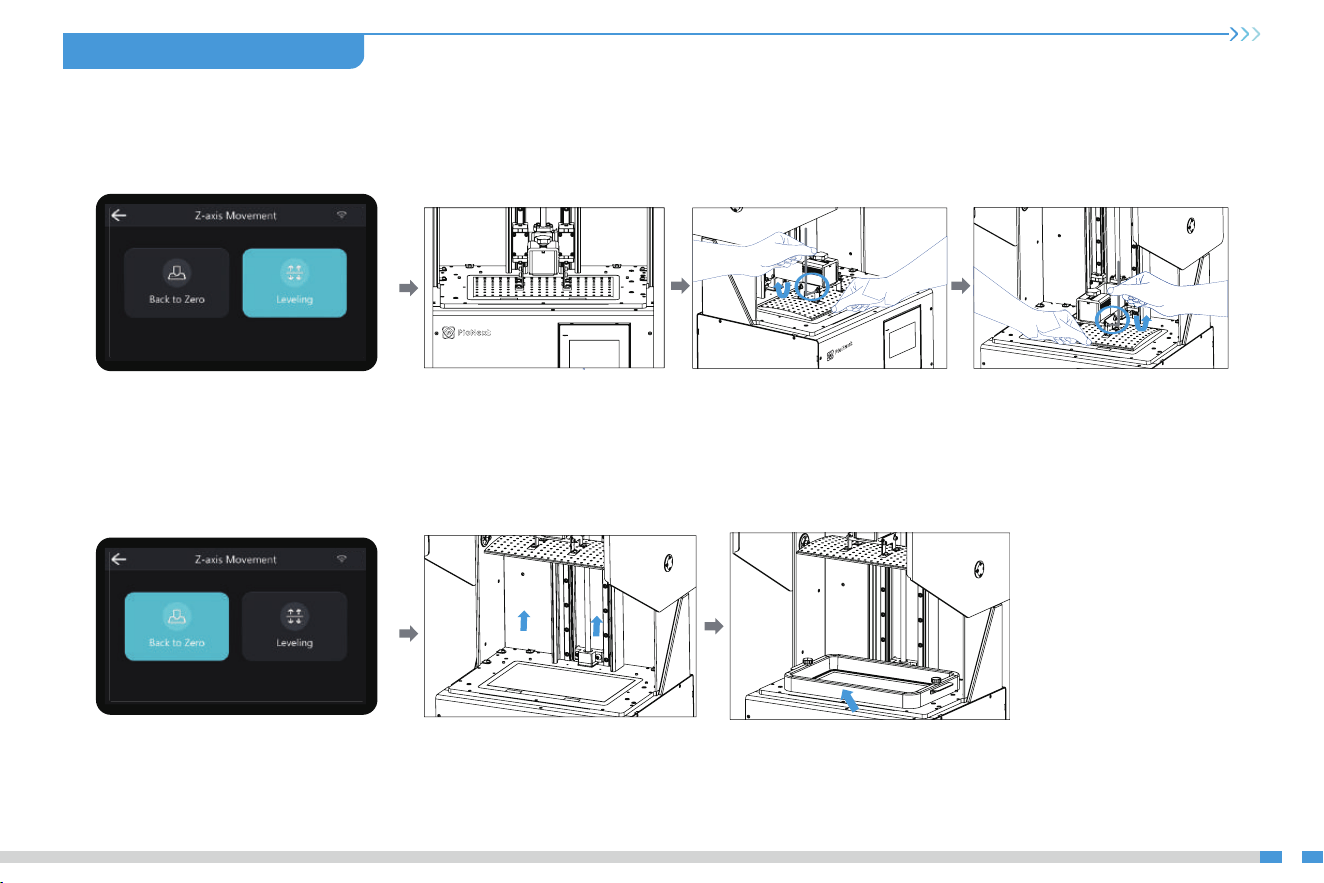
If the platform does not stick to the print screen, do as the following:
如果没有贴紧打印屏,请进行如下操作:
5. Level Platform 调平平台
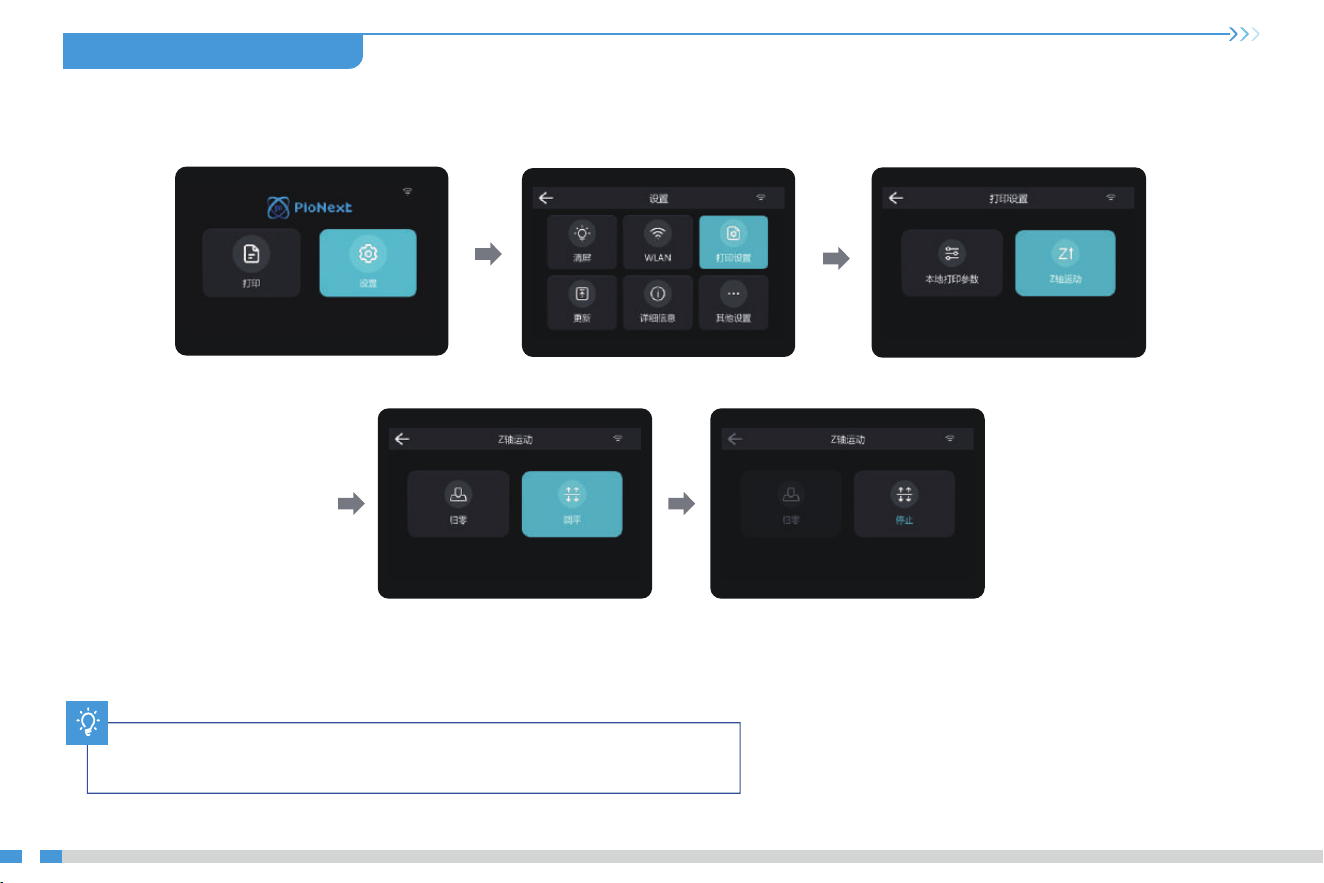
3. Press“Auto-homing",move up the z-axis to a proper position, and then tighten the fixing screws at both ends of the resin vat.
1. After unscrewing the leveling screws, press“Leveling" to keep
the platform and the print screen parallel.
2. Gently press the platform and tighten the 4 screws clockwise and
diagonally, and the platform will be successfully leveled.
07
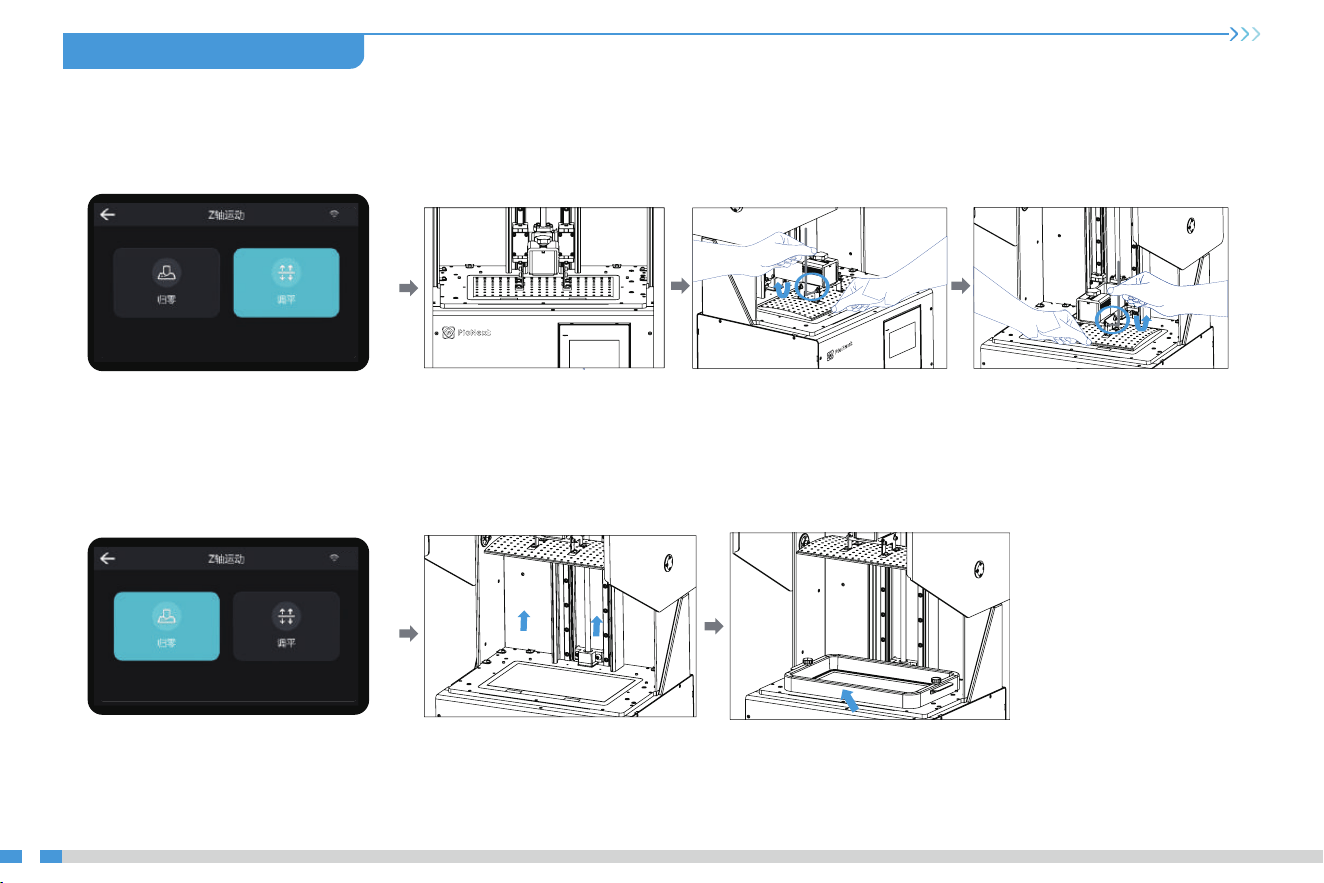
If the platform does not stick to the print screen, do as the following:
如果没有贴紧打印屏,请进行如下操作:
5. Level Platform 调平平台
3. 按触摸屏“归零”,控制Z轴上移,至合适位置,放入料盘,对准料盘两端螺孔后,旋紧两端的料盘固定螺丝。
1. 拧松调平螺丝后,按触摸屏“调平”,将打印平台贴合在打印屏上。 2. 轻轻压平台两端,顺时针对角拧紧4个平台螺丝,即平台调平成功。
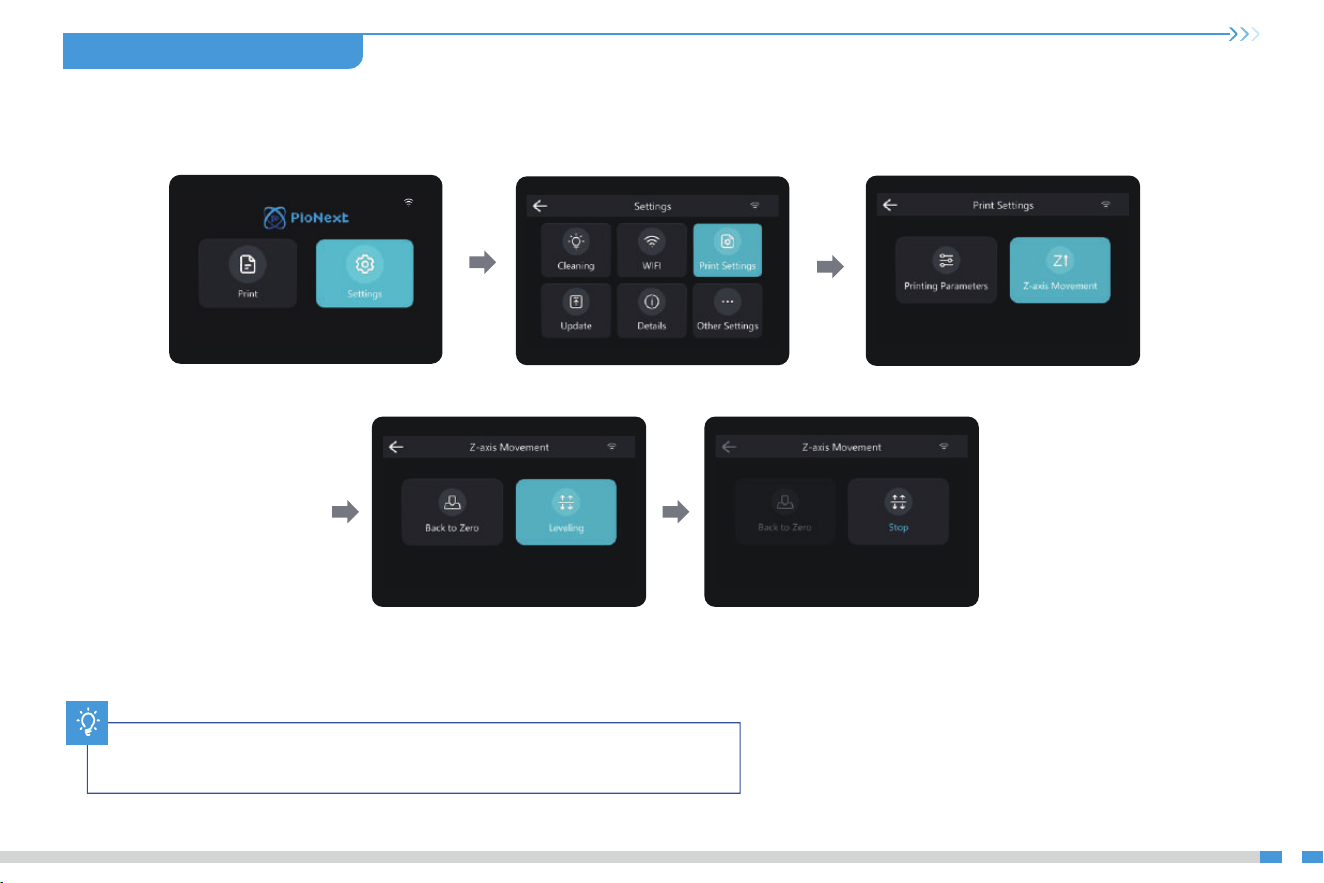
5. Level Platform 调平平台
Note: The UI is only for reference only and shall be subject to the actual UI.
注意:界面仅供参考,实际以UI为准。
08
5. Level Platform 调平平台
09
Note: The UI is only for reference only and shall be subject to the actual UI.
注意:界面仅供参考,实际以UI为准。
6. Load Resin 装料
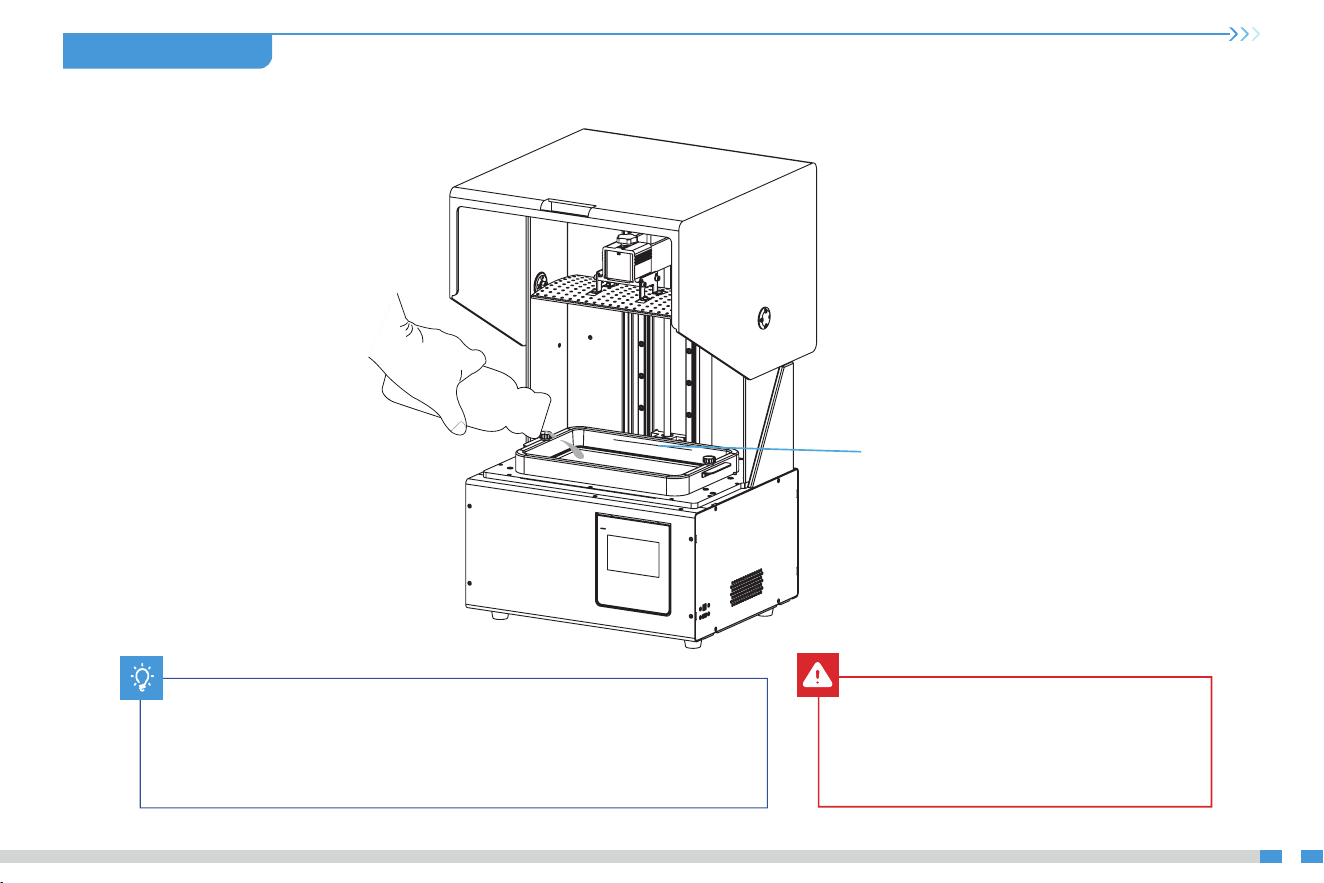
Pour the UV photosensitive resin into the resin vat. The slot capacity is 1000ml.
将3D打印机 UV 光敏树脂倒入料盘,槽位容量:1000ml。
Caution :Resin may cause skin irritation or an allergic
skin reaction. Please wear gloves before use to avoid
direct contact with the skin.
警示:请戴上手套方可进行装料,光敏树脂为刺激性材料,避
免接触到皮肤。
How to change resin:
提示:如何更换耗材?
将料盘缓缓取出,把剩余树脂倒入容器,清洗干净料盘,重新倒入新树脂,再把料盘安装到机器即可。
Tips:
Take out the resin vat slowly, pour out the remaining resin into a container, clean the resin
vat, pour in new resin, and then install the resin vat to the machine.
10
1000ml
7. Release Film Instructions 离型膜安装说明
11
安装步骤
Installation steps
(Thickness)
厚度:0.15-0.2mm
透光率:95%
(Light Transmittance )
(Size)
尺寸:393mm*263mm
规格参数
Parameters
a.
b.
c.
a.
b.
c.
d.
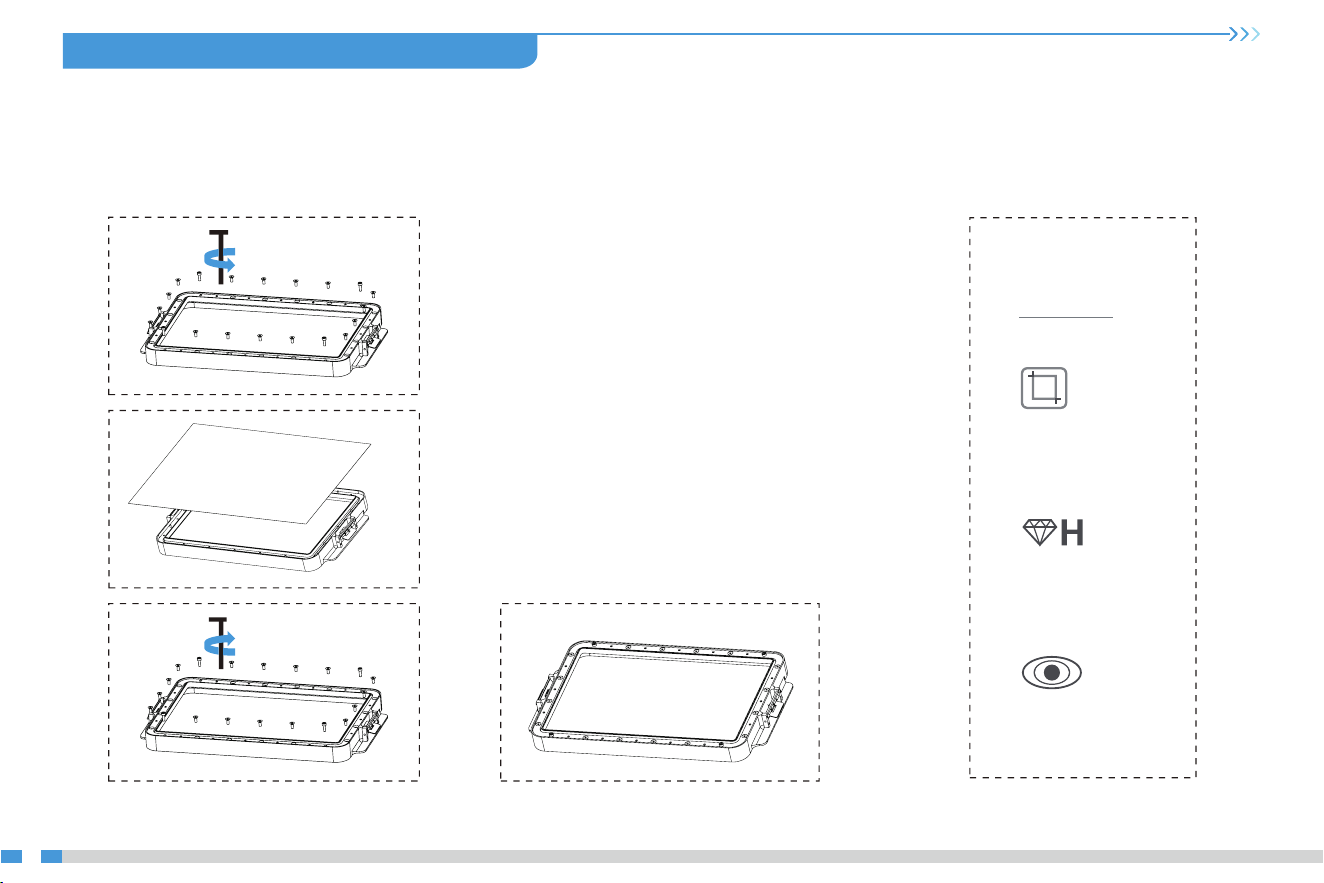
Place the clamping, install 16 countersunk head screws and
four them cylindrical head screws and use the opposite angle
to tighten.
放好压圈,安装16颗沉头螺丝和四个脚上的圆柱头螺丝并采用对
角的方式拧紧。
First, remove the 20 screws at the bottom of the vat and take
down the old release film.
首先拆卸料槽底部的20颗螺丝,取出坏的离型膜。
Prepare the new release film, peel off the the protective films
on both sides of the release film.
撕掉新的离型膜两个面上的保护膜。
The installed release film is as shown.
安装好的离型膜如下图。
d.
12
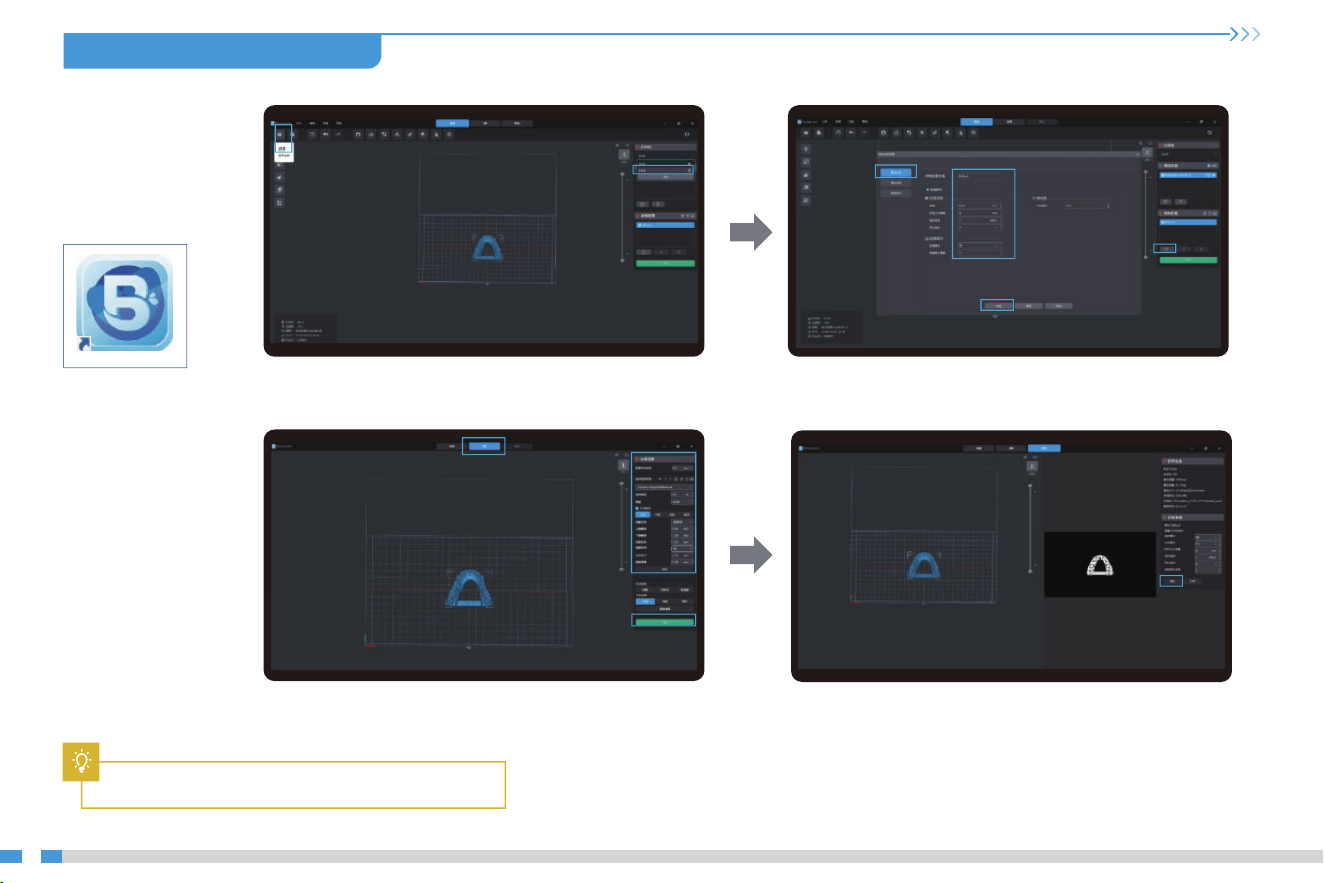
1. Slice
Piocreat BOX
Piocreat BOX
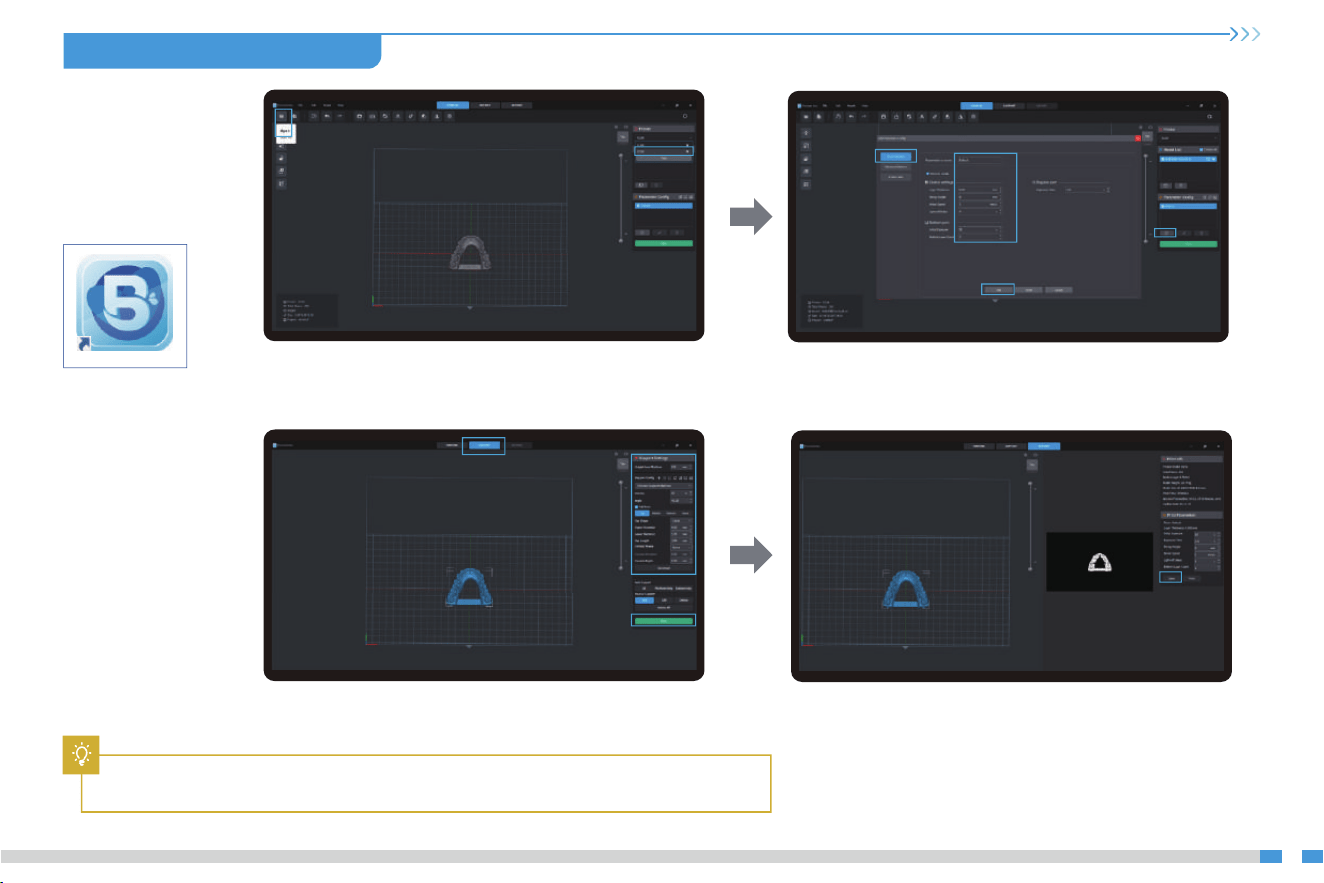
Note: The published UI of slicing software shall prevail for the interfaces of Piocreat BOX .
8.USB Disk Printing U盘打印
①
②
②
③
④
①
②
③
①
1. Open the Piocreat BOX slicing software.
→ ①Click the right printer column to select the device model
→ ②And click "OPEN" on the top left of the interface to import the model file;
2. Setting Printing Parameters (If use Default-Parameters,skip this step)
→①Click the "Add" icon in the Parameter Configuration
→ ②Click the Basic Setting Option
→ ③Set the appropriate parameters → ④Click "Add"
3. Add bracket to the model (skip steps ① and ② if no bracket is added).
→①Click the icon above →②Set the corresponding parameters
→③Click the slice;
4. Waiting for the auto slicing to complete
(you can adjust the print parameters as required).
→Click "Save"icon to save the sliced file.
(* slicing tutorial see the official website slicing video www.piocreat3d.com)
13
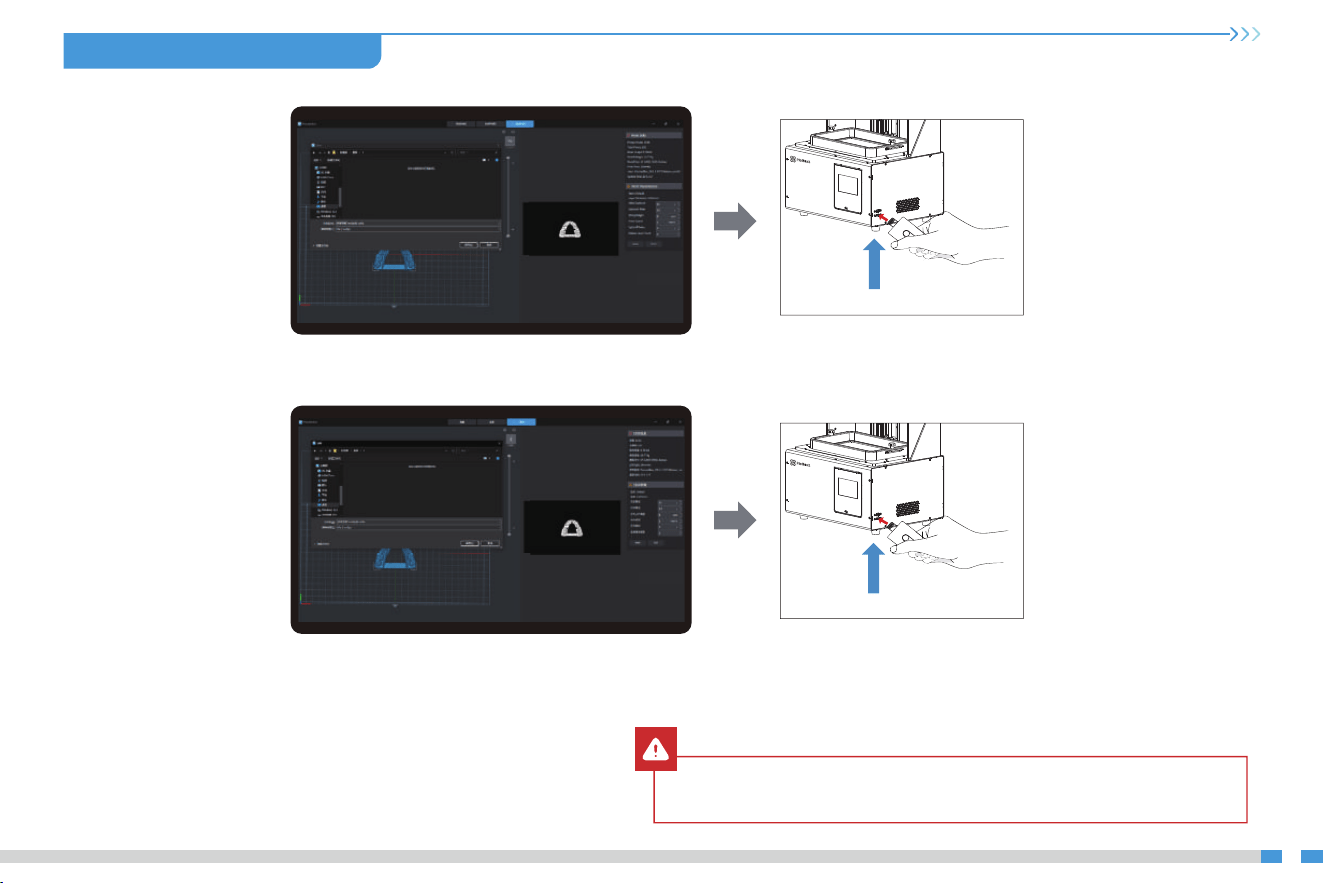
1. 切片
注意:Piocreat BOX 的界面均以发布的切片软件UI为准。
Piocreat BOX
Piocreat BOX
8.USB Disk Printing U盘打印
①
②
②
③
④
①
②
③
①
1. 打开Piocreat BOX 切片软件
→ ①点击右侧打印机栏选择设备型号
→ ②然后在界面的左上方点击“ 打开 ” 导入模型文件;
2. 设置打印参数(选择默认参数可跳过该步骤)
→①点击参数配置中的添加图标→②点击基础设置选项
→③设置相应参数→④点击添加;
3. 模型添加支撑(无需添加支撑跳过①②步骤)
→①点击上方图标 →②设置相应参数 →③点击切片;
4. 等待切片完成(可根据需求调整打印参数)
→选择“保存”另存切片完成的文件。
(*切片教程详见官网切片视频www.szcx3d.com)
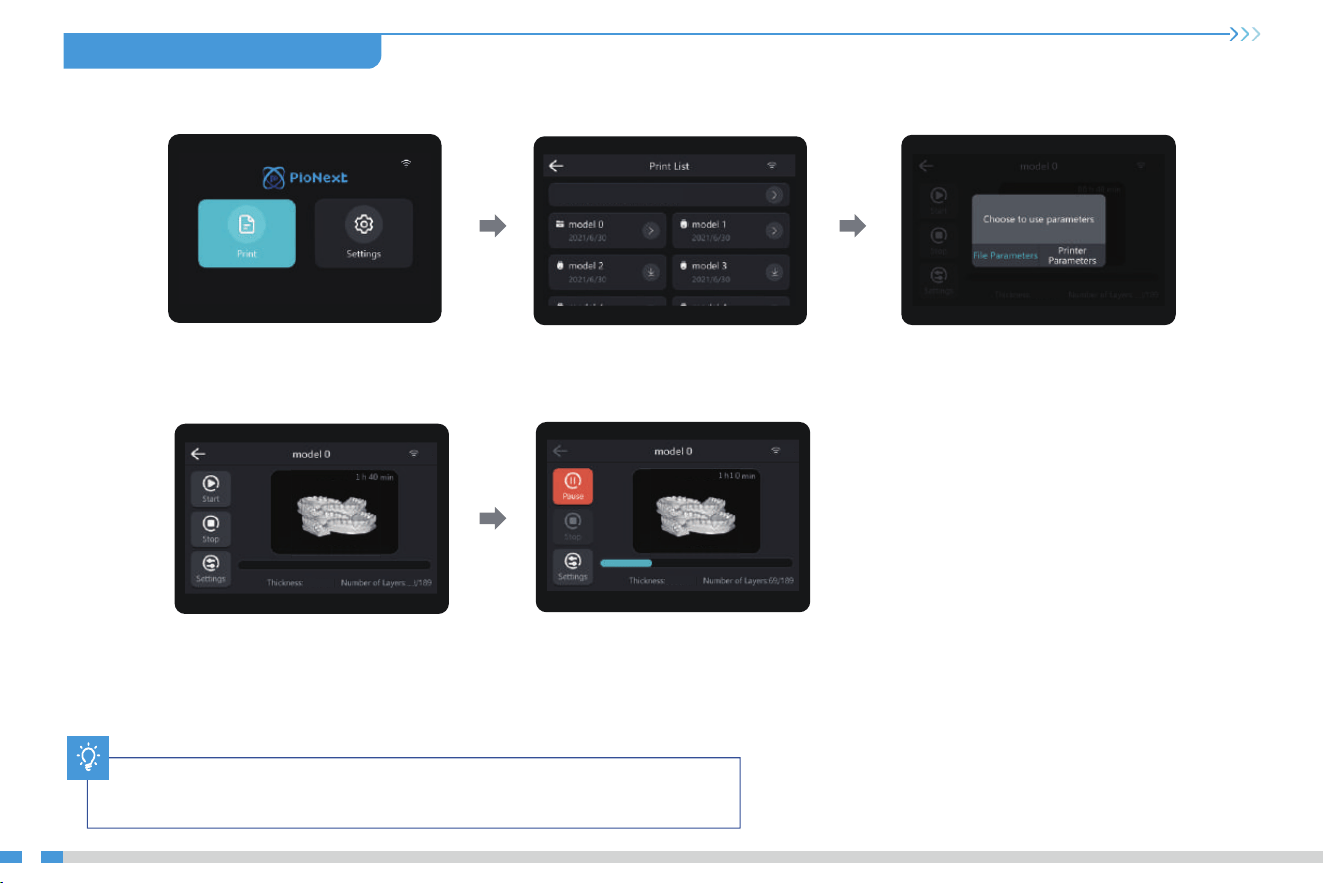
2. Insert the U disk → press the print button.
2. 插入U盘→按下打印按键
2. Print
2. 打印
USB port
U盘接口
Warning; During the printing process, it is frbidden to plug or unplug the U disk.
警告:在打印过程中,禁止插拔U盘。
14
8.USB Disk Printing U盘打印
1. 生成 .cxline文件→保存文件到U盘
1. Generate .cxline file,and save the file to U disk.
15
Note: The UI information is only for reference, the actual UI may be different.
注意:界面仅供参考,实际以UI为准。
2. Choose to use parameters;
1. Select USB disk files;
3. Press "Start" button
4. Printing···
0.05mm
0.05mm
0.05mm
0
1
1 1
0
8.USB Disk Printing U盘打印
1
1
1
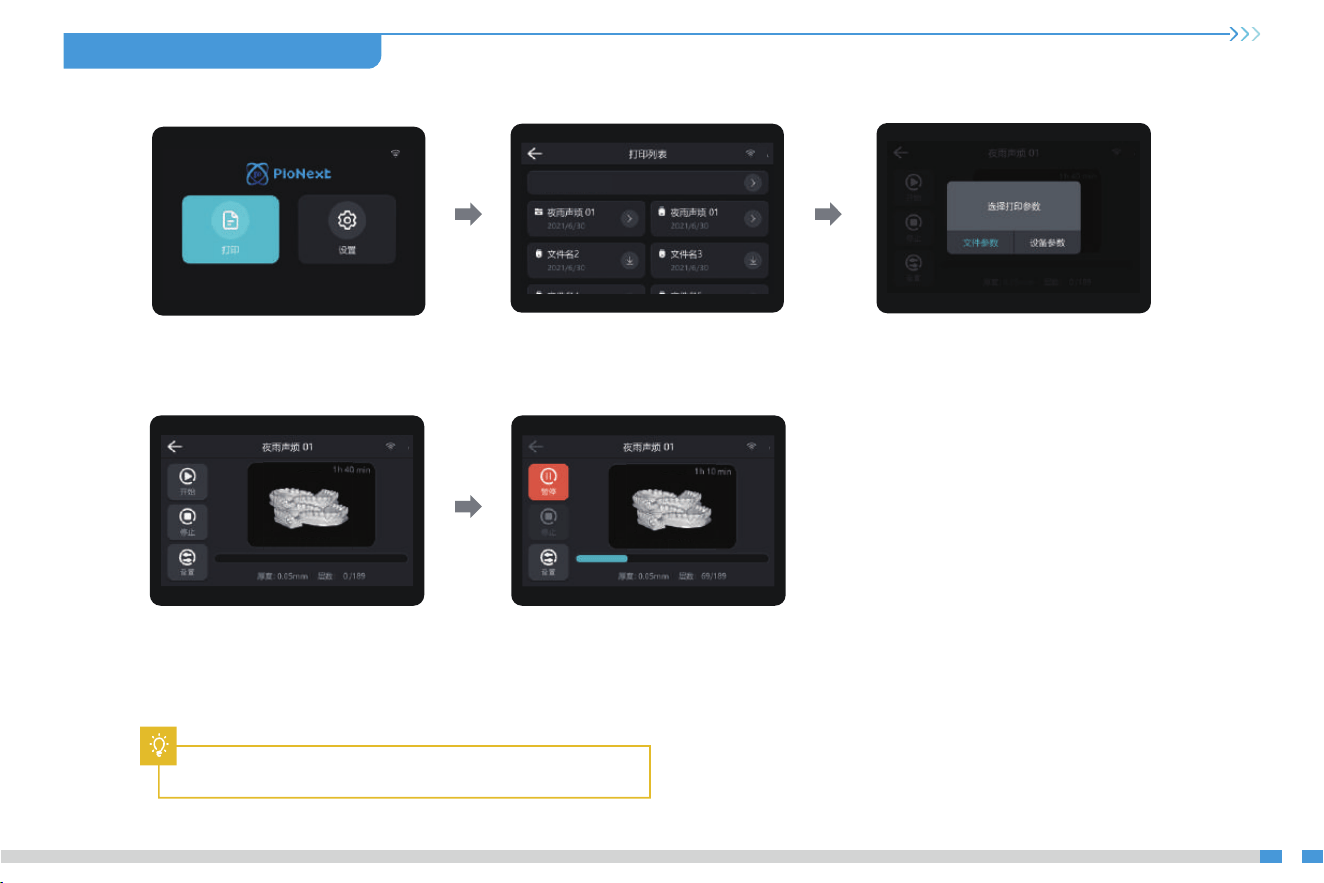
注意:界面仅供参考,实际以UI为准,机器默认存储当前打印文件。
1. 选择U盘文件; 2. 选择打印参数;
3. 按下开始键; 4. 正在打印中···
8.USB Disk Printing U盘打印
16
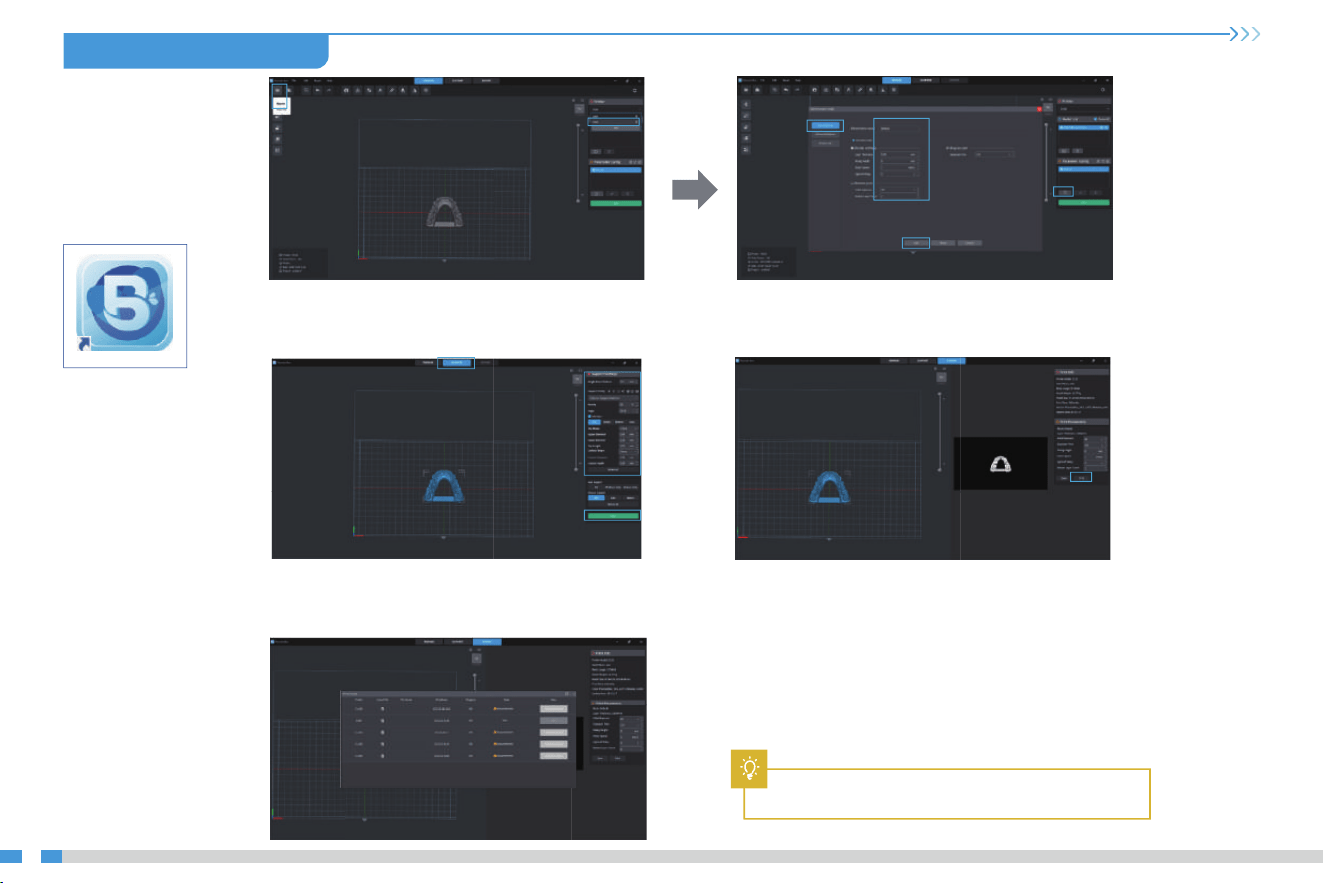
9. WIFI Print 无线打印
Slice
Piocreat BOX
Piocreat BOX
17
Note: Make sure the Piocreat BOX and the printer are
connected to the same WiFi.
②
③
①
②
③
④
①
①
②
1. Open the Piocreat BOX slicing software.
→①Click the right printer column to select the device model
→②And click "OPEN" on the top left of the interface
to import the model file;
2. Setting Printing Parameters (If use Default-Parameters,skip this step)
→①Click the "Add" icon in the Parameter Configuration
→ ②Click the Basic Setting Option
→ ③Set the appropriate parameters → ④Click "Add"
4. Waiting for the auto slicing to complete
(you can adjust the print parameters as required).
→Click "Print"icon to use WIFI-printing
(* slicing tutorial see the official website slicing video
www.piocreat3d.com)
3. Add bracket to the model
(skip steps ① and ② if no bracket is added).
→ ①Click the icon above →②Set the corresponding parameters
→③Click the slice;
5. Select the file on the machine to initiate printing
when the transfer is complete.
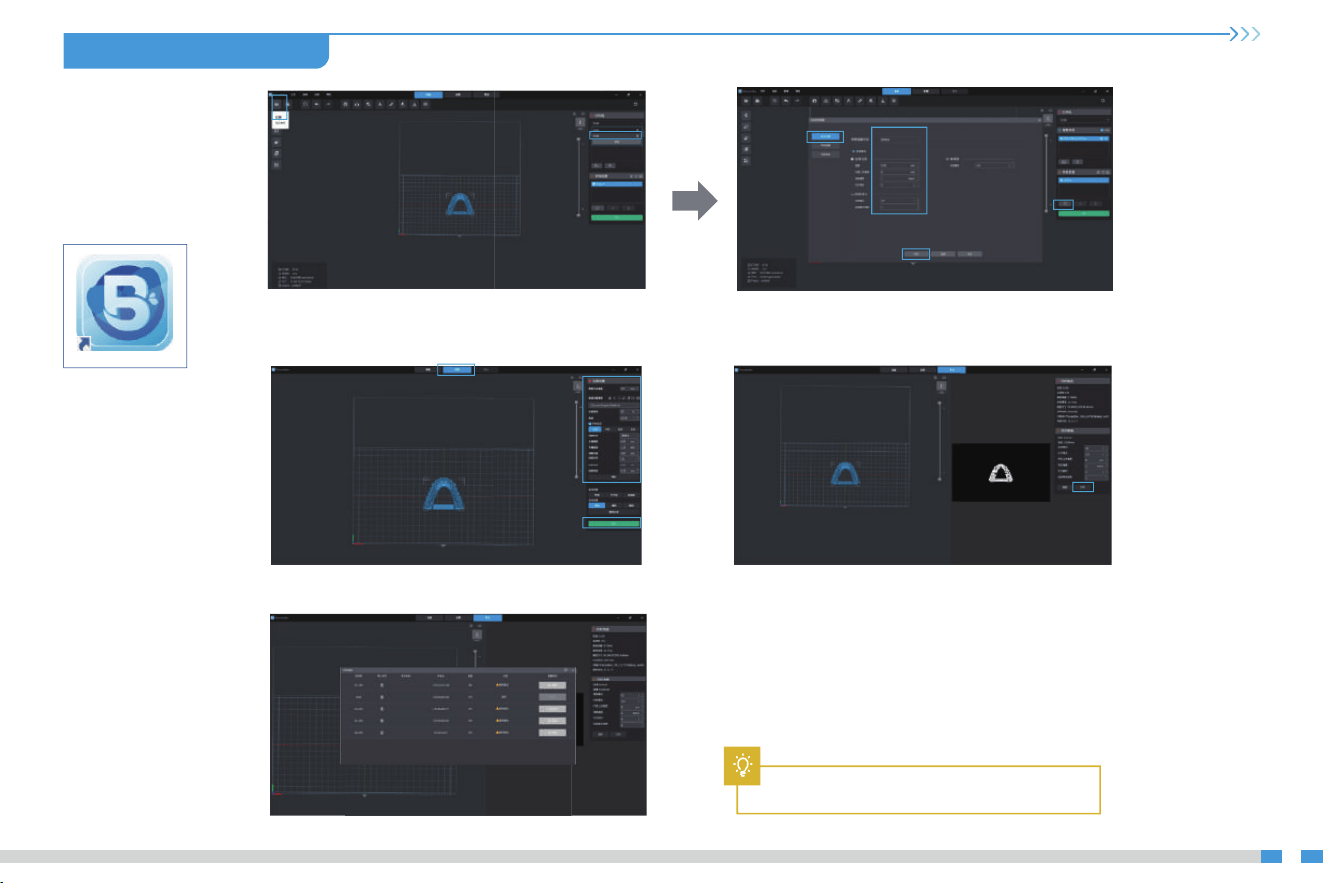
切片
Piocreat BOX
Piocreat BOX
9. WIFI Print 无线打印
18
②
③
①
②
③
④
①
①
②
1. 打开Piocreat BOX 切片软件
→ ①点击右侧打印机栏选择设备型号
→ ②然后在界面的左上方点击“ 打开 ” 导入模型文件;
2. 设置打印参数(选择默认参数可跳过该步骤)
→①点击参数配置中的添加图标→②点击基础设置选项
→③设置相应参数→④点击添加;
4. 等待切片完成(可根据需求调整打印参数)
→选择“打印”
进入WIFI打印;
(*切片教程详见官网切片视频www.szcx3d.com)
3. 模型添加支撑(无需添加支撑跳过①②步骤)
→①点击上方图标 →②设置相应参数 →③点击切片;
5. 传输完成后在机器上选择该文件启动打印。
注意:确保Piocreat BOX与打印机连接同一WIFI。
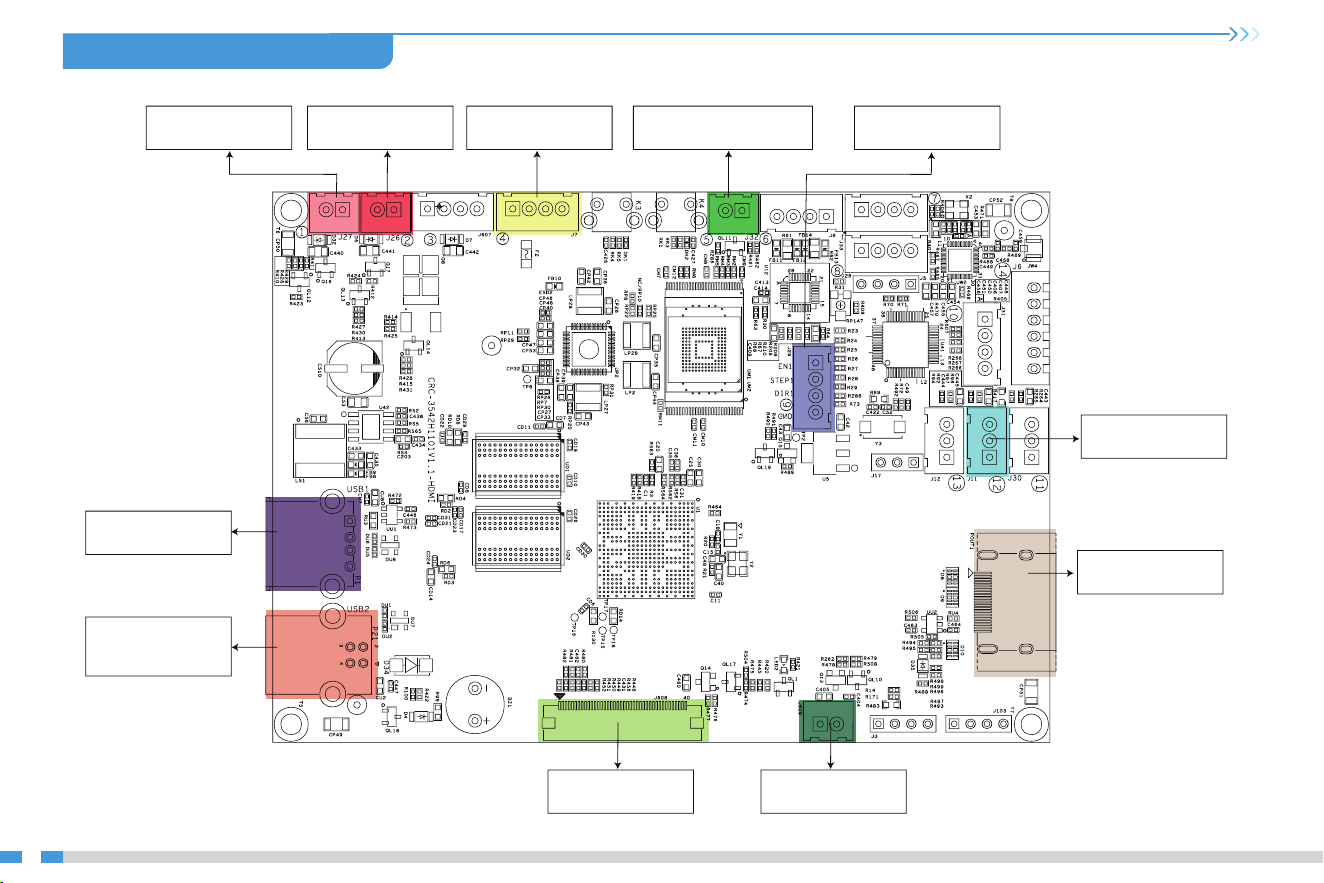
9.Wiring Connection电路接线
Z motor driver port
Z轴电机驱动接口
UV LED POWER EN port
灯板电源使能
Power Supply port
直流电源输入接口
Exhaust fan
排废气风扇接口
UV LED fan port
灯板散热风扇接口
USB HOST port
接U盘打印接口
Firmware interface
of spare brush
备用刷固件接口
RGB screen port
RGB屏接口
Z ends top
Z轴限位开关
HDMI port
HDMI接口
5V output port
5V输出接口
19
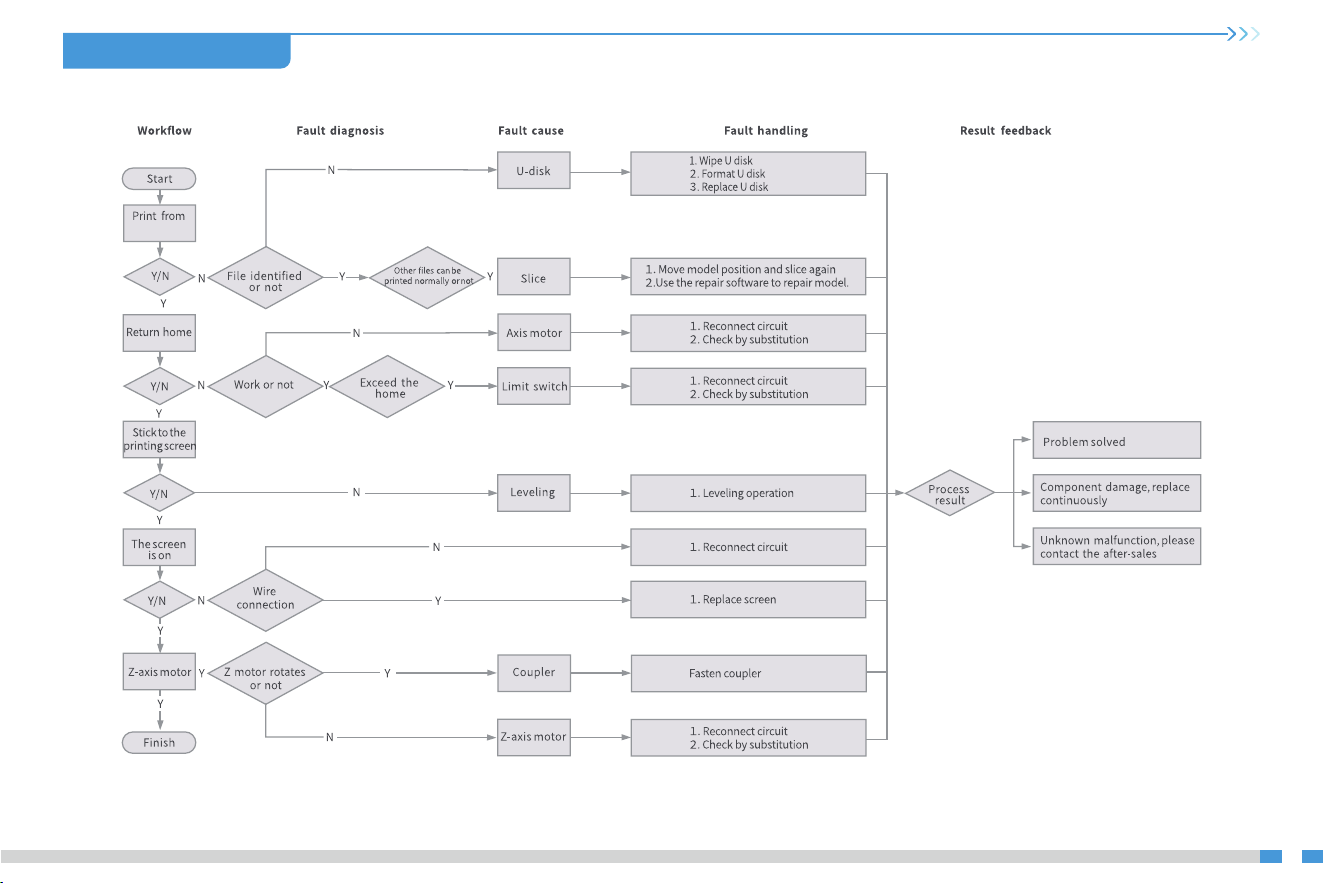
10.Troubleshooting
U disk
20
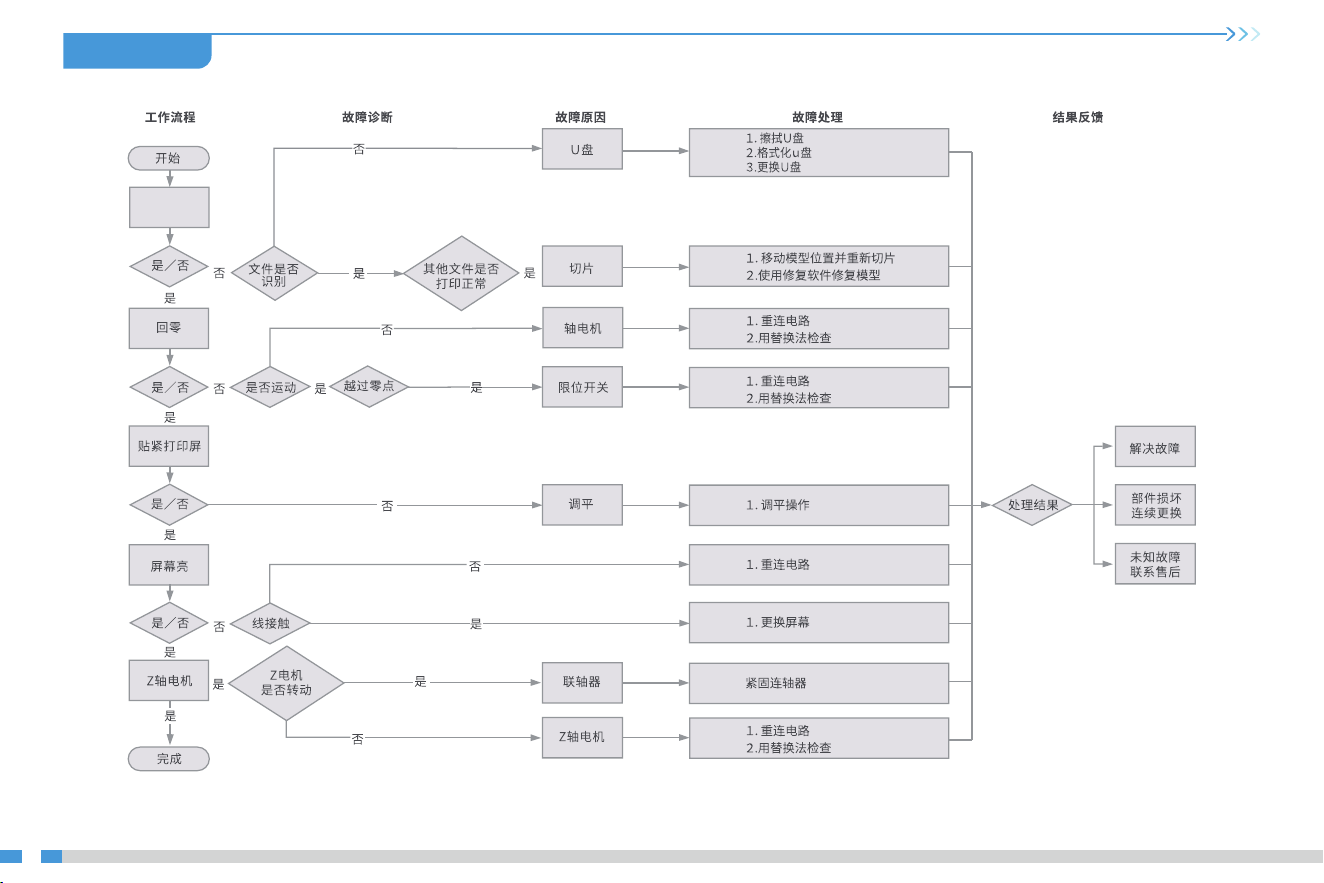
10 故障检修
由U盘打印
21
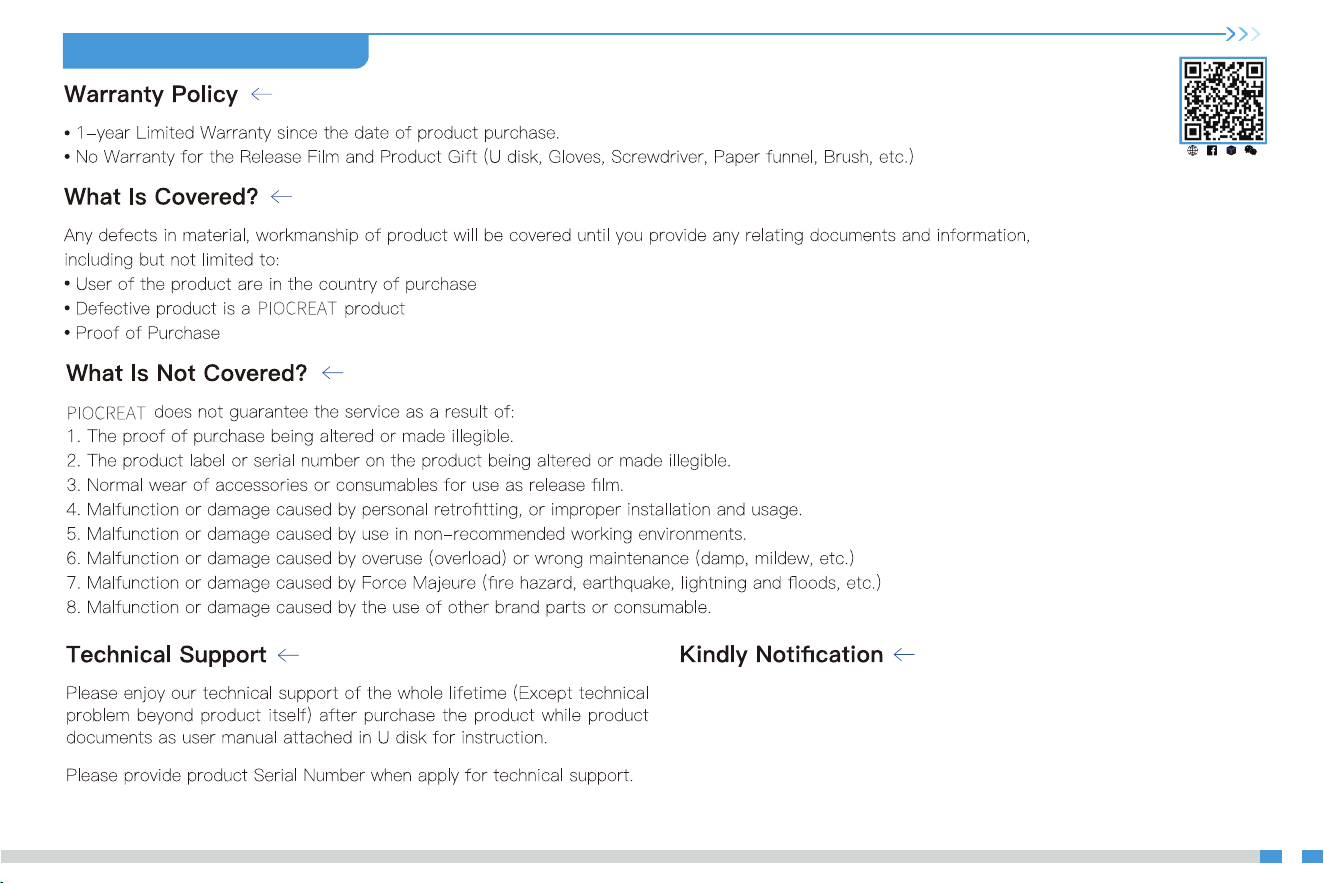
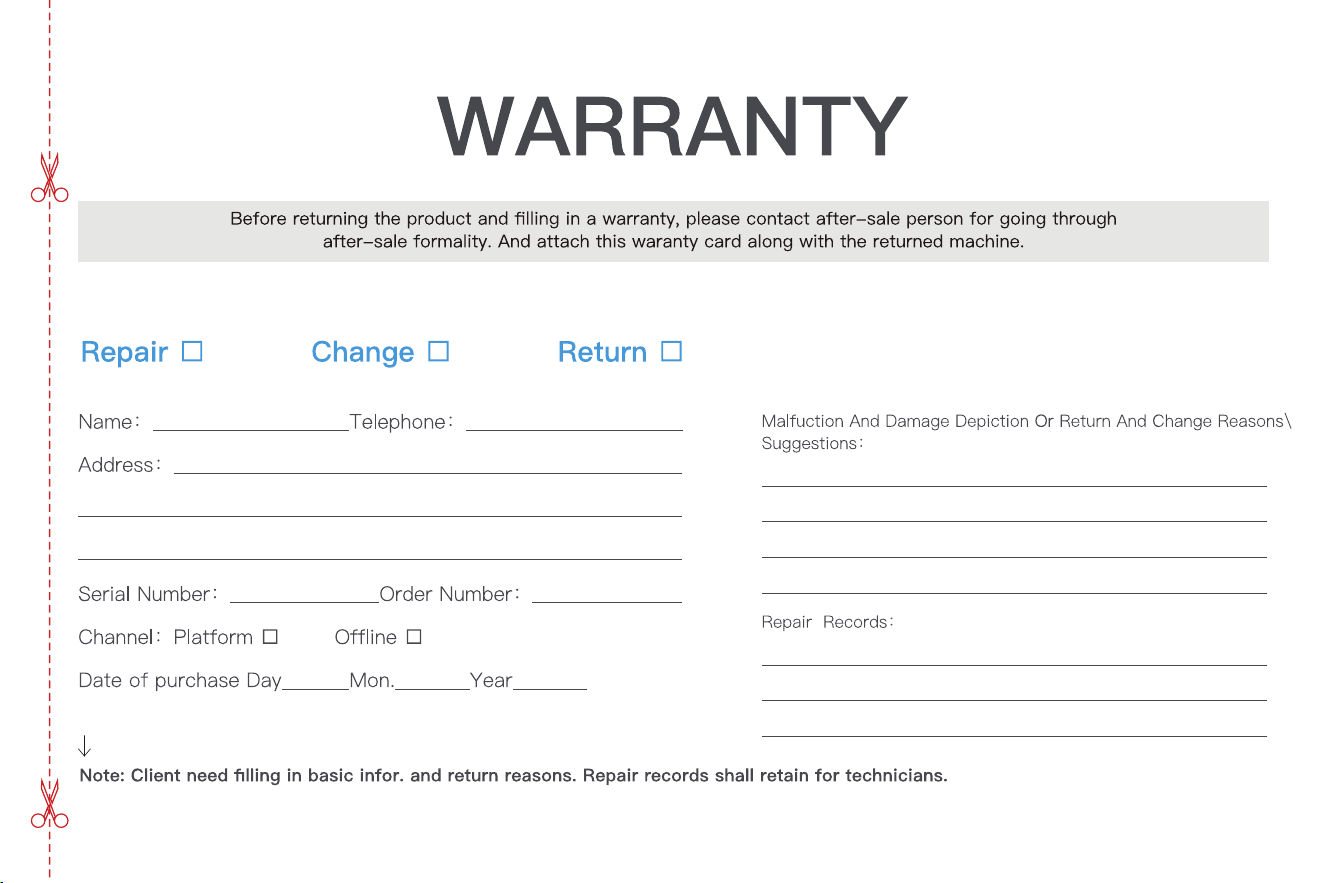
11.After-Sales Service Card
Please read the user manual and warranty card carefully before the use.
For any service, Please priorly contact local seller or contact us via
Email: after@piocreat 3d.com for support.
See www.piocreat3d.com / for specific warranty information
about your product and procedures to act on a warranty claim.
Scan the code to know more
22
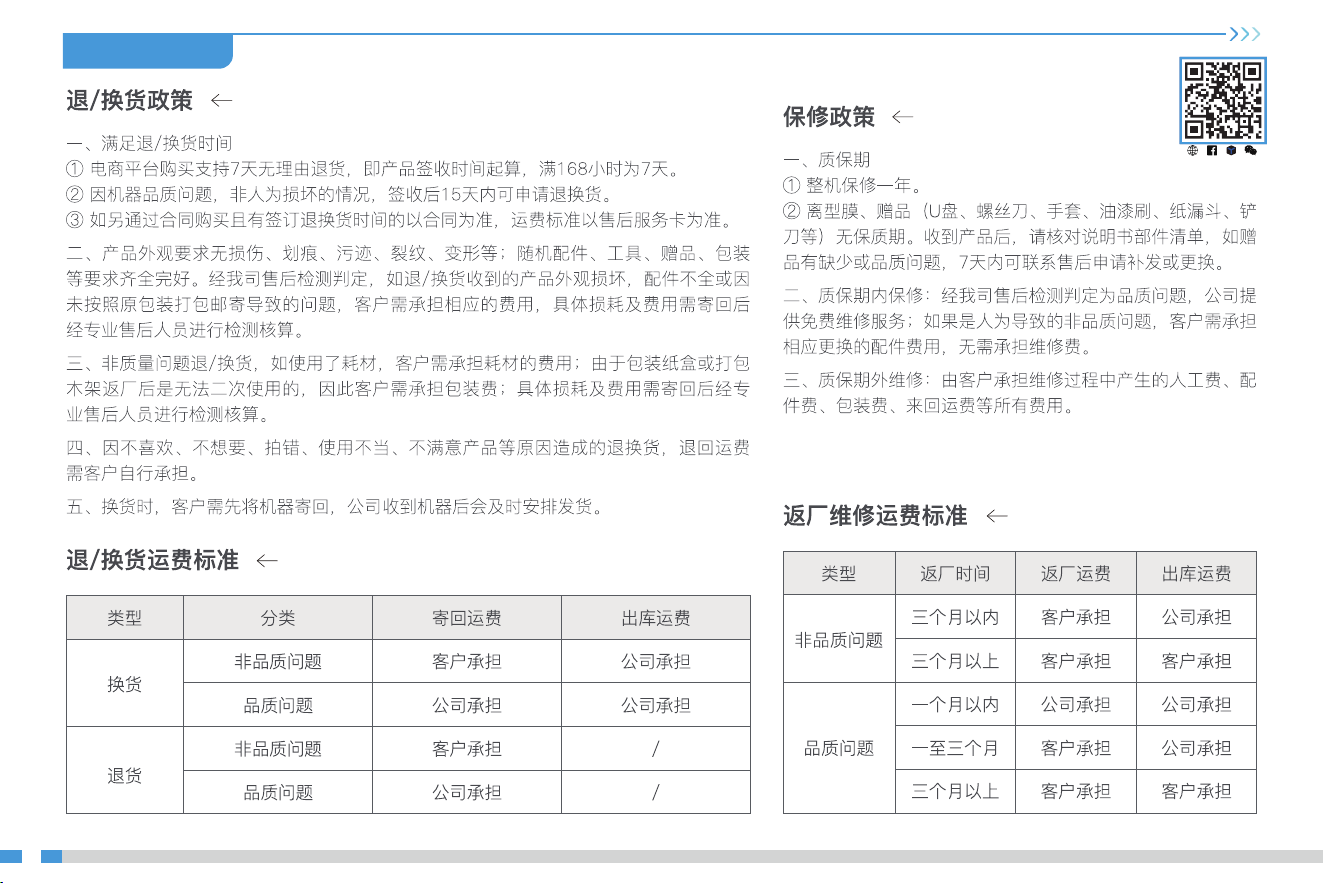
扫码了解更多
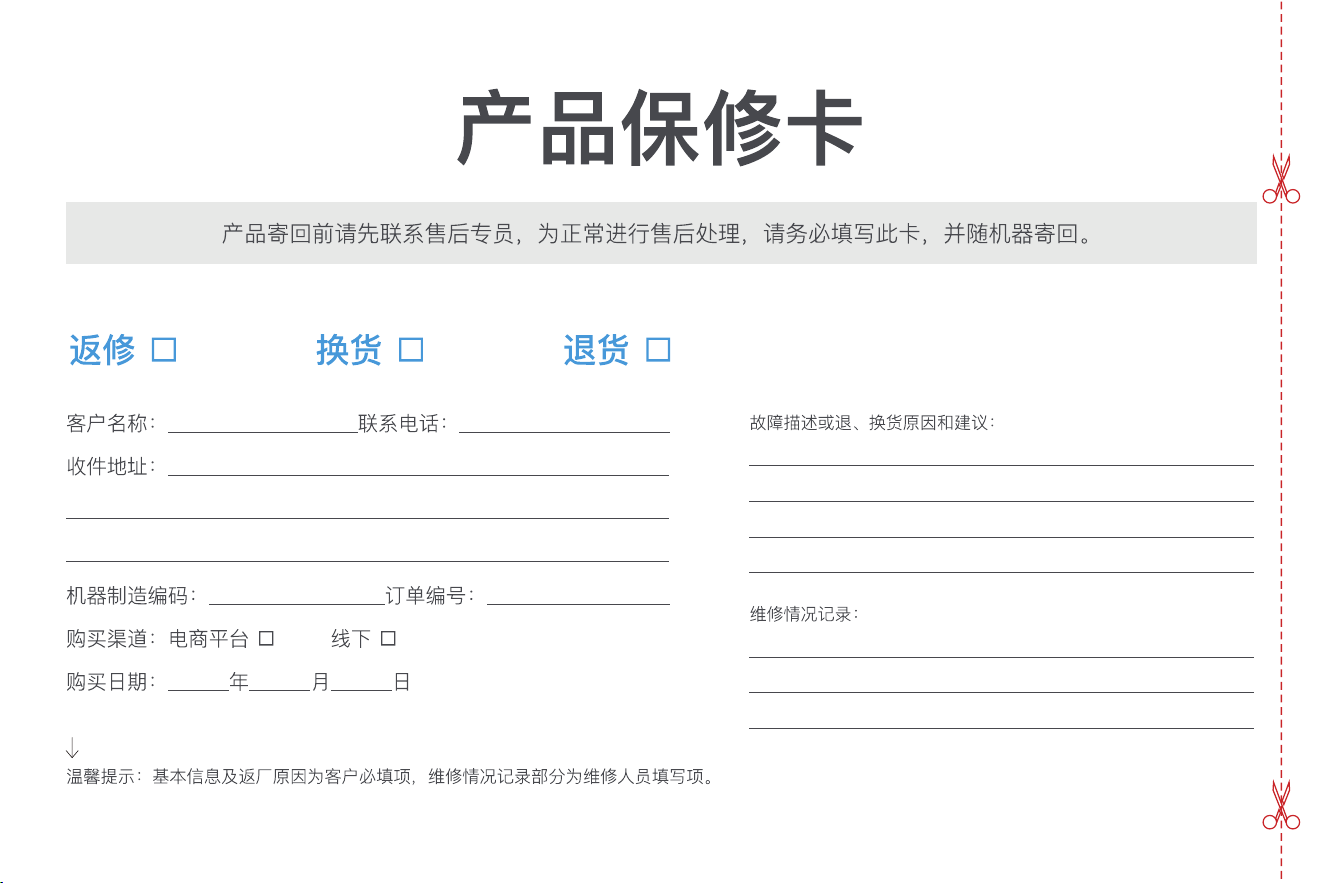
11.售后服务卡
23
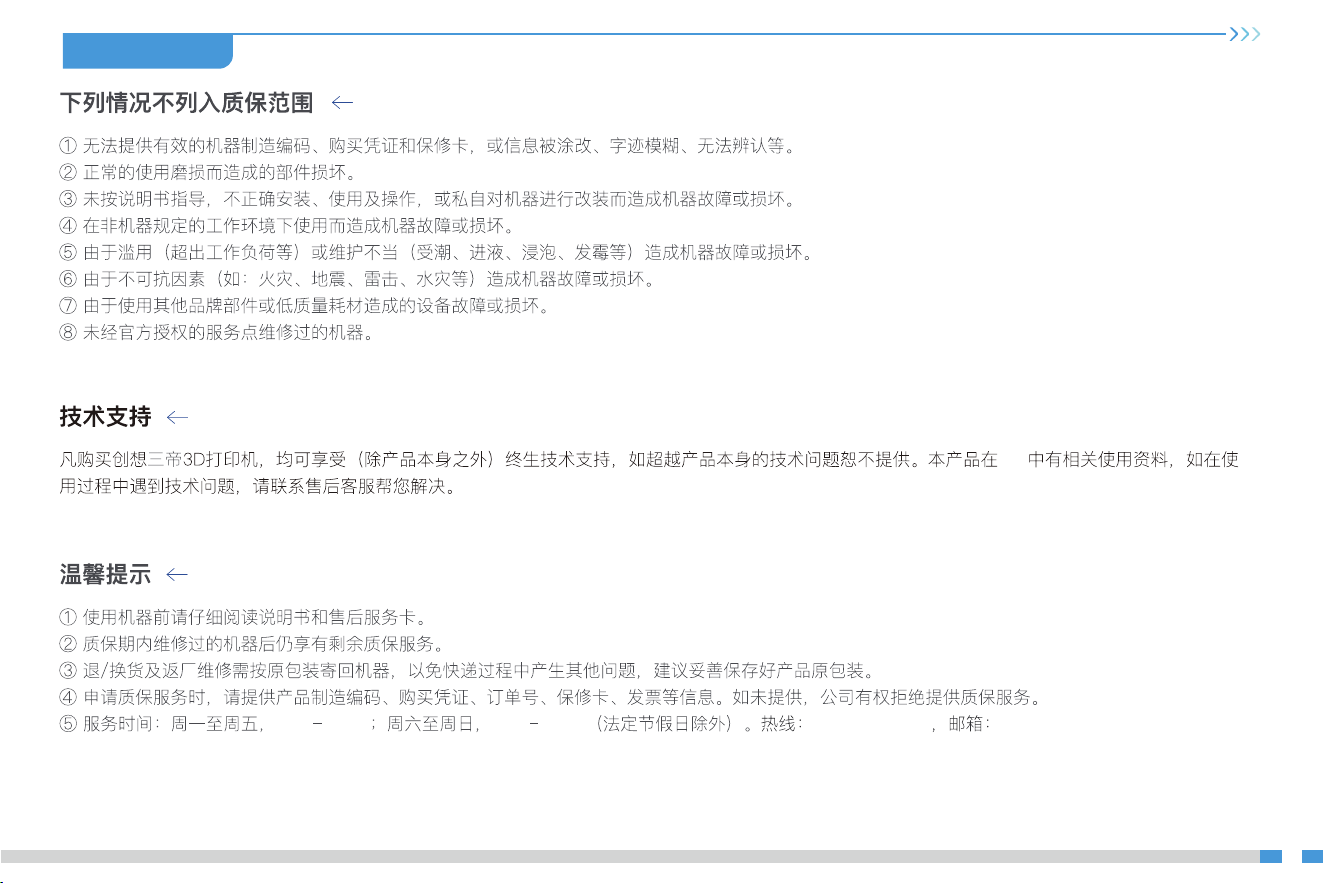
U盘
9:00 20:30
9:00 18:30
0755-2103-9743
after@piocreat3d.com
11.售后服务卡
24

Notes 笔记

Notes 笔记

Notes 笔记

Scan To Learn More
扫码了解更多
Add:19/F, Jinxiu Hongdu building, Meilong blvd., Minzhi street, Longhua Dist.,
Shenzhen,China 518131
Tel: +86 755-2103 9743
Official Website: www.szcx3d.com www.piocreat3d.com
E-mail: after@piocreat3d.com hello@piocreat3d.com
Shenzhen Piocreat 3D Technology Co., Ltd.
服务热线 0755-2103 9743
公司网站 www.szcx3d.com www.piocreat3d.com
深圳市龙华区民治街道梅龙大道锦绣鸿都大厦1908
因每款机型不同,实物与图可能有所差异,请以实物为准,最终解释归深圳市创想三帝科技有限公司所有。
Shenzhen Piocreat 3D Technology Co., Ltd.