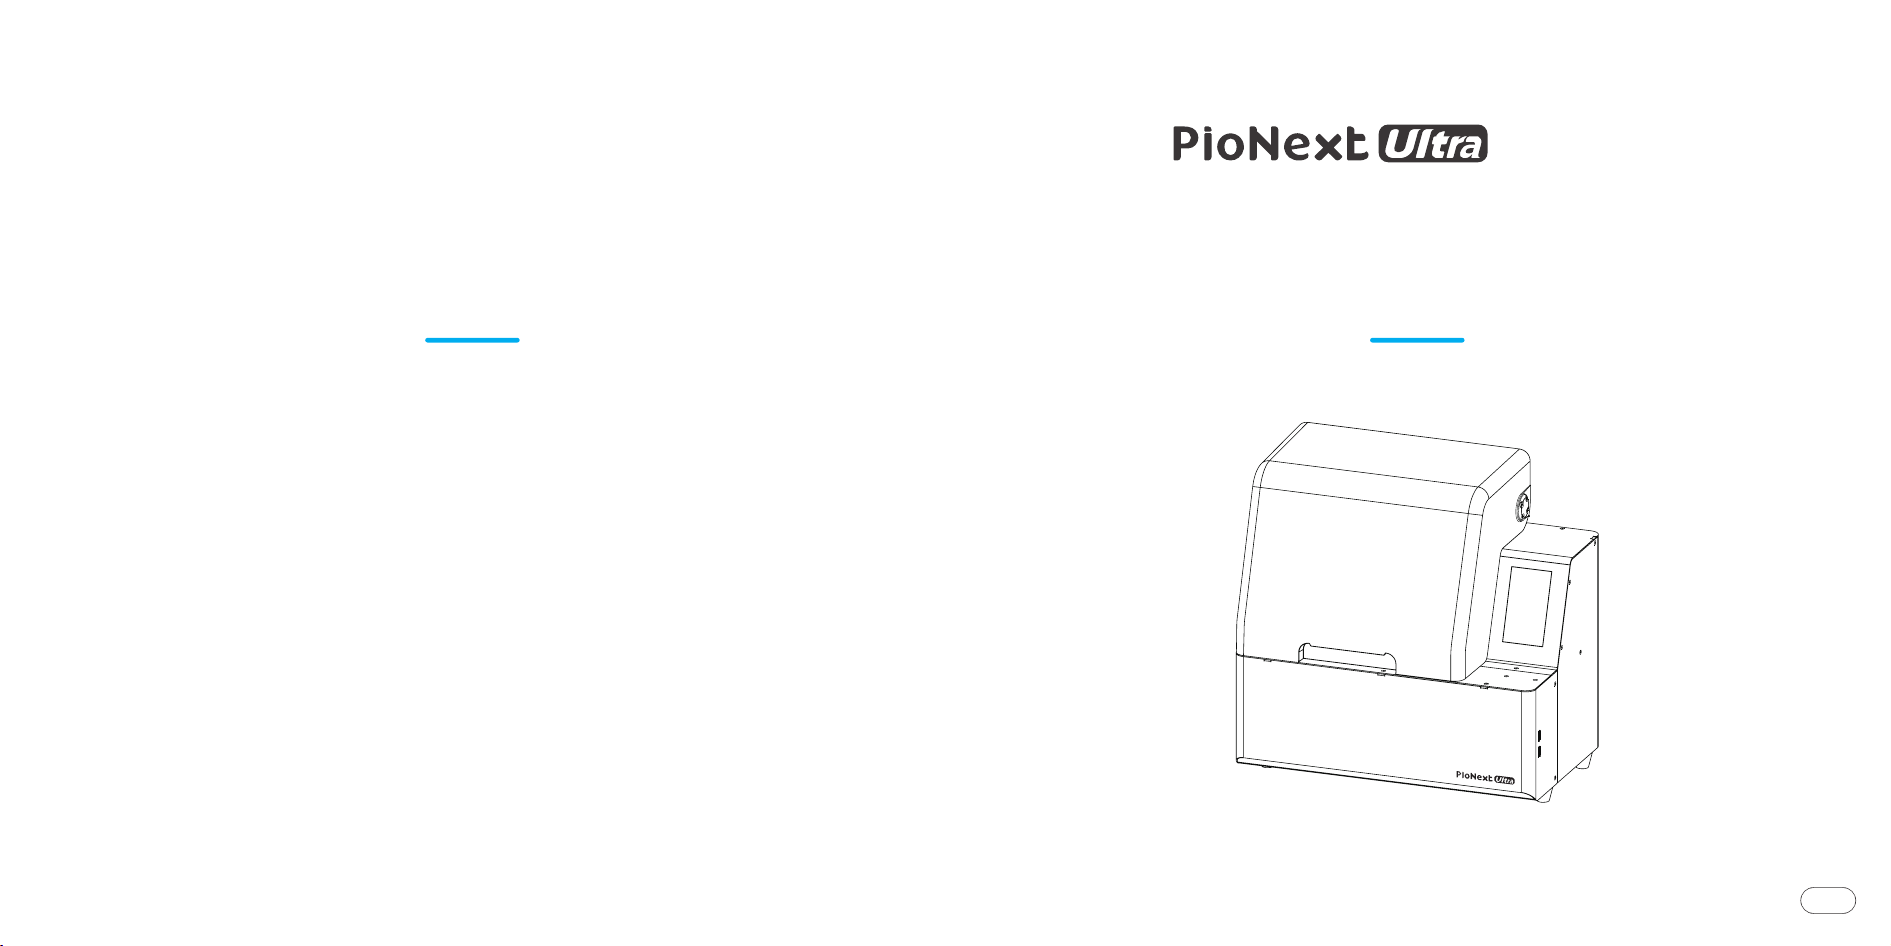
V�.�
Quick Start Guide
Combo
快速入门指南
Please visit the PioCreat website for more products operation and maintenance tutorials.
Note: The UI interface is only for reference, and shall be subject to the actual UI.
Enjoy!
请打开随机U盘, 查看其中的视频教程
注: UI界面仅供参考,具体以实际UI为准
*Safety Notice: Do not power on the printer before installation is complete.
Please refer to this guide to complete the installation and printing of the printer.
�
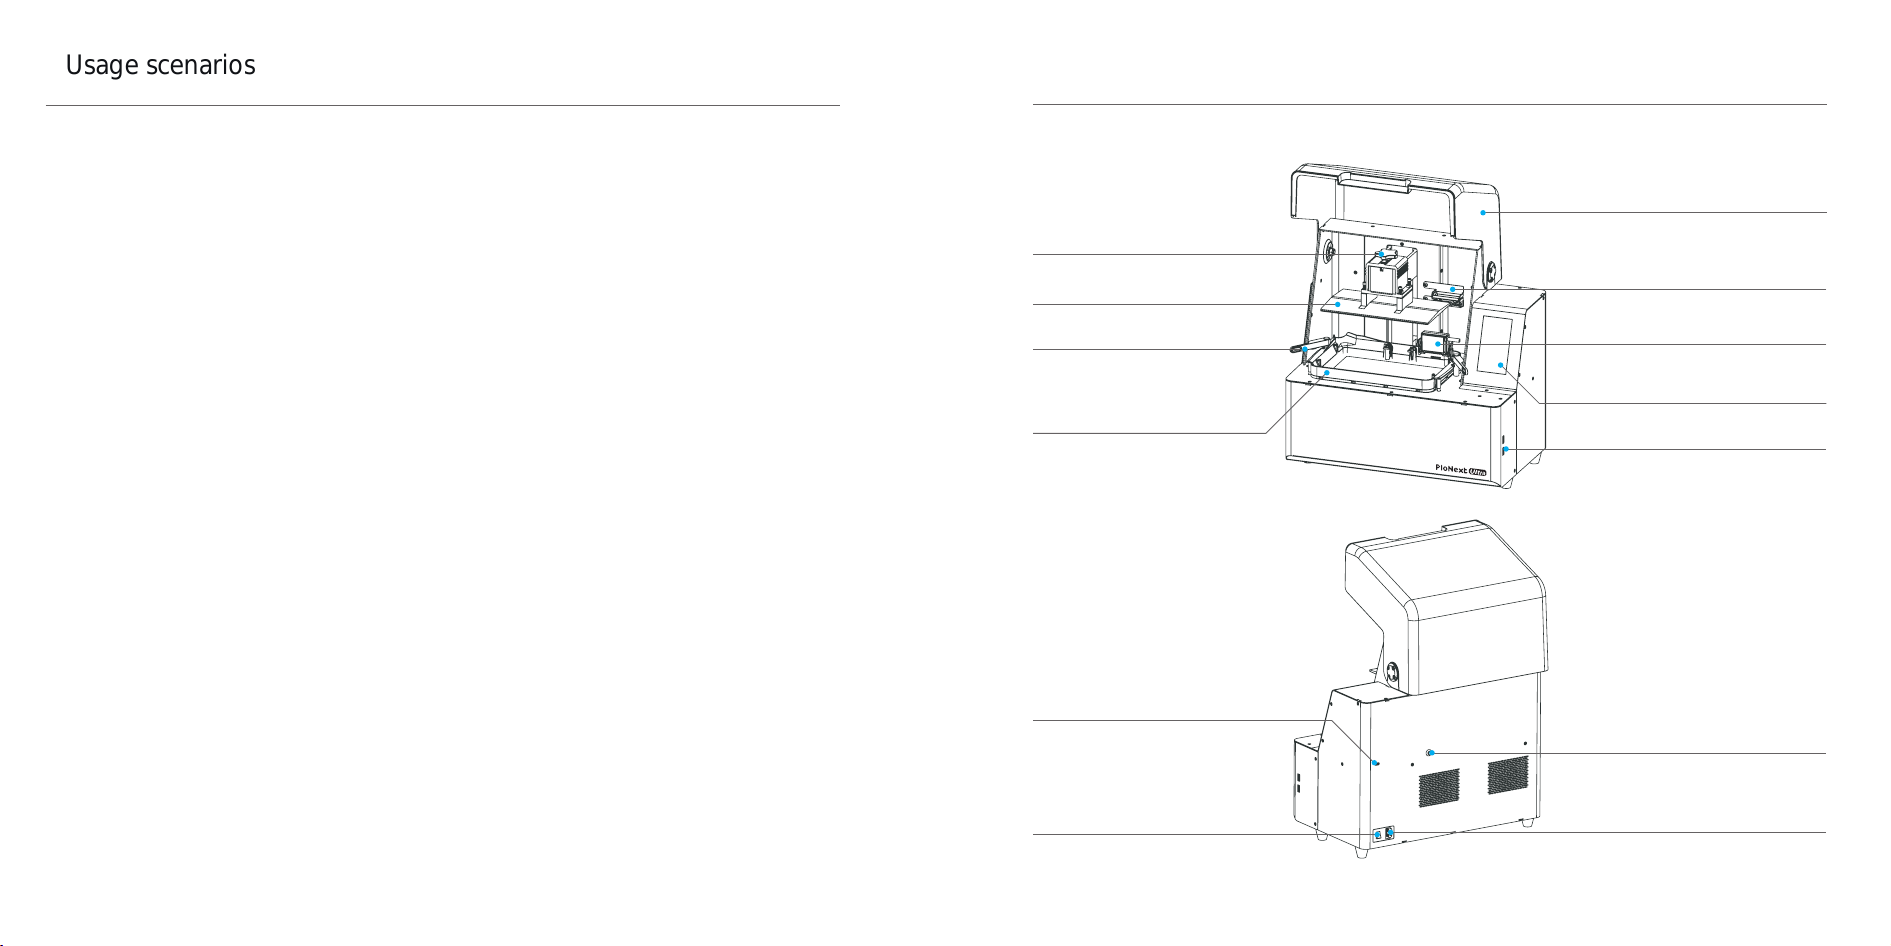
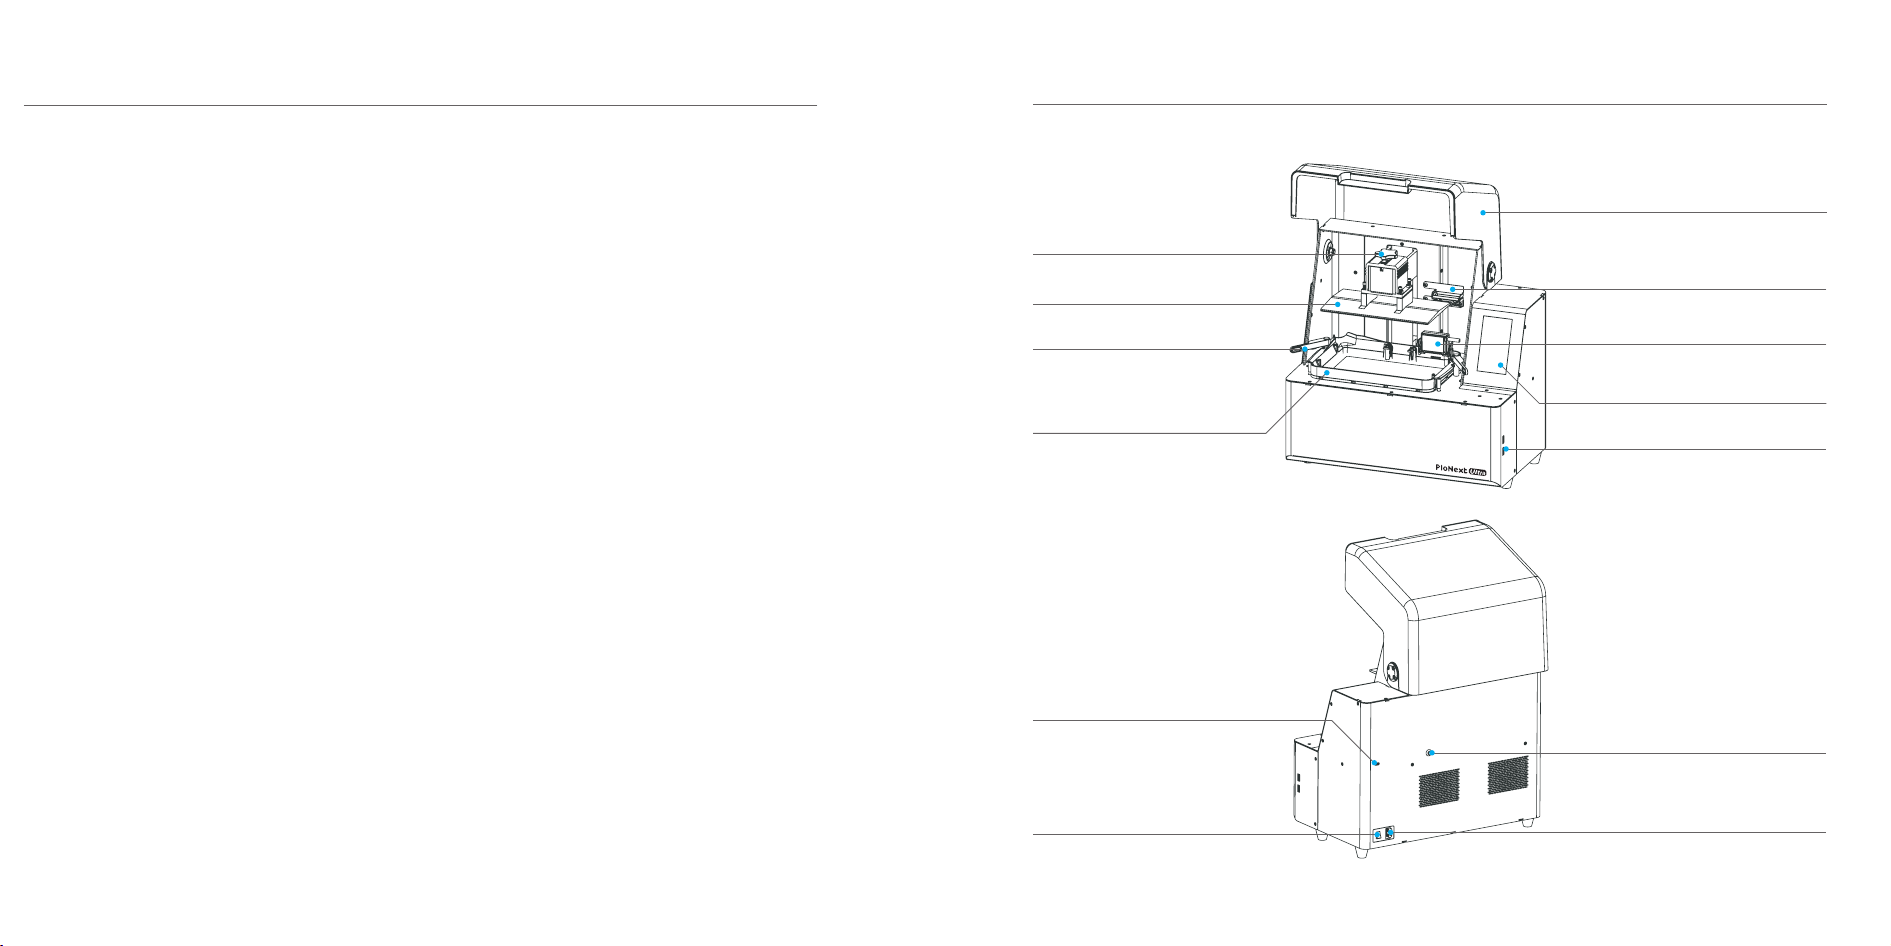
Lens Hood
Rangefinder Module Bracket (Optional)
USB Port
Range-finding Module (optional)
Touchscreen
Power Port
Feed Hose Opening
Platform Screws
Resin Vat Lock
Buliding Platform
Resin Vat
AFU Interface
Power Switch
Component Introduction
Usage scenarios
This product is designed for indoor use only
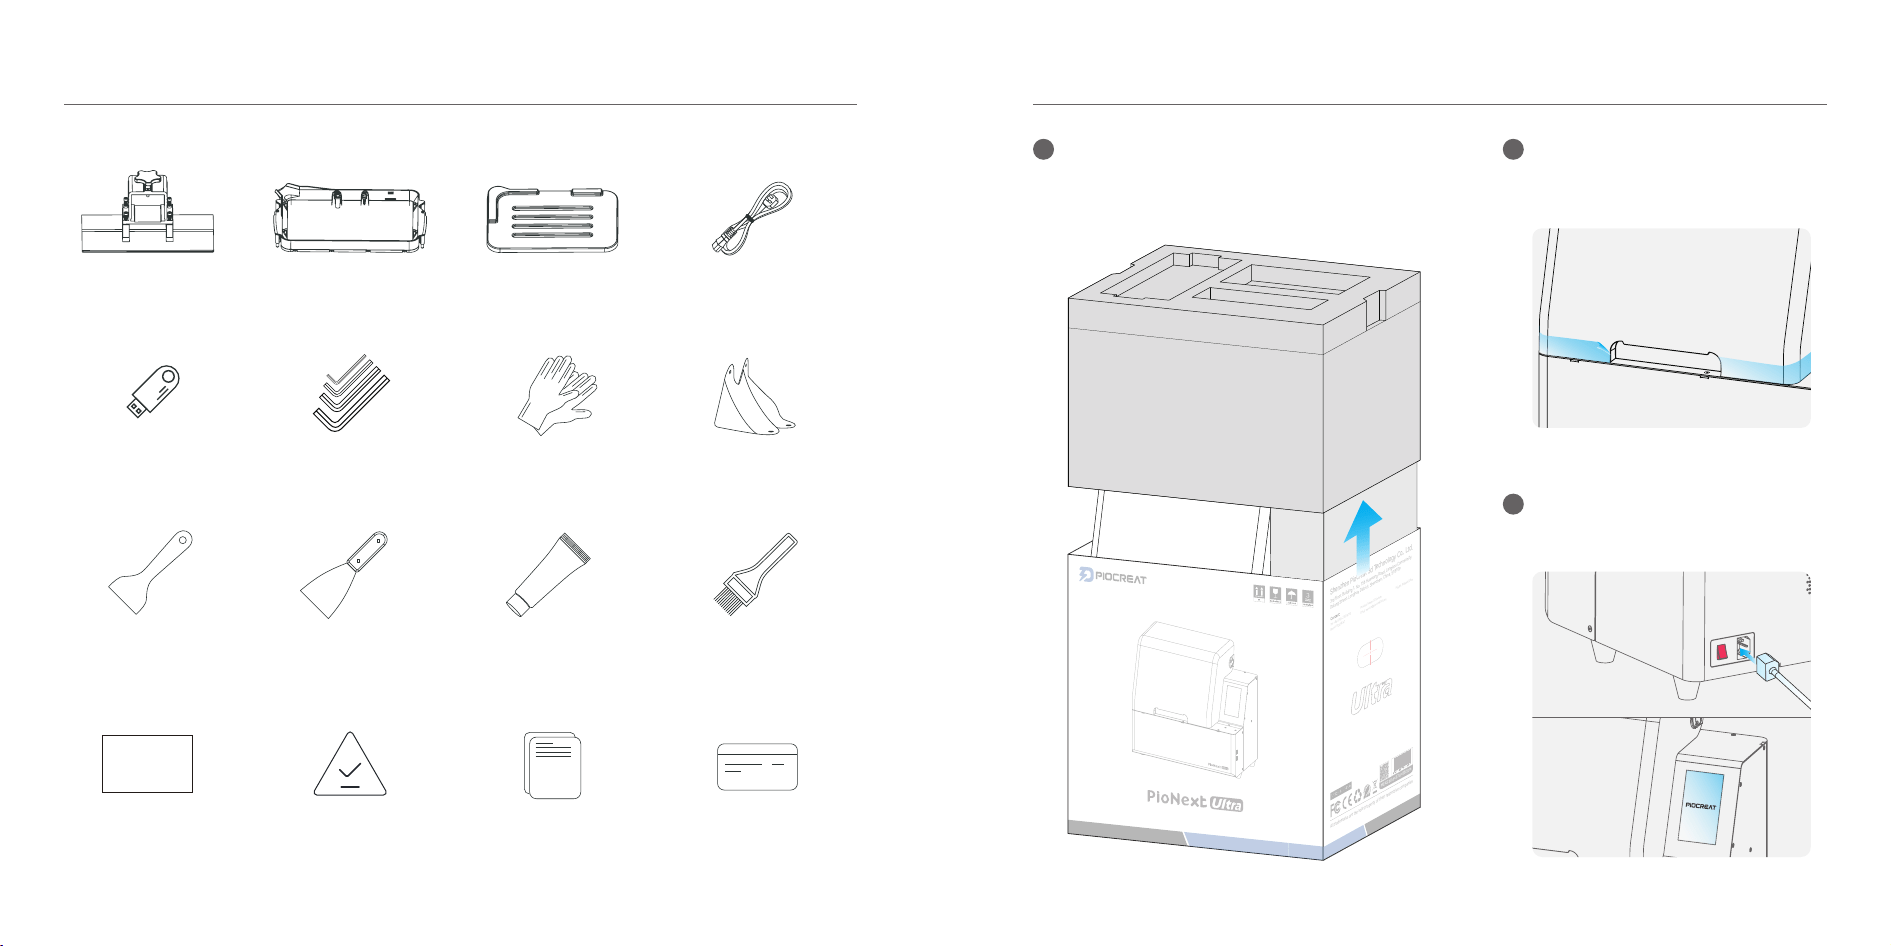
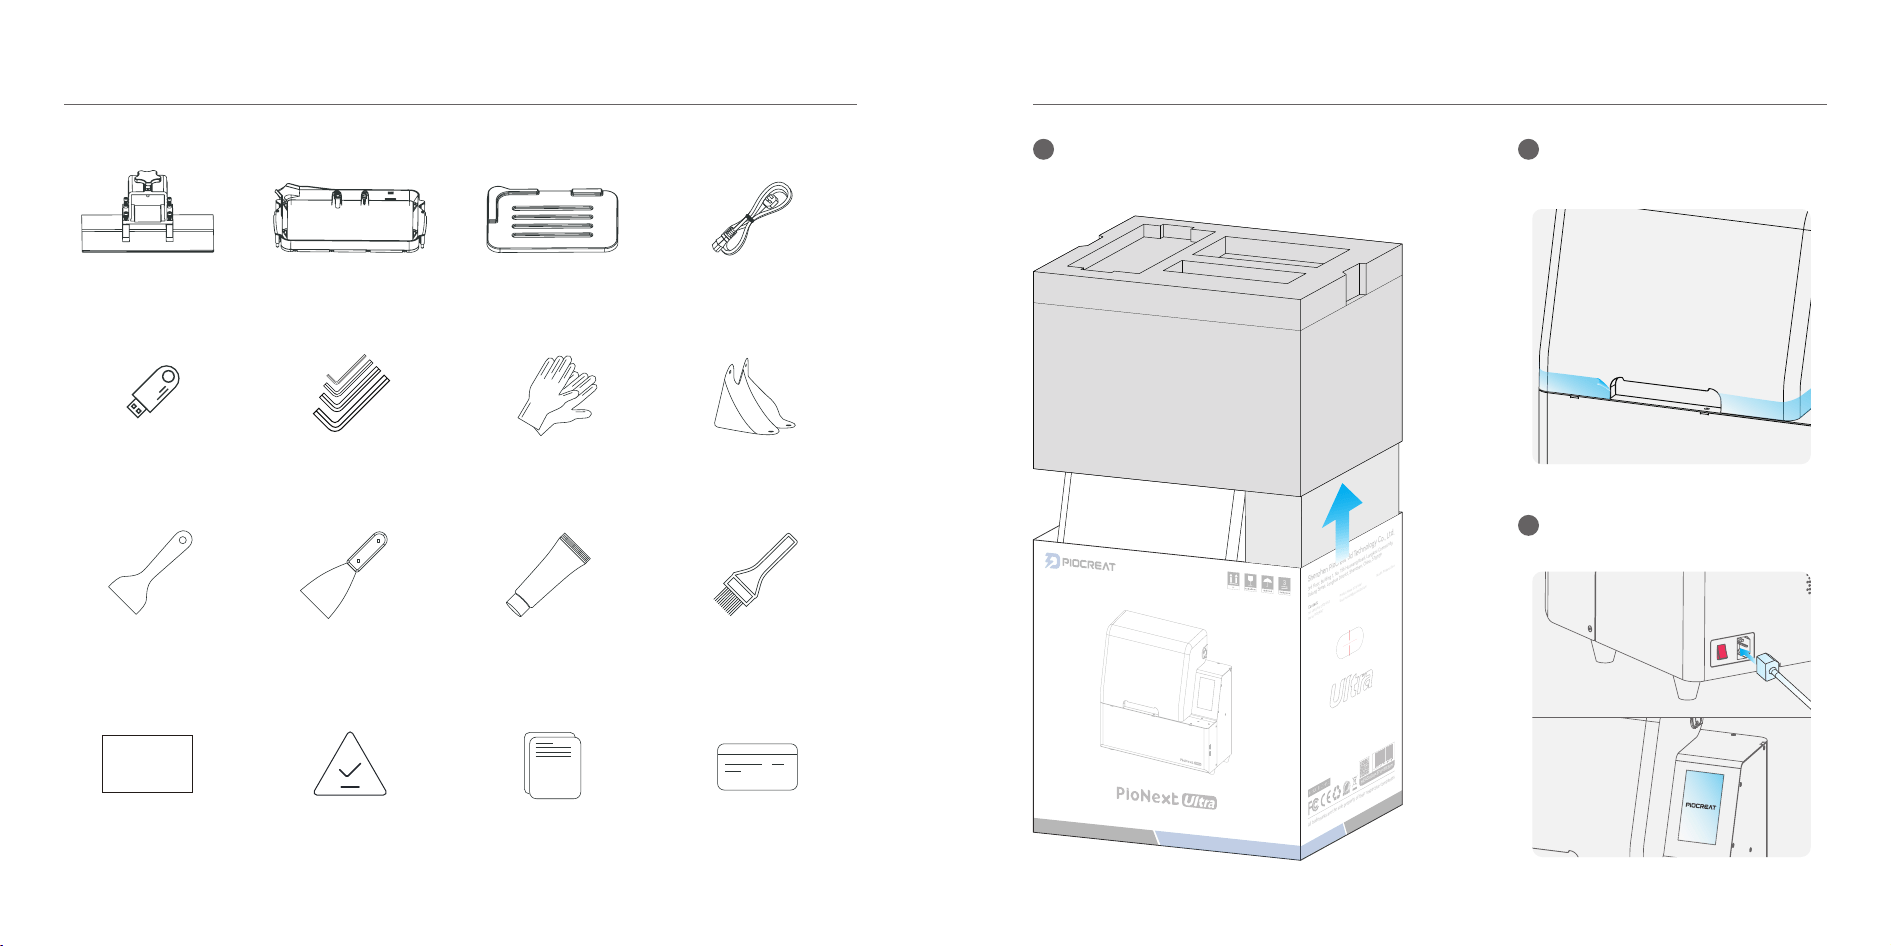
List of Accessories
�
Plastic Blade
�
Quick Start
Guide �
Qualified Certificate
�
After-Sales
Service Card �
Paintbrush
�
Resin Vat
�
Metal Blade
�
Resin Vat Dust Cover
�
Printing Platform
�
Lubricant
�
Power Cable
�
Calibration Card
�
Hex Keys Set
�
H�.�
H�.�
H�.�
H�.�
Disposable Latex Gloves
�
U Disk
�
Filters
�
Calibration Card
校准卡片
Quick Start Operation Schematic
Unpack the accessories such as the dust cover of c
the material tank and the power cable, remove the
protective foam from the top and the right side of
the machine.
� Remove the seamless tape between the
hood and the base, open the hood, and
take out all the foam inside the machine.
�
Once the power cord is connected,
turn on the device switch to complete
the startup operation.
�
�
Shenzhen PioCreat 3d Technology Co., Ltd.
3rd Floor, Building 1, No. 156 Huawang Road, Langkou Community,
Dalang Street, Longhua District, Shenzhen, China, 518109
Tel: +86 0755-2103 9743
Brand: PIOCREAT
Model: PioNext UltraProduct Name: 3D printer
Email: seice@piocreat3d.com
All trademarks are the sole propey of their respective companies
MEAS:60.6×37.6×58.5cm
所有商标均为其公司的专有财产
外箱尺寸:60.6×37.6×58.5cm
电话:0755-2103 9743
品牌:PIOCREAT
邮箱:seice@piocreat3d.com
执行标准: GB 4943.1
产品名称:3D打印机
型号:PioNext Ultra
深圳市创想三帝科技有限公司
中国深圳市龙华区大浪街道浪口社区华旺路156号1栋3层,518109
Shenzhen PioCreat 3d Technology Co., Ltd.
3rd Floor, Building 1, No. 156 Huawang Road, Langkou Community,
Dalang Street, Longhua District, Shenzhen, China, 518109
Tel: +86 0755-2103 9743
Brand: PIOCREAT
Model: PioNext UltraProduct Name: 3D printer
Email: seice@piocreat3d.com
All trademarks are the sole propey of their respective companies
MEAS:60.6×37.6×58.5cm
所有商标均为其公司的专有财产
外箱尺寸:60.6×37.6×58.5cm
电话:0755-2103 9743
品牌:PIOCREAT
邮箱:seice@piocreat3d.com
执行标准: GB 4943.1
产品名称:3D打印机
型号:PioNext Ultra
深圳市创想三帝科技有限公司
中国深圳市龙华区大浪街道浪口社区华旺路156号1栋3层,518109
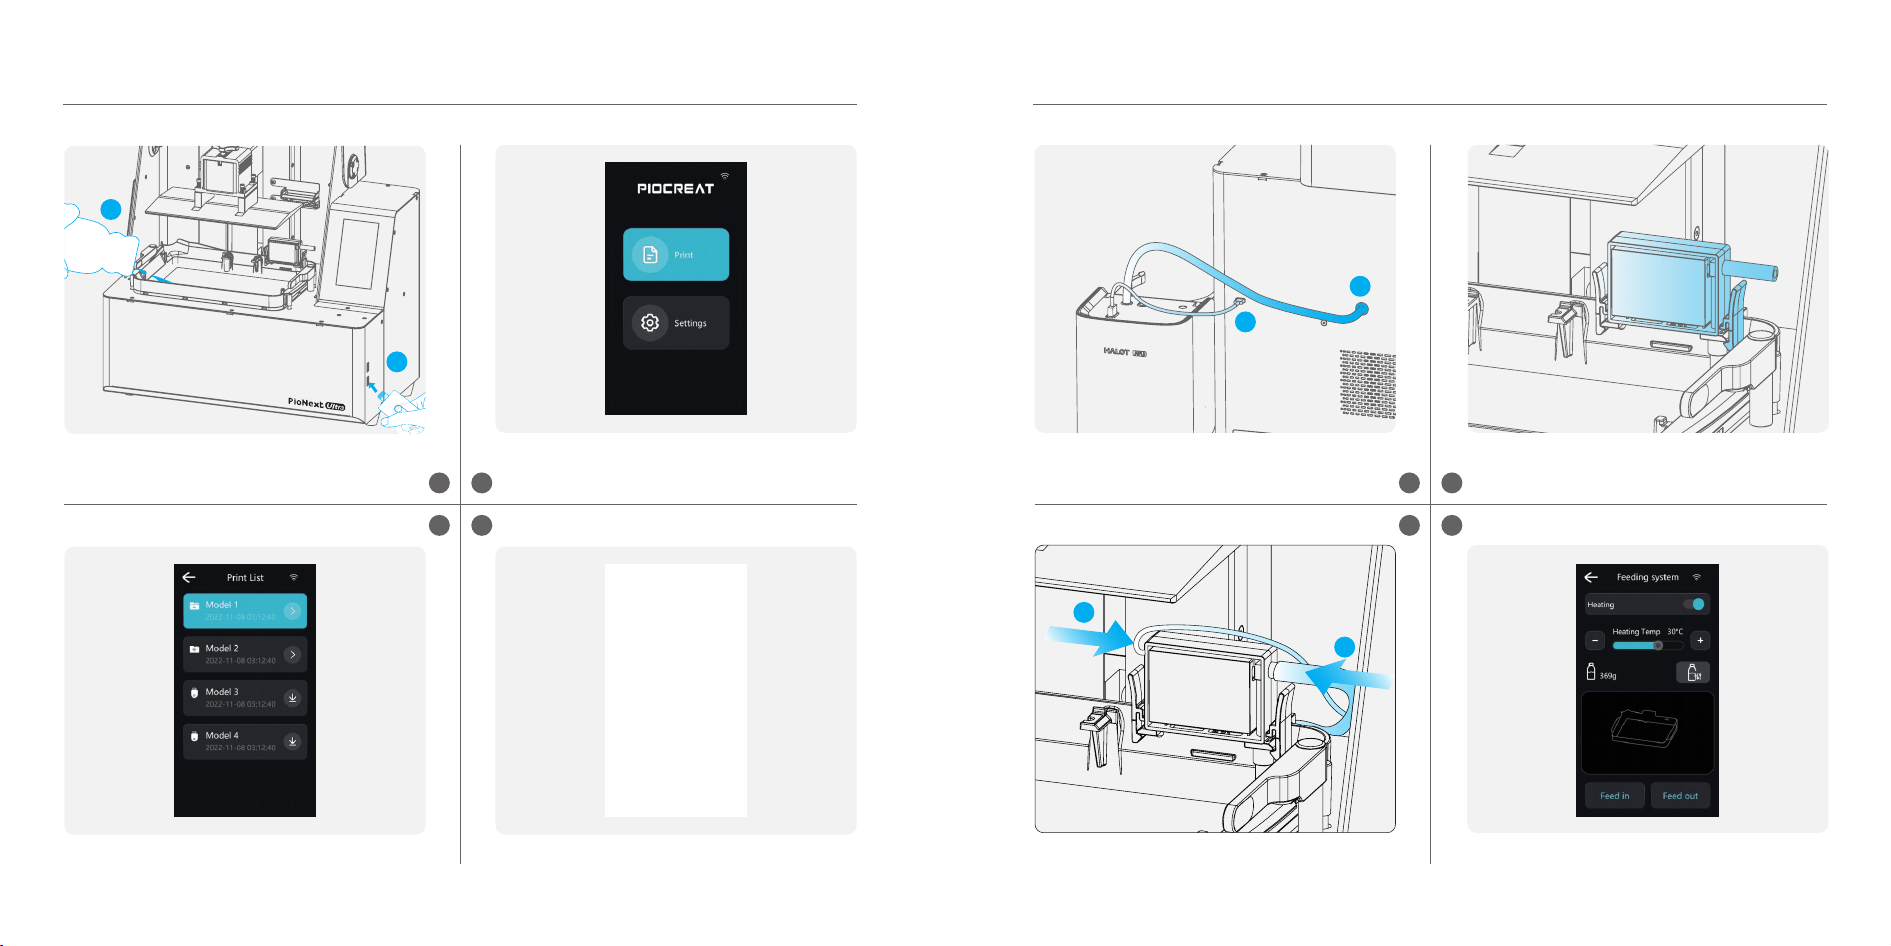
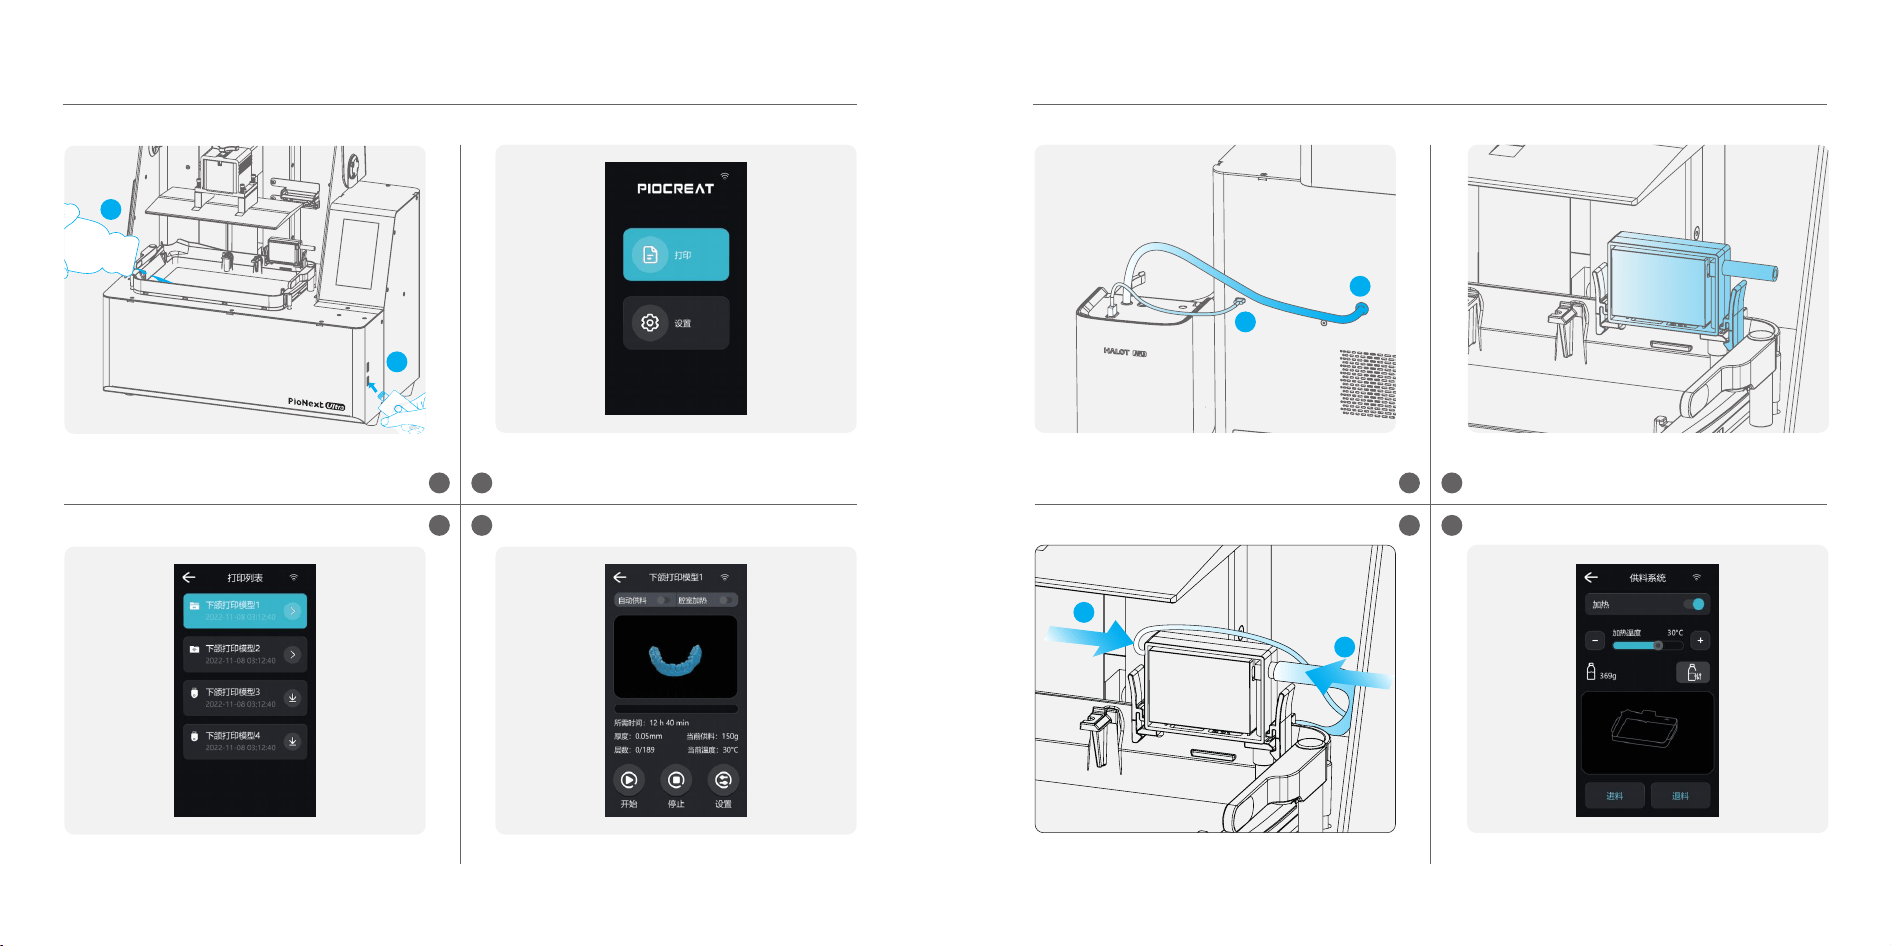
Tap “Print” on the home page.
Click "Start" to start the first print.
A. Fill the resin vat.
B. Insert the included USB drive.
Select the pre-sliced file stored in the device.
First Printing
� �
� �
�
A
B
Connect AFU
�
Remove the detection module and install it into
the fixed position on the material tank.
Press down until the buckle makes a "click" sound.
Click "Settings" → "Feeding System" on the main interface.
If you can successfully access the "Feeding System",
it indicates that the AFU has been connected.
A. Plug one end of the AFU control cable into the I/O port.
B. Thread the feed hose through the AFU material
pipe through-hole.
A- Insert the control cable vertically into the connection
port of the detection module.
B- Insert the feed hose vertically into the feed port of
the detection module.
� �
� �
A
B
A
B
�
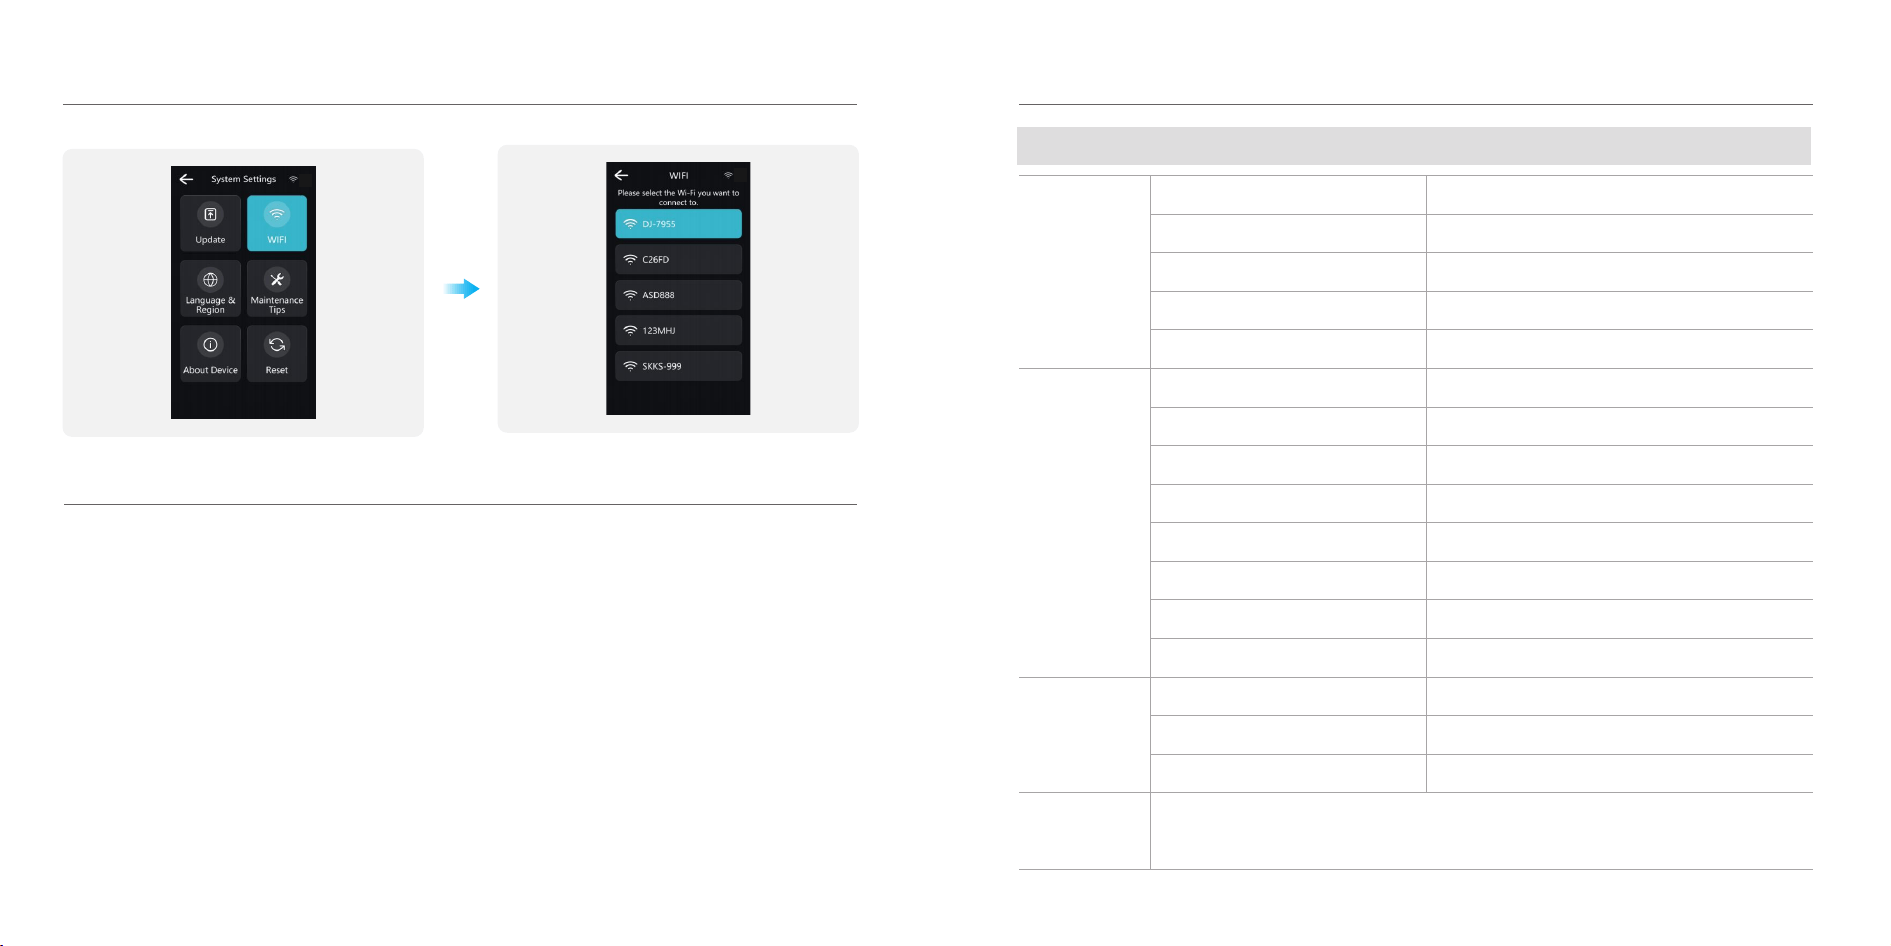
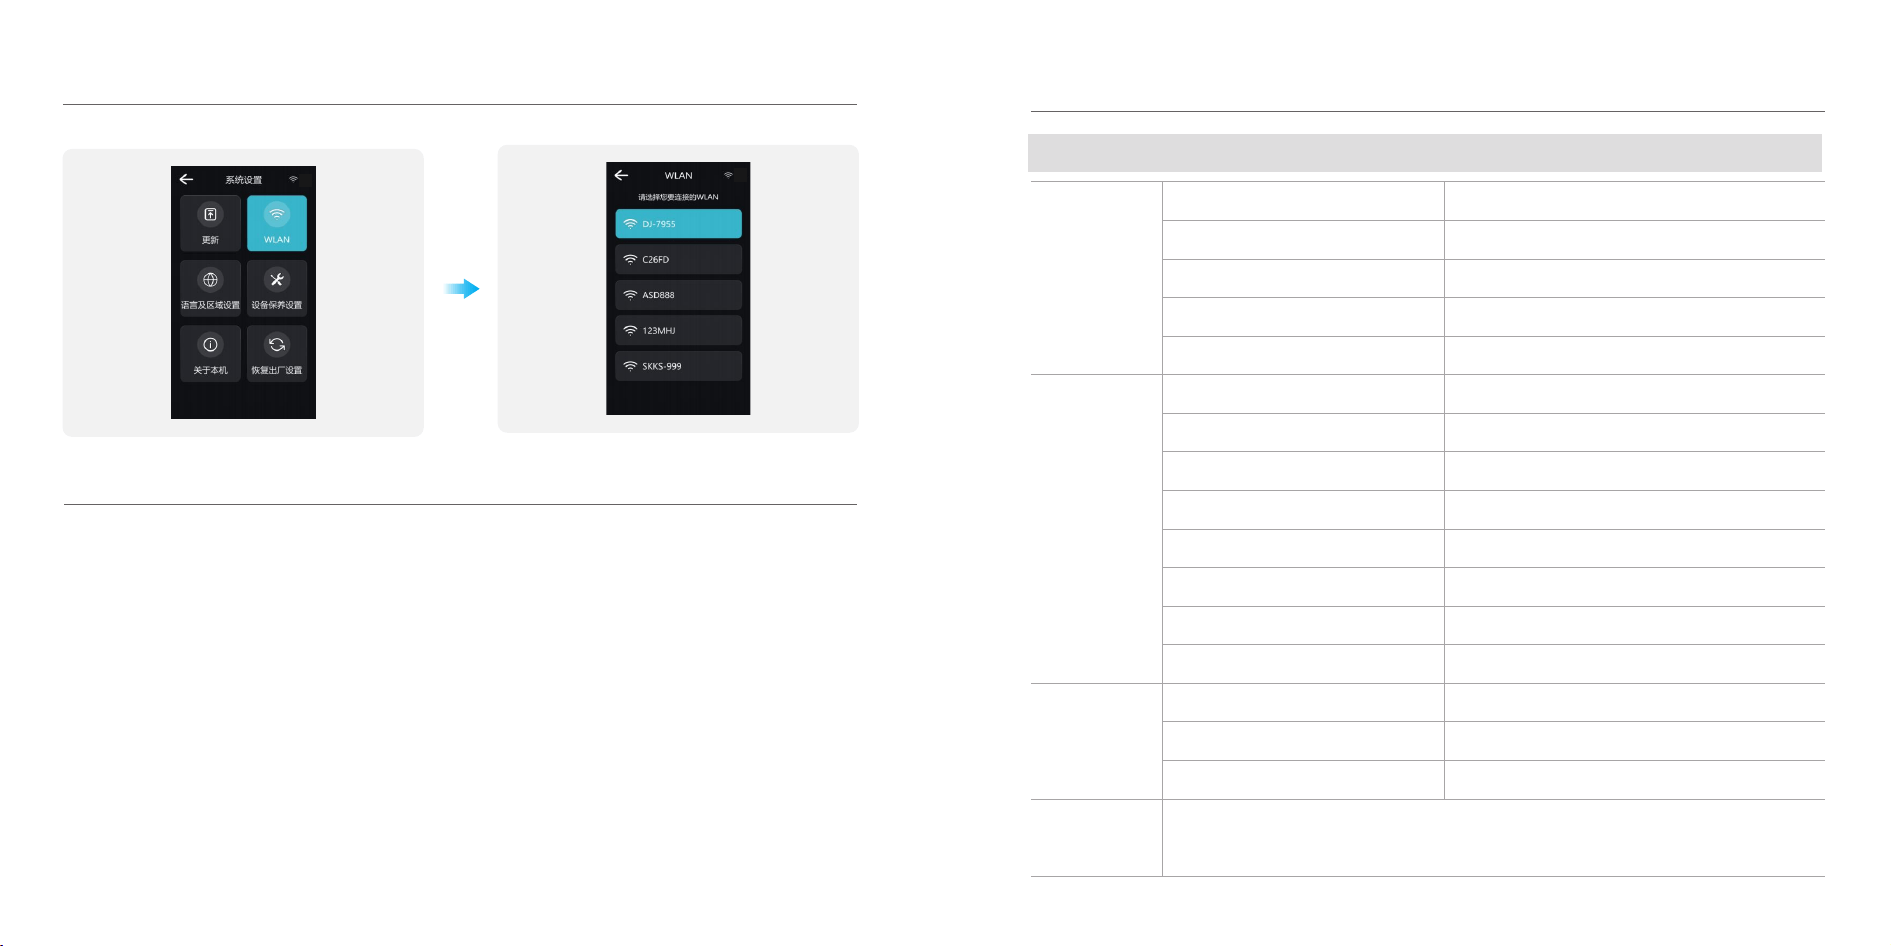
In the main interface of the device, go to “Settings” → “System Settings” → “Wi-Fi”,
select the Wi-Fi you want to connect to, and network the device.
Connect Device to Network & Install Software
Piocreat BOX
Download the installation package from www.piocreat�d.com
Read the installation package from a random USB flash drive.
Tips: This product supports CHITUBOX Dental. Contact customer service to receive a free �-month CHITUBOX Dental slicing software license.
�
Printing Size
Machine Size
Package Size
N.W.
G.W.
Printing Technology
Light Source Wavelength
Resolution
Pixel Size
Layer Thickness
Printing Speed
Touch Screen
Slicing Software
Data Transmission
Input Voltage
Power
Removable Die Model Resin / Ortho Model Resin / Ortho Model �.� Resin / Dental Casting
Resin / Surgical Guide Resin / Surgical Guide Pro Resin / Temporary Restoration Resin /
Denture Base Resin / Crown & Bridge Resin and other official authorized resin
Body
Parameters
Printing
Parameters
System
Parameters
Supported
Consumables
���.��mm���.��mm���mm
���mm���mm���mm
���mm���mm���mm
��.��kg
��.��kg
LCD
���nm、���nm
��K(�����*����px)
��*��μm
�.��-�.�mm
Max.��mm/h(�.�mm)
�-inch Capacitive Color Touch Screen
Piocreat BOX
USB/WIFI
���-���V~,��/��Hz
���W
PioNext Ultra Technical Specifications
PioNext Ultra
IC ID Requirement
This device contains licence-exempt transmitter(s)/receiver(s) that comply with Innovation, Science
and Economic Development Canada’s licence-exempt RSS(s). Operation is subject to the following
two conditions:
The device meets the exemption from the routine evaluation limits in section 6 of RSS ��� and
compliance with RSS-��� RF exposure, users can obtain Canadian information on RF exposure and
compliance.
This transmitter must not be co-located or operating in conjunction with any other antenna or
transmitter. This equipment should be installed and operated with a minimum distance of ��
centimeters between the radiator and your body.
This device may not cause interference;
This device must accept any interference, including interference that may cause undesired
operation of the device.
(�)
(�)
L'émetteur/récepteur exempt de licence contenu dans le présent appareil est conforme aux
CNR d'Innovation, Sciences et Développement économique Canada applicables aux appareils radio
exempts de licence. L'exploitation est autorisée aux deux conditions suivantes :
Le dispositif rencontre l'exemption des limites courantes d'évaluation dans la section 6 de RSS ���
etla conformité à l'exposition de RSS-��� rf, utilisateurs peut obtenir l'information canadienne
surl'exposition et la conformité de rf.
Cet émetteur ne doit pas être Co-placé ou ne fonctionnant en même temps qu'aucune autre antenne
ouémetteur. Cet équipement devrait être installé et actionné avec une distance minimum de ��
centimètres entre le radiateur et votre corps.
L'appareil ne doit pas produire de brouillage;
L'appareil doit accepter tout brouillage radioélectrique subi, même si le brouillage est susceptible
d'en compromettre le fonctionnement.
(�)
(�)
FCC Requirement
Any changes or modifications not expressly approved by the party responsible for compliance could
void the user’s authority to operate the equipment.
This device complies with Part �� of the FCC Rules. Operation is subject to the following two conditions:
Note: This equipment has been tested and found to comply with the limits for a Class B digital device,
pursuant to Part �� of the FCC Rules. These limits are designed to provide reasonable protection
against harmful interference in a residential installation. This equipment generates, uses, and can
radiate radio frequency energy, and if not installed and used in accordance with the instructions,
may cause harmful interference to radio communications. However, there is no guarantee that
interference will not occur in a particular installation. If this equipment does cause harmful
interference to radio or television reception, which can be determined by turning the equipment off
and on, the user is encouraged to try to correct the interference by one or more of the following
measures:
This equipment complies with FCC radiation exposure limits set forth for an uncontrolled
environment. This equipment should be installed and operated with a minimum distance of ��cm
between the radiator & your body. This transmitter must not be co-located or operating in
conjunction with any other antenna or transmitter.
This device may not cause harmful interference;
This device must accept any interference received, including interference that may cause
undesired operation.
Reorient or relocate the receiving antenna.
Increase the separation between the equipment and receiver.
Connect the equipment into an outlet on a circuit different from that to which the receiver is connected.
Consult the dealer or an experienced radio/TV technician for help
(�)
(�)
� �
�
遮光罩
测距模块支架(选配)
USB接口
测距模块(选配)
显示屏
电源接口
AFU料管通孔
平台手拧螺丝
料槽锁
成型平台
料槽
AFU接口
电源开关
部件介绍
*安全提示:请勿在打印机安装完成前通电
按照本指南操作, 轻松完成打印机安装及首次打印等基础操作
使用场景
本产品仅适用于室内
快速装机操作示意
开箱取出料槽防尘盖、电源线等配件,
取出顶部泡棉和机器右侧保护泡棉;
� 将遮光罩与底座间的无痕胶带撕掉,打开
遮光罩,取出机器内部所有泡棉;
�
连接电源线后开启设备开关,即可完成
开机操作。
�
�
Shenzhen PioCreat 3d Technology Co., Ltd.
3rd Floor, Building 1, No. 156 Huawang Road, Langkou Community,
Dalang Street, Longhua District, Shenzhen, China, 518109
Tel: +86 0755-2103 9743
Brand: PIOCREAT
Model: PioNext UltraProduct Name: 3D printer
Email: seice@piocreat3d.com
All trademarks are the sole propey of their respective companies
MEAS:60.6×37.6×58.5cm
所有商标均为其公司的专有财产
外箱尺寸:60.6×37.6×58.5cm
电话:0755-2103 9743
品牌:PIOCREAT
邮箱:seice@piocreat3d.com
执行标准: GB 4943.1
产品名称:3D打印机
型号:PioNext Ultra
深圳市创想三帝科技有限公司
中国深圳市龙华区大浪街道浪口社区华旺路156号1栋3层,518109
Shenzhen PioCreat 3d Technology Co., Ltd.
3rd Floor, Building 1, No. 156 Huawang Road, Langkou Community,
Dalang Street, Longhua District, Shenzhen, China, 518109
Tel: +86 0755-2103 9743
Brand: PIOCREAT
Model: PioNext UltraProduct Name: 3D printer
All trademarks are the sole propey of their respective companies
MEAS:60.6×37.6×58.5cm
所有商标均为其公司的专有财产
外箱尺寸:60.6×37.6×58.5cm
电话:0755-2103 9743
品牌:PIOCREAT
邮箱:seice@piocreat3d.com
执行标准: GB 4943.1
产品名称:3D打印机
型号:PioNext Ultra
深圳市创想三帝科技有限公司
中国深圳市龙华区大浪街道浪口社区华旺路156号1栋3层,518109
配件清单
�
塑料刮刀 ×�
快速入门指南 ×�合格证 ×� 售后服务卡 ×�
油漆刷 ×�
料槽 ×�
金属铲刀 ×�
料槽防尘盖 ×�打印平台×�
润滑脂 ×�
电源线 ×�
校准卡片×�
内六角扳手工具包 ×�
H�.�
H�.�
H�.�
H�.�
橡胶手套 ×�U盘 ×� 纸滤网 ×�
Calibration Card
校准卡片
连接AFU
�
将检测模块从支架上取下,安装到料槽固定位上,
向下按压直至卡扣发出"咔嗒"声。
主界面点击“设置”→“供料系统”
能够进入“供料系统”即已接入AFU。
A. AFU控制线一端接入I/O接口;
B. 将进料软管穿过AFU料管通孔;
A-将控制线垂直插入检测模块接线口;
B-将进料软管垂直插入检测模块进料口;
� �
� �
A
B
A
B
主界面点击“打印”;
点击“开始”,即可开始首次打印。
A. 料槽内加入树脂; B. 插入随机U盘;
选择本地存储内置已切片好的文件;
首次打印
� �
� �
�
A
B
�
成型尺寸(长×宽×高)
机器尺寸
包装尺寸
机器净重
机器毛重
成型技术
光源波段
分辨率
像素尺寸
层厚
打印速度
触摸屏
切片软件
数据传输
输入电压
额定功率
修复模型、正畸模型、正畸模型�.�、牙科铸造、牙龈树脂、手术导板树脂、
手术导板树脂Pro、临时牙树脂、基托树脂、冠桥树脂及其他官方授权树脂
主体参数
打印参数
系统参数
支持耗材
���.��mm���.��mm���mm
���mm���mm���mm
���mm���mm���mm
��.��kg
��.��kg
LCD
���nm、���nm
��K(�����*����px)
��*��μm
�.��-�.�mm
Max.��mm/h(�.�mm层厚)
�吋电容式触摸彩屏
Piocreat BOX
USB/WIFI
���-���V~,��/��Hz
���W
PioNext Ultra 技术参数
PioNext Ultra
�
设备主界面进入“设置”→“系统设置”→“WLAN”中, 选择需要连接的WLAN,为设备联网;
设备联网、安装软件
Piocreat BOX
www.szcx�d.com官网下载安装包/
随机U盘读取安装包
温馨提示:本产品支持CHITUBOX Dental,联系客服可免费领取�个月CHITUBOX Dental切片软件授权