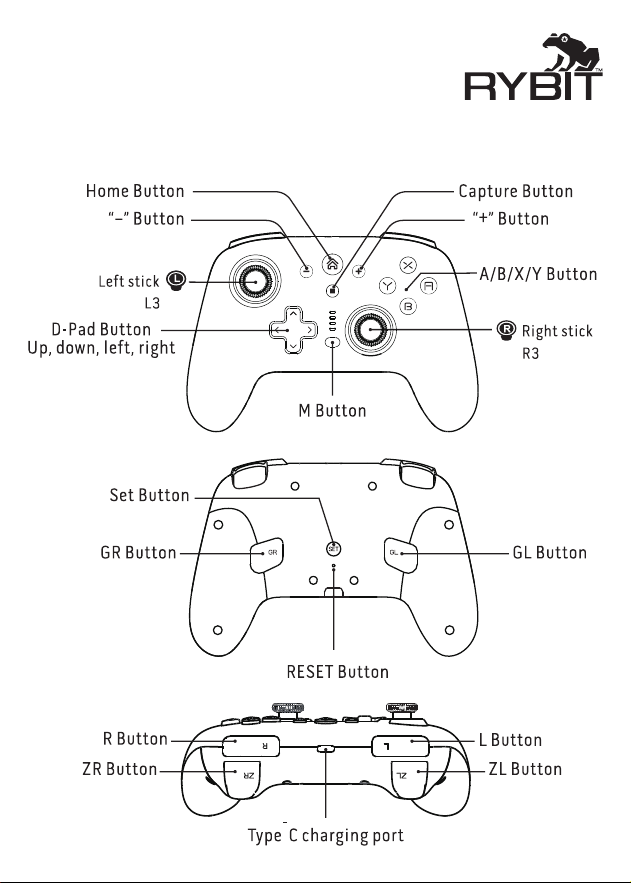
Pulse Glow Pro Wireless Controller
/ Pulse Pro Wireless Controller
for Nintendo Switch, Switch 2 & PC
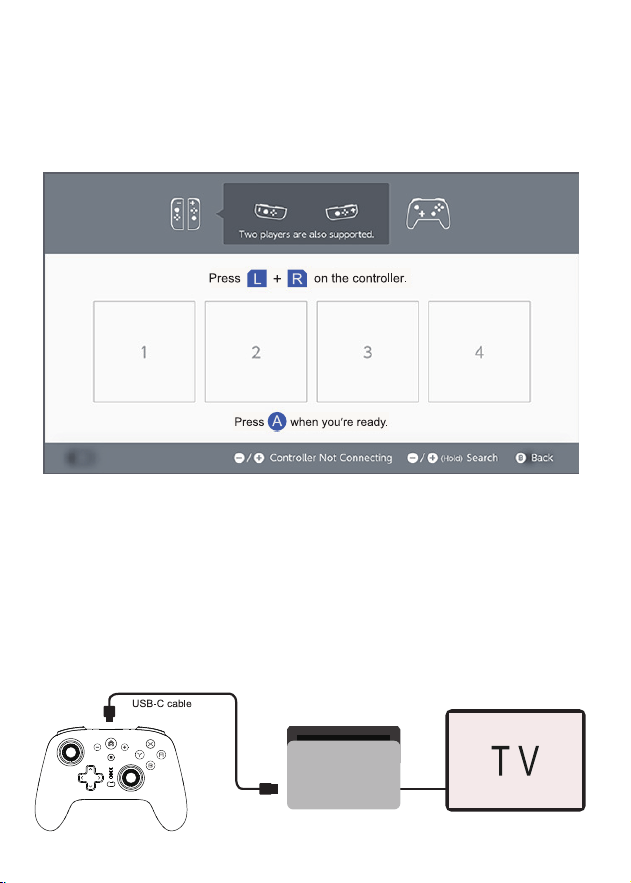
Connect to NS/OLED/NS 2 Console-Wireless Mode
Note: 1. Do not touch the stick while connected.
2. Turn o Airplane Mode in the console's system settings.
Step 1: On the Console home screen, click the "Controllers" option, then click the "Change Grip/Order"
option.
Step 2: Press and hold the Home button on the controller for 3–5 seconds, the indicator light changes
from a slow ash to a fast ash, and the controller will then automatically connect to the console.
Once the connection is established, the indicator light will remain on.
Connect to NS/OLED/NS 2 Console-Wired Mode
Joystick Light Settings
- Only applies to 26-S2WCRGB-RG-BLK
Connect to Windows
Note: Open the console's system settings, select and open "Controllers and Sensors" (or "Controllers and
Accessories") – "Pro Controller Wired Communication"
Place the game console into the dock, ensuring that the dock is plugged in and the console is not turned
o, then use the included charging cable (data cable) to connect the controller to the dock.
Once the connection is established, unplug the data cable, and the controller will switch to a wireless
connection.
Press the SET button on the back of the controller once to cycle through the lighting modes: Colorful,
Single Color, Slow Color Change, and O.
In single color mode, hold down the SET button and briey press the D-pad left or right to cycle
through colors. There are seven colors to choose from: red, orange, yellow, green, cyan, blue, and
purple.
Hold down the SET button and briey press the directional pad up or down to adjust the brightness.
There are three brightness levels: 30%, 60%, and 100%.
1.
2.
3.
To connect to Windows PC (wired mode): Power o the controller, connect it to your PC via USB cable
(default Xinput mode) — LED2 will ash during connection and remain steadily lit when fully charged.
To switch to Dinput mode,
press and hold "+" and "-" simultaneously for 5 seconds, then LED3 will light up (ashing) and stay
solidly on when fully charged.
To connect to Windows PC (wireless mode): Power o the controller, then press and hold R + HOME to
enter pairing mode (channel LED ashes rapidly), select "Xbox Wireless Controller" on your PC and click
Pair, and the connection is conrmed when LED2 remains solidly on.
Function Settings

Back Button Settings
Turbo Settings
The following buttons can be mapped to the GL/GR back buttons: A/B/X/Y/L/ZL/R/ZR/Left
stick/Right stick/D-pad (up, down, left, right).
Each back button can be assigned up to 16 button values, and the time intervals between them are
recorded.
Procedure: Hold down the GL (or GR) button and the M button simultaneously for 3 seconds until
the controller’s indicator light ashes. Then press the buttons you want to assign (e.g., A-B),
followed by a single press of the GL (or GR) button. The controller will vibrate once, indicating the
setup is complete (at this point, the GL (or GR) button functions as A-B).
Clearing the back button function: Press and hold the GL (or GR) button and the M button
simultaneously for 3 seconds until the controller’s indicator light ashes. Then, briey press the GL
(or GR) button to clear the GL (or GR) button.
1.
2.
3.
4.
The buttons that support turbo functionality are: A/B/X/Y/L/ZL/R/ZR.
Using the A button as an example, here are the steps:
Step 1: Simultaneously press and release the M and A buttons to activate manual turbo for the A
button. While holding down the A button, the controller will continuously and rapidly execute the A
function;
Step 2: Repeat the operation (simultaneously press and release the M and A buttons) to activate
automatic turbo. You do not need to hold down the A button; the controller will automatically and
continuously execute the A function;
Step 3: Repeat the operation once more to disable the turbo function.
1.
2.
Turbo Speed Adjustment: Hold down the M button and push the left stick to the left once to
decrease the speed by one level; hold down the M button and push the left stick to the right once
to increase the speed by one level. There are three speed levels: Low (5 pulses per second), Medium
(12 pulses per second), and High (20 pulses per second).
The GL and GR button can be used in combination with the M button to enable cyclic output:
Suppose the GL button has been programmed with the A-B key value. If you briey press the M and
GL buttons simultaneously, the system will automatically cycle through A/B/A/B/A/B…… .
Pressing the M and GL buttons simultaneously again will cancel the cyclic output.
Press the M button and the Capture button at the same time to clear all turbo settings.
3.
4.
5.

Summary of Troubleshooting Methods
Solution for can’t connecting to the NS console
Make sure the controller has enough power.
Use the data cable to connect the controller for the rst time.
The bluetooth signal may be blocked or interfered(For example, there are too many wireless
devices nearby), you can try again elsewhere (leave away from the spot to a distance about 30ft) or
at other times.
Clear the connected devices on the console. Steps: Open "System Settings - Controllers and Sensors
- Disconnect Controllers", then press and hold the X button.
1.
2.
3.
4.
Solution for Joystick Stuck
6-Axis Gyroscope Calibbration
Joystick/Trigger Button Calibration
Controller Reset
If the six-axis gyroscope exhibits issues such as skew or drift, you can calibrate it using the Switch
console or the controller itself.
Here are the steps to calibrate the controller:
With the controller powered o, place it at on a level surface. Press and hold the B button, the -
button, and the Home button simultaneously.
Once the indicator light ashes, press the + button once. Wait one or two seconds to complete the
calibration.
You can try to push the stick to the center position, and press down the stick vertically from the top of
the stick.
Here’s how to calibrate the joysticks and trigger buttons if they’re malfunctioning:
With the controller turned o, press and hold the - button, the + button, and the Home button simultaneous-
ly. Once the indicator light ashes, slowly press the ZL and ZR buttons two or three times, then slowly rotate
the left and right joysticks two or three times. Finally, briey press the - button once to complete the
calibration.
If the controller freezes or experiences other malfunctions during use and cannot be turned o, use a
paperclip or other thin, rigid object to press the RESET button on the back of the controller. A click
indicates that the reset has been completed.

Legal Notices
FCC Information
This device complies with part 15 of the FCC Rules. Operation is subject to the following two
conditions: (1) This device may not cause harmful interference, and (2) this device must accept any
interference received, including interference that may cause undesired operation.
Warning
compliance could void the user’s authority to operate the equipment.
: Changes or modications to this unit not expressly approved by the party responsible for
Note: This equipment has been tested and found to comply with the limits for a Class B digital device,
pursuant to Part 15 of the FCC Rules. These limits are designed to provide reasonable protection
against harmful interference in a residential installation. This equipment generates, uses and can
radiate radio frequency energy and, if not installed and used in accordance with the instructions, may
cause harmful interference to radio communications. However, there is no guarantee that interferen
ce
will not occur in a particular installation. If this equipment does cause harmful interference to radio or
encouraged to try to correct the interference by one or more of the following measures:
- Reorient or relocate the receiving antenna.
- Increase the separation between the equipment and receiver.
- Consult the dealer or an experienced radio/TV technician for help.
The device has been evaluated to meet general RF exposure requirement. The device can be used in
portable exposure condition without restriction.
FCC ID: WP8-26-S2WCRGB
- Connect the equipment into an outlet on a circuit dierent from that to which the receiver is connected.
television reception, which can be determined by turning the equipment o and on, the user is
This product is not approved, endorsed or aliated with Nintendo.
© 2026 RYBIT. All rights reserved.
Made in China
Restore Factory Settings
When the controller is connected to the console, press and hold the left and right sticks (L3 and R3)
simultaneously for 5 seconds. The controller will vibrate once, and all settings will be restored to their
factory defaults.