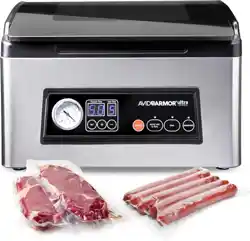
CHAMBER VACUUM SEALER
USER MANUAL
MODEL: USVX
processing fresh . . . eld to sealed!
ultra
X

1
Table of Contents
IMPORTANT SAFEGUARDS
When using electrical appliance, basic safety precautions should always be
followed including the following:
1. Carefully read all of the instructions before using this appliance and save
for future reference.
2. Unplug from outlet when not in use, before removing or putting on any
parts, and before cleaning.
3. To protect against the risk of electrical shock, do not put appliance in water
or other liquids.
4. This appliance is not a toy, and not intended for use by children without
adult supervision. Always ensure appliance is stored in a safe place, out of
reach of children.
5. Do not use any bags or attachments not recommended and do not use
this appliance for any other purpose than its intended use.
6. If the power cord is damaged, immediately stop using the appliance.
It must be replaced by the manufacturer, its service agent or similarly
qualified persons in order to avoid a hazard.
7. Keep away from moving parts.
8. Keep hands away from the the hot sealing element located on the top
edge of the machine’s lid. It can become very hot and may burn skin on
contact.
9. Do not try to repair this appliance by yourself.
10. Do not use the appliance if it has fallen or appears to be damaged.
11. Avoid doing the following: pull or carry by the cord, use cord as a handle,
close a door on cord, or pull cord around sharp edges or corners. Do not
operate appliance if the cord or plug is wet.
12. Keep away from hot ovens, electric burners or any other hot surface. Do
not use this appliance on wet or hot surface or near a heat source.
Important Safeguards ....................................................................................................... 1-2
Features ................................................................................................................................3-4
Vacuum Packaging Guidelines ..........................................................................................5
General Chamber Vacuum Packing Instructions..........................................................5
Set Vacuum Level ..................................................................................................................6
Set Seal Time ..........................................................................................................................6
Operating Instructions .....................................................................................................7-8
Marinating ................................................................................................................................8
Vacuum Sealing an External Canister ..............................................................................9
Cleaning & Maintenance ...................................................................................................10
Troubleshooting ................................................................................................................... 11
Notes ................................................................................................................................12-14
Warranty ............................................................................................................................Back

13. It is recommended to not use an extension cord with this appliance.
However, if one is used, it must have a rating equal to or exceeding the
rating of this appliance.
14. Disconnect to avoid any injury, unplug by grasping the plug, not the cord.
15. Before plugging appliance in or operating, make sure your hands are
thoroughly dry.
16. When powered “ON”, appliance must always be on a flat, stable surface,
such as table or counter.
17. There is no need to use any oil or water on this appliance.
18. Do not immerse any part of this appliance, power cord, or plug in water or
any other liquid.
19. Do not use this appliance outdoors or on a wet surface, it’s recommended
for household, indoor use only.
20. This appliance is not intended for use by persons, including children with
reduced physical, sensory or mental capabilities or lack of experience
and knowledge, unless they are being supervised or given instruction or
instruction concerning use of the appliance by a person responsible for
their safety.
21. Children should be supervised to ensure that they do not play with the
appliance.
22. Cleaning and user maintenance should only be performed by adults or
authorized service agents.
2
SAVE THESE INSTRUCTIONS
FOR HOUSEHOLD USE ONLY

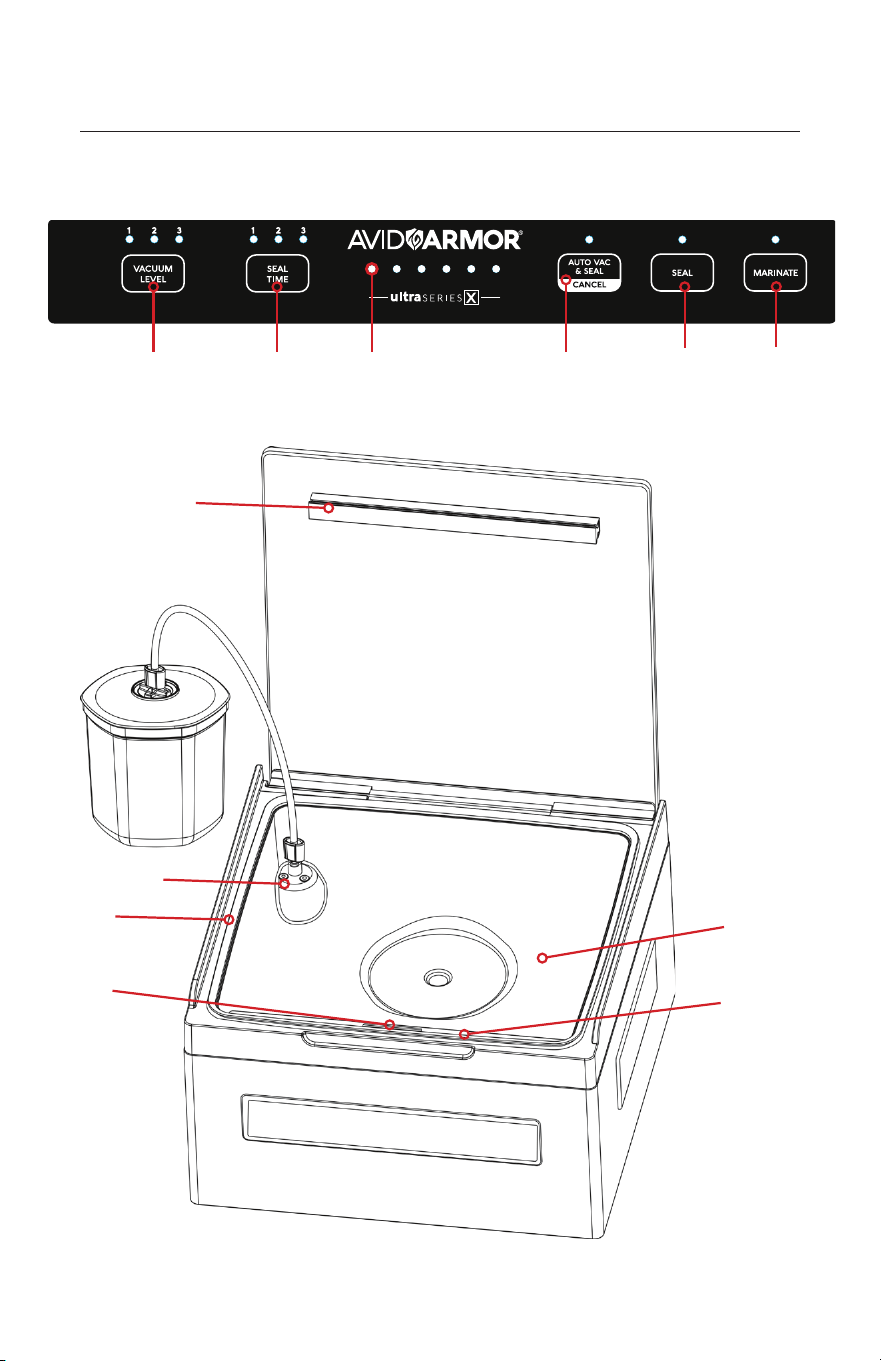
Features
3
1. Vacuum Level: Three settings for selecting desired vacuum level:
1 - For delicate items or items requiring minimal vacuum
2 - For dry items requiring a standard vacuum level
3 - For high moisture items or items requiring maximum vacuum
2. Seal Time: Three settings for selecting the desired seal time:
1 - For standard 3-4 mil chamber vacuum pouches
2 - For thicker 5-7 mil chamber vacuum pouches
3 - For mylar or similar vacuum pouches
3. Progress Lights: Displays progress of vacuum and sealing cycles.
4. Auto Vac & Seal / Cancel: This button provides three functions:
• Vacuum & Seal Cycle: Starts the default vacuum and seal cycle. Pouch is
automatically sealed once vacuum cycle is complete.
• Accessory Function: Press and hold for two seconds to vacuum an
external canister using the accessory port.
• Cancel Operation: Press to interupt and stop during the vacuum or
sealing cycle.
5. Seal: This button provides two functions:
• Use to seal open end of pouch when making pouch from a roll. The
sealer will begin vacuuming for approximately six seconds in order for the
seal bar to operate properly.
• To avoid crushing delicate item or to prevent liquids from overflowing in
chamber: When the ‘Auto Vac & Seal” function is in progress, press “Seal”
to immediately interupt the vacuum cycle and start the pouch sealing
cycle.
6. Marinate: Two automatic marinating cycles with no seal.
• Use this function to quickly penetrate food with wet marinades or dry
rubs. When food is under vacuum, it helps open pores to create
maximum infusion.
7. Seal Pad: Works with the seal bar to heat seal pouch during sealing cycle.
8. Vacuum / Accessory Port: Removes air from chamber during vacuum cycle.
Also, for use with external vacuum canisters.
9. Gasket: Ensures a tight seal between chamber and lid. Clean and dry or
replace when it becomes distorted or broken.
10. Pouch Clamp: Holds the opening of the pouch in place during the vacuum
and sealing cycles.
11. Seal Bar: Teflon-coated heating element which becomes hot and seals the
pouch during the sealing cycle. Clean and dry or replace when it becomes
distorted or broken.
12. Vacuum Sealer Chamber: Where pouch and food items are placed during
the vacuum and seal cycle.
Features
4
1
3
4
Control Panel
2
5
6
9
11
7
12
8
10

5
General Chamber Vacuum Packing Instructions
1. Always remove extra air out of the bag before closing the lid and starting
the vacuum pump.
2. Always place the open end of the pouch flat and smooth across the seal
bar and ensure there are no wrinkles.
3. The more ‘air’ that is in the chamber, a higher vacuum level will be
necessary. The more ‘product’ that occupies the chamber, a lower
vacuum level will be required.
4. To create a tighter package, increase the vacuum level or add filler to the
chamber.
5. For best marinating eects, repeat the marinating cycle 2 to 3 times.
6. Always check the heat seal to ensure it is clear, flat, evenly melted.
Increase seal time by one level if the seal is spotty. Reduce seal time by
one level if the seal is overly melted, has bubbles, or appears milky.
Vacuum Packaging Guidelines
• Follow all food safety regulations as outlined by the FDA at
www.FDA.gov.
• Vacuum packaging is NOT a substitute for canning.
• Vacuum packaging cannot reverse the deterioration of foods.
• Vacuum packaging is NOT a substitute for refrigeration or freezing.
• Some fruits and vegetables may release gases, known as outgassing.
When packaging these fruits and vegetables, outgassing can cause the
vacuum to be gradually lost over time. Blanching or freezing before
vacuum packaging helps prevent this from occurring.
NOTE: Due to the risk of anaerobic bacteria, soft cheeses, fresh mushrooms,
garlic and onions should never be vacuum packaged.
• It is critical that food handling and storage are maintained at low
temperatures. You can reduce the growth of microorganisms
at temperatures of 40°F or less (4°C). Freezing at 0°F will not kill
microorganisms, but reduces the chances of them growing. For long-
term food storage, always freeze foods that have been vacuumed
packaged.
NOTE: Beef and other proteins may look darker after being vacuum packaged.
This is due to the removal of oxygen and is not an indication
of spoilage.

6
Set Seal Time
Set Vacuum Time
Press “Vacuum Level” to activate vacuum level options. LED indicator light will
illuminate selected vacuum level.
NOTE: The following vacuum levels are only recommendations. It is always
best to test your product to achieve desired vacuum level.
Vacuum
Level
Applications Examples
1
Delicate items or
partial vacuum
Chips, muns, breads, etc.
2
Dry food items or
standard vacuum
Beans, rice, coee, flour, etc.
3
High moisture items
& liquids or maximum
vacuum
Beef, pork, fish, fruits & vegetables,
soups, stews, marinades, etc.
Press “Seal Time” to activate seal time options. LED indicator light will illuminate
selected seal time.
Seal
Time
Applications
1 For standard 3-4 mil chamber vacuum pouches
2 For thicker 5-7 mil chamber vacuum pouches
3 For mylar or similar type vacuum pouches
NOTE: The following seal times are only recommendations. It is always
best to test your product to achieve a proper heat seal.

Operating Instructions
7
1. Put the items inside the pouch.
2. Clean and straighten the open end of the pouch and ensure that the open
end is clean and dry.
3. Open lid, place the bag in the chamber and lay the open end of the pouch
across the seal bar, securing the bottom panel of the pouch with the pouch
clamp. -- See Figure 1
4. Remove any extra air out of the pouch. This will help ensure a tight vacuum
sealed bag.
5. Check the control panel to confirm vacuum level and seal time settings are
correct according to the type of food and pouch.
6. Close the lid, press the “Auto Vac & Seal” button, then press down on lid
until it draws down. The automatic vacuum and seal cycle will begin. The
LED progress lights will display the progress of the vacuum and seal cycles.
7. When the indicator LED lights turn o, the cycle is finished.
8. Lift the lid to open and remove the vacuum sealed pouch.
Creating a ‘Seal Only’ on a Pouch
A pouch may be sealed with slight vacuum. Place the pouch in the vacuum
chamber as usual, ensuring the pouch is laid flat and smooth across the seal
bar, then press ‘SEAL’.
NOTE:
• When vacuum sealing liquids, ensure that the bag is filled no more than
1/3 to 1/2 way to prevent liquids from overflowing into the chamber.
• When vacuum sealing solids, leave three inches of headspace to
ensure a positive seal.
NOTE:
• The machine can be used continuously, but for best results, allow to
cool down for one minute between cycles.
• If any food or liquid is spilled, ensure that the chamber area is clean
prior to running another vacuum cycle.
NOTE:
• The sealer does have to pull a very short vacuum for the seal bar to
properly work. If the ‘Seal Only’ function does not provide satisfactory
results, the pouch can be sealed from the outside of the chamber. To
do this, place the pouch over the seal bar with the remainder hanging
ouside the chamber.

8
FIGURE 1
When placing the pouch
in the chamber, position
the bottom panel of
the pouch within the
pouch clamp and lower
to secure in place. If
pouch is not positioned
properly, it can prevent
air from being completely
removed from pouch.
Marinating
1. Place food items and marinade in a container or pouch.
2. Open the lid and place the container or pouch inside the chamber and
secure in place.
3. Close and hold down the lid, then press the “Marinate” button to start
the marinate cycle. The progress indicator lights will advance from 1
through 3, then the pump will stop and the vacuum will release. (Do
not open lid.) The second marinating cycle will begin automatically. The
progress lights will advance from 4 to 6. When the progress indicator
light turns o and the sealer beeps, the marinating cycles are complete.
4. For increased intensity, repeat step 3, up to three additional times.
5. Open lid and remove container or pouch from chamber.
NOTE:
• If the lid is opened in between the two continuous marinating cycles,
the sealer will go into error mode by beeping and flashing all LED lights,
and will reset to default settings.
• If using a pouch during the marinating cycle, the sealer will NOT seal
the bag.
The marinating function is used to quickly infuse foods. The chamber goes
under vacuum for a period of two continous marinating cycles.
Operating Instructions
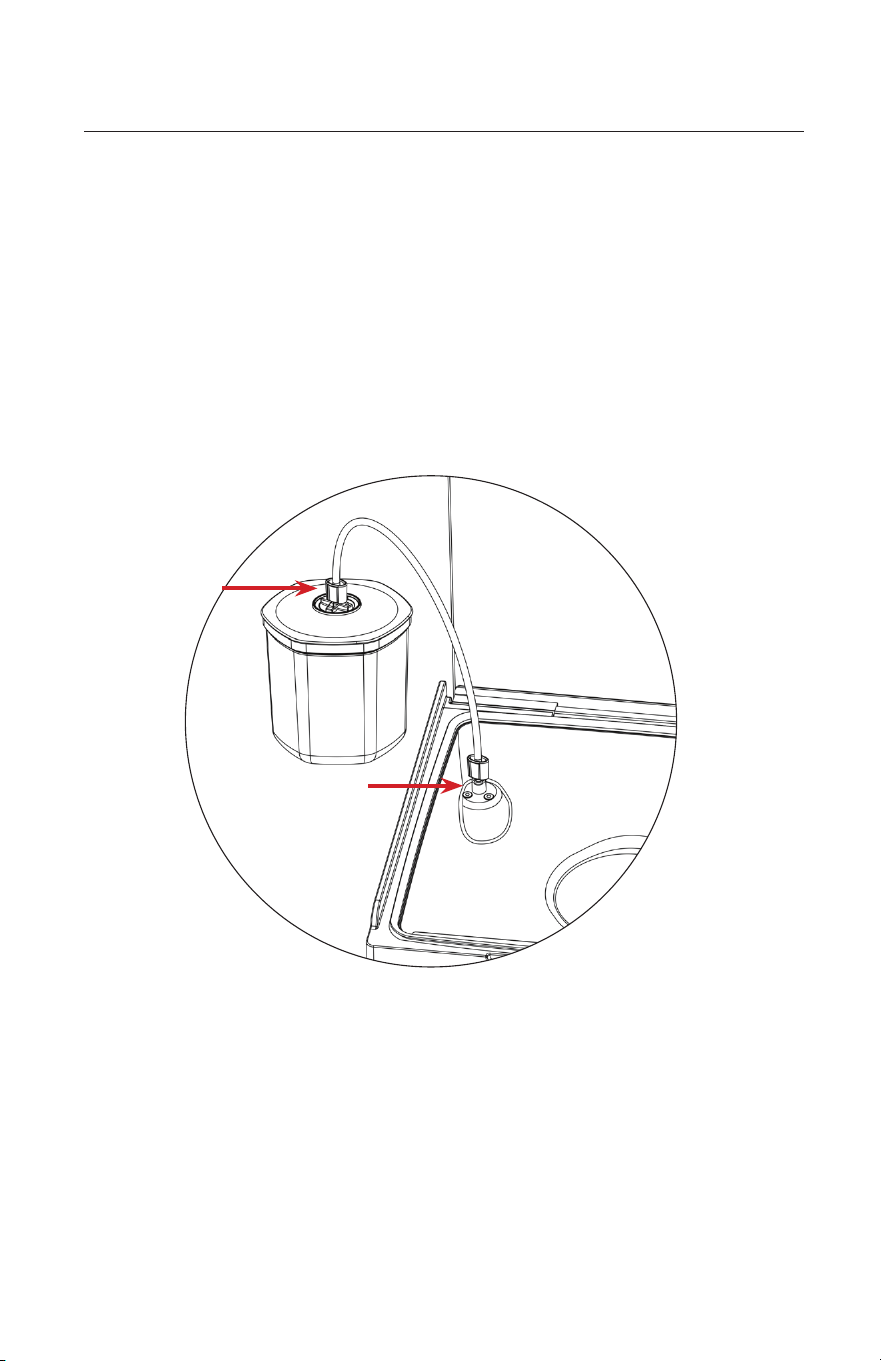
Vacuum Sealing External Canisters
9
1. Insert one end of the hose into the vacuum port and the other end of hose
into the center hole of canister lid. -- See Figure 2
2. Press and Hold the ‘Auto Vac & Seal’ button for two seconds to start the
vacuum cycle.
3. To ensure there is not any air leaking between the canister and lid, use your
hand to push down lid of the canister at the beginning of the vacuum cycle.
4. The sealer will automatically stop when the canister has reached adequate
vacuum pressure.
5. Remove the hose from the canister immediately after the cycle is
completed.
FIGURE 2

Cleaning and Maintenance
10
Chamber Vacuum Sealer
1. Always unplug the unit before cleaning.
2. Do not immerse in water or any other liquid.
3. Avoid using abrasive products or material to clean the unit, for they will
scratch the surface.
4. Use a mild dishwashing soap and a warm, damp cloth to wipe away
food residue around components.
5. Dry thoroughly before using again.
Storing Your Chamber Vacuum Sealer:
1. Store the machine in a flat and safe place, out of reach of children.
2. Always leave the lid in a closed position when storing. DO NOT stack
items on top of the lid or vacuum sealer. Extra weight on the lid can
cause the gasket to become compressed and the vacuum sealer may
not operate properly.

11
Troubleshooting
Problem Solutions
Sealer is vacuuming
well, but not creating
a seal.
Check if the sealing time is sucient.
If not, reset the sealing time.
Check if the seal bar is damaged and seal time properly
set. If damaged, replace the heating element and ensure it
is properly installed.
Check if the seal pad is damaged or installed properly.
If damaged, replace and make sure it is installed properly.
Check if the seal area of the pouch has any liquid or
moisture.
If yes, clean and dry the seal area and try again.
Sealer is not
vacuuming.
Check to ensure lid is closed tightly and forms seal with
lid gasket. If progress lights are illuminating, the sealer is
pulling a vacuum.
Check if the vacuum level is set high enough.
If not, increase the vacuum level.
Check to see if the food has any sharp edges. If yes, pack
any sharp edges with a bone protector sheet or double
bag the food item to prevent tears in pouch.
Check if the open end of the pouch is wet.
If yes, dry the opening of the pouch and try again.
Pouch inflates or does
not remove all air
while vacuum sealing.
Check to ensure that the opening of the pouch is not be-
ing pinched o during the vacuum cycle. This will cause
the pouch to excessively inflate or explode. Entire pouch
should remain inside the chamber.
Check to ensure food is room temperature when vacuum
sealing. High temperatures can create vapors, causing the
pouch to inflate excessively.
Check if the food is outgassing (letting o gas after
vacuum sealing). This will cause pouch to inflate or lose
vacuum. To prevent outgassing, immediately refrigerate
or freeze after vacuum sealing to slow down or stop the
outgassing.
The pouch melts
when sealed.
Check the seal time. Decrease seal time by one level
intervals until proper seal is achieved.

Notes
12

Notes
13

Notes
14

www.AvidArmor.com
Warranty
Avid Armor takes pride in the quality of our products and guarantees that
the vacuum sealer will be free from defects in material and workmanship
for one year following the purchase date. During this period, your exclusive
remedy is repair or replacement of this product or any component found
to be defective, at our discretion. Components including seal tape, seal bar,
gaskets, or any parts tampered or altered are NOT covered under the one
year warranty.
This warranty applies only to products purchased and used in the United
States, with a valid proof of purchase from an authorized seller.
To make a warranty claim: go to AvidArmor.com/contact. If the product
qualifies for warranty repair or replacement, we will bear the cost of all
shipping charges to and from our warehouse. (Only in the contiguous 48
states.) We are not responsible for shipping damage.
Before returning the product for any repair or service: it must be clean and
free from any food particles or other debris; otherwise, we will return it or
impose a $50 cleaning surcharge, at our discretion.
To register your warranty, go to www.AvidArmor.com and click on
“Product Registration”