
Technical Support and E-Warranty Certificate
www.vevor.com/support
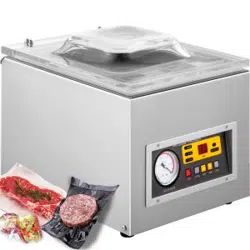
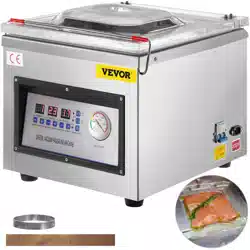
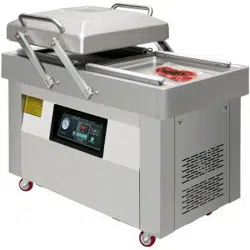
CONTINUOUS SEALING MACHINE
USER MANUAL
We continue to be committed to provide you tools with competitive price.
"Save Half", "Half Price" or any other similar expressions used by us only represents an
estimate of savings you might benefit from buying certain tools with us compared to the major
top brands and does not necessarily mean to cover all categories of tools offered by us. You
are kindly reminded to verify carefully when you are placing an order with us if you are
actually saving half in comparison with the top major brands.

- 1 -
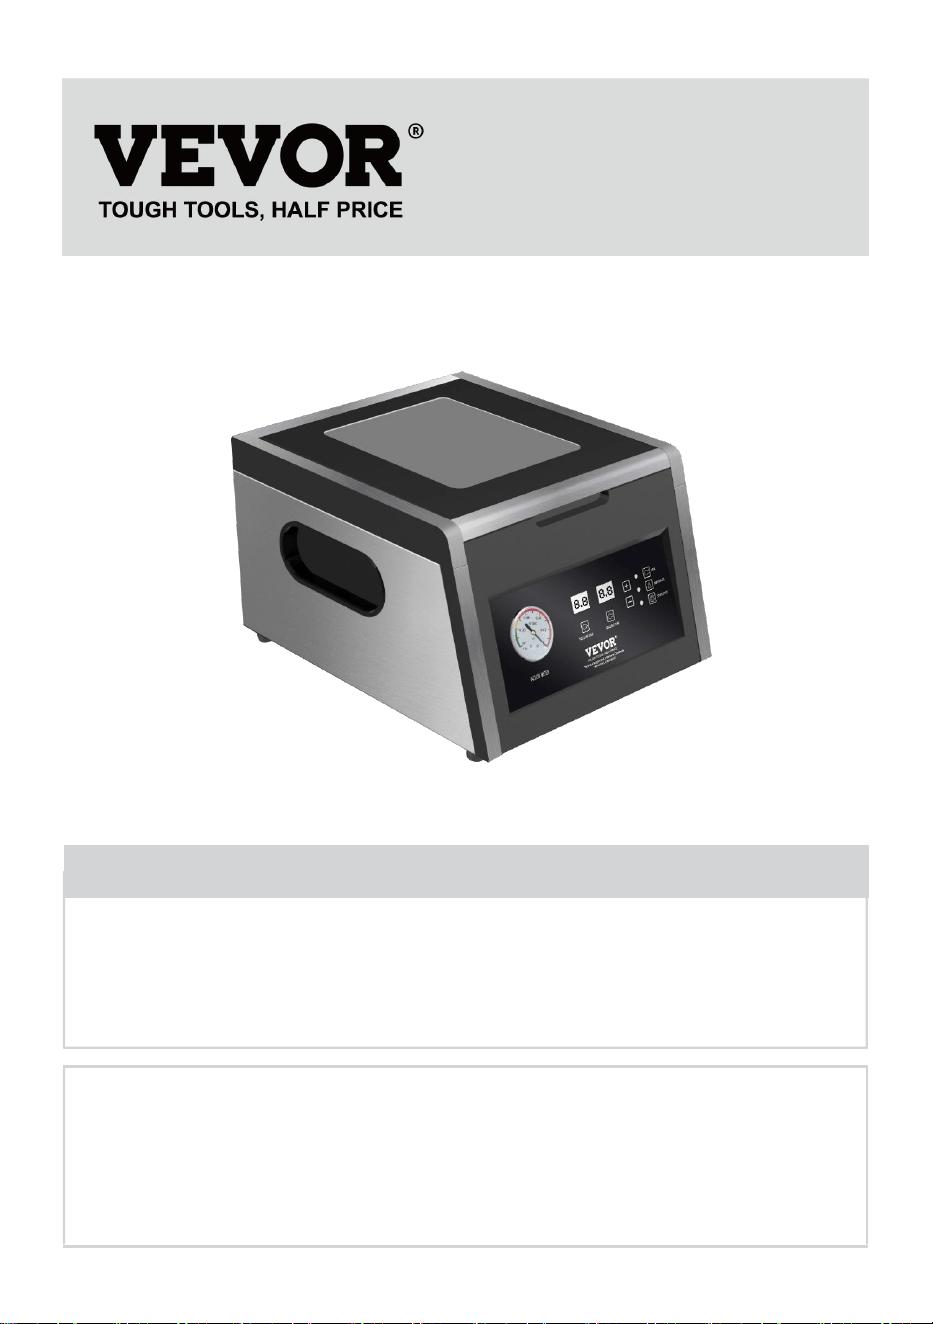
MODEL: YJ-300TV1 / YJ-300TV2 / YJ-300TV3 / YJ-260TV1 / YJ-260TV2 /
YJ-260TV3
(The picture is for reference only, please refer to the actual object)
Have product questions? Need technical support? Please feel free to
contact us:
Technical Support and E-Warranty Certificate
www.vevor.com/support
NEED HELP? CONTACT US!
This is the original instruction, please read all manual instructions
carefully before operating. VEVOR reserves a clear interpretation of our
user manual. The appearance of the product shall be subject to the
product you received. Please forgive us that we won't inform you again if
there are any technology or software updates on our product.
CONTINUOUS SEALING
MACHINE

- 2 -
SAFETY INSTRUCTION AND PRECAUTIONS
WARNING:
1. Read carefully and understand all ASSEMBLY AND OPERATION
INSTRUCTIONS before operating.
2. Failure to follow the safety rules and other basic safety precautions may
result in serious personal injury.
3. Keep clear explanations in our user manual. Product appearance
depends on the product you received. Please forgive us if there are any
technical or software updates to our products, and we will not notify you
again.
GENERAL SAFETY RULES
Please read the entire operating instructions before using the products for the first
time; They contain important information about the correct operation.
The guarantee/warranty will be void if damage is incurred resulting from
non-compliance with the operating instructions.Liability for any and all
consequential damage is excluded!
We do not assume any liability for damage to property or personal injury caused by
improper use or the failure to observe the safety instructions! In such cases the
guarantee/warranty will be void
The unauthorized conversion,modification of disassembly of the products is
inadmissible because of safety and approval reasons (CE).
The product is not a toy and must be kept out of the reach of children.
Particular care must therefore be exercised if children are present.
The product must not get damp or wet,it is only intended for use in dry, indoor
locations(not bathrooms or similarly damp areas).There is a risk of a fatal electric
shock.

- 3 -
Do not expose the product or its accessories to damp or extremely high or low
temperatures.
Do not leave packing materials unattended.They may become dangerous playing
material for children.
Dropping,falling,pressure or tensile forces could destroy or at least limit the
function of the product.
Never position the device in the vicinity of combustible or easily inflammable
materials.
Always make sure that the rotary table on which the object is placed is located in
the center of the housing!
This machine is suitable for plastic film sealing, bag making, can be widely
used in food, medicine, chemical industry, daily use, seed and other
industries.
This machine takes plastic film or plastic aluminum film as material, vacuum
packaging for paste food, fruit, sauce vegetables, chemical industry,
medicine, electronic components, precision instruments, rare metals and
other articles. The product after vacuum packaging is not easy to oxidize
and mold. Especially suitable for tea, food, medicine and other industries.
The sealing machine has the advantages of simple operation, beautiful
appearance and compact structure.
If you have reason to assume that safe operation is no longer
possible,disconnect the device immediately and secure it against inadvertent
operation.
It can be assumed that safe operation is no longer possible if:
- the device shows visible signs of damage,
- the device no longer functions,
- after a longer period of storage under unfavourable conditions,
- following heavy stress during transportation.
SAVE THESE INSTRUCTIONS
- 4 -
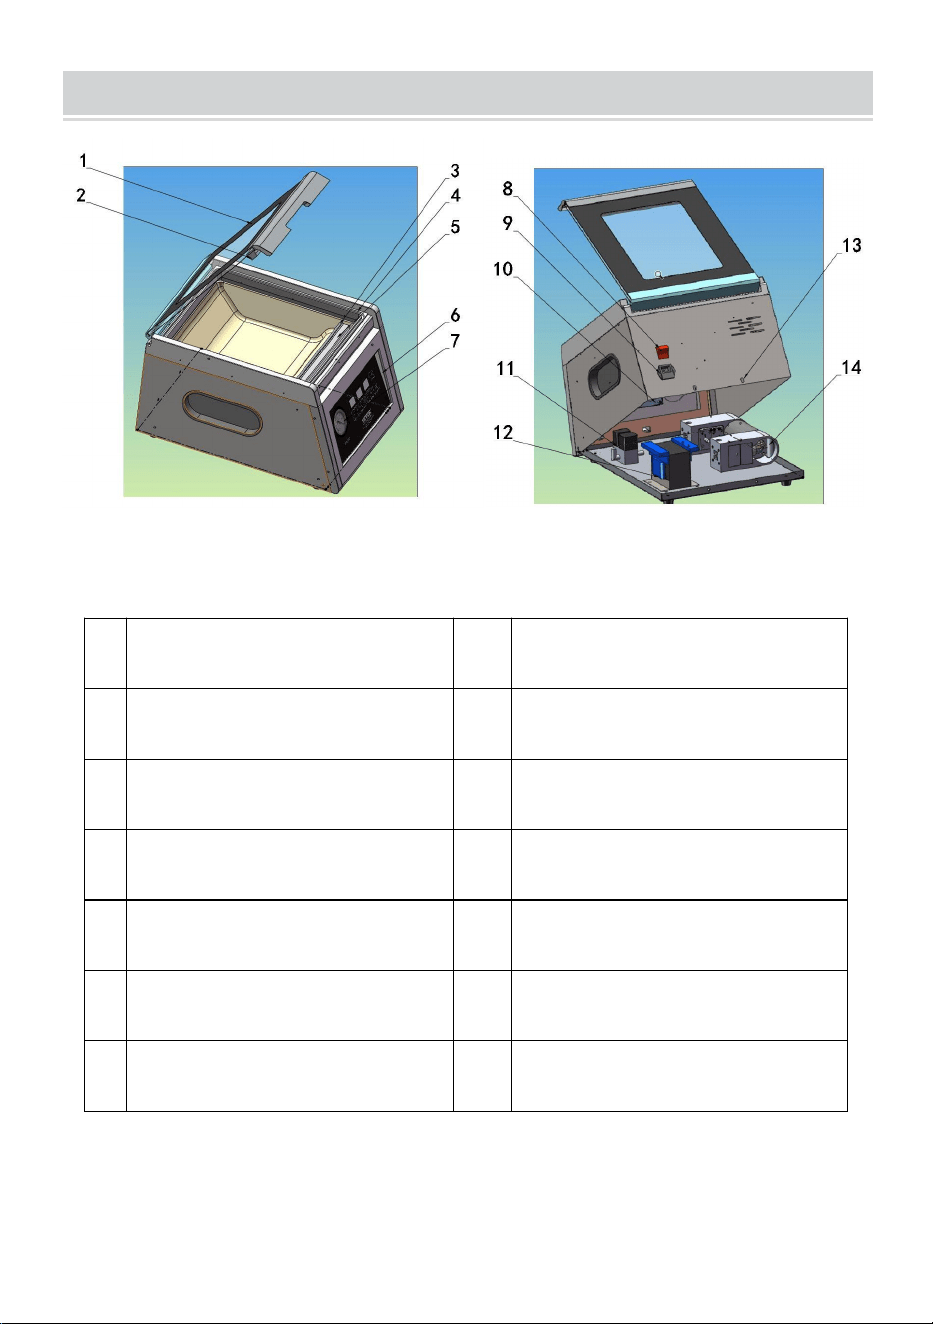
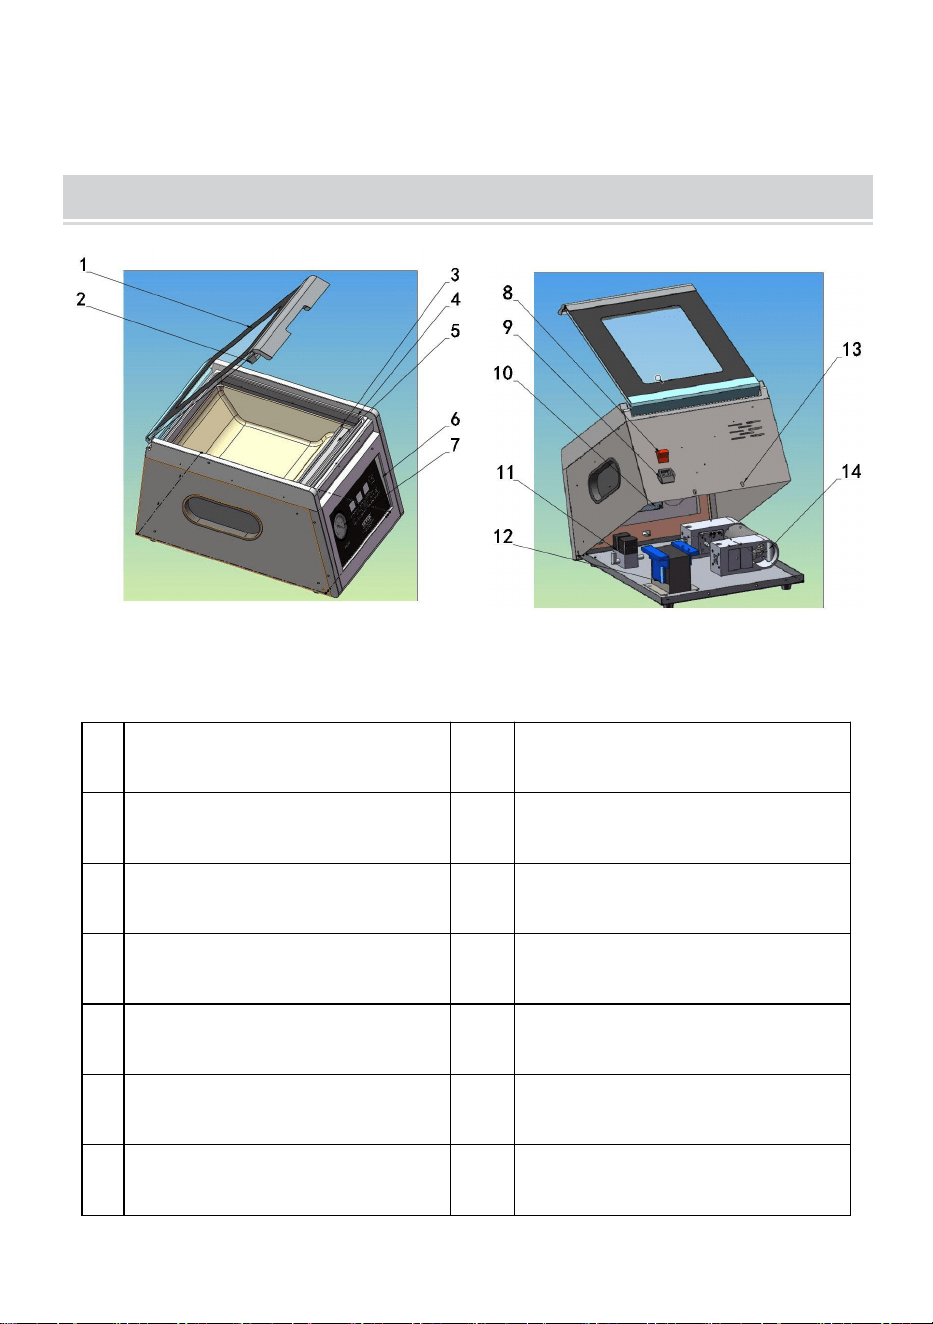
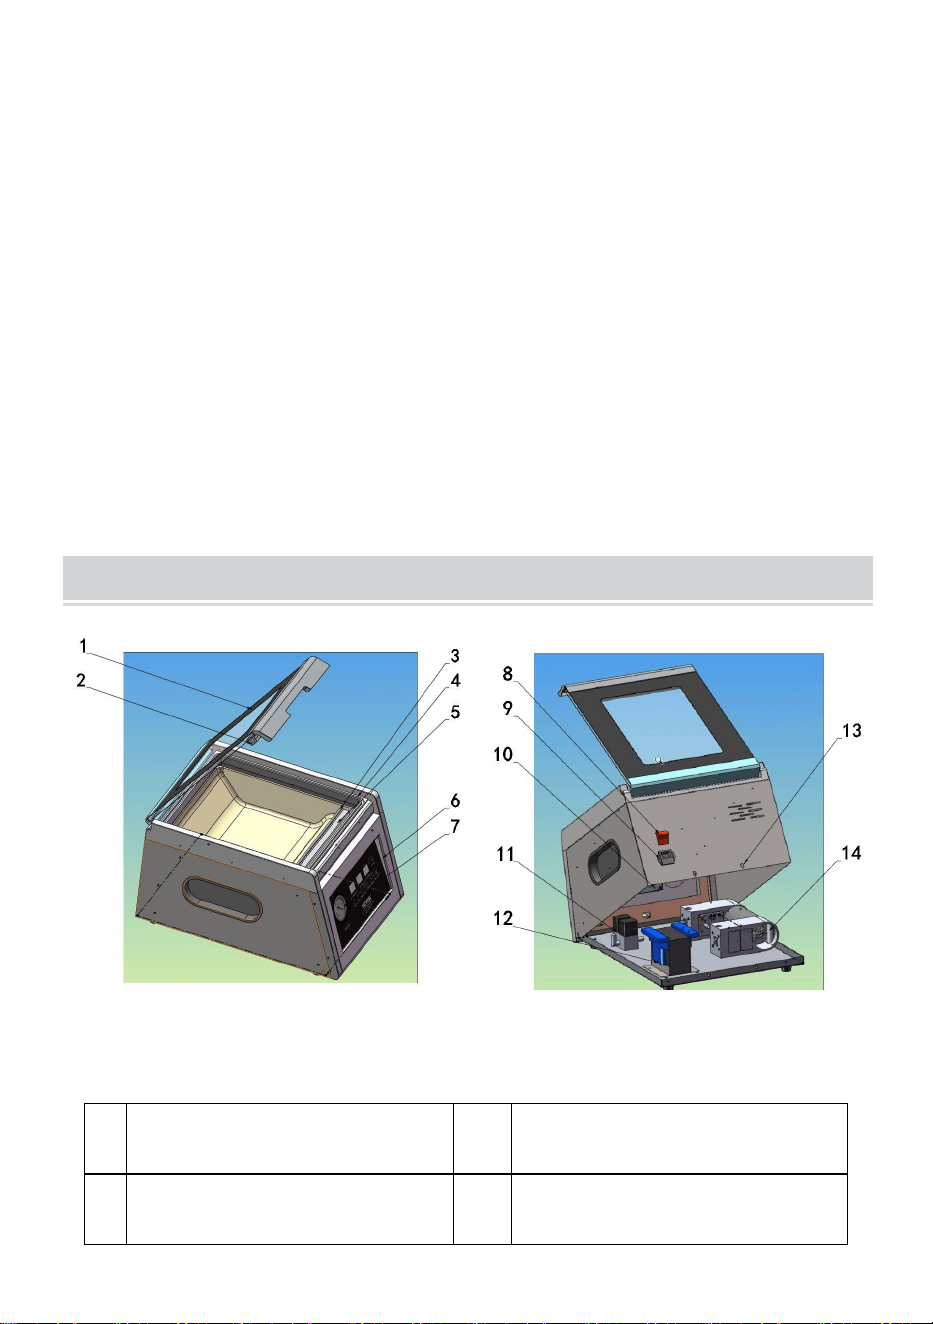
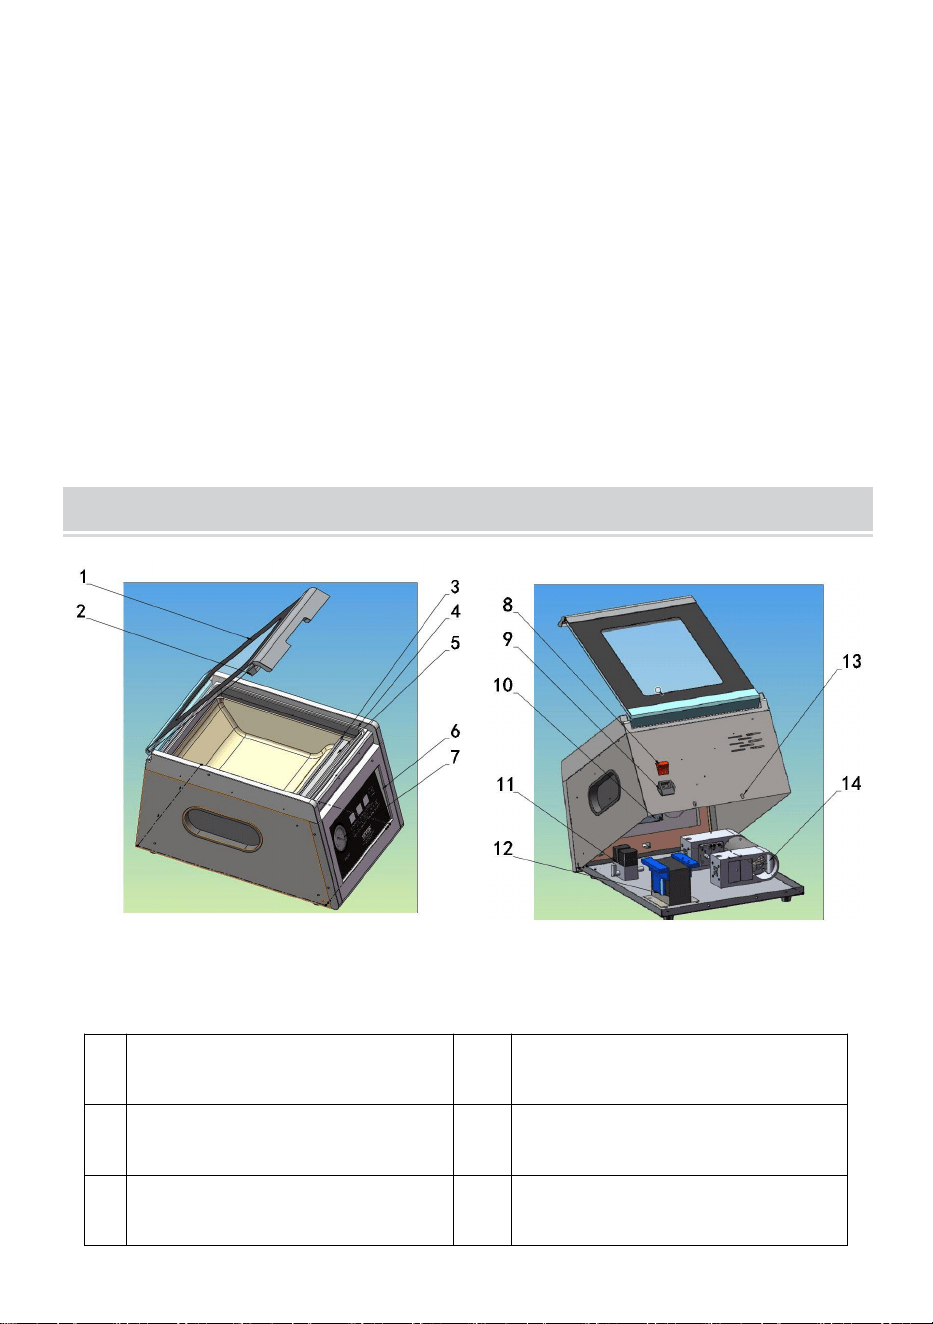
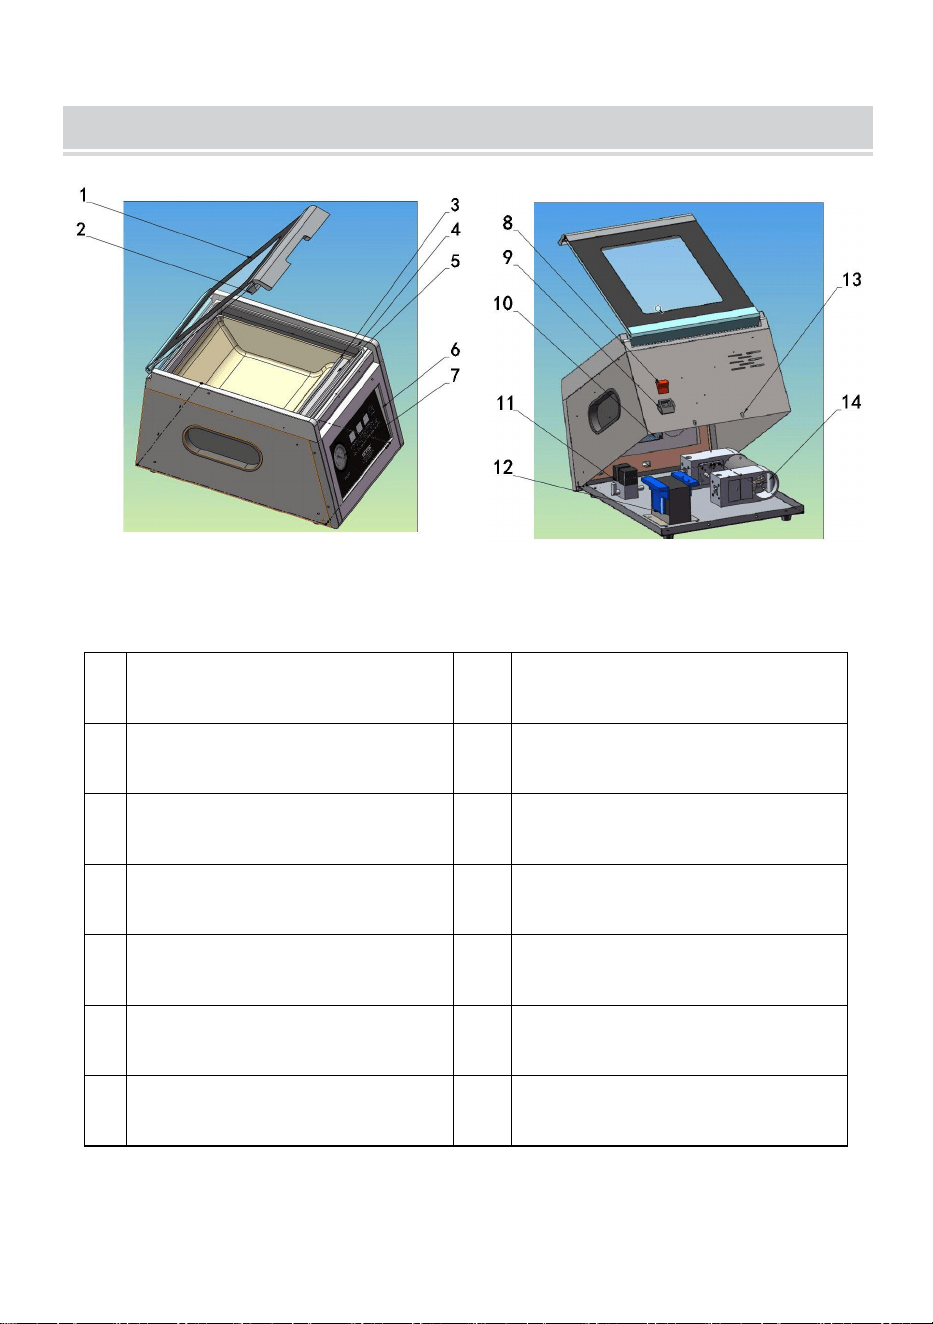
STRUCTURE DIAGRAM
1
Vacuum cap
8
Power switch
2
Silicone strip
9
Power plug
3
Bag press rod
10
Circuit board
4
Chamber seal strip
11
Solenoid valve
5
Heating strip
12
Heating transformer
6
indicator
13
Rear cover screw hole
7
Vacuum gauge
14
Vacuum pump
- 5 -
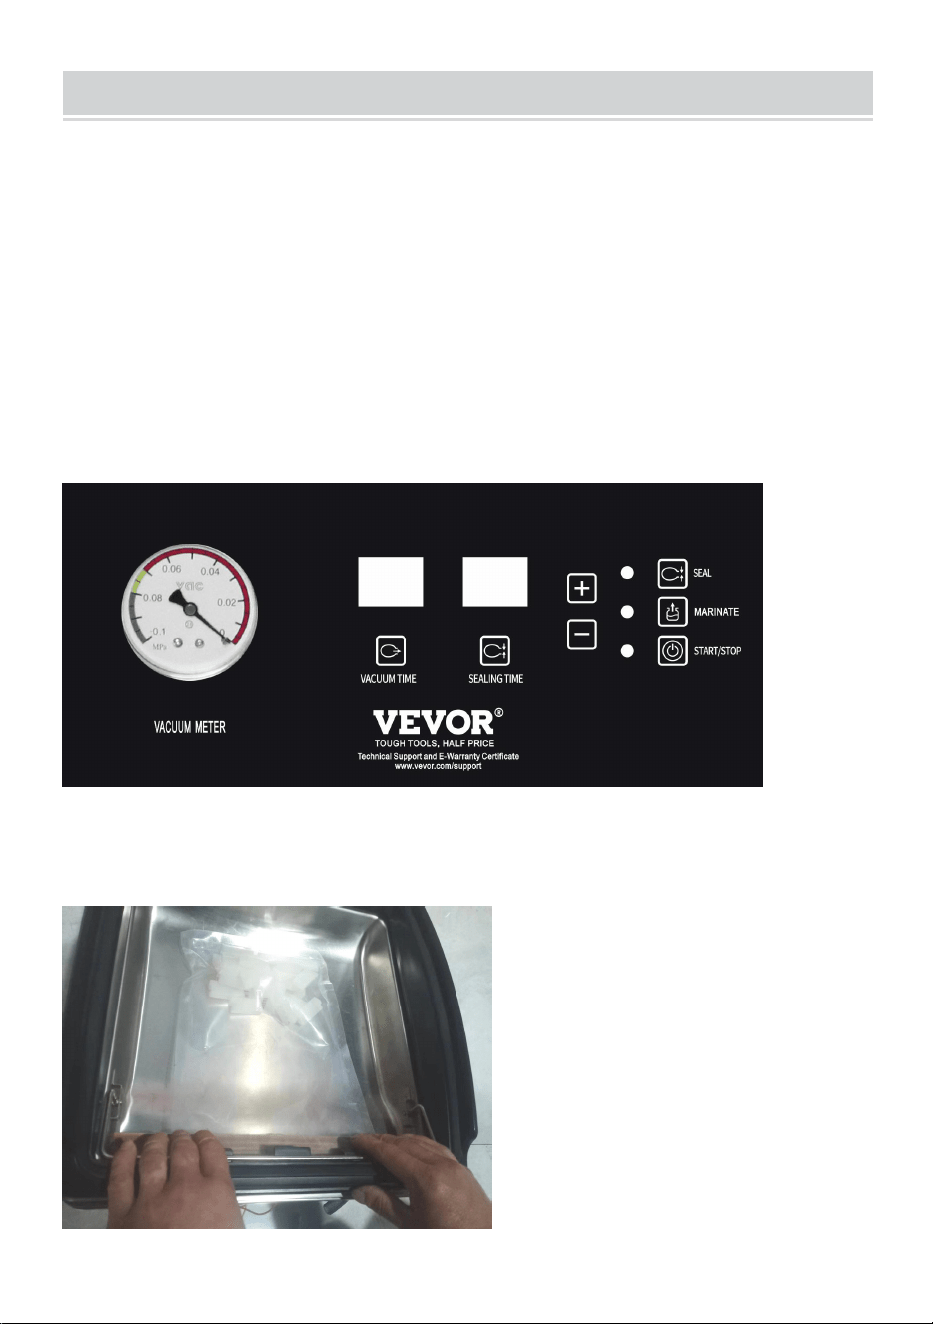
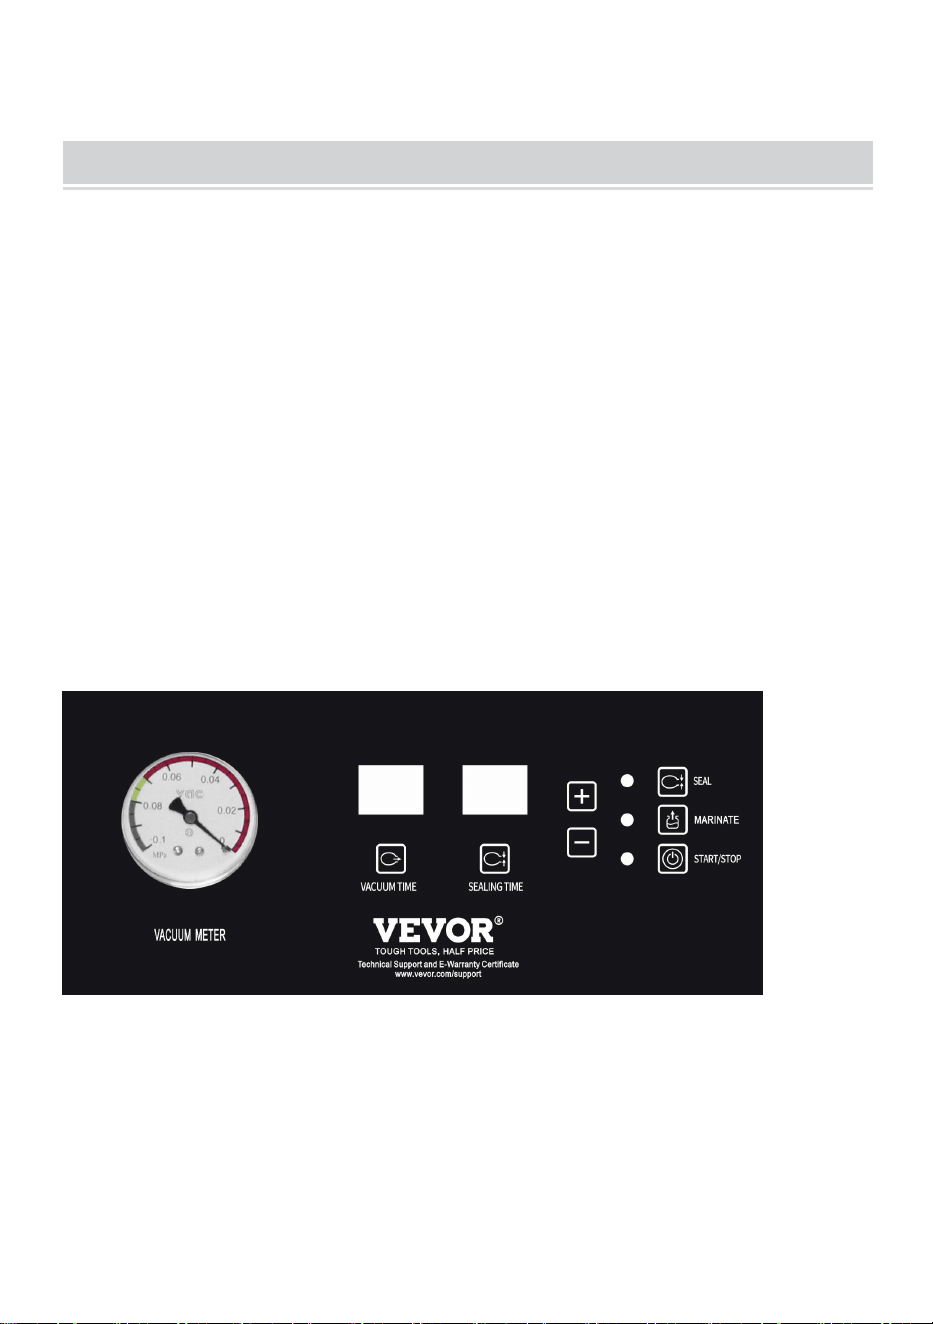
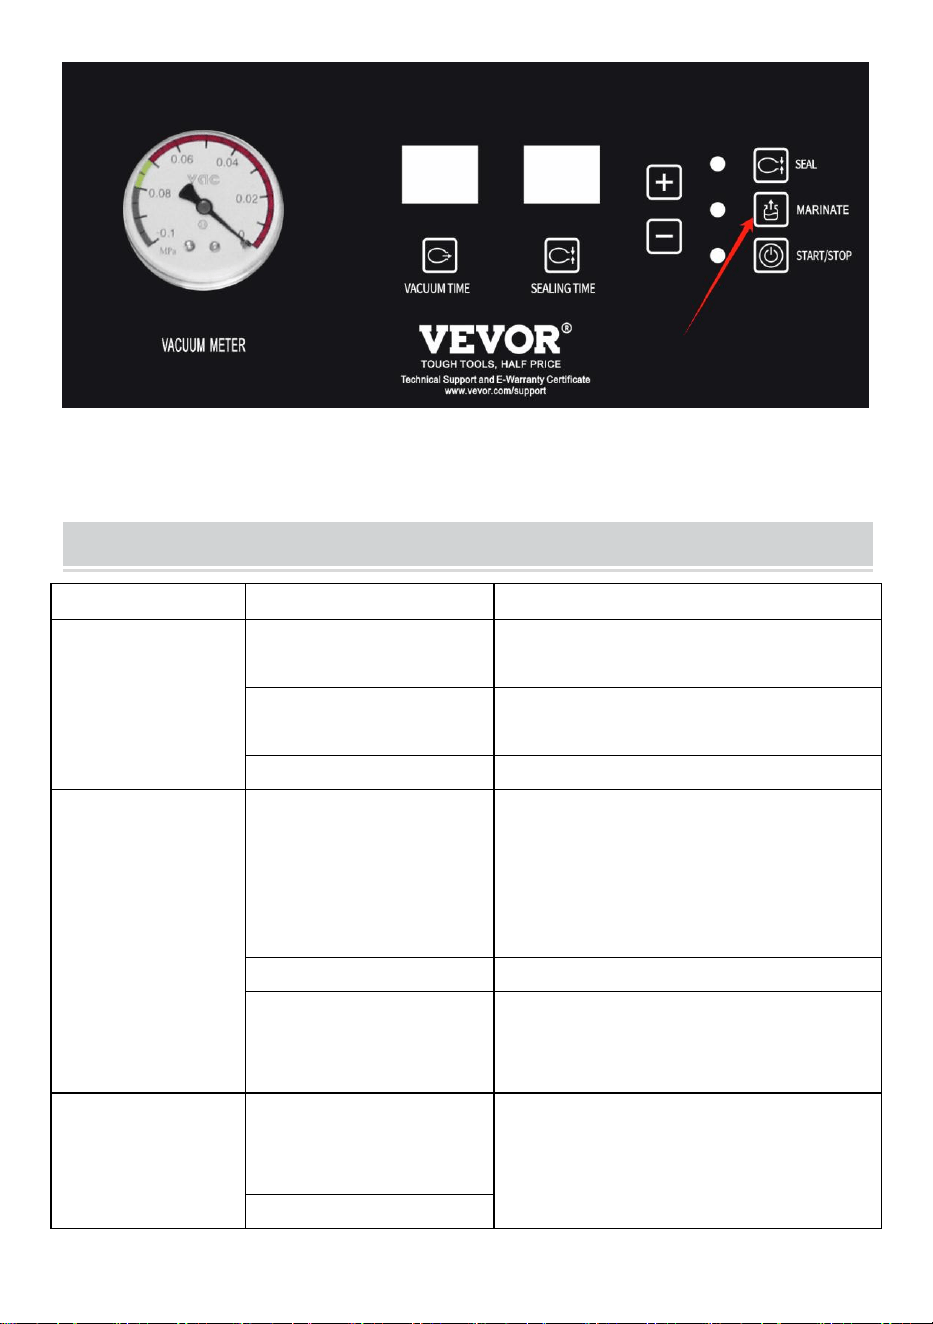
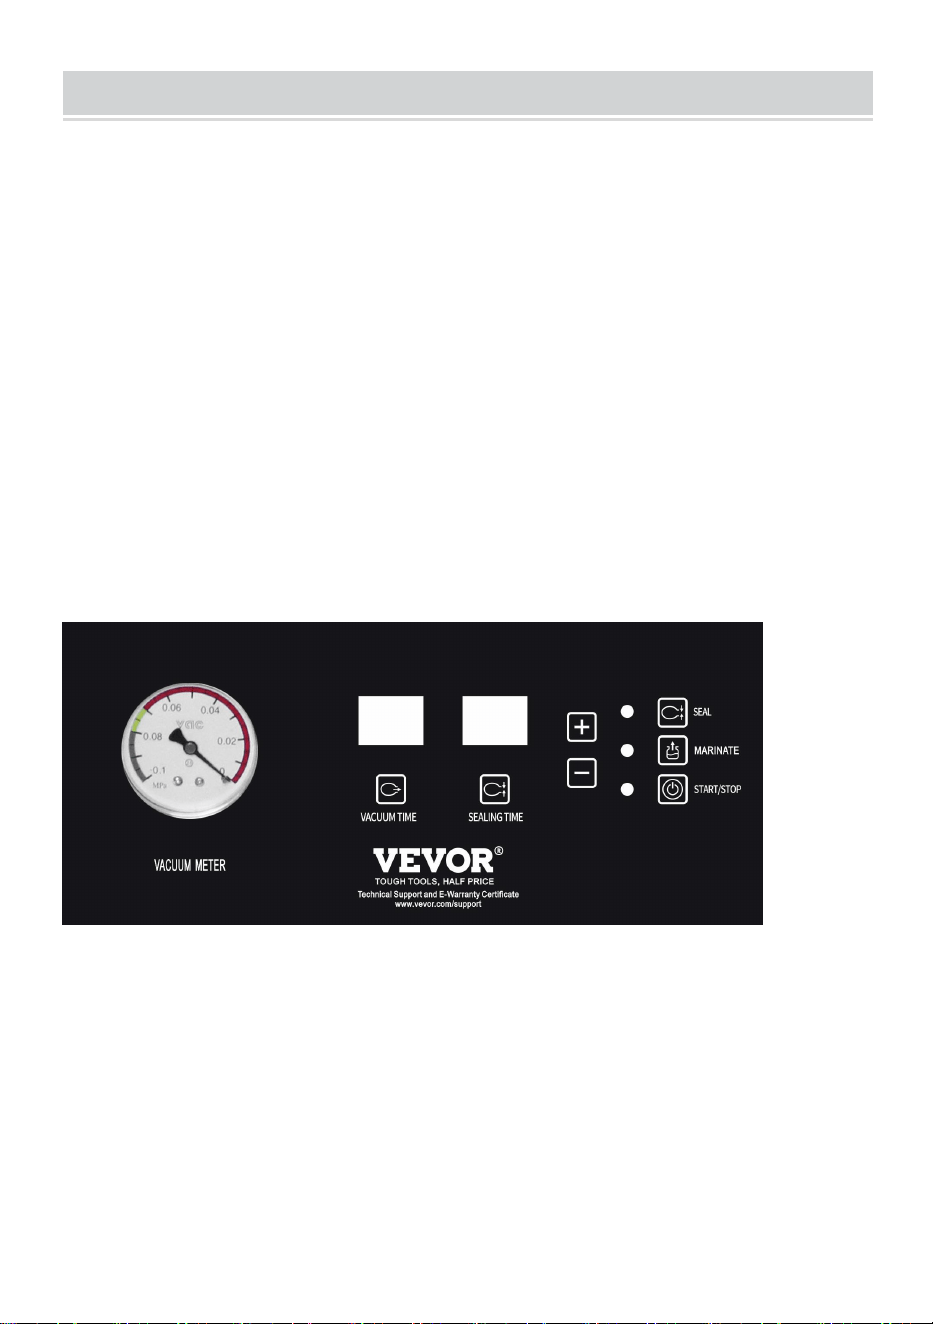
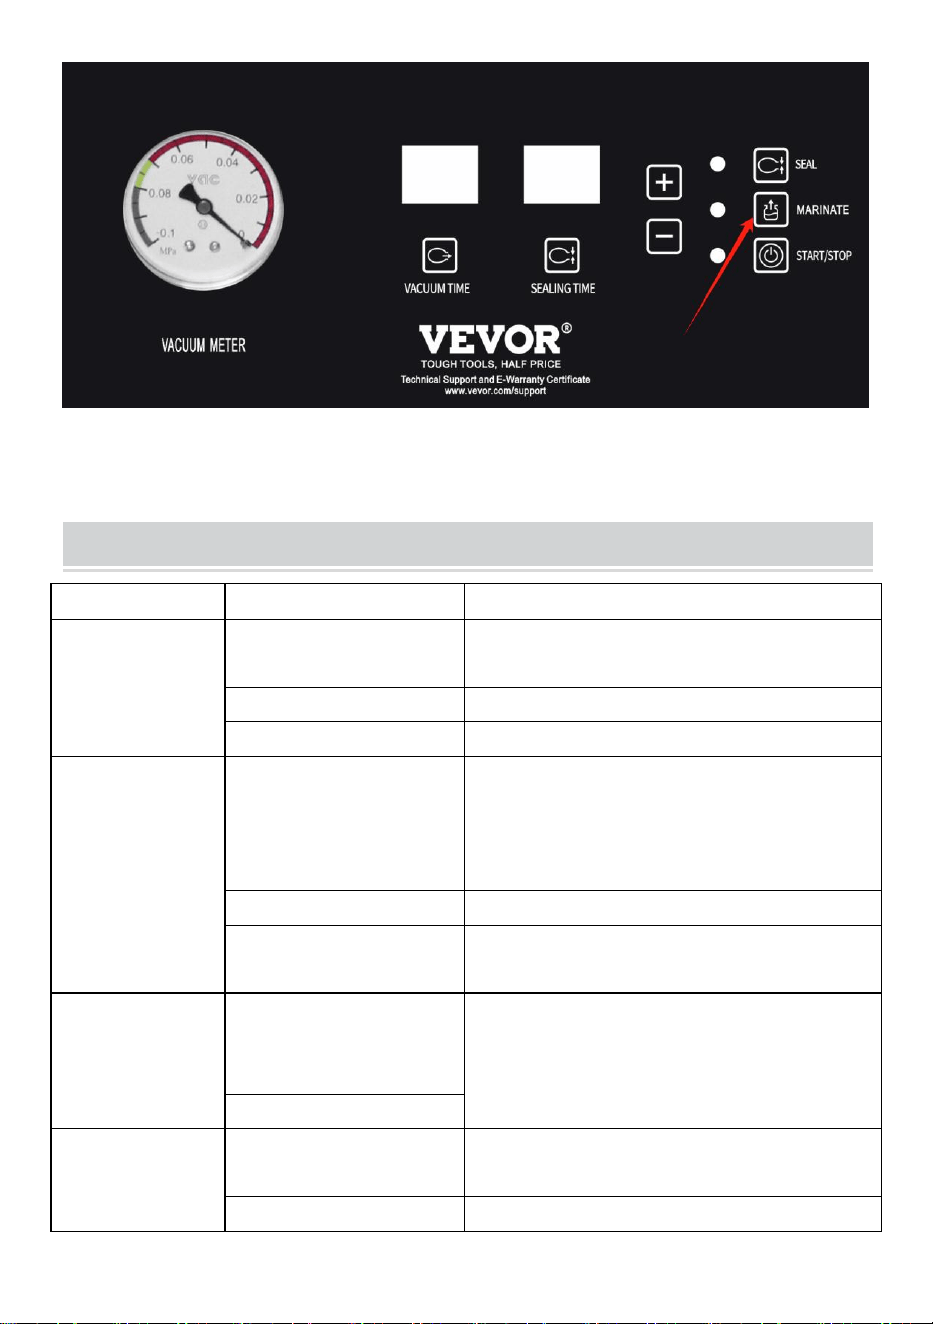
OPERATING INSTRUCTIONS
1.Click the "SETTING" button on the control panel and select the setting target.
a: The vacuum time is generally set at 30-40S, and the ideal vacuum time can be
set by clicking the "RAISE" or "LOWER" button.
b: Sealing time: Click the set button twice, the sealing time is generally set to
1.5-2S, and the sealing time is set according to the thickness of the vacuum bag.
Do not set the sealing time to be too long to burn the sealing heating strip.
c. After setting the sealing time, click the setting button again to set the cooling
time, usually 3-5S. After SETTING the cooling time, click the Setting button, and
the letters e.
d. will be displayed on the control panel, indicating the end of the setting process.
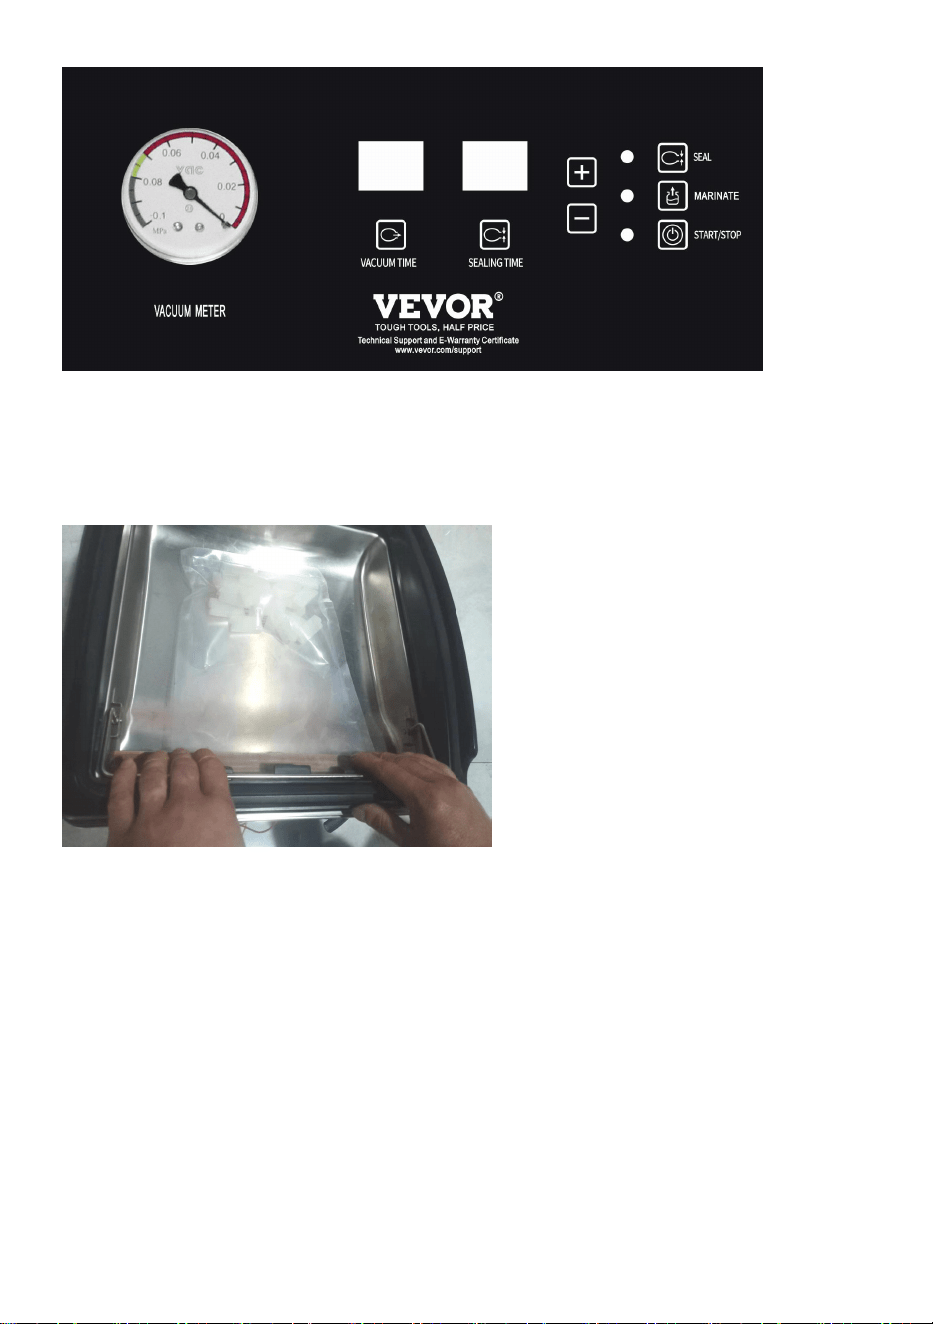
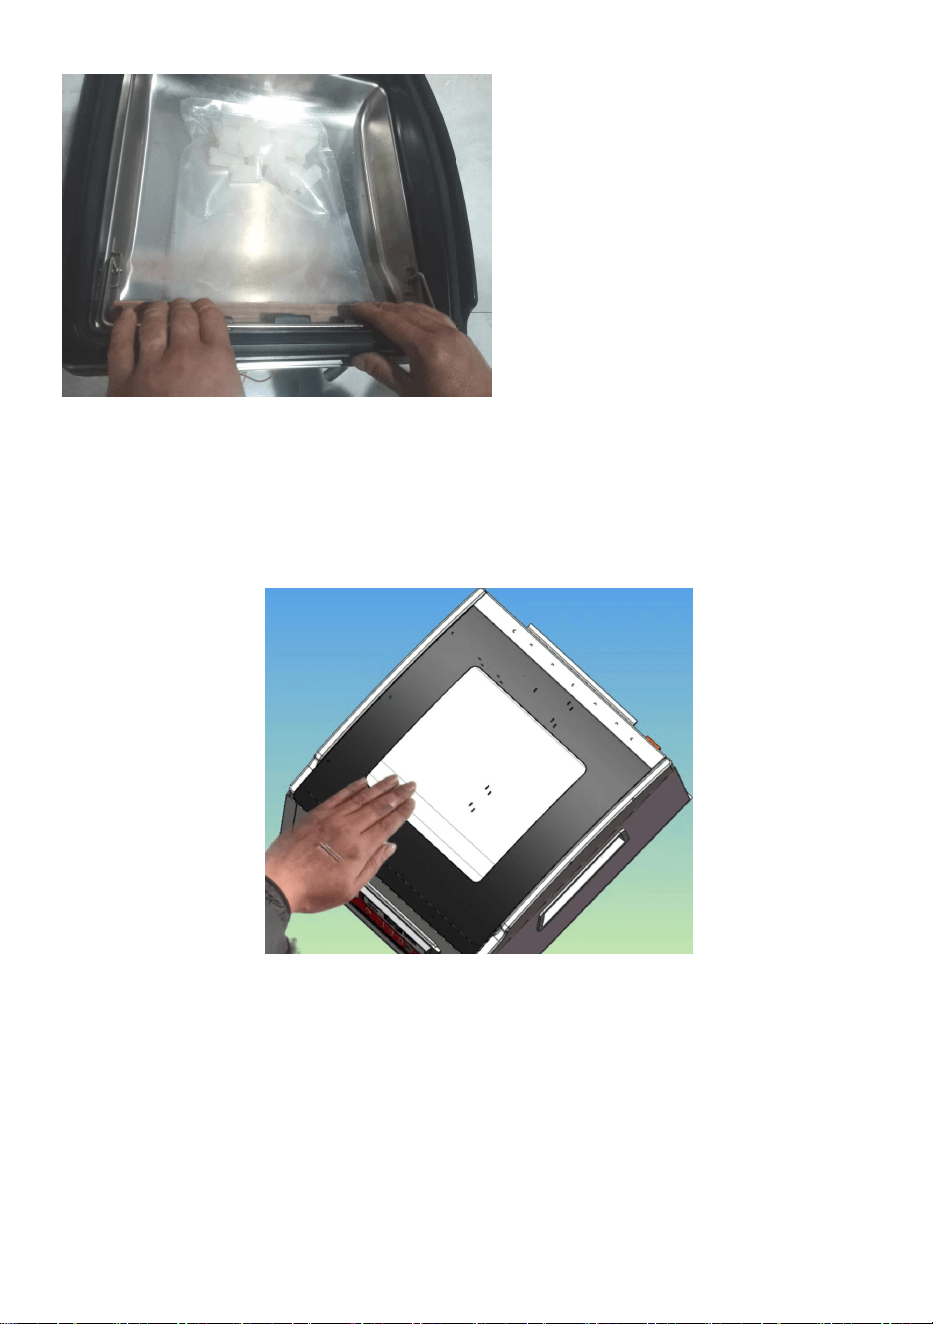
2 .Place the product to be packed into the vacuum chamber. Take the bag press
stick and place the vacuum bag flat on the seal strip. Drop the bag press stick.
- 6 -
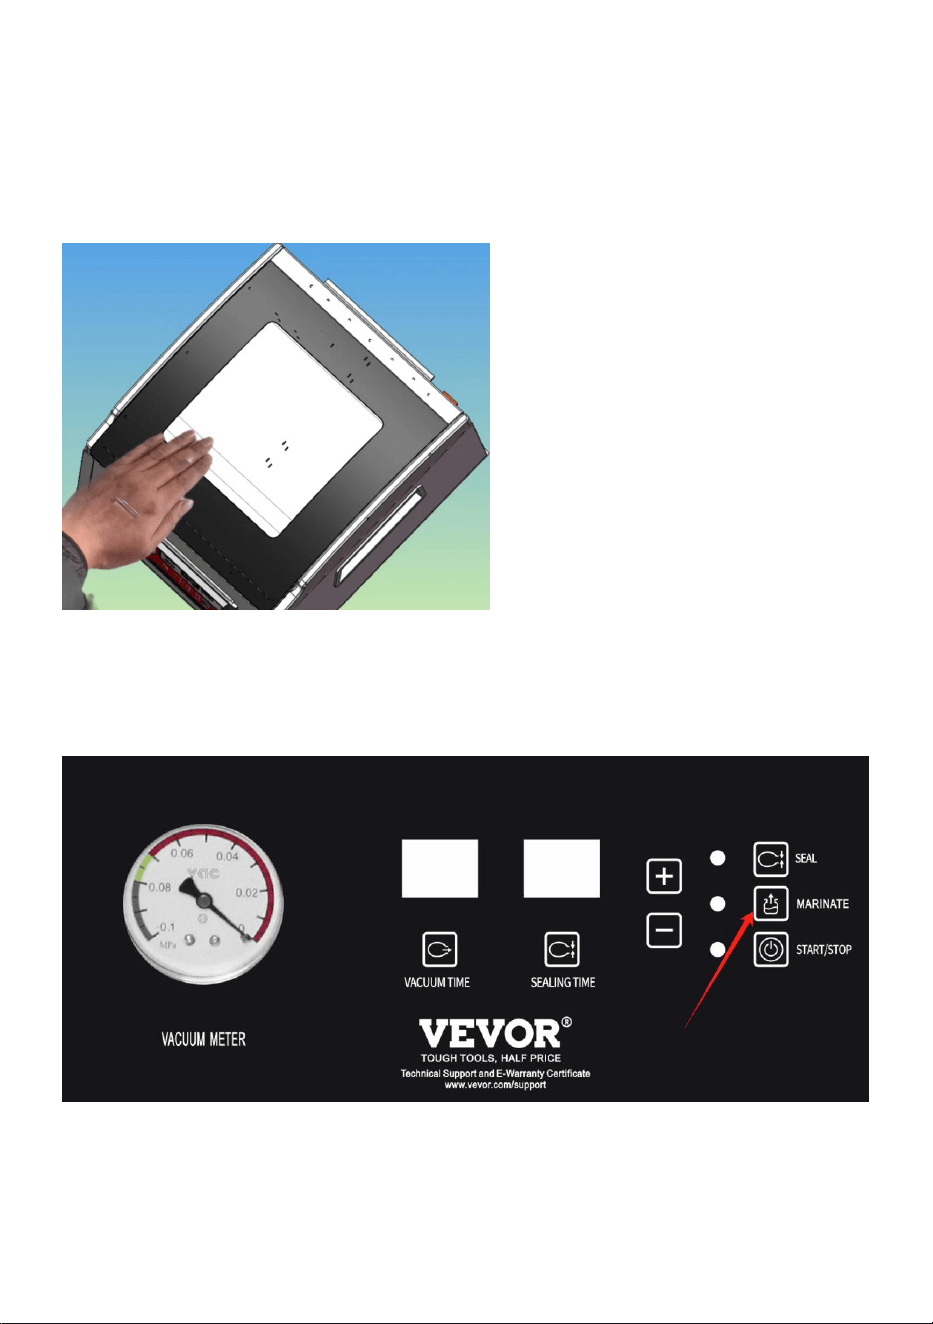
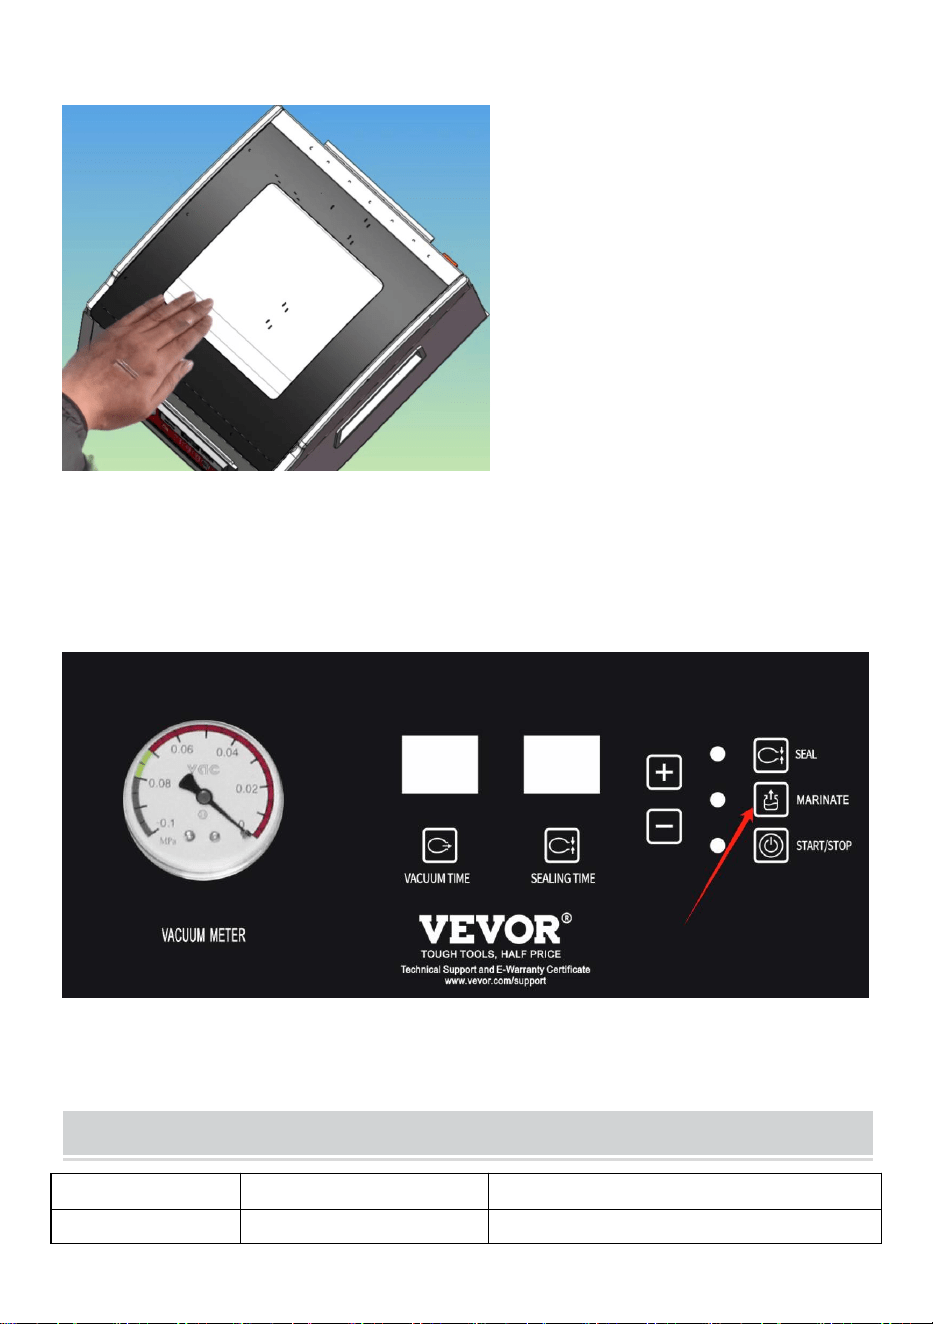
3.Press the front end of the vacuum hood by hand during operation. Press the
edge of the vacuum hood by hand during operation. Click the start button at the
front end of the vacuum machine cover, the vacuum machine starts to work, after
the vacuum machine starts to run, the hand can leave the machine, the machine
automatically completes the packaging process.
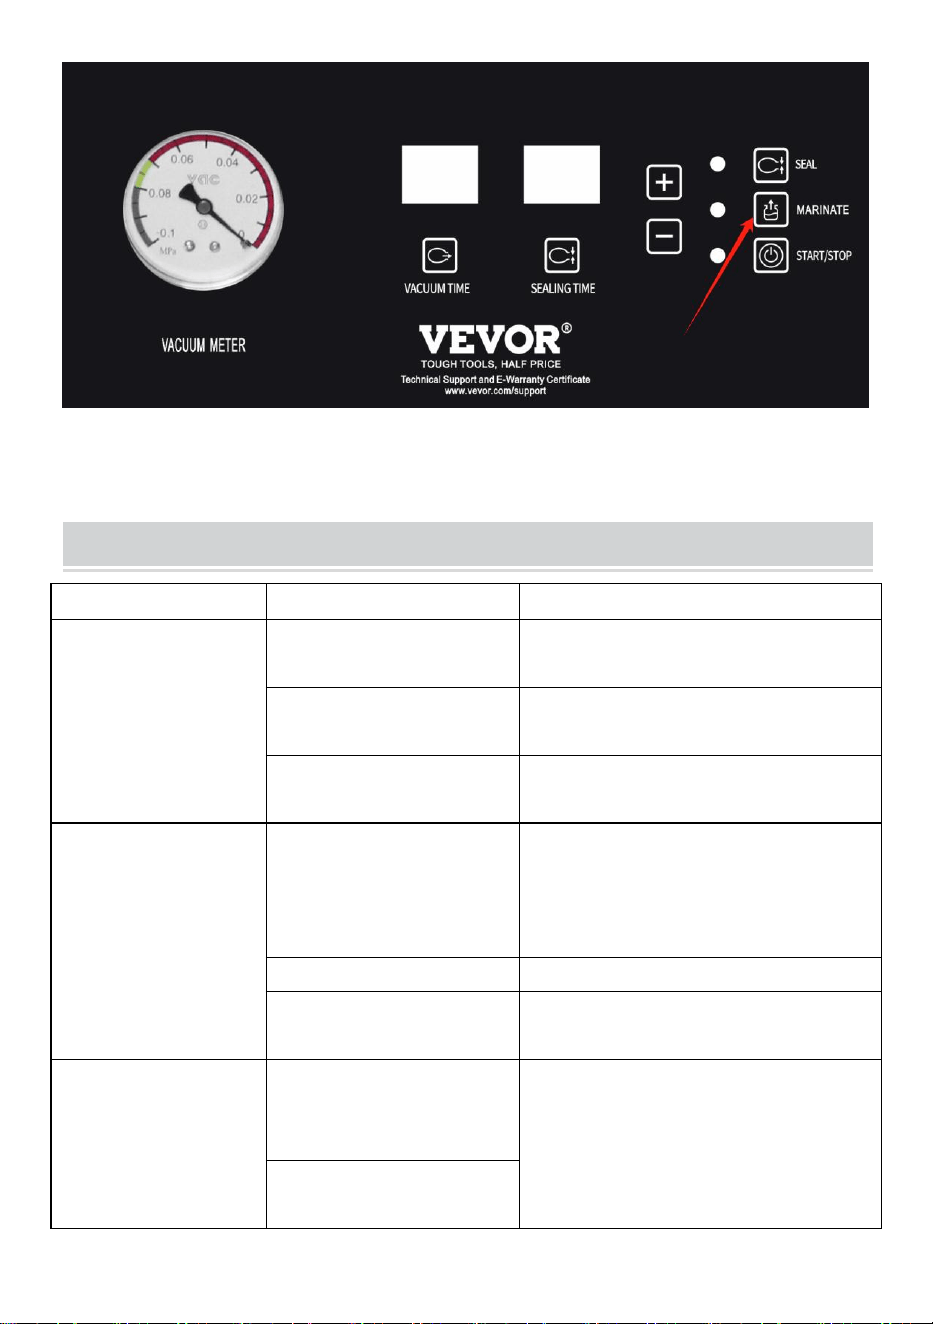
4.Marinate : Click the curing button on the upper right of the control panel, the
curing indicator will light up, adjust the pumping time, and carry out the curing work.
At this time, the machine is only vacuuming without sealing.

- 7 -
TROUBLESHOOTING TABLE
Fault
Possible Cause
To Rectify
Device does not
turn on
Power plug is not plugged in.
Plug in the power plug.
Defective power cord
Send device to Customer Service
Defect socket outlet
Select other outlet
A complete
vacuumis not being
createdin the bag.
The open end of the bag is
notcompletely inside the
vacuumchamber
Position the bag correctly
The bag is defect
Select another bag
There is residue on the
weldingand the seal
Clean the welding / seals andretry
once they are dry
The bag is not
being
sealed correctly
The sealing bar is
overheatingso that the bag
melts
Open the cover on the unit andlet it
cool dow for a few minutes.Sealing
bar needs to be replaced.
Defect sealing bar.
The bag does not
hold the
vacuumafter it has
beensealed
The bag is defective
Select another bag; wrap
paperaround any sharp edges
withinthe bag.
There are leaks along
thewelding seam as a result
ofcreases, crumbs, grease
orliquids.
Open the bag again and cleanthe
upper internal part of the
bagRemove any foreign matter
thatmight be on the welding
barbefore sealing.
This product is subject to the provision of European Directive
2012/19/EC. The symbol showing a wheelie bin crossed through
indicates that the product requires separate refuse collection in the
European Union. This applies to the product and all accessories
marked with this symbol. Products marked as such may not be
discarded with normal domestic waste but must be taken to a collection
point for recycling electrical and electronic devices.

- 8 -
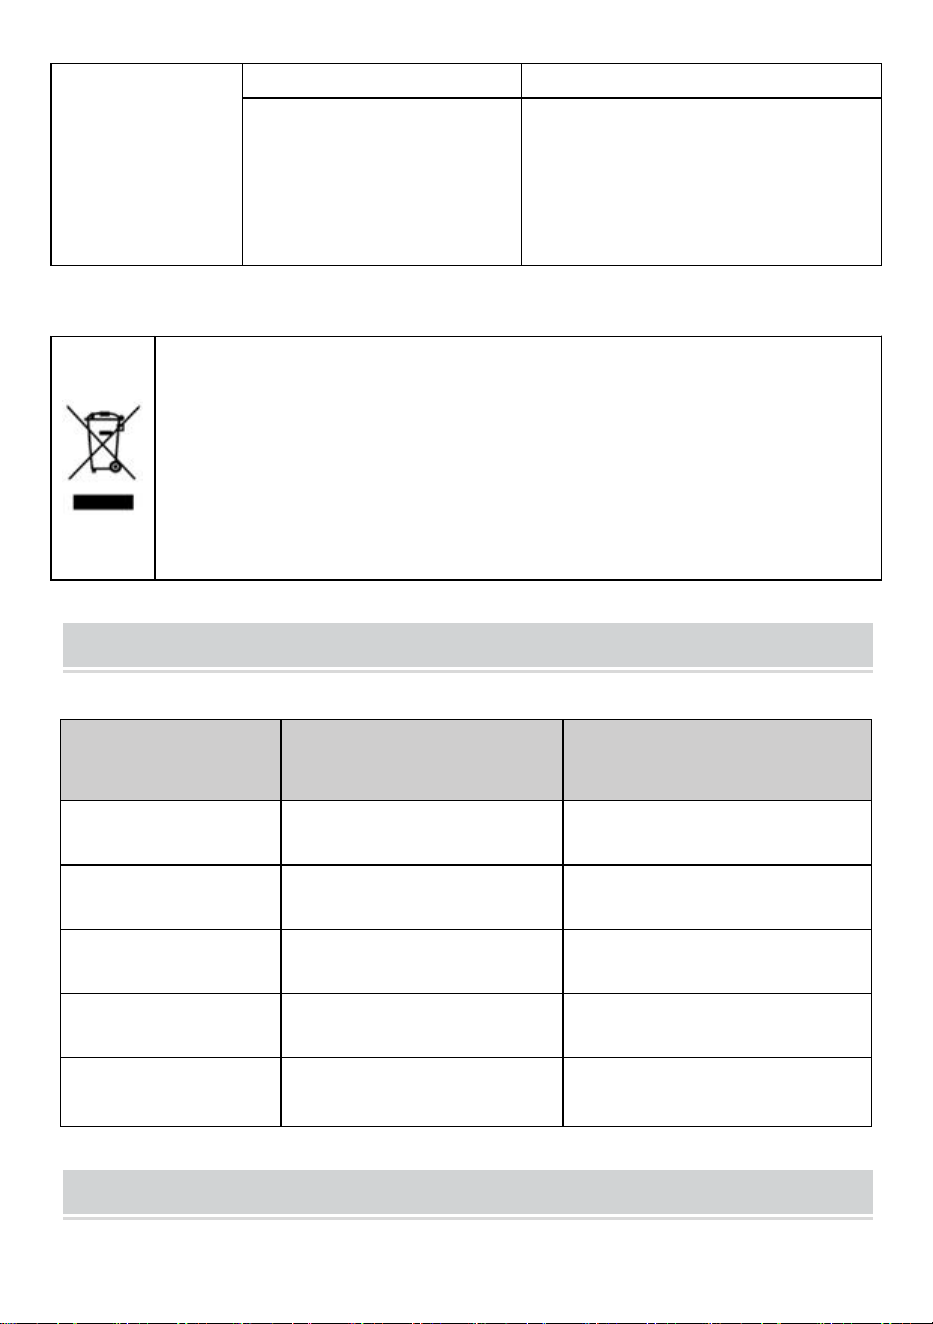
MODEL AND PARAMETERS
Model
USA:YJ-300TV1
EUR、AUS:
YJ-300TV2、YJ-300TV3
USA:YJ-260TV1
EUR、AUS:
YJ-260TV2、YJ-260TV3
Voltage
USA:120V/60Hz
EUR、AUS:230V/50Hz
USA:120V/60Hz
EUR、AUS:230V/50Hz
Vacuum pump
model
Piston pump
Piston pump
Seal Length
290mm
270mm
Maximum vacuum
degree
-95Kpa
-95Kpa
Dimension
(L*W*H)
540*469*342mm
520*449*342mm
SPARE PARTS LIST
Name
Quantity
1.Heating element
2 pcs
2.Teflon cloth
2 pcs
3.Filling plate
1 pcs
4.Safety tube
2 pcs
5.Hex key
1 pcs
6.Sealing strip of chamber
1 pcs
7.Power cord
1 pcs
8.Bags 20x25cm
30 pcs
9.User manual
1 pcs

- 9 -
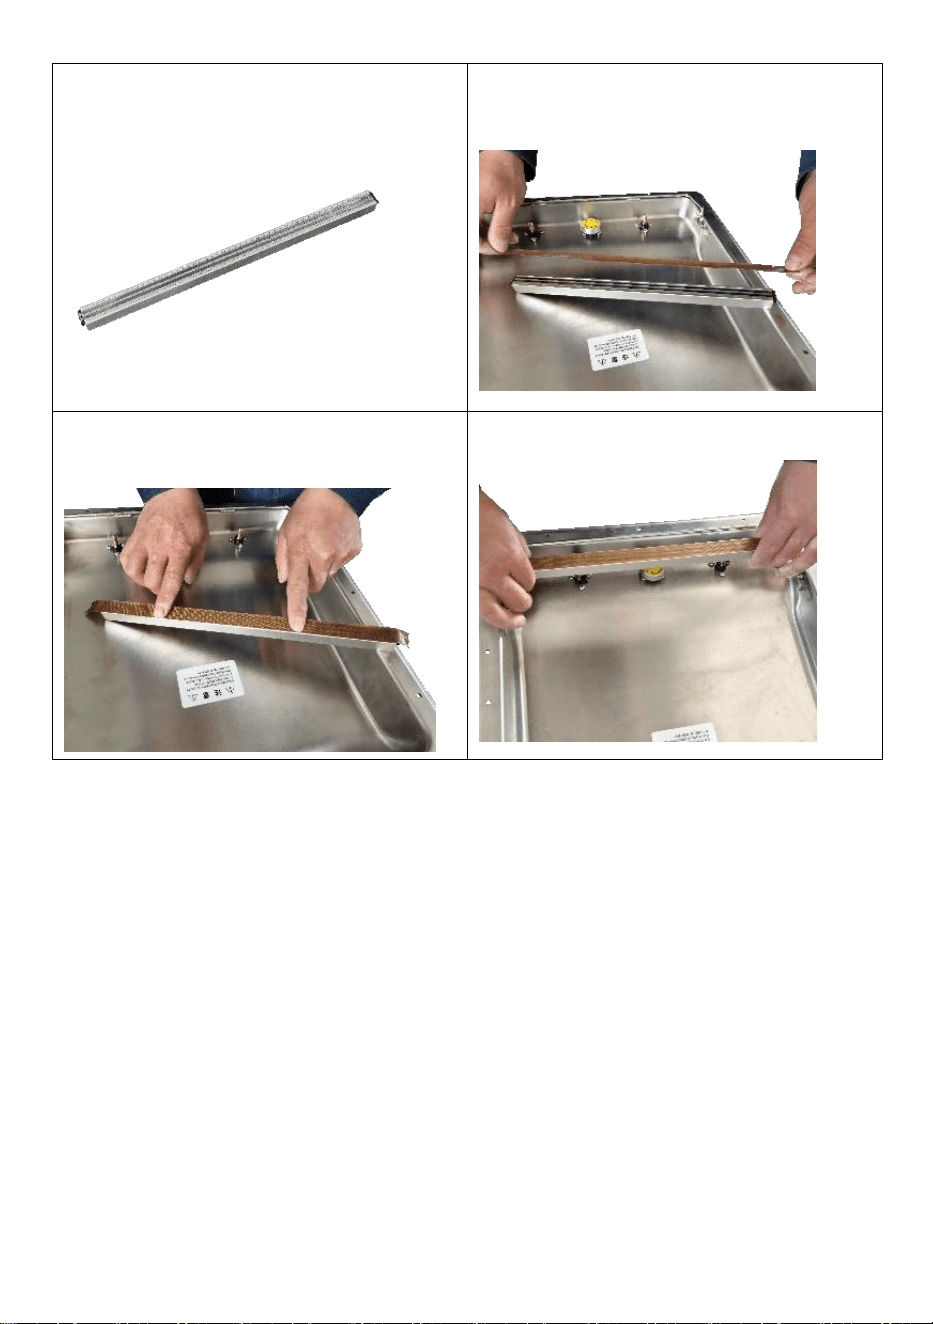
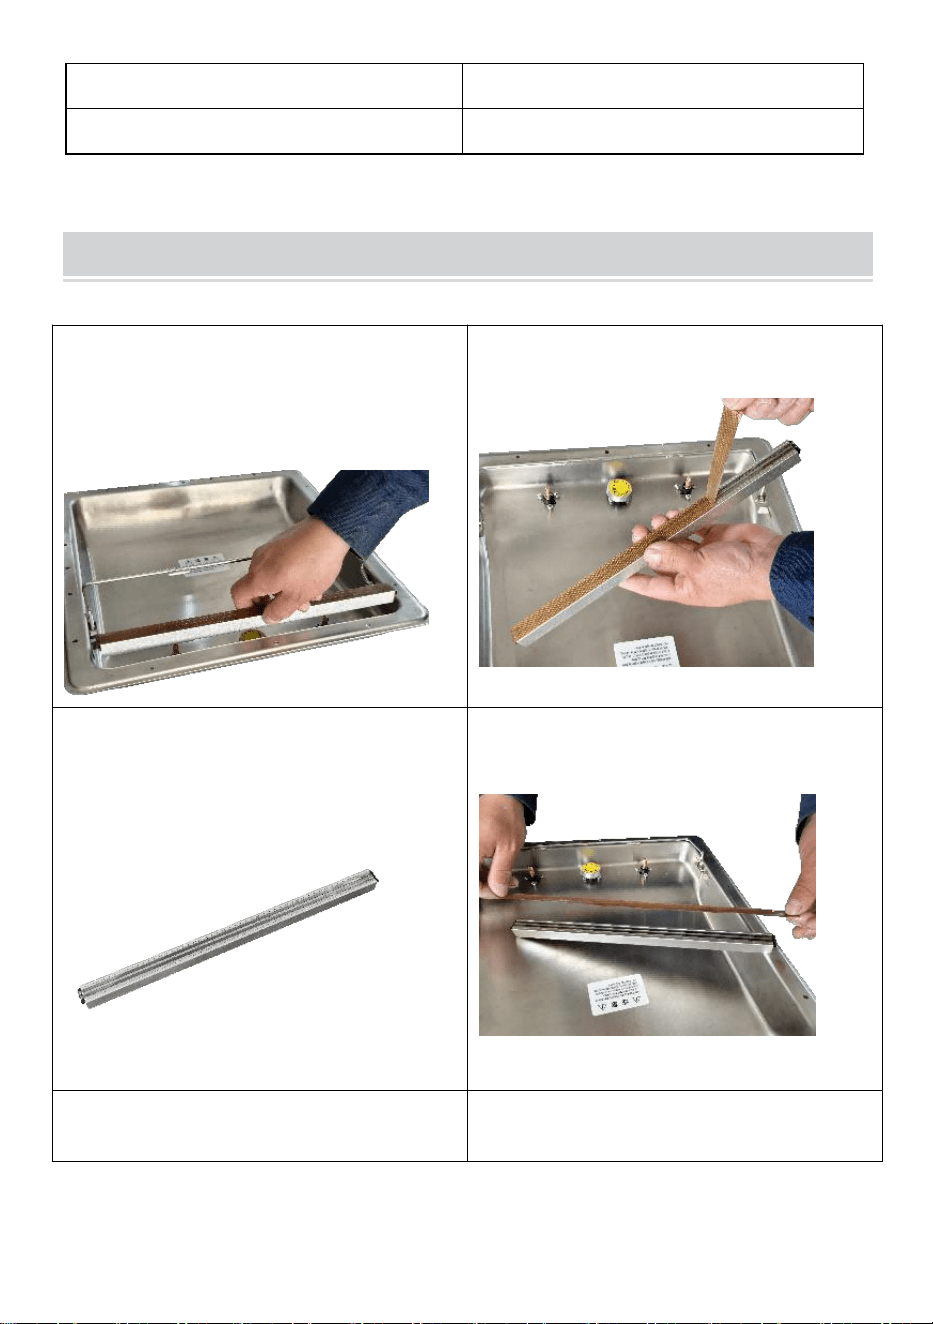
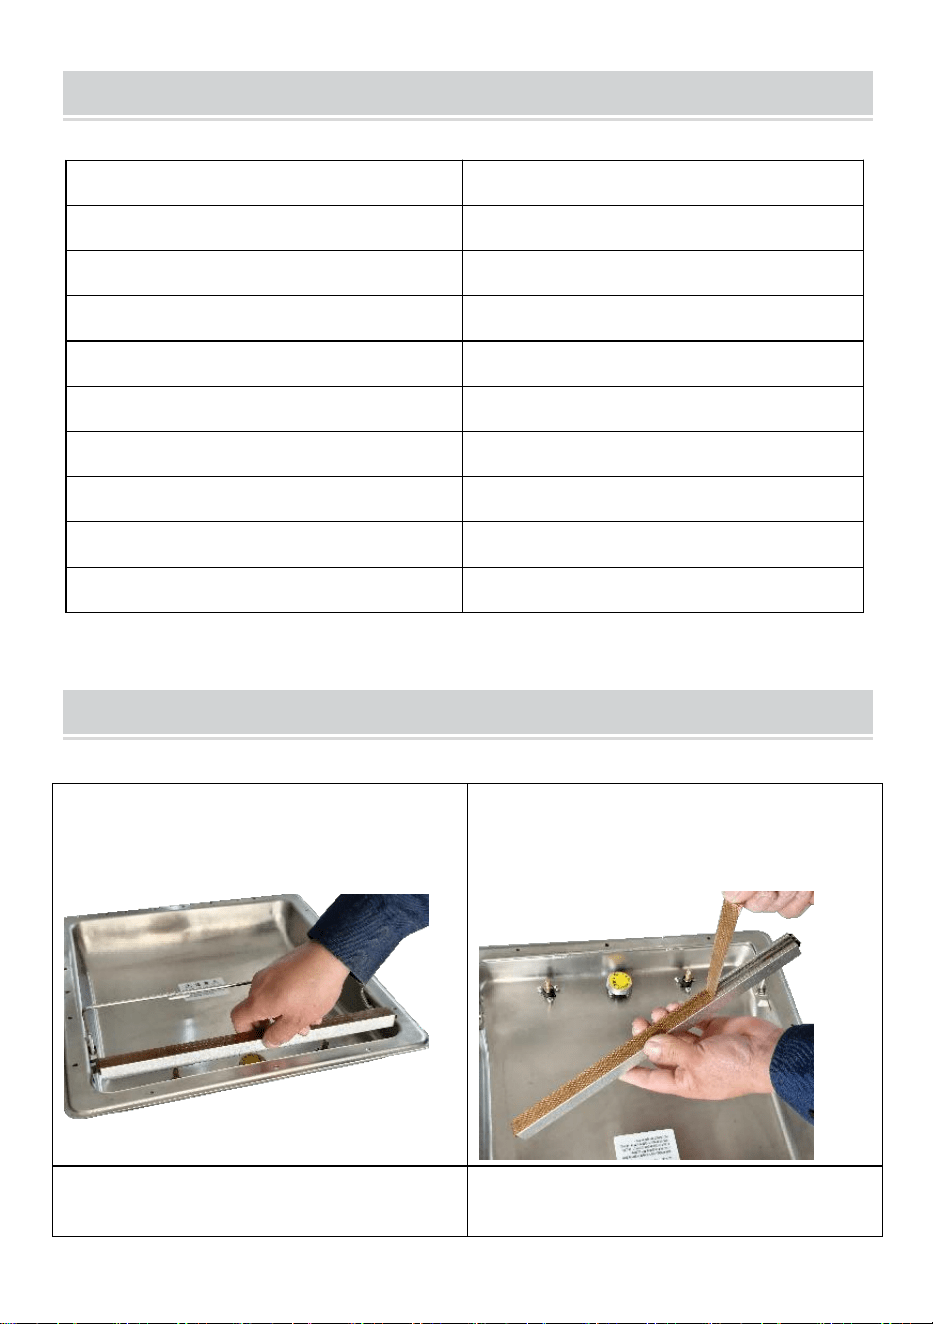
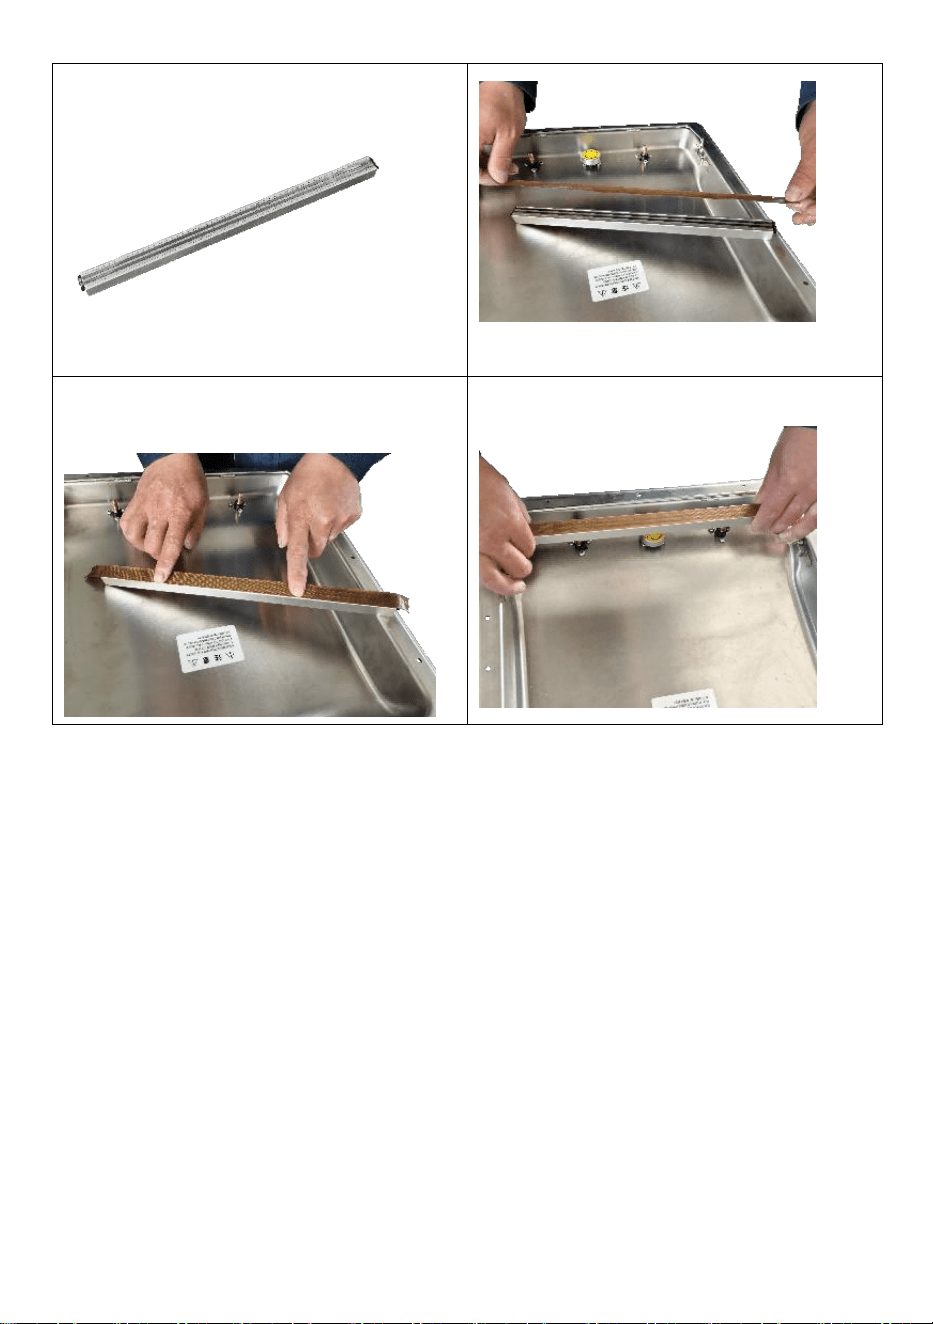
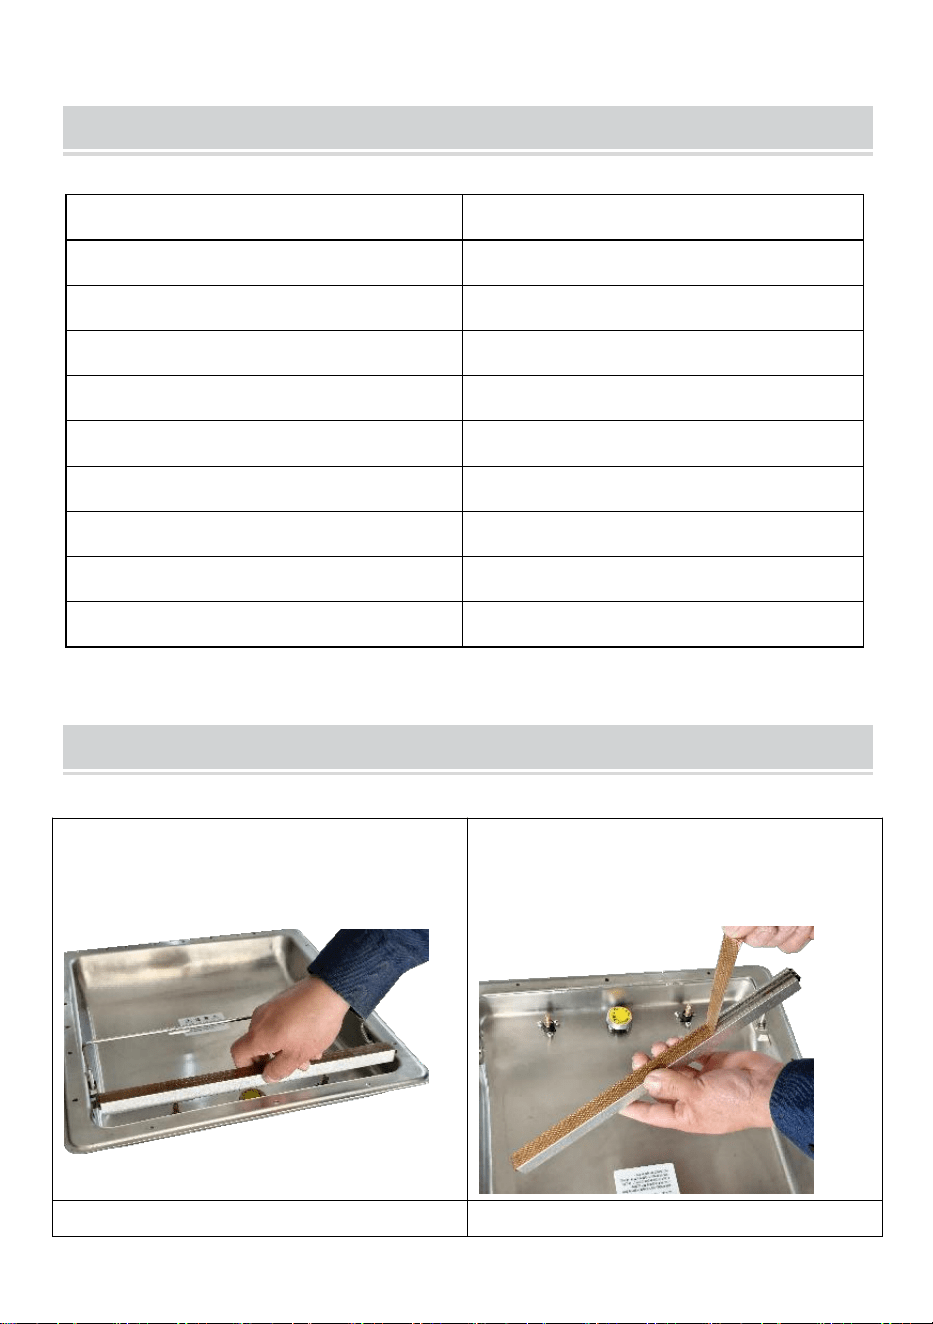
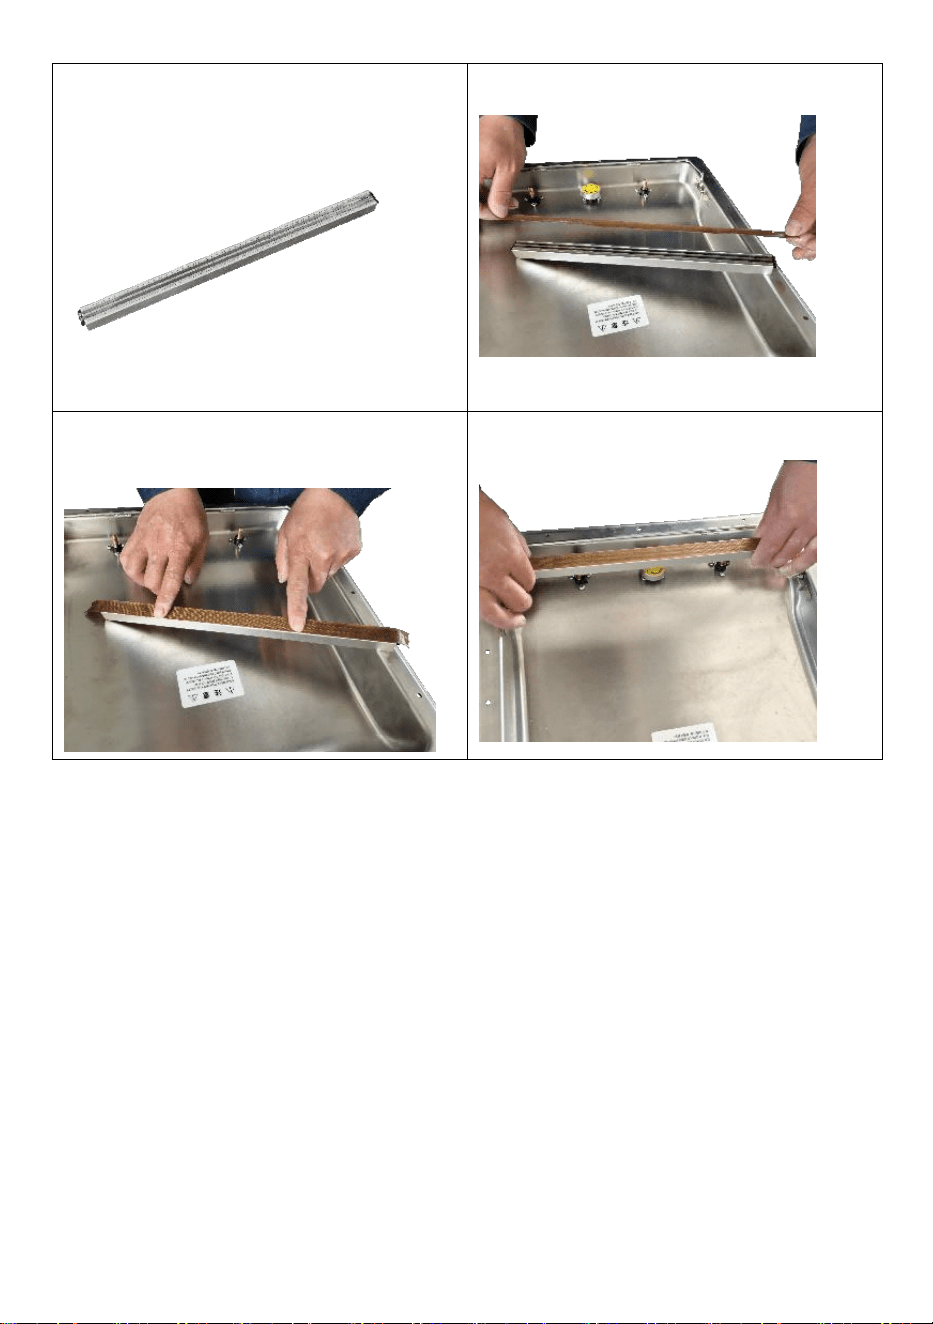
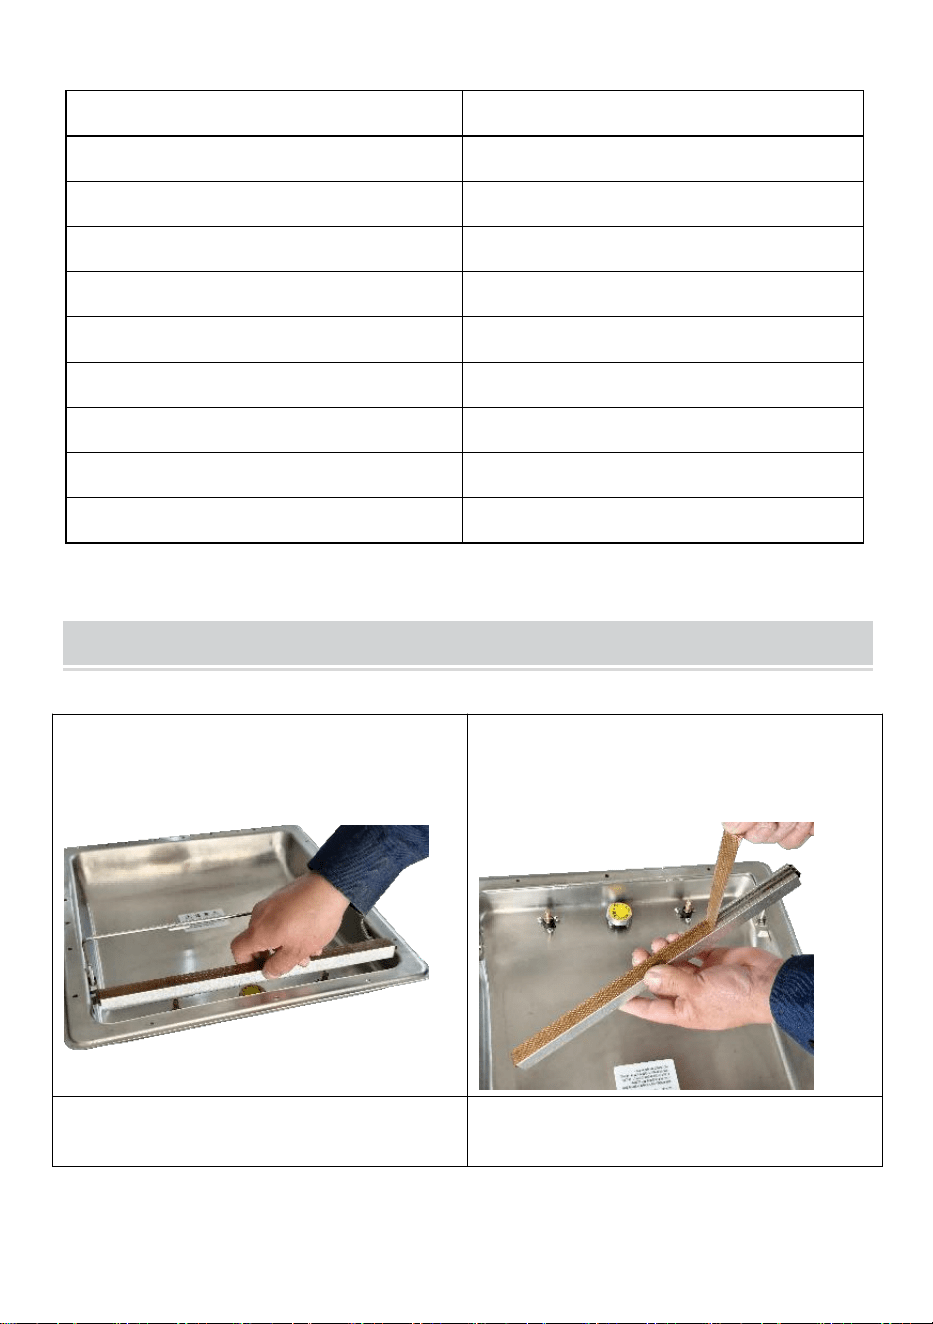
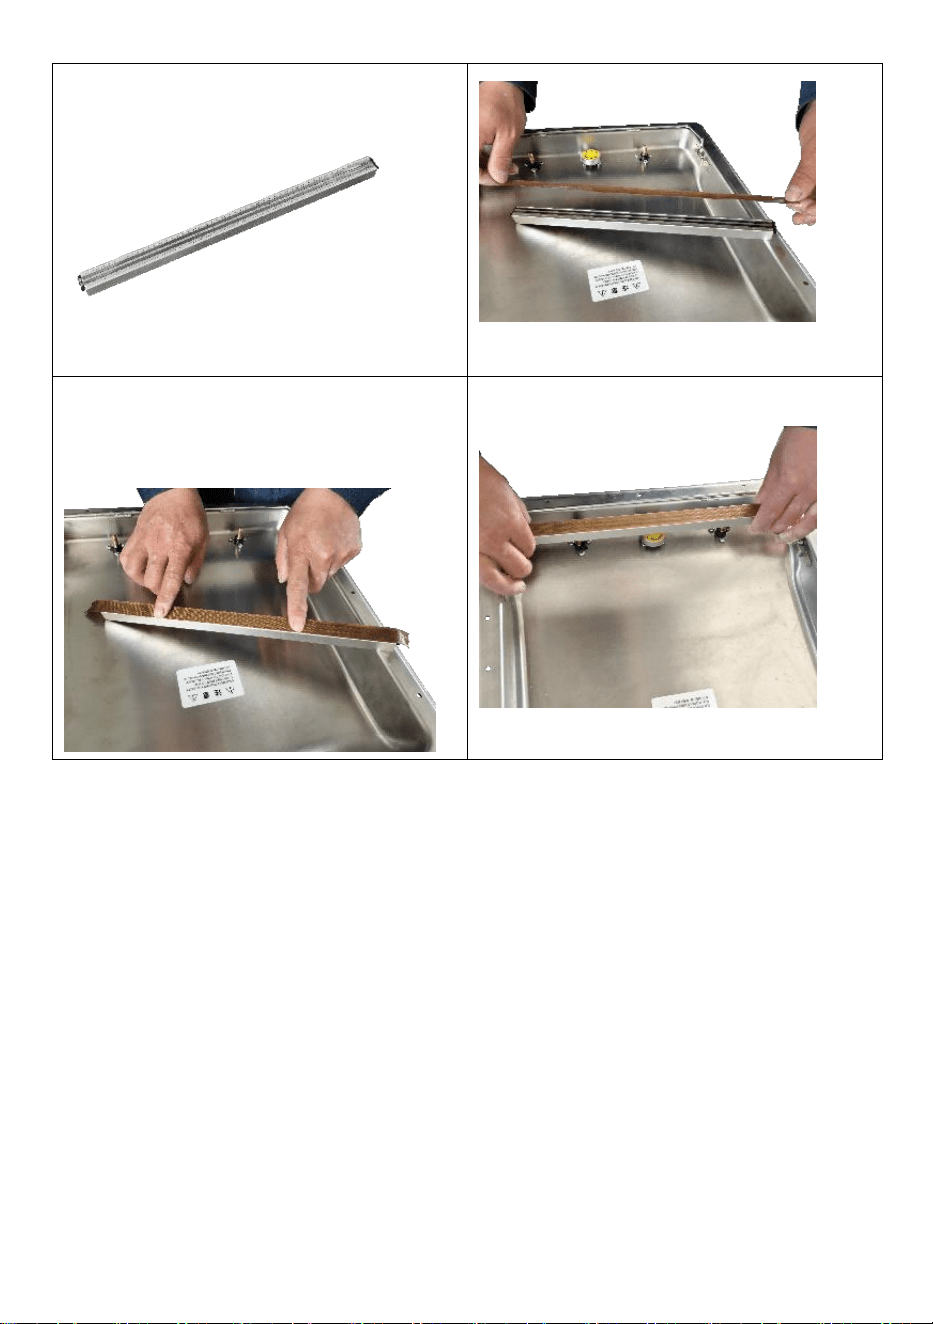
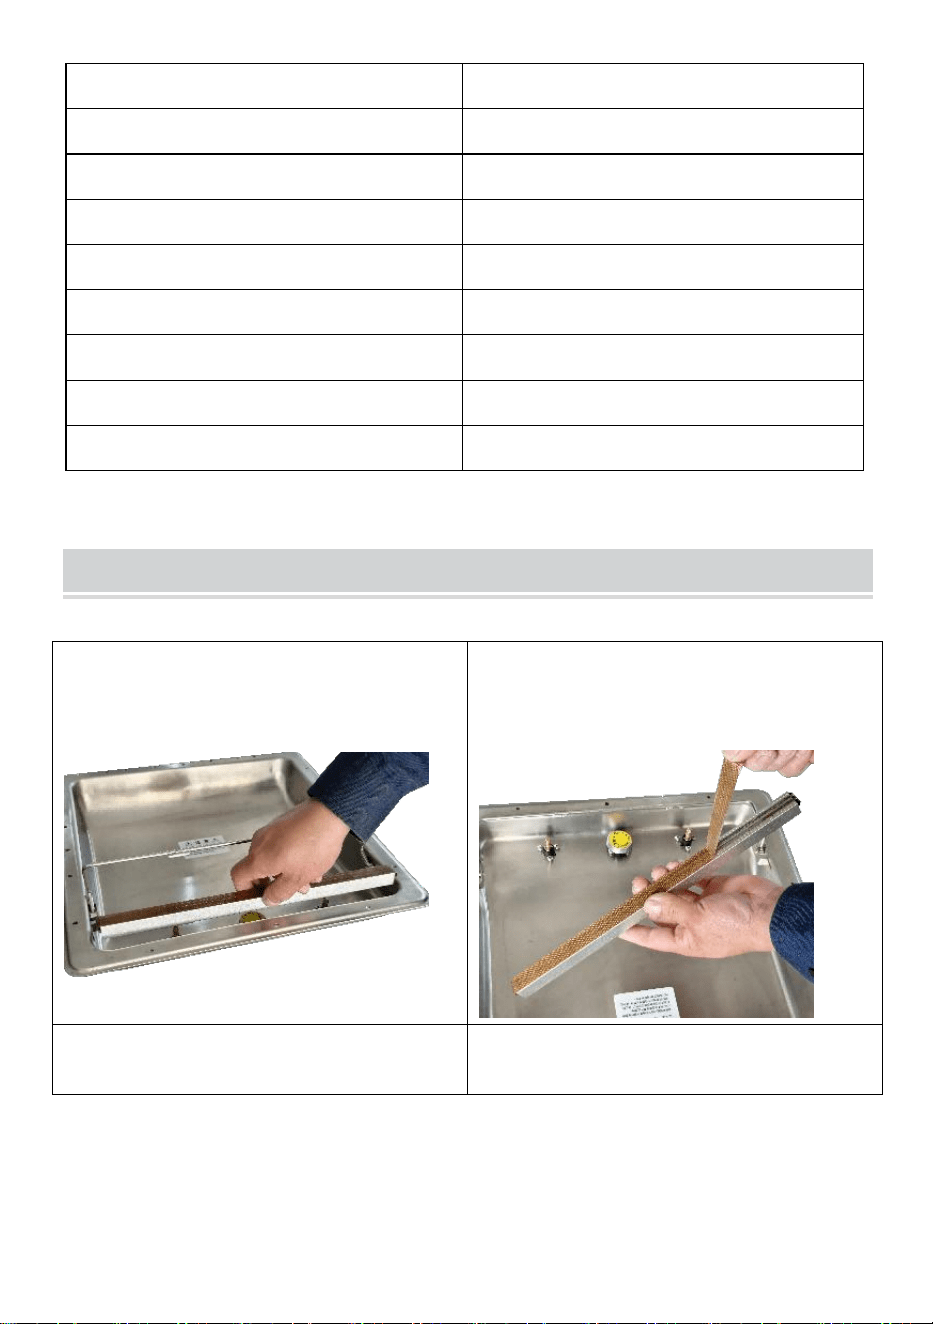
CHANGE HIGH TEMPERATURE CLOTH
1.Take out the aluminum base
2.Tear off the old
high-temperaturecloth
3.Apply new high-temperature cloth
4.Keep some high-temperature
cloth on both sides
5.Smooth high temperature cloth
6.Replace the aluminum base


Assistance technique et certificat de garantie électronique
www.vevor.com/support
MACHINE DE SCELLAGE CONTINUE
MANUEL DE L'UTILISATEUR
We continue to be committed to provide you tools with competitive price.
"Save Half", "Half Price" or any other similar expressions used by us only represents an
estimate of savings you might benefit from buying certain tools with us compared to the major
top brands and does not necessarily mean to cover all categories of tools offered by us. You
are kindly reminded to verify carefully when you are placing an order with us if you are
actually saving half in comparison with the top major brands.
- 1 -
MODÈLE: YJ-300TV1 / YJ-300TV2 / YJ-300TV3 / YJ-260TV1 / YJ-260TV2 /
YJ-260TV3
(L'image est uniquement à titre de référence, veuillez vous référer à l'objet réel)
Have product questions? Need technical support? Please feel free to
contact us:
Technical Support and E-Warranty Certificate
www.vevor.com/support
NEED HELP? CONTACT US!
This is the original instruction, please read all manual instructions
carefully before operating. VEVOR reserves a clear interpretation of our
user manual. The appearance of the product shall be subject to the
product you received. Please forgive us that we won't inform you again if
there are any technology or software updates on our product.
CONTINUOUS SEALING
MACHINE

- 2 -
SAFETY INSTRUCTION AND PRECAUTIONS
AVERTISSEMENT:
4. Lisez attentivement et comprenez toutes les INSTRUCTIONS
D'ASSEMBLAGE ET D'UTILISATION avant d'utiliser l'appareil.
5. Le non-respect des règles de sécurité et des autres précautions de
sécurité de base peut entraîner des blessures graves.
6. Gardez des explications claires dans notre manuel d’utilisation.
L'apparence du produit dépend du produit que vous avez reçu. Veuillez
nous pardonner s'il y a des mises à jour techniques ou logicielles sur nos
produits, et nous ne vous en informerons plus.
GENERAL SAFETY RULES
Veuillez lire l'intégralité du mode d'emploi avant d'utiliser les produits pour la
première fois ; Ils contiennent des informations importantes sur le bon
fonctionnement.
La garantie est annulée en cas de dommages résultant du non-respect des
instructions d'utilisation. La responsabilité pour tous les dommages consécutifs est
exclue !
Nous déclinons toute responsabilité pour les dommages matériels ou corporels
causés par une utilisation inappropriée ou le non-respect des consignes de
sécurité ! Dans de tels cas, la garantie sera nulle
La conversion, la modification ou le démontage non autorisé des produits est
inadmissible pour des raisons de sécurité et d'homologation (CE).
Le produit n'est pas un jouet et doit être tenu hors de portée des enfants.
Il faut donc être particulièrement vigilant en cas de présence d'enfants.
Le produit ne doit pas être humide ou mouillé, il est uniquement destiné à être
utilisé dans des endroits secs et intérieurs (pas dans les salles de bains ou dans
des zones tout aussi humides). Il existe un risque de choc électrique mortel.

- 3 -
N'exposez pas le produit ou ses accessoires à des températures humides ou
extrêmement élevées ou basses.
Ne laissez pas les matériaux d'emballage sans surveillance. Ils peuvent devenir
des matériaux de jeu dangereux pour les enfants.
Une chute, une chute, une pression ou des forces de traction pourraient détruire
ou au moins limiter le fonctionnement du produit.
Ne placez jamais l'appareil à proximité de matériaux combustibles ou facilement
inflammables.
Assurez-vous toujours que la table rotative sur laquelle l'objet est posé se trouve
au centre du boîtier !
Cette machine convient au scellage de films plastiques, à la fabrication de
sacs et peut être largement utilisée dans les industries alimentaires,
médicales, chimiques, quotidiennes, semencières et autres.
Cette machine utilise un film plastique ou un film plastique d'aluminium
comme matériau, un emballage sous vide pour les pâtes alimentaires, les
fruits, les légumes en sauce, l'industrie chimique, la médecine, les
composants électroniques, les instruments de précision, les métaux rares et
d'autres articles. Le produit après emballage sous vide n'est pas facile à
oxyder et à mouler. Particulièrement adapté au thé, à l'alimentation, à la
médecine et à d'autres industries. La machine à sceller présente les
avantages d'un fonctionnement simple, d'une belle apparence et d'une
structure compacte.
Si vous avez des raisons de penser qu'un fonctionnement sûr n'est plus
possible, débranchez immédiatement l'appareil et protégez-le contre toute
utilisation involontaire.
On peut supposer qu’un fonctionnement sûr n’est plus possible si :
- l'appareil présente des signes visibles de dommages,
- l' appareil ne fonctionne plus,
- après une période de stockage plus longue dans des conditions défavorables,
- suite à de fortes sollicitations lors du transport.
CONSERVEZ CES INSTRUCTIONS
- 4 -
STRUCTURE DIAGRAM
1
Bouchon à vide
8
Interrupteur
2
Bande de silicone
9
Fiche d'alimentation
3
Tige de presse à sacs
dix
Circuit imprimé
4
Bande d'étanchéité de
chambre
11
Électrovanne
5
Bande chauffante
12
Transformateur de chauffage
6
indicateur
13
Trou de vis du couvercle arrière
7
Jauge à vide
14
Pompe à vide
- 5 -
OPERATING INSTRUCTIONS
1. Cliquez sur le bouton « RÉGLAGE » sur le panneau de commande et
sélectionnez la cible de réglage.
a : Le temps de vide est généralement réglé sur 30-40S, et le temps de vide idéal
peut être réglé en cliquant sur le bouton « AUGMENTER » ou « BASPER ».
b : Temps de scellage : cliquez deux fois sur le bouton de réglage, le temps de
scellage est généralement réglé sur 1,5-2S et le temps de scellage est réglé en
fonction de l'épaisseur du sac sous vide. Ne réglez pas le temps de scellage sur
une durée trop longue pour brûler la bande chauffante de scellage.
c. Après avoir réglé le temps de scellage, cliquez à nouveau sur le bouton de
réglage pour régler le temps de refroidissement, généralement 3-5S. Après avoir
RÉGLÉ le temps de refroidissement, cliquez sur le bouton Paramètres et sur les
lettres e.
d. s'affichera sur le panneau de commande, indiquant la fin du processus de
réglage.
2. Placez le produit à emballer dans la chambre à vide. Prenez le bâton
presse-sac et placez le sac sous vide à plat sur la bande de soudure. Lâchez le
bâton presse-sac.

- 6 -
3. Appuyez à la main sur l'extrémité avant de la hotte aspirante pendant le
fonctionnement. Appuyez à la main sur le bord de la hotte aspirante pendant le
fonctionnement. Cliquez sur le bouton de démarrage à l'avant du couvercle de la
machine sous vide, la machine sous vide commence à fonctionner, une fois que la
machine sous vide commence à fonctionner, la main peut quitter la machine, la
machine termine automatiquement le processus d'emballage.
4.Mariner : Cliquez sur le bouton de durcissement en haut à droite du panneau de
commande, l'indicateur de durcissement s'allumera, ajustera le temps de
pompage et effectuera le travail de durcissement. À l’heure actuelle, la machine
aspire uniquement sans sceller.

- 7 -
TROUBLESHOOTING TABLE
Faute
Cause possible
Rectifier
L'appareil ne
s'allume pas
La fiche d’alimentation n’est
pas branchée.
Branchez la fiche d'alimentation.
Cordon d'alimentation
défectueux
Envoyer l'appareil au service client
Prise de courant
défectueuse
Sélectionnez un autre point de vente
Un vide complet
n'est pas créé
dans le sac.
L'extrémité ouverte du sac
n'est pas complètement à
l'intérieur de la chambre à
vide
Positionner correctement le sac
Le sac est défectueux
Sélectionnez un autre sac
Il y a des résidus sur la
soudure et le joint
Nettoyer les soudures/joints et
réessayer une fois qu'ils sont secs
Le sac n'est pas
scellé
correctement
La barre de soudure
surchauffe, ce qui fait fondre
le sac
Ouvrez le couvercle de l'appareil et
laissez-le refroidir pendant quelques
minutes. La barre de scellage doit être
remplacée.
Barre de soudure
défectueuse.
- 8 -
Le sac ne
maintenir le vide
après l'avoir
scellé
Le sac est défectueux
Sélectionnez un autre sac ; enroulez
du papier autour des bords tranchants
du sac.
Des fuites se produisent le
long du cordon de soudure à
cause de plis, de miettes, de
graisse ou de liquides.
Ouvrez à nouveau le sac et nettoyez
la partie interne supérieure du sac.
Retirez tout corps étranger qui pourrait
se trouver sur la barbe de soudure
avant de sceller.
Ce produit est soumis aux dispositions de la directive européenne
2012/19/CE. Le symbole représentant une poubelle barrée indique que
le produit nécessite une collecte sélective des déchets dans l'Union
européenne. Ceci s'applique au produit et à tous les accessoires
marqués de ce symbole. Les produits marqués comme tels ne peuvent
pas être jetés avec les ordures ménagères normales mais doivent être
déposés dans un point de collecte pour le recyclage des appareils
électriques et électroniques.
MODEL AND PARAMETERS
Modèle
États-Unis : YJ-300TV1
EUR、AUS:
YJ-300TV2, YJ-300TV3
États-Unis : YJ-260TV1
EUR、AUS:
YJ-260TV2, YJ-260TV3
Tension
États-Unis : 120 V/60 Hz.
EUR、AUS:230 V/50 Hz
États-Unis : 120 V/60 Hz.
EUR、AUS:230 V/50 Hz
Modèle de pompe à
vide
Pompe à piston
Pompe à piston
Longueur du joint
290mm
270 mm
Degré de vide
maximum
-95Kpa
-95Kpa
Dimension
(L * L * H)
540*469*342mm
520*449*342mm

- 9 -
SPARE PARTS LIST
CHANGE HIGH TEMPERATURE CLOTH
Nom
Quantité
1. Élément chauffant
2 pièces
2. Tissu en téflon
2 pièces
3. Plaque de remplissage
1 PCS
4. tube de sécurité
2 pièces
5. Clé hexagonale
1 PCS
6. Bande d'étanchéité de la chambre
1 PCS
7. Cordon d'alimentation
1 PCS
8. Sacs 20x25cm
30 pièces
9. Manuel d'utilisation
1 PCS
1. Retirez la base en aluminium
2. Enlevez l'ancien
tissu haute
température
3 . Appliquer un nouveau chiffon haute
4. Gardez un peu de température
- 10 -
température
élevée
tissu des deux côtés
5. Tissu lisse à haute température
6. Remplacez la base en aluminium


Zertifikat für technischen Support und E-Garantie
www.vevor.com/support
KONTINUIERLICHE SIEGELMASCHINE
BENUTZERHANDBUCH
We continue to be committed to provide you tools with competitive price.
"Save Half", "Half Price" or any other similar expressions used by us only represents an
estimate of savings you might benefit from buying certain tools with us compared to the major
top brands and does not necessarily mean to cover all categories of tools offered by us. You
are kindly reminded to verify carefully when you are placing an order with us if you are
actually saving half in comparison with the top major brands.

- 1 -
MODELL: YJ-300TV1 / YJ-300TV2 / YJ-300TV3 / YJ-260TV1 / YJ-260TV2 /
YJ-260TV3
(Das Bild dient nur als Referenz, bitte beziehen Sie sich auf das tatsächliche
Objekt)
Have product questions? Need technical support? Please feel free to
contact us:
Technical Support and E-Warranty Certificate
www.vevor.com/support
NEED HELP? CONTACT US!
CONTINUOUS SEALING
MACHINE

- 2 -
This is the original instruction, please read all manual instructions
carefully before operating. VEVOR reserves a clear interpretation of our
user manual. The appearance of the product shall be subject to the
product you received. Please forgive us that we won't inform you again if
there are any technology or software updates on our product.
SAFETY INSTRUCTION AND PRECAUTIONS
WARNUNG:
7. vor der Inbetriebnahme alle MONTAGE- UND
BEDIENUNGSANLEITUNGEN sorgfältig durch und stellen Sie sicher,
dass Sie sie verstanden haben.
8. Die Nichtbeachtung der Sicherheitsregeln und anderer grundlegender
Sicherheitsvorkehrungen kann zu schweren Verletzungen führen.
9. Halten Sie klare Erklärungen in unserem Benutzerhandbuch bereit. Das
Aussehen des Produkts hängt von dem Produkt ab, das Sie erhalten
haben. Bitte verzeihen Sie uns, wenn es technische oder
Software-Updates für unsere Produkte gibt, und wir werden Sie nicht
erneut benachrichtigen.
GENERAL SAFETY RULES
Bitte lesen Sie vor der ersten Inbetriebnahme der Produkte die gesamte
Bedienungsanleitung durch, sie enthält wichtige Hinweise zur richtigen
Bedienung.
Bei Schäden, die durch Nichtbeachten der Bedienungsanleitung entstehen,
erlischt die Garantie/Gewährleistung. Eine Haftung für sämtliche Folgeschäden ist
ausgeschlossen!
Für Sach- und Personenschäden, die durch unsachgemäßen Gebrauch oder
Nichtbeachten der Sicherheitshinweise verursacht werden, übernehmen wir keine
Haftung! In diesen Fällen erlischt die Garantie/Gewährleistung.
Aus Sicherheits- und Zulassungsgründen (CE) ist das eigenmächtige Umbauen,

- 3 -
Verändern oder Demontieren der Produkte nicht zulässig.
Das Produkt ist kein Spielzeug und muss außerhalb der Reichweite von Kindern
aufbewahrt werden.
Deshalb ist in Anwesenheit von Kindern besondere Vorsicht geboten.
Das Produkt darf nicht feucht oder nass werden, es ist nur für den Gebrauch in
trockenen Innenräumen vorgesehen (nicht in Badezimmern oder ähnlich feuchten
Bereichen). Es besteht die Gefahr eines tödlichen Stromschlags.
Setzen Sie das Produkt und sein Zubehör weder Feuchtigkeit noch extrem hohen
bzw. niedrigen Temperaturen aus.
Lassen Sie Verpackungsmaterialien nicht unbeaufsichtigt. Sie können für Kinder
zu gefährlichem Spielzeug werden.
Stürze, Stürze, Druck- oder Zugkräfte können die Funktion des Produkts zerstören
oder zumindest einschränken.
Stellen Sie das Gerät niemals in der Nähe von brennbaren oder leicht
entzündlichen Materialien auf.
Achten Sie immer darauf, dass sich der Drehtisch, auf dem das Objekt platziert
wird, in der Mitte des Gehäuses befindet!
Diese Maschine eignet sich zum Versiegeln von Kunststofffolien und zur
Beutelherstellung und kann in großem Umfang in der Lebensmittel-,
Medizin-, chemischen Industrie, im täglichen Gebrauch, im Saatgut und in
anderen Branchen eingesetzt werden.
Diese Maschine verwendet Kunststofffolie oder Kunststoff-Aluminiumfolie
als Material und eignet sich zur Vakuumverpackung von pastösen
Lebensmitteln, Obst, Gemüsesaucen, für die chemische Industrie, Medizin,
elektronische Bauteile, Präzisionsinstrumente, seltene Metalle und andere
Artikel. Das Produkt oxidiert und schimmelt nach der Vakuumverpackung
nicht so leicht. Besonders geeignet für Tee, Lebensmittel, Medizin und
andere Industrien. Die Versiegelungsmaschine bietet die Vorteile einer
einfachen Bedienung, eines schönen Erscheinungsbilds und einer
kompakten Struktur.
Wenn Sie annehmen, dass ein gefahrloser Betrieb nicht mehr möglich ist,
- 4 -
müssen Sie das Gerät sofort stromlos schalten und gegen unbeabsichtigten
Betrieb sichern.
Es kann davon ausgegangen werden, dass ein gefahrloser Betrieb nicht mehr
möglich ist, wenn:
- das Gerät sichtbare Schäden aufweist,
- das Gerät nicht mehr funktioniert,
- nach längerer Lagerung unter ungünstigen Bedingungen,
- nach starker Beanspruchung während des Transports.
ANLEITUNG AUFBEWAHREN
STRUCTURE DIAGRAM
1
Vakuumkappe
8
Stromschalter
2
Silikonstreifen
9
Netzstecker

- 5 -
3
Beutelpressstange
10
Leiterplatte
4
Kammerdichtstreifen
11
Magnetventil
5
Heizband
12
Heiztransformator
6
Indikator
13
Schraubenloch der hinteren
Abdeckung
7
Vakuummessgerät
14
Vakuumpumpe
OPERATING INSTRUCTIONS
1.Klicken Sie auf dem Bedienfeld auf die Schaltfläche „EINSTELLUNG“ und
wählen Sie das Einstellungsziel aus.
a: Die Vakuumzeit ist im Allgemeinen auf 30-40 Sekunden eingestellt, und die
ideale Vakuumzeit kann durch Klicken auf die Schaltfläche „HEBEN“ oder
„SENKEN“ eingestellt werden.
b: Versiegelungszeit: Klicken Sie zweimal auf die Schaltfläche „Einstellen“. Die
Versiegelungszeit wird im Allgemeinen auf 1,5–2 Sekunden eingestellt und die
Versiegelungszeit richtet sich nach der Dicke des Vakuumbeutels. Stellen Sie die
Siegelzeit nicht zu lang ein, um den Siegelheizstreifen zu verbrennen.
C. Nachdem Sie die Versiegelungszeit eingestellt haben, klicken Sie erneut auf
die Einstellungsschaltfläche, um die Abkühlzeit einzustellen, normalerweise 3–5
Sekunden. Klicken Sie nach dem EINSTELLEN der Abkühlzeit auf die
Schaltfläche „Einstellen“ und die Buchstaben „e“ werden angezeigt.
D. wird auf dem Bedienfeld angezeigt und zeigt das Ende des Einstellvorgangs
an.
- 6 -
2. Legen Sie das zu verpackende Produkt in die Vakuumkammer. Nehmen Sie
den Beutelpressstab und legen Sie den Vakuumbeutel flach auf den Siegelstreifen.
Lassen Sie den Beutelpressstab fallen.
3. Drücken Sie während des Betriebs mit der Hand auf das vordere Ende der
Vakuumhaube. Drücken Sie während des Betriebs mit der Hand auf den Rand der
Vakuumhaube. Klicken Sie auf die Starttaste am vorderen Ende der
Vakuummaschinenabdeckung, die Vakuummaschine beginnt zu arbeiten,
nachdem die Vakuummaschine zu laufen beginnt, kann die Hand die Maschine
- 7 -
verlassen, die Maschine schließt den Verpackungsvorgang automatisch ab.
4. Marinieren: Klicken Sie auf die Schaltfläche „Aushärtung“ oben rechts im
Bedienfeld. Die Aushärtungsanzeige leuchtet auf, passt die Pumpzeit an und führt
die Aushärtung durch. Zu diesem Zeitpunkt saugt die Maschine nur ohne
Versiegelung.
TROUBLESHOOTING TABLE
Fehler
Mögliche Ursache
Zur Korrektur
Gerät lässt sich
Netzstecker ist nicht
Stecken Sie den Netzstecker ein.

- 8 -
nicht einschalten
eingesteckt.
Defektes Netzkabel
Senden Sie das Gerät an den
Kundendienst
Steckdose defekt
Wählen Sie eine andere Steckdose
Es entsteht kein
vollständiges
Vakuum im
Beutel.
Das offene Ende des
Beutels befindet sich
nicht vollständig in der
Vakuumkammer
Positionieren Sie die Tasche richtig
Die Tasche ist defekt
Wählen Sie eine andere Tasche
Es sind Rückstände an
der Schweißnaht und der
Dichtung vorhanden
Reinigen Sie die
Schweißnähte/Dichtungen und
versuchen Sie es erneut, sobald sie
trocken sind
Die Tasche ist
nicht da
richtig abgedichtet
Die Schweißleiste
überhitzt, sodass der
Beutel schmilzt
Öffnen Sie die Abdeckung des Geräts
und lassen Sie es einige Minuten
abkühlen. Die Versiegelungsleiste muss
ersetzt werden.
Defekte Schweißleiste.
Die Tasche Halten
Sie das Vakuum,
nachdem es
versiegelt wurde
Die Tasche ist defekt
Wählen Sie eine andere Tüte und wickeln
Sie Papier um alle scharfen Kanten in der
Tüte.
Es kommt zu
Undichtigkeiten entlang
der Schweißnaht durch
Falten, Krümel, Fett oder
Flüssigkeiten.
Öffnen Sie den Beutel erneut und
reinigen Sie die obere Beutel-Innenseite.
Entfernen Sie vor dem Verschließen
eventuell vorhandene Fremdkörper auf
dem Schweißdraht.
Dieses Produkt unterliegt den Bestimmungen der europäischen
Richtlinie 2012/19/EU. Das Symbol einer durchgestrichenen Mülltonne
auf Rädern weist darauf hin, dass dieses Produkt in der Europäischen
Union einer getrennten Müllentsorgung unterliegt. Dies gilt für das
Produkt und alle mit diesem Symbol gekennzeichneten Zubehörteile.
So gekennzeichnete Produkte dürfen nicht im normalen Hausmüll
entsorgt werden, sondern müssen an einer Sammelstelle für das
Recycling von elektrischen und elektronischen Geräten abgegeben

- 9 -
werden.
MODEL AND PARAMETERS
Modell
USA: YJ-300TV1
EUR, AUS:
YJ-300TV2, YJ-300TV3
USA: YJ-260TV1
EUR, AUS:
YJ-260TV2, YJ-260TV3
Stromspannung
USA: 120 V/60 Hz
EUR, AUS: 230 V/50 Hz
USA: 120 V/60 Hz
EUR, AUS: 230 V/50 Hz
Vakuumpumpenmo
dell
Kolbenpumpe
Kolbenpumpe
Dichtungslänge
290mm
270mm
Maximaler
Vakuumgrad
-95Kpa
-95Kpa
Abmessungen
(L * B * H)
540*469*342mm
520*449*342mm
SPARE PARTS LIST
Name
Menge
1.Heizelement
2 Stk
2.Teflontuch
2 Stk
3. Füllplatte
1 Stück
4.Sicherheitsrohr
2 Stk
5. Sechskantschlüssel
1 Stück
6.Dichtungsstreifen der Kammer
1 Stück
7.Netzkabel
1 Stück
- 10 -
CHANGE HIGH TEMPERATURE CLOTH
8.Taschen 20x25cm
30 Stck.
9.Benutzerhandbuch
1 Stück
1. Nehmen Sie die Aluminiumbasis
heraus
2.Reißen Sie das Alte ab
Hochtemperaturtuch
3. Neues Hochtemperaturtuch
auftragen
4.Halten Sie einige hohe Temperaturen
Tuch auf beiden Seiten
5.Glattes Hochtemperaturtuch
6.Ersetzen Sie die Aluminiumbasis

- 11 -


Supporto tecnico e certificato di garanzia elettronica
www.vevor.com/support
MACCHINA PER LA SIGILLATURA CONTINUA
MANUALE D'USO
We continue to be committed to provide you tools with competitive price.
"Save Half", "Half Price" or any other similar expressions used by us only represents an
estimate of savings you might benefit from buying certain tools with us compared to the major
top brands and does not necessarily mean to cover all categories of tools offered by us. You
are kindly reminded to verify carefully when you are placing an order with us if you are
actually saving half in comparison with the top major brands.

- 1 -
MODELLO: YJ-300TV1 / YJ-300TV2 / YJ-300TV3 / YJ-260TV1 / YJ-260TV2 /
YJ-260TV3
(L'immagine è solo di riferimento, fare riferimento all'oggetto reale)
Have product questions? Need technical support? Please feel free to
contact us:
Technical Support and E-Warranty Certificate
www.vevor.com/support
NEED HELP? CONTACT US!
This is the original instruction, please read all manual instructions
carefully before operating. VEVOR reserves a clear interpretation of our
user manual. The appearance of the product shall be subject to the
product you received. Please forgive us that we won't inform you again if
there are any technology or software updates on our product.
CONTINUOUS SEALING
MACHINE

- 2 -
SAFETY INSTRUCTION AND PRECAUTIONS
AVVERTIMENTO:
10. Leggere attentamente e comprendere tutte le ISTRUZIONI DI
MONTAGGIO E FUNZIONAMENTO prima dell'uso.
11. La mancata osservanza delle norme di sicurezza e di altre precauzioni
di sicurezza di base può provocare gravi lesioni personali.
12. Mantieni spiegazioni chiare nel nostro manuale utente. L'aspetto del
prodotto dipende dal prodotto ricevuto. Vi preghiamo di perdonarci se sono
presenti aggiornamenti tecnici o software ai nostri prodotti e non vi
informeremo più.
GENERAL SAFETY RULES
Si prega di leggere tutte le istruzioni per l'uso prima di utilizzare i prodotti per la
prima volta; Contengono informazioni importanti sul corretto funzionamento.
In caso di danni derivanti dalla mancata osservanza delle istruzioni per l'uso la
garanzia decade. È esclusa la responsabilità per tutti i danni consequenziali!
Non ci assumiamo alcuna responsabilità per danni materiali o lesioni personali
causati da un uso improprio o dalla mancata osservanza delle istruzioni di
sicurezza! In tali casi la garanzia/garanzia sarà nulla
La conversione, modifica o smontaggio non autorizzata dei prodotti è
inammissibile per motivi di sicurezza e approvazione (CE).
Il prodotto non è un giocattolo e deve essere tenuto fuori dalla portata dei bambini.
Occorre quindi prestare particolare attenzione in caso di presenza di bambini.
Il prodotto non deve inumidirsi o bagnarsi, è destinato esclusivamente all'uso in
ambienti interni asciutti (non bagni o aree simili umide). Esiste il rischio di scossa
elettrica mortale.
Non esporre il prodotto o i suoi accessori all'umidità o a temperature

- 3 -
estremamente alte o basse.
Non lasciare incustoditi i materiali di imballaggio. Potrebbero diventare pericolosi
materiali di gioco per i bambini.
Cadute, cadute, pressioni o forze di trazione potrebbero distruggere o almeno
limitare il funzionamento del prodotto.
Non posizionare mai l'apparecchio in prossimità di materiali combustibili o
facilmente infiammabili.
Assicurarsi sempre che la tavola rotante su cui è posizionato l'oggetto si trovi al
centro dell'alloggiamento!
Questa macchina è adatta per la sigillatura di film plastici, la realizzazione di
sacchetti, può essere ampiamente utilizzata nell'industria alimentare,
medica, chimica, nell'uso quotidiano, nelle sementi e in altri settori.
Questa macchina utilizza film plastico o film plastico di alluminio come
materiale, confezionamento sottovuoto per pasta alimentare, frutta, salse
vegetali, industria chimica, medicina, componenti elettronici, strumenti di
precisione, metalli rari e altri articoli. Il prodotto dopo il confezionamento
sottovuoto non è facile da ossidare e modellare. Particolarmente adatto per
tè, cibo, medicine e altri settori. La sigillatrice presenta i vantaggi di un
funzionamento semplice, un bell'aspetto e una struttura compatta.
Se avete motivo di ritenere che non sia più possibile un funzionamento sicuro,
scollegate immediatamente l'apparecchio e assicuratelo contro un utilizzo
involontario.
Si può presumere che un funzionamento sicuro non sia più possibile se:
- il dispositivo presenta segni visibili di danneggiamento,
- il dispositivo non funziona più,
- dopo un lungo periodo di immagazzinamento in condizioni sfavorevoli,
- a seguito di forti sollecitazioni durante il trasporto.
CONSERVA QUESTE ISTRUZIONI

- 4 -
STRUCTURE DIAGRAM
1
Tappo sottovuoto
8
Interruttore di alimentazione
2
Striscia in silicone
9
Spina di alimentazione
3
Asta premisacco
10
Scheda di circuito
4
Striscia di tenuta della camera
11
Valvola solenoide
5
Striscia riscaldante
12
Trasformatore di riscaldamento
6
indicatore
13
Foro per la vite del coperchio
posteriore
7
Vacuometro
14
Pompa a vuoto

- 5 -
OPERATING INSTRUCTIONS
1.Fare clic sul pulsante "IMPOSTAZIONE" sul pannello di controllo e selezionare
la destinazione dell'impostazione.
a: Il tempo di vuoto è generalmente impostato su 30-40 S e il tempo di vuoto
ideale può essere impostato facendo clic sul pulsante "AUMENTA" o "ABBASSA".
b: Tempo di sigillatura: fare clic due volte sul pulsante di impostazione, il tempo di
sigillatura è generalmente impostato su 1,5-2S e il tempo di sigillatura è impostato
in base allo spessore del sacchetto sottovuoto. Non impostare un tempo di
sigillatura troppo lungo per bruciare la striscia riscaldante di sigillatura.
C. Dopo aver impostato il tempo di sigillatura, fare nuovamente clic sul pulsante di
impostazione per impostare il tempo di raffreddamento, in genere 3-5 secondi.
Dopo aver IMPOSTATO il tempo di raffreddamento, fare clic sul pulsante
Impostazione e sulle lettere e.
D. verrà visualizzato sul pannello di controllo, indicando la fine del processo di
impostazione.
2. Posizionare il prodotto da confezionare nella camera a vuoto. Prendi il
bastoncino premisacchetto e posiziona il sacchetto sottovuoto piatto sulla striscia
di tenuta. Lascia cadere il sacchetto e premi il bastoncino.

- 6 -
3.Premere manualmente l'estremità anteriore della cappa di aspirazione durante il
funzionamento. Premere manualmente il bordo della cappa di aspirazione durante
il funzionamento. Fare clic sul pulsante di avvio nella parte anteriore del coperchio
della macchina sottovuoto, la macchina sottovuoto inizia a funzionare, dopo che la
macchina sottovuoto inizia a funzionare, la mano può lasciare la macchina, la
macchina completa automaticamente il processo di confezionamento.
4.Marinazione: fare clic sul pulsante di polimerizzazione in alto a destra del
pannello di controllo, l'indicatore di polimerizzazione si accenderà, regolerà il
tempo di pompaggio ed eseguirà il lavoro di polimerizzazione. In questo momento
la macchina sta solo aspirando senza sigillare.
- 7 -
TROUBLESHOOTING TABLE
Colpa
Causa possibile
Rettificare
Il dispositivo non si
accende
La spina di alimentazione
non è inserita.
Collegare la spina di alimentazione.
Cavo di alimentazione
difettoso
Invia il dispositivo al servizio clienti
Presa difettosa
Seleziona un'altra presa
Nel sacchetto non
viene creato il
vuoto completo.
L'estremità aperta del
sacchetto non è
completamente
all'interno della camera a
vuoto
Posizionare correttamente la borsa
La borsa è difettosa
Seleziona un'altra borsa
Sono presenti residui
sulla saldatura e sulla
guarnizione
Pulire le saldature/guarnizioni e riprovare
una volta asciutte
La borsa non
esiste
sigillato
correttamente
La barra saldante si
surriscalda e il sacchetto
si scioglie
Aprire il coperchio dell'unità e lasciarla
raffreddare per alcuni minuti. La barra
saldante deve essere sostituita.
Barra saldante difettosa.
- 8 -
La borsa no
mantenere il vuoto
dopo che è stato
sigillato
La borsa è difettosa
Seleziona un'altra borsa; avvolgere la
carta attorno agli eventuali bordi taglienti
all'interno del sacchetto.
Sono presenti perdite
lungo il cordone di
saldatura a causa di
pieghe, briciole, grasso o
liquidi.
Aprire nuovamente il sacchetto e pulire
la parte interna superiore del sacchetto.
Rimuovere eventuali corpi estranei che
potrebbero trovarsi sulla barra saldante
prima della sigillatura.
Questo prodotto è soggetto alle disposizioni della Direttiva Europea
2012/19/CE. Il simbolo del bidone della spazzatura barrato indica che
nell'Unione Europea il prodotto richiede la raccolta differenziata dei
rifiuti. Ciò vale per il prodotto e tutti gli accessori contrassegnati da
questo simbolo. I prodotti contrassegnati come tali non possono essere
smaltiti con i normali rifiuti domestici ma devono essere portati in un
punto di raccolta per il riciclaggio di dispositivi elettrici ed elettronici.
MODEL AND PARAMETERS
Modello
Stati Uniti: YJ-300TV1
EUR, AUS:
YJ-300TV2, YJ-300TV3
Stati Uniti: YJ-260TV1
EUR, AUS:
YJ-260TV2、YJ-260TV3
Voltaggio
Stati Uniti: 120 V/60 Hz
EUR, Australia: 230 V/50 Hz
Stati Uniti: 120 V/60 Hz
EUR, Australia: 230 V/50 Hz
Modello di pompa
per vuoto
Pompa a pistone
Pompa a pistone
Lunghezza della
guarnizione
290 mm
270 mm
Grado massimo di
vuoto
-95Kpa
-95Kpa
Dimensione
(L * P * A)
540*469*342mm
520*449*342mm
- 9 -
SPARE PARTS LIST
CHANGE HIGH TEMPERATURE CLOTH
Nome
Quantità
1.Elemento riscaldante
2 pezzi
2.Panno in teflon
2 pezzi
3.Piatto di riempimento
1 pz
4. Tubo di sicurezza
2 pezzi
5.Chiave esagonale
1 pz
6. Striscia sigillante della camera
1 pz
7. Cavo di alimentazione
1 pz
8.Borse 20x25 cm
30 pezzi
9. Manuale dell'utente
1 pz
1. Estrarre la base in alluminio
2. Strappare il vecchio
panno ad alta
temperatura
3 . Applicare un nuovo panno per alte
temperature
4.Mantenere un po' ad alta temperatura
panno su entrambi i lati
- 10 -
5. Panno liscio per alte temperature
6.Sostituire la base in alluminio


Soporte técnico y certificado de garantía electrónica
www.vevor.com/support
MÁQUINA DE SELLADO CONTINUO
MANUAL DE USUARIO
We continue to be committed to provide you tools with competitive price.
"Save Half", "Half Price" or any other similar expressions used by us only represents an
estimate of savings you might benefit from buying certain tools with us compared to the major
top brands and does not necessarily mean to cover all categories of tools offered by us. You
are kindly reminded to verify carefully when you are placing an order with us if you are
actually saving half in comparison with the top major brands.

- 1 -
MODELO: YJ-300TV1 / YJ-300TV2 / YJ-300TV3 / YJ-260TV1 / YJ-260TV2 /
YJ-260TV3
(La imagen es solo para referencia, consulte el objeto real)
Have product questions? Need technical support? Please feel free to
contact us:
Technical Support and E-Warranty Certificate
www.vevor.com/support
NEED HELP? CONTACT US!
This is the original instruction, please read all manual instructions
carefully before operating. VEVOR reserves a clear interpretation of our
user manual. The appearance of the product shall be subject to the
product you received. Please forgive us that we won't inform you again if
there are any technology or software updates on our product.
CONTINUOUS SEALING
MACHINE

- 2 -
SAFETY INSTRUCTION AND PRECAUTIONS
ADVERTENCIA:
13. Lea atentamente y comprenda todas las INSTRUCCIONES DE
MONTAJE Y OPERACIÓN antes de operar.
14. El incumplimiento de las reglas de seguridad y otras precauciones
básicas de seguridad puede provocar lesiones personales graves.
15. Mantenga explicaciones claras en nuestro manual de usuario. La
apariencia del producto depende del producto que recibió. Perdónanos si
hay actualizaciones técnicas o de software para nuestros productos y no
te lo notificaremos nuevamente.
GENERAL SAFETY RULES
Lea todas las instrucciones de funcionamiento antes de utilizar los productos por
primera vez; Contienen información importante sobre el correcto funcionamiento.
La garantía quedará anulada si se producen daños como resultado del
incumplimiento de las instrucciones de funcionamiento. ¡Se excluye la
responsabilidad por cualquier daño consecuente!
¡No asumimos ninguna responsabilidad por daños a la propiedad o lesiones
personales causados por un uso inadecuado o por el incumplimiento de las
instrucciones de seguridad! En tales casos la garantía quedará anulada.
La conversión no autorizada, la modificación o el desmontaje de los productos son
inadmisibles por motivos de seguridad y aprobación (CE).
El producto no es un juguete y debe mantenerse fuera del alcance de los niños.
Por lo tanto, se debe tener especial cuidado si hay niños presentes.
El producto no debe humedecerse ni mojarse, solo está diseñado para usarse en
lugares interiores secos (no en baños ni áreas similarmente húmedas). Existe
riesgo de descarga eléctrica fatal.

- 3 -
No exponga el producto ni sus accesorios a humedad ni a temperaturas
extremadamente altas o bajas.
No deje los materiales de embalaje desatendidos. Pueden convertirse en material
de juego peligroso para los niños.
Caídas, caídas, presiones o fuerzas de tracción podrían destruir o al menos limitar
el funcionamiento del producto.
Nunca coloque el dispositivo cerca de materiales combustibles o fácilmente
inflamables.
¡Asegúrese siempre de que la mesa giratoria sobre la que se coloca el objeto esté
situada en el centro de la carcasa!
Esta máquina es adecuada para sellar películas plásticas y fabricar bolsas, y
puede usarse ampliamente en alimentos, medicinas, industrias químicas,
uso diario, semillas y otras industrias.
Esta máquina toma película plástica o película plástica de aluminio como
material, envasado al vacío para alimentos en pasta, frutas, verduras en
salsa, industria química, medicina, componentes electrónicos, instrumentos
de precisión, metales raros y otros artículos. El producto después del
envasado al vacío no se oxida ni se moldea fácilmente. Especialmente
indicado para la industria del té, la alimentación, la medicina y otras
industrias. La máquina selladora tiene las ventajas de un funcionamiento
sencillo, una apariencia hermosa y una estructura compacta.
Si tiene motivos para suponer que ya no es posible un funcionamiento seguro,
desconecte el dispositivo inmediatamente y asegúrelo contra un funcionamiento
involuntario.
Se puede suponer que ya no es posible un funcionamiento seguro si:
- el dispositivo presenta signos visibles de daños,
- el dispositivo ya no funciona,
- tras un largo período de almacenamiento en condiciones desfavorables,
- después de un estrés intenso durante el transporte.
GUARDA ESTAS INSTRUCCIONES

- 4 -
STRUCTURE DIAGRAM
1
tapa de vacío
8
Interruptor de alimentación
2
tira de silicona
9
Enchufe
3
Varilla de prensa de bolsa
10
Placa de circuito
4
Tira de sellado de la cámara
11
Válvula de solenoide
5
Tira calefactora
12
Transformador de calefacción
6
indicador
13
Orificio para tornillos de la
cubierta trasera
7
Indicador de vacio
14
Bomba aspiradora
- 5 -
OPERATING INSTRUCTIONS
1. Haga clic en el botón "CONFIGURACIÓN" en el panel de control y seleccione el
objetivo de configuración.
a: El tiempo de vacío generalmente se establece en 30-40 S, y el tiempo de vacío
ideal se puede configurar haciendo clic en el botón "Subir" o "Bajar".
b: Tiempo de sellado: haga clic en el botón Configurar dos veces, el tiempo de
sellado generalmente se establece en 1,5-2 S y el tiempo de sellado se establece
de acuerdo con el grosor de la bolsa de vacío. No establezca el tiempo de sellado
demasiado largo para quemar la tira calefactora de sellado.
C. Después de configurar el tiempo de sellado, haga clic nuevamente en el botón
de configuración para configurar el tiempo de enfriamiento, generalmente 3-5S.
Después de CONFIGURAR el tiempo de enfriamiento, haga clic en el botón
Configuración y las letras e.
d. Se mostrará en el panel de control, indicando el final del proceso de
configuración.
2.Colocar el producto a envasar en la cámara de vacío. Tome la varilla
prensadora de bolsas y coloque la bolsa de vacío sobre la tira de sellado. Suelte
la barra de prensa de bolsas.

- 6 -
3.Presione el extremo frontal de la campana de aspiración con la mano durante el
funcionamiento. Presione el borde de la campana de vacío con la mano durante el
funcionamiento. Haga clic en el botón de inicio en el extremo frontal de la cubierta
de la máquina de vacío, la máquina de vacío comienza a funcionar, después de
que la máquina de vacío comienza a funcionar, la mano puede salir de la máquina,
la máquina completa automáticamente el proceso de envasado.
4. Marinar: Haga clic en el botón de curado en la parte superior derecha del panel
de control, el indicador de curado se iluminará, ajustará el tiempo de bombeo y
realizará el trabajo de curado. En este momento la máquina sólo está aspirando
sin sellar.
- 7 -
TROUBLESHOOTING TABLE
Falla
Causa posible
Para rectificar
El dispositivo no
enciende
El enchufe no está
enchufado.
Conecte el enchufe de alimentación.
Cable de alimentación
defectuoso
Enviar dispositivo al Servicio de
Atención al Cliente
Toma de corriente
defectuosa
Selecciona otro punto de venta
No se crea un vacío
completo en la bolsa.
El extremo abierto de la
bolsa no está
completamente dentro de
la cámara de vacío.
Colocar la bolsa correctamente
La bolsa esta defectuosa
Selecciona otra bolsa
Hay residuos en la
soldadura y en el sello.
Limpiar las soldaduras/juntas y volver
a intentarlo una vez que estén secas.
La bolsa no está
siendo
sellado
correctamente
La barra selladora se
sobrecalienta y la bolsa
se derrite.
Abra la tapa de la unidad y déjela
enfriar durante unos minutos. Es
necesario reemplazar la barra de
sellado.
Barra de sellado de
defectos.

- 8 -
La bolsa no
mantenga el vacío
después de que haya
sido sellado
La bolsa esta defectuosa
Seleccione otra bolsa; envuelva papel
alrededor de los bordes afilados
dentro de la bolsa.
Hay fugas a lo largo de la
costura de soldadura
debido a arrugas, migas,
grasa o líquidos.
Abrir nuevamente la bolsa y limpiar la
parte superior interna de la bolsa.
Retirar cualquier materia extraña que
pueda haber en la barra de soldadura
antes de sellar.
Este producto está sujeto a las disposiciones de la Directiva Europea
2012/19/CE. El símbolo que muestra un contenedor con ruedas
tachado indica que el producto requiere recogida selectiva de basura
en la Unión Europea. Esto se aplica al producto y a todos los
accesorios marcados con este símbolo. Los productos marcados como
tales no podrán desecharse junto con la basura doméstica normal, sino
que deberán llevarse a un punto de recogida para el reciclaje de
aparatos eléctricos y electrónicos.
MODEL AND PARAMETERS
Modelo
Estados Unidos: YJ-300TV1
EUR、AUS:
YJ-300TV2、YJ-300TV3
Estados Unidos: YJ-260TV1
EUR、AUS:
YJ-260TV2、YJ-260TV3
Voltaje
EE. UU.: 120 V/60 Hz
EUR、AUS: 230V/50Hz
EE. UU.: 120 V/60 Hz
EUR、AUS: 230V/50Hz
Modelo de bomba
de vacío
Bomba de pistón
Bomba de pistón
Longitud del sello
290 mm
270 mm
Grado máximo de
vacío
-95Kpa
-95Kpa
Dimensión
(largo * ancho *
alto)
540*469*342mm
520*449*342mm
- 9 -
SPARE PARTS LIST
CHANGE HIGH TEMPERATURE CLOTH
Nombre
Cantidad
1.elemento calefactor
2 piezas
2.Paño de teflón
2 piezas
3.Placa de llenado
PC 1
4.Tubo de seguridad
2 piezas
5.Llave hexagonal
PC 1
6.Tira de sellado de la cámara
PC 1
7.Cable de alimentación
PC 1
8.Bolsas 20x25cm
30 piezas
9.manual de usuario
PC 1
1. Saca la base de aluminio.
2. Arranca lo viejo
paño de alta
temperatura
3 . Aplique un paño nuevo para alta
4.Mantenga algo de alta temperatura
- 10 -
temperatura
tela en ambos lados
5. Paño suave para altas temperaturas.
6.Reemplace la base de aluminio


Wsparcie techniczne i certyfikat e-gwarancji
www.vevor.com/support
CIĄGŁA MASZYNA USZCZELNIAJĄCA
INSTRUKCJA OBSŁUGI
We continue to be committed to provide you tools with competitive price.
"Save Half", "Half Price" or any other similar expressions used by us only represents an
estimate of savings you might benefit from buying certain tools with us compared to the major
top brands and does not necessarily mean to cover all categories of tools offered by us. You
are kindly reminded to verify carefully when you are placing an order with us if you are
actually saving half in comparison with the top major brands.
- 1 -
MODEL: YJ-300TV1 / YJ-300TV2 / YJ-300TV3 / YJ-260TV1 / YJ-260TV2 /
YJ-260TV3
(Zdjęcie ma charakter wyłącznie poglądowy, proszę zapoznać się z rzeczywistym
obiektem)
Have product questions? Need technical support? Please feel free to
contact us:
Technical Support and E-Warranty Certificate
www.vevor.com/support
NEED HELP? CONTACT US!
CONTINUOUS SEALING
MACHINE

- 2 -
This is the original instruction, please read all manual instructions
carefully before operating. VEVOR reserves a clear interpretation of our
user manual. The appearance of the product shall be subject to the
product you received. Please forgive us that we won't inform you again if
there are any technology or software updates on our product.
SAFETY INSTRUCTION AND PRECAUTIONS
OSTRZEŻENIE:
16. przeczytaj uważnie i zrozum całą INSTRUKCJĘ MONTAŻU I
OBSŁUGI .
17. Nieprzestrzeganie zasad bezpieczeństwa i innych podstawowych
środków ostrożności może skutkować poważnymi obrażeniami ciała.
18. W naszej instrukcji obsługi należy zachować jasne wyjaśnienia.
Wygląd produktu zależy od produktu, który otrzymałeś. Prosimy o
wyrozumiałość w przypadku pojawienia się aktualizacji technicznych lub
oprogramowania naszych produktów. Nie będziemy Państwa o tym więcej
powiadamiać.
GENERAL SAFETY RULES
Przed pierwszym użyciem produktów prosimy o zapoznanie się z całą instrukcją
obsługi; Zawierają ważne informacje dotyczące prawidłowej obsługi.
Gwarancja traci ważność, jeśli w wyniku nieprzestrzegania instrukcji obsługi
powstały szkody. Wykluczona jest odpowiedzialność za jakiekolwiek szkody
następcze!
Nie ponosimy żadnej odpowiedzialności za szkody materialne lub obrażenia ciała
powstałe na skutek nieprawidłowego użytkowania lub nieprzestrzegania
wskazówek bezpieczeństwa! W takich przypadkach gwarancja/rękojmia traci
ważność
Nieautoryzowane przeróbki, modyfikacje lub demontaż produktów są
niedopuszczalne ze względów bezpieczeństwa i ze względów homologacyjnych

- 3 -
(CE).
Produkt nie jest zabawką i należy go przechowywać w miejscu niedostępnym dla
dzieci.
Dlatego należy zachować szczególną ostrożność w przypadku obecności dzieci.
Produkt nie może zostać zawilgocony ani zmoczony. Jest przeznaczony wyłącznie
do użytku w suchych, zamkniętych pomieszczeniach (nie w łazienkach ani innych
podobnie wilgotnych miejscach). Istnieje ryzyko śmiertelnego porażenia prądem
elektrycznym.
Nie narażaj produktu ani jego akcesoriów na działanie wilgoci lub bardzo wysokich
lub niskich temperatur.
Nie pozostawiaj materiałów opakowaniowych bez nadzoru. Mogą stać się
niebezpiecznym materiałem do zabawy dla dzieci.
Upuszczenie, upadek, nacisk lub siły rozciągające mogą zniszczyć lub
przynajmniej ograniczyć działanie produktu.
Nigdy nie umieszczaj urządzenia w pobliżu materiałów palnych lub łatwopalnych.
Zawsze należy zwracać uwagę, aby stół obrotowy, na którym stawiany jest
przedmiot, znajdował się na środku obudowy!
Ta maszyna nadaje się do zgrzewania folii z tworzywa sztucznego, produkcji
torebek, może być szeroko stosowana w żywności, medycynie, przemyśle
chemicznym, codziennym użytkowaniu, nasionach i innych gałęziach
przemysłu.
Ta maszyna wykorzystuje jako materiał folię z tworzywa sztucznego lub
plastikową folię aluminiową, pakuje próżniowo do past spożywczych,
owoców, warzyw sosowych, przemysłu chemicznego, medycyny,
komponentów elektronicznych, instrumentów precyzyjnych, metali rzadkich
i innych artykułów. Produkt po zapakowaniu próżniowym nie jest łatwy do
utlenienia i pleśni. Szczególnie nadaje się do herbaty, żywności, medycyny i
innych gałęzi przemysłu. Zgrzewarka ma zalety prostej obsługi, pięknego
wyglądu i zwartej konstrukcji.
Jeżeli masz podstawy przypuszczać, że bezpieczna praca nie jest już możliwa,
należy natychmiast odłączyć urządzenie i zabezpieczyć je przed przypadkowym
- 4 -
uruchomieniem.
Można założyć, że bezpieczna praca nie jest już możliwa, jeżeli:
- urządzenie nosi widoczne ślady uszkodzeń,
- urządzenie przestało działać,
- po dłuższym okresie przechowywania w niekorzystnych warunkach,
- po dużym obciążeniu podczas transportu.
ZACHOWAJ TE INSTRUKCJE
STRUCTURE DIAGRAM
1
Korek próżniowy
8
Przycisk zasilania
2
Pasek silikonowy
9
Wtyczka zasilająca
3
Pręt dociskowy worka
10
Płytka drukowana

- 5 -
4
Listwa uszczelniająca komorę
11
Zawór elektromagnetyczny
5
Listwa grzewcza
12
Transformator grzewczy
6
wskaźnik
13
Otwór na śrubę w tylnej
pokrywie
7
Wakuometr
14
Pompa próżniowa
OPERATING INSTRUCTIONS
1.Kliknij przycisk „USTAWIENIA” na panelu sterowania i wybierz cel ustawień.
Odp.: Czas próżni jest zazwyczaj ustawiany na 30–40 sekund, a idealny czas
próżni można ustawić, klikając przycisk „PODNIŻ” lub „OBNIŻ”.
b: Czas zgrzewania: Kliknij dwukrotnie przycisk ustawiania, czas zgrzewania jest
zazwyczaj ustawiony na 1,5-2 S, a czas zgrzewania jest ustawiany w zależności
od grubości worka próżniowego. Nie ustawiaj czasu zgrzewania na zbyt długi, aby
spowodować spalenie zgrzewającej listwy grzewczej.
C. Po ustawieniu czasu zgrzewania kliknij ponownie przycisk ustawień, aby
ustawić czas chłodzenia, zwykle 3-5 sekund. Po USTAWIENIU czasu chłodzenia
kliknij przycisk Ustawienia i litery e.
D. na panelu sterowania wyświetli się, sygnalizując zakończenie procesu
ustawiania.

- 6 -
2.Włożyć pakowany produkt do komory próżniowej. Weź drążek dociskowy worka
i umieść worek próżniowy płasko na pasku zgrzewającym. Upuść drążek
dociskowy worka.
3. Podczas pracy naciśnij ręcznie przedni koniec osłony odsysającej. Podczas
pracy naciśnij ręcznie krawędź osłony odsysającej. Kliknij przycisk Start z przodu
pokrywy maszyny próżniowej, maszyna próżniowa zacznie działać, po
uruchomieniu maszyny próżniowej ręka może opuścić maszynę, maszyna
automatycznie zakończy proces pakowania.
4. Marynuj: Kliknij przycisk utwardzania w prawym górnym rogu panelu sterowania,
zaświeci się wskaźnik utwardzania, dostosuj czas pompowania i przeprowadź
utwardzanie. W tym czasie maszyna tylko odkurza bez uszczelniania.

- 7 -
TROUBLESHOOTING TABLE
Wada
Możliwa przyczyna
Korygować
Urządzenie nie
włącza się
Wtyczka zasilania nie jest
podłączona.
Podłącz wtyczkę zasilania.
Uszkodzony przewód
zasilający
Wyślij urządzenie do Działu Obsługi
Klienta
Wadliwe gniazdko
Wybierz inne gniazdko
W worku nie
wytwarza się
pełna próżnia.
Otwarty koniec worka nie
znajduje się całkowicie w
komorze próżniowej
Ułóż torbę prawidłowo
Torba ma wadę
Wybierz inną torbę
Na spawach i uszczelce
pozostały pozostałości
Oczyść spawy/uszczelki i spróbuj
ponownie, gdy wyschną
Torba nie istnieje
uszczelnione
prawidłowo
Listwa zgrzewająca
przegrzewa się, przez co
torebka się topi
Otwórz pokrywę urządzenia i
poczekaj kilka minut, aż ostygnie.
Należy wymienić listwę zgrzewającą.
Wadliwy pasek
uszczelniający.
Torba nie
przytrzymaj
Torba jest uszkodzona
Wybierz inną torbę; owiń papierem
wszystkie ostre krawędzie wewnątrz
- 8 -
odkurzacz po jego
zamknięciu
torby.
Wzdłuż szwu spawalniczego
powstają nieszczelności na
skutek zagnieceń,
okruchów, tłuszczu lub
płynów.
Otwórz ponownie worek i wyczyść
jego górną, wewnętrzną część. Przed
zgrzaniem usuń wszelkie ciała obce,
które mogły znajdować się na pręcie
zgrzewającym.
Ten produkt podlega przepisom Dyrektywy Europejskiej 2012/19/WE.
Symbol przekreślonego kosza na śmieci oznacza, że produkt wymaga
selektywnej zbiórki śmieci na terenie Unii Europejskiej. Dotyczy to
produktu i wszystkich akcesoriów oznaczonych tym symbolem.
Produktów oznaczonych jako takie nie można wyrzucać razem ze
zwykłymi odpadami domowymi, lecz należy je przekazać do punktu
zbiórki w celu recyklingu urządzeń elektrycznych i elektronicznych.
MODEL AND PARAMETERS
Model
USA: YJ-300TV1
EUR, Australia:
YJ-300TV2, YJ-300TV3
USA: YJ-260TV1
EUR, Australia:
YJ-260TV2, YJ-260TV3
Napięcie
USA: 120 V/60 Hz
EUR, Australia: 230 V/50 Hz
USA: 120 V/60 Hz
EUR, Australia: 230 V/50 Hz
Model pompy
próżniowej
Pompa tłokowa
Pompa tłokowa
Długość uszczelki
290mm
270mm
Maksymalny stopień
próżni
-95Kpa
-95Kpa
Wymiar
(dł . * szer. * wys.)
540*469*342mm
520*449*342mm
SPARE PARTS LIST
- 9 -
CHANGE HIGH TEMPERATURE CLOTH
Nazwa
Ilość
1.Element grzejny
2 szt
2. Tkanina teflonowa
2 szt
3. Płyta wypełniająca
1 szt
4.Rura zabezpieczająca
2 szt
5.Klucz sześciokątny
1 szt
6. Listwa uszczelniająca komorę
1 szt
7. Przewód zasilający
1 szt
8.Torby 20x25cm
30 szt
9. Instrukcja obsługi
1 szt
1. Wyjmij aluminiową podstawę
2. Oderwij stary
tkanina
wysokotemperaturowa
3 . Nałóż nową szmatkę odporną na
wysoką temperaturę
4. Utrzymuj wysoką temperaturę
szmatką po obu stronach
- 10 -
5. Gładka tkanina odporna na wysoką
temperaturę
6. Wymień aluminiową podstawę


Technische ondersteuning en e-garantiecertificaat
www.vevor.com/support
CONTINUE SLUITMACHINE
HANDLEIDING
We continue to be committed to provide you tools with competitive price.
"Save Half", "Half Price" or any other similar expressions used by us only represents an
estimate of savings you might benefit from buying certain tools with us compared to the major
top brands and does not necessarily mean to cover all categories of tools offered by us. You
are kindly reminded to verify carefully when you are placing an order with us if you are
actually saving half in comparison with the top major brands.

- 1 -
MODEL: YJ-300TV1 / YJ-300TV2 / YJ-300TV3 / YJ-260TV1 / YJ-260TV2 /
YJ-260TV3
(De afbeelding is alleen ter referentie, raadpleeg het werkelijke object)
Have product questions? Need technical support? Please feel free to
contact us:
Technical Support and E-Warranty Certificate
www.vevor.com/support
NEED HELP? CONTACT US!
This is the original instruction, please read all manual instructions
carefully before operating. VEVOR reserves a clear interpretation of our
user manual. The appearance of the product shall be subject to the
product you received. Please forgive us that we won't inform you again if
there are any technology or software updates on our product.
CONTINUOUS SEALING
MACHINE

- 2 -
SAFETY INSTRUCTION AND PRECAUTIONS
WAARSCHUWING:
19. Lees zorgvuldig alle MONTAGE- EN BEDIENINGSINSTRUCTIES
voordat u ermee aan de slag gaat.
20. Het niet naleven van de veiligheidsregels en andere elementaire
veiligheidsmaatregelen kan leiden tot ernstig persoonlijk letsel.
21. Zorg voor duidelijke uitleg in onze gebruikershandleiding. Het uiterlijk
van het product is afhankelijk van het product dat u heeft ontvangen.
Vergeef ons als er technische of software-updates zijn voor onze
producten, en we zullen u niet opnieuw op de hoogte stellen.
GENERAL SAFETY RULES
Lees de volledige gebruiksaanwijzing voordat u de producten voor de eerste keer
gebruikt; Ze bevatten belangrijke informatie over de juiste bediening.
Bij schade die voortvloeit uit het niet naleven van de gebruiksaanwijzing vervalt de
garantie/garantie. Aansprakelijkheid voor eventuele gevolgschade is uitgesloten!
Wij aanvaarden geen enkele aansprakelijkheid voor schade aan eigendommen of
persoonlijk letsel veroorzaakt door oneigenlijk gebruik of het niet in acht nemen
van de veiligheidsinstructies! In dergelijke gevallen vervalt de garantie/garantie
Het ongeoorloofd ombouwen, wijzigen of demonteren van de producten is om
veiligheids- en keuringsredenen (CE) niet toegestaan.
Het product is geen speelgoed en moet buiten het bereik van kinderen worden
bewaard.
Er moet daarom bijzondere voorzichtigheid worden betracht als er kinderen
aanwezig zijn.
Het product mag niet vochtig of nat worden. Het is uitsluitend bedoeld voor gebruik
op droge, binnenlocaties (niet in badkamers of soortgelijke vochtige ruimtes). Er
bestaat een risico op een dodelijke elektrische schok.

- 3 -
Stel het product en de accessoires niet bloot aan vocht of extreem hoge of lage
temperaturen.
Laat het verpakkingsmateriaal niet onbeheerd achter. Dit kan gevaarlijk
speelmateriaal voor kinderen worden.
Vallen, vallen, druk- of trekkrachten kunnen de werking van het product
vernietigen of op zijn minst beperken.
Plaats het apparaat nooit in de buurt van brandbare of licht ontvlambare
materialen.
Zorg er altijd voor dat de draaitafel waarop het object wordt geplaatst zich in het
midden van de behuizing bevindt!
Deze machine is geschikt voor het afdichten van plastic folie, het maken van
zakken en kan op grote schaal worden gebruikt in de voedingsmiddelen-,
geneeskunde-, chemische industrie, dagelijks gebruik, zaad- en andere
industrieën.
Deze machine gebruikt plastic folie of plastic aluminiumfolie als materiaal,
vacuümverpakking voor pastavoedsel, fruit, sausgroenten, chemische
industrie, medicijnen, elektronische componenten, precisie-instrumenten,
zeldzame metalen en andere artikelen. Het product is na vacuümverpakking
niet gemakkelijk te oxideren en te vormen. Vooral geschikt voor thee,
voedsel, medicijnen en andere industrieën. De sluitmachine heeft de
voordelen van eenvoudige bediening, mooi uiterlijk en compacte structuur.
Als u reden heeft om aan te nemen dat een veilige bediening niet meer mogelijk
is, koppel het apparaat dan onmiddellijk los en beveilig het tegen onbedoelde
bediening.
Er kan van worden uitgegaan dat veilig gebruik niet meer mogelijk is als:
- het apparaat zichtbare tekenen van schade vertoont,
- het apparaat functioneert niet meer,
- na een langere opslagperiode onder ongunstige omstandigheden,
- na zware belasting tijdens transport.
BEWAAR DEZE INSTRUCTIES
- 4 -
STRUCTURE DIAGRAM
1
Vacuüm dop
8
Aan/uit-schakelaar
2
Siliconen strip
9
Stekker
3
Zakpersstang
10
Printplaat
4
Kamerafdichtingsstrip
11
Magneetventiel
5
Verwarmingsstrip
12
Verwarmingstransformator
6
indicator
13
Schroefgat achterdeksel
7
Vacuümmeter
14
Vacuum pomp

- 5 -
OPERATING INSTRUCTIONS
1. Klik op de knop "INSTELLING" op het bedieningspaneel en selecteer het
insteldoel.
a: De vacuümtijd wordt doorgaans ingesteld op 30-40S, en de ideale vacuümtijd
kan worden ingesteld door op de knop "HOOG" of "LAAG" te klikken.
b: Sealtijd: klik twee keer op de instelknop, de sealtijd is over het algemeen
ingesteld op 1,5-2S en de sealtijd wordt ingesteld op basis van de dikte van de
vacuümzak. Stel de sealtijd niet te lang in om de sealverwarmingsstrip te
verbranden.
C. Nadat u de sealtijd hebt ingesteld, klikt u nogmaals op de instelknop om de
koeltijd in te stellen, meestal 3-5S. Na het INSTELLEN van de koeltijd klikt u op de
knop Instelling en op de letters e.
D. wordt weergegeven op het bedieningspaneel, wat het einde van het
instelproces aangeeft.
2. Plaats het te verpakken product in de vacuümkamer. Neem de zakkenpersstok
en plaats de vacuümzak plat op de sealstrip. Laat de zakpersstok vallen.
- 6 -
3.Druk tijdens het gebruik met de hand op de voorkant van de afzuigkap. Druk
tijdens het gebruik met de hand op de rand van de vacuümkap. Klik op de
startknop aan de voorkant van het deksel van de vacuümmachine, de
vacuümmachine begint te werken, nadat de vacuümmachine begint te lopen, kan
de hand de machine verlaten, de machine voltooit automatisch het
verpakkingsproces.
4.Marineren: Klik op de uithardingsknop rechtsboven op het bedieningspaneel, de
uithardingsindicator gaat branden, pas de pomptijd aan en voer het
uithardingswerk uit. Op dit moment zuigt de machine alleen zonder sealen.
- 7 -
TROUBLESHOOTING TABLE
Schuld
Mogelijke oorzaak
Te rectificeren
Apparaat gaat
niet aan
De stekker zit niet in het
stopcontact.
Steek de stekker in het stopcontact.
Defect netsnoer
Stuur het apparaat naar de klantenservice
Defect stopcontact
Selecteer een ander stopcontact
Er ontstaat geen
volledig vacuüm
in de zak.
Het open uiteinde van
de zak bevindt zich niet
volledig in de
vacuümkamer
Plaats de tas op de juiste manier
De tas is defect
Selecteer een andere tas
Er zitten resten op het
laswerk en de afdichting
Maak de lasnaden/afdichtingen schoon en
probeer het opnieuw zodra ze droog zijn
De tas is dat niet
correct
verzegeld
De sealbalk raakt
oververhit waardoor de
zak smelt
Open het deksel van het apparaat en laat
het een paar minuten afkoelen. Sealbalk
moet worden vervangen.
Defecte sealbalk.
De tas niet houd
het vacuüm vast
nadat het is
De tas is defect
Selecteer een andere tas; wikkel papier rond
eventuele scherpe randen in de zak.
Er zijn lekkages langs
Open de zak opnieuw en maak het bovenste
- 8 -
afgesloten
de lasnaad als gevolg
van kreukels, kruimels,
vet of vloeistoffen.
interne deel van de zak schoon. Verwijder
alle vreemde voorwerpen die zich eventueel
op het lasstaafje bevinden voordat u deze
afsluit.
Dit product valt onder de bepalingen van de Europese richtlijn
2012/19/EG. Het symbool met een doorgestreepte afvalcontainer geeft
aan dat het product in de Europese Unie een aparte afvalinzameling
vereist. Dit geldt voor het product en alle accessoires die met dit
symbool zijn gemarkeerd. Producten die als zodanig zijn gemarkeerd
mogen niet met het normale huisvuil worden weggegooid, maar moeten
naar een inzamelpunt voor recycling van elektrische en elektronische
apparaten worden gebracht.
MODEL AND PARAMETERS
Model
VS: YJ-300TV1
EUR、AUS:
YJ-300TV2, YJ-300TV3
VS: YJ-260TV1
EUR、AUS:
YJ-260TV2, YJ-260TV3
Spanning
VS: 120V/60Hz
EUR, AUS: 230V/50Hz
VS: 120V/60Hz
EUR, AUS: 230V/50Hz
Vacuümpompmodel
Zuigerpomp
Zuigerpomp
Verbindingslengte
290 mm
270 mm
Maximale
vacuümgraad
-95Kpa
-95Kpa
Dimensie
(L * B * H)
540*469*342mm
520*449*342mm
SPARE PARTS LIST
Naam
Hoeveelheid
- 9 -
CHANGE HIGH TEMPERATURE CLOTH
1. Verwarmingselement
2 stuks
2.Teflon-doek
2 stuks
3.Vulplaat
1 stuk
4. Veiligheidsbuis
2 stuks
5. Inbussleutel
1 stuk
6. Afdichtstrip van kamer
1 stuk
7. Netsnoer
1 stuk
8. Zakken 20x25cm
30 stuks
9. Gebruikershandleiding
1 stuk
1. Verwijder de aluminium basis
2. Scheur het oude af
hoge
temperatuurdoek
3 . Breng een nieuwe
hogetemperatuurdoek aan
4. Houd wat hoge temperaturen
stof aan beide zijden

- 10 -
5. Gladde doek op hoge temperatuur
6. Plaats de aluminium basis terug


Teknisk support och e-garanticertifikat
www.vevor.com/support
KONTINUERLIG TÄTNINGSMASKIN
ANVÄNDARMANUAL
We continue to be committed to provide you tools with competitive price.
"Save Half", "Half Price" or any other similar expressions used by us only represents an
estimate of savings you might benefit from buying certain tools with us compared to the major
top brands and does not necessarily mean to cover all categories of tools offered by us. You
are kindly reminded to verify carefully when you are placing an order with us if you are
actually saving half in comparison with the top major brands.

- 1 -
MODELL: YJ-300TV1 / YJ-300TV2 / YJ-300TV3 / YJ-260TV1 / YJ-260TV2 /
YJ-260TV3
(Bilden är endast för referens, se det faktiska objektet)
Have product questions? Need technical support? Please feel free to
contact us:
Technical Support and E-Warranty Certificate
www.vevor.com/support
NEED HELP? CONTACT US!
This is the original instruction, please read all manual instructions
carefully before operating. VEVOR reserves a clear interpretation of our
user manual. The appearance of the product shall be subject to the
product you received. Please forgive us that we won't inform you again if
there are any technology or software updates on our product.
CONTINUOUS SEALING
MACHINE

- 2 -
SAFETY INSTRUCTION AND PRECAUTIONS
VARNING:
22. Läs noga och förstå alla MONTERINGS- OCH
DRIFTINSTRUKTIONER innan användning.
23. Underlåtenhet att följa säkerhetsreglerna och andra grundläggande
säkerhetsåtgärder kan leda till allvarliga personskador.
24. Håll tydliga förklaringar i vår användarmanual. Produktens utseende
beror på produkten du fått. Ursäkta oss om det finns några tekniska
uppdateringar eller mjukvaruuppdateringar av våra produkter, så kommer
vi inte att meddela dig igen.
GENERAL SAFETY RULES
Läs hela bruksanvisningen innan du använder produkterna för första gången; De
innehåller viktig information om korrekt drift.
Garantin/garantin upphör att gälla om skador uppstår till följd av att
bruksanvisningen inte har följts. Ansvar för alla följdskador är uteslutet!
Vi tar inget ansvar för sakskador eller personskador orsakade av felaktig
användning eller underlåtenhet att följa säkerhetsanvisningarna! I sådana fall
upphör garantin/garantin
Den otillåtna omvandlingen, modifieringen av demonteringen av produkterna är
otillåten på grund av säkerhets- och godkännandeskäl (CE).
Produkten är inte en leksak och måste förvaras utom räckhåll för barn.
Särskild försiktighet måste därför iakttas om barn är närvarande.
Produkten får inte bli fuktig eller blöt, den är endast avsedd för användning i torra,
inomhusplatser (inte badrum eller liknande fuktiga utrymmen). Det finns risk för
dödlig elektrisk stöt.
Utsätt inte produkten eller dess tillbehör för fukt eller extremt höga eller låga

- 3 -
temperaturer.
Lämna inte förpackningsmaterial utan uppsikt. Det kan bli farligt lekmaterial för
barn.
Fall, fall, tryck eller dragkrafter kan förstöra eller åtminstone begränsa produktens
funktion.
Placera aldrig enheten i närheten av brännbara eller lättantändliga material.
Se alltid till att det roterande bordet som föremålet placeras på är placerat i mitten
av huset!
Denna maskin är lämplig för plastfilmförsegling, påsframställning, kan
användas i stor utsträckning inom livsmedel, medicin, kemisk industri,
daglig användning, frö och andra industrier.
Denna maskin tar plastfilm eller plastaluminiumfilm som material,
vakuumförpackning för pastamat, frukt, såsgrönsaker, kemisk industri,
medicin, elektroniska komponenter, precisionsinstrument, sällsynta
metaller och andra artiklar. Produkten efter vakuumförpackning är inte lätt
att oxidera och mögla. Särskilt lämplig för te, mat, medicin och andra
industrier. Tätningsmaskinen har fördelarna med enkel drift, vackert
utseende och kompakt struktur.
Om du har anledning att anta att säker användning inte längre är möjlig, koppla
ur enheten omedelbart och säkra den mot oavsiktlig användning.
Det kan antas att säker drift inte längre är möjlig om:
- enheten visar synliga tecken på skada,
- enheten fungerar inte längre,
- efter en längre tids lagring under ogynnsamma förhållanden,
- efter kraftig stress under transport.
SPARA DESSA INSTRUKTIONER
STRUCTURE DIAGRAM
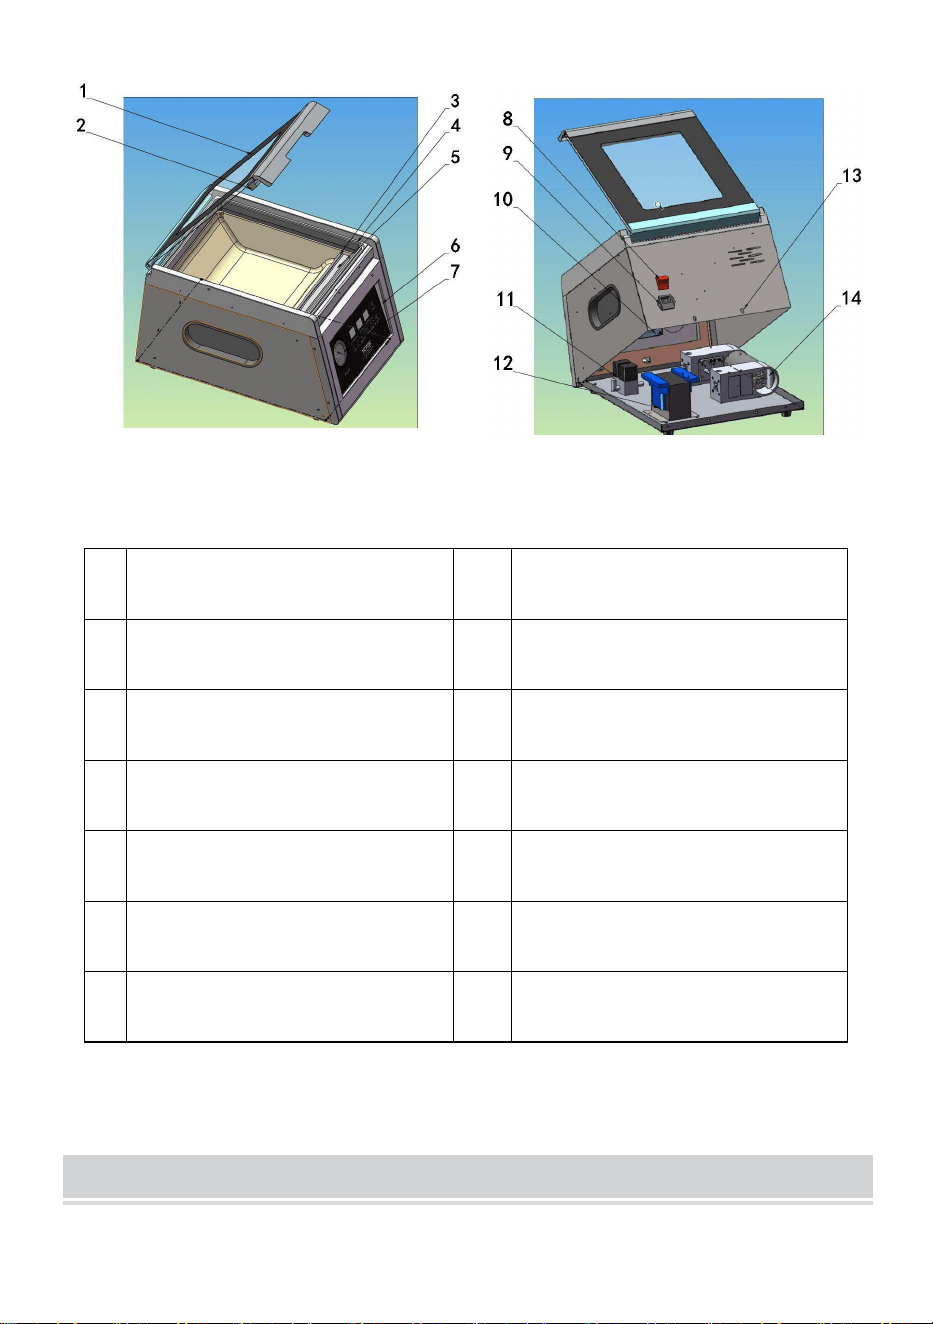
- 4 -
1
Vakuumlock
8
Strömbrytare
2
Silikonremsa
9
Strömkontakt
3
Pås pressstav
10
Kretskort
4
Kammartätningslist
11
Magnetventil
5
Värmelist
12
Värmetransformator
6
indikator
13
Skruvhål för bakstycke
7
Vakuummätare
14
Vakuumpump
OPERATING INSTRUCTIONS
1.Klicka på knappen "INSTÄLLNING" på kontrollpanelen och välj inställningsmål.
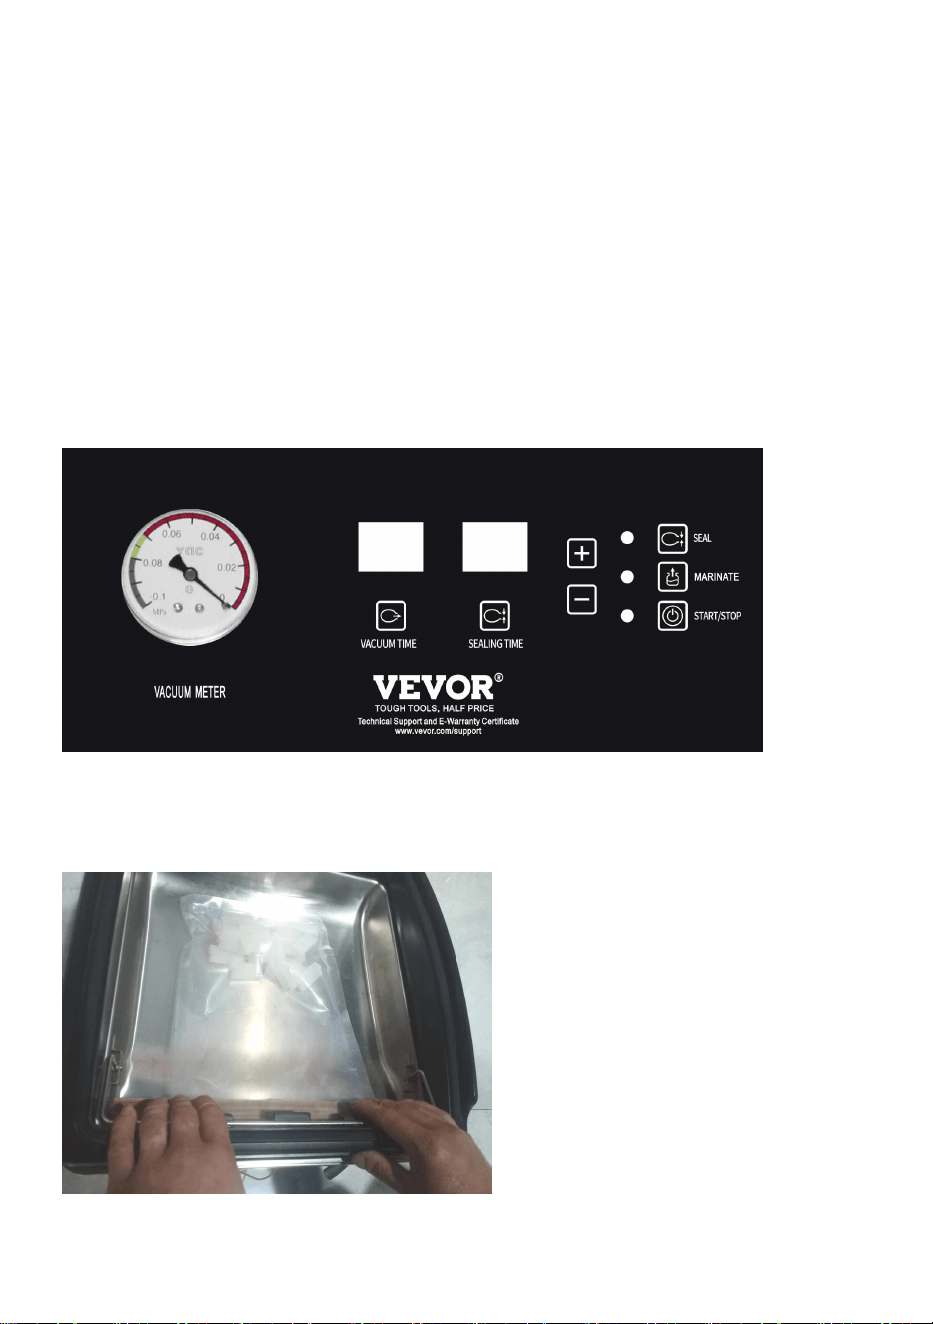
- 5 -
a: Vakuumtiden är vanligtvis inställd på 30-40S, och den ideala vakuumtiden kan
ställas in genom att klicka på knappen "HÖJ" eller "SÄNDR".
b: Förseglingstid: Klicka på inställningsknappen två gånger, förseglingstiden är i
allmänhet inställd på 1,5-2S, och förseglingstiden är inställd enligt tjockleken på
vakuumpåsen. Ställ inte in förseglingstiden på för lång för att bränna
tätningsvärmebandet.
c. Efter att ha ställt in förseglingstiden, klicka på inställningsknappen igen för att
ställa in kylningstiden, vanligtvis 3-5S. Efter att ha ställt in kyltiden, klicka på
knappen Inställning och bokstäverna e.
d. kommer att visas på kontrollpanelen, vilket indikerar slutet på
inställningsprocessen.
2. Placera produkten som ska packas i vakuumkammaren. Ta påspresspinnen
och placera vakuumpåsen platt på förseglingsremsan. Släpp påspresspinnen.
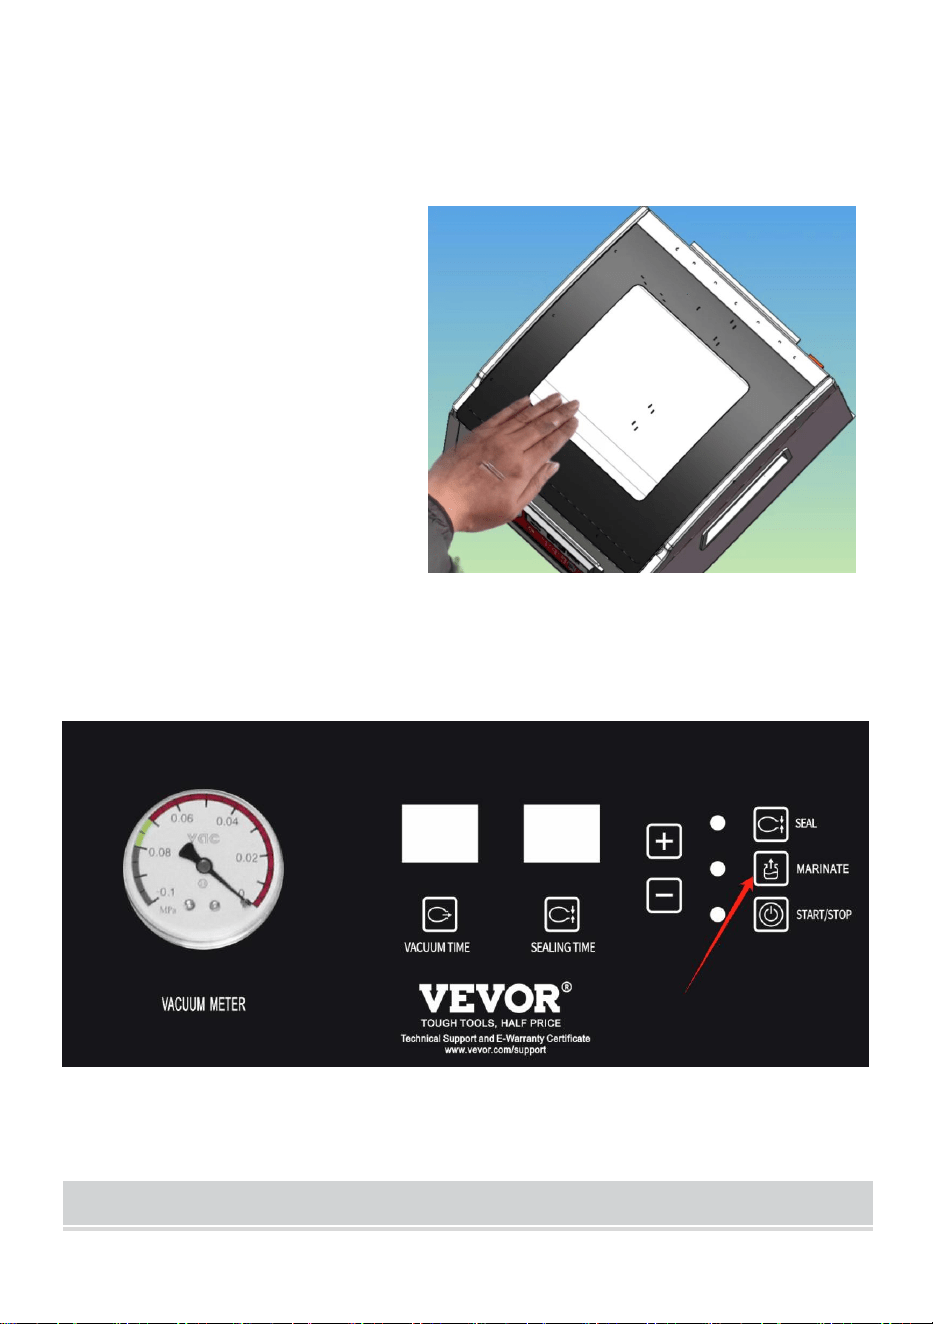
- 6 -
3. Tryck på den främre änden av vakuumhuven för hand under drift. Tryck på
kanten av vakuumkåpan för hand under drift. Klicka på startknappen på framsidan
av vakuummaskinens lock, vakuummaskinen börjar fungera, efter att
vakuummaskinen börjar köra kan handen lämna maskinen, maskinen slutför
automatiskt förpackningsprocessen.
4.Marinera: Klicka på härdningsknappen uppe till höger på kontrollpanelen,
härdningsindikatorn tänds, justerar pumptiden och utför härdningsarbetet. För
närvarande dammsuger maskinen bara utan att täta.
TROUBLESHOOTING TABLE
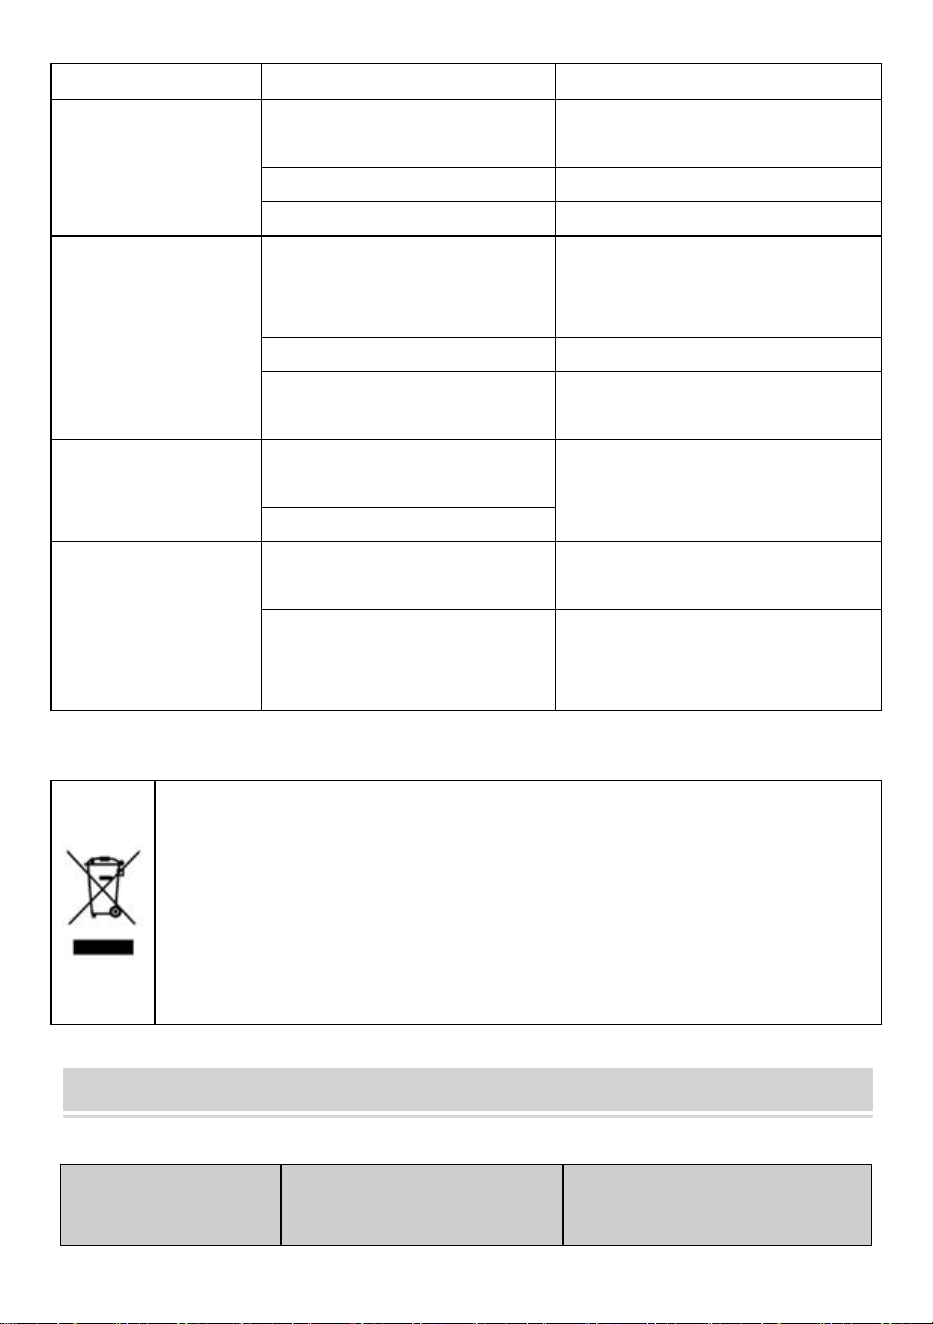
- 7 -
Fel
Möjlig orsak
Att rätta till
Enheten slås inte på
Strömkontakten är inte
ansluten.
Sätt i strömkontakten.
Defekt nätsladd
Skicka enheten till kundtjänst
Defekt uttag
Välj ett annat uttag
Ett fullständigt
vakuum skapas inte i
påsen.
Den öppna änden av påsen är
inte helt inne i
vakuumkammaren
Placera påsen korrekt
Väskan är defekt
Välj en annan väska
Det finns rester på svetsen
och tätningen
Rengör svetsen/tätningarna och
försök när de är torra
Väskan blir inte
tätat korrekt
Tätningsstången överhettas
så att påsen smälter
Öppna locket på enheten och låt
den svalna i några minuter.
Tätningslisten måste bytas ut.
Defekt tätningsstång.
Det gör inte väskan
håll i vakuumet efter
att det har förseglats
Väskan är defekt
Välj en annan väska; linda papper
runt alla vassa kanter i påsen.
Det finns läckor längs
svetssömmen till följd av veck,
smulor, fett eller vätskor.
Öppna påsen igen och rengör
påsens övre del.
Denna produkt omfattas av bestämmelserna i det europeiska direktivet
2012/19/EC. Symbolen som visar en soptunna korsad anger att
produkten kräver separat sophämtning i EU. Detta gäller för produkten
och alla tillbehör märkta med denna symbol. Produkter märkta som
sådana får inte kasseras tillsammans med vanligt hushållsavfall utan
måste lämnas till en insamlingsplats för återvinning av elektriska och
elektroniska apparater.
MODEL AND PARAMETERS
Modell
USA: YJ-300TV1
EUR, AUS:
YJ-300TV2, YJ-300TV3
USA: YJ-260TV1
EUR, AUS:
YJ-260TV2, YJ-260TV3

- 8 -
Spänning
USA: 120V/60Hz
EUR, AUS: 230V/50Hz
USA: 120V/60Hz
EUR, AUS: 230V/50Hz
Vakuumpump
modell
Kolvpump
Kolvpump
Tätningslängd
290 mm
270 mm
Maximal
vakuumgrad
-95Kpa
-95Kpa
Dimensionera
(L * B * H)
540*469*342mm
520*449*342mm
SPARE PARTS LIST
CHANGE HIGH TEMPERATURE CLOTH
namn
Kvantitet
1. Värmeelement
2 st
2.Teflonduk
2 st
3. Påfyllningsplatta
1 st
4. Säkerhetsrör
2 st
5. Sexkantnyckel
1 st
6.Tätningsremsa av kammaren
1 st
7. Strömsladd
1 st
8.Väskor 20x25cm
30 st
9. Användarmanual
1 st
1. Ta ut aluminiumbasen
2.Riv av det gamla
högtemperaturduk
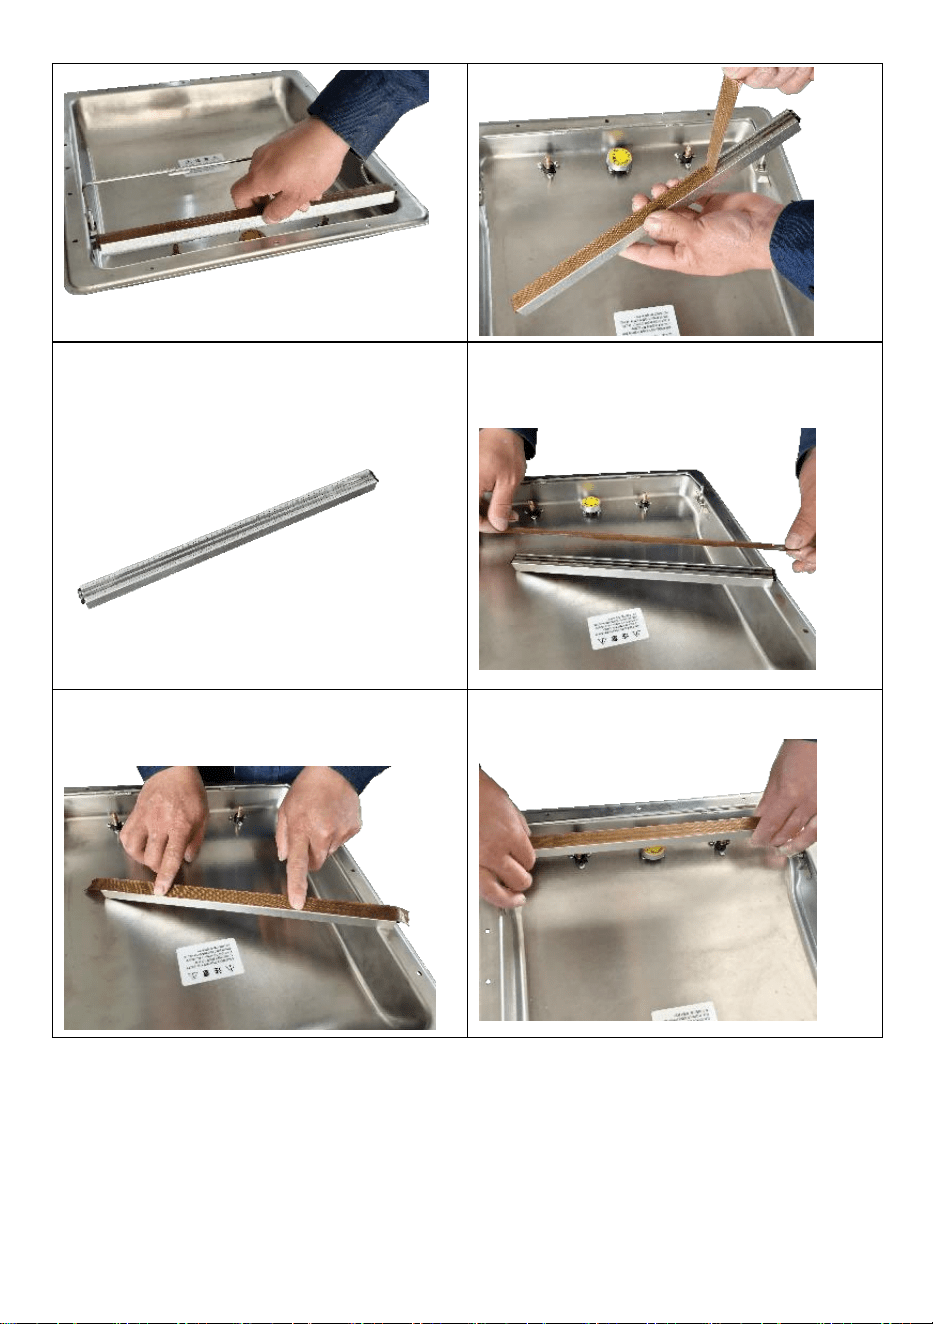
- 9 -
3 . Applicera ny högtemperaturduk
4. Håll lite hög temperatur
tyg på båda sidor
5. Slät högtemperaturduk
6.Sätt tillbaka aluminiumbasen