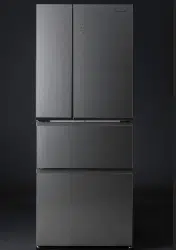
Operating Instructions
Refrigerator
For Household Use
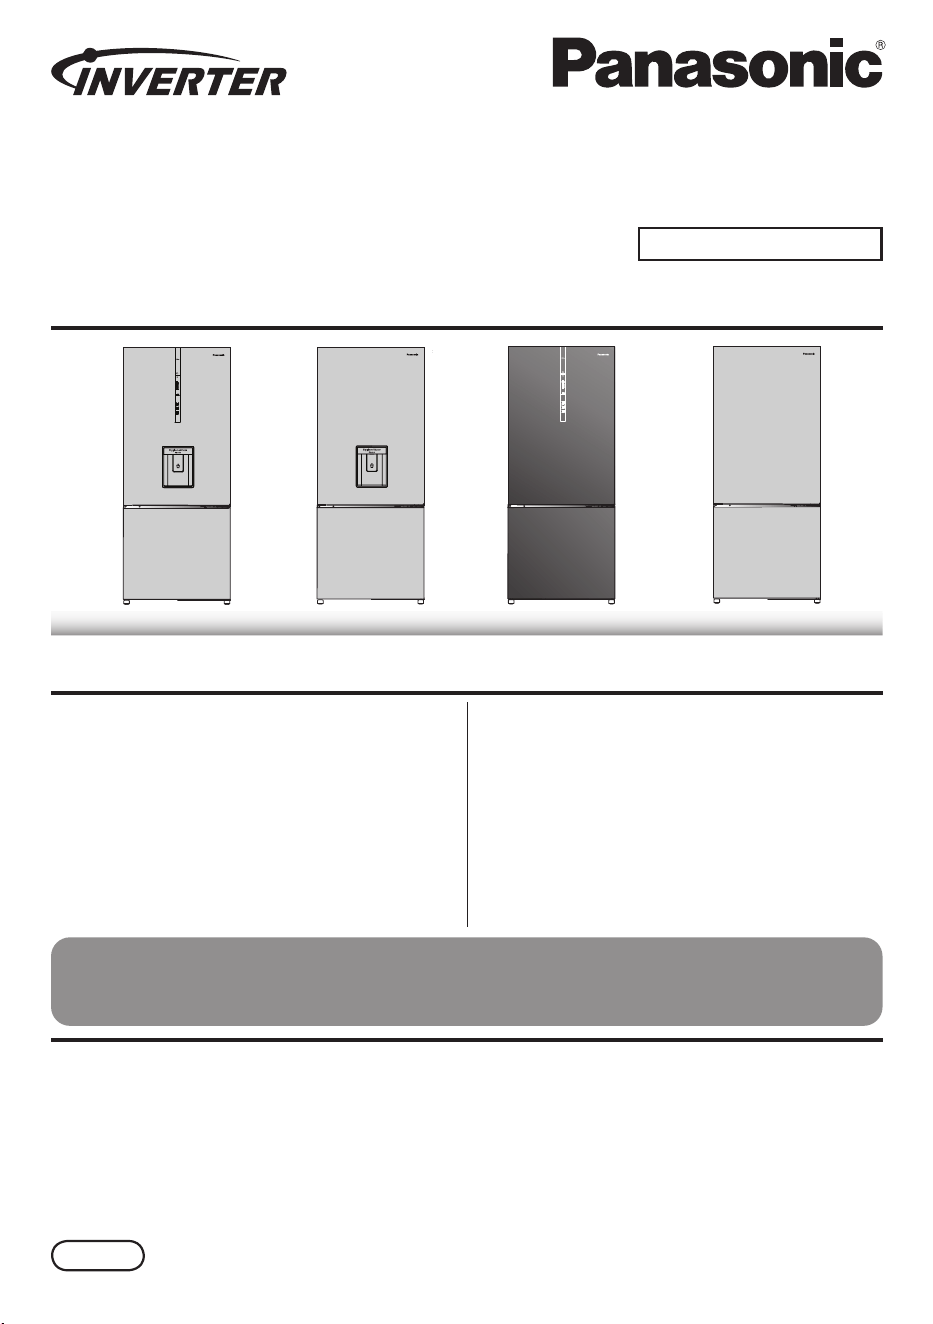
Model No.: NR-BX471G, NR-BX421B, NR-BX421G, NR-BX421H, NR-BX421W
Contents
Safety Precautions .................................. 2
Usage Precautions.................................. 4
Installation ............................................... 6
Parts Identication .................................. 8
Operation Panel .....................................11
Temperature Control ............................. 12
ECONAVI Operation ............................. 16
Quick Freezing ...................................... 17
Prime Fresh+ ........................................ 18
Auto Ice Off and Auto Ice Clean ............ 19
Fridge compartment .............................. 20
Prime Fresh case .................................. 20
Freezer compartment............................ 21
How to clean the Refrigerator ............... 25
Troubleshooting .................................... 29
Specications ........................................ 33
Copyright............................................... 34
■ NON-CFC
NON-CFC MATERIALS have been used for the refrigerant (R600a) and for the insulation
(Cyclopentane), making this product better for the Earth's Ozone Layer.
Thank you for purchasing the Panasonic product.
Please read these instructions carefully and follow safety precautions on page 2-5 before
using this product.
Please make sure the date and name of store of purchase are stamped in warranty card
and keep it with these operating instructions.
ARAH1E202481
P0421-1095
Printed in Vietnam
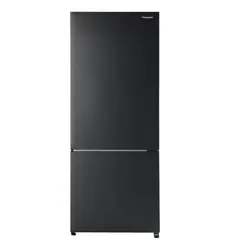
NR-BX421G
AU/NZ
NR-BX471G
NR-BX421W
NR-BX421B, NR-BX421H
Safety Precautions
Please be sure to follow these instructions.
Risk of re/flammable materials.
WARNING
WARNING
This sign means: It may lead to a serious
injury or death.
These signs mean prohibited
action.
This sign means required action.
This sign means the appliance must
be earthed to prevent electric shock.
CAUTION
This sign means: It may result in injury or
property damage.
Otherwise, it may
cause a re, injury,
electrical shock.
When recycling the product:
● Before taking the refrigerator to be recycled, please remove all the
door gasket to prevent locking a child in it.
● The warning labels mentioned above should be kept throughout the life
of the refrigerator.
● The operating instructions should be handed over to any person who
would use or handle the refrigerator whenever the refrigerator would be
transferred to another location and delivered to a recycling plant.
● In regards to local laws, Cyclopentane is used for insulation of this
refrigerator. When you throw away this unit, please discard it by proper
method and do not dispose it by burning.
In case of emergency:
● Maintenance work should only be carried out by a qualied technician.
● Do not store explosive substances, such as aerosol cans with
flammable propellant, in the refrigerator.
● Do not use electrical appliances such as a deodorizer in the
refrigerator. Leaked refrigerant may catch re from a spark of the
electrical contacts and may cause an explosion.
● Do not use electrical appliances inside the food storage compartments
of the appliance, unless they are of the type recommended by the
manufacturer.
● Do not disassemble, repair or modify the refrigerator by yourself.
If you want to repair the refrigerator, please consult your dealer or
authorized service center.
● Do not use mechanical devices or other means to accelerate
the defrosting process, other than those recommended by the
manufacturer.
iso-butane
iso-butane
2
When using:
● Do not damage the cooling circuit (piping on the back).
● Do not touch the Compressor and pipes, because of high temperature,
that there is a risk of burn injury.
● Do not let any children hang onto the refrigerator's door, it may fall and
injure the child.
● Do not place or store open containers of water on top of the
refrigerator. Spilled water can cause electrical shocks or combustion.
● Do not place multiple socket-outlets or portable power supplies at the
rear of the appliance.
● Keep ventilation openings, in the appliance enclosure or in the built-in
structure, clear of obstruction.
● This appliance is not intended for use by persons (including children)
with reduced physical, sensory or mental capabilities, or lack of
experience and knowledge of using the appliance, unless they have
been given supervision or instruction concerning use of the appliance
by a person responsible for their safety.
● Children should be supervised to ensure that they do not play with the
refrigerator.
When installing:
● Danger can occur when the
appliances is unbalanced, make
sure the feet are secure and
appliance is level.
● When positioning the appliance,
ensure the power cord is not
trapped or damaged.
● Ensure that the refrigerator
is plugged into an earthed
main socket.
WARNING
Otherwise, it may
cause a re, injury,
electrical shock.
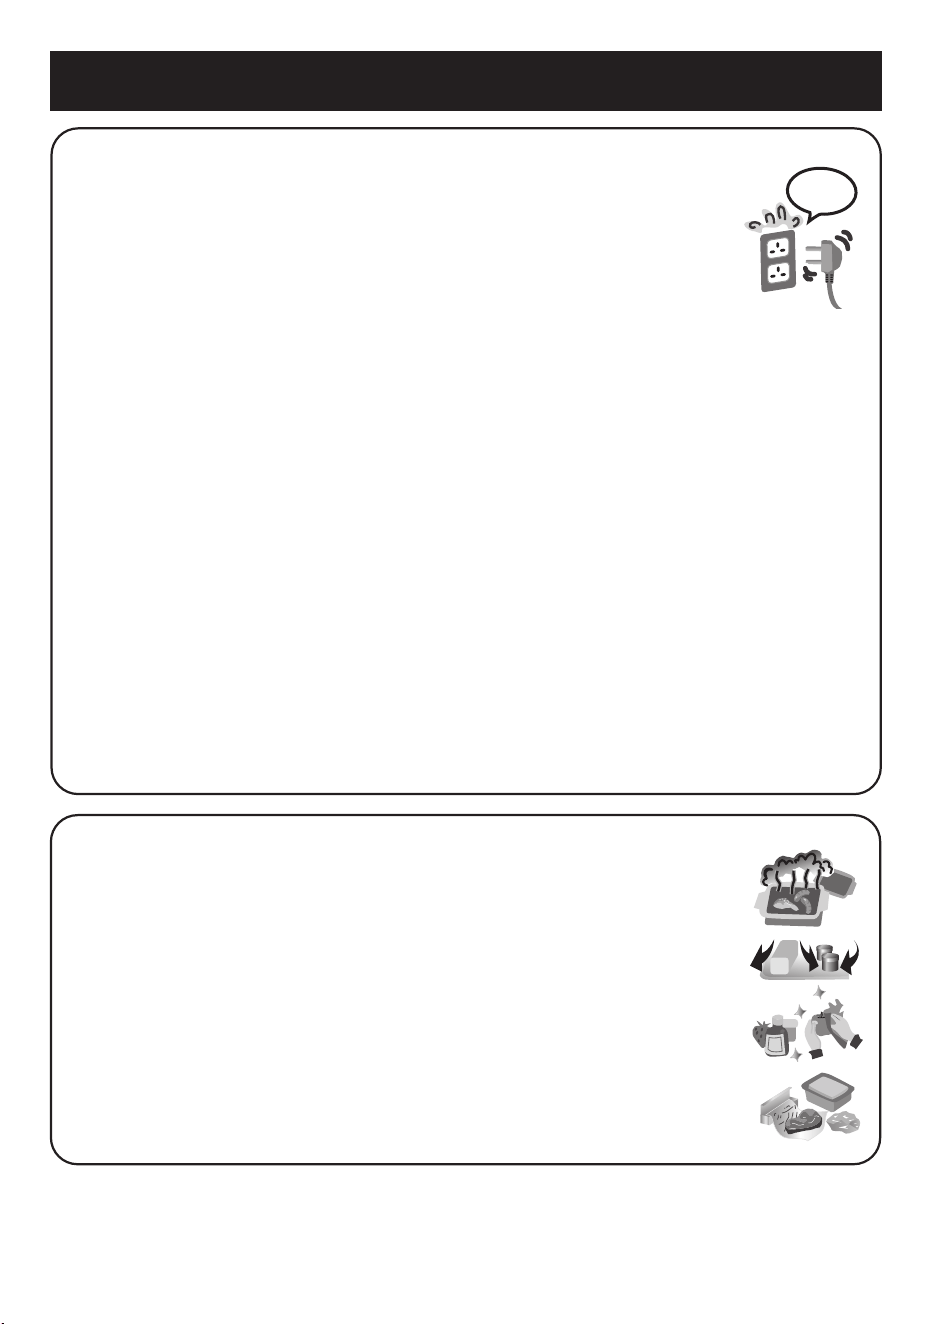
For power plug and power cord:
● Do not plug or unplug with wet hands.
● Do not let the power cord or power plug be damaged.
● Disconnect power plug when cleaning.
● Only plug into a wall outlet of the correct rated voltage and current, and
fully insert the power plug on its own.
● Reserve one socket for the refrigerator only. Avoid connecting many
appliances to the same socket and unroll the full length of the power
cord.
● Remove dust periodically from the power plug.
● If the power cord is damaged, it must be replaced by the manufacturer,
its service agent or similarly qualied persons in order to avoid a hazard.
● If you detect burning smell, disconnect the power plug and ventilate the
kitchen.
● Stop using the refrigerator and unplug the unit immediately if there is an
abnormality or failure. Abnormality and failure examples:
- Power cord or power plug is abnormally hot.
- Power cord is deeply cut or deformed.
- There is burning smell.
- You can feel tingling electricity when you touch the refrigerator body.
3

Usage Precautions
When opening/closing the doors:
When moving the refrigerator:
When storing food:
CAUTION
● While opening the refrigerator, be careful not
to pinch other one's hand holding the door.
● Be careful of the gap between the doors, as
they may pinch your hand when closing.
● Do not freeze glass bottles, that there is a risk of injury.
(If the liquid in a glass bottle is frozen, then the bottle
may break and you may be injured.)
● Do not add a high impact on glass trays. (Otherwise
those glass trays may break and you may be injured.)
● Hold the refrigerator tightly when transporting.
● Apply protective covering to fragile floors.
When opening/closing the doors:
● Do not refrigerate items which are bigger than tray or shelf, as the door will
not close completely causing leakage of cool air.
● Do not open refrigerator frequently or leave it open for long time in order to
prevent water dripping inside and waste energy.
● Frequently check the door gasket, it must be closed to the refrigerator's body
completely.
When cleaning:
● Do not clean the refrigerator with chemical substance or liquid.
It will cause damage and have corrosion on the surface.
● Clean the Pan water evap located over the Compressor at
the back of the refrigerator every three months to prevent the
odour generated from humidity.
Otherwise it may cause
injury, accidents.
4
Usage Precautions
When storing food:
● Do not overload the refrigerator. Gaps must be provided
between foodstus to maintain the cooling eect.
● Store fruits and vegetables in Vegetable case, where trapped
moisture helps preserve food quality for longer time periods.
● Seal drinking water and beverage bottles to prevent odor
contamination.
● Food stu such as vegetables, fruits and fresh food should be
wrapped or packed in a box or storage container before freezing.
● Meat and Fish should be put in the Freezer compartment if you
want to store them for an extended period.
● Cover juicy food with tight lids, plastic lm or foil.
5 mins
When using:
● When the power plug is disconnected, leave it for 5 minutes
before plugging again. If not, the Compressor may not work.
● Adjust the temperature according to the actual operating
condition for energy saving.
● The humidity inside the fresh case may condense so wipe it
with a cloth periodically. Clean the fresh case once a month.
● If you will not be at home for several days and there is nothing stored in the
refrigerator, the power plug should be disconnected for energy saving. When
the refrigerator is not used for several days, it is necessary to take out all
remaining food inside the refrigerator, clean and open the doors for a few
hours to let the moisture inside the refrigerator dry out, and prevent mold or
component oxidation.
● The outside wall of refrigerator cabinet may sometimes get warm, especially
just after installation. This is quite normal, and is due to the built-in Mullion
Dryer Pipe which prevents sweating and radiates heat.
● When humidity is high, e.g., during the rainy season, condensation may
appear on the surface of cabinet, especially around the door gasket. Wipe o
the condensed water with a clean cloth.
● Do not keep the door open any longer than necessary, particularly in hot,
humid weather.
● The top of the refrigerator is made of steel in order to prevent re caused by
external influences. Do not put things on top of the refrigerator to ensure this
factor.
5

6
Installation
The distance requested for installation
● When using for the rst time: clean the inside of the refrigerator.
• Use a soft damp cloth to clean the refrigerator.
• Rinse the Water tanks, Water lters and Ice trays.
• The smell of plastic could be smelt during the rst time using the refrigerator. If the
smell is a concern, it is recommended to ventilate the compartment.
● Do not place the refrigerator in a humid place as rust may form and may cause electric
leakage.
● Do not place the refrigerator exposing to direct sunlight as the heat and sunlight will
increase the temperature aecting the cooling capacity.
● Do not place the refrigerator near heat sources such as cooking stove or oven.
● Do not block the openings around the refrigerator.
● The refrigerator must be placed in an area where there is good air circulation.
● If the refrigerator is to be placed on an uneven surface, please adjust the Adjuster bolts
to ensure that the refrigerator is stable.
● The top of the refrigerator is at
least 1 cm from the ceiling.
● The left and
right sides of
the refrigerator
should be at least
5 cm from the
walls to ensure
proper heat
dissipation.
● The back of the refrigerator is at least
5 cm from the wall.
3 cm
1 cm
Caution
● In case the refrigerator is placed near
to walls, it is necessary to ensure that
the space between the right side of the
refrigerator and the wall is at least 43
cm. If this space is less than 43 cm,
the doors may not be fully opened and
the glass trays, Vegetable case, etc.
could not be taken out.
43 cm
129°

Have any measures taken
been against tipping due to
earthquakes?
In order to prevent the
refrigerator from tipping
due to earthquakes,
permanently x it by using
belts, etc.
Fix the refrigerator.
Turn the Adjuster
bolts (right and left)
until they reach the
floor to stabilize the
refrigerator.
Refrigerator doors should not be opened during the interior cooling process.
The doors should not be opened until the interior has been cooled down suciently.
(Warm air flowing into the interior will block the cooling function.)
Please wait until the interior has cooled down.
● The refrigerator may take at least 4 hours (or longer
especially in summer when the ambient temperature
is high) of continuous running to cool down the interior,
in the condition of no food items inside and the doors
are not opened.
● Depending on ambient temperature and usage condition,
it may take 24 hours to cool down the interior and
achieve the correct temperatures.
LED lamp and grounding
● The refrigerator LED lamp is specically designed for this refrigerator. Do not replace it
yourself. If the LED lamp needs to be replaced, please contact the Panasonic Service
Center.
● If there is no grounding wiring plug in the refrigerator, it should be connected with a
grounding connection to prevent electrical hazards from electrical leakage.
Moving or transporting
※ Before moving and transporting
1
Remove any food items and dispose of any ice cubes or water that remain in the
refrigerator.
2
Unplug the refrigerator.
3
Adjust the Adjuster bolts (left and right) so that they do not touch the floor.
※ How to move and transport
● At least 2 people are required to transport the refrigerator and
do not stack horizontally. (This can cause injury or breakdown.)
● Each person should lift one corner of the refrigerator.
● Do not transport by holding the refrigerator doors.
Caution
● When transporting, use tape to secure the refrigerator doors
and avoid letting the doors open by itself.
● Do not place the refrigerator on its side when transporting, as this may cause damage
to the refrigerator.
● After installation, wait at least 4 hours before plugging in the power to ensure that the
gas and oil in the Compressor are in a stable state.
7
Parts Identication
1. For NR-BX421B/NR-BX421W models
A-Fridge compartment
1 LED of Fridge compartment
2 Glass tray of Fridge compartment
(Quantity: 2 pcs)
3 Glass tray of Vegetable case
4 Vegetable case
5 Prime Fresh case (LED of Blue Ag
(*)
)
6 Door shelf (Quantity: 2 pcs)
7 Egg tray
8 Bottle shelf
9 Door gasket of Fridge compartment
(*)
In model NR-BX421B, there is no LED of
Blue Ag.
B-Freezer compartment
0 Door gasket of Freezer compartment
a Ice Twister
b Ice box
c Freezer case (Quantity: 3 pcs)
d Adjuster bolts
e Pan water evap
f Compressor
8
A
B
Product view from behind.
Parts Identication
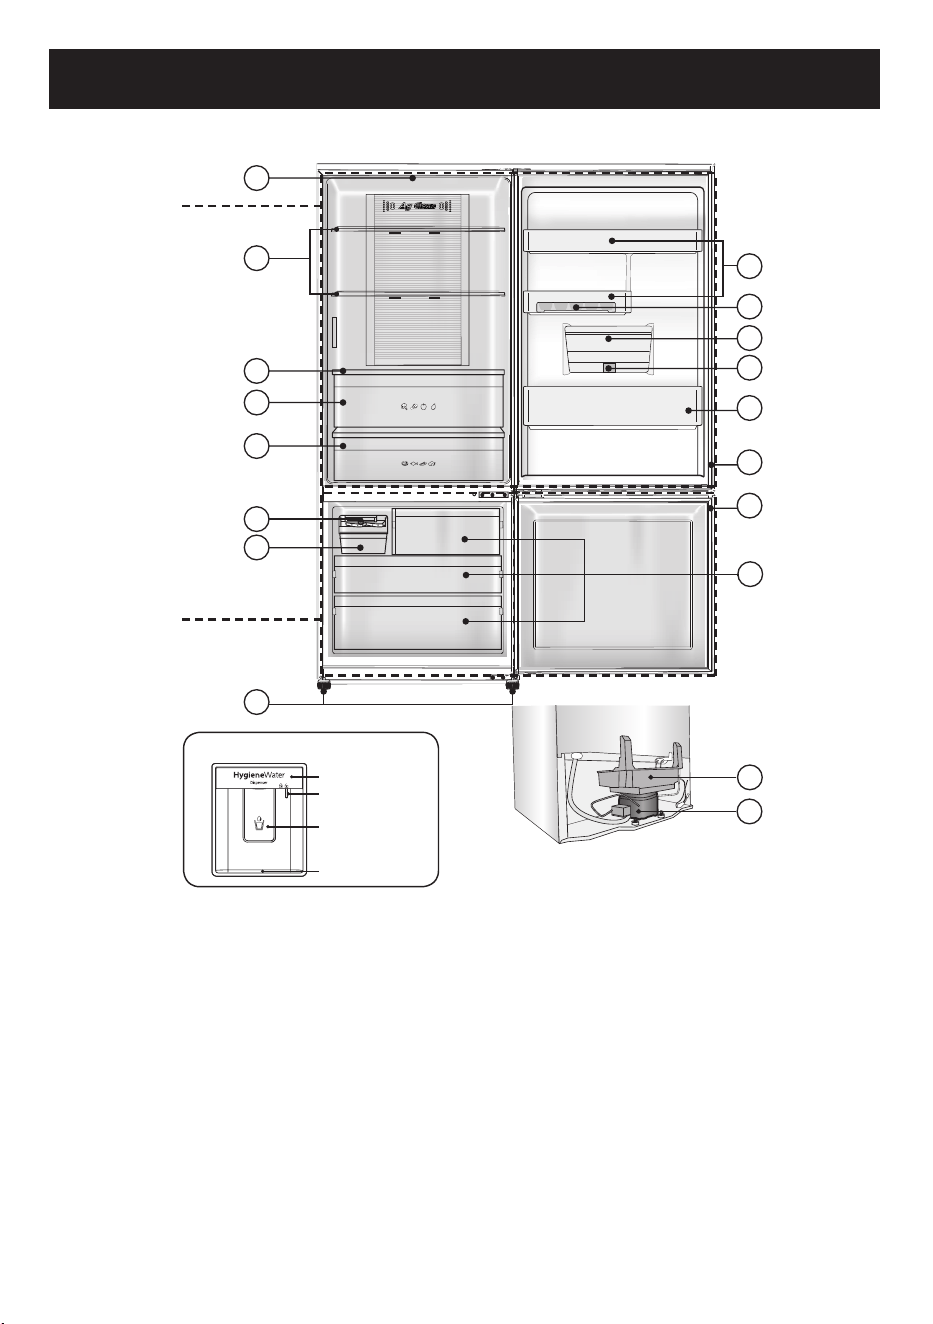
2. For NR-BX471G/NR-BX421G models
Product view from behind.
Water Dispenser (P.14)
Lever cover
Child lock
Lever
Case dispenser
A-Fridge compartment
1 LED of Fridge compartment
2 Glass tray of Fridge compartment
(Quantity: 2 pcs)
3 Glass tray of Vegetable case
4 Vegetable case
5 Prime Fresh case
6 Door shelf (Quantity: 2 pcs)
7 Egg tray
8 Water tank
9 Hygiene lter
0 Bottle shelf
a Door gasket of Fridge compartment
B-Freezer compartment
b Door gasket of Freezer compartment
c Freezer case (Quantity: 3 pcs)
d Ice Twister
e Ice box
f Adjuster bolts
g Pan water evap
h Compressor
A
1
2
6
7
9
3
15
13
16
12
B
4
11
14
8
5
10
17
18
9
Parts Identication
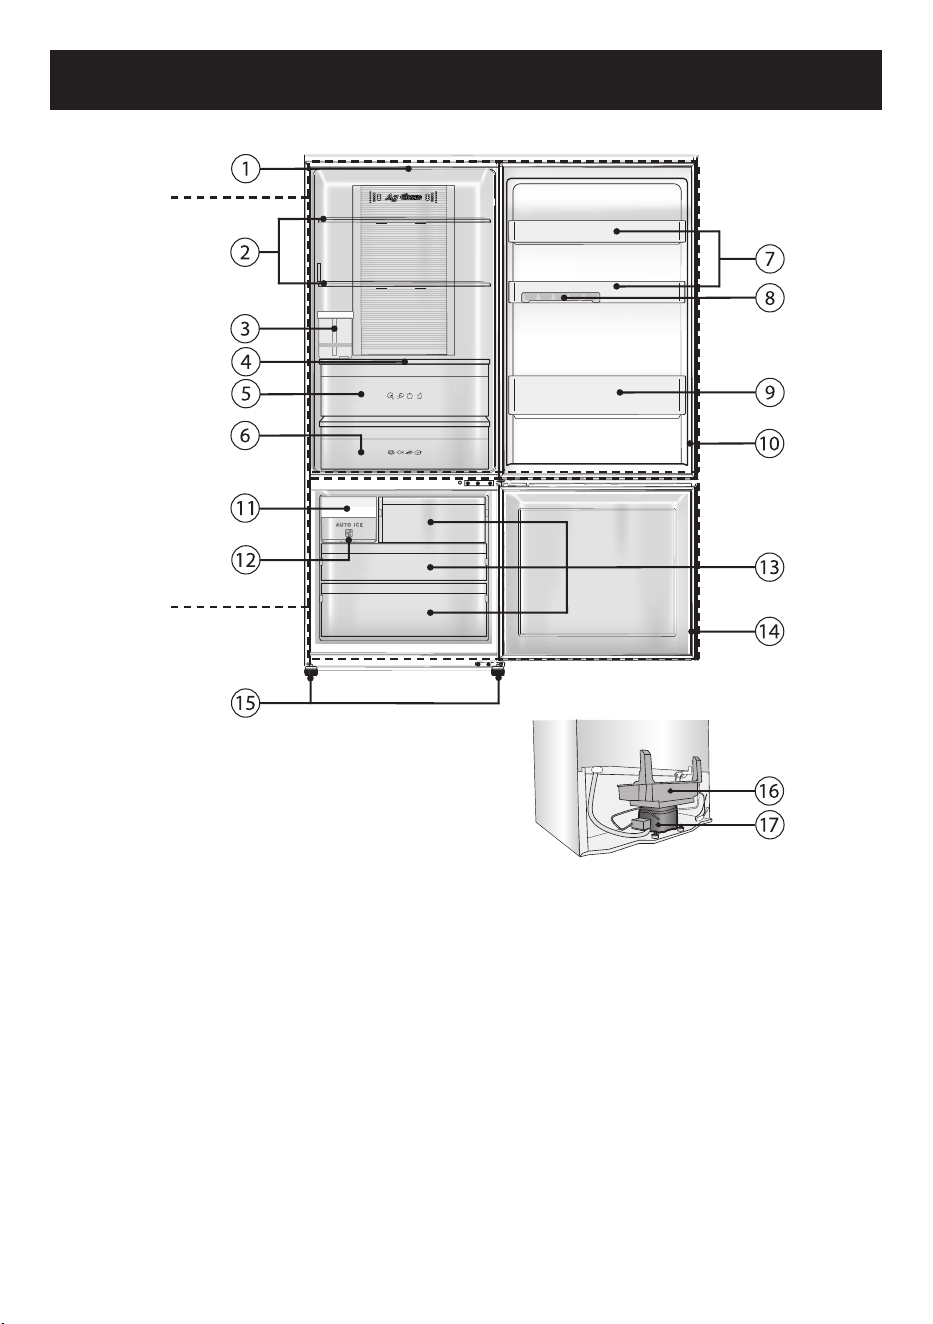
3. For NR-BX421H model
A
B
Product view from behind.
A-Fridge compartment
1 LED of Fridge compartment
2 Glass tray of Fridge compartment
(Quantity: 2 pcs)
3 Water tank of Auto Ice maker
4 Glass tray of Vegetable case
5 Vegetable case
6 Prime Fresh case
7 Door shelf (Quantity: 2 pcs)
8 Egg tray
9 Bottle shelf
0 Door gasket of Fridge compartment
B-Freezer compartment
a Auto Ice maker
b Ice box
c Freezer case (Quantity: 3 pcs)
d Door gasket of Freezer compartment
e Adjuster bolts
f Pan water evap
g Compressor
10
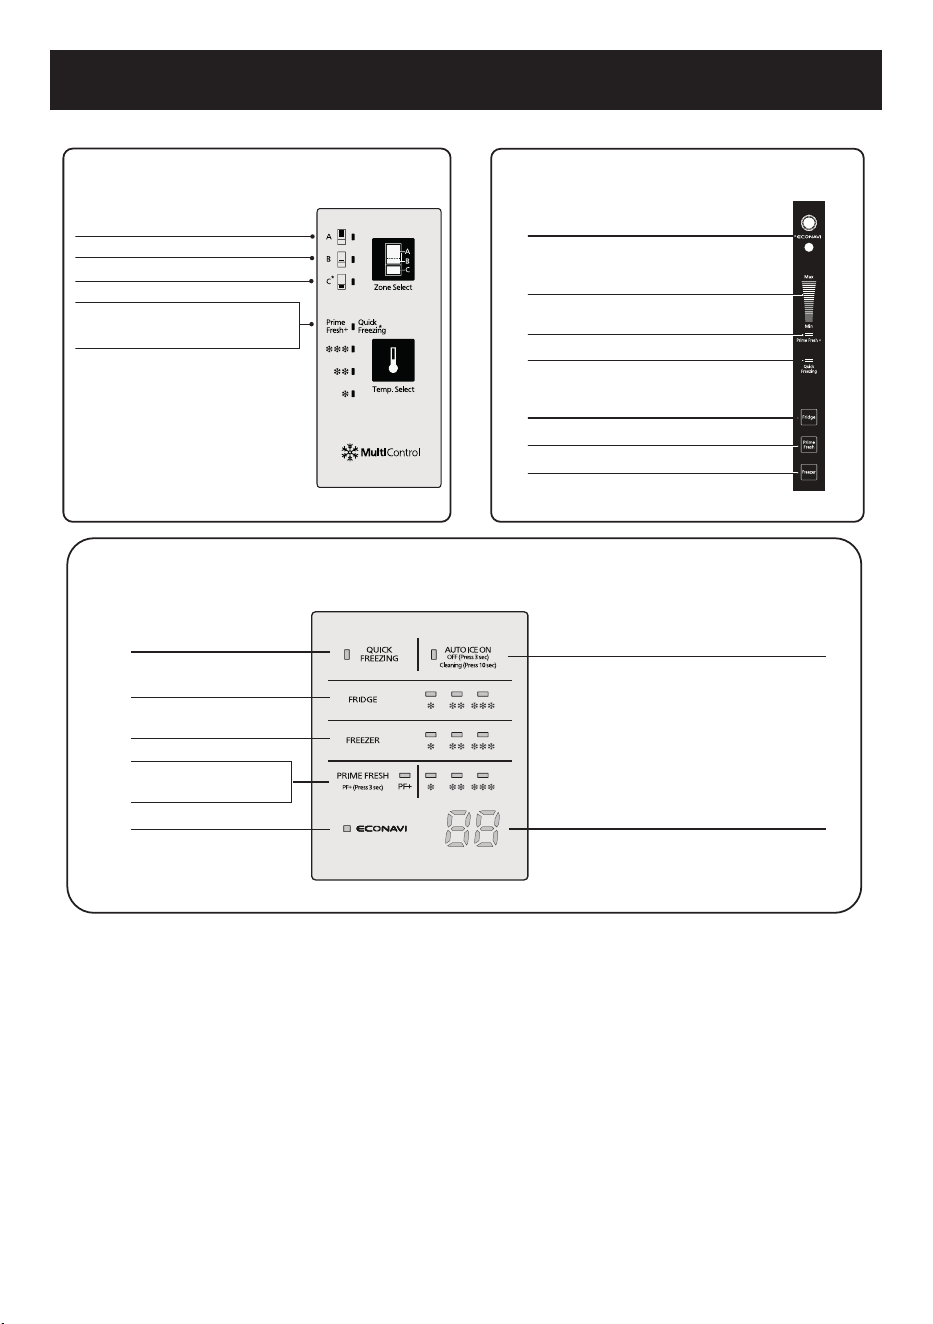
Operation Panel
Prime Fresh+ (P.18)
Inside Operation Panel
NR-BX421H
Quick Freezing (P.17)
Fridge (P.13)
Freezer (P.13)
Prime Fresh (P.13)
ECONAVI (P.16)
Auto Ice On/O
Auto Ice Clean (P.19)
Notication display area: display the
occurrence of abnormalities (P.31)
Inside Operation Panel
NR-BX421B/NR-BX421G
Inside Operation Panel
NR-BX421B
Fridge (P.12)
Freezer (P.12)
Prime Fresh+ (P.18)
Prime Fresh (P.12)
Quick Freezing (P.17)
11
ECONAVI (P. 16)
LED display
Freezer (P. 12)
Prime Fresh (P. 12)
Fridge (P. 12)
Prime Fresh+ (P. 18)
Quick Freezing (P. 17)
Door Operation Panel
NR-BX471G/
NR-BX421W
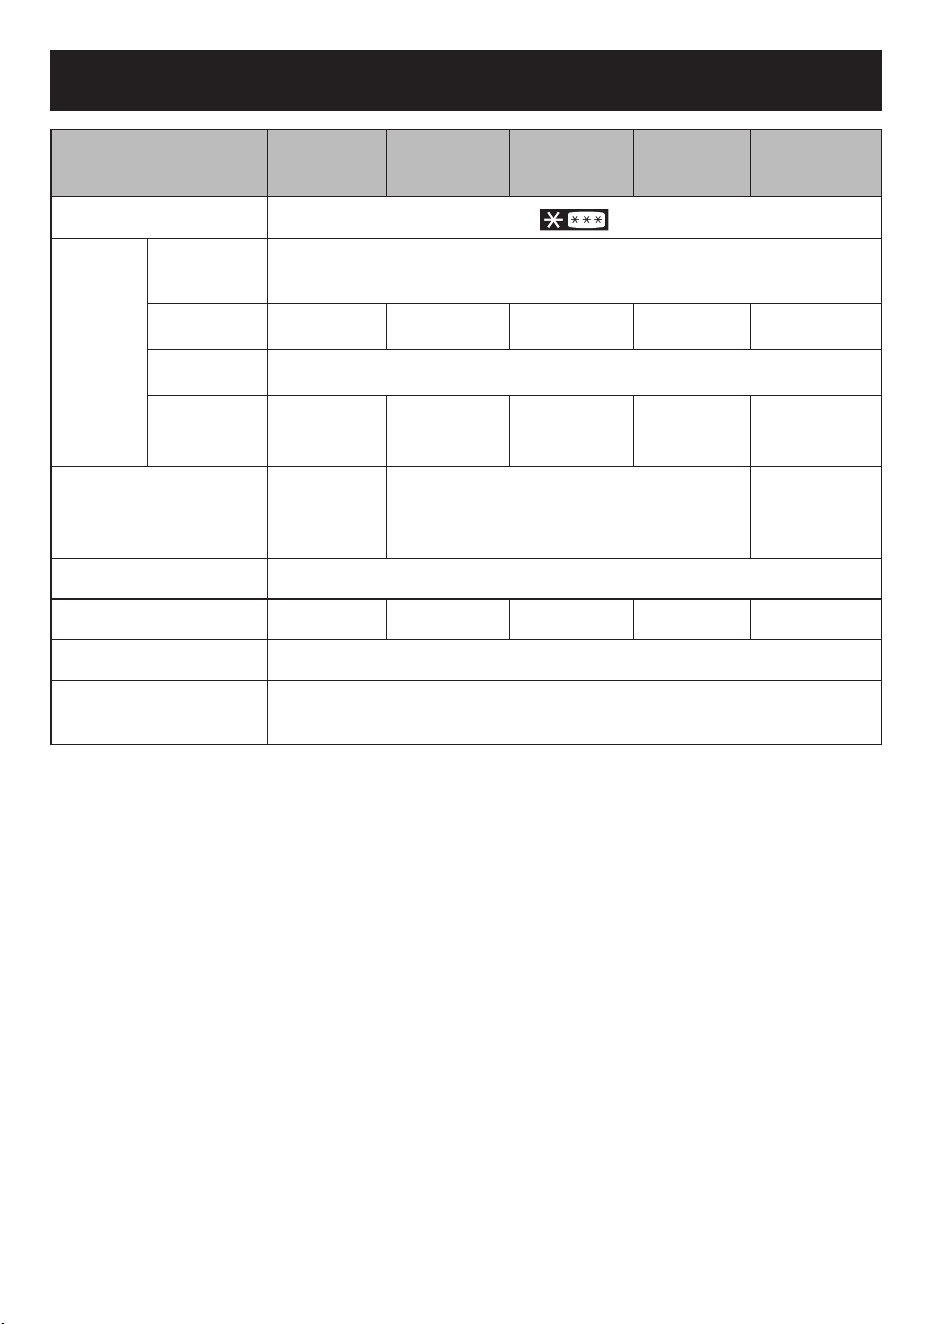
Temperature Control
Temperature setting and a guide of temperature
1. For
NR-BX471G/NR-BX421W
models (Door Operation Panel)
The temperature can be adjusted for Min-Max levels.
Touch the “Fridge” button to adjust temperature in Fridge compartment.
Touch the “Prime Fresh” button to adjust temperature in Prime Fresh case.
Touch the “Freezer” button to adjust temperature in Freezer compartment.
Button
Temperature
setting
“Fridge”
(Fridge compartment)
“Prime Fresh”
(
Prime Fresh case
)
“Freezer”
(Freezer compartment)
Max
Lower than “Med”
by approx.
2 °C ~ 3 °C
Lower than “Med”
by approx.
2 °C ~ 3 °C
Lower than “Med”
by approx.
2 °C ~ 3 °C
Med
Approximately
1 °C ~ 7 °C
Approximately
-5 °C ~ -1 °C
Approximately
-23 °C ~ -17 °C
Min
Higher than “Med”
by approx.
2 °C ~ 3 °C
Higher than “Med”
by approx.
2 °C ~ 3 °C
Higher than “Med”
by approx.
2 °C ~ 3 °C
2. For NR-BX421B/NR-BX421G models (Inside Operation Panel)
1
Press the
“
Zone Select
”
button to select Fridge compartment
“
A
”
, Prime Fresh case
“
B
”
,
or Freezer compartment
“
C*
”
.
2
Press the “Temp. Select” button to select Max, Med, or Min levels.
Area
Temperature
setting
“A”
(Fridge compartment)
“B”
(
Prime Fresh case
)
“C*”
(Freezer compartment)
Max
Lower than “Med”
by approx.
2 °C ~ 3 °C
Lower than “Med”
by approx.
2 °C ~ 3 °C
Lower than “Med”
by approx.
2 °C ~ 3 °C
Med
Approximately
1 °C ~ 7 °C
Approximately
-5 °C ~ -1 °C
Approximately
-23 °C ~ -17 °C
Min
Higher than “Med”
by approx.
2 °C ~ 3 °C
Higher than “Med”
by approx.
2 °C ~ 3 °C
Higher than “Med”
by approx.
2 °C ~ 3 °C
“Max”
“Med”
12
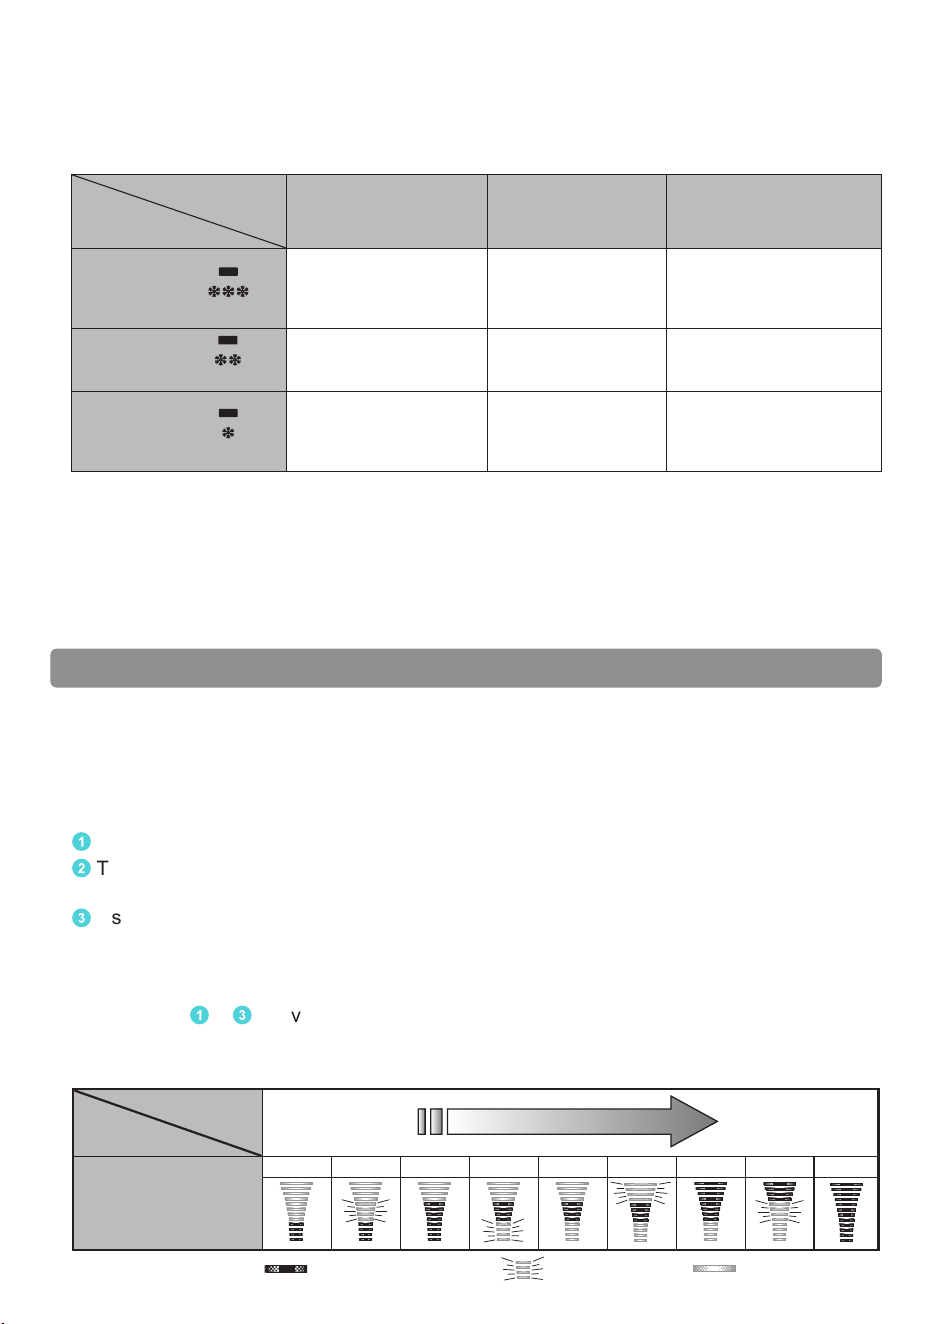
How to operate the “9 levels” mode
The refrigerator is specially designed for appropriate use, which can adjust the
temperature level to detailed 9 levels with the following details.
1. For NR-BX471G/NR-BX421W models (Door Operation Panel)
To adjust the temperature for the Fridge compartment
1
Set the LED display to the “Min” position by touching the “Fridge” button.
2
Touch and hold the “Fridge” button (for 10 seconds) until the LED display returns to
show at the “Min” position.
3
Use the “Fridge” button to set the required temperature mode, where level 1 is the
minimum cooling mode and level 9 is the maximum cooling mode. (As specied in the
LED Display table.)
To adjust the temperature for the Freezer compartment
Follow steps
1
~
3
above, but select “Freezer” button for Freezer compartment instead
of “Fridge” button for Fridge compartment.
Cooling
Level
Levels
Minimum
Maximum
LED Display
1 2 3 4 5 6 7 8 9
Lighting Blinking
Not lighting
3. For NR-BX421H model (Inside Operation Panel)
The temperature can be adjusted for Min-Max levels.
Touch the “Fridge” button to adjust temperature in Fridge compartment.
Touch the “Prime Fresh” button to adjust temperature in Prime Fresh case.
Touch the “Freezer” button to adjust temperature in Freezer compartment.
Button
Temperature
setting
“Fridge”
(Fridge compartment)
“Prime Fresh”
(Prime Fresh case)
“Freezer”
(Freezer compartment)
Lower than “Med”
by approx.
2 °C ~ 3 °C
Lower than “Med”
by approx.
2 °C ~ 3 °C
Lower than “Med”
by approx.
2 °C ~ 3 °C
Med
Approximately
1 °C ~ 7 °C
Approximately
-5 °C ~ -1 °C
Approximately
-23 °C ~ -17 °C
Min
Higher than “Med”
by approx.
2 °C ~ 3 °C
Higher than “Med”
by approx.
2 °C ~ 3 °C
Higher than “Med”
by approx.
2 °C ~ 3 °C
Generally, use the refrigerator with the temperature set to “Med”.
● The temperature inside the refrigerator will vary depending on the ambient temperature,
installation status, usage conditions and amount of food.
● This refrigerator is equipped with a processor to control the temperature inside the
refrigerator. When the ambient temperature changes, the Compressor runs or stops, the
doors are opened or closed, the temperature inside the refrigerator and the temperature
setting will have a slight dierence.
Fine Adjustment mode
Max
LED Display table (For NR-BX471G/NR-BX421W models)
13
Temperature Control
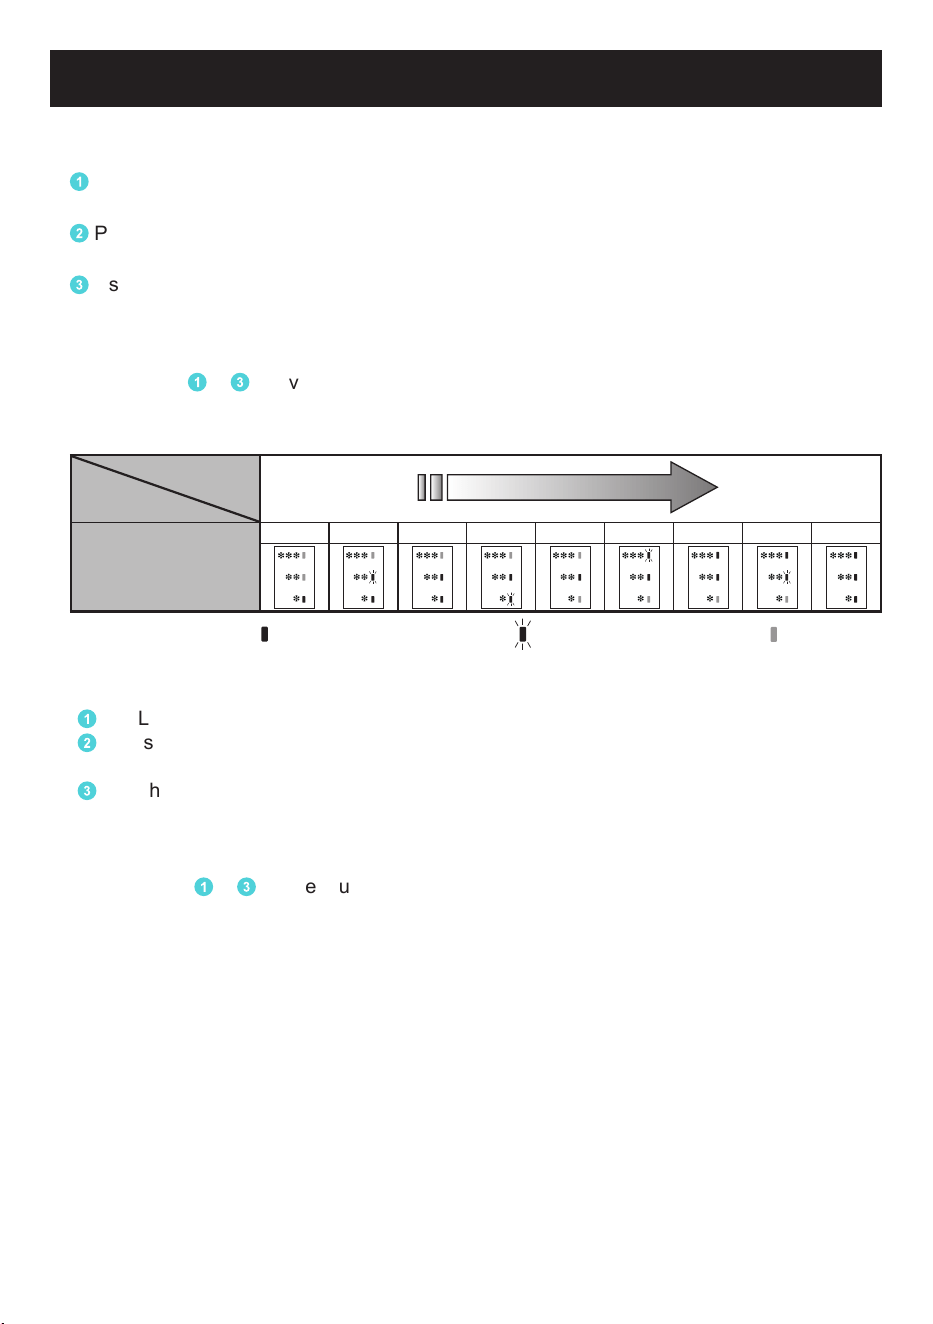
2. For NR-BX421B/NR-BX421G models (Inside Operation Panel)
To adjust the temperature for the Fridge compartment
1
Set the LED display to “Min” position by pressing the “Zone Select” button to select “A”
(Fridge compartment) then press the “Temp. Select” button to select “Min”.
2
Press and hold the “Temp. Select” button (for 10 seconds) until the LED display returns
to the “Min” position.
3
Use the “Temp. Select” button to set the required temperature mode, where level 1 is the
minimum cooling mode and level 9 is the maximum cooling mode. (As specied in the
LED Display table.)
To adjust the temperature for the Freezer compartment
Follow steps
1
~
3
above, but press the “Zone Select” button and select “C*” for Freezer
compartment instead of “A” for Fridge compartment.
LED Display table (For NR-BX421B/NR-BX421G models)
Cooling
Level
Levels
Minimum
Maximum
LED Display
1 2 3 4 5 6 7 8 9
Lighting Blinking
Not lighting
3. For NR-BX421H model (Inside Operation Panel)
To adjust the temperature for the Fridge compartment
1
Set LED display to the “Min” position by pressing the “Fridge” button.
2
Press and hold the “Fridge” button (for 10 seconds) until the LED display return to show
at “Min” position.
3
Use the “Fridge” button to set the required temperature mode, where level 1 is the
minimum cooling mode and level 9 is the maximum cooling mode. (As specied in the
LED Display table.)
To adjust the temperature for the Freezer compartment
Follow steps
1
~
3
above, but select “Freezer” button for Freezer compartment instead of
“Fridge” button for Fridge compartment.
14
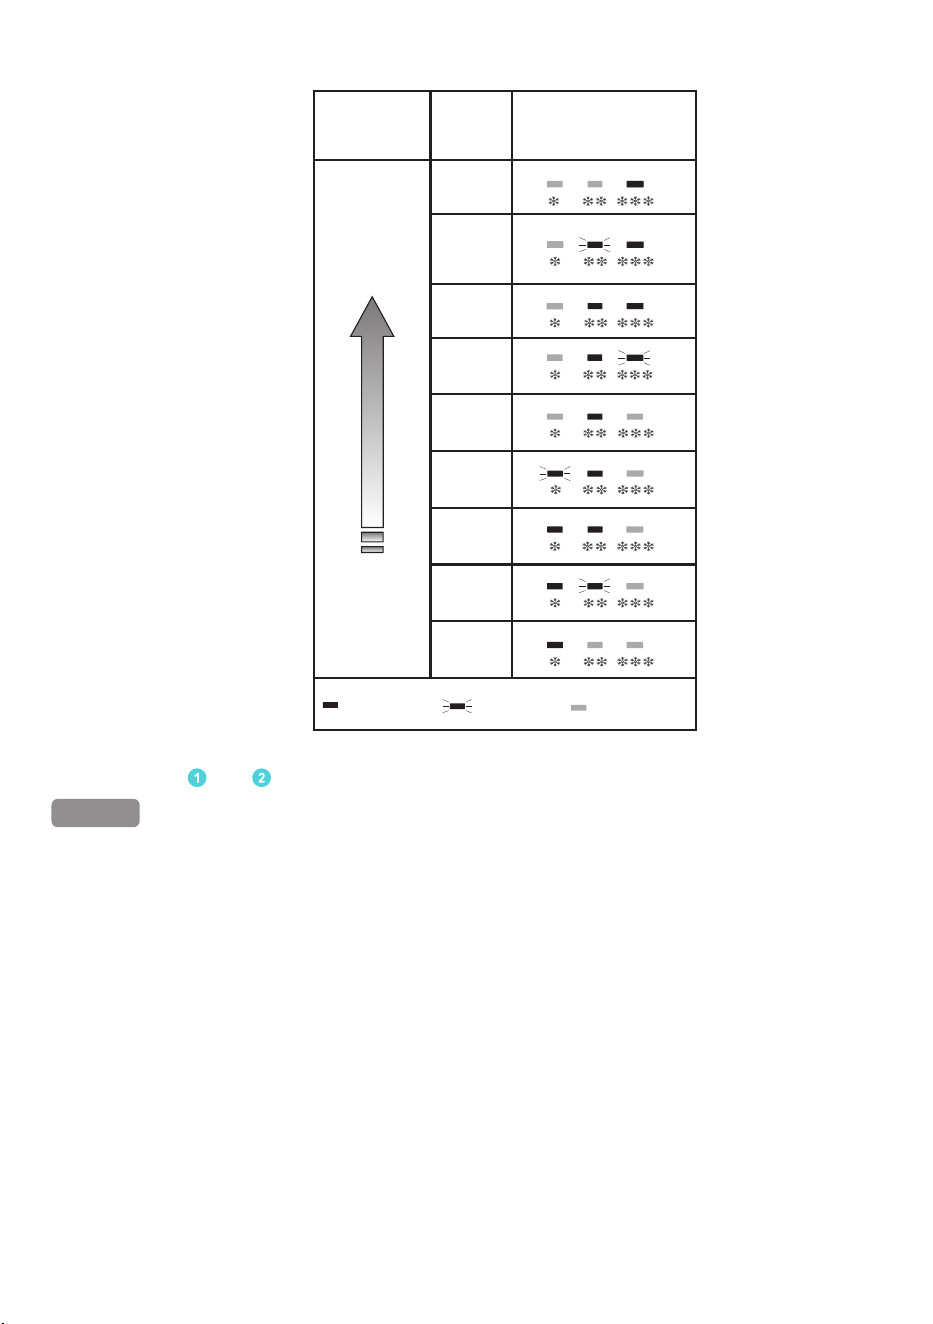
LED Display table (For NR-BX421H model)
To reset the setting Fine Adjustment mode
Repeat step
1
and
2
, then the refrigerator return to normal operation mode.
Remark
● Prime Fresh case does not have Fine Adjustment mode.
● The temperature control can vary depending on the environment and amount of food
stored in the refrigerator.
Cooling
Level
Levels LED Display
Maximum
9
8
7
6
5
4
3
Minimum
2
1
Lighting
Not lighting
Blinking
15
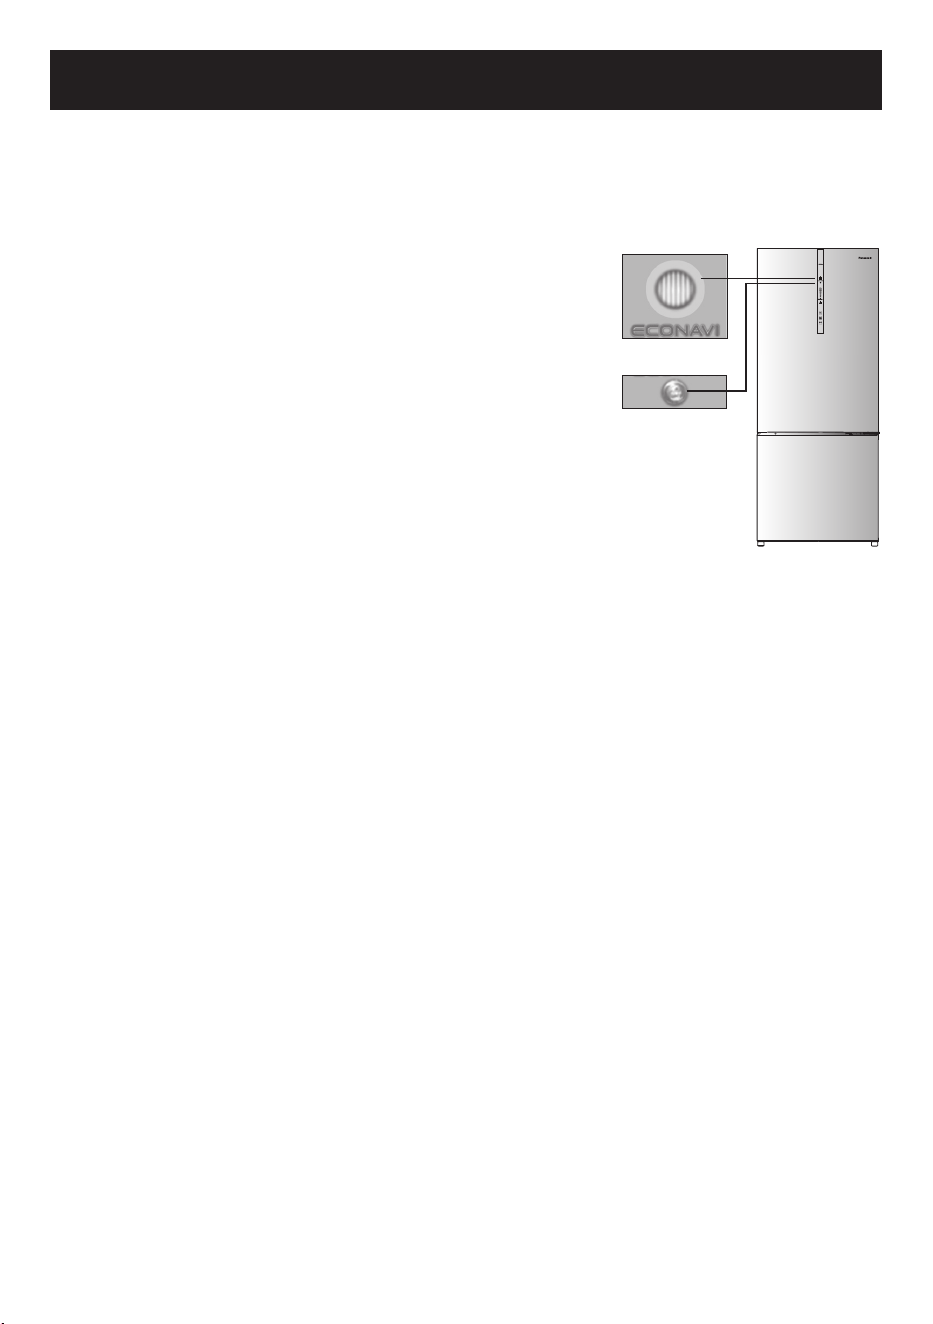
ECONAVI Operation
1. For NR-BX471G/NR-BX421W models
The refrigerator detects the opening and closing of the refrigerator door and the brightness
around the refrigerator to control operations automatically to ensure maximum energy saving.
(*)
ECONAVI Operation
● The refrigerator learns the lifestyle patterns of your family
from door opening and time periods of infrequent use to
maximise energy eciency.
● The refrigerator learns your lifestyle patterns from the
previous 3 weeks of use and uses that data from the
4
th
week onwards.
● The refrigerator performs the ECONAVI energy saving
operation when it becomes dark around the
refrigerator such as overnight when you are asleep.
(*)
The eectiveness of the ECONAVI mode is dependent on
the ambient temperature, ambient brightness and the number of times
the refrigerator door is opened and closed and the state in
which food is stored.
Settings for enabling ECONAVI operation
● ECONAVI Operation is automatically enabled
when the temperature control for both the Freezer or Fridge compartment is set to “Med”.
● ECONAVI Operation does not operate if the Quick Freezing or Prime Fresh+ is in
operation.
● It is not possible to force to start of the ECONAVI mode.
2. For NR-BX421B/NR-BX421G models
This model also has ECONAVI mode, but it does not feature LED of ECONAVI and light
intensity sensor.
3. For NR-BX421H model
This model also has ECONAVI mode, LED of ECONAVI but it does not feature the light
intensity sensor.
Light intensity sensor
ECONAVI Lamp
16
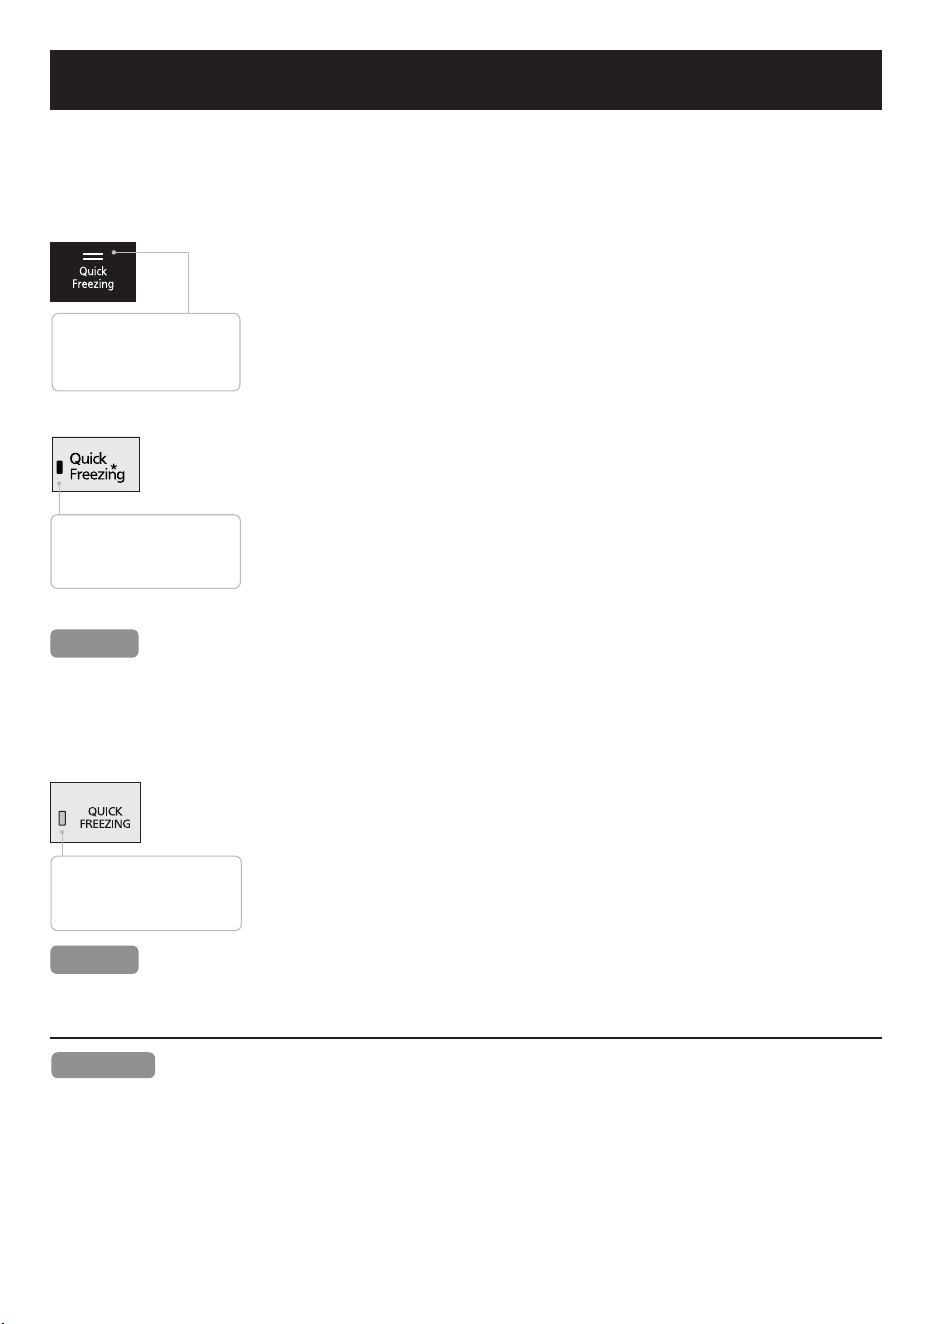
Quick Freezing
When Quick Freezing is set, the refrigerator will reduce the temperature quickly for better
performance of preserving food.
How to operate the Quick Freezing
1. For NR-BX471G/NR-BX421W models
LED is on: Quick Freezing is
operated.
LED is o: Quick Freezing is
not operated.
● Touch the “Freezer” button until the LED of Quick Freezing
turns on. Quick Freezing starts after about 10 seconds.
● If you want to stop the Quick Freezing operation immediately,
please touch the button “Freezer” until the LED of Quick Freezing
turns o.
2. For NR-BX421B/NR-BX421G models
LED is on: Quick Freezing is
operated.
LED is o: Quick Freezing is
not operated.
● Press the “Zone Select” button to select “C*” (Freezer
compartment), then press “Temp. Select” until the LED of
Quick Freezing turns on. Quick Freezing starts after about
10 seconds.
● If you want to stop the Quick Freezing operation immediately,
press the button “Zone Select” to select “C*” (Freezer
compartment), then press “Temp. Select” until the LED of
Quick Freezing turns o.
3. For NR-BX421H model
LED is on: Quick Freezing is
operated.
LED is o: Quick Freezing is
not operated.
● Press the “Quick Freezing” button once, then the LED of Quick
Freezing turns on.
● If you want to stop the Quick Freezing operation immediately,
please press the “Quick Freezing” button once, then the LED of
Quick Freezing turns o.
Remark
● The Quick Freezing operation will stop automatically after running for 150 mins and return
to normal mode. (The LED of Quick Freezing turns o .)
Remark
● The Quick Freezing operation will automatically stop after 60 mins (as ambient
temperature is 18°C or lower) or 150 mins (as ambient temperature is 19°C or higher)
and return to normal mode. (The LED of Quick Freezing turns o.)
Remark
● The LED of Quick Freezing flashing means that the defrosting system is now working. The
Quick Freezing will start right after the defrosting operation is nished.
● The Freezer temperature control will not operate during Quick Freezing as the Compressor
is already at maximum operating levels for the Quick Freezing.
17
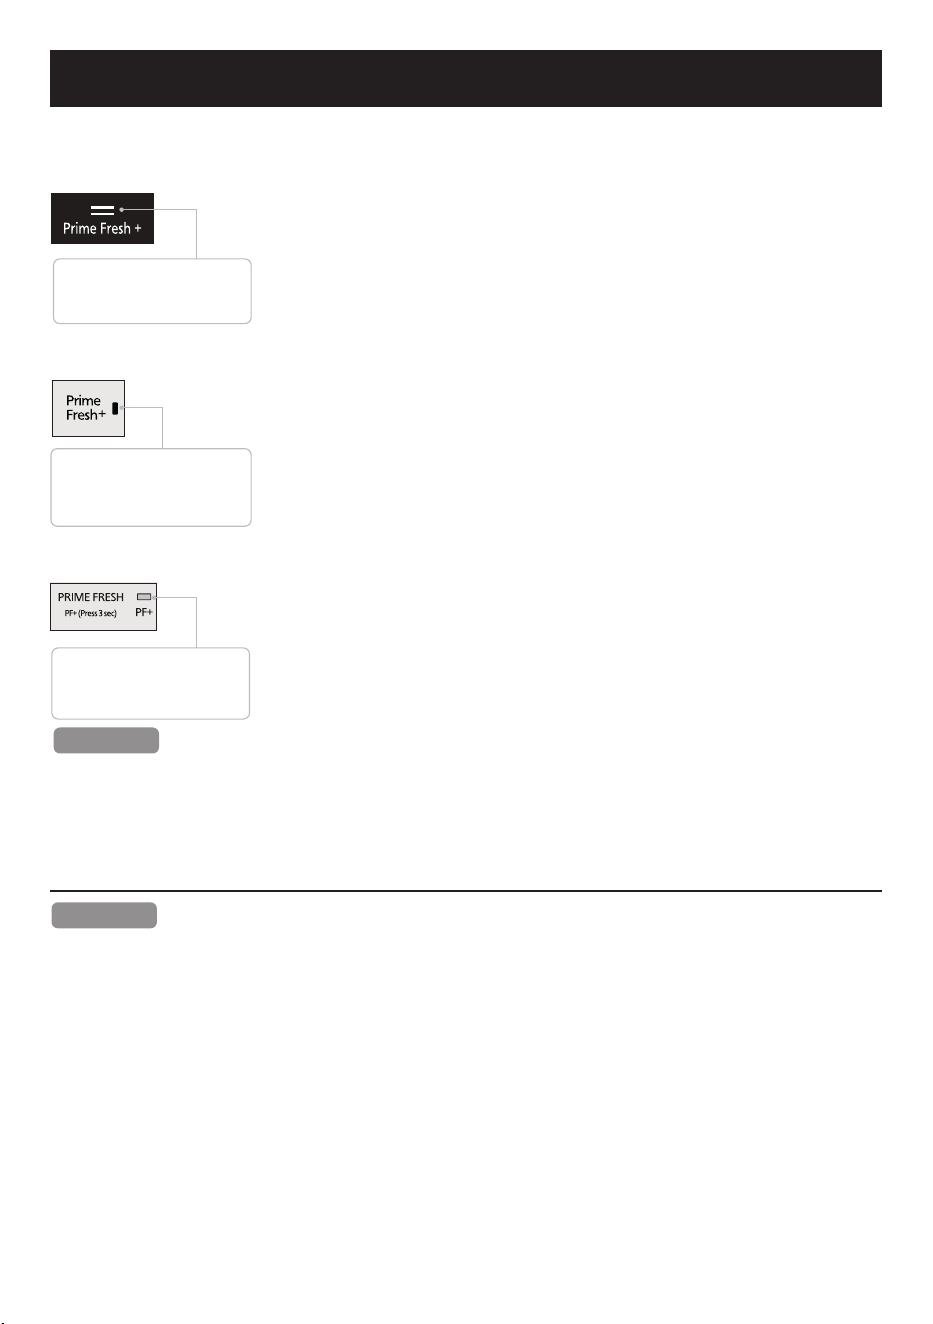
Prime Fresh+
How to operate the Prime Fresh+
1. For NR-BX471G/NR-BX421W models
● Touch the button “Prime Fresh” until the LED of Prime Fresh+
turns on.
● If you want to stop the Prime Fresh+ operation immediately,
please touch the button “Prime Fresh” until the LED of
Prime Fresh+ turns o.
2. For NR-BX421B/NR-BX421G models
● Press the button “Zone Select” to select “B” (Prime Fresh case),
then press “Temp. Select” until the LED of Prime Fresh
turns on.
● If you want to stop the Prime Fresh+ operation immediately,
please press the button “Zone Select” until the LED of Prime Fresh
turns on, then press the button “Temp. Select” until the LED of
Prime Fresh+ turns o.
3. For NR-BX421H model
● Press and hold the “Prime Fresh” button for 3 seconds to start
Prime Fresh+. Then, the LED of Prime Fresh+ will turns on.
● If you want to stop the Prime Fresh+ operation immediately,
please press and hold the “Prime Fresh” button for 3 seconds,
then the LED of Prime Fresh+ turns o.
● The system will stop the Prime Fresh+ operation automatically when it runs for 105 mins
(as ambient temperature is 18°C or lower) or 145 ~ 150 mins (as ambient temperature is
19°C or higher) and return to normal mode. (The LED of Prime Fresh+ turns o.)
● The LED of Prime Fresh+ flashing means that the defrosting system is now working. The
Prime Fresh+ will start right after the defrosting operation is nished.
LED is on: Prime Fresh+ is
operated.
LED is o: Prime Fresh+ is not
operated.
Remark
Remark
When Prime Fresh+ is active, if you set the Quick Freezing, the Prime Fresh+ will stop and
refrigerator activates Quick Freezing and vice versa.
LED is on: Prime Fresh+ is
operated.
LED is o: Prime Fresh+ is not
operated.
LED is on: Prime Fresh+ is
operated.
LED is o: Prime Fresh+ is not
operated.
18
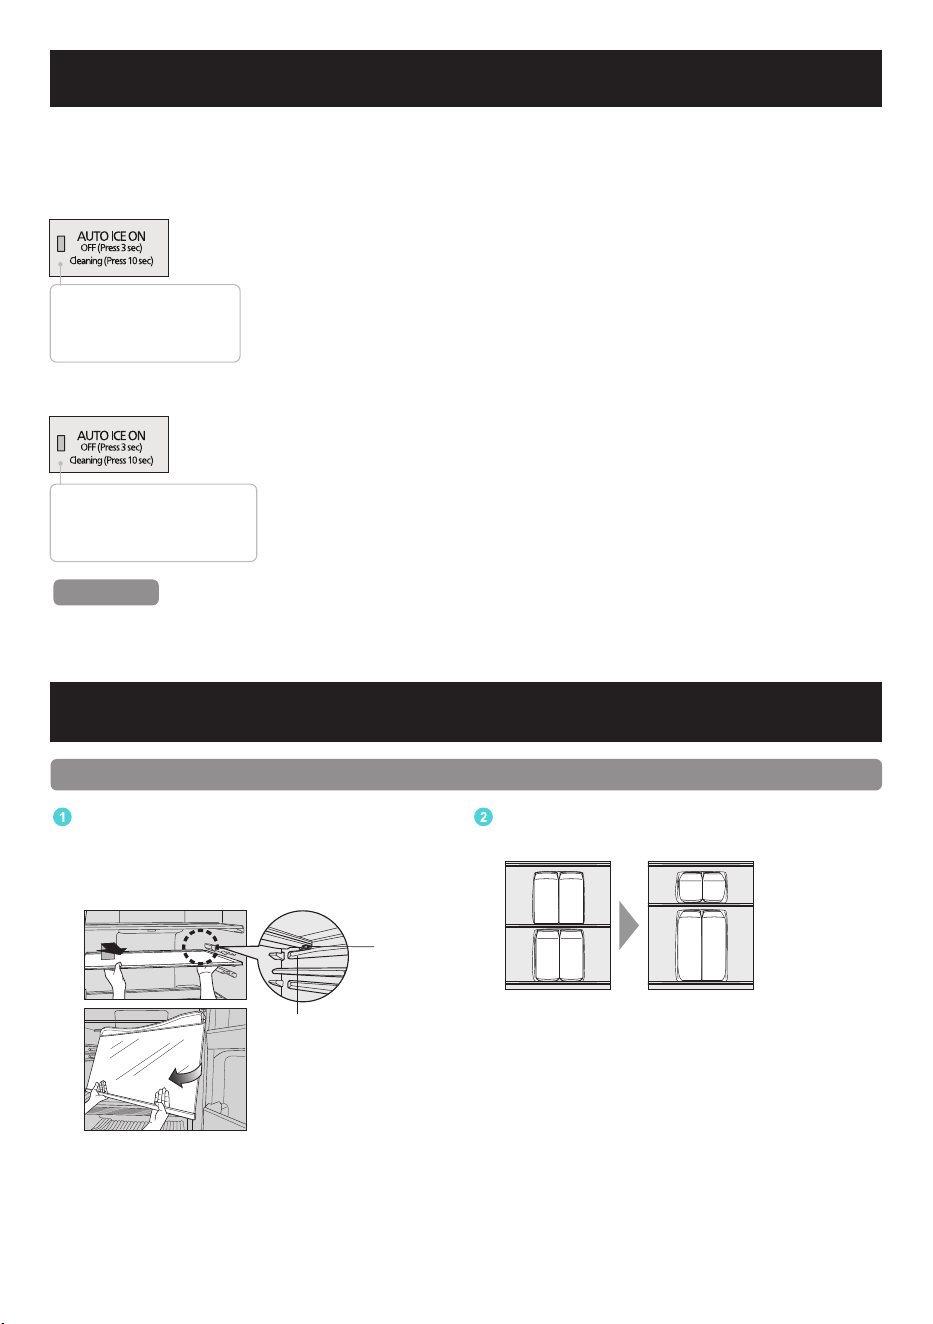
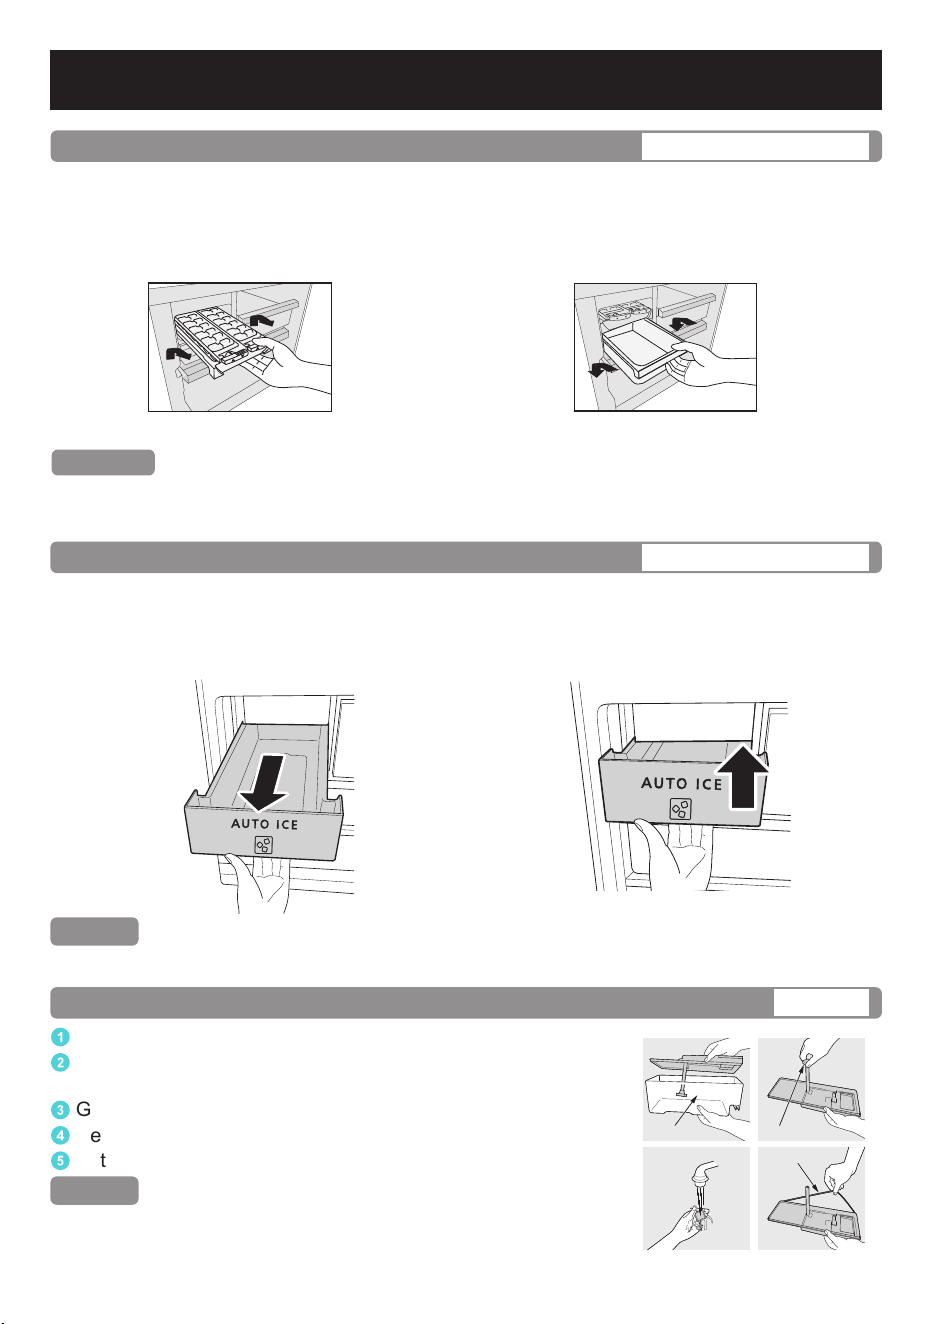
Auto Ice O and Auto Ice Clean (For NR-BX421H model)
Fridge compartment
The position of the second tray from the top can be changed
1
Lift up the back of the tray and pull it
forward. Once the protrusions of the tray
are unhooked from rails, tilt the tray and
remove it.
Rail
Protrusion
2
Insert the tray in the desired position by
reversing the steps.
● Glass trays are heavy.
Please handle them with care so that
they do not fall and cause any damage
or injury.
Remark
● Cannot stop/disable the operation of Auto Ice Clean when it is in processing.
For details on the cleaning operation of Auto Ice maker, please refer to P.24.
When the refrigerator is in operation, the Auto Ice making mode will automatically operate
without any setting. When setting the Auto Ice O and Auto Ice Clean mode, the refrigerator
will stop the Auto Ice making and clean the Auto Ice maker automatically.
How to operate the Auto Ice O
● Press and hold the “Auto Ice On” button for 3 seconds to stop
Auto Ice making. Then, the LED of Auto Ice On will turn o.
● When you want to restart the Auto Ice making mode, press and
hold the “Auto Ice O” button for 3 seconds. Then, the LED of
Auto Ice On will turn on.
How to operate the Auto Ice Clean
● Press and hold the “Auto Ice On” button for 10 seconds to
enable the Auto Ice Clean mode. When Auto Ice Clean mode
is in process, the LED of Auto Ice On will flash. At the end of
the automatically cleaning process, the refrigerator will have a
notication sound.
LED is on: Auto Ice On is
operated.
LED is o: Auto Ice On is not
operated.
LED is flashing: Auto Ice Clean
is operated.
LED is o : Auto Ice Clean
is not operated.
19
Cap
Lid
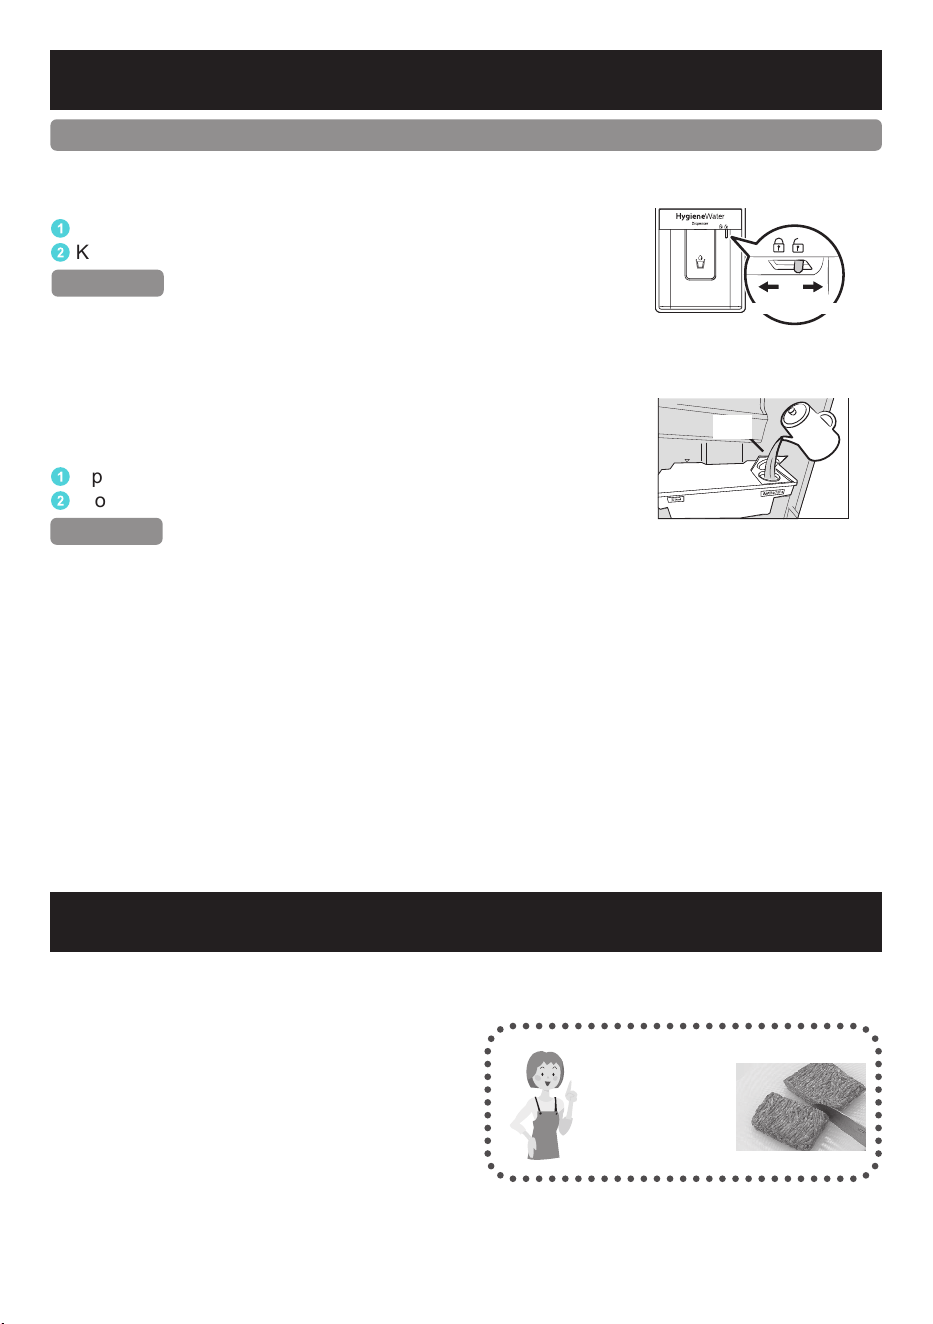
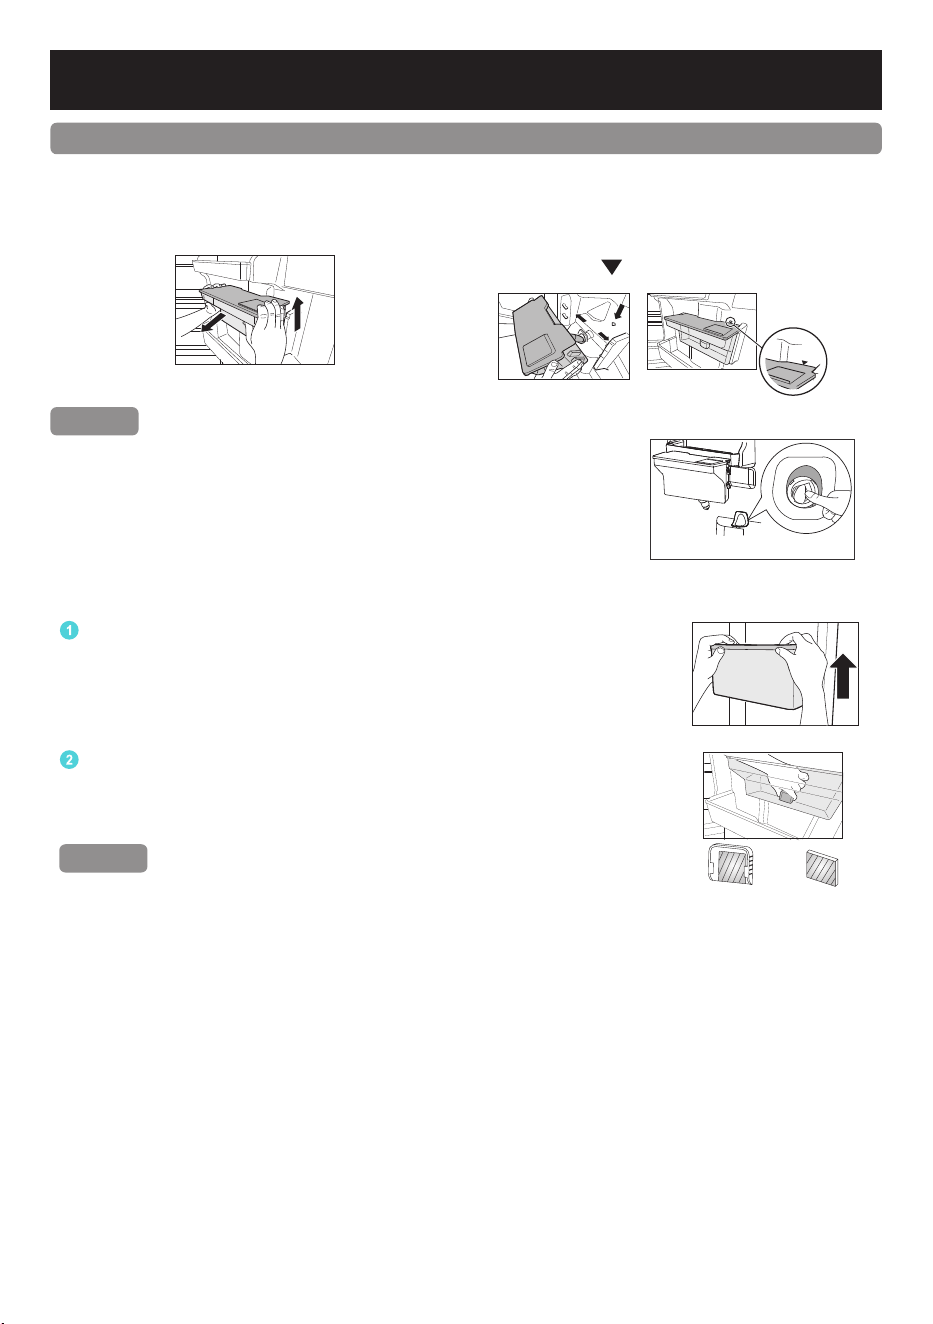
How to use the Water Dispenser (For NR-BX471G/NR-BX421G models)
With the Water Dispenser, you can get cold water without opening the refrigerator door.
How to get water
1
Slide the child lock to the “UNLOCK” position.
2
Keep the cup straight and gently push the lever to get water.
Attention
● After taking enough water, slowly take the cup out to avoid
the water leaking.
● Use a clean cloth to dry if any water spills out.
● Slide child lock to the “LOCK” position to avoid accidentally
touching it, causing water to run out.
How to use Water tank
1
Open the lid and fill it with water for use.
2
Close the lid tightly and close the refrigerator door.
Attention
● When using for the rst time, it is necessary to clean the Water tank rst.
● Do not pour hot water above 50°C to the tank.
● The tank can contain up to 3 liters of water.
Do not pour water above the 3 L line on the tank.
● Only pour drinking water into the Water tank; do not use beer, soft drinks, carbonated
beverages, etc.
● Ensure that the Water tank is always installed in the right position when the refrigerator is
in use. Otherwise it will aect the cooling eciency and cause sweating in the
Fridge compartment door.
● Check the Water tank before use.
● Hardness of water must be 100 mg/L or less. The minerals may appear as white floating
particles. They are not harmful.
● Water container should be lled from drinkable tap water. This product is not designed to
replace a water treatment system. Not suitable for untreated rain Water tanks.
UNLOCKLOCK
● This compartment is suitable for storing fresh food, such as meat or sh. Compared to
storing in the Fridge compartment, the storage life of meat or sh is extended.
● When food is too frozen,
sliced raw sh or meat may be too frozen.
Set the temperature to to “Min”
to prevent food from over frozen.
● When food is not partially-frozen,
depending on the type of food, such as a
large block of meat or a large sh, or the food
fullness of the case, the storage conditions,
and the ambient temperature, food may not be
partially frozen as it intended.
Set the temperature control to “Max” (P.12).
Prime Fresh case
Easy to cut.
The partially-
frozen foods is
easy to cut!
It comes in
handy.
Fridge compartment
20
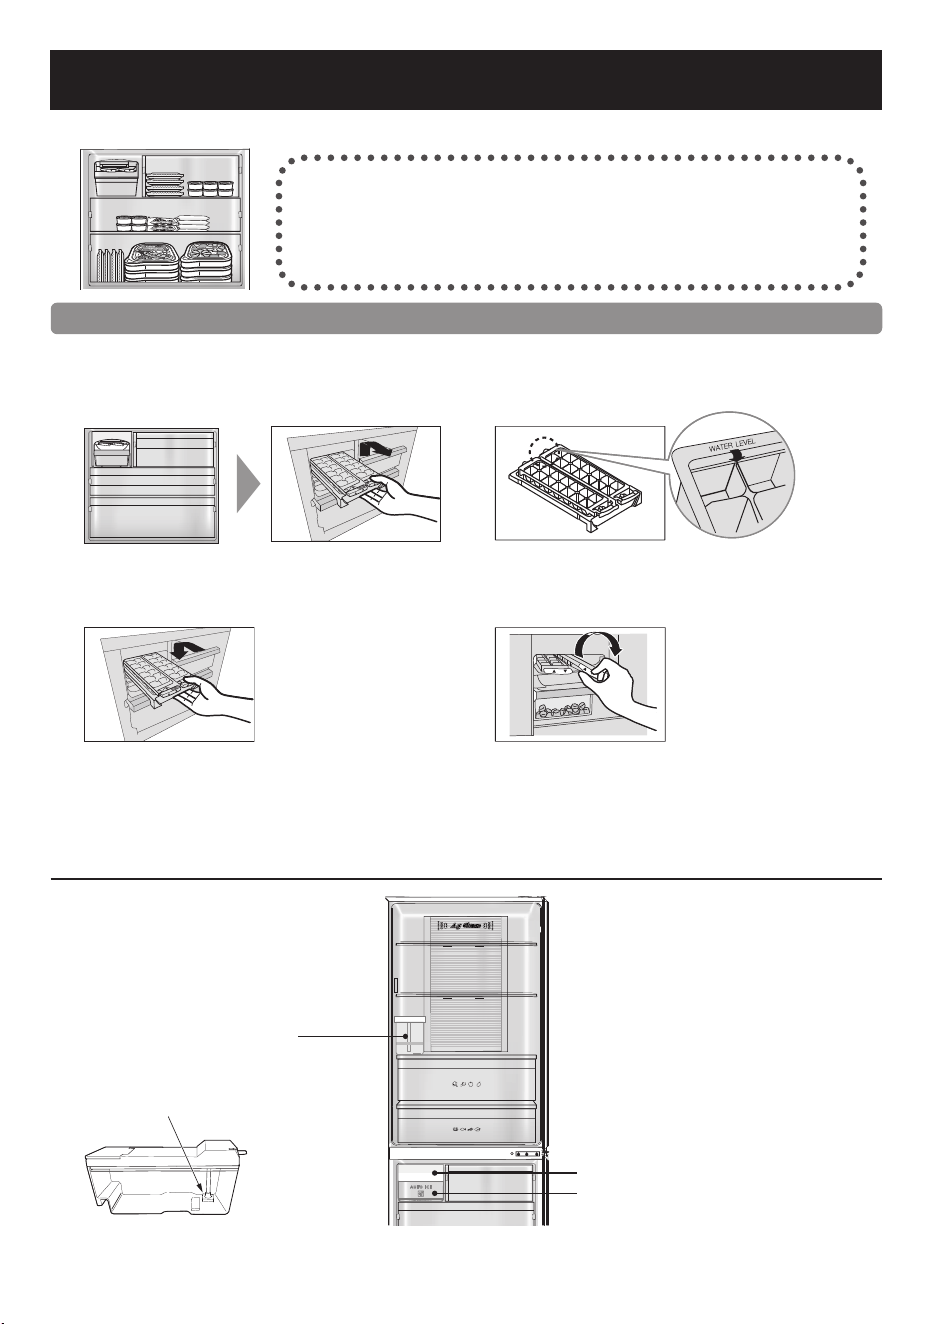
Freezer compartment
1. For NR-BX471G/NR-BX421B/NR-BX421G/NR-BX421W models
1
Take out the Ice Twister
ICE TWISTER
Quick Ice Making
Pull out the Ice Twister. (P.27)
2
Fill with water
Fill water up to the “WATER LEVEL” line.
3
Install the Ice Twister
Place tray back into the
Freezer compartment.
4
To move ice cubes
ICE TWISTER
Twist the Ice Twister clockwise.
(The ice cubes will drop into the Ice box.)
Auto Ice making
Water tank of
Auto Ice maker
Water lter
Ice tray of Auto Ice maker
Ice box
Back
Front
Three tips for freezing food and locking in the flavour...
1. Freeze thin and small items of food quickly
2. Fully sealed
3. Do not refreeze
● A lot of frozen food and cooked meal can be stored.
Frozen food
Frozen food
Frozen food
F f d
To make ice
2. For NR-BX421H model
21
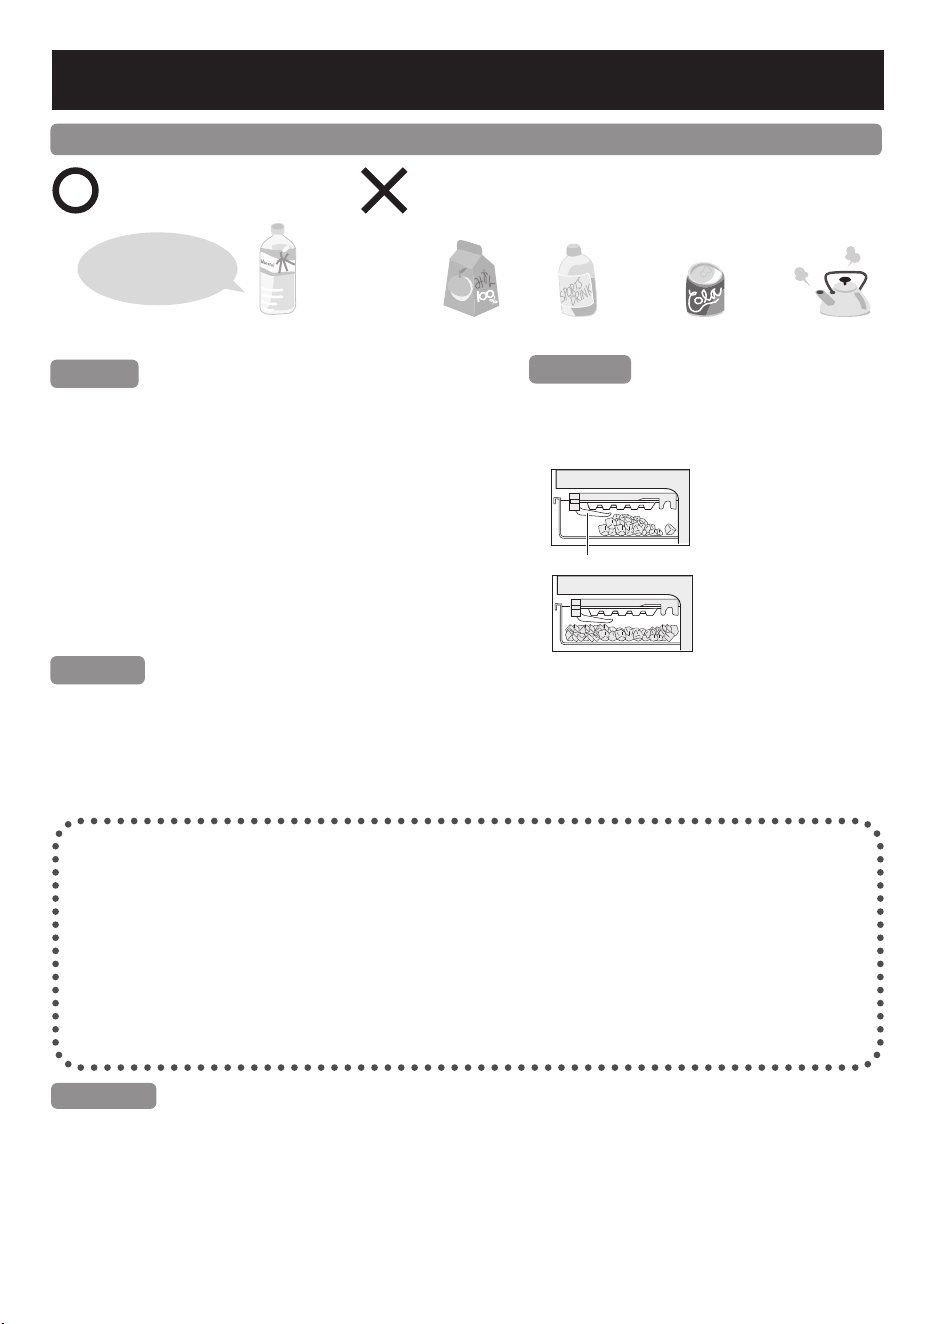
To use the Auto Ice maker in comfort
Please use only drinking
water for Auto Ice making.
Do not put liquids such as the following into the
Water tank.
(These liquids may damage the Auto Ice maker).
Juice, etc. Sports drinks Carbonated beverages Hot water
The hardness
of water must be
100 mg/L or less.
Drinking water
Tips
●
The hardness of water must be 100 mg/L or less.
The minerals may appear as white floating
particles. They are not harmful.
●
When using the Auto Ice maker for the rst time,
odor or dust may be on the Ice tray, etc.
Please throw away the rst lot of ice.
●
Remember to regularly use the Auto Ice Clean
function of the Auto Ice maker. (P.19)
Attention
When the Ice box is full and the ice
cubes touch the ice detection lever, the
Auto Ice making will stop automatically.
The pile of ice cubes will
touch the ice detection
lever.
(Then, the Auto Ice
making will stop).
Ice detection lever
Distribute the ice cubes
evenly inside the Ice box
for making more ice.
Request
● Do not pour water directly into the Ice box to make ice.
(Otherwise, the Ice box may be broken).
● Do not put food or other things into the Ice box.
(Otherwise, the amount of ice cannot be correctly detected and Auto Ice making may be
stopped or the Ice box cannot be pulled out.)
Ice maker cycle time will be longer in the following cases.
● The rst time using the refrigerator.
(It will take at least 24 hours since the
Auto Ice making function only starts
after the inside of the refrigerator is cool
enough).
● When the refrigerator doors are
frequently opened.
● When the refrigerator doors are ajar.
● When a large amount of food is stored at
once.
● When the ambient temperature is low
during winter or high during summer
● When a power failure occurs.
Remark
● The size of ice cubes may change if the refrigerator is not properly leveled.
Freezer compartment
22
How to use Water tank of Auto Ice maker
(
*
)
1
Take the Water tank out.
2
Fill with water.
3
Install the Water tank.
Do not ll more
water than the
“Max” (Maximum)
line.
Lid
Push the
Water tank in
completely.
Hold the handle tightly and
lift the Water tank out from
the refrigerator.
Open the lid and fill the
Water tank with water, then
put the lid back in place.
Confirm the direction of the
tank and install until the tank
reached the end lock.
(If the Water tank does not
reach the end lock, the Auto
Ice maker could not operate)
(
*
)
Ice can be made in approximately 2 hours when the temperature in each compartment is set
to “Med”.
In the Quick Freezing, the ice making speed will be increased.
Ice can be made within 90 minutes
(
**
)
at the quickest.
Remark
● In Quick Freezing, energy consumption increases more than usual.
● ECONAVI operation does not work during the setting of Quick Freezing.
(
**
)
Ambient temperature of 20 °C,
the temperature in each compartment is set to “Med”.
Remark
● Pouring water while Water tank is placed in the refrigerator may pose a risk of the Water
tank falling onto the customer's foot or contaminating the floor.
How to make ice quickly
23
How to clean the Auto Ice maker
When using for the rst time or when not being used after a long time, the Water tank may
smell unpleasantly or collect dust. Remember to clean the Water tank before proceeding to
clean the Ice maker.
After selecting the Auto Ice Clean mode, water will be automatically poured into the Ice tray
and water supply pipe 3 times (for about 2 minutes) to drain the water.
When selecting Auto Ice Clean mode, make sure there is enough water in the Water tank.
1
Pull out the Ice box, remove all ice cubes from the Ice box (after the ice cubes are fully
formed), and then install the Ice box back.
2
Fill the Water tank with water.
3
Select the Auto Ice Clean mode (P.19).
• At the same time, the refrigerator will sound a notication and begin to clean the Ice
maker.
• During the cleaning process, the sound cannot be turned o.
• After the beeping sound to inform the completion of the cleaning process, the LED of
Auto Ice On on the Operation Panel will turn o, the ice maker cleaning process will end
and the Auto Ice Making will be started.
4
Pull out the Ice box from the Freezer compartment, throw away the water in the Ice box
and wipe the water off.
If you do not clean all water on the Ice box, the Ice box may be broken.
You can enable/disable the Auto Ice Making mode according to your needs.
Turn o Auto Ice Making
1
Select the Auto Ice Off mode, the LED of Auto Ice On on the Operation Panel will turn off
and the refrigerator will stop making ice (P.19).
2
No need to pour water in the Water tank. The remaining water inside the Water tank will
keep making ice, and ice cubes will be available after 2 hours. Or when the Ice box is full,
the Auto Ice Making will be stopped.
3
When you want to continue making ice automatically, please select the Auto Ice On, and
the LED of Auto Ice On on the Operation Panel will turn on (P.19).
Turn o Auto Ice Making for a long period of time
1
Empty the Water tank and remove all ice cubes from the Ice box.
2
Clean the Water tank, Water filter, Water tank seal rubber and Ice box; dry and put them
back to their place.
3
When using again, please refill the Water tank and put it back.
When transporting the refrigerator
1
Remove all ice cubes from the Ice box.
2
Select the Auto Ice Clean mode, the LED of Auto Ice On on the Operation Panel will flash
and the refrigerator will start cleaning the Auto Ice maker.
(At this time the ice cubes and water in the process of making ice will fall into the Ice box)
3
The cleaning process will stop after 2 minutes. Take out the Ice box and empty the ice
cubes and water in the Ice box.
4
Clean the Water tank, Water filter and Ice box; dry and put them back to their place.
How to turn o Auto Ice maker
Freezer compartment
24
How to clean the Refrigerator
Before cleaning or conducting maintenance, be absolutely sure to disconnect the power plug
from the power outlet. Do not connect or disconnect the power plug with wet hands.
When the plug is disconnected, leave it for 5 minutes before plugging again. If not, the
Compressor may not work.
Clean the refrigerator immediately after it is
stained!
Wipe o stains on the interior surfaces quickly
before they harden. In particular, cooking oil or
lard may cause plastic to crack and citrus juice
may cause the refrigerator to become discolored.
When stains cannot be removed easily, wipe
them with a cloth lightly soaked in neutral kitchen
detergent. Then, wipe with a cloth lightly dipped
in water.
Use lukewarm
water!
Clean the detachable items occasionally.
Once a week for the Ice Twister. As a guide,
remove the trays, door shelves, etc. and wash
them by immersing them in lukewarm water
every three months.
Clean the door gasket at least once a month.
Clean by wiping with a soft damp cloth.
Lubricated gel has been applied to the door gasket
on the hinge side of the refrigerator be careful not
to wipe it o.
Point where
lubricated gel
was applied
Notice
The door gasket is replaceable by an authorised service agent.
If the door gasket comes o while cleaning, it can be pushed back into the groove.
Request
Do not use the following items for cleaning.
(Otherwise, the surface will be scratched or corroded.)
Alkaline or weak
Alkaline
Kitchen detergents
(They crack plastic!)
Cleanser or soap powder Benzine, thinner,
alcohol, acid, petroleum
Scrubber Hot Water
Rub the Operation Panel with a dry
cloth. (P.11)
Rub the door surface with a soft damp cloth.
Remove and
rinse!
25
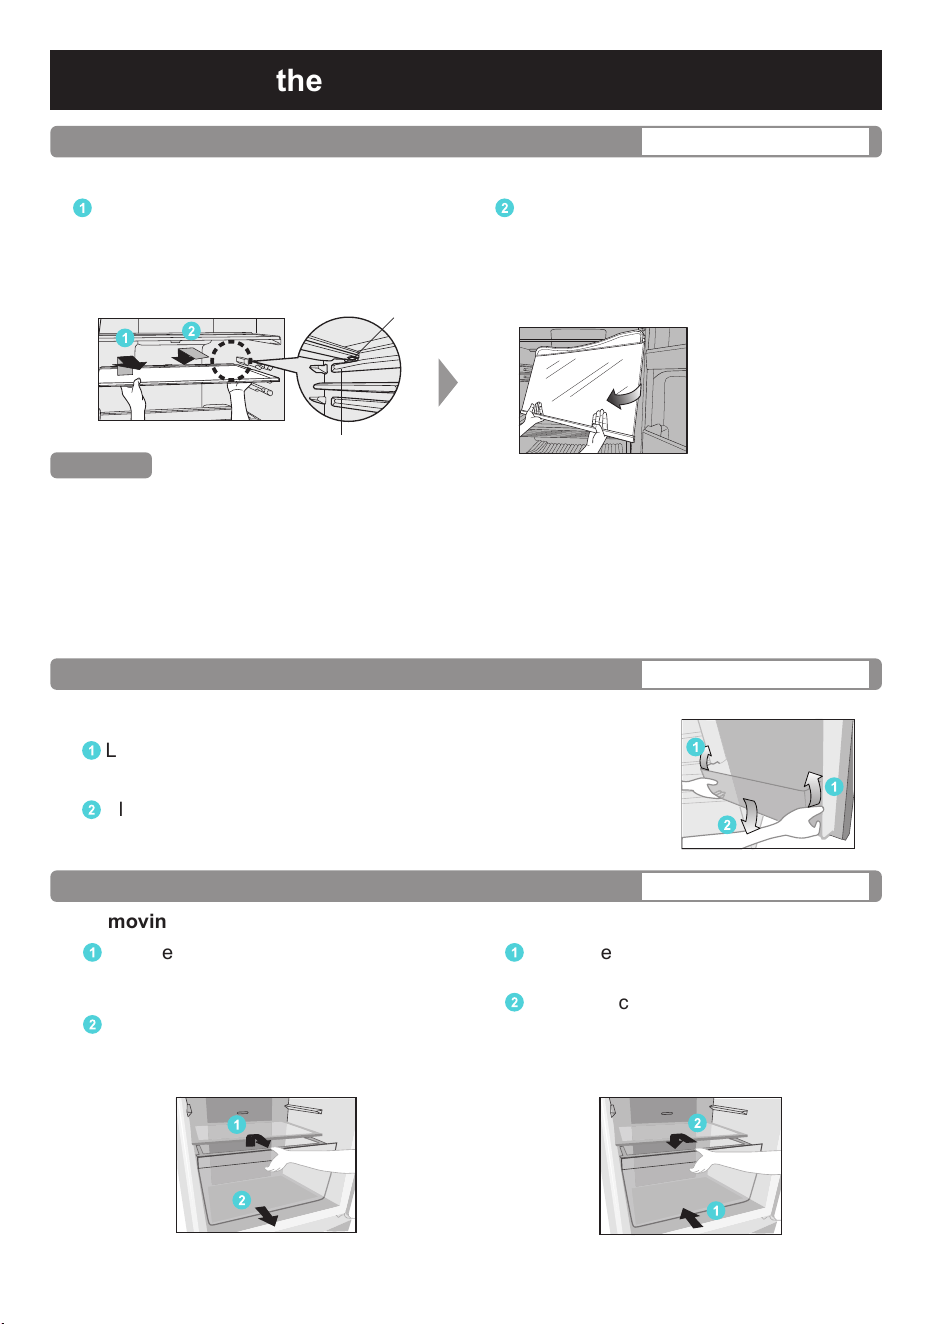
Once every 3 months
Tray
Removing
1
Lift up the back of the tray and pull it
forward. Once the protrusions of the tray
are unhooked from the rails, tilt the tray
and remove it.
Protrusion
Rail
Attaching
2
Push the tray until it reached the end
lock.
● When removing the tray above the Vegetable case, please pull out the Vegetable case rst
and then follow to removing the tray as above details.
● In case of attaching the tray and it does not lock, make sure that you did not attach it into it
the wrong tray.
● Trays made of glass are heavy.
Please handle them with care so that they do not fall and cause any damage or injury.
For attaching trays, hold them with the protrusion side down and rmly insert.
Once every 3 months
Door shelf/Bottle shelf
Removing
1
Lift it upward, alternating between the right and left side.
Attaching
2
Placing it on both supporters, and then press until it reaches
the end of supporters.
Once every 3 months
Vegetable case/Prime Fresh case/Freezer case
Remark
1
2
1
1
2
Removing
1
Pull the Vegetable case/Prime Fresh
case/Freezer case unit forward until it
reaches the end of the stopper.
2
Lift the front of the Vegetable case/Prime
Fresh case/Freezer case unit slightly
and remove completely.
Attaching
1
Insert the Vegetable case/Prime Fresh
case/Freezer case unit into the supports.
2
Raise the case unit up slightly and push
forward until the end is reached.
1
2
2
1
How to clean the Refrigerator
26
Once every 3 months
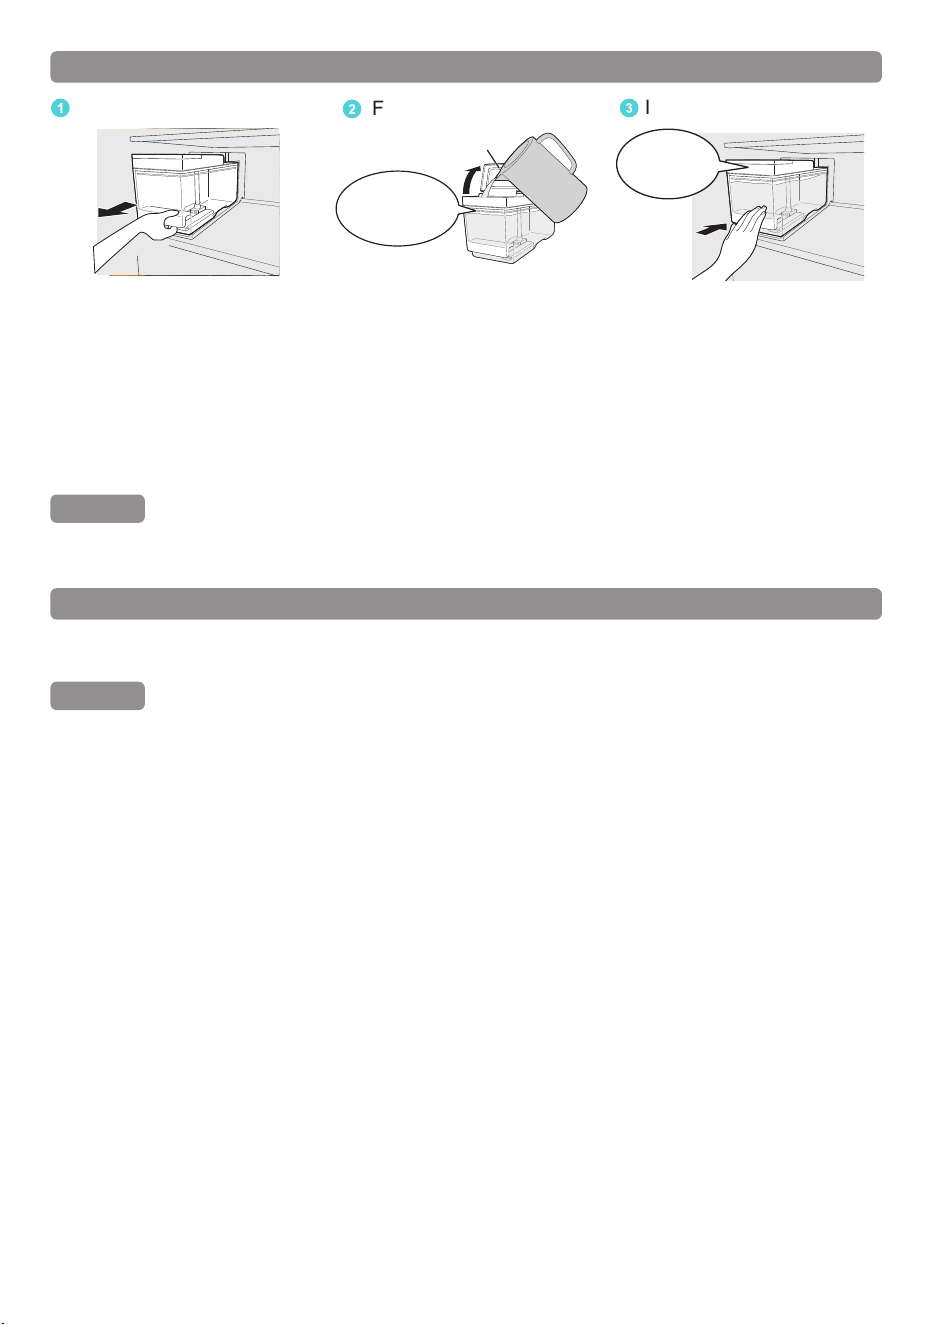
Ice Twister (For NR-BX471G/NR-BX421B/NR-BX421G/NR-BX421W models)
Removing
Unhook the protrusion by lifting it upward
and pulling the Ice Twister and Ice box
forward until completely removed.
Attaching
Push the Ice Twister and Ice box until it
reaches the end lock.
● You can disassemble the Ice Twister and Ice box to increase space in the Freezer
compartment.
Once every 3 months
Ice box (For NR-BX421H model)
Removing
Lift and pull the Ice box forward until it is
completely removed.
Attaching
Push the Ice box until it reaches the end
of the Ice box holder.
Remark
● Stop the Auto Ice making function before cleaning the Ice box (P.19).
Weekly
Water tank/Water lter of the Auto Ice maker (For NR-BX421H model)
1
Open the lid and clean the Water tank with water.
2
Rotate the Water filter to remove the hook and remove
the Water filter.
3
Gently wash the Water filter in water.
4
Remove the seal rubber on the edge and clean it with water.
5
Put the Water filter and rubber back into place.
Remark
● If there is water deposits or pipe blockages in the Water lter,
ice may not be made properly.
Water supply tank Water filter
Rubber gasket
Remark
How to clean the Refrigerator
Ice Twister
Ice box
27
Water tank (of Water Dispenser) (For NR-BX471G/NR-BX421G models)
Removing
Pull up the Water tank with both hands and
tilt it slightly towards you.
Attaching
Insert the tip of the valve into the hole.
Place both left and right edges of the Water
tank in the locked position. Fully push the
tank under “ ” symbol (position indicator).
Position indicator
● When removing the Water tank for cleaning, if the rubber seal
is inserted reversely due to friction with the faucet, use your
hand to push the seal reversely to its original position.
● The valve in the Water tank can be removed by turning it
counterclockwise.
Replace lter
1
Open the lid at the right corner using a hand.
2
Lift the filter straight out of the lock.
Replace with a new hygiene filter. Put the filter back to its original
position and close the lid tightly.
Remark
● The hygiene lter is recommended to be replaced every 3 years.
● The hygiene lter can be purchased at all authorized Panasonic
Service Center.
Cleaning filter
Cleaning
filter element
Remark
How to clean the Refrigerator
28
Troubleshooting
Before you call for service, please check the following items:
The refrigerator
does not operate.
● Check that the power plug and its socket are in good
condition.
● Check if there is any problem on main fuse and electrical
system of the house.
● Check by unplug and wait for 5 minutes before plugging it back
in.
The refrigerator
does not cool
enough.
● Check to be sure that LED in Operation Panel is displayed at
proper position.
● Check to see if the refrigerator is overloaded with stu or there
is any hot foodstu refrigerated inside.
● Is the refrigerator exposed directly to sunlight or heat source?
● Is the refrigerator door completely closed?
● Is the refrigerator door opened frequently?
● When the air humidity is high, there is a chance that moisture
will condense on the refrigerator surface, around the door
gasket or on the door surface. This situation will stop if the air
humidity decreases. Please wipe it up with dry cloth.
● Is the door closed rmly?
● Is the door being opened and closed too
frequently?
● Condensation inside the refrigerator can also
be caused by leaving high-humidity foods
uncovered or unwrapped.
● When the humidity is high, the door is open for
a long time, or when the refrigerator contains too much food
or makes too much ice, frost may form inside the Freezer
compartment at the location of the Freezer cases, Ice box.
This is normal. Please wipe with dry and soft cloth.
The refrigerator
generates noise.
Outside
Inside
● Check if the refrigerator is located on a stable floor or is
installed properly.
● Check if there is any object in contact with the refrigerator.
● Cracking sound within caused by the parts adjusting
temperature which is normal.
● After installation, the refrigerator may make loud noise.
The noise will be less when the refrigerator has been cooled.
● There may be a whistling sound inside the refrigerator when
opening and closing the door. This is caused by the air
outside being drawn in through the pipe on the backside of the
refrigerator to better balance the air circulation inside the unit.
● Check if evap pipe in contact with Pan water evap.
Dew,
frost
appear.
29

The inside is
smelling.
● Do you store food with dry odor without wrapping it?
The back and
sides of the
refrigerator are
warm and hot.
● Because the refrigerator is equipped with the dew prevention
and heat radiation tubes, the back and sides of the
refrigerator get warmer when operating.
● The back and side plates may get warmer especially when
starting up or if the door is frequently opened and closed.
The normal
sounds of
refrigerator.
● When the refrigerator starts operation, the sound like water
flowing and boiling water is created. This is the sound of the
cooling liquid.
● The noise is generated when the automatic defrost system
operates.
● The dilatation of the details inside the refrigerator in the
cooling process can cause sound “crack-crack”.
● You may feel that the operation sound is larger because
the Compressor operates in high-speed under the following
conditions: the refrigerator does not cool fully on the occasion
such as using it for the rst time, opening/closing the door too
frequently, the surrounding temperature is high. The sound
becomes more quiet after cooling fully.
LED does not
turn on.
● Please contact a Panasonic Service Center.
Food becomes
frozen.
● Do you put the food near cold air holes?
● Do you adjust the temperature control at “Max”?
Adjust to “Min”?
● Do you put food in Prime Fresh case?
Droplets are
kept on top
of nozzle.
● After getting water, a few droplets are kept on top of nozzle
and may drip into the Water tray.
This is a normal phenomenon.
● When the air humidity is high, a few droplets are kept on top
of nozzle and may flow into the Water tray. This is a normal
phenomenon and no longer appears when the air humidity is
decreased. Please clean with soft dry towel.
● When the air humidity is low but a few droplets are still kept
on top of faucet and flows into the Water tray, please contact
Panasonic Service Center immediately.
Only a few
droplets
ows into
Water tray.
Water ows
continuously
● Does the Water tray of the Water Dispenser have any abnormal
object or scale formation?
→ Please clean the Water tray of the Water Dispenser if it has
any abnormal object or scale formation.
● In case water flows continuously and no abnormal objects are
in the Water tray, please contact Panasonic Service Center
immediately.
Troubleshooting
Water Dispenser
(For
NR-BX471G/NR-BX421G models
)
30
● Has the Quick Freezing or Prime Fresh+ been activated?
(P.17)
● Is the temperature setting of the Freezer compartment or
Fridge compartment set to something other than “Med”?
● Has the door been opened frequently or has hot food been
placed in the refrigerator?
● The learning function may automatically disable ECONAVI
operation during times of frequent use.
● Is there a power failure?
If a power failure occurs, the learning function data collected
up until the point of power failure will be lost.
The ECONAVI operation will rarely be performed until the
learning function has collected data again.
● If the auto defrost function is turned on during ECONAVI
operation, the normal cooling operation will need to be
performed after defrost.
Therefore the ECONAVI operation may be stopped during
this defrost/cooling process.
● The learning function may sometimes restart the normal
cooling operation.
● Is the light intensity sensor hidden?
● Are there dirt or scratches on the Operation Panel where the
light intensity sensor is located?
● ECONAVI operation may be performed while the refrigerator
is being used depending on the conditions of use, but the
cooling performance is maintained.
The ECONAVI lamp does not light properly.
(For
NR-BX471G/NR-BX421W/NR-BX421H models
)
ECONAVI
operation is
stopped
part way
though.
ECONAVI
operation is
performed
too often
(the
ECONAVI
lamp rarely
turns o).
ECONAVI
does not
operate
(the
ECONAVI
lamp does
not light).
ECONAVI
operation
is rarely
performed.
Error display on
Operation Panel.
(For NR-BX421H
model)
● The letter “H” and two digits are displayed on Operation
Panel.
For example: H01
→ Please contact the Panasonic Service Center for support.
● U10: Warning if doors are opened too long.
→ Check that the doors are closed properly.
31
Troubleshooting

● If the water in the tank does not decrease after a while, the
Ice maker is not working.
● The ice making process begins after the inside of the
refrigerator is cold enough. (It may take more than 24 hours to
start the process)
● Check if the Auto Ice O mode is set. (P.19)
● Be sure to fully push the Water tank and Ice tray into place.
● Do not leave food in the ice maker.
● Do not install or remove the Ice tray frequently.
● Check if the Water tank is almost empty.
● If water spills on the Ice box, clean it up.
● Please contact Panasonic Service Center.
● Is the temperature of Freezer compartment set to “Med”?
→ Adjust to a lower temperature (P.13).
● There are protrusions.
→ The grooves of the Ice tray may be frozen.
● The ice cubes are round or connected to other ice cubes.
→ Ice has been stored for a long time.
(Ice cubes get round of connected by sublimation.)
● The ice is small.
→ Small ice cubes are made when there is no water left in the
tank.
● When the food in Prime Fresh case is over-frozen.
→
Please set the temperature control to “Min”.
● When the food in Prime Fresh case is not partially frozen.
→
Please set the temperature control to “Max”.
● Cooling or freezing may not be sucient depending on the
type of food, packaging condition, storage capacity, and how
often the door is opened and closed.
→ Create space between foods for cold air circulation,
arrange similar sized food in a Prime Fresh case and
adjust the temperature accordingly.
● When there is too much food, it may overflow from
Prime Fresh case and enter the gap behind Prime Fresh
case, causing it not to be fully sealed.
→ Check the back of Prime Fresh case contains food items?
If so, remove them before attaching Prime Fresh case.
→ Arrange food properly to avoid overflowing.
Auto Ice making
(For
NR-BX421H model
)
The
refrigerator
does not
make ice.
The ice does
not form any
ice cube
Unusual
shape of ice
cubes.
Prime Fresh case
Food is
over-frozen
or not
frozen.
Not cool,
not freezing.
Not fully
sealed.
Troubleshooting
32
33
Specications
Model No.
NR-BX471G NR-BX421B NR-BX421G NR-BX421H NR-BX421W
Freezer Star Rating
Capacity
(L)
Standard AS/NZS IEC 62552:2018
Total 417 380 377 376 380
Freezer 112
Fridge,
Prime Fresh
305 268 265 264 268
Outside dimensions
Width x Depth x
Height (mm)
686 x 695 x
1790
686 x 695 x 1680
686 x 697 x
1680
Refrigerant Type R600a
Net weight (kg) 68 65 66 67 72
Cooling System Non-frost cooling.
Rated Voltage (V)
Rated Frequency (Hz)
Refer to the rating label attached inside the cabinet.
Copyright
■ About software
Product number: NR-BX421H
This product consists of the following types of software.
(1) Software developed by or for Panasonic Corporation (Panasonic)
(2) Software owned by a third party and licensed to Panasonic
(3) Conditionally licensed open source software
The software classied in (3) above is distributed with the expectation that it will be useful
on its own, but we do not warrant any implied guarantee of “commerciality” or “tness for a
specic purpose”. No warranty is given, including.
You can nd the link to download the most up-to-date information of Copyright:
● For Australia:
https://www.panasonic.com/au/consumer/household/refrigeration/nr-bx421hwka.html
or QR Code below:
● For New Zealand:
https://www.panasonic.com/nz/consumer/home-appliances/refrigerators/nr-bx421hwka.
html
or QR Code below:
34
Memo
35

Panasonic Corporation
https://www.panasonic.com
© Panasonic Appliances Vietnam Co., Ltd. 2021
Memo