Panduan Pengendalian
Peti Sejuk
Untuk Kegunaan Isi Rumah
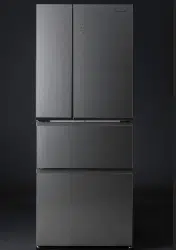
No. Model: NR-YW590Y
Kandungan
Peringatan Keselamatan .........................
2
Langkah-langkah Penggunaan
Yang Selamat .............................................
4
Ciri-ciri...................................................... 6
Pemasangan ........................................... 9
Pengenalpastian Bahagian ................... 12
Panel Operasi .......................................
14
Kawalan Suhu ....................................... 15
Operasi ECONAVI .................................
16
Mod nanoe
TM
X ......................................
16
Quick Freezing (Penyejukbekuan Pantas)
....
17
Prime Fresh+ (Segar Terbaik+) ............. 17
Prime Freeze (Pembeku Terbaik)
.........
18
Mod Pembuat Ais Pantas....................... 20
Pembuat Ais Automatik Ditutup dan
Mod Pembersihan ................................. 21
Menetapkan Child Lock
(Kunci Kanak-kanak) .............................. 21
Ruang Peti Sejuk ...................................
22
Ruang Segar Terbaik .............................
23
Ruang Penyejuk Beku ........................... 24
Bagaimana Mencuci Peti Sejuk .............
27
Pengenalpastian dan Penyelesaian Masalah...
32
Spesikasi ............................................. 36
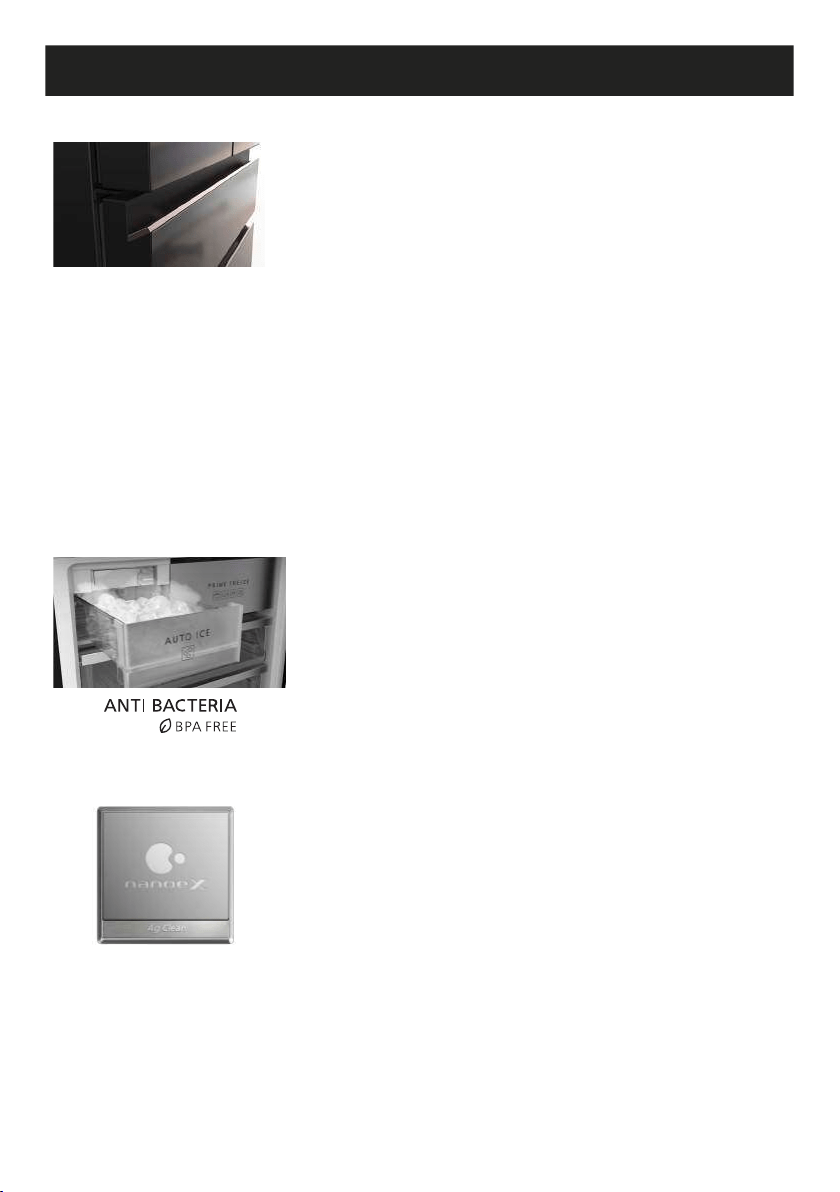
■ BUKAN CFC
Unit ini menggunakan BAHAN BUKAN CFC seratus peratus untuk bahan penyejuk
(R600a) dan untuk penebatan (Cyclo-Pentane). Oleh itu, peti sejuk ini tidak merosakkan
lapisan ozon Bumi.
Terima kasih kerana membeli produk Panasonic.
Sila baca panduan ini dengan teliti dan patuhi amaran keselamatan di halaman 2-5 sebelum
menggunakan produk ini.
Sila pastikan tarikh dan nama kedai di mana anda membeli produk ini dicapkan pada kad
jaminan dan simpannya dengan panduan pengendalian.
ARAH1E202970
P0122-0
Dicetak di Vietnam
MAL
Peringatan Keselamatan
Sila pastikan anda mematuhi Panduan ini.
Risiko kebakaran / bahan mudah terbakar
2
AMARAN
AMARAN
Tanda ini bermakna: Ia mungkin mengakibatkan
kecederaan parah atau kematian.
Tanda-tanda ini bermakna
perbuatan yang dilarang
Tanda-tanda ini bermakna perbuatan
yang diperlukan.
Tanda ini bermakna perkakas mesti dibumikan
untuk mengelakkan kejutan elektrik.
PERHATIAN
Tanda ini bermakna: Ia mungkin mengakibatkan
kecederaan atau kepincangan.
Jika tidak, ia boleh
menyebabkan kebakaran,
kecederaan dan kejutan
elektrik.
Apabila mengitar semula produk:
●
Sebelum menghantar peti sejuk untuk dikitar semula, sila cabutkan semua pelekat
pembuka pintu untuk mengelakkan kanak-kanak daripada terkurung di dalamnya.
●
Label amaran yang disebutkan di atas harus disimpan sepanjang hayat peti sejuk.
● Arahan pengendalian hendaklah diserahkan kepada sesiapa yang
akan menggunakan atau mengendalikan peti sejuk apabila peti sejuk
dipindahkan ke lokasi lain dan dihantar ke kilang kitar semula.
● Berhubung undang-undang tempatan, Siklo Pentana digunakan untuk
penebatan peti sejuk ini, apabila anda membuangkan unit ini, sila gunakan
kaedah yang betul dan jangan hapuskan dengan menggunakan api.
Sekiranya berlaku kecemasan:
● Kerja penyelenggaraan hanya boleh dijalankan di bengkel oleh pekerja
penyelenggaraan yang terlatih.
● Jangan menyimpan bahan yang mudah terbakar, misalnya penyembur
aerosol, dsb. dalam peti sejuk.
● Jangan gunakan peralatan elektrik seperti pewangi dalam peti sejuk.
Penyejuk yang terbakar boleh menangkap api dari percikan kenalan
elektrik dan boleh menyebabkan letupan.
● Jangan gunakan peralatan elektrik di dalam petak penyimpanan
makanan perkakas, kecuali jenis yang dicadangkan oleh pengilang.
● Jangan ceraikan komponennya, baiki atau ubah suai peti sejuk ini
sendiri. Jika anda ingin membaiki peti sejuk, sila hubungi pengedar
anda atau pusat servis yang sah.
● Jangan gunakan peranti mekanik atau sebarang cara lain untuk mempercepatkan
proses cair beku, selain daripada yang disarankan oleh pengilang.
iso-butane
iso-butane

3
Apabila menggunakan:
● Jangan rosakkan litar penyejukan (paip pada bahagian belakang).
● Jangan sentuh mesin pemampat atau paip, kawasan ini bersuhu tinggi.
● Jangan biarkan kanak-kanak bergayut pada pintu peti sejuk, ia boleh
terbalik dan menghempap kanak-kanak itu.
● Jangan letak sebarang bekas air di atas peti sejuk kerana tumpahan
air boleh menyebabkan kejutan elektrik atau pembakaran.
● Jangan letakkan pelbagai soket mudah alih atau bekalan mudah alih
di bahagian belakang perkakas.
● Pastikan pembukaan pengudaraan peti sejuk luaran atau struktur
terbina dalam tidak terhalang.
● Perkakas ini tidak bertujuan untuk digunakan oleh individu (termasuk kanak-kanak)
yang kekurangan kebolehan zikal, deria atau mental, atau kurang pengalaman dan
pengetahuan, melainkan mereka diawasi atau diberi arahan berkenaan penggunaan
perkakas ini oleh individu yang bertanggungjawab ke atas keselamatan mereka.
● Kanak-kanak hendaklah diawasi bagi memastikan mereka tidak
bermain dengan perkakas ini.
Memasang:
● Betulkan peti sejuk untuk
mengelakkan bahaya akibat
ketidakseimbangan.
● Apabila meletakkan perkakas,
pastikan kord bekalan tidak
terperangkap atau rosak.
● Pastikan peti sejuk
dipasangkan ke soket yang
disambungkan dengan
sambungan pembumian.
AMARAN
Jika tidak, ia boleh
menyebabkan kebakaran,
kecederaan dan kejutan
elektrik.
Untuk palam dan kord kuasa:
● Jangan pasang atau cabut palam menggunakan tangan yang basah.
● Jangan biarkan kord atau palam rosak.
● Cabut palam kuasa semasa membersihkan peti sejuk.
● Pasangkan terus ke soket dinding dengan voltan terkadar arus terkadar
yang sesuai dan pasangkan palam sepenuhnya.
● Khususkan satu soket untuk peti sejuk sahaja. Elakkan daripada menyambung
banyak perkakas kepada soket yang sama dan buka sepenuhnya gulungan kord.
● Buang habuk yang terlekat pada palam kuasa dari semasa ke semasa.
● Jika kord kuasa rosak, ia mesti diganti oleh pengilang, wakil servisnya,
Pusat Servis Panasonic yang Sah atau orang yang berkelayakan bagi
mengelakkan bahaya.
●
Jika anda mengesan bau terbakar, cabut palam kuasa dan alirkan udara di dapur.
●
Sila berhenti menggunakan peti sejuk dengan serta-merta jika sesuatu yang luar
biasa atau kegagalan berlaku. Contoh sesuatu yang luar biasa dan kegagalan.
- Kord atau palam kuasa panas luar biasa.
- Kord kuasa ada kesan torehan yang dalam dan cacat bentuknya.
- Anda dapat rasakan arus elektrik yang berdenyut denyut.
Langkah-langkah Penggunaan Yang Selamat
4
Apabila membuka/menutup pintu:
Apabila mengalih peti sejuk:
Apabila menyimpan makanan:
PERHATIAN
● Semasa membuka peti sejuk, berhati-hati
agar tidak mengepit tangan sebelah lagi yang
memegang pintu peti sejuk.
● Berhati-hati dengan celah di antara pintu
kerana ia mungkin menyepit tangan anda
semasa ditutup.
● Jangan bekukan botol kaca, terdapat risiko kecederaan.
(Jika cecair di dalam botol kaca membeku, botol itu
boleh pecah dan anda mungkin akan tercedera.)
● Jangan kenakan impak yang tinggi ke atas dulang
kaca. (Jika tidak, dulang kaca tersebut mungkin pecah
dan anda mungkin tercedera.)
● Pegang peti sejuk dengan kuat semasa mengangkutnya.
● Bentangkan pelapik pelindung, terutamanya di atas lantai yang
permukaannya mudah rosak.
Apabila membuka/menutup pintu:
● Jangan simpan barang yang lebih besar daripada dulang atau rak pintu
kerana ini akan menyebabkan pintu tidak tertutup rapat dan menyebabkan
tidak sejuk.
● Jangan buka peti sejuk dengan kerap atau biarkannya terbuka untuk tempoh
yang lama bagi mengelakkan air menitik di dalam dan membazirkan tenaga.
● Periksa pengedap bukaan pintu dengan kerap, ia mesti betul rapat dengan
badan peti sejuk.
Apabila membersihkan:
● Jangan bersihkan peti sejuk dengan bahan kimia atau
cecair. Ia mungkin menyebabkan kerosakan dan hakisan di
permukaan.
Jika tidak, ia boleh
menyebabkan kecederaan
dan kemalangan.
Langkah-langkah Penggunaan Yang Selamat
5
Apabila menyimpan makanan:
● Jangan simpan terlalu banyak makanan di dalam peti sejuk.
Ruang yang secukupnya mesti disediakan antara makanan untuk
mengekalkan kesan kesejukan.
● Simpan buah dan sayur di dalam petak sayuran, di mana
lembapan yang terperangkap akan membantu mengekalkan
kualiti makanan untuk tempoh yang lebih lama.
● Barang makanan seperti sayur, buah dan makanan segar
hendaklah dibungkus atau dimasukkan ke dalam bekas sebelum
menyimpannya di dalam petak sejuk beku atau peti sejuk.
● Tutup makanan berair dengan penutup yang ketat, plastik atau
kerajang pembalut makanan.
● Masukkan makanan seperti daging atau ikan di dalam petak
sejuk beku jika anda mahu menyimpannya untuk tempoh yang lama.
● Air minuman, botol minuman hendaklah ditutup rapat bagi mengelakkan ia
berbau.
Apabila menggunakan:
● Semasa mencabut keluar palam, biarkan 7 minit sebelum
memasangnya semula. Jika tidak, pemampat mungkin tidak
dapat berfungsi.
● Jangan biarkan pintu terbuka lebih lama daripada yang
diperlukan, terutama sekali dalam cuaca yang panas dan lembap.
● Apabila kelembapan tinggi, iaitu semasa musim hujan, pemeluwapan mungkin
kelihatan di permukaan kabinet, terutama sekali sekitar gasket pengedap
pintu. Lap air pemeluwapan menggunakan kain bersih.
● Laraskan suhu mengikut keadaan operasi sebenar untuk menjimatkan tenaga.
● Sekiranya anda akan meninggalkan rumah untuk beberapa hari atau tiada apa-
apa yang disejukkan di dalam peti sejuk, palam harus dicabut bagi menjimatkan
tenaga. Apabila peti sejuk tidak digunakan selama beberapa hari, adalah perlu
untuk mengeluarkan semua baki makanan di dalam peti sejuk, membersihkan
dan membuka pintu selama beberapa jam untuk membiarkan kelembapan di
dalam peti sejuk kering, mengelakkan acuan dan pengoksidaan komponen.
● Dinding luar kabinet peti sejuk kadangkala mungkin menjadi panas, terutama
sekali sejurus selepas pemasangan. Ini agak normal dan ia disebabkan oleh
Paip Pengering Jenang Antara terbina dalam yang mencegah perpeluhan dan
melepaskan haba.
● Kelembapan di dalam bekas segar mungkin memeluwap, oleh itu lap ia
dengan kain dari semasa ke semasa. Bersihkan bekas segar sekali sebulan.
● Bahagian atas peti sejuk diperbuat daripada keluli untuk mengelakkan
kebakaran yang disebabkan oleh pengaruh luar. Jangan letakkan barang di
atas peti sejuk untuk memastikan faktor ini.
7 minit
Ciri-ciri
Reka bentuk mewah sesuai untuk dapur yang mewah
Permukaan kaca tanpa sempadan dengan pemegang
moden dan canggih dalam setiap perincian.
Penjimatan kuasa
● Teknologi INVERTER Panasonic meningkatkan penjimatan kuasa dan mengurangkan
bunyi bising.
● Teknologi ECONAVI eksklusif Panasonic membolehkan untuk mengenal pasti perubahan
dalam tabiat gaya hidup pengguna, membantu peti sejuk menyesuaikan secara automatik
untuk mengurangkan penggunaan tenaga.
Pemampat terletak di atas peti sejuk (Unit Atas)
Reka bentuk eksklusif Panasonic mengalihkan pemampat daripada kedudukan tradisional,
iaitu di bahagian bawah peti sejuk ke bahagian atas, mengoptimumkan ruang di dalam
perkakas.
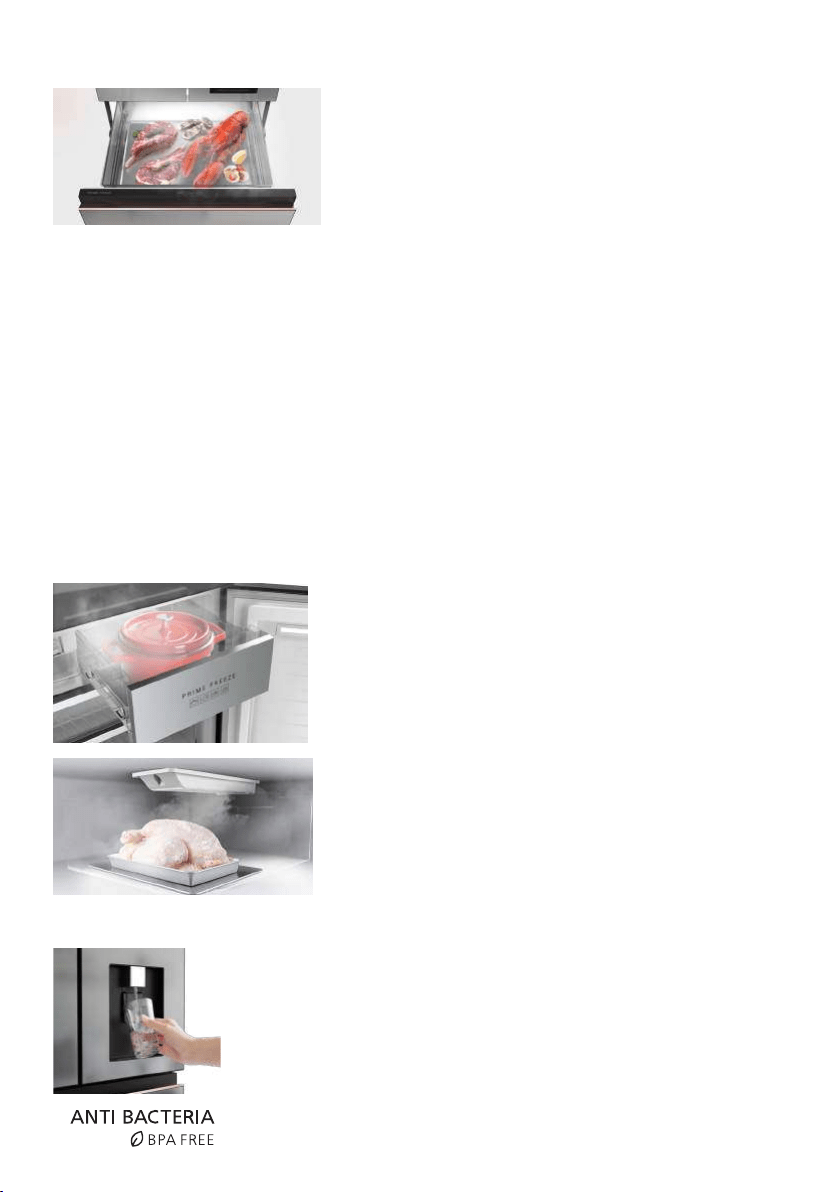
Sistem Pembuat Ais Automatik
● Perkakas dilengkapi dengan sistem pembuat ais
automatik bagi memenuhi permintaan penggunaan
ais pada setiap masa.
● Tangki bekalan air berkapasiti besar 5 Liter diperbuat
daripada bahan antibakteria bebas BPA dengan
penapis antibakteria yang selamat untuk kesihatan.
● Terdapat mod pembuat ais pantas.
● Terdapat mod untuk menghentikan pembuatan ais
dan membersihkan pembuat ais secara automatik.
nanoe
TM
X teknologi dan penapis Ag Clean
Panasonic eksklusif nanoe
TM
X teknologi dan penapis
Ag Clean membantu menyahbau dan meneutralkan
bakteria, memastikan makanan segar lebih lama.
Rel panduan dengan sudut bukaan maksimum
● Rel slaid tahan lasak mengoptimumkan kapasiti galas beban, membolehkan pengguna
menarik bekas makanan secara perlahan dengan hanya satu tangan.
● Ia adalah mungkin untuk menarik keluar keseluruhan petak, menjadikannya lebih mudah
untuk disusun dan diakses kepada bahan makanan.
6
● Suhu Ruang Segar Terbaik boleh diubah daripada
4 °C ~ -5 °C**.
-
Suhu -1 °C ~ -5 °C: Suhu beku lembut untuk
pengawetan makanan, yang membantu menjimatkan
masa dan usaha dalam mencair beku makanan, sambil
mengekalkan rasa dan kesegarannya lebih lama.
-
Suhu 4 °C ~ 0 °C: Sama seperti suhu Ruang Peti
Sejuk apabila anda inginkan lebih banyak ruang untuk
penyimpanan makanan di dalam Ruang Peti Sejuk.
● Ruang Segar Terbaik berkapasiti besar 61 L membantu menyimpan lebih banyak
makanan dan selesa untuk bahan makanan bersaiz besar.
● Ruang Segar Terbaik menjadikannya lebih mudah untuk ditanggalkan dan dibersihkan,
membantu mengelakkan pencampuran bau yang tidak menyenangkan atau jangkitan silang.
● Menjimatkan tenaga kerana anda boleh menggunakan Ruang Segar Terbaik tanpa
membuka seluruh Ruang Peti Sejuk.
*
Tetapan suhu lalai Ruang Segar Terbaik ialah -3 °C.
** Bergantung pada jenis makanan, seperti ketulan besar daging atau ikan besar, keadaan
penyimpanan dan suhu ambien, prestasi penyejukan mungkin terjejas. Dalam kes ini,
suhu Ruang Segar Terbaik hendaklah ditetapkan pada suhu terenda -5 °C.
Pembeku Terbaik (Prime Freeze)
● Bekukan makanan segar atau yang disediakan
dengan cepat mengikut kepada setiap mod, sambil
mengekalkan rasa segarnya.
● Bekas Pembeku Terbaik (Prime Freeze) termasuk
mod-mod berikut:
• Penyejukan (Cool Down) dalam 3 minit dan
5 minit
• Penyejukan Pantas (Quick Cooling) dalam
10 minit dan 15 minit
• Pembekuan Pantas (Rapid Freezing) dalam 45
minit dan 60 minit.
Bergantung kepada tujuan pemprosesan makanan
dan jenis makanan, adalah mungkin untuk memilih
dan menggunakan mod yang berbeza.
Dispenser air luaran
● Ini membolehkan pengguna mendapatkan air sejuk
tanpa membuka pintu peti sejuk.
● Tangki air berkapasiti besar 3 Liter diperbuat
daripada bahan antibakteria bebas BPA dengan
penapis antibakteria yang selamat untuk kesihatan.
Ruang Segar Terbaik (Prime Fresh) dan mod Segar Terbaik+ (Prime Fresh+)
7
Dulang kaca slaid keluar boleh laras
Dulang kaca slaid keluar boleh laras di dalam petak Peti Sejuk membolehkan pelarasan
eksibel terhadap kapasiti penyimpanan makanan.
Bekas sayur Fresh Safe
Bekas sayur berkapasiti besar dilengkapi dengan
penapis penahan lembapan, yang memastikan
sayur-sayuran segar dan memanjangkan jangka
hayatnya.
Mod “Quick Freezing” (Penyejukbekuan Pantas)
Mod “Quick Freezing” menyebabkan suhu dalam peti sejuk turun dengan cepat, untuk
mengekalkan rasa asalnya.
Panel operasi skrin yang mudah
● Adalah mungkin untuk melaraskan suhu dan
mod petak Peti Sejuk, Segar Terbaik, petak
Penyejuk Beku dan bekas Pembeku Terbaik
mengikut tujuan yang dimaksudkan oleh
pengguna.
● Petak Peti Sejuk dan Penyejuk Beku mempunyai
peringatan untuk menutup peti sejuk.
● Paparan LED dan panel operasi mempunyai
keterlihatan yang jelas dan mudah digunakan.
● Terdapat mod kunci kanak-kanak
8
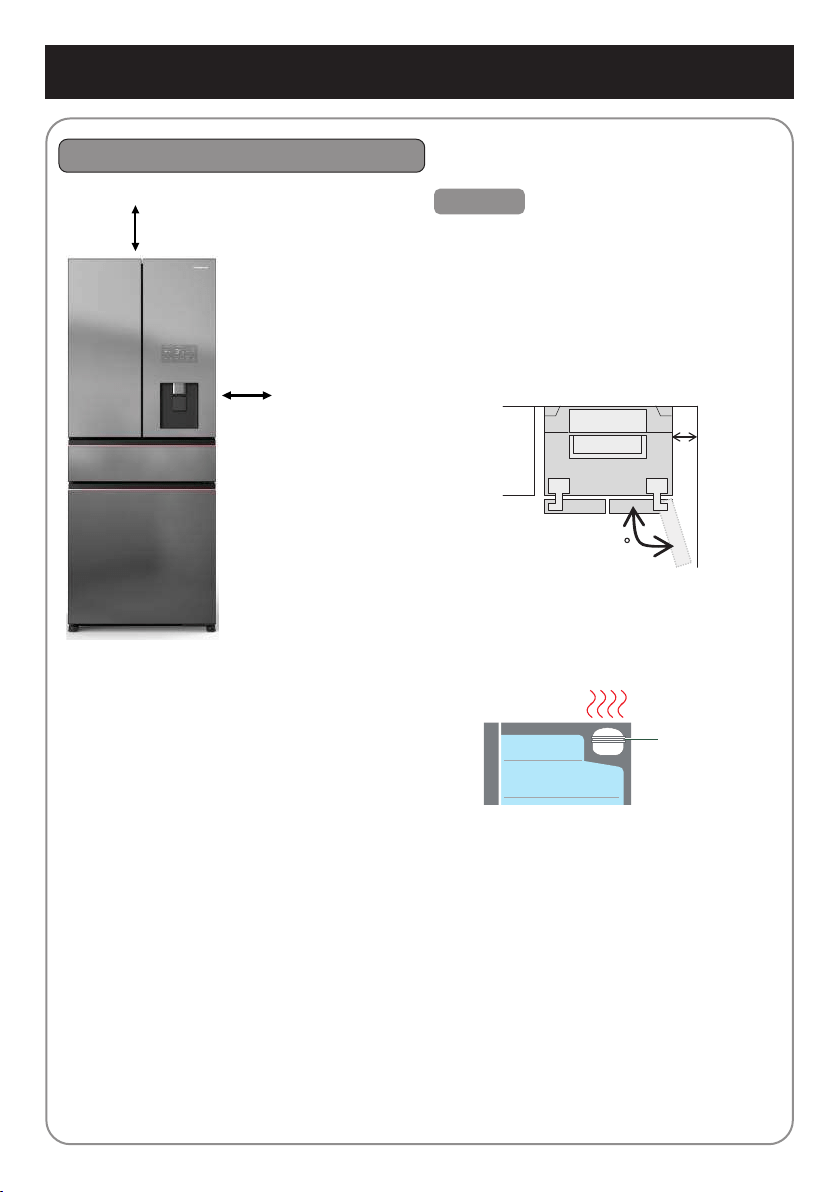
Pemasangan
Jarak dari dinding selepas pemasangan
Perhatian
● Sekiranya peti sejuk diletakkan
bersebelahan dengan dinding, adalah
perlu untuk memastikan bahawa ruang
antara sebelah kiri atau kanan peti sejuk
dan dinding adalah sekurang-kurangnya
25 cm. Jika ruang ini kurang daripada
25 cm, pintu mungkin tidak dibuka
sepenuhnya dan dulang kaca, bekas
sayur, dsb. tidak boleh ditanggalkan.
129
● Jangan letakkan sebarang objek di
atas peti sejuk. Ia boleh mengganggu
pelesapan haba pemampat,
menyebabkan ubah bentuk atau
kerosakan kepada komponennya.
Pemampat
● Apabila menggunakan buat kali pertama: bersihkan bahagian dalam peti sejuk.
• Gunakan kain lembap yang lembut untuk membersihkan peti sejuk.
• Bilas tangka air, penapis air dan dulang ais dengan air.
• Apabila anda menggunakan perkakas untuk pertama kali, anda boleh menghidu bau
plastik. Jika anda bimbang, alih udara bilik.
● Jangan letakkan peti sejuk di tempat yang lembap kerana ini boleh mengakibatkan
pembentukan karat dan menyebabkan kebocoran elektrik.
● Jangan letakkan peti sejuk di tempat yang terdedah kepada cahaya matahari kerana
haba dan sinaran matahari akan meningkatkan suhunya.
● Jangan letakkan peti sejuk dekat dengan sumber haba dapur masak atau ketuhar.
● Jangan halang bukaan mengikut keadaan peti sejuk.
● Peti sejuk mesti diletak di tempat yang mempunyai pengaliran udara yang bagus.
● Sekiranya peti sejuk diletakkan di atas permukaan yang tidak rata, laraskan bolt pelaras
agar peti sejuk berdiri dengan stabil.
● Bahagian atas peti sejuk ialah
sekurang-kurangnya 5 cm
daripada siling.
● Bahagian kiri
dan kanan peti
sejuk berada
sekurang-
kurangnya
5 cm daripada
dinding.
● Bahagian belakang peti sejuk berada
sekurang-kurangnya 5 cm daripada
dinding.
5 cm
5 cm
25 cm
9
Lampu LED dan Pembumian
● Lampu LED peti sejuk, yang direka khusus untuk peti sejuk ini, tidak direka untuk diganti
oleh sebarang individu. Jika anda perlu menggantikannya, sila hubungi Pusat Servis
Panasonic.
● Jika palam peti sejuk tidak mempunyai dawai bumi, peti sejuk mesti disambungkan
dengan sambungan pembumian bagi mengelakkan bahaya elektrik.
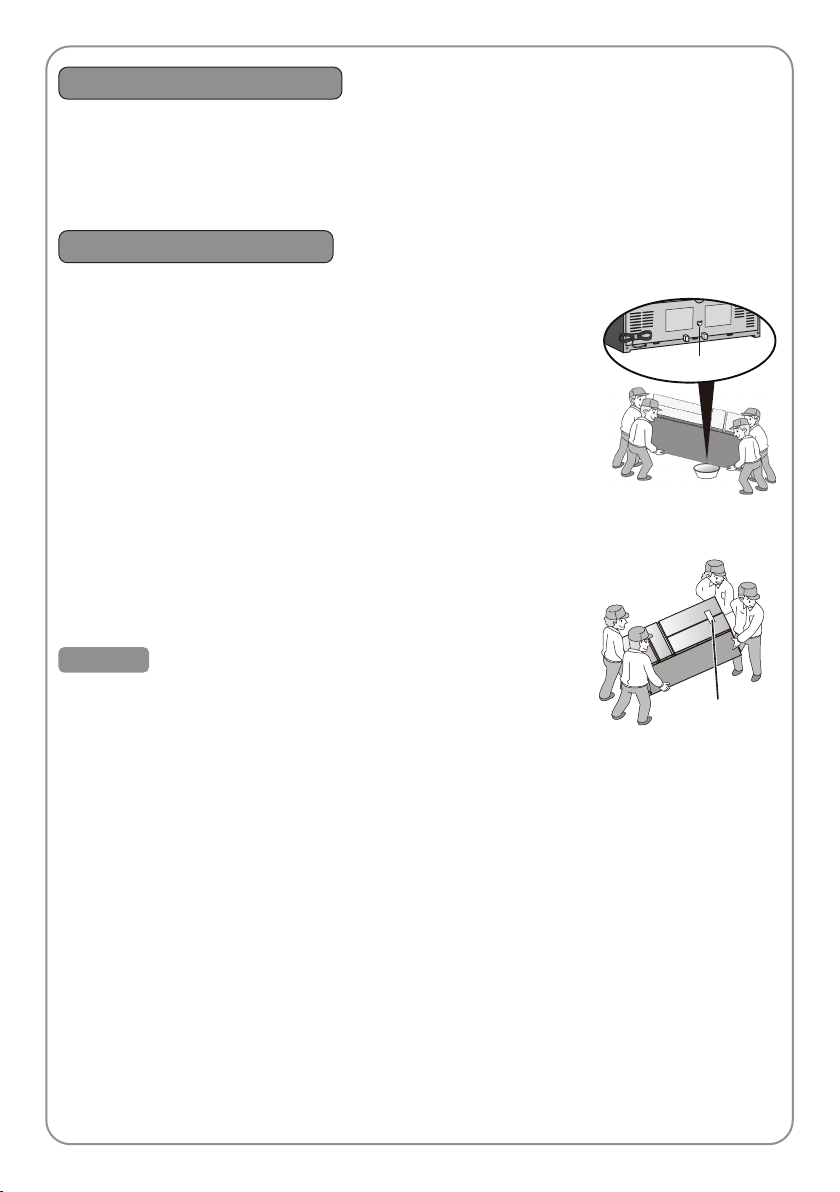
Bergerak atau pengangkutan
1 Keluarkan dulang ais, air dan ais di dalam tangki.
2 Cabut palam perkakas.
3 Laraskan bolt boleh laras (kiri dan kanan) supaya bolt tidak
menyentuh lantai.
4 Kosongkan dulang air di belakang peti sejuk. Letakkan
bekas di belakang dulang di belakang peti sejuk,
kemudian condongkan dulang ke belakang untuk menuangkan
air keluar dari dulang.Tindakan ini memerlukan 4 orang atau
lebih, di mana 2 orang daripadanya mengangkat bahagian
hadapan peti sejuk untuk mengelakkan peti sejuk daripada
tergelincir dan mengelakkan risiko kemalangan.
※ Bagaimana untuk menggerak dan mengangkut
● Sekurang-kurangnya 4 orang diperlukan untuk mengangkut
peti sejuk.
● Setiap orang mengangkat satu sudut peti sejuk.
● Jangan mengangkut dengan mencengkam pintu peti sejuk.
Perhatian
● Semasa mengangkut, gunakan tali untuk mengunci pintu
peti sejuk dan mengelak daripada membiarkan pintu terbuka
dengan sendirinya.
● Jangan letakkan peti sejuk pada sisinya semasa mengangkut,
kerana ini boleh menyebabkan kerosakan kepada peti sejuk.
● Selepas pemasangan, tunggu sekurang-kurangnya 4 jam sebelum memasangkan
kuasa untuk memastikan gas dan minyak dalam pemampat berada dalam keadaan
stabil.
Lubang saliran
Gunakan tali
untuk melindungi
10
Sudahkan langkah-langkah
yang diperlukan diambil
untuk mencegah peti ais
daripada terbalik
sewaktu gemba bumi?
Untuk mencegah peti sejuk
daripada terbalik, pasang
secara kekal dengan
menggunakan tali sawat, dll.
Stabilkan peti ais.
Putar bolt pelaras
(kanan dan kiri)
sehingga ia
mencecah lantai
untuk menstabilkan
peti sejuk.
Jika pintu condong ke bawah.
Putar bolt pelaras di sebelah bawah, seperti
yang ditunjukkan di dalam rajah, untuk
melaras tahap.
●Pintu Penyejuk Beku/Peti Sejuk
mungkin condong dalam tempoh empat
hingga lima hari selepas pemasangan
disebabkan oleh muatan makanan atau
penyesuaian terhadap permukaan lantai,
putar bolt pelaras yang berkaitan dengan
alat khususnya untuk melaraskan dan
membetulkan paras pintu sekali lagi untuk
memulihkannya.
Apabila pintu direndahkan.
Rendahkan bolt
pelaras kanan
bagi pintu kanan.
Rendahkan bolt
pelaras kiri bagi
pintu kiri.
●Alat khusus
(Aksesori)
Semasa proses penyejukan dalaman sedang dijalankan pintu
peti sejuk tidak boleh dibuka.
Pintu tidak sepatutnya dibuka sehingga kesemua proses
penyejukan telah dijalankan dengan keseluruhannya.
(Udara panas yang mengalir akan menyekat fungsi penyejuk)
Sila tunggu sehingga ruang dalaman sudah menyejuk.
●Peti sejuk mungkin mengambil masa sekurang-kurangnya 4
jam berjalan berterusan untuk menyejukkan bahagian dalam,
dalam keadaan tiada beban di dalam dan pintu tidak dibuka.
●Bergantung pada suhu ambien dan keadaan penggunaan,
ia mungkin mengambil masa 24 jam untuk menyejukkan
bahagian dalam dan mencapai keseimbangan.
11
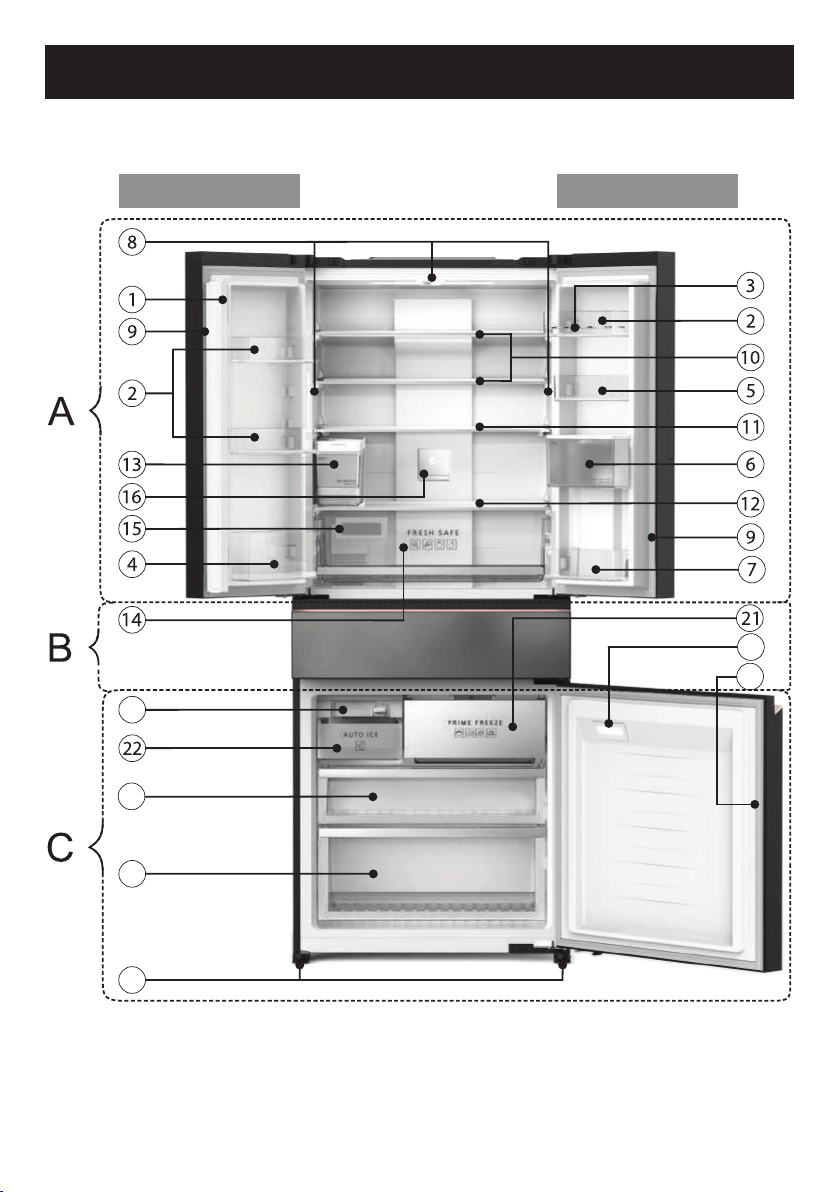
Pengenalpastian Bahagian
27
28
23
24
25
26
Pintu kiri Pintu kanan
12
Pengenalpastian Bahagian
A-Ruang Peti Sejuk
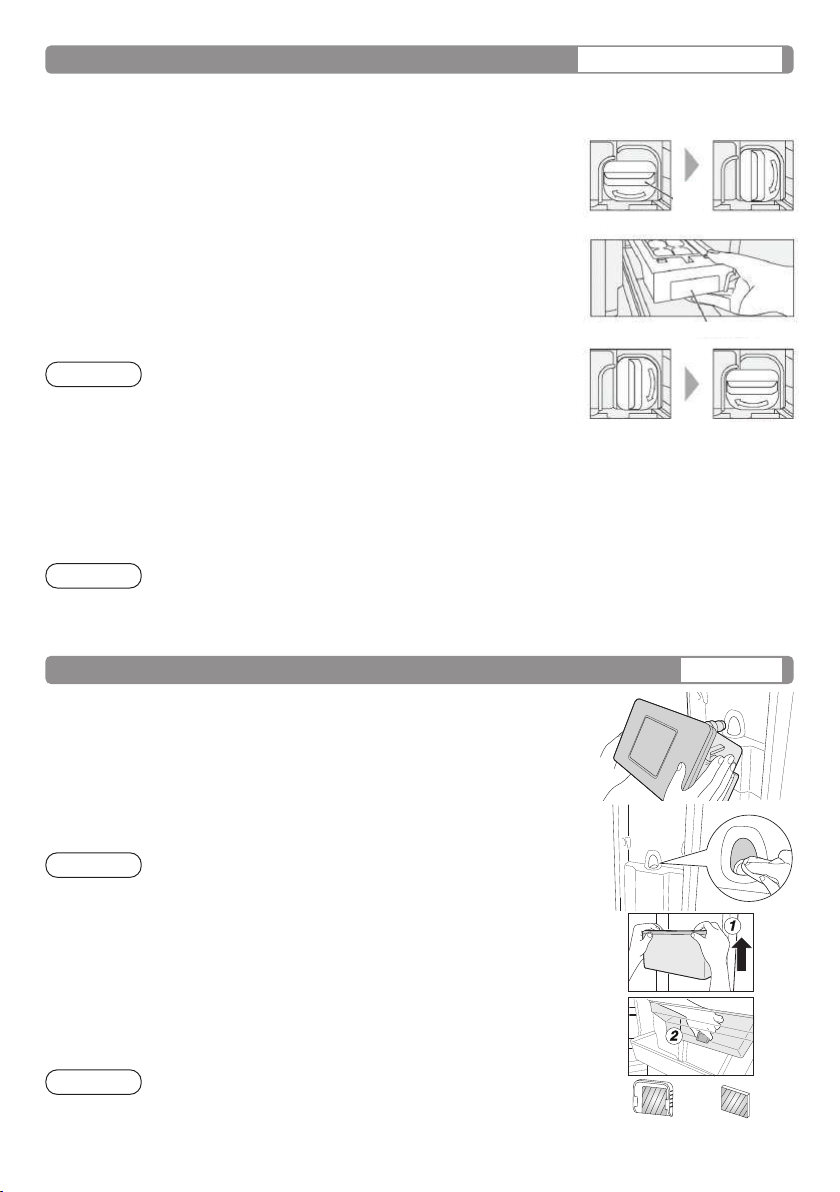
1 Engsel menegak
Engsel menegak meminimumkan jurang
antara pintu peti sejuk kiri dan pintu peti sejuk
kanan. Jika engsel menegak ini terbuka, lipat
semula ke dalam.
(Jika tidak, pintu peti sejuk tidak akan tertutup
sepenuhnya, menyebabkan peti sejuk
kehilangan udara dingin.)
2 Rak pintu (Kuantiti: 03)
3 Dulang telur
4 Para botol
5 Para pintu kecil
6 Tangki air dispenser air luaran
7 Para botol kecil
8 Lampu LED bagi Peti Sejuk (Kuantiti: 03)
9 Gasket pintu bagi Peti Sejuk
0 Dulang kaca (Kuantiti: 02)
a Dulang kaca slaid keluar
b Bekas sayur dulang kaca
c Tangki air pembuat ais automatik
d Bekas sayur
e Pelembap untuk bekas sayur
f Ikon nanoe
TM
X
B-Ruang Segar Terbaik
19
17
18
g Bekas Segar Terbaik
h Plat pemindahan haba aluminium bagi
Segar Terbaik
i Rel panduan logam bagi Segar Terbaik
j Gasket pintu bagi Segar Terbaik
Dispenser air luaran
Penutup sarung
belakang
Tekan tuil
paip untuk
mendapatkan air
C-Ruang Penyejuk Beku
k Bekas Pembeku Terbaik
l Kotak ais
m Pembuat ais automatik
n Petak sejuk beku atas
o Petak sejuk beku bawah
p Lampu LED bagi Penyejuk Beku
q Gasket pintu bagi Penyejuk Beku
r Bolt boleh laras
Kunci
Pandangan belakang produk
Sistem saliran
[Di dalam
dulang saliran]
Pintu kiri
Engsel menegak
13
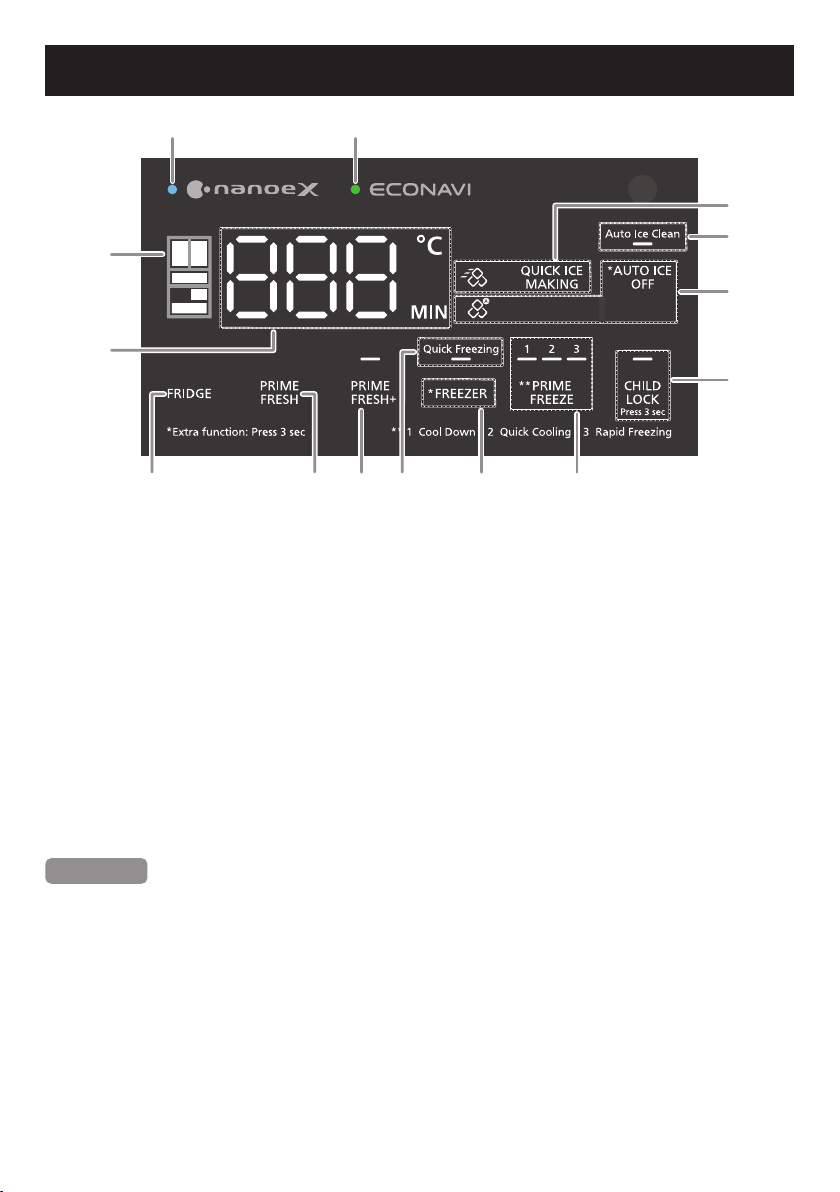
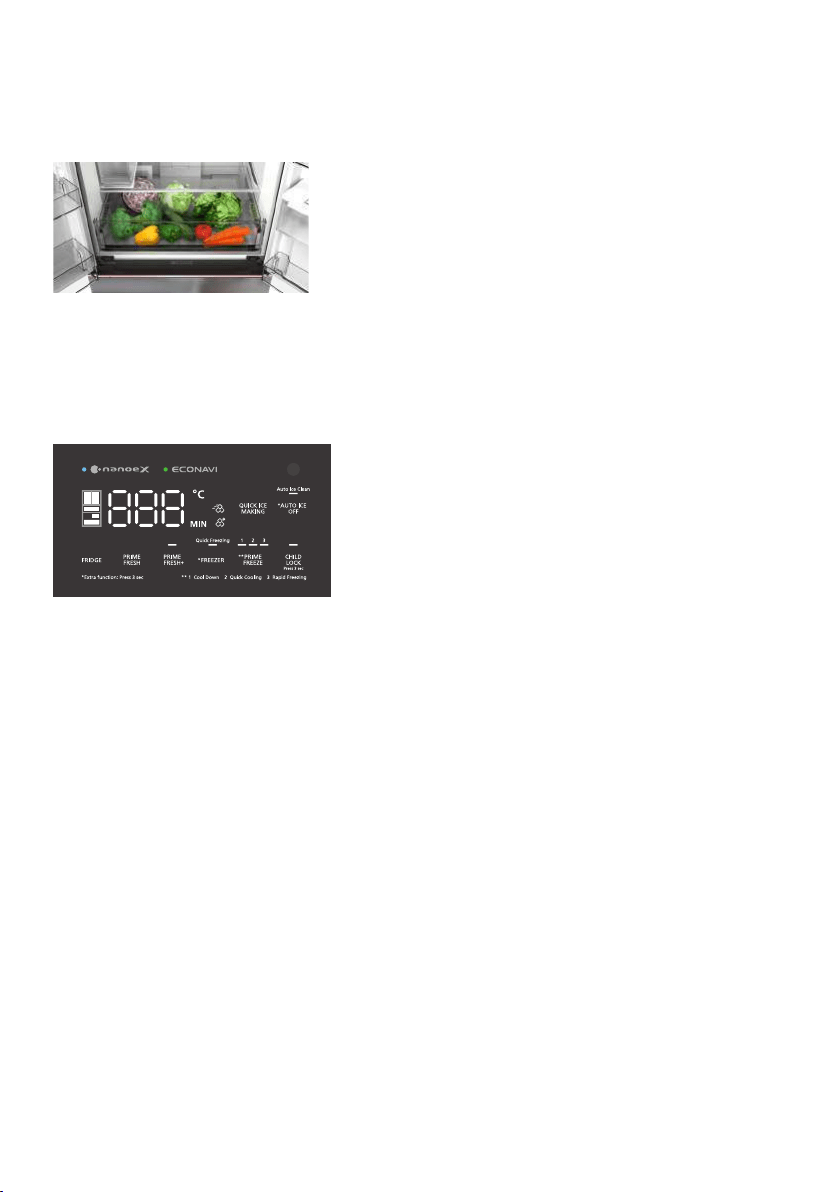
Panel Operasi
1 Ikon dan lampu LED mod nanoe
TM
X: mamaparkan status semasa mod nanoe
TM
X.
2 Ikon dan lampu LED mod ECONAVI: memaparkan status semasa mod ECONAVI.
3 Petak lampu LED: ikon petak masing-masing akan menyala apabila petak dipilih.
4 Kawasan paparan suhu dan masa: memaparkan suhu petak Peti Sejuk, petak Penyejuk
Beku, Segar Terbaik dan masa untuk mod Pembeku Terbaik.
5 Butang kawalan suhu untuk ruang Peti Sejuk.
6 Butang kawalan suhu untuk ruang Segar Terbaik.
7 Butang kawalan untuk mod dan lampu LED bagi Segar Terbaik baharu.
8 Butang kawalan suhu untuk ruang Penyejuk Beku.
9 Lampu LED bagi mod “Quick Freezing”.
0 Butang kawalan dan lampu LED untuk mod Pembeku Terbaik.
a Butang kawalan dan lampu LED bagi mod Pembuat Ais Pantas.
b Butang kawalan dan lampu LED bagi mod Penutupan Pembuat Ais Automatik.
c Lampu LED bagi mod Pembersihan Pembuat Ais Automatik.
d Butang kawalan dan lampu LED bagi mod Kunci Kanak-kanak.
Kenyataan
● Pada panel operasi: “*Fungsi tambahan: Tekan 3 saat”, bermakna anda perlu menekan
dan menahan butang yang bermula dengan tanda “*” selama 3 saat apabila anda ingin
memulakan fungsi tambahan.
● Dalam keadaan biasa, lampu panel operasi akan dimatikan. Apabila anda menekan
butang, lampu panel operasi akan menyala. Lampu panel operasi akan padam dan semua
butang tidak akan dikendalikan apabila pintu peti sejuk dibuka.
● Pada musim panas, apabila suhu tinggi, jika anda meletakkan makanan yang tidak
disejukkan di dalam peti sejuk atau membuka/menutup pintu peti sejuk berulang kali, suhu di
dalam perkakas akan meningkat dan nilai yang dipaparkan akan lebih tinggi daripada suhu
yang ditetapkan. Oleh itu, adalah perlu untuk mengurangkan bilangan pembukaan pintu.
● Apabila pertama kali dipalamkan, panel operasi akan memaparkan pengenalan mod dan
suhu petak selama kira-kira 10 saat. Butang tidak akan aktif dalam tempoh masa ini.
Selepas 10 saat, panel operasi boleh dilaraskan secara normal.
1 2
3
4
5 6 7
8
9
0
a
c
d
b
14
Kawalan Suhu
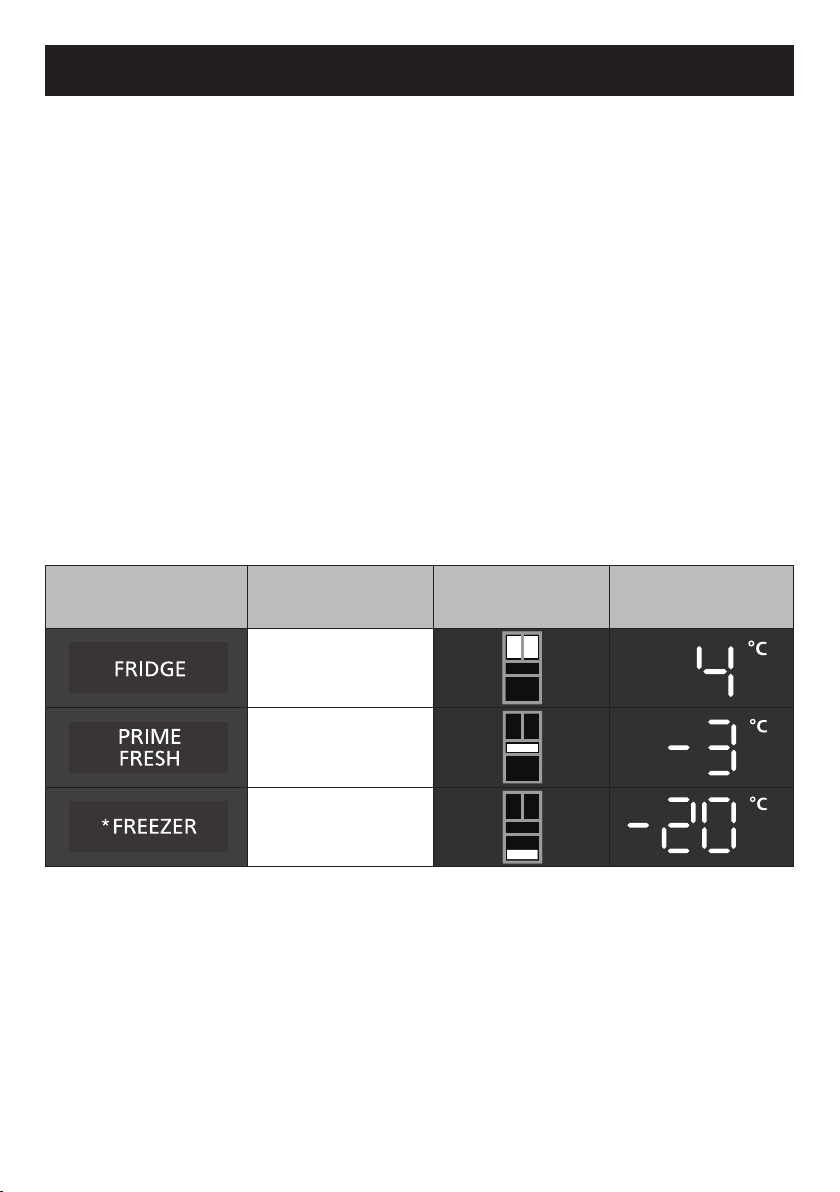
● Apabila peti sejuk dikeluarkan daripada kilang, suhu yang ditetapkan pada petak Peti
Sejuk, Segar Terbaik dan petak Penyejuk Beku masing-masing adalah 4 °C, -3 °C, dan
-20 °C. Tetapan suhu boleh diubah jika anda ingin melaraskan kapasiti penyejukan.
● Suhu yang ditetapkan bagi petak Peti Sejuk adalah antara 7 °C ~ 1 °C, petak Penyejuk
Beku adalah 4 °C ~ -5 °C (suhu pembeku lembut adalah -1 °C ~ -5 °C, dan suhu untuk
menggunakan Segar Terbaik seperti petak Penyejuk Beku adalah 4 °C ~ 0 °C), daripada
petak Penyejuk Beku adalah -15 °C ~ -23 °C.
● Suhu di dalam peti sejuk akan berbeza bergantung kepada suhu ambien, status
pemasangan, keadaan penggunaan dan kuantiti makanan.
● Disebabkan kaedah dan alat ujian yang berbeza, suhu ujian sebenar mungkin berbeza
daripada suhu yang dipaparkan.
● Peti sejuk ini dilengkapi dengan sebuah pemproses untuk mengawal suhu di dalam peti
sejuk. Apabila suhu ambien berubah, pemampat sedang berjalan atau menutup, pintu
terbuka atau tertutup, suhu dalaman akan turun naik, mengakibatkan sedikit perbezaan di
antara suhu di dalam peti sejuk dan suhu yang ditetapkan.
Tetapan suhu dan panduan tetapan suhu
1. Paparkan suhu semasa
Tekan ikon berikut untuk memaparkan suhu semasa petak ini: petak Peti Sejuk, Segar
Terbaik, dan petak Penyejuk Beku. Lampu paparan setiap petak sepadan dengan suhu
semasa akan menyala apabila dipilih.
Ikon Petak
Posisi lampu
indikator petak
Lampu suhu
indikator petak
Ruang Peti Sejuk
Ruang Segar Terbaik
Ruang Penyejuk
Beku
2. Tetapkan suhu
Selepas menekan ikon petak yang hendak ditetapkan (Petak Peti Sejuk, Segar Terbaik, Petak
Penyejuk Beku) untuk memaparkan suhu semasa, tekan sekali lagi untuk memulakan proses
penetapan suhu. Kemudian, petak posisi lampu indikator dan lampu indikator suhu akan
berkelip.
Teruskan menekan ikon petak itu untuk memilih tahap suhu yang diingini. Setiap kali butang
ditekan, suhu akan meningkat sebanyak 1 °C.
3. Tetapan suhu lengkap
Selepas melengkapkan tetapan suhu, tekan butang lain untuk menyelesaikan dan simpan
tetapan yang baru anda lakukan. Atau jika tiada butang lain ditekan dalam masa 10 saat,
panel operasi akan menyimpan tetapan dan kembali ke mod tidur.
15
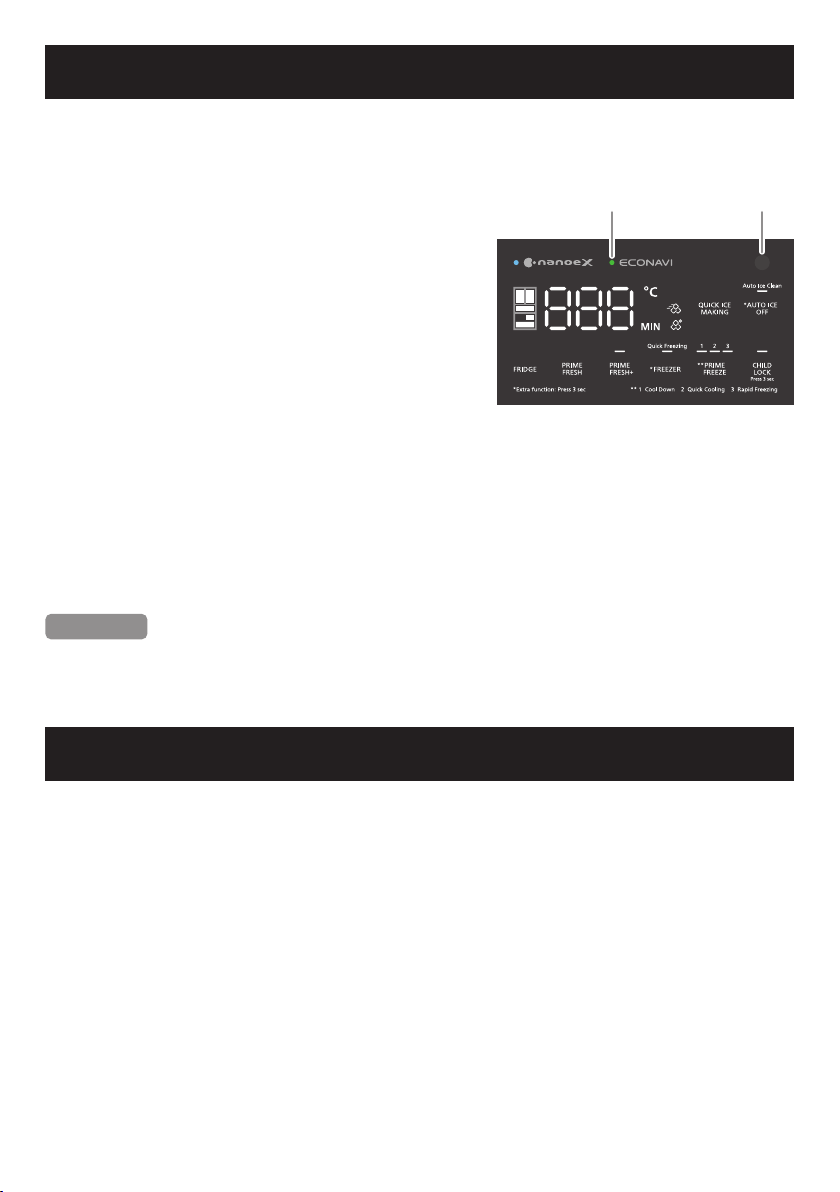
Operasi ECONAVI
Peti sejuk ini mengesan pembukaan dan penutupan pintu serta kecerahan di sekeliling peti
sejuk untuk mengawal operasinya secara automatik untuk memastikan penjimatan tenaga
maksimum.*
1
Operasi ECONAVI
●
P
eti sejuk ini mempelajari corak gaya hidup keluarga
anda daripada pembukaan pintu dan jumlah masa
penggunaan yang jarang untuk memaksimumkan
kecekapan tenaga.
●
P
eti sejuk ini mempelajari corak gaya hidup
daripada penggunaan selama 3 minggu dan
menggunakan data daripada Minggu ke-4 dan
seterusnya.
●
Peti sejuk ini menjalankan operasi penjimatan
tenaga ECONAVI apabila sekeliling peti sejuk gelap
seperti pada waktu malam.
Tetapan untuk mendayakan operasi ECONAVI
● Mod pengendalian ECONAVI didayakan secara automatik apabila pengawal suhu untuk
kedua-dua petak Peti Sejuk dan petak Penyejuk Beku masing-masing ditetapkan pada
4 °C dan -20 °C.
● Mod ECONAVI tidak beroperasi jika mod “Quick Freezing”, “Prime Fresh+”, “Prime
Freeze” atau mod “Quick Ice Making” sedang berjalan.
● Mod ECONAVI tidak boleh dimulakan atau dipaksa.
Kenyataan
*
1
K
eberkesanan mod ECONAVI bergantung kepada suhu sekitar, kecerahan sekitar dan
bilangan pintu peti sejuk dibuka dan ditutup dan keadaan makanan yang disimpan.
Lampu ECONAVI
Pengesan
kecerahan cahaya
Mod nanoe
TM
X
● nanoe
TM
ialah koleksi zarah ionik mikroskopik yang dikelilingi oleh zarah air.
nanoe
TM
X adalah zarah air bercas pada skala mikroskopik dengan radikal OH 10 kali lebih
banyak daripada nanoe
TM
.
● nanoe
TM
X mod akan bermula apabila peti sejuk dipasang dan akan sentiasa berjalan
apabila peti sejuk sedang digunakan. Walau bagaimanapun, memandangkan nanoe
TM
X
memerlukan kelembapan untuk beroperasi, keberkesanan mod ini mungkin berkurangan
jika kelembapan di dalam peti sejuk berkurangan (cth. apabila menyimpan terlalu sedikit
sayur-sayuran, dsb.).
● Semasa operasi, peranti nanoe
TM
X mungkin mengeluarkan bunyi kecil.
● Selepas menutup pintu peti sejuk untuk masa yang lama, apabila anda membukanya,
adalah mungkin untuk merasakan bau ciri ozon yang dihasilkan semasa operasinya. Ini
adalah fenomena biasa.
16
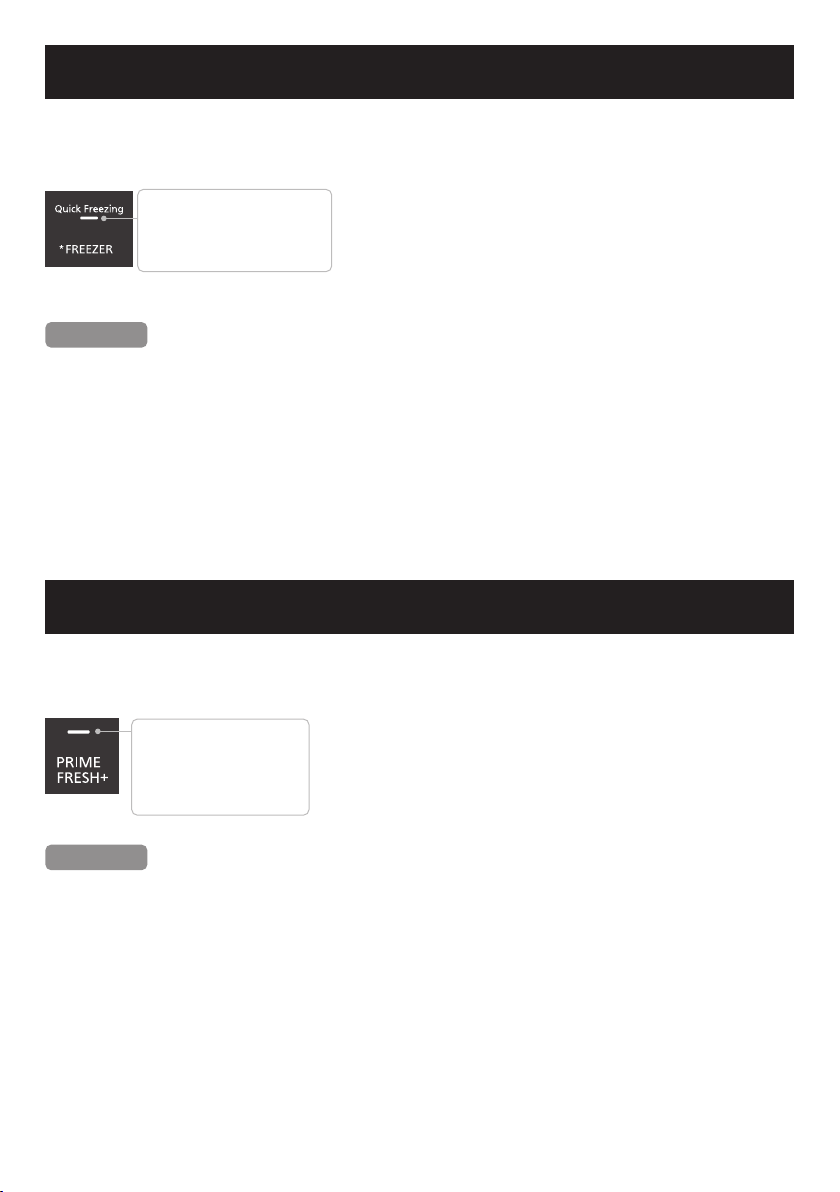
Quick Freezing (Penyejukbekuan Pantas)
Apabila “Quick Freezing” ditetapkan, peti sejuk akan menurunkan suhu dengan cepat agar
makanan diawet dengan lebih baik.
Bagaimana mengendalikan mod “Quick Freezing”
Lampu menyala: Penyejukbekuan
pantas beroperasi
Lampu padam: Penyejukbekuan
pantas tidak
beroperasi
●Tekan dan tahan ikon
“
Sejuk Beku
”
selama 3 saat untuk
memulakan mod pembekuan cepat. Kemudian, lampu di
bawah ikon
“
Quick Freezing
”
akan menyala.
●Apabila anda ingin menghentikan mod pembekuan cepat,
tekan dan tahan ikon
“
Freezer
”
sekali lagi selama 3 saat
sehingga lampu dimatikan.
Kenyataan
●Mod “Quick Freezing” akan berhenti secara automatik selepas berjalan selama 150 minit
dan kembali ke mod biasa. (Lampu LED [Quick Freezing] dimatikan.)
●Lampu LED [Quick Freezing yang berkelip bermakna sistem menyahfroskan sedang berfungsi.
Mod “Quick Freezing” akan dimulakan sejurus selepas operasi penyahbekuan selesai.
●Suhu petak Penyejuk Beku akan kembali ke tetapan sebelumnya apabila mod “Quick
Freezing” tamat.
●Apabila mod “Quick Freezing” dihidupkan, mod berikut, jika aktif, akan dihentikan: Mod
Segar Terbaik+ (Prime Fresh+), mod Pembuat Ais Pantas, Pembeku Terbaik (Prime Freeze).
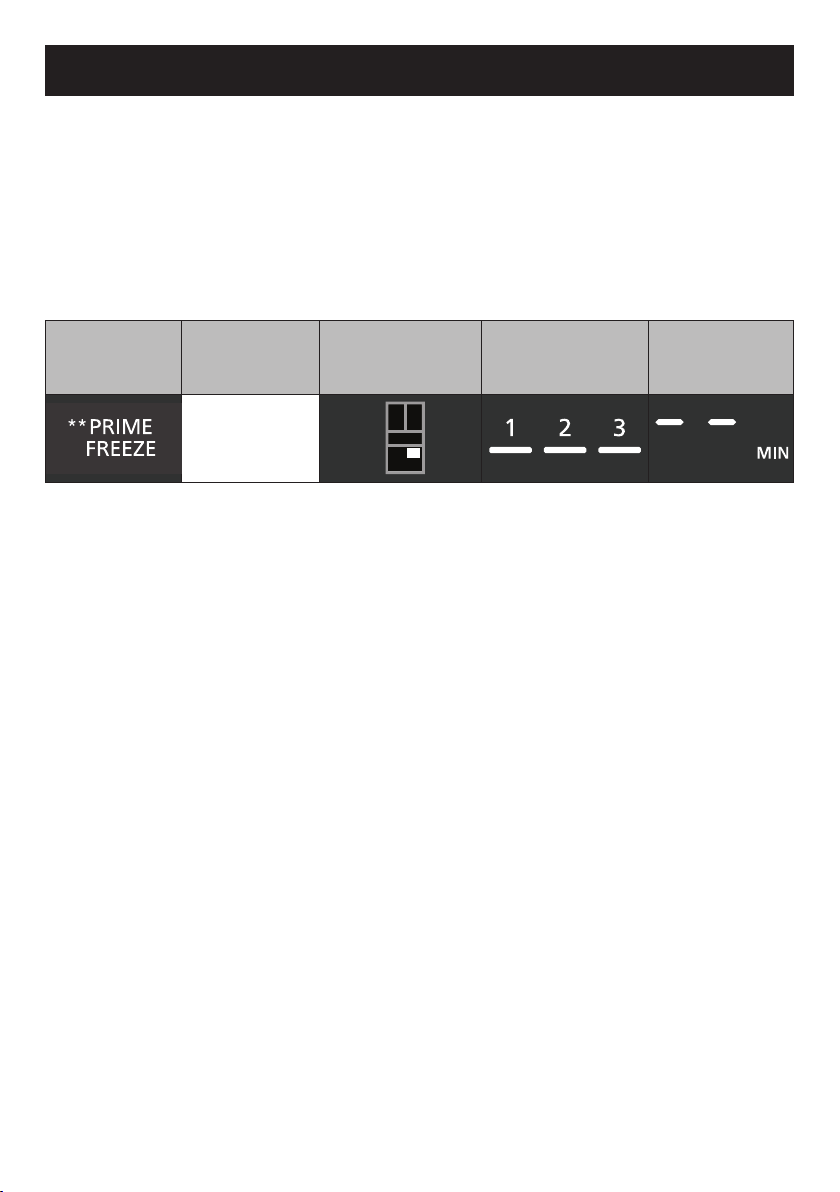
Prime Fresh+ (Segar Terbaik+)
Apabila “Prime Fresh+” ditetapkan, ruang segar terbaik akan menurunkan suhu dengan cepat
agar makanan diawet dengan lebih baik.
Bagaimana mengendalikan mod “Prime Fresh+”
Lampu menyala: Mod Segar
Terbaik+
beroperasi.
Lampu padam: Mod Segar
Terbaik+ tidak
beroperasi
.
●Tekan ikon “Prime Fresh+” dua kali berturut-turut untuk
memulakan mod Segar Terbaik+. Kemudian, lampu di atas
ikon “Prime Fresh+” akan menyala.
●Apabila anda ingin menghentikan mod Segar Terbaik+,
tekan ikon “Prime Fresh+” satu kali sehingga lampu
dimatikan.
Kenyataan
●Mod “Prime Fresh+” akan berhenti secara automatik selepas berjalan selama 105 minit
(apabila suhu ambien 18 °C atau kurang) atau antara 145 ~ 150 minit (apabila suhu ambien
lebih tinggi daripada 18 °C) dan kembali ke mod biasa. (Lampu LED [Prime Fresh+] dimatikan.)
●Lampu LED [Prime Fresh+] (Segar Terbaik+) yang berkelip bermakna sistem
menyahfroskan sedang berfungsi. Mod “Prime Fresh+” akan bermula sejurus selepas
operasi penyahbekuan selesai.
●Suhu Segar Terbaik akan kembali ke tetapan sebelumnya apabila mod “Prime Fresh+” tamat.
●Apabila mod “Prime Fresh+” dihidupkan, mod berikut, jika aktif, akan dihentikan: “Quick
Freezing”, “Quick Ice Making”, “Prime Freeze”.
●Mod “Prime Fresh+” tidak akan bermula apabila suhu Segar Terbaik ditetapkan pada
4 °C ~ 0 °C.
17
Prime Freeze (Pembeku Terbaik)
Pembeku Terbaik (Prime Freeze) ialah petak berasingan yang terletak di dalam petak
sejuk beku. Petak ini dilengkapi dengan sistem kipas individu dan plat pemindahan haba
aluminium kelas tinggi, dan mod untuk melaraskan masa penyejukan mengikut setiap tujuan
pemprosesan makanan untuk menyokong pengguna dalam menyediakan hidangan dalam
pelbagai cara serta menjimatkan masa.
Cara mengendalikan bekas Pembeku Terbaik
1 Tekan butang kawalan bekas Pembeku Terbaik (Prime Freeze) pada panel operasi.
Kemudian, LED penanda posisi bahagian, LED penanda untuk mod 1-2-3 dan LED
penanda masa operasi (**) bahagian Pembeku Terbaik akan menyala apabila dipilih.
Ikon Bekas
LED penanda
posisi bahagian
LED penanda
untuk mod 1-2-3
LED penanda
untuk waktu
pengendalian
Bekas
Pembeku
Terbaik
(*) Untuk penanda untuk mod 1-2-3:
• Jika tetapan sebelumnya belum habis, lampu akan memaparkan mod tetapan
sebelumnya.
• Jika masa untuk tetapan sebelumnya sudah habis, semua penanda untuk mod 1-2-3
akan padam.
(**) Untuk lampu yang menunjukkan masa pengendalian:
• Jika tetapan sebelumnya belum habis, baki minit akan dipaparkan.
• Jika masa untuk tetapan sebelumnya sudah habis, nilai baki minit akan dipaparkan
sebagai “--”.
2 Terus tekan butang kawalan bahagian Pembeku Terbaik (Prime Freeze), kemudian
Penanda posisi akan menyala. Selepas langkah ini, jika tetapan sebelumnya belum
habis, nilai minit akan dihilangkan dan kembali dipaparkan ke “--”. Tekan butang kawalan
bahagian Pembeku Terbaik (Prime Freeze), hingga mod yang diingini dipilih. Setiap kali
butang ditekan, LED penanda untuk waktu pengendalian akan menunjukkan masa untuk
setiap mod.
3 Lengkapkan tetapan
Selepas melengkapkan mod bahagian Pembeku Terbaik, tekan satu lagi butang untuk
selesaikan dan simpan tetapan yang anda baru lakukan. Atau jika tiada butang lain
ditekan dalam masa 10 saat, panel operasi akan menyimpan tetapan dan kembali ke mod
standby.
4 Tamatkan mod
Selepas masa mod tamat, skrin akan memaparkan masa kembali kepada “0” dan akan
terdapat bunyi pemberitahuan. Bunyi pemberitahuan akan diulang setiap 2 minit selama 6
minit, sehingga anda menekan ikon “Prime Freeze” pada panel operasi atau apabila pintu
Penyejuk Beku dibuka. Jika anda tidak mengeluarkan makanan serta-merta selepas mod
ini, makanan anda akan lebih beku.
18
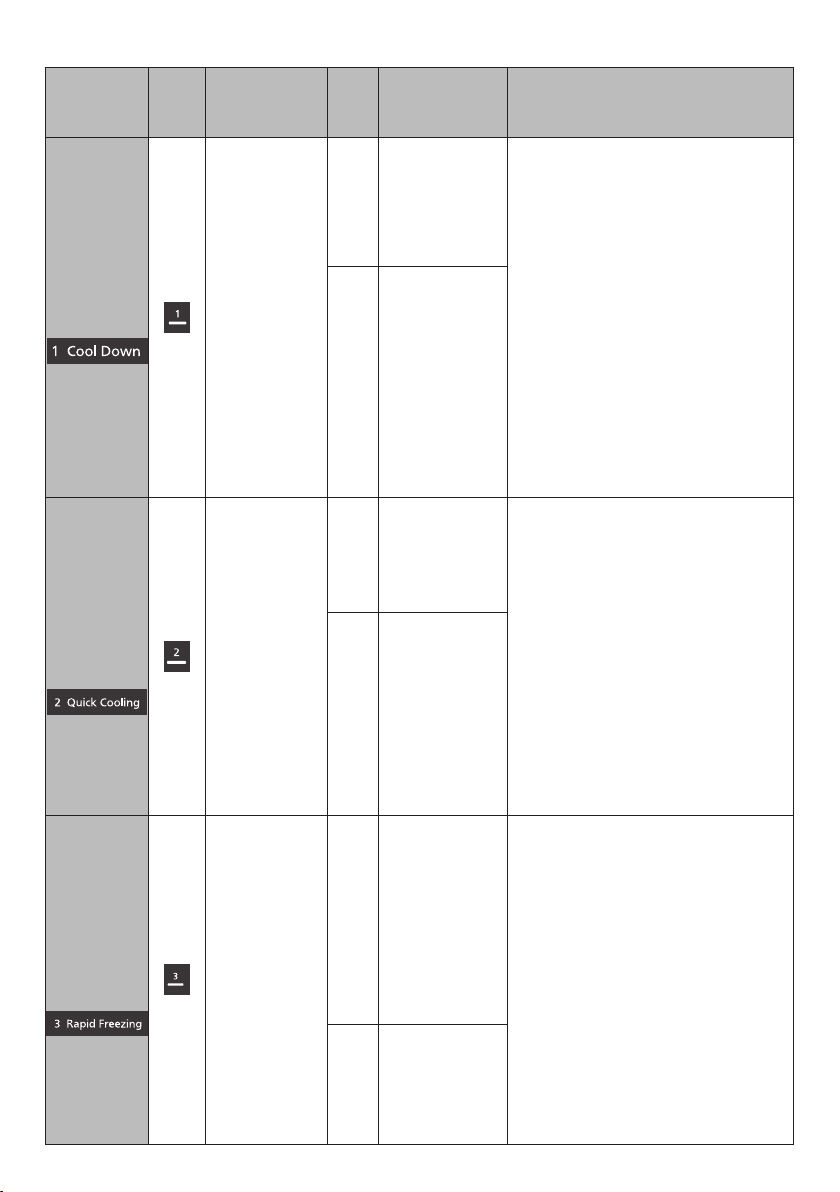
Mod Bahagian Pembeku Terbaik
Nama mod
Paparan
Tujuan
memproses
makanan
Mod
(Unit:
Minit)
Jenis makanan
yang disyorkan
Perhatian
Penyejukan
Menyejukkan
makanan
hangat/panas
dengan cepat
3
• Nasi (150
g
)
• Salad kentang
(150
g
)
- Jangan tutup kotak dengan penutup
atau lem lekap untuk memastikan
penyejukan yang baik. Jika anda
risau akan bau makanan, anda boleh
gunakan penutup atau lem lekap
untuk menutupnya, tetapi makanan
mungkin tidak akan cukup sejuk.
- 5 minit adalah anggaran masa
untuk 1 kotak makan tengahari (kira-
kira 150 g nasi) atau 200 g makanan
yang dimasak. Jika jumlah makanan
lebih besar, lebih lama diperlukan
untuk menyejukkannya.
- Mod Penyejukan boleh digunakan
untuk menyejukkan 200 ml susu
formula dalam 10 minit.
- Selepas menyejukkan susu formula
dengan mod Penyejukan, sila periksa
suhu susu formula tersebut sebelum
memberikannya kepada bayi.
5
• Nasi (300
g
)
• Salad kentang
(300
g
)
• Susu formula
(100 ml)
• Sup (150 ml)
Penyejukan
Pantas
Menyejukkan
makanan
dengan
pantas untuk
menjimatkan
masa
menyediakan
makanan dan
pemanis mulut.
10
• Kari (200
g
)
• Ikan (100
g
)
• Puding
(2 cawan)
• Jeli (2 cawan)
- Untuk ramuan yang perlu diperap atau
diperisakan seperti daging, ikan goreng/
gril, telur taucu, dsb., letakkan ramuan
dan rempah ke dalam bekas bertutup.
Ramuan anda akan penuh dengan perisa
semasa proses penyejukan.
- Untuk daging, ikan dan udang mentah
yang sukar untuk dihiris/dipotong, apabila
diletakkan dalam mod penyejukan pantas,
penghirisan/pemotongan akan menjadi
lebih mudah.
- Gunakan cawan aluminium atau logam
untuk agar-agar atau pemanis mulut.
Makanan mungkin tidak akan cukup sejuk
dengan bekas seramik atau porselin.
- Mod ini boleh digunakan untuk
menyejukkan minuman dengan cepat.
15
• Kari (400
g
)
• Peha Ayam
(250
g
)
• Puding atau
Flan (4 cawan)
• Jeli atau kuih
yang diperbuat
daripada gelatin
(4 cawan)
Pembekuan
Pantas
Penyejukbekuan
super-pantas
hidangan yang
baru disediakan
memastikan
pengawetan
makanan yang
disediakan untuk
menjimatkan
masa di dapur
setiap hari.
45
• Daging (150
g
)
• Sayur stim
(1 gugus brokoli)
• Sayur (250
g
kubis hiris)
• Ayam goreng
(250
g
untuk 2
orang)
• Aiskrim buah
(300 ml)
• Roti (2 keping)
- Tutup makanan segar dan sayur stim
dengan lem lekap, beg sejuk beku
atau tutup dengan penutup yang ketat.
- Makanan bergoreng (cth. Ayam
goreng, udang/sotong goreng, popia,
lumpia, dsb.) patut diletakkan atas
dulang aluminium dan gunakan
mod “Rapid Freezing” (Pembekuan
Pantas). Selepas menyejukbekukan
makanan, masukkan ke dalam beg
Penyejuk Beku atau bekas untuk
disimpan.
- Mod ini boleh digunakan untuk
menyejukbekukan sesetengah
buah-buahan seperti strawberi, laici,
beri, dsb. untuk pengawetan jangka
panjang.
60
• Daging bersalut
agar-agar (350
g
)
• Separuh ayam
(500
g
)
• Daging (250
g
)
•
Ais kiub (1 dulang)
19
Prime Freeze (Pembeku Terbaik)
Kenyataan
● Sentiasa letakkan makanan di atas pinggan pemindahan haba aluminium untuk penyejukan
paling berkesan.
● Apabila makanan panas atau basah diletakkan dalam pinggan pemindahan haba aluminium
tanpa penutup atau lem lekap, permukaan makanan boleh beku atau fros boleh terbentuk
di dalam bahagian Penyejuk Beku. Jika anda risau, gunakan penutup atau lem lekap.
● Jika makanan yang dimasak masih berada pada suhu tinggi, ia hendaklah disejukkan
kepada kira-kira 70 °C sebelum dimasukkan ke dalam bekas Pembeku Terbaik.
● Meninggalkan botol kaca atau tin dalam petak ini boleh membawa risiko pecah, retak atau
rosak.
● Jangan simpan makanan yang lebih tinggi daripada bekas Pembeku Terbaik untuk
mengelakkan pintu bahagian tidak boleh ditutup sepenuhnya, menyebabkan fros dan
merosakkan makanan dan bekas makanan.
● Jangan sentuh bekas simpanan logam secara langsung dengan tangan yang basah,
kerana terdapat risiko luka beku.
● Semasa mod operasi bahagian Pembeku Terbaik (Penyejuk Beku):
• Mod ECONAVI akan dihentikan.
• Bunyi kipas akan lebih bising.
• Penggunaan kuasa lebih tinggi daripada normal.
• Jika mod Pembuatan Ais Pantas ditetapkan, Pembeku Terbaik (Prime Freeze) akan
dihentikan.
• LED bahagian Pembeku Terbaik akan menyala apabila sistem nyahfros beroperasi dan akan
berhenti menyala apabila operasi nyahfros selesai. Ini adalah fenomena biasa.
● Apabila mod bahagian Pembeku Terbaik (Prime Freeze) tidak digunakan, bahagian ini boleh
juga digunakan sebagai sebahagian dalam bahagian Penyejuk Beku.
• Makanan yang kecil boleh disimpan untuk memudahkan pencarian.
• Suhu di petak ini mungkin lebih tinggi daripada suhu seluruh bahagian Penyejuk Beku.
Untuk penyimpanan jangka panjang, sila pindahkan makanan ke bahagian Penyejuk Beku.
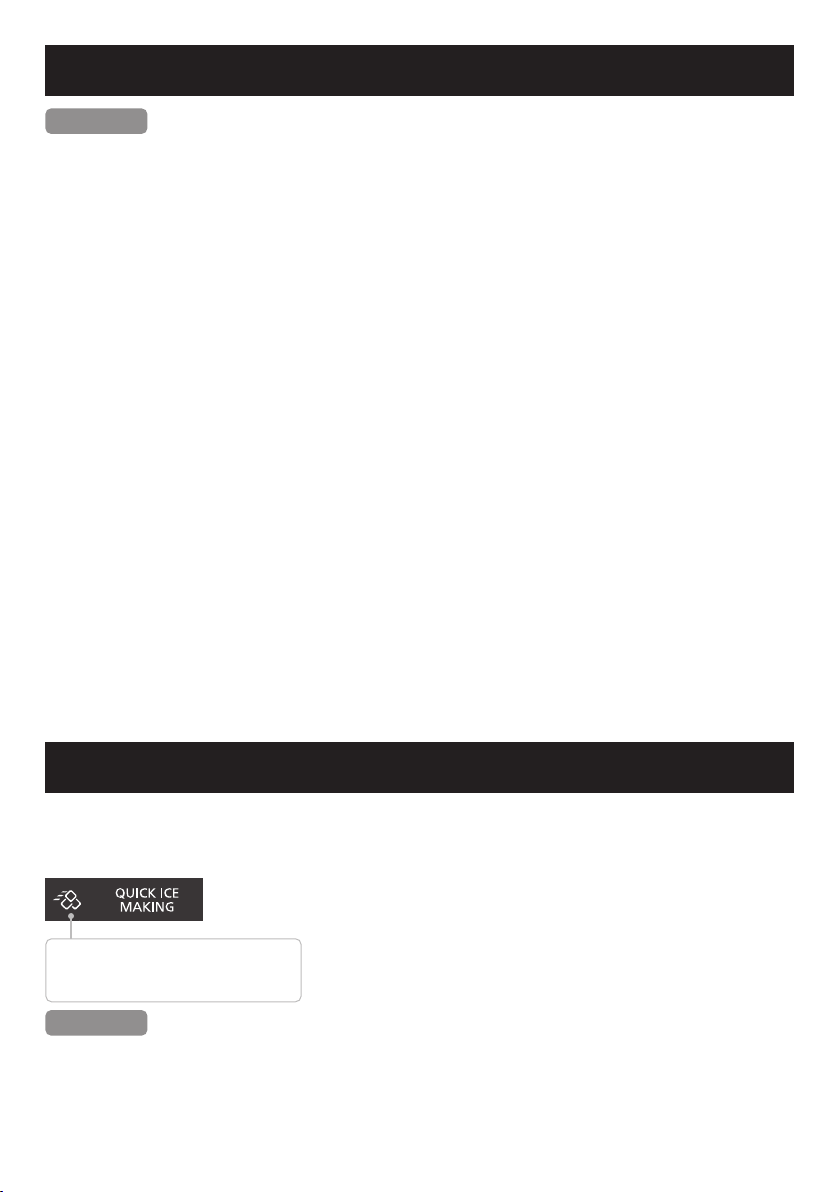
Mod Pembuat Ais Pantas
Apabila menetepkan mod pembuatan ais pantas, peti sejuk akan meningkatkan kapasitinya
untuk mengurangkan masa membuat ais.
Bagaimana mengendalikan Mod Pembuat Ais Pantas
Lampu menyala: Mod pembuatan ais pantas
beroperasi.
Lampu padam: Mod pembuatan ais pantas
tidak beroperasi.
●Tekan “ikon” Pembuatan Ais Pantas dua kali berturut-
turut untuk memulakannya. Kemudian, lampu ikon mod
pembuatan ais pantas akan menyala.
●Apabila anda ingin menghentikan mod pembuatan ais
pantas, tekan “ikon” Pembuatan Ais Pantas skali hingga
lampu padam.
Kenyataan
● Apabila mod pembuatan ais pantas berjalan, mod yang berikut, jika sedang aktif, akan berhenti:
• Mod “Quick Freezing” (Penyejukbekuan Pantas)
• Mod pembeku lembut baharu (Prime Fresh+)
• Mod kompartmen peti beku berkelajuan tinggi (Prime Freeze)
• Mod penutupan pembuat ais automatik (Auto Ice Off)
20
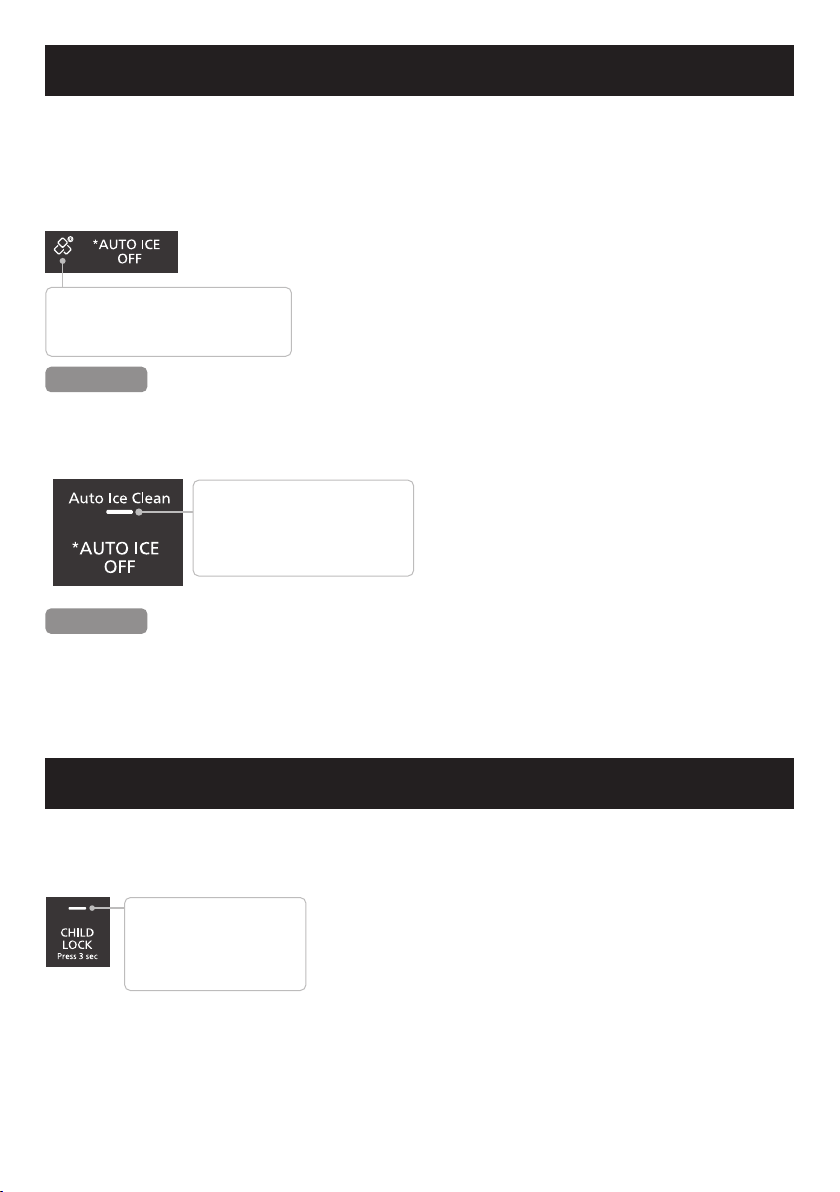
Menetapkan Child Lock (Kunci Kanak-kanak)
Apabila menetapkan mod Kunci Kanak-kanak, panel operasi akan menyahdayakan interaksi
untuk melaras suhu dan mod untuk mencegah pelarasan tanpa sengaja oleh kanak-kanak.
Bagaimana mengendalikan Mod Kunci Kanak-kanak
Lampu menyala: Mod kunci
kanak-kanak
aktif.
Lampu padam: Mod kunci
kanak-kanak
nyahaktif.
●Tekan “ikon” Child Lock dan tahan selama 3 saat untuk
medayakan mod kunci kanak-kanak. Kemudian, lampu
“ikon” Kunci Kanak-kanak akan menyala.
●Apabila anda ingin menghentikan mod Kunci Kanak-
kanak, tekan dan tahan “ikon” Kunci Kanak-kanak sekali
lagi selama 3 saat sehingga lampu padam.
Mod Penutupan dan Pembersihan Pembuat Ais Automatik
Apabila peti sejuk sedang beroperasi, mod pembuatan ais automatik (Auto Ice) akan
beroperasi secara automatik tanpa apa-apa tetapan. Apabila menetapkan mod penutupan
dan pembersihan pembuat ais automatik, peti sejuk akan menghentikan pembuat ais
automatik dan membersihkan pembuat ais secara automatik.
Bagaimana mengendalikan mod Penutupan Pembuat Ais Automatik
Lampu menyala: Mod penutupan pembuat
ais automatik beroperasi.
Lampu padam:
Mod penutupan pembuat ais
automatik tidak beroperasi.
●Tekan “ikon” Auto Ice Off dua kali berturut-turut untuk
menghentikan pembuatan ais automatik. Kemudian, lampu
ikon mod penutupan pembuat ais Automatik akan menyala.
●Apabila anda ingin memulakan semula mod pembuatan ais
automatik, tekan “Auto Ice Off” sekali. Kemudian, lampu
ikon mod penutupan pembuat ais automatik akan padam.
Kenyataan
● Apabila mod penutupan pembuat ais automatik sedang berjalan, mod pembuatan ais
automatik, jika sedang aktif, akan berhenti.
Bagaimana mengendalikan mod Pembersihan Pembuat Ais Automatik
●Tekan dan tahan “ikon” Auto Ice Off selama
3 saat untuk mendayakan/menyahdayakan
mod pembersihan pembuat ais automatik.
Di hujung proses pembersihan pembuat
ais, peti sejuk akan mengeluarkan bunyi
pemberitahuan.
Kenyataan
● A
pabila Mod Pembersihan Pembuat Ais Automatik sedang berjalan, ia tidak boleh
dihentikan/dinyahdayakan separuh jalan.
Untuk butiran tentang operasi pembersihan pembuat ais automatik, sila lihat Muka surat 26.
Lampu menyala:
Mod pembersihan
pembuat ais automatik
beroperasi.
Lampu padam:
Mod pembersihan
pembuat ais automatik
tidak beroperasi.
21
Ruang Peti Sejuk
Julat suhu bahagian Peti Sejuk ialah 7 °C ~ 1 °C
Jika suhu bahagian Penyejuk Beku ditetapkan pada 1 °C pada masa yang lama, makanan
anda boleh beku.
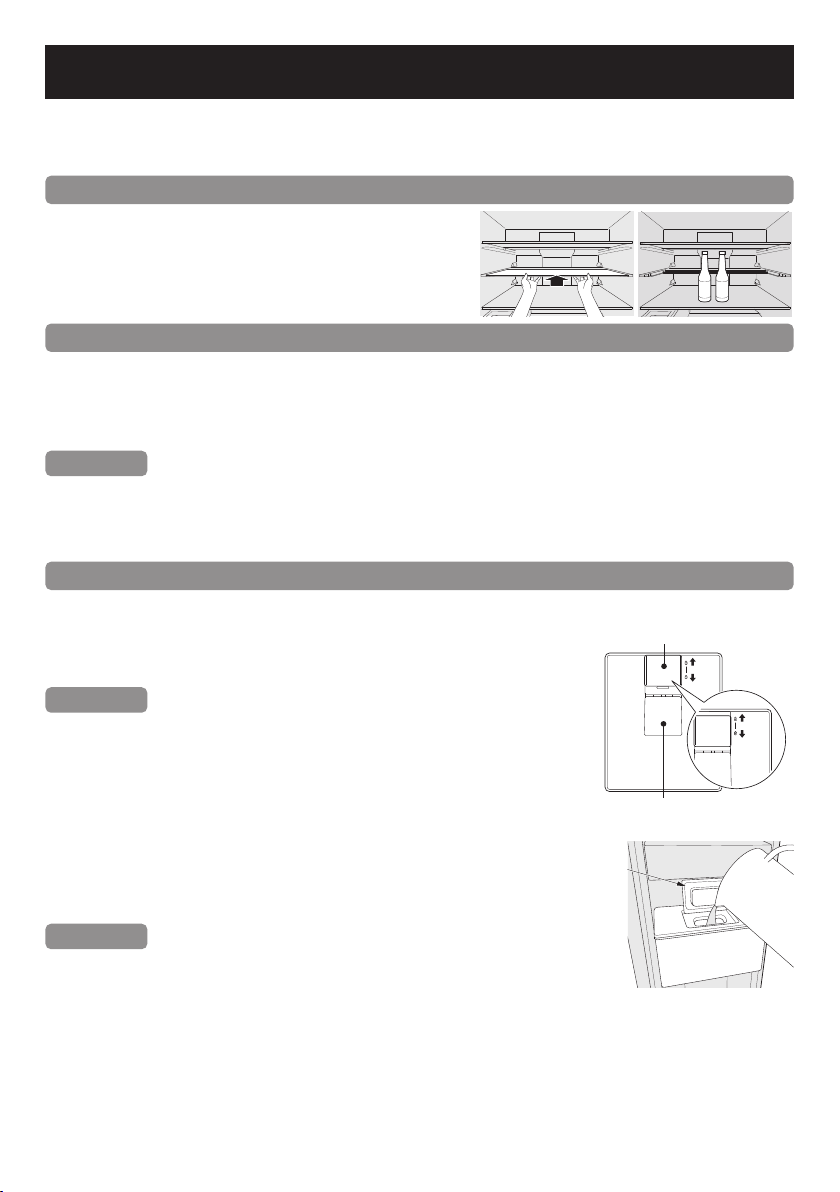
Bagaimana menggunakan dulang kaca gelangsar
Tolak separuh dulang kaca ke belakang,
Kemudian anda boleh simpan makanan yang tinggi
bergantung kepada tujuan kegunaan anda.
Untuk cara-cara mengalihkan dulang kaca gelangsar,
sila rujuk muka surat 28.
Bekas sayur
Bekas sayur besar dilengkapi dengan sistem rel panduan dengan sudut bukaan maksimum,
memudahkan anda untuk mengambil makanan yang diletakkan jauh di dalam bekas dan
meningkatkan kapasitinya. Ia juga membolehkan pengguna menarik bekas dengan satu
tangan. Pelembap membantu mengawal kelembapan dalam bekas sayur, membantu sayur
mengekalkan kelembapan dan kesegaran.
Kenyataan
● Disebabkan kelembapan yang tinggi, titisan air mungkin muncul pada dinding bekas sayur.
Jika air atau titisan air kekal di dinding, lap dengan kain lembut.
● Jangan biarkan makanan melebihi tinggi bekas, kerana terdapat risiko di mana pintu tidak dapat
ditutup sepenuhnya, yang boleh menyebabkan fros dan merosakkan sayur dan buah-buahan.
Manual pengguna untuk dispenser air luaran
Dengan dispenser air luaran, anda boleh mendapatkan air sejuk tanpa membuka pintu peti sejuk.
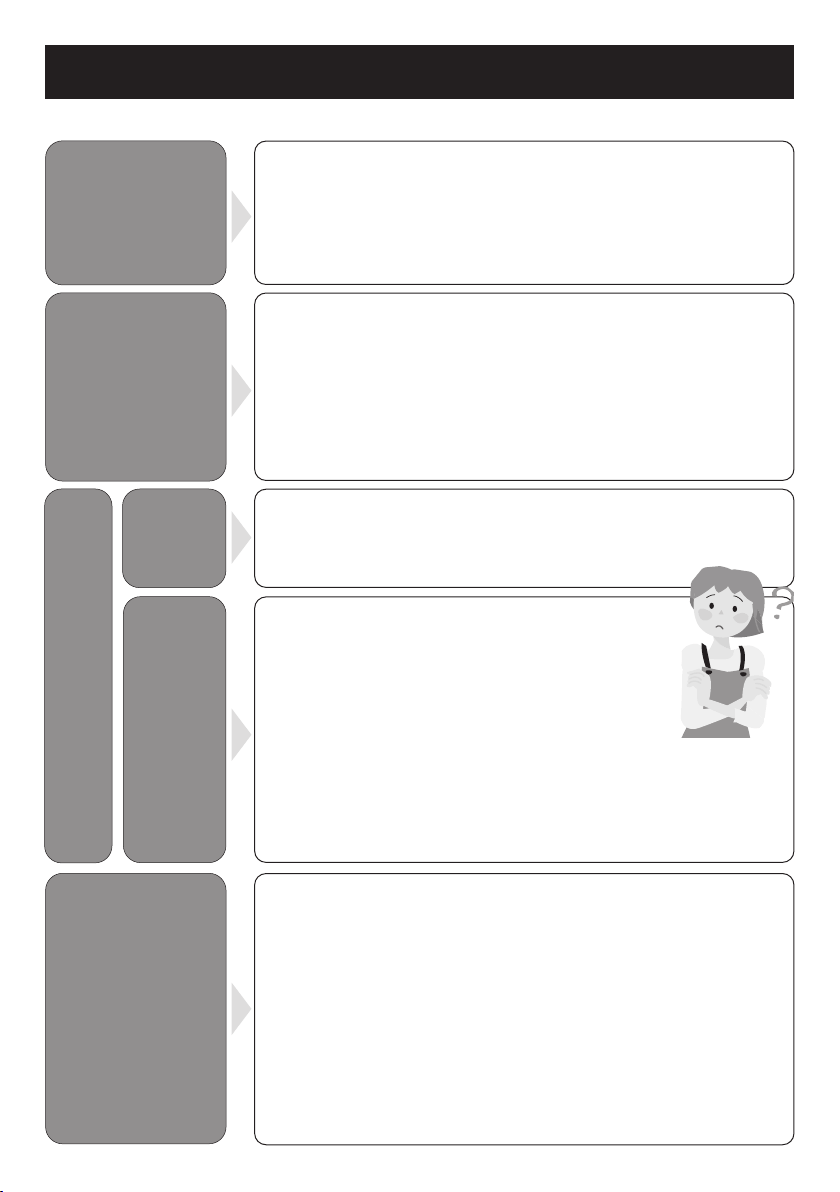
Bagaimana mendapatkan air daripada peti sejuk
1 Tolak kunci ke atas sehingga ia menyentuh hujung atas.
2 Tegakkan cawan dan tekan tuil untuk mendapatkan air.
Kenyataan
● Selepas mengambil air secukupnya, keluarkan cawan
perlahan-lahan untuk mengelakkan air menitis.
● Gunakan kain yang bersih untuk mengeringkan air yang tumpah jika ada.
● Apabila anda perlu mengunci dispenser air luaran, tarik kunci ke bawah
sehingga ia menyentuh hujung bawah dan garisan merah kelihatan.
Jika tidak perlu mengunci dispenser air luaran, langkau langkah ini.
Bagaimana menggunakan tangki air
1 Buka penutup dan tuang air ke dalam tangki.
2 Tutup penutup dengan ketat dan tutup pintu peti sejuk untuk
memulakan penyejukan.
Kenyataan
● Apabila menggunakan tangki air untuk kali pertama, adalah
perlu untuk mencuci tangki air terlebih dahulu.
● Jangan isi air panas melebihi 50 °C ke dalam tangki air.
● Tangki hanya boleh memuatkan 3 liter air. Jangan isi air melebihi bar 3 L pada tangki.
● Hanya isi air kosong sahaja ke dalam tangki air; jangan gunakan bir, minuman ringan,
minuman berkarbonat, dsb.
● Pastikan tangki air diletakkan dengan betul semasa menggunakan peti sejuk. Jika tidak,
kecekapan penyejukan akan terjejas dan pintu peti sejuk sejuk akan berpeluh.
● Periksa tangki air sebelum digunakan.
● Kandungan pepejal air mestilah 100 mg/L atau kurang. Zat mineral mungkin muncul
seperti mendapan putih. Ia tidak berbahaya.
Lid
Penutup
Open
Close
Kunci
Tekan tuil untuk
mendapatkan air
22
Ruang Segar Terbaik
Suhu dalam bahagian Segar Terbaik lembut boleh dipilih daripada -5 °C ~ 4 °C.
• Suhu untuk makanan untuk disejuk beku lembut ialah -1 °C ~ -5 °C.
• Suhu dalam bahagian
Segar Terbaik
lembut sebagai bahagian Peti Sejuk ialah 4 °C ~ 0 °C.
Apabila menggunakan peti sejuk, suhu boleh dilaraskan mengikut kegunaan peribadi anda.
*Suhu tetapan lalai kilang ialah -3 °C.
Menggunakan Ruang Segar Terbaik
Kira-kira -1 °C ~ -5 °C
●
Ruang ini sesuai untuk menyimpan makanan segar seperti daging atau ikan. Berbanding
menyimpan dalam ruang Peti Sejuk, hayat simpanan daging atau ikan akan menjadi lebih panjang.
● Jika makanan terlalu sejuk beku.
Hirisan ikan atau daging juga boleh terlalu membeku.
Tetapkan suhu kepada lebih tinggi daripada -3 °C
untuk mencegah makanan daripada membeku.
● Apabila makanan tidak separuh beku
.
Bergantung pada jenis makanan, seperti
blok besar daging atau ikan besar, keadaan
penyimpanan dan suhu ambien, makanan mungkin tidak dibekukan sebahagiannya seperti yang
dimaksudkan. Kemudian, tetapkan pada suhu terendah -5 °C.
● Jangan masukkan terlalu banyak makanan.
Apabila terdapat terlalu banyak makanan dan
tiada ruang untuk mengedarkan udara sejuk di dalam peti sejuk, operasi penyejukan akan
terjejas. Buka ruang antara makanan yang berbeza!
● Apabila menyimpan makanan dalam kuantiti yang banyak, spt. blok daging, ikan yang
besar atau ayam, adalah dinasihatkan untuk meletakkan makanan di tengah bahagian
Penyejuk Beku lembut untuk mengoptimumkan prestasi penyejukan.
● Apabila suhu bahagian Penyejuk Beku lembut adalah pada 4 °C ~ 0 °C, mod Segar
Terbaik+ (Prime Fresh+) baharu tidak akan beroperasi untuk mencegah makanan rosak.
● Jangan biarkan makanan menghalang peredaran udara dalam Bahagian Penyejuk Beku
lembut sejuk.Jika udara sejuk tidak diedarkan, ini akan
menyukarkan ruang dalaman bahagian Penyejuk
Beku lembut sejuk untuk sejuk dan boleh merosakkan
makanan anda. Justeru, makanan tidak patut disimpan
terlalu tinggi dan di depan salur masuk udara
(di atas bekas bahagian Penyejuk Beku lembut) dan
menghalang peredaran udara dalam bahagian tersebut.
Tip penyimpanan makanan
Jangan masukkan terlalu banyak makanan
Apabila terdapat terlalu banyak makanan dan tiada
ruang untuk mengedarkan udara sejuk di dalam
peti sejuk, operasi penyejukan akan terjejas.
Buka ruang antara makanan yang berbeza!
Jangan biarkan makanan menghalang peredaran udara dalam
peti sejuk
Jika udara sejuk tidak diedarkan, ini akan menyukarkan ruang dalaman
peti sejuk untuk sejuk dan akan menggunakan lebih banyak tenaga
elektrik. Oleh itu, makanan tidak patut menghalang saluran udara* dan
peredaran udara dalam peti sejuk.
Saluran udara terletak di atas pandu udara dalam bahagian Peti Sejuk.
Mudah dipotong.
Makanan yang
separuh beku
mudah dipotong!
Menyenangkan.
Tidak membazirkan udara
sejuk dalam peti sejuk adalah
rahsia mengekalkan makanan
lebih segar, lebih lama!
Salur masuk
udara
Sarung Segar
Terbaik
23
Ruang Penyejuk Beku
Makanan yang beku atau disejukkan disimpan pada masa yang lama menggunakan
bahagian Pembeku Terbaik (Prime Freeze).
Julat suhu bahagian Penyejuk Beku sejuk ialah -15 °C ~ -23 °C.
Frozen food
Frozen food
Frozen food
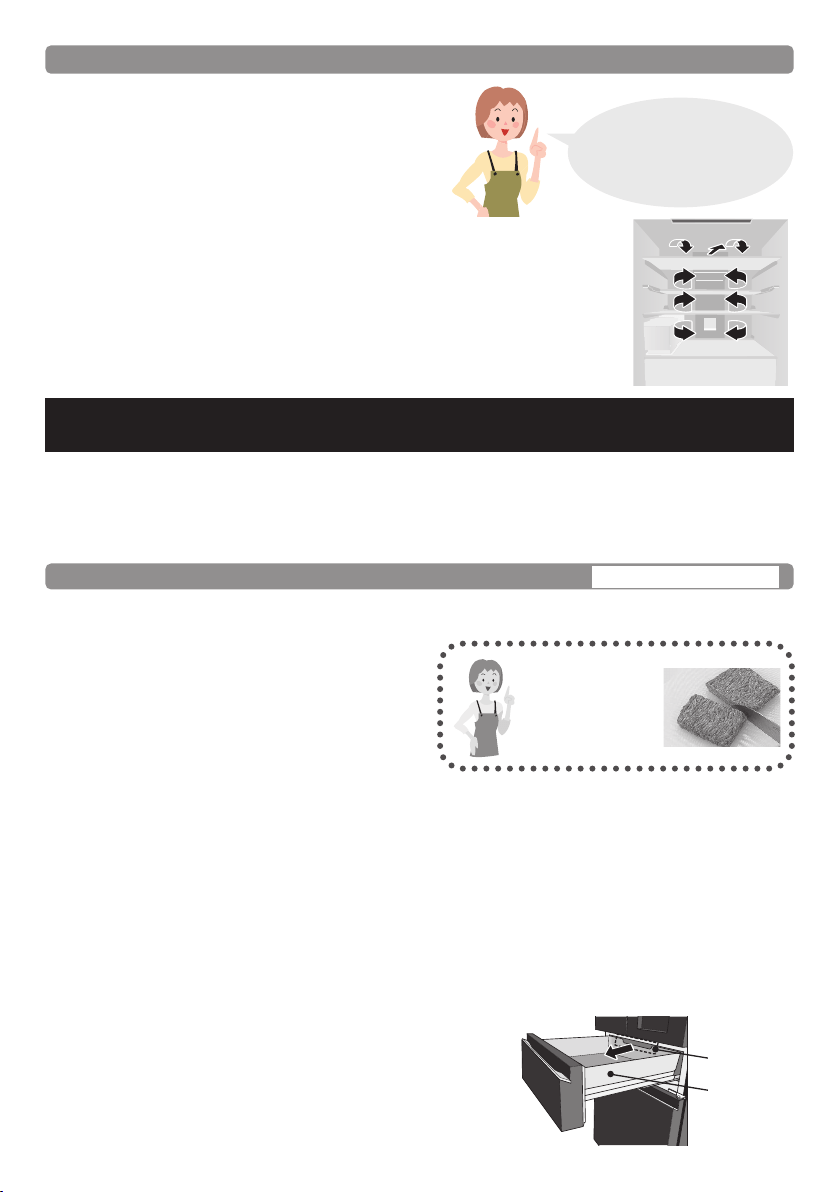
Tiga tip untuk menyejuk beku makanan dan mengekalkan rasanya
1. Sejuk bekukan makanan nipis dan kecil dengan cepat!
2. Tutup rapat
3. Jangan sejuk bekukan semula
Pembuatan ais automatik
Tangki air pembuat ais automatik
Penapis air
Dulang ais pembuat ais
automatik
Kotak ais
Untuk menggunakan pembuat ais automatik dengan mudah
Hanya gunakan air
minuman untuk membuat
ais automatik.
Jangan tuang cecair berikut ke dalam tangki bekalan air.
(Cecair ini boleh merosakkan pembuat ais automatik).
Jus, v.v. Minuman sukan Minuman berkarbonat Air panas
Kandungan pepejal
air mestilah 100 mg/L
atau kurang.
Air minuman
Tips
●
Kandungan pepejal air mestilah 100 mg/L atau
kurang. Zat mineral mungkin muncul seperti
mendapan putih. Ia tidak berbahaya.
●
Apabila menggunakan pembuat ais automatik untuk
kali pertama, bau atau habuk mungkin melekat pada
pembuat ais, dsb.
Buang ais dalam kotak yang pertama.
●
Ingat untuk gunakan ciri pembersih automatik untuk
pembuat ais automatik secara berkala.
(Muka surat 21)
Perhatian
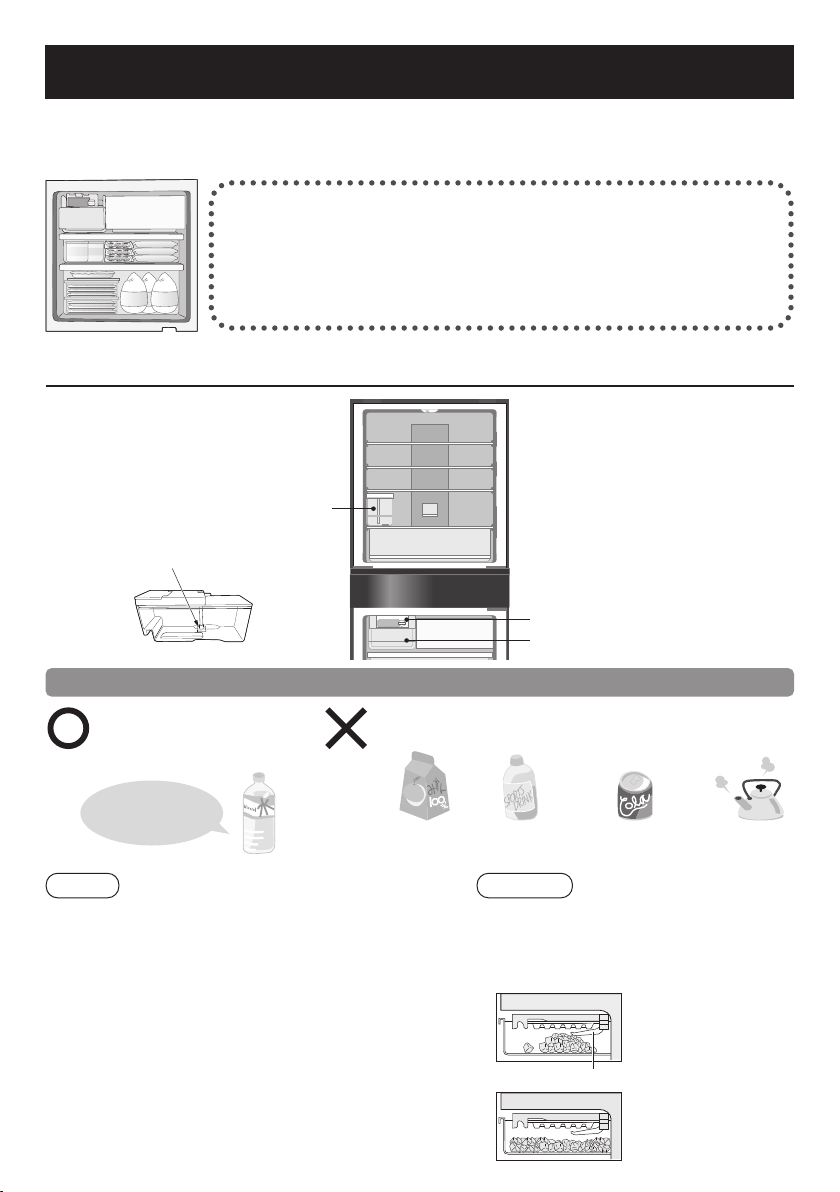
Apabila kotak ais penuh dan kiub ais
menyentuh tuil pengesanan ais, mod
pembuatan ais akan berhenti secara
automatik.
Timbunan kiub ais
akan menyentuh tuil
pengesanan ais.
(Kemudian, mod pembuatan
ais automatik akan berhenti).
Tuil pengesanan ais
Edarkan kiub ais dengan
sekata dalam kotak ais
untuk membuat lebih ais.
Depan Belakang
Front Rear
Water filter
24
1
Keluarkan tangki bekalan air.
2
Isi dengan air.
3
Pasang tangki bekalan air.
Jangan isi air
melebihi garisan
“Max” (Maksimum).
Penutup
Tekan masuk
keseluruhan
tangki bekalan
air.
Tarik keluar tangki bekalan
air sehingga ia tersekat.
Isi air hingga garisan “Min”
(Minimum).
Buka penutup dan isi air
ke dalam tangki dan tutup
semula.
Pastikan arah tangki bekalan
air dan pasang hingga tangki
menyentuh pin terakhir.
(Jika tangki air tidak
menyentuh pin terakhir,
pembuat ais tidak dapat
beroperasi)
*
Ais boleh dihasilkan selama kira-kira 2 jam, selagi suhu dalam bahagian Peti Sejuk ialah 4 °C, dalam
bahagian Penyejuk Beku lembut ialah -3 °C, dan dalam bahagian Penyejuk Beku ialah -20 °C.
Bagaimana membuat ais dengan pantas
Dalam mod “Pembuatan Ais Pantas”, pembuatan ais akan bertambah laju.
Kiub ais boleh dibuat dalam sekurang-kurangnya 90 minit*.
Perhatian
● Selepas kira-kira 6 jam, peti sejuk akan kembali ke mod pembuatan ais normal.
● Apabila peti sejuk dalam mod nyahfros, LED [Pembuatan Ais Automatik] akan menyala.
Mod pembuatan ais pantas akan bermula semula sejurus selepas operasi penyahbekuan
selesai.
● Dalam mod pembuatan ais pantas, tenaga yang digunakan akan lebih tinggi daripada
biasa.
● Mod ECONAVI tidak berfungsi semasa menetapkan mod “Pembuatan Ais Pantas”.
* Suhu bilik ialah 20 °C, suhu bahagian Peti Sejuk, bahagian Segar Terbaik lembut, dan
bahagian Penyejuk Beku masing-masing ialah 4 °C, -3 °C, dan -20 °C.
Bagaimana mengguna tangki air pembuat ais automatik
Permintaan
● Jangan tuang air terus ke dalam kotak ais untuk membuat ais.
(Jika tidak, kotak ais boleh pecah).
● Jangan tuang makanan atau benda lain dalam kotak ais.
(Jika tidak, adalah mustahil untuk mengesan jumlah ais yang betul, dan pembuat ais
automatik boleh berhenti berfungsi, ada kotak ais tidak boleh dikeluarkan.
Masa kitaran pembuat ais akan menjadi lebih panjang dalam keadaan berikut.
● Pertama kali menggunakan peti sejuk.
(Sekurang-kurangnya 24 jam diperlukan
memandangkan fungsi pembuatan ais
automatik hanya bermula selepas bahagian
dalam peti sejuk cukup sejuk.
●Apabila pintu peti sejuk dibuka dengan kerap.
●Apabila pintu peti sejuk dibuka sedikit.
●Apabila peti sejuk terlalu penuh.
● Apabila suhu bilik adalah rendah pada
musim sejuk atau tinggi pada musim
panas.
●Apabila kegagalan elektrik berlaku.
25

Bagaimana mematikan pembuat ais automatik
Anda boleh dayakan/nyahdayakan mod pembuatan ais menurut keperluan anda.
Tutup pembuat ais
1 Pilih mod “Penutupan pembuat ais automatik” (Auto Ice Off), ikon mod penutupan pembuat
ais pada panel operasi akan menyala dan peti sejuk akan berhenti membuat ais (Muka
surat 21).
2 Tidak perlu untuk menuang air ke dalam tangki air. Baki air dalam tangki air akan cukup
untuk membuat ais, dan kiub ais akan tersedia selepas 2 jam. Apabila kotak ais penuh,
kitaran seterusnya tidak akan berlaku.
3 Apabila anda ingin meneruskan membuat ais secara automatik, pilih mod “Penutupan
pembuat ais automatik” (Auto Ice Off), dan ikon mod penutupan pembuat ais pada panel
operasi akan padam (Muka surat 21).
Tutup pembuat ais untuk jangka masa yang panjang
1 Kosongkan tangki air dan keluarkan kiub ais daripada kotak ais.
2 Bersihkan tangki air, penapis air, pelapik kalis bunyi dan kotak ais; keringkan aksesori ini
dan pasang semula.
3
Apabila menggunakannya semula, isi tangki air dan pasangkannya di tempat asal.
Semasa mengangkut peti sejuk
1 Kosongkan tangki air dan keluarkan kiub ais daripada kotak ais.
2 Pilih mod “Pembersihan pembuat ais” (Auto Ice Clean), ikon mod pembersihan pembuat
ais pada panel operasi akan menyala dan peti sejuk akan mula membersihkan pembuat
ais. (Pada masa ini, kiub ais dan air dalam proses pembuatan ais akan jatuh ke dalam
kotak ais)
3
Proses pembersihan akan berhenti selepas 2 minit. Tarik keluar dulang gelangsar di bawah
Penyejuk Beku, keluarkan kotak ais dan kosongkan kiub ais dan air di dalam kotak ais.
4 Bersihkan tangki air, penapis air dan kotak ais; keringkan aksesori ini dan pasang semula.
Bagaimana membersihkan pembuat ais automatik
Apabila menggunakan untuk kali pertama atau tidak digunakan buat masa yang panjang,
tangki air mungkin berbau atau mengumpul habuk. Jangan lupa untuk membersihkan tangki
air sebelum membersihkan pembuat ais.
Selepas memilih mod pembersihan pembuat ais, air akan dituang secara automatik ke dalam
dulang ais dan paip bekalan air 3 kali (selama kira-kira 2 minit) untuk mengalirkan air.
Apabila memilih mod pembersihan pembuat ais, pastikan ada air yang cukup di dalam tangki
air.
1 Tarik keluar kotak ais di bawah Penyejuk Beku, keluarkan semua kiub ais daripada kotak
ais (selepas semua kiub ais terbentuk), dan pasang semula kotak ais di tempatnya.
2 Isi tangki air dengan air.
3 Pilih mod pembersihan pembuat ais (Muka surat 21).
• Pada masa yang sama, peti sejuk akan mengeluarkan bunyi sekejap-sekejap dan mula
membersihkan pembuat ais.
• Semasa proses pembersihan, bunyi tersebut tidak boleh dimatikan.
• Selepas bunyi bip untuk memaklumkan proses pembersihan lengkap, ikon mod
pembersihan pembuat ais pada panel operasi akan padam, proses pembersihan
pembuat ais akan berakhir dan memulakan proses pembuatan ais automatik.
4 Keluarkan kotak ais daripada Penyejuk Beku, buangkan air dalam kotak ais dan lap air di
luar kotak ais.
Jika anda tidak membersihkan semua air dalam kotak ais, kotak ais tersebut boleh pecah.
26
Bagaimana Mencuci Peti Sejuk
Sebelum mencuci atau membuat penyelenggaraan, pastikan palam kuasa dicabut daripada
outlet kuasa. Jangan pasang atau cabut palam kuasa dengan tangan yang basah. Apabila
palam dicabut, biarkan selama 7 minit sebelum dipasang semula. Jika tidak, pemampat
mungkin tidak berfungsi.
Bersihkan peti sejuk serta-merta jika kotor!
Lap kesan kotor pada permukaan dalam
sebelum ia keras. Minyak masak atau lemak
haiwan boleh menyebabkan plastik retak
dan jus sitrus boleh melunturkan warna
peti sejuk. Apabila kesan kotor tidak boleh
ditanggalkan dengan mudah, lap dengan
kain yang dicelup dengan pencuci dapur
neutral. Kemudian, lap dengan kain yang
dicelup dengan air.
Bersihkan item yang boleh ditanggalkan
sekali-sekala.
Bersihkan pemutar ais seminggu sekali.
Sebagai panduan, keluarkan dulang, para
pintu dan cuci dengan merendam ia dalam
air suam setiap tiga bulan.
Bersihkan gasket pintu sekurang-kurangnya sebulan sekali.
Bersihkan dengan mengelap dengan kain lembut yang lembap.
Gel petroleum disapu di gasket pintu di engsel peti
sejuk, berhati-hati agar tidak lap kawasan ini.
Notis
Gasket pintu boleh diganti oleh ejen servis bertauliah.
Jika gasket pintu tercabut semasa mencuci, ia boleh ditekan masuk semula
ke dalam alurnya.
Permintaan
Jangan gunakan item yang berikut untuk mencuci. (Jika tidak, permukaan akan calar atau karat.)
Alkali atau Alkali
lemah
Pencuci dapur
(Akan meretakkan plastik!)
Pembersih atau
sabun serbuk
Benzin, pencair, alkohol,
asid, petroleum
Penggosok Air Panas
Gunakan air
suam!
Keluarkan
dan bilas!
Tempat di mana gel
petroleum disapu.
Lap permukaan pintu dengan
kain lembut yang lembap.
Sekali setiap 3 bulan
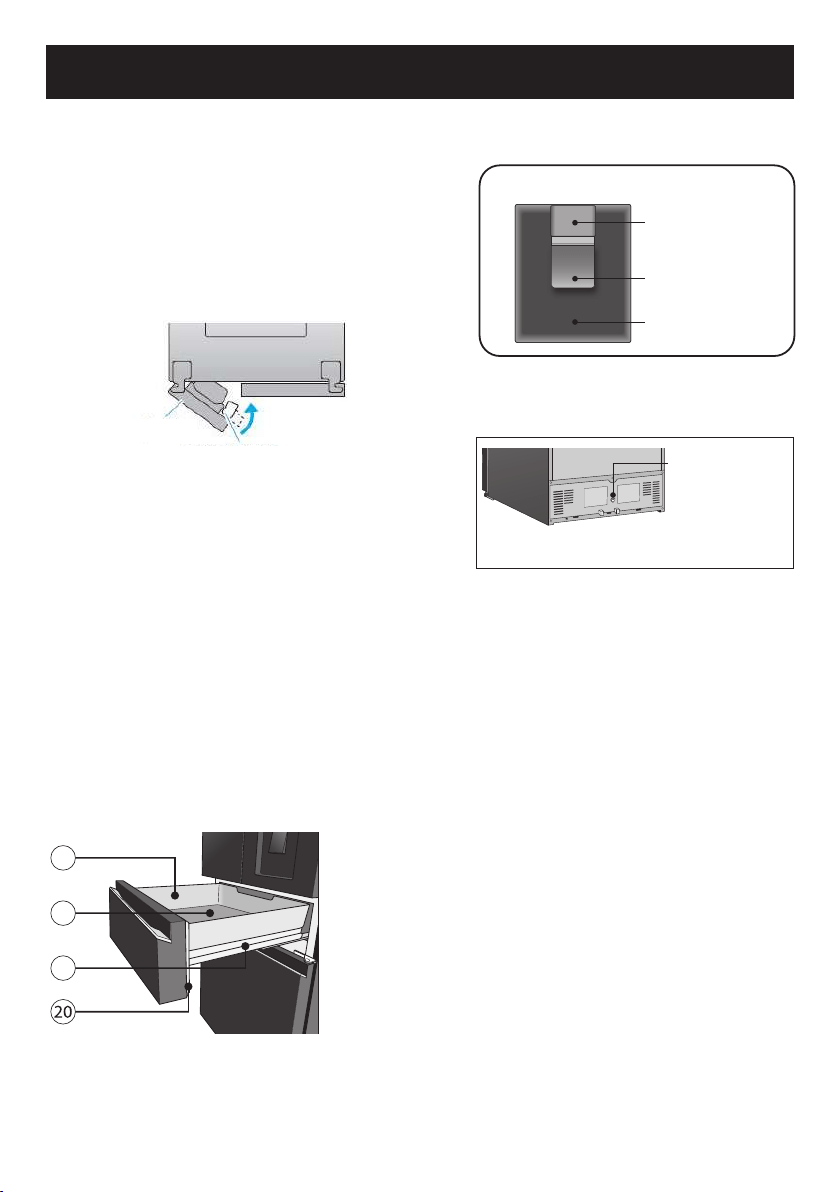
Para telur / Para botol
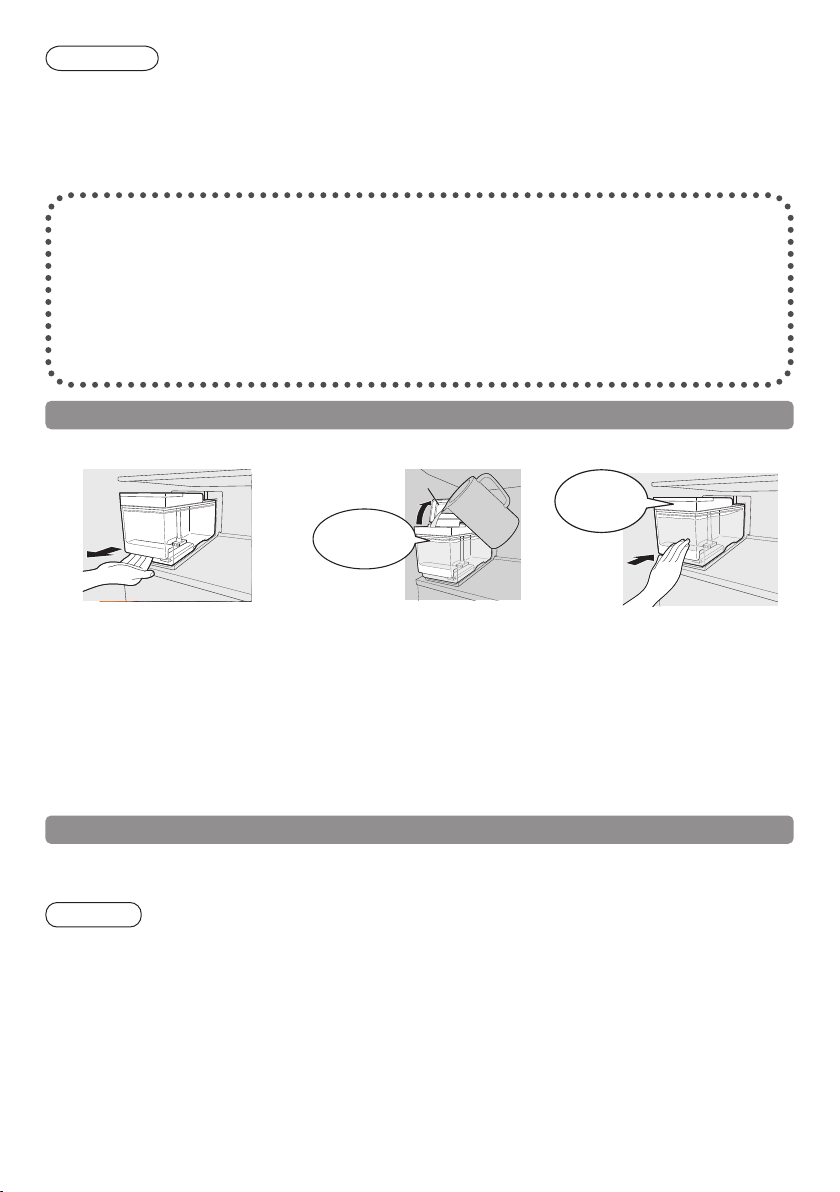
Mengeluarkan
1 Angkat ke atas, selang-seli antara kanan dan
kiri.
Memasang
2 Letakkan pada penyokong, kemudian tekan
hingga sampai ke hujung penyokongnya
.
27
Bagaimana Mencuci Peti Sejuk
Sekali setiap 3 bulan
Dulang
Mengeluarkan
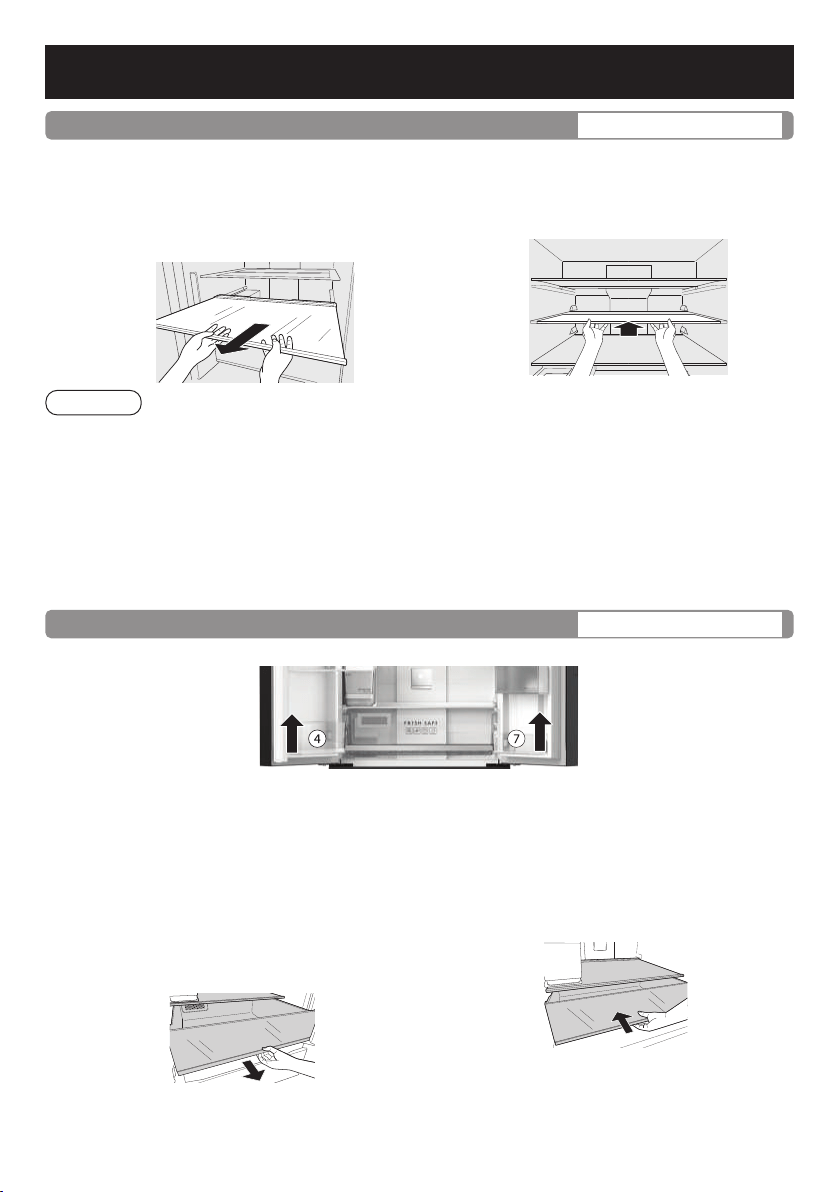
1
Angkat belakang dulang boleh laras dan tarik ke
depan. Sebaik bahagian tersembul dulang boleh
laras terkeluar daripada landasan, sengetkan
dulang boleh laras dan keluarkannya.
Memasang
2
Tolak dulang hingga ia sampai ke
kunci hujung.
Perhatian
● Bagi mengeluarkan dulang kaca dengan mudah, para dulang telur/para botol pada pintu
peti sejuk perlu dikeluarkan sebelum dulang kaca dalam petak peti sejuk.
● Dulang kaca di atas bekas sayur dibersihkan secara langsung semasa membersihkan
kawasan dalam peti sejuk. (Disebabkan rekaannya yang tetap.)
● Jika dulang tidak dikunci semasa memasangnya, pastikan anda tidak memasukkanya
secara terbalik.
● Dulang diperbuat daripada kaca dan berat.
Sila kendalikannya dengan berhati-hati agar ia tidak jatuh dan menyebabkan kerosakan dan
kecederaan. Semasa memasang dulang, pegang di bahagian bawah dan pasang dengan berhati-hati.
Sekali setiap 3 bulan
Bekas sayur / Bekas petak Penyejuk Beku
※ Bekas sayur
Mengeluarkan
1 Buka kedua-dua pintu petak Peti Sejuk
dengan luas
2
Keluarkan para botol besar 4 dan para
botol kecil 7 (Berdasarkan kepada
pengenalpastian Bahagian. Halaman 12,
13) sebelum mengeluarkan bekas sayur.
3 Tarik bekas ke hadapan sehingga
hujungnya dan angkat bahagian
depan secara perlahan-lahan untuk
dikeluarkan sepenuhnya.
Memasang
1 Masukkan bekas ke dalam para.
2
Angkat bekas secara perlahan-lahan
dan tolaknya ke hadapan sehingga
mencapai hunjung peti sejuk.
3 Pasang para botol besar 4 dan para
botol kecil 7 ke dalam pintu.
※ Bekas petak Penyejuk Beku
Abaikan cara mengeluarkan dan memasang para botol besar 4 dan para botol kecik 7.
Keluarkan dan pasangkan bekas dengan cara yang sama dengan bekas Sayur.
28
Sekali setiap 3 bulan
Pelembap bekas sayur
1
Selepas menarik keluar bekas sayur, didapati pelembap terletak pada belakang bekas sayur.
2 Pegang pelembap tersebut dan gelagsarkan pada para untuk mengeluarkannya.
Perhatian
● Selepas membilasnya dengan air, lap atau keringkannya.
● Bagi kotoran degil, cairkan bahan cuci dapur (neutral), dan basuh dengan perlahan
menggunakan berus gigi yang lembut, kemudian bilas sebersih-bersihnya dengan air.
Sekali setiap 3 bulan
Bekas Segar Terbaik (Prime Fresh)
Mengeluarkan
1 Tarik pintu Segar Terbaik tersebut sehingga terkeluar.
2
Angkat bahagian depan Segar Terbaik itu dengan perlahan, dan keluarkannya secara menyerong.
Plat aluminium
pemindah haba (Ambil
perhatian bahawa
plat aluminium mudah
tercalar dan rosak)
Memasang
1 Tarik pintu Segar Terbaik tersebut sehingga terkeluar.
2 Perlahan-lahan letakkan bekas Segar Terbaik itu secara menyerong di tempat asalnya
sehingga ke hujung peti.
Perhatian
● Semasa memasang bekas tersebut, pastikan bahagian depan dan belakang bekas
dimasukkan dengan betul. Bahagian depan bekas tersebut ada perkataan “Front”.
● Plat aluminium pemindah haba boleh dikeluarkan. Walau bagaimanapun, ingat untuk tidak
memegang plat aluminium tersebut ketika sejuk dengan tangan yang basah kerana boleh
menyebabkan luka beku.
● Jika plat aluminium tersebut dibasuh dengan air, lap atau biarkannya kering sebelum
dipasangkan ke dalam peti sejuk.
● Jangan lap pelincir pada batang besi laci atau permukaan sentuh landas panduan.
Jika anda terlap pelincir, sila hubungi Pusat Servis.
Mingguan
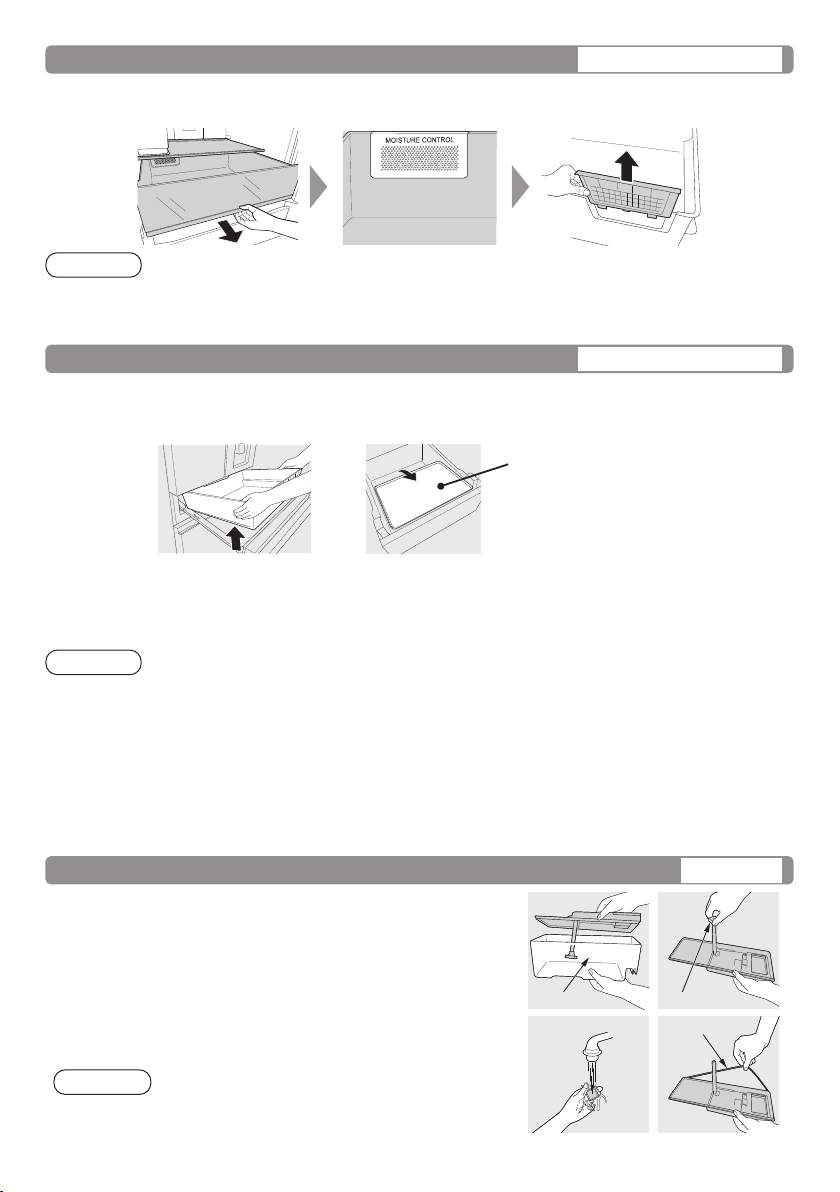
Tangki bekalan air/Penapis air (pembuat ais automatik)
1
Buka penutup tangki bekalan air dan bilasnya dengan air.
2 Pusingkan penapis air untuk mengeluarkan cangkuk
dan kemudian keluarkan penapis air tersebut.
3
Perlahan-lahan bersihkan penapis air tersebut dengan air.
4 Keluarkan gasket getah pada bahagian ensel
penutup dan basuhnya dengan air
5 Pasangkan penapis air dan gasket getah pada
tempatnya.
Perhatian
● Jika terdapat endapan air atau paip yang tersumbat
dalam penapis air, kemungkinan ais tidak disediakan
dengan betul.
Tangki bekalan air Penapis air
Gasket getah
29

Bagaimana Mencuci Peti Sejuk
Sekali setiap 3 bulan
Bekas kompartmen Pembeku Terbaik (Prime Freeze)
Mengeluarkan
1 Tarik pintu bekas bekas Pembeku Terbaik sehingga terkeluar.
2 Angkat bekas tersebut, kemudian memiringkannya dan keluarkannya daripada petak
secara menyerong.
Plat aluminium
pemindah haba (Ambil
perhatian bahawa
plat aluminium mudah
tercalar dan rosak)
Memasang
1 Angkat bekas bekas Pembeku Terbaik, angkat belakang bekas bersama cangkuk
pada alur dalaman sehingga padan dan tersentuh bahagian dalam.
Perhatian
● Plat aluminium pemindah haba boleh dikeluarkan. Walau bagaimanapun, ingat untuk tidak
memegang plat aluminium tersebut ketika sejuk dengan tangan yang basah kerana boleh
menyebabkan luka beku.
● Apabila mengeluarkan atau memasang bekas tersebut, pastikan dulang dipegang dengan
tangan yang terkedang. Jika tidak, jari anda mungkin tersipit pada pintu petak tersebut.
Sila rujuk gambar di atas.
● Jika plat aluminium tersebut dibasuh dengan air, lap atau biarkannya kering sebelum
dipasangkan ke dalam peti sejuk.
● Jangan mengelap pelincir pada permukaan sentuh landas panduan.
Jika anda terlap pelincir, sila hubungi agensi pemasaran.
Sekali setiap 3 bulan
Kotak ais
Mengeluarkan
Angkat dan tarik kotak ais ke
hadapan sehingga terkeluar
sepenuhnya.
Memasang
Tolak kotak ais tersebut
sehingga tersentuh pin
terakhir.
Perhatian
● Pilih untuk hentikan fungsi pembuat ais
automatik sebelum membersihkan kotak
ais (Muka surat 21).
30
Mingguan
Tangki bekalan air/Penapis air (untuk dispenser air yang diluar)
Mengeluarkan
Tarik tangki air ke atas menggunakan kedua-dua belah
tangan dan mencondongkannya sedikit ke arah anda.
Memasang
Masukkan hujung injap ke dalam lubang. Letakkan kedua-
dua sudut kiri dan kanan tangki air tersebut pada posisi
berkunci.
Tolak tangki air ke bawah sehingga ke dalam.
Perhatian
● Ketika mengeluarkan tangki air untuk pembersihan, jika span
getah terbalik akibat bergeser kepala paip, betulkan dengan
menolak span ke arah posisi asalnya.
● Injap dalam tangki air boleh dikeluarkan dengan memusingnya
mengikut arah lawan jam.
Menukar penapis
1 Gunakan tangan anda untuk buka penutup pada sudut kanan.
2 Angkat dan keluarkan terus penapis daripada kunci.
Tukarkan dengan penapis baharu. Letakkan semula penapis pada
posisi asalnya dan tutup penutup dengan ketat.
Perhatian
● Penapis sepatutunya ditukar setiap 3 tahun atau bila perlu.
●Anda boleh menghubungi Pusat Servis Panasonic seluruh negara
untuk membeli penapis pembersihan yang baharu.
Sekali setiap 3 bulan
Dulang Ais
Dulang ais tersebut boleh dibersihkan dengan menggunakan fungsi “Automatic ice maker
cleaning” (Auto Ice Clean) (Halaman 21). Selain itu, dulang ais boleh dikeluarkan dan
dibersihkan secara manual.
Cara membersihkan dulang ais secara manual.
Mengeluarkan dan membersihkan Dulang ais
1 Pilih mod “Automatic ice maker shutdown” (Auto Ice Off)
(Halaman 21).
2 Pusingkan tombol di dalam Penyejuk Beku kepada posisi tidak
berkunci.
3 Tarik bahagian yang terkeluar tersebut ke hadapan untuk
mengeluarkan dulang ais.
4 Bilas dengan air. (Jangan guna span yang tajam untuk
menggosok permukaan dulang. Jika dulang ais mempunyai
kesan calar, ais tidak dapat dibuat dengan betul yang
menyebabkan dulang ais tersebut rosak.)
Perhatian
● Dulang ais dan kerangka tersebut tidak boleh diasingkan.
● Jangan bersihkan dengan mesin basuh pinggan mangkuk
atau rak mengeringkan pinggan mangkuk.
Memasang
1 Tolak Dulang ais sehingga anda dengar bunyi “klik”.
2 Pusingkan tombol tersebut kepada posisi berkunci. Ais tidak dapat dibuat jika Dulang
ais tidak berkunci.
3 Tutup mod “Penutupan Pembuat Ais Automatik” (Auto Ice Off) (Halaman 21) untuk
memulakan semula proses membuat ais.
Perhatian
●
Ais tidak akan dibuat sehingga mod “Penutupan Pembuat Ais Automatik” (Auto Ice Off) ditutup.
● Jangan tuangkan air terus pada Dulang ais selepas membersihnya secara manual. (Kiub
ais mungkin akan melekat sesama sendiri atau menyebabkan Dulang ais rosak.)
Penapis
pembersihan
Elemen penapis
pembersihan
Tombol
Kedudukan dikunci
Kedudukan dikunci
Kedudukan
dibuka kunci
Kedudukan
dibuka kunci
Penonjolan
Posisi terkunci
Posisi terbuka
Posisi terkunci
Posisi terbuka
Penonjolan
Tombol
31
Pengenalpastian dan Penyelesaian Masalah
Sebelum anda membuat panggilan untuk perkhidmatan, sila semak item berikut:
Peti sejuk tidak
dapat beroperasi.
●Periksa dan pastikan bahawa palam dan soketnya berada
dalam keadaan yang baik.
●Periksa untuk melihat jika terdapat sebarang masalah pada us
utama dan sistem elektrik di dalam rumah.
●Periksa dengan mencabut palam dan tunggu 7 minit sebelum
memasang semula palam.
Peti sejuk tidak
cukup sejuk.
●Periksa untuk memastikan bahawa dail kawalan suhu berada
di kedudukan yang betul.
●Periksa untuk melihat jika peti sejuk mempunyai beban lebih atau
jika terdapat barang makanan yang panas dimasukkan ke dalamnya.
●Adakah peti sejuk terletak di tempat yang terdedah
terus kepada pancaran matahari atau sumber haba?
●Adakah pintu peti sejuk tertutup rapat?
●Adakah peti sejuk dibuka dengan kerap?
●Apabila kelembapan sekeliling terlalu tinggi, mungkin terdapat
embun pada gasket pintu. Keadaan ini akan terhenti sekiranya
kelembapan udara berkurang. Sila lapkannya dengan kain
yang kering.
●Adakah pintu ditutup rapat?
●Adakah pintu dibuka dan ditutup terlalu kerap?
●Pemeluwapan di dalam peti sejuk juga boleh
terjadi jika makanan berkelembapan tinggi
tidak ditutup atau dibalut.
●Apabila kadar kelembapan tinggi, pintu terbuka
untuk masa yang lama, peti sejuk mengandungi
terlalu banyak makanan atau membuat terlalu banyak ais, salji
akan terbentuk dalam petak Penyejuk Beku, iaitu pada bekas
petak Penyejuk Beku, kotak ais, atau pintu bekas Pembeku
Terbaik. Fenomena
ini adalah normal. Lapnya dengan kain yang
lembut dan kering.
Peti sejuk
mengeluarkan
bunyi bising.
●Periksa sama ada peti sejuk ditempatkan pada lantai yang
stabil atau dipasang dengan betul.
●Periksa jika terdapat sebarang objek yang bersentuh dengan
peti sejuk.
●Bunyi seperti merekah disebabkan bahagian-bahagian di dalam
sedang menyesuaikan diri dengan suhu, ini adalah perkara biasa.
●Selepas pemasangan, peti sejuk mungkin mengeluarkan bunyi
yang kuat. Bunyi tersebut akan menjadi rendah apabila peti
sejuk telah disejukkan.
●Mungkin ada bunyi bersiul di dalam peti sejuk semasa membuka
dan menutup pintu. Ini disebabkan oleh udara di luar yang
masuk melalui paip di bahagian belakang peti sejuk untuk
menyeimbangkan peredaran udara di dalam unit dengan lebih baik.
Luar
Dalam
Terdapat embun, fros.
32
Bahagian dalam
berbau.
●Adakah anda menyimpan makanan dengan bau kuat tanpa
membungkusnya?
Permukaan peti
sejuk panas.
● Disebabkan peti sejuk dilengkapi dengan pencegah embun dan tiub sinaran
haba, permukaan peti sejuk menjadi lebih hangat semasa beroperasi.
●Plat belakang dan sisi mungkin menjadi lebih hangat
terutamanya semasa memulakan atau sekiranya pintu dibuka
dan ditutup dengan kerap.
Bunyi normal peti
sejuk.
●Semasa peti sejuk mula beroperasi, bunyi seperti aliran air
dan air mendidih terhasil. Ia adalah bunyi cecair penyejuk.
●Bunyi bising akan terhasil semasa sistem nyahfros automatik
beroperasi.
●Dilatasi butiran di dalam peti sejuk semasa proses penyejukan
boleh menyebabkan bunyi “krek-krek”.
●Anda mungkin berasa bunyi operasi kuat kerana pemampat
beroperasi pada kelajuan tinggi dalam keadaan berikut: Peti
sejuk tidak sejuk sepenuhnya dalam keadaan tertentu seperti
menggunakannya buat pertama kali, bukaan/tutupan pintu
terlalu kerap, suhu persekitaran tinggi. Bunyi menjadi lebih
senyap selepas sejuk sepenuhnya.
Lampu tidak
menyala.
●Sila hubungi pusat servis Panasonic.
●Jika air dalam tangki tidak berkurangan, maksudnya pembuat
ais tidak berfungsi.
●Proses membuat ais bermula selepas dalaman peti sejuk
sudah cukup sejuk. (Proses akan mengambil lebih daripada
24 jam untuk mula)
●Periksa jika “Penutupan Pembuat Ais Automatik” (Auto Ice Off)
diaktifkan. (Halaman21)
●Pastikan tangki air dan dulang ais ditolak ke dalam dengan
sepenuhnya.
●Jangan tinggalkan makanan dalam pembuat ais.
●Jangan pasang atau keluarkan dulang ais dengan selalu.
●Periksa jika tangki air hampir kosong.
●Jika air tertumpah pada Penyejuk Beku, bersihkannya.
●Sila hubungi pusat servis Panasonic.
●Adakah suhu Penyejuk Beku diletak pada suhu yang lebih tinggi
daripada -20°C bersama-sama suhu petak Penyejuk Beku?
→ Ubah kepada suhu yang lebih rendah. (Halaman 15)
●Terdapat bonjolan. → Alur pada dulang ais mungkin beku.
●Kiub ais berbentuk bulat atau terlekat dengan kiub ais yang lain.
→ Ais disimpan terlalu lama.
(Kiub ais menjadi bulat atau melekit kerana sublimasi.)
●Kiub ais yang kecil.
→ Kiub ais yang kecil terhasil apabila tiada air di dalam tangki.
Pembuatan ais automatik.
Peti sejuk
tidak
menghasilkan
ais.
Ais yang
dihasilkan tidak
berbentuk kiub.
Bentuk kiub
ais yang
pelik.
33
Pengenalpastian dan Penyelesaian Masalah
Panel operasi
berkelip-kelip.
●Adakah anda sedang mengubah suhu Peti Sejuk atau
Penyejuk Beku?
→ Berkelip semasa memasang. Sila lengkapkan tetapan atau
panel operasi akan berhenti berkelip slepeas 10 saat.
Makanan sejuk
beku.
●Adakah anda meletakkan makanan anda berhampiran saluran
udara sejuk?
●Adakah anda menetapkan pengawalan suhu pada kurang
daripada 4 °C bagi petak Peti Sejuk dan/atau -3 °C bagi Segar
Terbaik?
→ Ubah kepada suhu lebih tinggi.
●Adakah anda meletakkan makanan anda dalam Segar Terbaik?
●Adakah mod “Quick Freezing”, mod Prime Fresh+ (Segar
Terbaik+), mod Quick Ice Making, mod Prime Freeze
(Pembeku Terbaik) aktik? (Halaman 17)
●Apabila suhu tidak ditetapkan pada 4°C bagi kompartmen Peti
Sejuk dan -20 °C bagi petak penyejukbeku, fungsi ECONAVI
tidak akan diaktifkan secara automatik.
●Adakah pintu sering dibuka atau makanan panas disimpan
dalam peti sejuk?
●Fungsi belajar boleh menyahaktifkan mod ECONAVI secara
automatik semasa penggunaan biasa.
●Adakah peti sejuk menunjukkan sebarang kod kesilapan?
●Terdapat bekalan elektik terputus?
Jika tiada bekalan elektrik, data yang dikumpul oleh fungsi
belajar akan hilang.
Mod ECONAVI jarang aktik kecuali sehingga fungsi belajar
boleh mengumpulkan data semula.
●Jika fungsi nyahfrosan automatik dibolehkan semasa mod
ECONAVI sedang aktif, mod penyejukan yang normal akan
diaktifkan selepas proses penyahfrosan selesai. Sebagai
kesan, mod ECONAVI mungkin akan dihentikan semasa
penyahfrosan/penyejukkan.
●Kadangkala, fungsi belajar memulakan semula mod penyejukan
normal.
●Adakah Pengesan kecerahan cahaya tersembunyi?
●Adakah terdapat sebarang kotoran atau calar pada panel
operasi bagi Pengesan kecerahan cahaya?
●Mod ECONAVI mungkin beroperasi semasa peti sejuk
digunakan bergantung kepada keadaan, namun operasi
penyejukan akan kekal berjalan.
34
Lampu ECONAVI tidak bernyala seperti biasa.
Fungsi
ECONAVI
tidak
berfungsi
(lampu
ECONAVI
tidak
bernyala).
Mod
ECONAVI
jarang aktif.
Mod
ECONAVI
berhenti
separuh
jalan.
Mod ECONAVI
selalu
berfungsi
(Lampu
ECONAVI
jarang
tertutup).
Pengenalpastian dan Penyelesaian Masalah
Pengenalpastian dan Penyelesaian Masalah
●Simpan makanan sejuk menggunakan bekas Pembeku
Terbaik (Prime Freeze) dalam jangka masa yang lama, atau
simpan ais krim berlemak tinggi dalam peti beku. (Prestasi
penyejukan oleh bekas Pembeku Terbaik adalah dua bintang.)
(Halaman 18)
●Jangan letakkan makanan sejuk di tepi makanan panas.
●Kapasiti pembekuan mungkin tidak mencukupi bergantung
kepada jenis makanan, keadaan bekasnya, kapasiti simpanan,
dan berapa banyak kali pintu dibuka dan ditutup.
→ Betulkan semula mod Pembeku Terbaik (Prime Freeze).
(Halaman 18)
●Jika bekas Pembeku Terbaik (Prime Freeze) ditetapkan
semasa penyahfrosan, petunjuk masa akan mula mengira tetapi
kipas akan berhenti dan makanan menjadi tidak cukup sejuk.
Selepas penyahfrosan, atur semula mod Pembeku Terbaik
(Prime Freeze).
●Jika mod Mod Pembuat Ais Pantas (Quick Ice Making),
Penyejukbekuan Pantas (Quick Freezing), mod Segar
Terbaik+ (Prime Fresh+) disetkan semasa mod Pembeku
Terbaik (Prime Freeze) beroperasi, mod Pembeku Terbaik
(Prime Freeze) akan dihentikan.
Kesilapan
ditunjukkan pada
panel operasi
●U10: Amaran jika pintu terbuka terlalu lama.
→
Periksa bahawa pintu petak ditutup dengan rapat.
●Huruf “H” dan dua digit dipaparkan pada panel operasi.
Contohnya:
H01
→
Sila hubungi Pusat Servis untuk bantuan.
Mod Pembeku Terbaik (Prime Freeze).
Makanan
mencair.
Tidak
sejuk, tidak
membeku.
Berhenti
separuh
jalan.
35
Panasonic Corporation
Laman web: https://www.panasonic.com
© Panasonic Appliances Vietnam Co., Ltd. 2022
Spesikasi
No. Model
NR-YW590Y
Pengkadaran Bintang Pembeku
Kapasiti BERSIH (L)
(MS IEC62552:2016)
Jumlah 540
Penyejuk Beku 186
Peti Sejuk 293
Segar Terbaik 61
Dimensi Luar
Luas x Dalam x Tinggi (mm)
750 x 750 x 1890
Berat Bersih (kg) 100
Jenis Peti Sejuk R600a
Sistem Penyejukan Penyejukan tanpa fros.
Voltan Terkadar (V)
Frekuensi Terkadar (Hz)
Rujuk kepada label kadaran yang ditampal dalam
kabinet.
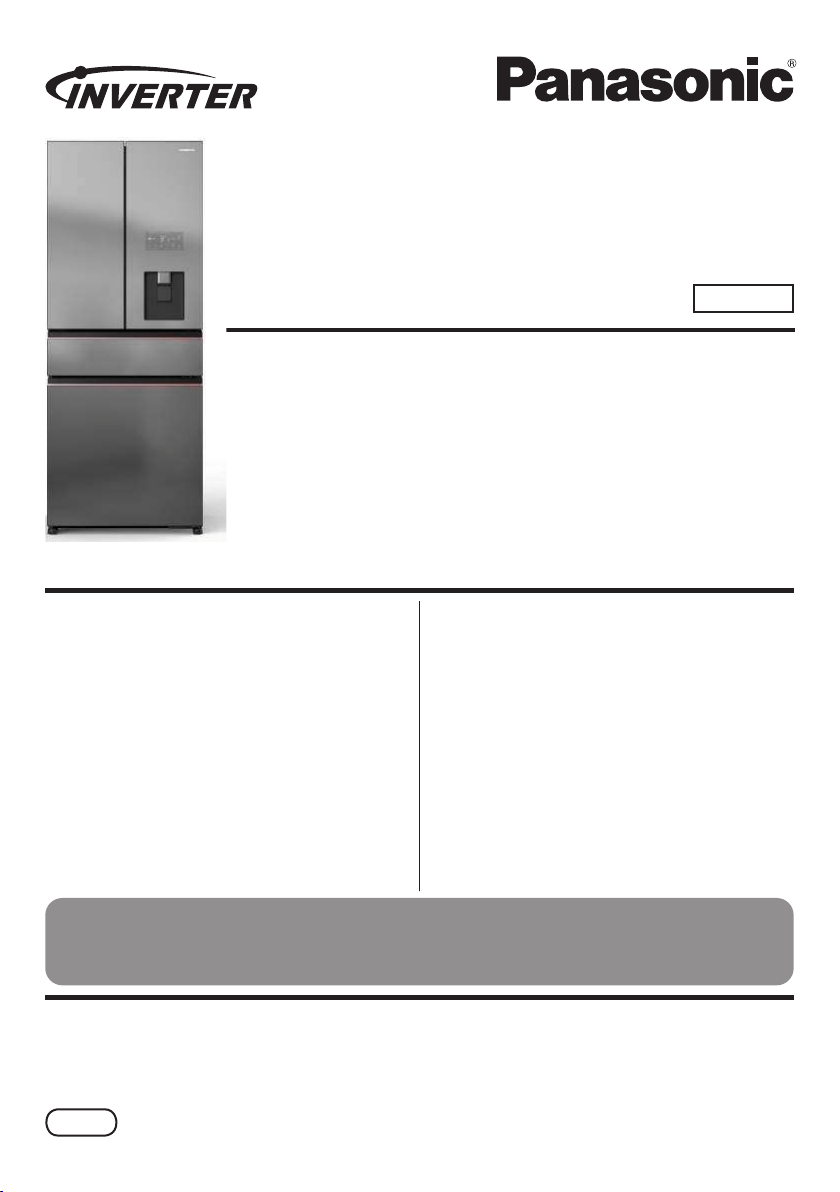
操作說明
雪櫃
家用型
型號: NR-YW590Y
內容
安全使用須知 ..................................................
2
使用須知 ...........................................................
4
特點 ....................................................................
6
安裝 ....................................................................
9
各部名稱 .........................................................
12
操作面板 .........................................................
14
溫度控制 .........................................................
15
ECONAVI 操作 ............................................. 16
nanoe
TM
X 模式.............................................
16
速凍 (Quick Freezing) ...............................
17
新主保鮮制模式 (Prime Fresh+) .............
17
急凍室(Prime Freeze)...........................
18
快速制冰模式(Quick Ice Making).........
20
自動制冰停止模式和制冰機清潔模式......
21
童鎖模式(Child Lock)............................ 21
冷藏室 ............................................................. 22
主保鮮室 .........................................................
23
急凍室 .............................................................
24
如何清洗雪櫃 ................................................ 27
雪櫃使用說明指引 .......................................
32
規格 .................................................................
36
■ NON-CFC
本機的製冷劑 (異丁烷(R600a)) 和隔熱劑 (Cyclo-Pentane) 都使用完全無氟的材料。所以
使用該雪櫃不會傷害地球的臭氧層。
非常感謝您購買 Panasonic 產品。
使用本產品前請仔細閱讀這些說明並遵照第 2-5 頁的安全使用須知。
請確保保用證上的購買日期和零售商名稱蓋有印章,並將它和本操作指南一同收妥。
ARAH1E202970
P0122-0
越南印刷
MAL

安全使用須知
請確保遵循這些說明。
火灾危害/易燃物品
2
警告
警告
這個標識表示
[可能導致嚴重傷害或者死亡。]
這些標識表示禁止。
這個標識表示需要採取行動。
這個標誌表示雪櫃必須接地以防止電
擊。
小心
這個標識表示
[可能導致傷害或故障。]
否則可能導致火災,
燙傷,爆炸或觸電。
回收產品時:
● 在將雪櫃做再生資源利用之前,請拆除所有的門上密封條,以防止孩童
被關閉在裏面。
● 務必在雪櫃的使用壽命全程保存好上述警告標籤。
● 如果雪櫃被搬遷到其他地點以及被運送到回收廠,必須將使用者手冊轉
交給任何可能使用或處理雪櫃的人。
● 根據當地相關法律,本雪櫃使用異丁烷作為製冷劑。
丟棄本機時,請以適當的方法處理之,切勿以火焚化。
在緊急情况下:
● 只能由專業維修工人在工作室進行維修工作。
● 勿在設備中存放易爆物品如有易燃推進劑的噴霧罐, 化學藥品或科學標本。
● 請勿在雪櫃中使用除臭劑等電器。洩漏的製冷劑可能會因電觸點火花而
著火併可能引起爆炸。
● 勿在雪櫃內使用電器,除非是製造商推薦的類型。
● 切勿自行嘗試拆解,維修或改裝雪櫃。
需要維修雪櫃時,請諮詢您的零售商或授權服務中心。
● 切勿使用機械裝置或製造商建議以外的方式加速除霜過程。
iso-butane
iso-butane
3
使用時:
● 切勿損壞製冷電路 (位於機背的管道)。
● 切勿觸摸壓縮機或管道,此區域溫度較高。
● 切勿讓孩童攀在雪櫃門上玩耍,雪櫃可能會因此翻倒壓在孩童身上。
● 不要將任何水容器放在雪櫃頂部以防止溢出來的水引起電擊或燃燒。
● 切勿在設備後部放置多個便攜式插座或便攜式電力供應。
● 保持設備外殼或內置結構中的通風口暢通無阻。
● 該雪櫃不適合身體,感官或精神能力降低或者缺乏經驗和知識的人員
(包括孩童)使用,除非得到其安全負責人員關於使用雪櫃的監督或指
示。
● 應對孩童進行監督,確保其不使用雪櫃玩耍。
安裝時需注意:
● 固定雪櫃以避免因不平衡而致
的危險。
● 放置設備時,請確保電源線沒
有被困或損壞。
● 確保雪櫃插入已接地線的電源插
座
。
警告
否則可能導致火災,
燙傷,爆炸或觸電。
適用於電源插頭和電源線:
● 切勿用濕手插拔插頭。
● 切勿讓電源線或插頭受損。
● 清潔時請拔下電源插頭。
● 完全插入符合雪櫃額定電流及額定電壓的牆上電源插座。
● 專為雪櫃預留一個插頭。
請完全展開電源線,避免將過多電器連接到供雪櫃使用的同一插頭上。
● 定期清除電源插頭上的灰塵。
● 如果電源線損壞,必須由廠家,服務代理或相關的合格人員進行更換,
以防發生危險。
● 若您聞到一股燒焦的氣味,請斷開電源插頭,並對廚房進行通風。
● 若出現任何異常現象或故障,請停止使用本雪櫃。
異常及故障範例:
- 電源線或插頭異常滾燙。
- 電源線被深切或變形。
- 聞到燒焦氣味。
- 有麻刺感。
請立即聯繫您當地的經銷商進行保養/維修。

使用須知
4
開/關櫃門時:
移動雪櫃時:
儲存食物時:
小心
● 在打開雪櫃時,注意不要夾到手。
● 注意門的間隔。關門時可能夾住您的手。
● 切勿急凍玻璃瓶,否則可能導致傷害事故發生。
(若玻璃瓶內的液體凍結,玻璃瓶可能破裂而對您造成傷
害。)
● 切勿在玻璃托架上放置較重物品或施加較大衝擊力。
(否則,玻璃托架可能會破碎,您可能會因此而受傷。)
● 搬運時請牢牢抓緊雪櫃。
● 表面容易受損的地面應使用防護罩等。
開/關櫃門時:
● 切勿冷藏比托架或托盤更大的物品,否則雪櫃門無法完全關閉,從而造成冷氣
洩漏。
● 切勿頻繁打開雪櫃或打開很長一段時間,以防雪櫃內部形成水滴,因而浪費能
源。
● 經常檢查櫃門密封條,它必須與雪櫃櫃身完全貼合。
清潔時:
● 切勿使用化學物質或液體清理雪櫃。這些物體將會損壞和
侵蝕雪櫃表面。
否則可能導致燙
傷或意外事故。
使用須知
5
儲存食物時:
● 切勿放置過多的東西。
食品之間必須要有間隙以保持冷卻效果。
● 將水果和蔬菜儲存在蔬菜保鮮盒中,鎖緊水份,
令食物長時間保鮮。
● 應蓋緊飲水瓶,飲料瓶,以防止異味進入瓶內。
● 用緊蓋,塑料膜或箔片蓋住多汁食品。
● 將蔬菜,水果及新鮮食品等食物放進雪櫃急凍或冷藏前,
應使用保鮮紙包好或放入保鮮盒中。
● 如要長時間儲存,應將肉或魚等食物放入急凍室。
使用時:
● 當拔掉插頭後,請等 7 分鐘,然後再插上。
否則,壓縮機可能無法正常運作。
● 根據實際操作狀態調校溫度以節省能源。
● 若您將外出一段時間,或是雪櫃裡沒有冷藏任何物品,應拔出
插頭以節約能源。 注意當多日不使用冰箱時,一定要把冰箱裡
剩餘的食物全部取出,清潔並打開冰箱門幾個小時,讓冰箱內的水分變乾,避
免發霉和氧化冰箱的組件。
● 雪櫃外壁有時會發熱,特別是在剛剛安裝之後。這種情況属于正常,這是由於
內置的豎框乾燥機管防止雪櫃凝結水汽和散發熱能。
● 當濕度很高時(例如在雨季)在雪櫃機身外部可能會有水汽,特別是在櫃門密
封墊周圍。請用乾淨的布片擦掉凝結的水汽。
● 新鮮盒里面的濕氣可能會凝結成水汽,所以需要用布片定期進行擦拭。每月對
新鮮盒清潔一次。
● 切勿長時間打開櫃門,特別是在炎熱潮濕的天氣裡更需注意。
● 雪櫃頂部采用鋼材制成的原因之一是為了防止外部撞擊引起火災。請勿將物品
放在雪櫃頂部以確保這一因素。
7 分鐘
特點
適合豪華廚房的高端設計
無邊框玻璃表面,帶現代設計、精致到每一個細節的手柄。
高效節能
● 采用Panasonic變頻壓縮機,耗電更少、噪音更低。
● Panasonic獨家的ECONAVI技術,有助于識別用戶生活習慣的變化,雪櫃可自動調節,節省
能源消耗。
頂部壓縮機(Top Unit)
Panasonic的獨家設計,將壓縮機從傳統的底部位置移至頂部,優化了內部使用空間。
自動制冰系統(Auto Ice Making)
● 配備自動制冰系統,隨時滿足制冰需求。
● 5升大容量雪櫃,由無BPA抗菌材質制成,配備抗菌過
濾網,對健康具有良好的安全性。
● 帶制冰功能。
● 帶停止制冰和自動清潔制冰機的功能。
Nanoe
TM
X技術和Ag Clean銀膜過濾器
Panasonic獨家的nanoe
TM
X技術和Ag Clean銀膜過濾器
有助于除臭和中和細菌,保持食物新鮮。
最大開度導軌設計
● 重型滑軌優化了承重能力,讓用戶僅需一只手即可輕輕拉動食物擱板。
● 整個擱板均可拉出,便于查看整理和挑選食物。
6
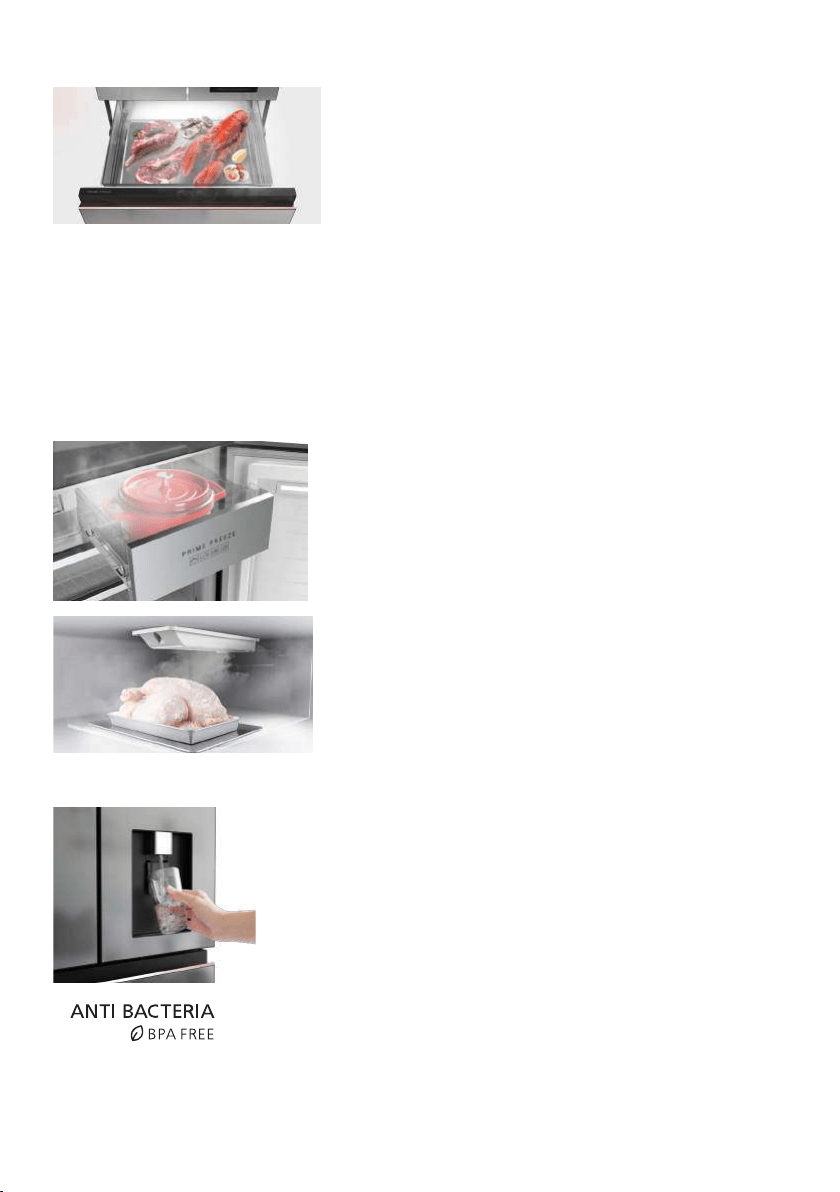
獨立的保鮮室(Prime Fresh)和新的新主保鮮模式(Prime Fresh+)
● 主保鮮室的溫度可以在 4 °C ~ -5 °C 之間變化**。
- 溫度 -1 °C ~ -5 °C:用於食物保存的軟冷凍溫
度,有助於節省解凍時間和精力,同時更長時間
地保持食物的風味和新鮮度。
- 溫度 4 °C ~ 0 °C:與冷藏室溫度相同,當您需要
更多空間在冷藏室中保存食物時。
● 大容量的 61 L 主保鮮室 有助於儲存更多食物,並且對於大尺寸食物而言更舒適。
● 獨立的主保鮮室房間更容易去除和清潔,有助於避免混合難聞的氣味或交叉感染。
● 節省能源,因為您無需打開整個冷藏室即可使用主保鮮室
。
*
主保鮮室的默認溫度設置為 -3 °C。
** 取決於食物的類型,例如大塊肉或大魚、儲存條件和環境溫度,冷卻性能可能會受到影響。
在這種情況下,主保鮮室的溫度應設置為最低溫度 -5 °C。
急凍室(Prime Freeze)
● 根據每種模式快速冷凍新鮮食物或預制食品,保持
新鮮的味道。
● 急速冷凍模式(Prime Freeze)
• 快速冷卻(Cool Down)3分鍾和5分鍾
• 快速冷凍(Quick cooling)10分鍾和15分鍾
• 急速冷凍(Rapid Freezing)45分鍾和60分鍾
根據加工的目的和食品的種類,可以選擇和使用不
同的模式。
外置取水系統
● 無需打開雪櫃門即可從外部取出冷飲用水。
● 3升大容量雪櫃,由無BPA抗菌材質制成,配備抗菌
過濾網,對健康具有良好的安全性。
可調節滑動玻璃擱板
冷藏室內的可調節滑動玻璃擱板可以靈活調節食品儲藏室。
7
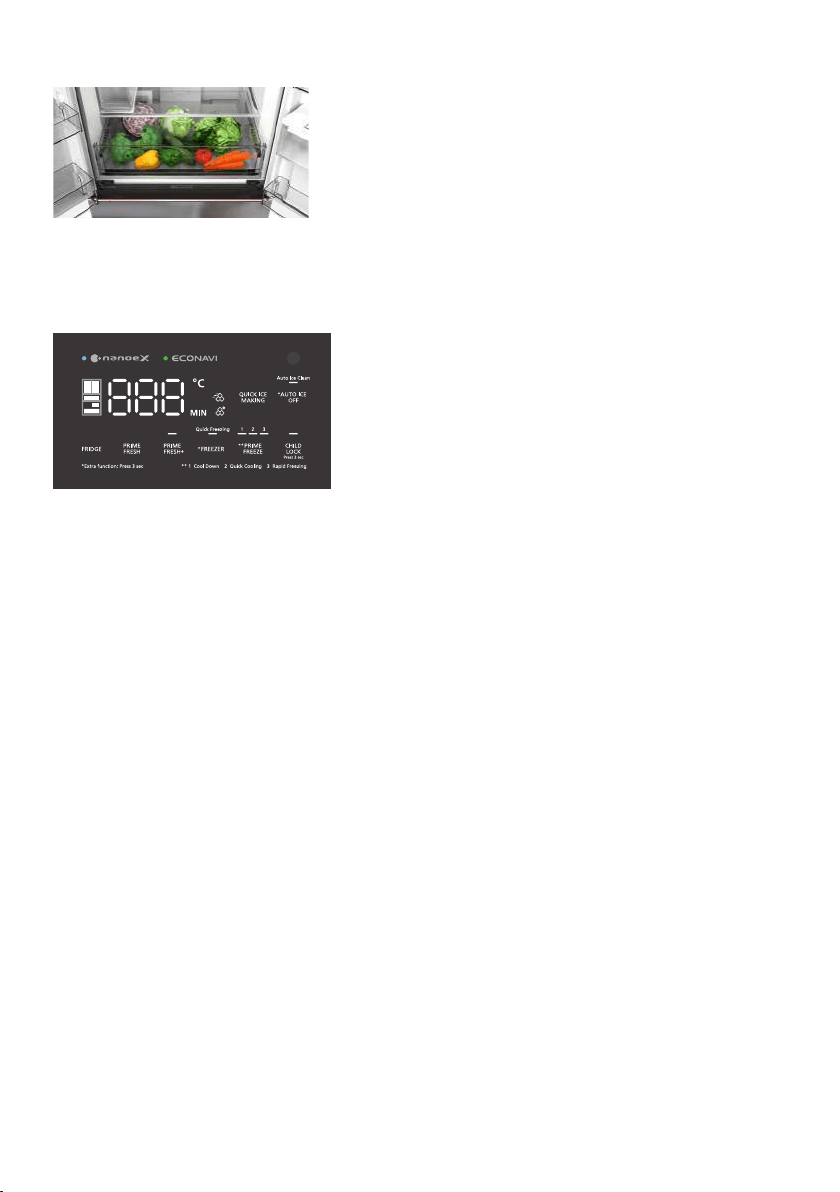
蔬菜保鮮室
大容量蔬菜保鮮室配備保濕過濾器,讓蔬菜保持新
鮮,延長保管時間。
速凍模式(Quick Freezing)
速凍模式使雪櫃內的溫度迅速下降,可保持食物的原味。
方便的控制屏幕
● 冷藏室、主保鮮室、冷凍室和急凍室都可以根據
用戶的用途調節溫度及其模式。
● 冷藏室和制冰室有關閉雪櫃提醒模式。
● LED 顯示和控制面板清晰且易于操作。
● 有童鎖模式。
8
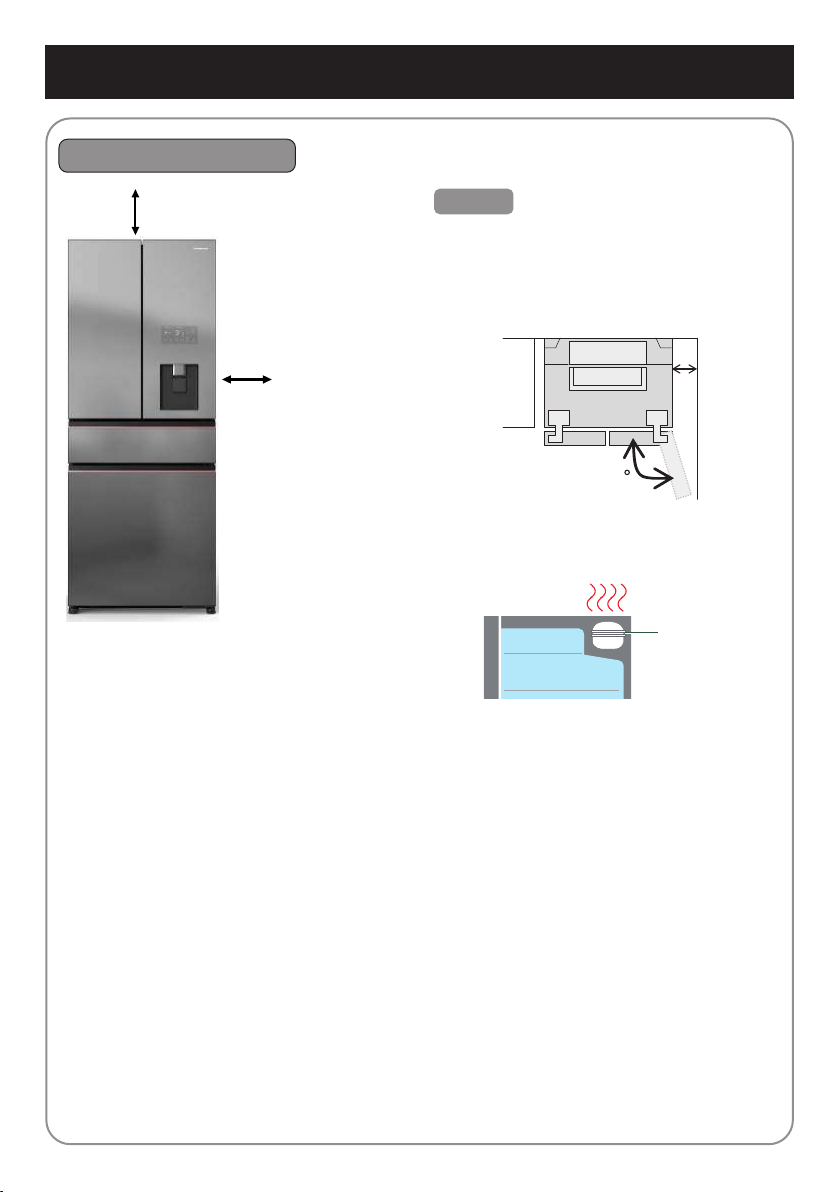
安裝
安裝位置與牆壁間的距離
注意
● 如果雪櫃靠近牆壁安裝,必須確保雪櫃左
側或右側與牆壁之間的距離至少為
25厘米。如果這個空間不夠25厘米,門
可能無法完全打開,玻璃擱板、蔬菜盒等
可能無法取出。
129
● 請勿在雪櫃頂部放置任何物品。它會幹擾
壓縮機的散熱,導致各部件變形或損壞。
壓縮機
● 第一次使用時:請清潔雪櫃內部。
• 用柔軟的濕布擦拭。
• 用水沖洗水箱、濾水器和冰盤。
• 第一次開始使用時,會聞到塑料的味道。如果擔心,對整個房間進行通風換氣。
● 切勿把雪櫃放置在潮濕的地方。因為這樣容易生銹可能導致漏電。
● 切勿把雪櫃直接放置在陽光下照射。因為熱和陽光將使雪櫃溫度上升。
● 切勿將雪櫃靠近熱源,例如廚灶或烤箱。
● 切勿堵塞雪櫃四周的空隙。
● 雪櫃必須放置在空氣流通的位置。
● 如果雪櫃沒有接地插頭,須將其連接至接地端,以防止漏電的危險。
● 雪櫃頂部和天花板之間必須
至少留有5厘米的空隙。
● 雪櫃背面與牆壁
之間必須至少
留有5厘米的空
隙。
● 雪櫃側面與牆壁之間必須至少留有5厘米
的空隙。
5厘米
5厘米
25厘米
9
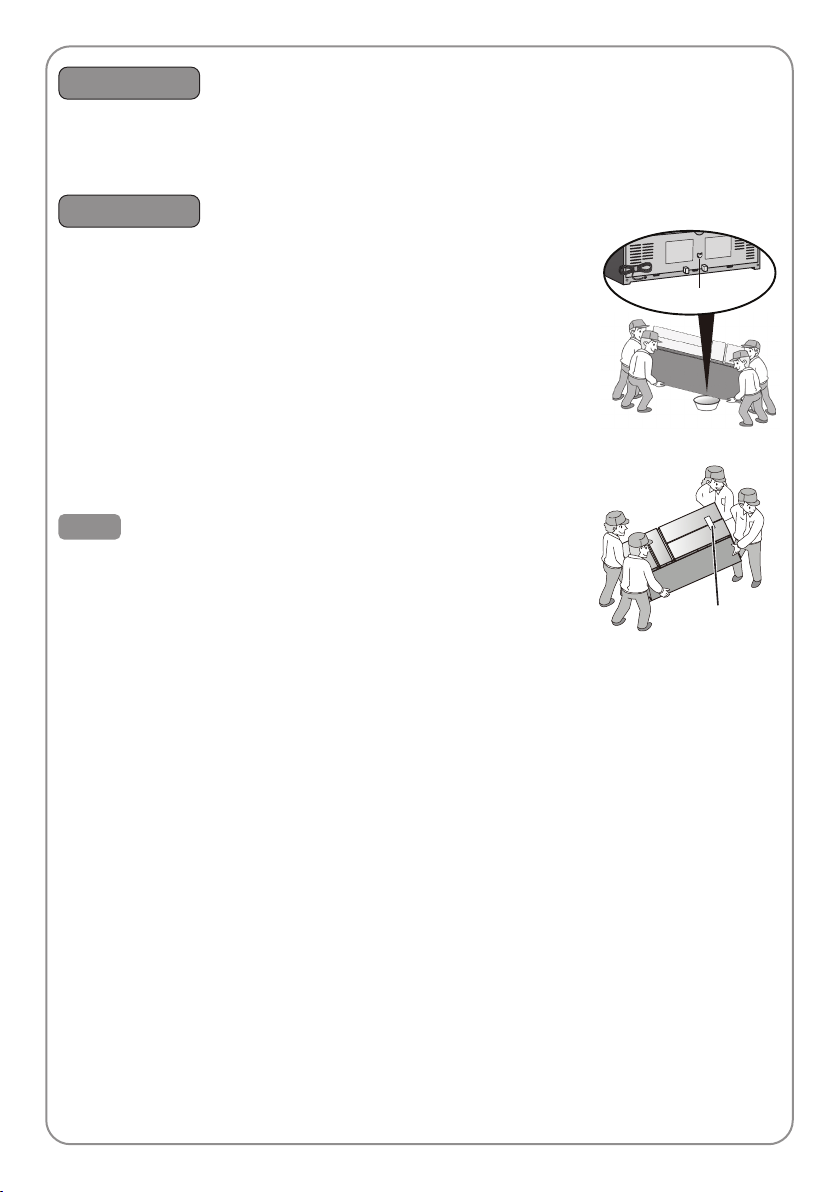
LED 燈和接地
● 專為本雪櫃設計的雪櫃內 LED 燈,無法由個人進行更換。
若您需要更換時,請聯絡‘服務中心’。
● 如果雪櫃沒有接地插頭,須將其連接至接地端以防漏電。
移動及搬運
1取出冰盤、冰盒中的水和冰塊。
2 拔下插頭。
3 扭轉調整腳(左右),使它不接觸地板。
4 將雪櫃背面托盤的水倒掉。將一個容器放在雪櫃背面的托盤後面,
然後將托盤向後傾斜,讓水從托盤中流出。
操作需要4人以上,其中2人擡起雪櫃前面,避免雪櫃滑動造成受
傷。
※移動和搬運方法
● 至少需要4人搬運。
● 每個人擡起雪櫃的一角。
● 搬運雪櫃時,請勿抓著雪櫃門。
注意
● 搬運時,用綁帶固定雪櫃門,避免雪櫃門自行打開。
● 搬運時,請勿將雪櫃側放,這可能會損壞雪櫃。
● 安裝完成後,至少等待4小時後再接通電源,以確保壓縮機內的
氣體和油液處於穩定狀態。
排水孔
使用綁帶固定好
10
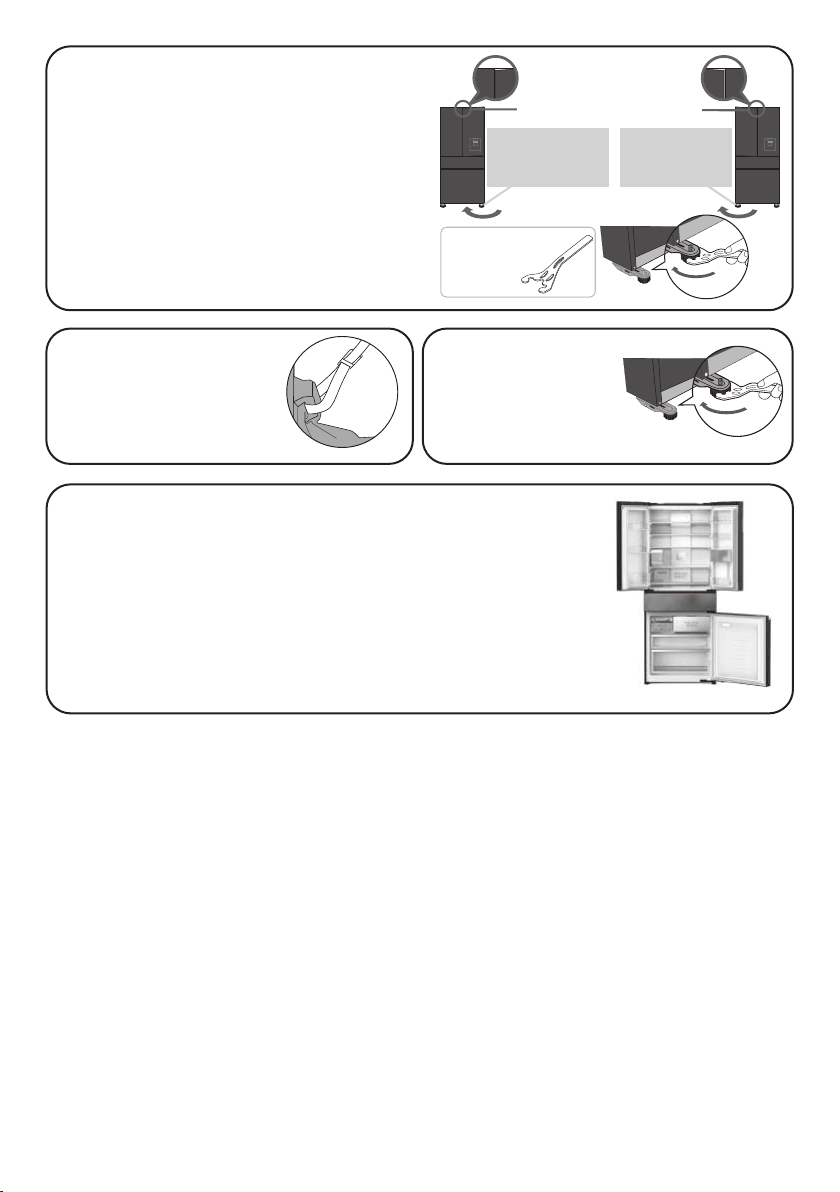
是否已採取措施預防地震
時出現傾側?
為避免雪櫃傾側,請使用
固定帶等物件將其永久固
定。
固定雪櫃。
旋轉可調節櫃腳
(左右兩側),直至
其觸及地面以穩定雪
櫃。
雪櫃門向下傾斜。
如圖所示,旋轉位置較低側的調節螺栓,
以便調節水平。
●雪櫃會因食物重量或適應地板表面而在
4-5 日內傾斜,為恢復水平位置,請使用
專用工具旋轉相應的櫃腳來調節及放平雪
櫃門 。
雪櫃門位置較低時。
降低右側櫃腳來
調低右門位置。
降低左側櫃腳來
調低左門位置。
●專用工具
(配件)
在雪櫃內部冷卻期間,請勿打開/關閉雪櫃門
。
在雪櫃內部充分冷卻下來之前,請勿打開/關閉雪櫃門。
(暖空氣流入雪櫃內將阻斷製冷功能。)
請等待直至雪櫃內部冷卻下來。
●冰箱在內部空載且門未打開的情況下,連續運行至少需要 4 小時
才能使內部冷卻。
●根據環境溫度和使用條件,可能需要 24 小時才能使內部冷卻並達
到平衡。
11

各部名稱
27
28
23
24
25
26
雪櫃左門 雪櫃右門
12
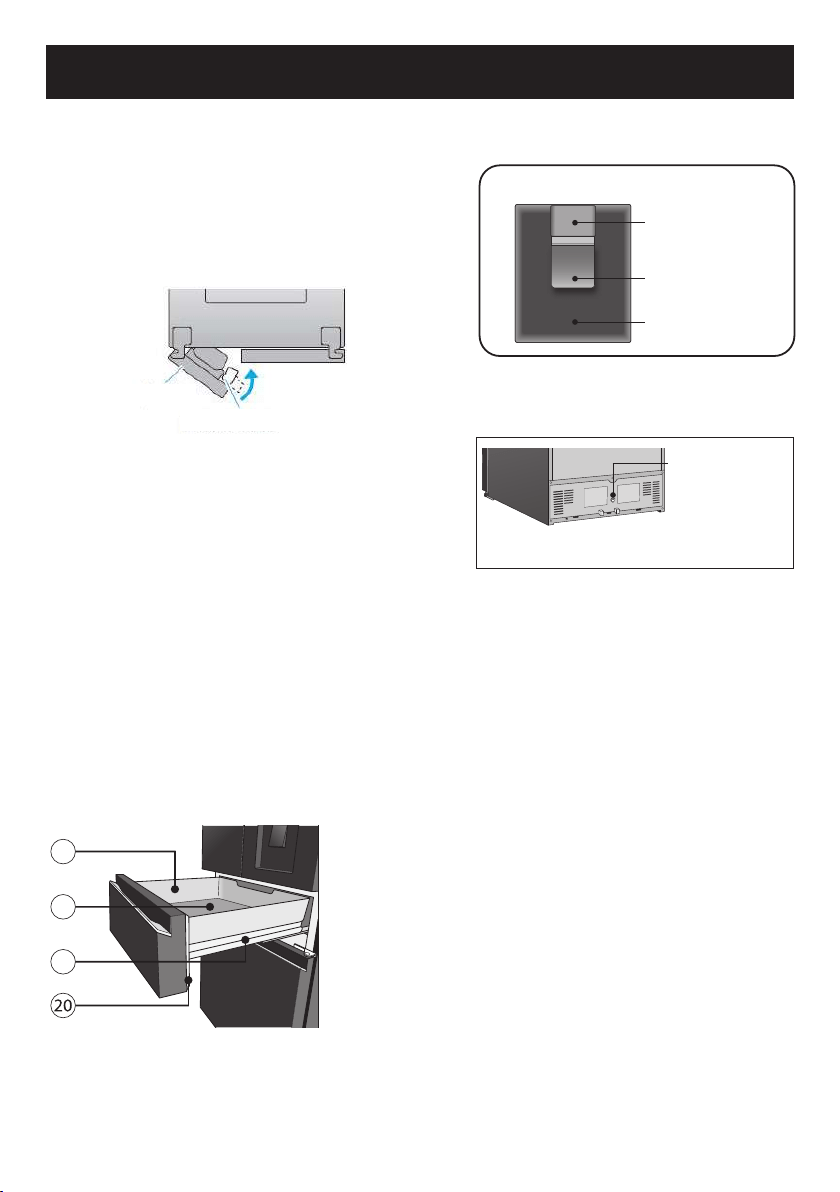
各部名稱
A-冷藏室
1 旋轉擱架
旋轉擱架用于縮小雪櫃左門和右門之間的間
隙。如果它正在打開的,請將其折回到裏面。
(否則雪櫃門無法閉合,造成雪櫃內冷空氣損
失)
2 門架(數量:03)
3 蛋 托
4 製冰格
5 小門架
6 外置取水器水箱
7 小瓶架
8 冷藏室LED燈(數量:03)
9 冷藏室封條
0 玻璃托板(數量:02)
a 滑動玻璃擱板
b 玻璃托板保鮮格
c 自動制冰機水箱
d 蔬果格
e 蔬菜室濕度調節器
f nanoe
TM
X圖標
B-主保鮮室
19
17
18
g 主保鮮格
h 主保鮮室的傳熱鋁板
i 主保鮮室的金屬導軌
j 主保鮮室的門封條
外置取水系統
後蓋
取水檔
C-急凍室
k 製冰格
l 冰盒
m 自動制冰冰盤
n 上方冷凍室收納盒
o 下方冷凍室收納盒
p 冷凍室LED燈
q 冷凍室封條
r 可調節螺栓
鎖
產品後視圖
排水系統
[排水箱內部]
雪櫃左門
旋轉擱架
13
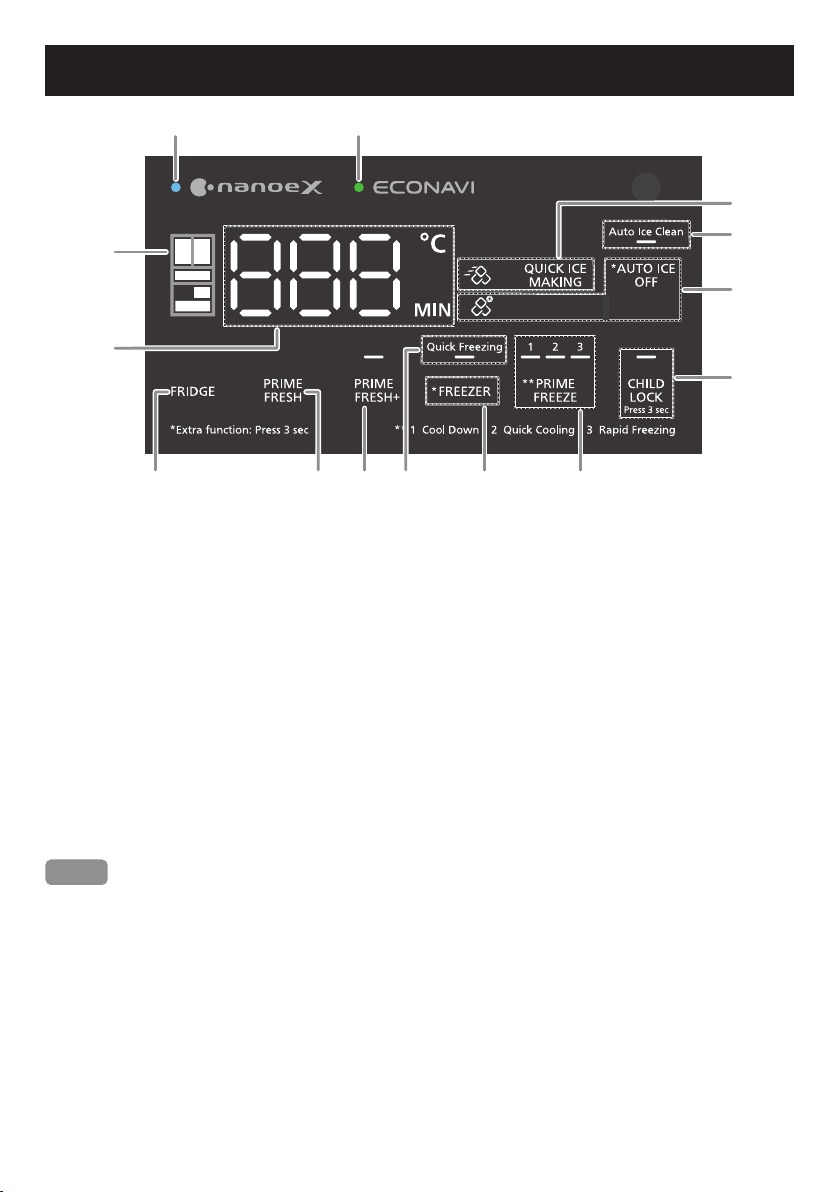
操作面板
1 2
3
4
5 6 7 89 0
a
c
d
b
1 顯示nanoe
TM
X模式的圖標和LED燈: 顯示nanoe
TM
X模式的當前狀態。
2 顯示ECONAVI模式的圖標和LED燈:
顯示ECONAVI模式的當前狀態。
3 顯示各室的LED燈:選擇不同的室時,相應的室的圖標將亮起。
4 溫度和時間顯示區:顯示冷藏室、冷凍室、主保鮮室的溫度和速凍模式的時間。
5 冷藏室溫度控制按鈕。
6 主保鮮室溫度控制按鈕。
7 新主保鮮模式控制按鈕及LED燈。
8 冷凍室溫度控制按鈕。
9 速凍模式LED燈。
0 急速冷凍模式的控制按鈕及LED燈。
a 快速制冰模式控制按鈕及LED燈。
b 停止自動制冰模式控制按鈕及LED燈。
c 自動制冰機自動清潔模式LED燈。
d 童鎖模式控制按鈕及LED燈。
注意
● 在顯示控制面板上:“*Extra function:Press 3 sec”,即要啓動附加功能時,需要長按前
面標有“*”的按鈕3秒。
● 在正常情況下,控制面板燈熄滅。當您按下按鈕時,操作面板燈將亮起。 冰箱門打開時,操
作面板燈會熄滅,所有按鈕都不會被操作。
● 夏季氣溫高,放置未冷凍的食物或頻繁開閉門時,雪櫃內溫度會升高,顯示值將高于設定溫
度,因此請減少開門次數。
● 接通電源後,控制面板將顯示各模式介紹和各室的溫度約10秒。在此期間,各按鈕尚未工
作。10秒後,可以正常調整控制面板。
14
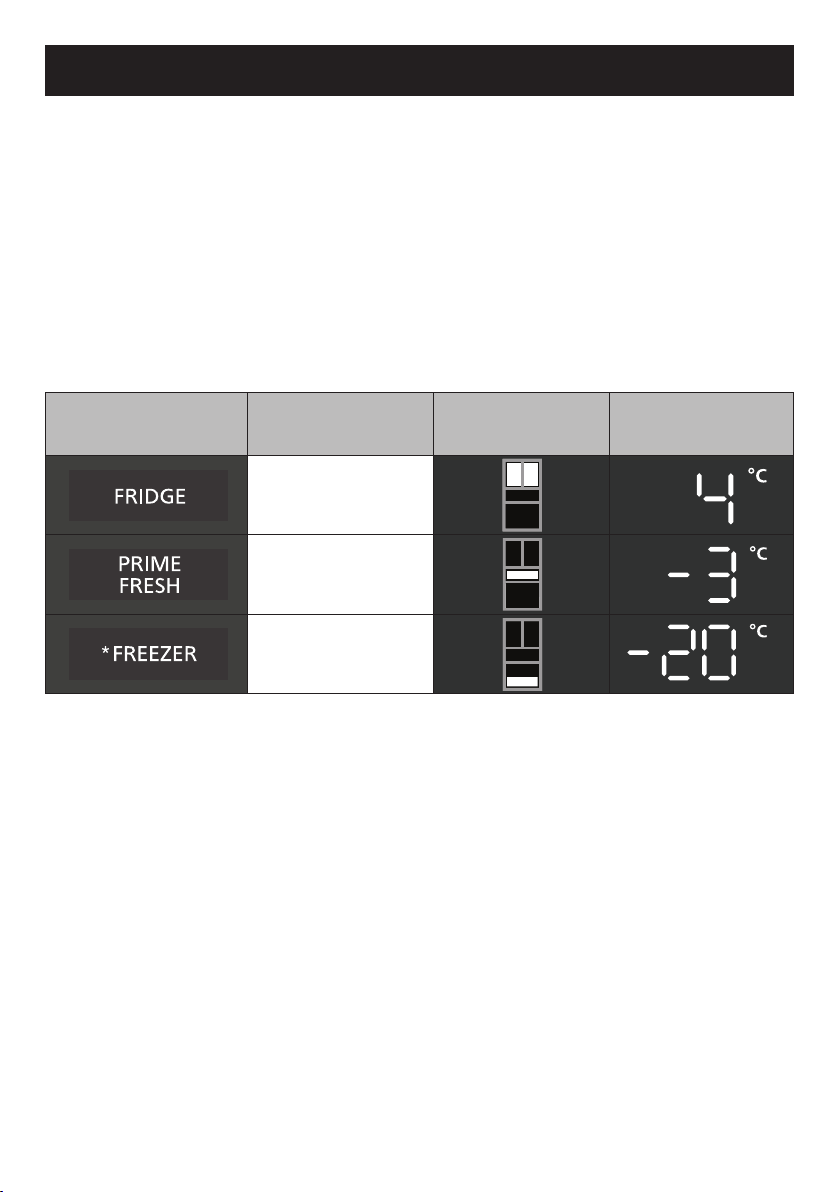
溫度控制
● 雪櫃出廠時,冷藏室、主保鮮室、冷凍室的設定溫度分別為4 ℃、-3 ℃、-20 ℃。如想調整
冷凍功率,可以更改溫度設置。
● 冷藏室的設定溫度範圍為7 ℃~1 ℃,主保鮮室為 4 ℃~-5 ℃(主保鮮室溫度為 -1 ℃~-5 ℃
,如冷凍室一樣使用的主保鮮室溫度為 4 ℃~0 ℃),冷凍室為 -15 ℃~-23 ℃。
● 雪櫃內的溫度會根據環境溫度、安裝狀態、使用條件和食物數量而有所不同。
● 由于測試方法和工具不同,實際測試溫度可能與顯示溫度有所不同。
● 本雪櫃配備了處理器來控制雪櫃內的溫度。當環境溫度變化、壓縮機運行或停止、門打開或
關閉、室內溫度波動時,導致雪櫃內溫度與設定溫度略有差異。
溫度設置及溫度設置說明
1、顯示當前溫度
觸摸下面的圖標以顯示:冷藏室、主保鮮室,冷凍室的當前溫度。選擇時,當前溫度相應的每
個室的指示燈都會亮起。
圖標 室別 位置LED燈 溫度指示燈
冷藏室
主保鮮室
急凍室
2、溫度設置
觸摸要設置的室(冷藏室、主保鮮室、冷凍室)圖標,以顯示當前溫度後,再次觸摸開始溫度
設置過程。此時,位置LED燈和溫度LED燈會閃爍。
繼續觸摸該室圖標,以選擇所需的溫度。每次按下按鈕,溫度就會升高或降低1 ℃。
3、溫度設置完畢
溫度設置完畢後,輕觸另一個按鈕,以完成並保存剛進行的設置。或在10秒內不觸摸任何其他
按鈕,控制面板將保存設置並返回休眠模式。
15
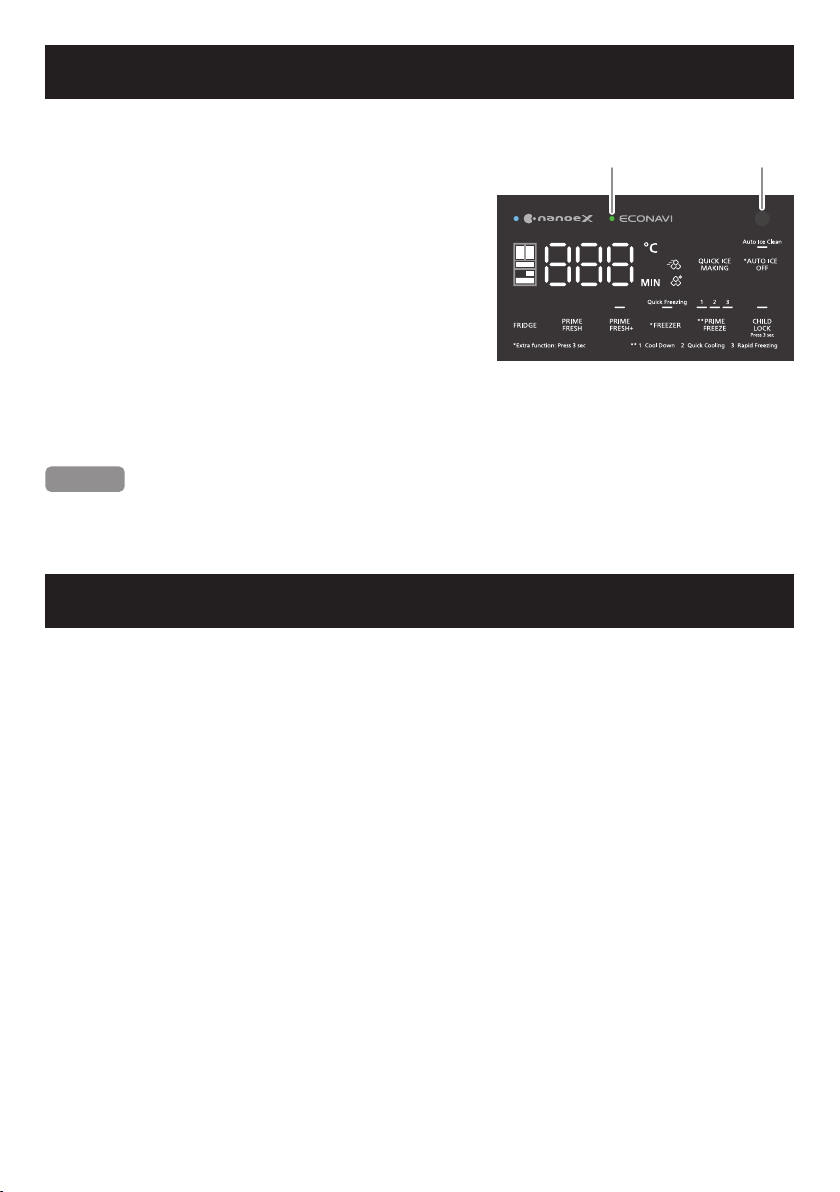
ECONAVI操作
檢測門的打開和關閉以及雪櫃周圍的亮度,並自動操作控制,從而節約能源。*
1
ECONAVI操作
● 雪櫃在開啟及偶爾執行使用期間,可以學習您的家
庭生活方式,以最大程度地提高能源效率。
● 雪櫃前3周學習您的生活方式,從 第 4 周開始可按
您的生活方式來執行工作。
● 當雪櫃周圍變暗時,將執行ECONAVI節能操作,
例如在夜間。
啟用 ECONAVI 操作的設定
● 當冷藏室和冷凍室的溫度控制器設置為冷藏室溫度
4 ℃和冷凍室溫度-20 ℃時,ECONAVI運行模式會自
動激活。
● “速凍”、“新主保鮮”、“急速冷凍”或“快速制冰”模式正在運行中,則 ECONAVI模
式不會運行。
● 不能強行啟動 ECONAVI 操作。
注意
*
1
ECONAVI模式的效力視乎環境溫度、環境的亮度、次數和門打開和關閉狀態,以及食品存儲
狀態而不同。
ECONAVI 燈
光強傳感器
nanoe
TM
X 模式
● nanoe
TM
是被水粒子包圍的超細微離子粒子的集合。
nanoe
TM
X是具有超細微的帶電水粒子,其OH自由基是nanoe
TM
的10倍.
● nanoe
TM
X模式將在雪櫃通電時啓動,並在使用雪櫃時始終運行。然而,由于nanoe
TM
X運
行時需要濕度,因此如果雪櫃內濕度降低(如存放少量果菜等),此模式的有效性可能會降
低。
● 在運行過程中,nanoe
TM
X設備可能發出微小的聲音。
● 長時間關閉雪櫃門後,打開雪櫃門時,會感覺到運行過程中産生的臭氧特有氣味,這是正常
現象。
16
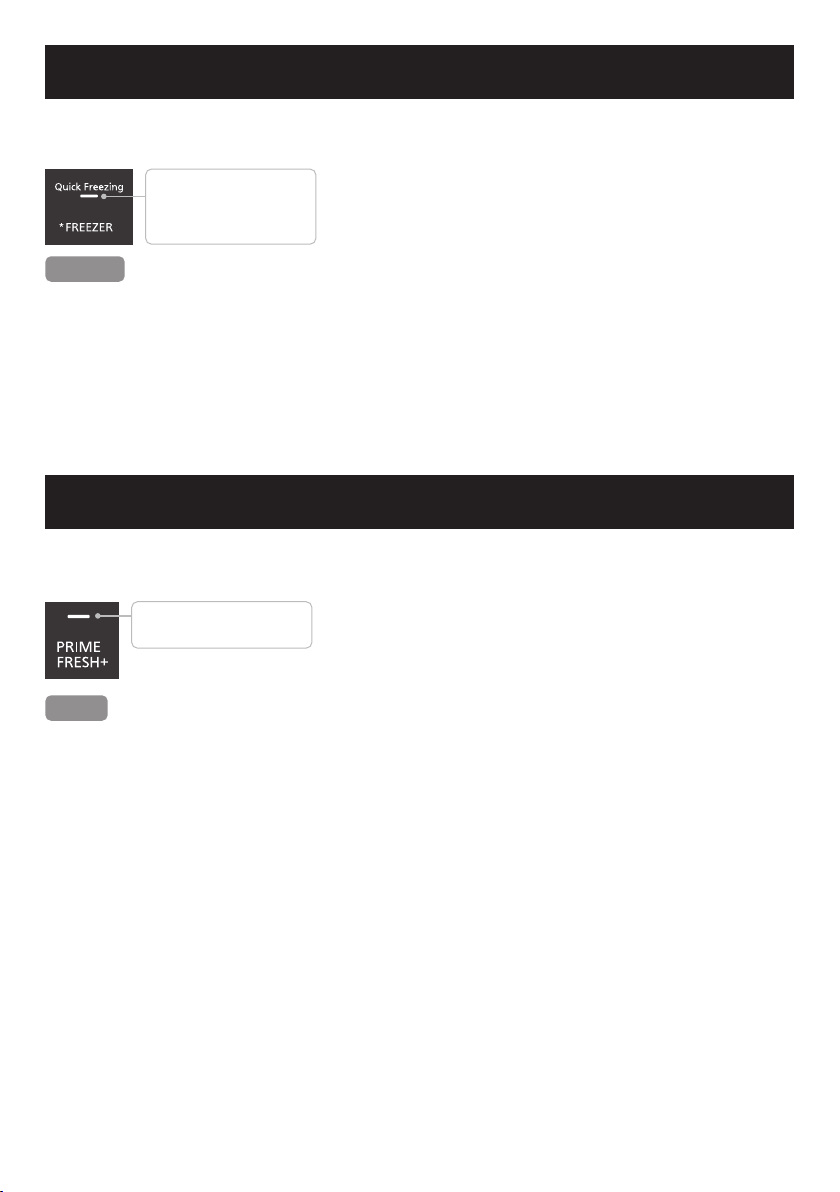
速凍 (Quick Freezing)
設置為“Quick Freezing”(速凍)時,雪櫃將快速降低溫度,以更好地保存食物。
如何操作“Quick Freezing”(速凍)模式
燈 亮 起: Quick Freezing
(速凍) 運行
燈 熄 滅: Quick Freezing
(速凍) 停止
●觸摸並按住
“
Freezer
”
圖標3秒,以啓動速凍模式。此
時,
“
Quick Freezing
”
圖標下方的燈會亮起。
●想停止速凍模式時,再次觸摸並按住
“
Freezer
”
圖標3
秒,直到指示燈熄滅為止。
●“速凍”模式運行150分鍾後自動停止並返回正常模式。([Quick Freezing] (速凍)LED燈
熄滅)
●[Quick Freezing](速凍)LED燈閃爍表示除霜系統正在運行。除霜完成後,“速凍”模式將立
即啓動。
●當速凍模式結束時,冷凍室的溫度將恢複到先前設定的狀態。
●當速凍模式啓動時,以下模式(如果處于工作狀態)將停止:
“
Prime Fresh+
”
(新主保鮮
模式)、
“
Quick Ice Making
”
(快速制冰模式)、
“
Prime Freeze
”
(急速冷凍模式)。
注意
新主保鮮制模式 (Prime Fresh+)
設置為“Prime Fresh+” (新主保鮮制模式)時, 主保鮮室將快速降低溫度,以更好地保存食物。
如何操作“Prime Fresh+”(新主保鮮制模式)模式
燈 亮 起:
新主保鮮模式
運行
。
燈熄滅: 新主保鮮模式停止。
●連續2次點擊“Prime Fresh+”圖標,以啓動新主保鮮模
式。此時,“Prime Fresh+”圖標上方的燈會亮起。
●想停止新主保鮮模式時,觸摸“Prime Fresh+”圖標一
次,直到指示燈熄滅為止。
注意
●“新主保鮮”模式會在運行105分鍾(環境溫度為18 ℃及以下)或145~150分鍾(環境溫
度為18 ℃以上)後自動停止,並返回正常模式。([Prime Fresh+](新主保鮮室)LED燈熄
滅)
●[Prime Fresh+](新主保鮮室)LED燈閃爍表示除霜系統正在運行。除霜完成後,“新主保
鮮”模式將立即啓動。
●當新主保鮮模式結束時,保鮮室的溫度將恢複到先前設定的狀態。
●當新主保鮮模式啓動時,以下模式(如果處于工作狀態)將停止:速凍模式(Quick
Freezing)、快速制冰模式(Quick Ice Making)、急速冷凍模式(Prime Freeze)。
●“新主保鮮”
模式在保鮮室溫度設置為4 ℃~0 ℃時不會啓動。
17
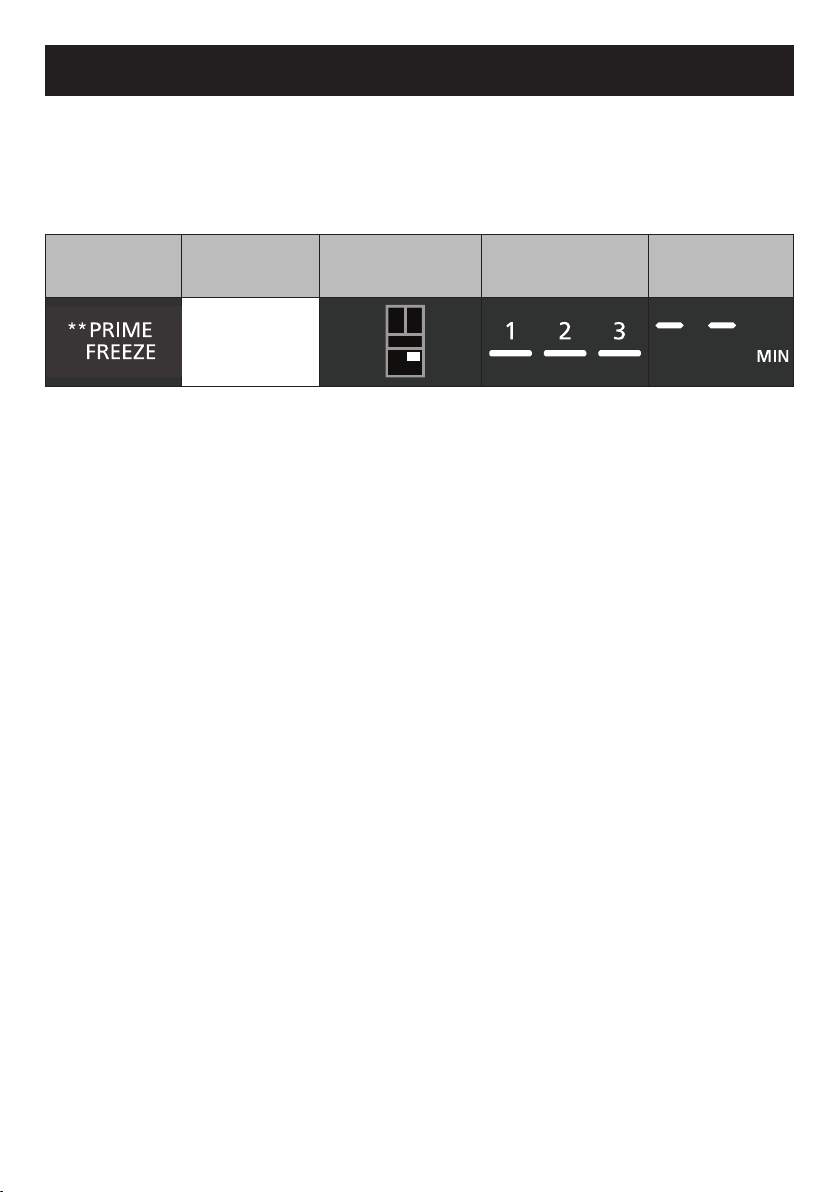
急凍室(Prime Freeze)
急凍室(Prime Freeze)是位于冷凍室的一個特殊室。該室配備了獨立的風機系統和高級傳熱
鋁板,可根據每個加工目的調整冷凍時間,以支持用戶以多種方式烹饪,節省時間。
急凍室運行方法
1 觸摸控制面板上的急凍室(Prime Freeze)控制按鈕。此時,顯示該室位置的LED燈、顯示
1-2-3(*)模式的LED燈和顯示急凍室運行時間(**)的LED燈將在選擇時亮起。
圖標 室別 位置LED燈
1-2-3(*)模式
LED燈
運行時間LED燈
急凍室
(*)對于1-2-3模式LED燈:
• 如果之前設置的時間尚未用完,LED燈將顯示之前設置模式。
• 如果之前設置的時間已經用完,則1-2-3模式LED燈都熄滅。
(**)對于運行時間LED燈:
• 如果之前設置的時間尚未用完,將顯示剩余分鍾值。
• 如果之前設置的時間已經用完,則顯示的分鍾值為“--”。
2 繼續觸摸急凍室(Prime Freeze)控制按鈕,此時,位置LED燈會閃爍。此步驟後,如果之
前設置的時間尚未用完,分鍾值將被清除並顯示為 “--”。觸摸急凍室控制按鈕,直到選
擇到所需的模式為止。每次觸摸,顯示運行時間的LED燈將顯示每個相應模式的時間。
3 設置完畢
完成急速冷凍模式設置後,按另一個按鈕以完成並保存剛進行的設置。或在10秒內不按任
何其他按鈕,控制面板將保存設置並返回休眠模式。
4 模式結束
一個模式時間結束後,顯示屏將顯示為“0”並且會有提示音。提示音將每2分鍾響一次,
持續6分鍾,直到您按下控制面板上的“Prime Freeze”圖標或冷凍室門打開時。如果在模
式結束後沒有立即取出食物,食物可能會被冷凍得超過預期。
18
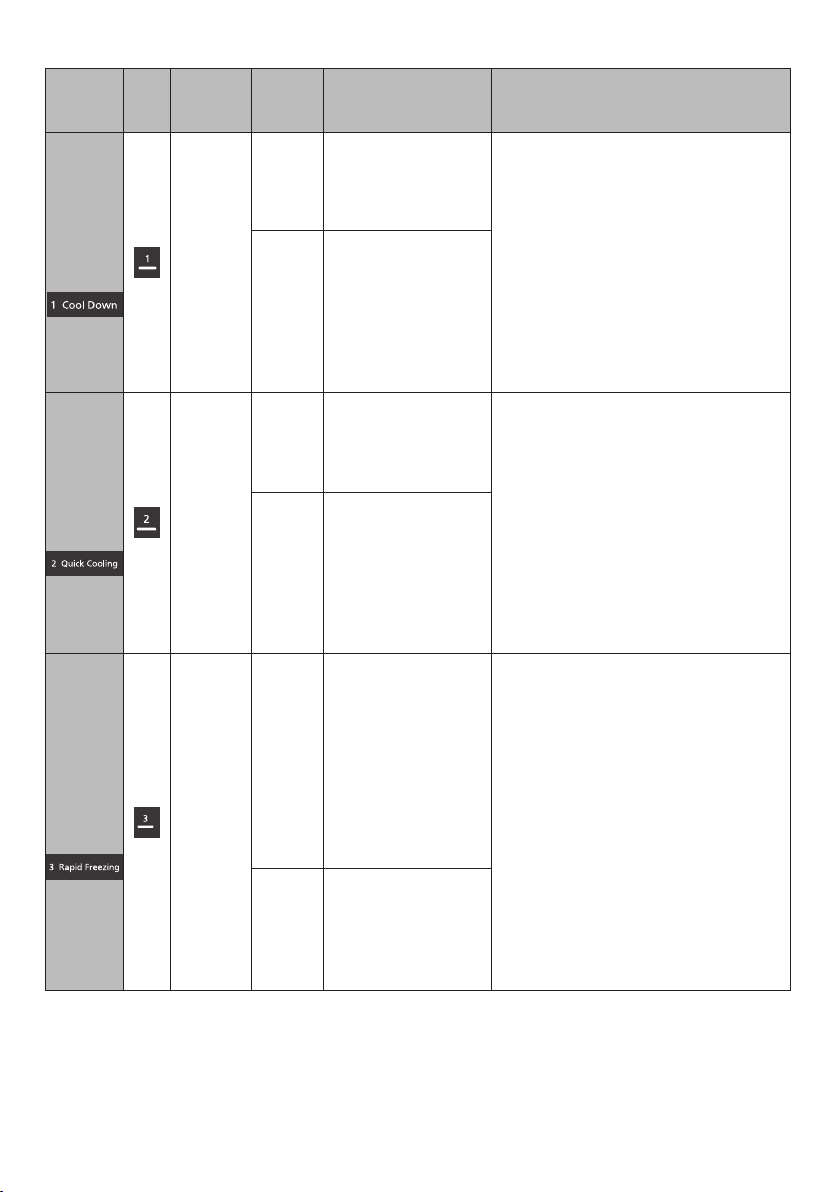
急凍室的模式:
模式名稱 顯示 加工目的
模式(單
位:分)
推薦食物類型
注意
快速冷
卻
快速冷
卻溫/熱
食物
3
• 飯盒(150 g)
•
土豆沙拉(150 g)
- 不要蓋住盒蓋或用保鮮膜包裝食
物,以確保快速冷卻效果。如擔心食
物的氣味,可以使用蓋子或保鮮膜,
但食物可能不夠冷。
- 5分鍾是1盒飯盒(約150 g)或
200 g 預制食品的估計時間。如果食
物量較大,冷卻時間可能會更長。
-
200 ml以上的嬰兒奶可以在快速冷凍
模式下冷卻10分鍾。
- 用快速冷卻模式將奶冷卻後,給寶
寶喂奶前一定要檢查奶溫。
5
• 飯盒(300 g)
•
土豆沙拉(300 g)
• 嬰兒奶(100 ml)
• 湯(150 ml)
快速冷
凍
快速冷凍
食物以節
省准備食
物和甜點
的時間。
10
• 咖喱(200 g)
• 魚類(100 g)
• 布丁(2個)
•
果凍(2個)
- 對于需要腌制或調味的菜料,如:
肉類、炸/烤魚、腌雞蛋等,請將菜料
和調料放入密封盒/袋中。菜料將在冷
凍過程中滲透調料。
- 對于難以切片的生肉、魚和蝦,當置
于快速冷凍模式時,切片工作會更容
易。
- 使用鋁或金屬杯盛裝果凍或甜點。
使用陶瓷或瓷器容器,食物可能不夠
冷。
- 此模式可用于快速冷凍飲料。
15
• 咖喱(400 g)
•
雞大腿
(
250
g)
•
布丁或焦糖(4個)
• 由明膠制成的果凍
或蛋糕(4個)
急速冷
凍
對剛烹
饪的菜
肴進行
急速冷
凍,確
保烹制
食物的
保鮮質
量,節
省每天
的烹饪
時間。
45
•
牛肉(150
g
)
•
水煮蔬菜
(1束西蘭花)
• 生蔬菜(250 g 切
碎的白菜)
•
炸雞(250 g 2人)
• 水果冰淇淋
(300 ml)
•
面包(2個)
- 用保鮮膜、冷凍袋包裝或蓋緊新鮮
食物、煮熟的蔬菜。
- 對于油炸食品(炸雞、炸蝦/鱿魚、
春卷、肉團),應放在鋁盤內,並
以“急速冷凍”模式運行。冷凍後,
放在冷凍袋或盒子中儲存。
- 此模式可用于冷凍一些水果,如:
草莓、荔枝、漿果等,以便長期保
存。
60
•冷凍肉(350 g)
• 雞肉,1/2只
(500 g)
•
牛肉(250
g
)
• 制作冰塊(1盤)
19
急凍室(Prime Freeze)
注意
● 始終將食物放在傳熱鋁板上,以達到最佳冷凍效果。
● 如果在沒有蓋子或保鮮膜包裝的情況下放置熱的或濕的食物,食物表面可能會凝固或在冷藏
室內形成露水。如果擔心,請使用蓋子或保鮮膜包裝好。
● 如果煮熟的食物仍處於高溫狀態,應將其冷卻至 70 °C 左右,然後再放入急凍室。
● 把玻璃瓶或罐放在雪櫃裏面可能會存在破損、開裂或損壞的風險。
● 請勿將食物放置在高于急凍室高度,以免急凍室門無法關緊,導致結霜並損壞急凍室中的食
物和容器。
● 請勿用濕手直接接觸金屬收納盒,存在凍傷風險。
● 在運行急速冷凍模式(Prime Freeze)的過程中:
• ECONAVI 模式將停止。
• 風機的噪音會更大。
• 耗電量會比平時高。
• 如設置快速制冰模式(Quick Ice Making),則急速冷凍模式(Prime Freeze)將停止。
• 急凍室LED燈在除霜系統運行時閃爍,並在除霜完畢後停止閃爍。這是正常現象。
● 當不使用急速冷凍模式(Prime Freeze) 時,急凍室都可以用作冷凍室內的任何其他位置。
• 可以存放小食物,方便查找。
• 該室的溫度可能會高于整個冷凍室的溫度,為了長期保存,請將食物移到冷凍室。
快速制冰模式(Quick Ice Making)
設置快速制冰時,冰箱將增加其容量以減少製冰時間。
快速制冰模式運行方法
指示燈亮起: 快速制冰模式工作。
指示燈熄滅: 快速制冰模式不運行。
●連續2次點擊“Quick Ice Making”圖標,以啓動快速制冰
模式。此時,快速制冰模式圖標燈會亮起。
●想停止快速制冰模式時,再次觸摸並按住“Quick Ice
Making” 圖標,直到指示燈熄滅為止。
注意
● 當快速制冰模式啓動時,以下模式(如果處于工作狀態)將停止:
• 速凍模式(Quick Freezing)
• 新主保鮮模式(Prime Fresh+)
• 急速冷凍模式(Prime Freeze)
• 自動制冰模式(Auto Ice Off)
20
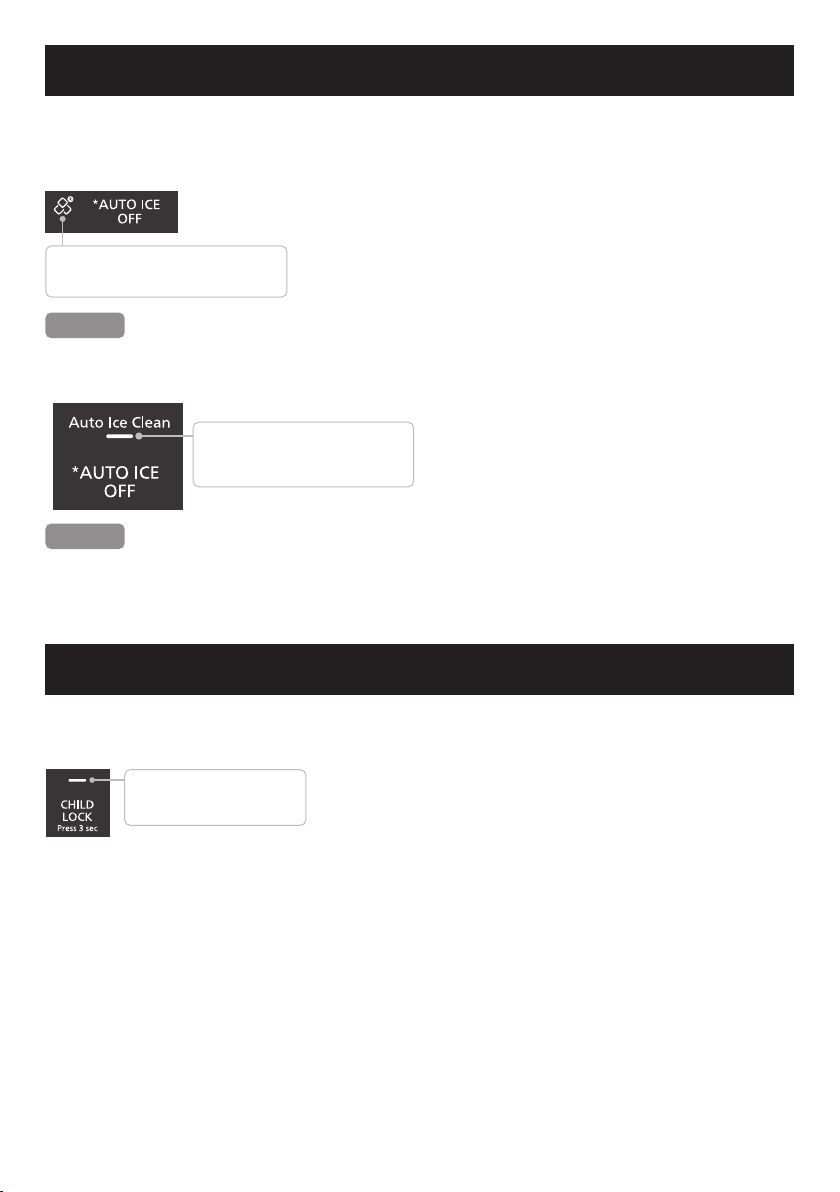
童鎖模式(Child Lock)
設置童鎖模式時,控制面板會禁用溫度和模式調整觸摸,以防止兒童意外調整。
童鎖模式運行方法
指示燈亮起: 童鎖模式正在運
行。
指示燈熄滅: 童鎖模式不運行。
●觸摸並按住“Child Lock”模式3秒,以啓動童鎖模式。此
時,“Child Lock”圖標上方的燈會亮起。
●想停止童鎖模式時,再次觸摸並按住“Child Lock” 圖標3
秒,直到指示燈熄滅為止。
自動制冰停止模式和制冰機清潔模式
雪櫃運行時,自動制冰模式(Auto Ice)將自動運行,而無需任何設置。當設置自動制冰停止
模式和制冰機清潔模式時,雪櫃將停止自動制冰機並自動清潔制冰機。
自動制冰停止模式運行方法
指示燈亮起: 自動制冰停止模式正在
運行。
指示燈熄滅: 自動制冰停止模式不運行。
●連續2次點擊“Auto Ice Off”圖標,以停止自動制冰。此
時,自動制冰停止模式圖標燈會亮起。
●想重新啓動自動制冰模式時,點擊“Auto Ice Off”圖標一
次。此時,自動制冰停止模式圖標燈會熄滅。
注意
● 當自動制冰停止模式啓動時,快速制冰模式將停止。
制冰機清潔模式運行方法
●觸摸並按住“Auto Ice Off”模式3秒,以啓
動/關閉制冰機自動清潔模式。制冰機清潔過
程結束時,雪櫃會發出提示音。
注意
● 制冰機清潔模式正在運行時,不能中途停止/關閉該模式。
制冰機自動清潔操作詳見第26頁。
指示燈亮起: 制冰機自動清潔模式正
在運行。
指示燈熄滅: 制冰機自動清潔模式不
運行。
21
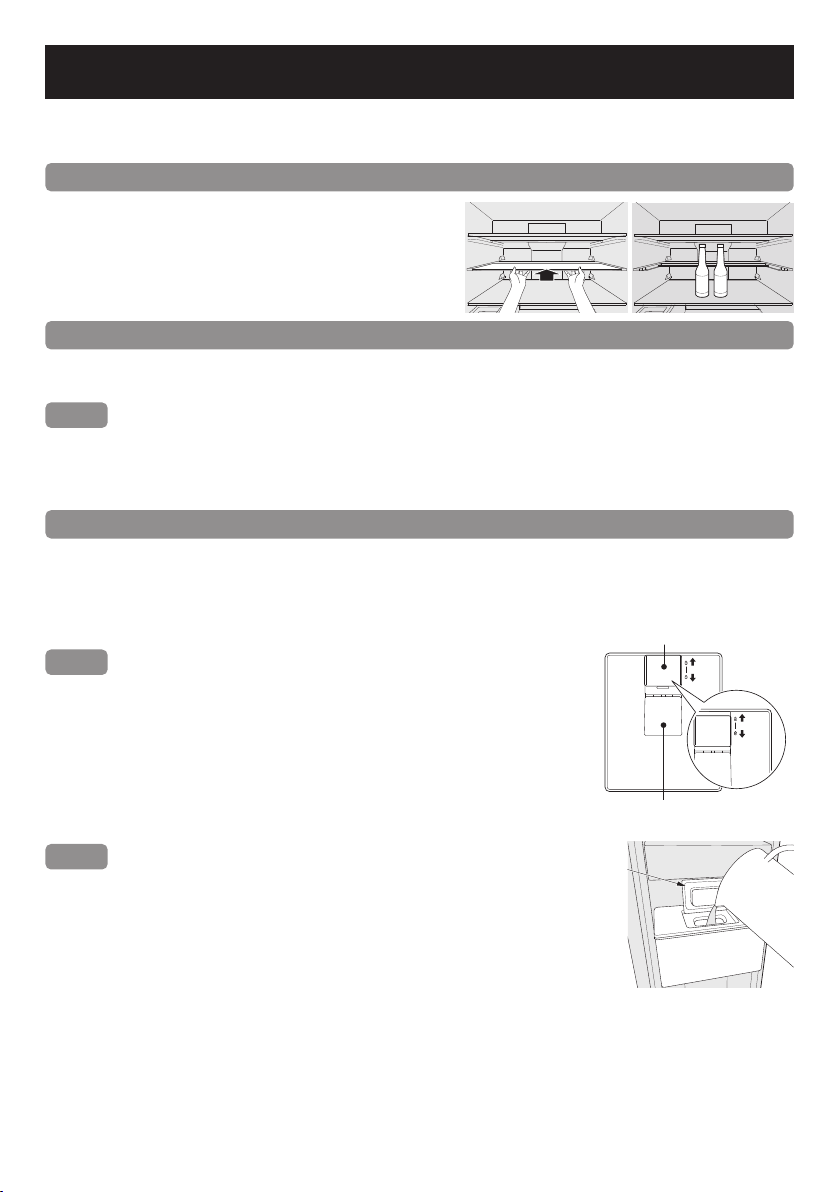
冷藏室
冷藏室溫度設定範圍為7 ℃~1 ℃。
如果冷藏室的溫度長時間設置在1 ℃,食物可能會凍結。
滑動玻璃擱板使用方法
將前玻璃擱板的一半向後滑動,此時,
可以根據使用目的將東西放高。
滑動玻璃擱板拆卸,詳見第28頁。
蔬菜抽屜
大開導軌系統的大蔬菜抽屜,可容易拿出深藏在抽屜裏面的食物,增加承載力,讓用戶只用一只
手輕輕拉動抽屜。濕度控制器有助于控制蔬菜抽屜的濕度,可幫助蔬菜保持濕度和新鮮度。
注意
● 由于濕度高,水滴會粘附在蔬菜抽屜壁上。如果有水或水滴殘留,請用軟布擦掉。
● 請勿把食物放置高于蔬菜抽屜的高度,很容易導致門關不上的情況,導致結霜,蔬菜和水果
可能會被卡住並變質。
外置取水系統使用方法
設有外置取水系統,無需打開雪櫃門即可從外部取冷水。
外取水方法
1 向上推鎖直到接觸到上邊緣。
2 將杯子伸直並輕輕推動水龍頭杆以出水。
注意
● 取出水後,將杯子慢慢取出,以免水溢流。
● 如果有水溢流,請使用毛巾擦幹淨。
● 當需要鎖定外取水模式時,將鎖向下拉,直到它接觸到下邊緣,
並會看到紅線。如果不需要鎖定外取水模式,則可以跳過此步驟。
水箱使用方法
1 打開蓋子,將水箱裝滿水即可使用。
2 蓋緊蓋子並關閉雪櫃門以進行冷凍。
注意
● 第一次使用時,先清洗水箱。
● 請勿將50 ℃以上的熱水倒入水箱。
● 水箱最多可容納3升。請勿將水倒在水箱上的3升標記處。
● 只倒入普通的飲用水,請勿倒入啤酒、汽水、汽水燈。
● 使用雪櫃時,請確保水箱始終安裝在正確的位置。否則會影響冷
凍性能,導致雪櫃門外出汗。
● 使用前檢查水箱。
● 水固體含量必須為100mg/L及以下。礦物質呈白色漂浮物。這些礦物質是無害的。
Lid
蓋子
Open
Close
鎖
取水檔
22
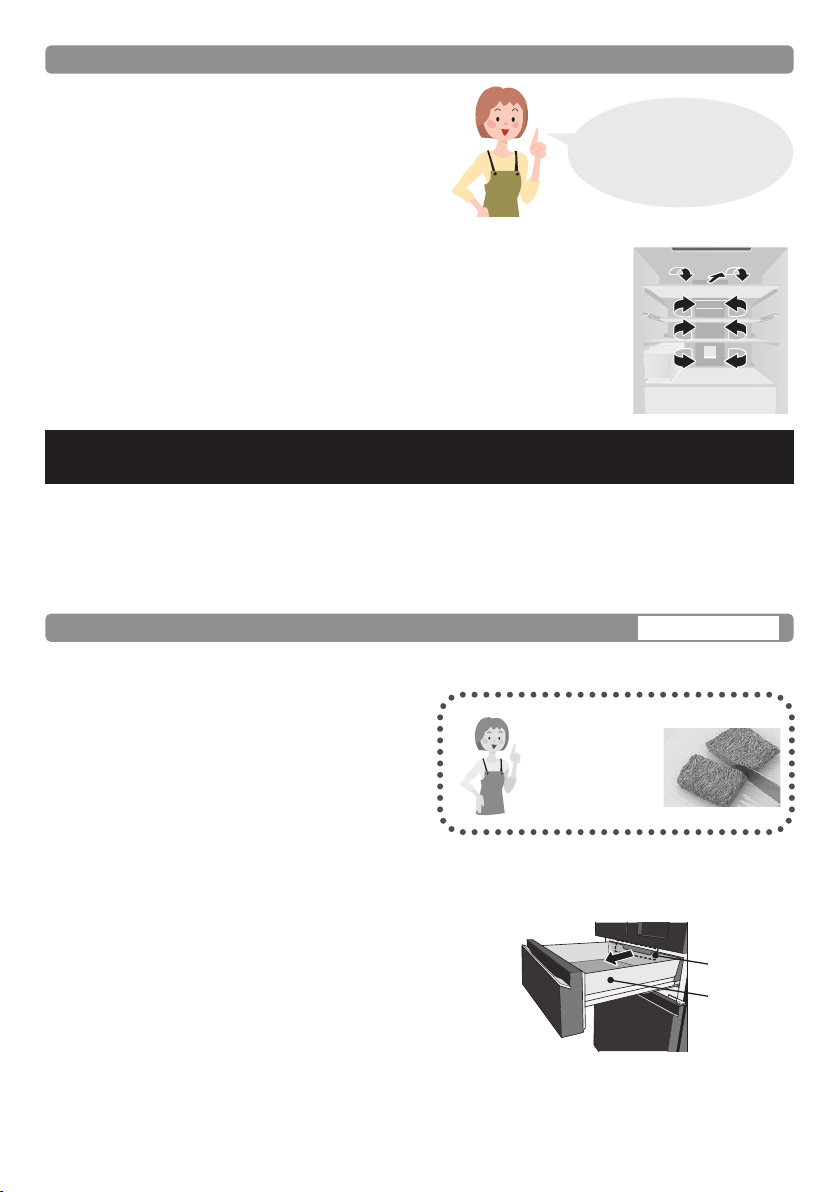
主保鮮室
主保鮮室的溫度可選擇-5 ℃~4 ℃。
• 食物保鮮溫度為-1 ℃~-5 ℃。
• 如冷藏室一樣使用的主保鮮室溫度為4 ℃~0 ℃。
使用雪櫃時,可根據個人使用情況調節溫度。
*出廠設置溫度默認為-3 ℃。
用作保鮮功能
大約-1 ℃~-5 ℃
● 主保鮮室適合儲存魚、肉等新鮮食材。與冷藏室相比,魚、肉的儲藏壽命會延長。
● 當食物太冷凍時。
切片的魚類或肉類可能會太凍。請將溫度設置
為高于-3 ℃,防止食物凍結。
●
當食物未部分冷凍時。
根據食物的類型(例如一大塊肉或大魚)、儲
存條件和環境溫度,食物可能不會按預期進行
部分冷凍。 然後,設置為最低溫度 -5 °C。
● 請勿把雪櫃裝的太滿。裝的太滿時,雪櫃內的
冷風無法流通,會影響冷凍性能。在各種食物之間留出空間!
● 當保存大量食物時,如一塊肉、一條大魚或一只雞,請將食物放在保鮮室的中間,以優化冷
凍效果。
● 當保鮮室的溫度在4 ℃~0 ℃時,新主保鮮模式
(Prime Fresh+) 將不運行,防止食物變質。
● 請勿放置阻礙保鮮室的空氣流通的食物
如果冷氣不擴散,保鮮室內部很難下降溫度,食物可能
會變質。
因此,食物不應放置在進風口位置(位于保鮮室上方)
前,會阻礙保鮮室的空氣流通。
食物保存小貼士
請勿把雪櫃裝的太滿
裝的太滿時,雪櫃內的冷風無法流通,
會影響冷凍性能。在各種食物之間留出空間!
請勿放置阻礙雪櫃內的空氣流通的食物
如果冷氣不擴散,雪櫃內部很難下降溫度,需要消耗更多的電力來冷
凍。因此,食物不應阻塞通風口*前,阻礙雪櫃內的空氣流通。
*通風口位于冷藏室的空氣吹送裝置。
易於切開
冷凍食物易於
切開!
更為方便。
不浪費使用雪櫃的冷空氣是
保持食物新鮮的時間更長的
關鍵!
進風口位置
保鮮室收
納盒
23
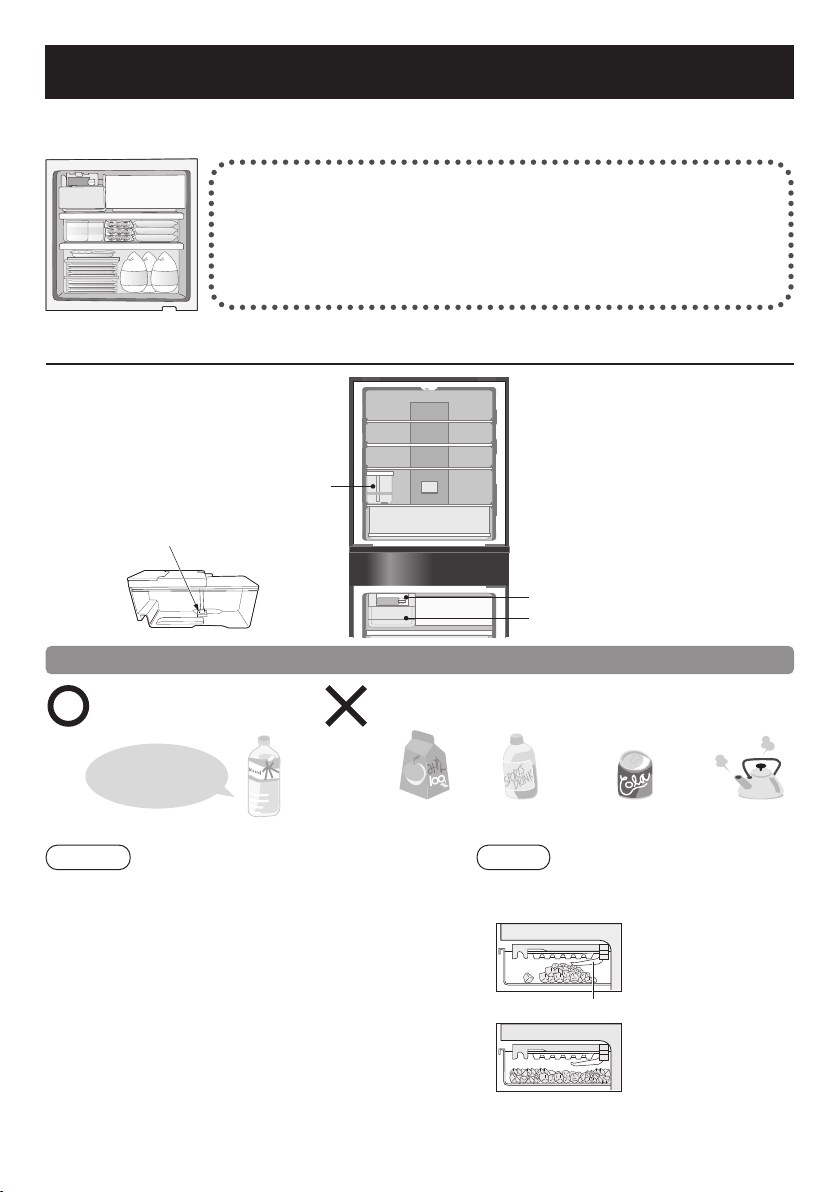
急凍室
使用急凍室(Prime Freeze)長期保存冷凍或冷卻食物。
冷凍室溫度設定範圍為-15 ℃~-23 ℃。
Frozen food
Frozen food
Frozen food
冷凍食物和鎖定風味的三個技巧
1. 快速冷凍薄且小的食物!
2. 完全密封
3. 不要重新急凍
自動制冰
自動制冰機水箱
濾水器
自動制冰盒
存冰盒
為方便使用自動制冰機
自動制冰時,請僅使用飲
用水。
請勿將以下液體倒入供水箱。
(以下液體可能會損壞自動制冰系統)
果汁等 運動飲料 汽水 熱水
水硬度應為
100mg/L及以下。
飲用水
小貼士
●
水硬度應為100mg/L及以下。礦物質呈白色漂浮顆
粒。這些礦物質是無害的。
●
第一次使用自動制冰機時,制冰機等處可能會有異味
或積聚灰塵。
請放棄第一次制冰的冰塊。
●
定期使用自動制冰機自動清洗功能。(第21頁)
注意
當冰滿時,觸動冰塊檢測杆,制冰模式將
自動停止。
冰塊形成一堆,將接觸冰
塊檢測杆。
(此時,自動制冰模式會
停止)
冰塊檢測杆
將冰塊均勻地鋪在存冰
盒,以制出更多的冰塊。
濾水器
前
後
24
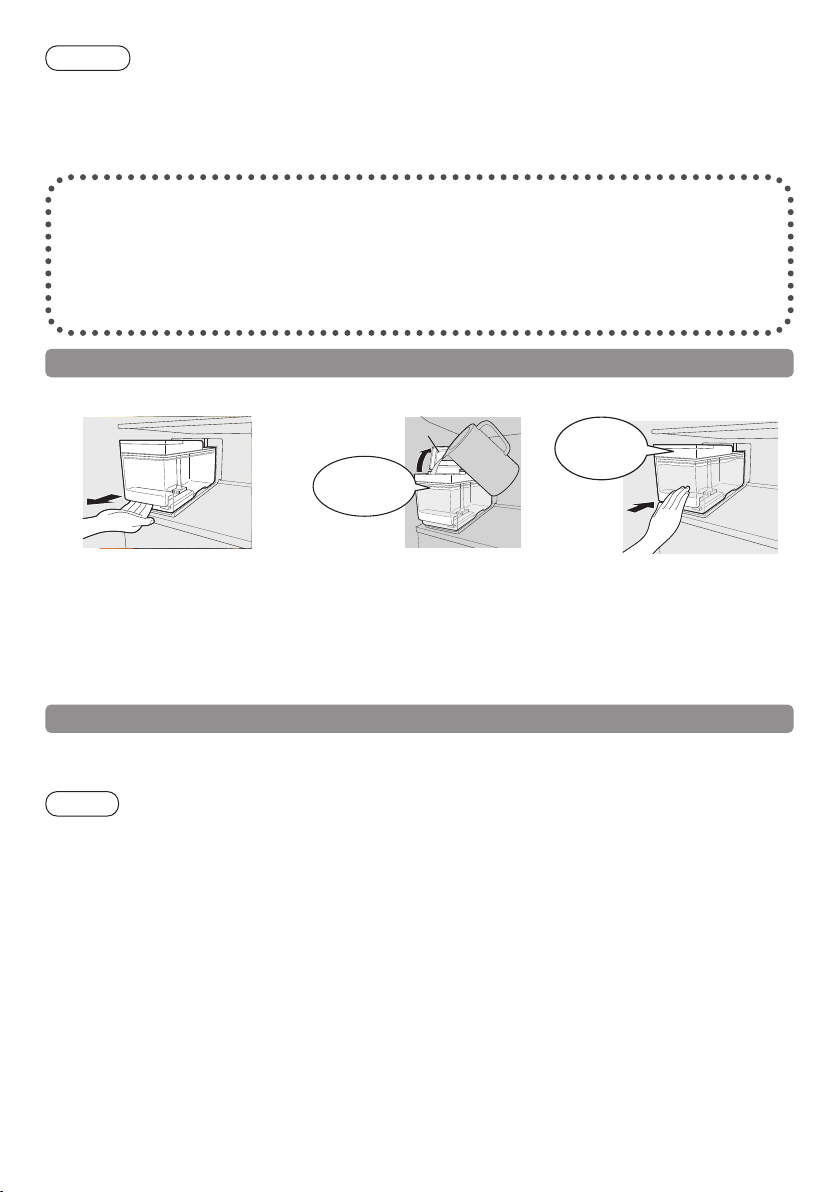
1取出供水箱。 2
裝滿水。
3
蓋好蓋子。
加水時,水位不
得超過“Max”線
(最高水位)。
蓋子
將整個水箱推
到位。
將水箱拉出直到被堵住為
止。
如果水位低于“Min”線
(最低水位),請加水。
打開蓋子,將水箱裝滿水,
然後將蓋子放回原位。
確認水箱的方向並安裝,直到到
位為止。
(如果不把水箱安裝到位,則
無法制冰)
* 可以在大約2小時內制冰,冷藏室的溫度為 4 ℃,主保鮮室為-3 ℃,冷凍室-20 ℃。
快速制冰方法
當設置為“Quick Ice Making”模式(快速制冰)時,制冰速度會增加。
僅需90分鍾即可制冰*。
注意
● 約6小時後,該模式將自動恢複正常自動制冰模式。
● 當雪櫃處于除霜模式時,[Quick Ice Making] (快速制冰)LED 燈將閃爍。除霜完成後,快
速制冰模式將立即啓動。
● 在快速制冰模式下,消耗能量會比正常增加更多。
● 在設置“Quick Ice Making”(快速制冰)模式時,ECONAVI模式不會運行。
室內溫度為20℃時,冷藏室、主保鮮室、冷凍室的溫度分別為4 ℃、-3 ℃、-20 ℃。
自動制冰水箱使用方法*
要求
● 請勿將水直接倒入存冰盒制冰。
(否則,存冰盒可能會破裂)
● 請勿將食物或其他物品倒入存冰盒。
(否則無法正確檢測冰量,自動制冰機可能會停止工作或無法拉出存冰盒)
在以下情況下,制冰時間會更長。
● 第一次使用雪櫃。
(至少需要24小時,因為自動制冰功能僅
在雪櫃內部夠冷時方啓動)
●經常打開雪櫃門時。
●雪櫃門半開時。
●雪櫃裝滿食物時。
● 室內溫度冬天較低或夏天較高時。
●發生電氣故障時。
25

自動制冰停止方法
可按需啓動/關閉制冰模式。
暫停制冰
1 選擇“自動制冰停止”模式,控制面板上的制冰停止模式圖標亮起,雪櫃停止制冰(第21
頁)。
2 無需往水箱倒水。倒入冰盤的水仍會結冰,2小時後會結冰。當冰盒已滿時,將不會繼續制
冰。
3 想繼續自動制冰時,請選擇“自動制冰停止”(Auto Ice Off),控制面板上的制冰停止模
式圖標將熄滅(第21頁)。
長時間停止制冰
1 清空水箱中的水,取出冰盒中的冰塊。
2 將水箱、濾水膜、隔音墊、冰盒清洗幹淨,擦幹後放回原位。
3 再次使用時,請將水箱裝滿水並放回原位。
移動雪櫃時
1 清空水箱中的水,取出冰盒中的冰塊。
2 選擇“自動制冰機清潔”模式,控制面板上的制冰機清潔模式圖標亮起,雪櫃將進行清潔
制冰機。(此時,制冰過程中的冰塊和水會落入冰盒中)
3 制冰機清潔過程將在大約2分鍾後停止。拉出制冰室下方的抽屜,取出冰盒,清空冰盒內的
冰塊和水。
4 將水箱、濾水膜、冰盒清洗幹淨,擦幹後放回原位。
自動制冰機清潔方法
第一次使用或長時間不使用時,冰盤可能會有異味或積聚灰塵。進行清潔制冰機前,請先清潔
冰盤。
選擇制冰機清洗模式後,會自動將水倒入冰盤和供水管3次(約2分鍾)以排出水。
選擇制冰機清潔模式時,請確保水箱內是否有足夠的水。
1 從制冰室中取出冰盒,取清冰盒中的全部冰塊(當已形成冰塊時),然後將冰盒放回原位。
2 將水箱填充足夠量的水。
3 選擇制冰機清潔模式(第21頁)。
• 水箱同時發出斷斷續續的聲音,並開始清潔制冰機。
• 制冰機清潔過程中,聲音無法關閉。
• 當哔聲結束時,控制面板上的制冰機清潔模式圖標熄滅,制冰機清潔結束,自動制冰過程
開始。
4 從制冰室中取出冰盒,將水从冰盒中倒出並擦去冰盒上的水。
如果不把冰盒上的水擦幹淨,冰盒可能會破裂。
26
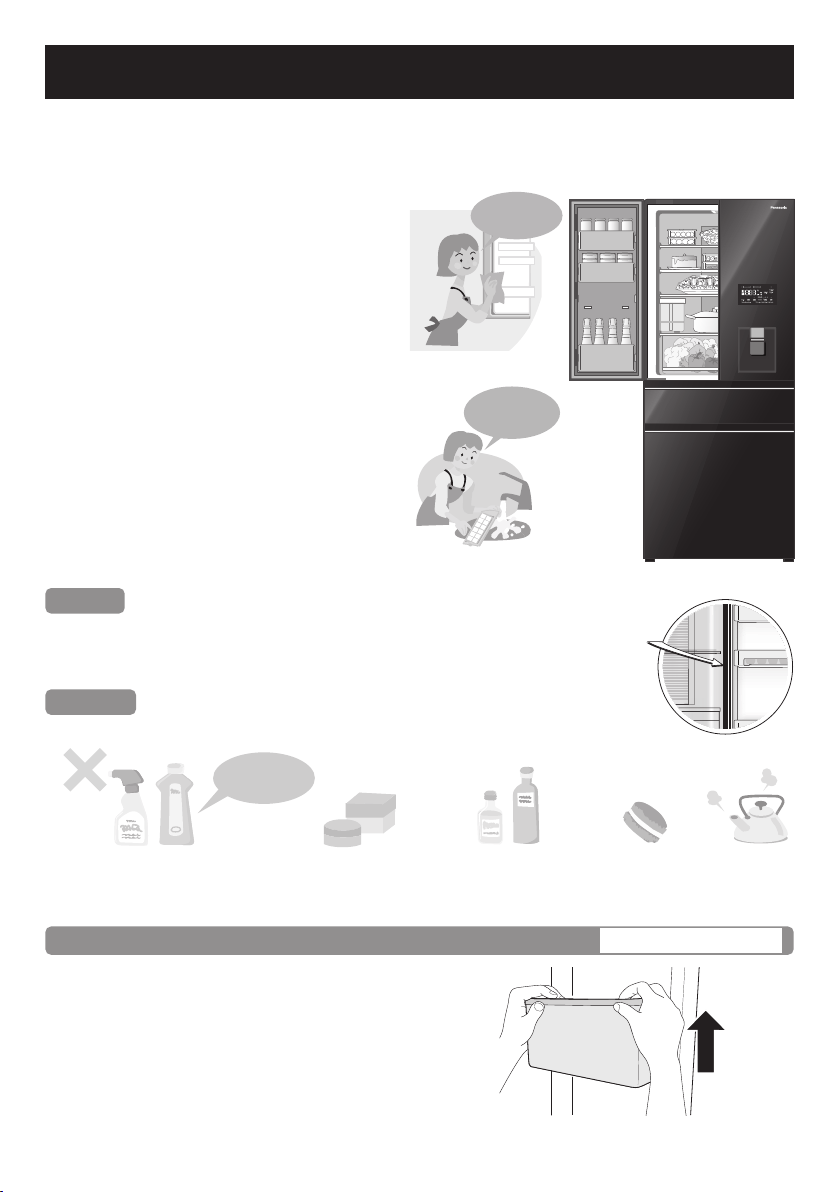
如何清洗雪櫃
清潔或進行維護之前,請務必確保從電源插座上拔下電源插頭。請勿用濕手連接或斷開電源插
頭。拔下插頭後,請放置5分鐘再重新插入。否則,壓縮機可能無法運作。
弄髒後立即清潔雪櫃!
在污漬變硬之前,迅速擦去內側表面的污
漬。
特別是食用油或豬油可能會導致塑料破裂,
柑橘汁可能會導致雪櫃變色。當污漬無法輕
鬆擦除時請使用溫水。請用濕軟布擦拭門表
面。用乾布擦拭控制面板。當污漬無法輕易
清除時,用蘸有中性廚房清潔劑的布擦拭。
然後,用蘸有少量水的布擦拭。
偶爾清潔可拆卸部件。
制冰裝置,一周清理一次。根據指引,請每
三個月取下托盤,門架等,然後將其浸入溫
水中清洗。
每個月至少清理門襯墊一次。
用軟濕布擦拭清潔門襯墊。
注意不要擦拭門鉸鏈上的石油膠。
注意
門襯墊可由授權的服務代理商進行更換。
清潔時,如果門襯墊脫落,可將其推回到凹槽內。
要求
請勿使用以下物品清潔。(否則,表面會被刮刮花或侵蝕)
鹼性或弱鹼性
廚房用清潔劑
(會使塑料破裂!)
清潔劑或肥皂粉 汽油、稀釋劑、
油精、酸、石油
清洗器 熱水
請使用溫水!
取出並沖洗!
使用石油凝膠的點。
請用濕軟布擦拭門表面。
每三個月清洗一次
雞蛋架 / 瓶架
取出
1 向上抬起,在左右側間交替更換。
裝上
2
置于兩邊的支架上,向裡推入,
直至到達盡頭。
27
如何清洗雪櫃
每三個月清洗一次
托盤
取出
1
向上抬起托盤並往前拉。打開托盤與
滑軌間的銷扣,傾斜托盤並取出。
裝上
2
托盤向裡推入,直至到達盡頭。
注意
● 在取下冷藏室內的玻璃擱板之前,應先取下門上的雞蛋加/瓶架,以便于取下玻璃擱板。
● 可直接在雪櫃裏清潔果蔬盒上方的玻璃擱板。
(因此玻璃擱板的設計為固定的)
● 萬一在裝回盤子時卡不住,請檢查確認是否裝錯了托盤。
● 托盤是由玻璃製成的且很重。
請小心處理它們,以免它們掉落並造成任何損壞或傷害。要裝托盤時,將突出側朝
下握住並牢固插入。
每三個月清洗一次
果蔬盒/冷凍室收納盒
※果蔬盒
取出
1
完全打開冷藏室的2個門
2
先取下大瓶架4和小瓶架7(根據各部名
稱,第12頁、第13頁),再取下果蔬盒。
3
向前拉動果蔬盒直到碰到終點為止,然
後輕輕擡起果蔬盒的前部,以將其完全
取出。
裝上
1 將果蔬盒安裝到支架上。
2
輕輕擡起果蔬盒並向前推,直到碰到終
點為止。
3 安裝大瓶架4和小瓶架。
※冷凍室收納盒
跳過取下大瓶架4和小瓶架7 的步驟。如同果蔬盒取下和安裝冷凍室收納盒。
28
每三個月清洗一次
果蔬室溫度控制過濾器
1
拉動並取下果蔬盒,濕度控制過濾器位于蔬菜室的背面。
2 抓住過濾器並將其滑到支架上以將其取下。
注意
● 用水沖洗後,擦拭幹淨或烘幹。
● 對于頑固汙漬,稀釋廚房清潔劑(中性),用軟牙刷輕輕刷落,然後用水徹底沖洗。
每三個月清洗一次
主保鮮室(Prime Fresh)收納盒
取出
1 將主保鮮室門完全打開。
2 輕輕擡起主保鮮室的前部並斜著取出。
傳熱鋁板(注意鋁板容
易劃傷變形)
裝上
1 將主保鮮室門完全打開。
2 輕輕地將主保鮮室收納盒斜放回其原位,直到碰到終點為止。
注意
● 安裝收納盒時,請確保正確安裝收納盒的正面和背面。收納盒正面標有“Front”字。
● 可以取下傳熱鋁板,注意鋁板冷的時候不要用濕手直接拿著,存在凍傷的危險。
● 如果用水清洗,請擦拭幹淨或烘幹,再安裝到雪櫃中。
● 請勿擦掉抽屜杆或導軌接觸面上的潤滑劑。
如果已經擦掉這些潤滑劑,請咨詢服務中心。
每周
供水箱/濾水器(自動制冰機的)
1 打開蓋子,用水沖洗供水箱。
2 旋轉濾水器以取下呆鈎並將其取下。
3 用水輕輕沖洗過濾器。
4 取下蓋子側面的橡膠墊圈,用水沖洗幹淨。
5 將濾水器和橡膠墊圈安裝到位。
注意
● 如果濾水器中的管道有積水或堵塞,可能無法正確地
制冰。
供水箱
濾水器
橡膠墊圈
29
如何清洗雪櫃
每三個月清洗一次
急凍室(Prime Freeze)收納盒
取出
1 將急凍室收納盒完全拉出。
2 提起收納盒,傾斜並從急凍室拿出來。
傳熱鋁板(注意鋁板容易
劃傷變形)
裝上
1 提起急凍室收納盒,沿著裏面凹槽安裝,直到接合並碰到終點。
注意
● 可以取下傳熱鋁板,注意鋁板冷的時候不要用濕手直接拿著,存在凍傷的危險。
● 取下或安裝收納盒時,請務必用伸出的手抓住玻璃擱板的把手。否則,急凍室門可能會碰到
手指。請參考上圖。
● 如果用水清洗,請擦拭幹淨或烘幹,再安裝到雪櫃中。
● 請勿擦掉導軌接觸面上的潤滑劑。
如果已經擦掉這些潤滑劑,請咨詢經銷商。
每三個月清洗一次
冰盒
取出
提起並向前拉冰盒,
直至完全取出為止。
裝上
推動冰盒直到碰到終點為止。
注意
● 在清洗冰盒前,選擇停止自動制冰功能
(第 21 頁)。
30
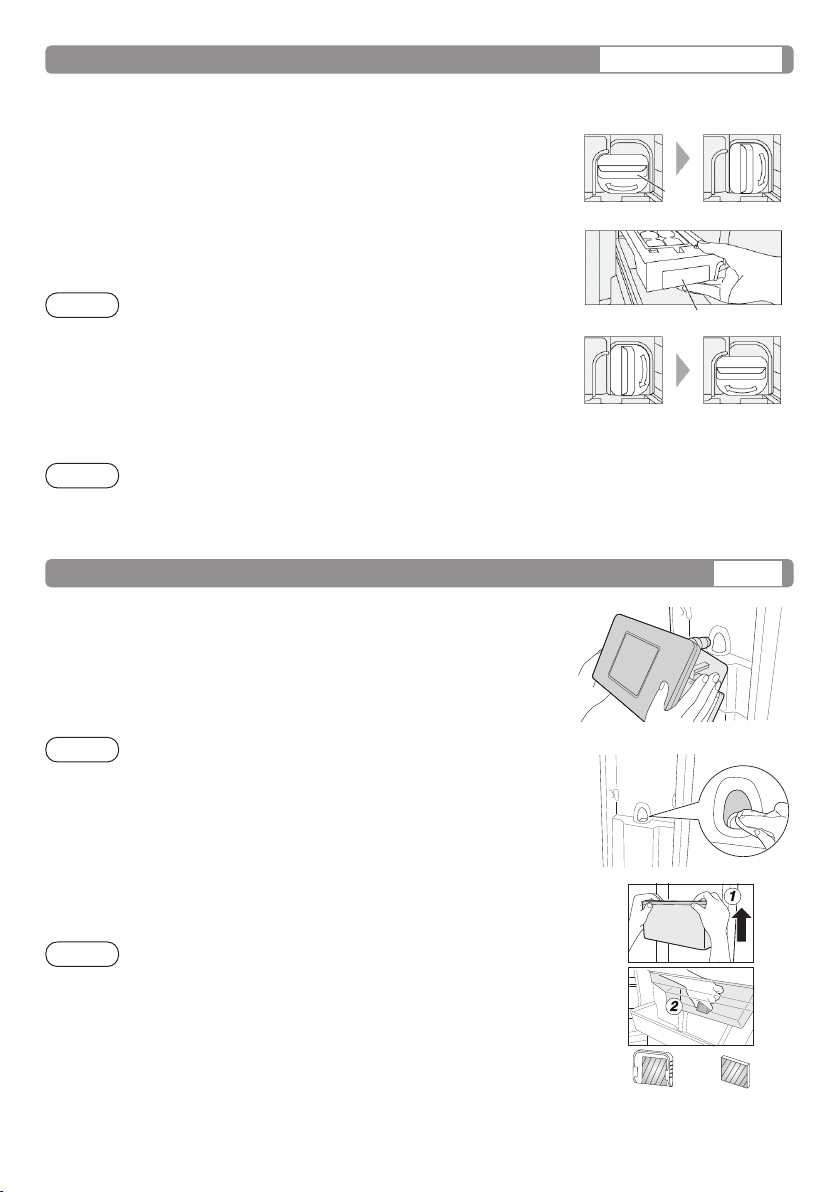
每周
供水箱/濾水器(外置取水器的)
取出
用雙手拉起水箱,將其稍微向您的方向傾斜。
裝上
將閥門的尖端插入孔中。將水箱的左右邊緣置于鎖定位置。
將水箱一直向下推,直到碰到終點為止。
注意
● 取下水箱清洗時,若橡膠墊因與水龍頭摩擦而倒置,用手將橡膠
墊從原位朝反向推。
● 水箱的閥門可以按逆時針旋轉並將其取下。
更換過濾器
1 用手打開右上角的蓋子。
2 將過濾器直接從鎖中取出。
更換新的過濾器。將過濾器放回原位並蓋緊蓋子。
注意
● 過濾器應每3年或在適當時更換一次。
●可以聯系全國的Panasonic服務中心購買新的自清潔式過濾器。
每三個月清洗一次
冰盤
可以使用“自動清潔制冰機”(Auto Ice Clean)功能清潔冰盤(第21頁)。此外,可以取
下進行手動清潔。
冰盤手動清潔方法
取下和清洗冰盤
1 選擇“自動制冰模式”(Auto Ice Off)(第21頁)。
2 將制冰室的把手轉到解鎖位置。
3 向前拉突出部分,以取下冰盤。
4 用水沖洗。(請勿使用鋒利的擦洗工具擦洗冰盤表面。如果
冰盤被劃傷,冰塊將無法正常落下,導致冰盤損壞)
注意
● 冰盤和框架不能分開。
● 請勿使用洗碗機或烘幹機。
裝上
1 推入冰盤直至發出咔聲為止。
2 將把手轉到鎖定位置。如果冰盤未鎖定,則無法制冰。
3 關閉“自動制冰停止模式”(Auto Ice Off)(第21頁),以重新啓動制冰。
注意
● 僅在關閉“自動制冰停止” 模式(Auto Ice Off)時,方可制冰。
● 手動清潔後,請勿將水直接倒入冰盤。(這可能會導致冰塊粘在一起或造成損壞)
自清潔式過
濾器
自清潔式
過濾
把手
鎖定位置 解鎖位置
凸出部分
解鎖位置
鎖定位置
31
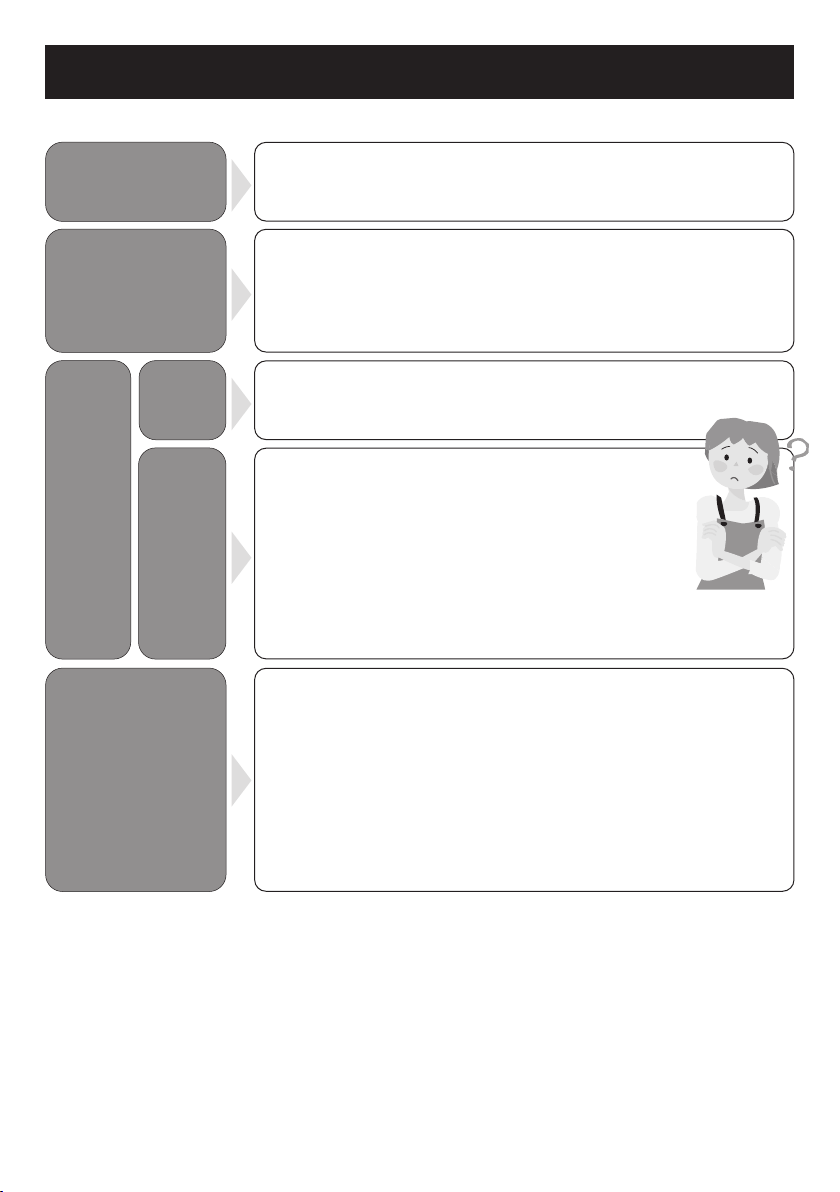
雪櫃使用說明指引
在要求服務前,請檢查下列事項:
雪櫃不能操作。
●檢查並確保插頭及其插座的狀況良好。
●檢查屋內的主保險絲和電力系統有否出問題。
●檢查時請拔除插頭,7 分鐘後再重新插回。
雪櫃溫度不夠低。
●檢查確保控制面板上的指示燈在正確位置顯示。
●檢查雪櫃是否負荷過多或冷藏了任何熱食。
●雪櫃是否直接曝露在陽光下或靠近熱源?
●雪櫃門是否完全關上?
●是否過於頻繁打開雪櫃?
●當環境濕度過高時,門墊圈可能出現水珠。空氣濕度降低時,這
種情形將消失。請用乾布將水珠擦掉。
●門是否緊密關閉?
●開關門是否太過頻繁?
●雪櫃內的露水凝結還可能是由于存放高濕度的食物
而無蓋好或包裝好。
●空氣濕度高時,開門時間長,當雪櫃內裝有大量食物
或制冰時,冷凍室收納盒的冷凍室、冰盒的或急凍室
門等處可能會形成雪。這種現象是正常的。用柔軟的
幹布擦拭幹淨。
雪櫃發出噪聲。
●檢查
雪櫃
是否已穩固放置或正確安裝。
●檢查是否有任何物體與雪櫃接觸。
●相應部件溫度調整導致雪櫃內的碎裂聲音屬正常現象。
●安裝後,雪櫃可能會發出較大的噪聲。
當雪櫃製冷後,噪聲將降低。
●打開和關閉門時,雪櫃內部可能會發出嘯叫聲。 這是由於外部
空氣通過雪櫃背面的管道吸入,以更好地平衡設備內部的空氣流
通所致。
外部
內部
出現水
珠、結
霜。
32
內部出現異味。
●是否放置沒有包裹
,
會發出氣味的食物?
雪櫃的表面發熱。
●由於
雪櫃
具有防結露和發熱管設備,因此它在工作時表面會變熱。
●當制冷啟動或櫃門經常開閉時,背部和兩側發熱會更為明顯。
雪櫃的正常聲音。
●當雪櫃開始運行時,會聽見像流水或沸水的聲音。這其實是冷
媒流動的聲音。
●當自動除霜系統工作時會產生噪聲。
●雪櫃內附件在制冷過程中膨脹會發出「劈啪」破裂聲。
●當壓縮機在以下情況下高速運作時,您可能會感覺運作聲音變
大:雪櫃在首次使用,過於頻繁地開閉櫃門或環境溫度過高等情
況下未完全冷卻。當雪櫃完全冷卻後,聲音會變得更為安靜。
燈無法打開。
●請聯繫 Panasonic 電器服務中心。
●如果一段時間後水箱中的水沒有減少,即制冰模式不運行。
●雪櫃內部足夠冷後開始制冰過程。(開始使用可能需要24小時
以上)
●檢查是否設置為“自動制冰停止”模式 (Auto Ice Off)?
(第21頁)
●務必將水箱和冰盤完全推入到位。
●請勿將食物存放在制冰機中。
●請勿頻繁安裝或取下冰盤。
●檢查水箱中的水是否充足。
●如果水溢在制冰室,請清潔幹淨。
●請聯系Panasonic服務中心。
●制冰室溫度設置是否比冷凍室高-20 ℃?
→ 請調整為較低的溫度。(第15頁)
●有突出部分。→ 冰盤的凹槽可能被凍結。
●冰塊是否呈圓形或與其他冰塊粘在一起。
→ 冰塊已存放很長時間。
(由固體變成蒸汽,冰塊變成圓形或粘黏)
●小冰塊。→ 當水箱沒有水時,就會形成小冰塊。
自動制冰。
雪櫃不制冰。
冰塊不會凍結
成冰
冰塊形狀異
常。
33
雪櫃使用說明指引
控制面板閃爍。
●是否正在調整雪櫃或冷凍箱的溫度?
→ 安裝過程中閃爍。請完成設置,或控制面板將在10秒後停止閃
爍。
食物被凍結。
●是否把食物放在冷風管附近?
●是否把溫度控制器調到較低的溫度,冷凍室為4 ℃,保鮮室為
-3 ℃?
→ 請調整為更高的溫度。
●是否把食物放在保鮮室?
●“Quick Freezing”(快速冷凍)、Prime Fresh+(新主保
鮮)、Quick Ice Making(快速制冰)、Prime Freeze (急速
冷凍)等模式是否處于運行狀態?(第17頁)
●如果冷藏室的溫度未設置為4 ℃,冷凍室的溫度未設置為-20 ℃
,則ECONAVI功能不會自動激活。
●雪櫃門是否頻繁打開或雪櫃中是否存放熱食?
●學習功能可以在正常使用過程中自動關閉ECONAVI模式。
●雪櫃是否顯示任何錯誤代碼?
●是否停電?
如果停電,學習功能所采集的數據在停電時都會丟失。
ECONAVI模式很少運行,直到學習功能可以再次收集數據。
●如果在ECONAVI模式正在運行時啓用自動除霜功能,則在除霜
完成後將激活正常制冷模式。因此,ECONAVI模式可能會在除
霜/制冷過程中停止。
●學習功能有時會重新啓動正常制冷模式。
●光強傳感器是否被遮蓋?
●光強傳感器控制面板上是否有汙漬或劃痕?
●ECONAVI模式可能會在雪櫃使用時根據使用條件運行,但仍保
持制冷模式的運行。
34
ECONAVI燈不能正常點亮。
ECONAVI
功能不運行
(ECONAVI
燈不亮)。
ECONAVI
模式很少運
行。
ECONAVI
模式中途停
止。
ECONAVI模
式運行太頻繁
(ECONAVI
燈很少關閉)
。
雪櫃使用說明指引
雪櫃使用說明指引
●使用急凍室(Prime Freeze)長時間儲存冷凍食品,或將高脂
冰淇淋儲存在雪櫃中。(急凍室的冷凍性能是兩星級)
(第18頁)
●請勿將冷食靠近熱食。
●冷凍或凍結可能不夠,這取決于食物的種類、包裝條件、存儲
容量以及雪櫃門開閉頻率。
→重新設置急速冷凍模式(Prime Freeze)。(第18頁)
●如果在除霜過程中設置急速冷凍模式(Prime Freeze),時間
顯示屏會計數,但風機會停止,食物不夠冷。除霜後,請重新
設置急速冷凍模式(Prime Freeze)。
●如果在運行急速冷凍模式(Prime Freeze)時設置了快速制
冰、快速冷凍、新主保鮮等模式,則急速冷凍模式將停止。
控制面板顯示的
錯誤
●U10:警報開門時間過長。
→
請檢查各室的門是否閉合。
●操作面板上顯示字母“H”和兩位數字。
例如:
H01
→請聯系服務中心尋求支持。
急速冷凍模式(Prime Freeze)。
食物融化。
不冷不凍
結。
中途停止運
行。
35

Panasonic Corporation
網址:https://www.panasonic.com
© Panasonic Appliances Vietnam Co., Ltd. 2022
規格
型號
NR-YW590Y
急凍等級
容量 (公升)
(MS IEC62552:2016)
合計
540
急凍室
186
冷藏室 293
主保鮮室 61
外型尺寸
闊 × 深 × 高 (毫米)
750 x 750 x 1890
淨重 (kg) 100
製冷劑類型 R600a
製冷系統 無霜製冷。
額定電壓 (伏特)
額定頻率 (赫茲)
請參考雪櫃門上的額定標籤。
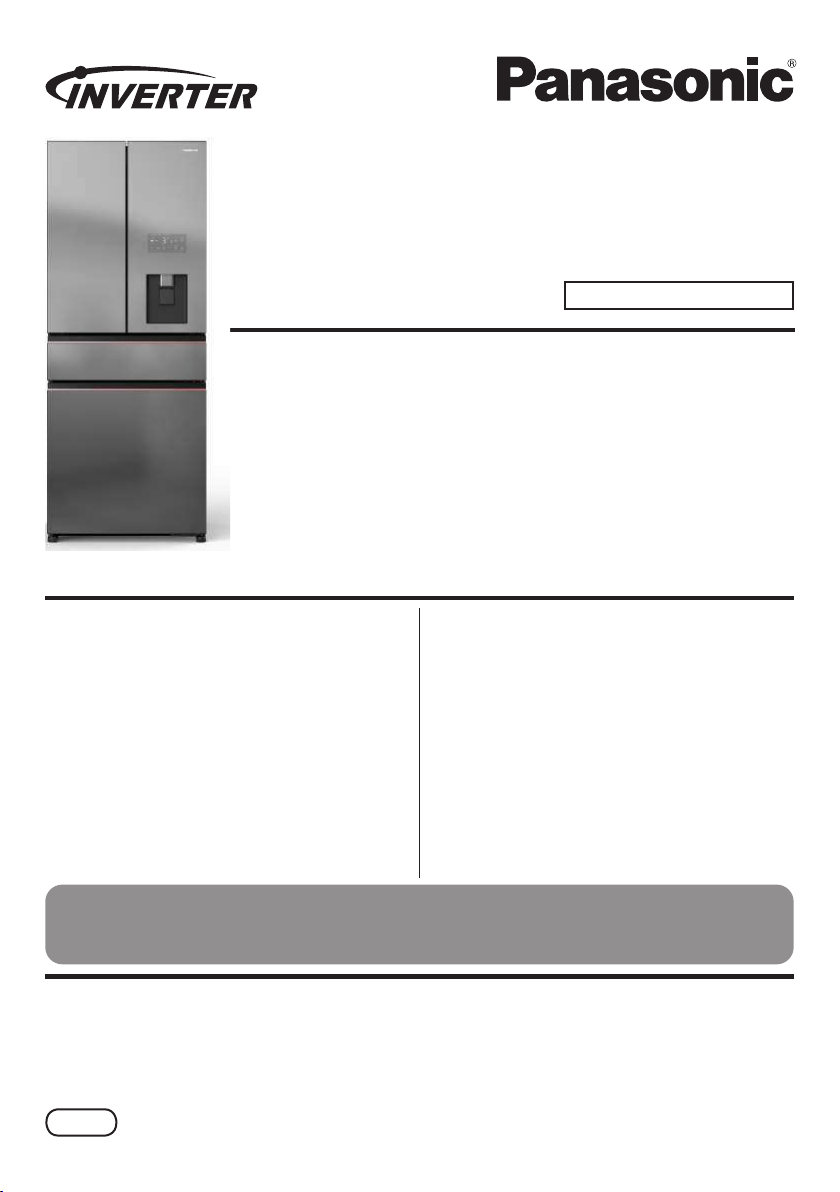
Operating Instructions
Refrigerator
For Household Use
Model No.: NR-YW590Y
Contents
y Safety Precautions .................................. 2
y Usage Precautions .................................. 4
y Highlighted Features ............................... 6
y Installation ............................................... 9
y3DUWV,GHQWL¿FDWLRQ
12
y Operation Panel ............................
.........
14
y Temperature Control ..............................
15
y ECONAVI Operation
..............................
16
y nanoe
TM
X ..............................................
16
y Quick Freezing ......................................
17
y Prime Fresh+ .........................................
17
y Prime Freeze .........................................
18
y Quick Ice Making ...................................
20
y Auto Ice Off and Auto Ice Clean ............
21
y Child Lock ..............................................
21
y Fridge Room .........................................
22
y Prime Fresh Room ................................ 23
y Freezer Room .......................................
24
y How to Clean the Refrigerator ...............
27
y Troubleshooting .....................................
32
y6SHFL¿FDWLRQV
Ŷ NON-CFC
This unit uses totally NON-CFC MATERIALS both for refrigerant (R600a) and for
insulation (Cyclo-Pentane). So, this refrigerator does not damage the Earth’s ozone layer.
Thank you for purchasing the Panasonic product.
y Please read these instructions carefully and follow safety precautions on page 2-5 before
using this product.
y Please make sure the date and name of store of purchase are stamped in warranty card
and keep it with this operating instructions.
ARAH1E202970
P0122-0
Printed in Vietnam
MAL

Safety Precautions
Please be sure to follow these instructions.
5LVNRI¿UHÀDPPDEOHPDWHULDOV
2
WARNING
WARNING
This sign means: It may lead to a serious
injury or death.
These signs mean prohibited
action.
This sign means required action.
This sign means the appliance must
be earthed to prevent electric shock.
CAUTION
This sign means: It may result in injury or
property damage.
Otherwise, it may
FDXVHD¿UHLQMXU\
electrical shock.
When recycling the product:
Ɣ Before taking the refrigerator to be recycled, please remove all the
door opening seal to prevent locking a child in it.
Ɣ The warning labels mentioned above should be kept throughout the life
of the refrigerator.
Ɣ The operating instructions should be handed over to any person who
would use or handle the refrigerator whenever the refrigerator would be
transferred to another location and delivered to a recycling plant.
Ɣ Regarding to local laws, Cyclo-Pentane is used for insulation of this
refrigerator. When you throw away this unit, please discard it by proper
method and do not dispose it by burning.
In case of emergency:
Ɣ Maintenance work only be carried out at workshop by well-trained
maintenance worker.
Ɣ Do not store explosive substances, such as aerosol cans with a
ÀDPPDEOHSURSHOODQWHWFLQWKHUHIULJHUDWRU
Ɣ Do not use electrical appliances such as a deodorizer in the
UHIULJHUDWRU/HDNHGUHIULJHUDQWPD\FDWFK¿UHIURPDVSDUNRIWKH
electrical contacts and may cause an explosion.
Ɣ Do not use electrical appliances inside the food storage compartments of the
appliance, unless they are of the type recommended by the manufacturer.
Ɣ Do not disassemble, repair or modify the refrigerator by yourself.
If you want to repair the refrigerator, please consult your dealer or
authorized service center.
Ɣ Do not use mechanical device or other means to accelerate the
defrosting process, other than those recommended by the manufacturer.
iso-butane
iso-butane
3
When using:
Ɣ Do not damage the cooling circuit (piping on the back).
Ɣ Do not touch the compressor and pipes, because of high temperature,
that there is a risk of burn injury.
Ɣ Do not let any children hang onto the refrigerator's door, it may
overturn to the kid.
Ɣ Do not place any water container on the top of the refrigerator in case
the spilling water causes electrical shock or combustion.
Ɣ Do not locate multiple portable socket-outlets or portable supplies at
the rear of the appliance.
Ɣ Keep ventilation openings, in the appliance enclosure or in the built-in
structure, clear of obstruction.
Ɣ This appliance is not intended for use by persons (including children) with
reduced physical, sensory or mental capabilities, or lack of experience
and knowledge, unless they have been given supervision or instruction
concerning use of the appliance by a person responsible for their safety.
Ɣ Children should be supervised to ensure that they do not play with the
refrigerator.
When installing:
Ɣ Fix the refrigerator to avoid
danger due to unbalance.
Ɣ When positioning the appliance,
ensure the supply cord is not
trapped or damaged.
Ɣ Ensure that the refrigerator
is plugged into an earthed
mains socket.
WARNING
Otherwise, it may
FDXVHD¿UHLQMXU\
electrical shock.
For power plug and cord:
Ɣ Do not plug or unplug with wet hands.
Ɣ Do not let the cord or plug be damaged.
Ɣ Disconnect power plug when cleaning.
Ɣ Plug into a wall outlet of the rated voltage on its own with the rated
current and insert plug fully.
Ɣ Reserve one socket for the refrigerator only. Avoid connecting many
appliances to the same socket and unroll through the length of cord.
Ɣ Remove dust periodically from the power plug.
Ɣ If the supply cord is damaged, it must be replaced by the manufacturer,
LWVVHUYLFHDJHQWRUVLPLODUO\TXDOL¿HGSHUVRQVLQRUGHUWRDYRLGDKD]DUG
Ɣ If you detect burning smell, disconnect the power plug and ventilate the kitchen.
Ɣ Stop using the refrigerator and unplug the unit immediately if there is an
abnormality or failure.
Abnormality and failure examples:
- Power cord or plug is abnormally hot.
- Power cord is deeply cut or deformed.
- There is burning smell.
- You can feel tingling electricity.
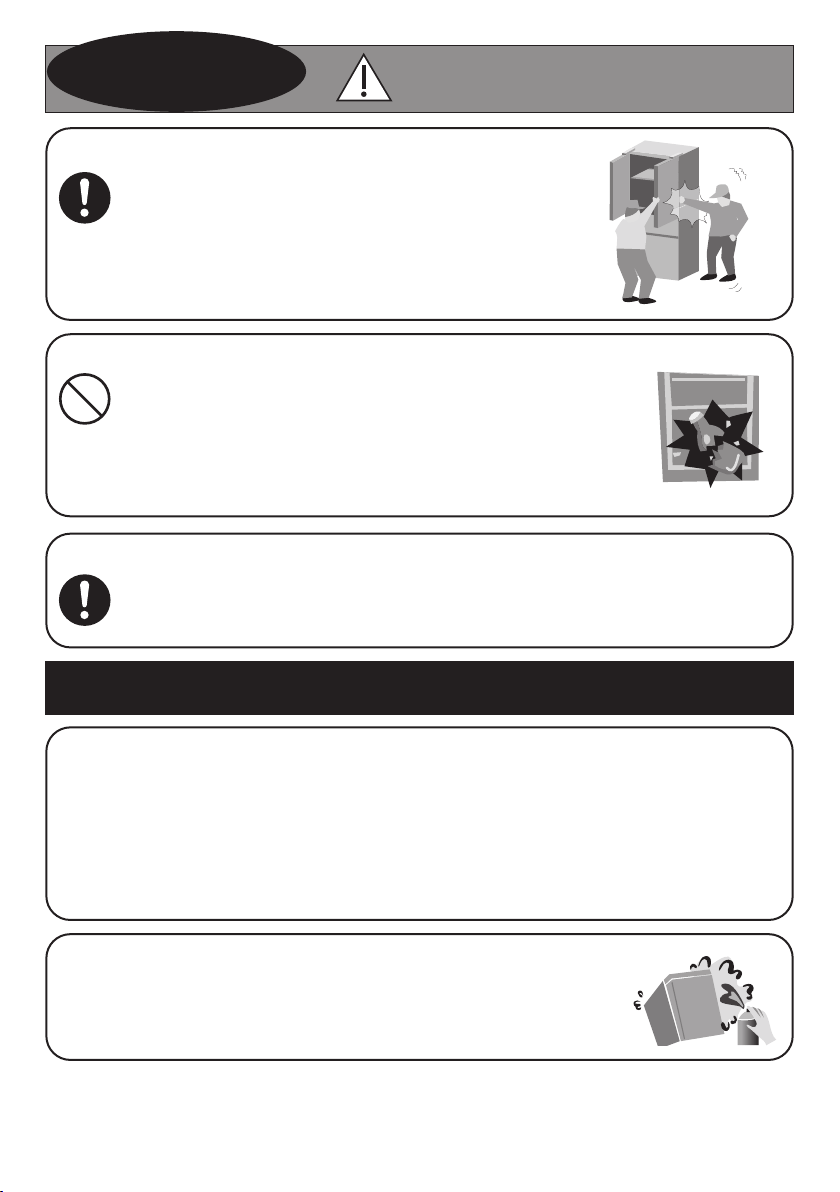
Usage Precautions
4
When opening/closing the doors:
When moving the refrigerator:
When storing food:
CAUTION
Ɣ While opening the refrigerator, be careful not
to pinch other one's hand holding the door.
Ɣ Mind the gap between the doors. They may
nip your hand while closing the door.
Ɣ Do not freeze glass bottles, that there is a risk of injury.
(If the liquid in a glass bottle is frozen, then the bottle
may break and you may be injured.)
Ɣ Do not add a high impact on glass trays. (Otherwise
those glass trays may break and you may be injured.)
Ɣ Hold the refrigerator tightly when transporting.
Ɣ $SSO\SURWHFWLYHFRYHULQJHWFWRÀRRUVZLWKDIUDJLOHVXUIDFH
When opening/closing the doors:
Ɣ Do not refrigerate items which are bigger than tray or shelf, as the door will
not close completely causing leakage of cool air.
Ɣ Do not open refrigerator frequently or leave it open for long time in order to
prevent water dripping inside and waste energy.
Ɣ Frequently check the door opening seal, it must be closed to the refrigerator's
body completely.
When cleaning:
Ɣ Do not clean the refrigerator with chemical substance or
liquid. It will cause damage and have corrosion on the
surface.
Otherwise it may cause
LQMXU\DFFLGHQWV
Usage Precautions
5
When storing food:
Ɣ Do not overload the refrigerator. Gap must be provided between
foodstuffs to maintain the cooling effect.
Ɣ Store fruits and vegetables in vegetable case, where trapped
moisture helps preserve food quality for longer time periods.
Ɣ Drinking water, beverage bottles should be sealed to prevent
odor contamination.
Ɣ Food stuff such as vegetables, fruits and fresh food should be
wrapped or packed in box before freezing and refrigerating.
Ɣ 3XWWKHIRRGVXFKDVPHDWRU¿VKLQWKHIUHH]HULI\RXZDQWWR
store for an extended period.
Ɣ &RYHUMXLF\IRRGZLWKWLJKWOLGVSODVWLF¿OPRUIRLO
7 mins
When using:
Ɣ When the plug is disconnected, leave it for 7 minutes before
plugging again. If not, the compressor may not work.
Ɣ Adjust the temperature according to the actual operating
condition for energy saving.
Ɣ The humidity inside the fresh case may condense so wipe it
with a cloth periodically. Clean the fresh case once a month.
Ɣ If you will not be at home for several days and there are nothing refrigerated
in the refrigerator, the plug should be disconnected for energy saving. When
the refrigerator is not used for several days, it is necessary to take out all
remaining food inside the refrigerator, clean and open the doors for a few
hours to let the moisture inside the refrigerator dry out, avoiding mold and
oxidation of components.
Ɣ The outside wall of refrigerator cabinet may sometimes get warm, especially
just after installation. This is quite normal, and is due to the built-in Mullion
Dryer Pipe which prevents sweating and radiates heat.
Ɣ When humidity is high, e.g. during rainy-season, condensation may appear
on the surface of cabinet, especially around the door seal gasket. Wipe off the
condensed water with a clean cloth.
Ɣ Do not keep the door open any longer than necessary, particularly in hot,
humid weather.
Ɣ 7KHWRSRIWKHUHIULJHUDWRULVPDGHRIVWHHOLQRUGHUWRSUHYHQW¿UHFDXVHGE\
H[WHUQDOLQÀXHQFHVDo not put things on top of the refrigerator to ensure this
factor.
Highlighted Features
High-end design suitable for luxury kitchens
Borderless glass surface with modern handle design.
Energy saving
Ɣ Panasonic’s INVERTER technology increases energy saving and reduces noise.
Ɣ 3DQDVRQLF¶VH[FOXVLYH(&21$9,WHFKQRORJ\DOORZVLGHQWL¿FDWLRQRIFKDQJHVLQ
user’s lifestyle habits, helping the refrigerator to automatically adjust to reduce energy
consumption.
Compressor located on top of the refrigerator (Top Unit)
Panasonic’s exclusive design moves the compressor from traditional position at the bottom of
the refrigerator to the top of the refrigerator, optimizing the space inside the refrigerator.
Auto Ice Making system
Ɣ The refrigerator is equipped with an Auto Ice making
system to meet the demand for ice usage at all times.
Ɣ The 5 L large-capacity water supply tank is made of
BPA-free and antibacterial material that is safe for
health.
Ɣ There is a Quick Ice Making mode.
Ɣ There is a Auto Ice Off mode to stop ice making and
Auto Ice Clean mode to automatically clean the ice
maker.
nanoe
TM
X technology and Ag Clean
Panasonic’s exclusive nanoe
TM
X technology and Ag
Clean help to deodorize and neutralize bacteria, keeping
food fresh for longer.
Steel rails for cases with maximum opening angle
Ɣ Heavy-duty steel rails optimize the load-bearing capacity, allowing users to gently pull out
the food containers with just one hand.
Ɣ It is possible to fully pull out the compartment, making it easier to organize and select
foodstuffs.
6
Independent Prime Fresh room and Prime Fresh+
Ɣ The temperature of Prime Fresh room can be
changed from 4 °C ~ -5 °C**.
- Temperature -1 °C ~ -5 °C: Soft freeze
temperature for food preservation, which helps
to save time and effort in defrosting food, while
NHHSLQJWKHLUÀDYRUDQGIUHVKQHVVIRUORQJHU
- Temperature 4 °C ~ 0 °C: Same as Fridge room
temperature when you want more space for food
preservation in the Fridge room.
Ɣ The large-capacity Prime Fresh room 61 L helps to store more food and comfortable for
big-size of foodstuff.
Ɣ Independent Prime Fresh room makes it easier to remove and clean, helps avoid mixing
unpleasant odor or cross-infection.
Ɣ Saving energy as you can use Prime Fresh room without opening the whole Fridge room.
*
The default temperature setting of Prime Fresh room is -3 °C.
** 'HSHQGLQJRQWKHW\SHRIIRRGVXFKDVDODUJHEORFNRIPHDWRUDODUJH¿VKWKHVWRUDJH
conditions and the ambient temperature, the cooling performance may be effected. In this
case, the temperature of Prime Fresh room should be set to the lowest temperature -5 °C.
Prime Freeze
Ɣ Freeze fresh or prepared food quickly according
to each mode, while keeping their fresh taste.
Ɣ Prime Freeze case includes the following modes:
• Cool Down in 3 minutes and 5 minutes
• Quick Cooling in 10 minutes and 15 minutes
• Rapid Freezing in 45 minutes and 60 minutes.
Depending on the purpose of food processing
and the type of food, it is possible to choose from
and apply different modes.
External water dispenser
Ɣ Allows users to get cold water without opening the
refrigerator door.
Ɣ The 3 L large-capacity Water tank is made of
BPA-free, antibacterial material that is safe for
health.
7

$GMXVWDEOHVOLGHJODVVWUD\
7KHDGMXVWDEOHVOLGHJODVVWUD\LQWKH)ULGJHURRPDOORZVÀH[LEOHDGMXVWPHQWRIIRRGVWRUDJH
capacity.
Fresh Safe vegetable case
The large-capacity Fresh Safe vegetable case is
HTXLSSHGZLWKD0RLVWXUHFRQWURO¿OWHUZKLFKNHHSV
vegetables fresh and prolongs their shelf life.
Quick Freezing
Quick Freezing makes the temperature in the refrigerator cool down quickly, so as to retain
WKHIRRGVWXIIVRULJLQDOÀDYRU
Convenient Operation Panel
Ɣ It is possible to adjust the temperature and
modes of the Fridge room, the Prime Fresh
room, the Freezer room and the Prime Freeze
according to the user’s intended purpose.
Ɣ The Fridge room and Freeze room have doors
alarm to remind closing the refrigerator doors.
Ɣ The LED display and Operation Panel appear
clearly and easy to use.
Ɣ There is a Child Lock mode.
8
Installation
The distance requested for installation
Caution
Ɣ In case the refrigerator is placed next to
walls, it is necessary to ensure that the
space between the left or right side of the
refrigerator and the wall is at least
25 cm. If this space is less than 25 cm,
the doors may not be fully opened and
the glass trays, vegetable case, etc.
could not be taken out.
129
Ɣ Do not place any objects on top of the
refrigerator. It may become hot due to heat
generated by the compressor at the top
RIWKHUHIULJHUDWRU,ILWLVGLI¿FXOWWRUHOHDVH
heat, the cooling capacity may be lowered.
Compressor
Ɣ :KHQXVLQJIRUWKH¿UVWWLPHFOHDQWKHLQVLGHRIWKHUHIULJHUDWRU
• Use a soft damp cloth to clean the refrigerator.
• 5LQVHWKH:DWHUWDQNV:DWHU¿OWHUVDQG,FHWUD\V
• 7KHVPHOORISODVWLFFRXOGEHVPHOOHGLQWKH¿UVWWLPHXVLQJWKHUHIULJHUDWRU,I\RXDUH
worry about it, please ventilate the room.
Ɣ Do not locate the refrigerator in a humid place as rust may form and may cause electric
leakage.
Ɣ Do not locate the refrigerator exposing to direct sunlight as the heat and sunlight will increase
the temperature affecting to the cooling capacity.
Ɣ Do not locate the refrigerator near heat source such as cooking stove or oven.
Ɣ Do not block the openings around the refrigerator.
Ɣ The refrigerator must be located in the place where there is good air circulation.
Ɣ In case of placing the refrigerator on an uneven surface, adjust the adjustable leg to
make the refrigerator stands stably.
Ɣ The top of the refrigerator is at
least 5 cm from the ceiling.
Ɣ The left and
right sides of the
refrigerator are
at least 5 cm
from the walls.
Ɣ The back of the refrigerator is at least
5 cm from the wall.
5 cm
5 cm
25 cm
9
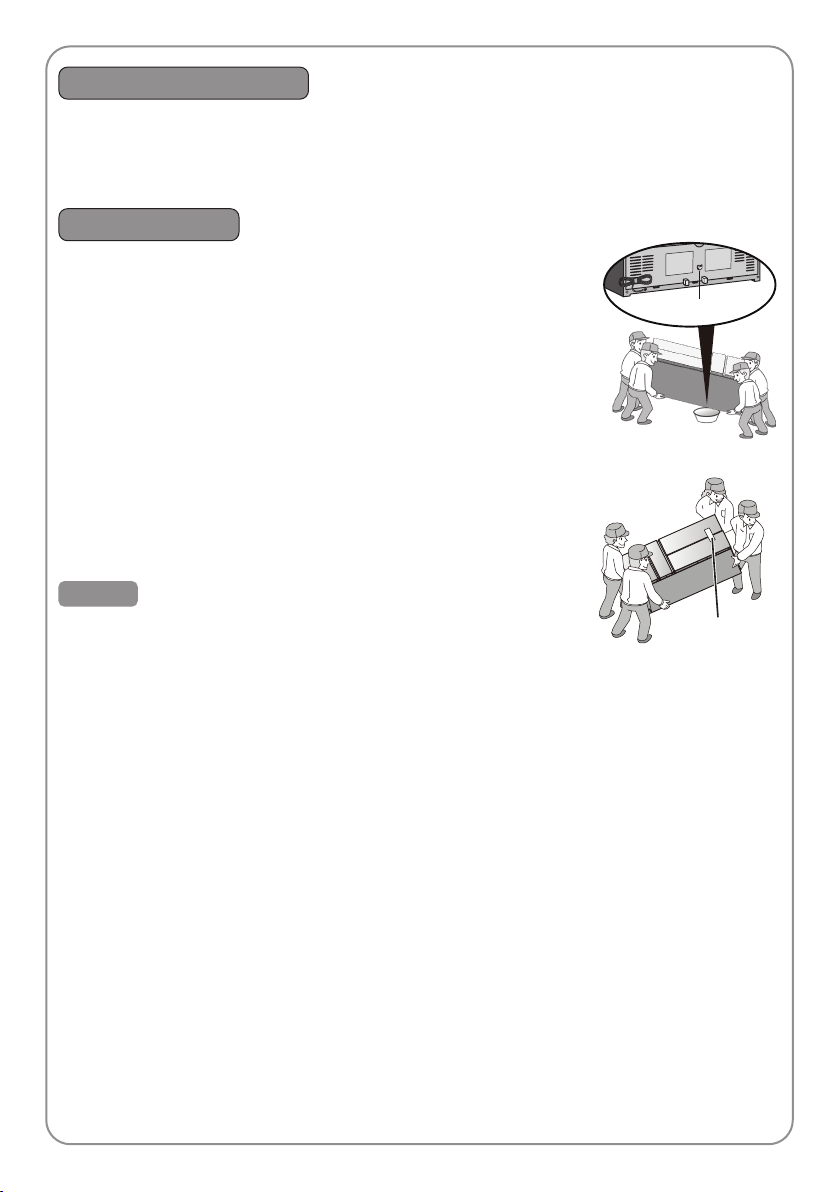
LED lamp and grounding
Ɣ The refrigerator LED lamp, specially designed for this refrigerator, do not replace it by
yourself. If you need replacement, please contact Panasonic Service Center.
Ɣ If there is no grounding wiring plug in refrigerator, it should be connected with grounding
connection to prevent electrical hazard from electric leakage.
Moving or shifting
1 Remove ice in the Ice Trays and Ice Box, water in the Water
Tanks.
2 Unplug the refrigerator.
3 Adjust the adjuster bolts (left and right) so that they do not touch
WKHÀRRU
4 Place a container underneath the drainage hole, then slowly tilt
the refrigerator backward to drain water from the drainage hole.
This action requires 4 or more people, of which 2 people lift the
front of the refrigerator to prevent the refrigerator from sliding
and avoid the risk of accidents.
※ How to move and transport
Ɣ At least 4 people are required to transport the refrigerator.
Ɣ Each person lifts a corner of the refrigerator.
Ɣ Do not transport by holding the refrigerator doors.
Caution
Ɣ When transporting, use straps to secure the refrigerator doors
and avoid letting the doors open by itself.
Ɣ Do not place the refrigerator on its side when transporting, as
this may cause damage to the refrigerator.
Ɣ After installation, wait at least 4 hours before plugging in the power to ensure that the
gas and oil in the compressor are in a stable state.
Drainage hole
Use straps to
secure
10
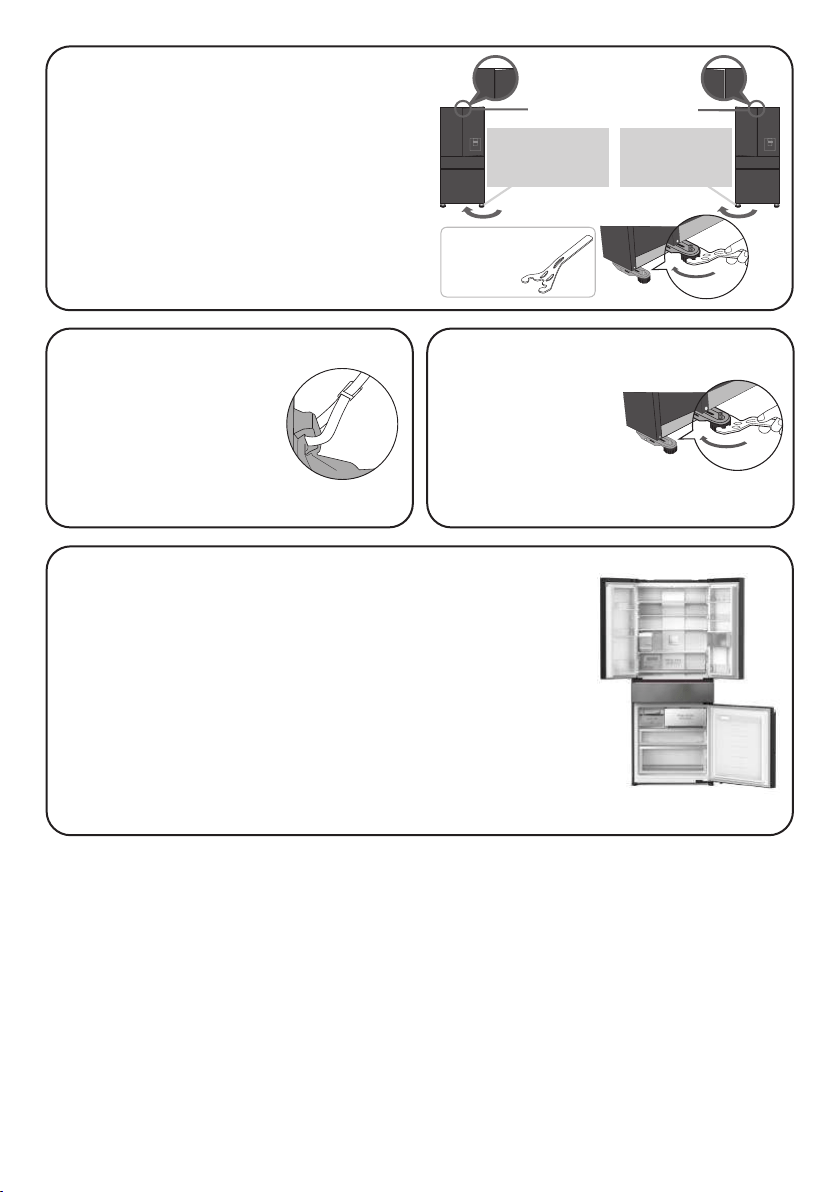
Have any measures taken
against tipping due to
earthquakes?
In order to prevent the
refrigerator from tipping
due to earthquakes,
SHUPDQHQWO\¿[LWE\XVLQJ
belts, etc.
Fix the refrigerator.
Turn the adjuster
bolts (right and left)
until they reach the
ÀRRUWRVWDELOL]HWKH
refrigerator.
If the door is slanted downwards.
Turn the adjuster bolt on the lower side, as
shown in the diagram, in order to adjust the
level.
Ɣ7KHIUHH]HUUHIULJHUDWRUGRRUVPD\WLOW
ZLWKLQIRXUWR¿YHGD\VDIWHULQVWDOODWLRQ
due to the load of the food or adaptation
WRWKHÀRRUVXUIDFHWXUQWKHFRUUHVSRQGLQJ
adjuster bolt with the dedicated tool to
adjust and level the door again to restore.
When the door is
lowered.
Lower the right
adjuster bolt for
the right door.
Lower the left
adjuster bolt for
the left door.
ƔDedicated tool
(Accessories)
Refrigerator doors should not be opened during the interior
cooling process.
The doors should not be opened until the interior has been
FRROHGGRZQVXI¿FLHQWO\:DUPDLUÀRZLQJLQWRWKHLQWHULRUZLOO
block the cooling function.)
Please wait until the interior has cooled down.
ƔThe refrigerator may take at least 4 hours in continuous running
to cool down the interior, in the condition of no loads inside and
the doors are not opened.
ƔDepending on ambient temperature and usage condition, it may
take 24 hours to cool down the interior and achieve equilibrium.
11
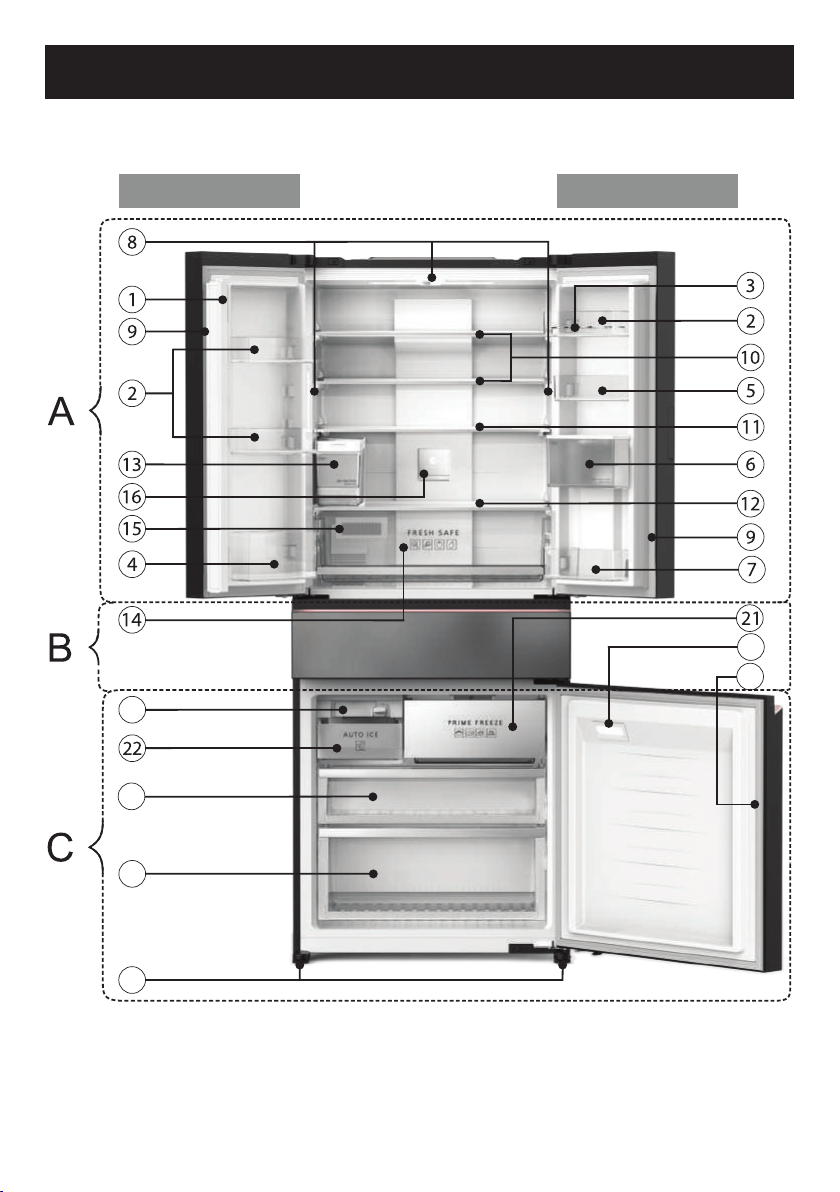
3DUWV,GHQWL¿FDWLRQ
27
28
23
24
25
26
Left door Right door
12
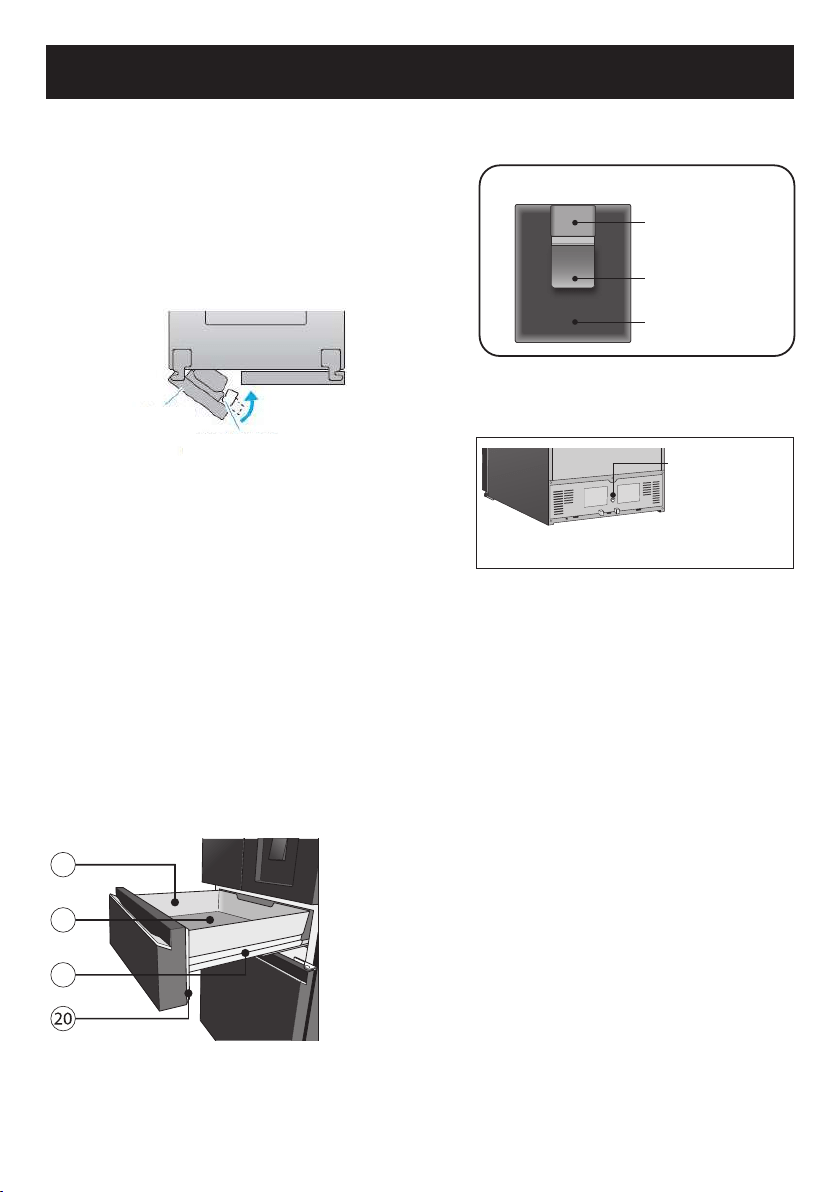
3DUWV,GHQWL¿FDWLRQ
A-Fridge room
1 French Crossrail
The French Crossrail minimizes the gap
between the left door and the right door of the
refrigerator. If this French Crossrail is opened
forward, put it back into place.
(Otherwise, the refrigerator doors cannot be closed
fully, causing the refrigerator to lose cool air.)
2 Door shelves (Quantity: 3 pcs)
3 Egg tray
4 Bottle shelf
5 Small door shelf
6 Water tank of Water Dispenser
7 Small bottle shelf
8 LED of Fridge room (Quantity: 3 pcs)
9 Door gasket of Fridge room
0 Glass trays (Quantity: 2 pcs)
a Slide glass tray
b Glass tray vegetable case
c Water tank of Auto Ice maker
d Vegetable case
e0RLVWXUHFRQWURO¿OWHUIRUYHJHWDEOHFDVH
f nanoe
TM
X icon
B-Prime Fresh room
19
17
18
g Prime Fresh case
h Aluminum tray
i Steel guide rails of Prime Fresh room
j Door gasket of Prime Fresh room
Water Dispenser
Rear case cover
Press the faucet
lever to get water
C-Freezer room
k Prime Freeze case
l Ice box
m Auto Ice maker
n Upper freezer case
o Lower freezer case
p LED of Freezer room
q Door gasket of Freezer room
r Adjuster bolts
Lock
Product view from behind
Drainage
system
[Inside the
drain tray]
Refrigerator
Left door
French Crossrail
13
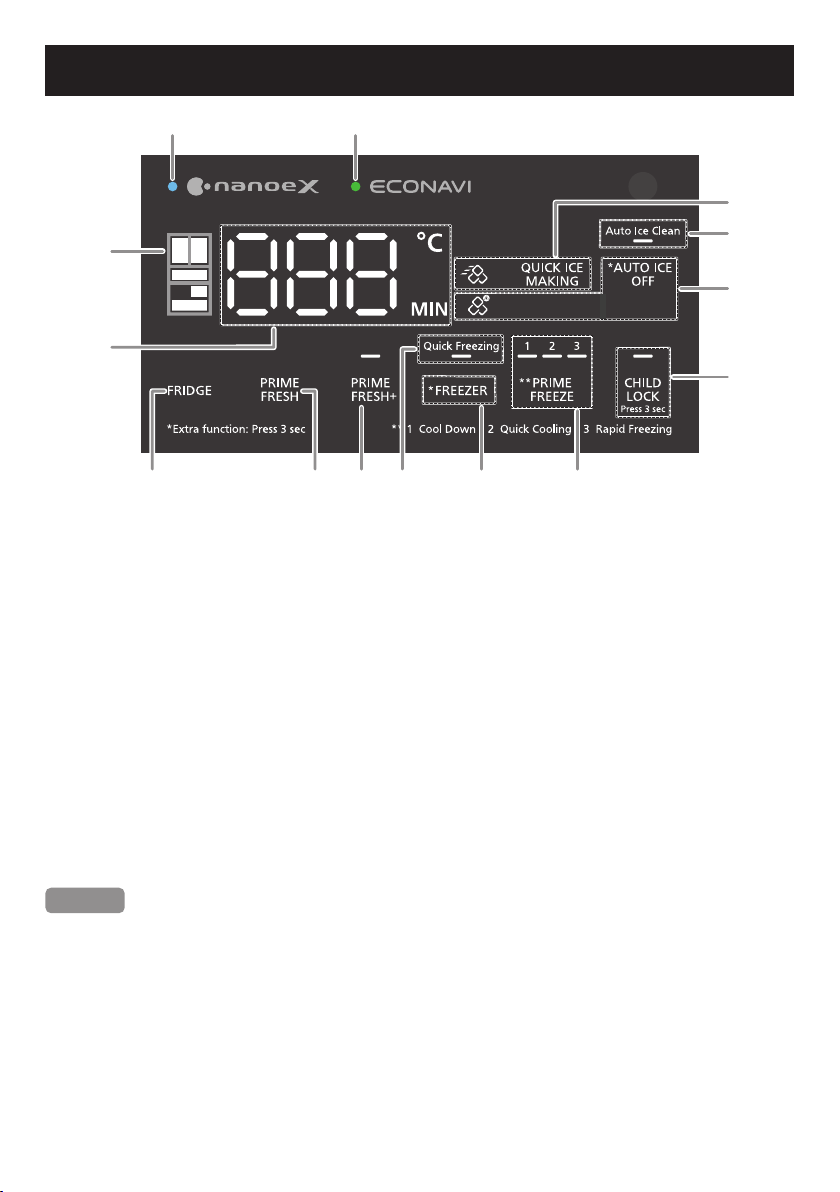
Operation Panel
1 2
3
4
5 6 7 89 0
a
c
d
b
1
Icon and LED of nanoe
TM
X: display the current status of nanoe
TM
X mode.
2
Icon and LED of ECONAVI: display the current status of ECONAVI operation.
3
LED of compartments: the icon of the respective compartment will light up when the
compartment is selected.
4 Temperature and time display area: display the temperature of Fridge room, Freezer room,
Prime Fresh room and the time for modes of the Prime Freeze.
5 Temperature control button of Fridge room.
6 Temperature control button of Prime Fresh room.
7 Control button and LED of Prime Fresh+.
8 Temperature control button of Freezer room.
9 LED of Quick Freezing.
0 Control button and LED for modes of Prime Freeze.
a Control button and LED of Quick Ice Making.
b Control button and LED of Auto Ice Off.
c LED of Auto Ice Clean.
d Control button and LED of Child Lock.
Remark
Ɣ On the Operation Panel: “*Extra function: Press 3 sec”, means that you need to press and hold
the button beginning with “*” mark for 3 seconds when you want to start the extra functions.
Ɣ Under normal conditions, the Operation Panel light will turn off. When you press the buttons,
the Operation Panel light will turn on. The Operation Panel light will turn off and all the
buttons will not be operated when the refrigerator door is opened.
Ɣ ,QVXPPHUZKHQWKHWHPSHUDWXUHLVKLJKLI\RXSXWXQFRROHGIRRGLQWKHUHIULJHUDWRURURSHQFORVH
the refrigerator doors repeatedly, the temperature inside will increase and the displayed value will
be higher than the setting temperature. Therefore, it is necessary to reduce doors opening times.
Ɣ :KHQ¿UVWSOXJJHGLQWKH2SHUDWLRQ3DQHOZLOOGLVSOD\WKHLQWURGXFWLRQRIPRGHVDQGWKH
temperature of compartments for about 10 seconds. Buttons will not be active during this
period of time. After 10 seconds, the Operation Panel can be adjusted normally.
14
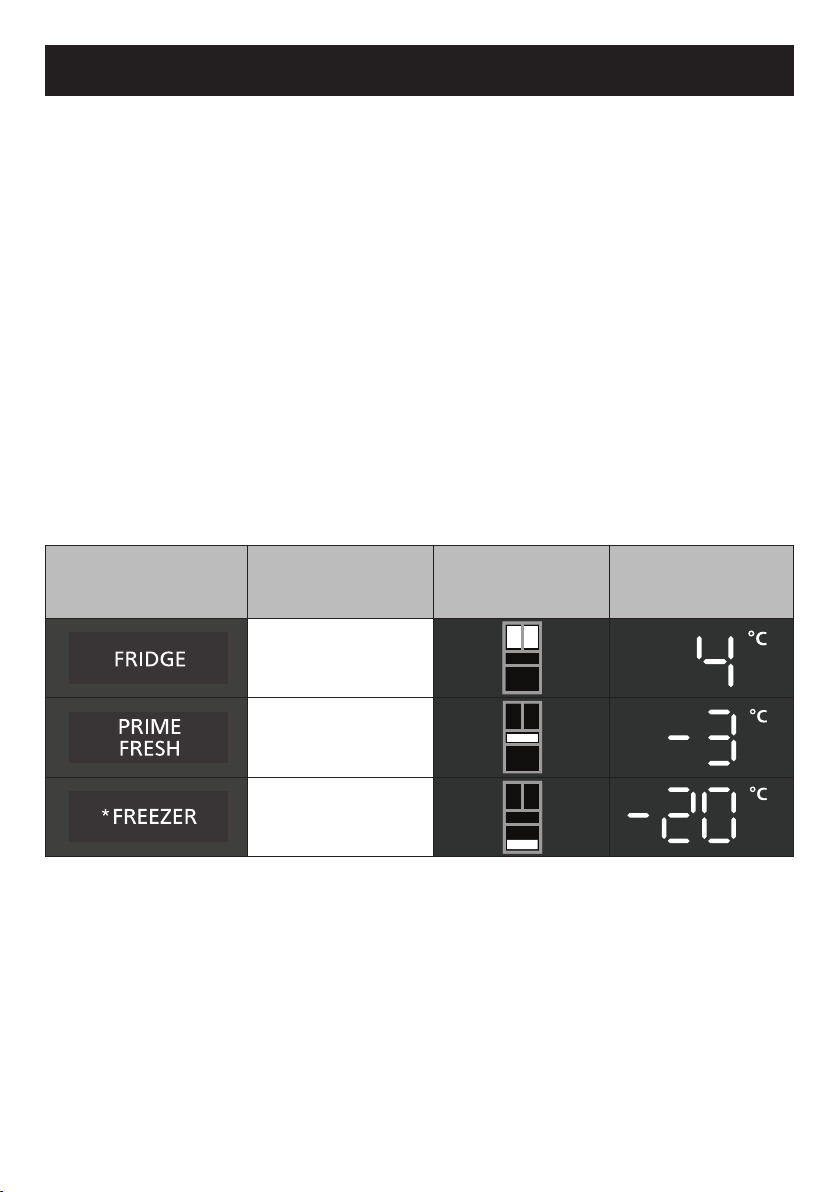
Temperature Control
Ɣ 7KH¿UVWWHPSHUDWXUHVHWWLQJIRU)ULGJHURRPLV&3ULPH)UHVKURRPLV&DQG
Freezer room is -20 °C. The temperature setting for each compartment can be adjusted.
Ɣ The temperature setting range of the Fridge room is 7 °C ~ 1 °C, of the Prime Fresh room
is 4 °C ~ -5 °C (the temperature for soft freezing is -1 °C ~ -5 °C, and the temperature to
use the Prime Fresh room as the Fridge room is 4 °C ~ 0 °C), of the Freezer room is
-15 °C ~ -23 °C.
Ɣ The temperature inside the refrigerator will vary depending on the ambient temperature,
installation status, usage conditions and amount of food.
Ɣ Due to different testing methods and tools, the actual temperature may differ from the
displayed temperature.
Ɣ This refrigerator is equipped with a processor to control the temperature inside the
refrigerator. When the ambient temperature changes, the compressor runs or stops, the
doors are opened or closed, the temperature inside the refrigerator and the temperature
setting will have a slight difference.
Temperature setting instructions
1. Display the current temperature
Press the following icons to display the current temperature of these compartments: Fridge
room, Prime Fresh room, and Freezer room. The LED indicates position and the LED
indicates temperature of the compartment will light on when selected.
Icon Compartment
LED indicates
position of the
compartment
LED indicates
temperature of the
compartment
Fridge room
Prime Fresh room
Freezer room
2. Temperature setting
After pressing the icon of compartment (Fridge, Prime Fresh, Freezer) to display the current
temperature, press again to start the temperature setting process. Then, LED indicates
SRVLWLRQRIWKHFRPSDUWPHQWDQG/('LQGLFDWHVWHPSHUDWXUHRIWKHFRPSDUWPHQWZLOOÀDVK
Continue to press the icon of that compartment to select the desired temperature level. Each
time the button is pressed, the temperature will increase by 1 °C.
3. Complete temperature setting
$IWHUFRPSOHWLQJWKHWHPSHUDWXUHVHWWLQJSUHVVDQRWKHUEXWWRQWR¿QLVKDQGVDYHWKHVHWWLQJ
that you have just made. Or if no other button is pressed within 10 seconds, the Operation
Panel will save the setting and return to stand by mode.
15
ECONAVI Operation
The refrigerator detects the opening and closing of the refrigerator door and the brightness
around the refrigerator to control operations automatically to ensure maximum energy saving.*
1
ECONAVI operation
Ɣ
The refrigerator learns the lifestyle patterns of
your family from door opening and time periods of
LQIUHTXHQWXVHWRPD[LPL]HHQHUJ\HI¿FLHQF\
Ɣ
T
he refrigerator learns your lifestyle patterns from
the previous 3 weeks of use and uses that data
from the 4th week onwards.
Ɣ
The refrigerator performs the ECONAVI energy
saving operation when it becomes dark around the
refrigerator such as in the night.
Settings for enabling ECONAVI operation
Ɣ ECONAVI operation is enabled automatically when the temperature control for both the
Fridge room and the Freezer room is set to 4 °C and -20 °C, respectively.
Ɣ ECONAVI operation does not operate if the “Quick Freezing”, “Prime Fresh+”, “Prime
Freeze” or “Quick Ice Making” mode is in operation.
Ɣ It is not possible to force to start of the ECONAVI mode.
Remark
*
1
T
he effectiveness of the ECONAVI mode is dependant on the ambient temperature, ambient
brightness and the number of times the refrigerator door is opened and closed and the state
in which food is stored.
ECONAVI light
Light intensity
sensor
nanoe
TM
X
Ɣ A nanoe
TM
is a nano-sized ion particle coated with water particles.
nanoe
TM
X are nano-sized electrostatic atomized water particles with 10 times the OH
radicals of nanoe
TM
.
Ɣ nanoe
TM
X will start when the refrigerator is plugged in and always run when the refrigerator
is in use. However, nanoe
TM
X requires moisture when operating, the effectiveness of this
mode will be reduced if the humidity inside the Fridge room is reduced (such as when
storing a few of vegetables, tubers).
Ɣ The nanoe
TM
X device device may cause a small sound during operation.
Ɣ After a long time closing, when open the doors of the refrigerator, it is possible to sense the
typical odor of ozone generated during operation, this is a normal phenomenon.
16
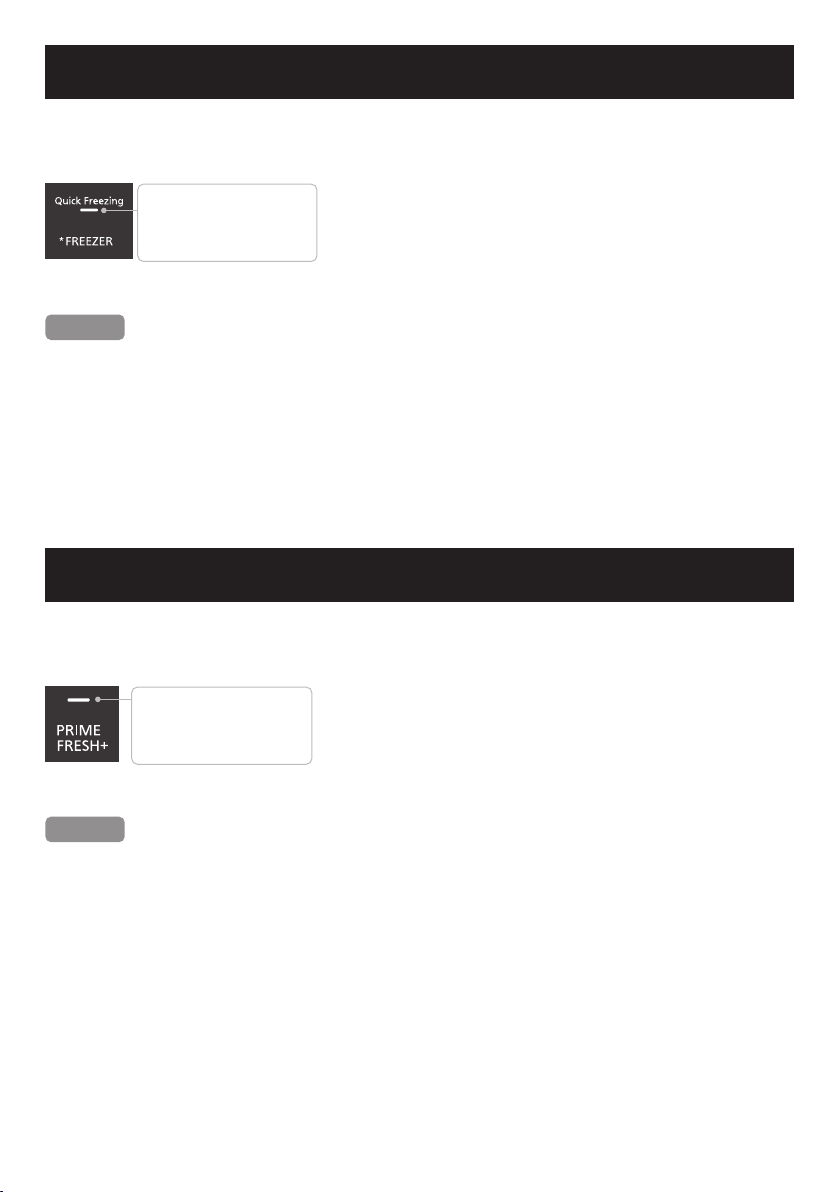
Quick Freezing
When
“
Quick Freezing
”
is set, the refrigerator will reduce the temperature quickly for better
performance of preserving food
.
How to operate the “Quick Freezing” mode
Light is on: Quick Freezing
is operated.
Light is off: Quick Freezing
is not operated.
ƔPress and hold the
“
Freezer
”
icon for 3 seconds to start
the Quick Freezing. Then, the light below the
“
Quick
Freezing
”
icon will turn on.
ƔIf you want to stop the Quick Freezing operation
immediately, press and hold the
“
Freezer
”
icon for
3 seconds until the light turns off.
Remark
Ɣ The “Quick Freezing” operation will stop automatically after running for 150 minutes and
return to normal mode. (The light LED [Quick Freezing] turns off.)
Ɣ 7KHÀDVKLQJRIOLJKW/('>4XLFN)UHH]LQJ@PHDQVWKDWWKHGHIURVWLQJV\VWHPLVFXUUHQWO\
ZRUNLQJ7KH³4XLFN)UHH]LQJ´PRGHZLOOVWDUWULJKWDIWHUWKHGHIURVWLQJRSHUDWLRQLV¿QLVKHG
Ɣ The temperature of the Freezer room will return to its previous setting when the Quick
Freezing mode ends.
Ɣ The following modes will be stopped when Quick Freezing is turned on: Prime Fresh+ ;
Quick Ice Making; Prime Freeze.
Prime Fresh+
When “Prime Fresh+” is set, the Prime Fresh room will reduce the temperature quickly for
better performance of preserving food.
How to operate the “Prime Fresh+” mode
Light is on: Prime Fresh+
is operated .
Light is off: Prime Fresh+
is not operated.
ƔPress the “Prime Fresh+” icon twice in a row to start
Prime Fresh+. Then, the light above the “Prime Fresh+”
icon will turn on.
ƔIf you want to stop the Prime Fresh+ operation
immediately, press the “Prime Fresh+” icon once until the
light turns off.
Remark
Ɣ “Prime Fresh+” will stop automatically after running for 105 minutes (when the ambient
temperature is 18 °C or less) or between 145 ~ 150 minutes (when the ambient
temperature is higher than 18 °C) and return to normal mode. (The light LED [Prime
Fresh+] turns off.)
Ɣ 7KHÀDVKLQJRIOLJKW/('>3ULPH)UHVK@PHDQVWKDWWKHGHIURVWLQJV\VWHPLVFXUUHQWO\
ZRUNLQJ³3ULPH)UHVK´ZLOOVWDUWULJKWDIWHUWKHGHIURVWLQJRSHUDWLRQLV¿QLVKHG
Ɣ The temperature of the Prime Fresh room will return to its previous setting when “Prime
Fresh+” ends.
Ɣ The following modes will be stopped when Prime Fresh+ is turned on: Quick Freezing;
Quick Ice Making; Prime Freeze.
Ɣ “Prime Fresh+”
will not start when the temperature of the Prime Fresh room is being set at
4 °C ~ 0 °C.
17
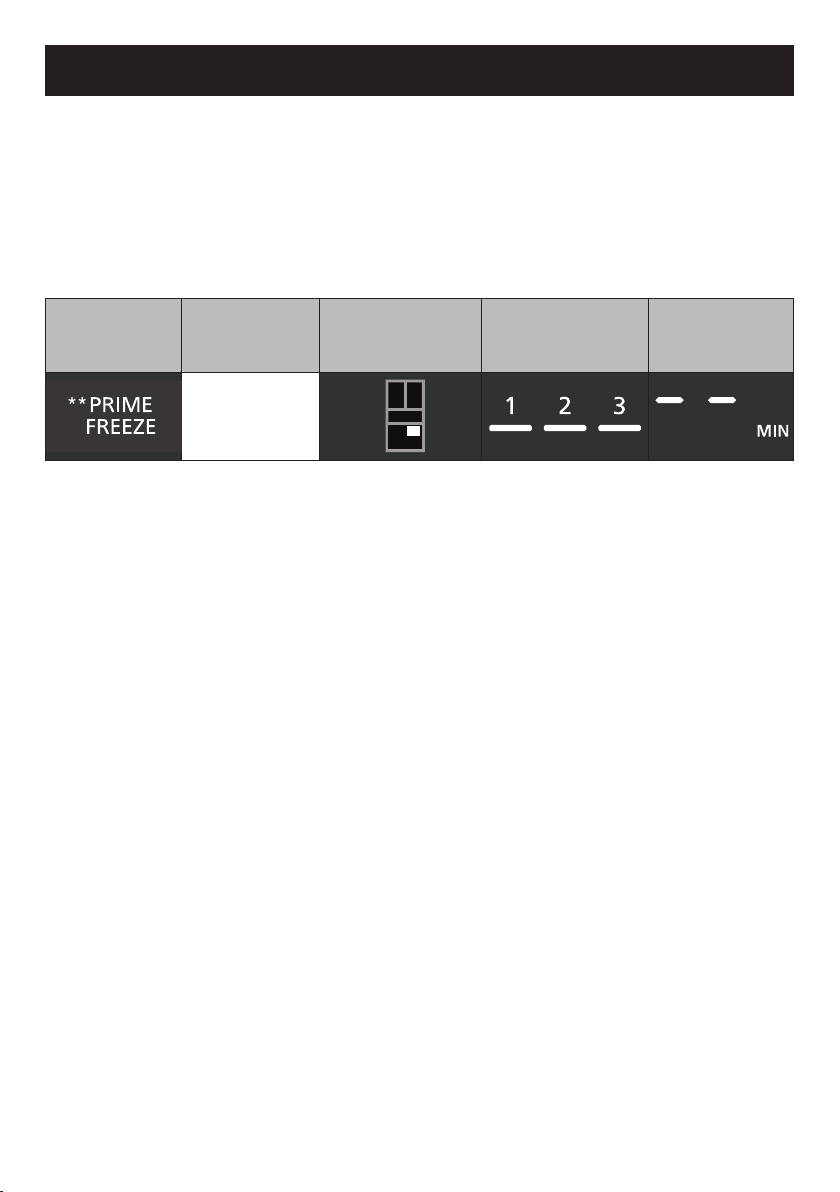
Prime Freeze
Prime Freeze is a separate room located inside the Freezer room. This compartment is
equipped with an individual fan system and high-class aluminum heat transfer plate, and
modes to adjust the cooling time according to each food processing purpose in order to
support the user in preparing dishes in a variety of way and save time.
How to operate Prime Freeze
1 Press the icon of the Prime Freeze compartment on the Operation Panel. Then, the LED
indicates position of the compartment, the LED indicates mode 1-2-3(*) and the LED
indicates operating time(**) of the Prime Freeze will turn on when selected.
Icon Compartment
LED indicates
position of the
compartment
LED indicates
mode 1-2-3
LED indicates
operating time
Prime Freeze
(*) For LED indicates mode 1-2-3:
• If the previous setting has not run out of time, the light will display the previous setting
mode.
• If there is no time left from the previous setting, all LED indicates mode 1-2-3 will turn off.
(**) For LED indicates operating time:
• If the previous setting has not run out of time, the remaining minute value will be
displayed.
• If there is no time left from the previous setting, the minute value will be displayed as “--”.
2 Continue to press the icon of the Prime Freeze compartment, then the LED indicates
SRVLWLRQZLOOÀDVK$IWHUWKLVVWHSLIWKHSUHYLRXVVHWWLQJKDYHQRWUXQRXWRIWLPHWKH
minute value will be cleared and displayed back to “--”. Press the icon of the Prime Freeze
until the desired mode is selected. Each time the button is press, the LED indicates
operating time will show the time in each respective mode.
3 Complete the setting
$IWHUFRPSOHWLQJWKHVHWWLQJRI3ULPH)UHH]HSUHVVDQRWKHUEXWWRQWR¿QLVKDQGVDYHWKH
settings that you have just made. Or if no other button is pressed within 10 seconds, the
Operation Panel will save the setting and return to stand by mode.
4 End mode
After the setting time of a mode running out, the Operation Panel will display the time back
to “0”DQGWKHUHZLOOEHDQRWL¿FDWLRQVRXQG7KHQRWL¿FDWLRQVRXQGZLOOUHSHDWHYHU\
2 minutes for 6 minutes, until you press the “Prime Freeze” icon on the Operation Panel or
when the Freezer room door is opened. If you do not take food out immediately after the
end of the mode, your food may be frozen more than desired.
18
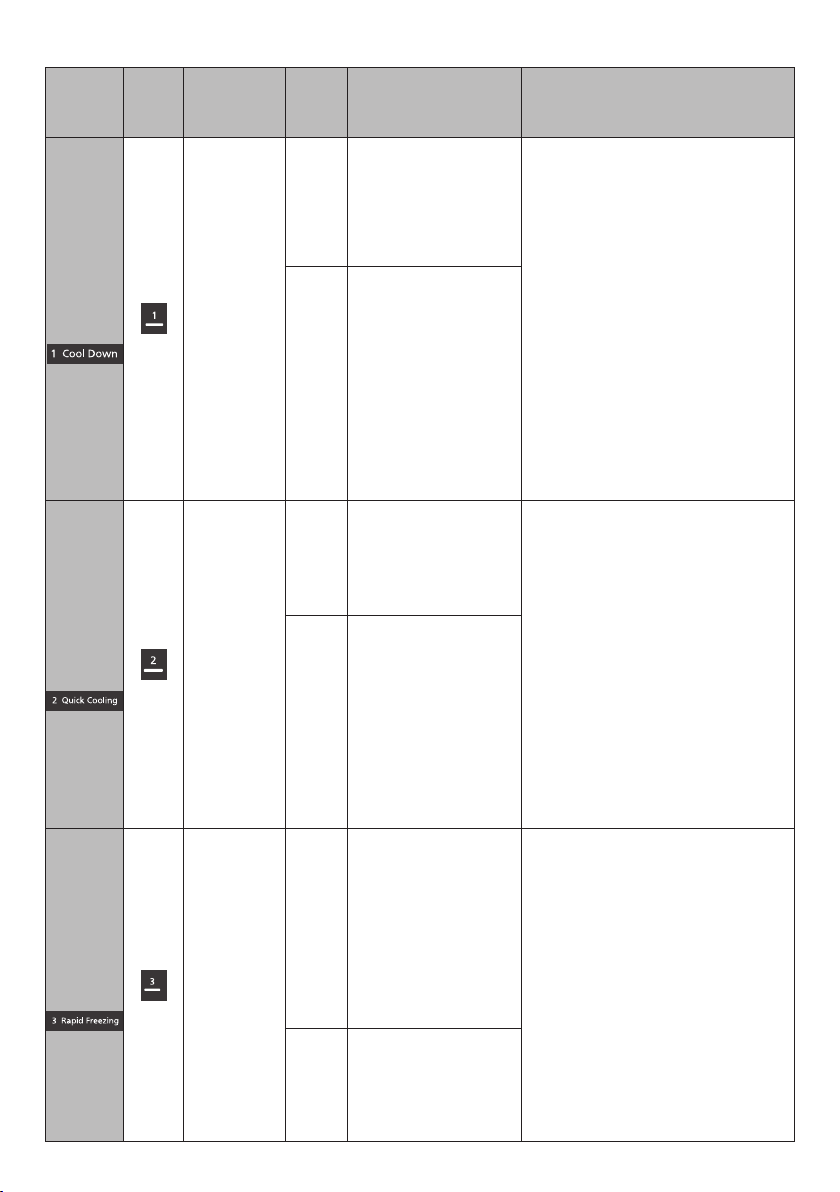
Modes of Prime Freeze
Mode
name
Display
Purpose
of food
processing
Mode
(Unit:
Minute)
Recommended type
of food
Remark
Cool
Down
Cooling
down
quickly the
ZDUPKRW
food
3
• Rice (150
g
)
• Potato salad (150
g
)
- Do not cover the box with lid or food
wrapper to ensure the effectiveness
of Cool Down. If you are concerned
about the smell of your food, you can
use a lid or food wrapper to cover it,
but the food may not be cold enough.
- 5 minutes is the estimated time for
1 lunch box (about 150
g
of rice) or
200
g
of prepared food. If the amount
of food is larger, it may take longer to
cool down.
- Quick Cooling can be used to
cooling down over 200 ml of formula
milk within 10 minutes.
- After cooling down the formula milk
with Cool Down, it is necessary to
check the temperature of the formula
milk before giving it to the baby.
5
• Rice (300
g
)
• Potato salad (300
g
)
• Formula milk (100 ml)
• Soup (150 ml)
Quick
Cooling
Cooling
food
quickly
to save
time for
preparing
food and
desserts.
10
• Curry (200
g
)
• Fish (100
g
)
• Pudding (2 pieces)
• Jelly (2 pieces)
- For ingredients that need to be
marinated or seasoned such as
PHDWIULHGJULOOHG¿VKVR\PDULQDWHG
eggs, etc., put the ingredients and
VSLFHVLQWRVHDOHGFRQWDLQHUVEDJV
7KHLQJUHGLHQWVZLOOEXUVWZLWKÀDYRU
during the cooling process.
)RUIUHVKPHDW¿VKDQGVKULPS
WKDWPD\EHGLI¿FXOWWRVOLFHFXWWKH
VOLFLQJFXWWLQJZLOOEHHDVLHUDIWHU
placing them in Quick Cooling mode.
-
Use aluminum or metal cups for jelly
or desserts. With ceramic or porcelain
containers, food may not be cold enough.
- This mode can be used to cool
beverages quickly.
15
• Curry (400
g
)
• Chicken drumstick
(250
g
)
• Pudding or Flan
(4 pieces)
• Jelly or cakes made
from gelatine
(4 pieces)
Rapid
Freezing
Freezing
rapidly
prepared
dishes to
ensure the
preservation
of prepared
foods and
save time
for every
day cooking.
45
• Beef (150
g
)
• Steamed vegetables
(1 bunch of broccoli)
• Vegetables (250
g
of
sliced cabbage)
• Fried chicken (250
g
for 2 people)
• Sherbet (300 ml)
• Bread (2 pieces)
- Cover fresh food and steamed
vegetables with food wrapper,
freezer bags or cover with tight lids.
- Fried foods (e.g. fried chicken,
IULHGVKULPSVTXLGVSULQJUROOV
should be placed onto an aluminum
tray and use
“Rapid Freezing”.
After freezing the food, put them
into freezer bags or containers for
storage.
- This mode can be used to freeze
some fruits such as strawberries,
lychees, berries,... for long-term
preservation.
60
• Jellied meat (350
g
)
• Half of a chicken
(500
g
)
• Beef (250
g
)
• Cubed ice (1 tray)
19

Prime Freeze
Remark
Ɣ Always place food on the aluminum heat transfer plate for the best effectiveness of cooling.
Ɣ When hot or wet food is placed on the aluminum heat transfer plate without a lid or food
wrapper, the surface of the food may be frozen and the inside of Freezer room may be
frosted. If you are worry, please use lids or food wrapper.
Ɣ If cooked food is still at a high temperature, it should be cooled down to about 70 °C before
putting in the Prime Freeze case.
Ɣ Leaving a glass bottle or can inside the compartment may pose a risk of broken, cracking,
or damage.
Ɣ Do not place the food which is higher than the height of the Prime Freeze case to avoid the
risk that the Prime Fresh case does not close completely, causing frost and damaging food
or food containers in the room.
Ɣ Do not touch the metal food container directly with wet hands, as there is a risk of frostbite.
Ɣ During the operation of Prime Freeze:
• ECONAVI operation will be stopped.
• The noise from the fan will be louder.
• The power consumption will be higher than normal.
• If Quick Ice Making are set, Prime Freeze will be stopped.
• 7KHÀDVKLQJRI>3ULPH)UHH]H@/('PHDQVWKDWWKHGHIURVWLQJV\VWHPLVFXUUHQWO\
ZRUNLQJ³3ULPH)UHH]H´ZLOOVWDUWULJKWDIWHUWKHGHIURVWLQJRSHUDWLRQLV¿QLVKHG7KLVLVD
normal phenomenon.
Ɣ When Prime Freeze is not in use, this case can also be used as any other position in the
Freezer room.
• 6PDOOIRRGVFDQEHVWRUHGIRUHDVLHU¿QGLQJ
• The temperature in this room may be higher than the temperature in the entire Freezer
room. For long-term preservation, please transfer food to the Freezer room.
Quick Ice Making
When setting Quick Ice Making, the refrigerator will increase its capacity to reduce ice making
time.
How to operate Quick Ice Making
Light is on: Quick Ice Making is operated.
Light is off: Quick Ice Making is not operated.
ƔPress the “Quick Ice Making” icon twice in a row to start
Quick Ice Making. Then, the icon of Quick Ice Making will
turn on.
ƔWhen you want to stop quick ice making, press the “Quick
Ice Making” icon once until the light turns off.
Remark
Ɣ The following modes will be stopped when Quick Ice Making is turned on:
• Quick Freezing
• Prime Fresh+
• Prime Freeze
• Auto Ice Off
20
Child Lock
When setting the Child Lock mode, the Operation Panel will disable the interaction to adjust
temperature and modes in order to prevent unintended adjustment by children.
How to operate Child Lock
Light is on: Child lock is operated.
Light is off: Child lock is not
operated.
ƔPress the “Child Lock” icon and hold for 3 seconds to
enable the Child Lock mode. Then, the light of “Child
Lock” will turn on.
ƔWhen you want to stop the Child Lock mode, press and
hold the “Child Lock” icon again for 3 seconds until the
light turns off.
Auto Ice Off and Auto Ice Clean
When the refrigerator is in operation, the Auto Ice making mode will automatically operate
without any setting. When setting the Auto Ice Off and Auto Ice Clean mode, the refrigerator
will stop the Auto Ice making and clean the ice maker automatically.
How to operate the Auto Ice Off mode
Light is on: Auto Ice Off is operated.
Light is off: Auto Ice Off is not operated.
ƔPress the “Auto Ice Off” icon twice in a row to stop Auto Ice
making. Then, the LED icon of Auto Ice Off mode will turn on.
ƔWhen you want to restart the Auto Ice making mode, press
the “Auto Ice Off” once. Then, the LED icon of the Auto Ice
Off mode will turn off.
Remark
Ɣ When the Auto Ice Off mode is on, Quick Ice Making, if active, will be stopped.
How to operate the Auto Ice Clean mode
ƔPress and hold the “Auto Ice Off” icon for
VHFRQGVWRHQDEOHGLVDEOHWKH$XWR,FH
Clean mode. At the end of the automatically
cleaning process, the refrigerator will have a
QRWL¿FDWLRQVRXQG
Remark
Ɣ &DQQRWVWRSGLVDEOHWKHRSHUDWLRQRI$XWR,FH&OHDQPRGHZKHQLWLVLQSURFHVVLQJ
.
For details on the cleaning operation of Auto Ice maker, please refer to Page 26.
Light is on: Auto Ice Clean is operated.
Light is off: Auto Ice Clean is not
operated.
21
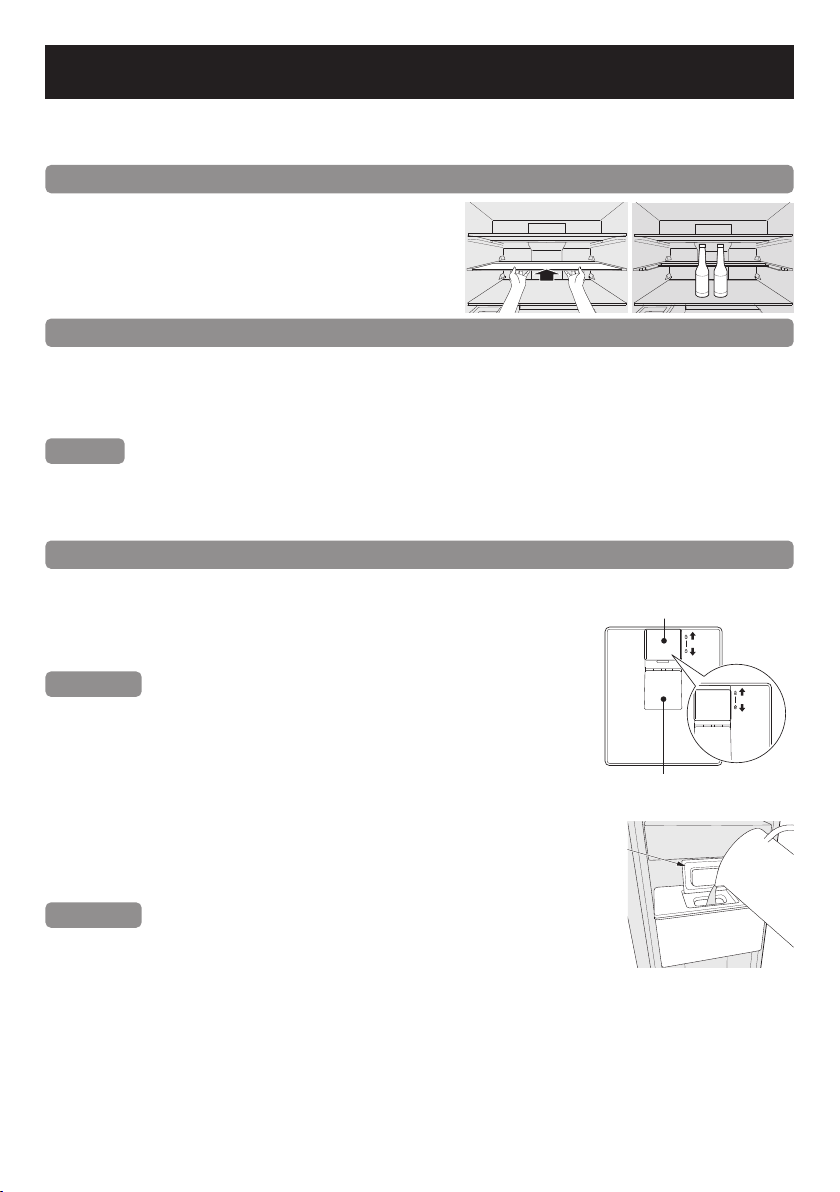
Fridge Room
The temperature range of the Fridge room is 7 °C ~ 1 °C
If the temperature of the Freezer room is set to 1 °C during a long period of time, your food may be frozen.
How to use slide glass tray
Slide the front-half glass tray to the back, then
you can put higher things depending on your
purpose of use.
Please refer to Page 28 for how to remove the Slide
glass tray.
Vegetable case
Vegetable case is equipped with large-capacitor and the guide rail with maximum opening angle,
making it easier to take out food and increasing its load-bearing capacity, allowing the user to
JHQWO\SXOOWKHFDVHRXWZLWKMXVWRQHKDQG7KH0RLVWXUHFRQWURO¿OWHUZLOOFRQWUROWKHKXPLGLW\
inside the vegetable case, helping the vegetables retain moisture and stay fresh.
Remark
Ɣ Due to high humidity, water drops may appear on the vegetable case. Wipe it off with a soft cloth.
Ɣ Do not place food higher than the height of the vegetable case to avoid the risk that the
vegetable case does not close completely, causing frost and damaging vegetables and fruits.
How to use the Water dispenser
With the Water dispenser, you can get cold water without opening the refrigerator door.
Method of getting water
1 Push the lock upward until it touches the top edge.
2 Keep the cup straight and gently push the lever to get water.
Attention
Ɣ After taking enough water, slowly take the cup out
to avoid the water leaking.
Ɣ Use a clean cloth to dry if any water spills out.
Ɣ When you need to lock the Water dispenser, pull the lock
downward until it touches the bottom edge and the red line can be seen.
If it is not necessary to lock the Water dispenser, skip this step.
How to use Water tank
1 Open the cap and pour water into the tank.
2
Close the cap tightly and close the refrigerator door.
Attention
Ɣ :KHQXVLQJIRUWKH¿UVWWLPHLWLVQHFHVVDU\WRFOHDQWKH:DWHUWDQN¿UVW
Ɣ Do not pour hot water above 50 °C into the Water tank.
Ɣ The tank can contain up to 3 liters of water. Do not pour water above the 3 L line on the tank.
Ɣ Only pour drinking water into the Water tank; do not use beer, soft drinks, carbonated beverages, etc.
Ɣ Ensure that the Water tank is always installed in the right position when the refrigerator is in
XVH2WKHUZLVHLWZLOODIIHFWWKHFRROLQJHI¿FLHQF\DQGFDXVHVZHDWLQJLQWKH)ULGJHURRPGRRU
Ɣ Check the Water tank before use.
Ɣ +DUGQHVVRIZDWHUPXVWEHPJ/RUOHVV7KHPLQHUDOVPD\DSSHDUDVZKLWHÀRDWLQJ
particles. They are not harmful.
Ɣ :DWHUFRQWDLQHUVKRXOGEH¿OOHGIURPGULQNDEOHWDSZDWHU7KLVSURGXFWLVQRWGHVLJQHGWR
replace a water treatment system. Not suitable for untreated rain Water tanks.
Lid
Cap
Open
Close
Lock
Push the level
to get water
22
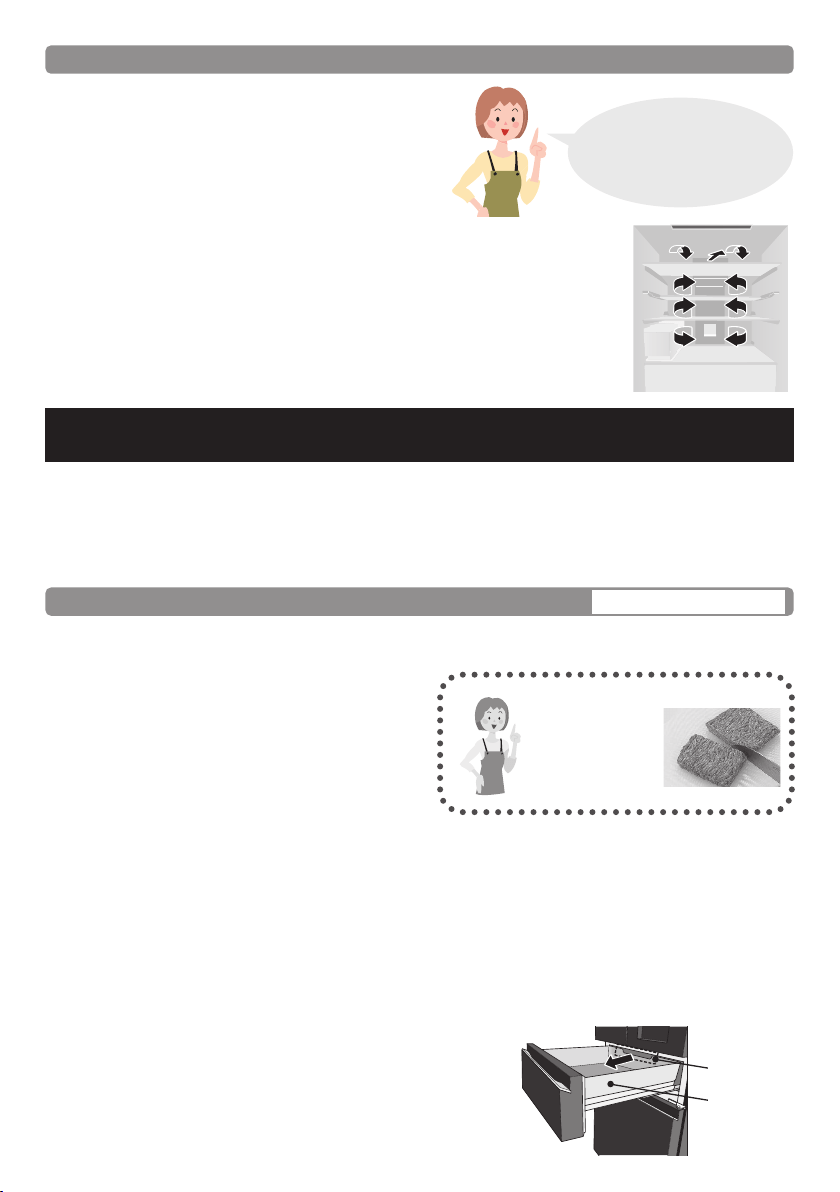
Prime Fresh Room
The temperature in the Prime Fresh room can be selected as below:
• The temperature for soft freeze is -1 °C ~ -5 °C.
• The temperature to use the Prime Fresh room as the Fridge room is 4 °C ~ 0 °C.
When using the refrigerator, the temperature can be adjusted according to your usage.
*The default temperature setting of Prime Fresh room is -3 °C.
Using Prime Fresh room
Approx. -1 °C ~ -5 °C
Ɣ 7KLVURRPLVVXLWDEOHIRUVWRULQJIUHVKIRRGVXFKDVPHDWRU¿VK&RPSDUHGWRVWRULQJLQ
WKH)ULGJHURRPWKHVWRUDJHOLIHRIPHDWRU¿VKEHFRPHVORQJHU
Ɣ When food is frozen too much.
6OLFHGUDZ¿VKRUPHDWPD\EHIUR]HQWRR
much. Set the temperature to higher than
-3 °C to prevent food from over frozen.
Ɣ
When food is not partially-frozen.
Depending on the type of food, such as a
ODUJHEORFNRIPHDWRUDODUJH¿VKWKHVWRUDJH
conditions and the ambient temperature, food
may not be partially-frozen as it intended. Then, set to the lowest temperature -5 °C.
Ɣ Do not stuff too many food items. When there are too many food items and there is no
space for cool air circulation inside the refrigerator, the cooling capacity will be affected.
3URYLGHVXI¿FLHQWVSDFHEHWZHHQIRRGVLQVLGH3ULPH)UHVKURRP
Ɣ
:KHQVWRULQJIRRGLQODUJHDPRXQWHJDODUJHEORFNRIPHDWDODUJH¿VKRUDFKLFNHQLWLVDGYLVDEOH
to place the food at the center of the Prime Fresh room to optimize the cooling performance.
Ɣ When the temperature of the Prime Fresh room is set at 4 °C ~ 0 °C, the Prime Fresh+
mode will not operate in order to prevent food spoilage.
Ɣ Do not block the cool air outlet with food items inside the Prime Fresh room.
If the cool air does not spread into every corner of Prime
)UHVKURRPWKHQWKHLQWHULRUZLOOQRWEHVXI¿FLHQWO\
cooled and the food may be affected. Therefore, food
should not be placed in front of the Cooling air guide
(on the Prime Fresh case) to prevent blocking the air
circulation inside the room.
Tips for food preservation
Do not stuff too many food items
When there are too many food items and there is
no space for cool air circulation inside the
refrigerator, the cooling capacity will be affected.
3URYLGHVXI¿FLHQWVSDFHEHWZHHQIRRGV
Do not block the cool air outlet with food items
If the cool air does not spread into every corner of compartments, then
WKHLQWHULRUZLOOQRWEHVXI¿FLHQWO\FRROHGDQGPRUHHOHFWULFLW\ZLOOEH
consumed.
*The cooling air vents are located on the duct inside the Fridge room.
Easy to cut.
The partially-
frozen foods is
easy to cut!
It comes in handy.
No wasting cool air
inside the refrigerator is the
key to keeping food fresher
for longer!
Cooling air
guide
Prime Fresh
case
23
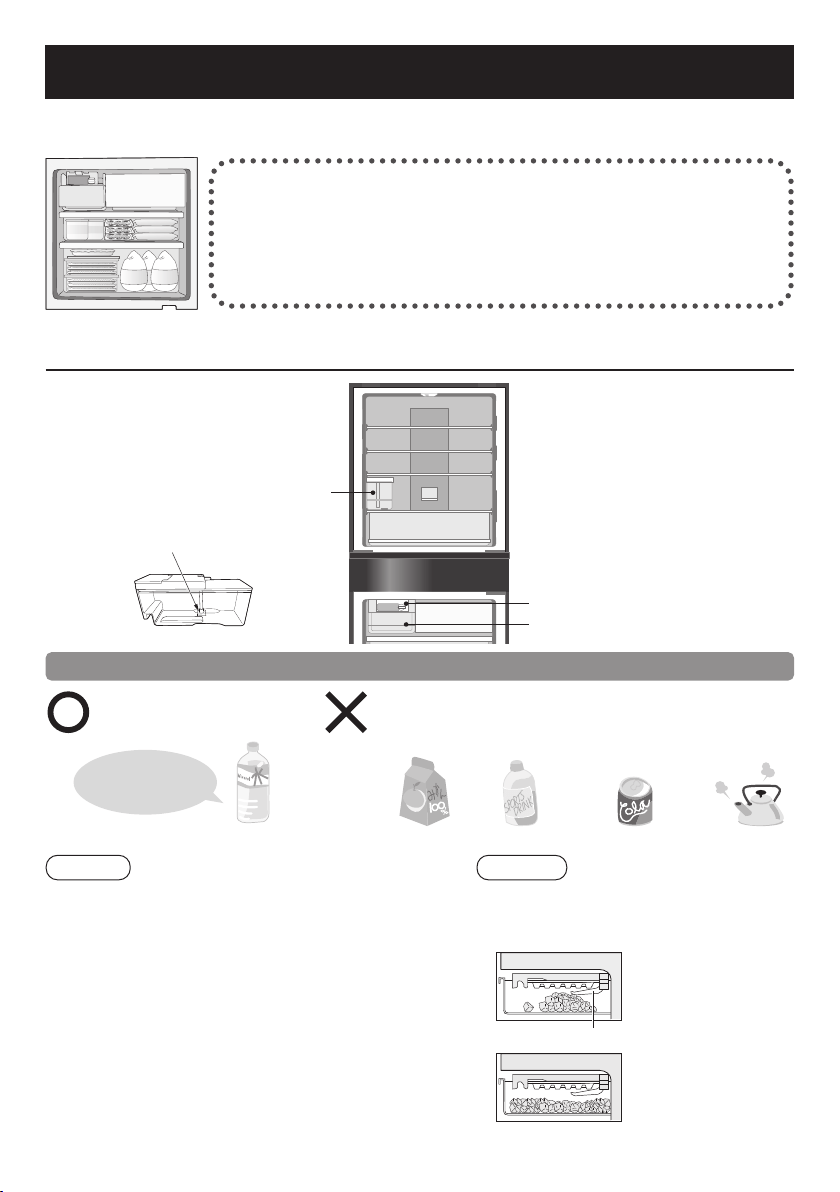
Freezer Room
Storing frozen food, cooked meal and food freezing by Prime Freeze case.
The temperature range of the Freezer room is -15 °C to -23 °C.
Frozen food
Frozen food
Frozen food
Three tips for freezing food and locking in the flavour
1. Freeze thin and small items of food quickly!
2. Fully sealed
3. Do not refreeze
Auto Ice making
Water tank of
Auto Ice maker
:DWHU¿OWHU
Ice tray of Auto Ice maker
Ice box
To use the Auto Ice maker in comfort
Please use only drinking
water for Auto Ice making.
Do not put liquids such as the following into the
Water tank.
(These liquids may damage the Auto Ice maker).
Juice, etc. Sports drinks Carbonated beverages Hot water
The hardness
of water must be 100
mg/RUOHVV
Drinking water
Tips
Ɣ
The hardness of water must be 100 mg/RUOHVV
7KHPLQHUDOVPD\DSSHDUDVZKLWHÀRDWLQJSDUWLFOHV
They are not harmful.
Ɣ
:KHQXVLQJWKH$XWR,FHPDNHUIRUWKH¿UVWWLPH
odor or dust may be on the Ice tray, etc.
3OHDVHWKURZDZD\WKH¿UVWORWRILFH
Ɣ
Remember to regularly use the Auto Clean function
of the Auto Ice maker. (Page 21)
Attention
When the Ice box is full and the ice cubes
touch the ice detection lever, the ice
making will stop automatically.
The pile of ice cubes will
touch the ice detection lever.
(Then, the Auto Ice
making will stop).
Ice detection lever
Distribute the ice cubes
evenly inside the Ice box
for making more ice.
Front Rear
Water filter
Back
Front
24
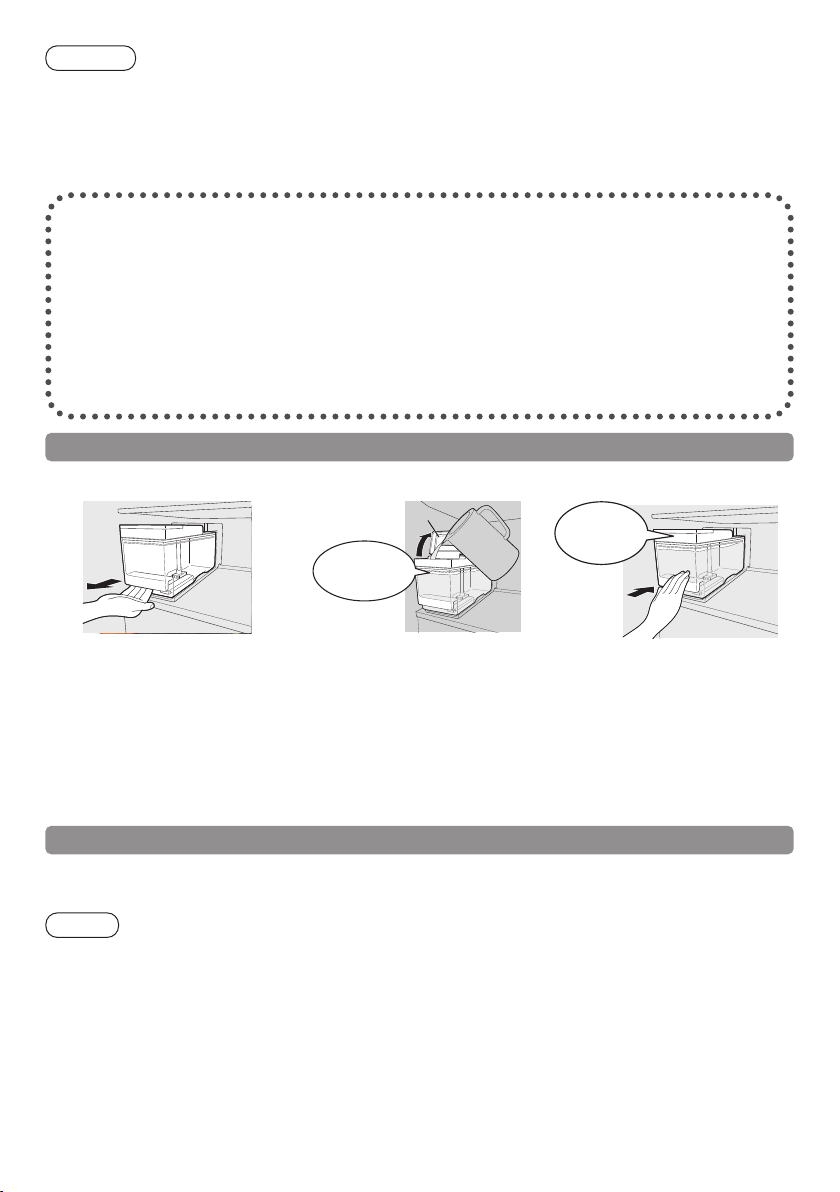
1
Take the Water tank out. 2
Fill with water.
3
Install the Water tank.
'RQRW¿OOPRUH
water than the “Max”
(Maximum) line.
Lid
Push the
Water tank in
completely.
Pull out the Water tank until
it is blocked.
Fill water up to the “Min”
(Minimum) line.
Open the lid and fill the
Water tank with water, then
put the lid back in place.
Confirm the direction of the
tank and install until the tank
reached the end lock.
(If the Water tank does not
reach the end lock, the Auto
Ice maker could not operate)
* Ice could be made in approx. 2 hours, with the temperature in the Fridge room is 4 °C, Prime
Fresh room is -3 °C, and Freezer room is -20 °C.
How to make ice quickly
In the “Quick Ice Making” mode, the ice making speed will be increased.
Ice can be made within 90 minutes* at the quickest.
Remark
Ɣ After about 6 hours, the refrigerator will automatically return to normal Auto Ice making
mode.
Ɣ 7KHÀDVKLQJRI>4XLFN,FH0DNLQJ@/('PHDQVWKDWWKHGHIURVWLQJV\VWHPLVFXUUHQWO\
ZRUNLQJ³4XLFN,FH0DNLQJ´ZLOOVWDUWULJKWDIWHUWKHGHIURVWLQJRSHUDWLRQLV¿QLVKHG
Ɣ In Quick Ice Making, energy consumption increases more than usual.
Ɣ ECONAVI operation does not work during the setting of “Quick Ice Making”.
* Ambient temperature of 20 °C, the temperature of the Fridge room, the Prime Fresh room,
and the Freezer room are 4 °C, -3 °C, and -20 °C, respectively.
How to use Water tank of Auto Ice maker*
Request
Ɣ Do not pour water directly into the Ice box to make ice.
(Otherwise, the Ice box may be broken).
Ɣ Do not put food or other things into the Ice box.
(Otherwise, the amount of ice cannot be correctly detected and Auto Ice making may be
stopped or the Ice box cannot be pulled out.)
Ice maker cycle time will be longer in the following cases.
Ɣ7KH¿UVWWLPHXVLQJWKHUHIULJHUDWRU
(It will take at least 24 hours since the Auto
Ice making function only starts after the
inside of the refrigerator is cool enough).
Ɣ When the refrigerator doors is frequently
opened.
ƔWhen the refrigerator doors is ajar.
Ɣ When a large amount of food is stored at
once.
Ɣ When the ambient temperature is low
during winter or high during summer.
ƔWhen a power failure occurs.
25

How to turn off Auto Ice maker
<RXFDQHQDEOHGLVDEOHWKH$XWR,FHPDNLQJPRGHDFFRUGLQJWR\RXUQHHGV
Turn off Auto Ice making
1 Choose the Auto Ice Off mode, the icon of the Auto Ice Off mode on the Operation Panel
will turn on and the refrigerator will stop making ice (Page 21).
2 No need to pour water in the Water tank. The remaining water inside the Water tank will
keep making ice, and ice cubes will be available after 2 hours. Or when the Ice box is full,
the Auto Ice making will be stopped.
3 When you want to continue making ice automatically, please choose the Auto Ice Off
mode, and the icon of the Auto Ice Off mode on the Operation Panel will turn off (Page 21).
Turn off Auto Ice making for a long period of time
1 Empty the Water tank and remove all ice cubes from the Ice box.
2 Clean the Water tank, Water filter, Water tank seal rubber and Ice box; dry and put them
back to their place.
3 When using again, please refill the Water tank and put it back.
When transporting the refrigerator
1 Empty the Water tank and remove all ice cubes from the Ice box.
2
Choose the Auto Ice Clean mode, the icon of Auto Ice Clean mode on the Operation Panel
will turn on and the refrigerator will start cleaning the ice maker. (At this time the ice cubes
and water in the process of making ice will fall into the Ice box)
3 The cleaning process will stop after 2 minutes. Take out the Ice box and empty the ice
cubes and water in the Ice box.
4 Clean the Water tank, Water filter and Ice box; dry and put them back to their place.
How to clean the Auto Ice Maker
:KHQXVLQJIRUWKH¿UVWWLPHRUZKHQQRWEHLQJXVHGDIWHUDORQJWLPHWKH:DWHUWDQNPD\
smell unpleasantly or collect dust. Remember to clean the Water tank before proceeding to
clean the ice maker.
After selecting the Auto Ice Clean mode, water will be automatically poured into the Ice tray
and water supply pipe 3 times (for about 2 minutes) to drain the water.
When selecting the ice maker cleaning mode, make sure there is enough water in the Water
tank.
1 Pull out the Ice box, remove all ice cubes from the Ice box (after the ice cubes are fully
formed), and then install the Ice box back.
2 Fill the Water tank with water.
3 Select the Auto Ice Clean mode (Page 21).
• $WWKHVDPHWLPHWKHUHIULJHUDWRUZLOOVRXQGDQRWL¿FDWLRQDQGEHJLQWRFOHDQWKHLFH
maker.
• During the cleaning process, the sound cannot be turned off.
• After the beeping sound to inform the completion of the cleaning process, the icon of the
Auto Ice Clean mode on the Operation Panel will turn off, the ice maker cleaning process
will end and the Auto Ice making will be started.
4 Pull out the Ice box from the Freezer room, throw away the water in the Ice box and wipe
the water off.
If you do not clean all water on the Ice box, the Ice box may be broken.
26
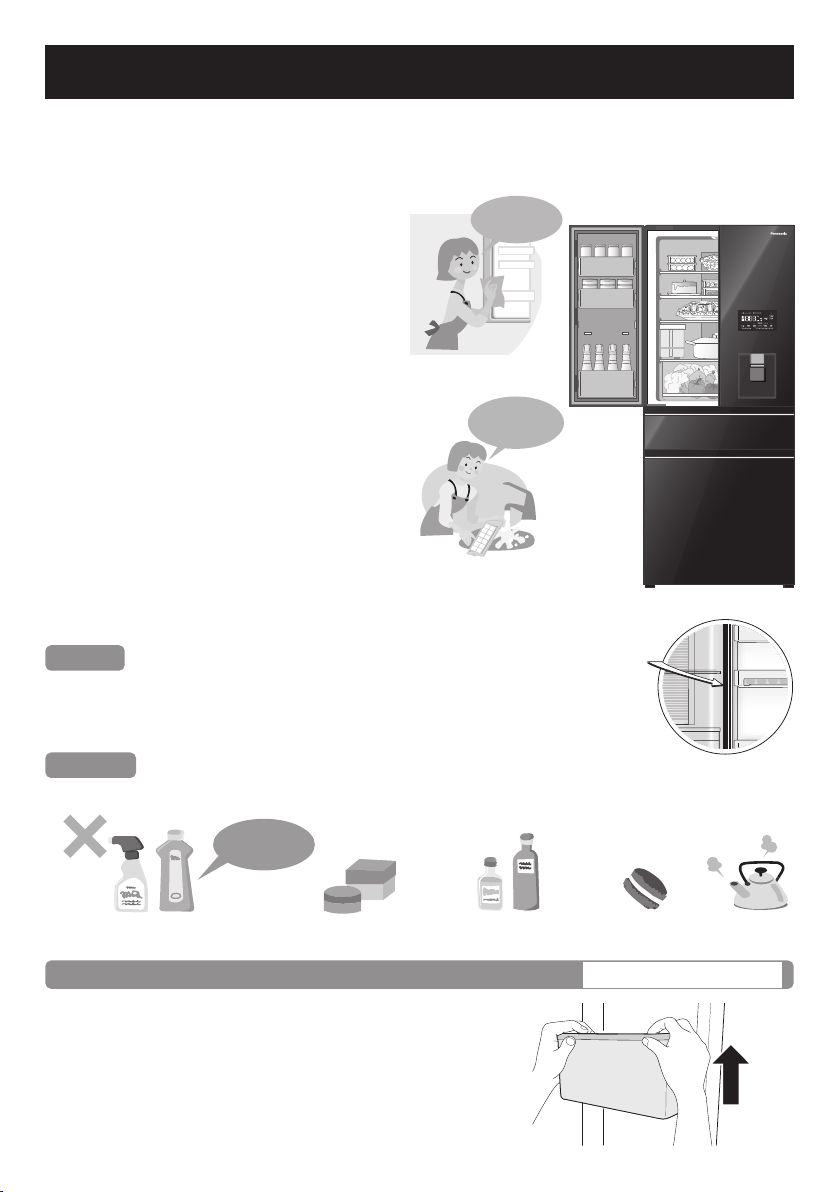
How to Clean the Refrigerator
Before cleaning or conducting maintenance, be absolutely sure to disconnect the power plug
from the power outlet. Do not connect or disconnect the power plug with wet hands.
When the plug is disconnected, leave it for 7 minutes before plugging again. If not, the
compressor may not work.
Clean the refrigerator immediately after it is stained!
Wipe off stains on the interior surfaces
quickly before they harden. In particular,
cooking oil or lard may cause plastic to
crack and citrus juice may cause the
refrigerator to become discolored. When
stains cannot be removed easily, wipe
them with a cloth lightly soaked in neutral
kitchen detergent. Then, wipe with a cloth
lightly dipped in water.
Clean the detachable items occasionally.
Clean the ice tray once a week. As a guide,
remove the trays, door shelves, etc. and
wash them by immersing them in lukewarm
water every three months.
Clean the door gasket at least once a month.
Clean by wiping with a soft damp cloth.
Lubricated gel has been applied to the door gasket on the
hinge side of the refrigerator, be careful not to wipe it off.
Notices
The door gasket is replaceable by an authorised service agent.
If the door gasket comes off while cleaning, it can be pushed
back into the groove.
Requests
Do not use the following items for cleaning. (Otherwise, the surface will be scratched or corroded.)
Alkaline or weak
Alkaline
Kitchen detergents
(They crack plastic!)
Cleanser or soap
powder
Benzine, thinner,
alcohol, acid, petroleum
Scrubber Hot Water
Use lukewarm
water!
Remove and
rinse!
Point where lubricated
gel was applied
Rub the door surface
with a soft damp cloth.
Once every 3 months
Egg shelf / Bottle shelf
Removing
1 Lift it upward, alternating between the right
and left side.
Attaching
2 Placing it on both supporters, and then
press until it reaches the end of supporters.
27
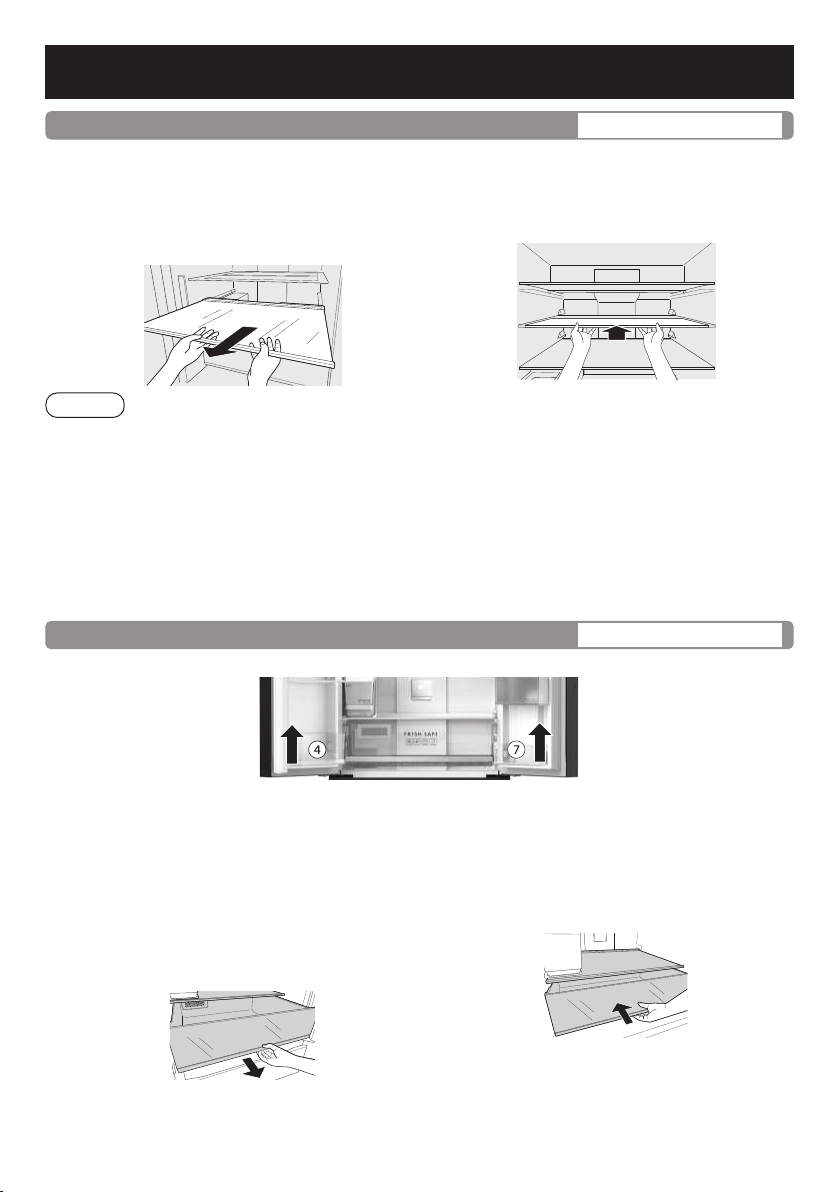
How to Clean the Refrigerator
Once every 3 months
Tray
Removing
1
Lift up the back of the tray and pull it
forward. Once the protrusions of the
tray are unhooked from the rails, tilt the
tray and remove it.
Attaching
2
Push the tray until it reaches the end
lock.
Remark
Ɣ For easier to take the glass trays out from the refrigerator, please remove door shelves and
ERWWOHVKHOYHV¿UVW
Ɣ The Glass tray vegetable case is cleaned by directly cleaning inside the refrigerator. (Due
WRLWV¿[HGGHVLJQ
Ɣ In case of attaching the tray and it does not lock, make sure that you did not attach it into it
the wrong tray.
Ɣ Trays are made of glass and heavy.
Please handle them with care so that they do not fall and cause any damage or injury.
)RUDWWDFKLQJWUD\VKROGWKHPZLWKWKHSURWUXVLRQVLGHGRZQDQG¿UPO\LQVHUW
Once every 3 months
Vegetable case / Freezer cases
※ Vegetable case
Removing
1
Fully open both doors of the Fridge room
2
Remove the Bottle shelf 4 and Small
bottle shelf 7 (According to Parts
identification in Page 12, 13 before
removing the Vegetable case.
3
Pull the case forward until it reaches the
end and gently lift the front of the case to
remove it completely.
Attaching
1 Insert the case into the shelf.
2
Gently lift the case and push forward
until it reaches the end.
3 Install Bottle shelf 4 and Small bottle
shelf 7 into the doors.
※ Freezer cases
Skip the steps of removing and installing the Bottle shelf 4 and Small bottle shelf 7.
Remove and install Freezer cases in steps same as Vegetable case.
28
Once every 3 months
Moisture control of vegetable case
1
After pulling out the Vegetable case, the Moisture control is located at the back of the Vegetable case.
2 Slide the Moisture control upward to remove it.
Remark
Ɣ After cleaning by water, wipe it or let it dry.
Ɣ For tough stains, dilute (neutral) kitchen detergent, and gently wash with a soft toothbrush,
then rinse thoroughly with water.
Once every 3 months
Prime Fresh case
Removing
1 Pull out the Prime Fresh room door completely.
2 Gently lift the front of the Prime Fresh case and remove it diagonally.
Aluminum heat transfer plate
(Note that the aluminum plate
is easy to be scratched and
deformed)
Attaching
1 Pull out the Prime Fresh room door completely.
2 Gently place the Prime Fresh case diagonally back to its original position, until it
reaches the end.
Remark
Ɣ When installing the case, make sure to install the front and the back of the case properly.
The front of the case has the word “Front”.
Ɣ The aluminum heat transfer plate can be removed; however, remember not to hold it with
wet hands when the aluminum plate is cold, as there may be a risk of frostbite.
Ɣ If cleaning by water, wipe the aluminum plate or allow it to dry before reinstalling into the
refrigerator.
Ɣ Do not wipe the lubricant off the steel guide rails or the contact surface of the guide rail.
If you have wiped out the lubricant, please contact with the Service Center.
Weekly
:DWHUWDQN:DWHU¿OWHURIWKH$XWR,FHPDNHU
1
Open the lid and clean the Water tank with water.
2 Rotate the Water filter to remove the hook and
remove the Water filter.
3 Gently wash the Water filter in water.
4 Remove the seal rubber on the edge and clean it
with water
5 Put the Water filter and rubber back into place.
Remark
Ɣ If there is water deposits or pipe blockages in the
:DWHU¿OWHULFHPD\QRWEHPDGHSURSHUO\
Water supply tank Water filter
Rubber gasket
29
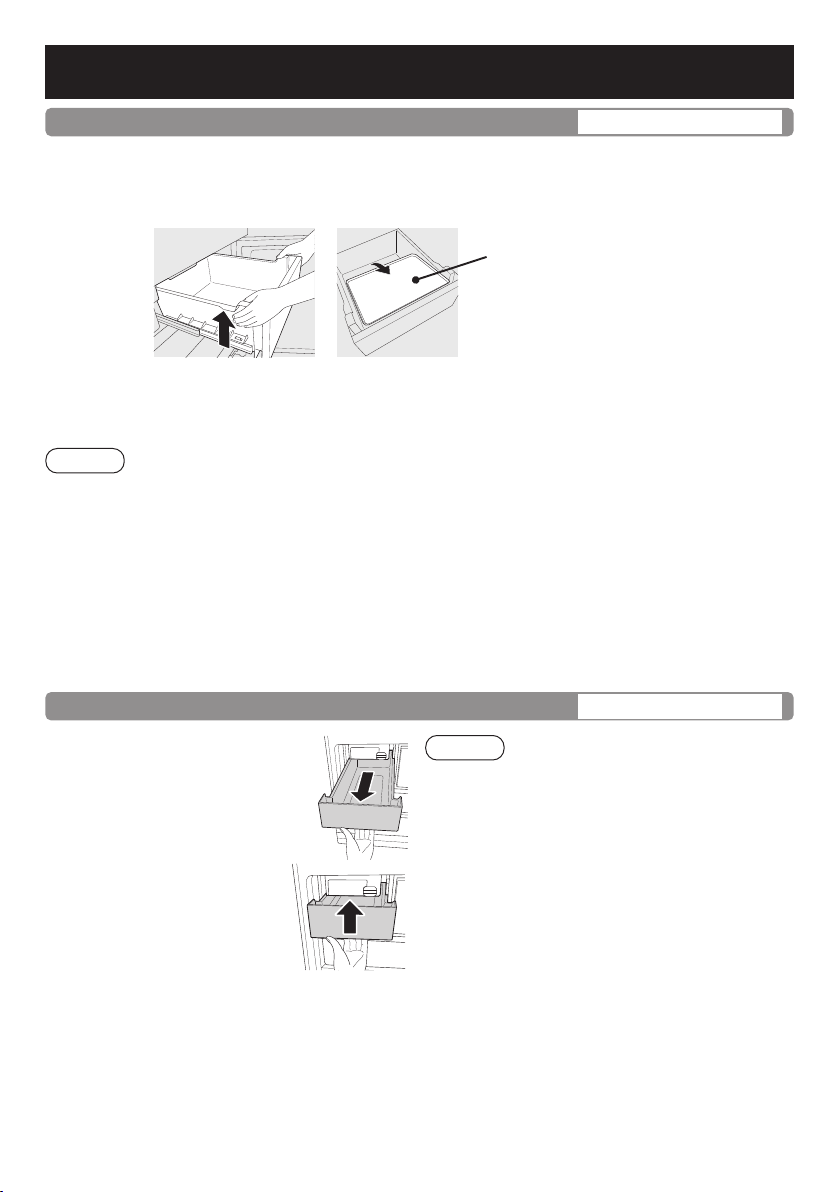
How to Clean the Refrigerator
Once every 3 months
Prime Freeze case
Removing
1 Pull out the Prime Freeze completely.
2 Lift the case, tilt it, and lift it out of the compartment diagonally.
Aluminum heat transfer plate
(Note that the aluminum plate
is easy to be scratched and
deformed)
Attaching
1 Pull out the Prime Freeze case, lift the back of the case and hook along the inner
grooves until it matches and touches the end point.
Remark
Ɣ The aluminum heat transfer plate can be removed; however, remember not to hold it with
wet hands when the aluminum plate is cold, as there may be a risk of frostbite.
Ɣ When removing or installing the case, be sure to grasp the tray handle with your
RXWVWUHWFKHGKDQG2WKHUZLVHWKHFRPSDUWPHQWGRRUPD\DFFLGHQWDOO\KLW\RXU¿QJHU
Please refer to the illustration above.
Ɣ If cleaning by water, wipe the aluminum plate or allow it to dry before reinstalling into the
refrigerator.
Ɣ Do not wipe the lubricant off the contact surface of the guide rail.
If you have wiped out the lubricant, please contact with the Service Center.
Once every 3 months
Ice box
Removing
Lift and pull the Ice box forward
until it is completely removed.
Attaching
Push the Ice box until it
reaches the end of the
Ice box holder.
Remark
Ɣ Stop the Auto Ice making function before
cleaning the Ice box (Page 21).
30
Weekly
:DWHUWDQN:DWHU¿OWHURI:DWHUGLVSHQVHU
Removing
Pull up the Water tank with both hands and tilt it slightly towards you.
Attaching
Insert the tip of the valve into the hole. Place both left and
right edges of the Water tank in the locked position.
Push the Water tank all the way down until it reaches the end point.
Remark
Ɣ
When removing the Water tank for cleaning, if the rubber seal is
inserted reversely due to friction with the faucet, use your hand to
push the seal reversely to its original position.
Ɣ The valve in the Water tank can be removed by turning it
counterclockwise.
5HSODFH¿OWHU
1 Open the lid at the right corner using a hand.
2 Lift the filter straight out of the lock.
Replace with a new hygiene filter. Put the filter back to its original
position and close the lid tightly.
Notices
Ɣ
7KHK\JLHQH¿OWHUVKRXOGEHUHSODFHGHYHU\\HDUVRUZKHQDSSURSULDWH
Ɣ7KHK\JLHQH¿OWHUFDQEHSXUFKDVHGDWDOODXWKRUL]HGVHUYLFHFHQWHU
Once every 3 months
Ice tray
The Ice tray can be cleaned by using the Auto Ice Clean function (Page 21). In addition,
the Ice tray can be removed and cleaned manually.
How to clean the Ice tray manually.
Remove and clean the Ice tray
1
Choose the Auto Ice Off mode (Page 21).
2 Turn the knob on the Auto Ice maker to the unlocked position.
3 Pull the protruding side forward to remove the Ice tray.
4
Clean it with water. (Do not use sharp scouring pads to scrub
the surface of Ice tray. If the Ice tray is scratched, ice may not
be properly released, leading to a malfunction.)
Remark
Ɣ The Ice tray and its frame cannot be separated.
Ɣ Do not clean with dishwashers or dish drying rack.
Attaching
1 Push the Ice tray in until you hear a “click”.
2 Turn the knob into the locked position. Ice cannot be made if the Ice tray is not locked.
3 Disable the Auto Ice Off mode (Page 21) to restart the Auto Ice makings.
Remark
Ɣ
Ice will not be made until the Auto Ice Off mode is turned off.
Ɣ Do not pour water directly into the Ice tray after manual cleaning.
(That may cause ice cubes sticking together or a malfunction.)
Knob
Lock position
Lock position
Unlock position
Unlock position
Protrusion
Cleaning filter Cleaning
filter element
31
Troubleshooting
Before you call for service, please check the following steps:
The refrigerator
does not operate.
ƔCheck that the plug and its socket are in good condition.
ƔCheck if there is any problem on main fuse and electrical
system of the house.
ƔCheck by unplug and wait for 7 minutes before plugging it back in.
The refrigerator
does not cool
enough.
ƔCheck to be sure that light in Operation Panel is displayed at
proper position.
ƔCheck to see if the refrigerator is overloaded with stuff or there
is any hot foodstuff refrigerated inside.
ƔIs the refrigerator exposed directly to sunlight or heat source?
ƔIs the refrigerator door completely closed?
ƔIs the refrigerator door opened frequently?
ƔWhen the air humidity is high, there is a chance
that moisture will condense on the refrigerator
surface, around the door gasket or on the door
surface. This situation will stop if the air humidity
decreases. Please wipe it up with dry cloth.
Ɣ,VWKHGRRUFORVHG¿UPO\"
ƔIs the door being opened and closed too frequently?
ƔCondensation inside the refrigerator can also be caused by
leaving high-humidity foods uncovered or unwrapped.
ƔWhen the humidity is high, the door is open for a long time,
or when the refrigerator contains too much food or makes too
much ice, frost may form inside the Freezer room at the location
of the Freezer room case, Ice box or the Prime Freeze case
door. This is normal. Please wipe with dry and soft cloth.
The refrigerator
generates noise.
Ɣ&KHFNLIWKHUHIULJHUDWRULVORFDWHGRQDVWDEOHÀRRURULV
installed properly.
ƔCheck if there is any object in contact with the refrigerator.
ƔCracking sound within caused by the parts adjusting
temperature which is normal.
ƔAfter installation, the refrigerator may make loud noise.
The noise will be less when the refrigerator has been cooled.
ƔThere may be a whistling sound inside the refrigerator when
opening and closing the door. This is caused by the air
outside being drawn in through the pipe on the backside of the
refrigerator to better balance the air circulation inside the unit.
Outside
Inside
Dew, frost appears.
32
The inside is
smelling.
ƔDo you store food with dry odor without wrapping it?
The surfaces of
the refrigerator is
hot.
ƔBecause the refrigerator is equipped with the dew prevention
and heat radiation tubes, the surfaces of the refrigerator get
warmer when operating.
ƔThe back and side plates may get warmer especially when
starting up or if the door is frequently opened and closed.
The normal
sounds of
refrigerator.
Ɣ:KHQWKHUHIULJHUDWRUVWDUWVRSHUDWLRQWKHVRXQGOLNHZDWHUÀRZLQJ
and boiling water is created. This is the sound of the cooling liquid.
ƔThe noise is generated when the automatic defrost system operated.
ƔThe dilatation of the details inside the refrigerator in the
cooling process can cause sound “crack-crack”.
ƔYou may feel that the operation sound is larger because
the compressor operates in high-speed under the following
conditions: the refrigerator does not cool fully on the occasion
VXFKDVXVLQJLWIRUWKH¿UVWWLPHRSHQLQJFORVLQJWKHGRRUWRR
frequently, the surrounding temperature is high. The sound
becomes more quiet after cooling fully.
Light does not
turn on.
ƔPlease contact Panasonic Service Center.
ƔIf the water in the tank does not decrease after a while, the ice
maker is not working.
ƔThe ice making process begins after the inside of the
refrigerator is cold enough. (It may take more than 24 hours to
start the process)
ƔCheck if the Auto Ice Off mode is set. (Page 21)
ƔBe sure to fully push the Water tank and Ice tray into place.
ƔDo not leave food in the ice maker.
ƔDo not install or remove the Ice tray frequently.
ƔCheck if the Water tank is almost empty.
ƔIf water spills on the Ice box, clean it up.
ƔPlease contact Panasonic Service Center.
ƔIs the temperature of Freezer room set
to a higher temperature
than -20 °C
?
ĺ$GMXVWWRa lower temperature. (Page 15)
Ɣ7KHUHDUHSURWUXVLRQVĺ7KHJURRYHVRIWKH,FHWUD\PD\EHIUR]HQ
ƔThe ice cubes are round or connected to other ice cubes
.
ĺ,FHKDVEHHQVWRUHGIRUDORQJWLPH,FHFXEHVJHWURXQGRI
connected by sublimation.)
Ɣ7KHLFHLVVPDOOĺ6PDOOLFHFXEHVDUHPDGHZKHQWKHUHLV
no water left in the tank.
Auto Ice making.
The
refrigerator
does not
make ice.
The ice does
not form any
ice cube
Unusual
shape of ice
cubes.
33
Troubleshooting
The Operation
3DQHOÀDVKHV
ƔAre you adjusting the temperature of your refrigerator?
ĺ)ODVKHVGXULQJDGMXVWLQJ3OHDVHFRPSOHWHWKHVHWWLQJRUWKH
2SHUDWLRQ3DQHOZLOOVWRSÀDVKLQJDIWHUVHFRQGV
Food becomes
frozen.
ƔDo you put the food near cold air holes?
ƔDo you adjust the temperature control to less than 4 °C for the
)ULGJHURRPDQGRU&IRUWKH3ULPH)UHVKURRP"
ĺ$GMXVWWRa higher temperature.
ƔDo you put food in Prime Fresh room?
ƔAre “Quick Freezing”, Prime Fresh+ room , Quick Ice Making,
Prime Freeze case in active? (Page 17)
ƔWhen the temperature is not set at 4 °C for the Fridge room
and -20 °C for the Freezer room, the ECONAVI function does
not activate automatically.
ƔIs the door opened too often or are there hot food stored in the
refrigerator?
ƔThe learning function can automatically disable the ECONAVI
operation during regular use.
ƔDoes the refrigerator display any error codes?
ƔIs there a power failure?
If there is a power failure, the data collected by the learning
function until the power failure will be lost.
The ECONAVI operation is rarely active until the learning
function could collect the data again.
ƔIf the automatic defrost function is enabled while the ECONAVI
operation is active, the normal cooling mode will be activated
after the defrosting process completes. As a result, the
(&21$9,RSHUDWLRQPD\EHVWRSSHGGXULQJGHIURVWLQJFRROLQJ
ƔSometimes, the learning function restarts the normal cooling mode.
ƔIs the light intensity sensor hidden?
ƔAre there any dirt or scratches on Operation Panel of the light
intensity sensor?
ƔThe ECONAVI operation may operate while the refrigerator
is in use depending on the usage conditions, but the cooling
operation is still maintained.
34
The ECONAVI light does not come on normally.
The
ECONAVI
function
does not
work (the
ECONAVI
light does
not come
on).
The
ECONAVI
operation
is rarely
active.
The
ECONAVI
operation
is stopped
halfway.
The ECONAVI
operation
works too
often (the
ECONAVI
light rarely
turns off).
Troubleshooting
Troubleshooting
ƔStore frozen foods with the Prime Freeze case in a long period
of time, or store high-fat ice cream in the freezer. (The cooling
performance of the Prime Freeze case is rated with two stars.)
(Page 18)
ƔDo not place cold food next to hot food.
Ɣ)UHH]LQJFDSDFLW\PD\QRWEHVXI¿FLHQWGHSHQGLQJRQWKHW\SH
of food, packaging condition, storage capacity, and how often
that the door is opened and closed.
ĺ5HVHW3ULPH)UHH]H3DJH
ƔIf Prime Freeze is set during defrosting, the time display will
start counting, but the fan will stop and the food will not be
cooled enough. After defrosting, reset Prime Freeze.
ƔIf Quick Ice Making, Quick Freezing, Prime Fresh+ are set
during the operation of Prime Freeze, Prime Freeze will be
stopped.
Error display on
Operation Panel.
ƔU10: Warning if doors are opened too long.
ĺ
Check that the doors are closed properly.
ƔThe letter “H” and two digits are displayed on Operation Panel.
For
example: H01
ĺ
Please contact the Service Center for support.
Prime Freeze.
The food
melts.
Not cold, no
freezing.
Stop
working
halfway.
35
Panasonic Corporation
:HEVLWHKWWSVZZZSDQDVRQLFFRP
© Panasonic Appliances Vietnam Co., Ltd. 2022
6SHFL¿FDWLRQV
Model No.
NR-YW590Y
Freezer Star Rating
Net Capacity (L)
(MS IEC62552:2016)
Total 540
Freezer 186
Fridge 293
Prime Fresh 61
Outside Dimensions
Width x Depth x Height (mm)
750 x 750 x 1890
Net Weight (kg) 100
Refrigerant Type R600a
Cooling System Non-frost cooling.
Rated Voltage (V)
Rated Frequency (Hz)
Refer to the rating label attached inside the cabinet.