
EN
MOBILE AIR CONDITIONER WI-FI
Translation of the original manual
SAC MT7042C/
SAC MT7043C
SAC MT7042C/
SAC MT7043C
A
1
2
3
10
11
4
5
6
7
8
9
B
12
3
456
7
C
1 2 3 4
8 9 10 11
5 6
12
7
13
D
1
2
3
4
6
7
8
10
5
9
I
- 1 -
01/2026
2026, .
EN
Mobile Air Conditioner Wi-Fi
User Manual
Important Safety Instructions
READ CAREFULLY AND STORE FOR FUTURE USE.
This symbol means that failure to follow the instructions
can cause death or serious injury.
WARNING:
In order to prevent death or injury to the user or
other persons anddamage to property, the following
instructions must be followed. Incorrect use as aresult
of not following the instructions may cause death, injury
or damage.
• This appliance may only be used by children aged 8
years and older and by persons with physical, sensory or
mental impairments or lack of experience and knowledge,
if they are supervised or have been instructed on the safe
use of the appliance and understand the potential hazards.
Cleaning and maintenance must not be performed by
unsupervised children. Children must not play with the
appliance.
• If the power cord is damaged, it must be replaced by an
authorised service centre or by another similarly qualified
person, this will prevent the creation of adangerous
situation. It is forbidden to use the appliance if it has
adamaged power cord.

- 2 -
01/2026
2026, .
• The appliance must be stored in amanner that prevents its
mechanical damage.
• The appliance must be stored in awell ventilated location,
where the dimensions of the room correspond to the
dimensions specified for its operation.
• The appliance must be stored in aroom where an
open flame is not continuously in use (e.g. running gas
appliance) or where there are sources of ignition (e.g.
running electrical heating element).
• Before connecting the appliance to apower socket, check
that the rated voltage on its rating label matches the
electrical voltage in the power socket.
• Connect the appliance only to aproperly earthed socket.
• The power socket must be freely accessible so that it is
possible to quickly disconnect the power cord from the
power source if necessary.
• The appliance is designed for use in household, offices
and similar types of areas. Do not use it in very dusty or
humid rooms such as laundries or bathrooms, in areas
where chemical or explosive substances are stored, in
industrial surroundings or outdoors.
• Keep the appliance away from open flames or heat
sources.
• Do not place the appliance on unstable surfaces such as
carpets with very long and thick fibres.
• The appliance may only be used on adry, stable, smooth
and horizontal surface.
• The appliance is equipped with travel wheels so pay extra
attention when handling it so that it does not fall down

- 3 -
01/2026
2026, .
stairs or travel down from sloped areas. If necessary
secure the wheels using the stoppers.
• Only use original parts to assemble the appliance. Before
starting to assemble the appliance, make sure that it is
turned off and disconnected from the power socket.
• Prior to connecting the appliance to apower socket, make
sure that the appliance is correctly assembled according
to the instructions in this user'smanual.
• Do not touch the appliance with wet or damp hands. This
applies especially when it is connected to apower socket.
• Do not expose the appliance to dripping or splashing water
or immerse it in water or other liquid.
• Do not cover or insert anything into the air inlet or air outlet
openings. This could damage the appliance.
• During operation there needs to be sufficient space for air
circulation of at least 50 cm on all sides of the appliance.
• Do not expose yourself to acold air current for along time.
This could have anegative effect on your health.
• To turn the appliance on or off, always use the appropriate
buttons on the control panel or the remote control. Do not
turn off the appliance by disconnecting the power cord
from the power socket.
• Always turn off the appliance and disconnect it from the
power socket when leaving it without supervision, when
not using it and before moving, disassembling or cleaning
it.
• Do not attempt to remove the outer case of the appliance.

- 4 -
01/2026
2026, .
• Unplug the appliance from the power socket by pulling the
plug, not the power cord. Otherwise, damage to the power
cable or socket could occur.
• Do not use the appliance if damaged in any way, or with
adamaged mains cable or plug.
• Store the appliance in avertical position. It may be
transported in avertical position or tilted on the sided. If
you have already used the appliance, check that all the
condensate has been drained. After transporting it, wait at
least 1 hour before using the appliance.
• Do not use the appliance if it is not working correctly, if
it has been damaged or has been submerged in water.
To avoid ahazardous situation arising, do not repair the
device yourself or modify it in any way. All repairs should
be carried out by an authorised service centre. Tampering
with the appliance may result in the loss of your legal
rights regarding faulty performance or warranty for quality.
• The installation must be carried out inaccordance with the
installation instructions. Improper installation can result in
water leaks, electric shock or fire.
• To prevent the risk of fire or electric shock, do not use this
appliance withatimer or other similar device that could
start this appliance spontaneously.
• The appliance must be installed in accordance with the
national wiring regulations.
• Use this product only for the purposes described in this
instruction manual. Otherwise, this may result in damage
or excessive noise and vibration.

- 5 -
01/2026
2026, .
• Use only accessories andcomponents that are supplied
with the device andtools specifically intended for
installation. The use of non-standard parts andaccessories
may lead to water leakage, electric shock, fire, injury or
property damage.
• DO NOT adjust the length of the unit'spower cord or use
an extension cord to power the unit.
• DO NOT plug the unit into an outlet where other electrical
appliances are already plugged in. The wrong choice of
power supply may result in fire or electric shock.
• Do not cover the cord with carpet. Do not place carpets,
mouldings or other coverings on the cord. Do not place
the cord under furniture or appliances. Place the cord
where nothing can run over or trip over it. If this occurs,
immediately disconnect the unit from the socket.
• If the unit is tipped over during use, turn it off and
immediately disconnect it from the main power supply.
Visually inspect the unit forany damage. If you suspect
that the unit has been damaged in any way, contact
atechnician or customer service.
• In the event of athunderstorm, the power supply must be
disconnected to prevent damage to the device caused by
lightning.
• If there is astrange sound or smell or smoke, disconnect
the power supply.

- 6 -
01/2026
2026, .
Read this user'smanual.
Warning:
Fire hazard.
SPECIFIC INFORMATION FOR APPLIANCES USING
REFRIGERANT GAS R290
• Please read the warning carefully.
• For defrosting and cleaning, do not use any other tools
than those recommended by the manufacturer.
• This appliance should be placed in an environment free
from sources of ignition for continuous operation (e.g. open
flame, gas or electric appliances).
• Do not drill or burn into the appliance.
• Refrigerant gases may be odourless.
• This appliance should be placed inrooms with an area of
more than 6 m
2
.
• This appliance contains approximately 135 g of R290
refrigerant gas.
• R290 is arefrigerant gas that meets European
environmental protection directives. Do not drill holes into
any part of the cooling circuit.
• The room in which this appliance is installed, operated, or
stored must be such that refrigerants cannot accumulate

- 7 -
01/2026
2026, .
in the event of aleak, which could cause an explosion
or fire as aresult of the refrigerant igniting when electric
heaters, cookers, or other sources of ignition are switched
on.
• The appliance must be stored in such amanner that its
mechanical damage is prevented.
• Persons working with or repairing cooling circuits must
have appropriate authorisation issued by an authorised
institution that certifies this person'scompetence to
work with refrigerants in accordance with the specific
assessment of the association for this sector.
• Maintenance tasks must be performed solely on the basis
of the recommendations of this appliance'smanufacturer.
Maintenance and repair tasks that required the
contribution of other qualified expert personnel may only
be performed under the supervision of specialised experts
in the flammable refrigerants sector.
• Check the rating label for the type of refrigerant gas used
in your appliance.
• Do not cover the vents.
• Adhere to national codes relating to gas.
. . . . . . . . . . . . . . . . . . . . . . . . . . . . . . . . . . . . . . . . . . . . . . . . . . . . . . . . . . . . . . . . . . . . . . . . . . . . . . . . . . . . . . . . . . . . . . . . . . . . . . . . . . . . . . . . . . . . . . . . . . . . . . . . . . . . . . . . . . . .
EXPLANATION OF SYMBOLS PLACED ON THE PRODUCT OR INTHE ACCOMPANYING DOCUMENTATION
The product meets all the basic requirements of the applicable EU directives.
This symbol on products or accompanying documents means that used electric or electronic products must not be added to ordinary
municipal waste.
This symbol on the accumulator or battery means that the used battery must not be added to normal municipal waste.
. . . . . . . . . . . . . . . . . . . . . . . . . . . . . . . . . . . . . . . . . . . . . . . . . . . . . . . . . . . . . . . . . . . . . . . . . . . . . . . . . . . . . . . . . . . . . . . . . . . . . . . . . . . . . . . . . . . . . . . . . . . . . . . . . . . . . . . . . . . .
- 8 -
01/2026
2026, .
• Thank you for purchasing our SENCOR product; we hope it will serve
to your satisfaction.
• Before using this appliance, please familiarise yourself with the user
manual, even if you are already familiar with using similar types of
appliances. Use the appliance only as described in this user manual.
Keep the manual for future reference.
• It is recommended to keep the original packaging, packing material,
receipt and confirmation of the extent of the seller'sliability or warranty
certificate at least for the duration of the legal right to file defect
claims or the quality warranty. When transporting the appliance,
we recommend repackaging it in the original box provided by the
manufacturer.
. . . . . . . . . . . . . . . . . . . . . . . . . . . . . . . . . . . . . . . . . . . . . . . . . . . . . . . . . . . . . . . . . . . .
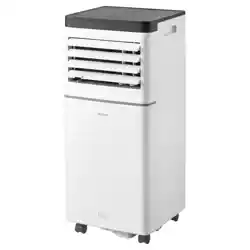
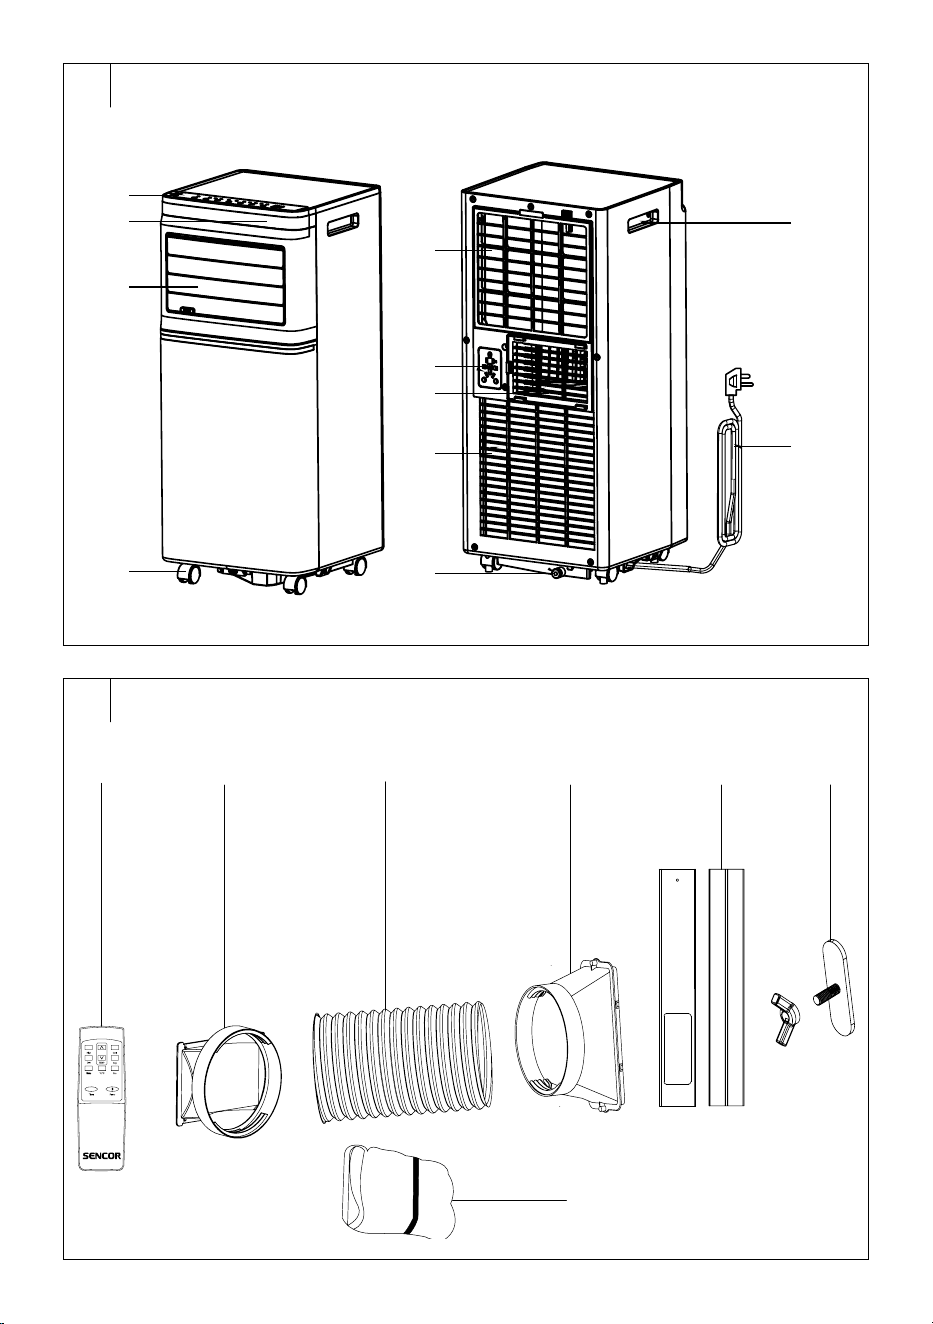
DESCRIPTION OF THE APPLIANCE
A1 Control panel
A2 Decorative panel
A3 Air outflow
A4 Castors
A5 Rear air inlet protective grille
A6 Power cord storage space
A7 Air outlet for connecting a
flexible hose
A8 Lower air inlet protective grille
withfilter
A9 Lower drain hole
A10 Handles (located on both
sides)
A11 Power cord
. . . . . . . . . . . . . . . . . . . . . . . . . . . . . . . . . . . . . . . . . . . . . . . . . . . . . . . . . . . . . . . . . . . .
DESCRIPTION OF ACCESSORIES
B1 Remote control
B2 Adapter for connection to the
air outlet
B3 Flexible air exhaust hose
B4 Adapter for window
connection
B5 Window insert
B6 Wing nut
B7 Textile window seal kit
. . . . . . . . . . . . . . . . . . . . . . . . . . . . . . . . . . . . . . . . . . . . . . . . . . . . . . . . . . . . . . . . . . . .
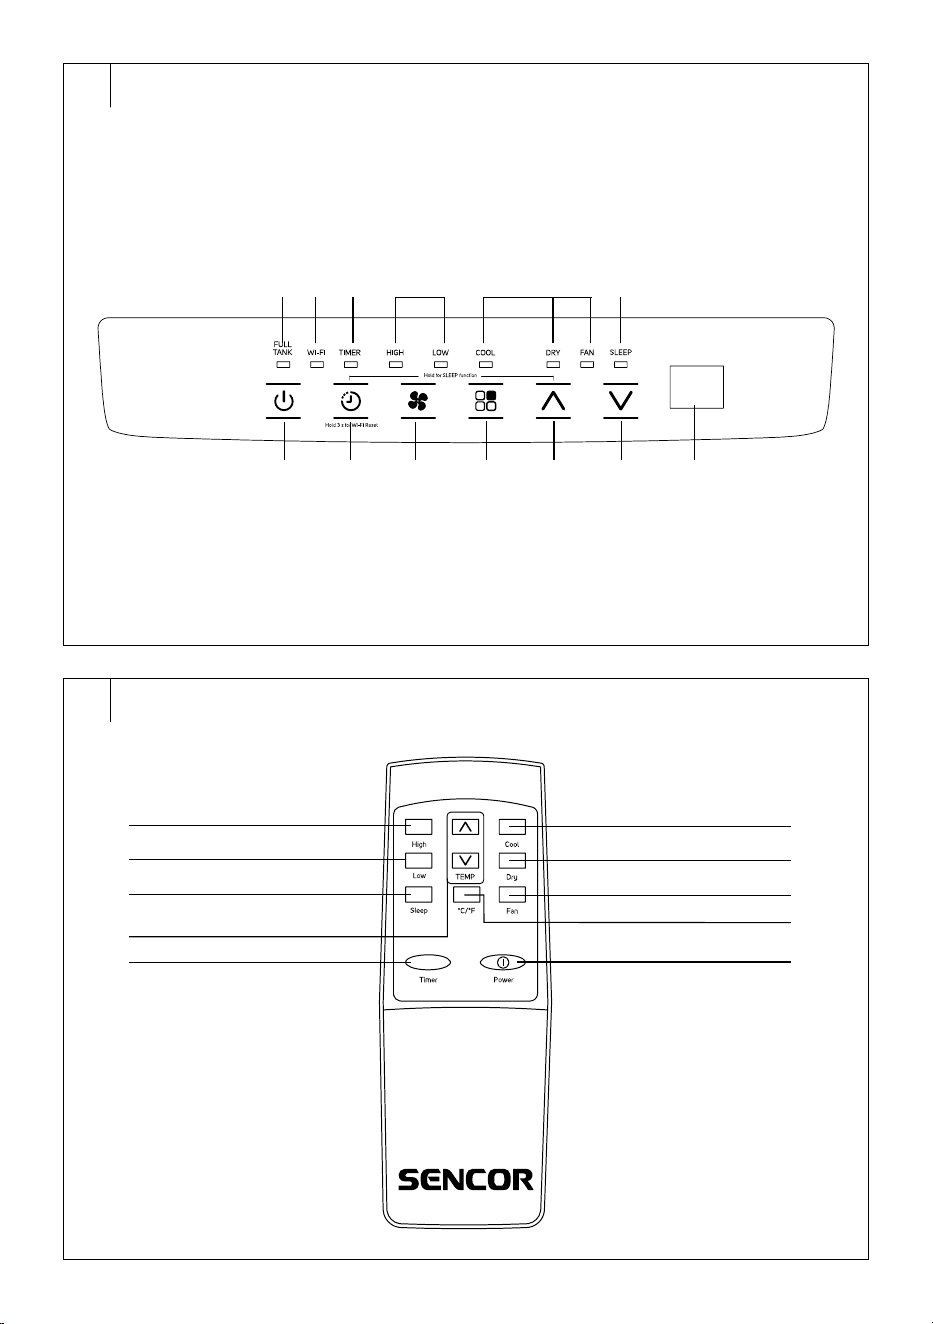
DESCRIPTION OF THE CONTROL PANEL
C1 On/Off button
C2
button to set the timer
C3
button to adjust fan speed
C4
button to select the
operating mode
C5
button
C6
button
C7 Display
C8 Full reservoir indicator light
C9 Wi-Fi indicator light
C10 Timer indicator light
C11 Fan speed indicator lights
(high/low)
C12 Operating mode indicators
(cooling/dehumidifier/fan)
C13 Sleep mode indicator
. . . . . . . . . . . . . . . . . . . . . . . . . . . . . . . . . . . . . . . . . . . . . . . . . . . . . . . . . . . . . . . . . . . .
REMOTE CONTROL
D1 High speed button
D2 Low speed button
D3 SLEEP button to set the sleep
mode
D4 TEMP buttons
D5 TIMER button to set the timer
D6 COOL button
D7 DRY button
D8 FAN button
D9 °C/°F button
D10 POWER button for switching
on/off
. . . . . . . . . . . . . . . . . . . . . . . . . . . . . . . . . . . . . . . . . . . . . . . . . . . . . . . . . . . . . . . . . . . .
INSTALLATION
Installation Location for the Mobile Air Conditioner
• Remove the mobile air conditioner from the packaging andmake sure
that you have removed all parts andaccessories. We recommend that
two adults remove the mobile air conditioner from the package.
• Locate the mobile air conditioner on an even, dry and stable surface
and within reach of agrounded power socket. Do not place it on an
unstable or inclined surface from which the mobile air conditioner
could slide, fall, become damaged or lead to injury.
• The mobile air conditioner must be located in such away that it is not
exposed to direct sunlight.
• Check that there are no heat sources (e.g. heating, portable heaters,
stoves, etc.) in the vicinity of the place where the mobile air conditioner
will be located.
• The mobile air conditioner is equipped with castors that facilitate
handling. Do not use the castors if you need to move the air
conditioner on acarpet or similar surface. Avoid running over objects.
• For optimum efficiency, maintain aminimum distance of 50 cm from
walls or other obstacles.
• Place the mobile air conditioner at asufficient distance from curtains,
drapes or blinds.
• Make sure that the drain hose does not touch any objects.
Note:
Do not use the mobile air conditioner to cool aroom
with computer servers, etc. Installation, adjustment,
maintenance and repair must only be carried out by
aqualified person.
Installation of the Flexible Hose for the Mobile Air Conditioner
• The flexible hose must be connected to the mobile air conditioner and
installed in the window in accordance with the operating mode you
want to set. Install the flexible hose if you want to select the operating
modes: cooling or sleeping. The flexible hose does not need to be
installed if you want to set the fan or dehumidification mode.
1. Stretch the flexible hose to the required length.
2. Attach the adapter for connection to the outlet to one end of the
flexible hose and screw it counterclockwise. Attach the adapter for
connection to the window to the other end of the flexible hose and
screw it counterclockwise – see Figure E1.
3. Place the flexible hose ontothe air outlet andinsert it into the air
outlet – see Figure E2.
Installation of the Flexible Hose in aSliding Window
• The window insert is designed to be compatible with most sliding
windows (both vertical and horizontal). Nonetheless, for certain types
of sliding windows it may be necessary to modify the installation
procedure described below.
1. Unscrew the wing nut – see Figure F1.
2. Insert the screw from below into the main panel of the window insert,
fit the washer andscrew the wing nut – see Figure F2. However, do
not tighten the nut tightly, leave afree space of about 2.5cm.
3. Insert the additional panel into the main panel of the window insert –
see Figure F3. When inserting the additional panel, make sure that
the lower part of the wing nut fits into the groove in the additional
panel.
4. Set the desired length/width of the window insert according to the
window into which you will install it – see Figure F4. Tighten the
wing nut to fix the length of the window insert – see Figure F5.
5. Open the sliding window sash and place the window insert into the
opening.
6. Carefully close the sliding window sash. Hold the window insert in
place with one hand to ensure it remains secure.
7. Install the flexible hose with the adapter in place into the opening in
the window insert – see Figure F6.
Note:
Ifnecessary, cut off part of the window insert if the window
is too small.
EN
Mobile Air Conditioner Wi-Fi
User Manual
- 9 -
01/2026
2026, .
Installation of the Flexible Hose Using Textile Seal
• The textile seal is suitable for tilt, casement, or roof windows. The
textile seal is equipped with aVelcro tape, which makes it easier to
install the seal in the window. Open the window and install the textile
seal in the resulting gap. We recommend that you properly degrease
the area where you will be attaching the textile seals with asuitable
product. Remove the protective paper from thetape andstick the tape
to the window frame.
• In order to insert the flexible hose, the seal is equipped with an
integrated zipper. Open the zipper insuch aplace that you can easily
insert aflexible hose into the opening.
• It is not necessary to remove the textile seal from the window if you do
not use the mobile air conditioner. The window can also be closed with
the seal installed.
Note:
When installing, avoid excessive bending of the hose. To
ensure proper operation of the mobile air conditioner, it
is important that you do not overload or bend the hose
unnecessarily. Excessive load or bending may damage
the hose.
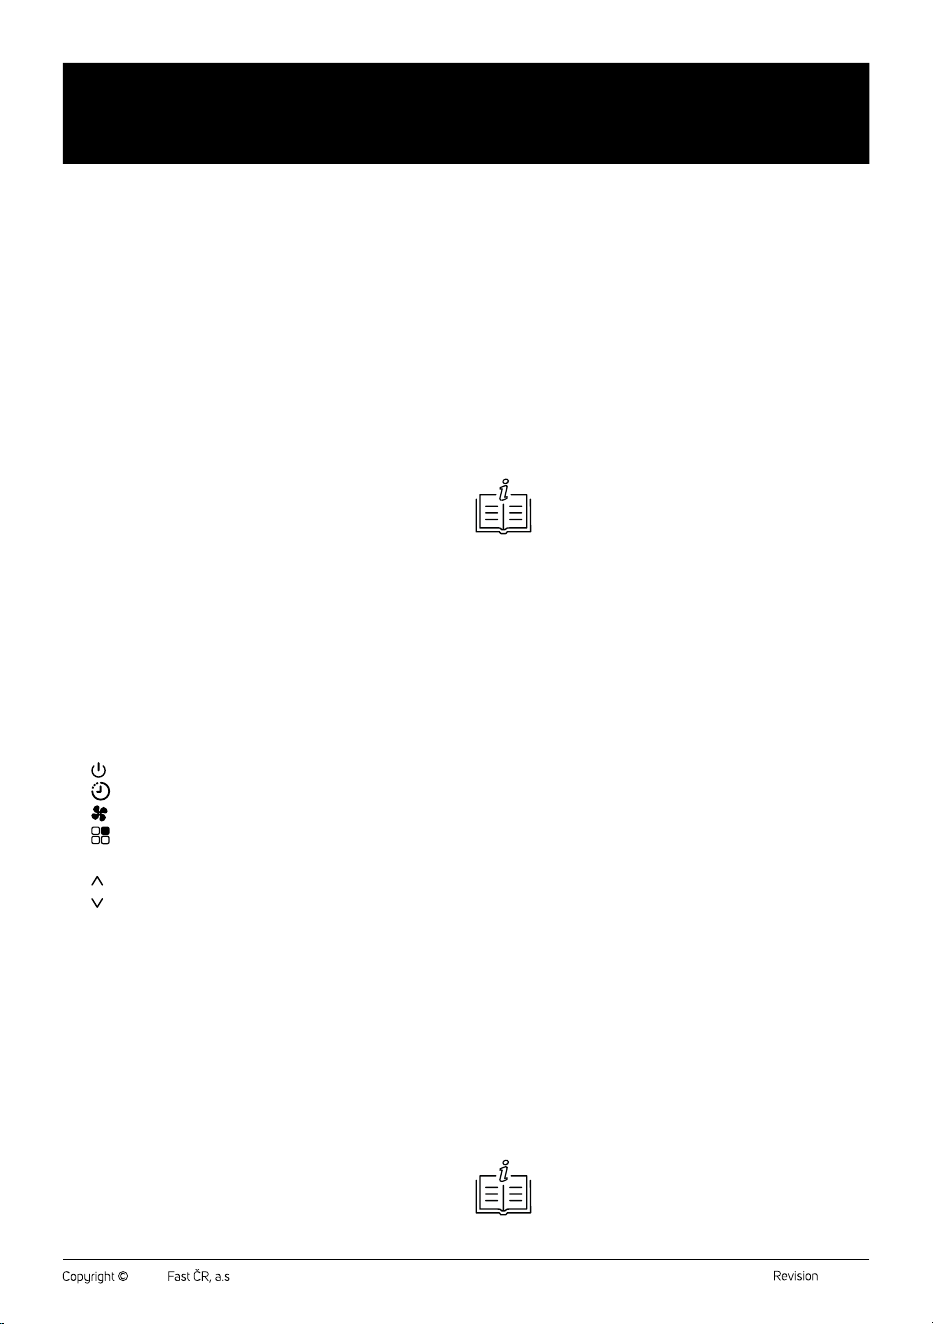
Installation of the Sleeve
• Open the window. Clean dust and grease from the window frame
and pane in locations where the Velcro tape is to be installed. Stick
the Velcro part and the sleeve part according to the diagram in Figure I.
. . . . . . . . . . . . . . . . . . . . . . . . . . . . . . . . . . . . . . . . . . . . . . . . . . . . . . . . . . . . . . . . . . . .
COMMISSIONING
• Check that the mobile air conditioner is correctly assembled and
that the flexible hose is properly attached inaccordance with the
instructions above.
• Make sure that the mobile air conditioner is located in asuitable place
atsufficient distance from the power socket.
• Insert the power plug into aproperly grounded power socket.
• The mobile air conditioner will switch to the stand-by mode.
. . . . . . . . . . . . . . . . . . . . . . . . . . . . . . . . . . . . . . . . . . . . . . . . . . . . . . . . . . . . . . . . . . . .
CONTROLS OF THE MOBILE AIR CONDITIONER
A. CONTROL PANEL
Mobile Air Conditioner On/Off
• Press the button briefly and the mobile air conditioner will switch
on and start by default.
• Press the
button again to switch the mobile air conditioner off and
into standby mode. To switch off completely, disconnect the plug from
the power socket.
Warning:
Do not turn on the mobile air conditioner immediately
after it is turned off. Wait afew minutes before
switching on again. Otherwise, the compressor could
be damaged.
Note:
Never switch off the mobile air conditioner by unplugging
the power cord from the power socket. Turn off the mobile
air conditioner with the button, wait several minutes
andthen disconnect the power cord.
. . . . . . . . . . . . . . . . . . . . . . . . . . . . . . . . . . . . . . . . . . . . . . . . . . . . . . . . . . . . . . . . . . . .
OPERATING MODES
1. Cooling Mode
• Press the
button repeatedly until the COOL indicator lights up on
the control panel.
• Use the
/ buttons to set the desired temperature. You can set the
temperature in the range from 17 to 30 °C.
• Press the
button to adjust the fan speed. Press the button
repeatedly to switch the speed in the following order: High – Low.
Each time the button is pressed, the respective indicator will also be lit
on the control panel.
2. Dehumidifier Mode
• Press the
button repeatedly until the DRY indicator lights up on
the control panel.
• The humidity in the room is reduced in this mode. Condensed
moisture accumulates in the reservoir. Methods of condensate
drainage can be found in thechapter “CONDENSATE DRAIN” in
thenext part of the user'smanual.
• Inthis mode it is not possible to set the temperature or the speed of the
fan. The fan speed is automatically set to low speed.
3. Fan Mode
• Press the
button repeatedly until the FAN indicator lights up on
the control panel.
• Inthis mode, the fan will circulate the air in theroom, but will not cool
it.
• Press the
button to adjust the fan speed. Press the button
repeatedly to switch the speed in the following order: High – Low.
Each time the button is pressed, the respective indicator will also be lit
on the control panel.
. . . . . . . . . . . . . . . . . . . . . . . . . . . . . . . . . . . . . . . . . . . . . . . . . . . . . . . . . . . . . . . . . . . .
MOBILE AIR CONDITIONER FUNCTIONS
1. Timer Functions
• The mobile air conditioner allows you to set two different timers – the
on timer and the off timer of the mobile air conditioner.
a) Timer for Turning On the Mobile air conditioner
• The timer for turning on the mobile air conditioner allows you to
activate it after aset period.
• While the mobile air conditioner is in standby mode, press the
button. The numeric display will start blinking, and the timer indicator
lights up.
• Use the
/ buttons to set the time after which the air conditioner
should turn on. The time can be set in arange from 1 to 24 hours, in
1-hour increments.
• Wait approximately 5 seconds for the time to be saved in memory.
The countdown for the set time will then begin automatically.
• Once the set time has elapsed, the air conditioner will start in the last
operating mode.
b) Timer for Turning Off the Mobile air conditioner
• The timer for turning off the mobile air conditioner allows you to
deactivate it after aset period.
• While the mobile air conditioner is running, press the
button. The
numeric display will start blinking, and the timer indicator lights up.
• Use the
/ buttons to set the time after which the air conditioner
should turn off. The time can be set in arange from 1 to
24 hours, in 1-hour increments.
• Wait approximately 5 seconds for the time to be saved in memory.
The countdown for the set time will then begin automatically.
• Once the set time has elapsed, the air conditioner will turn off and
switch to standby mode.
• If you need to switch off the appliance, press the
button. The
remaining countdown time will flash. Press the button again and
the timer will be canceled.
2. Sleep Timer
• The sleep timer is used to reduce energy consumption during the
night when aconstant temperature is not required. The function also
- 10 -
01/2026
2026, .
ensures comfort during sleep, as the operation of the air conditioner is
muted and the display light is dimmed.
• Select the cooling mode andset the default temperature. Then press
the
and buttons simultaneously to activate the sleep function.
• The fan speed is automatically set to low.
• The sleep function cannot be set in the fan anddehumidifier modes.
B. REMOTE CONTROL
Inserting and Replacing Batteries
• Slide out the battery compartment cover, which is located on the rear
side of the remote control. Place 2 AAA/LR03 (2 x 1.5 V) alkaline
batteries into the battery compartment and close the cover.
• When inserting the batteries ensure the correct polarity as shown in
the battery compartment.
• When replacing batteries, always use new batteries of the same type,
never combine old andnew batteries or batteries of various types.
Note:
Taking the batteries out of the remote control will delete
all the settings. After new batteries are inserted the default
remote control setting as programmed by the manufacturer
will be renewed.
• If you will not be using the remote control for longer than 2 months,
remove the batteries.
Caution:
Dispose of used batteries in accordance with local
regulations. Do not throw batteries into mixed
household waste. Do not use old and new batteries
at the same time. Do not use alkaline, standard or
rechargeable batteries at the same time. Do not
throw the batteries into afire. They might explode or
electrolyte might leak.
Using the remote control
• For the remote control to work properly, make sure that the maximum
distance between the control and the mobile air conditioner does not
exceed 8 m and that there is no obstacle between the control and the
mobile air conditioner that could prevent signal transmission.
• Point the remote control directly at the mobile air conditioner. The
signal transmission is confirmed by ashort sound signal.
• Do not expose the remote control to direct sunlight or high
temperatures. Otherwise the signal may not be transmitted.
Mobile air conditioner On/Off
• Press the POWER button briefly and the mobile air conditioner will
switch on andstart by default.
• Press the POWER button again to switch the mobile air conditioner off
and into standby mode. To switch off completely, disconnect the plug
from the power socket.
Warning:
Do not turn on the mobile air conditioner immediately
after it is turned off. Wait afew minutes before
switching on again. Otherwise, the compressor could
be damaged.
Note:
Never switch off the mobile air conditioner by unplugging
the power cord from the power socket. Turn off the mobile
air conditioner with the POWER button, wait several
minutes andthen disconnect the power cord.
. . . . . . . . . . . . . . . . . . . . . . . . . . . . . . . . . . . . . . . . . . . . . . . . . . . . . . . . . . . . . . . . . . . .
OPERATING MODES
1. Cooling Mode
• Press the COOL button.
• Use the
/ buttons to set the desired temperature. You can set the
temperature in the range from 17 to 30 °C.
• Use the HIGH/LOW buttons to set the fan speed, HIGH for high speed,
LOW for low speed.
2. Dehumidifier Mode
• Press the DRY button.
• The humidity in the room is reduced in this mode. Condensed
moisture accumulates in the reservoir. Methods of condensate
drainage can be found in thechapter “CONDENSATE DRAIN” in
thenext part of the user'smanual.
• Inthis mode it is not possible to set the temperature or the speed of the
fan. The fan speed is automatically set to low speed.
3. Fan Mode
• Press the FAN button.
• Inthis mode, the fan will circulate the air in theroom, but will not cool
it.
• Use the HIGH/LOW buttons to set the fan speed, HIGH for high
speed, LOW for low speed.
. . . . . . . . . . . . . . . . . . . . . . . . . . . . . . . . . . . . . . . . . . . . . . . . . . . . . . . . . . . . . . . . . . . .
MOBILE AIR CONDITIONER FUNCTIONS
1. Timer Functions
• The mobile air conditioner allows you to set two different timers – the
on timer and the off timer of the mobile air conditioner.
a) Timer for Turning On the Mobile air conditioner
• The timer for turning on the mobile air conditioner allows you to
activate it after aset period.
• While the mobile air conditioner is in standby mode, press the TIMER
button. The numeric display will start blinking, and the timer indicator
lights up.
• Use the
/ buttons to set the time after which the air conditioner
should turn on. The time can be set in arange from 1 to 24 hours, in
1-hour increments.
• Wait approximately 5 seconds for the time to be saved in memory.
The countdown for the set time will then begin automatically.
• Once the set time has elapsed, the air conditioner will start in the last
operating mode.
b) Timer for Turning Off the Mobile air conditioner
• The timer for turning off the mobile air conditioner allows you to
deactivate it after aset period.
• While the mobile air conditioner is running, press the TIMER button.
The numeric display will start blinking, and the timer indicator lights
up.
• Use the
/ buttons to set the time after which the air conditioner
should turn off. The time can be set in arange from 1 to 24 hours, in
1-hour increments.
• Wait approximately 5 seconds for the time to be saved in memory.
The countdown for the set time will then begin automatically.
• Once the set time has elapsed, the air conditioner will turn off and
switch to standby mode.
• If you need to cancel the timer, press the TIMER button. The remaining
countdown time will flash. Press the TIMER button again and the timer
will be cancelled.
2. Sleep Timer
• The sleep timer is used to reduce energy consumption during the
night when aconstant temperature is not required. The function also
ensures comfort during sleep, as the operation of the air conditioner is
muted and the display light is dimmed.
• Select the cooling mode andset the default temperature. Then press
the SLEEP button to turn on the sleep function.
• The fan speed is automatically set to low.
• The sleep function cannot be set in the fan anddehumidifier modes.
Changing Temperature Units
• Press the °C/°F button to change the temperature units from °C to °F
and vice versa.

- 11 -
01/2026
2026, .
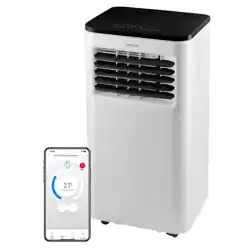
C. OPERATION VIA SENCOR HOME APP
• This mobile air conditioner can be controlled via the Sencor HOME
app.
• Download the application to your smartphone, register and control
your portable air conditioning via the application.
• If you already have the app installed, add portable air conditioning to
your devices.
Adding the Mobile air conditioner to the Device List via
Bluetooth
• You can add the mobile air conditioner to the Sencor HOME app by
pairing via Bluetooth.
1. Switch on the Bluetooth function on your mobile phone.
2. Switch on the mobile air conditioner.
3. Open the app and on the app'shome page, click the “+” icon.
4. The device itself will offer the “Do not add / Go to add” options.
5. Click on “Go to add” and the app will automatically guide you
through the addition.
Note:
If the Bluetooth connection fails or is not possible, make
sure there are no solid obstacles between your phone and
the mobile air conditioner and that the two devices are
close together.
Adding the Mobile air conditioner to the Device List via QR Code
• The mobile air conditioner can also be added to the Sencor HOME
app using the QR code provided below. On the home screen of the
application, click on the “+” icon and on the Add device screen, click
on the [−] icon in the top right corner.
QR Code for Adding the Control Panel of the Mobile air
conditioner to the Sencor HOME App
Manually Adding the Mobile air conditioner to the Device List
• On the main screen, click “Add Device” or the “+” icon in the top right
corner.
• Ascreen with appliance categories and alist of appliances will appear.
• Click “Cooling” and select the mobile air conditioner model from the
list of products.
• On the next screen, you will be prompted toselect aWi-Fi network.
Select the network, enter your password andclick “Next”.
• Check that the mobile air conditioner is ready for pairing. It is important
that the mobile air conditioner is connected to apower source and is
instand-by mode. The Wi-Fi indicator will flash quickly on the control
panel. If the indicator does not flash, press and hold the
button for
3 seconds until the Wi-Fi indicator flashes rapidly. In the app, confirm
that the Wi-Fi indicator is blinking rapidly and click “Next”.
• The mobile air conditioner is automatically added to the device list.
The Wi-Fi indicator will turn on.
• In the device list on the main screen, click on the mobile air conditioner
icon to access the mobile air conditioner controls.
Wi-Fi reset
• Press the button for 3 seconds while the mobile air conditioner is
in operation. The Wi-Fi settings will be reset and the Wi-Fi indicator
will blink rapidly (twice per second).
. . . . . . . . . . . . . . . . . . . . . . . . . . . . . . . . . . . . . . . . . . . . . . . . . . . . . . . . . . . . . . . . . . . .
CONDENSATE DRAIN OUTLET
• The mobile air conditioner is equipped with two drain holes, each of
which drains condensate from adifferent part of the air conditioner. If
the mobile air conditioner is used frequently, the condensate must be
regularly checked and drained. If you select the dehumidifier operating
mode, we recommend draining the condensate using adrain hose
that you connect to the upper drain hole.
Note:
In cooling and fan operation modes (assuming low
humidity in the room) it may not be necessary to drain
the condensate. The mobile air conditioner is designed to
increase its efficiency withasmall amount of water in the
condensate reservoir.
Condensate Outlet from the Lower Drain Hole
• If the water level in thereservoir reaches apredetermined level,
the mobile air conditioner will stop running, an audible warning will
sound and the full reservoir indicator light will illuminate. To drain the
condensate from theair conditioner, proceed as follows:
1. Unplug the power cord from the power socket.
2. Carefully move the mobile air conditioner to the drain point.
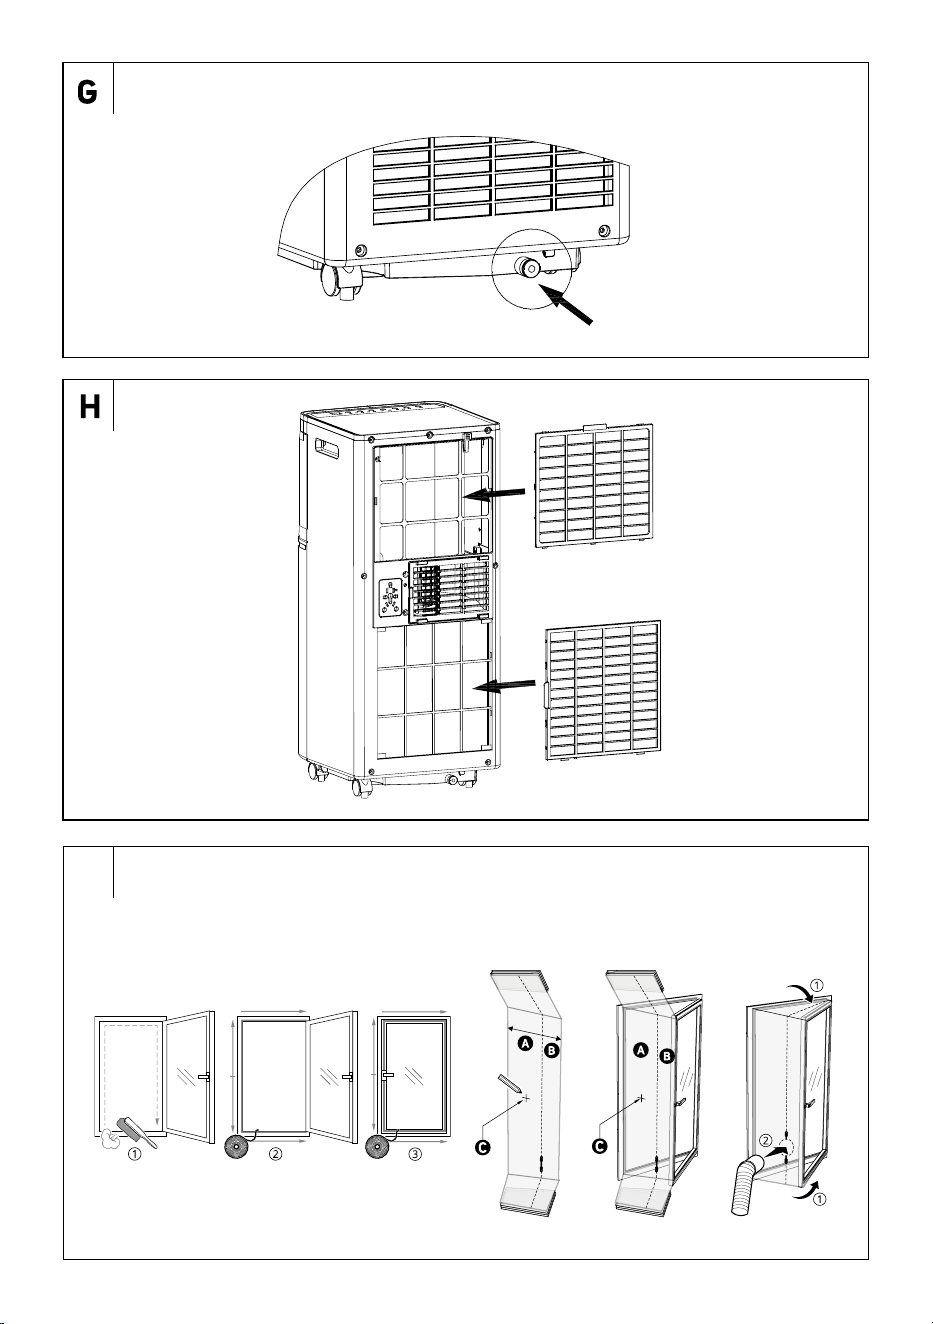
3. Place acontainer under the lower drain hole into which the
condensate will flow – see Figure G. Carefully remove the drain
plug. Ifnecessary, connect the drain hose andallow the condensate
to drain. You can tilt the mobile air conditioner slightly backwards
during draining the condensate.
4. As soon as the reservoir is empty (condensate has stopped flowing),
disconnect the drain hose, if used, andreplace the drain plug. Before
switching on the mobile air conditioner again, check that the drain
plug is correctly inserted and seals well. Otherwise, condensate may
leak during operation anddamage the floor or carpet.
5. Plug the power cord into the power socket and the mobile air
conditioner will automatically resume operation.
Note:
If you turn off the mobile air conditioner with the button,
its operation will not automatically resume andit will be
necessary to set it again.
Note:
If the mobile air conditioner is added to the list of devices
in the Sencor HOME application, thefull reservoir warning
will also appear directly in the application, as well as other
warning messages.
Continuous drainage
1. Unplug the power cord from the power socket.
2. Remove the drain plug. Connect the drain hose. If the length of the
drain hose is not sufficient, it will be necessary to purchase alonger
hose of the same type. Never extend the drain hose by adjusting it.
3. Connect the end of the drain hose to the drain hole.
4. Unplug the power cord into the power socket and switch on the
mobile air conditioner.
Note:
The drain hose should be installed at the same height or
lower than the drain hole. Otherwise, the condensate will
not drain properly from the reservoir.
. . . . . . . . . . . . . . . . . . . . . . . . . . . . . . . . . . . . . . . . . . . . . . . . . . . . . . . . . . . . . . . . . . . .
- 12 -
01/2026
2026, .
SAFETY PROTECTION ELEMENTS
Audible Warning and Shutoff When Reservoir is Full
• If the water level in thereservoir reaches apredetermined level, the
mobile air conditioner will stop running, an audible warning will sound
and the full reservoir indicator light will illuminate.
• The condensate reservoir must be emptied. Follow the instructions in
the “CONDENSATE DRAIN” section.
Protection of the Compressor
• The compressor is equipped with atime protection against damage
when switching on again for aperiod of 3 minutes. If the mobile air
conditioner is switched on shortly after it is switched off, the operation
of the compressor will start only after 3 minutes.
Room andCoil Temperature Sensor Malfunction
1. Detects sensor malfunction when switched on or inoperation.
2. When afault is detected when switching on, it immediately puts
the mobile air conditioner in an error state. If it returns to normal
duringthis time, the mobile air conditioner will switch to the standby
mode.
. . . . . . . . . . . . . . . . . . . . . . . . . . . . . . . . . . . . . . . . . . . . . . . . . . . . . . . . . . . . . . . . . . . .
TIPS FOR PROPER USE
• To ensure that the mobile air conditioner works correctly, we
recommend that you observe the following:
– Close all windows anddoors of the room where the mobile air
conditioner is used. If you have installed amobile air conditioner
in aroom only temporarily, you can leave the door slightly ajar
(about 1 cm) to ensure proper ventilation.
– Prevent direct sunlight from entering the room. Close the curtains
or blinds to ensure economical operation of the air conditioner.
– Do not block the air outlet andinlet openings.
– Check that there is no heat source turned on in the room.
– Never use the mobile air conditioner in an excessively humid
environment, such as in laundries.
– Never use the mobile air conditioner outdoors.
– Check that the mobile air conditioner is located on aflat surface. If
necessary, install special brakes on the castors.
. . . . . . . . . . . . . . . . . . . . . . . . . . . . . . . . . . . . . . . . . . . . . . . . . . . . . . . . . . . . . . . . . . . .
MAINTENANCE AND CLEANING
• Before cleaning, turn off the mobile air conditioner, wait several
minutes andthen disconnect the power cord from the power socket.
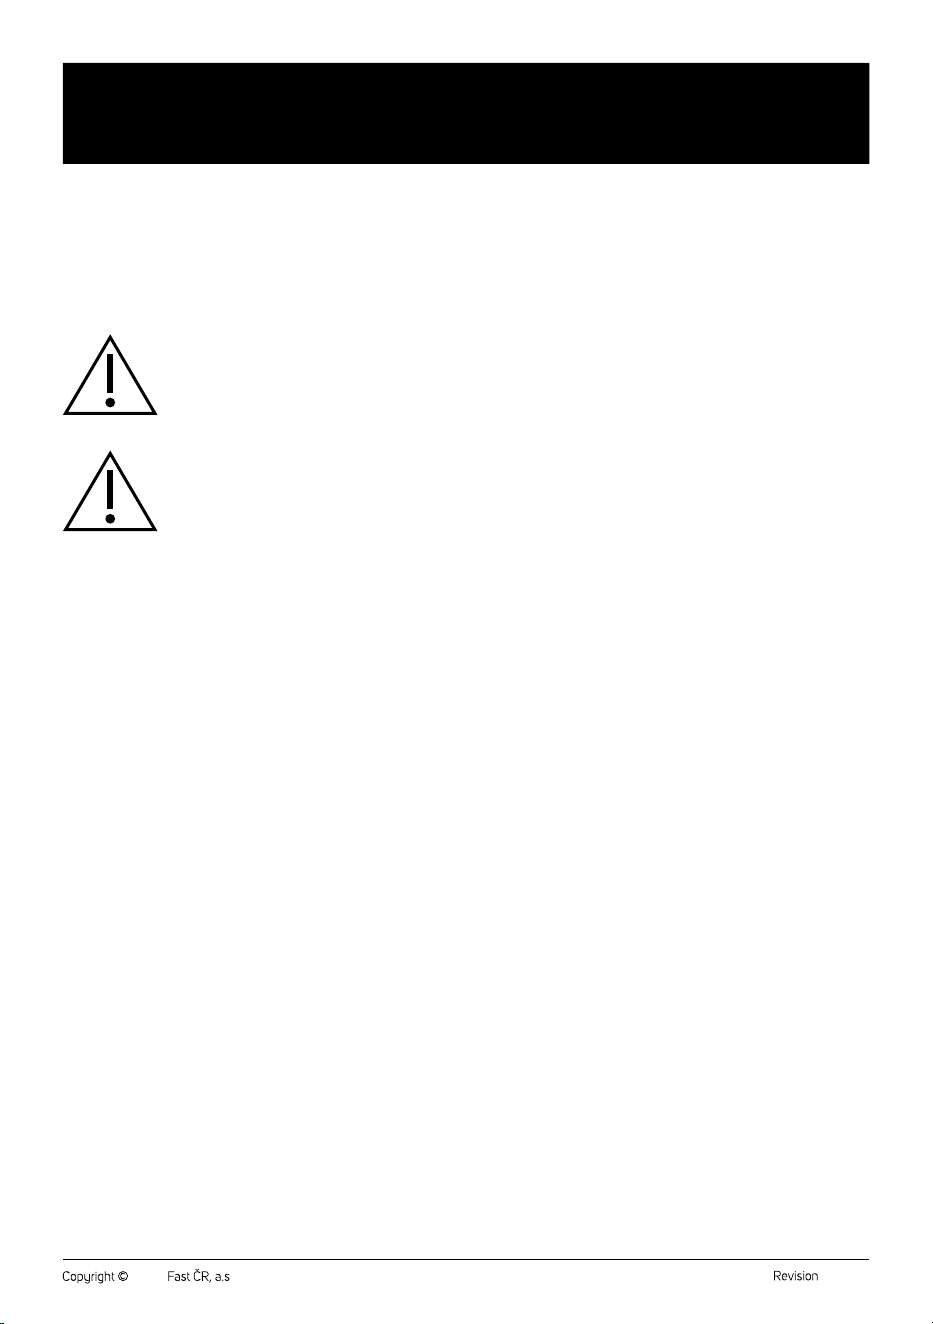
Cleaning the Protective Grilles and Air Filters
• When using the mobile air conditioner regularly, clean the protective
grilles and air filters at least once every two weeks to prevent dust
from clogging the fan.
• Carefully remove the protective grilles andremove the filters – see
Figure H. Use avacuum cleaner to remove dust from the grilles
andfilters.
• In case of heavy soiling, wash the filter by hand in asolution of
lukewarm water (max. 40°C) andneutral detergent. Then thoroughly
rinse under flowing water and allow to dry naturally. Do not dry it in
aclothes dryer or in direct sunlight. Once the filters are dry, you can
install them back in their place.
• In case of heavier soiling, you can wipe the protective grilles with
aslightly damp cloth and then wipe them dry with aclean cloth.
Note:
Do not use mobile air conditioning without properly installed
air filters and protective grilles. Never install wet or damp air
filters and protective grilles in mobile air conditioners.
Cleaning the outer casing
• To clean the outer case, use asoft wiping cloth dipped in asolution of
lukewarm water and neutral detergent. Then wipe the surface dry.
• When cleaning, do not spray water or any other liquid on the mobile air
conditioner, do not water it or submerge it in water or in any other liquid.
• Do not use abrasive cleaning products, solvents, petrol, etc. for
cleaning.
Mobile air conditioner Storage
• Keep the mobile air conditioner running in aheated room in fan mode
for about 12 hours to dry it out andprevent mould.
• Disconnect the flexible hose and store it in asafe place out of the
reach of children.
• Drain all condensate from the reservoir – see the chapter
“CONDENSATE DRAIN”.
• Clean the air filters and reattach them. Wipe the outer case of the
mobile air conditioner. Remove the batteries from the remote control.
• Store the air conditioner in acold, dry anddark location.
Recommissioning
• Make sure that the power cord andplug are not damaged and the air
filters are clean. Insert new batteries in the remote control. Follow the
instructions in the Inserting and Replacing Batteries section. Install
the mobile air conditioner according to the guidelines provided in
theprevious section of the manual, “Installation”.
. . . . . . . . . . . . . . . . . . . . . . . . . . . . . . . . . . . . . . . . . . . . . . . . . . . . . . . . . . . . . . . . . . . .
TROUBLESHOOTING
• Before contacting an authorised service centre, check this equipment
by following these instructions:
Problem Possible cause Troubleshooting
The mobile air
conditioner did
not switch on.
The supply cable is not
connected to the power
socket, or the power
socket is not under
voltage.
Plug the plug properly
into the power socket,
or check that the socket
is live.
The condensate
reservoir is full.
Empty the reservoir
according to the instructions
in the “CONDENSATE
DRAIN” section.
The ambient
temperature is too low
or high.
We recommend using
amobile air conditioner
at temperatures from 5°C
to 35°C.
The temperature inthe
room is lower than
the set temperature
(cooling operating
mode).
Adjust the set
temperature.
The mobile
air conditioner
is not cooling
sufficiently.
The mobile air
conditioner is exposed
to direct sunlight.
Move the mobile air
conditioner or shade it.
The windows
anddoors of the room
are open and warm
air flows into the room
or the heat sources
are switched on in the
room.
Ensure that all windows
anddoors are closed, or
turn off heat sources.
The air filter is dirty.
Switch off the air
conditioner and clean the
air filter according to the
instructions in “Cleaning
the Air Filter”.
Air inlet or outlet
openings are blocked.
Remove the cause of the
blockage.
The mobile air
conditioner is
too loud.
The air conditioner is
placed on an uneven
surface.
Turn off the air conditioner,
unplug the power cord
from the power socket
andmove it to aflat
andlevel place.
The compressor
is not working.
Overheating protection
has been activated.
Wait 3 minutes until
the temperature drops.
After that, operation is
automatically resumed.
- 13 -
01/2026
2026, .
The remote
control doesn't
work.
The distance between
the control and the
mobile air conditioner is
too large.
Approach the mobile air
conditioner andmake
sure that there are no
obstacles between the
control and the mobile air
conditioner.
The remote control
does not point at the
signal sensor.
The batteries are flat. Replace the batteries.
Error Messages
Display Meaning Solution
E1
Room temperature
sensor malfunction
Contact an authorised
service centre.
E2
Temperature tube
sensor malfunction
Contact an authorised
service centre.
The full reservoir
indicator light
has turned on.
Condensate reservoir
is full.
Empty the reservoir
according to the
instructions in the
“CONDENSATE DRAIN”
section.
Note:
If any of the above malfunctions occur, turn off the mobile
air conditioner andcheck the cause of the malfunction.
Turn it on again, andif this fault occurs again, turn it
off, disconnect the power cord from the power socket
andcontact the manufacturer, an authorised service centre
or aperson withappropriate qualifications andentrust them
with the repair of the fault.
. . . . . . . . . . . . . . . . . . . . . . . . . . . . . . . . . . . . . . . . . . . . . . . . . . . . . . . . . . . . . . . . . . . .
TECHNICAL SPECIFICATIONS
Power supply 220–240 V~ / 50 Hz
Cooling power output 7,000 BTU/hour
Cooling power consumption 760 W
Current consumption 3.4 A
EER cooling factor 2.6
Dehumidification capacity 20 l/day
Capacity of the built-in
condensate reservoir
0,7 l
Coolant type and weight R290 / 135 g
Air flow volume 300 / 220 m
3
/hour (high/low)
Sound pressure level 64/61 dB (A) (high/low)
Sound power level 55/52 dB (A) (high/low)
Maximum permissible value of
operating pressure (low/high):
2/2.6 MPa
Dimensions of the mobile air
conditioner (W × D × H)
300 × 294 × 695 mm
Weight 18.7 kg
Operating temperature (cooling) 17 to 30 °C
Recommended room area
(Central Europe)*
21–26 m
2
Recommended room size
(Central Europe)*
54–67 m
3
Maximum room size
26 m
2
/ 67 m
3
(ceiling height 2.6 m)
Wireless technology used
Wi-Fi: IEEE 802.11 B/G/N20 support
Bluetooth: Bluetooth 4.2 Low Energy
* This is the conversion of the value to the climatic conditions typical
for Central Europe. For an ordinary room with astandard height ceiling.
Values may vary if used in rugged areas, areas with multiple heat sourc-
es, heavily glazed and/or poorly insulated areas. If you know that you
are buying amobile air conditioner for aspace withthe above described
properties, choose amodel with ahigher power for the given area.
The declared noise emission value of the appliance is 64/61 dB (A), which
is the Asound pressure level relative to areference sound power of 1 pW.
Note:
The efficiency of the mobile air conditioner may be reduced
if it is used outside the range of operating temperatures
listed above.
. . . . . . . . . . . . . . . . . . . . . . . . . . . . . . . . . . . . . . . . . . . . . . . . . . . . . . . . . . . . . . . . . . . .
DISPOSAL OF USED BATTERIES
Batteries contain environmentally damaging compounds and therefore
do not belong in standard municipal waste. Take used batteries for proper
disposal at adesignated battery collection point.
SENCOR hereby declares that the SAC MT7042C radio device conforms
to the 2014/53/EU directive. The full text of the Declaration of Conformity
can be found at www.sencor.eu.
. . . . . . . . . . . . . . . . . . . . . . . . . . . . . . . . . . . . . . . . . . . . . . . . . . . . . . . . . . . . . . . . . . . .
INSTRUCTIONS AND INFORMATION ON DISPOSAL
OF USED PACKAGING MATERIAL
Dispose of used packaging material at the designated municipal waste
disposal site.
. . . . . . . . . . . . . . . . . . . . . . . . . . . . . . . . . . . . . . . . . . . . . . . . . . . . . . . . . . . . . . . . . . . .
DISPOSAL OF USED ELECTRICAL AND ELECTRONIC
EQUIPMENT
Used electrical andelectronic products must not be disposed of in
ordinary municipal waste. To enable the proper disposal, renewal and
recycling of these products, deliver them to the designated collection
points. Alternatively, in some European Union states or other European
countries the products can be returned to the local retailer when buying
an equivalent new product. By disposing of this product correctly, you
help to conserve valuable natural resources and prevent any potential
adverse impact on the environment and human health that could result
from improper waste disposal. For more details, contact your local
authority or nearest collection point. Fines may be imposed for the
improper disposal of this type of waste as per national regulations.
For business entities in European Union States
If you wish to dispose of electrical and electronic equipment, please
request the necessary information from your retailer or supplier.
Disposal in other countries outside the European Union
To dispose of this product elsewhere, request the necessary information
on the correct disposal method from local authorities or your retailer.
. . . . . . . . . . . . . . . . . . . . . . . . . . . . . . . . . . . . . . . . . . . . . . . . . . . . . . . . . . . . . . . . . . . .
Changes to text and technical parameters are reserved.