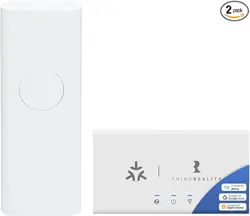
Smart Switch Gen3 Starter Kit
Matter supported via Smart Bridege MZ1

Contents
Product Overview
What's in the Box
Smart Bridge LED Status
Smart Switch Gen3 LED Status
Setting up the Smart Switch Gen3
Factory Reset
Setup with 3R-Installer
Setup with Apple Home
Setup with Google Home
Setup with Alexa
Setup with SmartThings
FCC Regulatory Conformance
RF Exposure
Limited Warranty
01
01
02
02
03
06
06
10
15
20
25
31
32
32
Product Overview
Elevate your smart home with the Smart Switch Gen3 Matter Kit. With
the Matter protocol, it offers effortless integration with leading smart
home platforms. The 3R-Installer App ensures a smooth setup and easy
device management. Whether you're at home or on-the-go, you can con-
trol your devices remotely or with simple voice commands.
01
User Guide
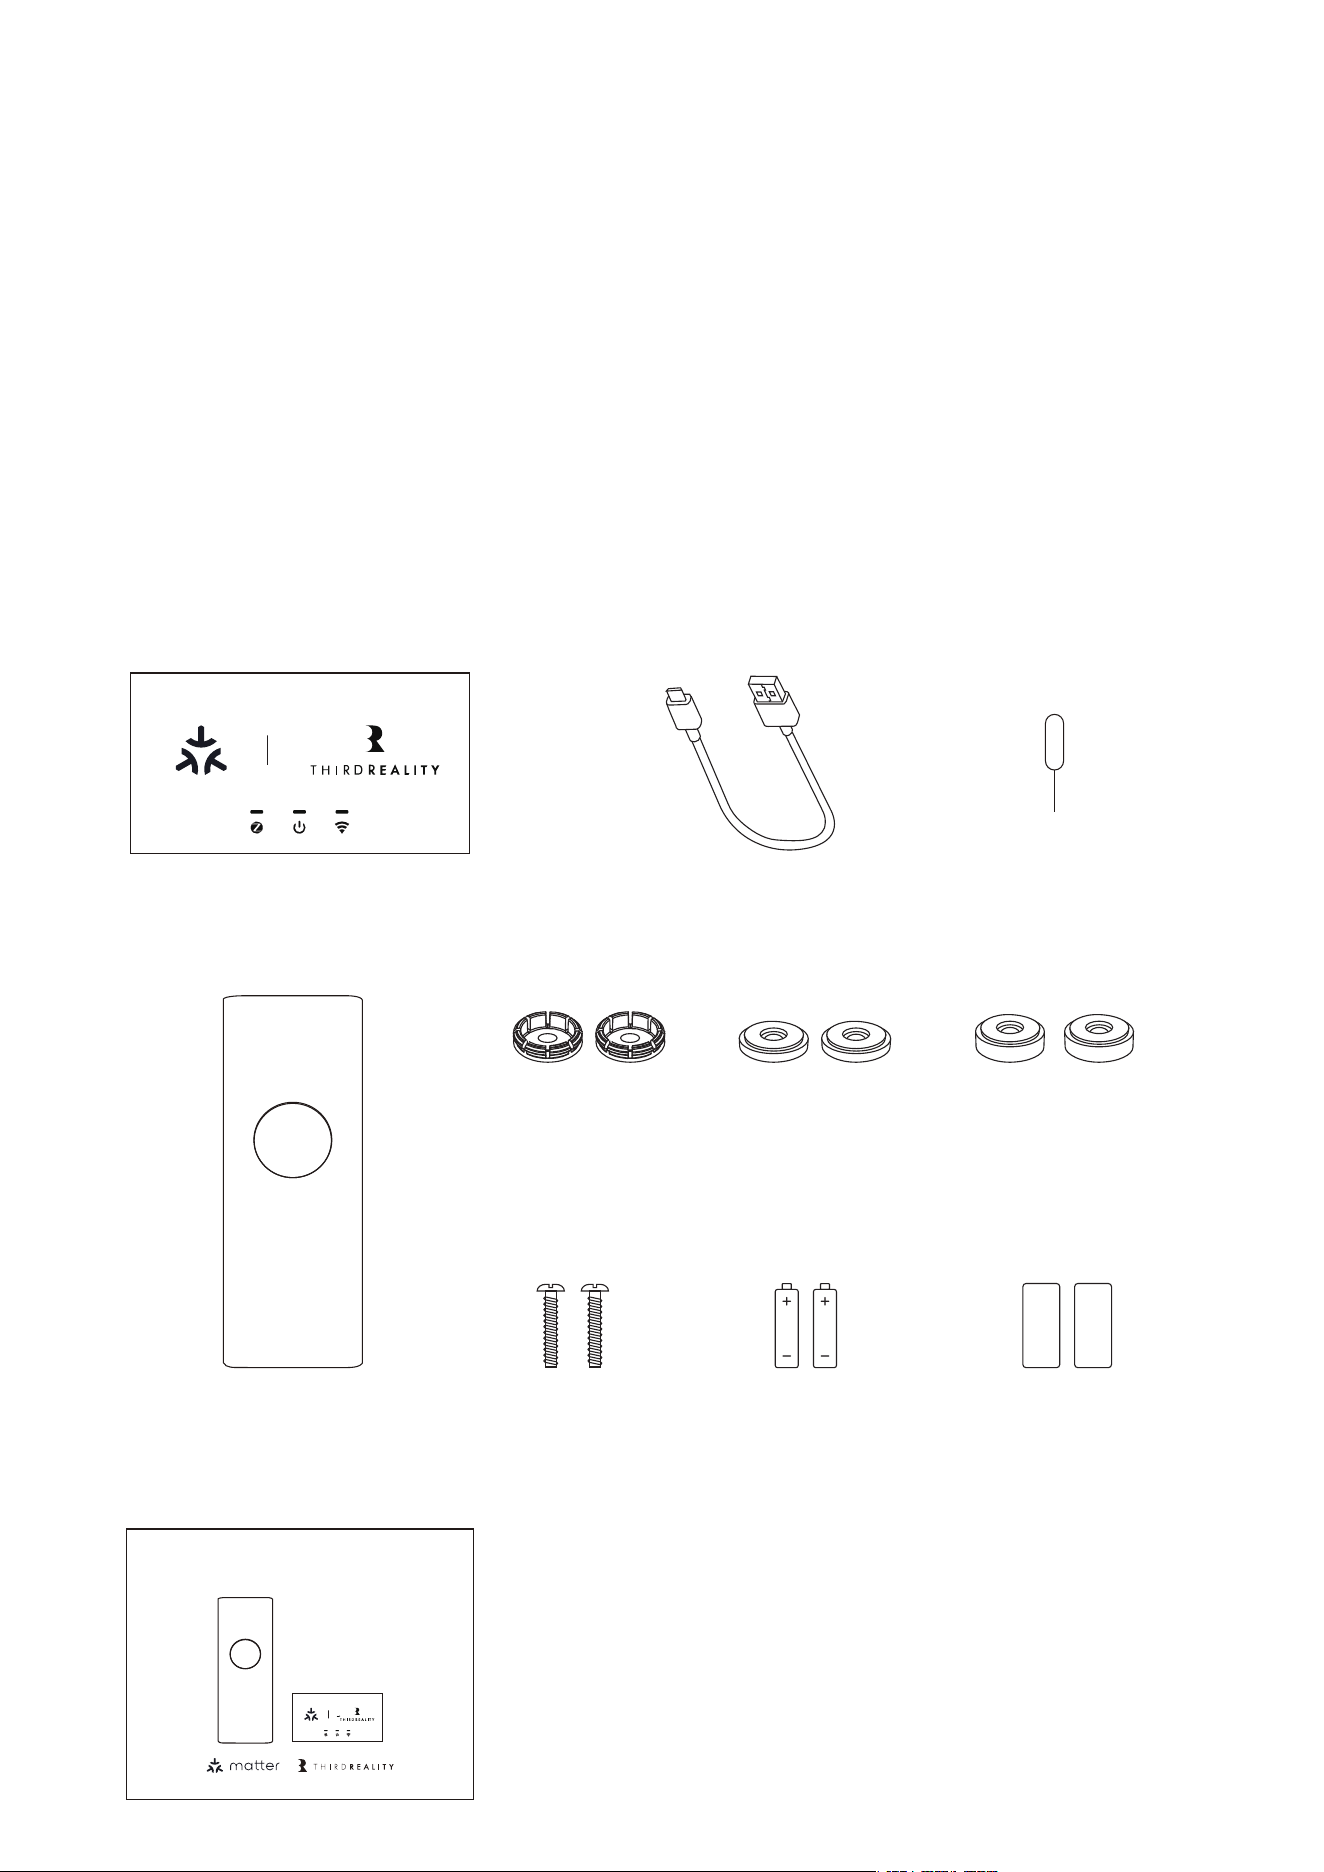
What's in the Box
Fastener x2 Thin Spacer x2
Thick Spacer x2
Battery x2
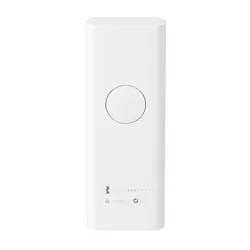
Smart Switch Gen3
Smart Bridge MZ1 Power Cable Pin
Protective Film x2Screw x2
Smart Switch Gen3 Starter Kit
Matter supported via Smart Bridege MZ1
02
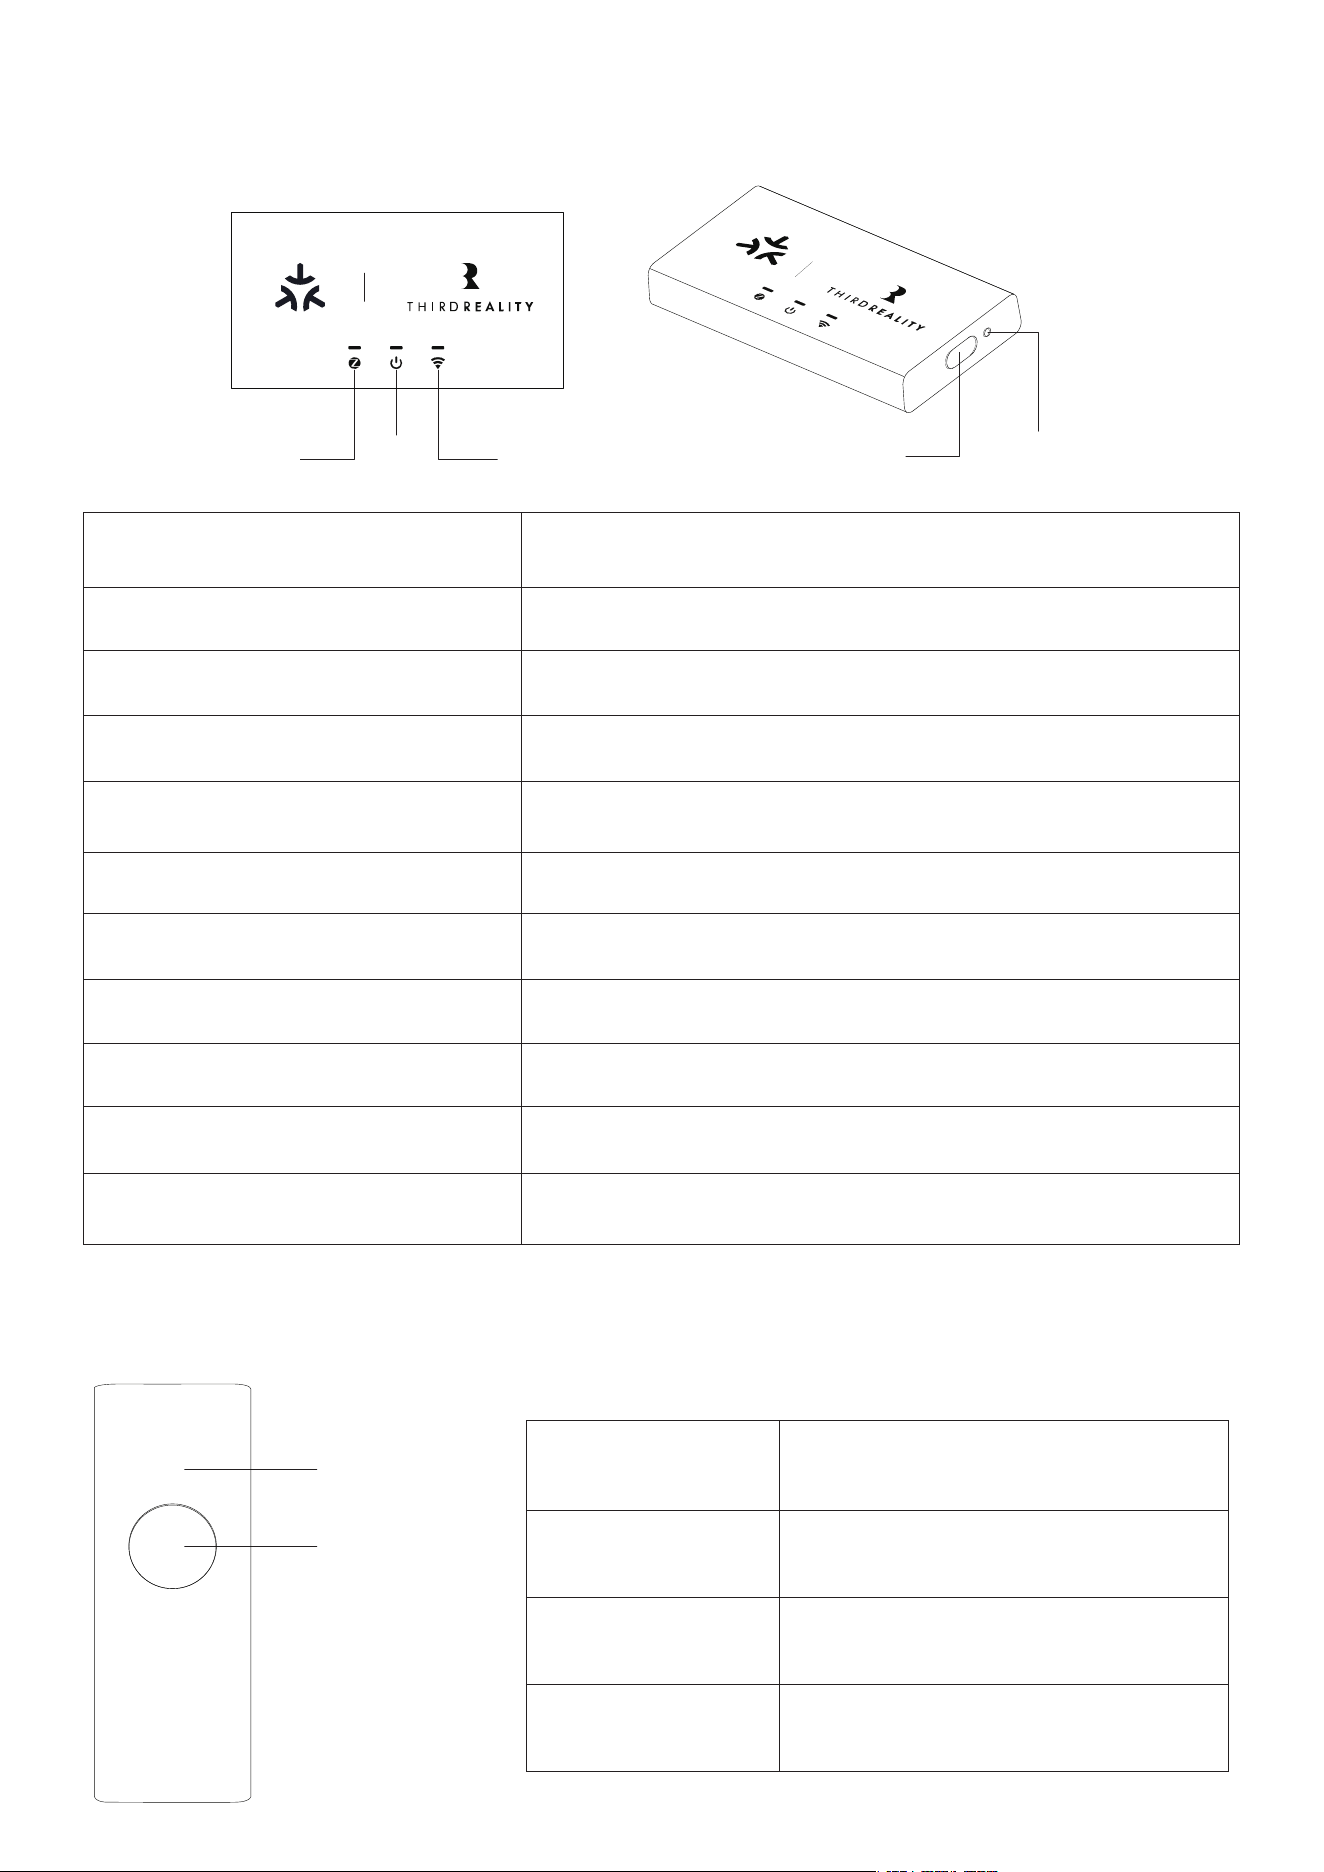
Zigbee Wi-Fi Power Input Reset PinholePower
Smart Bridge LED Status
Device Status
Zigbee idle
Zigbee ready for pairing
Wi-Fi Idle/Ready for setup/Wi-Fi Matter reset
Wi-Fi connection 15 min timeout
Wi-Fi connected
Wi-Fi connection lost/resuming
Power on
Device OTA in progress
Device/Module self test fault
Factory reset
LED Status
Zigbee LED On
Zigbee LED slow blinking
Wi-Fi LED fast blinking
Wi-Fi LED Off
Wi-Fi LED On
Wi-Fi LED slow blinking
Power LED On
Power LED slow blinking
Power LED fast blinking
All 3 LED fast blinking
Smart Switch Gen3 LED Status
On/Off
Button
LED
Device Status
Low battery
Pairing
Offline
LED Status
LED double blinking
LED fast blinking
LED slow blinking
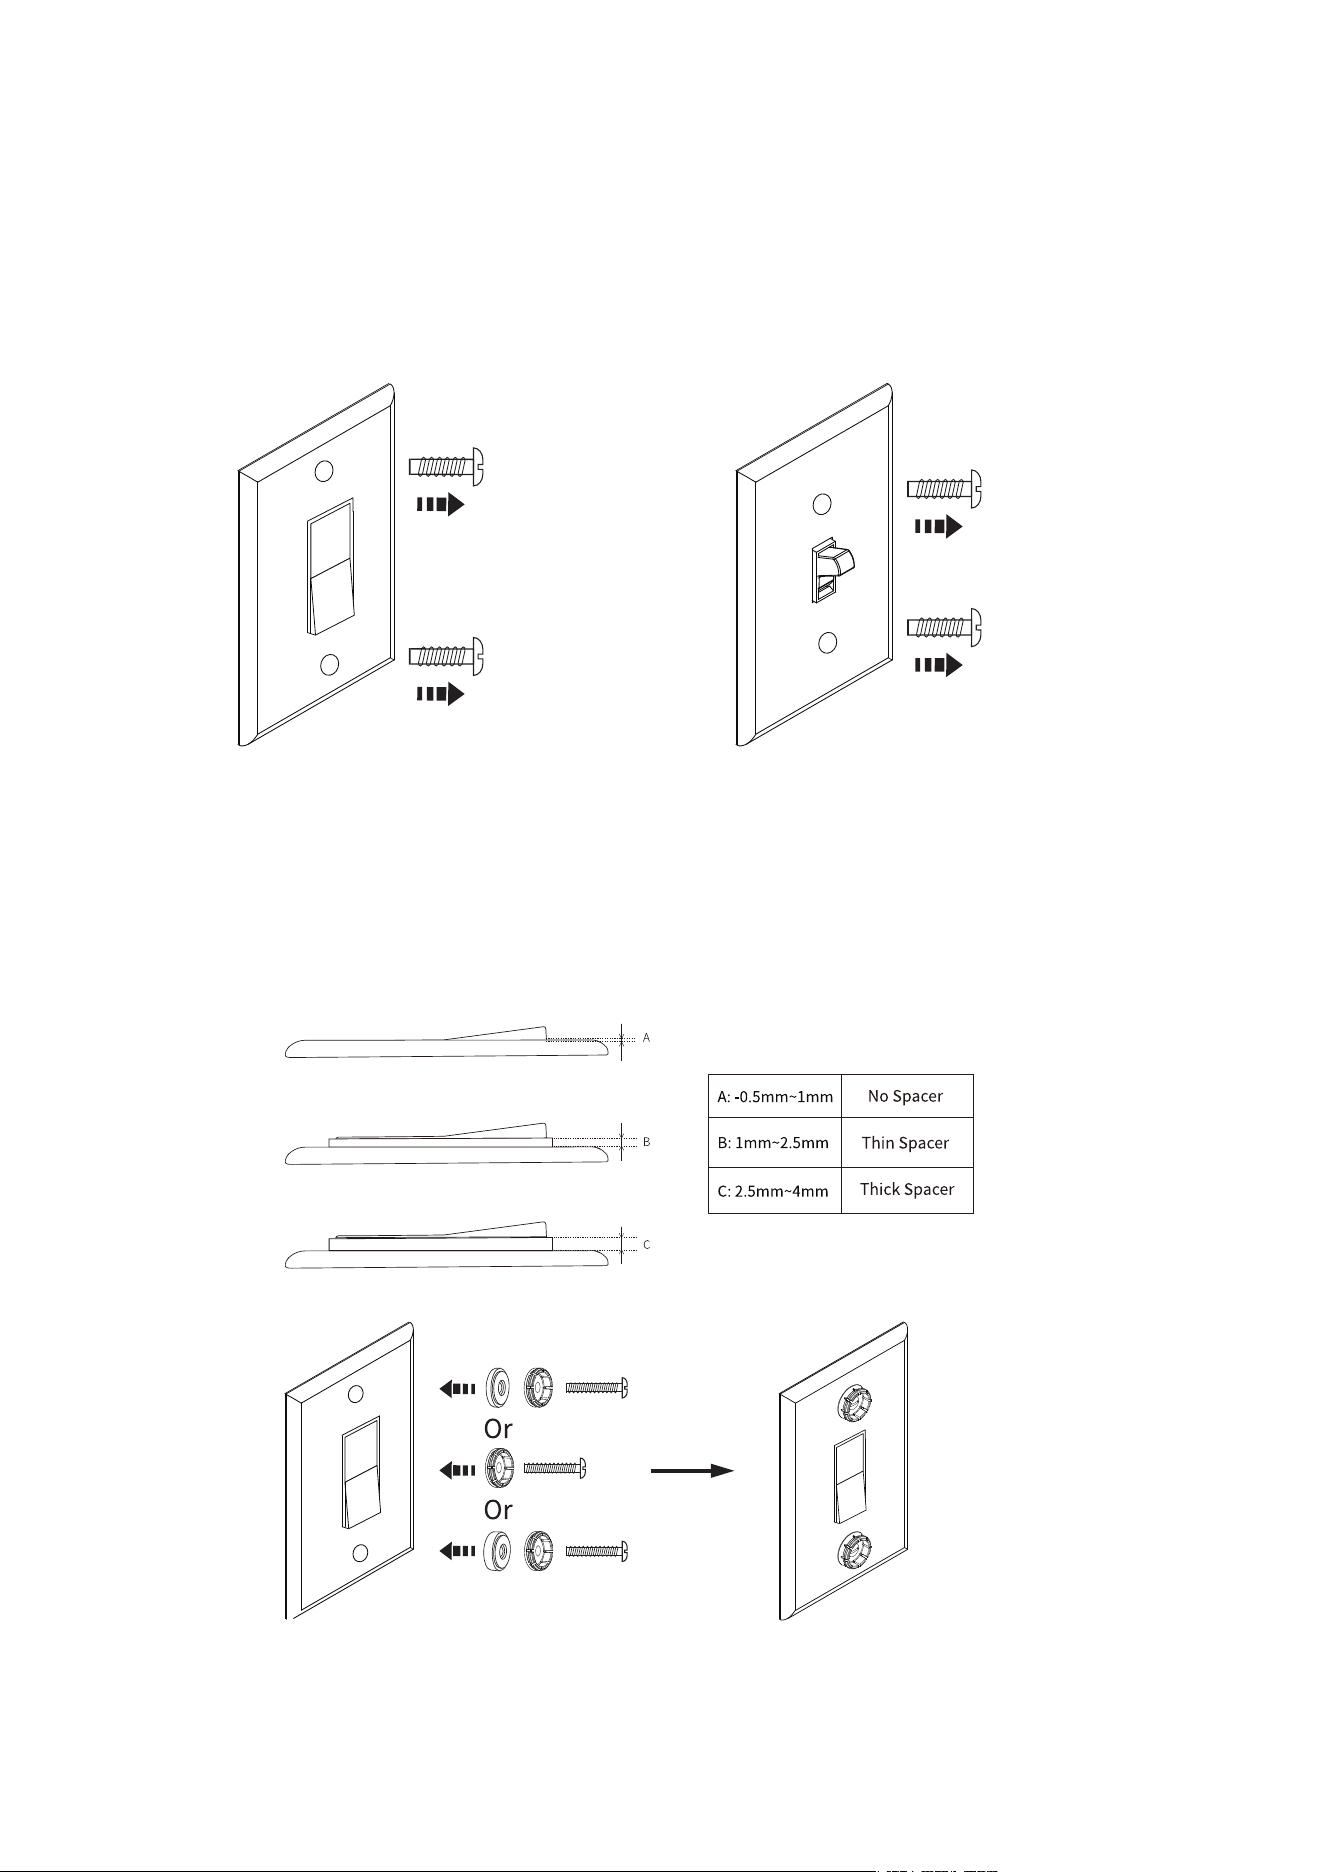
Works with both toggle and rocker style switches.
Remove screws from faceplate.1.
For rocker switch, please select the fasteners and spacers as shown
below. Start with the appropriate spacers. When you get to Step7,
you may need to adjust the spacers accordingly.
2.
Setting up the Smart Switch Gen3
03
04
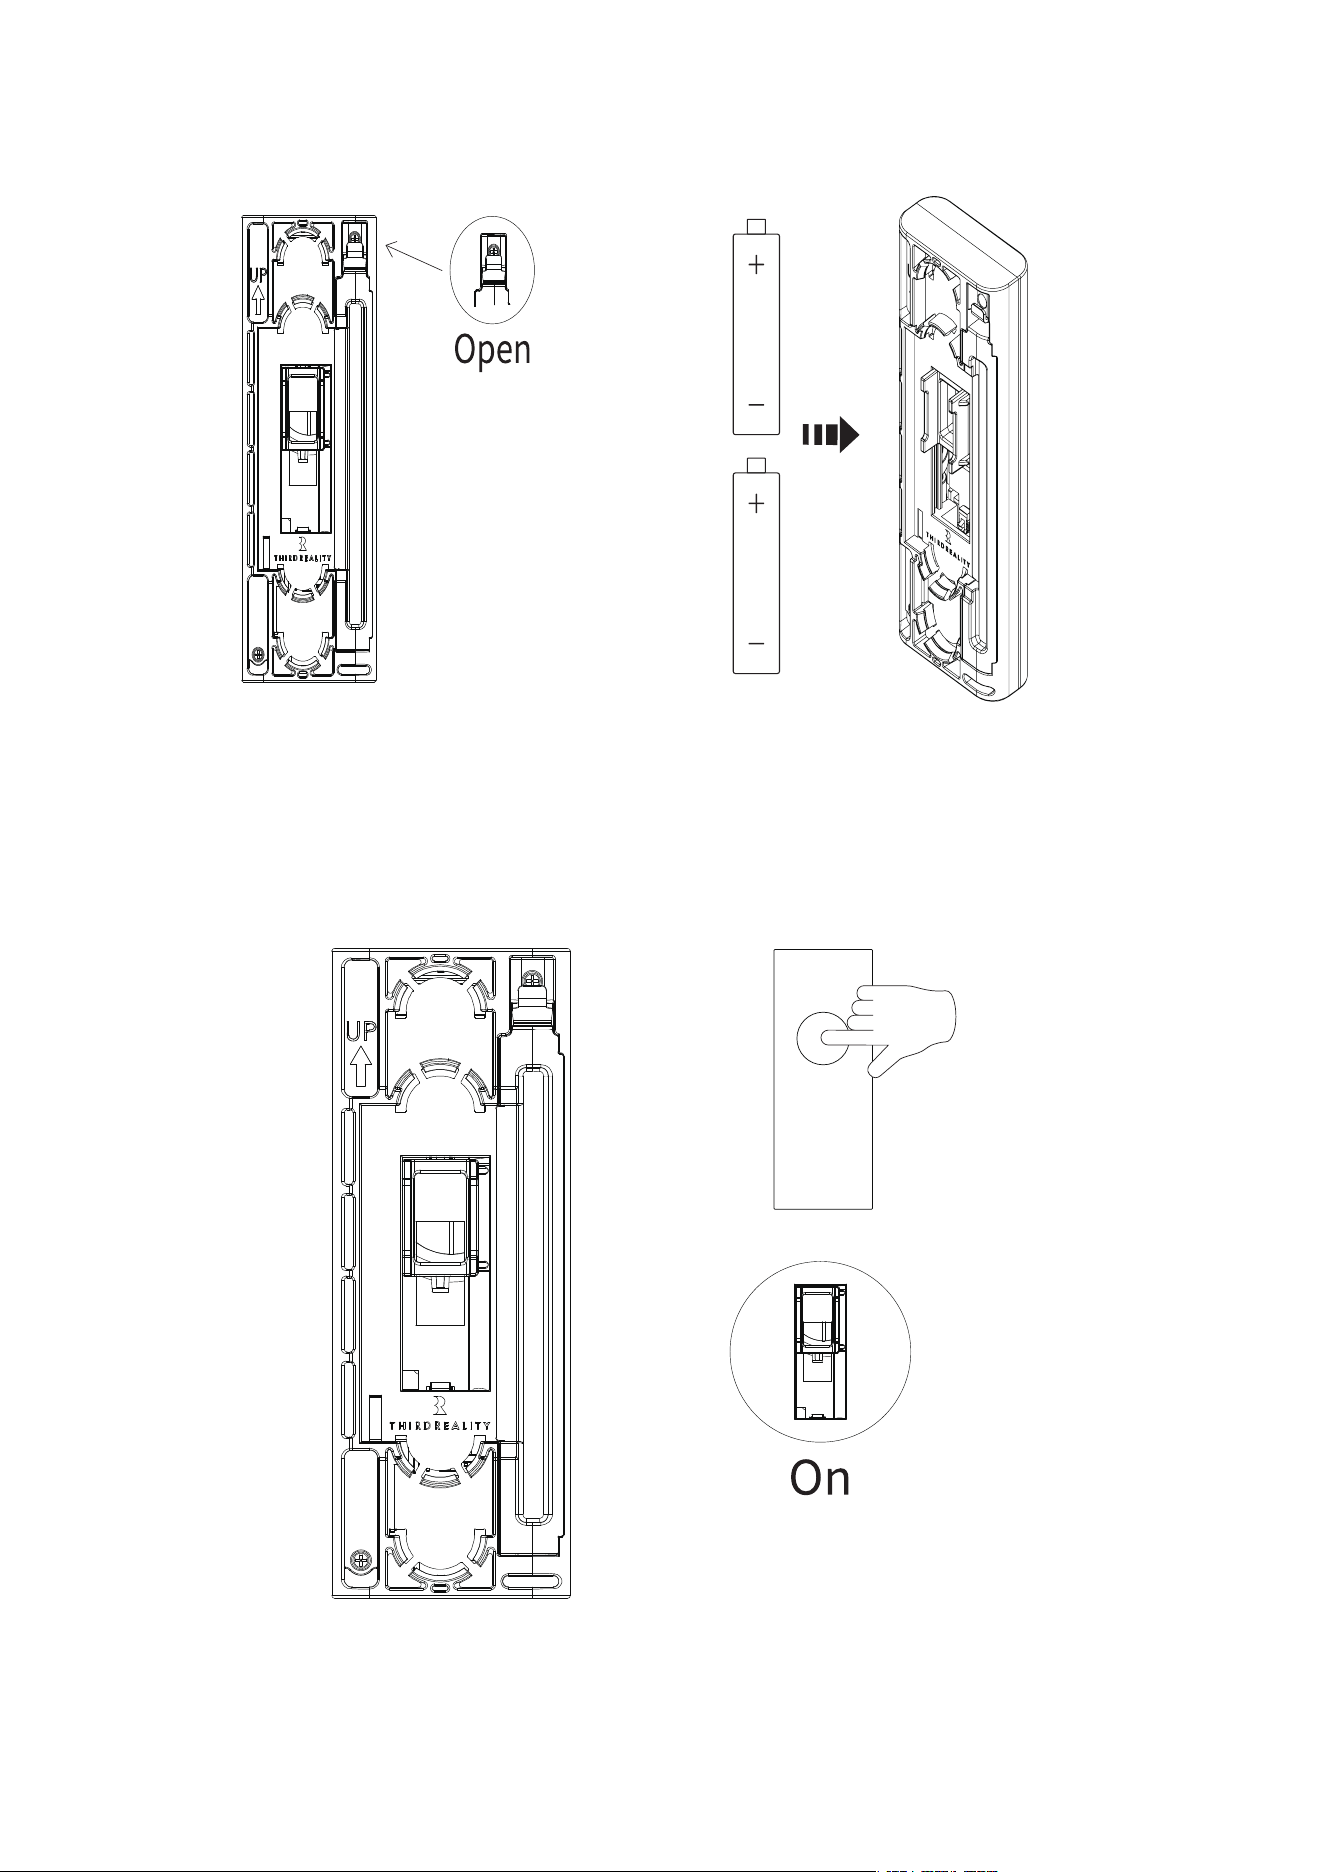
Insert two AAAbatteries and replace cover.3.
Make sure Smart Switch actuator is in the up positon by pressing
the button.
4.
05
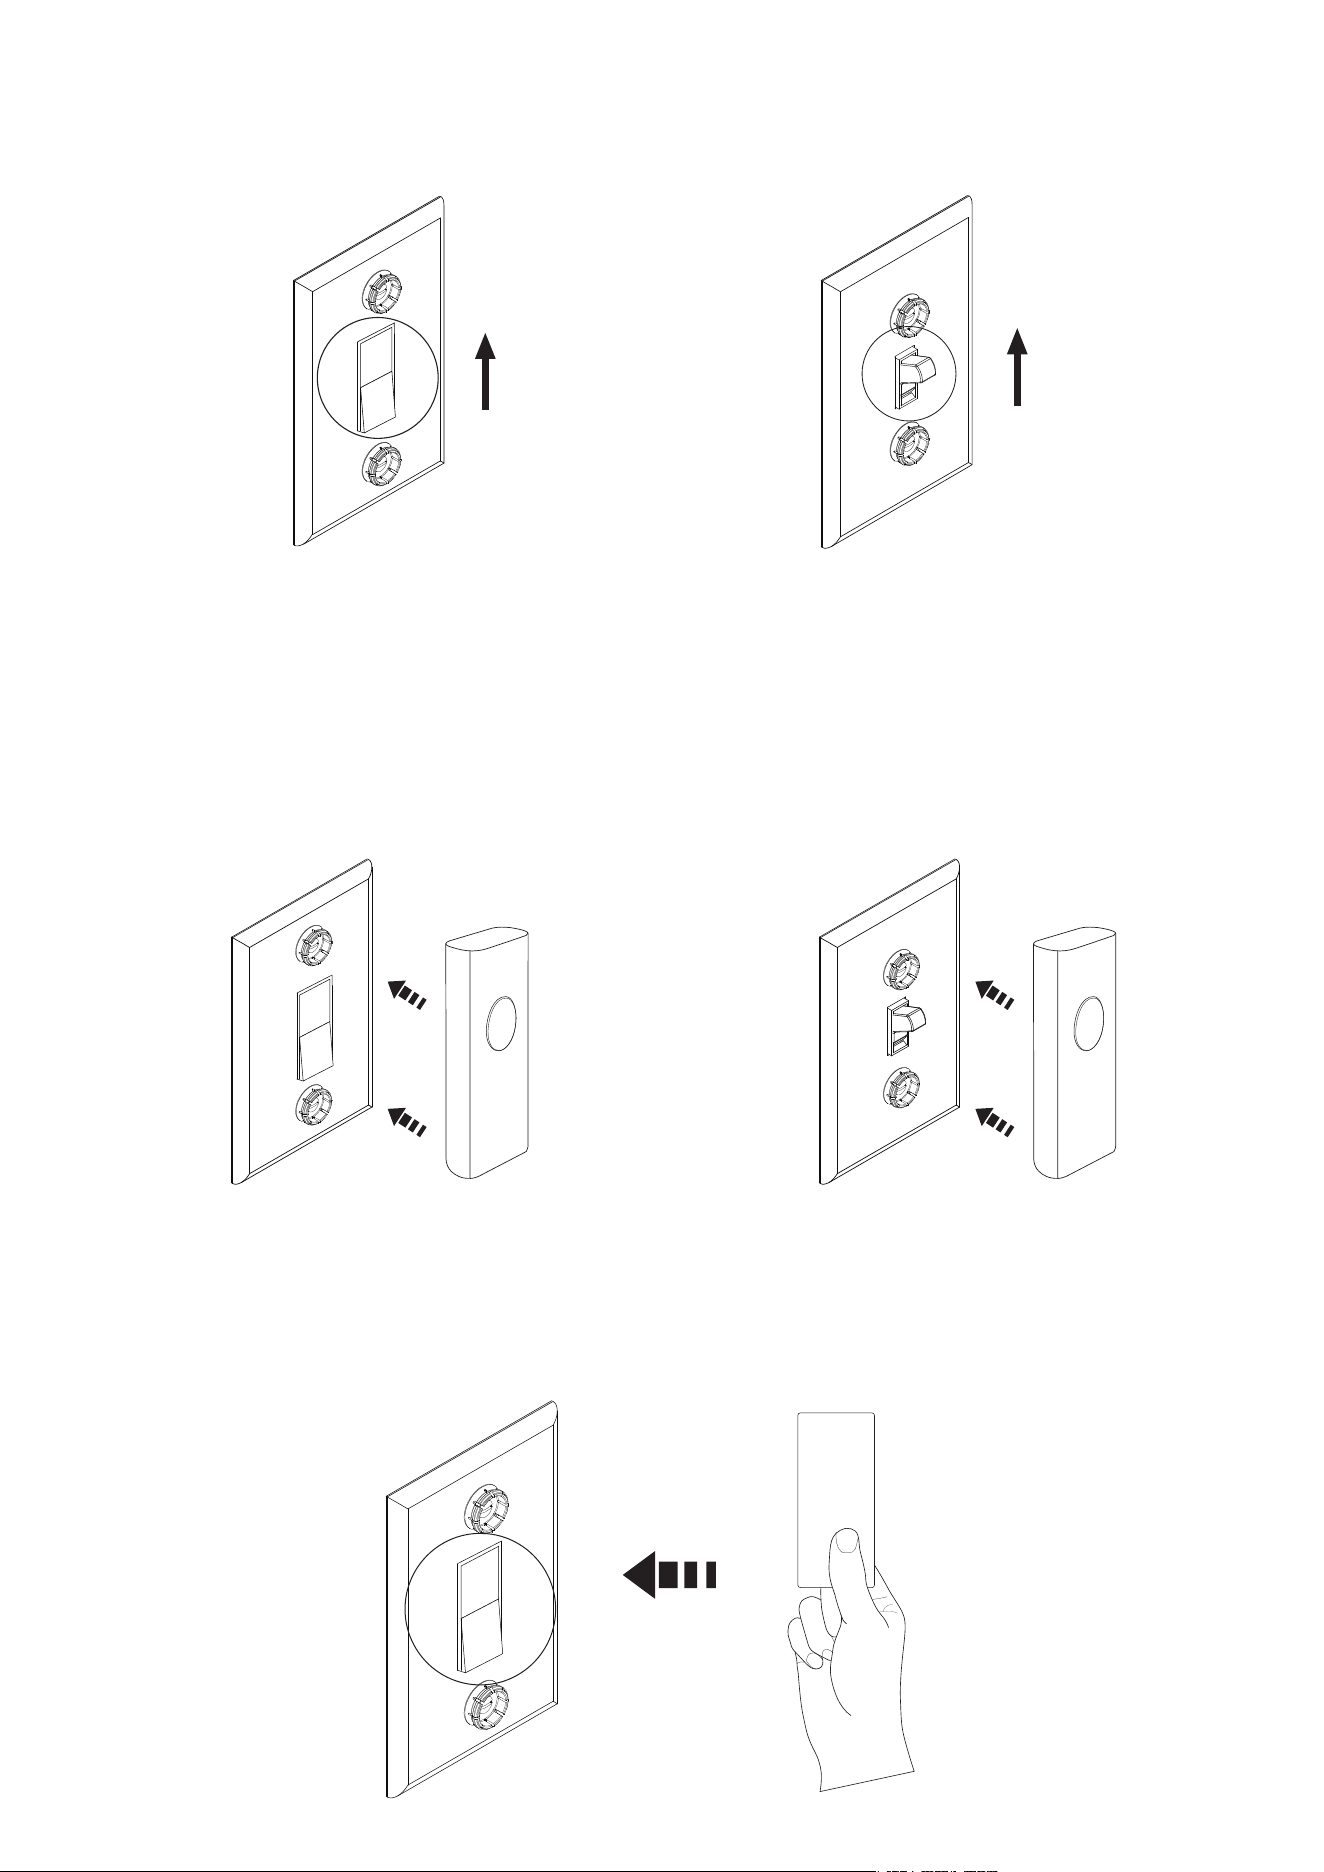
Turn your rocker or toggle switch ON positon, as shown.5.
Place Smart Switch over existing switch. Test the switch by pressing
the button to turn on and off. Adjust the spacers to ensure proper
engagement between the Smart Switch and wall switch.
Optional-For rocker switch, place protective film over paddle.
6.
Long press the reset button of the bridge through the pinhole until all
three LED turn fast blinking.
Long press the button of the switch for 30 seconds until the LED turns
fast blinking.
This Matter certified bridge can be paired to any Matter certified ecosys-
tems.
Download and install the 3R-Installer App(iOS/Android) on your
phone.
1.
Turn on Bluetooth on your phone, and make sure your phone is
connected to a stable internet access through a 2.4GHz Wi-Fi net-
work.
2.
Power on the Smart Bridge with the power adaptor, the Wi-Fi LED
indicator is in blue blinking, indicating it is ready for Wi-Fi setup.
3.
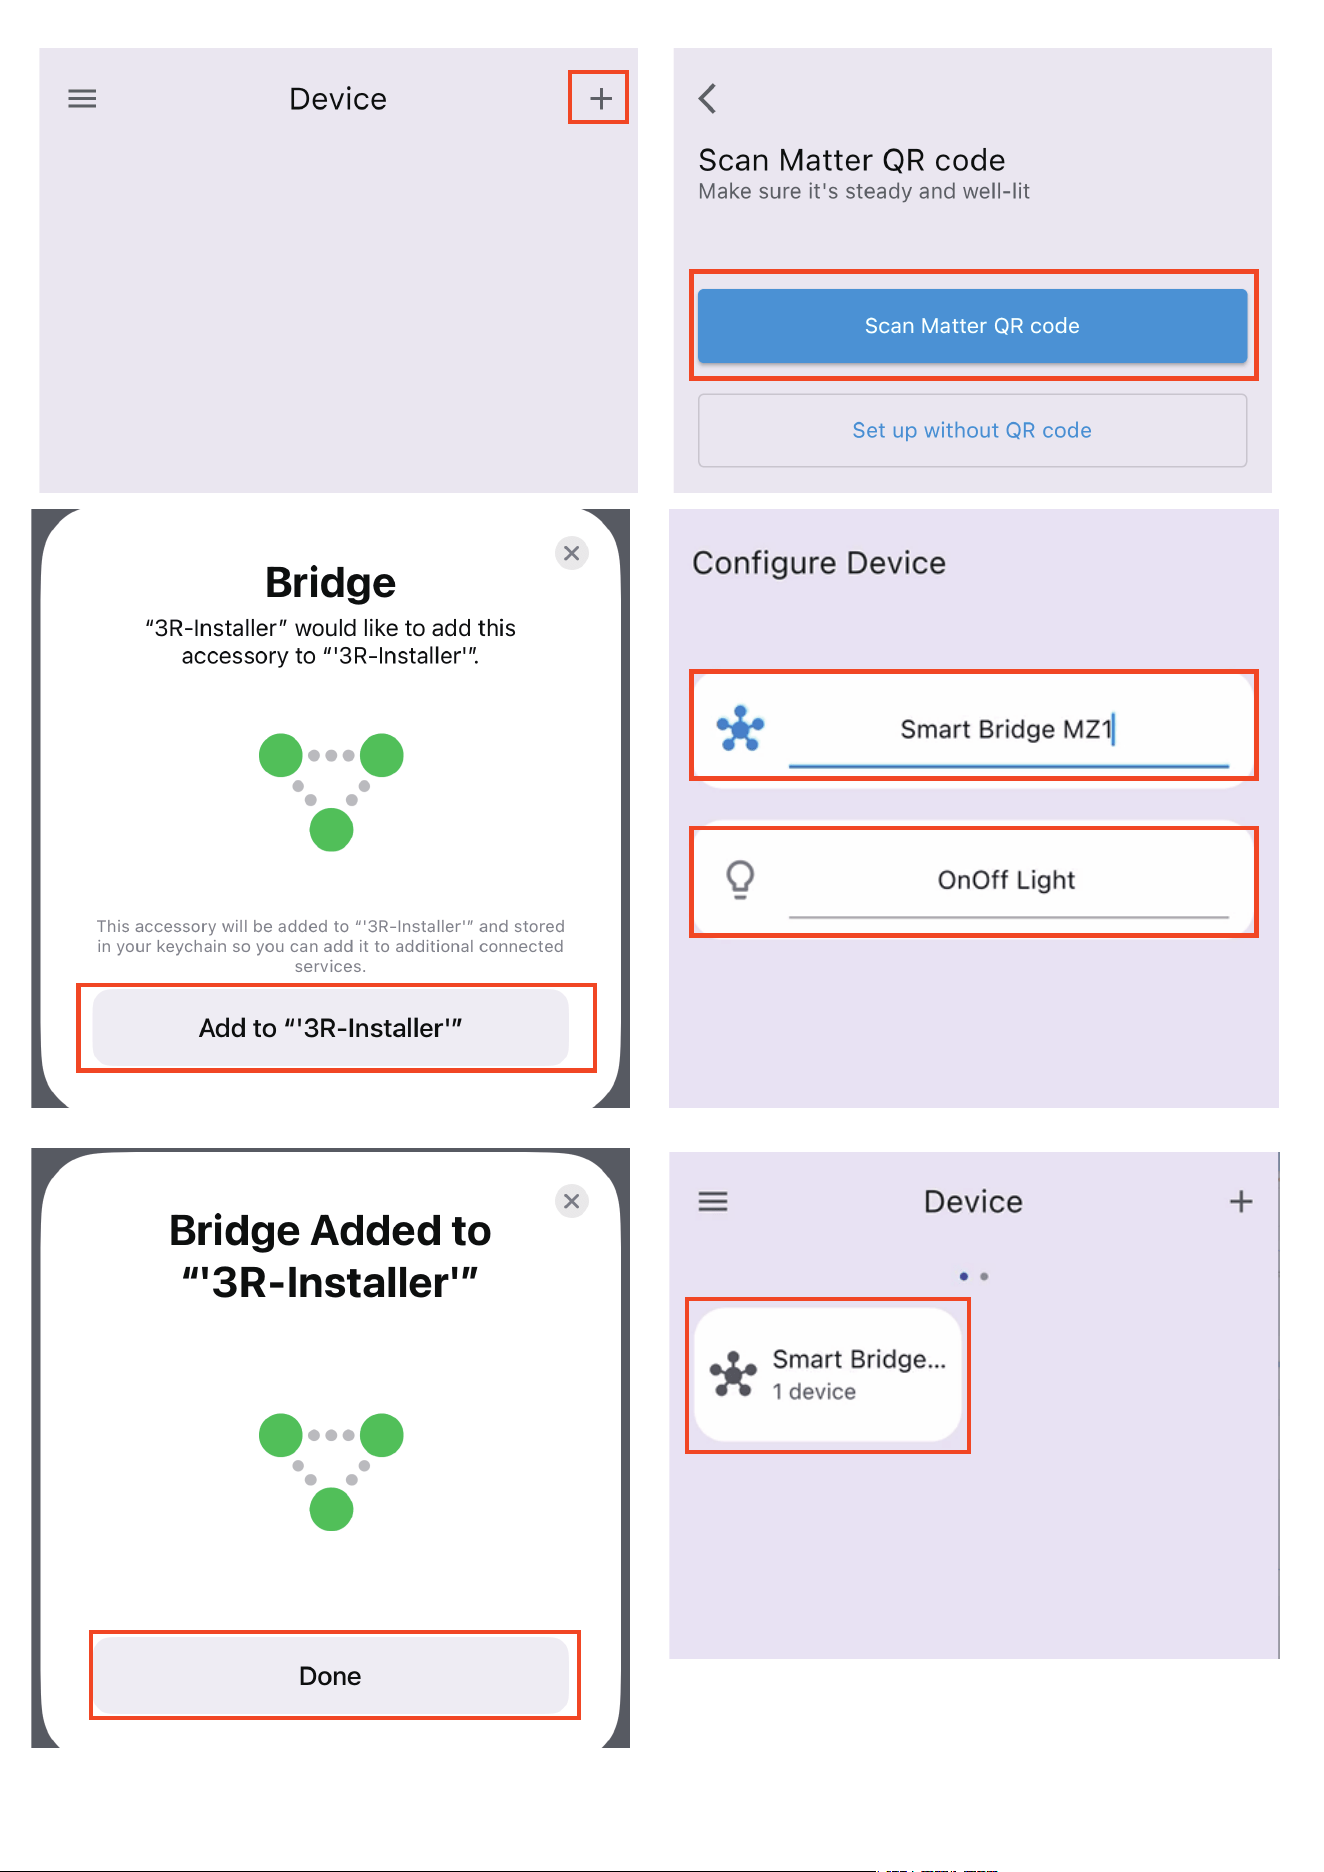
Open the 3R-Installer App on your phone and tap + in the upper
right corner.
4.
Factory Reset
Setup with 3R-Installer
Compatibility:
iOS system: Version 1.0.2 or later.
06

After the Wi-Fi network configuration is completed and the Zigbee
end device is powered up, you can find the Smart bridge and
pre-connected Zigbee devices on the device page.
6.
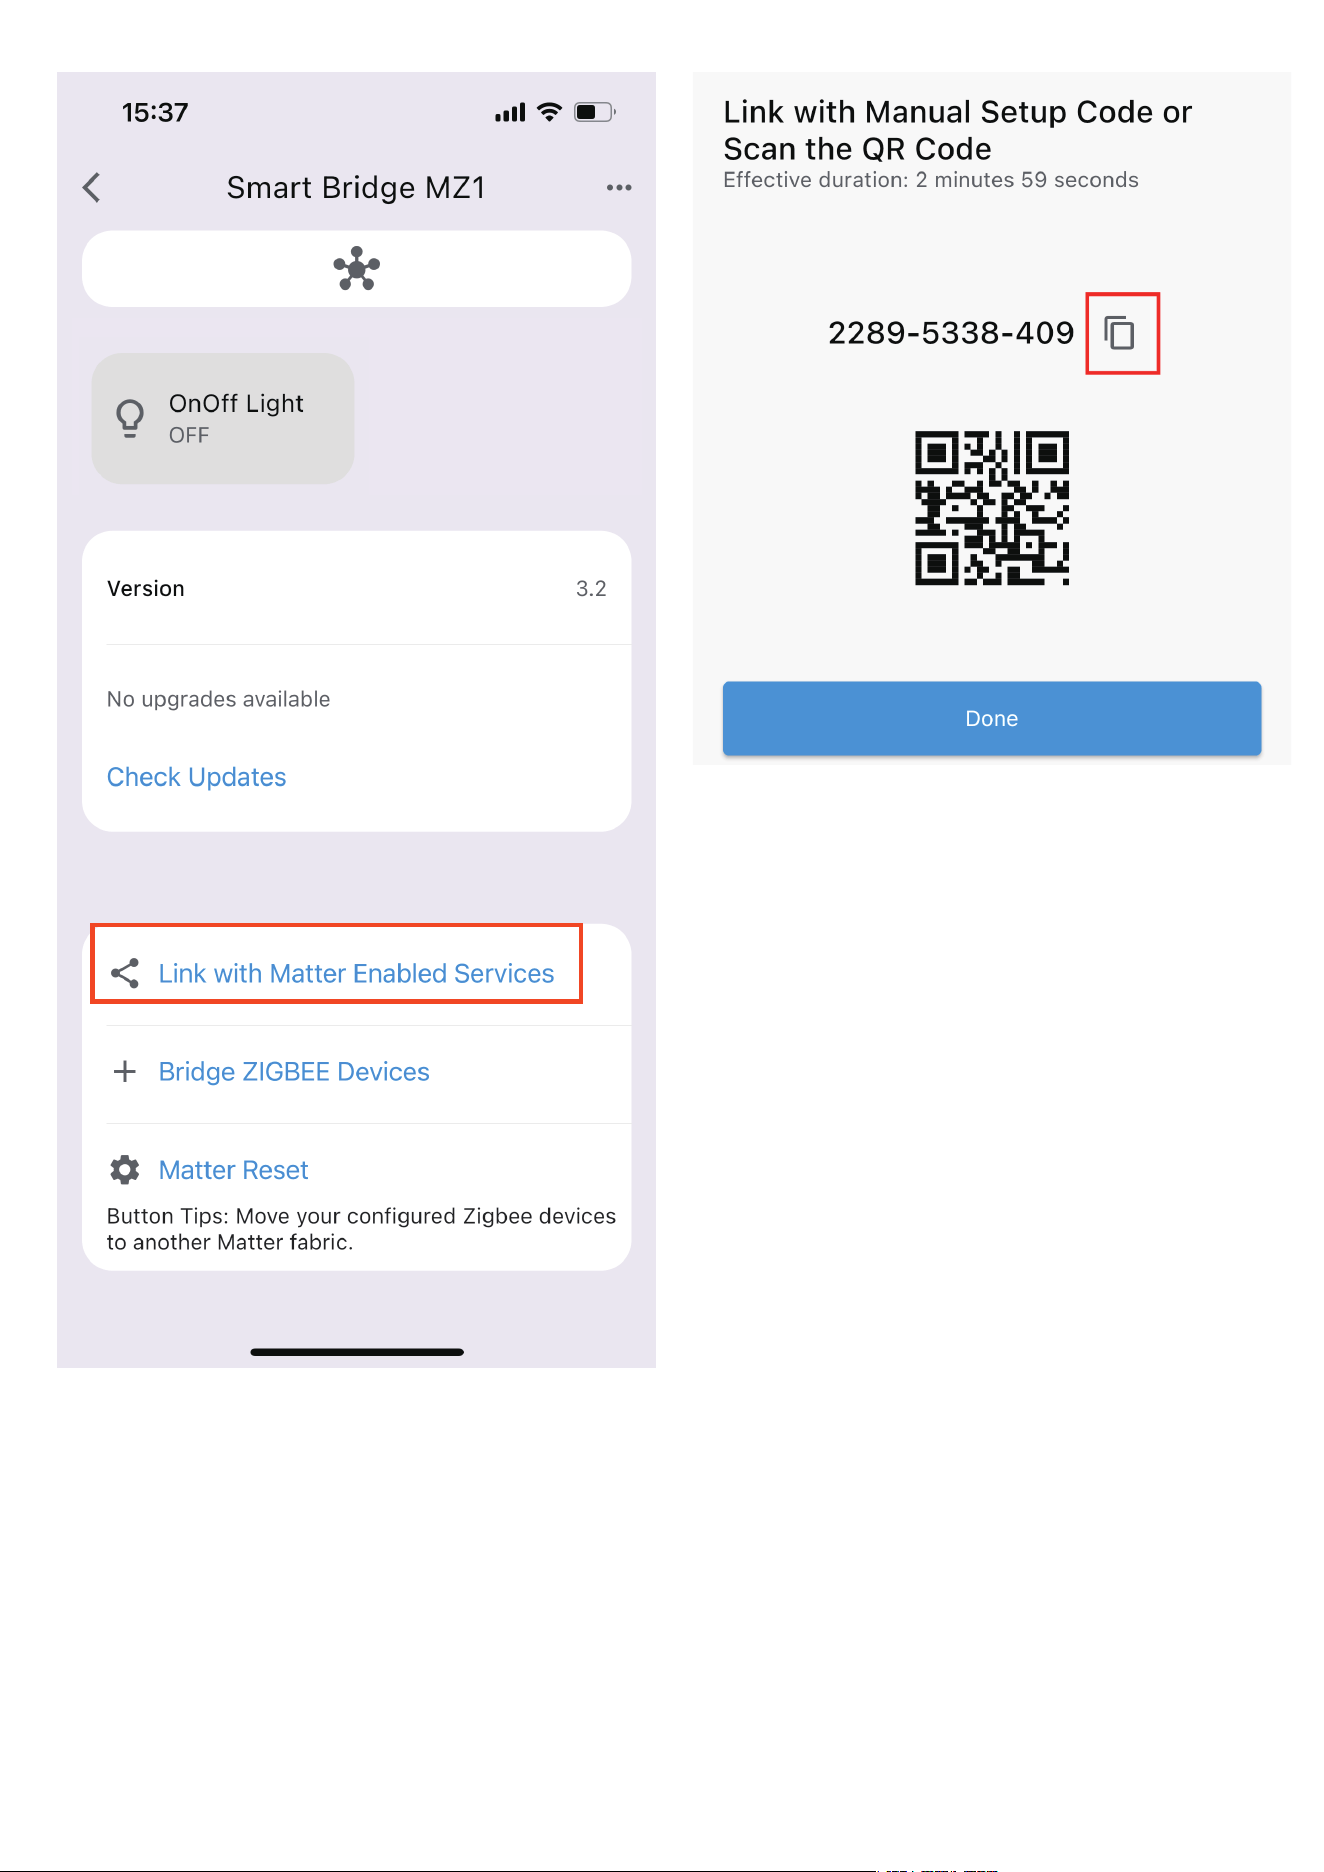
Open the 3R-Installer App, swipe to the right to check the devices
connected to the bridge, tab the device icon to enter the device
page, you can Check Updates for firmware OTA for the device.
7.
Tab Link With Matter Enabled Services, copy the Manual Setup Code
or Scan the QR Code within 3 min, then you can add the bridge to
other Matter supported ecosystems through multi-admin.
8.
07
Scan the Matter QR Code on the Smart bridge and follow the
on-screen instructions to configure the Wi-Fi network.
5.
08
09

Compatibility:
iOS system: Version 16.6 or later.
Matter-supported Controller: Home Pod, Home Pod mini, or Apple TV.
Note: It is highly recommended to download and install 3R-Installer
app on your phone first, follow the instructions below to setup the
bridge in the 3R-Installer app, then get the setup code and add the
bridge to your Apple Home through multi-admin. You can also Scan
the QR code to add the bridge to your Apple Home directly.
Setup the Smart Bridge with 3R-Installer App, copy the Setup code
of the Smart bridge in 3R-Installer App.(Code effective duration: 3
min)
1.
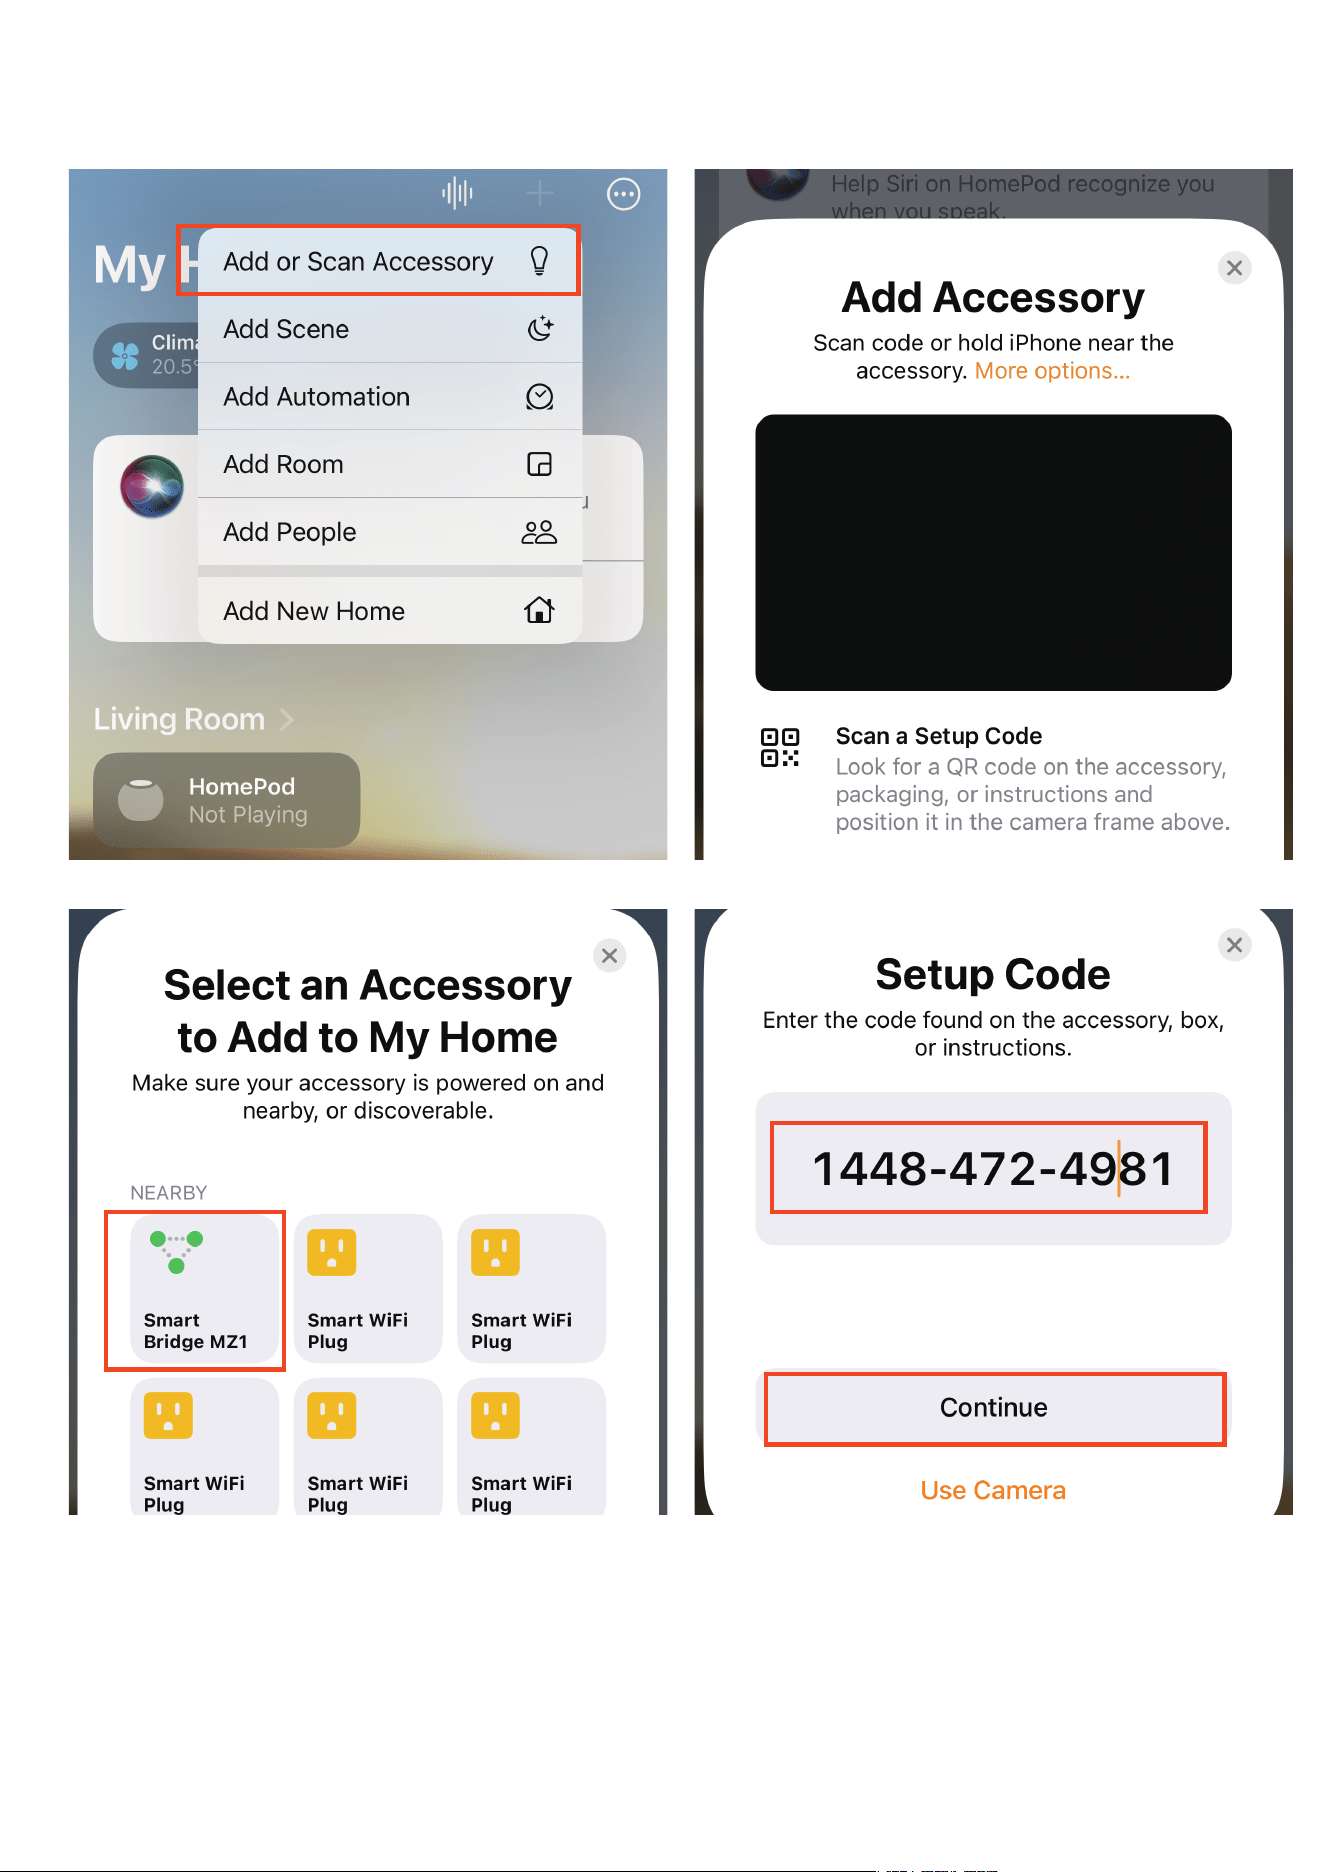
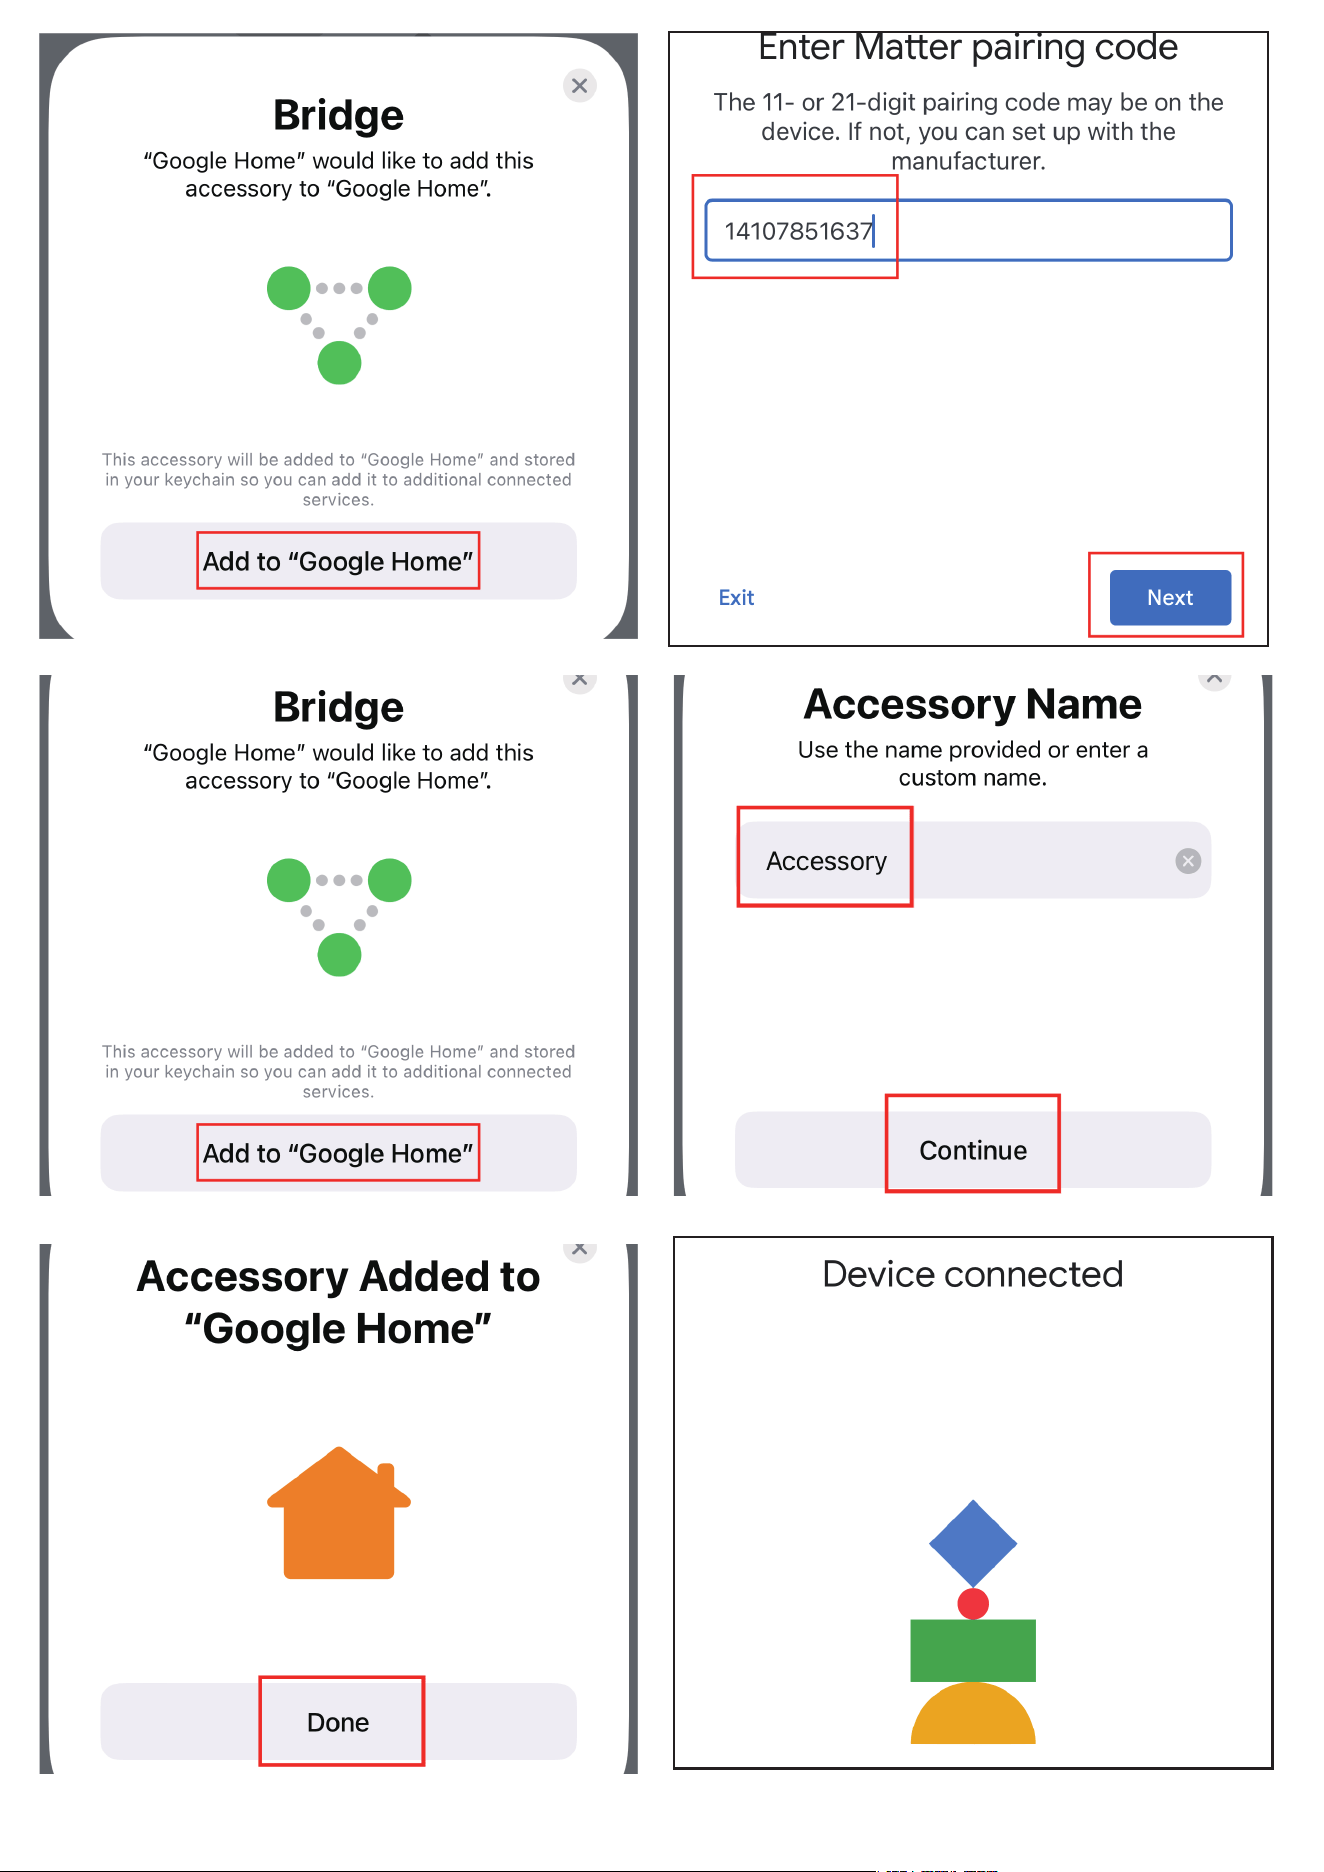
Make sure your Apple Home Controller is connected to the same
Wi-Fi network, launch your Home App. Tap + and then tap Add or
Scan Accessory to add a new device. Tab More Options, Select the
Smart Bridge MZ1 to Add device, paste the Setup Code copied from
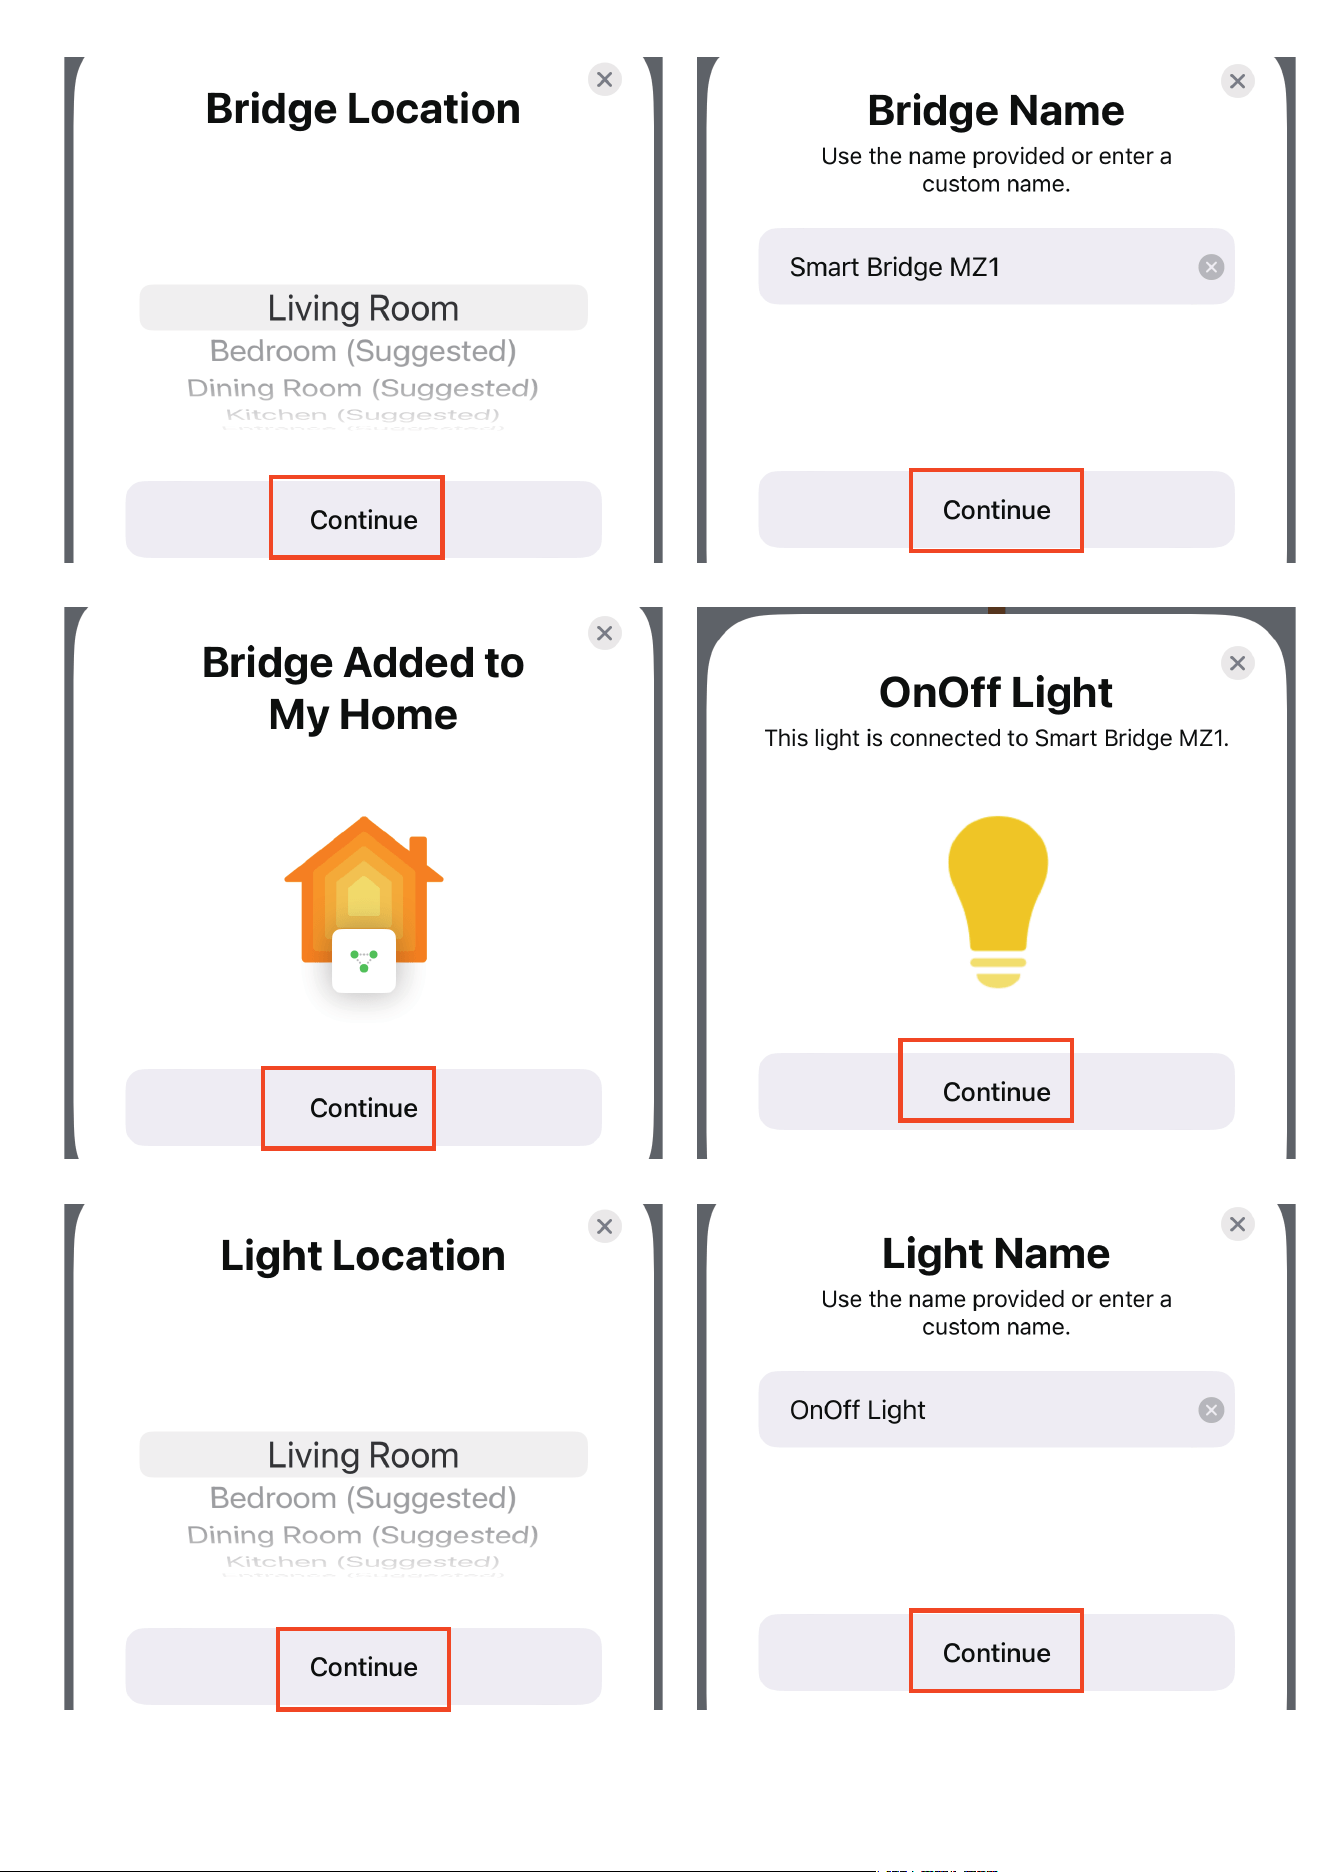
3R-Installer App to Continue, set the location and name for the
bridge, the bridge will be added to My Home.
2.
Pre-connected accessories attached to the Smart Bridge will be au-
tomatically updated.
3.
Setup with Apple Home
10

11
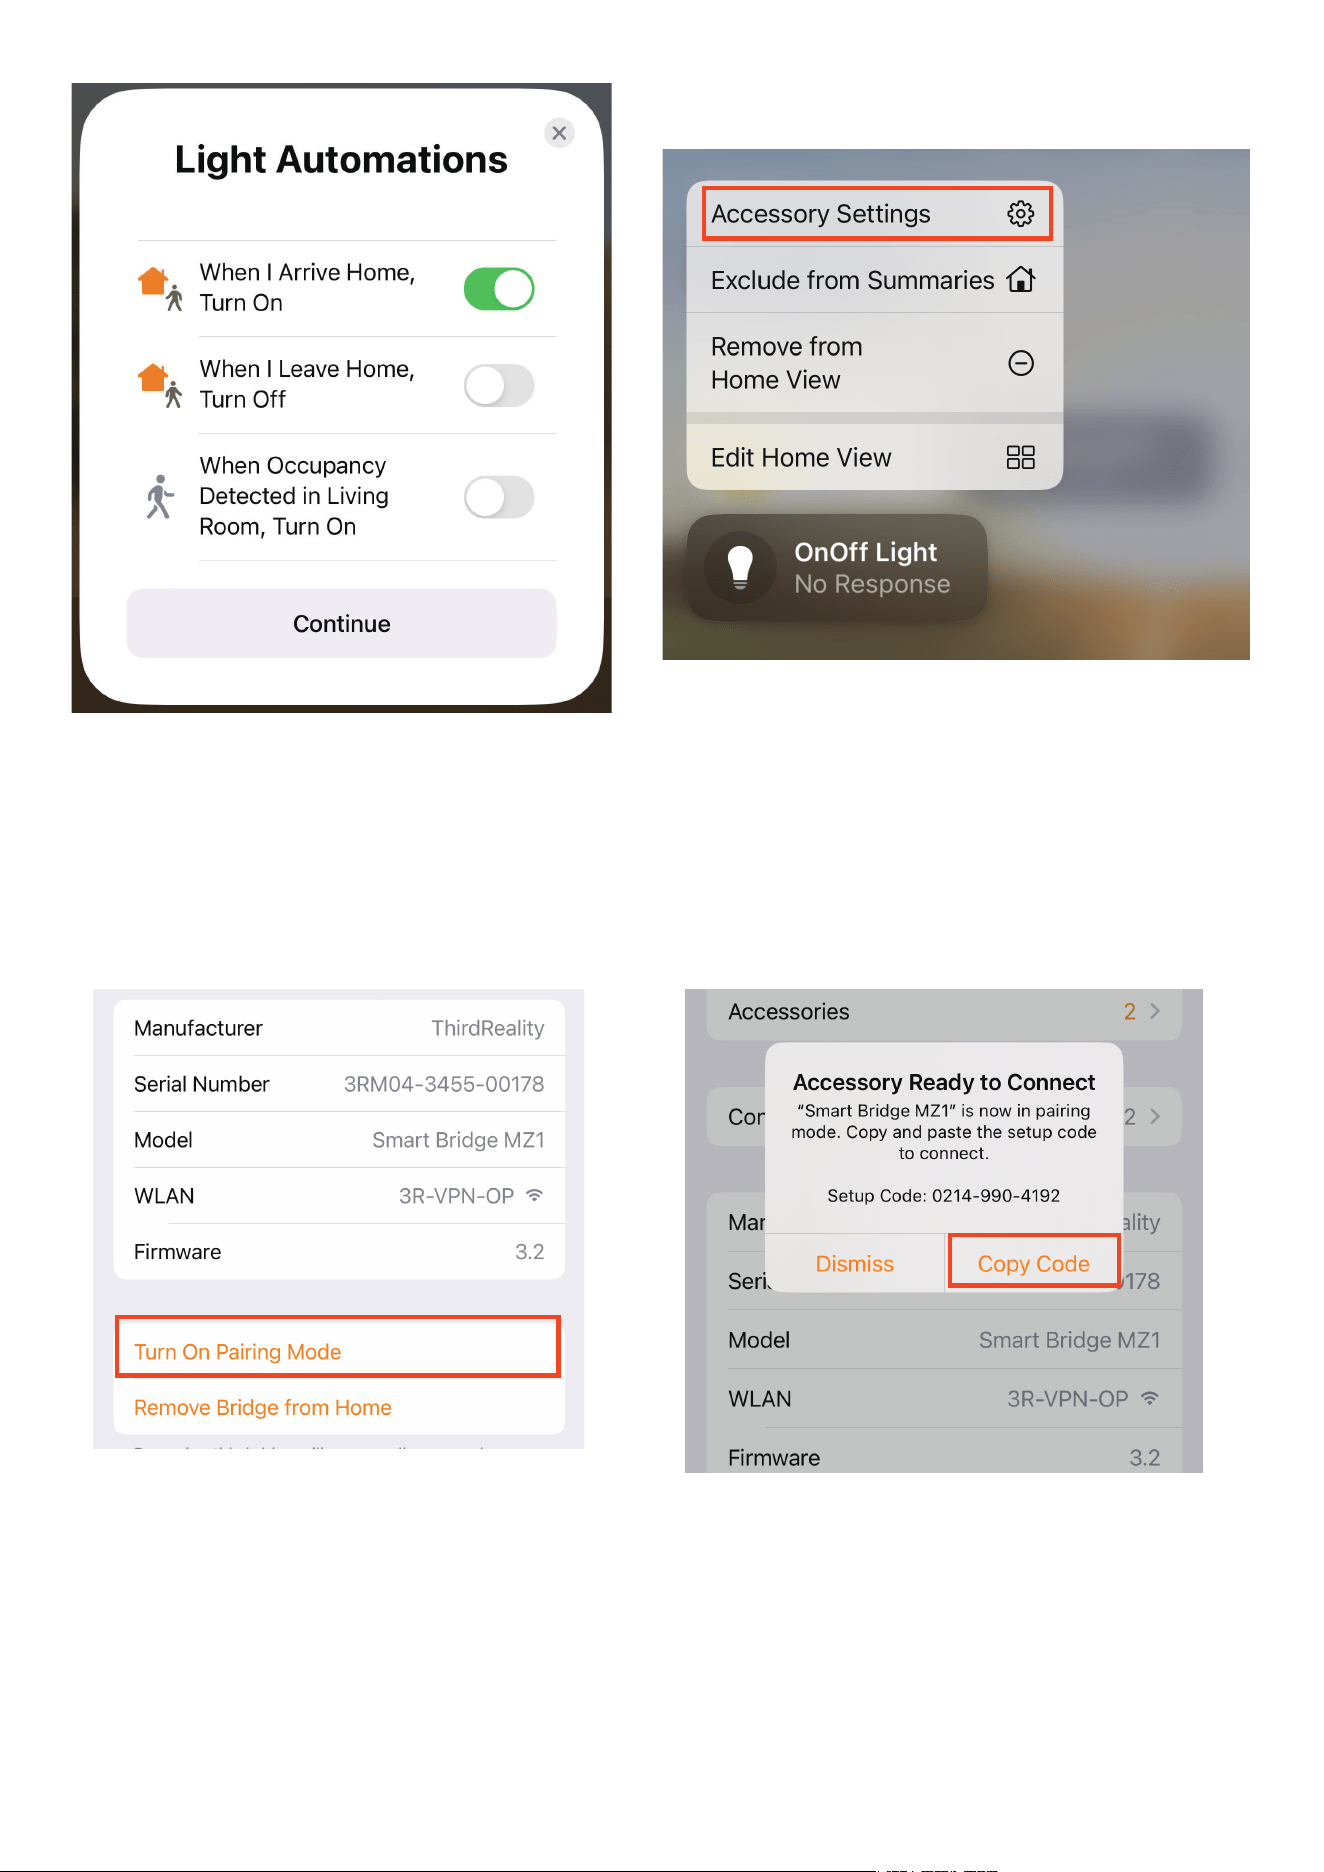
Set location and name for the accessories, then create automation
for the accessories.
4.
To connect the device to another Matter certified ecosystem app,
long press any attached accessories and tab Accessory Settings to
enter accessory page, tab Bridge to enter the Smart Bridge MZ1
device page, tab Turn On Pairing Mode to generate and copy a new
setup code. Launch the app of another Matter certified ecosystem,
follow the setup instruction to paste the setup code and follow the
app instructions to complete the setup.
5.
12
Product Overview
What's in the Box
Smart Bridge LED Status
Smart Switch Gen3 LED Status
Setting up the Smart Switch Gen3
Factory Reset
Setup with 3R-Installer
Setup with Apple Home
Setup with Google Home
Setup with Alexa
Setup with SmartThings
FCC Regulatory Conformance
RF Exposure
Limited Warranty
01
01
02
02
03
06
06
10
15
20
25
31
32
32
13
14

Compatibility
Google Home App version:
Android: 3.3.1.4 or later
IOS: 3.3.104 or later
Setup the Smart Bridge with 3R-Installer App, copy the Setup code
of the Smart bridge in 3R-Installer App.(Code effective duration: 3
min)
1.
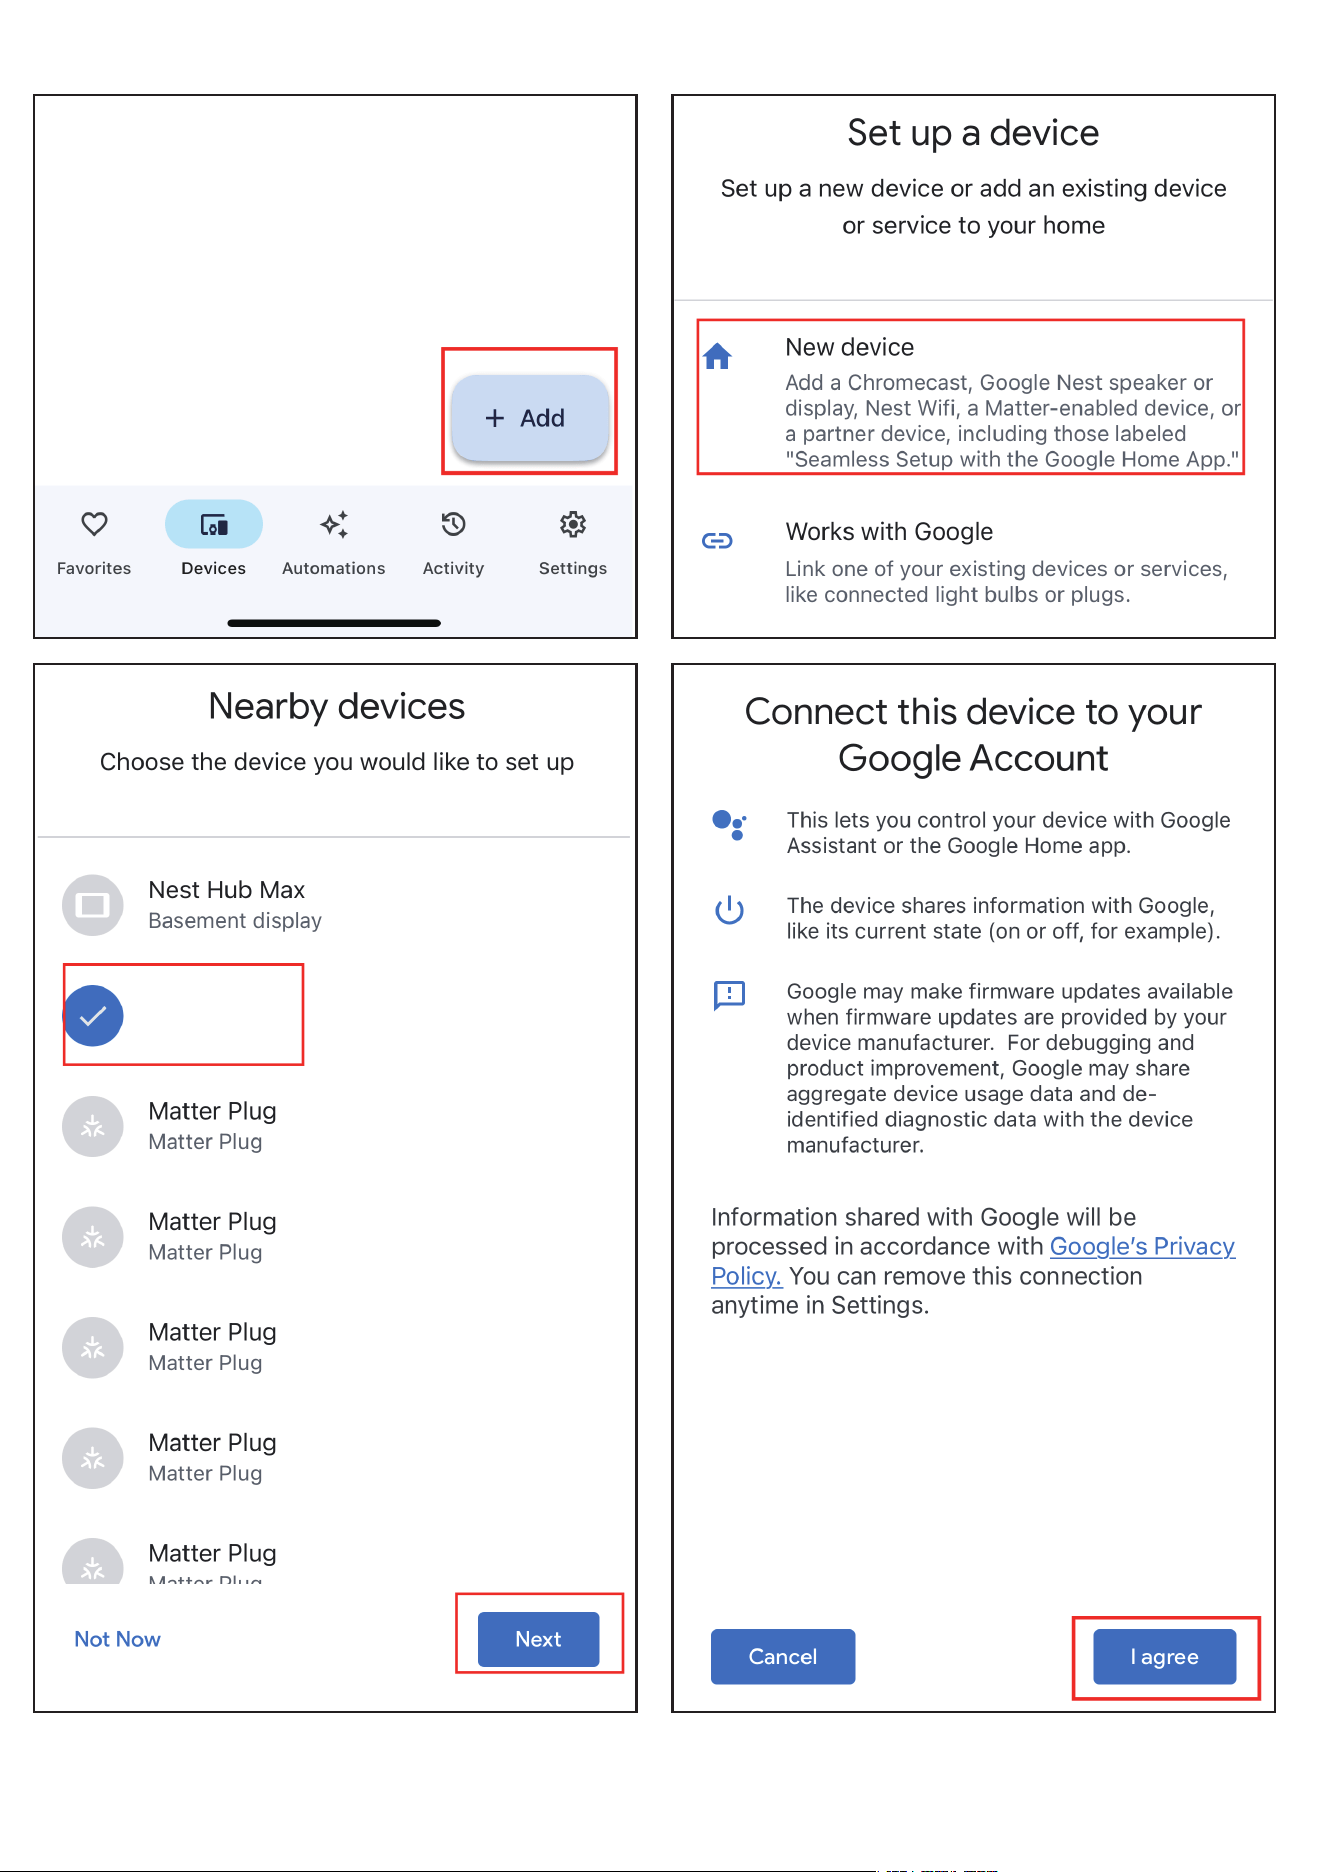
Make sure your Google Home speaker is connected to the same
Wi-Fi network, launch your Google Home App. Tap + and then tap
New device. Choose a home and tab Next, choose the Smart bridge
then tab Next, Continue without scanning, paste the Setup Code to
Continue, create a name for the bridge, the bridge will be added.
2.
Setup with Google Home
15
Note: It is highly recommended to download and install 3R-Installer
app on your phone first, follow the instructions below to setup the
bridge in the 3R-Installer app, then get the setup code and add the
bridge to your Apple Home through multi-admin. You can also Scan
the QR code to add the bridge to your Apple Home directly.

Pre-connected devices attached to the Smart Bridge will be auto-
matically updated.
3.
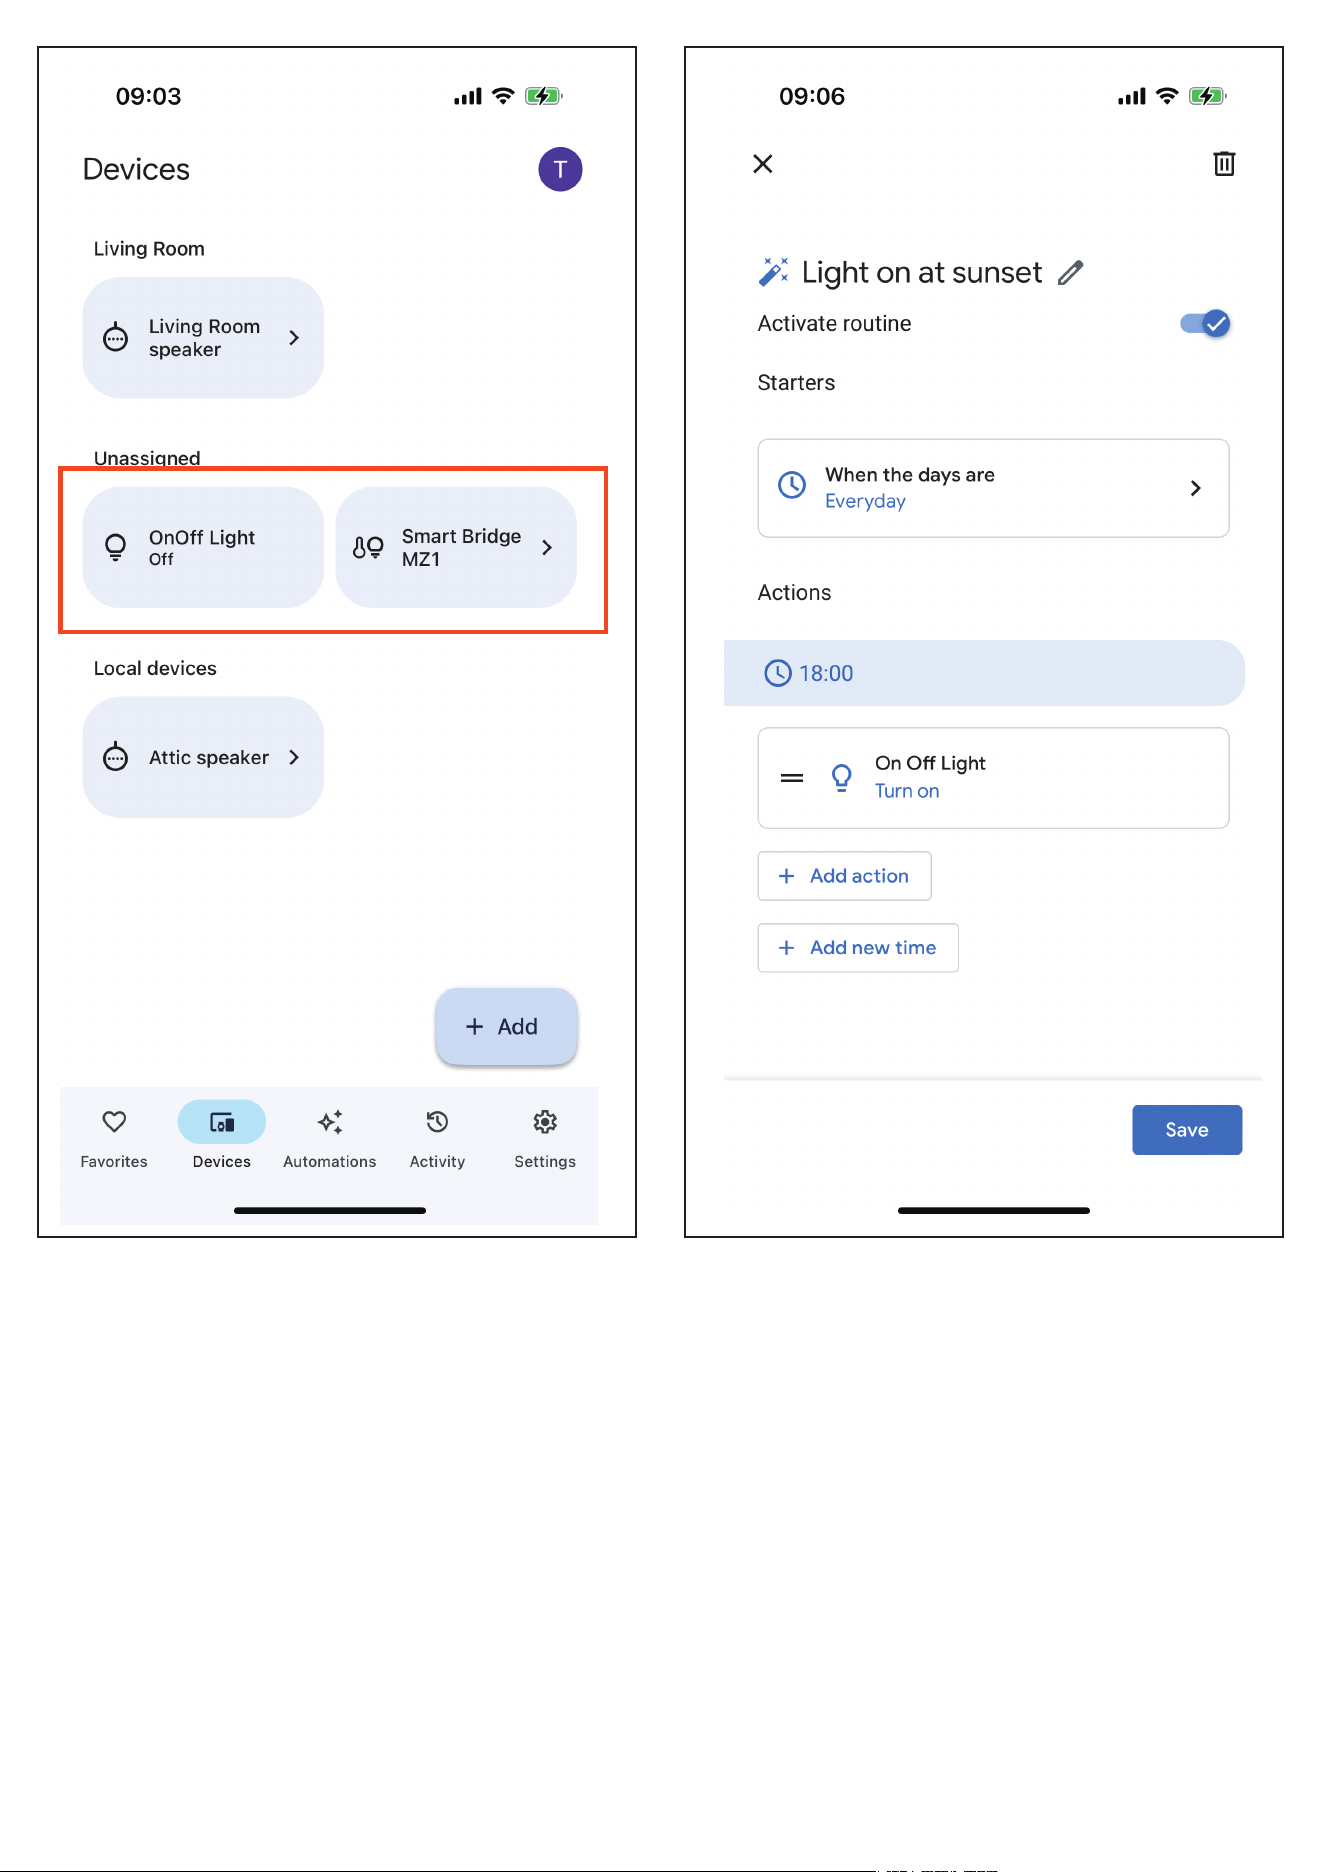
Create names and add the devices to Google Home, then create au-
tomation for the devices.
4.
16
To connect the device to another Matter certified ecosystem app,
long press any attached accessories and tab Accessory Settings to
enter accessory page, tab Bridge to enter the Smart Bridge MZ1
device page, tab Turn On Pairing Mode to generate and copy a new
setup code. Launch the app of another Matter certified ecosystem,
follow the setup instruction to paste the setup code and follow the
app instructions to complete the setup.
5.
17
18
19

Note: It is highly recommended to download and install 3R-Installer
app on your phone first, follow the instructions below to setup the
bridge in the 3R-Installer app, then get the setup code and add the
bridge to your Alexa through multi-admin. You can also Scan the QR
code to add the bridge to your Alexa directly.
20
Alexa App version:
Android: 2.2.521848.0 or later for build version, and 2023.15 or later for
APP version
IOS: 2.2.548660 or later for build version, and 2023.15 or later for APP
version
Setup the Smart Bridge with 3R-Installer App, copy the Setup code
of the Smart bridge in 3R-Installer App. (Code effective duration: 3
min)
1.
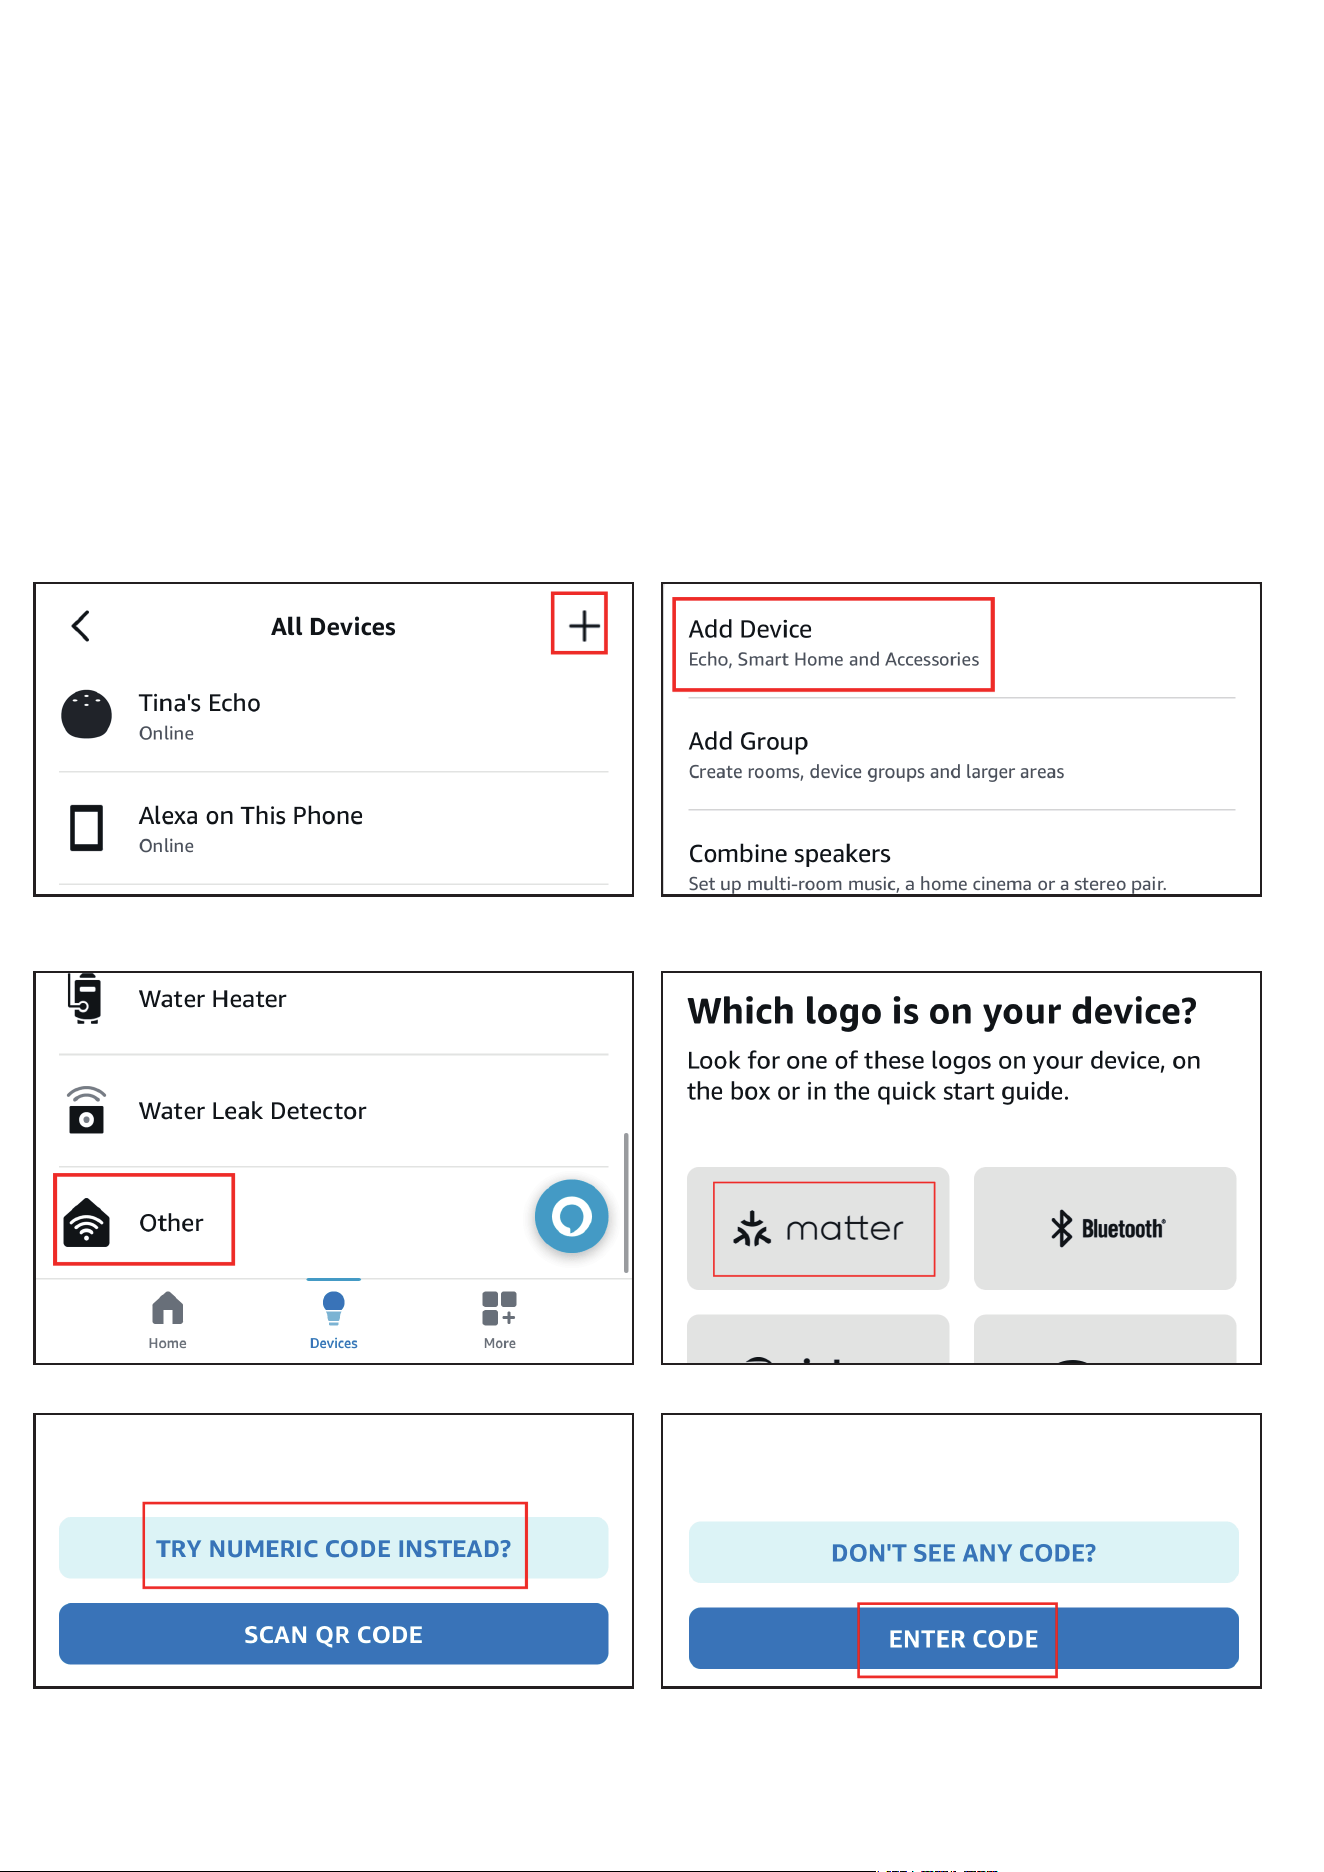
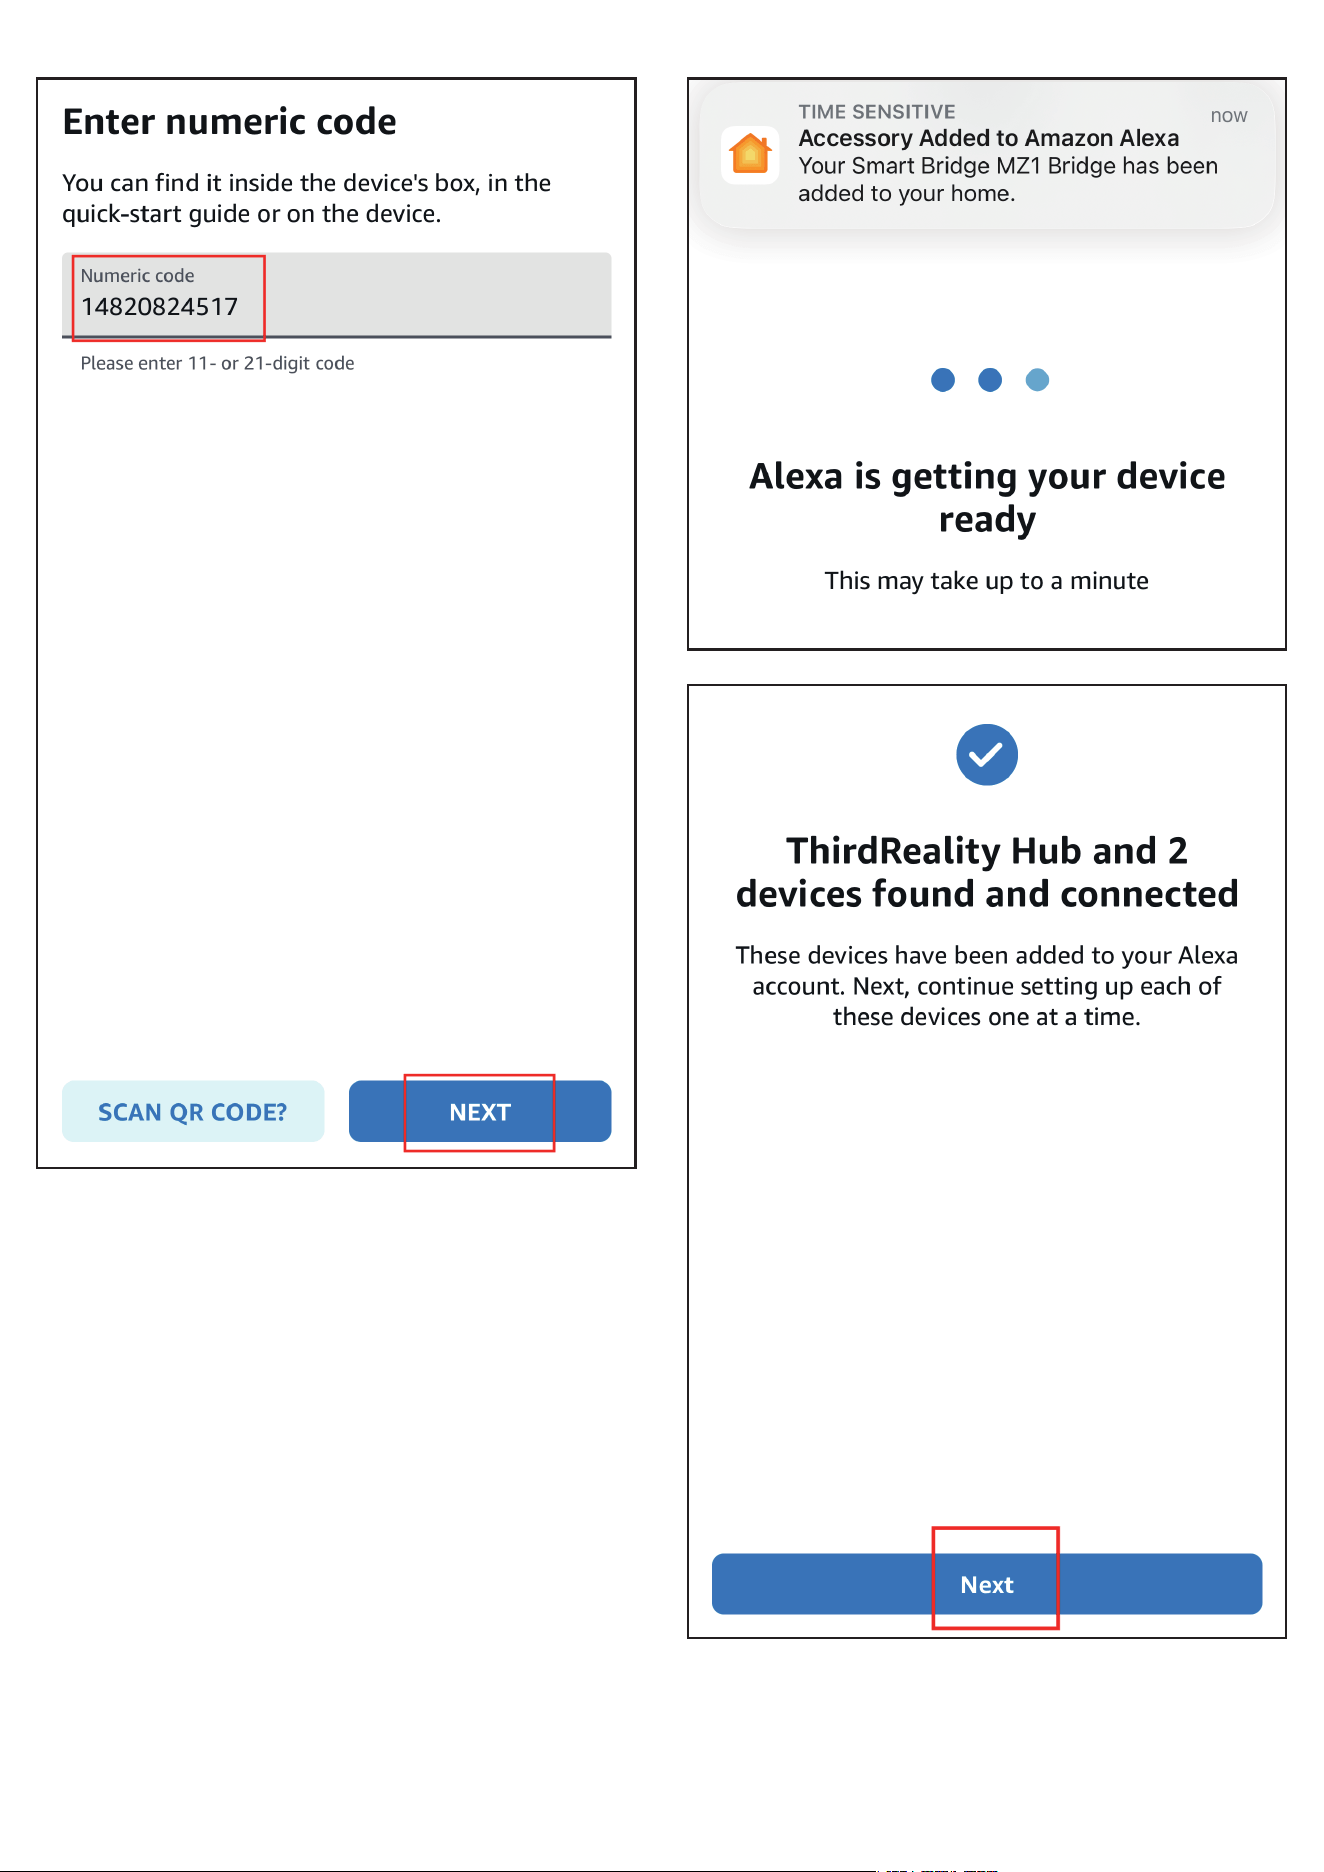
Make sure your Alexa speaker is connected to the same Wi-Fi net-
work, launch your Amazon Alexa App, tab + in the up right on the
device page to Add Device, scroll down the the list and tab Other,
choose matter, TRY MUMERIC CODE INSTEAD to ENTER CODE, and
follow the instructions to add the bridge and pre-connected devic-
es.
2.
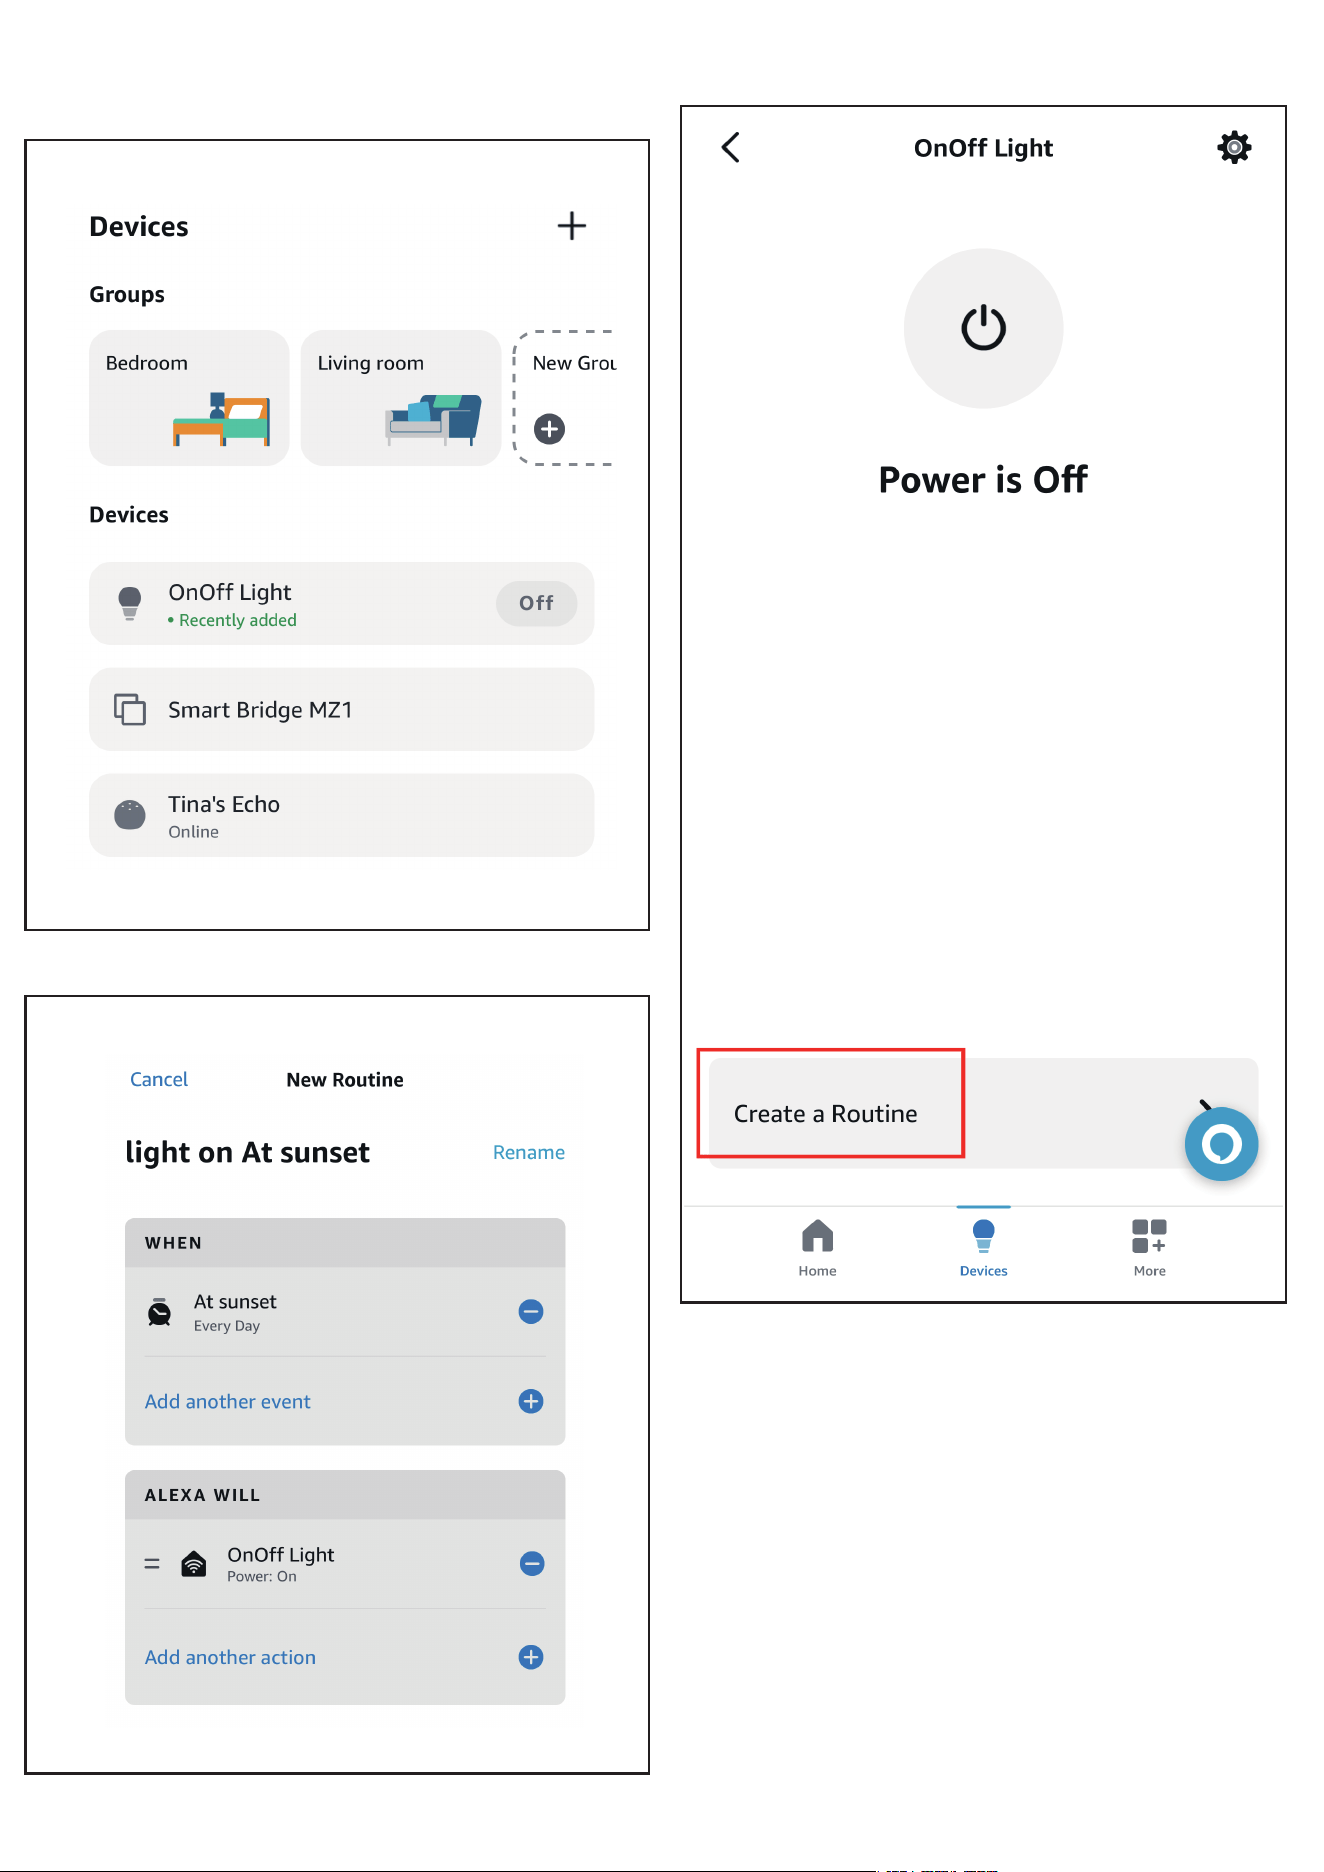
Create routines with the devices.3.
Setup with Alexa
21
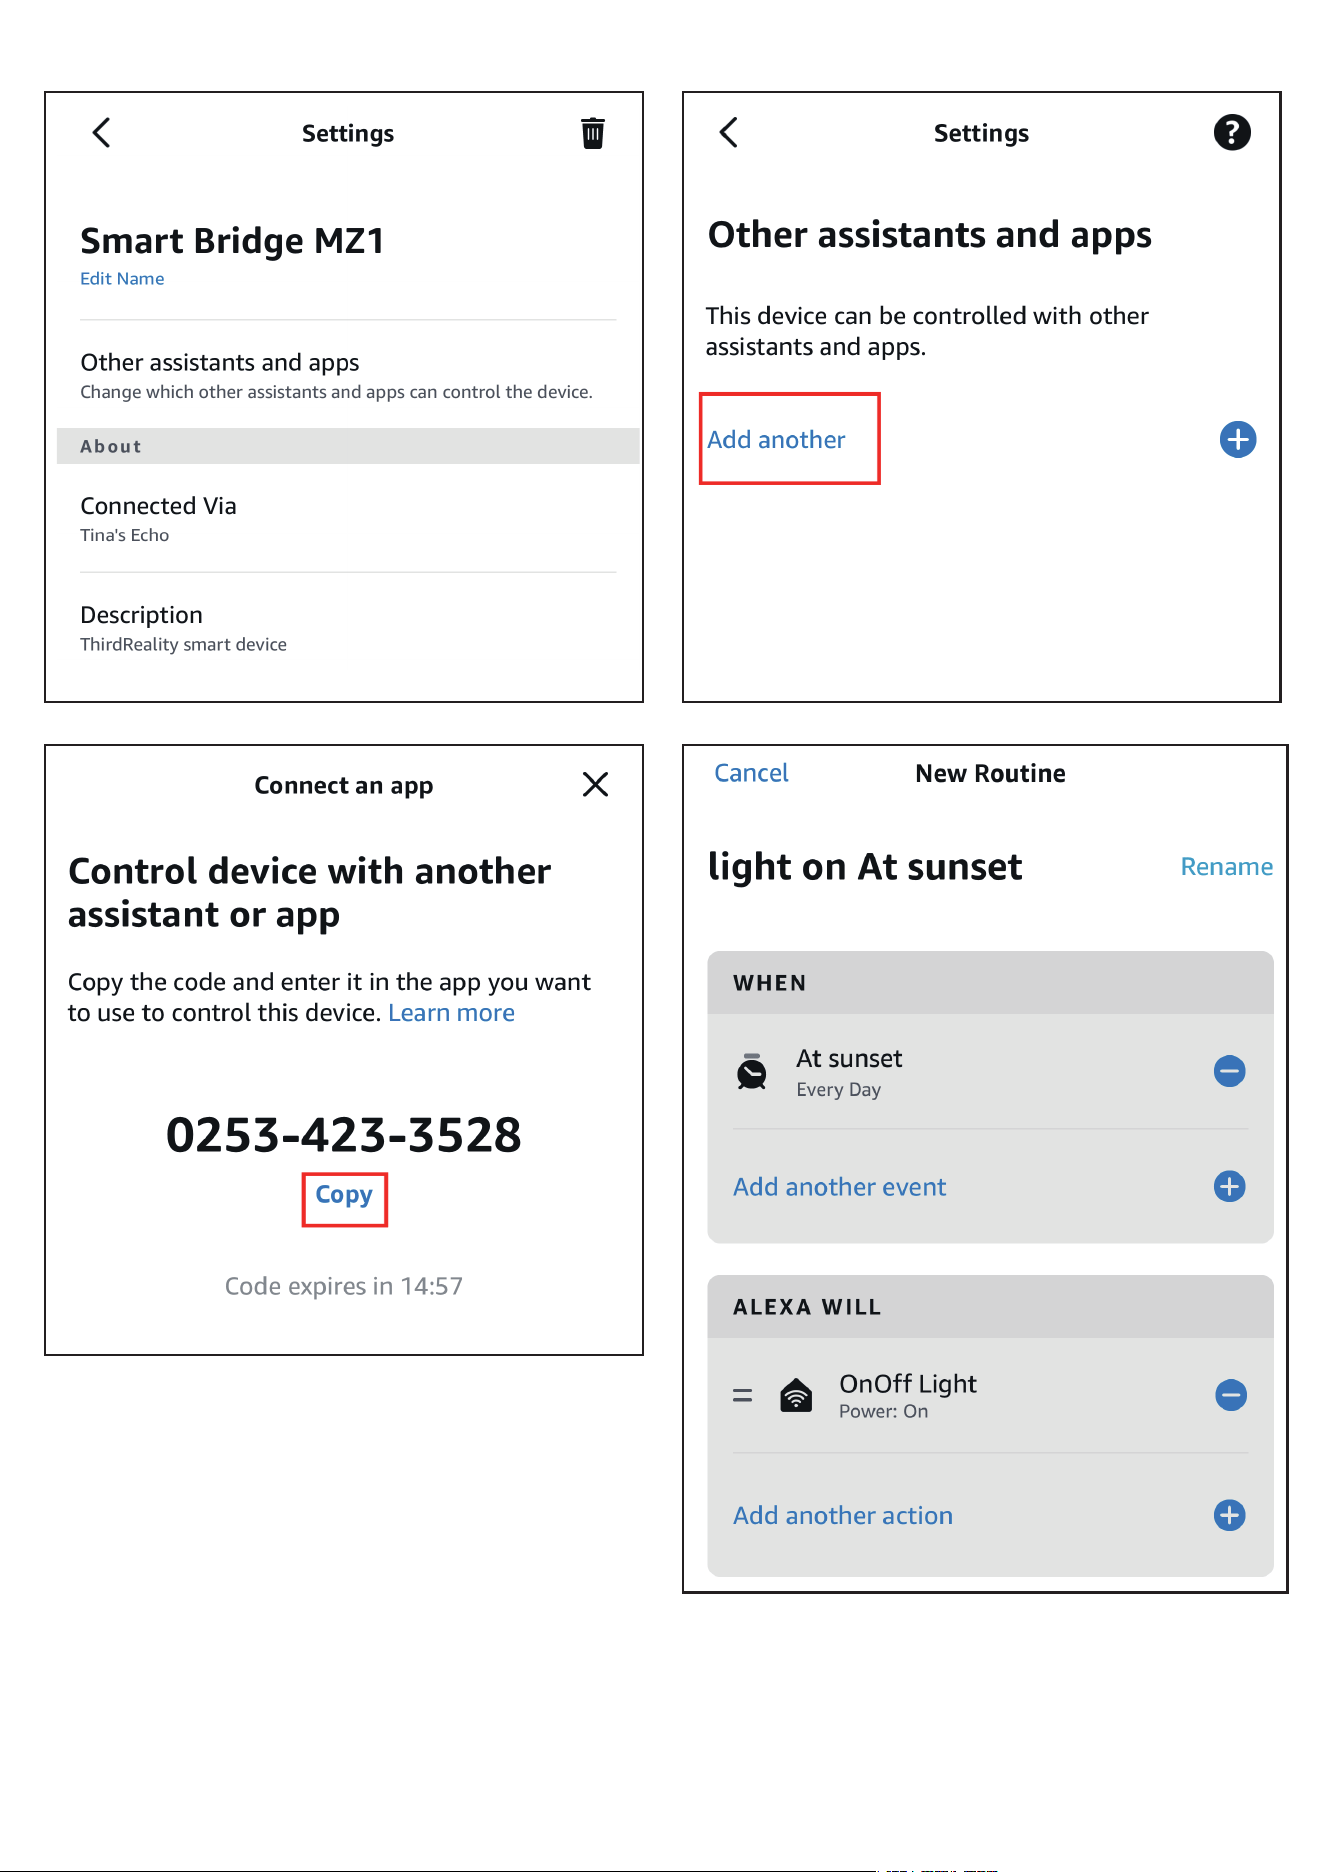
4. To connect the device to another Matter certified ecosystem app, go
to the app of the first ecosystem to generate a new setup code. Go
to the Device Settings page, tap Other assistants and apps and Add
another, then copy the setup code. Launch the app of another
Matter certified ecosystem, follow the setup instruction to enter the
setup code and follow the app instructions to complete the setup.
22
23
24

Compatibility:
SmartThings App version 1.8.01.22 or higher. iOS SmartThings App ver-
sion 1.7.02.16
Matter-supported Controller: SmartThings Hub V2& V3, Aeotec Smart
Home Hub
Setup the Smart Bridge with 3R-Installer App, copy the Setup code of
the Smart bridge in 3R-Installer App. (Code effective duration: 3 min)
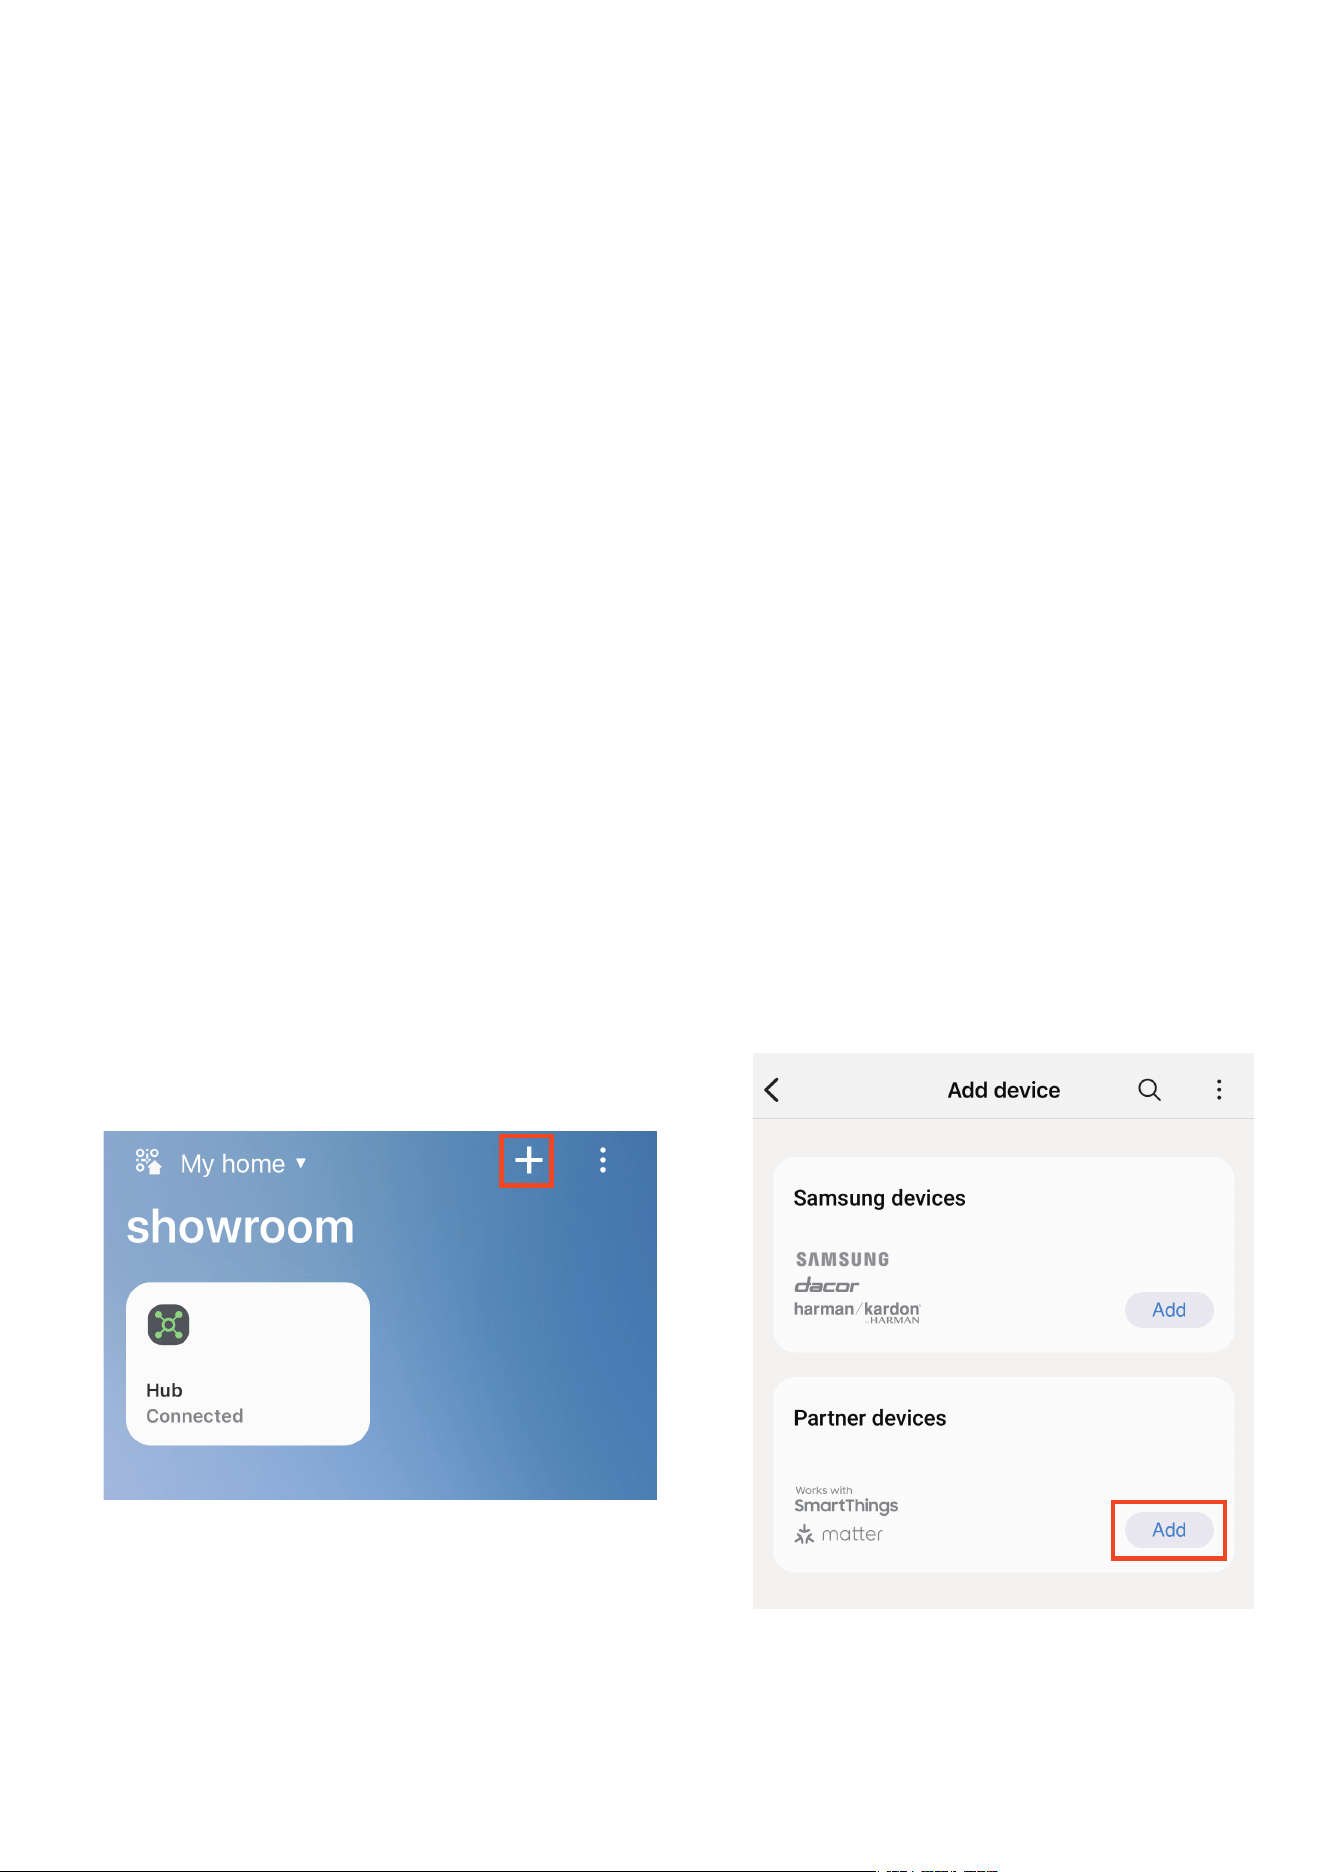
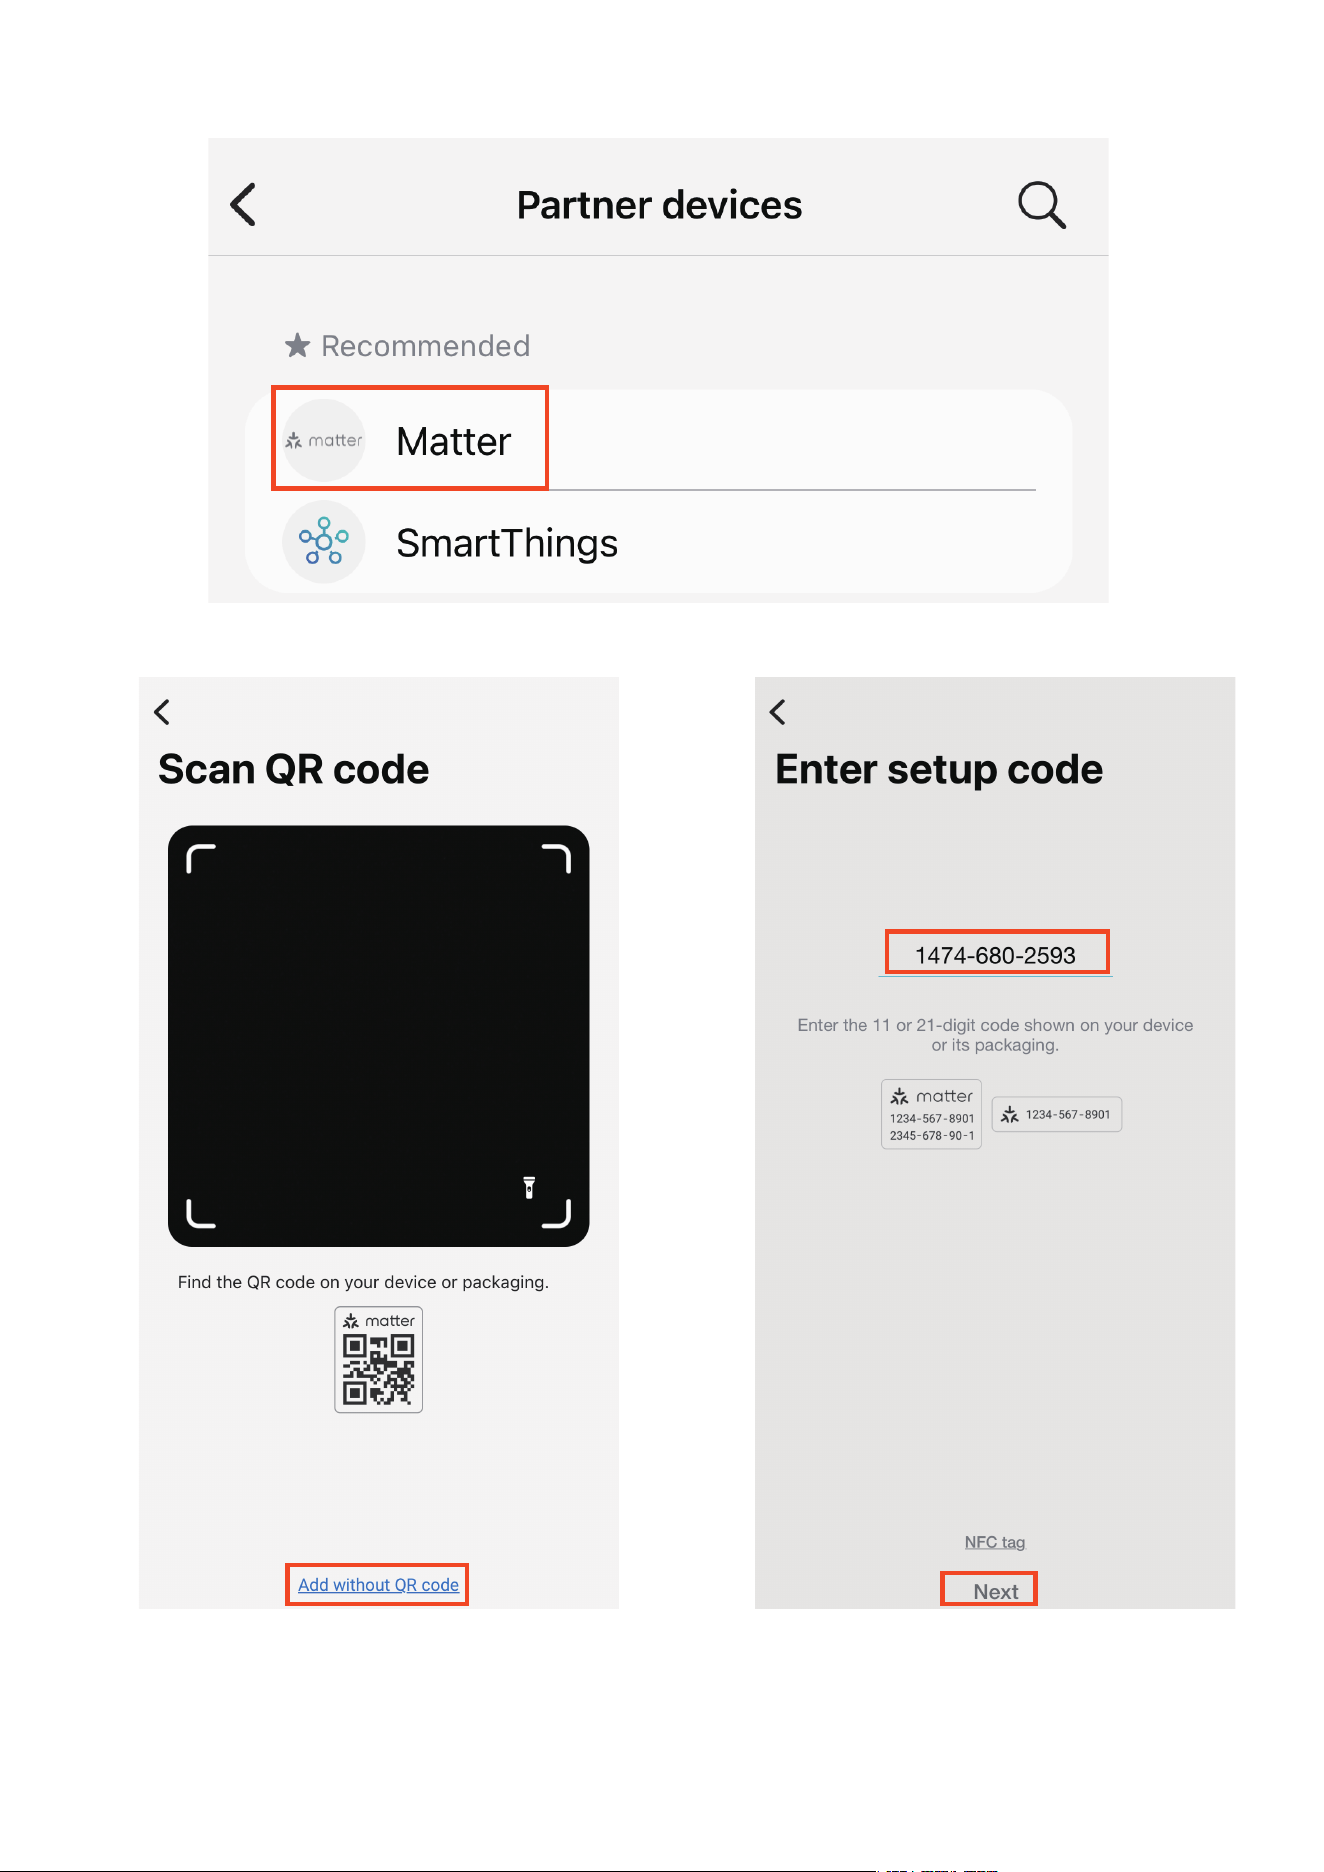
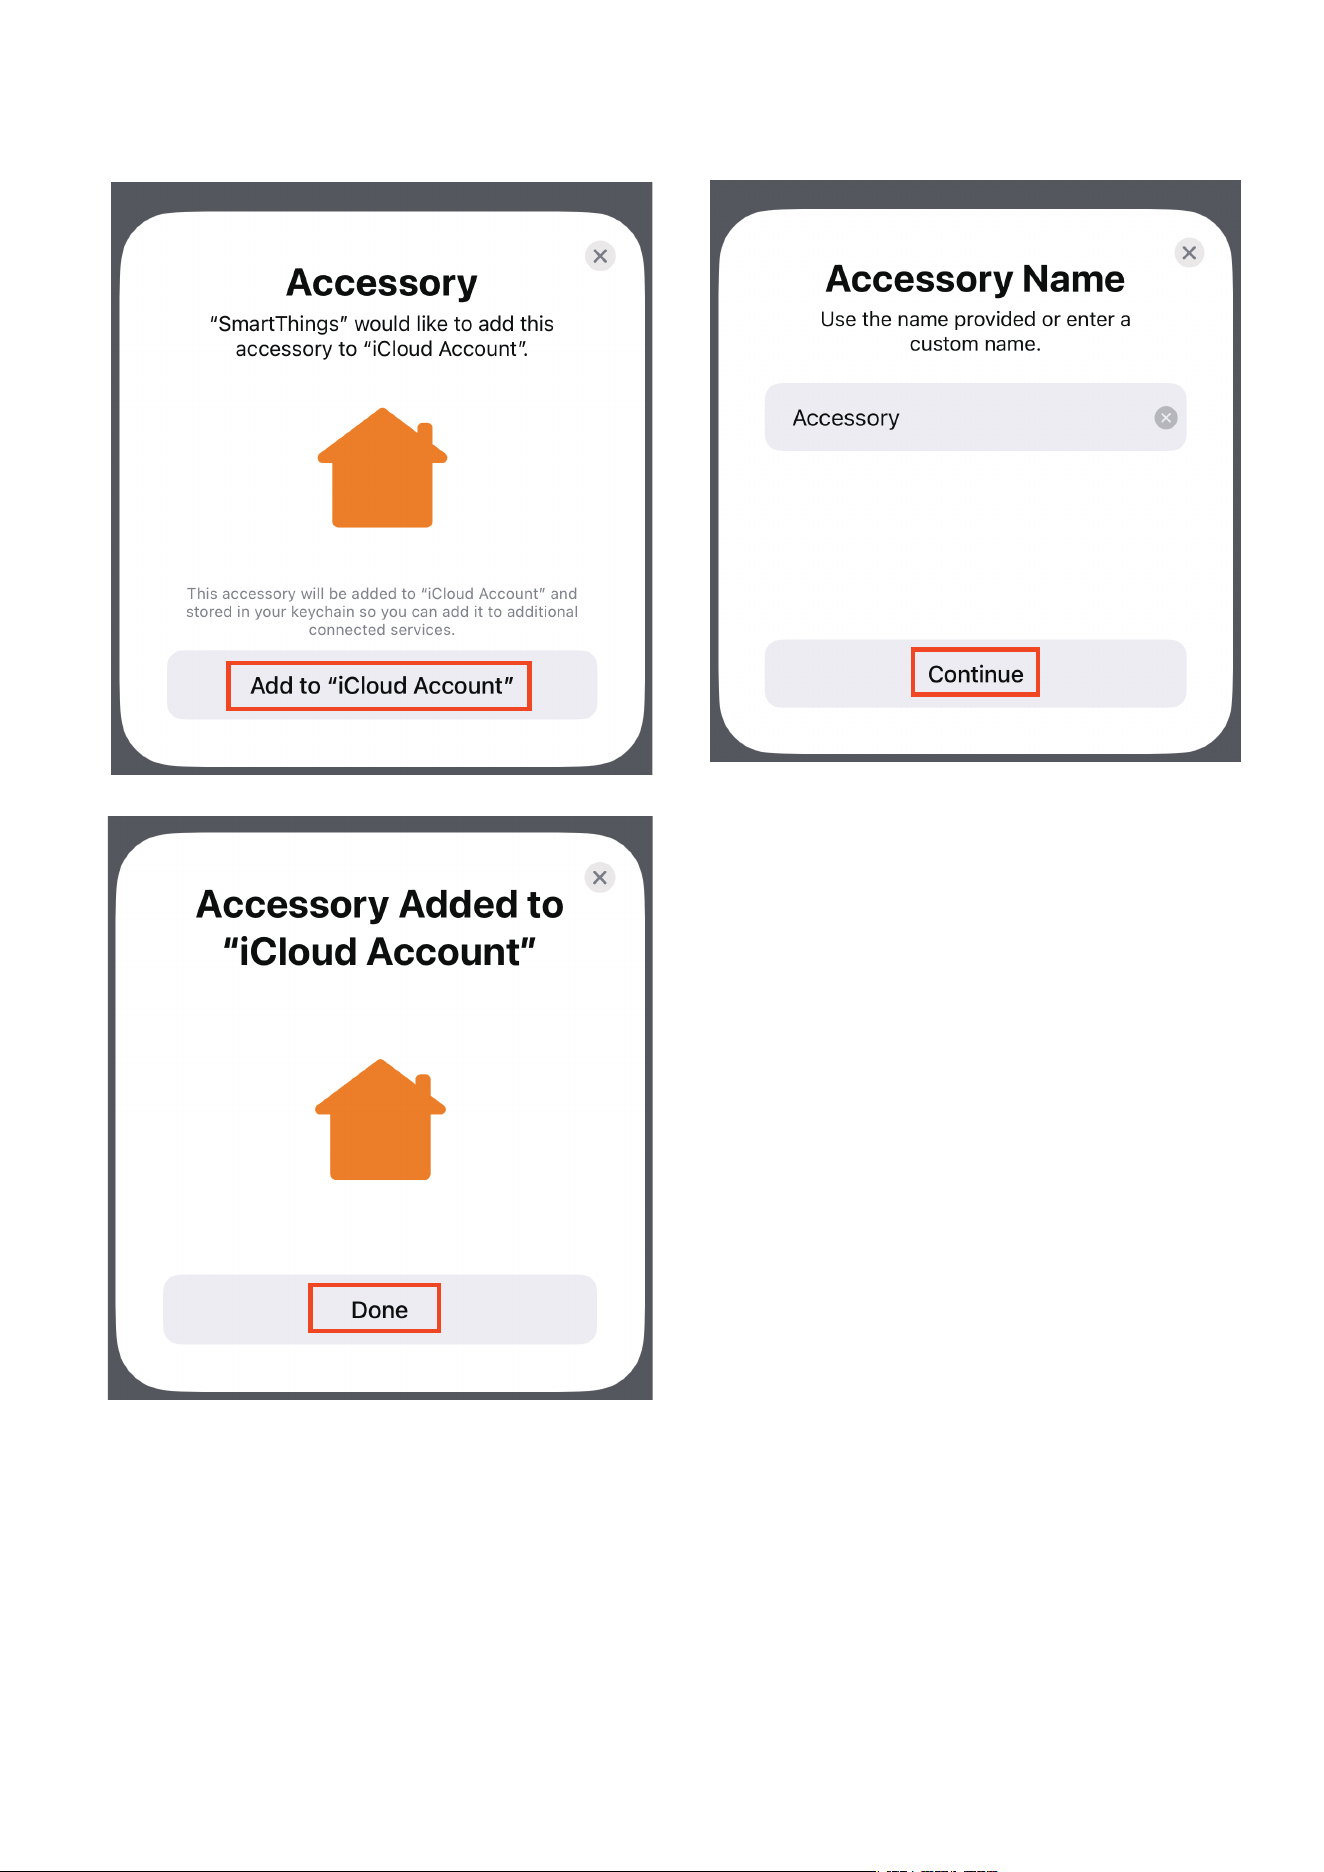
Make sure your SmartThings hub is connected to the same Wi-Fi net-
work, launch your SmartThings App. Tap + to add Partner device,
choose Matter, then Add without QR code, enter the numeric code
copied from 3R-Installer app, tab Next and follow the on-screen
instructions to add the bridge and pre-paired devices.
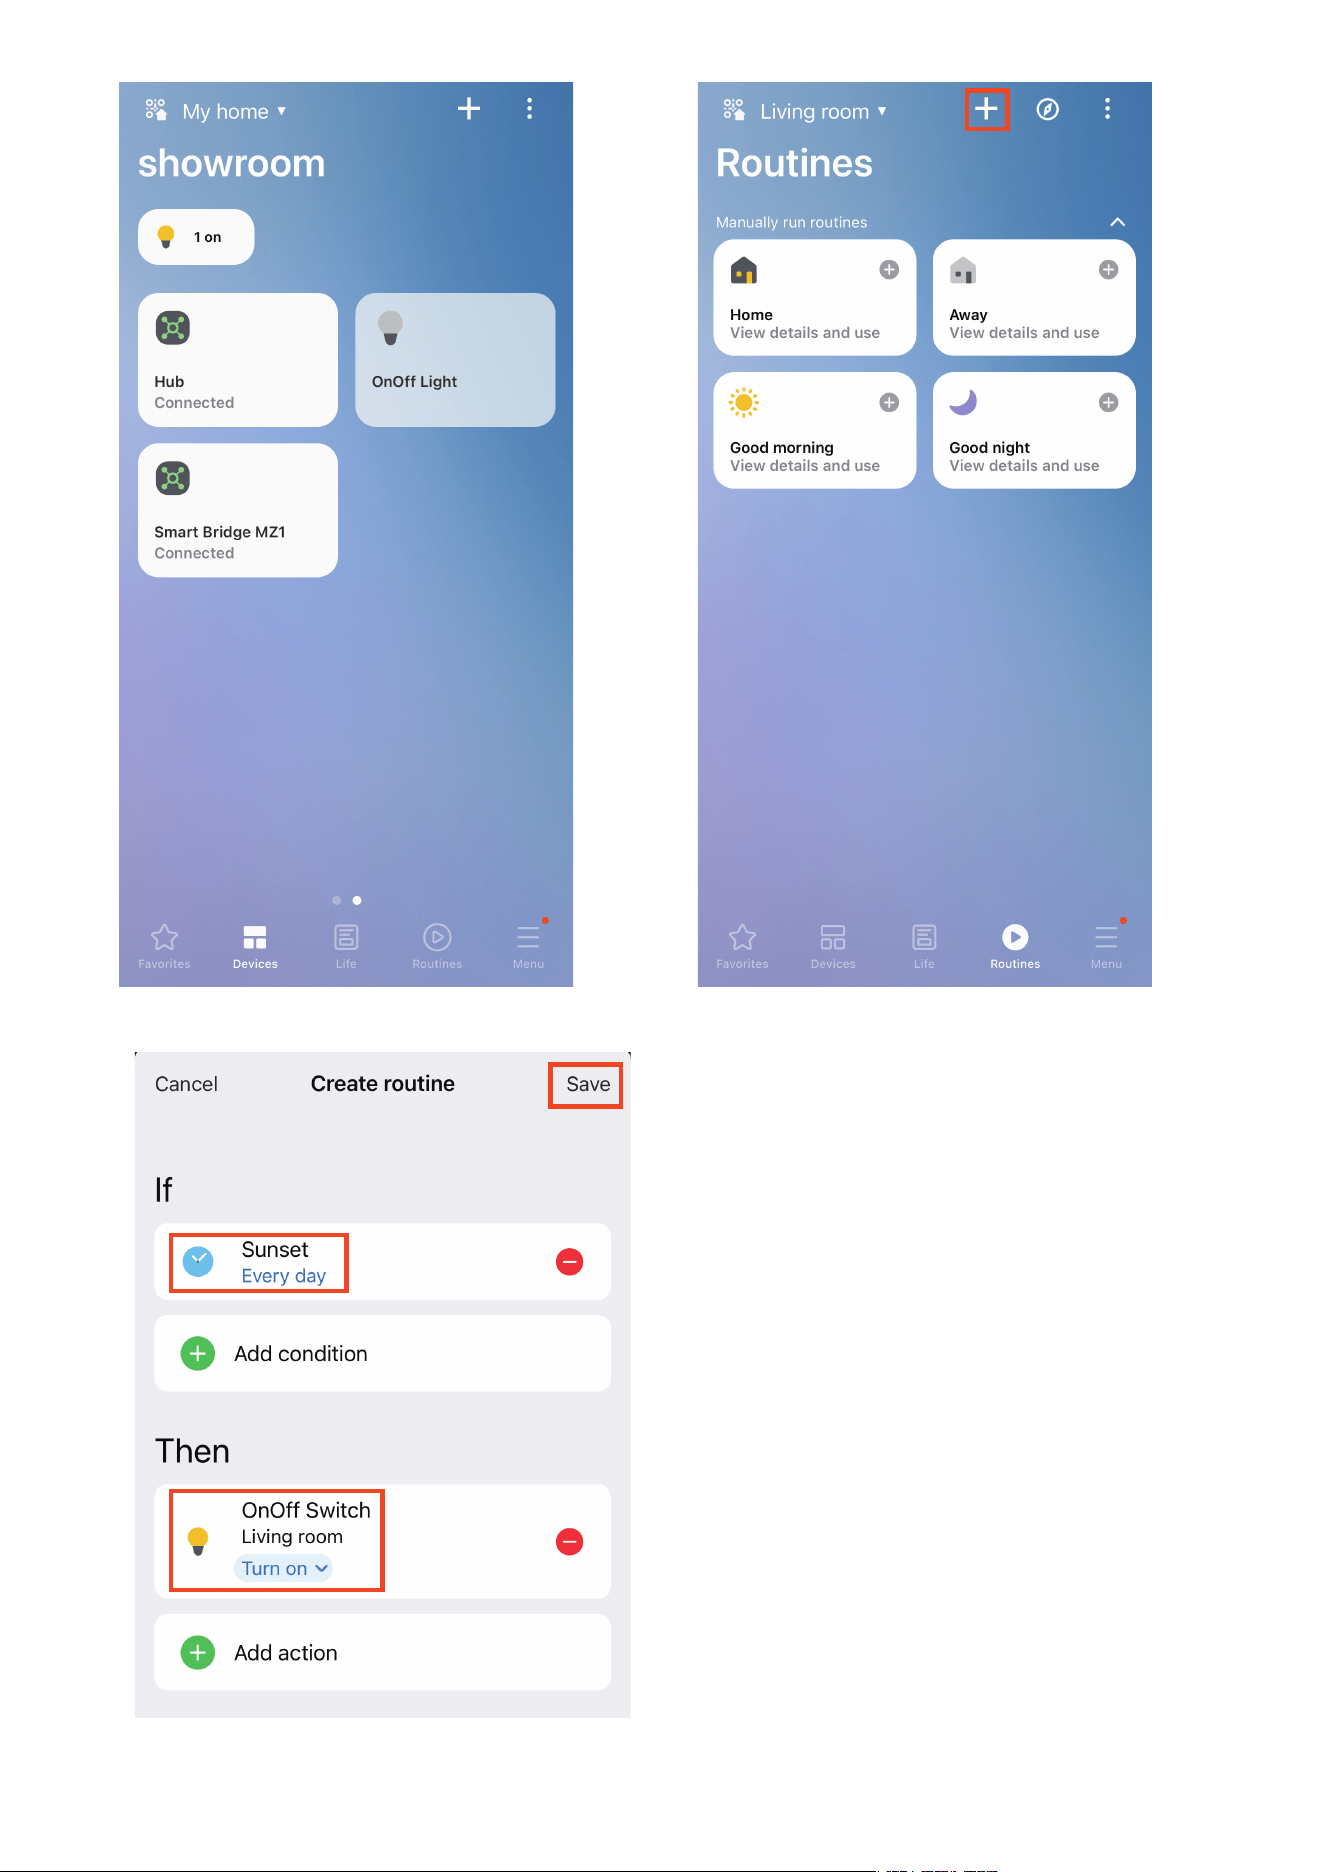
Create routine with the Zigbee devices added through the Smart
bridge.
Press the reset button through the pinhole with a pin to enable
Zigbee pairing, the Zigbee LED indicator of the Smart bridge truns
into blue blinking, put THIRDREALITY Zigbee devices into pairing
mode to add devices.
1.
2.
3.
4.
25
Setup with SmartThings
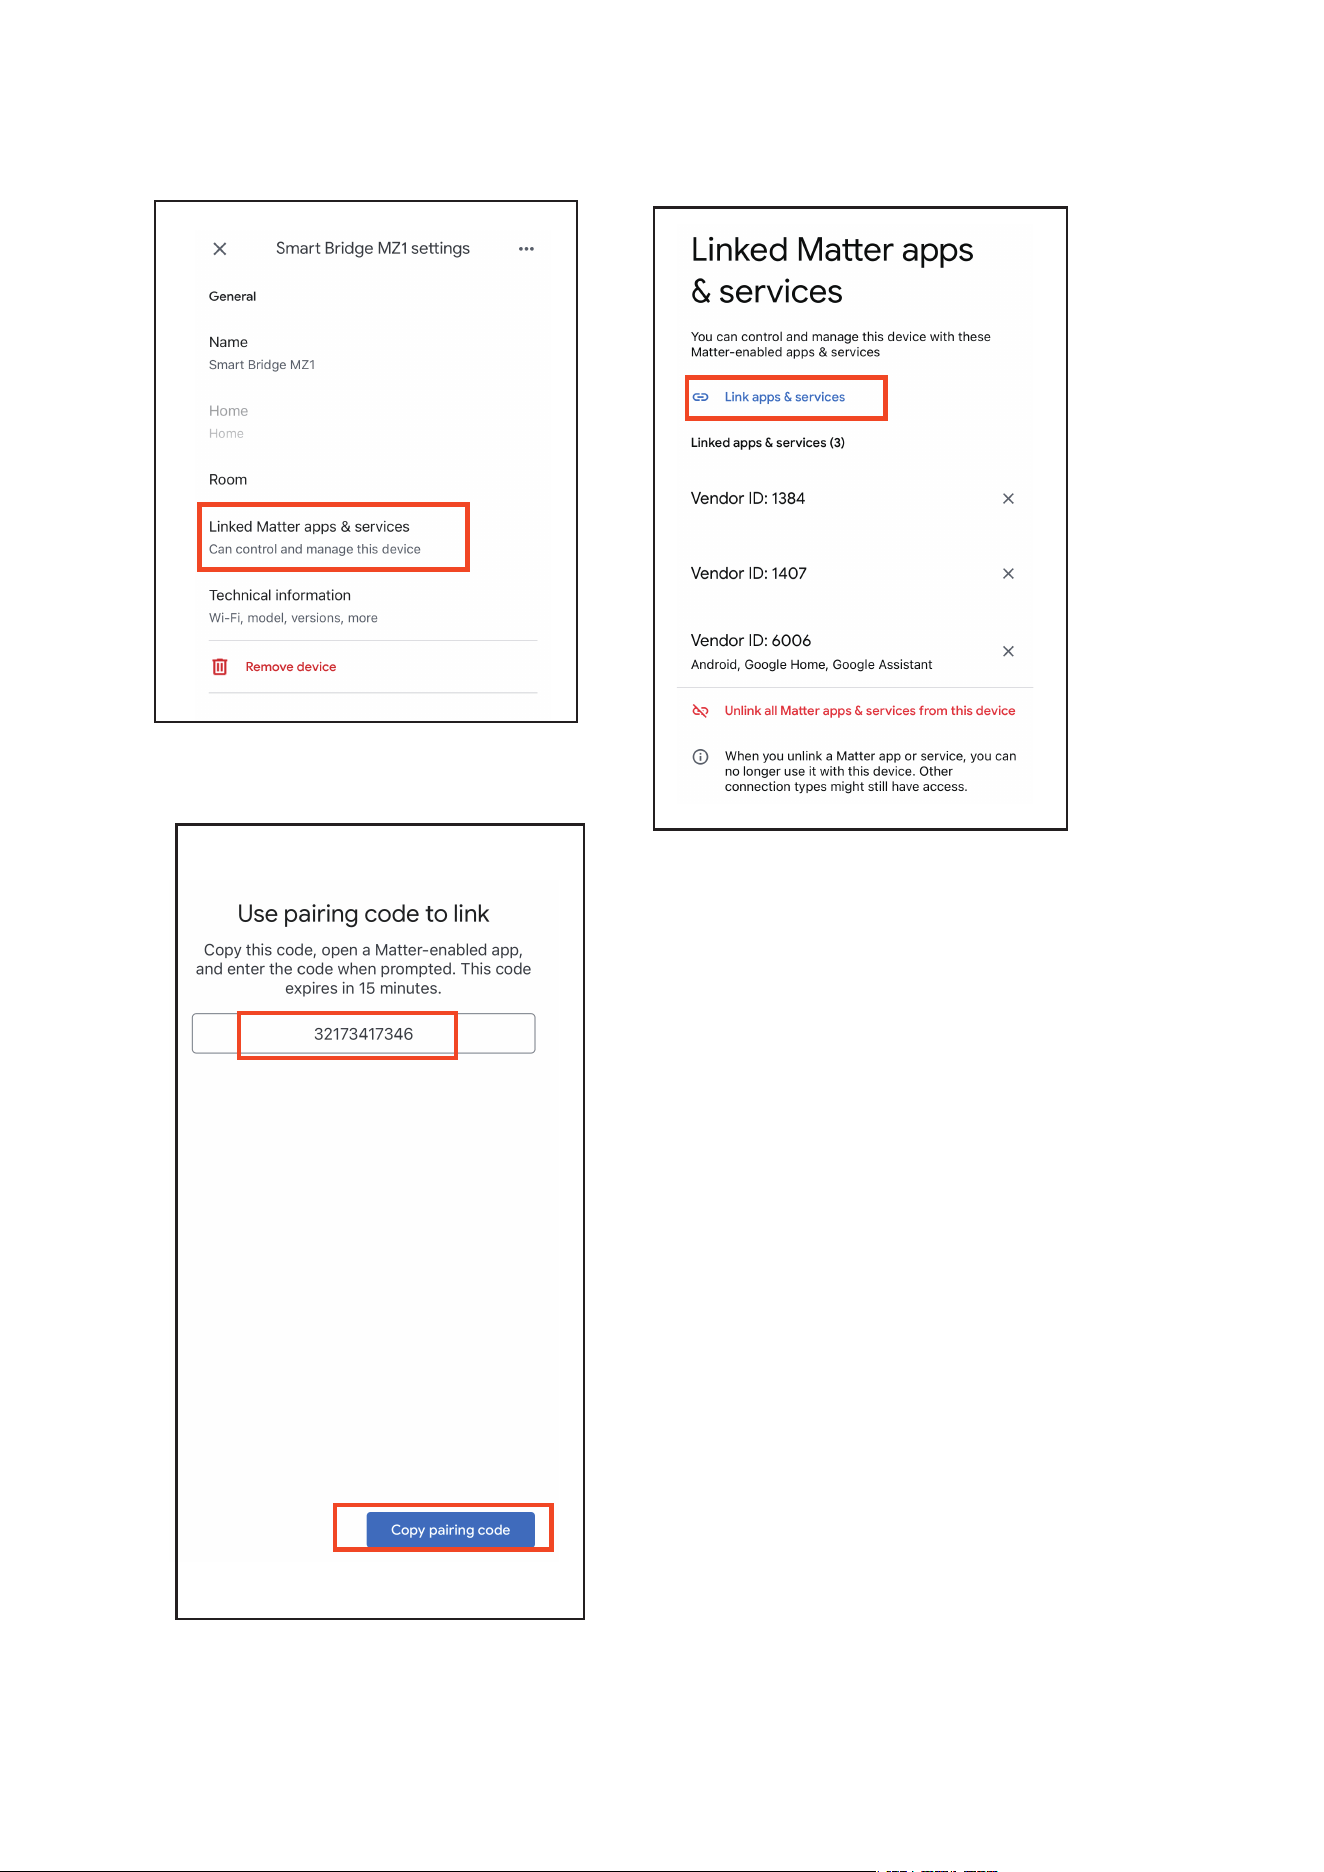
To connect the device to another Matter certified ecosystem app, go
to the app of the first ecosystem to generate a new setup code. Go to
the Device Settings page, tab Share with other services then Share
device, there will be QR code and a numeric code. Launch the app of
another Matter certified ecosystem, follow the setup instruction to
enter the setup code and follow the app instructions to complete the
setup.
5.
26
27
28
29
30

31
FCC Regulatory Conformance
This device complies with part 15 of the FCC rules. Operation is subject
to the following two conditions: (1) this device may not cause harmful
interference, and (2) this device must accept any interference received,
including interference that may cause undesired operation.
Changes or modifications not expressly approved by the party respon-
sible for compliance could void the user’s authority to operate the
equipment.
NOTE: This equipment has been tested and found to comply with the
limits for a Class B digital device, pursuant to part 15 of the FCC Rules.
These limits are designed to provide reasonable protection against
harmful interference in a residential installation.
This equipment generates uses and can radiate radio frequency energy
and, if not installed and used in accordance with the instructions, may
cause harmful interference to radio communications. However, there is
no guarantee that interference will not occur in a particular installation.
If this equipment does cause harmful interference to radio or television
reception, which can be determined by turning the equipment off and
on, the user is encouraged to try to correct the interference by one or
more of the following measures:

32
RF Exposure
Limited Warranty
‐Reorient or relocate the receiving antenna.
‐Increase the separation between the equipment and receiver.
‐Connect the equipment into an outlet on a circuit different from that
to which the receiver is connected.
‐Consult the dealer or an experienced radio/TV technician for help im-
portant announcement.
NOTE: The manufacturer is not responsible for any radio or TV interfer-
ence caused by unauthorized modifications to this equipment. Such
modifications could void the user’s authority to operate the equip-
ment.
This equipment complies with FCC radiation exposure limits set forth
for an uncontrolled environment.
This transmitter must not be co-located or operating in conjunction
with any other antenna or transmitter.
For limited warranty, please visit www.3reality.com/devicesupport
For customer support, please contact us at info@3reality.com or visit
www.3reality.com
For help and troubleshooting related to Amazon Alexa, visit the Alexa
app.