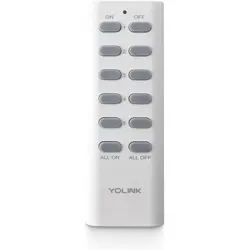
ALL OFFALL ON
OFFON
1
2
3
4
5
YoLink Remote
YS3603-UC
Set-up & User Guide
Rev 1.1
Sincerely,
Queenie, Clair, James, Eric
Customer Support Team
Thank you for purchasing YoLink products and for entrusng us with your smart home needs!
Your 100% sasfacon is our goal. If you experience any problems with seng up your new
YoLink Remote, please give us a chance to assist you, before returning your purchase.
We at Customer Support are here for you.If you need any assistance installing , seng up or
using a YoLink product or our app.
Find addional support and ways to reach us at:
www.yosmart.com/support-and-service
Or scan this QR code with your smartphone
Email us, 24/7 at:
service@yosmart.com
Call us, 9AM to 5PM Pacific Standard Time at:
(949) 825-5958
You may chat with us on Facebook (non-urgent maers):
www.facebook.com/YoLinkbyYoSmart

Contents
A.
B .
C .
D.
E .
F .
G.
H.
In the Box ······· ····· · ·· · ··1······················ ····· ···················································· · ·
·Introducon ······························································································ 2
YoLink Control ···························································································14
Maintenance ······················································································· ····18·
Specificaons ····················································································· ·····21·
Troubleshoong ················································································· ·····22·
Warning ······························································································ ····23·
Customer Service & Warranty ······························································· ····24·
Revised: 05/24/2021
Copyright 2021 YoSmart Inc. All rights reserved©
A. In the Box
A. YoLink Remote
B. Quick Start Guide
1
B.
AL L OFFAL L ON
OFFON
1
2
3
4
5
A.
B. Introducon
Yo L i n k Re m o te is co mp a b l e wi t h Yo Li n k de v i c e s t h at ar e s u p p o r t e d Yo L i n k Co n t r ol an d
a ct a s r e s p o n d e r s . W i t h Yo L i n k Re m o t e , you c a n c u s to m g ro u p i n g p l u g s , s w i tc h es , a n d
o u t l e ts an d co nt ro l t h e m b y on e b u o n . (N o hu b o r in te r n e t is req u i re d )
2
AL L OFFAL L ON
OFFON
1
2
3
4
5
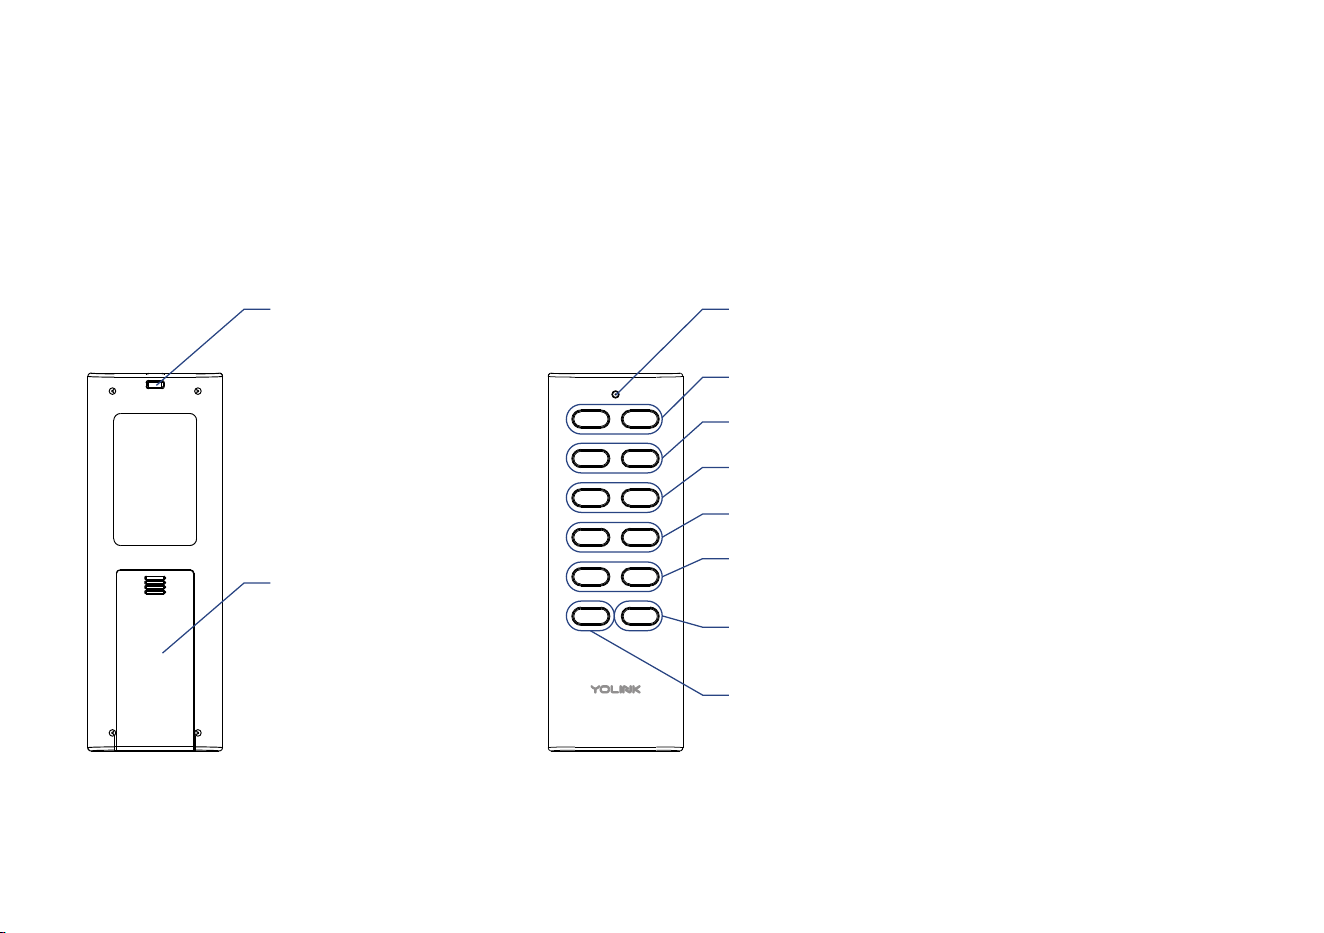
Status LED
All ON
- Tap to turn on the remote (First-Time use/aer
Factory Reset)
- Tap to turn on all devices paired to the remote
Group 1 (ON / OFF)
Group 3 (ON / OFF)
Group 5 (ON / OFF)
Group 4 (ON / OFF)
Group 2 (ON / OFF)
ON: Tap in each group to
turn on devices paired to
the associated group
OFF: Tap in each group to
turn off devices paired to
the associated group
Baery
Compartment
Includes two AAA
non-rechargeable
baeries
Hanging Slot
Use a string to hang
the remote in any
place
ALL OFF
- Tap to turn off all devices paired to the remote
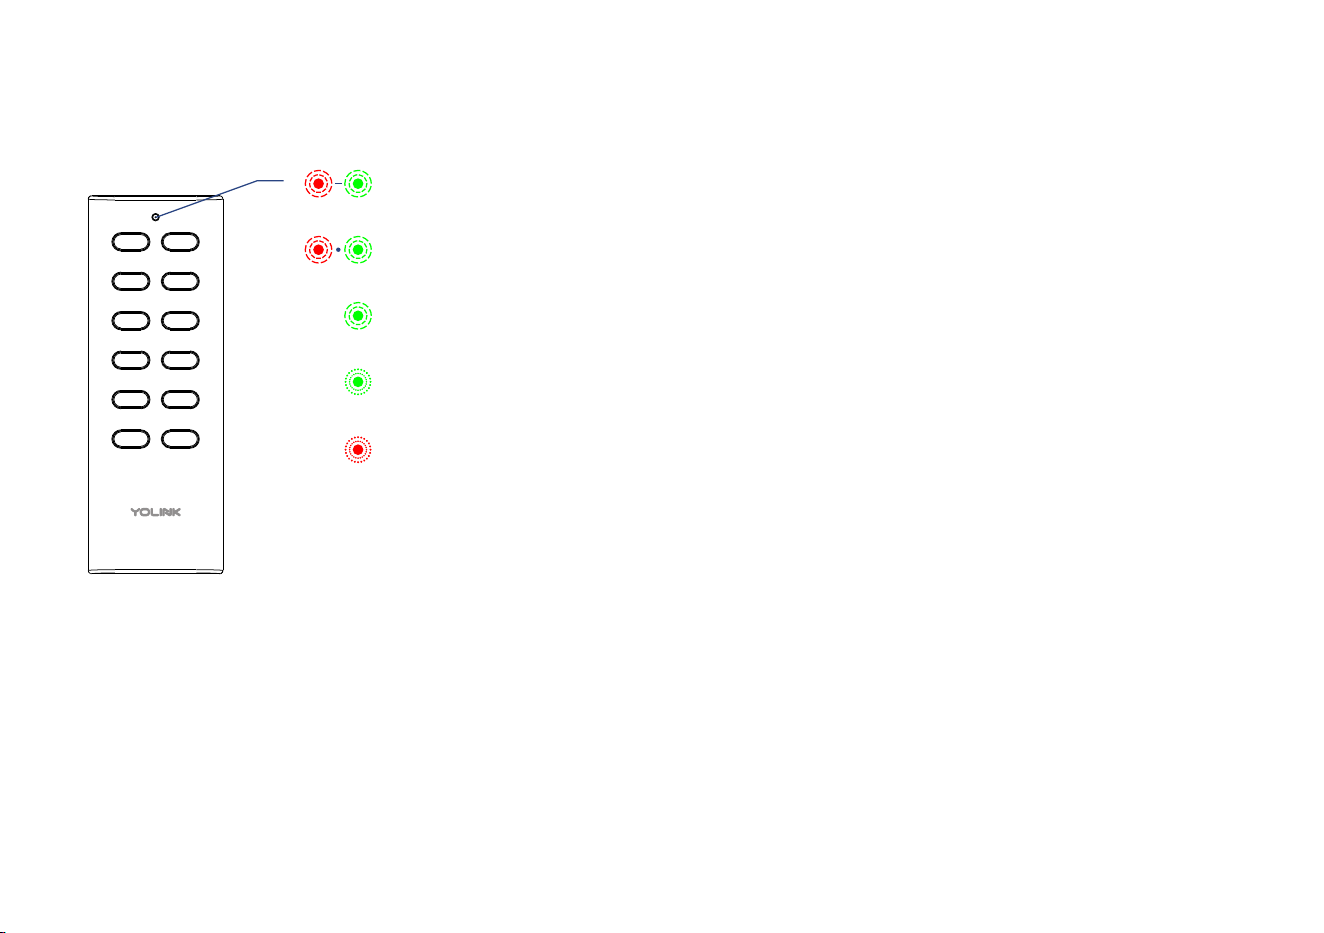
The LED light indicates the current status of the YoLink Remote:
3
AL L OFFAL L ON
OFFON
1
2
3
4
5
Blinking Red And Green Alternately
Restoring to Factory Defaults
Blinking Red Once, then Green Once
Device turned on
Fast Blinking Red
Removing Connecon to YoLink System (YoLink Control)
Fast Blinking Green
Establishing Connecon with YoLink System (YoLink Control)
Blinking Green Once
Trigger an acon
C. About YoLink Control
4
YoLink Control is our unique device-to-device control technology. Using YoLink Control, YoLink
devices can be controlled without the Hub or an internet connecon. (Use of YoLink Control is
oponal; you can use the Automaon feature in the app OR use YoLink Control, but YoLink
Control offers the benefit of operaon without the Hub or internet connecon.)
One device controls another, directly. A device that sends out commands is called the controller. A
device that receives the commands is called the responder. Examples of a controller are a YoLink
Remote or Water Leak Sensor, while examples of a responder are a Siren or a YoLink Relay
The YoLink Remote can work as the controller of YoLink Control
C-1. Pairing
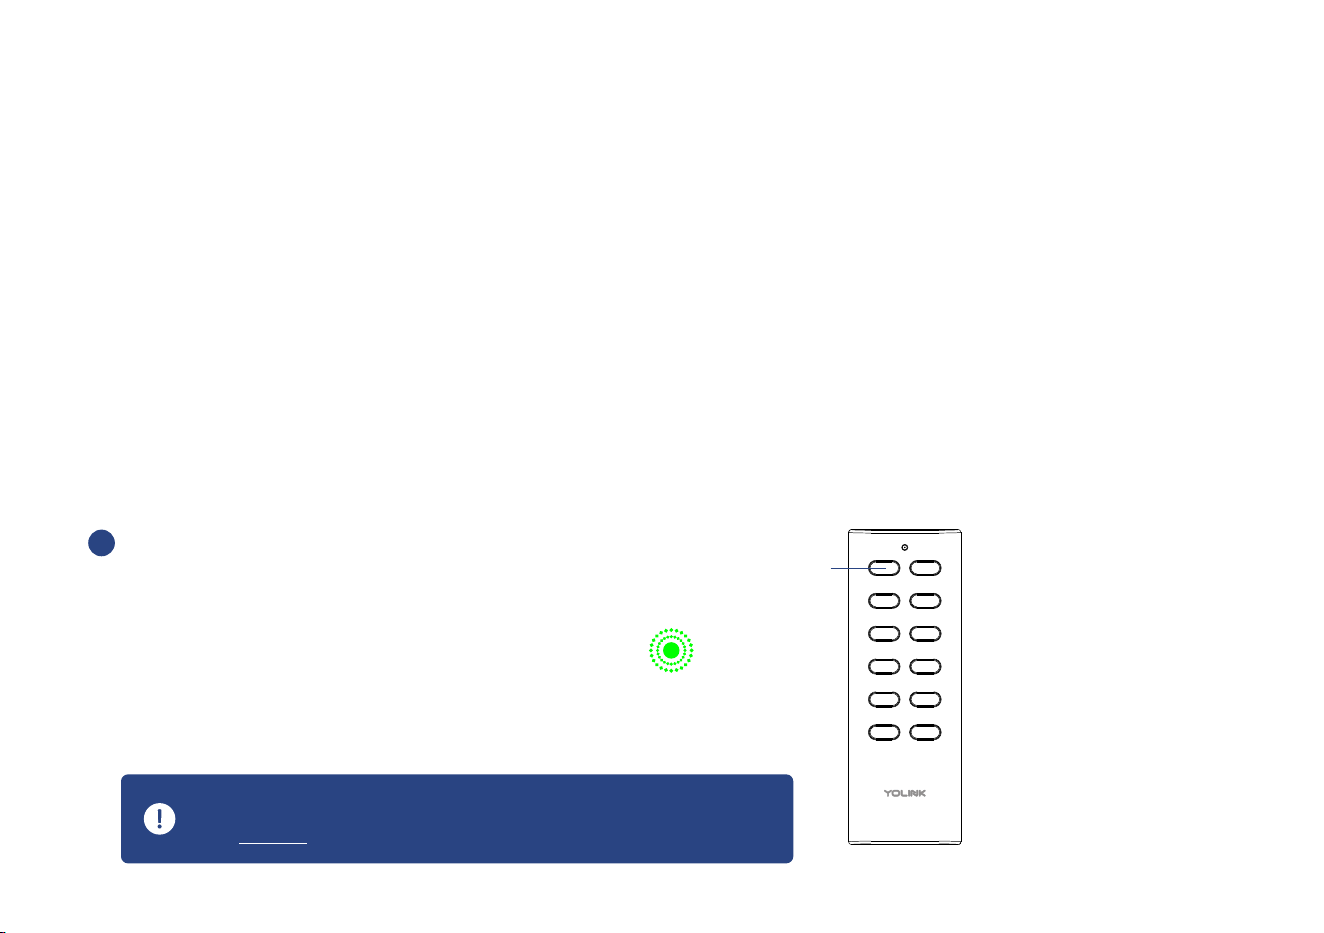
To configure your YoLink Remote as
a controller. Press and hold any of
the five ON buons (take the first
ON buon for example) for 5-10
seconds unl the LED quickly blinks
green, then, release the buon
1
AL L OFFAL L ON
OF FON
1
2
3
4
5
a. ON Buon
(5-10 seconds)
Hold the ON/SET/POWER buon longer than 10 seconds
will ABORT the paring operaon
5
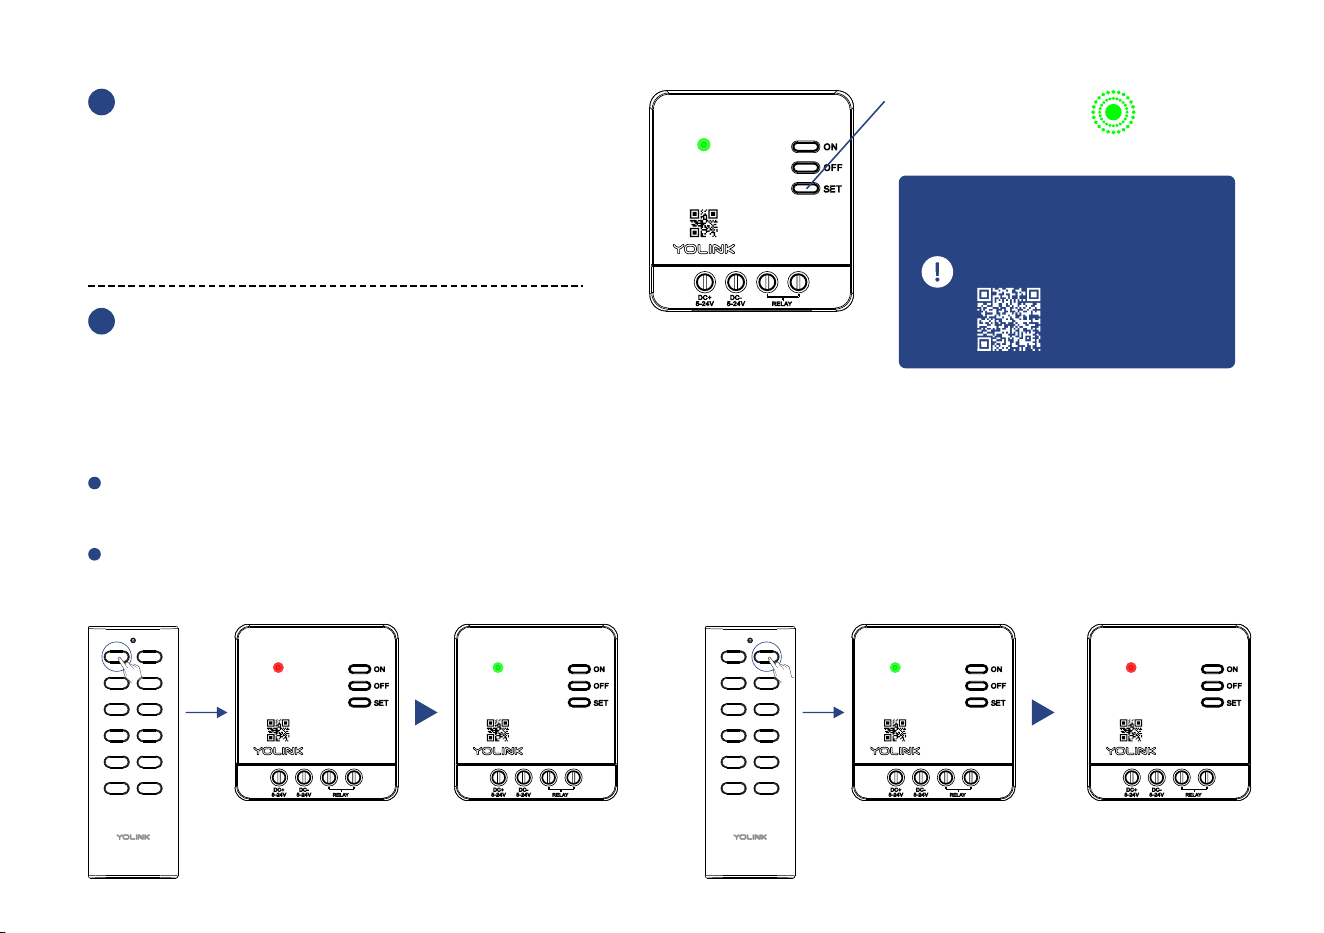
To configure a a s the YoLin k Relay
respond e r. Press and hol d the SET
buon for 5- 1 0 se co nds u nl t h e
L E D q u i c k l y b l i n k s g re e n , t h e n
release th e buon
2
U p o n p a i r i n g , t h e L E D w i l l st o p
blinking (this may happen aer only
blinking two or three mes)
3
Refer to the YoLink Relay
manual for more
informaon:
YS5706-UC
YoLink Relay
b. SET Buon
(5-10 seconds)
W h e n p r e s s t h e a s s o c i a v e O N b u o n o n Yo L i n k R e m o te , t h e Yo L i n k R e l a y w i l l n o w
i m m e d i a t e l y t u r n o n
C-1-1. Operaon
W h e n p re s s t h e a s s o c i a ve O F F b u o n o n Yo L i n k Re m o t e , t h e Yo L i n k Re l a y w i l l n ow
i m m e d i a t e l y t u r n o ff
Turned on
Turned off
ALL O FFALL O N
OF FON
1
2
3
4
5
Turned on
ALL O FFALL O N
OF FON
1
2
3
4
5
Turned off
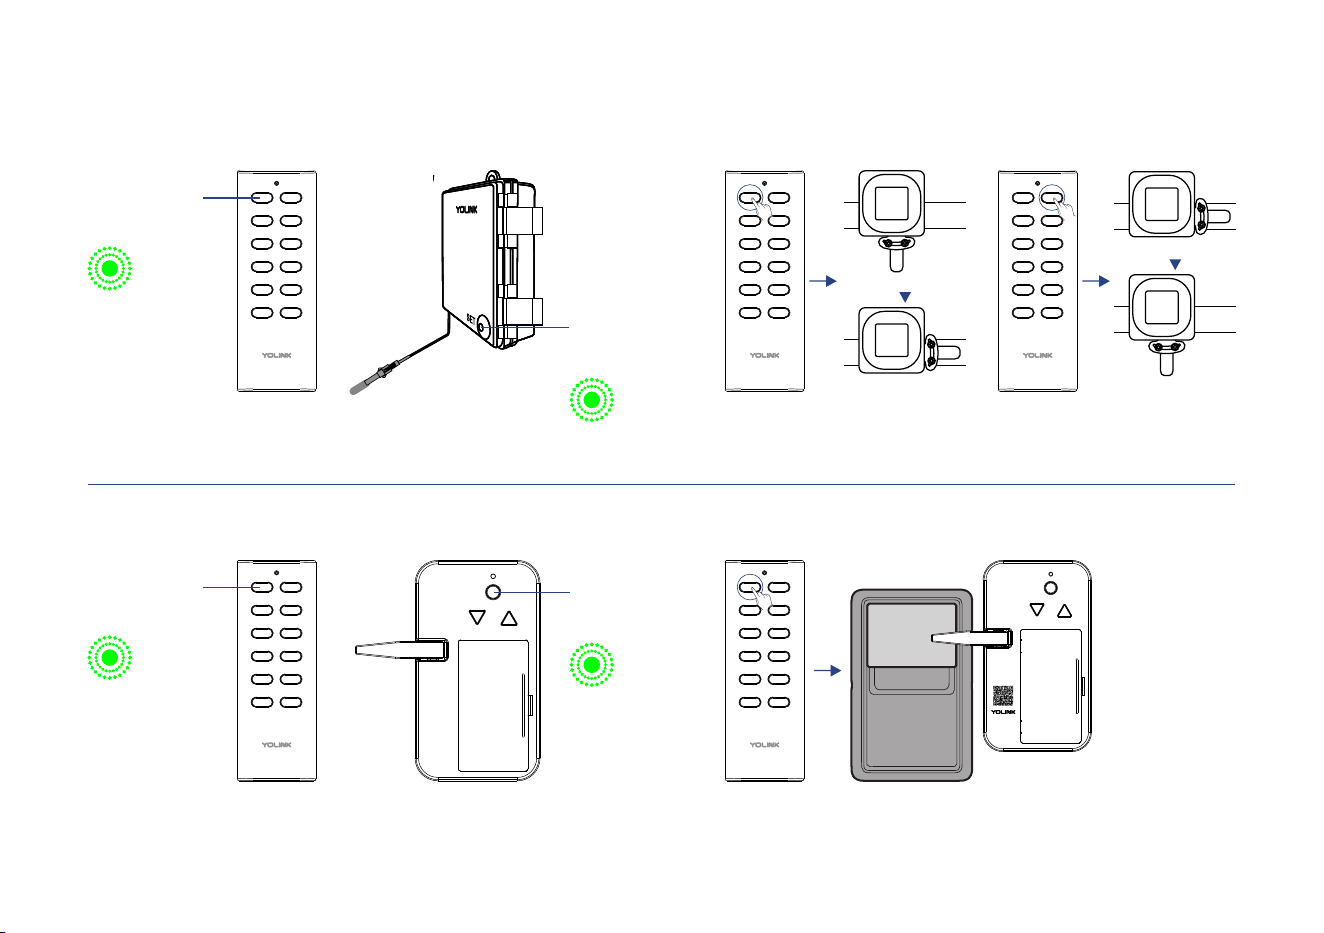
C-1-2. Diagram of YoLink Control of other devices act as a Responder
Operaon
YoLink Remote
Gas/Water Valve
Controller
Pairing
When , the Press the first ON/OFF buon once
Gas/Water Valve will turn on / turn off
OperaonPairing
ALL OF FALL ON
OF FON
1
2
3
4
5
ALL OF FALL ON
OF FON
1
2
3
4
5
ALL OF FALL ON
OF FON
1
2
3
4
5
YoLink Remote
YoLink Finger
ALL OF FALL ON
OF FON
1
2
3
4
5
SET
UP
DOWN
When , Press the first ON buon once
the YoLink Finger will click the control
button once
ALL OF FALL ON
OF FON
1
2
3
4
5
SET
UP
DOWN
6
ON Buon
(5-10 seconds)
SET Buon
(5-10 seconds)
ON Buon
(5-10 seconds)
SET Buon
(5-10 seconds)
Opened
Closed
Opened
Closed
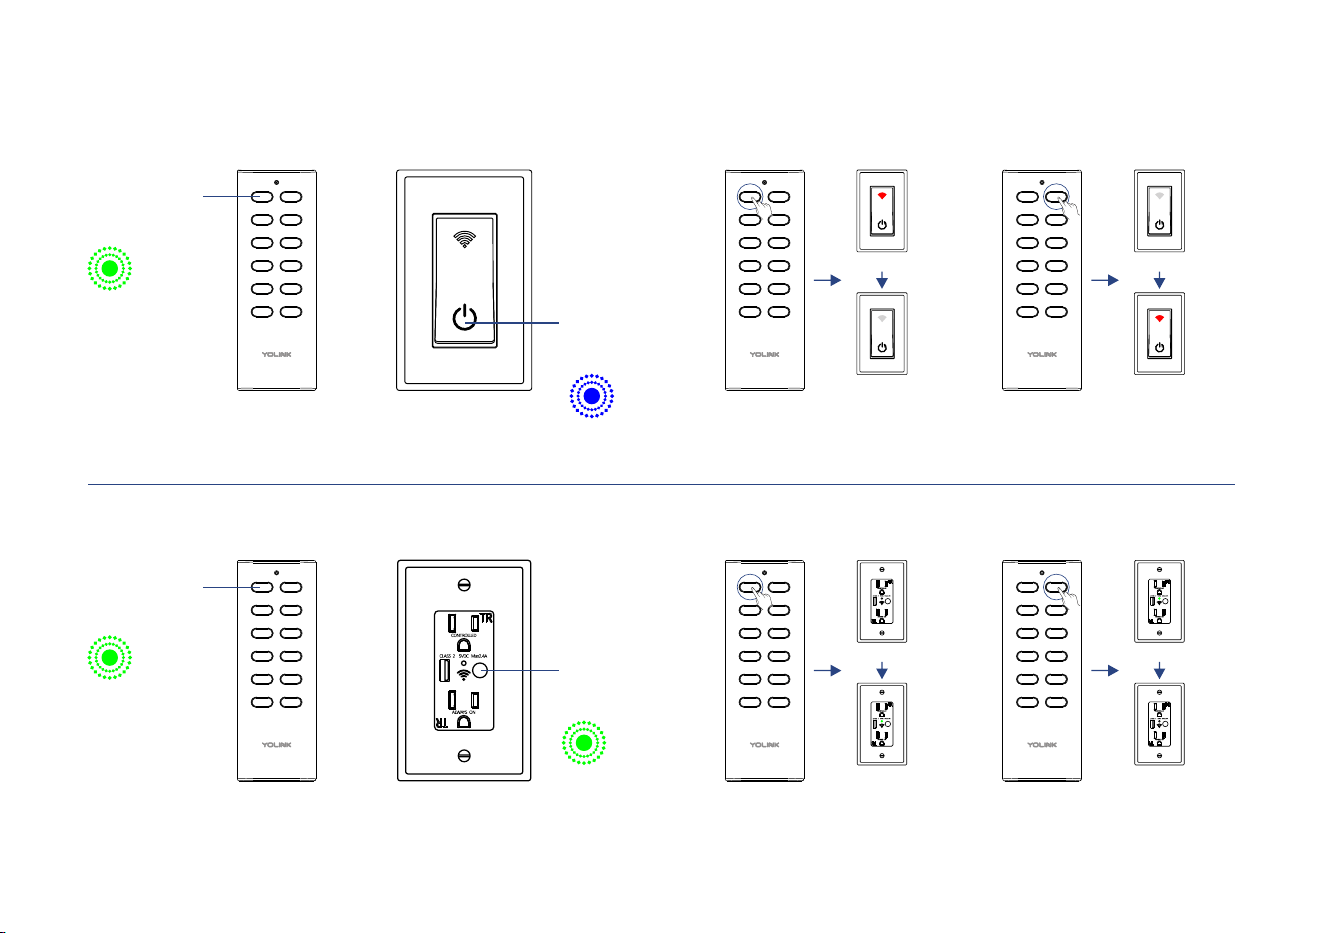
OperaonPairing
YoLink Remote
When , the Press the first ON/OFF buon once
In-wall Outlet will turn on / turn off
ALL OF FALL ON
OF FON
1
2
3
4
5
ALL OF FALL ON
OF FON
1
2
3
4
5
ALL OF FALL ON
OF FON
1
2
3
4
5
Turned Off
Turned OnTurned Off
Turned On
In-wall Outlet
OperaonPairing
YoLink Remote
In-wall Switch When , the Press the first ON/OFF buon once
In-wall Switch will turn on / turn off
ALL OF FALL ON
OF FON
1
2
3
4
5
ALL OF FALL ON
OF FON
1
2
3
4
5
Turned Off
Turned On
ALL OF FALL ON
OF FON
1
2
3
4
5
Turned Off
Turned On
POWER Buon
(5-10 seconds)
ON Buon
(5-10 seconds)
ON Buon
(5-10 seconds)
POWER Buon
(5-10 seconds)
7
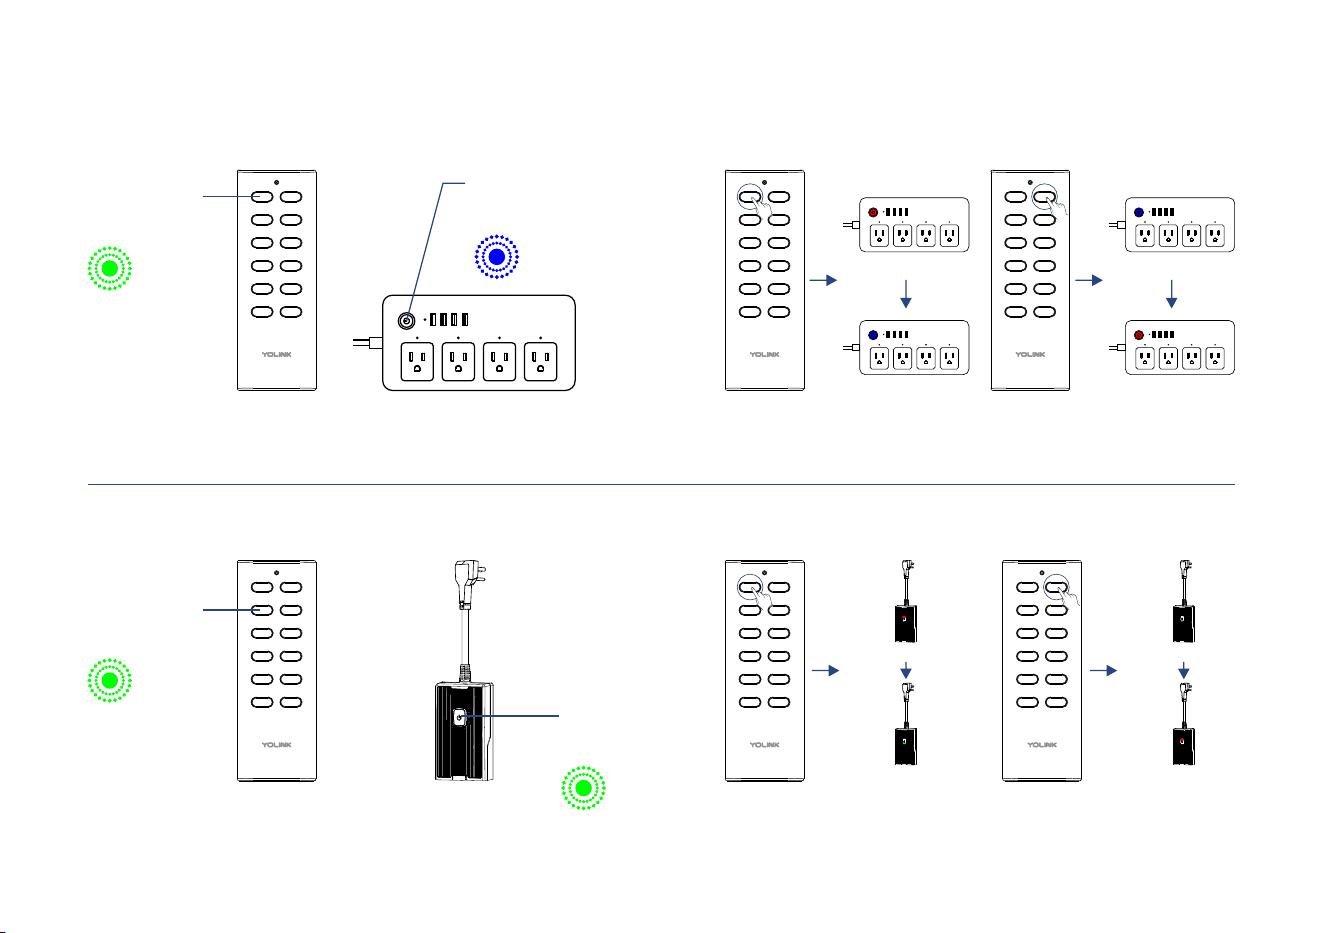
OperaonPairing
YoLink Remote
Smart Switch When , the Press the first ON/OFF buon once
Smart Switch will turn all on / turn all off
ALL OF FALL ON
OF FON
1
2
3
4
5
OperaonPairing
YoLink Remote
Smart Power Strip When , the Smart Press the first ON/OFF buon once
Power Strip will turn all on / turn all off
ALL OF FALL ON
OF FON
1
2
3
4
5
ALL OF FALL ON
OF FON
1
2
3
4
5
All Off (or paral on)
All On
ALL OF FALL ON
OF FON
1
2
3
4
5
All On (or paral on)
All Off
ALL OF FALL ON
OF FON
1
2
3
4
5
All Off (or paral on)
All On
ALL OF FALL ON
OF FON
1
2
3
4
5
All Off
All On (or paral on)
ON Buon
(5-10 seconds)
ON Buon
(5-10 seconds)
POWER Buon
(5-10 seconds)
POWER Buon
(5-10 seconds)
8
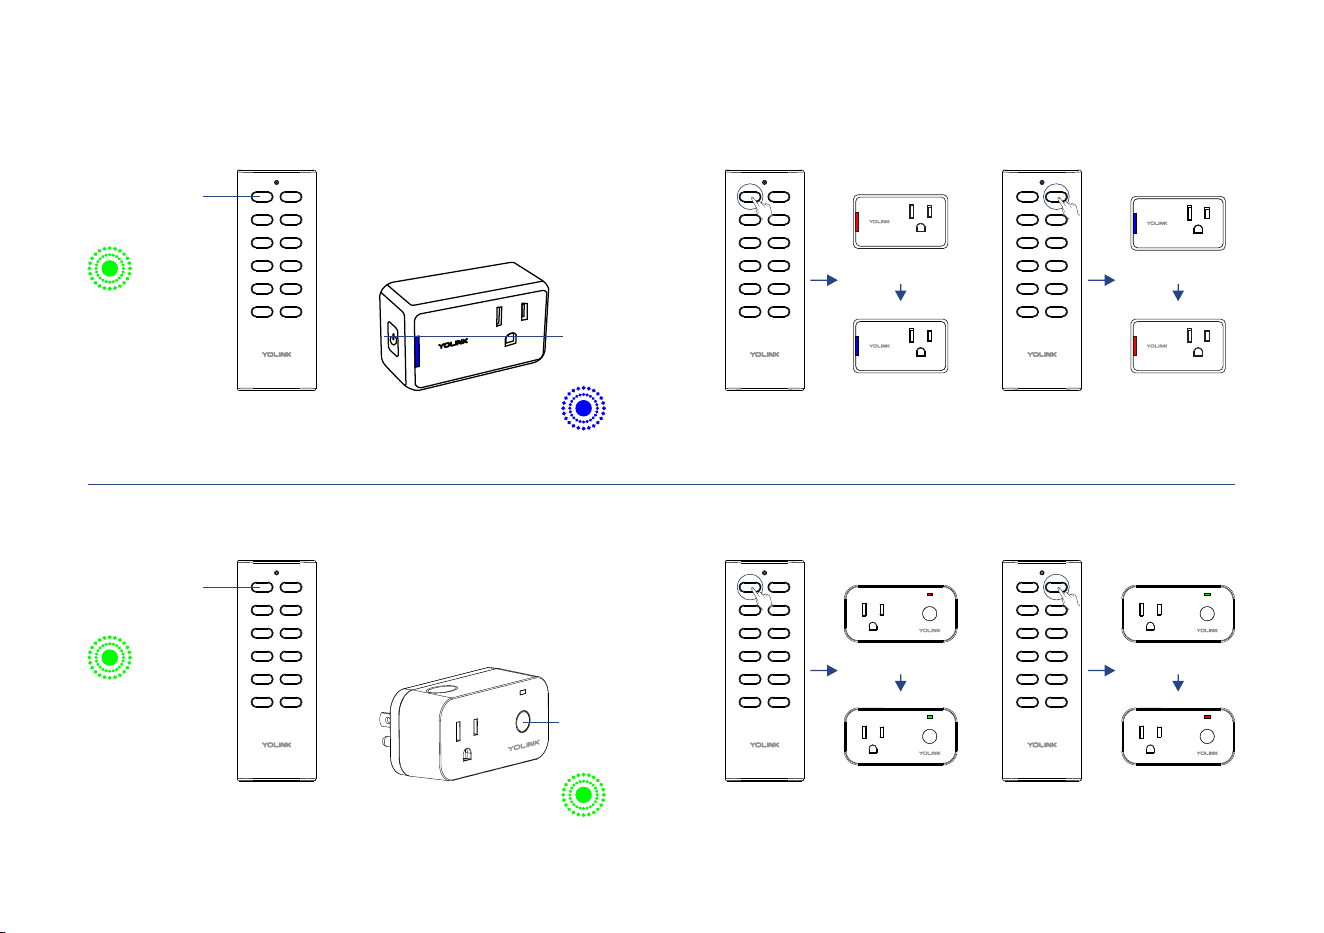
OperaonPairing
YoLink Remote
When , the YoLink Press the first ON/OFF buon once
Plug will turn on / turn off
ALL OF FALL ON
OF FON
1
2
3
4
5
YoLink Plug
Pairing
YoLink Remote
YoLink Plug Mini
ALL OF FALL ON
OF FON
1
2
3
4
5
ALL OF FALL ON
OF FON
1
2
3
4
5
Turned Off
Turned On
ALL OF FALL ON
OF FON
1
2
3
4
5
Turned Off
Turned On
ON Buon
(5-10 seconds)
ON Buon
(5-10 seconds)
POWER Buon
(5-10 seconds)
POWER Buon
(5-10 seconds)
9
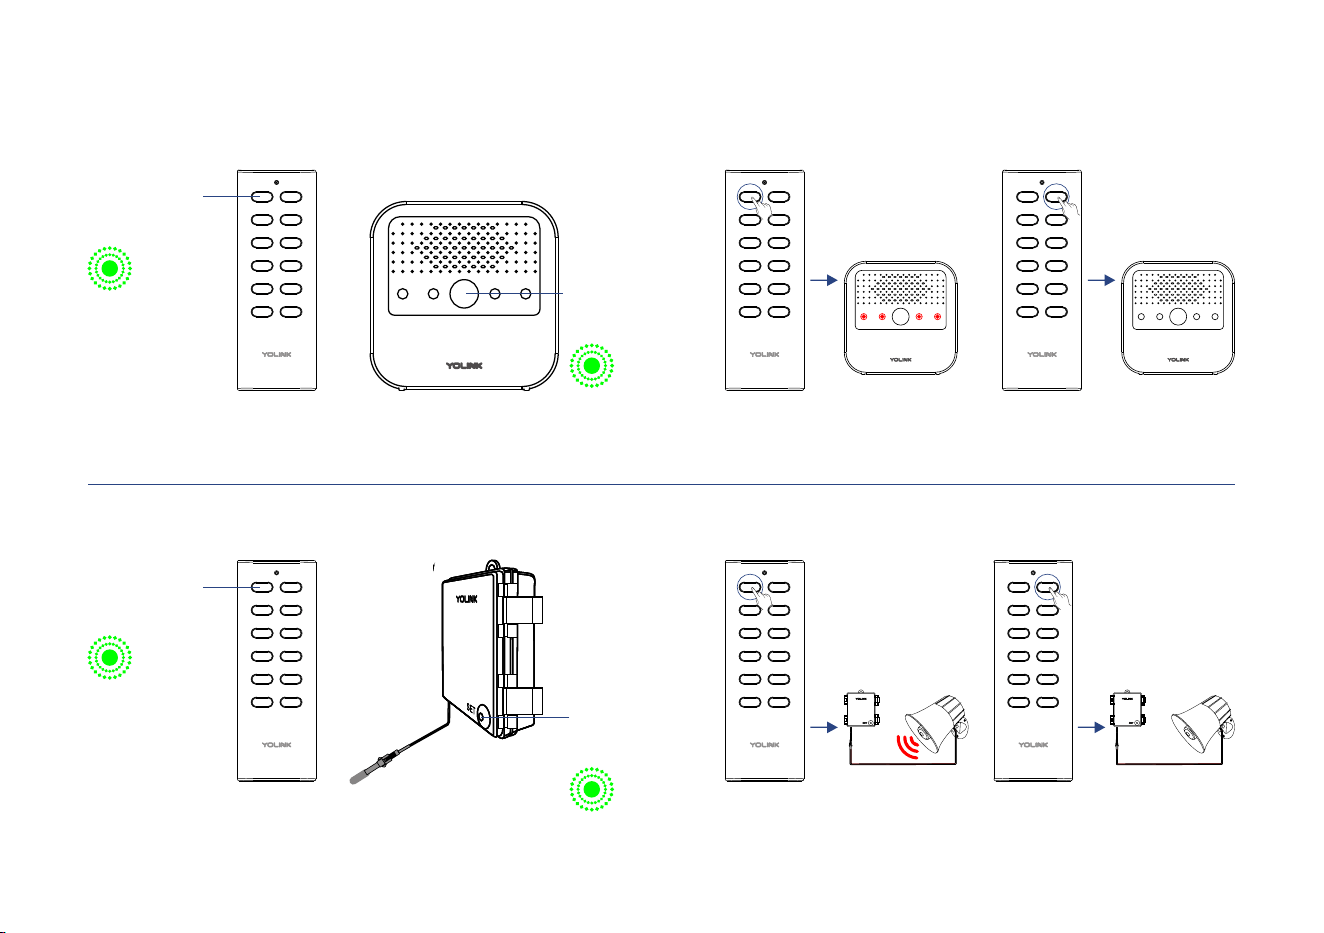
Operaon
When , the YoLink Press the first ON/OFF buon once
Plug Mini will turn on / turn off
ALL OF FALL ON
OF FON
1
2
3
4
5
Turned Off
Turned On
ALL OF FALL ON
OF FON
1
2
3
4
5
Turned On
Turned Off
10
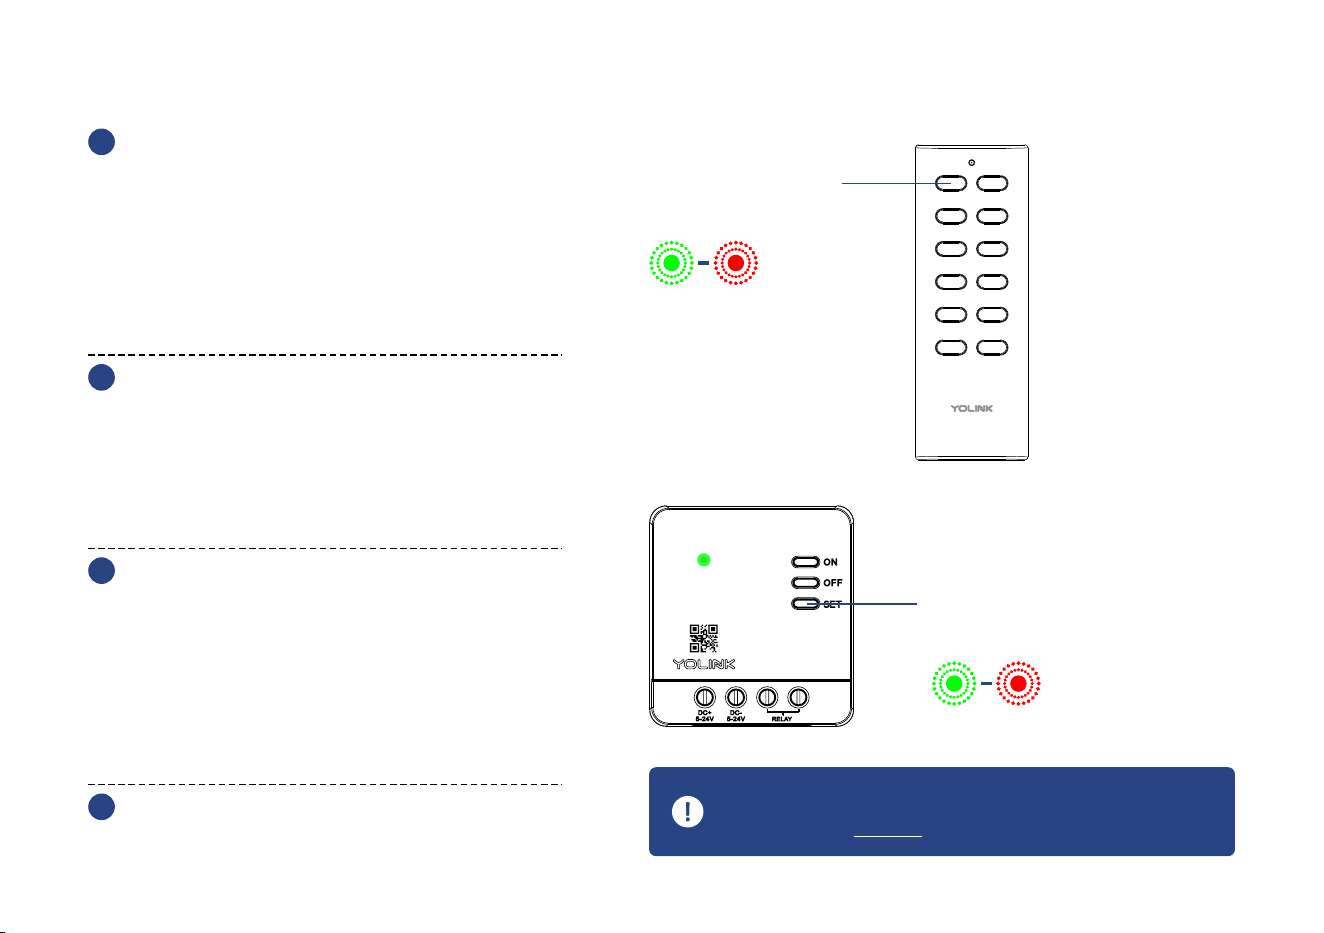
OperaonPairing
YoLink Remote
When , the Alarm Press the first ON/OFF buon once
Controller will activate / silence Alarm Device
ALL OF FALL ON
OF FON
1
2
3
4
5
OperaonPairing
YoLink Remote
Siren Alarm
ALL OF FALL ON
OF FON
1
2
3
4
5
SE T
When , the Siren Press the first ON/OFF buon once
Alarm will activate / silence
ALL OF FALL ON
OF FON
1
2
3
4
5
ALL OF FALL ON
OF FON
1
2
3
4
5
SET
Acvate Siren Silence Siren
SET
ALL OF FALL ON
OF FON
1
2
3
4
5
ALL OF FALL ON
OF FON
1
2
3
4
5
ON Buon
(5-10 seconds)
ON Buon
(5-10 seconds)
SET Buon
(5-10 seconds)
Outdoor Alarm
Controller
SET Buon
(5-10 seconds)
Acvate Alarm Device Silence Alarm Device
C-2. Unpairing
11
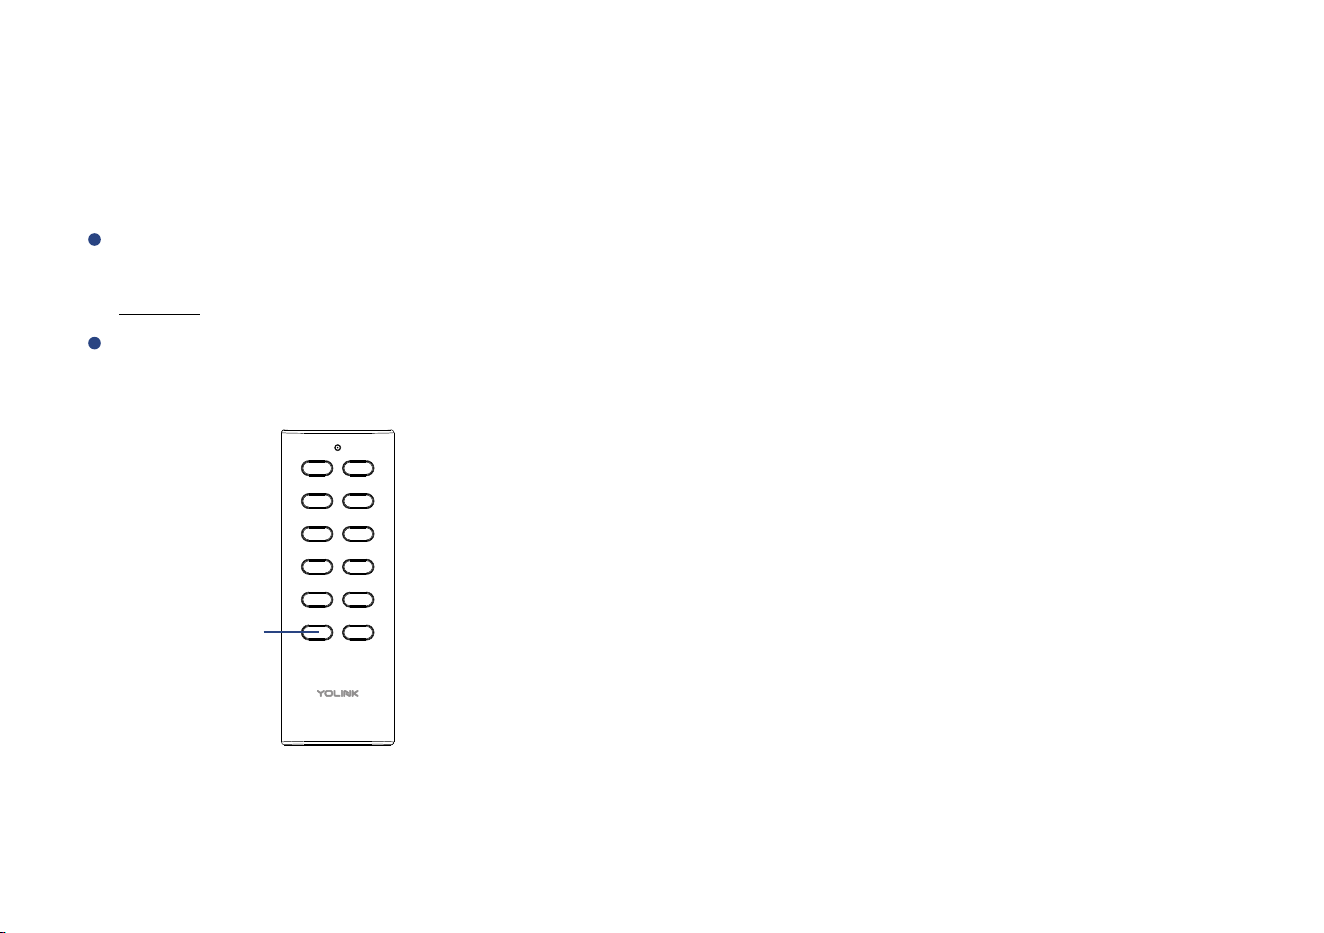
At the YoLink Remote (controller),
press and hold any of the five ON
buons (take the first ON buon for
example) for 10-15 seconds unl the
LED quickly blinks green, then red,
then, release the buon
1
At the YoLink Relay (responder),
press and hold the POWER buon for
10-15 seconds, unl the LED quickly
blinks green, then red, then, release
the buon
2
U p o n u n - p a i r i n g , t h e Yo L i n k
Remote LED will stop blinking and
turn off, and the YoLink Relay LED
will stop blinking and return to the
previous color (green for turned
on, red for turned off)
3
T h e Yo L i n k R e l ay w i l l n o l o n g e r
r e s p o n d w h e n t h e p r e s s t h e
a s s o c i a v e O N / O F F b u o n o n c e
4
b. SET Buon
(10-15 seconds)
a. ON Buon
(10-15 seconds)
AL L OFFAL L ON
OF FON
1
2
3
4
5
Hold the ON/SET/POWER buon longer than 15
seconds will ABORT the unparing operaon
D. Maintenance
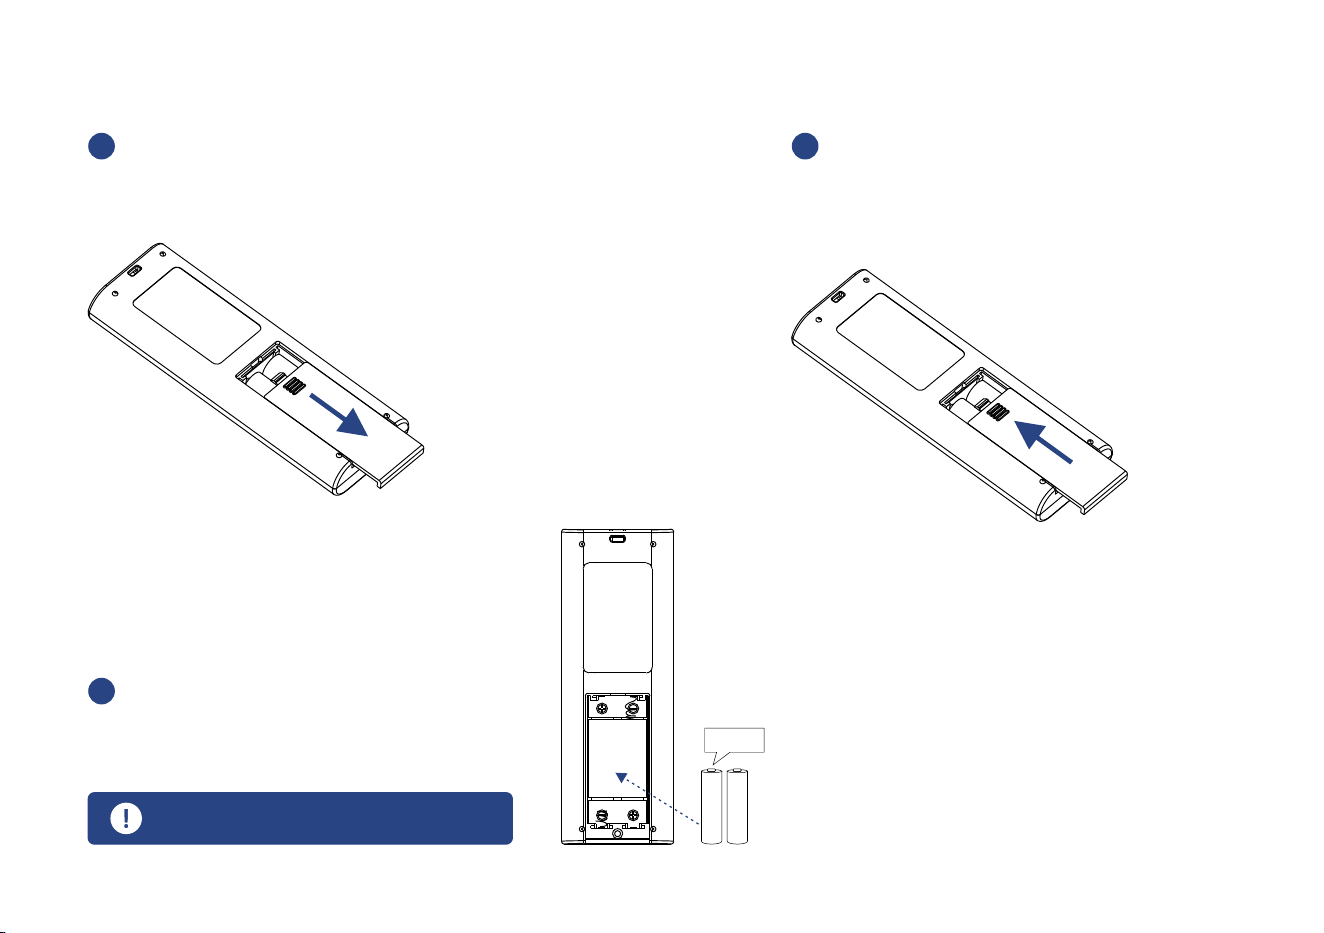
D-1. Factory Reset
Factory reset will erase all of your sengs and restore it to factory defaults
Hold the ALL ON buon of finger for 20-25 seconds unl the status light blinks red and green
alternately, then, release the buon (Hold the ALL ON buon longer than 25 seconds will
ABORT the factory reset operaon)
Factory reset will be complete when the status light stops blinking
AL L OFFAL L ON
OF FON
1
2
3
4
5
ALL ON Buon
12
D-2. Replacing the Baeries
13
Slide the baery cover to open the
cover and remove the baeries
1
Pre ss any bu on to ch ec k t he
stat u s o f t h e re mo te a n d ve ri fy
th e stat us L E D wil l b l in k o nc e
3
2 x AAA
I n s t a l l n e w t w o a l k a l i n e
non-rechargeable AAA baeries,
and then close the baery cover
2
Do not mix old and new baeries

E. Specificaons
Voltage:
3V DC (2 - alkaline non-rechargeable AAA baery)
Device Current Draw:
≤ ( ), ≤ (standby) 135mA operang 5uA
14
Environment:
Working Temperature: 32°F - 104°F (0°C - 40°C)
Working Humidity: 10% - 90% non-condensing
Dimensions:
4.53 x 1.65 x 0.63 inch (L x W x D)

F. Troubleshoong
1. Symptom:
Status LED doesn’t light up:
- If the baeries got loose, please re-install the baeries
- If the condion of the baeries is in queson, replace the baeries with two premium “AAA”
alkaline baeries
2. Other issues, contact customer service, 1-949-825-5958 (M-F 9am - 5pm PST)
15

G. Warning
Please operate and maintain the YoLink Remote only as directed herein. Failure to follow the
informaon in this manual can void the warranty and result in malfuncons and/or equipment
failure
If your YoLink Remote gets dirty, please clean it by wiping it down with a clean, dry cloth. Do not
use strong chemicals or detergents, which may discolor or damage the exterior and/or damage
the electronics, voiding the warranty
Do not use this device where it will be subjected to physical impacts and/or strong vibraon.
Physical damage is not covered by the warranty
Power the remote only with two AAA baeries (see below, regarding baeries)
Use only new, name brand, alkaline non-rechargeable AAA baeries
Do not use rechargeable baeries
Do not use zinc blend baeries
YoLink Remote is not waterproof and are designed and intended only for indoor use. Subjecng
this device to outdoor environment condions such as direct sunlight, extreme hot or cold
temperatures, rain, water and/or condensaon can damage the device and will void the
warranty. Refer to Specificaons (page ) for the device environmental limitaons14
Do not puncture or damage baeries. Leakage can cause harm on skin contact, and is toxic if
ingested
Do not mix new and old baeries
16

Do not dispose of baeries in fire as they may explode! Please follow local baery disposal
procedures
To avoid damaging the device, if storing the device for an extended period, remove the
baeries
Please contact Customer Service before aempng to repair, disassemble or modify the
device, any of which can void the warranty and permanently damage the device
17

18
If you have any difficules installing or using YoLink products, please contact
our Customer Service department during business hours:
US Live Tech Support: 1-949-825-5958 M-F 9am - 5pm PST
Email: service@yosmart.com
YoSmart Inc. 15375 Barranca Parkway, Ste G-105 Irvine, Irvine, CA 92618, USA
Warranty 2 Year Limited Electrical Warranty
To implement this warranty please give us a call during business hours at 1-949-825-5958, or visit
www.yosmart.com
YoSmart warrants to the original residenal user of this product that it will be free from defects in
materials and workmanship, under normal use, for 2 year from the date of purchase. User must
provide a copy of original purchase receipt. This warranty does not cover abuse or misused products
or products used in commercial applicaons. This warranty does not apply to devices that have been
improperly installed, modified, put to a use other than designed, or subjected to acts of God (such as
floods, lightning, earthquakes, etc.). This warranty is limited to repair or replacement of the device
only at YoSmart's sole discreon. YoSmart will NOT be liable for the cost of installing, removing, nor
reinstalling this product, nor direct, indirect, or consequenal damages to persons or property
resulng from the use of this product. This warranty only covers the cost of replacement parts or
replacement units, it does not cover shipping & handling fees

FCC Statement
This equipment has been tested and found to comply with the limits for a Class B digital device,
pursuant to part 15 of the FCC Rules. These limits are designed to provide reasonable protecon
against harmful interference in a residenal installaon. This equipment generates, uses and can
radiate radio frequency energy and, if not installed and used in accordance with the instrucons,
may cause harmful interference to radio communicaons. However, there is no guarantee that
interference will not occur in a parcular installaon. If this equipment does cause harmful
interference to radio or television recepon, which can be determined by turning the equipment
off and on, the user is encouraged to try to correct the interference by one or more of the following
measures:
Reorient or relocate the receiving antenna
Connect the equipment into an outlet on a circuit different from that to which the receiver is
connected
Increase the separaon between the equipment and receiver
Consult the dealer or an experienced radio / TV technician for help
This device complies with part 15 of the FCC Rules. Operaon is subject to the following two
condions:
1) This device may not cause harmful interference
2) This device must accept any interference received, including interference that may cause
undesired operaon. Any changes or modificaons not expressly approved by the party
responsible for compliance could void the user ’s authority to operate the equipment

This equipment complies with FCC RF radiaon exposure limits set forth for an uncontrolled
environment. This device and its antenna must not be co-located or operang in conjuncon with
any other antenna or transmier.
FCC RF Radiaon Exposure Statement
Note: The manufacturer is not responsible for any radio or TV interference caused by unauthorized
modificaons to this equipment. Such modificaons could void the user’s authority to operate the
equipment.
“To comply with FCC RF exposure compliance requirements, this grant is applicable to only Mobile
Configuraons. The antennas used for this transmier must be installed to provide a separaon
distance of at least 20 cm from all persons and must not be co-located or operang in conjuncon
with any other antenna or transmier.”