Multi-Language User Manual
Industrial Endoscope
DS620

DE
EN
01 - 08
IT
09 - 16
FR
17 - 24
ES
25 - 32
JP
33 - 40
41 - 48
Catalog

Product Features
• DEPSTECH is a booming technology company, specialized in creating various
endoscopes and committed to make you feel more secure.
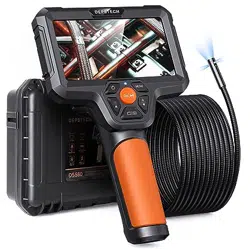
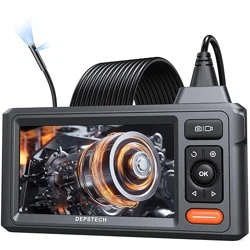
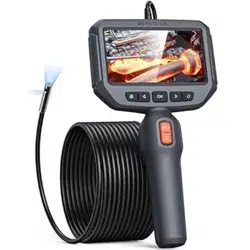
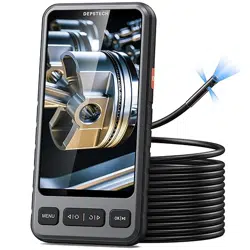
• DS620 is a high-performance industrial endoscope, equipped with 5 inch IPS
high-definition display, has the camera and video functions and saves into TF memory
card. Such camera uses high-performance CMOS chip that supports the record-high
frame rate to get clear images with Bluart 3.0 technology, widely used in industrial
maintenance, appliance maintenance, mechanical maintenance and design and other
fields.
• TF Card is not included, if you need to take photos or videos, please purchase one
separately.
• This product is a camera of industrial endoscope, not applicable to medical or physical
examination!
• In order to lengthen the battery life, it is recommended that you should charge the
device once every 3 months whether it is used.
• Do not try to replace internal battery by yourself, because unprofessional operation may
lead to risks of personal injury due to battery overheating, etc.
Special Warning and Notice
Safety and Protection
• Probe of camera is an electronic device of high precision, so please do not hit the probe
of camera or pull the cables, which may lead to failure of the device.
• With IP67 waterproof layer, the probe shall be used with extra care and protected from
scratches!
• Camera probe is made from materials that are not high temperature resistant, so make
sure the internal temperature of any internal combustion engine or other equipment
whose internal temperature is higher has been cooled when they are examined,
otherwise the device will be directly damaged!
• In case of device damaged, please do not dismantle it by yourself, but contact the seller
or the supplier for more professional maintenance services.
• Children may not use this device independently without the guidance of adults.
Operating and Storage Environments
• The device should be operated at an ambient temperature of 32~113℉ (0~45℃).
• The device should be stored in a dry, clean, oil-free and waterless place without any
chemical liquid.
EN
- 01 -

Product Introduction
3
4
5
6
2
1
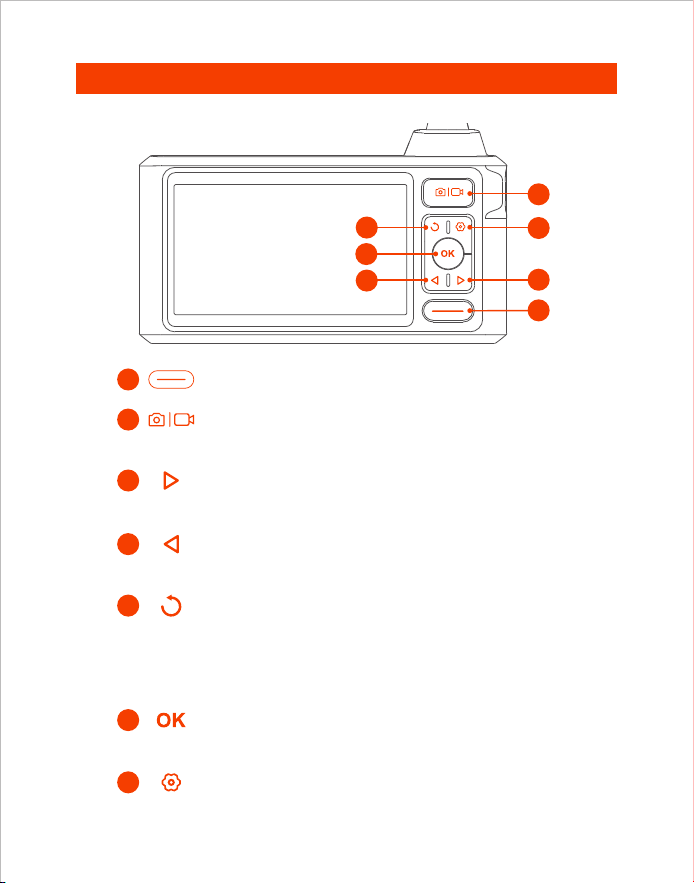
• Hold this button for 2s to power on/off the endoscope
• Single press to take a photo or end the video record
• Hold this button for 2s to start a video record
• Click to dim the LED lights of the camera
• Move the cursor up(In the menu)
• Click to rotate the real-time image 180°
• Hold this button for 2s to switch main/side camera
(Only available for dual and triple lens products)
• Click on the button to return to the previous
level(When in the menu)
• Click to increase the LED lights brightness of the camera
• Move the cursor down(When in the menu)
• Hold this button for 2s to enter/exit the album
• Click to confirm the selections (When in the menu)
7
• Click to enter the menu
1
3
7
2
5
4
6
Front
- 02 -

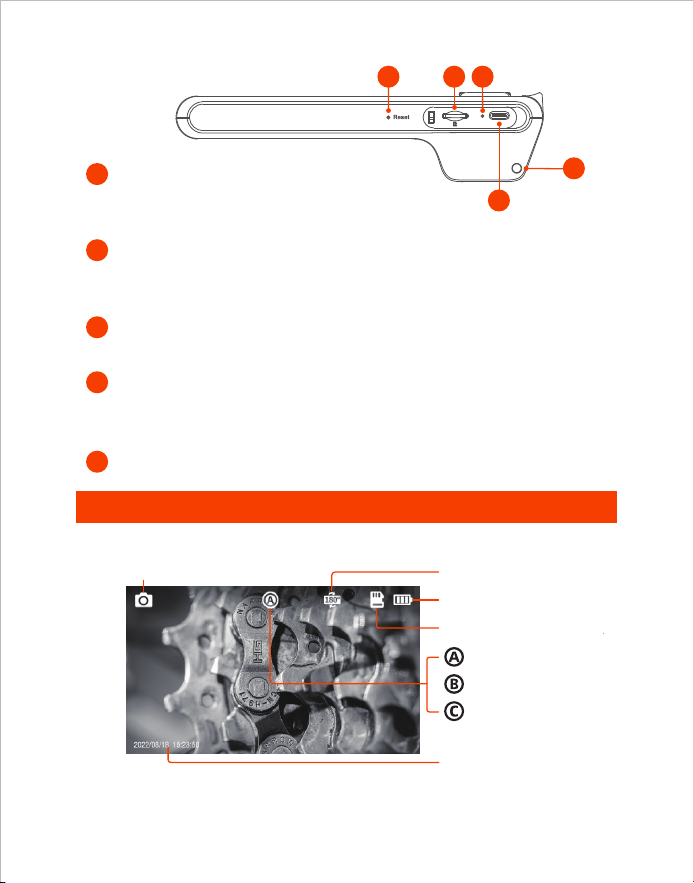
TF Card Slot
10
11
• Short click the reset button with the reset pin, the device will be
shut down and reseted.
Reset Button
12
• Red LED indicator flashes: Charging
• Red LED indicator stays on: Charging finished
Charging Status LED Indicator
13
Lanyard Hole
9
• Support up to 32G TF card
• Please format it on first use
UI Introduction
Photo Shoot/Video Record
TF Card Status
Screen Rotation 180°
9
12
13
11
10
Bottom
Battery Power
Main Lens
Side Lens(B)
Side Lens(C)
Timestamp
Preview
Tips:
Dual Lens: A:Main Lens B:Side Lens
Triple Lens: A:Main Lens B:Side Lens(B) C:Side Lens(C)
Type-C Charging Port
• For charging (Type-C cable connected to the adapter)
• For data transmission (Type-C cable connected to PC client)
- 03 -
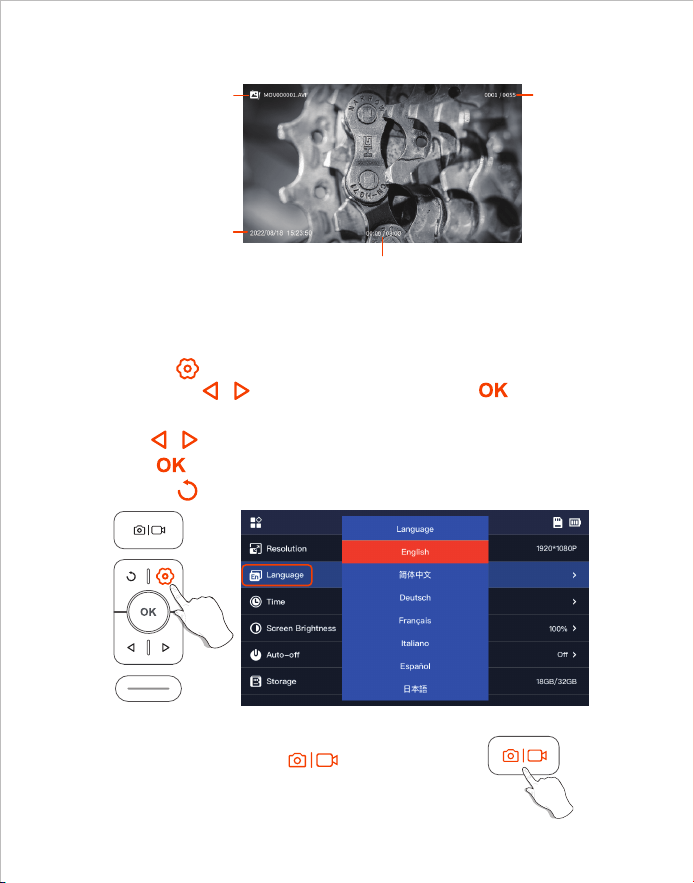
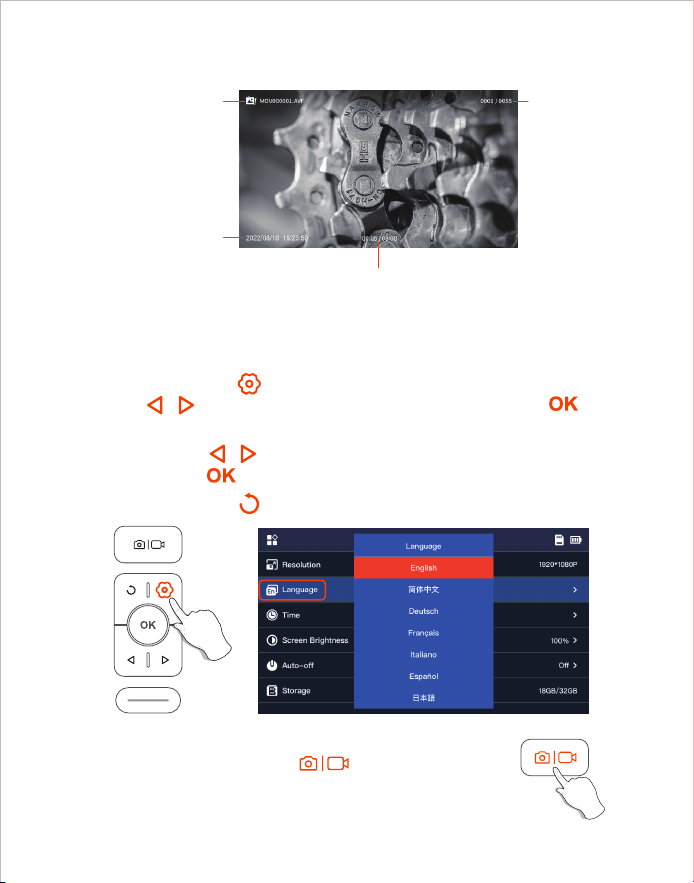
1. Click the button to enter menu interface, select Language by
pressing the / arrow button and then press the button,
enter the language setting interface.
2. Click / button to select the language you need, and then
press button to switch the language.
3. Click the button to return the Main Interface.
1. Take photos by pressing button.
2. Long press to start a video recording, single press
to the end video recording.
Default language of the device is English; If other language is required,
please follow the steps below:
Language Setting
Photo/Video
Album
File name
Photography date
File number
Current playback duration / Total video duration
- 04 -
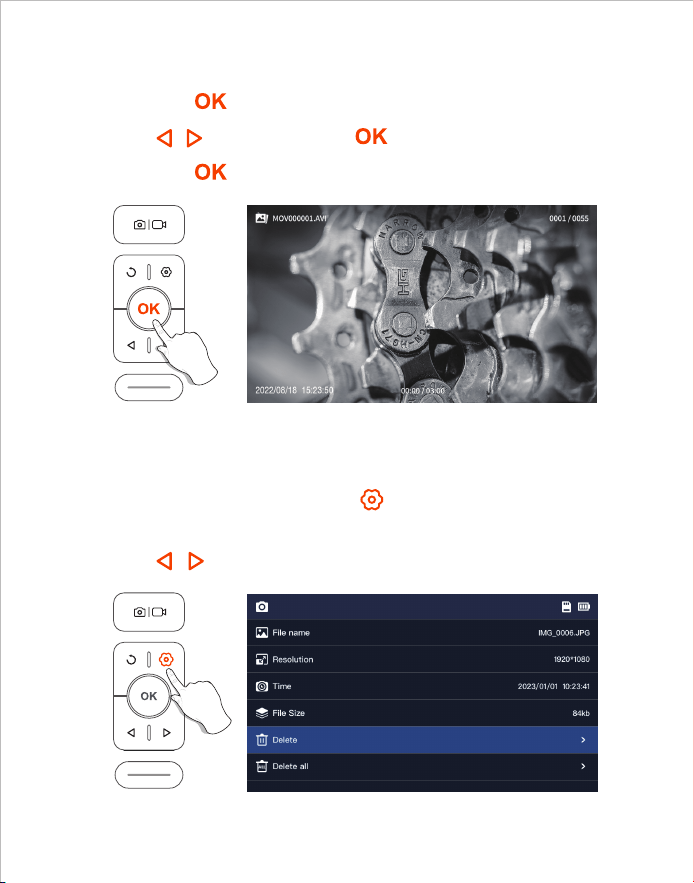
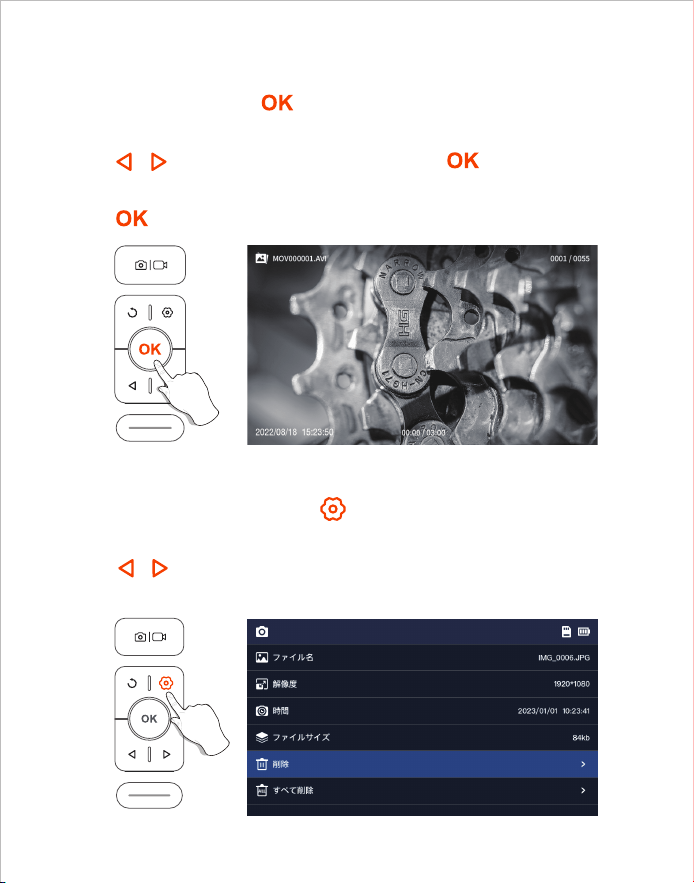
1. When viewing photos/videos, press to enter the photo/video
detail page.
2. Press / to choose to delete the current file or all files.
1. Long press in preview mode to enter the photo album.
2. Press / to view photos, Click to play videos.
3. Long press to exit the photo album.
View Photo/Video
Delete Photo/Video
- 05 -
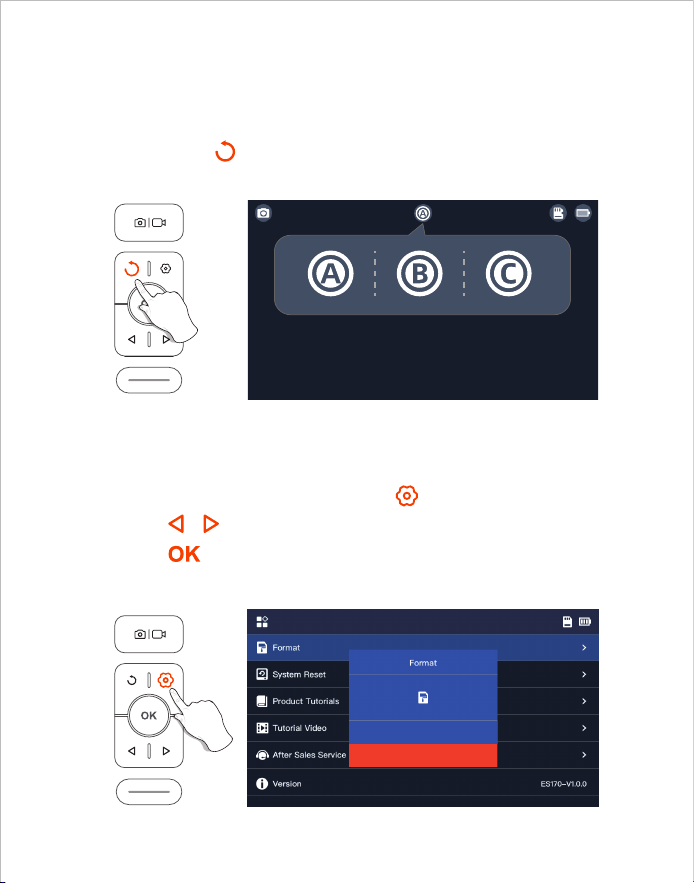
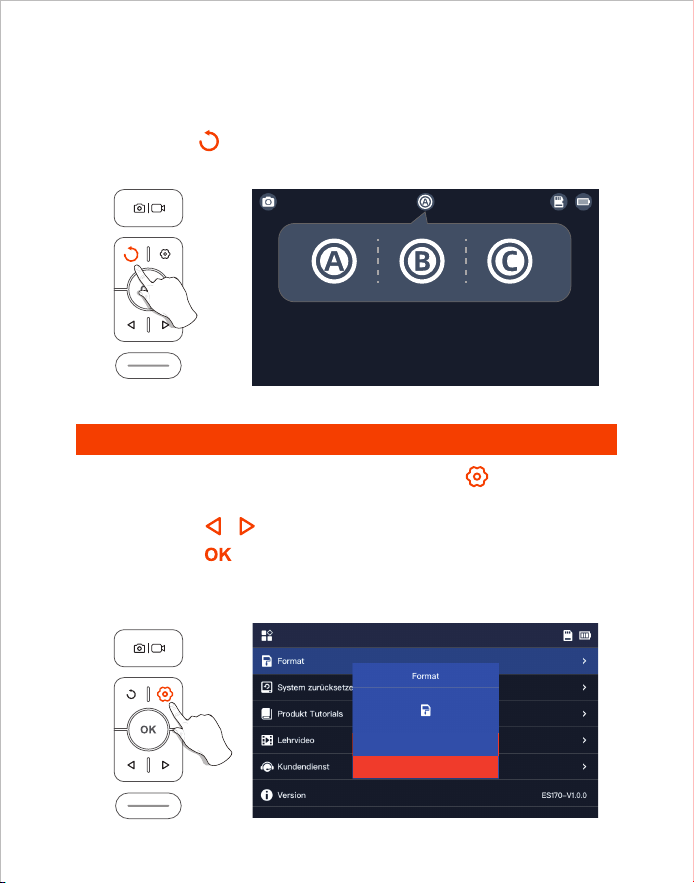
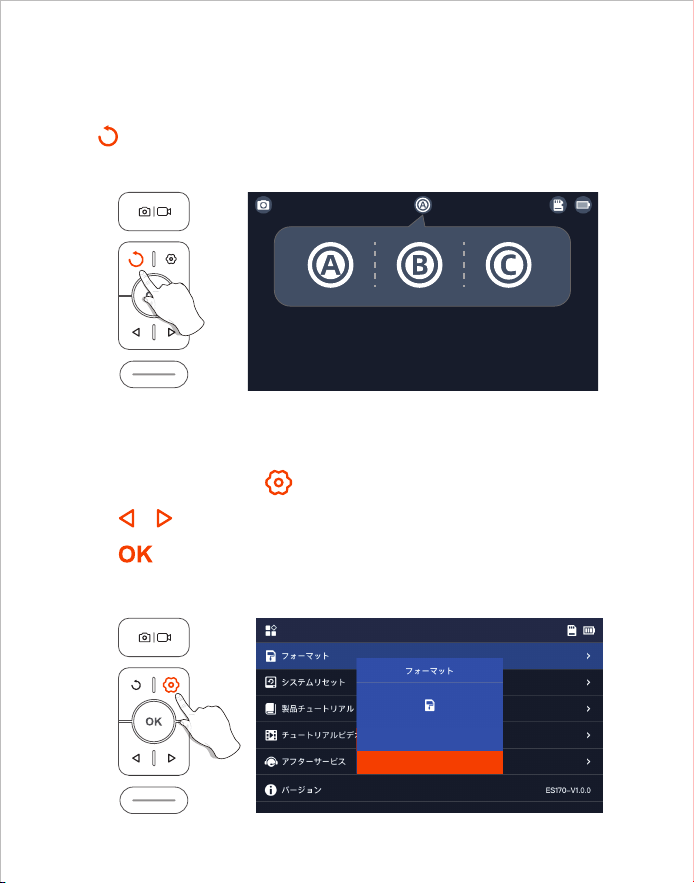
When the product is turned on, it opens the main lens by default,
long press the button 2s can switch the lens.
1. On the preview interface, press the button to enter the menu;
2. Press / to select “Format” options;
3. Press to enter the option interface, Select “OK”;
4. Wait for the formatting to complete.
Lens Switching
TF Card Formatting
(Only available for dual and triple lens products)
- 06 -
OK
Cancel
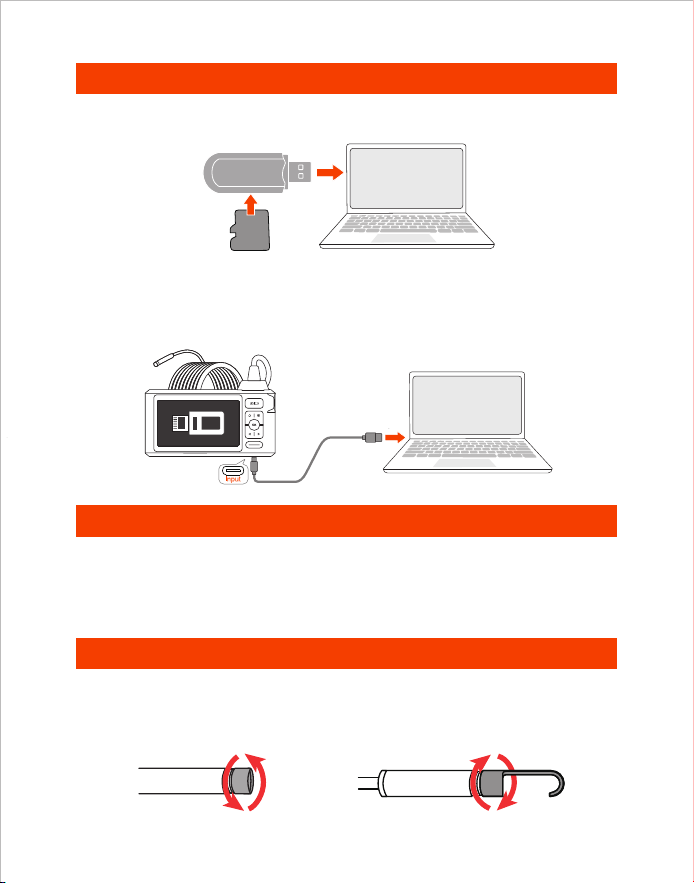
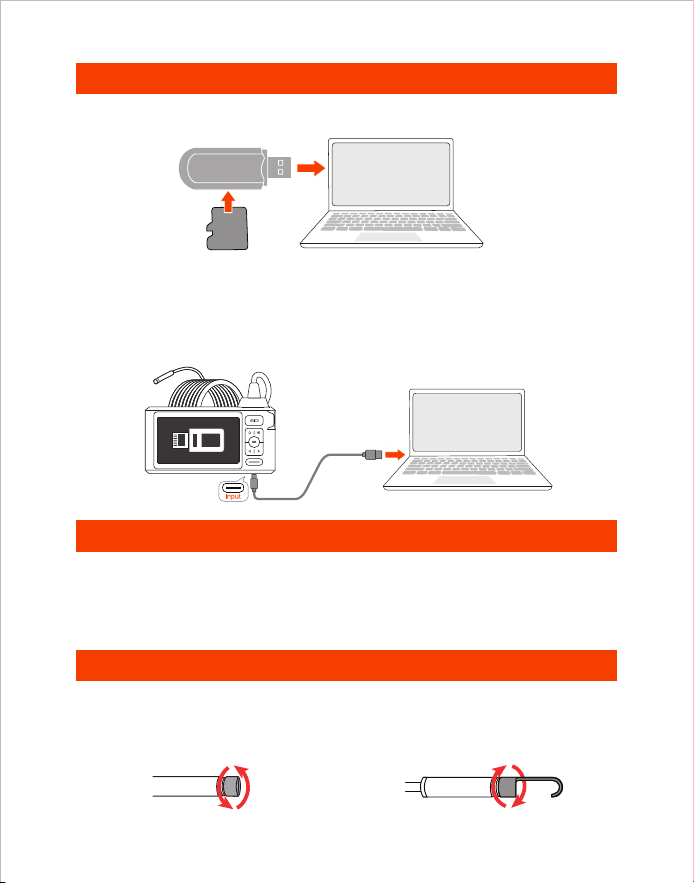
1. Please connect the product to your computer.
2. Select “Data transmission”.
Copy Photo And Video Files To Computer
Guide For Accessories Installation
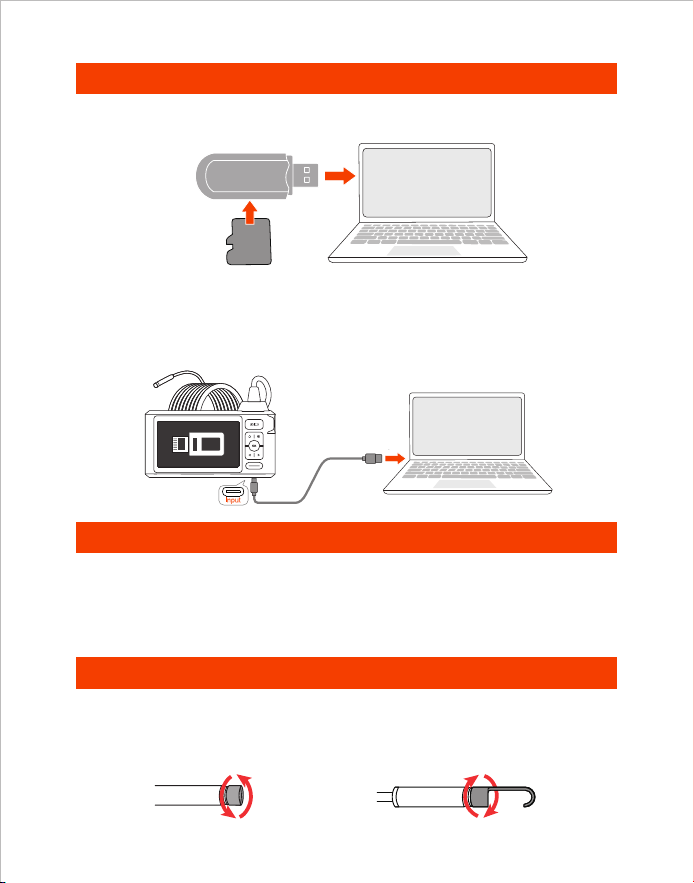
Installation method:
Turn counterclockwise-remove
protect cap
Turn clockwise-tighten
accessories
Charging Instructions
1. Use a TF card reader to copy data directly.
1. Connect the device to the DC 5V adapter for charging;
2. The red indicator light flashes when the device is charging,
and is always on when fully charged.
Card Reader
TF
Card
2. Use a Type-C cable to connect to computer for copying Setting path.
- 07 -
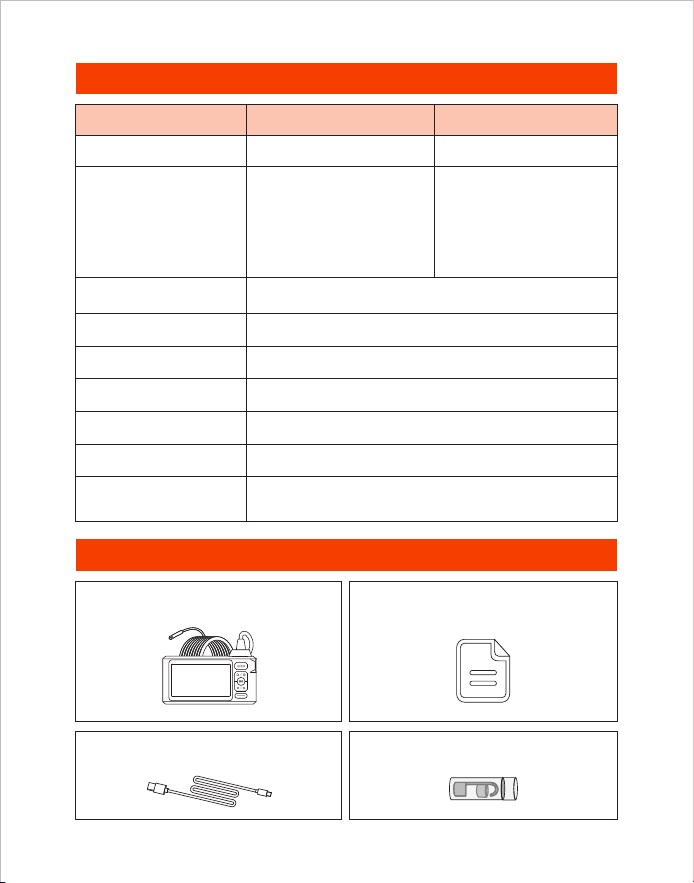
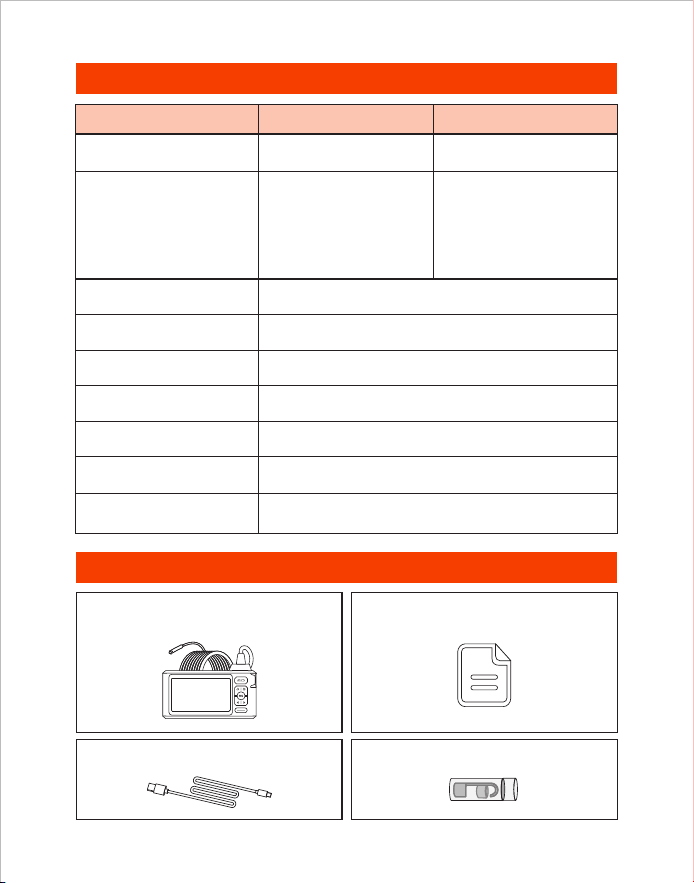
Screen Spec 5” IPS Screen
Specifications
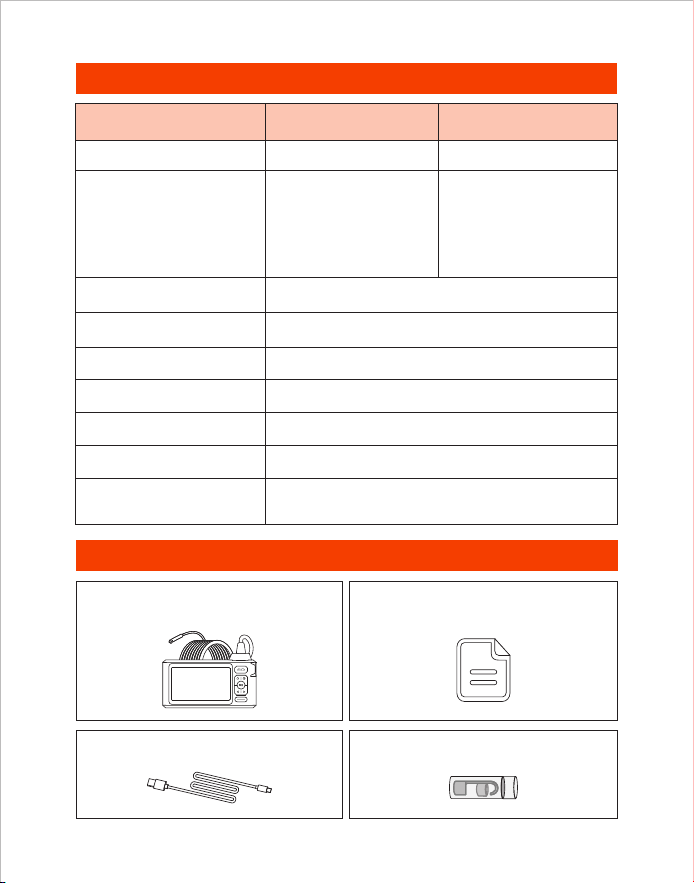
Packing List
Endoscope User Manual
Type-C Charging Cable
Accessories
Camera Diameter
Camera View
Video Spec
Charging Time
80°
720p
3-4 H
7.9 mm (0.31 in)
A: 3-10 cm
(1.18-3.93 in)
B: 2-6 cm
(0.79-2.36 in)
C: 2-4 cm
(0.79-1.57 in)
Best Focal Range
Photo Resolution 1920*1080
Battery Life 3-4 H
Charging Voltage
and current
DC 5V/2A
- 08 -
Model Triple Camera
7.9 mm (0.31 in)
A: 3-10 cm
(1.18-3.93 in)
B: 2-6 cm
(0.79-2.36 in)
Dual Camera

Produktbeschreibung
• DEPSTECH ist ein florierendes Technologieunternehmen, das sich auf die Entwicklung
einer Vielzahl von Endoskopen konzentriert, die Ihr Leben sicherer machen.
• DS620 ist ein leistungsstarkes industrielles Endoskop mit einem 5 Zoll IPS HD
Bildschirm. Die aufgenommenen Fotos und Videos können auf einer TF-Speicherkarte
gespeichert werden. Die Kamera verwendet einen Hochleistungs-CMOS-Chip, der die
höchste Aufnahmebildrate unterstützt, und verwendet die Bluart 3.0-Technologie, um
klare Bilder zu erhalten. Es ist weit verbreitet in Es ist weit verbreitet in der industriellen
Wartung, Gerätewartung, mechanischen Wartung und anderen Bereichen.
• Die TF-Karte ist nicht im Standardset enthalten und muss zusätzlich erworben werden.
• Dieses Produkt ist eine industrielle Endoskopkamera, die nicht für medizinische oder
menschliche Untersuchungen geeignet ist!
• Um die Batterielebensdauer zu verlängern, empfehlen wir Ihnen, Ihr Gerät alle 3 Monate
aufzuladen, unabhängig davon, ob es verwendet wird oder nicht!
• Versuchen Sie nicht, den eingebauten Akku selbst auszutauschen. Bei unsachgemäßer
Handhabung besteht die Gefahr von Personenschäden, wie z. B. Überhitzung des Akkus.
Besondere Warnungen und Vorsichtsmaßnahmen
Sicherheit und Schutz
• Die Kamerasonde ist ein hochpräzises elektronisches Gerät. Nicht auf die
Kamerasonde klopfen oder am Kabel ziehen. Diese Aktion kann zu Fehlfunktionen des
Geräts führen!
• Die Sonde nimmt eine wasserdichte IP67-Schicht an, bitte seien Sie vorsichtig, wenn
Sie sie verwenden, um Kratzer zu vermeiden!
• Das Material der Kamerasonde ist nicht beständig gegen hohe Temperaturen. Stellen
Sie daher bei der Überprüfung von Verbrennungsmotoren oder Geräten mit hoher
Innentemperatur sicher, dass die Innentemperatur abgekühlt ist, da das Gerät sonst
direkt beschädigt wird!
• Wenn das Gerät beschädigt ist, bitte zerlegen Sie es nicht selbst. Um professionellere
Dienstleistungen zu erhalten, wenden Sie sich für Wartungsdienste an den Verkäufer
oder Lieferanten.
• Kinder dürfen dieses Gerät nicht alleine verwenden und sollte unter Anleitung von
Erwachsenen verwendet werden.
Nutzungsumgebung und Speicherumgebung
• Bei Verwendung des Geräts sollte die Umgebungstemperatur 0 bis 45°C (32 bis 113°F)
betragen.
• Bei der Lagerung des Geräts sollte die Umgebung an einem trockenen, sauberen, öl-,
wasser- und chemikalienfreien Ort sein.
DE
- 09 -

1
3
7
2
5
4
6
Produkteinführung
• Halten Sie die Taste 2 Sekunden lang gedrückt, um das Endoskop
einzuschalten/auszuschalten.
• Einmal drücken, um ein Foto aufzunehmen oder Videoaufnahme zu beenden.
• Halten Sie diese Taste 2 Sekunden lang gedrückt, um die Videoaufnahme zu
starten.
• Klicken Sie auf die Taste, um die LED-Lichter der Kamera zu dimmen.
• Bewegen Sie den Cursor nach oben (im Menü)
• Klicken Sie, um das Echtzeitbild um 180° zu drehen.
• Halten Sie diese Taste 2 Sekunden lang gedrückt, um die Haupt/
Seitenkamera umzuschalten. (Diese Funktion ist nur für Produkte mit zwei
und drei Linsen verfügbar)
• Klicken Sie auf die Schaltfläche, um zur vorherigen Ebene zurückzukehren
(im Menü)
• Klichen Sie auf die Taste, um die LED-Lichter der Kamera aufzuhellen
• Bewegen Sie den Cursor nach unten (im Menü)
• Klicken Sie auf die Taste, um die Auswahl im Menü zu bestätigen.
• Halten Sie die Taste 2 Sekunden lang gedrückt, um das Album zu
öffnen/schließen.
• Klicken Sie auf die Taste, um ins Menü zu gelangen.
3
4
5
6
2
1
7
Vorderseite
- 10 -
9
12
13
11
10
LED-Anzeige für Ladestatus
TF-Karte Steckplatz
10
11
12
Handschlaufe Loch
13
• Klicken Sie kurz auf die Reset-Taste mit dem Reset-Pin, um das Gerät herunterzufahren
Reset-Taste
9
• Unterstützt bis zu 32G TF-Karte
• Bitte beim ersten Mal formatieren
Einführung in die UI
• Rote LED-Anzeige blinkt: Ladestatus
• Rote LED-Anzeige bleibt an: Ladevorgang beendet
Unterseite
Vorschau
Haupt-Kamera
Status der TF-Karte
Seiten-Kamera(B)
Seiten-Kamera(C)
Bild um 180° gedreht
Tipps:
Doppelte Linse: A:Haupt-Kamera B:Seiten-Kamera
Drei Linse: A:Haupt-Kamera B:Seiten-Kamera(B) C:Seiten-Kamera(C)
Foto-/Videoaufnahme
Batteriestandsanzeige
Zeitstempel
Ladeanschluss Type-C
• Aufladen (Schließen Sie das Gerät mit dem Type-C Kabel an das Netzteil an)
• Datenübertragung (Schließen Sie das Gerät mit dem Type-C Kabel an den PC an)
- 11 -
1. Klicken Sie auf die , um die Menüoberfläche aufzurufen, drücken Sie die /
Taste, um Language auszuwählen, und drücken Sie dann die Taste, um die
Sprachauswahl zu öffnen.
2. Klicken Sie auf die Taste / , um die Sprache auszuwählen, die Sie umschalten
möchten, und drücken Sie dann die Taste , um die Sprache erfolgreich
umzuschalten.
3. Klicken Sie auf die Taste , um zum Hauptschnittstelle zurückzukehren.
1. Drücken Sie einmal, um ein Foto aufzunehmen.
2. Halten Sie zwei Sekunden lang gedrückt, um ein Video
aufzunehmen. Drücken Sie einmal, um die Videoaufnahme
zu beenden.
Die Standardsprache des Geräts ist Englisch. Um andere Sprachen einzustellen, führen
Sie bitte die folgenden Schritte aus, um sie einzustellen:
Spracheinstellung
Durchsuchen von Alben
Foto-/Videoaufnahme
Dateiname
Aufnahmezeit
Dateinummer
Aktuelle Wiedergabezeit / Gesamte Videodauer
- 12 -
1. Wenn Sie Fotos/Videos ansehen, drücken Sie auf , um die Seite mit
den Foto-/Videodetails aufzurufen.
2. Drücken Sie die / Taste, um zu wählen, ob Sie die aktuelle Datei
oder alle Dateien löschen möchten.
1. Halten Sie im Vorschaumodus die Taste lang gedrückt, um das
Album aufzurufen.
2. Drücken Sie / , um das Foto/Video anzusehen, Drücken Sie
nochmal , um Videos abzuspielen.
3. Halten Sie die Taste gedrückt, um das Album zu verlassen.
Fotos/Videos ansehen
Fotos/Videos löschen
- 13 -
Beim Einschalten des Geräts ist das Hauptobjektiv standardmäßig geöffnet,
Halten Sie die Taste 2S lang gedrückt, um die Kamera zu wechseln .
1. Auf der Vorschauoberfläche drücken Sie die Taste , um das Menü
aufzurufen.
2. Drücken Sie / , um die Option "Format" auszuwählen.
3. Drücken Sie , um die Optionsschnittstelle zu öffnen, wählen Sie
"Bestätigen Sie".
4. Warten Sie auf die erfolgreiche Formatierung.
Kamera zu wechseln
Formatierung der TF-Karte
(Diese Funktion ist nur für Produkte mit zwei und drei Linsen verfügbar)
- 14 -
Stornierung
Bestätigen Sie
1. Schließen Sie das Gerät an Ihren Computer an.
2. Wählen Sie "Datenübertragung" aus.
Datenübertragung
Ladeanleitung
1. Verwenden Sie einen TF-Kartenleser, um Daten direkt zu kopieren.
1. Schließen Sie das Gerät zum Aufladen an einen DC 5V-Adapter an.
2. Die rote Anzeige blinkt, wenn das Gerät aufgeladen wird, und bleibt immer an,
wenn es vollständig aufgeladen ist.
Montage des Zubehörs
Installationsmethode:
Gegen den Uhrzeigersinn
herausdrehen
Zum Anziehen im
Uhrzeigersinn drehen
Card Reader
TF
Card
2. Verwenden Sie ein Type-C-Kabel zum Anschluss an einen Computer
zum Kopieren.
- 15 -
Spezifikationen
Packliste
Endoskop Benutzerhandbuch
Ladekabel Typ-C
Zubehör
80°
720p
3-4 H
Triple Kamera
7.9 mm (0.31 in)
A: 3-10 cm
(1.18-3.93 in)
B: 2-6 cm
(0.79-2.36 in)
C: 2-4 cm
(0.79-1.57 in)
Dual-Kamera
7.9 mm (0.31 in)
A: 3-10 cm
(1.18-3.93 in)
B: 2-6 cm
(0.79-2.36 in)
1920*1080
3-4 H
DC 5V/2A
Display Spezifikation 5” IPS Bildschirm
Typ
Kamera-Diameter
Kamerawinkel
Video Spezifikation
Ladezeit
Optimaler
Brennweitenbereich
Fotoauflösung
Akkulaufzeit
Ladespannung
und Stromstärke
- 16 -

Descrizione del Prodotto
• DEPSTECH è una fiorente azienda tecnologica nella creazione di una vasta gamma di
endoscopi, dedicati a rendere la tua vita più sicura.
• DS620 è un endoscopio industriale ad elevate prestazioni con un display IPS HD da 5".
Che supporta le funzioni di foto e video e sono salvati nella scheda di memoria TF. La
telecamera utilizza un chip CMOS ad elevata prestazioni che supporta la frequenza dei
fotogrammi di registrazione più elevato, utilizza la tecnologia Bluart 3.0 per ottenere
immagini nitide ed è ampiamente utilizzato nella manutenzione industriale, nella
manutenzione degli elettrodomestici, nella progettazione della manutenzione meccanica
e in altri settori.
• La scheda TF non è inclusa nella configurazione standard e deve essere acquistata
separatamente.
• Questo prodotto è una telecamera di endoscopio industriale, non si applica ai medici o
esami umani!
• Per una maggiore durata della batteria, usata o meno, ti consigliamo di caricare il tuo
dispositivo ogni 3 mesi!
• Non tentare di sostituire la batteria integrata da soli, perché se fare un funzionamento
non professionale, può causare il rischio di lesioni personali come il surriscaldamento
della batteria.
Avvertenze Speciali e Note
Sicurezza e Protezione
• La sonda della telecamera è l'attrezzatura elettronico di elevata precisione, si prega di
non colpire la sonda della telecamera o tirare i cavi, perché si potrebbe causare il guasto
del dispositivo!
• La sonda utilizza lo strato impermeabile IP67, si prega di prestare particolare attenzione
durante l'uso per evitare di graffiarsi!
• Il materiale della sonda della telecamera non può resistere alle alte temperature, quindi
quando controllare qualsiasi motori a combustione interna o un'attrezzatura con una
temperatura interna elevata, assicurarsi che la sua temperatura interna si sia
raffreddata, altrimenti potrebbe danneggiare direttamente l'attrezzatura!
• Per fornire servizi più professionali, se l'attrezzatura è danneggiata, si prega di non
smontarla, è necessario contattare il venditore o il fornitore per i servizi di manutenzione.
• Non rendere i bambini usare questa attrezzatura da soli, deve usarla sotto la guida di un
adulto.
Ambiente di Utilizzo e Conservazione
• Quando si utilizza l'attrezzatura, la temperatura ambiente deve essere di 0~45°C
(32~113°F)
• Quando conservare l'attrezzatura, deve metterla in un luogo asciutto, pulito, privo di oli,
acqua e sostanze chimiche.
IT
- 17 -

1
3
7
2
5
4
6
Introduzione alla Prodotto
• Fai clic per attenuare le luci LED della telecamera.
• Spostare il cursore verso l‘alto.
• Fai clic per ruotare l‘immagine in tempo reale di 180°.
• Tieni premuto questo pulsante per cambiare telecamera principale/
laterale(Disponibile solo per le versioni con doppia e tripla fotocamera).
• Fare clic sul pulsante per tornare al livello precedente.(All'interno del
menu)
• Fai clic per aumentare la luminosità delle luci LED della telecamera.
• Spostare il cursore verso il basso.
• Tieni premuto questo pulsante per accedere/hiudere l‘album.
• Fai clic per confermare le scelte nel menù.
• Fai clic per accedere al menù per ulteriori impostazioni.
• Premi una volta il pulsante per scattare una foto o
terminare la registrazione vide.
• Tenere premuto questo pulsante per 2 secondi per iniziare o
terminare la registrazione video.
• Si prega di tenere premuto questo pulsante per 2 secondi per
accendere/spegnere l‘endoscopio.
3
4
5
6
2
1
7
Anteriore
- 18 -

Indicatore LED dello stato di carica
Fessura per schede TF
10
11
12
Foro per il cordino
13
• Fai clic brevemente sul pulsante di ripristino con il perno di ripristino per
spegnere il dispositivo.
Pulsante di ripristino
9
Introduzione all'interfaccia utente
• Indicatore LED rosso lampeggiante: Stato di carica
• L'indicatore LED rosso rimane acceso: Ricarica terminata
• Supporta fino a 32G TF card
• La scheda TF è stata inserita nella macchina,
si prega di formattarla per il primo utilizzo
Fotocamera principale
Fotocamera laterale(B)
Fotocamera laterale(C)
Suggerimenti:
Doppia lente: A:Fotocamera principale B:Fotocamera laterale
Tripla lente: A:Fotocamera principale B:Fotocamera laterale(B) C:Fotocamera laterale(C)
Schermata di anteprima
Registrazione foto/video
Rotazione dell'immagine
di 180° gradi
Stato della scheda TF
Visualizzazione del livello
della batteria
Timestamp
Lato inferiore
Porta di ricarica di Type-C
• Ricarica (collega all'alimentazione con cavo dati Type-C)
• Trasferire dati (collega al PC con cavo dati Type-C)
9
12
13
11
10
- 19 -
1. Fare clic sul tasto per accedere all'interfaccia del menù, premere i
tasti / per selezionare Language, quindi premere il tasto per
entrare nell'interfaccia di selezione della lingua.
2. Clicca il tasto / per selezionare la lingua che vuoi cambiare, poi
premi il tasto per cambiare la lingua con successo.
3. Fare clic sul tasto per tornare all'interfaccia principale.
La lingua predefinita del dispositivo è l'inglese, se è necessario impostare
altre lingue, si prega di impostare seguire i passi seguenti:
Impostazione della lingua
Scattare foto/video
1. Premi una volta il pulsante per scattare una foto.
2. Premi a lungo per avviare la registrazione video, premi
una volta per terminare la registrazione video.
Interfaccia dell'album
Nome del file
Tempo di ripresa
Numero di
serie del
documento
Tempo di esecuzione del video corrente/Lunghezza totale del video
- 20 -

1. Quando si visualizzano foto/video, premere per entrare nella
pagina dei dettagli della foto/video.
2. Premete il tasto / per scegliere di cancellare il file corrente o
tutti i file.
1. In modalità anteprima, tenere premuto il pulsante per entrare
nell'album.
2. Premere / per visualizzare la foto/video, premere per riprodurre
solo il video.
3. Premere e tenere premuto il pulsante per uscire dall'album.
Vedi foto/video
Cancellare foto/video
- 21 -
Quando il prodotto è acceso, la lente principale è aperta per default,
premere a lungo il tasto 2S per commutare la lente.
1. Sull'interfaccia di anteprima, premere il tasto per entrare nel menu.
2. Premere / per selezionare le opzioni "Formato".
3. Premere per entrare nell'interfaccia delle opzioni, selezionare
"Confermare".
4. Attendere che la formattazione abbia successo.
Commutazione a lente singola e doppia
Formatta la scheda TF
(Disponibile solo per le versioni con doppia e tripla fotocamera)
- 22 -
Confermare
Cancellare
Trasferimento di dati
Guida alla Ricarica
1. Utilizzare un lettore di schede TF per copiare direttamente i dati.
1. Collegare il dispositivo all'adattatore DC 5V per la ricarica;
2. La spia rossa lampeggia quando il dispositivo è in carica ed è sempre
accesa quando è completamente carico.
Installazione degli accessori
Modalità di installazione:
Rimuovere il coperchio di
protezione in senso antiorario
Girare in senso orario
per stringere
Card Reader
TF
Card
1. Si prega di collegare il prodotto al computer.
2. Selezionare "Trasmissione dati" .
2. Utilizzare un cavo Type-C per connettersi al computer per copiare.
- 23 -
Specificazione
Lista di imballaggio
Endoscopio Manuali d'uso
Cavo di ricarica Type-C
Accessori
80°
720p
3-4 H
7.9 mm (0.31 in)
A: 3-10 cm
(1.18-3.93 in)
B: 2-6 cm
(0.79-2.36 in)
C: 2-4 cm
(0.79-1.57 in)
1920*1080
3-4 H
DC 5V/2A
Schermo IPS da 5
Tre
Fotocamere
7.9 mm (0.31 in)
A: 3-10 cm
(1.18-3.93 in)
B: 2-6 cm
(0.79-2.36 in)
Due
Fotocamere
Specifiche dello schermo
Diametro della fotocamera
Risoluzione della foto
Specifiche video
Migliore gamma focale
Tempo di ricarica
Durata della batteria
Tensione e
corrente di carica
Angolo della telecamera
Modello
- 24 -

Vue d’ensemble du produit
• DEPSTECH est une entreprise technologique florissante, axée sur la création d’une
variété d’endoscopes et dédiée à rendre votre vie plus sûre.
• Le DS620 est un endoscope industriel de haute performance, avec un écran IPS HD de
5 pouces. Il prend en charge la prise de photos, l’enregistrement de vidéos et leur
enregistrement sur une carte mémoire TF. La caméra utilise un capteur CMOS de haute
performance qui prend en charge la fréquence d’images d’enregistrement la plus
élevée, utilise la technologie Bluart 3.0 pour obtenir des images claires et est largement
utilisée dans la réparation industrielle, la réparation d’appareils ménagers, la conception
de réparations mécaniques et d’autres domaines.
• La carte TF n'est pas incluse dans la configuration standard et doit être achetée
séparément.
• Ce produit est une caméra endoscopique industrielle et n’est pas destiné à un examen
médical ou humain!
• Pour une durée de vie de la batterie plus longue, qu’elle soit utilisée ou non, nous vous
recommandons de charger votre appareil tous les 3 mois!
• N’essayez pas de remplacer la batterie intégrée vous-même, car un fonctionnement non
professionnel peut présenter un risque de blessure corporelle telle qu’une surchauffe de
la batterie.
Mises en garde et précautions spéciales
Sécurité et protection
• Les sondes de caméra sont des appareils électroniques de haute précision, ne frappez
pas la sonde de la caméra et ne tirez pas le câble, cette opération peut entraîner la
défaillance de l’appareil!
• La sonde est faite d’une couche imperméable IP67, veuillez prendre des précautions
supplémentaires pendant l’utilisation pour éviter les rayures!
• Le matériau de la sonde de la caméra n’est pas résistant aux températures élevées,
donc lors de l’inspection d’un moteur à combustion interne ou d’un équipement à
température interne élevée, assurez-vous que sa température interne a refroidi, sinon
elle endommagera directement l’équipement!
• Si l’équipement est endommagé, afin de fournir des services plus professionnels,
veuillez ne pas le démonter vous-même et contacter le vendeur ou le fournisseur pour
un service de réparation
• Les enfants ne doivent pas utiliser cet appareil seul, il doit être utilisé sous la direction
d’un adulte.
Environnements d’utilisation et de stockage
• Lors de l’utilisation de l’appareil, la température ambiante doit être de 32 à 113 °F
(0 à 45 °C)
• Lors de l’entreposage de l’équipement, l’environnement doit être un endroit sec,
propre, sans huile, sans eau et sans produits chimiques.
FR
- 25 -

1
3
7
2
5
4
6
Présentation du produit
• Tenez le bouton en 2 secondes à allumer/éteindre l'endoscope.
• Appuyez une fois pour prendre une photo ou terminer
l'enregistrement vidéo.
• Maintenez ce bouton pendant 2s pour commencer
l'enregistrement vidéo.
• Cliquez pour atténuer les lumières de LED de la caméra.
• Déplacez le curseur vers le haut.
• Cliquez pour faire tourner l'image en temps réel de 180°
• Tenez le bouton pour changer la caméra principale/latérale.
(Disponible uniquement pour les produits à double et triple caméra)
• Cliquez sur le bouton pour revenir au niveau précédent. (dans le
menu)
• Cliquez pour éclairer les lumières de LED de la caméra.
• Déplacez le curseur vers le bas.
• Tenez le bouton pour entrer/fermer l'album.
• Cliquez pour confirmer les choix au menu.
• Cliquez pour entrer au menu pour plus de réglages.
3
4
5
6
2
1
7
Vue frontale
- 26 -

Indicateur LED pour l'état de charge
Fente pour carte de TF
10
11
12
Trou pour la lanière
13
• Appuyez brièvement sur le bouton de réinitialisation avec la broche
de réinitialisation pour éteindre l'appareil.
Bouton de réinitialisation
9
• Prend en charge jusqu'à la carte de TF de 32G.
• Veuillez la formater lorsque vous l'utilisez pour la première fois.
Introduction à l'interface utilisateur
• Le voyant LED rouge clignote: état de charge.
• Le voyant LED rouge reste allumé: Chargement terminé.
Écran de prévisualisation
Affichage du niveau de
la batterie
Caméra principale
Statut de la carte TF
Caméra latérale(B)
Caméra latérale(C)
Rotation de l'image à 180°
Conseils:
Double caméra: A:Caméra principale B:Caméra latérale
Trois caméras: A:Caméra principale B:Caméra latérale(B) C:Caméra latérale(C)
Séance de Photos / Vidéo
Horodatage
Côté inférieur
Port de charge de Type-C
• Charge (le câble de Type-C est connecté à l’alimentation)
• Transfert de données (le câble de Type-C est connecté au PC)
9
12
13
11
10
- 27 -
1. Cliquez sur la touche pour accéder à l’interface du menu, Appuyez sur la
touche / pour sélectionner Language, puis appuyez sur la touche
pour accéder à l'interface de sélection de la langue.
2. Cliquez sur la touche / pour sélectionner la langue que vous voulez
changer, puis appuyez sur la touche pour changer la langue avec succès.
3. Cliquez sur la touche pour revenir à l’interface principale.
1. Pressez le bouton de pour une fois, vous
pouvez prendre une photo.
2. Appuyez et maintenez enfoncé pour commencer
l'enregistrement. Appuyez une fois pour terminer
l'enregistrement.
La langue par défaut de l’appareil est l’anglais, pour configurer une autre langue,
suivez les étapes ci-dessous pour le configurer:
Réglage de langues
Photo/Vidéo
Interface de l'album
Nom du fichier
Temps de
prise de vue
Numéro de série
du document
Durée actuelle de la vidéo / Durée totale de la vidéo
- 28 -

1. Lorsque vous regardez des photos/vidéos, appuyez sur la touche pour
accéder à la page des détails de la photo/vidéo.
2. Appuyez sur la touche / pour choisir de supprimer le fichier actuel
ou tous les fichiers.
1. En mode aperçu, appuyez et maintenez le bouton pour entrer dans
l'album.
2. Appuyez sur / pour visualiser la photo/vidéo, appuyez sur pour
lire la vidéo seule.
3. Appuyez et maintenez le bouton pour quitter l'album.
Voir les photos/vidéos
Supprimer des photos/vidéos
- 29 -
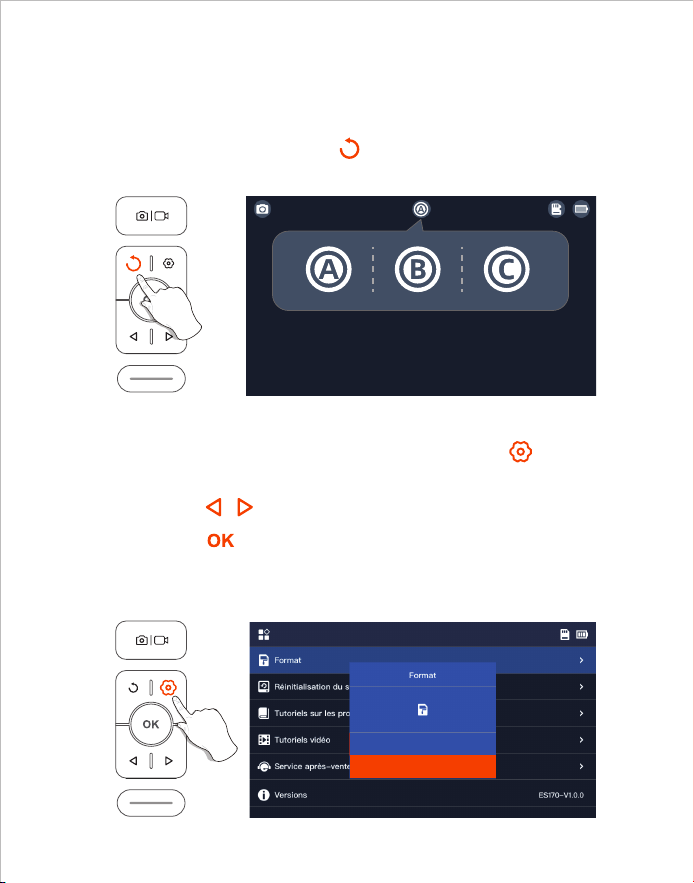
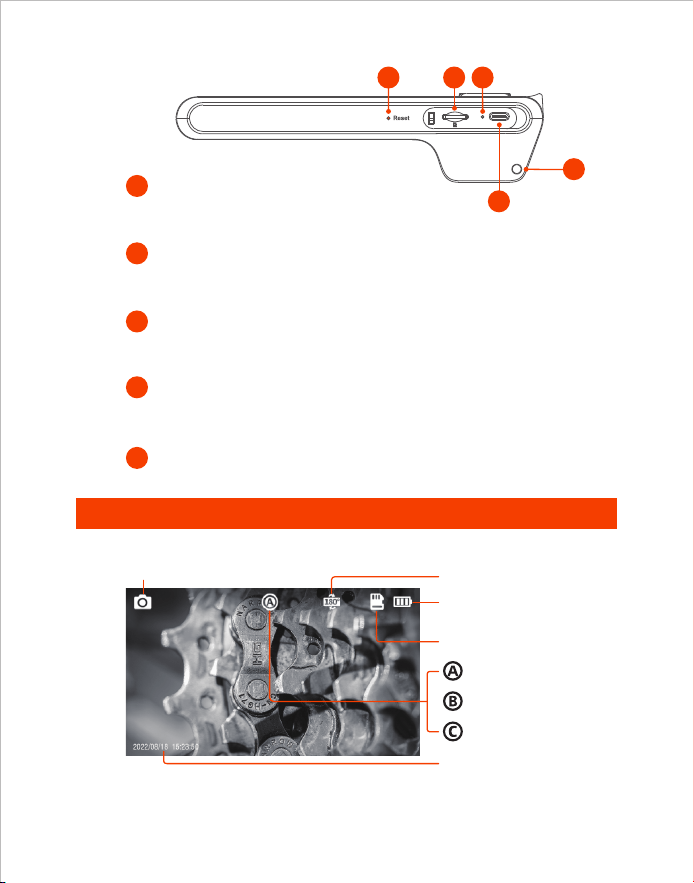
Lorsque le produit est allumé, l'objectif principal est ouvert par défaut,
appuyez longuement sur la touche 2S pour changer l'objectif.
1. Sur l'interface de prévisualisation, appuyez sur la touche pour
accéder au menu;
2. Appuyez sur / pour sélectionner les options "Format";
3. Appuyez sur pour accéder à l'interface des options, Sélectionnez
"Confirmer";
4. Attendez que le formatage soit réussi.
Changement d'objectif
Formatage de carte de TF
(Disponible uniquement pour les produits à double et triple caméra)
- 30 -
Confirmer
Annuler
Transfert de données
Instructions de chargement
1. Utiliser un lecteur de carte TF pour copier directement les données.
1. Connectez l’appareil à un adaptateur DC 5V pour le chargement.
2. Le témoin lumineux rouge clignote lorsque l'appareil est en charge et reste
allumé lorsqu'il est complètement chargé.
Installation des accessoires
Mode d’installation:
Retirer dans le sens inverse
des aiguilles d'une montre
Serrer dans le sens des
aiguilles d'une montre
Card Reader
TF
Card
1. Veuillez connecter le produit à votre ordinateur.
2. Sélectionnez "Transmission de données".
2. Utiliser un câble Type-C pour se connecter à un ordinateur pour la copie.
- 31 -
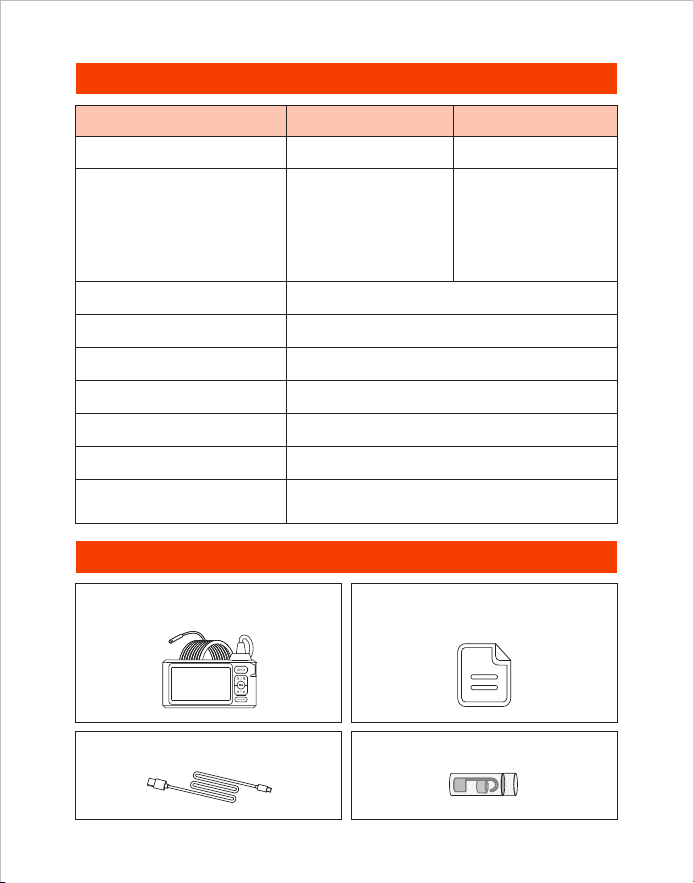
Diamètre de Caméra
Angle de vue de l’objectif
Spécifications vidéo
Temps de charge
Spécification
Meilleur champ focal
Résolution des photos
Autonomie de la batterie
Voltage et courant
de charge
Liste d'emballage
Endoscope Manuels d'utilisation
Câble de chargement Type-C Accessoires
80°
720p
3-4 H
7.9 mm (0.31 in)
A: 3-10 cm
(1.18-3.93 in)
B: 2-6 cm
(0.79-2.36 in)
C: 2-4 cm
(0.79-1.57 in)
1920*1080
3-4 H
DC 5V/2A
Écran IPS de 5 pouces
Trois Caméras
7.9 mm (0.31 in)
A: 3-10 cm
(1.18-3.93 in)
B: 2-6 cm
(0.79-2.36 in)
Double Caméras
Spécification de l'écran
Modèle
- 32 -

Descripción del producto
• DEPSTECH es una empresa de tecnología de desarrollo en auge, que se enfoca en
crear una variedad de endoscopios para hacer su vida más cómoda.
• DS620 es un endoscopio industrial de alto rendimiento con una pantalla de alta
definición de 5 pulgadas IPS. Admite funciones de foto y video, y se guarda en la tarjeta
de memoria TF. La cámara utiliza un chip CMOS de alto rendimiento que admite la
velocidad de fotogramas de grabación más alta, adopta la tecnología Bluart 3.0 para
obtener imágenes claras y se usa ampliamente en mantenimiento industrial,
mantenimiento de electrodomésticos, diseño y mantenimiento mecánico y otros campos.
• La tarjeta TF no está incluida en la configuración estándar y debe adquirirse por
separado.
• ¡Este producto es una cámara endoscópica industrial, no es adecuada para exámenes
médicos o humanos!
• Para una mayor duración de la batería, ya sea que se use o no, ¡le recomendamos
que cargue su dispositivo cada 3 meses!
• No intente reemplazar la batería incorporada usted mismo. La operación no profesional
puede causar riesgos como el sobrecalentamiento de la batería, lo que producirá el
riesgo de lesiones personales.
Advertencia especial y precaución
Seguridad
• La sonda de la cámara es un dispositivo electrónico de alta precisión. No golpee la
sonda de la cámara ni tire del cable. ¡Esta operación puede hacer que el dispositivo
falle!
• La sonda adopta una capa impermeable IP67, tenga mucho cuidado durante el uso
para evitar que se raye.
• El material de la sonda de la cámara no es resistente a altas temperaturas, por lo tanto,
cuando revise cualquier motor de combustión interna o equipo con una temperatura
interna alta, asegúrese de que su temperatura interna se haya enfriado, de lo contrario,
dañará directamente el equipo.
• Si el equipo está dañado, para brindar servicios más profesionales, no lo desmonte
usted mismo, debe comunicarse con el vendedor o proveedor para obtener servicios
de mantenimiento.
• Los niños no deben usar este dispositivo solos, debe usarse bajo la supervisión de
adultos.
Entornos para uso y almacenamiento
• Al usar el dispositivo, la temperatura ambiente debe ser de 32~113°F (0~45°C)
• Al almacenar el dispositivo, el entorno debe ser un lugar seco, limpio, libre de aceite,
agua y productos químicos.
ES
- 33 -

1
3
7
2
5
4
6
Frente
• Mantenga presionado este botón durante 2 segundos para
encender/apagar el endoscopio.
• Presione una vez para tomar una foto o finalizar la grabación
de video
• Mantenga presionado este botón para iniciar la grabación de
video
• Haga clic para atenuar las luces LED de la cámara
• Mover el cursor hacia arriba
• Haga clic para girar la imagen en tiempo real 180°
• Mantenga presionado este botón para cambiar la cámara principal/
lateral (Sólo para productos de doble y triple espejo)
• Pulse el botón para volver al nivel anterior (en el menú)
• Haga clic para iluminar las luces LED de la cámara
• Mueva el cursor hacia abajo
• Haga clic para confirmar las opciones en el menú
• Mantenga presionado este botón para ingresar
• Haga clic para ingresar al menú para más configuraciones
Breve descripción del producto
3
4
5
6
2
1
7
- 34 -
Zona inferior
Indicador LED de estado de carga
Ranura para tarjeta TF
10
11
12
Orificio para cordón
13
• Haga clic corto en el botón de reinicio con el pin de reinicio para apagar
el dispositivo.
Bouton de réinitialisation
9
• Admite tarjetas TF de hasta 32G.
• La tarjeta TF se ha insertado en la máquina, formatéela por primera vez.
Puerto de carga Type-C
Introducción a la interfaz de usuario
• El indicador LED rojo parpadea: Estado de carga
• El indicador LED rojo permanece encendido: Carga terminada
Fotos / Vídeos
Cámara principal
Estado de la tarjeta TF
Cámara lateral(B)
Cámara lateral(C)
Rotación de la imagen 180°
Consejos:
Doble Lente: A:Cámara principal B:Cámara lateral
Tres lentes: A:Cámara principal B:Cámara lateral(B) C:Cámara lateral(C)
Indicación del nivel de
la batería
Marca de tiempo
Pantalla de vista previa
• Carga (conecta el cable Type-C a la fuente de alimentación).
• Transferencia de datos (cable de datos Type-C conectado a la PC).
9
12
13
11
10
- 35 -

1. Pulse la tecla para acceder a la interfaz del menú, pulse la tecla /
para seleccionar Language y, a continuación, pulse la tecla para
acceder a la interfaz de selección de idioma.
2. Pulse la tecla / para seleccionar el idioma que desea cambiar y, a
continuación, pulse la tecla para cambiar el idioma con éxito.
3. Pulse la tecla para volver a la interfaz principal.
1. Presione una vez el botón de para tomar fotos.
2. Presione prolongadamente para iniciar la grabación de video,
presione una vez para finalizar la grabación de video.
El idioma predeterminado del dispositivo es el inglés, si necesita configurar otros
idiomas, siga los pasos a continuación para configurar.
Configuración de idioma
Hacer fotos/vídeos
Pantalla de visualización del álbum
Número de serie
del documento
Nombre del
archivo
Tiempo de
rodaje
Tiempo de ejecución del vídeo actual/Duración total del vídeo
- 36 -
1. En el modo de vista previa, mantenga pulsado el botón para entrar
en el álbum.
2. Pulsa / para ver la foto/vídeo, pulsa para reproducir el vídeo
solo.
3. Mantenga pulsado el botón para salir del álbum.
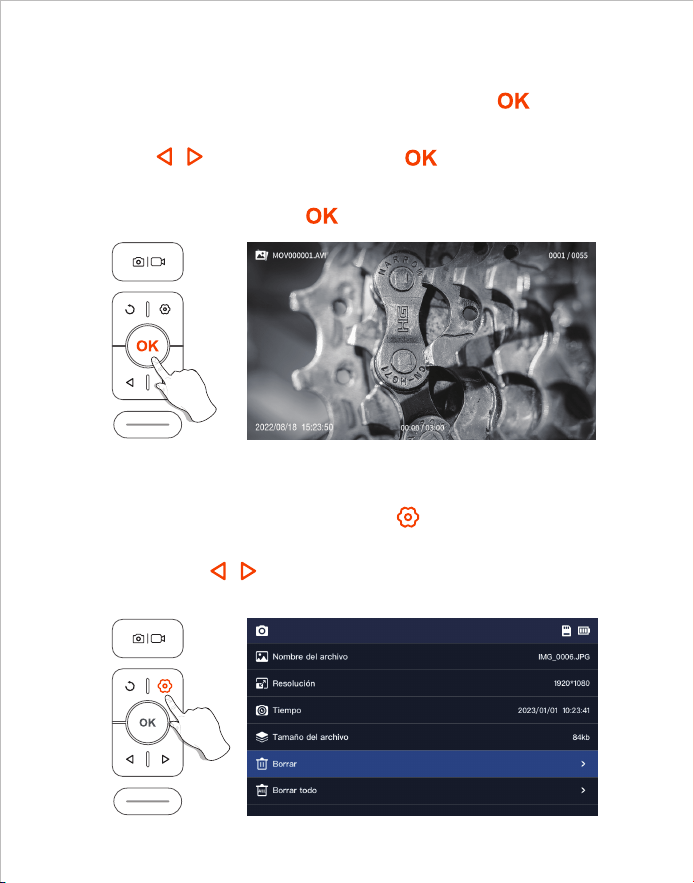
1. Cuando estés viendo fotos/vídeos, pulsa para entrar en la página
de detalles de la foto/vídeo.
2. Pulse la tecla / para elegir si desea eliminar el archivo actual o
todos los archivos.
Ver fotos/vídeos
Borrar fotos/vídeos
- 37 -
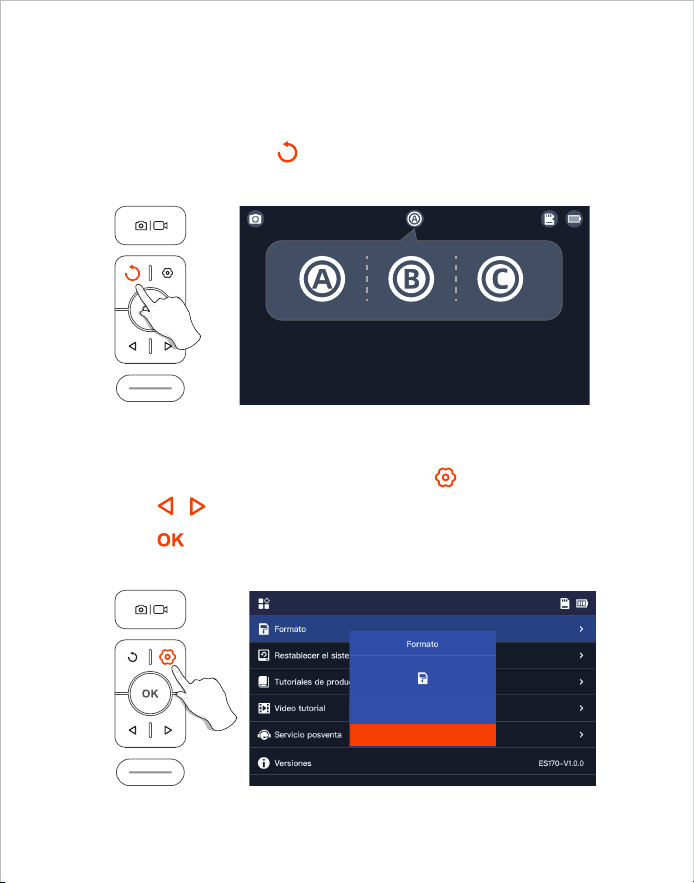
1. En la interfaz de vista previa, presione la tecla para entrar en el menú;
2. Pulse / para seleccionar las opciones de "Formato";
3. Pulse para entrar en la interfaz de opciones, Seleccione "Confirmar";
4. Espere a que se formatee con éxito.
Al encender el producto, la lente principal está abierta por defecto, pulse
prolongadamente la tecla 2S para cambiar la lente.
Cambio de cámara principal a subcámara
Formato de la tarjeta TF
(Sólo para productos de doble y triple espejo)
- 38 -
Confirmar
Cancelar
Transferencia de datos
Guía de carga
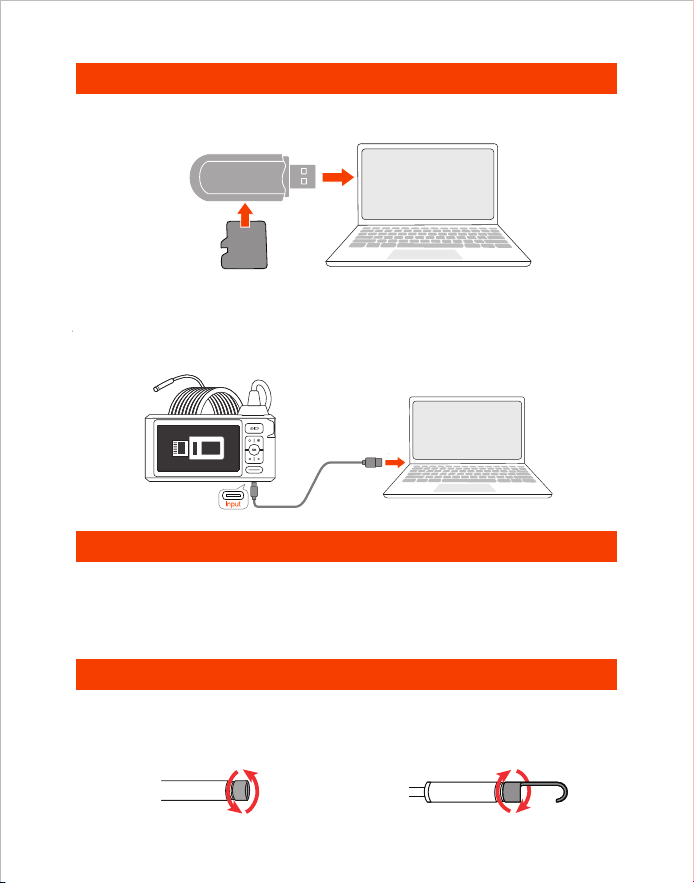
1. Utiliza un lector de tarjetas TF para copiar los datos directamente.
Card Reader
TF
Card
1. Conecte el dispositivo a un adaptador DC 5V para cargar.
2. El indicador luminoso rojo parpadea cuando el dispositivo se está cargando,
y siempre está encendido cuando está completamente cargado.
Montaje de accesorios
Método de instalación:
Desmontaje en sentido
contrario a las agujas del reloj
Apretar en el sentido de
las agujas del reloj
1. Conecte el producto a su ordenador.
2. Seleccione "Transmisión de datos".
2. Utiliza un cable Type-C para conectarte al ordenador para copiar.
- 39 -
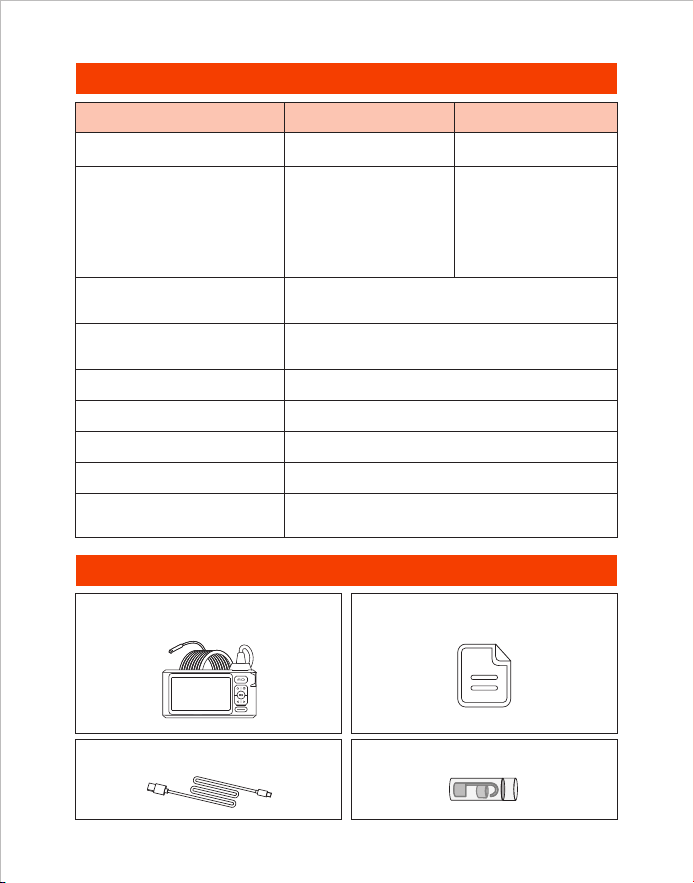
Especificaciones
Lista de embalaje
Endoscopio Manuales de usuario
Cable de carga tipo C Accesorios
Pantalla IPS de 5 pulgadas
80°
720p
3-4 H
7.9 mm (0.31 in)
A: 3-10 cm
(1.18-3.93 in)
B: 2-6 cm
(0.79-2.36 in)
C: 2-4 cm
(0.79-1.57 in)
1920*1080
3-4 H
DC 5V/2A
Diámetro de la cámara
Ángulo de visión
de la lente
Especificación de video
Tiempo de carga
Mejor rango focal
Resolución de fotos
Duración de la batería
Voltaje de carga
y corriente
Tres Lente
7.9 mm (0.31 in)
A: 3-10 cm
(1.18-3.93 in)
B: 2-6 cm
(0.79-2.36 in)
Doble Lente
Especificaciones
de pantalla
Modelo
- 40 -

製品概要
• DEPSTECHは、さまざまなファイバースコープの製造に専念し、生々発展しているテクノロ
ジー企業であり、より安心な生活の実現をサポートすることに取り組んでいます。
• DS620は、5インチIPS HDディスプレイを備えた高性能工業用内視鏡となり、写真とビデオ撮
影機能を搭載し、TFメモリーカード(SDカード)に保存できます。この製品は、最高フレーム
レートに対応できる高性能CMOSチップを採用し、さらに、Bluart 3.0テクノロジーにより、鮮
明な画像を取得することができます。産業機械メンテナンス、家電メンテナンス、機械設計な
どの分野で幅広く使用されています。
• スタンダードセットにはTFメモリーカードが含まれていないため、別途でご購入ください。
警告と注意事項
• 本製品は工業用を想定し設計されたファイバースコープとなり、医療分野では使えないため、
人体や生物等への使用はしないでください。
・ バッテリー寿命を延ばし、充電を長持ちさせるために、使用の有無にかかわらず3ヶ月に1度
充電することをお勧めします。
・ 正しくない操作によりバッテリーが過熱して怪我をする恐れがあるため、内蔵バッテリーを自
分 で 交 換 し な い で く だ さ い 。
安全と保護
• カメラのプローブは高精度の電子機器です。カメラのプローブを叩いたり、ケーブルを引っ
張ったりしないでください。デバイスの故障の原因になります!
• プローブには、IP67防水処理を施しています。傷がつかないように、使用中は特に注意してく
ださい。
• カメラのプローブの材質は高温に弱いため、内燃機関や内部温度の高い機器を点検すると
きは、内部温度が下がっていることを確認してください。製品が損傷する原因になります。
• 製品が破損している場合は、自分で分解しないでください。 より専門的な修理サービスを提
供するために、販売者またはサポートチーム([email protected])に連絡してくだ
さ い 。
・ お子様は両親や保護者の監視なしに本製品を使用してはいけません。大人の指導監督のも
とで使用する必要があります。
使用環境および保管環境
• 本製品は必ず32~113°F(0~45°C)の温度範囲内で使用してください。
・ オイル・水・化学薬品がない、清潔で乾燥した場所で保管してください。
JP
- 41 -
1
3
7
2
5
4
6
機能説明
• 2s 間長押しするとオンになります。
• 短く押すと、写真が撮れます / 動画撮影一時停止。
• 長押しで動画撮影開始。
• カメラの LED ライトを暗くします。
• カーソルが下の行へ移動します(メニュー画面)。
• 短く押すと映像が 180° 回転します。
• 2s 長押しすると、レンズが切り替わります(デュアルお
よびトリプルレンズ製品のみに適用されます)。
• ボタンをクリックして前のレベルに戻る ( メニュー内)。
• カメラの LED ライトを明るくします。
• カーソルが上の行へ移動します(メニュー画面)。
• 長押しするとアルバムが表示 / 終了します。
• 選択を確認します(メニュー画面)。
• メニューオプションに入ります。
3
4
5
6
2
1
7
本体正面
- 42 -
9
12
13
11
10
充電状態LEDインジケーター
TFメモリカードスロット
10
11
12
ストラップホルダー
13
• リセットピンでリセット穴を押し込むとシャットダウンします。
リセット穴
9
• 32G までの TF カードに対応。
• 初回使用の場合に初期化(フォーマット)が必要。
UI画面紹介
• LED が赤色に点滅:充電中
• LED が赤色に常時点灯:充電完了
写真/ビデオ
メインレンズ
TFカードのステータス
サイドレンズ(B)
画面180°回転
ヒント:
デュアルレンズ:A: メインレンズ B: サイドレンズ
トリプルレンズ:A: メインレンズ B: サイドレンズ (B) C: サイドレンズ (C)
サイドレンズ(C)
プレビュー画面
バッテリー残量表示
タイムスタンプ
本体底部
Type-C充電ポート
• 充電(Type-C USB ケーブルでアダプタに接続)
• データ転送(Type-C USB データケーブルで PC に接続)
- 43 -

1. ボタンを押してメニュー画面に入り、 / ボタンを押して
Language を選択し、 ボタンを押して言語選択画面に入ります。
2. / ボタンを押hして切り替えたい言語を選択し、そして、 ボタ
ンをもう一度押すと、言語の変更が完了します。
3. ボタンをもう一度押すとホーム画面に戻ります。
1. を押すことで写真を撮影できます。
2. 長押しすることで録画が開始、もう一度押す
と録画が終了します。
言語設定
写真/ビデオ
デバイスのデフォルト言語は英語です。言語を変更する場合は、
以下の手順に従って設定してください。
アルバム画面
ファイル番 号
現在の再生時間 / ビデオの合計時間
撮影時間
ファイル名
- 44 -
1. プレビュー画面で ボタンを長押しするとアルバム画面が
表示されます。
2. / を押すと写真 / ビデオが表示され、 を押すとビデオ
が再生します。
3. ボタンを押すと、アルバム画面が終了します。
1. 写真 / ビデオを見るとき、 ボタンを押して写真 / ビデオ詳細
ページに入ります。
2. / ボタンを押して現在のファイルまたはすべてのファイル
を削除することを選択します。
写真/ビデオの削除
写真/ビデオの閲覧
- 45 -
ボタンを2s長押しすると、レンズが切り替わります。
1. プレビュー画面で ボタンを押してメニューに入ります。
2. / ボタンを押してフォーマットを選択します。
3. ボタンを押して入り、「確定」をクリックします。
4. 初期化が完了するまでお待ちしてください。
レンズの切り替え
TFカード初期化
(デュアルおよびトリプルレンズ製品のみに適用されます)
- 46 -
確認
キャンセルについて
1. 本製品をパソコンに接続します。
2. 「データ転送」を選 択します。
データ転送
充 電ガイド
1. TFカードリーダーを使用してデータを直接コピーします。
1. 製品を DC5V アダプターに接続して充電してください。
2. 充電中は赤いインジケーターランプが点滅し、満充電になると
常時点灯します。
付属品の装着
装着方法:
保護カバーを反時計回
りに緩めます
アタッチメントを時計回
りに回して締めます
Card Reader
TF
Card
2. Type-Cケーブルでパソコンに接続してコピーします。
- 47 -
製品仕樣
パッケージ内容
内視鏡 ユーザーマニュアル
充電ケーブル Type-C 付属品
80°
720p
3-4 H
7.9 mm (0.31 in)
A: 3-10 cm
(1.18-3.93 in)
B: 2-6 cm
(0.79-2.36 in)
C: 2-4 cm
(0.79-1.57 in)
1920*1080
3-4 H
DC 5V/2A
カメラ直径
画角
ビデオの解像度
充電時間
焦点範囲
写真の解像度
連続駆動時間
充電電圧と電流
5インチIPS液晶ディスプレイモニター仕様
型番 トリプルレンズ
7.9 mm (0.31 in)
A: 3-10 cm
(1.18-3.93 in)
B: 2-6 cm
(0.79-2.36 in)
デュアルレンズ
- 48 -

※ FCC Requirement: Changes or modifications not expressly approved by the party
responsible for compliance could void the user’s authority to operate the equipment.
This device complies with Part 15 of the FCC Rules. Operation is subject to the
following two conditions:
(1) This device may not cause harmful interference, and
(2) This device must accept any interference received, including interference that may
cause undesired operation.
Note: This equipment has been tested and found to comply with the limits for a Class B
digital device, pursuant to Part 15 of the FCC Rules. These limits are designed to
provide reasonable protection against harmful interference in a residential installation.
This equipment generates, uses, and can radiate radio frequency energy, and if not
installed and used in accordance with the instructions, may cause harmful interference
to radio communications. However, there is no guarantee that interference will not
occur in a particular installation. If this equipment does cause harmful interference to
radio or television reception, which can be determined by turning the equipment off
and on, the user is encouraged to try to correct the interference by one or more of the
following measures:
※ CE compliance: This device complies with EN 62368 standard, which means this
device will not do harm to the user or products as following situations: 1)Electric shock
2)High temperature 3)Radiation 4)Explosion from inner 5)Mechanical Harm
6)Fire Hazard 7)Chemical burns.
※ EU Conformity Statement: This product and - if applicable - the supplied accessories
too are marked with "CE" and comply therefore with the applicable harmonized
European standards listed under the EMC Directive 2014/35/EU, the RoHS Directive
2011/65/EU and Amendment (EU) 2015/863.
※ WEEE Notice: 2012/19/EU (WEEE directive): Products marked with this symbol
cannot be disposed of as unsorted municipal waste in the European Union. For proper
recycling, return this product to your local supplier upon the purchase of equivalent
new equipment, or dispose of it at designated collection points. For more information
see: www.recyclethis.info
※ 2013/56/EU (battery directive): This product contains a battery that cannot be
disposed of as unsorted municipal waste in the European Union. See the product
documentation for specific battery information. The battery is marked with this symbol,
which may include lettering to indicate cadmium (Cd), lead (Pb), or mercury (Hg). For
proper recycling, return the battery to your supplier or to a designated collection point.
For more information see: www.recyclethis.info
– Reorient or relocate the receiving antenna.
– Increase the separation between the equipment and receiver.
– Connect the equipment into an outlet on a circuit different from that to which the
receiver is connected.
– Consult the dealer or an experienced radio/TV technician for help.

Room 1901, Jinqizhigu Building, Tangling Road, Nanshan District, Shenzhen, China
Shenzhen Potensic Intelligent Co., Ltd.
Made in China
Please contact us if you have any questions,
we love to hear from you
Customer Services
Facebook Official Page: @DEPSTECH. FANS
www.depstech.com
V04.24.07