Vacuum Packaging Machine
Cyclone, Pampero, Solar
User Manual
Art No. 0894516
Original Instructions for Use
©
Eurodib 2017-2022

• The machine is not suitable for the packaging of toxic, corrosive, irritant or potentially
explosive materials.
• All persons responsible for the operation of this machine must at least fully read and
understand the chapters about the operation and safety provided in these operating
instructions.
• All persons responsible for the assembly, installation, maintenance and/or repairs must
fully read and understand these operating instructions.
• The user is at all times responsible for the interpretation and use of this manual.
Contact the owner or the manager in case of questions or doubts about the correct
interpretation.
• This manual should be kept near the machine and should be within reach for its users.
• All major maintenance work, modifications to the machine and observations must be
kept in a logbook; see Logbook on page 89.
• Modifications to the installation/machine are not allowed without the prior written
consent of the supplier. Such modifications will invalidate the ETL Certification.
• For specific maintenance work not included in this manual, please contact the supplier.
• Comply with the safety requirements as set out in Safety on page 10 at all times.
• The correct operation and safety of the system can only be guaranteed if the
recommended maintenance is performed on time and properly.
• Illustrations shown may differ from your machine.
Copyright
©
Eurodib 2017-2022
Eurodib reserves the right to change specifications and/or spare parts without prior notice.
The content of this user manual may also be changed without prior notice.
For information about settings, maintenance and repairs not provided for in this user manual, please contact the technical department of your supplier.
Eurodib accepts no liability for damage and/or problems arising from the use of spare parts not supplied by Eurodib.
This user manual has been compiled with all possible care. Eurodib assumes no responsibility for any errors in this manual and/or the consequences of an
erroneous interpretation of the instructions.
All rights reserved. No part of this publication may be reproduced, stored in computerised databases, or made public, in any form or by any means, either
electronic, mechanical, through photocopying, recording or otherwise, without the prior written consent of Eurodib. This also applies to the associated
drawings and diagrams.

Contents
List of Figures................................................................................................................................. 6
1 Preamble....................................................................................................................................... 7
1.1 List of the Symbols Used in this Manual............................................................................... 7
1.2 Qualified personnel................................................................................................................ 7
1.3 Storing the manual.................................................................................................................8
1.4 Regulatory information........................................................................................................... 8
1.5 Terms of Warranty..................................................................................................................8
1.6 Liability....................................................................................................................................8
1.7 Terms and abbreviations........................................................................................................9
2 Safety...........................................................................................................................................10
2.1 Pictograms on the Machine................................................................................................. 10
2.2 General Warnings................................................................................................................ 11
2.3 Warnings During Use...........................................................................................................12
2.4 Warnings for Operating Personnel.......................................................................................12
2.5 Safety features..................................................................................................................... 12
2.5.1 Emergency Stop Buttons............................................................................................. 13
3 Introduction.................................................................................................................................14
4 Description of the Machine.......................................................................................................15
4.1 Cyclone series......................................................................................................................15
4.1.1 Overview of the Main Components..............................................................................16
4.2 Pampero series.................................................................................................................... 17
4.2.1 Overview of the Main Components..............................................................................18
4.3 Solar series.......................................................................................................................... 19
4.3.1 Overview of the Main Components..............................................................................20
4.4 Description of the Packaging Process/Machine Functions.................................................. 21
4.4.1 Packaging Process/Machine Functions........................................................................21
4.4.2 General Functions........................................................................................................ 25
4.5 Sealing System.................................................................................................................... 26
5 Installation...................................................................................................................................27
5.1 Transportation and Installation............................................................................................. 27
5.2 Connecting the Machine...................................................................................................... 27
5.3 Prior to the First Use........................................................................................................... 29
6 Operation.....................................................................................................................................30
6.1 10-Program Control System (10-PCS).................................................................................30
6.1.1 Operating Elements......................................................................................................30
6.1.2 Starting the Machine.................................................................................................... 31
6.1.3 Starting the Packaging Cycle.......................................................................................31
6.1.4 Proceeding to the Next Step in the Cycle....................................................................32
Contents 3

6.1.5 Terminating a Program.................................................................................................32
6.1.6 Changing the Program Settings...................................................................................32
6.1.6.1 Vacuum.................................................................................................................32
6.1.6.2 Vacuum (automatic)..............................................................................................33
6.1.6.3 Vacuum+ (optional)...............................................................................................33
6.1.6.4 Gas (optional)....................................................................................................... 33
6.1.6.5 Gas+ (optional).....................................................................................................34
6.1.6.6 Liquid Control (optional)....................................................................................... 34
6.1.6.7 Liquid Control+ (optional)..................................................................................... 35
6.1.6.8 Red Meat (optional)..............................................................................................35
6.1.6.9 Multi-Cycle Vacuum (optional)..............................................................................35
6.1.6.10 Seal.....................................................................................................................36
6.1.6.11 Soft-Air (optional for the Pampero).....................................................................36
6.1.6.12 External Vacuum (optional)................................................................................ 36
6.1.6.13 Sleeper Option....................................................................................................37
6.1.7 Example programmes.................................................................................................. 38
6.1.8 Guideline for Function Values...................................................................................... 39
6.2 Advanced Control System (ACS).........................................................................................41
6.2.1 Operating Elements......................................................................................................42
6.2.1.1 Changing the ACS Settings................................................................................. 43
6.2.1.2 Importing/Exporting Data......................................................................................46
6.2.1.3 Data Log ID.......................................................................................................... 46
6.2.2 Starting the Machine.................................................................................................... 48
6.2.3 Starting the Packaging Cycle.......................................................................................48
6.2.4 Proceeding to the Next Step in the Cycle....................................................................48
6.2.5 Changing the Program Settings...................................................................................49
6.2.5.1 Programming the ACS Control Using the PC...................................................... 50
6.2.5.2 Functions.............................................................................................................. 50
6.2.5.3 Vacuum................................................................................................................. 50
6.2.5.4 Vacuum (automatic)..............................................................................................51
6.2.5.5 Vacuum+ (optional)...............................................................................................51
6.2.5.6 Gas (optional)....................................................................................................... 51
6.2.5.7 Gas+ (optional).....................................................................................................52
6.2.5.8 Liquid Control (optional)....................................................................................... 52
6.2.5.9 Liquid Control+ (optional)..................................................................................... 53
6.2.5.10 Red Meat (optional)............................................................................................53
6.2.5.11 Sequential Vacuum (optional).............................................................................53
6.2.5.12 Marinating (optional)...........................................................................................54
6.2.5.13 Tenderising (optional)......................................................................................... 54
6.2.5.14 Jars (optional).....................................................................................................55
6.2.5.15 Seal.....................................................................................................................55
6.2.5.16 Soft-Air (optional for the Pampero).....................................................................56
6.2.5.17 External Vacuum (optional)................................................................................ 56
6.2.5.18 Sleeper Option....................................................................................................57
6.2.5.19 Dealer Information.............................................................................................. 57
6.2.6 Terminating a Program.................................................................................................57
6.2.7 Printer........................................................................................................................... 57
Contents 4

6.2.7.1 Connecting a Printer............................................................................................ 57
6.2.7.2 Creating a Label...................................................................................................58
6.2.7.3 Replacing a Printer Roll....................................................................................... 59
6.2.7.4 Aligning the Printer...............................................................................................60
6.2.8 Example programmes.................................................................................................. 61
6.2.9 Guideline for Function Values...................................................................................... 62
6.3 Automatic lid (optional).........................................................................................................64
6.3.1 Operating the automatic lid.......................................................................................... 65
6.3.2 Restarting the automatic lid after an emergency......................................................... 66
7 Maintenance................................................................................................................................67
7.1 Maintenance Schedule.........................................................................................................67
7.2 Cleaning the Machine.......................................................................................................... 68
7.3 Replacing the Sealing Wire................................................................................................. 68
7.4 Replacing the Silicone Rubber of the Silicone Holders....................................................... 70
7.5 Replacing the Lid Gasket.....................................................................................................71
7.6 Inspecting the Lid Springs................................................................................................... 73
7.7 Vacuum Pump maintenance................................................................................................ 73
7.7.1 Overview pump 75 - 360 m
3
/h (2,780 - 12,713 cf/h)................................................... 73
7.7.2 Removing Oil, Replacing Oil Filter, Refilling Oil...........................................................73
7.7.3 Replacing the Oil Exhaust Filter.................................................................................. 74
7.7.4 Running the Pump Cleaning Program......................................................................... 75
8 Troubleshooting and Error Codes........................................................................................... 76
9 Disposal.......................................................................................................................................79
10 Appendices............................................................................................................................... 80
10.1 Technical Data....................................................................................................................80
10.1.1 Cyclone series............................................................................................................80
10.1.2 Pampero series.......................................................................................................... 81
10.1.3 Solar series................................................................................................................ 83
10.2 Electrical Installation...........................................................................................................86
10.3 Vapour Pressure Curve of Water.......................................................................................88
10.4 Logbook..............................................................................................................................89
Contents 5

List of Figures
Figure 1: Emergency stop...............................................................................................................13
Figure 2: Overview of the Main Components................................................................................. 16
Figure 3: Overview of the Main Components................................................................................. 18
Figure 4: Overview of the Main Components................................................................................. 20
Figure 5: Overview of the Sealing System (Including Seal Bag).................................................... 26
Figure 6: Overview of the Sealing System (Including Sealing Cylinder).........................................26
Figure 7: Direction of Rotation of the Vacuum Pump..................................................................... 28
Figure 8: Hose connection for compressed air...............................................................................29
Figure 9: Control Panel of the 10-Program Control System........................................................... 30
Figure 10: External Vacuum Adapter Set (10-Program Control System)........................................37
Figure 11: Control Panel of the Advanced Control System (ACS)..................................................42
Figure 12: Possible Display Modes.................................................................................................43
Figure 13: Possible Display Modes.................................................................................................43
Figure 14: Overview of the Settings menu..................................................................................... 45
Figure 15: Example of an Exported Data Log................................................................................47
Figure 16: Screen shot of the navigation mode and the operating buttons of the ACS...................49
Figure 17: External Vacuum Adapter Set (ACS)............................................................................ 57
Figure 18: Replacing the Printer Roll............................................................................................. 59
Figure 19: Aligning the Printer........................................................................................................ 60
Figure 20: Printing the First Label.................................................................................................. 60
Figure 21: Foot switch.....................................................................................................................65
Figure 22: Reset button.................................................................................................................. 65
Figure 23: Automatic lid switch....................................................................................................... 66
Figure 24: Removing the Sealing Bar (Plastic Lid).........................................................................69
Figure 25: Removing the Sealing Bar (Metal Lid).......................................................................... 69
Figure 26: Replacing the Sealing Wire........................................................................................... 70
Figure 27: Replacing the Silicone Rubber of the Silicone Holders................................................. 71
Figure 28: Replacing the Lid Gasket.............................................................................................. 72
Figure 29: Overview of the Busch Pump........................................................................................73
Figure 30: Replacing the Oil Exhaust Filter....................................................................................74
Figure 31: Overview of the Electrical Installation, Cyclone.............................................................86
Figure 32: Overview of the Electrical Installation, Pampero, Solar................................................. 87
Figure 33: Vapour Pressure Curve of Water.................................................................................. 88
List of Figures 6
1 Preamble
This is the manual for your Eurodib Vacuum Packaging Machine series: Cyclone, Pampero and
Solar.
This manual is intended for anyone who works with or services the machine.
This manual contains information and instructions for installation, operation and maintenance
of the machine. We recommend that you carefully read this manual before use and follow the
procedures and instructions strictly. This will ensure that you get the best out of the machine and
prevents possible accidents and serious injury.
1.1 List of the Symbols Used in this Manual
For all operations in which the safety of the operator and/or technician is at stake and where
caution should be exercised, the following symbols are used.
Indicates a hazardous situation that, if not avoided, could result in serious injury or death
and possibly material damage if one does not follow the safety instructions.
Indicates a hazardous situation that, if not avoided, could result in minor or moderate
injury and possibly material damage if one does not follow the safety instructions.
Provides additional information that is helpful to do a task or to avoid problems.
This symbol warns for high voltage.
1.2 Qualified personnel
This document is intended for qualified personnel.
The term "qualified personnel" is defined here as individuals who thoroughly understand
the equipment and its safe installation, operation or maintenance. Qualified personnel are
physically capable of performing the required tasks, are familiar with all relevant and local
safety rules and regulations and have been trained to safely install, operate or maintain the
equipment. It is the responsibility of the company installing, operating or maintaining this
equipment to ensure that its personnel meet these requirements.
Preamble 7

1.3 Storing the manual
This manual is a part of your product. Store the manual in the immediate vicinity of the product.
Always present a copy of the manual to operators and engineers working on the Vacuum
Packaging Machine.
1.4 Regulatory information
The Eurodib Cyclone, Pampero and Solar Vacuum Packaging Machine is designed to comply with
the following directives:
• 2006/42/EC: Machinery Directive
• 2014/30/EG: EMC Directive
• 2014/35/EC: Low Voltage Directive
The CE Declaration is available upon request. Please contact the manufacturer.
1.5 Terms of Warranty
This warranty is limited to manufacturing and machining defects and therefore does not cover
breakdowns involving any part of the product that is exposed to any form of wear and tear. Normal
wear and tear that may be expected with the use of this product is therefore hereby excluded.
• The responsibility of Eurodib is limited to replacing defective parts; we shall not acknowledge
claims for any other kind of damage or costs.
• The warranty automatically expires in case of overdue or poor maintenance.
• If there are doubts about the maintenance activities or if the machine fails to work correctly,
always contact the supplier.
• The warranty does not apply if the defect is the result of incorrect or negligent use, or
maintenance that was conducted contrary to the instructions given in this manual.
• The warranty is void in the event of repairs or modifications to the product by third parties.
• Defects due to damage or accidents caused by external factors are excluded from the warranty.
• If we replace parts in compliance with the obligations of this warranty, then the replaced parts
become our property.
The provisions regarding the warranty and liability are part of the general terms and conditions of
sale, which can be sent to you upon request.
1.6 Liability
• We exclude all liability insofar as far as it is not required by law.
• Our liability shall never exceed the total amount of the machine value in question.
• With the exception of the applicable legal regulations of public order and good faith, we are not
liable to pay for any damage of any sort whatsoever to the opposite party or to third parties,
Preamble 8

directly or indirectly, including lost profits, damage to movable or immovable property or
personal injury.
• We are in no way liable for damages arising from or resulting from the use of the product used,
or the unsuitability thereof for the purpose for which the other party decided to purchase the
product.
1.7 Terms and abbreviations
10-PCS 10-Program Control System
ACS Advanced Control System
Machine Vacuum Packaging Machine
Pump Vacuum pump
Preamble 9
2 Safety
Your Vacuum Packaging Machine has been carefully designed and expertly built to be operated
safely. This is corroborated by the EC Declaration of Conformity. However, there are always
dangers and safety risks that cannot be eliminated. These dangers and risks are the result of the
use functions of the machine and operation of the machine by the user. This section discusses
safety instructions and precautions, how they will be pointed out to you and the requirements
the user must meet. It is essential that you are well aware of these safety instructions and
requirements and observe them at all times!
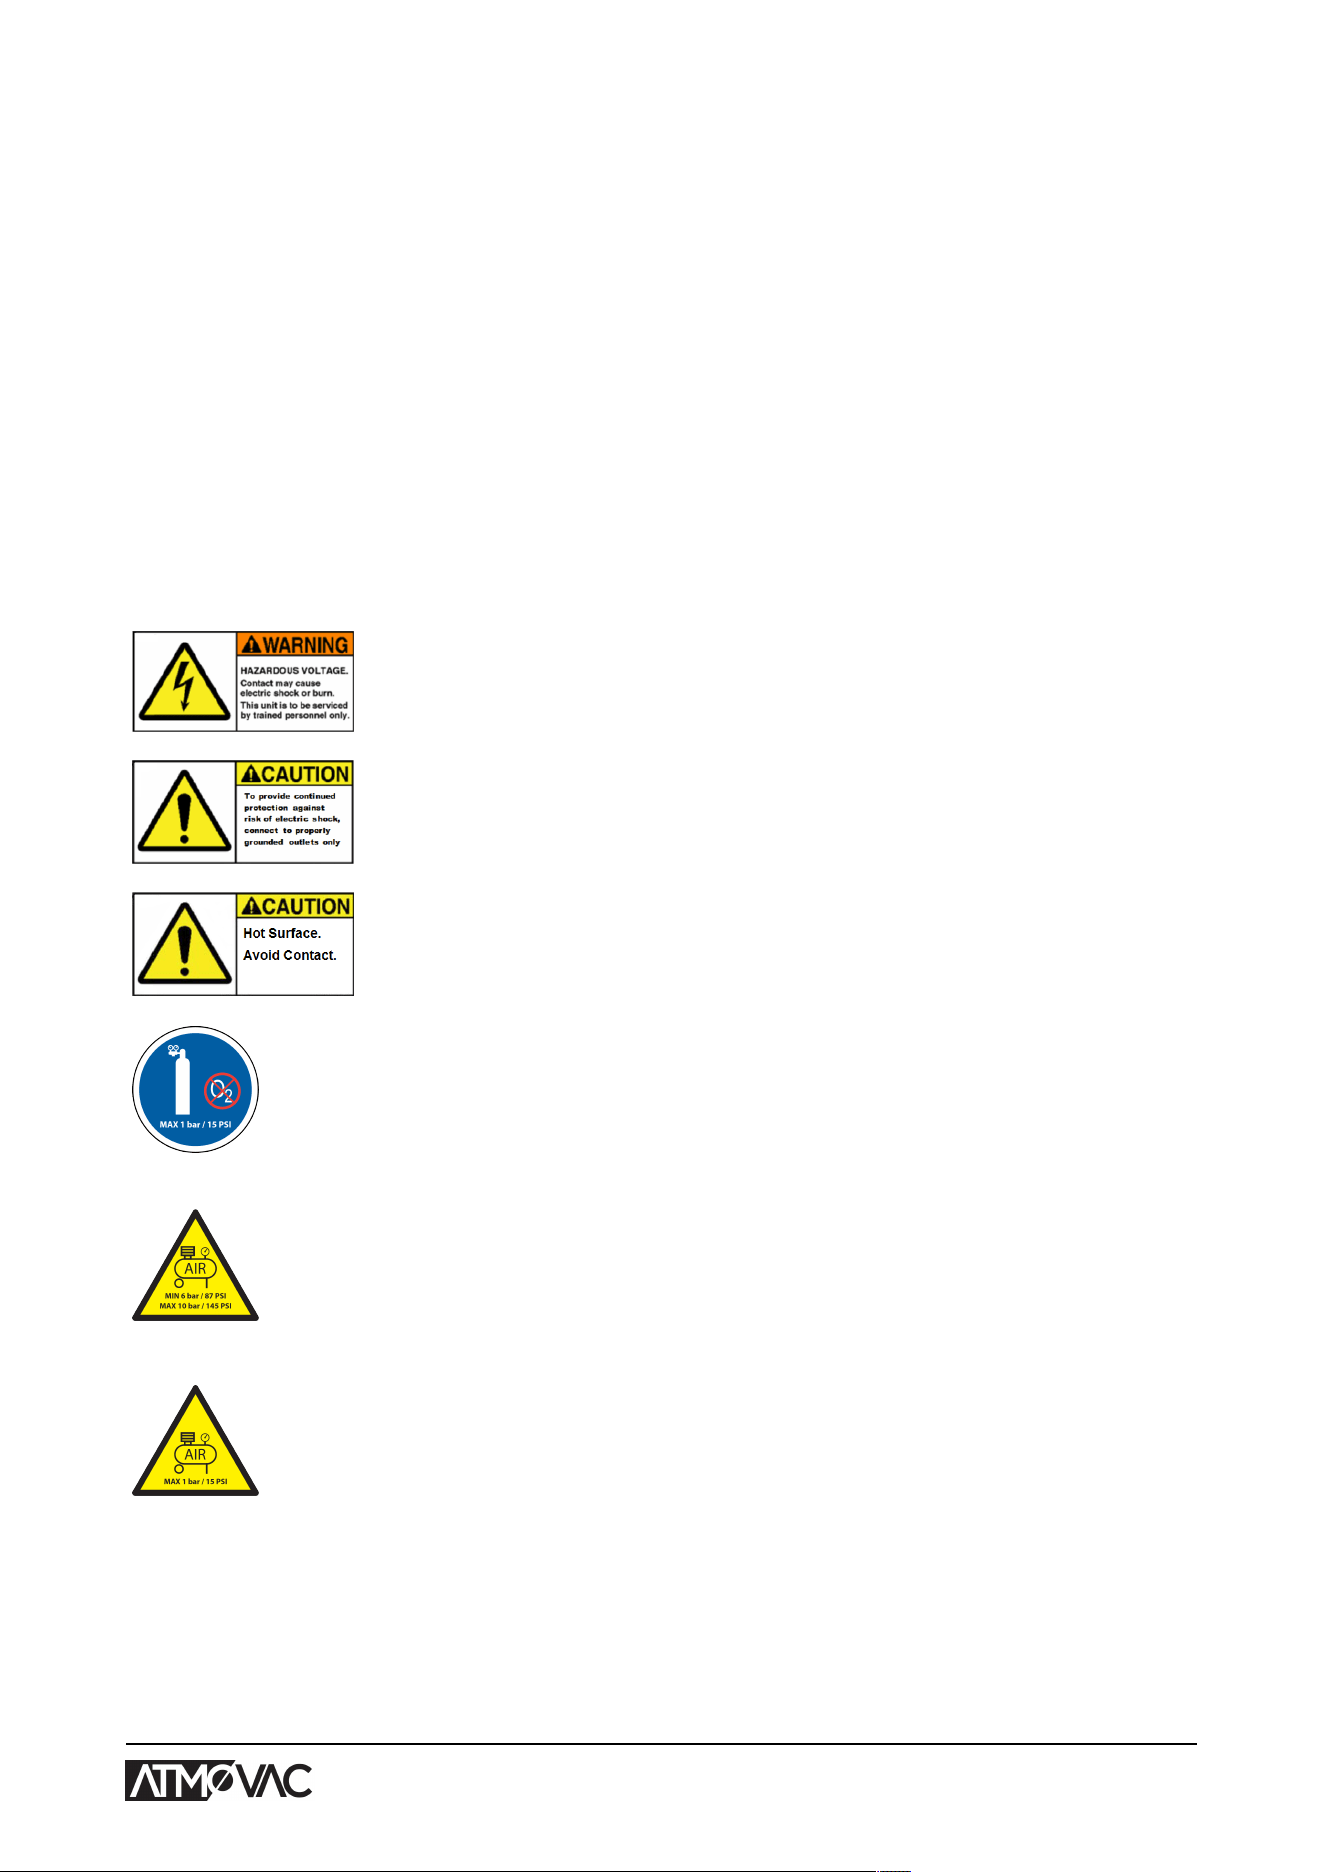
2.1 Pictograms on the Machine
Pictograms and warnings have been fitted on the machine to warn users of the possible risks.
Warning sign 'Hazardous voltage'
• Is located on the back of the machine
Caution sign ‘Electric shock’
• Is located on the back of the machine
Caution sign ‘Hot surface’
• Is located on the housing of the machine
Warning sign ‘Gas Connection’ (optional)
Forbidden to connect oxygen
• Is located on the back of the machine
Warning sign ‘Pneumatic Air Connection’ (optional)
Minimum and maximum allowed gas pressure of the pneumatic air sys-
tem
• Is located on the back of the machine
Warning sign ‘Seal Pressure Connector’ (optional)
Maximum allowed gas pressure of the gas flush system
• Is located on the back of the machine
Safety 10
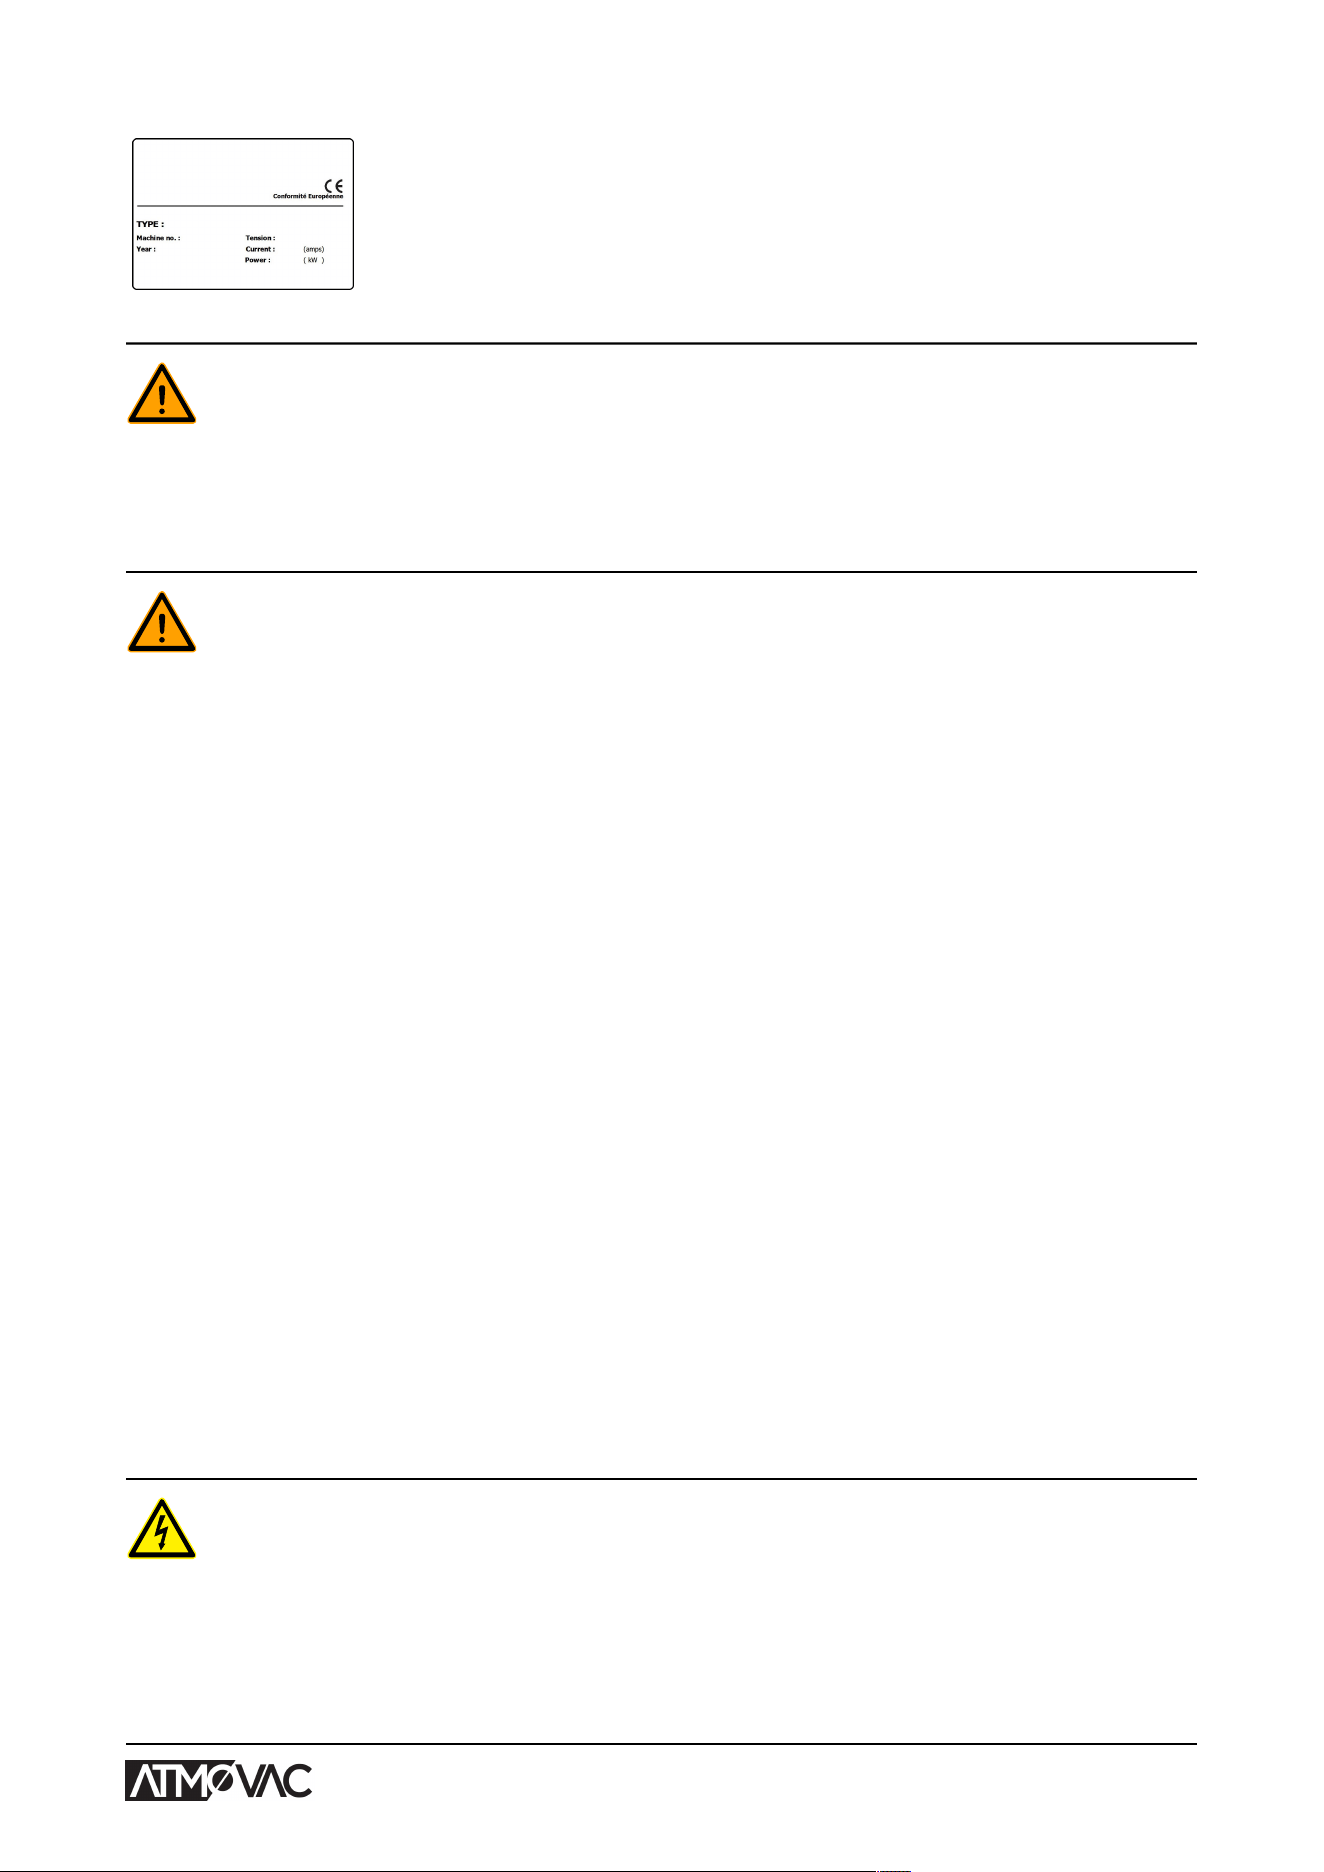
Machine plate
• Is located on the back of the machine
Regularly check whether the pictograms and markings are still clearly recognisable and
legible. Replace them if this is not the case.
2.2 General Warnings
• All persons responsible for the operation of this machine must at least fully read and
understand the chapters Safety on page 10 and Operation on page 30.
• Failure to follow or disregard of the safety instructions may result in serious injury.
• Never pack products that can be damaged by vacuum.
• Never vacuum live animals.
• Warranty and/or liability is void if any damage is caused by repairs and/or modifications
that are not authorised by the supplier or any of its distributors.
• In case of malfunction, contact the supplier.
• High pressure cleaning is not allowed. This may cause damage to the electronics and
other components.
• Prevent water from entering the ventilation inlet of the chamber or the exhaust of the
pump. This causes irreversible damage to the pump.
• The work space around the machine must be safe. The owner of the machine must take
the necessary precautions to operate the machine safely.
• It is forbidden to start the machine in an explosive environment.
• The machine has been designed in such a way that production is safe under normal
ambient conditions.
• The owner of the machine must ensure that the instructions in this manual are actually
complied with.
• The available safety devices may not be removed.
• The correct operation and safety of the system can only be guaranteed if the
recommended maintenance is performed on time and properly.
• If work must be carried out on the machine, it must be disconnected and blocked from
the power supply and, if applicable, from the air and gas supply.
• Only a technical expert may perform work on the electrical installation.
• Internal procedures and monitoring must be in place to ensure that all relevant power
supplies are disconnected.
• The machine may not be used during cleaning, inspection, repair or maintenance and
must be disconnected from the power supply by disconnecting the plug and/or using the
main switch.
Safety 11
• Never perform welding work on the machine without first disconnecting the cable
connection to the electrical components.
• Never use the power supply of the control unit to connect other machines.
• All electrical connections must be connected to the terminal strips according to the
wiring diagram.
2.3 Warnings During Use
• Before starting the machine, make sure no work is being performed on the installation
and that the machine is ready for use.
• The machine may not be operated by unauthorised persons. This should be monitored
by the machine operator(s).
• Immediately contact the service technician of your technical department or dealer if
something does not seem right, such as unusual vibrations or unusual noise.
• Components of the sealing system can become very hot. Contact with these
components may cause injuries.
• Improper use, such as switching off the machine while it is creating a vacuum, is
strongly discouraged. Such actions may cause oil leaking back to the vacuum chamber.
2.4 Warnings for Operating Personnel
• Operating personnel must be 18 years or older.
• Only authorised persons are allowed to perform work on or with the machine.
• Personnel may only perform work for which it was trained. This applies to both
maintenance and normal use.
• The machine may only be operated by trained personnel.
• The machine must never be unattended during operation.
• Operating personnel must be familiar with all circumstances, so quick and effective
action can be taken in case of an emergency.
• If an operator notices errors or risks or disagrees with safety measures, he or she
should report this to the owner or manager.
• Safety shoes are mandatory.
• Appropriate work clothing is mandatory.
• All personnel must obey the safety regulations to avoid danger to themselves and
others. Always strictly follow the work instructions.
2.5 Safety features
When you machine is equipped with an automatic moving lid, additional safety features are
installed on the machine to prevent persons getting injured.
Safety 12
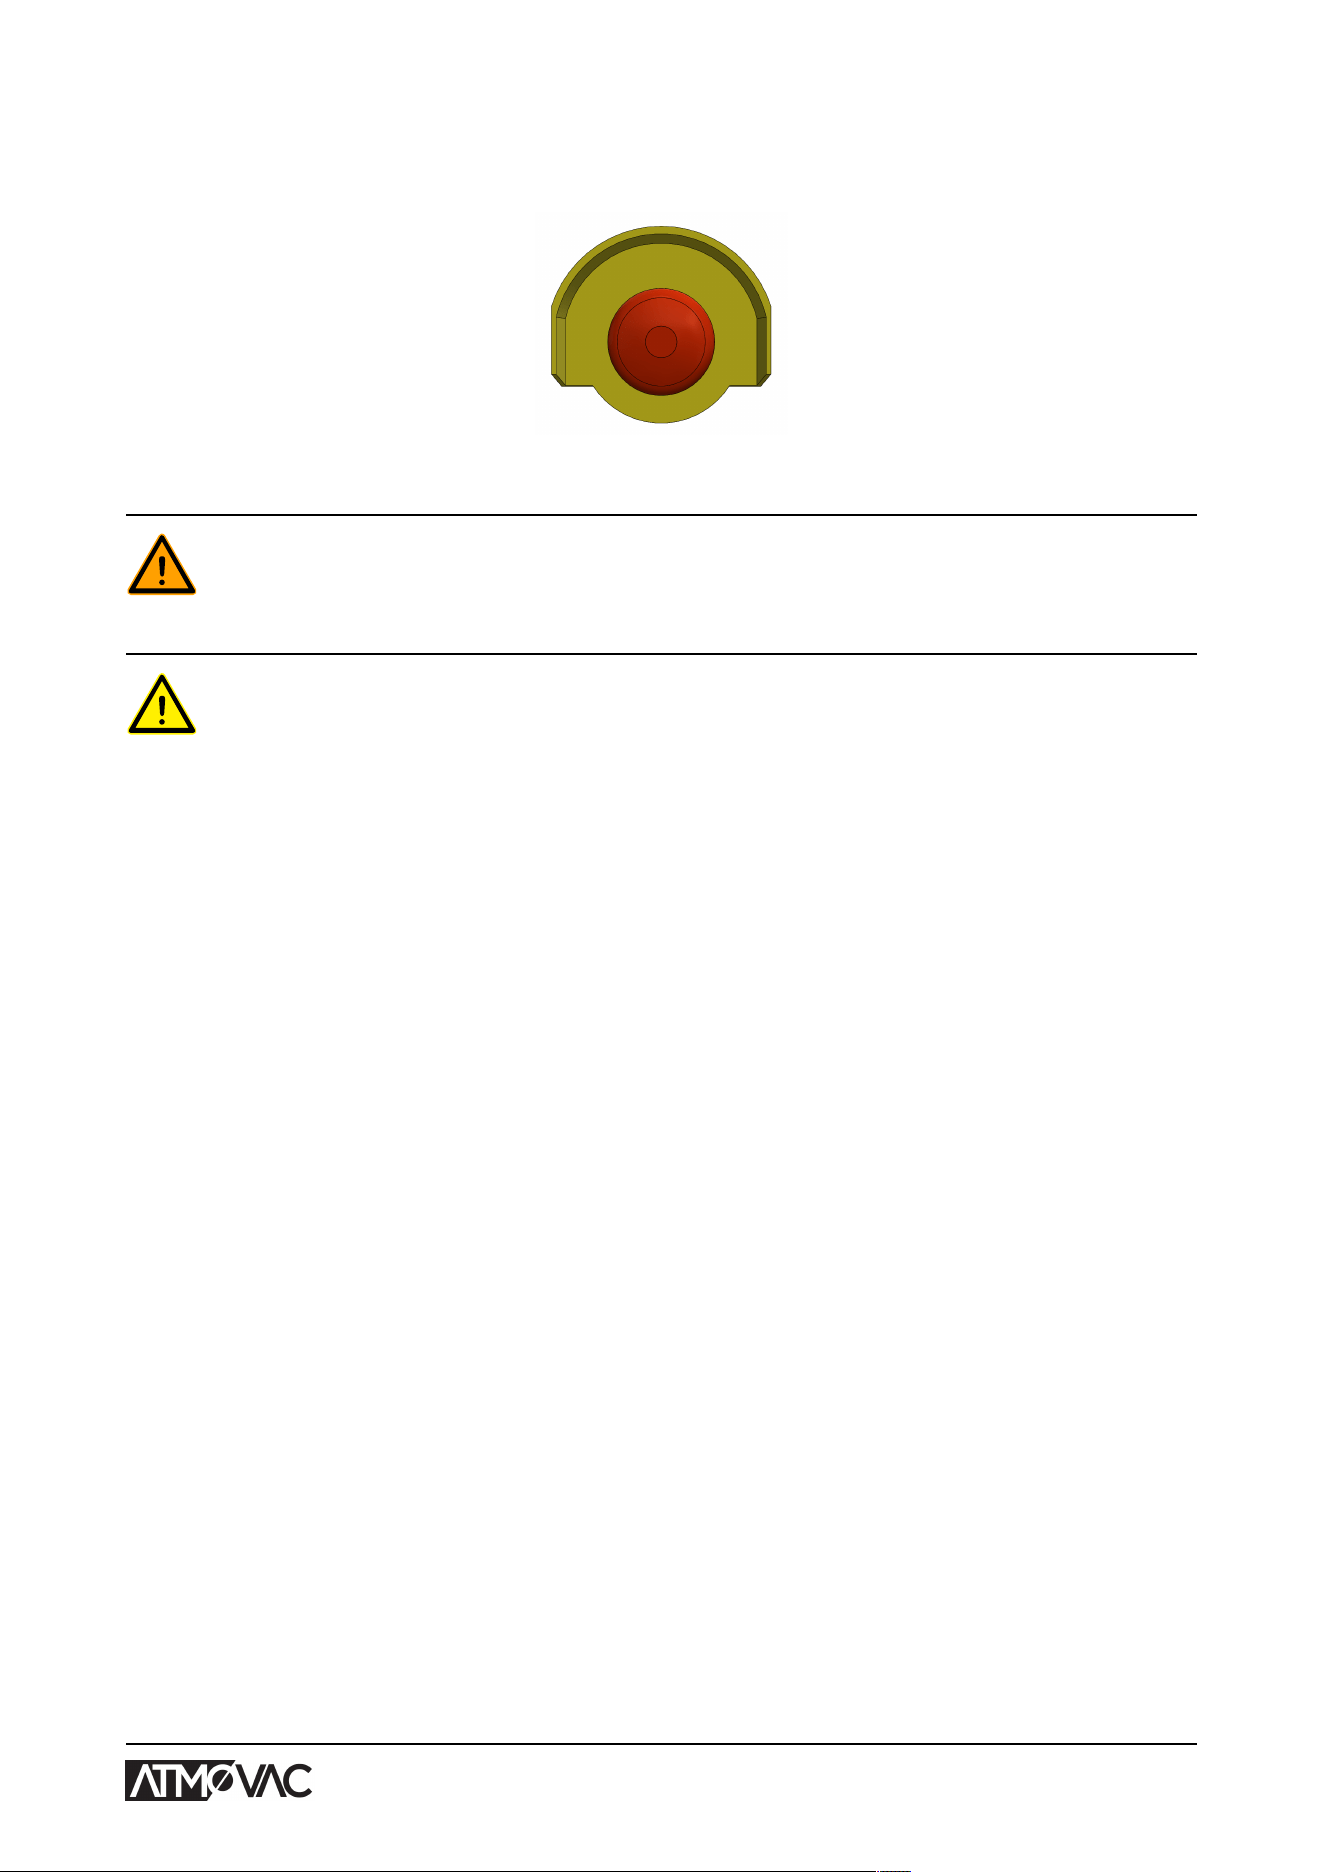
2.5.1 Emergency Stop Buttons
Pressing one of these emergency stop buttons stops the lid arms from moving.
Figure 1: Emergency stop
Be aware that the lid will not stop immediately, but will still move a few centimetres due to
momentum.
An emergency stop button may normally only be operated in the event of an emergency.
However, it is also recommended to check the correct operation of the emergency stop
buttons on a daily basis.
To reset an emergency stop button, proceed as follow:
1. Check that the emergency situation has been resolved and that persons are no longer
exposed to any risk.
2. Pull the emergency stop button back in its original position. This resets the emergency stop
button.
Safety 13

3 Introduction
Eurodib is a supplier of ultra-modern vacuum packaging machines. Our machines are developed
and manufactured to meet the highest standards. They combine a sleekly build and functional
design with optimal ease of use and a long service life. After mounting the plug, it is just a matter of
"plug & pack". The clever design ensures compliance with the hygiene standards at all times.
The Cyclone, Pampero and Solar series comprises floor models with various options suitable
for a variety of applications. These machines have several programmes and options for optimal
packaging.
Introduction 14
4 Description of the Machine
This section provides an short introduction to the machine and an overview of it's main
components and functions. If detailed information is available in this manual, you will be referred to
the specific sections.
4.1 Cyclone series
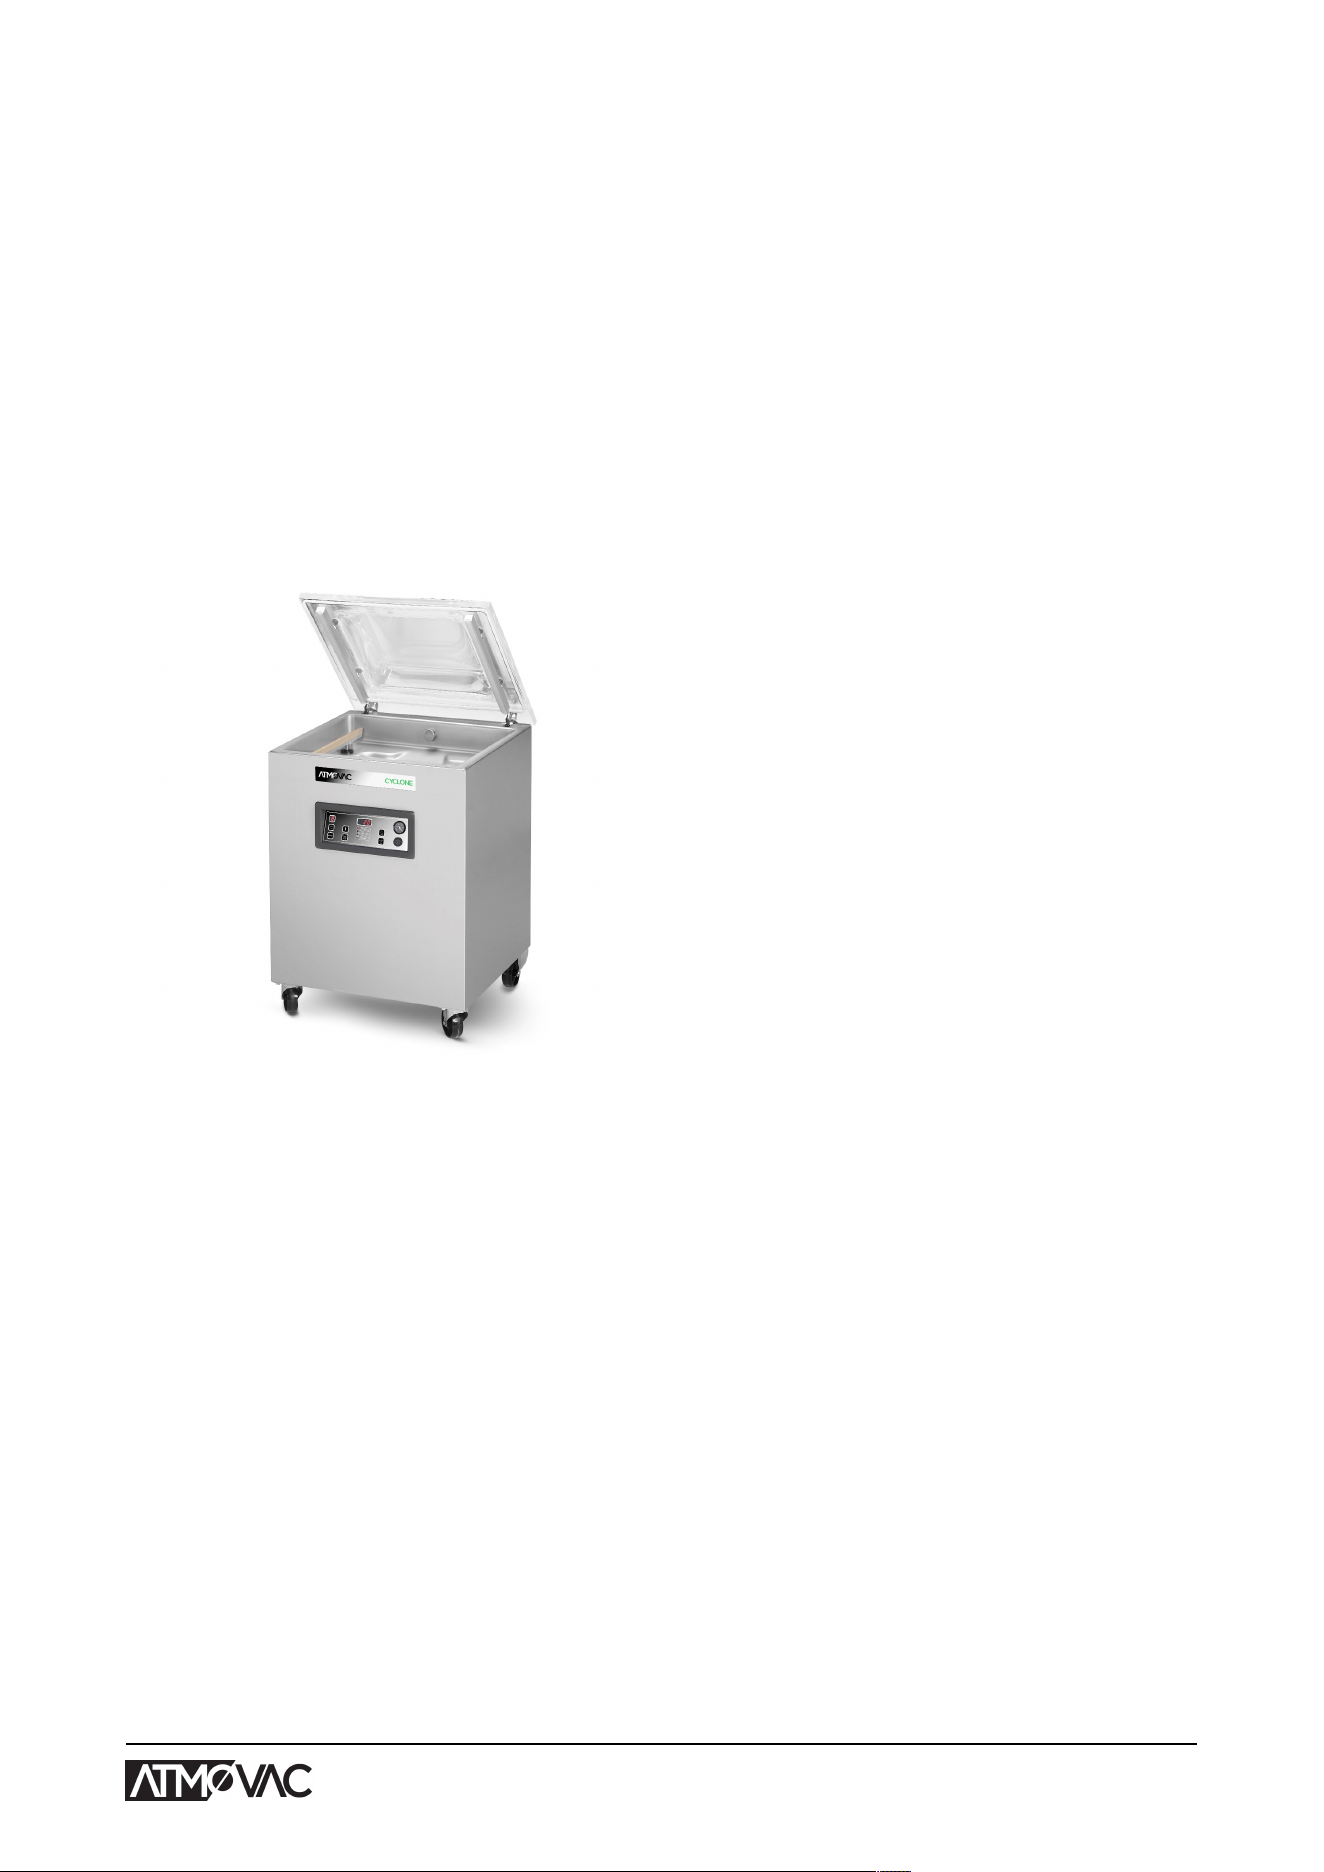
The Cyclone series offer long lasting quality, optimal capacity and an attractive price. Sensor
control, Advanced Control System, Gas flush and many more options are available to customize
these vacuum packaging machines to your packaging needs.
• Standard 10 program memory
• Standard with sensor control
• Standard double seal
• Free options: Cut-off an wide seal
• Standard delivered with insert plates
Description of the Machine 15
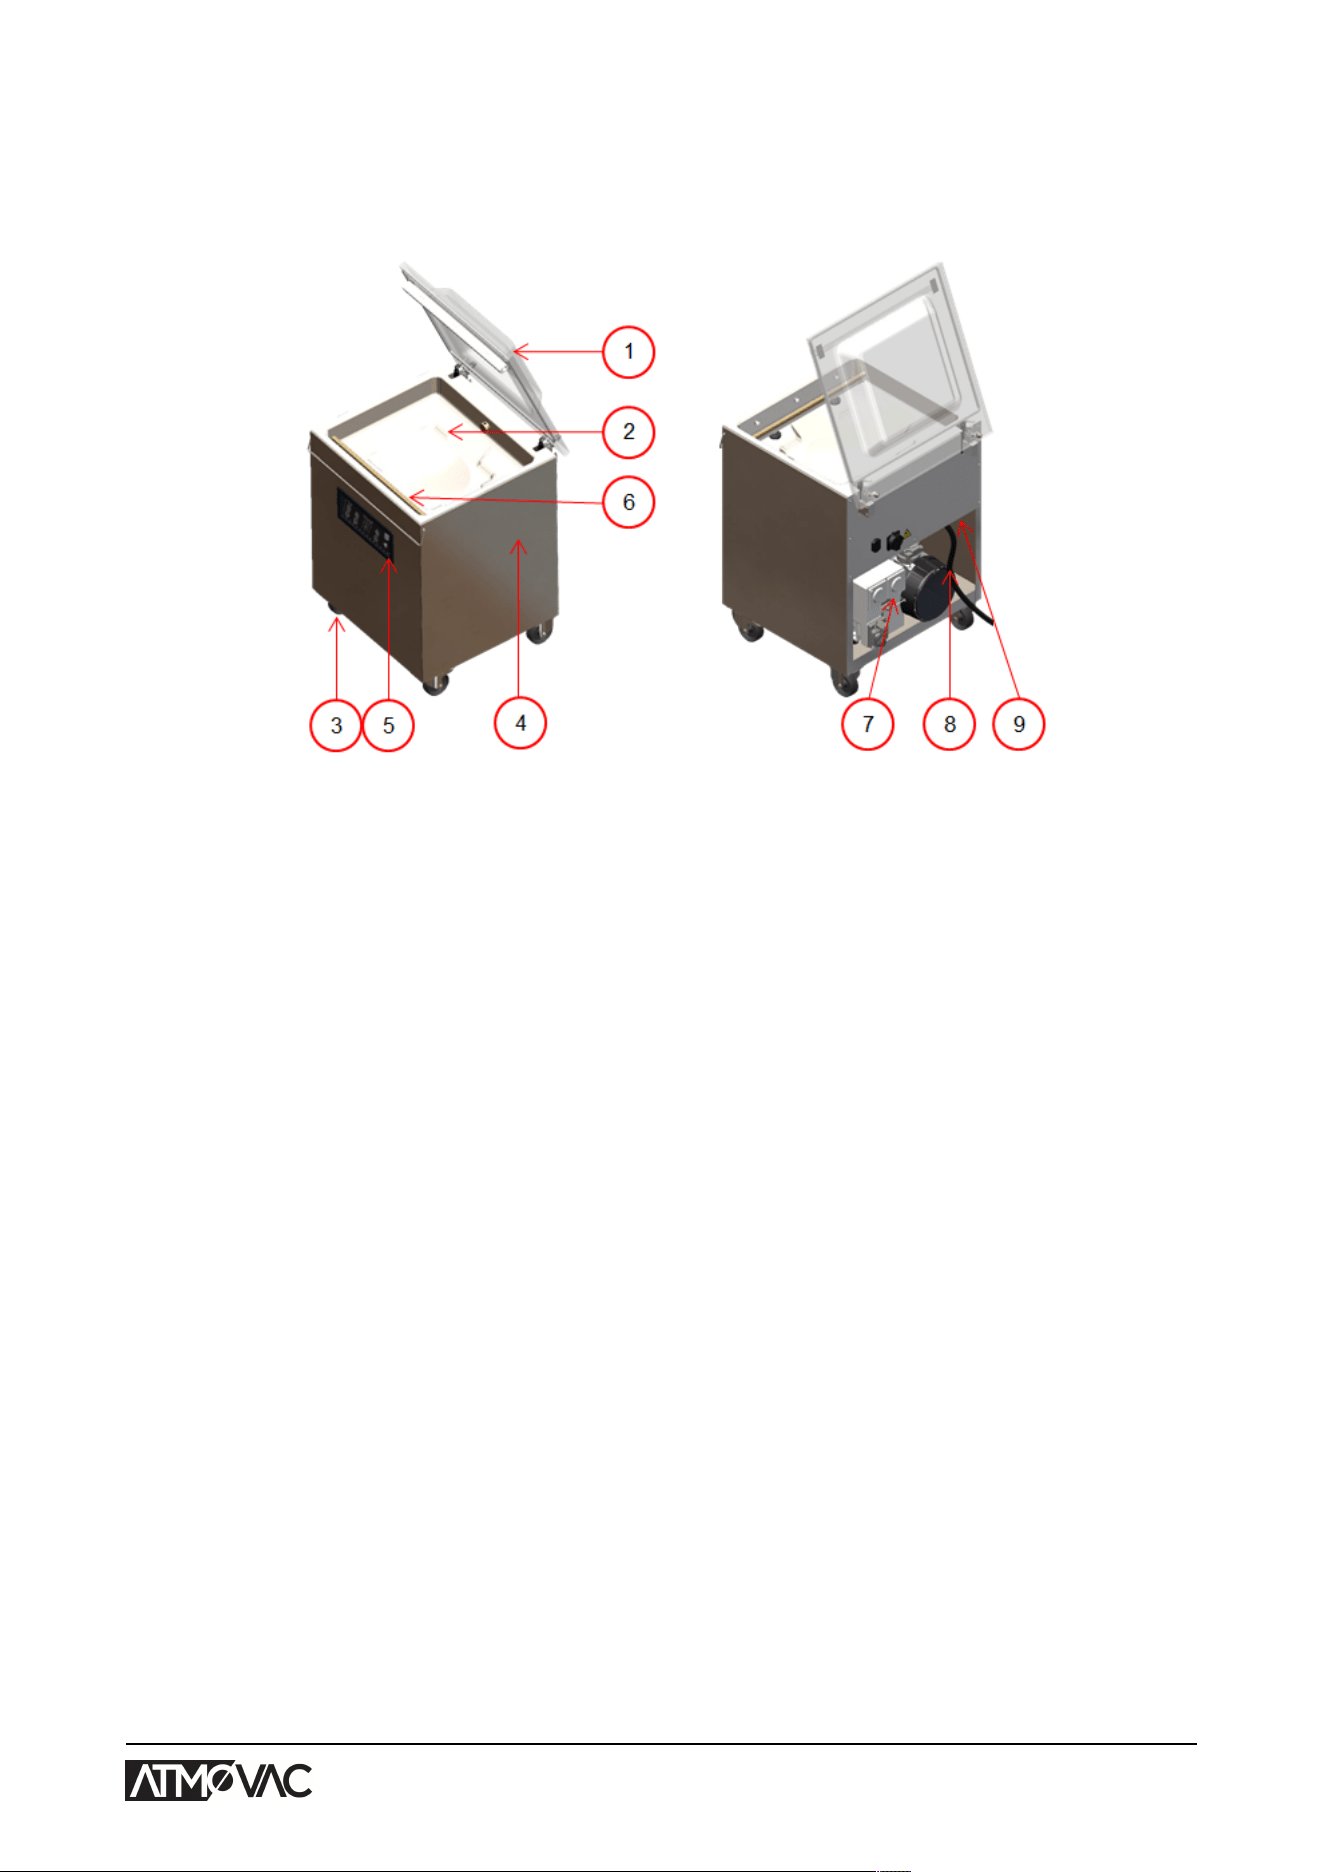
4.1.1 Overview of the Main Components
The figure below shows the main components of the Cyclone. The model shown may differ from
your machine.
Figure 2: Overview of the Main Components
1. Lid
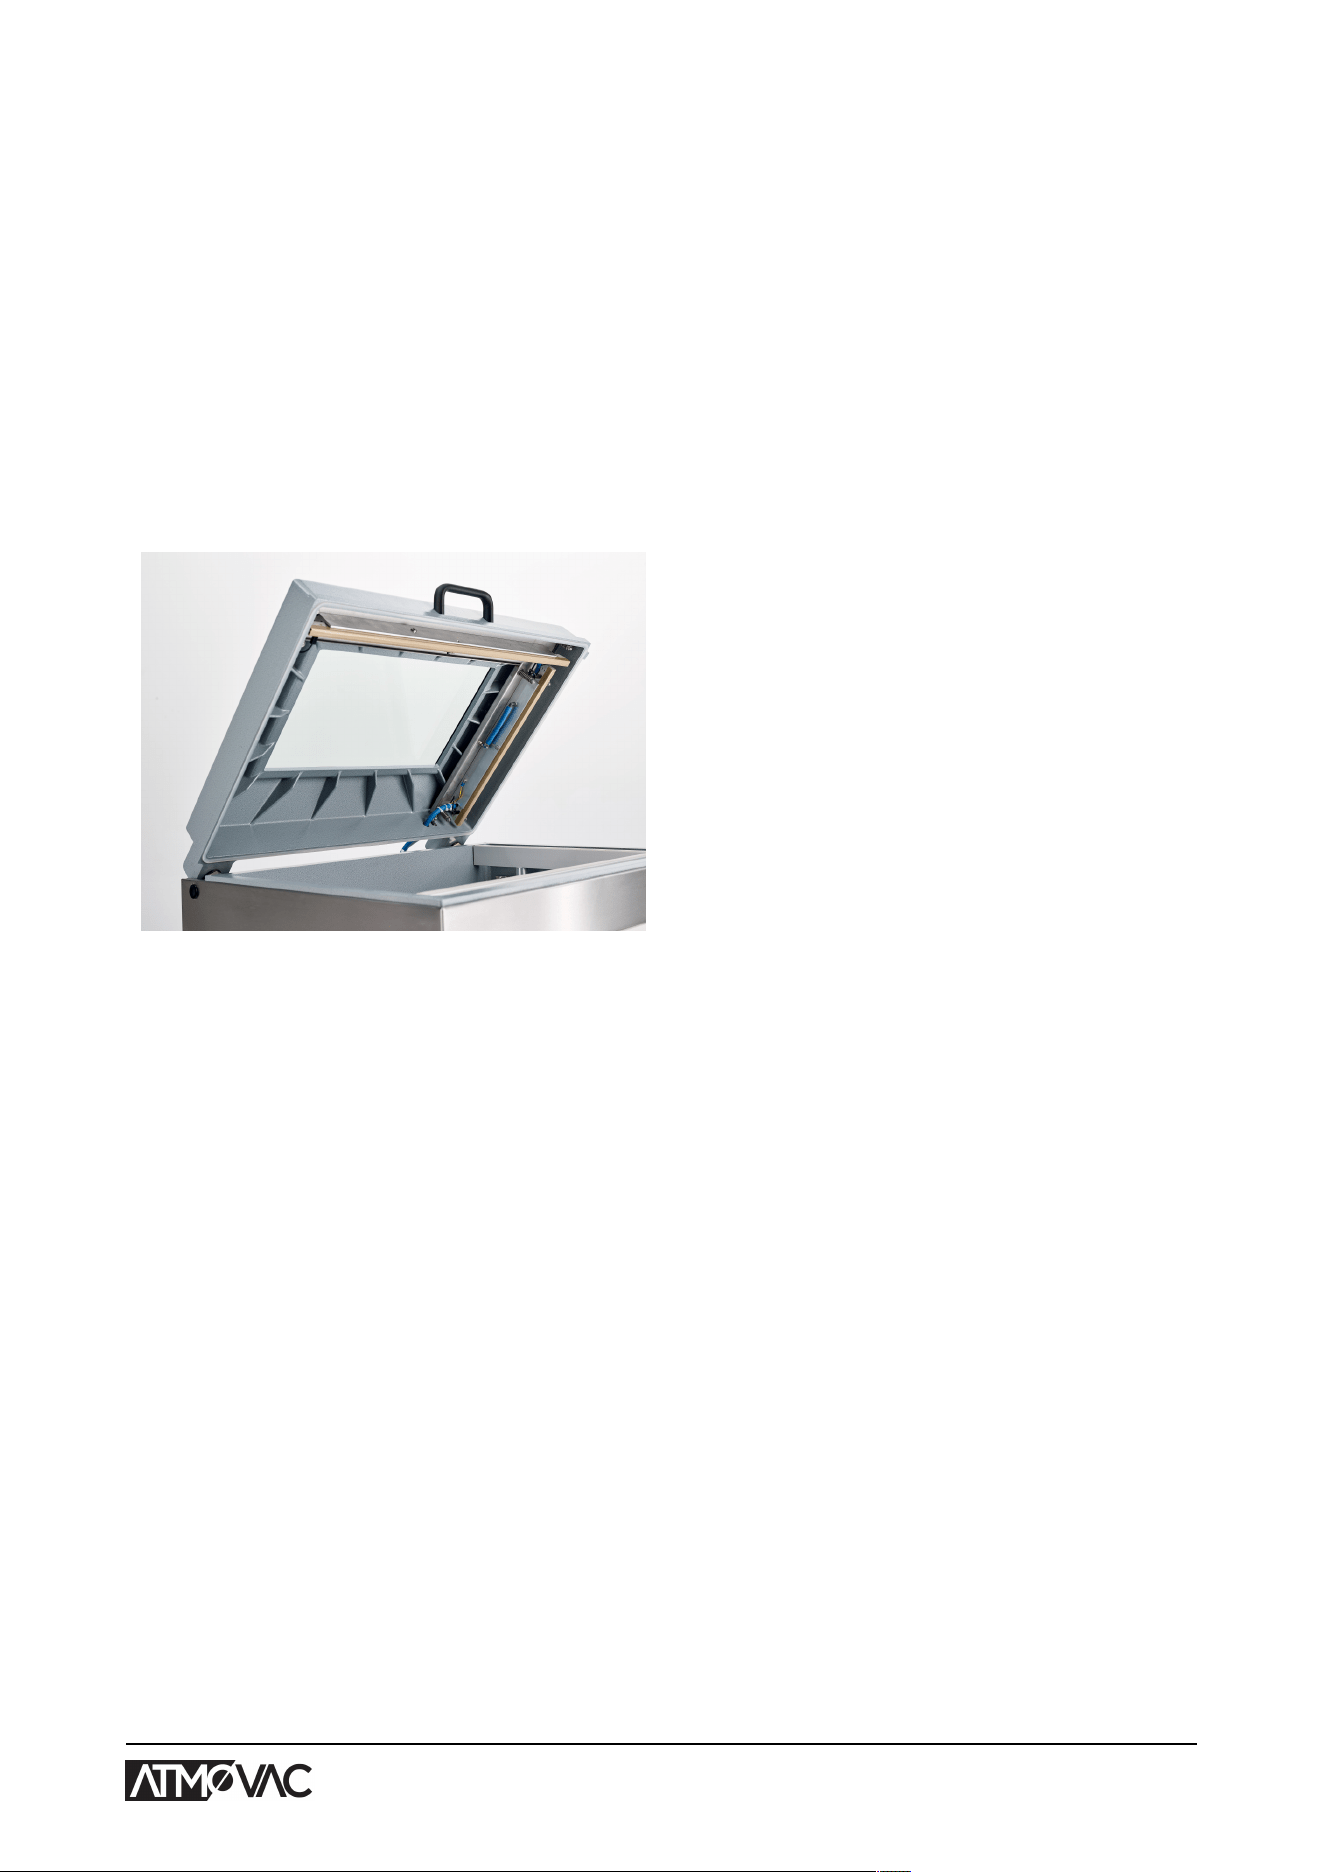
The lid closes the vacuum chamber during the application of the vacuum. A rubber is mounted
in the lid to ensure proper closing. On machines with two vacuum chambers, the lid can be
moved from position 1 to position 2 manually. In these machines, the sealing bars and suction
inlet for the vacuum are included in the lid.
2. Vacuum chamber
The products to be packaged are placed on the work surface with the openings of the vacuum
bags on the sealing position. On machines with two vacuum chambers, the already packaged
product can be removed and new products can be placed on the free work surface during the
vacuuming and sealing process.
3. Castor with brake
The machines are fitted with four castors with brake. This allows for easy moving of the
machine to a different location.
4. Machine housing
The machine housing contains all the components necessary for the functioning of the
machine.
5. Control panel
This serves to operate the available control functions. Depending on your model, your
machine will have the 10-Program Control System (10-PCS) or the Advanced Control System
(ACS).
6. Seal system
Depending on the model, one, two or three sealing bars are mounted in the vacuum chamber.
These close the vacuum bag.
7. Vacuum pump
The vacuum pump creates the vacuum.
Description of the Machine 16
8. Power connection and cable
This serves to connect the machine to the power supply.
9. Seal pressure connector (optional)
Where the standard model makes use of atmospheric pressure to press the seal bar onto the
vacuum bag during the sealing process, it is also possible (optional) to connect to an external
source in order to obtain a higher sealing pressure.
4.2 Pampero series
All Pampero models are equipped with an aluminium vacuum chamber and aluminium lid.
Furthermore, the lid has a viewing window to monitor the packaging cycle.
Available with single or double vacuum chamber.
• Standard with 10 program memory
• Free options: Cut-off and Wide seal
• Aluminium lid with sight glass
• Standard Double seal
Description of the Machine 17
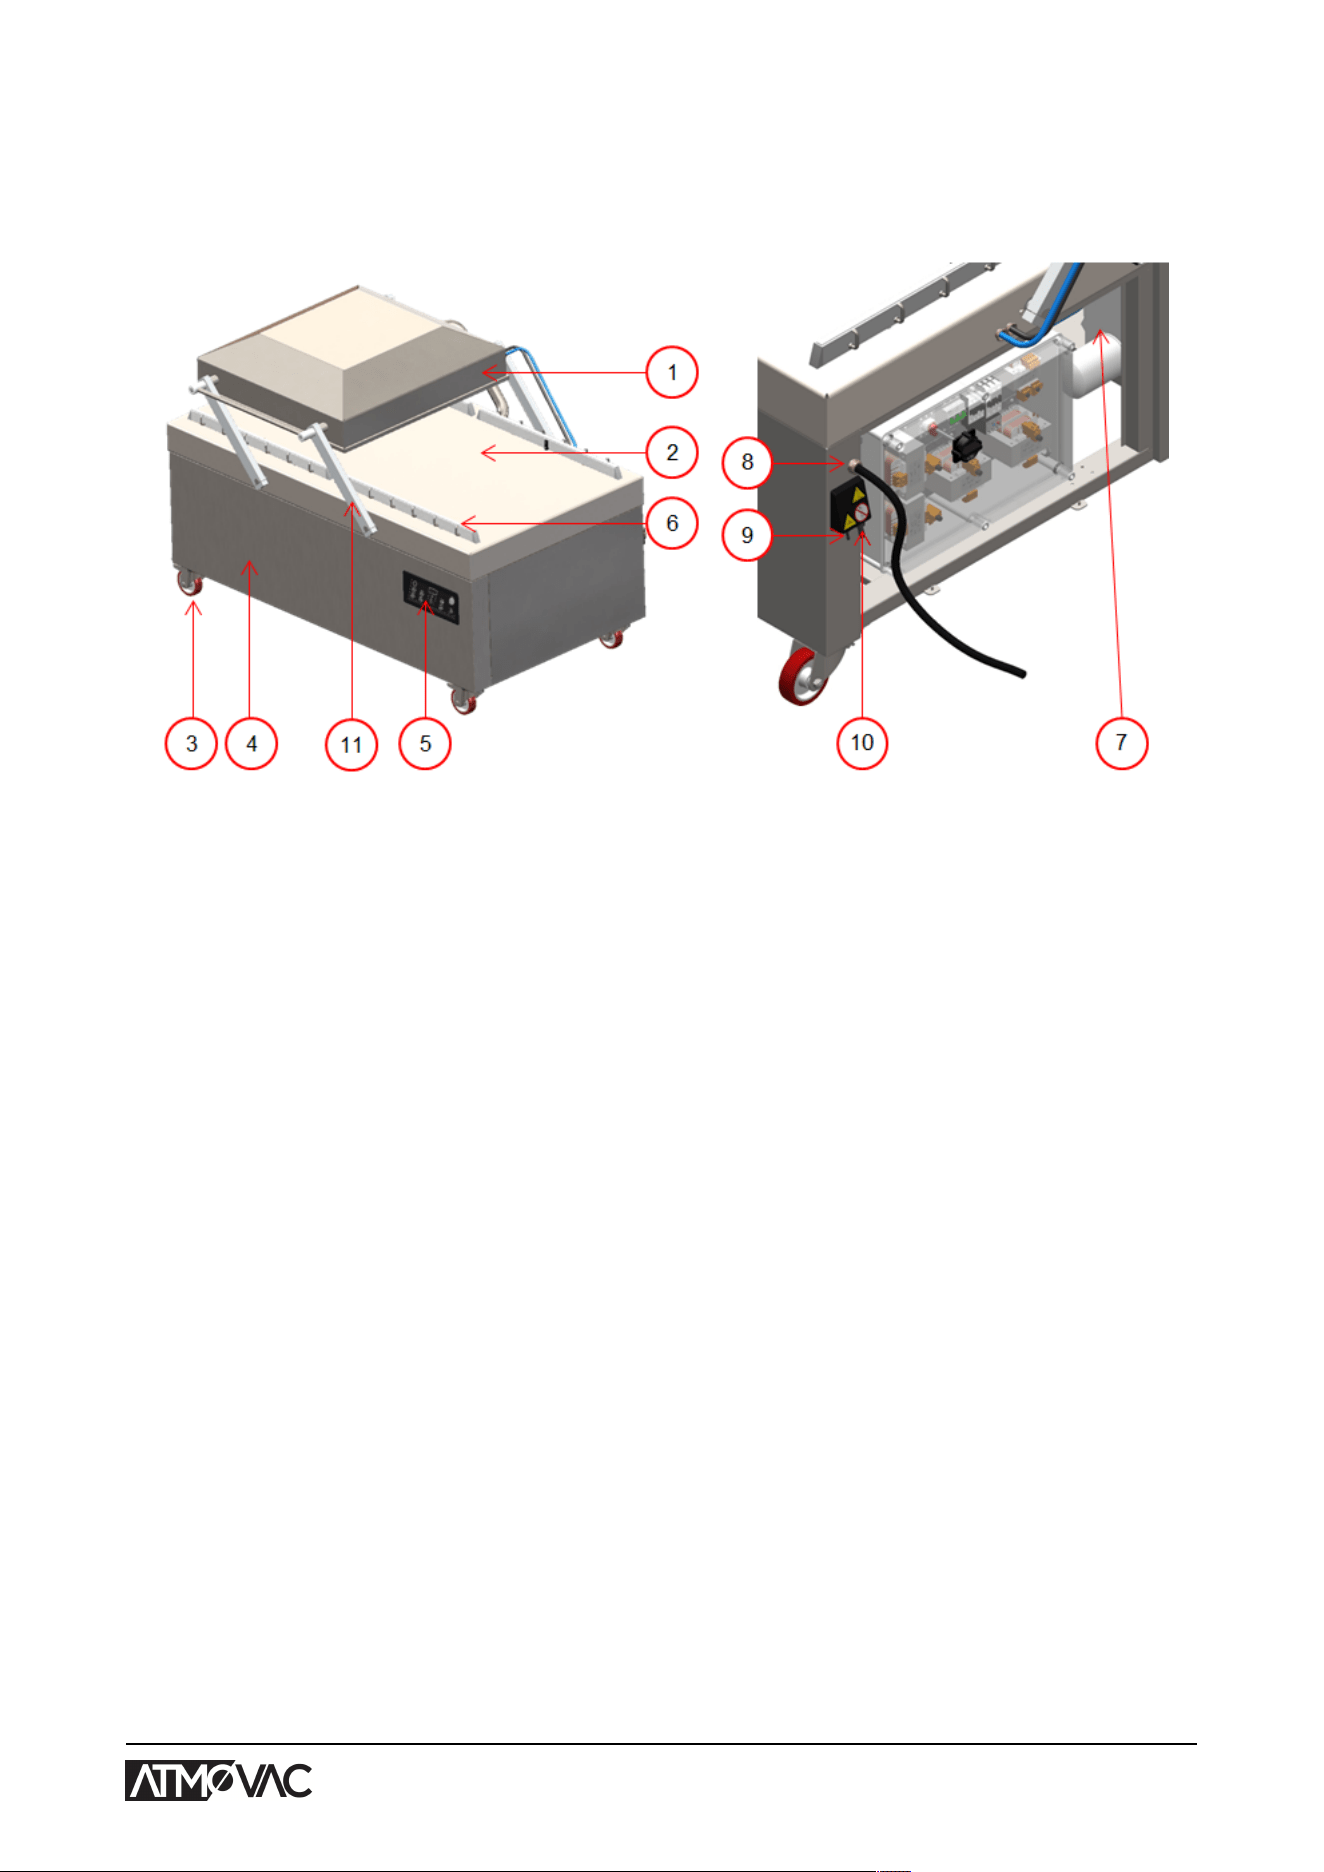
4.2.1 Overview of the Main Components
The figure below shows the main components of the Pampero. The model shown may differ from
your machine.
Figure 3: Overview of the Main Components
1. Lid
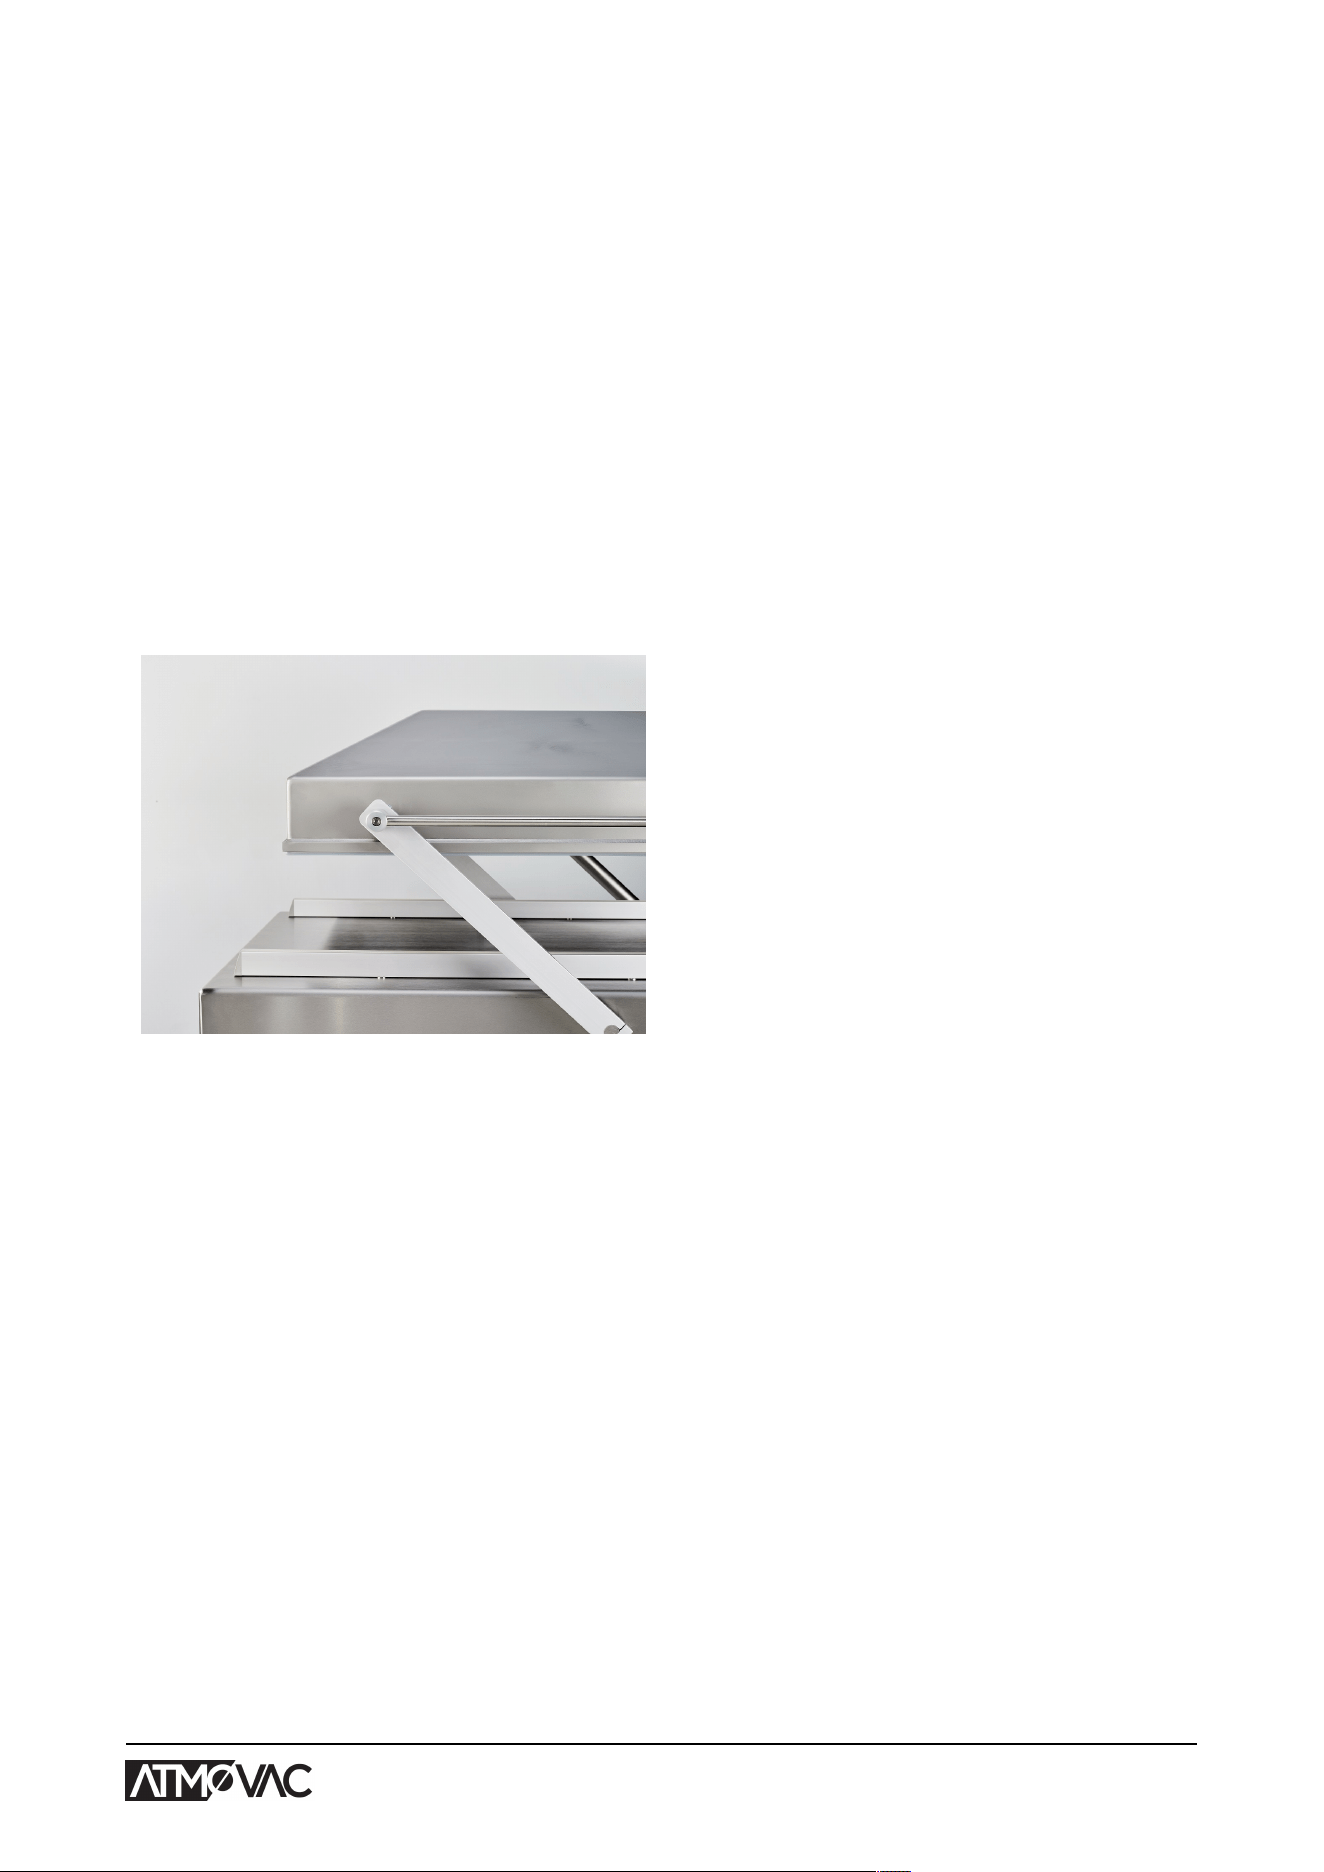
The lid closes the vacuum chamber during the application of the vacuum. A rubber is mounted
in the lid to ensure proper closing. On machines with two vacuum chambers, the lid can be
moved from position 1 to position 2 manually. In these machines, the sealing bars and suction
inlet for the vacuum are included in the lid.
2. Vacuum chamber
The products to be packaged are placed on the work surface with the openings of the vacuum
bags on the sealing position. On machines with two vacuum chambers, the already packaged
product can be removed and new products can be placed on the free work surface during the
vacuuming and sealing process.
3. Castor with brake
The machines are fitted with four castors with brake. This allows for easy moving of the
machine to a different location.
4. Machine housing
The machine housing contains all the components necessary for the functioning of the
machine.
5. Control panel
This serves to operate the available control functions. Depending on your model, your
machine will have the 10-Program Control System (10-PCS) or the Advanced Control System
(ACS).
6. Seal system
Depending on the model, one, two or three sealing bars are mounted in the vacuum chamber.
These close the vacuum bag.
7. Vacuum pump
The vacuum pump creates the vacuum.
Description of the Machine 18
8. Power connection and cable
This serves to connect the machine to the power supply.
9. Seal pressure connector (optional)
Where the standard model makes use of atmospheric pressure to press the seal bar onto the
vacuum bag during the sealing process, it is also possible (optional) to connect to an external
source in order to obtain a higher sealing pressure.
10. Gas flush system connector (optional)
After applying vacuum, a gas is injected into the packaging to create a modified atmosphere to
protect the shape of the product or increase the shelf life of the product.
4.3 Solar series
Full stainless steel industrial machines with flat working plate for MAP and vacuum packaging. The
hygienic construction ensures reliability in operation and low maintenance.
Available with single or double vacuum chamber.
Solar machines are standard equipped with Time control, a 10 program memory, insert plates and
Double seal.
• Standard with 10 program memory
• Standard Soft Air
• Flat working plate
• Free options: Cut-off and Wide seal
Description of the Machine 19
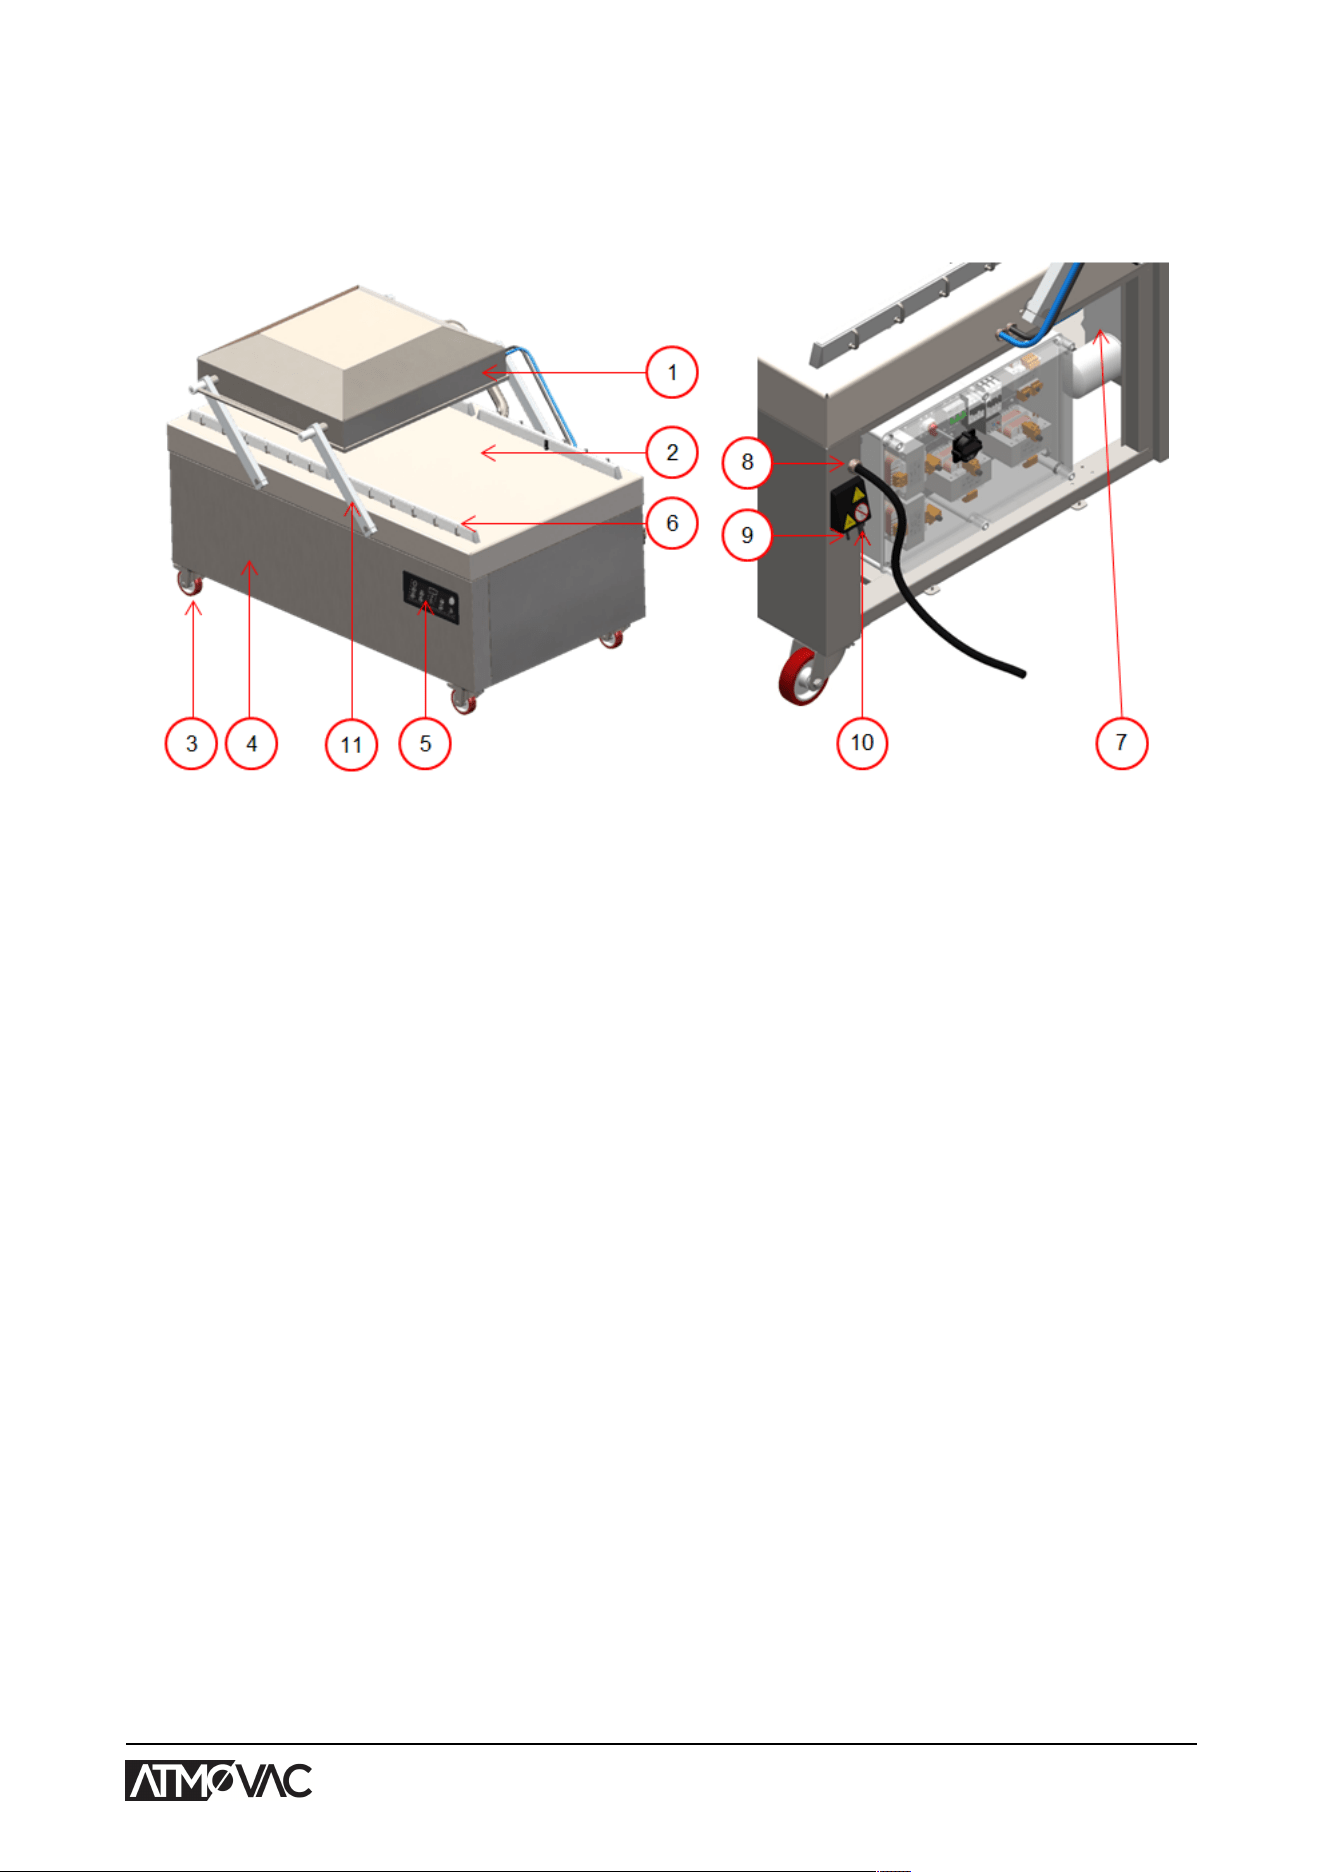
4.3.1 Overview of the Main Components
The figure below shows the main components of the Solar. The model shown may differ from your
machine.
Figure 4: Overview of the Main Components
1. Lid
The lid closes the vacuum chamber during the application of the vacuum. A rubber is mounted
in the lid to ensure proper closing. On machines with two vacuum chambers, the lid can be
moved from position 1 to position 2 manually. In these machines, the sealing bars and suction
inlet for the vacuum are included in the lid.
2. Vacuum chamber
The products to be packaged are placed on the work surface with the openings of the vacuum
bags on the sealing position. On machines with two vacuum chambers, the already packaged
product can be removed and new products can be placed on the free work surface during the
vacuuming and sealing process.
3. Castor with brake
The machines are fitted with four castors with brake. This allows for easy moving of the
machine to a different location.
4. Machine housing
The machine housing contains all the components necessary for the functioning of the
machine.
5. Control panel
This serves to operate the available control functions. Depending on your model, your
machine will have the 10-Program Control System (10-PCS) or the Advanced Control System
(ACS).
6. Seal system
Depending on the model, one, two or three sealing bars are mounted in the vacuum chamber.
These close the vacuum bag.
7. Vacuum pump
The vacuum pump creates the vacuum.
Description of the Machine 20
8. Power connection and cable
This serves to connect the machine to the power supply.
9. Seal pressure connector (optional)
Where the standard model makes use of atmospheric pressure to press the seal bar onto the
vacuum bag during the sealing process, it is also possible (optional) to connect to an external
source in order to obtain a higher sealing pressure.
10. Gas flush system connector (optional)
After applying vacuum, a gas is injected into the packaging to create a modified atmosphere to
protect the shape of the product or increase the shelf life of the product.
4.4 Description of the Packaging Process/Machine Functions
This section provides an overview of the packaging process and available machine functions.
For the functions Liquid Control (and Liquid Control+), Gas (and Gas+), Seal 1-2 Cut-off
and Soft-air, specific components must be installed on your machine before they can be
enabled. Contact your supplier for more details.
4.4.1 Packaging Process/Machine Functions
This section describes the packaging process and the machine functions. See Operation on page
30 for the realization of the specific steps of the procedure.
Step Process phase Operation
1. Preparation The operator puts the product in a vacuum bag and places it
on the work surface with the opening on the sealing position.
2. Applying vacuum
The vacuum process is initiated by closing the lid.
Depending on the options you selected for your machine and
the product you are packaging, the following functions are
available:
Vacuum During the cycle, the air is removed from the chamber un-
til the set time or pressure has been reached, depending on
the selected model.
Applying vacuum until a set value is reached is only possible
if your machine is sensor-controlled (optional for 10-PCS).
This value can be set in %. The percentage indicates the
depth of the vacuum. This is in relation to an outside atmo-
sphere of 0%. In case of the ACS, the value is indicated in
percentages, mbar or hPa.
Description of the Machine 21
Step Process phase Operation
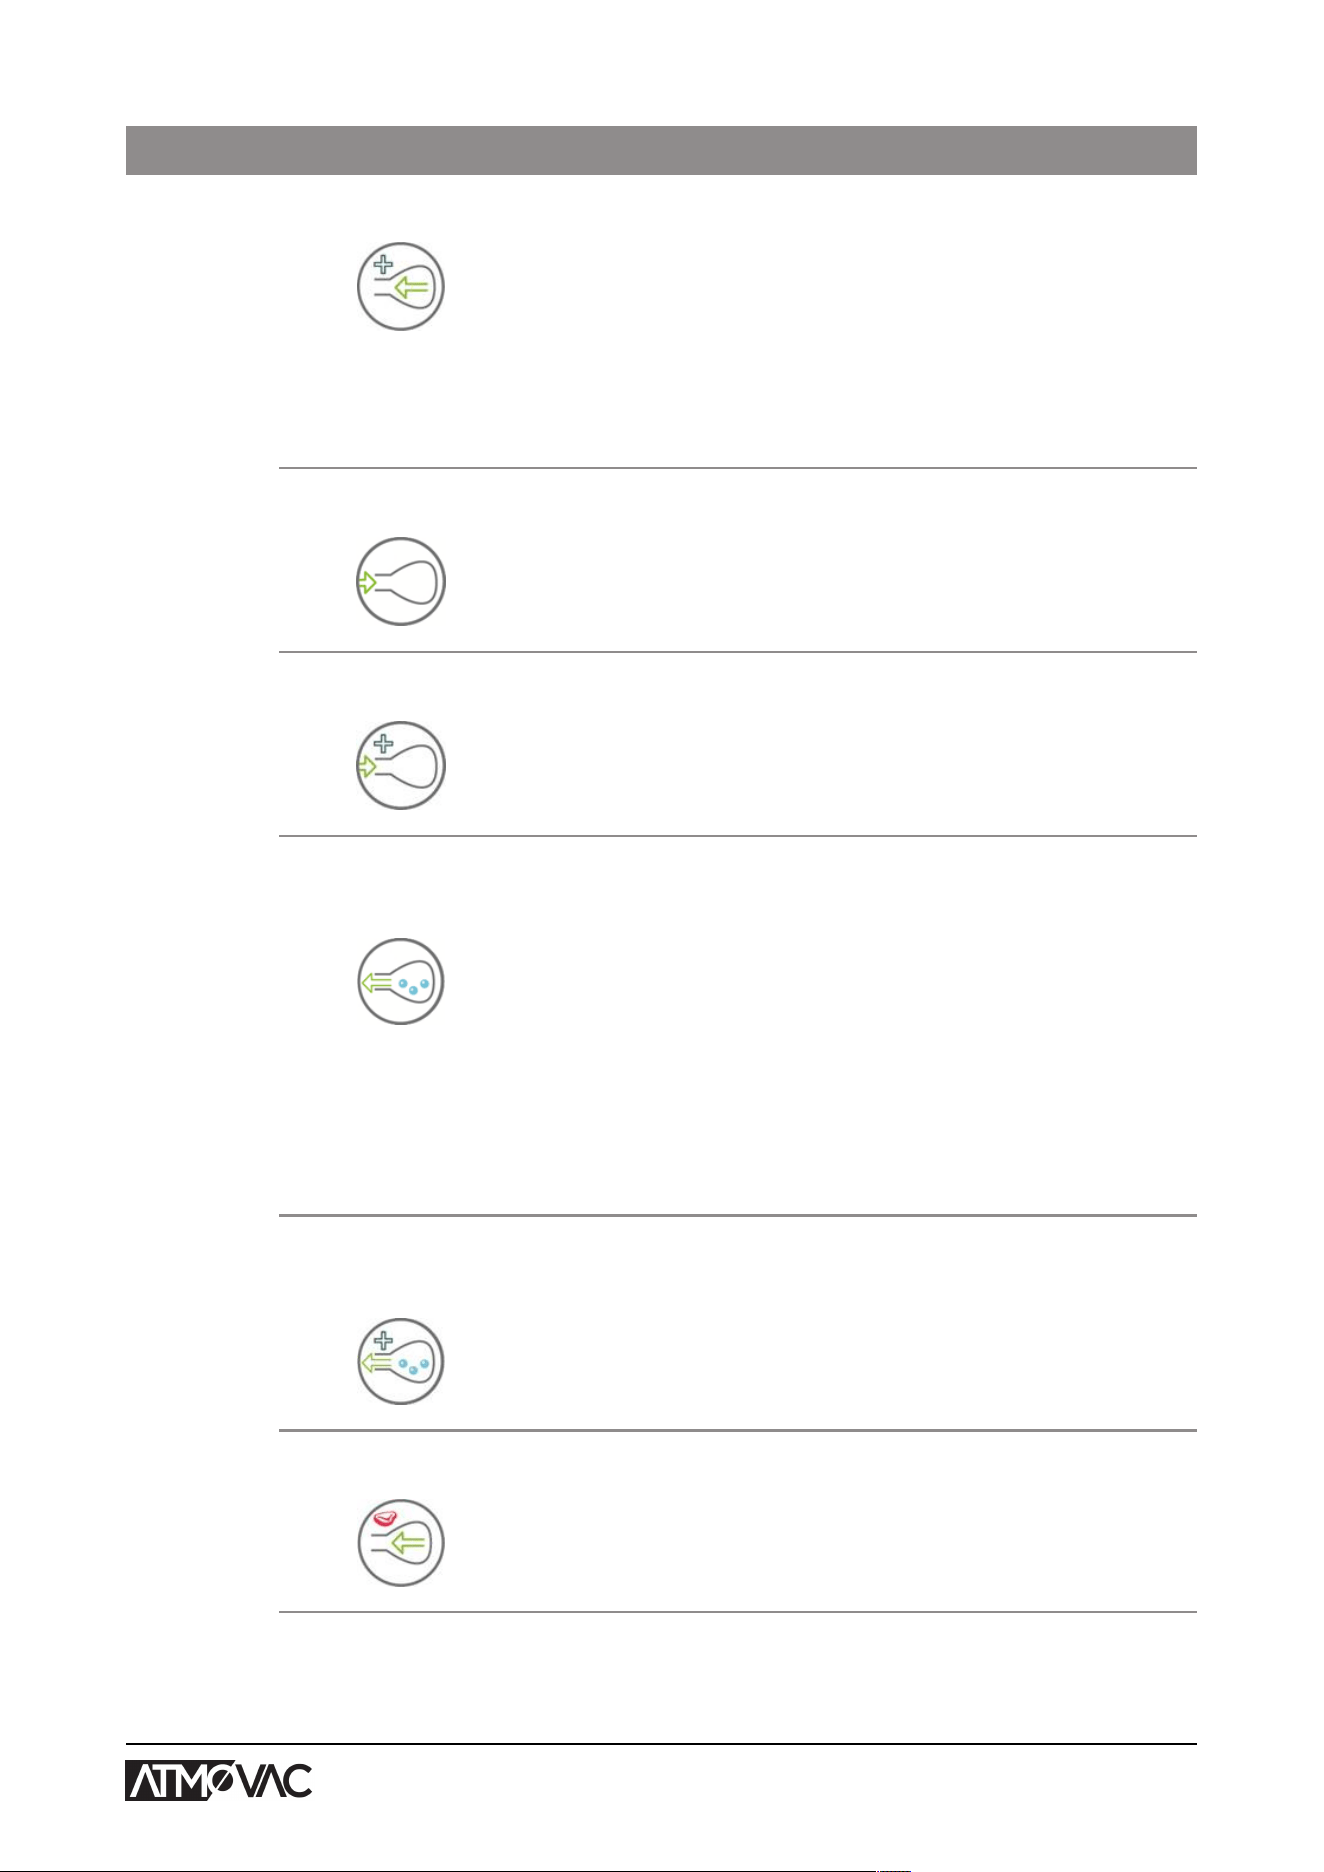
Vacuum+ Vacuum+ is only available if the vacuum percentage is set to
the maximum.
The Vacuum+ option continues the vacuum process for an
additional time to allow any entrapped air to escape from the
product.
The Vacuum+ option is only available on sensor-controlled
machines.
Gas (optional)
After applying vacuum, a gas is injected into the package
to create a modified atmosphere to protect the shape of the
product or to increase the shelf life of the product. The value
of the gas function can be set in %, mbar or hPa or time, de-
pending on the control type of the machine.
Gas+ (optional)
The Gas+ option continues injecting gas during the closing
of the bars to increase the amount of gas in the package.
Liquid Control (op-
tional)
Liquid Control is only available if your machine is equipped
with the optional Liquid Control sensor.
With the Liquid Control option, the system is controlled by a
highly sensitive sensor. The sensor is able to detect the mo-
ment that liquids from the product or the product itself be-
gin to evaporate (boil). At that time the system will proceed
to the next step in the process. This will prevent the product
from dehydrating, losing weight and/or the vacuum bag from
bursting, thus contaminating the seal, the chamber, and the
oil in the pump.
Liquid Control+ (op-
tional)
Liquid Control+ is only available if your machine is equipped
with the Liquid Control option.
The Liquid Control+ function allows you to continue the vacu-
um process for a certain time after the evaporation point has
been reached.
Red meat (optional)
This option is especially designed for the packaging of fresh
meat. It is added to the normal vacuum function to prevent
degassing of the product during and after the sealing phase.
This degassing could create air pockets inside the package.
Description of the Machine 22
Step Process phase Operation
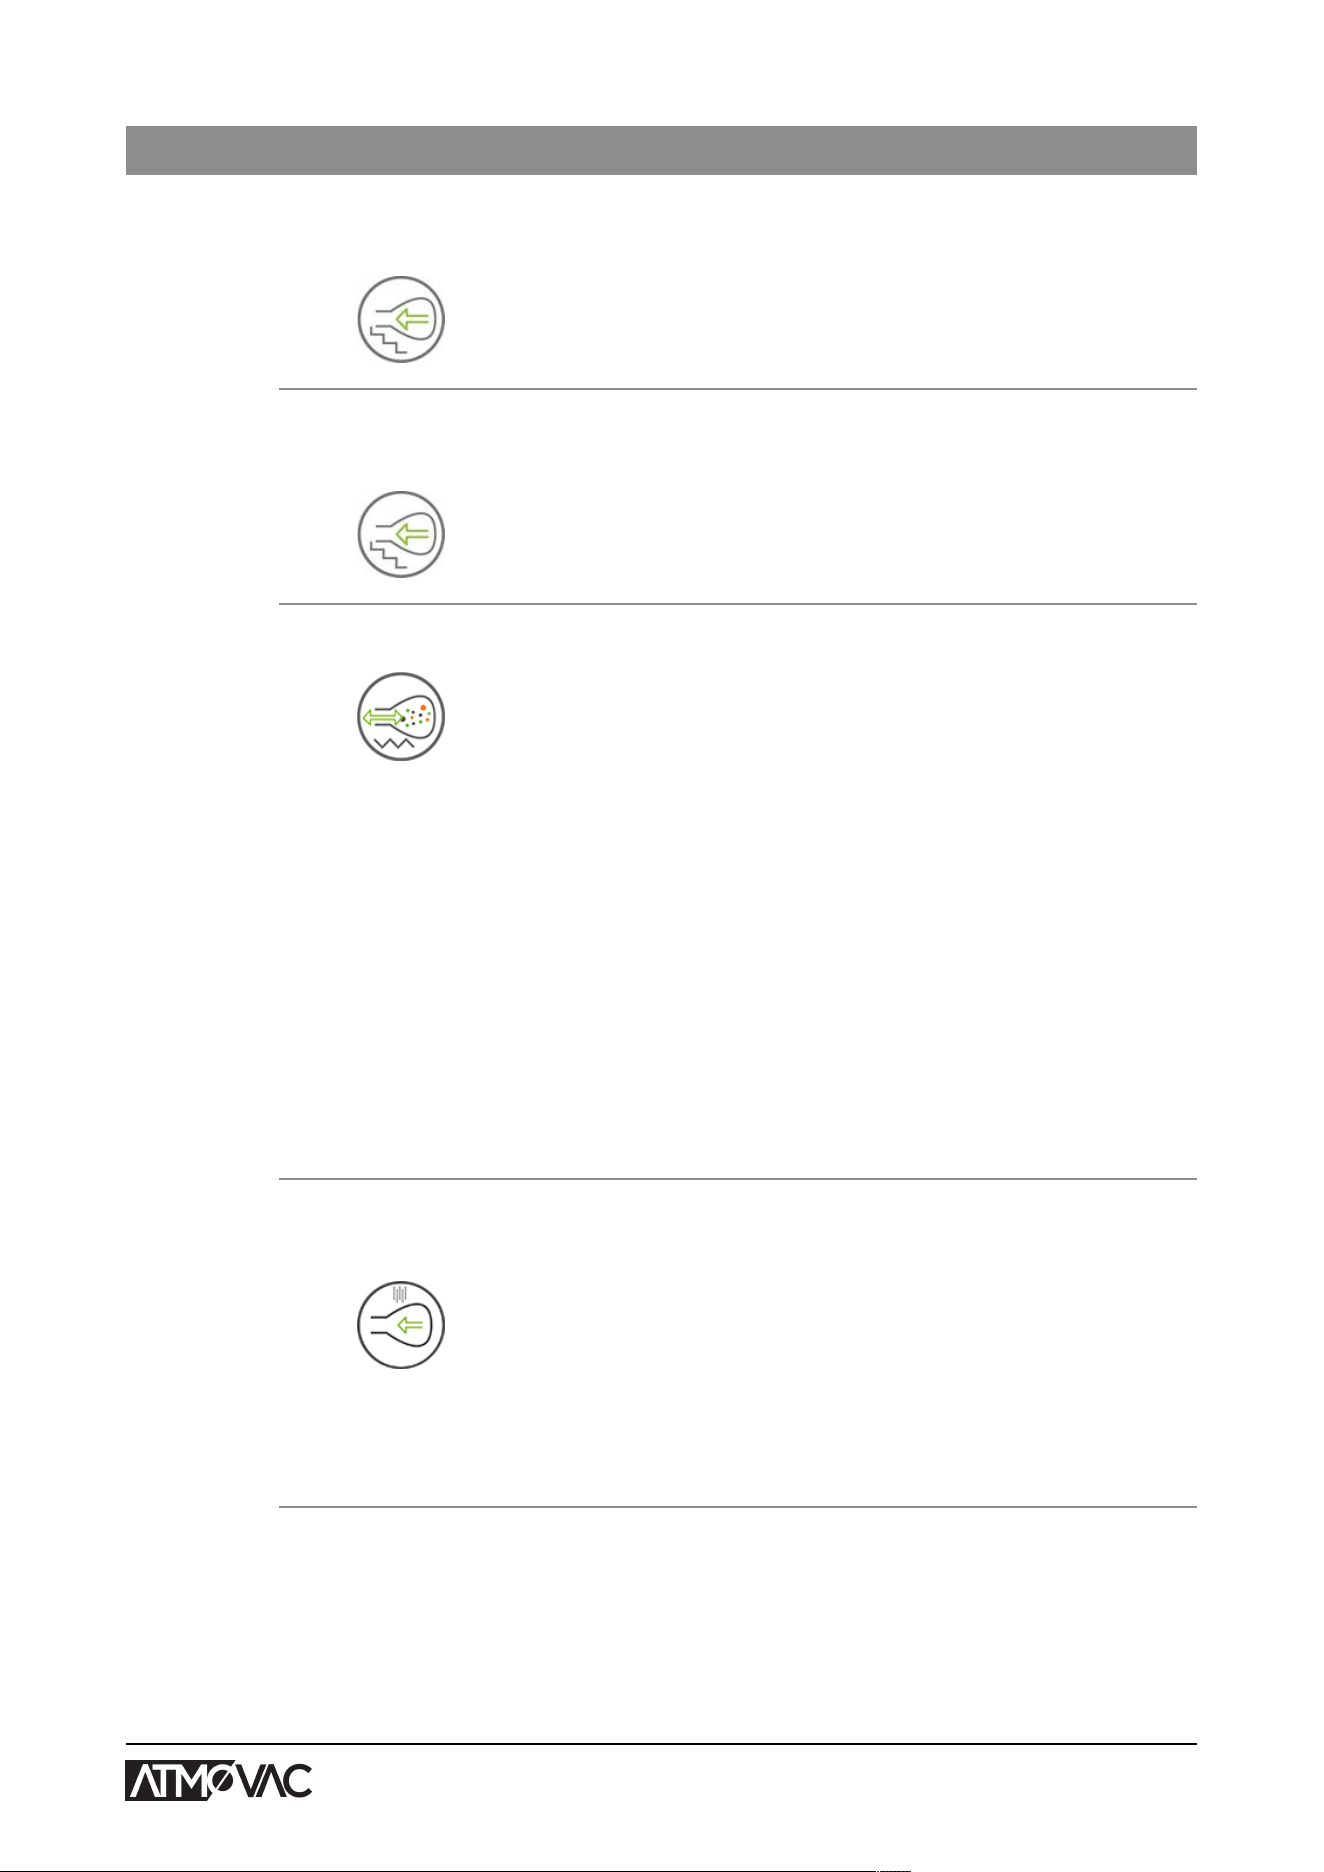
Sequential Vacuum
(optional)
This function is only available on machines with the ACS.
With sequential vacuum, you can alternate vacuum and
pause steps to allow air trapped inside a product to escape
from the core. A maximum of 5 steps can be programmed.
Multi-Cycle Vacuum
(optional)
This function is only available on machines with a 10-PCS.
The Multi-Cycle Vacuum option allows you to vacuum and in-
sert gas in steps. This provides an additional reduction in the
oxygen content.
Marinating (optional) This function is only available on machines with the ACS.
This function is especially designed to accelerate the marin-
ating of a product. This program allows definition of up to 5
vacuuming steps with intermediate ventilation steps.
The vacuuming steps have a fixed vacuum value of 80%, ex-
cept for the last step. The last vacuuming step has an ad-
justable value of up to 99.8%. This also allows setting Vacu-
um+. The intermediate ventilation steps have a fixed value of
42%. After the last step, sealing takes place.
Liquid Control: It is also possible to enable Liquid Control.
This function will then only be active during the last vacu-
uming step. If, for instance, 3 vacuuming steps have been
defined, Liquid Control will be active during the third step.
Vacuum+ is also possible here; however, this would be a Li-
quid Control+ setting of 0.1 sec with a maximum of 5.0 sec.
Tenderising (option-
al)
This function is only available on machines with the ACS.
This feature has been designed to keep the chamber at a
pre-determined vacuum level for a certain time. This is done
to tenderise or degas the product.
During the cycle, the air is removed from the chamber un-
til the pre-set value has been reached. Once this value has
been reached, the chamber will remain at this vacuum level
for the pre-set time.
Description of the Machine 23
Step Process phase Operation
Jars (optional) This function is only available on machines with the ACS.
This is a fast program specially designed for vacuum sealing
jars. The seal and soft-air phase are shut off during this pro-
gram.
During the cycle, the air is removed from the chamber until
the pre-set value has been reached. During the fast decom-
pression the lids are being closed.
This program can also be combined with liquid control. In
this case, set the values in the liquid control program.
Sealing The sealing bars are pressed against the vacuum bag and
melt the bag closed.
3.
Seal During the sealing process, the material of the vacuum bag
is heated and pressed together to create a hermetic seal.
The programming of this function takes place in seconds.
Optionally, a cut-off wire is available. The purpose of the cut-
off wire is to remove the excess foil. Depending on the selec-
ted model, the cut-off wire is controlled simultaneously with
or independent from the sealing wire (Seal 1-2 cut-off).
Decompressing The vacuum is removed from the vacuum chamber by letting
air into the chamber.
4.
Soft-Air (optional for
the Falcon)
This function allows air from outside to slowly enter the
chamber so the vacuum bag will shape itself slowly around
the product. This prevents sharp edges of the product from
puncturing the foil and causing leaks.
5. Opening the vacu-
um chamber
The lid opens.
6. Removing the
product
The operator can remove the packaged product from the
work surface.
Description of the Machine 24
4.4.2 General Functions
Function Pictogram Operation
Cleaning of the
pump oil
The pump cleaning program ensures that the pump is thoroughly
rinsed. During the program, the pump and oil reach the operat-
ing temperature, so the oil and moisture are separated and any
contamination is filtered. The high temperature causes any mois-
ture in the pump to evaporate, thus minimising the risk of corro-
sion.
Menu This menu is available on machines with ACS control. The menu
is used to change the machine settings, such as language and
print options.
Printing
This function is available on machines with ACS control.
This function allows the creation of one or more labels per cycle,
to be put on the packaging.
The following information can be printed on the label: name of
the producer, name of the product, production date, shelf life,
achieved vacuum, initials of the user, recommended storage
temperature and an information field (for example to indicate the
gas used).
External Vacu-
um
This function is available as an option, depending on the type of
machine.
This function allows special food containers to be vacuumed out-
side the machine.
The options to set the vacuum value are the same as for stand-
ard vacuuming (see External Vacuum (optional) on page 36
for 10-program control system or External Vacuum (optional) on
page 56 for ACS control).
Sleeper option The Sleeper option shuts down the machine after a certain time.
The default setting is 10 minutes. If you wish to change this time,
please contact your supplier.
Description of the Machine 25
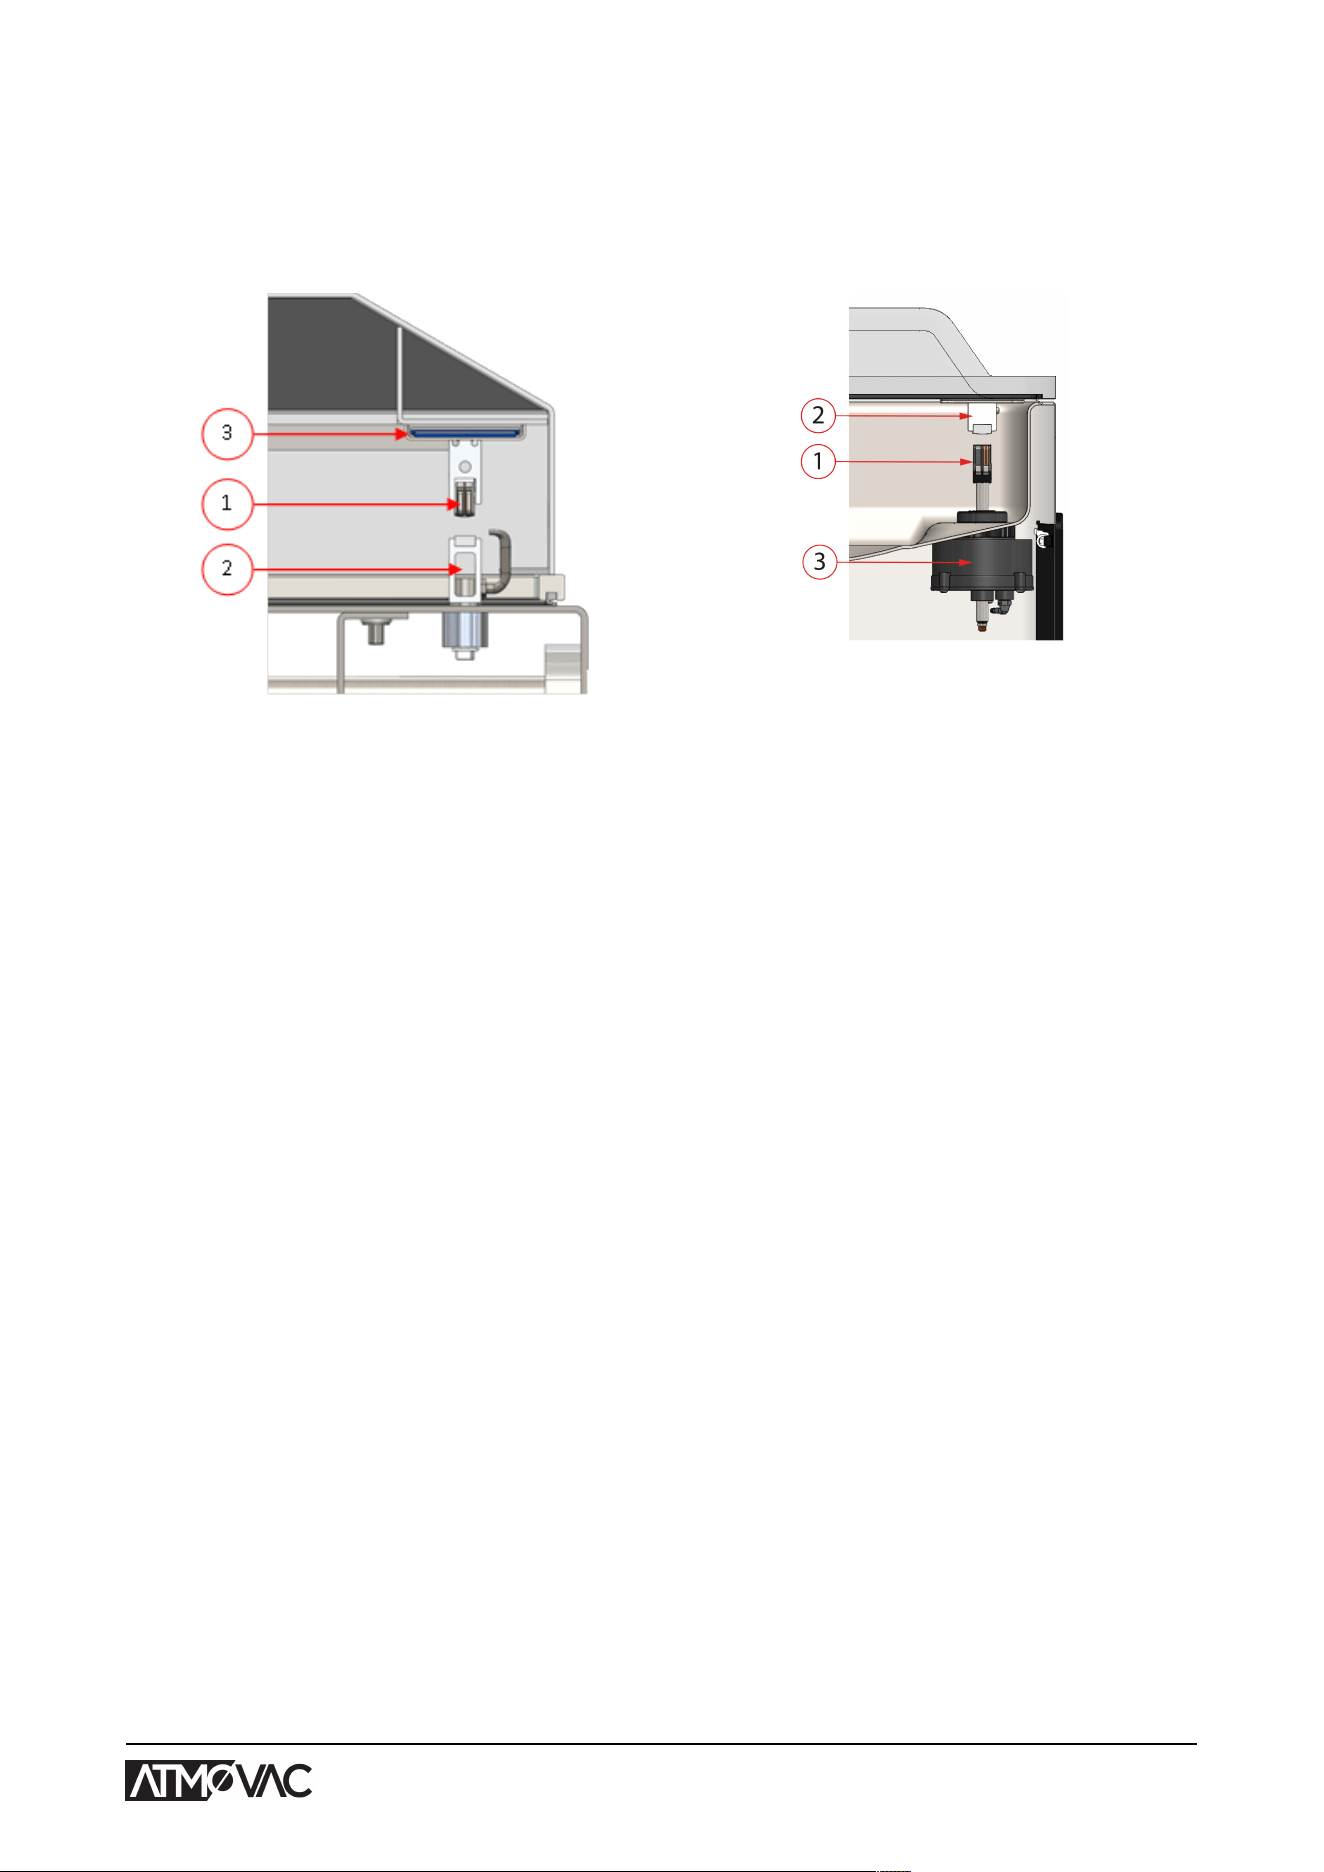
4.5 Sealing System
The sealing system closes the opening(s) of the bag to retain the vacuum and/or gas in the bag.
The end of the bag can optionally be cut off by the sealing bar.
Figure 5: Overview of the Seal-
ing System (Including Seal Bag)
Figure 6: Overview of the Sealing
System (Including Sealing Cylinder)
1. Sealing bar
The sealing bar consists of the following components:
• Sealing wires: during the sealing process, the sealing wires are heated for a certain time
causing the edges of the vacuum bag to melt together.
• Cut-off wires (optional): A cut-off wire is heated in such a way that the foil of the bag
partially melts, allowing the excess foil of the vacuum bag to be removed easily.
• Teflon tape: sealing and cut-off wires are covered with Teflon tape to prevent the bag from
sticking to the sealing bar.
Consult Replacing the Sealing Wire on page 68 for more detailed information about
maintenance.
2. Silicone holder
Opposite the sealing bar is a silicone holder which provides counter pressure on the cylinders/
seal bag (Replacing the Silicone Rubber of the Silicone Holders on page 70).
3. Sealing mechanism
The sealing bars are pressed onto the vacuum bag by bellows or cylinders. By connecting the
inlet of the bellows or cylinders with the atmospheric pressure outside, they press the sealing
bar onto the bag.
Additional sealing pressure (optional) may, depending on the model you have, be used if
additional pressure force is needed. See Technical Data on page 80 and Connecting the
Machine on page 27 for more information.
Description of the Machine 26
5 Installation
Consult Technical Data on page 80 for the specifications of the machine.
Before installing the machine, carefully read the safety instructions in Safety on page 10.
Failure to follow or disregard of the safety instructions may result in serious injury.
5.1 Transportation and Installation
The machine must be moved and transported in an upright position.
The machine may not be transported using a crane. The machine may be transported with a forklift
provided it is still on the pallet packaging.
Moving the machine on wheels on uneven surfaces may lead to loss of stability of the machine.
Always move the machine slowly and carefully.
1. Place the machine on a flat, level surface. This is essential to ensure a trouble-free operation
of the machine.
Do not position machines with plastic covers in the vicinity of a heat source.
Make sure there is sufficient space (at least 19.7 in (50 cm)) around the machine to
ensure a proper ventilation.
2. Ensure the brakes of the machine are activated.
3. Verify that the machine housing is present and correctly fitted.
If the machine is provided with the optional automatic lid (Polar 2-85 and 2-95 only):
4. Remove the panel door on the right hand side of the machine and release the cable of the foot
switch.
5.2 Connecting the Machine
Only a technical expert may perform work on the electrical installation.
Make sure the power supply for this machine matches to the voltage and current stated on the
machine plate.
The table below is an example:
Installation 27
Specified amperage: 16 /fuse
20 C
Description
16 Nominal amperage
Fuse 20 Minimum fuse value with the recommended type of fuse
C C characteristic
1. Fit the correct plug on the cable in accordance with local legislation and connection data. See
Technical Data on page 80 for the correct electrical connection.
2. Connect the machine to a grounded wall outlet to avoid fire or electric shock.
• The power cable must be free at all times, and nothing may be placed on it.
• Immediately replace the power cable if damaged.
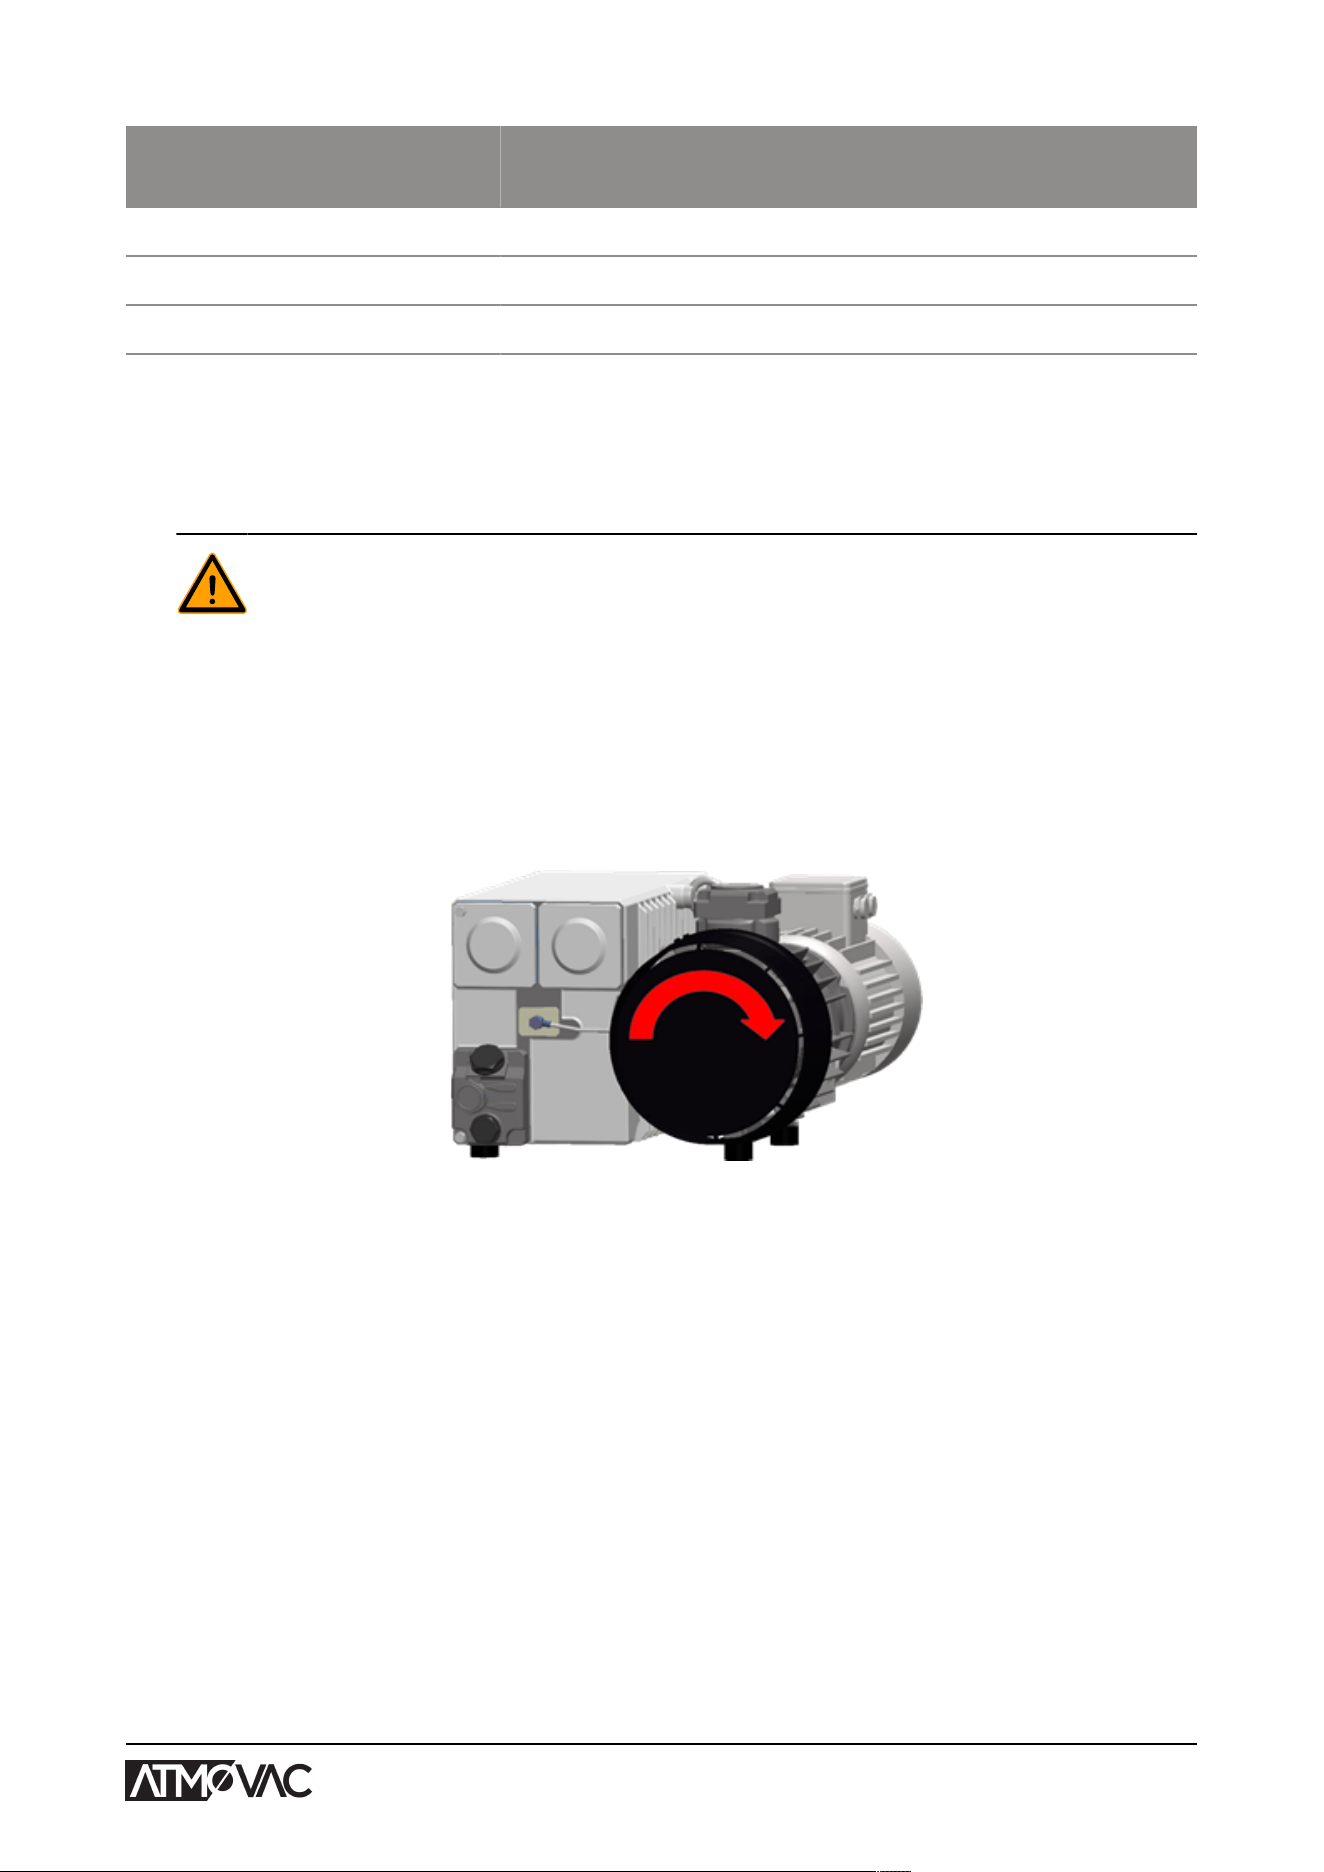
3. Check the correct direction of rotation of the three-phase model pump. See Figure 7: Direction
of Rotation of the Vacuum Pump on page 28.
Operating the machine with an incorrect direction of rotation results in damage to the pump,
in which case no vacuum can be created. After connecting the machine to a different three-
phase power supply, the direction of rotation should be checked again. If the direction of
rotation is incorrect, two phases in the plug must be interchanged.
Figure 7: Direction of Rotation of the Vacuum Pump
4. Optional: Connect the gas supply for the gas flush system.
5. Optional: Connect the air supply for additional sealing pressure.
Installation 28
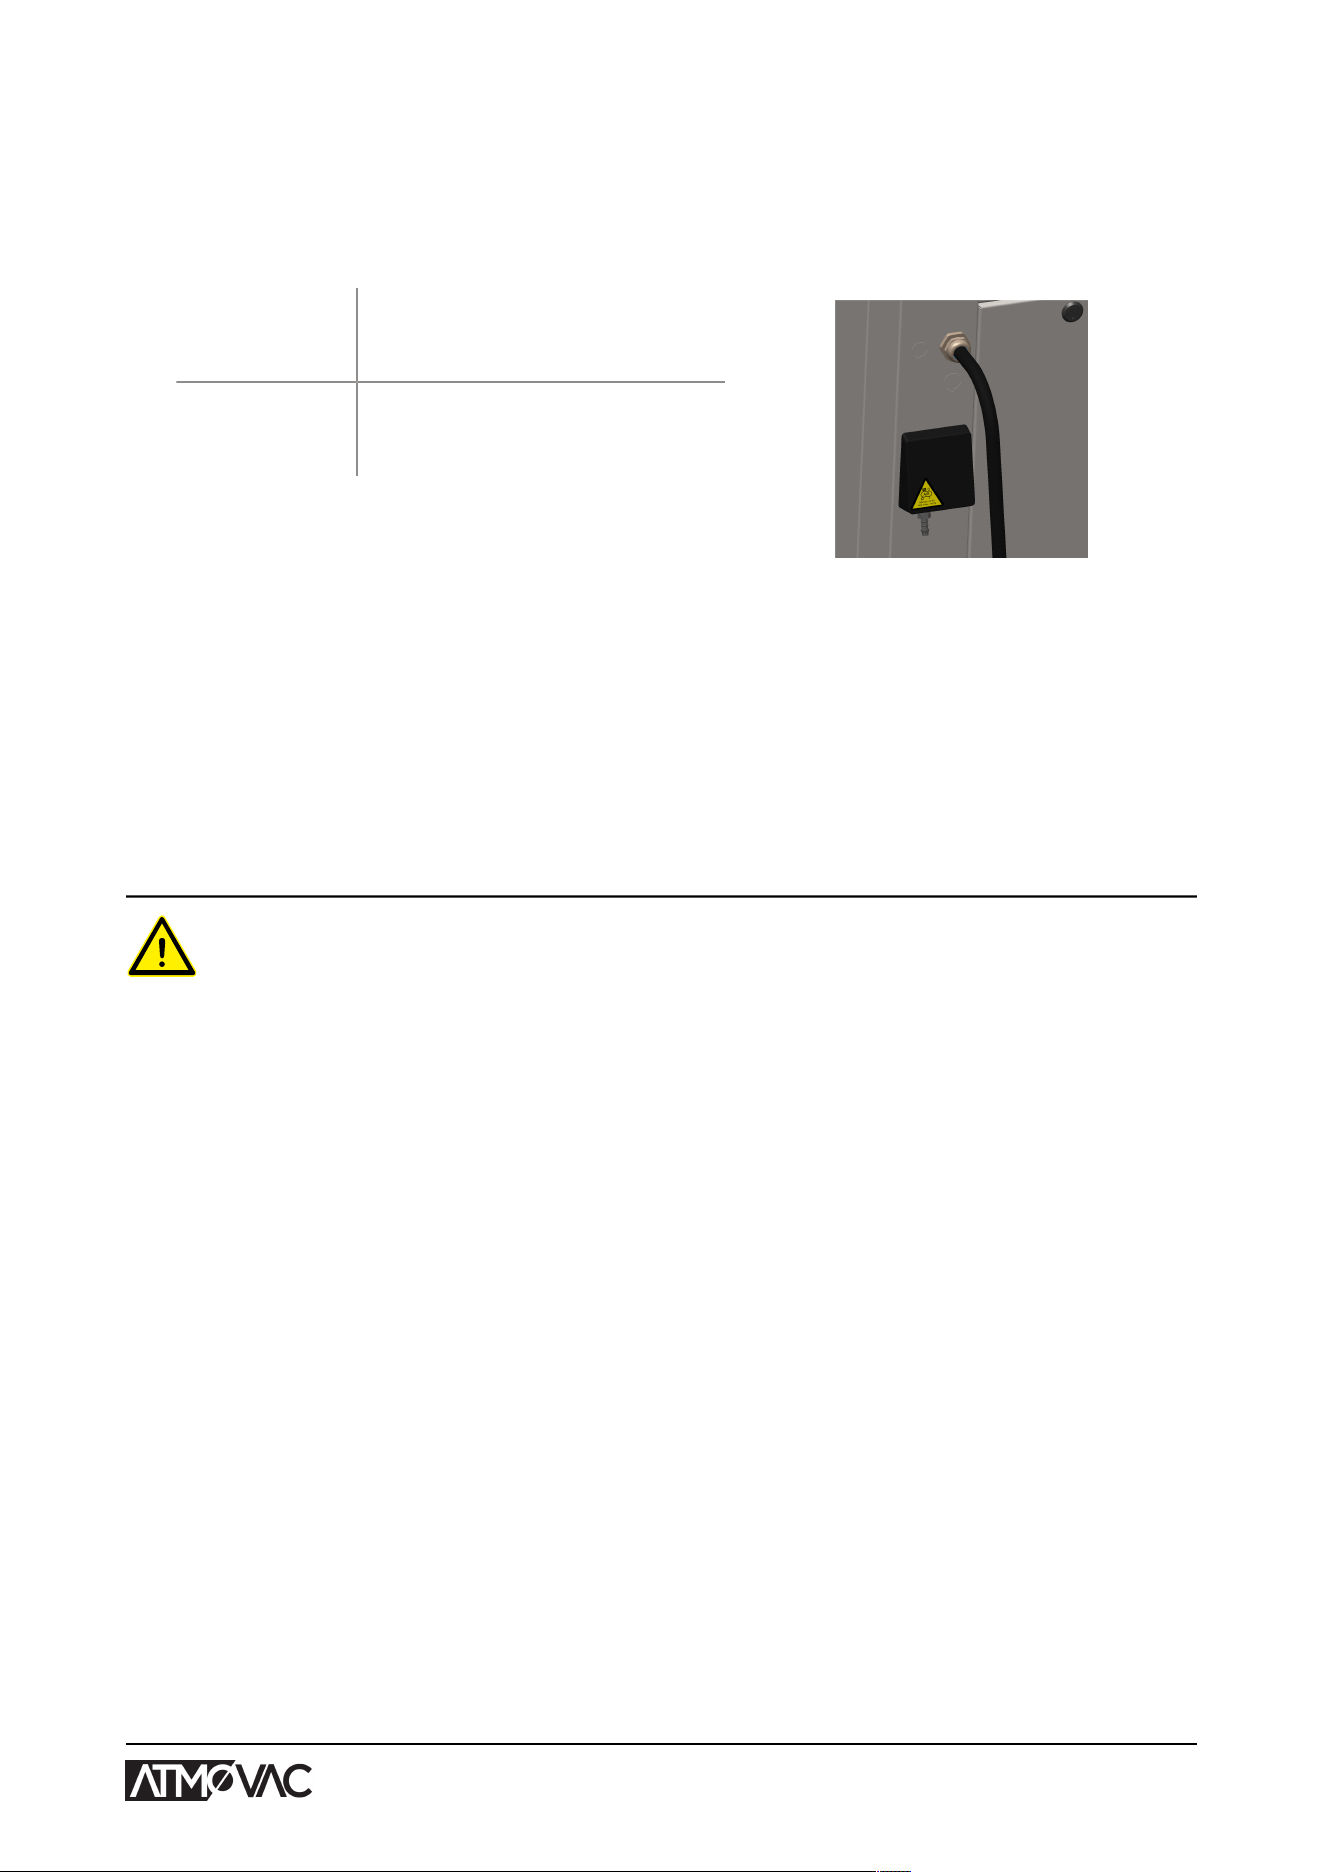
If the Solar is provided with the optional automatic lid (available on models 2-85 and 2-95 only):
6. Connect the hose for compressed air to the hose pillar (8 mm) at the back of the machine. The
compressed air is used for the movement of the automatic lid and conveyor and for extra seal
pressure.
Pressure
≥
6 bar -
≤
10 bar
(≥
87 Psi -
≤
145 Psi)
Flow
≥
100 l/min
(≥
26 gal/min)
Figure 8: Hose connec-
tion for compressed air
5.3 Prior to the First Use
See Vacuum Pump maintenance on page 73 for more information how to perform these steps.
Prior to the first use, the following steps must be performed:
Failure to do so may result in unrepairable damage to the machine.
1. Check the oil sight glass to see if the amount of oil in the pump is sufficient.
2. Optional: If the amount of oil in the pump is insufficient, refill it.
3. Start up the machine. See Operation on page 30 for more information.
Installation 29
6 Operation
Depending on the configuration of the vacuum packaging machine it is equipped with one of the
following control systems:
• 10-Program Control System (10-PCS)
• Advanced Control System (ACS)
Read the appropriate section how to operate the vacuum packaging machine.
• All persons responsible for the operation of this machine must at least fully read and
understand the chapters Safety on page 10 and Operation on page 30.
• Failure to follow or disregard of the safety instructions may result in serious injury.
6.1 10-Program Control System (10-PCS)
6.1.1 Operating Elements
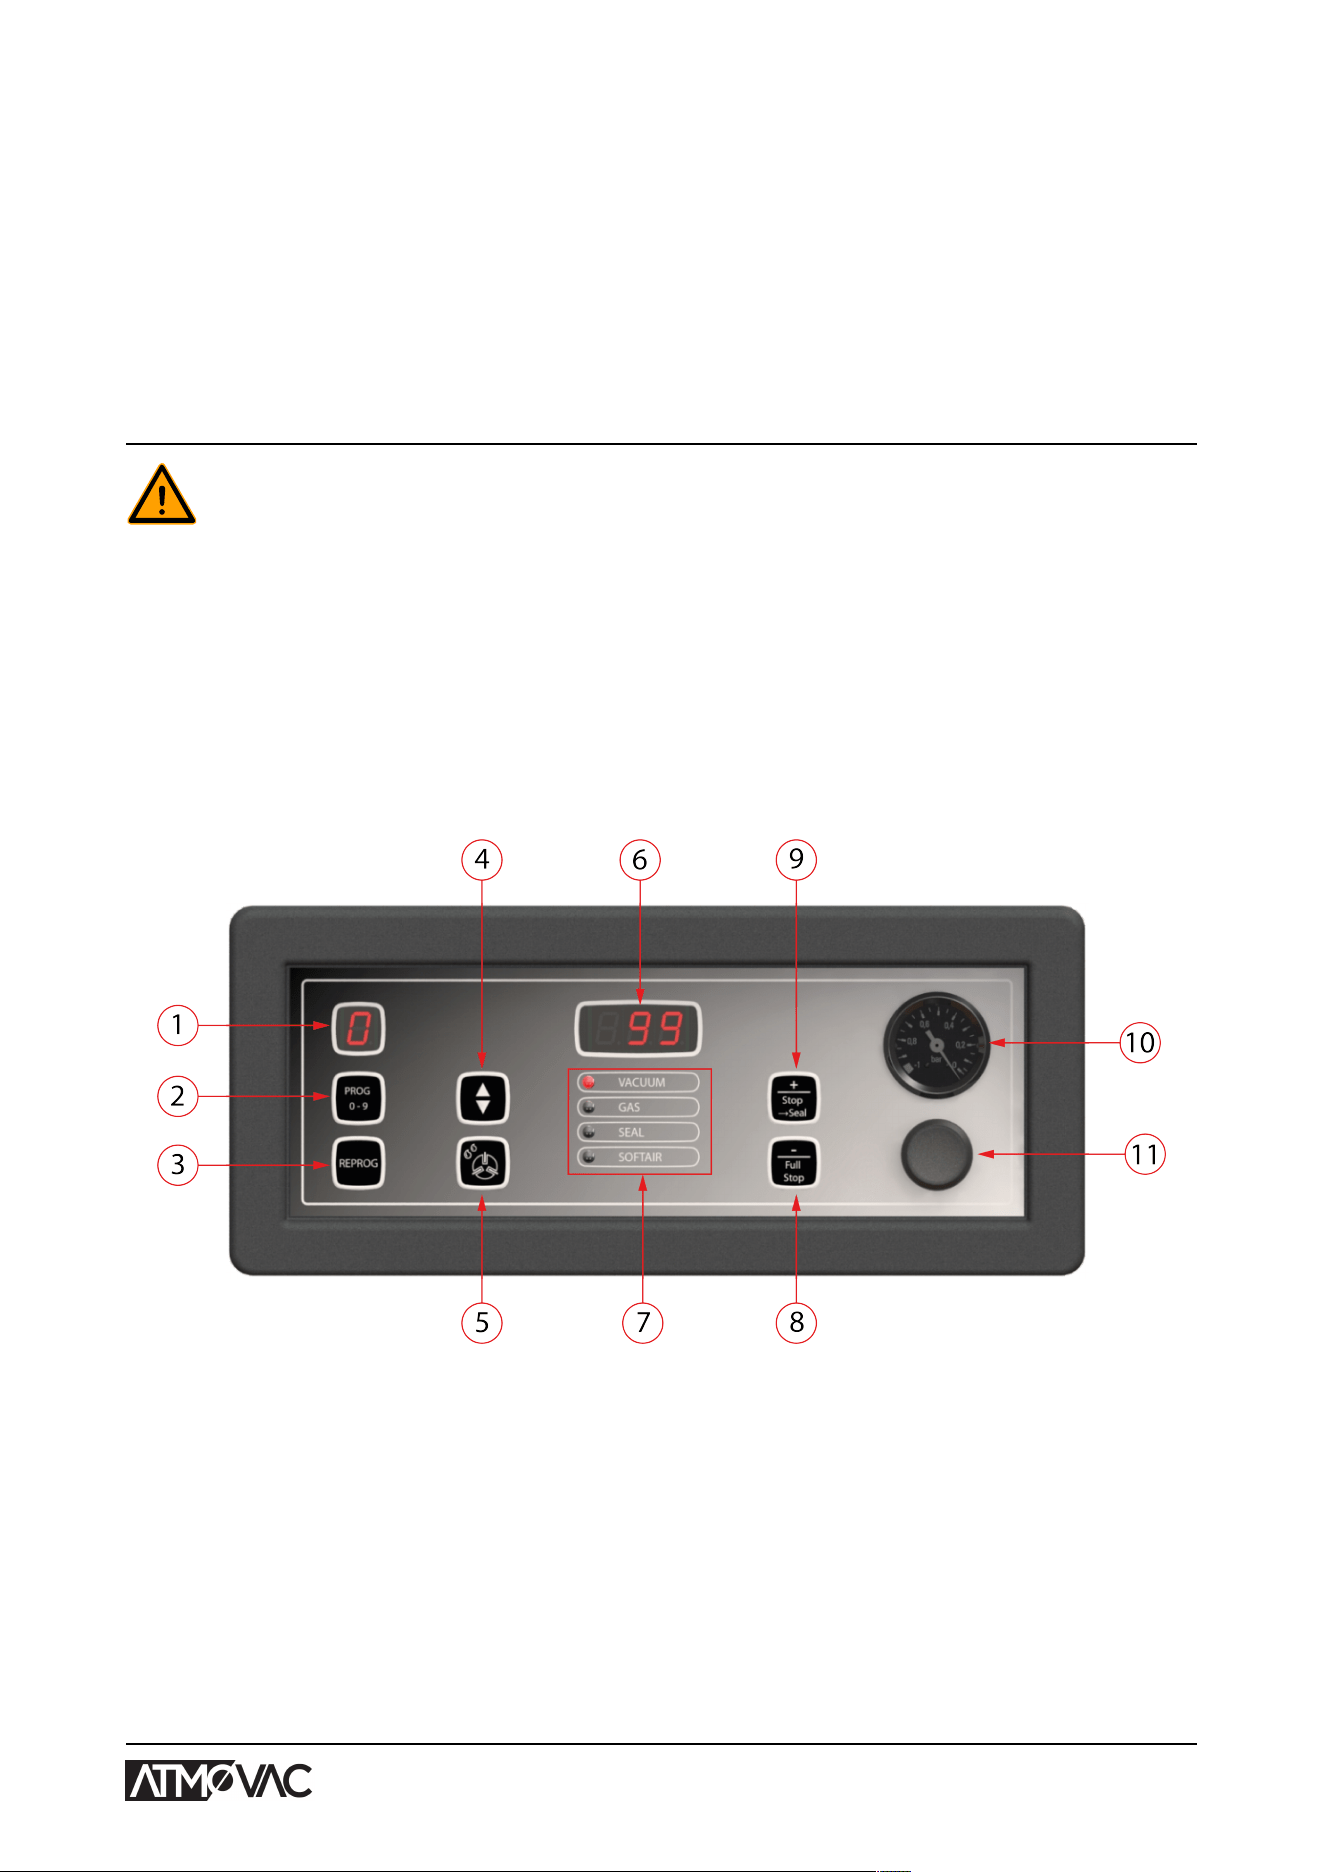
The 10-program control system allows the machine to be operated and programmes to be
changed.
Figure 9: Control Panel of the 10-Program Control System
1. Program display
Shows the selected program.
2. PROG 0 – 9 button
This is used to select the desired program.
3. REPROG button
This is used to enable the programming mode. The parameters can be changed using the
Cursor key, the – / STOP button and the + / VACUUM STOP button.
Operation 30

4. Cursor key
This key is used to operate the functions of the parameter display and function display.
5. Pump cleaning program button
This is used to activate the pump cleaning program. Moisture can be absorbed by the oil
when the pump is running only short cycles or when you are packaging moisture-containing
products. This program removes moisture from the oil of the vacuum pump. See Running the
Pump Cleaning Program on page 75 for instructions.
6. Parameter display
This display shows the current value of the active function during the program cycle or the
set value of the selected function when the machine is inactive. A red dot will light up in the
bottom right if the Vacuum+ option is enabled.
7. Function display
The LED light in front of the function lights up if the function is active during the program cycle
or if the function is selected in the programming mode.
8. – / STOP button
This is used to interrupt the entire cycle during a packaging cycle. All functions are skipped
and the cycle is terminated. In the programming mode, the value of the selected parameter
can be lowered using this button.
9. + / VACUUM STOP button
This stops the active function and proceeds to the next program step. In the programming
mode, the value of the selected parameter can be increased using this button.
10. Vacuum meter
Shows the pressure in the vacuum chamber. A value of -1 bar corresponds to 99% vacuum.
11. On/Off button
Serves to turn the control panel on or off.
6.1.2 Starting the Machine
1. Plug in the machine.
2. Turn the main switch to the ON position (see Electrical Installation on page 86) to turn on
the machine.
3. Press the on/off button on the control panel to enable the operation.
3 dashes may be shown on the display during the first start-up or ventilation. This means that the
machine needs to be decompressed. In this case, open the lid to decompress the machine.
6.1.3 Starting the Packaging Cycle
The machine must be started in accordance with Starting the Machine on page 31 before
starting a packaging cycle.
1. Select the desired program.
Press the PROG 0 – 9 button
2. Put the product/products in place.
a. Put the product/products in the vacuum bag.
b. Place the vacuum bag in/on the vacuum chamber. Make sure the opening(s) is/are
correctly placed with regard to the seal position(s).
Operation 31

3. Close the lid.
The packaging cycle will start.
6.1.4 Proceeding to the Next Step in the Cycle
For some products, it may be necessary to proceed to the next step in the packaging cycle before
the vacuum time or the vacuum level has been reached.
1. Proceed to the next step in the cycle.
Press the + / VACUUM STOP button.
The next step will be started.
6.1.5 Terminating a Program
Programmes such as the packaging program or the pump cleaning program can be terminated at
any time.
1. Terminate the program.
Press the – / STOP button.
The program will be terminated and the vacuum chamber is decompressed.
6.1.6 Changing the Program Settings
10 programmes are available. Programmes 1 – 9 can be adjusted by the user. Program 0 is
intended for servicing purposes only. This section describes the units and limits of the parameters
and how parameters can be adjusted.
See Operating Elements on page 30 for an overview of the operating elements of the 10-PCS.
1. Press the PROG 0 – 9 button to select the program you wish to change.
2. Press the REPROG button to select the programming mode.
The function display will start flashing.
3. Use the Cursor key to scroll to the desired parameter.
The LED in front of the selected function will light up.
4. Press the – / STOP button and the + / VACUUM STOP button to adjust the value.
5. Press the REPROG button to activate the new parameter.
The function display will stop flashing.
6.1.6.1 Vacuum
During the cycle, the air is removed from the chamber until the set time or pressure has been
reached, depending on the selected model (time-controlled or sensor-controlled).
1. Press the PROG 0 – 9 button to select the program for which you wish to set the Vacuum
option.
2. Press the REPROG button to select the programming mode.
The function display will start flashing.
3. Use the Cursor key to scroll to the parameter Vacuum.
The LED in front of the selected function will light up.
4. Press the – / STOP button or the + / VACUUM STOP button to adjust the value.
5. Press the REPROG button to activate the new parameter.
The function display will stop flashing.
Operation 32

6.1.6.2 Vacuum (automatic)
During the cycle, the air is removed from the chamber until the set time or pressure has been
reached, depending on the selected model (time-controlled or sensor-controlled).
To program the vacuum level automatically:
1. Press the PROG 0 – 9 button to select the program for which you wish to set the Vacuum
option.
2. Press the REPROG button to select the programming mode.
The function display will start flashing.
3. Close the lid.
The vacuum cycle starts to run.
4. Press the + / VACUUM STOP button when the desired vacuum level has been reached.
The cycle will continue to the next phases.
5. When the cycle is finished, press the REPROG button to save the settings.
6.1.6.3 Vacuum+ (optional)
If air is trapped in the product, it may be desirable to extend the vacuuming time after the maximum
vacuum has been reached. This to allow entrapped air to escape from the product.
The Vacuum+ time is set in seconds. If a Vacuum+ time has been set, a dot will appear in the
bottom right of the parameter display.
1. Press the PROG 0 – 9 button to select the program for which you wish to set the Vacuum+
option.
2. Press the REPROG button to select the programming mode.
The function display will start flashing.
3. Use the Cursor key to scroll to the parameter Vacuum.
The LED in front of the selected function will light up.
4. Press the + / VACUUM STOP button to adjust the value to maximum.
5. Press the Cursor key once to select the Vacuum+ parameter.
The parameter display indicates OFF. The LED of the function display will remain on Vacuum.
6. Press the – / STOP button and the + / VACUUM STOP button to adjust the value of Vacuum+.
When setting a value, a dot will appear in the bottom right of the parameter display.
7. Press the REPROG button to activate the new parameter.
The function display will stop flashing.
6.1.6.4 Gas (optional)
For the protection of the product, it may be desirable to insert a gas into the packaging after
vacuuming. Optionally, the machine can be equipped with a gas flush system.
See Technical Data on page 80 for the connection details.
Never use a gas mixture containing more than 20% oxygen or other explosive gases. This
may cause life-threatening explosions.
Operation 33

The insertion of gas lowers the seal pressure. The minimum final pressure (after the
insertion of gas) must be 30% (300 mbar/0.3 on vacuum meter) to ensure proper sealing.
1. Press the PROG 0 – 9 button to select the program for which you wish to set Gas.
2. Press the REPROG button to select the programming mode.
The function display will start flashing.
3. Use the Cursor key to scroll to the parameter Gas.
The LED in front of the selected function will light up.
4. Press the + / VACUUM STOP button to adjust the value.
5. Press the REPROG button to activate the new parameter.
The function display will stop flashing.
6.1.6.5 Gas+ (optional)
The Gas+ option only applies if the machine is equipped with the gas option. For some products it
may be desirable to insert additional gas into the packaging to create a "balloon packaging". This
allows for a better protection of a fragile product. The recommended value for Gas+ is 0.7 seconds.
If the Gas+ option is enabled, a dot will appear in the bottom right of the program display. If the Gas
+ option is enabled, this will apply to all programmes for which gas has been set.
To enable the Gas+ option on your machine, please contact your supplier.
6.1.6.6 Liquid Control (optional)
The Liquid Control option can be enabled or disabled for each program. If the Liquid Control option
is enabled, the machine will vacuum until the maximum vacuum is reached (99%). If the product
reaches the boiling point before the maximum vacuum is reached, the machine will proceed to the
next step of the cycle.
1. Press the PROG 0 – 9 button to select the program for which you wish to set Liquid Control.
2. Press the REPROG button to select the programming mode.
The function display will start flashing.
3. Press the PROG 0 – 9 button until H2O is shown on the parameter display.
The parameter display indicates H2O.
4. Press the REPROG button to activate the new parameter.
The function display will stop flashing.
The Liquid Control function prevents excessive fluid from being drawn out of the product. This
means that if the product reaches the boiling point, the machine will proceed to the next step of the
cycle. Depending on the moisture content, the manner in which moisture is bound, the available
surface for evaporation and the temperature, the end vacuum percentage might be limited and
there might be too much residual oxygen content present in the package. If the product/process
requires packaging with a low residual oxygen content, despite the high moisture content, there are
two options:
1. Lower the product temperature. This allows for a deeper vacuum to be reached before the
product reaches the boiling point.
2. Use the Liquid Control+ option.
Operation 34

6.1.6.7 Liquid Control+ (optional)
The Liquid Control+ time is set in seconds. This is the time the vacuuming will continue after
detection of the evaporation point.
You can only set Liquid Control+ if Liquid Control has been set to the maximum. To set the Liquid
Control+ option, follow the steps below:
1. Press the PROG 0 – 9 button to select the program for which you wish to set Liquid Control+.
2. Press the REPROG button to select the programming mode.
The function display will start flashing.
3. Press the PROG 0 – 9 button until H2O is shown on the parameter display.
The parameter display indicates H2O.
4. Press the Cursor key once to select the Liquid Control+ parameter.
The parameter display indicates OFF. The LED of the function display will remain on Vacuum.
5. Press the – / STOP button and the + / VACUUM STOP button to adjust the value of Liquid
Control+.
When setting a value, a dot will appear in the bottom right of the parameter display.
6. Press the REPROG button to activate the new parameter.
The function display will stop flashing.
6.1.6.8 Red Meat (optional)
The Red Meat option is especially designed for the packaging of fresh meat. Degassing the
product during the vacuuming process may result in the formation of air pockets inside the
package. The Red Meat option prevents degassing of the product during and after the sealing
phase.
The Red Meat option can be set for each program individually. If the Red Meat option is enabled in
a program, it will not be possible to enable the Soft-air option in that program.
When selecting this option, a parameter to set the "expansion reduction time" will appear. This is
indicated by a flashing LED in front of the Soft-air option in the function display. It is recommended
not to change this setting. Please contact your supplier for this.
To enable the Red Meat option on your machine, please contact your supplier.
6.1.6.9 Multi-Cycle Vacuum (optional)
The Multi-Cycle Vacuum option allows you to vacuum and insert gas in up to 5 steps. This
provides an additional reduction in the oxygen content. This function is useful only for very specific
applications, which set very special demands on the residual oxygen content or the maximum
allowed vacuum. This option will not result in any appreciable benefit in the food industry.
To enable the Multi-Cycle Vacuum option on your machine, please contact your supplier.
1. Press the PROG 0 – 9 button to select the program for which you wish to set Multi-Cycle.
2. Press the REPROG button to select the programming mode.
The function display will start flashing.
3. Use the Cursor key to scroll to the parameter Vacuum.
The LED in front of the selected function will light up.
The right-side character of the parameter display indicates which vacuuming step you are
programming.
Operation 35

4. Press the – / STOP button and the + / VACUUM STOP button to adjust the value of Vacuum.
5. Use the Cursor key to scroll to the parameter Gas.
The LED in front of the selected function will light up.
6. Press the – / STOP button and the + / VACUUM STOP button to adjust the value of Gas.
7. Repeat steps 3 and 4 if an additional vacuuming step is desired.
8. Press the REPROG button to activate the new parameter.
The function display will stop flashing.
6.1.6.10 Seal
This is the time that the sealing wire and/or the cut-off wire are heated. The longer the time, the
more heat is transferred to the bag.
As an option, the machine can be equipped with a Seal 1-2 option. This means the seal wire is
activated separately from the cut-off wire. This way the cut-off wire can be activated a bit longer, to
cut through thicker bags.
To set the Seal option, follow the steps below:
1. Press the PROG 0 – 9 button to select the program you wish to change.
2. Press the REPROG button to select the programming mode.
The function display will start flashing.
3. Use the Cursor key to scroll to the parameter Seal.
The LED in front of the selected function will light up.
4. Press the – / STOP button and the + / VACUUM STOP button to adjust the value.
5. Press the REPROG button to activate the new parameter.
The function display will stop flashing.
To change the Cut-off time:
6. Press the Cursor key again. The LED in front of Seal will still be lit. Repeat steps 4 and 5.
6.1.6.11 Soft-Air (optional for the Pampero)
This is the time that air is softly released into the chamber after sealing has taken place.
To set the Soft-air function, follow the steps below:
1. Press the PROG 0 – 9 button to select the program you wish to change.
2. Press the REPROG button to select the programming mode.
The function display will start flashing.
3. Use the Cursor key to scroll to the parameter Soft-air.
The LED in front of the selected function will light up.
4. Press the – / STOP button and the + / VACUUM STOP button to adjust the value.
5. Press the REPROG button to activate the new parameter.
The function display will stop flashing.
6.1.6.12 External Vacuum (optional)
The External Vacuum function allows special food containers to be vacuumed outside the machine.
Depending on whether the machine is time or sensor-controlled, the vacuum value is set in
seconds or %.
Operation 36
With the external vacuum program, you can program as with any other program. Check in advance
whether the relevant food container can withstand and hold a vacuum.
To select the external vacuum option, follow the steps below.
1. Select the external vacuum program.
a. Press the Pump Cleaning Program button.
The display will show "C".
b. Press the Cursor key.
The display will show "E".
2. Program the external vacuum program according to the steps specified in Changing the
Program Settings on page 32.
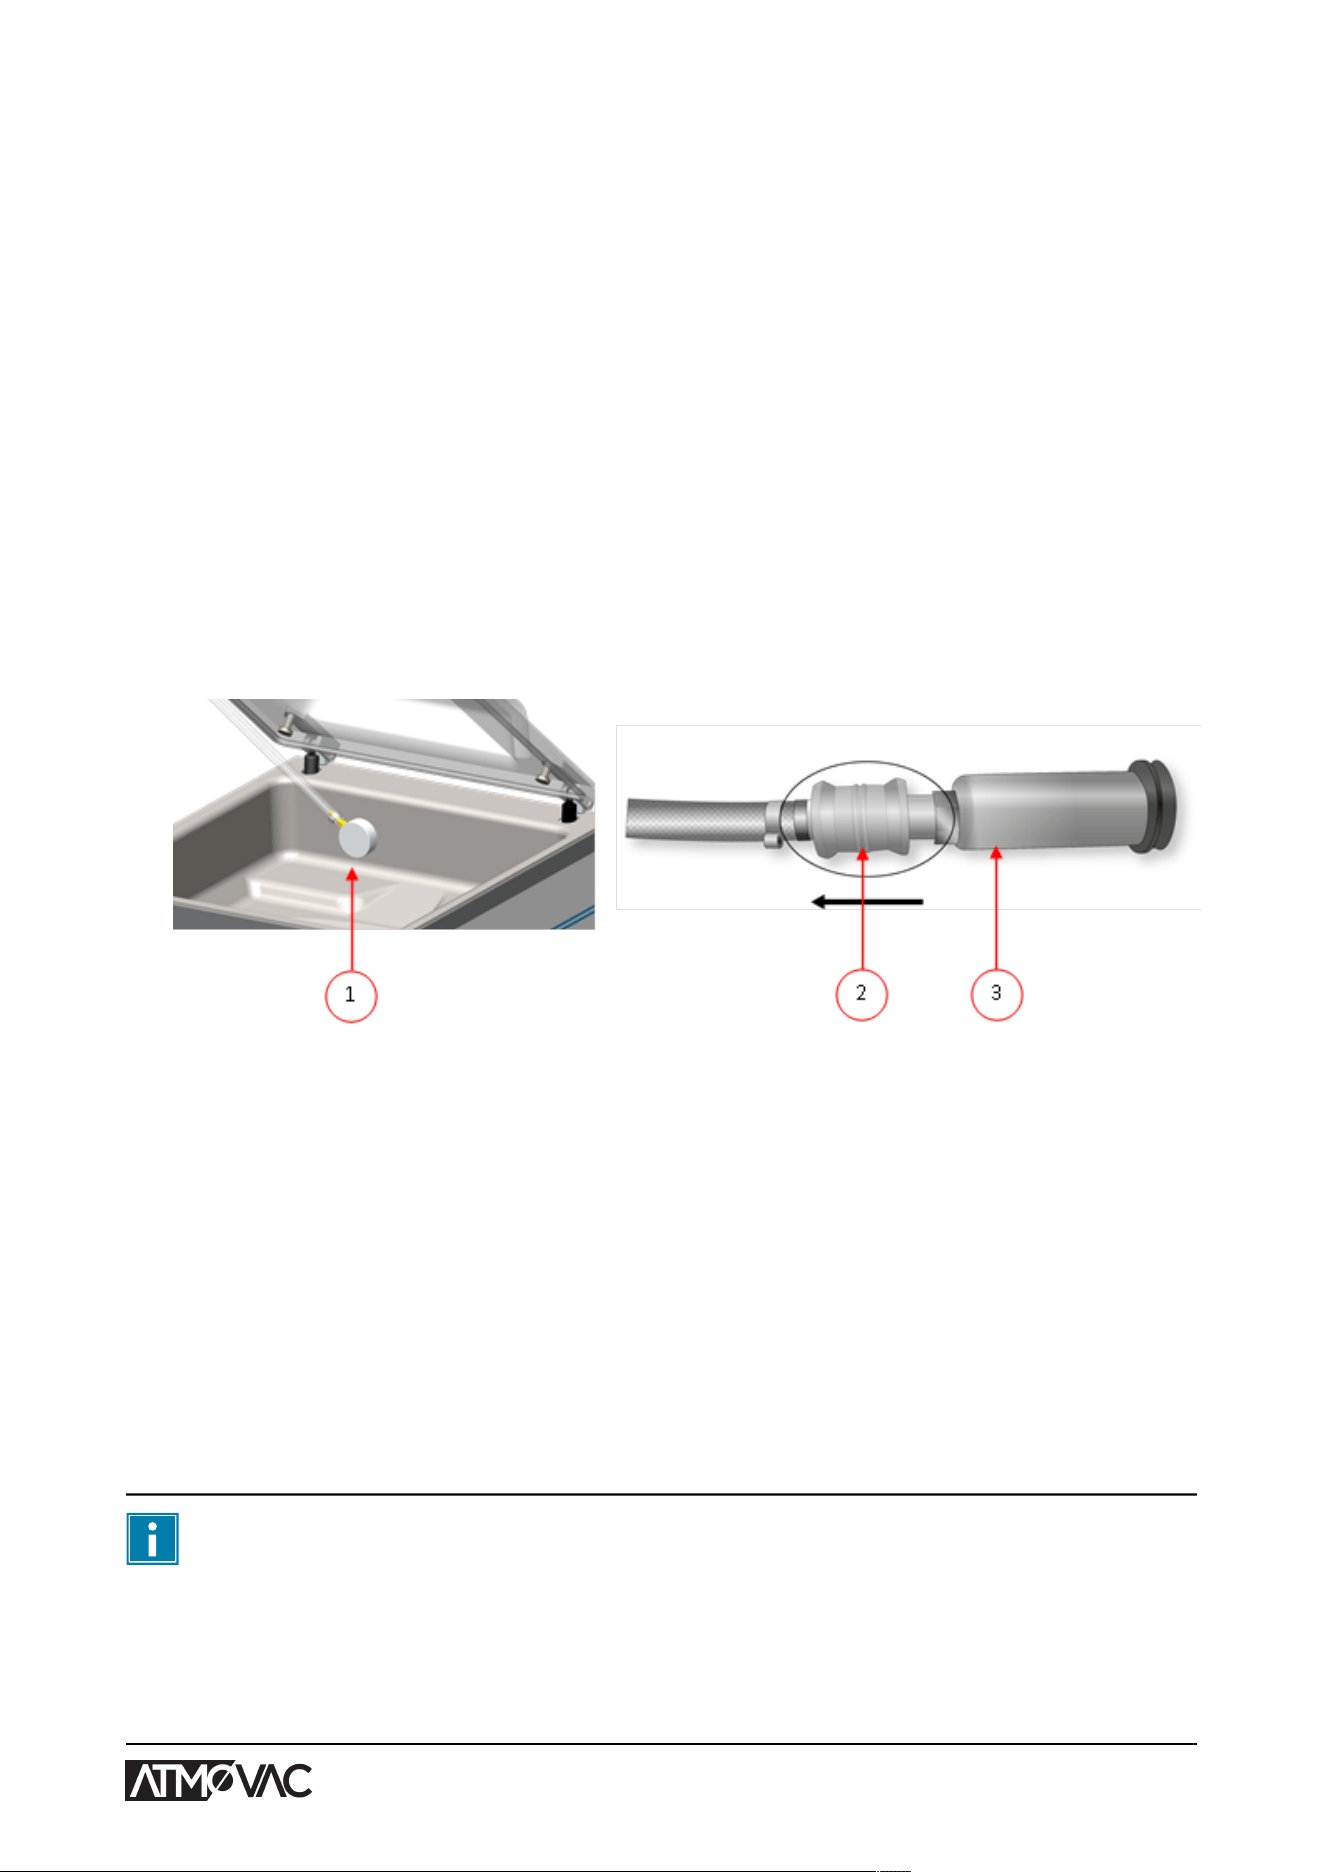
3. Connect the external vacuum hose to the machine by placing the adapter over the suction
inlet (1) in the vacuum chamber.
4. Connect the external vacuum hose to the packaging.
a. Connect the adapter (3) of the external vacuum hose to the valve of the packaging.
b. Slide the sliding valve (2) towards the hose (closed position).
Figure 10: External Vacuum Adapter Set (10-Program Control System)
5. Press the + / VACUUM STOP button to start vacuuming.
The packaging is vacuumed until the programmed value is reached.
6. Slide the sliding valve of the adapter towards the packaging (open position) and remove the
external vacuum hose from the packaging.
6.1.6.13 Sleeper Option
If the Sleeper option is enabled, the pump will automatically shut off after the set time has elapsed
and the machine is not in use during this period. The pump will automatically start again once a
new vacuum cycle is started.
By default, the Sleeper option is set to 10 minutes. If you wish to change this time, please contact
your supplier.
The Sleeper option cannot be set to less than 1 minute.
Operation 37
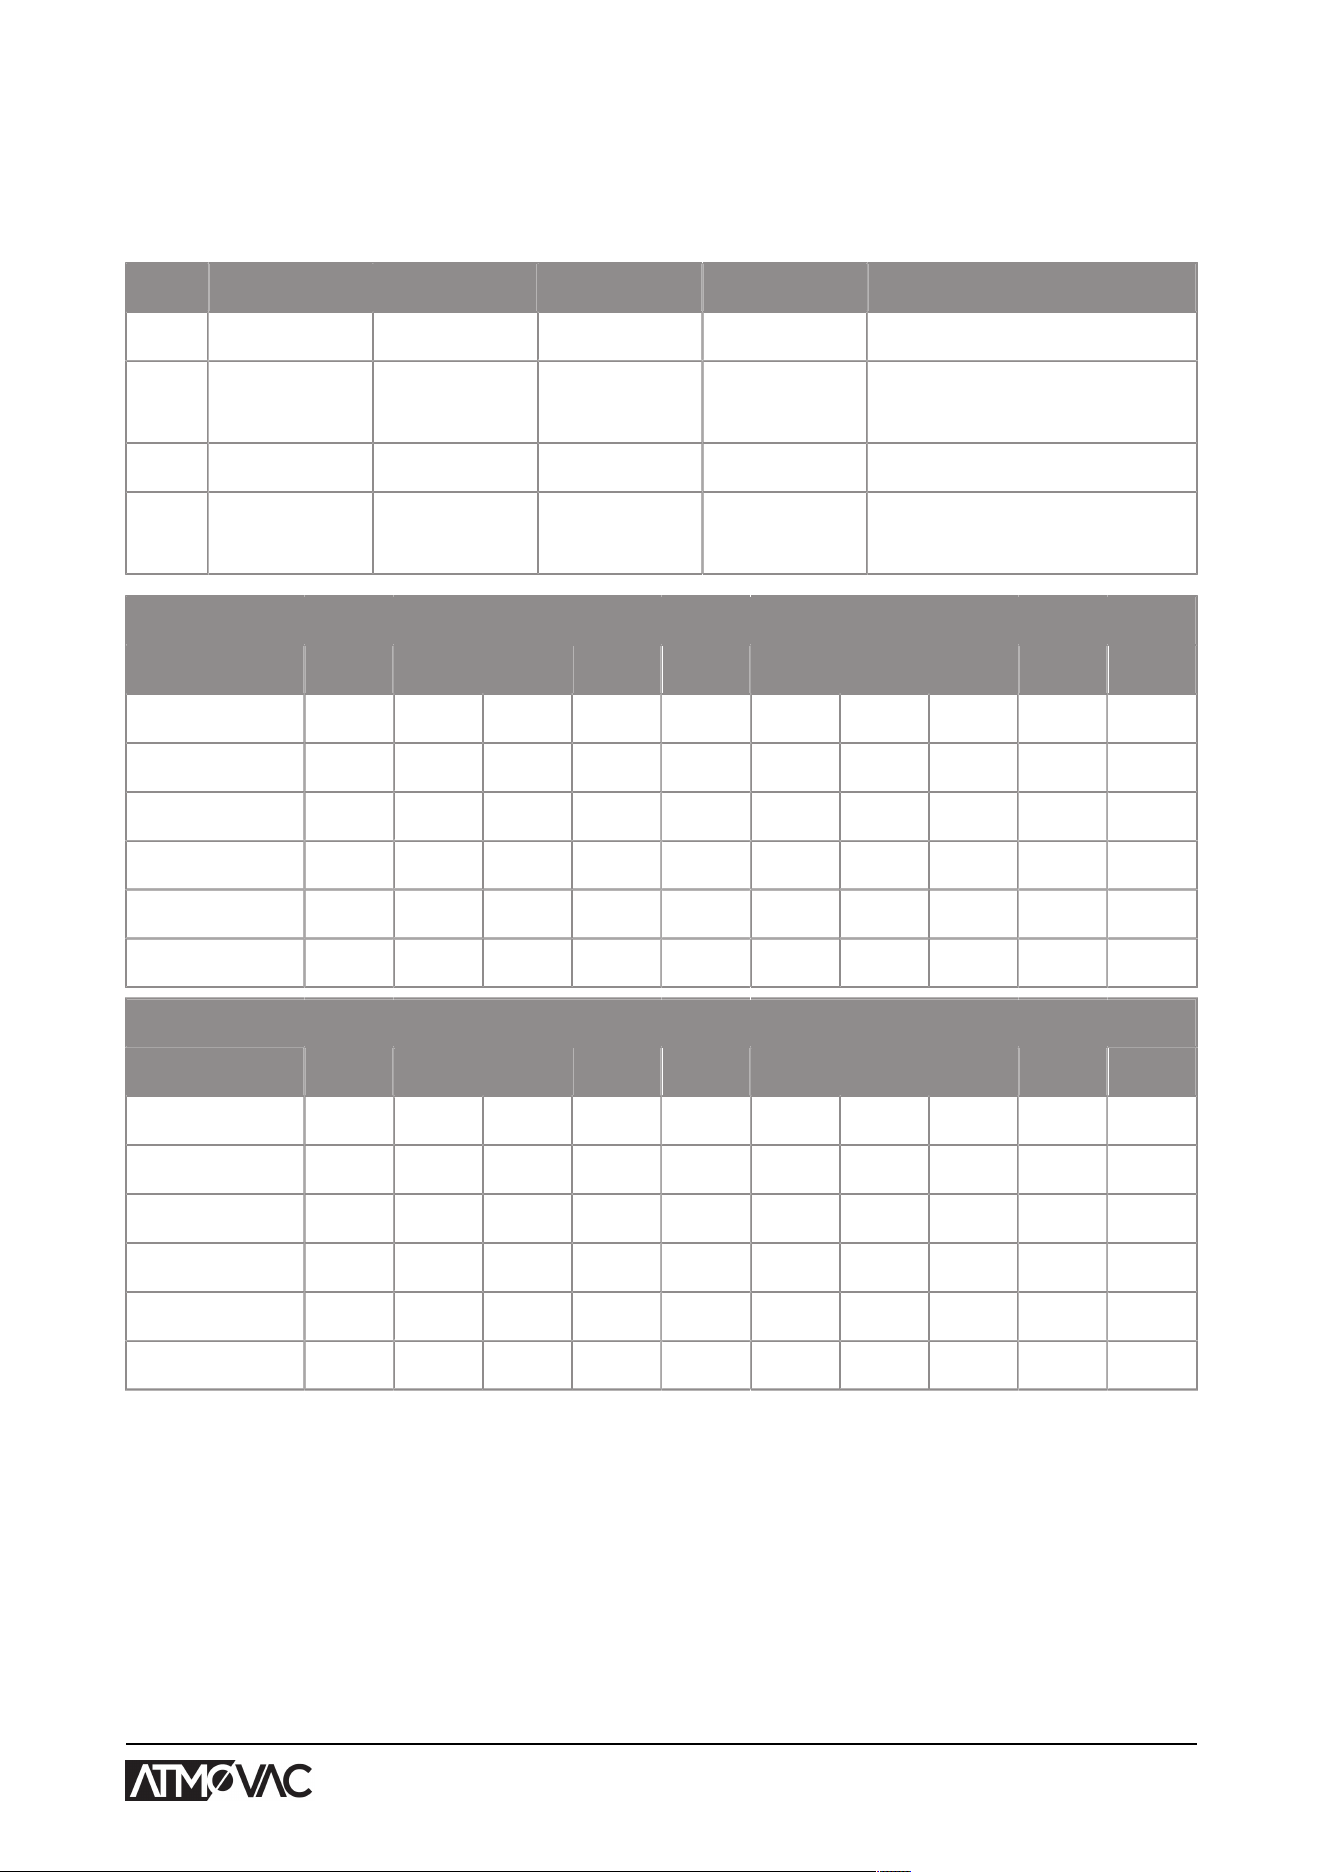
6.1.7 Example programmes
The vacuum packaging machine is equipped with sample programmes with pre-set parameters. It
is possible to optimise a program for your products by modifying the parameters.
Prog Vacuum Vacuum+ Seal Soft-air Type of product
1. 99% OFF 2.2 s 3 s Solid products
2. 97% N/A 2.2 s OFF
Liquids/liquid-con-
taining products
3. 99% OFF 2.2 s 8 s Fragile/sharp products
4. 99% 4 s 2.2 s 3 s
Product that may con-
tain entrapped air
Set as sensor-controlled
Prog no. 1 2 3 4 5 6 7 8 9 10
Vacuum 99% 97% 99% 99% 80% 90% 50% 90% 60% 99%
Vacuum+ OFF OFF 4 s 15
Gas OFF OFF OFF 60% 50% 80% OFF 80% 30% OFF
Seal 2.2 s 2.2 s 2.2 s 2.2 s 2.5 s 2.5 s 2.5 s 2.5 s 2.5 s 2.5 s
Seal 2 3.5 s 3.5 s 3.5 s 3.5 s 3.5 s 3.5 s 3.5 s 3.5 s 3.5 s 3.5 s
Soft-air 3 s OFF 8 s 3 s OFF OFF 2 s OFF OFF 3 s
Set as controlled by Liquid Control sensor
Prog no. 1 2 3 4 5 6 7 8 9 10
Vacuum 99% 97% 99% 99% H2O 90% 50% 90% 60% 99%
Vacuum+ OFF OFF 4 s 15
Gas OFF OFF OFF 60% 50% 80% OFF 80% 30% OFF
Seal 2.2 s 2.2 s 2.2 s 2.2 s 2.5 s 2.5 s 2.5 s 2.5 s 2.5 s 2.5 s
Seal 2 3.5 s 3.5 s 3.5 s 3.5 s 3.5 s 3.5 s 3.5 s 3.5 s 3.5 s 3.5 s
Soft-air 3 s OFF 8 s 3 s OFF OFF 2 s OFF OFF 3 s
Operation 38
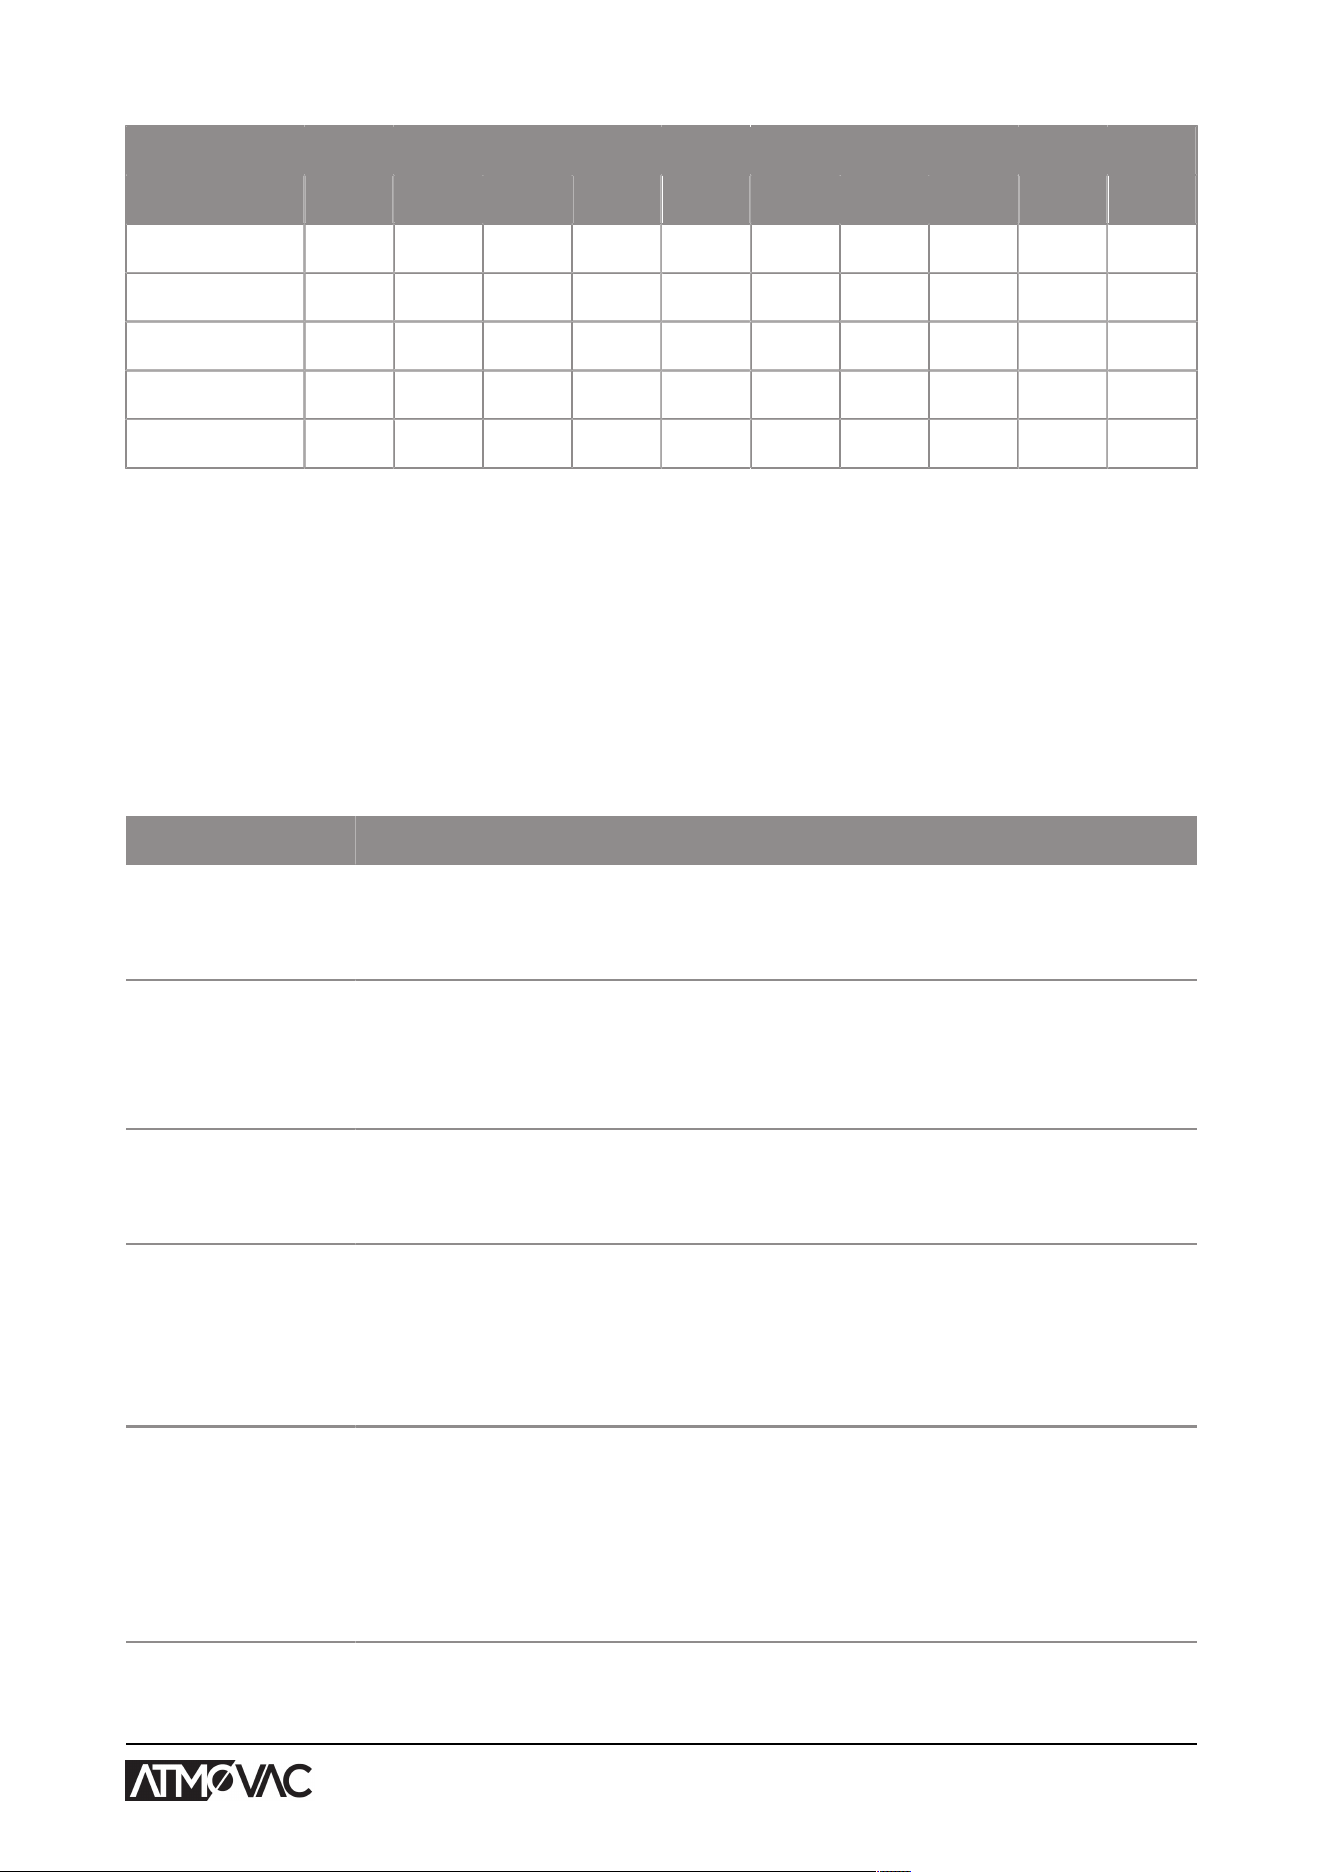
Set as time-controlled
Prog no. 1 2 3 4 5 6 7 8 9 10
Vacuum 25 s 20 s 15 s 10 s 30 s 25 s 20 s 20 s 15 s 30 s
Gas OFF OFF OFF OFF 5 s 5 s 10 s 15 s 15 s OFF
Seal 2.2 s 2.2 s 2.2 s 2.2 s 2.5 s 2.5 s 2.5 s 2.5 s 2.5 s 2.5 s
Seal 2 3.5 s 3.5 s 3.5 s 3.5 s 3.5 s 3.5 s 3.5 s 3.5 s 3.5 s 3.5 s
Soft-air 3 s OFF 8 s 3 s OFF OFF 2 s OFF OFF 3 s
6.1.8 Guideline for Function Values
For each function, values can be set if you are authorised as an owner. In order to understand the
consequence of the set value, the table below explains the consequences of giving a low or high
value for each function.
For the values in the table below, the following rule of thumb applies to setting a value in mbar.
These values may vary slightly, depending on the humidity.
• 99.8% = 2 mbar (0.029 psi)
• 0% = 1013 mbar (14.7 psi)
Function Range Conditions
Vacuum 0 – 99% Rule of thumb: the higher the vacuum, the less oxygen
remains in the package and the longer the shelf life of
the product. There are exceptions to this rule.
Vacuum+ 0 – 99% This is the time the vacuuming will continue after the
maximum vacuum has been reached. This to allow en-
trapped air to escape from the product. Please note
that the vacuum must be set to the maximum.
Gas 30 – 98% For some products it may be desirable to insert gas
into the packaging to increase the shelf life of the
product.
Gas+ 0.1 – 1 second For some products it may be desirable to insert ad-
ditional gas into the packaging to create a "balloon
packaging". This allows for a better protection of a fra-
gile product. The recommended value for Gas+ is 0.7
seconds.
Red meat 0.1 – 1 second When packaging large pieces of fresh meat, the
product continues to degas during the sealing phase.
Since the opening of the vacuum bag is already
closed, air pockets may form inside the package after
decompressing. This function prevents these air pock-
ets.
Operation 39
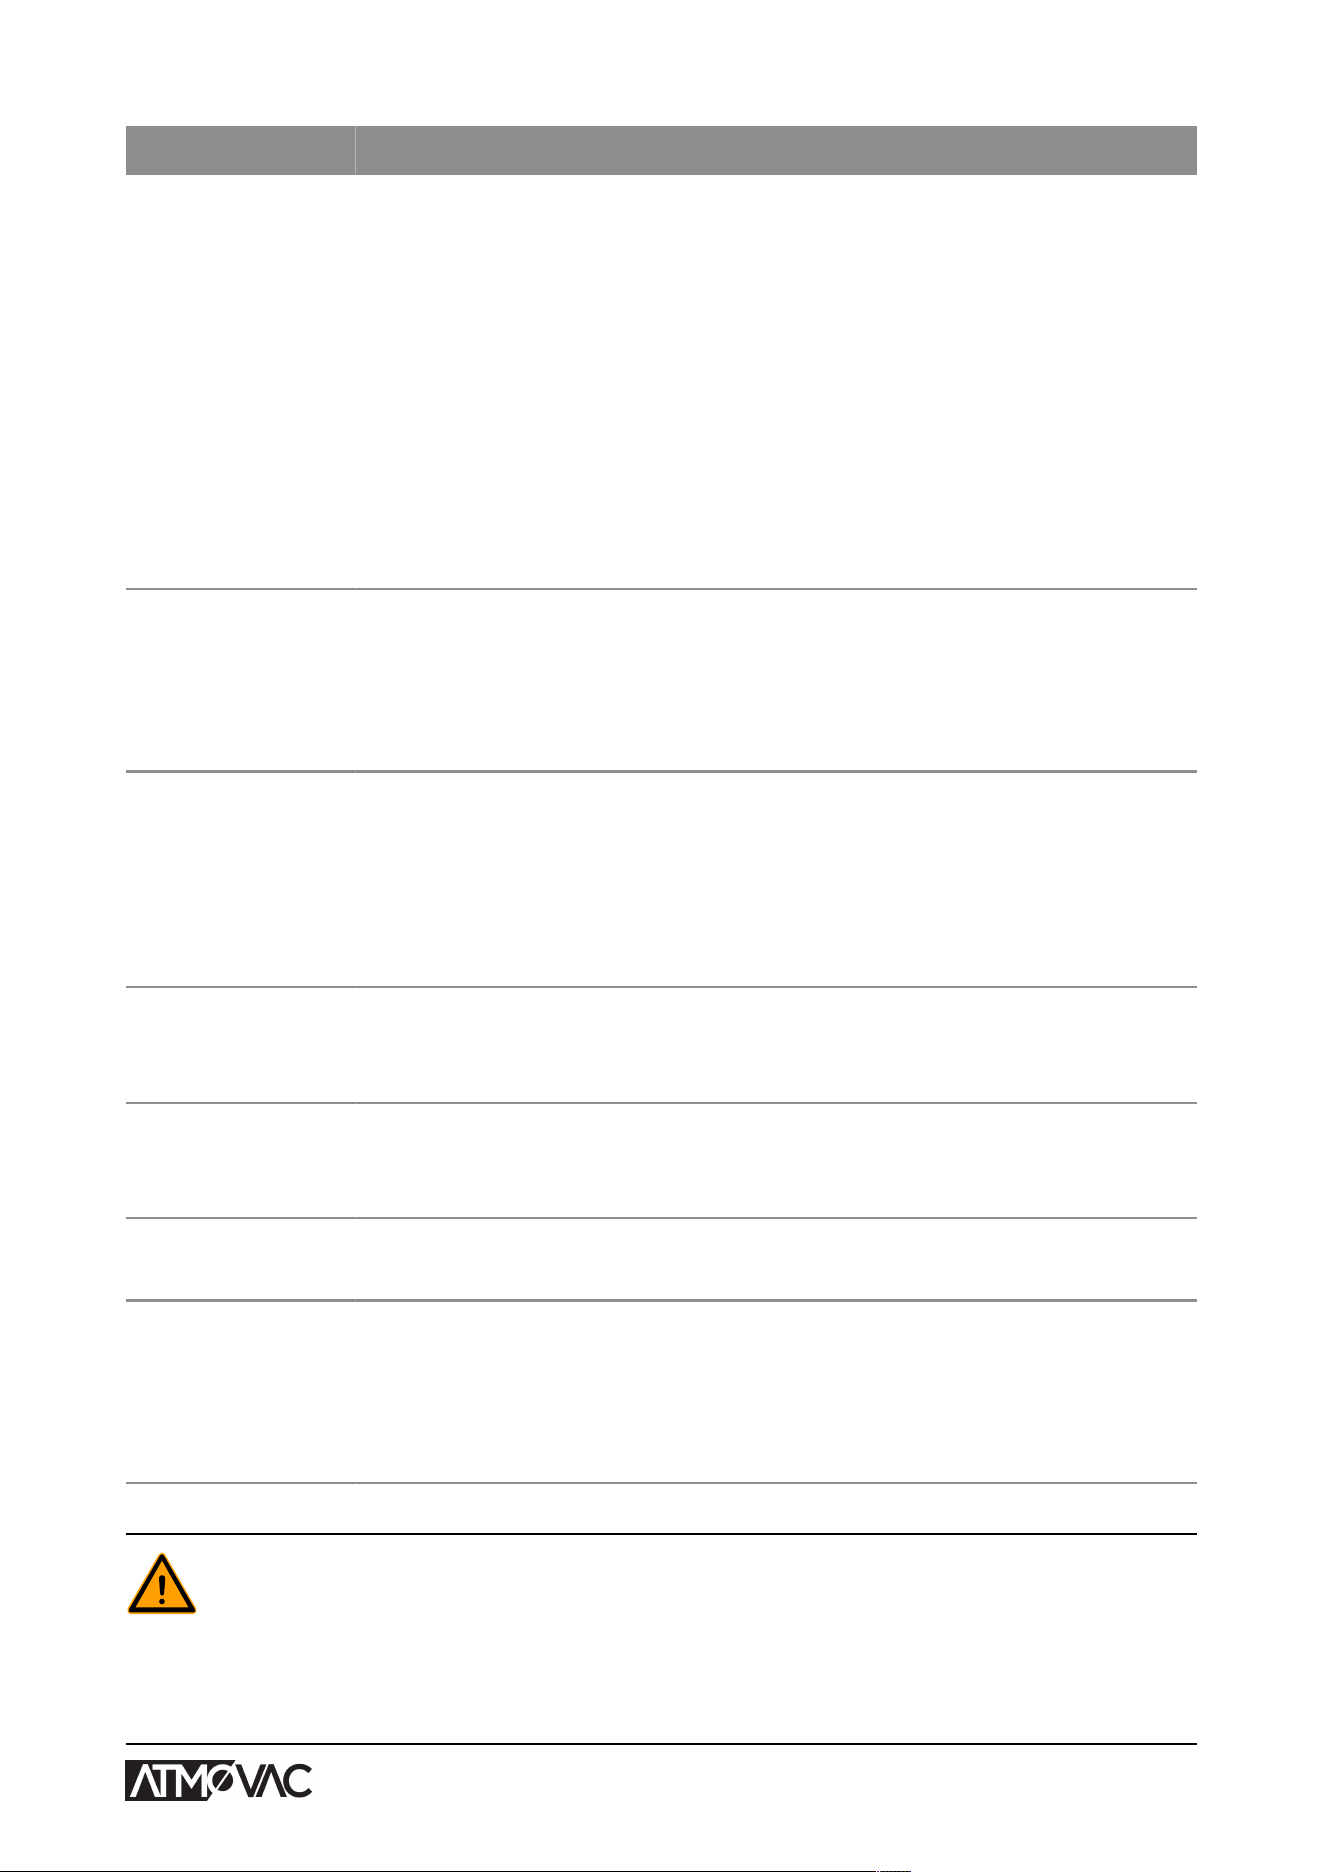
Function Range Conditions
Liquid Control 0 – 99% If the pressure is reduced, the boiling point of liquids
will be decreased. As a result of this law of nature, a
product may start boiling. In addition to contamination
of the machine, this will reduce the weight and qual-
ity of the product to be packaged. By enabling the Li-
quid Control function, this special sensor will detect the
evaporation point, and the program will stop vacuuming
and proceed to the next step in the packaging process.
The value that can be set is the maximum achievable
vacuum value. Please keep in mind that this maxim-
um vacuum value can only be achieved as long as the
product does not start boiling.
Liquid Control+ 1 – 99 second This is the time the vacuuming will continue after de-
tection of the evaporation point. Because of the evap-
oration, a minor shock wave may occur, pushing all re-
maining air from the bag. The best way to determine
the right time is trial and error.
Multi-Cycle Vacuum 0 – 99% If the value for the Vacuum+ time is insufficiently ef-
fective for the entrapped air to escape, the Sequential
Vacuum/Multi-Cycle Vacuum Step must be enabled.
In maximum five steps, vacuuming is alternated with
maintaining time. Each step increases the vacuum
reached in the previous step.
Seal time
1-2 cutting time
0.1 – 4.0 seconds This is the time that the sealing wire and/or the cut-off
wire are heated. The longer the time, the more heat is
transferred to the bag.
Soft-air 0 – 99 seconds This is the time that air is softly released into the cham-
ber after sealing has taken place. The best way to de-
termine the right time is trial and error.
Cleaning of the
pump
15 minutes Fixed value.
Sleeper option 1 – 100 minutes This is the time the pump will continue running after
running a cycle. This maintains the pump at operating
temperature and prevents unnecessary starting and
stopping of the pump, which causes additional wear of
the pump.
The vacuum in the chamber must be at least 30% at the moment of sealing.
Operation 40

If the pressure is reduced, the boiling point of liquids will be decreased; see Vapour Pressure
Curve of Water on page 88 . As a result of this law of nature, a product may start boiling. In
addition to contamination of the machine, this will reduce the weight and quality of the product to
be packaged.
When packaging moisture-containing products, such as soups and sauces, it is important to
closely monitor the vacuuming process. The moment bubbles are formed or the product starts to
bubble, you should immediately proceed to the next step in the cycle. See Proceeding to the Next
Step in the Cycle on page 32
By letting products cool down sufficiently prior to starting the vacuuming process, a higher vacuum
can be achieved.
If the machine is equipped with the Liquid Control option, the control will automatically proceed to
the next step if the product starts boiling.
When packaging moisture-containing products, it is important to run the pump cleaning program
at least once a week. When moisture-containing products are vacuumed on a daily basis, it is
recommended to run the pump cleaning program at the end of the day.
6.2 Advanced Control System (ACS)
The ACS is more than a control system. It includes unique features, special options and intelligent
functions that add significant value to your vacuum packaging operations.
Standard ACS features
• LCD panel
• Software in 5 languages
• 20 program memory
• USB connection to upload programs
• Standard Sensor control
• Label printer compatibility
• HACCP compliance
• Secured multi-level access
• Online programming (link to the ACS Configurator)
Operation 41
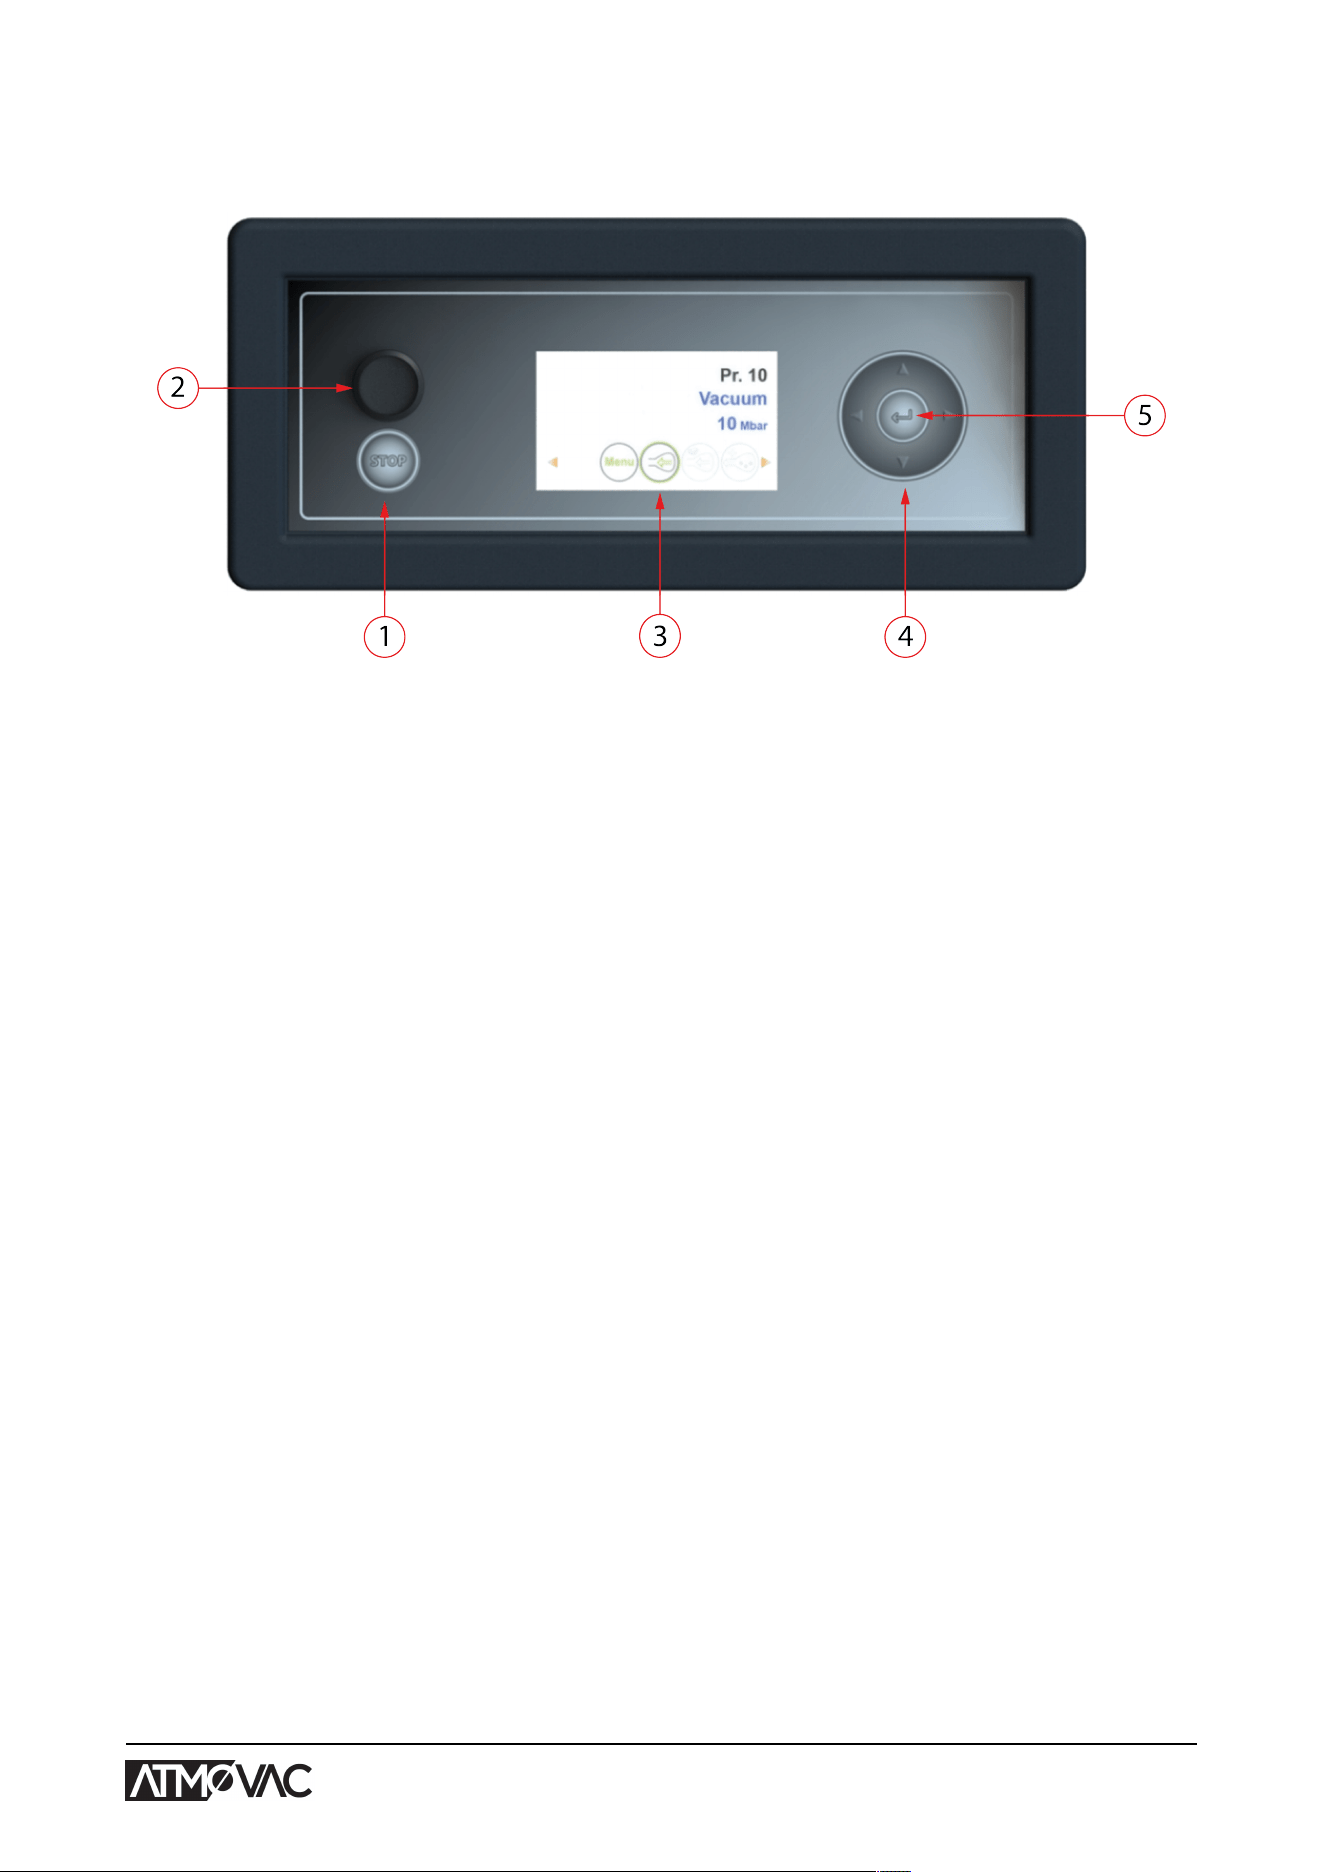
6.2.1 Operating Elements
The ACS control panel allows the machine to be operated and programs to be changed.
Figure 11: Control Panel of the Advanced Control System (ACS)
1. STOP button
This is used to interrupt the entire cycle during a packaging cycle. All functions are skipped
and the cycle is terminated.
2. On/Off button
Serves to turn the control on or off.
3. Display
The display has four possible modes: See Figure 12: Possible Display Modes on page 43
and Figure 13: Possible Display Modes on page 43.
• Start-up mode: displays the current date and time when starting the machine. It also
displays the installed software version. The user cannot take any action.
• Navigation mode: displays a program and its functions. The user can navigate through the
various programmes and view the current settings of each function.
• Setting mode: the user can view and adjust all settings, provided the user is logged in as
the owner.
• Cycle mode: once the machine starts a packaging cycle, animations of the functions are
displayed along with the current value of the function.
4. Cursor keys
▲
,
▼
,
◄
and
►
These are used to navigate through the functions. The
►
button stops the active function and
proceeds to the next cycle step. See Proceeding to the Next Step in the Cycle on page 48.
5. Enter
This activates/confirms the selected value.
Operation 42
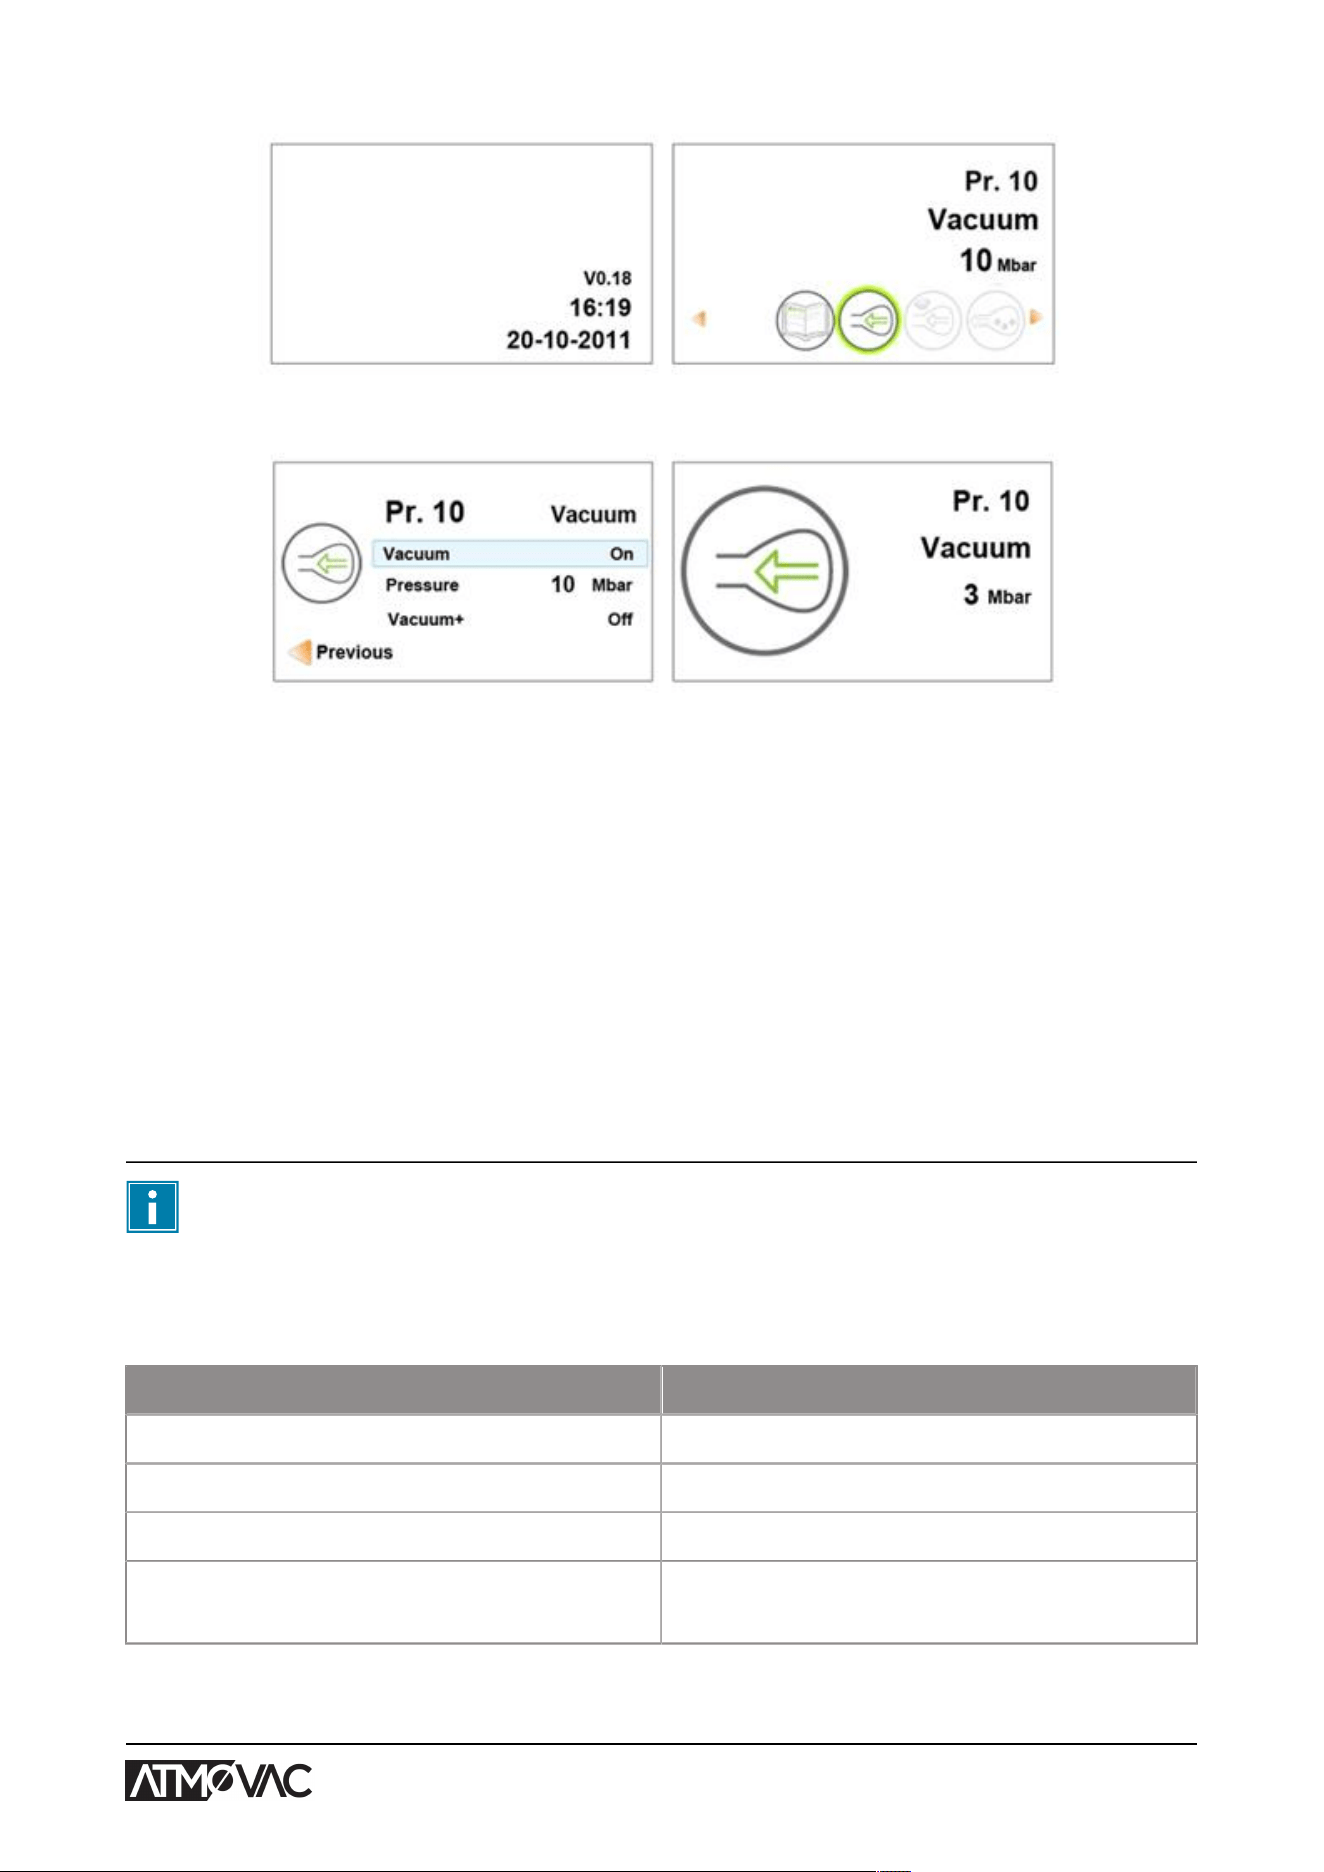
Figure 12: Possible Display Modes
Figure 13: Possible Display Modes
6.2.1.1 Changing the ACS Settings
To prevent unauthorised changing of the settings and adjustments, there are different levels of
authorisation: user and owner. Authorisation codes for users or owners allow access to the various
levels. User access to change the settings of the machine is limited. The default user code is 0000.
Users can only activate the printer via the printer icon in the navigation mode.
Owners of the machine are authorised to change the machine settings as well as all function
settings. An owner code is requested when the menu icon is selected in navigation mode. This
owner code is 1324. When the owner code has been entered, the machine settings menu will
be opened. When logged in, the function settings can also be changed. To do so, return to the
navigation mode by pressing
◄
.
The machine remembers the last authorisation code used, even when the machine has
been turned off. Therefore, it may be necessary to manually change the authorisation
setting when you are done.
The basic functions below allow you to adjust the machine and/or function settings:
What to do? Action
Selecting a different setting Press
▲
or
▼
.
Editing the selected setting Press Enter.
Adjusting a variable Press
▲
or
▼
.
Conforming a variable Press Enter once the desired variable has been
found.
Operation 43

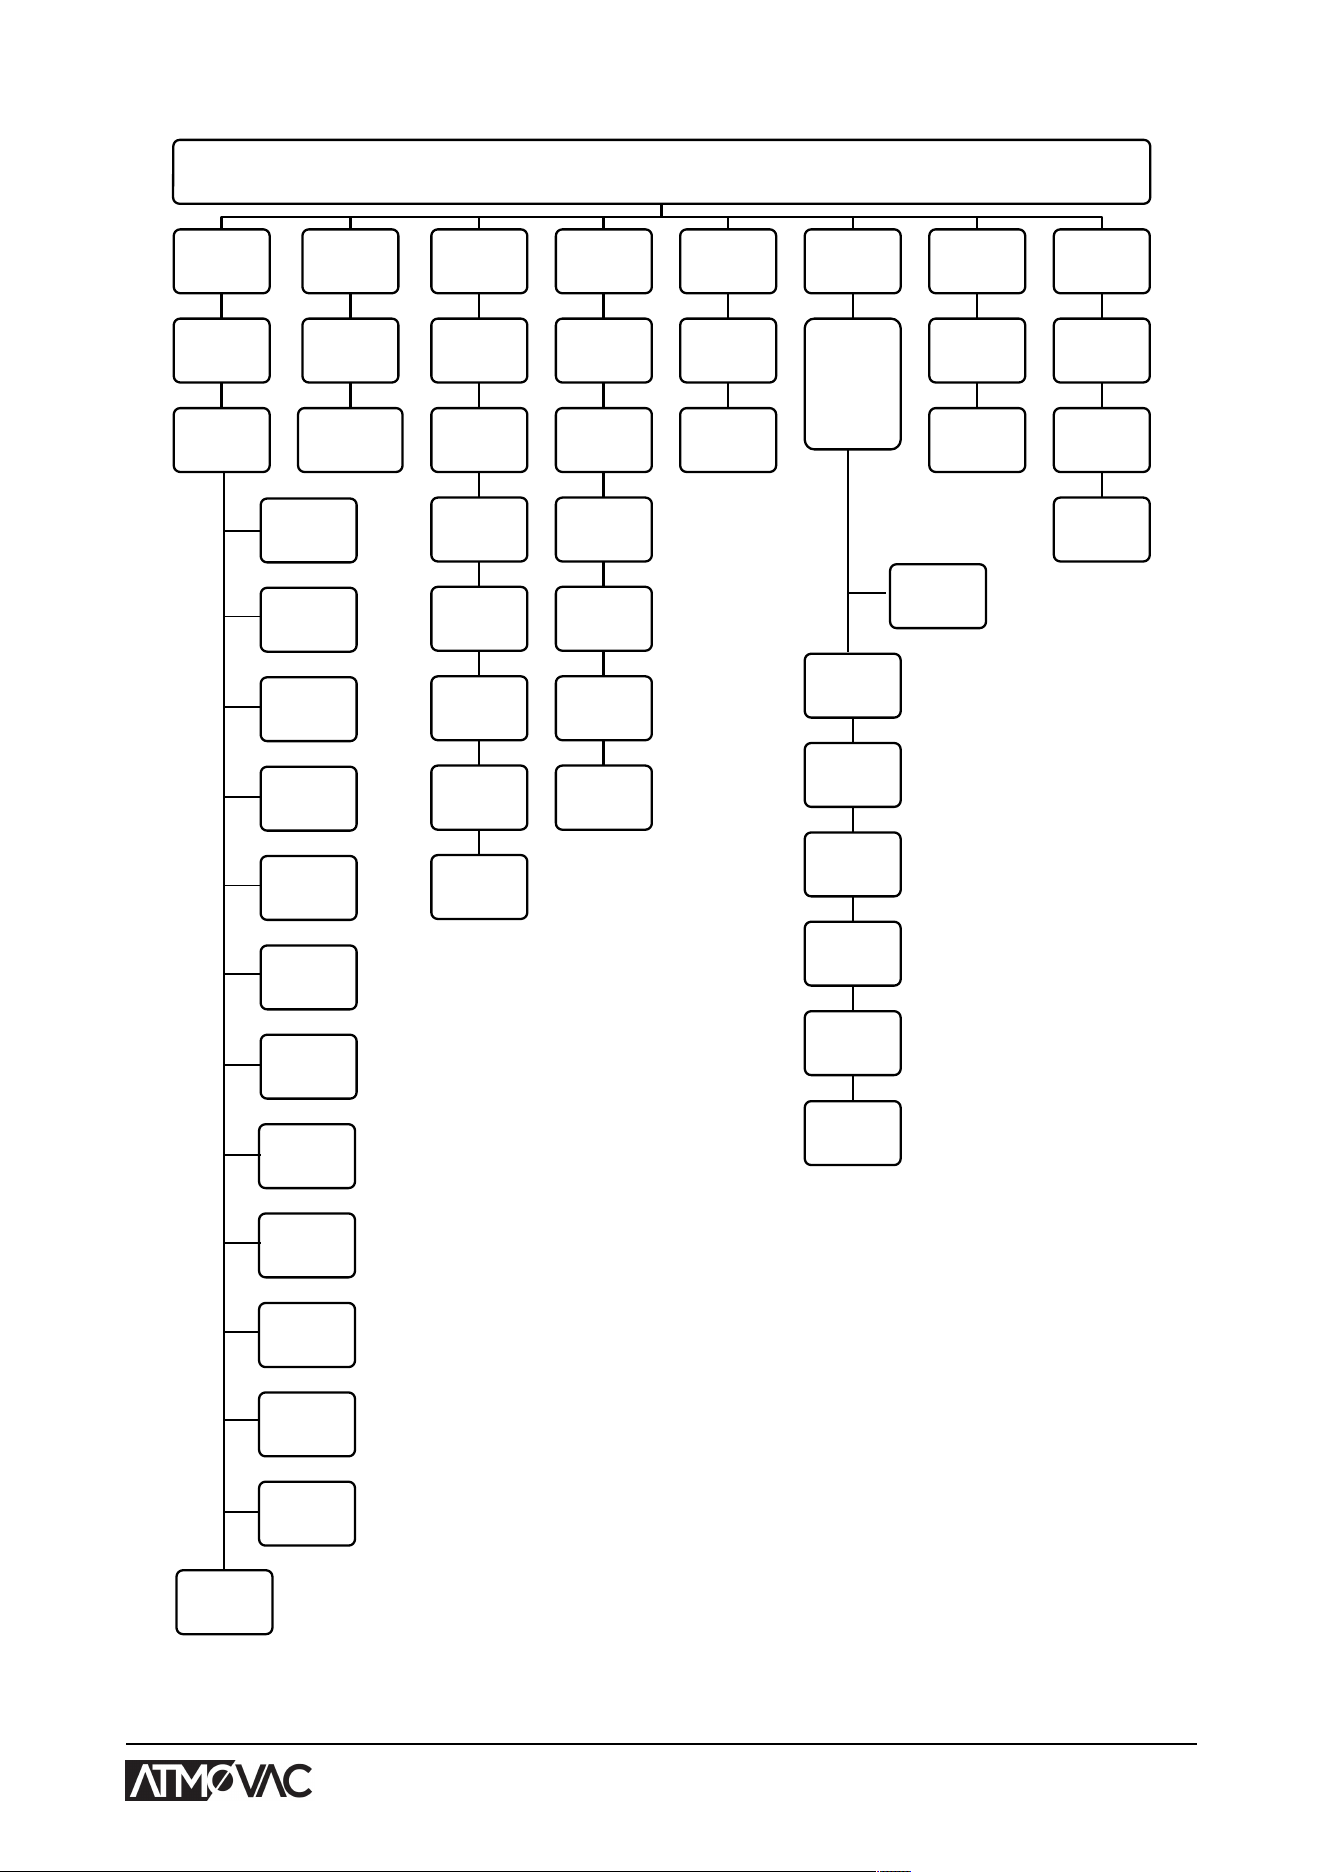
Settings
1.1 Printer
Printer
Set labels
Customer
name
Label nr.
Name
Info
Use by /
Storage life
Storage
temp.
Print
customer
name
Print info
Print
achieved
vacuum
Print expiry
date
Print user
Print
storage
temp.
Printer
connected
Y/N
1.2 Units
Pressure
unit
Temperature
unit
1.3 Date &
Time
Date format
Time format
12h/24h
Year
Month
Day
Hour
Minutes
1.4
Language
English
Español
Nederlands
Francais
Deutsch
Additional
language
1.5 Screen
saver
Screen
saver
On/Off
Waiting
time in min
1.6 Options
Sleeper
option
On/Off
(only on
floor
models)
Sleeper
timeout in
min
Red meat
On/Off
External
vacuum
On/Off
Sequential
On/Off
Tenderise
On/Off
Marinating
On/Off
1.7 Program
names
Program
Name
1.8 Data log
ID
Data log ID
On/Off
User pin
Name
Jars
On/Off
Figure 14: Overview of the Settings menu
Operation 45

6.2.1.2 Importing/Exporting Data
Data such as programmes and labels can be imported and exported via the USB connection.
6.2.1.3 Data Log ID
The control system is provided with the option to store the production information. The data log is
stored in lined entries. Each entry consists of:
• Date
• Time
• User initials
• Selected program and settings
• Selected label
• Number of cycles
A new entry is stored when:
• A different user logs in.
• The program or program settings are changed.
The data log is stored as a .txt file. You can then export the data log to a USB stick, see Exporting
Data Log on page 47.
6.2.1.3.1 Setting and Using the Data Log ID
This setting is disabled by default. This option can be enabled after logging in using the owner
code. 5 possible users can be set:
• Owner
• Four other users:
∘
User 2: 3821
∘
User 3: 5718
∘
User 4: 6982
∘
User 5: 9217
1. Log in using the owner code (1324).
You will be granted access to the relevant settings.
2. Within the menu, go to Settings > Data log ID and select ON.
From this moment on, the data will be logged.
3. Assign initials to the user codes (maximum 2 characters).
a. At User, select the desired user code.
b. Enter the initials of the user at Name.
The initials of the user will be displayed in the data log.
The initials of the user must be set. If this is not the case, it cannot be traced who
operated the machine.
Operation 46
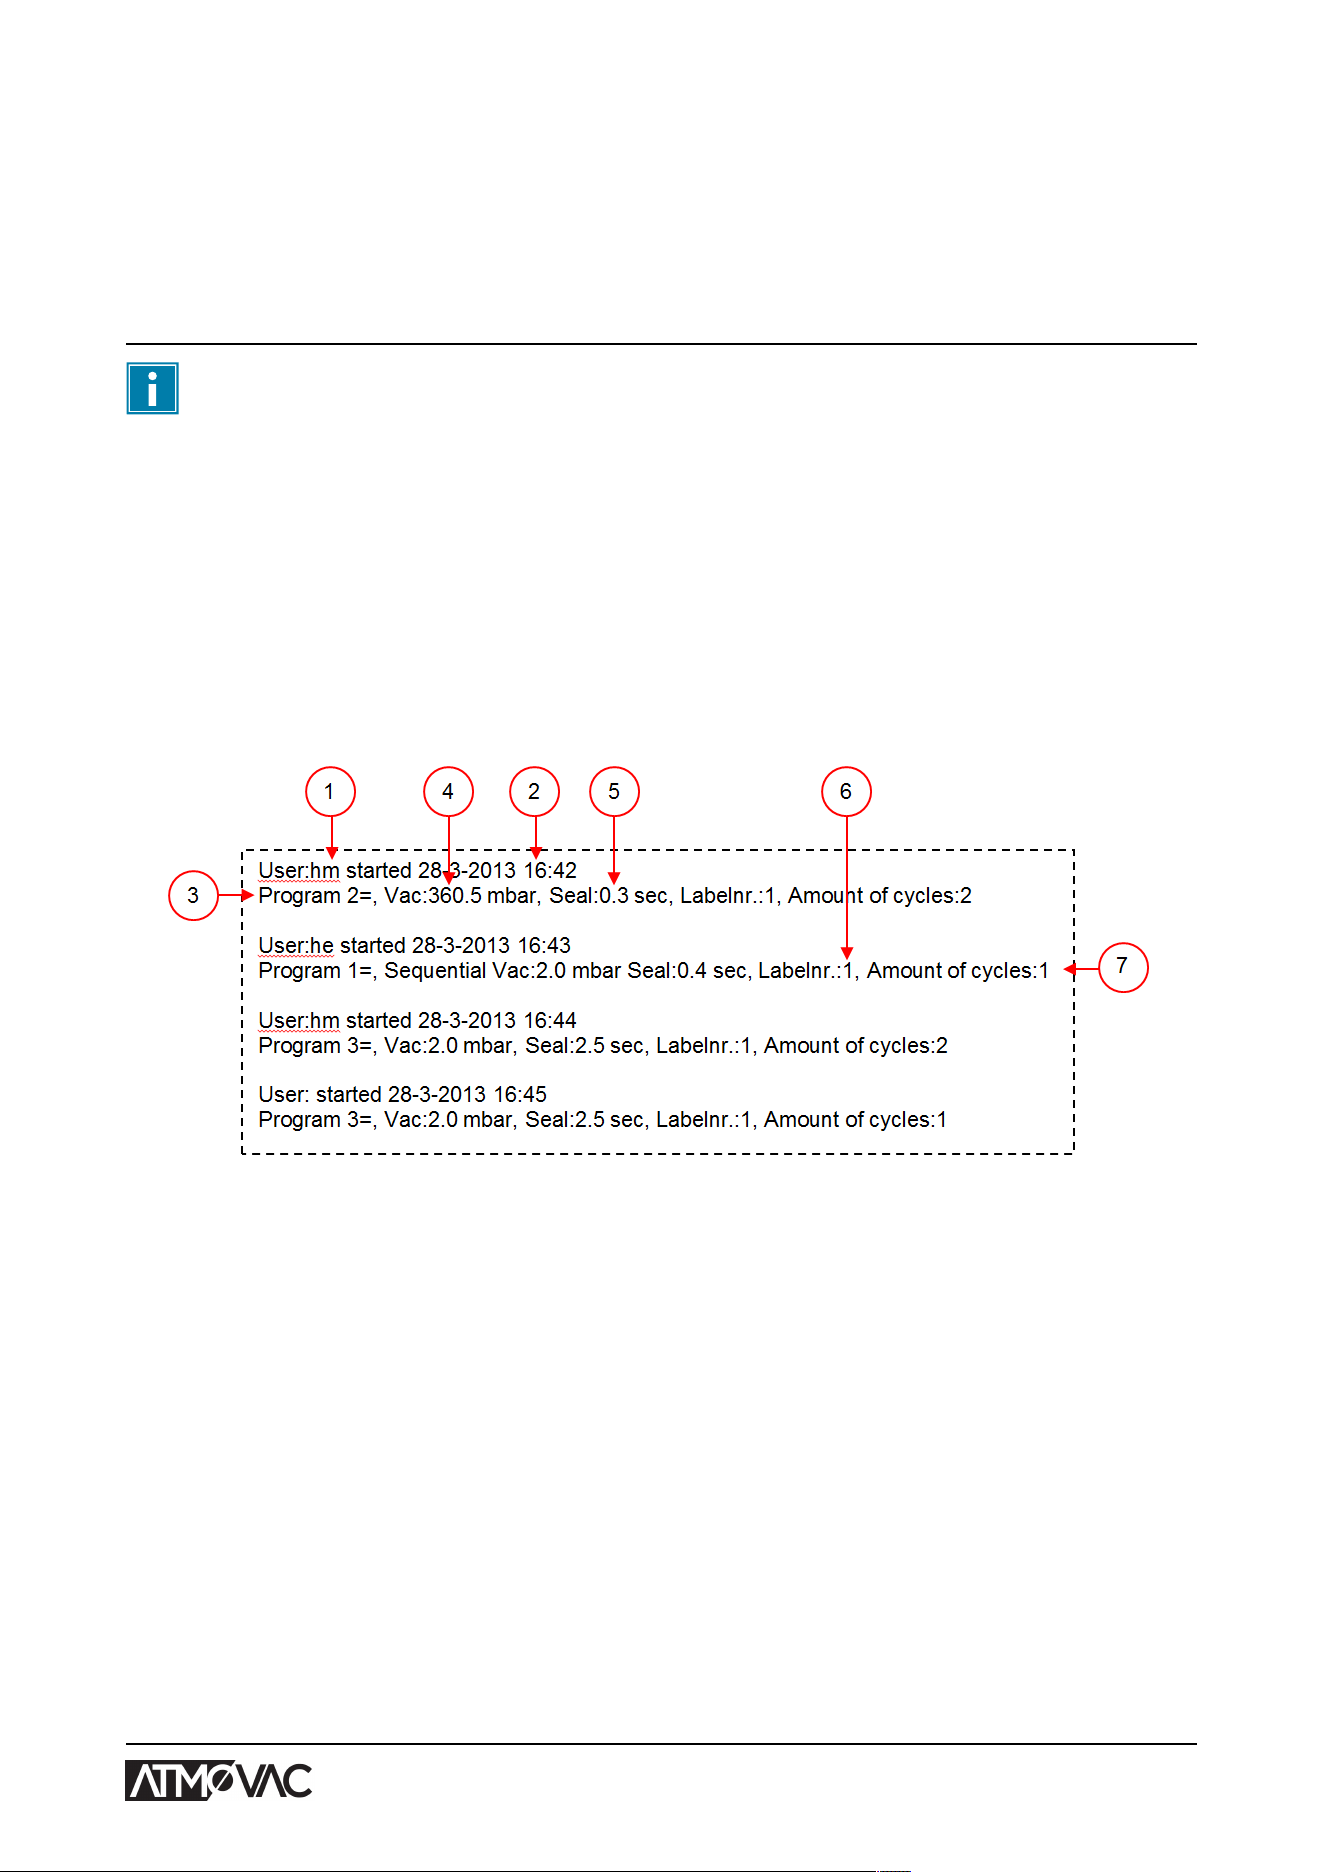
6.2.1.3.2 Exporting Data Log
The memory can store up to 100 entries. If the memory is full, you will receive a message. The
data log will first need to be exported before you can continue your work. You can export the data
at any time. Only the owner can export data. After exporting the data, the memory will be erased
automatically.
Avoid undesired delay during production by downloading the data log at fixed times.
1. Log in using the owner code (1324).
You will be granted access to the relevant settings.
2. Within the menu, go to Import/Export and select Export.
3. Insert a USB stick into the USB port.
Various options will appear on the screen.
4. Select Export Data log.
The log will be downloaded to the USB stick and the memory is erased.
Figure 15: Example of an Exported Data Log
1. User Initials
The initials of the person who logged in. If no initials were entered in the settings, nothing will
be shown here. See the example in the bottom line of Figure 15: Example of an Exported Data
Log on page 47.
2. Start Time and Date
Start time and date of the production.
3. Program
The program number used.
4. Vacuum
The maximum achieved vacuum of the package.
5. Seal Time
The seal time used.
Operation 47

6. Label Number
The label that was printed for this package.
7. Number of Cycles
The number of cycles run from the start time.
6.2.2 Starting the Machine
1. Plug in the machine.
2. Turn the main switch to the ON position (see Electrical Installation on page 86) to turn on
the machine.
3. Press the on/off button on the control panel to enable the operation.
6.2.3 Starting the Packaging Cycle
The machine must be started in accordance with Starting the Machine on page 48 before
starting a packaging cycle.
1. Select the desired program.
Press the
►
button or the
▼
button.
2. Put the product/products in place.
a. Put the product/products in the vacuum bag.
b. Place the vacuum bag in/on the vacuum chamber. Make sure the opening(s) is/are
correctly placed with regard to the seal position(s).
3. Close the lid.
The packaging cycle will start.
6.2.4 Proceeding to the Next Step in the Cycle
For some products, it may be necessary to proceed to the next step in the packaging cycle before
the vacuum time or the vacuum level has been reached.
1. Proceed to the next step in the cycle.
Press the
►
button.
The next step will be started.
Operation 48
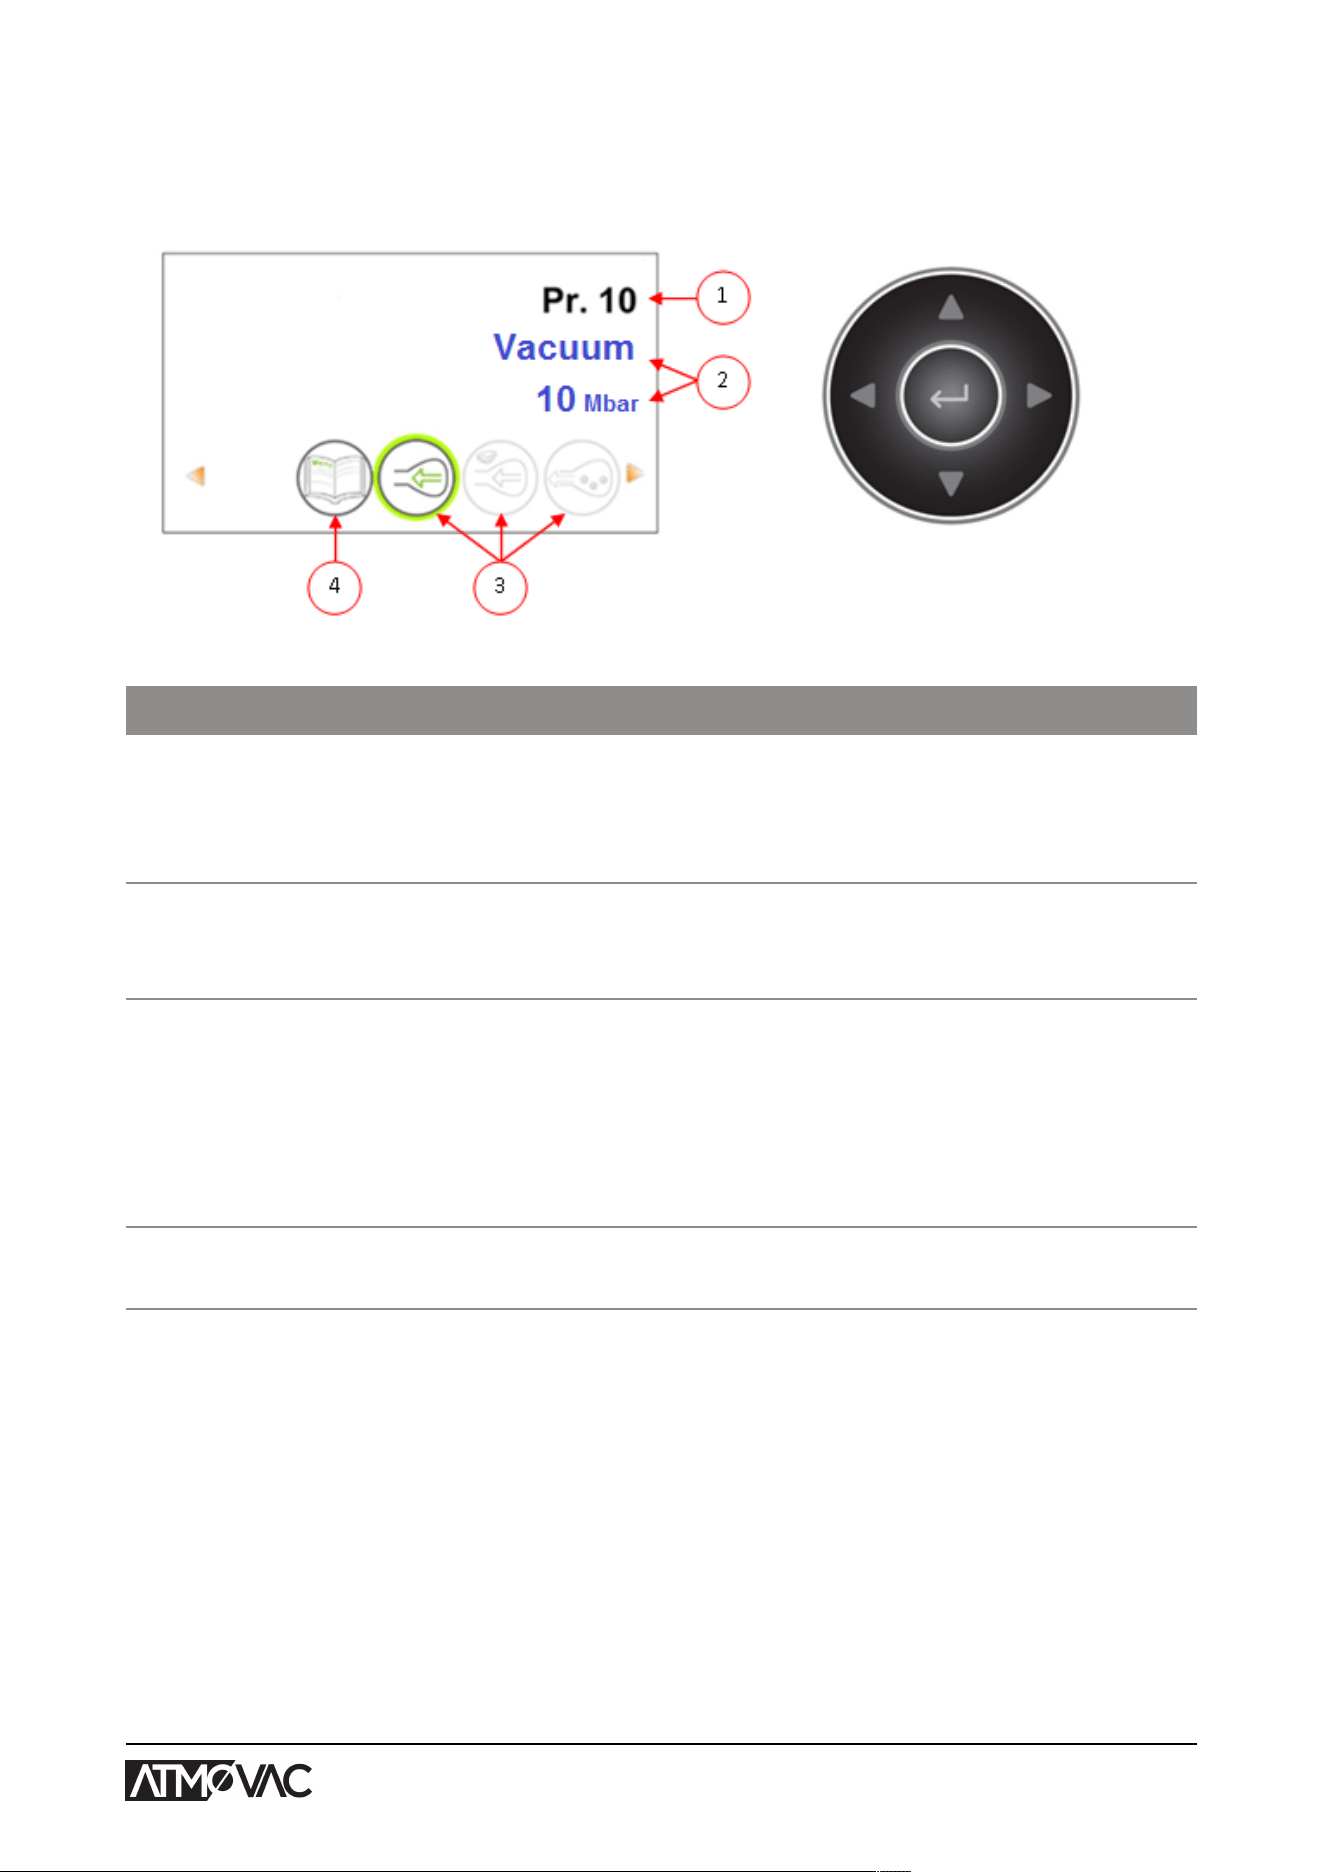
6.2.5 Changing the Program Settings
Users can view the machine programmes and activate the functions in the navigation mode. This is
the mode that appears immediately after start-up.
Figure 16: Screen shot of the navigation mode and the operating buttons of the ACS
No. Element Explanation
1. Program number/name The program shows the currently selected, pre-set pro-
gram. By switching to a different program, other func-
tions will be activated. The program selection depends
on the product being packaged.
2. Functions These functions are active or inactive. If a function is
active, it is displayed in a blue shade. If a function is in-
active, it is displayed in a grey shade.
3. Function active/inactive The selected function is marked with a green circle.
The name and current value of this function will appear
on the screen.
If the + functions are activated, the + is indicated in col-
our. If these functions are not active, they are displayed
in a grey shade.
4. Menu The machine settings can be adjusted via the Menu
pictogram at the left of the function overview.
1. Press the
▲
or
▼
buttons to select the desired program.
2. Press the
◄
or
►
buttons to view the functions.
3. After selecting the desired function, press Enter to view and adjust the function settings.
Users can view the pre-set configuration and the owner is also authorised to change it.
4. Select the Machine Settings menu and press Enter to adjust the machine settings.
This menu can only be accessed by the owner. See Guideline for Function Values on page
62 for the possible limit values of the function values.
Operation 49

6.2.5.1 Programming the ACS Control Using the PC
You can import labels and programmes from a USB stick by inserting the stick into the USB port of
your machine. You can create the data to be imported using the online software that is available on:
http://acs-configurator.com.
Before you set-up the next program or label, please make sure you have saved the
previous one.
Follow the steps below:
1. Click on the link of the LX Software.
2. Click on the Programmes or Labels button, to start your settings. You can also click on
Select a file to import to import existing programmes and/or labels from the machine.
3. Enter the necessary information.
4. Click on Save to save the program or label.
Each program and label should be stored separately using the Save button.
After saving the programmes and labels into the configurator, you can save the file with the labels
or programmes on your computer or directly on a USB stick:
5. Click on Save all programmes/labels to export programmes or labels.
6. Choose Save as to save the file on the correct location.
Do not change de name of the files labels.txt and programs.txt. Otherwise the
machine will not be able recognise the files.
Use an empty USB stick to export the files to your machine.
To import the programmes and labels into the machine, follow the steps below:
7. Insert a USB stick into the USB port of the machine.
8. In the menu, go to Import/Export and import the data.
Your machine must be equipped with the chosen options, since not all options are standard on our
machinery.
6.2.5.2 Functions
The built-in functions of the machine can be enabled or disabled by the owner under Settings. See
Changing the ACS Settings on page 43. The options of the various programmes can then be
programmed.
6.2.5.3 Vacuum
During the cycle, the air is removed from the chamber until the set pressure has been reached
(sensor-controlled).
To set the vacuum level, follow the steps below:
1. Press the cursor keys
◄
and
►
and select the program Vacuum.
2. Press Enter to open the menu.
Operation 50

3. If Vacuum is not enabled, enable it. Press Enter and use the cursor keys
▲
and
▼
to turn ON
Vacuum. Press Enter.
4. Use the cursor keys
▲
and
▼
to go to the value for the Vacuum and press Enter.
5. Set the desired value using the cursor keys
▲
and
▼
and press Enter.
6. Press the cursor key
◄
to return to the menu.
7. Close the lid to start the vacuum cycle.
6.2.5.4 Vacuum (automatic)
During the cycle, the air is removed from the chamber until the set pressure has been reached
(sensor-controlled).
To set the vacuum level automatically, follow the steps below:
1. Press the cursor keys
◄
and
►
and select the program Vacuum.
2. Press Enter to open the menu.
3. If Vacuum is not enabled, enable it. Press Enter and use the cursor keys
▲
and
▼
to turn ON
Vacuum. Press Enter.
4. Use the cursor keys
▲
and
▼
to go to the value for the Vacuum and press Enter.
5. Close the lid.
The vacuum cycle starts to run.
6. When you reached the desired vacuum level, press the cursor key
►
to go to the next phase of
the packaging cycle.
When the cycle is finished, a message will appear.
7. If you want to save, press enter to confirm.
6.2.5.5 Vacuum+ (optional)
If a lot of air is trapped in the product, it may be desirable to extend the vacuuming time after the
maximum vacuum has been reached. This to allow entrapped air to escape from the product.
You can only set Vacuum+ if Vacuum has been set to at least 99%. To set the Vacuum+ option,
follow the steps below:
1. Set the value of the Vacuum to at least 99% as described in Vacuum on page 50.
2. Enable Vacuum+. Use the cursor keys
▲
and
▼
to go to the value for the Vacuum+ and press
Enter.
3. Set the desired value using the cursor keys
▲
and
▼
and press Enter.
4. Press the cursor key
◄
to return to the menu.
5. Close the lid to start the vacuum cycle.
6.2.5.6 Gas (optional)
For the protection of the product, it may be desirable to insert a gas into the packaging after
vacuuming. Optionally, the machine can be equipped with a gas flush system.
See Technical Data on page 80 for the connection details.
Never use a gas mixture containing more than 20% oxygen or other explosive gases. This
may cause life-threatening explosions.
Operation 51

The insertion of gas lowers the seal pressure. The minimum final pressure (after the
insertion of gas) must be 30% (300 mbar) to ensure proper sealing.
To set the Gas function, follow the steps below:
1. Press the cursor keys
▲
and
▼
and select the program Gas.
2. Press Enter to open the menu.
3. If Gas is not enabled, enable it. Press Enter and use the cursor keys
▲
and
▼
to turn ON Gas.
Press Enter.
4. Use the cursor keys
▲
and
▼
to go to the value for Gas and press Enter.
5. Set the desired value using the cursor keys
▲
and
▼
and press Enter.
6. Press the cursor key
◄
to return to the menu.
7. Close the lid to start the vacuum cycle.
6.2.5.7 Gas+ (optional)
The Gas+ option only applies if the machine is equipped with the gas option. For some products it
may be desirable to insert additional gas into the packaging to create a "balloon packaging". This
allows for a better protection of a fragile product. The recommended value for Gas+ is 0.7 seconds.
To set the Gas+ option, follow the steps below:
1. Set the value of Gas in accordance with Gas (optional) on page 51.
2. Enable Gas+. Use the cursor keys
▲
and
▼
to go to the value for Gas+ and press Enter.
3. Set the desired value using the cursor keys
▲
and
▼
and press Enter.
4. Press the cursor key
◄
to return to the menu.
5. Close the lid to start the vacuum cycle.
6.2.5.8 Liquid Control (optional)
The Liquid Control option can be enabled or disabled for each program. If the product reaches the
boiling point before the set vacuum is reached, the machine will proceed to the next step of the
cycle.
To set the Liquid Control option, follow the steps below:
1. Press the cursor keys
◄
and
►
and select the program Liquid Control.
2. Press Enter to open the menu.
3. If Liquid Control is not enabled, enable it. Press Enter and use the cursor keys
▲
and
▼
to turn
ON Liquid Control. Press Enter.
4. Use the cursor keys
▲
and
▼
to go to the value for Liquid Control and press Enter.
5. Set the desired value using the cursor keys
▲
and
▼
and press Enter.
6. Press the cursor key
◄
to return to the menu.
7. Close the lid to start the vacuum cycle.
The Liquid Control function prevents excessive fluid from being drawn out of the product. This
means that if the product reaches the boiling point, the machine will proceed to the next step of the
cycle. Depending on the moisture content, the manner in which moisture is bound, the available
surface for evaporation and the temperature, the end vacuum percentage might be limited and
there might be too much residual oxygen content present in the package. If the product/process
Operation 52

requires packaging with a low residual oxygen content, despite the high moisture content, there are
two options:
1. Lower the product temperature. This allows for a deeper vacuum to be reached before the
product reaches the boiling point.
2. Use the Liquid Control+ option.
6.2.5.9 Liquid Control+ (optional)
The Liquid Control+ time is set in seconds. This is the time the vacuuming will continue after
detection of the evaporation point.
You can only set Liquid Control+ if Liquid Control has been set to the maximum (99.8%). To set the
Liquid Control+ option, follow the steps below:
1. Set the value of Liquid Control to the maximum (99.8%) as described in Liquid Control
(optional) on page 52.
2. Enable Liquid Control+. Use the cursor keys
▲
and
▼
to go to the value for Liquid Control+ and
press Enter.
3. Set the desired value using the cursor keys
▲
and
▼
and press Enter.
4. Press the cursor key
◄
to return to the menu.
5. Close the lid to start the vacuum cycle.
6.2.5.10 Red Meat (optional)
When packaging large pieces of fresh meat, the product continues to degas during the sealing
phase. Since the opening of the vacuum bag is already closed, air pockets may form inside the
package after decompressing. This function prevents these air pockets.
To set the Red Meat option, follow the steps below:
1. Press the cursor keys
◄
and
►
and select the program Red Meat.
2. Press Enter to open the menu.
3. If Red Meat is not enabled, enable it. Press Enter and use cursor key
▲
and
▼
to turn ON Red
Meat. Press Enter.
4. Use the cursor keys
▲
and
▼
to go to the value for the Ventilation Time and press Enter.
5. Set the desired value using the cursor keys
▲
and
▼
and press Enter.
6. Use the cursor keys
▲
and
▼
to go to the value for the Pause Time and press Enter.
7. Set the desired value using the cursor keys
▲
and
▼
and press Enter.
8. Press the cursor key
◄
to return to the menu.
9. Close the lid to start the vacuum cycle.
A Red Meat+ function is also available. It works the same as the Vacuum+ function (see Vacuum+
(optional) on page 51).
6.2.5.11 Sequential Vacuum (optional)
The Sequential Vacuum option allows you to vacuum in up to 5 steps, alternating vacuuming steps
with maintaining periods. Each step increases the vacuum reached in the previous step.
To set the Sequential Vacuum option, follow the steps below:
1. Press the cursor keys
◄
and
►
and select the program Sequential Vacuum.
Operation 53

2. Press Enter to open the menu.
3. If Sequential Vacuum is not enabled, enable it. Press Enter and use the cursor keys
▲
and
▼
to turn ON Sequential Vacuum. Press Enter.
4. Use the cursor keys
▲
and
▼
to go to the value for the Vacuum 1 and press Enter.
5. Set the desired value using the cursor keys
▲
and
▼
and press Enter.
6. Use the cursor keys
▲
and
▼
to go to the value for the Time 1 and press Enter.
7. Set the desired value using the cursor keys
▲
and
▼
and press Enter.
8. Repeat steps 4 to 7 for the other Vacuum steps (2 to 5) and Times (2 to 5). At each Vacuum
step, the value must be higher than that of the previous step.
9. Press the cursor key
◄
to return to the menu.
10. Close the lid to start the vacuum cycle.
6.2.5.12 Marinating (optional)
This function is especially designed to accelerate the marinating of a product. This program allows
definition of up to 5 vacuuming steps with intermediate ventilation steps.
The vacuuming steps have a fixed vacuum value of 80%, except for the last step. The last
vacuuming step has an adjustable value of up to 99.8%. This also allows setting Vacuum+. The
intermediate ventilation steps have a fixed value of 42%. After the last step, sealing takes place. To
set the Marinating option, follow the steps below:
1. Press the cursor keys
◄
and
►
and select the Marinating program.
2. Press Enter to open the menu.
3. If Marinating is not enabled, enable it. Press Enter and use the cursor key
▲
and
▼
to turn ON
Marinating. Press Enter.
4. Use the cursor keys
▲
and
▼
to go to the value for the Vacuum of the last step and press
Enter.
5. Use the cursor keys
▲
and
▼
to go to the number of steps and press Enter.
6. Use the cursor keys
▲
and
▼
to set the number of steps and press Enter.
7. Press the cursor key
◄
to return to the menu.
8. Close the lid to start the vacuum cycle.
Vacuuming will take place in the set number of steps of 80% vacuum and 42%
ventilation. Then vacuuming will continue until the set vacuum of the last step. If, for
instance, 3 steps have been set with an end vacuum of 90%, vacuuming will take
place as follows: 80% -> 42% -> 80% -> 42% -> 80% -> 42% -> 90%.
It is also possible to enable Liquid Control. This function will then only be active during the last
vacuuming step. If, for instance, 3 vacuuming steps have been defined, Liquid Control will be active
during the third step. Liquid Control+ is also possible here, see Liquid Control+ (optional) on page
53.
6.2.5.13 Tenderising (optional)
This feature has been designed to keep the chamber at a pre-determined vacuum level for a
certain time. This is done to tenderise or degas the product.
To set the Tenderising option, follow the steps below:
Operation 54

1. Press the cursor keys
◄
and
►
and select the program Tenderising.
2. Press Enter to open the menu.
3. If Tenderising is not enabled, enable it. Press Enter and use the cursor keys
▲
and
▼
to turn
ON Tenderising. Press Enter.
4. Use the cursor keys
▲
and
▼
to go to the value for the Tenderising and press Enter.
5. Set the desired value using the cursor keys
▲
and
▼
and press Enter.
6. Use the cursor keys
▲
and
▼
to go to the value for the Tenderising Time and press Enter.
7. Set the desired value using the cursor keys
▲
and
▼
and press Enter.
8. Use the cursor keys
▲
and
▼
to go to the value for Accuracy and press Enter.
9. Set the desired value using the cursor keys
▲
and
▼
and press Enter.
10. Press the cursor key
◄
to return to the menu.
11. Close the lid to start the vacuum cycle.
6.2.5.14 Jars (optional)
Fast program specially designed for vacuum sealing jars. Seal and soft-air phase are shut off
during this program.
During the cycle, the air is removed from the chamber until the set pressure has been reached.
During the fast decompression the lids are being closed. It can also be combined with liquid
control, if this is the case, set the values in the liquid control program (sensor-controlled).
To set the vacuum level, follow the steps below:
1. Press the cursor keys
◄
and
►
and select the program Jars.
2. Press Enter to open the menu.
3. If Vacuum is not enabled, enable it. Press Enter and use the cursor keys
▲
and
▼
to turn ON
Vacuum. Press Enter.
4. Use the cursor keys
▲
and
▼
to go to the value for the Vacuum and press Enter.
5. Set the desired value using the cursor keys
▲
and
▼
and press Enter.
6. Press the cursor key
◄
to return to the menu.
7. Close the lid to start the vacuum cycle.
6.2.5.15 Seal
This is the time that the sealing wire and/or the cut-off wire are heated. The longer the time, the
more heat is transferred to the bag.
As an option, the machine can be equipped with a Seal 1-2 option. This means the seal wire is
activated separately from the cut-off wire. This way the cut-off wire can be activated a bit longer, to
cut through thicker bags.
To set the Seal option, follow the steps below:
1. Press the cursor keys
◄
and
►
and select the program Seal.
2. Press Enter to open the menu.
3. Use the cursor keys
▲
and
▼
to go to the value for the Sealing Time and press Enter.
4. Set the desired value using the cursor keys
▲
and
▼
and press Enter.
Operation 55

When Seal 1-2 is activated, the cut-off time cannot be set lower than the seal time.
5. Press the cursor key
◄
to return to the menu.
6. Close the lid to start sealing.
6.2.5.16 Soft-Air (optional for the Pampero)
This is the time that air is softly released into the chamber after sealing has taken place.
To set the Soft-air function, follow the steps below:
1. Press the cursor keys
▲
and
▼
and select the program Soft-air.
2. Press Enter to open the menu.
3. If Soft-air is not enabled, enable it. Press Enter and use the cursor keys
▲
and
▼
to turn Soft-
air ON. Press Enter.
4. Use the cursor keys
▲
and
▼
to go to the value for the Soft-air time and press Enter.
5. Set the desired value using the cursor keys
▲
and
▼
and press Enter.
6. Press the cursor key
◄
to return to the menu.
7. Close the lid to start sealing.
6.2.5.17 External Vacuum (optional)
The External Vacuum function allows special food containers to be vacuumed outside the machine.
The packaging is vacuumed until a vacuum of 99.8% is reached.
External Vacuum is only available on the Cyclone series.
Check in advance whether the relevant food container can withstand and hold a vacuum.
To select the External Vacuum option, follow the steps below:
1. Connect the external vacuum hose to the machine by placing the adapter over the suction
inlet (1) in the vacuum chamber.
2. Connect the external vacuum hose to the packaging.
a. Connect the adapter (3) of the external vacuum hose to the valve of the packaging.
b. Slide the sliding valve (2) towards the hose (closed position).
Operation 56
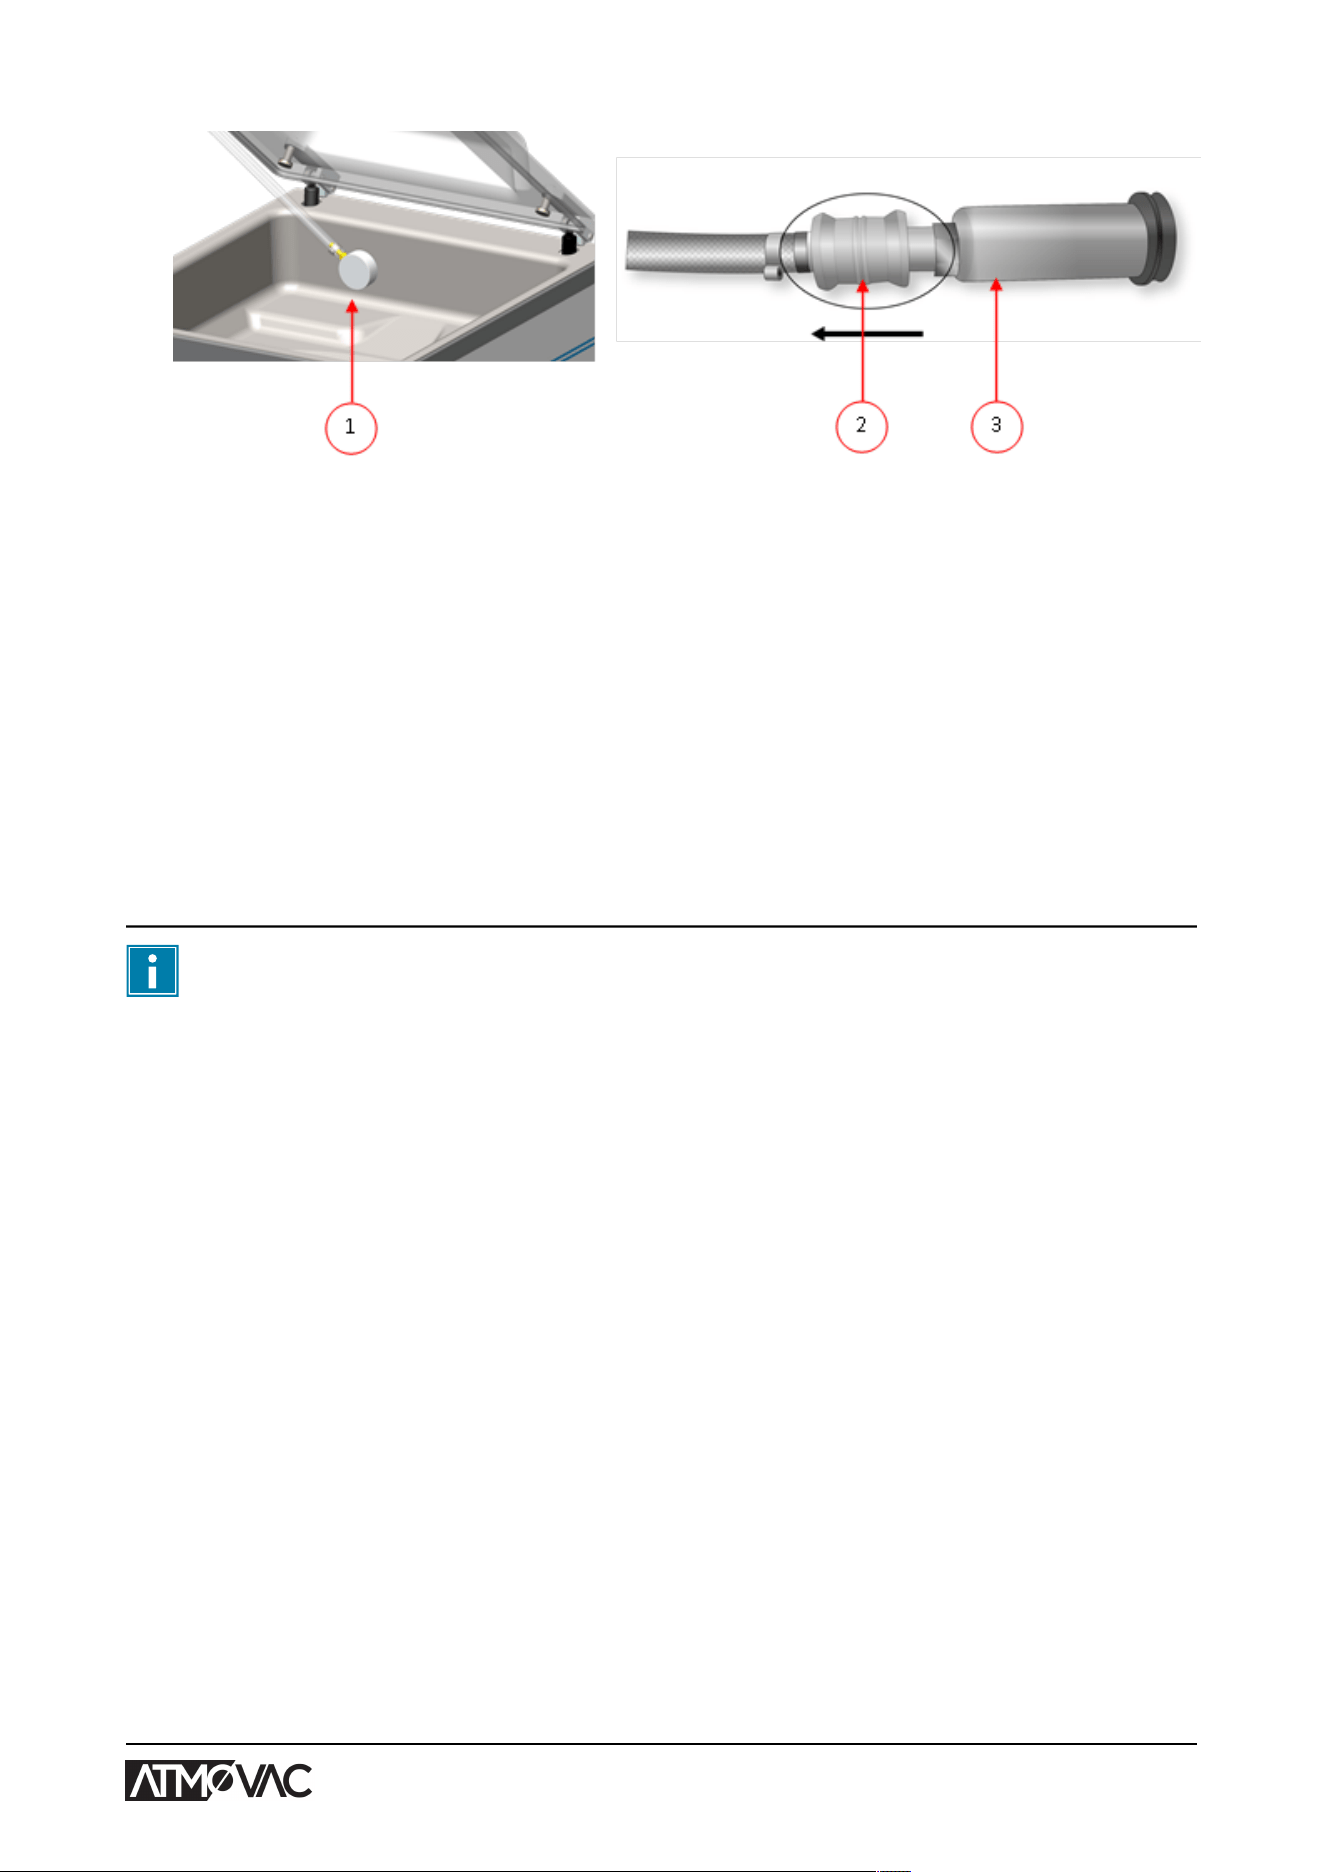
Figure 17: External Vacuum Adapter Set (ACS)
3. Press the cursor keys and select the program External Vacuum to start vacuuming.
The packaging is vacuumed until the maximum vacuum is reached.
4. Slide the sliding valve of the adapter towards the packaging (open position) and remove the
external vacuum hose from the packaging.
6.2.5.18 Sleeper Option
If the Sleeper option is enabled, the pump will automatically shut off after the set time has elapsed
and the machine is not in use during this period. The pump will automatically start again once a
new vacuum cycle is started.
By default, the Sleeper option is set to 10 minutes. If you wish to change this time, please contact
your supplier.
The Sleeper option cannot be set to less than 1 minute.
6.2.5.19 Dealer Information
If dealer information is entered into the machine, this will be displayed on the start-up screen.
6.2.6 Terminating a Program
Programmes such as the packaging program or the pump cleaning program can be terminated at
any time.
1. Terminate the program.
Press the – / STOP button.
The program will be terminated and the vacuum chamber is decompressed.
6.2.7 Printer
A printer can be connected to the machine to print package labels.
6.2.7.1 Connecting a Printer
To connect a printer to the machine, follow the steps below:
1. Connect the printer to the mains supply.
2. Connect the printer to the USB connector on the machine.
3. Turn on the printer.
Operation 57

4. Select the correct printer in the machine menu.
a. Open the menu.
b. Enter the owner code 1324.
c. Go to Settings.
d. Go to 1.1 Printer.
e. Select ZD410.
f. Press the cursor key
◄
to return to the menu.
6.2.7.2 Creating a Label
To create a label, perform the steps below:
1. Open the menu.
2. Enter the owner code 1324.
3. Go to Settings.
4. Go to 1.1 Printer.
5. Go to Labels.
6. Enter the desired information.
1. Customer name
2. Label number
3. Name
4. Info
5. Use by / Storage life
6. Storage temperature
7. Print customer name Y/N
8. Print info Y/N
9. Print achieved vacuum Y/N
10. Print expiry date Y/N
11. Print user Y/N
12. Print storage temperature Y/N
Once the printer is selected and the required information for the label is entered, the printer can be
activated on each separate program. To do this, go to the main menu, all the way to the right. Here
you can enable or disable the printer and select the label number you require. You can also select
the number of labels you require per cycle.
If you require an additional label after the complete cycle has ended and all labels have already
been printed, select the Print extra label option. This will print the last printed label again.
Operation 58
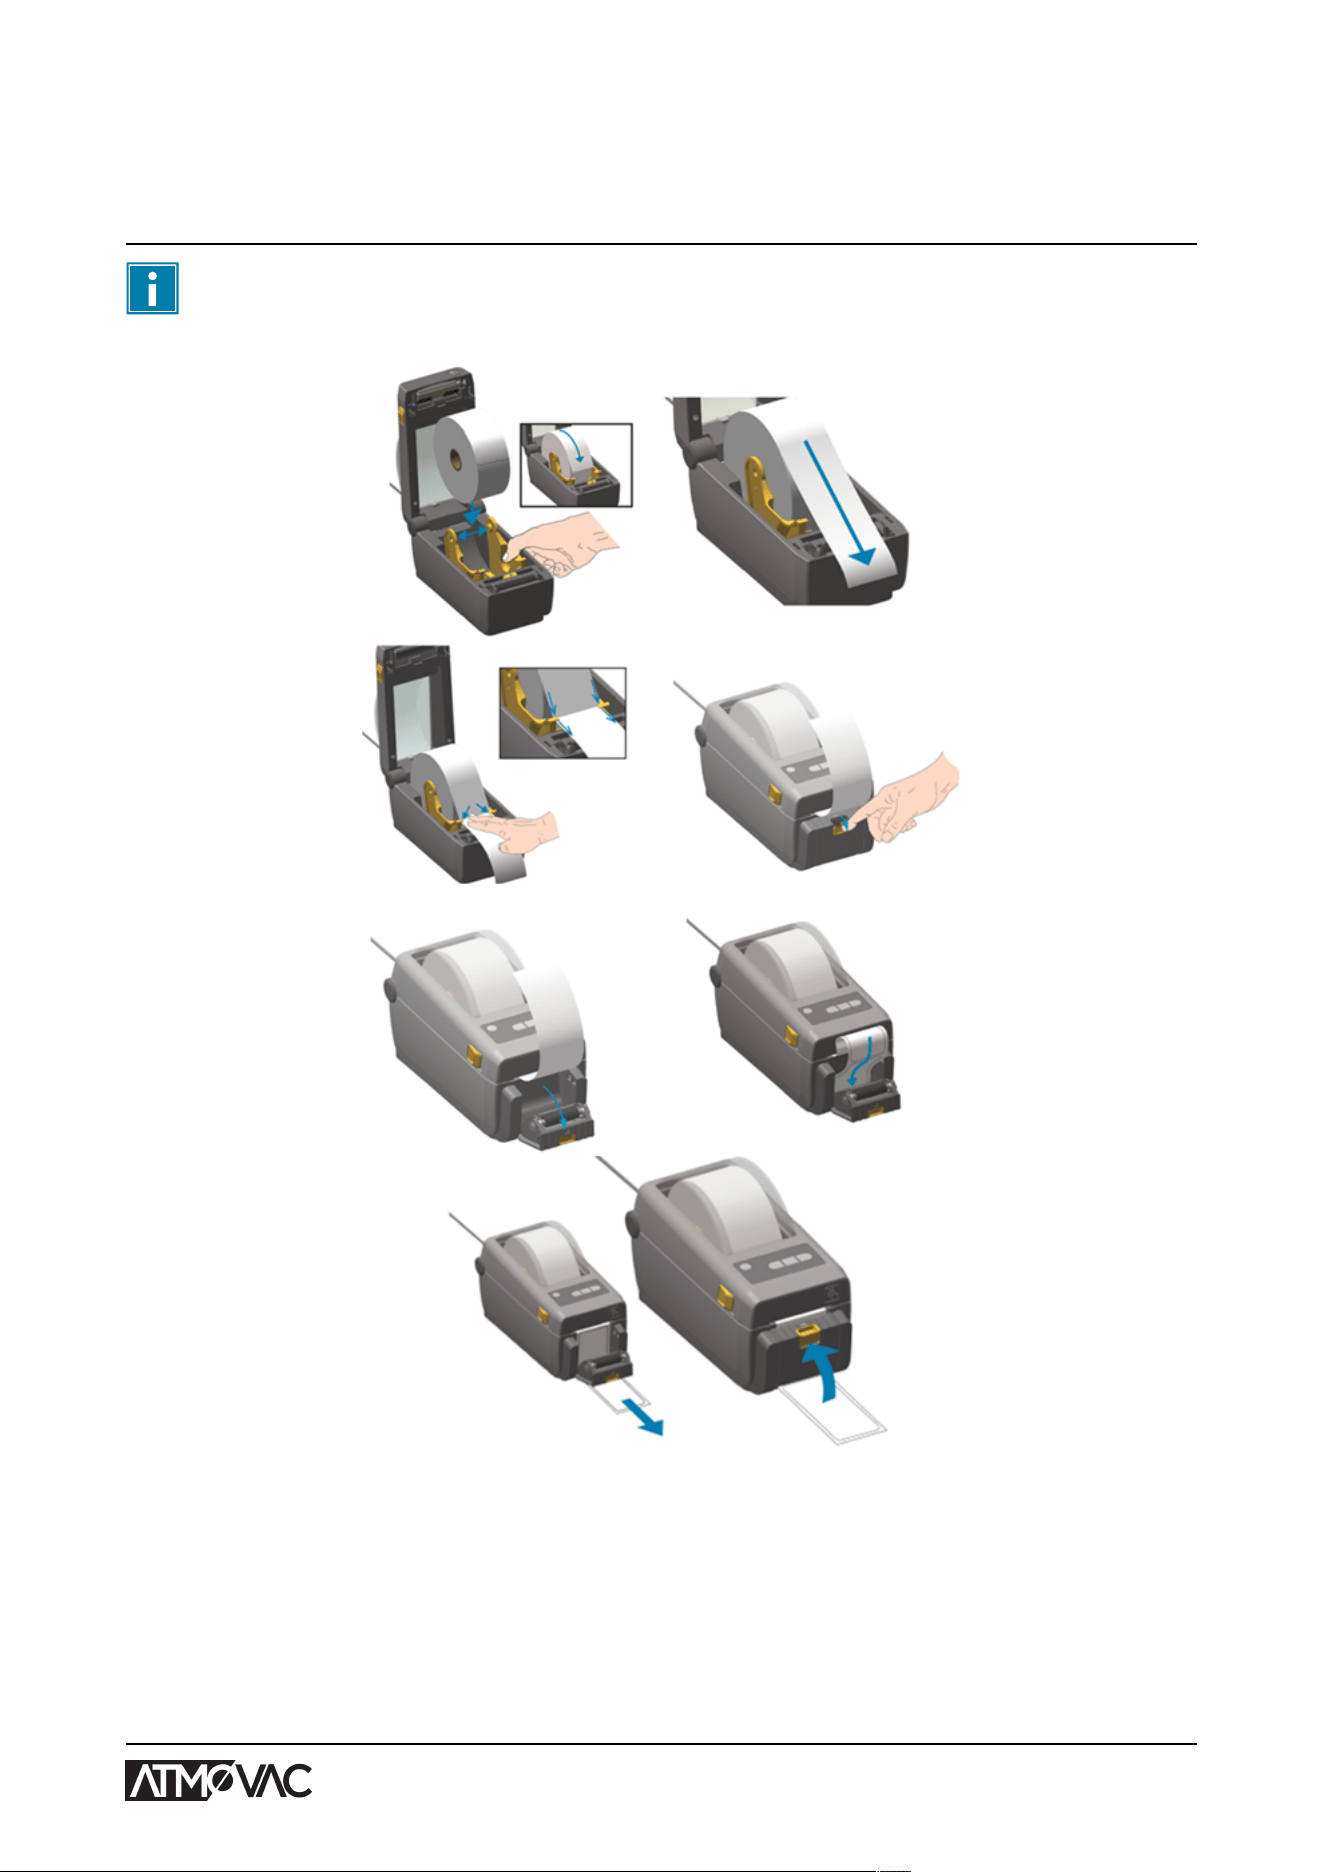
6.2.7.3 Replacing a Printer Roll
Follow the steps below to place the label roll in the printer.
Despite the inner diameter of the label roll being bigger than the holder, the roll can be
used without any issues.
Figure 18: Replacing the Printer Roll
Operation 59
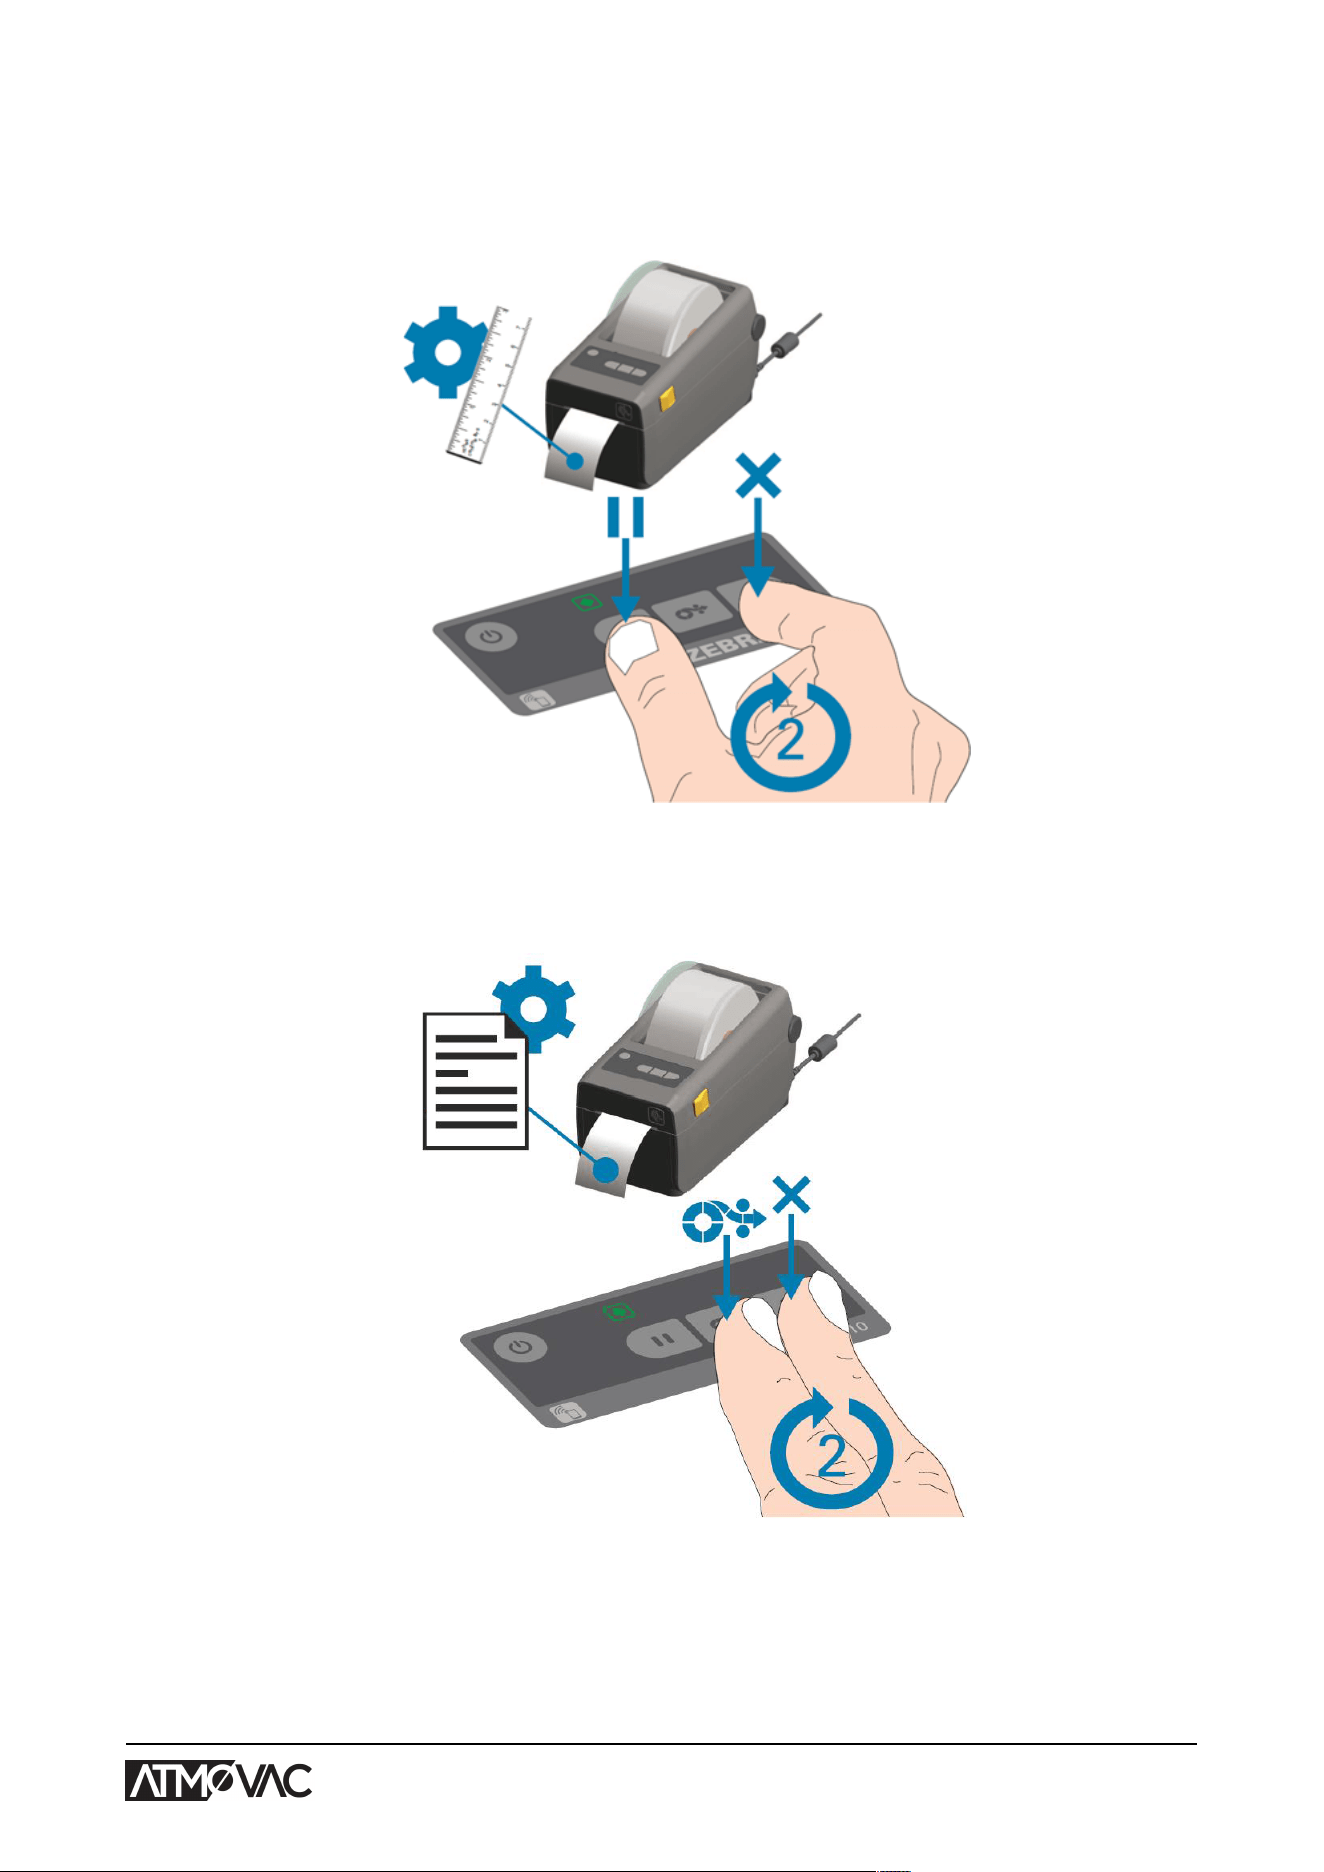
6.2.7.4 Aligning the Printer
1. Switch on the printer and make sure the indication light is green.
2. Press the Pause and Cancel button simultaneously for 2 seconds.
Figure 19: Aligning the Printer
The printer will print several labels and determine the correct position.
3. Press the Feed and Cancel button simultaneously for 2 seconds.
Figure 20: Printing the First Label
The printer will print the first label.
4. Remove the first printed label to print the next labels.
Operation 60
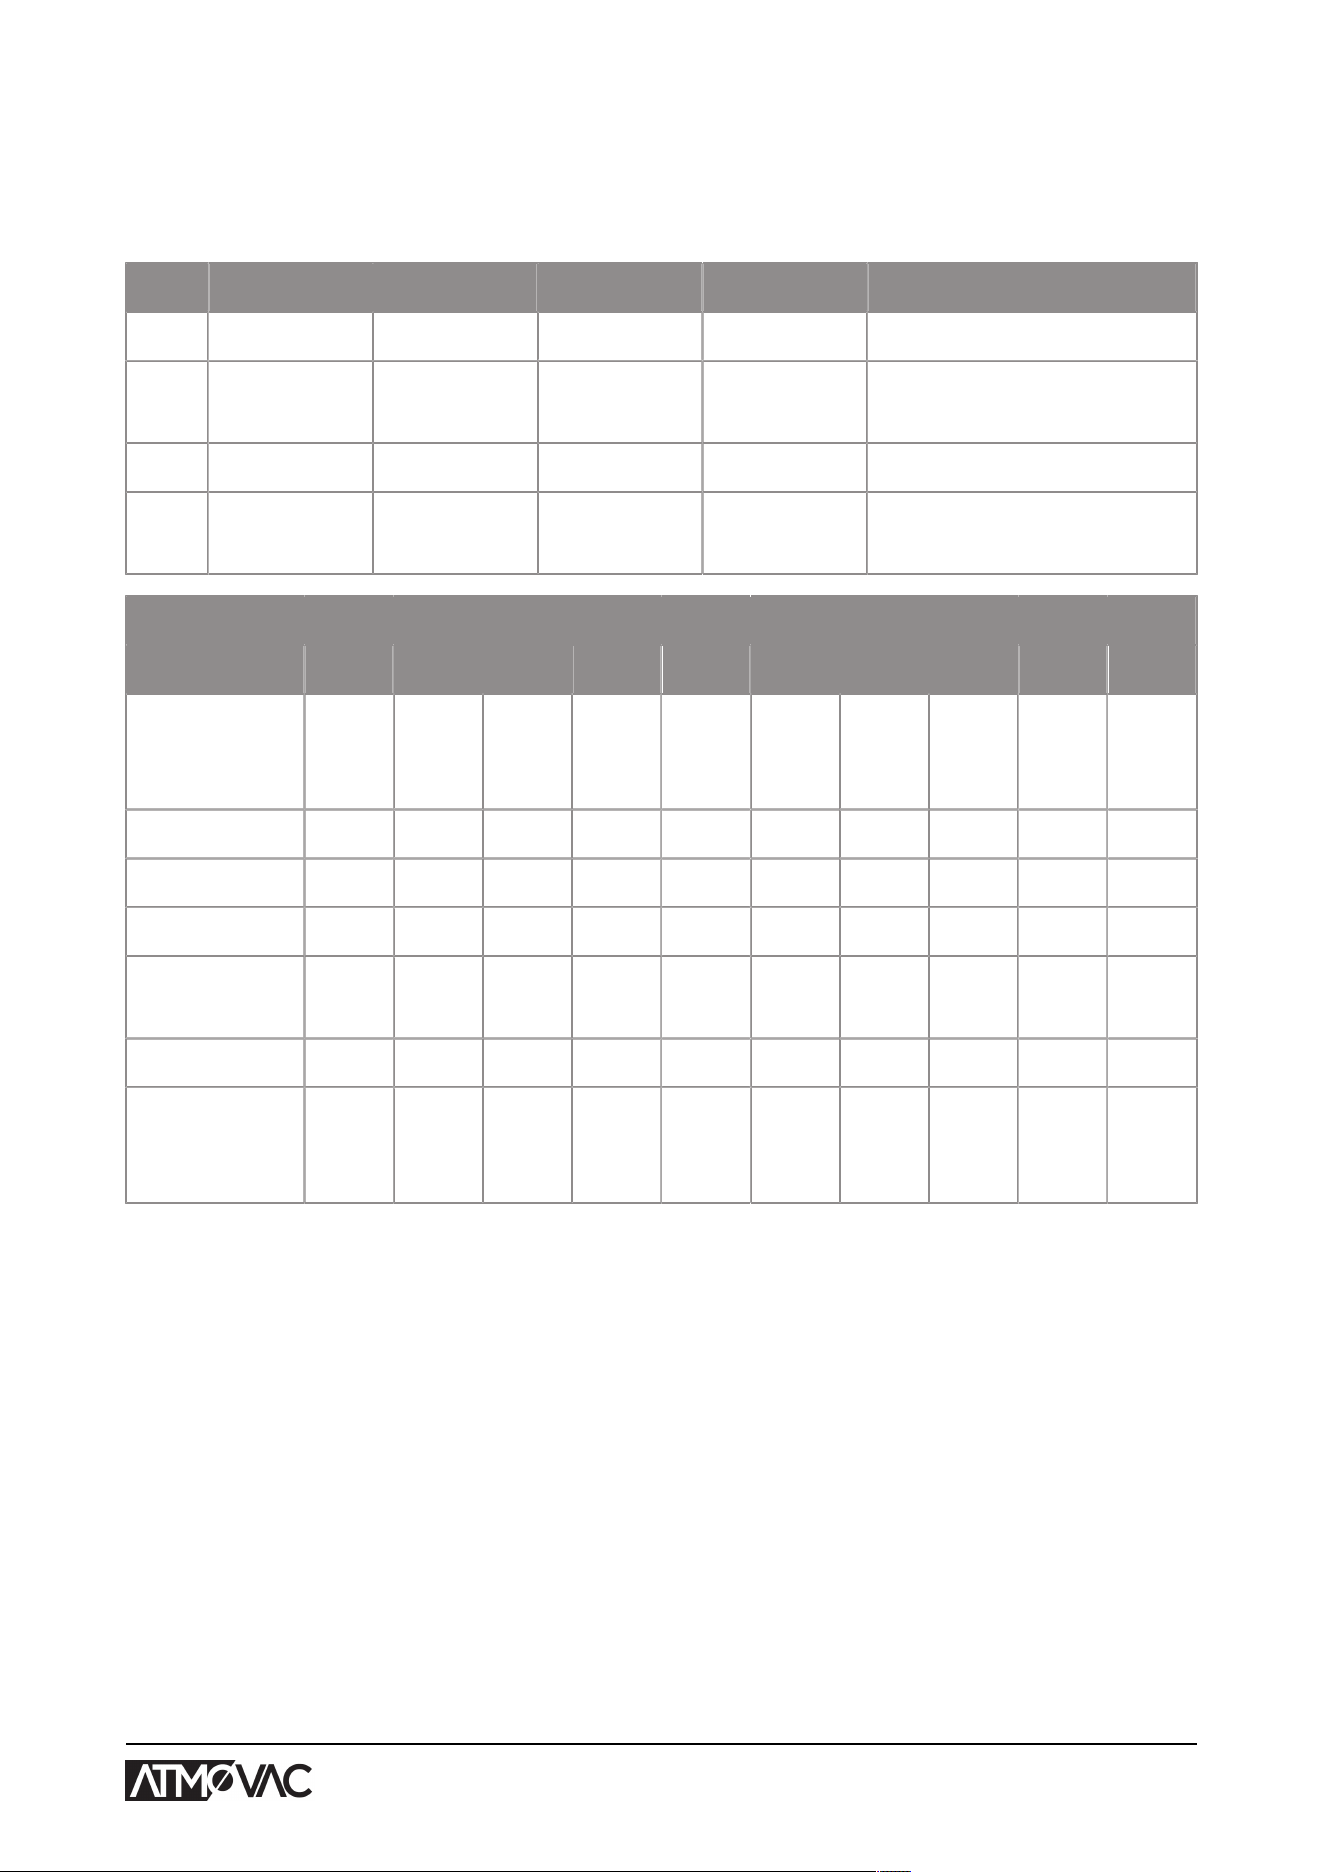
6.2.8 Example programmes
The vacuum packaging machine is equipped with sample programmes with pre-set parameters. It
is possible to optimise a program for your products by modifying the parameters.
Prog Vacuum Vacuum+ Seal Soft-air Type of product
1. 99.8% OFF 2.2 s 3 s Solid products
2. 97% N/A 2.2 s OFF
Liquids/liquid-con-
taining products
3. 99.8% OFF 2.2 s 8 s Fragile/sharp products
4. 99.8% 4 s 2.2 s 3 s
Product that may con-
tain entrapped air
Set as sensor-controlled controlled by Liquid Control sensor (optional)
Prog no. 1 2 3 4 5 6 7 8 9 10
Vacuum
99.8% 99.8%
93% /
99.8%*
90% /
99.8%
**
99.8% 99.8% 99.8% 99.8% 95% 99,8%
Vacuum+ OFF OFF OFF OFF OFF OFF OFF 5 s OFF
Gas (optional) OFF OFF 40% OFF OFF OFF OFF OFF OFF OFF
Seal 2.2 s 2.2 s 2.2 s 2.2 s 2.2 s 2.2 s 2.2 s 2.2 s 2.5 s OFF
Seal 2 (option-
al)
2.2 s 2.2 s 2.2 s 2.2 s 2.5 s 2.5 s 4.0 s 3.5 s 2.5 s OFF
Soft-air OFF 5 s OFF OFF OFF OFF OFF OFF 5 s OFF
Option on
Red
meat
Mari-
nade
Se-
quen-
tial
Jars
* Vacuum percentage when the gas option is enabled.
** Vacuum percentage when the liquid control sensor is enabled.
Operation 61
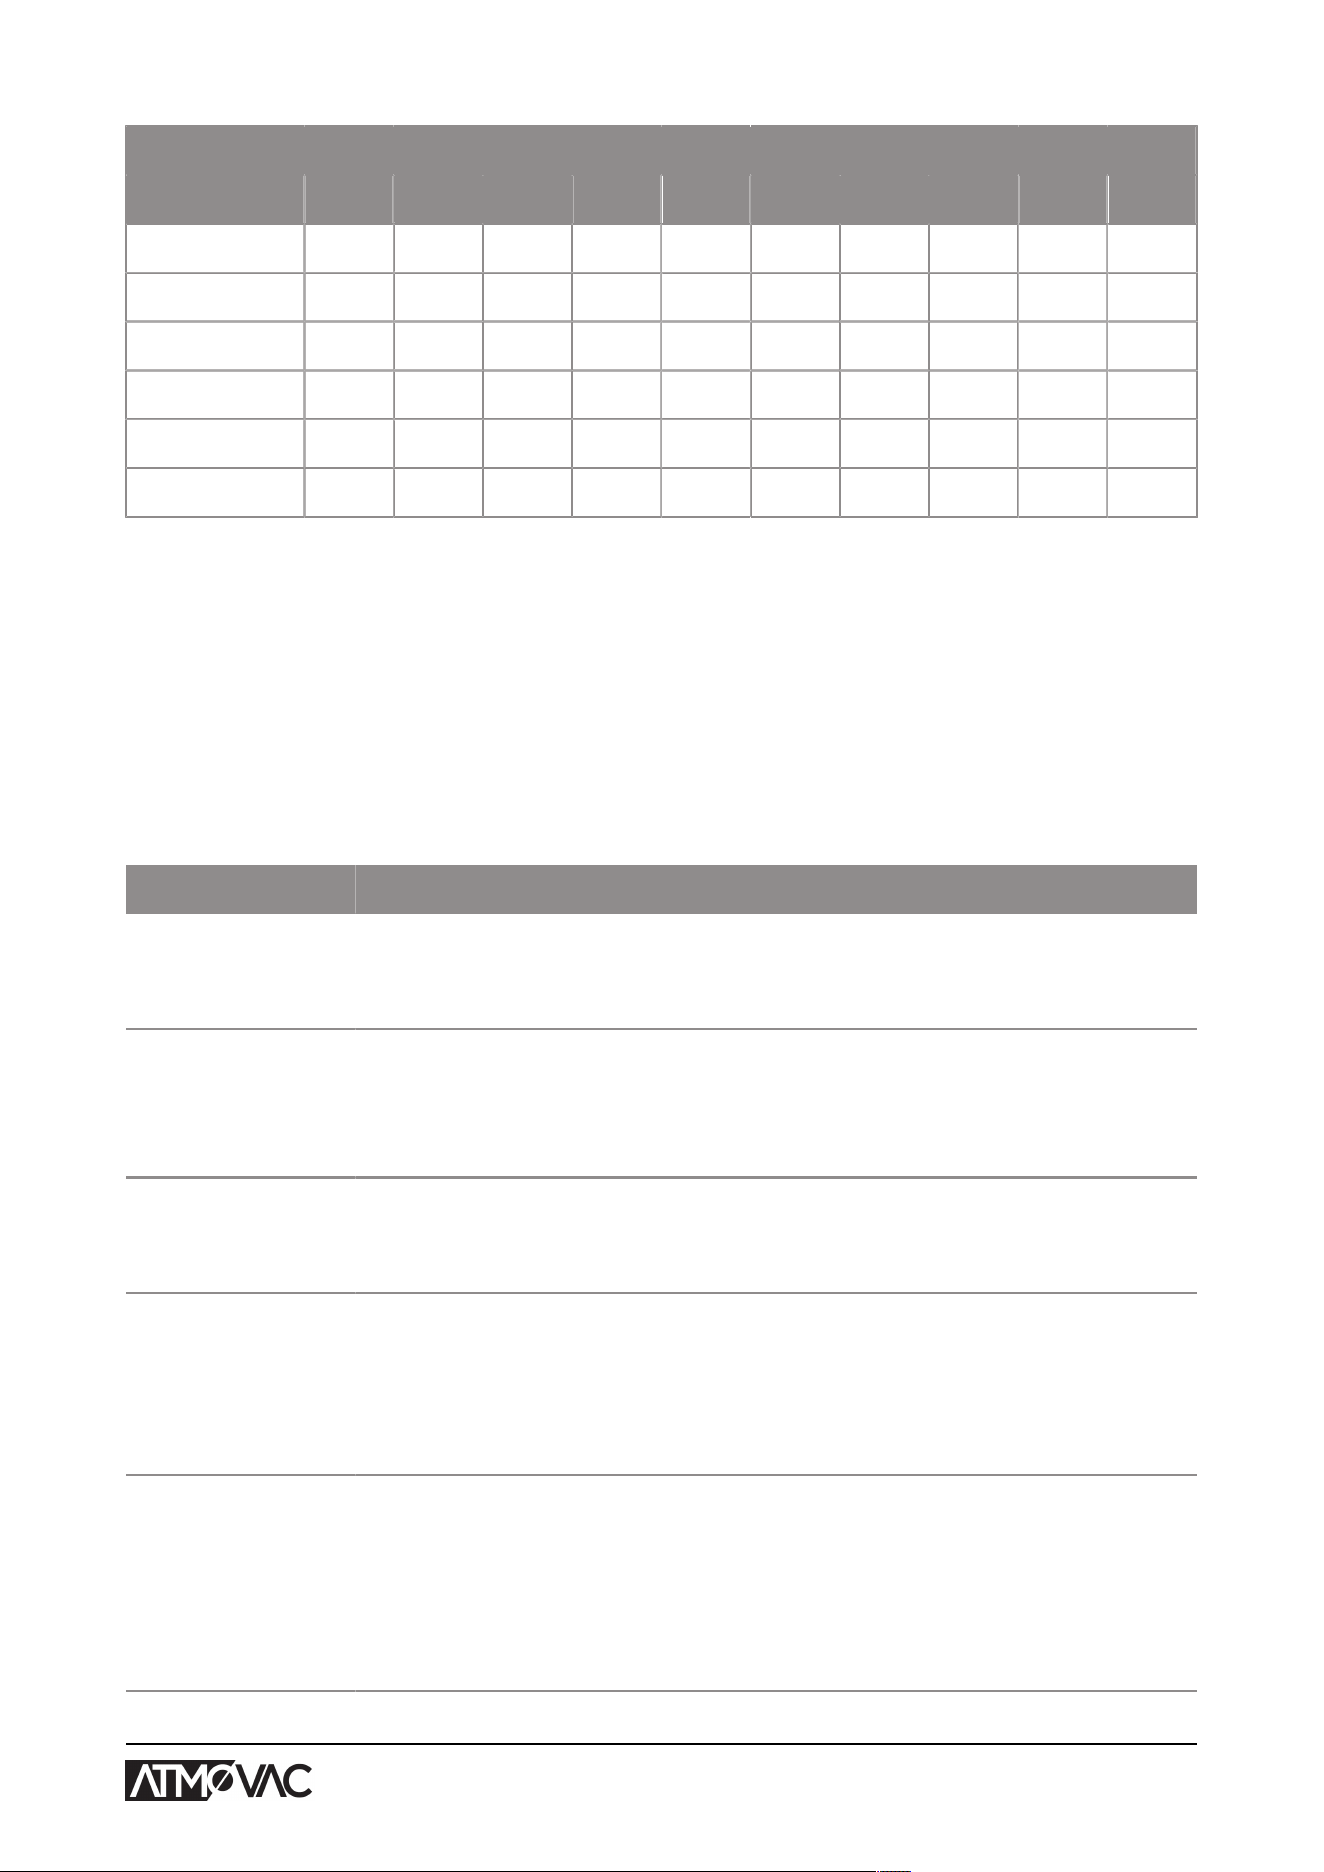
Set as sensor-controlled
Prog no. 11 12 13 14 15 16 17 18 19 20
Vacuum 99.8% 99.8% 99.8% 99.8% 99.5% 99.8% 90% 95% 95% 99.8%
Vacuum+ OFF OFF 5 s 5 s 5 s OFF
Gas (optional) 50% 40% OFF 70% 70% OFF 68% OFF OFF OFF
Seal 2.5 s 2.5 s 2.0 s 2.0 s 2.0 s 2.0 s 2.0 s 2.0 s 2.0 s 2.0 s
Seal 2 2.5 s 2.5 s 2.0 s 2.0 s 2.0 s 4.0 s 2.0 s 2.0 s 2.0 s 4.0 s
Soft-air OFF OFF OFF 5 s OFF OFF OFF OFF OFF OFF
6.2.9 Guideline for Function Values
For each function, values can be set if you are authorised as an owner. In order to understand the
consequence of the set value, the table below explains the consequences of giving a low or high
value for each function.
For the values in the table below, the following rule of thumb applies to setting a value in mbar.
These values may vary slightly, depending on the humidity.
• 99.8% = 2 mbar
• 0% = 1013 mbar
Function Range Conditions
Vacuum 30 – 99.8% Rule of thumb: the higher the vacuum, the less oxygen
remains in the package and the longer the shelf life of
the product. There are exceptions to this rule.
Vacuum+ 0 – 60 seconds This is the time the vacuuming will continue after the
maximum vacuum has been reached. This to allow en-
trapped air to escape from the product. Please note
that the vacuum must be set to the maximum.
Gas 1 – 69% For some products it may be desirable to insert gas
into the packaging to increase the shelf life of the
product.
Gas+ 0.1 – 1 second For some products it may be desirable to insert ad-
ditional gas into the packaging to create a "balloon
packaging". This allows for a better protection of a fra-
gile product. The recommended value for Gas+ is 0.7
seconds.
Red meat 0.1 – 1 second When packaging large pieces of fresh meat, the
product continues to degas during the sealing phase.
Since the opening of the vacuum bag is already
closed, air pockets may form inside the package after
decompressing. This function prevents these air pock-
ets.
Operation 62
Function Range Conditions
Liquid Control 30 – 99.8% If the pressure is reduced, the boiling point of liquids
will be decreased. As a result of this law of nature, a
product may start boiling. In addition to contamination
of the machine, this will reduce the weight and qual-
ity of the product to be packaged. By enabling the Li-
quid Control function, this special sensor will detect the
evaporation point, and the program will stop vacuuming
and proceed to the next step in the packaging process.
The value that can be set is the maximum achievable
vacuum value. Please keep in mind that this maxim-
um vacuum value can only be achieved as long as the
product does not start boiling.
Liquid Control+ 0.1 – 5.0 seconds This is the time the vacuuming will continue after de-
tection of the evaporation point. Because of the evap-
oration, a minor shockwave may occur, pushing all re-
maining air from the bag. The best way to determine
the right time is trial and error.
Sequential Vacuum 30 – 99.8% If the value for the Vacuum+ time is insufficiently ef-
fective for the entrapped air to escape, the Sequential
Vacuum/Multi-Cycle Vacuum Step must be enabled.
In maximum five steps, vacuuming is alternated with
maintaining time. Each step increases the vacuum
reached in the previous step.
Marinating 42% – 99.8%
Steps: 1 – 5
This is the adjustable value of the last step. If it is set
to 42%, no more vacuuming will take place during this
step, but it will immediately proceed to sealing. 1 – 5
steps can be set. The set end vacuum can only be
achieved during the last step.
Jars 30 - 99% This function is used only to vacuum seal jars. Jars
with lids suitable for vacuum sealing need to be used.
The Seal and Soft air phase are shut off with this func-
tion.
Tenderising 30 – 99.8%
Time: 0 – 30
minutes
This is the value at which the Tenderising takes place.
The duration of the Tenderising process can also be
set.
Seal time
1-2 cutting time
0.1 – 4.0 seconds This is the time that the sealing wire and/or the cut-off
wire are heated. The longer the time, the more heat is
transferred to the bag.
Soft-air 0 – 20 seconds This is the time that air is softly released into the cham-
ber after sealing has taken place. The best way to de-
termine the right time is trial and error.
Operation 63

Function Range Conditions
Cleaning of the
pump
15 minutes Fixed value.
Sleeper option 1 – 59 minutes This is the time the pump will continue running after
running a cycle. This maintains the pump at operating
temperature and prevents unnecessary starting and
stopping of the pump, which causes additional wear of
the pump.
The vacuum in the chamber must be at least 30% at the moment of sealing.
If the pressure is reduced, the boiling point of liquids will be decreased; see Vapour Pressure
Curve of Water on page 88. As a result of this law of nature, a product may start boiling. In
addition to contamination of the machine, this will reduce the weight and quality of the product to
be packaged.
When packaging moisture-containing products, such as soups and sauces, it is important to
closely monitor the vacuuming process. The moment bubbles are formed or the product starts to
bubble, you should immediately proceed to the next step in the cycle. See Proceeding to the Next
Step in the Cycle on page 48.
By letting products cool down sufficiently prior to starting the vacuuming process, a higher vacuum
can be achieved.
If the machine is equipped with the Liquid Control option, the control will automatically proceed to
the next step if the product starts boiling.
When packaging moisture-containing products, it is important to run the pump cleaning program
at least once a week. When moisture-containing products are vacuumed on a daily basis, it is
recommended to run the pump cleaning program at the end of the day.
6.3 Automatic lid (optional)
Certain double chamber models can be equipped with an automatic moving lid.
There are two modes for the automatic lid: foot switch and automatic:
Foot switch
When the foot switch is activated, the lid will remain closed after the vacuum cycle. Press the foot
switch to open the lid. It will automatically close on the other side. After the vacuum cycle, the foot
switch can be pressed again, and therefore the movement of the lid is controllable.
Operation 64
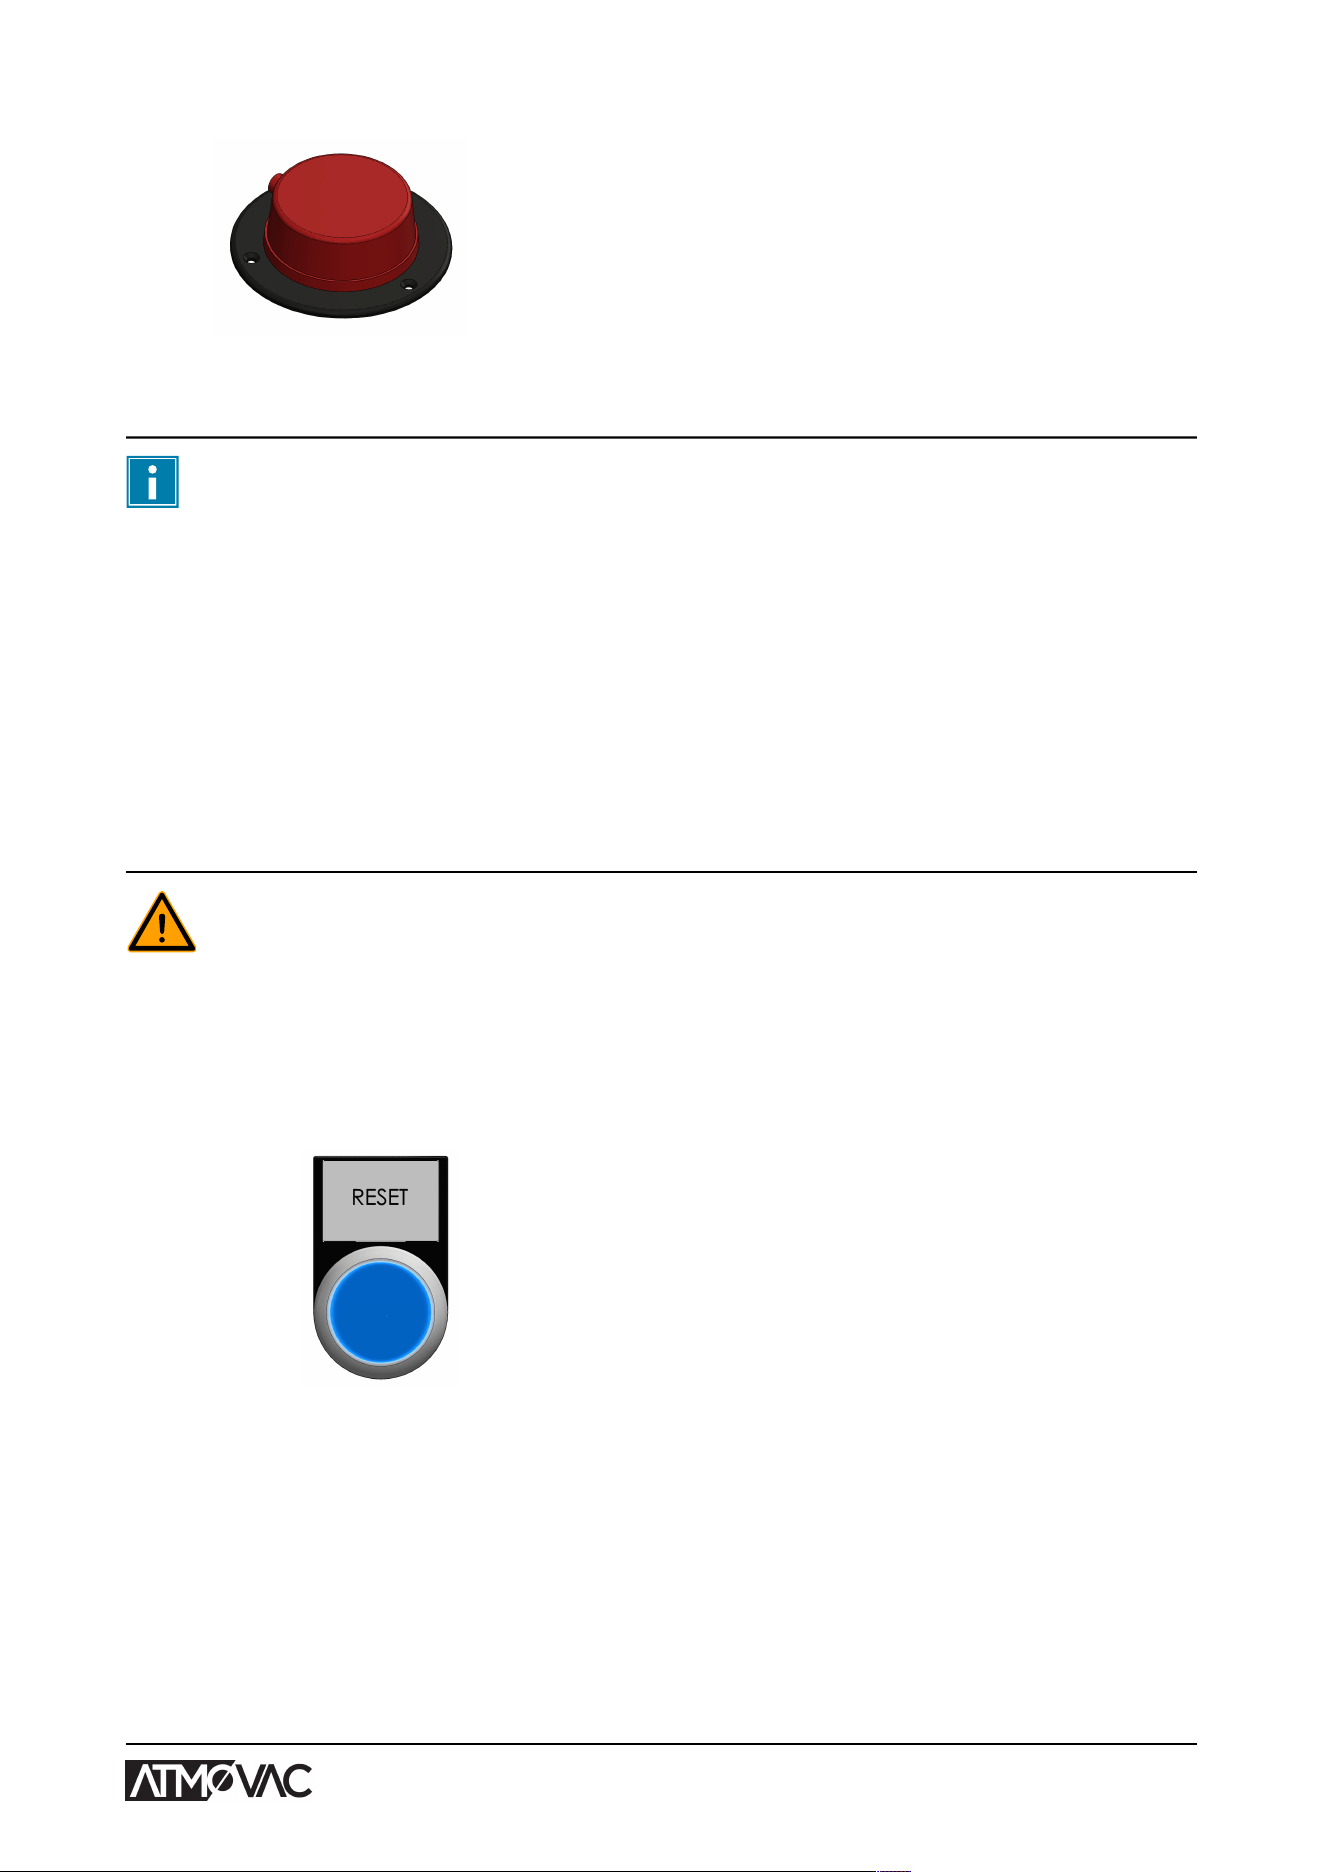
Figure 21: Foot switch
To protect the foot switch during transportation, it is tied to the interior of the machine.
Before using the machine, remove the panel door on the right hand side of the machine
and release the cable of the foot switch.
Automatic
When the automatic mode is activated, the lid will automatically open as soon as the vacuum cycle
is finished and will then close on the other side. The lid keeps moving until it is powered off, or
if an emergency button or safety bumper is activated. See Safety features on page 12 for more
information.
6.3.1 Operating the automatic lid
Before you use the automatic lid, always reset the machine.
To operate the automatic lid, follow these steps.
1. Turn on the machine
The reset button light will turn on.
Figure 22: Reset button
2. Press the reset button.
The reset button light will turn off.
3. Set the automated lid switch to the desired mode.
Operation 65
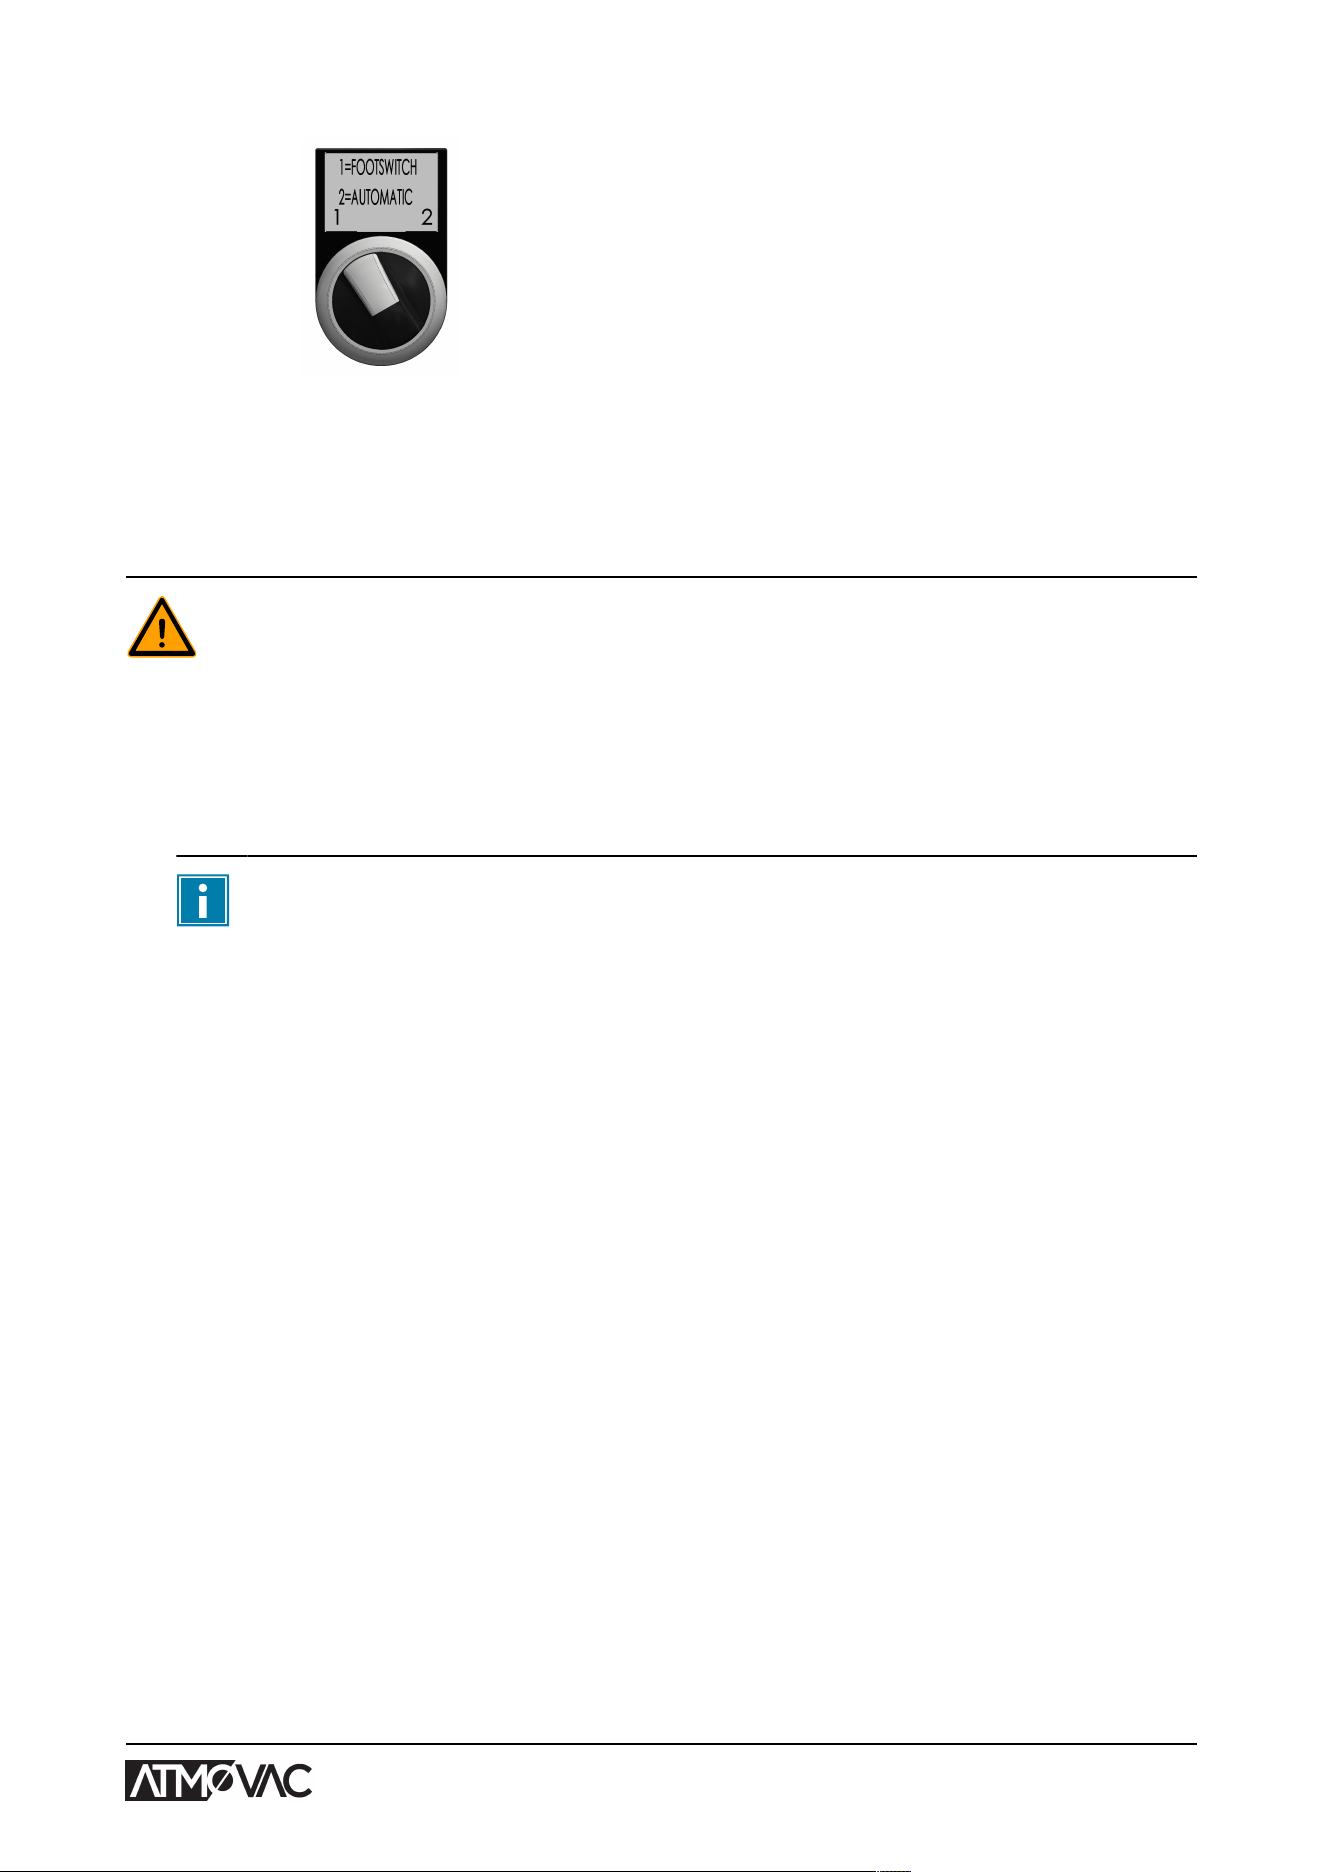
Figure 23: Automatic lid switch
1. Foot switch
2. Automatic
4. Close the lid by hand.
6.3.2 Restarting the automatic lid after an emergency
First check that the emergency situation has been resolved and that persons are no
longer exposed to any risk.
To restart the automatic lid after an emergency.
1. If an emergency stop button was pressed, turn the emergency stop button slightly clockwise
until it springs out.
The machine cannot reset when an emergency button remains pressed inward.
2. Press the reset button.
The reset button light will go off.
3. Close the lid by hand.
The automatic movement continues.
Operation 66
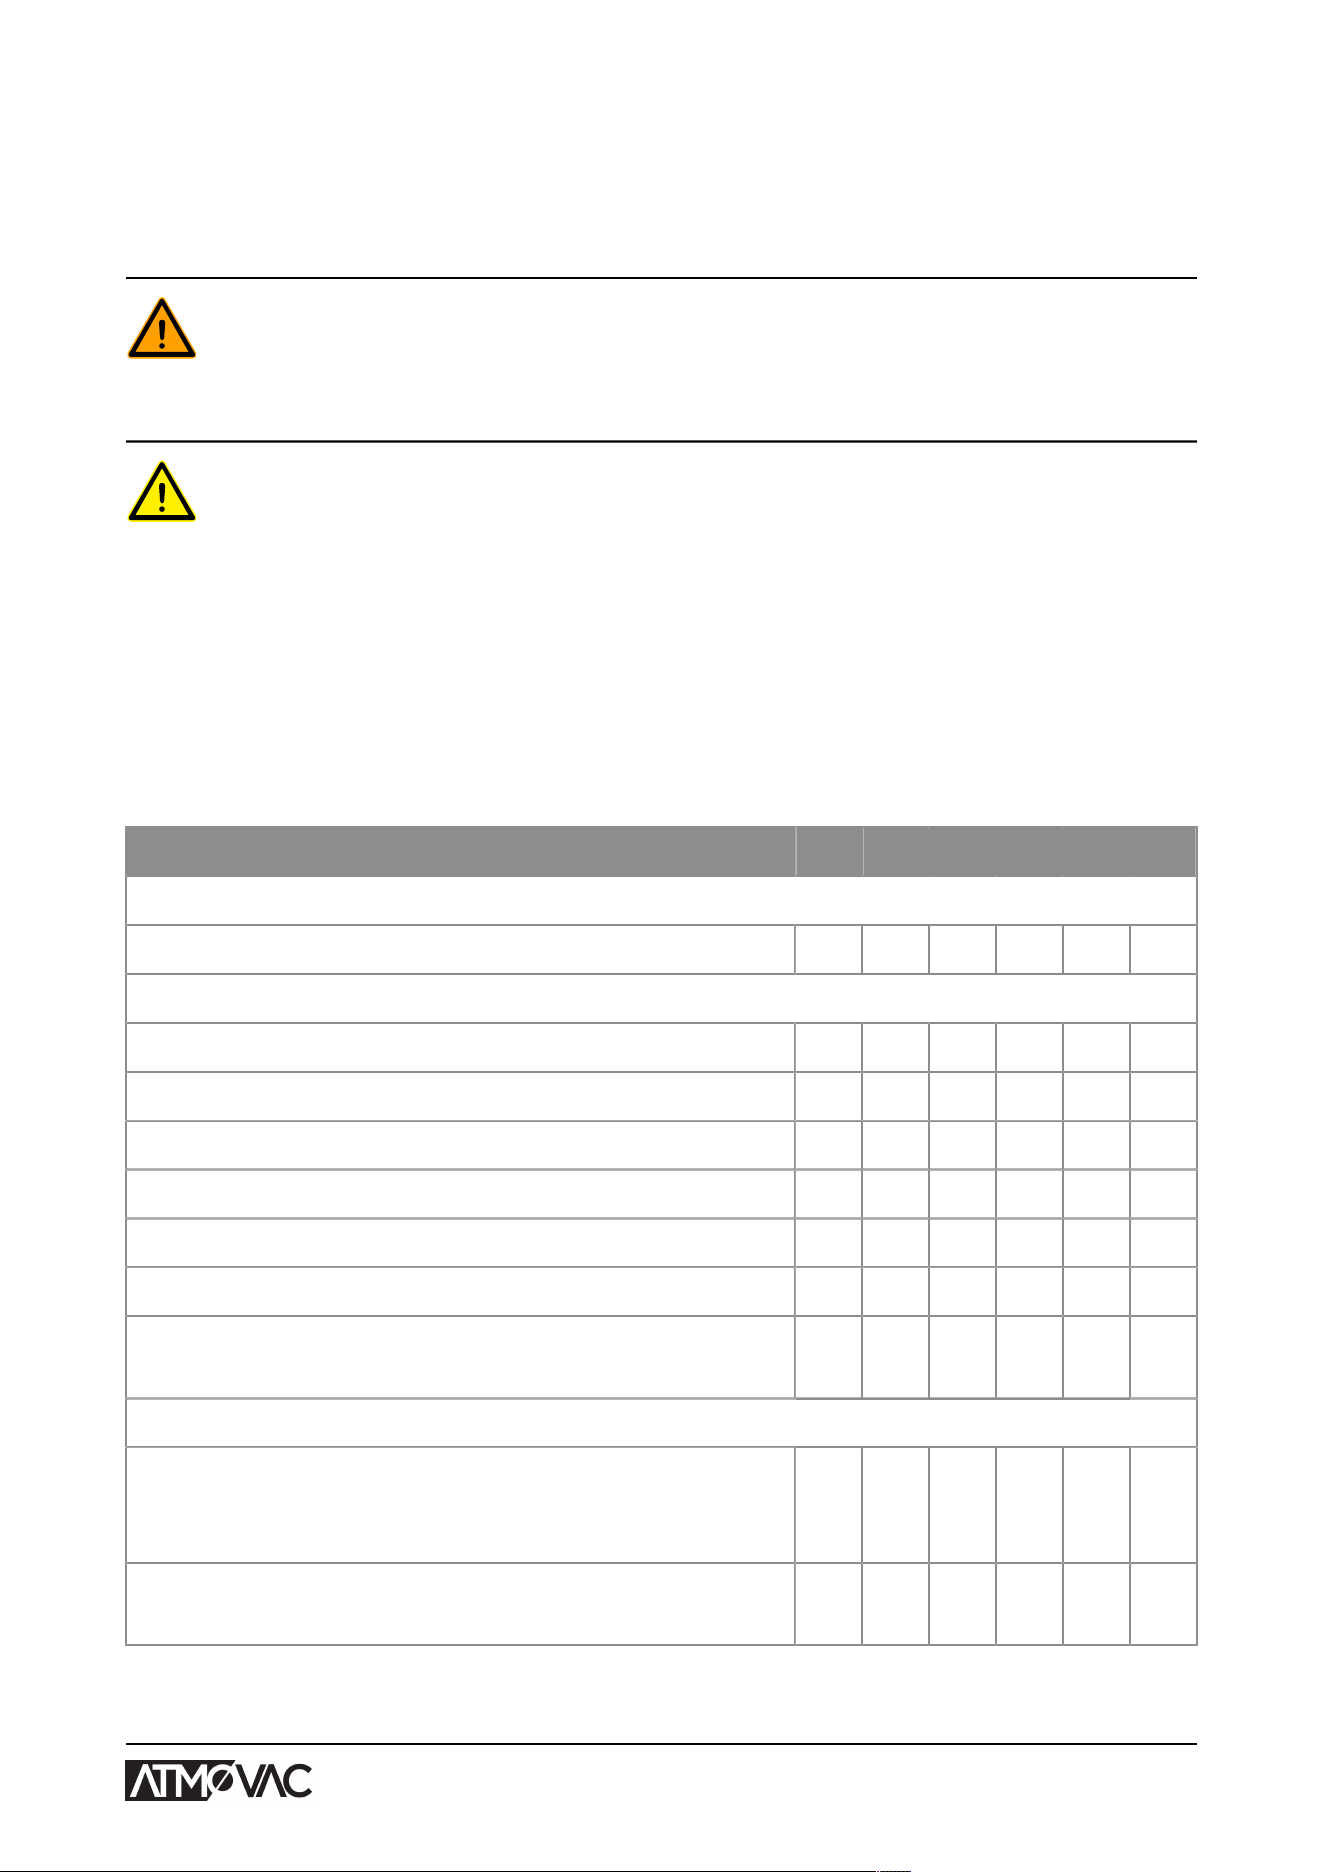
7 Maintenance
When carrying out maintenance work, always observe the following safety rules.
• Always disconnect the power supply by turning the main switch to "0" or disconnecting
the plug.
• Always disconnect the air supply (if applicable).
• Only trained technicians are authorised to perform the described maintenance activities.
• Test the machine after carrying out maintenance work or repairs to make sure the
machine can be used safely.
7.1 Maintenance Schedule
The diagram below shows the maintenance activities that must be performed and the interval with
which these activities must be performed.
For specific descriptions for performing maintenance activities, consult the appropriate section.
Activity * 1-D 1-W 1-M 6-M 1-Y 4-Y
Cleaning
Cleaning the machine. X
Inspections
Check the oil level. X
Run the pump cleaning program. X
Inspect the sealing bars. X
Inspect the silicone rubber of the silicone holders. X
Inspect the lid gasket. X
Check the plastic lid for cracks (if applicable). X
Inspect the lid springs. Pay additional attention to damage
and the fastenings of the lid springs.
X
Lubrication
Lubricate the grease nipples of the parallel arms at the pivot
point using a food grade grease that is approved by the local
authorities.
X
Replace the oil and the oil filter of the vacuum pump. See
Technical Data on page 80 for the type of oil.
X
Maintenance 67
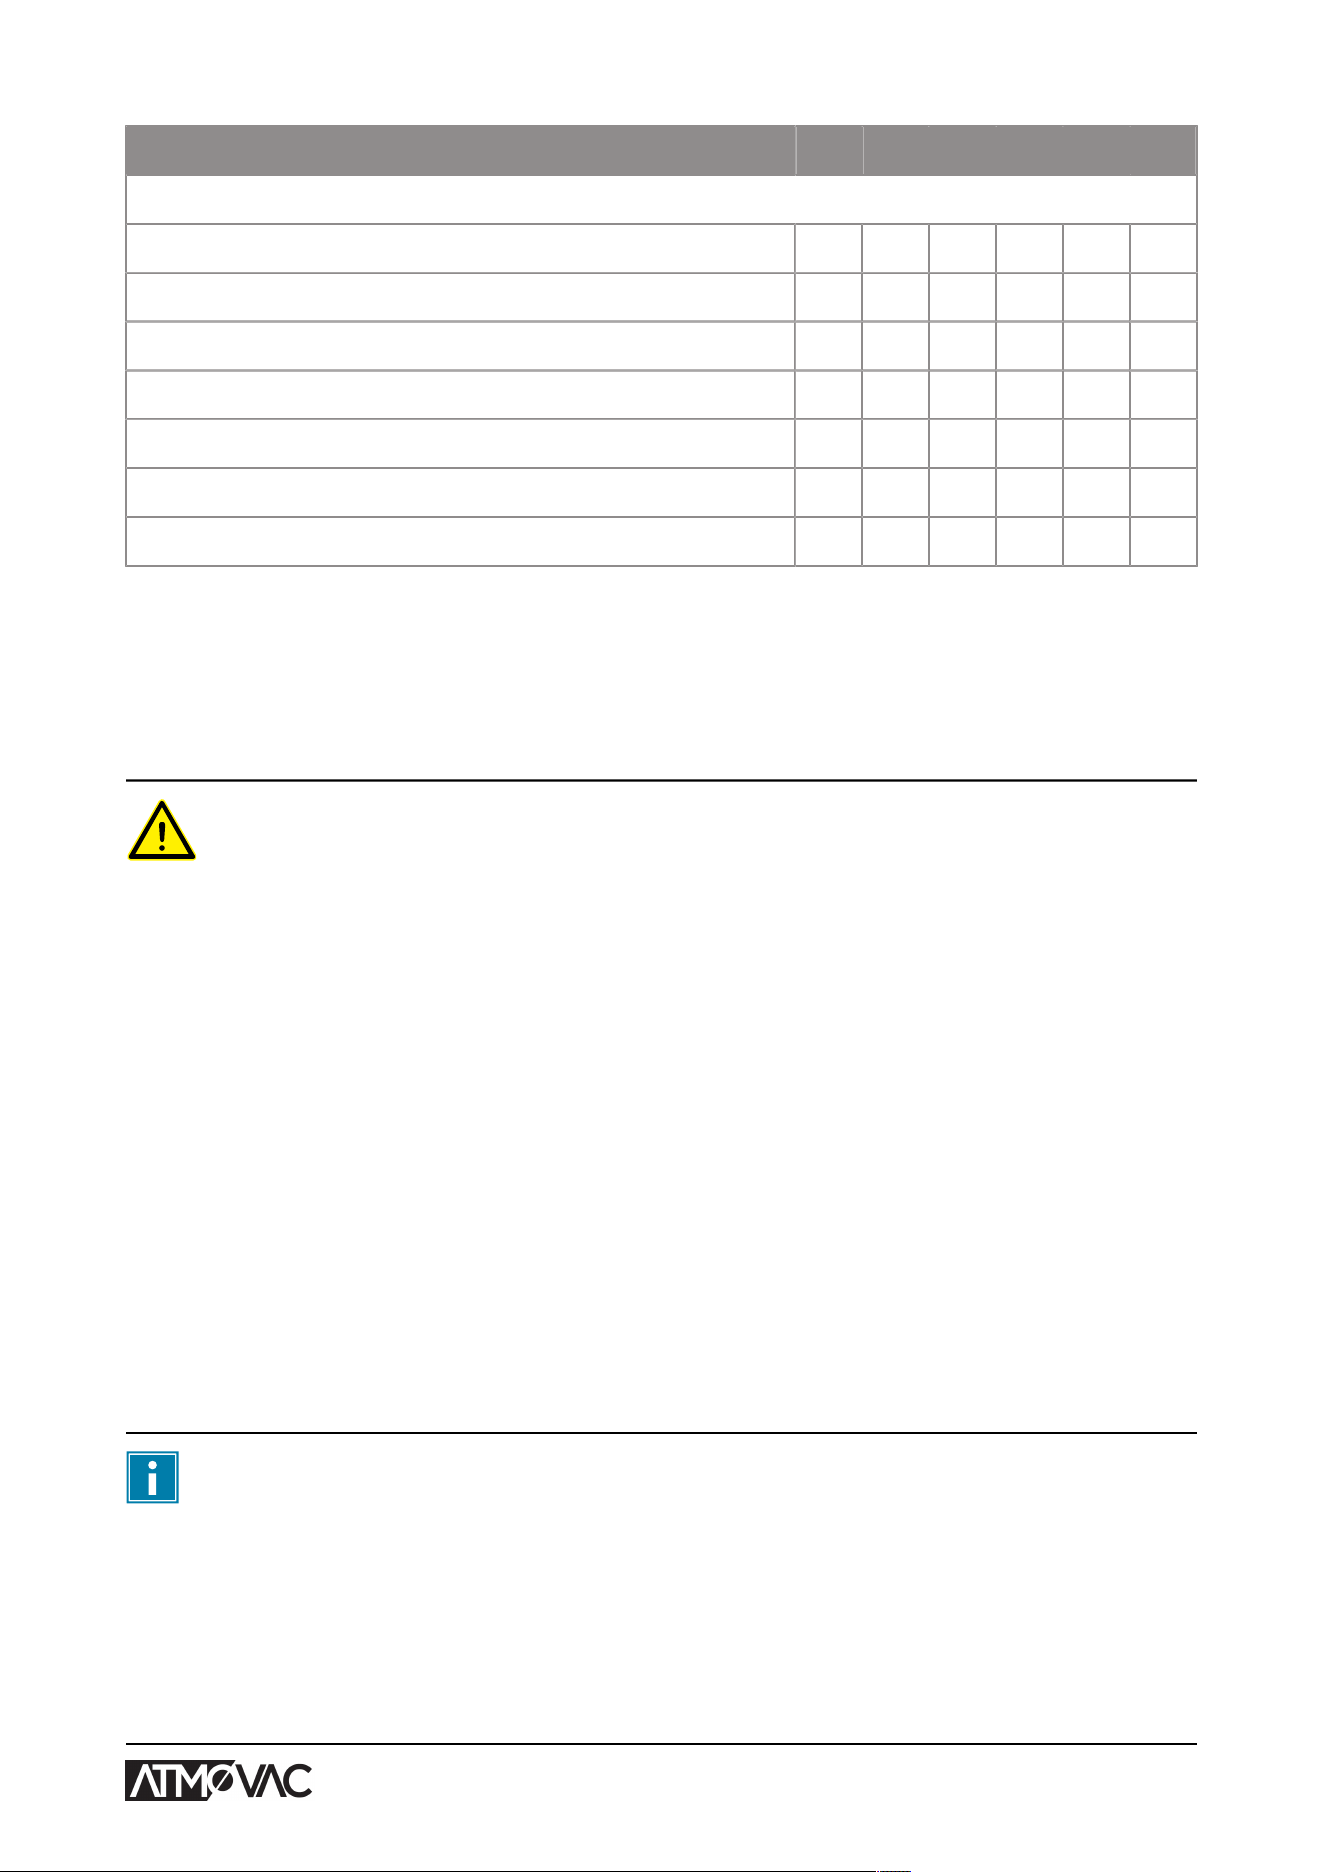
Activity * 1-D 1-W 1-M 6-M 1-Y 4-Y
Replacement
Replace the sealing wires. X
Replace the silicone rubber of the silicone holders. X
Replace the lid gasket. X
Replace the oil exhaust filter. X
Replace the oil filter. X
Contact your dealer for professional servicing. X
Replace the plastic lid (if applicable). X
* 1-D = Daily, 1-W = Weekly, 1-M = Every month, 6-M = Every 6 months, 1-Y = Annually, 4-Y =
Every 4 years
7.2 Cleaning the Machine
• Never clean the machine using a high pressure cleaner.
• Do not use any aggressive or toxic cleaning agents.
• Do not use any cleaning agents containing solvents.
1. Clean the surfaces with a soft, damp cloth. You can also apply a cleaning agent to the
machine and wash it with clean water.
7.3 Replacing the Sealing Wire
Depending on the specifications of your machine, you can have one of the following (combinations
of) sealing wires:
• Wide seal: one wide sealing wire
• Cut-off seal: one sealing wire and one cutting wire
• Double seal: two sealing wires
• Bi-active seal: one seal bar with a wide sealing wire on both sides
The process of replacing the sealing wires is the same for all types.
Make sure, for bi-active seal systems, that the upper and lower sealing wires are aligned
precisely during the sealing.
Replace the sealing wires if the wire and/or the Teflon tape are damaged, or as specified in
Maintenance Schedule on page 67.
Maintenance 68
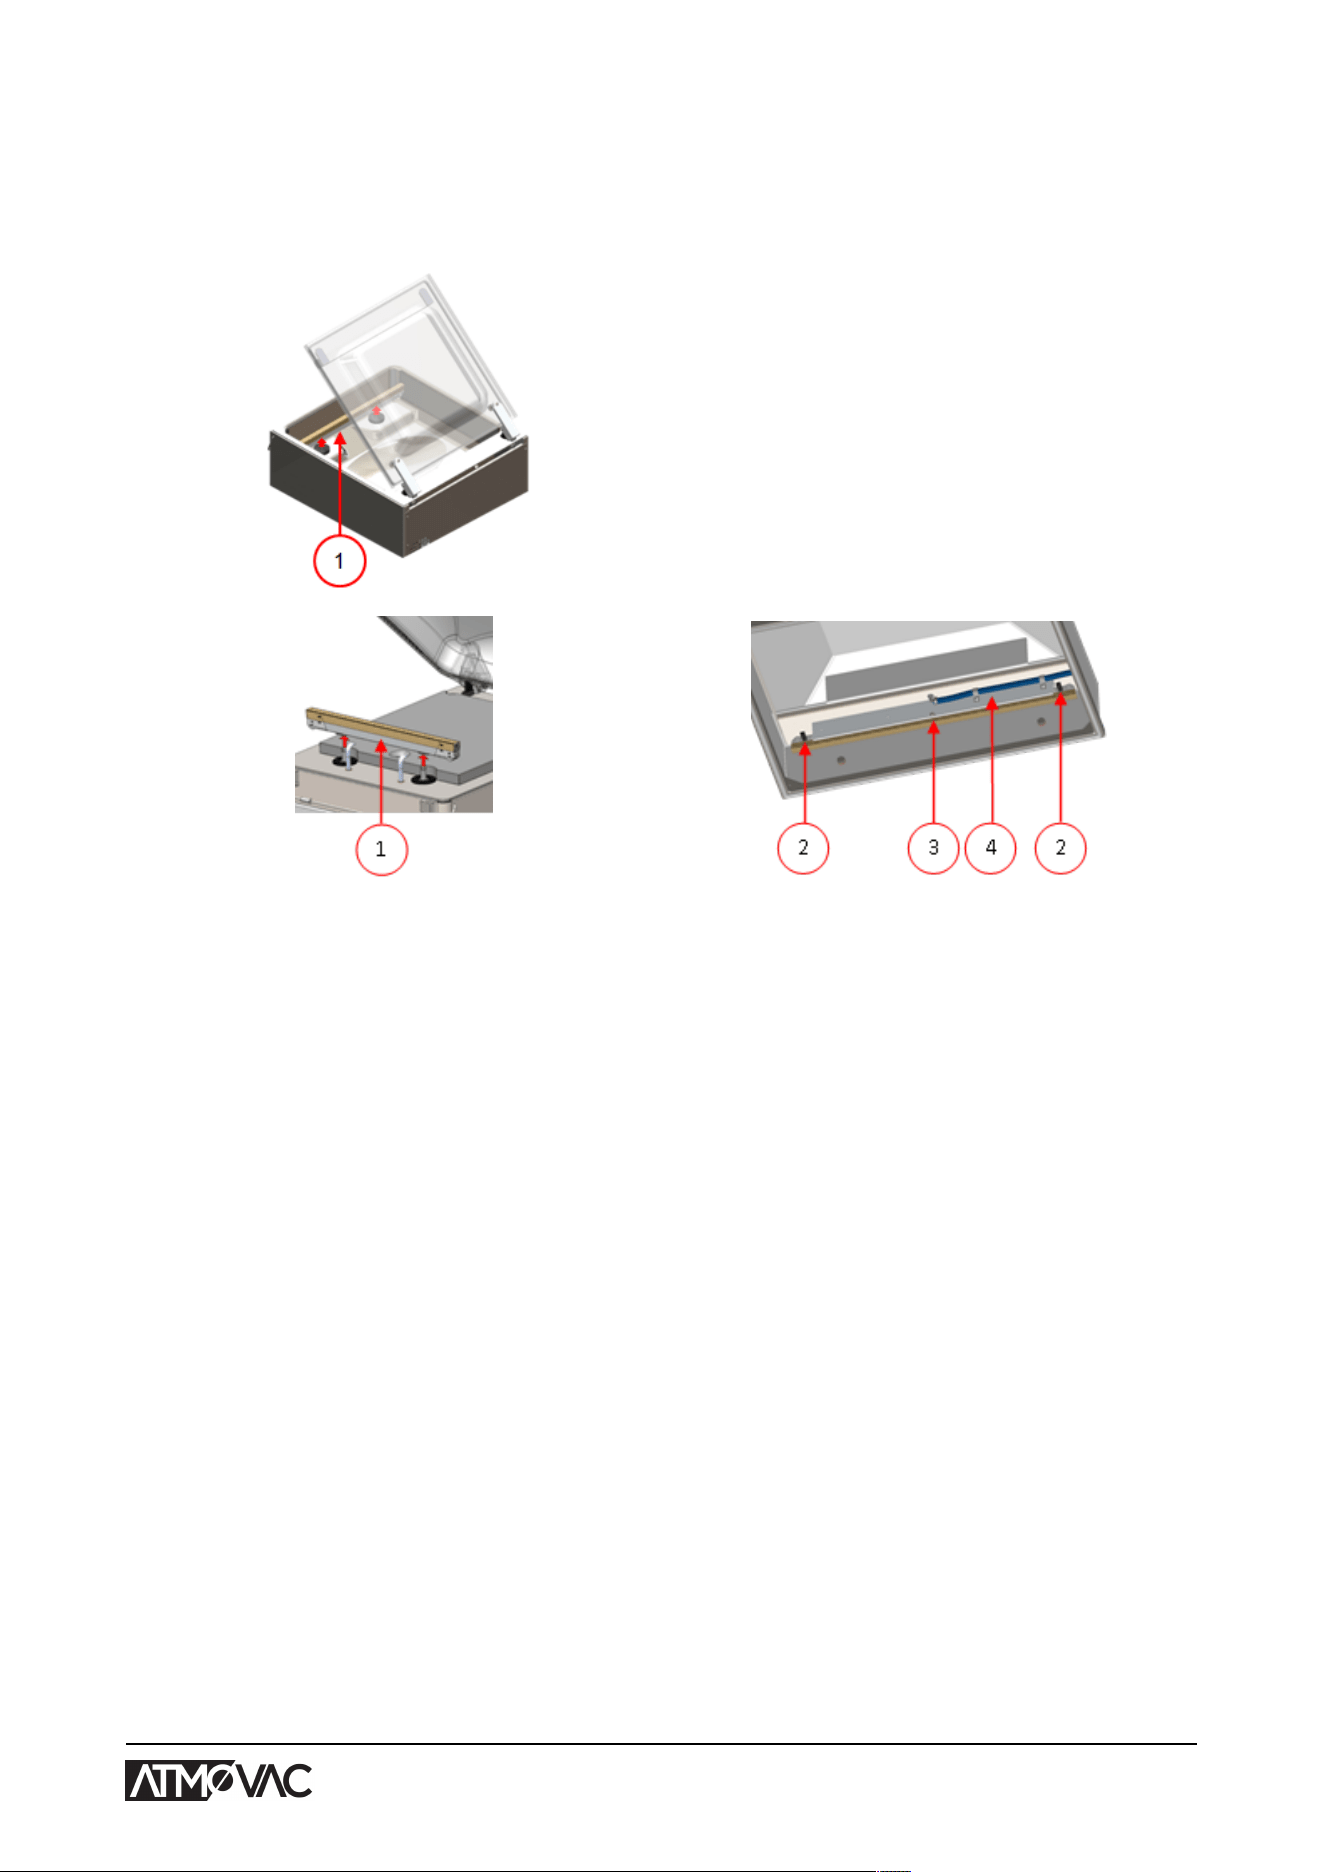
On machines with a plastic lid, the sealing bars are mounted on cylinders (Figure 24: Removing
the Sealing Bar (Plastic Lid) on page 69). On machines with a metal lid, the sealing bars are
mounted in the lid (Figure 25: Removing the Sealing Bar (Metal Lid) on page 69).
Figure 24: Removing the
Sealing Bar (Plastic Lid)
Figure 25: Removing the
Sealing Bar (Metal Lid)
1. Remove the sealing bar by lifting it from the cylinders. See Figure 24: Removing the Sealing
Bar (Plastic Lid) on page 69.
2. Remove the sealing bar.
Plastic lid Lift the sealing bar from the cylinders. See Figure 24: Removing the
Sealing Bar (Plastic Lid) on page 69.
Metal lid See Figure 25: Removing the Sealing Bar (Metal Lid) on page 69.
Remove the sealing bar from the holders (4) by disconnecting the two
electrical connector plugs (2) and removing the M6 screw (3).
Maintenance 69
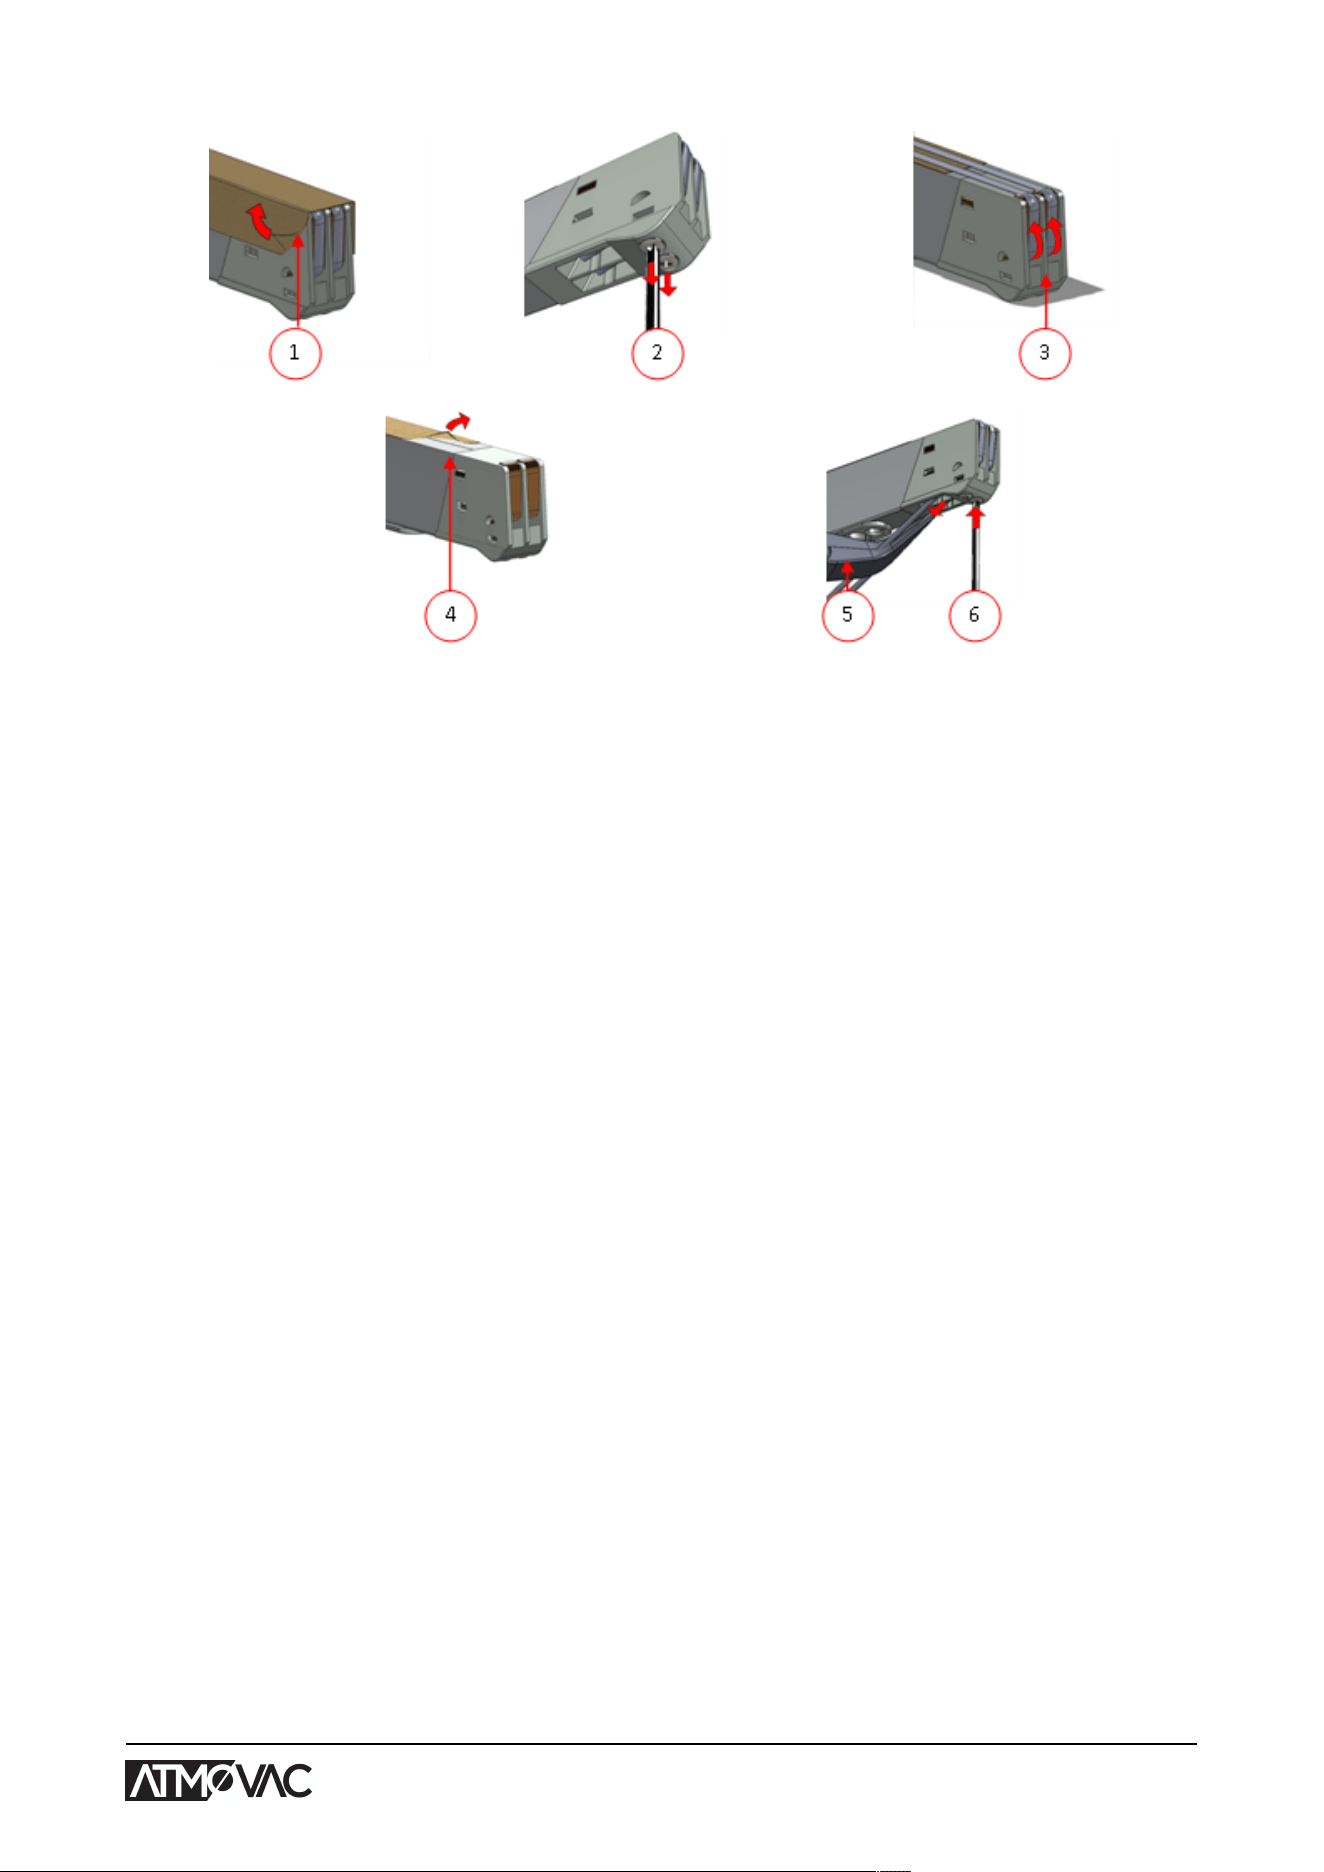
Figure 26: Replacing the Sealing Wire
3. Remove the Teflon tape (1) that protects the sealing wire.
4. Remove the screws (2) at the bottom of the sealing bar and remove the sealing wires (3).
5. Replace the Teflon tape on the sealing bar.
a. Pull the Teflon tape from the top of the sealing bar (4).
b. Clean the sealing bar with a dust-free cloth.
c. Apply a new piece of Teflon tape of the same length on the sealing bar.
6. Replace the sealing wires.
a. Cut a new piece of sealing wire or cutting wire at the length of the sealing bar plus
approximately 5.9 in (15 cm).
b. First place the wire on one side of the sealing bar by tightening the screws (2).
c. Place the other end of the wire in its location and tension it with pliers. Now fasten it by
tightening the screws.
d. Cut both ends of the wire.
7. Replace the Teflon tape on the sealing wire.
a. Cut a piece of Teflon tape at the length of the sealing bar plus approximately 2.0 in
(5 cm).
b. Attach the tape over the sealing wires on the sealing bar evenly and without folds.
c. Cut the tape.
8. Place the sealing bar back in its position.
7.4 Replacing the Silicone Rubber of the Silicone Holders
To ensure a seal of good quality, the silicone rubber may not be damaged and the surface must be
smooth. Mechanical contact or burning by the sealing wire may damage the rubber.
Replace the silicone rubber if damaged or as specified in Maintenance Schedule on page 67.
Maintenance 70
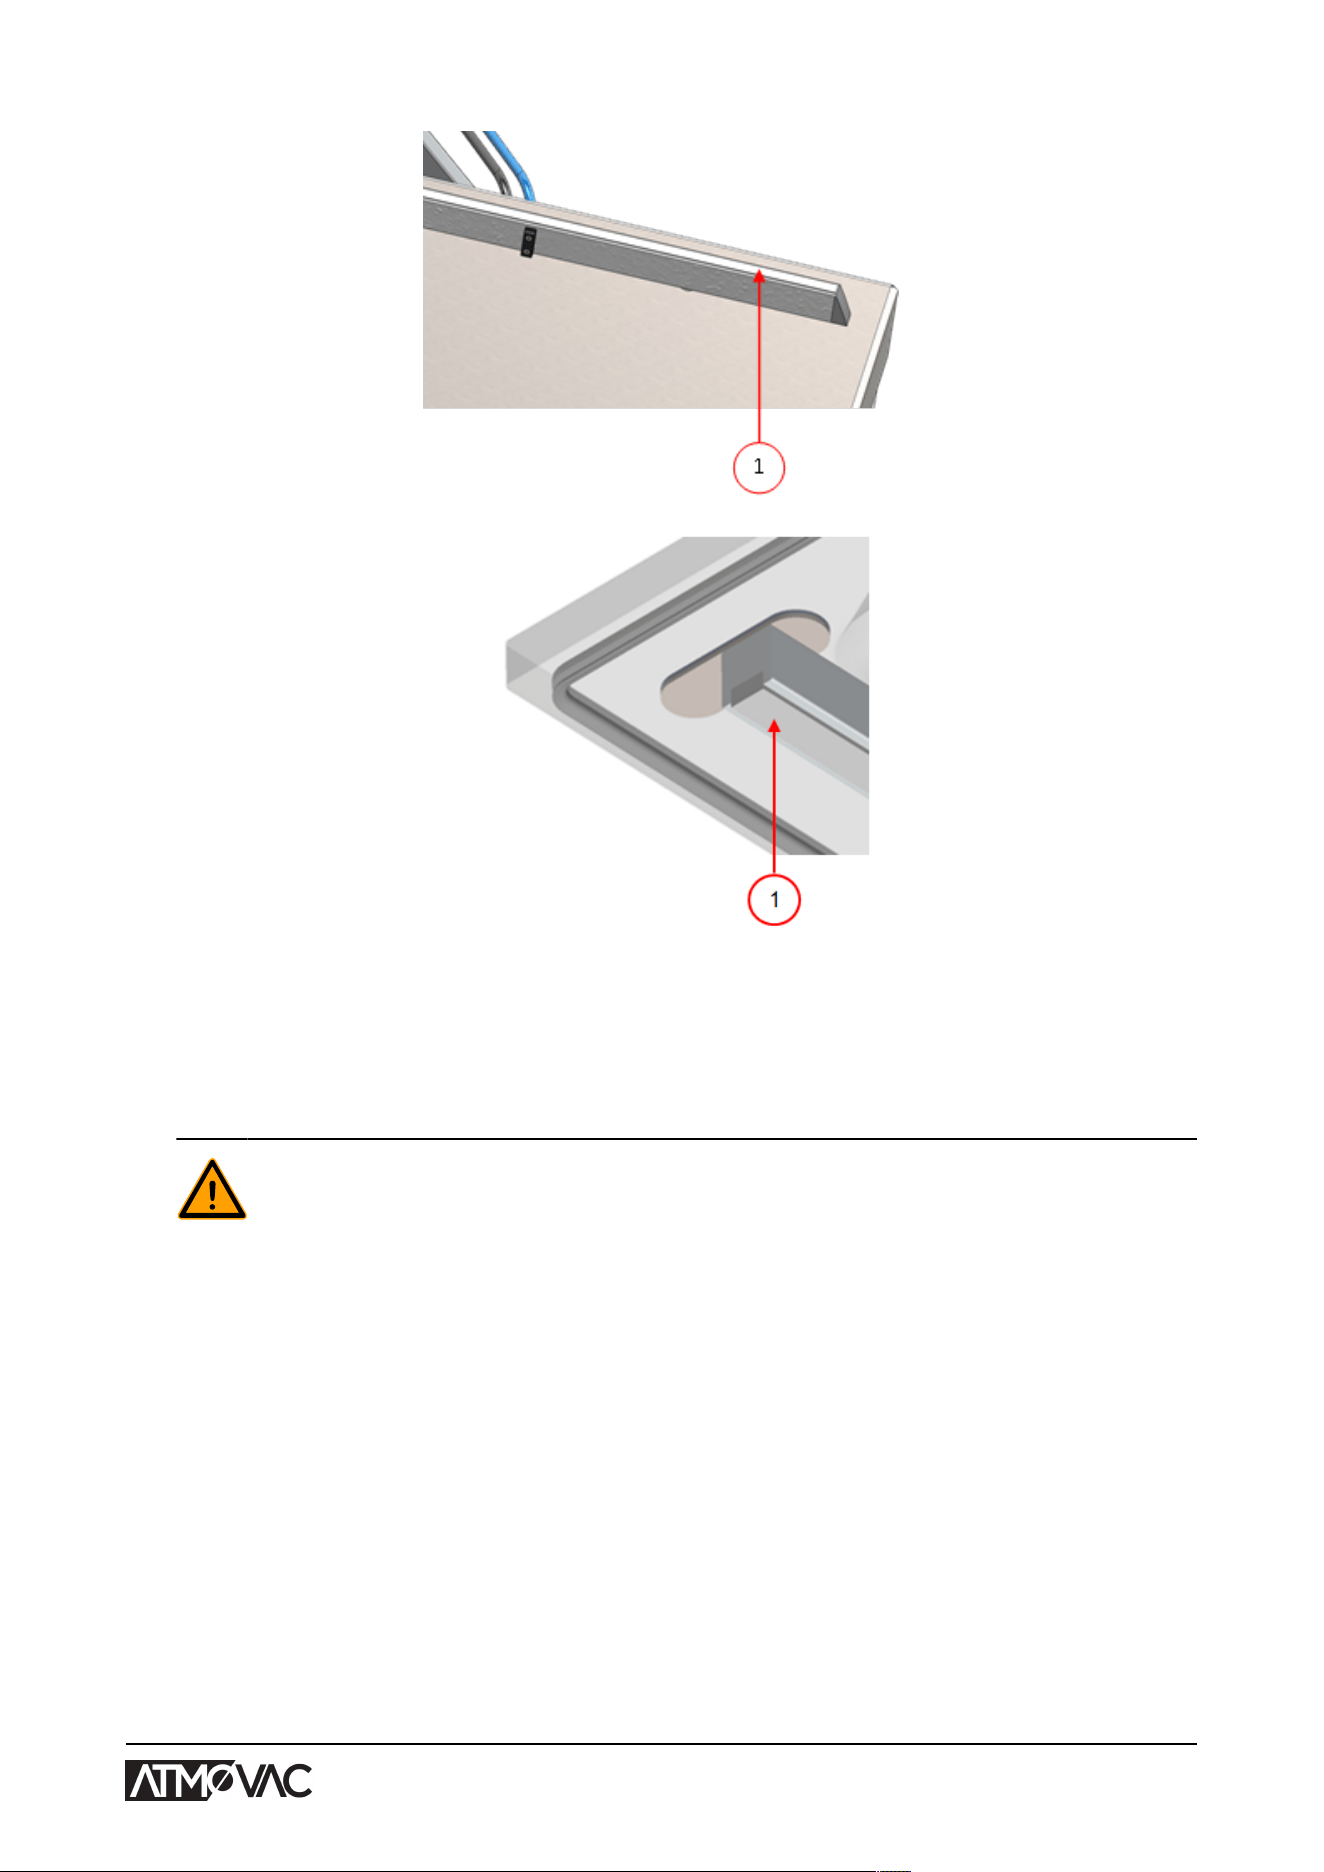
Figure 27: Replacing the Silicone Rubber of the Silicone Holders
1. Pull the old silicone rubber from the holder, see Figure 27: Replacing the Silicone Rubber of
the Silicone Holders on page 71.
2. Cut a new piece of silicone rubber. Make sure it is the same length as the holder.
If the rubber is too short or too long, this may cause problems with the seal of the
bag.
3. Install the new piece of silicone rubber by pressing it into the recess of the silicone holder.
Ensure that the silicone rubber is fully and uniformly placed in the recess. It is also important
that the surface of the silicone rubber is smooth after it is in place, and that it shows no signs
of stress.
7.5 Replacing the Lid Gasket
The lid gasket ensures the vacuum chamber is fully closed during the machine cycle. This is
essential to reach the maximum vacuum level. Due to extreme pressure differences, the gasket
wears and should therefore be replaced regularly.
Replace the lid gasket if damaged or as specified in Maintenance Schedule on page 67.
Maintenance 71
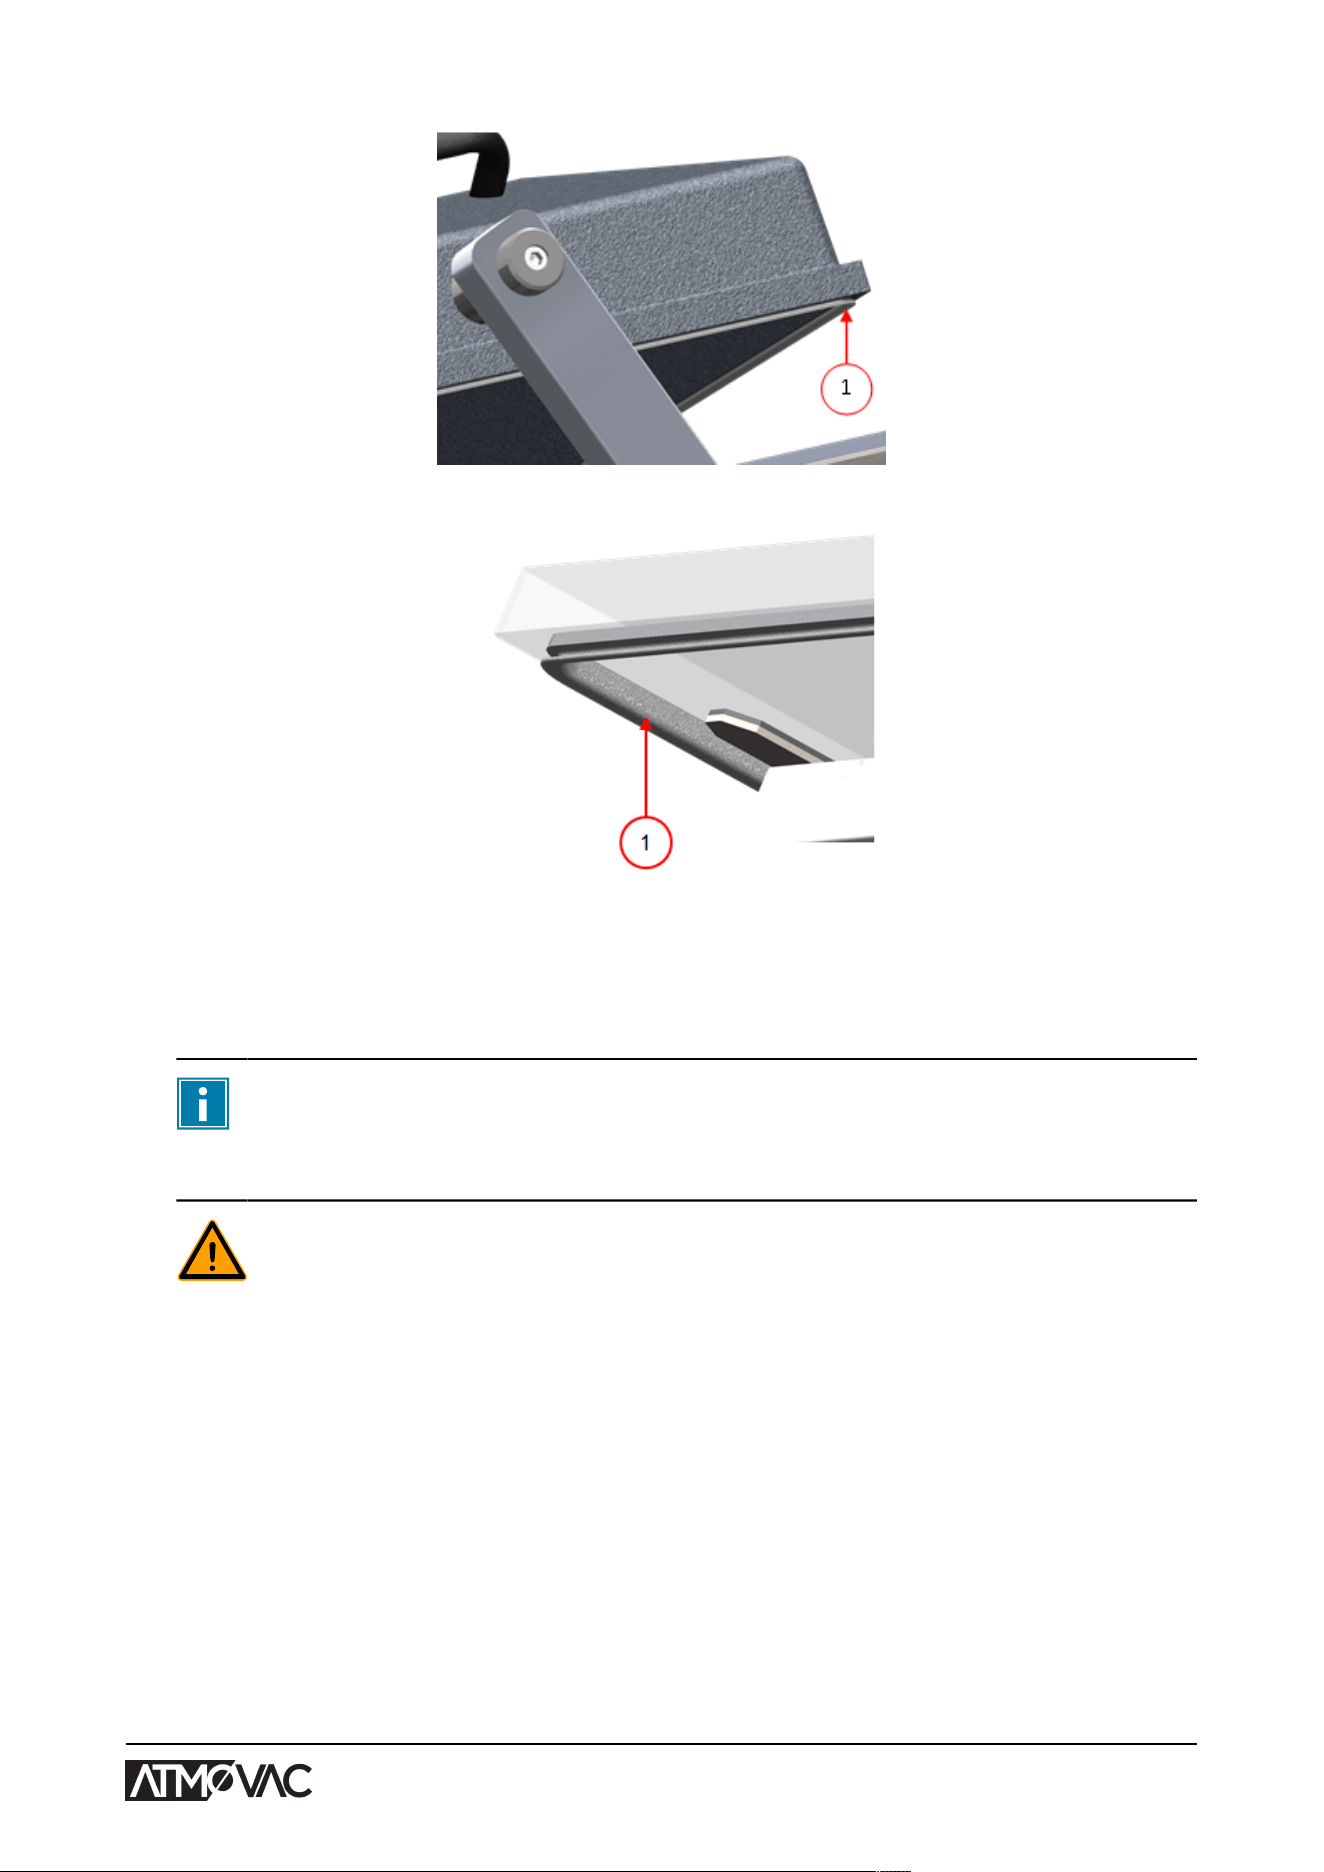
Figure 28: Replacing the Lid Gasket
1. Pull the old gasket loose to remove it.
2. Cut a new piece of rubber.
Preferably cut the new piece of rubber slightly longer than the old piece.
The edges must be cut straight.
If the lid gasket is too short or too long, this may cause problems when closing the lid
or it may cause leakage.
3. Install the new gasket by pressing it into the gasket slot. The lip of the gasket must face
downwards and outwards.
The gasket should be placed in the slot evenly and without any tension. The edges must be
placed closely together to prevent leakage.
Maintenance 72
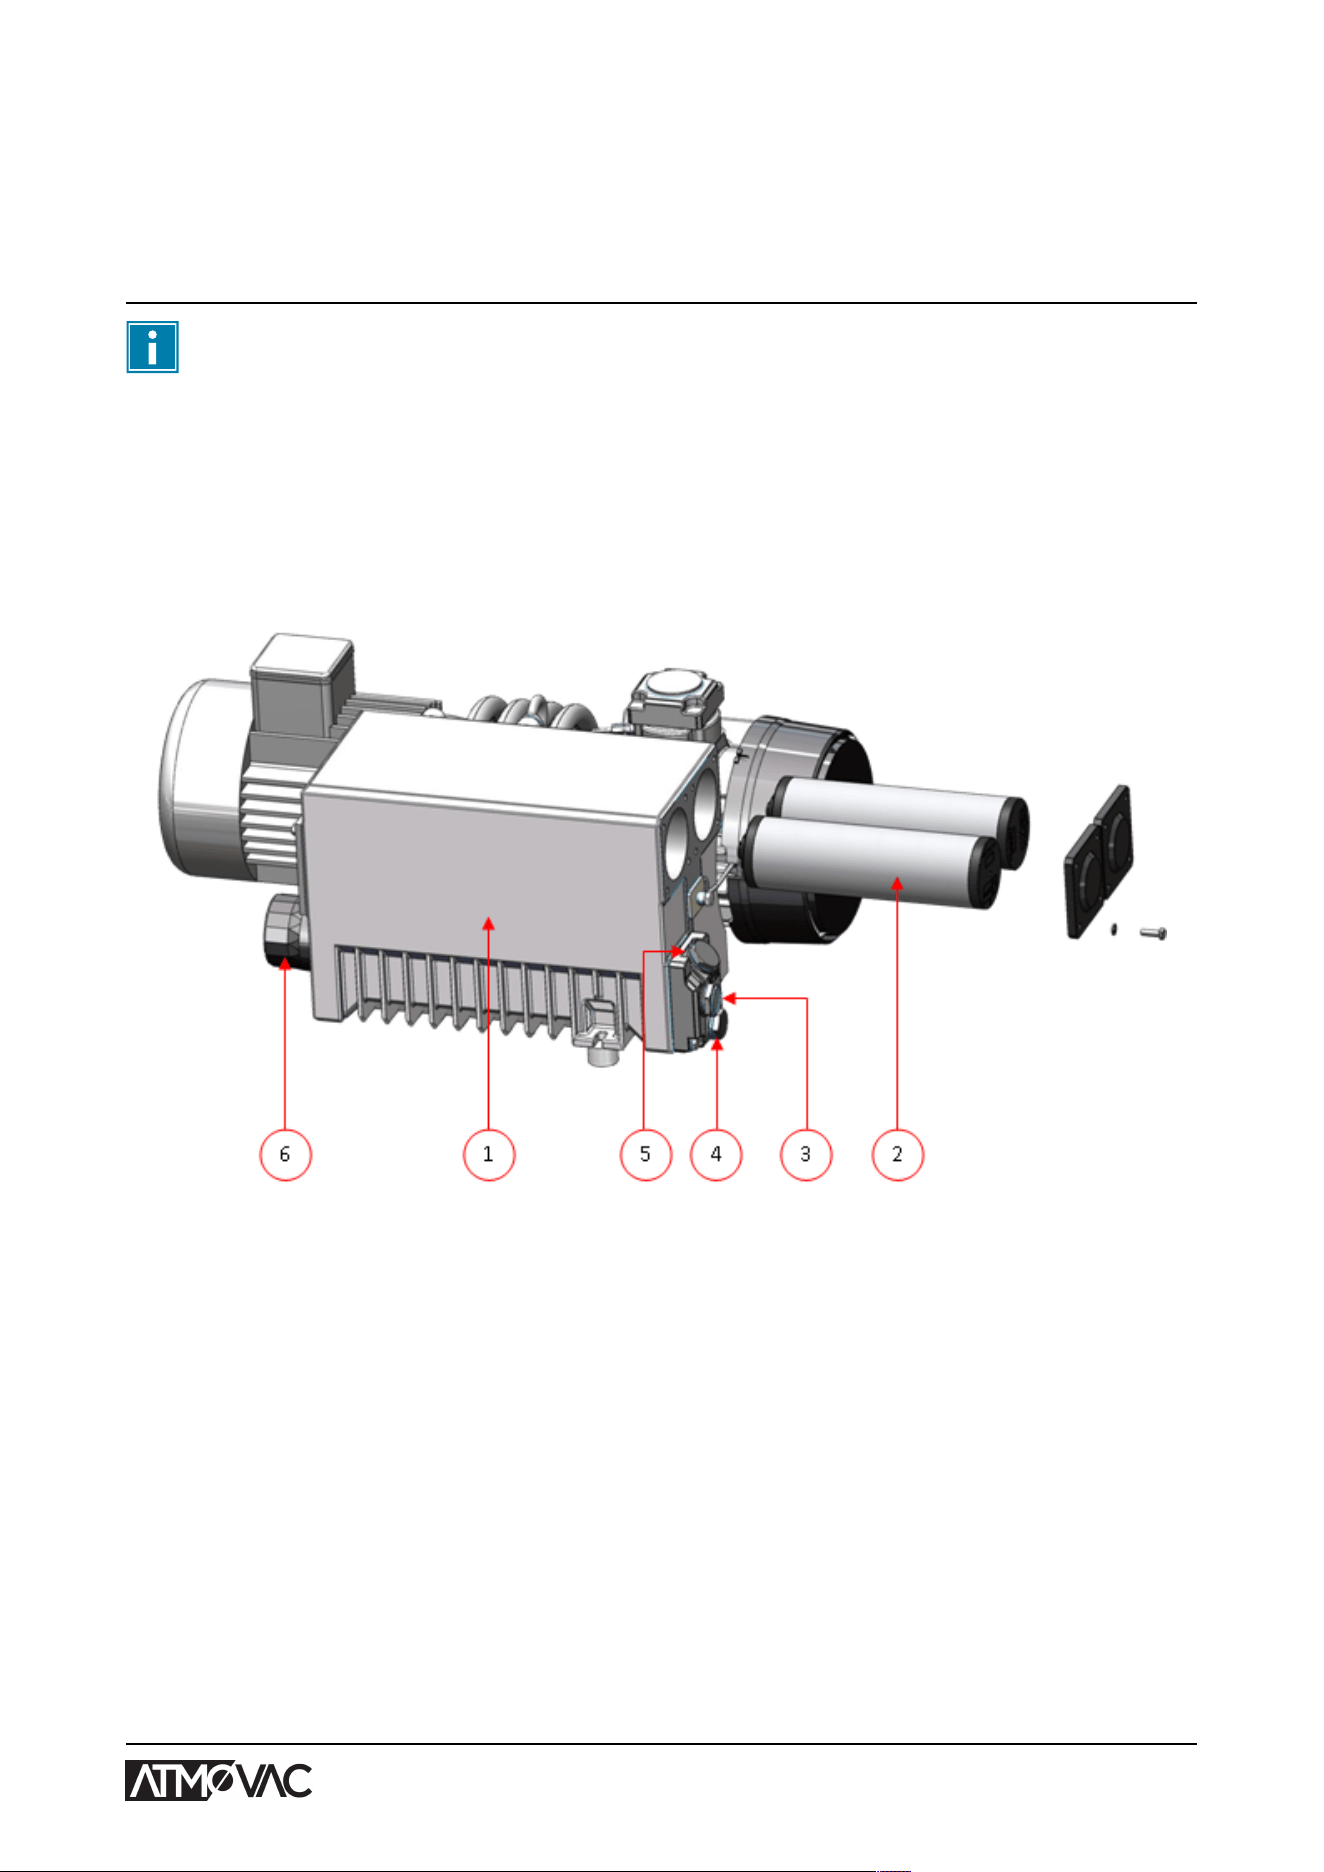
7.6 Inspecting the Lid Springs
1. Check the fastenings of the lid springs for wear, corrosion and damage.
2. Check the lid springs for wear and damage.
In the case of leakage, please contact your service dealer.
7.7 Vacuum Pump maintenance
The vacuum pump creates the vacuum. Regular maintenance of the pump is very important.
7.7.1 Overview pump 75 - 360 m
3
/h (2,780 - 12,713 cf/h)
Figure 29: Overview of the Busch Pump
1. Vacuum pump - Creates the vacuum for the process.
2. Oil exhaust filter - Filters the air by capturing oil vapours.
3. Oil sight glass - Indicates the maximum and minimum oil levels of the vacuum pump.
4. Oil drain plug - Removing the oil drain plug allows the oil to be drained.
5. Oil filler plug - Removing the oil filler plug allows the oil to be refilled.
6. Oil filter - Filters the oil.
7.7.2 Removing Oil, Replacing Oil Filter, Refilling Oil
This section describes how to remove oil from the pump, replace the oil filter and refill the oil.
See Overview pump 75 - 360 m3/h (2,780 - 12,713 cf/h) on page 73 for the pump fitted in the
machine and an overview of the parts.
Maintenance 73
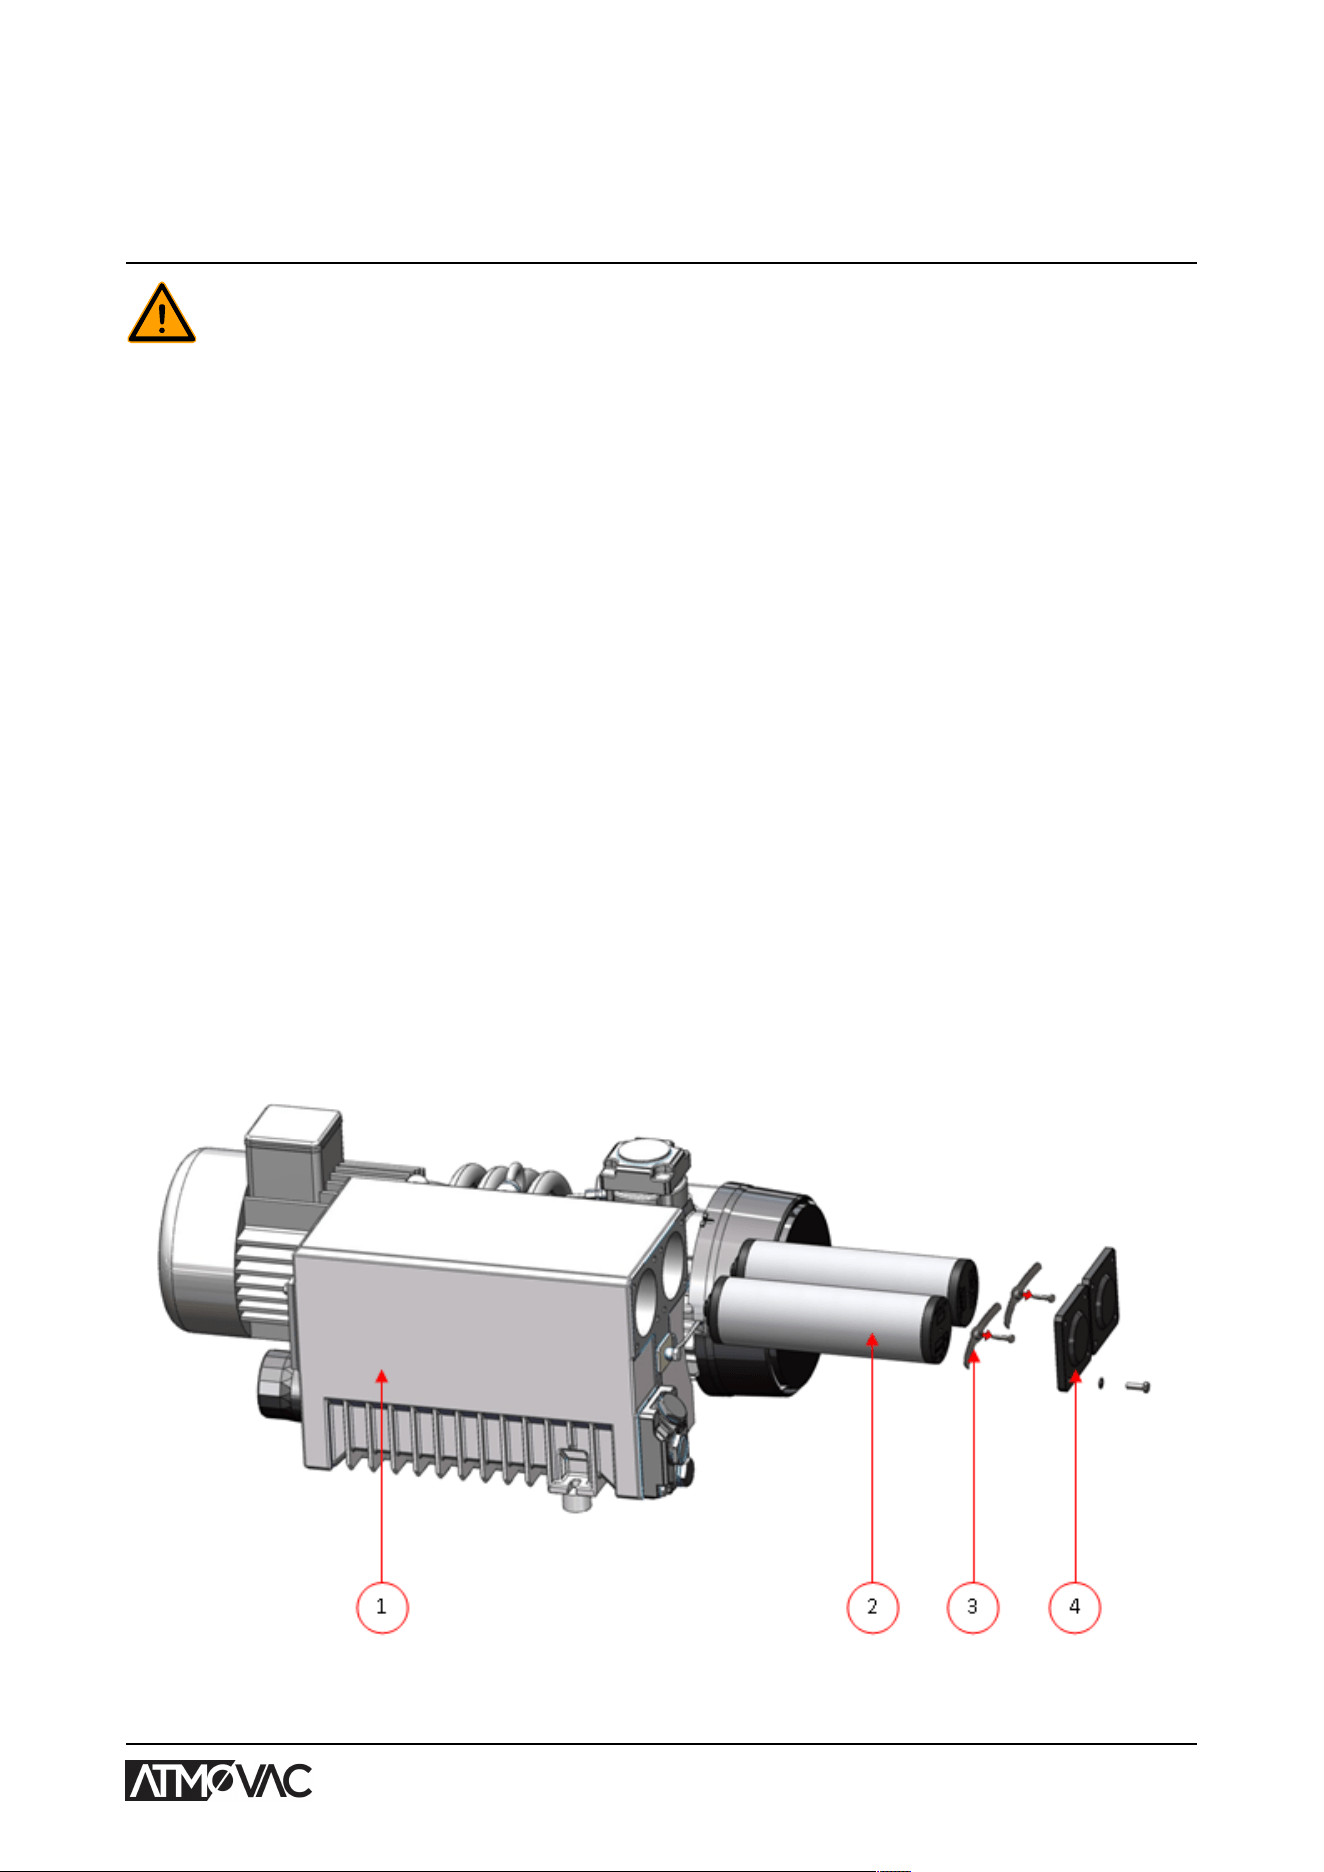
If the machine remains unused for a prolonged period of time, the oil must be removed from the
pump. This is necessary because moisture and dirt in the oil may affect the pump, causing the
pump to jam at the next use.
The oil in the vacuum pump may be hot. Avoid contact with hot oil when removing the oil.
Follow the steps below to remove the oil from the pump:
1. Place a drip pan under the oil drain plug.
2. Remove the oil drain plug.
The oil will drain from the pump.
3. Replace the oil drain plug.
Follow the steps below to replace the oil filter:
4. Remove the old oil filter.
5. Insert a new oil filter.
Follow the steps below to add oil to the pump. You can follow these steps after all oil has been
removed, but also to refill oil.
6. Remove the oil filler plug.
7. Add oil until the oil level is between the minimum and maximum levels.
8. Replace the oil filler plug.
7.7.3 Replacing the Oil Exhaust Filter
The oil exhaust filter prevents oil vapours from being emitted from the vacuum pump with the
exhaust air. If the filter becomes saturated, the maximum vacuum level can no longer be reached.
Replace the filter in case of vacuum problems or as specified in the Maintenance Schedule on
page 67.
Figure 30: Replacing the Oil Exhaust Filter
Maintenance 74

Follow the steps below to remove the old oil exhaust filter:
1. Remove the filter cover (4) of the vacuum pump (1) and put it aside.
2. Remove the leaf spring (3) and put it aside.
3. Remove the old filter (2).
Follow the steps below to install a new oil exhaust filter:
4. Insert the new filter into the vacuum pump.
Make sure the O-ring is properly placed on the filter inlet.
5. Mount the leaf spring placed aside.
6. Mount the filter cover placed aside.
7.7.4 Running the Pump Cleaning Program
The pump cleaning program runs the vacuum pump for 15 minutes. During the program, the pump
and the oil reach the operating temperature. Moisture in the pump is absorbed by the oil. The high
temperature causes any moisture in the pump to evaporate, and minimises the risk of corrosion.
It is advisable to run the program before using the machine for the first time, after the machine has
been stationary for a lengthy period of time, and especially prior to changing oil.
Run the pump cleaning program every week. If you package moisture-containing products, such as
soups and sauces, the pump cleaning program should be run every day.
1. Select the pump cleaning program.
10-PCS Press the Pump Cleaning Program button.
ACS Press the
▲
button or the
▼
button to browse to the pump
cleaning program.
2. Close the lid to start the pump cleaning program.
The pump cleaning program will run for 15 minutes up to 100%.
Maintenance 75

8 Troubleshooting and Error Codes
The tables below show the possible malfunctions and the corresponding causes as well as the
steps to be taken.
Malfunction Activity More information
Control panel does not illumin-
ate.
• Connect the machine to the
power supply.
• Check the machine/circuit
breaker.
Connecting the Machine on
page 27
Electrical Installation on page
86
The control panel is on, but
there is no activity after closing
the lid.
• Check or adjust the switch of
the lid.
Contact your supplier.
Insufficient end vacuum. • Check the vacuum settings
of the program and adjust
them.
• Make sure that the extrac-
tion opening is not covered.
• Check the oil level in the
pump.
• Check/replace the oil ex-
haust filter.
• Check/replace the lid gas-
ket.
Operation on page 30.
Vacuum Pump maintenance on
page 73.
Replacing the Oil Exhaust Filter
on page 74.
Replacing the Lid Gasket on
page 71.
Vacuum process is slow. • Make sure that the extrac-
tion opening is not covered.
• Check the oil level in the
pump.
• Check/replace the oil ex-
haust filter.
Vacuum Pump maintenance on
page 73.
Replacing the Oil Exhaust Filter
on page 74.
Troubleshooting and Error Codes 76
Malfunction Activity More information
Vacuum bag is not sealed cor-
rectly.
• Check the seal settings
of the program and adjust
them.
• Check/replace the Teflon
tape and the sealing wires.
• Check/replace the silicone
rubber of the silicone hold-
ers.
• Check the inside of the va-
cuum for contamination and
clean it.
Operation on page 30.
Replacing the Sealing Wire on
page 68.
Replacing the Silicone Rubber
of the Silicone Holders on page
70.
The automatic lid does not
work.
• Check the air supply pres-
sure.
• Check the springs of the lid.
Contact your supplier.
Error messages for the 10-PCS
Malfunction Activity More information
F1 in display. • Check or adjust the switch of
the lid.
• Verify that the vacuum pump
is running.
Contact your supplier.
F2 in display of the 10-PCS
with sensor control.
• Check whether the lid is
open and restart the ma-
chine.
• If the message appears
again, please contact your
supplier.
Contact your supplier.
--- in display. • Check whether the lid is
open.
Flashing "C" in display. • This is a reminder to run the
pump cleaning program.
Run the pump cleaning pro-
gram.
Oil Notification (if activated). A service check is needed. Contact your supplier.
Troubleshooting and Error Codes 77

Error messages for the ACS
Malfunction Activity More information
Message "Sensor missing" in
display.
• Check whether the sensor is
connected.
Message "Cycle aborted" in
display.
• Check whether the lid is
open.
Oil Notification (if activated). • A service check is needed. Contact your supplier.
Oil Alert (if activated) • A service check is needed. Contact your supplier.
Pump Cleaning Alert • Turn on the pump cleaning
program.
Troubleshooting and Error Codes 78

9 Disposal
Do not dispose of oil and components as household waste. When repla-
cing oil or components at the end of the service life, ensure that all ma-
terials are collected and disposed or reused in a legal and environment-
ally sound manner.
Disposal 79

10 Appendices
10.1 Technical Data
10.1.1 Cyclone series
Cyclone 201D / 203D
General
Ambient temperature during operation 41 to 86°F
Sound emission < 70 dB(A)
Maximum daily production 8 hrs/day
Dimensions of the machine
Width 27.4 in
Length 28.0 in
Height 40.4 in
Weight 364 lbs
Maximum product height 7.9 in
Gas flush system (optional)
Dimensions connector 0.24 in
Gas supply 60-100 l/min
Maximum supply pressure 1 bar / 14.5 psi
Electrical connection
Supply voltage *
Connected load *
Vacuum pump
Capacity 75 m
3
/h / 2,780 cf/h
Oil 2 litres
Type of synthetic oil Foodmax Air 100
Ambient temperature synthetic oil 14 to 104°F
*See machine plate.
Appendices 80

10.1.2 Pampero series
Pampero 20D3 30/20D3 2-18D3 2-22D3
General
Ambient temperature during
operation
41 to 86°F 41 to 86°F 41 to 86°F 41 to 86°F
Machine working conditions:
relative humidity (non-condens-
ing)
10-90% 10-90% 10-90% 10-90%
Sound emission < 70 dB(A) < 70 dB(A) < 70 dB(A) < 70 dB(A)
Maximum daily production 8 hrs/day 8 hrs/day 8 hrs/day 8 hrs/day
Dimensions of the machine
Width 26.9 in 35.4 in 41.7 in 49.6 in
Length 27.4 in 32.3 in 35.4 in 40.2 in
Height 41.7 in 43.3 in 46.4 in 46.7 in
Weight 359 lbs 500 lbs 520 lbs 703 lbs
Maximum product height 9.3 in 9.3 in 9.3 in 9.3 in
Sealing pressure (optional)
Dimensions hose connector 0.32 in 0.32 in 0.32 in 0.32 in
Maximum supply pressure 1 bar / 14.5 psi 1 bar / 14.5 psi 1 bar / 14.5 psi 1 bar / 14.5 psi
Maximum air consumption 1 l/cycle 3 l/cycle 1 l/cycle 1 l/cycle
Gas flush system (optional)
Dimensions connector 0.24 in 0.24 in 0.24 in 0.24 in
Gas supply 60-100 l/min 60-100 l/min 60-100 l/min 60-100 l/min
Maximum supply pressure 1 bar / 14.5 psi 1 bar / 14.5 psi 1 bar / 14.5 psi 1 bar / 14.5 psi
Electrical connection
Supply voltage * * * *
Connected load * * * *
*See machine plate.
Appendices 81

Pampero 20D3 30/20D3 2-18D3 2-22D3
Vacuum pump
Capacity 76 m
3
/h /
2,684 cf/h
120 m
3
/h /
4,238 cf/h
76 m
3
/h /
2,684 cf/h
120 m
3
/h /
4,238 cf/h
Oil 2 litres 2 litres 2 litres 2 litres
Type of mineral oil VM100 VM100 VM100 VM100
Ambient temperature mineral
oil
41 to 86°F 41 to 86°F 41 to 86°F 41 to 86°F
Type of synthetic oil Foodmax
Air 100
Foodmax
Air 100
Foodmax
Air 100
Foodmax
Air 100
Ambient temperature synthetic
oil
14 to 104°F 14 to 104°F 14 to 104°F 14 to 104°F
Appendices 82

10.1.3 Solar series
Solar 20D3 30/20D3 41/24D3
General
Ambient temperature during operation 41 to 86°F 41 to 86°F 41 to 86°F
Machine working conditions: rel. hu-
midity (non-condensing)
10-90% 10-90% 10-90%
Sound emission < 70 dB(A) < 70 dB(A) < 70 dB(A)
Maximum daily production 8 hrs/day 8 hrs/day 8 hrs/day
Dimensions of the machine
Width 27.60 in 35.40 in 47.20 in
Length 29.10 in 31.10 in 34.70 in
Height 43.30 in 43.30 in 44.30 in
Weight 404 lbs 531 lbs 860 lbs
Maximum product height 7.9 in 7.9 in 10.6 in
Sealing pressure (optional)
Dimensions hose connector 0.32 in 0.32 in 0.32 in
Maximum supply pressure 1 bar / 14.5 psi 1 bar / 14.5 psi 1 bar / 14.5 psi
Maximum air consumption 1 l/cycle 3 l/cycle 3 l/cycle
Gas flush system (optional)
Dimensions connector 0.24 in 0.24 in 0.24 in
Gas supply 60-100 l/min 60-100 l/min 60-100 l/min
Maximum supply pressure 1 bar / 14.5 psi 1 bar / 14.5 psi 1 bar / 14.5 psi
Electrical connection
Supply voltage / Connected load * * *
Vacuum pump
Capacity 76 m
3
/h /
2,384 cf/h
120 m
3
/h /
4,238 cf/h
120/190 m
3
/h /
4,238/6,710 cf/h
Oil 2 litres 2 litres 2/5 litres
Type of mineral oil VM100 VM100 VM100
Ambient temperature mineral oil 41 to 86°F 41 to 86°F 41 to 86°F
Type of synthetic oil Foodmax Air 100 Foodmax Air 100 Foodmax Air 100
Ambient temperature synthetic oil 14 to 104°F 14 to 104°F 14 to 104°F
Appendices 83

Polar 2-24D3 2-42D3W 2-24D3EW
General
Ambient temperature during operation 41 to 86°F 41 to 86°F 41 to 86°F
Machine working conditions: relative
humidity (non-condensing)
10-90% 10-90% 10-90%
Sound emission < 70 dB(A) < 70 dB(A) < 70 dB(A)
Maximum daily production 8 hrs/day 8 hrs/day 8 hrs/day
Dimensions of the machine
Width 55.10 in 55.10 in 58.70 in
Length 32.30 in 36.20 in 48.00 in
Height 52.20 in 52.20 in 52.90 in
Weight 683 lbs 761 lbs 1,184 lbs
Maximum product height 9.5 in 9.5 in 9.5 in
Sealing pressure (optional)
Dimensions hose connector 0.32 in 0.32 in 0.32 in
Maximum supply pressure 1 bar / 14.5 psi 1 bar / 14.5 psi 1 bar / 14.5 psi
Maximum air consumption 2.5 l/cycle 2.5 l/cycle 3 l/cycle
Gas flush system (optional)
Dimensions connector 0.24 in 0.24 in 0.24 in
Gas supply 60-100 l/min 60-100 l/min 60-100 l/min
Maximum supply pressure 1 bar / 14.5 psi 1 bar / 14.5 psi 1 bar / 14.5 psi
Electrical connection
Supply voltage / Connected load * * *
Vacuum pump
Capacity 76 m
3
/h /
2,384 cf/h
120 m
3
/h /
4,238 cf/h
190 m
3
/h /
6,710 cf/h
Oil 2 litres 2 litres 5 litres
Type of mineral oil VM100 VM100 VM100
Ambient temperature mineral oil 41 to 86°F 41 to 86°F 41 to 86°F
Type of synthetic oil Foodmax Air 100 Foodmax Air 100 Foodmax Air 100
Ambient temperature synthetic oil 14 to 104°F 14 to 104°F 14 to 104°F
*See machine plate.
Appendices 84

Solar 2-33D3 2-43D3
General
Ambient temperature during operation 41 to 86°F 41 to 86°F
Machine working conditions: relative humidity
(non-condensing)
10-90% 10-90%
Sound emission < 70 dB(A) < 70 dB(A)
Maximum daily production 8 hrs/day 8 hrs/day
Dimensions of the machine
Width 74.80 in 95.50 in
Length 51.00 in 48.80 in
Height 57.10 in 63.30 in
Weight 1,510 lbs 1,691 lbs
Maximum product height 10.0 in 11.0 in
Sealing pressure (optional)
Dimensions hose connector 0.32 in 0.32 in
Maximum supply pressure 1 bar / 14.5 psi 1 bar / 14.5 psi
Maximum air consumption 3 l/cycle 4.5 l/cycle
Gas flush system (optional)
Dimensions connector 0.24 in 0.24 in
Gas supply 60-100 l/min 60-100 l/min
Maximum supply pressure 1 bar / 14.5 psi 1 bar / 14.5 psi
Electrical connection
Supply voltage / Connected load * *
Vacuum pump
Capacity 360 m
3
/h / 12,713 cf/h 360 m
3
/h / 12,713 cf/h
Oil 6.5 litres 6.5 litres
Type of mineral oil VM100 VM100
Ambient temperature mineral oil 41 to 86°F 41 to 86°F
Type of synthetic oil Foodmax Air 100 Foodmax Air 100
Ambient temperature synthetic oil 14 to 104°F 14 to 104°F
*See machine plate.
Appendices 85
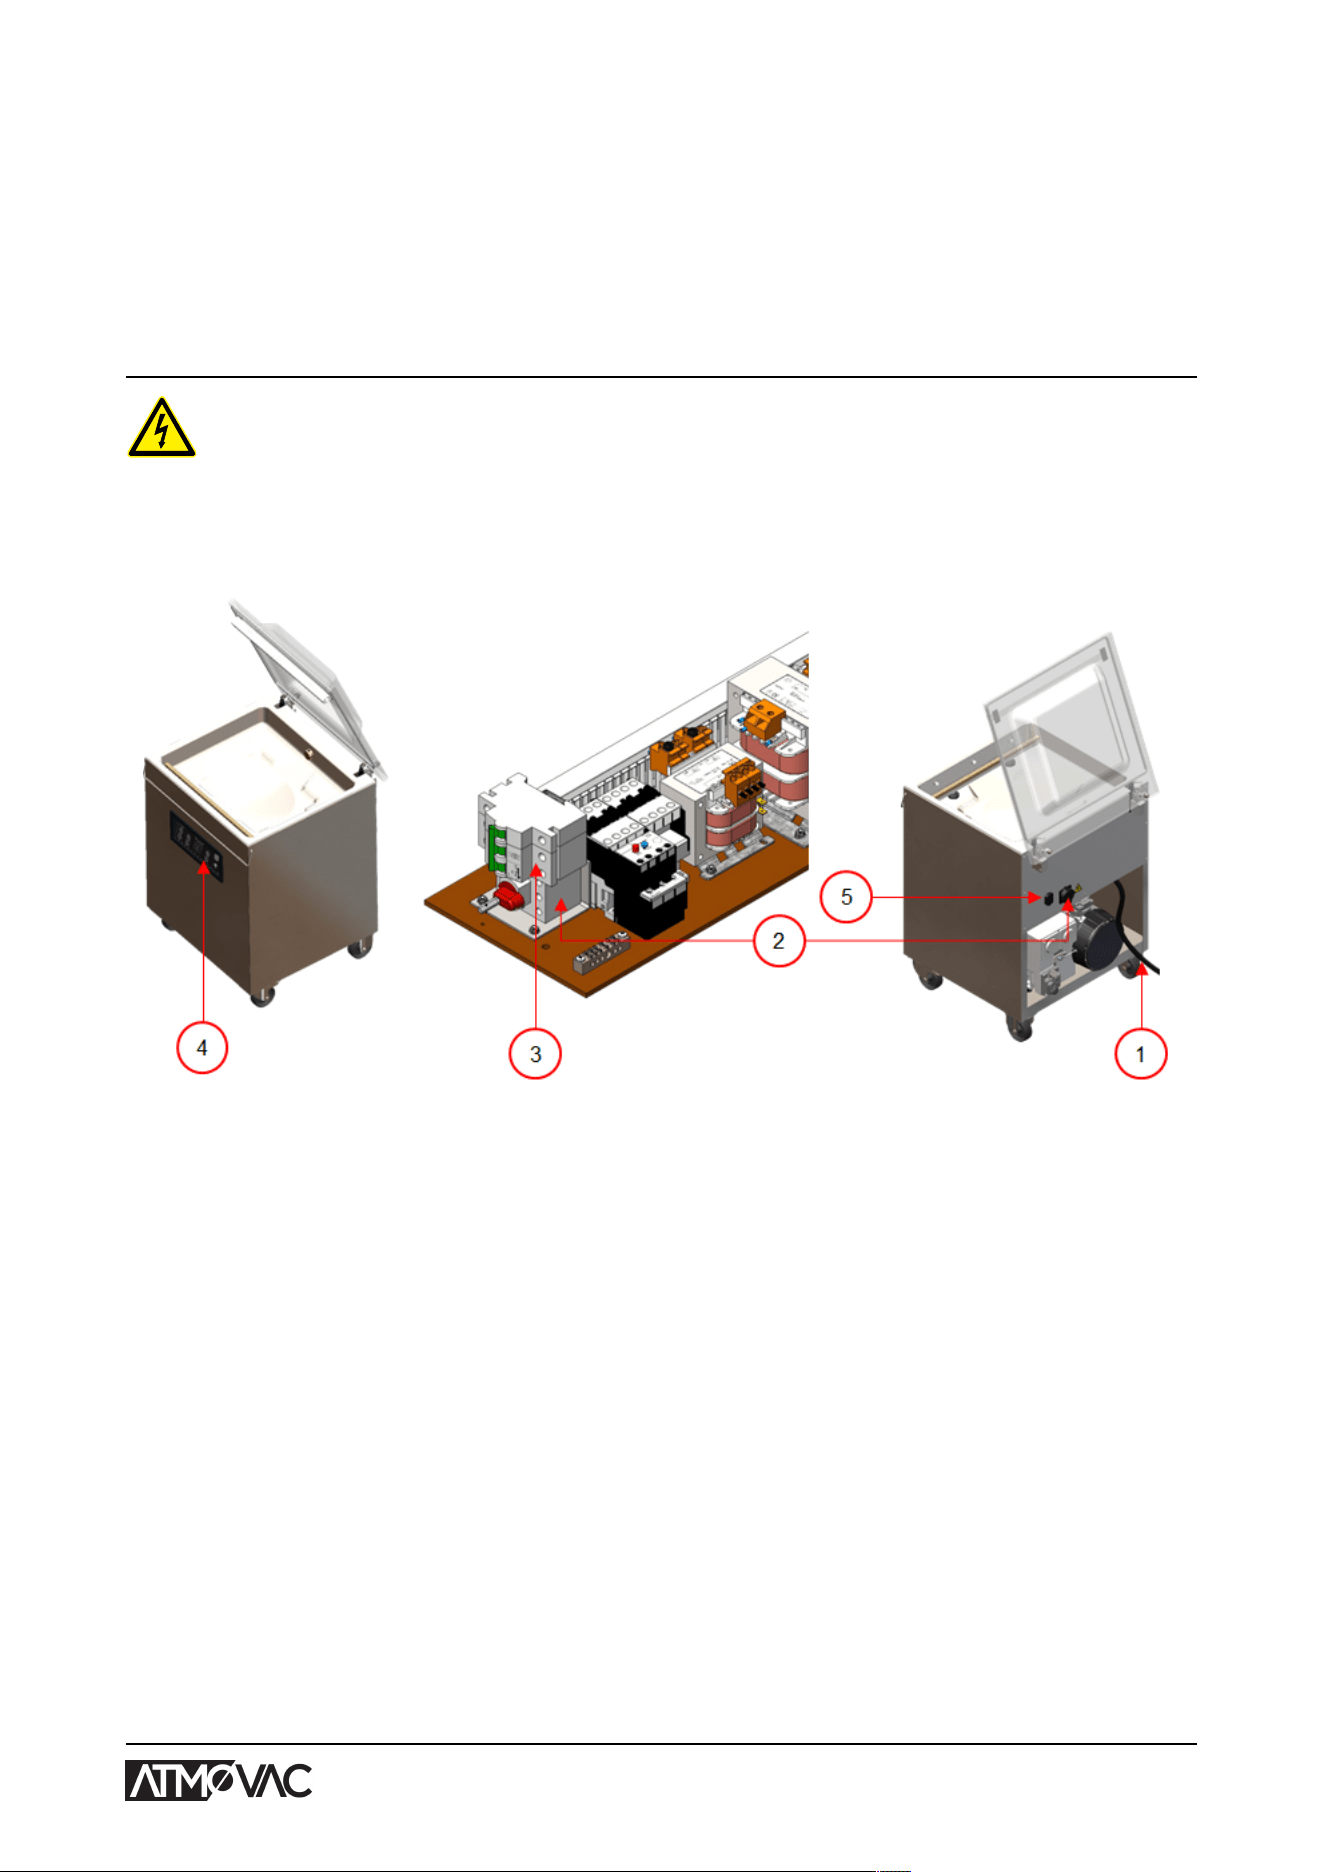
10.2 Electrical Installation
The electrical installation provides power for the vacuum pump, the seal system and the operation
of the machine.
See the electrical diagram for the further structure and operation of the electrical installation.
Please contact your supplier for the electrical diagram.
Only a technical expert may perform work on the electrical installation.
The machine consists of the following electrical components:
Figure 31: Overview of the Electrical Installation, Cyclone
Appendices 86
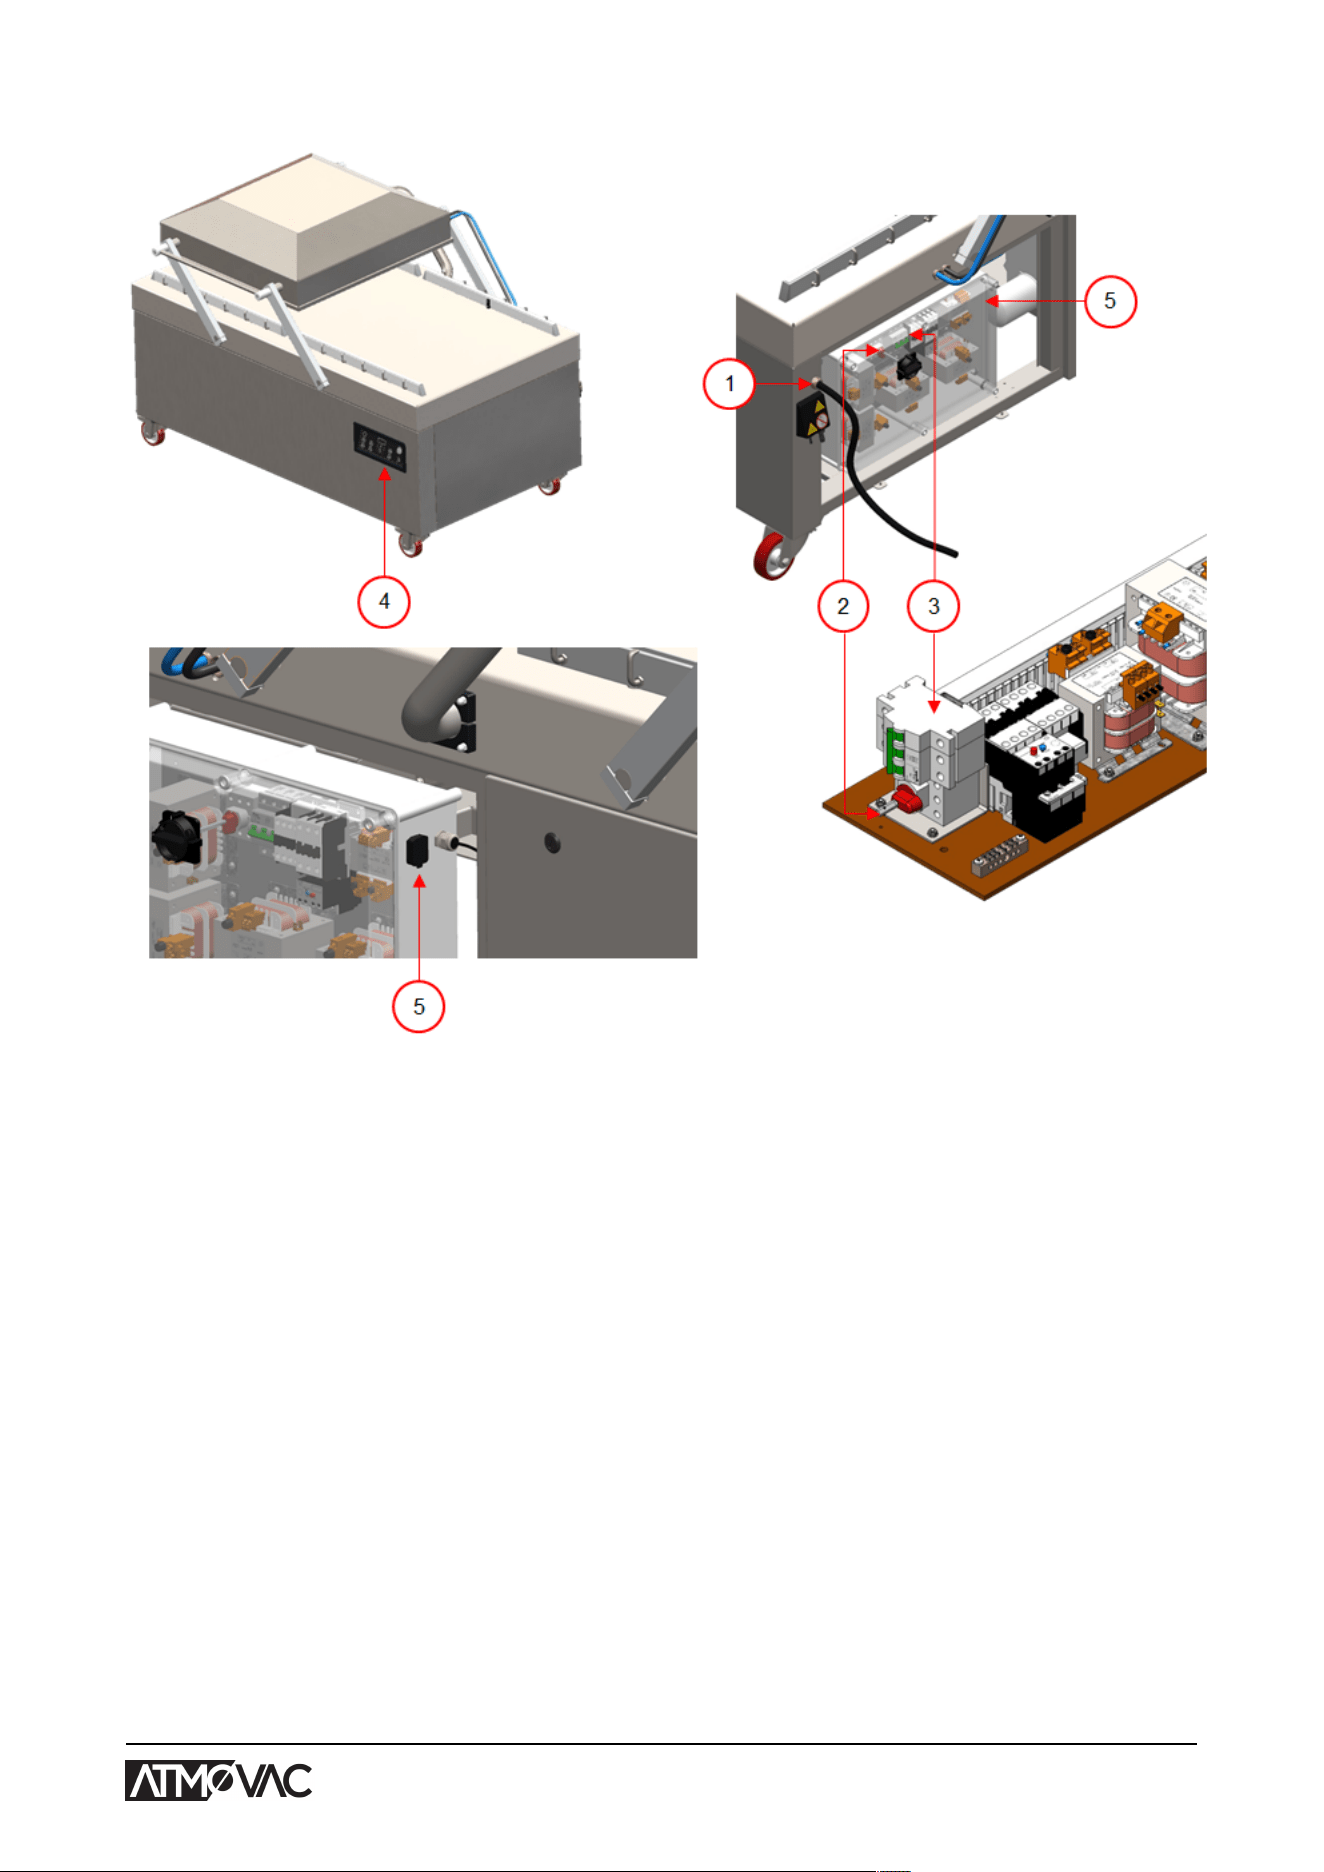
Figure 32: Overview of the Electrical Installation, Pampero, Solar
1. Power connection and cable
This serves to connect the machine to the power supply. The machine is supplied without an
electrical plug.
2. Main switch
This switch is used to switch the machine ON and OFF.
3. Circuit breaker
Protects against overload or a short circuit. Also see Troubleshooting and Error Codes on
page 76.
4. Control panel
This serves to operate the control functions. Depending on your model, your machine will have
one of the following control options:
• Operating Elements on page 30
• Operating Elements on page 42
5. USB connector (only in case of ACS control)
The USB connector is located on the side of the control box, which is located behind the rear
wall. Reaching the USB connector requires removing the rear wall.
Appendices 87
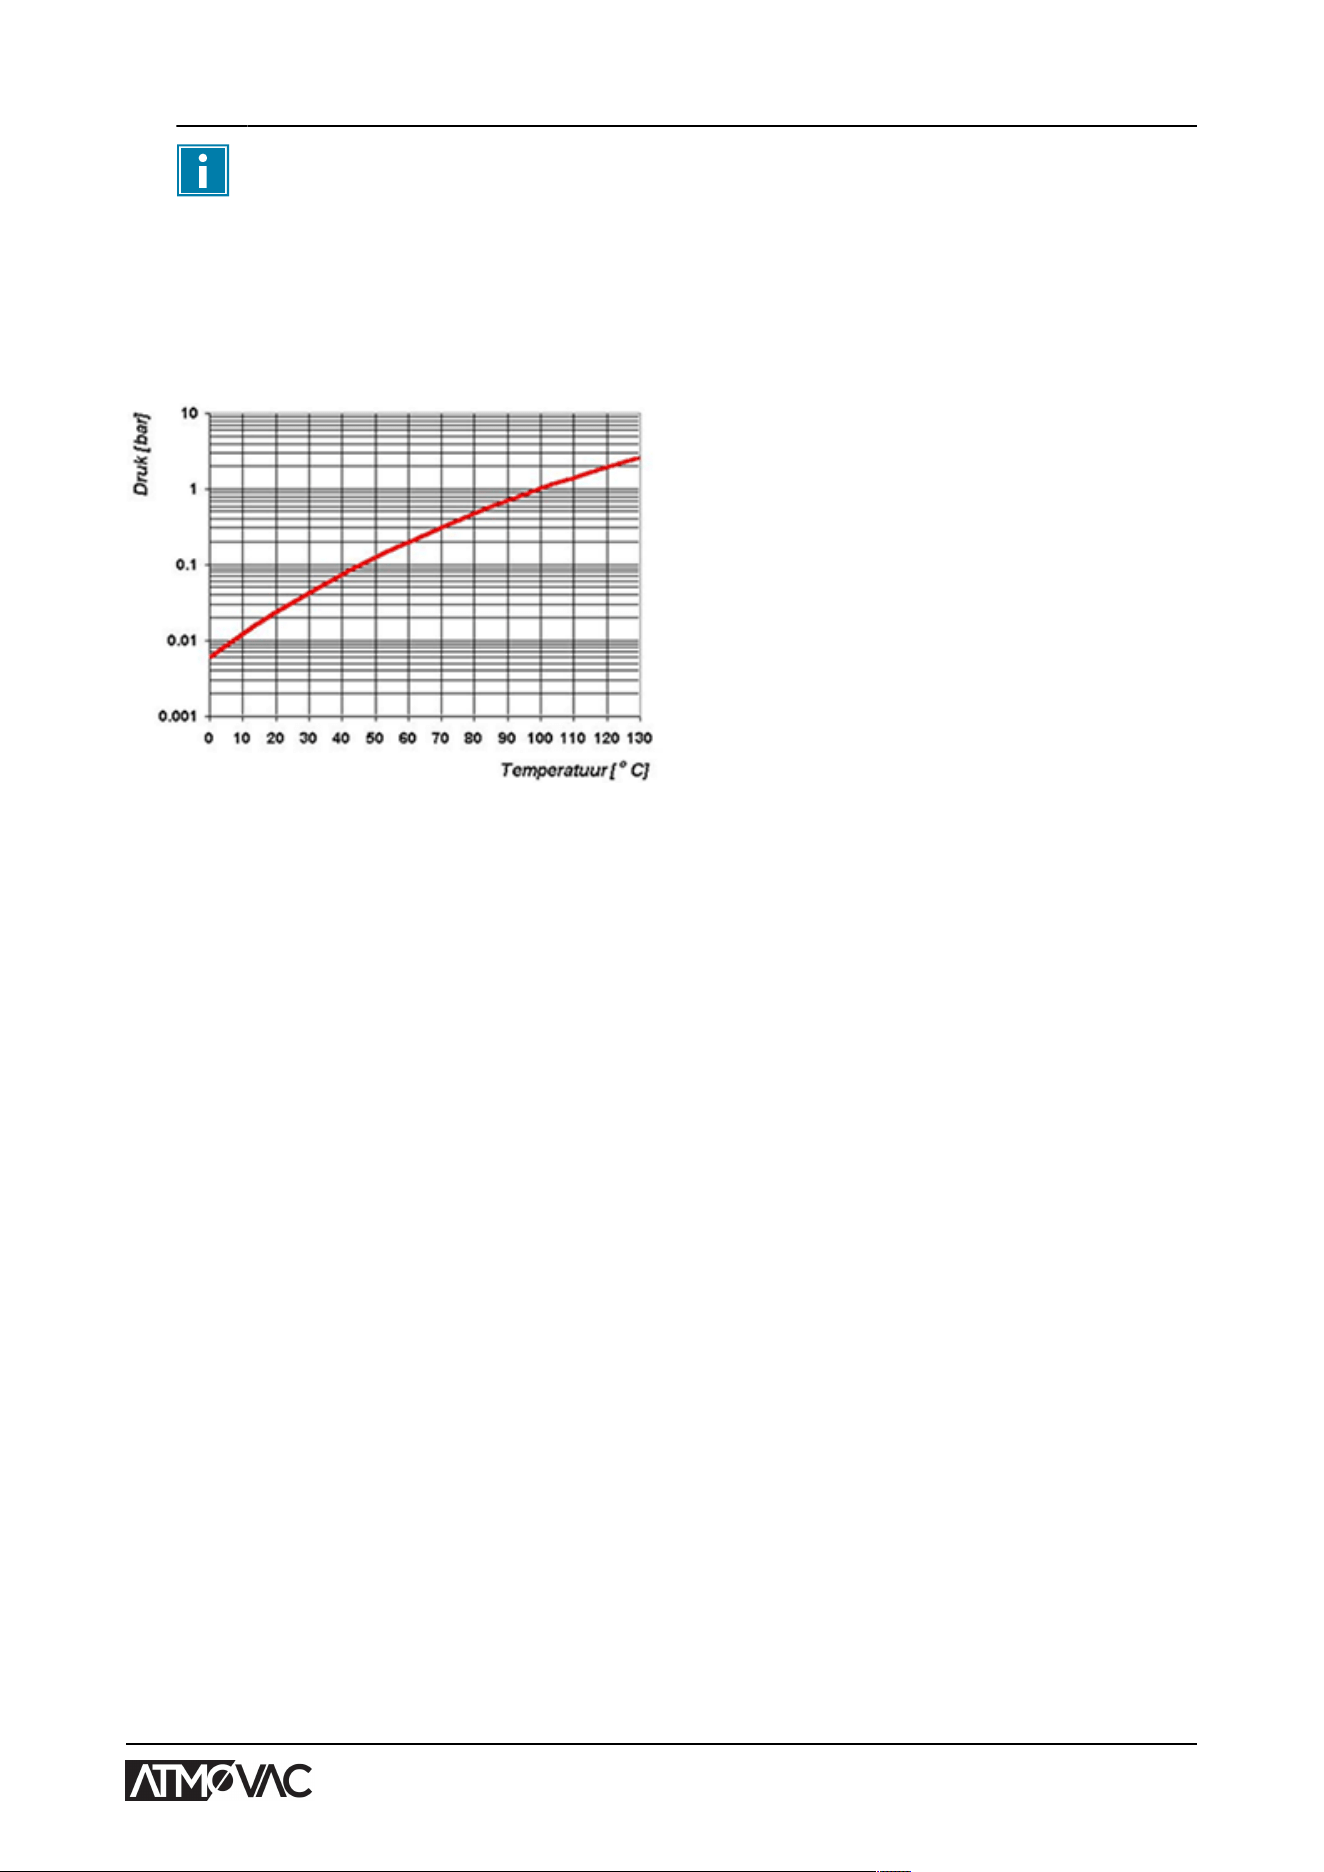
After opening the cover of the USB connector, the machine is no longer waterproof
(IP65).
The USB connector enables the import and export of data.
10.3 Vapour Pressure Curve of Water
Figure 33: Vapour Pressure Curve of Water
Appendices 88
10.4 Logbook
This logbook must include:
• Annual maintenance work
• Major replacements and emergencies
• Modifications
• Tests of the emergency stop buttons and safety devices
Date:
Performed by:
(authority, technician)
Description:
(nature of the activities, which
parts have been replaced)
Appendices 89
Date:
Performed by:
(authority, technician)
Description:
(nature of the activities, which
parts have been replaced)
Appendices 90

91

Eurodib Eurodib Corp
120 de la Barre 334 Cornelia St #272
J4B 2X7 Boucherville (Quebec) NY 12901 Plattsburgh
+1 (888) 956-6866 +1 (888) 956-6866
https://www.eurodib.com https://www.eurodib.com
info@eurodib.com info@eurodib.com