
User Manual
Please read this instruction manual carefully
before use and keep it for future reference.
Engraving Rotary Tool
F2MasterEng
Quick Operation Guide
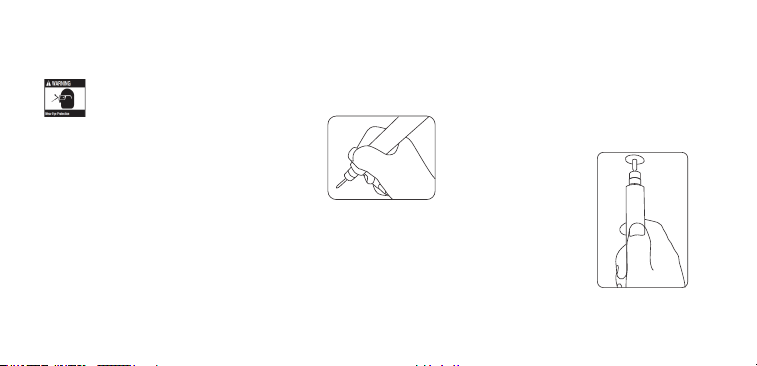
Remark:Always hold the tool away from your face. Accessories can be damaged during handling, and can fly apart as they come up to speed. This is not common,
but it does happen.Please wear goggles to better protect yourself.
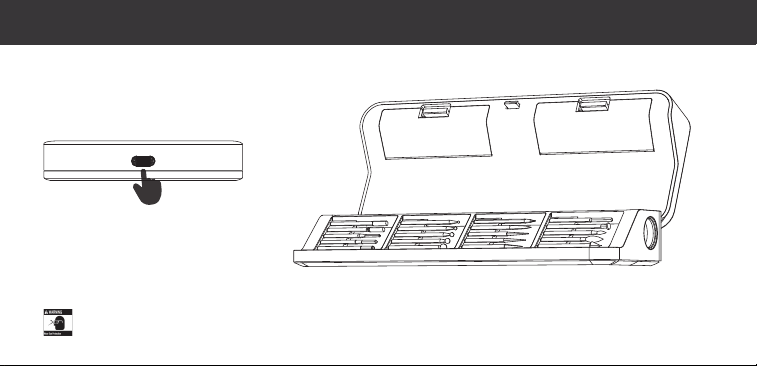
Open the storage case
Press the unlock button located in
the middle of the case lid, then
open the case.
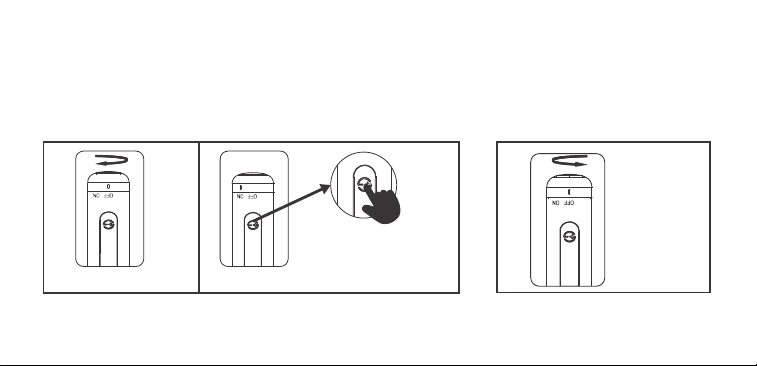
Rotate safety switch energized and press the speed control
button to turn on the tool and speed control.
Rotate switch to turn off the tool.
Rotate switch from OFF to ON.
Rotate switch
from ON to OFF.
Ramerk:
When the switch is turned from OFF to
ON, press the speed control switch to
adjust the rotation speed for use. (The
tool will enter sleep mode if there is no
operation within 30 seconds.)
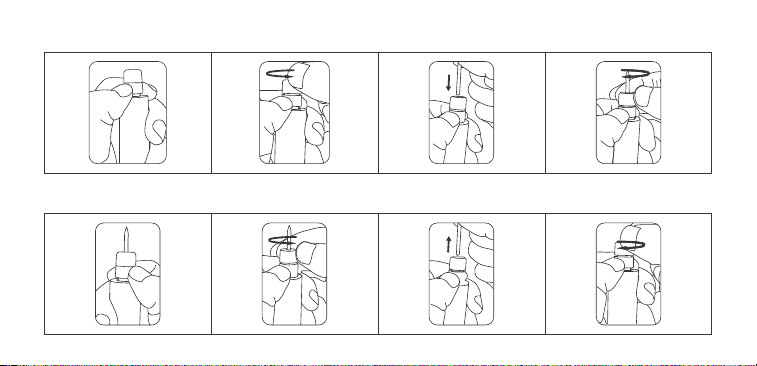
Loosen the collet nut and clamping accessories.
Loosen the collet nut and remove accessories.

1.Safety Warnings
2.Packing List
3.Product Overview
4.Operation and Functions
5.Specifications
6.Troubleshooting
Warranty
01
06
07
08
18
19
20
Contents

SAFETY RULES FOR ROTARY TOOLS
•
•
•
•
•
•
•
•
•
•
•
•
•
•
•
•
•
•
•
•
•
•
•
ADDITIONAL SAFETY WARNINGS
•
•
Safety Warnings
WARNINGS
Read all safety warnings and all instructions. Failure to follow the warnings and instructions may result in electric shock, fire and/or
serious injury.
Safety warnings common for grinding, sanding, wire brushing, polishing, carving or abrasive cutting-off operations:
This power tool is intended to function as a grinder, sander, wire brush, polisher, carving or cut-off tool. Read all safety warnings,
instructions, illustrations and specifications provided with this power tool. Failure to follow all instructions listed below may result in
electric shock, fire and/or serious injury.
Do not use accessories which are not specifically designed and recommended by the tool manufacturer. Just because the accessory
can be attached to your power tool, it does not assure safe operation.
The RATED SPEED of the accessories must be at least equal to the operating speed setting marked on the power tool. Accessories
running faster than their RATED SPEED can break and fly apart.
The outside diameter and the thickness of your accessory must be within the capacity rating of your power tool. Incorrectly sized
accessories cannot be adequately controlled.
The arbor size of wheels, sanding drums or any other accessory must properly fit the spindle or collet of the power tool. Accessories that
do not match the mounting hardware of the power tool will run out of balance, vibrate excessively and may cause loss of control.
Mandrel mounted wheels, sanding drums, cutters or other accessories must be fully inserted into the collet or chuck. If the mandrel is
insufficiently held and/or the overhang of the wheel is too long, the mounted wheel may become loose and be ejected at high velocity.
Do not use a damaged accessory. Before each use inspect the accessory such as abrasive wheels for chips and cracks, sanding drum
for cracks, tear or excess wear, wire brush for loose or cracked wires. If power tool or accessory is dropped, inspect for damage or install
an undamaged accessory. After inspecting and installing an accessory, position yourself and bystanders away from the plane of the
rotating accessory and run the power tool at maximum no-load speed for one minute. Damaged accessories will normally break apart
during this test time.
Wear personal protective equipment. Depending on application, use face shield, safety goggles or safety glasses. As appropriate, wear
dust mask, hearing protectors, gloves and workshop apron capable of stopping small abrasive or workpiece fragments. The eye
protection must be capable of stopping flying debris generated by various operations. The dust mask or respirator must be capable of
filtrating particles generated by your operation. Prolonged exposure to high intensity noise may cause hearing loss.
Keep bystanders a safe distance away from work area. Anyone entering the work area must wear personal protective equipment.
Fragments of workpiece or of a broken accessory may fly away and cause injury beyond immediate area of operation.
Hold power tool by insulated gripping surfaces only, when performing an operation where the cutting accessory may contact hidden
wiring. Cutting accessory contacting a “live” wire may make exposed metal parts of the power tool “live” and could give the operator
an electric shock.
Always hold the tool firmly in your hand(s) during the start-up. The reaction torque of the motor, as it accelerates to full speed, can cause
the tool to twist.
Use clamps to support workpiece whenever practical. Never hold a small workpiece in one hand and the tool in the other hand while
in use. Clamping a small workpiece allows you to use your hand(s) to control the tool. Round material such as dowel rods, pipes or
tubing have a tendency to roll while being cut, and may cause the bit to bind or jump toward you.
Position the cord clear of the spinning accessory. If you lose control, the cord may be cut or snagged and your hand or arm may be
pulled into the spinning accessory.
Never lay the power tool down until the accessory has come to a complete stop. The spinning accessory may grab the surface and pull
the power tool out of your control.
After changing the bits or making any adjustments, make sure the collet nut, chuck or any other adjustment devices are securely
tightened. Loose adjustment devices can unexpectedly shift, causing loss of control, loose rotating components will be violently
thrown.
Do not run the power tool while carrying it at your side. Accidental contact with the spinning accessory could snag your clothing,
pulling the accessory into your body.
Regularly clean the power tool’s air vents. The motor’s fan will draw the dust inside the housing and excessive accumulation of
powdered metal may cause electrical hazards.
Do not operate the power tool near flammable materials. Sparks could ignite these materials.
Do not use accessories that require liquid coolants. Using water or other liquid coolants may result in electrocution or shock.
Use only in well-ventilated area. Working in a safe environment reduces risk of injury.
Allow for sufficient space, at least 6”, between your hand and the spinning bit. Do not reach in the area of the spinning bit. The proximity
of the spinning bit to your hand may not always be obvious.
Do not touch the bit or collet after use. After use the bit and collet are too hot to be touched by bare hands.
Do not alter or misuse tool. Any alteration or modification is a misuse and may result in serious personal injury.
This product is not intended for use as a dental drill, in human or veterinary medical applications. Serious injury may result.
Keep handles dry, clean and free from oil and grease. Slippery hands cannot safely control the power tool.
Develop a periodic maintenance schedule for your tool.When cleaning a tool be careful not to disassemble any portion of the tool since
internal wires may be misplaced or pinched or safety guard return springs may be improperly mounted. Certain cleaning agents such
as gasoline, carbon tetrachloride, ammonia, etc. may damage plastic parts
Some dust created by power sanding, sawing, grinding, drilling, and other construction activities contains chemicals known to cause
cancer, birth defects or other reproductive harm. Some examples of these chemicals are:
• Lead from lead-based paints,
• Crystalline silica from bricks and cement and other masonry products,
• Arsenic and chromium from chemically�treated lumber.
Your risk from these exposures varies, depending on how often you do this type of work. To reduce your exposure to these chemicals:
work in a well ventilated area, and work with approved safety equipment, such as those dust masks that are specially designed to filter
out microscopic particles.
- 01 -

SAFETY RULES FOR ROTARY TOOLS
•
•
•
•
•
•
•
•
•
•
•
•
•
•
•
•
•
•
•
•
•
•
•
ADDITIONAL SAFETY WARNINGS
•
•
Safety warnings common for grinding, sanding, wire brushing, polishing, carving or abrasive cutting-off operations:
This power tool is intended to function as a grinder, sander, wire brush, polisher, carving or cut-off tool. Read all safety warnings,
instructions, illustrations and specifications provided with this power tool. Failure to follow all instructions listed below may result in
electric shock, fire and/or serious injury.
Do not use accessories which are not specifically designed and recommended by the tool manufacturer. Just because the accessory
can be attached to your power tool, it does not assure safe operation.
The RATED SPEED of the accessories must be at least equal to the operating speed setting marked on the power tool. Accessories
running faster than their RATED SPEED can break and fly apart.
The outside diameter and the thickness of your accessory must be within the capacity rating of your power tool. Incorrectly sized
accessories cannot be adequately controlled.
The arbor size of wheels, sanding drums or any other accessory must properly fit the spindle or collet of the power tool. Accessories that
do not match the mounting hardware of the power tool will run out of balance, vibrate excessively and may cause loss of control.
Mandrel mounted wheels, sanding drums, cutters or other accessories must be fully inserted into the collet or chuck. If the mandrel is
insufficiently held and/or the overhang of the wheel is too long, the mounted wheel may become loose and be ejected at high velocity.
Do not use a damaged accessory. Before each use inspect the accessory such as abrasive wheels for chips and cracks, sanding drum
for cracks, tear or excess wear, wire brush for loose or cracked wires. If power tool or accessory is dropped, inspect for damage or install
an undamaged accessory. After inspecting and installing an accessory, position yourself and bystanders away from the plane of the
rotating accessory and run the power tool at maximum no-load speed for one minute. Damaged accessories will normally break apart
during this test time.
Wear personal protective equipment. Depending on application, use face shield, safety goggles or safety glasses. As appropriate, wear
dust mask, hearing protectors, gloves and workshop apron capable of stopping small abrasive or workpiece fragments. The eye
protection must be capable of stopping flying debris generated by various operations. The dust mask or respirator must be capable of
filtrating particles generated by your operation. Prolonged exposure to high intensity noise may cause hearing loss.
Keep bystanders a safe distance away from work area. Anyone entering the work area must wear personal protective equipment.
Fragments of workpiece or of a broken accessory may fly away and cause injury beyond immediate area of operation.
Hold power tool by insulated gripping surfaces only, when performing an operation where the cutting accessory may contact hidden
wiring. Cutting accessory contacting a “live” wire may make exposed metal parts of the power tool “live” and could give the operator
an electric shock.
Always hold the tool firmly in your hand(s) during the start-up. The reaction torque of the motor, as it accelerates to full speed, can cause
the tool to twist.
Use clamps to support workpiece whenever practical. Never hold a small workpiece in one hand and the tool in the other hand while
in use. Clamping a small workpiece allows you to use your hand(s) to control the tool. Round material such as dowel rods, pipes or
tubing have a tendency to roll while being cut, and may cause the bit to bind or jump toward you.
Position the cord clear of the spinning accessory. If you lose control, the cord may be cut or snagged and your hand or arm may be
pulled into the spinning accessory.
Never lay the power tool down until the accessory has come to a complete stop. The spinning accessory may grab the surface and pull
the power tool out of your control.
After changing the bits or making any adjustments, make sure the collet nut, chuck or any other adjustment devices are securely
tightened. Loose adjustment devices can unexpectedly shift, causing loss of control, loose rotating components will be violently
thrown.
Do not run the power tool while carrying it at your side. Accidental contact with the spinning accessory could snag your clothing,
pulling the accessory into your body.
Regularly clean the power tool’s air vents. The motor’s fan will draw the dust inside the housing and excessive accumulation of
powdered metal may cause electrical hazards.
Do not operate the power tool near flammable materials. Sparks could ignite these materials.
Do not use accessories that require liquid coolants. Using water or other liquid coolants may result in electrocution or shock.
Use only in well-ventilated area. Working in a safe environment reduces risk of injury.
Allow for sufficient space, at least 6”, between your hand and the spinning bit. Do not reach in the area of the spinning bit. The proximity
of the spinning bit to your hand may not always be obvious.
Do not touch the bit or collet after use. After use the bit and collet are too hot to be touched by bare hands.
Do not alter or misuse tool. Any alteration or modification is a misuse and may result in serious personal injury.
This product is not intended for use as a dental drill, in human or veterinary medical applications. Serious injury may result.
Keep handles dry, clean and free from oil and grease. Slippery hands cannot safely control the power tool.
Develop a periodic maintenance schedule for your tool.When cleaning a tool be careful not to disassemble any portion of the tool since
internal wires may be misplaced or pinched or safety guard return springs may be improperly mounted. Certain cleaning agents such
as gasoline, carbon tetrachloride, ammonia, etc. may damage plastic parts
Some dust created by power sanding, sawing, grinding, drilling, and other construction activities contains chemicals known to cause
cancer, birth defects or other reproductive harm. Some examples of these chemicals are:
• Lead from lead-based paints,
• Crystalline silica from bricks and cement and other masonry products,
• Arsenic and chromium from chemically�treated lumber.
Your risk from these exposures varies, depending on how often you do this type of work. To reduce your exposure to these chemicals:
work in a well ventilated area, and work with approved safety equipment, such as those dust masks that are specially designed to filter
out microscopic particles.
- 02 -

SAFETY RULES FOR ROTARY TOOLS
•
•
•
•
•
•
•
•
•
•
•
•
•
•
•
•
•
•
•
•
•
•
•
ADDITIONAL SAFETY WARNINGS
•
•
Safety warnings common for grinding, sanding, wire brushing, polishing, carving or abrasive cutting-off operations:
This power tool is intended to function as a grinder, sander, wire brush, polisher, carving or cut-off tool. Read all safety warnings,
instructions, illustrations and specifications provided with this power tool. Failure to follow all instructions listed below may result in
electric shock, fire and/or serious injury.
Do not use accessories which are not specifically designed and recommended by the tool manufacturer. Just because the accessory
can be attached to your power tool, it does not assure safe operation.
The RATED SPEED of the accessories must be at least equal to the operating speed setting marked on the power tool. Accessories
running faster than their RATED SPEED can break and fly apart.
The outside diameter and the thickness of your accessory must be within the capacity rating of your power tool. Incorrectly sized
accessories cannot be adequately controlled.
The arbor size of wheels, sanding drums or any other accessory must properly fit the spindle or collet of the power tool. Accessories that
do not match the mounting hardware of the power tool will run out of balance, vibrate excessively and may cause loss of control.
Mandrel mounted wheels, sanding drums, cutters or other accessories must be fully inserted into the collet or chuck. If the mandrel is
insufficiently held and/or the overhang of the wheel is too long, the mounted wheel may become loose and be ejected at high velocity.
Do not use a damaged accessory. Before each use inspect the accessory such as abrasive wheels for chips and cracks, sanding drum
for cracks, tear or excess wear, wire brush for loose or cracked wires. If power tool or accessory is dropped, inspect for damage or install
an undamaged accessory. After inspecting and installing an accessory, position yourself and bystanders away from the plane of the
rotating accessory and run the power tool at maximum no-load speed for one minute. Damaged accessories will normally break apart
during this test time.
Wear personal protective equipment. Depending on application, use face shield, safety goggles or safety glasses. As appropriate, wear
dust mask, hearing protectors, gloves and workshop apron capable of stopping small abrasive or workpiece fragments. The eye
protection must be capable of stopping flying debris generated by various operations. The dust mask or respirator must be capable of
filtrating particles generated by your operation. Prolonged exposure to high intensity noise may cause hearing loss.
Keep bystanders a safe distance away from work area. Anyone entering the work area must wear personal protective equipment.
Fragments of workpiece or of a broken accessory may fly away and cause injury beyond immediate area of operation.
Hold power tool by insulated gripping surfaces only, when performing an operation where the cutting accessory may contact hidden
wiring. Cutting accessory contacting a “live” wire may make exposed metal parts of the power tool “live” and could give the operator
an electric shock.
Always hold the tool firmly in your hand(s) during the start-up. The reaction torque of the motor, as it accelerates to full speed, can cause
the tool to twist.
Use clamps to support workpiece whenever practical. Never hold a small workpiece in one hand and the tool in the other hand while
in use. Clamping a small workpiece allows you to use your hand(s) to control the tool. Round material such as dowel rods, pipes or
tubing have a tendency to roll while being cut, and may cause the bit to bind or jump toward you.
Position the cord clear of the spinning accessory. If you lose control, the cord may be cut or snagged and your hand or arm may be
pulled into the spinning accessory.
Never lay the power tool down until the accessory has come to a complete stop. The spinning accessory may grab the surface and pull
the power tool out of your control.
After changing the bits or making any adjustments, make sure the collet nut, chuck or any other adjustment devices are securely
tightened. Loose adjustment devices can unexpectedly shift, causing loss of control, loose rotating components will be violently
thrown.
Do not run the power tool while carrying it at your side. Accidental contact with the spinning accessory could snag your clothing,
pulling the accessory into your body.
Regularly clean the power tool’s air vents. The motor’s fan will draw the dust inside the housing and excessive accumulation of
powdered metal may cause electrical hazards.
Do not operate the power tool near flammable materials. Sparks could ignite these materials.
Do not use accessories that require liquid coolants. Using water or other liquid coolants may result in electrocution or shock.
Use only in well-ventilated area. Working in a safe environment reduces risk of injury.
Allow for sufficient space, at least 6”, between your hand and the spinning bit. Do not reach in the area of the spinning bit. The proximity
of the spinning bit to your hand may not always be obvious.
Do not touch the bit or collet after use. After use the bit and collet are too hot to be touched by bare hands.
Do not alter or misuse tool. Any alteration or modification is a misuse and may result in serious personal injury.
This product is not intended for use as a dental drill, in human or veterinary medical applications. Serious injury may result.
Keep handles dry, clean and free from oil and grease. Slippery hands cannot safely control the power tool.
Develop a periodic maintenance schedule for your tool.When cleaning a tool be careful not to disassemble any portion of the tool since
internal wires may be misplaced or pinched or safety guard return springs may be improperly mounted. Certain cleaning agents such
as gasoline, carbon tetrachloride, ammonia, etc. may damage plastic parts
Some dust created by power sanding, sawing, grinding, drilling, and other construction activities contains chemicals known to cause
cancer, birth defects or other reproductive harm. Some examples of these chemicals are:
• Lead from lead-based paints,
• Crystalline silica from bricks and cement and other masonry products,
• Arsenic and chromium from chemically�treated lumber.
Your risk from these exposures varies, depending on how often you do this type of work. To reduce your exposure to these chemicals:
work in a well ventilated area, and work with approved safety equipment, such as those dust masks that are specially designed to filter
out microscopic particles.
- 03 -

SAFETY RULES FOR ROTARY TOOLS
•
•
•
•
•
•
•
•
•
•
•
•
•
•
•
•
•
•
•
•
•
•
•
ADDITIONAL SAFETY WARNINGS
•
•
Safety warnings common for grinding, sanding, wire brushing, polishing, carving or abrasive cutting-off operations:
This power tool is intended to function as a grinder, sander, wire brush, polisher, carving or cut-off tool. Read all safety warnings,
instructions, illustrations and specifications provided with this power tool. Failure to follow all instructions listed below may result in
electric shock, fire and/or serious injury.
Do not use accessories which are not specifically designed and recommended by the tool manufacturer. Just because the accessory
can be attached to your power tool, it does not assure safe operation.
The RATED SPEED of the accessories must be at least equal to the operating speed setting marked on the power tool. Accessories
running faster than their RATED SPEED can break and fly apart.
The outside diameter and the thickness of your accessory must be within the capacity rating of your power tool. Incorrectly sized
accessories cannot be adequately controlled.
The arbor size of wheels, sanding drums or any other accessory must properly fit the spindle or collet of the power tool. Accessories that
do not match the mounting hardware of the power tool will run out of balance, vibrate excessively and may cause loss of control.
Mandrel mounted wheels, sanding drums, cutters or other accessories must be fully inserted into the collet or chuck. If the mandrel is
insufficiently held and/or the overhang of the wheel is too long, the mounted wheel may become loose and be ejected at high velocity.
Do not use a damaged accessory. Before each use inspect the accessory such as abrasive wheels for chips and cracks, sanding drum
for cracks, tear or excess wear, wire brush for loose or cracked wires. If power tool or accessory is dropped, inspect for damage or install
an undamaged accessory. After inspecting and installing an accessory, position yourself and bystanders away from the plane of the
rotating accessory and run the power tool at maximum no-load speed for one minute. Damaged accessories will normally break apart
during this test time.
Wear personal protective equipment. Depending on application, use face shield, safety goggles or safety glasses. As appropriate, wear
dust mask, hearing protectors, gloves and workshop apron capable of stopping small abrasive or workpiece fragments. The eye
protection must be capable of stopping flying debris generated by various operations. The dust mask or respirator must be capable of
filtrating particles generated by your operation. Prolonged exposure to high intensity noise may cause hearing loss.
Keep bystanders a safe distance away from work area. Anyone entering the work area must wear personal protective equipment.
Fragments of workpiece or of a broken accessory may fly away and cause injury beyond immediate area of operation.
Hold power tool by insulated gripping surfaces only, when performing an operation where the cutting accessory may contact hidden
wiring. Cutting accessory contacting a “live” wire may make exposed metal parts of the power tool “live” and could give the operator
an electric shock.
Always hold the tool firmly in your hand(s) during the start-up. The reaction torque of the motor, as it accelerates to full speed, can cause
the tool to twist.
Use clamps to support workpiece whenever practical. Never hold a small workpiece in one hand and the tool in the other hand while
in use. Clamping a small workpiece allows you to use your hand(s) to control the tool. Round material such as dowel rods, pipes or
tubing have a tendency to roll while being cut, and may cause the bit to bind or jump toward you.
Position the cord clear of the spinning accessory. If you lose control, the cord may be cut or snagged and your hand or arm may be
pulled into the spinning accessory.
Never lay the power tool down until the accessory has come to a complete stop. The spinning accessory may grab the surface and pull
the power tool out of your control.
After changing the bits or making any adjustments, make sure the collet nut, chuck or any other adjustment devices are securely
tightened. Loose adjustment devices can unexpectedly shift, causing loss of control, loose rotating components will be violently
thrown.
Do not run the power tool while carrying it at your side. Accidental contact with the spinning accessory could snag your clothing,
pulling the accessory into your body.
Regularly clean the power tool’s air vents. The motor’s fan will draw the dust inside the housing and excessive accumulation of
powdered metal may cause electrical hazards.
Do not operate the power tool near flammable materials. Sparks could ignite these materials.
Do not use accessories that require liquid coolants. Using water or other liquid coolants may result in electrocution or shock.
Use only in well-ventilated area. Working in a safe environment reduces risk of injury.
Allow for sufficient space, at least 6”, between your hand and the spinning bit. Do not reach in the area of the spinning bit. The proximity
of the spinning bit to your hand may not always be obvious.
Do not touch the bit or collet after use. After use the bit and collet are too hot to be touched by bare hands.
Do not alter or misuse tool. Any alteration or modification is a misuse and may result in serious personal injury.
This product is not intended for use as a dental drill, in human or veterinary medical applications. Serious injury may result.
Keep handles dry, clean and free from oil and grease. Slippery hands cannot safely control the power tool.
Develop a periodic maintenance schedule for your tool.When cleaning a tool be careful not to disassemble any portion of the tool since
internal wires may be misplaced or pinched or safety guard return springs may be improperly mounted. Certain cleaning agents such
as gasoline, carbon tetrachloride, ammonia, etc. may damage plastic parts
Some dust created by power sanding, sawing, grinding, drilling, and other construction activities contains chemicals known to cause
cancer, birth defects or other reproductive harm. Some examples of these chemicals are:
• Lead from lead-based paints,
• Crystalline silica from bricks and cement and other masonry products,
• Arsenic and chromium from chemically�treated lumber.
Your risk from these exposures varies, depending on how often you do this type of work. To reduce your exposure to these chemicals:
work in a well ventilated area, and work with approved safety equipment, such as those dust masks that are specially designed to filter
out microscopic particles.
- 04 -

SAFETY RULES FOR ROTARY TOOLS
•
•
•
•
•
•
•
•
•
•
•
•
•
•
•
•
•
•
•
•
•
•
•
ADDITIONAL SAFETY WARNINGS
•
•
Some dust created by power sanding, sawing, grinding, drilling, and other construction activities contains chemicals known to cause
cancer, birth defects or other reproductive harm. Some examples of these chemicals are:
• Lead from lead-based paints,
• Crystalline silica from bricks and cement and other masonry products,
• Arsenic and chromium from chemically�treated lumber.
Your risk from these exposures varies, depending on how often you do this type of work. To reduce your exposure to these chemicals:
work in a well ventilated area, and work with approved safety equipment, such as those dust masks that are specially designed to filter
out microscopic particles.
WARNINGS
- 05 -
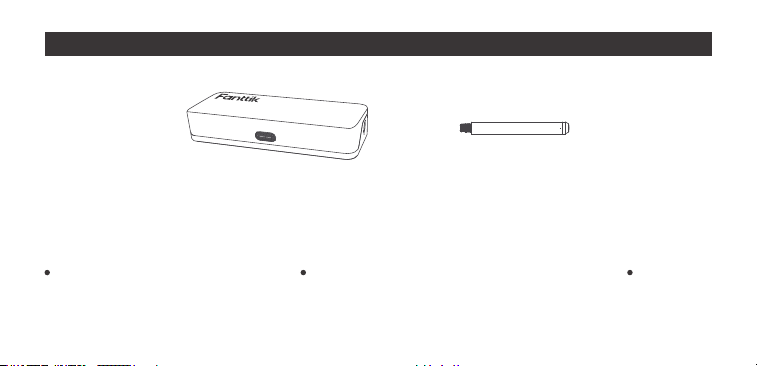
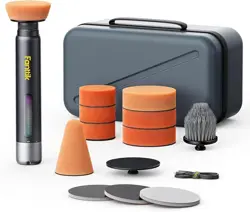
Packing list
Accessories x 23pcs
Engraving bits x 20pcs Engraving templates x 2pcs Collect x 1pc
Rotary tool x 1pcStorage case x 1pc
- 06 -
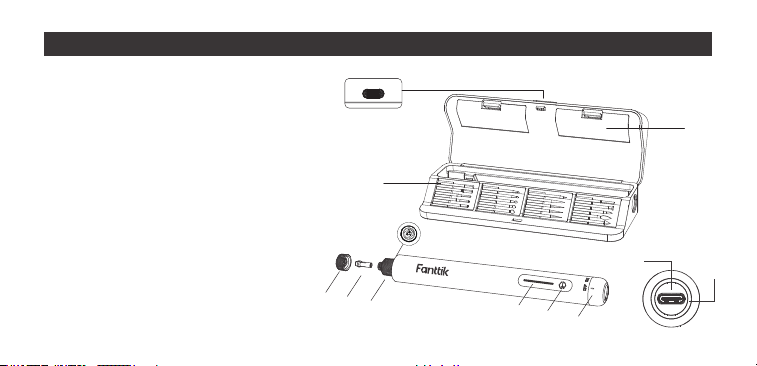
01. Collet nut
02. Collet
03. Shaft lock nut
04. LED light
05. Speed indicator light bar
06. Speed control area
07. ON/OFF switch
08. Battery indicator
09. Type-C charging port
10. Storage case unlock button
11. Storage space
12. Engraving bits
Product Overview
11
10
12
1
2
3
4
5
6
7
8
9
- 07 -

Charging the Tool
2
1
Be sure to charge tool prior to initial use.
Insert cable (purchased separately) into type-c port(9) of rotary tool .charge tool using 5V/≤4A power adapter.
Plug power adapter into standard power outlet.
Charging indicator
The battery charge indicator (8) indicates the charging progress. During the charging process,
the indicator light (8) will flashing . The battery is fully charged when the indicator light turns ON . Charge time
is approximately 60 minutes.It is normal for the handle of the tool to get warm during charging.
Note: It is recommended to charge the tool every 2 months during storage. Prolonged storage may cause the battery to have a low
charge level. When the battery level falls below the normal charging threshold, the charger will supply a low current to the tool, and
the charging indicator (8) will not respond. Once the battery level is restored to the normal charging threshold, the charging indicator (8)
will initially flash slowly for 2 seconds before starting to flash normally.
Power indicator
This tool is equipped with a power indicator (8) that tells you how much charge your battery has.When the power indicator light (8) is
red,the battery is almost empty. When the red light flashes, the machine will stop shortly
- 08 -

Battery indicator operation
1-Turn on the ON/OFF switch(7), the battery indicator light will light up for 3 seconds.When the power indicator (8)light is white, the
battery level is >30%; when the power indicator (8) light is red, the battery level is <30%.
2-In normal operation, when the battery is exhausted, the power indicator (8) will flash.
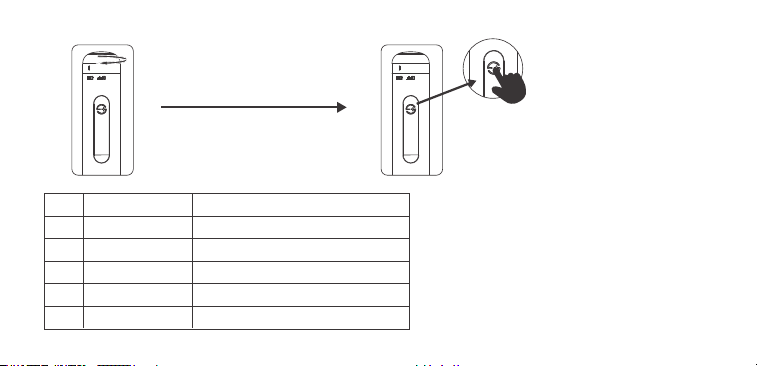
operate
Turn on the tool and Speed control
1:with your finger rotate the switch(7) from OFF to on.At this time, The machine is awakened(the working LED(4) lights up;the speed
indicator light bar(5) ON/OFF for 3 cycles;the power indicator(8) light up for 3 seconds;)
2:press the Speed control area(6) and the tool will start working at third gear, The speed switch is a cycle switch. If you need to adjust to
another speed, please continue to press the Speed control area(6) until you find the speed you want.
REMARK:If the tool is not activated within 30 seconds, it will go to sleep again. To restart the tool, you need to turn on the ON/OFF
switch(7) again;
- 09 -
1:rotate the switch(7) from OFF to ON
2:press the speed control area(6)
Waiting time should not exceed
30 seconds
Gear
1
2
3
4
5
Speed range
12,000RPM
15,000RPM
18,000RPM
20,000RPM
25,000RPM
speed indicator light bar(5) state
20%
40%
60%
80%
100%
- 10 -

Turn OFF the tool
with your finger rotate the switch(7) from ON to OFF,The tool will stops working and the working light turns off after 10 seconds.
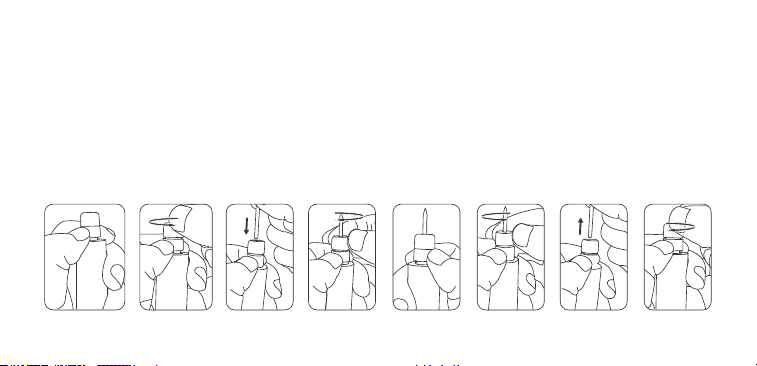
Clamping system
The clamping system consists of Collet nut, Collet ,shaft and Shaft Lock.this tool is only suitable for 3/32" collet. The operation is as below :
Add accessories to the tool
1:hold on the Shaft Lock(3) with your hand to Lock the drive shaft;
2:lock the drive shaft and Turn the collet nut(1) counterclockwise to loosen the collet (2);
3:Put the accessory through the collet nut(1) and into the collet 2,by inserting the accessories into the collet as far as possible to minimize
rotate the switch(7)
from ON to OFF
runout and unbalance;
4:lock the drive shaft and Turn the collet nut(1) Clockwise to tighten the collet (2) securely;
Remove the accessories from the tool
5:hold on the Shaft Lock(3) with your hand to Lock the drive shaft;
6:lock the drive shaft and Turn the collet nut(1) counterclockwise to loosen the collet (2);
7:remove the accessories form the collet(2)
8:lock the drive shaft and Turn the collet nut(1) Clockwise to tighten the collet (2) securely;
- 11 -
Turn OFF the tool
with your finger rotate the switch(7) from ON to OFF,The tool will stops working and the working light turns off after 10 seconds.
Clamping system
The clamping system consists of Collet nut, Collet ,shaft and Shaft Lock.this tool is only suitable for 3/32" collet. The operation is as below :
Add accessories to the tool
1:hold on the Shaft Lock(3) with your hand to Lock the drive shaft;
2:lock the drive shaft and Turn the collet nut(1) counterclockwise to loosen the collet (2);
3:Put the accessory through the collet nut(1) and into the collet 2,by inserting the accessories into the collet as far as possible to minimize
runout and unbalance;
4:lock the drive shaft and Turn the collet nut(1) Clockwise to tighten the collet (2) securely;
Remove the accessories from the tool
5:hold on the Shaft Lock(3) with your hand to Lock the drive shaft;
6:lock the drive shaft and Turn the collet nut(1) counterclockwise to loosen the collet (2);
7:remove the accessories form the collet(2)
8:lock the drive shaft and Turn the collet nut(1) Clockwise to tighten the collet (2) securely;
1 2 3 4 5 6 7 8
- 12 -

Choose the engraving bits of different shapes and sizes according to your needs.
Area 1 Area 2 Area 3 Area 4
A7
A10
C10
C15
C20
B15
B20
B25
B30
B40
R20
R30
P15
P20
P25
V20
F40
S32
S34
T40
- 13 -

Model Size Model Size Model Size Model Size
A7
A10
C10
C15
C20
∅2.5x7mm
∅2.5x10mm
∅1.0mm
∅1.5mm
∅2.0mm
∅1.5mm
∅2.0mm
∅2.5mm
∅3.0mm
∅4.0mm
∅20mm
∅40mm
-
-
∅40mm
-
-
15°
20°
25°
B15
B20
B25
B30
B40
R20
R30
P15
P20
P25
V20
F40
S32
S34
T40
Ideal for carving fine patterns and precision lines, or punching tiny holes on material surfaces. It is also commonly used for
micro-carving on materials such as jade, wood, ceramics, glass, and metal, as well as marking small symbols on components.
It is recommended that the speed of the rotary tool should not exceed 25,000RPM
- 14 -

The Rotary Tool has a small, powerful electric motor, is comfort able in the hand, and is made to accept a large variety of accessories
including drill bits, polishers, engraving cutters, cutting Blade. As you be come familiar with the range of accessories and their uses, you
will learn just how versatile the Rotary Tool is. You’ll see dozens of uses you hadn’t thought of before.
The real secret of the Rotary Tool is its speed. To understand the advantages of its high speed, you have to know that the standard
portable electric drill runs at speeds up to 1500 revolutions per minute. The Rotary Tool operates at speeds up to 25,000 revolutions per
minute. The typical electric drill is a low�speed, high torque tool; the Rotary Tool is just the opposite – a high-speed, low torque tool. The
major difference to the user is that in the high speed tools, the speed combined with the accessory mounted in the collet does the work.
You don’t apply pressure to the tool, but simply hold and guide it. In the low speed tools, you not only guide the tool, but also apply
pressure to it, as you do, for example, when drilling a hole.
It is this high speed, along with its compact size and wide variety of special accessories, that makes the Rotary Tool different from other
tools. The speed enables it to do jobs low speed tools cannot do, such as cutting hardened steel, engraving glass, etc.
Getting the most out of your Rotary Tool is a matter of learning how to let this speed work for you. To learn about more uses and the
versatility of accessories and attachments refer to this Owner's Manual
Using the Rotary Tool
The first step in learning to use the Rotary Tool is to get the “feel” of it. Hold it in your hand and feel its weight and balance. Feel the taper
of the housing.
For best control in close work, grip the Rotary Tool like
Writing between your thumb and forefinger.
Hold the tool from the rear can be used for more aggressive operations such as grinding a flat surface or using
cutoff blade . Practice on scrap materials first to see how the Rotary Tool's high speed action performs. Keep in
mind that the work is done by the speed of the tool and by the accessory in the collet. You should not lean on
or push the tool during use.
Instead, lower the spinning accessory lightly to the work and allow it to touch the point at which you want cutting (or sanding or etching,
etc.) to begin. Concentrate on guiding the tool over the work using very little pressure from your hand. Allow the accessory to do the work.
Usually, it is best to make a series of passes with the tool rather than attempt to do all the work in one pass. To make a cut, for example,
pass the tool back and forth over the work, much as you would a small paint brush. Cut a little material on each pass until you reach the
desired depth. For most work, the gentle touch is best. With it, you have the best control, are less likely to make errors, and will get the
most efficient work out of the accessory.
Disposal
- 15 -
Always hold the tool away from your face. Accessories can be damaged during handling, and can fly apart as they come up to
speed. This is not common, but it does happen.
The Rotary Tool has a small, powerful electric motor, is comfort able in the hand, and is made to accept a large variety of accessories
including drill bits, polishers, engraving cutters, cutting Blade. As you be come familiar with the range of accessories and their uses, you
will learn just how versatile the Rotary Tool is. You’ll see dozens of uses you hadn’t thought of before.
The real secret of the Rotary Tool is its speed. To understand the advantages of its high speed, you have to know that the standard
portable electric drill runs at speeds up to 1500 revolutions per minute. The Rotary Tool operates at speeds up to 25,000 revolutions per
minute. The typical electric drill is a low�speed, high torque tool; the Rotary Tool is just the opposite – a high-speed, low torque tool. The
major difference to the user is that in the high speed tools, the speed combined with the accessory mounted in the collet does the work.
You don’t apply pressure to the tool, but simply hold and guide it. In the low speed tools, you not only guide the tool, but also apply
pressure to it, as you do, for example, when drilling a hole.
It is this high speed, along with its compact size and wide variety of special accessories, that makes the Rotary Tool different from other
tools. The speed enables it to do jobs low speed tools cannot do, such as cutting hardened steel, engraving glass, etc.
Getting the most out of your Rotary Tool is a matter of learning how to let this speed work for you. To learn about more uses and the
versatility of accessories and attachments refer to this Owner's Manual
The first step in learning to use the Rotary Tool is to get the “feel” of it. Hold it in your hand and feel its weight and balance. Feel the taper
of the housing.
For best control in close work, grip the Rotary Tool like
Writing between your thumb and forefinger.
Hold the tool from the rear can be used for more aggressive operations such as grinding a flat surface or using
cutoff blade . Practice on scrap materials first to see how the Rotary Tool's high speed action performs. Keep in
mind that the work is done by the speed of the tool and by the accessory in the collet. You should not lean on
or push the tool during use.
Instead, lower the spinning accessory lightly to the work and allow it to touch the point at which you want cutting (or sanding or etching,
etc.) to begin. Concentrate on guiding the tool over the work using very little pressure from your hand. Allow the accessory to do the work.
Usually, it is best to make a series of passes with the tool rather than attempt to do all the work in one pass. To make a cut, for example,
pass the tool back and forth over the work, much as you would a small paint brush. Cut a little material on each pass until you reach the
desired depth. For most work, the gentle touch is best. With it, you have the best control, are less likely to make errors, and will get the
most efficient work out of the accessory.
Disposal
- 16 -

Always adhere to national regulations when disposing of power tools that are no longer functional and are not viable for repair.
- Do not dispose of power tools, or other waste electrical and electronic equipment (WEEE), with household waste.
- Contact your local waste disposal authority for information on the correct way to dispose of power tools Li-Ion.
The Rotary Tool has a small, powerful electric motor, is comfort able in the hand, and is made to accept a large variety of accessories
including drill bits, polishers, engraving cutters, cutting Blade. As you be come familiar with the range of accessories and their uses, you
will learn just how versatile the Rotary Tool is. You’ll see dozens of uses you hadn’t thought of before.
The real secret of the Rotary Tool is its speed. To understand the advantages of its high speed, you have to know that the standard
portable electric drill runs at speeds up to 1500 revolutions per minute. The Rotary Tool operates at speeds up to 25,000 revolutions per
minute. The typical electric drill is a low�speed, high torque tool; the Rotary Tool is just the opposite – a high-speed, low torque tool. The
major difference to the user is that in the high speed tools, the speed combined with the accessory mounted in the collet does the work.
You don’t apply pressure to the tool, but simply hold and guide it. In the low speed tools, you not only guide the tool, but also apply
pressure to it, as you do, for example, when drilling a hole.
It is this high speed, along with its compact size and wide variety of special accessories, that makes the Rotary Tool different from other
tools. The speed enables it to do jobs low speed tools cannot do, such as cutting hardened steel, engraving glass, etc.
Getting the most out of your Rotary Tool is a matter of learning how to let this speed work for you. To learn about more uses and the
versatility of accessories and attachments refer to this Owner's Manual
The first step in learning to use the Rotary Tool is to get the “feel” of it. Hold it in your hand and feel its weight and balance. Feel the taper
of the housing.
For best control in close work, grip the Rotary Tool like
Writing between your thumb and forefinger.
Hold the tool from the rear can be used for more aggressive operations such as grinding a flat surface or using
cutoff blade . Practice on scrap materials first to see how the Rotary Tool's high speed action performs. Keep in
mind that the work is done by the speed of the tool and by the accessory in the collet. You should not lean on
or push the tool during use.
Instead, lower the spinning accessory lightly to the work and allow it to touch the point at which you want cutting (or sanding or etching,
etc.) to begin. Concentrate on guiding the tool over the work using very little pressure from your hand. Allow the accessory to do the work.
Usually, it is best to make a series of passes with the tool rather than attempt to do all the work in one pass. To make a cut, for example,
pass the tool back and forth over the work, much as you would a small paint brush. Cut a little material on each pass until you reach the
desired depth. For most work, the gentle touch is best. With it, you have the best control, are less likely to make errors, and will get the
most efficient work out of the accessory.
Disposal
- 17 -

Specifications
Models
Speed
Collet capacities
Battery
Charge port
Charger specifications
F2 Master Eng
12,000/15,000/18,000/20,000/25,000RPM±10%
3/32” | 2.3mm
4V Max/700mA/2.8Wh
TYPE-C
5V/1A
- 18 -

Troubleshooting
Problem Cause Solution
Failure to power on
Machine stops rotating
during operation
Failure to install
accessories
The machine runs under continuous heavy
load, causing over-temperature protection or
undervoltage protection activated
Let it cool down, or charge the machine
Use the included accessories or use accessories
with a shaft diameter of 2.3 mm
Battery exhausted
Accessory size does not match the chuck
Failure to charge Replug the charging cableCharging cable not plugged in properly
Charge the tool
- 19 -

Warranty
This product is covered by a 12-month limited warranty for manufacturing defects.
- 20 -

929-693-6066 MON-FRI 9AM-5PM [ET)
METASEE LLC
12 GREENWAY PLZ STE 1161A HOUSTON, TX 77046-12033
www.fanttik.com