1
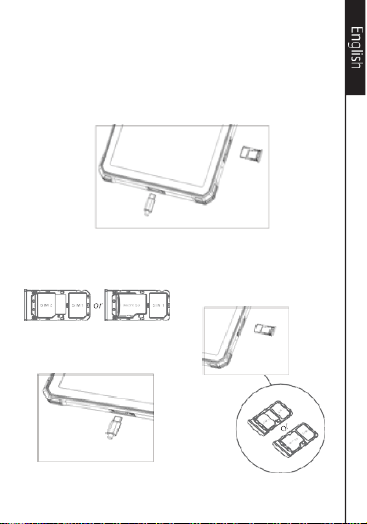
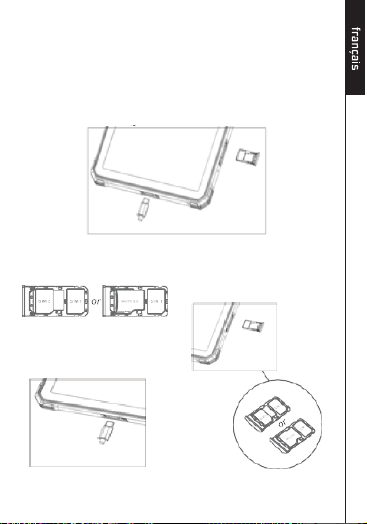
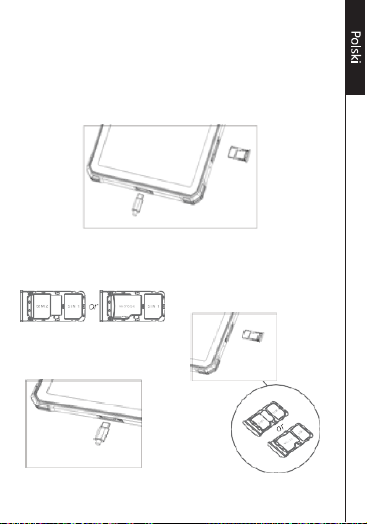
Installing the SlM cards and anoptional
memory card
1.
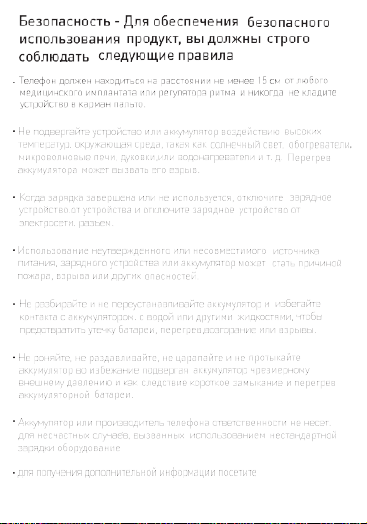
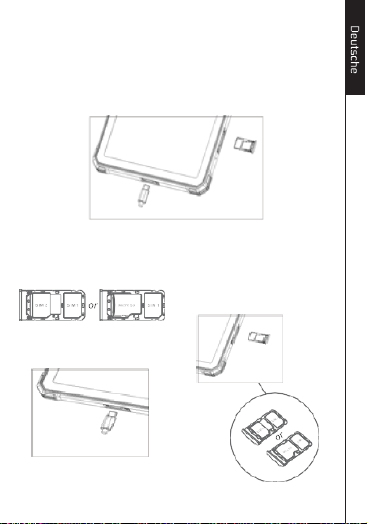
Make sure the phone is turned off.Loosen the rubber cover of the SlM
cardtray, and use the silver pin provided, insert it into the small round
hole located on theleft-hand side of the phone until the SlMcard tray
unlocks and comes out slightly.Then pull the SlM card tray out of the
phone.
2.
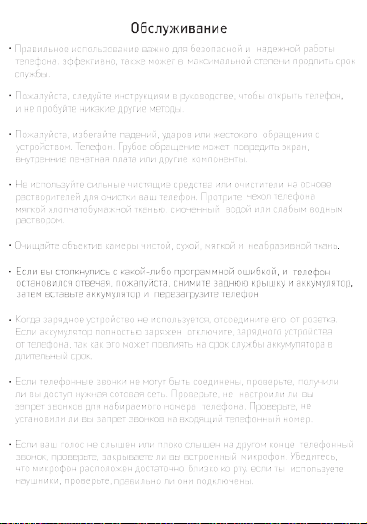
Place your SlM or memory cards
into theSlM card tray until they are
in place.
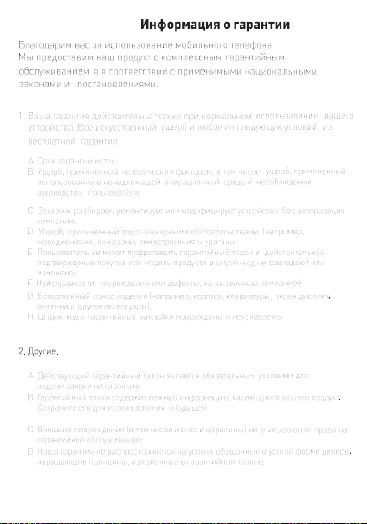
4. Charge your phone.
3.
Slide the SlM tray back into
the phone untilit locks back
into place. Secure the rubber
cover before using the phone
again.
2
4
5
ORCATAB
ORCATAB
6
Установка SIM-карт и дополнительного
карта памяти
1.
Убедитесь, что телефон выключен. Ослабьте резиновую крышку
SIM-карты. лоток для карточек и с помощью прилагаемой
серебряной булавки вставьте ее в небольшой круглый отверстие,
расположенное на левой стороне телефона до лотка для SIM-карты.
разблокируется и слегка выдвигается. Затем вытащите лоток для
SIM-карты из телефон.
2.
Поместите SIM-карту или карту
памяти. в лоток для SIM-карт, пока
они не на месте.
4. Зарядите телефон.
3.
Вставьте лоток для SIM-карты
обратно в телефон, пока он не
заблокируется на место.
Закрепите резину накройте
перед использованием
телефона снова.
7
9
10
ORCATAB
ORCATAB
11
Installieren der SLM-Karten und einer optionalen
Karte Speicherkarte
1.
Stellen Sie sicher, dass das Telefon ausgeschaltet ist. Lösen Sie die
Gummiabdeckung des SlM Stecken Sie den mitgelieferten silbernen Stift
in das kleine runde Kartenfach Loch auf der linken Seite des Telefons bis
zum SlMcard-Fach entriegelt sich und kommt leicht heraus. Ziehen Sie
dann das SlM-Kartenfach aus dem heraus Telefon.
2.
Platzieren Sie Ihre SLM- oder
Speicherkarten in das SlM-
Kartenfach, bis sie einrasten
an Ort und Stelle.
4. Laden Sie Ihr Telefon auf.
3. Schieben Sie das SlM-Fach
wieder hinein Halten Sie das
Telefon gedrückt, bis es wieder
einrastet an Ort und Stelle.
Befestigen Sie das Gummi
Abdeckung, bevor Sie das Telefon
verwenden wieder.
12
14
15
ORCATAB
ORCATAB
16
Installation des cartes SlM et optionnelle
carte mémoire
1.
Assurez-vous que le téléphone est éteint. Desserrez le couvercle en
caoutchouc du SlM. plateau m cartes, et utilisez l'épingle argentée
fournie, insérez-la dans le petit rond trou situé sur le côté gauche du
téléphone jusqu'm ce que le plateau de la SlMcard se déverrouille et
ressort légèrement. Retirez ensuite le plateau de la carte SlM du
téléphone.
2.
Placez votre SlM ou vos cartes
mémoire dans le plateau de la
carte SLM jusqu'm ce qu'ils soient
en place.
4. Chargez votre téléphone.
3. Faites glisser le plateau SlM
dans le téléphone jusqu'm ce qu'il
se verrouille en place. Fixez le
caoutchouc couverture avant
d'utiliser le téléphone encore.
17
19
20
ORCATAB
ORCATAB
21
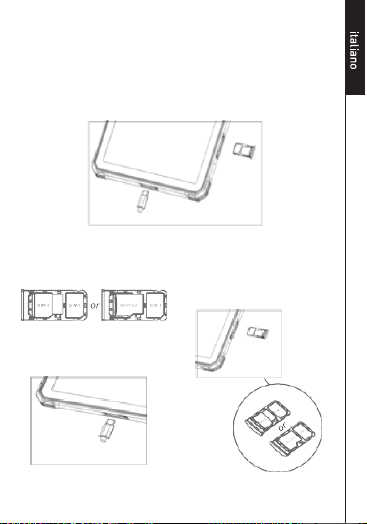
Installazione delle schede SLM e accessori
opzionali scheda di memoria
1.
Assicurarsi che il telefono sia spento. Allentare la copertura in gomma
dello SlM cardtray e utilizzare il perno argentato fornito, inserirlo nel
piccolo tondo foro situato sul lato sinistro del telefono fino al vassoio
SlM card si sblocca e fuoriesce leggermente. Quindi estrarre il vassoio
della scheda SLM dal telefono.
2.
Posizionare la scheda SLM o le
schede di memoria nel vassoio della
scheda SLM finché non vengono
inseriti a posto.
4.
Carica
il
telefono.
3.
Reinserire il vassoio SlM il
telefono finché non si blocca Nel
luogo. Fissare la gomma
copertura prima di utilizzare il
telefono Ancora.
22
24
25
ORCATAB.
ORCATAB
26
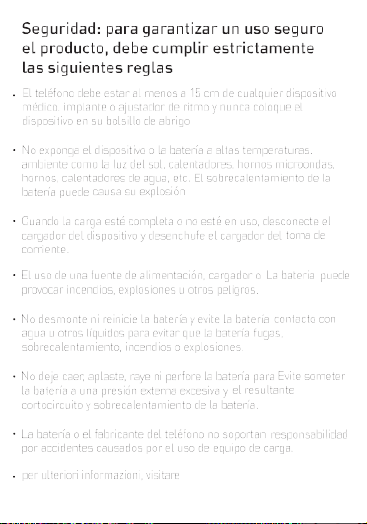
Instalación de las tarjetas SlM y una opcional
tarjeta de memoria
1.
Asegúrese de que el teléfono esté apagado. Afloje la cubierta de goma
del SlM bandeja para tarjetas, y use el alfiler plateado provisto, insértelo
en el pequeño orificio ubicado en el lado izquierdo del teléfono hasta
que la bandeja SlMcard se desbloquea y sale ligeramente. Luego, extraiga
la bandeja de la tarjeta SlM de la teléfono.
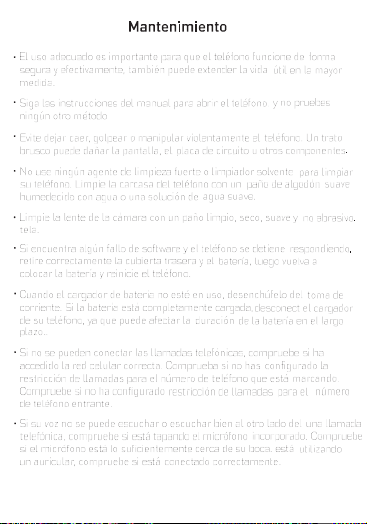
2.
Coloca tu SlM o tarjetas de
memoria en la bandeja para
tarjetas SlM hasta que estén
en su lugar.
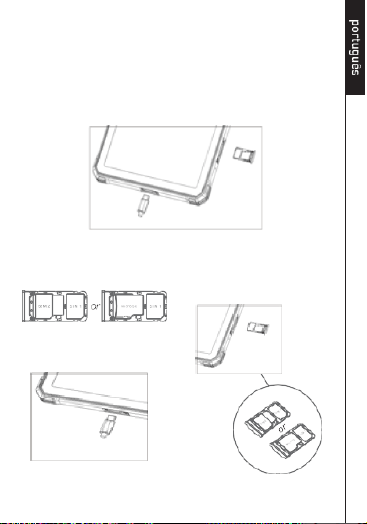
4. Cargue su teléfono.
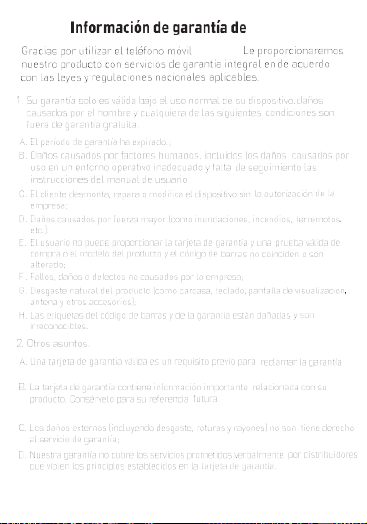
3. Deslice la bandeja SlM
nuevamente el teléfono hasta que
se bloquee en su lugar. Asegure la
gomacubrir antes de usar el
teléfono de nuevo.
27
29
30
ORCATAB
ORCATAB
31
Instalando as placas SlM e um opcional
cartão de memória
1.
Certifique-se de que o telefone esteja desligado. Solte a tampa de
borracha do SlM bandeja de cartões e use o alfinete prateado fornecido,
insira-o no pequeno redondo orifício localizado no lado esquerdo do
telefone até que a bandeja do SlMcard desbloqueia e sai ligeiramente.
Em seguida, puxe a bandeja do cartão SLM para fora do telefone.
2.
Coloque seu SLM ou cartões de
memória na bandeja do cartão SLM
até que estejam no lugar.
4. Carregue seu telefone.
3.
Deslize a bandeja SlM de volta
o telefone até que ele bloqueie
novamente no lugar. Prenda a
borrachacapa antes de usar o
telefone de novo.
32
34
35
ORCATAB
ORCATAB
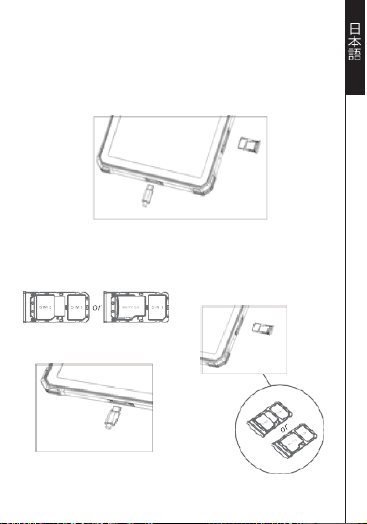
36
SlM カードとオプションの取り付け
メモリカード
1.
電話機の電源がオフになっていることを確認します。SlM のゴム製カバーを緩め
ます。カードトレイに付属の銀色のピンを使用し、小さな丸い部分に差し込みます。
電話機の左側にある穴を SILMcard トレイまで挿入します。ロックが解除され、少し
出てきます。その後、SlM カードトレイを引き出します。電話。
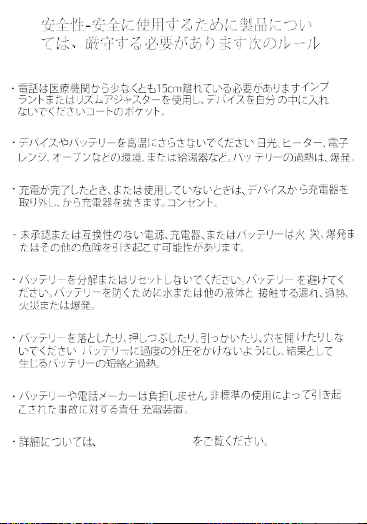
2.
SlM またはメモリカードを置きます
SlM カードトレイに挿入します。所定
の位置に。
4. 携帯電話を充電します。
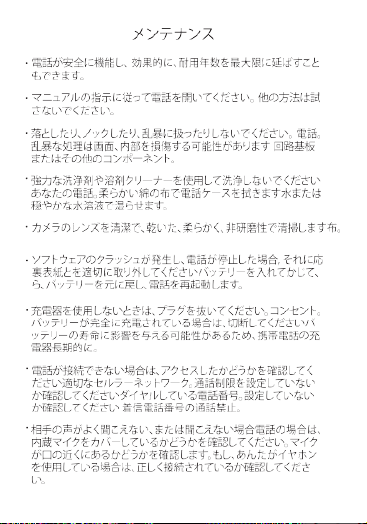
3. SlM トレイをスライドさせて元に戻
します。電話がロックされるまで 所定
の位置に。ゴムを固定する携帯電話を
使用する前にカバーをしてくださいま
た。
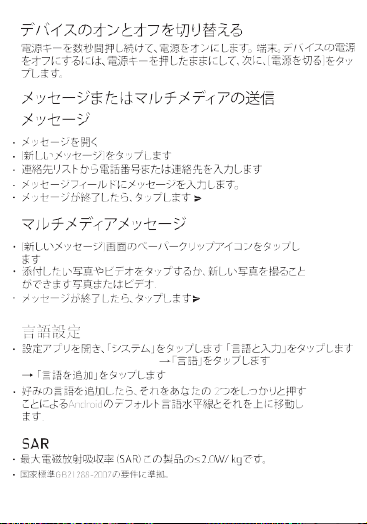
37
39
40
ORCATAB
ORCATAB
41
Instalowanie kart SLM i opcjonalnych
karta pamięci
1.
Upewnij się, że telefon jest wyłączony. Poluzuj gumową osłonę SLM
tacce na karty i użyj dołączonej srebrnej szpilki, włóż ją do małej okrągłości
otwór znajdujący się po lewej stronie telefonu, aż do kieszeni SILMcard
odblokuje się i lekko wysunie. Następnie wyciągnij tacę karty SLM z
telefon.
2.
Umieść SLM lub karty pamięci
do tacy na karty SLM, aż się znajdą
w miejscu.
4. Naładuj swój telefon.
3. Wsuń tacę SLM z powrotem
telefon, aż się ponownie zablokuje
do miejsca. Zabezpiecz gumę
osłonę przed użyciem telefonu
Ponownie.
42
43
45
ORCATAB
ORCATAB
46


FCC Caution.
This device complies with part 15 of the FCC Rules. Operation is subject to the following
two conditions: (1) This device may not cause harmful interference, and (2) this device
must accept any interference received, including interference that may cause undesired
operation.
Any Changes or modifications not expressly approved by the party responsible for
compliance could void the user's authority to operate the equipment.
Note: This equipment has been tested and found to comply with the limits for a Class B
digital device, pursuant to part 15 of the FCC Rules. These limits are designed to provide
reasonable protection against harmful interference in a residential installation. This
equipment generates uses and can radiate radio frequency energy and, if not installed
and used in accordance with the instructions, may cause harmful interference to radio
communications. However, there is no guarantee that interference will not occur in a
particular installation. If this equipment does cause harmful interference to radio or
television reception, which can be determined by turning the equipment off and on, the
user is encouraged to try to correct the interference by one or more of the following
measures:
-Reorient or relocate the receiving antenna.
-Increase the separation between the equipment and receiver.
-Connect the equipment into an outlet on a circuit different from that to which the receiver
is connected.
-Consult the dealer or an experienced radio/TV technician for help.
This Tablet computer meets the government's requirements for exposure to radio waves.
The guidelines are based on standards that were developed by independent scientific
organizations through periodic and thorough evaluation of scientific studies. Thestandards
include a substantial safety margin designed to assure the safety of all persons regardless
of age or health.
The SAR limit of USA (FCC) is 1.6 W/kg averaged over one gram of tissue. Device types:
Tablet computer (FCC ID: 2BTXF-WT1PRO) has also been tested against this SAR limit.
The highest SAR value reported under this standard during product certification for when
properly worn on the body is 1.343W/kg. This device was tested for typical body-worn
operations with the back of the handset kept 0mm from the body. To maintain compliance
with FCC RF exposure requirements, use accessories that maintain a 0mm separation
distance between the user's body and the back of the handset. The use of belt clips,
holsters and similar accessories should not contain metallic components in its assembly.
The use of accessories that do not satisfy these requirements may not comply with FCC
RF exposure requirements, and should be avoided.
This device was tested for typical body-worn operations. To comply with RF exposure
requirements, a minimum separation distance of 0mm must be maintained between the
user’s body and the handset, including the antenna. Third-party belt-clips, holsters, and
similar accessories used by this device should not contain any metallic components.

Body-worn accessories that do not meet these requirements may not comply with RF
exposure requirements and should be avoided. Use only the supplied or an approved
antenna.