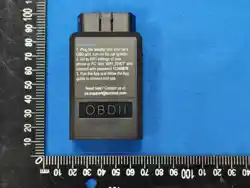
OBDCheckEW
User Instruction
Connection Steps
1. Plug the adapter into your car’s OBD-II
port. Ensure it is securely inserted.
2. Turn on car ignition.
3. Open your phone’s WiFi settings. Wait
for “WiFi_ENET” to show up and join the
network by password 12345678.
4. Open your App, select ENET WiFi
adapter or make the proper settings and
connect.
Note: Be sure to grant the necessary App
permissions including Local Network (iOS),
Nearby Devices (Android).
For detailed in-App usage instructions, visit
the App’s official website.
Verbindung herstellen
1. Stecken Sie den Adapter in den
OBD-II-Anschluss Ihres Fahrzeugs. Achten
Sie darauf, dass er fest sitzt.
2. Zündung einschalten.
3. Öffnen Sie die WLAN-Einstellungen Ihres
Smartphones. Warten Sie, bis „WiFi_ENET“
angezeigt wird, und verbinden Sie sich mit
dem Passwort 12345678.
4. Öffnen Sie Ihre App, wählen Sie den
ENET WiFi-Adapter oder nehmen Sie die
entsprechenden Einstellungen vor und
verbinden Sie.
Hinweis: Erteilen Sie die erforderlichen
App-Berechtigungen, einschließlich Lokales
Netzwerk (iOS) und Geräte in der Nähe
(Android).
Für detaillierte Nutzungshinweise besuchen
Sie bitte die offizielle Website der App.
Connexion
1. Branchez l’adaptateur sur le port OBD-II
de votre véhicule. Assurez-vous qu’il est
bien inséré.
2. Mettez le contact de la voiture.
3. Ouvrez les paramètres WiFi de votre
téléphone. Attendez que « WiFi_ENET »
apparaisse et connectez-vous au réseau
avec le mot de passe 12345678.
4. Ouvrez votre application, sélectionnez
l’adaptateur ENET WiFi ou configurez les
paramètres appropriés et connectez-vous.
Remarque : Accordez les autorisations
nécessaires à l’application, notamment
Réseau local (iOS) et Appareils à proximité
(Android).
Pour des instructions détaillées, consultez
le site officiel de l’application.
Connessione
1. Inserire l’adattatore nella porta OBD-II
della vettura. Assicurarsi che sia ben
inserito.
2. Accendere il quadro della macchina.
3. Aprire le impostazioni WiFi del telefono.
Attendere che appaia “WiFi_ENET” e
connettersi alla rete usando la password
12345678.
4. Aprire l’App, selezionare l’adattatore
ENET WiFi o impostare correttamente le
opzioni e connettersi.
Nota: Concedere le autorizzazioni
necessarie all’App, inclusi Rete locale (iOS)
e Dispositivi nelle vicinanze (Android).
Per istruzioni dettagliate, visitare il sito
ufficiale dell’App.
Conexión
1. Conecte el adaptador al puerto OBD-II
de su vehículo. Asegúrese de que esté
bien insertado.
2. Encienda el contacto del coche.
3. Abra los ajustes de WiFi de su teléfono.
Espere a que aparezca “WiFi_ENET” y
únase a la red usando la contraseña
12345678.
4. Abra su App, seleccione el adaptador
ENET WiFi o configure los ajustes
adecuados y conéctese.
Nota: Conceda los permisos necesarios a
la App, incluyendo Red local (iOS) y
Dispositivos cercanos (Android).
Para instrucciones detalladas, visite la
página oficial de la App.
接続方法
1. アダプターを車両のOBD-IIポートに
差し込みます。しっかりと装着され
ていることを確認してください。
2. 車のイグニッションをONにします
。
3. スマートフォンのWiFi設定を開き
、「WiFi_ENET」 が表示されるのを
待ち、パスワード 12345678 で接続し
ます。
4. アプリを開き、ENET WiFiアダプタ
ーを選択するか、適切な設定を行っ
て接続します。
注意:アプリに必要な権限(ローカ
ルネットワーク:iOS、近くのデバイ
ス:Android)を許可してください。
詳細な使用方法は、アプリの公式ウ
ェブサイトをご覧ください。
Compatible Applications
Windows: ISTA+, E-SYS
Android: BimmerCode, Bimmerlink,
Bootmod3, xDelete, xHP Flashtool, Deep
OBD, MHD Flasher, BimmerGeeks ProTool
iOS: BimmerCode, Bimmerlink, DITUPA,
Bootmod3, xDelete, xHP Flashtool, MHD
Flasher, MKFlasher
May also work with other software or Apps
that support a standard ENET WiFi adapter.
Special Notes
1. Compatible with BMW & Mini F series, G
and I series. E series not supported.
2. Each App or software has its own vehicle
compatibility. Please check on their website
to check if your specific model/year is
supported, and what functions are
supported.
3. For G-Series cars, the diagnostic mode
has to be activated additionally (press the
start button in the car three times in quick
succession without pushing the brake or
clutch pedal).
4. Unplug the adapter after use. Don’t leave
it plugged for days, as it may drain your
car’s battery.
Support and Warranty
Customer support: [email protected].
All Veepeak products are covered by
one-year replacement warranty against
defect from the date of purchase. Valid
purchase proof required.
Disclaimer
Features and functions are offered and
achieved through third-party Applications.
We are not responsible for any warranty
voided or damaged caused by using these
Applications.
Software names, brands, vehicle
makes/models and other trademarks
featured or referred to within this user
manual are the property of their respective
trademark holders. Use of them does not
imply any affiliation with or endorsement by
them.
- 1 -
- 5 - - 6 - - 7 - - 8 -
- 2 - - 3 - - 4 -
- -
9
Warning Statement
This device complies with part 15 of the FCC Rules. Operation is subject to the
following two conditions: (1) This device may not cause harmful interference, and (2)
this device must accept any interference received, including interference that may cause
undesired operation.
Any Changes or modifications not expressly approved by the party responsible for
compliance could void the user's authority to operate the equipment.
Note: This equipment has been tested and found to comply with the limits for a Class B
digital device, pursuant to part 15 of the FCC Rules. These limits are designed to
provide reasonable protection against harmful interference in a residential installation.
This equipment generates uses and can radiate radio frequency energy and, if not
installed and used in accordance with the instructions, may cause harmful interference
to radio communications. However, there is no guarantee that interference will not
occur in a particular installation. If this equipment does cause harmful interference to
radio or television reception, which can be determined by turning the equipment off and
on, the user is encouraged to try to correct the interference by one or more of the
following measures:
-Reorient or relocate the receiving antenna.
-Increase the separation between the equipment and receiver.
-Connect the equipment into an outlet on a circuit different from that to which the
receiver is connected.
-Consult the dealer or an experienced radio/TV technician for help.
This equipment complies with FCC radiation exposure limits set forth for an
uncontrolled environment.