
The illustrations in this manual are for reference only. Please refer to the actual product.
Robot Vacuum and Mop with
Auto-Empty and Mop Self-Cleaning
Dreame Aqua10 Roller
User Manual
C-3
C-5 C-6
C-4
D E
F-1
F
1
1
2
①
① ②
②
①
③
②
1 2
3
4
14
15
>1 m (40")
>5 cm (2")
>5 cm (2")
C-2
B
C
C-1
14
20
16
18
17
13
21
22
23
24
15
19
1
2
16
17
18
19
20
15
14
A-2
A-4
A-3
A-1
A
13
12
10
11
1
2
3
4
25
31
32
34
36
37
38
21
22
23
26
27
24
12
33
35
5
2
1
6
1
2
4
7
3
5
6
8
9
6
5
9
10
8
3
4
11
7
28
30
29
F-3 F-4
1
1 12 2
2
2
3
3 4
F-2
1
F-5
1
2
24h
3
2
1
2
F-6
1
2
3
4
F-7 F-8
F-10
F-11
F-12 F-13
1
3
4
5
F-9
6
7
1
3
2
2
1 2
1
2
2
1

Contents
User Manual
01
EN
Manual de Usuario
68
ES
Εγχειρίδιο χρήστη
154
EL
Manuel d'utilisation
34
FR
Gebruikershandleiding
103
NL
188
HE
Benutzerhandbuch
17
DE
Instrukcja obsługi
85
PL
Manual do utilizador
171
PT
Manuale utente
51
IT
Användarmanual
137
SV
Brukerhåndbok
120
NO
204
AR
שמתשמל ךירדמ
مدختسملا ليلد

Contents
Пайдаланушы нұсқаулығы
348
KK
Uporabniški priročnik
433
SL
Käyttöohjeet
314
FI
Посібник користувача
382
UA
Manual Pengguna
297
MS
Foydalanuvchi qoʻllanmasi
365
UZ
Brugermanual
331
DA
Používateľská príručka
416
SK
Uživatelská příručka
399
CZ
Panduan Pengguna
用戶手冊
268
284
ID
Hướng dẫn sử dụng
236
VI
Kullanıcı Kılavuzu
220
TR
คู่มือการใช้งาน
252
TH
ZH-HK

Manual de utilizare
518
RO
取扱説明書
556
JA
467
SR
Uputstvo za upotrebu
Használati útmutató
450
HU
Naudotojo vadovas
484
LT
Lietotāja rokasgrāmata
사용설명서
501
535
LV
KO
Contents

1
EN
Usage Restrictions
Safety Information
•Thisproductshouldnotbeusedbychildrenyoungerthan8yearsoldnorpersonswithphysical,
sensory,intellectualdeficiencies,orlimitedexperienceorknowledgewithoutthesupervisionofa
parentorguardiantoensuresafeoperationandtoavoidanyrisks.Cleaningandmaintenanceshallnot
beperformedbychildrenwithoutsupervision.
•Theapplianceisonlytobeusedwiththepowersupplyunitprovidedwiththeappliance.
•Thisappliancecontainsbatteriesthatareonlyreplaceablebyskilledpersons.
•Cleartheareatobecleaned.Childrenshallnotplaywiththeappliance.Ensurechildrenandpetsare
keptatasafedistancefromtherobotwhileitisoperating.
•Donotinstall,chargeorusetheapplianceinthebathroomsoraroundthepools.
•Thisproductisforfloorcleaninginahomeenvironmentonly.Donotuseitoutdoors,onnon-floor
surfaces,orinacommercialorindustrialsetting.
•Ensurethattheapplianceoperatescorrectlyinaproperenvironment.Otherwise,donotusethe
appliance.
•Ifthepowercordisdamaged,itmustbereplacedbyaspecialcordorassemblyavailablefromthe
manufactureroritsserviceagent.
•Donotusetherobotinanareasuspendedabovegroundlevelwithoutaprotectivebarrier.
Toavoidelectricshock,fireorinjurycausedbyimproperuseoftheappliance,pleasereadtheuser
manualcarefullybeforeusingtheapplianceandkeepitforfuturereference.

2
EN
Safety Information
•Donotplacetherobotupsidedown.DonotusetheLDScover,robotcover,orbumperasahandlefor
therobot.
•Usetherobotinenvironmentswithanambienttemperatureabove0° Candbelow40° C.Makesure
thereisnoliquidorstickysubstanceonthefloor.
•Topreventdamageorharmfromdragging,clearanylooseobjectsfromthefloor,andremovecablesor
powercordsonthecleaningpathbeforeoperatingtheappliance.
•Removefragileorsmallitemsfromthefloortopreventtherobotfrombumpingintoanddamaging
them.
•Keephair,fingers,andotherbodypartsawayfromthesuctionopeningoftherobot.
•Keepthecleaningtooloutofreachofchildren.
•Donotoperatetheapplianceinaroomwhereaninfantorchildissleeping.
•Donotplacechildren,pets,oranyitemontopoftherobotregardlessofwhetheritisstationaryor
moving.
•Onlycleanwaterandtheofficially-approvedcleaningsolutioncanbeaddedtothecleanwatertank.
Donotaddanyotherliquidsuchasalcoholordisinfectant.Theratioofthecleaningsolutiontoclean
watercanbecheckedonthecleaningsolutionbottle.Keepthecleaningsolutionoutofreachof
children.
•Donotusetherobottocleananyburningobjects.Donotusetherobottopickupflammableor
combustibleliquids,corrosivegases,orundilutedacidsorsolvents.
•Donotvacuumhardorsharpobjects.Donotusetheappliancetopickupobjectssuchasstones,large
piecesofpaperoranyitemthatmayclogtheappliance.

3
EN
Safety Information
•WARNING:Againstrechargingnon-rechargeablebatteries.
•Donotuseanythird-partybatteryorbasestation.Therobotcanonlybeusedwiththemodel
RCHE0403basestation.
•Donotattempttodisassemble,repair,ormodifythebatteryorthebasestationonyourown.
•Donotplacethebasestationnearaheatsource.
•Donotuseawetclothorwethandstowipeorcleanthebasestation'schargingcontacts.
•Donotimproperlydisposeofoldbatteries.Unneededbatteriesshouldbediscardedatanappropriate
recyclingfacility.
•Ifthepowercordbecomesdamagedorbroken,stopusingitimmediatelyandcontactafter-sales
service.
•Makesuretherobotisturnedoffwhenbeingtransportedandkeptinitsoriginalpackagingifpossible.
•Iftherobotwillnotbeusedforanextendedperiodoftime,fullychargeit,thenturnitoffandstore
itinacool,dryplace.Rechargetherobotatleastonceevery3monthstoavoidover-dischargingthe
battery.
•Plugmustberemovedfromthesocket-outletbeforecleaningormaintainingtheappliance.
•Donotwipetherobotorthebasestationwithawetclothorrinsethemwithanyliquid.Aftercleaning
washableparts,fullydrythepartsbeforereinstallingandusingthem.
•PleaseusethisproductinaccordancewiththeinstructionsintheUserManual.Usersareresponsible
foranylossordamagethatarisefromimproperuseofthisproduct.
Batteries and Charging

4
EN
•ThelasersensorinthisproductmeetstheIEC60825-1:2014/EN60825-1:2014/A11:2021Standardfor
Class1laserproducts.Pleaseavoiddirecteyecontactwithitduringuse.
CLASS1LASERPRODUCT
CONSUMERLASERPRODUCT
EN50689:2021
Laser Safety Information
Safety Information
Hereby,DreameTrading(Tianjin)Co.,Ltd.declaresthattheradioequipmenttypeRLH31CEisincompliancewithDirective2014/53/EU.ThefulltextoftheEU
declarationofconformityisavailableatthefollowinginternetaddress:https://global.dreametech.com
Fordetailede-manual,pleasegotohttps://global.dreametech.com/pages/user-manuals-and-faqs
Forindooruseonly
Readoperator'smanual

5
EN
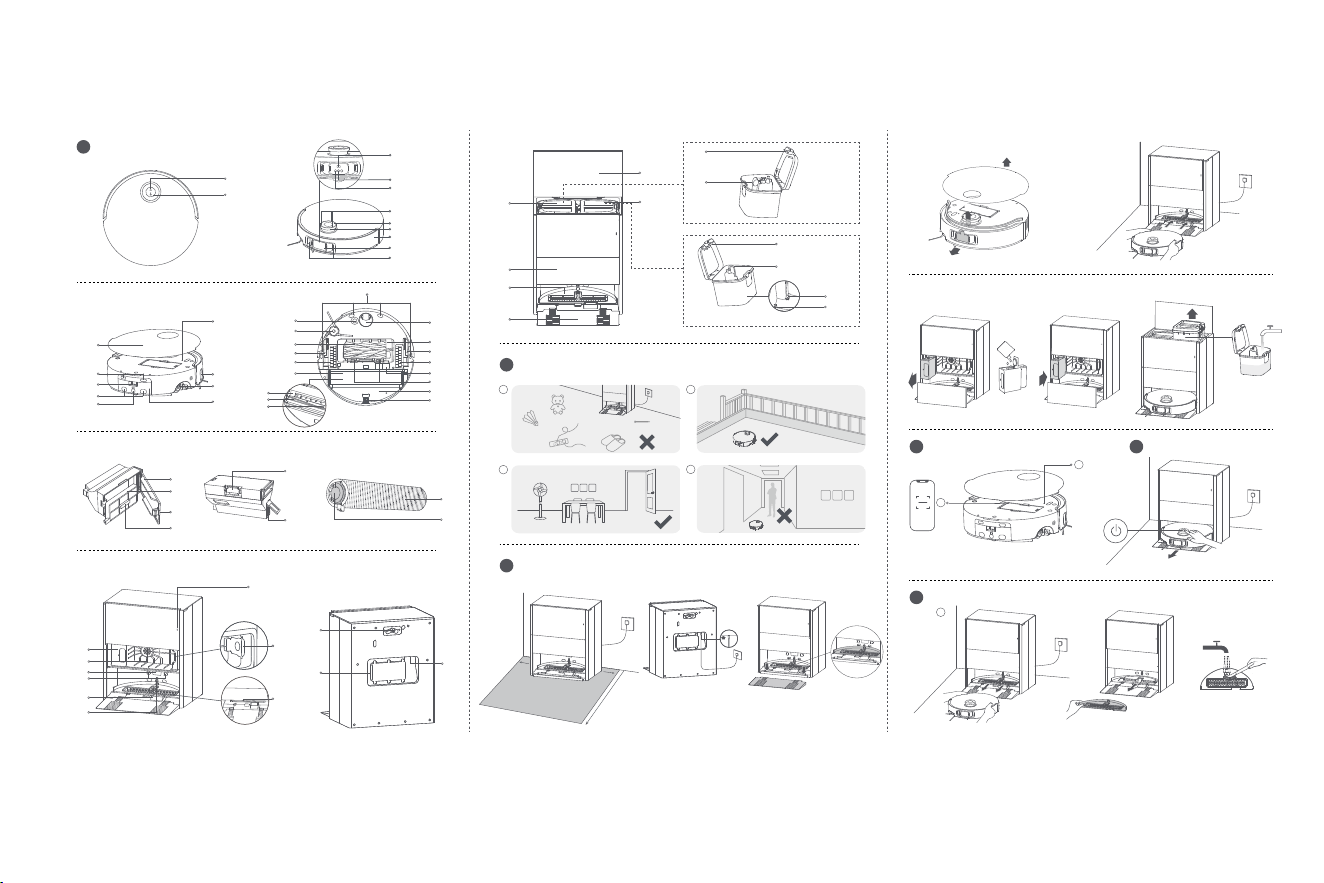
Dust Box
1. DustBoxCover
2.Filter
3.DustBoxCoverClip
4.FilterHandle
5.DustBoxClip
6.Auto-EmptyVent
Fig. A-2
Mop Assembly
1. Mop
2.MopAssemblyClip
Fig. A-3
Base Station
1. AutoSolutionDispenserModule-Single
Compartment
2.Filter
3.SignalingArea
4.ChargingContacts
5.Auto-EmptyVent
6.AutomaticWaterAddingOutlet
7. StatusIndicator
•SolidWhite:Thebasestationisconnectedto
power
•SolidOrange:Thebasestationhasanerror
8.DustBagSlot
9. HeatingModule
Product Overview
A
Robot
1. DockButton
•Presstosendtherobotbacktothebasestation
•Pressandholdfor3secondstodisableChild
Lock
2.Power/CleanButton
•Pressandholdfor3secondstoturnonoroff
•Presstostartcleaningaftertherobotisturnedon
ButtonStatusIndicator
•SolidWhite:Cleaningorcleanupcompleted
•BreathingWhite:Charging(notlowbattery)
•SolidOrange:Awaitingatlowbatteryorpaused
atlowbattery
•BreathingOrange:Charging(lowbattery)
•BlinkingOrange:Error
Note:
•Pressanybuttonontherobottopausewhiletherobotis
cleaningorreturningtocharge.
•ChildLockcanbeenabled/disabledthroughthe
DreamehomeApp.
3.LEDAuxiliaryLight
4.AIIRCamera
5.AIHDCamera
6.Microphones
7. LDSCover
8.LaserDistanceSensor(LDS)
9. Bumper
10.BumperWindow
11.3DDual-LineLaserSensors
12.Cover
13.ChargingContacts
14.UsedWaterBoxClip
15.Connectors
16.AutomaticWaterRefillingInlet
17.ResetButton/Wi-FiIndicator
•Pressandholdfor3secondstorestoretofactory
settings
18.EdgeSensor
19.MopAssemblyClip
20.UsedWaterBox
21.CliffSensors
22.CarpetSensor
23.SideBrushExtensionAssembly
24.MainBrushes
25.RetractableLeg
26.MainWheel
27.MopExtendAssembly
28.MopAssemblyCompartment
29.Wiper
30.Filter
31.OmnidirectionalWheel
32.BrushGuard
33.RetractableLeg
34.MainWheel
35.Auto-EmptyVent
36.BrushGuardClips
37.CleanWaterBox
38.CasterWheel
Fig. A-1
Dust Box
Base Station
Mop Assembly

6
EN
10.ReservedSlotforConnectingtheWaterHookup
KitforAutoRefillingandDraining
Note:
Thewaterhookupkitforautorefillinganddraining
needstobepurchasedseparately.(Onlyavailableinspecific
regions)
11.PowerCordStorageSlot
12.PowerPort
13.Cover
14.UsedWaterTank
15.CleanWaterTank
16.DustTankCover
17.Washboard
18.RampExtensionPlate
19.WaterTankClip
20.FloatBall
21.WaterTankClip
22.WaterPipe
23.Filter
24.Floater
Fig. A-4
Preparing Your Home
B
1. Beforecleaning,pleasemoveawayunstable,
fragile,valuableordangerousitems,andclean
upcables,cloths,toys,hardobjectsandsharp
objectsonthegroundtoavoidbeingentangled,
scratchedorknockedoverbytherobotand
causinglosses.
1. PlacetheBaseStationandConnecttoan
ElectricalOutlet
Placethebasestationinalocationthatisasopen
aspossiblewithagoodWi-Fisignal.Leaveenough
spaceasshowninthefigureandremoveanyobjects
intheshadedarea.Insertthepowercordintothe
basestationandplugitintothesocket.
Note:
•Firmlyinsertthepowercordupwardsuntiltheindicator
turnson.
•Makesurethatnoobjectsmightblockthesignalingarea.
•Topreventwaterstainsfromwettingwoodfloorsor
carpets,placingthebasestationontilefloorsormarble
floorsisrecommended.
2.InstalltheRampExtensionPlate
Note:
•Ensurethatthewashboardisinstalledintoplacebefore
use.
•Thewashboardcanberemovedforcleaningduring
routinemaintenance.
3.RemoveRobotProtections
4.ConnecttheRobottotheBaseStation
Pressandholdthepowerbuttonontherobotfor3
secondstoturniton.Placetherobotontothebase
stationwiththemopassemblyfacingtowardthe
washboard.Thenyouwillhearavoicenotification
whentherobotsuccessfullyconnectstothebase
station.Aftertherobotisfullycharged,thestatus
indicatorsontherobotandthebasestationwill
remainlitfor10minutesandwillthendim.
Note:Itisrecommendedtofullychargetherobotbefore
itsfirstuse.Whentherobotcannotbeturnedonafterthe
batteryisdepleted,manuallyconnecttherobotwiththe
stationtochargeit.
5.AddtheCleaningSolution
(1)Removethedusttankcoverandpullouttheauto
solutiondispensermodule.
(2)Opentheupperlidofthemoduleandaddthe
cleaningsolution.
(3)Closethelidofthemodule,putitbackintothe
basestation,andthenreinstallthedusttankcover.
Thecleaningsolutionwillbeaddedautomatically
whileworking.
Before Use
C
2.Beforecleaning,placeaphysicalbarrieratthe
edgeofthestairstoensurethesecureand
smoothoperationsoftherobot.
3.Openthedooroftheroomtobecleaned,and
putthefurnitureinitsproperplacetoleavemore
space.
4.Topreventtherobotfrommissingareasthatneed
tobecleaned,donotstandinfrontoftherobot,
threshold,hallway,ornarrowplaces.
Note:
•Whenoperatingtherobotforthefirsttime,followit
aroundwhilecleaningtoremoveanypotentialobstacles
intime.
•TheLEDauxiliarylightwillprovideauxiliarylightingin
dimlylitenvironments.
•Donotvacuumhardobjectslikestones,steelballsand
toyparts,orsharpobjectslikeconstructionwaste,broken
glassandnails,otherwisethegroundmaybescratched.
7
EN
Note:
•Theautosolutiondispensermodulecanbefilledupwith
cleaningsolutionforuse.Donotaddanyliquidotherthan
theofficially-approvedcleaningsolutiontohelpprevent
malfunction.
•Installtheautosolutiondispensermoduleuntilitclicks
intoplace.
6.AddWatertotheCleanWaterTank
Takeoutthecleanwatertankfromthebasestation
andfillupthetankwithcleanwater.Theninstallit
backintothebasestation.
Note:Donotaddhotwaterintothewatertank,asthismay
causethetanktobecomedeformed.
Fig. C-1-Fig. C-6
Connecting with the
Dreamehome App
D
1. DownloadtheDreamehomeApp
RemovetherobotcoverandscantheQRcodeon
therobot,orsearch"Dreamehome"intheappstore
todownloadandinstalltheapp.
Note:
•Only2.4GHzWi-Fiissupported.
•Duetoupgradesintheappsoftware,theactual
operationsmaydifferfromthedirectionsinthismanual.
Pleasefollowtheinstructionsbasedonthecurrentapp
version.
2.AddDevice
OpentheDreamehomeapp,tap"ScanQRcodeto
How to Use
E
Pressandholdthepowerbuttonfor3secondsto
turnontherobot.Thepowerindicatorwillremain
lit.Or,placetherobotontothebasestationby
aligningthechargingcontactsoftherobotwith
thoseofthebasestation,andthentherobotwill
turnonautomaticallyandbegincharging.Toturn
offtherobot,movetherobotawayfromthebase
stationandpressandholdthepowerbuttonfor3
seconds.
Afterconfiguringthenetworkforthefirsttime,
followtheinstructionsintheapptoquicklycreatea
map.Therobotwillstartmappingwithoutcleaning.
Whentherobotreturnstothebasestation,the
mappingprocesshasbeencompletedandthemap
willbesavedautomatically.
Whentherobotisrunning,pressanybuttonto
pauseit.
Iftherobotispausedformorethan10minutes,it
automaticallyenterssleepmode.Allindicatorson
therobotwillturnoff.Pressanybuttonontherobot,
orusetheapptowakeuptherobot.
Note: Iftherobotispausedandplacedontothebasestation,
thecurrentcleaningprocesswillend.
Fast Mapping
Pause/Sleep
Turn On/Off
Ifthebatteryistoolow,therobotwillautomatically
returntothebasestationtocharge.Aftercharging
totheappropriatebatterylevel,itwillresume
unfinishedcleaningtasks.
Note:
Tousethisfunction,pleaseenableitintheapp.
WhentherobotissettotheDoNotDisturb(DND)
mode,therobotwillbepreventedfromresuming
Auto Resume Cleaning
Do Not Disturb (DND) Mode
connect"andscanthesameQRcodeontherobot
againtoaddthedevice.Pleasefollowtheprompts
tofinishtheWi-Ficonnection.
Note:
•ToresetWi-Fi,repeatstep2andthenfollowtheprompts
tofinishtheWi-Ficonnection.
•Afterthedeviceissuccessfullyconnectedtothehome
Wi-Finetwork,itwillcontinuouslyattempttoreconnect
incaseofnetworkdisruptionscausedbyissuessuchas
unpaidbillsorpoweroutages,inordertoensureasmooth
userexperienceuponnetworkrestoration.
•TodisconnectthedevicefromWi-Finetwork,pressand
holdtheResetbuttonontherobotfor3seconds.
1
Wi-FiIndicator
•Blinkingslowly:Tobeconnected
•Blinkingquickly:Connecting
•On:Connected
2
QRCode

8
EN
Iftherobotstopsrespondingorcannotbeturned
off,pressandholdthepowerbuttonfor10seconds
toforcefullyturnitoff.Then,pressandholdthe
powerbuttonfor3secondstoturntheroboton.
Note:Whenusingtherobotforthefirsttime,therobotwill
defaultto"VacuumandMop"mode.Toadjustthecleaning
mode,gototheCleaningModesettingsintheappandselect
fromthefollowingthreeadditionaloptions:
①MopafterVacuuming
②Vacuum
③Mop
1. Startcleaning
Pressthepowerbuttonontherobot,orusethe
apptomaketherobotstartfromthebasestation.
Thentherobotwillplantheoptimalcleaningroute
andperformthecleaningtaskbasedonthecreated
map.
Robot Restarting
Vacuum and Mop
Note:
•Toensuretheroboteasilyreturnstothebasestationafter
cleaning,itisrecommendedtomaketherobotstartfrom
thebasestation.
•Themopwillbecleanedbeforetherobotstartsmopping,
pleasewaitpatiently.
•Donotmovethebasestation,thecleanwatertank,the
usedwatertank,orthewashboardduringoperation.
•Topreventscalding,donottouchthewateroutletor
heatingmodulewhilethebasestationisoperating.
2.Automopwashing
Whencleaning,therobotwillautomaticallyreturnto
thebasestationtowashthemopbasedonthemop
cleaningfrequencyspecifiedintheapp.Thebase
stationwillautomaticallyrefilltherobot'swaterbox
andtherobotwillresumecleanup.
3.Automaticallyemptythedustboxandwashand
drythemop
Aftertherobotfinishesacleaningtaskandreturns
tothebasestationtocharge,thebasestationwill
automaticallyemptythedustboxandthenwash
anddrythemop.
Note:
•Iftheauto-emptyfunctionisturnedoffintheapp,the
basestationwillnotautomaticallyemptythedustbox.
•Thebasestationwillemptythedustboxaccordingtothe
settingintheapp.
4.Cleantheusedwatertank
Aftertherobothascompleteditstask,pleaseclean
theusedwatertanktopreventanyodor.
cleaning.TheDNDmodeisdisabledbydefaultat
thefactory.YoucanusetheapptoenabletheDND
modeormodifytheDNDperiod.TheDNDperiodis
22:00-8:00bydefault.
Note:
•Thescheduledcleaningtaskswillbeperformedontime
duringtheDNDperiod.
•Therobotwillresumecleanupwhereitleftoffafterthe
DNDperiodexpires.
9
EN
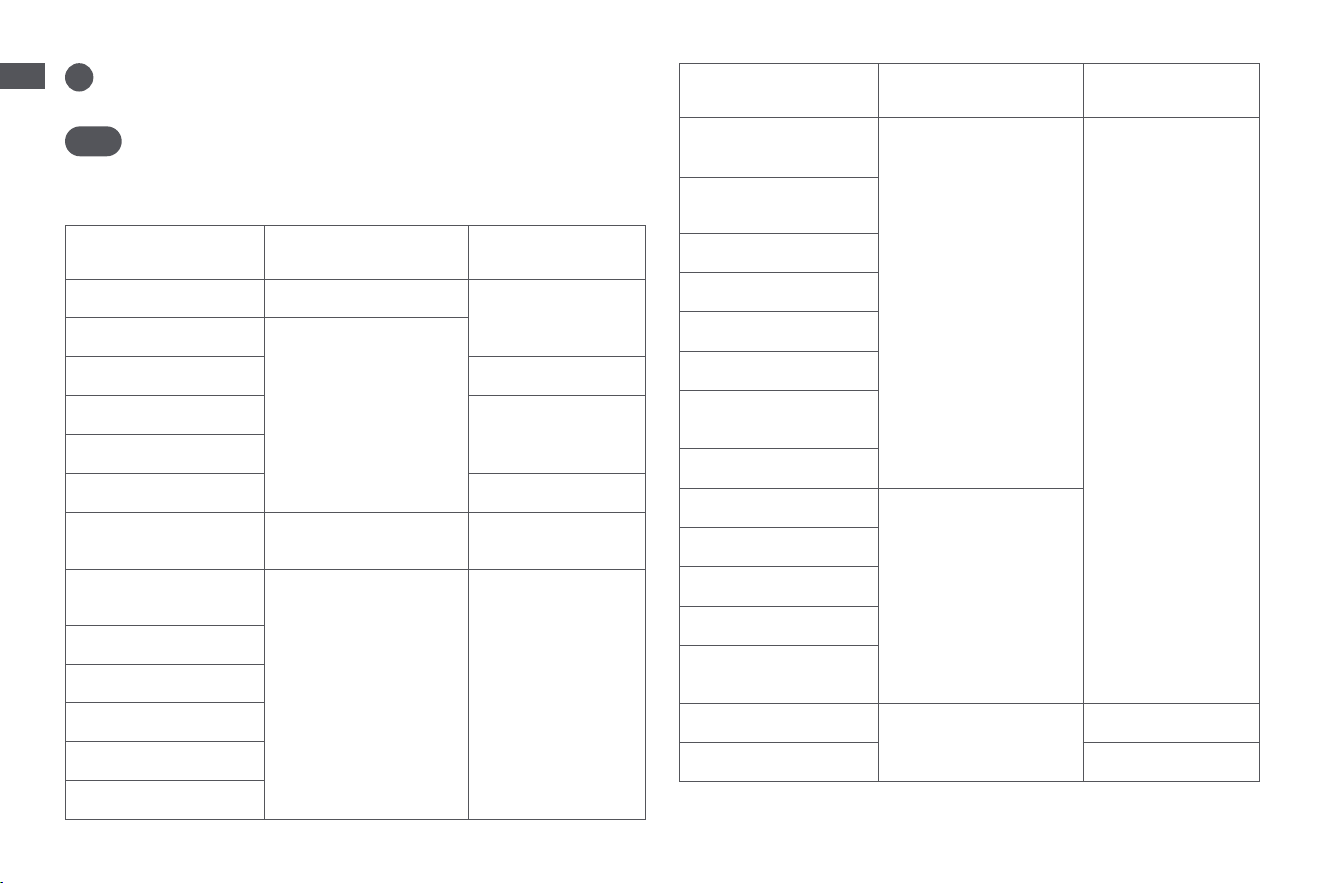
Part
Maintenance
Frequency
Replacement
Period
Usedwatertank Aftereachuse
/
Cleanwatertank
Onceevery2weeks
Mainbrushes Every6to12months
Dustbox'sfilter
Every3to6months
Sidebrush
Washboard /
Heatingmodule
Onceevery6months
/
Basestation'ssignaling
area
Onceeverymonth /
Chargingcontacts
Auto-emptyvents
Omnidirectionalwheel
Casterwheel
Edgesensor
F
Part
Maintenance
Frequency
Replacement
Period
3DDual-LineLaser
Sensors
Onceeverymonth
/
LaserDistanceSensor
(LDS)
Carpetsensor
Cliffsensors
Bumperwindow
Bumper
Robot'sautomatic
waterrefillinginlet
Bottomoftherobot
Dustbox
Cleanitasneeded
Mainwheels
Retractablelegs
Usedwaterbox
Mopassembly
compartment
Dustbag
/
Every2to4months
Mopassembly Every1to3months
Parts
Routine Maintenance
Tokeeptherobotingoodcondition,itisrecommendedtorefertotheaccessory
usageintheapporthefollowingtableforroutinemaintenance.
Note:Thefrequencyofmaintenanceandreplacementdependsonactualusage.
Ifanexceptionoccursduetospecialcircumstances,promptmaintenanceor
replacementisrecommended.
10
EN
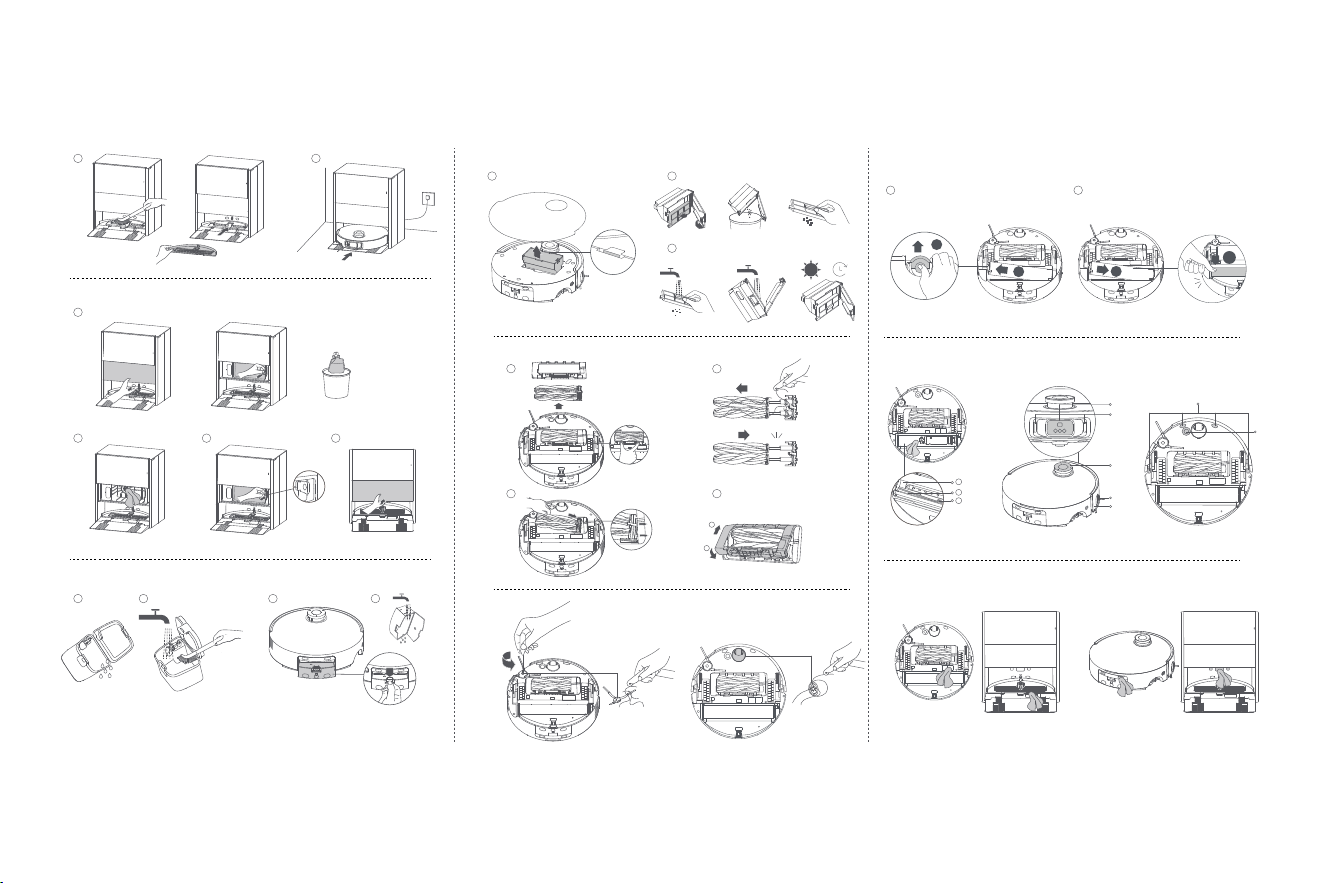
Washboard and Heating Module
1. Takeouttherobotandremovethewashboard
afterthemopcleaningiscomplete.Thenrinse
thewashboardwithcleanwaterandwipeitclean.
Note:
Theheatingmoduleunderthewashboardmayretain
residualheat.Topreventscalding,becarefulwhenremoving
thewashboard.
2.Duringuse,theheatingmodulemaydevelop
scale.Toremoveit,takeouttherobot,poura
smallamountofwhitevinegar(5%aceticacid)
onthesurfaceoftheheatingmoduleandcleanit
withapropertool.Thenreinstallthewashboard.
Note:
•Topreventscalding,waituntilthesurfaceoftheheating
modulecoolsdowntoroomtemperaturebeforecleaning.
•Anappropriatedescalercanalsobeusedinaccordance
withtheinstructionsitprovides.
•Donotaddwhitevinegarordescalerdirectlyintothe
cleanwatertanktohelppreventmalfunction.
•Donotusesharptoolsorcorrosiveliquidssuchas
hydrochloricacidtocleantheheatingmodule.
3.Usetheapporpressthebutton toreturnthe
robottothebasestation,ormanuallyputthe
robotback.
Fig. F-1
Dust Bag
1. Removethedusttankcoveranddiscardthedust
bag.
Note:
Pullingupwardsonthehandlewillsealthebagto
preventthedustanddebrisfromaccidentallyfallingout.
2.Removethedustanddebrisfromthefilterwitha
drycloth.
3.Installanewdustbag.
4.Reinstallthedusttankcover.
Fig. F-2
Used Water Tank
1. Removetheusedwatertank,openitscoverand
pourouttheusedwater.
2.Rinsetheusedwatertankwithcleanwater,and
useapropertooltocleantheinnerwallofthe
usedwatertank.
Note:Thefloatballintheusedwatertankisamovable
part.Donotapplytoomuchforcewhencleaningittoavoid
damagingit.
Fig. F-3
Used Water Box
1. Presstheclipoftheusedwaterboxtoremoveit.
2.Openthecoveroftheusedwaterboxandpour
outtheusedwater.Thenrinsetheboxwithclean
water,anddryitbeforereinstallingitintothe
robot.
Fig. F-4
Dust Box and Filter
1. Removetherobotcoverandpressthedustbox
cliptoremovethedustbox.
2.Openthedustboxcover,removethefilter,and
thenemptythedustbox.Gentlytapthebasketof
thefiltertoremovethedirt.
Note:Donotattempttocleanthefilterwithabrush,afinger
orsharpobjectstopreventdamage.
3.Rinsethedustboxandfilterwithwateranddry
themcompletelybeforereinstalling.
Note:
•Rinsethedustboxandfilterwithcleanwateronly.Donot
useanydetergent.
•Usethedustboxandfilteronlywhentheyarecompletely
dry.
Fig. F-5
Main Brushes
1. Pressthebrushguardclipsinwardstoremovethe
brushguard,andthenliftthebrushesoutofthe
robot.
2.Pulloutthebrushesasshowninthefigure.Use
apropertooltoremoveanyhairtangledinthe
brushes.Aftercleaning,pushthebrushesfirmly
intothemainbrushholderuntiltheyclickinto
place.
Note:Becarefulwhilepullingoutthemainbrushesto
preventinjury.
3.Withthescreen-printedarrowsfacingupwards,
insertthemainbrushholderintotheslots
downwardsinaninclinedway.
4.Alignthefrontendofthebrushguardwiththe
slot,insertitdownwardsinaninclinedway,and

12
EN
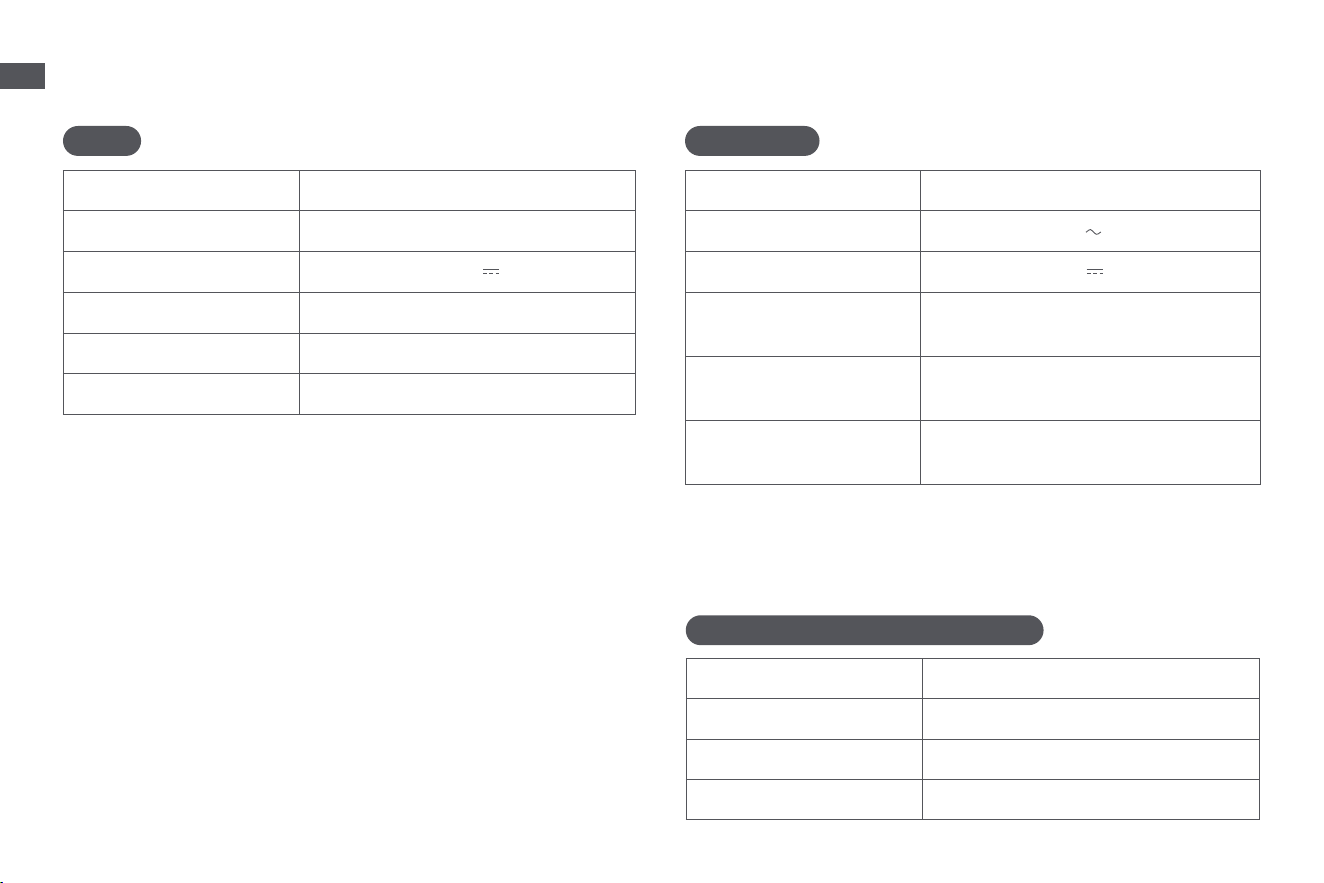
Troubleshooting
Problem Solution
Therobotwill
notturnon.
•Thebatteryislow.Rechargetherobotonthebase
stationandtryagain.
•Thetemperatureofthebatteryistoolowortoohigh.
Itisrecommendedtooperatetheapplianceata
temperaturebetween0° C(32° F)and40° C(104° F).
Therobotwill
notcharge.
•Thebasestationisnotconnectedtopower,please
makesurebothendsofitspowercordarecorrectly
pluggedin.
•Thecontactbetweenthechargingcontactsonthe
basestationandtherobotispoor,pleasecleanthe
chargingcontacts.
•Checkwhetherthereisanyforeignobjectatthe
connectorsoftherobotandremovetheforeignobject
ifany.
Therobot
failsto
connectto
Wi-Fi.
•TheWi-Finetworkpasswordisincorrect.Makesure
thepasswordusedtoconnecttoyourWi-Finetworkis
correct.
•Therobotdoesnotsupporta5GHzWi-Ficonnection.
Makesuretherobotisconnectedtoa2.4GHzWi-Fi
connection.
•TheWi-Fisignalisweak.Makesuretherobotisinan
areawithgoodWi-Ficoverage.
•Therobotmaynotbereadytobeconfigured.Please
exitandre-entertheapp,andthentryagainas
instructed.
Problem Solution
Therobot
cannotfind
andreturn
tothebase
station.
•Therouteforreturningtochargeisblocked,e.g.the
doorisclosed.
•Thebasestationisdisconnectedfrompowerormoved
whentherobotisnotonit.Pleaseconnectthebase
stationtothepowersupplyorplacetherobotontothe
basestationtocharge.
•Therearetoomanyobstructionsaroundthebase
station.Placethebasestationinamoreopenarea.
•Movingtherobotmaycauseittore-positionitself,and
itwillrecreateamapifre-positioningfails.Iftherobot
istoofarfromthebasestation,itmightnotbeable
toautomaticallyreturnonitsown,inwhichcaseyou
willneedtomanuallyplacetherobotontothebase
station.
•Wipethesignalingareaonthebasestationtoremove
dustordebris.
Therobot
getsstuckin
frontofthe
basestation
andcannot
returntoit.
•Checkwhetherthereisenoughspaceonbothsidesor
infrontofthebasestationtopreventtherobotfrom
beingblocked.
•Therobotmayslipifthefloorinfrontofthebase
stationisoverlywet.Ifso,cleantheexcesswater
beforetryingagain.
•Itisrecommendedtomovethebasestationtoa
differentplaceandtryagain.
•Makesuretherampextensionplateisinstalled
properly.
13
EN
Troubleshooting
Problem Solution
Therobotwill
notturnoff.
•Therobotcannotbeturnedoffwhenitischarging.
Itisrecommendedtomovetherobotfromthebase
station,andthenpressandholdthepowerbuttonfor
3secondstoturnitoff.
•Iftherobotcannotbeturnedoffbyperformingstep
1,pressandholdthepowerbuttonfor10seconds
toforciblyturnofftherobot.Iftheproblempersists,
pleasecontactafter-salesservice.
Thecharging
speedisslow.
•Ittakesabout4.5hourstofullychargetherobotwhen
itsbatteryislow.
•Ifyouoperatetherobotattemperaturesoutsideofthe
specifiedrange,thechargingspeedwillautomatically
slowdowntoextendthebatterylife.
•Thechargingcontactsonboththerobotandthebase
stationmaybedirty,pleasewipethemwithadry
cloth.
Thenoise
increases
whiletherobot
isoperating.
•Checkwhetherthedustbox'sfilterisclogged.Ifso,
cleanitorreplaceit.
•Ahardobjectmaybecaughtinthemainbrushesor
thedustbox.Checkandremoveanyhardobject.
•Themainbrushesorthesidebrushmaybecome
tangled.Checkandremoveanyforeignobjects.
•SwitchthesuctionmodetoStandardorQuiet.
Problem Solution
Therobot
moveswithout
followingthe
setroute.
•Objectssuchaspowercordsandslippersshouldbe
organizedbeforeusingtherobot.
•Workingonwetslipperysurfacescausesthemain
wheeltoslip.Itisrecommendedtodrythewetplaces
beforeusingtherobot.
•Wipethebumperwindowand3Ddual-linelaser
sensorsontherobotwithaclean,softclothtokeep
themcleanandunobstructed.
Therobot
missesthe
roomstobe
cleaned.
•Makesurethatthedoorsoftheroomstobecleaned
areopen.
•Theplaceinfrontoftheroomtobecleanedmaybe
wetandslippery,causingtherobottoslipandwork
abnormally.Pleasetrydryingthefloorbeforeusing
therobot.
Therobotwill
notresume
cleaningafter
charging.
•MakesurethattherobotisnotsettotheDoNot
Disturb(DND)mode,whichwillpreventitfrom
resumingcleaning.
•Therobotwillnotresumecleaningafteryoumanually
placetherobotonthebasestationorsendtherobot
tochargeviatheapporthebutton
.

14
EN
Troubleshooting
Problem Solution
Thestationcannot
automaticallyemptythedust
box.
•Checkwhetherthedustbaginthedust
tankisfull.
•Ifthedustbagisnotfull,checkwhether
thereisanyobstructionattheauto-
emptyventsoftherobot,thebase
station,orthedustbox.Ifany,cleanthe
blockedpartintime.
Thewaterlevelinthe
washboardisabnormal.
•Checkwhetherthesealontheused
watertankislooseornotcorrectly
installed,andmanuallyresetitifso.If
theproblempersists,pleasecontactthe
after-salesserviceteam.
•Gentlypressdownontheusedwater
tanktomakesureitisinstalledcorrectly.
•Removethewashboardandcheck
whetherthesewagedrainoutletis
blockedandcleanit.
•Checkthecleaningsolution.Donot
addanyliquidotherthantheofficially-
approvedcleaningsolution.
Problem Solution
Themopassemblyisraised
abnormally.
•Pleaseremovethemopassemblyto
checkifthereisanyforeignobjectstuck
init,andtrytorestarttherobot.Ifthe
problempersists,pleasecontactthe
after-salesserviceteam.
Thereiswaterunderthe
cleanwatertankoraround
theseal.
•Whentakingoutthecleanwatertank,
somewaterinthepipemaybeleft
underthetankoraroundtheseal.Thisis
normal.Pleasewipewithadrycloth.
Formoresupport,contactusviahttps://global.dreametech.com
15
EN
Specifications
Model RCHE0403
RatedInput 220-240V50-60Hz
RatedOutput 20V
3A
RatedPower
(duringdustemptying)
650W
RatedPower
(duringhotwatercleaning)
400W
RatedPower
(duringcharginganddrying)
100W
Robot
Base Station/Charging Dock
Power consumption in standby mode: ≤0.5 W (within 15 minutes after
the robot leaves the base station/charging dock)
Robot&Base Station/Charging Dock
Power consumption in networked standby mode: ≤2 W (Within 20
minutes after the battery pack of robotic vacuum cleaner is fully
charged.)
Power consumption in standby mode: ≤0.5 W (Within 20 minutes after
the battery pack of robotic vacuum cleaner is fully charged.)
Base Station
Undernormaluseofcondition,thisequipmentshouldbekeptaseparation
distanceofatleast20cmbetweentheantennaandthebodyoftheuser.
Note:
•RatedPower(duringhotwatercleaning)isdeterminedbythepowervalue
duringtherepresentativeperiod(watertemperature25℃ ).
•RatedPower(duringcharginganddrying)isdeterminedbythepowervalue
duringfullloadperiod(ambienttemperature23° C±2° C).
Model RLH31CE
Charging Time Approx. 4.5 hours
Rated Voltage 14.4 V
Rated Power 75 W
Operation Frequency 2400-2483.5 MHz
Maximum Output Power < 20 dBm
Rechargeable Lithium-ion Battery Pack
Model R2401-4S2P-XDEV/R2401-4S2P-MMYD
Type Li-ion
Number 1
RatedCapacity 5.8Ah

16
EN
Battery Disposal and Removal
The built-in lithium-ion battery contains substances that are hazardous to the
environment. Before disposing of the battery, make sure the battery is removed
by qualified technicians and discarded at an appropriate recycling facility.
– the battery must be removed from the appliance before it is scrapped;
– the appliance must be disconnected from the supply mains when removing
the battery;
– the battery is to be disposed of safely.
CAUTION:
Before removing the battery, disconnect the power and run out the battery as
much as possible.
Unneeded batteries should be discarded at an appropriate recycling facility.
Do not expose to high temperature environment to avoid risks of explosion.
Under abusive conditions, liquid may be ejected from the battery. If contact
occurs, flush with water and seek medical help.
Removal Guide:
1. Turn over the robot, use a proper tool to remove the screws on the back of
the robot, and then remove the cover.
2. Unplug the terminals between the battery and PCB board to remove the
battery.
All products bearing this symbol are waste electrical and electronic
equipment (WEEE as in directive 2012/19/EU) which should not be
mixed with unsorted household waste. Instead, you should protect
human health and the environment by handing over your waste
equipment to a designated collection point for the recycling of waste
electrical and electronic equipment, appointed by the government
or local authorities. Correct disposal and recycling will help prevent
potential negative consequences to the environment and human
health. Please contact the installer or local authorities for more
information about the location as well as terms and conditions of such
collection points.
WEEE Information
