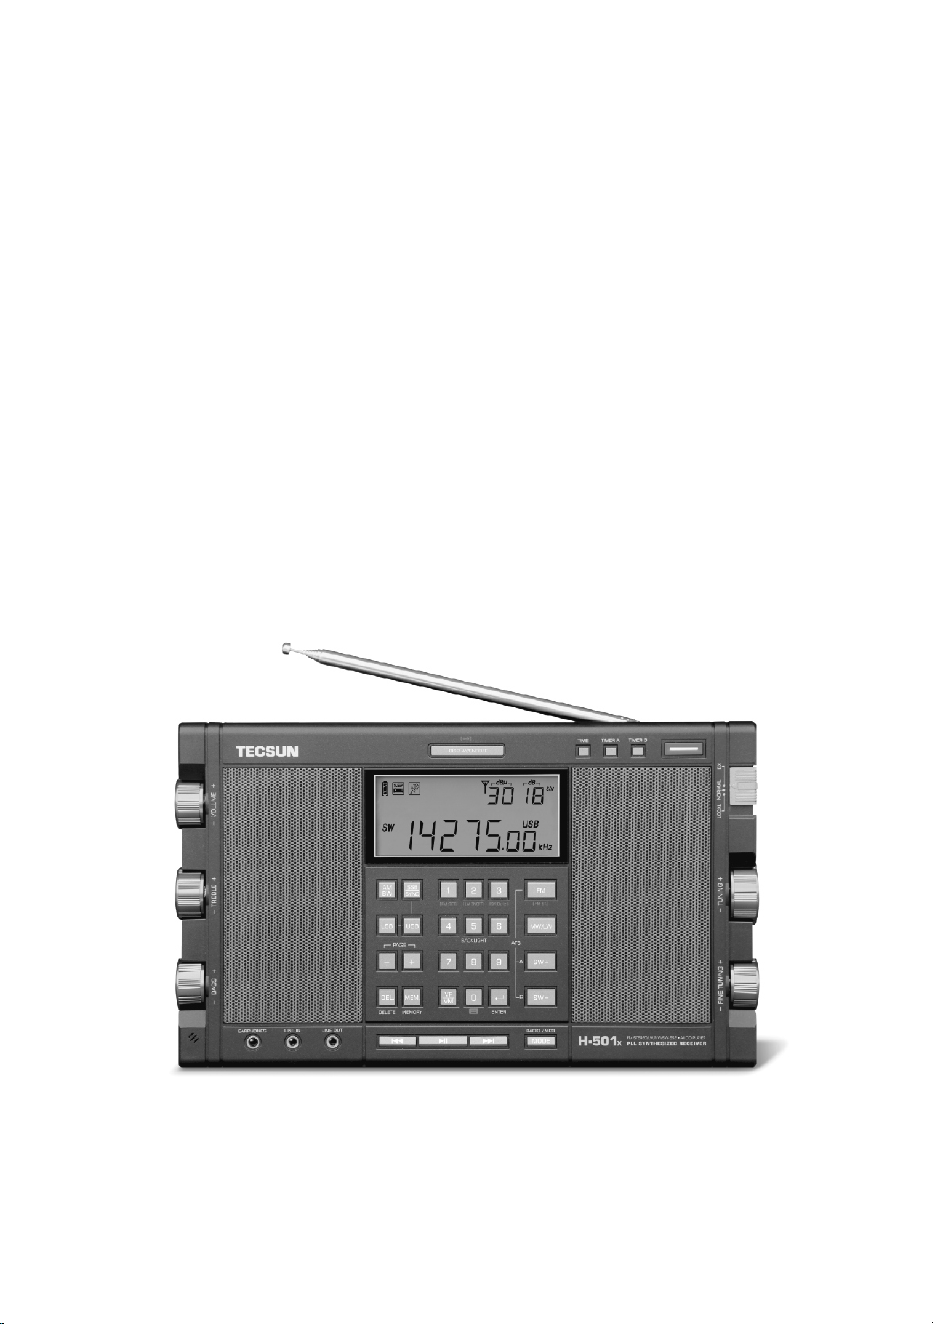
TECSUN
H-501x
OPERATION MANUAL
FM STEREO / LW / MW / SW-SSB PLL SYNTHESIZED RECEIVER
●
AUDIO PLAYER
TECSUN ELECTRONIC IND. LTD.


CONTENTSCONTENTS
USING THE DEVICE
Turning the device on/off .................................................................................................................................. 8
Volume control ................................................................................................................................................... 8
(1) LISTENING TO RADIO ................................................................................................................................ 8
VF (View Frequency) and VM (View Memory) ................................................................................................. 8
Using the radio’s antennas ................................................................................................................................ 9
Tuning into stations .......................................................................................................................................... 10
Manual tuning .............................................................................................................................................. 10
Auto scan ..................................................................................................................................................... 10
Direct keypad entry ...................................................................................................................................... 10
SW/SSB meter band selection .................................................................................................................... 10
Working with station memories ........................................................................................................................ 11
Storing stations manually ............................................................................................................................. 11
Auto tuning storage (ATS) ............................................................................................................................ 11
Storing stations during auto scan ................................................................................................................ 12
Auto Sorting Memory ................................................................................................................................... 12
Listening to stored stations .............................................................................................................................. 13
Recalling stored stations ............................................................................................................................. 13
Memory page scan ...................................................................................................................................... 13
Deleting Stored Stations .................................................................................................................................. 14
Deleting a single station ............................................................................................................................... 14
Deleting stations during memory page scan ................................................................................................ 14
Deleting all stored stations ........................................................................................................................... 14
GETTING STARTED
H-501x at a glance ............................................................................................................................................ 1
Powering your device ......................................................................................................................................... 6
Charging the battery ........................................................................................................................................... 6
Setting the clock ................................................................................................................................................ 7
Setting the FM frequency range ...................................................................................................................... 7
Setting the MW tuning step and AM (MW/LW/SW) frequency range ................................................................ 7

Using the (AM) antenna gain [ DX/Normal/Local ] switch ............................................................................... 15
AM bandwidth selection .................................................................................................................................. 15
Single sideband (SSB) .................................................................................................................................... 15
Synchronous detection (SYNC) ...................................................................................................................... 15
FM stereo/mono selection ............................................................................................................................... 16
Display mode ................................................................................................................................................... 16
(2) AUDIO PLAYER MODE ............................................................................................................................ 16
Album preview ................................................................................................................................................. 17
Selecting an album .......................................................................................................................................... 17
Selecting an audio track.................................................................................................................................... 17
Deleting an audio track .................................................................................................................................... 17
(3) COMPUTER SPEAKER MODE ................................................................................................................ 18
(4) OTHER SETTINGS AND FEATURES ........................................................................................................ 18
Activating / Deactivating the alarm .................................................................................................................. 18
Setting the alarm time ..................................................................................................................................... 18
Setting the alarm by radio or audio player ....................................................................................................... 19
Snooze function ............................................................................................................................................... 19
Display backlight ............................................................................................................................................. 19
Setting the sleep timer ..................................................................................................................................... 20
Keylock ............................................................................................................................................................ 20
Treble & bass .................................................................................................................................................. 20
Using headphones .......................................................................................................................................... 20
Stereo audio input (line in) .............................................................................................................................. 20
Stereo audio output (line out) ......................................................................................................................... 20
MISCELLANEOUS
Troubleshooting ............................................................................................................................................... 21
System reset ................................................................................................................................................... 22
Maintenance .................................................................................................................................................... 22
Lithium battery safety instructions ................................................................................................................... 22
H-501x specifications ...................................................................................................................................... 23
1
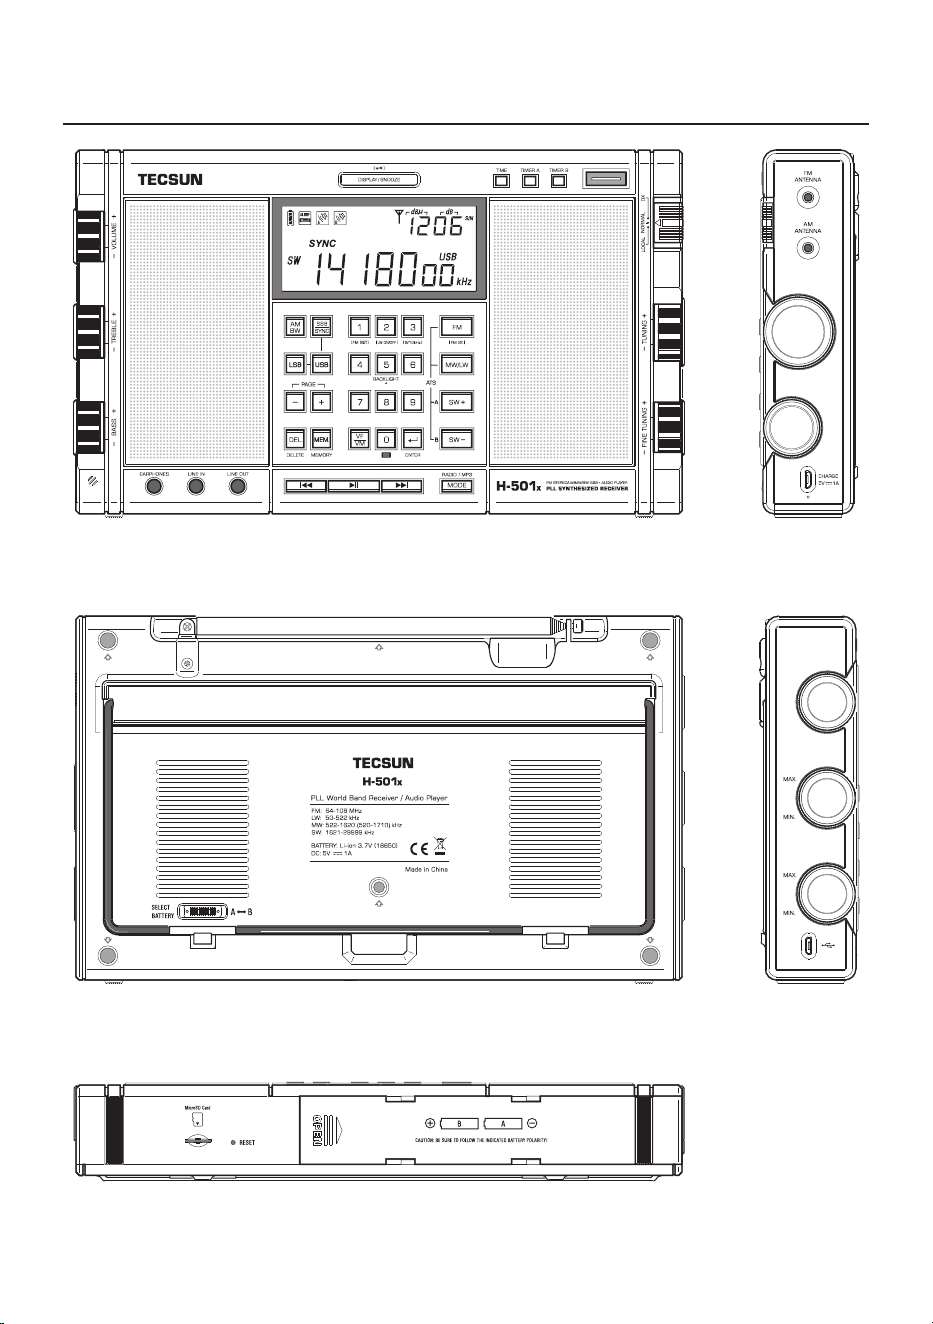
H-501x at a Glance
Back
Left side
Right side
Bottom
Front
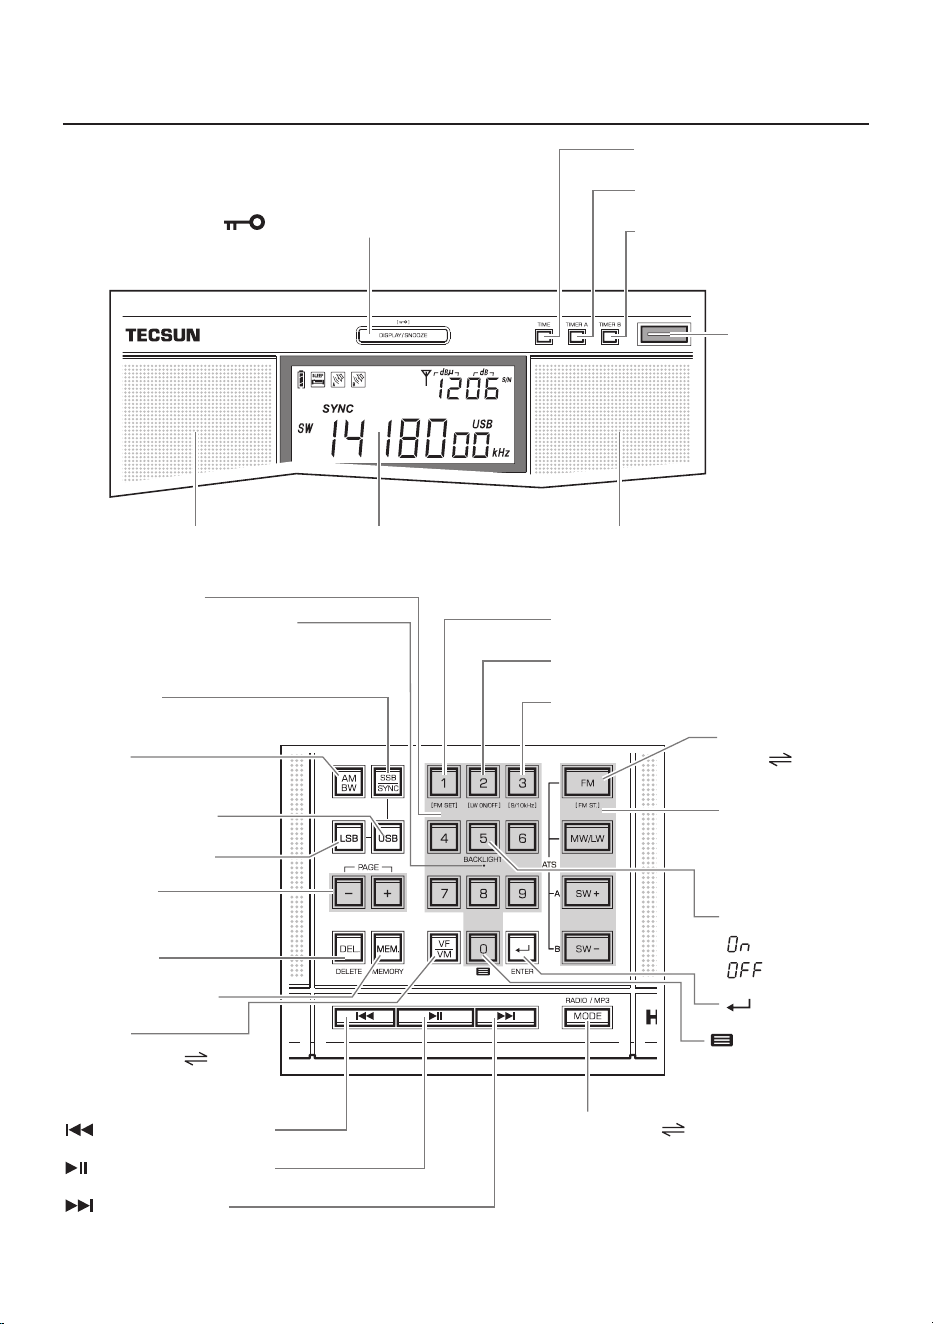
Left channel speaker
Right channel speaker
PAGE -/+:
Select memory page
DEL.: Delete
MEM.: Store stations
:
Organize memory pages
: Confirm
2
H-501x at a Glance - Location of Controls
DISPLAY: Display mode
SNOOZE: Alarm snooze mode
: Locks keys and tuning knobs
TIME: Set time/display time
TIMER A: Alarm setting
TIMER B: Alarm setting
Display
POWER/SLEEP
• Power switch
• Sleep timer setting
0 - 9: Numeric keys
SSB/SYNC:
Single sideband/synchronous detection
AM BW:
AM bandwidth selection
USB: Upper Sideband
LSB: Lower Sideband
: Previous / replay / rewind
: Play / pause / repeat track
: Next / fast forward
FM SET: Set FM frequency range
LW ON/OFF: Enable/Disable LW
9/10kHz: MW frequency step setting
FM ST. :
Stereo Mono
Band selection/ATS:
FM
MW (AM) / LW
SW
MODE: Radio Audio player
VF/VM:
• View Frequency Memory
• Scan (frequency/memory)
BACKLIGHT:
: always-on
: Auto lighting
Keypad location guidance light
for the visually impaired.
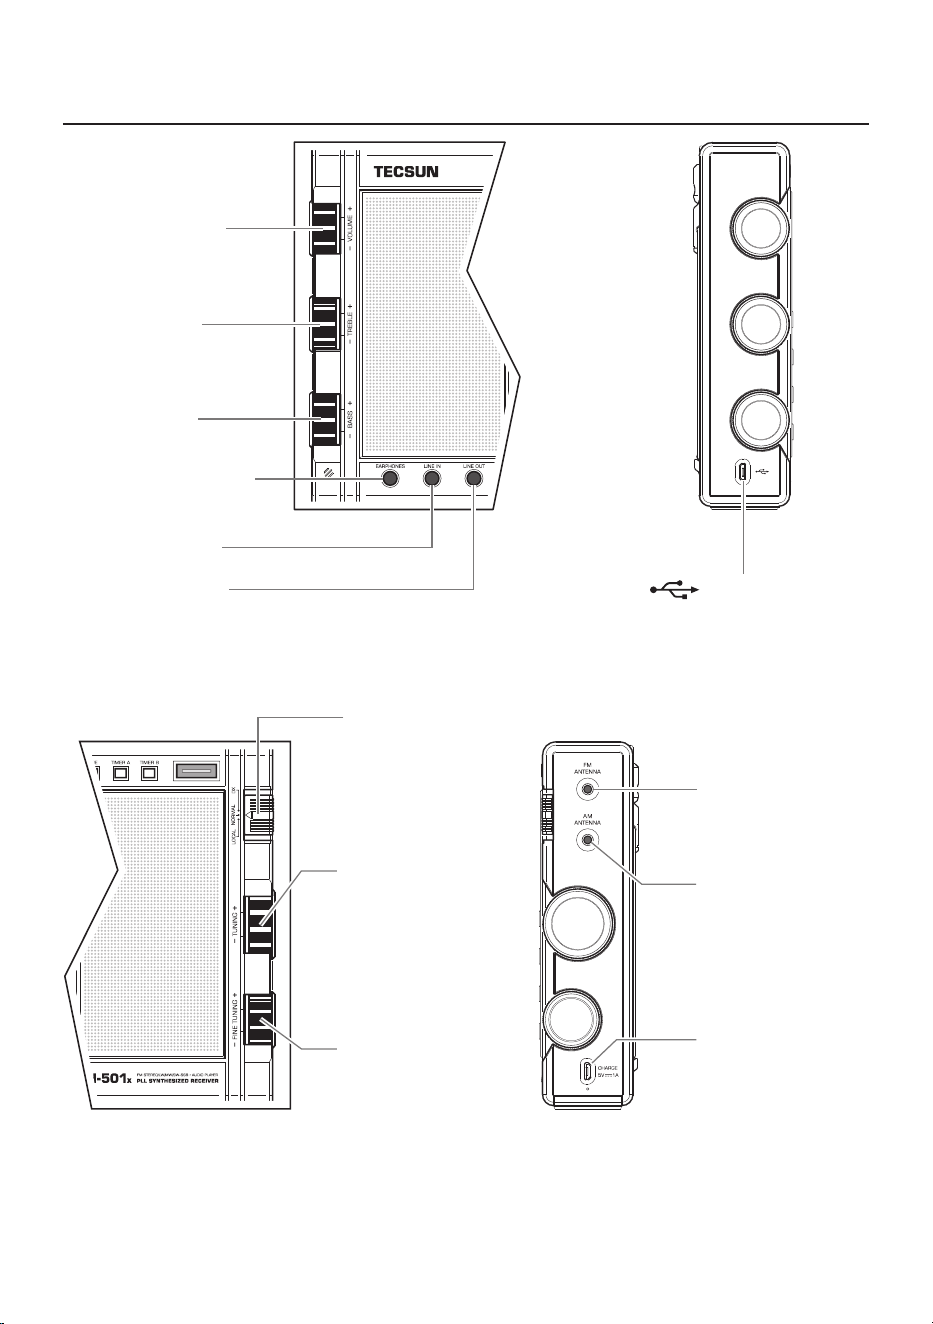
Adjust treble
Adjust bass
Stereo headphone socket
Stereo audio input
Stereo audio output
CHARGE:
Charging input/
Power supply
(DC 5V/1A)
AM ANTENNA:
Socket for external
AM antenna
(LW / MW / SW)
FM ANTENNA:
Socket for external
FM antenna
: Digital audio input
3
Adjust volume level
(AM) sensitivity selection
DX
NORMAL
LOCAL
TUNING:
• Tuning frequency
• Browsing a memory page
• Selecting audio files
• Adjusting clock (hours)
FINE TUNING:
• Fine tune frequency
• Select bandwidth
• Select a memory page
• Select audio album
• Adjust clock (minutes)
4
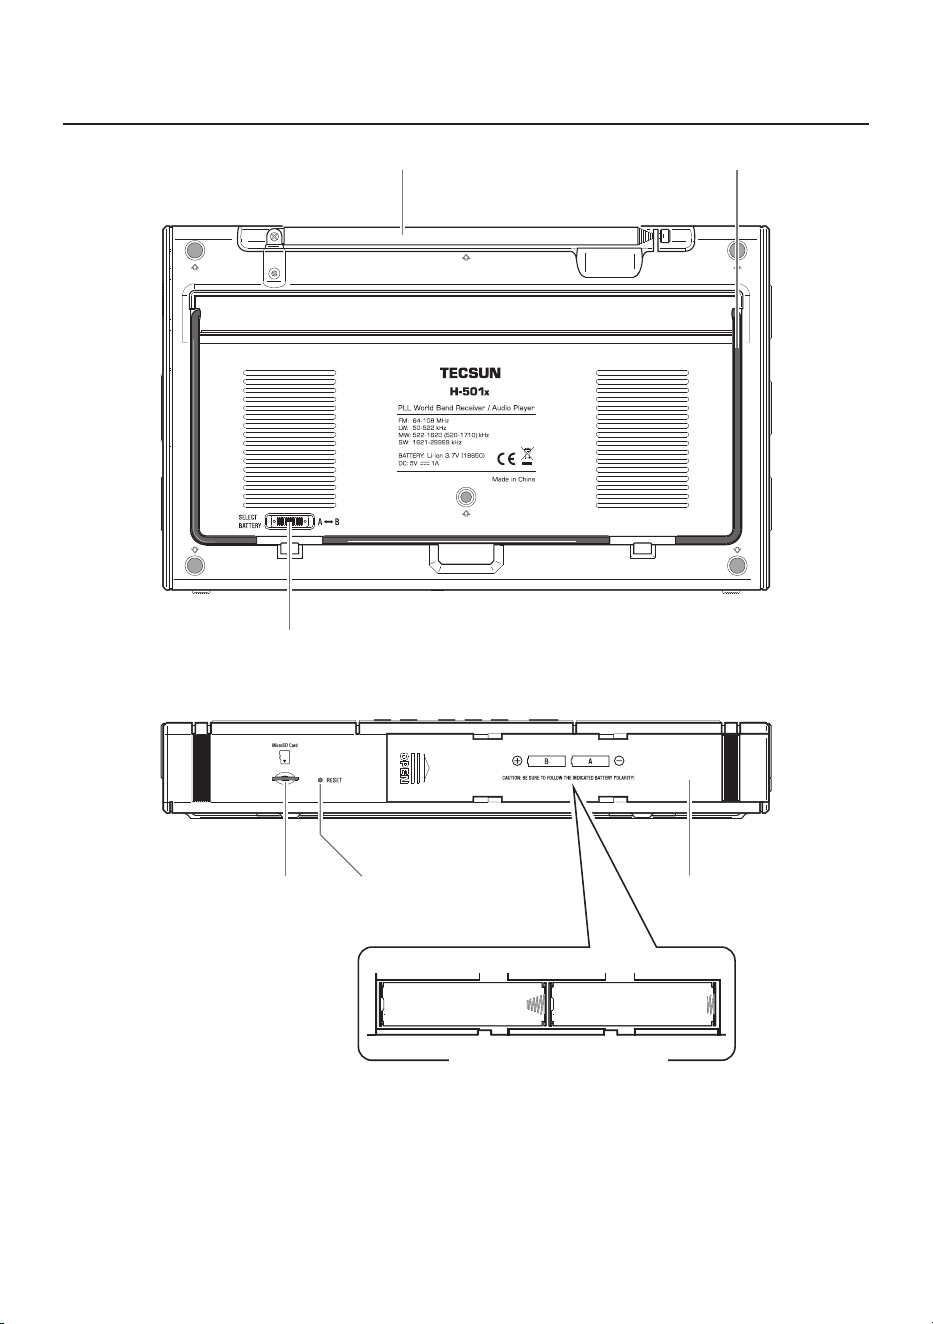
MicroSD card slot
RESET: System reset button
Battery compartment
compartment B compartment A
Inside battery compartment
Whip antenna (FM / SW) Support stand
Battery selection switch
5
H-501x at a Glance - Display Indication
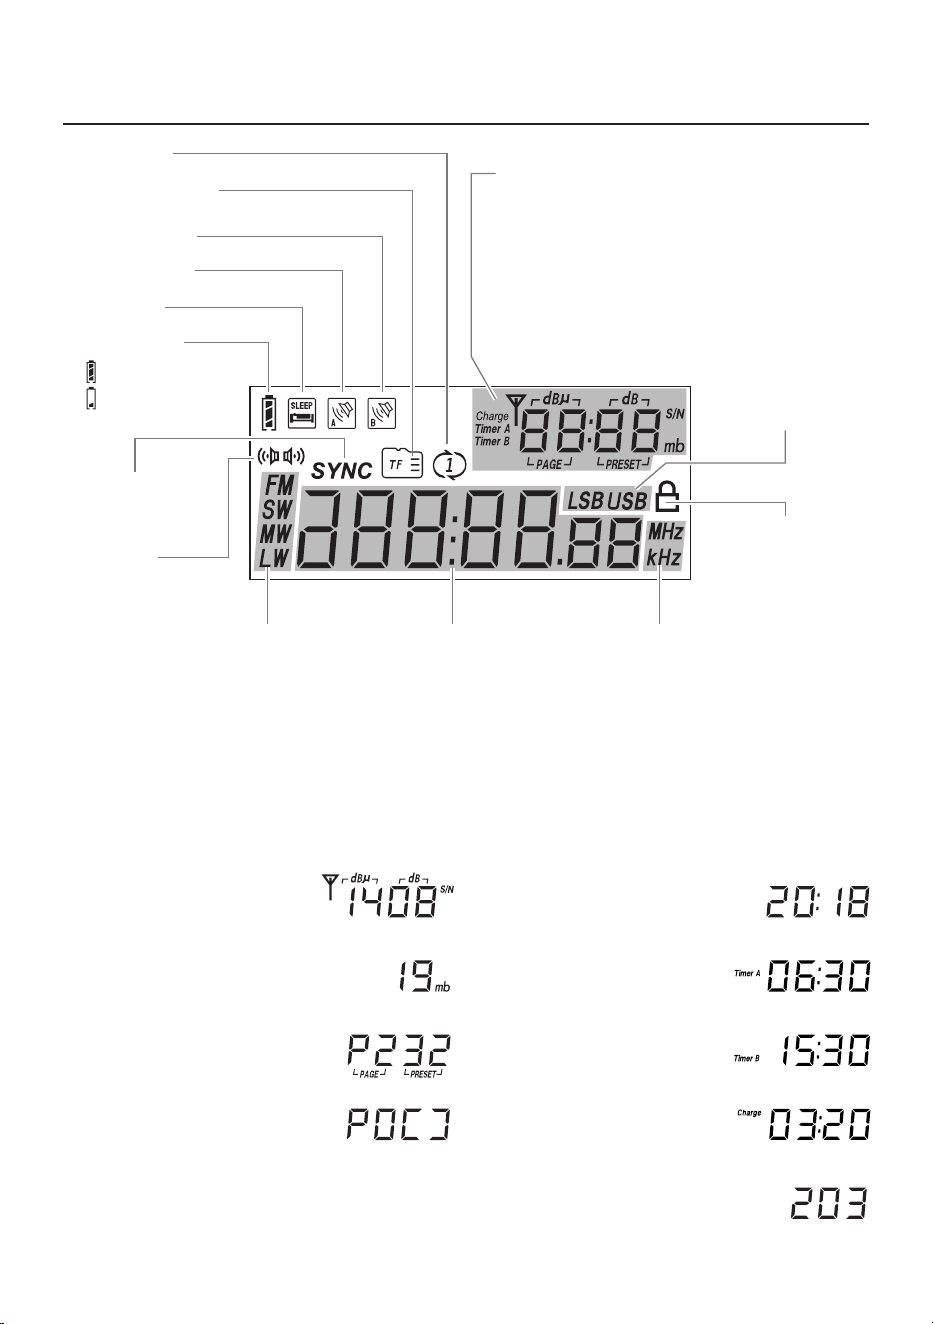
** Display indication examples:
“Timer A”:
“Timer B”:
Audio track number:
Organizing memory:
Memory location:
Shortwave meter band:
Signal strength / S/N ratio:
Clock time:
Charging time:
Audio player mode
Repeat track
Alarm (Timer B)
Alarm (Timer A)
Sleep timer
Battery power
Low battery
(charging required)
Full capacity
Synchronous
detection
Frequency Band
FM: FM
SW: Shortwave
MW: Medium wave (AM)
LW: Longwave
Displays time/frequency/
album number/
track playback progress
MHz: unit display for FM
kHz: unit display for SW / MW / LW
Keylock
Single Sideband
LSB: Lower sideband
USB: Upper sideband
** dBμ: Signal strength measuring unit
dB: Signal-to-noise ratio measuring unit
S/N: Signal-to-noise ratio
mb: Shortwave meter band
PAGE: Memory page number
PRESET: Location within memory page
Charge: Charging indicator
Timer A, Timer B: Alarm time
FM Stereo
reception
6
Powering Your Device
This device can be powered by a 18650 3.7V rechargeable lithium (Li-ion) battery or by connecting a
DC 5V/1A power adapter.
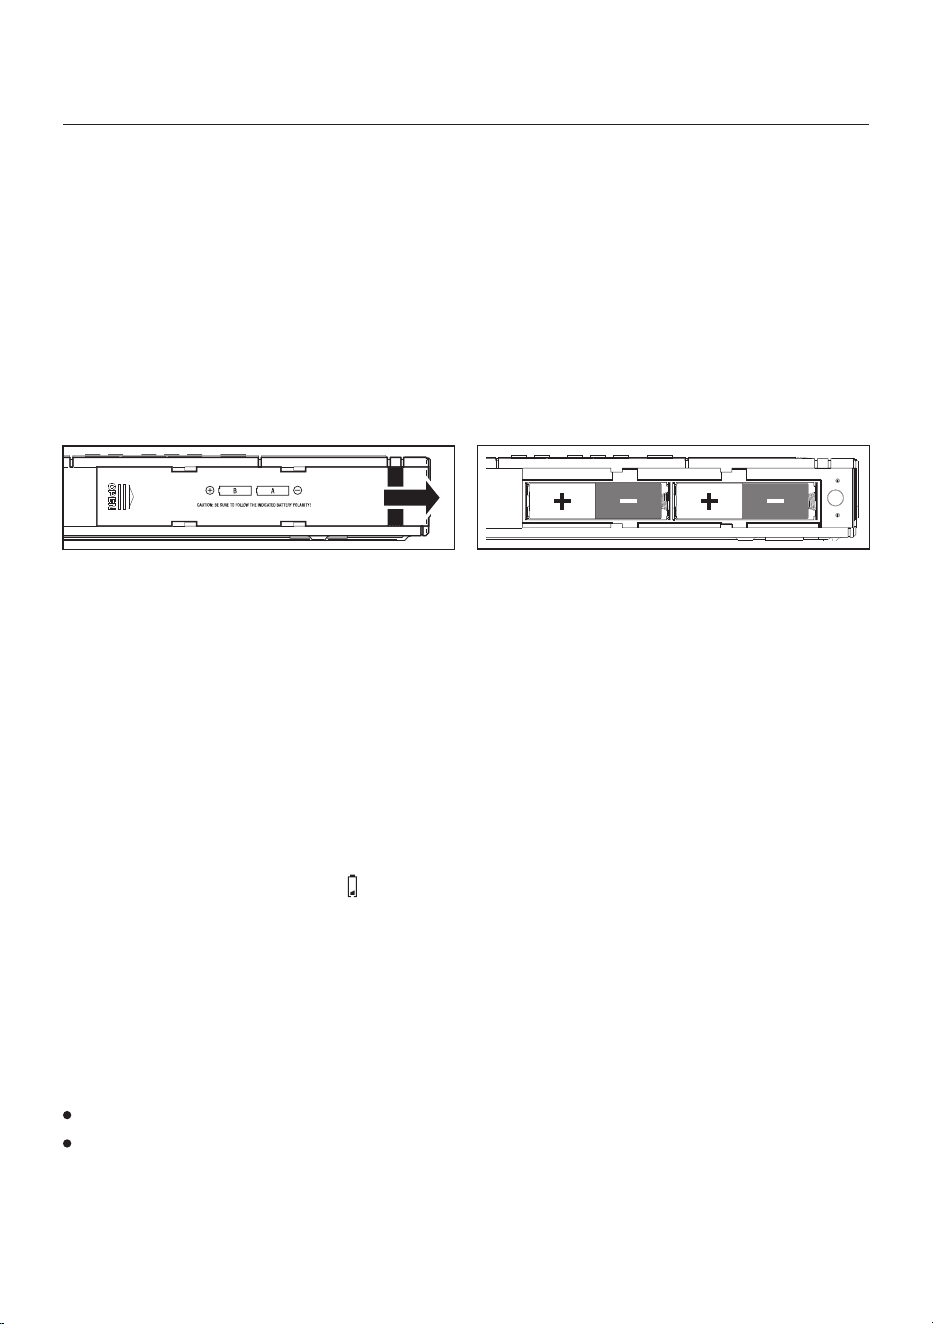
1) Battery powered: Push the battery compartment cover to the right as shown below. Install the battery
following the indicated battery polarity and then place back the cover.
Although the device is powered by only one battery, it has a second compartment to hold a spare battery. Both
compartments can be used to power the device. Use the [ SELECT BATTERY ] switch at the back of the device
to select which battery to use for powering the device.
2) DC powered: When there is no battery inside the radio, connect a DC 5V/1A power adapter to the micro-USB
type-B “CHARGE” socket on the right side of the device.
Note: Connecting an external power supply causes interference when listening to radio frequencies. If
experiencing reception difficulties, disconnect the DC power supply and use a battery instead.
Attention! If you use a power adapter, assure that is appropriately certified and meets the safety standards for
an adapter in your region.
Charging the Battery
When the battery icon is displayed as “ “, this indicates that battery power is about to run out. Please charge it
in time. To charge the 18650 rechargeable lithium (Li-ion) battery, use the [ SELECT BATTERY ] switch at the
back of the device to select which battery to charge. Connect a DC 5V/1A charger to the “CHARGE” socket on
the right side of the device using a micro-USB type-B charging cable. While charging, the charging time is
shown and the charging indicator "Charge" flashes on the display. The charging indicator "Charge" stops
flashing once charging is complete.
Note:
To avoid electrical noise interference, do not to charge the battery and listen to the radio at the same time.
If the device is not used for a prolonged period of time, it is advisable to charge the battery once every
3 months for about 4 hours. This may extend battery life.
7
Setting the Clock (24-hour format):
1) Turn the device off.
2) Press and hold [ TIME ] until the clock time starts flashing.
3) Use the numeric keys to enter the current time (hours + minutes is four digits). Alternatively, rotate the
[ TUNING ] knob to adjust the hour, then rotate the [ FINE TUNING ] knob to adjust the minutes, followed by
a quick press of the [ TIME ] button to confirm the setting.
Tip: With the device on, quick press [ TIME ] to display the current time. Quick press [ TIME ] again to return to
the radio frequency or audio playback display.
Setting the FM Frequency Range
Set the frequency range to correspond with the country in which to use the radio.
1) Turn the device off.
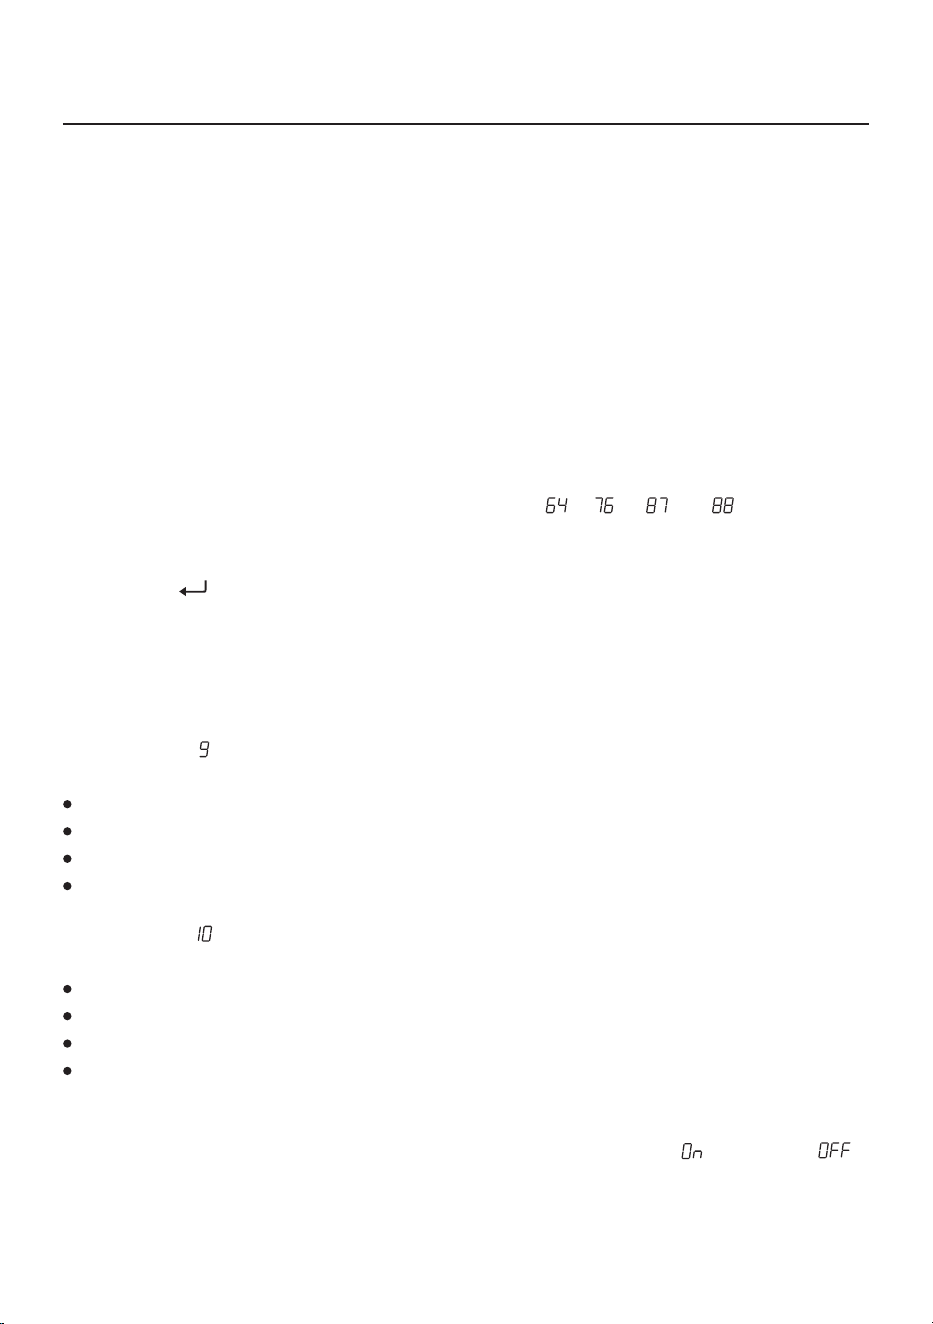
2) Press and hold the [ 1 ] (FM SET) button, the display will show “ ”, “ ”, “ ” or “ ” to indicate the
corresponding range: 64 ~ 108MHz, 76 ~ 108MHz, 87 ~ 108MHz or 87.5 ~ 108MHz.
3) Quick press the [ 1 ] button repeatedly to select an appropriate range.
4) Quick press [ ] (ENTER) to confirm, or wait for 2 seconds for the system to automatically confirm.
Setting the MW Tuning Step and AM (MW/LW/SW) Frequency Range
With the device off, press and hold the [ 3 ] (9/10kHz) button to set the tuning step and frequency range of MW
that corresponds with the country in which to use the radio.
Display indicates “ ”:
MW tuning steps are set to 9 kHz.
MW frequency range is 522 ~ 1620 kHz (for Europe, Africa, Asia, Oceania).
LW frequency range is 50 ~ 522 kHz.
SW frequency range is 1621 ~ 29999 kHz.
Display indicates “ ”:
MW tuning steps are set to 10 kHz.
MW frequency range is 520 ~ 1710 kHz (for North and South America).
LW frequency range is 100 ~ 519 kHz.
SW frequency range is 1711 ~ 29999 kHz.
Enabling/Disabling Longwave (LW)
With the device off, press and hold the [ 2 ] (LW ON/OFF) button, the display shows “ ” (enabled) or “ ”
(disabled). To select the LW frequency band, power on the device and then quick press the [ MW/LW ] button
twice.
USING THE DEVICE
Turning the device on/off: Quick press the red (POWER/SLEEP) button.
Volume control: Rotate the [ VOLUME ] knob upwards or downwards to select your desired volume level.
Note: Volume control on this device is disabled when feeding audio through the [ LINE OUT ] socket.
VF mode
Flashing 2 times
VM mode
Flashing 3 times
(1) LISTENING TO RADIO
VF (View Frequency) and VM (View Memory)
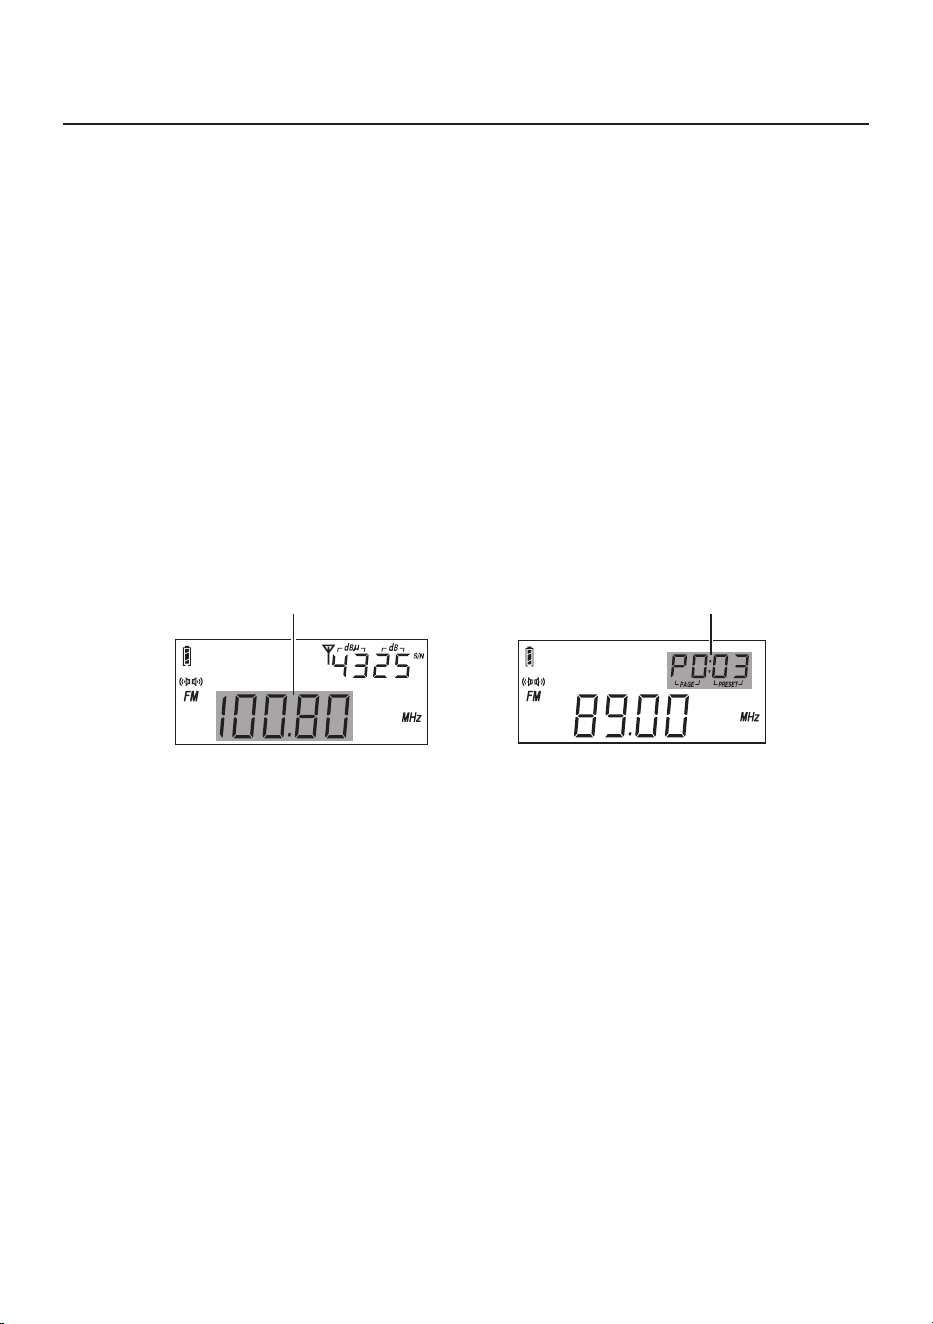
VF: VF mode is used when searching for new radio signals. Quick press the [ VF/VM ] button. When the
frequency indicator flashes, the VF mode is activated.
VM: VM mode is used for recalling stations that have already been stored into the memory. Quick press the
[ VF/VM ] button. When the station memory indicator in the top right corner of the display flashes, the VM mode
is activated.
Note: When the memory contains no stored stations, it is not possible to access VM (View Memory) mode.
8
Using the Radio’s Antennas
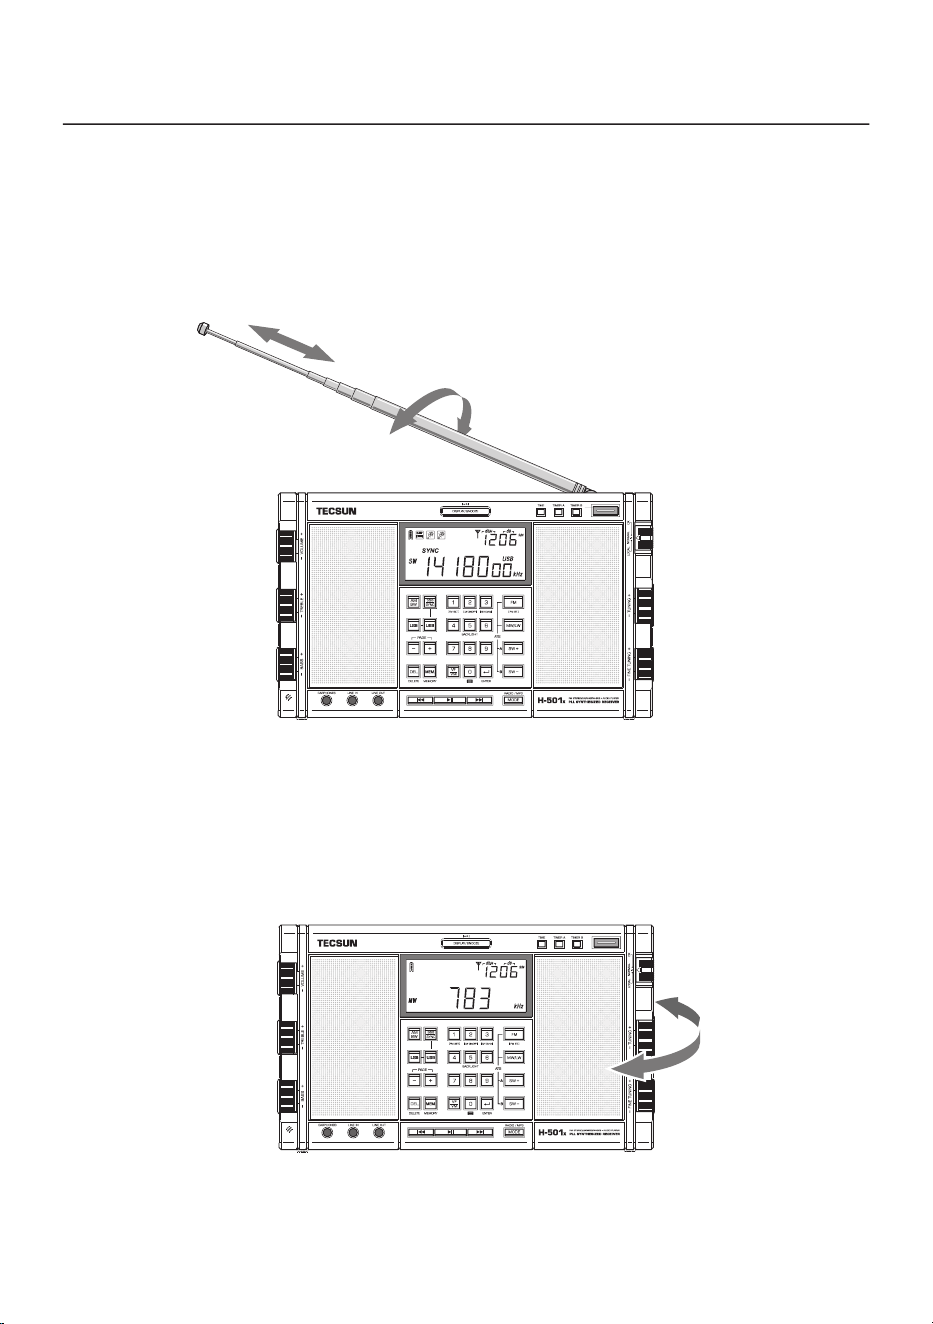
FM / Shortwave (SW):
When listening to FM or shortwave radio, extend the antenna and adjust its length and direction in order to get
the optimum reception.
Medium Wave (MW) / Long Wave (LW):
This radio uses an internal ferrite bar antenna to receive medium wave and long wave broadcasts, the quality of
which can be enhanced by changing the device's position and direction.
9

Turn on the device, then quick press the [ FM ], [ MW/LW ], [ SW + ] or [ SW - ] button to select your desired
frequency band. You can tune into your favorite stations using any of the following tuning methods.
Manual Tuning
In VF mode, rotate the [ TUNING ] and [ FINE TUNING ] knobs to search for your desired stations.
Auto Scan
In VF mode, press and hold the [ VF/VM ] button. The device will automatically scan the entire frequency band
for available stations. When a station is found it will stay there for about 5 seconds before continuing the search.
To stop the auto scan feature, quick press the [ VF/VM ] button or gently rotate the [ TUNING ] knob.
Direct Keypad Entry
In VF mode, quick press the numeric keys [ 0 - 9 ] (followed by [ ]) to directly enter a station frequency.
Notes:
For FM band, ignore the decimal point when inputting frequency numbers. For example: enter 8, 9, 3 for
FM 89.3 MHz.
If the entered frequency is not within the covering range, the error “ Err ” symbol will be displayed
SW / SSB Meter Band Selection
When tuned into a shortwave or SSB frequency, quick press [ SW + ] or [ SW - ] to change the SW or SSB
meter band:
SW meter bands: 120m / 90m / 75m / 60m / 49m / 41m / 31m / 25m / 22m / 19m / 16m / 15m / 13m / 11m
SSB meter bands: 160m / 80m / 60m / 40m / 30m / 24m / 20m / 17m / 15m / 12m / 10m
TUNING INTO STATIONS
10
11
WORKING WITH STATION MEMORIES
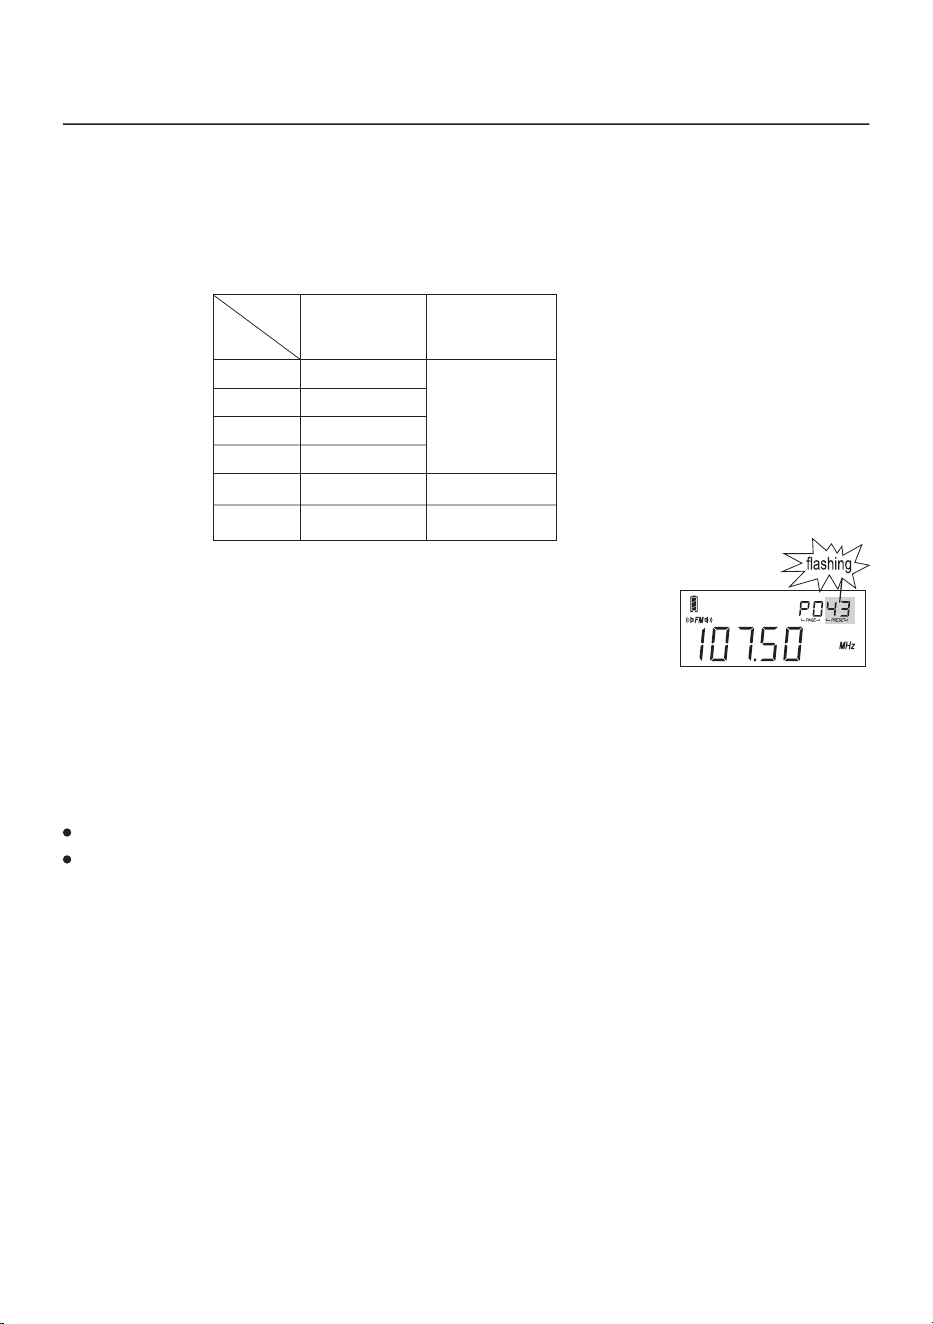
This device can store 3150 stations (presets), separated over 25 memory pages (P0 - P24).
1) Page 0, indicated as “P0” on the display, can store 750 stations: 100 stations each for FM, MW, LW, SSB
and SYNC, and 250 stations for SW.
2) Pages 1-24 (“P1”, “P2”, etc.) can store 100 stations each for FM, MW, LW and SW.
Storing Stations Manually
1) Tune into a radio station.
2) Quick press the memory [ MEM. ] button, “PRESET” flashes and indicates the
first available storage location in the selected memory page. If desired, change
the page and/or preset location by using the [ PAGE - ] or [ PAGE + ] button and/or the [ TUNING ] knob.
3) Quick press the [ MEM. ] button again to confirm or wait for about 3 seconds to automatically store the station
into memory.
Notes:
SSB and SYNC stations are only available for storage in Page 0.
Stored SSB and SYNC station details include USB/LSB and frequency information, but no frequency details
smaller than 1 kHz.
Auto Tuning Storage (ATS)
Automatically tune into and store FM, LW, MW and SW stations.
Operation for FM and MW/LW:
1) Use the [ PAGE - ] or [ PAGE + ] button to select an (empty) memory page.
2) Quick press [ FM ] or [ MW/LW ] to select the frequency band.
3) Press and hold the [ FM ] or [ MW/LW ] button until "PRESET" flashes and the frequency starts running.
4) When the frequency stops running, it means the ATS operation has been completed. Rotate the [ TUNING ]
knob to view all the stored stations.
FM
MW
LW
SW
SSB
Page 0 ( P0 )
100 stations
100 stations
100 stations
250 stations
100 stations
Each memory
page can store
100 stations.
Page 1-24
SYNC
100 stations
X
X

Storing Stations During Auto Scan
To avoid any unwanted stations that might be stored during Auto Tuning Storage (ATS), store stations manually
during “Auto Scan” (see also page 10).
1) Use the [ PAGE - ] or [ PAGE + ] button to select a memory page.
2) Quick press the [ VF/VM ] button.
3) Quick press the [ FM ], [ MW/LW ] or [ SW ] button to select the frequency band.
4) Press and hold the [ VF/VM ] button. The device starts to scan the frequency band for available stations.
5) When a station of your liking is found, quick press the memory [ MEM. ] button to store it; the device
continues to scan for the next available station.
6) To stop the auto scan feature, quick press the [ VF/VM ] button or gently rotate the [ TUNING ] knob.
Auto Sorting Memory
This feature can automatically organize all stations that have been stored into the memory. Turn the device off,
and then press and hold the [ ] (0) button until the memory page number on the display starts running.
Duplicate stations are deleted and the remaining stations are organized:
In memory page P0, stations within a frequency band are sorted in sequence from low to high frequency.
In memory pages P1-24, stations are sorted in sequence of frequency (from low to high), and in sequence of
band: FM, SW, MW, LW.
Operation for SW:
1) Use the [ PAGE - ] or [ PAGE + ] button to select an (empty) memory page.
2) Quick press [ SW+ ] or [ SW- ] to select the SW frequency band.
3) There are two ATS modes for SW:
Mode A: Press and hold the [ SW+ ] button to initiate ATS within the selected meter band.
Mode B: Press and hold the [ SW- ] button to initiate ATS for stations within all meter bands.
Tips:
ATS (except in SW mode B) replaces previously stored radio stations within a memory page. To prevent this
from happening, please select an empty memory page before initiating ATS.
ATS results for LW, MW and SW strongly depend on radio wave propagation conditions, the receiving
environment and other factors. If the results are poor, try to initiate ATS at a different location and/or time, or
tune into stations manually and then store them.
12

LISTENING TO STORED STATIONS
When recalling stored stations or initiating a memory page scan, Page 0 (P0) only shows the stations of the
frequency band (FM/LW/MW/SW) or mode (SYNC/SSB) that was selected when entering the memory (VM).
In Page 1-24 it is not necessary to preselect a frequency band or mode, the device will show stored stations
from all bands within the selected memory page.
Recalling Stored Stations
Operation for memory Page 0:
1) Use the [ PAGE - ] or [ PAGE + ] button to select memory page P0.
2) Select a frequency band (FM, LW, MW, SW) or mode (SYNC, SSB).
3) Quick press the [ VF/VM ] button to enter the VM mode (see also page 8).
4) Rotate the [ TUNING ] knob with some vigor to browse through the station list, or use the numeric keys to
directly enter the preset station number.
Operation for memory Page 1-24:
1) Use the [ PAGE - ] or [ PAGE + ] button to select a memory page.
2) Rotate the [ TUNING ] knob with some vigor to browse through the selected memory page, or use the
numeric keys to directly enter the preset station number.
Memory Page Scan
This device can auto scan all stored stations within a memory page, staying on each station for about 5 seconds.
1) Use the [ PAGE - ] or [ PAGE + ] button to select a memory page.
2) Press and hold the [ VF/VM ] button until “PRESET” flashes in the upper right corner of the display. The
device starts to scan all stored stations within the selected memory page.
3) To stop scanning, quick press the [ VF/VM ] button or gently rotate the [ TUNING ] knob.
13
Deleting Stations During Memory Page Scan
This device can auto scan all stored stations within a memory page, staying on each station for about 5
seconds, and giving you the opportunity to delete any unwanted stations.
1) Use the [ PAGE - ] or [ PAGE + ] button to select the memory page from which to delete stored stations.
2) Press and hold the [ VF/VM ] button to start the memory scan.
3) Upon finding an unwanted station, press the [ DEL. ] button. No confirmation is required and scanning
continues immediately.
4) To stop the memory scan, quick press the [ VF/VM ] button or gently rotate the [ TUNING ] knob.
Deleting All Stored Stations
To delete all stations within a memory page:
1) Select the memory page from which you wish to delete all stored stations.
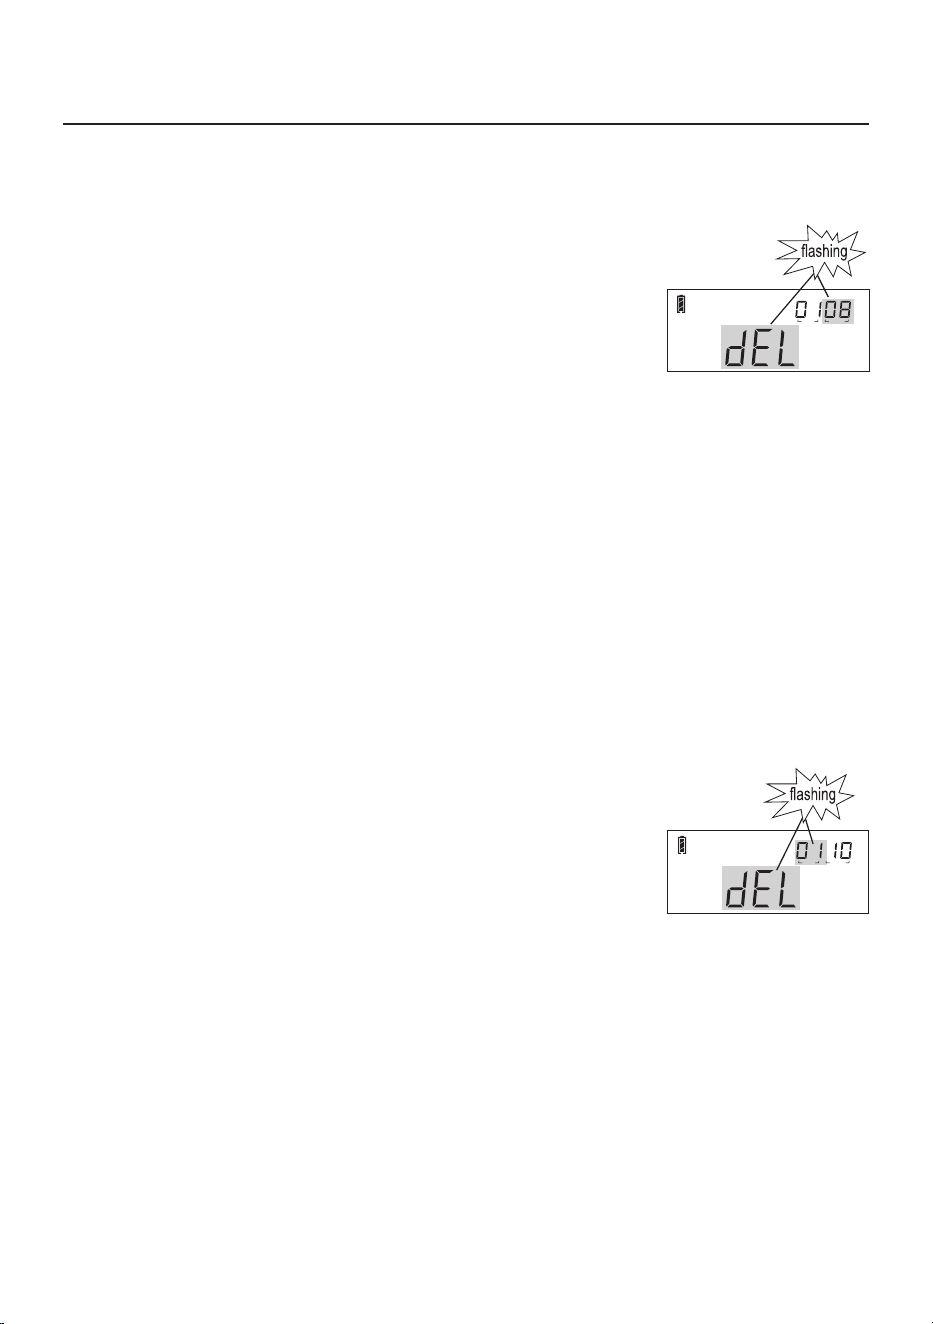
2) Press and hold the [ DEL. ] button until “dEL” and “PAGE” flash on the display.
3) Quick press the [ DEL. ] button again to confirm.
Note: In Page 0, stored stations need to be deleted for each frequency band or
mode (SYNC/SSB) separately.
To delete all stations from the memory:
1) Turn the device off.
2) Press and hold [ DEL. ] untill “dEL” and “ALL” flash on the display.
3) Quick press the red (POWER/SLEEP) button to confirm and delete all stored stations.
Note: If the red (POWER/SLEEP) button is not pressed for confirmation within 3 seconds, the delete function is
exited automatically.
DELETING STORED STATIONS
Deleting a Single Station
1) Enter the memory (VM) mode and select the station that you wish to delete.
2) Press and hold the [ DEL. ] button until “dEL” and “PRESET” flash on the
display.
3) Quick press the [ DEL. ] button to delete the unwanted station.
Note: If the [ DEL. ] button is not pressed for confirmation within 3 seconds,
the delete function is exited automatically.
14
PAGE
PRESET
PAGE
PRESET

Using the (AM) Antenna Gain [ DX/Normal/Local ] Switch
The distance and transmission power of radio stations are not all the same; some received signals will therefore
be strong whereas others are weak. To improve the listening experience, sensitivity can be adjusted with the
[ DX/NORMAL/LOCAL ] switch. When listening to distant and weak signal stations, select “DX” to increase
sensitivity. When listening to strong (local) signals that seem distorted, select “LOCAL” to avoid strong signal
overload blocking.
AM Bandwidth Selection
Quick press [ AM BW ] repeatedly, or press and then rotate the [ FINE TUNING ] knob, to select different
bandwidths to enhance the intelligibility of longwave, medium wave and shortwave signals. Selectable
bandwidths are:
LW/MW: 2.3, 3.5, 5.0 and 9.0kHz.
SW: 2.3, 3.5, 5.0 and 6.0kHz.
SSB: 0.5, 1.2, 2.3, 3.0 and 4.0kHz.
● Wider bandwidth: Has better audio fidelity when receiving strong signals or local stations.
● Narrower bandwidth: Limits interference from adjacent strong signals and background noise, thereby
especially suitable for receiving weak and distant stations.
Single Sideband (SSB)
When receiving longwave, medium wave and shortwave signals, you can activate the SSB mode to receive
particular signals like for example amateur radio communication and Morse Code, but it can also help to
mitigate interference.
Enable/Disable SSB mode: Quick press [ LSB ] (lower sideband) or [ USB ] (upper sideband) to enable the
sideband. Quick press [ SSB/SYNC ] to disable SSB.
Synchronous Detection (SYNC)
When listening to longwave, medium wave and shortwave broadcasts, turning on synchronous detection may
reduce noise interference, eliminate distortion caused by local fading during signal transmission, and suppress
interference caused by adjacent stations.
Enable/Disable SYNC detection:
1) Press and hold [ SSB/SYNC ], the display shows “ SYNC ” and the radio enters the synchronous detection
mode.
2) Quick press [ LSB ] or [ USB ] to select Lower Sideband or Upper Sideband SYNC detection.
3) To disable, quick press [ SSB/SYNC ] and “SYNC” disappears from the display.
Note: Enabling the SYNC detector does not always reduce interference.
15
FM Stereo/Mono Selection
While listening to FM, quick press [ FM ]. If the FM signal is in stereo the “ ” icon is shown on the display.
Quick press [ FM ] again to return to mono listening.
Note: When the FM signal is broadcasted in mono, or if the station is broadcasted in stereo but the signal is
weak, “ ” is not displayed.
Display Mode
When listening to the radio, quick press [ DISPLAY/SNOOZE ] repeatedly to select your preferred display mode.
The top right corner of the display can show the signal strength/signal-to-noise ratio, alarm time “Timer A”,
alarm time “Timer B”, clock time, or the memory location of the frequency (in VM mode only).
16
Play/Pause: Quick press [ ]
Restart track: Quick press [ ]
Previous: Quick press [ ] twice, or rotate the [ TUNING ] knob
downwards.
Next: Quick press [ ], or rotate the [ TUNING ] knob upwards.
(2) AUDIO PLAYER MODE
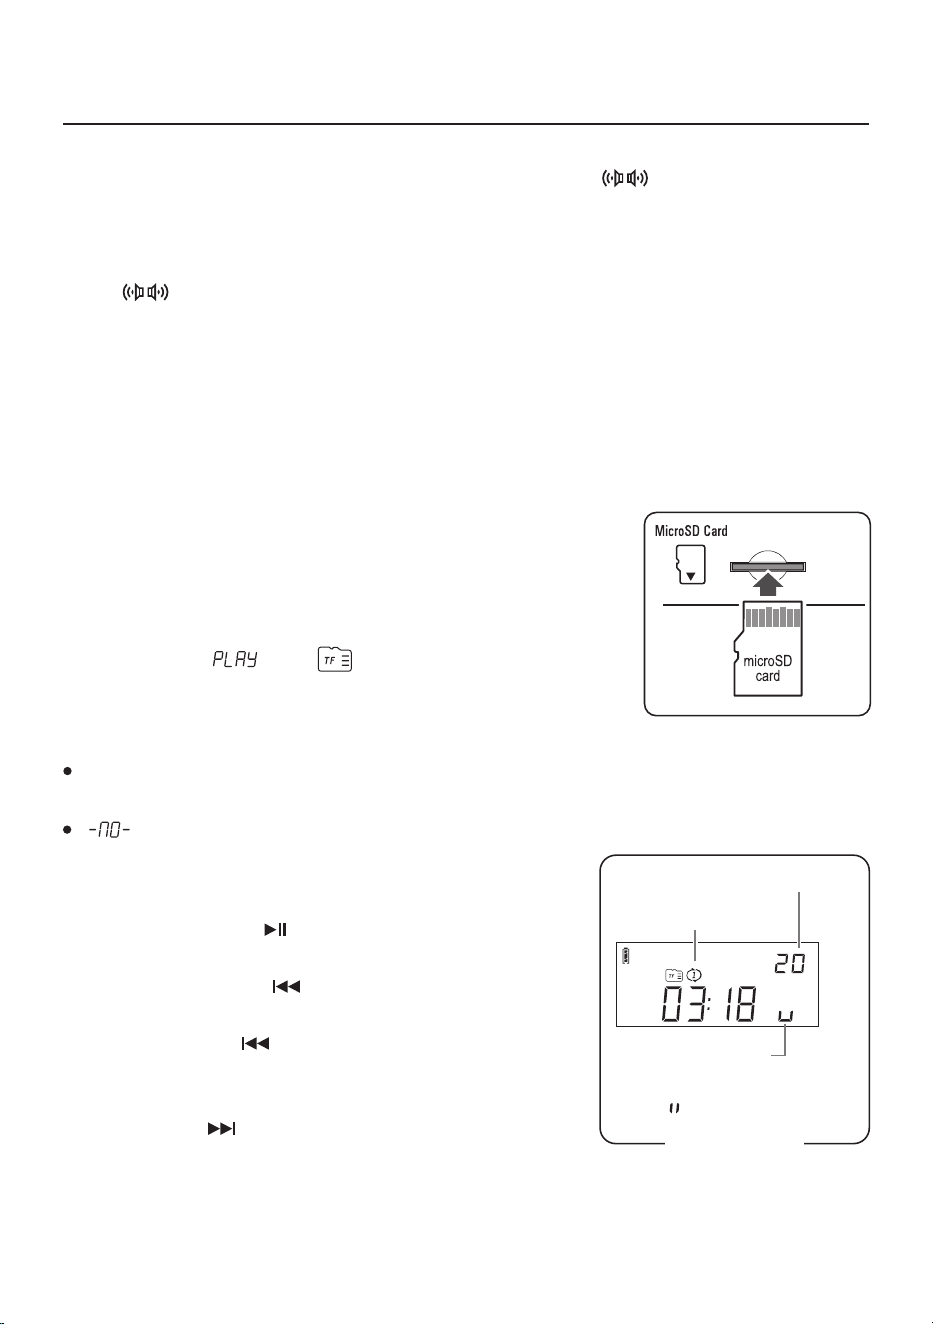
Insert a microSD card with supported audio files into the card slot at the
bottom of the device. Turn the device on. If in radio mode, quick press
[ MODE ] (RADIO / MP3) to enter the audio player mode.
The display shows “ ” and “ ” and audio playback starts
automatically.
Notes:
Supported audio formats: 16bit / 44.1kHz, FLAC / WAV / APE / WMA and MP3.
“ ” is displayed when there is no card inserted, the card is not supported,
or the card does not contain any (supported) files.
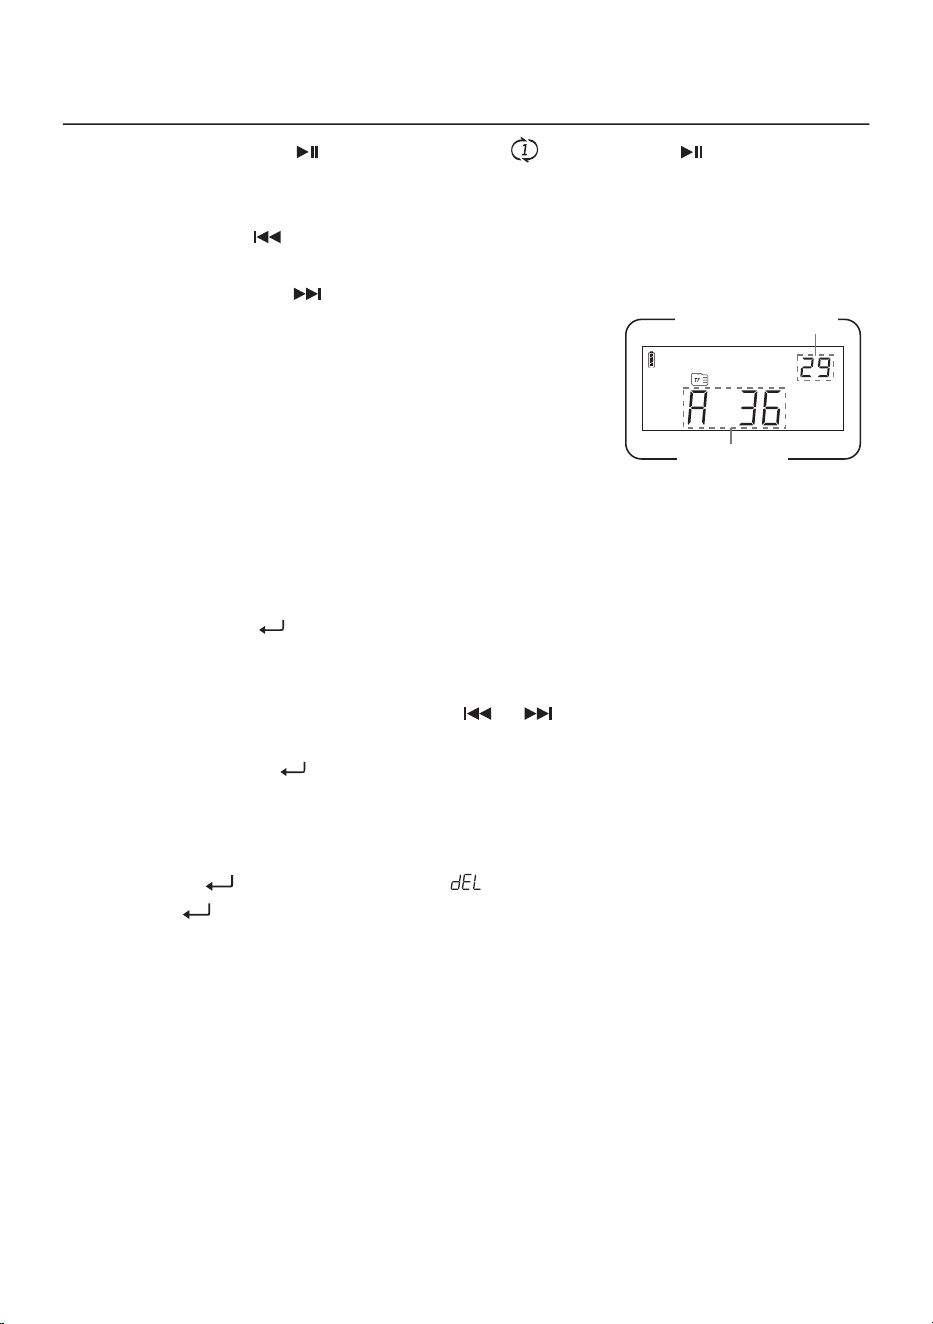
track number
repeat track icon
playback status
- running during playback
- “ “ while paused
playback display
17
Repeat track: Press and hold [ ] until the display shows “ ”. Press and hold [ ] again to resume
normal playback.
Rewind: Press and hold [ ]
Fast forward: Press and hold [ ]
Album Preview
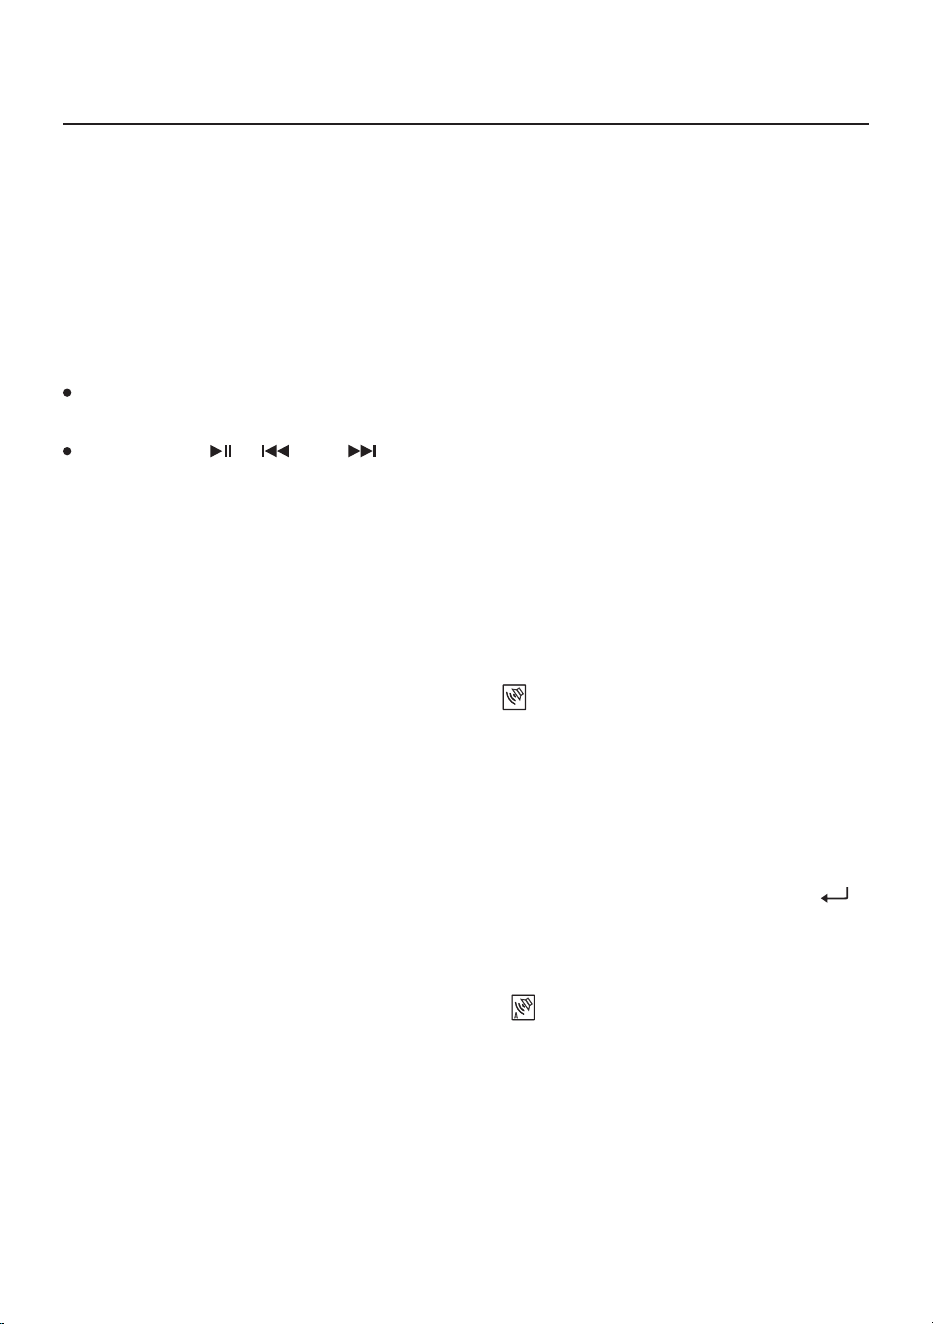
During playback, quick press [ DISPLAY/SNOOZE ] to display the current
album number and the total number of files within the album. Quick press
[ DISPLAY/SNOOZE ] again to display the total number of albums and the
total number of files on the microSD card.
Selecting an Album (folder)
Method 1: Rotate the [ FINE TUNING ] knob.
Method 2: Rotate the [ FINE TUNING ] knob to select the next album, then use the numeric keys to enter an
album number and press [ ] to confirm.
Selecting an Audio Track
Method 1: Rotate the [ TUNING ] knob or quick press [ ] / [ ].
Method 2: Rotate the [ TUNING ] knob to select the next track, then enter the desired audio track number using
the numeric keys and press [ ] to confirm.
Deleting an Audio Track
1) Select the track you want to delete.
2) Press and hold [ ] until the track number and “ ” flash on the display.
3) Quick press [ ] to confirm and deleted the track.
total tracks in album
album number
Album Preview Mode
18
(3) COMPUTER SPEAKER MODE
You can use this device as a speaker for a computer by following the below steps:
1) Turn on the device and quick press [ MODE ] to enter the audio player mode.
2) Connect the digital audio input socket (micro-USB type-B) on the left side of this device to the computer
using a suitable USB data cable.
3) Turn on the audio player of the computer.
Note:
If there is no sound, adjust the sound output settings of your computer, or turn off and restart the computer’s
audio player.
You can use the [ ], [ ] and [ ] buttons to control audio playback, and use the [ VOLUME ],
[ TREBLE ] and [ BASS ] knobs to adjust the audio output.
(4) OTHER SETTINGS AND FEATURES
Activating/Deactivating the Alarm
There are two independently programmable alarms to turn on the device at a specific time. Quick press
[ TIMER A ] or [ TIMER B ] to activate the alarm. The alarm “ ” icon is shown on the display to indicate that
the device will turn on at the preset time. Quick press again to deactivate the alarm setting.
Setting the Alarm Time
1) With the device off, press and hold [ TIMER A ], the alarm time in the upper right corner of the display will
start to flash.
2) While still flashing, use the numeric keys to enter the time (4 digits in total). Alternatively, rotate the
[ TUNING ] knob to adjust the hour and the [ FINE TUNING ] knob to adjust the minutes, followed by [ ]
to confirm. The duration of the alarm now flashes on the display.
3) While still flashing, rotate the [ TUNING ] knob to set the duration after which the device turns off (01 -
60 minutes).
4) Quick press [ TIMER A ] to confirm the setting. The alarm “ ” icon is shown on the display. For setting
[ TIMER B ] you can follow the same steps.
19
Setting the Alarm by Radio or Audio Player
● Alarm by radio
1) Turn on the device, select the station frequency you want to use as the alarm.
2) Quick press [ MEM. ], the memory location will flash.
3) While still flashing, quick press [ TIMER A ] or [ TIMER B ], the alarm “ ” icon starts flashing.
4) While still flashing, quick press [ ], “ ” stops flashing and the setting is complete.
5) Make sure to adjust the volume to an appropriate level.
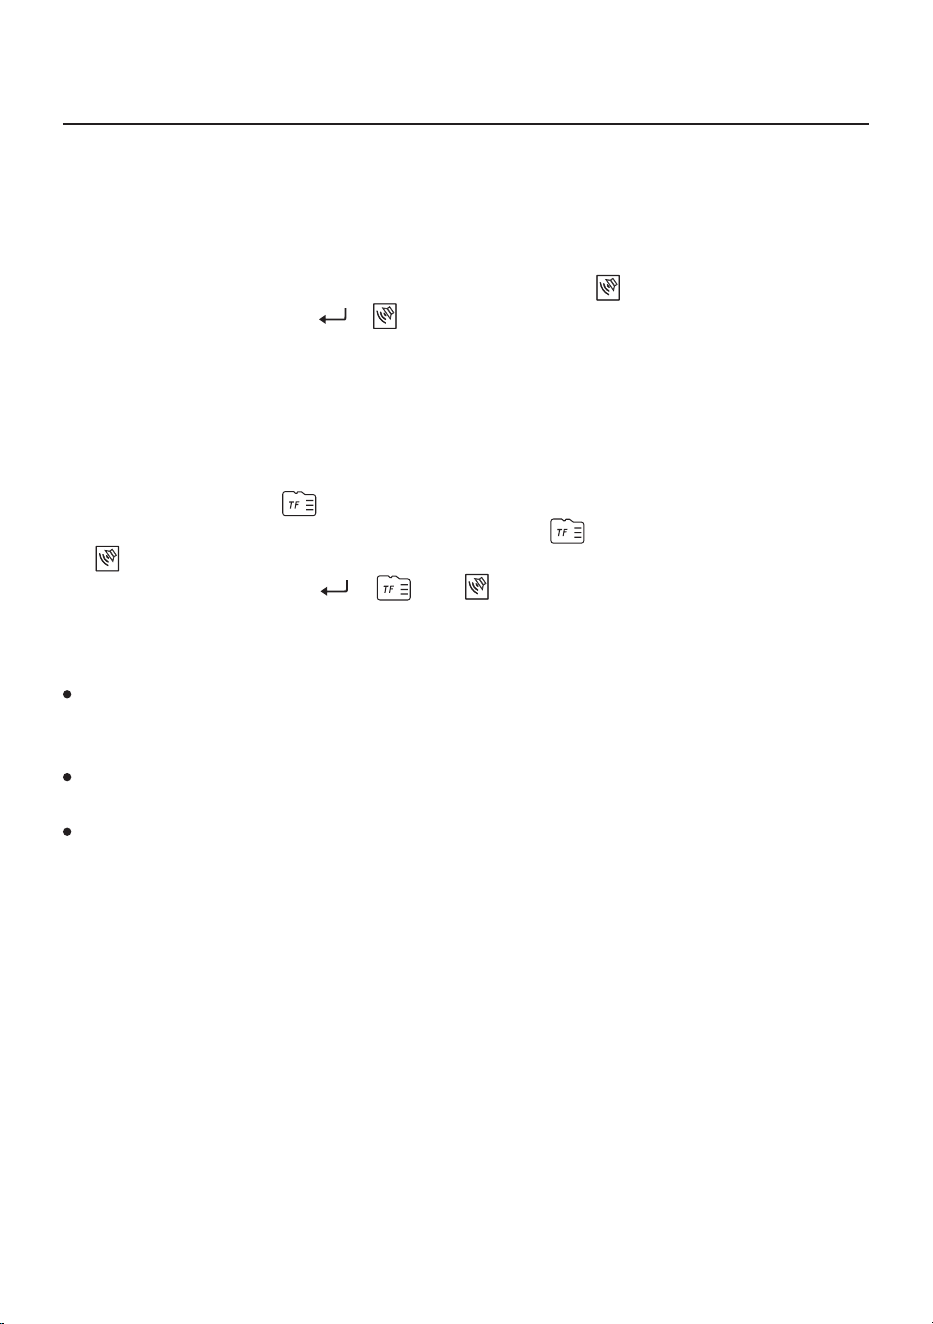
● Alarm by audio player
1) Insert a microSD card containing audio files.
2) Enter the audio player mode and select the audio track you want to use as
the alarm.
3) Quick press [ MEM. ], the “ ” icon starts flashing.
4) While still flashing, quick press [ TIMER A ] or [ TIMER B ], the “ ” and
“ ” icon will flash simultaneously.
5) While still flashing, quick press [ ], “ ” and “ ” stop flashing and the setting is complete.
6) Make sure to adjust the volume to an appropriate level
Tips:
Once the preset alarm time is reached, the radio turns on and stays on for as long as the alarm duration (01 –
60 minutes) was set. To turn off the device during the alarm playtime, quick press the red (POWER/SLEEP)
button twice.
If you wish to change the radio frequency during the alarm playtime, quick press the red (POWER/SLEEP)
button. This will deactivate the alarm after which you can adjust the frequency.
If you wish to choose other audio tracks during the alarm playtime, quick press the red (POWER/SLEEP)
button. This will deactivate the alarm after which you can use the audio player normally.
Snooze Function
When the alarm goes off, press [ DISPLAY/SNOOZE ] to temporarily turn off the alarm. The alarm will go off
again after 5 minutes. To disable this feature while still snoozing, quick press the red (POWER/SLEEP) button.
Display Backlight
With the device on, press and hold the [ 5 ] (BACKLIGHT) button to set your preference:
“ON”: Backlight is set to always-on.
“OFF”: Backlight turns on when a button or tuning knob is operated and turns off after 5 seconds.
20
Setting the Sleep Timer
Use this feature to listen to the radio or audio player and let the device automatically power off after a specified
time.
1) Turn the device off.
2) Press and hold the red (POWER/SLEEP) button to enter the sleep timer setting.
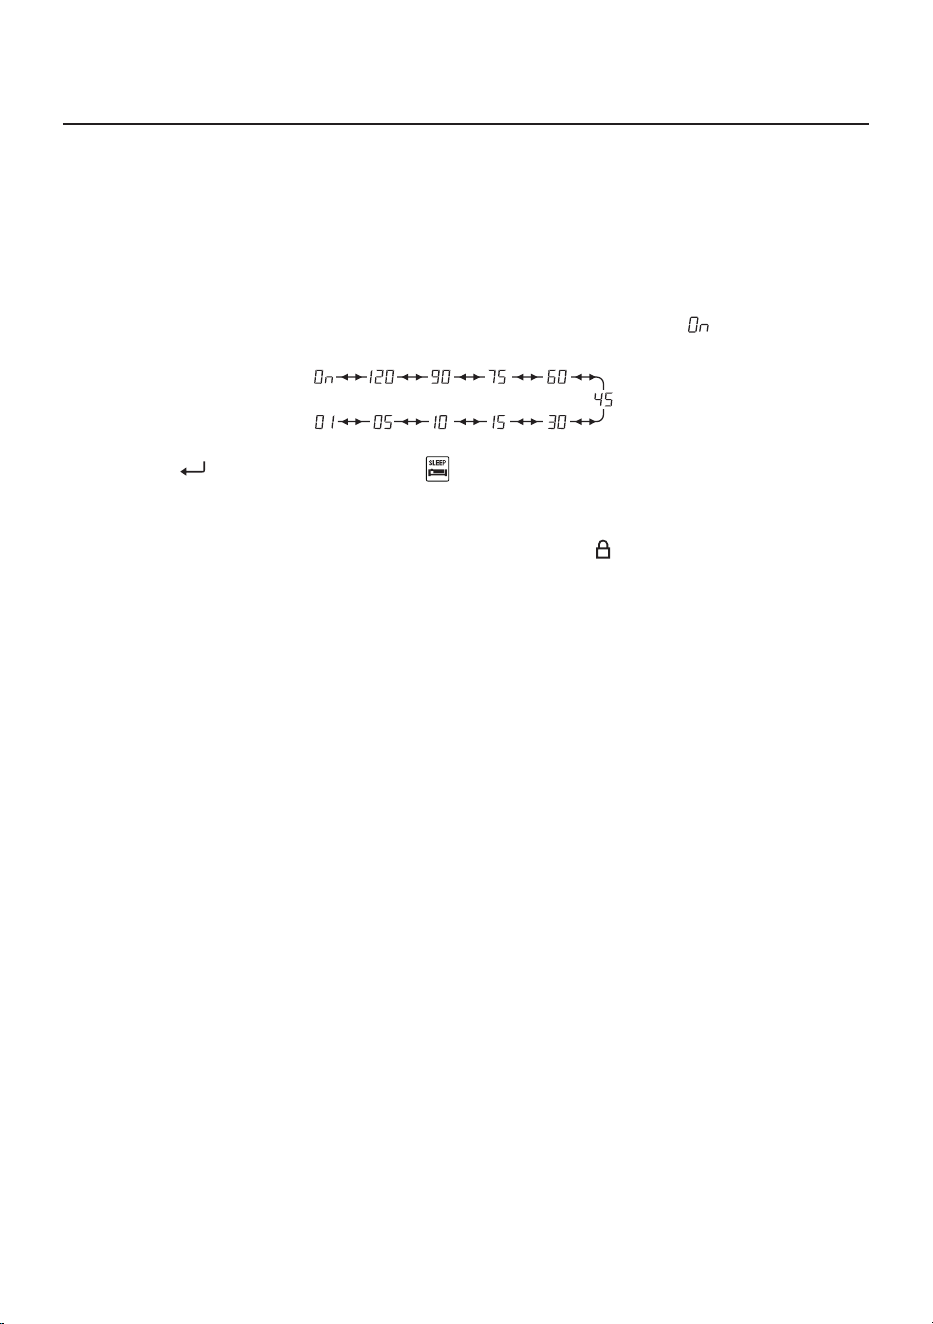
3) Rotate the [ TUNING ] knob to select a power-off timer of 1-120 minutes, or select “ ” to deactivate the
sleep timer.
4) Quick press [ ] to confirm. The sleep timer “ ” icon is shown on the display.
Keylock
To activate the keylock, press and hold [ DISPLAY/SNOOZE ]. The lock “ ” icon is displayed and the buttons,
treble, bass and tuning knobs are disabled. Press and hold [ DISPLAY/SNOOZE ] again to unlock.
Treble & Bass
Use the [ TREBLE ] and [ BASS ] knobs to adjust the treble (higher frequencies) and bass (lower frequencies)
of the speakers’ sound.
Using Headphones
Plug a stereo headphone (below 300Ω) into the [ EARPHONES ] socket.
Stereo Audio Input (Line In)
Use H-501x as a speaker for an external audio source. Use a stereo audio cable with a 3.5 mm (1/8 inch) plug
to connect the [ LINE IN ] socket of H-501x to the audio output socket of the source.
Stereo Audio Output (Line Out)
To feed audio to external amplifiers, amplified speakers or recording equipment. Use a stereo audio cable with
a 3.5 mm (1/8 inch) plug to connect the [ LINE OUT ] socket of H-501x to the audio input socket of the external
device.
Note: Volume, treble and bass control on this device is disabled while feeding audio through the [ LINE OUT ]
socket.
Sleep timer range
21
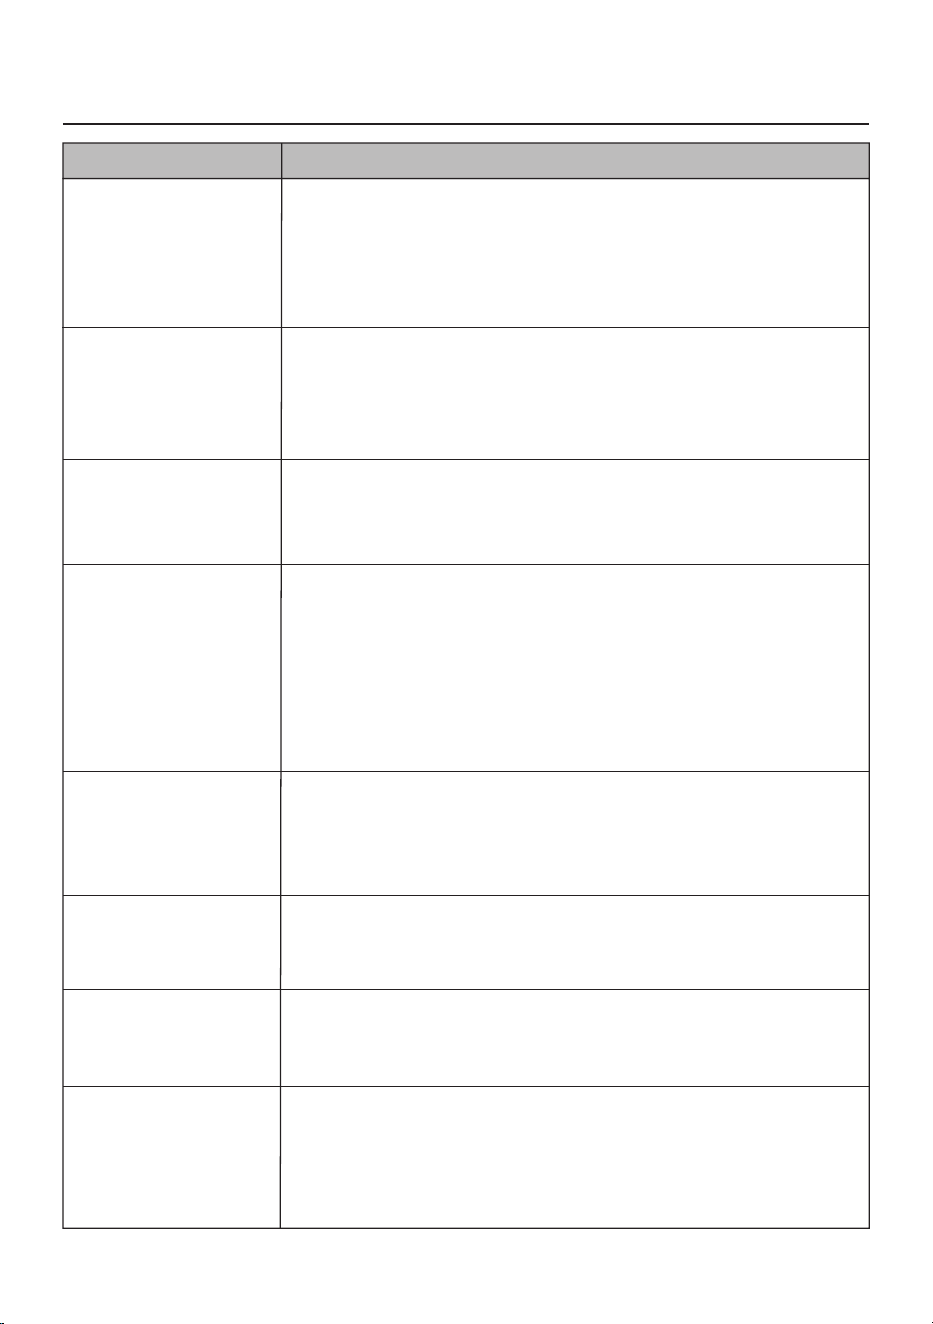
Troubleshooting
ISSUE
POSSIBLE CAUSE / SOLUTION
Unable to charge the
battery
.
Unable to power on the
device.
Radio auto turns of
f
while listening.
ATS skips stations, or
some stored stations
have only noise.
Poor MW (AM) reception
while using in North or
South
America.
Only few FM stations can
be received.
Audio quality is not good
when listening to L
W
,
MW (AM) and SW
.
When the alarm goes off
the radio broadcast is
only noise.
Charging instructions are not followed correctly, or the lithium battery is aging.
● Connect the charger to the “charge” socket on the right side of the device.
● Push the
A-B battery switch in the correct position.
● Replace the battery.
Battery has no power, is installed incorrectly, or the
A-B battery switch is not in
the correct position.
● Replace, charge or reinstall the battery
.
● Push the
A-B battery switch in the correct position.
Battery has no power or the sleep timer is activated.
● Replace or charge the battery.
● Deactivate the sleep timer and turn the radio back on.
The radio signal is too weak, there is strong interference, or MW (AM) tuning
steps are not set accurately
.
● Search and store stations manually
.
● Adjust the length and direction of the antenna or change to a dif
ferent
location and try again.
● The MW tuning steps may have been set incorrectly. Please review page 7
and then try again.
MW (AM) stations are spaced at 10 kHz in the
Americas, the device may be
set to 9 kHz tuning steps.
● Turn off the device, then press and hold the [ 3 ] button to change the MW
tuning step to 10 kHz.
FM frequency range may not be set correctly for your country.
● Find information about the FM frequency coverage in your country
.
Turn of
f
the radio, press and hold the [ 1 ] button to select a suitable range.
The
AM bandwidth is set to a narrow band.
● Press the [
AM BW ] button repeatedly to change to a wider bandwidth.
Alarm preset radio frequency was not properly set, or there are no broadcasts
at that time.
●
Assure that receiving a broadcast is possible at the alarm time and the
location where the device is placed.
● Switch to alarm by audio player instead of radio.
22
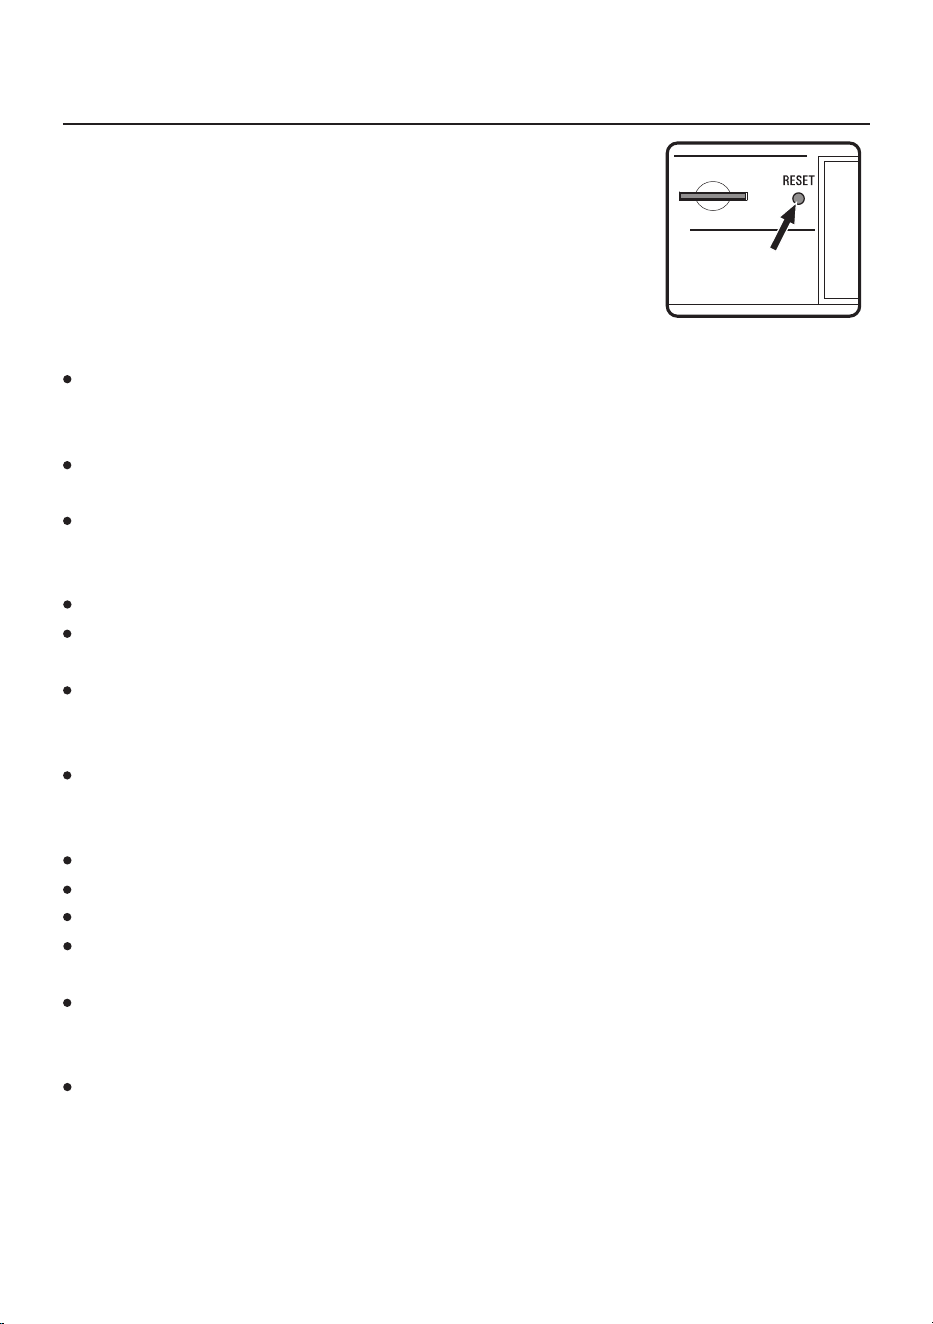
System Reset
This device works on advanced and stable firmware to enhance users'
enjoyment. In the event that a sudden firmware glitch does occur (e.g.
unresponsive or erratic behavior of buttons/knobs, LCD display issues)
press the [ RESET ] button with a pointy object to return to normal
operation; stored stations will not be lost when resetting the firmware.
Maintenance
Keep it dry. Rain, humidity and other types of liquids or moisture can contain minerals that may cause
corrosion to components. If the device does accidentally get wet, remove the battery and wait for the radio to
dry completely before placing it back.
Do not place or store the device in environments above +45°C.
High temperatures can shorten the life span of certain components.
Do not place or store the device in cold environments below -5°C .
Otherwise, once the surrounding temperature rises, internal condensation may develop and damage the
circuit board and LCD display.
Do not drop, hit, or smash the device.
Do not use harsh chemicals, cleaning solvents, or strong detergents to clean the device. Use a clean, soft,
dry cloth to clean the screen.
Do not attempt to disassemble the device to adjust internal parameters.
Lithium Battery Safety Instructions
Improper replacement of the lithium battery may result in an explosion. Replace only with a lithium battery of
the same type or equivalent (the lithium battery used in this device is a 18650 rechargeable lithium battery
with a protection circuit).
Do not charge non-rechargeable batteries.
Do not expose the battery to heat sources (e.g. sunlight, fire), low temperatures, humidity, or high pressure.
Dispose of the battery properly and prevent children from playing with electric currents.
Do not short-circuit or disassemble the battery. If the battery is seriously inflated, please do not continue to
use it.
If not using for an extended period of time, remove the battery and store it in a safe manner. Please use
non-conductive material to wrap the battery in order to avoid direct contact with metal. You can avoid
performance loss by keeping the battery in a cool dry place.
Please consciously abide by aviation regulations; lithium batteries are strictly prohibited from placing into
checked luggage.

H-501x Specifications
23
Station Memory:
Frequency Range:
LW:
MW (AM):
SW:
FM:
Sensitivity:
LW (S/N=26dB)
MW (S/N=26d B )
SW (S/N=26dB )
FM (S/N=30d B )
SSB (S/N=10d B )
Selectivity:
LW/MW
SW
FM
SYNC Lock Range:
S/N Ratio:
LW/MW
SW
FM
3150 in total
50 ~ 522kHz, 9kHz tuning / 1kHz fine-tuning
100 ~ 519kHz, 9kHz tuning / 1kHz fine-tuning
522 ~ 1620kHz, 9kHz tuning / 1kHz fine-tuning
520 ~ 1710kHz, 10kHz tuning / 1kHz fine-tuning
1621 ~ 29999kHz, 5kHz tuning / 1kHz fine-tuning
1711 ~ 29999kHz, 5kHz tuning / 1kHz fine-tuning
(When LW, MW and SW are received in SSB mode,
the tuning step is 1kHz and the fine-tuning step is 10Hz)
64 ~ 108MHz, 100kHz tuning / 10kHz fine-tuning
76 ~ 108MHz, 100kHz tuning / 10kHz fine-tuning
87 ~ 108MHz, 100kHz tuning / 10kHz fine-tuning
87.5 ~ 108MHz, 50kHz tuning / 10kHz fine-tuning
(tuning step is 50kHz only when MW is set to 9kHz tuning)
< 3mV/m
< 1mV/m
< 20μV
< 3μV
< 1μV
> 40dB
> 40dB
> 65dB
+/- 1kHz
> 40dB
> 45dB
> 60dB

24
IF Frequency:
AM:
FM:
FM Stereo Crosstalk:
Output Power:
Quiescent Current:
MW / LW
SW
SSB
FM
Audio Player
Shutdown Current:
MicroSD Card:
Supported Audio:
Speakers:
Headphone Input:
Power Supply:
Charger / Power:
Dimensions:
Weight (excl. battery):
1st IF: 55.845MHz, 2nd IF: 10.7MHz, 3rd IF (DSP): 45kHz
128kHz
33dB
≥ 500mW x 2 (at 10% harmonic distortion)
< 80mA
< 95mA
< 95mA
< 36mA
Approx. 60mA
< 120μA
Max. 128GB
16bit / 44.1kHz; FLAC / WAV / APE / WMA / MP3
6Ω, 3W x 2
3.5mm / < 300Ω
3.7V (18650 Li-ion battery x 1) or external DC 5V
5V 1A, micro-USB type-B socket
277 (W) x 167 (H) x 44 (D) mm
1.1kg
25
MEMORANDUM
26
MEMORANDUM


TECSUN ELECTRONIC IND. LTD.
Address: Unit 11, 13/F, Block A, Hoi Luen Ind. Ctr., 55 Hoi Yuen Road,
Kwun Tong, Kowloon, Hong Kong.
E-mail: [email protected]
Website: www.tecsun.com.cn www.tecsun-audio.com
V041120