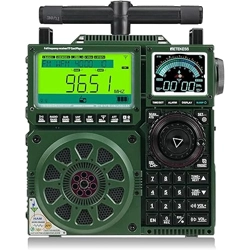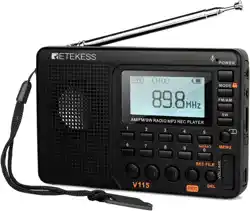
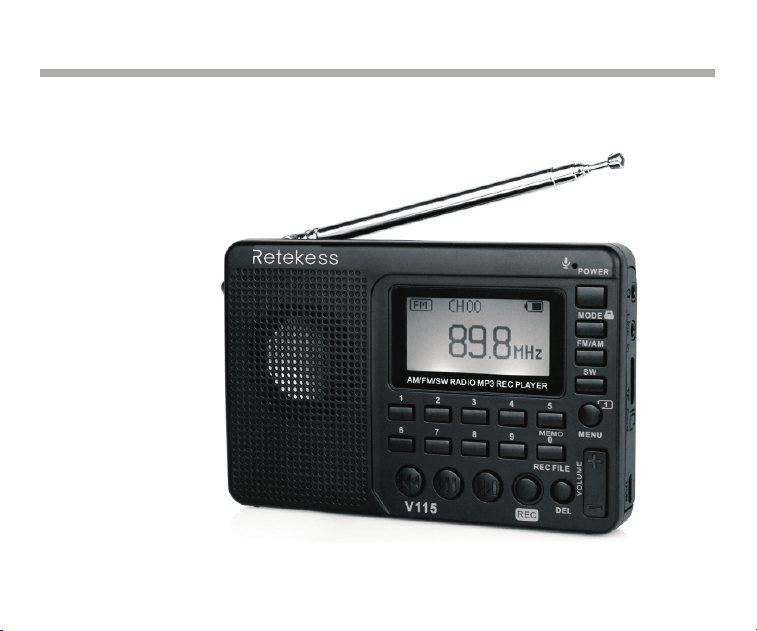
RETEKESS V115 AM/FM/SW FULL BAND STEREO RADIO RECORDER
Henan Eshow Electronic Commerce Co.,Ltd
EN User's manual
DE Bedienungsanleitung
FR Mode d'emploi
ES Instrucción manual
IT Manuale d'istruzioni
EU Importer:
Name:Germany Retevis Technology GmbH
Address:Uetzenacker 29,38176 wendeburg

CONTENTS
Screen Display
Diagram Location of Controls
Introduction
Battery Power Supply
Radio Operation
Music Play Operation
Recording Operation
System Setup
Trouble Shooting
Specification
Caution
……………………………..02
…..……..…03
…………………………………04
…............…………05
……………………………06
………………………08
………………………09
………………………….……11
………………………..…12
..…………………..…........…13
…………………………..…........…13

RETEKESS V115 AM/FM/SW FULL BAND STEREO RADIO RECORDER
Thank you for purchasing the RETEKESS V115. Please read the manual thoroughly
before operating and keep this book in a safe place for future reference.
Precautions
Before using this pocket-sized radio recorder, be sure to follow the basis safety tips to
guarantee safe and liable use of the product.
Read and understand all safety guidelines and use information.
Recommended to use the original lithium battery.
Please Use the charging device with the output voltage 5V, 500mA-1000A to avoid damaging the
lithium battery and device.
If the lithium battery will not be used for an extended period of time, please remove it, store it
separately, and remember to charge it once a month.
Do not allow the radio to come into direct contact with rain, moisture, or any liquid drops.
Avoid direct heat sources. Do not bake or blow dry the product.
Do not expose the device to direct sunshine for an extended period of time.
Do not drop the product or applying heavy pressure.
Included items: V115, Lithium battery, USB cable, Operational manual
01
定时关机
中文
English
对比调节
背光时间
录音设置
AM 步进设置
返回主界面
语言选择
Espanol
Auto power
Contrast
Back light time
Language
Record set
AM Stepping set
Back
Off Time
Contraste
Tiempo brillante
Idioma
Record set
AM Stepping set
Espada
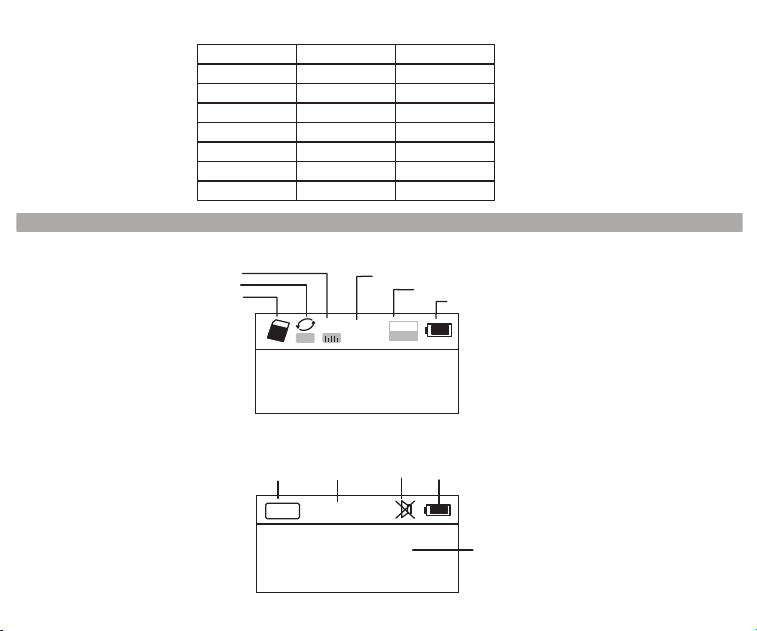
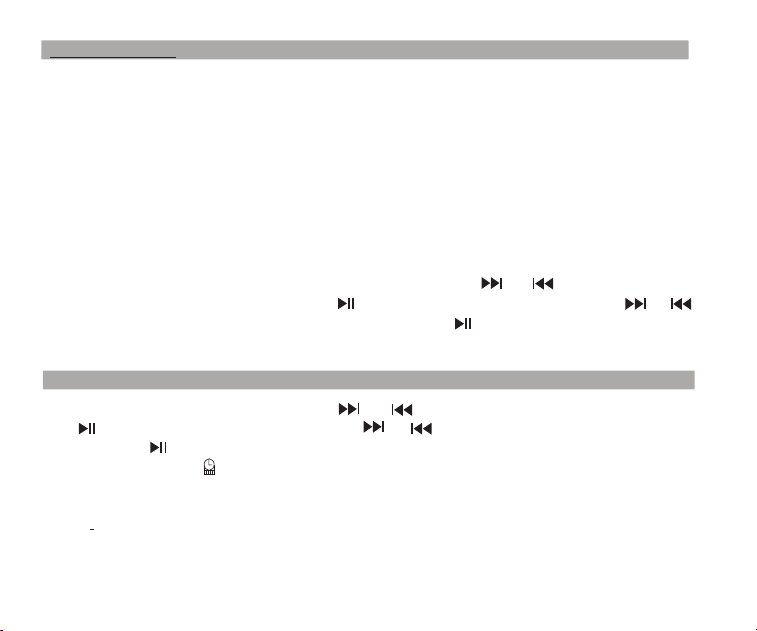
Screen Display
A
NOR
02:12
18:06
128
MP3
Sound Effect mode
Repeat mode
Insert TF card
Time lapsed of the current music
Format of the song file
Battery power
Song name and
synchronic lyric displayed
Displaying on TF Music Play Screen
Displaying on the Radio Screen
FM
88.6
MH
Z
CH07
Radio band
Current radio
station saved
Mute
Battery power
Frequency of the
radio station
02
System Menu
RETEKESS V115 AM/FM/SW FULL BAND STEREO RADIO RECORDER
Thank you for purchasing the RETEKESS V115. Please read the manual thoroughly
before operating and keep this book in a safe place for future reference.
Precautions
Before using this pocket-sized radio recorder, be sure to follow the basis safety tips to
guarantee safe and liable use of the product.
Read and understand all safety guidelines and use information.
Recommended to use the original lithium battery.
Please Use the charging device with the output voltage 5V, 500mA-1000A to avoid damaging the
lithium battery and device.
If the lithium battery will not be used for an extended period of time, please remove it, store it
separately, and remember to charge it once a month.
Do not allow the radio to come into direct contact with rain, moisture, or any liquid drops.
Avoid direct heat sources. Do not bake or blow dry the product.
Do not expose the device to direct sunshine for an extended period of time.
Do not drop the product or applying heavy pressure.
Included items: V115, Lithium battery, USB cable, Operational manual
01
定时关机
中文
English
对比调节
背光时间
录音设置
AM 步进设置
返回主界面
语言选择
Espanol
Auto power
Contrast
Back light time
Language
Record set
AM Stepping set
Back
Off Time
Contraste
Tiempo brillante
Idioma
Record set
AM Stepping set
Espada
Screen Display
A
NOR
02:12
18:06
128
MP3
Sound Effect mode
Repeat mode
Insert TF card
Time lapsed of the current music
Format of the song file
Battery power
Song name and
synchronic lyric displayed
Displaying on TF Music Play Screen
Displaying on the Radio Screen
FM
88.6
MH
Z
CH07
Radio band
Current radio
station saved
Mute
Battery power
Frequency of the
radio station
02
System Menu
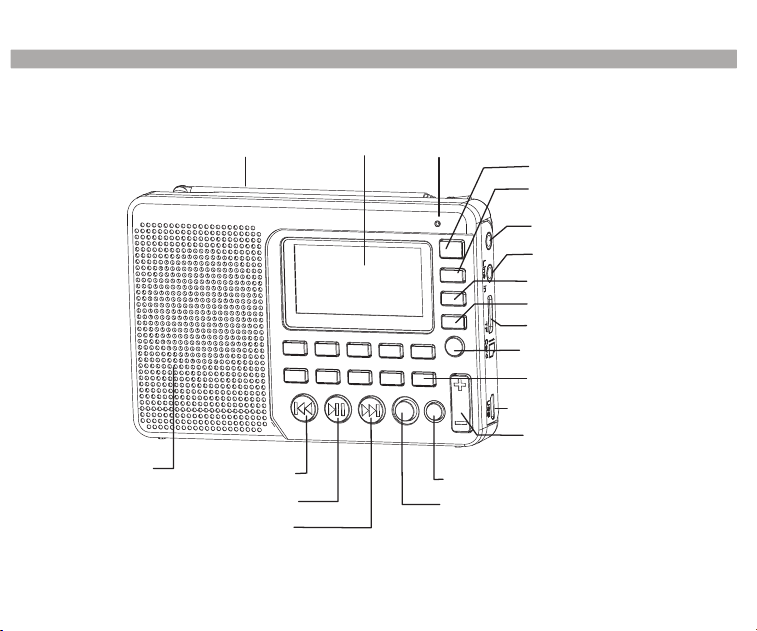
Display
MIC
Power switch
Earphone jack
Audio input interface
MODE key
AM/FM band key
SW band key
TF card slot
REPEAT/ System setup
Long press to invoke
recording
USB/ Charging interface
Volume key
DEL (Delete) key
Next key
Play/ Pause key
Previous key
Speaker
REC (Recording) key
Fm/sw antenna
Diagram Location of Controls
03
AM/FM/SW Pocket-sized Full Band Radio Recorder is an integrated digital electric tuning
radio that can play MP3 and WMA files, Multilingual menu operation, that display lyric
synchronously, supports MIC Recording, Radio Recording, LINE IN Recording, and stereo
earphone output, with a rechargeable lithium battery (battery can be replaceabled with a
larger capacity BL-5C battery to achieve longer playtime).
Introduction
Definition of key operations
There are 3 operation ways of pressing the keys: short press, long press and hold on. Unless
expressly stated all the operations are short press.
Short press: press the key once, and the function starts to work.
Long press: press and hold for more than 1.2 seconds and the function starts to work, and
works only one time.
Hold on: press the key and hold on till stop, the function works several times in a certain
frequency, such as fast forward/backward.
Battery Power Supply
Install/Replace
1. Open the battery cover.
2. Insert the lithium battery according to the polarity indicated.
3. Close the battery cover.
4. Prior to using for the first time charge the lithium battery for 6 hours. After the first charge,
charge time should be about 4 hours.
5. Recommend: use the 5V, 500mA charger provided.
the battery:
04
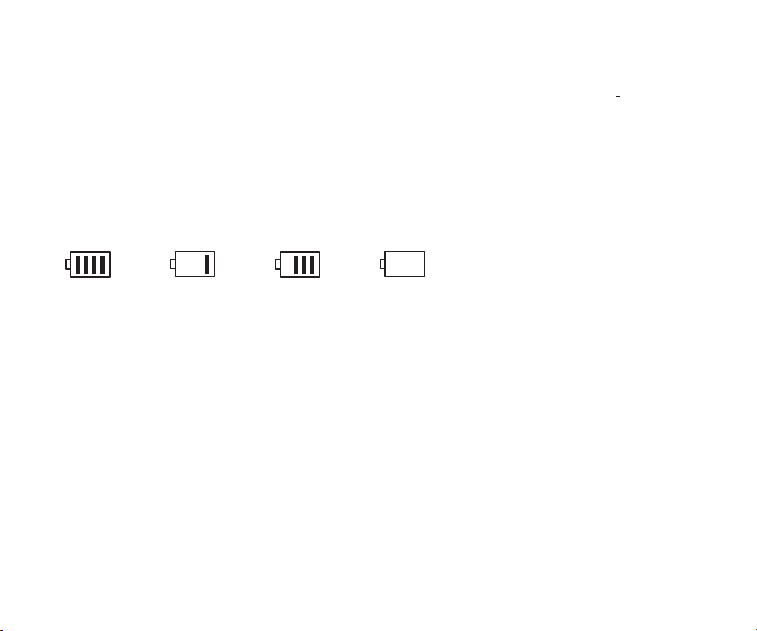
Battery Consumption indicator:
1.Full
3.Low
2.Medium
4.Exhausted
Suggested to continue to charge for 1-2 hours to guarantee the lithium battery reaches the
maximum charging capacity.
6. In normal cases, before charging the battery, please make sure the product is in the radio OFF
mode. During charging the LCD displays the "Charging Screen". The flashing battery power
icon indicates that the charging is in progress. When the battery is fully charged, the battery
power icon will not flash and will show full battery power. At this moment, it is
Charging the Lithium Battery:
1. External Adapter (not included). Please use a matched adapter (5V DC/500mA, USB port) to
charge the radio.
2. Install the lithium battery.
3. To charge the battery, connect the Micro-USB cable to the radio, the other end to a USB
adapter.
4. While charging, the battery symbol shown on the displaymoves from right to left, and stops
when the battery is full charged. Then disconnect the radio and the adapter.
05
Note: When charging, alternating current can interfere with receive radio signals, so it is not
recommended to use the radio when charging.
Do not use AC adapter or computer to power the radio to play music or listen to the radio when
the battery is unloaded.
Please unload the battery or fully charge it once in 2 months if the radio is not used for a long
time.
Charged by PC:
1. Connect the radio to the computer with the provided USB cable.
2. While charging, the battery symbol shown on the display moves from right to left.
3. The battery symbol stops moving when the battery is full charged.
Power on/off radio:
1. Long press the Power button to turn on the device.
2. Extend the antenna.
3. Press the AM/FM or SW key to select the band.
4. Long press the Power button again to turn off the device.
Automatically search and store Station:
In the radio mode, long press the key to enter Automatic search and store Stations. The
available stations have been automatically numbered and stored from low to high frequencies.
When stations have finished storing, press the or key to invoke the radio stations
stored and begin listen. If any interfering radio station is saved automatically, long press the DEL
key to delete it.
Radio Operation
06

To save a radio station manually:
A. In radio mode, long press the or key to search radio stations forward or backward.
When a radio station is received, the search will stop and the radio station received will begin to
play.
B. Directly input the frequency of a radio station: For example, the frequency of the radio station
is 88.5MHz. Press the number keys 8, 8 and 5, then press the key to confirm the input. The
radio will jump to 88.5MHz.
*AM: the numbers that are 522+Multiples of 9 are valid; for North America 520+ Multiples of 10
are valid
C. Shortwave Operation: Press the SW key to invoke metric waves in order:
60m (4.750MHz), 49m (5.950MHz), 41m (7.100MHz)
31m (9.500MHz), 25m (11.650MHz), 22m (13.600MHz)19m (15.100MHz), 16m
(17.500MHz), 13m (21.45MHz)
After selecting a metric wave, long press the key to search radio stations.
Invoke a radio station with the method described in the following A, B or C, and long press the
MEMO "5" key, when the "CH00" flashing on the display, press the numeric keys to enter the
location of the storage station, and press the "PLAY" button, the screen prompts to save, then
press the "PLAY" button again to confirm can be stored in the specified location.
Note: There is a limit on the number of preset stations in each band. (FM: 80 presets, MW: 60
prestes, SW: 300 presets)
07
AM Stepping set:
In the AM radio mode, long press MENU key to the system main menu, press or key,
to select AM Stepping submenu choose step 9 KHz or 10 KHz (North America), Press the
key to confirm.
To delete a radio station:
Invoke a radio station and long press the DEL key, the display will display radio station deletion
confirmation. Press the key to confirm the deletion of the current radio station.
* If the above operation is not finished within 5 seconds, the system will return to the radio
mode.
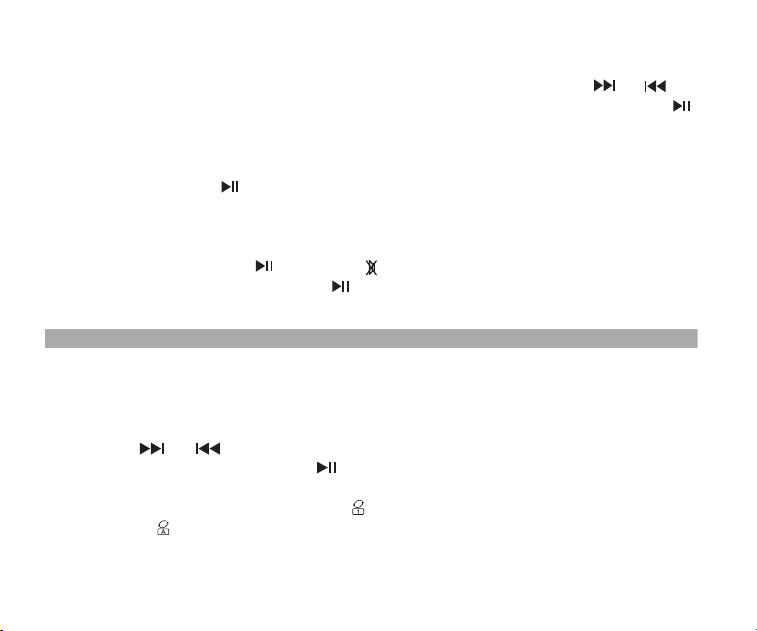
To mute the radio:
In the radio mode, press the key and the icon will flash on the screen, which indicates
the radio is in the mute mode. Press the key again to deactivate mute.
1. Correctly insert the music TF card in MP3 or WMA format.
2. Press the Power key to turn on the device.
3. Press the MODE key to enter the play mode. The screen will display the music name, format,
time lapsed, etc.
4. Press the or key to select the next or previous song or press the numeric keys to
select a song, and then Press the key to confirm the selection. The radio will directly
jump to the song number to play the corresponding song.
5. Press the Repeat key to repeat a song ( indicates repeating a song) or repeat all songs
in order ( indicates repeating all songs).
Music Play Operation
08
To save a radio station manually:
A. In radio mode, long press the or key to search radio stations forward or backward.
When a radio station is received, the search will stop and the radio station received will begin to
play.
B. Directly input the frequency of a radio station: For example, the frequency of the radio station
is 88.5MHz. Press the number keys 8, 8 and 5, then press the key to confirm the input. The
radio will jump to 88.5MHz.
*AM: the numbers that are 522+Multiples of 9 are valid; for North America 520+ Multiples of 10
are valid
C. Shortwave Operation: Press the SW key to invoke metric waves in order:
60m (4.750MHz), 49m (5.950MHz), 41m (7.100MHz)
31m (9.500MHz), 25m (11.650MHz), 22m (13.600MHz)19m (15.100MHz), 16m
(17.500MHz), 13m (21.45MHz)
After selecting a metric wave, long press the key to search radio stations.
Invoke a radio station with the method described in the following A, B or C, and long press the
MEMO "5" key, when the "CH00" flashing on the display, press the numeric keys to enter the
location of the storage station, and press the "PLAY" button, the screen prompts to save, then
press the "PLAY" button again to confirm can be stored in the specified location.
Note: There is a limit on the number of preset stations in each band. (FM: 80 presets, MW: 60
prestes, SW: 300 presets)
07
AM Stepping set:
In the AM radio mode, long press MENU key to the system main menu, press or key,
to select AM Stepping submenu choose step 9 KHz or 10 KHz (North America), Press the
key to confirm.
To delete a radio station:
Invoke a radio station and long press the DEL key, the display will display radio station deletion
confirmation. Press the key to confirm the deletion of the current radio station.
* If the above operation is not finished within 5 seconds, the system will return to the radio
mode.
To mute the radio:
In the radio mode, press the key and the icon will flash on the screen, which indicates
the radio is in the mute mode. Press the key again to deactivate mute.
1. Correctly insert the music TF card in MP3 or WMA format.
2. Press the Power key to turn on the device.
3. Press the MODE key to enter the play mode. The screen will display the music name, format,
time lapsed, etc.
4. Press the or key to select the next or previous song or press the numeric keys to
select a song, and then Press the key to confirm the selection. The radio will directly
jump to the song number to play the corresponding song.
5. Press the Repeat key to repeat a song ( indicates repeating a song) or repeat all songs
in order ( indicates repeating all songs).
Music Play Operation
08
Play Setup:
*This has been set in the factory. It is not recommended to set it again.
1. In the play mode, long press the key to enter the main screen of Play.
A. Main Directory (Select this item to select the songs in the folders under the directory)
B. Play Mode: Repeat All, Repeat One, Repeat Directory (select this option to play the songs in
the selected folder only)
C. Sound effect (NATURAL, POP, ROCK, JAZZ, COUNTRY, HEAVY BASS)
D. Return to the main screen
2. Press the or key to select the sub-menu and press the key to enter the sub-
menu. Press the or key to select the corresponding sub-item and press the key to
confirm the selection. The setup will be successful and the system will exit the setup mode.
Computer Data Transmission:
Turn on the device, and connect to the computer with the Micro USB cable. Press any key of
the device and the computer will install the driver software automatically. The screen of the
device will display the computer connected icon to indicate the connection is successful. Here
the computer can read, copy, and delete the files in the TF card in the device (can be used as a
card reader) and can also be used as an external USB speaker of the computer. (Certain
computers of different configuration may not be compatible)
MIC Recording:
Insert the TF card and turn on the device. Press the MODE key to enter the play mode. Long
press the REC key to enter the MIC recording mode. During recording press the REC key to
finish and exit the recording mode.
LINE IN Recording:
Connect the external audio cable ("Line in" is identified automatically) Make sure an external
song is being played. Adjust the volume of the external audio and long press the
Recording Operation
09
REC key to enter "LINE IN Recording". During recording press the REC key to finish and exit.
Radio Recording:
Press the FM key to enter the radio mode and adjust the radio station. Long press the REC key
to enter the radio recording mode. During recording, Press key can Pause recording, Press
- key again can Resume recording. Press the REC key to finish the recording and exit the
recording mode.
*In the recording mode the volume is locked at the level set before recording. If you press the
Volume key the volume will not be changed.
Recording File Invoking Operation:
Long press the REC FILE"0" key to invoke recording file. Press the or key to select
the recording file to be played. The file name "MIC" indicates a MIC Recording file; "LIN"
indicates a LINE I n Recording file; "RAD" indicates a Radio Recording file.
Recording File Deletion Operation:
Long press the REC FILE "0"key to invoke a recording file. Press the or key to select the
recording file to be deleted. Long press the"DEL "key and the screen will pop up "Are you sure
to delete the file" Press the key to delete the recording file.
Key Locking Operation:
Long press the MODE key, the lock icon will appear on the screen, which indicates the system
has entered the keys locked mode. If you press other keys they will not function and the lock
icon will appear on the screen. Long press the MODE key and the unlock icon will appear on the
screen, which indicates the keys have been unlocked.
10
1. Long press the MENU key to enter the System Setup screen
(The system will return to the main screen automatically if no operation within 5 seconds.)
System Screen: a. Auto power (the time of automatic shutdown can be set to 0-90 min)
b. Contrast (the contrast ratio of the screen can be set to 1-15 level)
c. Back light Time (the back light can be set to Normal ON, OFF or a duration)
d. Language (Chinese/English/Spanish)
e. Record set (compression ratio: Simple record 64kbps / Quality record 96 kbps / Super
record 128kbps )
f. Back (Return to the main screen)
Note: For the convenience of customers use, the machine default language setting is English
2. After the system enters the System Setup screen, press the or key to select the
corresponding sub-item and press the key to enter the sub-menu. Press the or
key to select the corresponding sub-item and press the key to confirm the selection to
finish the setup.
System Setup
Enter the system setup screen, press the or key to select "Auto Power" and press
the. key to enter the sub-item. Press the or key to set the time (00-90 minutes)
and press The key to confirm the setup. When the sleep shutdown is successfully set the
timing shutdown icon will appear on the screen, which indicates the system has entered
the timing shutdown mode. The timer will begin countdown till the time set arrives and then the
device will shut down automatically. When the time is set to 00 or when you turn off the power
switch, the sleep shutdown function will be canceled.
Sleep Shutdown Setup Operation
11
3. Q: Speaker does not sound.
A: Check if the volume level is too low, turn it up.
4. Q: Can not play audio from the Micro SD(TF) card or USB drive.
A: Check if the card or the USB drive has poor compatibility, try another card or USB drive. The
files are damaged or with incorrect format, delete the file and try again.
5. Q: Can not charge the radio.
A: Check if the external adapter or the USB cable was connected correctly.
Check if the adapter or USB cable is damaged.
6: Q: Why the radio sound out of the speaker, when using ear buds?
A: Because the ear buds have MIC function, in fact, this radio can't work with the ear buds
which have MIC function.
So you can try a ear buds without MIC function, if still can't solve, please email me freely
7: Q: Why the SW reception is not good?
A: Shortwave is a delicate medium. Little things like time of day, the sunspot cycle, weather
and atmospheric issues can play the devil with reception. But once the sun goes down, the
shortwave bands come alive with music, news, propaganda and even some pirate radio
stations. so the signal strength will be weak indoors than outdoors.
So the best way to listen to shortwave should be: extend antenna, in night, and outdoor
1. Q: Can not turn on the radio.
A: Possibly the battery drained, please charge the battery.
2. Q: Can not be connected to a computer.
A: Please do the connection in radio off mode. The USB cable maybe damaged, please try
another one.
Trouble Shooting
12
Specification
Frequency: FM: 87-108MHz, MW: 522-1710KHz, SW: 4.75-21.85MHz
Output power: 2W
Power supply: 1000mAh lithium battery
Charging: DC 5V---500mA
Caution
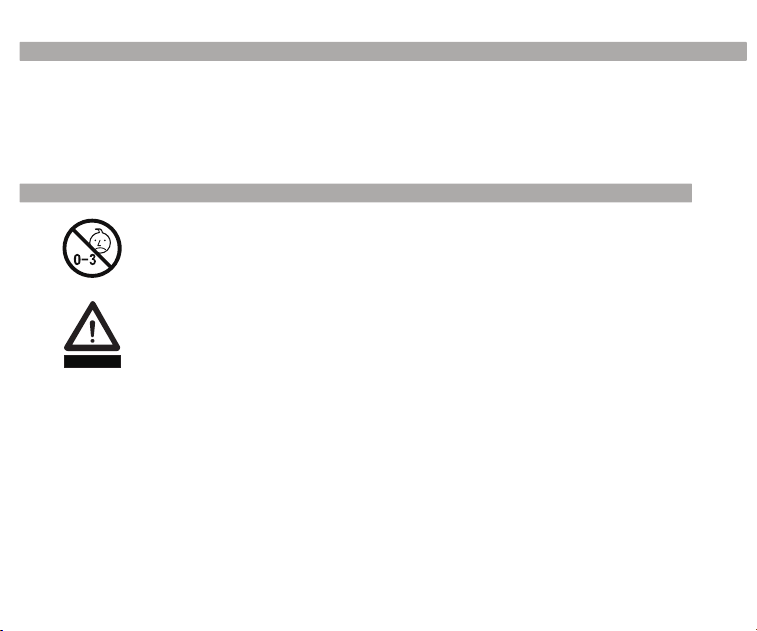
Avoid Choking Hazard
Protect your hearing
● Use the lowest volume necessary to do your job.
● Turn up the volume only if you are in noisy surroundings.
● Turn down the volume before adding headset or earpiece.
● Limit the amount of time you use headsets or earpieces at high volume.
● When using the radio without a headset or earpiece, do not place the radio's
speaker directly against your ear
Note: Exposure to loud noises from any source for extended periods of time
may temporarily or permanently affect your hearing. The louder the
radio's volume, the less time is required before your hearing could be
affected. Hearing damage from loud noise is sometimes undetectable at
first and can have a cumulative effect.
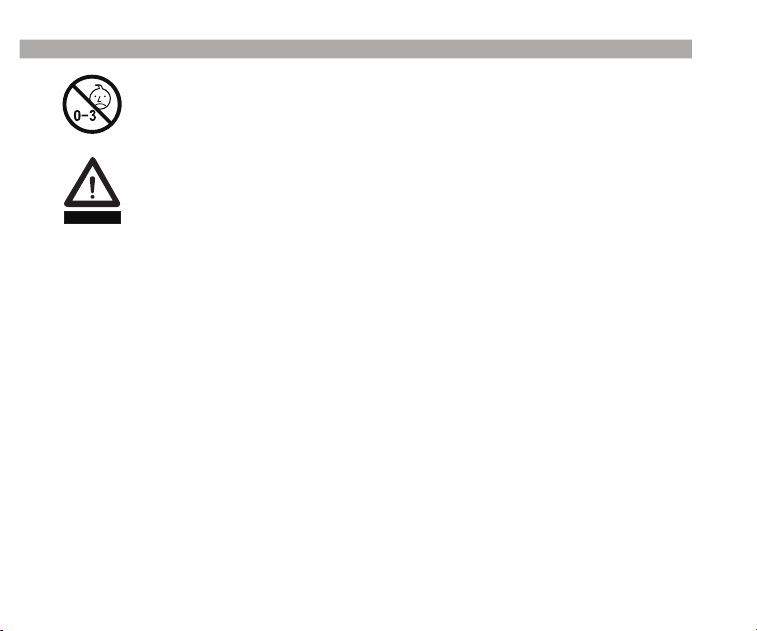
Small Parts. Not for children under 3 years.
WARNING
Inhalt
Bildschirmanzeige
Diagramm Position des Steuerelement
Einführung
Aufladen der Lithium-Batterie
Radio betätigen
Musik abspielen
Tonaufnahme betätigen
Systemkonfiguration
Fehlerbehebung
Spezifikation
Vorsicht
…..….............................…..02
.....…..…03
…..…………..........................………03
…..….........………04
……………………............………05
……………............…......………07
……………......…………09
…………………….…….……10
………………............………..…11
……………………...........…........…12
……………………..................…........…13
13

Specification
Frequency: FM: 87-108MHz, MW: 522-1710KHz, SW: 4.75-21.85MHz
Output power: 2W
Power supply: 1000mAh lithium battery
Charging: DC 5V---500mA
Caution
Avoid Choking Hazard
Protect your hearing
● Use the lowest volume necessary to do your job.
● Turn up the volume only if you are in noisy surroundings.
● Turn down the volume before adding headset or earpiece.
● Limit the amount of time you use headsets or earpieces at high volume.
● When using the radio without a headset or earpiece, do not place the radio's
speaker directly against your ear
Note: Exposure to loud noises from any source for extended periods of time
may temporarily or permanently affect your hearing. The louder the
radio's volume, the less time is required before your hearing could be
affected. Hearing damage from loud noise is sometimes undetectable at
first and can have a cumulative effect.
Small Parts. Not for children under 3 years.
WARNING
Inhalt
Bildschirmanzeige
Diagramm Position des Steuerelement
Einführung
Aufladen der Lithium-Batterie
Radio betätigen
Musik abspielen
Tonaufnahme betätigen
Systemkonfiguration
Fehlerbehebung
Spezifikation
Vorsicht
…..….............................…..02
.....…..…03
…..…………..........................………03
…..….........………04
……………………............………05
……………............…......………07
……………......…………09
…………………….…….……10
………………............………..…11
……………………...........…........…12
……………………..................…........…13
13

01
Lesen und verstehen Sie alle Sicherheitshinweise und Gebrauchsinformationen.
Wenden Sie sich an die Original-Lithium-Batterie.
Bitte Verwenden Sie das Ladegerät mit der Ausgangsspannung 5V, 500mA-1A, um
die Lithium-Batterie und das Gerät nicht zu beschädigen.
Wenn die Lithium-Batterie längere Zeit nicht benutzt wird, entfernen Sie sie bitte, spei-
chern Sie sie separat, und denken Sie daran, sie einmalim Monat zu laden.
Stellen Sie das Radio nicht in direktem Kontakt mit Regen, Feuchtigkeit und andere
Flüssigkeiten.
Verwenden Sie keine direkten Wärmequellen. Das Produkt nicht backen oder föhnen.
Setzen Sie das Gerät nicht längere Zeit direkter Sonneneinstrahlung aus.
Das Produkt nicht fallen lassen oder starken Druck ausüben..
Vielen Dank für den Einkauf des RETEKESS V115. Bitte lesen Sie die Bedienungsanleitung
vor der Inbetriebnahme sorgfältig durch und bewahren Sie dieses Buch zum späteren
Nachschlagen auf.
Das ist ein integriertes digitales elektronisches Stimmradio, das MP3- und WMA-Dateien
wiedergeben kann. Mehrsprachige Menüfunktionen, die Lyrik synchronisieren, unterstützt
MIC Recording, Radio Recording, LINE IN Recording und Stereo-Ohrhörer Ausgang, mit
einer wiederaufladbaren Lithium-Batterie (Batterie kann mit einer größeren Kapazität BL-
5C ersetzt werden, um längere Spielzeit zu erreichen).
RETEKESS
V115 AM/FM/SW FULL BAND STEREO RADIO RECORDER
Vorsichtsmaßnahmen
Bevor Sie dieses Radio verwenden, müssen Sie unbedingt die Sicherheitshinweise bea-
chten, um eine sichere und verantwortungsvolle Verwendung des Produkts zu gewährle-
isten.
Einführung
定时关机
中文
English
对比调节
背光时间
录音设置
AM 步进设置
返回主界面
语言选择
Deutsch
Auto power
Contrast
Back light time
Language
Record set
AM Stepping set
Back
Kontrast
Hintergrundbeleuchtung Zeit
Sprache
Ton-Aufzeichnung Einstellung
AM Schritt Einstellung
Zurück
Anzeige auf TF Musik Play Bildschirm
A
NOR
02:12
18:06
128
MP3
Widerholungsmodus
Ton-ModusAbgelaufene Zeit der aktuellen Musik
Format des Songs Datei
Batterieleistung
TF Karte einfügen
Die Anzeige der Name und Liedtexte
Anzeige auf Radio Bildschirm
FM
88.6
MH
Z
CH07
Radio Band
Aktuelle Sender speichern
Stumm
Batterieleistung
Frequenz der
Senderon
Systemmenü
02
Automatische Abschaltung
Bildschirmanzeige
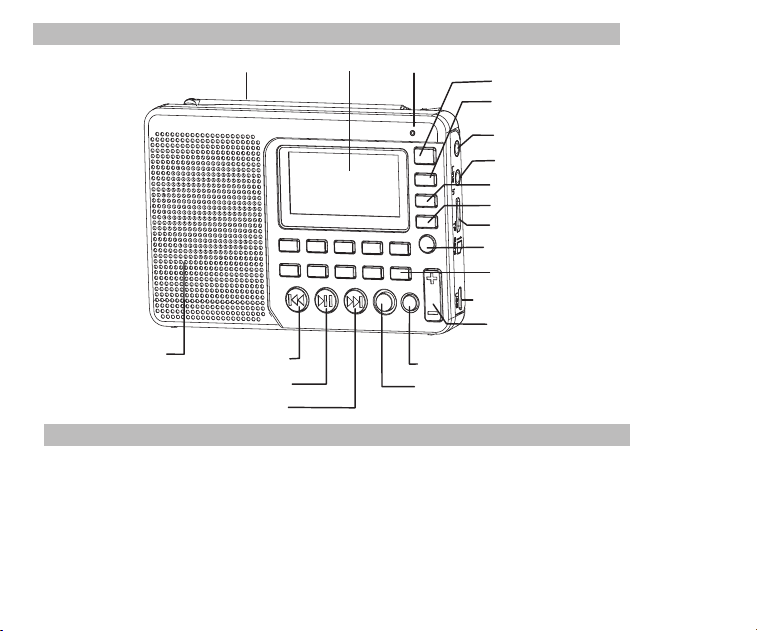
Diagramm Lage der Bedienelemente
FM / SW Antenne
Monitor
MIC
Netzschalter
MODE Taste
Kopfhöreranschluss
Audioeingang Schnittstelle
AM /FM Band Taste
SW Band Taste
TF-Karte Slot
Durch lange Drück die Aufnahme
aufzurufen
USB/ Ladebuchse
Lautstärktaste
DEL(Löschen)Taste
Nächste Taste
Play/ Pause Taste
Vorherige Taste
Lautsprecher
REC (Aufnahme) Taste
widerholung/ System Setup
Definition von Schlüsseloperationen
Es gibt 3 Betriebsarten des Betätigens der Tasten: kurzes Drücken, langes Drücken und
halten an. Sofern nicht ausdrücklich angegeben, sind alle Operationen kurz drücken.
Kurzes Drücken: Taste einmal drücken, und die Funktion beginnt zu arbeiten.
Langes Drücken: länger als 1,2 Sekunden gedrückt halten und die Funktion beginnt zu
arbeiten und arbeitet nur einmal.
Halten Sie die Taste gedrückt und halten Sie die Taste bis zum Anschlag gedrückt, die Fu-
nktion arbeitet mehrmals in einer bestimmten Frequenz, z. B. schnell vorwärts/ rückwärts.
03
Batteriespannung
Einsetzen /Austauschen der Batterie
1. Öffnen Sie die Batteriefachabdeckung.
2. Legen Sie die Lithiumbatterie entsprechend der angegebenen Polarität ein.
3. Schließen Sie den Batteriefachdeckel.
4. Vor dem ersten Gebrauch laden Sie bitte die Lithium-Batterie mindestens 6 Stunden auf.
Nach der ersten Ladung sollte die Ladezeit etwa 4 Stunden dauern.
5. Empfehlen: Verwenden Sie die 5 V, 500mA Ladegerät.
6. Vergewissern Sie sich, dass das Gerät sich im Normalbetrieb befindet, bevor Sie den Ak-
ku laden. Während des Ladevorgangs zeigt das LCD den "Ladebildschirm" an. Das blin-
kende Batteriesymbol zeigt an, dass der Ladevorgang läuft. Wenn der Akku vollständig
aufgeladen ist, blinkt das Batteriesymbol nicht und zeigt die volle Batterieleistung an.
Voll MittelNiederigErschöpft
Aufladen der Lithium-Batterie
1. Externer Adapter (nicht enthalten). Benutzen Sie bitte einen zusammengebrachten Ada-
pter (5V DC / 500mA, USB-Hafen), um das Radio aufzuladen.
2. Installieren Sie die Lithium-Batterie.
3. Zum Aufladen des Akkus schließen Sie das Micro-USB-Kabel an das Radio und das an-
dere Ende an einen USB-Adapter an.
4. Während des Ladevorgangs bewegt sich das auf dem Display angezeigte Batteriesymbol-
von rechts nach links und stoppt, wenn der Akku vollständig aufgeladen ist. Trennen Sie dann
das Radio und den Adapter.
04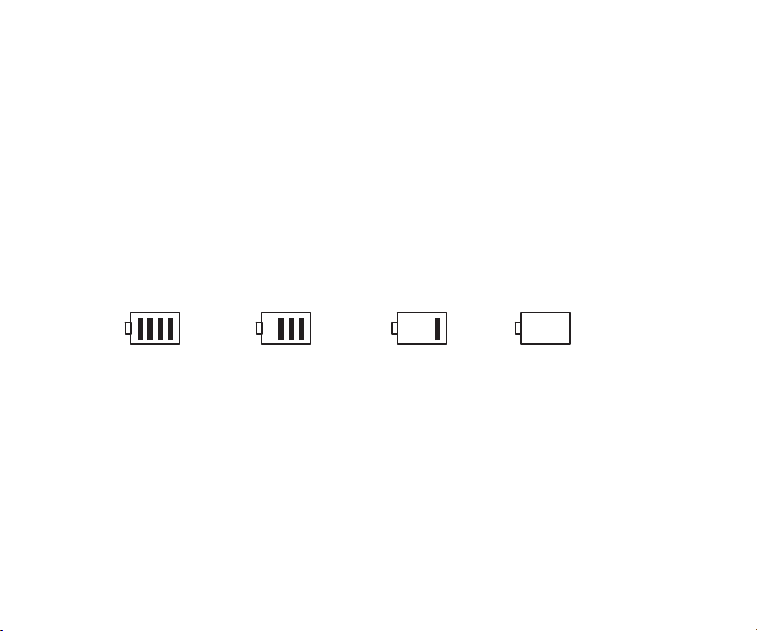
So speichern Sie einen Radiosender manuell
A. Drücken Sie im Radiomodus die Taste oder , um Radiosender vorwärts oder
rückwärts zu suchen. Wenn ein Radiosender empfangen wird, stoppt die Suche und der
empfangene Radiosender beginnt zu spielen
B. Direkte Eingabe der Frequenz eines Radiosenders: Zum Beispiel beträgt die Frequenz .
des Radiosenders 88,5 MHz. Drücken Sie die Zi fferntasten 8, 8 und 5, und drücken Sie
dann die Taste , um die Eingabe zu bestätigen. Das Radio springt auf 88,5 MHZ.
*AM: die Zahlen, die 522 +Vielfache von 9 sind gültig; Für Nordamerika 520+Vielfache
von 10 sindgültig
C. Kurzwellenbetrieb: Drücken Sie die SW Taste, um die metrischen Wellen in der
Reihenfolge aufzurufen:
60 m (4,750 MHz), 49 m (5,950 MHz), 41 m (7,100 MHZ)
31 m (9,500 MHz), 25 m (11,650 MHz), 22 m (13,600 MHZ)
19 m (15,100 MHz), 16 m (17,500 MHz), 13 m (21,45 MHZ)
Nach dem Auswählen einer metrischen Welle, lange drücken Sie die Taste , um Rad-
iosender zu suchen.Sie speichern manuell den Radiosender nach der Methode A, B oder C,
und drücken lange die MEMO-Taste "5". Wenn "CH00" auf dem Display blinkt, drüken Sie die
Zifferntasten, um den Speicherort der Speicherstation einzugeben. Und Sie drücken die "PLAY"
-Taste, weist der Bildschirm auf Speicherung hin, dann drücken nochmal die Taste "PLAY", um
zu bestätigen, dass sie an der angegebenen Position gespeichert werden kann.
Hinweis:Die Anzahl der voreingestellten Sender in jedem Band ist begrenzt.(FM: 80
Voreinstellungen , MW: 60 Voreinstellungen, SW: 300 Voreinstellungen)
AM Schrittzähler
Drücken Sie im AM-Radiomodus die Taste MENU, um das Hauptmenü des Systems aus-
zuwählen, drücken Sie oder , um das Untermenü AM Stepping auszuwählen,
Hinweis: Beim Aufladen drücken Sie die Netzschalter , um das Radio ein-/ auszuschalten.
Wechselstrom kann das Empfangen durch Funksignalen stören, daher wird es nicht empf-
ohlen, das Radio beim Laden zu verwenden.
Verwenden Sie das Netzteil oder den Computer nicht, um das Radio wiederzugeben, um
Musik abzuspielen oder das Radio zu hören, wenn die Batterie entladen ist. Bitte entladen
Sie den Akku oder laden es einmal jeder 2 Monaten vollständig, wenn das Funkgerät län-
gere Zeit nicht benutzt wird.
Aufgeladen durch PC
1.Verbinden Sie das Radio mit dem mitgelieferten USB-Kabel an dem Computer
2. Während des Ladevorgangs bewegt sich das auf dem Display angezeigte Batteriesym-
bol von rechts nach links.
3. Das Batteriesymbol bleibt stehen, wenn der Akku vollständig aufgeladen ist.
Betrieb des Radio
Ein- /Ausschalten des Radios
1. Drücken Sie den Netzschalter, um das Gerät einzuschalten.
2. Verlängern Sie die Antenne.
3. Drücken Sie die Taste AM / FM oder SW , um das Band auszuwählen.
4. Drücken Sie erneut die Netzschalter , um das Gerät auszuschalten.
Drücken Sie im Radiomodus die Taste , um Tdie automatischen Such- und Speicherst-
ationen Funktion aufzurufen. Die verfügbaren Stationen wurden automatisch nummeriert
und von niedrigen zu hohen Frequenzen gespeichert. Wenn die Sender fertig sind, drüc-
ken Sie die Taste oder , um die gespeicherten Radiosender aufzurufen und zu
hören. Wenn irgendein interferierender Radiosender automatisch gespeichert wird, drüc-
ken Sie lange die DEL-aste, um ihn zu löschen. T
05
06
Play Setup
*Diese wurde im Werk eingestellt. Es wird nicht empfohlen, sie erneut einzustellen.
1. Drücken Sie im Wiedergabemodus lang die Taste , um den Hauptbildschirm von Play
aufzurufen.
A. Hauptverzeichnis (Wählen Sie diese Option, um die Titel in den Ordnern unter dem
Verzeichnis auszuwählen)
B. Wiedergabemodus: Alle wiederholen, Eins wiederholen, Verzeichnis wiederholen (wählen
Sie diese Option, um die Titel nur im ausgewählten Ordner abzuspielen)
C. Klange ffekt (NATÜRLICH, POP, ROCK, JAZZ, LAND, HEAVY BASS)
D. Kehren Sie zum Hauptbildschirm zurück
2. Drücken Sie die Taste oder , um das Untermenü auszuwählen, und drücken Sie
die Taste , um das Untermenü aufzurufen. Drücken Sie die Taste oder , um die
entsprechende Unterposition auszuwählen, und drücken Sie die Taste , um die Auswahl zu
bestätigen. Das Setup wird erfolgreich sein und das System verlässt den Setup-Modus.
Datenübertragung
Schalten Sie das Gerät ein und schließen Sie es mit dem Micro USB-Kabel an den
Computers an. Drücken Sie eine beliebige Taste des Geräts, und der Computer installiert die
Treibersoftware automatisch. Der Bildschirm des Geräts zeigt das Symbol des Computersan,
um anzuzeigen, dass die Verbindung erfolgreich ist. Hier kann der Computer die Dateien auf
der TF-Karte im Gerät lesen, kopieren und löschen (kann als Kartenleser verwendet werden)
und kann auch als externer USB-Lautsprecher des Computers verwendet werden.
(Bestimmte Computer mit anderer Konfiguration sind möglicherweise nicht kompatibel)
A
wählen Sie den Schritt 9 KHz oder 10 KHz (Nordamerika) aus, drücken Sie die Taste
zur Bestätigung.
So löschen Sie einen Radiosender
Rufen Sie einen Radiosender auf, und drücken Sie lange die DEL-Taste, im Display ersc-
heint die Bestätigung der Radiosender-Löschung. Drücken Sie die Taste , um das Löschen
des aktuellen Radiosenders zu bestätigen.
*Wenn der oben genannte Vorgang nicht innerhalb von 5 Sekunden beendet ist, kehrt das
System zum Radiomodus zurück.
So schalten Sie das Radio stumm
Drücken Sie im Radiomodus die Taste, und das Symbol blinkt auf dem Bildschirm,
was bedeutet, dass das Radio im Stummschaltmodus ist. Drücken Sie die Taste erneut,
um die Stummschaltung zu deaktivieren.
Musikwiedergabe
1. Legen Sie die Musik-TF-Karte korrekt im MP3- oder WMA-Format ein.
2. Drücken Sie die Netzschalter, um das Gerät einzuschalten.
3. Drücken Sie die MODE-Taste, um in den Wiedergabemodus zu gelangen.Auf dem Bil-
dschirm werden der Name des Musiktitels, das Format, die Zeitspanne usw. angezeigt.
4. Drücken Sie die Taste oder , um den nächsten oder vorherigen Song auszuwä-
hlen, oder drücken Sie die Zi fferntasten, um einen Song auszuwählen, und drücken Sie
dann die Taste , um die Auswahl zu bestätigen. Das Radio springt direkt zur Song-
Nummer, um das entsprechende Lied abzuspielen.
5. Drücken Sie die Wiederholungstaste, um einen Titel zu wiederholen ( zeigt die Wied-
erholungeines Songs an) oder wiederholen Sie alle Titel in der Reihenfolge ( zeigt an,
07
08
Aufnahmebetrieb
MIC Aufnahme
Setzen Sie die TF-Karte ein und schalten Sie das Gerät ein. Drücken Sie die Taste MODE
um in den Wiedergabemodus zu gelangen. Drücken Sie lange die REC-Taste, um den MIC-
Aufnahmemodus aufzurufen. Während der Aufnahme drücken Sie die REC -Taste zum
Beenden und verlassen den Aufnahmemodus.
LINE IN Aufnahme
Schließen Sie das externe Audiokabel an ( "Line in" wird automatisch erkannt). Stellen Sie
sicher, dass ein externer Song abgespielt wird. Stellen Sie die Lautstärke des externen
Audiosignals ein, und drücken Sie die REC-Taste, um "LINE IN Recording" einzugeben.
Während der Aufnahme drücken Sie die REC-Taste zum Beenden und beenden.
Radioaufnahme
Drücken Sie die FM-Taste, um den Radiomodus aufzurufen und den Radiosender einzu-
stellen. Drücken Sie lange die REC-Taste, um den Radio-Aufnahmemodus aufzurufen. Drü
cken Sie während der Aufnahme die Taste , um die Aufnahme zu unterbrechen. Drücken
Sie die Taste erneut, um die Aufnahme fortzusetzen. Drücken Sie die REC Taste, um
dieAufnahme zu beenden und den Aufnahmemodus zu verlassen.
* Im Aufnahmemodus ist die Lautstärke auf der vor der Aufnahme eingestellten Lautstärke
gesperrt. Wenn Sie die Lautstärketaste drücken, wird die Lautstärke nicht geändert.
Datei aufrufen
Drücken Sie lang die Taste REC FILE"0", um die Aufnahmedatei aufzurufen. Drücken Sie die
Taste oder , um die Aufnahmedatei auszuwählen, die wiedergegeben werden soll.
Der Dateiname "MIC" bezeichnet eine MIC-Aufzeichnungsdatei; "LIN" bezeichnet eine
LINE I n Aufzeichnungsdatei; "RAD" bezeichnet eine Radioaufnahme-Datei.
09
Löschen von Dateien
Drücken Sie lange die Taste REC FILE "0", um eine Aufnahmedatei aufzurufen. Drücken
Sie die Taste oder , um die zu löschende Aufnahmedatei auszuwählen. Lang drüc-
ken Sie die "DEL"-Taste und der Bildschirm wird Pop-up "Sind Sie sicher, die Datei zu
löschen". Drücken Sie die Taste , um die Aufnahme-Datei zu löschen.
Schlüsselverriegelung
Drücken Sie lang die MODE-Taste, das Sperrsymbol erscheint auf dem Bildschirm, was
anzeigt, dass das System den Tastensperrmodus eingegeben hat. Wenn Sie andere Ta-
sten drücken, funktionieren sie nicht und das Sperrsymbol erscheint auf dem Bildschirm.
Drücken Sie lang die MODE-Taste und das Entsperrungssymbol erscheint auf dem Bild-
schirm, der angibt, dass die Tasten entsperrt wurden.
Systemkonfiguration
1.Drücken Sie lang die MENU-Taste, um den System-Setup-Bildschirm aufzurufen (Das
System kehrt automatisch zum Hauptbildschirm zurück, wenn keine Bedienung innerhalb
von 5 Sekunden erfolgt).
Systembildschirm
a. Zeitgesteurte Abschaltung(die automatische Abschaltzeit kann auf 0-90 min einges-
tellt werden)
b. Kontrast (das Kontrastverhältnis des Bildschirms kann auf 1-15 eingestellt werden)
c. Hintergrundbeleuchtung Zeit (die Hintergrundbeleuchtung kann auf Normal EIN, AUS
oder eine Dauer eingestellt werden)
d. Sprache (Chinesisch / Englisch / Spanisch)
e. Datensatz (Kompressionsverhältnis: Einfache Aufnahme 64kbps / Qualität Rekord 96
kbps / Super Rekord 128kbps)
f. Zurück (Zurück zum Hauptbildschirm)
10
Hinweis: Für die Benutzerfreundlichkeit ist die Standardeinstellung der Maschine auf
Englisch eingestellt.
2.Nachdem das System in den System-Setup-Bildschirm gelangt ist, drücken Sie die Taste
oder , um die entsprechende Unterposition auszuwählen, und drücken Sie die
Taste , um das Untermenü aufzurufen. Drücken Sie die Taste oder , um die
entsprechende Unterposition auszuwählen, und drücken Sie die Taste , um die Auswa-
hl zu bestätigen, um das Setup zu beenden.
Sleep Shutdown Setup Betrieb
Geben Sie den Systemeinstellungsbildschirm ein, drücken Sie die Taste oder , um
"Auto Power" auszuwählen, und drücken Sie die Taste , um die Unterposition einzugeb-
en. Drücken Sie die Taste oder , um die Uhrzeit einzustellen (00-90 Minuten) und
drücken Sie die Taste , um das Setup zu bestätigen. Wenn das Abschalten des Systems
erfolgreich eingestellt ist, wird das Symbol für die Zeitabschaltung auf dem Bildschirm
angezeigt, was anzeigt, dass das System den Zeitabschaltungsmodus eingegeben hat. Der
Timer beginnt mit dem Countdown, bis die eingestellte Zeit erreicht ist. Danach wird das
Gerät automatisch heruntergefahren. Wenn die Zeit auf 00 eingestellt ist oder wenn Sie den
Netzschalter ausschalten, wird die Abschaltfunktion abgebrochen.
Fehlerbehebung
1. Q: Das Radio kann nicht eingeschaltet werden.
A: Möglicherweise ist die Batterie entladen, laden Sie bitte den Akku auf.
2. Q: Kann nicht an einen Computer angeschlossen werden.
A: Bitte Verbindung im Radio-O ff-Modus herstellen. Das USB-Kabel möglicherweise be-
schädigt, versuchen Sie bitte ein anderes.
3. Q: Der Lautsprecher ertönt nicht.
11
4.Q: Kann Audio von der Mikro-Sd (TF) Karte oder USB-Antrieb nicht wiedergeben.
A: Prüfen Sie, ob die Karte oder das USB-Laufwerk eine schlechte Kompatibilität aufwei-
st, versuchen Sie es mit einer anderen Karte oder einem USB-Stick. Die Dateien sind
beschädigt oder falsch formatiert, löschen Sie die Datei und versuchen Sie es erneut.
5. F: Das Radio kann nicht aufgeladen werden.
A: Überprüfen Sie, ob der externe Adapter oder das USB-Kabel richtig angeschlossen
war .Überprüfen Sie, ob der Adapter oder das USB-Kabel beschädigt ist.
6: Q: Warum das Radio aus dem Lautsprecher, wenn Sie Ohrknospen?
A: Weil die Ohrknospen MIC Funktion haben, in der Tat kann dieses Radio nicht mit den
Ohrknospen arbeiten, die MIC Funktion haben. So können Sie eine Ohrknospen ohne
MIC Funktion versuchen, wenn noch nicht lösen können, mailen Sie mich bitte frei.
7: F: Warum ist der SW-Empfang nicht gut?
A:Kurzwelle ist ein zartes Medium. Kleine Sachen wie Tageszeit, der Sonnenfleckzyklus,
Wetter und atmosphärische Ausgaben können den Teufel mit Empfang spielen. Aber
sobald die Sonne untergegangen ist, kommen die Kurzwellenbands lebendig mit Musik,
Nachrichten, Propaganda und sogar einigen Piratenradiosendern. Die Signalstärke ist
drinnen schwächer als im Freien. Es ist der beste Weg für stärkste Signalstärke, die
Antenne in der Nacht und im Freien zu verlängern.
12
Spezifikation
Frequenz:FM: 87-108MHz, MW: 522-1710KHz, SW: 4.75-21.85MHz
Ausgangsleistung: 2W
Stromversorgung: 1000mAh Lithium-Batterie
Aufladen: DC 5V --- 500mA
12
Vorsicht
Erstickungsgefahr vermeiden
Schützen Sie Ihr Gehör
● Verwenden Sie das niedrigste Volumen, das Sie für Ihre Arbeit benötigen.
● Erhöhen Sie die Lautstärke , wenn Sie sich in einer lauten Umgebung
befinden.
● Verringern Sie die Lautstärke, bevor Sie das Headset oder den Kopfhörer
hinzufügen.
● Begrenzen Sie die Dauer der Verwendung von Headsets oder Ohrhörern bei
hoher Lautstärke.
● Wenn Sie das Radio ohne Headset oder Ohrhörer verwenden, platzieren Sie
den Lautsprecher des Radios nicht direkt an Ihrem Ohr.
Note: Die Einwirkung von lauten Geräuschen von jeder Grund für längere Zeit
kann Ihr Gehör vorübergehend oder dauerhaft beeinflussen.Je lauter
die Lautstärke des Radios ist, desto weniger Zeit wird benötigt, bevor
Ihr Gehör beeinträchtigt werden kann.Gehörschäden durch laute
Geräusche sind zunächst nicht erkennbar und können kumulativ
wirken.
Kleine Teile. Nicht für Kinder unter 3 Jahren.
WARNUNG
Contenu
Affichage d’cran
Introduction du bouton
Introduction
Recharger la batterie de lithium
Opration de la radio
Opration de jouer la musique
Opration d'enregistrer des sons
Rgler le syst
ème
Dpannage
Sp
écification
é
é
é
é
é
é
Avertissement
....................................…..…02
…..……….............………03
…..…..................................………04
……….....………04
………………............………04
…………….………06
……….......……07
……………….................…..…09
……………………...…..................…11
…………………...…..................…..12
…..…...................................…..12
13

●Lire et comprendre tout les avis en guides et comment utiliser.
●Recommander d’utiliser la batterie originelle.
●Veuillez utiliser le chargeur avec la tension de sortie 5V, 500mA-1000mA pour éviter
d'endommager la batterie de lithium et le dispositif.
●Si vous ne l’utilisez pas en long temps, veuillez retirer la batterie, la mettre en place
séparative, et ne pas oublier de la recharger par mois.
●Ne laissez pas la radio entrer en contact directement avec la pluie, l'humidité ou les
gouttes de liquide.
●Evitez les sources de chaleur directes. Ne pas cuire ou chauffer le produit.
●N'exposez pas l'appareil à l'ensoleillement directement pendant une priode prolongée.é
●Ne laissez pas tomber le produit ou n'appliquez pas une forte pression.
Merci beaucoup d’acheter RETEKESSV115Veuillez lire tout ce manuel avant de l’utiliser et le
garder pour référence plus tard.
RETEKESSV
115 Radio Portable Enregistreur AM/FM/SW Stéréo
Remarque
Avant de l’utiliser, veuillez remarquer les avis suivants pour protéger votre radio portable
enregistreur.
01
Affichage en mode de TF Musique
Affichage en mode de Radio
System Menu
定时关机
中文
Anglais
对比调节
背光时间
录音设置
AM 步进设置
返回主界面
语言选择
Auto power
Contrast
Back light time
Language
Record set
AM Stepping set
Back
A
NOR
02:12
18:06
128
MP3
Mode de cycle
Mode d’audio
FM
88.6
MH
Z
CH07
Bande de fréquence
Canal de station réservée
MuetAlimentation
Fréquence de
radio station
Temps de marche de la musique
Formant de fichier de la chanson
Alimentation
TF carte insérée
Nom et paroles de la chanson
02
Français
Éteindre à temps
Rentrer
Contraste
Temps de rétro-éclairage
Langage
Réglage de enregistrement du son
Réglage Incrément AM
Bildschirmanzeige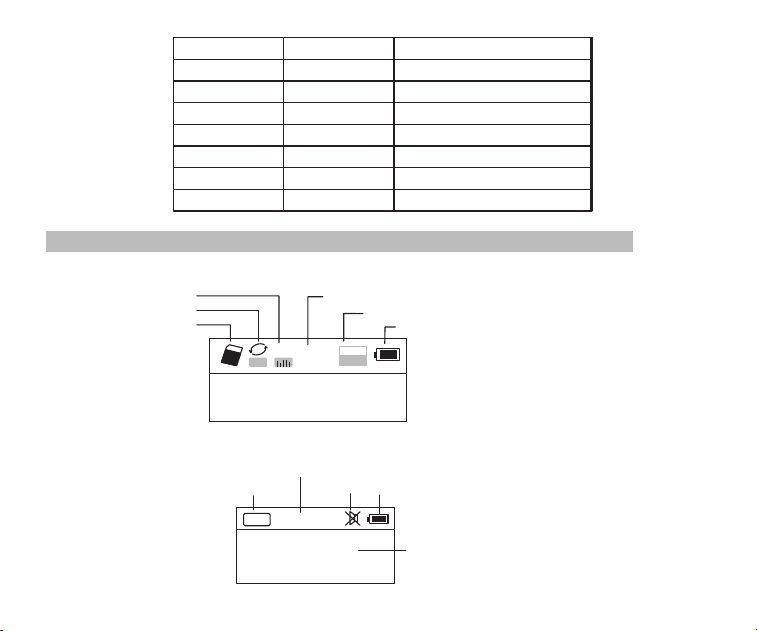
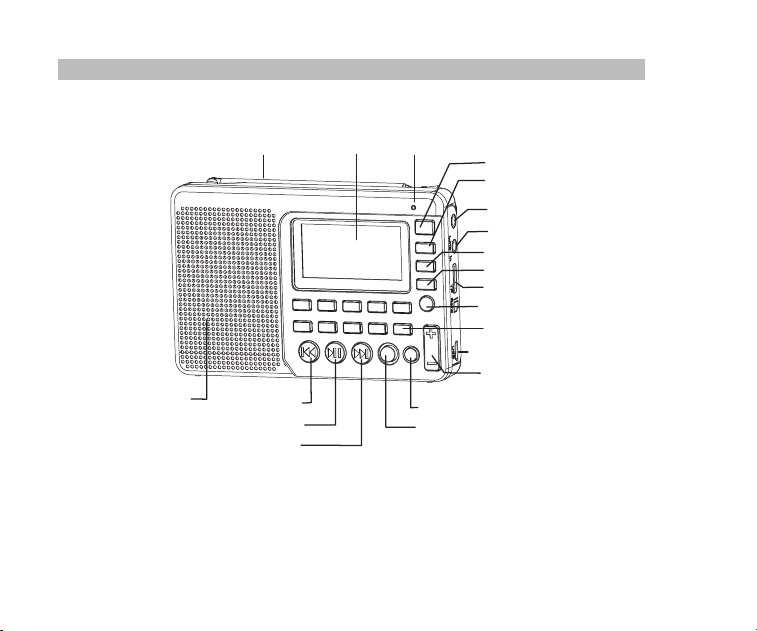
Présentation
FM/AW antenne
Affichage
Micro
Alimentation
MODE
Prise des écouteurs
Interface d’entrée audio
AM/FM
SW
Slot de TF carte
Appuyez longtemps pour
invoquer l’enregistrement
Interface de USB/chargeur
Volume
Effacer
Suivant
Marche/ pause
Précédent
Haut-parleur
Enregistrement
Répétition/ configuration du système
03
AM / FM / SW L'enregistreur de radio de bande de poche est une radio de réglage élect-
rique numérique intégrée, qui peut jouer les fichiers MP3 et WMA, dont l'opération de
menu est multilingue, qui affichent les paroles synchrones, qui soutient l'enregistrement
MIC, l'enregistrement radio, l'enregistrement d'entrée de ligne audio, qui dispose de l'éc-
outeur stéréo et une batterie de lithium rechargeable (la batterie peut être remplacée par
une batterie BL-5C de plus grande capacité pour obtenir une durée plus longue).
Installer la batterie
1. Ouvrez le couvercle de batterie
2. Installez exactement la batterie selon le “+” et “-”
3. Replacez le couvercle de batterie
4. Rechargez 6 heures à la première fois, et en général 4 heures
5. Le chargeur(5 V, 500mA) d’interface USB conseillé
6. Dans des cas normaux, avant de charger la batterie, assurez-vous que le produit est
teint. Pendant la charge, l'écran LCD aéffiche l'écran de charge. L'icône clignotante
indique que la charge est en cours. Lorsque la batterie est complètement chargée,
l'icône d'alimentation de la batterie ne clignote pas et la batterie est pleine.
Introduction
Opération de Radio
Allumer la radio
Appuyez longtemps sur le bouton d’alimentation, étendez l’antenne, et appuyez sur
AM/FM ou SW pour choisir la bande. Appuyez longtemps encore sur le bouton d’aliment-
ation, la radio est éteinte.
04
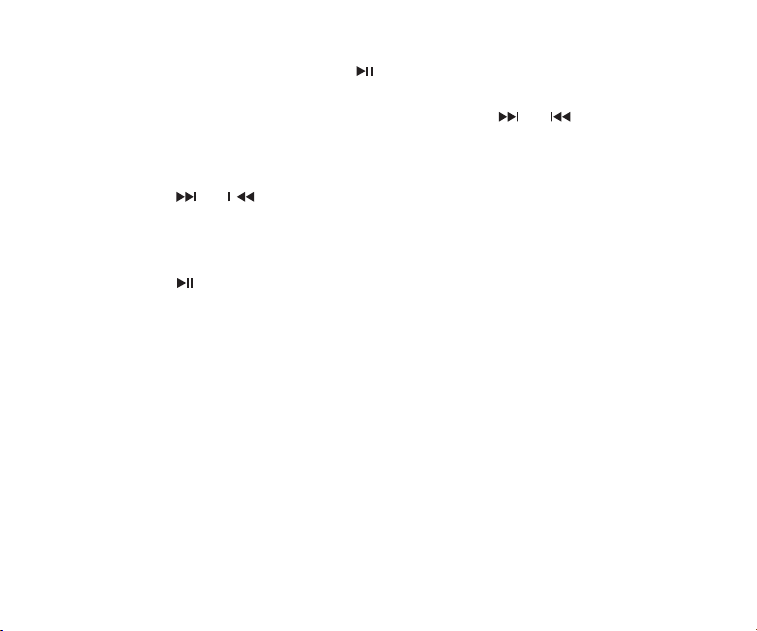
Chercher les stations et les sauvegarder automatiquement
En mode de radio, appuyez longtemps sur , la radio va chercher les stations commen-
cant par la fréquence basse, et les sauvegarder automatiquement lors de trouver les
stations. Après terminé de sauvegarder les stations, appuyez sur ou pour choisir
et écouter. Si vous voulez supprimer cette station, appuyez sur DEL.
Chercher les stations et les sauvegarder manuellement
A. Appuyez sur ou pour chercher les stations. La radio va terminer de chercher et
commencer à jouer lorsque une station a été reçue.
B. Entrer directement la fréquence d'une station de radio: Par exemple, la fréquence de
Appuyez sur les touches numériques 8, 8 et 5, puis
appuyez sur pour confirmer l'entrée. La radio sautera à 88.5MHz.
AM: les nombres qui sont 522 + le pas d'incrment de 9 KHz sont valides; Pour é
Appuyez sur la touche SW pour appeler les ondes métriques
60m (4.750MHz), 49m (5.950MHz), 41m (7.100MHz)
1.650MHz), 22m (13.600MHz)
19m (15.100MHz), 16m (17.500MHz), 13m (21.45MHz)
Après avoir sélectionné une onde métrique, appuyez longuement sur la touche pour
Stocker manuellement la station de radio, la méthode est A, B ou C. Appuyer longuement le
bouton MEMO (5), quand “CH00” clignote sur l’cran, appuyer le bouton numrique pour
entrer la station stocke, puis appuyer le bouton “PLAY”, l'affichage d’cran vous dit qu'il a
stock la station, puis appuyer le bouton “PLAY” à nouveau pour confirmer qu' il a stock.
éé
éé
éé
la station de radio est de 88.5MHz.
*
520+ le pas d'incrment de 10KHz sont validesl'Amérique du Nord é
C.Opération ondes courtes:
dans l'ordre:
31m (9.500MHz), 25m (1
rechercher les stations de radio.
05
1. Insérez correctement la carte TF de musique au format MP3 ou WMA.
2. Appuyez sur Power
pour allumer l’appareil.
3. Appuyez sur la touche MODE pour accéder au mode de lecture. L'écran affiche le nom
de la musique, le format, le temps écoulé, etc.
Muet
En mode radio, appuyez sur et le icone clignotera sur l'écran, ce qui indique que
la radio est en mode muet. Apuyez
de nouveau sur pour désactiver le muet.
Supprimer la station de radio
Appelez une station de radio et appuyez longuement sur DEL, l'écran affiche la confir-
mation de suppression de la station de radio. Appuyez sur pour confirmer la suppres-
sion de la station de radio actuelle.
* Si l'opération ci-dessus n'est pas terminée dans les 5 secondes, le système retourne
au mode radio.
Opération de Musique
4. Appuyez sur ou pour sélectionner la chanson suivante ou précédente ou
appuyez sur les touches numériques pour sélectionner une chanson, puis appuyez
sur pour confirmer la sélection. La radio saute directement au numéro de morceau
pour jouer le morceau correspondant.
5. Appuyez sur Repeat pour répéter un morceau ( indique la répétition d'un morceau)
ou répéter tous les morceaux dans l'ordre ( indique la répétition de tous les morcea-
ux).
A
06
Note : Il y a les limitations des quantités de stations stockées de chaque bande.
(FM: 80 stations , MW: 60 stations, SW: 300 stations)
Opération de Enregistreur
Transmission des données par ordinateur
Allumez l'appareil et connectez avec l'ordinateur par le câble Micro USB. Appuyez sur n'i-
mporte quelle touche de l'appareil et l'ordinateur va installer le logiciel automatiquement.
L'écran de l'appareil affichera l'icône connectée avec l'ordinateur pour indiquer que la
connexion est réussie. Ici, l'ordinateur peut lire, copier et supprimer les fichiers de la
carte TF dans l'appareil (peut être utilisé comme un lecteur de carte) et peut également
être utilisé comme un haut-parleur USB externe de l'ordinateur
. (Certains ordinateurs de
configuration différente peuvent ne pas être compatibles).
Lecture
* Ceci a été réglé en usine. Il n'est pas recommandé de le régler à nouveau.
1. En mode de lecture, appuyez longuement sur pour accéder à l'écran principal.
A. Répertoire principal (Sélectionnez cet élément pour sélectionner les chansons dans
les dossiers sous le répertoire)
B. Mode de lecture: Répéter tout, Répéter un, Répéter répertoire (sélectionnez cette
option pour lire les chansons uniquement dans le dossier sélectionné)
C.
Effet sonore(NATURAL, POP, ROCK, JAZZ, COUNTRY, HEAVY BASS)
D. Revenir à l'écran principal
2. Appuyez sur ou pour sélectionner le sous-menu et appuyez sur pour
accéder au sous-menu. Appuyez sur ou pour sélectionner la sous-rubrique
correspondante et appuyez sur pour confirmer la sélection. L'installation réussira
et le système quittera le mode de configuration.
07
Enregistrement MIC
Insérez la carte TF et allumez l'appareil. Appuyez sur
MODE pour accéder au mode de
Enregistrement LINE IN
Branchez le câble audio externe («Line in» est identifié automatiquement) Assure-vous
qu'un morceau externe est en cours de lecture. Réglez le volume de l'audio externe et
appuyez longuement sur REC pour entrer "Enregistrement LINE IN". Pendant l'enregistr-
ement, appuyez sur REC pour terminer et quitter.
Enregistrement Radio
Appuyez sur FM pour accéder au mode radio et régler la station de radio. Appuyez long-
uement sur REC pour accéder au mode d'enregistrement radio. Pendant l'enregistreme-
nt, appuyez sur peut mettre en pause l'enregistrement, appuyez de nouveau sur
pour continuer de l'enregistrement. Appuyez sur REC pour terminer l'enregistrement et
quitter le mode d'enregistrement.
* En mode d'enregistrement, le volume est verrouillé au niveau défini avant l'enregistrem-
ent. Si vous appuyez sur la touche Volume, le volume ne change pas.
Invoquer les enregistrements
Appuyez longuement sur la touche REC FILE "0" pour appeler le fichier d'enregistreme-
nt. Appuyez sur la touche ou pour sélectionner le fichier d'enregistrement à lire.
Le nom de fichier "MIC" indique un fichier d'enregistrement MIC; "LIN" indique un fichier
d'enregistrement LINE IN; "RAD" indique un fichier d'enregistrement Radio.
lecture. Appuyez longuement sur REC pour accéder au mode d'enregistrement MIC.
Pendant l'enregistrement, appuyez sur REC pour terminer et quitter le mode d'enregistre-
ment.
08

Verrouillage des touches
Appuyer longuement sur la touche MODE
, l'icône de verrouillage apparaît sur l'écran, ce
qui indique que le système est entré dans le mode verrouillé. Si vous appuyez sur d'autres
Supprimer les enregistrements
Appuyez longuement sur la touche REC FILE "0" pour appeler un fichier d'enregistrem-
ent. Appuyez sur la touche ou pour sélectionner le fichier d'enregistrement à
supprimer. Appuyer longuement sur la touche "DEL" et l'écran apparaîtra "Are you sure
to delete the file" (soit, êtes-vous sûr de supprimer le fichier). Appuyez sur la touche
pour supprimer le fichier d'enregistrement.
Configuration du système
Écran système:
A.
Auto power (): Le temps automatiquement peut être Éteindre à tempsd'éteindre
réglé à 0-90 min.
B. Contrast(Contraste):Le rapport de contraste de l'écran peut être réglé sur le niveau
1-15.
Appuyez longuement sur la touche
MENU pour accéder à l'écran de configuration du
système (Le système revient automatiquement à l'écran principal si aucune opération
n'est effectuée dans les 5 secondes.)
touches, elles ne fonctionneront pas et l'icône de verrou apparaîtra à l'écran. Appuyez
longuement sur la touche MODE et l'icône de déverrouillage apparaîtra à l'écran, ce qui
indique que les touches ont été déverrouillées.
09
C. Back light Time
(Rétro-éclairage
Temps):Le rétro-éclairage peut être réglé sur ON
normal, OFF ou une durée.
D. Language (Langue): chinois / anglais / espagnol
E. Record set (rglage d'enregistrement): taux de compression: Record simple é
64kbps / Qualité record 96 kbps / Super record 128kbps
F. Back (Retour): Retour à l'écran principal.
Remarque
1. Pour la commodité de l'utilisation des clients, le paramètre de langue par défaut de
l'appareil est anglais
2. Une fois le système entré dans l'écran de configuration du système, appuyez sur la
touche ou pour sélectionner le sous-élément correspondant et appuyez sur
la touche pour accéder au sous-menu. Appuyez sur la touche ou pour
sélectionner la sous-rubrique correspondante et appuyez sur la touche pour
confirmer la sélection pour terminer la configuration.
Opération de Fermer automatiquement
Accdez à l'écran de rglage du système, appuyez sur la touche ou pour éé
slectionner é
"Auto Power" et appuyez sur la touche pour entrer le sous-élément.
Appuyez sur ou pour régler l'heure (00-90 minutes) et appuyez sur la touche
pour confirmer le rglage. Lorsque la fermeture automatique est réglée avec succès, é
l'icône apparaît sur l'écran, ce qui indique que le système est entré dans le mode d'arr-
êt de temporisation. La minuterie commence le compte à rebours jusqu'à ce que le temps
réglé arrive et ensuite l'appareil teint automatiquement. Lorsque l'heure est réglée sur é
00 ou lorsque vous éteignez l’appareil, la fonction de mise en veille est annulée automati-
quement.
10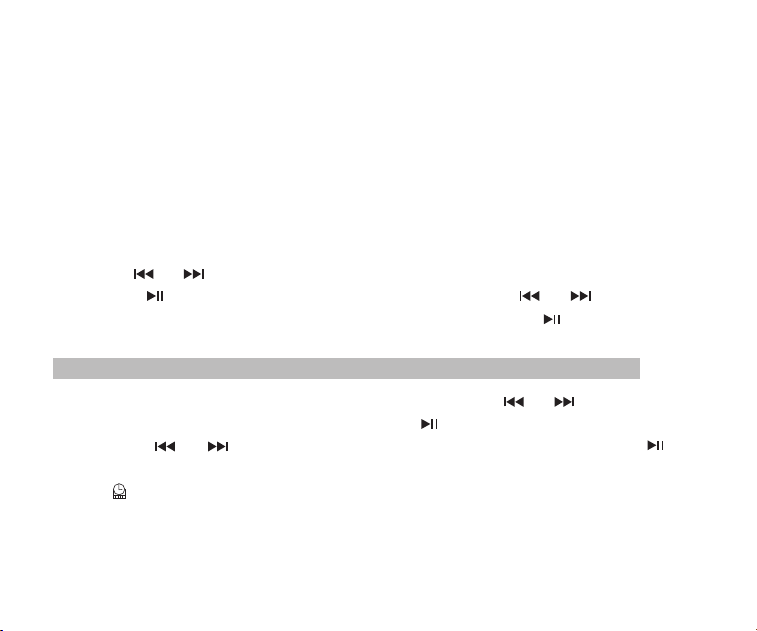

Questions et Réponses
1. Q: Impossible d'allumer la radio.
R: Peut-être que la batterie a été vidangée, veuillez charger la batterie.
2. Q: Impossible de se connecter à un ordinateur..
R: Veuillez faire la connexion en mode radio désactivé. Le câble USB peut-être endom-
magé, veuillez essayer un autre.
3. Q: Le haut-parleur ne sonne pas.
R: Veuillez vérifier si le volume est trop bas, tournez-le vers le haut.
4. Q: Impossible de lire l'audio à partir de la carte Micro SD (TF) ou du lecteur USB.
R: Veuillez vérifier si la carte ou le lecteur USB est de mauvaise compatibilité, essayez
une autre carte ou un lecteur USB. Les fichiers sont endommagés ou avec un format
incorrect, supprimez le fichier et essayez à nouveau.
5. Q: Impossible de recharger la radio.
R: Veuillez vérifier si l'adaptateur externe ou le câble USB est correctement connecté.
Veuillez vérifier si l'adaptateur ou le câble USB est endommagé.
6: Q: Pourquoi le son de la radio vient du haut-parleur, pendant l'utilisation du casque ?
R: Parce que les écouteurs ont MIC fonction, en fait, cette radio ne peut pas fonctionner
avec les oreillettes qui ont MIC fonction. Donc, vous pouvez essayer un écouteurs
sans MIC fonction, si encore ne peut pas résoudre, n’hésitez pas à contacter notre
SAV s'il vous plaît.
7: Q: Pourquoi la rception SW n'est pas bonne?é
R: L'onde courte est un médium délicat. De petites choses comme l'heure de la journée,
le cycle des taches solaires, le temps et les questions atmosphériques peuvent jouer
le diable avec la réception. Mais une fois que le soleil se couche, les bandes de vague
11
courte s'animent avec la musique, les nouvelles, la propagande et même quelques
qu'à l'extérieur
stations de radio pirate. De sorte que la puissance du signal sera faible à l'intérieur
.Ainsi, la meilleure façon d'écouter les ondes courtes devrait être:
étendre l'antenne, dans le temps de la nuit et à l'extérieur
12
Spécification
Frquence : FM: 87-108MHz, MW: 522-1710KHz, SW: 4.75-21.85MHz
Circuit sortant : 2W
Capacit de batterie : 1000mAh batterie de lithium
é
é
Éviter les risques d’touffement
Petite parts. Pas pour les enfants de moins de 3 ans.
Protgez votre ouïe
● Utilisez le volume le plus bas pendant l'utilisation.
● Augmentez le volume seulement si vous tes dans un environnement
bruyant.
● Baissez le volume avant d'utiliser un casque ou un couteur.
● Limitez la dure d'utilisation des casques ou des couteurs au grand volume
● Lorsque vous utilisez la radio sans casque ou oreillette, ne placez pas le
haut-parleur de la radio directement contre votre oreille.
Remarque: L'exposition des bruits forts de n'importe quelle source pendant
une longue priode peut affecter temporairement ou dfinitivement
votre audition. Plus fort le volume de la radio, moins le temps avant
que votre audition puisse tre affecte. Les dommages auditifs
causs par les bruits forts sont parfois indtectables au début mais
il peut avoir un effet si quelqu'un toujours .utilisent le grand volume.
.
é
é
ê
é
éé
à
éé
êé
éé
Avertissement
ATTENTION

DIRECTORIO
Visualización de la pantalla
Ubicación de los controles
Introducción
Carga de la batería de litio
Operación de radio
Operación de reproducción de música
Operación de grabación
Configuración del sistema
Solución de problemas
Especificación
Precaución
....................…..…02
…..……….........……03
…..….................................………04
……….....…......……04
………………............………05
...………07
………..................……08
………………...…..…10
…………………….......…11
…………………...…..............…..12
…..….......................................…..13
01
●
Leer y comprender todas las directrices de seguridad y la información del uso
Se recomienda utilizar la batería de litio original.
Utilice por favor el dispositivo de carga con el voltaje de salida 5 V, 500mA-1000mA para
evitar dañar la batería de litio y el dispositivo
Si no va a utilizar la batería de litio durante un período de tiempo prolongado, retírela,
guárdela por separado y recuerde cargarla una vez al mes.
No permita que la radio entre en contacto directo con la lluvia, la humedad o las gotas
de líquido.
Evite las fuentes de calor directas. No hornee ni sople el producto.
No exponga el dispositivo a la luz directa del sol durante un período de tiempo prolon-
gado.
No deje caer el producto ni aplique una fuerte presión.
Gracias por adquirir el
RETEKESS
V115. Por favor lea el manual detenidamente antes de
operar y guarde este libro en un lugar seguro para referencia futura.
El grabador de radio de bolsillo con AM / FM / SW de banda completa es una radio de sin-
tonía eléctrica digital integrada que puede reproducir archivos MP3 y WMA, operación de
menú multilingüe, que muestra la letra de forma sincronizada, admite grabación MIC, gra-
bación de radio, grabación LINE IN y auriculares estéreo , con una batería de litio recarga-
ble (la batería puede reemplazarse con una batería BL-5C de mayor capacidad para lograr
un tiempo de reproducción más largo).
RETEKESS
V
115 AM / FM / SW GRABADOR DE RADIO STEREO DE
BANDA COMPLETA
Precauciones
Antes de usar este registrador de radio de bolsillo, asegúrese de seguir las recomendac-
iones de seguridad básicas para garantizar el uso seguro y responsable del producto.
Introducción
●
●
●
●
●
●
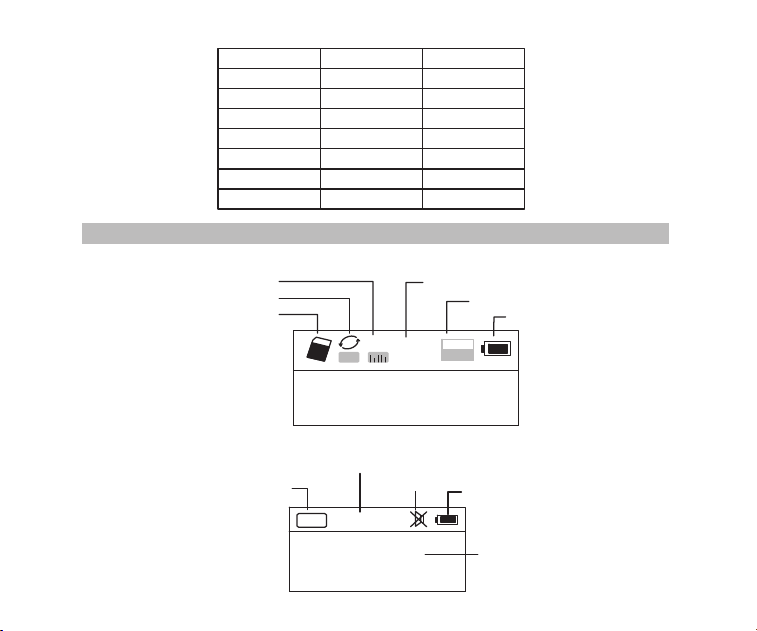
02
Reproducción de Radio
Menú del sistema
定时关机
中文
Inglés
对比调节
背光时间
录音设置
AM 步进设置
返回主界面
语言选择
Español
Auto power
Contrast
Back light time
Language
Record set
AM Stepping set
Back
Off Time
Contraste
Tiempo brillante
Idioma
Record set
AM Stepping set
Espada
FM
88.6
MH
Z
CH07
Radio banda
Estación guarda de radio actual
Mudo
Estado de la batería
Frecuncia de radio
Reproducción de TF música
A
NOR
02:12
18:06
128
MP3
Modo de Repetición
Modo de efecto de sonido
Tiempo transcurrido de la música actual
Formato del archivo de canción
Estado de la batería
Insertar TF tarjeta
Nombre de la canción
Letra sincrónica
Visualización de la pantalla
03
Presentación
FM/SW antena
Pantalla
MIC
Power
Modo
Toma del auricular
Entrada del audio
AM/FM
SW
TF tarjeta
Pulsa prolongada para
invocar la grabación
Interfaz de carga/USB
Volumen
DEL(Borrar)
Atrás
Reproducción/Pausa
Adelante
Altavoz
REC(Grabación)
Ajuste de Repetir/Sistema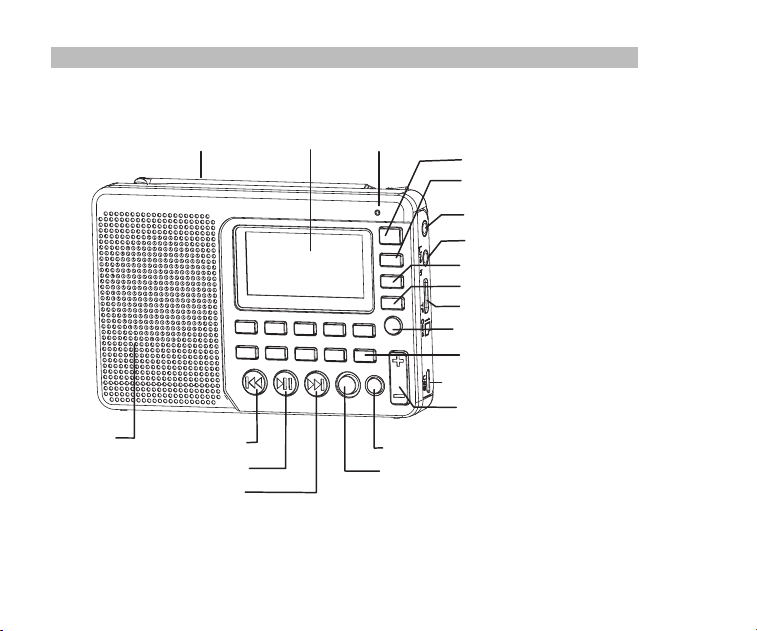
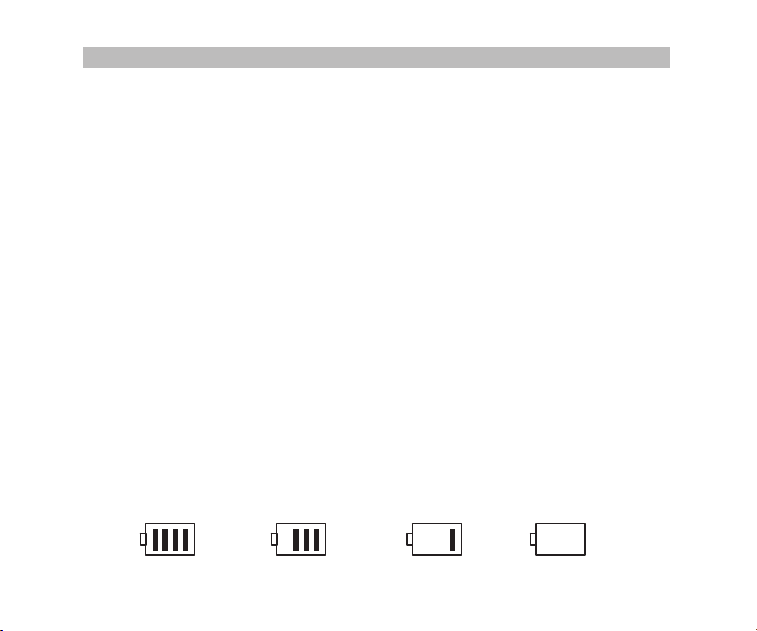
04
Hay 3 formas de operación de presionar las teclas: presionar brevemente, presionar larga
y mantener presionado. A menos que se indique expresamente, todas las operaciones se
presiona brevemente.
Presione brevemente: presione la tecla una vez y la función comenzará a funcionar.
Presión prolongada: mantenga pulsada durante más de 1,2 segundos y la función empieza
a funcionar, y sólo funciona una vez.
Mantenga pulsado: presione la tecla y mantenga presionado hasta la parada, la función fu-
nciona varias veces en una cierta frecuencia, como avance / retroceso rápido.
Definición de operaciones de tecla
Fuente de alimentación de batería
Instalación / Sustitución de la batería
1. Abra la tapa de la batería.
2. Inserte la pila de litio de acuerdo con la polaridad indicada.
3. Cierre la tapa de la batería.
4. Antes de utilizar por primera vez la batería de litio por favor carga por 6 horas. Después
de la primera carga, el tiempo de carga debe ser de aproximadamente 4 horas.
5. Recomiende: utilice el cargador de 5 V, 500mA proporcionado.
6. En casos normales, antes de cargar la batería, por favor cerciórese de que el radio esté
apagado. Durante la carga, LCD pantalla muestra "Pantalla de carga". El icono de ence-
ndido de la batería parpadeante indica que la carga está en curso. Cuando la batería es-
tá completamente cargada, el icono de carga de la batería no parpadeará y mostrará la
batería completa.
Indicador de consumo de batería
Completo MedioBajoAgotado
05
Carga de la batería de litio
1. Adaptador externo (no incluido). Utilice un adaptador adaptado (5V DC / 500mA, USB
puerto) para cargar la radio.
2. Instale la batería de litio.
3. Para cargar la batería, conecte el cable Micro-USB a la radio y el otro extremo a un
adaptador USB.
4. Durante la carga, el símbolo de la batería que se muestra en la pantalla se mueve de
derecha a izquierda y se detiene cuando la batería está completamente cargada. A
continuación, desconecte la radio y el adaptador.
Nota: Cuando cargue, presione el botón Power para apagar la radio. La corriente alterna
puede interferir con la recepción de señales de radio, por lo que no se recomienda
Cargado por el PC
1. Conecte la radio al ordenador con el cable USB suministrado.
2. Al cargarla, ícono de batería se muestra en la pantalla y se mueve de derecha a izquierda.
3. El símbolo de la batería deja de moverse cuando la batería está completamente carg-
ada
Encender / apagar la radio
1. Mantenga presionado el botón Power
para encender el dispositivo.
2. Ampliar la antena
3. Presione la tecla AM / FM o SW para seleccionar la banda.
4. Mantenga presionado el botón Power nuevamente para apagar el dispositivo.
utilizar la radio durante la carga.
No utilice AC adaptador o la computadora para alimentar la radio para reproducir
música o escuchar la radio cuando la batería está descargada.
Descargue la batería o cargue completamente una vez en 2 meses si la radio no
se utiliza durante mucho tiempo.
Operación de radio

06
Buscar y almacenar automáticamente estación
En el modo de radio, mantenga presionada la tecla para entrar en búsqueda autom-
ática y almacenar estaciones. Las estaciones disponibles se han numerado y almacena-
do automáticamente de frecuencias bajas a altas. Cuando las estaciones hayan termina-
do de almacenar, presione o para invocar las emisoras de radio almacenadas y
comience a escuchar. Si alguna estación interferente se guarda automáticamente, presi-
one la tecla DEL para borrarla.
Guardar una emisora de radio manualmente
A. En el modo de radio, pulse prolongadamente o para buscar emisoras de ra-
dio hacia delante o hacia atrás. Cuando se recibe una emisora de radio, la búsqueda
se detendrá y comenzará a reproducirse la emisora recibida.
B. Introduzca directamente la frecuencia de una estación de radio: Por ejemplo, la frecu-
encia de la estación de radio es de 88.5MHz. Pulse las teclas numéricas 8, 8 y 5, a
continuación, pulse la tecla para confirmar la entrada. La radio saltará a 88.5MHz.
* AM: los números que son 522 + Multiples de 9 son válidos; Para América del Norte
520+ Múltiples de 10 son válidos
C. Operación de onda corta: Pulse la tecla
SW
para invocar ondas métricas en orden:
60m (4.750MHz), 49m (5.950MHz), 41m (7.100MHz)
31m (9.500MHz), 25m (11.650MHz), 22m (13.600MHz)
19m (15.100MHz), 16m (17.500MHz), 13m (21.45MHz)
Después de seleccionar una onda métrica, pulsa largamente la tecla para buscar
emisoras de radio.
Invoque una estación de radio con el método descrito en las siguientes A, B o C, y mantenga
presionada la tecla MEMO "5", cuando el "CH00" parpadee en la pantalla, presione las teclas
numéricas para ingresar a la ubicación de almacenamiento de la estación, y presione el botón
"PLAY", la pantalla indica “guardar,” luego presione el botón "PLAY" nuevamente para confirmar
que se puede almacenar en la ubicación especificada.
Nota: Hay un límite en el número de emisoras preestablecidas en cada banda.
(FM: 80 presets, MW: 60 prestes, SW: 300 presets)
07
AM pasos configura
En el modo de radio AM, mantenga presionada la tecla MENU para entrar en el menú
principal del sistema, pulse la tecla o para entrar en el submenú de Paso AM
a seleccionar paso 9 KHz o paso 10 KHz (Norteamérica), pulse la tecla para conf-
irmar.
Eliminar una emisora de radio
Invoque una emisora de radio y presione prolongadamente la tecla DEL, la pantalla most-
rará la confirmación de borrado de estación de radio. Pulse la tecla para confirmar la
eliminación de la emisora de radio actual.
* Si la operación anterior no se termina en 5 segundos, el sistema volverá al modo de radio.
Silenciar la radio
En el modo de radio, presione la tecla y el icono parpadeará en la pantalla, lo que
indica que la radio está en modo de silencio. Presione nuevamente la tecla para des-
activar el silencio.
Operación de reproducción de música
1. Introduzca correctamente la tarjeta TF de música en formato MP3 o WMA.
2. Presione la tecla
Power para encender el dispositivo.
3. Pulse la tecla MODE para entrar en el modo de reproducción. La pantalla mostrará el
nombre de la música, el formato, el tiempo transcurrido, etc.
4. Pulse la tecla o para seleccionar la canción siguiente o anterior o pulse las tec-
las numéricas para seleccionar una canción y, a continuación, pulse la tecla para con-
firmar la selección. La radio saltará directamente al número de la canción para reprod-
ucir la canción correspondiente.
5. Pulse la tecla Repeat para repetir una canción ( indica repetir una canción) o repetir
todas las canciones en orden ( indica repetir todas las canciones).
A
08
Configuración de reproducción
* Esto se ha establecido en la fábrica. No se recomienda volver a configurarlo.
1. En el modo de reproducción, pulse prolongadamente la tecla para entrar en la pan-
talla principal de reproducción.
A. Directorio principal (Seleccione este elemento para seleccionar las canciones en las
carpetas del directorio)
B. Modo de reproducción: Repetir todo, Repetir uno, Repetir directorio (seleccione esta
opción para reproducir las canciones de la carpeta seleccionada solamente)
Transmisión de datos por computadora
Encienda el dispositivo y conéctelo al ordenador con el cable Micro USB. Presione cualq-
uier tecla del dispositivo y el ordenador instalará automáticamente el software y controla-
dor. La pantalla del dispositivo mostrará el icono conectado a la computadora para indicar
que la conexión ha tenido éxito. Aquí el ordenador puede leer,copiar y borrar los archivos
de la tarjeta TF del dispositivo (se puede utilizar como lector de tarjetas) y también puede
utilizarse como USB altavoz externo del ordenador. (Ciertas computadoras de configurac-
ión diferente pueden no ser compatibles)
2. Pulse la tecla o para seleccionar el submenú y pulse la tecla para acceder
al submenú. Pulse la tecla o para seleccionar el sub-elemento correspondiente
y pulse la tecla para confirmar la selección. La configuración se realizará correcta-
mente y el sistema saldrá del modo de configuración.
C. Efecto de sonido (NATURAL, POP , ROCK, JAZZ, PAIS, HEAVY BASS)
D. Volver a la pantalla principal
Operación de grabación
MIC Grabación
Inserte la tarjeta TF y encienda el dispositivo. Pulse la tecla MODE para entrar en el modo
de reproducción. Pulse prolongadamente la tecla REC para entrar en el modo de grabaci-
ón MIC. Durante la grabación presione la tecla REC para terminar y salir del modo de gra-
bación.
09
Operación de invocación de archivo de grabación
Mantenga pulsada la teclaREC FILE "0" para invocar el archivo de grabación. Pulse la
tecla o para seleccionar el archivo de grabación a reproducir.El nombre de archi-
vo "MIC" indica un archivo de grabación MIC; "LIN" indica un archivo de grabación LINE
IN; "RAD" indica un archivo de grabación de radio.
LINE IN Grabación
Conecte el cable de audio externo ("Line in" se identifica automáticamente) Asegúrese de
que se está reproduciendo una canción externa. Ajuste el volumen del audio externo y pr-
esione prolongadamente la tecla REC
para entrar en "LINE IN Recording". Durante la gra-
bación presione la tecla REC para terminar y salir.
Radio grabación
Pulse la tecla FM para entrar en el modo de radio y ajustar la emisora de radio. Presione
prolongadamente la tecla REC para entrar en el modo de grabación de radio. Durante la
grabación, presione la tecla puede detener la grabación, presione la tecla otra vez
puede reanudar la grabación. Pulse la tecla RECpara finalizar la grabación y salir del
modo de grabación.
* En el modo de grabación, el volumen se bloquea al nivel establecido antes de grabar. Si
pulsa la tecla Volume, el volumen no cambiará.
vo "MIC" indica un archivo de grabación MIC; "LIN" indica un archivo de grabación LINE
IN; "RAD" indica un archivo de grabación de radio.
Operación de eliminación de archivo de grabación
Mantenga pulsada la tecla REC FILE "0" para invocar un archivo de grabación. Pulse la
tecla o para seleccionar el archivo de grabación que desea borrar.Mantenga puls-
ada la tecla DEL y aparecerá la pantalla "¿Está seguro de borrar el archivo?" Presione la
tecla para borrar el archivo de grabación.
10
Configuración del sistema
1.Pulse prolongadamente la tecla MENU para entrar en la pantalla de configuración del
sistema (El sistema volverá a la pantalla principal automáticamente si no hay operación
dentro de 5 segundos.)
Pantalla del sistema
a. Apagado automático (el tiempo de apagado automático se puede establecer en 0-90
minutos)
b. Contraste (la relación de contraste de la pantalla se puede establecer en el nivel 1-15)
c. Tiempo de retroiluminación (Retroiluminación puede ajustarse a Normal ON, OFF o una
duración)
d. Idioma (chino / inglés / español)
e. Conjunto de discos (Relación de compresión: Grabación simple 64kbps / Grabación de
calidad 96 kbps / Grabación super 128kbps)
f. Atrás (Regresar a la pantalla principal)
Nota: Para comodidad de los clientes, la configuración de idioma predeterminada de la
máquina es el inglés
2. Después de que el sistema ingrese a la pantalla de Configuración del sistema, presione
la tecla o para seleccionar el sub-elemento correspondiente y presione la tecla
para entrar en el submenú. Presione la tecla o para seleccionar el sub-ele-
mento correspondiente y presione la tecla para confirmar la selección para finalizar
la configuración.
Bloqueo de teclas
Mantenga presionada la tecla MODE, el icono de bloqueo aparecerá en la pantalla, lo que
indica que el sistema ha entrado en el modo de bloqueo de teclas. Si presiona otras teclas,
no funcionarán y el icono de bloqueo aparecerá en la pantalla. Mantenga pulsada la tecla
MODE y el icono de desbloqueo aparecerá en la pantalla, lo que indica que las teclas se
han desbloqueado.
11
Solución de problemas
1. P: No se puede encender la radio.
R: Posiblemente la batería esté agotada, por favor cargue la batería.
2. P: No se puede conectar a una computadora.
R: Por favor, haga la conexión en modo de apagado de radio. El cable USB puede est-
ar dañado. Intente otro.
3. P: El altavoz no suena.
R: Compruebe si el nivel de volumen es demasiado bajo, gírelo hacia arriba.
4. P: No se puede reproducir audio desde la tarjeta Micro SD (TF) o unidad USB.
R: Compruebe si la tarjeta o la unidad USB tiene poca compatibilidad, pruebe con otra
tarjeta o unidad USB. Los archivos están dañados o con formato incorrecto, elimine
el archivo y vuelva a intentarlo.
5. P: No se puede cargar la radio.
R: Compruebe si el adaptador externo o el cable USB estaban correctamente conecta-
Operación de ajuste de temporizador de apagado
Ingrese a la pantalla de configuración del sistema, presione la tecla o para selec-
cionar "Auto Power" y presione la tecla para ingresar el sub-ítem. Presione o para
ajustar la hora (00-90 minutos) y presione la tecla para confirmar la configuración.
Cuando el apagado del sueño se ha ajustado correctamente, el icono de apagado de la
temporización aparecerá en la pantalla, lo que indica que el sistema ha entrado en el
modo de apagado del temporizador. El temporizador comenzará la cuenta atrás hasta que
llegue el tiempo establecido y luego el dispositivo se apagará automáticamente. Cuando
la hora se ajusta en 00 o cuando se apaga el interruptor de encendido, la función de apa-
gado automático se cancelará.
dos. Compruebe si el adaptador o el cable USB están dañados.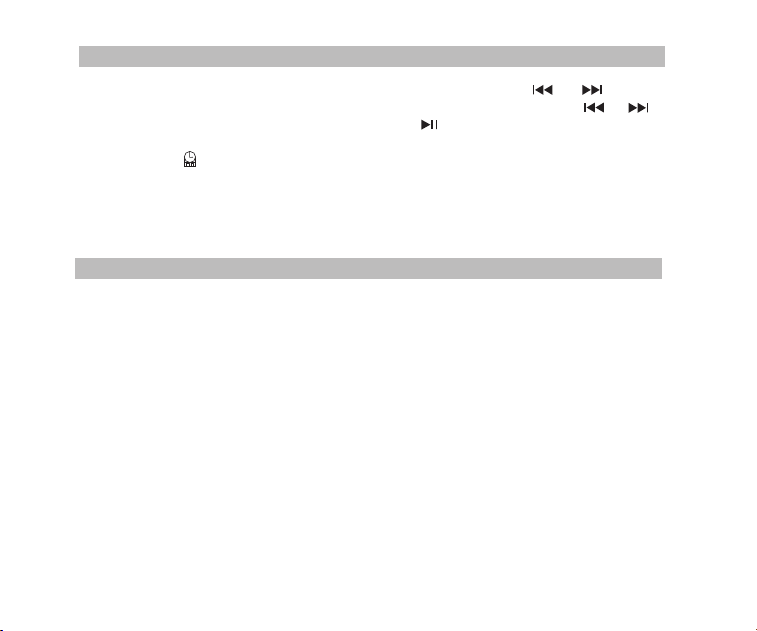

12
6: P: ¿Por qué el sonido está fuera del altavoz del radio al usar auricular?
R: Debido a que los auriculares tienen función MIC, de hecho, esta radio no puede fun-
cionar con los auriculares que tienen función MIC. Así que puede probar un auricular
sin función MIC, si todavía no puede resolver, por favor envíeme un correo electrón-
ico libremente
7: P: ¿Por qué la recepción del SW no es buena?
R: La onda corta es un medio delicado. Pequeñas cosas como la hora del día, el ciclo
de las manchas solares, el clima y los problemas atmosféricos pueden jugar al dia-
blo con la recepción. Pero una vez que el sol se pone, las bandas de onda corta co-
bran vida con música, noticias, propaganda e incluso algunas estaciones de radio
piratas. Por lo que la intensidad de la señal será débil en interiores que en exteriores.
Así que la mejor manera de escuchar la onda corta debería ser: extender la antena,
en la noche y al aire libre
Especificación
Frecuencia: FM: 87-108MHz, MW: 522-1710KHz, SW: 4.75-21.85MHz
Potencia de salida: 2W
Fuente de alimentación: 1000mAh batería de litio
Carga: DC 5V --- 500mA
13
Evite el riesgo de asfixia
Pequeñas partes. No para niños menores de 3 años.
Protégé tu audición
● Use el volumen bajo necesario para hacer su trabajo.
● Suba el volumen solo si se encuentra en un entorno ruidoso.
● Baje el volumen antes de agregar auriculares o auriculares.
● Limite el tiempo que usa auriculares o auriculares a un volumen alto.
● Cuando utilice la radio sin auriculares o auriculares, no coloque el altavoz de
la radio directamente contra su oreja
Nota: la exposición a ruidos fuertes de cualquier fuente durante períodos
prolongados de tiempo puede afectar su audición de manera temporal o
permanente. Cuanto más alto sea el volumen de la radio, menos tiempo
se necesitará para que su audición pueda verse afectada. El daño
auditivo debido al ruido es a veces indetectable al principio y puede
tener un efecto acumulativo..
Precaución
ADVERTENCIA

CONTENUTO
Descrizione schermo radio
Descrizione pannelli
Introduzione
Caricare la batteria al litio
Funzionamento della radio
Operazione di riproduzione di musica
Operazione di registrazione
Configurazione del Sistema
Risoluzione dei problemi
Specifiche
Precauzioni
........................…..02
...............................…..…03
….......................……….........……04
......................………04
…...….....…......……05
....………07
..................………08
…...................……10
………....................…11
…………………….........................…12
…………………........................…..13
01
Grazie per aver acquistato RETEKESS
V
115. Si prega di leggere attentamente il manuale prima
di utilizzare e mantenere questo manuale in un luogo sicuro per riferimenti futuri.
Radio registratore tascabile con banda
AM/FM/SW,
è una radio sintonizzazione digitale
integrato elettrico in grado di riprodurre file MP3 e WMA, il funzionamento del menu multi-
lingue, che esposizione lirica sincrono, supporta MIC registrazione, registrazione radio, re-
gistrazioneLINE IN, uscita auricolare stereo, con una batteria al litio ricaricabile (batteria
può essere sostituita con la batteria di capacità elevata BL-5C, al fine di ottenere più tem-
po di riproduzione).
RETEKESS
V115 BANDA AM/FM/SW STEREO RADIO REGISTRATORE
Precauzioni
Introduzione
Leggere e comprendere tutte le regole di sicurezza ed le informazioni di utilizzo.
Si consiglia di utilizzare la batteria al litio originale.
Ricaricare il dispositivo con la tensione di 5V, 500mAh 1A per evitare danni alla batteria
e al dispositivo.
Se la batteria al litio non viene utilizzata per un lungo periodo, si prega di rimuoverlo ed
conservarla separatamente, e ricordarsi di caricarla una volta al mese.
Non permettere la radio di entrare in contatto diretto con pioggia, umidità, o eventuali
gocce di liquido.
Evitare fonti di calore dirette. Non o asciugare il prodotto.riscaldare
Non esporre il dispositivo alla luce diretta del sole per un periodo prolungato di tempo.
Non far cadere il prodotto o applicare una forte pressione.
Prima di utilizzare questo stereo portatile, assicurarsi di seguire i consigli di sicurezza per
garantire un uso sicuro e responsabile del prodotto.

02
Sistema Menù
定时关机
中文
English
对比调节
背光时间
录音设置
AM 步进设置
返回主界面
语言选择
Espanol
Auto power
Contrast
Back light time
Language
Record set
AM Stepping set
Back
Off Time
Contraste
Tiempo brillante
Idioma
Record set
AM Stepping set
Espada
Descrizione schermo
Schermo con la Micro SD card
A
NOR
02:12
18:06
128
MP3
Modalità ripetere
Modalità sonora
Tempo del file con durata di file
Formato file
Stato batteria
SD card inserita
Nome file ed esposizione
di sincronizzazione
Descrizione schermo radio
Schermo con la radio
FM
88.6
MH
Z
CH07
Banda radio
Canale stazione
Mute
Stato batteria
Frequenza o stazione radio
Descrizione schermo radio
03
Descrizione pannelli
Antenna FM/SW
Display
MIC
Accensione
Modalità
Jack cuffie
Entrata del audio
Banda AM/FM
Banda SW
Micro SD card
Premere a lungo
per i file registrati
USB/Caricabatteria
Volume
Elimina
Successivo
Play/Pausa
Precedente
Altoparlante
Registrare
Ripetere/Menù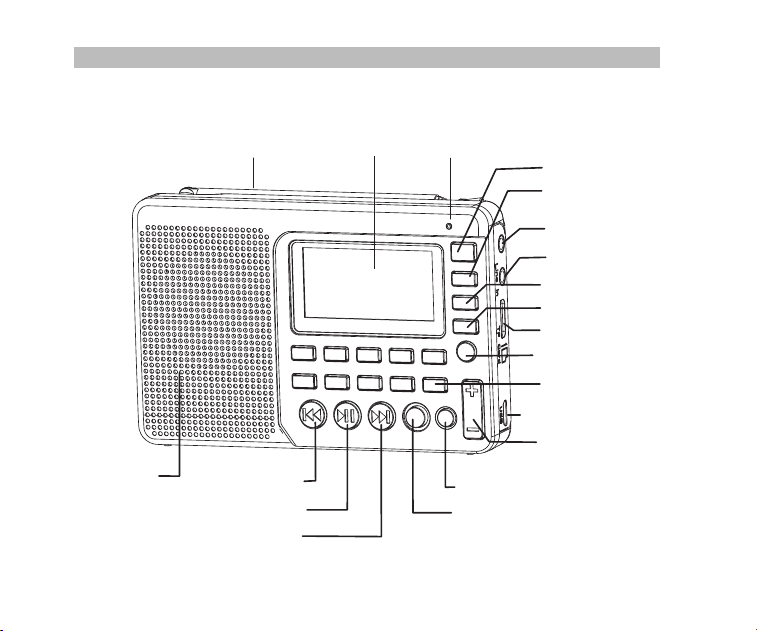
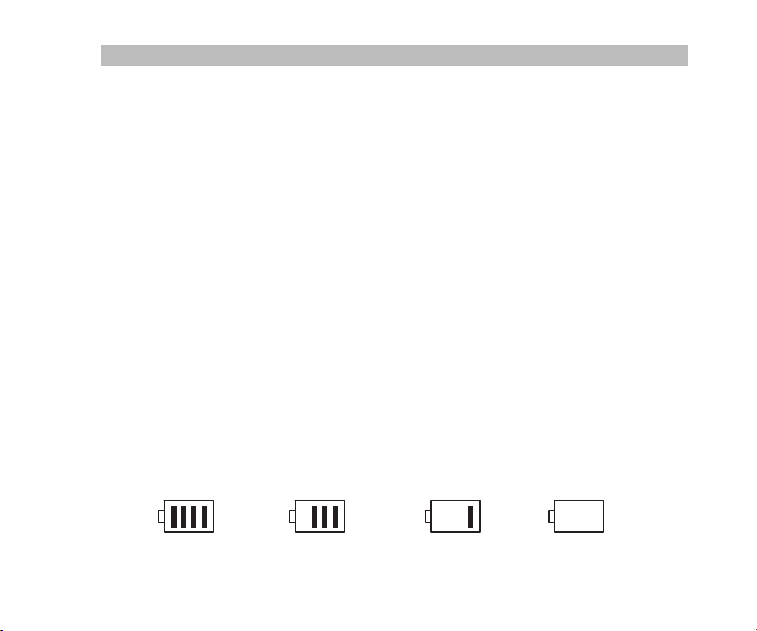
04
Ci sono 3 modi di funzionamento su come premere un tasto: Premere a breve, Premere a
lungo e Tenere premuto. A meno che non espressamente indicato, tutte le operazioni sono
da premere a breve.
Premere a breve: premere il tasto una volta, e la funzione inizia a lavorare.
Premere a lungo: premere e tenere premuto per più di 1-2 secondi e la funzione inizia a
lavorare, e funziona solo una volta.
Tenere premuto: tenere premuto il pulsante fino al suo arresto, che funzionano con una
certa frequenza di lavorare più volte, come ad esempio avanti / indietro veloce.
Definizione sui tasti
Batteria di alimentazione
Installazione / sostituzione della batteria
1. Aprire il coperchio della batteria.
2. Inserire la batteria al litio in base alla polarità indicata.
3. Chiudere il coperchio della batteria.
4. Prima di utilizzare per la prima volta caricare la batteria al litio per sei ore. Dopo le prime
cariche, la carica può essere circa 4 ore.
5. Raccomando: utilizzare il caricabatteria 5V,500mAh fornito.
6. In casi normali, prima di caricare la batteria, assicurarsi che il prodotto è in modalità radio.
Durante la ricarica il display LCD visualizza la "schermata di ricarica". L'icona della batte-
ria lampeggiante indica che la carica è in corso. Quando la batteria è completamente car-
ica, l'icona della batteria non lampeggia e mostrerà piena potenza della batteria.
Indicatore di consumo della batter ai
PienoMedioBassoEsaurito
05
Caricare la batteria al litio
1. Adattatore esterno (non incluso). Si prega di utilizzare un adattatore abbinato (5V DC /
500mA, porta USB) per caricare la radio.
2. Installare la batteria al litio.
3. Per caricare la batteria, collegare il cavo Micro-USB per la radio, l'altra estremità ad un
adattatore USB.
4. Durante la ricarica, il simbolo della batteria visualizzato sullo schermo si sposta da des-
tra a sinistra, e si ferma quando la batteria è completamente carica. Quindi scollegare la
radio e l'adattatore.
Nota: Durante la carica, premere Accensione per accendere / spegnere la radio. Corrente
alternata può interferire con ricevere segnali radio, in modo che non si consiglia di
Caricare dal PC
1. Collegare la radio al computer con il cavo USB in dotazione.
2. Durante la ricarica, il simbolo della batteria visualizzato sul display si sposta da destra a
sinistra.
3. Il simbolo della batteria smette di muoversi quando la batteria è completamente carica.
Accensione / spegnimento della radio
1. Premere a lungo il pulsante di Accensione per accendere il dispositivo.
2. Estendere l'antenna.
3. Premere il tasto AM / FM o SW per selezionare la banda.
4. Premere a lungo il pulsante di Accensione per spegnere il dispositivo.
utilizzare la radio durante la ricarica.
Non utilizzare l'adattatore AC o al computer per alimentare la radio per ascoltare la
musica o ascoltare la radio quando la batteria è scarica.
Si prega di scaricare la batteria o caricarla completamente una volta in 2 mesi se la
radio non viene utilizzato per un lungo periodo di tempo.
Funzionamento della radio

06
Ricercare automaticamente e memorizzare la stazione
In modalità radio, premere a lungo il tasto per accedere stazioni di ricerca e memori-
zzazione automatica. Le stazioni disponibili sono state numerate e conservati dalle basse
alle alte frequenze automaticamente.
Quando le stazioni hanno terminato la memorizzazione, premere o per invocare
le stazioni radio memorizzate e iniziare ascoltare. Se una stazione radio interferenza vi-
ene salvato automaticamente, premere a lungo il tasto CANC
per eliminarlo.
Salvare una stazione radio manuale
A. In modalità radio, premere a lungo o per cercare stazioni radio in avanti o in-
dietro. Quando si riceve una stazione radio, la ricerca si ferma e la radio stazione rice-
vuta inizierà a riprodure.
B. Direttamente ingresso la frequenza di una stazione radio: Per esempio, la frequenza
della stazione radio è 88.5MHz. Premere i tasti numerici 8- 8 - 5, quindi premere il ta-
sto per confermare l'ingresso. La radio passerà a 88.5MHz.
* AM: i numeri che sono 522 + multipli di 9 sono validi; Per il Nord America 520+ multipli
di 10 sono valide
C. Onde corte Operazione: Premere il tasto SW per richiamare le onde metriche in ordine:
60m (4.750MHz), 49m (5.950MHz), 41m (7.100MHz)
31m (9.500MHz), 25m (11.650MHz), 22m (13.600MHz)
19m (15.100MHz), 16m (17.500MHz), 13m (21.45MHz)
Dopo aver selezionato un onda metrica, premere a lungo il tasto per la ricerca delle s-
tazioni radio.
Richiamare la frequenza che desidera da memorizzare con il metodo descritto in A, B o C, poi
premere a lungo il tasto MEMO "5", quando appare il numero "CH00" lampeggiata sul display,
premere i tasti numerici per inserire la posizione della frequenza di memoria, e premere il tasto
"PLAY", lo schermo richiede di salvare, quindi premere nuovamente il tasto "PLAY" per
confermare e per essere memorizzato nella posizione specificata.
Nota: Ogni banda ha un limite di numero da memorizzare le stazioni selezionate.
(FM: Max 80, MW: Max 60, SW: Max 300)
07
1. Inserire correttamente la scheda Micro SD di musica in formato MP3 o WMA.
2. Premere il tasto di Accensione per accendere il dispositivo.
3. Premere il tasto MODE per accedere alla modalità di riproduzione. Lo schermo visual-
izzerà il nome della musica, il formato, il tempo trascorso, ecc
4. Premere il tasto o per selezionare il brano successivo o precedente o premere
i tasti numerici per selezionare un brano, quindi premere il tasto per confermare la
selezione. La radio passa automaticamente dal brano da riprodurre al brano corrispondente.
5. Premere il tasto REPEAT per ripetere un brano ( indica la ripetizione di un brano) o
ripetere tutti i brani in ordine ( indica la ripetizione di tutti i brani).
AM Stepping set
Nella modalità radio AM, premere a lungo il tasto MENU per il sistema di menu principale,
premere il tasto o , per selezionare AM sottomenu Stepping scegliere passo 9 kHz
o 10 KHz (Nord America), premere il tasto per confermare.
Eliminare una stazione radio
Richiamare una stazione radio e premere a lungo il tastoDEL, il display visualizzerà staz-
ione eliminazione conferma radio. Premere il tasto per confermare l'eliminazione della
stazione radio corrente.
* Se l'operazione di cui sopra non è finito entro 5 secondi, il sistema torna alla modalità
radio.
Mettere Mute alla radio:
In modalità radio, premere il tasto e lampeggia sullo schermo, che indica la radio è
in modalità mute. Premere nuovamente il tasto per disattivare mute.
Operazione di riproduzione di musica
A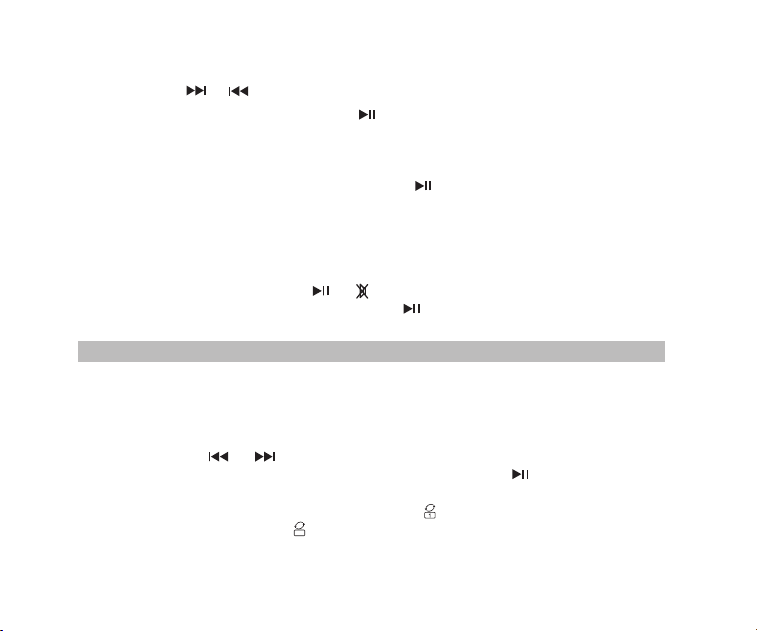
08
Riprodurre imposta:
* Questa è stata impostata in fabbrica. Non è consigliabile impostare di nuovo.
1. In modalità di riproduzione, premere a lungo il tasto per accedere alla schermata
principale.
A. directory principale (selezionare questa voce per selezionare i brani nelle cartelle nella
directory)
B. Modalità di riproduzione: Ripeti tutto, Ripeti uno, Ripeti Directory (selezionare questa
opzione per riprodurre i brani nella cartella selezionata solo)
2. Premere il tasto o per selezionare il sottomenu e premere il tasto per acced-
ere al sotto-menu. Premere il tasto o per selezionare il sub-voce corrispondente
e premere il tasto per confermare la selezione. La messa a punto avrà successo e
il sistema esce dalla modalità di impostazione.
C. Effetto sonoro (naturale, pop, rock, jazz, country, basso pesante)
D. Per tornare alla schermata principale
Trasmissione dei dati dal Computer
Accendere il dispositivo e connettersi al computer con il cavo Micro USB. Premere un tas-
to del dispositivo e il computer installare il software del driver automaticamente. Lo scher-
mo del dispositivo viene visualizzata l'icona di computer collegato per indicare la connes-
sione è riuscita. Qui il computer in grado di leggere, copiare ed eliminare i file nella scheda
Micro SD del dispositivo (può essere utilizzato come lettore di schede) e può essere utili-
zzato anche come un altoparlante esterno USB del computer. (Alcuni computer di config-
urazione diversa potrebbero non essere compatibili).
L'operazione di registrazione
Registrazione MIC
Inserire la scheda Micro SD e accendere il dispositivo. Premere il tasto MODE
per acced-
ere alla modalità di riproduzione. Premere a lungo il tasto REC per entrare nella modalità
di registrazione MIC. Durante la registrazione, premere il tasto REC per terminare e uscire
dalla modalità di registrazione.
09
Registrazione File Invocare
Premere a lungo il tastoREC FILE "0" per richiamare file di registrazione. Premere il
tasto o per selezionare il file di registrazione da riprodurre. Il nome del file "MIC"
Registrazione LINE IN
Collegare il cavo audio esterno ( "LINE IN" viene identificato automaticamente) Assicurarsi
che una canzone esterna è in riproduzione. Regolare il volume dell'audio esterna e prem-
ere a lungo il tasto REC per entrare in "LINE IN Recording". Durante la registrazione, pre-
mere il tasto REC per terminare e uscire.
RegistrazioneRadio
Premere il tasto FM per accedere alla modalità radio e regolare la stazione radio. Preme-
re a lungo il tasto REC per entrare nella modalità di registrazione radio. Durante la regist-
razione, premere il tasto può mettere in pausa la registrazione, premere il tasto di nu-
ovo in grado di riprendere la registrazione. Premere il tasto REC per terminare la reg-
istrazione e uscire dalla modalità di registrazione.
* Nella modalità di registrazione il volume è bloccato al livello impostato prima della regis-
trazione. Se si preme il tasto del volume il volume non sarà cambiato.
indica un file di registrazione MIC; "LIN" indica una linea di I a file di registrazione; "RAD"
indica un file di registrazione radio.
Registrazione File eliminazione:
Premere a lungo il tasto REC FILE "0" per richiamare un file di registrazione. Premere
il tasto o per selezionare il file di registrazione da cancellare. Premere a lungo il
tasto "DEL" e la schermata pop-up "Sei sicuro di voler eliminare il file" Premere il tasto
per cancellare il file di registrazione.
Tasto di bloccaggio:
Premere a lungo il tasto MODE, verrà visualizzata l'icona di blocco sullo schermo, che
indica che il sistema è entrato i tasti modalità bloccata. Se si preme altri tasti che non
10
Configurazione del sistema
1. Premere a lungo il tasto MENU per accedere alla schermata di configurazione del sist-
ema. (Il sistema tornerà alla schermata principale automaticamente se nessuna opera-
zione entro 5 secondi.)
Operazione timer di autospegnimento
Schermo di sistema
A. Spegnimento automatico(Il tempo di spegnimento automatico può essere impostato per
0-90 min)
B. Contrasto(Il rapporto di contrasto dello schermo può essere impostato a 1-15 livello)
C. Retroilluminazione (La retroilluminazione può essere impostata su normale ON, OFF o
durata)
D. Lingua(Cinese / inglese / spagnolo)
E. Record (Rapporto di compressione: 64 kbps record di semplice / record di 96 kbps di
qualità / Super Record 128 kbps)
F. Indietro (tornare alla schermata principale)
Nota:Per la comodità dei clienti utilizzano, l'impostazione della lingua predefinita la radio
è l'inglese
2. Dopo che il sistema entra nella schermata di configurazione del sistema, premere il ta-
sto o per selezionare il sub-voce corrispondente e premere il tasto per ac-
cedere al sotto-menu. Premere il tasto o per selezionare il sub-voce corrispon-
dente e premere il tasto per confermare la selezione per terminare l'impostazione.
funzionano e apparirà l'icona di blocco sullo schermo. Premere a lungo apparirà il tasto
MODE e l'icona di sblocco dello schermo, che indica i tasti sono stati sbloccati.
Inserire la schermata di configurazione del sistema, premere il tasto o per selezi-
onare "Auto Power" e premere il tasto per accedere al sotto-voce. Premere o
per impostare il tempo (00-90 minuti) e premere il tasto per confermare l'impostazione.
11
Risoluzione dei problemi
1. D: Non è possibile accendere la radio.
R: Forse la batteria è scarica, si prega di caricare la batteria.
2. D: Non riesco ad collegare a un computer.
R: Si prega di fare la connessione in modalità radio. Il cavo USB può essere danneggi-
ato, si prega di provare un altro nuovo.
3. Q: Gli altoparlanti non suonano.
R: Verificare se il livello del volume è troppo basso, prova a alzarlo.
4. D: Non è possibile riprodurre l'audio dalla scheda o con USB drive / Micro SD (TF).
R: Verificare che la scheda o con USB drive ha scarsa compatibilità, provare un'altra
scheda o con USB drive. I file vengono danneggiati o con formato non corretto,
eliminare il file e riprovare.
5. D: Non è possibile caricare la radio.
R: Verificare che l'adattatore esterno o il cavo USB è stato collegato correttamente.
Controllare se il cavo adattatore USB o è danneggiato.
6: D: Perché la radio sondare del diffusore, quando si utilizzano auricolari?
R: Perché gli auricolari hanno la funzione MIC, infatti, questa radio non può lavorare
con gli auricolari che hanno la funzione MIC.
Quindi può provare con un auricolare con senza la funzione MIC, se ancora non
può risolvere, mandate un email senza problemi.
Quando l'arresto del sonno è impostato con successo apparirà l'icona di arresto di si-
ncronizzazione sullo schermo, che indica che il sistema è entrato nella modalità di speg-
nimento di temporizzazione. Il timer inizierà il conto alla rovescia fino al tempo impostato
arriva e poi il dispositivo si spegne automaticamente. Quando il tempo è impostato su 00
o quando si spegne l'interruttore di alimentazione, la funzione di spegnimento sleep viene
annullata.

12
7: D: Perché la ricezione SW non è buona?
R: Perchè ha una onda corta è un mezzo delicato. Le piccole cose come l'ora del giorno,
il ciclo delle macchie solari, il tempo e le questioni atmosferiche possono produrre il
diavolo con la ricezione. Ma una volta che il sole va giù, le bande a onde corte si an-
imano con musica, notizie, la propaganda e anche alcune stazioni radio pirata. così
la forza del segnale sarà chiuso deboli rispetto all'esterno.
Quindi il modo migliore per ascoltare onde corte dovrebbe essere: estendere l'ante-
nna, nella notte all'aperto.
Specifiche
Frequenza: FM: 87-108MHz, MW: 522-1710KHz, SW: 4.75-21.85 MHz
Potenza in uscita: 2W
Batteria: batteria al litio da 1000mAh
Alimentazione: DC 5V --- 500mA
13
Evitare il rischio di soffocamento
Contiene piccole parti. Non per bambini sotto i 3 anni.
Protezione al tuo udito:
●
● Alzare il volume solo se ci si trova in un ambiente rumoroso.
● Abbassare il volume prima di inserire l'auricolare o cuffie.
● Limitare la quantità di tempo in cui si utilizzano auricolari o cuffie a volume
elevato.
● Quando si utilizza la radio senza auricolare o cuffie, non posizionare
l'altoparlante della radio direttamente contro l'orecchio.
Nota: l'esposizione a forti rumori provenienti da qualsiasi fonte per lunghi
periodi di tempo può influenzare temporaneamente o permanentemente
l'udito. Più forte è il volume della radio, meno tempo è necessario prima
che l'udito possa essere influenzato. Il danno uditivo da rumore forte a
volte non rilevabile e può avere un effetto cumulativo.
Utilizzare il volume più basso necessario per svolgere il proprio lavoro.
Precauzioni
AVVERTIMENTO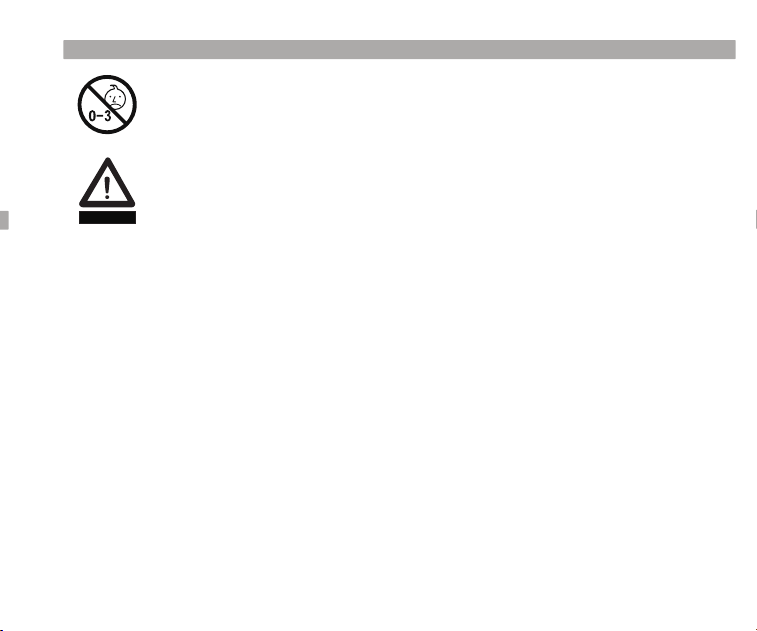

RETEKESS V115 AM/FM/SW FULL BAND STEREO RADIO RECORDER
Henan Eshow Electronic Commerce Co.,Ltd
EN User's manual
DE Bedienungsanleitung
FR Mode d'emploi
ES Instrucción manual
IT Manuale d'istruzioni
EU Importer:
Name:Germany Retevis Technology GmbH
Address:Uetzenacker 29,38176 wendeburg