1. Overview
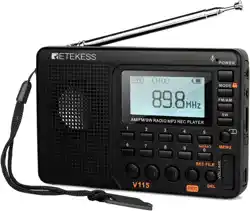
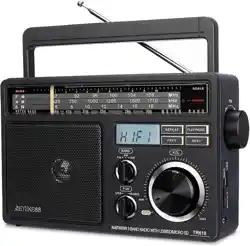
The Retekess V115P is a portable, multi-band digital radio. It receives AM, FM, Shortwave (SW), Longwave (LW), and Weather Band (WB) broadcasts. The device includes a rechargeable battery, digital tuner, Bluetooth connectivity, a TF card slot for media playback and recording, a built-in flashlight, and alarm clock functions.

2. Package Contents
- Retekess V115P Radio
- USB Charging Cable
- Lithium Battery (BL-10C, 1800mAh)
- Owner's Manual
- Bracket Buckle
- Lanyard
3. Features & Specifications
3.1 Physical Specifications
- Dimensions: 5.31" L x 0.98" W x 3.26" H
- Weight: 192 grams
- Enclosure Material: Plastic
- Color: Black
3.2 Radio Tuner
- Bands Supported: 5-Band (AM, FM, SW, LW, WB)
- Tuner Technology: Digital Tuning
- Frequency Range:
- FM: 87-108 MHz
- AM: 520-1710 KHz (10k step) or 522-1710 KHz (9k step)
- SW: 4.75-21.85 MHz
- Station Memory: Save up to 132 AM, 928 SW+LW, and 440 FM channels.

3.3 Audio & Connectivity
- Speaker: 3W bass speaker.
- Connectivity: Bluetooth, 3.5mm AUX input, USB (for charging).
- Playback: Supports MP3, WMA, and WAV audio files from a TF (MicroSD) card.
- Playback Modes: Sequential, folder repeat, shuffle, single track repeat.

3.4 Power & Battery
- Battery: 1 x Rechargeable BL-10C Lithium-Ion battery (1800mAh, included).
- Charging: Via Micro USB cable (5V). Full charge takes approximately 3 hours with a 5V/2A adapter.
- Battery Life:
- Approximately 6-8 hours at high volume.
- Approximately 20 hours at low or medium volume.

3.5 Additional Features
- Recording: Can record via microphone, line-in, or directly from the radio. Quality options: 64 kbps, 96 kbps, 128 kbps.
- Flashlight: Built-in LED light.
- Display: LCD screen with adjustable backlight.
- Clock & Alarm: Built-in clock with alarm function.
- Sleep Timer: Can be set from 00-90 minutes.
- Language Support: English, Chinese, Spanish (default is English).
- Lock Function: Prevents accidental button presses.

4. Use Guide
4.1 Initial Setup
- Insert the included lithium battery into the compartment on the back of the radio.
- Connect the radio to a power source using the provided USB cable to charge the battery fully.
- Extend the telescopic antenna for best reception.
4.2 Basic Operation
Turning On/Off and Volume
Press and hold the Power button to turn the radio on or off. Use the Volume Up (+) and Down (-) buttons to adjust the sound level.
Selecting a Band
Press the BAND button to cycle through the available radio bands: FM -> AM -> SW -> LW -> WB.
Tuning a Station
Use the Tuning Up (>>) and Tuning Down (<<) buttons to manually search for stations. For fine tuning, press and hold these buttons.
Saving a Preset Station
- Tune to the desired station.
- Press and hold a number key (0-9) on the keypad for a few seconds until the display confirms the save.
- To recall a preset, press the corresponding number key.
4.3 Using the TF Card (MicroSD)
- Ensure the radio is powered off.
- Insert a TF card (MicroSD card, up to 256GB capacity, not included) into the slot.
- Turn on the radio and press the MODE button until "TF CARD" appears on the display.
- Use the Play/Pause, Next, and Previous buttons to control playback.
- Press the EQ button to cycle through 5 sound effects.
4.4 Bluetooth Connection
- Press the MODE button until "BT" appears on the display. The radio will enter pairing mode.
- On your Bluetooth device (e.g., smartphone), enable Bluetooth and search for new devices.
- Select "Retekess V115P" from the list to pair.
- Once connected, audio from your device will play through the radio's speaker.
4.5 Recording Audio
- Insert a TF card.
- Press the REC button to start recording.
- In Radio Mode: Records the currently playing station.
- In TF Card or AUX Mode: Records the line-in audio.
- In BT Mode: Records the Bluetooth audio stream.
- Otherwise, it uses the built-in microphone.
- Press the REC button again to stop recording. Files are saved to the TF card.
4.6 Using the Flashlight
Press the Flashlight button (typically marked with a bulb icon) to turn the LED light on or off.
4.7 Setting the Alarm and Sleep Timer
Alarm
- Ensure the clock is set correctly (time is usually set automatically via radio signal or manually through settings).
- Press the ALARM button to enter alarm setting mode. Use the number keys or tuning buttons to set the alarm time.
- Select the alarm source (Radio or Buzzer).
- Press ALARM again to save and activate.
Sleep Timer
- While the radio is playing, press the SLEEP button.
- Use the number keys or tuning buttons to set the duration (00 to 90 minutes).
- The radio will automatically power off after the set time elapses.
4.8 Locking the Keypad
Press and hold the Lock button (often represented by a padlock icon) to disable all other buttons, preventing accidental operation during transport or storage. Press and hold again to unlock.
5. Care and Maintenance
- Keep the radio dry and avoid extreme temperatures.
- Clean the exterior with a soft, dry cloth. Do not use liquid cleaners.
- Use only the provided USB cable or a compatible 5V charger to avoid battery damage.
- For long-term storage, charge the battery to approximately 50% and store in a cool, dry place.
6. Troubleshooting
- No Power: Ensure the battery is installed correctly and fully charged. Check the USB connection.
- Poor Reception: Fully extend the antenna. Move to a location with fewer obstructions. For AM, try rotating the radio.
- Bluetooth Won't Connect: Ensure the radio is in BT mode and in pairing state. Restart both the radio and your Bluetooth device.
- TF Card Not Recognized: Ensure the card is properly inserted. Format the card to FAT32 on a computer if necessary. The card must be 256GB or smaller.
- Buttons Not Responding: Check if the keypad lock is enabled.
7. Warranty and Support
The product includes a 1-year warranty and a 30-day return policy. For service or support, contact the seller directly through your Amazon account. The seller states they will respond within 12 hours.
Manufacturer: Retekess
Model: V115P
ASIN: B0FF251J97
Note: This manual is based on information available from the product listing. Always refer to the included printed Owner's Manual for the most complete and accurate instructions.