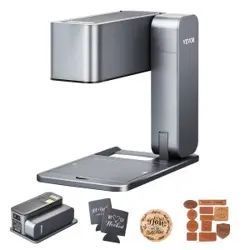
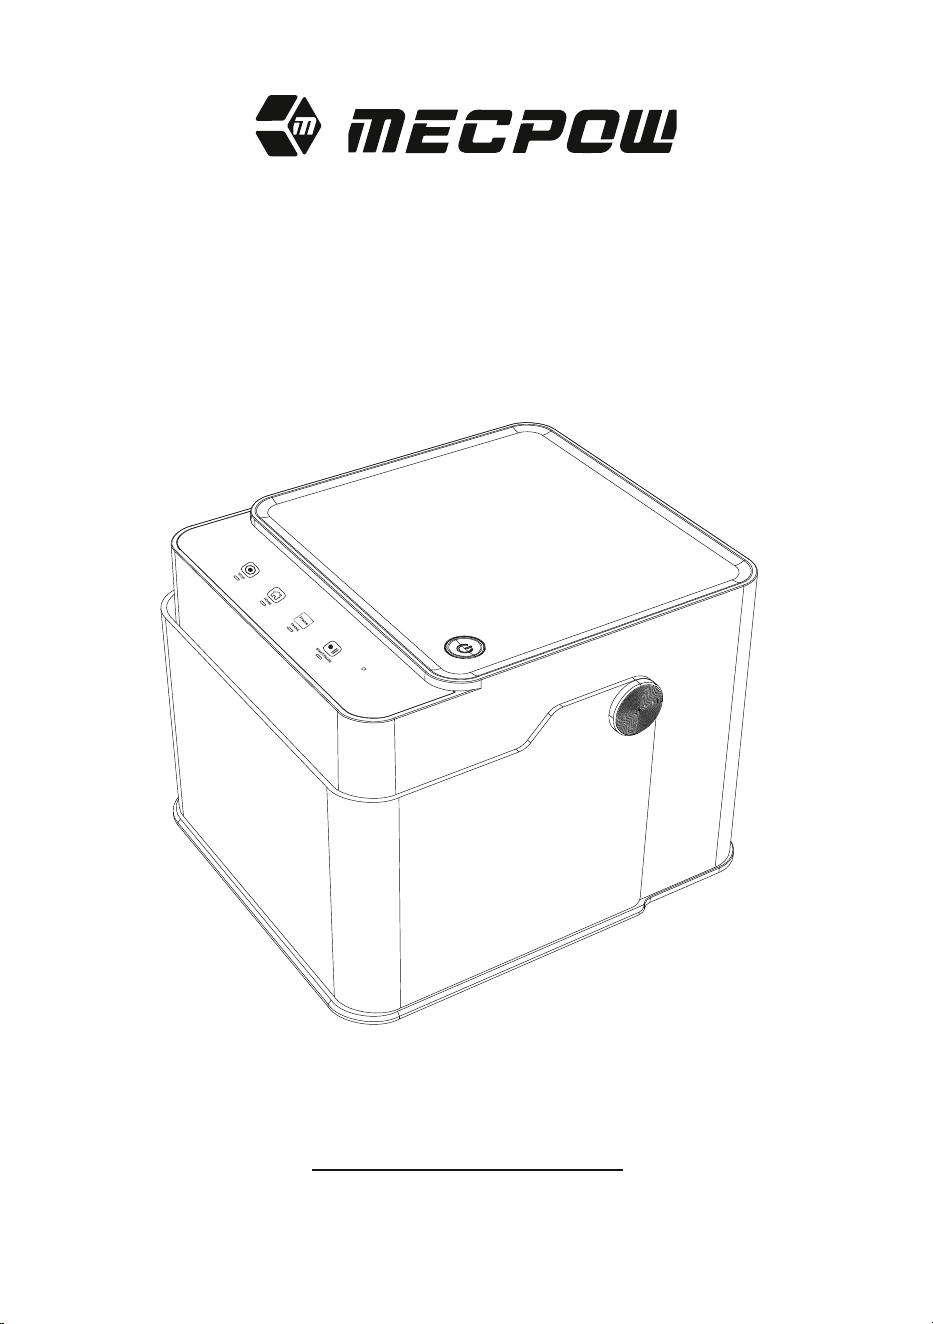
Laser Engraver
User Manual
M1

CATALOGUE
ENGLISH............................................................
DEUTSCH...........................................................
ESPAÑOL...........................................................
FRANÇAIS..........................................................
ITALIANO........................................................
POLSKI...........................................................
01-19
20-38
39-57
58-76
77-95
96-114

EN
1. Preface......................................................................
2. Security Statement.................................................
3. Diagram....................................................................
4. Specifications..........................................................
5. Package List............................................................
6. Instructions for Use...............................................
7. Driver......................................................................
8. Control via Computer Software............................
9. Control via Mobile App & TF Card.........................
10. Recommended Operating Parameters ...............
11. Troubleshooting ...................................................
12. Compliance Statement .......................................
01
01
03
04
04
05
09
10
15
17
18
19
CONTENTS

EN
-01-
1. Preface
2. Security Statement
Dear Customer,
Thank you for purchasing our laser engraving machine. This device is a high-tech product that integrates light,
machinery, and electricity. In order for you to use and maintain the equipment better, please read the user
manual carefully and follow the steps in the manual.
Disclaimer
Any losses caused by improper use or failure to follow the steps in the user manual will be borne by the individu-
al. The nal interpretation of the user manual belongs to our company, and we reserve the right to modify any
information, data, technical details, etc. in the manual.
* Laser processing can be risky, and users should carefully consider whether the object to be processed is
suitable for laser work.
* The object being processed and emissions must comply with local laws and regulations.
* This machine uses a Class IV laser (high-power laser radiation), which may cause the following situations:
(1) Ignition of surrounding ammable materials;
(2) During laser processing, other radiation and toxic and harmful gases may be produced, depending on the
object being processed;
(3) Direct exposure to laser radiation can cause harm to the human body. There must be re-ghting equipment
in the workplace, and ammable and explosive materials must not be stacked around the workbench or
machine. Good ventilation must also be maintained.
* The environment in which the machine is located should be dry, free from pollution, vibration, strong
electricity, strong magnetism and other interference. The working ambient temperature should be 5-30°C, and
the working ambient humidity should be 35-65%RH.
* The working voltage of the machine is AC100-240V.
* During the operation of the machine, it must be monitored throughout. Before leaving, all power must be cut
o to prevent any unforeseen issues. If an abnormal situation occurs, please immediately cut o the power and
deal with it!
* It is strictly prohibited to place any reective or diuse objects in the machine that are not relevant to its
operation to prevent laser reection on the human body or ammable materials.
* The machine should be kept away from electrical equipment sensitive to electromagnetic interference, which
may cause electromagnetic interference to it.
* It is strictly forbidden for non-professionals to disassemble the laser engraver as there may be dangers such as
high voltage inside the machine.
Safety Precautions
Warning
1. The laser engraving machine can produce laser light. It is strictly prohibited to place any living organisms under
the laser emission (the port is marked with a yellow warning sign).
2. Photosensitive patients are prohibited from using or getting close to the laser engraver.
3. When using the laser engraving machine, the operator and anyone near the machine must wear laser safety
glasses. Do not operate the laser machine without laser goggles. Our machine comes with a pair of laser safety
glasses. If you want to purchase additional goggles, the goggles should oer wavelength protection between
400-445nm (+-5nm), have an outer diameter of +5, and meet a minimum L5 level.
4. When the laser engraving machine is in operation, the user must pay close attention and not leave it unattend-
ed to avoid ignition of the engraved material. Place the machine in a reproof area and ensure good ventilation. It
is recommended to have a re extinguisher nearby in case of emergencies.
5. Make sure there are no ammable materials near the laser engraving machine. We recommend placing a
honeycomb working table under the machine.
6. When operating the laser engraver, ensure that there is enough space around it. Engraving certain materials
may produce smoke, which should be vented out using a specialized exhaust system.
7.Do not touch the laser beam or the object being processed while the machine is in operation, as this could

EN
-02-
1. Before using the Mecpow M1, please ensure that the protective cover is closed and the laser reector is clean.
2. The M1 complies with Class 1 laser safety standards. Before starting laser engraving, check that the protective
cover is intact and not damaged. If any damage is found, stop using the device.
3. During operation, ensure that the laser remains within the protective cover. When processing objects with the
Mecpow M1, always cover the work area with the protective cover and wear eye protection for safety.
4. It is important to avoid moving the device while laser engraving to prevent any self-protection measures from
causing the device to stop working. This can also aect the nal result of the engraving work by disrupting the
engraving process. If you need to move the device or the object being engraved, it is recommended to do so
before or after the engraving process. It is crucial to avoid moving the device or objects during laser operation.
5. Minors should always be supervised and assisted by an adult when operating this product.
6. When cutting or engraving ammable materials at low speed and high power, there is a risk of ames
occurring. If ames are detected, it is important to stop the processing immediately.
7. When the device is powered on, it is essential to avoid disassembling any parts of the machine body to
prevent accidental contact with the power supply. Additionally, do not touch any electronic components with
your hands or tools.
8. If you encounter any of the following situations, please stop using the product immediately and turn o the
power:
- A burnt smell coming from the machine
- An open ame generated from the engraving material
- Damage to the internal components of the product
- Unexpected stoppage of the product
- Abnormal noise or light that has never occurred before
9. Please use caution when using controls or making adjustments, as performing procedures not specied may
result in hazardous radiation exposure.
1. To maintain optimal performance, regularly clean the lens of the machine with a dust-free cloth or paper
dampened with alcohol.
2. Be cautious when using or storing the machine to prevent foreign objects from entering the top vents and
interfering with its operation.
Safety Instructions
Maintenance
EN
-03-
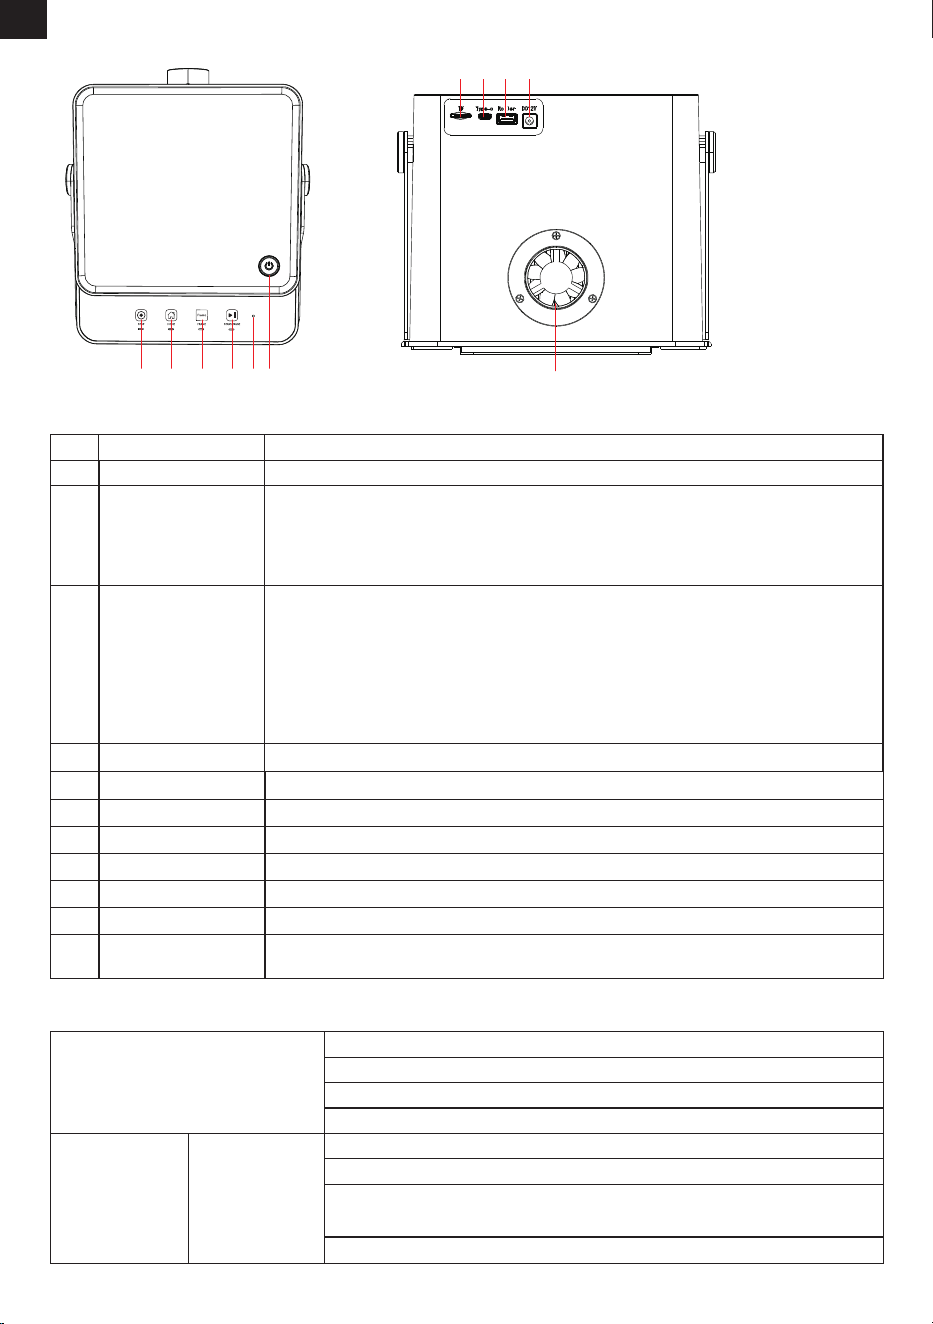
Introductions and Functions
Parts Names
Functions
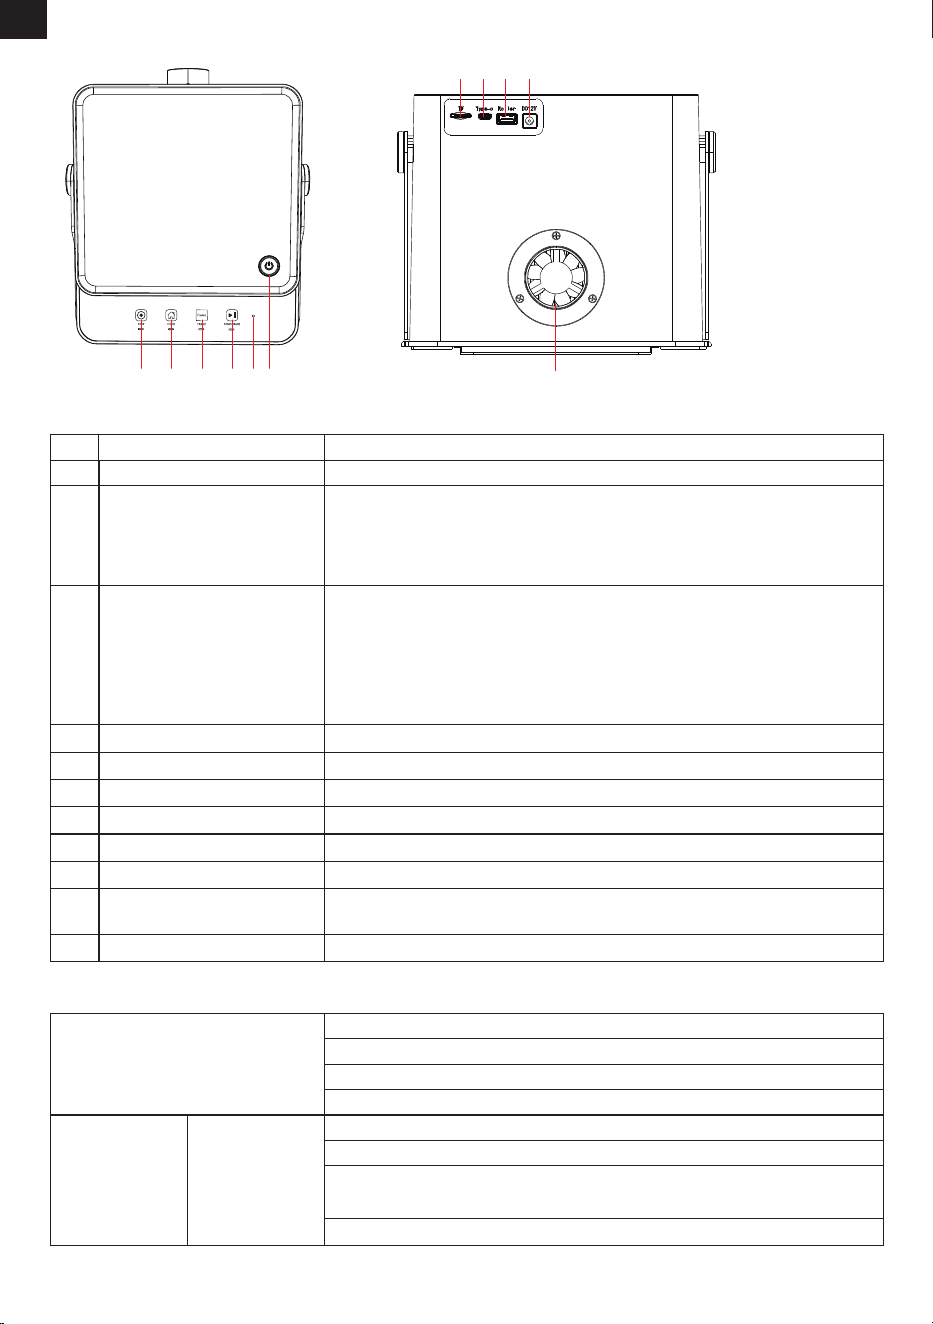
1
2
3
4
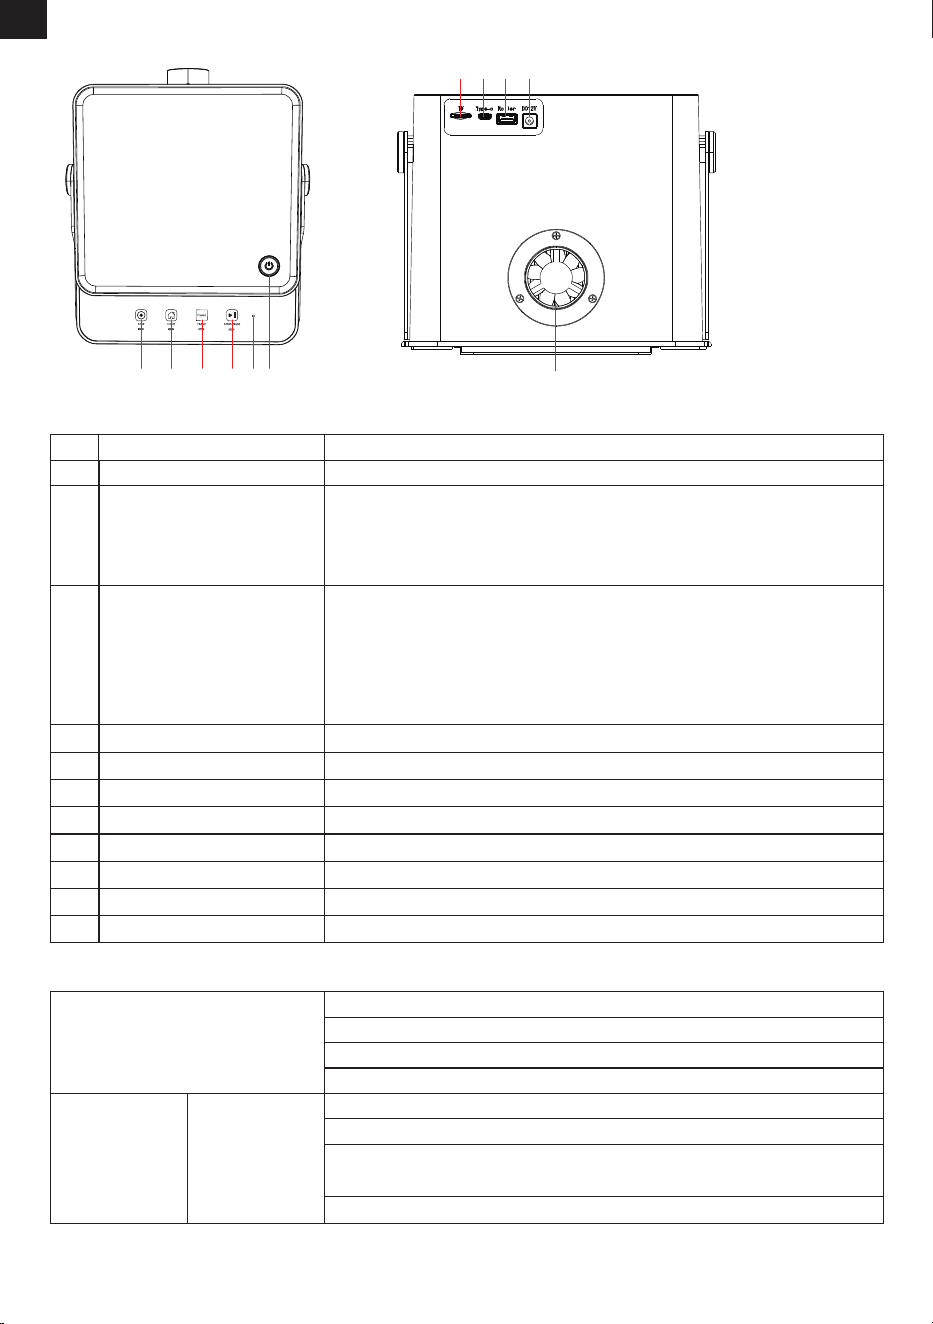
Power Button
Indicator
START/PAUSE Button
FRAME Button Start framing the working area of the laser.
Indicate machine status:
White: Standby
Blue: Running
Red: Alarm
Green: Wi-Fi Connected
3. Diagram
Turn the power on/off.
Indicator
A. STOP
B. HOME
C. FRAME
D. START/PAUSE
Press these four buttons, and the
white light comes on.
A. Machine Startup and Standby: Solid white
B. Engraving Status: Solid blue
C. Protective Cover Opened/Machine Tilted (≥15°): Flashing red light
(with 3 alarm sounds)
D. WiFi Connected: Solid green
Indicator Indicator Status
(1) Click it to start engraving/cutting before the machine works.
(2) During operation:
First click: Pause the machine.
Second click: Continue engraving/cutting.
(3) In standby status:
Click it to repeat engraving the latest file transferred to the TF card (excluding
MKSLaser mobile DLC files).
11
Exhaust Fan
For removal of fumes and smoke during engraving or cutting
5
HOME Button Return to origin.
6
STOP Button Stop engraving/framing.
7
TF Port Insert the TF card to read files.
8
Type-C Port For connection to a computer
9
Rotary Roller Port Insert the roller cable to connect the rotary roller.
10
DC Input Port Plug in the power adapter for power.
123
456
10
11
98
7
EN
-04-
4. Specifications
Product Size
Electrical Power
Input of Laser
Laser Power
Wavelength
Engraving Area
Max. Engraving Speed
Engraving Accuracy
Height of Engraved Objects
Materials for Laser Engraving
Software Support
System Support
File Format Support
Method of Data Transmission
Tilt Alarm
220 x 264 x 194 mm
60W
DC 12V 5A DC 12V 5A
3.5W 5W
455±5nm
100 x 100 mm
10000 mm/min
0.01 mm
<4.5 cm
Wood, plastic, leather, cardboard, stone, ceramic, coated metal, bamboo, etc.
LaserGRBL, LightBurn, MKSLaser
Windows, macOS, Android, iOS
JPEG, BMP, JPG, GIF, PLT, PNG, DXF, HPGL, NC, etc.
Wired Connection: USB Port
Wireless Connection: WiFi
15±5°
Model M1
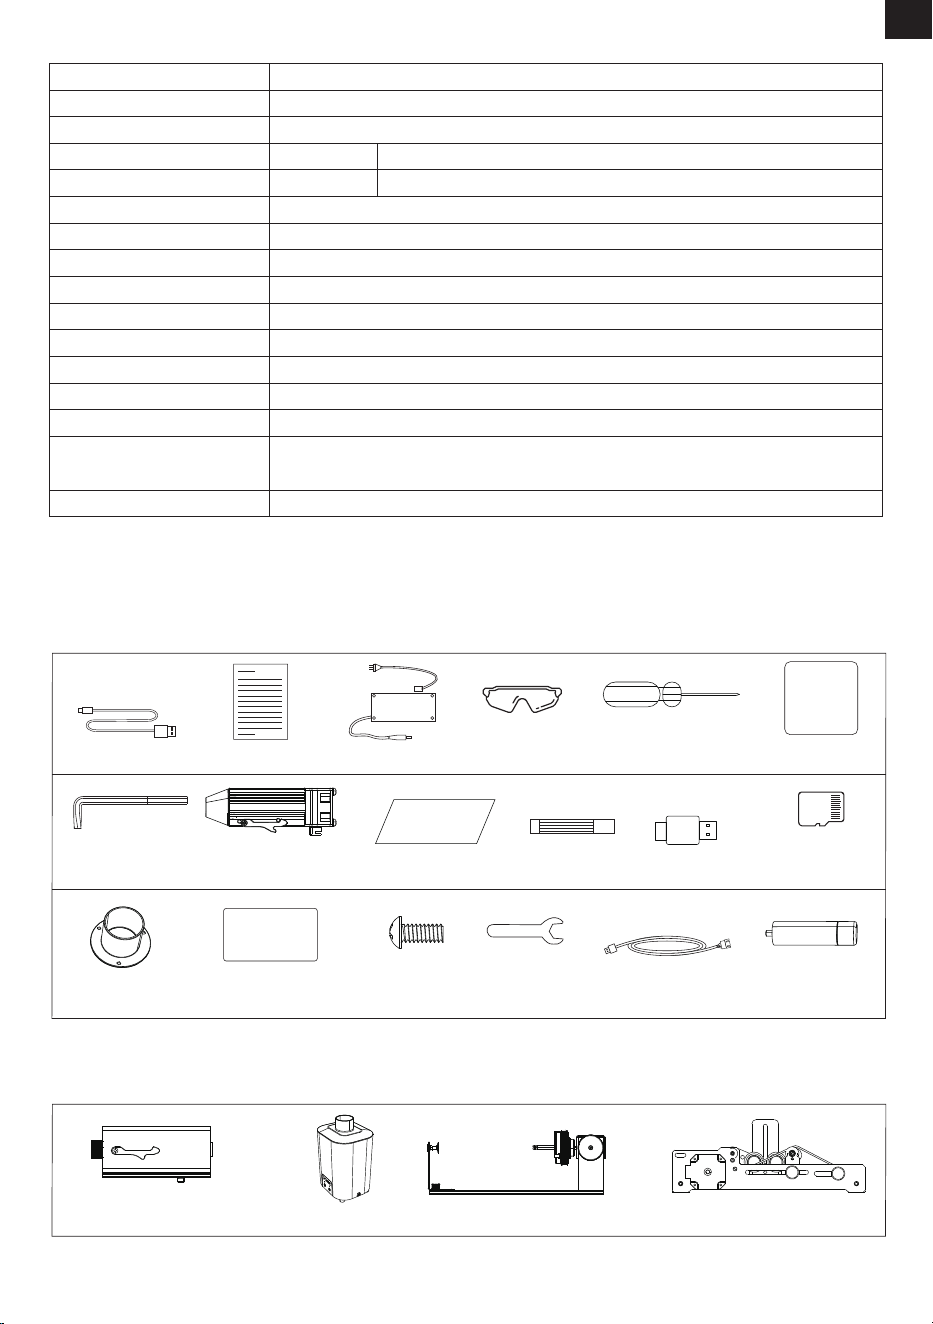
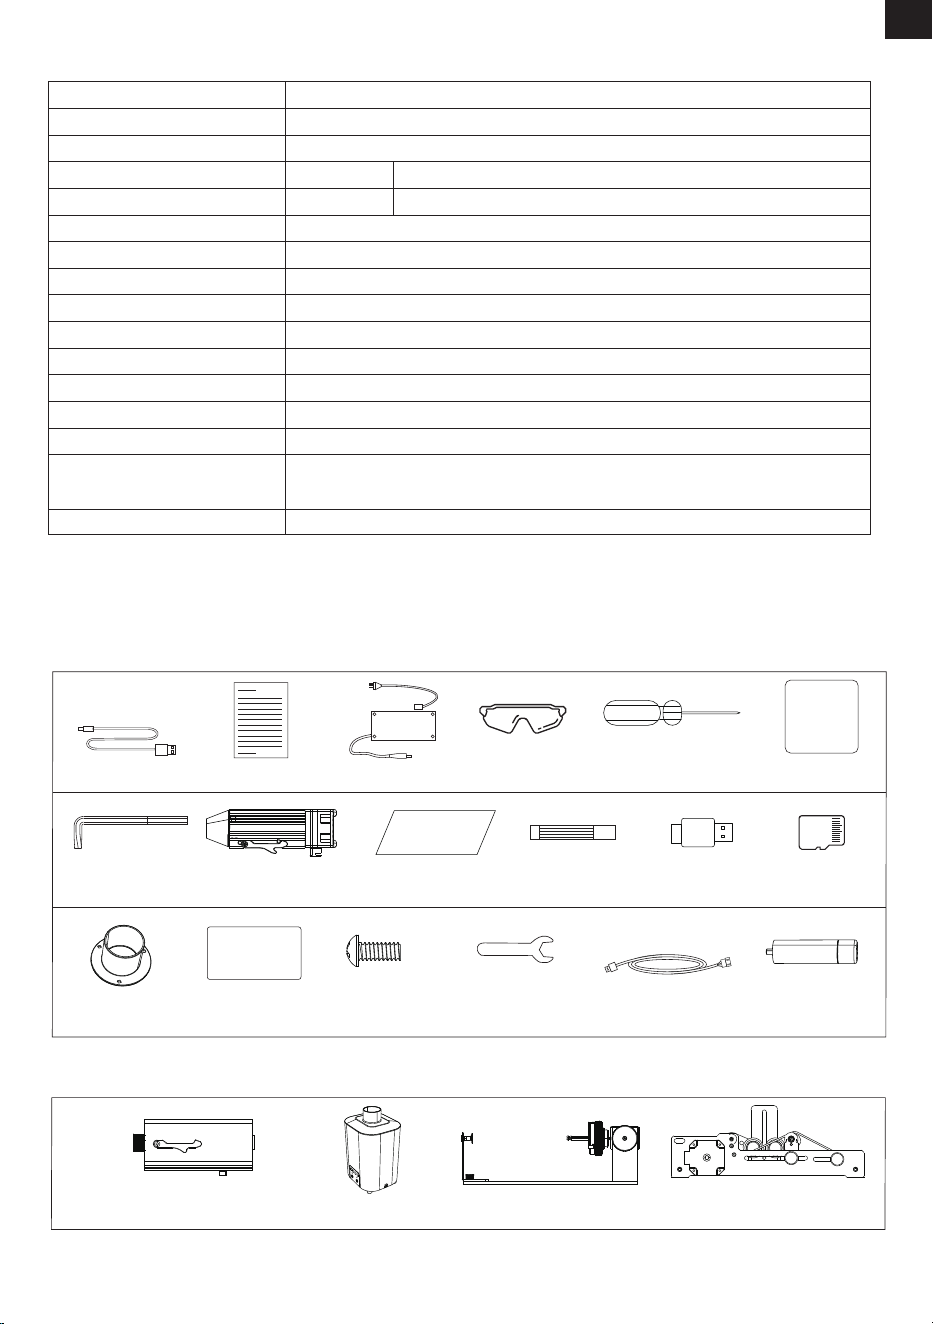
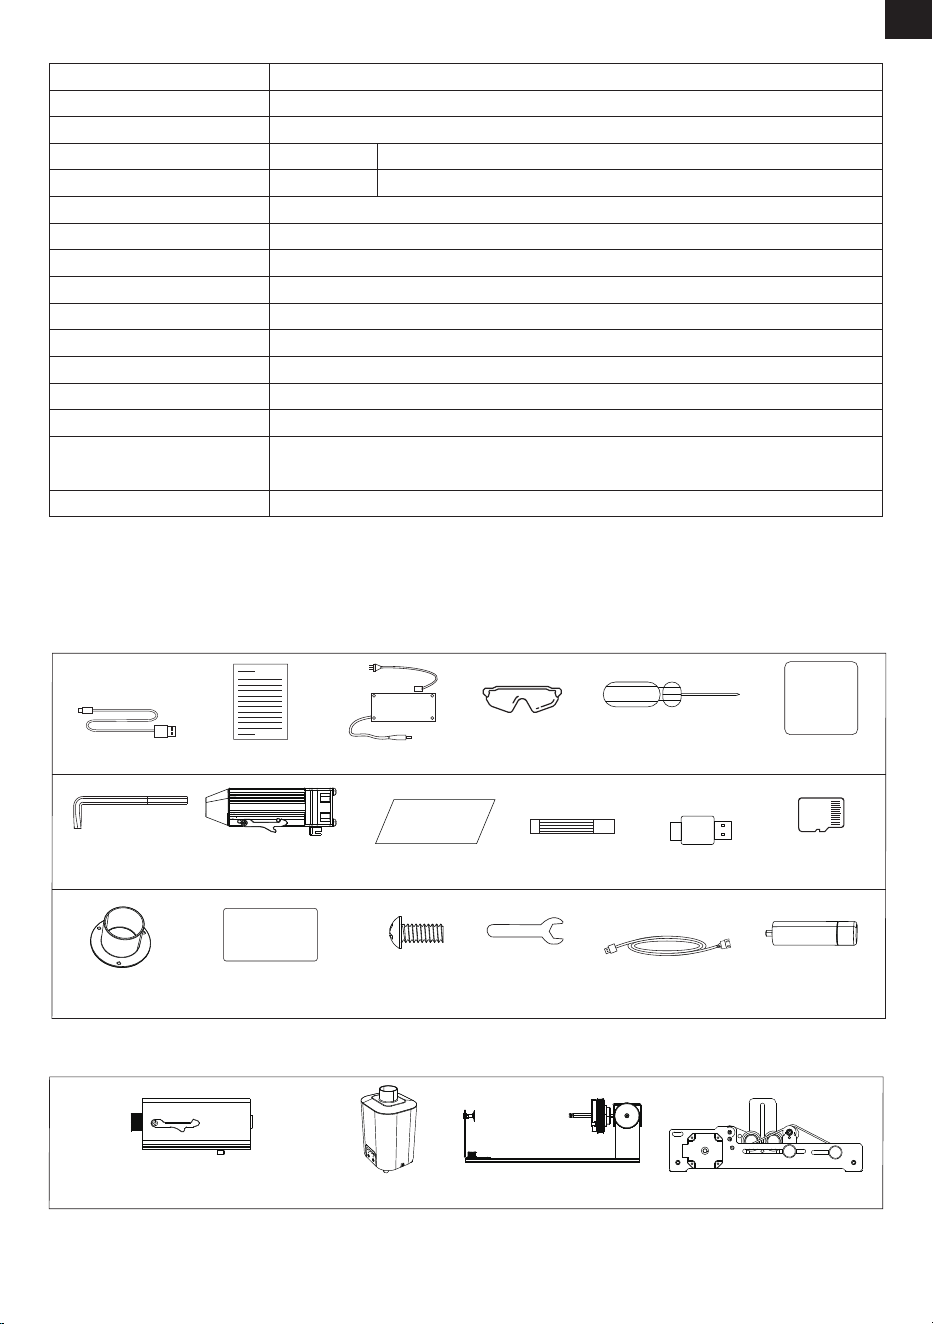
5. Package List
Optional Accessories
Accessories
Power Cable *1
Aluminium Plate *5
M3x7 *3
Wood Board *2
Googles *1
2.5mm Hex Key *1
Flange *1
TF Card * 1
Machine Maximum
Capacity Support: 16G
Laser Module *1 Engraving Area
Positioning Plate *1
Marker Pen *1 Card Reader *1
Screwdriver *1
Roller Cable *1
User Manual *1
Power Adapter *1
Wrench *1
Riser Column*4
1064nm 1.2W Infrared Laser Module
(Suitable for Engraving Metals)
Fume Extractor
Rotary Roller Module (G5) Rotary Roller Module (G3 Pro)
EN
-05-
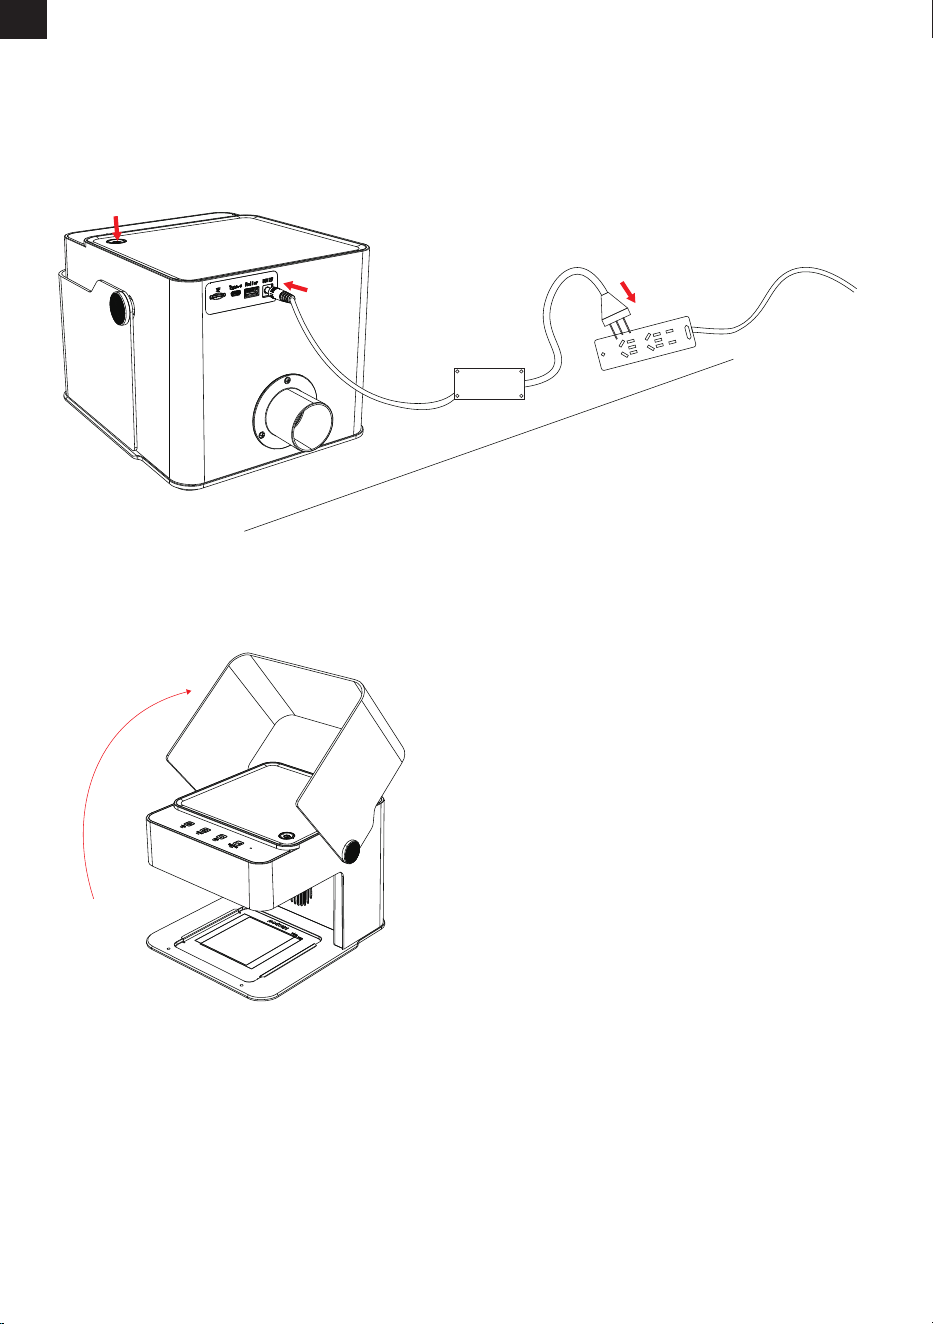
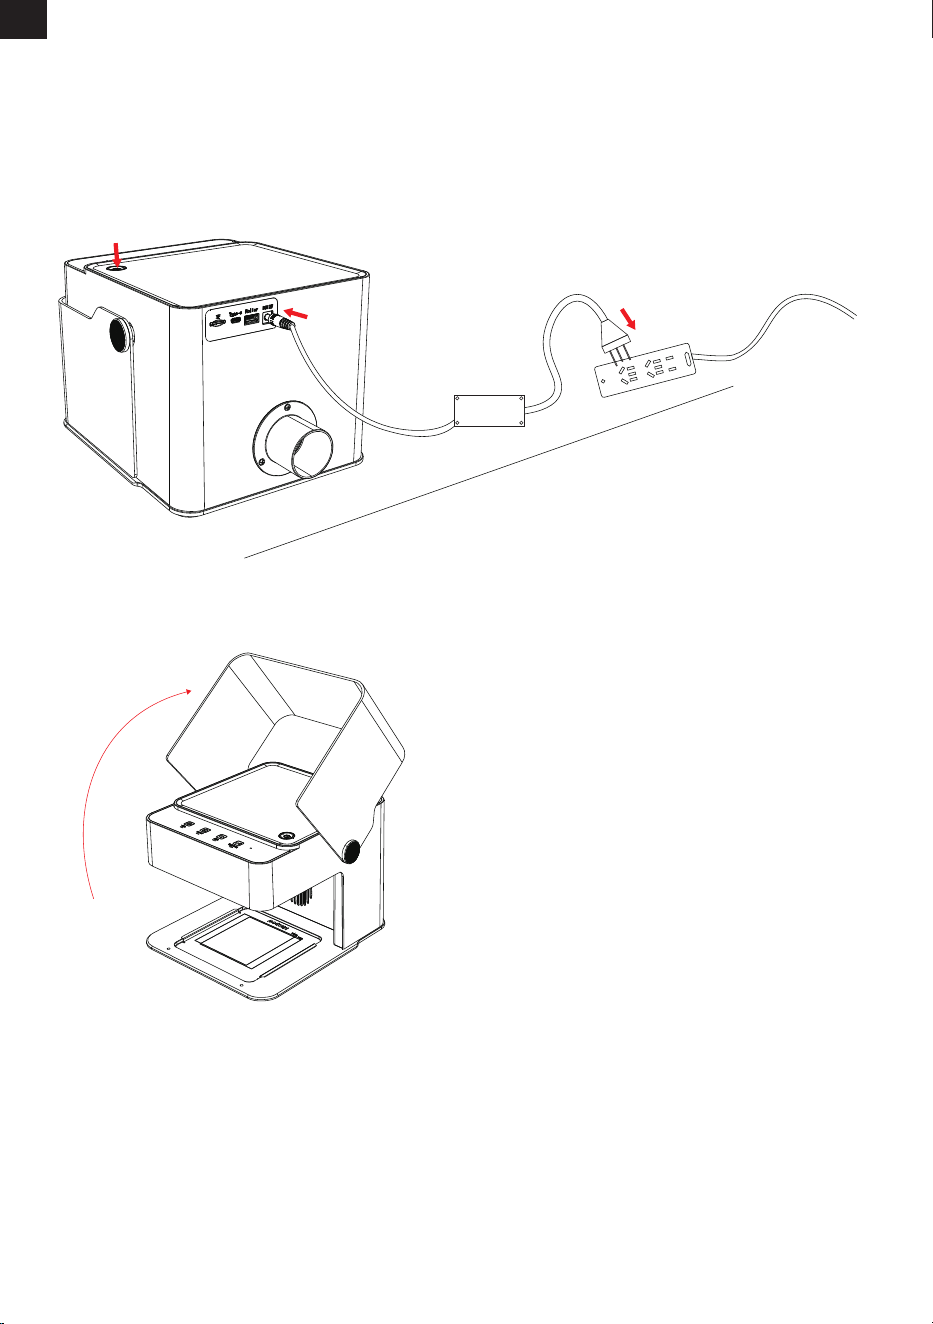
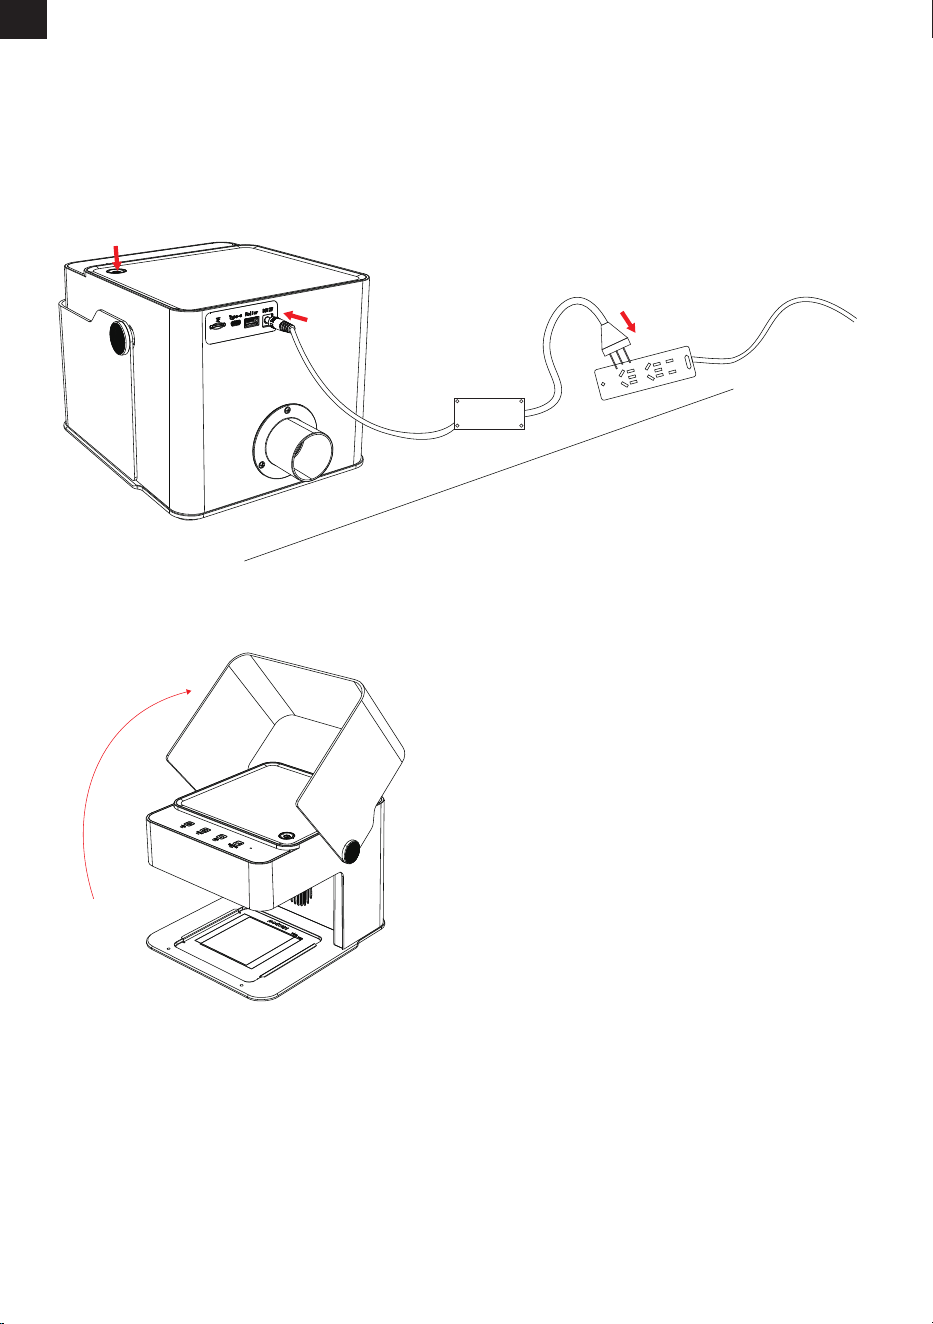
1. Power the Machine
2. Place Material
6. Instructions for Use
(1)Insert the power adapter into the socket.
(2)Connect the 12V DC power cable to the power port.
(3)Press the power button to start the machine. The indicator light will turn white. (As shown in the gure below.)
(1)Lift the protective cover.
(2)Place the engraving/cutting material on the working area.
EN
-06-
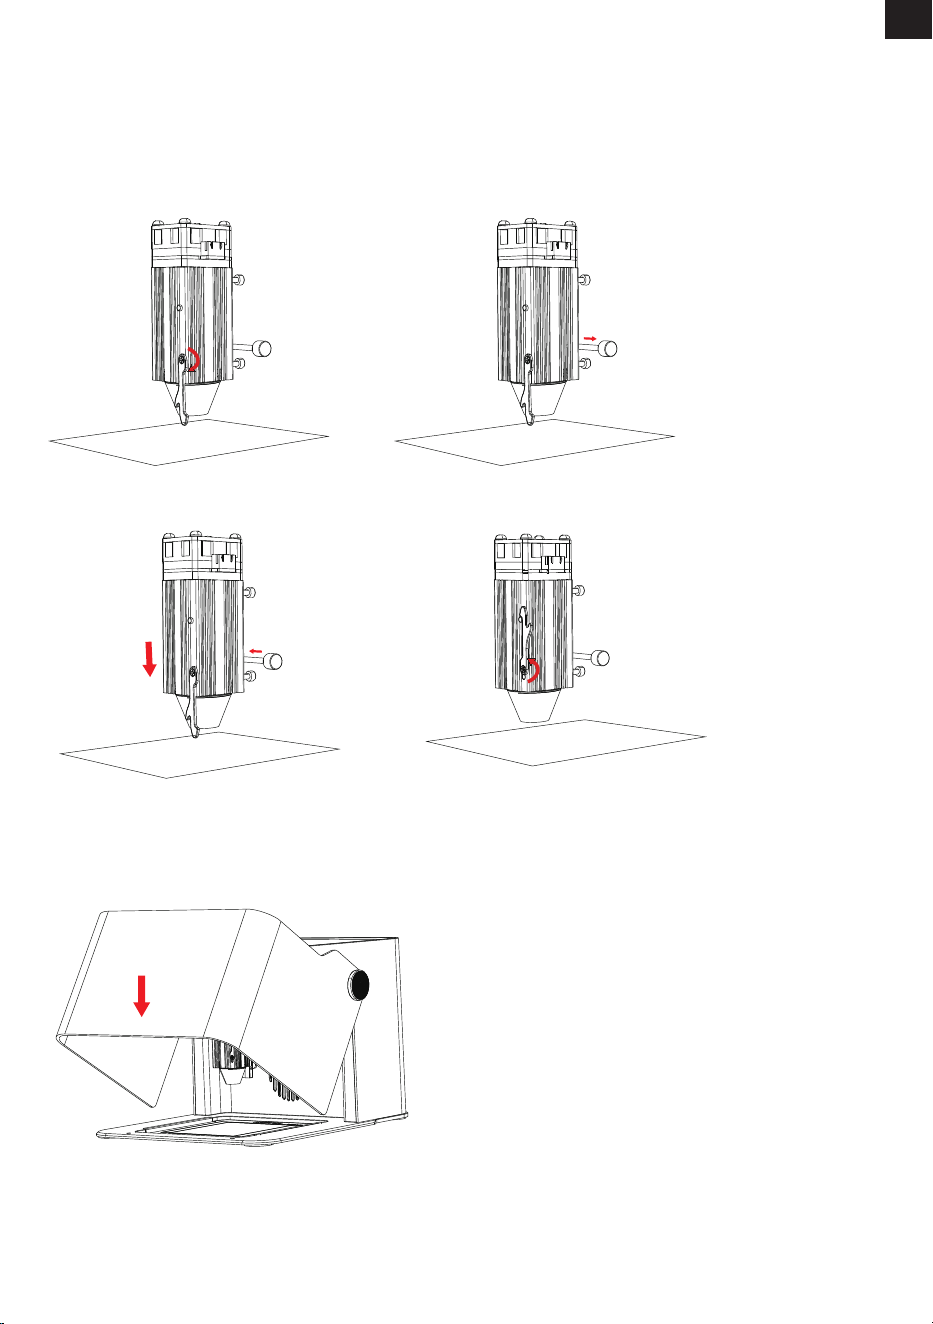
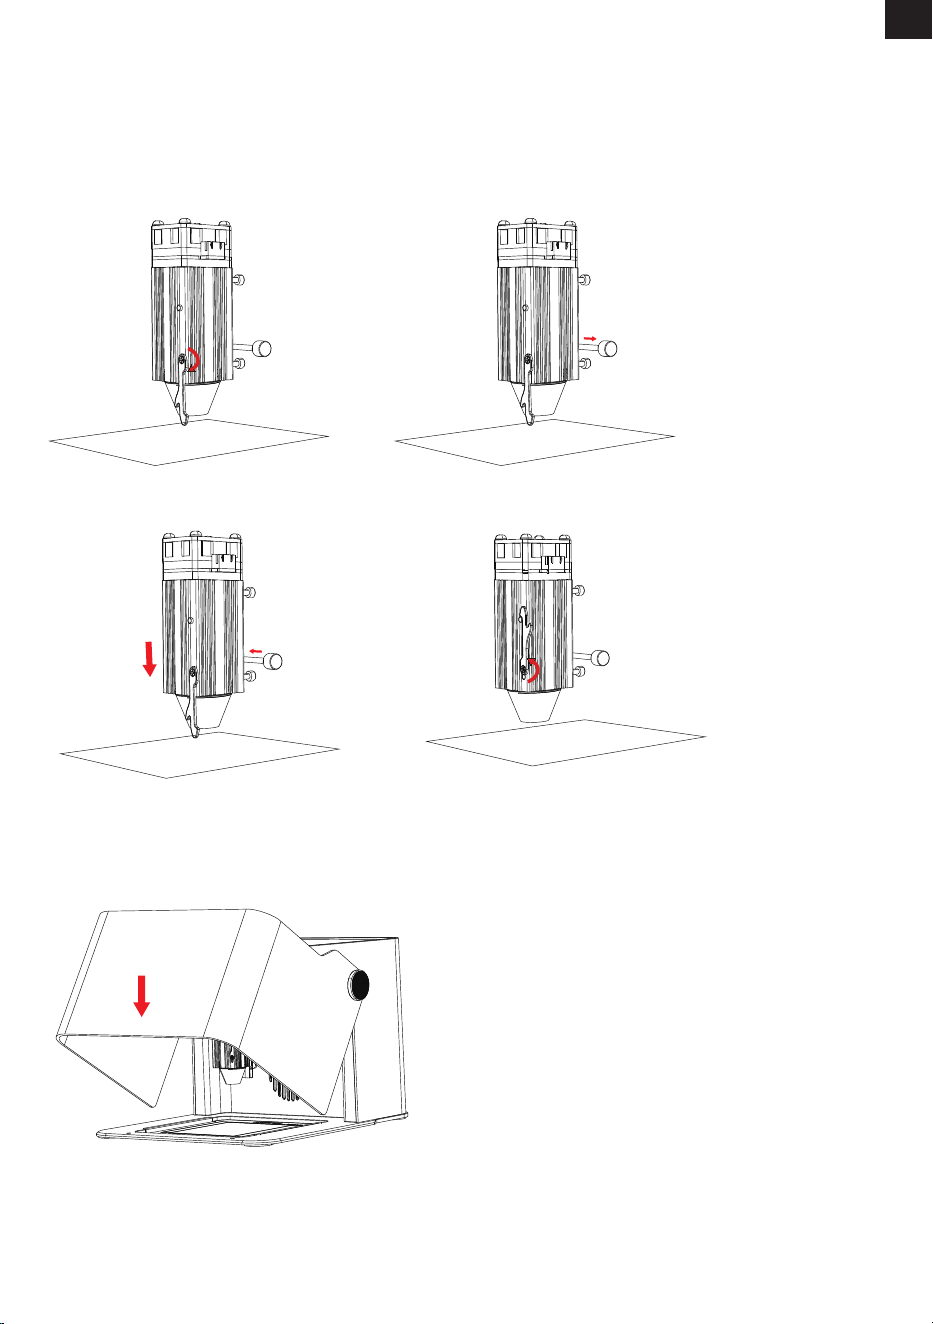
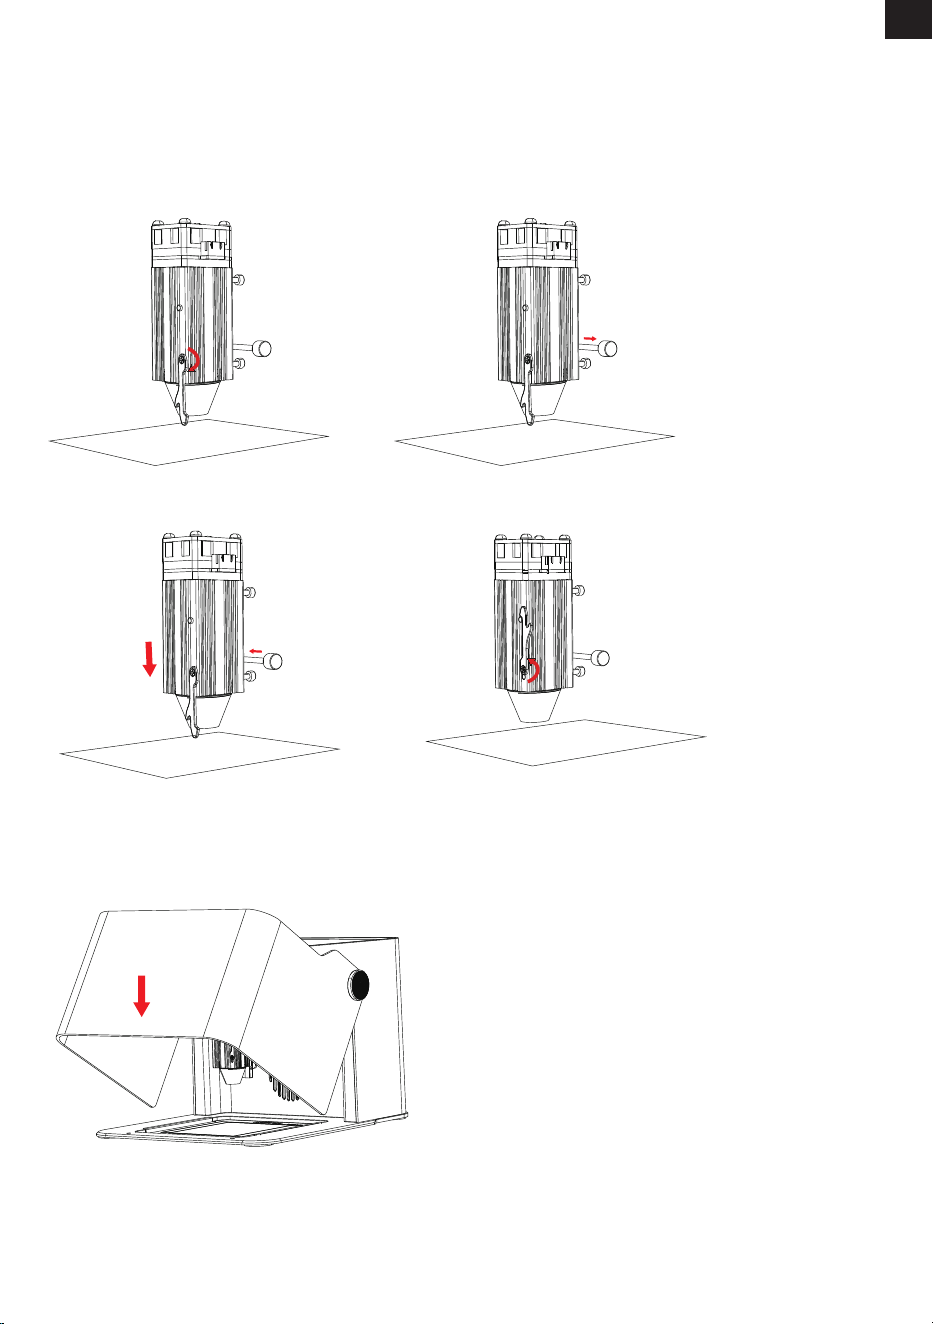
Note: The protective cover must be closed for operation. Otherwise, operation will not proceed. During
engraving or cutting, opening the protective cover will interrupt the process.
3. Adjust Laser Focus (As Shown In The Figure Below)
(1) Pull the focusing lever downward.
(2) Loosen the handle screw.
(3) Adjust the laser module height until the focusing lever contacts the material surface, and tighten the handle
screw.
(4) Return the focusing lever to its original position.
4. Close the protective cover, and press the HOME button to make the laser module
return to origin.
5. Start Engraving/Cutting (Compatible with MKSLaser (APP), LightBurn, and LaserGRBL)
EN
-07-
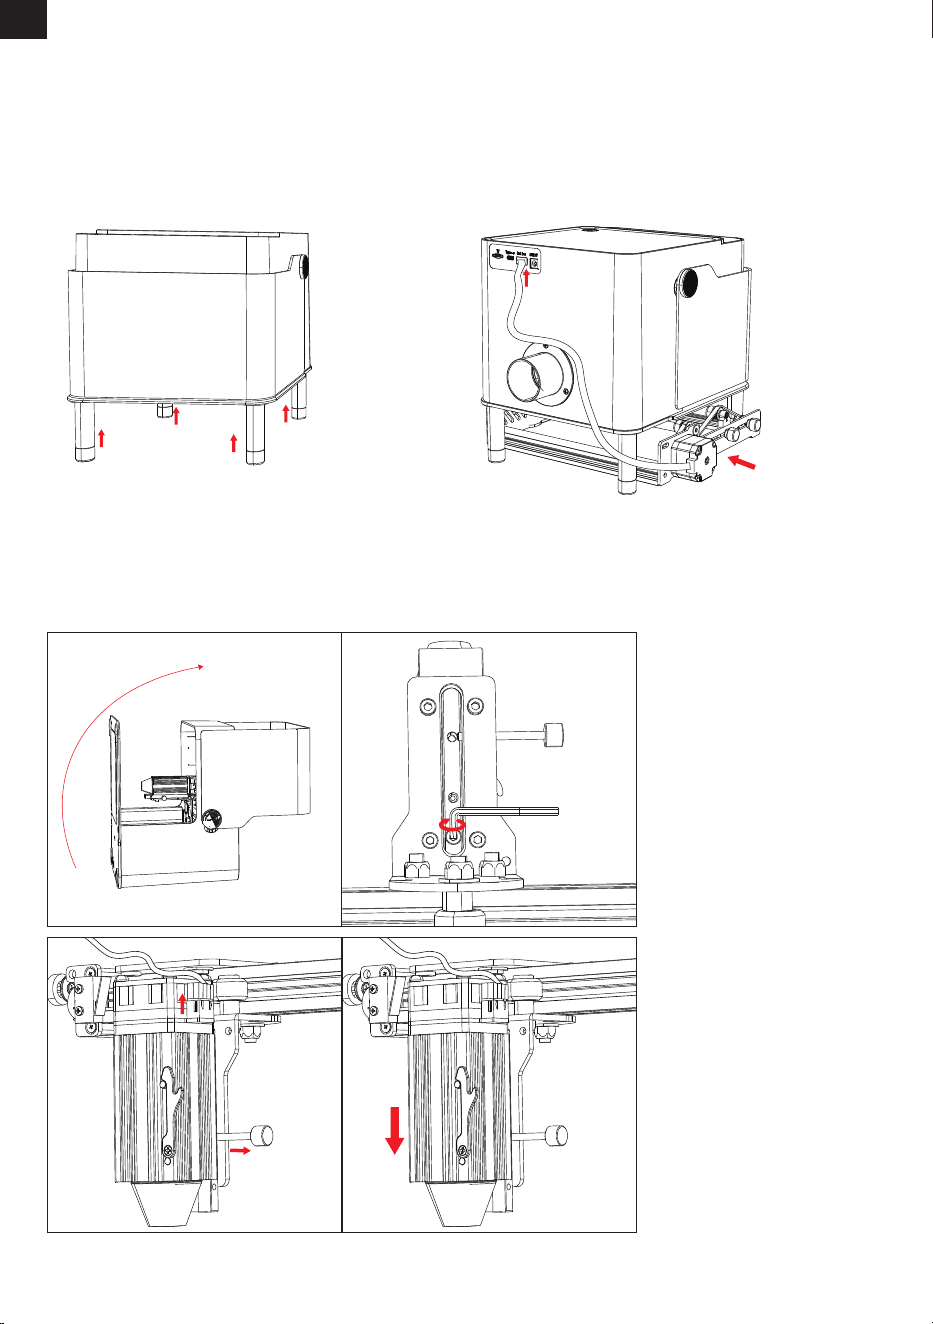
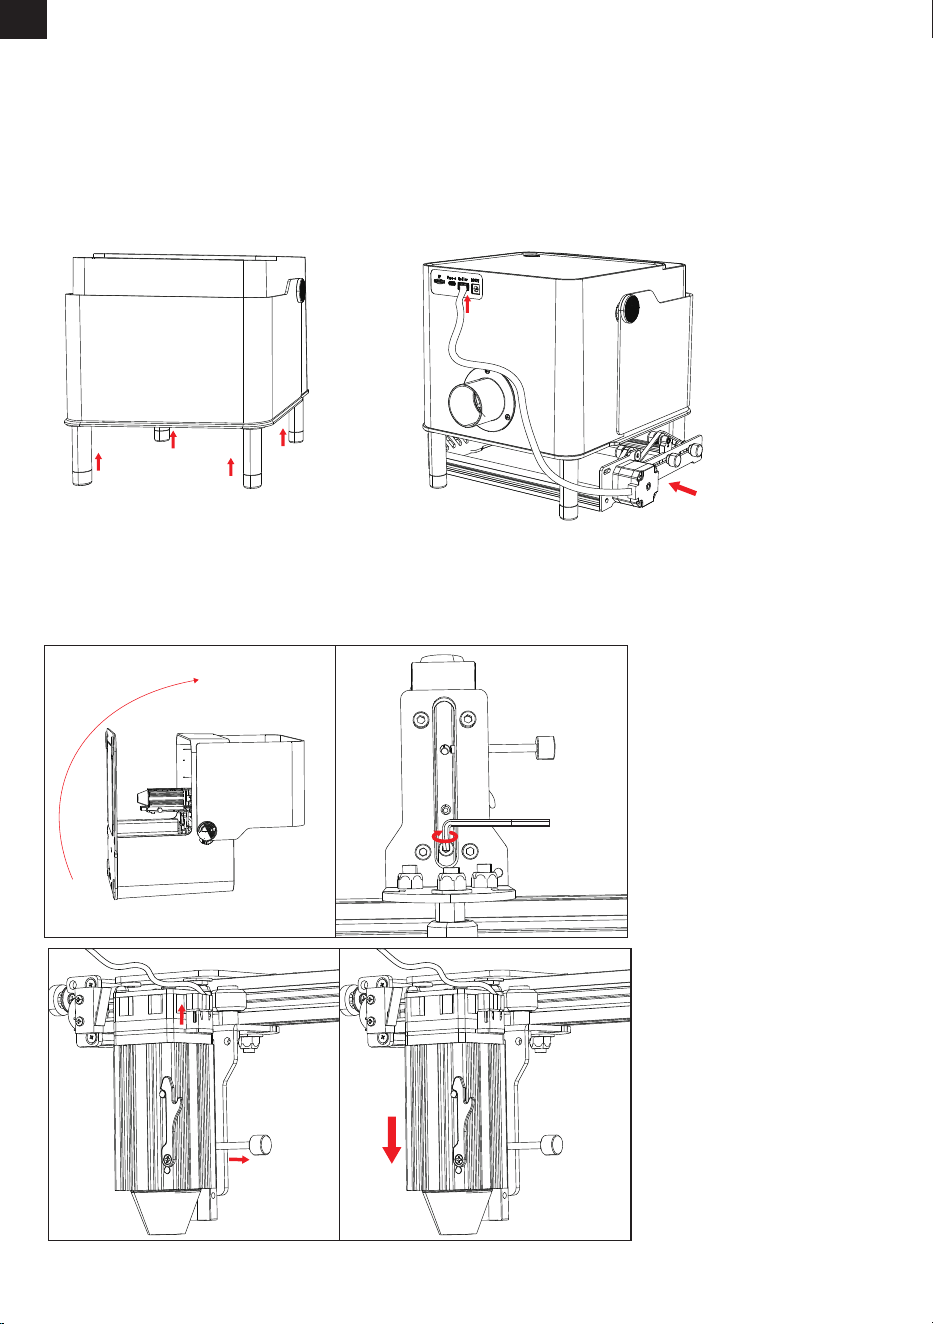
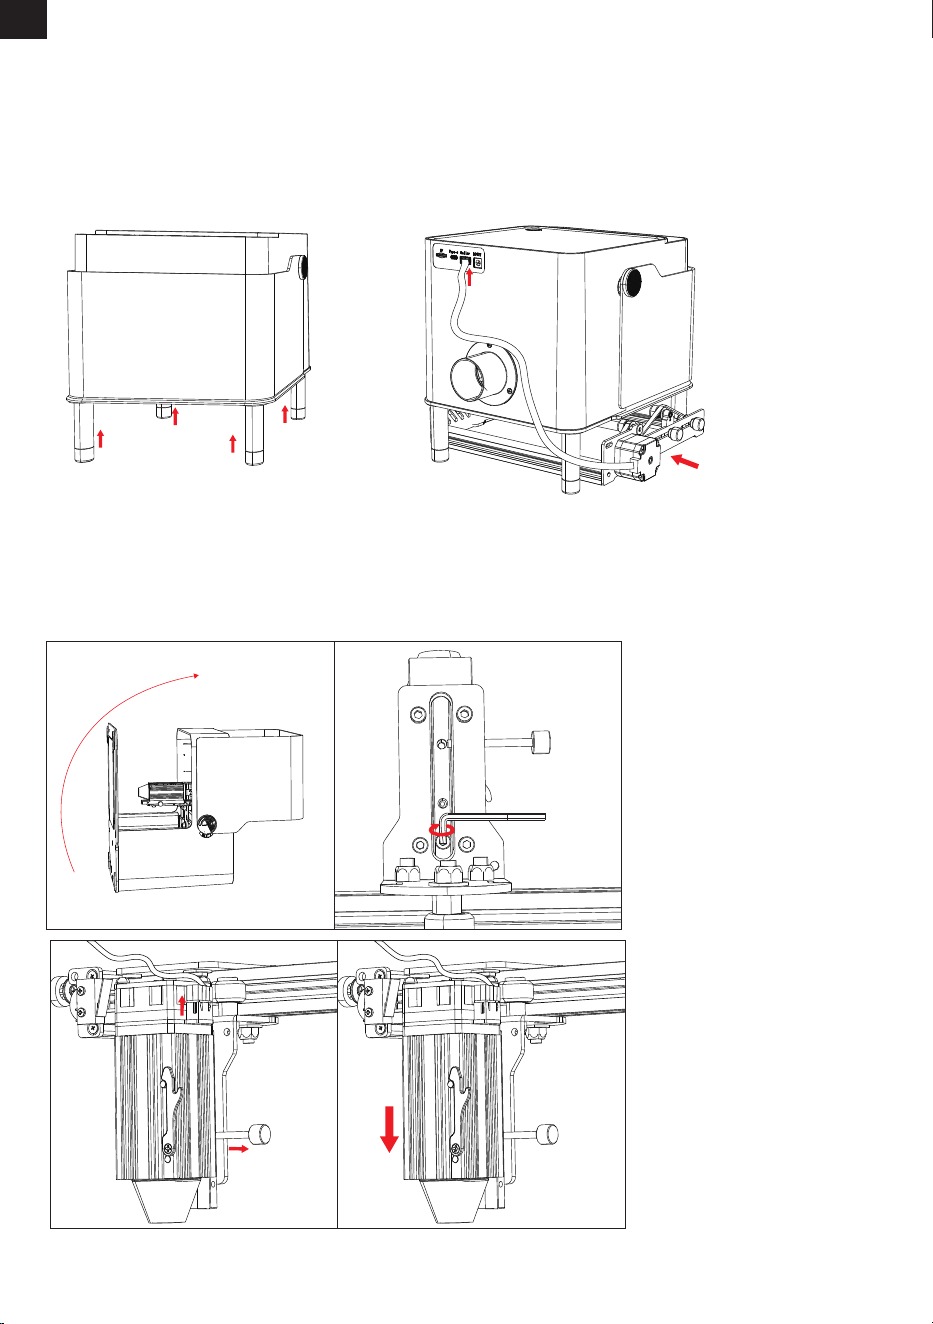
(For rotary roller module applications or engraving thick materials)
(1)Align four riser columns with the screw holes on the machine base.
(2)Tighten them to secure them in place.
(3)Place the rotary roller at the bottom of the machine.
(4)Insert the USB end of the roller cable into the rotary roller port on the rear of the machine, and connect the
other end to the rotary roller.
6. Adjust the Machine Height
(1)Tilt the machine base upward.
(2)Remove the rear screw by using the 2.5mm hex key.
(3)Loosen the left-side screw and unplug the laser power cable.
(4)Slide the laser module downward and remove it.
7. Replace the Laser Module
EN
-08-
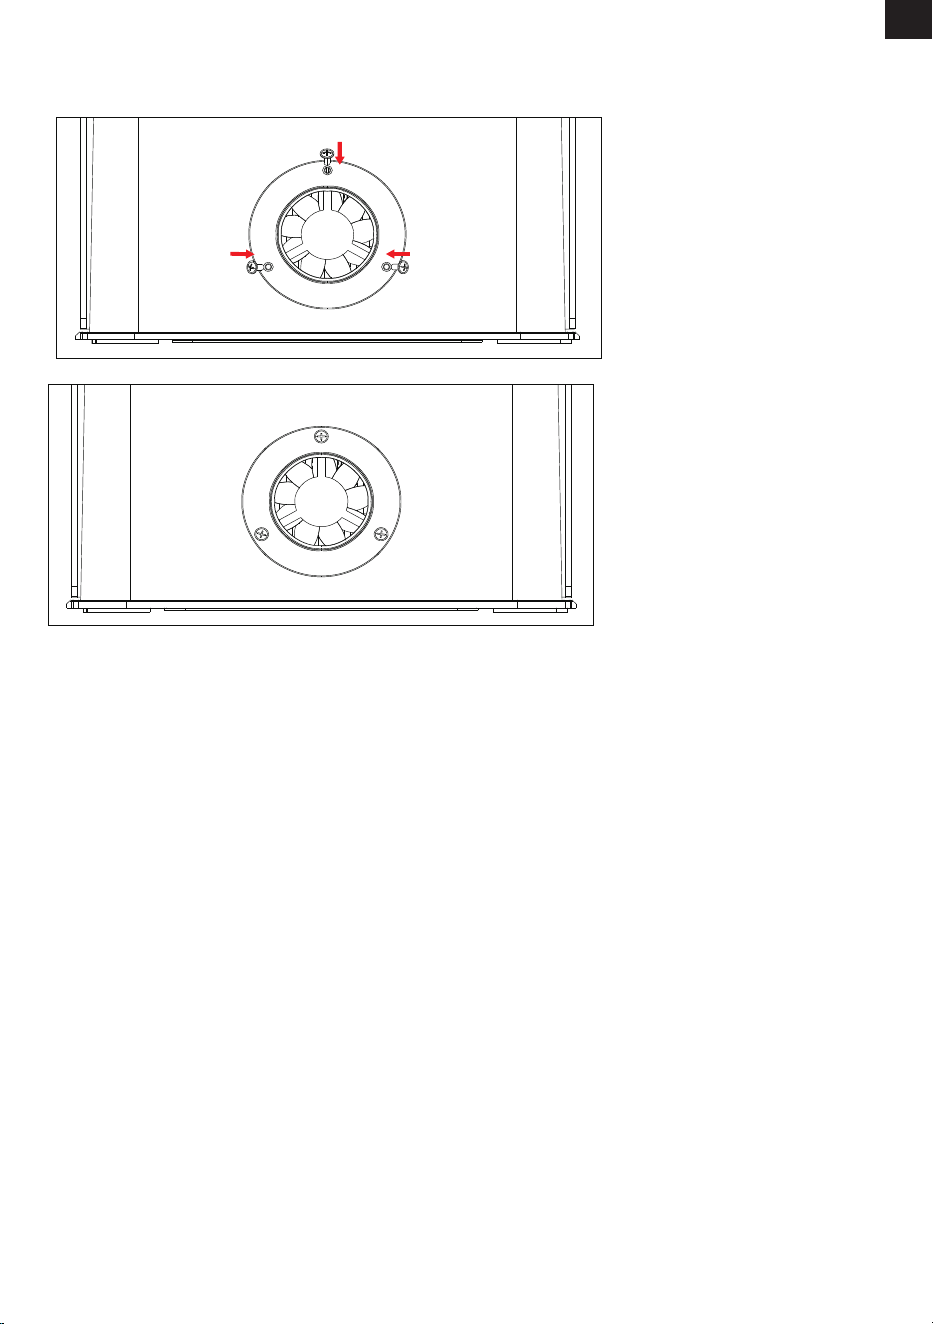
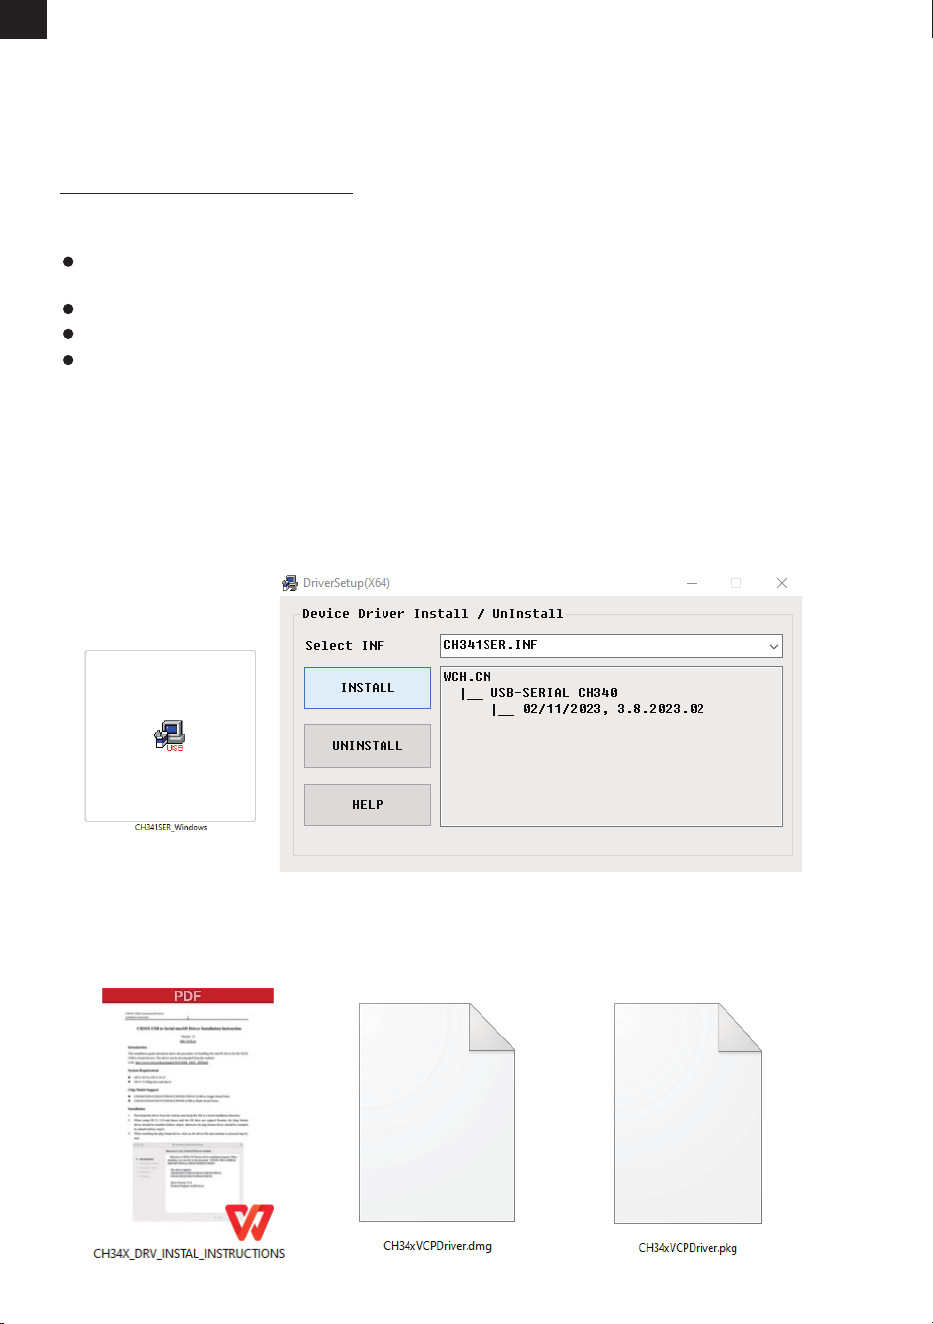
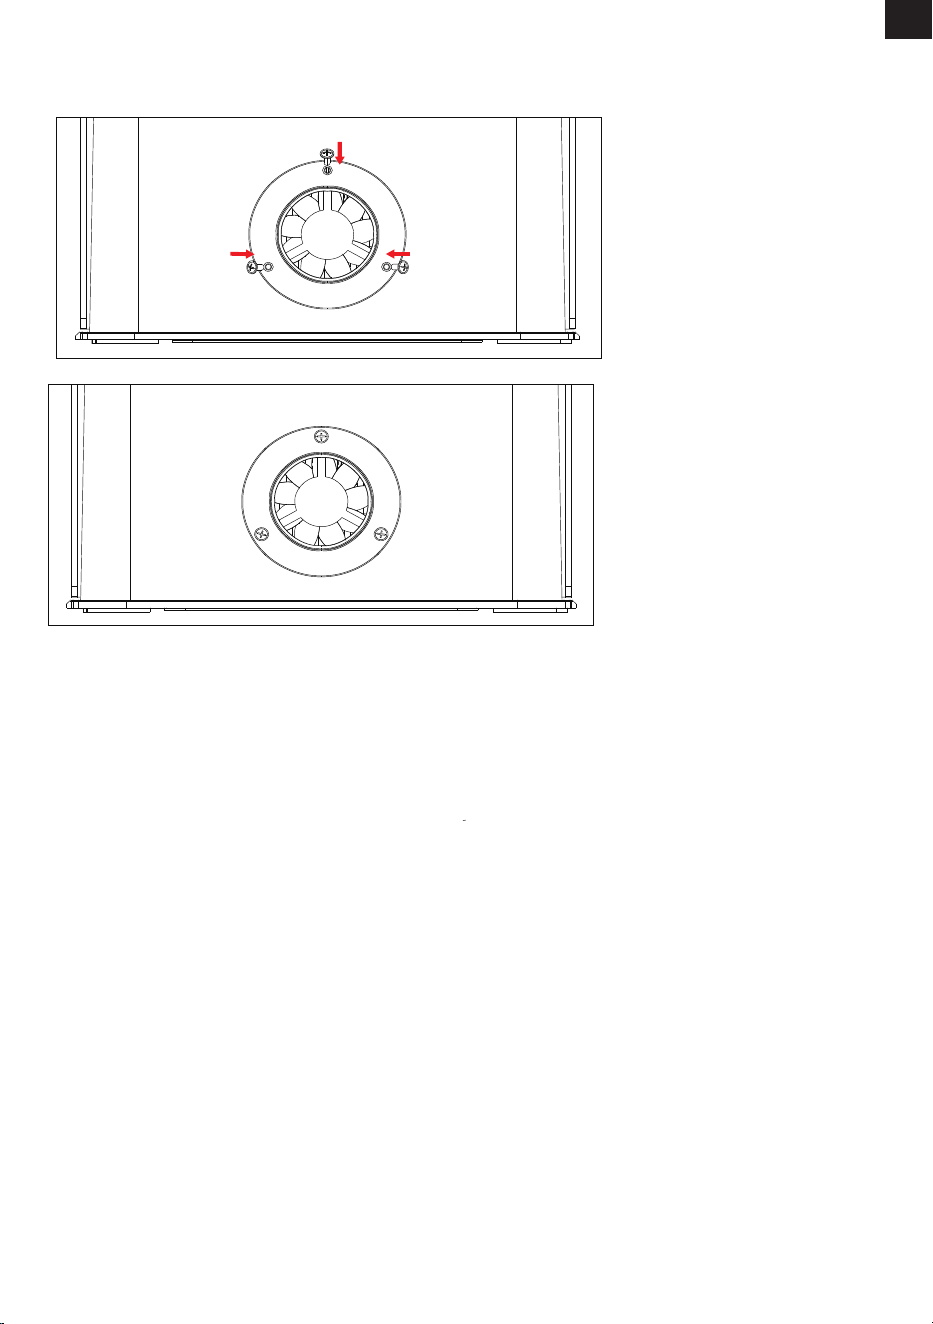
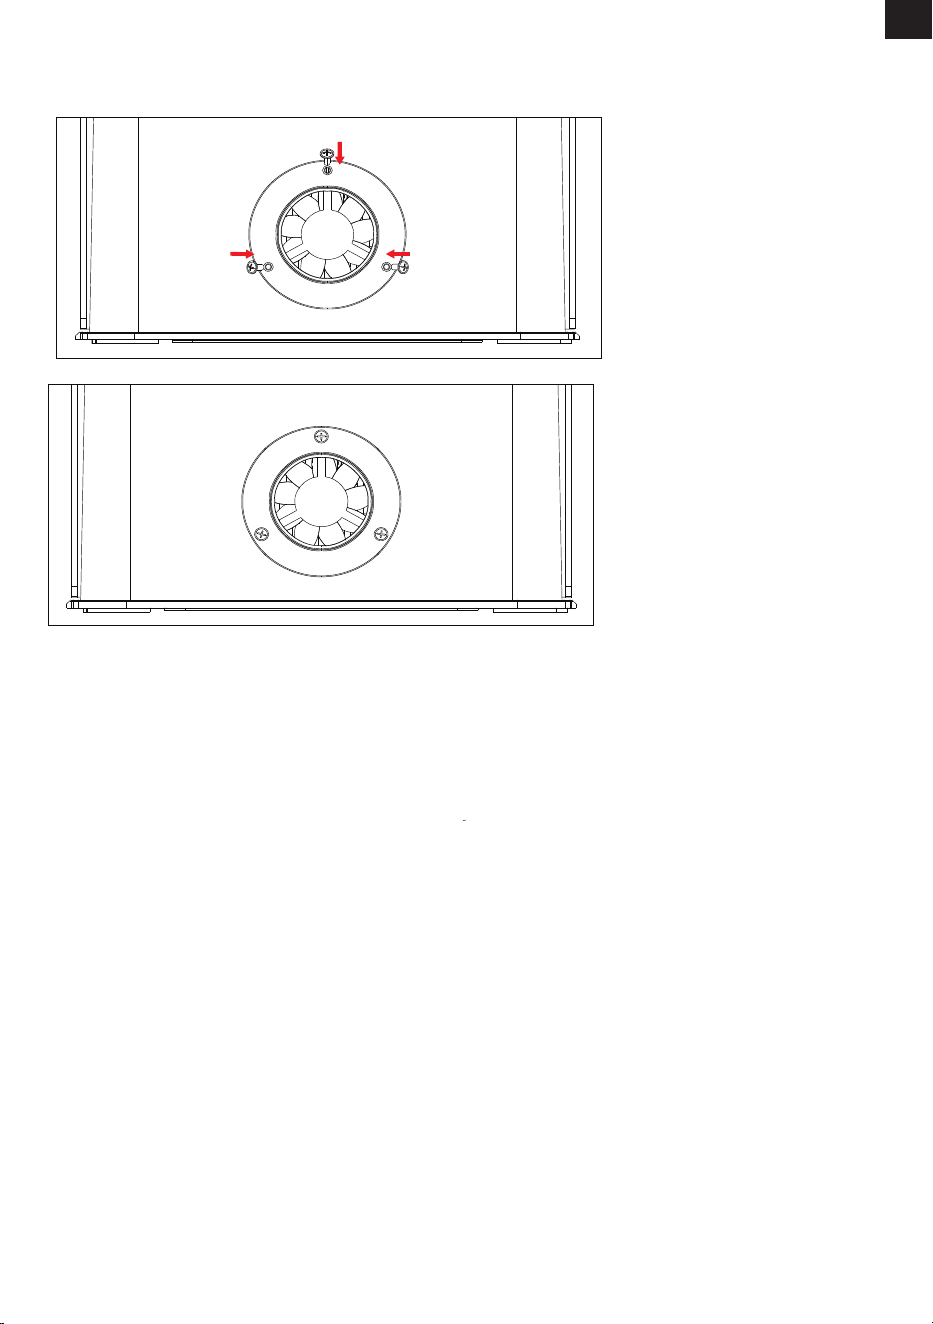
Align the ange with the rear fan screw holes and secure it with three M3×7 screws.
8. Install the Flange
EN
-09-
7. Driver
Download Methods
Installation
1. Download the driver from the link below.
https://mecpow.com/pages/driver-les
2. Contact the customer service to get the le of the driver.
Note:
For Windows users, if you're using a system below Win10, you'll need to install the driver manually.
If you're using the Win10 system or above, there is no need to install the driver.
The driver for Mac users supports OS X 10.9 to OS X 10.15 and OS X 11.0 (Big Sur) and above.
The driver for Linux users supports 32-bit and 64-bit systems.
Please turn on the machine and connect it to your computer via the USB cable before starting the
driver!
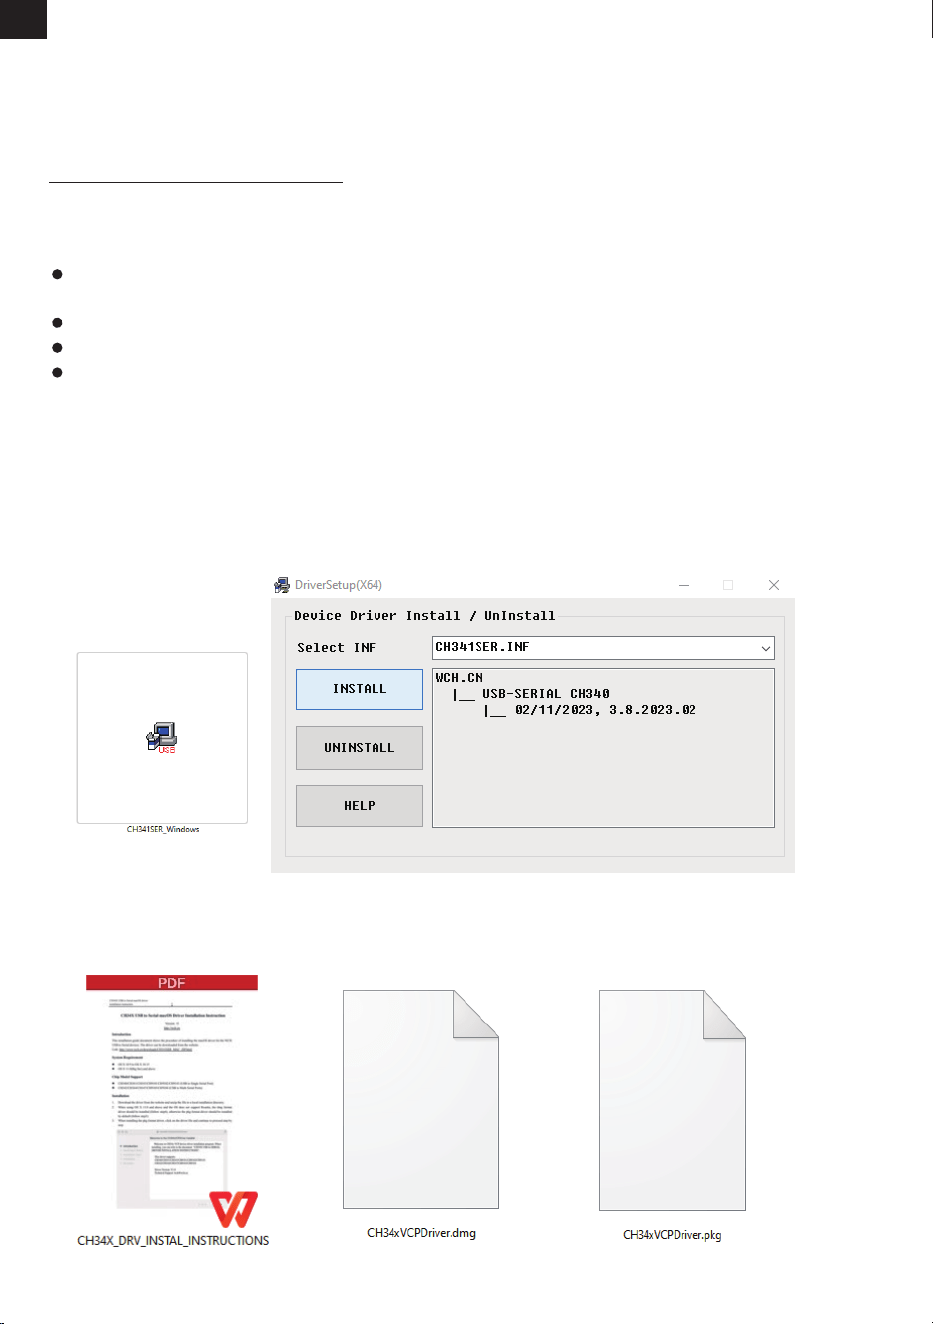
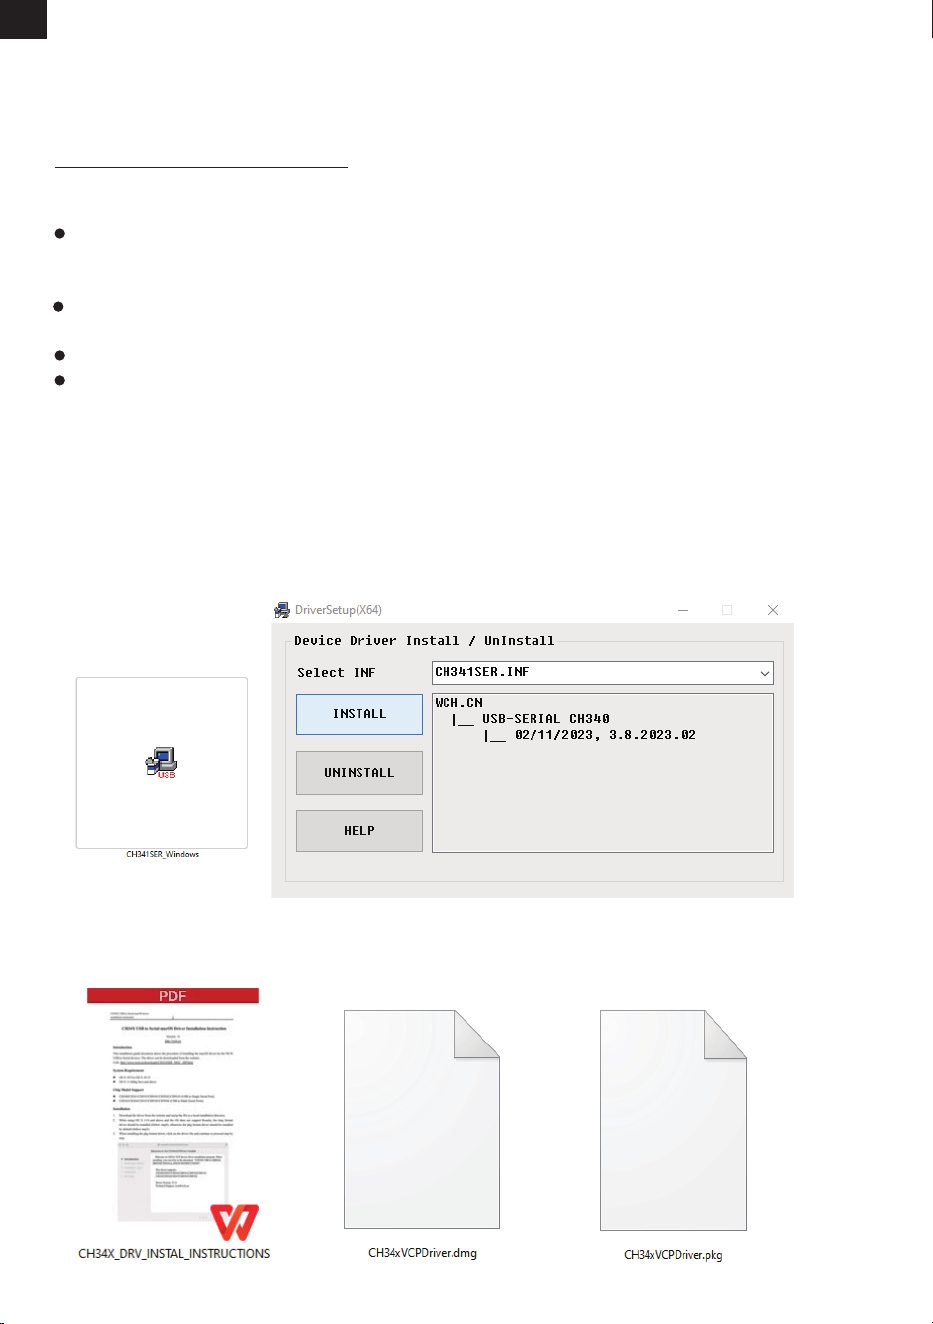
Before installing the driver, power on the machine and connect it to your PC via a USB cable.
For Windows Users:
1. Open the downloaded driver.
2. Click "INSTALL".
3. Click "OK" when the driver is installed successfully.
For Mac Users:
1. Open the instructions.
2. Open the downloaded driver and follow the instructions to install it.
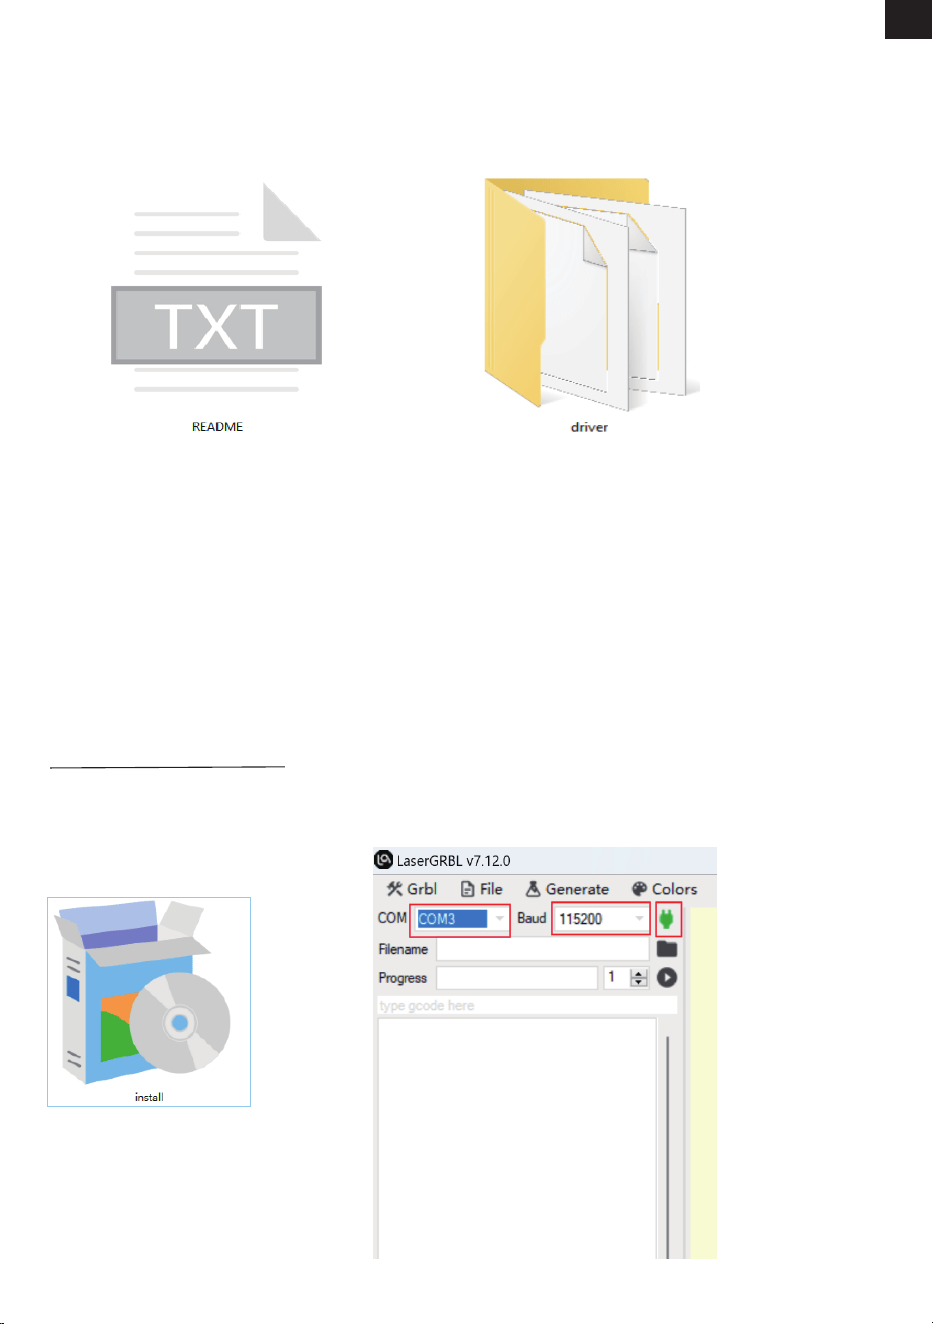
EN
-10-
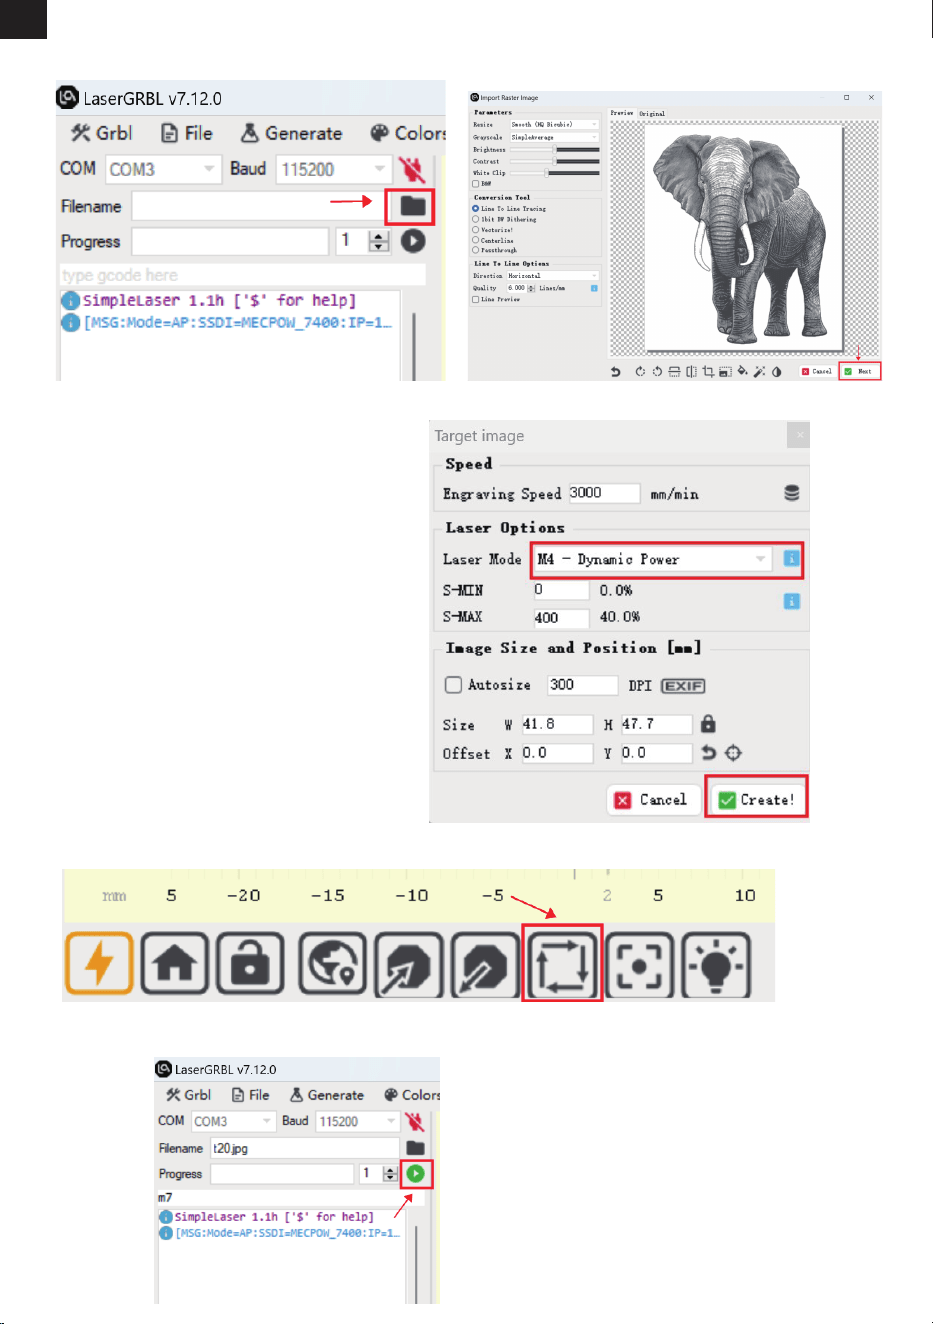
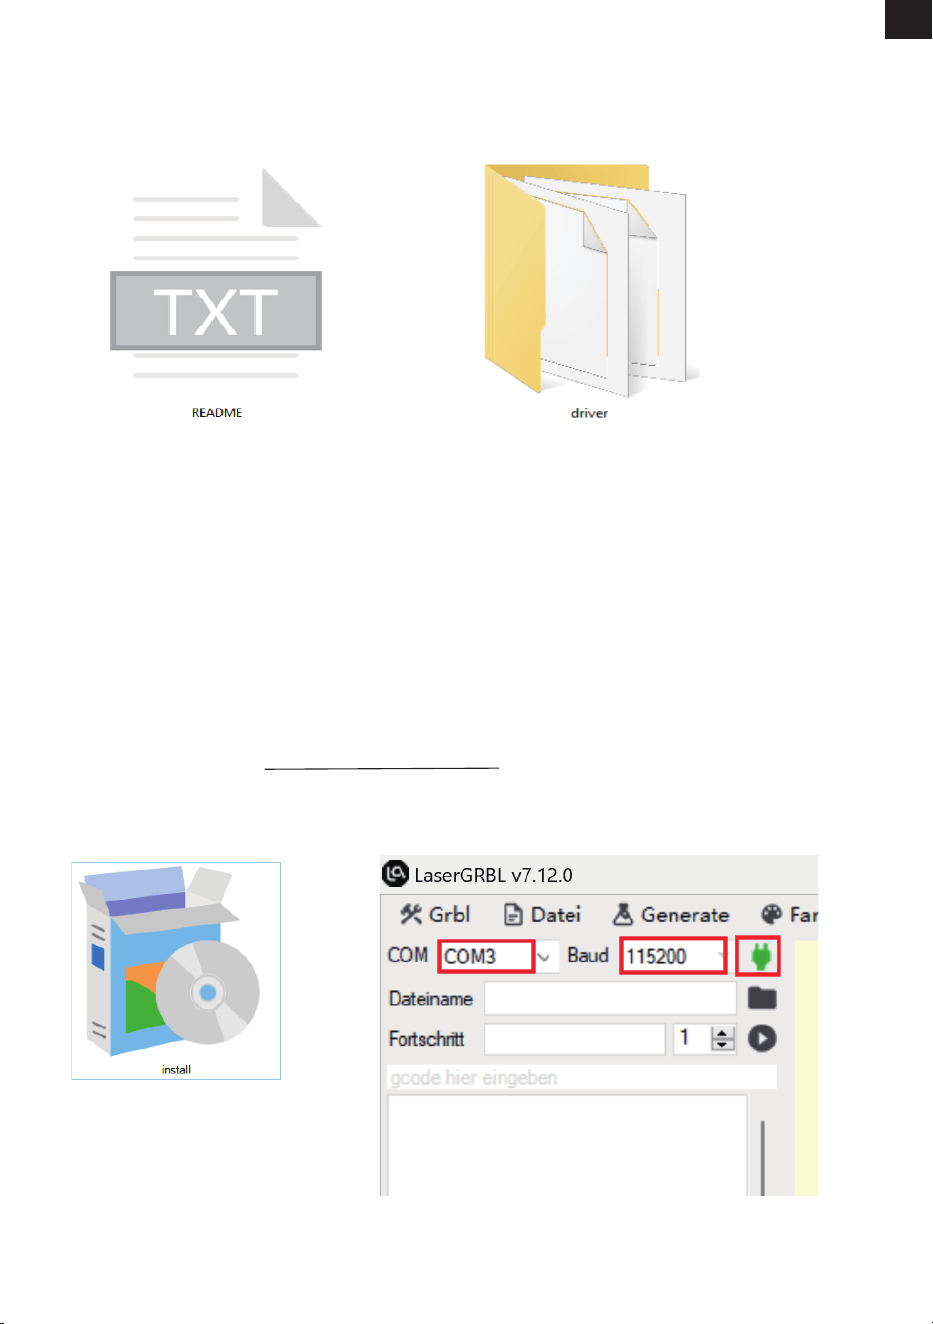
For Linux Users:
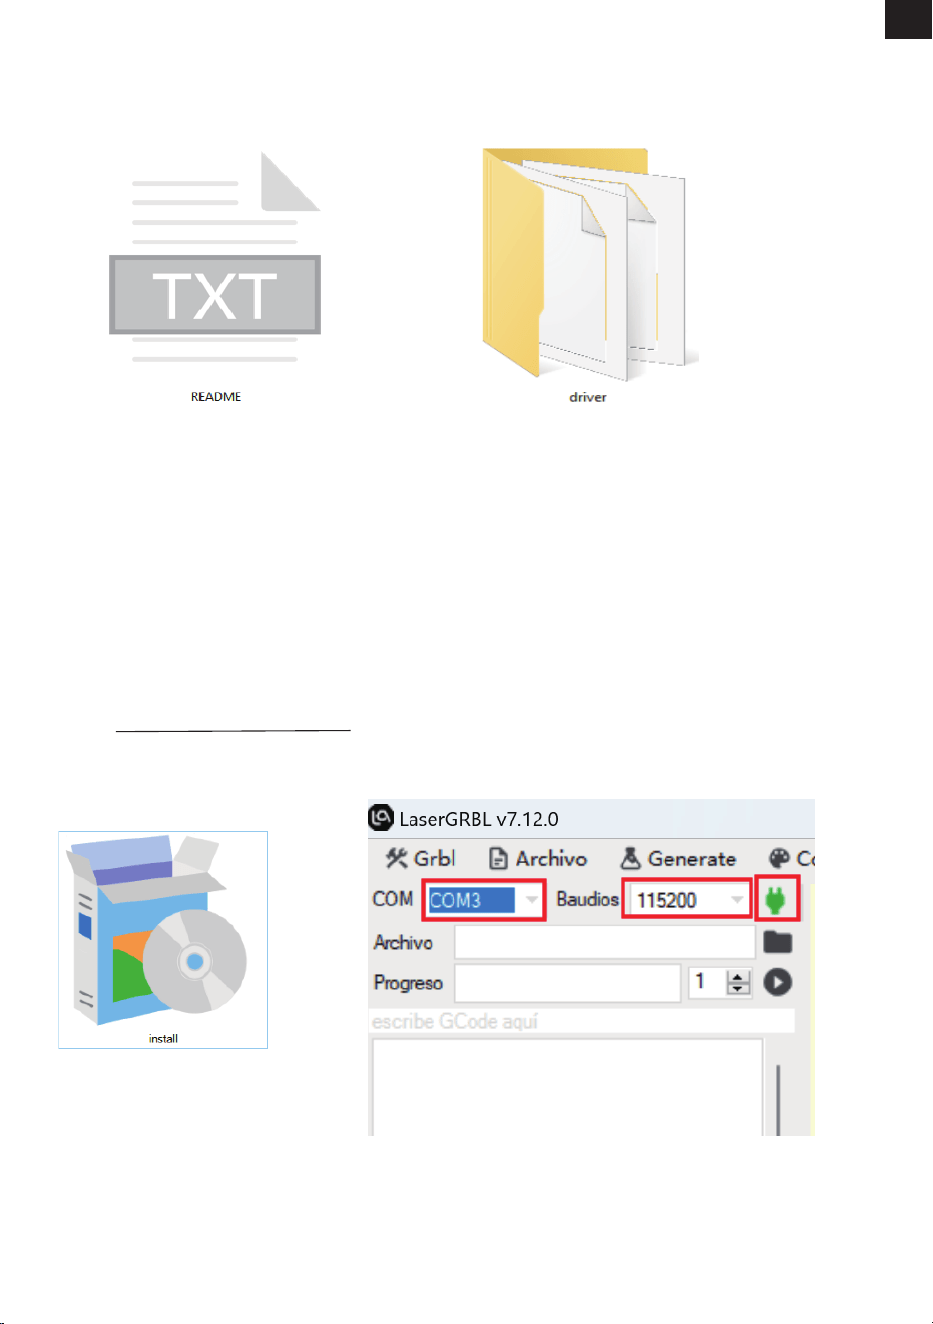
1. Open the le - README.
2. Open the le - driver, and follow the "README" to install it
8. Control via Computer Software
LaserGRBL
It's a free open-source software that supports Windows computers. Download it from:
http://lasergrbl.com/download/
ConnecttheengravingmachinewiththesoftwareinrealtimeviatheUSBcable.During
operation,youcanstartorstoptheengravingmachinethroughthecontrolpanel.
1.Installit.
2. Open the software. Select "COM3" and "115200", then click "Connect".
EN
-11-
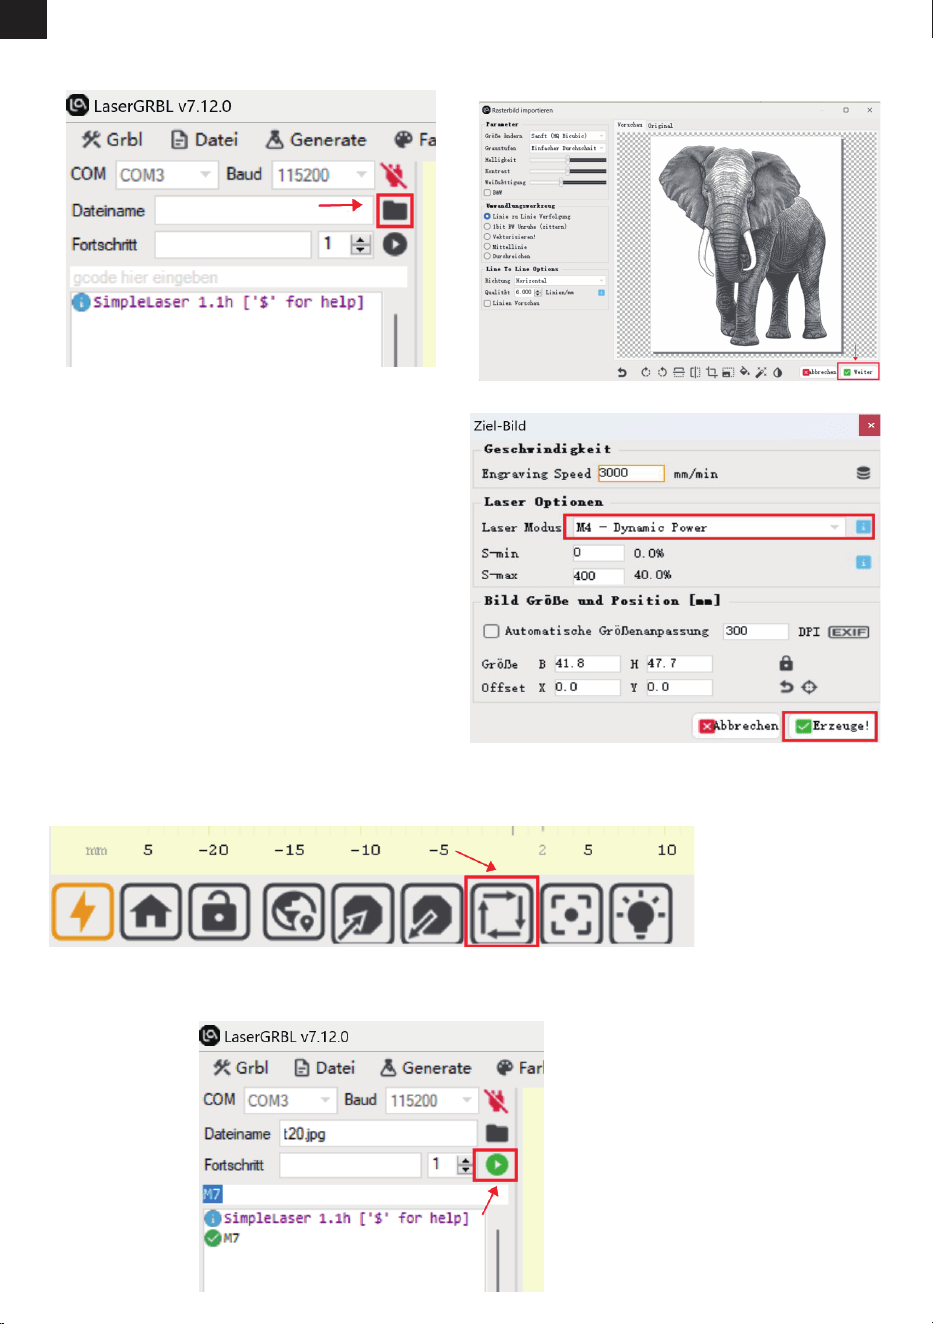
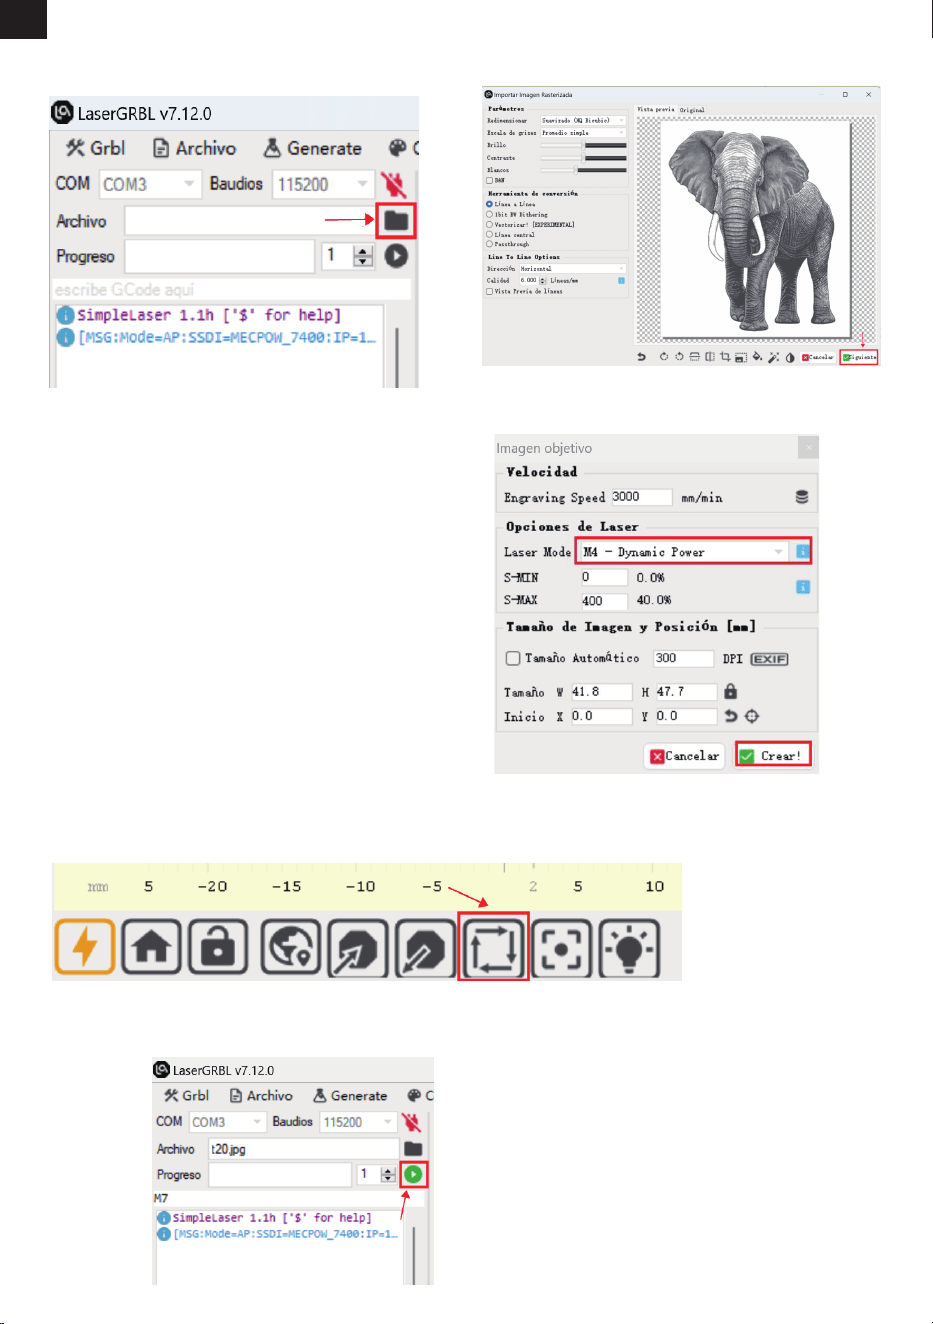
5. Select the operating parameters for laser
engraving or cutting. (M3 is for constant power
carving, and M4 is for variable power. Please
check section 10 for recommended operating
parameters for engraving or cutting dierent
materials.)
3. Click "Open File" to select the engraving le. 4. Select the engraving mode and click “Next”.
6. Click “Framing” to preview the engraving range and adjust the engraving position.
7. Click “Run Program” to start engraving
EN
-12-
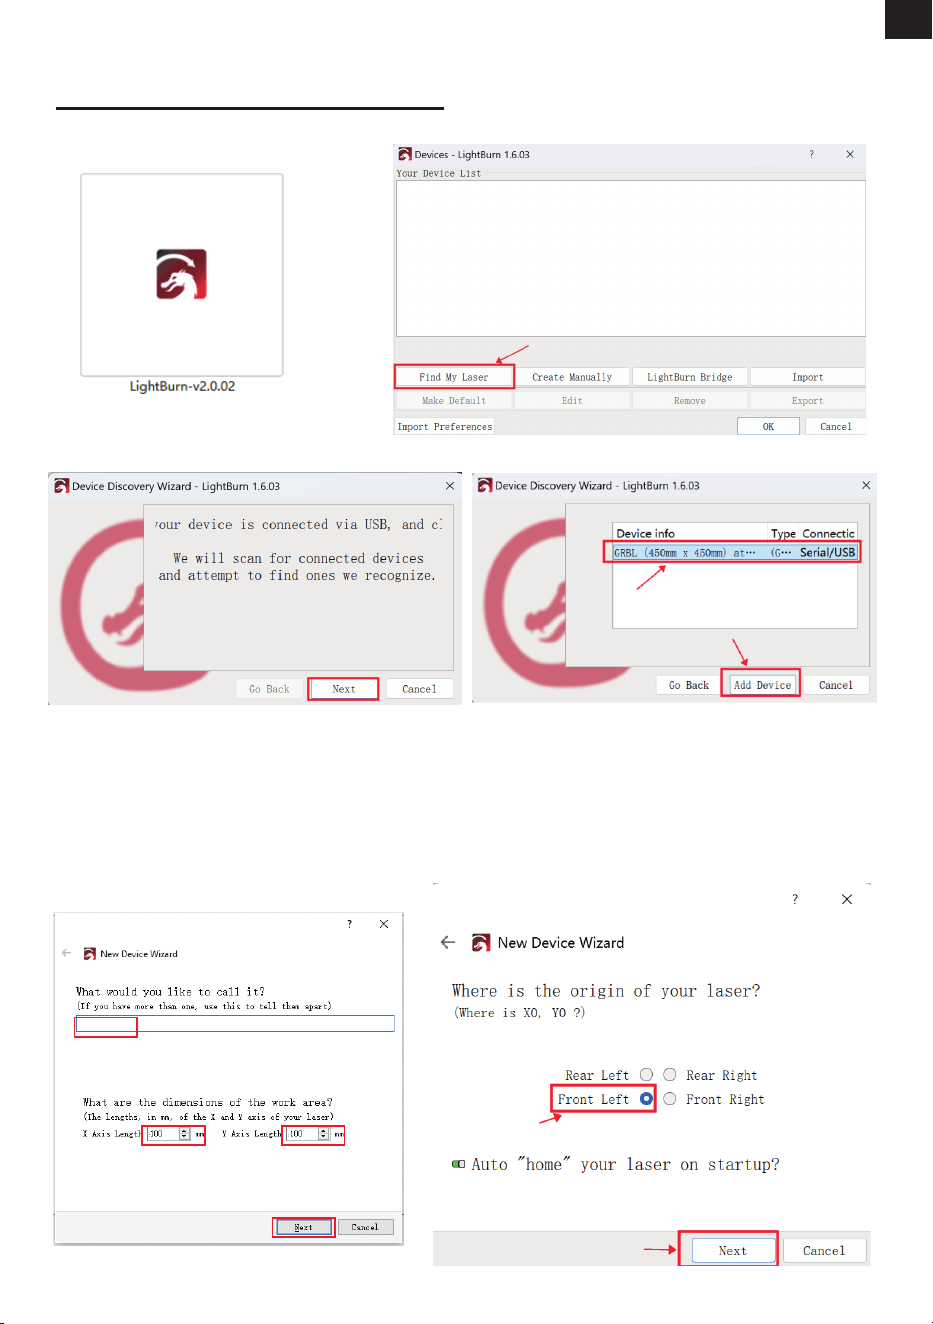
LightBurn
It's a paid professional software that supports MAC, Linux and Windows computers. Download it from:
https://lightburnsoftware.com/pages/download-trial
1.Install it.
2. Open the software and click “Find My Laser”.
3. Select your device and click “Add Device”.
5. Select “Front Left” as the origin of
your laser and click “Next”.
4. Name your device and enter the X-axis and
Y-axis lengths, then click “Next”.
Name: Mecpow M1
X Axis Length: 100mm
Y-Axis Length: 100mm
MecpowM1
EN
-13-
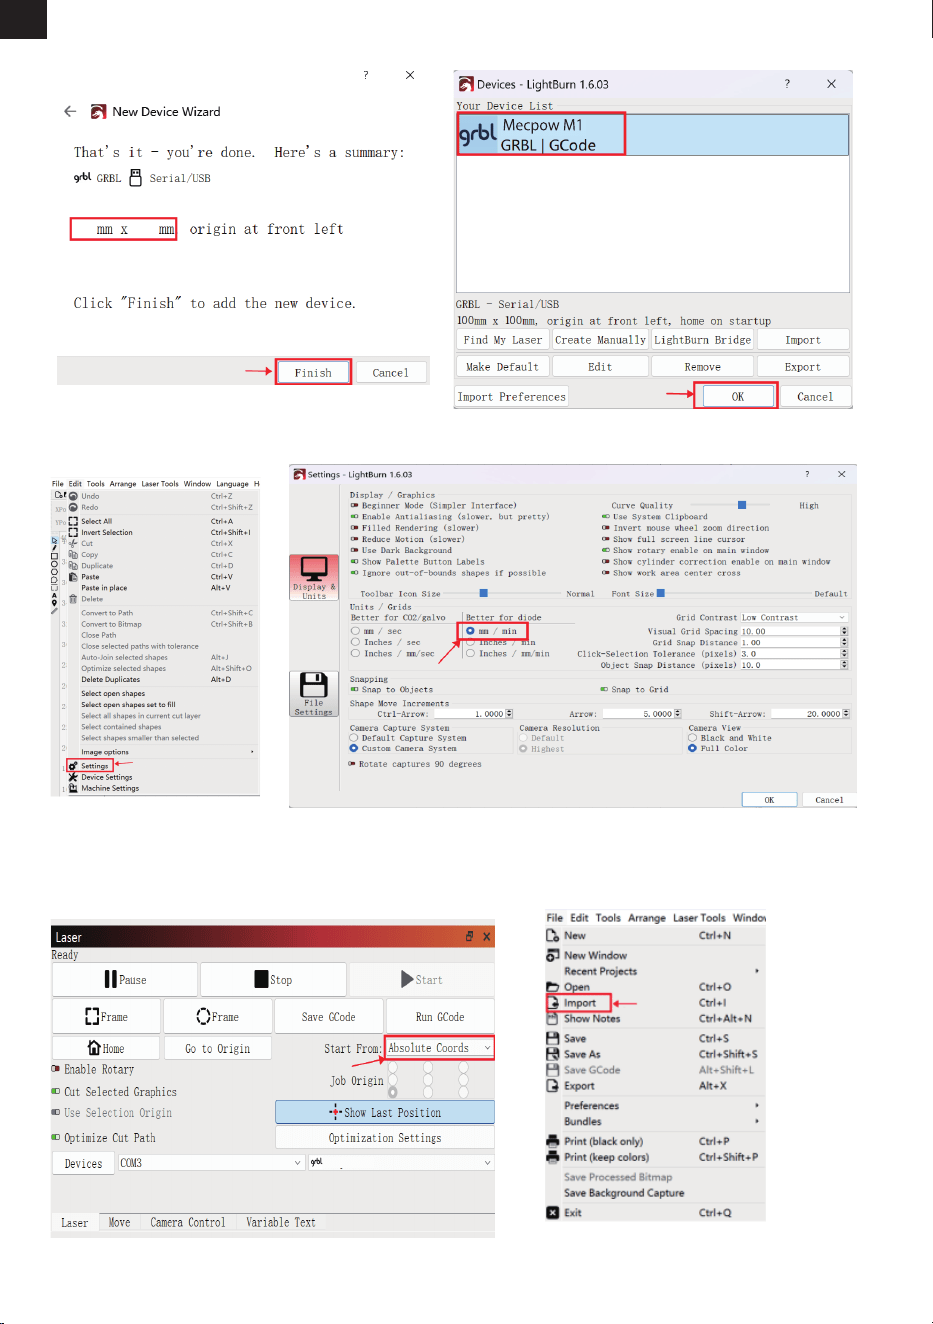
6. Click “Finish”. 7. Select Mecpow M1 and click “OK”.
8. Click “Edit” - “Settings” and set the unit to “mm/min”, then click “OK”.
9. Select "Absolute Coords” in the “Start From”
section, and then select the circle in the lower
left corner in the “Job Origin” section.
10. Click “File” - “Import” to import the
engraving le.
Mecpow M1
100 100
Mecpow M1
EN
-14-
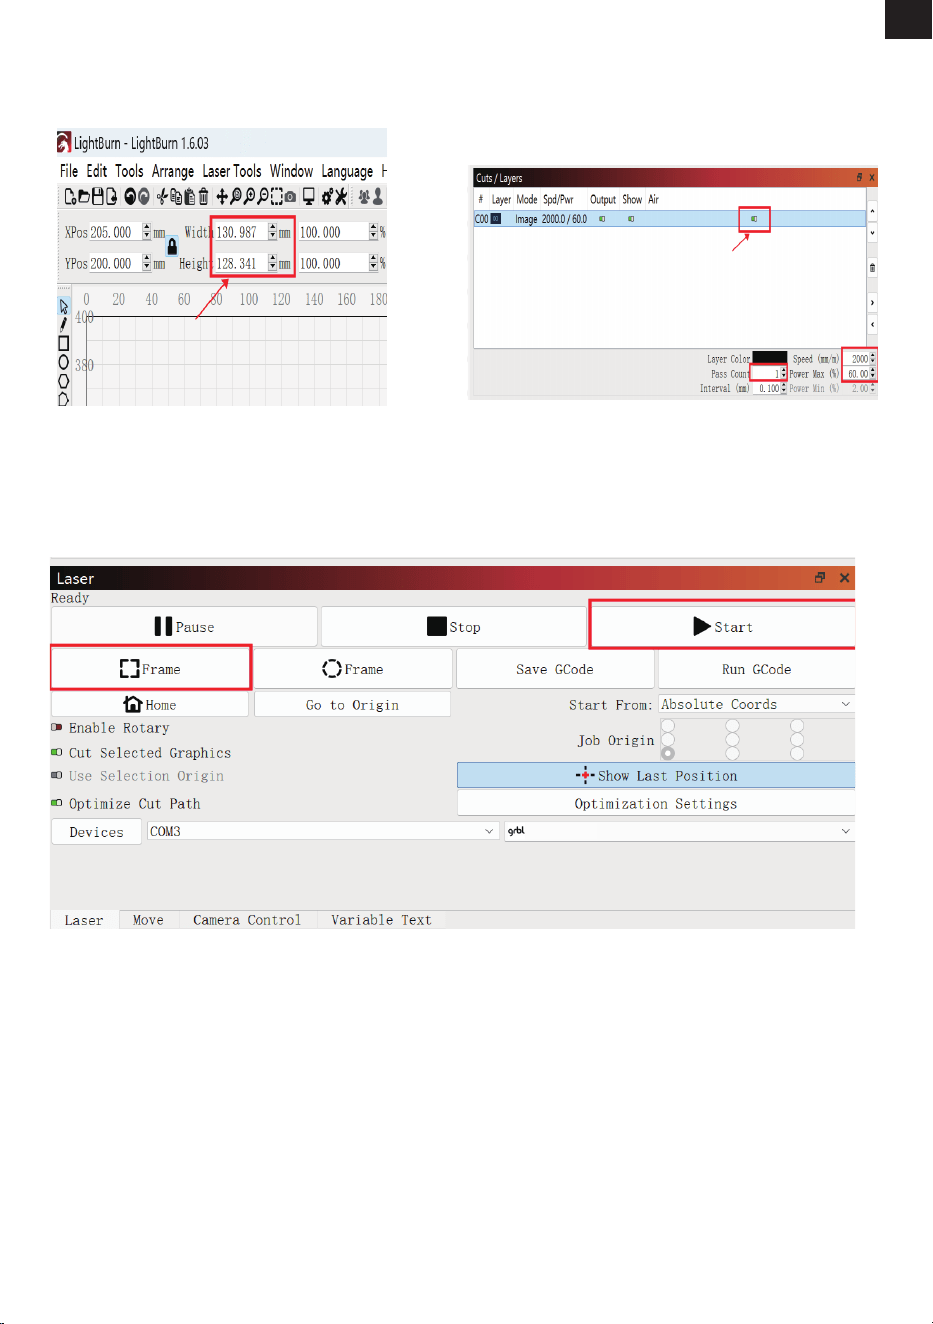
11. You can modify the engraving size on the
top of the interface after importing the le.
12. Select the engraving mode and set the
operating parameters for laser engraving or
cutting. (Recommended operating parameters
for engraving or cutting dierent materials are
listed in the next section.).
13. Click “Frame” to preview the engraving range and adjust the engraving position, then click
“Start” to start engraving.
Mecpow M1
EN
-15-
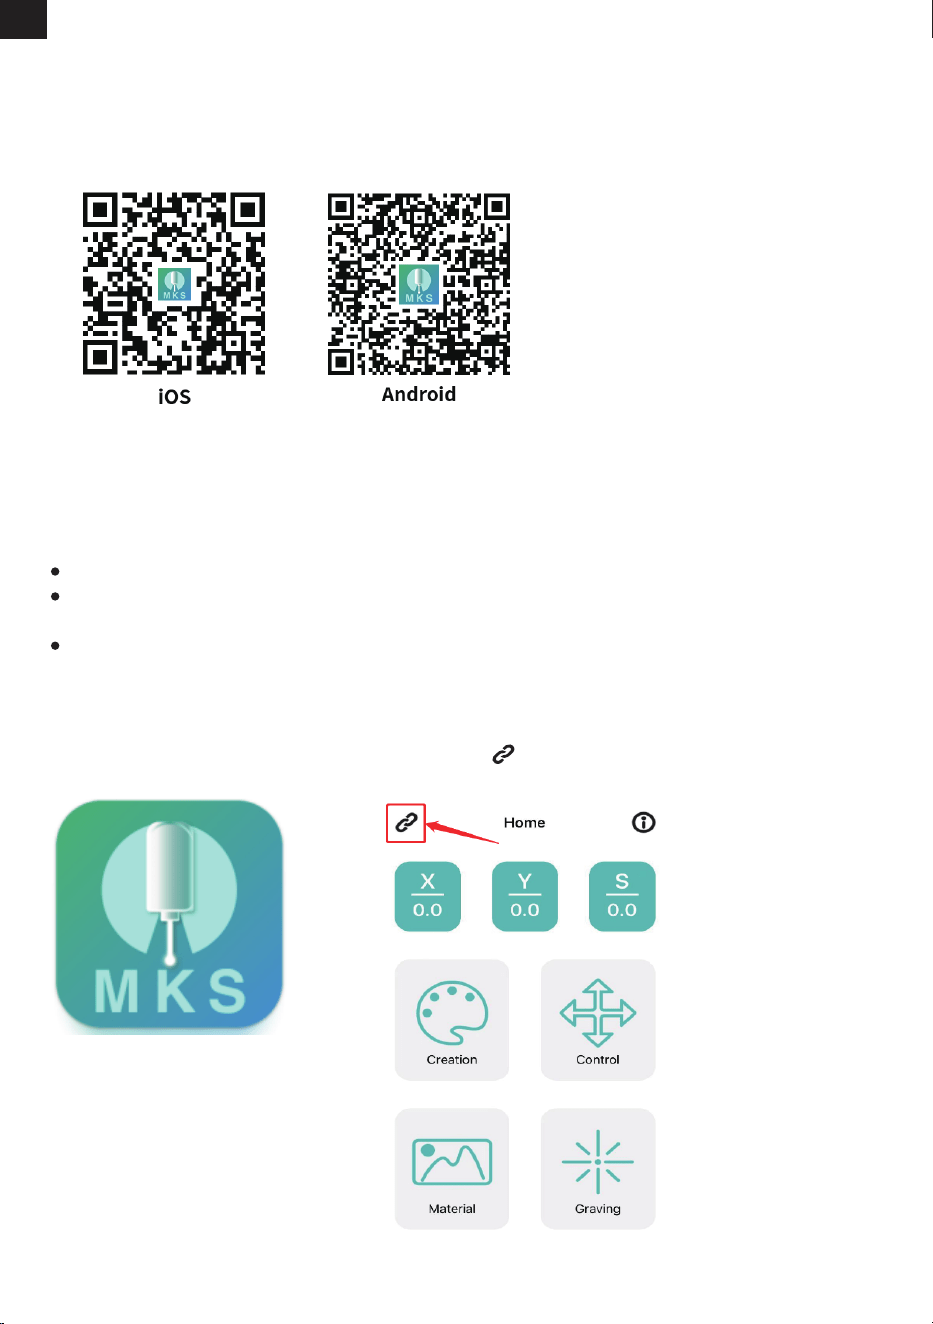
MKSLaser is a free mobile application that supports Android and iOS devices.
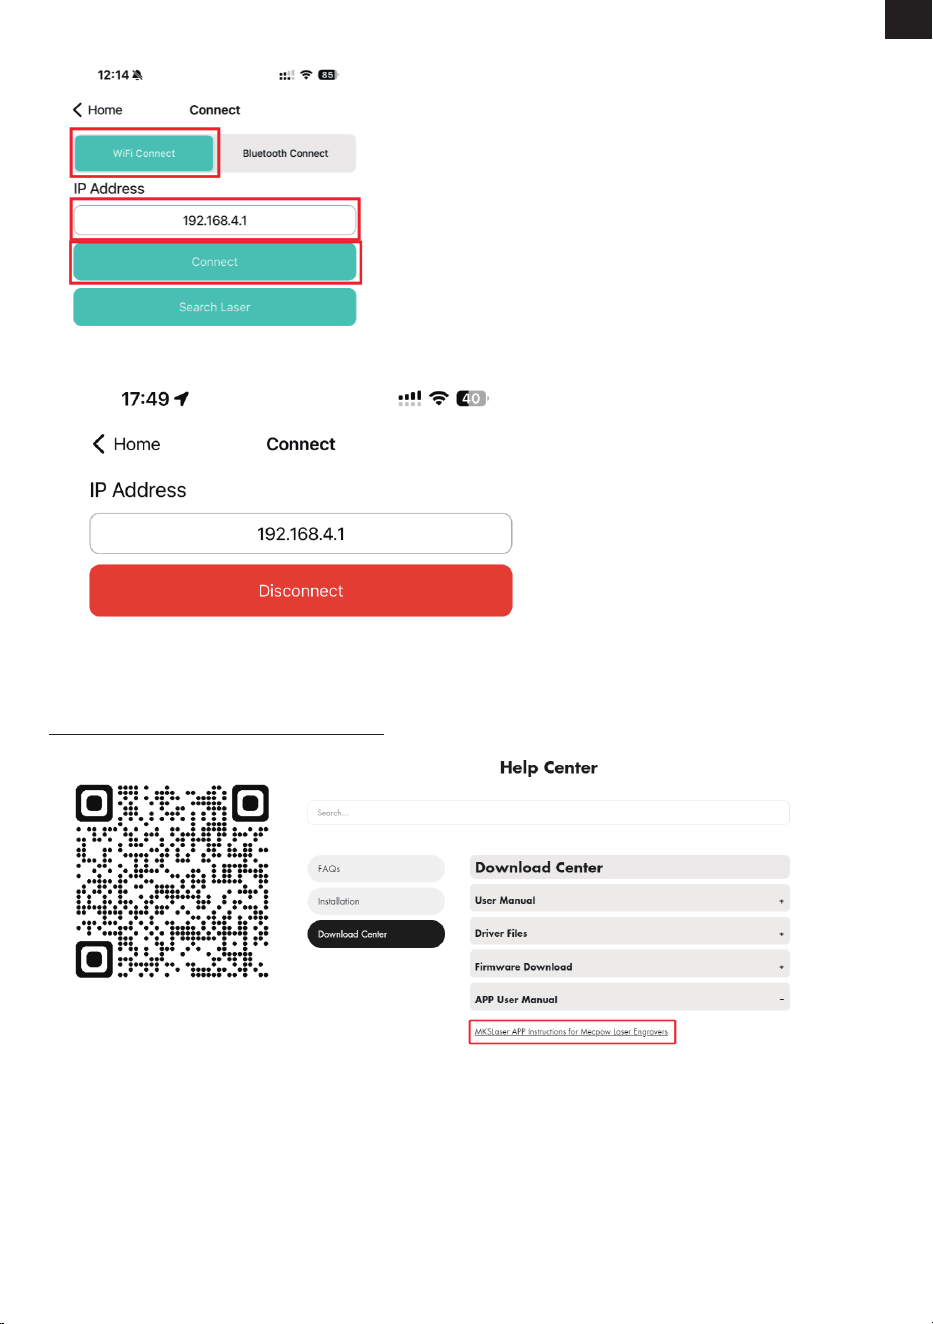
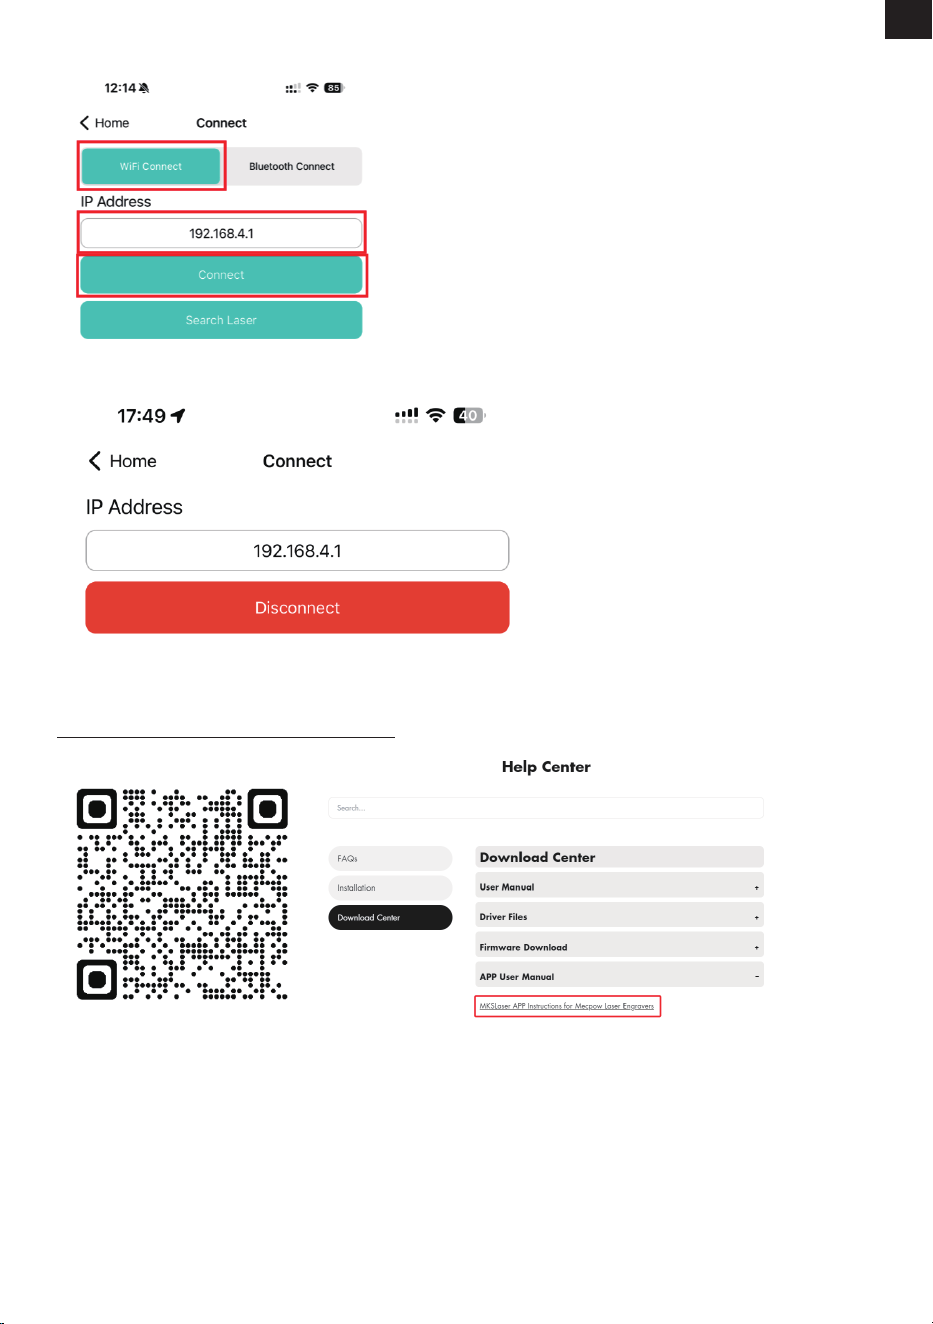
1. Enable the Wi-Fi function of your phone and connect the Wi-Fi “Mecpow_*****”.
Wi-Fi Name: Mecpow_*****
Wi-Fi Password: 12345678
2. Open the MKSLaser app.
3. Click on the icon.
Scan the QR code and download it.
App Download
Wi-Fi Connection
9. Control via Mobile App & TF Card
The "*****" in the Wi-Fi name is a random combination of numbers. It varies by machine.
To ensure the stability of the Wi-Fi signal, it is recommended to connect your phone to the Wi-Fi of the
engraving machine before inserting the TF card.
The app needs to be used with the TF card. The uploading of the engraving le will fail if the TF card has not
been inserted.
Note:
EN
-16-
Control via TF Card
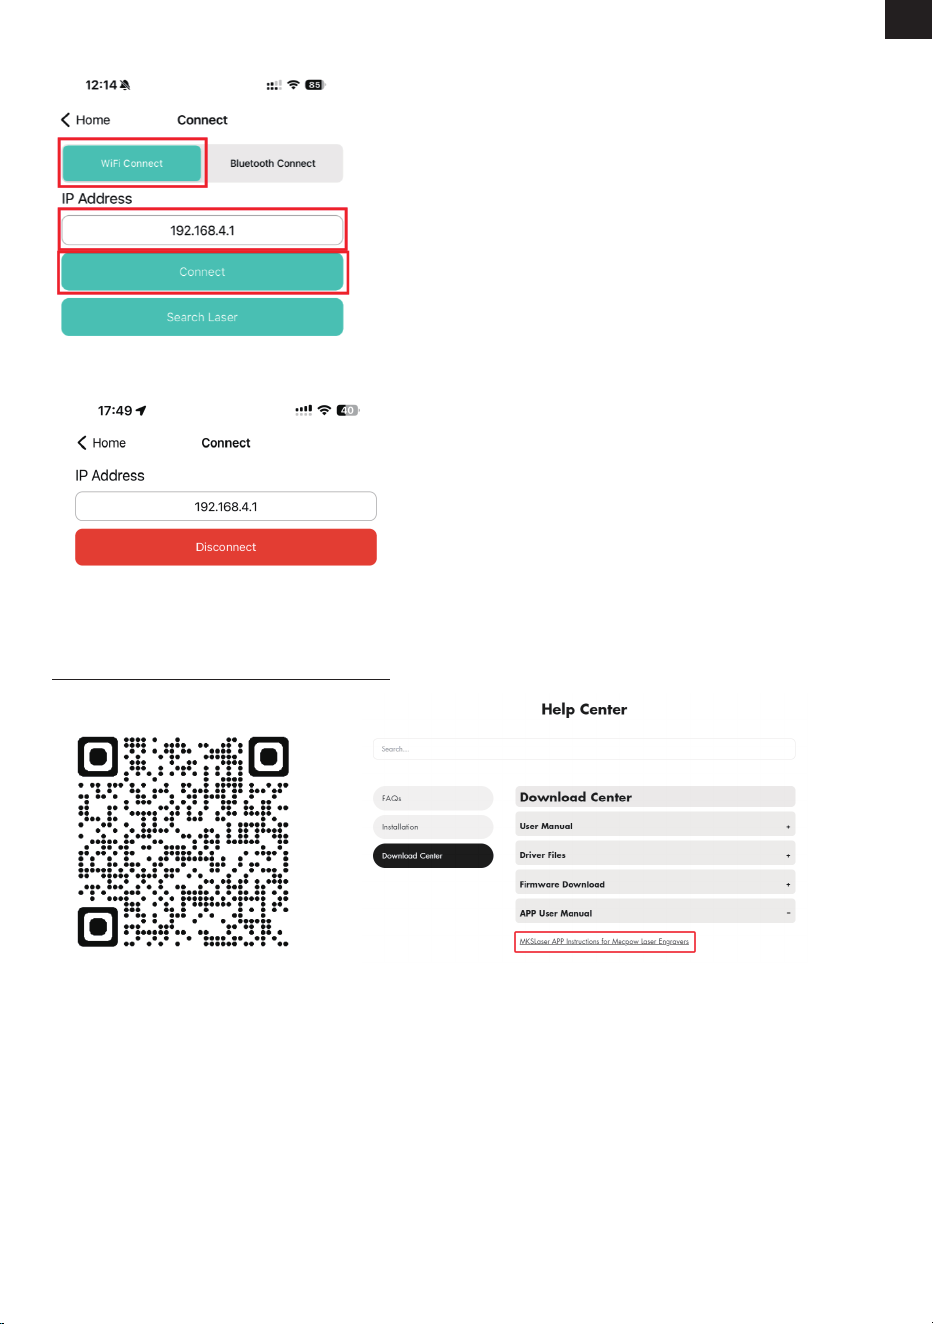
5.When "Connect" turns to "Disconnect", it means the Wi-Fi connection is successful.
For detailed usage of the MKSLaser app, please refer to the information in the TF card or download the user
manual by visiting the link below or scanning the QR code below.
https://mecpow.com/pages/download-center
Prepare a LightBurn G-code lefor engraving or cutting and save it in the root directory of the TF card.Insert the TF card into the laser engraver.
Note:
- The TF card only supports the FAT32 format.
- The laser engraver reads the latest modied le in the root directory of the TF card by default when there is more than one le in it.
- The engraver can only recognize NC and GC les with English names.
- The engraver can recognize NC and GC les saved with LightBurn. However, NC and GC les saved with LaserGRBL can only be recognized by the
engraver after being converted with MKSLaser. MKSLaser can be obtained from the attached TF card or Mecpow.com.
4. Select "WiFi Connect", enter IP Address "192.168.4.1", and click "Connect".
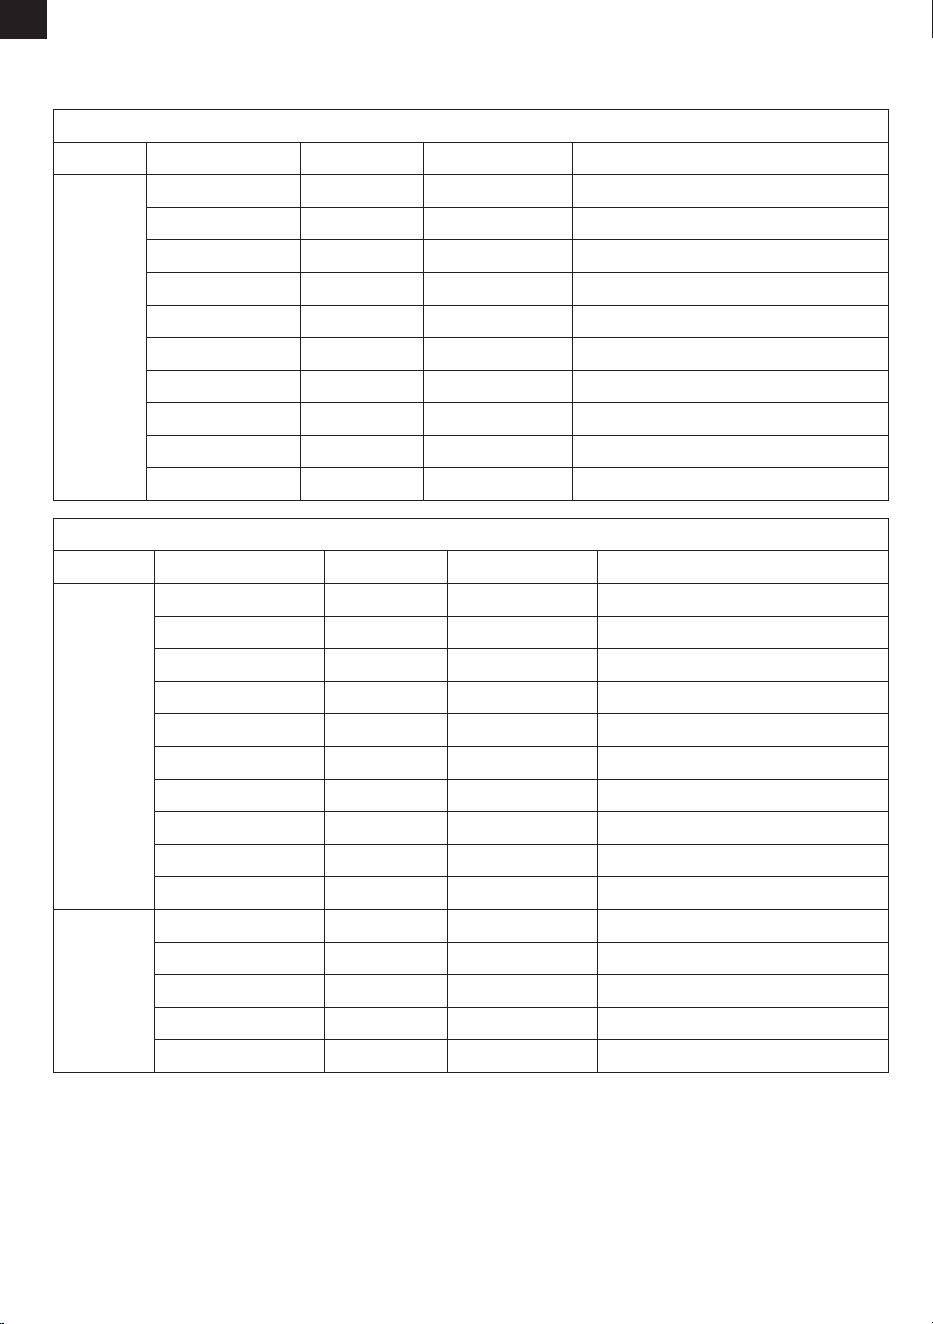
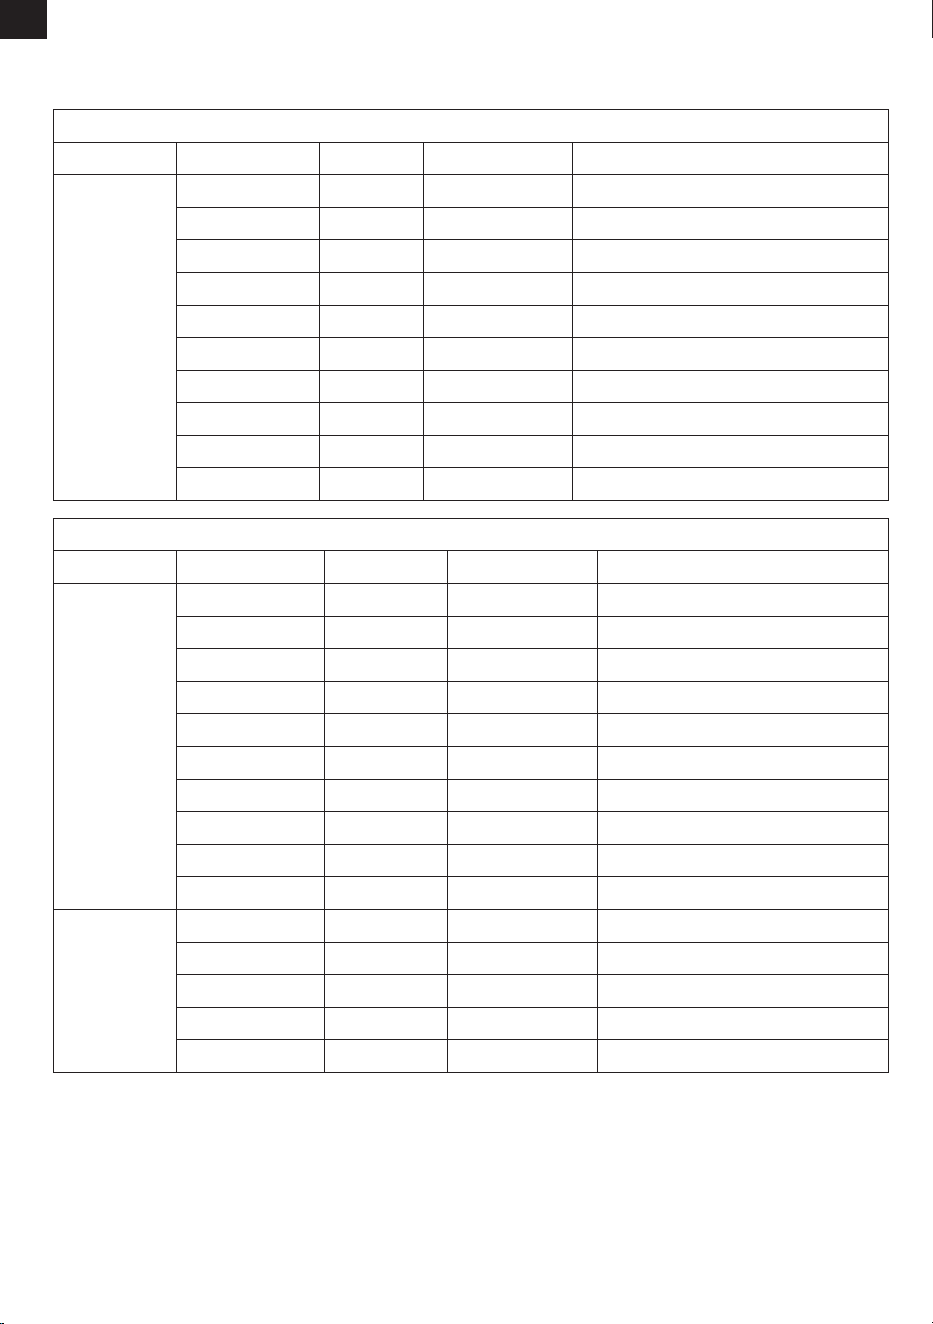
10. Recommended Operating Parameters
EN
-17-
100
100
100
100
100
100
100
100
60
100
2000
2000
2000
1600
600
600
40
600
3500
1000
The surface must be frosted.
The surface must be frosted, not glossy.
The surface needs to be painted.
Mode
Engraving
Materials
Wood Board
Bamboo
Solid Wood
Leather
Glass
Ceramics
Stainless Steel
Anodized Metal
Fabric
Acrylic
Power (%) Speed (mm/min) Note
Mecpow M1 (3.5W)
100
100
100
100
100
100
100
100
40
100
100
100
100
100
100
3000
3000
3000
2000
800
800
300
800
5000
1500
70
120
1300
100
1500
The surface must be frosted.
The surface must be frosted, not glossy.
The surface needs to be painted.
Mode
Engraving
Cutting
Materials
Wood Board
Bamboo
Solid Wood
Leather
Glass
Ceramics
Stainless Steel
Anodized Metal
Fabric
Acrylic
2mm Thick Board
3mm Thick Board
Cardboard
Leather
Fabric
Power (%) Speed (mm/min) Note
Mecpow M1 (5W)

EN
-18-
11. Troubleshooting
1. Why can’t the M1 laser engraver power on?
Causes:
a. The M1 laser engraver may not be properly connected to the input port.
b. The plug could be loose.
c. The power adapter might be damaged.
Solutions:
a. Check that the power cable is securely connected and that you're using the ocial adapter.
b. Test alternative outlets. If the issue persists, we recommend contacting technical support.
c. Purchase a new power adapter.
2. Can’t the machine connect to Wi-Fi?
Causes:
a. Weak or unstable Wi-Fi signal
b. Incorrect Wi-Fi password
c. Incorrect IP address input
Solutions:
a. Make sure the machine is connected to the network.
b. Ensure the password is entered correctly (capital letters matter).
c. Try accessing 192.168.4.1 in your browser.
3. Why is my computer software unable to connect to the machine?
Causes:
a. Select the incorrect port.
b. Use Windows 7/8 without the proper drivers.
Solutions:
a. Try switching the COM port.
b. Install the appropriate driver if you're using Windows 7/8.
4. Why does my laser engraving look blurry?
Causes:
a. Incorrect focal length
b. Unsuitable material for engraving/cutting
c. Incorrect power or speed settings
Solutions:
a. Adjustthe focal lengthof the laser module via thefocusing lever until the beam achieves minimal dot size.
b. Ensure the material is appropriate for engraving/cutting.
c. Adjust power, speed, or other parameters accordingly.
5. What should I do if the lens is damaged?.
Causes:
a. Lens not cleaned regularly, causing dust buildup
b. Lens assembly damage from external force
Solutions:
a. Regularly clean the lens with alcohol swabs (recommended after every 20 hours of cumulative use) to prevent
dust buildup aecting laser output.
b. If the lens assembly is damaged, you can replace it as needed or contact Mecpow's manufacturer to purchase
replacement components.
EN
-19-
12. Compliance Statement
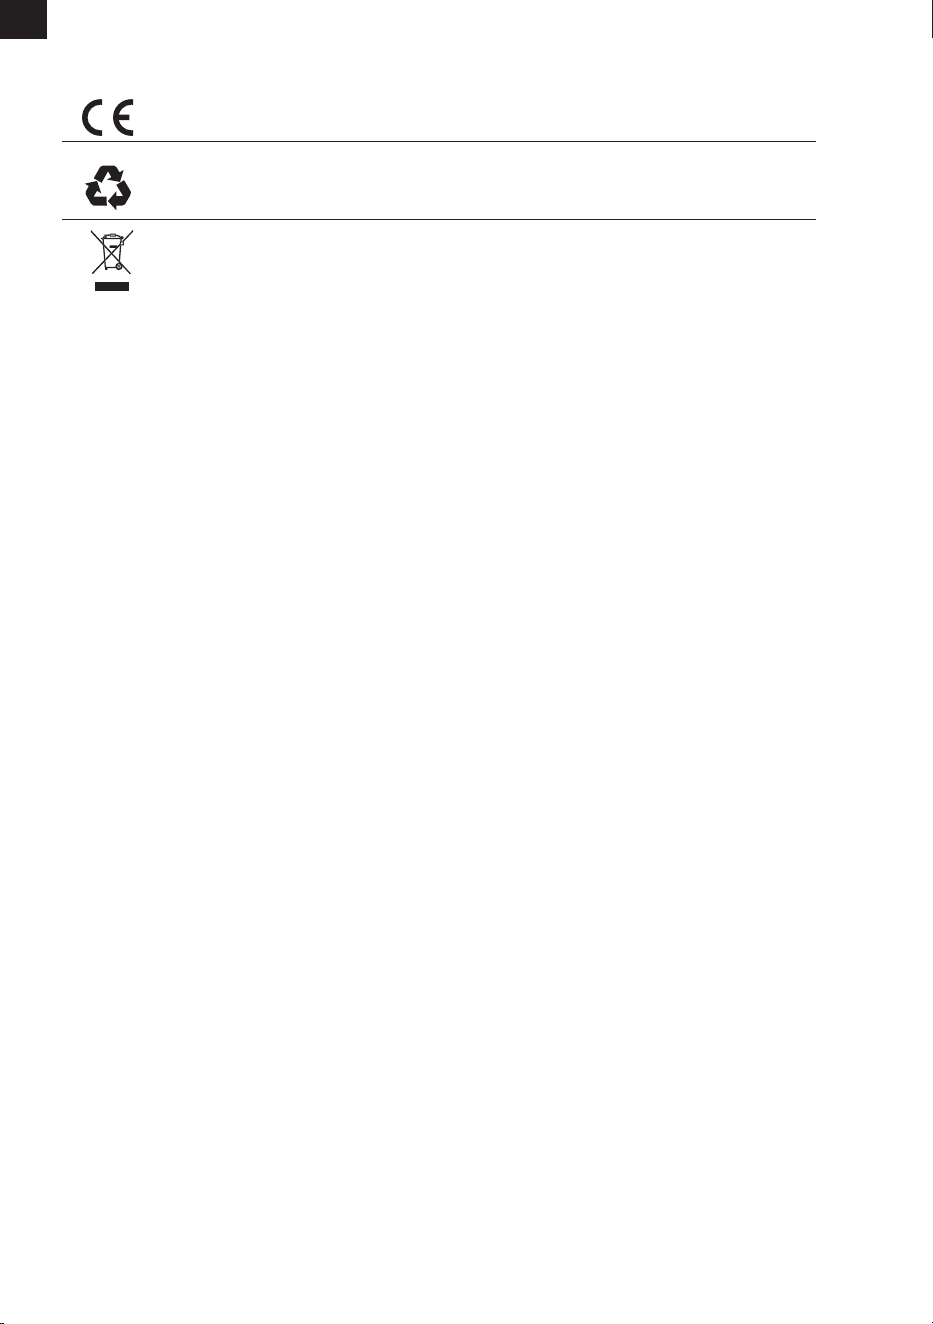
This product is in compliance with the standards of the European Community.
This symbol indicates that the product should not be disposed of as household waste. The product
must be sent to separate collection facilities for recovery and recycling of electrical and electronic
equipment.
FCC Statement
Changes or modications not expressly approved by the party responsible for compliance could void the user's authority
to operate the equipment.
This equipment has been tested and found to comply with the limits for a Class B digital device, pursuant to Part 15 of the
FCC Rules. These limits are designed to provide reasonable protection against harmful interference in a residential
installation. This equipment generates and radiates radio frequency energy and, if not installed and used in accordance
with the instructions, may cause harmful interference to radio communications. However, there is no guarantee that
interference will not occur in a particular installation. If this equipment causes harmful interference to radio or TV
reception, which can be determined by turning the equipment o and on, the user is encouraged to try to correct the
interference by one or more of the following measures:
-- Reorient or relocate the receiving antenna.
-- Increase the separation between the equipment and receiver.
-- Connect the equipment into an outlet on a circuit dierent from that to which the receiver is connected.
-- Consult the dealer or an experienced radio/TV technician for help.
This device complies with part 15 of the FCC rules. Operation is subject to the following two conditions: (1) this device may
not cause harmful interference, and (2) this device must accept any interference received, including interference that may
cause undesired operation.
This symbol indicates that the product is capable of being recycled.

DE
1. Vorwort.................................................................... ..
2. Sicherheitserklärung................................................
3. Diagramm...................................................................
4. Spezifikationen..........................................................
5. Packliste......................................................................
6. Gebrauchsanweisung ................................................
7. Treiber .........................................................................
8. Steuerung über Computersoftware.........................
9. Steuerung über Mobile App & TF-Karte...................
10. Empfohlene Betriebsparameter .............................
11. Fehlerbehebung .......................................................
12. Konformitätserklärung ...........................................
20
20
22
23
23
24
28
29
34
36
37
38
CONTENTS

DE
-20-
1. Vorwort
2. Sicherheitserklärung
Sehr geehrter Kunde,
Vielen Dank, dass Sie sich für unser Lasergravurgerät entschieden haben. Dieses Gerät ist ein High-Tech-Produkt,
das Licht, Maschinen und Elektrizität vereint. Damit Sie das Gerät besser nutzen und warten können, lesen Sie
bitte das Benutzerhandbuch sorgfältig durch und befolgen Sie die darin beschriebenen Schritte.
Haftungsausschluss
Jegliche Verluste, die durch unsachgemäßen Gebrauch oder Nichtbeachtung der Schritte im Benutzerhandbuch
verursacht werden, gehen zu Lasten der Person. Die endgültige Interpretation des Benutzerhandbuchs obliegt
unserem
und wir behalten uns das Recht vor, alle Informationen, Daten, technischen Details usw. in diesem Handbuch zu
ändern.
* Die Laserbearbeitung kann risikoreich sein, und Benutzer sollten sorgfältig prüfen, ob das zu bearbeitende
Objekt für die Laserarbeit geeignet ist.
* Das zu bearbeitende Objekt und die Emissionen müssen den örtlichen Gesetzen und Vorschriften entsprechen.
* Dieses Gerät verwendet einen Laser der Klasse IV (leistungsstarke Laserstrahlung), der die folgende Situationen:
(1) Entzündung von brennbaren Materialien in der Umgebung;
(2) Bei der Laserbearbeitung können je nach dem zu bearbeitenden Objekt andere Strahlung sowie giftige und
schädliche Gase entstehen;
(3) Die direkte Einwirkung von Laserstrahlung kann den menschlichen Körper schädigen. Am Arbeitsplatz
müssen Feuerlöschgeräte vorhanden sein, und brennbare und explosive Materialien dürfen nicht um die
Werkbank oder Maschine herum gestapelt werden. Außerdem muss für eine gute Belüftung gesorgt werden.
* Die Umgebung, in der das Gerät steht, sollte trocken und frei von Verschmutzung, Vibrationen, starker
Elektrizität, starkem Magnetismus und anderen Störungen sein. Die Umgebungstemperatur sollte 5-30°C und die
Luftfeuchtigkeit 35-65%RH betragen.
* Die Betriebsspannung der Maschine ist AC100-240V.
* Während des Betriebs der Maschine muss diese durchgehend überwacht werden. Vor der Abreise muss der
Strom abgeschaltet werden, um unvorhergesehene Probleme zu vermeiden. Wenn eine abnormale Situation
auftritt, schalten Sie bitte sofort den Strom ab und kümmern Sie sich darum!
* Es ist strengstens untersagt, reektierende oder diuse Gegenstände in das Gerät zu stellen, die für den Betrieb
nicht relevant sind, um Laserreexionen auf den menschlichen Körper oder brennbare Materialien zu vermeiden.
* Das Gerät sollte von elektrischen Geräten ferngehalten werden, die empndlich auf elektromagnetische
Störungen reagieren und diese verursachen können.
* Das Zerlegen des Lasergravierers durch Nichtfachleute ist strengstens untersagt, da im Inneren des Geräts
Gefahren wie Hochspannung bestehen können.
Sicherheitsvorkehrungen
Warnung
1. Die Lasergravurmaschine kann Laserlicht erzeugen. Es ist strengstens untersagt, lebende Organismen unter
den Laserstrahl zu bringen (der Anschluss ist mit einem gelben Warnschild gekennzeichnet). 2. Lichtempndli-
chen Patienten ist es untersagt, das Lasergerät zu benutzen oder sich ihm zu nähern. 3. Bei der Verwendung der
Lasergravurmaschine müssen der Bediener und alle Personen in der Nähe der Maschine eine Laserschutzbrille
tragen. Bedienen Sie das Lasergerät nicht ohne Laserschutzbrille. Unser Gerät wird mit einer Laserschutzbrille
geliefert. Wenn Sie eine zusätzliche Schutzbrille kaufen möchten, sollte diese einen Wellenlängenschutz
zwischen 400-445nm (+-5nm) bieten, einen Außendurchmesser von +5 haben und mindestens der Stufe L5
entsprechen.
4. Wenn das Lasergravurgerät in Betrieb ist, muss der Benutzer sehr aufmerksam sein und darf es nicht
unbeaufsichtigt lassen, um eine Entzündung des gravierten Materials zu vermeiden. Stellen Sie das Gerät an
einem feuerfesten Ort auf und sorgen Sie für eine gute Belüftung. Es wird empfohlen, ein Feuerlöscher in der
Nähe zu haben, für Notfälle.
5. Stellen Sie sicher, dass sich in der Nähe des Lasergraviergeräts keine brennbaren Materialien benden. Wir
empfehlen, einen Wabenarbeitstisch unter die Maschine zu stellen.
6. Achten Sie beim Betrieb des Lasergravierers darauf, dass genügend Platz um ihn herum vorhanden ist. Beim
Gravieren bestimmter Materialien kann Rauch entstehen, der über ein spezielles Abluftsystem abgesaugt
werden sollte.

DE
-21-
1. Bevor Sie den Mecpow M1 verwenden, stellen Sie bitte sicher, dass der Schutzdeckel geschlossen ist und der
Laserreektor sauber ist.
2. Der M1 entspricht den Sicherheitsstandards der Laserklasse 1. Vor Beginn der Lasergravur ist zu überprüfen,
ob die Schutzabdeckung intakt und unbeschädigt ist. Im Falle einer Beschädigung darf das Gerät nicht weiter
verwendet werden.
3. Es muss darauf geachtet werden, dass der Laser während des Betriebs immer innerhalb der Schutzabdeckung
bleibt. Der Arbeitsbereich ist stets mit der Schutzabdeckung abzudecken, und es sollte ein Augenschutz
getragen werden, um die Sicherheit zu gewährleisten.
4. Während der Lasergravur sollte das Gerät nicht bewegt werden, um eine Beeinträchtigung der Selbstschutz-
mechanismen und eine Unterbrechung des Gravurprozesses zu vermeiden. Bewegungen des Geräts oder des zu
gravierenden Objekts sollten vor oder nach dem Graviervorgang durchgeführt werden. Eine Bewegung
während des Betriebs ist unbedingt zu vermeiden.
5. Minderjährige sollten bei der Nutzung des Produkts immer von einem Erwachsenen beaufsichtigt werden.
6. Beim Schneiden oder Gravieren von entammbaren Materialien mit niedriger Geschwindigkeit und hoher
Leistung kann die Entstehung von Flammen nicht ausgeschlossen werden. Im Falle einer Flamme muss die
Bearbeitung sofort unterbrochen werden.
7. Es sollte unbedingt vermieden werden, Teile des Geräts zu demontieren, wenn es eingeschaltet ist, um einen
Kontakt mit der Stromversorgung zu verhindern. Auch das Berühren elektronischer Komponenten mit den
Händen oder Werkzeugen sollte unterlassen werden.
8. Bei Auftreten einer der folgenden Situationen ist das Gerät auszuschalten und nicht weiter zu verwenden:
• Ein verbrannter Geruch wird wahrgenommen.
• Eine oene Flamme entsteht, die vom Graviermaterial ausgeht.
• Schäden an den internen Komponenten des Produkts werden festgestellt.
• Ein unerwarteter Stillstand des Geräts tritt auf.
• Ungewöhnliche Geräusche oder Lichter, die zuvor nicht aufgetreten sind, werden bemerkt.
9. Vorsicht ist bei der Bedienung und Einstellung der Bedienelemente geboten, da unspezizierte Verfahren zu
gefährlicher Strahlenbelastung führen können.
1. Für eine optimale Leistung sollte das Objektiv des Geräts regelmäßig mit einem staubfreien Tuch oder Papier,
das mit Alkohol angefeuchtet ist, gereinigt werden.
2. Es ist darauf zu achten, dass das Gerät während der Nutzung oder Lagerung nicht in Kontakt mit Fremd-
körpern kommt, die in die oberen Belüftungsönungen eindringen und den Betrieb des Geräts beeinträchtigen
könnten.
Sicherheitshinweise
Wartung
DE
-22-
Einführung und Funktionen
Teile Bezeichnungen
Funktionen
1
2
3
4
Ein-/Aus-Taste
Anzeige
START/PAUSE-Taste
FRAME-Taste Beginnen Sie damit, den Arbeitsbereich des Lasers zu rahmen.
Zeigt den Status des Geräts an:
Weiß: Standby
Blau: In Betrieb
Rot: Alarm
Grün: WLAN-Verbindung
3. Diagramm
Gerät ein-/ausschalten.
(1)Um das Gravieren/Schneiden zu starten, bevor die Maschine in Betrieb ist, klicken Sie
darauf.
(2)Im Betrieb:
Erster Klick: Maschine pausieren.
Zweiter Klick: Die Gravur/das Schneiden wird fortgesetzt.
(3)Im Standby-Modus:
Wenn Sie die Gravur der zuletzt auf die TF-Karte übertragenen Datei wiederholen
möchten (ausgenommen MKSLaser mobile DLC-Dateien), klicken Sie bitte hier.
11
Abluftventilator
Zum Abführen von Dämpfen und Rauch. Das ist während des Gravierens oder Schneidens
wichtig.
5
HOME-Taste Der Rückweg zum Ausgangspunkt ist einzuschlagen.
6
STOP-Taste Beenden Sie die Gravur/Rahmung.
7
TF-Anschluss Legen Sie die TF-Karte zum Lesen von Dateien ein.
8
Typ-C-Anschluss Zum Anschluss an einen Computer
9
Drehrollenanschluss Um die Drehrolle anzuschließen, muss zunächst das Rollenkabel eingesteckt werden.
10
DC-Eingangsanschluss Das Netzteil wird an die Stromversorgung angeschlossen.
123456
10
11
98
7
Display
A. STOP
B. HOME
C. FRAME
D. START/PAUSE
Wenn Sie diese vier Tasten drücken,
dann leuchtet die weiße Leuchte auf.
A. Maschinenstart und Standby: Weiß leuchtend
B. Gravurstatus: Blau leuchtend
C. Schutzabdeckung geöffnet/Gerät geneigt (≥15°): Rot blinkende Leuchte
(mit 3 Alarmtönen)
D. WLAN verbunden: Leuchtet grün
Anzeige Anzeigestatus
DE
-23-
4. Technische Daten
Produktgröße
Stromversorgung
Lasereingang
Laserleistung
Wellenlänge
Gravuräche
Max. Gravurgeschwindigkeit
Graviergenauigkeit
Höhe der zu gravierenden Objekte
Materialien für die Lasergravur
Unterstützte Software
Systemunterstützung
Unterstützte Dateiformate
Methode der Datenübertragung
Neigungsalarm
220 x 264 x 194 mm
60W
DC 12V 5A DC 12V 5A
3.5W 5W
455 ± 5 nm
100 x 100 mm
10000 mm/min
0,01 mm
<4,5 cm
Holz, Kunststo, Leder, Pappe, Stein, Keramik, beschichtetes Metall, Bambus usw.
LaserGRBL, LightBurn, MKSLaser
Windows, macOS, Android, iOS
JPEG, BMP, JPG, GIF, PLT, PNG, DXF, HPGL, NC usw.
Kabelverbindung: USB-Anschluss
Drahtlose Verbindung: WLAN
15±5°
Modell M1
5. Lieferumfang
Accesorios opcionales
Zubehör
Typ-C-Kabel *1
Aluminiumplatte *5 M3x7 *3
Holzplatte *2Schutzbrille *1
2,5-mm-
Sechskantschlüssel *1
Flansch *1
TF-Karte *1
Maschinen-
Maximalkapazität: 16 G
Lasermodul *1
Positionierungsplatte
für Gravurbereich *1
Marker *1 Kartenleser *1
Schraubendreher *1
Rollenkabel *1
Benutzerhandbuch *1 Netzteil *1
Schraubenschlüssel *1
Anhebersäule *4
1064 nm 1,2 W Infrarot-Lasermodul
(geeignet für die Gravur von Metallen)
Rauchabsaugung
Drehrollenmodul (G5) Drehrollenmodul (G3 Pro)
DE
-24-
1. Gerät ein-/ausschalten.
2. Material einlegen
6. Gebrauchsanweisung
(1)Das Netzteil wird in die Steckdose gesteckt.
(2)Das 12-V-Gleichstromkabel wird an den Stromanschluss angeschlossen.
(3)Um das Gerät zu starten, drücken Sie bitte den Netzschalter. Die Anzeigeleuchte leuchtet weiß. (Siehe
Abbildung unten.)
(1)Schutzabdeckung anheben.
(2)Gravur-/Schneidematerial auf die Arbeitsäche legen.
DE
-25-
Hinweis: Für den Betrieb muss die Schutzabdeckung geschlossen sein. Andernfalls wird der Vorgang nicht
fortgesetzt. Das Önen der Schutzabdeckung während des Gravur- oder Schneidvorgangs unterbricht den
Prozess.
3. Laserfokus einstellen (siehe Abbildung unten)
(1)Der Fokussierhebel muss nach unten gezogen werden.
(2)Als Nächstes muss die Handgrischraube gelöst werden.
(3)Stellen Sie dann die Höhe des Lasermoduls so ein, dass der Fokussierhebel die Materialoberäche berührt.
Zum Schluss muss die Handgrischraube festgezogen werden.
(4)Der Fokussierhebel wird wieder in seine Ausgangsposition zurückgebracht.
4. Schutzabdeckung schließen und die HOME-Taste drücken, um das Lasermodul in
die Ausgangsposition zurückzusetzen.
5. Gravieren/Schneiden starten (kompatibel mit MKSLaser (APP), LightBurn und LaserGR-
BL)
DE
-26-
(Für Anwendungen mit Drehwalzenmodul oder zum Gravieren dicker Materialien)
(1)Die vier Standfüße müssen so ausgerichtet werden, dass sie mit den Schraubenlöchern am Maschinenfuß
übereinstimmen.
(2)Um sie zu sichern, ziehen Sie sie fest.
(3)Platzieren Sie die Drehrolle am Boden der Maschine.
(4)Stecken Sie das USB-Ende des Rollenkabels in den Drehrollenanschluss an der Rückseite der Maschine und
verbinden Sie das andere Ende mit der Drehrolle.
6. Maschinenhöhe einstellen
(1)Maschinenbasis nach oben neugen.
(2)Hintere Schraube mit dem 2,5-mm-Inbusschlüssel entfernen.
(3)Linke Schraube lösen und das Stromkabel des Lasers abziehen.
(4)Lasermodul nach unten schieben und entfernen.
7. Lasermodul austauschen
DE
-27-
Befestigen Sie den Flansch mit drei M3×7-Schrauben, nachdem Sie ihn an den hinteren Lüfterschraubenlöchern
ausgerichtet haben.
8. Flansch installieren
DE
-28-
1.Laden Sie den Treiber über den unten stehenden Link herunter.
https://mecpow.com/pages/driver-les
2.Wenden Sie sich an den Kundendienst, um die Datei des Treibers zu erhalten.
Anmerkung:
Für Windows-Benutzer: Wenn Sie ein System unter Win10 verwenden, müssen Sie den Treiber manuell
installieren. Wenn Sie ein Win10-System oder höher verwenden, müssen Sie den Treiber nicht installieren.
Der Treiber für Mac-Benutzer unterstützt OS X 10.9 bis OS X 10.15 und OS X 11.0 (Big Sur) und höher.
Der Treiber für Linux-Benutzer unterstützt 32-Bit- und 64-Bit-Systeme.
Bitte schalten Sie das Gerät ein und verbinden Sie es über das USB-Kabel mit Ihrem Computer, bevor
Sie den Treiber starten!
Bevor Sie den Treiber installieren, schalten Sie das Gerät ein und verbinden Sie es über ein USB-Kabel mit Ihrem PC.
8. Treiber
Download-Methoden
Installation
Für Windows-Benutzer:
1. Önen Sie den heruntergeladenen Treiber.
2. Klicken Sie auf "INSTALL".
3. Klicken Sie auf "OK", wenn der Treiber erfolgreich installiert wurde.
Für Mac-Benutzer:
1. Önen Sie die Anleitung.
2. Önen Sie den heruntergeladenen Treiber und folgen Sie den Anweisungen, um ihn zu installieren.
DE
-29-
Für Linux-Benutzer:
1. Önen Sie die Datei - README.
2. Önen Sie die Datei - Treiber, und folgen Sie den Anweisungen in "README", um ihn zu installieren.
IEs handelt sich um eine kostenlose Open-Source-Software, die Windows-Computer unterstützt.
Laden Sie es herunter von: http://lasergrbl.com/download/
Verbinden Sie die Graviermaschine in Echtzeit über das USB-Kabel mit der Software. Während des
Betriebs können Sie die Graviermaschine über das Bedienfeld starten oder anhalten.
9. Steuerung über Computersoftware
LaserGRBL
1. Installieren Sie es. 2. Önen Sie die Software. Wählen Sie „COM3“ und „115200“
und klicken Sie dann auf „Verbinden“.
DE
-30-
5. Wählen Sie die Betriebsparameter für die
Lasergravur oder das Laserschneiden aus. (M3 ist
für das Schnitzen mit konstanter Leistung und M4
für das Schnitzen mit variabler Leistung. Die
empfohlenen Betriebsparameter zum Gravieren
oder Schneiden verschiedener Materialien nden
Sie in Abschnitt 10.)
3. Klicken Sie auf „Open Bestand“, um die
Gravurdatei auszuwählen
4. Wählen Sie den Gravurmodus und klicken Sie
auf „Volgende“.
6. Klicken Sie auf „Framing“, um eine Vorschau des Gravurbereichs anzuzeigen und die Gravurposition
anzupassen.
7. Klicken Sie auf „Start Programma“, um mit der Gravur zu beginnen.
DE
-31-
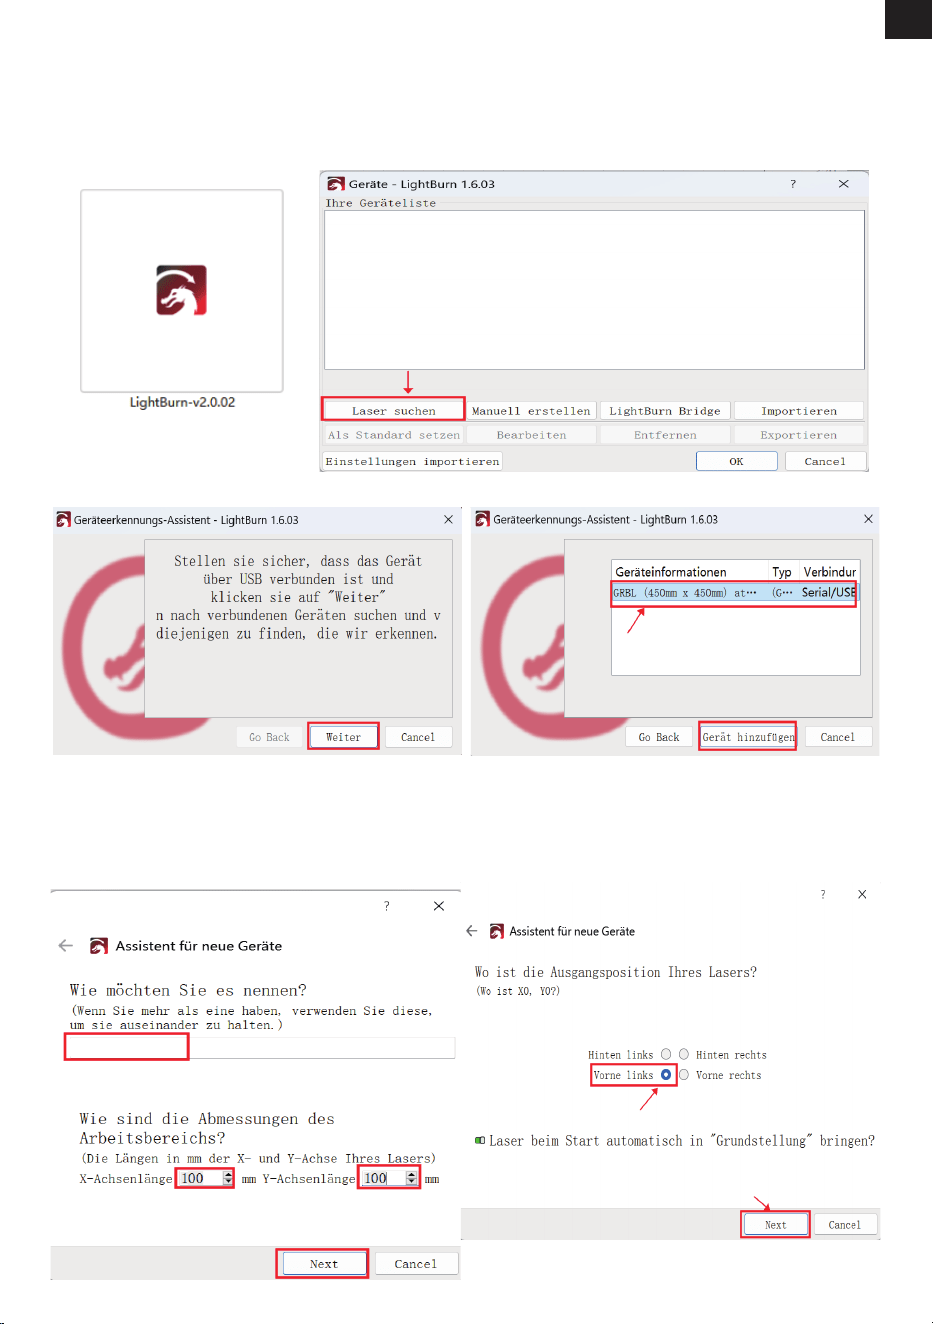
4. Benennen Sie Ihr Gerät, geben Sie die Längen der
X- und Y-Achse ein und klicken Sie dann auf „Next“.
Name: Mecpow M1
Länge der X-Achse: 100 mm
Y-Achsenlänge: 100 mm
LightBurn
Es ist eine kostenpichtige professionelle Software, die MAC-, Linux- und Windows-Computer
unterstützt. Laden Sie sie hier herunter:
https://lightburnsoftware.com/pages/download-trial.
1. Installieren Sie es. 2. Önen Sie die Software und klicken Sie auf „Laser suchen“.
3. Wählen Sie Ihr Gerät aus und klicken Sie auf „Gerät hinzufügen“.
5. Wählen Sie „Vorne Links“ als Ursprung
Ihres Lasers und klicken Sie auf „Next“.
MecpowM1
DE
-32-
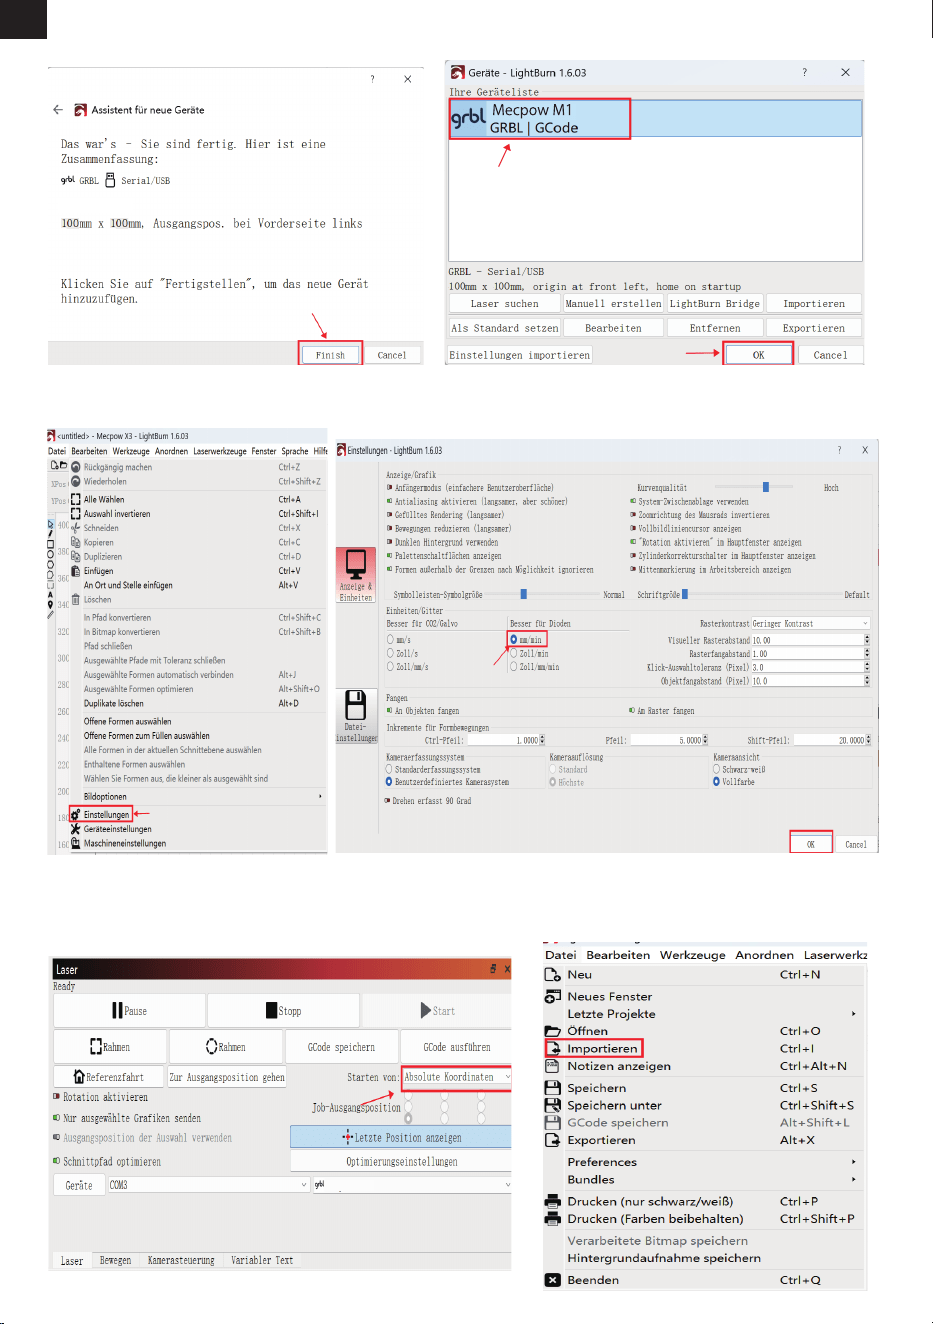
6. Klicken Sie auf „Finish“ 7. Wählen Sie Mecpow M1 und klicken Sie auf „OK“.
8. Klicken Sie auf „Bearbeiten“ – „Einstellungen“, stellen Sie die Einheit auf „mm/min“
ein und klicken Sie dann auf „OK“.
9. Wählen Sie „Absolute Koordinaten“ im Abschnitt
„Starten von“ und dann den Kreis in der unteren
linken Ecke im Abschnitt „Ausganspos. des Auftrages“.
10. Klicken Sie auf „Datei“ – „Importieren“,
um die Gravurdatei zu importieren.
MecpowM1
Mecpow M1
DE
-33-
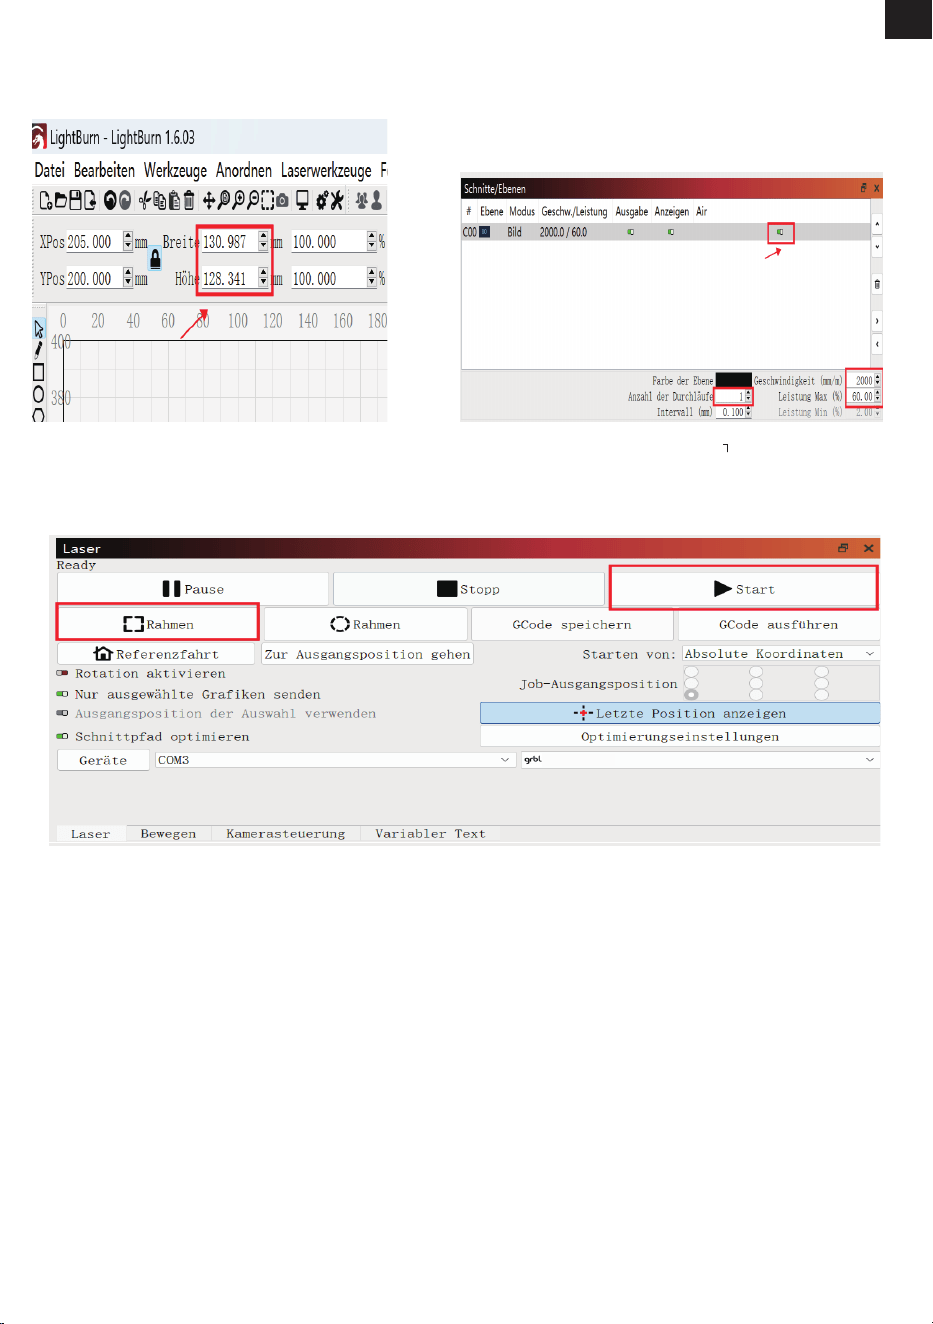
11. Nach dem Importieren der Datei können Sie
die Gravurgröße oben auf der Benutzerober-
äche ändern.
12. Wählen Sie den Gravurmodus und stellen Sie
die Betriebsparameter für die Lasergravur oder
das Laserschneiden ein. (Empfohlene Betrieb-
sparameter zum Gravieren oder Schneiden
verschiedener Materialien sind im nächsten
Abschnitt aufgeführt.)
13. Klicken Sie auf „Rahmen“, um eine Vorschau des Gravurbereichs anzuzeigen und die Gravurposi-
tion anzupassen. Klicken Sie dann auf „Start“, um mit der Gravur zu beginnen.
Mecpow M1
DE
-34-
Das „*****“ im WLAN-Namen ist eine zufällige Zahlenkombination. Es variiert je nach Maschine.
Um die Stabilität des WLAN-Signals zu gewährleisten, wird empfohlen, Ihr Telefon vor dem Einsetzen der
TF-Karte mit dem WLAN der Graviermaschine zu verbinden.
Die App muss mit der TF-Karte verwendet werden. Das Hochladen der Gravurdatei schlägt fehl, wenn die
TF-Karte nicht eingelegt ist.
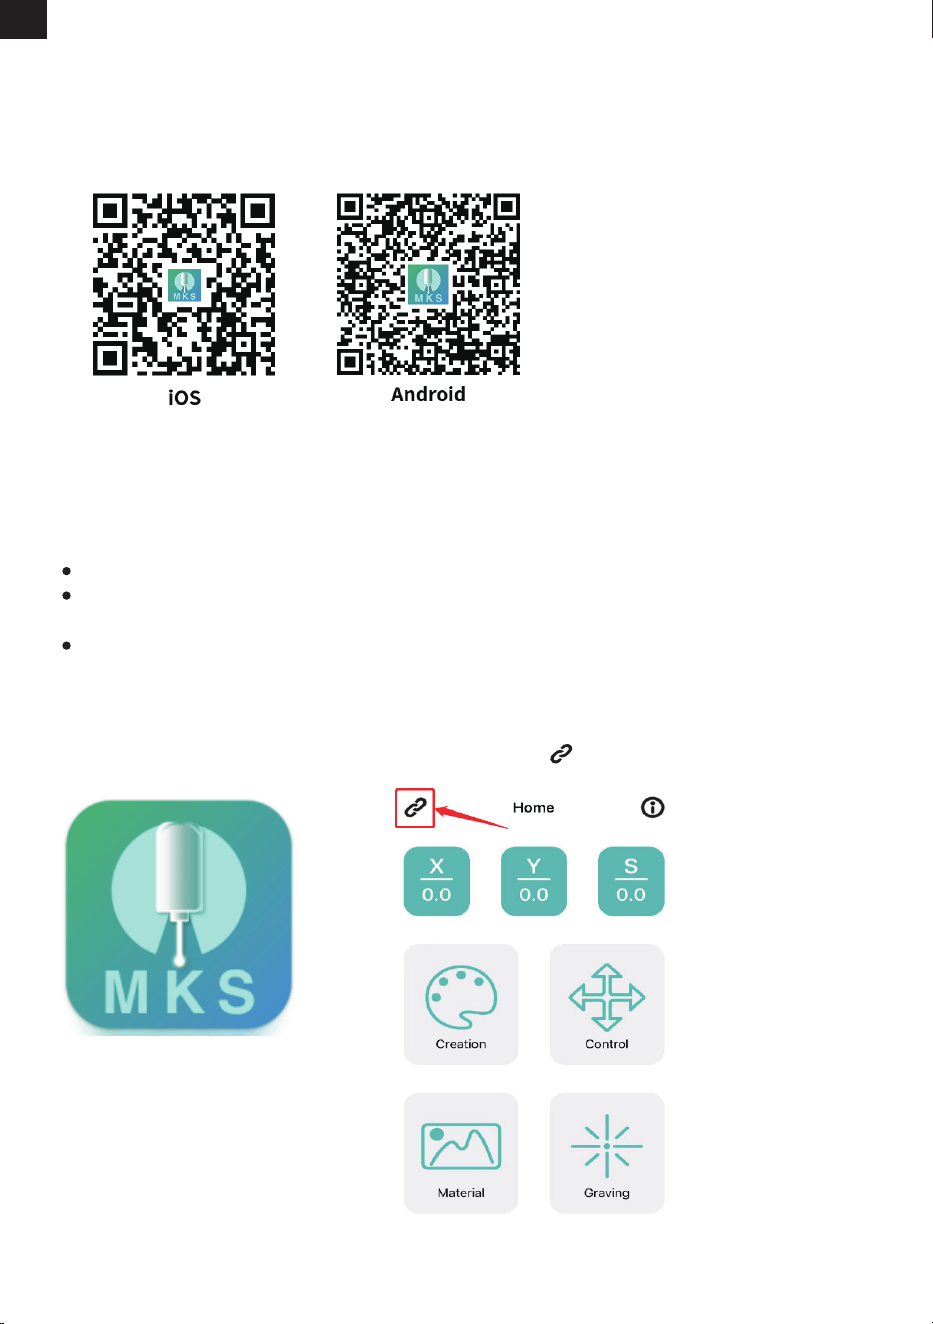
MKSLaser ist eine kostenlose mobile Anwendung, die Android- und iOS-Geräte unterstützt.
1. Aktivieren Sie die Wi-Fi Funktion Ihres Telefons und verbinden Sie das Wi-Fi "Mecpow_*****".
Wi-Fi Name: Mecpow_*****
Wi-Fi Kennwort: 12345678
2. Önen Sie die MKSLaser-App.
3. Klicken Sie auf das -Symbol.
Scannen Sie den QR-Code und laden Sie die App herunter.
App herunterladen
Wi-Fi-Verbindung
10. Steuerung über Mobile App & TF-Karte
Hinweis:
DE
-35-
Damit Sie eine LightBurn-G-Code-Datei zum Gravieren oder Schneiden verwenden können, müssen Sie diese zunächst vorbereiten und im
Stammverzeichnis der TF-Karte speichern. Stecken Sie anschließend die TF-Karte in den Lasergravierer.
Hinweis:
-Die TF-Karte unterstützt nur das FAT32-Format.
-Der Lasergravierer liest standardmäßig die zuletzt geänderte Datei im Stammverzeichnis der TF-Karte, wenn sich mehrere Dateien darauf benden.
-Der Gravierer kann nur NC- und GC-Dateien mit englischen Namen erkennen.
-Der Gravierer kann NC- und GC-Dateien, die mit LightBurn gespeichert wurden, erkennen. NC- und GC-Dateien, die mit LaserGRBL gespeichert
wurden, können vom Gravierer jedoch nur nach der Konvertierung mit MKSLaser erkannt werden. MKSLaser ist auf der mitgelieferten TF-Karte oder
auf der Mecpow-Website erhältlich.
Steuerung über TF-Karte
Für die detaillierte Verwendung der MKSLaser-App lesen Sie bitte die Informationen auf der TF-Karte oder
laden Sie das Benutzerhandbuch herunter, indem Sie den untenstehenden Link aufrufen oder den QR-Code
scannen.
https://mecpow.com/pages/download-center
4. Wählen Sie „WiFi Connect“, geben Sie „192.168.4.1“ ein, und klicken Sie auf „Connect“.
5. Wenn „Verbinden“ zu „Trennen“ wird, bedeutet dies, dass die Wi-Fi-Verbindung erfolgreich ist.
10. Empfohlene Betriebsparameter
DE
-36-
100
100
100
100
100
100
100
100
60
100
2000
2000
2000
1600
600
600
40
600
3500
1000
Die Oberfläche muss matt sein.
Die Oberfläche muss matt sein, nicht glänzend.
Die Oberfläche muss gestrichen werden.
Die Oberfläche muss matt sein.
Die Oberfläche muss matt sein, nicht glänzend.
Die Oberfläche muss gestrichen werden.
Modus
Gravur
Material
Holzplatte
Bambus
Massivholz
Leder
Glas
Keramik
Edelstahl
Eloxiertes Metall
Stoff
Acryl
Leistung (%)
Geschwindigkeit
(mm/min)
Hinweis
Leistung (%)
Geschwindigkeit
(mm/min)
Hinweis
Mecpow M1 (3.5 W)
100
100
100
100
100
100
100
100
40
100
100
100
100
100
100
3000
3000
3000
2000
800
800
300
800
5000
1500
70
120
1300
100
1500
Modus
Gravurv
Schneiden
Material
Holzplatte
Bambus
Massivholz
Leder
Glas
Keramik
Edelstahl
Eloxiertes Metall
Gewebe
Acryl
2 mm dicke Platte
3 mm dicke Platte
Karton
Leder
Stoff
Mecpow M1 (5W)

DE
-37-
11. Fehlerbehebung
1.Warum lässt sich der M1-Lasergravierer nicht einschalten?
Ursachen
a.Der M1-Lasergravierer ist möglicherweise nicht ordnungsgemäß an den Eingangsanschluss angeschlossen.
b.Der Stecker ist möglicherweise locker.
c.Das Netzteil ist möglicherweise beschädigt.
Lösungen:
a.Es sollte überprüft werden, ob das Netzkabel fest angeschlossen ist und ob das ozielle Netzteil verwendet wird.
b.Versuchen Sie es mit einer alternativen Steckdose. Sollte das Problem weiterhin bestehen, ist der technische Support zu
kontaktieren.
c.Bitte besorgen Sie sich ein neues Netzteil.
2.Kann das Gerät keine Verbindung zum WLAN herstellen?
Ursachen:
a.Schwaches oder instabiles WLAN-Signal
b.Falsches WLAN-Passwort
c.Falsche IP-Adresse
Lösungen:
a.Es muss sichergestellt werden, dass eine Verbindung zwischen Gerät und Netzwerk besteht.
b.Bitte überprüfen Sie, ob Sie das Passwort richtig eingegeben haben. Beachten Sie auch die Regeln zur Groß- und Kleinschrei-
bung.
c.Rufen Sie die Adresse 192.168.4.1 in Ihrem Browser auf.
3.Warum kann meine Computersoftware keine Verbindung zum Gerät herstellen?
Ursachen:
a.Falschen Port gewählt.
b.Sie verwenden Windows 7/8 ohne die richtigen Treiber.
Lösungen:
a.Versuchen Sie, den COM-Port zu wechseln.
b.Der entsprechende Treiber muss installiert werden, wenn Windows 7/8 verwendet wird.
4.Warum sieht meine Lasergravur unscharf aus?
Ursachen:
a.Falsche Brennweite
b.Ungeeignetes Material zum Gravieren/Schneiden
c.Falsche Leistungs- oder Geschwindigkeitseinstellungen
Lösungen:
a.Um den Strahl des Lasermoduls auf eine minimale Punktgröße zu bringen, ist es erforderlich, die Brennweite über den
Fokussierhebel anzupassen.
b.Es ist wichtig, dass Sie sicherstellen, dass das Material für die Gravur oder das Schneiden geeignet ist.
c.Die Leistung, die Geschwindigkeit oder andere Parameter müssen angepasst werden.
5.Was ist zu tun, wenn die Linse beschädigt ist?
Ursachen:
a.Die Linse wurde nicht regelmäßig gereinigt, wodurch sich Staub angesammelt hat.
b.Beschädigung der Linsenbaugruppe durch äußere Einwirkung
Lösungen:
a.Um Staubansammlungen zu vermeiden, die die Laserleistung beeinträchtigen könnten, sollten Sie die Linse regelmäßig mit
Alkoholtupfern reinigen (empfohlen nach jeweils 20 Betriebsstunden).
b.Sollte die Linsenbaugruppe beschädigt sein, besteht die Möglichkeit, sie auszutauschen. Alternativ können Sie sich auch an
den Hersteller von Mecpow wenden, um dort Ersatzteile zu erwerben.
DE
-38-
12. Konformitätserklärung
Dieses Produkt entspricht den Normen der Europäischen Gemeinschaft.
Dieses Symbol zeigt an, dass das Produkt recycelt werden kann.
Dieses Symbol weist darauf hin, dass das Produkt nicht als Hausmüll entsorgt werden darf. Das
Produkt muss an getrennten Sammelstellen für die Wiederverwertung und das Recycling von
elektrischen und elektronischen Geräten abgegeben werden.

ES
1. Prefacio ......................................................................
2. Declaración de seguridad .......................................
3. Diagrama ....................................................................
4. Especificaciones .......................................................
5. Lista del Paquete ......................................................
6. Instrucciones de Uso ...............................................
7. Controlador ...............................................................
8. Control mediante software de computadora ........
9. Control mediante aplicación móvil y tarjeta TF .....
10. Parámetros de funcionamiento recomendados ..
11. Resolución de Problemas .......................................
12. Declaración de conformidad .................................
39
39
41
42
42
43
47
48
53
55
56
57
ÍNDICE DE CONTENIDO

ES
-39-
1. Introducción
2. Declaración de seguridad
Estimado/a cliente:
Agradecemos su adquisición de nuestra máquina de grabado láser. Este aparato representa un producto
avanzado que combina luz, maquinaria y electricidad. Para aprovechar al máximo el equipo y asegurar su
correcto mantenimiento, le recomendamos leer detenidamente el manual del usuario y seguir sus instrucciones
paso a paso.
Descargo de responsabilidad
La responsabilidad de cualquier pérdida derivada de un uso inadecuado o el no seguimiento de las instruc-
ciones del manual del usuario recae en el individuo. La interpretación nal del manual de usuario pertenece a
nuestra empresa, y nos reservamos el derecho de modicar cualquier información, datos, detalles técnicos, etc.
en el manual.
* Es importante tener en cuenta que el procesamiento láser puede implicar riesgos, por lo tanto, se recomienda a
los usuarios evaluar cuidadosamente si el objeto a procesar es adecuado para trabajar con láser.
* Es imprescindible cumplir con las leyes y regulaciones locales respecto al objeto que se procesa y las emisiones
generadas.
* Esta máquina está equipada con un láser de clase IV, el cual emite radiación láser de alta potencia y puede dar
lugar a las siguientes situaciones:
(1) Ignición de materiales inamables circundantes;
(2) Durante el procesamiento láser, se pueden producir otras radiaciones y gases tóxicos y nocivos, dependiendo
del objeto que se procesa;
(3) La exposición directa a la radiación láser puede causar daños al cuerpo humano. Es necesario contar con
equipos contra incendios en el área de trabajo y se debe evitar apilar materiales inamables y explosivos cerca
del banco de trabajo o la máquina. Asimismo, es importante mantener una adecuada ventilación.
*Además, el entorno en el que se ubica la máquina debe estar seco, sin contaminantes, vibraciones, corrientes
eléctricas fuertes, campos magnéticos intensos y otras interferencias. La temperatura ambiente de trabajo debe
oscilar entre 5-30 ºC, y la humedad relativa del ambiente de trabajo debe situarse entre 35-65%.
* El voltaje de funcionamiento de la máquina es AC100-240V.
* Es fundamental mantener una supervisión constante durante el funcionamiento de la máquina. Antes de iniciar
cualquier actividad, es necesario apagar completamente la energía para evitar cualquier problema imprevisto. En
caso de que se presente una situación anormal, se debe interrumpir de inmediato la energía y abordar la
situación de manera adecuada.
* Se prohíbe de manera estricta colocar objetos reectantes o difusos en la máquina que no sean necesarios para
su funcionamiento. Esto se hace con el objetivo de evitar la reexión del láser en el cuerpo humano o en
materiales inamables.
* Es necesario mantener la máquina alejada de equipos eléctricos que sean sensibles a interferencias electro-
magnéticas, ya que esto puede ocasionar interferencias electromagnéticas en dichos equipos.
* Está totalmente prohibido que personas no profesionales desmonten el grabador láser debido a los posibles
peligros, como la presencia de alto voltaje, dentro de la máquina.
Precauciones de seguridad
1. Queda estrictamente prohibido exponer organismos vivos a la emisión del láser producida por la máquina de
grabado láser. Esto se indica claramente con una señal de advertencia amarilla en el puerto correspondiente.
2. Las personas que sean fotosensibles tienen prohibido utilizar o acercarse al grabador láser debido a los
posibles efectos adversos que esto puede tener en su salud.
3. Durante el uso de la máquina de grabado láser, tanto el operador como cualquier persona en las proximidades
deben utilizar gafas de seguridad láser. Es imprescindible no operar la máquina láser sin el uso de dichas gafas.
Nuestra máquina incluye un par de gafas de seguridad láser. Si desea adquirir gafas adicionales, estas deben
ofrecer protección para longitudes de onda entre 400-445 nm (+-5 nm), tener un diámetro exterior de +5 y
cumplir con un nivel mínimo de clasicación L5.
4. Durante el funcionamiento de la máquina de grabado láser, es crucial que el usuario esté atento y no la deje
desatendida para evitar cualquier riesgo de ignición del material que se está grabando. Es recomendable ubicar
la máquina en un área que sea resistente al fuego y garantizar una adecuada ventilación. Se sugiere tener un
extintor de incendios cercano en caso de situaciones de emergencia.
5. Es importante garantizar que no haya materiales inamables en las proximidades de la máquina de grabado
láser. Se recomienda colocar una mesa de trabajo en forma de panal debajo de la máquina como medida
adicional de seguridad.
Advertencia

ES
-40-
1. Antes de usar el Mecpow M1, asegúrese de que la cubierta protectora esté cerrada y el reector láser esté
limpio.
2. El M1 cumple con las normas de seguridad láser de Clase 1. Antes de iniciar el grabado láser, verique que la
cubierta de protección esté intacta y no presente daños. Si se detecta algún daño, suspenda el uso del
dispositivo.
3. Durante el funcionamiento, asegúrese de que el láser permanezca dentro de la cubierta protectora. Cuando
procese objetos con el Mecpow M1, cubra siempre el área de trabajo con la cubierta protectora y utilice
protección ocular para su seguridad.
4. Es crucial evitar mover el dispositivo mientras realiza grabados láser, ya que esto podría activar las medidas de
autoprotección y provocar que el dispositivo deje de funcionar. Además, podría afectar el resultado nal del
grabado al interrumpir el proceso. Si necesita mover el dispositivo o el objeto que está grabando, se recomienda
hacerlo antes o después del proceso de grabado. Es fundamental evitar mover el dispositivo o los objetos
durante la operación del láser.
5. Los menores de edad deben estar siempre supervisados y asistidos por un adulto cuando utilicen este
producto.
6. Al cortar o grabar materiales inamables a baja velocidad y alta potencia, existe riesgo de que se generen
llamas. Si se detecta la presencia de llamas, es crucial detener el proceso de inmediato.
7. Cuando el dispositivo esté encendido, es esencial no desmontar ninguna parte de la estructura de la máquina
para evitar el contacto accidental con la fuente de alimentación. Además, no toque ningún componente
electrónico con las manos ni con herramientas.
8. Si se presenta alguna de las siguientes situaciones, suspenda de inmediato el uso del producto y apague la
alimentación eléctrica:
- Olor a quemado proveniente de la máquina
- Llama abierta generada por el material que se está grabando
- Daños en los componentes internos del producto
- Parada inesperada del producto
- Ruidos o luces anómalos que no se hayan producido anteriormente
9. Tenga cuidado al utilizar los controles o al realizar ajustes, ya que llevar a cabo procedimientos no especica-
dos puede provocar la exposición a radiación peligrosa.
1. Para mantener un rendimiento óptimo, limpie periódicamente la lente de la máquina con un paño o papel
libre de polvo humedecido con alcohol.
2. Tenga precaución al usar o almacenar la máquina para evitar que objetos extraños entren por las rejillas de
ventilación superiores y afecten su funcionamiento.
Instrucciones de seguridad
Mantenimiento
6. Al utilizar el grabador láser, es fundamental contar con suciente espacio alrededor de la máquina. El proceso
de grabado de ciertos materiales puede generar humo, por lo que se recomienda contar con un sistema de
escape especializado para garantizar una adecuada ventilación y eliminación del humo.
7. Es crucial no tocar ni el rayo láser ni el objeto en proceso mientras la máquina de grabado láser esté en
funcionamiento, ya que esto podría resultar en lesiones graves o la reexión del rayo. Asimismo, se debe evitar
tocar el radiador, ya que puede estar caliente debido al funcionamiento continuo o reciente detención de la
máquina de grabado láser. 8. Es necesario que los niños o adolescentes, especialmente aquellos menores de 14
años, no utilicen la máquina de grabado láser de forma individual. Siempre deben ser supervisados por un adulto
responsable durante su uso.
9. La temperatura de funcionamiento de la máquina es de 5 ºF a 86 ºF (-15 ºC a 30 ºC).
10. Durante el proceso de grabado con láser, existe un riesgo potencial de incendio. Por lo tanto, es esencial que
la máquina de grabado láser esté bajo la supervisión de un operador experto mientras está en funcionamiento
para controlar cualquier accidente que pueda ocurrir.
11. Nuestra máquina de grabado láser cuenta con un sensor de llama integrado para proporcionar un nivel
adicional de seguridad. Sin embargo, es importante tener en cuenta que no ofrecemos ninguna garantía, ya sea
explícita o implícita, en cuanto a la disponibilidad o funcionalidad del sensor de llama.
ES
-41-
Introducción y funciones
Partes
Nombres
Funciones
1
2
3
4
Botón de encendido
Indicador
Botón INICIAR/PAUSA
Botón MARCO Inicia el encuadre del área de trabajo del láser.
Indica el estado del equipo:
Blanco: En espera
Azul: En funcionamiento
Rojo: Alarma
Verde: Conectado por Wi-Fi
3. Diagrama
Encender / apagar la máquina.
Indicador
A. STOP
B. INICIO
C. MARCO
D. INICIAR/PAUSA
Cuando se presionan los siguientes
botones, se enciende la luz blanca.
A. Inicio/en espera: Luz blanca fija
B. Grabando: Luz azul fija
C. Cubierta protectora abierta/Máquina inclinada (≥15°): Luz roja intermitente
(con 3 sonidos de alarma)
D. Conexión Wi-Fi: Luz verde fija
Indicador Estado del
indicador
(1)Pulsar para iniciar grabado/corte antes de comenzar.
(2)Durante la operación:
Primer clic: Pausar
Segundo clic: Reanudar
En modo en espera:
Pulsar para repetir el último archivo transferido a la tarjeta TF (excepto archivos
MKSLaser desde la app móvil).
11
Ventilador de extracción
Elimina humo y gases durante el grabado o corte.
5
Botón INICIO Regresa al punto de origen.
6
Botón STOP Detiene el grabado o el encuadre.
7
Puerto TF Inserta la tarjeta TF para leer archivos.
8
Puerto Tipo-C Para conexión con computadora.
9
Puerto del Rodillo giratorio Inserte el cable del rodillo para conectar el rodillo giratorio.
10
Puerto de entrada de corriente
continua (DC)
Conecte el adaptador de corriente para alimentar la máquina.
123456
10
11
98
7
ES
-42-
4. Especificaciones
Tamaño del producto
Potencia eléctrica
Entrada de láser
Potencia del láser
Longitud de onda
Área de grabado
Velocidad de grabado máx.
Precisión de grabado
Altura máx. del objeto
Materiales para grabado láser
Software compatible
Sistemas compatibles
Formatos de archivo compatibles
Método de transmisión de datos
Alarma de inclinación
220 x 264 x 194 mm
60W
DC 12V 5A DC 12V 5A
3.5W 5W
455±5 nm
100 × 100 mm
10000 mm/min
0.01 mm
< 4.5 cm
Madera, plástico, cuero, cartón, piedra, cerámica, metal revestido, bambú, etc.
LaserGRBL, LightBurn, MKSLaser
Windows, macOS, Android, iOS
JPEG, BMP, JPG, GIF, PLT, PNG, DXF, HPGL, NC, etc.
Conexión por cable: USB
Conexión inalámbrica: Wi-Fi
15±5°
Modelo M1
5. Lista de empaque
Accesorios opcionales
Accesorios
Cable Type-C *1
Placas de aluminio *5
M3x7 *3
Tablero de madera *2
Gafas *1
Llave hexagonal
de 2.5 mm *1
Brida *1
Tarjeta TF *1
Capacidad Máxima
de la Máquina: 16 G
Módulo Láser *1 Placa de posicionamiento
del área de grabado *1
Rotulador *1 Lector de tarjetas *1
Destornillador *1
Cable del rodillo giratorio *1
Manual de usuario *1
Adaptador de corriente *1
Llave inglesa *1
Columnas elevadoras *4
Módulo láser infrarrojo de 1064 nm y 1.2 W
(adecuado para grabado en metales)
Extractor de humos
Módulo de rodillos
giratorios (G5)
Módulo de rodillos
giratorios (G3 Pro)
ES
-43-
1. Encender la máquina
2. Colocar el material
6. 6.Instrucciones de uso
(1)Inserte el adaptador de corriente en el enchufe.
(2)Conecte el cable de alimentación DC de 12 V al puerto de corriente.
(3)Presione el botón de encendido para iniciar la máquina. La luz indicadora se encenderá en blanco (como se
muestra en la gura inferior).
(1)Levante la cubierta protectora.
(2)Coloque el material de grabado o corte sobre el área de trabajo.
ES
-44-
Nota: La cubierta protectora debe estar cerrada para que la operación se lleve a cabo. De lo contrario, el proceso
no comenzará. Si se abre la cubierta durante el grabado o corte, la operación se interrumpirá.
3. Ajustar el enfoque del láser (como se muestra en la figura inferior)
(1)Tire hacia abajo de la palanca de enfoque.
(2)Aoje el tornillo de jación.
(3)Ajuste la altura del módulo láser hasta que la palanca de enfoque toque la supercie del material, y luego
apriete el tornillo de nuevo.
(4)Devuelva la palanca de enfoque a su posición original.
4. Cierre la cubierta protectora y presione el botón HOME para que el módulo láser
regrese al punto de origen.
5. Iniciar grabado/corte (Compatible con MKSLaser (app móvil), LightBurn y LaserGRBL)
ES
-45-
(Para usar el módulo de rodillo giratorio o grabar materiales gruesos)
(1)Alinee las cuatro columnas elevadoras con los oricios de tornillo en la base de la máquina.
(2)Ajústelas bien para jarlas en su lugar.
(3)Coloque el rodillo rotatorio en la parte inferior de la máquina.
(4)Inserte el extremo USB del cable del rodillo en el puerto del rodillo rotatorio en la parte trasera de la máquina
y conecte el otro extremo al rodillo rotatorio.
6. Ajustar la altura de la máquina
(1)Incline la base de la máquina hacia arriba.
(2)Retire el tornillo trasero usando la llave hexagonal de 2.5 mm.
(3)Aoje el tornillo lateral izquierdo y desconecte el cable de alimentación del láser.
(4)Deslice el módulo láser hacia abajo para retirarlo.
7. Reemplazar el módulo láser
ES
-46-
Alinee la brida con los oricios del ventilador trasero y fíjela con tres tornillos M3×7.
8. Instalar la brida
ES
-47-
1. Descargue el controlador desde el siguiente enlace.
https://mecpow.com/pages/driver-les
2.Póngase en contacto con el servicio de atención al cliente para obtener el archivo del controlador.
Nota:
Para los usuarios de Windows, si está utilizando un sistema por debajo de Win10, tendrá que
instalar el controlador manualmente. Si está utilizando el sistema Win10 o superior, no es
necesario instalar el controlador.
El controlador para usuarios de Mac es compatible con OS X 10.9 a OS X 10.15 y OS X 11.0
(Big Sur) y superior.
El controlador para usuarios de Linux es compatible con sistemas de 32 y 64 bits.
Encienda la máquina y conéctela a su computadora a través del cable USB antes de iniciar el
controlador.
Antes de instalar el controlador, encienda la máquina y conéctela a su PC mediante un cable USB.
7. Controlador
Métodos de descarga
Instalación
Para usuarios de Windows:
1. Abra el controlador descargado.
2. Haga clic en "INSTALL".
3. Haga clic en "OK" cuando el controlador se haya instalado correctamente.
Para usuarios de Mac:
1. Abra las instrucciones.
2. Abra el controlador descargado y siga las instrucciones para instalarlo.
ES
-48-
Para usuarios de Linux:
1. Abra el archivo README.
2. Abra el archivo - driver, y siga el "README" para instalarlo.
Es un software gratuito de código abierto que admite computadoras con Windows. Descárguelo
desde: http://lasergrbl.com/download/
Conecte la máquina de grabado con el software en tiempo real a través del cable USB. Durante el
funcionamiento, puede iniciar o detener la máquina de grabado a través del panel de control.
8. Control a través del software del ordenador
Laser GRBL
2. Abra el software. Seleccione «COM3» y «115200», luego haga
clic en «Conectar».
1. Instálelo.
ES
-49-
5. Seleccione los parámetros operativos para el
grabado o corte por láser. (M3 es para tallado de
potencia constante y M4 es para potencia
variable. Consulte la sección 10 para conocer los
parámetros de funcionamiento recomendados
para grabar o cortar diferentes materiales).
3. Haga clic en "Abrir archivo" para seleccio-
nar el archivo de grabado.
4. Seleccione el modo de grabado y haga clic en
"Siguiente".
6. Haga clic en "Framing" para obtener una vista previa del rango de grabado y ajustar la
posición de grabado.
7. Haga clic en "Ejecutar programa" para comenzar a grabar.
ES
-50-
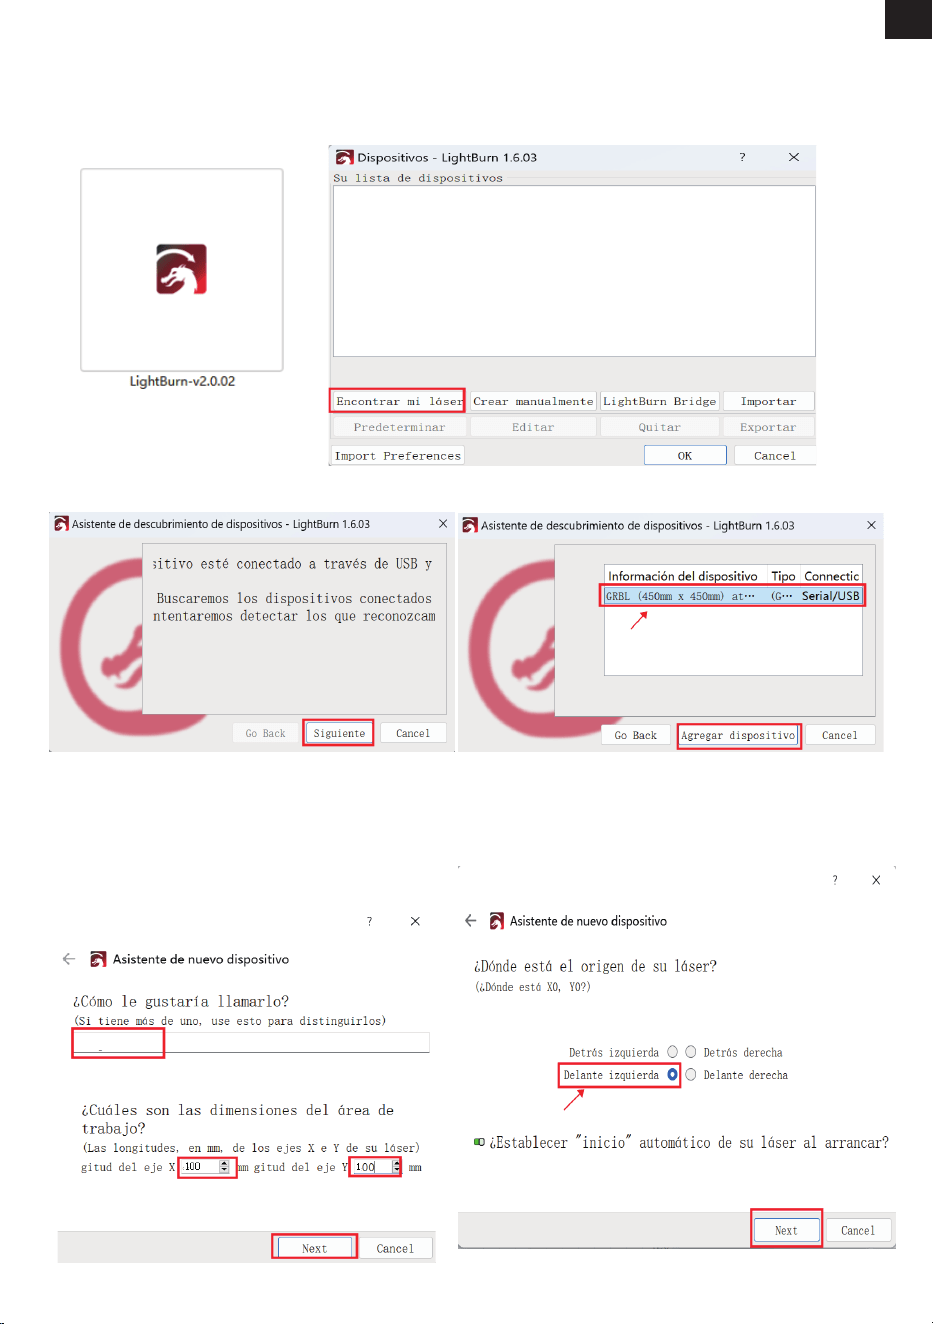
Es un software profesional de pago compatible con computadoras MAC, Linux y Windows. Descárgue-
lo desde: https://lightburnsoftware.com/pages/download-trial.
4. Asigne un nombre a su dispositivo e ingrese
las longitudes del eje X y el eje Y, luego haga clic
en "Next".
Nombre: Mecpow M1
Longitud del eje X: 100 mm
Longitud del eje Y: 100 mm
LightBurn
1. Instálelo. 2. Abra el software y haga clic en "Encontrar mi láser".
3. Seleccione su dispositivo y haga clic en "Agregar dispositivo".
5. Seleccione "Delante izquierda"
como origen de su láser y haga clic en
"Next".
MecpowM1
ES
-51-
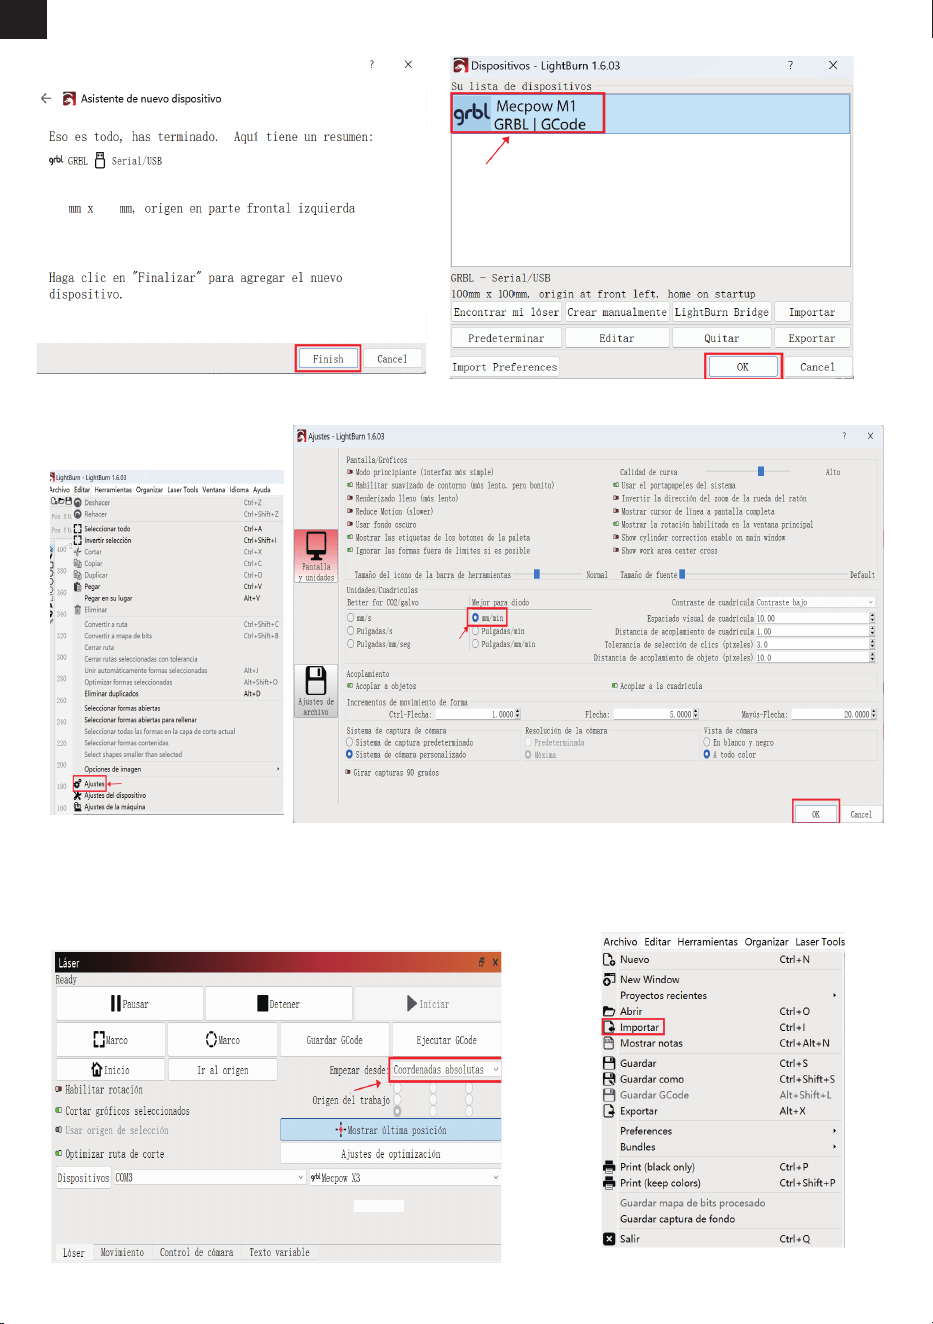
6. Haga clic en "Finish". 7.Seleccione Mecpow M1 y haga clic en "OK".
8. Haga clic en "Editar" - "Ajustes" y congure la unidad en "mm/min", luego haga clic
en "OK".
9. Seleccione "Coordenadas absolutas" en la sección
"Empezar desde" y luego seleccione el círculo en la esquina
inferior izquierda en la sección "Origen del trabajo".
10.Haga clic en "Archivo" - "Importar"
para importar el archivo de grabado.
Mecpow M1
100
100
Mecpow M1
ES
-52-
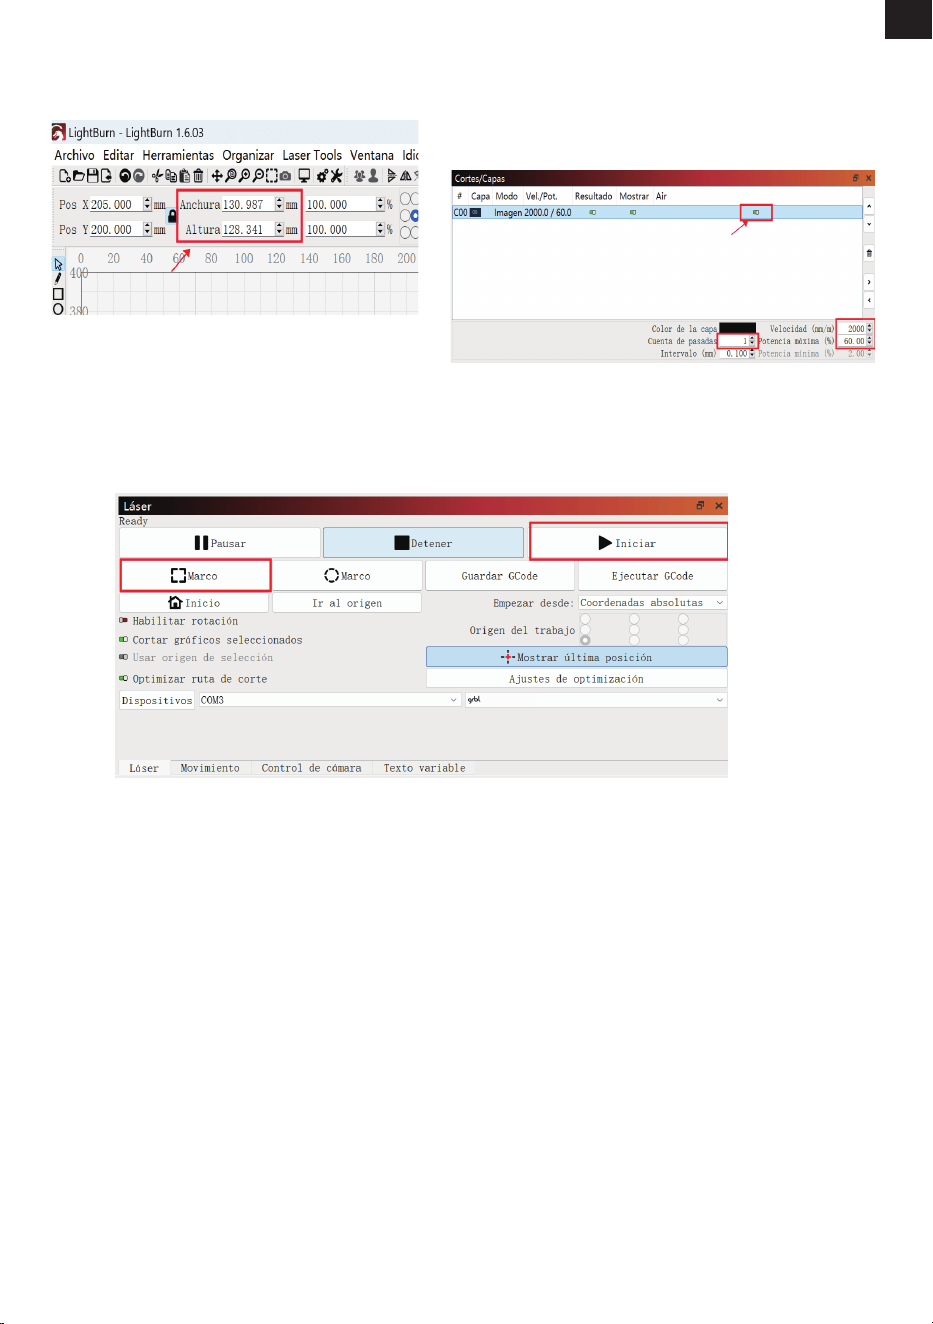
11. Puede modicar el tamaño del grabado en la
parte superior de la interfaz después de importar
el archivo.
12. Seleccione el modo de grabado y establezca los
parámetros operativos para el grabado o corte por láser.
(Los parámetros de funcionamiento recomendados para
grabar o cortar diferentes materiales se enumeran en la
siguiente sección).
13. Haga clic en "Marco" para obtener una vista previa del rango de grabado y ajuste la posición de
grabado, luego haga clic en "Iniciar" para comenzar a grabar.
Mecpow M1
ES
-53-
El "*****" en el nombre de Wi-Fi es una combinación aleatoria de números. Varía según la máquina.
Para garantizar la estabilidad de la señal Wi-Fi, se recomienda conectar su teléfono al Wi-Fi de la máquina de
grabado antes de insertar la tarjeta TF.
La aplicación debe usarse con la tarjeta TF. La carga del archivo de grabado fallará si no se ha insertado la
tarjeta TF.
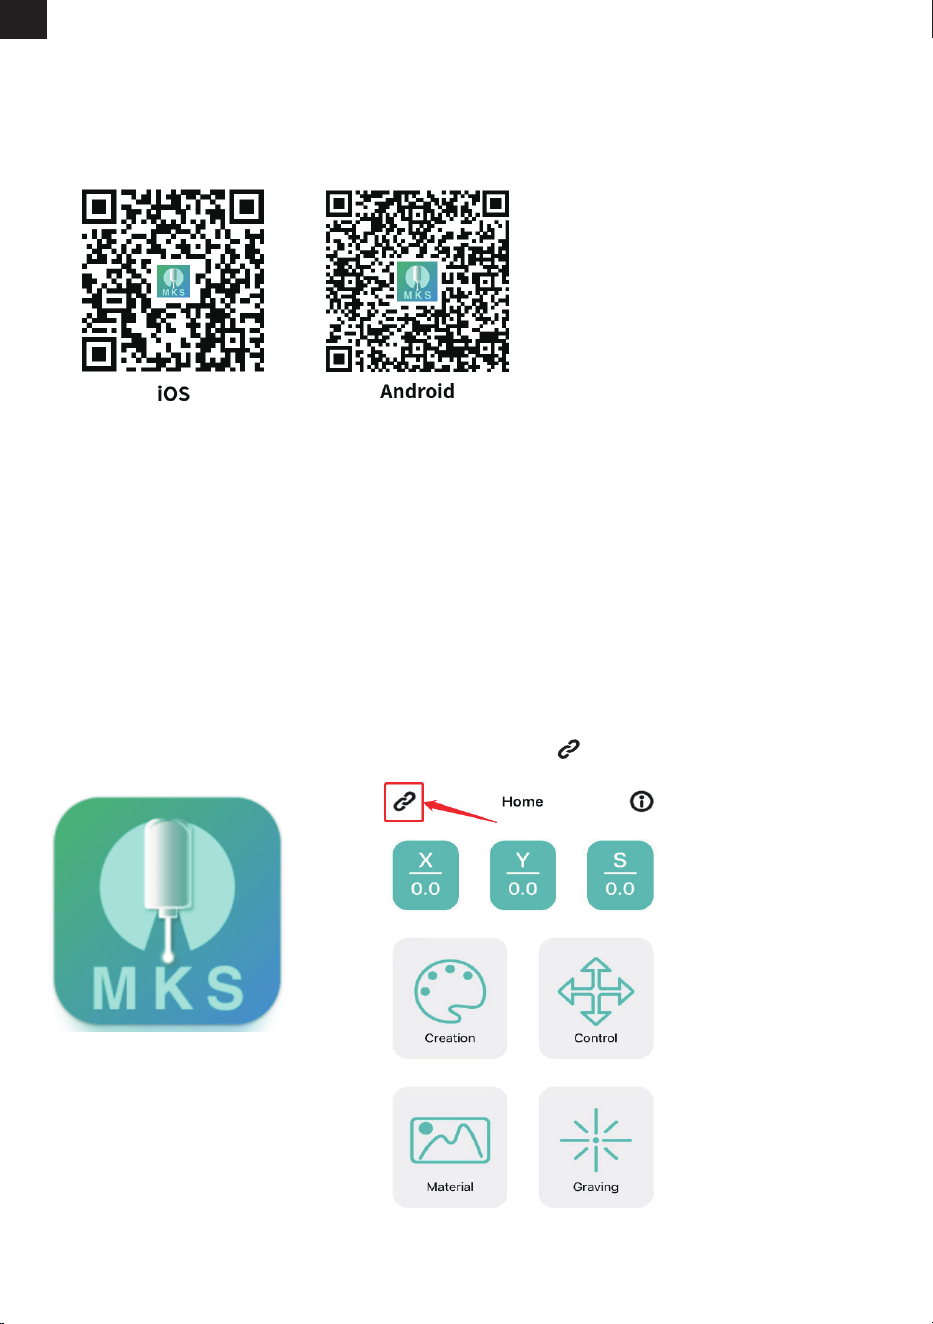
MKSLaser es una aplicación móvil gratuita compatible con dispositivos Android e iOS.
1. Active la función Wi-Fi de su teléfono y conecte el Wi-Fi "Mecpow_*****".
Nombre Wi-Fi: Mecpow_*****
Contraseña Wi-Fi: 12345678
2. Abra la aplicación MKSLaser.
3. Haga clic en el icono .
Escanee el código QR y descárguela.
Descarga de la App
Conexión Wi-Fi
9. Control mediante aplicación móvil y tarjeta TF
Nota:
Control mediante tarjeta TF
ES
-54-
Prepare un archivo G-code con LightBurn para grabado o corte y guárdelo en el directorio raíz de la tarjeta TF. Inserte la tarjeta TF en el grabador
láser.
Nota:
- La tarjeta TF solo admite el formato FAT32.
- El grabador láser leerá por defecto el archivo más recientemente modicado en el directorio raíz cuando haya más de un archivo.
- El grabador solo reconoce archivos NC y GC con nombres en inglés.
- El grabador puede reconocer archivos NC y GC generados con LightBurn. Sin embargo, los archivos NC y GC creados con LaserGRBL solo se
reconocerán si se convierten con MKSLaser. Puede obtener MKSLaser desde la tarjeta TF incluida o desde el sitio web Mecpow.com.
Para obtener información detallada sobre el uso de la aplicación MKSLaser, consulte la información de la
tarjeta TF o descargue el manual de usuario visitando el siguiente enlace o escaneando el código QR que
aparece a continuación.
https://mecpow.com/pages/download-center
4. Seleccione «WiFi Connect», introduzca «192.168.4.1» y haga clic en «Connect».
5. Cuando "Connect" cambia a "Disconnect", signica que la conexión Wi-Fi se realizó correctamente.
10. Parámetros de funcionamiento recomendados
ES
-55-
100
100
100
100
100
100
100
100
60
100
2000
2000
2000
1600
600
600
40
600
3500
1000
La superficie debe estar esmerilada.
La superficie debe estar esmerilada, no brillante.
La superficie debe estar pintada.
La superficie debe estar esmerilada.
La superficie debe estar esmerilada, no brillante.
La superficie debe estar pintada.
Modo
Grabado
Materiales
Tablero de madera
Bambú
Madera maciza
Cuero
Vidrio
Cerámica
Acero inoxidable
Metal anodizado
Tejido
Acrílico
Potencia (%)
Velocidad
(mm/min)
Nota
Mecpow M1 (3.5W)
100
100
100
100
100
100
100
100
40
100
100
100
100
100
100
3000
3000
3000
2000
800
800
300
800
5000
1500
70
120
1300
100
1500
Modo
Grabado
Corte
Materiales
Tablero de madera
Bambú
Madera maciza
Cuero
Vidrio
Cerámica
Acero inoxidable
Metal anodizado
Tejido
Acrílico
Tablero de 2 mm
Tablero de 3 mm
Cartón
Cuero
Tejido
Potencia (%)
Velocidad (mm/min)
Note
Mecpow M1 (5W)

ES
-56-
11. Solución de problemas
1.¿Por qué no se enciende el grabador láser M1?
Causas:
a.El grabador M1 puede no estar correctamente conectado al puerto de entrada.
b.El enchufe podría estar ojo.
c.El adaptador de corriente puede estar dañado.
Soluciones:
a.Verique que el cable de alimentación esté bien conectado y que esté utilizando el adaptador ocial.
b.Pruebe con otros enchufes. Si el problema persiste, recomendamos contactar con el soporte técnico.
c.Adquiera un nuevo adaptador de corriente.
2.¿La máquina no puede conectarse al Wi-Fi?
Causas:
a.Señal de Wi-Fi débil o inestable
b.Contraseña de Wi-Fi incorrecta
c.Dirección IP introducida incorrectamente
Soluciones:
a.Asegúrese de que la máquina esté correctamente conectada a la red.
b.Verique que la contraseña esté escrita correctamente (las mayúsculas son importantes).
c.Intente acceder a 192.168.4.1 en su navegador.
3.¿Por qué el software de mi computadora no se conecta a la máquina?
Causas:
a.Se ha seleccionado un puerto incorrecto.
b.Uso de Windows 7/8 sin los controladores adecuados.
Soluciones:
a.Soluciones: a. Pruebe cambiar el puerto COM.
b.Instale el controlador correspondiente si utiliza Windows 7 u 8.
4.¿Por qué el grabado láser se ve borroso?
Causas:
a.Longitud focal incorrecta
b.Material no adecuado para grabado o corte
c.Parámetros de potencia o velocidad incorrectos
Soluciones:
a.Ajuste la distancia focal del módulo láser usando la palanca de enfoque hasta que el punto del láser sea lo más
pequeño posible.
b.Asegúrese de que el material sea apto para grabado o corte.
c.Ajuste los parámetros de potencia, velocidad u otros según sea necesario.
5.¿Qué debo hacer si la lente está dañada?
Causas:
a.La lente no se limpia regularmente, lo que provoca acumulación de polvo.
b.Daños por impacto externo en el conjunto de la lente.
Soluciones:
a.Limpie la lente regularmente con toallitas con alcohol (se recomienda hacerlo cada 20 horas de uso acumula-
do) para evitar que el polvo afecte la salida del láser.
b.Si el conjunto de la lente está dañado, puede reemplazarlo según sea necesario o contactar con el fabricante
Mecpow para adquirir piezas de repuesto.
ES
-57-
13. Declaración de cumplimiento
Este producto cumple con los estándares de la Comunidad Europea (UE).
Este símbolo indica que el producto es reciclable.
Este símbolo indica que el producto no debe eliminarse como residuo doméstico. El producto
debe enviarse a instalaciones de recogida selectiva para la recuperación y el reciclaje de aparatos
eléctricos y electrónicos.

58
58
60
61
61
62
66
67
72
74
75
76
FR
1. Préface.........................................................................
2. Déclaration de sécurité..............................................
3. Schéma.........................................................................
4. Caractéristiques..........................................................
5. Contenu de la Boîte....................................................
6. Mode d'Emploi............................................................
7. Pilote. ..........................................................................
8. Contrôle par Logiciel Informatique..........................
9. Contrôle via l'Application Mobile et la Carte TF......
10. Paramètres de Fonctionnement Recommandés ...
11. Dépannage.................................................................
12. Déclaration de conformité .......................................
TABLE DES MATIÈRES

FR
-58-
1. Préface
Attention
2. Déclaration de sécurité
Cher client,
Nous vous remercions d'avoir acheté notre machine à graver au laser. Cet appareil est un produit de haute
technologie qui intègre la lumière, les machines et l'électricité. An d'améliorer l'utilisation et l'entretien de
l'appareil, veuillez lire attentivement le manuel d'utilisation et suivre les étapes indiquées dans le manuel.
Clause de non-responsabilité
Toute perte causée par une utilisation incorrecte ou le non-respect des étapes du manuel d'utilisation sera à la
charge de l'utilisateur. L'interprétation nale du manuel d'utilisation appartient à notre société, et nous nous
réservons le droit de modier toute information, donnée, détail technique, etc. dans le manuel.
* Le traitement au laser peut être risqué, et les utilisateurs doivent soigneusement vérier si l'objet à traiter est
adapté au travail au laser.
* L'objet traité et les émissions doivent être conformes aux lois et réglementations locales. * Cette machine utilise
un laser de classe IV (radiation laser de haute puissance), qui peut provoquer les situations suivantes :
(1) Allumage des matériaux inammables environnants ;
(2) Pendant le traitement laser, d'autres radiations et des gaz toxiques et nocifs peuvent être produits, en fonction
de l'objet traité ;
(3) L'exposition directe au rayonnement laser peut causer des dommages au corps humain. Le lieu de travail doit
être équipé d'un dispositif de lutte contre l'incendie et les matériaux inammables et explosifs ne doivent pas être
empilés autour de l'établi ou de la machine. Une bonne ventilation doit également être assurée.
* L'environnement dans lequel se trouve la machine doit être sec, exempt de pollution, de vibrations, d'électricité
forte, de magnétisme fort et d'autres interférences. La température ambiante de travail doit être comprise entre 5
et 30°C, et l'humidité ambiante de travail doit être comprise entre 35 et 65%HR.
* La tension de fonctionnement de l'appareil est de 100-240 V CA.
* Pendant le fonctionnement de la machine, celle-ci doit être surveillée en permanence. Avant de quitter l'appareil,
il convient de couper l'alimentation électrique an d'éviter tout problème imprévu. Si une situation anormale se
produit, veuillez immédiatement couper le courant et vous en occuper !
* Il est strictement interdit de placer dans la machine des objets rééchissants ou dius qui ne sont pas utiles à son
fonctionnement, an d'éviter que le laser ne se reète sur le corps humain ou sur des matériaux inammables.
* La machine doit être tenue à l'écart des équipements électriques sensibles aux interférences électromag-
nétiques, qui peuvent provoquer des interférences électromagnétiques.
* Il est strictement interdit aux non-professionnels de démonter le graveur laser, car il peut y avoir des dangers tels
que la haute tension à l'intérieur de la machine.
Précautions de sécurité
1. La machine à graver au laser peut produire de la lumière laser. Il est strictement interdit de placer des
organismes vivants sous l'émission laser (le port est marqué d'un panneau d'avertissement jaune).
2. Il est interdit aux patients photosensibles d'utiliser le graveur laser ou de s'en approcher.
3. Lors de l'utilisation de la machine à graver au laser, l'opérateur et toute personne se trouvant à proximité de la
machine doivent porter des lunettes de sécurité laser. Ne pas utiliser la machine laser sans lunettes de protection
laser. Notre machine est livrée avec une paire de lunettes de sécurité. Si vous souhaitez acheter des lunettes
supplémentaires, celles-ci doivent orir une protection contre les longueurs d'onde comprises entre 400 et 445
nm (+-5 nm), avoir un diamètre extérieur de +5 et correspondre à un niveau L5 minimum.
4. Lorsque la machine à graver au laser fonctionne, l'utilisateur doit être très attentif et ne pas la laisser sans
surveillance an d'éviter que le matériau gravé ne s'enamme. Placez la machine dans un endroit à l'abri du feu
et assurez une bonne ventilation. Il est recommandé d'avoir un extincteur à proximité en cas d'urgence.
5. Veillez à ce qu'aucun matériau inammable ne se trouve à proximité de la machine à graver au laser. Nous
recommandons de placer une table de travail en nid d'abeille sous la machine.
6. Lorsque vous utilisez le graveur laser, veillez à ce qu'il y ait susamment d'espace autour de lui. La gravure de
certains matériaux peut produire de la fumée, qui doit être évacuée à l'aide d'un système d'échappement
spécialisé.
7.Ne touchez pas le faisceau laser ou l'objet en cours de traitement lorsque la machine est en fonctionnement,
car cela pourrait provoquer des blessures graves ou une réexion du faisceau. En outre, évitez de toucher le
radiateur car il peut être chaud en raison du fonctionnement de la machine à graver au laser ou de son arrêt
récent.

FR
-59-
1. Avant d'utiliser le Mecpow M1, veuillez vous assurer que le cache de protection est fermé et que le réecteur
laser est propre.
2. La M1 est conforme aux normes de sécurité laser de classe 1. Avant de commencer la gravure au laser, vériez
que le couvercle de protection est intact et n'est pas endommagé. Si vous constatez des dommages, cessez
d'utiliser l'appareil.
3. Pendant le fonctionnement, veillez à ce que le laser reste à l'intérieur du couvercle de protection. Lorsque vous
traitez des objets avec la Mecpow M1, couvrez toujours la zone de travail avec le couvercle de protection et
portez une protection oculaire pour plus de sécurité.
4. Il est important d'éviter de déplacer l'appareil pendant la gravure au laser an d'éviter que les mesures
d'autoprotection ne provoquent l'arrêt du fonctionnement de l'appareil. Cela peut également aecter le résultat
nal de la gravure en perturbant le processus de gravure. Si vous devez déplacer l'appareil ou l'objet à graver, il
est recommandé de le faire avant ou après le processus de gravure. Il est essentiel d'éviter de déplacer l'appareil
ou les objets pendant le fonctionnement du laser.
5. Les mineurs doivent toujours être surveillés et assistés par un adulte lorsqu'ils utilisent ce produit.
6. Lors de la découpe ou de la gravure de matériaux inammables à faible vitesse et à forte puissance, il existe un
risque d'apparition de ammes. Si des ammes sont détectées, il est important d'arrêter le processus immédiate-
ment.
7. Lorsque l'appareil est sous tension, il est essentiel d'éviter de démonter toute partie du corps de la machine
an d'éviter tout contact accidentel avec l'alimentation électrique. En outre, ne touchez pas les composants
électroniques avec vos mains ou avec des outils.
8. Si vous rencontrez l'une des situations suivantes, arrêtez immédiatement d'utiliser le produit et mettez-le hors
tension :
- Une odeur de brûlé se dégage de l'appareil
- Une amme nue générée par le matériau de gravure
- Dommages aux composants internes du produit
- Arrêt inattendu du produit
- Bruit ou lumière anormale qui ne s'est jamais produite auparavant
9. Soyez prudent lorsque vous utilisez les commandes ou eectuez des réglages, car l'exécution de procédures
non spéciées peut entraîner une exposition dangereuse aux rayonnements.
1. Pour maintenir des performances optimales, nettoyez régulièrement l'objectif de l'appareil avec un chion
non poussiéreux ou du papier imbibé d'alcool.
2. Soyez prudent lorsque vous utilisez ou rangez la machine an d'éviter que des objets étrangers ne pénètrent
dans les orices d'aération supérieurs et ne perturbent son fonctionnement.
Consignes de sécurité
Maintenance
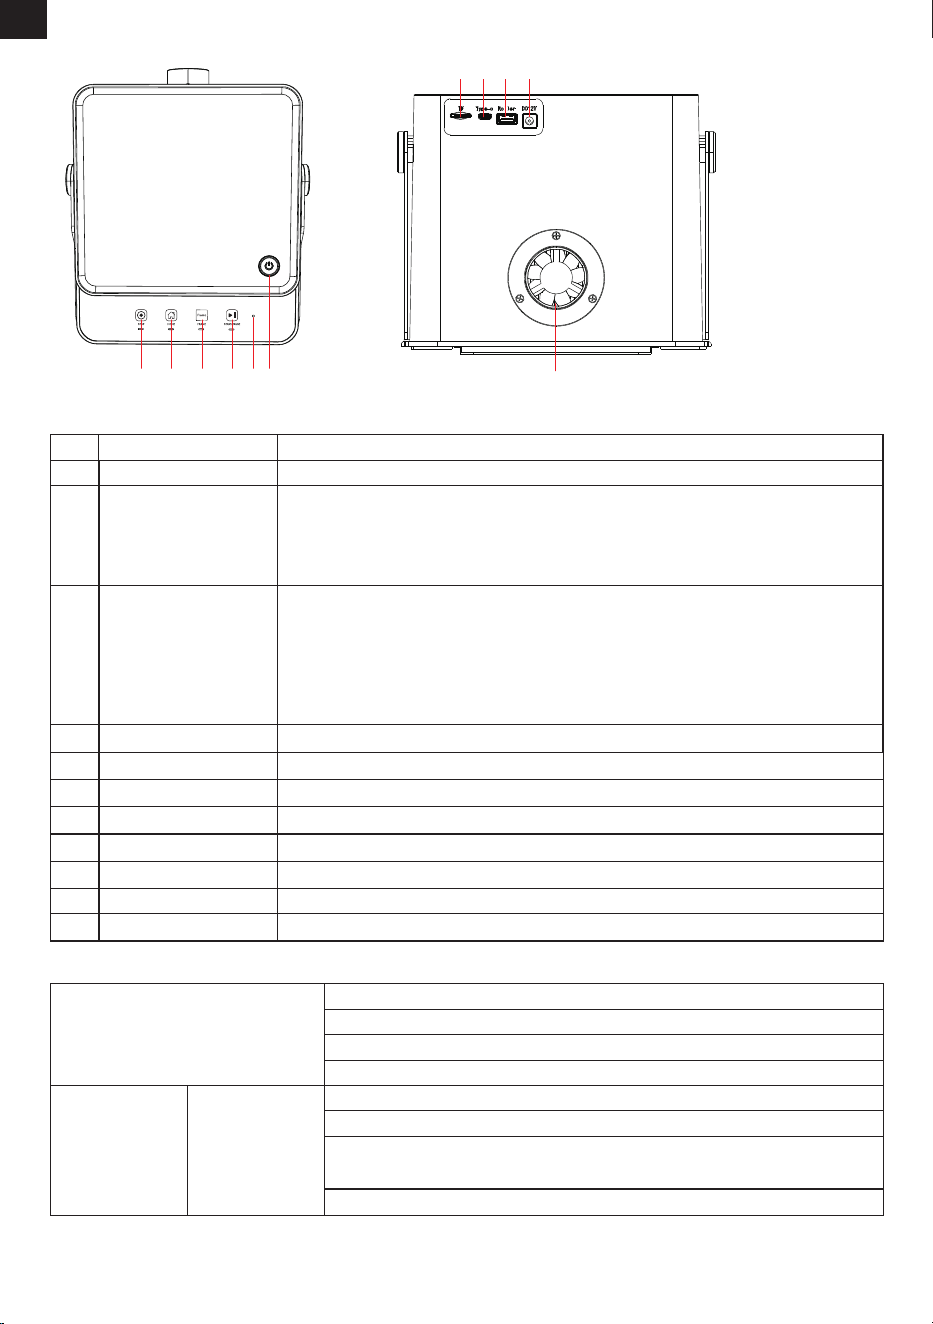
FR
-60-
Introductions et fonctions
Pièces
Nom
Funciones
1
2
3
4
Bouton Power
Voyan
Bouton START/PAUSE
Bouton FRAME Commencer à encadrer la zone de travail du laser.
Indique l'état de la machine :
Blanc : Veille
Bleu : Marche
Rouge : Alarme
Vert : Wi-Fi connecté
3. Schéma
Allumer ou éteindre l'appareil
Voyant
A. STOP
B. HOME
C. FRAME
D. START/PAUSE
Appuyer sur ces quatre boutons et la
lumière blanche s'allume.
A. Mise en marche et mise en veille de la machine : Blanc continu
B. État de la gravure : Bleu continu
C. Cache de protection ouvert OU Appareil incliné (≥15°) :
Voyant rouge clignotant (avec 3 sons d'alarme)
D. WiFi connecté : Vert continu
Voyant État du voyant
(1)En cliquant dessus, la gravure/découpe est lancée avant que la machine ne fonctionne.
(2)Pendant le fonctionnement :
Premier clic : Mettre la machine en pause.
Deuxième clic : Continuer la gravure/coupe.
(3)En mode veille :
Cliquer sur ce bouton pour répéter la gravure du dernier fichier transféré sur la carte TF (sauf
les fichiers DLC de MKSLaser mobile).
11
Ventilateur d'Extraction
Pour évacuer les vapeurs et la fumée pendant la gravure ou la découpe
5
Bouton HOME Revenir à l'origine.
6
Bouton STOP Arrêter la gravure/le cadrage.
7
Port TF Port Insérer la carte TF pour lire les fichiers.
8
Type-C Pour une connexion à un ordinateur
9
Port Rouleau Rotatif Insérer le câble du rouleau pour connecter le rouleau rotatif.
10
Port Entrée DC Brancher l'adaptateur d'alimentation.
123456
10
11
98
7
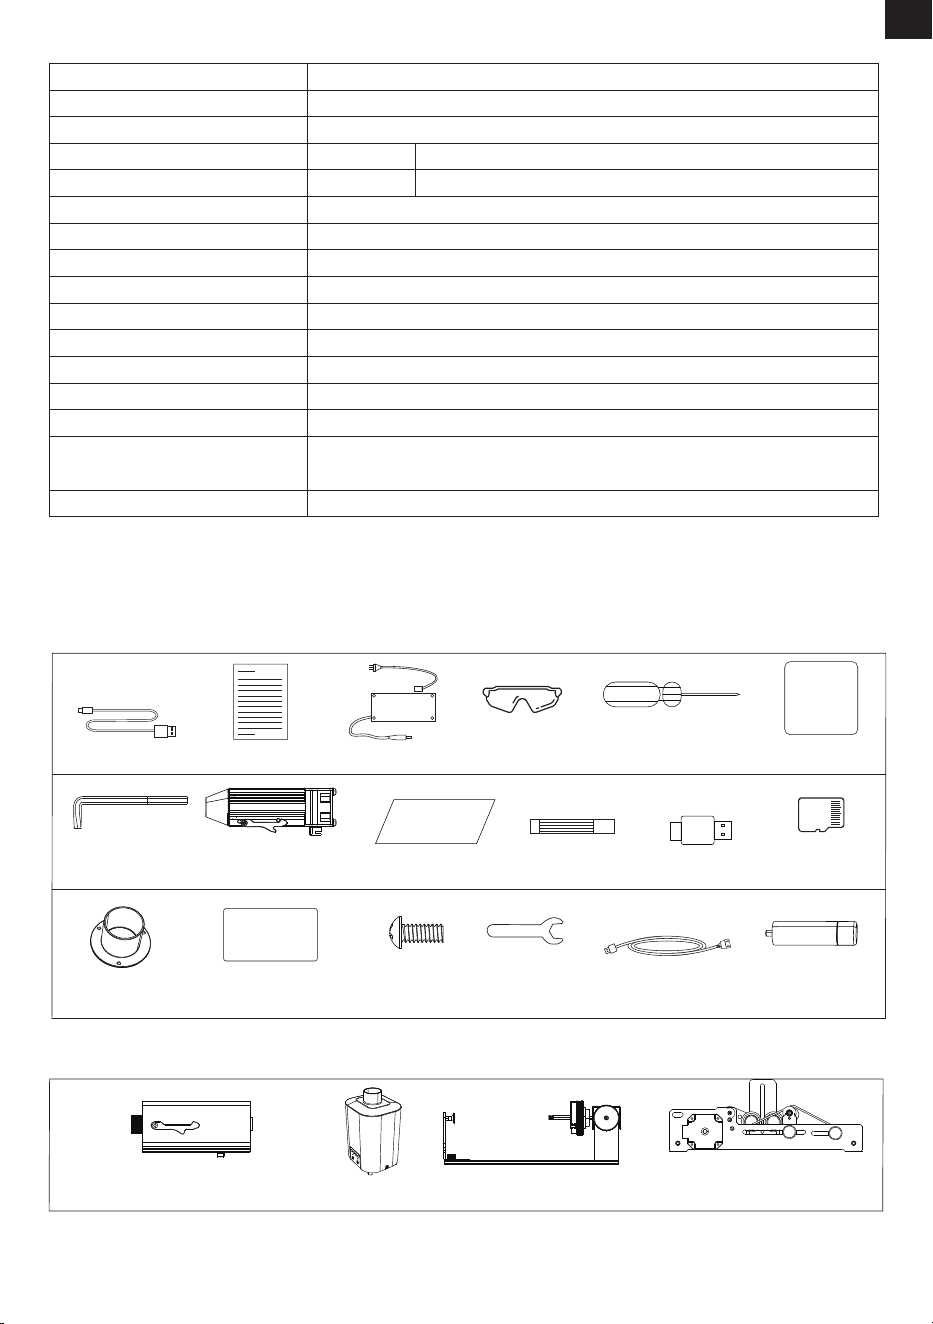
FR
-61-
4. Caractéristiques
Modèle
Taille du produit
Puissance
Entrée du laser
Puissance du laser
Longueur d'onde
Surface de gravure
Vitesse de gravure Max.
Précision de gravure
Hauteur des objets gravés
Matériaux pour la gravure au laser
Logiciels pris en charge
Systèmes pris en charge
Formats de chier pris en charge
Méthode de transmission des données
Alarme d'inclinaison
220 x 264 x 194 mm
60W
DC 12V 5A DC 12V 5A
3.5W 5W
455±5nm
100 x 100 mm
10000 mm/min
0.01 mm
<4.5 cm
Bois, plastique, cuir, carton, pierre, céramique, métal revêtu, bambou, etc.
LaserGRBL, LightBurn, MKSLaser
Windows, macOS, Android, iOS
JPEG, BMP, JPG, GIF, PLT, PNG, DXF, HPGL, NC, etc.
Connexion laire : Port USB
Connexion sans l : WiFi
15±5°
M1
5. Contenu de la Boîte
Accessoires Facultatifs
Accessories
Câble type-C *1
Plaque en aluminium *5
M3x7 *3
Planche en bois *2
Lunettes de
protection *1
Clé Allen de 2,5 mm *1
Bride *1
Carte TF *1
Capacité Maximale
de la Machine : 16 G
Module laser *1 Plaque de positionnement
de la zone de gravure *1
Marqueur *1 Lecteur de cartes *1
Tournevis *1
Câble du rouleau *1
Manuel de
l'utilisateur *1
Adaptateur secteur*1
Clé *1
Pieds de surélévation*4
Module laser infrarouge 1064nm 1.2W
(adapté à la gravure des métaux)
Extracteur de vapeurs
Module à rouleau rotatif (G5) Module à rouleau rotatif (G3 Pro)
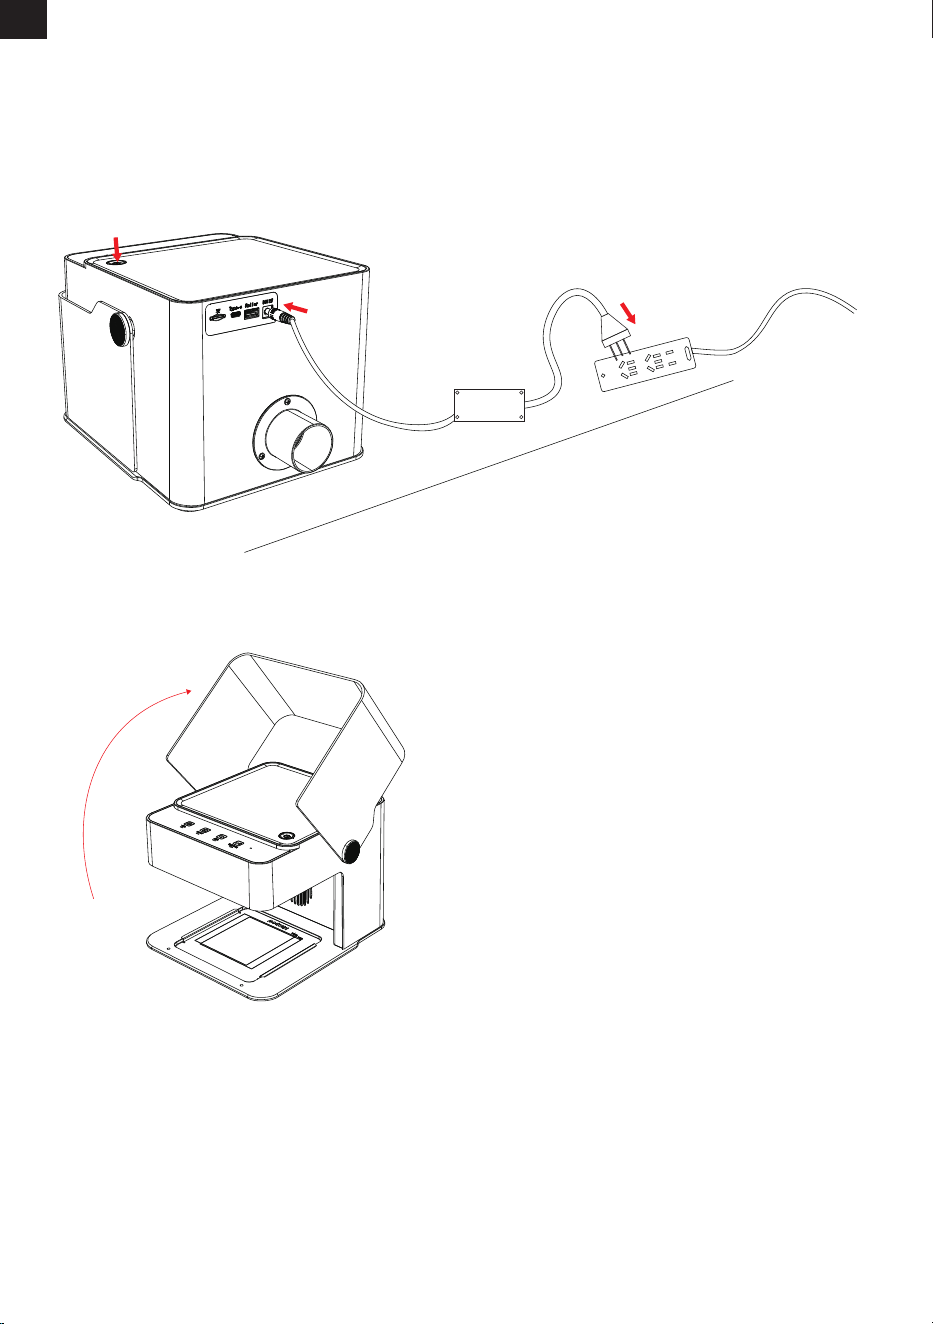
FR
-62-
1. Lancez la machine
2. Insérez le matériau
6. Mode d’Emploi
(1)Insérez l'adaptateur secteur dans la prise.
(2)Connectez le câble d'alimentation 12V DC au port d'alimentation.
(3)Appuyez sur le bouton d'alimentation pour démarrer la machine. Le voyant lumineux devient blanc (comme
indiqué sur la gure ci-dessous).
(1)Soulevez le couvercle de protection.
(2)Placez le matériau de gravure/découpe sur la zone de travail.
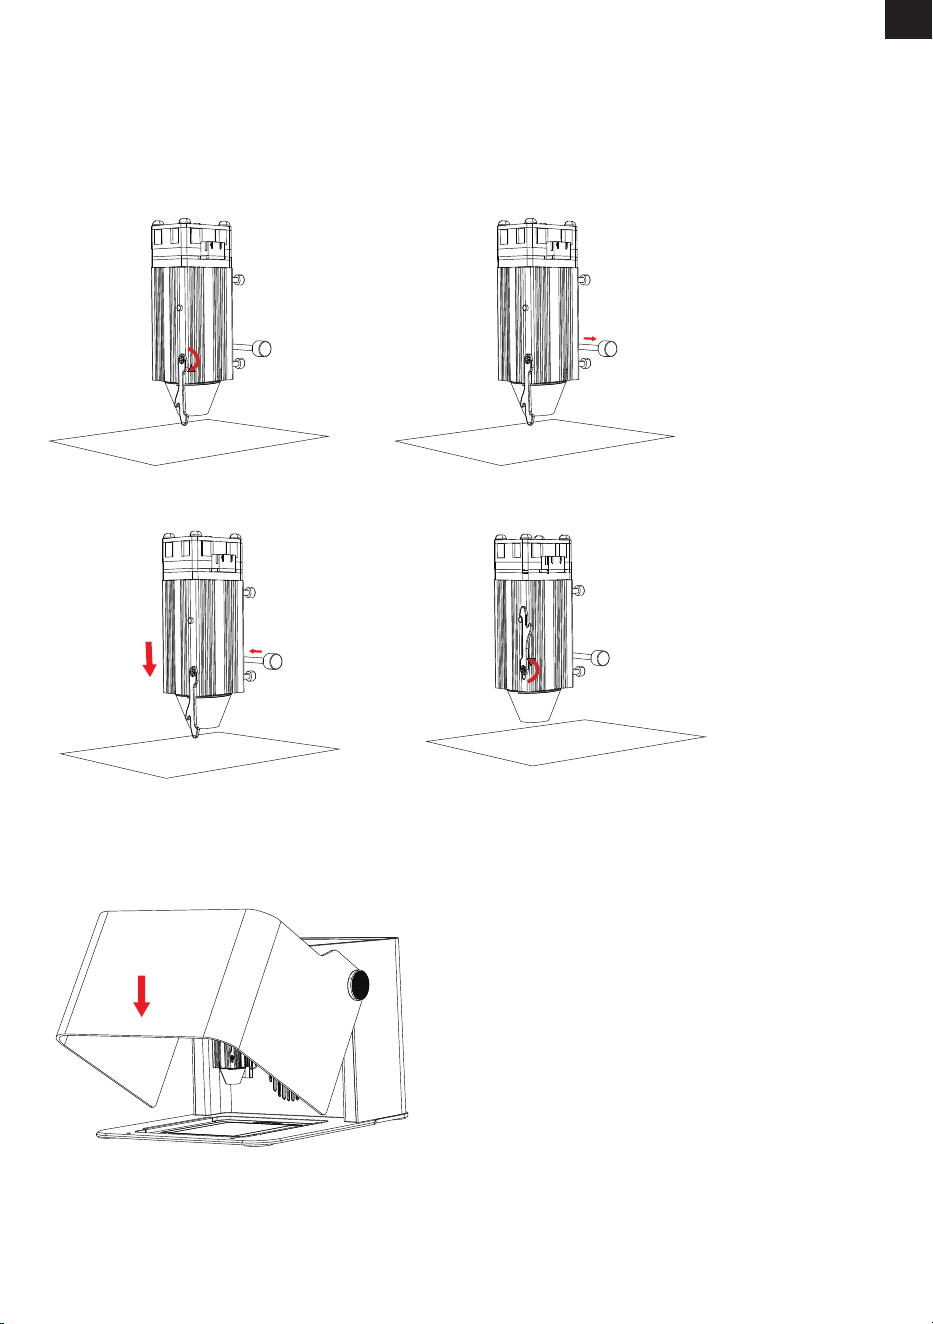
FR
-63-
Remarque : Le couvercle de protection doit être fermé pour l'opération. Autrement, l'opération ne se déroulera
pas. Pendant la gravure ou la découpe, l'ouverture du couvercle de protection interrompt le processus.
3. Réglez la mise au point du laser (comme indiqué dans la figure ci-dessous)
(1)Tirez le levier de mise au point vers le bas.
(2)Desserrez la vis de la poignée.
(3)Réglez la hauteur du module laser jusqu'à ce que le levier de mise au point entre en contact avec la surface du
matériau, puis serrez la vis de la poignée.
(4)Remettez le levier de mise au point dans sa position initiale.
4.Fermez le couvercle de protection et appuyez sur le bouton HOME pour que le
module laser revienne à son point d’origine.
5.Démarrez la gravure/découpe (compatible avec MKSLaser (Appli), LightBurn et LaserGRBL)
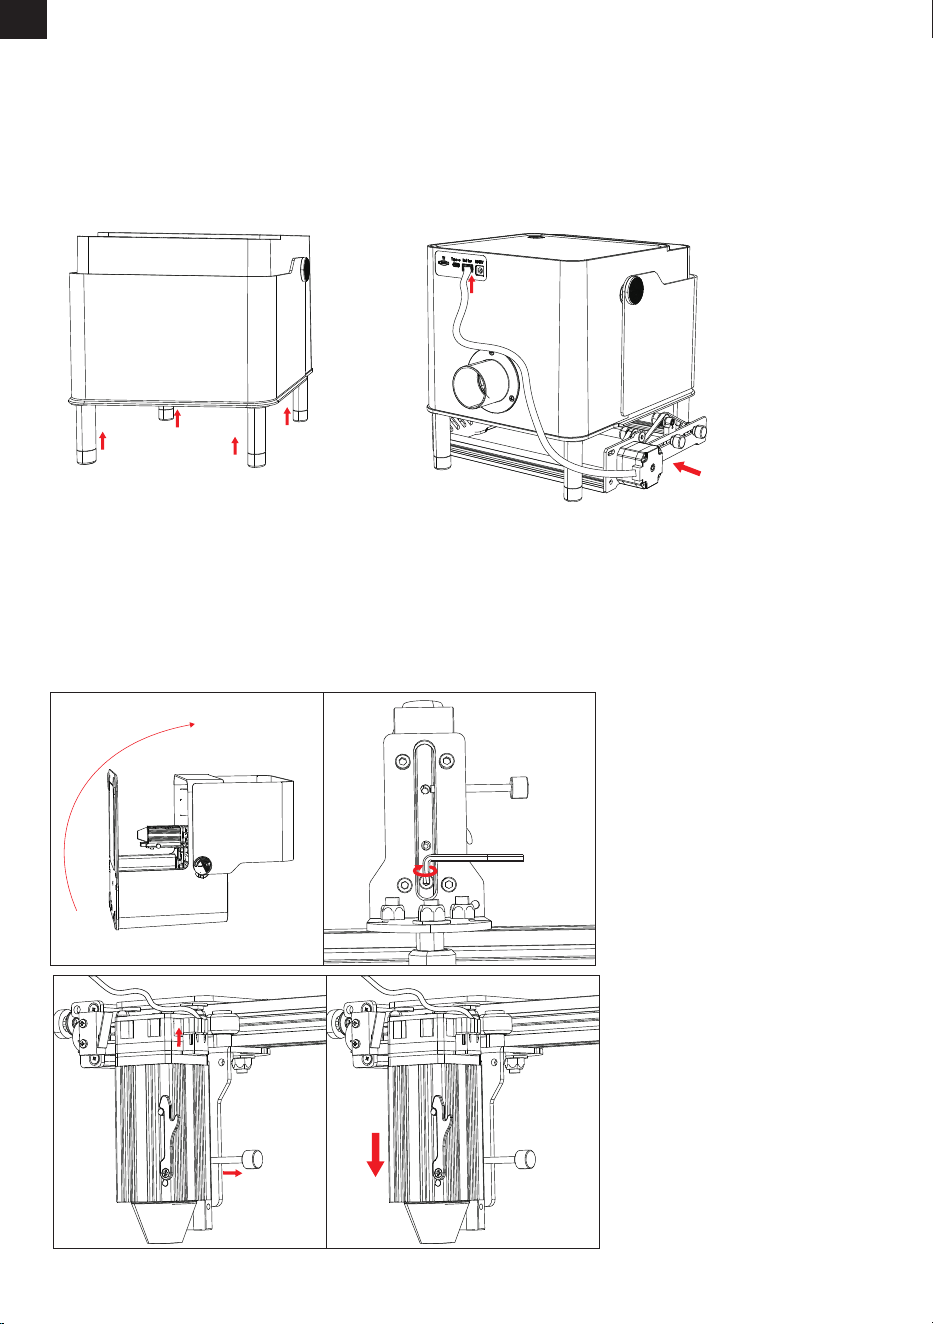
FR
-64-
(Pour les tâches qui sollicitent les modules à rouleaux rotatifs ou pour la gravure de matériaux épais)
(1)Alignez les quatre pieds avec les trous de vis de la base de la machine.
(2)Serrez les vis pour les xer en place.
(3)Placez le rouleau rotatif au bas de la machine.
(4)Insérez l'extrémité USB du câble du rouleau dans le port du rouleau rotatif à l'arrière de la machine et
connectez l'autre extrémité au rouleau rotatif.
6. Réglez la hauteur de la machine
(1)Inclinez la base de la machine vers le haut.
(2)Retirez la vis arrière à l'aide de la clé Allen de 2,5 mm.
(3)Desserrez la vis de gauche et débranchez le câble d'alimentation du laser.
(4)Faites glisser le module laser vers le bas et retirez-le.
7. Replace the Laser Module
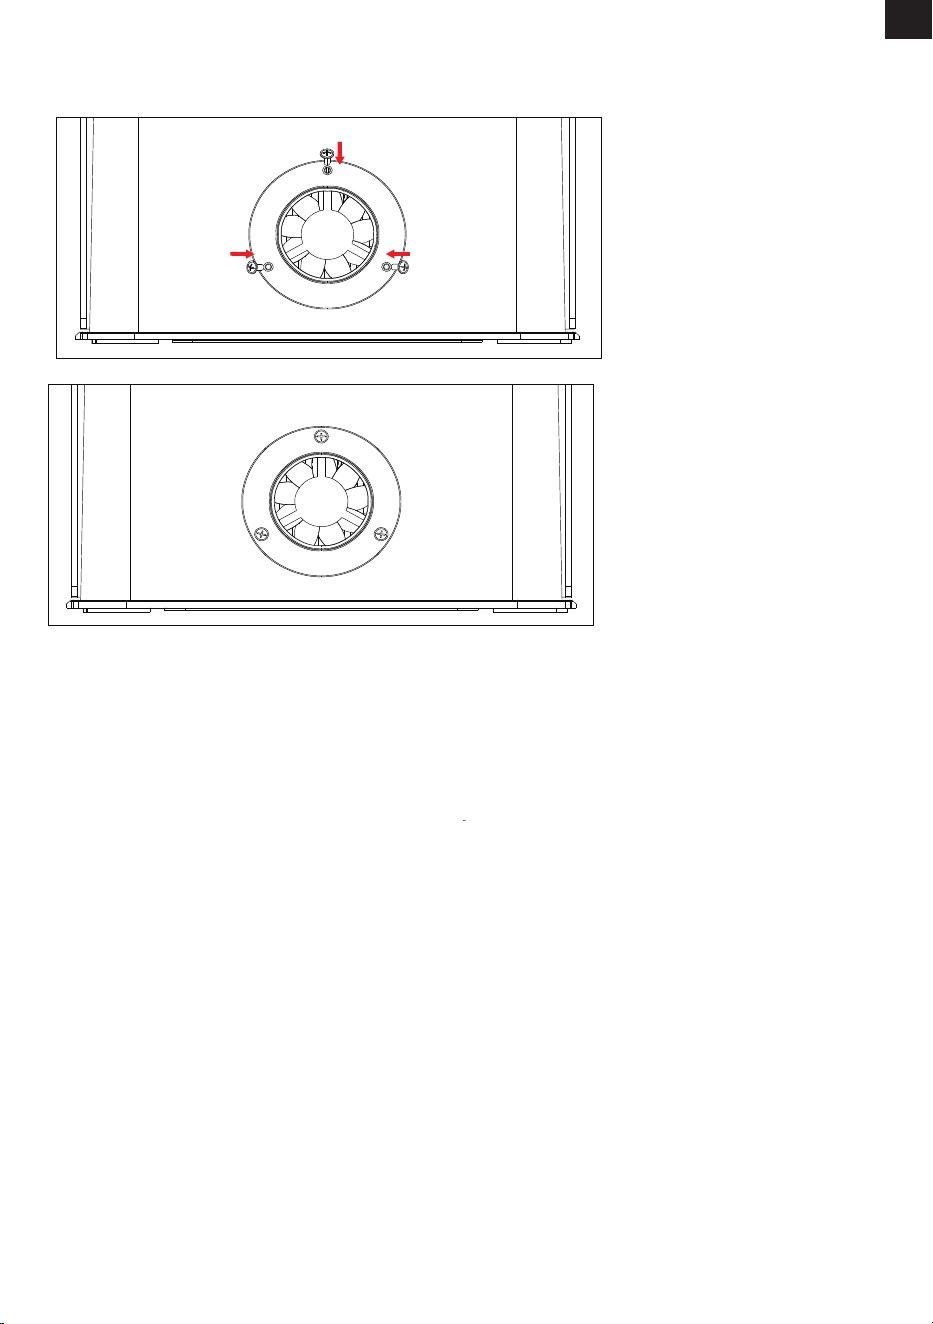
FR
-65-
Alignez la bride avec les trous de vis du ventilateur arrière et xez-la avec trois vis M3×7.
8. Installez la bride
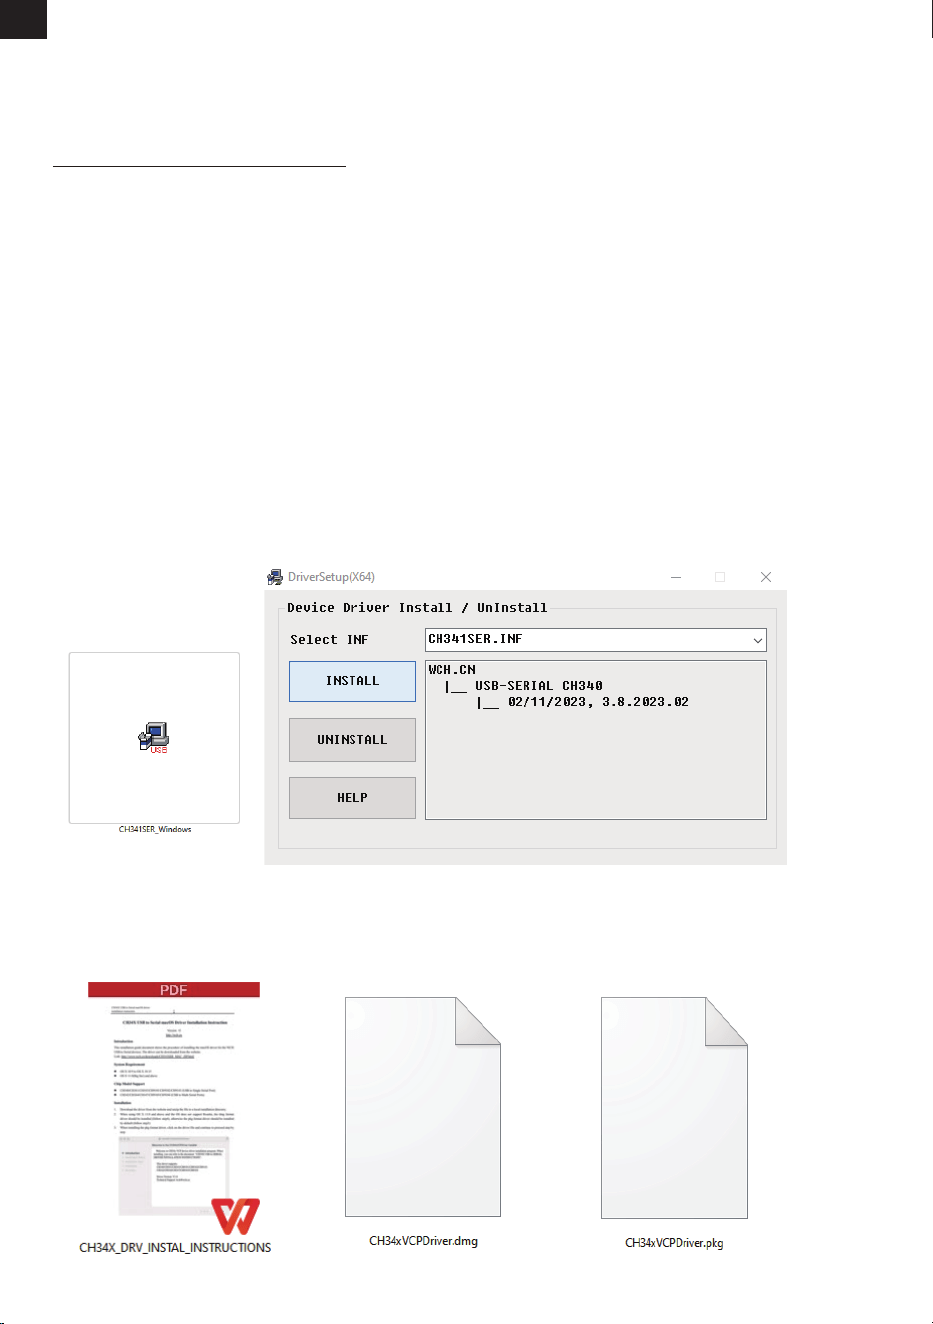
FR
-66-
1. Télécharger le pilote à partir du lien ci-dessous.
https://mecpow.com/pages/driver-les
2. Contacter le service clientèle pour obtenir le chier du pilote.
Remarque :
Pour les utilisateurs de Windows, si vous utilisez un système inférieur à Win10, vous devrez
installer le pilote manuellement. Si vous utilisez un système Win10 ou supérieur, il n'est pas
nécessaire d'installer le pilote.
Le pilote pour les utilisateurs Mac est compatible avec OS X 10.9 à OS X 10.15 et OS X 11.0
(Big Sur) et supérieur.
Le pilote pour les utilisateurs de Linux est compatible avec les systèmes 32 bits et 64 bits.
Veuillez allumer l'appareil et le connecter à votre ordinateur via le câble USB avant de
lancer le pilote !
Avant d'installer le pilote, allumez l'appareil et connectez-le à votre PC à l'aide d'un câble USB.
Pour les utilisateurs de Mac :
1. Ouvrez les instructions.
2. Ouvrez le pilote téléchargé et suivez les instructions pour l'installer.
8. Pilote
Méthodes de téléchargement
Installation du pilote
Pour les utilisateurs de Windows :
1. Ouvrez le pilote téléchargé.
2. Cliquez sur "INSTALL".
3. Cliquez sur "OK" lorsque le pilote est installé avec succès.
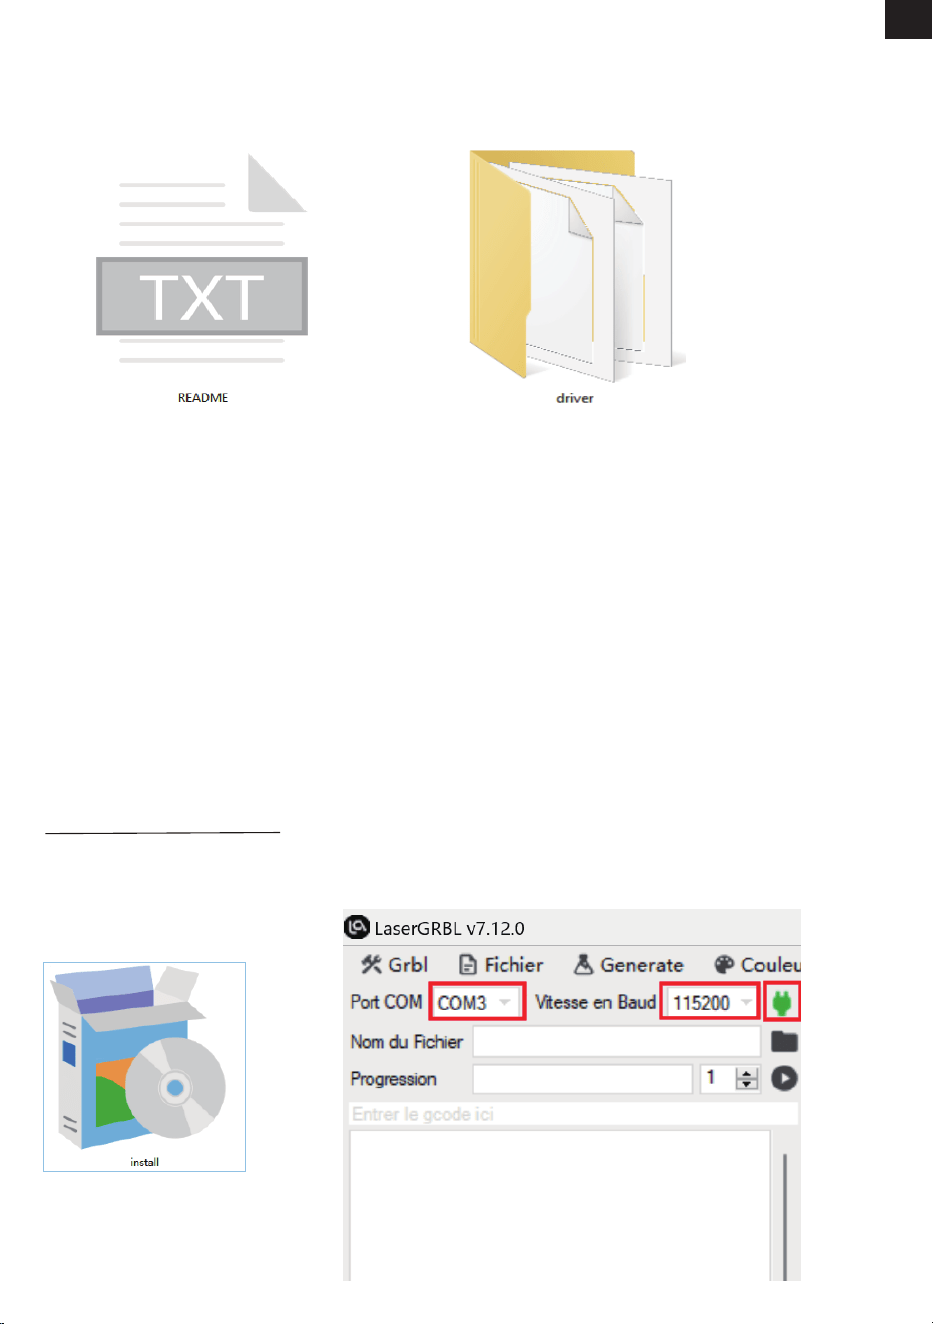
FR
-67-
Pour les utilisateurs de Linux :
1. Ouvrez le chier README.
2. Ouvrez le chier - driver, et suivez le "README" pour l'installer.
LaserGRBL
C'est un logiciel open source gratuit qui prend en charge les ordinateurs Windows. Téléchargez-le sur :
http://lasergrbl.com/download/
1. Installez-le. 2. Ouvrez le logiciel. Sélectionnez « COM3 » et « 115200 », puis
cliquez sur « Connecter ».
9. Contrôle via le logiciel de l'ordinateur
Connectez la machine à graver au logiciel en temps réel via le câble USB. En cours de fonctionnement, vous
pouvez démarrer ou arrêter la machine à graver via le panneau de commande.
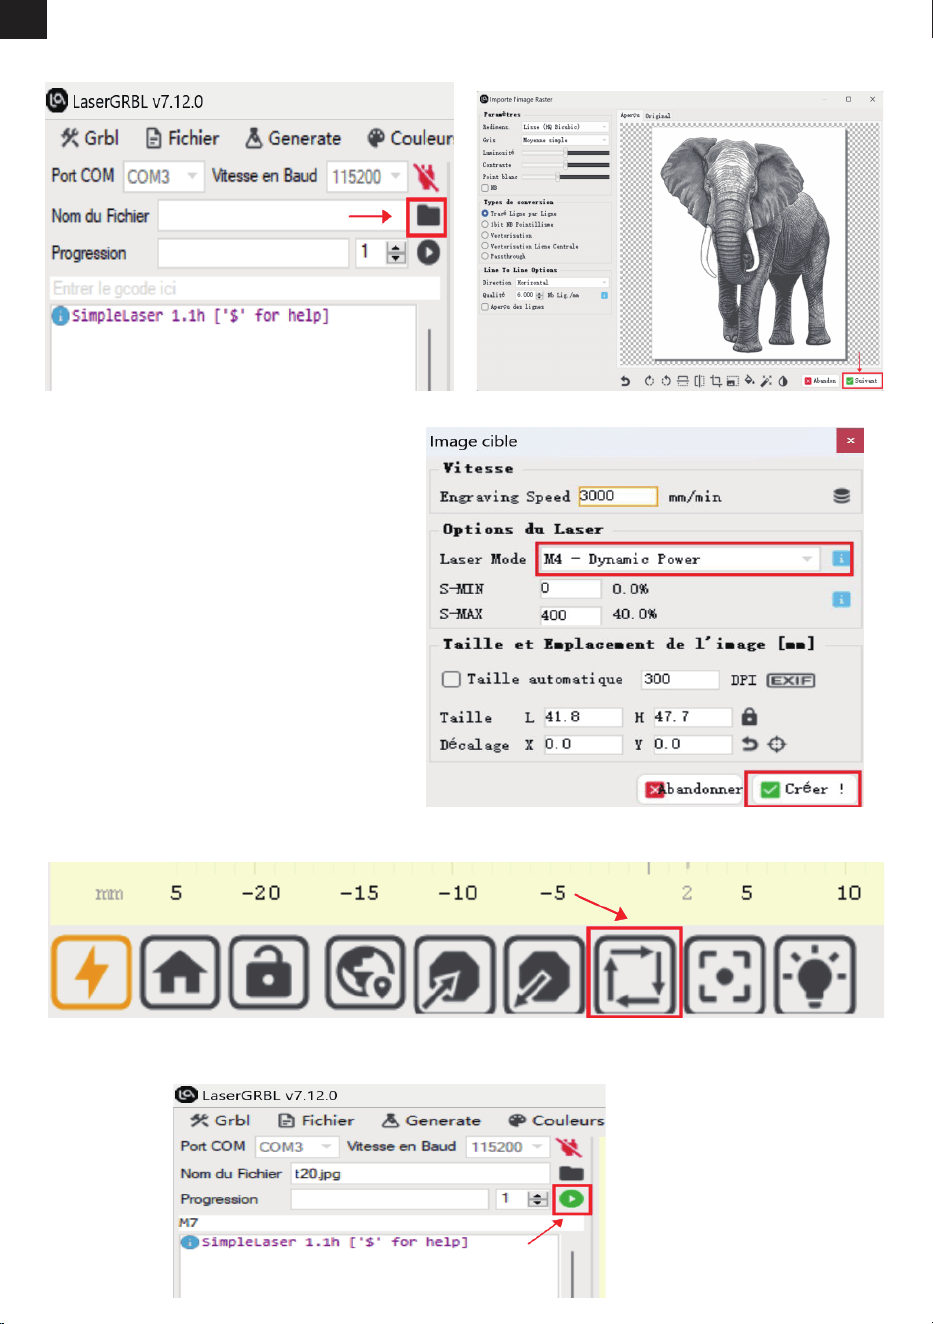
FR
-68-
3. Cliquez sur "Ouvrir le Fichier" pour
sélectionner le chier de gravure.
4. Sélectionnez le mode de gravure et cliquez
sur "Suivant".
5. Sélectionnez les paramètres de fonctionne-
ment pour la gravure ou la découpe au laser.
(M3 correspond à la gravure à puissance
constante et M4 à la puissance variable. Veuillez
consulter la section 10 pour connaître les
paramètres de fonctionnement recommandés
pour la gravure ou la découpe de diérents
matériaux.)
6. Cliquez sur "Framing" pour prévisualiser la plage de gravure et ajuster la position de gravure.
7. Cliquez sur "Démarrer le Programme" pour commencer la gravure.
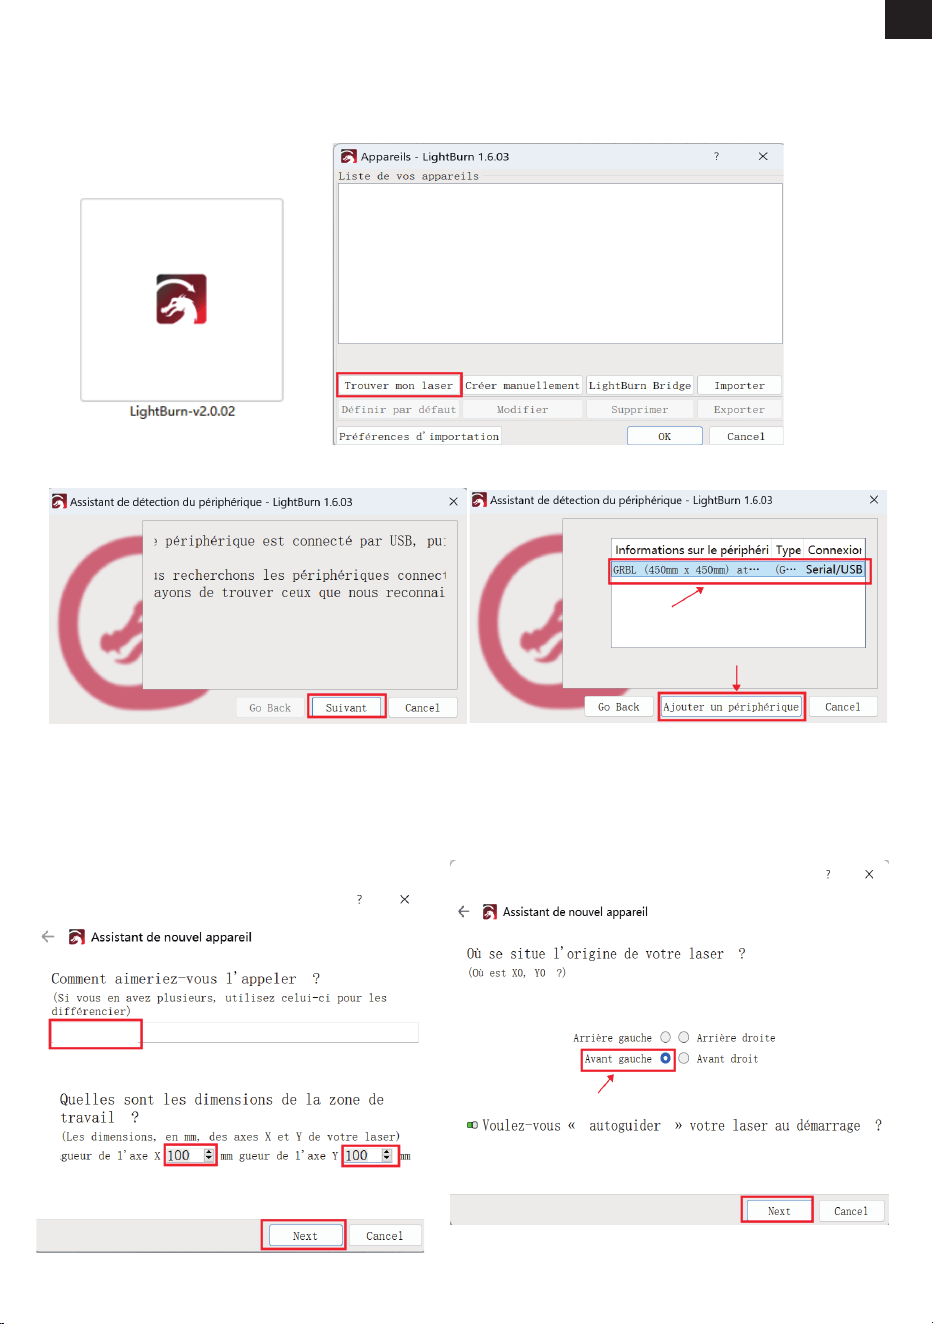
FR
-69-
C'est un logiciel professionnel payant compatible avec les ordinateurs MAC, Linux et Windows.
Téléchargez-le sur: https://lightburnsoftware.com/pages/download-trial.
4. Nommez votre appareil et entrez les longueurs
des axes X et Y, puis cliquez sur "Next".
Nom : Mecpow M1
Longueur de l'axe X : 100 mm
Longueur de l'axe Y : 100 mm
LightBurn
1. Installez-le. 2. Ouvrez le logiciel et cliquez sur "Trouver mon laser".
3. Sélectionnez votre appareil et cliquez sur "Ajouter un appareil".
5. Sélectionnez "Avant gauche" comme
origine de votre laser et cliquez sur "Next".
MecpowM1
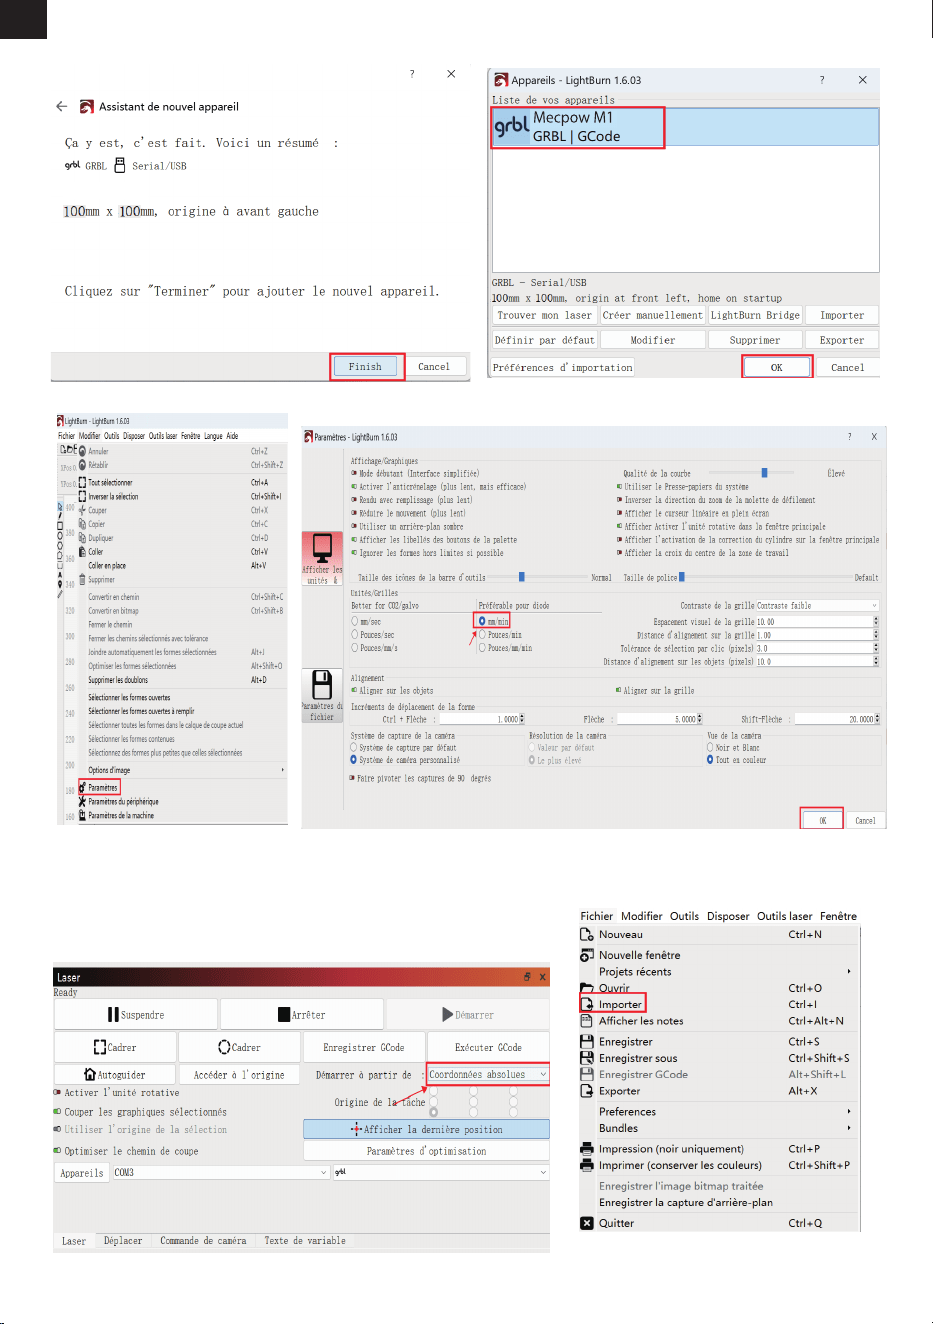
FR
-70-
6. Cliquez sur "Finish". 7. Sélectionnez Mecpow M1 et cliquez sur "OK".
8. Cliquez sur "Modier" - "Paramètres" et réglez l'unité sur "mm/min", puis cliquez sur "OK".
9. Sélectionnez "Coordonnées absolues" dans la
section "Démarrer à partir de", puis sélectionnez
le cercle dans le coin inférieur gauche de la
section"Origine du travail".
10. Cliquez sur "Fichier" - "Importer"
pour importer le chier de gravure.
MecpowM1
Mecpow M1
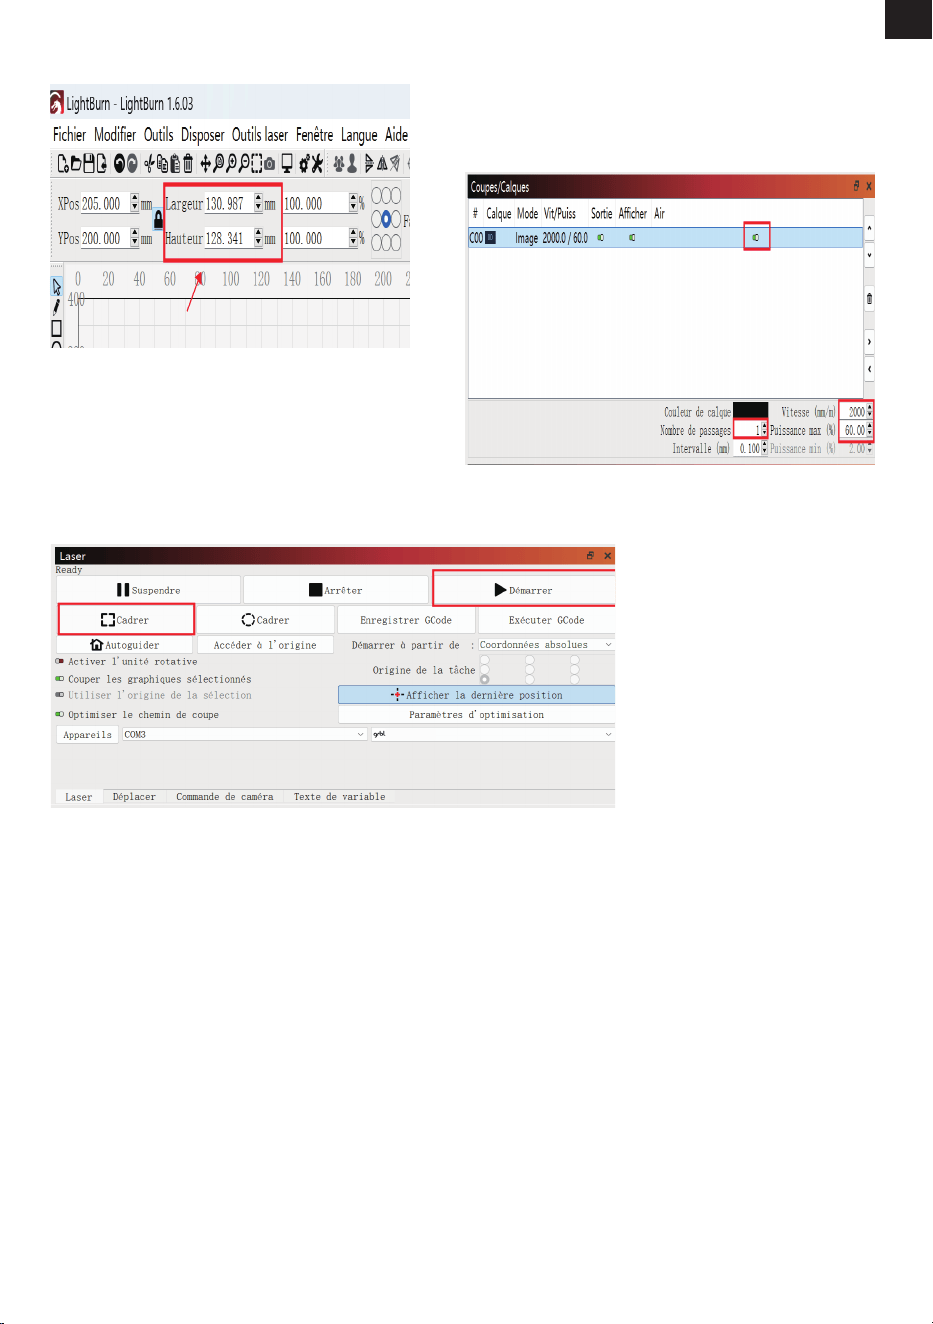
FR
-71-
11. Vous pouvez modier la taille de la gravure en
haut de l'interface après avoir importé le chier.
12. Sélectionnez le mode de gravure et dénissez les
paramètres de fonctionnement pour la gravure ou la
découpe au laser. (Les paramètres de fonctionnement
recommandés pour la gravure ou la découpe de
diérents matériaux sont répertoriés dans la section
suivante.)
13. Cliquez sur "Cadrer" pour prévisualiser la plage de gravure et ajuster la position de gravure, puis
cliquez sur "Démarrer" pour commencer la gravure.
Mecpow M1
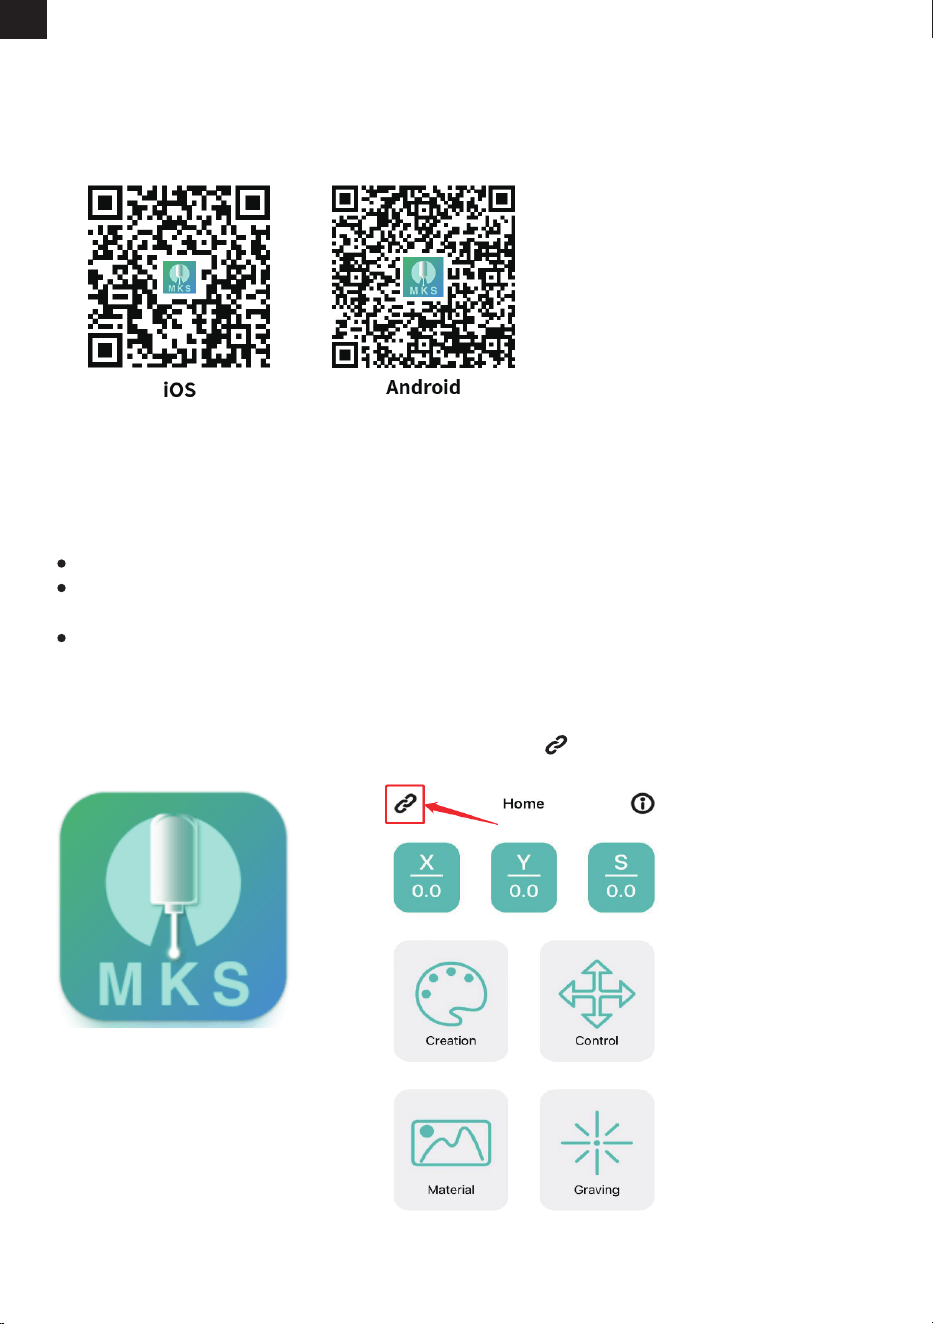
FR
-72-
Le « ***** » dans le nom du Wi-Fi est une combinaison aléatoire de chires. Cela varie selon la machine.
Pour garantir la stabilité du signal Wi-Fi, il est recommandé de connecter votre téléphone au Wi-Fi de la
machine de gravure avant d'insérer la carte TF.
L'application doit être utilisée avec la carte TF. Le téléchargement du chier de gravure échouera si la carte
TF n'a pas été insérée.
MKSLaser est une application mobile gratuite compatible avec les appareils Android et iOS.
1. Activez la fonction Wi-Fi de votre téléphone et connectez le Wi-Fi "Mecpow_*****".
Nom du Wi-Fi : Mecpow_*****
Mot de passe Wi-Fi : 12345678
2. Ouvrez l'application MKSLaser.
3. Cliquez sur l'icône .
Scannez le code QR et téléchargez l'application.
Téléchargement de l'application
Connexion Wi-Fi
10. Contrôle via l'application mobile et la carte TF
Note:
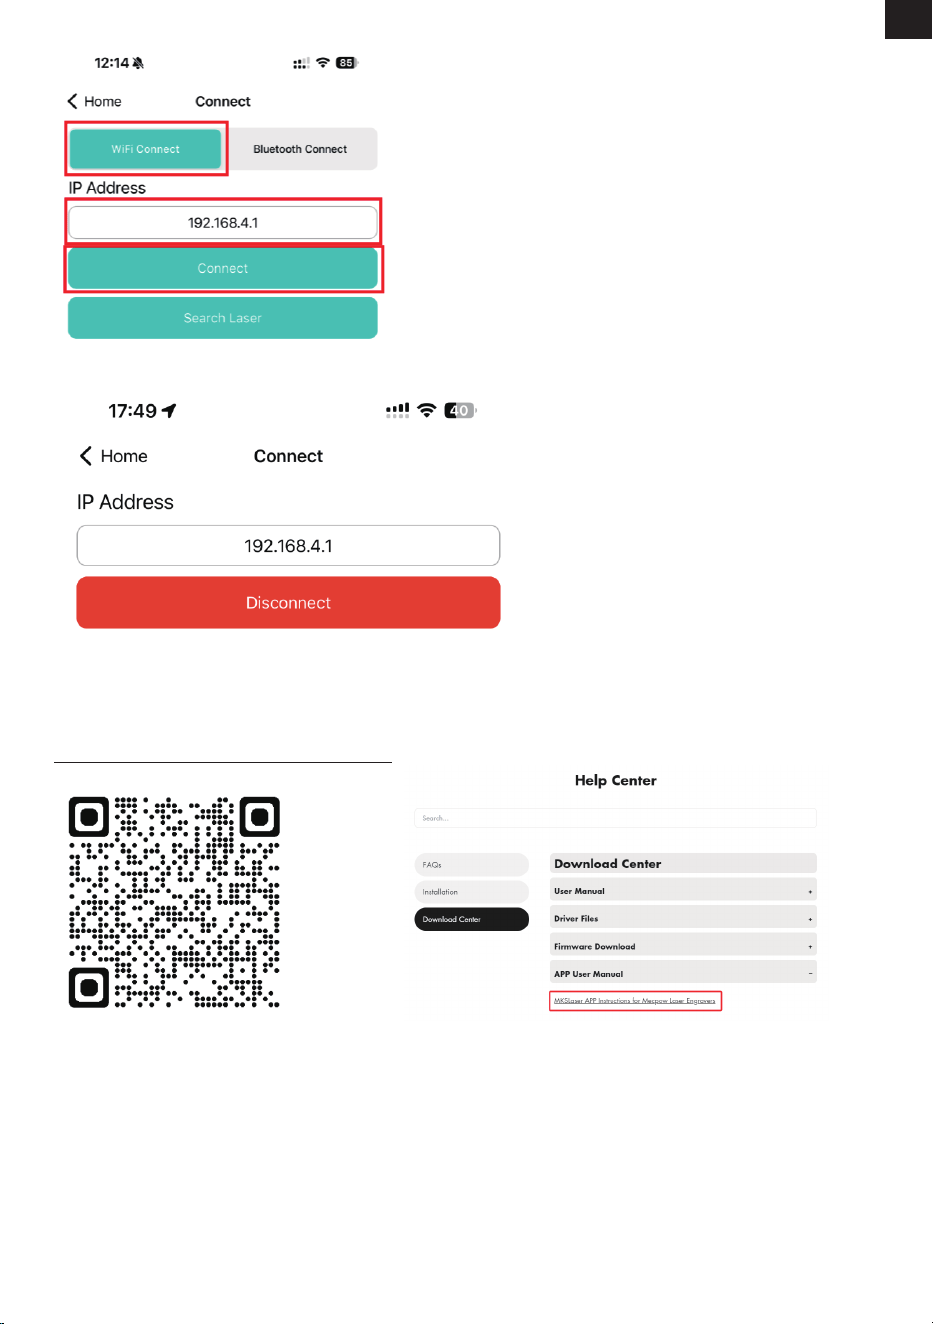
Contrôle via la Carte TF
FR
-73-
Préparez un chier LightBurn G-code pour la gravure ou la découpe et enregistrez-le dans le répertoire racine de la carte TF. Insérez la carte TF dans
le graveur laser.
Remarque :
- La carte TF ne prend en charge que le format FAT32.
- Le graveur laser lira par défaut le dernier chier modié dans le répertoire racine de la carte TF lorsqu'il y a plus d'un chier.
- Le graveur ne peut reconnaître que les chiers NC et GC dont les noms sont en anglais.
- Le graveur est capable de reconnaître les chiers NC et GC enregistrés avec LightBurn. Toutefois, les chiers NC et GC enregistrés avec LaserGRBL
ne peuvent être reconnus par le graveur qu'après avoir été convertis avec MKSLaser. MKSLaser peut être obtenu à partir de la carte TF jointe ou de
Mecpow.com.
Pour une utilisation détaillée de l'application MKSLaser, veuillez vous référer aux informations contenues dans
la carte TF ou télécharger le manuel d'utilisation en visitant le lien ci-dessous ou en scannant le code QR
ci-dessous.
https://mecpow.com/pages/download-center
4. Sélectionnez « WiFi Connect », entrez « 192.168.4.1 », et cliquez sur « Connect ».
5. Lorsque « Connecter » devient « Déconnecter », cela signie que la connexion Wi-Fi est réussie.
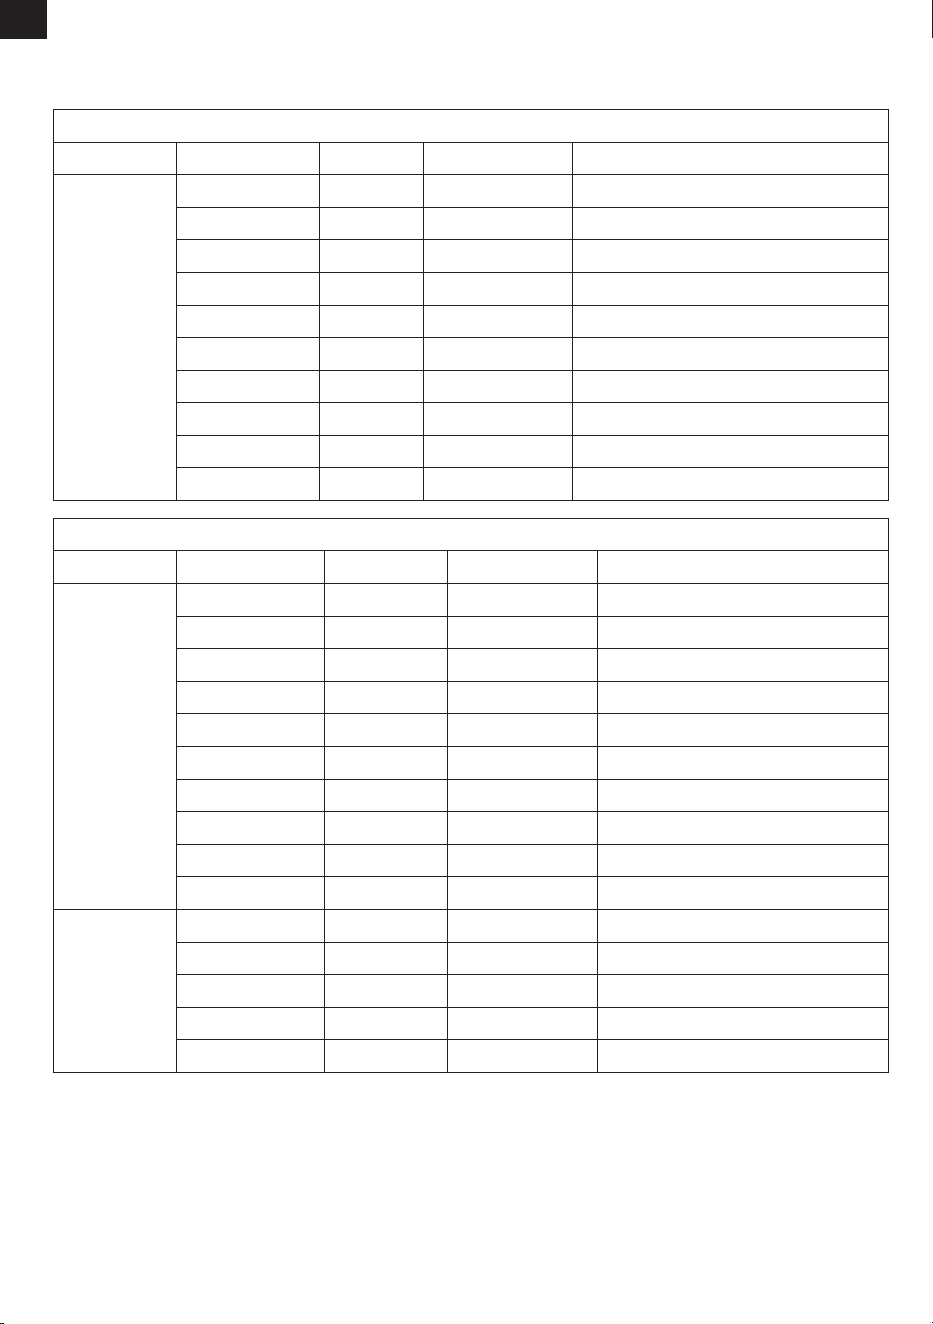
10. Paramètres de Fonctionnement Recommandés
FR
-74-
100
100
100
100
100
100
100
100
60
100
2000
2000
2000
1600
600
600
40
600
3500
1000
La surface doit être dépolie.
La surface doit être dépolie et non brillante.
La surface doit être peinte.
La surface doit être dépolie.
La surface doit être dépolie et non brillante.
La surface doit être peinte.
Mode
Gravure
Mode
Gravure
Matériau
Planche de bois
Bambou
Bois massif
Cuir
Verre
Céramique
Acier inoxydable
Métal anodisé
Tissu
Acrylique
Puissance (%)
Vitesse (mm/min)
Remarque
Mecpow M1 (3.5W)
100
100
100
100
100
100
100
100
40
100
100
100
100
100
100
3000
3000
3000
2000
800
800
300
800
5000
1500
70
120
1300
100
1500
Découpe
Matériau
Planche de bois
Bambou
Bois massif
Cuir
Verre
Céramique
Acier inoxydable
Métal anodisé
Tissu
Acrylique
Carton
Cuir
Tissu
Mecpow M1 (5W)
Panneau d'une
épaisseur de 2 mm
Panneau d'une
épaisseur de 3 mm
Puissance (%)
Vitesse (mm/min)
Remarque

FR
-75-
11. Dépannage
1.Pourquoi le graveur laser M1 ne s'allume-t-il pas ?
Causes :
a.Le graveur laser M1 n'est peut-être pas correctement connecté au port d'entrée
b.La che peut être desserrée
c.L'adaptateur secteur peut être endommagé
Solutions :
a.Vériez que le câble d'alimentation est bien branché et que vous utilisez l'adaptateur ociel.
b.Testez d'autres prises de courant. Si le problème persiste, nous vous recommandons de contacter le support technique.
c.Achetez un nouvel adaptateur secteur.
2.L'appareil n'arrive pas à se connecter au Wi-Fi
Causes :
a.Signal Wi-Fi faible ou instable
b.Mot de passe Wi-Fi incorrect
c.Saisie d'une adresse IP incorrecte
Solutions :
a.Assurez-vous que la machine est connectée au réseau.
b.Assurez-vous que le mot de passe est correctement saisi (les majuscules sont importantes).
c.Essayez d'accéder à 192.168.4.1 dans votre navigateur.
3.Pourquoi mon logiciel ne parvient-il pas à se connecter à la machine ?
Causes :
a.Sélection d’un mauvais port
b.Utilisation de Windows 7/8 sans les pilotes appropriés
Solutions :
a.Essayez de changer de port COM.
b.Installez le pilote approprié si vous utilisez Windows 7/8.
4.Pourquoi ma gravure laser est-elle oue ?
Causes :
a.Longueur focale inadaptée
b.Matériau inadapté à la gravure/découpe
c.Réglages de puissance ou de vitesse incorrects
Solutions :
a.Réglez la longueur focale du module laser à l'aide du levier de focalisation jusqu'à ce que le faisceau atteigne une taille de point
minimale.
b.Assurez-vous que le matériau est adapté à la gravure/découpe.
c.Réglez la puissance, la vitesse ou d'autres paramètres en conséquence.
5.Que dois-je faire si l'objectif est endommagé ?
Causes :
a.L'objectif n'est pas nettoyé régulièrement, provoquant une accumulation de poussière
b.Le bloc de l'objectif est endommagé par intervention extérieure
Solutions :
a.Nettoyez régulièrement la lentille à l'aide de compresses d'alcool (recommandé toutes les 20 heures d'utilisation cumulée)
pour éviter que l'accumulation de poussière n'aecte la sortie du laser.
b.Si le bloc optique est endommagé, vous pouvez le remplacer au besoin ou contacter le fabricant de Mecpow pour acheter des
composants de remplacement.
FR
-76-
12. Déclaration de conformité
Ce produit est conforme aux normes de la Communauté européenne.
Ce symbole indique que le produit peut être recyclé.
Ce symbole indique que le produit ne doit pas être éliminé avec les déchets ménagers. Le
produit doit être envoyé à des installations de collecte séparée pour la récupération et le
recyclage des équipements électriques et électroniques.

IT
1. Prefazione...................................................................
2. Informativa sulla Sicurezza.......................................
3. Diagramma..................................................................
4. Specifiche....................................................................
5. Lista dei Pacchetti .....................................................
6. Istruzioni per l'Uso.....................................................
7. Installazione Driver....................................................
8. Controllo tramite Software per Computer..............
9. Controllo tramite App Mobile e Scheda TF..............
10. Parametri Operativi Consigliati..............................
11. Risoluzione dei Problemi.........................................
12. Dichiarazione di Conformità...................................
INDICE
77
77
79
80
80
81
85
86
91
93
94
95

IT
-77-
1. Prefazione
Avvertimento
2. Dichiarazione di sicurezza
Gentile Cliente,
Grazie per aver acquistato la nostra macchina per incisione laser. Questo dispositivo è un prodotto high-tech che
integra luce, macchinari ed elettricità. Per poter utilizzare e mantenere meglio l'apparecchiatura, leggere
attentamente il manuale dell'utente e seguire i passaggi del Manuale.
Disclaimer
Eventuali perdite causate da un uso improprio o dal mancato rispetto dei passaggi nel manuale dell'utente
essere a carico dell'individuo. L'ultima interpretazione di il manuale d'uso appartiene al ns società, e ci riservia-
mo il diritto di modicare qualsiasi informazione, dato, dettaglio tecnico , ecc. nel manuale.
* L'elaborazione laser può essere rischiosa e gli utenti dovrebbero considerare attentamente se l'oggetto è essere
lavorato è adatto per il lavoro laser.
* L'oggetto in lavorazione e le emissioni devono essere conformi alle leggi e ai regolamenti locali .
* Questa macchina utilizza un laser di Classe IV (radiazione laser ad alta potenza), che può causare il seguenti
situazioni:
(1) Accensione di materiali inammabili circostanti;
(2) Durante la lavorazione laser possono essere presenti altre radiazioni e gas tossici e nocivi Essere prodotto, a
seconda dell'oggetto in lavorazione ;
(3) L'esposizione diretta alla radiazione laser può causare danni al corpo umano. Sul luogo di lavoro devono
essere presenti attrezzature antincendio e non devono essere presenti materiali inammabili ed esplosivi essere
impilati intorno al banco da lavoro o alla macchina. Occorre inoltre mantenere una buona ventilazione.
* L'ambiente in cui si trova la macchina deve essere asciutto, privo di inquinamento,
vibrazioni, forte elettricità, forte magnetismo e altre interferenze. La temperatura dell'ambiente di lavoro
dovrebbe essere compresa tra 5 e 30°C e l' umidità dell'ambiente di lavoro dovrebbe esserlo 35-65% di umidità
relativa.
* La tensione di lavoro di la macchina è AC100- 240V.
* Durante il funzionamento di la macchina, deve essere monitorata per tutto il tempo. Prima di partire, tutta
l'alimentazione deve essere interrotta per prevenire problemi imprevisti. Se una situazione anomala si verica, si
prega di interrompere immediatamente il potere e arontalo!
* È severamente vietato posizionare oggetti riettenti o diusi nella macchina che non sono rilevanti per il suo
funzionamento per impedire la riessione del laser sul corpo umano o materiali inammabili materiali.
* La macchina deve essere tenuta lontana da apparecchiature elettriche sensibili all'elettromagnete t- interferen-
ze elettriche, che possono causare interferenze elettromagnetiche.
* È severamente vietato ai non professionisti smontare l'incisore laser come lì possono esserci pericoli come l'alta
tensione all'interno della macchina.
Misure di sicurezza
1. La macchina per incisione laser può produrre luce laser. È rigorosamente vietato posizionare Qualunque
organismi viventi sotto l'emissione laser (la porta è contrassegnata da un segnale di avvertimento giallo).
2. Ai pazienti fotosensibili è vietato utilizzare o avvicinarsi all'incisore laser.
3. Quando si utilizza la macchina per incisione laser , l'operatore e chiunque si trovi nelle vicinanze della macchina
deve indossare occhiali di protezione laser. Non utilizzare la macchina laser senza occhiali laser. La nostra
macchina viene fornita con un paio di occhiali di protezione laser. Se si desidera acquistare ulteriori occhiali
protettivi, gli occhiali devono orire una protezione della lunghezza d'onda compresa tra 400 e 445 nm (+-5 nm),
hanno un diametro esterno di +5 e soddisfano un livello minimo L5.
4. Quando la macchina per incisione laser è in funzione, l'utente deve prestare molta attenzione e non lasciarla
incustodita per evitare l'accensione di il materiale inciso. Posizionare la macchina in una zona ignifuga e garantire
una buona ventilazione. Si consiglia di accendere un fuoco estintore nelle vicinanze in caso di emergenza.
5. Assicurarsi che non vi siano materiali inammabili vicino alla macchina per incisione laser. Noi consiglia di
posizionare un piano di lavoro a nido d'ape sotto la macchina.
6. Quando si utilizza l'incisore laser, assicurarsi che vi sia spazio suciente attorno ad esso. L'incisione di alcuni
materiali può produrre fumo, che deve essere scaricato utilizzando a sistema di scarico specializzato.
7. Non toccare il raggio laser o l'oggetto in lavorazione mentre la macchina è all'interno

IT
-78-
1. Prima di utilizzare il Mecpow M1, si prega di accertarsi che la copertura protettiva sia chiusa e che il riettore
laser sia pulito.
2. Il Mecpow M1 è conforme agli standard di sicurezza laser di Classe 1. Prima di iniziare l'incisione laser,
vericare che la copertura protettiva sia intatta e non danneggiata. In caso di danni, interrompere l'utilizzo del
dispositivo.
3. Durante il funzionamento, assicurarsi che il laser rimanga all'interno della copertura protettiva. Quando si
lavora con il Mecpow M1, coprire sempre l'area di lavoro con la copertura protettiva e indossare occhiali
protettivi per la sicurezza.
4. È importante evitare di spostare il dispositivo durante l'incisione laser per evitare che eventuali misure di
autoprotezione ne causino l'arresto. Ciò può anche inuire sul risultato nale del lavoro di incisione,
interrompendo il processo di incisione. Se è necessario spostare il dispositivo o l'oggetto da incidere, si consiglia
di farlo prima o dopo il processo di incisione. È fondamentale evitare di spostare il dispositivo o gli oggetti
durante il funzionamento del laser.
5. I minori devono sempre essere supervisionati e assistiti da un adulto durante l'utilizzo di questo prodotto. 6.
Durante il taglio o l'incisione di materiali inammabili a bassa velocità e ad alta potenza, sussiste il rischio di
formazione di amme. In caso di presenza di amme, è importante interrompere immediatamente la lavorazi-
one.
7. Quando il dispositivo è acceso, è essenziale evitare di smontare qualsiasi parte del corpo macchina per evitare
il contatto accidentale con l'alimentatore. Inoltre, non toccare i componenti elettronici con le mani o con utensili.
8. Se si verica una delle seguenti situazioni, interrompere immediatamente l'utilizzo del prodotto e spegnerlo:
- Odore di bruciato proveniente dalla macchina
- Fiamma libera generata dal materiale da incidere
- Danni ai componenti interni del prodotto
- Arresto imprevisto del prodotto
- Rumori o luci anomali mai vericatisi prima
9. Prestare attenzione durante l'utilizzo dei comandi o l'esecuzione di regolazioni, poiché l'esecuzione di
procedure non specicate può comportare l'esposizione a radiazioni pericolose.
1. Per mantenere prestazioni ottimali, pulire regolarmente la lente della macchina con un panno privo di polvere
o con carta imbevuta di alcol.
2. Prestare attenzione durante l'utilizzo o la conservazione della macchina per evitare che corpi estranei
penetrino nelle prese d'aria superiori e ne interferiscano con il funzionamento.
Istruzioni di Sicurezza
Manutenzione
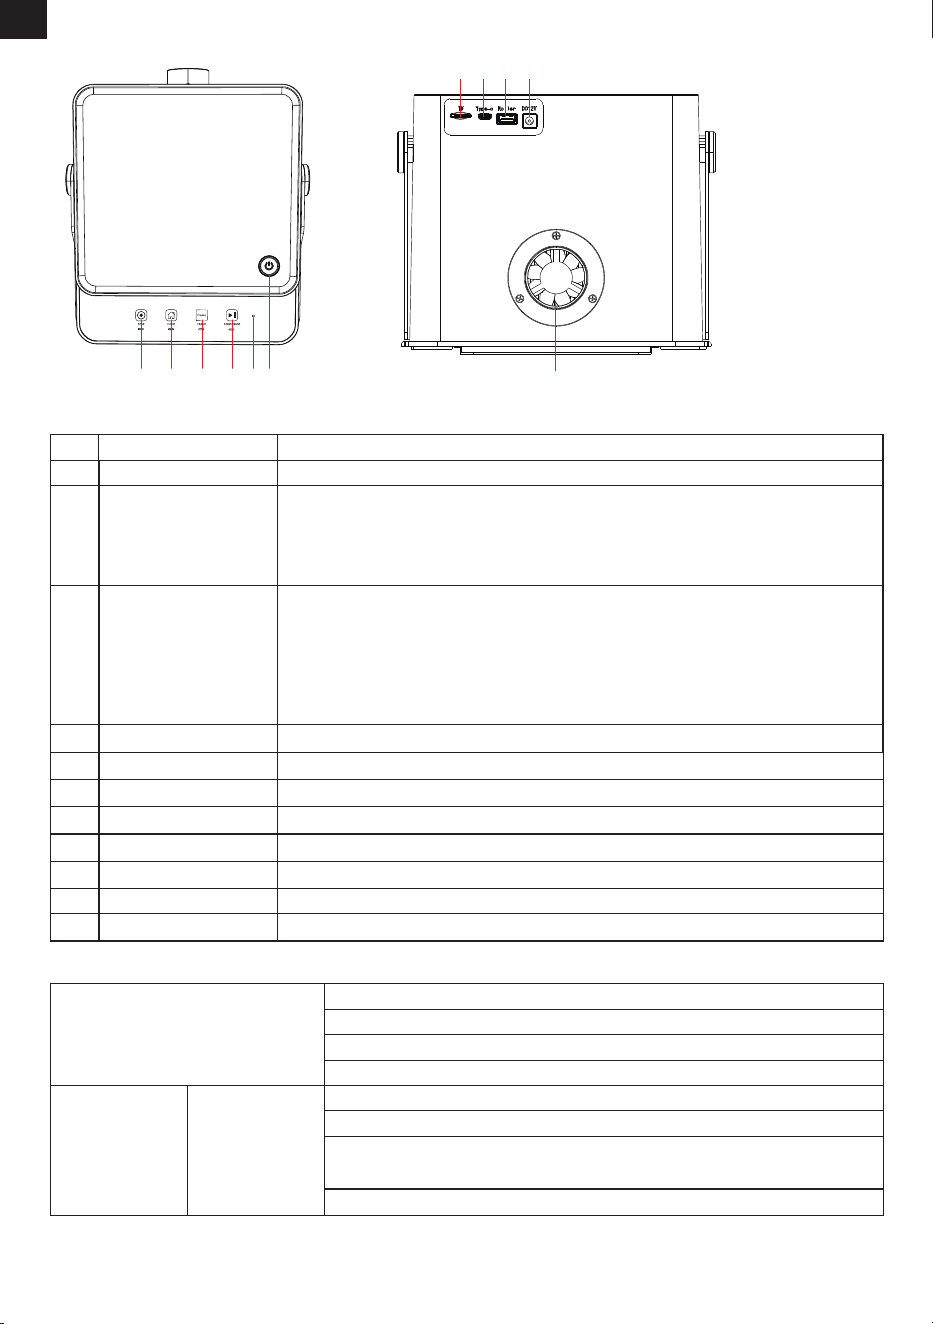
IT
-79-
Introduzione e Funzioni
Parti
Nomi
Funzioni
1
2
3
4
Pulsante di Accensione
Indicatore
Pulsante START/PAUSA
Pulsante FRAME
Pulsante HOME
Pulsante STOP
Porta TF
Porta Type-C
Porta Rullo Rotante
Ingresso DC
Ventola di Scarico
Inquadra l'area di lavoro del laser.
Indica lo stato della macchina:
Bianco: Standby
Blu: In funzione
Rosso: Allarme
Verde: Wi-Fi connesso
3. Diagramma
Accende/Spegne il dispositivo.
Indicatore
A. STOP
B. HOME
C. FRAME
D. START/PAUSE
Premi questi quattro pulsanti e si
accende la luce bianca.
A. Avvio e Standby: Bianco fisso
B. In Incisione: Blu fisso
C. Copertura di protezione aperta/Macchina inclinata (≥15°): Luce rossa
lampeggiante (con 3 suoni di allarme)
D. Wi-Fi Connesso: Verde fisso
Indicatore Stato Indicatore
(1)Premi per avviare l'incisione/taglio prima che la macchina inizi a funzionare.
(2)Durante l'operazione:
Primo clic: Pausa.
Secondo clic: Riprende.
In standby:
Ripete l'incisione dell'ultimo file trasferito sulla scheda TF (eccetto file DLC da app MKSLaser).
11
Per la rimozione di fumi durante l’incisione o il taglio.
5
Torna all'origine.
6
Ferma incisione/inquadratura.
7
Inserire la scheda TF per leggere i file.
8
Per connessione al computer.
9
Collega il cavo del rullo rotante.
10
Collega l'adattatore di alimentazione.
123456
10
11
98
7
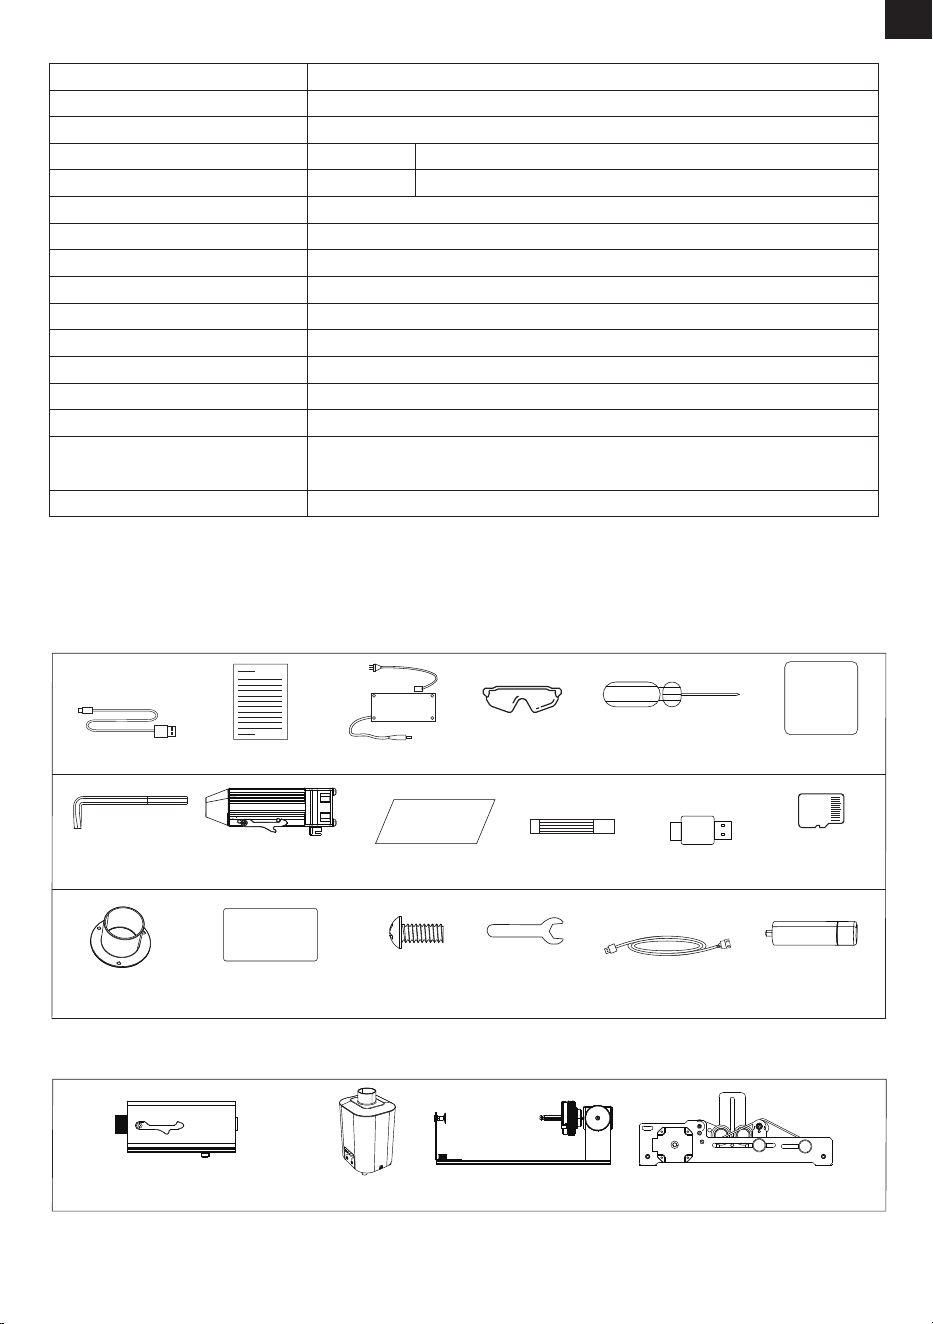
IT
-80-
4. Specifiche
Modello
Dimensioni
Potenza Elettrica
Ingresso Laser
Potenza Laser
Lunghezza d'Onda
Area di Incisione
Velocità Max D’Incisione
Precisione
Altezza Oggetti Incidibili
Materiali
Software Supportati
Sistemi Operativi
Formati File Supportati
Trasmissione Dati
Allarme Inclinazione
220 x 264 x 194 mm
60W
DC 12V 5A DC 12V 5A
3.5W 5W
455±5nm
100 x 100 mm
10000 mm/min
0.01 mm
<4.5 cm
Legno, plastica, pelle, cartone, pietra, ceramica, metallo rivestito, bambù, ecc.
LaserGRBL, LightBurn, MKSLaser
Windows, macOS, Android, iOS
JPEG, BMP, JPG, GIF, PLT, PNG, DXF, HPGL, NC, ecc.
Connessione Cablata: Porta USB
Connessione Wireless: Wi-Fi
15±5°
M1
5. Lista dei Pacchetti
Accessori Opzionali
Accessori
Cavo Tipo-C*1
Piastra di Alluminio*5
M3x7 *3
Tavola di Legno*2
Occhiali*1
Chiave a
Brugola 2.5mm*1
Flangia*1
Scheda TF*1
Capacità Massima
Macchina: 16 G
Modulo Laser*1 Piastra di Posizionamento
Area Incisione*1
Pennarello*1 Lettore di Schede*1
Cacciavite*1
Cavo per Rullo*1
Manuale per l’utente*1
Adattatore di
Alimentazione*1
Chiave Inglese*1
Colonne di Sollevamento*4
Modulo Laser Infrarosso 1064nm 1.2W
(Adatto per l'incisione di metalli)
Aspiratore fumi Rullo Rotante (G5) Rullo Rotante (G3 Pro)
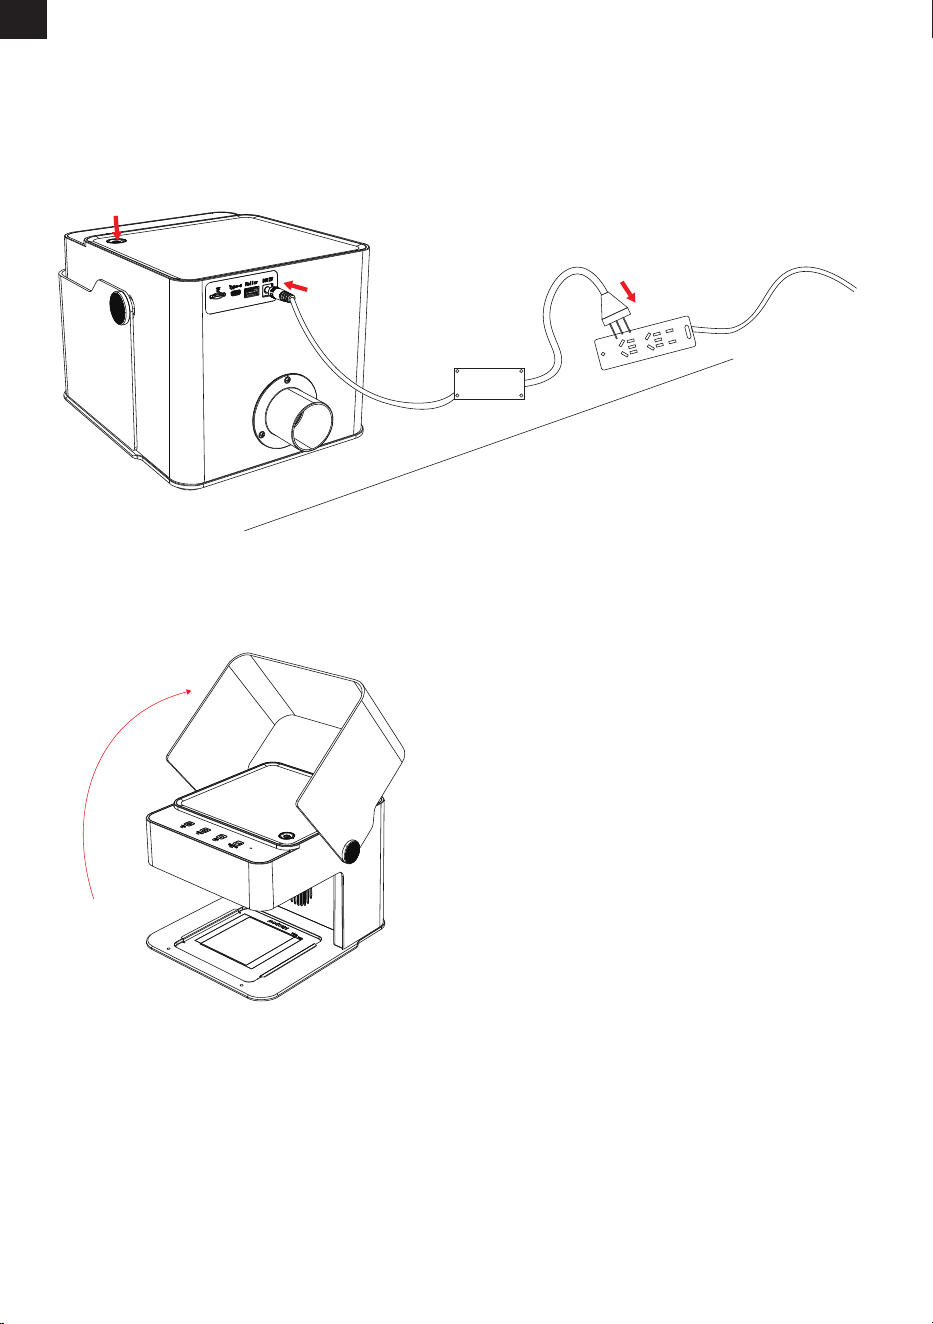
IT
-81-
1. Accensione
2. Posizionamento Materiale
6. Istruzioni per L’uso
(1)Inserire l'adattatore nella presa.
(2)Collegare il cavo 12V DC all'ingresso.
(3)Premere il tasto di accensione. La luce diventa bianca. (Come mostrato nell’immagine sottostante)
(1)Sollevare il coperchio protettivo.
(2)Posizionare il materiale nell'area di lavoro.
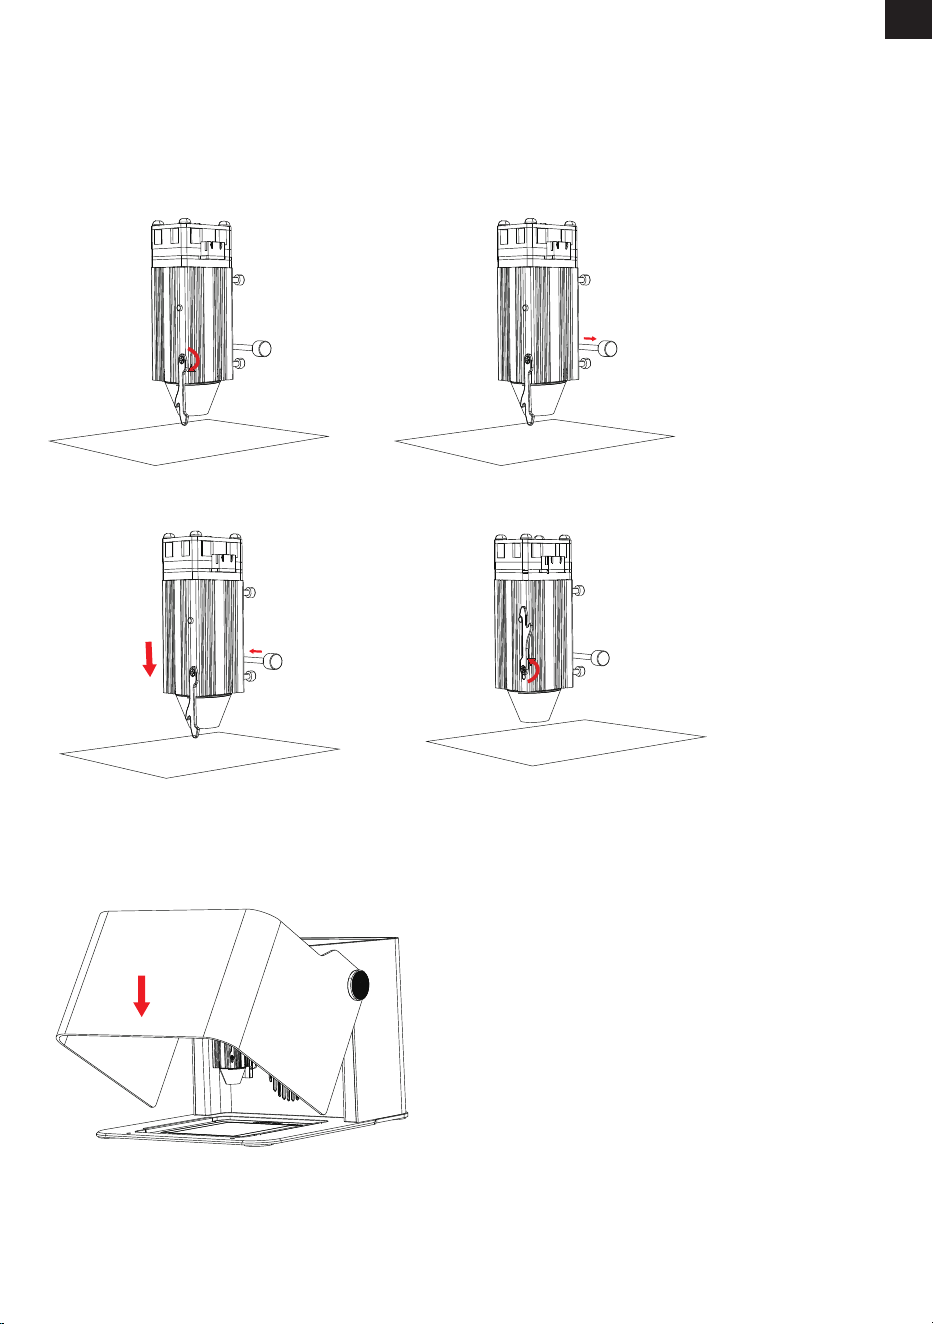
IT
-82-
Nota: Il coperchio deve essere chiuso. In caso contrario, il processo si interrompe.
Durante l'incisione o il taglio, l'apertura del coperchio protettivo interromperà il processo.
3. Impostare la Messa a Fuoco del Laser (Come mostrato nell’immagine sottostante)
(1)Abbassare la leva di messa a fuoco.
(2)Allentare la vite della manopola.
(3)Regolare l'altezza del modulo laser nché la leva di messa a fuoco non tocca la supercie del materiale, quindi
serrare nuovamente la vite della manopola.
(4)Riportare la leva di messa a fuoco nella posizione originale.
4.Chiudere il coperchio protettivo, premere HOME per tornare all'origine.
5.Avvio Incisione/Taglio (Compatibile con MKSLaser, LightBurn, LaserGRBL)
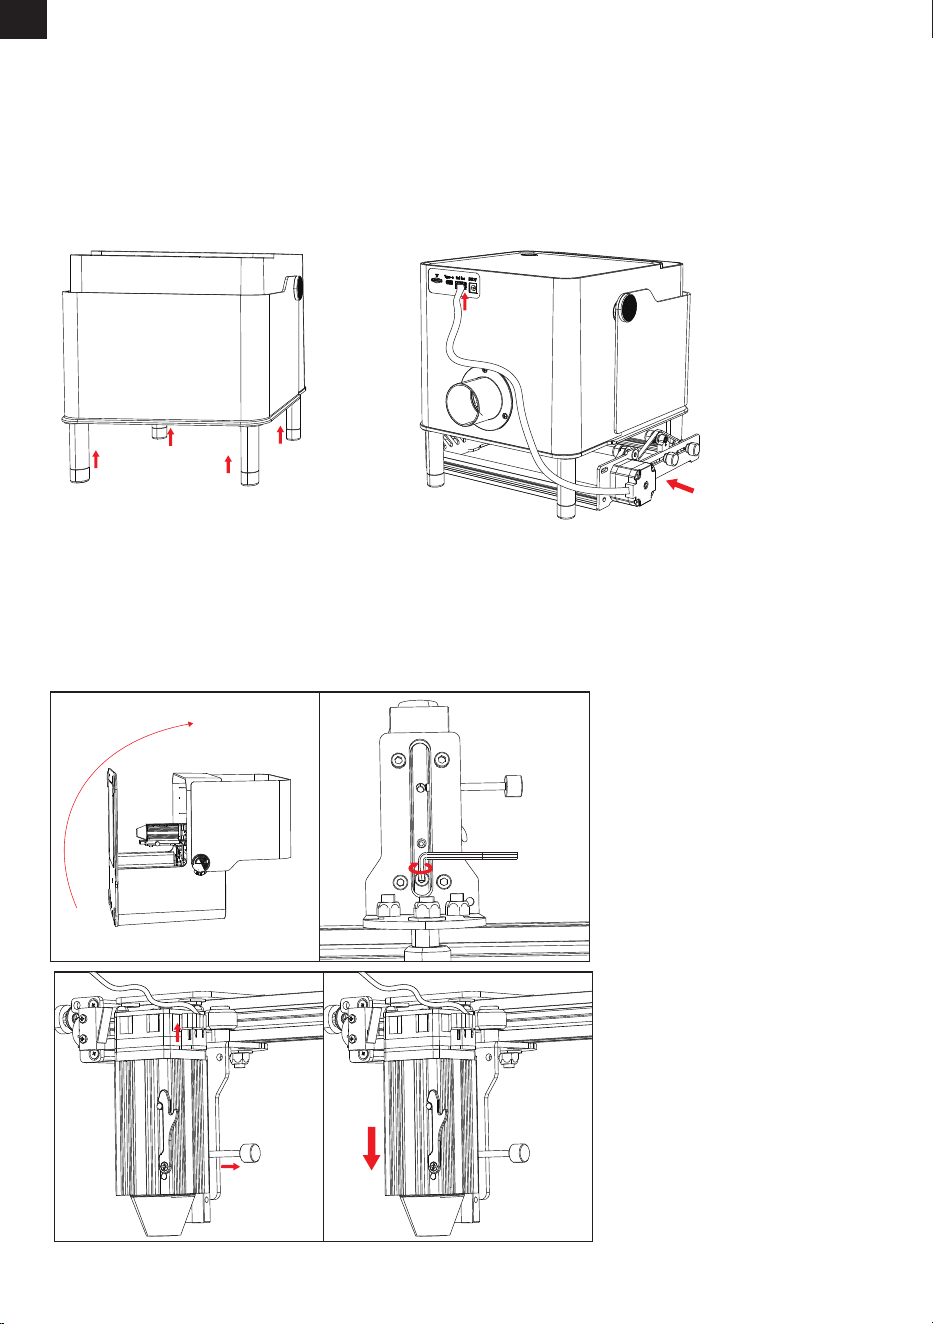
IT
-83-
(Per rullo rotante o materiali spessi).
(1)Allineare le colonne con i fori.
(2)Fissare con viti.
(3)Posizionare il rullo rotante nella parte inferiore della macchina.
(4)Inserire l'estremità USB del cavo del rullo nella porta del rullo rotante sul retro della macchina e collegare
l'altra estremità al rullo rotante.
6. Regolazione Altezza Macchina
(1)Inclinare la base verso l’alto.
(2)Rimuovere vite posteriore usando la chiave a brugola 2.5mm.
(3)Allentare la vite laterale sinistra e scollegare il cavo di alimentazione del laser.
(4)Far scorrere il modulo laser verso il basso e rimuoverlo.
7. Sostituzione Modulo Laser
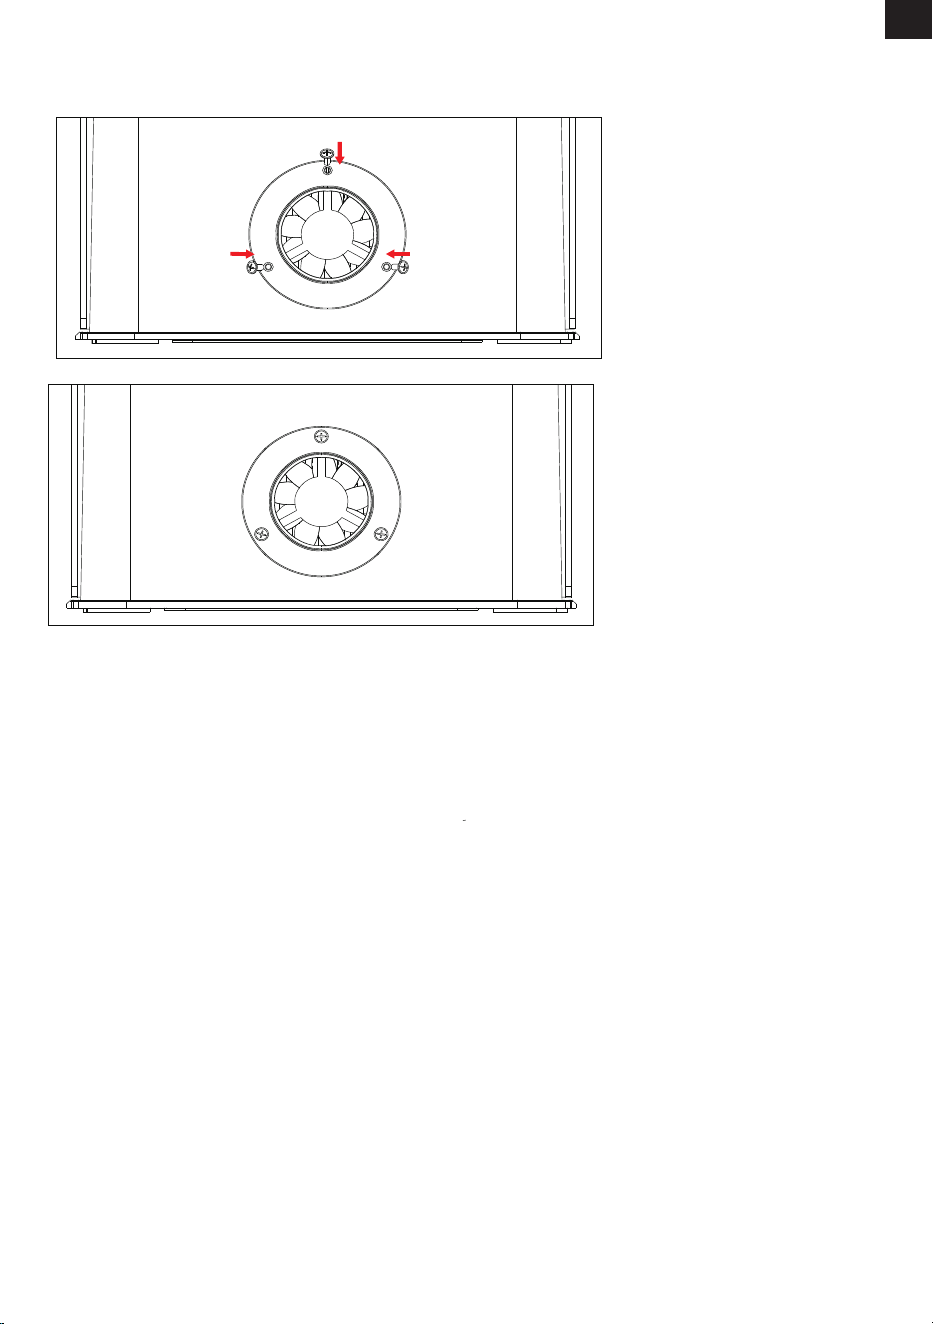
IT
-84-
Allineare la angia con i fori delle viti della ventola posteriore e ssarla con tre viti M3×7.
8. Installazione Flangia
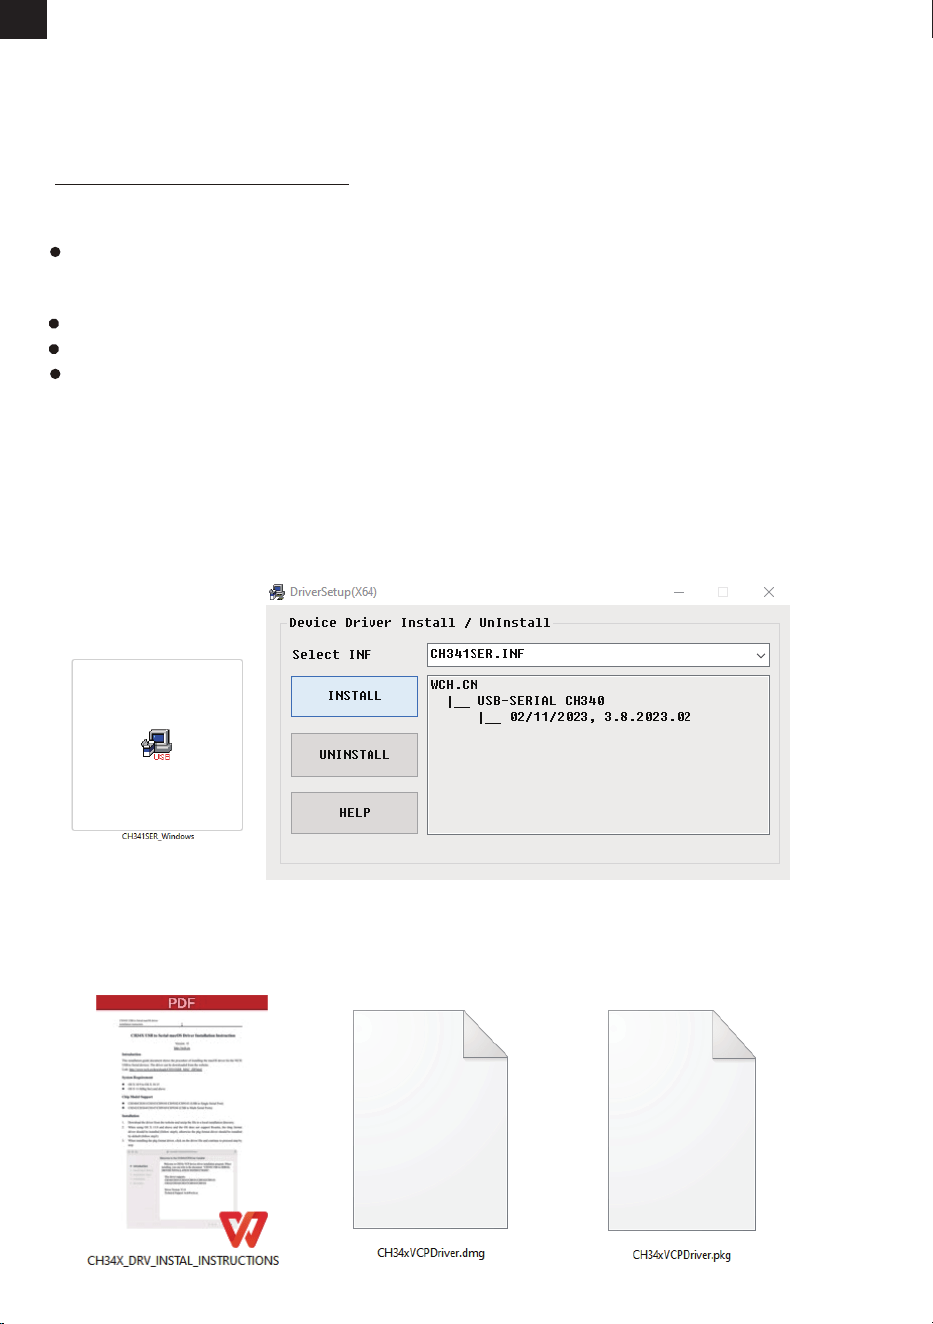
IT
-85-
1. Scaricare il driver dal collegamento sottostante.
https://mecpow.com/pages/driver-les
2. Contatta il servizio clienti per ottenere il le del driver.
Nota:
Per gli utenti Windows, se si utilizza un sistema inferiore a Win10, è necessario installare il
driver manualmente. Se si utilizza un sistema Win10 o superiore, non è necessario installare il
driver.
Il driver per gli utenti Mac supporta da OS X 10.9 a OS X 10.15 e OS X 11.0 (Big Sur) e oltre.
Il driver per gli utenti Linux supporta sistemi a 32 e 64 bit.
Si prega di accendere la macchina e collegarla al computer tramite il cavo USB prima di
avviare il driver!
Prima di installare il driver, accendere la macchina e collegarla al PC via USB.
7. Installazione del Driver
Scarica Metodi
Installazione
Per gli utenti Windows:
1. Aprire il driver scaricato.
2. Fare clic su "INSTALL".
3. Fare clic su "OK" quando il driver è stato installato correttamente.
Per gli utenti Mac:
1. Aprire le istruzioni.
2. Aprire il driver scaricato e seguire le istruzioni per installarlo.
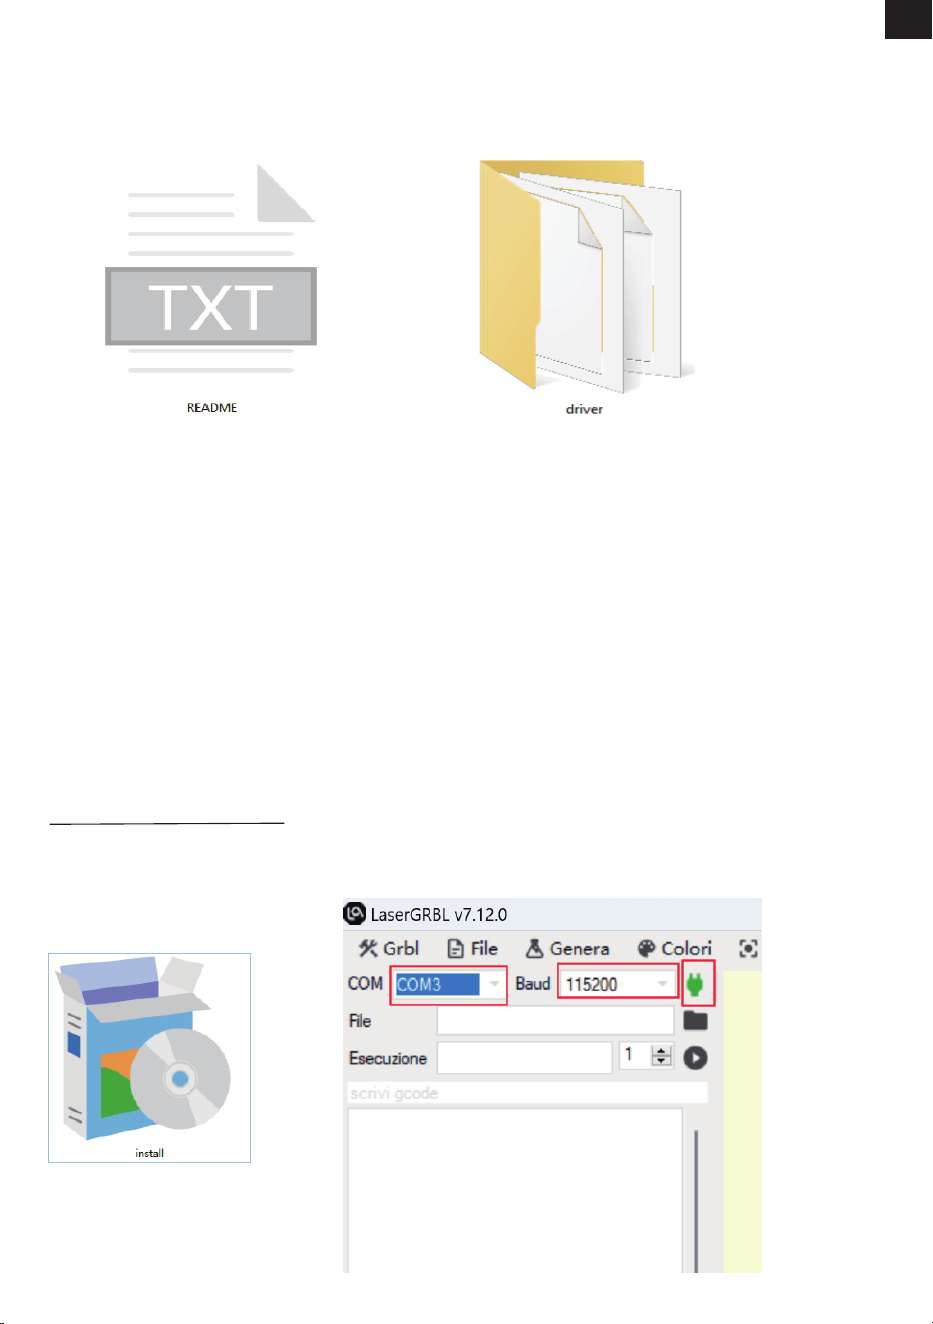
IT
-86-
Per gli utenti Linux:
1. Aprire il le README.
2. Aprire il le - driver e seguire le istruzioni "README" per installarlo.
LaserGRBL
È un software open source gratuito che supporta i computer Windows. Scaricalo da:
http://lasergrbl.com/download/
1. Installalo.
2. Aprire il software. Selezionare “COM3” e “115200”, quindi fare
clic su “Connetti”.
8. Controllo tramite Software per Computer
Collegare la macchina per incisione al software in tempo reale tramite il cavo USB. Durante il
funzionamento, è possibile avviare o arrestare la macchina per incisione attraverso il pannello di
controllo.
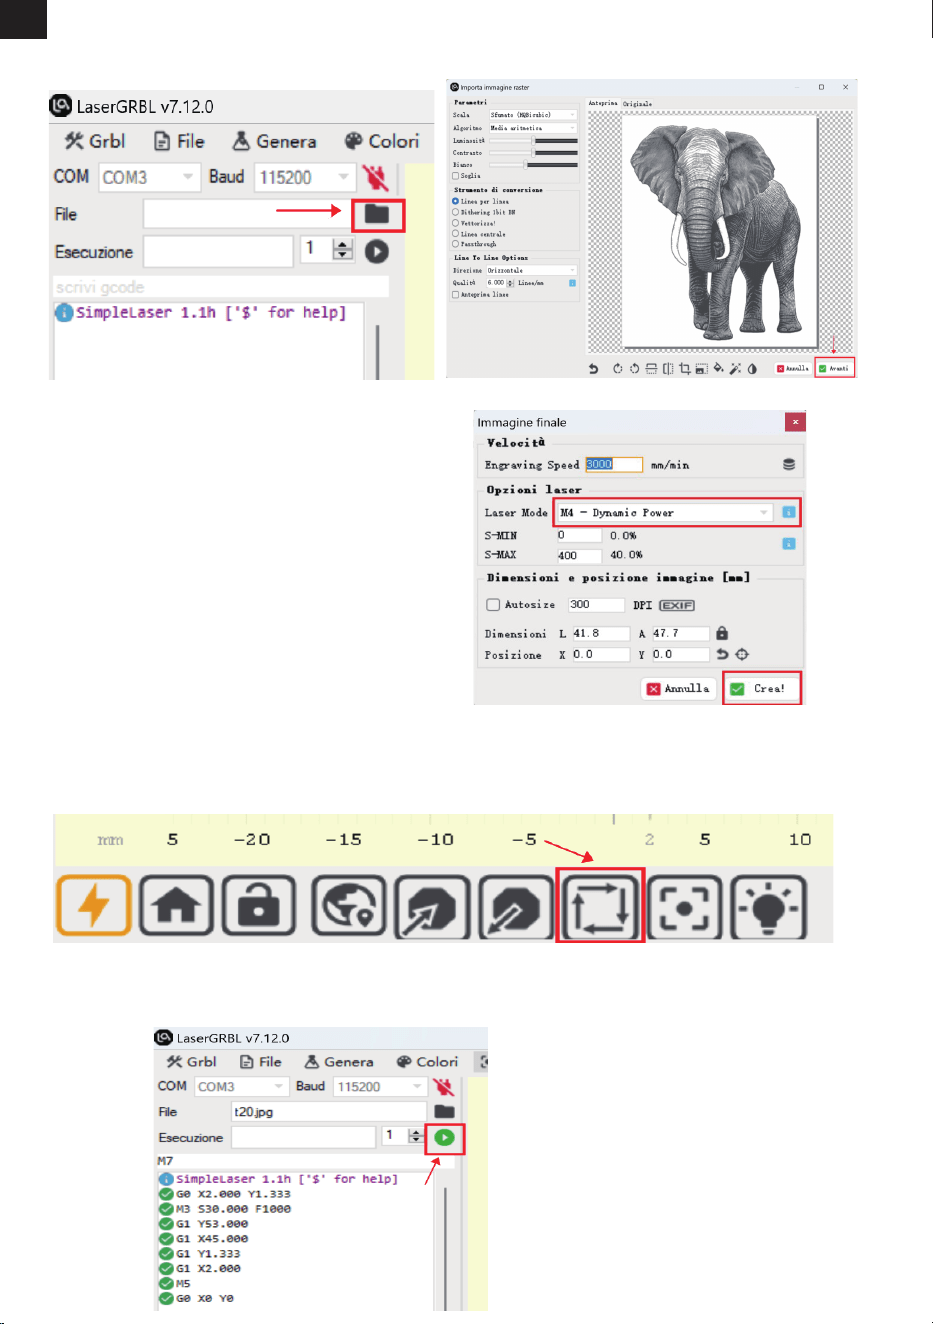
IT
-87-
5. Selezionare i parametri operativi per l'incisione o il
taglio laser. (M3 è per intaglio a potenza costante e
M4 è per potenza variabile. Consultare la sezione 10
per i parametri operativi consigliati per l'incisione o il
taglio di materiali diversi.)
6. Fare clic su "Framing" per visualizzare in anteprima l'intervallo di incisione e regolare la posizione
dell'incisione.
7. Fare clic su "Esegui il programma" per avviare l'incisione.
3. Fare clic su "Apri le" per selezionare il le
di incisione.
4. Selezionare la modalità di incisione e fare clic
su "Avanti".
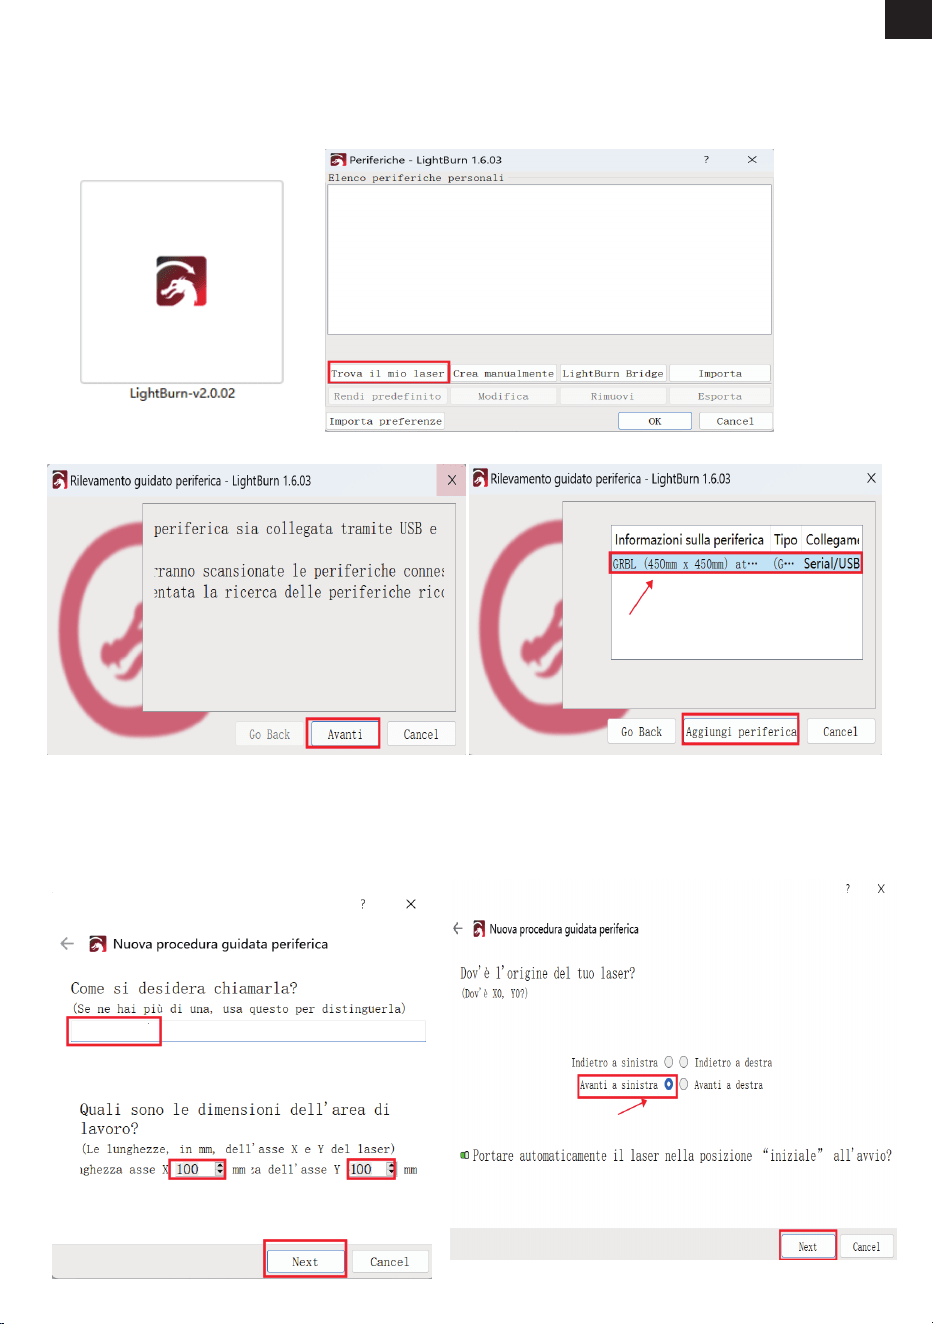
IT
-88-
È un software professionale a pagamento che supporta computer MAC, Linux e Windows. Scaricalo da:
https://lightburnsoftware.com/pages/download-trial.
4. Assegna un nome al dispositivo e inserisci le
lunghezze dell'asse X e dell'asse Y, quindi fai clic su
"Next".
Nome: Mecpow M1
Lunghezza asse X: 100 mm
Lunghezza asse Y: 100 mm
LightBurn
1. Installalo. 2. Aprire il software e fare clic su "Trova il mio laser".
3. Selezionare il dispositivo e fare clic su "Aggiungi periferica".
5. Selezionare "Avanti a sinistra" come
origine del laser e fare clic su "Next".
MecpowM1
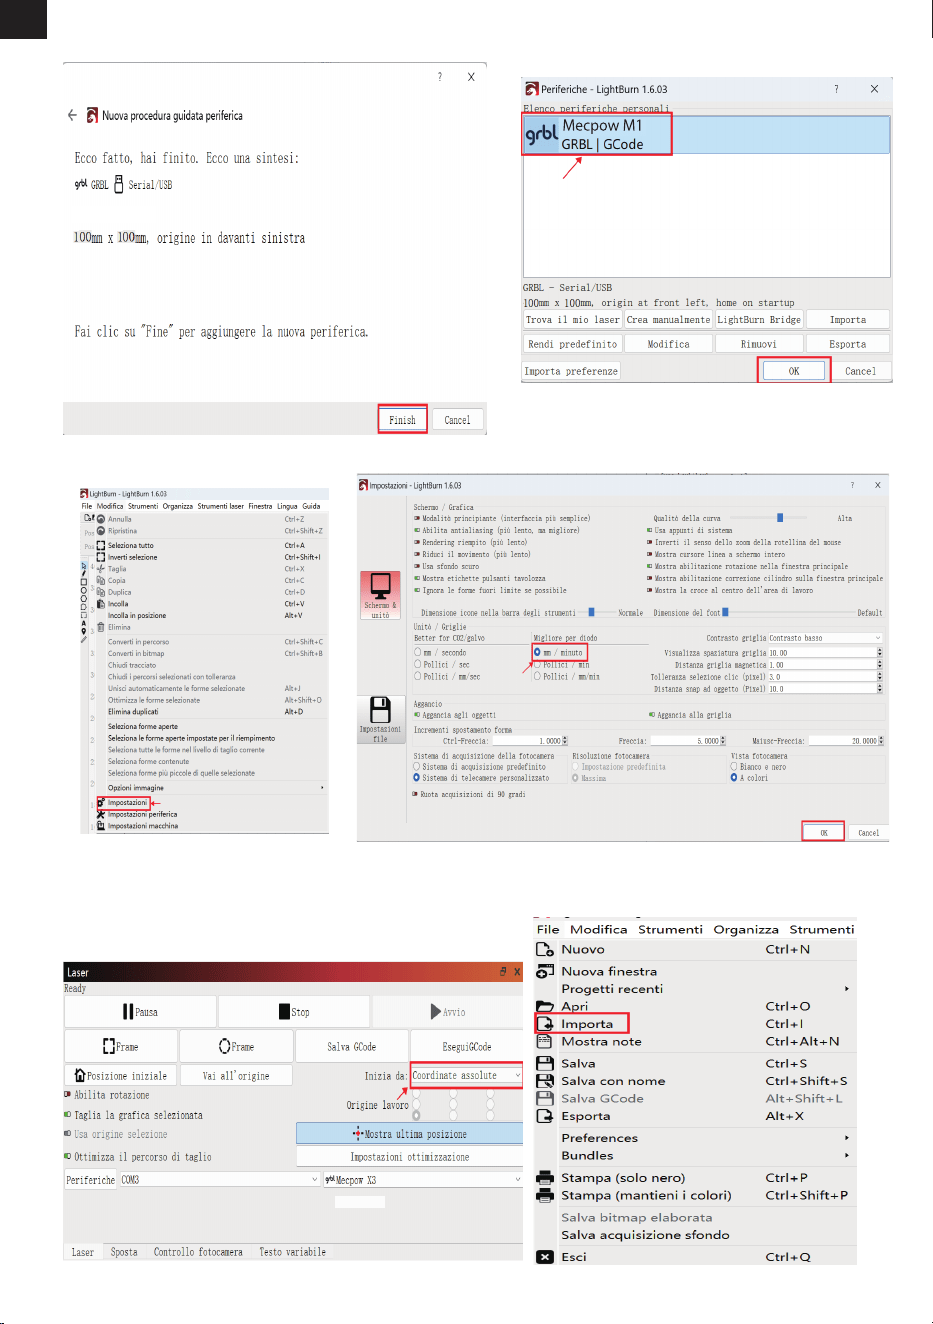
IT
-89-
6. Fare clic su "Finish".
7. Seleziona Mecpow M1 e fai clic su "OK".
8. Fare clic su "Modica" - "Impostazioni" e impostare l'unità su "mm/min", quindi fare clic su "OK".
9. Selezionare "Coordinate assolute" nella sezione
"Inizia da", quindi selezionare il cerchio nell'ango-
lo in basso a sinistra nella sezione "Origine
lavoro".
10. Fare clic su "File" - "Importa" per
importare il le di incisione.
MecpowM1
Mecpow M1
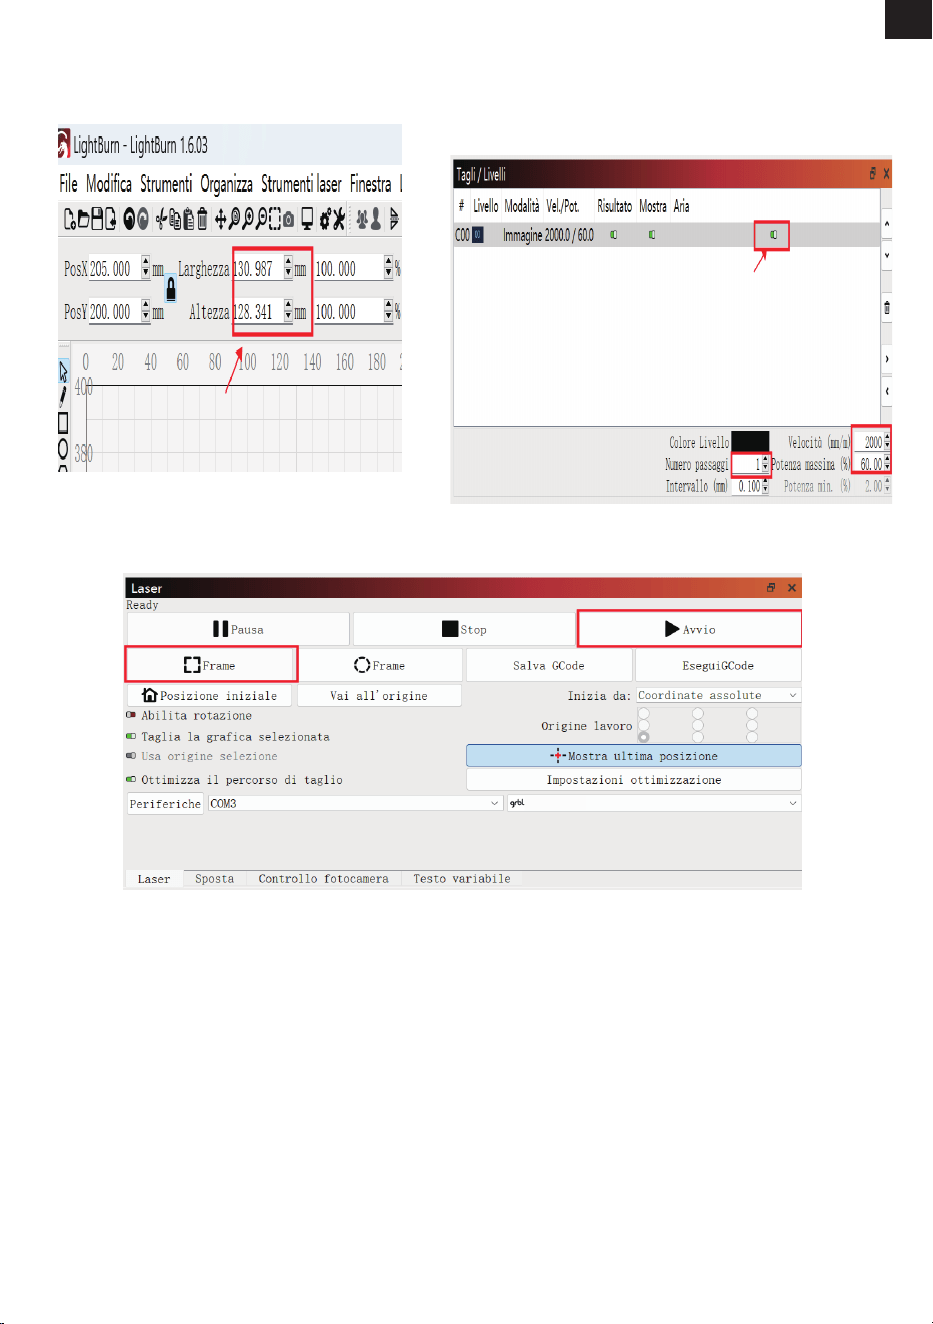
IT
-90-
11. È possibile modicare la dimensione
dell'incisione nella parte superiore dell'interfaccia
dopo aver importato il le.
12. Selezionare la modalità di incisione e
impostare i parametri operativi per l'incisione o
il taglio laser. (I parametri operativi consigliati
per l'incisione o il taglio di materiali diversi sono
elencati nella sezione successiva.)
13. Fare clic su "Frame" per visualizzare in anteprima l'intervallo di incisione e regolare la posizione
dell'incisione, quindi fare clic su "Avvia" per avviare l'incisione.
Mecpow M1
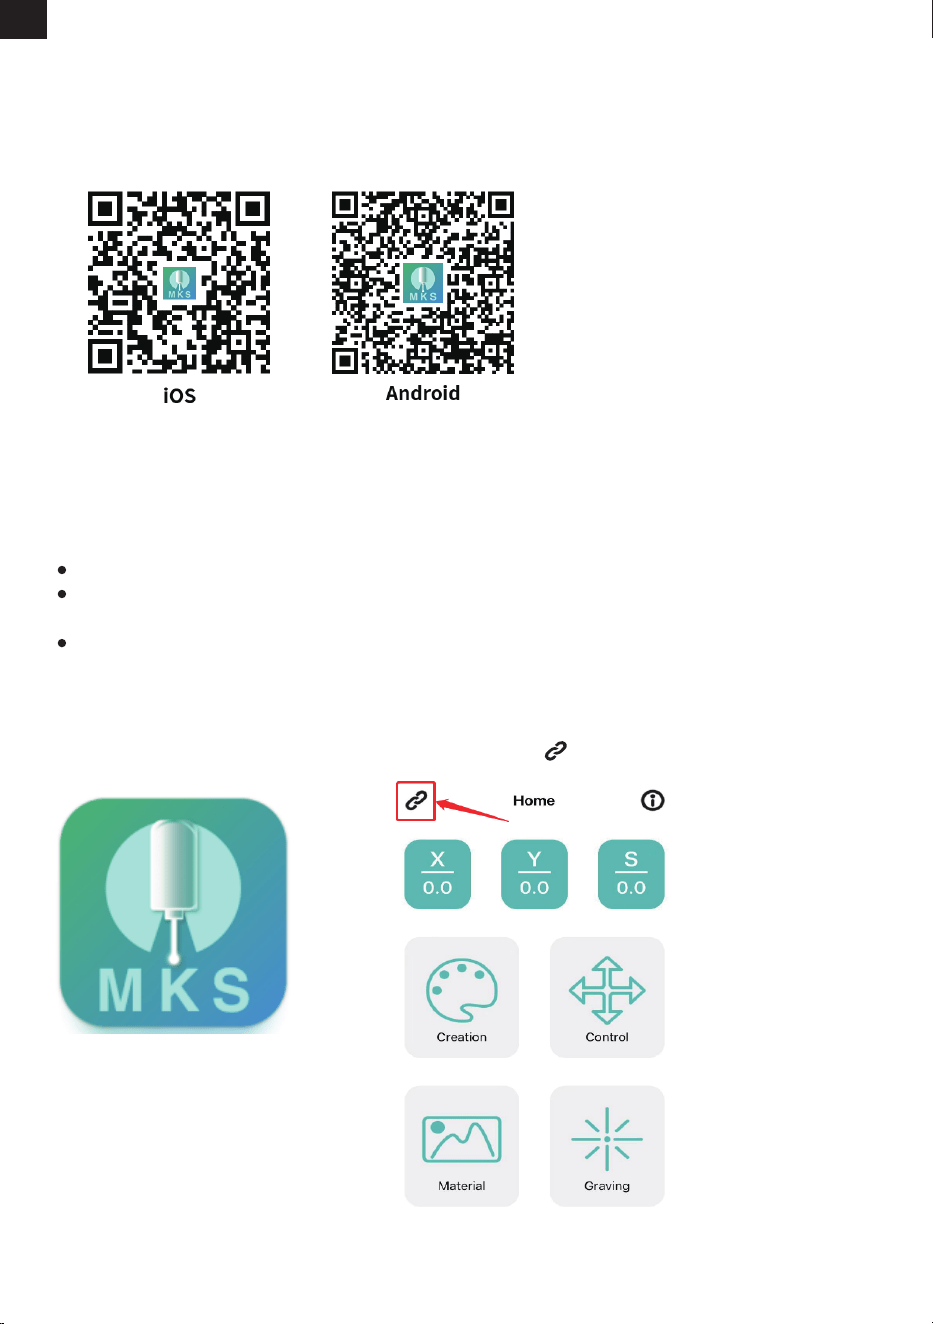
IT
-91-
Il "*****" nel nome Wi-Fi è una combinazione casuale di numeri. Varia in base alla macchina.
Per garantire la stabilità del segnale Wi-Fi, si consiglia di connettere il telefono al Wi-Fi della macchina per
incidere prima di inserire la scheda TF.
L'app deve essere utilizzata con la scheda TF. Il caricamento del le dell'incisione fallirà se la scheda TF non è
stata inserita.
MKSLaser è un'applicazione mobile gratuita che supporta i dispositivi Android e iOS.
1. Attivare la funzione Wi-Fi del telefono e collegare il Wi-Fi "Mecpow_*****".
Nome Wi-Fi: Mecpow_*****
Password Wi-Fi: 12345678
2. Apri l'app MKSLaser.
3. Fare clic sull'icona .
Scansionare il codice QR e scaricarla.
Scaricare l'applicazione
Connessione Wi-Fi
9. Controllo tramite App mobile e scheda TF
Nota:
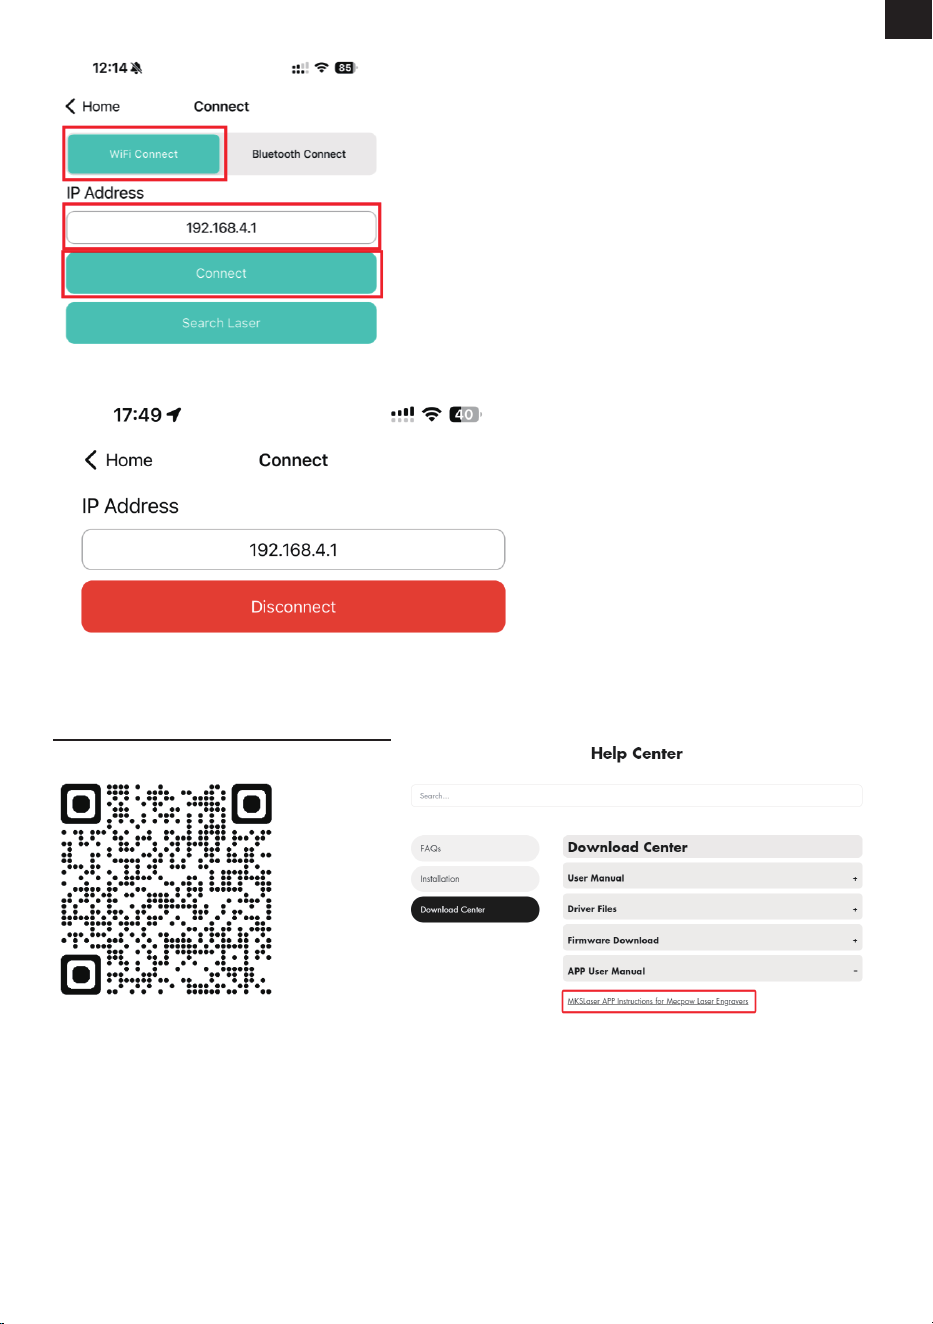
IT
-92-
Preparare un le G-code generati con LightBurn per l’incisione o il taglio e salvarlo nella directory principale della scheda TF. Inserire la scheda nella
macchina.
Note:
- La scheda TF supporta solo formato FAT32.
- Per impostazione predenita, il laser legge il le più recentemente modicato nella directory principale della scheda TF, quando sono presenti più
le.
- Il laser riconosce solo le NC e GC che abbiano nomi in lingua inglese.
- Il laser è in grado di riconoscere i le NC e GC salvati con LightBurn. Tuttavia, i le NC e GC generati con LaserGRBL possono essere riconosciuti
solo dopo la conversione tramite MKSLaser. MKSLaser è disponibile nella scheda TF fornita o scaricabile da Mecpow.com.
Controllo tramite Scheda TF
Per un utilizzo dettagliato dell'applicazione MKSLaser, consultare le informazioni contenute nella scheda TF o
scaricare il manuale d'uso visitando il link sottostante o scansionando il codice QR.
https://mecpow.com/pages/download-center
4. Selezionare “WiFi Connect”, inserire “192.168.4.1” e fare clic su “Connect”.
5. Quando "Connetti" diventa "Disconnetti", signica che la connessione Wi-Fi è riuscita.
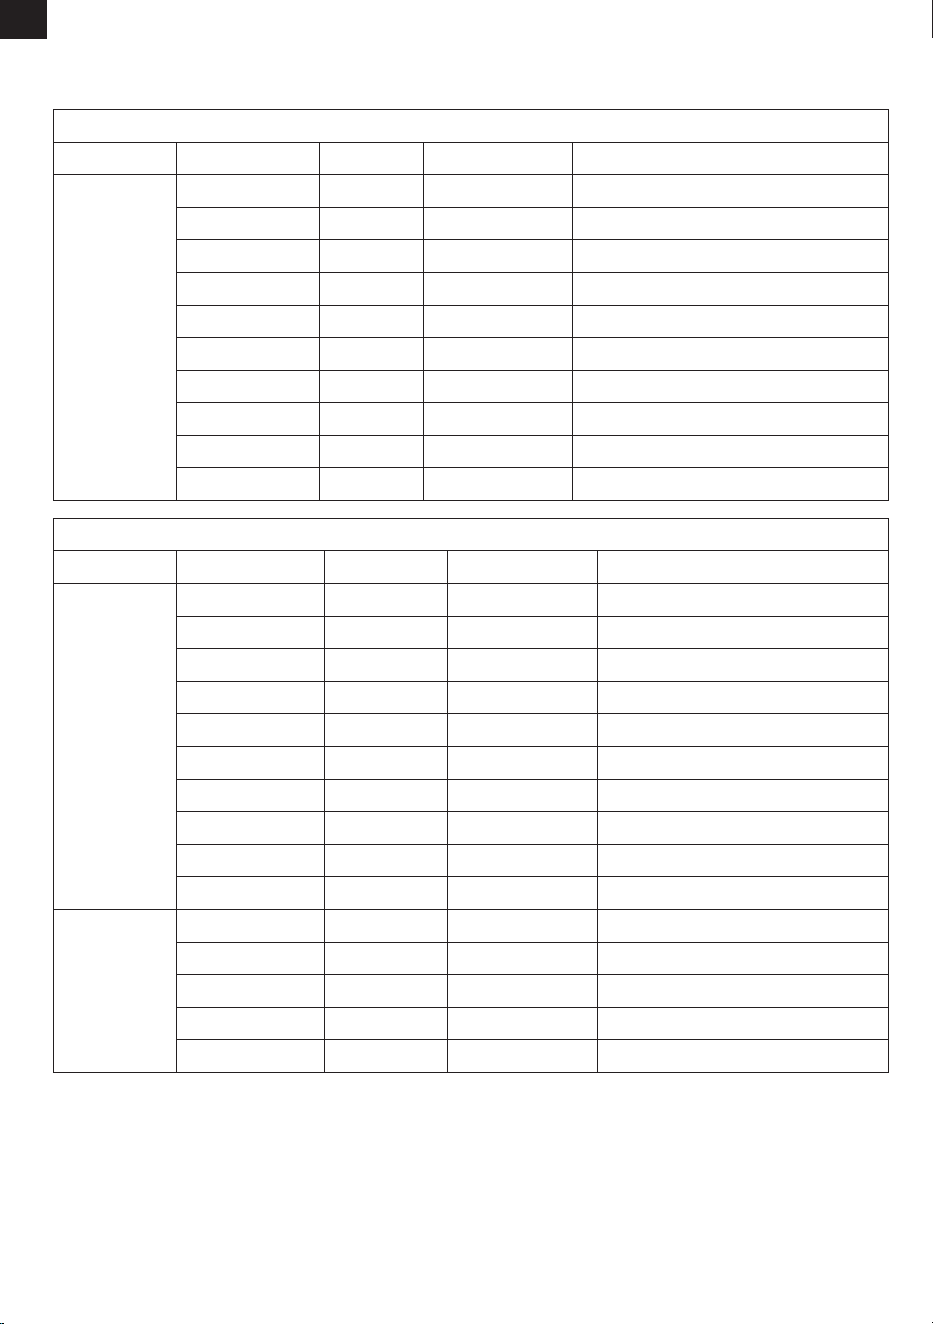
10. Parametri Operativi Consigliati
IT
-93-
100
100
100
100
100
100
100
100
60
100
2000
2000
2000
1600
600
600
40
600
3500
1000
La Superficie deve essere smerigliata.
La superficie deve essere smerigliata, non lucida.
La superficie va verniciata.
La Superficie deve essere smerigliata.
La superficie deve essere smerigliata, non lucida.
La superficie va verniciata.
Modalità
Incisione
Modalità
Incisione
Materiali
Tavola di Legno
Bambù
Legno massiccio
Pelle
Vetro
Ceramica
Acciaio Inox
Metallo Anodizzato
Tessuto
Acrilico
Potenza (%)
Velocità (mm/min)
Note
Note
Mecpow M1 (3.5W)
100
100
100
100
100
100
100
100
40
100
100
100
100
100
100
3000
3000
3000
2000
800
800
300
800
5000
1500
70
120
1300
100
1500
Taglio
Materiali
Tavola di Legno
Bambù
Legno massiccio
Pelle
Vetro
Ceramica
Acciaio Inox
Metallo Anodizzato
Tessuto
Acrilico
Tavola da 2mm
Tavola da 3mm
Cartone
Pelle
Tessuto
Mecpow M1 (5W)
Puissance (%) Velocità (mm/min)

IT
-94-
11. Risoluzione dei Problemi
1.Perché il laser M1 non si accende?
Cause:
a.L'incisore laser M1 potrebbe non essere correttamente collegato alla porta di ingresso.
b.La spina potrebbe essere allentata.
c.L'adattatore di alimentazione potrebbe essere danneggiato.
Soluzioni:
a.Vericare che il cavo di alimentazione sia collegato saldamente e che si stia utilizzando l'adattatore originale.
b.Provare con prese di corrente alternative. Se il problema persiste, si consiglia di contattare il supporto tecnico.
c.Acquistare un nuovo adattatore di alimentazione.
2.La macchina non riesce a connettersi al Wi-Fi?
Cause:
a. Segnale Wi-Fi debole o instabile.
b. Password Wi-Fi errata.
c. Inserimento errato dell'indirizzo IP.
Soluzioni:
a. Vericare che la macchina sia connessa alla rete.
b. Assicurarsi che la password sia inserita correttamente (le lettere maiuscole contano).
c. Provare ad accedere a 192.168.4.1 dal browser.
3.Il software del computer non riesce a connettersi alla macchina?
Cause:
a. Porta selezionata errata.
b. Utilizzo di Windows 7/8 senza i driver corretti.
Soluzioni:
a. Provare a cambiare la porta COM.
b. Installare il driver appropriato se si utilizza Windows 7/8.
4.Perché la mia incisione laser appare sfocata?
Cause:
a. Lunghezza focale errata.
b. Materiale inadatto all'incisione/taglio.
c. Impostazioni errate di potenza o velocità.
Soluzioni:
a. Regolare la lunghezza focale del modulo laser tramite la leva di messa a fuoco no a ottenere un punto minimo del fascio.
b. Assicurarsi che il materiale sia adatto all'incisione/taglio.
c. Regolare di conseguenza potenza, velocità o altri parametri.
5.Cosa devo fare se la lente è danneggiata?
Cause:
a.Mancata pulizia regolare che causa accumulo di polvere.
b.Danni alla lente dovuti a urti esterni.
Soluzioni:
a. Pulire regolarmente la lente con tamponi imbevuti di alcol (si consiglia dopo ogni 20 ore di utilizzo) per evitare che l'accumulo
di polvere comprometta l'emissione laser.
b. Se il gruppo lente è danneggiato, sostituirlo oppure contattare il produttore Mecpow per acquistare componenti di ricambio.
IT
-95-
12. Dichiarazione di conformità
Questo prodotto è conforme agli standard di IL Comunità Europea.
Questo simbolo indica che il prodotto è in grado di essere riciclato.
Questo simbolo indica che il prodotto non deve essere smaltito come riuto domestico. Il
prodotto deve essere inviato a centri di raccolta dierenziata per il recupero e il riciclaggio
di apparecchiature elettriche ed elettroniche.

96
96
98
99
99
100
104
105
110
112
113
114
PL
1. Wstęp.........................................................................................
2. Informacje dotyczące bezpieczeństwa...................................
3. Schemat.....................................................................................
4. Specyfikacja techniczna............................................................
5. Zawartość opakowania.............................................................
6. Instrukcja obsługi......................................................................
7. Sterownik.....................................................................................
8. Sterowanie za pomocą oprogramowania komputerowego..
9. Sterowanie za pomocą aplikację mobilną i karty TF.............
10. Zalecane parametry pracy....................................................
11. Rozwiązywanie problemów....................................................
12. Oświadczenie o zgodności......................................................
SPIS TREŚCI

PL
-96-
1. Przedmowa
Ostrzeżenie
2. Oświadczenie o bezpieczeństwie
Szanowny Kliencie,
Dziękujemy za zakup naszej maszyny do grawerowania laserowego. To urządzenie to zaawansowany
technologicznie produkt, który integruje światło, mechanizm i elektryczność. Aby lepiej użytkować i
konserwować sprzęt, przeczytaj uważnie instrukcję obsługi i postępuj zgodnie z zawartymi w niej
krokami.
Zastrzeżenie
Wszelkie straty spowodowane niewłaściwym użytkowaniem lub nieprzestrzeganiem instrukcji
obsługi ponosi użytkownik. Ostateczna interpretacja instrukcji obsługi należy do naszej rmy i
zastrzegamy sobie prawo do zmiany wszelkich informacji, danych, szczegółów technicznych itp.
zawartych w instrukcji.
* Obróbka laserowa może być ryzykowna, a użytkownicy powinni dokładnie rozważyć, czy obrabiany przedmi-
ot nadaje się do obróbki laserowej.
* Przetwarzany obiekt i emisje muszą być zgodne z lokalnymi przepisami i regulacjami.
* To urządzenie wykorzystuje laser klasy IV (promieniowanie laserowe o dużej mocy), co może powodować
następujące sytuacje:
(1) Zapłon otaczających materiałów łatwopalnych;
(2) Podczas obróbki laserowej mogą powstawać inne rodzaje promieniowania oraz toksyczne i szkodliwe gazy,
w zależności od obrabianego przedmiotu;
(3) Bezpośrednia ekspozycja na promieniowanie laserowe może spowodować uszkodzenie ciała ludzkiego. W
miejscu pracy musi znajdować się sprzęt przeciwpożarowy, a wokół stołu roboczego lub maszyny nie wolno
układać materiałów łatwopalnych i wybuchowych. Należy również zadbać o dobrą wentylację.
* Otoczenie, w którym znajduje się maszyna powinno być suche, wolne od zanieczyszczeń,
wibracji, silnej elektryczności, silnego magnetyzmu i innych zakłóceń. Temperatura otoczenia podczas pracy
powinna wynosić 5-30°C, a wilgotność otoczenia podczas pracy powinna wynosić 35-65% RH.
* Napięcie robocze maszyny wynosi AC100-240V.
* Podczas pracy maszyny należy ją cały czas monitorować. Przed wyjazdem należy odciąć zasilanie, aby
zapobiec nieprzewidzianym problemom. Jeśli nienormalna sytuacja
wystąpi, należy natychmiast odciąć zasilanie i zająć się tym!
* Surowo zabrania się umieszczania w urządzeniu jakichkolwiek odblaskowych lub rozpraszających przedmi-
otów, które nie są związane z jego działaniem, aby zapobiec odbiciu lasera od ludzkiego ciała lub materiałów
łatwopalnych.
* Maszynę należy trzymać z dala od urządzeń elektrycznych wrażliwych na zakłócenia elektromagnetyczne,
które mogą powodować zakłócenia elektromagnetyczne.
* Surowo zabrania się osobom nieprofesjonalnym demontować grawerki laserowej, ponieważ wewnątrz
urządzenia może wystąpić niebezpieczeństwo w postaci wysokiego napięcia.
Środki bezpieczeństwa
1. Maszyna do grawerowania laserowego może wytwarzać światło laserowe. Zabrania się umieszczania
jakichkolwiek organizmów żywych pod emisją lasera (port jest oznaczony żółtym znakiem ostrzegawczym).
2. Pacjenci z nadwrażliwością na światło nie mogą używać ani zbliżać się do grawera laserowego.
3. Podczas korzystania z maszyny do grawerowania laserowego operator i osoby przebywające w pobliżu
maszyny muszą nosić okulary ochronne chroniące przed laserem. Nie obsługuj urządzenia laserowego bez
okularów laserowych. Nasza maszyna jest dostarczana z parą laserowych okularów ochronnych. Jeśli chcesz
kupić dodatkowe gogle, gogle powinny zapewniać ochronę przed długością fali w zakresie 400-445nm
(+-5nm), mieć średnicę zewnętrzną +5 i spełniać wymagania co najmniej na poziomie L5.
4. Gdy grawerka laserowa pracuje, użytkownik musi zachować szczególną ostrożność i nie pozostawiać jej bez
nadzoru, aby uniknąć zapłonu grawerowanego materiału. Umieść maszynę w miejscu ognioodpornym i
zapewnij dobrą wentylację. Zaleca się palić
gaśnica w pobliżu na wypadek sytuacji awaryjnych.
5. Upewnij się, że w pobliżu urządzenia do grawerowania laserowego nie ma materiałów łatwopalnych.
Zalecamy umieszczenie pod maszyną stołu roboczego o strukturze plastra miodu.
6. Podczas obsługi grawerki laserowej upewnij się, że wokół niej jest wystarczająco dużo miejsca. Grawerowanie
niektórych materiałów może powodować wydzielanie się dymu, który należy odprowadzić za pomocą

PL
-97-
1. Przed użyciem urządzenia Mecpow M1 proszę upewnić się, że osłona ochronna jest zamknięta, a odbłyśnik
lasera jest czysty.
2. Urządzenie M1 jest zgodne z normami bezpieczeństwa lasera klasy 1. Przed rozpoczęciem grawerowania
laserowego należy sprawdzić, czy pokrywa ochronna jest nienaruszona
i nieuszkodzona. W przypadku stwierdzenia jakichkolwiek uszkodzeń należy zaprzestać korzystania z
urządzenia.
3. Podczas pracy należy upewnić się, że laser pozostaje w osłonie ochronnej. Podczas obróbki przedmiotów za
pomocą Mecpow M1 należy zawsze przykrywać obszar roboczy osłoną ochronną i nosić okulary ochronne.
4. Ważne jest, aby nie poruszać urządzeniem podczas grawerowania laserowego, aby zapobiec sytuacji, w
której środki ochrony własnej spowodują zatrzymanie pracy urządzenia. Może to również wpłynąć na końcowy
rezultat grawerowania poprzez zakłócenie procesu grawerowania. Jeśli konieczne jest poruszanie urządzeniem
lub grawerowanym obiektem, zaleca się zrobienie tego przed lub po zakończeniu procesu grawerowania. Należy
unikać poruszania urządzeniem lub obiektami podczas pracy lasera.
5. Osoby niepełnoletnie powinny być zawsze nadzorowane i wspierane przez osoby dorosłe podczas obsługi
tego produktu.
6. Podczas cięcia lub grawerowania materiałów łatwopalnych przy niskiej prędkości i wysokiej mocy istnieje
ryzyko pojawienia się płomieni. W przypadku wykrycia płomieni należy natychmiast przerwać pracę.
7. Gdy urządzenie jest włączone, należy unikać demontażu jakichkolwiek części korpusu urządzenia, aby
zapobiec przypadkowemu kontaktowi z zasilaczem. Ponadto nie należy dotykać żadnych elementów
elektronicznych rękami ani narzędziami.
8. Jeśli wystąpi którakolwiek z poniższych sytuacji, należy natychmiast przerwać korzystanie z produktu i
wyłączyć zasilanie:
- Zapach spalenizny wydobywający się z urządzenia
- Otwarty płomień generowany przez materiał do grawerowania
- Uszkodzenie wewnętrznych komponentów produktu
- Nieoczekiwane zatrzymanie produktu
- Nietypowy hałas lub światło, które nigdy wcześniej nie występowały
9. Należy zachować ostrożność podczas korzystania z elementów sterujących lub dokonywania
regulacji, ponieważ wykonywanie procedur niezgodnych ze specykacją może spowodować niebezpieczne
narażenie na promieniowanie.
1. Aby utrzymać optymalną wydajność, należy regularnie czyścić obiektyw urządzenia bezpyłową szmatką lub
papierem zwilżonym alkoholem.
2. Zachowaj ostrożność podczas używania lub przechowywania urządzenia, aby zapobiec przedostawaniu się
ciał obcych do górnych otworów wentylacyjnych i zakłócaniu jego
działania.
Instrukcje bezpieczeństwa
Konserwacja
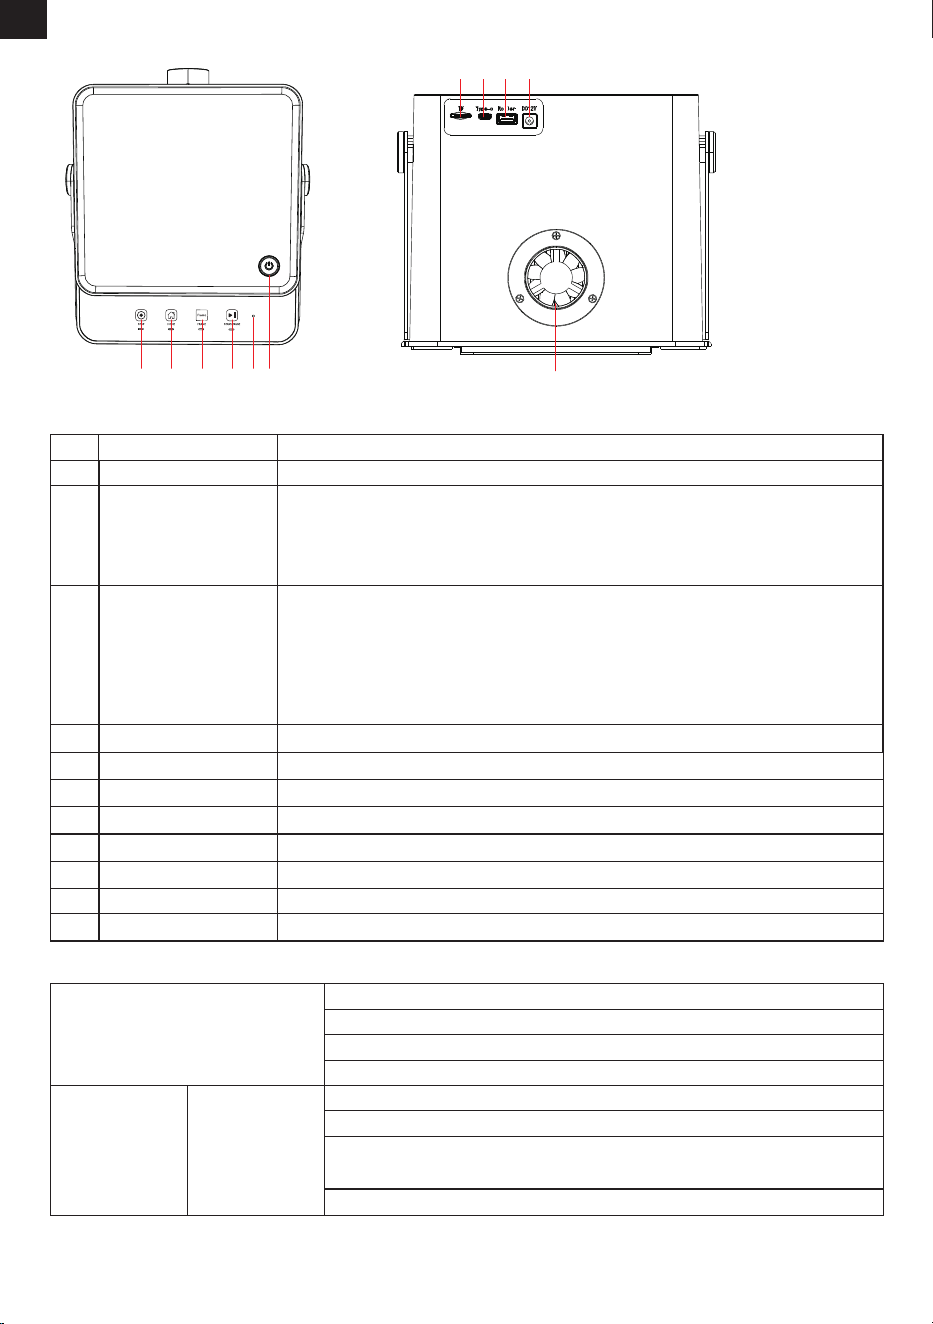
Przycisk FRAME
Przycisk HOME
Przycisk STOP
Port TF
Port Type-C
Port wałka obrotowego
Port zasilania DC
Wentylator wyciągowy
PL
-98-
Wprowadzenie i funkcje
Nr
Nazwa elementu
Funkcja
1
2
3
4
Przycisk zasilania
Wskaźnik LED
Przycisk START/PAUSE
Rozpoczyna obrysowywanie pola roboczego lasera
Informuje o statusie urządzenia:
Biały: Tryb czuwania
Niebieski: Praca
Czerwony: Alarm
Zielony: Połączenie Wi-Fi
3. Schemat
Włączanie/wyłączanie urządzenia
Wskaźnik LED – Statusy
A. STOP
B. HOME
C. FRAME
D. START/PAUSE
Przy naciśnięciu przycisków STOP,
HOME, FRAME, START/PAUSE –
zaświeci się światło białe
A. Uruchamianie / Tryb czuwania: Stałe białe
B. Grawerowanie: Stałe niebieskie
C. Osłona ochronna otwarta/Maszyna pochylona (≥15°): Migające czerwone
światło (z 3 sygnałami dźwiękowymi alarmu)
D. Połączenie Wi-Fi: Stałe zielone
Kolor wskaźnika Status
urządzenia
(1) Rozpoczyna grawerowanie/cięcie.
(2) W trakcie pracy:
Pierwsze naciśnięcie: pauza
Drugie naciśnięcie: wznowienie
(3) W trybie czuwania: powtarza ostatni plik z karty TF (z wyjątkiem plików MKSLaser z
aplikacji mobilnej)
11
Usuwanie oparów i dymu podczas grawerowania/cięcia
5
Powrót do pozycji początkowej
6
Zatrzymuje grawerowanie/obrysowywanie
7
Wejście na kartę TF (czytanie plików)
8
Połączenie z komputerem
9
Połączenie kabla wałka obrotowego
10
Podłączenie zasilacza
123456
10
11
98
7
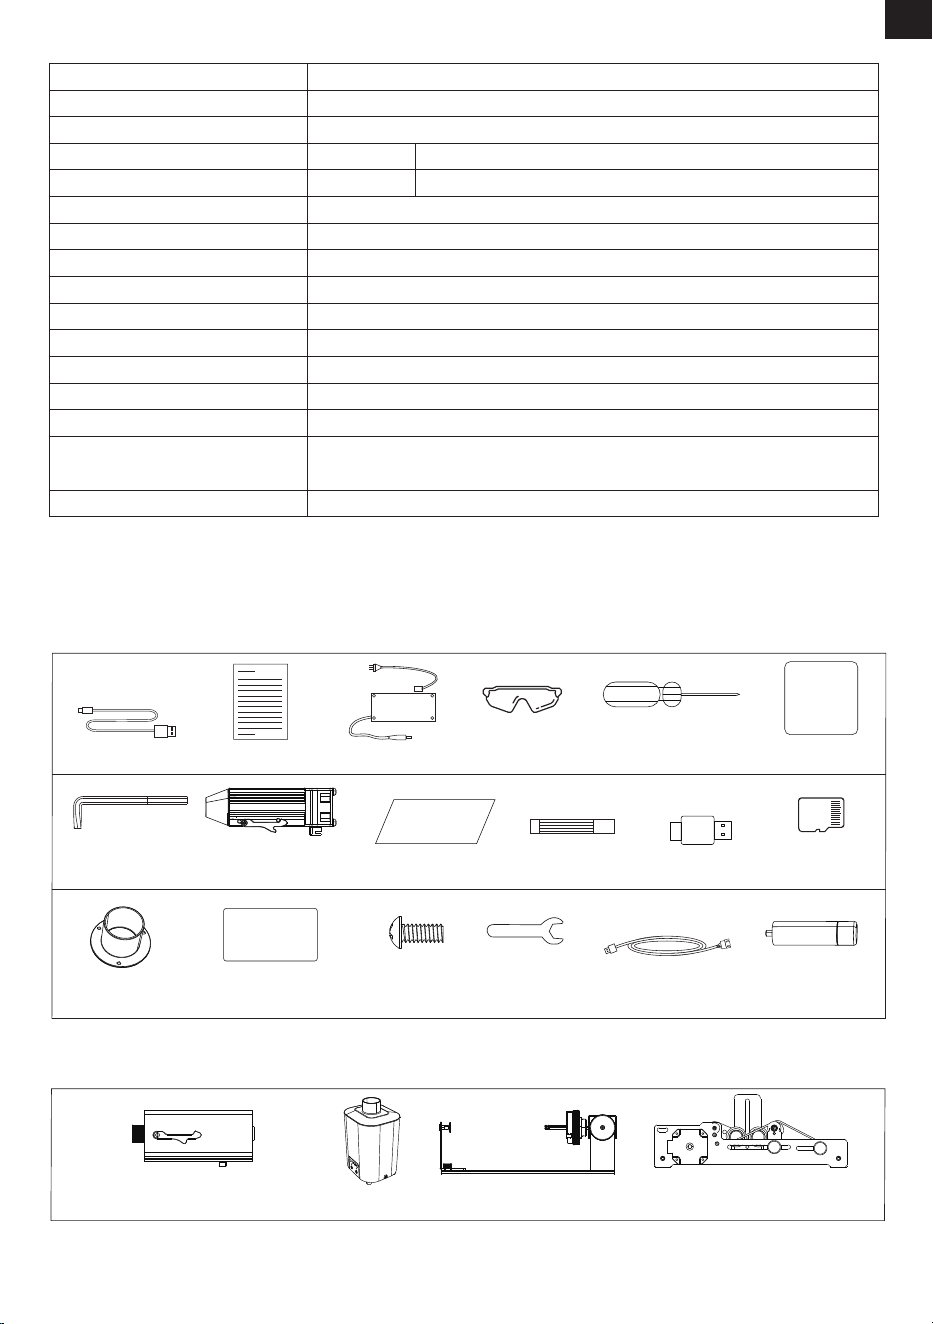
PL
-99-
4. Specyfikacja techniczna
Model
Wymiary produktu
Moc znamionowa
Wejście zasilania lasera
Moc lasera
Długość fali
Obszar roboczy
Maks.prędkość grawerowania
Dokładność grawerowania
Maks. wysokość materiału
Materiały do grawerowania
Obsługiwane oprogramowanie
Kompatybilność systemowa
Obsługiwane formaty plików
Transmisja danych
Alarm przechyłu
220 x 264 x 194 mm
60W
DC 12V 5A DC 12V 5A
3.5W 5W
455±5nm
100 x 100 mm
10000 mm/min
0.01 mm
<4.5 cm
Drewno, plastik, skóra, tektura, kamień, ceramika, metal powlekany, bambus, itd.
LaserGRBL, LightBurn, MKSLaser
Windows, macOS, Android, iOS
JPEG, BMP, JPG, GIF, PLT, PNG, DXF, HPGL, NC, etc.
Przewodowe: USB
Bezprzewodowe: WiFi
15±5°
M1
5. Zawartość opakowania
Akcesoria opcjonalne
Accessories
Kabel Type-C ×1
Płytki aluminiowe ×5
Śruby M3×7 ×3
Drewniana deseczka ×2
Gogle ochronne ×1
Klucz imbusowy
2.5 mm ×1
Kołnierz ×1
Karta TF ×1
Maksymalna nośność
maszyny: 16 G
Moduł lasera ×1 Płytka pozycjonująca
obszaru grawerowania ×1
Marker ×1 Czytnik kart ×1
Śrubokręt ×1
Kabel do wałka obrotowego ×1
Instrukcja
obsługi ×1
Zasilacz ×1
Klucz płaski ×1
Kolumny
podwyższające ×4
Moduł lasera IR 1064nm 1.2W (do metalu)
Wyciąg oparów
Moduł wałka obrotowego (G5) Moduł wałka obrotowego (G3 Pro)
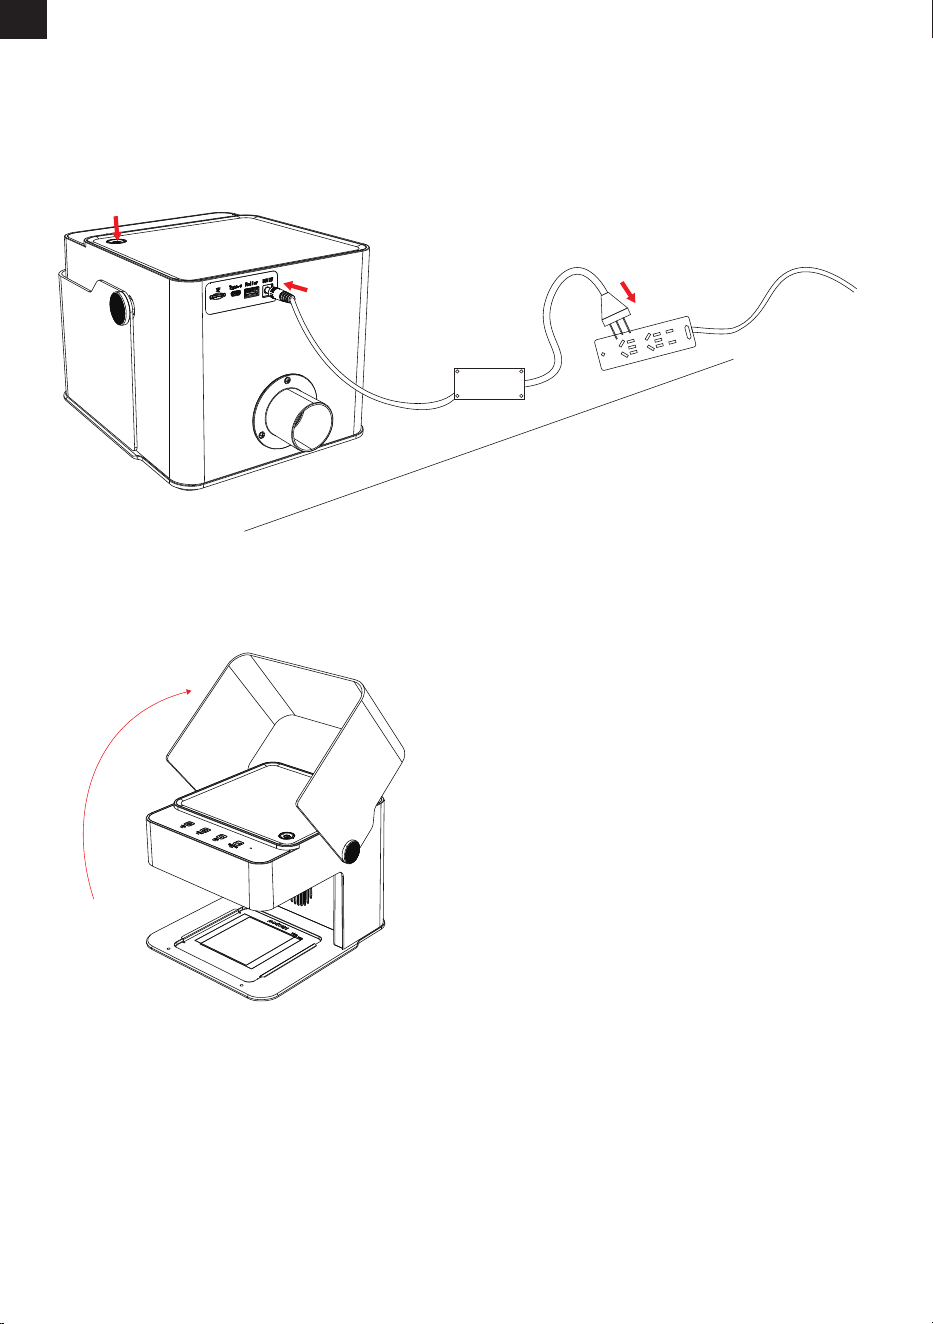
PL
-100-
1. Włączanie urządzenia
2. Umieszczenie materiału
6. Instrukcja obsługi
(1)Podłącz zasilacz do gniazdka elektrycznego.
(2)Podłącz kabel zasilający DC 12V do portu zasilania urządzenia.
(3)Naciśnij przycisk zasilania. Wskaźnik LED zaświeci się na biało (patrz ilustracja).
(1)Podnieś pokrywę ochronną.
(2)Umieść materiał do grawerowania/cięcia na obszarze roboczym.
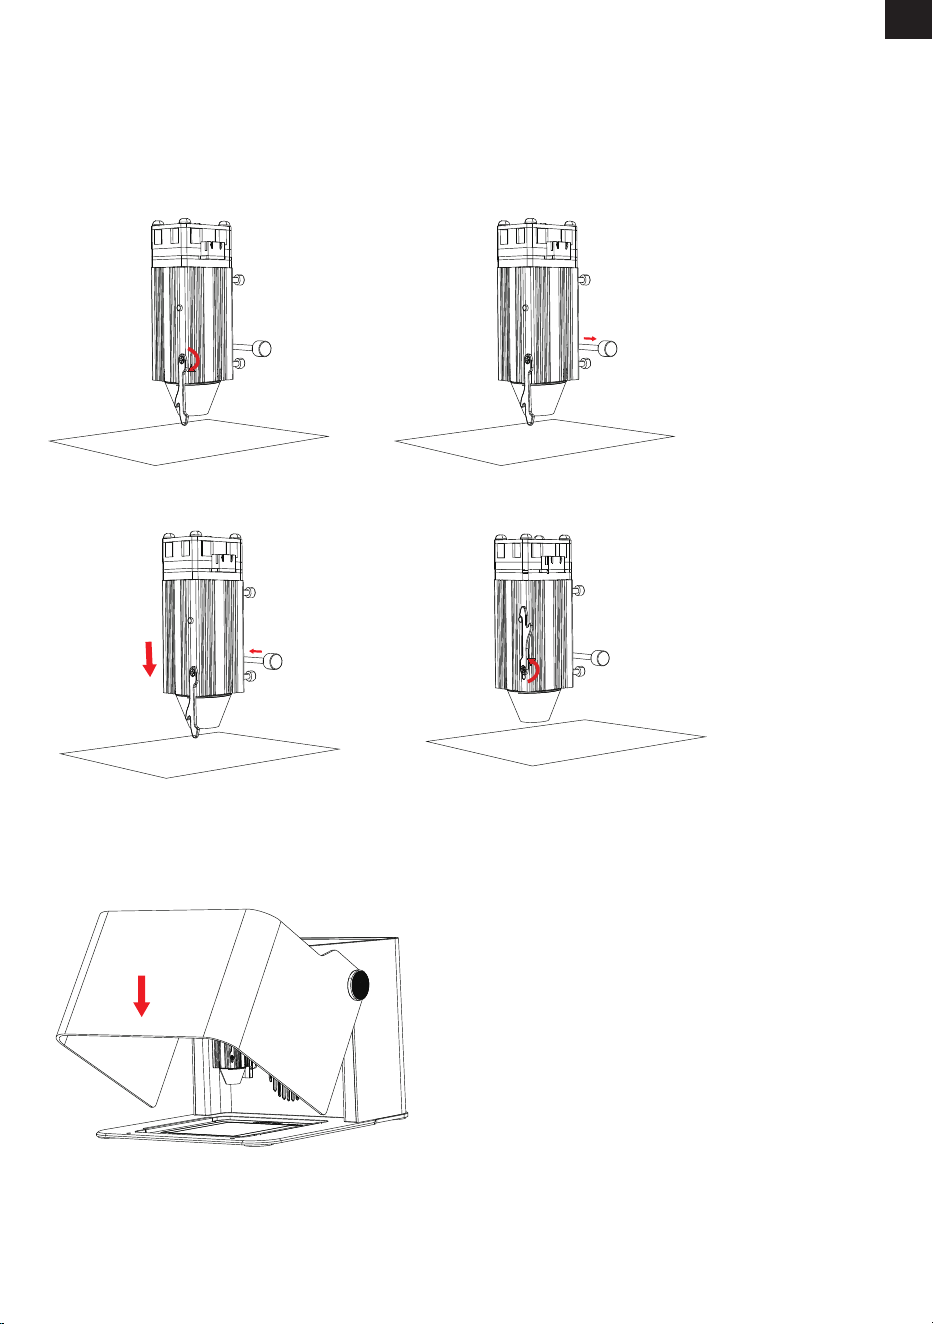
PL
-101-
Uwaga: Pokrywa ochronna musi być zamknięta – inaczej operacja nie rozpocznie się. Otwarcie pokrywy w
trakcie pracy przerywa proces.
3. Ustawianie ostrości lasera (patrz ilustracja)
(1)Opuść dźwignię ogniskowania.
(2)Poluzuj śrubę mocującą.
(3)Dostosuj wysokość modułu lasera, aż dźwignia dotknie powierzchni materiału i dokręć śrubę.
(4) Przywróć dźwignię ogniskowania do pozycji początkowej.
4. Zamknij pokrywę ochronną i naciśnij przycisk HOME – moduł lasera wróci do
pozycji początkowej.
5.Rozpoczęcie grawerowania/cięcia (obsługiwane aplikacje: MKSLaser, LightBurn, LaserGRBL)
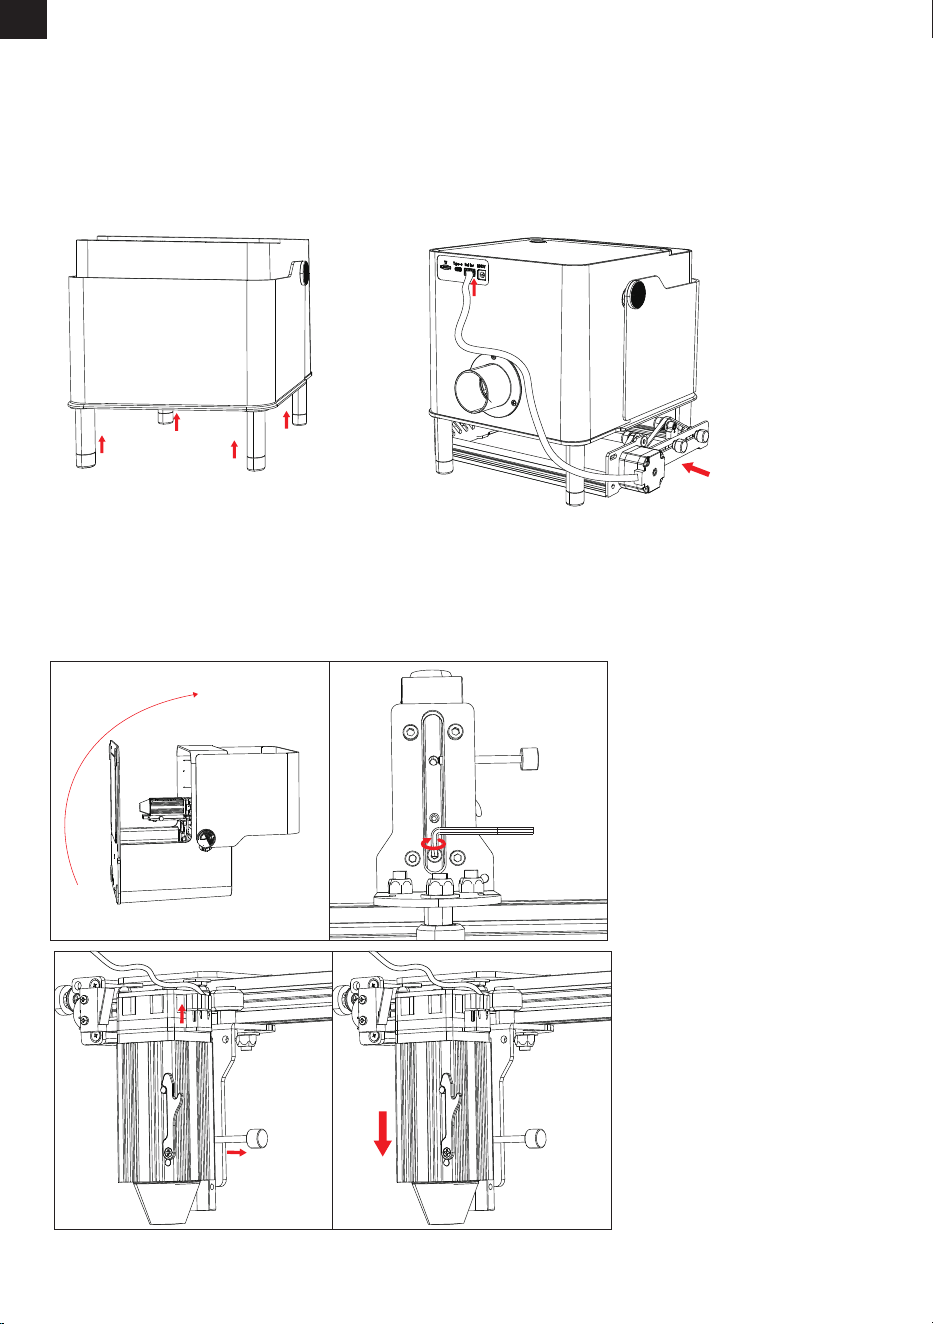
PL
-102-
(Dla modułu wałka obrotowego lub materiałów o dużej grubości)
(1)Wyrównaj cztery kolumny podwyższające z otworami w podstawie urządzenia.
(2)Przykręć je, aby zamocować.
(3)Umieść obrotowy rolkę na dole maszyny.
(4)Włóż końcówkę USB przewodu rolki do portu rolki obrotowej z tyłu maszyny i podłącz drugi koniec do rolki
obrotowej.
6. Regulacja wysokości maszyny
(1)Unieś tylną część podstawy urządzenia.
(2)Odkręć tylną śrubę przy użyciu klucza imbusowego 2.5 mm.
(3)Poluzuj lewą śrubę i odłącz przewód zasilający lasera.
(4)Przesuń moduł lasera w dół i wyjmij go.
7. Wymiana modułu lasera
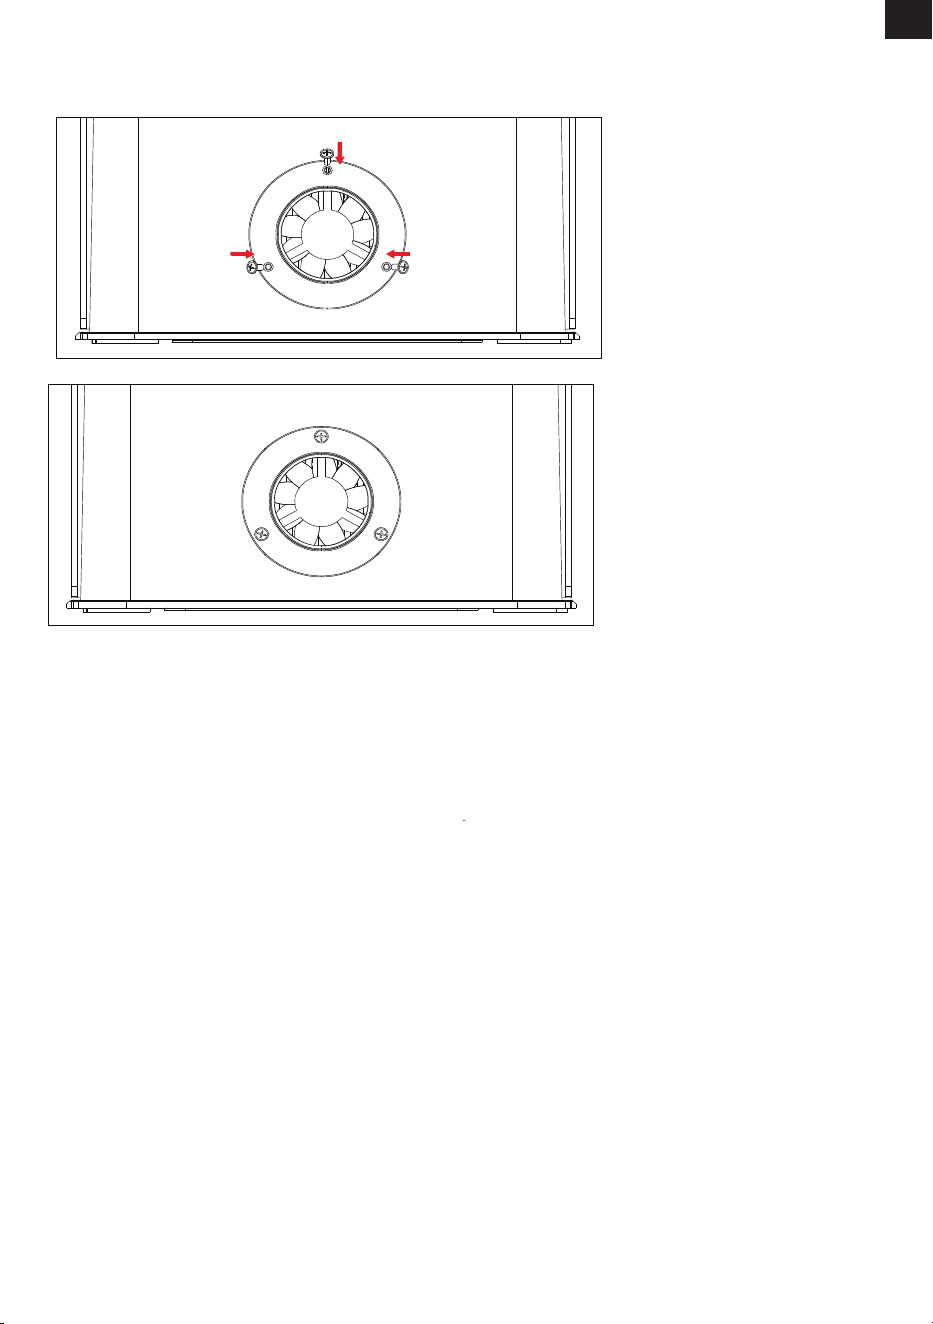
PL
-103-
Wyrównaj kołnierz z otworami na śruby przy wentylatorze z tyłu urządzenia i przymocuj go trzema śrubami
M3×7.
8. Montaż kołnierza (flanszy)
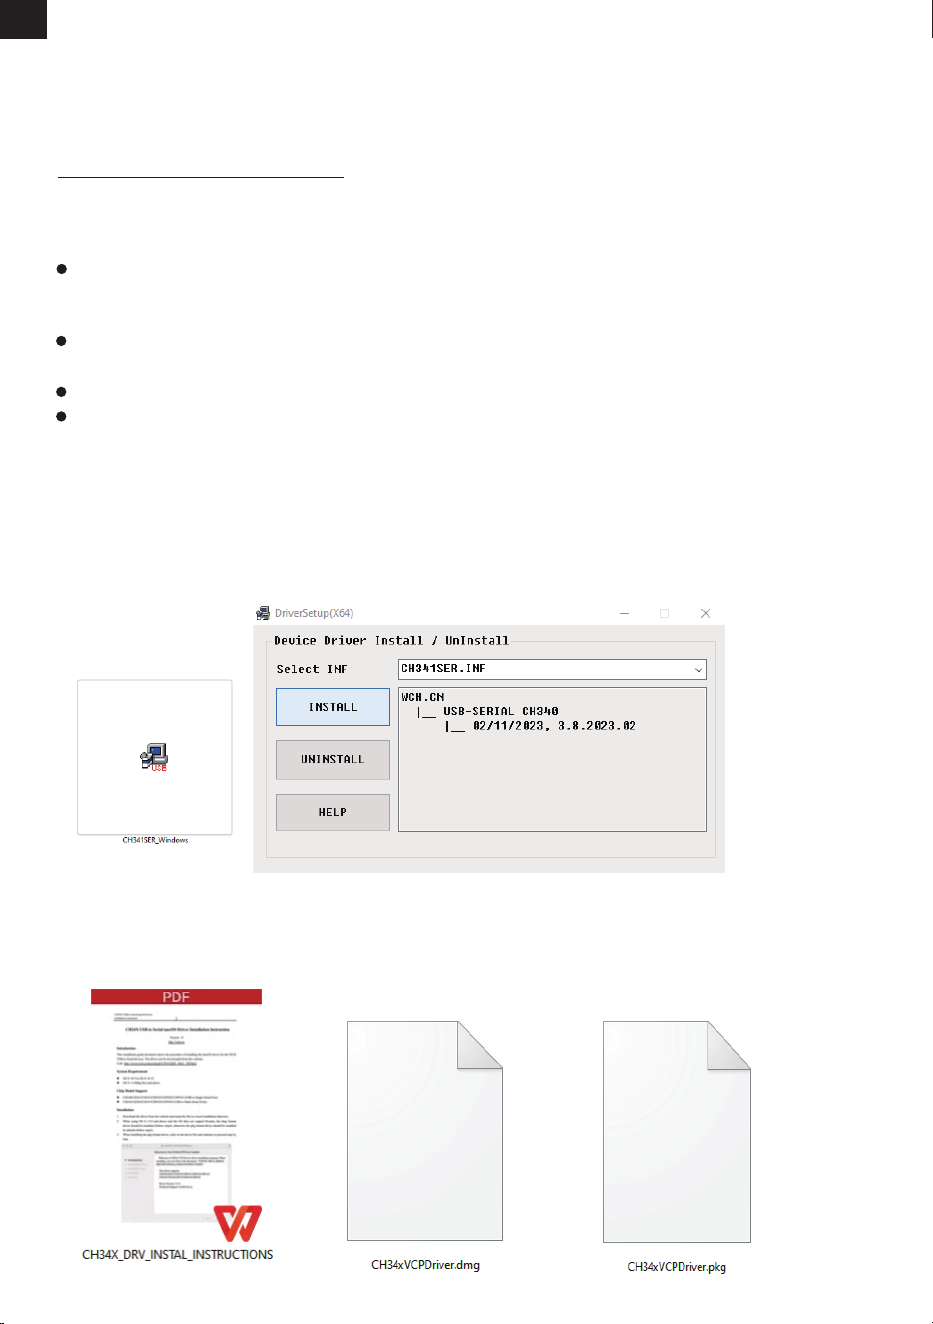
PL
-104-
1. Pobierz sterownik z poniższego łącza.
https://mecpow.com/pages/driver-les
2. Skontaktuj się z obsługą klienta, aby uzyskać plik sterownika..
Notatka:
W przypadku użytkowników systemu Windows, jeśli korzystasz z systemu poniżej Win10,
musisz ręcznie zainstalować sterownik. W przypadku korzystania z systemu Win10 lub nowsze-
go nie ma potrzeby instalowania sterownika.
Sterownik dla użytkowników komputerów Mac obsługuje systemy od OS X 10.9 do OS X 10.15
oraz OS X 11.0 (Big Sur) i nowsze.
Sterownik dla użytkowników systemu Linux obsługuje systemy 32-bitowe i 64-bitowe.
Włącz urządzenie i podłącz je do komputera kablem USB przed uruchomieniem sterownika!
Przed instalacją sterownika włącz urządzenie i podłącz je do komputera za pomocą kabla USB.
7. Sterownik
Metody ściągania sterownika
Instalacja
Dla użytkowników systemu Windows:
1. Otwórz pobrany sterownik.
2. Kliknij "INSTALL".
3. Kliknij "OK", gdy sterownik zostanie pomyślnie zainstalowany.
Dla użytkowników komputerów Mac:
1. Otwórz instrukcję.
2. Otwórz pobrany sterownik i postępuj zgodnie z instrukcjami, aby go zainstalować.
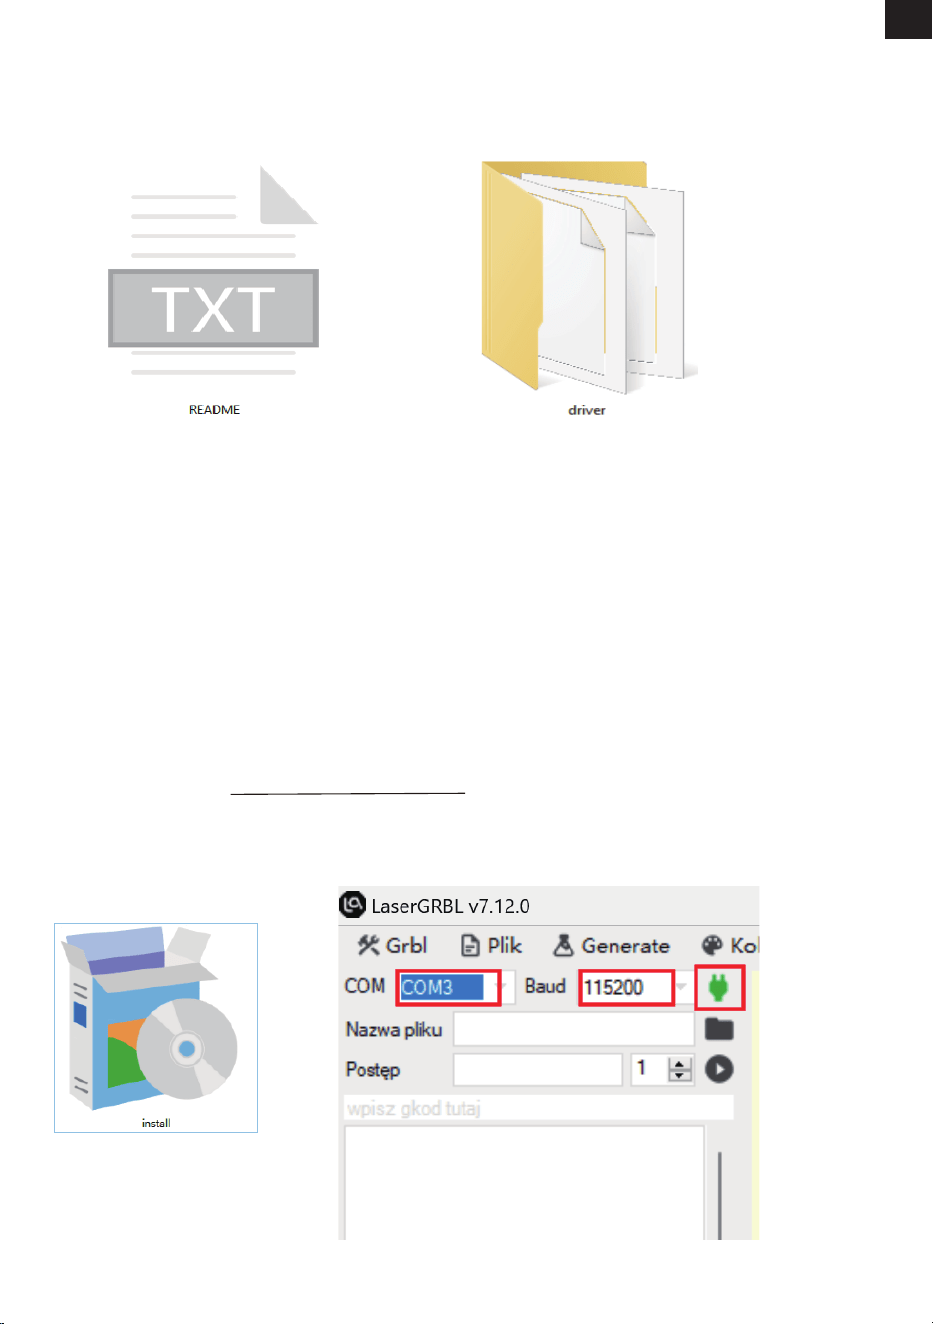
PL
-105-
Dla użytkowników systemu Linux:
1. Otwórz plik - README.
2. Otwórz plik - sterownik i postępuj zgodnie z "README", aby go zainstalować.
LaserGRBL
Jest to bezpłatne oprogramowanie typu open source, które obsługuje komputery z systemem
Windows. Pobierz go z: http://lasergrbl.com/download/
1. Zainstaluj go.
2. Otwórz oprogramowanie. Wybierz „COM3” i „115200”, a
następnie kliknij „Połącz”.
8. Sterowanie za pomocą oprogramowania
komputerowego
Podłącz maszynę do grawerowania do oprogramowania w czasie rzeczywistym za pomocą kabla USB.
Podczas pracy można uruchomić lub zatrzymać maszynę grawerującą za pomocą panelu sterowania.
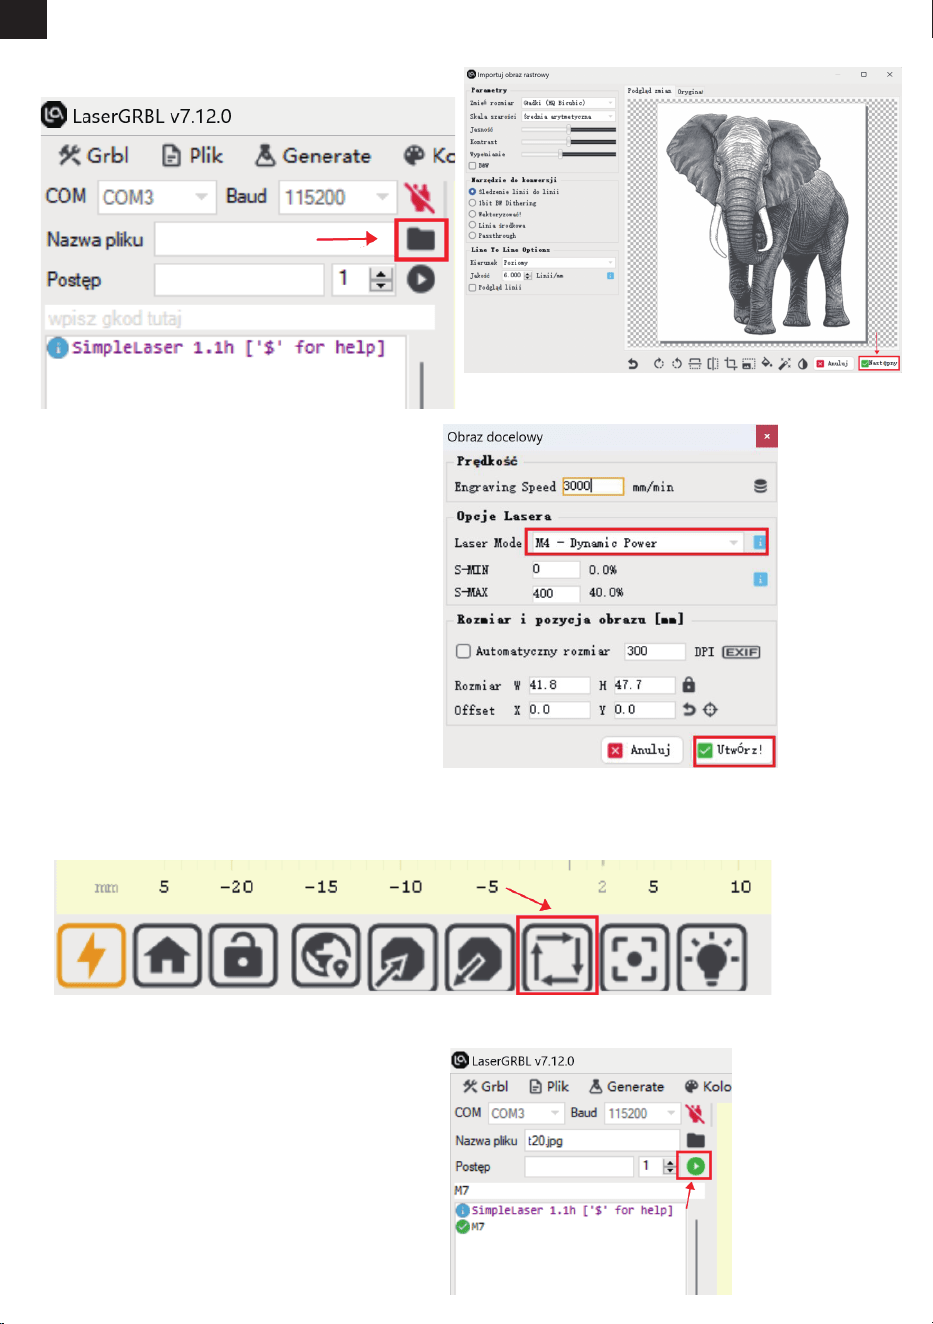
PL
-106-
5. Wybierz parametry operacyjne do grawerowa-
nia lub cięcia laserowego. (M3 służy do
rzeźbienia ze stałą mocą, a M4 do zmiennej
mocy. Sprawdź w rozdziale 10 zalecane
parametry operacyjne do grawerowania lub
cięcia różnych materiałów.)
6. Kliknij „Framing”, aby wyświetlić podgląd zakresu grawerowania i dostosować pozycję grawerowania.
7. Kliknij „Uruchom program”, aby rozpocząć grawerowanie.
3. Kliknij „Otwórz plik”, aby wybrać plik
do grawerowania.
4. Wybierz tryb grawerowania i kliknij „Następny”.
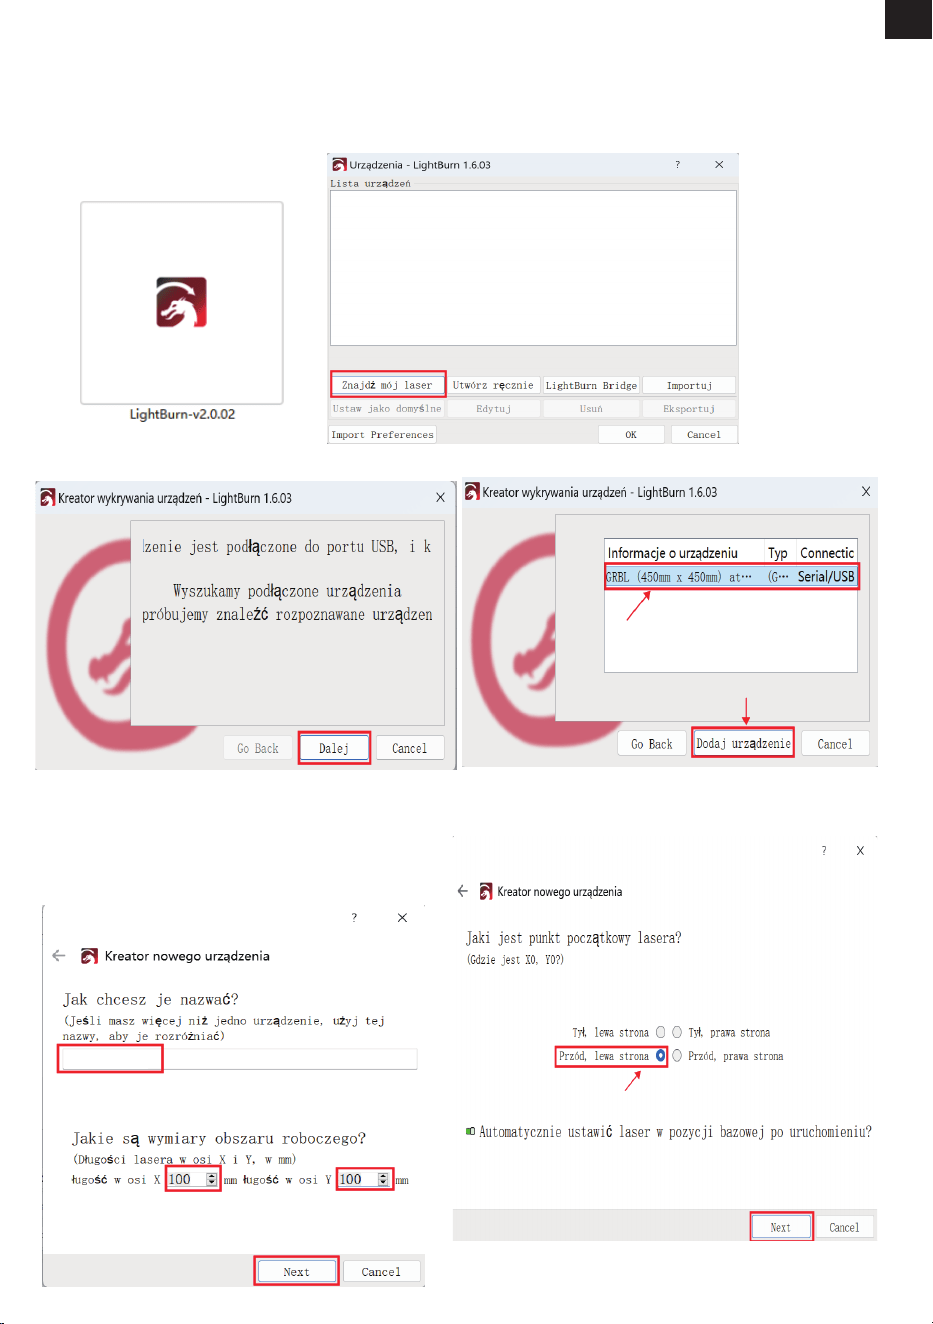
PL
-107-
To płatne, profesjonalne oprogramowanie obsługujące komputery MAC, Linux i Windows. Pobierz je
ze strony: https://lightburnsoftware.com/pages/download-trial.
4. Nazwij swoje urządzenie i wprowadź
długości osi X i Y, a następnie kliknij „Next”.
Nazwa: Mecpow M1
Długość w osi X: 100 mm
Długość w osi Y: 100 mm
LightBurn
1. Zainstaluj go. 2. Otwórz oprogramowanie i kliknij „Znajdź mój laser”.
3. Wybierz swoje urządzenie i kliknij „Dodaj urządzenie”.
5. Wybierz „Przód, lewa strona” jako
źródło lasera i kliknij „Next”.
MecpowM1
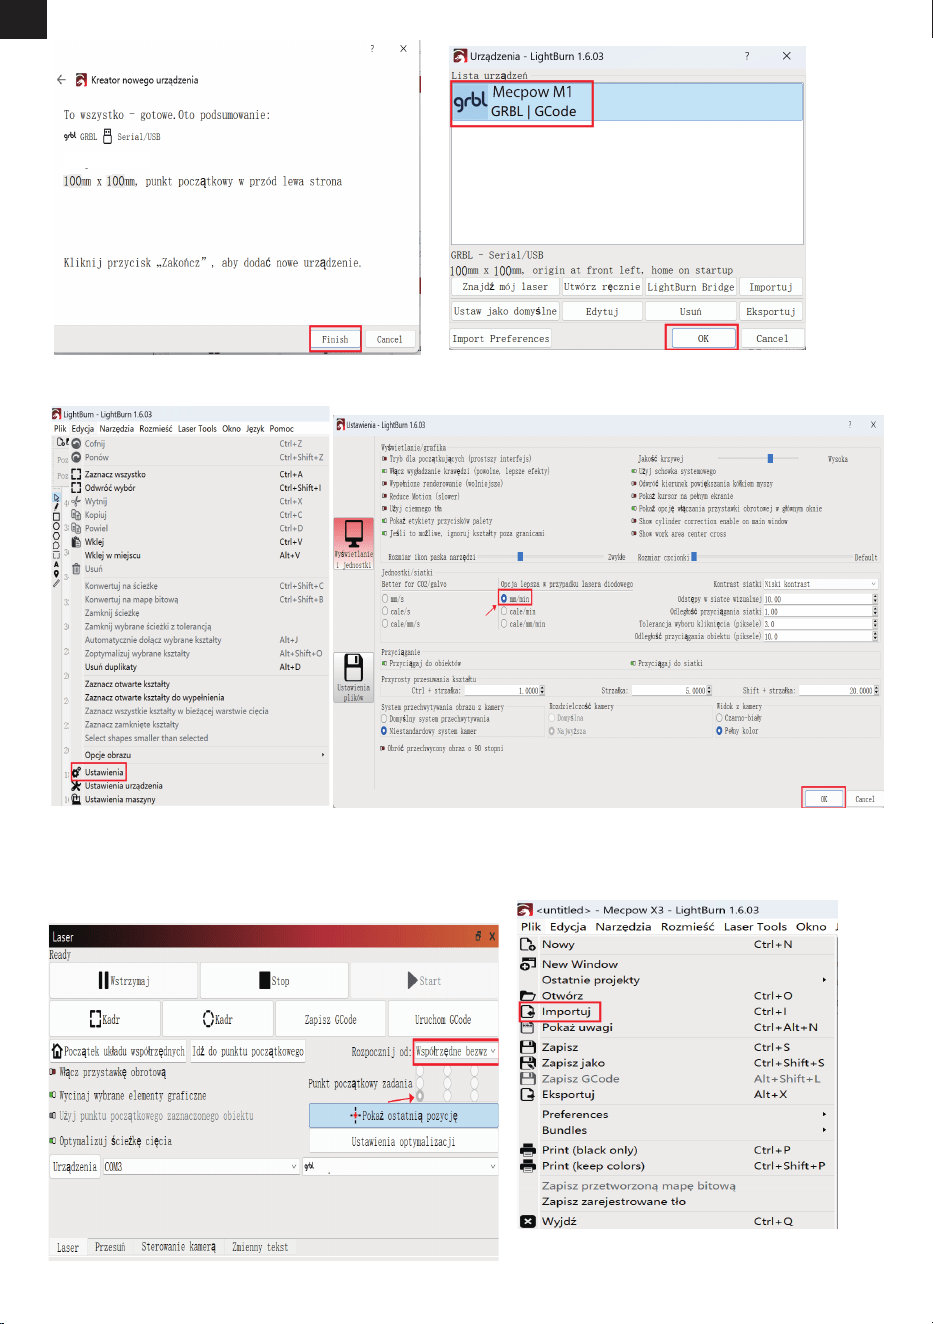
PL
-108-
6. Kliknij „Finish”. 7. Wybierz Mecpow X3 i kliknij „OK”.
8. Kliknij „Edycja” - „Ustawienia” i ustaw jednostkę „mm/min”, a następnie kliknij „OK”.
9. Wybierz opcję „Współrzędne bezwzględne” w
sekcji „Rozpocznij od”, a następnie wybierz kółko
w lewym dolnym rogu sekcji „Punkt początkowy
zadania”.
10. Kliknij „Plik” - „Importuj”, aby
zaimportować plik grawerowania.
MecpowM1
Mecpow M1
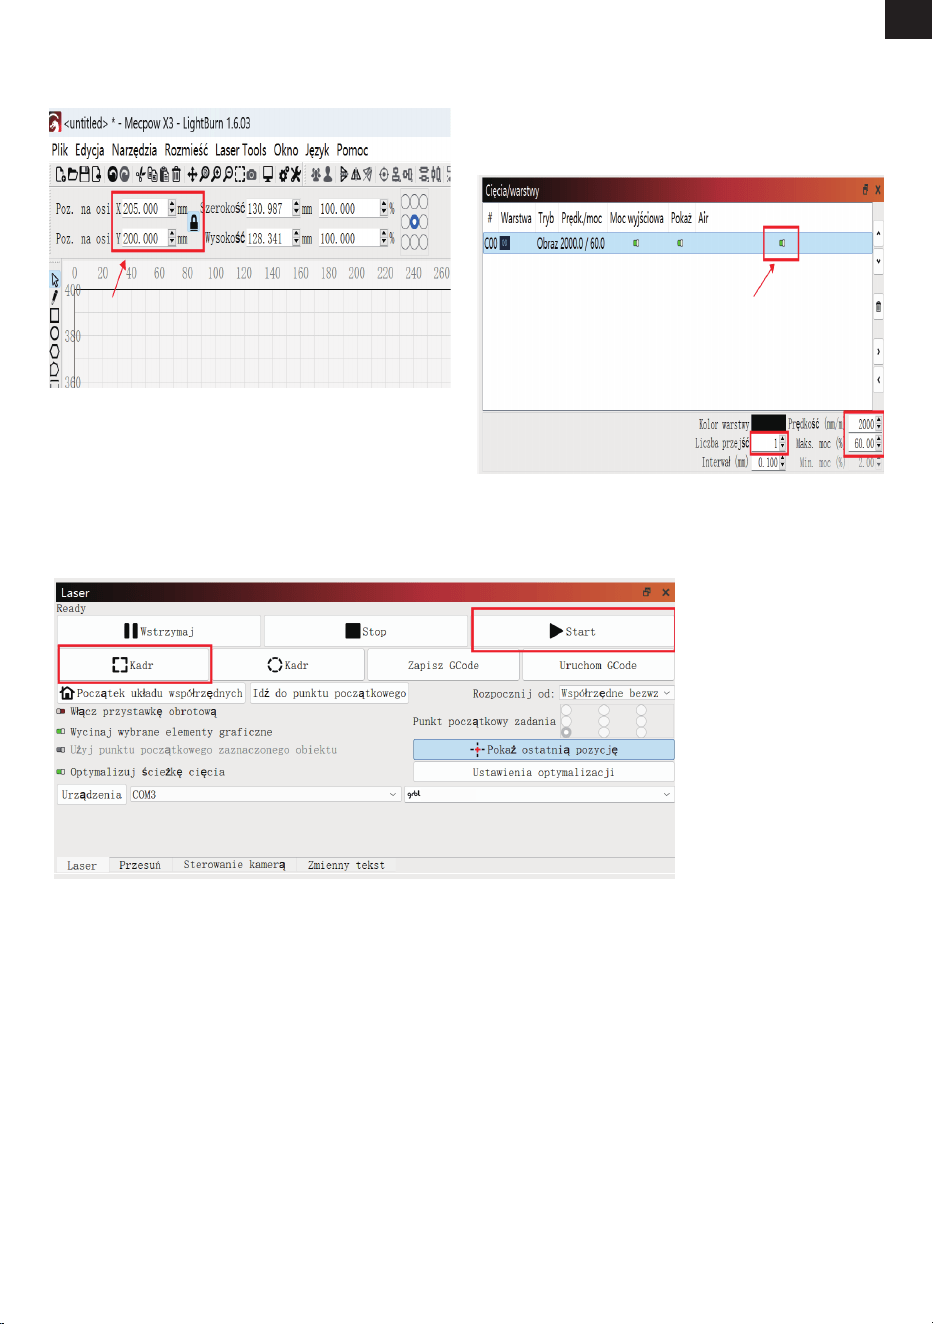
PL
-109-
11. Możesz zmodykować rozmiar grawerowania
w górnej części interfejsu po zaimportowaniu
pliku.
12. Wybierz tryb grawerowania i ustaw
parametry pracy dla grawerowania lub cięcia
laserowego. (Zalecane parametry operacyjne do
grawerowania lub cięcia różnych materiałów są
wymienione w następnej sekcji.)
13. Kliknij „Kadr”, aby wyświetlić podgląd zakresu grawerowania i dostosować pozycję grawerowan-
ia, a następnie kliknij „Start”, aby rozpocząć grawerowanie.
Mecpow M1
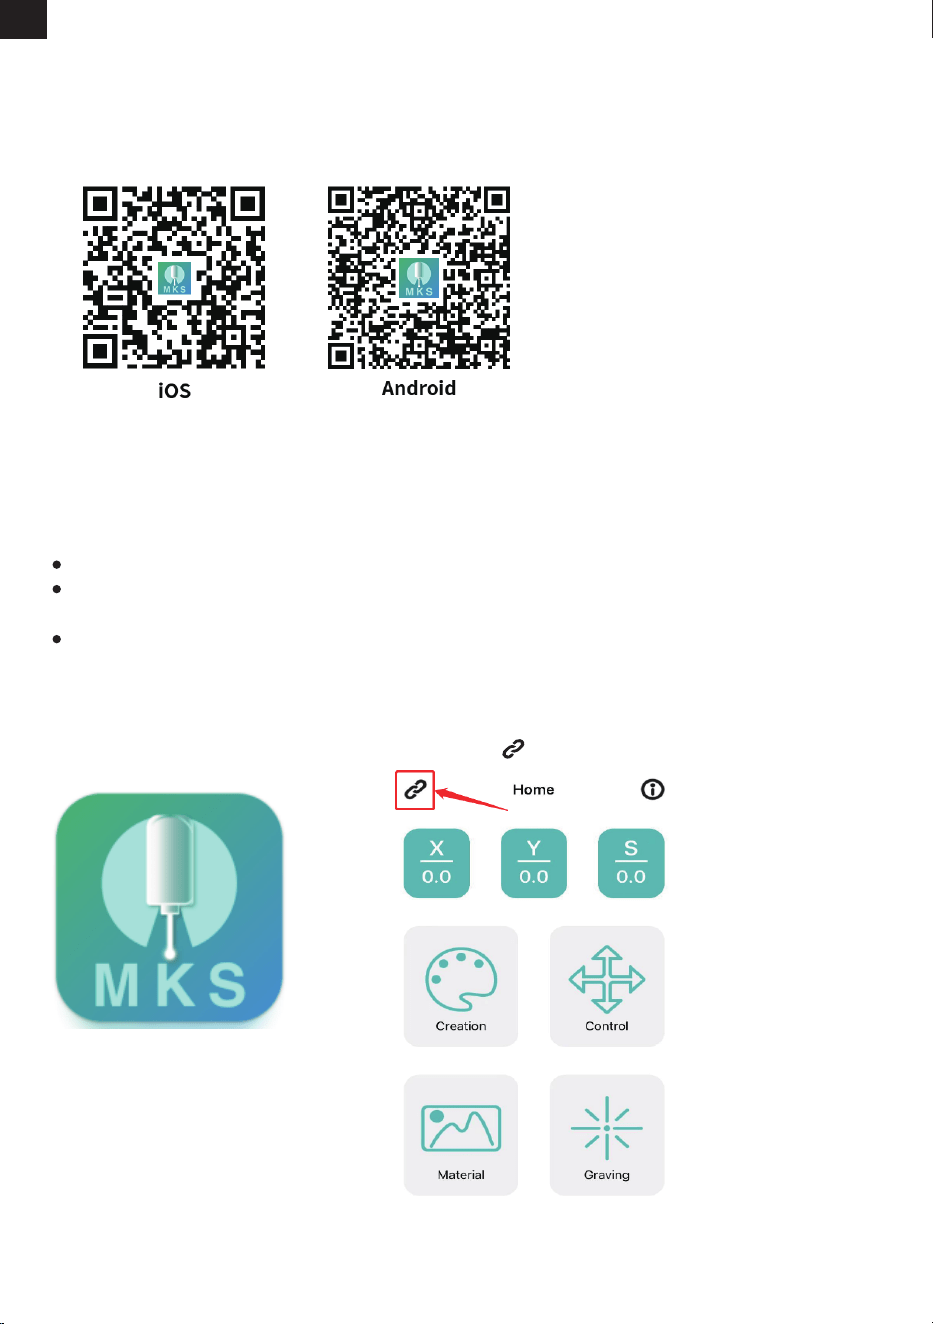
PL
-110-
„*****” w nazwie sieci Wi-Fi to losowa kombinacja cyfr. Zależy to od maszyny.
Aby zapewnić stabilność sygnału Wi-Fi, zaleca się podłączenie telefonu do Wi-Fi maszyny grawerującej
przed włożeniem karty TF.
Aplikacja musi być używana z kartą TF. Przesyłanie pliku grawerowania nie powiedzie się, jeśli karta TF nie
została włożona
MKSLaser to bezpłatna aplikacja mobilna, która obsługuje urządzenia z systemem Android i iOS.
1. Włącz funkcję Wi-Fi w telefonie i połącz Wi-Fi "Mecpow_*****".
Nazwa Wi-Fi: Mecpow_*****
Hasło Wi-Fi: 12345678
2. Otwórz aplikację MKSLaser.
3. Kliknij ikonę .
Zeskanuj kod QR i pobierz aplikację.
Pobieranie aplikacji
Połączenie Wi-Fi
9. Sterowanie za pomocą aplikację mobilną i karty TF
Uwaga:
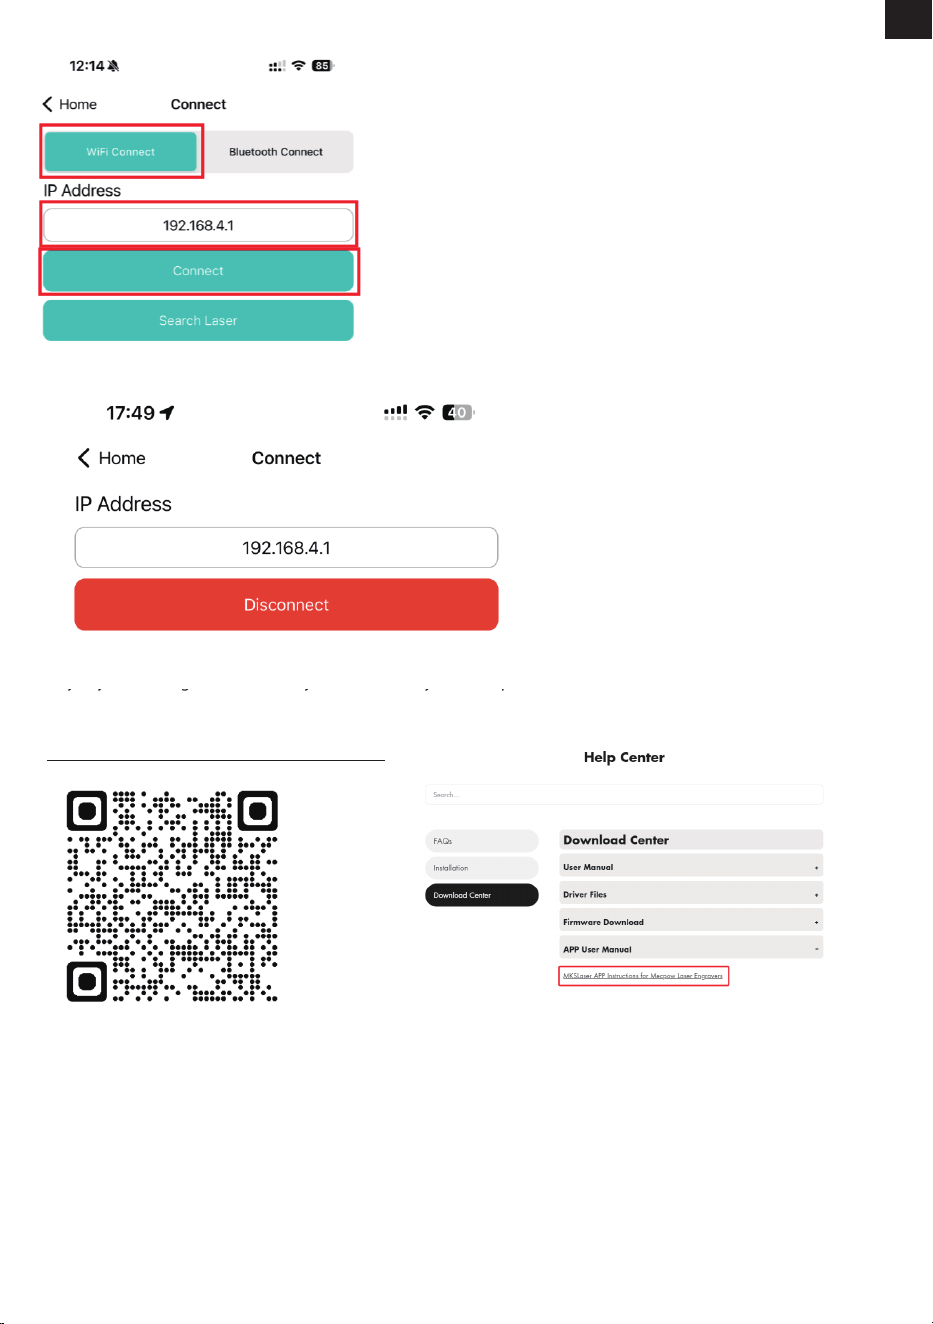
Sterowanie za pomocą karty TF
PL
-111-
Przygotuj plik G-code za pomocą LightBurn i zapisz plik w głównym katalogu karty TF. Następnie włóż kartę do gniazda w urządzeniu.
Uwagi:
- Karta TF musi być sformatowana w systemie FAT32.
- Urządzenie odczytuje najnowszy zmodykowany plik z głównego katalogu.
- Obsługiwane są tylko pliki o nazwach w języku angielskim. Obsługiwane rozszerzenia: .NC, .GC.
- Pliki .NC i .GC wygenerowane przez LaserGRBL muszą być skonwertowane za pomocą MKSLaser. Sterownik można zainstalować z plików
dostępnych na karcie TF lub z ocjalnej strony: Mecpow.com.
Aby uzyskać szczegółowe informacje na temat korzystania z aplikacji MKSLaser, należy zapoznać się z
informacjami na karcie TF lub pobrać instrukcję obsługi, odwiedzając poniższe łącze lub skanując poniższy
kod QR.
https://mecpow.com/pages/download-center
4. Wybierz „WiFi Connect”, wprowadź „192.168.4.1” i kliknij „Connect”.
5. Kiedy „Connect” zmieni się na „Disconnect”, oznacza to, że połączenie Wi-Fi zostało pomyślnie nawiązane.
10. Zalecane parametry pracy
PL
-112-
100
100
100
100
100
100
100
100
60
100
2000
2000
2000
1600
600
600
40
600
3500
1000
Powierzchnia musi być zmrożona.
Powierzchnia musi być zmrożona, nie błyszcząca.
Powierzchnia musi być pomalowana.
Powierzchnia musi być zmrożona.
Powierzchnia musi być zmrożona, nie błyszcząca.
Powierzchnia musi być pomalowana.
Tryb
Grawerowanie
Tryb
Grawerowanie
Materiał
Deska drewniana
Bambus
Drewno lite
Skóra
Szkło
Ceramika
Stal nierdzewna
Metal anodowany
Tkanina
Akryl
Moc (%)
Prędkość (mm/min)
Uwagi
Mecpow M1 (3.5W)
100
100
100
100
100
100
100
100
40
100
100
100
100
100
100
3000
3000
3000
2000
800
800
300
800
5000
1500
70
120
1300
100
1500
Cięcie
Materiał
Deska drewniana
Bambus
Drewno lite
Skóra
Szkło
Ceramika
Stal nierdzewna
Metal anodowany
Tkanina
Akryl
Deska 2 mm
Deska 3 mm
Tektura
Skóra
Tkanina
Mecpow M1 (5W)
Moc (%)
Prędkość (mm/min)
Uwagi

PL
-113-
11. Rozwiązywanie problemów
1.Urządzenie się nie włącza.
Możliwe przyczyny:
a.Nieprawidłowe podłączenie do portu zasilania.
b.Luźna wtyczka.
c.Uszkodzony zasilacz.
Rozwiązania:
a.Upewnij się, że kabel zasilający jest prawidłowo podłączony i używasz oryginalnego zasilacza.
b.Sprawdź inne gniazdka.
c.W razie potrzeby skontaktuj się z pomocą techniczną lub wymień zasilacz.
2.Brak połączenia Wi-Fi.
Możliwe przyczyny:
a.Słaby lub niestabilny sygnał Wi-Fi
b.Błędne hasło
c.Nieprawidłowy adres IP
Rozwiązania:
a.Upewnij się, że urządzenie jest połączone z siecią.
b.Sprawdź, czy hasło zostało wpisane poprawnie (uwzględniając wielkość liter).
c.Spróbuj uzyskać dostęp do strony 192.168.4.1 w przeglądarce.
3.Komputer nie widzi urządzenia.
Możliwe przyczyny:
a.Wybrany niewłaściwy port COM.
b.System Windows 7/8 bez odpowiedniego sterownika.
Rozwiązania:
a.Zmień port COM.
b.Zainstaluj odpowiedni sterownik dla swojego systemu.
4.Rozmazany grawerunek.
Możliwe przyczyny:
a.Zła odległość ogniskowa
b.Niewłaściwy materiał
c.Nieprawidłowe ustawienia mocy lub prędkości
Rozwiązania:
a.Wyreguluj ostrość za pomocą dźwigni ogniskowania.
b.Upewnij się, że materiał nadaje się do cięcia/grawerowania.
c.Dostosuj moc i prędkość.
5.Uszkodzona soczewka lasera.
Możliwe przyczyny:
a.Brak regularnego czyszczenia (nagromadzenie kurzu)
b.Uszkodzenie zyczne
Rozwiązania:
a.Czyść soczewkę wacikami nasączonymi alkoholem co 20 godzin pracy.
b.W razie uszkodzenia skontaktuj się z producentem Mecpow lub wymień element.
PL
-114-
13. Oświadczenie o zgodności
Ten produkt jest zgodny z normami Wspólnoty Europejskiej.
Ten symbol oznacza, że produkt nadaje się do recyklingu.
Ten symbol wskazuje, że produktu nie należy wyrzucać jako odpadu domowego. Produkt należy
przekazać do punktów selektywnej zbiórki odpadów w celu odzysku i recyklingu urządzeń
elektrycznych i elektronicznych.

EC REP
EC REP SERVICES SL
Calle Gran Via 49,7 DCH.Madrid 28013 Spain
Email: [email protected] Tel: +34682797075
CHENGDU XINHONGJIN TECHNOLOGY CO., LTD.
No. 26, 1/F, Building 3, No. 68, Haichang Road, Huayang Street,
Tianfu New District, Chengdu City, Sichuan, China
www.mecpow.com [email protected]
Hereby, CHENGDU XINHONGJIN TECHNOLOGY CO., LTD declares that the radio equipment type
Laser Engraver M1 is in compliance with Directive 2014/53/EU. The full text of the EU declaration
of conformity is available at the following internet address:
https://cdn.shopify.com/s/files/1/0777/1547/2695/files/EU-DoC-en_US.pdf?v=1753413510
Hiermit erklärt CHENGDU XINHONGJIN TECHNOLOGY CO., LTD, dass der Funkanlagentyp Laser
Engraver M1 der Richtlinie 2014/53/EU entspricht. Der vollständige Text der EU-Konformität-
serklärung ist unter der folgenden Internetadresse verfügbar:
https://cdn.shopify.com/s/files/1/0777/1547/2695/files/EU-DoC-de_DE.pdf?v=1753413510
FCC ID:2BQVW-M1 Made in China
IEC60825-1: 2014