HEARING
AMPLIFIER
Good Voice
Secure
GV-SA0361
User Manual

Table of Contents:
Welcome
Important Guidelines for Optimal Performance
Getting to Know Your Good Voice Secure Hearing Amplifier
Controller
Bluetooth Neckband Earphones
Included Accessories
Care and Maintenance Guidelines
Daily Use of the Good Voice Secure Hearing Amplifier
Extension of Your Wireless Everyday Hearing
Use of External Microphone
In Meetings
When Watching TV
Activating Noise Reduction Modes In Noisy Environments
Instructions for Product Use
Wearing Your Bluetooth Neckband Earphones
Finding the Suitable Ear Tips
Removing Ear Tips
Replacing Ear Tips
When to Discard an Ear Tip
When to Reuse an Ear Tip
How to Use Bluetooth Neckband Earphones
Device Controls
Adjust the Volume
Unlock the Controller
Power Off the Controller
Status and Indicators
Bluetooth Pairing Instructions
Answering Phone Calls
Audio Streaming Bluetooth Devices
Charging Instructions
Charging Your Good Voice Secure Controller
1
3
3
4
4
5
6
7
8
8
8
8
9
9
10
10
10
10
11
11
11
12
13
13
13
13
14
15
16
17
18
18
1

Charging Your Bluetooth Neckband Earphones
Troubleshooting Guide
Symbol Information
Technical Specifications
FCC Warning Statement
Manufacturer Information
Service and Warranty
General Warranty Information
Warranty Period and Coverage
Customer Responsibilities
How to Claim Warranty Service
Out-of-Warranty Cases
Your Warranty Information
Contact Details
19
20
22
23
24
25
26
26
26
27
27
28
29
30
2

Welcome
Thank You for Choosing the Good Voice Secure Hearing Amplifier. We appreciate your purchase
as a greater step toward hearing what MATTERS.
Please thoroughly review this manual before using your Good Voice Secure Hearing Amplifier. It
contains important information on product features, safety precautions, and regulatory guidelines.
Similar to trying on any new devices, it may take some time to get used to the device.
Caution: Please retain this manual for future reference. If you have any questions, please see the
back page for full contact details. Follow the safety information to avoid damage or injury.
Important Guidelines for Optimal Performance
• Ensure the earphones fit securely and comfortably in your ears. Improper fitting may result in
discomfort or reduced performance. Gradually increase the volume to a comfortable level to
avoid discomfort.
• Regularly clean or replace the ear tips as instructed to maintain optimal functionality.
Accumulation of earwax or residue may cause irritation or impair performance.
• To ensure the best performance of your Good Voice devices, use only authentic Good Voice
accessories purchased from authorized dealers.
• This hearing device is intended exclusively for individuals with hearing loss. It is not
recommended for use by individuals with normal hearing.
• Keep the device and all components out of reach of children to prevent choking or accidental
swallowing.
• Remove the earphones immediately if exposed to excessively loud sounds.
• Confirm whether the hearing amplifier can be used in areas where electronics or wireless devices
are restricted (e.g., on aircraft) as they may cause interference.
• Consult your healthcare professional before using the device if you have an active implanted
medical device (e.g. pacemaker).
• The in-built lithium battery can only be replaced by the manufacturer or authorized dealing party.
• Avoid using the hearing devices or charger in areas with oxygen enrichment or a risk of explosion
• This product is NOT waterproof. Avoid exposing it to water or immersing it in any liquid.
• Protect the product from exposure to electromagnetic fields, humidity, smoke, direct sunlight,
fire, and extreme temperatures.
3
Getting to Know Your
Good Voice Secure Hearing Amplifier
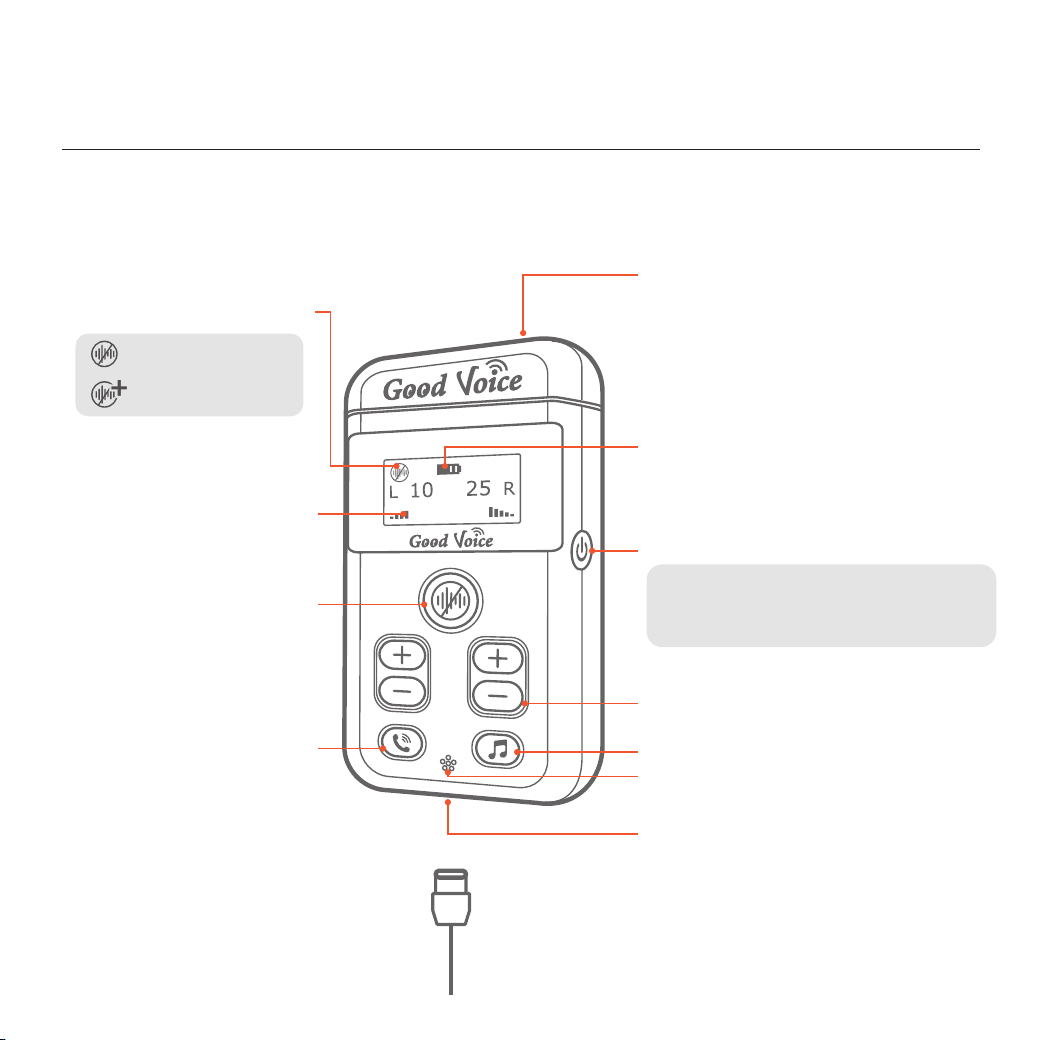
Controller
Standard
External Microphone Port
Type-C Charging Port
Type-C Charging Cable
Power Button
Volume Indicator
L: Left / R: Right
Noise Reduction Mode
Battery Indicator
Noise Reduction Button
Volume Control Buttons
Call Answer Button
Stream Button
Sound Inlet (Microphone)
Power on: Press power button once.
Unlock: Press power button once.
Power off: Hold power button for 3 sec.
Enhanced
4
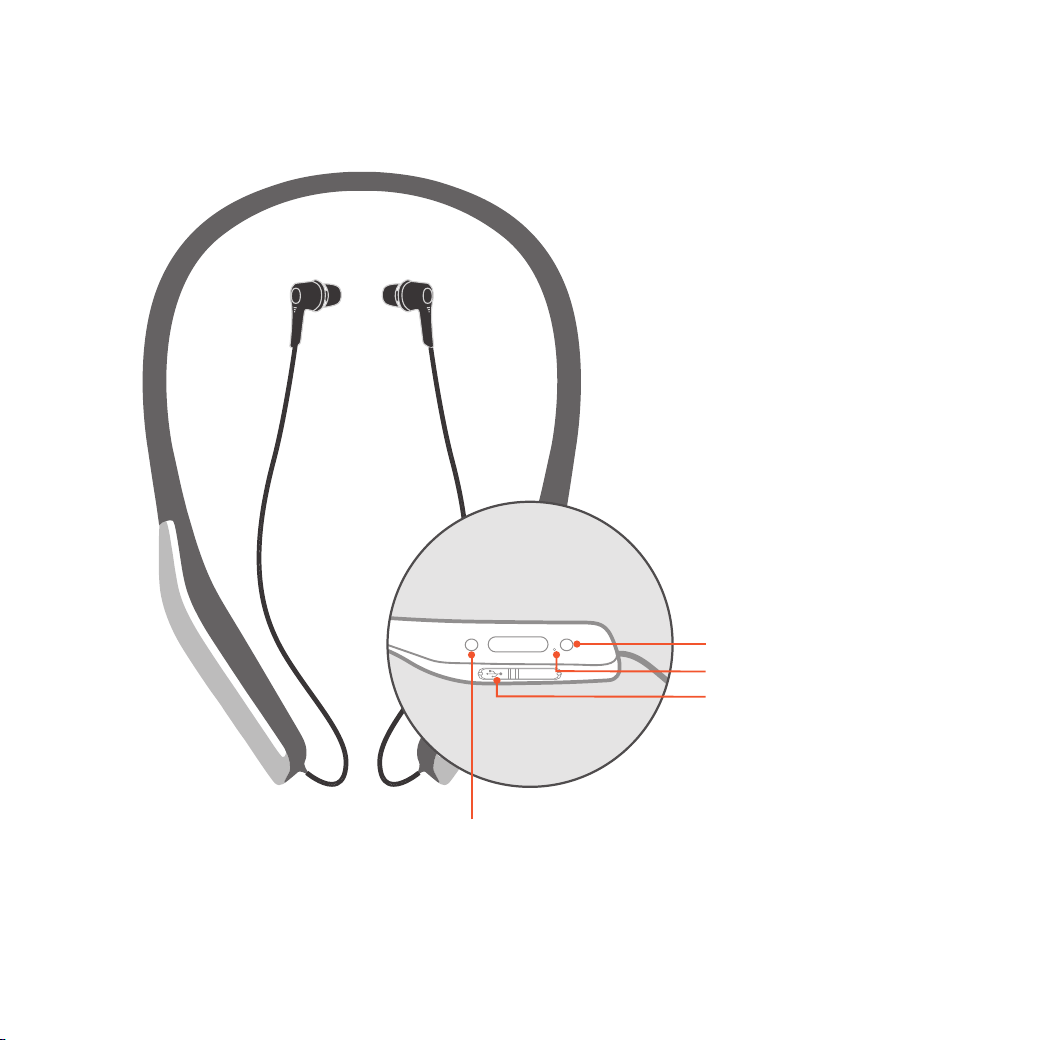
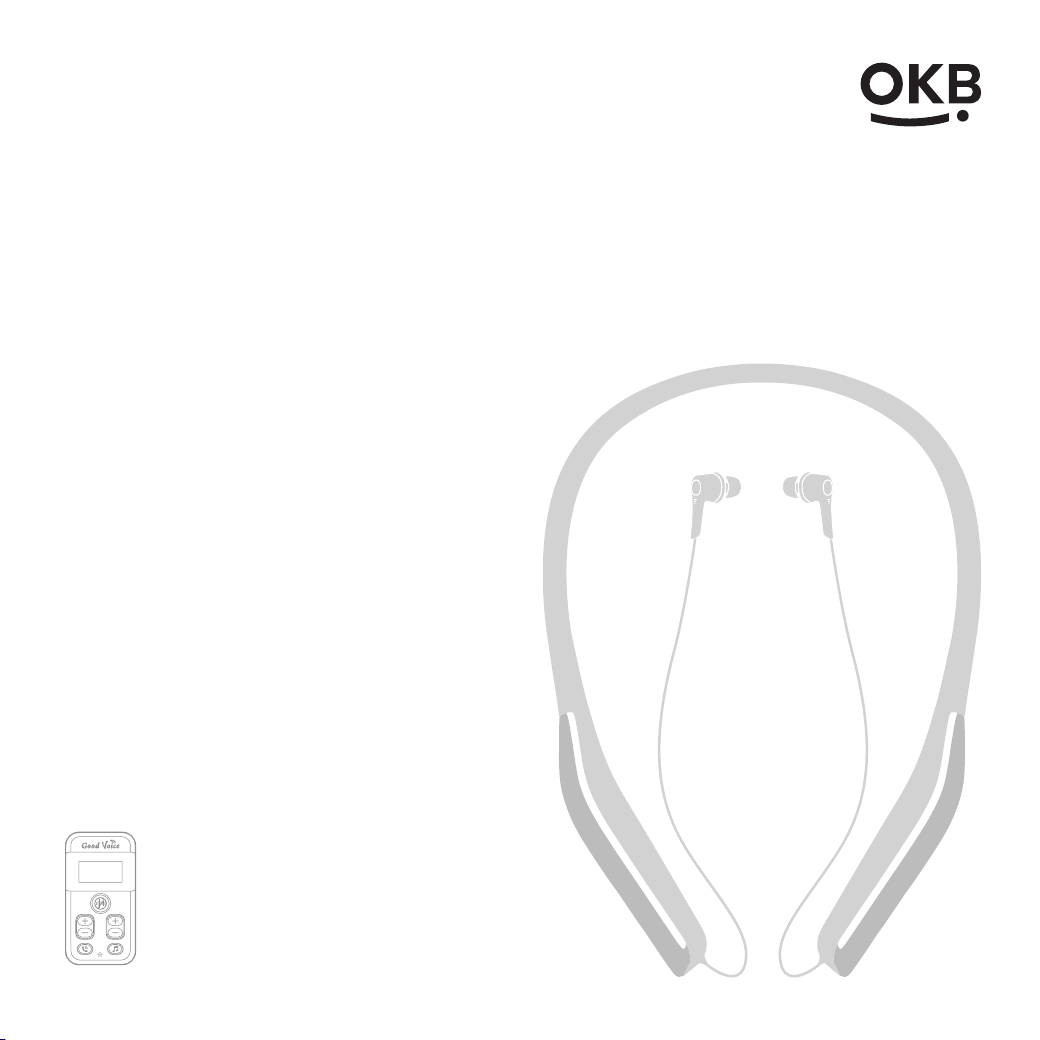
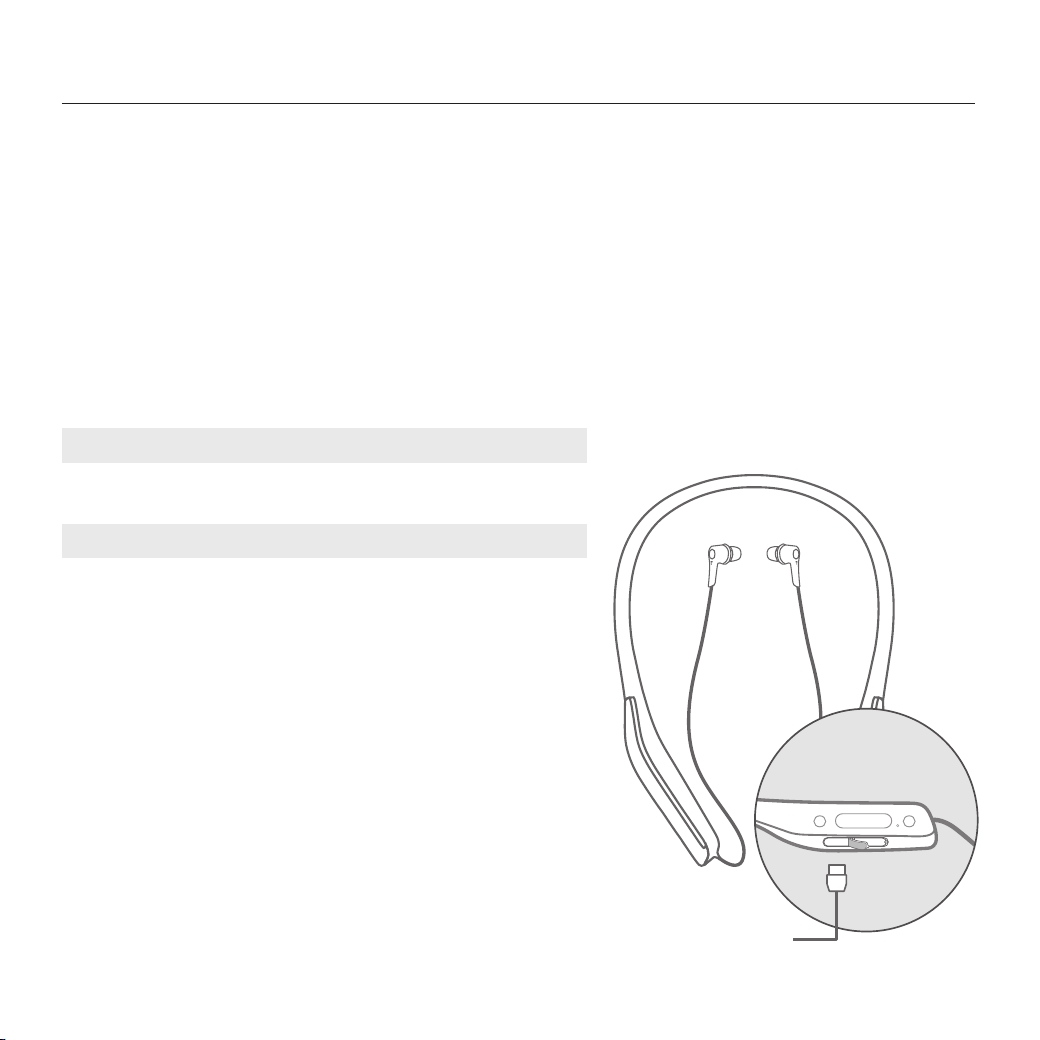
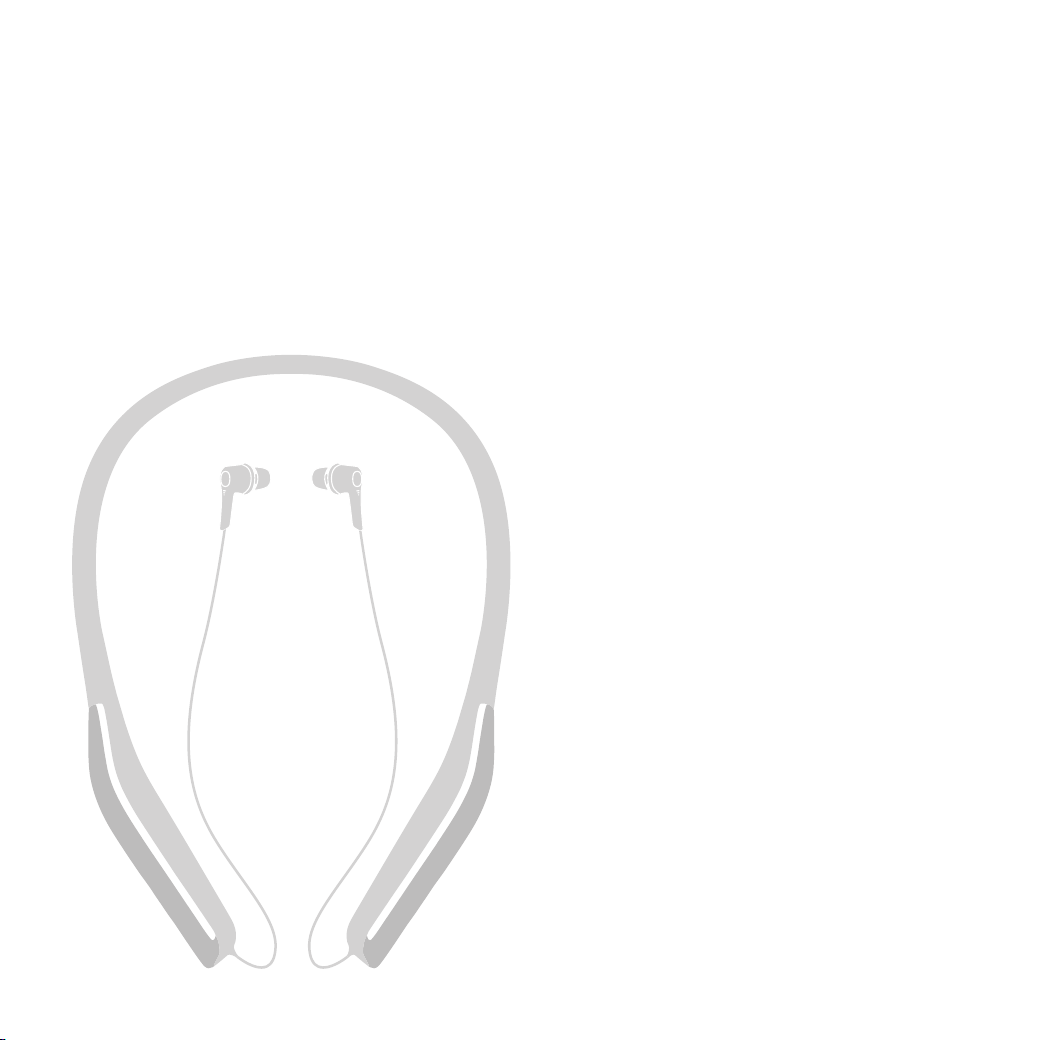
Bluetooth Neckband Earphones
Power Button
Charging Port
on/off
M
Note: The included Bluetooth earphones
are exclusively designed for pairing with
the Good Voice Secure controller.
Indicator Light
M button
5
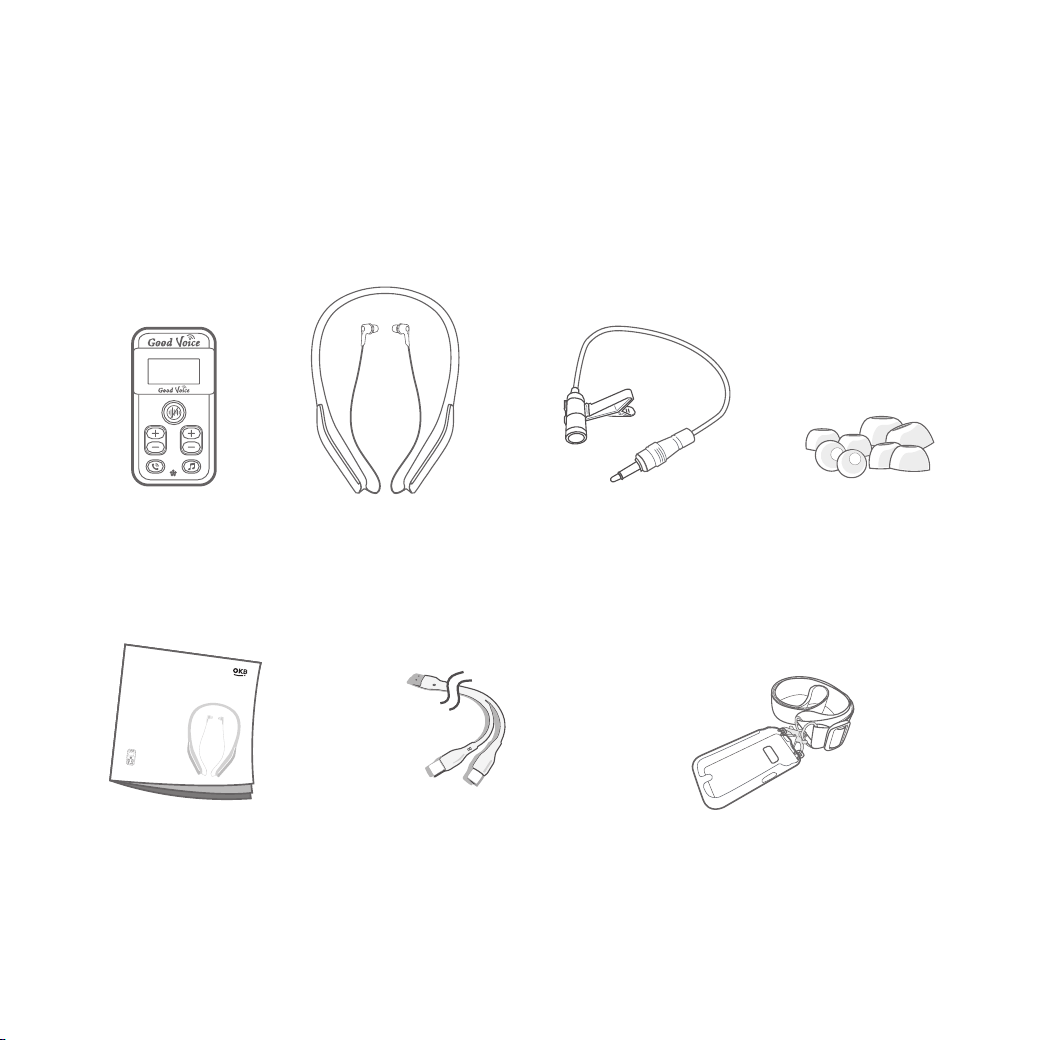
Included Accessories
Please ensure all the following items are included in the package. If any of the following
accessories are missing, please see the back page for full contact details.
Controller
Bluetooth Neckband
Earphones
External Microphone Replacement
Ear Tips
User Manual Charging Cable
(USB-A to Dual Type-C)
Controller
Protection Case
HEARING
AMPLIFIER
Good Voice
Secure
GV-SA0361
User Manual
6

Care and Maintenance Guidelines
To maximize the life of your rechargeable Good Voice Secure Hearing Amplifier batteries, do not
store the devices for extended periods without recharging them. Recharge at least once every six
months if it is not used.
• Avoid storing the hearing device in extreme temperatures or harsh weather conditions to
prevent battery deterioration.
• “Enhanced Noise Reduction Mode” reduces environmental sound awareness. Avoid using
this mode when full awareness of the user's surroundings is necessary.
• Do not expose the hearing device to sand, dust, or other fine particulates, as this may cause
permanent damage to the device.
• Store and charge your devices in a dry location. Prolonged exposure to moisture can harm the
hearing device.
• Avoid using a hairdryer or other heating devices to dry the hearing device as excessive heat
may cause damage.
• Clean the hearing device as instructed to prevent earwax or residue buildup for maximum
product performance.
• To prevent a voided warranty, do not attempt to repair, disassemble, or modify the product.
• When using neckband earphones, please handle them with care and avoid pulling on the
connecting cable, as this may result in poor connectivity.
7
Daily Use of the Good Voice Secure Hearing Amplifier
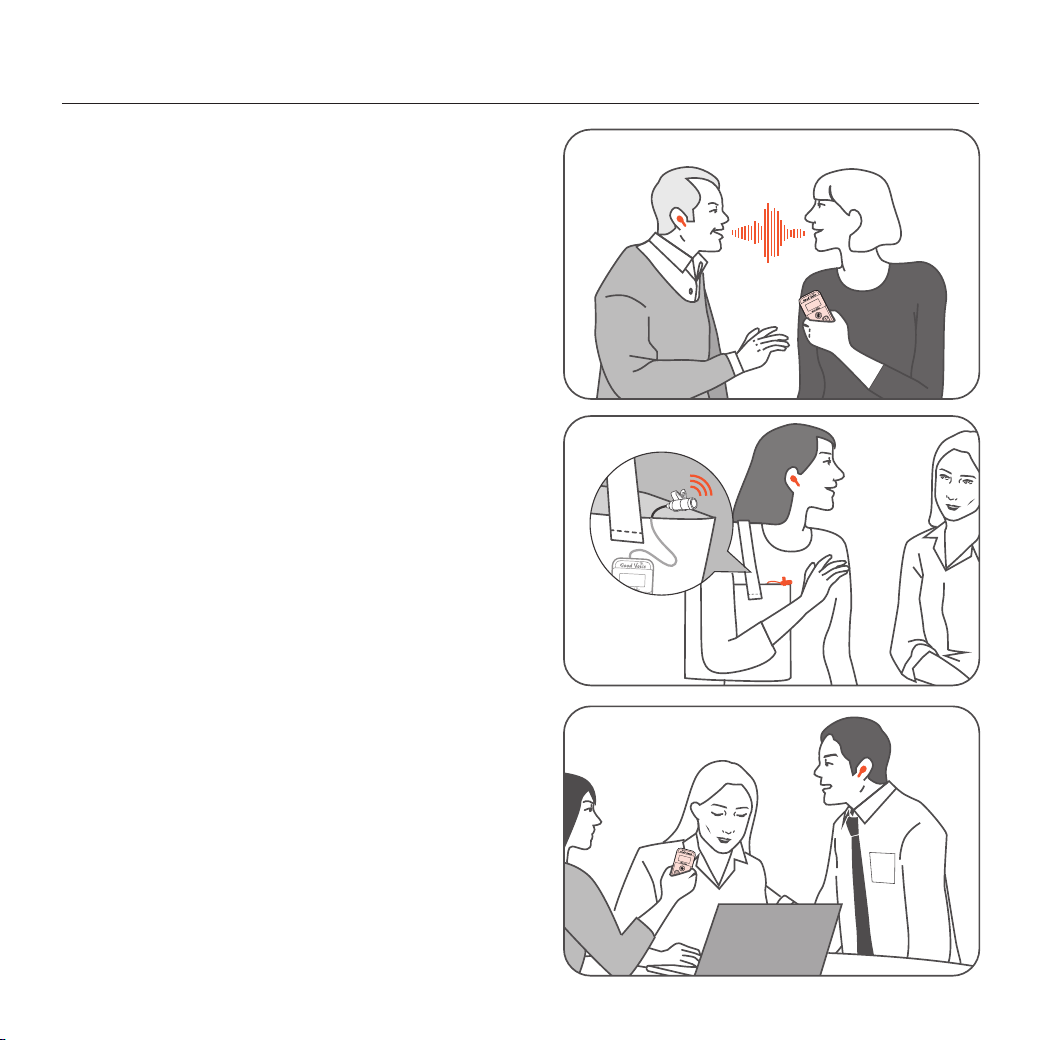
Extension of Your
Wireless Everyday Hearing
The device is suitable for various environments,
ensuring seamless communication with others
and helping users to hear WHAT MATTERS
Consider the controller as an extension of your
ears. For optimal audio reception, position the
controller close to the speaker or sound source in
different situations.
In Meetings
For effective participation and easier follow-up
on conversations, place the controller in the
center of the conference room table to capture
discussions clearly.
Use of External Microphone
When using the device outdoors, it is
recommended to use the included external
microphone and clip it to your clothing or bag to
avoid noise interference caused by friction when
placing the controller in your pocket or bag.
8
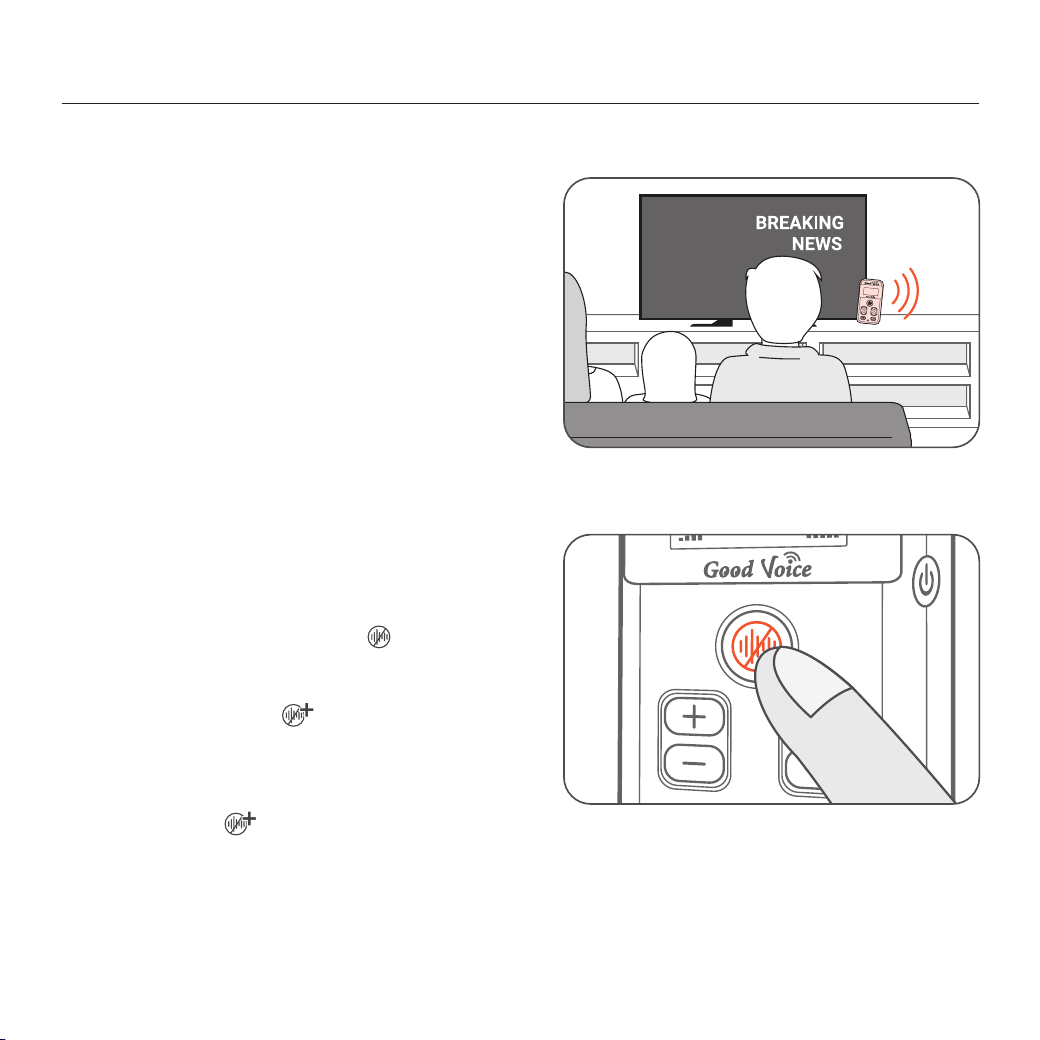
When Watching TV
Position the controller near the TV to enhance
audio clarity.
If the controller cannot be placed close to the
sound source, adjust the volume for each ear
to achieve optimal audio performance.
Activating Noise Reduction Modes
In Noisy Environments
Daily Use of the Good Voice Secure Hearing Amplifier
Press the noise reduction button once to
activate “Standard Noise Reduction Mode”
Press the button again to switch to “Enhanced
Noise Reduction Mode”
Press the button once more to return to
Regular Mode.
Caution: Avoid using “Enhanced Noise
Reduction Mode” when full awareness of
your surroundings is needed for safety or
situational awareness.
9
Instructions for Product Use
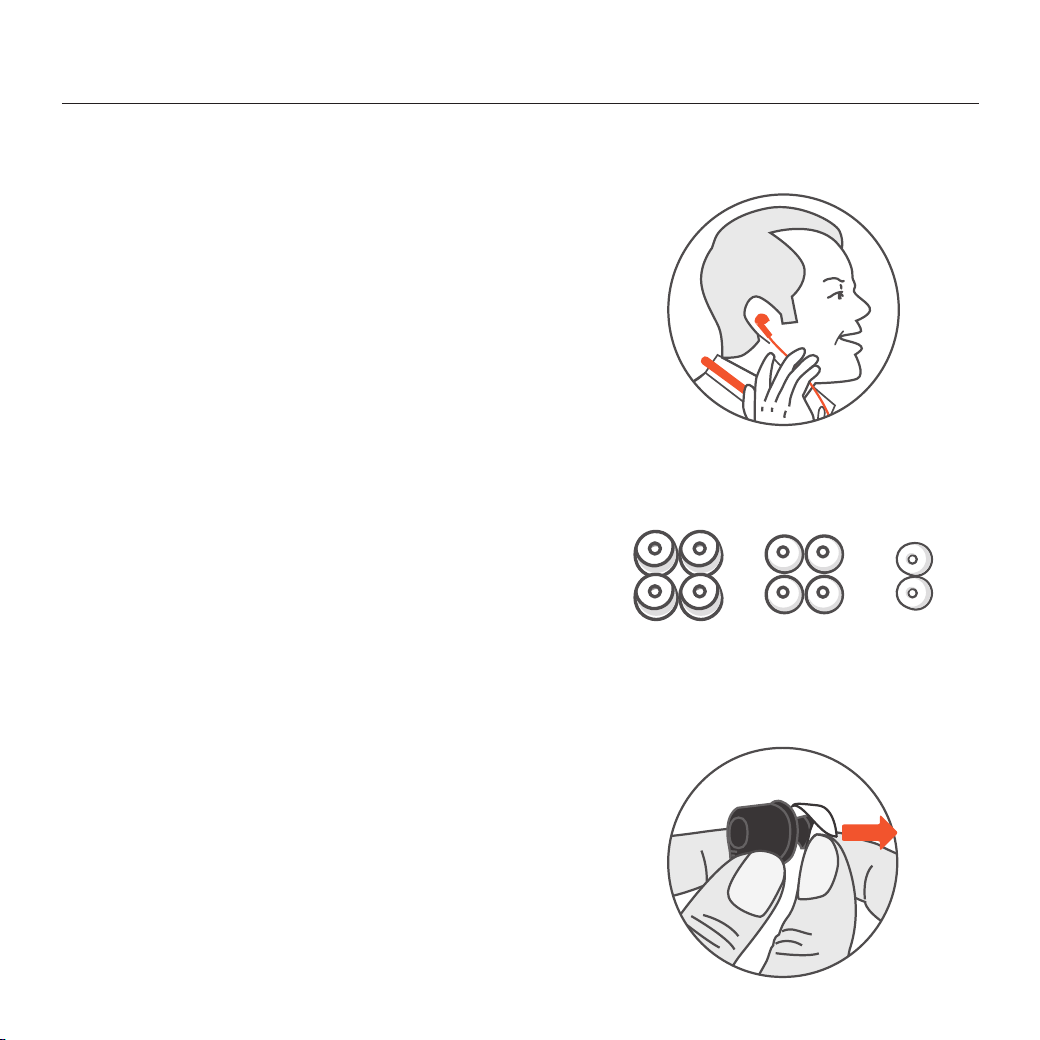
Wearing Your Bluetooth neckband earphones
1. Consider practicing in front of a mirror
2. Gently place the Bluetooth Neckband
Earphones around the back of your neck.
3. Ensure the power button is on your left side.
4. Insert the left and right ear tip into your ears
and adjust for a comfortable fit.
Finding the Suitable Ear Tips
For the best audio performance and hearing
experience, selecting the correct ear tip size is
essential.
The earphones come pre-fitted with medium ear
tips. If the ear tips do not fit your ear comfortably,
consider testing out other ear tip size options.
Choose the ear tip that offers the best combination
of a snug fit and comfort for optimal performance.
Silicone Eartips
L M
S
Removing Ear Tips
1. Hold the earphone securely in one hand.
2. Use the other hand to grasp the ear tip.
3. Gently pull the ear tip away from the
earphone to detach.
10

Replacing Ear Tips
1. Align the chosen ear tip with the sound
outlet of the earphone.
2. Press the ear tip firmly onto the sound
outlet.
3. Ensure the ear tip is fully and securely
mounted on the sound outlet before use.
Instructions for Product Use
When to Discard an Ear Tip
Dispose of the ear tips when:
• Ear tips appear noticeably dirty or stained.
• Signs of wear and tear, such as cracks or deformation, are visible.
• Ear tips no longer fit securely or comfortably.
When to Reuse an Ear Tip
Ear tips can be reused if they remain intact and show minimal signs of wear or damage. To clean:
• Soak the ear tip in a mixture of dish soap and warm water.
• Rinse thoroughly with clean water.
• Allow the ear tip to dry completely before reattaching it to the earphone.
When to Reuse an Ear Tip
11
Instructions for Product Use
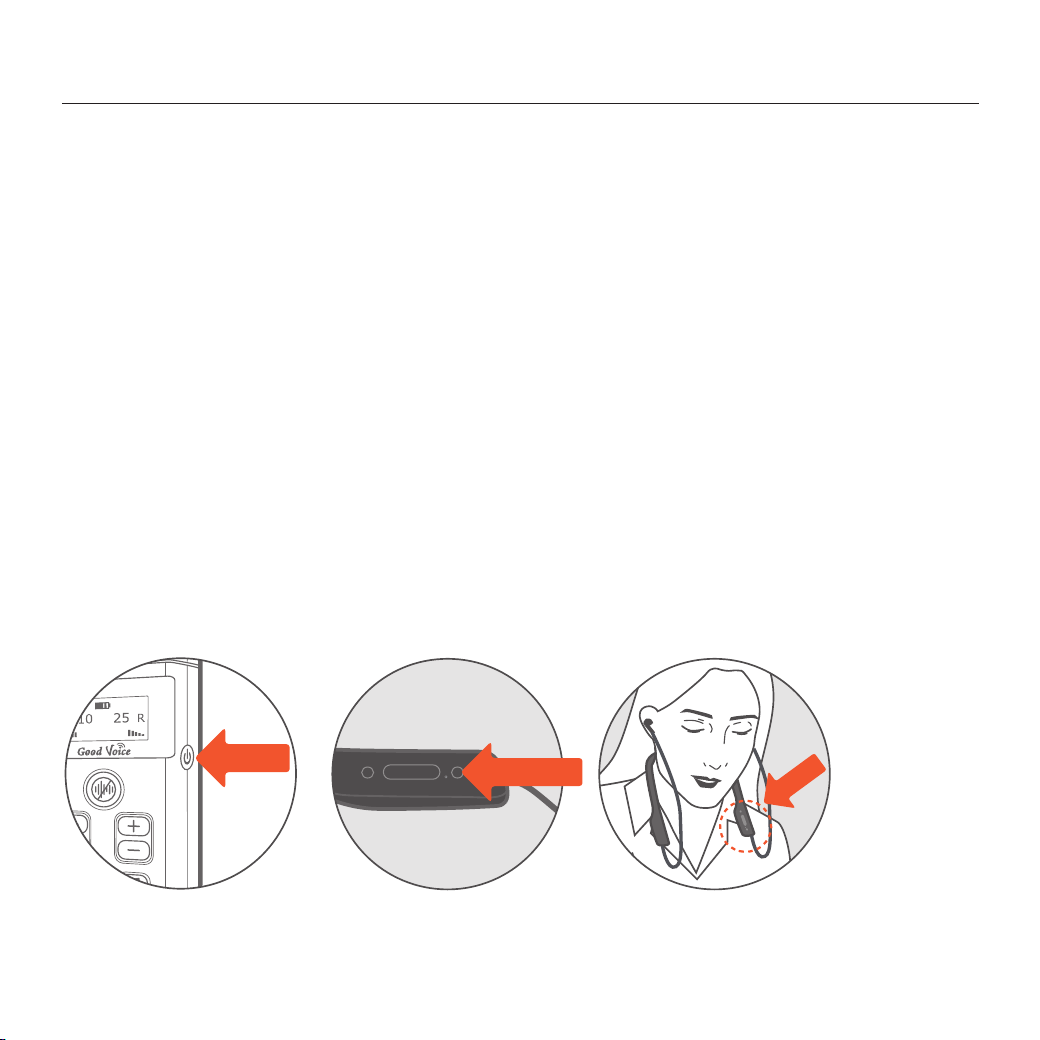
How to Use Bluetooth Neckband Earphones
• Press the power button for 3 seconds to turn on the earphones.
• The controller and earphones are pre-paired before leaving the factory. Once both devices are
powered on, they will automatically attempt to connect to each other.
• If successful, you will hear the "Bluetooth connected" voice prompt, indicating that the
earphones are now connected to the controller.
• Press the power button once to turn on the controller.
1. Turn On the Controller
2. Turn On the Bluetooth Neckband Earphones
• Put on the neckband Bluetooth earphones and make sure the power button is on your left
side-this means you're wearing them correctly. Then, put the left and right ear tips in your
ears.
3. Wear the Earphones
Press Once
on/off
M
Press 3 Seconds
on/off
M
Left Side
12
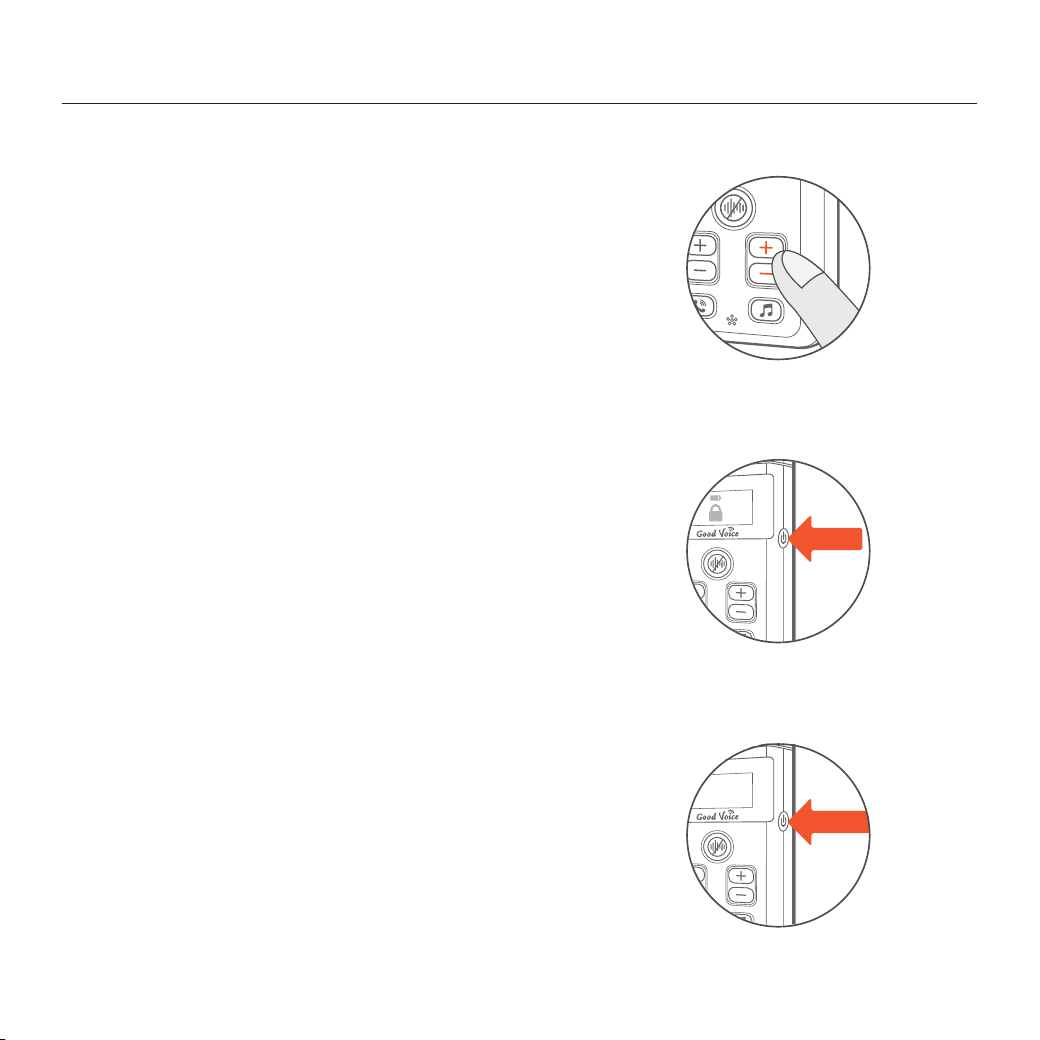
Device Controls
Adjust the Volume
• Use the volume buttons on the controller to adjust the
volume for the left and right ear correspondingly.
• Press “+” to increase the volume
• Press “-“ to decrease the volume
Unlock the Controller
• If the Controller is inactive for 60 seconds, it will
automatically lock to prevent accidental pressing of
the volume buttons.
• To unlock, press the power button.
Power Off the Controller
• Press the power button for 3 seconds.
Press for
3 Seconds
POWER OFF
LOCK
Press Once
13
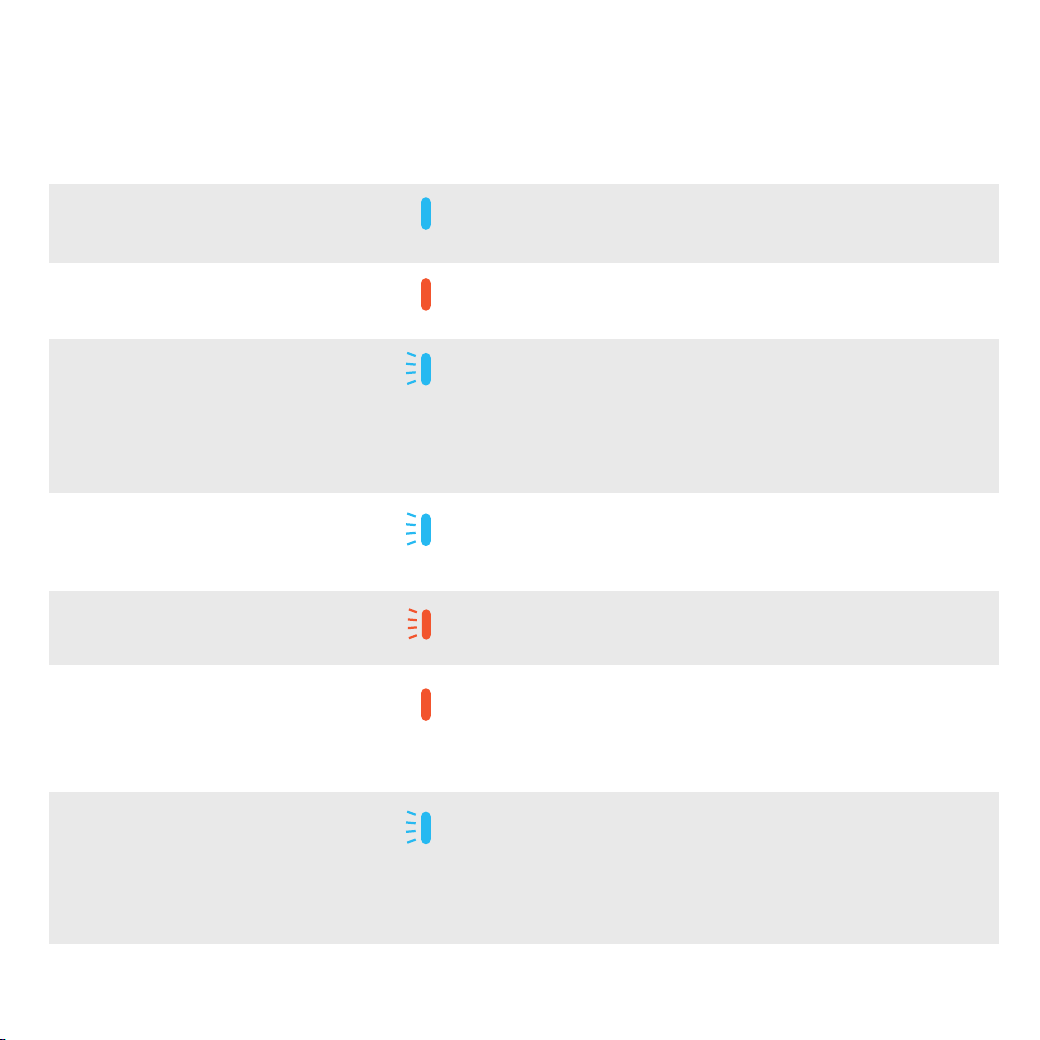
Status and Indicators
Status
Description Indicator Light Notification Sound Remark
Press and Hold the Power
Button for 3 Seconds.
Press the power button on
Bluetooth Neckband
Earphones for 3 seconds
Power on
Power Off
Low battery
Search for the
Controller's
Bluetooth
signal
Bluetooth
connected
Power on the Bluetooth
neckband earphones
When the controller and the
earphones are connected
When the battery is low
The blue light on the
Bluetooth earphones
flashes twice quickly.
"Power on"
Amber light stays on
3 seconds
The blue light flashes
twice at regular
intervals, indicating it
is in pairing mode.
The blue light on the
Bluetooth earphones
flashes once every 5
seconds.
Amber light flashes "Battery Low"
When both the bluetooth
earphones and the
controller are on, they will
automatically connect to
each other, followed by a
"Bluetooth Connected"
prompt.
Please recharge the
bluetooth earphones.
Charging
When the bluetooth
earphones are connected to
the power source
Amber light stays on Make sure the amber
light stays on when
charging the earphones,
indicating that the cable
is properly plugged.
Disconnected
Case 1: When the controller
is turned off
Case 2: The controller and
earphones are beyond the
connection range (26 feet/8
meters in open space).
The blue light
flashes twice quickly
every 3 seconds.
"Bluetooth
Disconnected"
The Bluetooth connected
range is around 26 feet (8
meters) in open spaces.
14
Bluetooth Pairing Instructions
Pairing your Good Voice Secure Hearing Amplifier
with your Mobile or Bluetooth Devices
Follow these steps during the initial use or
if the connection is interrupted:
• Ensure the controller is powered on.
• Confirm that the phone’s Bluetooth is enabled.
• Pair the device following the instructions provided in this
manual.
Once the setup is complete, the device will automatically
reconnect whenever the controller is powered on and the
phone’s Bluetooth is active.
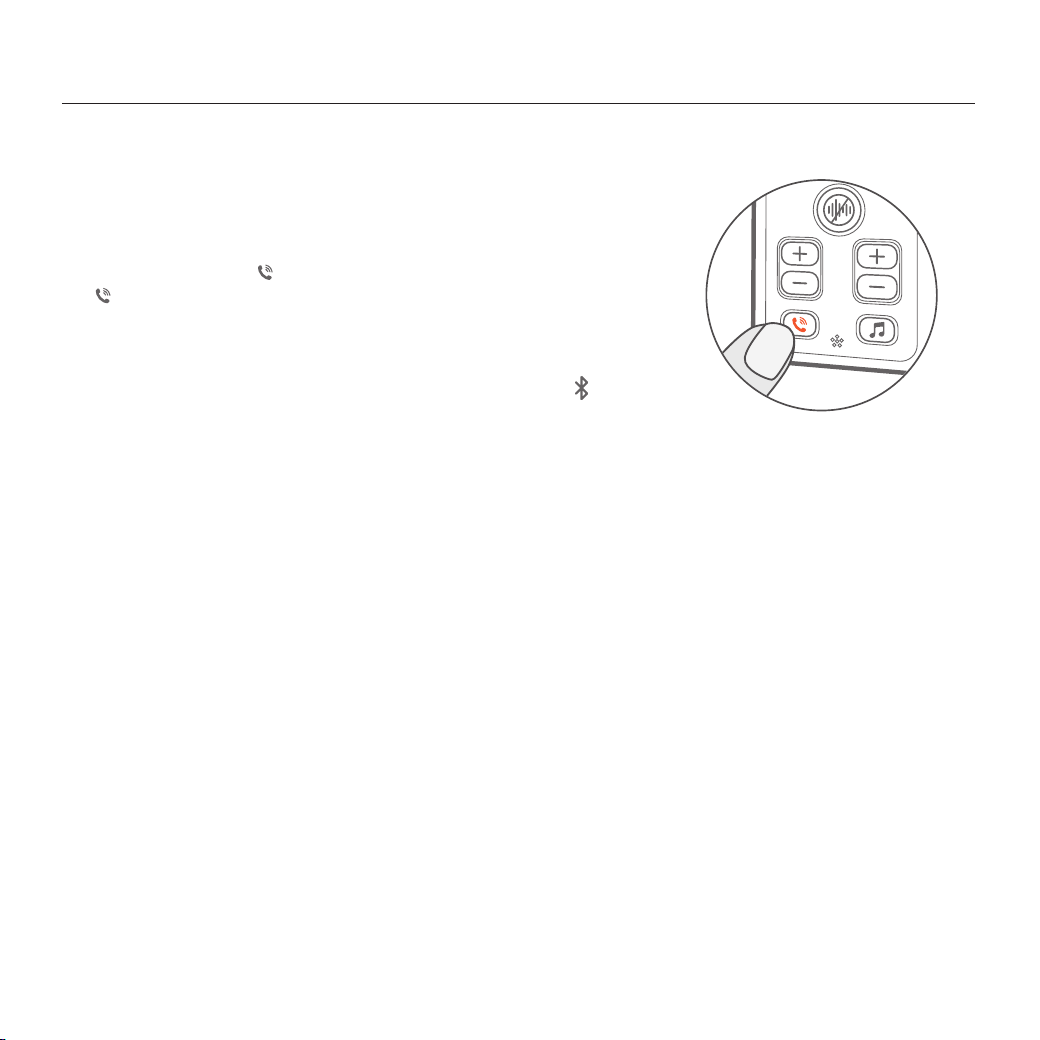
• Press and hold the button for about 5 seconds, then release.
“ Pairing” will appear on the screen.
• Turn on the Bluetooth function on your phone.
• "OK Good Voice" will appear on your phone for connection.
• After a successful connection, the Bluetooth symbol
will appear on the screen of the Controller.
15
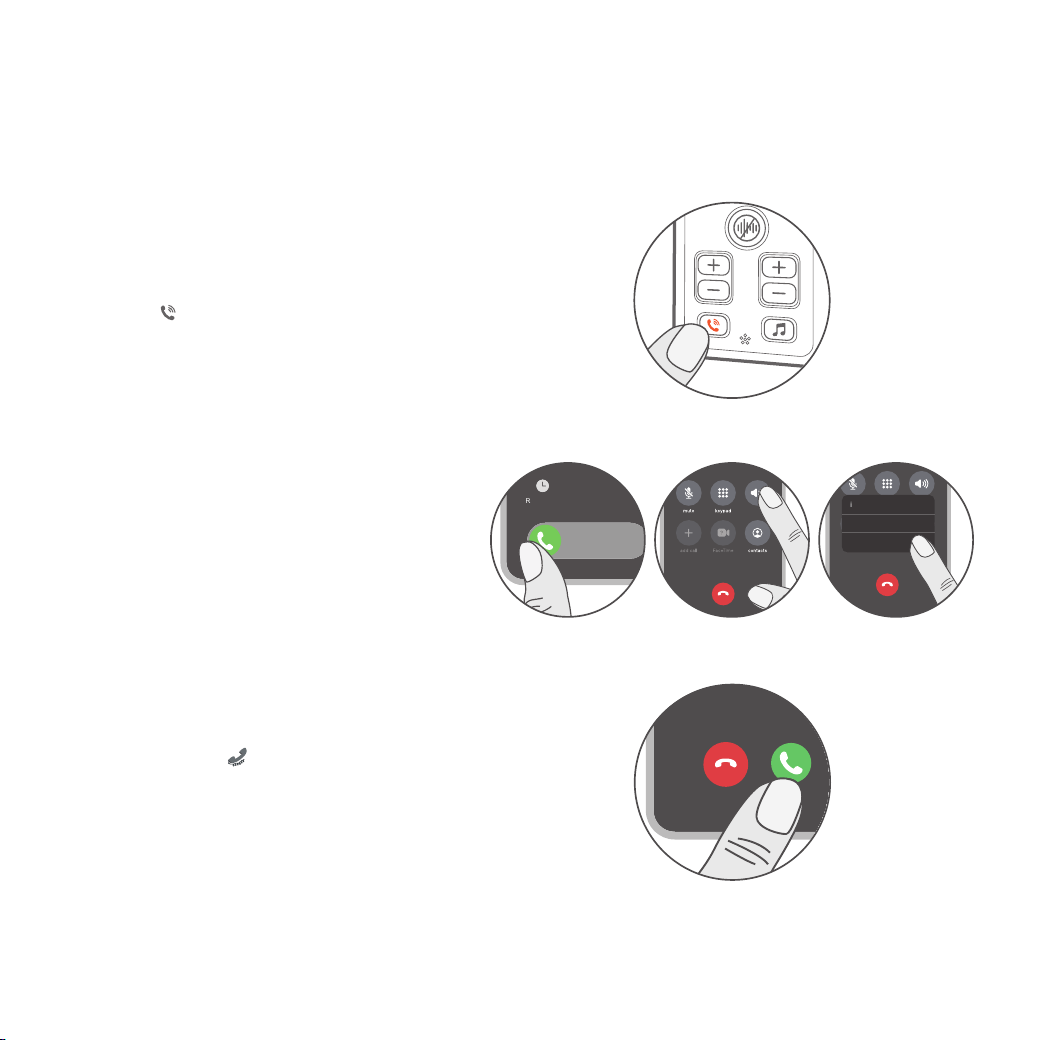
Answering Phone Calls
IOS
Answer the phone call via your iPhone
- Swipe right or Tap "Accept" to
answer the call
- Tap "audio"
- Choose “OK Good Voice”
Android
Answer from your Android phone
- Swipe or Tap
📞
/ "Accept" icons to
answer the call from your Android
phone. Do not answer the phone from
the controller directly.
- For Android systems, calls can only be
answered via the phone, not through
the device.
Answer directly from the controller.
- Press on the controller.
audio
audio
iPhone
Speaker
OK Good Voice
Slide to answer
MessageRemind Me
16
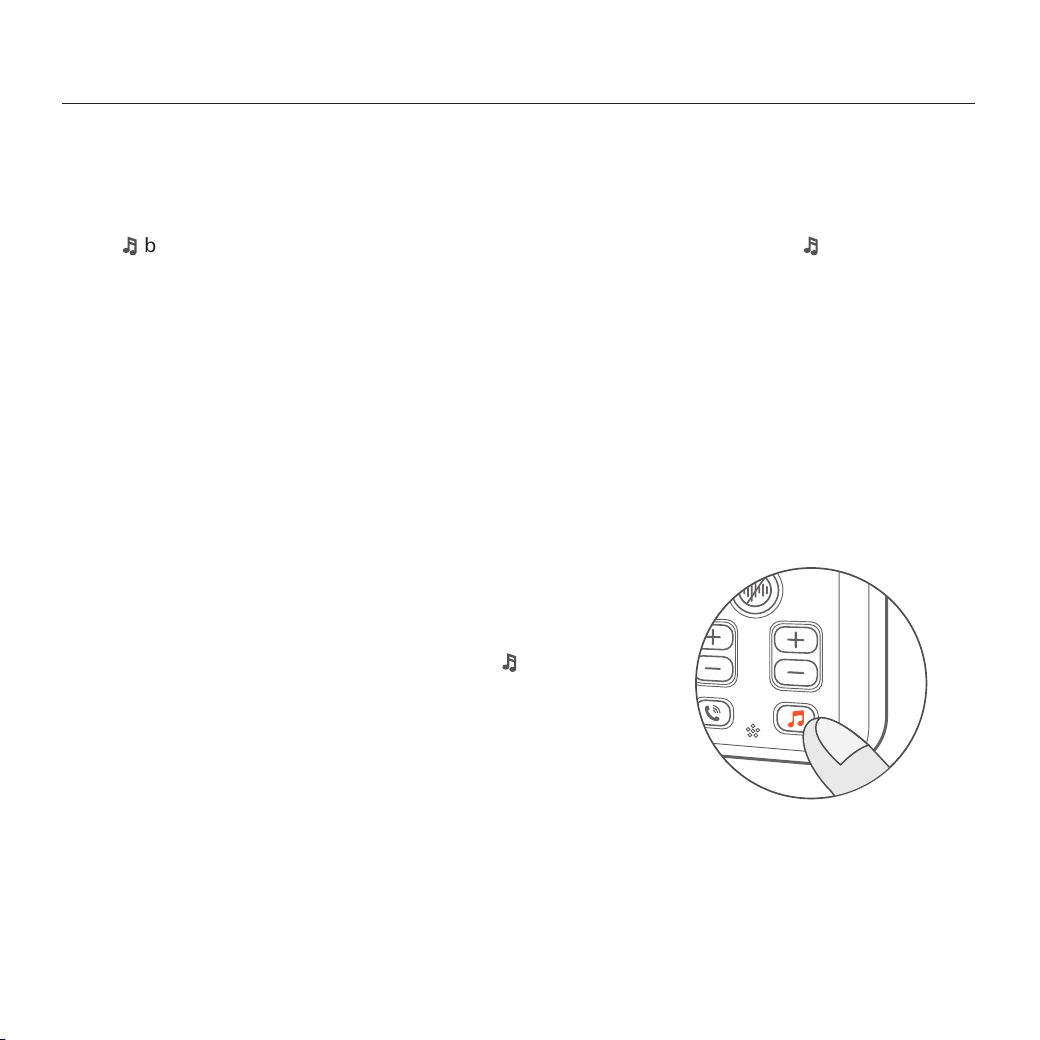
Audio Streaming Bluetooth Devices
Bluetooth Pairing Instructions
After connecting to your phone or tablet, press
🎵
button
on the controller to switch to music mode. Your Good
Voice hearing aid amplifies audio for clear listening while
enjoying videos or music.
Enjoying Music or Videos from Your Mobile Devices
Press
🎵
button once and release the button. The controller's screen will display
🎵
, indicating
you're ready to enjoy audio from both music and videos on your Bluetooth device. Press the button
again to return to regular mode.
General Warnings:
• During Bluetooth streaming, ensure that the volume is adjusted directly on the Bluetooth device.
• IOS 6 or higher is required to use the controller with an iPhone, and Android 5 or later for Android
phones. Please ensure your device meets the required operation system version before use.
• Bluetooth streaming will lead to higher power consumption on your Good Voice device.
17
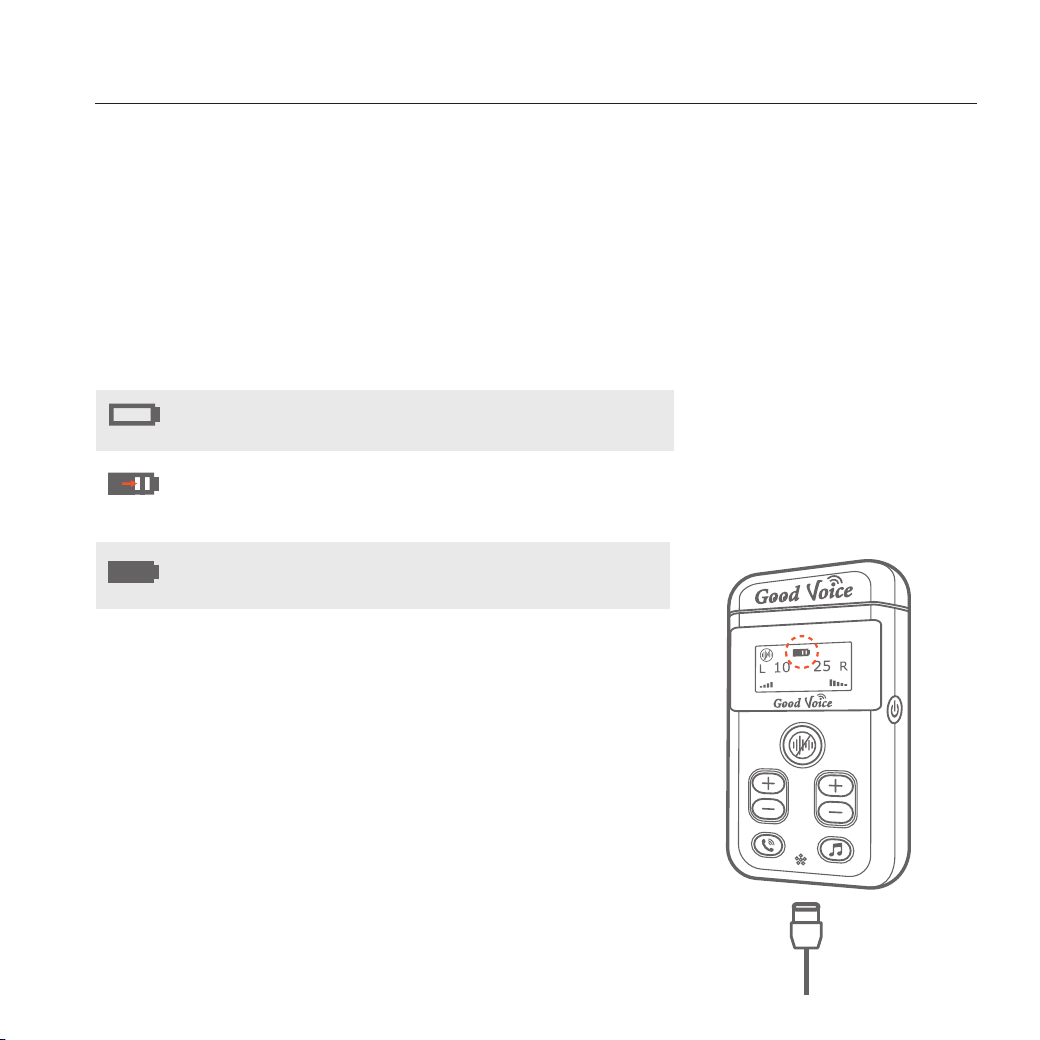
Charging Your Good Voice Secure Controller
Charging Instructions
The controller is designed to provide a battery life of up to 10 hours on a full charge.
A fully depleted controller takes approximately 2.5 hours to recharge completely.
Controller
Controller Battery Status Indicators
The Good Voice Controller's battery capacity
gradually decreases with use. Lithium-ion batteries
lose a small amount of capacity with each full charge
cycle, which consists of a complete discharge and
recharge. After 300 cycles, the battery retains 80% of
its capacity. However, it can be recharged at any time
without needing a full discharge, ensuring
long-lasting performance.
Battery Life
Low Battery
Charging
Charging
Completed
The empty battery icon will flash on
the screen.
The battery icon will display the
current battery level and flash while
charging.
The battery icon will stop flashing,
indicating the charge is complete.
18
Charging Your Bluetooth Neckband Earphones
Charging Instructions
Fully charged earphones provide up to 8 hours of use. A 5-minute charge provides approximately
20 minutes of use.
Charging the Earphones
• Connect the charging cable to a power source.
• Open the cap of the charging port, then securely plug the cable into the earphones’ charging port.
• A solid amber indicator light will confirm that the earphones are charging properly.
Earphones Battery Status Indicators
• Use the supplied dual USB-C cable to connect the
devices.
• Plug one end of the cable into the USB-C port
located at the bottom of the controller.
• Connect the other end to the charging port of the
neckband earphones.
• Insert the larger end of the cable into the included
USB wall adapter (supports 5V/1.2A output).
Important: Always use the USB cable provided in the
packaging to ensure safe and proper charging.
Additional Notes:
on/off
M
Open the cap of the charging
port, and charge with Type-C.
Solid amber light on.
Solid amber light for 10 minutes,
then turns off.
Pulsing amber light, then power off.
Charging
Fully Charged
Low Battery
19
Troubleshooting Guide
If you encounter any issues with your device, please try the following steps:
No.
Description
Possible Cause
Solution
The Earphones can not connect to the
Controller.
1. Earphones were replaced with a new set.
2. The Bluetooth memory is cleared.
3. The connection between the controller and
earphones are interrupted.
Step1:
Power on the controller.
Step2:
Hold the
🎵
button on the controller for 5
seconds, then release. The “
🎧
pairing” icon will
appear on the screen.
Step 3:
Turn on the earphones. The blue indicator light
on the earphones will flash, you will hear the
"Power on" prompt.
Step 4:
Press and hold the M button on the earphone
until the amber and blue indicator lights start
flashing alternately.
Step 5.
Wait for pairing, once paired, the
🎧
icon will
appear on the screen of Controller, and you will
hear the "Bluetooth connected" prompt.
Loud feedback noise
Earphones are too close to the controller.
Increase the distance between the earphones
and the controller, especially when the volume
is set to high.
1 2
20

Troubleshooting Guide
Controller cannot connect to mobile phone
The Controller is already paired with
another phone
Disable Bluetooth on the currently paired
device, then reconnect the controller to your
mobile phone. Follow the instructions in the
section "Bluetooth Pairing Instructions" on
page 15.
3
No sound in phone calls or audio streaming mode, even
when the controller is connected to the Bluetooth device.
The Bluetooth device is muted.
During Bluetooth streaming, ensure that the volume is
adjusted directly on the connected Bluetooth device.
4
If the issue persists or cannot be resolved with the steps above, please
contact the retailer where you purchased the product for further assistance.
21
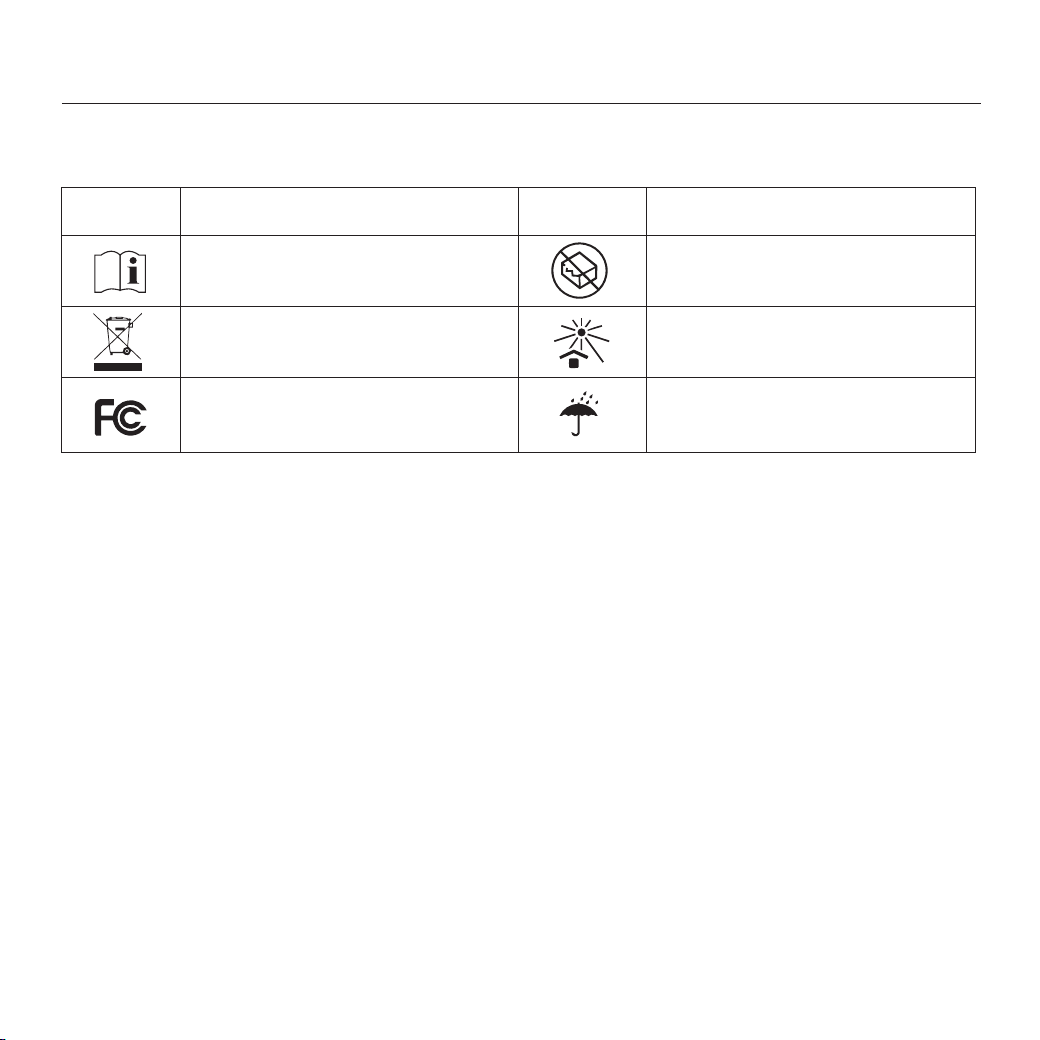
Symbol Information
Troubleshooting Guide
Symbol
Description
Consult instructions for use.
Dispose of electronics in accordance with
local regulations.
Do not use it if packaging is damaged.
Symbol Description
Keep away from direct sunlight
Protected from moisture
Federal Communications
Commission symbol
22
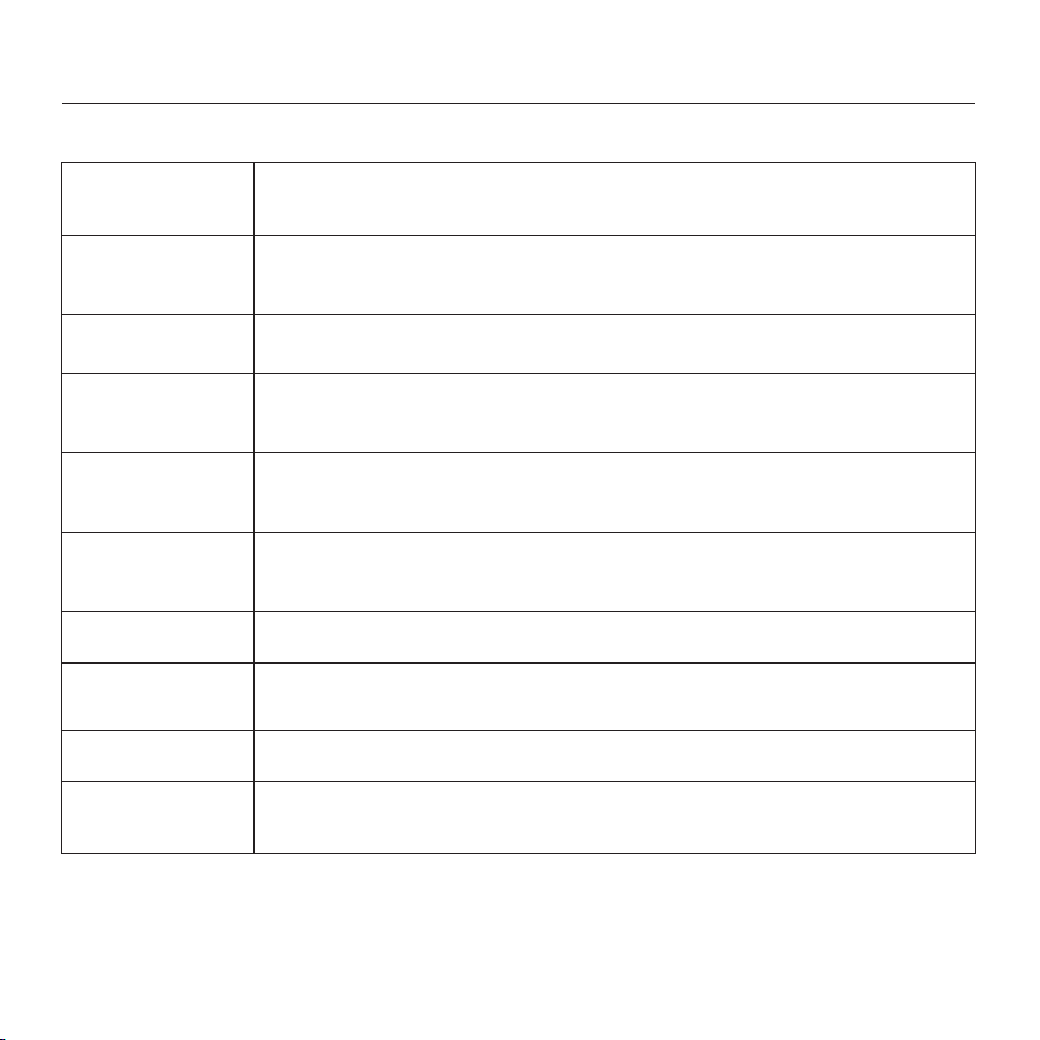
Technical Specifications
Design
Audio Specs
Compatibility
Max Output: 120dB (OSPL90)
Frequency Range (Earphones): 200~5.8KHz
Bluetooth Version: 5.0
Battery Life
Controller: Approx. 10 hours
Bluetooth neckband earphones: Approx. 8 hours
Neckband-style wireless earphones featuring a lightweight, ergonomic design
Color: Mirror Chrome
Charging Time
Controller: Approx. 2-2.5 hours
Bluetooth neckband earphones: Approx. 2 hours
Battery Capacity
Controller: 1400mAh / 3.7V
Bluetooth neckband earphones: 280mAh / 3.7V
Charging Port
Type-C
Operating Conditions
Temperature: 32°F to 104°F (0°C to 40°C)
Humidity: 5% to 95% RH
Output 3.5mm Auxiliary Output x1
Storage Conditions
Temperature: 14°F to 122°F (-10°C to 50°C)
Humidity: 5% to 95% RH
23

FCC Warning Statement
Changes or modifications not expressly approved by the party responsible for compliance could
void the user's authority to operate the equipment.
This device complies with Part 15 of the FCC Rules. Operation is subject to the following two
conditions: (1) this device may not cause harmful interference, and (2) this device must accept any
interference received, including interference that may cause undesired operation
This device has been tested and found to comply with the limits for a Class B digital device,
pursuant to Part 15 of the FCC Rules. These limits are designed to provide reasonable protection
against harmful interference in a residential installation. This device generates, uses and can
radiate radio frequency energy and, if not installed and used in accordance with the instructions,
may cause harmful interference to radio communications.
However, there is no guarantee that interference will not occur in a particular installation. If this
device does cause harmful interference to radio or television reception, which can be determined
by turning the device off and on, the user is encouraged to try to correct the interference by one or
more of the following measures:
• Reorient or relocate the receiving antenna.
• Increase the separation between the device and receiver.
• Connect the device into an outlet on a circuit different from that to which the receiver is
connected.
• Consult the dealer or an experienced radio/TV technician for help.
24

Manufacturer Information
OK Biotech Co., Ltd.
Address: No. 91, Sec. 2, Gongdao 5th Rd., Hsinchu City 30070, Taiwan (ROC)
Website: www.okbiotech.com
Tel: +886-3-5160258
Made in Taiwan
25

Service and Warranty
General Warranty Information:
OKB Hearing warrants the product to be free from defects in workmanship and materials for the
duration of the warranty period. If the product fails during normal and proper use within the
warranty period, OKB Hearing may, at its discretion, repair or replace the defective parts or the
product itself with new or reconditioned parts/products of equal or superior functionality.
The warranty applies only to products newly manufactured at the time of purchase and does not
cover used, refurbished, or manufacturing seconds. Please retain your original purchase invoice
for warranty claims.
Warranty Period and Coverage:
• 30-Day Money-Back Guarantee: Begins on the delivery date and expires on the 31st day.
• 1-Year Manufacturer’s Warranty: Starts on the delivery date and lasts 365 days. For
replacements, the warranty duration is calculated from the original purchase date.
• If proof of purchase is unavailable, the manufacturer’s recorded date will be used as the
warranty start date.
This warranty covers all OKB Hearing and accessories purchased directly from OKB Hearing and
includes defects in materials or workmanship under normal use.
26

This warranty excludes damage or failure caused by:
• Improper installation, operation, cleaning, or maintenance
• Tampering, unauthorized repairs, or modifications
• Loss or theft
• Wear and tear, including changes in texture, color, or finish
• External factors such as accidents, natural disasters, or electrical faults
• Use outside recommended operational conditions as stated in the user manual
Customer Responsibilities:
• Read the user manual and follow instructions carefully.
• Avoid overcharging; unplug the product once fully charged.
• Keep the original packaging for transportation if servicing is required.
How to Claim Warranty Service:
1. Contact customer support in the back page with a description of the issue.
2. Provide proof of purchase.
3. Follow instructions for sending the product for evaluation.
Service and Warranty
27

Out-of-Warranty Cases:
If the warranty period has expired or exclusions apply, OKB Hearing will offer a service estimate.
Repairs will proceed only after customer approval and payment.
International Warranty:
The warranty applies only in the country of purchase.
Limitation of Liability:
OKB Hearing is not responsible for incidental or consequential damages beyond the scope of this
warranty.
28

Your Warranty Information
Thank You for Choosing OKB Hearing. This warranty is valid for a period of 12 months from the date
of purchase. To ensure smooth service, please keep your warranty card in a safe place.
• Name:
• Address:
• Phone:
• E-mail:
• Product Serial Number:
• Date of Purchase:
• Purchased from (Dealer’s Name)
29

Contact Details
Email: support@okbhearing.com
Phone: +1 626-225-0621
Business Hours: 9:00 AM – 6:00 PM (PST) | Monday - Friday
Business Address: 414C Cloverleaf Dr, Baldwin Park, CA 91706
30
GV-SA0361
10-81-0377-0203 V1-MAY25