
CANDY HOOVER GROUP S.R.L. • Via Comolli 16 • 20861 Brugherio (MB) Italy
BUILT-IN ELECTRIC OVENS
INSTALLATION ADVICES - INSTRUCTIONS FOR THE USE
GB
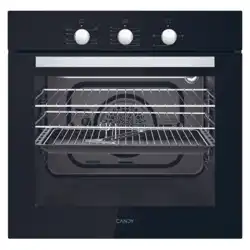
• FCEM663N 19
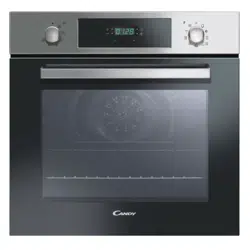
• FCEM662DN 19
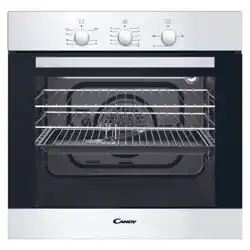
• FCES663X 19
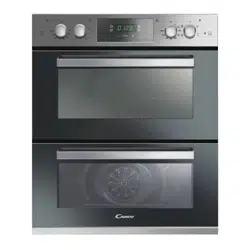
• FCEM663X 19

22

33
Dear Customer,
Thank you for having purchased and given your preference
to our product. The safety precautions and recommendations
within this booklet are for your own safety and that of others. They
will also provide a means by which to make full use of the features
oered by your appliance.
Please preserve this booklet carefully. It may be useful
in future, either to yourself or to others in the event that doubts
should arise relating to its operation.
This appliance must be used only for the task it has
explicitly been designed for, that is for cooking foodstus.
Any other form of usage is to be considered as inappropriate
and therefore dangerous.
The manufacturer declines all responsibility in the
event of damage caused by improper, incorrect or illogical
use of the appliance.

44
IMPORTANT SAFETY PRECAUTIONS AND RECOMMENDATIONS
IMPORTANT: This appliance is designed and manufactured
solely for the cooking of domestic (household) food and is
not suitable for any non domestic application and therefore
should not be used in a commercial environment.
The appliance guarantee will be void if the appliance is used
within a non domestic environment i.e. a semi commercial,
commercial or communal environment.
Read the instructions carefully before installing and using
the appliance.
• This appliance has been designed and manufactured in
compliance with the applicable standards for the household
cooking products and it fullls all the safety requirements shown
in this manual, including those for surface temperatures.
Some people with sensitive skin may have a more pronounced
temperature perception with some components although these
parts are within the limits allowed by the norms.
The complete safety of the appliance also depends on the correct
use, we therefore recommend to always pay a extreme attention
while using the product, especially in the presence of children.
• After having unpacked the appliance, check to ensure that it is
not damaged and that the oven door closes correctly.
In case of doubt, do not use it and consult your supplier or a
professionally qualied technician.
• Packing elements (i.e. plastic bags, polystyrene foam, nails,
packing straps, etc.) should not be left around within easy reach
of children, as these may cause serious injuries.
• Some appliances are supplied with a protective lm on steel and
aluminum parts. This lm must be removed before using the
appliance.
• IMPORTANT: The use of suitable protective clothing/gloves is
recommended when handling or cleaning this appliance.

55
• Do not attempt to modify the technical characteristics of
the appliance as this may become dangerous to use. The
manufacturer declines all responsibility for any inconvenience
resulting from the inobservance of this condition.
• Do not operate your appliance by means of an external timer or
separate remote-control system.
• Do not carry out cleaning or maintenance operations on the
appliance without having previously disconnected it from the
electric power supply.
• WARNING: Ensure that the appliance is switched o before
replacing the oven lamp to avoid the possibility of electric shock.
• Do not use a steam cleaner because the moisture can get into
the appliance therefore making it unsafe.
• Do not touch the appliance with wet or damp hands (or feet).
• Do not use the appliance whilst in bare feet.
• If you should decide not to use this appliance any longer (or
decide to substitute another model), before disposing of it, it
is recommended that it be made inoperative in an appropriate
manner in accordance to health and environmental protection
regulations, ensuring in particular that all potentially hazardous
parts be made harmless, especially in relation to children who
could play with unused appliances.
• The various components of the appliance are recyclable. Dispose
of them in accordance with the regulations in force in your country.
If the appliance is to be scrapped, remove the power cord.
• After use, ensure that the knobs/controls are in the o position.
• Children less than 8 years of age shall be kept away unless
continuously supervised.
• This appliance can be used by children aged from 8 years and
above and persons with reduced physical, sensory or mental
capabilities or lack of experience and knowledge if they have
been given supervision or instruction concerning use of the
appliance in a safe way and understand the hazards involved.
Children shall not play with the appliance. Cleaning and user
maintenance shall not be made by children without supervision.

66
• The manufacturer declines all liability for injury to persons or
damage to property caused by incorrect or improper use of the
appliance.
• WARNING: During use the appliance and its accessible parts
become hot; they remain hot for some time after use.
– Care should be taken to avoid touching heating elements
inside the oven.
– The door is hot, use the handle.
– To avoid burns and scalds, young children should be kept
away.
• Make sure that electrical cables connecting other appliances in
the proximity of the oven cannot become entrapped in the oven
door.
• WARNING: When correctly installed, your product meets all
safety requirements laid down for this type of product category.
However special care should be taken around the rear or the
underneath of the appliance as these areas are not designed or
intended to be touched and may contain sharp or rough edges,
that may cause injury.
• FIRST USE OF THE OVEN - it is advised to follow these
instructions:
– Furnish the interior of the oven as described in the chapter
“CLEANING AND MAINTENANCE”.
– Switch on the empty oven on max to eliminate grease from the
heating elements.
– Disconnect the appliance from the electrical power supply, let
the oven cool down and clean the interior of the oven with a
cloth soaked in water and neutral detergent; then dry carefully.
• CAUTION: Do not use harsh abrasive cleaners or sharp metal
scrapers to clean the oven door glass since they can scratch the
surface, which may result in shattering of the glass.
• Do not line the oven walls or oor with aluminum foil. Do not place
baking trays or the drip tray on the base of the oven chamber.
• FIRE RISK! Do not store ammable material in the oven.
• Always use oven gloves when removing the shelves and food
trays from the oven whilst hot.

77
• Do not hang towels, dishcloths or other items on the appliance or
its handle – as this could be a re hazard.
• Clean the oven regularly and do not allow fat or oils to build up in
the oven base or tray. Remove spillages as soon as they occur.
• Do not stand on the open oven door.
• Always stand back from the appliance when opening the oven
door to allow steam and hot air to escape before removing the
food.
• SAFE FOOD HANDLING: Leave food in the oven for as short
a time as possible before and after cooking. This is to avoid
contamination by organisms which may cause food poisoning.
Take particular care during warmer weather.
• WARNING: Take care NOT to lift the appliance by the door
handle.
• The appliance must not be installed behind a decorative door in
order to avoid overheating.
• The oven accessories (e.g. oven wire rack) must be tted
correctly as indicated at page 52,53.
• IMPORTANT NOTE: The oven shelves (for some products one
shelf only is provided) have not been designed to place the food
directly on the shelf itself. When cooking, always place the food
in special containers or use specic materials suitable for the
food contact.
• If the power supply cable is damaged, it must be replaced only
by an authorized service agent in order to avoid a hazard.
• If the appliance is not tted with a supply cord and a plug, or with
other means for disconnection from the supply mains having a
contact separation in all poles that provide full disconnection under
overvoltage category III conditions, means for disconnection
must be incorporated in the xed wiring in accordance with the
wiring rules.
• WARNING: The appliance and its accessible parts become hot
during use.
Care should be taken to avoid touching heating elements.
Children less than 8 years of age shall be kept away unless
continuously supervised.

88

99
Advice forAdvice for
the installerthe installer

1010
INSTALLATION
1
IMPORTANT:
• The appliance is designed and approved for domestic use only and should not be
installed in a commercial, semi commercial or communal environment.
Your product will not be guaranteed if installed in any of the above environments
and could aect any third party or public liability insurances you may have.
• This appliance is to be installed only by an authorised person according to the current
local regulations and in observation of the manufacturer’s instructions.
Failure to comply with this condition will render the guarantee invalid.
• Incorrect installation, for which the manufacturer accepts no responsibility, may cause
personal injury of damage.
• This appliance shall only be serviced by authorized personnel.
• Always disconnect the appliance from mains power supply before carrying out any
maintenance operations or repairs.
• Some appliances are supplied with a protective lm on steel and aluminum parts. This
lm must be removed before using the appliances.
• Important: The use of suitable protective clothing/gloves is recommended when
handling or installing this appliance.
• The appliance must be housed in heat resistant units.
• The walls of the units must be capable of resisting temperatures of 70 °C above
room temperature.
• We would point out that the adhesive which bonds the plastic laminate to the
furniture must withstand temperatures not less than 150 °C to avoid delamination.
• Do not install the appliance near inammable materials (e.g. curtains).
WARNING!
When correctly installed, your product meets all safety requirements laid down for
this type of product category.
However special care should be taken around the rear or the underneath of the
appliance as these areas are not designed or intended to be touched and may
contain sharp or rough edges, that may cause injury.
1111
IMPORTANT
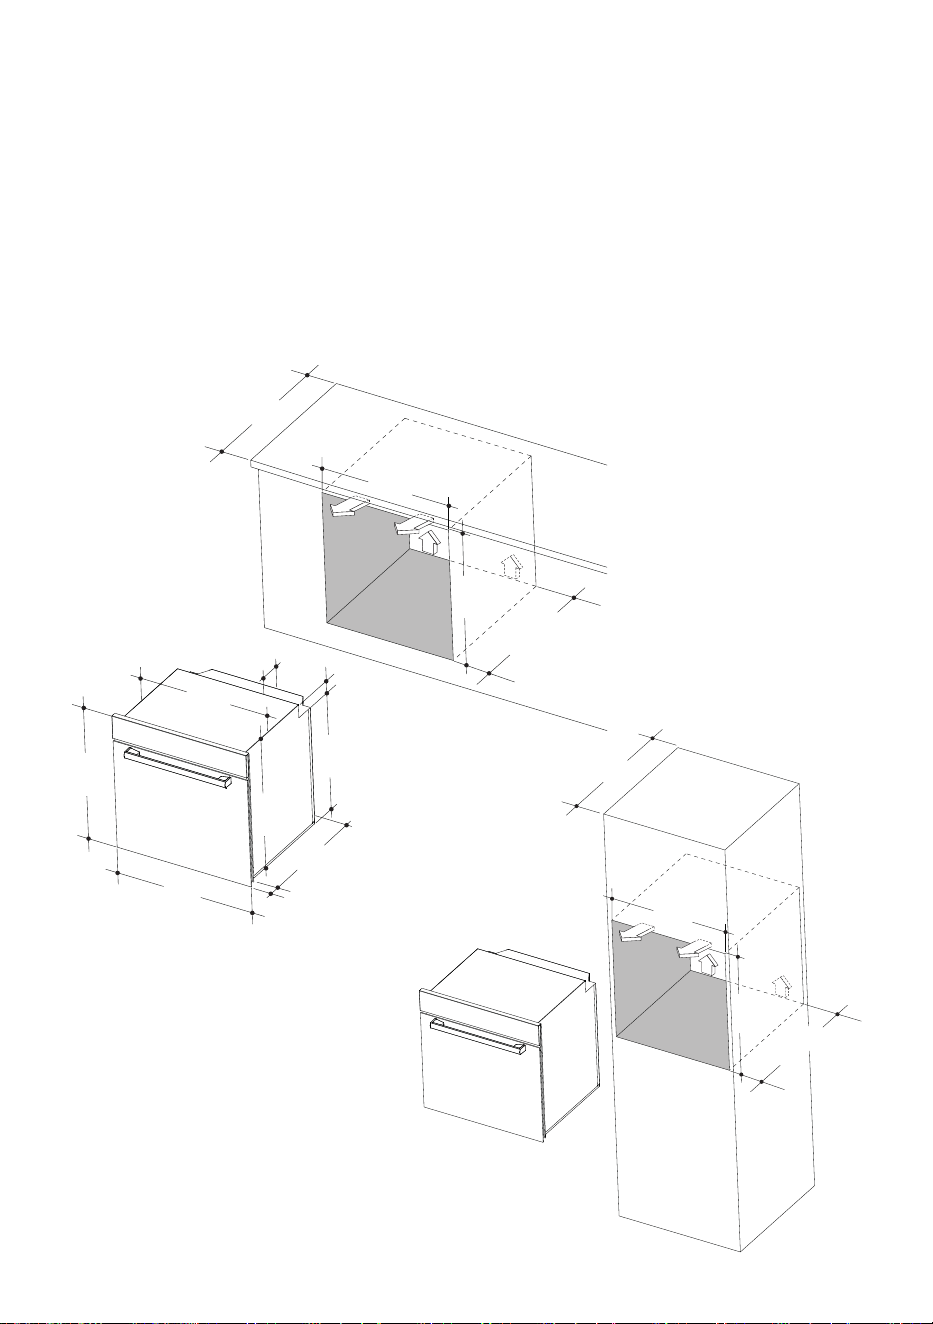
• The oven can be tted in standard units, width and depth 60 cm.
• Installation requires a compartment as illustrated in gures 1.1 and 1.2.
On the lower side, the oven must lay on supports standing the oven weight.
• Remember the housing should not be free standing but be secured to the wall and/or
adjacent ttings.
• Do not seal the oven into the cabinetry with silicone or glue; this makes future
servicing dicult. The manufacturer will not cover the costs of removing the
oven, or of damage caused by this removal.
• Caution! Do not lift this oven by the door handle.
Fig. 1.2
Fig. 1.1
595
595
545
22
556
600
550 min
560
600
139,5
520
59,5
583
600
550 min
560
590
1212
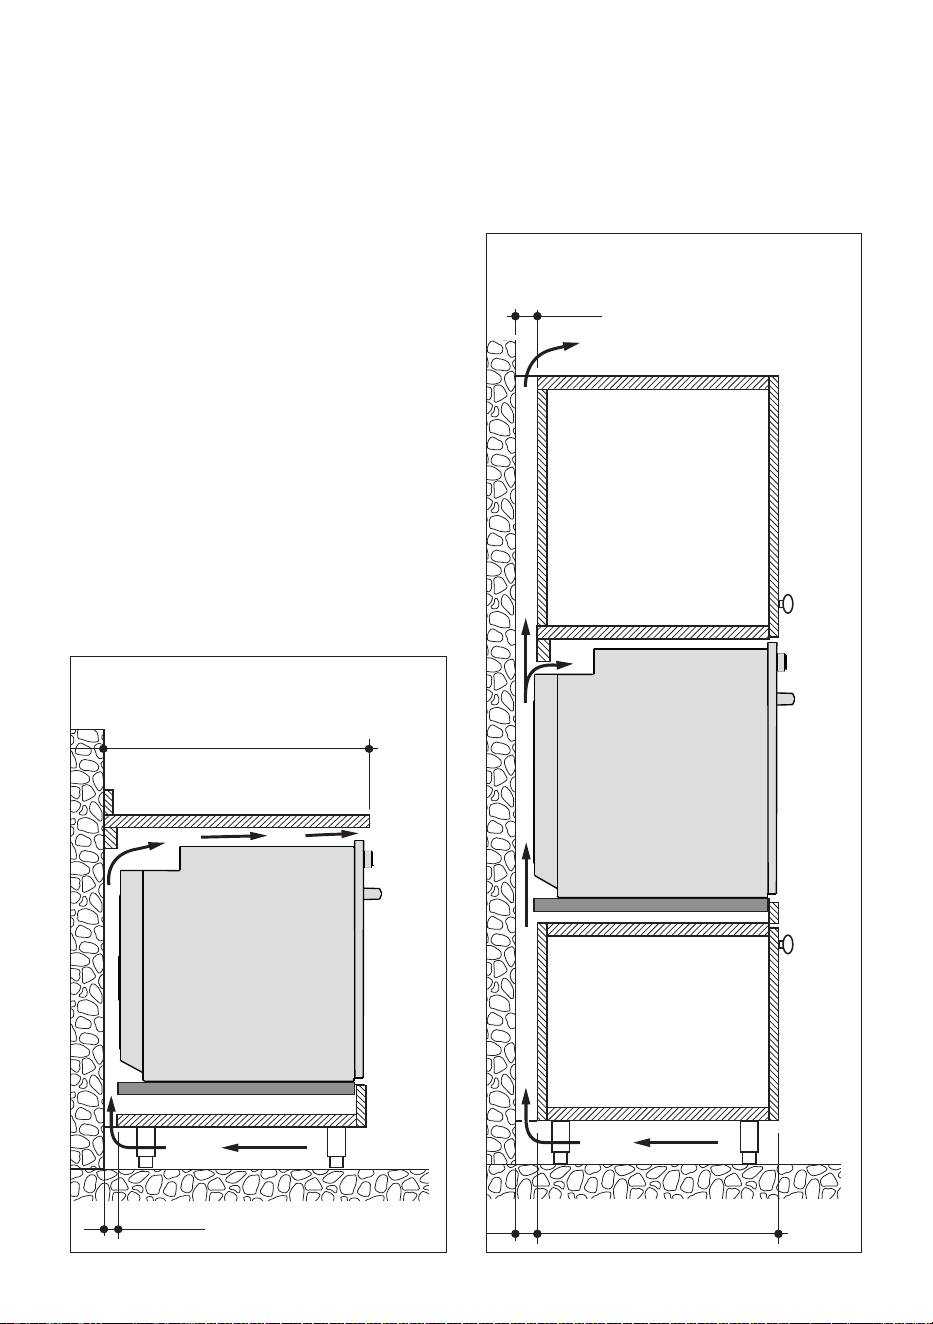
To ensure internal ventilation, aeration channels must be provided as illustrated in the
gures 1.3 and 1.4.
30 mm
600
50 mm
50 550
Fig. 1.4
Fig. 1.3
1313
FIXING THE OVEN
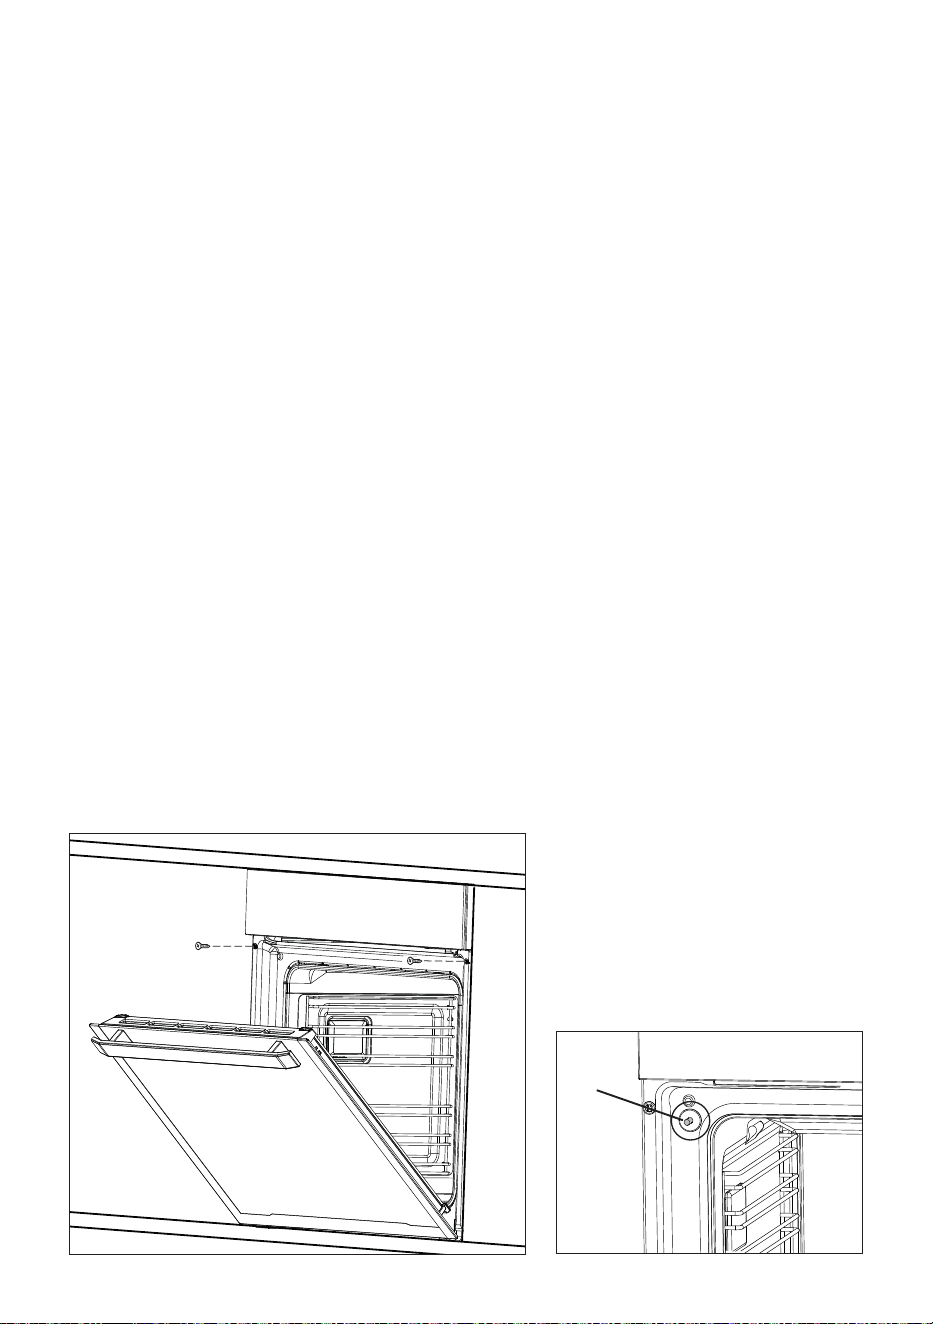
Introduce the oven into the furniture opening and x it with 2 screws (not supplied) as gure
1.5.
It is essential that the oven rests on a surface which will support its weight, as the screw
xing is only complementary.
Note:
It is essential that when installing your oven adequate air circulation is allowed for within the
installation. See gures 1.1,1.2, 1.3 and 1.4.
Inadequate air circulation may greatly impair the performance of your oven and may aect
adjacent cabinets due to an increase in temperature.
Caution! Do not lift this oven by the door handle.
Adjust the hinges of furniture doors adjacent to the oven to allow a 4-5 mm gap between
the furniture door and the oven frame.
Fig. 1.5
IMPORTANT (only for some
models): When handling the
oven, take care not to damage
the door sensor lever “L” (g.
1.6) (near the top left corner of
the oven seal).
L
Fig. 1.6

1414
ELECTRICAL SECTION
2
GENERAL
• The connection to the electrical
network must be carried out by
qualied personnel and must be
according to existing norms.
• The appliance must be connected to
the electrical network verifying above
all that the voltage corresponds to the
value indicated on the specications
plate and that the cables section of
the electrical plant can bear the load
which is also indicated on the plate.
• If the appliance is supplied without a
power supply plug and if you are not
connecting directly to the mains, a
standardized plug suitable for the load
must be tted.
• The colours of the wires in the
appliance power cable may not
correspond with the colours marked
on the terminals of your electrical plug.
The plug should always be wired as
follows:
– connect the green/yellow wire to the
terminal marked with the letter “E”
or the earth symbol or coloured
green/yellow;
– connect the blue wire to the
terminal marked with the letter “N”
or coloured black;
– connect the brown wire to the
terminal marked with the letter “L”
or coloured red.
• The bi-polar plug must be connected to
an outlet connected to the grounding
unit in conformity to security norms.
• If the oven is to be connected directly
to the mains, it must be placed with
an omnipolar switch with minimum
opening between the contacts of 3 mm
between the appliance and the mains.
• The power supply cable must not touch
the hot parts and must be positioned
so that it does not exceed 50 °C at any
point.
• Once the oven has been installed,
the switch or socket must always be
accessible.
• If the power supply cable is damaged it
must be substituted by a suitable cable
available in the after sales service.
N.B. For connection to the mains, do
not use adapters, reducers or branching
devices as they can cause overheating
and burning.
If the installation requires alterations to the
domestic electrical system call an expert.
He should also check that the domestic
electrical system is suitable for the power
absorbed by the appliance.
The connection of the appliance to the
grounding unit is mandatory.
The manufacturer declines every
responsibility for any inconvenience
resulting from the inobservance of this
condition.
Before eecting any intervention on
the electrical parts of the appliance,
the connection to the network must be
interrupted.
IMPORTANT: The appliance must be
installed by a qualied technician
according with the current local
regulations and in compliance with the
manufacturer instructions.
Incorrect
installation may cause harm and
damage to people, animals or property,
for which the manufacturer accepts no
responsibility.

1515
CONNECTION OF THE POWER SUPPLY CABLE
WARNING: If the power supply cable is damaged, it must be replaced only by an
authorised service agent in order to avoid a hazard.
NOTE: The earth conductor must be left about 3 cm longer than the others.
The operations must be executed by a qualied technician.
FEEDER CABLE SPECIFICATIONS
“TYPE
H05VV-F or H05V2V2-F
(
resistance to temperatures of 90 °C
)
”
220-240 V ac 3 x 1,5 mm
2
(*)
(*)
Connection possible with plug and outlet

1616

1717
User guideUser guide
1818
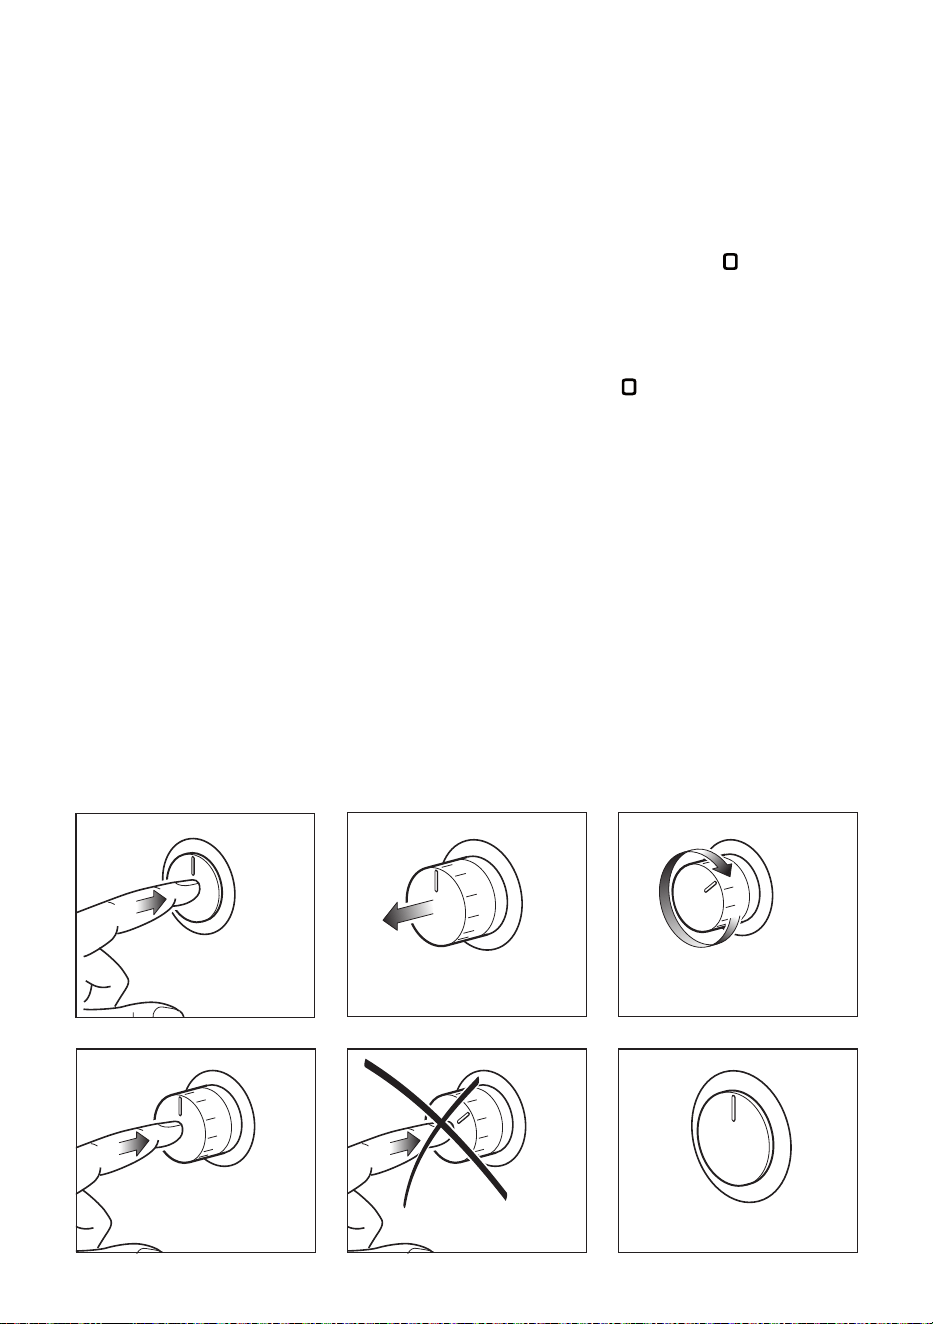
USING THE PRESS-AND-TURN CONTROL KNOBS (SOME MODELS ONLY)
The control knobs are ush-mounted in the control panel.
Use them as follows:
a. Press lightly on the knob (gure A);
b. The knob will extend outwards as illustrated in gure B.
c. Turn the knob to the required position (gure C).
d. When you have nished cooking, turn the knob back to the “0”, “O” or “ ” (o) position
and press it (gure D) so that it stays ush with the control panel again (gure F).
IMPORTANT:
Never press down the knob when it is not in the “0”, “O” or “ ” (o) position (gure E).
Fig. A Fig. B Fig. C
Fig. D Fig. E Fig. F
1919
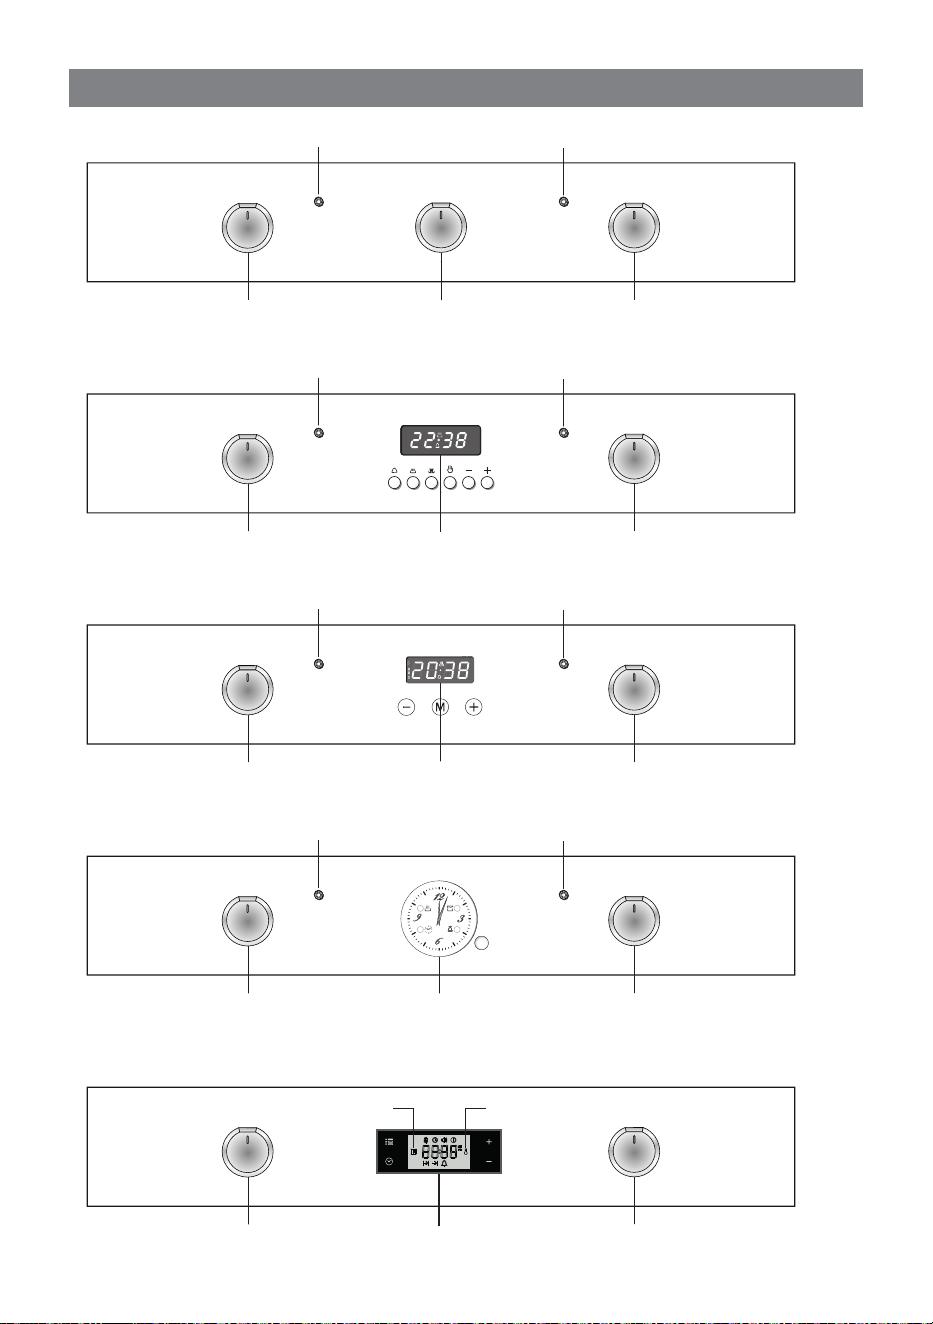
CONTROL PANELS
1
1
2
5 - 6 - 7
4
3
1
2
4
3
A
U
T
O
8
1
2
4
3
9
1
2
4
3
10
1
2
11
8
3
4
Fig. 1.1
Fig. 1.2
Fig. 1.3
Fig. 1.4
Fig. 1.5

2020
Please note: Your appliance has been tted with a cooling fan to achieve optimum
eciency of the controls and to ensure lower surface temperatures are maintained.
The cooling fan motor switches ON/OFF depending on temperature.
Depending on cooking temperatures and times, the cooling fan may run on even after the
appliance oven has been switched o.
The duration of this time is dependent on previous cooking temperature and duration.
NOTES: The knob and symbols may vary.
The symbols may be printed on the knob
itself.
CONTROLS DESCRIPTION
1. Function selector control knob
2. Oven temperature control knob
3. Oven temperature indicator light
4. Power on indicator light
5. 60 minutes alarm
6. 120 minutes alarm
7. Timer (120 minutes cut-o)
8. Electronic clock/programmer
9. Clock and timer with “Touch-Control” keys
10. Electric clock/programmer
11. Electronic clock/programmer “Touch-controls”

2121
Attention: The oven door becomes
very hot during operation.
Keep children away.
WARNING:
The door is hot, use the handle.
During use the appliance becomes
hot. Care should be taken to avoid
touching heating elements inside
the oven.
Do not line the oven walls or oor
with aluminum foil. Do not place
baking trays or the drip tray on the
base of the oven chamber.
RISK OF IRREPARABLE DAMAGE
TO THE ENAMEL.
THERMOSTAT CONTROL KNOB
To turn on the heating elements of the
oven, set function selector knob to the
required position and the thermostat knob
to the desired temperature.
To set the temperature, line up the
temperature knob indicator with the
required temperature.
The elements will turn on or o automatically
which is determined by the thermostat.
The operation of the heating elements is
signaled by a light placed on the control
panel.
HOW TO USE THE OVEN
2
NOTE: When using the oven for the rst
time, in order to eliminate any traces of
substances or odours left over from the
production process, switch the oven on
and run it empty (without the accessories,
which should be washed separately),
keeping the installation environment
suciently ventilated:
• for 60 minutes in the position
(thermostat in position 250 °C);
• for 30 minutes in the position
(thermostat in position 250 °C);
• for 15 minutes in the position
(thermostat in position 225 °C).
Note: depending on model, only some of
these functions may be available.
When the oven has cooled down
completely, unplug it from the mains power
socket and clean inside it as described in
“CLEANING AND MAINTENANCE”.
2222
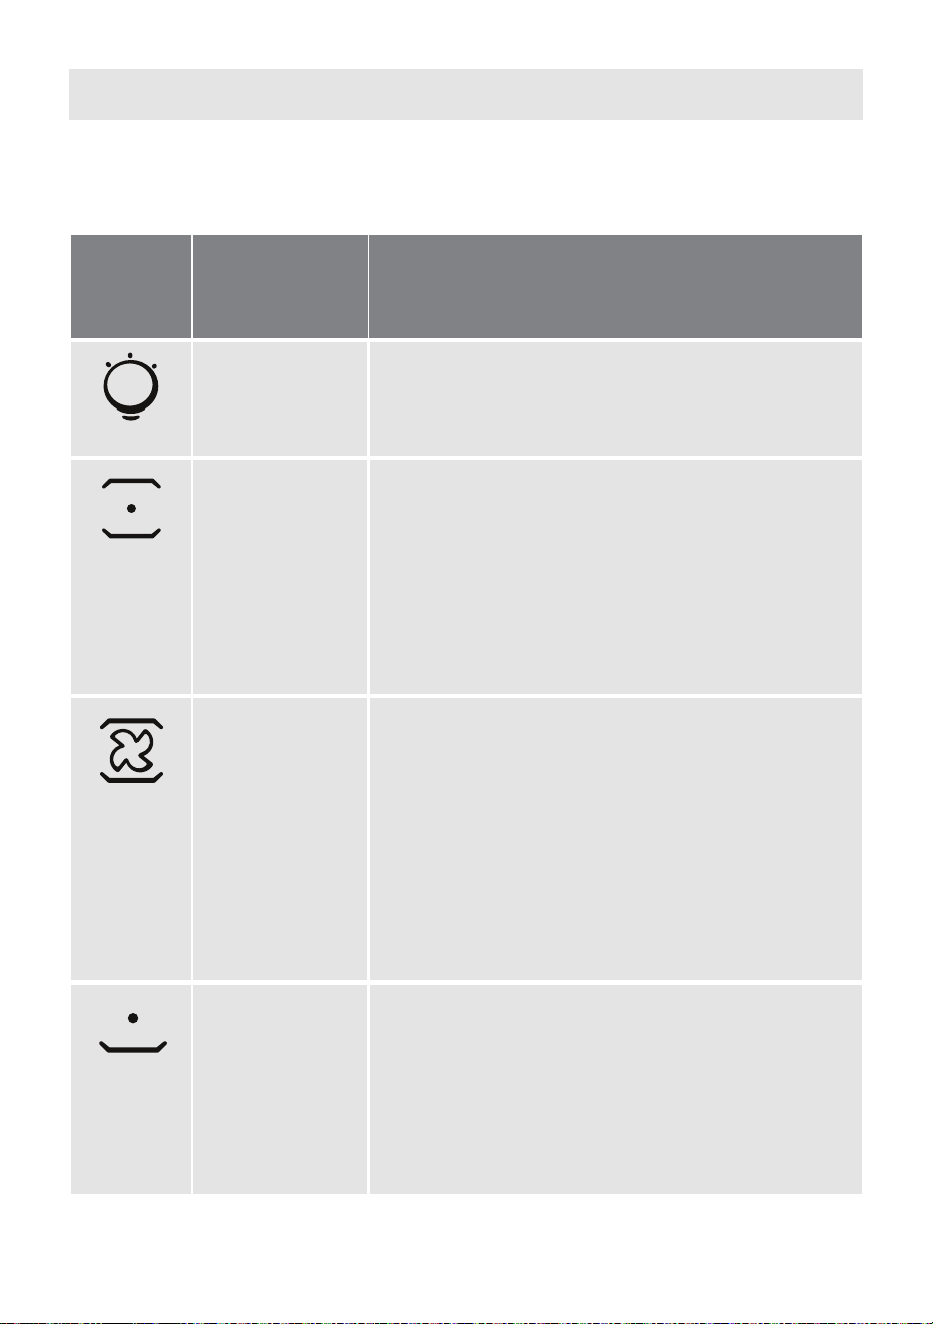
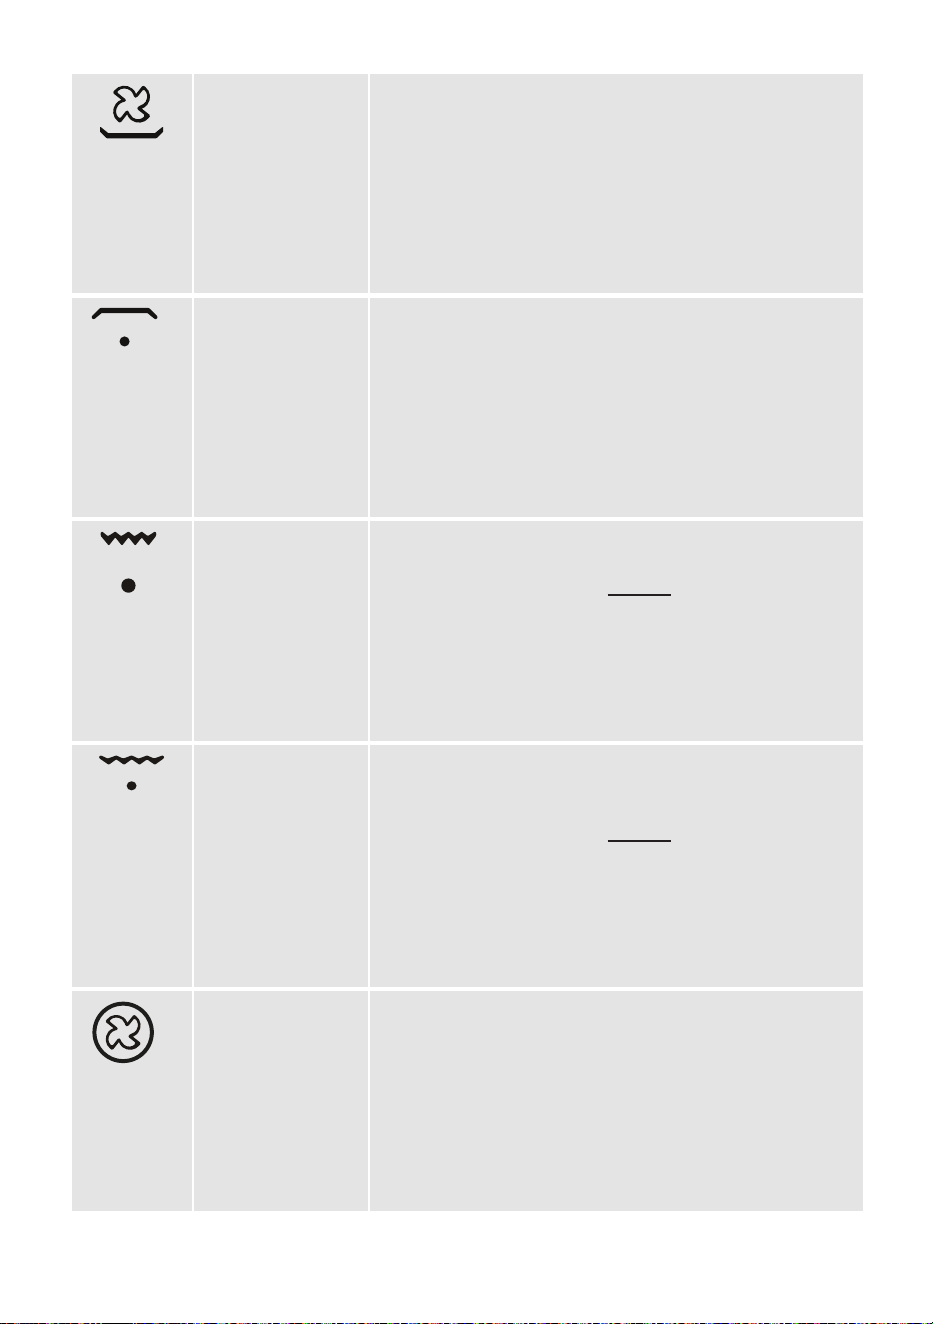
FUNCTION
NAME OF THE
FUNCTION
DESCRIPTION OF THE FUNCTION
OVEN LIGHT By turning the function selector knob to this setting, the
oven light/s will illuminate in the oven cavity.
The oven light/s will operate on all selected functions.
TRADITIONAL
CONVECTION
COOKING
The upper and lower heating elements are switched
on.
The heat is diused by natural convection and the
temperature must be regulated between the minimum
and the maximum position with the thermostat knob.
Recommended for:
For foods which require the same cooking temperature
both internally and externally, i. e. roasts, spare ribs,
meringue, etc.
CONVECTION
COOKING
WITH
VENTILATION
The upper and lower heating elements and the fan
motor are switched on.
The heat coming from the top and bottom is diused
by forced convection.
The temperature must be regulated between
the minimum and the maximum position with the
thermostat knob.
Recommended for:
For foods of large volume and quantity which require
the same internal and external degree of cooking; for
ex: rolled roasts, turkey, legs, cakes, etc.
LOWER HEATING
ELEMENT
In this position only the lower heating element is
switched on.
Heat is distributed by natural convection.
The temperature must be regulated between the
minimum and 250 °C maximum.
Recommended for:
To complete cooking of dishes that require higher
temperature at the bottom.
Depending on your model, your oven may only have some of these functions.
For best results, always preheat the oven.
NOTE: The symbols shown in this section are for guidance only and represent the
primary function.
2323
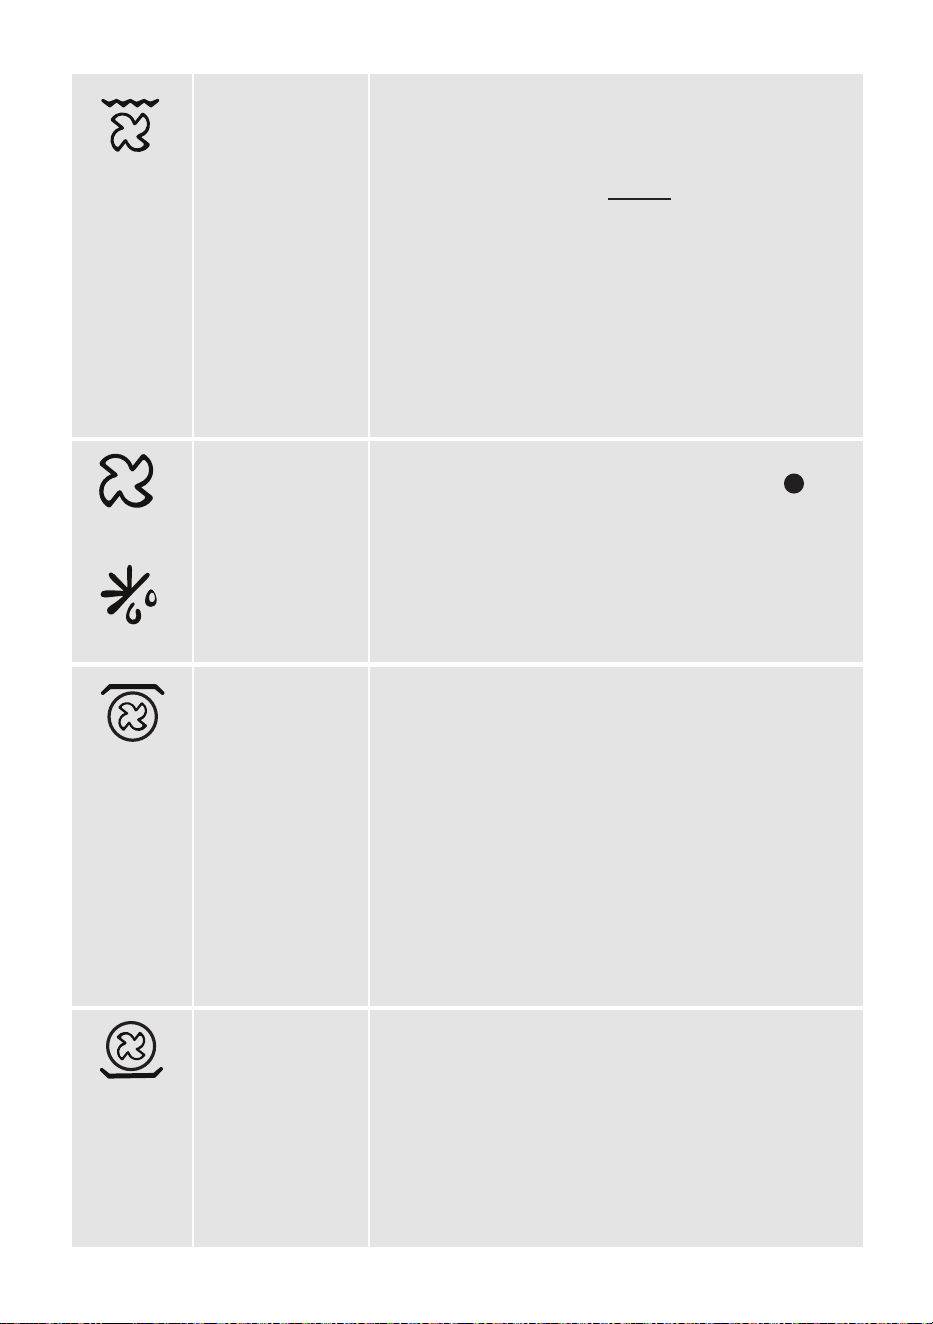
LOWER HEATING
ELEMENT
WITH
VENTILATION
The lower heating element and the fan motor are
switched on.
The heat coming from the bottom is diused by forced
convection.
The temperature must be regulated between the
minimum and 250 °C maximum with the thermostat knob.
Recommended for:
To complete cooking of dishes that require higher
temperature at the bottom.
UPPER
HEATING
ELEMENT
In this position only the upper heating element is
switched on.
Heat is distributed by natural convection.
The temperature must be regulated between
the minimum and the maximum position with the
thermostat knob.
Recommended for:
To complete cooking of dishes that require higher
temperature at the top.
TRADITIONAL
GRILLING
The infrared heating element is switched on. The heat
is diused by radiation.
Use with the oven door closed and the thermostat
knob must be regulated between the minimum and
225 °C maximum.
For correct use see chapter “USE OF THE GRILL”.
Recommended for:
Grilling action for cooking with the broiler; browning,
crisping, “au gratin”, toasting, etc.
DOUBLE GRILL
COOKING
The infrared heating element and the upper heating
element is switched on. The heat is diused by
radiation.
Use with the oven door closed and the thermostat
knob must be regulated between the minimum and
225 °C maximum.
For correct use see chapter “USE OF THE GRILL”.
Recommended for:
Intense grilling action for cooking with the broiler;
browning, crisping, “au gratin”, toasting, etc.
HOT AIR
COOKING
The circular heating element and the fan motor are
switched on.
The heat is diused by forced convection and the
temperature must be regulated between the minimum
and the maximum position with the thermostat knob.
Recommended for:
For foods that must be well done on the outside and
tender or rare on the inside, i. e. lasagna, lamb, roast
beef, whole sh, etc.
2424
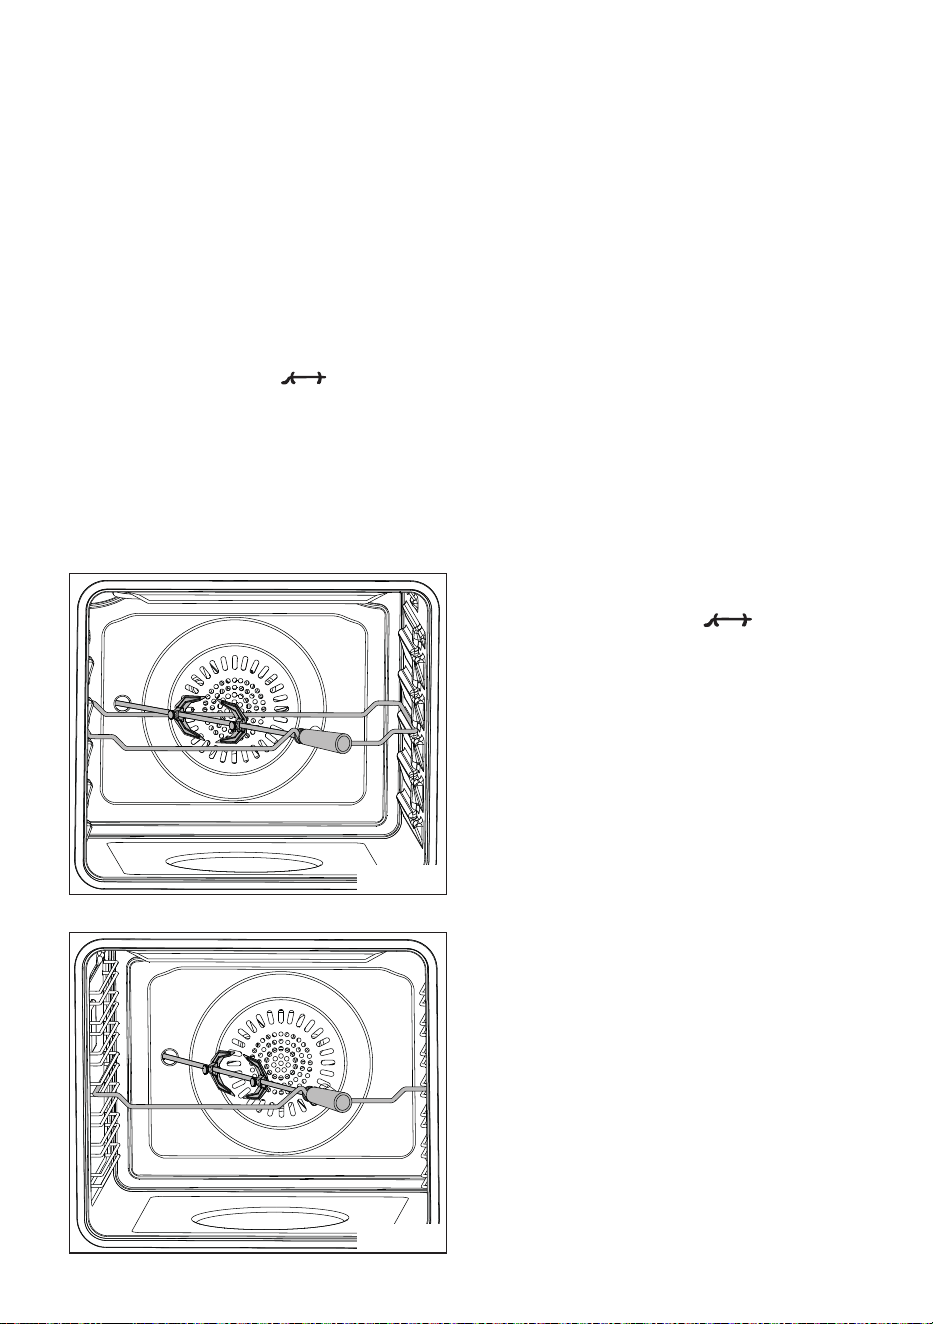
VENTILATED
DOUBLE GRILL
COOKING
The infrared heating element, the upper heating
element and the fan motor are switched on.
The heat is mainly diused by radiation and the fan
then distributes it throughout the oven.
Use with the oven door closed and the thermostat
knob must be regulated between the minimum and
200 °C maximum.
It is necessary to preheat the oven for about 5 minutes.
For correct use see chapter “GRILLING AND AU
GRATIN”.
Recommended for:
For grill cooking when a fast outside browning is
necessary to keep the juices in, i. e. veal steak, steak,
hamburger, etc.
or
DEFROSTING
FROZEN FOODS
Only the oven fan is switched on.
To be used with the thermostat knob in the “ ” (o)
position because the other positions have no eect.
The defrosting is done by simple ventilation without heat.
Recommended for:
To rapidly defrost frozen foods; 1 kilogram requires
about one hour. The defrosting times vary according to
the quantity and type of foods to be defrosted.
HOT AIR
COOKING WITH
UPPER HEATING
ELEMENT
The circular heating element, the fan motor and the
upper heating elements are switched on.
The heat is diused by forced convection and the
temperature must be regulated between the minimum
and the maximum position with the thermostat knob.
Recommended for:
cooking of frozen products.
This function can also be used for quick preheating.
Set the thermostat knob to the desired temperature;
when the pre-heating temperature has been reached,
the oven temperature indicator light, placed on the
control panel, switches o. You can then select the
cooking function you want.
HOT AIR
COOKING
WITH LOWER
HEATING
ELEMENT
The circular heating element, the fan motor and the
lower heating elements are switched on.
The temperature must be regulated between
the minimum and the maximum position with the
thermostat knob.
Recommended for:
Foods that need to be cooked with more heat
underneath, e.g. pizza, quiche, etc.

2525
OPTIONAL ADDITIONAL FUNCTIONS TO THE PRIMARY FUNCTION
ROTISSERIE
See chapter “ROTISSERIE” and “USE OF THE
ROTISSERIE”
2626
ROTISSERIE
(SOME MODELS ONLY)
This is used for spit roasting and comprises:
• an electrical motor mounted on the
rear part of the oven;
• a stainless steel rod, equipped with
a detachable athermic grip and 2
recordable forks;
• a rod support to be inserted into the
central guides of the oven cavity.
The rotisserie motor is operated by switch
the knob in the position .
USE OF THE ROTISSERIE (g. 2.1a,
2.1b)
• Insert the tray into the lowest rack
holders of the oven and insert the
rod support into the intermediate rack
holders (g. 2.2a, 2.2b).
• Put the meat to be cooked onto the
rod, being careful to secure it in the
center with the special forks.
• Important!
Take care, the forks are sharp!
• Insert the rod into the motor opening
(g. 2.1a, 2.1b). It is correctly tted
only if the rod does not turn when
inserted. It will then rotate only when
the spit motor is operating (check the
right rotation of the rod).
• Rest the rod onto the support of the spit
collar (g. 2.1a, 2.1b); then remove the
grip by turning it to the left.
• Close the oven door and switch the
knob in the position .
The rotation direction of the rotisserie
can be either clockwise or counter-
clockwise.
Very important: The rotisserie must
always be used with the oven door closed.
Do not grill for longer than 60 minutes at
any one time.
Attention: The oven door becomes very
hot during operation. Keep children away.
CAUTION: When the grill is on, some
parts may become hot.
Keep children
away.
Fig. 2.1a
Fig. 2.1b

2727
STERILIZATION
Sterilization of foods to be conserved, in full and hermetically sealed jars, is done in the
following way:
a. Set the switch to position .
b. Set the thermostat knob to position 185 °C and preheat the oven.
c. Fill the grill pan with hot water.
d. Set the jars into the grill pan making sure they do not touch each other and the door
and set the thermostat knob to position 135 °C.
When sterilization has begun, that is, when the contents of the jars start to bubble, turn o
the oven and let cool.
REGENERATION
Set the switch to position and the thermostat knob to position 150 °C.
Bread becomes fragrant again if wet with a few drops of water and put into the oven for
about 10 minutes.
COOKING DIFFERENT DISHES AT THE SAME TIME
With the function selector in position or , the ventilated oven allows you to cook
dierent types of food at the same time.
Fish, cakes and meat can be cooked together without the smells and avours mixing.
The only precautions required are the following:
• The cooking temperatures must be as close as possible with a maximum dierence of
20 - 25 °C between the dierent foods.
• Dierent dishes must be placed in the oven at dierent times according to the cooking
time required for each one. This type of cooking obviously provides a considerable
saving on time and energy.
GRILLING AND “AU GRATIN”
Grilling may be done by selecting grill + fan setting with the function selector knob,
because the hot air completely envelops the food that is to be cooked.
Set the thermostat knob between the minimum and 200 °C maximum, and after having
preheated the oven, simply place the food on the grid.
Close the door and let the oven operate until grilling is done.
Adding a few dabs of butter before the end of the cooking time gives the golden “au gratin”
eect.
Do not grill for longer than 60 minutes at any one time.
CAUTION: When the grill is on, some parts may become hot.
Keep children away.

2828
USE OF THE GRILL
Leave to warm up for approximately 5 minutes with the door closed.
Place the food inside positioning the rack as near as possible to the grill.
Insert the drip pan under the rack to collect the cooking juices.
Always grill with the oven door closed.
CAUTION: You can only use the grill function after an oven-cooking cycle if the temperature
you set is higher than the one just used for oven cooking.
Do not grill for longer than 60 minutes at any one time.
CAUTION: When the grill is on, some parts may become hot.
Keep children away.
OVEN COOKING
To cook, before introducing the food, preheat the oven to the desired temperature.
When the oven has reached the desired temperature, introduce the food, control the
cooking time and tum o the oven 5 minutes before the theoretical time to recuperate the
stored heat.
PIZZA STONE (SOME MODELS ONLY)
Pizza Stone, the baking stone that retains the moisture from the dough and distributes
heat evenly, is made with materials that can reach and maintain high temperatures. Ideal
accessory for cooking pizza, bread and focaccia.
CLEANING THE PIZZA STONE
Once the pizza stone has cooled down, clean it with a soft damp cloth, avoiding direct
contact with water.
If necessary, use a metal spatula or knife to remove any food residues before cleaning with
the cloth.
The stone is made of porous material, so do not wash it with detergents.
Do not wash in a dishwasher.
With use, dark patches may appear on the pizza stone: these have no eect on the quality
of cooking.
DESSERT DISH (SOME MODELS ONLY)
Aluminum tray, ideal for cooking biscuits and pastries.
The tray has a at, non-stick surface, so there is no need to grease it or use baking paper
to get perfect bakes.
Do not wash in a dishwasher.
2929
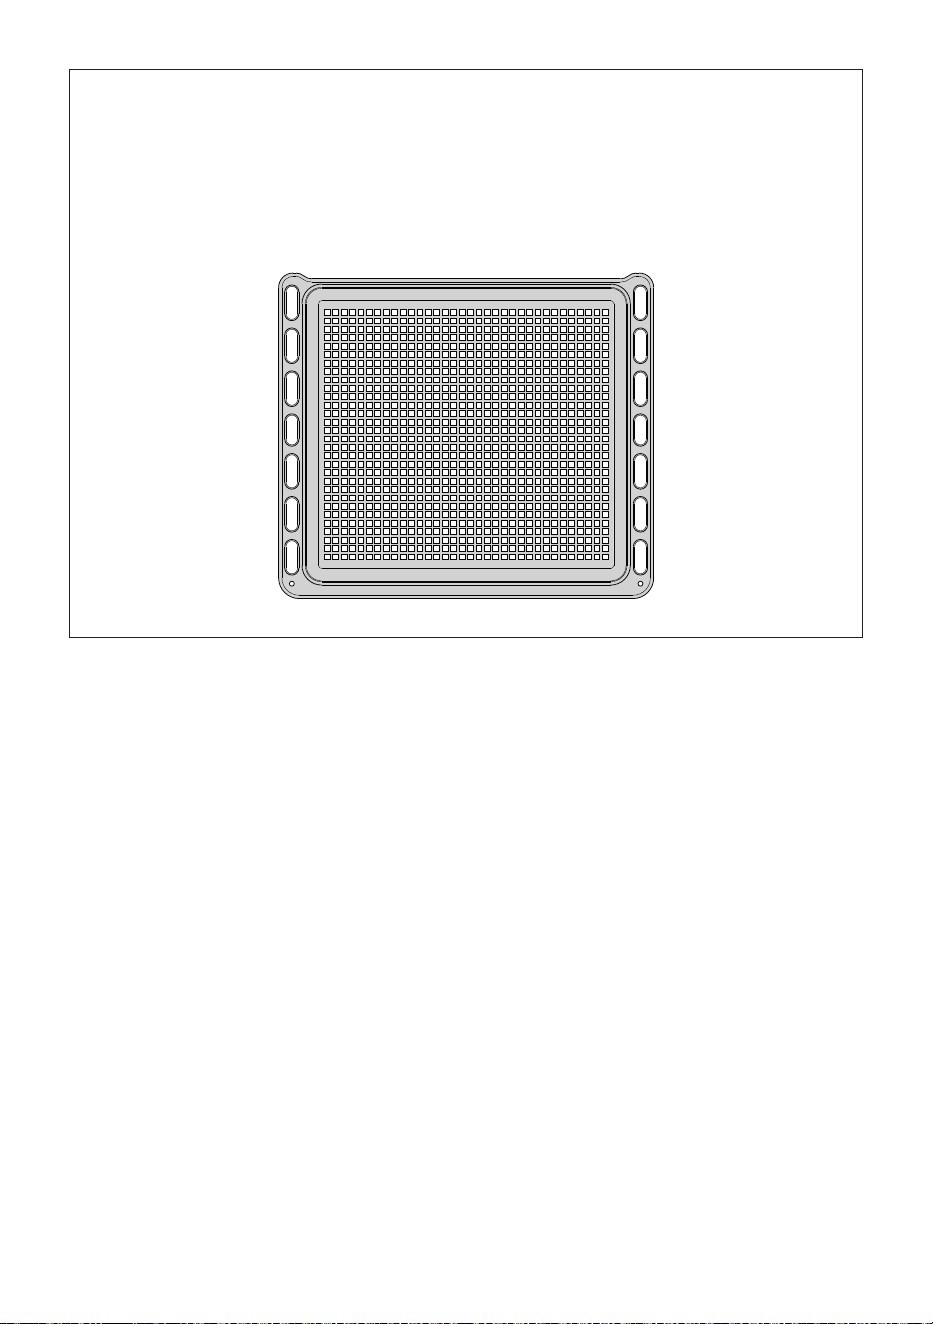
AIR FRY ENAMELLED TRAY (Some models only)
The special Air Fry enamelled tray has a perforated surface so as to facilitate the entry
of air, giving the dishes a tasty crispy eect without adding condiments.
Recommended for:
French fries (frozen potatoes classic or rustics), chicken wings, potato croquettes and
other frozen or pre-cooked foods.
Fig. 2.2
3030
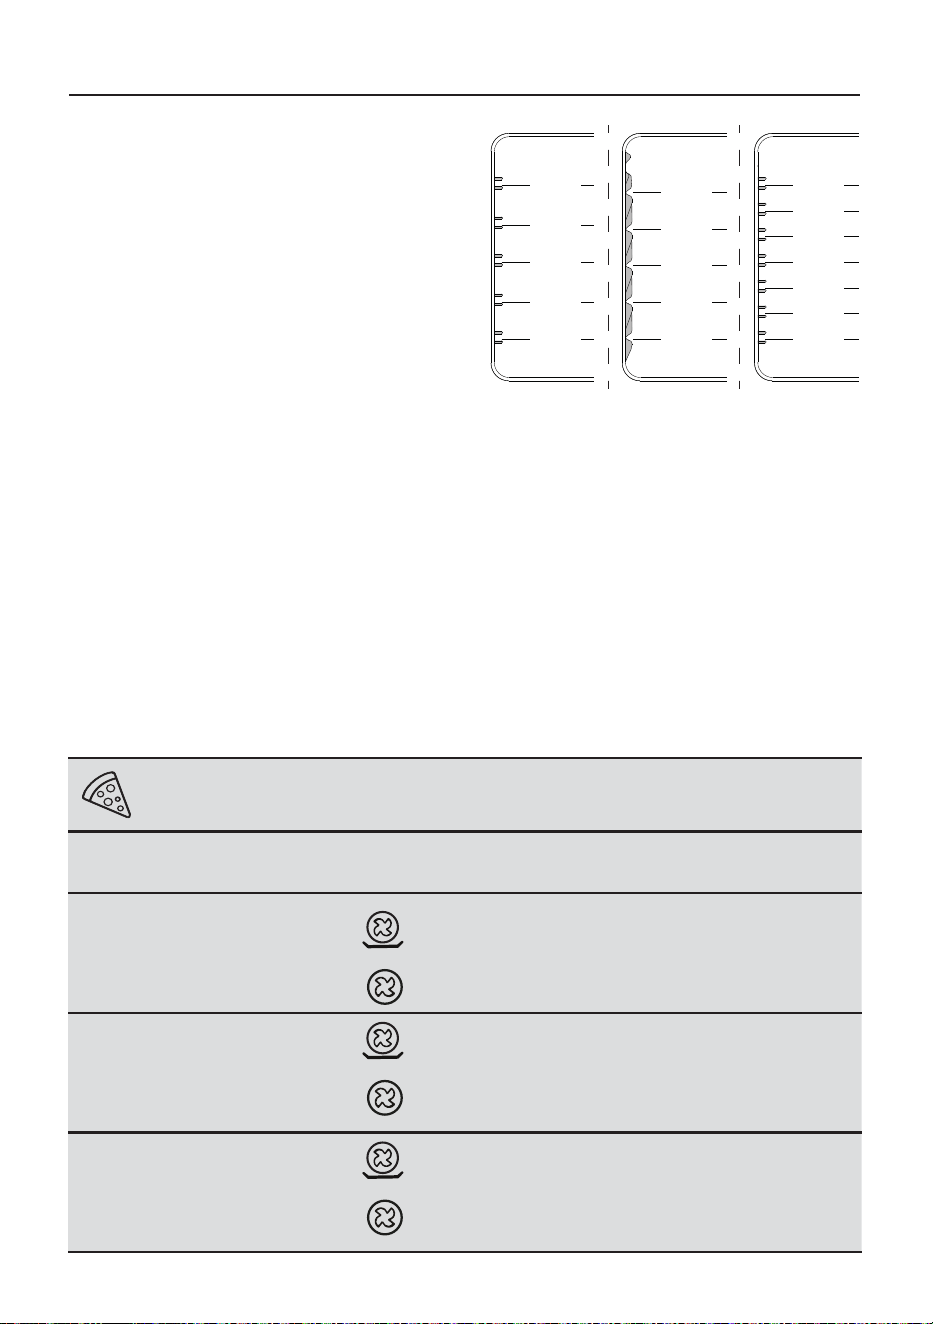
COOKING ADVICE
PIZZA
WEIGHT
[gr]
TEMP.
[°C]
FUNCTION
LEVELS
[1÷5]
LEVELS
[1÷7]
TIME
[min.]
WATER
[ml]
ACCESSORIES
/
DISHES
MARGHERITA
PIZZA
180 300
or
1
or
2-3
1
or
3-4
4 - 5 Pizza stone
CAPRICCIOSA
PIZZA
180 300
or
1
or
2-3
1
or
3-4
5 - 6 Pizza stone
CALZONE
PIZZA
180 300
or
1
or
2-3
1
or
3-4
5 - 7 Pizza stone
Remember to use ovenproof dishes and to adjust the oven temperature during cooking if
necessary. For best results, always preheat the oven.
Not all of the accessories/ovenware are included in the standard equipment. Those that
are not included can be ordered as optional accessories or purchased on the open market.
The cooking settings specied in the tables
below are guidelines and may vary according
to the type and quantity of ingredients and
the type of accessory used.
The appliance’s cooking performance
may dier from the performance of your
previous appliance. You may therefore
need to review the settings you usually use
(temperature, cooking time and which level
you place the oven grid on) according to the
recommendations provided in the tables.
1
Livelli
2
3
4
5
1
Livelli
2
3
4
5
1
Livelli
2
3
4
5
6
7
Type 2 Type 3Type 1
L
e
v
e
l
s
L
e
v
e
l
s
L
e
v
e
l
s
3131
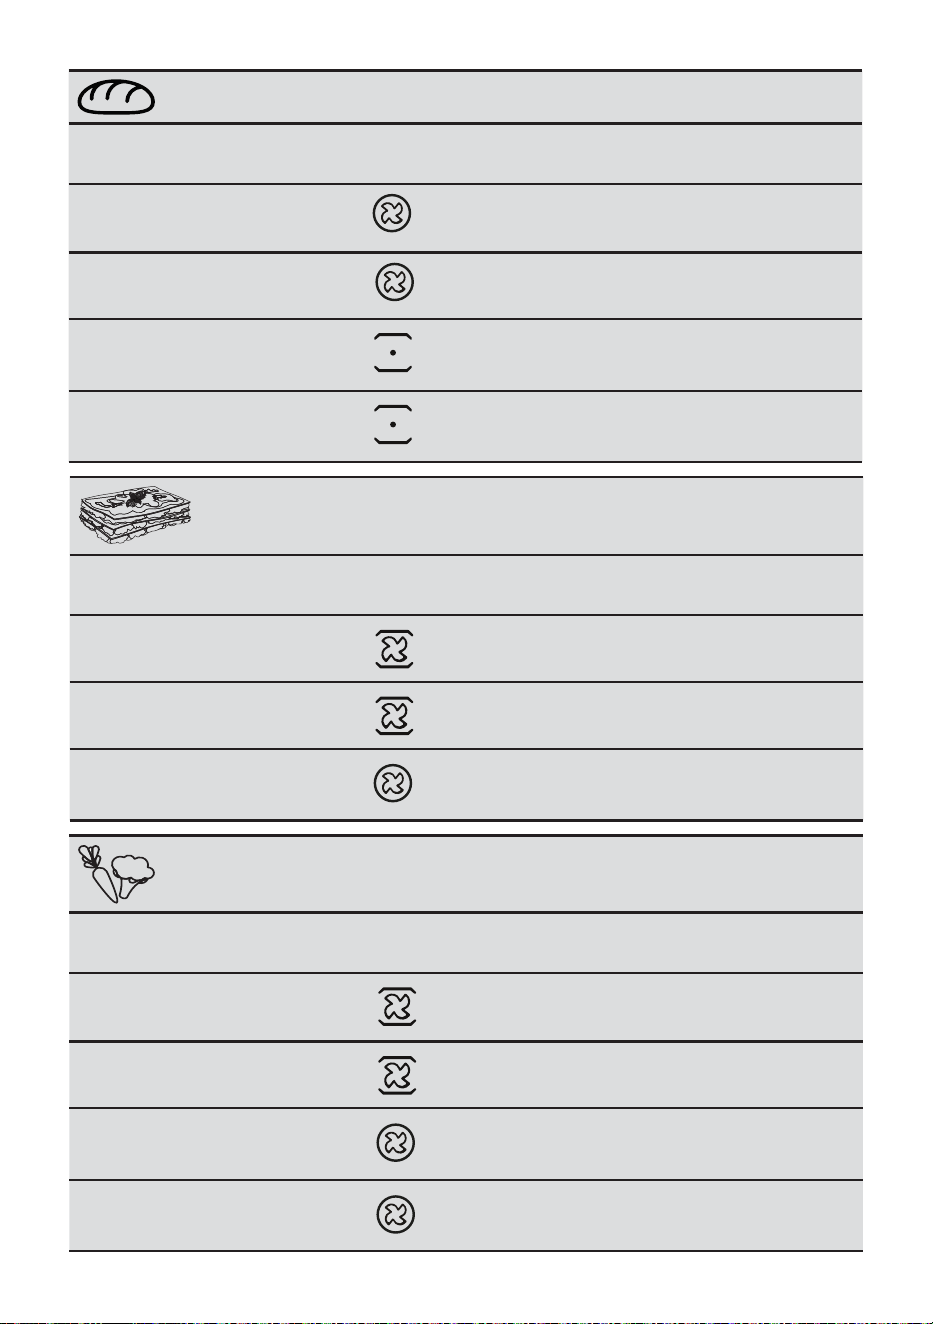
BAKERY
WEIGHT
[gr]
TEMP.
[°C]
FUNCTION
LEVELS
[1÷5]
LEVELS
[1÷7]
TIME
[min.]
WATER
[ml]
ACCESSORIES
/
DISHES
BIGA BREAD 390-410 210-230 2 2 25-35
110-130
Pizza stone
BREAD 4
pieces
90-110
piece
225-240
2-3 3 30-40
100-170
Pizza stone
FOCACCIA
WITH OLIVES
400-500 245-260 2-3 3 20-25
Aluminum
baking tray
CLASSIC
FOCACCIA
400-500 225-240 2-3 3 20-25
Aluminum
baking tray
FIRST COURSES
WEIGHT
[gr]
TEMP.
[°C]
FUNCTION
LEVELS
[1÷5]
LEVELS
[1÷7]
TIME
[min.]
WATER
[ml]
ACCESSORIES
/
DISHES
LASAGNE
900-1000
175-190 2-3 3 25-35
Aluminum
baking tray
AUBERGINE
PARMESAN
600-750 180-200 2-3 3 20-30
Aluminum
baking tray
SAVOURY
CAKE
800-900 190-210 2-3 3 40-50
Aluminum
baking tray
VEGETABLES
WEIGHT
[gr]
TEMP.
[°C]
FUNCTION
LEVELS
[1÷5]
LEVELS
[1÷7]
TIME
[min.]
WATER
[ml]
ACCESSORIES
/
DISHES
POTATOES 240-260 170-190 2-3 3 35-45 Baking tray
CARROTS 150-170 170-190 2-3 3 30-40 Baking tray
BROCCOLI 150-160 165-180 2-3 3 20-30 155-165 Baking tray
CAVOLFLOWERS
400-500 165-180 2-3 3 20-30 Baking tray
3232
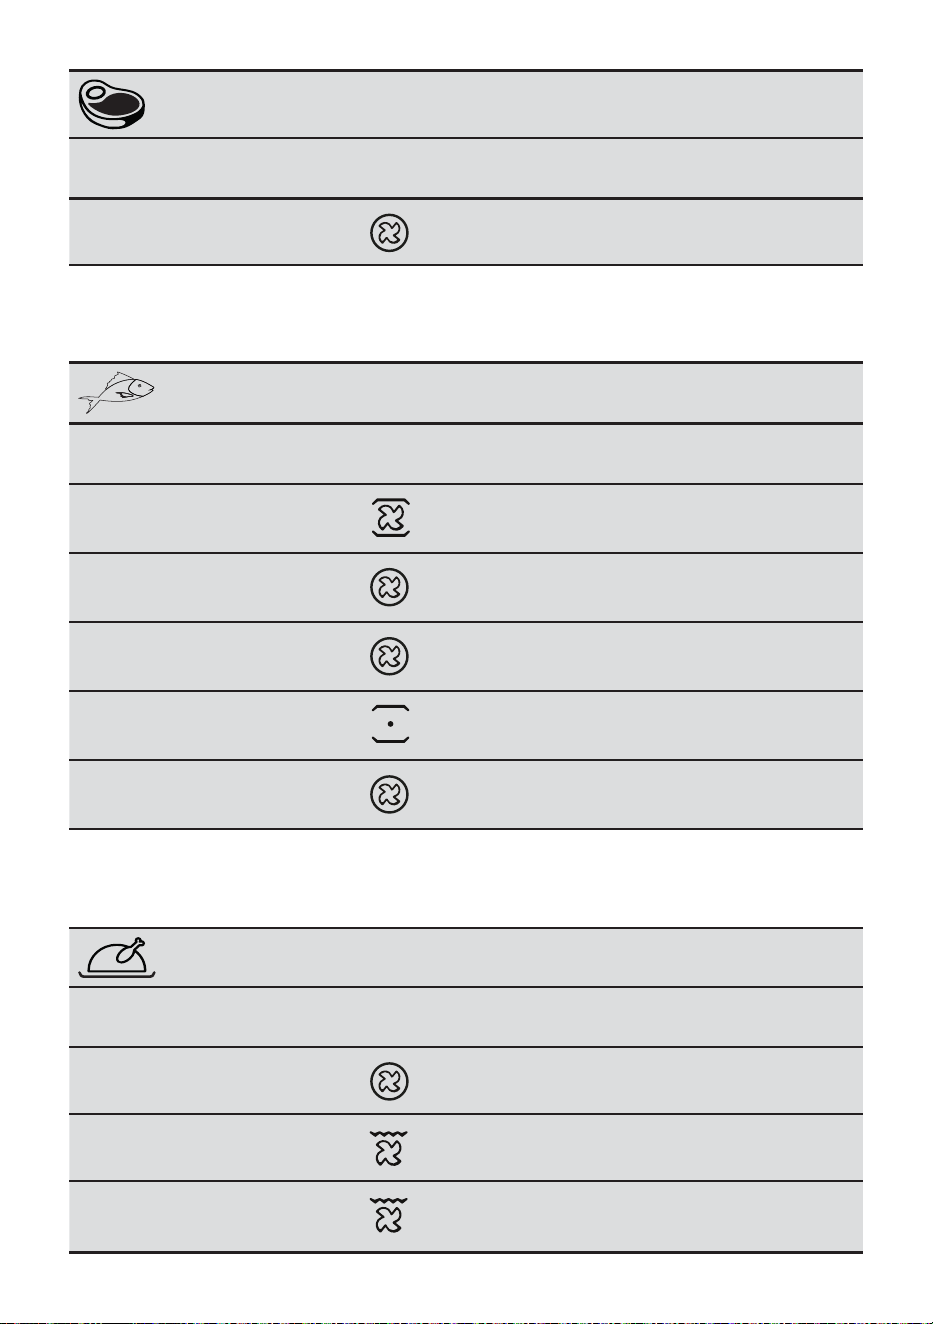
FISH
WEIGHT
[gr]
TEMP.
[°C]
FUNCTION
LEVELS
[1÷5]
LEVELS
[1÷7]
TIME
[min.]
WATER
[ml]
ACCESSORIES
/
DISHES
SEA BASS
900-1000
175-190 3 4 30-40 Baking tray
TROUT
2 Portions
1100-1300
175-190 3 4 20-30 195-210 Baking tray
SEA BREAM 500-650 175-190 2-3 3 25-35 100-125 Baking tray
BAKED SEA
BREAM
450-550 175-180 2-3 3 25-35 Baking tray
SLICE OF
SALMON
150-250 190-210 2-3 3 10 - 15 100-125 Baking tray
POULTRY
WEIGHT
[gr]
TEMP.
[°C]
FUNCTION
LEVELS
[1÷5]
LEVELS
[1÷7]
TIME
[min.]
WATER
[ml]
ACCESSORIES
/
DISHES
TURKEY
RUMP
400-450 170-190 2-3 3 40-50 90-110 Baking tray
CHICKEN
1100-1300
190-210 2 2 65-75 Baking tray
ROASTED
CHICKEN
1200-1400
190-210 85-95 Baking tray
MEAT
WEIGHT
[gr]
TEMP.
[°C]
FUNCTION
LEVELS
[1÷5]
LEVELS
[1÷7]
TIME
[min.]
WATER
[ml]
ACCESSORIES
/
DISHES
ROAST VEAL 350-450 160-180 2-3 3 80-100 150-170 Baking tray
3333
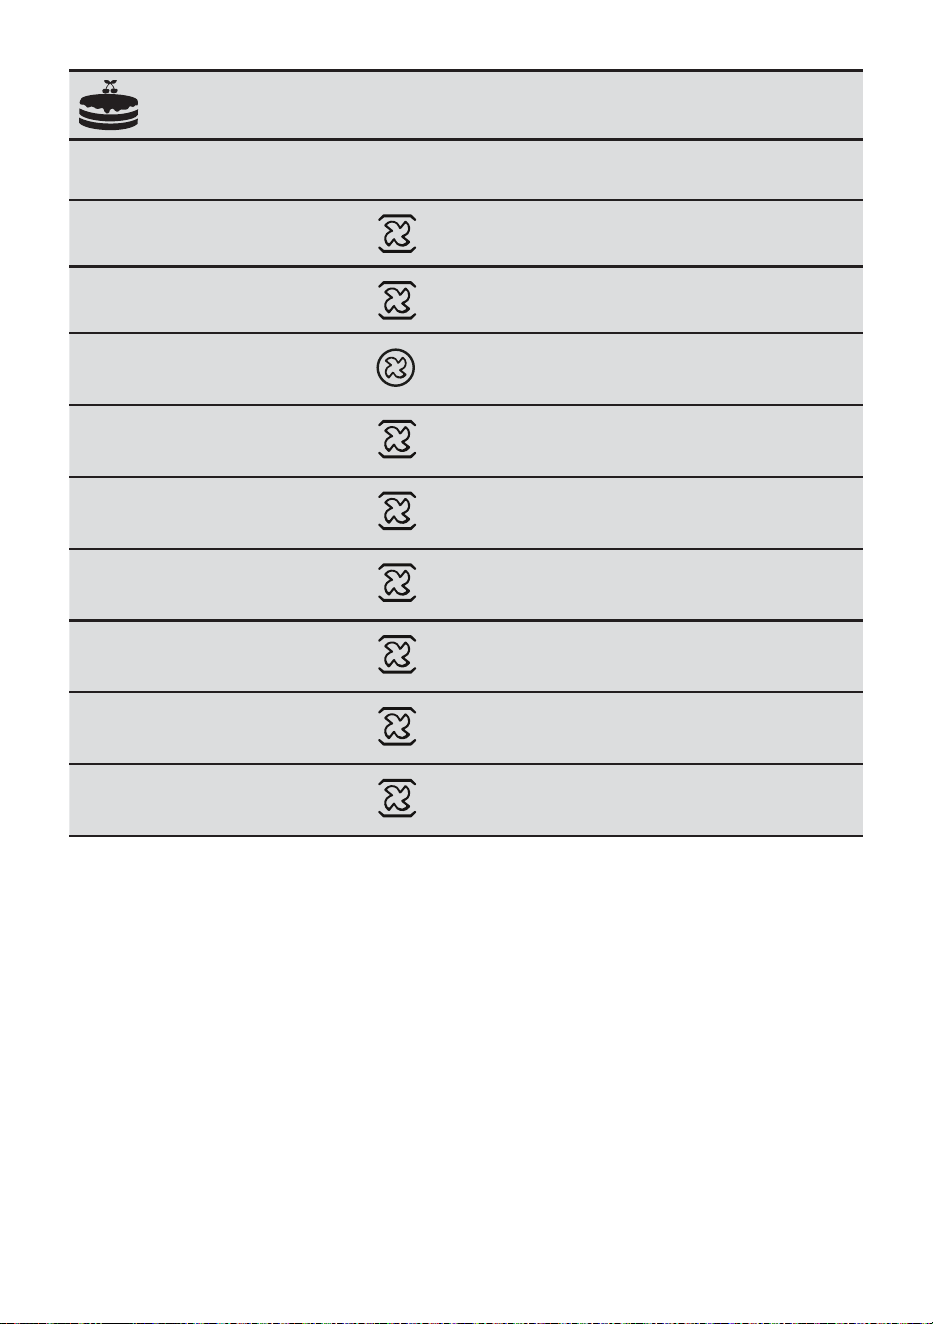
SWEETS
WEIGHT
[gr]
TEMP.
[°C]
FUNCTION
LEVELS
[1÷5]
LEVELS
[1÷7]
TIME
[min.]
WATER
[ml]
ACCESSORIES
/
DISHES
SPUNGE
CAKE
360-430 175-180 2-3 3 20-30
Round cake tin
JAM CROSTATA
700-800 175-185 2-3 3 20-30 Cake tin
PLUM CAKE 450-550 160-180 2 2 30-40
Rectangular
cake tin
MUFFIN 350-450 160-180 2 2 20-35 140-160 Mun cups
STRUDEL 650-750 175-185 2-3 3 25-35 Baking tray
POUND CAKE
680-730 175-185 2-3 3 35-45
Round cake tin
APPLE CAKE
1350-1500
175-185 2-3 3 35-45
Round cake tin
BISCUITS
135-150
175-185 2 2 12-18 Dessert dish
BISCUITS
270-300
175-185
Multilevel
2 and 4
Multilevel
2 and 4
12-18 Dessert dish
3434
FROZEN FOODS
WEIGHT
[gr]
TEMP.
[°C]
FUNCTION
LEVELS
[1÷5]
LEVELS
[1÷7]
TIME
[min.]
WATER
[ml]
ACCESSORIES
/
DISHES
FROZEN
POTATOES
Classic
580-620 195-205 3 3 12 - 15 Air fry tray
FROZEN
POTATOES
Rustics
600-700 215-225 3 3 12 - 15 Air fry tray
NUGGETS
220-270 175-185 3 4 12 - 17 Air fry tray
POTATO
CROQUETTES
700-800 215-225 3 4 14 - 17 Air fry tray
BATTERED
VEGETABLE
450-550 215-225 3 3 12 - 15 Air fry tray
3535
60’ or 120’ ALARM 120’ CUT-OFF TIMER
3
MODELS WITH 120 MINUTES
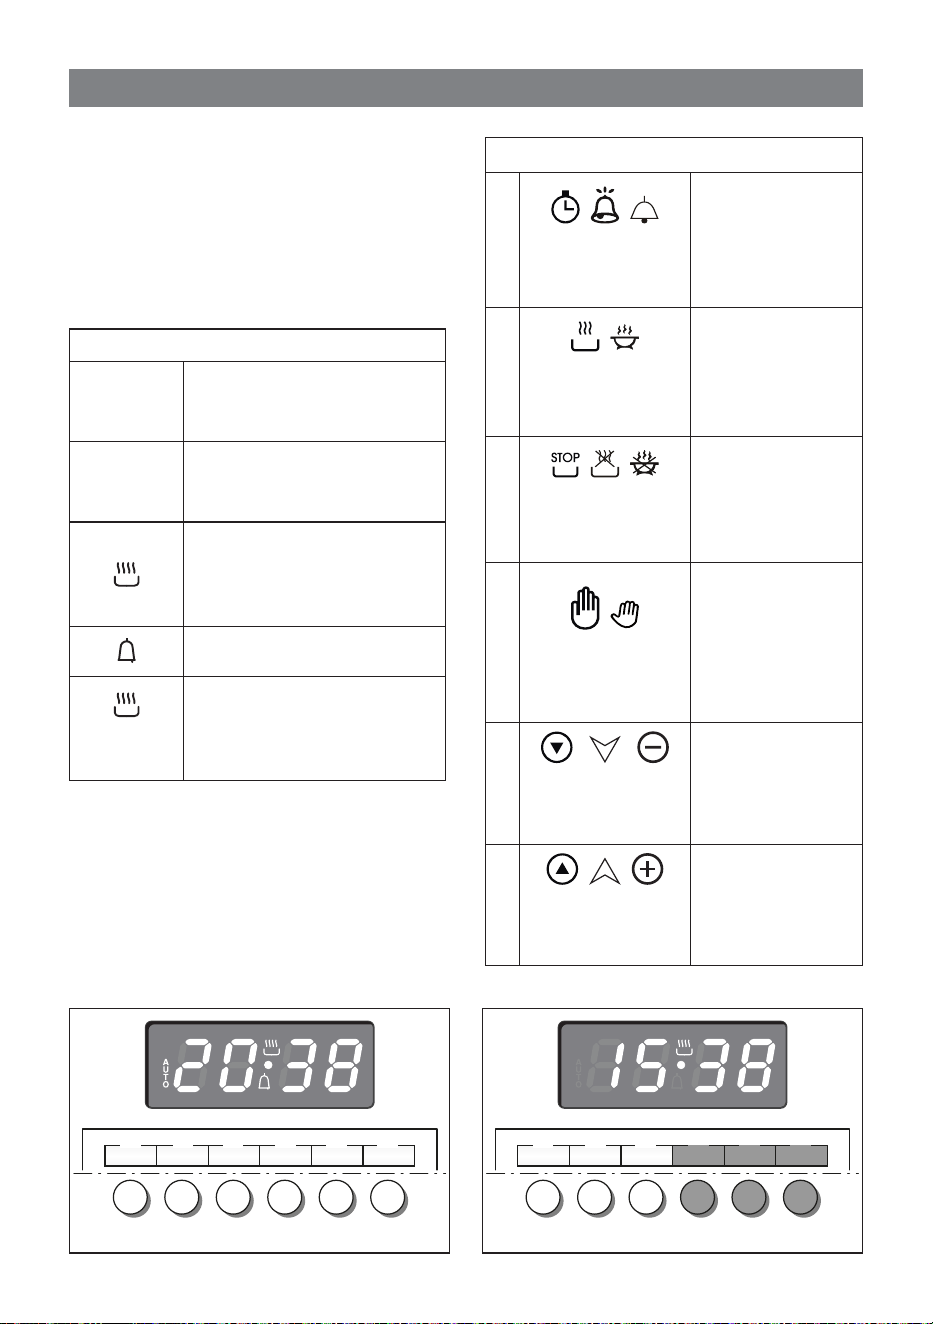
CUT-OFF TIMER (g. 3.3a, 3.3b)
The timer runs the oven for a preset time.
1. Starting up.
After setting the function selector and
thermostat to the required mode and
temperature, rotate the timer knob
clockwise until you reach the required
cooking time (max 120 minutes) (g.
3.3a).
Once this time has elapsed, the timer
will return to the “0” position and the
oven will automatically switch o.
2. Manual position.
If the cooking time is longer than
two hours or if you wish to use the
oven manually, switching it o as
required, the knob must be turned
counterclockwise to position (g.
3.3b).
55
50
45
40
35
30
25
20
15
10
5
0
110
100
90
80
70
60
50
40
30
20
10
0
NOTES: The knob and symbols may vary.
The symbols may be printed on the knob
itself.
MODELS WITH 60 or 120 MINUTES
ALARM (g. 3.1, 3.2)
The minute counter is a timed acoustic
warning device which can be set for a
maximum of 60 or 120 minutes.
The knob must be rotated clockwise as
far as the 60 or 120 minute position and
then set to the required time by rotating it
anticlockwise.
Fig. 3.2
Fig. 3.1
Fig. 3.3a
Fig. 3.3b
ATTENTION - MOST IMPORTANT:
This is only an alarm that DOES NOT
switch o the oven or grill.
REMEMBER TO TURN OFF THE OVEN
OR GRILL MANUALLY.
3636
A B C D E F
A B C D E F
A B C D E F
A B C D E F
Fig. 4.2Fig. 4.1
ELECTRONIC CLOCK / PROGRAMMER
4
The electronic clock/programmer is a
device which groups together the following
functions:
• 24 hours clock with illuminated display;
• timer (up to 23 hours and 59 minutes);
• program for automatic oven cooking;
• program for semi-automatic oven
cooking.
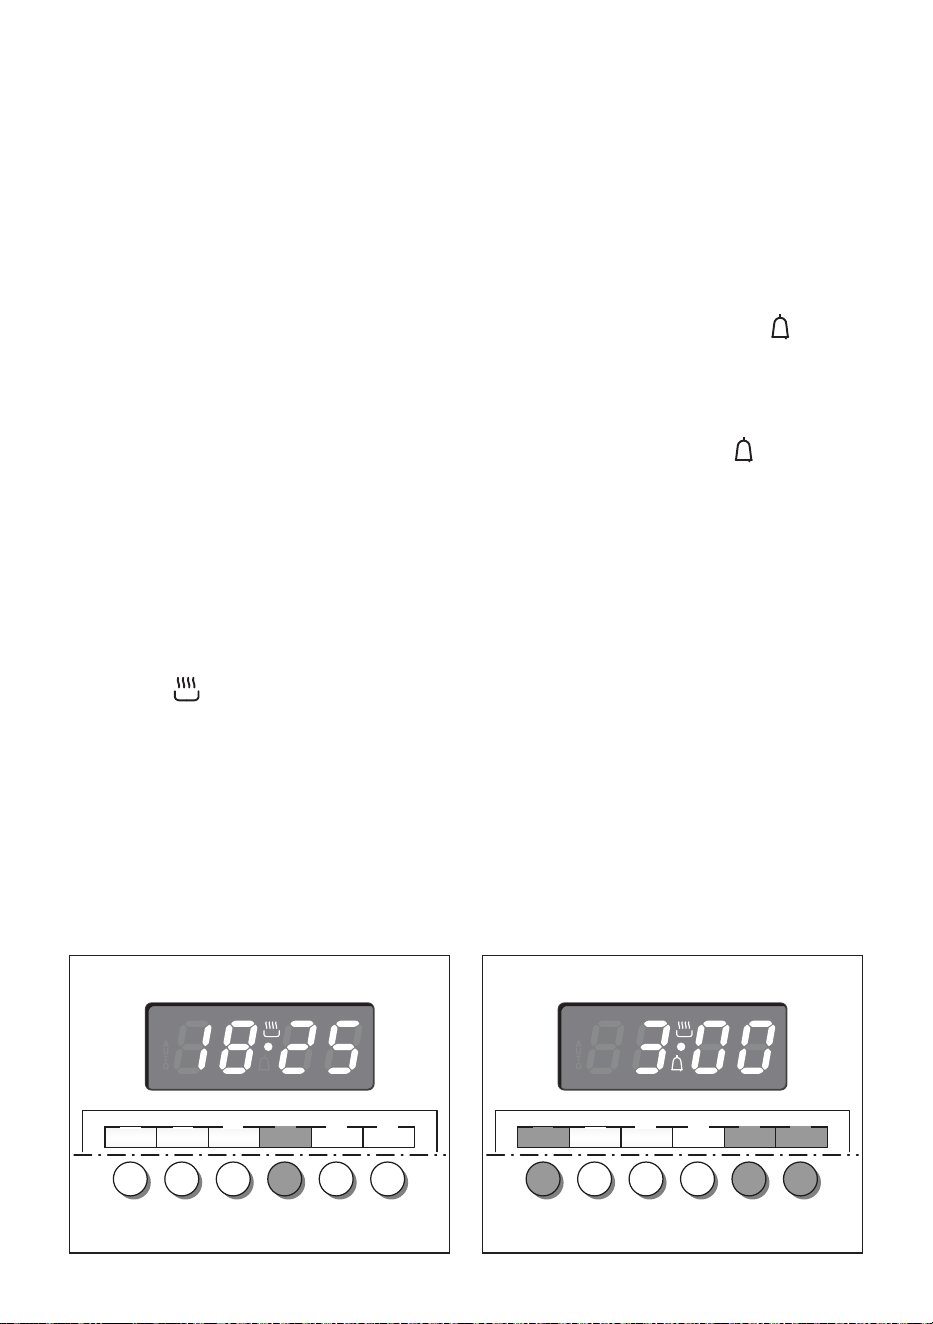
Description of the illuminated symbols:
AUTO
ashing
Programmer in automatic
or semi-automatic position
but not programmed.
AUTO
illuminated
Programmer in automatic
or semi-automatic position
with program inserted.
Oven set for manual
cooking or automatic/semi-
automatic cooking taking
place.
Timer in operation.
and AUTO
ashing
Program error.
(The time of day lies between
the calculated cooking start
and end time).
Note: Select a function by the respective
button and, in 5 seconds, set the required
time with the “E” / “F” buttons (“one-hand”
operation). After a power cut the display
resets to zero and cancels the set programs.
Description of the buttons:
A
, ,
or other
equivalent
symbols
Timer
B
,
or other
equivalent
symbols
Cooking time
C
, ,
or other
equivalent
symbols
End of cooking
time
D
,
or other
equivalent
symbols
Manual position,
cancellation of
the inserted
cooking program
and set the time
of the day
E
, ,
or other
equivalent
symbols
To decrease the
numbers on the
digital display
F
, ,
or other
equivalent
symbols
To increase the
numbers on the
digital display
3737
A B C D E F
A B C D E F
A B C D E F
A B C D E F
Fig. 4.4
Fig. 4.3
ELECTRONIC CLOCK (g. 4.2)
The programmer is equipped with an
electronic clock with illuminated numbers
which indicates hours and minutes.
Upon immediate connection of the oven or
after a power cut, three zeros will ash on
the programmer display.
To set the correct time of day it is necessary
to push the “D” button and then the “E” or
“F” button until you have set the correct
time (g. 4.2).
In another way push simultaneously the
“B” / “C” two buttons and at the same time
push the “E” or “F” button.
Note: If the clock is reset it deletes any
previously set programs
NORMAL COOKING WITHOUT THE
USE OF THE PROGRAMMER
To manually use the oven, without the
aid of the programmer, it is necessary to
cancel the ashing AUTO by pushing the
“D” button (AUTO will be switched o and
the symbol will illuminate - g. 4.3).
Attention: If the AUTO is illuminated (which
means a cooking program has already
been inserted), by pushing the button
“D” you cancel the program and return to
manual operation.
If the oven is switched on, you must switch
it o manually.
ELECTRONIC TIMER
The timer program consists only of a
buzzer which may be set for a maximum
period of 23 hours and 59 minutes.
If the AUTO symbol is ashing push the “D”
button.
To set the time, push the “A” button and the
“E” or “F” until you obtain the desired time
in the display (g. 4.4).
Having nished the setting, the clock hour
will appear on the panel and the symbol
will be illuminated.
The countdown will start immediately and
may be seen at any moment on the panel
by simply pressing the button “A”.
At the end of the time, the symbol will
disappear and the buzzer will sound for
some minutes or until a button is pressed
(not the “E” / “F” buttons).
After a short time the display will revert
back to the time of day.
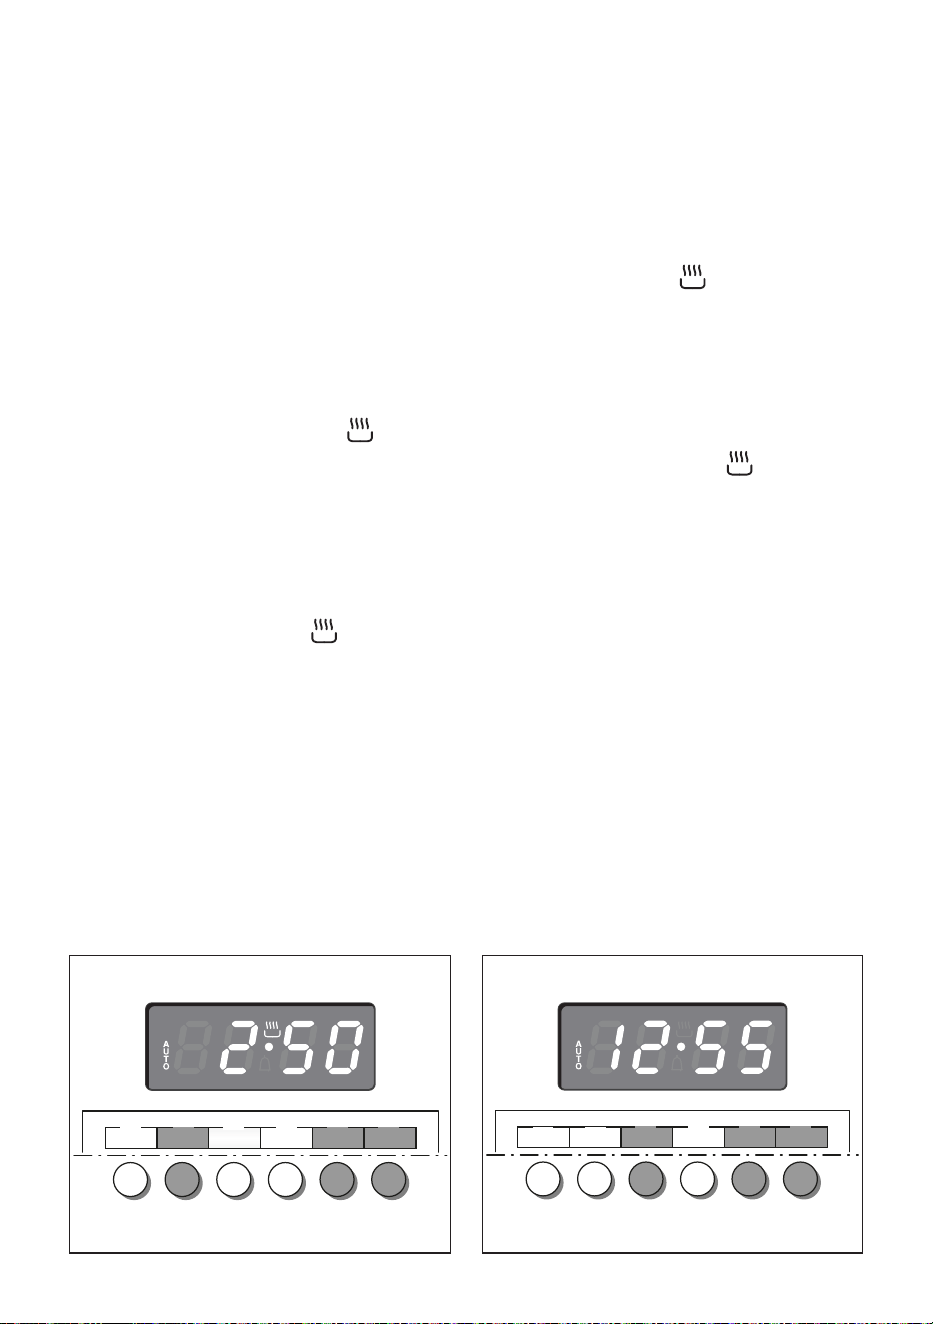
SETTING THE FREQUENCY OF THE
AUDIBLE SIGNAL
The buzzer has 3 dierent tones and can
be changed by pressing the “E” button, but
only when the time of day is displayed
3838
Fig. 4.6Fig. 4.5
A B C D E F
A B C D E F
A B C D E F
A B C D E F
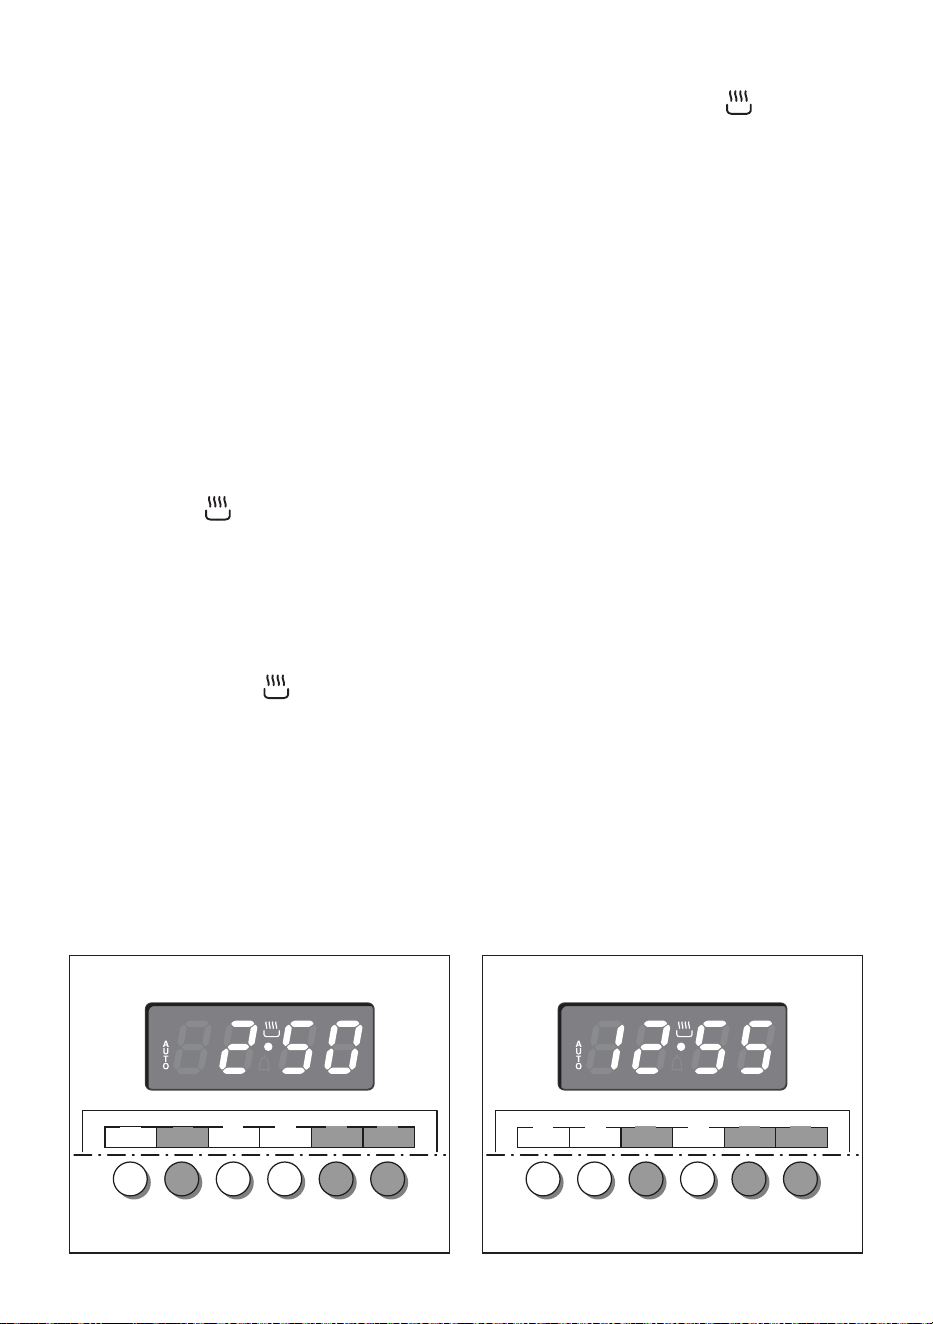
AUTOMATIC OVEN COOKING
To cook food automatically in the oven, it is
necessary to:
1. Set the length of the cooking period.
2. Set the end of the cooking time.
3. Set the temperature and the oven
cooking program.
These operations are done in the following
way:
1. Set the length of the cooking period
by pushing the “B” button and the “F”
button to increase or “E” to decrease if
you have passed the desired time (g.
4.5). The AUTO and the symbol
will illuminate.
2. Set the end of the cooking time by
pressing the
“C”
button (the cooking
time already added to the clock time will
appear) and the
“F”
button (g. 4.6); if
you pass the desired time you may get
back by pushing the
“E”
button.
After this setting, the symbol will
disappear. If after this setting, the
AUTO ashes on the display and a
buzzer sounds, it means there was
an error in the programming, that
is that the cooking cycle has been
superimposed on the clock. In this
case, modify the end of cooking
time or the cooking period itself by
following again the above mentioned
instructions.
3. Set the temperature and the cooking
function by using the switch and
thermostat knobs of the oven (see
specic chapters).
Now the oven is programmed and
everything will work automatically, that is
the oven will turn on at the right moment
to end the cooking at the established hour.
During cooking, the symbol remains
illuminated.
By pushing the “B” button you can see the
time that remains until the end of cooking.
The cooking program may be cancelled
at any time by pushing “D”.
At the end of the cooking time the oven will
turn o automatically, the symbol will
turn o, AUTO will ash and a buzzer will
sound, which can be turned o by pushing
any of the buttons except the “E” / “F”
buttons.
Turn the switch and thermostat knobs to
zero and set the programmer onto “manual”
by pressing the “D” button.
Attention: After a power cut the clock resets
to zero and cancels the set programs.
After a power cut, three zeros will ash on
the display.
3939
A B C D E F
A B C D E F
A B C D E F
A B C D E F
Fig. 4.8
Fig. 4.7
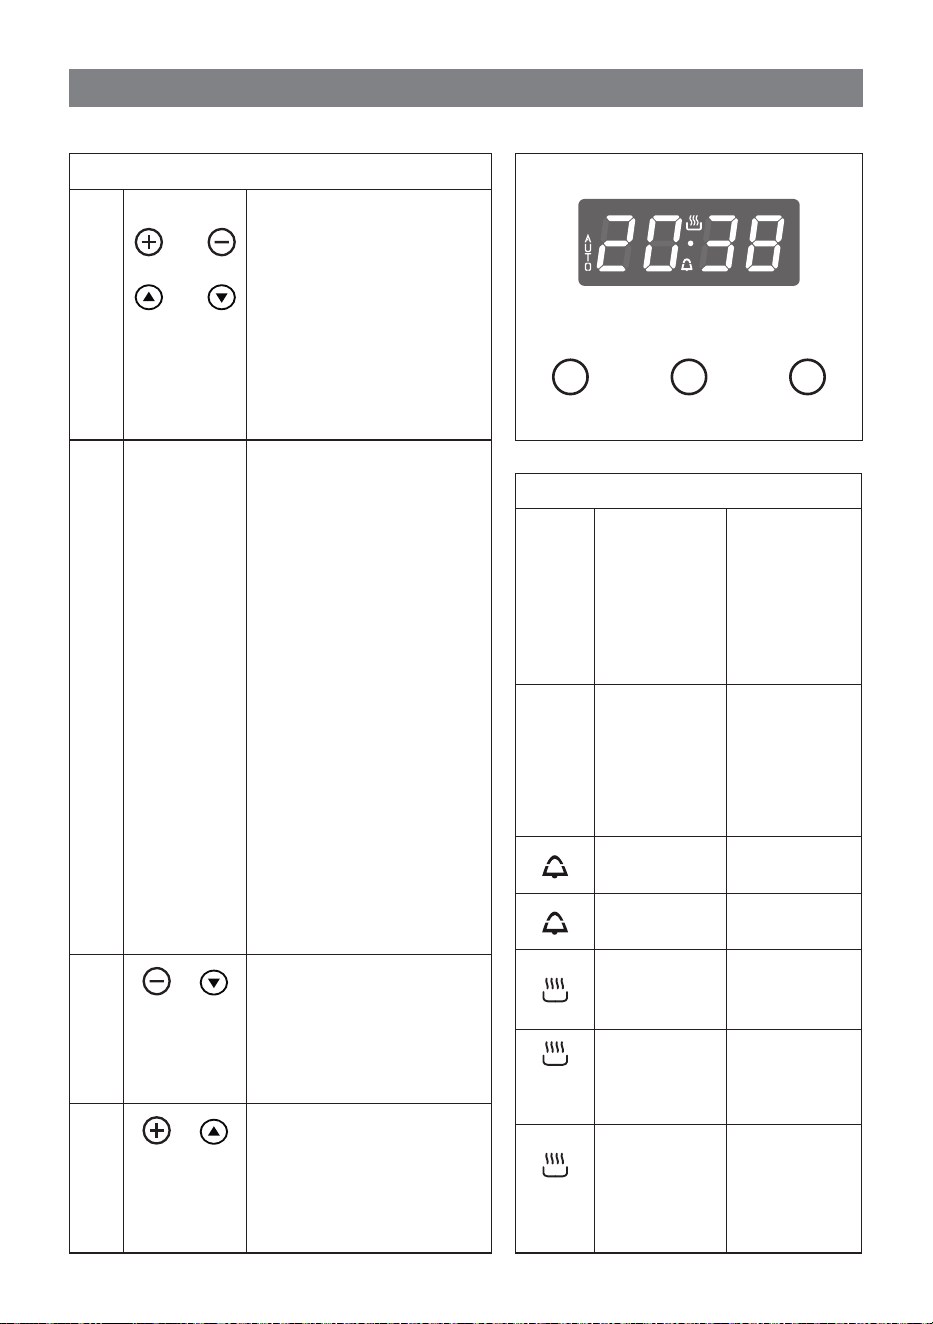
SEMI-AUTOMATIC COOKING
This is used to automatically switch o the
oven after the desired cooking time has
elapsed.
There are two ways to set your oven:
1. Set the length of the cooking time
by pushing the “B” button and the
“F” button to advance, or “E” to go
backwards if you have passed the
desired time (g. 4.7).
or
2. Set the end of the cooking time
by pushing the “C” button and the
“F” button to advance, or “E” to go
backwards if you have passed the
desired time (g. 4.8).
AUTO and the symbol will be on.
Then set the temperature and the cooking
function using the oven switch and
thermostat knobs (see specic chapters).
The oven is switched on and it will be
switched o automatically at the end of the
desired time.
During cooking, the symbol remains
on and by pressing the button “B” you can
see the time that remains till the end of the
cooking.
The cooking program may be cancelled
at any time by pushing “D”.
At the end of the cooking time the oven will
turn o automatically, the symbol will
turn o, AUTO will ash and a buzzer will
sound, which can be turned o by pushing
any of the buttons except the “E” / “F”
buttons.
Turn the switch and thermostat knobs to
zero and set the programmer onto “manual”
by pressing the “D” button.
Attention: After a power cut the clock resets
to zero and cancels the set programs.
After a power cut, three zeros will ash on
the display.
4040
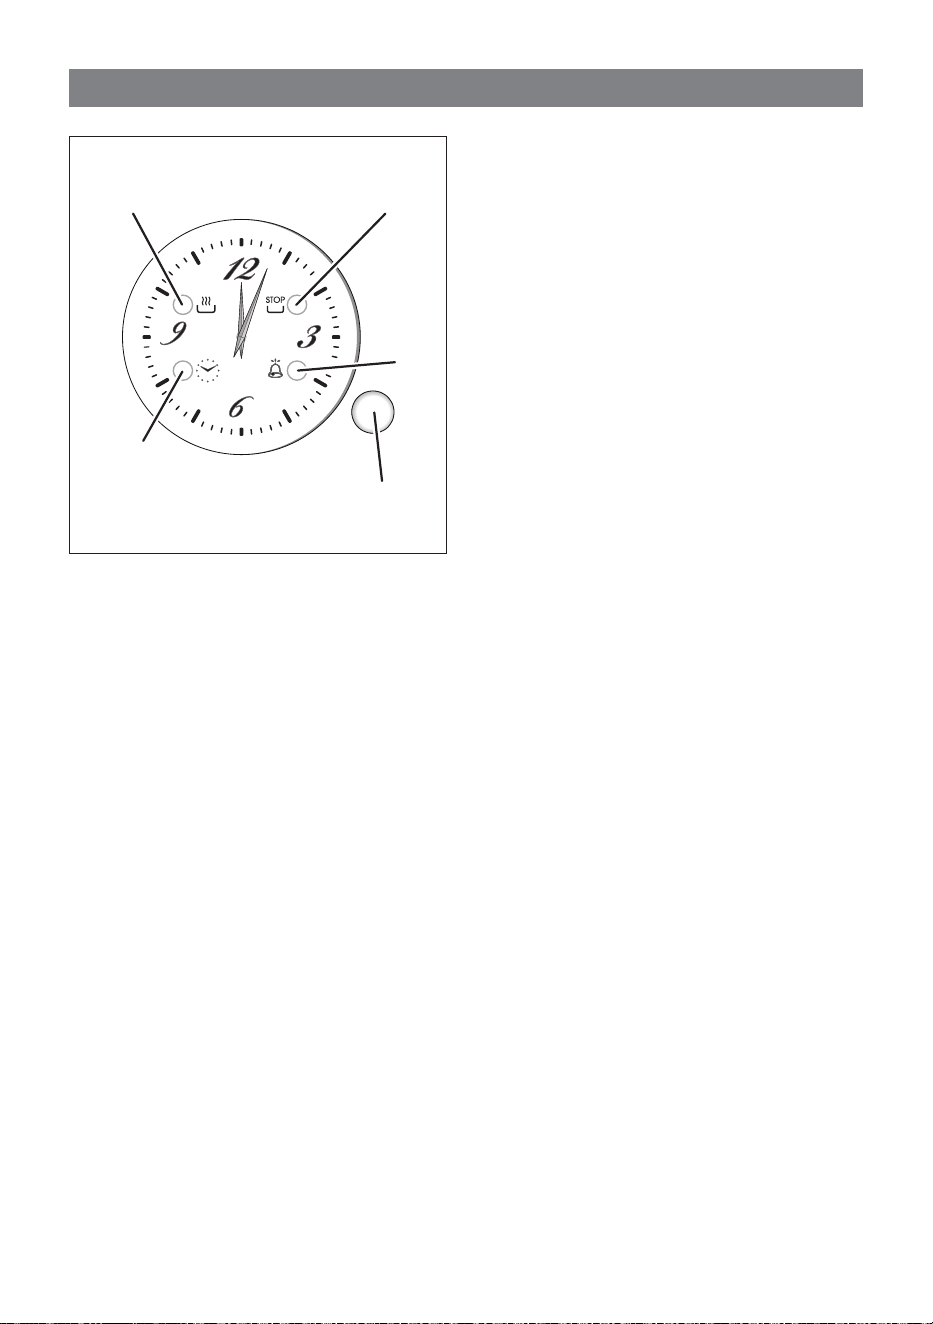
CLOCK AND TIMER WITH “TOUCH CONTROL” KEYS
5
Illuminated symbols:
AUTO ashing
Automatic
cooking
completed,
oven in
automatic
position but
not set
AUTO
steady
illumination
Oven set for
automatic
cooking,
cooking still
not taking
place
ashing
Timer being
set
steady
illumination
Timer in
operation
steady
illumination
Oven set
for manual
cooking
and
AUTO
AUTO
ashing
Automatic
cooking
being set
and
AUTO
steady
illumination
Oven set for
automatic
cooking,
cooking
taking place
Keys:
A
and
C
and
or
and
or
other
equivalent
symbols
Touched simultaneously
(for more than 2 seconds):
• setting the clock;
• setting the timer
volume (by touching
once, along with the
“B” key);
• to cancel automatic
cooking at any time.
B
MODE
or
other
equivalent
wording /
symbol
Function selection
(touched for more than 2
seconds):
• setting the clock
(only after rst
connection or after a
power failure);
• timer;
• automatic cooking
“dur” (duration) -
how long the food
will take to cook (by
touching the “B” key
again);
• automatic cooking
“End” - the time you
would like the oven
turns o (by touching
the “B” key two more
times).
A
or
or
other
equivalent
symbols
Decreases the number
shown on the display
C
or
or
other
equivalent
symbols
Increases the number
shown on the display
A B C
Fig. 5.1

4141
“TOUCH-CONTROL” KEYS
The “touch-control” keys shall be operated by the ngers (just by touching the key).
When using touch controls it is best to use the ball of your nger rather than the tip.
The keys are automatically deactivated:
• 8 seconds after the last selection; the deactivation is indicated by an acoustic signal
(“beep”).
To reactivate just touch the “B” key or the “A” and “C” keys (simultaneously) for more than
2 seconds.
SETTING THE CLOCK
When rst connected, or after a power failure, the digits and “AUTO” will show on the
display.
Important: The oven does not operate, in manual cooking, without rst having set
the clock.
To set the clock, touch the “B” key, for more than 2 seconds, and then the “A” or “C” keys.
To set the clock, with the appliance already connected, touch the “A” and “C” keys
simultaneously (for more than 2 seconds), then “A” or “C” keys.
Important:
• changing the time will delete any automatic program;
• after setting the clock, the oven starts to operate in the selected function (manual
cooking). The “ ” symbol is steady illuminated.
USING THE TIMER
You can use the timer at any time, even when the oven is not in use.
The timer does not turn the oven o.
The timer can be set for up to 23 hours and 59 minutes.
• To set the timer, touch the “B” key for more than 2 seconds (the “ ” symbol ashes),
than the “C” or “A” keys.
• After about 8 seconds an acoustic signal (“beep”) will sound conrming the regulation
(“ ” symbol steady illuminated).
• To check the remaining time touch the “B” key for more than 2 seconds. If the remaining
time is more than a minute the display will show hours and minutes; if less than a
minute the display will show seconds.
• When the time is up, the timer will beep. Touch the “B” key , for more than 2 seconds,
to turn it o; or press the “A” or “C” key to stop the beep and then the “B” key, for more
than 2 seconds, to deactivate the “ ” symbol ashing on the display.
• Turn o the oven manually (function and thermostat knobs in the o position) if the
manual cooking has been completed.

4242
SETTING THE TIMER VOLUME
You can select from three volume levels.
• Touch the “A” and “C” keys simultaneously for more than 2 seconds.
• Touch the “B” key; you can read on the display the current timer volume (“ton1”, “ton2”
or “ton3”).
• Touch the “A” key to listen or change the timer volume.
• Timer volume activated: the last displayed.
• After about 8 seconds an acoustic signal (“beep”) will sound conrming the volume
setting; then the time of day will be displayed.
AUTOMATIC COOKING
Use automatic cooking to automatically turn the oven on, cook, and then turn the oven o.
1. Check the clock shows the correct time.
2. Select the function and temperature (function and temperature knobs). The oven will
come on.
3. Decide how long the food will take to cook, allowing time for preheating if necessary.
4. Touch the “B” key for more than 2 seconds and then touch again; “dur” will show
(duration). Using the “C” and “A” keys, set the cooking time.
5. Decide the time you would like the oven to turn o; touch the “B” key for more than
2 seconds and then touch it two times again; “End” will show. Using the “C” and “A”
keys, set the stop time.
Note: while “dur” is displayed you can change to “End” just by touching one time the
“B” key (within 8 seconds from the last selection).
If there is time to wait before cooking starts, the current time of day and “AUTO” will show
in the clock display. The oven will switch o but is now set for automatic cooking.
If you are already at home to turn the oven on and only want the oven to turn o automatically,
start cooking as normal, then follow step 4 or step 5 to set a time to stop the oven.
When automatic cooking starts, “ ” will be displayed and the oven will turn on.
• To see the remaining cook time, follow step 4 up to display “dur” (duration).
• To see the set stop time, follow step 5 up to display “End”.
• To cancel automatic cooking at any time, touch the “A” and “C” keys simultaneously
(for more than 2 seconds) and turn the temperature and function knobs to the o
position.
When the stop time is reached, the oven will turn o, the timer will beep and “AUTO” will
ash:
• Touch any key to stop the beeping.
• Touch the “B” key, for more than 2 seconds, to return the oven to the manual mode
(“ ” symbol steady illuminated on the display).
• Turn the temperature and function knobs to the o position.
Attention: After a power failure any automatic program is deleted. Turn o the oven
manually.
4343
ELECTRIC CLOCK/PROGRAMMER
6
The electric clock/programmer is a device
which groups the following functions:
• 12-hour analog clock;
• minute minder (max 3 hours);
• automatic cooking (* see note below);
• acoustic signal (beep) which is
activated each time the “setting knob”
is pressed or at the end of the minute
minder function or automatic cooking
program.
(*) The maximum programmable time
(MPT) depends from the set start
cooking time.
MPT = 15 hours - dierence of hours
between the set start cooking time
and the time of day (e.g. time of day =
08:00, set start cooking time = 11:00;
MPT = 15 - 3 = 12 hours).
ELECTRIC CLOCK
Upon immediate connection of the
appliance or after a blackout, the “clock
indicator light” is ashing. This indicates
that it is recommended to check if the time
of the day is correct.
• If the time of the day is correct keep
the “setting knob” pressed until the
“clock indicator light” goes out.
• To set the time of the day press the
“setting knob” briey (repeatedly) until
the “clock indicator light” is ashing.
Then turn the “setting knob” (to the
right or left) to set the time of the day.
At the end of the time adjustment,
keep the “setting knob” pressed for
conrmation until the “clock indicator
light” goes out.
MINUTE MINDER
The minute minder function consists only
of a buzzer which is automatically activated
at the end of the set time (max 3 hours).
Important : It is not possible to use the
minute minder function if an automatic
cooking has been set.
To set the minute minder press the “setting
knob” briey (one or more times) until the
“minute minder indicator light” is ashing.
Then turn the “setting knob” (to the right or
left) to set the time.
At the end of the adjustment (within 10
seconds), keep the “setting knob” pressed
for conrmation until the “minute minder
indicator light” changes from ashing to
steadily lit.
Then the countdown starts immediately.
At the end of the time, the “minute minder
indicator light” changes from steadily lit to
ashing and a buzzer (beep) sounds for
one minute.
Press the “setting knob” briey to stop the
buzzer and to turn o the ashing “minute
minder indicator light”.
Setting knob
Clock
indicator
light
Start Cooking
indicator light
End Cooking
indicator light
Minute
minder
indicator
light
Fig. 6.1

4444
During the minute minder program it is
possible, at any time, to display the set time
by pressing the “setting knob” briey (one
or more times) until the “minute minder
indicator light” is ashing.
To cancel the program before completion,
keep the “setting knob” pressed for about 3
seconds until the “minute minder indicator
light” goes out; the minute minder function
will be cancelled.
AUTOMATIC COOKING
Use automatic cooking to automatically
turn the oven on, cook, and then turn the
oven o.
1. Check the clock shows the correct
time.
2. Select the function and temperature
(function and temperature knobs). The
oven will come on.
3. Press the “setting knob” briey (one
or more times) until the “Start Cooking
indicator light” is ashing.
Then turn the “setting knob” (to the
right or left) to set the start cooking
time (not less than 2 minutes and max
12 hours from the current time of the
day).
At the end of the adjustment (within
10 seconds), keep the “setting knob”
pressed for conrmation until the
“Start Cooking indicator light” changes
from ashing to steadily lit.
4. Decide how long the food will take to
cook, allowing time for preheating if
necessary.
Press the “setting knob” briey (one
or more times) until the “End Cooking
indicator light” is ashing.
Then turn the “setting knob” (to the
right or left) to set the end cooking time
(at least 2 minutes from the set start
cooking time).
At the end of the adjustment (within
10 seconds), keep the “setting knob”
pressed for conrmation until the “End
Cooking indicator light” changes from
ashing to steadily lit.
If there is time to wait before cooking starts,
the oven will switch o but is now set for
automatic cooking.
If you are already at home to turn the
oven on and only want the oven to turn o
automatically, start cooking as normal, then
follow step 4 to set a time to stop the oven.
• To see the set start cooking time,
press the “setting knob” briey (one
or more times) until the “Start Cooking
indicator light” is ashing.
• To see the set stop time, press the
“setting knob” briey (one or more
times) until the “End Cooking indicator
light” is ashing.
• To cancel the program before
completion, keep the “setting knob”
pressed for about 3 seconds until the
“Start Cooking indicator light” and/or
“End Cooking indicator light” go/goes
out. REMEMBER TO TURN OFF THE
OVEN OR GRILL MANUALLY.
When the stop time is reached, the oven
will turn o, the “End Cooking indicator
light” changes from steadily lit to ashing
and a buzzer (beep) sounds for one minute.
• Press the “setting knob” briey to stop
the buzzer and to turn o the ashing
“End Cooking indicator light”.
• Turn the temperature and function
knobs to the o position.
Attention: After a power failure any
automatic program is NOT deleted and
the “clock indicator light” is ashing
(this indicates that it is recommended to
check if the time of the day is correct).
ATTENTION - MOST IMPORTANT:
This is only an alarm that DOES NOT
switch o the oven or grill.
REMEMBER TO TURN OFF THE
OVEN OR GRILL MANUALLY.
4545
ELECTRONIC CLOCK/PROGRAMMER “TOUCH-CONTROLS”
7
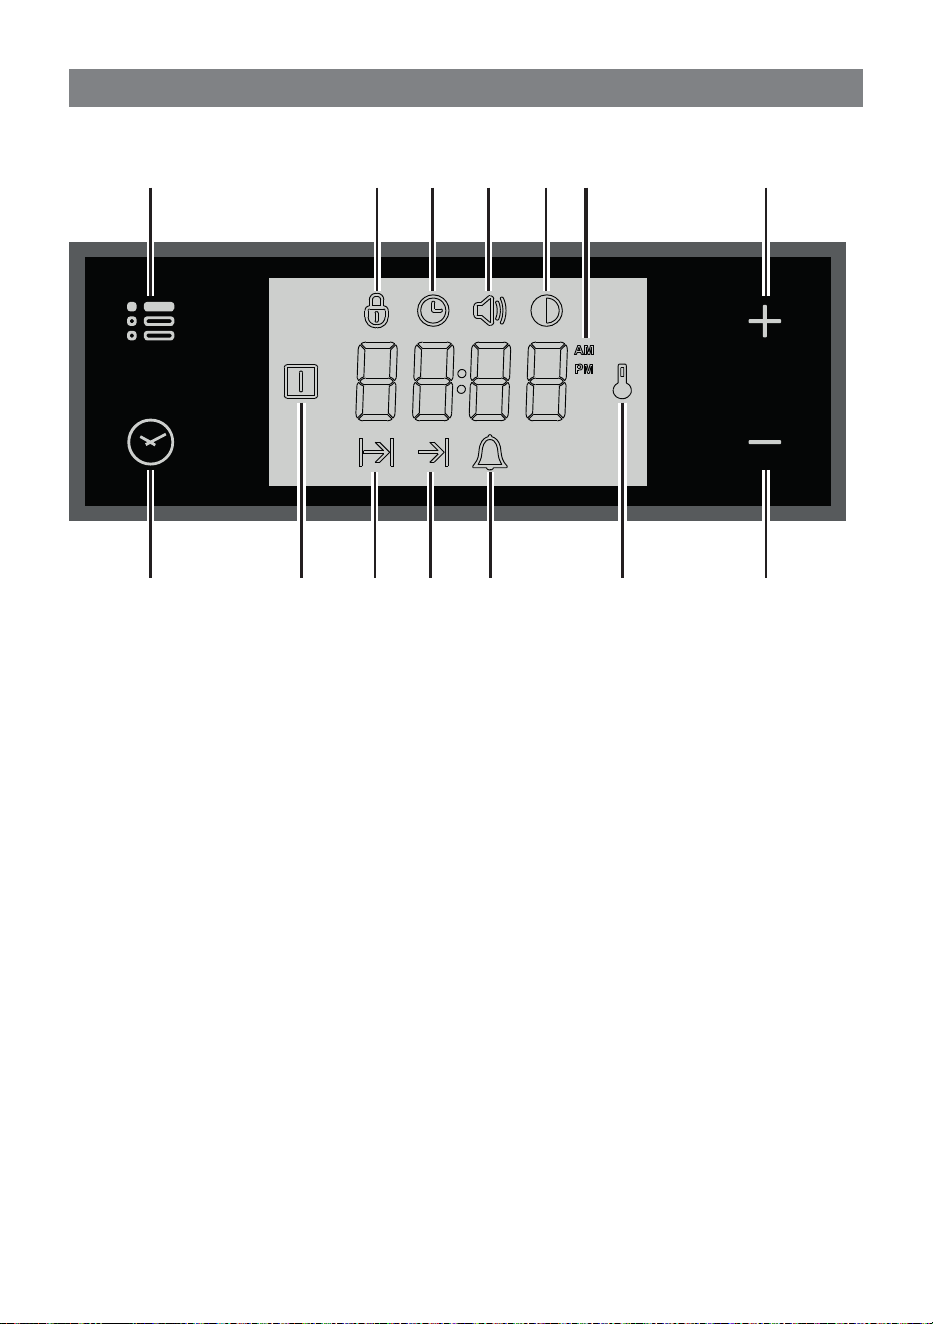
11 12
14 13
1 2 3 4 5
10 9 8 7 6
Description of display symbols:
1. Oven on
2. Cooking time
3. End of cooking time
4. Timer
5. Oven temperature
6. AM/PM time format
7. Screen brightness
8. Acoustic signal volume
9. Time of day setting
10. Programmer ‘touch’ control panel key lock
Description of the ‘touch control’ panel symbols:
11. Program selection
12. Digit backward setting for all functions
13. Digit forward setting for all functions
14. Menu selection
IMPORTANT NOTE: When using the timer and during a semi-automatic or automatic
cooking, the countdown of the function with less time remaining prevails on the display.
ATTENTION - MOST IMPORTANT:
ELECTRONIC PROGRAMMER DISPLAY CLEANING
Strictly follow the information indicated in the chapter "CLEANING AND
MAINTENANCE".
Fig. 7.1
4646
“TOUCH-CONTROL” KEYS
The “touch-control” keys shall be operated by the ngers (just by touching the key).
When using touch controls it is best to use the ball of your nger rather than the tip.
Program and menu selection: after starting the procedure, the selection is automatically
deactivated after approx. 5 seconds from the last touch on the display.
SETTING THE CLOCK
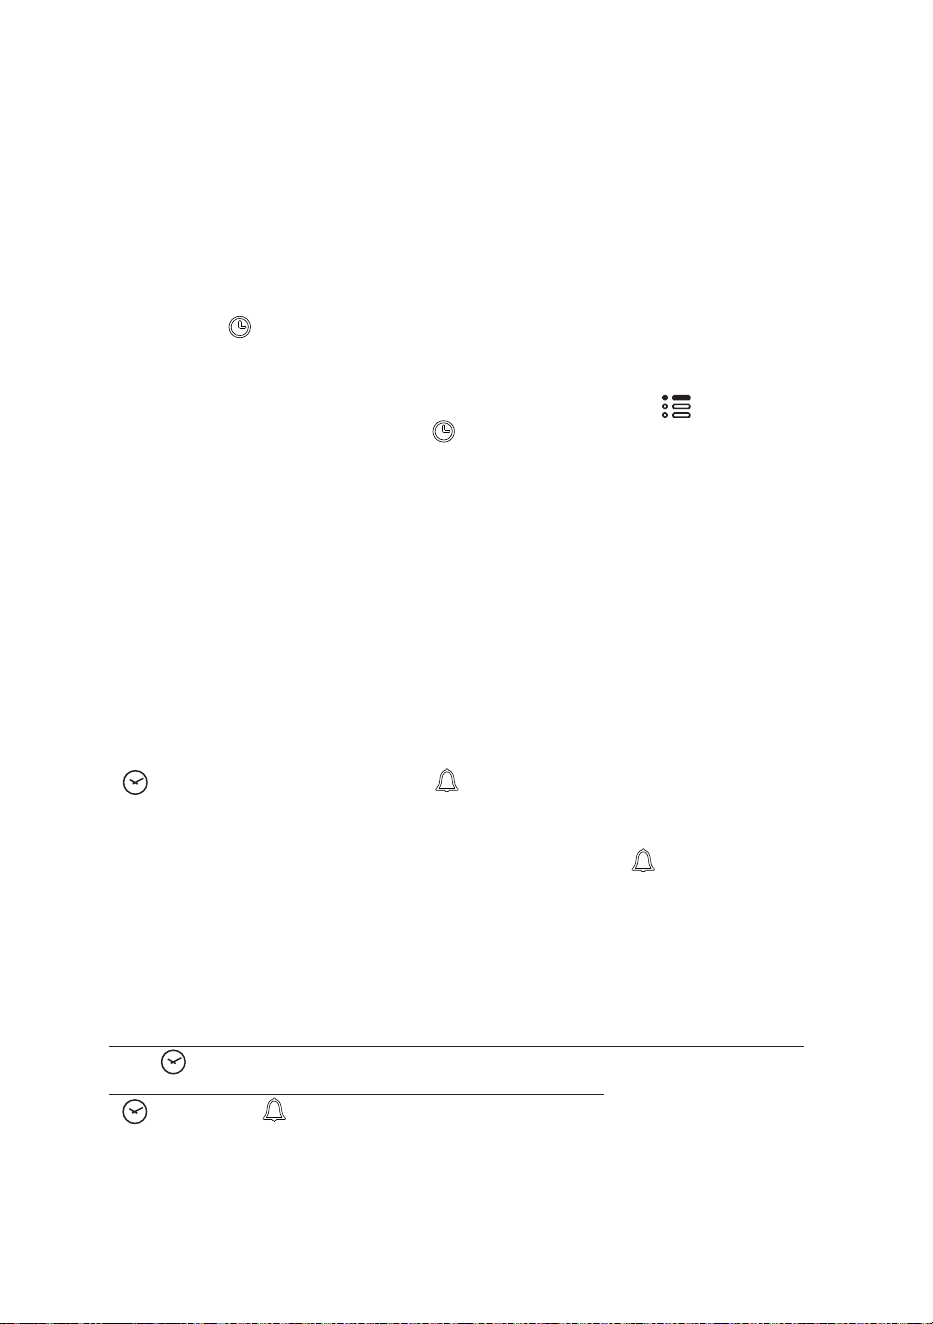
When connecting for the rst time, or after a power failure, the word “OFF” ashes on the
display and the “ ” symbol is lit. Adjust the time touching the “+” or “―” key.
Important: The oven does not operate, in manual cooking, without rst having set
the clock.
To change the time with the appliance already installed, touch the " " key for more than
2 seconds, then touch it again until the “ ” symbol ashes. Then adjust the time, within
5 seconds, using the “+” or “―”.
Important: It is not possible to adjust the clock if a cooking program is in progress.
USING THE TIMER
You can use the timer at any time, even when the oven is not in use.
ATTENTION - MOST IMPORTANT: This is only an alarm that DOES NOT switch o
the oven or grill.
REMEMBER TO TURN OFF THE OVEN/GRILL MANUALLY.
The timer can be set for a maximum time of 23 hours and 59 minutes.
1. To set the timer, with the appliance already connected, touch the
" " key (several times) until the “ ” symbol ashes on the display. Set the time
(increase in minutes) within 5 seconds using the “+” or “―”. key. At the end of the
adjustment the display shows the countdown.
2. At the end of the count, the timer starts beeping and the “ ”symbol ashes on the
display. Touch any key to turn o the acoustic signal that would otherwise stop after
7 minutes.
3. Turn the oven o manually (switch and thermostat knobs in the o position) if you do
not wish to continue with manual cooking.
To reset the timer in operation at any time:
1A. Only timer function active (no semi-automatic or automatic cooking in progress): touch
the " " key for 3 seconds..
1B. With semi-automatic or automatic cooking in progress: touch the key several times
" " until the “ ” symbol ashes on the display. Then touch the “―” key within 5
seconds until " 00:00 " appears on the display.
2. The time of day is shown on the display.
4747
SEMI-AUTOMATIC COOKING
This is used to automatically switch o the oven after the desired cooking time has elapsed.
Check the clock shows the correct time.
The semi-automatic cooking program can be set for a maximum period of 10 hours.
1. Select the function and temperature (function and temperature knobs). The oven will
come on.
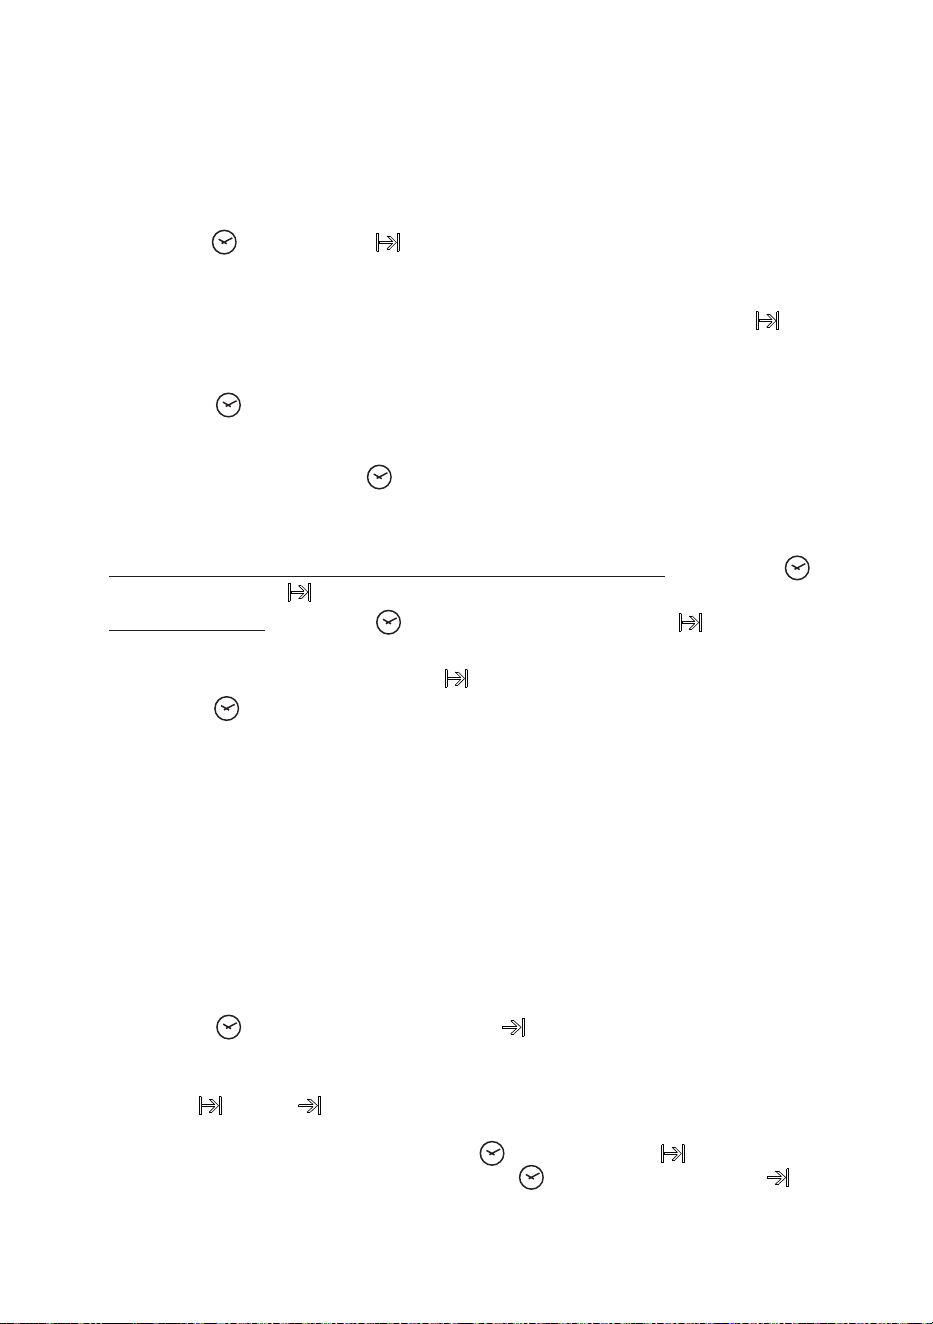
2. Touch the " " key until the " " symbol ashes on the display. Set the cooking time
(increase in minutes - consider the preheating time, if necessary) within 5 seconds
using the “+” or “―”. At the end of the adjustment the display shows the countdown.
3. At the end of the count the oven turns o, the timer starts beeping, the " " symbol
ashes and the word “End” appears on the display.
4. Turn the temperature and function knobs to the o position.
5. Touch the " " key to deactivate the acoustic signal (which otherwise will stop after
7 minutes) and to return the programmer to manual mode (the time is shown on the
display). If instead the acoustic signal is deactivated with one of the other keys, after
deactivation also touch the " " key to return the programmer to manual mode (the
time is shown on the display).
To cancel the semi-automatic cooking program at any time:
1A. Only semi-automatic cooking function active (no timer in use): touch the " " key
for 3 seconds, the " " symbol and the word “End” (ne) are shown on the display.
1B. With active timer: touch the " " key several times until the " " symbol ashes.
Then touch the “―” key within 5 seconds until " 00:00 " appears on the display,
replaced after a few seconds by the " " symbol and the word “End”.
2. Touch the " " key again to return the programmer to manual mode (the time of day
is shown on the display). If cooking is nished turn the temperature and function knobs
to the o position, otherwise continue cooking and then remember to turn the oven o
manually.
AUTOMATIC COOKING
Use automatic cooking to automatically turn the oven on, cook, and then turn the oven o.
Check the clock shows the correct time.
1. Select the function and temperature (function and temperature knobs). The oven will
come on.
2. Decide the cooking time considering the preheating time, if necessary, and set it as
described above in the “SEMI-AUTOMATIC COOKING” chapter.
3. Touch the " " key several times until the " " symbol appears on the display. Then
set the time at which you want the oven to turn o, touching the “+” or “―” key.
4. If the cooking is not started immediately, the display shows the current time of day
and the " " and " " symbols. The oven turns o but now it is set for automatic
operation.
• To check the cooking time, touch the " " key once, the " " symbol ashes.
• To check the turn-o time, touch the key several times until the symbol
ashes.
4848
To cancel the automatic cooking program at any time, proceed as described in the “SEMI-
AUTOMATIC COOKING” chapter.
Turn the temperature and function knobs to the o position, otherwise continue cooking
and then remember to turn the oven o manually.
ATTENTION - VERY IMPORTANT (AUTOMATIC OR SEMI-AUTOMATIC COOKING):
If a very short power interruption occurs, the oven keeps the programming.
If the interruption is instead longer than a few tens of seconds, the automatic cooking
is cancelled. In this case, turn the temperature and function knobs to the o position
and restart programming if necessary.
USER PREFERENCES SETTINGS
PROGRAMMER ‘TOUCH CONTROL’ PANEL KEY LOCK
This function is used to prevent the accidental touch of the programmer selection keys and
to avoid unintentionally activating or modifying its functions.
The key lock can be activated at any time, with a cooking in progress or with the oven o.
To lock:
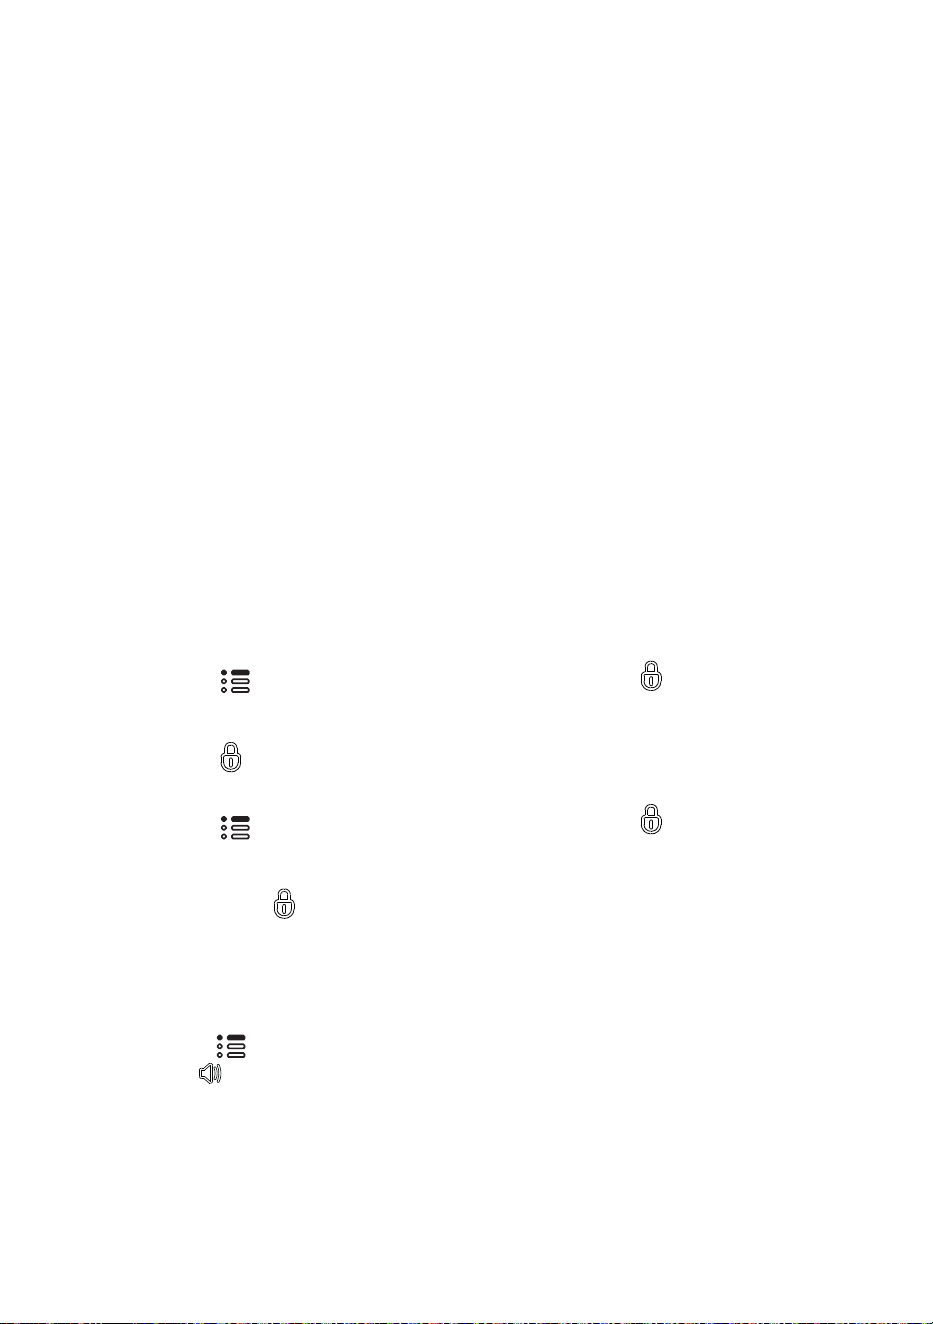
• Touch the " " key for more than 2 seconds until the " " indicator light starts
ashing. Then touch the “+” key to activate the key lock, the word "On", appears on
the display, wait a few seconds until the operation is completed. When this function is
active, the " " indicator light is on.
To unlock:
• Touch the " " key for more than 2 seconds until the " " indicator light starts
ashing. Then touch the “―” key to deactivate the key lock, the word "OFF" appears
on the display, wait a few seconds until the operation is completed. When this function
is not active, the " " indicator light is o.
ACOUSTIC SIGNAL TONE SETTING
It is possible to select three sound tones.
• Touch the " " key for more than 2 seconds, then touch the same key several times
until the " " symbol ashes.
• Touch the “+” or “―”; key; the display shows the tone set (“b-01”, “b-02” or “b-03”).
• The last tone displayed remains active.

4949
SCREEN BRIGHTNESS SETTING
It is possible to select three brightness levels.
• Touch the " " key for more than 2 seconds, then touch the same key several times
until the " " symbol ashes.
• Touch the “+” or “―”; key; the display shows the brightness set (“d-01”, “d-02” or
“d-03”).
• The last brightness displayed remains active.
TIME FORMAT
It is possible to choose the 24 hour or 12 hour clock format.
• To activate the 12 hour format, touch the “+”, key for more than 5 seconds until the
" " or " " symbol is activated.
• To activate the 24 hour format, touch the “+”, key for more than 5 seconds until the
" " or " " symbol is deactivated.

5050
GENERAL ADVICE
• Important: Before any operation
of cleaning and maintenance
disconnect the appliance from the
electrical supply.
• It is advisable to clean when the
appliance is cold and especially when
cleaning the enamelled parts.
• Avoid leaving alkaline or acidic
substances (lemon juice, vinegar, etc.)
on the surfaces.
• Avoid using cleaning products with a
chlorine or acidic base.
• Always clean the oven with appropriate
products after use.
• Important: The use of suitable
protective clothing/gloves is
recommended when handling or
cleaning of this appliance.
WARNING:
When correctly installed, your product
meets all safety requirements laid down
for this type of product category.
However special care should be taken
around the rear or the underneath of
the appliance as these areas are not
designed or intended to be touched and
may contain sharp or rough edges, that
may cause injury.
ENAMELLED PARTS
All the enamelled parts must be cleaned
with a sponge and soapy water or other
non-abrasive products.
Dry preferably with a microbre or soft
cloth.
Acidic substances like lemon juice, tomato
sauce, vinegar etc. can damage the enamel
if left too long.
STAINLESS STEEL, ALUMINUM
PARTS AND PAINTED OR SILK-
SCREEN PRINTED SURFACES
Clean using an appropriate product. Always
dry thoroughly.
IMPORTANT: These parts must be
cleaned very carefully to avoid scratching
and abrasion. You are advised to use a soft
cloth and neutral soap.
CAUTION: Do not use abrasive
substances or non-neutral detergents
as these will irreparably damage the
surface.
CLEANING AND MAINTENANCE
8
Important: The manufacturer declines all liability for possible damage caused by
the use of unsuitable products to clean the appliance.
The appliance gets very hot, mainly around the cooking areas. It is very important
that children are not left alone in the kitchen when you are cooking.
Do not store ammable material in the oven.
Do not use a steam cleaner because the moisture can get into the appliance thus
make it unsafe.
Do not use harsh abrasive cleaners or sharp metal scrapers to clean the oven door
glass since they can scratch the surface, which may result in shattering of the
glass.

5151
GLASS CONTROL PANEL (some
models only)
Clean using an appropriate product. Always
dry thoroughly.
Do not use harsh abrasive cleaners or
sharp metal scrapers to clean the control
panel since they can scratch the surface,
which may result in shattering of the glass.
ELECTRONIC PROGRAMMER
DISPLAY CLEANING
(SOME MODELS ONLY)
Clean the programmer display using a
soft cloth, warm water and neutral soap,
or a soft cloth with a liquid detergent (non-
abrasive).
When cleaning, be careful to move the
cloth in one direction only.
Then wipe the display with a damp cloth
and dry it with a soft cloth.
IMPORTANT: DO NOT use chlorine-
based or acid-based cleaning
products, abrasive products or non-
neutral detergents as they may cause
irreparable damage to the surface. DO
NOT spray cleaning liquids directly on
the programmer display.
INSIDE OF OVEN
The oven should always be cleaned after
use when it has cooled down.
The cavity should be cleaned using a mild
detergent solution and warm water.
Suitable proprietary chemical cleaners
may be used after rst consulting with
the manufacturers recommendations and
testing a small sample of the oven cavity.
Abrasive cleaning agents, scouring pads/
cloths or sharp metal scrapers should not
be used on the cavity surface.
NOTE: The manufacturers of this appliance
will accept no responsibility for damage
caused by chemical or abrasive cleaning.
Let the oven cool down and pay special
attention no to touch the hot heating
elements inside the oven cavity.
5252
Fig. 8.1c
Traverso posteriore Arresto di sicurezza
1°
Livelli
2°
3°
4°
5°
6°
7°
A
A
OPTIONAL CATALYTIC
PANEL, WITH OR WITHOUT
HOLE FOR SIDE LIGHT
(some models only)
Fig. 8.1a
OVEN FITTING OUT
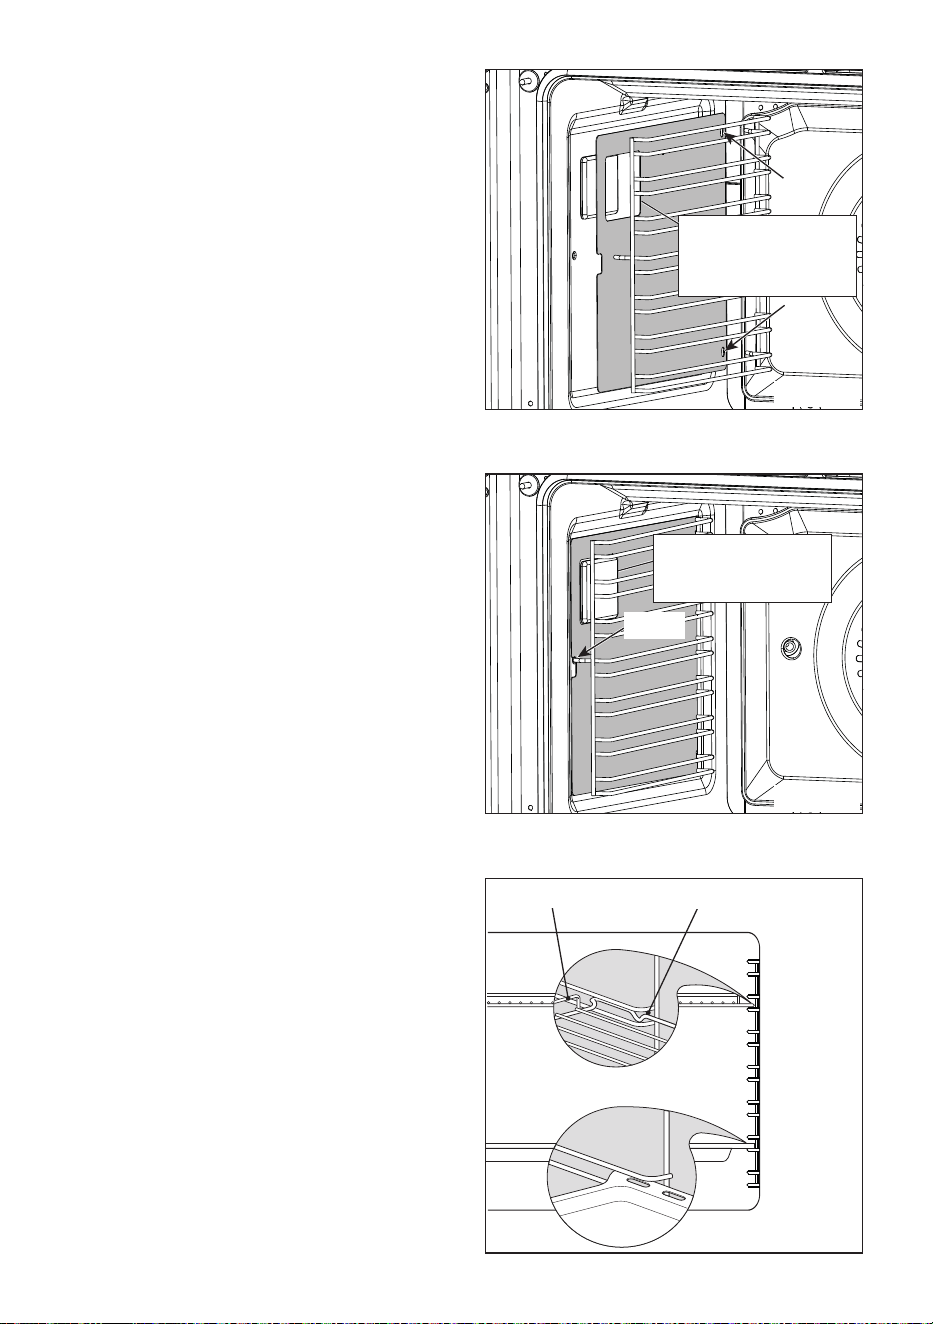
1. MODELS WITH SIDE WIRE RACKS:
Assembly of the side runner frames
• Slide the rear prongs of the side rack
into the holes “A” at the rear of the
oven (g. 8.1a).
• Slide the front prong of the side rack
into the holes at the front of the oven
(g. 8.1b).
• Slide in, on the guides, the shelf and
the tray (g. 8.1c).
The shelf must be tted so that the
safety notch, which stops it sliding out,
faces the inside of the oven; the guard
rail shall be at the back.
• To dismantle, operate in reverse order.
Fit the catalytic panel to the side
rack (some models only)
• Make sure the panels are tted
correctly (with the arrow pointing up
and the rear holes aligned with holes
“A” in the back of the oven): the cut-
out in the panel must be placed over
the light in the oven (certain models
only).
• The panels must be positioned
between the inside wall of the oven
and the side rack. Once the catalytic
panels are in place, securing the side
rack will also secure the panels.
2. MODELS WITH EMBOSSED
CAVITY:
• The oven shelf is provided with a
security block to prevent accidental
extraction. It must be inserted
operating as per gure 8.1d.
• To remove it, operate in the reverse
order.
Click
OPTIONAL CATALYTIC
PANEL, WITH OR WITHOUT
HOLE FOR SIDE LIGHT
(some models only)
Fig. 8.1b
Guard rail
Stop notch
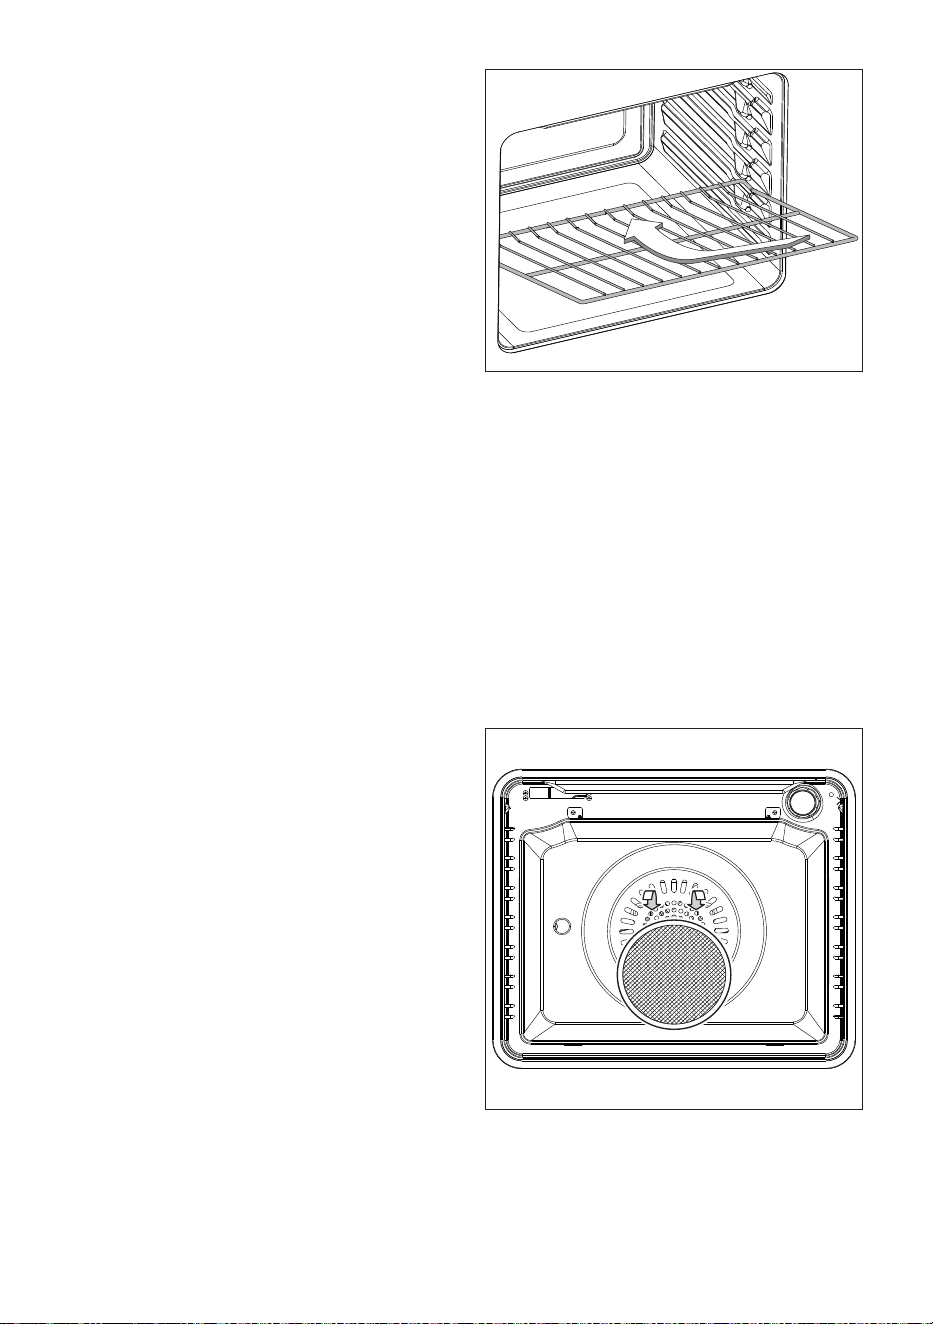
5353
Fig. 8.2
ADVICE FOR USE AND
MAINTENANCE OF CATALYTIC
PANELS (some models only)
The catalytic panels are covered with
special microporous enamel which absorbs
and does away with oil and fat splashes
during normal baking over 200 °C.
If, after cooking very fatty foods, the panels
remain dirty, operate the oven “idling” on
max temperature for about 30 minutes.
These panels do not require to be cleaned,
however it is advised to periodically remove
them from the oven and to wash them with
tepid soapy water and then wipe o with a
soft cloth.
Do not clean or wash them with abrasive
products or with products containing
acids or alkalis.
GREASE FILTER (some models
only)
• A special screen is provided at the
back of the oven to catch grease
particles, mainly when meat is being
roasted. Slide in the grease lters on
the back of the oven as in g. 8.2.
• When baking pastry etc. this lter
should be removed.
• Clean the lter after any cooking!
The grease lter can be removed
for cleaning and should be washed
regularly in hot soapy water. Always
clean the lters after cooking as any
solid residues on it might adversely
aect the oven performance.
• Always dry the lter properly before
tting it back into the oven.
Fig. 8.1d
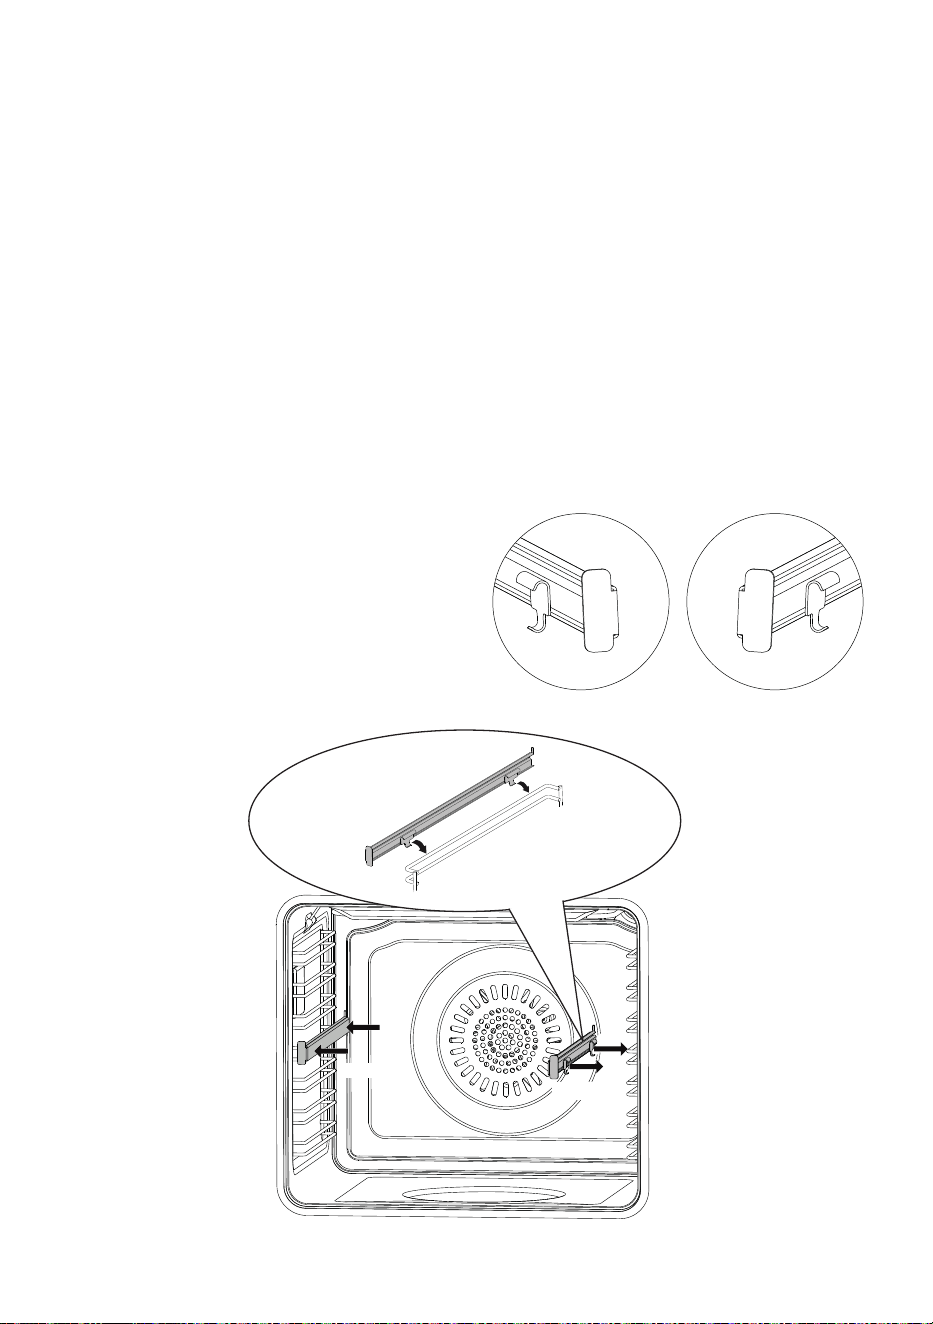
5454
Clip Clip
Left Right
Left
Right
TELESCOPIC SLIDING SHELF SUPPORTS (some models only)
The telescopic sliding shelf supports make it safer and easier to insert and remove the
oven shelf and tray.
They stop when they are pulled out to the maximum position.
Important! When tting the sliding shelf supports, make sure that you t:
• The slides to the top wire of a rack. They do not t on the lower wire.
• The slides so that they run out towards the oven door.
• Both sides of each pair of shelf slides.
• Both sides on the same level.
To x the sliding shelf supports onto the side racks:
• Fit the sliding shelf supports onto the top wire of a rack and press. You will hear a click
as the safety locks clip over the wire.
IMPORTANT NOTE: When cooking with the rotisserie DO NOT position the grill tray
on the sliding shelf supports.
To remove the telescopic sliding, operate in reverse order.
Cleaning the sliding shelf supports:
• Wipe the supports with a damp cloth and
a mild detergent only.
• Do not wash them in the dishwasher,
immerse in soapy water, or use oven
cleaner on them.
Fig. 8.3
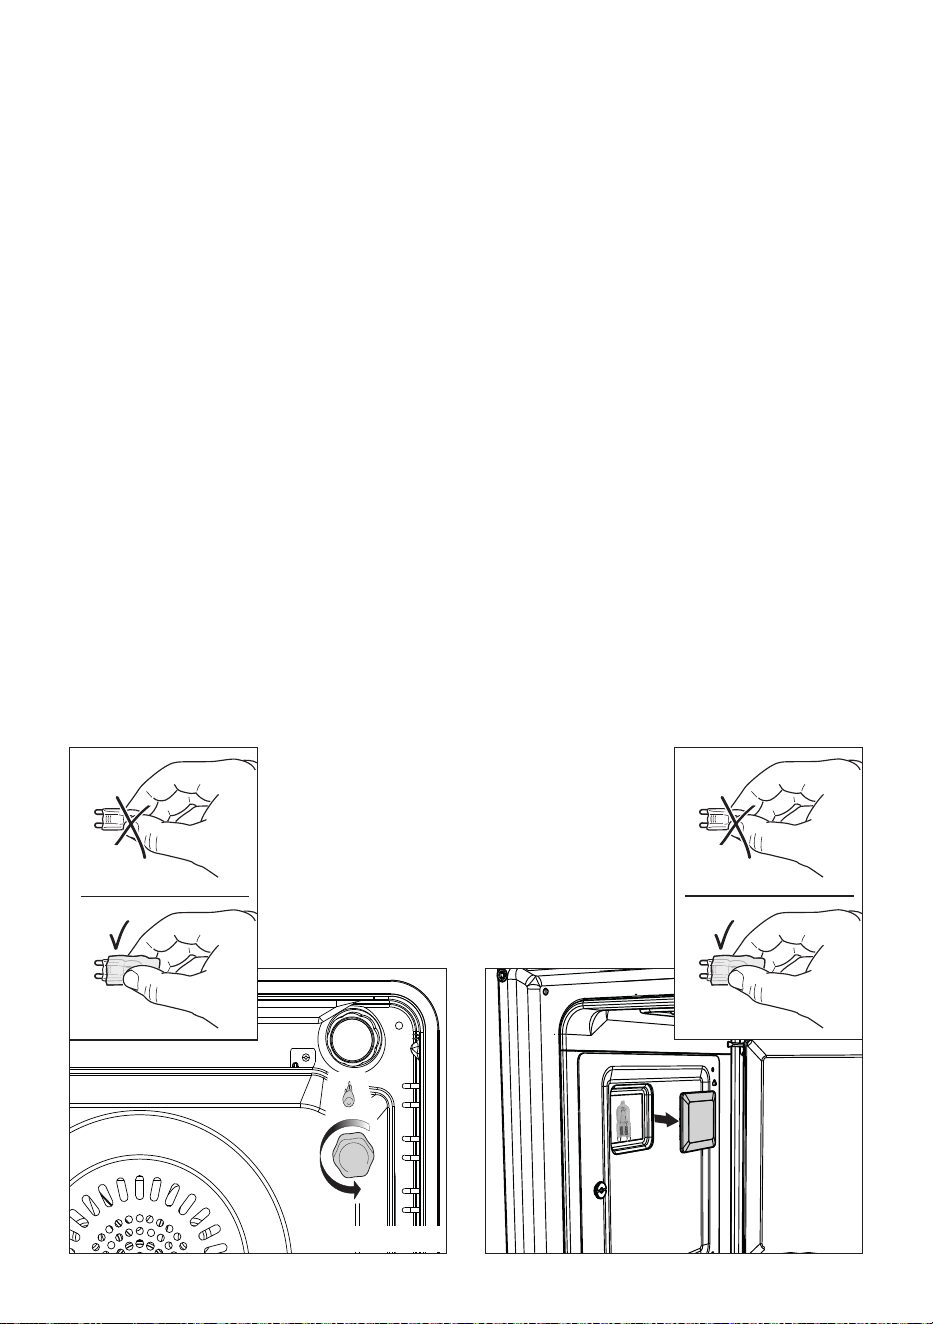
5555
REPLACING THE OVEN LIGHTS
(NOTE: DEPENDING ON YOUR MODEL, YOUR OVEN MAY ONLY HAVE SOME OF
THESE LIGHTS)
WARNING: Ensure the appliance is switched o before replacing the lamp to avoid
the possibility of electric shock.
• Let the oven cavity and the heating elements to cool down.
• Switch o the electrical supply.
• Remove the protective cover (g. 8.4 - 8.5).
• Replace the halogen lamp with a new one suitable for high temperatures having the
following specications: 220-240 V ac and same power (check watt power as stamped
in the bulb itself) of the replaced lamp.
IMPORTANT WARNING: Never replace the lamp with bare hands; contamination
from your ngers can cause premature failure. Always use a clean cloth or
gloves.
• Ret the protective cover.
NOTE: Oven bulb replacement is not covered by your guarantee.
The intended purpose of the lamp, tted on this appliance, is to illuminate the oven cavity
and thus help the user to better monitor the food while cooking. This lamp is not suitable for
other usage (e.g. environments lighting).
This product contains a light source of energy eciency class G.
WRONG
CORRECT
WRONG
CORRECT
Fig. 8.5
Fig. 8.4

5656
REMOVING AND REPLACING THE INNER AND MIDDLE DOOR GLASS PANES
FOR CLEANING
If you wish to clean the inner pane of glass of the door, make sure you follow the precautions
and instructions very carefully.
Replacing the glass pane and the door incorrectly may result in damage to the appliance
and may void your warranty.
IMPORTANT!
• Take care, the oven door is heavy. If you have any doubts, do not attempt to remove
the door.
• Make sure the oven and all its parts have cooled down. Do not attempt to handle the
parts of a hot oven.
• Take extreme care when handling the glass pane. Avoid the edges of the glass
bumping against any surface. This may result in the glass shattering.
• CAUTION:
Do not use harsh abrasive cleaners or sharp metal scrapers to clean the oven door
panes of glass since they can scratch the surface, which may result in shattering of
the glass.
• If you notice any sign of damage on any of the glass panes (such as chipping, or
cracks), do not use the oven. Call your Authorised Service Centre or Customer Care.
• Make sure you replace the glass pane correctly. Do not use the oven without glass
pane correctly in place.
• If the glass pane feels dicult to remove or replace, do not force it. Call your Authorised
Repairer or Customer Care for help.
Note: service visits providing assistance with using or maintaining the oven are not
covered by your warranty.
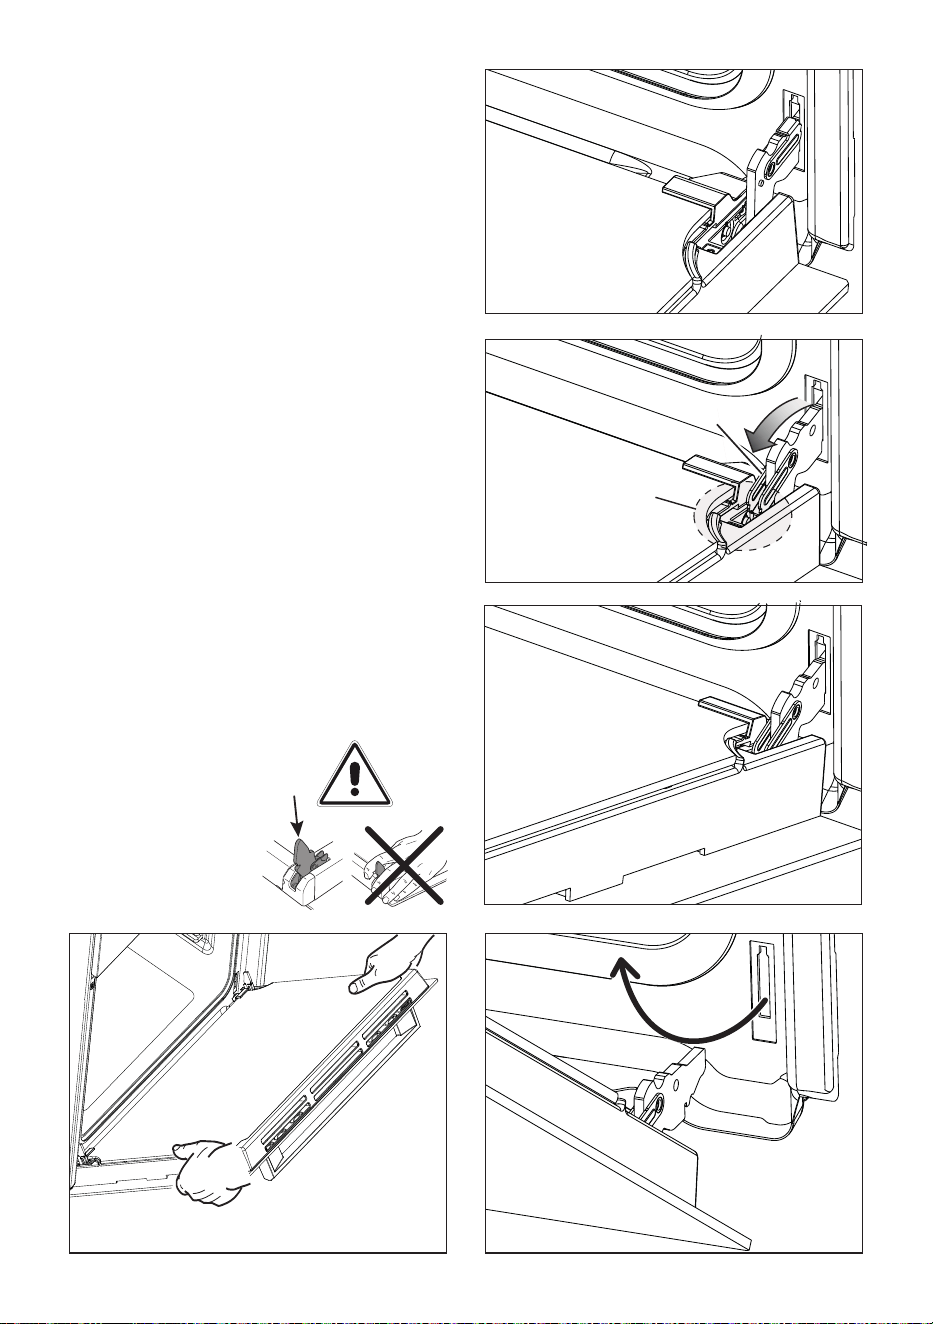
5757
B
A
Fig. 8.6
REMOVING THE OVEN DOOR
The oven door can easily be removed as
follows:
• Open the door to the full extent (g.
8.7).
• Open the lever “A” completely on the
left and right hinges (g. 8.8).
• Hold the door as shown in g. 8.6.
• Gently close the door until left and
right hinge levers “A” are hooked to
part “B” of the door (g. 8.8).
• Withdraw the hinge hooks from their
location following arrow “C” (g. 8.10).
• Rest the door on a soft surface.
• To replace the door, repeat the above
steps in reverse order.
Important!
Always keep a safe distance from the door
hinges, paying special attention to the position
of your hands.
If the door hinges are
not correctly hooked,
they could unhook
and close suddenly
and unexpectedly
with risk of injury.
C
Fig. 8.7
Fig. 8.8
Fig. 8.10
Fig. 8.9
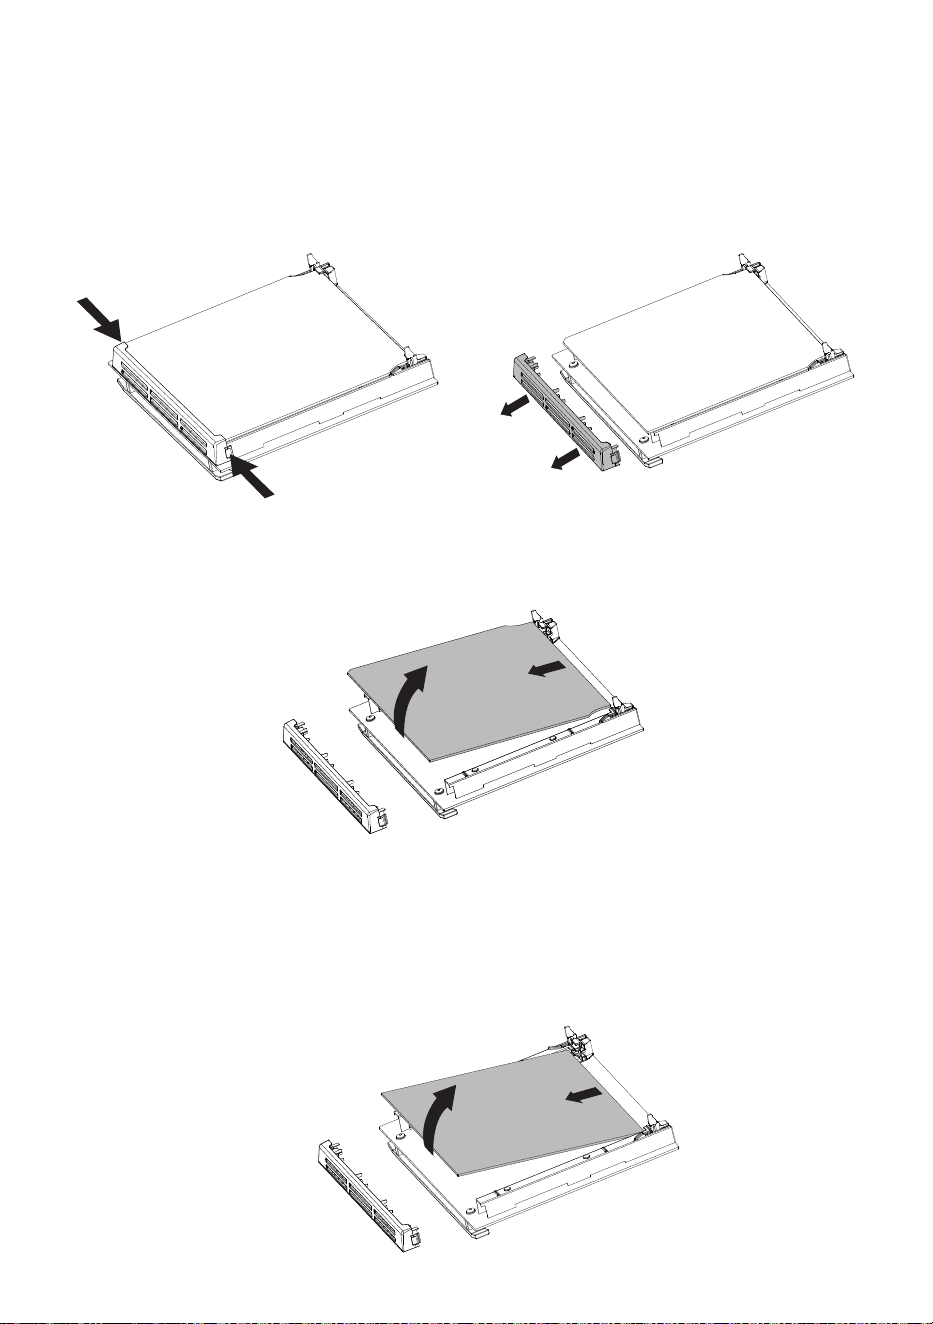
5858
To remove the middle pane (some models only)
• Gently lift and pull out the middle pane of glass by releasing it from the bottom
retaining notches (fig. 8.14).
To remove the inner pane
• Touch the glass retainer tabs in on both sides of the door and remove the glass
retainer (figs. 8.11, 8.12).
• Gently lift and pull out the inner pane of glass by releasing it from the bottom retainers.
Do not angle the pane too much as you may damage the glass (fig. 8.13).
Fig. 8.14
1
1
2
3
6
5
4
Fig. 8.11 Fig. 8.12
Fig. 8.13
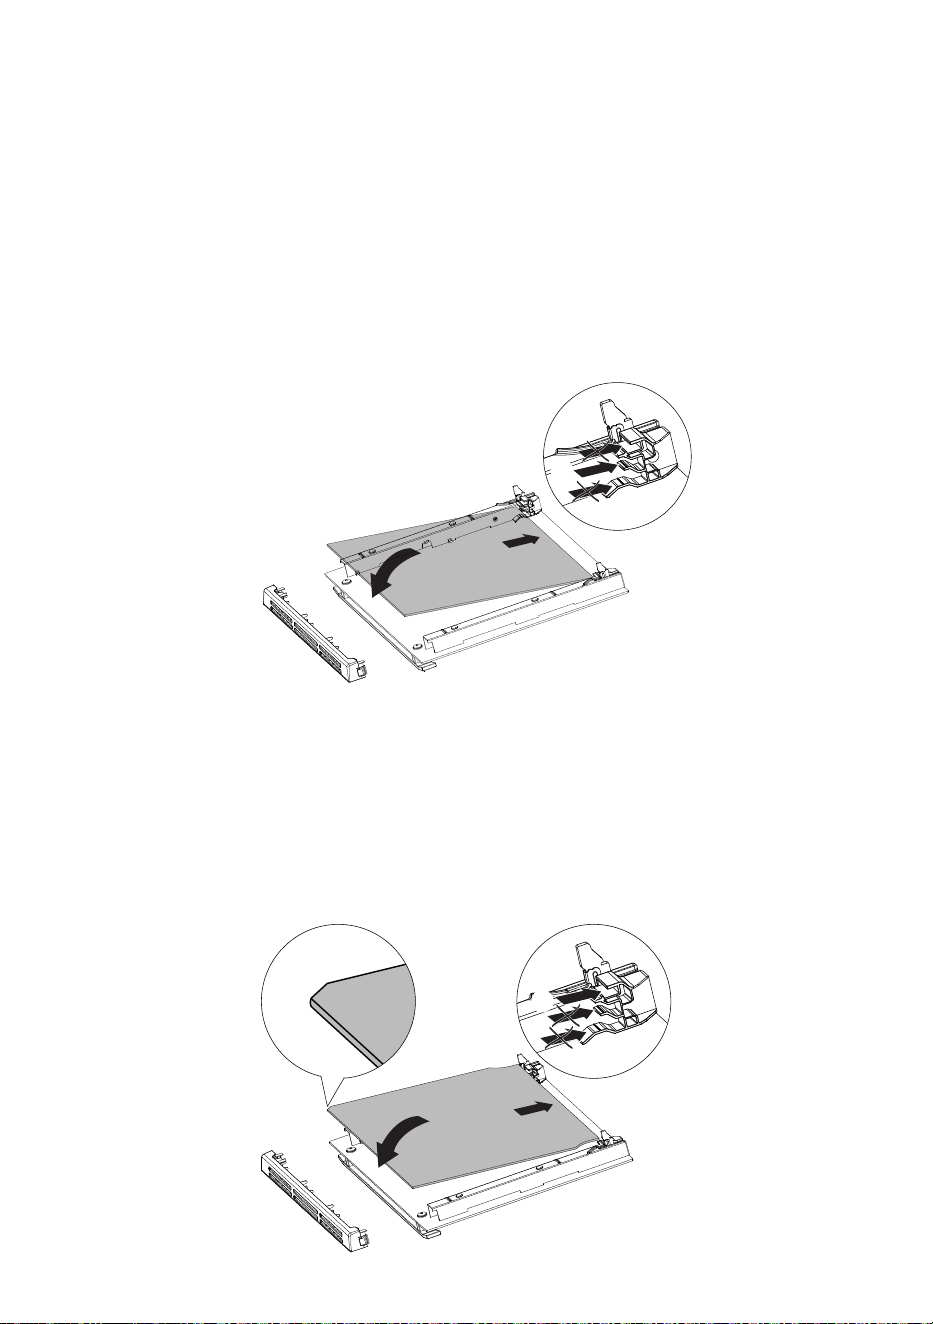
5959
After cleaning replace the door glass panes
When replacing the glass panes make sure that:
• you replace the inner pane correctly as shown. The pane must be in the position
described below in order to t into the door and to ensure that the oven operates safely
and correctly;
• you take extra care not to bump the edges of the glass against any object or surface
you do not force any of the panes into place. If you are experiencing diculties
replacing the panes, remove them and start the process again from the beginning. If
this still does not help, call Customer Care.
Replace the middle pane (some models only)
Ensure the pane is the right way up (the warning text should be readable back to front
when the pane is fitted correctly).
• Slot the bottom of the pane into the lower notch at the bottom of the door.
• Position the pane by gently lowering it.
1
2
Replace the inner pane
Make sure you fit the glass the right way up, with the bevelled top corner in the correct
position.
• Slot the bottom of the pane into the lower notch at the bottom of the door.
• Position the pane by gently lowering it.
• Slide the glass retainer back into place and ensure it is fully clipped securely in place.
Important!
Make sure the glass retainer is correctly and firmly in place and the glass pane
is secure.
1
3
3
4
Fig. 8.15
Fig. 8.16

6060
The manufacturer will not be responsible for any inaccuracy resulting from printing or transcript errors
contained in this brochure. We reserve the right to carry out modications to products as required,
including the interests of consumption, without prejudice to the characteristics relating to safety or
function.
GB
Cod. 1106716/GB - ß0