Dampfbügeleisen
Steam Iron
Fer à vapeur
Hierro de vapor
Ferro da vapore
Model No.: MG-S7-101
Type No: SG-8002


Sehr geehrter Kunde,
wir gratulieren Ihnen zum Erwerb Ihres Gerätes. Lesen Sie die folgenden Hinweise sorgfältig durch
und befolgen Sie diese, um möglichen Schäden vorzubeugen. Für Schäden, die durch Missachtung
der Hinweise und unsachgemäßen Gebrauch entstehen, übernehmen wir keine Haftung.
Technische Daten 1
Sicherheitshinweise 2
Geräteüberblick 3
Bedienung 4
Textiltyp und Temperatureinstellung 6
Fehlerbehebung 7
Hinweise zur Entsorgung 8
INHALT
TECHNISCHE DATEN
Artikelnummer
MG-S7-101
Stromversorgung
220-240 V~ 50-60 Hz
Leistungsaufnahme
3000 W
Bügeltemperatur
20-220℃
- 01 -

SICHERHEITSHINWEISE
Lesen Sie sich die Bedienungsanleitung vor der Installation und Inbetriebnahme
des Geräts aufmerksam durch und bewahren Sie diese für den zukünftigen
Gebrauch auf.
•Verwenden Sie ausschließlich geerdete Steckdosen. Der Netzstecker und das
Netzkabel müssen bei der Verwendung trocken sein.
•Wickeln Sie das Netzkabel vor der Verwendung des Geräts vollständig ab.
•Stellen Sie sicher, dass der Netzstecker aus der Steckdose gezogen wird, wenn
Sie das Dampfbügeleisen unbeaufsichtigt lassen. Stellen Sie das Dampfbüge-
leisen immer auf seinem Heck ab.
•Achten Sie darauf, dass sich das Dampfbügeleisen außerhalb der Reichweite
von Kindern befindet.
•Lassen Sie das Dampfbügeleisen, während es eingeschaltet ist, nicht unbeauf-
sich- tigt.
•Das Dampfbügeleisen wird bei der Verwendung sehr heiß. Berühren Sie es
niemals mit der Hand und achten Sie darauf, dass es sich außerhalb der
Reichweite von leicht entzündlichen Produkten befindet, um Unfälle zu
vermeiden.
•Ziehen Sie den Netzstecker aus der Steckdose, bevor Sie das Dampfbügeleisen
mit Wasser befüllen oder das darin verbliebene Wasser ausleeren.
•Tauchen Sie das Bügeleisen niemals unter Wasser oder in andere Flüssigkeiten.
•Schicken Sie das Bügeleisen an unser Reparaturcenter, wenn das Netzkabel
Beschädigungen aufweist.
•Kalkrückstände und Mineralwasser können dazu führen, dass die Dampföffnung
blockiert wird. Es ist deshalb empfehlenswert, destilliertes Wasser zu verwenden.
•Um eine Überlastung des Stromkreislaufs zu vermeiden, sollten Sie keine
leistungs- starken Geräte im selben Stromkreislauf wie das Bügeleisen verwen-
den.
•Falls sich die Verwendung mehrerer leistungsstarker Geräte im gleichen
Stromkreis- lauf nicht vermeiden lässt, sollten Sie für das Dampfbügeleisen das
Netzkabel mit 10 A verwenden, da Kabel mit weniger als 10 A sich zu schnell
erhitzen.
•Platzieren Sie das Netzkabel so, dass es nicht zur Stolperfalle werden kann.
•Dieses Gerät darf nicht von Personen (Kinder eingeschlossen) mit eingeschränk-
ten physischen, sensorischen oder mentalen Fähigkeiten und/ oder mangelnder
Erfahrung und Wissen verwendet werden, es sei denn, diese wurden von einer für
ihre Sicherheit verantwortlichen Person bei der Verwendung beaufsichtigt oder in
das Gerät eingewiesen.
•Beaufsichtigen Sie Kinder, welche sich in Gerätenähe aufhalten, damit diese
nicht mit dem Gerät spielen.
•Verwenden Sie das Dampfbügeleisen ausschließlich auf einer stabilen, fest
fixierten Oberfläche.
•Achten Sie darauf, dass die Oberfläche, an welcher die Bügelstation befestigt ist,
stabil ist, bevor Sie das Bügeleisen auf der Bügelstation abstellen.
•Wenn das Bügeleisen heruntergefallen ist, sichtbare Beschädigungen aufweist
oder leckt, darf es nicht verwendet werden.
- 02 -
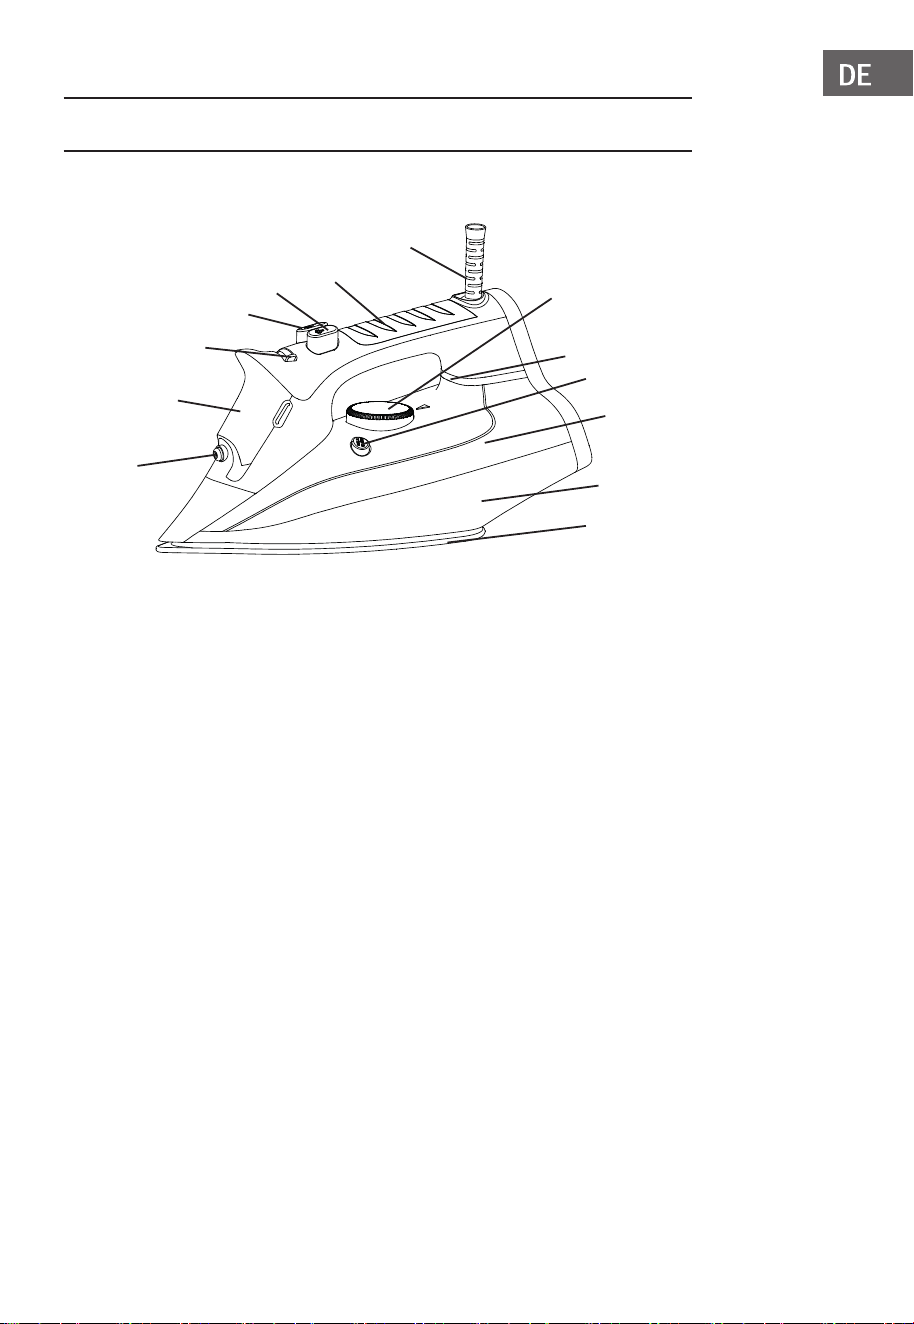
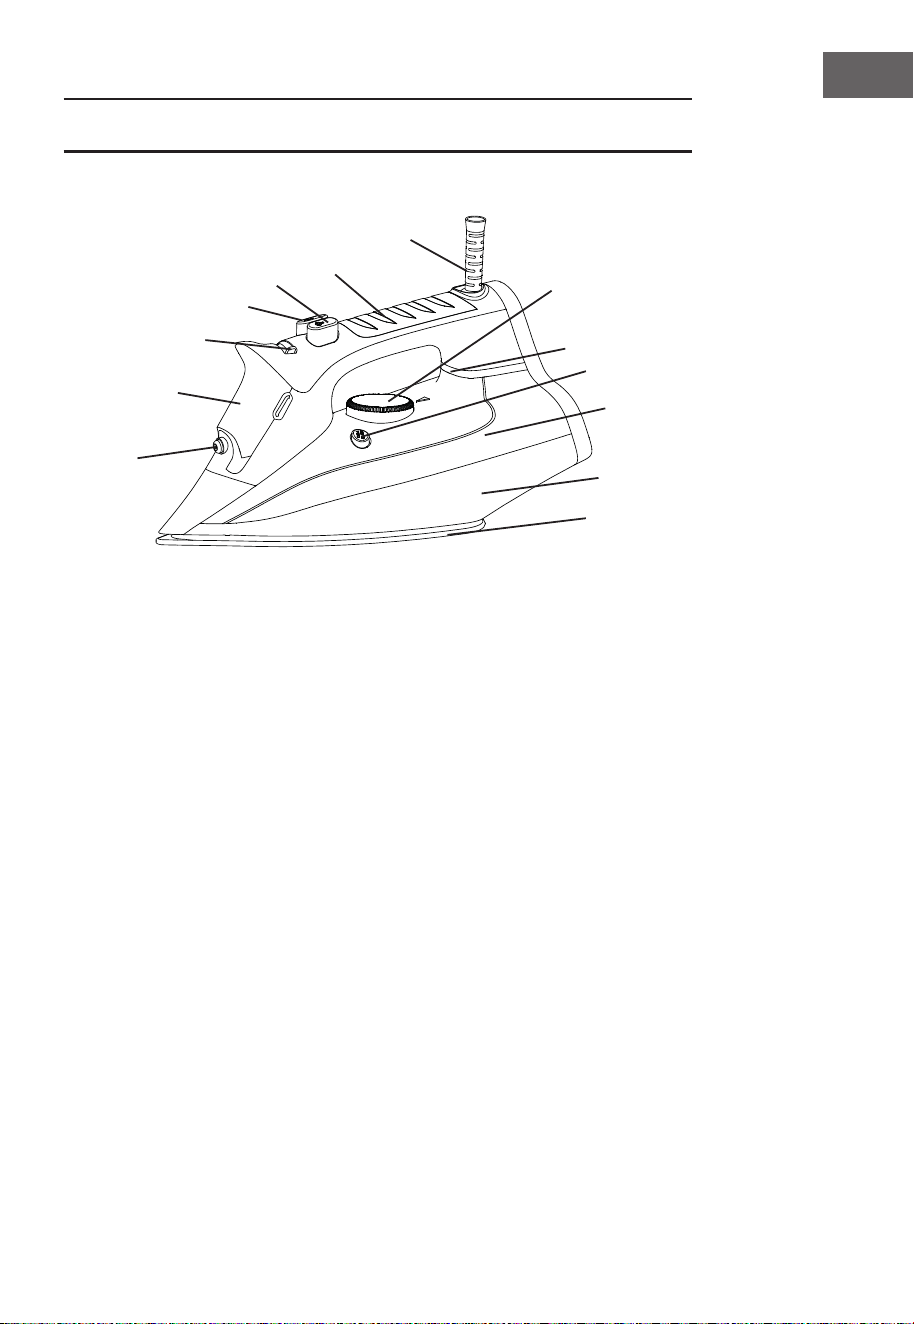
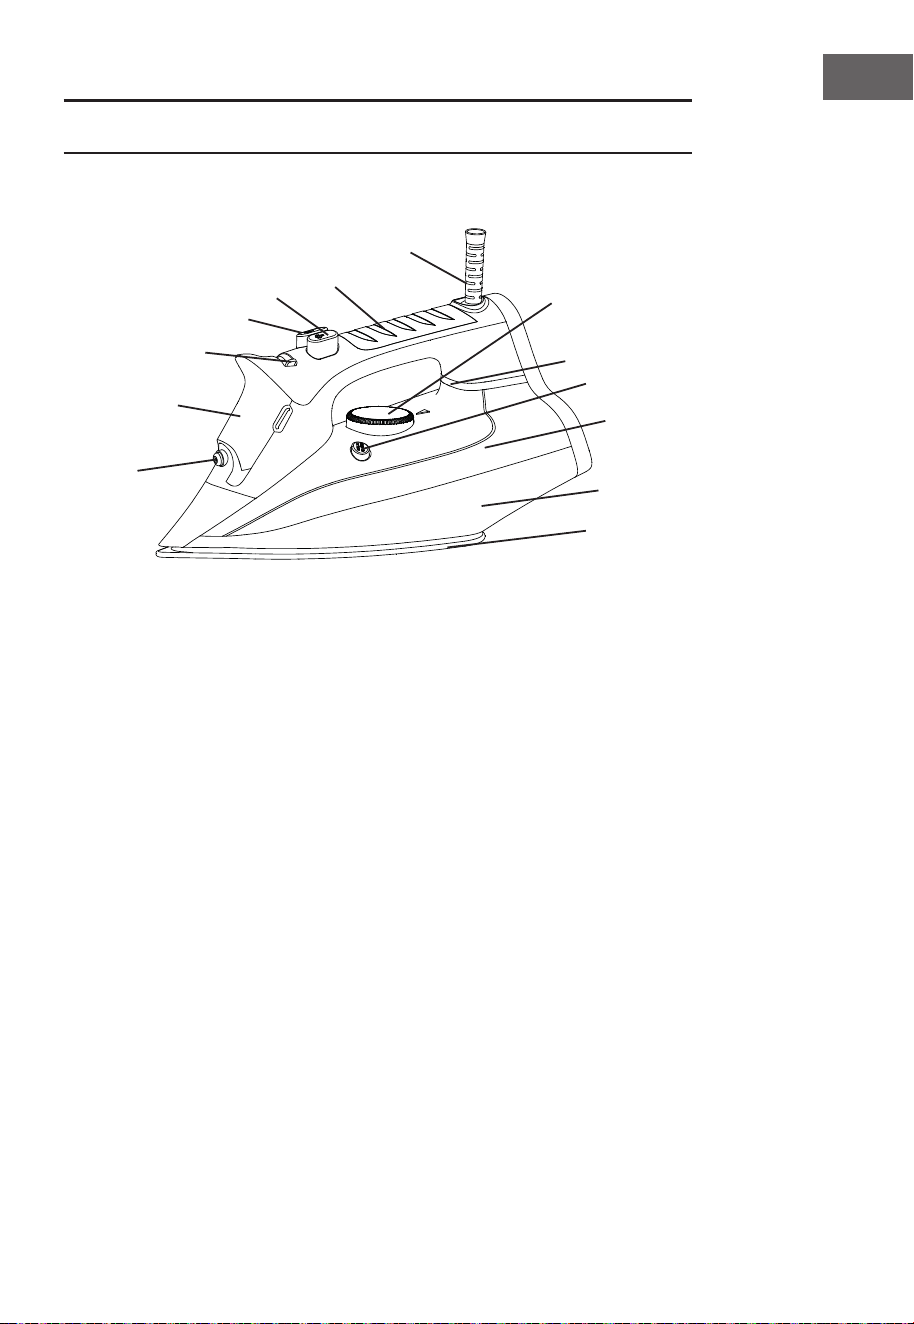
GERÄTEÜBERBLICK
A Sprühdüse
B Wassertankabdeckug
C Dampfregulator
D Sprühknopf
E Dampfstoßdruckknopf
F Handgriff
G Kabelanschluss
H Temperaturregler
I Betriebsanzeigeleuchte
J Selbstreinigungstaste
K Gerätekorpus
L Bügelsohle
M Sensoranzeigeleuchte
A
B
C
D
E
F
G
H
I
J
K
L
M
- 03 -

BEDIENUNG
Inbetriebnahme und Bedienung
•Das Bügeleisen wurde eingefettet. Deshalb kann es vorkommen, dass das Bügeleisen, wenn es
zum ersten Mal eingeschaltet wird, leicht qualmt. Nach kurzer Zeit, wird dies aufhören.
•Entfernen Sie vor der ersten Verwendung des Geräts Schutzfolien und andere Klebefolien von der
Bügelsohle. Entfernen Sie Rückstände mit einem weichen Tuch.
•Achten Sie darauf, dass die Bügelsohle glatt bleibt: vermeiden Sie das Bügeln über metallische
Gegenstände (beispielsweise Hosenknöpfe, Knöpfe und Reißverschlüsse).
•Kleidung aus reiner Wolle (100 % Wolle) kann mit der Dampffunktion gebügelt werden. Stellen Sie
eine vorzugsweise hohe Dampfposition aus und verwenden Sie ein trockenes Bügeltuch.
Mit Wasser befüllen
1.Stellen Sie den Dampfregler auf O (=kein Dampf) (nur beim Dampfbügeln).
2.Halten Sie das Bügeleisen am Handgriff fest und neigen Sie das Bügeleisen um 45° nach unten.
Öffnen Sie die Abdeckung des Wassertanks (falls vorhanden).
3.Befüllen Sie den Wassertank, indem Sie Wasser in das Loch hineinlaufen lassen. Sollte das
Wasser aus dem Wasserhahn sehr kalkhaltig sein, empfiehlt sich die Verwendung von destilliertem
Wasser. Befüllen Sie den Wassertank keinesfalls mit auf chemische Art und Weise entkalktem
Wasser.
4.Entfernen Sie Wasser, welches sich auf der Außenseite des Wassertanks befindet.
Leeren Sie den Wassertank nach jeder Verwendung aus.
Trockenbügeln
1.Sortieren Sie die Kleidung vor dem Einschalten des Bügeleisens, gemäß der Hinweise auf dem
Wäscheetikett. Das Bügeleisen heizt sich schneller auf, als dass es sich abkühlt. Deshalb empfiehlt
es sich, zunächst die Kleidung, welche eine niedrigere Bügeltemperatur erfordert (beispielsweise
synthetische Stoffe, Seide etc.) zu bügeln und anschließend die Kleidung, welche eine höhere
Bügeltemperatur erfordert (beispielsweise Wolle, Baumwolle, Leinen etc.).
2.Stellen Sie das Bügeleisen auf seinem Heck ab und drehen Sie den Temperaturregler auf „MIN“.
3.Stecken Sie den Netzstecker des Bügeleisens in die Steckdose und stellen Sie durch Drehen des
Temperaturreglers die gewünschte Temperatur ein. Falls sich im Wassertank Wasser befindet,
drehen Sie den Dampfregler in die Position „OFF“. Warten Sie bis die Anzeigeleuchte ausgeht, was
bedeutet, dass die eingestellte Temperatur erreicht wurde.
Dampfbügeln
1.Befüllen Sie den Wassertank mit Wasser.
2.Stecken Sie den Netzstecker in die Steckdose.
3.Wenn Sie den Temperaturregler auf „MAX“ stellen, ist das Dampfbügeln verfügbar. Andernfalls
kann aus der Bügelsohle Wasser auslaufen.
4.Wenn die Leuchtanzeige ausgeht, bedeutet dies, dass die eingestellte Temperatur erreicht wurde.
5.Stellen Sie die Dampfintensität am Dampfregler ein. Wenn Sie den Dampfregler gegen den
Uhrzeigersinn drehen nimmt die Dampfintensität zu und wenn Sie den Dampfregler im Uhrzei-
gersinn drehen ab.
Dampfstoß
Durch Drücken des Dampfstoßdruckknopfes wird mehr Dampf produziert, was das Entfernen von
hartnäckigen Falten erleichtert.
Vorsicht: : Synthe�sche Stoffe, Nylon, Synthe�sche Siede und Seide dürfen nicht im
Damp�ügelmodus gebügelt werden, da die Struktur und die Oberfläche dieser Stoffe
dadurch beschädigt werden könnten.
- 04 -
1.Stellen Sie den Temperaturregler auf „MAX“ und warten Sie, bis die Leuchtanzeige ausgeht.
2.Drücken Sie den Dampfstoßdruckknopf, so dass der Dampf freigesetzt wird.
3.Warten Sie einige Sekunden und lassen Sie den Dampf den Stoff durchdringen und drücken Sie
den Dampfstoßdruckknopf anschließend erneut.
Hinweise
•Um das beste Ergebnis zu erzielen, sollten zwischen dem ersten und dem zweiten
Drücken des Dampfstoßdruckknopfs 3 – 5 Sekunden liegen.
•Befüllen Sie den Wassertank bis zur Position „MAX“, bevor Sie den Dampfbügelmodus verwenden.
•Damit kein Wasser aus der Bügelsohle ausläuft, sollten Sie den Dampfstoßdruckknopf nicht mehr
als 5 Sekunden am Stück gedrückt halten.
Sprühmethoden:
1.Befüllen Sie den Wassertank mit Wasser.
2.Drücken Sie den Sprühknopf.

Inbetriebnahme und Bedienung
•Das Bügeleisen wurde eingefettet. Deshalb kann es vorkommen, dass das Bügeleisen, wenn es
zum ersten Mal eingeschaltet wird, leicht qualmt. Nach kurzer Zeit, wird dies aufhören.
•Entfernen Sie vor der ersten Verwendung des Geräts Schutzfolien und andere Klebefolien von der
Bügelsohle. Entfernen Sie Rückstände mit einem weichen Tuch.
•Achten Sie darauf, dass die Bügelsohle glatt bleibt: vermeiden Sie das Bügeln über metallische
Gegenstände (beispielsweise Hosenknöpfe, Knöpfe und Reißverschlüsse).
•Kleidung aus reiner Wolle (100 % Wolle) kann mit der Dampffunktion gebügelt werden. Stellen Sie
eine vorzugsweise hohe Dampfposition aus und verwenden Sie ein trockenes Bügeltuch.
Mit Wasser befüllen
1.Stellen Sie den Dampfregler auf O (=kein Dampf) (nur beim Dampfbügeln).
2.Halten Sie das Bügeleisen am Handgriff fest und neigen Sie das Bügeleisen um 45° nach unten.
Öffnen Sie die Abdeckung des Wassertanks (falls vorhanden).
3.Befüllen Sie den Wassertank, indem Sie Wasser in das Loch hineinlaufen lassen. Sollte das
Wasser aus dem Wasserhahn sehr kalkhaltig sein, empfiehlt sich die Verwendung von destilliertem
Wasser. Befüllen Sie den Wassertank keinesfalls mit auf chemische Art und Weise entkalktem
Wasser.
4.Entfernen Sie Wasser, welches sich auf der Außenseite des Wassertanks befindet.
Leeren Sie den Wassertank nach jeder Verwendung aus.
Trockenbügeln
1.Sortieren Sie die Kleidung vor dem Einschalten des Bügeleisens, gemäß der Hinweise auf dem
Wäscheetikett. Das Bügeleisen heizt sich schneller auf, als dass es sich abkühlt. Deshalb empfiehlt
es sich, zunächst die Kleidung, welche eine niedrigere Bügeltemperatur erfordert (beispielsweise
synthetische Stoffe, Seide etc.) zu bügeln und anschließend die Kleidung, welche eine höhere
Bügeltemperatur erfordert (beispielsweise Wolle, Baumwolle, Leinen etc.).
2.Stellen Sie das Bügeleisen auf seinem Heck ab und drehen Sie den Temperaturregler auf „MIN“.
3.Stecken Sie den Netzstecker des Bügeleisens in die Steckdose und stellen Sie durch Drehen des
Temperaturreglers die gewünschte Temperatur ein. Falls sich im Wassertank Wasser befindet,
drehen Sie den Dampfregler in die Position „OFF“. Warten Sie bis die Anzeigeleuchte ausgeht, was
bedeutet, dass die eingestellte Temperatur erreicht wurde.
Dampfbügeln
1.Befüllen Sie den Wassertank mit Wasser.
2.Stecken Sie den Netzstecker in die Steckdose.
3.Wenn Sie den Temperaturregler auf „MAX“ stellen, ist das Dampfbügeln verfügbar. Andernfalls
kann aus der Bügelsohle Wasser auslaufen.
4.Wenn die Leuchtanzeige ausgeht, bedeutet dies, dass die eingestellte Temperatur erreicht wurde.
5.Stellen Sie die Dampfintensität am Dampfregler ein. Wenn Sie den Dampfregler gegen den
Uhrzeigersinn drehen nimmt die Dampfintensität zu und wenn Sie den Dampfregler im Uhrzei-
gersinn drehen ab.
Dampfstoß
Durch Drücken des Dampfstoßdruckknopfes wird mehr Dampf produziert, was das Entfernen von
hartnäckigen Falten erleichtert.
Selbstreinigung
Um kalkrückstände und Unreinheiten zu entfernen, sollte der Selbstreinigungsmodus mindestens
einmal im Monat verwendet werden.
1.Befüllen Sie den Wassertank zur Hälfte mit Wasser. Stellen Sie den Dampfregler in die Position
„O“.
2.Stecken Sie den Netzstecker in die Steckdose. Stellen Sie den Temperaturregler in die Position
„MAX“.
3.Sobald die Anzeigeleuchte ausgeht, ist die eingestellte Temperatur erreicht.
4.Ziehen Sie den Netzstecker aus der Steckdose und halten Sie das Bügeleisen vertikal über ein
Waschbecken.
5.Stellen Sie den Dampfregler in die Position „Self-Clean“. Anschließend treten
kochendes Wasser und Dampf aus der Bügelsohle aus. Schütteln Sie das Bügeleisen leicht, um
Unreinheiten und Kalkablagerungen aus dem Inneren des Wassertanks zu entfernen.
6.Wenn sich kein Wasser mehr im Wassertank befindet, stellen Sie den Dampfregler in die Position
„O“.
7.Stellen Sie das Bügeleisen auf dessen Heck ab, stecken Sie den Netzstecker in die Steckdose
und heizen Sie das Bügeleisen erneut auf.
8.Bewegen Sie das Bügeleisen über ein sauberes Baumwolltuch. Das im Wassertank verbliebene
Wasser tritt dann in Form von Dampf aus der Bügelsohle aus.
Anti-Kalk
Ein eingebauter kleiner Filter kann macht hartes Wasser weich und verhindert dadurch, dass sich
Kalk an der Bügelsohle ablagert und verlängert dadurch die Lebensdauer des Bügeleisen.
Tropfschutz
Im Inneren des Bügeleisens befindet sich ein Bimetall, welches den Dampfaustritt verschließen
kann, so dass, selbst wenn die Bügelsohle sehr tief liegt, kein Wasser austreten kann.
Automatische Sicherheitsabschaltung:
Wenn das Bügeleisen eingesteckt ist, leuchtet die Betriebsanzeige konstant und zeigt damit an,
dass das Bügeleisen mit Strom versorgt wird.
Wenn Sie das Bügeleisen stehen lassen:
1. Wenn Sie das Bügeleisen waagerecht stehen lassen, ohne es zu bewegen, oder es versehen-
tlich umkippen, schaltet es sich nach 30 Sekunden automatisch ab. Die Anzeige für die automa-
tische Abschaltung blinkt, um Ihnen mitzuteilen, dass das Bügeleisen nicht mehr heizt.
2. Wenn das Bügeleisen senkrecht steht (auf der Fersenablage) und nicht bewegt wird, schaltet es
sich nach 8 Minuten automatisch ab. Die Kontrollleuchte für die automatische Abschaltung blinkt,
Hinweis: Egal ob sie den Damp�ügel- oder Trockenbügelmodus verwenden, der Sprühknopf
kann in beiden Modi jederzeit gedrückt werden.
um Ihnen anzuzeigen, dass das Bügeleisen nicht mehr heizt.
WICHTIG: Die automatische Abschaltanzeige blinkt so lange, bis das
Bügeleisen vom Stromnetz getrennt oder zurückgesetzt wird.
So setzen Sie das Bügeleisen zurück:
Bewegen Sie das Bügeleisen hin und her. Die Abschaltautomatik-Anzeige hört
auf zu blinken und das Bügeleisen heizt wieder auf.
WARNUNG: Die automatische Sicherheitsabschaltung ist eine Sicherheitsfunk-
tion und kein empfohlenes Mittel, um das Bügeleisen auszuschalten.
Übersetzt mit www.DeepL.com/Translator (kostenlose Version)
- 05 -
1.Stellen Sie den Temperaturregler auf „MAX“ und warten Sie, bis die Leuchtanzeige ausgeht.
2.Drücken Sie den Dampfstoßdruckknopf, so dass der Dampf freigesetzt wird.
3.Warten Sie einige Sekunden und lassen Sie den Dampf den Stoff durchdringen und drücken Sie
den Dampfstoßdruckknopf anschließend erneut.
Hinweise
•Um das beste Ergebnis zu erzielen, sollten zwischen dem ersten und dem zweiten
Drücken des Dampfstoßdruckknopfs 3 – 5 Sekunden liegen.
•Befüllen Sie den Wassertank bis zur Position „MAX“, bevor Sie den Dampfbügelmodus verwenden.
•Damit kein Wasser aus der Bügelsohle ausläuft, sollten Sie den Dampfstoßdruckknopf nicht mehr
als 5 Sekunden am Stück gedrückt halten.
Sprühmethoden:
1.Befüllen Sie den Wassertank mit Wasser.
2.Drücken Sie den Sprühknopf.
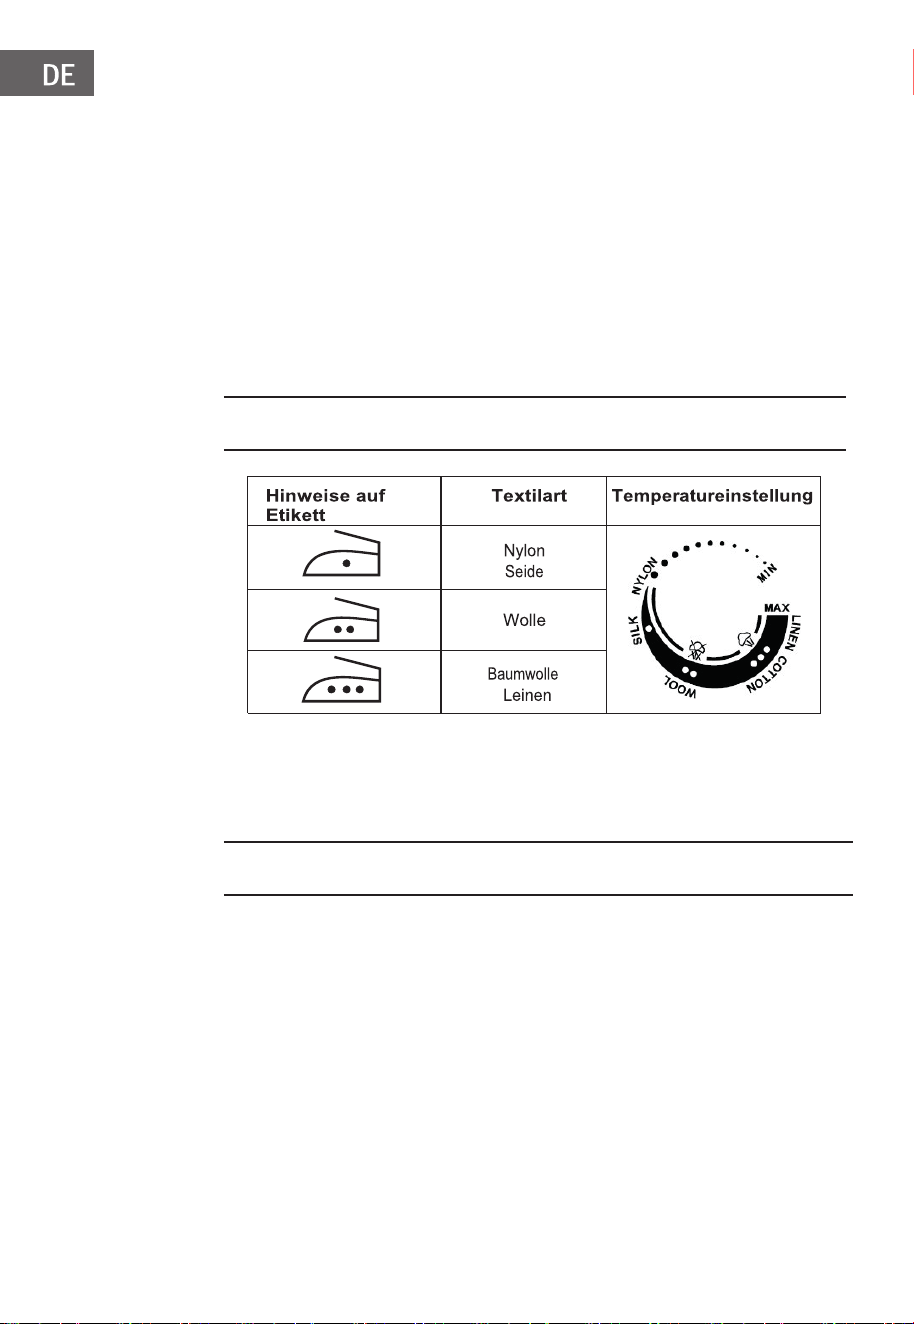
TEXTILTYP UND TEMPERATUREINSTELLUNG
REINIGUNG
Selbstreinigung
Um kalkrückstände und Unreinheiten zu entfernen, sollte der Selbstreinigungsmodus mindestens
einmal im Monat verwendet werden.
1.Befüllen Sie den Wassertank zur Hälfte mit Wasser. Stellen Sie den Dampfregler in die Position
„O“.
2.Stecken Sie den Netzstecker in die Steckdose. Stellen Sie den Temperaturregler in die Position
„MAX“.
3.Sobald die Anzeigeleuchte ausgeht, ist die eingestellte Temperatur erreicht.
4.Ziehen Sie den Netzstecker aus der Steckdose und halten Sie das Bügeleisen vertikal über ein
Waschbecken.
5.Stellen Sie den Dampfregler in die Position „Self-Clean“. Anschließend treten
kochendes Wasser und Dampf aus der Bügelsohle aus. Schütteln Sie das Bügeleisen leicht, um
Unreinheiten und Kalkablagerungen aus dem Inneren des Wassertanks zu entfernen.
6.Wenn sich kein Wasser mehr im Wassertank befindet, stellen Sie den Dampfregler in die Position
„O“.
7.Stellen Sie das Bügeleisen auf dessen Heck ab, stecken Sie den Netzstecker in die Steckdose
und heizen Sie das Bügeleisen erneut auf.
8.Bewegen Sie das Bügeleisen über ein sauberes Baumwolltuch. Das im Wassertank verbliebene
Wasser tritt dann in Form von Dampf aus der Bügelsohle aus.
Anti-Kalk
Ein eingebauter kleiner Filter kann macht hartes Wasser weich und verhindert dadurch, dass sich
Kalk an der Bügelsohle ablagert und verlängert dadurch die Lebensdauer des Bügeleisen.
Tropfschutz
Im Inneren des Bügeleisens befindet sich ein Bimetall, welches den Dampfaustritt verschließen
kann, so dass, selbst wenn die Bügelsohle sehr tief liegt, kein Wasser austreten kann.
Automatische Sicherheitsabschaltung:
Wenn das Bügeleisen eingesteckt ist, leuchtet die Betriebsanzeige konstant und zeigt damit an,
dass das Bügeleisen mit Strom versorgt wird.
Wenn Sie das Bügeleisen stehen lassen:
1. Wenn Sie das Bügeleisen waagerecht stehen lassen, ohne es zu bewegen, oder es versehen-
tlich umkippen, schaltet es sich nach 30 Sekunden automatisch ab. Die Anzeige für die automa-
tische Abschaltung blinkt, um Ihnen mitzuteilen, dass das Bügeleisen nicht mehr heizt.
2. Wenn das Bügeleisen senkrecht steht (auf der Fersenablage) und nicht bewegt wird, schaltet es
sich nach 8 Minuten automatisch ab. Die Kontrollleuchte für die automatische Abschaltung blinkt,
um Ihnen anzuzeigen, dass das Bügeleisen nicht mehr heizt.
WICHTIG: Die automatische Abschaltanzeige blinkt so lange, bis das
Bügeleisen vom Stromnetz getrennt oder zurückgesetzt wird.
So setzen Sie das Bügeleisen zurück:
Bewegen Sie das Bügeleisen hin und her. Die Abschaltautomatik-Anzeige hört
auf zu blinken und das Bügeleisen heizt wieder auf.
WARNUNG: Die automatische Sicherheitsabschaltung ist eine Sicherheitsfunk-
tion und kein empfohlenes Mittel, um das Bügeleisen auszuschalten.
Übersetzt mit www.DeepL.com/Translator (kostenlose Version)
Vorsicht: Wenn ein Kleidungsstück aus mehreren Gewebearten
zusammengesetzt sein sollte, wählen Sie immer die niedrigste angegebene
Bügeltemperatur aus
Ziehen Sie vor der Reinigung den Netzstecker aus der Steckdose und lassen
Sie das Bügeleisen vollständig abkühlen.
1.Reiben Sie die Bügelsohle mit einem feuchten Tuch und einem nicht
abreibenden (Flüssig-)Reinigungsmittel ab.
2.Falls Gewebe an der Bügelsohle anhaftet, reiben Sie diese mit einem
feuchten Tuch und etwas Essig ab.
3.Verwenden Sie niemals starke Säuren oder alkalische Lösungen zur
Reinigung, da die Bügelsohle dadurch beschädigt werden könnte.
4.Falls der Dampfauslass durch Kalk blockiert wird, entfernen Sie diesen mit
einem Zahnstocher und achten Sie darauf, dass Sie die Bügelsohle dabei
nicht beschädigen.
5.Stellen Sie das Bügeleisen auf sein Heck und lassen Sie es ausreichend
abkühlen. Leeren Sie in der Zwischenzeit das im Behälter verbliebene Wasser
aus und stellen Sie den Dampfregler in die Position „O“.
- 06 -
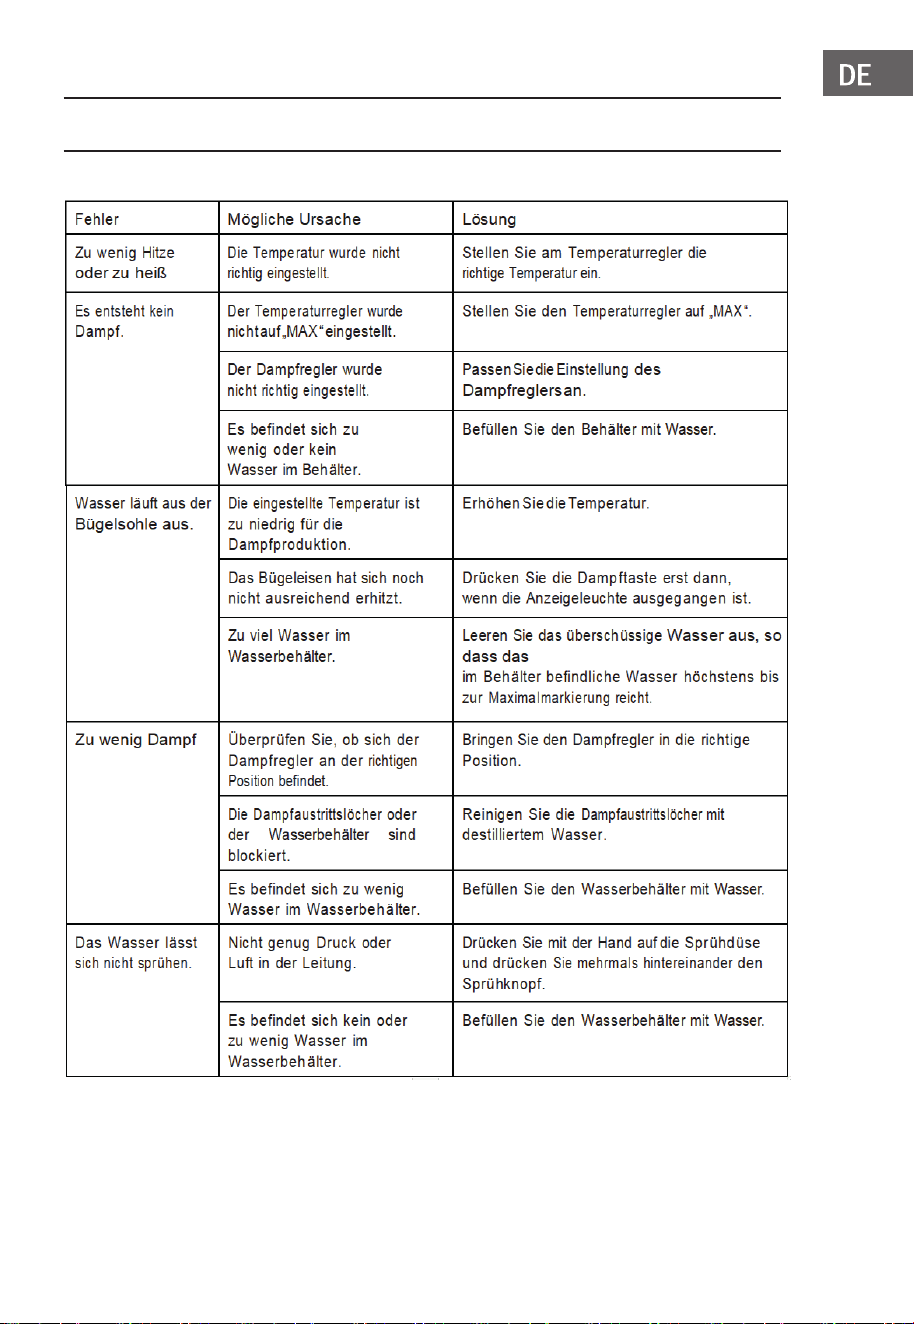
FEHLERBEHEBUNG
Falls sich das Problem nach der Durchführung der oben genannten Lösung-
shinweise noch nicht beheben lässt, kontaktieren Sie den Kundendienst.
- 07 -

HINWEISE ZUR ENTSORGUNG
Befindet sich die linke Abbildung (durchgestrichene Mülltonne
auf Rädern) auf dem Produkt, gilt die Europäische Richtlinie
2012/19/EU. Diese Produkte dürfen nicht mit dem normalen
Hausmüll entsorgt werden. Informieren Sie sich über die
örtlichen Regelungen zur getrennten Sammlung elektrischer
und elektronischer Gerätschaften. Richten Sie sich nach den
örtlichen Regelungen und entsorgen Sie Altgeräte nicht über
den Hausmüll. Durch die regelkonforme Entsorgung der
Altgeräte werden Umwelt und die Gesundheit Ihrer Mitmen-
schen vor möglichen negativen Konsequenzen geschützt.
Materialrecycling hilft, den Verbrauch von Rohstoffen zu
verringern.
- 08 -

Dear Customer,
Congratulations on purchasing this equipment. Please read this manual carefully and take care
of the following hints to avoid damages. Any failure caused by ignoring the items and cautions
mentioned in the instruction manual are not covered by our warranty and any liability.
Technical Data 09
Safety Instructions 10
Overview 11
Operation 12
Type of Fabric and Thermostat Dial Form 14
Cleaning and Maintenance 14
Troubleshooting 15
Disposal Considerations 16
CONTENTS
TECHNICAL DATA
Item number
MG-S7-101
Power supply
220-240 V~ 50-60 Hz
Power rating
3000W
Iron temperatur
20-220℃
EN
- 09 -

SAFETY INSTRUCTIONS
Before using for the first time, please check if the voltage rating on the type plate
corresponds to the mains voltage in your home, if not, please contact with the
seller.
•Use an earthed wall socket; the cord and plug must be dry.
•Unfold the AC cord completely before using.
•Make sure to unplug the appliance from the socket when leaving the iron even
for a short while, and stand the iron on its end. Please leave the iron away from
the touch of children. Take care of the iron when it is on.
•The iron will be of high temperature when used, never touch it with hand or close
tothe flammable product in order to avoid the accident.
•Caution: Unplug the appliance from the socket before filling the iron with water or
pouring out the remaining water.
•Never immerse the iron in water or other liquid.
•Please send the iron to our special repair agent for repair if any damage on cord.
•Deposit or Mineral in the water will lead to generate the scales and block the
steam hole, therefore it is advisable to use distilled water.
•In order to prevent overriding the circuit load, please don’t use other appliances
with high power at the same line.
•If necessary to connect with several appliances with high power at the same line,
please use the cord with 10A, otherwise the cord with less than 10A will be too
heat. The cord should be placed carefully in order not to be pulled out or
stumbled.
•This appliance is not intended for use by persons (including children) with
reduced physical, sensory or mental capabilities, or lack of experience and
knowledge, unless they have been given supervision or instruction concerning
use of the appliance by a person responsible for their safety. Children should be
supervised to ensure that they do not play with the appliance.
•The iron must not be left unattended while it is connected to the supply mains.
•The iron must be used and rested on a stable surface.
•When placing the iron on its stand, ensure that the surface on which the stand is
placed is stable.
•The iron is not to be used if it has been dropped, if there are visible signs of
damage or if it is leaking.
EN
- 10 -
A
B
C
D
E
F
G
H
I
J
K
L
M
OVERVIEW
A Spray Nozzle
B Water Tank Cover
C Steam Control Button
D Spray Button
E Burst of Steam Button
F Touch Handle
G Bushing
H Thermostat Button
I Power Indicator Light
J Self Clean Button
K Water Tank
L Skirtbody
M Soleplate
EN
- 11 -

OPERATION
Cautions of the first use:
•The iron has been greased, and as a result, the iron may slightly smoke when
switched on for the first time. After a short while, this will cease.
•Before using for the first time, remove any sticker or protective foil from the
soleplate. Clean the soleplate with a soft cloth.
•Keep the soleplate smooth: avoid hard contact with metal objects (such as
clothes rack, button and slide fastener).
•Pure woolen fabrics (100% wool) may be pressed with the iron set to a steam
position. Preferably set the steam regulator to strong position, and use a dry
pressing cloth.
Filling with Water:
1.Set the steam regulator to O (=no steam) (only for steam iron).
2.Hold the iron by hand and slant the iron with 45° down, open Water Filling
Cover if any.
3.Fill the water in the box through the Water-Filling Hole, if the water is too hard,
it is advisable to use distilled water, do not put the chemically decaled water in
the water reservoir.
4.Wipe off the water over the box; pour out the remaining water after use.
Dry Ironing:
1.Before running the iron, please classify the clothes as per its washing label,
as it will be quicker for the iron to heat up that to cool, the clothes (such as
synthetic fabric, silk etc) with lower ironing temperature shall be ironed firstly,
and then iron the clothes (such as wool, cotton and linen etc) with higher
temperature.
2.Stand the iron on its end, and turn the thermostat dial to the MIN position.
3.Plug in the iron and select the temperature by turning the thermostat dial. If
there is water in the reservoir, turn the steam regulator to OFF position. Wait
until the indicator light goes off showing that the required temperature has been
reached.
Steam Ironing:
1.Fill water in the iron as per the water-filling methods.
2.Plug the appliance in the socket.
3.If only set thermostat dial to MAX position as per the temperature indicator,
steam iron will be available, otherwise water may leak from the soleplate.
4.It indicates that the temperature has been ready until the indicator light goes
off.
5.Set the steam regulator correctly, increase the steam output by rotating the
steam regulator anticlockwise, otherwise decrease.
Burst of Steam:
This function will be able to provide more steam to remove stubborn creases.
1.Set the thermostat dial button to MAX until the indicator light goes off.
2.Release the steam by pressing the steam button.
3.Wait for several minutes and let the steam penetrate through the fabric, and
then release more steam through pressing this buttons again.
Notes
•There should be 3-5 seconds rest between two times of pressing Steam Button
in order to obtain the best steaming result.
•Fill the water to the Max position before using this function.
•In order to prevent the water leaking from soleplate, please do not press the
steam button continuously with more than 5 seconds.
Spraying Methods:
1.Fill the water in the iron as per water-filling methods.
2.Press water spray button.
Note: No matter what steam ironing or dry ironing is, Spray will always be
available in any case.
Self-cleaning:
In order to remove scale and impurities, apply self-clean system once every
month at least.
1.Fill half of the box with box. Set the steam knob to No Steam position.
2.Plug in the iron to the socket. Set the thermostat knob dial to Max.
3.When the pilot light goes off, i.e. the steam iron has been in its presetting
temperature.
4.Unplug the iron, and hold the appliance horizontally over a sink.
5.Set the steam knob to position “Self-Clean”, boiling water and steam will come
out from the soleplate, shake the iron slightly in order to wash out impurities &
scale.
6.Set the steam knob to position O when no water in the box.
7.Stand the iron on its end and plug the appliance in the socket, heat up the iron
again.
8.Move the iron over a piece of clean cotton cloth, and the remaining water in
the iron will evaporate from the soleplate.
Anti Calc:
With a small filter built-in,which can make hard water soft, thus preventing any
calc or flake accumulated on the surface of soleplate,this features can prolong
the life of the iron for long use.
Anti Drip:
With a bimetal assembled inside the iron, which can close the steam when the
iron soleplate becomes very low, so water leakage will never happen with this
features.
Automatic safety shut-off:
When the iron is plugged in, the Power Indicator will light steadily, indicating that
there is power to the iron.
If you leave the iron:
1. In a horizontal position without moving it, or accidentally tip the iron over, it
will automatically stop heating after 30 seconds. The Auto-off Indicator Light will
blink to let you know that the iron has stopped heating.
2. In a vertical position (on its heel rest) without moving it, the iron will
automatically turn off after 8 minutes. The Auto-off Indicator Light will blink to let
you know that the iron has stopped heating.
IMPORTANT: The Auto-off Indicator Light will continue to blink until the iron is
unplugged or reset.
To reset the iron:
Move the iron back and forth. The Auto-off Indicator Light will stop blinking and
the iron will start heating again.
Caution: Synthetic Fabric, Nylon, Synthetic Silk and Silk cannot use the steam
iron,otherwise it will damage the finish of surface.
EN
- 12 -
WARNING: The Automatic safety shut-off is a safety feature, not a recommend-
ed means for turning your iron off.

Cautions of the first use:
•The iron has been greased, and as a result, the iron may slightly smoke when
switched on for the first time. After a short while, this will cease.
•Before using for the first time, remove any sticker or protective foil from the
soleplate. Clean the soleplate with a soft cloth.
•Keep the soleplate smooth: avoid hard contact with metal objects (such as
clothes rack, button and slide fastener).
•Pure woolen fabrics (100% wool) may be pressed with the iron set to a steam
position. Preferably set the steam regulator to strong position, and use a dry
pressing cloth.
Filling with Water:
1.Set the steam regulator to O (=no steam) (only for steam iron).
2.Hold the iron by hand and slant the iron with 45° down, open Water Filling
Cover if any.
3.Fill the water in the box through the Water-Filling Hole, if the water is too hard,
it is advisable to use distilled water, do not put the chemically decaled water in
the water reservoir.
4.Wipe off the water over the box; pour out the remaining water after use.
Dry Ironing:
1.Before running the iron, please classify the clothes as per its washing label,
as it will be quicker for the iron to heat up that to cool, the clothes (such as
synthetic fabric, silk etc) with lower ironing temperature shall be ironed firstly,
and then iron the clothes (such as wool, cotton and linen etc) with higher
temperature.
2.Stand the iron on its end, and turn the thermostat dial to the MIN position.
3.Plug in the iron and select the temperature by turning the thermostat dial. If
there is water in the reservoir, turn the steam regulator to OFF position. Wait
until the indicator light goes off showing that the required temperature has been
reached.
Steam Ironing:
1.Fill water in the iron as per the water-filling methods.
2.Plug the appliance in the socket.
3.If only set thermostat dial to MAX position as per the temperature indicator,
steam iron will be available, otherwise water may leak from the soleplate.
4.It indicates that the temperature has been ready until the indicator light goes
off.
5.Set the steam regulator correctly, increase the steam output by rotating the
steam regulator anticlockwise, otherwise decrease.
Burst of Steam:
This function will be able to provide more steam to remove stubborn creases.
1.Set the thermostat dial button to MAX until the indicator light goes off.
2.Release the steam by pressing the steam button.
3.Wait for several minutes and let the steam penetrate through the fabric, and
then release more steam through pressing this buttons again.
Notes
•There should be 3-5 seconds rest between two times of pressing Steam Button
in order to obtain the best steaming result.
•Fill the water to the Max position before using this function.
•In order to prevent the water leaking from soleplate, please do not press the
steam button continuously with more than 5 seconds.
Spraying Methods:
1.Fill the water in the iron as per water-filling methods.
2.Press water spray button.
Note: No matter what steam ironing or dry ironing is, Spray will always be
available in any case.
Self-cleaning:
In order to remove scale and impurities, apply self-clean system once every
month at least.
1.Fill half of the box with box. Set the steam knob to No Steam position.
2.Plug in the iron to the socket. Set the thermostat knob dial to Max.
3.When the pilot light goes off, i.e. the steam iron has been in its presetting
temperature.
4.Unplug the iron, and hold the appliance horizontally over a sink.
5.Set the steam knob to position “Self-Clean”, boiling water and steam will come
out from the soleplate, shake the iron slightly in order to wash out impurities &
scale.
6.Set the steam knob to position O when no water in the box.
7.Stand the iron on its end and plug the appliance in the socket, heat up the iron
again.
8.Move the iron over a piece of clean cotton cloth, and the remaining water in
the iron will evaporate from the soleplate.
Anti Calc:
With a small filter built-in,which can make hard water soft, thus preventing any
calc or flake accumulated on the surface of soleplate,this features can prolong
the life of the iron for long use.
Anti Drip:
With a bimetal assembled inside the iron, which can close the steam when the
iron soleplate becomes very low, so water leakage will never happen with this
features.
Automatic safety shut-off:
When the iron is plugged in, the Power Indicator will light steadily, indicating that
there is power to the iron.
If you leave the iron:
1. In a horizontal position without moving it, or accidentally tip the iron over, it
will automatically stop heating after 30 seconds. The Auto-off Indicator Light will
blink to let you know that the iron has stopped heating.
2. In a vertical position (on its heel rest) without moving it, the iron will
automatically turn off after 8 minutes. The Auto-off Indicator Light will blink to let
you know that the iron has stopped heating.
IMPORTANT: The Auto-off Indicator Light will continue to blink until the iron is
unplugged or reset.
To reset the iron:
Move the iron back and forth. The Auto-off Indicator Light will stop blinking and
the iron will start heating again.
EN
- 13 -
WARNING: The Automatic safety shut-off is a safety feature, not a recommend-
ed means for turning your iron off.
Cautions of the first use:
•The iron has been greased, and as a result, the iron may slightly smoke when
switched on for the first time. After a short while, this will cease.
•Before using for the first time, remove any sticker or protective foil from the
soleplate. Clean the soleplate with a soft cloth.
•Keep the soleplate smooth: avoid hard contact with metal objects (such as
clothes rack, button and slide fastener).
•Pure woolen fabrics (100% wool) may be pressed with the iron set to a steam
position. Preferably set the steam regulator to strong position, and use a dry
pressing cloth.
Filling with Water:
1.Set the steam regulator to O (=no steam) (only for steam iron).
2.Hold the iron by hand and slant the iron with 45° down, open Water Filling
Cover if any.
3.Fill the water in the box through the Water-Filling Hole, if the water is too hard,
it is advisable to use distilled water, do not put the chemically decaled water in
the water reservoir.
4.Wipe off the water over the box; pour out the remaining water after use.
Dry Ironing:
1.Before running the iron, please classify the clothes as per its washing label,
as it will be quicker for the iron to heat up that to cool, the clothes (such as
synthetic fabric, silk etc) with lower ironing temperature shall be ironed firstly,
and then iron the clothes (such as wool, cotton and linen etc) with higher
temperature.
2.Stand the iron on its end, and turn the thermostat dial to the MIN position.
3.Plug in the iron and select the temperature by turning the thermostat dial. If
there is water in the reservoir, turn the steam regulator to OFF position. Wait
until the indicator light goes off showing that the required temperature has been
reached.
Steam Ironing:
1.Fill water in the iron as per the water-filling methods.
2.Plug the appliance in the socket.
3.If only set thermostat dial to MAX position as per the temperature indicator,
steam iron will be available, otherwise water may leak from the soleplate.
4.It indicates that the temperature has been ready until the indicator light goes
off.
5.Set the steam regulator correctly, increase the steam output by rotating the
steam regulator anticlockwise, otherwise decrease.
Burst of Steam:
This function will be able to provide more steam to remove stubborn creases.
1.Set the thermostat dial button to MAX until the indicator light goes off.
2.Release the steam by pressing the steam button.
3.Wait for several minutes and let the steam penetrate through the fabric, and
TYPE OF FABRIC AND THERMOSTAT DIAL FORM
CLEANING AND MAINTENANCE
Caution: If the fabric consists of various kinds of fibers, always select the
lowest ironing temperature of the composition of those fibers
Before cleaning, remove the plug from the socket and allow the iron to cool
down sufficiently.
1.Wipe off the soleplate with a damp cloth and a non-abrasive (liquid) cleaner.
2.If the fiber is adhered to the soleplate, use a damp cloth with vinegar to wipe
off the soleplate.
3.Never use strong acid or alkali in order to avoid damaging the soleplate.
4.If the scale blocks the steam hole, please remove the scale with toothpick; do
not damage the surface of soleplate.
5.Stand the iron on its end and let it cool down sufficiently, and meantime pour
any remaining water out of the box, set the steam regulator to position “O”.
then release more steam through pressing this buttons again.
Notes
•There should be 3-5 seconds rest between two times of pressing Steam Button
in order to obtain the best steaming result.
•Fill the water to the Max position before using this function.
•In order to prevent the water leaking from soleplate, please do not press the
steam button continuously with more than 5 seconds.
Spraying Methods:
1.Fill the water in the iron as per water-filling methods.
2.Press water spray button.
Note: No matter what steam ironing or dry ironing is, Spray will always be
available in any case.
Self-cleaning:
In order to remove scale and impurities, apply self-clean system once every
month at least.
1.Fill half of the box with box. Set the steam knob to No Steam position.
2.Plug in the iron to the socket. Set the thermostat knob dial to Max.
3.When the pilot light goes off, i.e. the steam iron has been in its presetting
temperature.
4.Unplug the iron, and hold the appliance horizontally over a sink.
5.Set the steam knob to position “Self-Clean”, boiling water and steam will come
out from the soleplate, shake the iron slightly in order to wash out impurities &
scale.
6.Set the steam knob to position O when no water in the box.
7.Stand the iron on its end and plug the appliance in the socket, heat up the iron
again.
8.Move the iron over a piece of clean cotton cloth, and the remaining water in
the iron will evaporate from the soleplate.
Anti Calc:
With a small filter built-in,which can make hard water soft, thus preventing any
calc or flake accumulated on the surface of soleplate,this features can prolong
the life of the iron for long use.
Anti Drip:
With a bimetal assembled inside the iron, which can close the steam when the
iron soleplate becomes very low, so water leakage will never happen with this
features.
Automatic safety shut-off:
When the iron is plugged in, the Power Indicator will light steadily, indicating that
there is power to the iron.
If you leave the iron:
1. In a horizontal position without moving it, or accidentally tip the iron over, it
will automatically stop heating after 30 seconds. The Auto-off Indicator Light will
blink to let you know that the iron has stopped heating.
2. In a vertical position (on its heel rest) without moving it, the iron will
automatically turn off after 8 minutes. The Auto-off Indicator Light will blink to let
you know that the iron has stopped heating.
IMPORTANT: The Auto-off Indicator Light will continue to blink until the iron is
unplugged or reset.
To reset the iron:
Move the iron back and forth. The Auto-off Indicator Light will stop blinking and
the iron will start heating again.
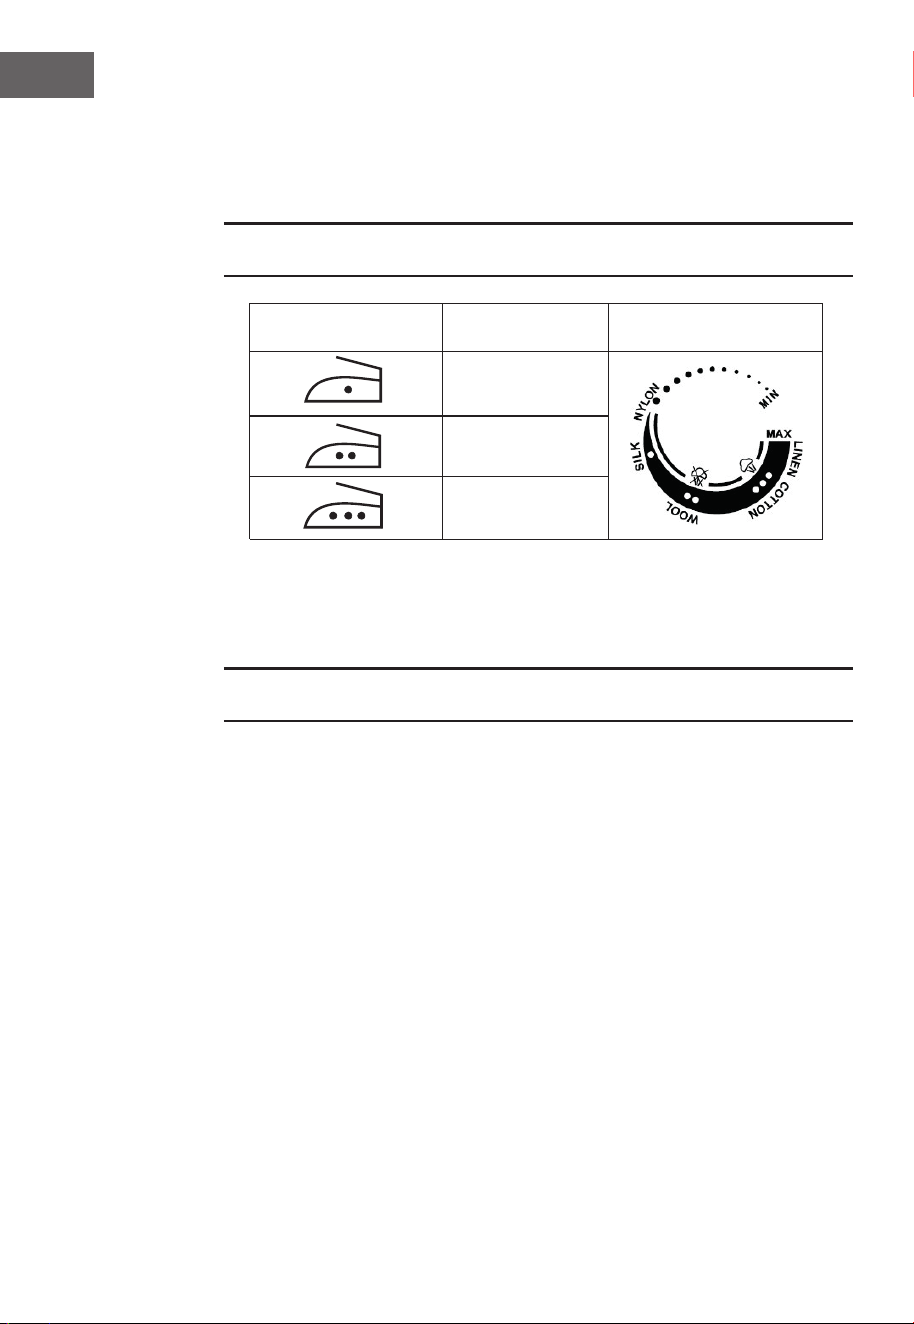
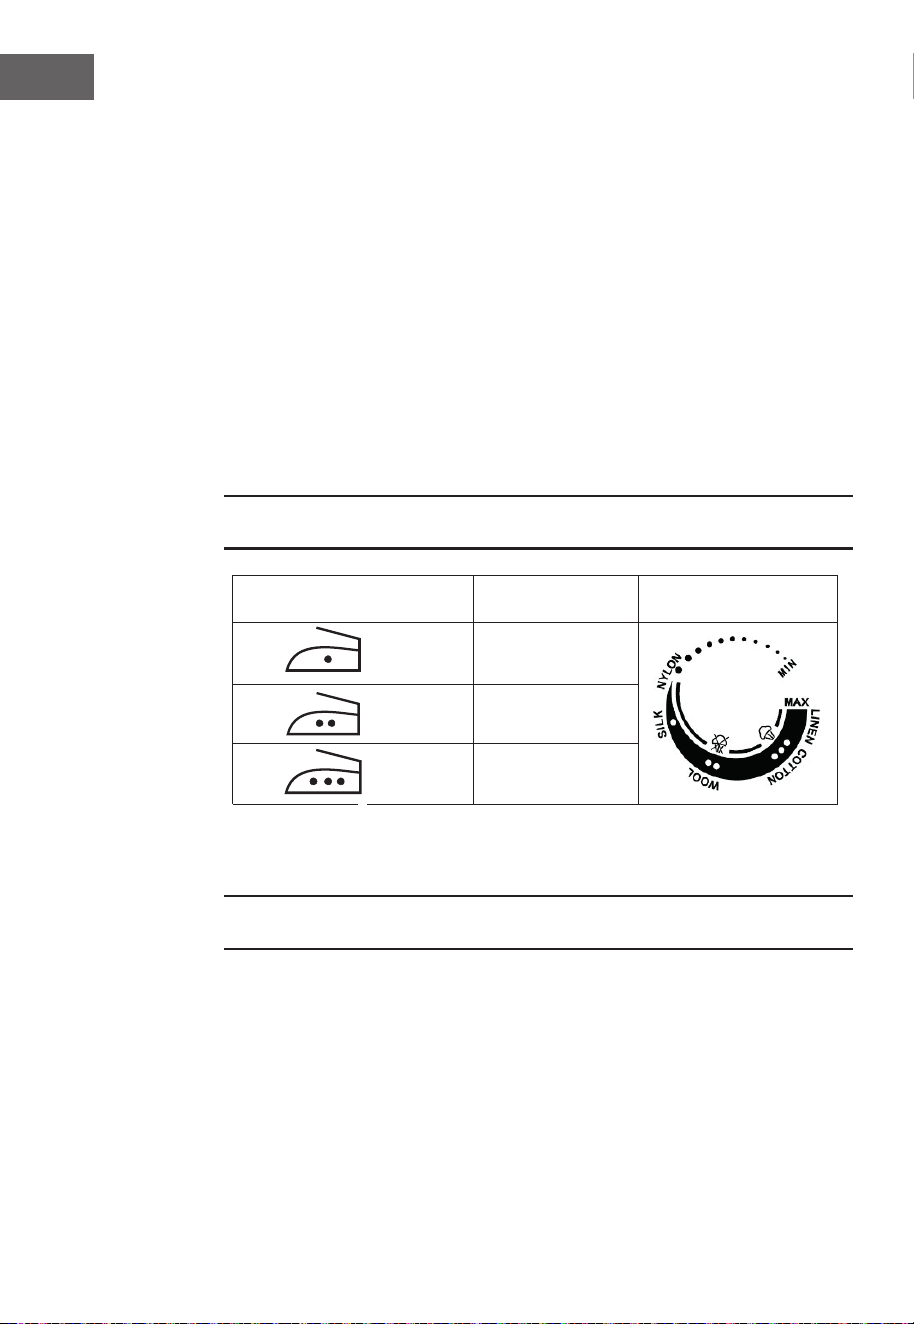
Instructions on label Type of fabric Thermostat dial
Nylon Silk
Wool
Cotton Linen
EN
- 14 -
WARNING: The Automatic safety shut-off is a safety feature, not a recommend-
ed means for turning your iron off.
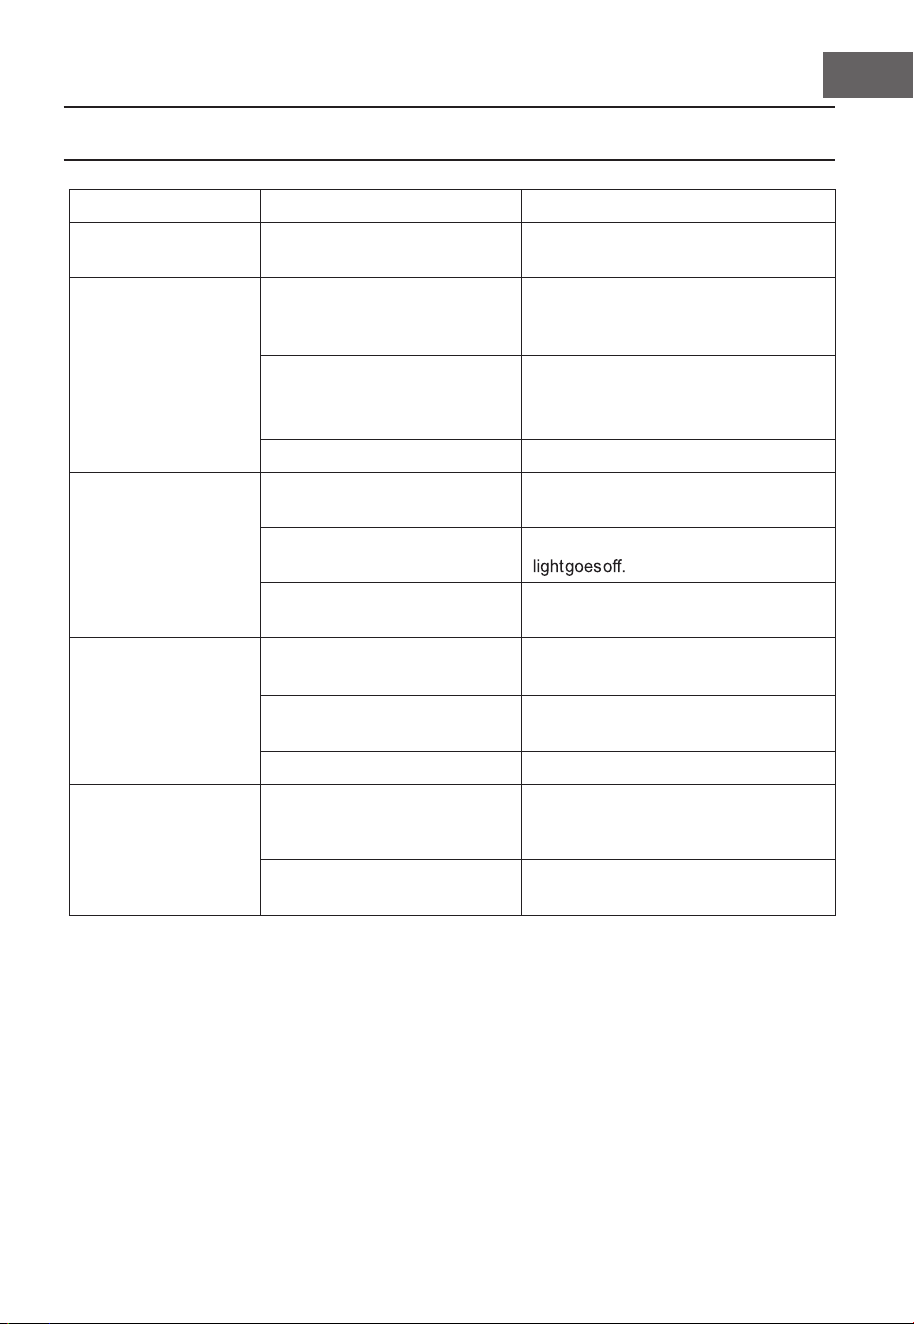
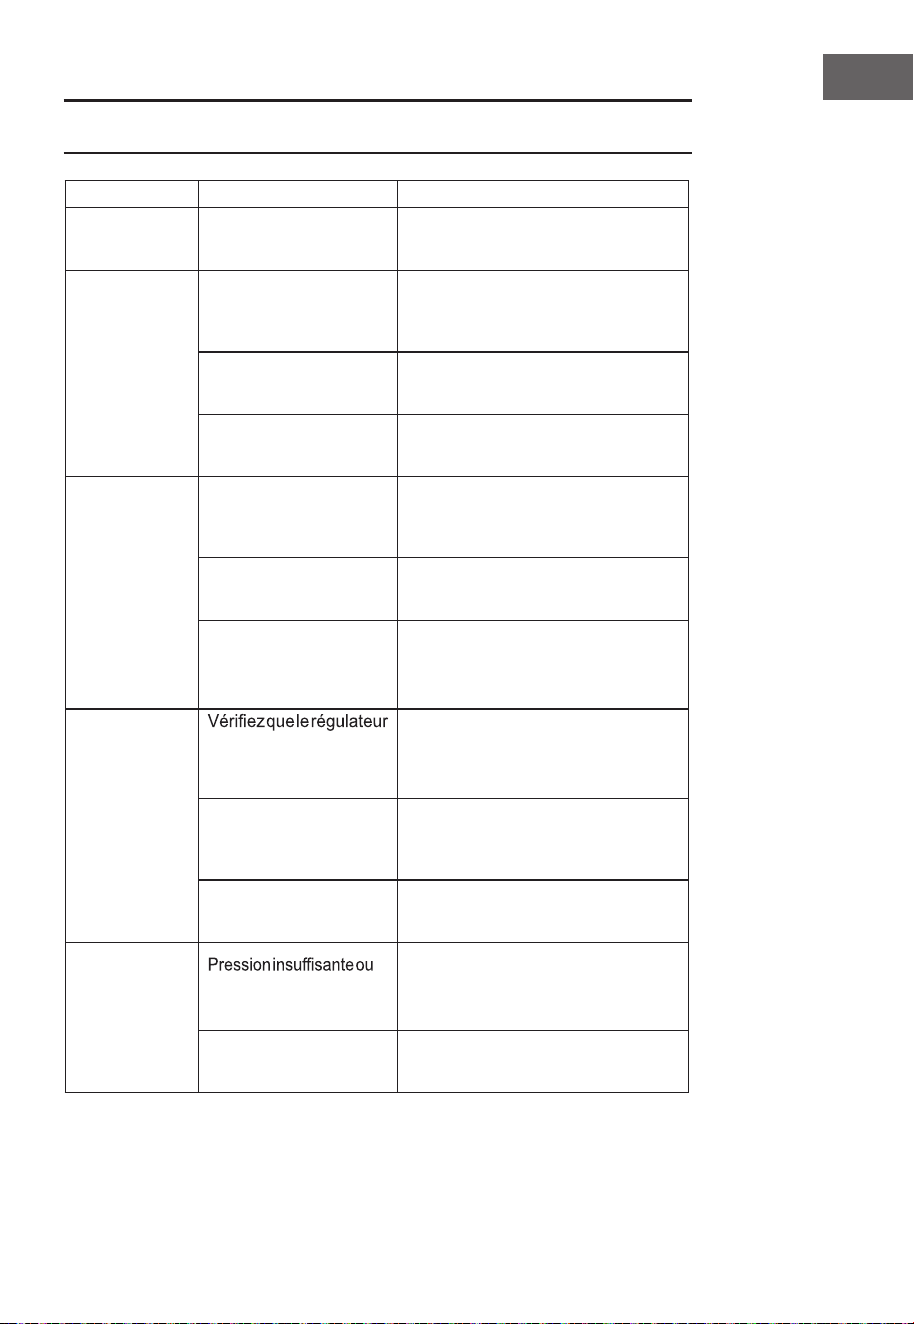
TROUBLESHOOTING
After the above-mentioned methods to repair iron, if it still cannot come to
work normally, please send to our special repair agent for repair.
Failur
e Possible Reasons Measurement
Not enough heat
or
Too heat
Rotate thermostat dial
button improperly.
Correct Thermostat dial
Button in position.
No steam produces
Check if the Thermostat dial
has been set towards the
steam range.
Adjust the thermostat dial
as per steam
range.
Check if the steam regulator has
been set towards
the steam position.
Set steam regulator
towards the
steam range.
Fill water into the box
Leaking water
from
Soleplate
Set the thermostat dial
out of
steam range.
Set the thermostat dial
as per
steam range.
The heat is still not enough.
Open steam button only after
the indicator
The water is over
than
max position
Pour out the remaining water
Little Steam
Check if the steam regulator
is in
proper location.
Set the steam regulator
to the proper
location.
Steam hole or box is
blocked.
Clean hole with
distilled water.
Too little water in the box Fill water into the box
No Spraying
No enough pressure
or
air inside
Press the spray nozzle
by hand,
and push the spray button several
times continuously.
No
or little water in the box Fill water into the box
EN
- 15 -
DISPOSAL CONSIDERATIONS
According to the European waste regulation 2012/19/EU this
symbol on the product or on its packaging indicates that this
product may not be treated as household waste. Instead it
should be taken to the appropriate collection point for the
recycling of electrical and electronic equipment. By ensuring
this product is disposed of correctly, you will help prevent
potential negative consequences for the environment and
human health, which could otherwise be caused by inappropri-
ate waste handling of this product. For more detailed informa-
tion about recycling of this product, please contact your local
council or your household waste disposal service.
EN
- 16 -
Chère cliente, cher client,
Toutes nos félicitations pour l’acquisition de ce nouvel appareil. Veuillez lire attentivement et
respecter les ins tructions de ce mode d’emploi afin d’éviter d’éventuels dommages. Nous ne
saurions être tenus pour responsa- bles des dommages dus au non-respect des consignes
et à la mauvaise utilisation de l’appareil.
Fiche technique 17
Consignes de sécurité 18
Aperçu de l'appareil 19
Utilisation 20
Type de textile et réglage de la température 22
Résolution des problèmes 23
Informations sur le recyclage 24
SOMMAIRE
FICHE TECHNIQUE
Numéro d'article
MG-S7-101
Alimentation
220-240 V~ 50-60 Hz
Puissance
3000W
Température de repassage
20-220℃
FR
- 17 -

CONSIGNES DE SÉCURITÉ
Lisez attentivement le mode d‘emploi avant d’installer et d’utiliser l’appareil et
conser- vez-le pour référence ultérieure.
•Utilisez uniquement des prises avec mise à la terre. La fiche et le cordon
d‘alimentation doivent être secs pendant l‘utilisation.
•Déroulez complètement le cordon d‘alimentation avant d‘utiliser l‘appareil.
•Assurez-vous que la fiche d‘alimentation est débranchée de la prise lorsque vous
laissez le fer à repasser sans surveillance. Posez toujours le fer à repasser
debout.
•Assurez-vous que le fer à repasser est hors de portée des enfants.
•Ne laissez pas le fer à repasser sans surveillance lorsqu‘il est allumé.
•Le fer à vapeur devient très chaud en fonctionnement. Ne le touchez jamais avec
les mains et assurez-vous qu‘il est hors de portée des produits inflammables pour
éviter les accidents.
•Débranchez le cordon d‘alimentation du secteur avant de remplir le fer à
repasser avec de l‘eau ou de vider le reste de l‘eau.
•Ne mettez jamais le fer sous l’eau ou dans d’autres liquides.
•Envoyez le fer à notre centre de réparation si le cordon d’alimentation est
endom- magé.
•Les dépôts calcaire et l’eau minérale peuvent obstruer l’ouverture de la vapeur. Il
est donc recommandé d‘utiliser de l‘eau distillée.
•Pour éviter de surcharger le circuit, n‘utilisez pas d‘autres appareils puissants sur
le même circuit que le fer à repasser.
•Si vous ne pouvez pas éviter d’utiliser des périphériques plus puissants dans le
même circuit, vous devez utiliser le cordon d’alimentation 10 A pour le fer à repas-
ser à vapeur, car les câbles de moins de 10 A chaufferont trop rapidement.
•Placez le cordon d’alimentation de manière à ne pas risquer de trébucher.
•Cet appareil ne doit pas être utilisé par des personnes (enfants compris) aya- nt
des capacités physiques, sensorielles ou mentales limitées et / ou dénuées
d‘expérience et de connaissances, à moins d‘avoir été formées ou instruites à
l‘utilisation par une personne responsable de leur sécurité.
•Surveillez les enfants à proximité de l‘appareil afin qu‘ils ne jouent pas avec.
•Utilisez le fer à vapeur uniquement sur une surface stable et bien fixée.
•Assurez-vous que la surface sur laquelle la station de repassage est fixée est
stable avant de placer le fer sur la station de repassage.
•Si le fer est tombé, présente des dommages visibles ou des fuites, ne l‘utilisez
pas.
FR
- 18 -
A
B
C
D
E
F
G
H
I
J
K
L
M
APERÇU DE L'APPAREIL
A Buse de pulvérisation
B Couvercle du réservoir d'eau
C Régulateur de vapeur
D Bouton de pulvérisation
E Bouton vapeur
F Poignée
G Prise de câble d'alimentation
H Réglage de la température
I Témoin de marche
J Touche d'auto nettoyage
K Corps de l'appareil
L Semelle du fer
M Témoin de capteur
FR
- 19 -

UTILISATION
Mise en marche et utilisation
•Le fer a été graissé. Par conséquent, lorsque vous l'allumez pour la première
fois, le fer peut fumer légèrement. Cela s'arrête rapidement.
•Retirez le film protecteur et les autres films adhésifs de la semelle avant
d'utiliser
l'appareil pour la première fois. Enlevez les résidus avec un chiffon doux.
•Assurez-vous que la semelle reste lisse : évitez de repasser sur des objets
métalliques (tels que des boutons de pantalon, des boutons et des fermetures à
glissière).
•Les vêtements en pure laine (100% laine) peuvent être repassés avec la
fonction vapeur. Définissez une position de préférence haute vapeur et utilisez
un chiffon sec.
Pour ajouter de l'eau
1.Réglez la commande de vapeur sur O (= pas de vapeur) (en repassage à la
vapeur uniquement).
2.Tenez le fer par la poignée et inclinez-le à 45°. Ouvrez le couvercle du
réservoir d’eau (si présent).
3.Remplissez le réservoir d'eau en faisant couler de l'eau dans le trou. Si l'eau
du robinet est très calcaire, il est recommandé d'utiliser de l'eau distillée. Ne
remplissez jamais le réservoir d'eau avec de l'eau chimiquement détartrée.
4.Essuyez l'eau qui se trouve à l'extérieur du réservoir d'eau. Videz le réservoir
d'eau après chaque utilisation.
Repassage à sec
1.Triez les vêtements avant de mettre le fer en marche conformément aux
instructions des étiquettes. Le fer chauffe plus vite qu'il ne refroidit. Par
conséquent, il est recommandé de repasser d'abord les vêtements qui
nécessitent une température de repassage plus basse (par exemple, les tissus
synthétiques, la soie, etc.), puis les vêtements, qui nécessitent une température
de repassage plus élevée (par exemple, la laine, le coton, le lin, etc.).
2.Posez le fer sur son socle arrière et réglez le thermostat sur "MIN".
3.Insérez la fiche d’alimentation du fer dans la prise et réglez la température
souhaitée en tournant le bouton de réglage de la température. S'il y a de l'eau
dans le réservoir, tournez le cadran de vapeur sur "OFF". Attendez que le
voyant s'éteigne, ce qui signifie que la température définie a été atteinte.
Repassage à la vapeur
1.Remplir le réservoir avec de l'eau.
2.Branchez le cordon d’alimentation dans la prise.
3.Si vous réglez la température sur "MAX", le repassage à la vapeur est
disponible.
4.Sinon, de l'eau peut couler par la semelle.
5.Lorsque le voyant s'éteint, cela signifie que la température définie a été
atteinte.
6.Réglez l'intensité de la vapeur avec le régulateur de vapeur. En tournant le
bouton vapeur dans le sens contraire des aiguilles d'une montre, l'intensité de
la vapeur
augmente. En le tournant dans le sens des aiguilles d'une montre, elle diminue.
FR
- 20 -

Vapeur
En appuyant sur le bouton vapeur, vous produisez plus de vapeur, ce qui facilite
l'élimination des faux-plis rebelles.
1.Réglez le thermostat sur "MAX" et attendez que le voyant s’éteigne.
2.Appuyez sur le bouton vapeur pour libérer la vapeur.
3.Attendez quelques secondes et laissez la vapeur pénétrer dans le tissu, puis
appuyez à nouveau sur le bouton vapeur.
Remarques
•Pour le meilleur résultat, attendez 3 à 5 secondes entre la première et la
deuxième pression sur le bouton vapeur.
•Remplissez le réservoir d’eau jusqu’à la position "MAX" avant d’utiliser le mode
repassage à la vapeur.
•Pour que l’eau ne coule pas de la semelle, n'appuyez pas plus de 5 secondes
à la fois sur le bouton vapeur.
Méthodes de pulvérisation :
1.Remplissez le réservoir avec de l'eau.
2.Appuyez sur le bouton de pulvérisation.
Remarque : en mode de repassage à sec ou à vapeur, vous pouvez appuyer
sur le bouton de pulvérisation à tout moment.
Auto nettoyage
Pour éliminer le tartre et les impuretés, utilisez le mode autonettoyant au moins
une fois par mois.
1.Remplissez le réservoir à moitié avec de l'eau. Réglez la commande de
vapeur sur la position "O".
2.Branchez le cordon d’alimentation dans la prise. Réglez le thermostat sur la
position "MAX".
3.Dès que le voyant s'éteint, la température réglée est atteinte.
4.Débranchez le cordon d'alimentation et tenez le fer à la verticale au-dessus
d'un évier.
5.Réglez la commande de vapeur sur la position "Auto nettoyage". De l'eau
bouillante et de la vapeur s'échappent de la semelle. Secouez légèrement le fer
pour éliminer les impuretés et le tartre de l'intérieur du réservoir d'eau.
6.Lorsqu'il n'y a plus d'eau dans le réservoir d'eau, réglez la commande de
vapeur sur "O".
7.Placez le fer sur sa partie arrière, branchez la fiche secteur dans la prise et
chauffez à nouveau le fer.
8.Passez le fer sur un chiffon en coton propre. L’eau restante dans le réservoir
d’eau sort alors sous forme de vapeur par la semelle.
Antitartre
Un petit filtre intégré adoucit l'eau dure, empêchant le calcaire de se déposer
sur la semelle, prolongeant la durée de vie du fer.
Anti goutte
Le fer comporte un bilame à l'intérieur qui peut bloquer la sortie de vapeur, de
sorte que même si la semelle est réglée très bas, l'eau ne peut s'échapper.
Arrêt automatique de sécurité :
Lorsque le fer est branché, le voyant d'alimentation s'allume en continu,
indiquant que le fer est alimenté.
Attention : Les tissus synthétiques, le nylon, la soie synthétique et la soie ne
doivent pas être repassés à la vapeur car cela pourrait endommager la
structure et la finition de ces tissus.
FR
- 21 -
Si vous laissez le fer :
1. En position horizontale sans le déplacer, ou si vous renversez accidentelle-
ment le fer, il s'arrêtera automatiquement de chauffer après 30 secondes. Le
témoin lumineux d'arrêt automatique clignote pour vous indiquer que le fer a
cessé de chauffer.
2. En position verticale (sur son repose-talon) sans le déplacer, le fer s'éteint
automatiquement après 8 minutes. Le voyant lumineux d'arrêt automatique
clignote pour vous indiquer que le fer a cessé de chauffer.
IMPORTANT : Le témoin lumineux d'arrêt automatique continue de clignoter
jusqu'à ce que le fer soit débranché ou réinitialisé.
Pour réinitialiser le fer :
Déplacez le fer d'avant en arrière. Le voyant d'arrêt automatique cesse de
clignoter et le fer recommence à chauffer.
AVERTISSEMENT : L'arrêt automatique est un dispositif de sécurité et non un
moyen recommandé d'éteindre le fer.
Traduit avec www.DeepL.com/Translator (version gratuite)
Vapeur
En appuyant sur le bouton vapeur, vous produisez plus de vapeur, ce qui facilite
l'élimination des faux-plis rebelles.
1.Réglez le thermostat sur "MAX" et attendez que le voyant s’éteigne.
2.Appuyez sur le bouton vapeur pour libérer la vapeur.
3.Attendez quelques secondes et laissez la vapeur pénétrer dans le tissu, puis
appuyez à nouveau sur le bouton vapeur.
Remarques
•Pour le meilleur résultat, attendez 3 à 5 secondes entre la première et la
deuxième pression sur le bouton vapeur.
•Remplissez le réservoir d’eau jusqu’à la position "MAX" avant d’utiliser le mode
repassage à la vapeur.
•Pour que l’eau ne coule pas de la semelle, n'appuyez pas plus de 5 secondes
à la fois sur le bouton vapeur.
Méthodes de pulvérisation :
1.Remplissez le réservoir avec de l'eau.
2.Appuyez sur le bouton de pulvérisation.
Remarque : en mode de repassage à sec ou à vapeur, vous pouvez appuyer
sur le bouton de pulvérisation à tout moment.
Auto nettoyage
Pour éliminer le tartre et les impuretés, utilisez le mode autonettoyant au moins
une fois par mois.
1.Remplissez le réservoir à moitié avec de l'eau. Réglez la commande de
vapeur sur la position "O".
2.Branchez le cordon d’alimentation dans la prise. Réglez le thermostat sur la
position "MAX".
3.Dès que le voyant s'éteint, la température réglée est atteinte.
4.Débranchez le cordon d'alimentation et tenez le fer à la verticale au-dessus
d'un évier.
5.Réglez la commande de vapeur sur la position "Auto nettoyage". De l'eau
bouillante et de la vapeur s'échappent de la semelle. Secouez légèrement le fer
pour éliminer les impuretés et le tartre de l'intérieur du réservoir d'eau.
6.Lorsqu'il n'y a plus d'eau dans le réservoir d'eau, réglez la commande de
vapeur sur "O".
7.Placez le fer sur sa partie arrière, branchez la fiche secteur dans la prise et
chauffez à nouveau le fer.
8.Passez le fer sur un chiffon en coton propre. L’eau restante dans le réservoir
d’eau sort alors sous forme de vapeur par la semelle.
Antitartre
Un petit filtre intégré adoucit l'eau dure, empêchant le calcaire de se déposer
sur la semelle, prolongeant la durée de vie du fer.
Anti goutte
Le fer comporte un bilame à l'intérieur qui peut bloquer la sortie de vapeur, de
sorte que même si la semelle est réglée très bas, l'eau ne peut s'échapper.
Arrêt automatique de sécurité :
Lorsque le fer est branché, le voyant d'alimentation s'allume en continu,
indiquant que le fer est alimenté.
TYPE DE TEXTILE ET RÉGLAGE DE LA TEMPÉRATURE
NETTOYAGE
Attention : Si un vêtement est composé de plusieurs types de tissu, sélection-
nez toujours la température de repassage la plus basse indiquée.
Avant de nettoyer le fer, débranchez le cordon d’alimentation et laissez le fer
refroidir complètement.
1.Essuyez la semelle avec un chiffon humide et un détergent non abrasif
(liquide).
2.Si le tissu adhère à la semelle, nettoyez-la avec un chiffon humide et un peu
de vinaigre.
3.N'utilisez jamais d'acides forts ou de solutions alcalines pour le nettoyage,
cela pourrait endommager la semelle.
4.Si la sortie de vapeur est obstruée par du tartre, retirez-le avec un cure-dent
en prenant soin de ne pas endommager la semelle.
5.Placez le fer sur son talon et laissez-le refroidir suffisamment. Pendant ce
temps,videz l’eau restante dans le réservoir et réglez la commande de vapeur
sur "O".
Informations sur l'étiquette Type de textile
Réglage de la
température
Nylon Soie
Laine
Coton Lin
FR
- 22 -
Si vous laissez le fer :
1. En position horizontale sans le déplacer, ou si vous renversez accidentelle-
ment le fer, il s'arrêtera automatiquement de chauffer après 30 secondes. Le
témoin lumineux d'arrêt automatique clignote pour vous indiquer que le fer a
cessé de chauffer.
2. En position verticale (sur son repose-talon) sans le déplacer, le fer s'éteint
automatiquement après 8 minutes. Le voyant lumineux d'arrêt automatique
clignote pour vous indiquer que le fer a cessé de chauffer.
IMPORTANT : Le témoin lumineux d'arrêt automatique continue de clignoter
jusqu'à ce que le fer soit débranché ou réinitialisé.
Pour réinitialiser le fer :
Déplacez le fer d'avant en arrière. Le voyant d'arrêt automatique cesse de
clignoter et le fer recommence à chauffer.
AVERTISSEMENT : L'arrêt automatique est un dispositif de sécurité et non un
moyen recommandé d'éteindre le fer.
Traduit avec www.DeepL.com/Translator (version gratuite)
RÉSOLUTION DES PROBLÈMES
Si le problème persiste après avoir appliqué les solutions listées ci-dessus,
contactez le service clientèle.
Problème
Cause possible
Solutio
n
Fer trop
froid ou
trop
chaud
La température est
mal réglée
Réglez correctement la
température avec le
bouton de
réglage.
Pas de vapeur.
Le bouton de
réglage
de la
température n‘est
pas
sur „MAX“.
Réglez le bouton de réglage
de la
température sur „MAX“.
Le bouton de réglage
de la vapeur est mal
réglé.
Ajustez le réglage
de la
vapeur.
Il y a trop peu d‘eau
ou plus d‘eau dans le
réservoir.
Remplissez le réservoir d‘eau.
L‘eau fuit
par la
semelle du
fer.
La température
réglée
est trop faible
pour
produire de la
vapeur.
Augmentez la température.
Le fer n‘est pas
encore
assez
chaud.
N‘appuyez pas sur le
bouton de
vapeur tant que le voyant n‘est pas
éteint.
Trop d‘eau dans le
réservoir.
Videz l‘excès d‘eau pour
que
l‘eau dans le réservoir
atteigne au
maximum
la marque max.
Trop peu de
vapeur
de
vapeur est en bonne
position.
Mettez le régulateur
de vapeur
dans la bonne position.
Les trous de sortie
de vapeur ou le
réservoir
d‘eau sont
bouchés.
Nettoyer les trous de sortie de
vapeur avec
de l‘eau distillée.
Il n‘y a pas assez
d‘eau dans le
réservoir.
Remplissez le réservoir d‘eau.
Impossible
de
pulvériser
de l‘eau.
bulles
d‘air dans les conduites.
Appuyez sur la buse de
pulvérisation avec votre main et
appuyez plusieurs fois de suite sur
le bouton
de pulvérisation.
Pas d‘eau ou trop
peu
d‘eau dans le
réservoir.
Remplissez le réservoir d‘eau.
FR
- 23 -

INFORMATIONS SUR LE RECYCLAGE
Vous trouverez sur le produit l’image ci-contre (une poubelle
sur roues, barrée d‘une croix), ce qui indique que le produit se
trouve soumis à la directive européenne 2012/19/UE. Rensei-
gnez-vous sur les dispositions en vigueur dans votre région
concernant la collecte séparée des appareils électriques et
électroniques. Respectez-les et ne jetez pas les appareils
usagés avec les ordures ménagères. La mise en rebut correcte
du produit usagé permet de préserver l’environnement et la
santé. Le recyclage des matériaux contribue à la préservation
des ressources naturelles.
FR
- 24 -

Estimado cliente:
Le felicitamos por la adquisición de este producto. Lea atentamente el siguiente manual y siga
cuidadosamente las instrucciones de uso con el fin de evitar posibles daños. La empresa no se
responsabiliza de los daños oca- sionados por un uso indebido del producto o por haber
desatendido las indicaciones de seguridad.
Datos técnicos 25
Indicaciones de seguridad 26
Visión general del aparato 27
Manejo 28
Tipo de textil y configuración de temperatura 30
Resolución de problemas 31
Retirada del aparato 32
ÍNDICE
DATOS TÉCNICOS
Número de artículo
MG-S7-101
Suministro eléctrico
220-240 V~ 50-60 Hz
Consumo
3000W
Temperatura de planchado
20-220℃
ES
- 25 -

INDICACIONES DE SEGURIDAD
Lea con detenimiento las instrucciones antes de la instalación y puesta en
marcha del aparato y consérvelas para consultas posteriores.
•Utilice exclusivamente tomas de corriente con toma a tierra. El enchufe y el
cable de alimentación deben estar secos durante el uso del aparato.
•Desenrolle el cable completamente antes de utilizar el aparato.
•Asegúrese de que el enchufe se haya desconectado de la toma de corriente si
deja la plancha sin supervisión. Coloque la plancha siempre sobre su parte
trasera.
•Asegúrese de que la plancha se encuentre fuera del alcance de los niños.
•No deje la plancha sin supervisión mientras esté encendida.
•La plancha alcanza temperaturas elevadas durante su uso. Nunca la toque con
la mano y asegúrese de que se encuentre fuera del alcance de productos
fácilmente inflamables para evitar accidentes.
•Desconecte el enchufe de la toma de corriente antes de llenar la plancha de
agua o de vaciar el agua que contiene.
•Nunca sumerja la plancha en agua ni en otros líquidos.
•Envíe la plancha a nuestro centro de reparación si el cable de alimentación
presenta daños.
•Los restos de cal y el agua mineral pueden provocar que se obstruyan los
orificios del vapor. Por ello se recomienda utilizar agua destilada.
•Para evitar una sobrecarga del circuito eléctrico, no debe utilizar ningún aparato
potente en el mismo circuito eléctrico que la plancha.
•Si no quiere evitar utilizar varios aparatos potentes en el mismo circuito eléctrico,
debe utilizar un cable de alimentación de 10A para la plancha, pues los cables
con un amperaje menor a 10 A se calientan muy rápidamente.
•Coloque el cable de alimentación de tal manera que no pueda provocar
tropiezos.
•Las personas con discapacidades físicas, sensoriales y mentales o con falta de
experiencia y conocimiento (niños incluidos) solo podrán utilizar el aparato si han
sido instruidas por una persona responsable de su seguridad y conocen los
riesgos que entraña el riesgo de su uso.
•Instruya a los niños para que no jueguen con el aparato.
•Utilice la plancha a vapor exclusivamente en una superficie estable y bien fijada.
•Asegúrese de que la superficie a la que se fije la plancha a vapor sea estable
antes de colocar la plancha en su estación.
•Si la plancha se cae, presenta daños visibles o pierde agua, no debe utilizarse.
ES
- 26 -

A
B
C
D
E
F
G
H
I
J
K
L
M
VISIÓN GENERAL DEL APARATO
A Boquilla pulverizadora
B Tapa del depósito de agua
C Regulador de vapor
D Cabezal de pulverización
E Botón de golpe de vapor
F Asa
G Conexión del cable
H Regulador de temperatura
I Luz de funcionamiento
J Botón de limpieza automática
K Estructura del aparato
L Suela de la plancha
M Luz indicadora del sensor
ES
- 27 -

MANEJO
Puesta en marcha y uso
•La plancha se ha engrasado. Por ello puede ocurrir que la plancha humee un
poco cuando la encienda por primera vez. Este fenómeno desaparecerá al poco
tiempo.
•Antes de utilizar por primera vez el aparato, retire todas las láminas y adhesivos
de la suelta de la plancha. Elimine los restos con un paño suave.
•Asegúrese de que la suela de la plancha se mantenga lisa: evite planchar sobre
objetos metálicos (botones de pantalones, botones y cremalleras).
•La ropa de lana pura (100 % lana) se puede planchar con la función de vapor.
Ajuste preferiblemente una posición elevada del vapor y utilice un paño seco para
planchar.
Rellenar el aparato de agua
1.Coloque el regulador de vapor en O (sin vapor) (solo para planchas a vapor).
2.Sujete la plancha por el asa e inclínela 45° hacia abajo. Abra la tapa del
depósito de agua (si existe).
3.Llene el depósito de agua vertiendo el agua por el agujero. Si el agua del grifo
tiene demasiada cal, se recomienda utilizar agua destilada. Nunca llene el
depósito de agua con agua descalcificada a partir de productos químicos.
4.Retire el agua que se encuentra en la parte exterior del aparato. Vacíe el
depósito después de cada uso.
Planchado en seco
1.Clasifique la ropa antes de encender la plancha en función de las indicaciones
que aparecen en la etiqueta de lavado. La plancha se calienta más rápido de lo
que se enfría. Por ello se recomienda planchar primero la ropa que necesita una
temperatura de planchado más baja (como tejidos sintéticos, seda, etc.) y a
continuación la ropa que necesita una temperatura de planchado elevada (como
lana, algodón, lino, etc.).
2.Coloque la plancha siempre sobre su parte trasera y gire el regulador de
temperatura hasta "MIN".
3.Conecte el enchufe de la plancha a la toma de corriente y regule la temperatura
deseada girando el regulador de temperatura. Si hay agua en el depósito de agua,
gire el regulador de vapor a la posición "OFF". Espere a que se haya apagado la
luz indicadora, lo cual significa que se ha alcanzado la temperatura seleccionada.
Planchado a vapor
1.Rellene el depósito de agua.
2.Conecte el enchufe en la toma de corriente.
3.Si coloca el regulador de temperatura en la posición "MAX“, el aparato dispon-
drá de función de vapor. De lo contrario, la suela de la plancha expulsará agua.
4.Si se apaga la luz, esto significa que se ha alcanzado la temperatura
seleccionada.
5.Regule la intensidad del vapor en el regulador de vapor. Si gira el regulador
devapor en sentido antihorario, la intensidad del vapor aumenta, y cuando gira el
regulador de vapor en sentido horario, disminuye.
Atención: Los tejidos sintéticos, nailon, seda sintética y seda no se pueden
planchar enmodo vapor, pues la estructura y la superficie de estos tejidos
podría dañarse.
ES
- 28 -

Golpe de vapor
Presionando el botón de golpe de vapor se produce más vapor, lo cual facilita la
eliminación de las arrugas más profundas.
1.Ajuste el regulador de temperatura en la posición "MAX" hasta que se apague el
indicador luminoso.
2.Pulse el botón de golpe de vapor para liberar el vapor.
3.Espere unos segundos y deje que el vapor penetre en el tejido y a continuación
presione de nuevo el vapor de golpe de vapor.
Notas
•Para obtener el mejor resultado, debe esperar 3-5 segundos entre el primer y el
segundo golpe de vapor.
•Llene el depósito de agua hasta la posición "MAX" antes de utilizar el modo de
vapor.
•Para evitar que el agua rebose de la suela de la plancha, no debe mantener pulsado
el botón del golpe de vapor durante más de 5 segundos.
Métodos de pulverización:
1.Rellene el depósito de agua.
2.Pulse el botón de pulverización.
Remarque : en mode de repassage à sec ou à vapeur, vous pouvez appuyer sur le
bouton de pulvérisation à tout moment.
Limpieza automática
Para eliminar los restos de cal y las impurezas, debe utilizarse el modo de limpieza
automática al menos una vez al mes.
1.Rellene el depósito de agua hasta la mitad de su capacidad. Coloque el regulador
de vapor en la posición "O".
2.Conecte el enchufe a la toma de corriente. Coloque el regulador de temperatura en
la posición "MAX".
3.En cuanto se apague el indicador luminoso se habrá alcanzado la temperatura
seleccionada.
4.Desconecte el enchufe de la toma de corriente y coloque la plancha en posición
vertical sobre un fregadero.
5.Coloque el regulador de vapor en la posición "Self-Clean". A continuación, saldrán
el agua hirviendo y el vapor de la suela de la plancha. Agite ligeramente la plancha
para eliminar las impurezas y los depósitos de cal del interior del depósito de agua.
6.Cuando ya no haya agua en el depósito, coloque el regulador de vapor en la
posición "O".
7.Coloque la plancha sobre su parte trasera, conecte el enchufe a la toma de
corriente y caliente de nuevo la plancha.
8.Mueva la plancha encima de un paño de algodón limpio. El agua restante del
depósito saldrá por la suela de la plancha en forma de vapor.
Antical
Un pequeño filtro integrado puede ablandar el agua dura y evitar así que se acumule
cal en la suela de la plancha, lo cual prolonga la vida útil del producto.
Protección antigoteo
En el interior de la plancha se encuentra una tira bimetálica que evita que salga el
vapor para que cuando la suela de la plancha está muy inclinada no salga nada de
agua.
Desconexión automática de seguridad:
Cuando la plancha esté enchufada, el indicador de encendido se iluminará de forma
fija, indicando que hay corriente en la plancha.
Si deja la plancha
ES
- 29 -
1. en posición horizontal sin moverla, o vuelca accidentalmente la plancha, ésta
dejará de calentarse automáticamente transcurridos 30 segundos. La luz
indicadora de apagado automático parpadeará para hacerle saber que la
plancha ha dejado de calentar.
2. 2. En posición vertical (sobre el soporte del talón) sin moverla, la plancha se
apagará automáticamente transcurridos 8 minutos. El piloto de apagado
automático parpadeará para indicarle que la plancha ha dejado de calentarse.
IMPORTANTE: El indicador luminoso de apagado automático seguirá parpade-
ando hasta que desenchufe o reinicie la plancha.
Para reiniciar la plancha
Mueva la plancha hacia adelante y hacia atrás. La luz indicadora de apagado
automático dejará de parpadear y la plancha comenzará a calentarse de nuevo.
ADVERTENCIA: El apagado automático de seguridad es una función de
seguridad, no un medio recomendado para apagar la plancha.
Traducción realizada con la versión gratuita del traductor
www.DeepL.com/Translator
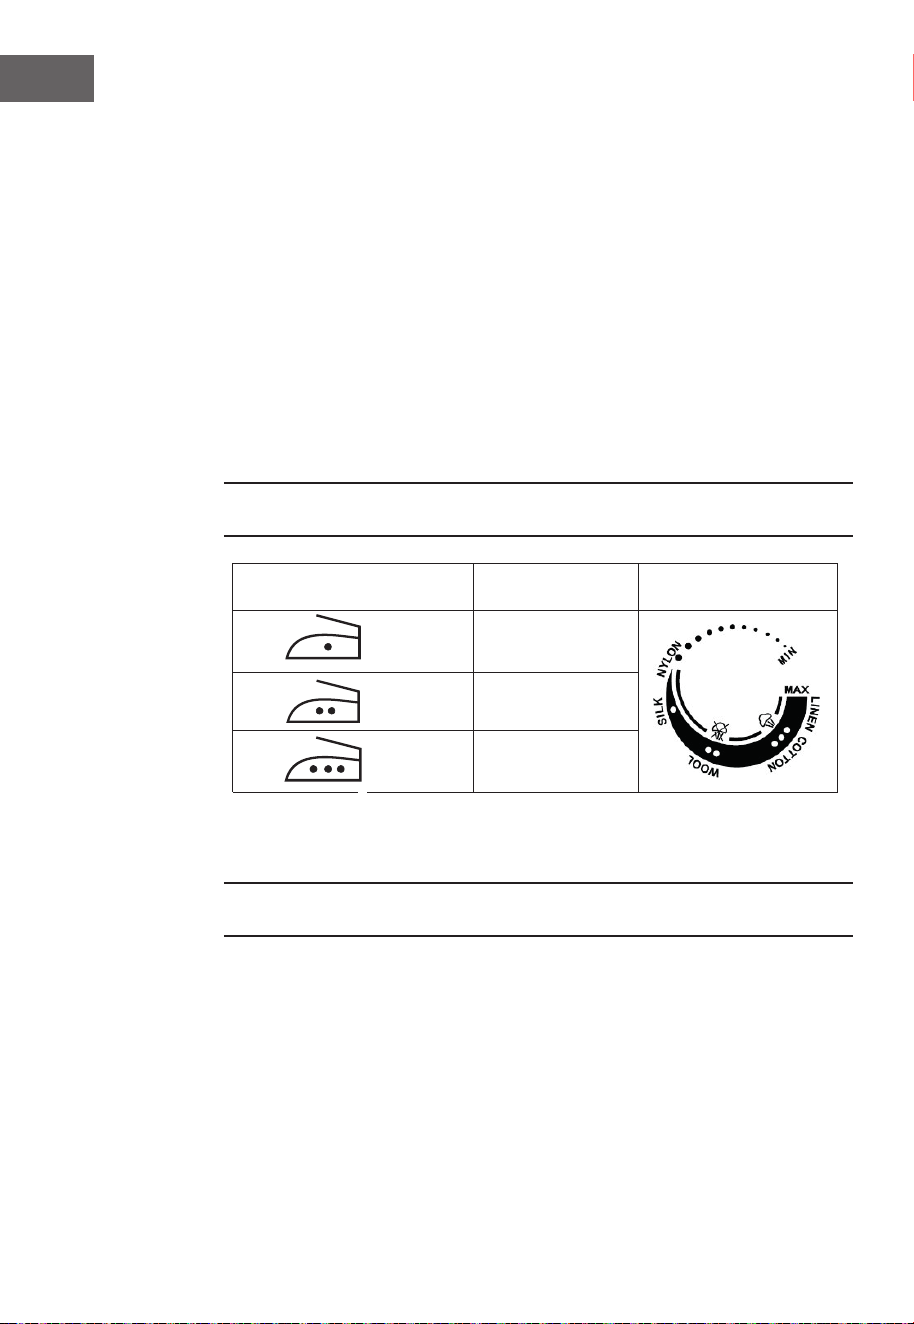
TIPO DE TEXTIL Y CONFIGURACIÓN DE TEMPERATURA
LIMPIEZA
Atención: si una prenda de ropa está compuesta por varios tipos de tejido,
seleccione siempre la temperatura de planchado más baja.
Desconecte el enchufe y deje que el aparato se enfríe por completo antes de
limpiarlo.
1.Limpie la suela de la plancha con un paño húmedo y con un producto de
limpieza líquido no abrasivo.
2.Si los tejidos se quedan pegados a la suela de la plancha, limpie esta con un
paño húmedo y un poco de vinagre.
3.Nunca utilice ácidos potentes ni soluciones alcalinas para la limpieza, pues la
suela de la plancha se dañaría.
4.Si la salida de vapor se obstruye debido a la cal, retire la cal con un palillo de
dientes mientras se cerciora de que la suela no se daña.
5.Coloque la plancha sobre su parte trasera y deje que se enfríe. Mientras
tanto, vacíe el agua que queda en el depósito y coloque el regulador de vapor
en la posición "O".
Indicaciones en la etiqueta Tipo de textil
Configuración de
temperatura
Nailon Seda
Lana
Algodón Lino
Golpe de vapor
Presionando el botón de golpe de vapor se produce más vapor, lo cual facilita la
eliminación de las arrugas más profundas.
1.Ajuste el regulador de temperatura en la posición "MAX" hasta que se apague el
indicador luminoso.
2.Pulse el botón de golpe de vapor para liberar el vapor.
3.Espere unos segundos y deje que el vapor penetre en el tejido y a continuación
presione de nuevo el vapor de golpe de vapor.
Notas
•Para obtener el mejor resultado, debe esperar 3-5 segundos entre el primer y el
segundo golpe de vapor.
•Llene el depósito de agua hasta la posición "MAX" antes de utilizar el modo de
vapor.
•Para evitar que el agua rebose de la suela de la plancha, no debe mantener pulsado
el botón del golpe de vapor durante más de 5 segundos.
Métodos de pulverización:
1.Rellene el depósito de agua.
2.Pulse el botón de pulverización.
Remarque : en mode de repassage à sec ou à vapeur, vous pouvez appuyer sur le
bouton de pulvérisation à tout moment.
Limpieza automática
Para eliminar los restos de cal y las impurezas, debe utilizarse el modo de limpieza
automática al menos una vez al mes.
1.Rellene el depósito de agua hasta la mitad de su capacidad. Coloque el regulador
de vapor en la posición "O".
2.Conecte el enchufe a la toma de corriente. Coloque el regulador de temperatura en
la posición "MAX".
3.En cuanto se apague el indicador luminoso se habrá alcanzado la temperatura
seleccionada.
4.Desconecte el enchufe de la toma de corriente y coloque la plancha en posición
vertical sobre un fregadero.
5.Coloque el regulador de vapor en la posición "Self-Clean". A continuación, saldrán
el agua hirviendo y el vapor de la suela de la plancha. Agite ligeramente la plancha
para eliminar las impurezas y los depósitos de cal del interior del depósito de agua.
6.Cuando ya no haya agua en el depósito, coloque el regulador de vapor en la
posición "O".
7.Coloque la plancha sobre su parte trasera, conecte el enchufe a la toma de
corriente y caliente de nuevo la plancha.
8.Mueva la plancha encima de un paño de algodón limpio. El agua restante del
depósito saldrá por la suela de la plancha en forma de vapor.
Antical
Un pequeño filtro integrado puede ablandar el agua dura y evitar así que se acumule
cal en la suela de la plancha, lo cual prolonga la vida útil del producto.
Protección antigoteo
En el interior de la plancha se encuentra una tira bimetálica que evita que salga el
vapor para que cuando la suela de la plancha está muy inclinada no salga nada de
agua.
Desconexión automática de seguridad:
Cuando la plancha esté enchufada, el indicador de encendido se iluminará de forma
fija, indicando que hay corriente en la plancha.
Si deja la plancha
ES
- 30 -
1. en posición horizontal sin moverla, o vuelca accidentalmente la plancha, ésta
dejará de calentarse automáticamente transcurridos 30 segundos. La luz
indicadora de apagado automático parpadeará para hacerle saber que la
plancha ha dejado de calentar.
2. 2. En posición vertical (sobre el soporte del talón) sin moverla, la plancha se
apagará automáticamente transcurridos 8 minutos. El piloto de apagado
automático parpadeará para indicarle que la plancha ha dejado de calentarse.
IMPORTANTE: El indicador luminoso de apagado automático seguirá parpade-
ando hasta que desenchufe o reinicie la plancha.
Para reiniciar la plancha
Mueva la plancha hacia adelante y hacia atrás. La luz indicadora de apagado
automático dejará de parpadear y la plancha comenzará a calentarse de nuevo.
ADVERTENCIA: El apagado automático de seguridad es una función de
seguridad, no un medio recomendado para apagar la plancha.
Traducción realizada con la versión gratuita del traductor
www.DeepL.com/Translator
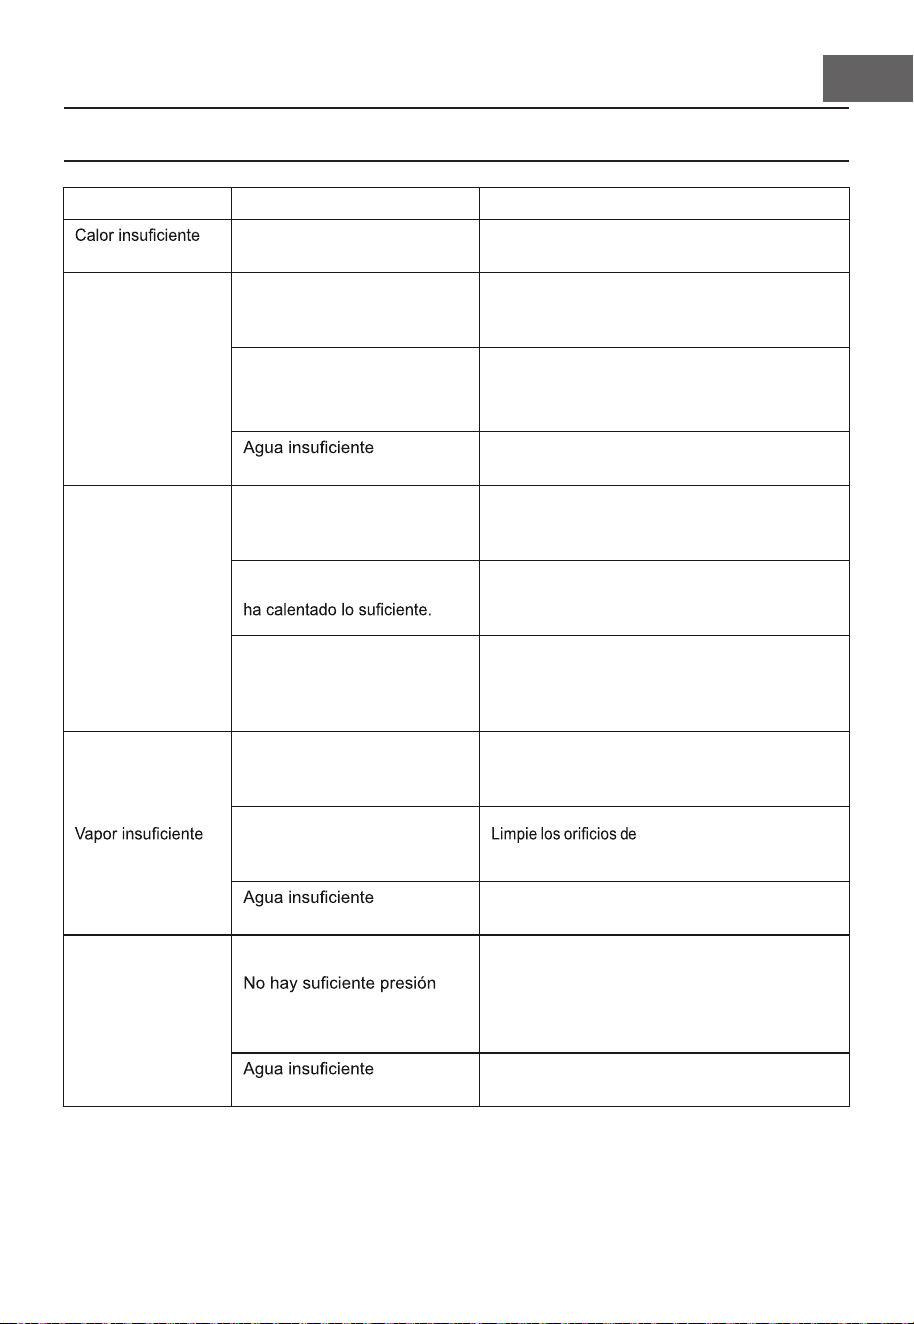
RESOLUCIÓN DE PROBLEMAS
Si no puede solucionar el problema con las indicaciones anteriormente
mencionadas, contacte con el servicio de atención al cliente.
Error
Posible causa Solución
o excesivo
La temperatura no se ha
ajustado correctamente.
Ajuste la temperatura
correcta con el regulador.
No se genera vapor.
El regulador de
temperatura no se ha
colocado en „MAX“.
Ajuste el regulador
de temperatura en la
posición MAX.
El regulador de temperatura
no se ha
ajustado
correctamente.
Ajuste el regulador
de temperatura.
en el depósito.
Llene el recipiente de agua.
El agua sale por la
suela de la plancha.
La temperatura ajustada
es
demasiado baja para
generar vapor.
Aumente la temperatura.
La plancha todavía no se
Pulse el botón de vapor cuando se haya
apagado el indicador luminoso.
Demasiada agua
en
el depósito.
Vacíe el agua sobrante de modo que la cantidad
de agua no supere la marca
máxima del
mismo.
Compruebe que el regulador
de
vapor se encuentre en
la posición correcta.
Coloque el regulador
de vapor en la
posición correcta.
El orificio de salida de
vapor o el depósito de
agua están obstruidos.
salida del vapor con
agua destilada.
en el depósito.
Llene el depósito de agua.
No se pulveriza
el agua.
o aire en el conducto.
Presione con la mano la
boquilla de
pulverización
y presione varias veces
consecutivas el botón
de pulverización.
en el depósito.
Llene el depósito de agua.
ES
- 31 -

RETIRADA DEL APARATO
Si el aparato lleva adherida la ilustración de la izquierda (el
contenedor de basura tachado) entonces rige la normativa
europea, directiva 2012/19/UE. Estos productos no pueden
depositarse en los contenedores destinados a la basura
común. Infórmese sobre las leyes territoriales que regulan la
recogida separada de aparatos eléctricos y electrónicos.
Guíese por las regulaciones locales y no deseche el aparato
como un residuo doméstico. Una retirada de aparatos
conforme a las leyes contribuye a proteger el medio ambiente
y a las personas a su alrededor frente a posibles consecuen-
cias perjudiciales para la salud. El reciclaje ayuda a reducir el
consumo de materias primas.
ES
- 32 -
Gentile Cliente,
La ringraziamo per aver acquistato il dispositivo. La preghiamo di leggere attentamente le
seguenti istruzioni per l’uso e di seguirle per evitare possibili danni tecnici. Non ci assumiamo
alcuna responsabilità per danni scaturiti da una mancata osservazione delle avverten- ze di
sicurezza e da un uso improprio del dispositivo.
Dati tecnici 33
Avvertenze di sicurezza 34
Descrizione del dispositivo 35
Utilizzo 36
Tipi di tessuto e impostazione della temperatura 38
Correzione degli errori 39
Smaltimento 40
INDICE
DATI TECNICI
Numero articolo
MG-S7-101
Alimentazione
220-240 V~ 50-60 Hz
Potenza
3000W
Temperatura di stiratura
20-220℃
IT
- 33 -

AVVERTENZE DI SICUREZZA
Leggere attentamente tutto il manuale prima di installazione e messa in funzione
e conservarlo per futuri utilizzi.
•Utilizzare solo prese elettriche con messa a terra. La spina e il cavo di alimen-
tazio- ne devono essere asciutti quando vengono utilizzati.
•Srotolare completamente il cavo di alimentazione prima dell’utilizzo.
•Assicurarsi che la spina sia scollegata dalla presa elettrica quando si lascia il
ferro da stiro senza controllo. Poggiare sempre il ferro da stiro sulla parte
posteriore.
•Assicurarsi che il ferro da stiro sia fuori dalla portata dei bambini.
•Non lasciare senza controllo il ferro da stiro mentre è acceso.
•Il ferro da stiro diventa bollente durante l’utilizzo. Non toccarlo mai con le mani e
assicurarsi che si trovi lontano da prodotti facilmente infiammabili, in modo da
evitare incidenti.
•Staccare la spina prima di riempire il ferro da stiro o di svuotare l’acqua residua
al suo interno.
•Non immergere mai il ferro da stiro in acqua o altri liquidi.
•Se il cavo di alimentazioni presenta danneggiamenti, inviarlo al nostro centro di
riparazione.
•Residui di calcare e acqua minerale possono causare il bloccaggio dell’apertura
del vapore. Si consiglia l’utilizzo di acqua distillata.
•Per evitare il sovraccarico del circuito elettrico, non utilizzare altri dispositivi a
potenza elevata nello stesso circuito elettrico del ferro da stiro.
•Se non è possibile evitare l’utilizzo nello stesso circuito elettrico di diversi
dispositivi a potenza elevata, utilizzare per il ferro da stiro il cavo di alimentazione
da 10 A, dato che quello con meno di 10 A si surriscalda troppo rapidamente.
•Posizionare il cavo in modo tale da non inciamparvi.
•Questo dispositivo può essere utilizzato da persone (inclusi bambini) con limitate
facoltà fisiche, sensoriali e mentali e/o con conoscenze ed esperienza insufficienti
solo se sono tenuti sotto controllo da una persona responsabile e hanno ricevuto
precise istruzioni sull’uso del dispositivo.
•Controllare i bambini nelle vicinanze del dispositivo, per assicurarsi che non ci
giochino.
•Utilizzare il ferro da stiro solo su superfici stabili e fisse.
•Assicurarsi che la superficie su cui viene fissata la stazione sia stabile prima di
poggiarci sopra il ferro da stiro.
•Se il ferro da stiro è caduto, presenta danni visibili o perde, non utilizzarlo.
IT
- 34 -
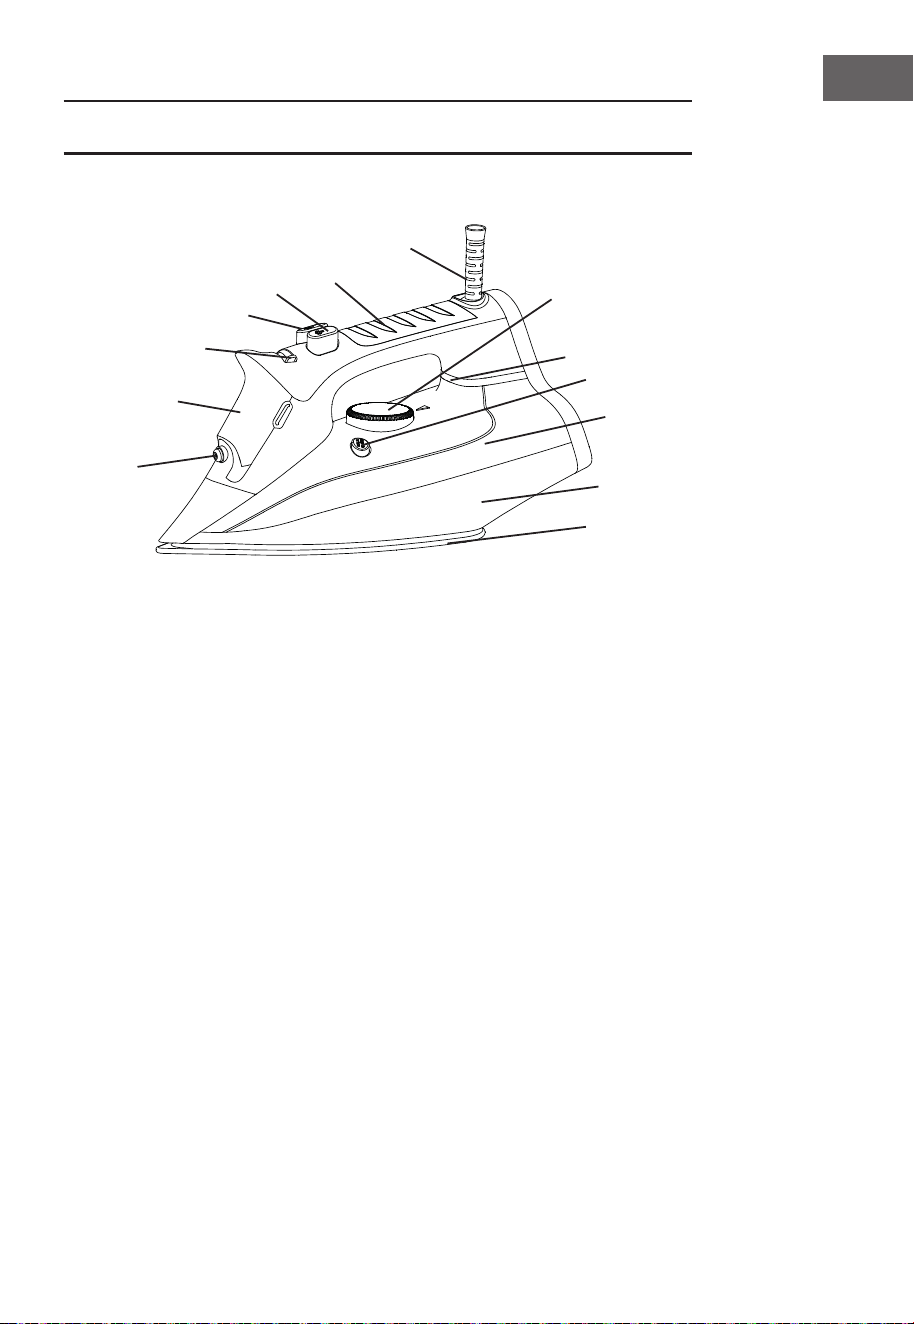
A
B
C
D
E
F
G
H
I
J
K
L
M
DESCRIZIONE DEL DISPOSITIVO
A Ugello di spruzzo
B Copertura serbatoio
C Regolazione vapore
D Tasto per spruzzare
E Tasto per getto di vapore
F Impugnatura
G Connessione cavo
H Regolazione temperatura
I Spie di funzionamento
J Tasto per funzione autopulente
K Corpo del dispositivo
L Piastra
M Spia del sensore
IT
- 35 -

UTILIZZO
Messa in funzione e utilizzo
•Il ferro da stiro è stato ingrassato. Può succedere che si generi un po’ di fumo
quando lo si accende per la prima volta. Questo scompare dopo breve tempo.
•Prima dell’utilizzo, rimuovere la pellicola protettiva e altre pellicole adesive
dalla piastra. Rimuovere i residui con un panno morbido.
•Assicurarsi che la piastra rimanga liscia: evitare di stirare sopra a oggetti
metallici (ad es. bottoni o cerniere).
•Indumenti in pura lana (100% lana) possono essere stirati con la funzione a
vapore. Si consiglia di impostare una posizione di vapore elevata e utilizzare un
panno per stirare asciutto.
Riempire d’acqua
1.Posizionare la manopola di regolazione del vapore su 0 (= niente vapore)
(solo se si stira a vapore).
2.Tenere saldamente il ferro da stiro dall’impugnatura e inclinarlo di 45° verso il
basso. Aprire la copertura del serbatoio (se presente).
3.Riempire il serbatoio lasciando scorrere acqua nel foro. Se l’acqua del
rubinetto contiene molto calcare, si consiglia l’uso di acqua distillata. Non
riempire assolutamente il serbatoio con acqua decalcificata chimicamente.
4.Rimuovere l’acqua che si trova sul lato esterno del serbatoio. Svuotare il
serbatoio dopo ogni utilizzo.
Stirare a secco
1.Suddividere gli indumenti prima di accendere il ferro da stiro in base alle
indicazioni sulle etichette di lavaggio. Il ferro da stiro si scalda più rapidamente
di quanto si raffredda. Consigliamo quindi di iniziare a stirare gli indumenti che
richiedono la temperatura più bassa (ad es. tessuti sintetici, seta, ecc.) e poi
quelli che ne richiedono una più alta (ad es. lana, cotone, lino, ecc.).
2.Poggiare il ferro da stiro sul lato posteriore e ruotare la manopola della
temperatura su “MIN”.
3.Inserire la spina del ferro da stiro nella presa elettrica e impostare la tempera-
tura desiderata con la manopola. Se c’è acqua nel serbatoio, ruotare la
manopola del vapore su “OFF”. Attendere fino a quando la spia si spegne, a
indicare che è stata raggiunta la temperatura impostata.
Stirare a vapore
1.Riempire il serbatoio d’acqua.
2.Collegare la spina alla presa elettrica.
3.Se si imposta la temperatura su “MAX”, è possibile stirare a vapore. In caso
contrario, potrebbe uscire acqua dalla piastra.
4.Quando la spia si spegne, significa che è stata raggiunta la temperatura
impostata.
5.Impostare l’intensità del vapore con la manopola. Se si ruota la manopola in
senso antiorario si aumenta l’intensità, se si ruota in senso orario la si
diminuisce.
Attenzione: tessuti sintetici, nylon, seta sintetica e seta non possono essere
stirati a vapore, dato che la struttura e la superficie di questi tessuti potrebbe
danneggiarsi.
IT
- 36 -

Getto di vapore
Premendo il tasto del getto di vapore viene prodotto più vapore, in modo da
facilitare l’eliminazione di pieghe ostinate.
1.Posizionare la temperatura su “MAX” e attendere che la spia si spenga.
2.Premere il tasto per emettere il vapore.
3.Attendere qualche secondo e lasciare che il vapore penetri nel tessuto e
premere poi nuovamente il tasto per il getto di vapore.
Avvertenze
•Per i migliori risultati, attendere 3-5 secondi tra la prima pressione del tasto e la
seconda.
•Riempire il serbatoio fino al punto “MAX” prima di utilizzare la modalità di
stiratura a vapore.
•Per impedire che esca acqua dalla piastra, non tenere premuto il tasto per il
getto di vapore per più di 5 secondi alla volta.
Come utilizzare la funzione di spruzzo:
1. Riempire d’acqua il serbatoio.
2. Premere il tasto per spruzzare.
Avvertenza: che si stiri a secco o a vapore, il tasto per spruzzare può essere
premuto in ogni momento in entrambe le modalità.
Funzione autopulente
Per eliminare residui di calcare e impurità, utilizzare la funzione autopulente
almeno una volta al mese.
1.Riempire il serbatoio d’acqua fino a metà. Posizionare la manopola del vapore
su “0”.
2.Inserire la spina nella presa elettrica. Impostare la temperatura su “MAX”.
3.Quando la spia si spegne, la temperatura impostata è stata raggiunta.
4.Staccare la spina e tenere il ferro da stiro in verticale sopra a un lavandino.
5.Posizionare la manopola del vapore su “Self-Clean”. Escono vapore e acqua
bollente dalla piastra. Scuotere leggermente il ferro da stiro per rimuovere
depositi di calcare e impurità dall’interno del serbatoio.
6.Quando non c’è più acqua nel serbatoio, posizionare la manopola del vapore
su “0”.
7.Poggiare il ferro da stiro sul lato posteriore, collegare la spina e lasciarlo
scaldare nuovamente.
8.Muovere il ferro da stiro su un panno in cotone pulito. L’acqua rimasta nel
serbatoio fuoriesce dalla piastra sotto forma di vapore.
Anticalcare
Un piccolo filtro integrato ammorbidisce l’acqua dura e impedisce che si
accumuli calcare sulla piastra, prolungando così la vita utile del ferro da stiro.
Protezione antigocciolamento
All’interno del ferro da stiro si trova un bimetallo in grado di bloccare l’uscita di
vapore, in modo che non esca acqua dalla piastra anche se si trova in una
posizione molto bassa, in modo che non esca acqua.
Spegnimento automatico di sicurezza:
Quando il ferro è collegato alla presa di corrente, l'indicatore di alimentazione si
accende in modo fisso, indicando che il ferro è alimentato.
Se si lascia il ferro da stiro:
1. in posizione orizzontale senza spostarlo o se lo si rovescia accidentalmente,
il ferro smetterà automaticamente di riscaldarsi dopo 30 secondi. L'indicatore
luminoso di autospegnimento lampeggia per segnalare che il ferro ha smesso di
riscaldarsi.
IT
- 37 -
2. In posizione verticale (sull'appoggio del tallone) senza spostarlo, il ferro si
spegnerà automaticamente dopo 8 minuti. La spia di autospegnimento
lampeggia per segnalare che il ferro ha smesso di riscaldarsi.
IMPORTANTE: la spia di autospegnimento continuerà a lampeggiare finché il
ferro non verrà scollegato o resettato.
Per resettare il ferro:
Muovere il ferro avanti e indietro. La spia di autospegnimento smetterà di
lampeggiare e il ferro ricomincerà a riscaldarsi.
AVVERTENZA: lo spegnimento automatico di sicurezza è una funzione di
sicurezza, non un mezzo consigliato per spegnere il ferro.
Getto di vapore
Premendo il tasto del getto di vapore viene prodotto più vapore, in modo da
facilitare l’eliminazione di pieghe ostinate.
1.Posizionare la temperatura su “MAX” e attendere che la spia si spenga.
2.Premere il tasto per emettere il vapore.
3.Attendere qualche secondo e lasciare che il vapore penetri nel tessuto e
premere poi nuovamente il tasto per il getto di vapore.
Avvertenze
•Per i migliori risultati, attendere 3-5 secondi tra la prima pressione del tasto e la
seconda.
•Riempire il serbatoio fino al punto “MAX” prima di utilizzare la modalità di
stiratura a vapore.
•Per impedire che esca acqua dalla piastra, non tenere premuto il tasto per il
getto di vapore per più di 5 secondi alla volta.
Come utilizzare la funzione di spruzzo:
1. Riempire d’acqua il serbatoio.
2. Premere il tasto per spruzzare.
Avvertenza: che si stiri a secco o a vapore, il tasto per spruzzare può essere
premuto in ogni momento in entrambe le modalità.
Funzione autopulente
Per eliminare residui di calcare e impurità, utilizzare la funzione autopulente
almeno una volta al mese.
1.Riempire il serbatoio d’acqua fino a metà. Posizionare la manopola del vapore
su “0”.
2.Inserire la spina nella presa elettrica. Impostare la temperatura su “MAX”.
3.Quando la spia si spegne, la temperatura impostata è stata raggiunta.
4.Staccare la spina e tenere il ferro da stiro in verticale sopra a un lavandino.
5.Posizionare la manopola del vapore su “Self-Clean”. Escono vapore e acqua
bollente dalla piastra. Scuotere leggermente il ferro da stiro per rimuovere
depositi di calcare e impurità dall’interno del serbatoio.
6.Quando non c’è più acqua nel serbatoio, posizionare la manopola del vapore
su “0”.
7.Poggiare il ferro da stiro sul lato posteriore, collegare la spina e lasciarlo
scaldare nuovamente.
8.Muovere il ferro da stiro su un panno in cotone pulito. L’acqua rimasta nel
serbatoio fuoriesce dalla piastra sotto forma di vapore.
Anticalcare
Un piccolo filtro integrato ammorbidisce l’acqua dura e impedisce che si
accumuli calcare sulla piastra, prolungando così la vita utile del ferro da stiro.
Protezione antigocciolamento
All’interno del ferro da stiro si trova un bimetallo in grado di bloccare l’uscita di
vapore, in modo che non esca acqua dalla piastra anche se si trova in una
posizione molto bassa, in modo che non esca acqua.
Spegnimento automatico di sicurezza:
Quando il ferro è collegato alla presa di corrente, l'indicatore di alimentazione si
accende in modo fisso, indicando che il ferro è alimentato.
Se si lascia il ferro da stiro:
1. in posizione orizzontale senza spostarlo o se lo si rovescia accidentalmente,
il ferro smetterà automaticamente di riscaldarsi dopo 30 secondi. L'indicatore
luminoso di autospegnimento lampeggia per segnalare che il ferro ha smesso di
riscaldarsi.
TIPI DI TESSUTO E IMPOSTAZIONE DELLA TEMPERATURA
PULIZIA
Attenzione: se un indumento è composto da diversi tessuti, selezionare
sempre la temperatura indicata più bassa.
Prima della pulizia, staccare sempre la spina e lasciare raffreddare completa-
mente il ferro da stiro.
1.Sfregare la piastra con un panno morbido e un detergente liquido non
abrasivo.
2.Se del tessuto aderisce alla piastra, rimuoverlo con un panno inumidito e un
po’ di aceto.
3.Non utilizzare mai acidi aggressivi o soluzioni alcaline per la pulizia, dato che
potrebbero danneggiare la piastra.
4.Se l’uscita del vapore è bloccata da calcare, rimuoverlo con uno stuzzicadenti
e assicurarsi di non danneggiare la piastra.
5.Posizionare il ferro da stiro sul lato posteriore e lasciarlo raffreddare a
sufficienza. Nel frattempo, svuotare l’acqua rimasta nel serbatoio e posizionare
la manopola del vapore su “0”.
Indicazioni sull’etichetta Tipo di tessuto Impostazione temperatura
Nylon Seta
Lana
Cotone Lino
IT
- 38 -
2. In posizione verticale (sull'appoggio del tallone) senza spostarlo, il ferro si
spegnerà automaticamente dopo 8 minuti. La spia di autospegnimento
lampeggia per segnalare che il ferro ha smesso di riscaldarsi.
IMPORTANTE: la spia di autospegnimento continuerà a lampeggiare finché il
ferro non verrà scollegato o resettato.
Per resettare il ferro:
Muovere il ferro avanti e indietro. La spia di autospegnimento smetterà di
lampeggiare e il ferro ricomincerà a riscaldarsi.
AVVERTENZA: lo spegnimento automatico di sicurezza è una funzione di
sicurezza, non un mezzo consigliato per spegnere il ferro.
CORREZIONE DEGLI ERRORI
Se non è possibile risolvere il problema dopo aver provato le soluzioni descritte,
contattare il servizio di assistenza ai clienti.
Error
e Possibile causa Soluzione
Troppo o troppo
poco calore.
La temperatura non è stata
impostata
correttamente.
Impostare la temperatura
corretta
con la manopola
Non viene
prodotto vapore.
La temperatura non è impostata su
“MAX”.
Impostare la temperatura
su “MAX”.
La manopola del vapore non
è impostata
correttamente.
Impostare correttamente
il vapore.
Acqua assente o
Riempire il serbatoio.
Esce acqua
dalla piastra.
La temperatura impostata
è troppo
bassa per la funzione a vapore.
Aumentare la temperatura.
Il ferro da stiro non
ha
raggiunto una
Premere il tasto per il
vapore
solo quando la spia si è
spenta.
Troppa acqua nel serbatoio.
Rimuovere l’acqua in
eccesso
nel serbatoio,
in modo che
raggiunga il segno di massimo
riempimento consentito.
Troppo poco vapore.
Controllare che la manopola del
vapore sia
sulla posizione corretta.
Posizionare la manopola
del vapore
correttamente.
Il foro di uscita del vapore
o il serbatoio
dell’acqua sono bloccati.
Pulire il foro di uscita del
vapore con
acqua distillata.
nel serbatoio.
Riempire il serbatoio.
Non è possibile
spruzzare acqua.
o aria nel condotto.
Premere l’ugello per spruzzare
con la mano e premere più
volte consecutivamente il tasto
per spruzzare.
Acqua assente o
Riempire il serbatoio.
- 39 -
IT

SMALTIMENTO
Se sul prodotto è presente la figura a sinistra (il bidone dei
rifiuti con le ruote), si applica la direttiva europea 2012/19/UE.
Questi prodotti non possono essere smaltiti con i rifiuti normali.
Informarsi sulle disposizioni vigenti per la raccolta di dispositivi
elettrici ed elettronici. Attenersi alle disposizioni vigenti e non
smaltire i vecchi dispositivi con i rifiuti domestici. Grazie al
corretto smaltimento dei vecchi dispositivi si tutela il pianeta e
la salute delle persone da possibili conseguenze negative. Il
riciclo di materiali aiuta a diminuire il consumo di materie prime.
IT
- 40 -