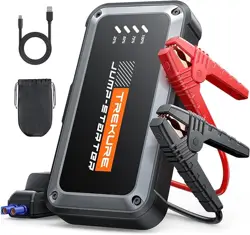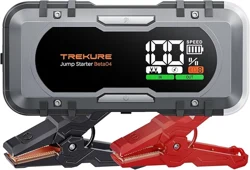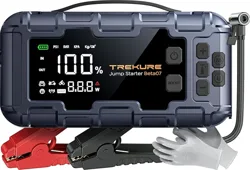
QUICK-START GUIDE
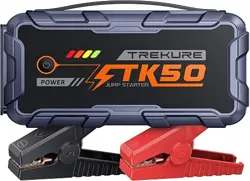
TK50 Portable Jump Starter
Ver.1.0

Language
English
España
Deutsch
Français
Italia
01-07
08-14
15-21
22-28
29-35
1
EN
WARRANTY
TREKURE provides customers with warranty of 24 months from the
date of purchase.
For assistance or warranty cover claim, please contact us via email at
support@trekure.com
1. Please use the included USB-C cable and 5V/2A or above adapter
for charging.
2. Please make sure the device is fully charged before using the
product for the first time.
3. It is recommended to fully charge the device at least once every 3
months to help extend the life of the device.
PRECAUTIONS BEFORE USE
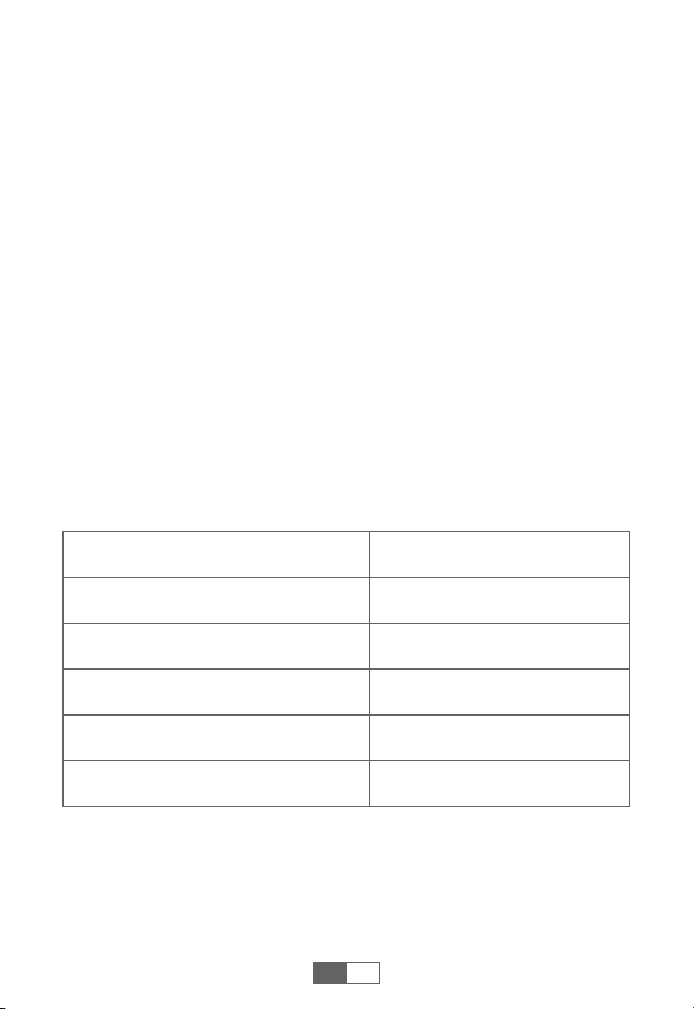
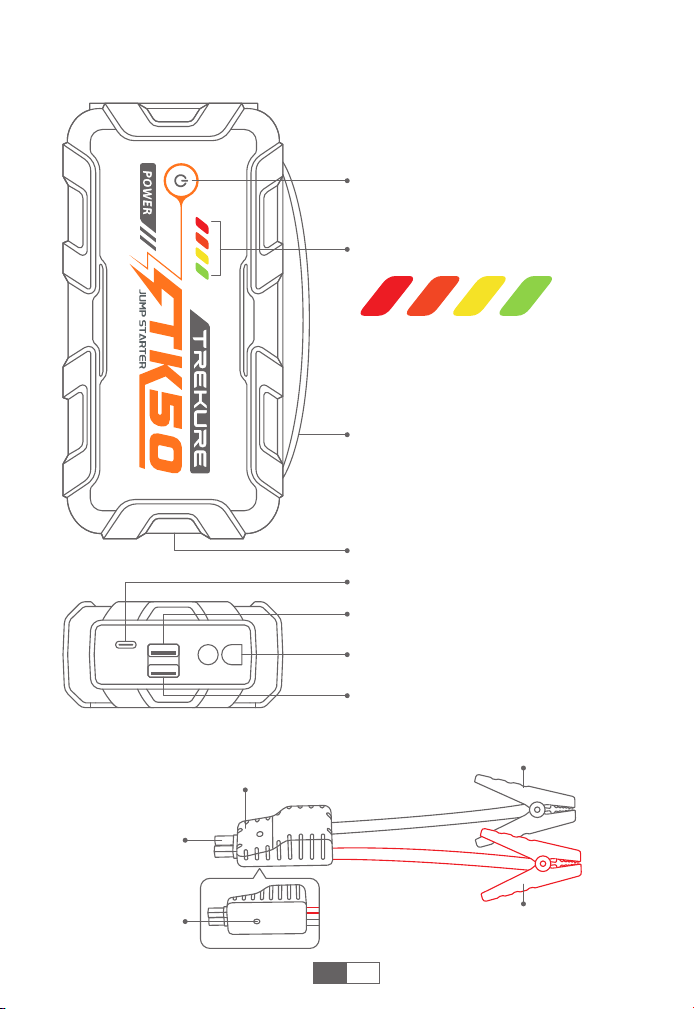
SPECIFICATIONS
Model
Capacity
USB-C Input
USB Output 1
USB Output 2
Operation Temp
TK50
26800mAh, 99.16Wh
5V/2A, 9V/2A, 12V/1.5A
5V/3A, 9V/2A, 12V/1.5A
5V/3A, 9V/2A, 12V/1.5A
-20°C~60°C
2
EN
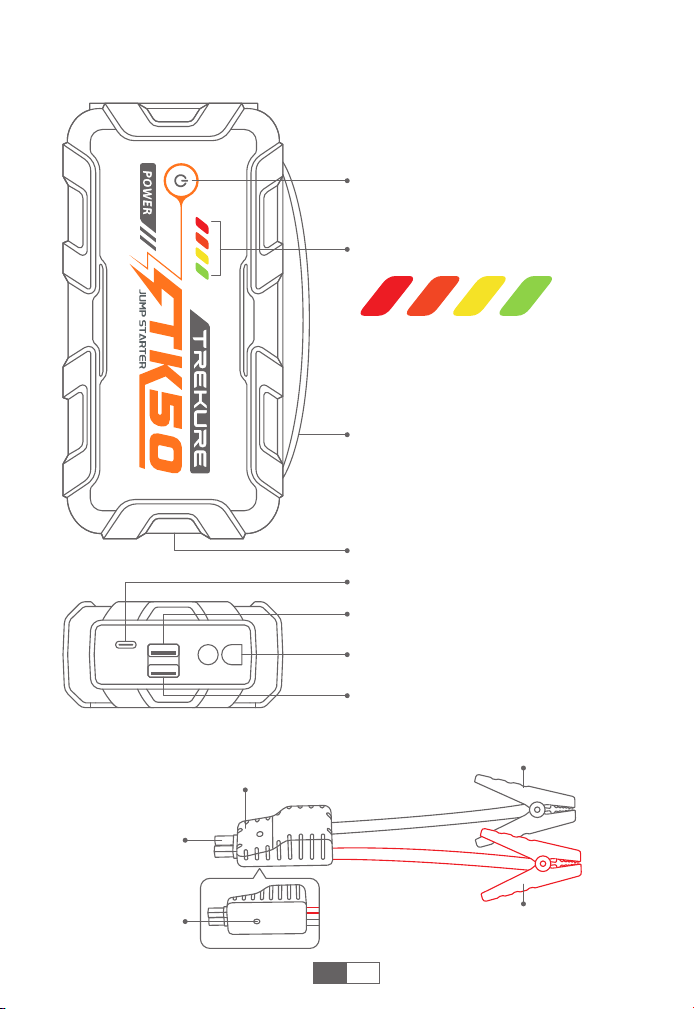
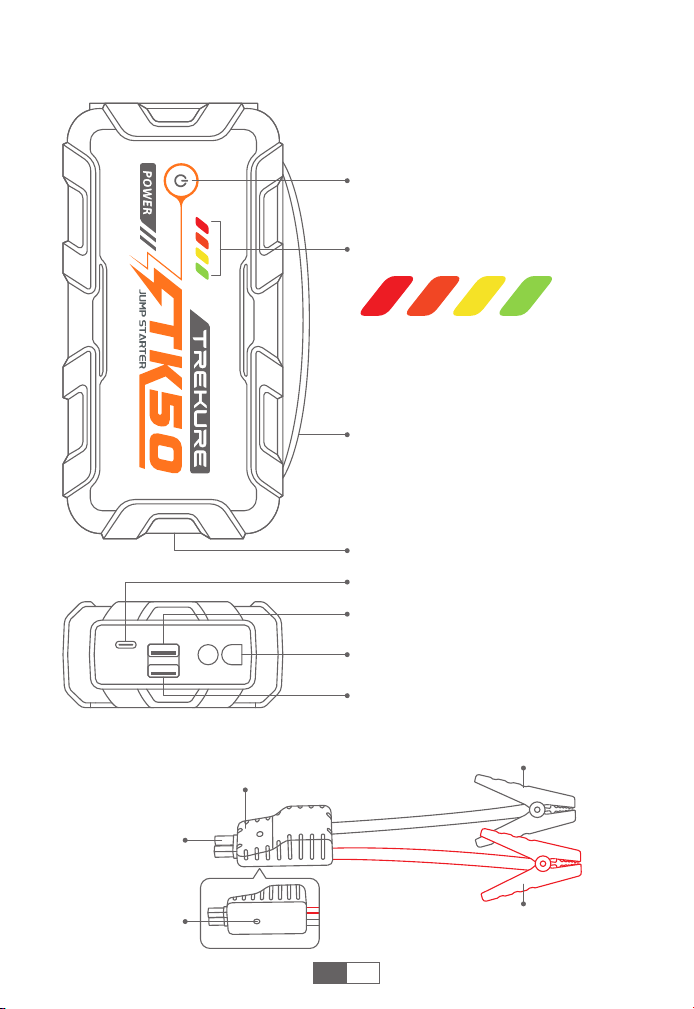
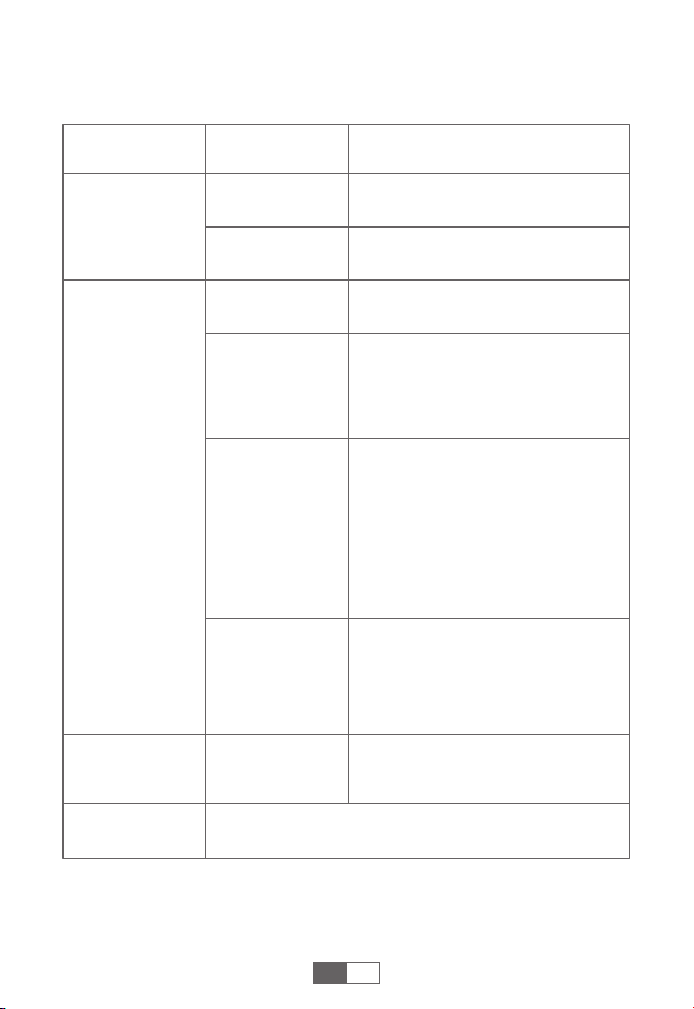
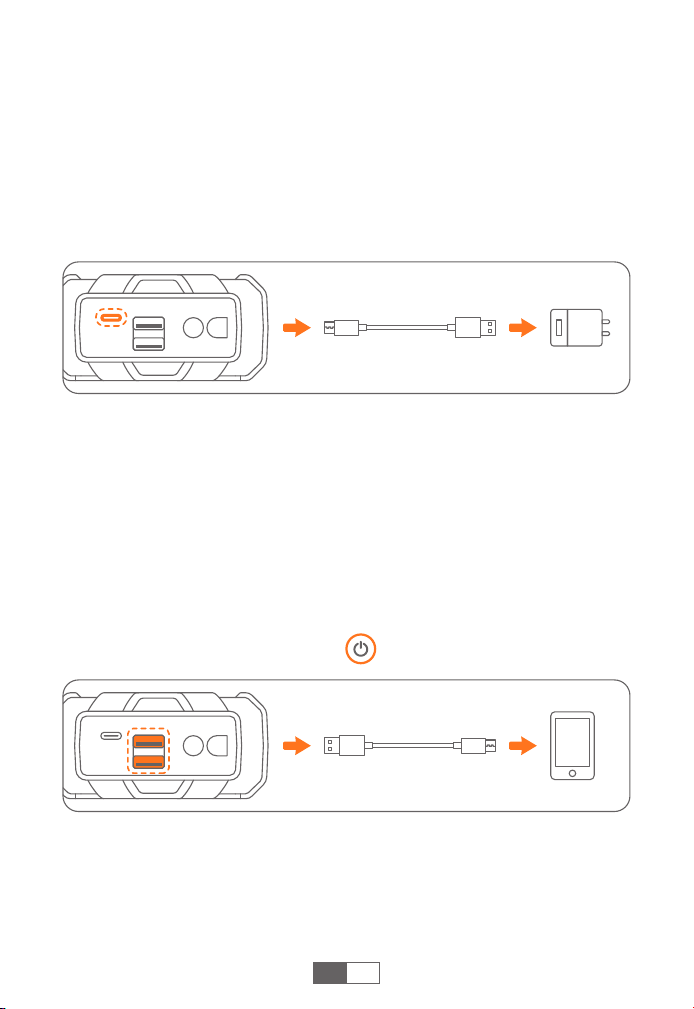
PRODUCT OVERVIEW
Power Button
Power Indicator
Silicone Handle
Jump-Start Port
USB Output 2 (18W)
USB-C Input
Light
USB Output 1 (18W)
Green: Reaches 75%-100%
Yellow: Reaches 50%-74%
Orange: Reaches 25%-49%
Red: Lower than 25%
Smart Clamp
Connector
Force Start
Button
Smart Clamp
Indicator
Black Clamp
(Negative)
Red Clamp
(Positive)
3
EN
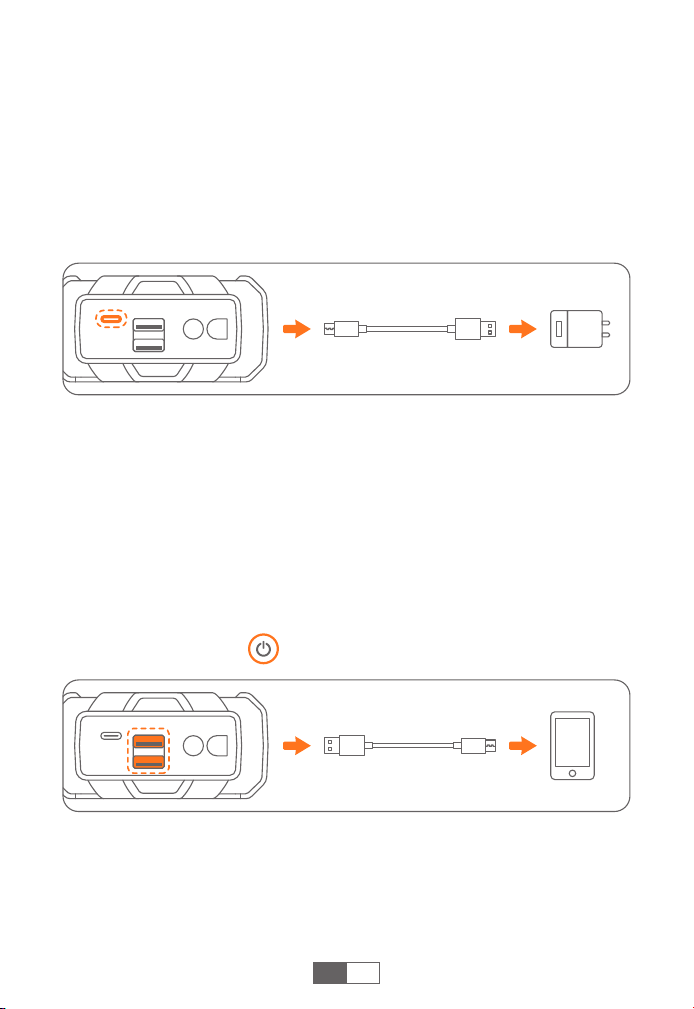
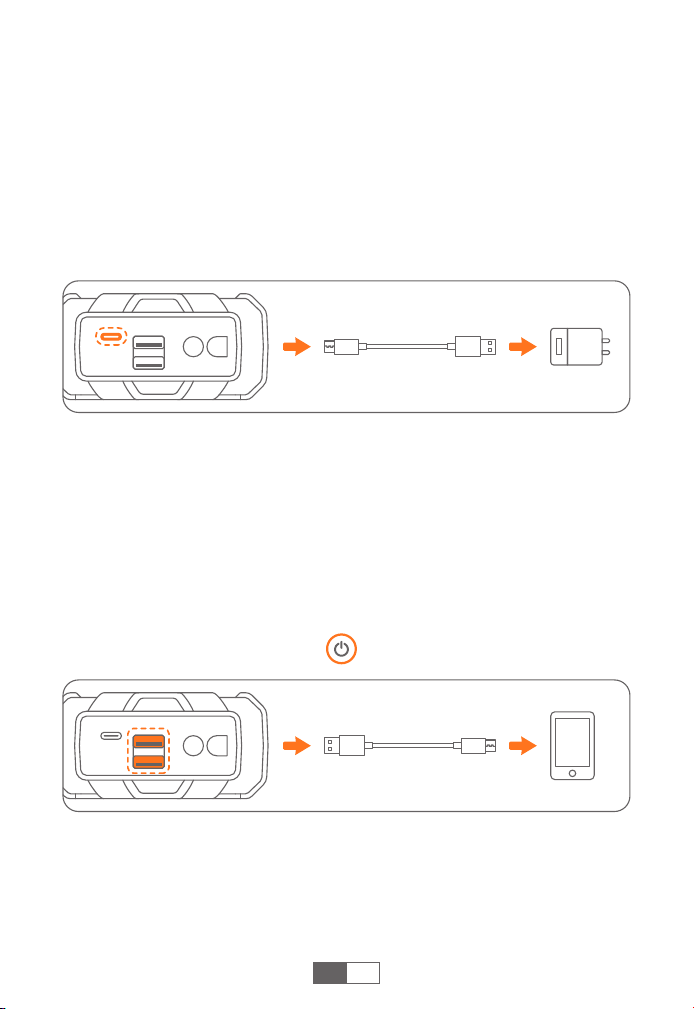
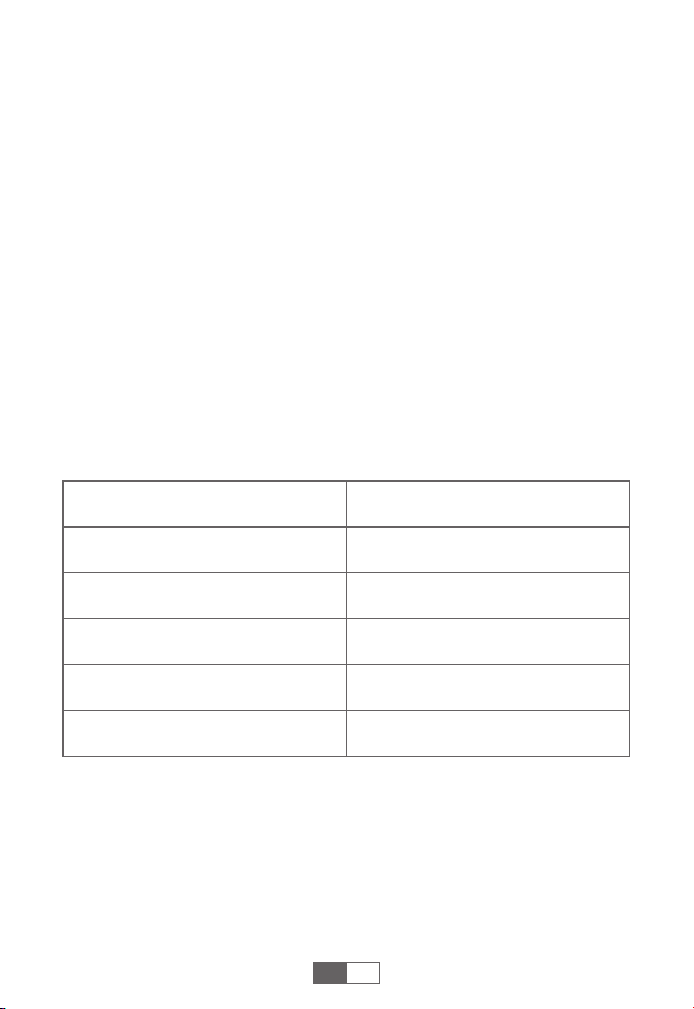
HOW TO CHARGE YOUR JUMP STARTER
❶
Insert the charging cable into USB-C port.
❷
Connect the charging cable to a 5V/2A or above adapter (adapter
not included).
❸
When charging, the Power Indicator light flashes. When fully
charged, all four indicator lights remain on.
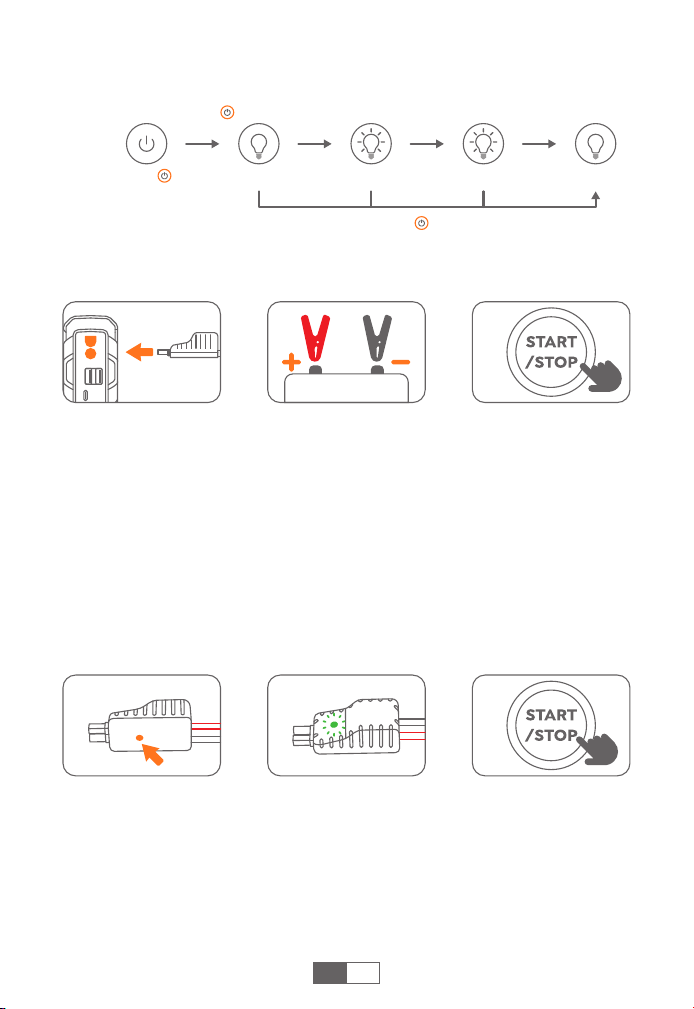
HOW TO CHARGE ELECTRONIC DEVICES
❶
Plug the cable into USB output port.
❷
Connect to electronics, such as smart phones.
❸
Press Power Button .
Tip: Please make sure the device is fully charged before using it for the
first time.
Caution: For the best speed (18W MAX), charge one device at a time.
Charging two devices simultaneously will adjust to standard speed.
4
EN
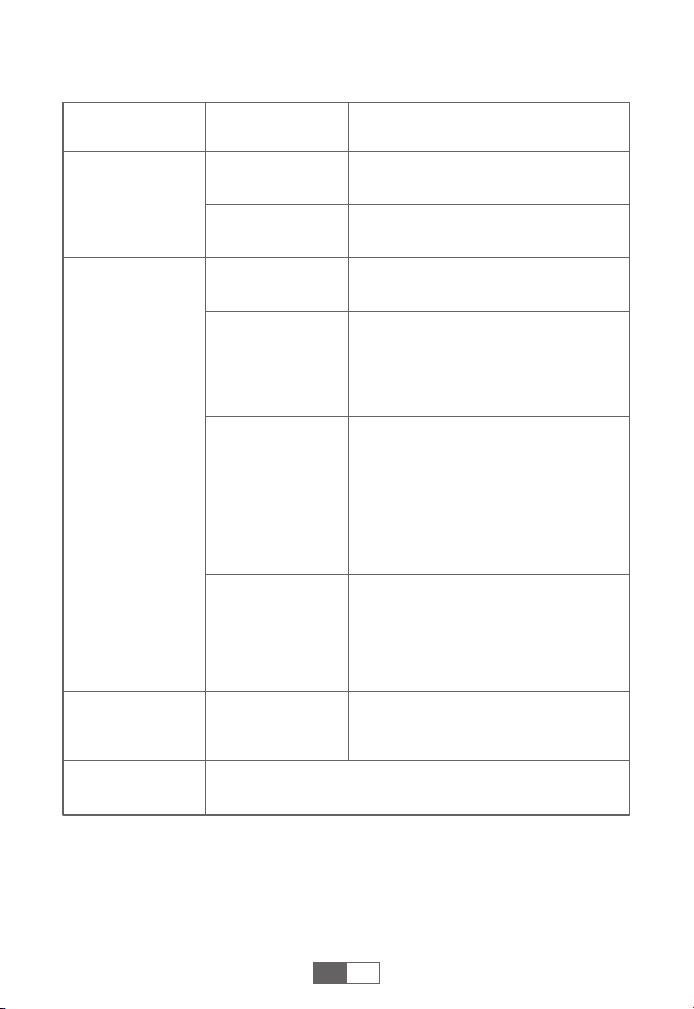
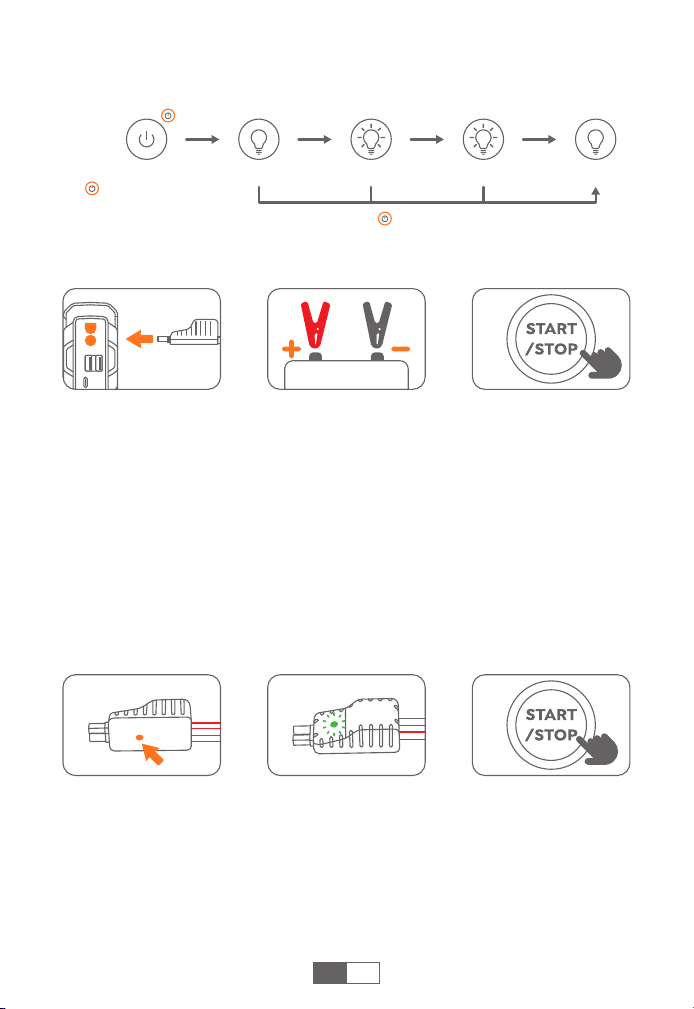
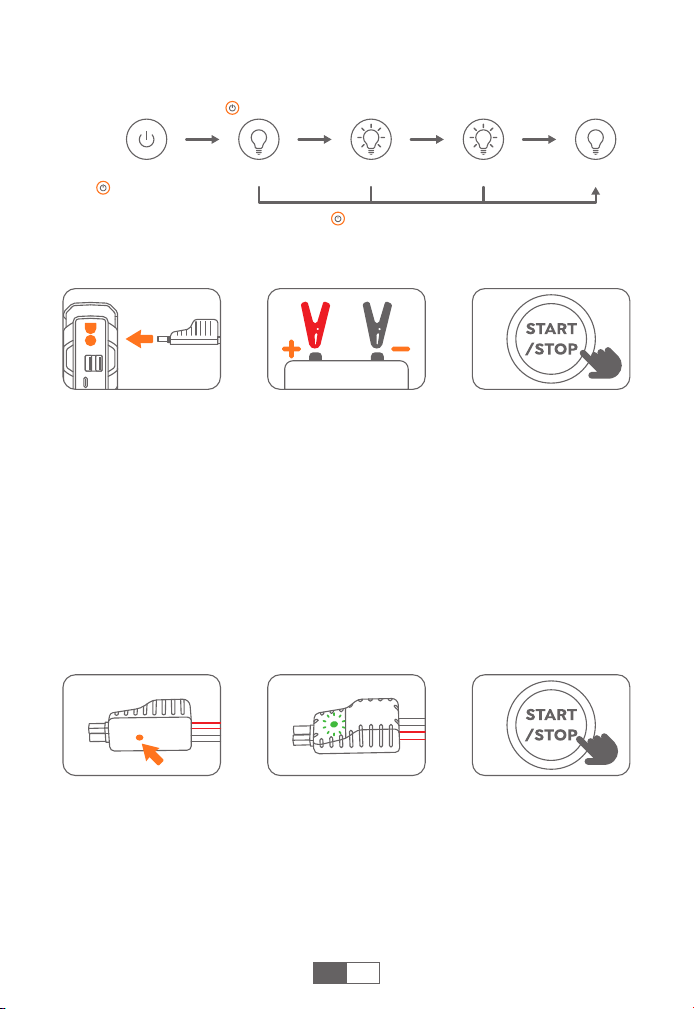
HOW TO USE THE LED LIGHT
Lighting Strobe OFFSOS
Press shortlyLong press 3S Press shortly Press shortly
Press shortly to turn
on the device
Long press 3s to turn off
ABOUT THE FORCE START FUNCTION
If three attempts fail when the clamps correctly connected to your
car, you can use the Force Start Function.
❶
Check the clamps connection and the product's battery is above
50%.
❷
Press the Force Start Button for 3s.
❸
The indicator will be green, and go back to start your car in 30s.
Caution: When using this function, auto-detection and safety
features will be disabled temporarily.
❶
Insert the jumper cable into the jump starter (50% power at least).
The smart clamp indicator will flash red and green alternately.
❷
Connect the clamps to the car battery (red to +, black to -). The
smart clamp indicator light stays green.
❸
Start your car engine in 30s.
HOW TO JUMP START YOUR CAR
5
EN
After car ignition
Others
Please contact support@trekure.com with details
Solid red
Over-heating Protection
---Remove the clamps to let it cool.
Red and green
light flashing
alternately after
solid green
Vehicle Not Recognized
---Long press the force start button
for 3s, when the indicator lighr turns
green, please start the car.
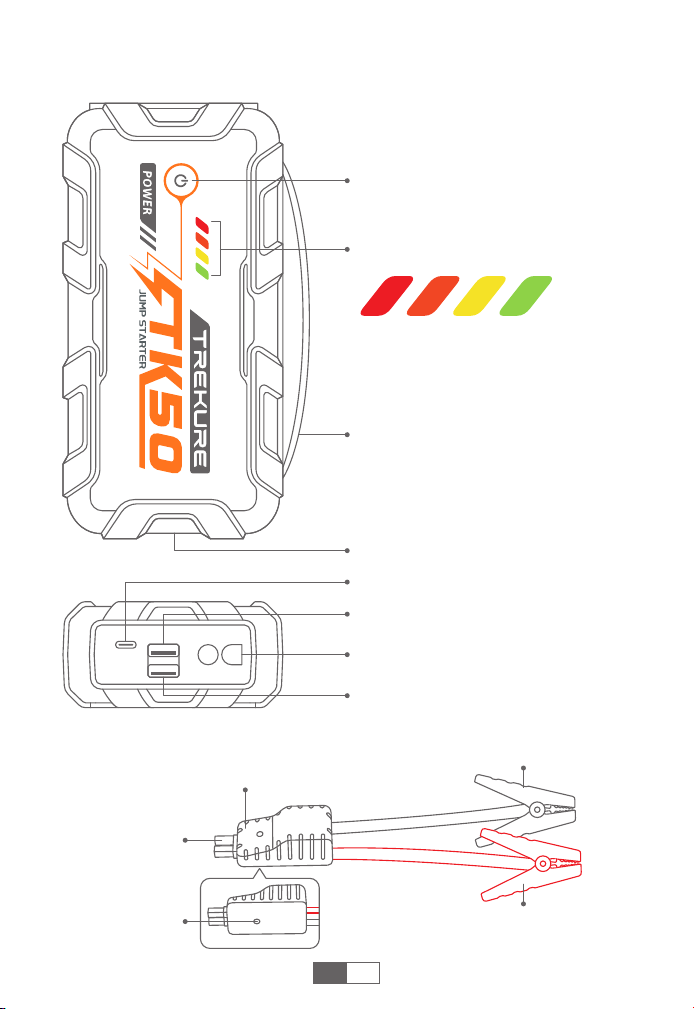
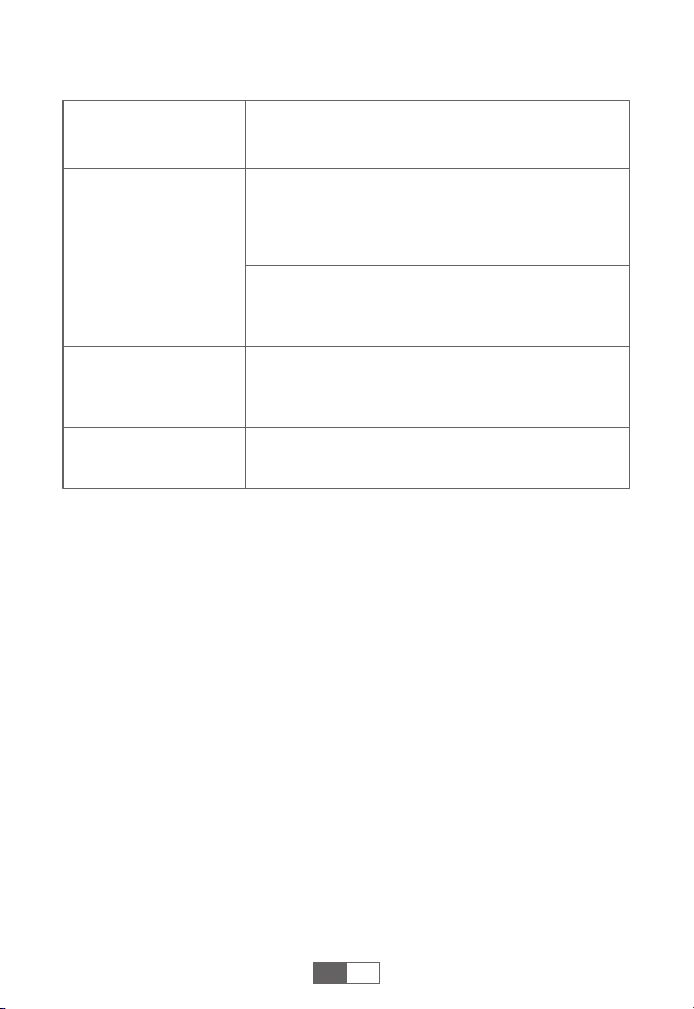
TROUBLESHOOTING ABOUT CLAMPS
Connection
Status
Situations and Solutions
Smart clamps
connected to the
jump starter only
Smart clamps
connected to
both the jump
starter and the
car battery
Standby Status
Indicator
Flashing red and
green
Timeout Protection
---Please start the car within 30s, or
remove and reconnect to try again
after 30s.
Solid red
Reverse Polarity Protection
---Reverse the clips and ensure the
correct connection (red to +, black to -).
Short-circuit Protection
---Don't connect the clips together or
to the same metal.
Solid red with
long beep
Green light
flashing slowly
Low Voltage Protection
---Recharge the product.
Solid green Ready to Start

6
EN
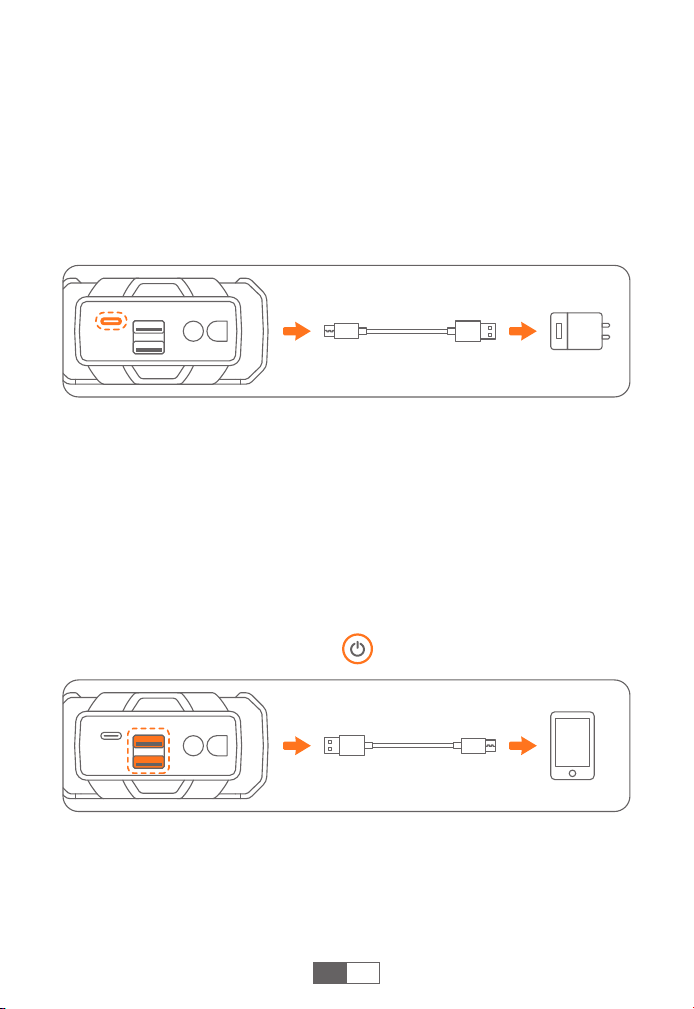
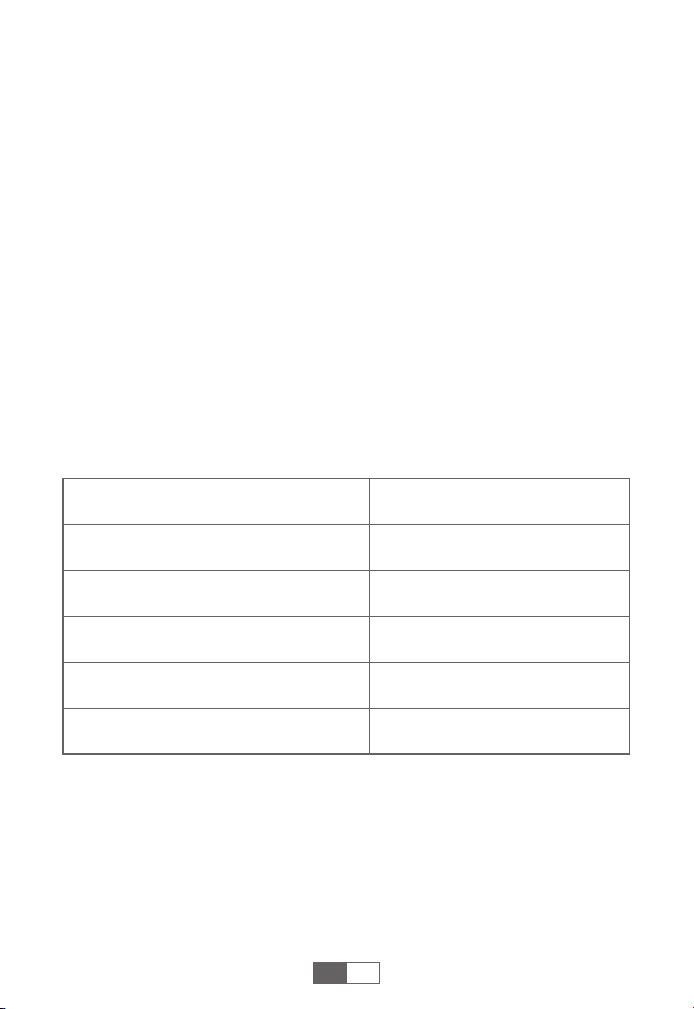
INTERPRETATION ABOUT POWER INDICATOR
Others
Power Indicator Situations and Solutions
High Temperature Protection
---Please disconnect and let it cool down for the
error to disappear before using it.
All lights flash
simultaneously
Only the red light is
on and flashing
Lower Temperature Charging Protection
---Please charge the product in an environment
above 0°C.
Lower Power Reminder
---The power of the product is less than 5%, please
charge it immediately.
Please contact support@trekure.com with details

7
ATTENTION: Please read the following safety warning before using
the product and take safety protection measures to avoid malfunc-
tions caused by accidental operation.
1. Store in a cool and well-ventilated place out reach of children and
pets.
2. Do not place the product in high temperature environment for a
long time. The operation temperature of this product is -4°F~140°F.
The storage temperature should not exceed 122°F.
Personal Safety
1. Do not litter the product and it should be safely recycled.
2. Do not incinerate the product or exposed to high temperaturesas
they may explode.
3. Only use replacement parts or accessories provided or recom-
mended by manufacturer.
Battery Safety
1. Only start vehicles with the smart jumper cable supplied by the
manufacturer.
2. Do not use the product if the clamp or cable is damaged.
3. Do not connect the red and black clamps together when the
product is outputting.
4. Do not connect the red and black clamps to the same piece of
metal.
5. Do not disassemble or modify this product.
6. Do not use detergent to clean this product.
7. Do not abuse this product and avoid heavy dropping or repeatedly
hitting it.
8. Do not operate the product in explosive environments such as
flammable liquidsgases or dusts.
9.Do not immerse the product in water.
Electrical Safety
IMPORTANT SAFETY WARNING
EN
8
ES
GARANTÍA
TREKURE ofrece a los clientes una garantía de 24 meses a partir de la
fecha de compra.
Para obtener asistencia o reclamar la cobertura de la garantía,
póngase en contacto con nosotros por correo electrónico en
support@trekure.com.
1. Utilice el cable USB-C incluido y un adaptador de 5 V/2 A o superior
para cargarlo.
2. Asegúrese de que el dispositivo esté completamente cargado
antes de utilizar el producto por primera vez.
3. Se recomienda cargar completamente el dispositivo al menos una
vez cada 3 meses para ayudar a prolongar su vida útil.
PRECAUCIONES ANTES DE USAR EL PRODUCTO
ESPECIFICACIONES
Modelo
Capacidad
Entrada USB-C
Salida USB 1
Salida USB 2
Temperatura de funcionamiento
TK50
26800mAh, 99.16Wh
5V/2A, 9V/2A, 12V/1.5A
5V/3A, 9V/2A, 12V/1.5A
5V/3A, 9V/2A, 12V/1.5A
-20°C~60°C
9
ES
DESCRIPCIÓN GENERAL DEL PRODUCTO
Botón de Encendido
Indicador de Encendido
Asa de Silicona
Puerto de Arranque Rápido
Salida USB 2 (18 W)
Entrada USB-C
Luz
Salida USB 1 (18 W)
Verde: Alcanza el 75 %-100 %
Amarillo: Alcanza el 50 %-74 %
Naranja: Alcanza el 25 %-49 %
Rojo: Menos del 25 %
Conector de
Pinza
Inteligente
Botón de
Arranque
Forzado
Indicador de
Pinza Inteligente
Pinza Negra
(Negativo)
Pinza Roja
(Positivo)
10
ES
CÓMO CARGAR SU ARRANCADOR DE COCHE
❶
Inserte el cable de carga en el puerto USB-C.
❷
Conecte el cable de carga a un adaptador de 5 V/2 A o superior
(adaptador no incluido).
❸
Durante la carga, la luz Indicadora de Encendido parpadea.
Cuando está completamente cargado, las cuatro luces indicadoras
permanecen encendidas.
CÓMO CARGAR DISPOSITIVOS ELECTRÓNICOS
❶
Enchufe el cable en el puerto de salida USB.
❷
Conéctelo a dispositivos electrónicos, como teléfonos inteligentes.
❸
Pulse el botón de encendido .
Consejos: Asegúrese de que el dispositivo esté completamente
cargado antes de utilizarlo por primera vez.
Precaución: Para obtener la mejor velocidad (18 W MÁX.), cargue un
dispositivo a la vez. Si carga dos dispositivos simultáneamente, se
ajustará a la velocidad estándar.
11
ES
CÓMO UTILIZAR LA LUZ LED
Iluminación Estrobo ApagarSOS
Pulse
brevemente
Mantenga pulsado
durante 3s
Pulse
brevemente
Pulse
brevemente
Pulse brevemente
para encender el
dispositivo
Mantenga pulsado durante 3 segundos para apagar
ACERCA DE LA FUNCIÓN DE ARRANQUE FORZADO
Si fallan tres intentos con las pinzas correctamente conectadas a su
vehículo, puede utilizar la función de arranque forzado.
❶
Compruebe la conexión de las pinzas y que la batería del producto
esté por encima del 50 %.
❷
Pulse el botón de arranque forzado durante 3 segundos.
❸
El indicador se pondrá en verde y podrá volver a arrancar el coche
en 30 segundos.
Precaución: al utilizar esta función, las funciones de detección
automática y seguridad se desactivarán temporalmente.
❶
Inserte el cable de arranque en el arrancador (al menos al 50 % de
potencia). El indicador de la pinza inteligente parpadeará alternati-
vamente en rojo y verde.
❷
Conecte las pinzas a la batería del coche (la roja al polo positivo y
la negra al negativo). La luz indicadora de la pinza inteligente
permanecerá en verde.
❸
Arranque el motor del coche en 30s.
CÓMO ARRANCAR SU COCHE CON CABLES DE ARRANQUE
12
ES
Después de
encender el
coche
Otros
Comuníquese con support@trekure.com con los
detalles.
Rojo fijo
Protección Contra Sobrecalentamiento
---Retire las pinzas para que se
enfríen.
Luces roja y verde
intermitentes
alternativamente
después de verde
fijo
Vehículo No Reconocido
---Mantenga pulsado el botón de
arranque forzado durante 3 segundos;
cuando el indicador se ilumine en
verde, arranque el coche.
SOLUCIÓN DE PROBLEMAS RELACIONADOS CON
LAS PINZA
Estado de la
Conexión
Situaciones y Soluciones
Pinzas inteligen-
tes conectadas
solo al arrancador
de coche
Pinzas inteligen-
tes conectadas
tanto al
arrancador de
coche como a la
batería del coche
Estado De Espera
Indicador
Rojo y verde
intermitentes
Protección Contra Tiempo De Espera
---Arranque el coche en un plazo de
30 segundos o retire y vuelva a
conectar para volver a intentarlo
después de 30s.
Rojo fijo
Protección Contra Polaridad Inversa
---Invierta las pinzas y asegúrese de
que la conexión sea correcta (rojo a +,
negro a -).
Protección Contra Cortocircuitos
---No conecte las pinzas entre sí ni al
mismo metal.
Rojo fijo con
pitido largo
Luz verde
intermitente lenta
Protección Contra Bajo Voltaje
---Recargue el producto.
Verde fijo Listo Para Arrancar

13
ES
INTERPRETACIÓN SOBRE EL INDICADOR DE POTENCIA
Otros
Indicador de
Encendido
Situaciones y Soluciones
Protección Contra Altas Temperaturas
---Desconéctelo y deje que se enfríe para que
desaparezca el error antes de utilizarlo.
Todas las luces
parpadean
simultáneamente
Solo la luz roja está
encendida y
parpadea
Protección Contra Cargas a Bajas Temperaturas
---Cargue el producto en un entorno con una
temperatura superior a 0°C.
Aviso de Batería Baja
---La batería del producto está por debajo del 5%,
cárguelo inmediatamente.
Póngase en contacto con support@trekure.com
con los detalles.

14
ATENCIÓN: Lea la siguiente advertencia de seguridad antes de
utilizar el producto y tome medidas de protección para evitar fallos
de funcionamiento causados por un uso accidental.
1. Guárdelo en un lugar fresco y bien ventilado, fuera del alcance de
los niños y las mascotas.
2. No coloque el producto en un entorno con altas temperaturas
durante un periodo prolongado. La temperatura de funcionamiento
de este producto es de -4 °F a 140 °F. La temperatura de almace-
namiento no debe superar los 122 °F.
Seguridad Personal
1. No tire el producto a la basura, debe reciclarse de forma segura.
2. No incinere el producto ni lo exponga a altas temperaturas, ya que
podría explotar.
3. Utilice únicamente piezas de repuesto o accesorios proporciona-
dos o recomendados por el fabricante.
Seguridad de la Batería
1. Arranque los vehículos únicamente con el cable de arranque
inteligente suministrado por el fabricante.
2. No utilice el producto si la pinza o el cable están dañados.
3. No conecte las pinzas roja y negra entre sí cuando el producto esté
en funcionamiento.
4. No conecte las pinzas roja y negra a la misma pieza de metal.
5. No desmonte ni modifique este producto.
6. No utilice detergente para limpiar este producto.
7. No abuse de este producto y evite caídas fuertes o golpes
repetidos.
8. No utilice el producto en entornos explosivos, como líquidos, gases
o polvos inflamables.
9. No sumerja el producto en agua.
Seguridad Eléctrica
ADVERTENCIA DE SEGURIDAD IMPORTANTE
ES
15
DE
GARANTIE
TREKURE gewährt seinen Kunden 24 Monate Garantie ab Kaufdatum.
Für Unterstützung oder Garantieansprüche kontaktieren Sie uns bitte
per E-Mail unter support@trekure.com.
1. Verwenden Sie zum Laden das mitgelieferte USB-C-Kabel und
einen Adapter mit 5 V/2 A oder höher.
2. Stellen Sie sicher, dass das Gerät vor der ersten Verwendung
vollständig aufgeladen ist.
3. Es wird empfohlen, das Gerät mindestens alle 3 Monate vollständig
aufzuladen, um die Lebensdauer des Geräts zu verlängern.
HINWEISE VOR DER VERWENDUNG
SPEZIFIKATIONEN
Modell
Kapazität
USB-C-Eingang
USB-Ausgang 1
USB-Ausgang 2
Betriebstemperatur
TK50
26800mAh, 99.16Wh
5V/2A, 9V/2A, 12V/1.5A
5V/3A, 9V/2A, 12V/1.5A
5V/3A, 9V/2A, 12V/1.5A
-20°C~60°C
16
DE
PRODUKTÜBERSICHT
Einschalttaste
Einschalt-Anzeige
Silikongriff
Starthilfeanschluss
USB-Ausgang 2 (18 W)
USB-C-Eingang
Leuchte
USB-Ausgang 1 (18 W)
Grün: 75 %–100 % erreicht
Gelb: 50 %–74 % erreicht
Orange: 25 %–49 % erreicht
Rot: Unter 25 %
Smart-Klem-
menanschluss
Starthilfetaste
Smart-
Klemmenanzeige
Schwarze Klemme
(Minuspol)
Rote Klemme
(Pluspol)
17
DE
SO LADEN SIE IHRE STARTHILFE AUF
❶
Stecken Sie das Ladekabel in den USB-C-Anschluss.
❷
Verbinden Sie das Ladekabel mit einem 5-V/2-A-Adapter (oder
höher) (Adapter nicht im Lieferumfang enthalten).
❸
Während des Ladevorgangs blinkt die Einschalt-Anzeige. Bei
vollständiger Ladung leuchten alle vier Anzeigen dauerhaft.
SO LADEN SIE ELEKTRONISCHE GERÄTE AUF
❶
Stecken Sie das Kabel in den USB-Ausgang.
❷
Verbinden Sie es mit elektronischen Geräten wie Smartphones.
❸
Drücken Sie die Ein-/Aus-Taste .
Tipp: Stellen Sie sicher, dass das Gerät vor der ersten Verwendung
vollständig aufgeladen ist.
Achtung: Für eine optimale Geschwindigkeit (max. 18 W) laden Sie
jeweils ein Gerät. Beim gleichzeitigen Laden von zwei Geräten wird
die Standardgeschwindigkeit verwendet.
18
DE
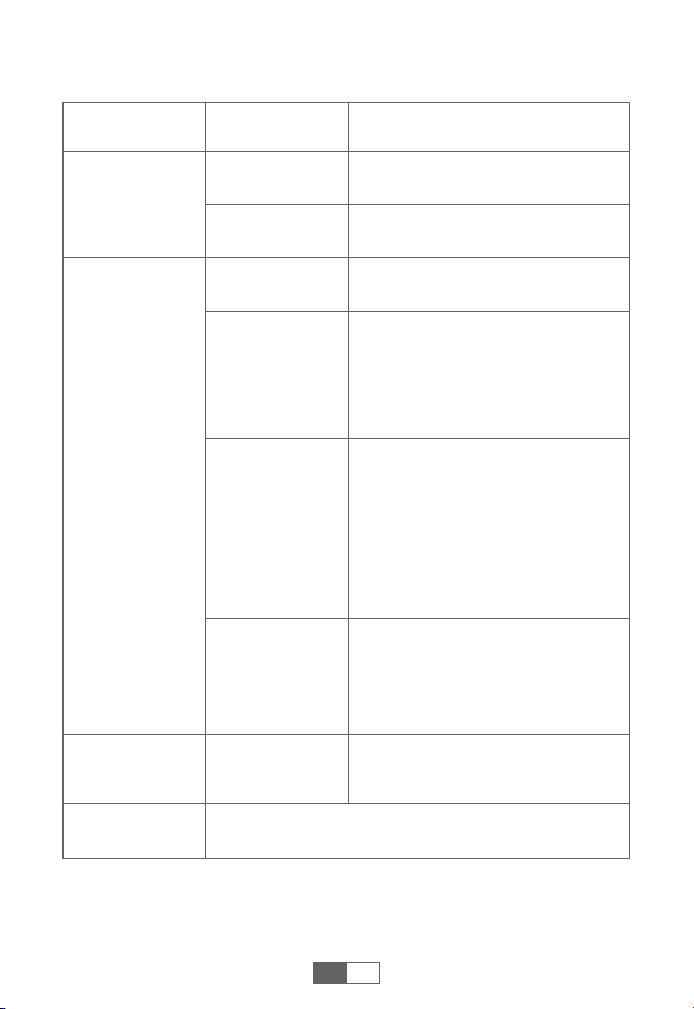
VERWENDUNG DES LED-LICHTS
Beleuchtung Blitzlicht AusSOS
Kurz drückenDrücken Sie 3S Kurz drücken Kurz drücken
Drücken Sie kurz das
um das Gerät
einzuschalten
Drücken Sie das 3 Sekunden lang, um das Licht auszuschalten.
ÜBER DIE FORCE START-FUNKTION
Wenn die Klemmen nach drei Versuchen nicht korrekt an Ihr
Fahrzeug angeschlossen werden konnten, können Sie die Starthilfe-
funktion nutzen.
❶
Überprüfen Sie, ob die Klemmen angeschlossen sind und ob die
Batterieladung über 50 % liegt.
❷
Drücken Sie die Starthilfetaste 3 Sekunden lang.
❸
Die Anzeige leuchtet grün. Nach 30 Sekunden startet das Fahrzeug
erneut.
Achtung: Bei Verwendung dieser Funktion werden die automatische
Erkennung und die Sicherheitsfunktionen vorübergehend deaktiviert.
❶
Stecken Sie das Starthilfekabel in die Starthilfe (mindestens 50 %
Leistung). Die Anzeige der intelligenten Klemme blinkt abwechsel-
nd rot und grün.
❷
Schließen Sie die Klemmen an die Batterie an (rot an +, schwarz an
-). Die Anzeige der intelligenten Klemme leuchtet grün.
❸
Starten Sie Ihren Automotor nach 30 Sekunden.
SO GEBEN SIE IHREM AUTO STARTHILFE
19
DE
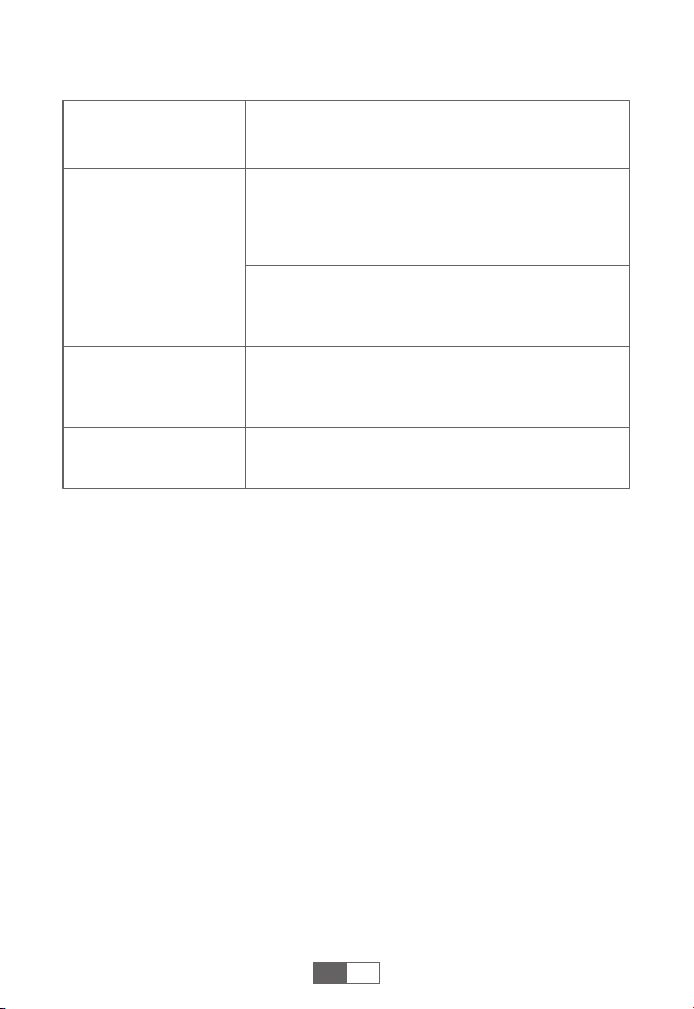
FEHLERSUCHE BEI KLEMMEN
Nach der
Zündung des
Autos
Andere
Bitte wenden Sie sich mit Einzelheiten an
support@trekure.com.
Einfarbig rot
Überhitzungsschutz
---Entfernen Sie die Klemmen, um das
Gerät abkühlen zu lassen.
Rotes und grünes
Licht blinken nach
durchgehend
grünem Licht
Fahrzeug nicht erkannt
---Drücken Sie die Starttaste 3
Sekunden lang. Sobald die Kontroll-
leuchte grün leuchtet, starten Sie das
Fahrzeug.
Verbindungs-
status
Situationen und Lösungen
Intelligente
Klemmen, die nur
mit dem
Starthilfegerät
verbunden sind
Intelligente
Klemmen, die
sowohl mit dem
Starthilfegerät als
auch mit der
Autobatterie
verbunden sind
Standby-Status
Indikator
Rot und grün
blinkend
Timeout-Schutz
--- Bitte starten Sie das Fahrzeug
innerhalb von 30 Sekunden oder
entfernen Sie den Stecker und
versuchen Sie es nach 30 Sekunden
erneut.
Einfarbig rot
Verpolungsschutz
---Vertauschen Sie die Klemmen und
achten Sie auf den korrekten Anschluss
(rot an +, schwarz an -).
Kurzschlussschutz
---Verbinden Sie die Klemmen nicht
miteinander oder mit demselben
Metall.
Durchgehend rot
mit langem
Piepton
Grünes Licht
blinkt langsam
Unterspannungsschutz
---Laden Sie das Produkt auf.
Einfarbig grün Bereit zum Start
20
DE
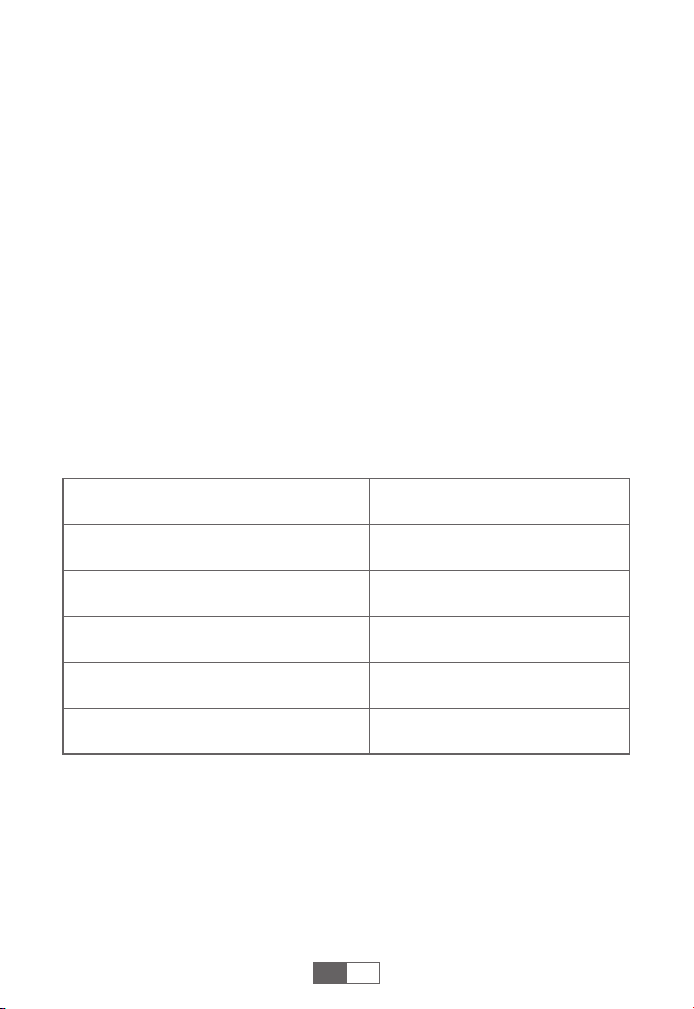
INTERPRETATION DER EINSCHALT-ANZEIGE
Andere
Einschalt-
Anzeige
Situationen und Lösungen
Übertemperaturschutz
---Bitte trennen Sie das Gerät vom Stromnetz und
lassen Sie es abkühlen, damit der Fehler verschwin-
det, bevor Sie es verwenden.
Alle Lichter blinken
gleichzeitig
Nur das rote Licht
leuchtet und blinkt
Ladeschutz bei niedrigen Temperaturen
---Bitte laden Sie das Produkt bei einer Umgebung
über 0 °C.
Erinnerung bei niedrigerer Ladung
---Die Ladung des Produkts beträgt weniger als
5%. Bitte laden Sie es umgehend auf.
Bitte wenden Sie sich mit Einzelheiten an
support@trekure.com.

21
ACHTUNG: Bitte lesen Sie die folgenden Sicherheitshinweise vor der
Verwendung des Produkts und treffen Sie Sicherheitsvorkehrungen,
um Fehlfunktionen durch versehentliche Bedienung zu vermeiden.
1. Kühl und gut belüftet außerhalb der Reichweite von Kindern und
Haustieren lagern.
2. Das Produkt nicht über längere Zeit hohen Temperaturen ausset-
zen. Die Betriebstemperatur beträgt -20 °C bis 60 °C. Die Lagertem-
peratur sollte 50 °C nicht überschreiten.
Personenschutz
1. Werfen Sie das Produkt nicht weg, es sollte sicher recycelt werden.
2. Verbrennen Sie das Produkt nicht und setzen Sie es keinen hohen
Temperaturen aus, da Explosionsgefahr besteht.
3. Verwenden Sie nur vom Hersteller bereitgestellte oder empfohlene
Ersatzteile oder Zubehör.
Batteriesicherheit
1. Starten Sie Fahrzeuge nur mit dem vom Hersteller mitgelieferten
Starthilfekabel.
2. Verwenden Sie das Produkt nicht, wenn die Klemme oder das Kabel
beschädigt ist.
3. Verbinden Sie die rote und die schwarze Klemme nicht mitein-
ander, wenn das Produkt Strom liefert.
4. Verbinden Sie die rote und die schwarze Klemme nicht mit
demselben Metallteil.
5. Das Produkt nicht zerlegen oder modifizieren.
6. Verwenden Sie keine Reinigungsmittel zur Reinigung.
7. Behandeln Sie das Produkt nicht unsachgemäß und vermeiden Sie
schwere Stürze oder wiederholte Stöße.
8. Betreiben Sie das Produkt nicht in explosionsgefährdeten Umge-
bungen mit brennbaren Flüssigkeiten, Gasen oder Stäuben.
9. Tauchen Sie das Produkt nicht in Wasser.
Elektrische Sicherheit
WICHTIGER SICHERHEITSHINWEIS
DE
22
FR
GARANTIE
TREKURE offre à ses clients une garantie de 24 mois à compter de la
date d'achat.
Pour toute assistance ou réclamation au titre de la garantie, veuillez
nous contacter par e-mail à l'adresse support@trekure.com.
1. Veuillez utiliser le câble USB-C fourni et l'adaptateur 5 V/2 A ou
supérieur pour le chargement.
2. Veuillez vous assurer que l'appareil est complètement chargé avant
la première utilisation.
3. Il est recommandé de charger complètement l'appareil au moins
une fois tous les 3 mois afin de prolonger sa durée de vie.
PRÉCAUTIONS D'UTILISATION
CARACTÉRISTIQUES
Modèle
Capacité
Entrée USB-C
Sortie USB 1
Sortie USB 2
Température de fonctionnement
TK50
26800mAh, 99.16Wh
5V/2A, 9V/2A, 12V/1.5A
5V/3A, 9V/2A, 12V/1.5A
5V/3A, 9V/2A, 12V/1.5A
-20°C~60°C
23
FR
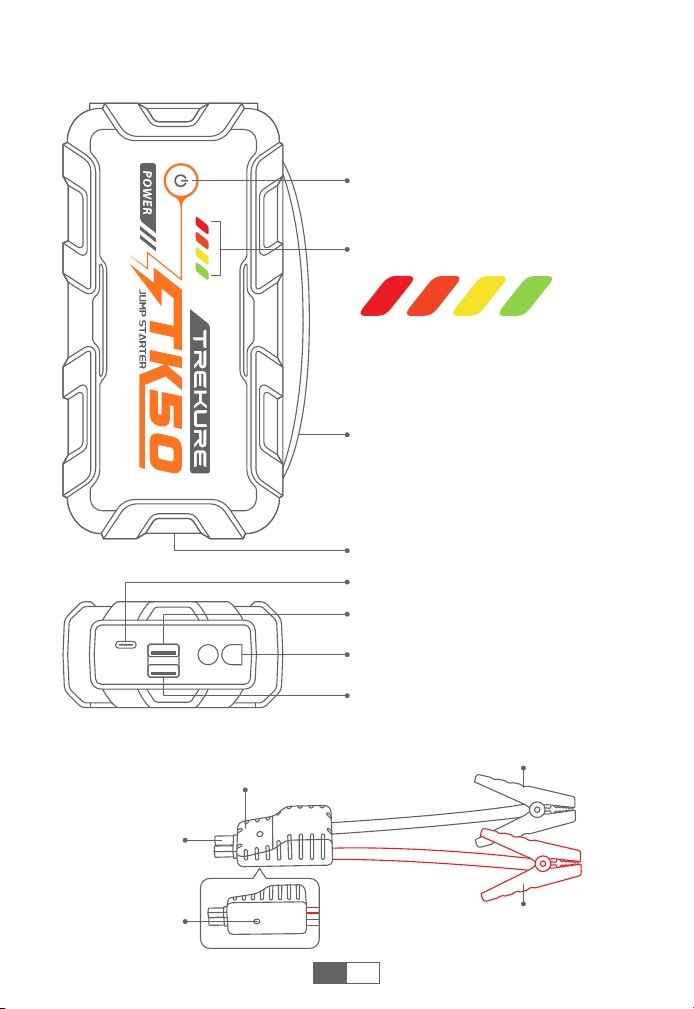
PRÉSENTATION DU PRODUIT
Bouton d'alimentation
Indicateur d'alimentation
Poignée en Silicone
Port de Démarrage
Sortie USB 2 (18 W)
Entrée USB-C
Éclairage LED
Sortie USB 1 (18 W)
Vert : Atteint 75 % à 100 %
Jaune : Atteint 50 % à 74 %
Orange : Atteint 25 % à 49 %
Rouge : Inférieur à 25 %
Connecteur de
Pince
Intelligente
Bouton de
Démarrage
Forcé
Indicateur de
Pince Intelligente
Pince Noire
(négative)
Pince Rouge
(positive)
24
FR
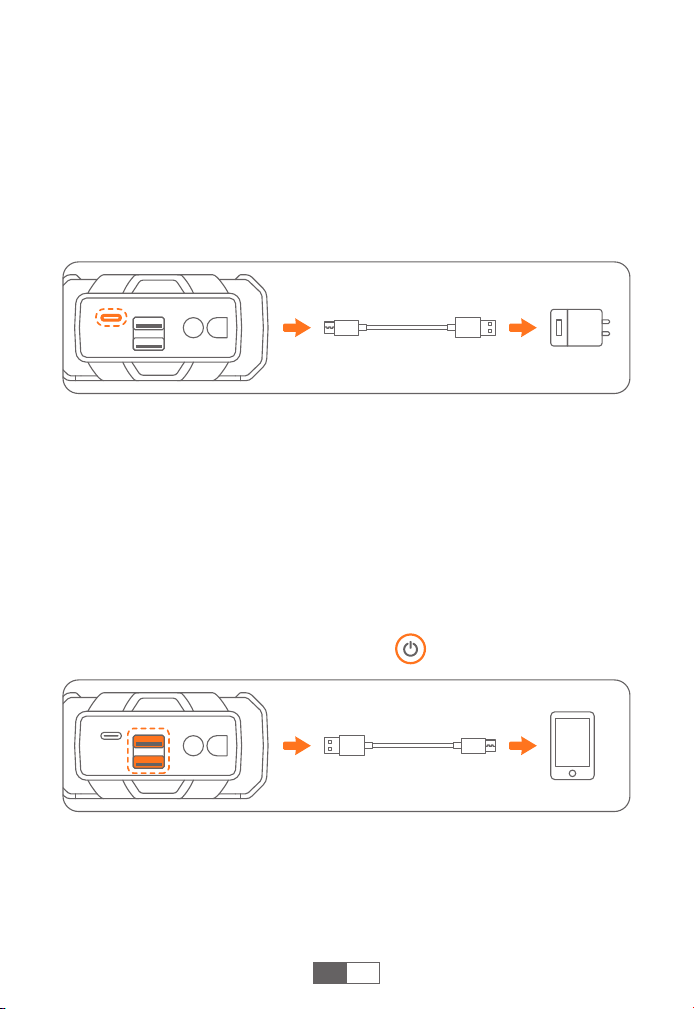
COMMENT CHARGER VOTRE DÉMARREUR
❶
Insérez le câble de charge dans le port USB-C.
❷
Connectez le câble de charge à un adaptateur 5 V/2 A ou
supérieur (adaptateur non inclus).
❸
Pendant la charge, le Indicateurs d'alimentation clignote. Une fois
la charge terminée, les quatre voyants restent allumés.
COMMENT CHARGER DES APPAREILS ÉLECTRONIQUES
❶
Branchez le câble sur le port de sortie USB.
❷
Connectez-le à des appareils électroniques, comme un smartphone.
❸
Appuyez sur le bouton d’alimentation .
Conseil: Assurez-vous que l’appareil est complètement chargé avant la
première utilisation.
Attention: Pour une vitesse optimale (18 W max.), chargez un appareil
à la fois. Charger deux appareils simultanément permet d’atteindre la
vitesse standard.
25
FR
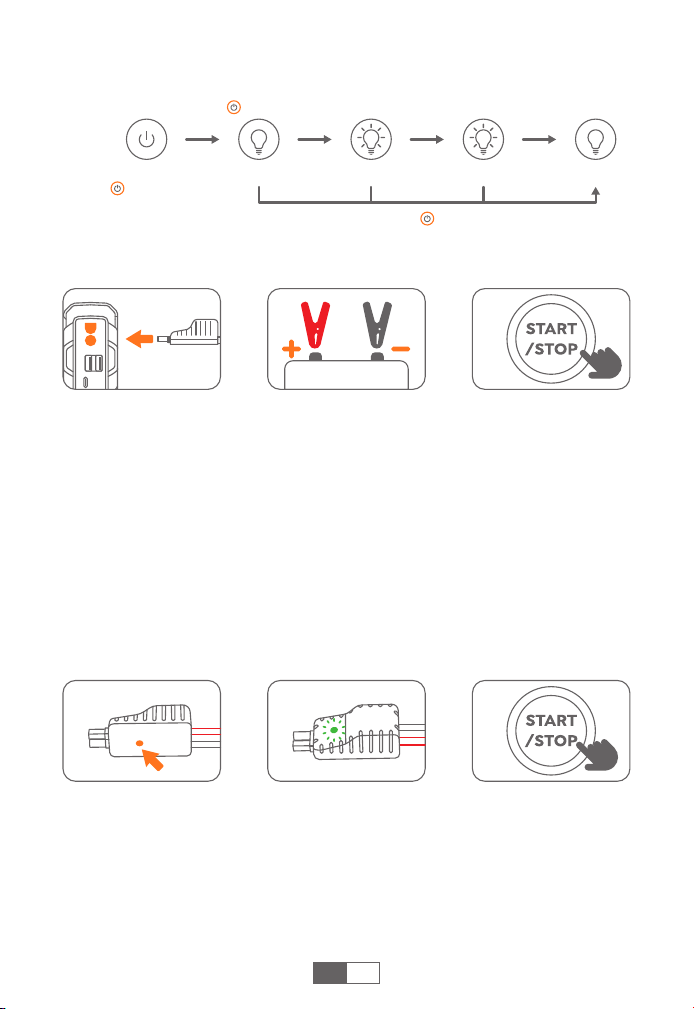
UTILISATION DE LA ÉCLAIRAGE LED
Éclairage Stroboscope OFFSOS
Appuyez
brièvement
Appuyez sur 3S
Appuyez
brièvement
Appuyez
brièvement
Appuyez brièvement
sur pour allumer
l'appareil
Appuyez longuement sur pendant 3s pour éteindre
À PROPOS DE DÉMARRAGE FORCÉ
Si trois tentatives échouent alors que les pinces sont correctement
connectées à votre véhicule, vous pouvez utiliser la fonction de
démarrage forcé.
❶
Vérifiez la connexion des pinces et vérifiez que la batterie du
produit est chargée à plus de 50 %.
❷
Appuyez sur le bouton de démarrage forcé pendant 3 secondes.
❸
Le voyant s'allume en vert et redémarre au bout de 30 secondes.
Attention: Cette fonction désactive temporairement la détection
automatique et les fonctions de sécurité.
❶
Insérez le câble de démarrage dans le démarreur (charge
minimale de 50 %). Le voyant de la pince intelligente clignotera
alternativement en rouge et en vert.
❷
Connectez les pinces à la batterie (rouge sur +, noir sur -). Le voyant
de la pince intelligente reste vert.
❸
Démarrez votre voiture en 30 secondes.
COMMENT DÉMARRER VOTRE VOITURE
26
FR
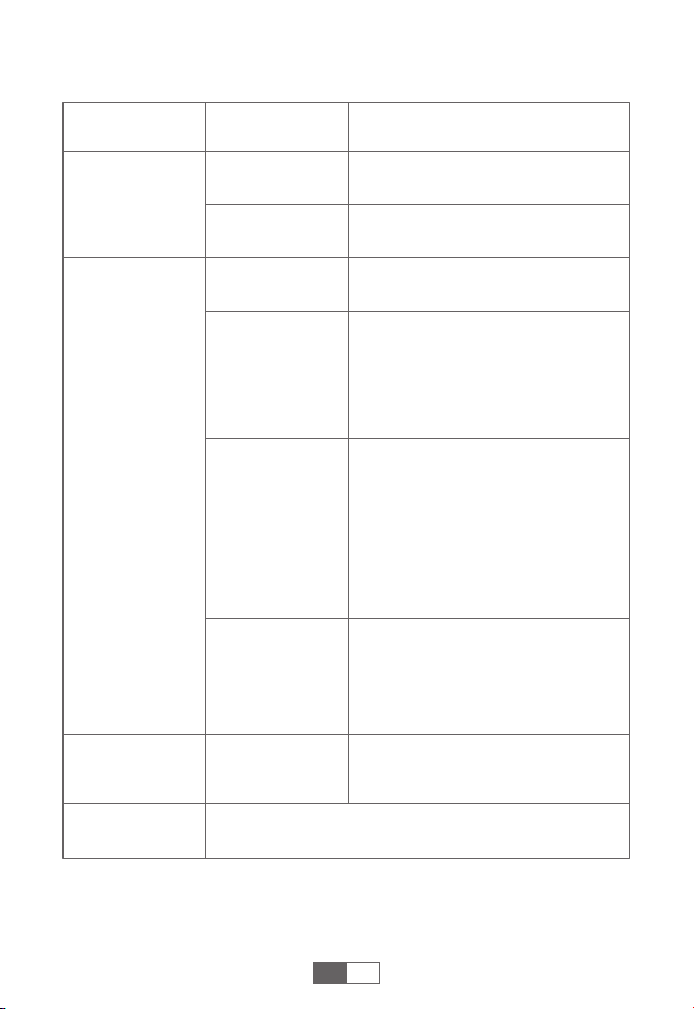
DÉPANNAGE CONCERNANT LES PINCES
Après l'allumage
du véhicule
Autres
Veuillez contacter support@trekure.com avec les détails.
Rouge fixe
Protection contre la Surchauffe
---Retirez les pinces pour laisser
refroidir.
Voyant rouge et
vert clignotant
après le vert
continu
Véhicule non Reconnu
---Appuyez longuement sur le bouton
de démarrage forcé pendant 3
secondes. Lorsque le voyant devient
vert, démarrez la voiture.
État de
Connexion
Situations et Solutions
Pinces intelligen-
tes connectées
uniquement au
démarreur
Pinces intelligen-
tes connectées à
la fois au
démarreur et à la
batterie de la
voiture
État de Attente
Indicateur
Clignotant rouge
et vert
Protection contre Dépassements de
Délai
---Veuillez démarrer la voiture dans les
30 secondes, ou retirez-la et
reconnectez-la pour réessayer après
30 secondes.
Rouge fixe
Protection contre l'inversion de
Polarité
---Inversez les pinces et assurez-vous
du bon branchement (rouge sur +, noir
sur -).
Protection contre les Courts-circuits
---Ne branchez pas les pinces
ensemble ni avec le même métal.
Rouge fixe avec
bip long
Lumière verte clig-
notant lentement
Protection Basse Tension
---Rechargez le produit.
Vert fixe Prêt à Démarrage
27
FR
INTERPRÉTATION DU INDICATEUR D'ALIMENTATION
Autres
Indicateur
d'alimentation
Situations et Solutions
Protection contre les Cautes Températures
---Veuillez débrancher l'appareil et le laisser
refroidir pour que l'erreur disparaisse avant de
l'utiliser.
Toutes les lumières
clignotent
simultanément
Seule la lumière
rouge est allumée et
clignote
Protection contre les Basses Températures de
Charge
---Veuillez charger le produit dans un environne-
ment à température supérieure à 0 °C.
Rappel de Faible Puissance
---La puissance du produit est inférieure à 5 %,
veuillez le charger immédiatement.
Veuillez contacter support@trekure.com avec les
détails.

28
ATTENTION: Veuillez lire l’avertissement de sécurité suivant avant
d’utiliser le produit et prendre les mesures de sécurité nécessaires
pour éviter tout dysfonctionnement dû à une utilisation accidentelle.
1. Conserver dans un endroit frais et bien ventilé, hors de portée des
enfants et des animaux domestiques.
2. Ne pas exposer le produit à des températures élevées pendant une
durée prolongée. La température de fonctionnement de ce produit
est comprise entre -20 °C et 60 °C. La température de stockage ne
doit pas dépasser 50 °C.
Sécurité Personnelle
1. Ne pas jeter le produit dans les ordures ménagères ; il doit être
recyclé en toute sécurité.
2. Ne pas incinérer le produit ni l'exposer à des températures élevées,
car il pourrait exploser.
3. Utiliser uniquement les pièces de rechange ou les accessoires
fournis ou recommandés par le fabricant.
Sécurité des Piles
1. Démarrez les véhicules uniquement avec le câble de démarrage
intelligent fourni par le fabricant.
2. N’utilisez pas le produit si la pince ou le câble est endommagé.
3. Ne connectez pas les pinces rouge et noire ensemble lorsque le
produit est en sortie.
4. Ne connectez pas les pinces rouge et noire à la même pièce
métallique.
5. Ne démontez pas et ne modifiez pas ce produit.
6. N’utilisez pas de détergent pour le nettoyer.
7. Ne pas maltraiter ce produit et éviter les chutes violentes ou les
chocs répétés.
8. Ne pas utiliser le produit dans des environnements explosifs tels
que des liquides, gaz ou poussières inflammables.
9. Ne pas immerger le produit dans l'eau.
Sécurité Électrique
AVERTISSEMENT DE SÉCURITÉ IMPORTANT
FR
29
IT
GARANZIA
TREKURE fornisce ai clienti una garanzia di 24 mesi a partire dalla
data dell’acquisto.Per assistenza o per richiedere l’ammasso della
garanzia, contattaci tramite email all’indirizzo [email protected].
1.Per la ricarica, utilizza esclusivamente il cavo USB-C incluso e un
adattatore da 5V/2A o superiore.
2.Assicurati che il dispositivo sia completamente caricato prima di
utilizzarlo per la prima volta.
3.È consigliato caricare completamente il dispositivo almeno una
volta ogni 3 mesi: questa operazione aiuta a prolungare la durata
del prodotto.
PRECAUZIONI PRIMA DELL’USO
SPECIFICHE TECNICHE
Modello
Capacità
Ingresso USB-C
Uscita USB 1
Uscita USB 2
Temperatura di funzionamento
TK50
26800mAh, 99.16Wh
5V/2A, 9V/2A, 12V/1.5A
5V/3A, 9V/2A, 12V/1.5A
5V/3A, 9V/2A, 12V/1.5A
-20°C~60°C
30
IT
PANORAMA DEL PRODOTTO
Pulsante di Accensione
Indicatore di Alimentazione
Maniglia in Silicone
Porta di Avvio di Emergenza
Uscita USB 2 (18W)
Ingresso USB-C
Luci
Uscita USB 1 (18W)
Vert : Atteint 75 % à 100 %
Jaune : Atteint 50 % à 74 %
Orange : Atteint 25 % à 49 %
Rouge : Inférieur à 25 %
Connettore a
Pinzette
Intelligente
Pulsante di
Avvio Forzato
Indicatore a Pinzette
Intelligente
Pinzette Nere
(Polare Negativo)
Pinzette Rosse
(Polare Positivo)
31
IT
COME CARICARE L'AVVIATORE DI EMERGENZA
❶
Inserisci il cavo di ricarica nella porta USB-C.
❷
Collega il cavo di ricarica a un adattatore da 5V/2A o superiore
(adattatore non incluso).
❸
Durante la ricarica, la spia di alimentazione lampeggia. A carica
completa, tutte e quattro le spie rimangono accese.
COME CARICARE I DISPOSITIVI ELETTRONICI
❶
Inserisci il cavo nella porta di uscita USB.
❷
Collega ai dispositivi elettronici, come ad esempio gli smartphone.
❸
Premi il pulsante di accensione .
Suggerimento: Assicurati che il dispositivo sia completamente
caricato prima di utilizzarlo per la prima volta.
Attenzione: Per ottenere la migliore velocità (max 18W), carica un
solo dispositivo alla volta. Caricando due dispositivi simultaneamente,
la velocità si regolerà a quella standard.
32
IT
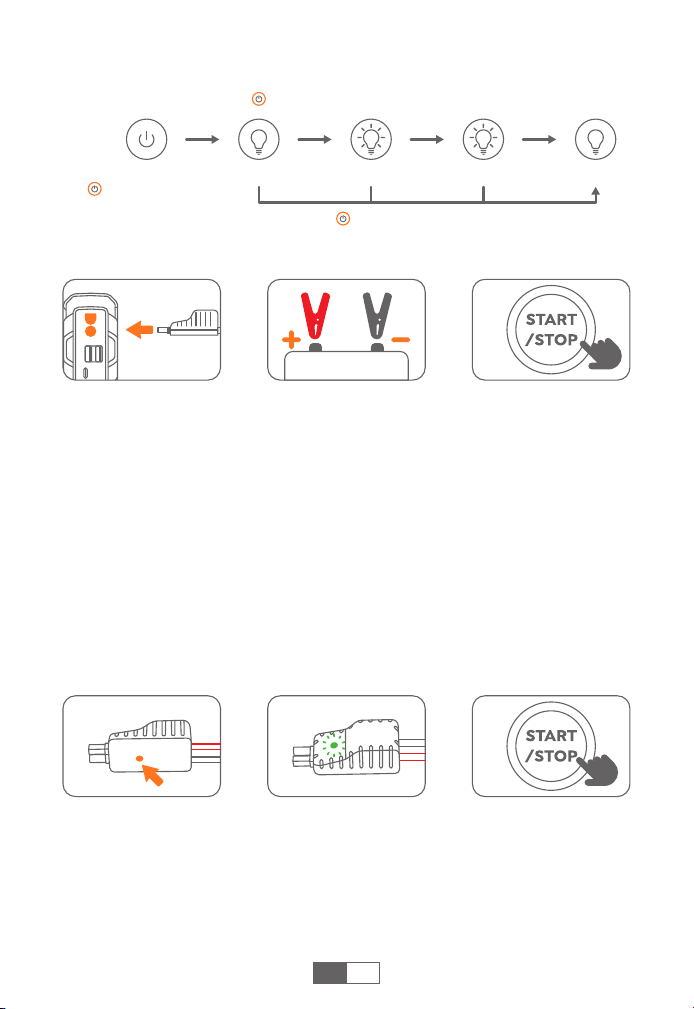
USO DELLA LUCE LED
Illuminazione Strobo OFFSOS
Premere
brevemente
Premere a lungo
per 3 secondi
Premere
brevemente
Premere
brevemente
Premere brevemente
per accendere il
dispositivo
Premi il per 3 secondi per spegnere la luce.
SU LA FUNZIONE DI AVVIO FORZATO (FORCE START)
Se tre tentativi falliscono nonostante i morsetti siano collegati
correttamente all'auto, è possibile utilizzare la funzione di avvio
forzato.
❶
Controllare il collegamento dei morsetti e che la batteria del
prodotto sia superiore al 50%.
❷
Premere il pulsante di avvio forzato per 3 secondi.
❸
La luce diventerà verde e l'auto ripartirà entro 30 secondi.
Attenzione: Quando si utilizza questa funzione, il rilevamento automa-
tico e le funzioni di sicurezza vengono disattivati temporaneamente.
❶
Inserisci il cavo di avvio di emergenza nell'apparecchio di avvio di
emergenza (assicurati che l'apparecchio abbia almeno il 50% di
carica).L'indicatore delle pinzette intelligenti lampeggia alternata-
mente rosso e verde.
❷
Collega le pinzette alla batteria dell'auto (la pinzette rossa al polo
positivo [+], la pinzette nera al polo negativo [-]).L'indicatore delle
pinzette intelligenti si accende di verde.
❸
Avvia il motore della tua auto in 30 secondi.
COME DARE AVVIO DI EMERGENZA ALL'AUTO
33
IT
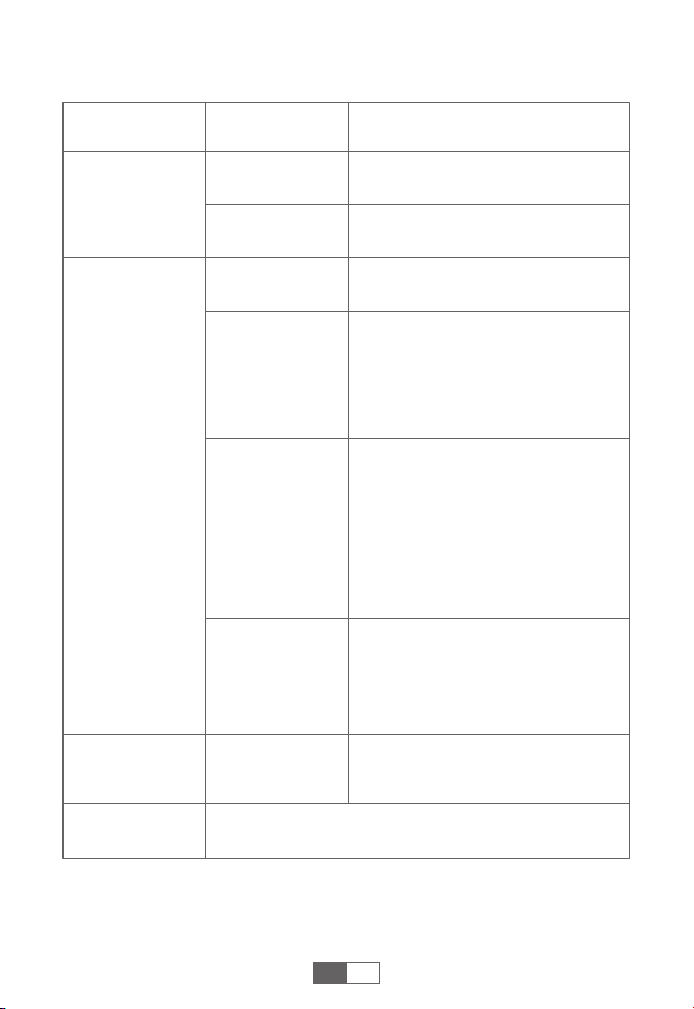
RISOLUZIONE DEI PROBLEMI RELATIVE ALLE PINZETTE
Dopo l’accensi-
one dell’auto
Altri casi
Contatta support@trekure.com con i dettagli.
Rosso fisso
Protezione da Surriscaldamento
--- Scollega le pinzette per farla
raffreddare.
Luce rosso e
verde lampeggia
alternatamente
dopo il verde fisso
Veicolo Non Riconosciuto
--- Tieni premuto il pulsante di avvio
forzato per 3 secondi; quando
l’indicatore diventa verde, avvia l’auto.
Stato di
Connessione
Situazioni e Soluzioni
Pinzette
intelligenti
collegate solo
all’avviatore di
emergenza
Pinzette
intelligenti
collegate sia
all’avviatore di
emergenza che
alla batteria
dell’auto
Stato di attesa
Indicatore
Lampeggia rosso
e verde
Protezione da Timeout
--- Avvia l’auto entro 30 secondi, o
scollega e ricollega per riprovare dopo
30 secondi.
Rosso fisso
Protezione da Polarità Invertita
--- Inverti le pinzette e assicurati la
connessione corretta (rosso a +, nero a
-).
Protezione da Cortocircuito
--- Non collegare le pinzette insieme o
allo stesso metallo.
Solid red with
long beep
Luce verde lamp-
eggia lentamente
Protezione da Bassa Tensione
--- Ricarga il prodotto.
Verde fisso Pronto per l’avvio
34
IT
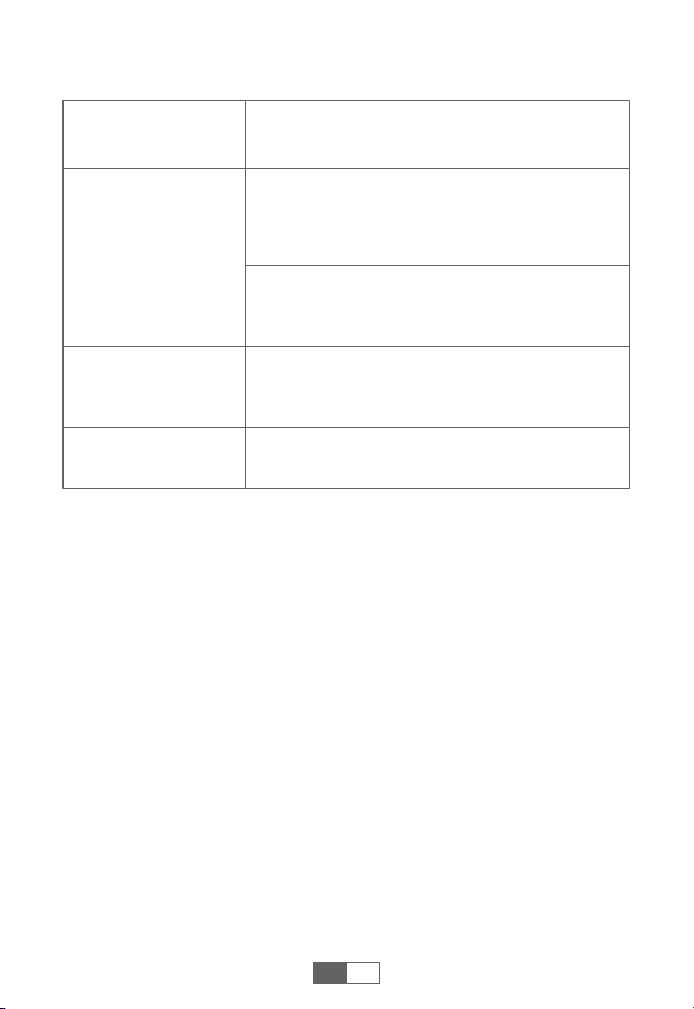
INTERPRETAZIONE DELL'INDICATORE DI ALIMENTAZIONE
Altri casi
Indicatore di
Alimentazione
Situazioni e Soluzioni
Protezione dalle alte temperature
---Scollegare e lasciare raffreddare il dispositivo
affinché l'errore scompaia prima di utilizzarlo.
Tutte le luci
lampeggiano
contemporanea-
mente
Solo la luce rossa è
accesa e lampeggia
Protezione da Ricarica a Bassa Temperatura
--- Ricarica il prodotto in un ambiente con
temperatura superiore a 0°C.
Avviso di Bassa Carica
--- Il livello di carica del prodotto è inferiore al 5%,
ricaricalo immediatamente.
Contatta support@trekure.com con i dettagli

35
ATTENZIONE: Leggere attentamente l’avvertenza sulla sicurezza
seguente prima di utilizzare il prodotto e adottare misure di protezi-
one per evitare malfunzionamenti causati da operazioni accidentali.
1. Conservare in un luogo fresco e ben ventilato, fuori dal raggio
d’azione di bambini e animali domestici.
2. Non lasciare il prodotto in un ambiente ad alta temperatura per
lungo tempo. La temperatura di funzionamento di questo prodotto è
-4°F~140°F. La temperatura di conservazione non deve superare i
122°F.
Sicurezza Personale
1. Non gettare il prodotto come rifiuto ordinario; deve essere riciclato
in modo sicuro.
2. Non incenerire il prodotto e non esporsi ad alte temperature,
poiché potrebbe esplodere.
3. Utilizzare esclusivamente parti di ricambio o accessori forniti o
raccomandati dal produttore.
Sicurezza della Batteria
1. Avviare i veicoli esclusivamente con il cavo di avvio intelligente
fornito dal produttore.
2. Non utilizzare il prodotto se le pinzette o il cavo sono danneggiati.
3. Non collegare insieme le pinzette rosse e nere quando il prodotto è
in fase di uscita di corrente.
4. Non collegare le pinzette rosse e nere allo stesso pezzo di metallo.
5. Non smontare o modificare questo prodotto.
6. Non utilizzare detergenti per pulire questo prodotto.
7. Non abusare del prodotto e evitare di lasciarlo cadere con forza o
di colpirlo ripetutamente.
8. Non operare il prodotto in ambienti esplosivi, come ad esempio in
presenza di liquidi infiammabili, gas o polveri.
9. Non immergere il prodotto in acqua.
Sicurezza Elettrica
AVVERTENZA IMPORTANTE SULLA SICUREZZA
IT

Federal Communication Commission Interference Statement
NOTE: This equipment has been tested and found to comply with the
limits for a Class B digital device, pursuant to part 15 of the FCC Rules.
These limits are designed to provide reasonable protection against
harmful interference in a residential installation. This equipment
generates, uses and can radiate radio frequency energy and, if not
installed and used in accordance with the instructions, may cause
harmful interference to radio communications. However, there is no
guarantee that interference will not occur in a particular installation. If
this equipment does cause harmful interference to radio or television
reception, which can be determined by turning the equipment off and
on, the user is encouraged to try to correct the interference by one or
more of the following measures:
· Reorient or relocate the receiving antenna.
· Increase the separation between the equipment and receiver.
· Connect the equipment into an outlet on a circuit different from that
to which the receiver is connected.
· Consult the dealer or an experienced radio/TV technician for help.
Caution: Changes or modifications not expressly approved by the
party responsible for compliance could void the user's authority to
operate this equipment.
This device complies with part 15 of the FCC Rules. Operation is subject
to the following two conditions:
(1) This device may not cause harmful interference, and
(2) This device must accept any interference received, including
interference that may cause undesired operation.

Declaration of Conformity
We (EU based importer is responsible for this declaration)
SUCCESS COURIER SL
(Company name)
CALLE RIO TORMES NUM.1, PLANTA 1, DERECHA, OFICINA 3, Fuenlabra-
da, Madrid,28947 Spain
(Company address)
declare under our sole responsibility that the product
Trade name: TREKURE
Equipment: Jump Starter
Model No. : TK50
to which this declaration relates is in conformity with the essential
requirement set out in the Council Directive on the Approximation of
the laws of the Member States relating to LVD Directive(2014/35/EU) &
EMC Directive(2014/30/EU) & RoHS(2011/65/EU) product is responsible
to affix CE marking, the following standards were applied:
EN IEC 62368-1:2020+A11:2020
EN 55032:2015 AMD.1:2020+A11:2020
EN 55035:2017AMD.1:2020
EN IEC 61000-3-2:2019/A1:2021
EN 61000-3-3:2013AMD.1:2019+ AMD.2:2021
IEC62321-3-1:2013
IEC62321-4:2013
IEC62321-5:2013
IEC62321-6:2015
IEC62321-7-1:2015
IEC62321-7-2:2017
IEC62321-8:2017
Full Name: George.wang Position: Approbation Manager
Signature: Place/Date: Shenzhen,China/Oct.8-2025
[email protected] https://www.trekure.com
WHERE TO GET MORE HELP
Scan And Download PDF Version Of User Manual
https://www.trekure.com/pages/manuals