User Manual
v1.0 2025.11
This document is copyrighted by DJI with all rights reserved. Unless otherwise authorized
by DJI, you are not eligible to use or allow others to use the document or any part of
the document by reproducing, transferring or selling the document. Only refer to this
document and the content thereof as instructions to operate DJI products. The document
should not be used for other purposes.
In the event of divergence among dierent versions, the English version shall prevail.
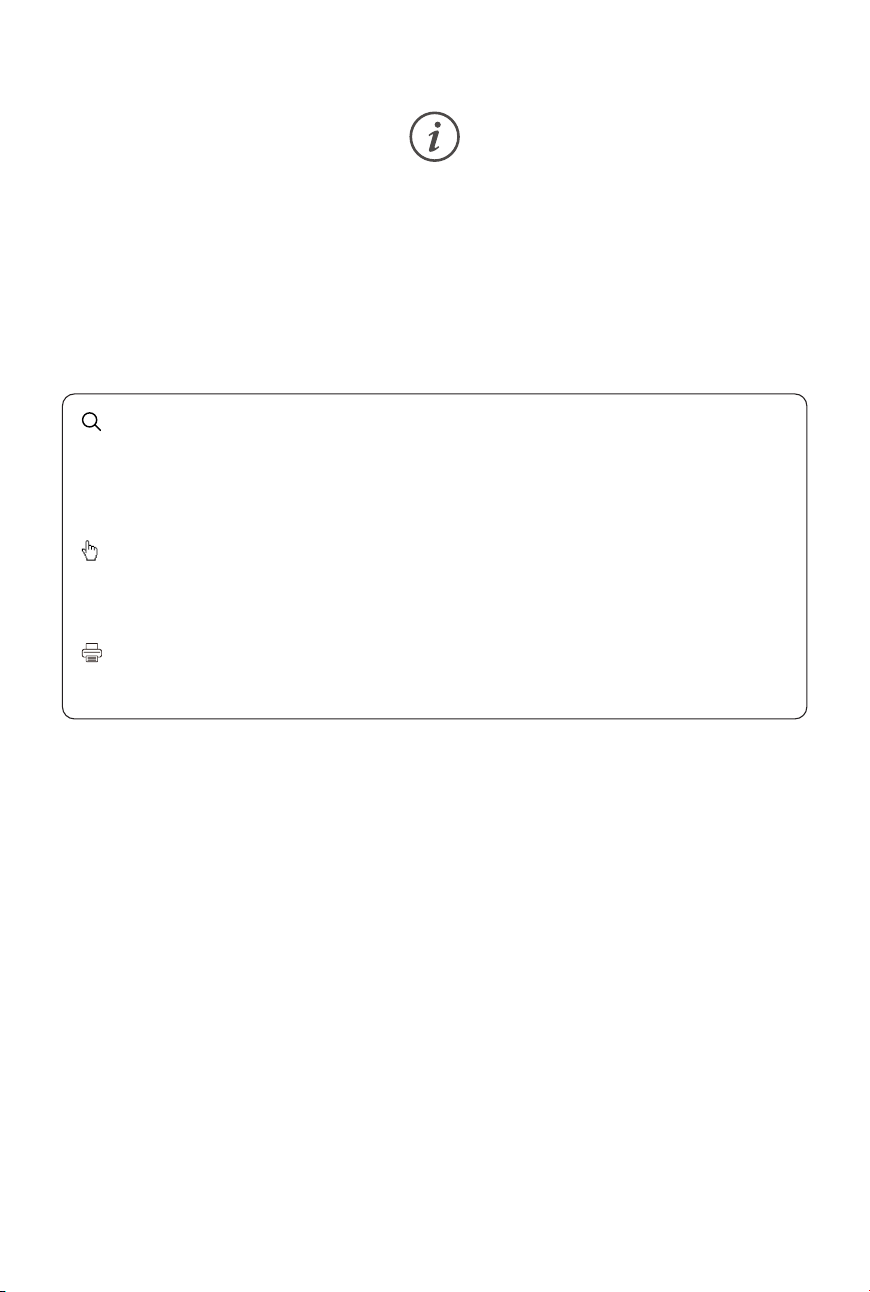
Searching for Keywords
Search for keywords such as “battery” and “install” to nd a topic. If you are
using Adobe Acrobat Reader to read this document, press Ctrl+F on Windows or
Command+F on Mac to begin a search.
Navigating to a Topic
View a complete list of topics in the table of contents. Click on a topic to navigate to
that section.
Printing this Document
This document supports high resolution printing.
2 © 2025 DJI All Rights Reserved.
Using this Manual
Legend
Important
Hints and Tips
Reference
Read Before Use
DJI
™
provides you with tutorial videos and the following documents:
1. Safety Guidelines
2. Quick Start Guide
3. User Manual
It is recommended to watch all the tutorial videos and read the Safety Guidelines before
using for the rst time. Make sure to review the Quick Start Guide before using for the rst
time and refer to this User Manual for more information.
Video Tutorials
Go to the address below or scan the QR code to watch the tutorial videos, which
demonstrate how to use the product safely:
https://www.dji.com/osmo-action-6/video
Osmo Action 6 User Manual
© 2025 DJI All Rights Reserved. 3

Osmo Action 6 User Manual
4 © 2025 DJI All Rights Reserved.
Contents
Using this Manual 3
Legend 3
Read Before Use 3
Video Tutorials 3
1 Product Prole 5
1.1 Overview 6
1.2 Curved Adhesive Base 6
1.3 Osmo 1.5m Extension Rod 8
1.4 Battery Case 9
2 Getting Started 11
2.1 Attaching the Battery and Charging 11
2.2 Activation 12
2.3 Firmware Update 12
3 Using the Product 14
3.1 Button Features 14
3.2 Operating the Touchscreen 15
Setting the Shooting Mode 16
Setting the Shooting Parameters 16
Control Center 18
3.3 Super Slow-Motion 19
3.4 Footage Storage and Transmission 20
Storage Space 20
Transferring Files 21
Transferring Files to a Mobile Device 21
Transferring Files to a Computer 21
3.5 Webcam Mode 22
3.6 Removing/Installing Side Covers 22
3.7 Usage Notes 23
Underwater Usage 23
Battery 25
Cleaning 25
4 Specications 27

1 Product Prole
Accessories may vary depending on the combo and can also be purchased separately.
Visitthe ocial storefor a full list of compatible accessories.
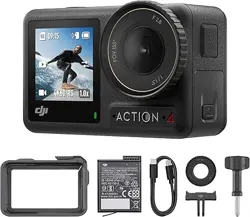
Accessory Osmo Action 6
Standard Com-
bo
Osmo Action 6
Adventure
Combo
Osmo Dual-Direction Quick-Release Adapter Mount
(hereinafter referred to as "Quick-Release Adapter
Mount")
Osmo Action Curved Adhesive Base
(hereinafter referred to as "Curved Adhesive Base")
Osmo Multifunctional Battery Case 3
(hereinafter referred to as "Battery Case")
-
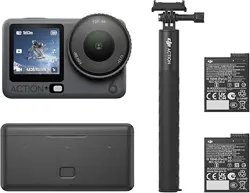
Osmo 1.5m Extension Rod
-
Osmo Action 6 User Manual
© 2025 DJI All Rights Reserved. 5
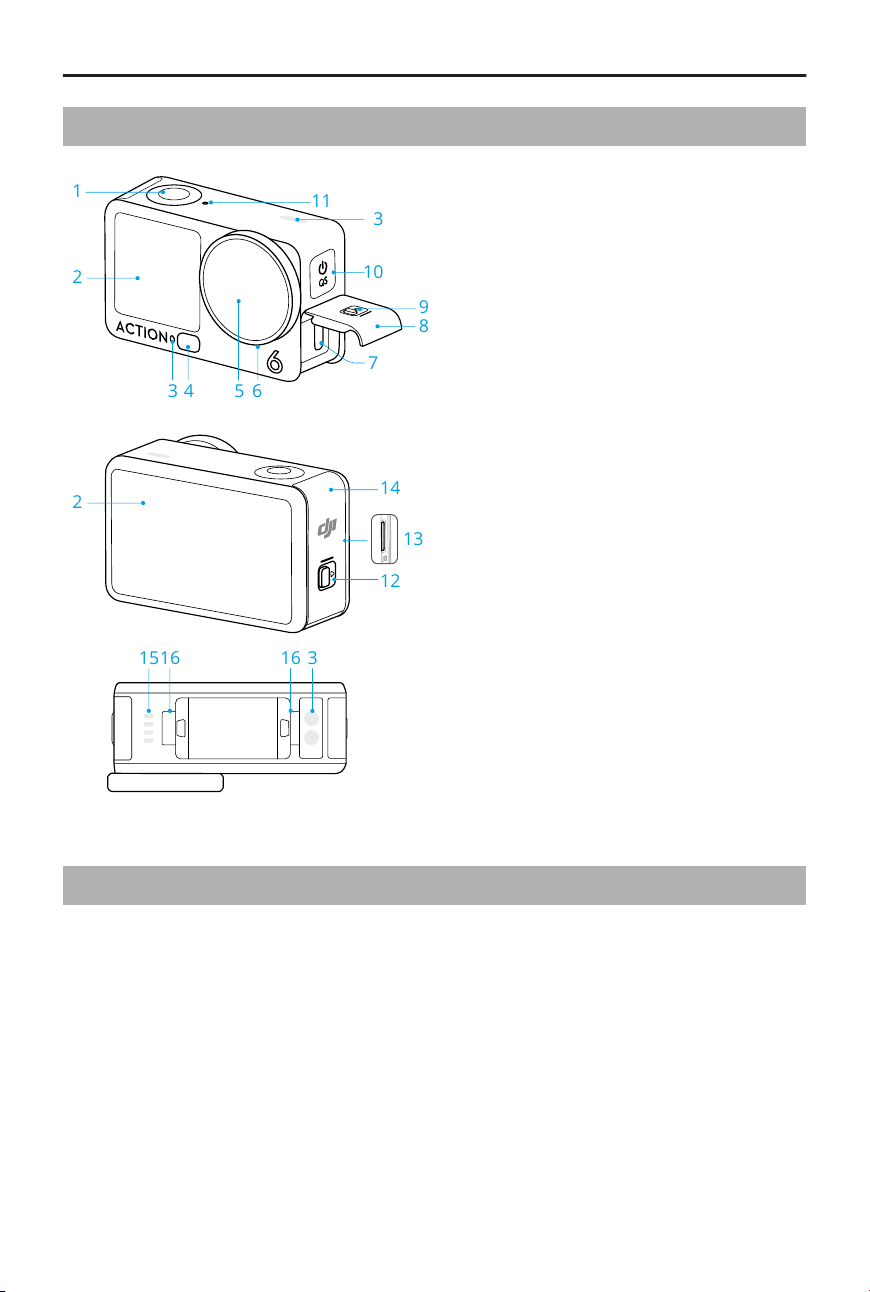
1.1 Overview
1
2
43 5
7
6
8
9
2
12
14
10
3
11
1516 16 3
13
1. Shutter/Record Button
2. Touchscreen
3. Microphone
4. Color temperature sensor
5. Lens
6. Lens Protective Cover
7. USB-C Port
8. USB-C Port Cover
9. USB-C Port Cover Release Button
10. Power/Quick Switch Button
11. Pressure Sensor
12. Battery Compartment Cover Release
Button
13. microSD Card Slot
14. Battery Compartment Cover
15. Speaker
16. Quick-Release Slot
1.2 Curved Adhesive Base
The camera can be securely mounted on smooth and clean curved surfaces using the
Curved Adhesive Base.
Osmo Action 6 User Manual
6 © 2025 DJI All Rights Reserved.
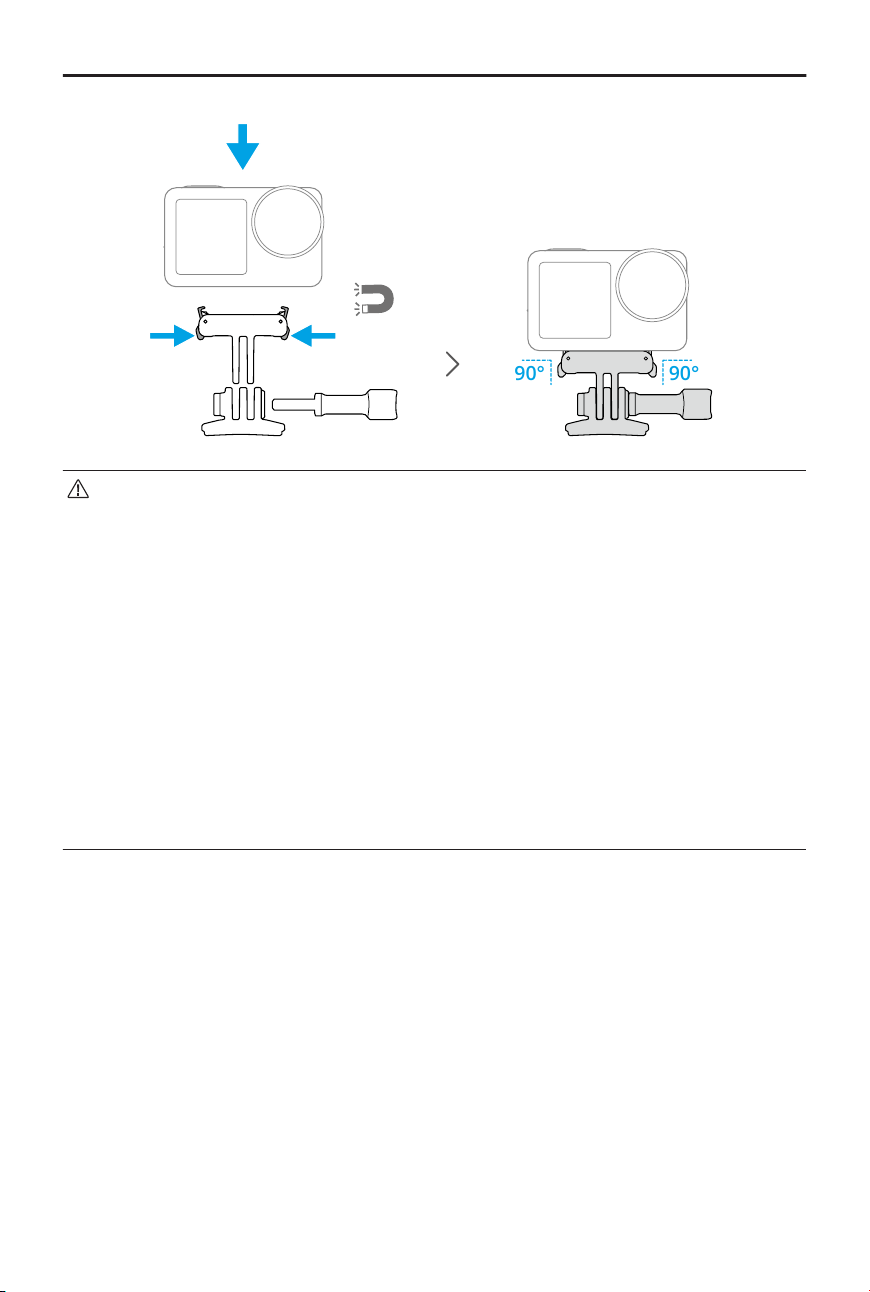
90°90°
• Press down on the camera until the clips of the quick-release adapter mount
are rmly inserted into the quick-release slots on the camera, and then tighten
the locking screws. Press both clips of the quick-release adapter mount when
removing the camera.
• Attach and press the adhesive base down rmly, and hold for at least 10
seconds. It is recommended to wait 30 minutes before attaching the camera.
• The adhesive base can only be applied to clean curved surfaces once. DO NOT
attach the adhesive base to surfaces that are at, rough, powdered, peeling,
covered in dust or sand, or have oil, wax, or water stains. Otherwise, the adapter
mount may not be attached rmly.
• The recommended application temperature for the adhesive base is -10° to
40°C (14° to 104° F). DO NOT attach the adhesive base to a surface with a
higher or lower temperature.
Osmo Action 6 User Manual
© 2025 DJI All Rights Reserved. 7
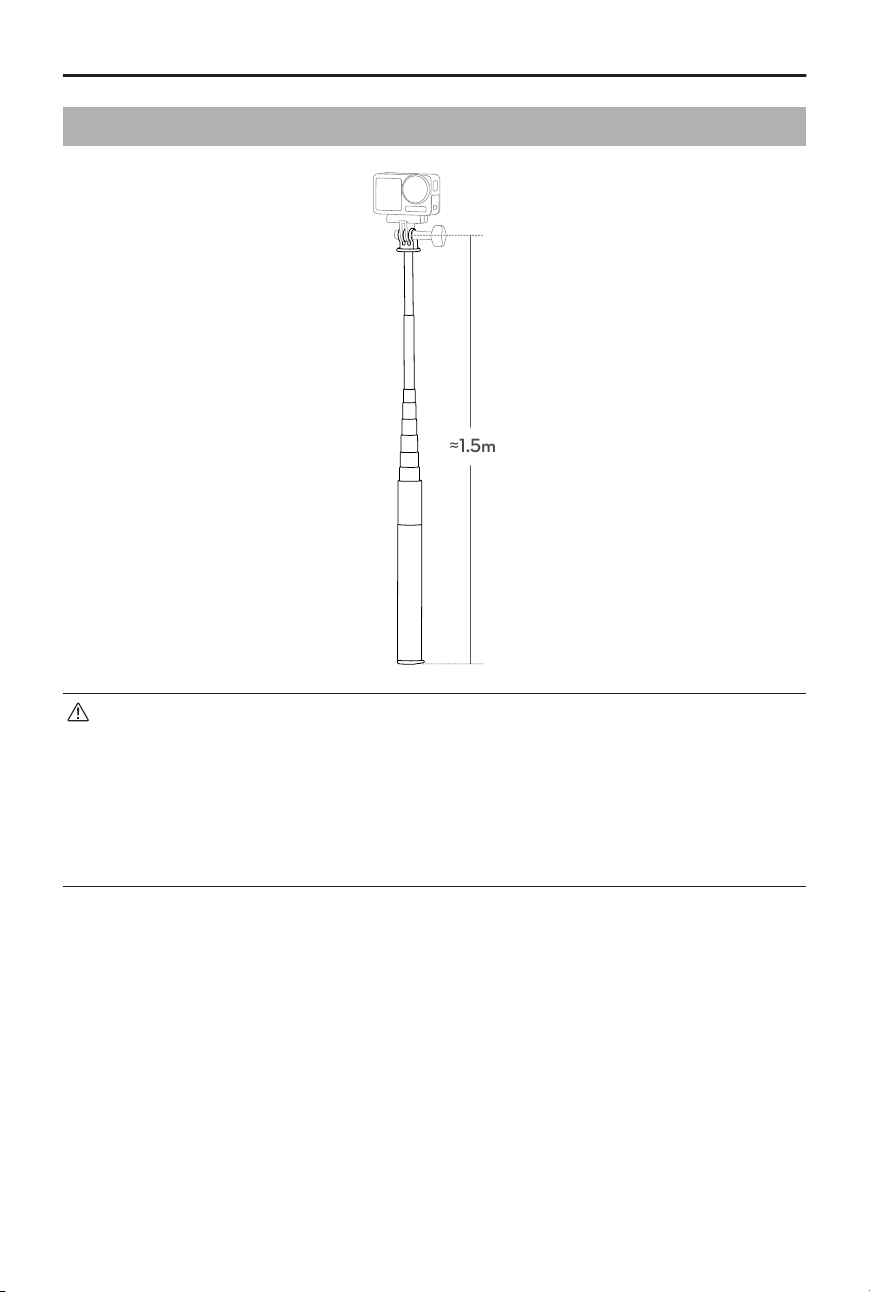
1.3 Osmo 1.5m Extension Rod
≈1.5m
• DO NOT drop or strike the extension rod in any way when in use to avoid
damage.
• DO NOT shake the extension rod violently when installed with the camera to
avoid damage.
• Rinse with clean water to remove sand after underwater usage.
• DO NOT use the extension rod during thunderstorms to avoid lightning strikes.
Osmo Action 6 User Manual
8 © 2025 DJI All Rights Reserved.
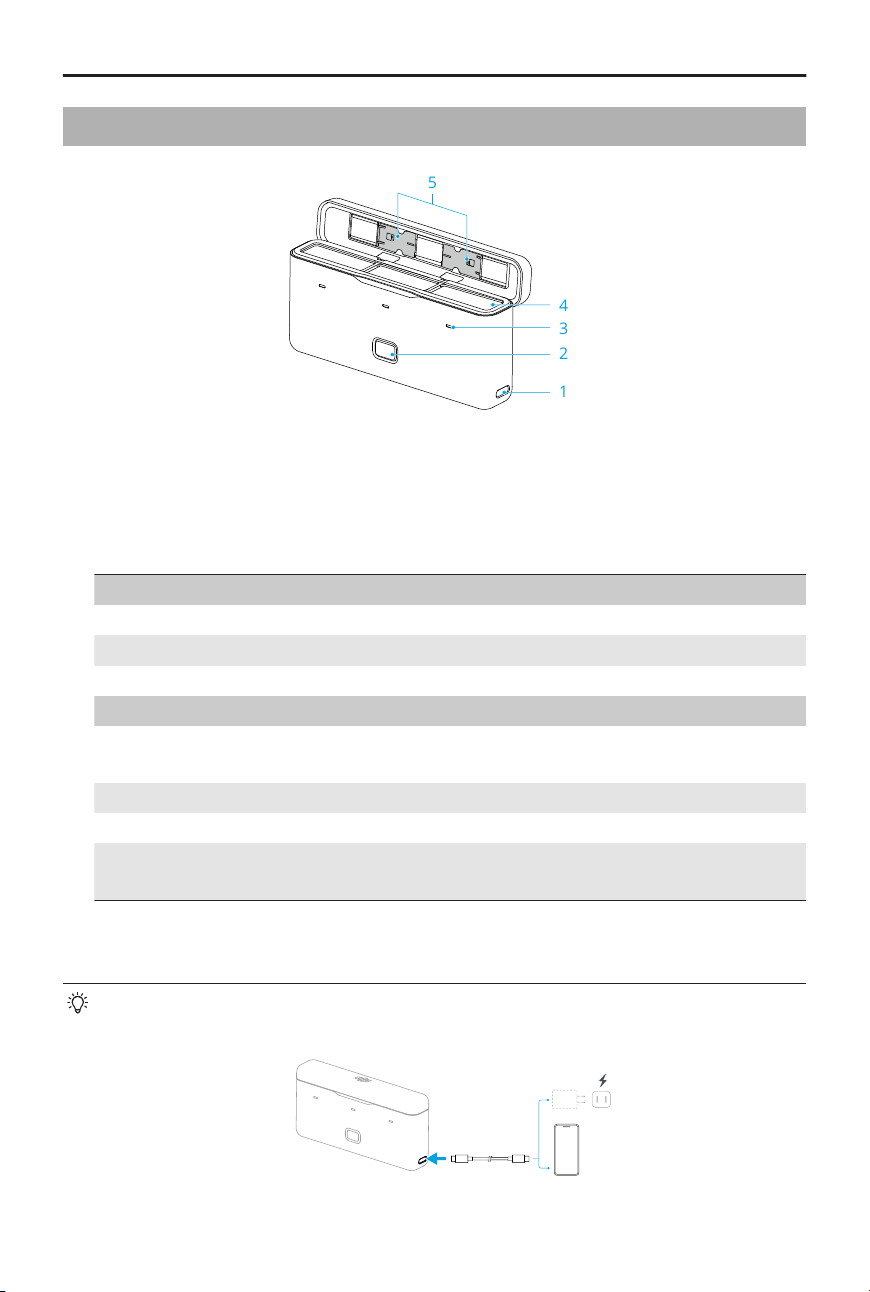
1.4 Battery Case
5
4
3
2
1
1. USB-C Port
2. Status Button
Press once to check the battery level.
3. Status LEDs
Battery Level
Solid red 0-20%
Solid yellow 20%-80%
Solid green 80%-100%
Charging and Discharging Status
O
The battery in the corresponding battery port is fully
charged or discharged.
Breathing The corresponding battery is charging.
Blink green successively No battery is inserted.
Blinks red
Abnormal battery is inserted into the corresponding
battery port.
4. Battery Ports
5. microSD Card Slot
With batteries inserted, the battery case can charge the batteries or external devices
such as smartphones.
Osmo Action 6 User Manual
© 2025 DJI All Rights Reserved. 9

• When charging the batteries, it is recommended to use a USB-C charger that
supports PD (Power Delivery) or PPS (Programmable Power Supply). The battery
with the highest power level will be charged rst.
• When charging external devices, the battery with the lowest power level will be
discharged rst.
• Place the battery case on a at and stable surface when in use. Make sure the
device is properly insulated to prevent re hazards.
• DO NOT touch the metal terminals on the battery ports.
• Clean the metal terminals with a clean, dry cloth if there is any noticeable
buildup.
• The battery case is not waterproof. DO NOT place it in water or spill any liquid
on the case.
Osmo Action 6 User Manual
10 © 2025 DJI All Rights Reserved.
2 Getting Started
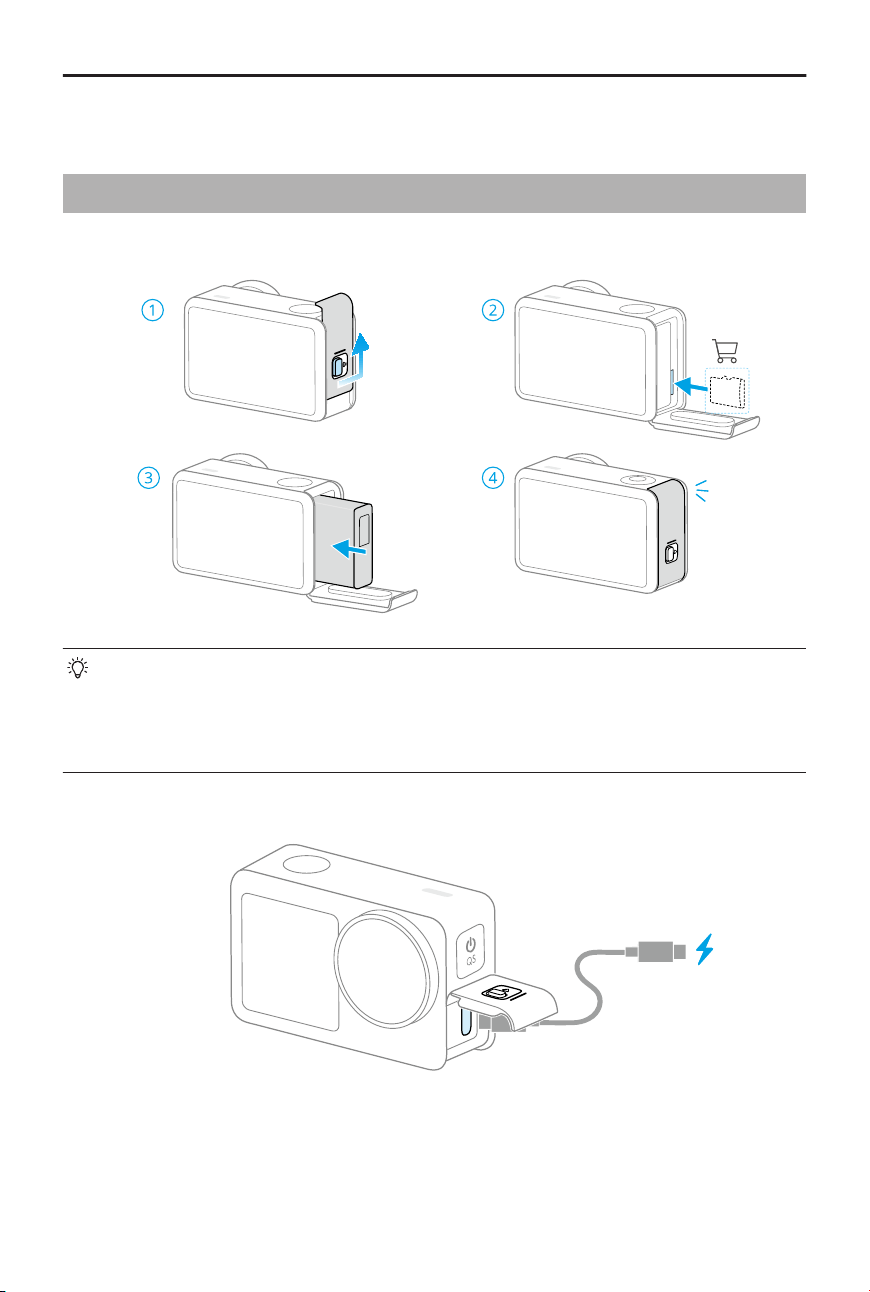
2.1 Attaching the Battery and Charging
Insert the battery and completely close the cover.
• The camera has 50GB of usable storage and supports microSD cards for storage
expansion. Refer to Specications for the recommended microSD cards.
• Both side covers on the camera can be removed. For details, see Removing/
Installing Side Covers.
It is recommended to use a USB-C charger that supports PD or PPS.
Osmo Action 6 User Manual
© 2025 DJI All Rights Reserved. 11
2.2 Activation
Make sure to activate the camera using DJI Mimo App before rst use.
1. Press and hold the power button to power on the camera.
2. Scan the QR code on the screen to download the DJI Mimo App.
3. Enable Wi-Fi and Bluetooth on the mobile device.
4. Launch DJI Mimo App on the mobile device, tap the camera icon to connect to the
camera, and then follow the instructions to activate the camera.
When the camera is used with the DJI Mimo App, you can monitor the current camera
view, set the camera parameters, and control the camera with a mobile device.
• To check the Android and iOS operating system versions supported by the app,
visit https://www.dji.com/downloads/djiapp/dji-mimo.
• The interface and functions of the app may vary as the software version is
updated. Actual user experience is based on the software version used.
If there is a problem when connecting to DJI Mimo App, follow the steps below:
1. Make sure both Wi-Fi and Bluetooth are enabled on the mobile device.
2. Make sure the DJI Mimo App has the latest rmware version.
3. In the liveview on the camera, swipe down from the top of the screen and
tap > Wireless Connection > Reset Connection. The camera will reset all
connections and Wi-Fi passwords.
2.3 Firmware Update
A prompt will appear in DJI Mimo Appwhen new rmware is available. Tap the prompt
and follow the on-screen instructions to update the rmware.
If the update fails, follow the steps for troubleshooting.
1. Restart the camera and DJI Mimo App.
Osmo Action 6 User Manual
12 © 2025 DJI All Rights Reserved.

2. Enable Wi-Fi and Bluetooth on the mobile device.
3. Connect the camera to DJI Mimo App and try the update again.
Contact DJI Support if the update fails again.
Osmo Action 6 User Manual
© 2025 DJI All Rights Reserved. 13
3 Using the Product
3.1 Button Features
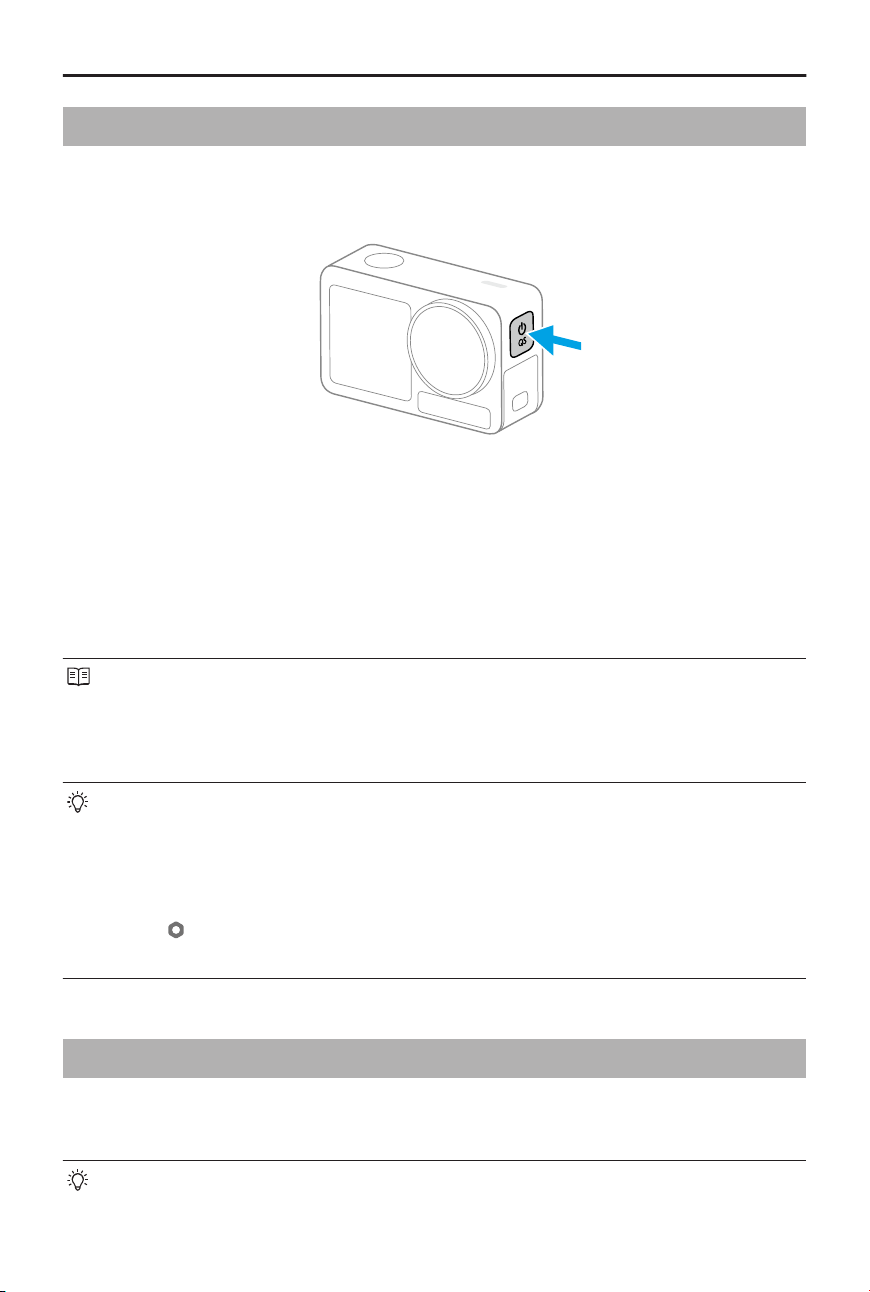
Power/Quick Switch Button
• Press and hold: Power on/o.
• In the liveview: Press once to enter the Quick Switch
page. Press again to cycle through preset shooting
modes
*
.
* To modify the presets, tap in the upper right corner
of the Quick Switch page.
• During video or slow motion video recording: Tap
the icon to mark “highlights”, helping to quickly locate
specic moments during post-editing, reducing the
time to nd highlights.
• On other pages: Press once to return to the liveview.
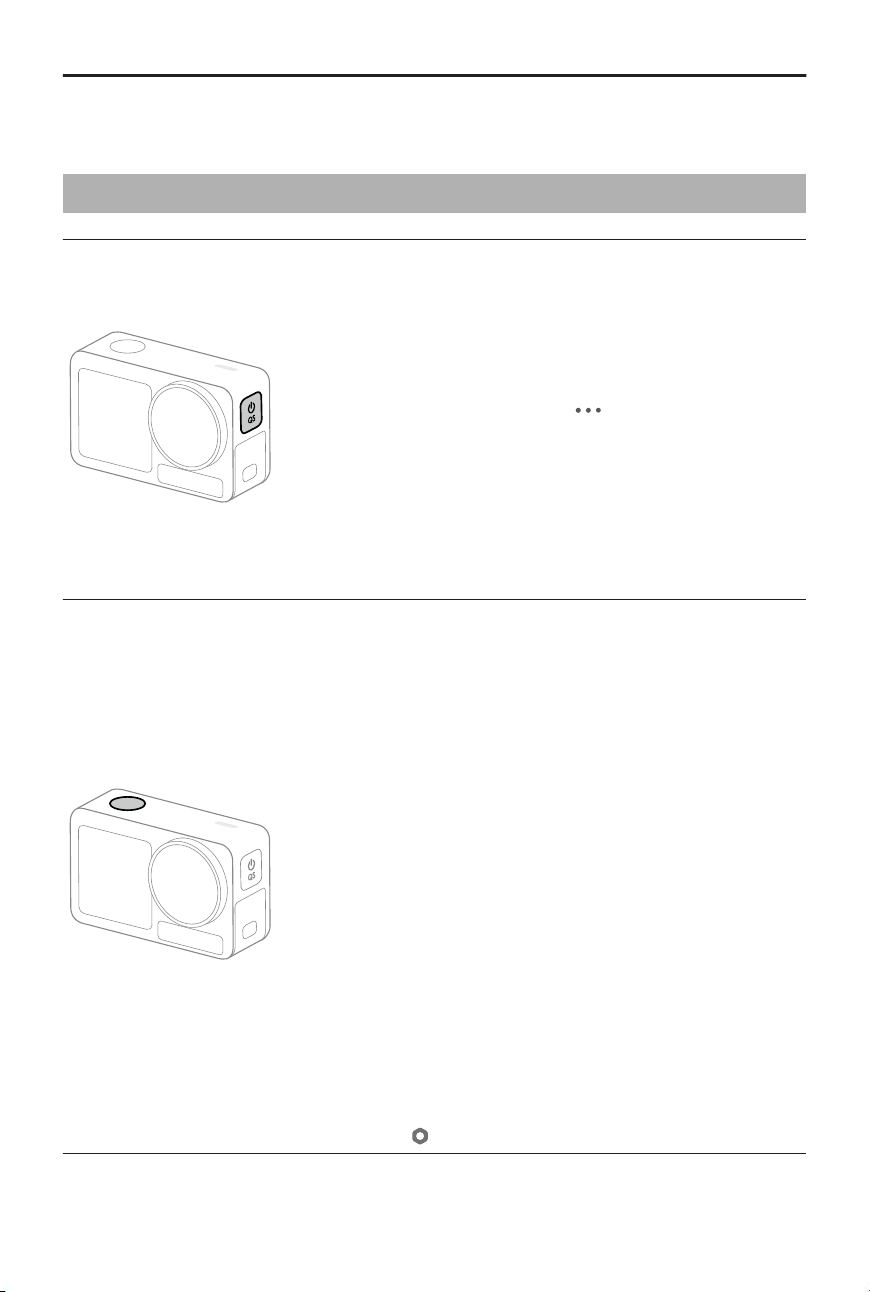
Shutter/Record Button
When powered on
• Press once: Take a photo or start/stop recording.
• Shutter/Record Button Protection is enabled
automatically when the camera dives to 14 m
*
or
deeper. In this mode, press the Quick Switch button
once to take a photo or start/stop recording, and
double-press to enter the Quick Switch page. After
surfacing, follow the on-screen instructions to exit
protection mode and restore normal button functions.
* The depth may vary depending on water conditions and
device status; 14 m is for reference only.
When powered o
Press once: Power on and start recording (SnapShot).
Press again to stop recording. After shooting, the camera
will automatically power o if left idle for three seconds.
* SnapShot is the quickest way to start shooting and never miss
a moment of the action. By default, SnapShot applies the last
used shooting settings. To modify, enter the Control Center
and tap
> SnapShot.
Osmo Action 6 User Manual
14 © 2025 DJI All Rights Reserved.
3.2 Operating the Touchscreen
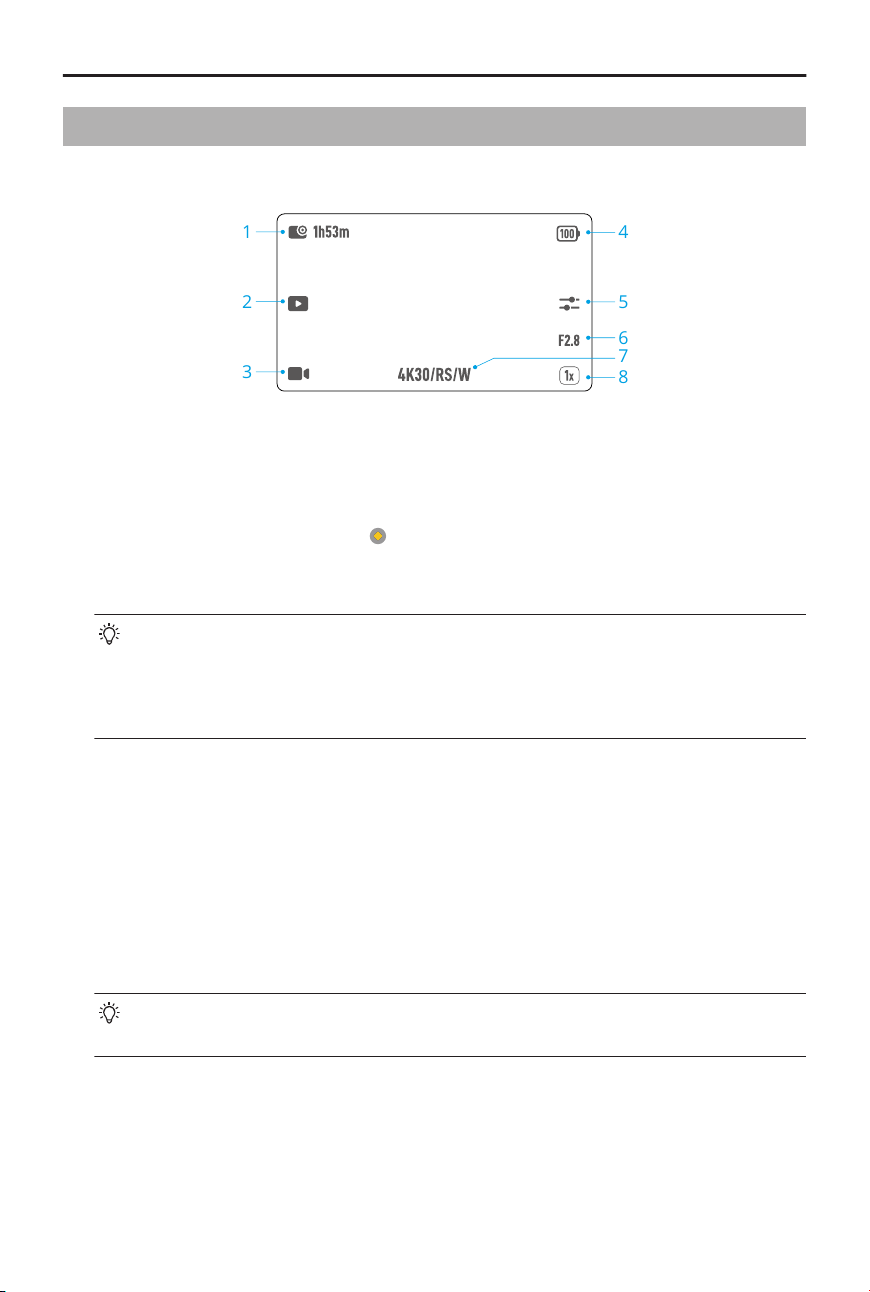
After the camera powers on, the touchscreen shows the liveview.
1
2
3
4
5
6
8
7
1. Storage Capacity/Remaining Recording Time
2. Playback
The touchscreen displays the last photo or video captured or played back.
During playback, you can tap the
icon to mark “highlights”, helping to quickly locate
specic moments during post-editing, and reducing the time to nd highlights. The
marked “highlights” can be viewed during playback in DJI Mimo App.
• When playing back the video, long press any blank area on the screen to
play at double speed.
• During playback, swipe left from the right edge of the screen to return to the
liveview.
3. Shooting Mode
4. Camera Battery Level
5. Image/Audio Parameters
6. Aperture Value
7. Shooting Specications
8. Zoom
Zoom adjustment is available in certain shooting modes.
With Osmo Action 6 Macro Lens installed, Zoom is disabled. You can rotate the
focus ring to manually focus on much closer subjects.
Osmo Action 6 User Manual
© 2025 DJI All Rights Reserved. 15
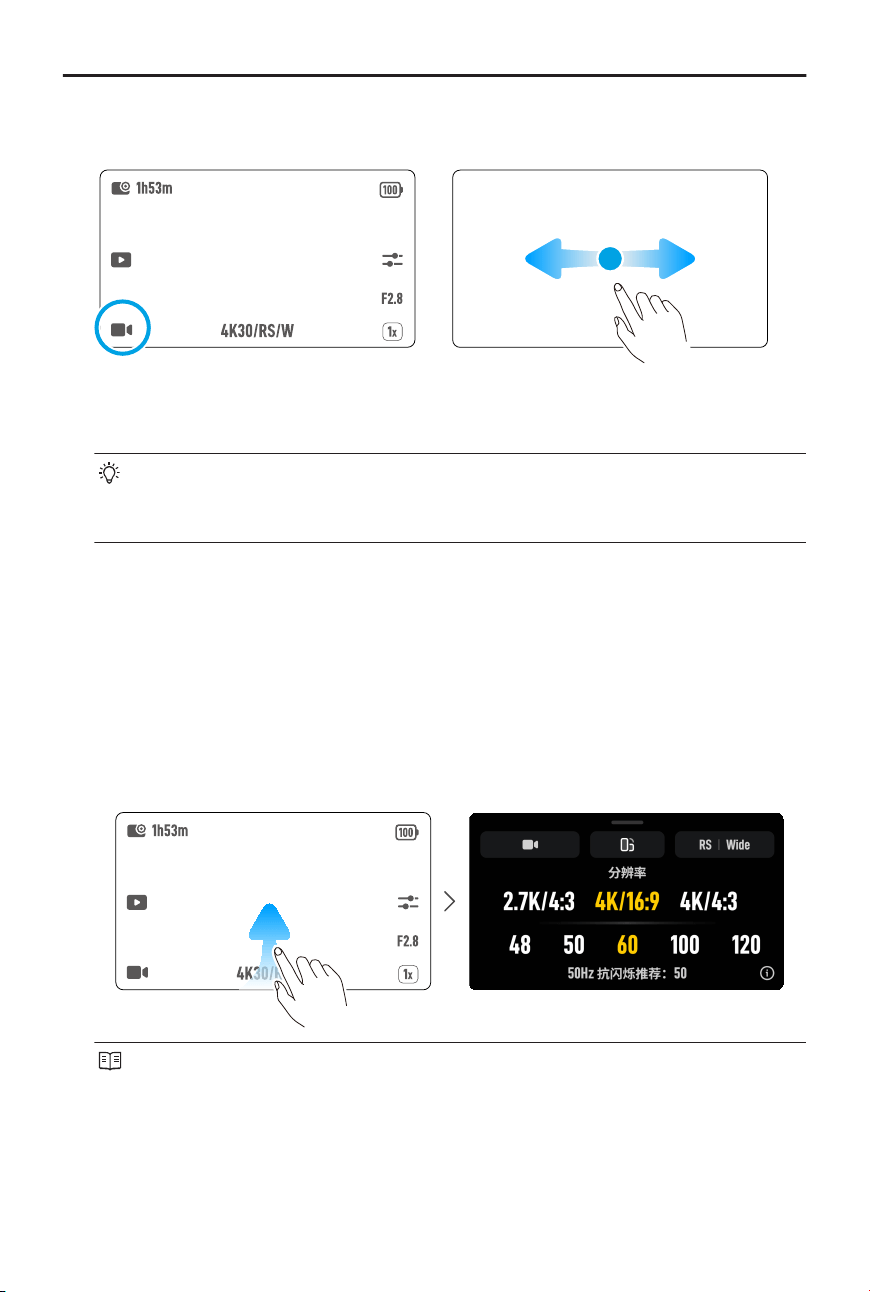
Setting the Shooting Mode
1. Tap the icon or swipe left or right on the screen to enter the mode switch page.
2. Swipe to select a shooting mode.
Slow-motion videos do not include audio. The audio le is stored as a
standalone le and has the same path as the video le, which can be transferred
to your computer.
3. Tap the selected shooting mode or swipe up from the bottom of the screen to return
to the liveview.
Setting the Shooting Parameters
Various parameters can be set in dierent shooting modes. Refer to the actual interface.
1. Swipe up from the bottom of the screen to set the parameters for each shooting
mode.
In video mode, tap the upper left corner to enable Pre-Rec or Loop Recording.
Tap the upper right corner to set the EIS mode and Field of view (FOV).
• Pre-Rec: When enabled, the camera will pre-record footage within the set
time duration. Once the shutter/record button is pressed, the camera will
save the latest pre-recorded footage before pressing the shutter/record
button and keep recording, then save the footage as a whole video. This
Osmo Action 6 User Manual
16 © 2025 DJI All Rights Reserved.

function allows the camera to save the footage before pressing the shutter/
record button to avoid taking up too much storage space, helping capture
highlights (especially for shing).
• Loop Recording: When enabled, the camera records a video by overwriting
older footage with new footage at selected time intervals. This function
allows the camera to save storage space, and is suitable for use in scenes
where the user is waiting to capture unanticipated highlights (such as when
driving).
• Aspect Ratio:The default setting is Auto, but it can also be set to Custom.
This setting allows you to capture 4K videos and crop the videos to ratios like
16:9 or 9:16 in post-editing, tting dierent media platforms.
• EIS (Electronic Image Stabilization) mode:
◆
O: Records the video with the largest FOV.
◆
RockSteady: stabilizing footage while retaining the dynamics of
movement, which is suitable for rst-person perspective shooting.
◆
RockSteady+: Compared with RockSteady, the edges of these images will
be reduced slightly to obtain a stronger stabilization performance.
◆
HorizonBalancing: This mode reduces the shaking of images within ±45°
horizontally, while preserving high-resolution image quality.
◆
HorizonSteady: Eliminates roll axis jitters within 360º. It ensures that
the image remains level and stable even in scenarios involving intense
bumps or turns.
To record videos with Gyro data, disable EIS Mode and set the camera FOV to
Wide.
Once you have set the parameters, swipe down from the top of the screen to return
to the liveview.
2. In the liveview, tap to adjust image and audio parameters. Tap PRO to adjust pro
parameters.
• Tap Variable Aperture to select the appropriate aperture mode based on
your shooting environment. Various aperture modes can be set in dierent
shooting modes. Visit the ocial website for more information.
• D-Log M is designed for professional color grading when post-editing. In
high-contrast or multi-color scenarios (e.g., garden, eld, etc.), it can enlarge
the dynamic range for more color-grading in post-production.
Osmo Action 6 User Manual
© 2025 DJI All Rights Reserved. 17
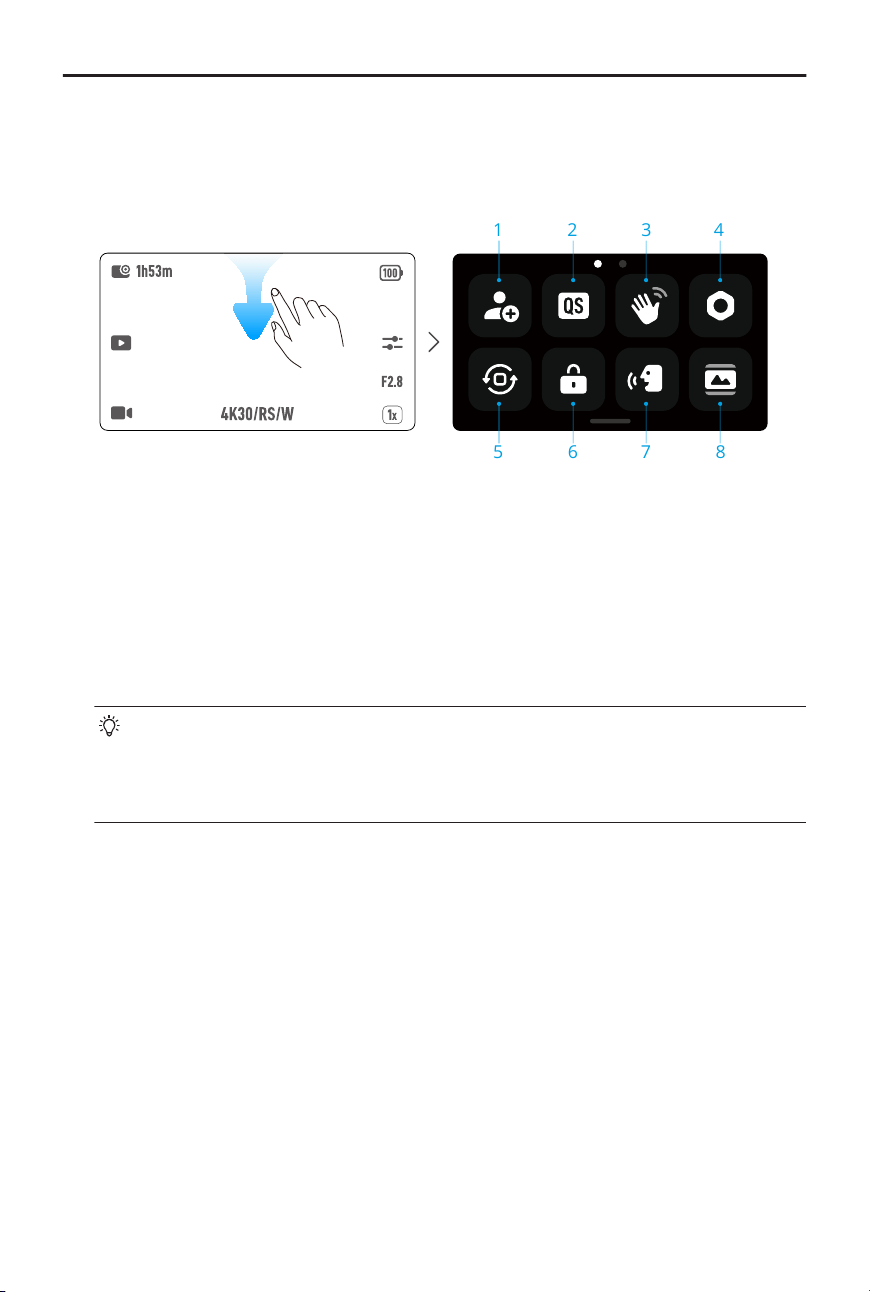
Control Center
Swipe down from the top of the screen to enter the control center. Swipe up from the
bottom of the screen to return to the liveview.
1 2 3 4
5 6 7 8
1. Custom Modes
Save the current shooting settings as a custom mode and select a scene. Custom
modes can then be used directly to shoot similar scenes.
2. Quick Switch
Set the modes accessible with the Quick Switch button. When the function of the
Quick Switch button is set mode switching, you can customize the quick switch modes
in the Shooting Mode menu, and enable/disable Voice Prompt when switching modes.
When Voice Prompt is enabled, the camera announces the current shooting
mode each time you press the Quick Switch button. When the camera is
installed on a helmet or other hard-to-see locations, users can accurately select
the required mode with Voice Prompt.
3. Gesture Control
When enabled, you can use hand gestures to take photos or start/stop recording.
4. Settings
• Wireless Microphone
Follow the on-screen instructions for linking. Once linked, you can use the
transmitter to control the camera to start recording, with the audio being
captured by the transmitter. When the transmitter is linked to the camera, tap
Wireless Microphone settings to adjust the audio parameters of the transmitter.
The camera can connect to two DJI wireless microphone transmitters
simultaneously. Visit the DJI website and refer to the user manual of the mic
product for more information.
• Wireless Earbuds
Osmo Action 6 User Manual
18 © 2025 DJI All Rights Reserved.

Make sure the earbuds are in pairing status. When the device name appears in
the list, tap to connect. Once connected, the camera records videos using the
audio captured by the earbuds.
* The wireless earbuds only supports recording and cannot be used for audio playback.
• Depth & Altitude
When the related settings of depth or altitude are enabled, the recorded video will
include depth or altitude information. The recorded data can also be added to the
video footage in a visualized form using the dashboard feature on theDJI Mimo
App app, which can better showcase exciting sports moments.
• Built-in Mic Audio Backup
When recording with wireless microphones, users can enable the Built-in
Mic Audio Backup feature, which records simultaneously from the camera's
microphone. This backup audio can be saved either as a separate .aac le or as an
extra audio track embedded in the video le.
• Timecode
Either reset the timecode or sync with the system time. The camera timecode can
be synchronized by a time code synchronizer using the USB-C port.
Tap Timecode Display to display the time code in the liveview.
5. Orientation Lock
6. Screen Lock
7. Voice Control
Enable Voice Control to control the camera with voice commands.
Simplied Chinese and English are supported. Refer to the on-screen interface for a
full list of commands.
8. Full Front Screen
3.3 Super Slow-Motion
The super slow-motion feature enables frame-by-frame analysis of the footage and
generate slow-motion videos. The feature is particularly suitable for showcasing stunning
and exciting moments in high-speed sports scenes such as cycling and skiing.
When playing back a video, select a specic point and tap the icon to generate a super
slow-motion video clip. During the generating process, you can tap Preview to preview
the slow-motion eect.
Osmo Action 6 User Manual
© 2025 DJI All Rights Reserved. 19
You can tap Cancel to stop the generation of the super slow-motion clip during the
process. To delete a super slow-motion clip, tap the icon in the upper right corner
when playing back the video.
• The camera performs 4x frame interpolation, allowing the camera to generate
slow-motion videos at up to 960fps.
• Up to 6 super slow-motion clips can be added to a single video footage.
• Super slow-motion is only supported for 4K/2.7K/1080p 16:9 video footage with
a frame rate of no less than 100fps. The generated super slow-motion videos
will all be in 1080p format.
• The rst 1.5 seconds and the last 2 seconds of the video do not support
generating super slow-motion clips.
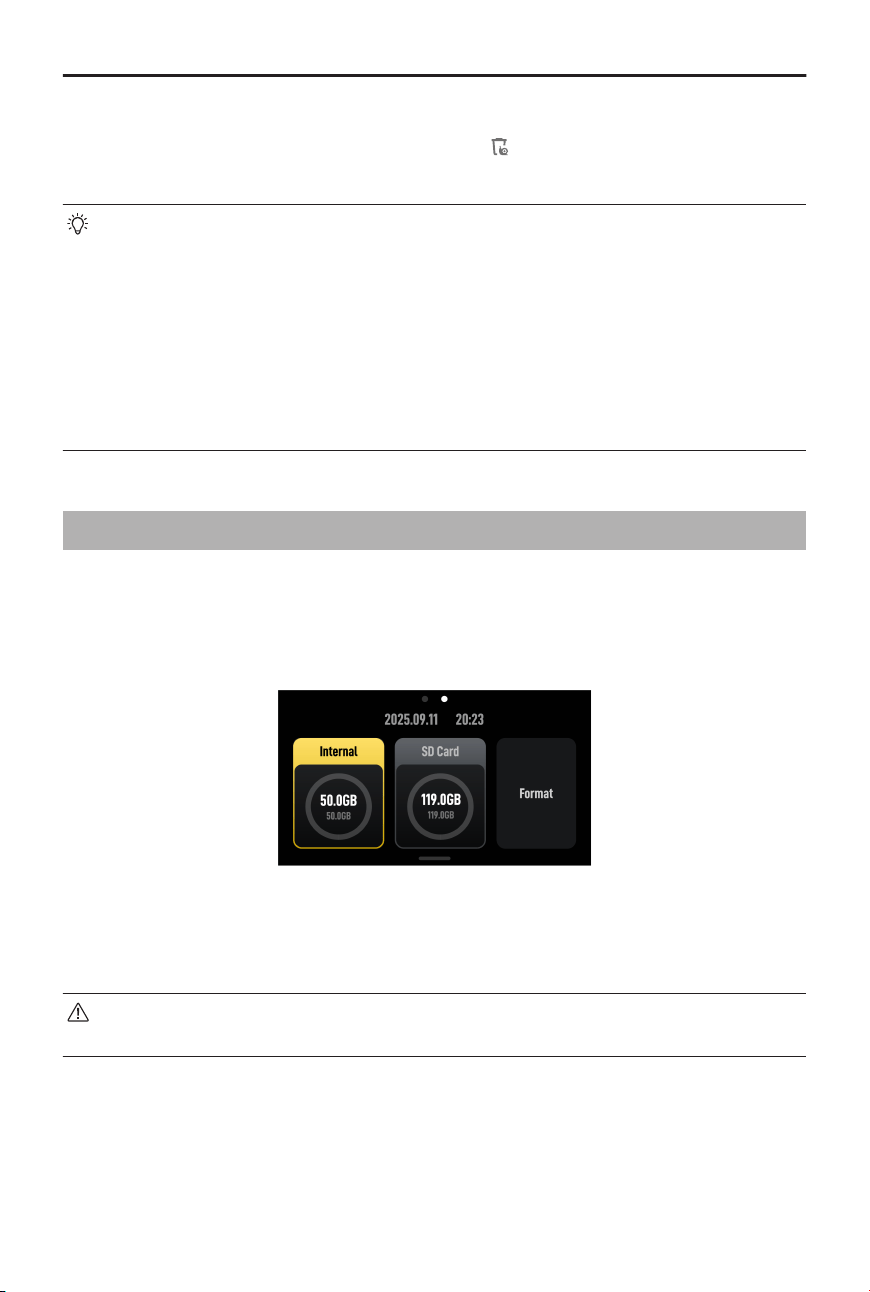
3.4 Footage Storage and Transmission
Storage Space
Swipe down from the top of the screen, and then swipe left to check the storage
information.
The camera has built-in storage and also supports expanding storage by installing a
microSD card.
Tap Storage to format the internal storage or the microSD card.
Formatting will permanently delete all data. Make sure to back up all required data
before formatting.
Osmo Action 6 User Manual
20 © 2025 DJI All Rights Reserved.
Transferring Files
• When transferring les by cables, if the camera cannot automatically recognize
the connected device, enter the control center, tap > USB mode, and
reconnect the camera.
Transferring Files to a Mobile Device
• Connect the camera to DJI Mimo App, tap the album icon to preview photos and
videos. Click to download photos and videos.
• For mobile devices that support OTG connection, the les can be transferred with
USB mode.Use the provided cable to connect the camera to the mobile device. When
connected, view and transfer photos and videos via the device album or le manager.
• For Android devices that support the Mutual Transfer Alliance (MTA) protocol, the les
can be transferred using the Sharing feature. Ensure the phone supports the MTA
protocol and the necessary permissions are enabled before use. Select your les in
the album, tap
, and follow the on-screen instructions.
The photos and videos can be shared directly from DJI Mimo App to social media
platforms.
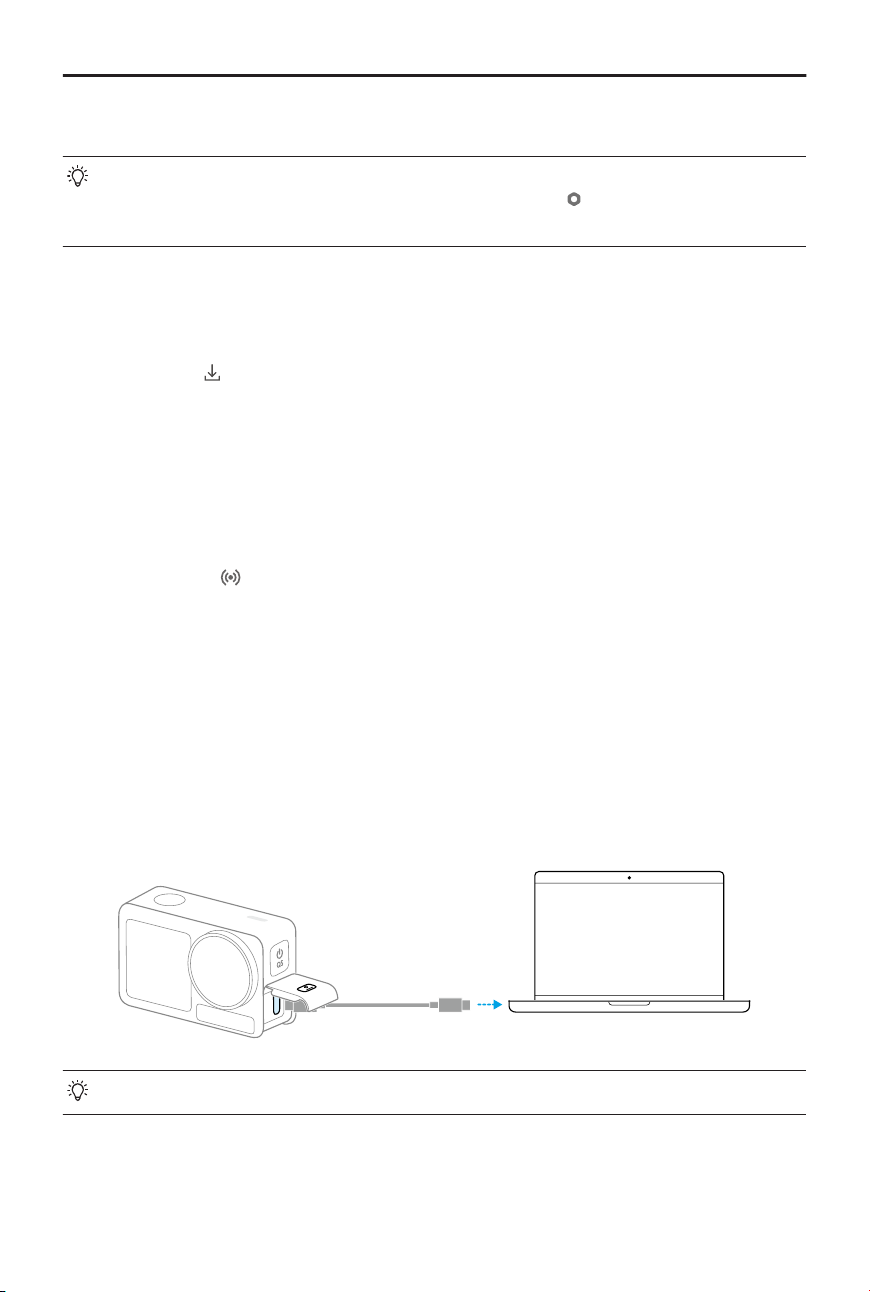
Transferring Files to a Computer
Power on the camera and connect it to a computer using a USB-C cable. When connected
to a computer, a pop-up will appear. Tap Transfer File: USB to download the les from
the camera to the computer. When transferring a le, the camera cannot take photos or
record videos.
Reconnect the device to the computer if a le transfer is interrupted.
Osmo Action 6 User Manual
© 2025 DJI All Rights Reserved. 21

3.5 Webcam Mode
The product can work as a webcam on a computer. Power on the product and connect
it to the computer using a USB cable. Tap Webcam on the camera to enter the Webcam
mode, and the camera will function as a webcam input device. The bottom of the screen
displays Webcam.
Press the Shutter/Record button to start recording. Users can preview recorded videos
after exiting the Webcam mode.
3.6 Removing/Installing Side Covers
Both side covers on the camera can be removed. The battery compartment cover is used
as an example in the illustrations.
Removing
Installing
Make sure the cover is released and the red mark is exposed. Align the slot on the cover
with the mounting post on the camera.
Osmo Action 6 User Manual
22 © 2025 DJI All Rights Reserved.

3.7 Usage Notes
Underwater Usage
• The product can be used underwater at depths of up to 20 m.
• When used with the Osmo Action 6 Waterproof Case, the product can be
operated underwater up to 60 m deep.
Observe the following precautions before using the product in water.
1. Make sure the battery and battery compartment are dry and clean before inserting
the battery. Otherwise, it may aect the battery contact and waterproong ability.
Make sure the battery compartment cover is rmly fastened after the battery is
inserted. Note that the red marks should not be visible after the cover is properly
fastened.
2. Make sure the USB-C port cover, and lens protective cover are rmly mounted and
fastened, and that the waterproof seal is clean. Otherwise, it will aect the device
waterproong ability. All the holes on the product use a built-in waterproof material.
DO NOT poke the holes.
3. Check if the lens protective cover is in good condition. If damaged, replace it
immediately. Make sure the lens protective cover and lens are dry and clean. Sharp or
hard objects may damage the lens and aect the ability of the camera. Make sure that
Osmo Action 6 User Manual
© 2025 DJI All Rights Reserved. 23

the lens protective cover is rmly mounted and the rubber ring at the base of the lens
is not detached.
4. The product is NOT waterproof when used with Osmo Action 6 Macro Lens.
Observe the following precautions when using the product in water.
1. Avoid jumping into water at high speed with the product. Otherwise, the impact may
result in water seepage.
2. DO NOT use the product in hot springs, corrosive liquids, or extreme underwater
environments.
Observe the following precautions after using the product in water.
1. Rinse the camera with tap water after using it underwater. Allow it to dry naturally
before using again. Wipe the surface of the camera with a soft and dry cloth.
2. DO NOT dry the camera with hot air using a hair dryer, otherwise the microphone
membrane and the built-in breathable membrane will rupture, and the camera will no
longer be waterproof.
3. After using the camera in water, open the battery compartment cover facing
downward to prevent water from entering the gaps in the battery compartment if
you need to replace the battery. Wipe o any water droplets in the gaps of the
battery compartment and clean the red waterproof rubber ring to prevent any foreign
objects from remaining. Otherwise, it will aect the waterproof performance during
subsequent use.
4. When changing the lens protective cover, make sure the camera is dry. After using the
camera in water, let it dry before using it again. This will prevent water from seeping
into the lens protective cover, allowing for the lens to fog up.
Observe the following precautions when using the product with the waterproof case:
1. Make sure the rubber seal is clean and rmly secured during use.
2. Make sure the waterproof case is dry (for best results, place an anti-fog ber in the
case during use) and that the latch is secure.
3. Before use, it is recommended to place the waterproof case underwater for
approximately 5 minutes to ensure it is working properly.
4. Rinse the case with tap water to prevent corrosion after using it in the sea.
• The touchscreens can be used when the surface is wet.
• The touchscreens do not function when fully submerged underwater. Users
can press the camera buttons to start recording. The Shutter/Record button is
Osmo Action 6 User Manual
24 © 2025 DJI All Rights Reserved.

disabled automatically when the camera is used without a waterproof case at a
depth of more than 14 m.
Battery
1. DO NOT use non-ocial batteries. DJI takes no responsibility for any damage caused
by non-ocial batteries.
2. Use the battery within the temperature range specied at https://www.dji.com/osmo-
action-6/specs. Use of the battery in a high-temperature environment can lead to
a re or explosion. Before using the battery in a low-temperature environment, it
is recommended to charge the battery fully in a normal temperature environment.
Charging the battery at the ideal temperature can prolong battery life.
3. Discharge and charge the battery completely once every three months to keep it in
good condition.
4. The battery is designed to stop charging when it is fully charged. It is good practice
to monitor the charging progress and disconnect the charger when battery is fully
charged.
5. When the battery voltage is too low, the battery will enter low-power state. Charging
the battery will exit low-power mode.
6. DO NOT store the battery for an extended period of time after fully discharging.
Otherwise, the battery may over-discharge and cause irreparable damage to the
battery cell.
7. Discharge the battery to 40-65% if it will not be used for 10 days or more. This can
greatly extend the battery life.
Cleaning
1. DO NOT spill any liquids containing alcohol or cleansing solution on the camera.
2. If the holes of the microphone, heat dissipation slots, or other parts of the camera are
blocked by sand or other foreign matter, rinse with fresh water while the camera is in
a sealed waterproof state.
3. Clean the lens protective cover with water or a lens cleaning pen, lens air blower, or
lens cleaning cloth. DO NOT remove the lens protective cover frequently to avoid dust
accumulating inside the lens cover, which can aect shooting quality.
4. Clean the lens with a lens cleaning pen, lens air blower, or lens cleaning cloth.
5. Clean the battery and battery compartment with a clean, dry cloth.
Osmo Action 6 User Manual
© 2025 DJI All Rights Reserved. 25

6. Make sure the quick-release slots on the camera are clear of dust and sand when
attaching the Quick-Release Adapter Mount.
Osmo Action 6 User Manual
26 © 2025 DJI All Rights Reserved.


Contact
DJI SUPPORT
This content is subject to change without notice.
Download the latest version from
https://www.dji.com/osmo-action-6/downloads
If you have any questions about this document, please contact DJI by sending a message
DJI and OSMO are trademarks of DJI.
Copyright © 2025 DJI All Rights Reserved.