User Manual
2023.09v1.2
2
©
2023 DJI All Rights Reserved.
Searching for Keywords
Search for keywords such as Battery or Install to find a topic. If you are using Adobe
Acrobat Reader to read this document, press Ctrl+F on Windows or Command+F on Mac
to begin a search.
Navigating to a Topic
View a complete list of topics in the table of contents. Click on a topic to navigate to that
section.
Printing this Document
This document supports high resolution printing.
This document is copyrighted by DJI with all rights reserved. Unless otherwise authorized by DJI,
you are not eligible to use or allow others to use the document or any part of the document by
reproducing, transferring, or selling the document. Users should only refer to this document
and the content thereof as instructions to operate DJI products. The document should not be
used for other purposes.
Version Date Revisions
v1.2 2023.09 Added Pre-Rec and Highlight function.
Revision Log
DJI Osmo Action 4
User Manual
©
2023 DJI All Rights Reserved.
3
Using this Manual
Legends
Important Hints and Tips
Read Before Use
Read the following documents before using DJI™ OSMO™ Action 4.
1. Osmo Action 4 Safety Guidelines
2. Osmo Action 4 Quick Start Guide
3. Osmo Action 4 User Manual
It is recommended to watch all tutorial videos and read the safety guidelines before using for
the rst time. Make sure to review the Quick Start Guide before using for the rst time and refer
to this User Manual for more information.
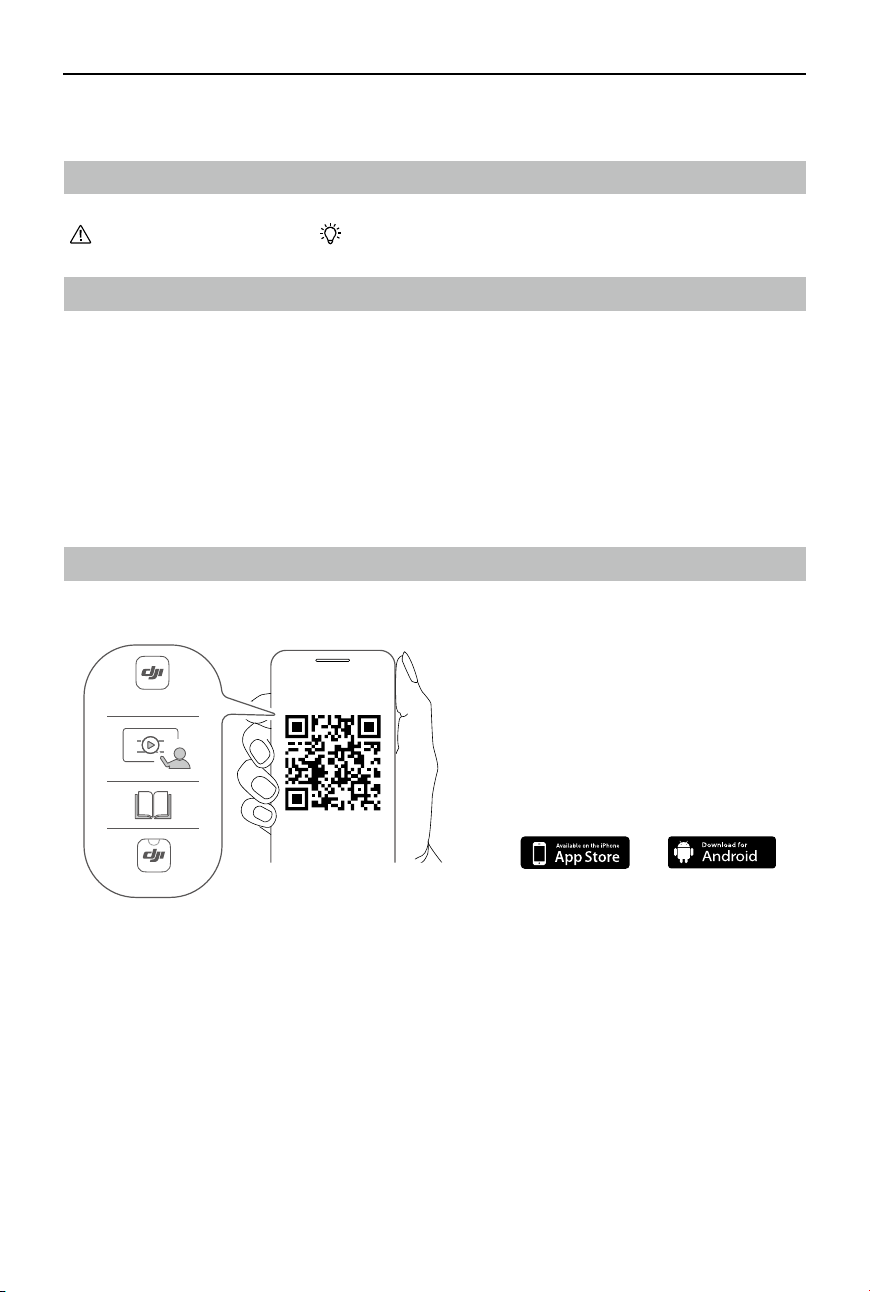
Download DJI Mimo App and Watch the Tutorial Video
Scan the QR code to download the DJI Mimo App and watch the tutorial videos.
Android 8.0 or aboveiOS 12.0 or above
https://s.dji.com/guide60
DJI Store App
DJI Mimo App

4
©
2023 DJI All Rights Reserved.
Contents
Using this Manual 3
Legends 3
Read Before Use 3
Download DJI Mimo App and Watch the Tutorial Video 3
Contents 4
Product Profile 5
Overview 5
Accessories 6
Using for the First Time 9
Attaching the Battery 9
Inserting the microSD Card 9
Activating Osmo Action 4 10
Charging Osmo Action 4 10
Operation 11
Button Features 11
Operating the Touchscreen 11
Status LED Descriptions 20
Storing Photos and Videos 20
Transferring Files 21
Webcam Mode 22
Microphone Connection 22
DJI Mimo App 23
Download the DJI Mimo App 23
Connecting to the DJI Mimo App 23
DJI Mimo App Home Screen 24
Camera View 25
Maintenance 27
Firmware Update 27
Underwater Usage Notes 27
Cleaning Notes 28
Battery Usage Notes 28
Using Other Accessories (Not Included) 29
Specifications 32
DJI Osmo Action 4
User Manual
©
2023 DJI All Rights Reserved.
5
Product Prole
Osmo Action 4 is capable of capturing smooth video at up to 4K/120fps and offers a 155°
super-wide FOV. With DJI’s latest EIS (Electronic Image Stabilization) technology, Osmo Action
4 can record super smooth footage for various sports scenes. With a 1/1.3-inch image sensor,
the camera ensures low-noise footage in sports scenarios and low-light scenes with a high
dynamic range or high contrast. In addition, D-Log M color mode provides a more comfortable
color perception and a larger dynamic range, which is convenient for post-production color
correction.
Osmo Action 4 is equipped with dual touchscreens. The front touchscreen helps capture the
perfect sele, while the rear touchscreen displays the liveview of the camera. Both touchscreens
enable users to change the settings with fingertip movements. The buttons on the camera
enable users to control recording or switch the shooting mode. Osmo Action 4 is waterproof at
depths of up to 18 m. With dierent Osmo accessories, users can enjoy the full range of Osmo
Action 4 features.
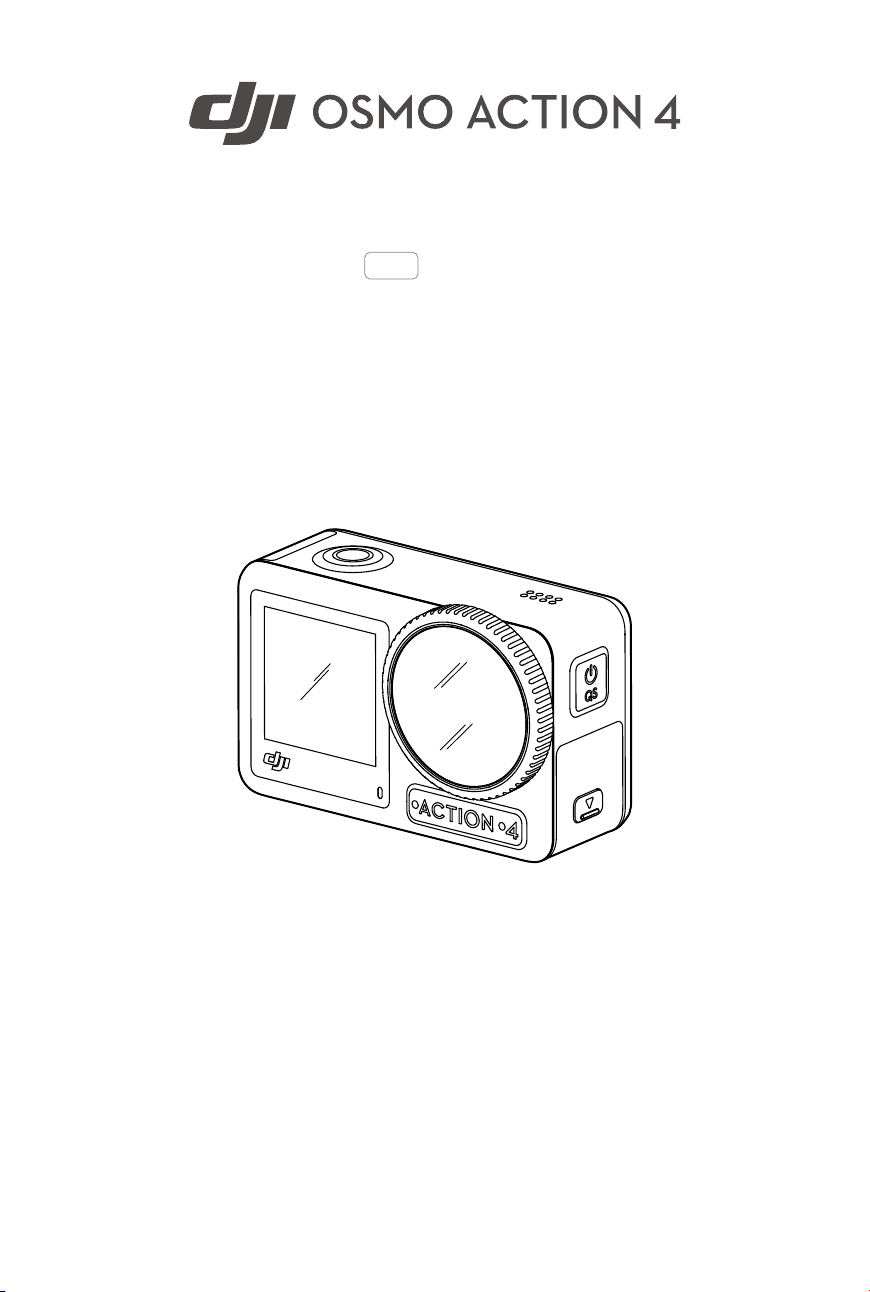
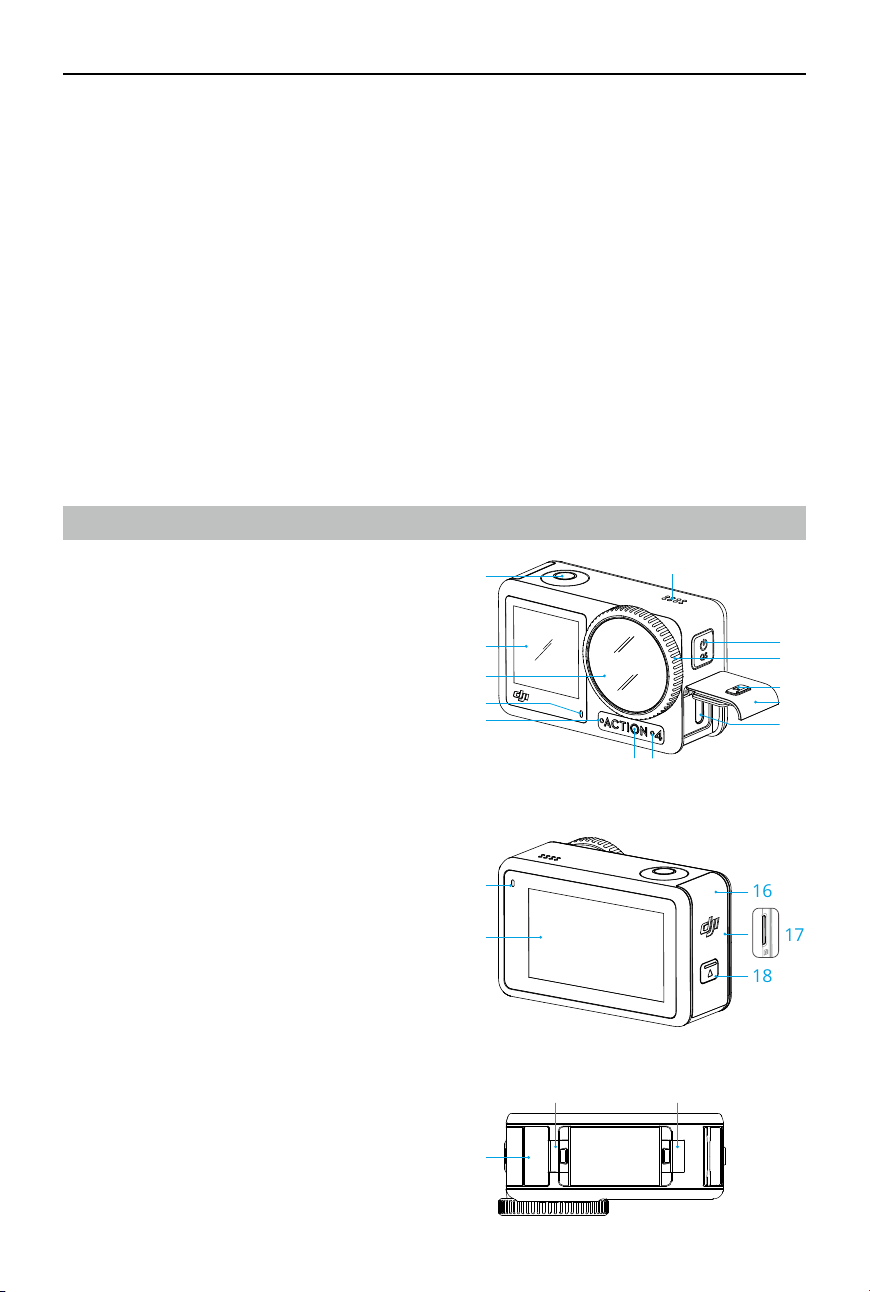
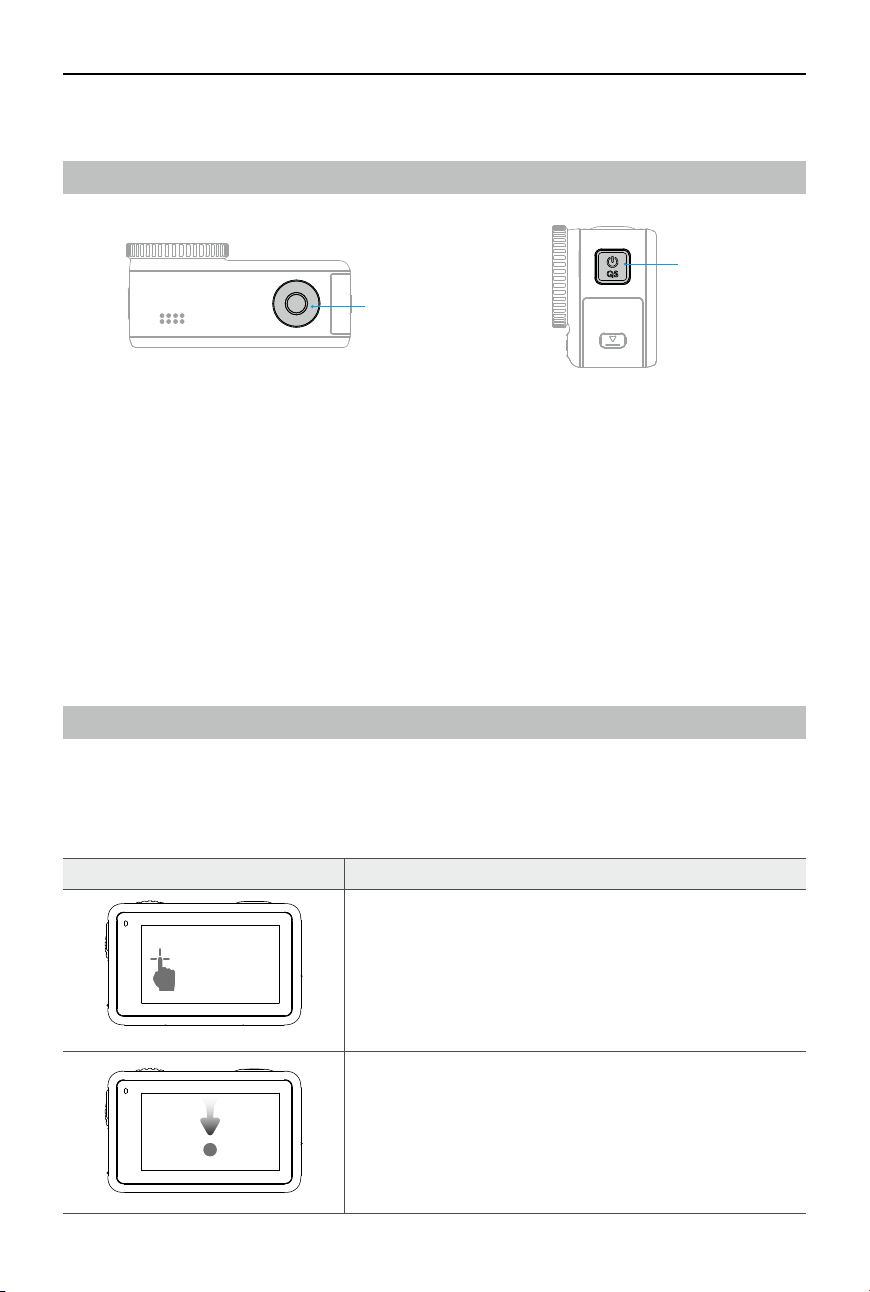
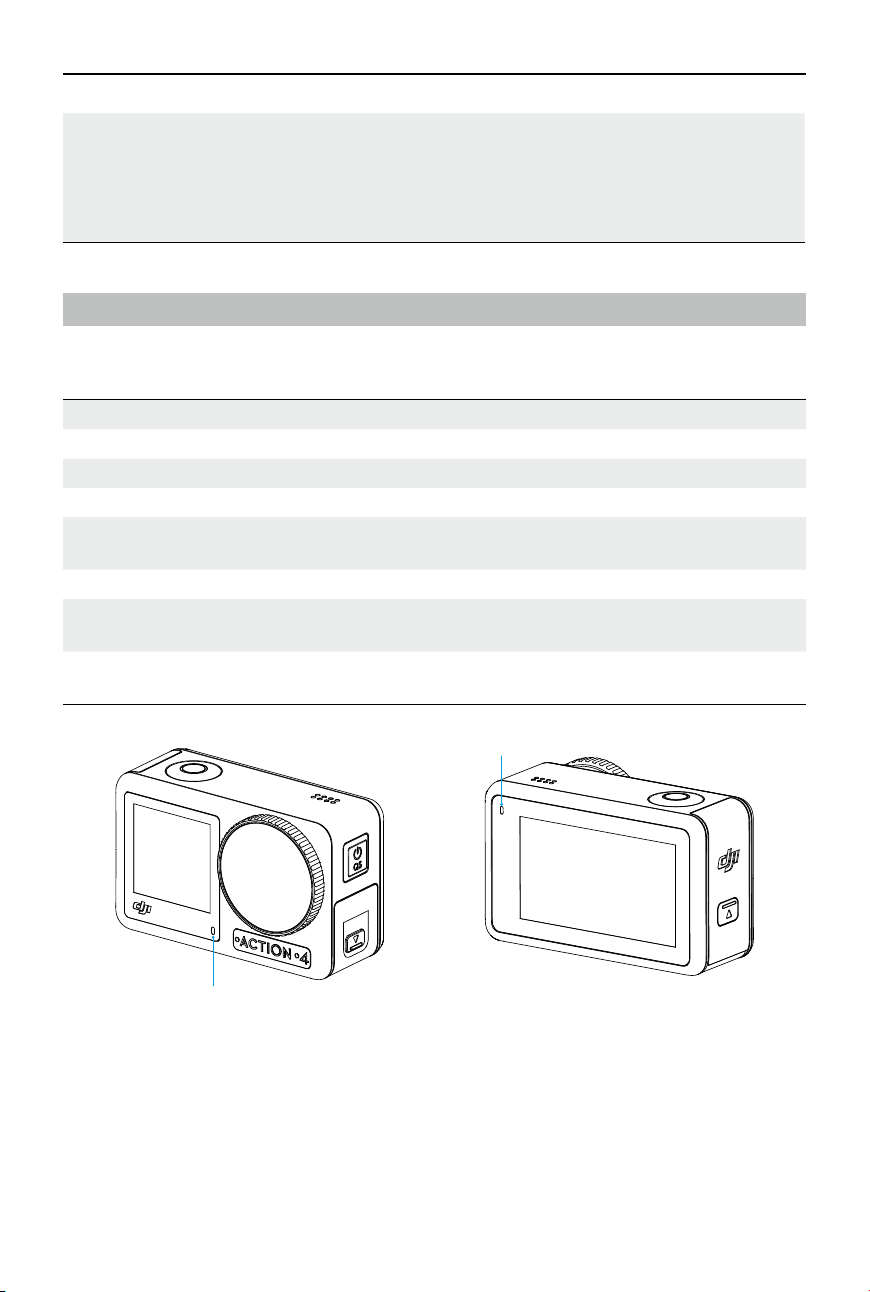
Overview
1. Shutter/Record Button
2. Front Touchscreen
3. Lens
4. Status LED I
5. Microphone I
6. Color Temperature Photo Sensor
7. Microphone II
8. USB-C Port
9. USB-C Port Cover
10. USB-C Port Cover Release Button
11. Lens Protective Cover
12. Quick Switch Button
13. Speaker
14. Status LED II
15. Rear Touchscreen
16. Battery Compartment Cover
17. microSD Card Slot
18. Battery Compartment Cover Release Button
19. Windproof Microphone
20. Quick-Release Slot I
21. Quick-Release Slot II
1
2
7
13
3
4
8
9
10
11
12
5
6
19
20 21
14
15
16
17
18
DJI Osmo Action 4
User Manual
6
©
2023 DJI All Rights Reserved.
Accessories
Osmo Action 4 is compatible with various accessories to exibly change the position to shoot
various sports scenes.
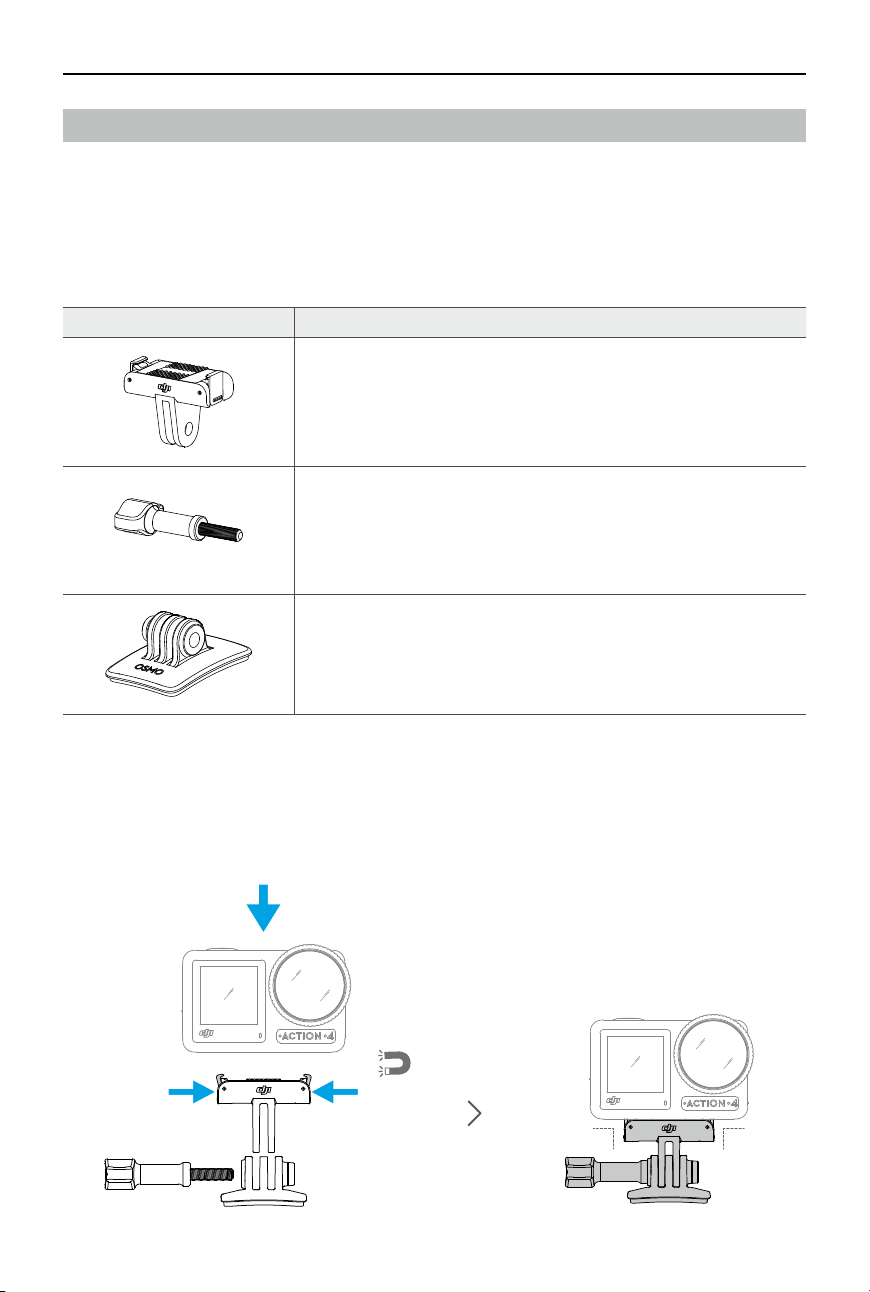
Osmo Action Curved Adhesive Base Kit
The Osmo Action Curved Adhesive Base Kit includes the following accessories.
Accessory Description
Osmo Action Quick-Release Adapter Mount: with a magnetic
design, the quick-release adapter mount can be easily attached
to the camera and connected to other accessories.
Osmo Locking Screw: secures the Osmo Action Quick-Release
Adapter Mount to the Osmo Action Curved Adhesive Base.
Osmo Action Curved Adhesive Base: the base forms a strong,
durable, and long-lasting bond on clean and curved surfaces,
ensuring secure mounting.
Press down on the camera until the clips of the quick-release adapter mount are rmly inserted
into the quick-release slots on the camera, and then tighten the locking screws. Wipe the
surface of the object before attaching the adhesive base. Attach and press the adhesive base
down rmly, and hold for at least 10 seconds. It is recommended to wait 30 minutes before
attaching the camera.
90°90°
DJI Osmo Action 4
User Manual
©
2023 DJI All Rights Reserved.
7
• Press down on the camera until the clips of the quick-release adapter mount are
rmly inserted into the quick-release slots on the camera, and then tighten the locking
screws. Press both clips of the quick-release adapter mount when removing the
camera.
• Osmo Action Curved Adhesive Base can only be applied to clean curved surfaces once.
DO NOT attach the curved adhesive base to surfaces that are at, rough, powdered,
peeling, covered in dust or sand, or have oil, wax, or water stains. Otherwise, the
adapter mount may not be attached rmly.
• The recommended application temperature for the base is -10° to 40° C (14° to 104° F).
DO NOT attach the adhesive base to a surface with a higher or lower temperature.
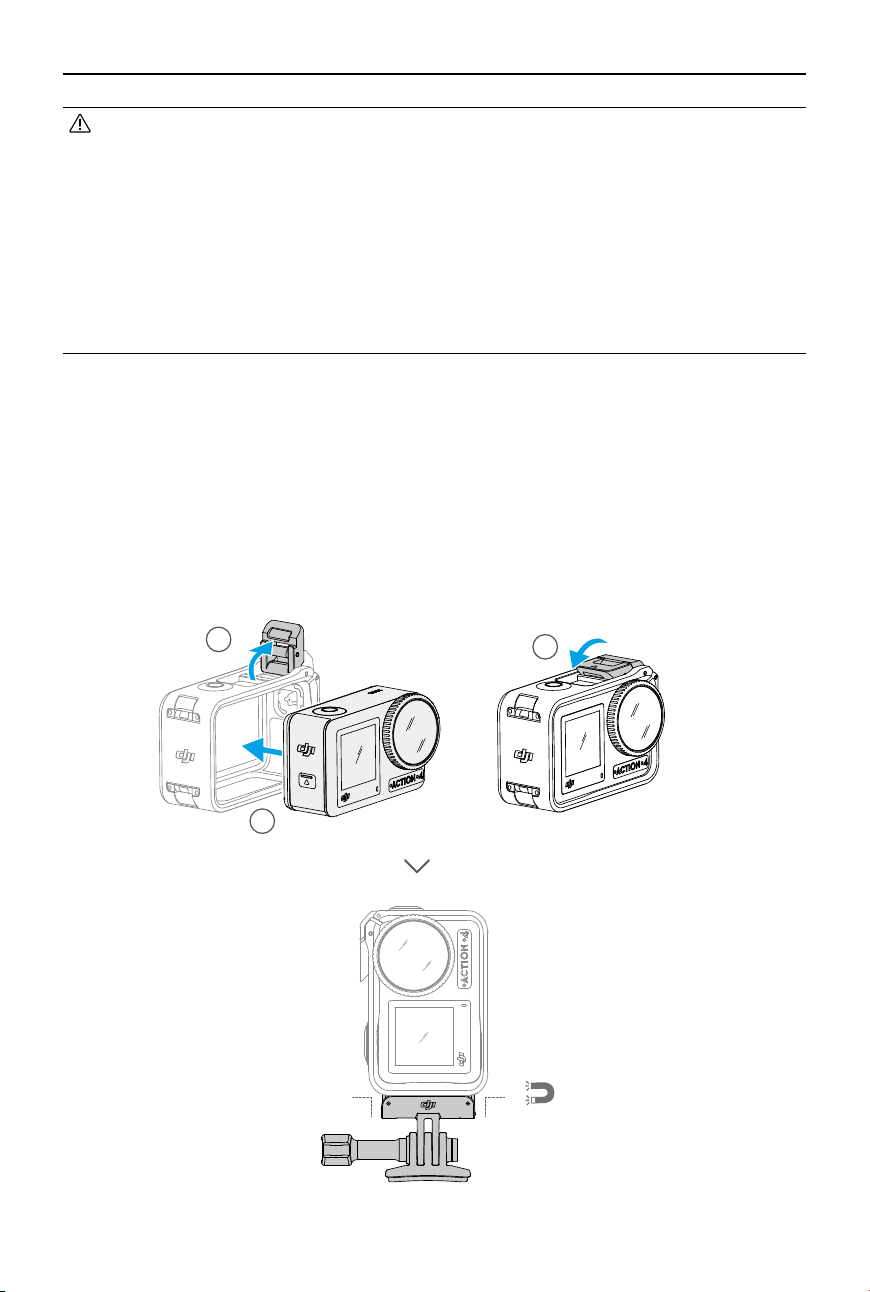
Osmo Action Horizontal-Vertical Protective Frame
With the Osmo Action Horizontal-Vertical Protective Frame, users can ip the camera from the
horizontal to the vertical position for dierent shooting angles. As shown in the gure below,
open the buckle of the horizontal-vertical protective frame, align and place the camera into the
frame, and then close the buckle. The left side of the frame is equipped with two quick-release
slots, which can be used with the Osmo Action Quick-Release Adapter Mount to fasten other
accessories such as the Osmo Action Curved Adhesive Base Kit and the Osmo 1.5m Extension
Rod.
1
2
3
90°90°
DJI Osmo Action 4
User Manual
8
©
2023 DJI All Rights Reserved.
• DO NOT use the battery case to charge non-DJI OSMO batteries. DJI OSMO shall not be
responsible for any fault or damage caused by the use of any non-DJI OSMO battery.
• Place the battery case on a at and stable surface when in use. Make sure the device is
properly insulated to prevent re hazards.
• DO NOT attempt to touch the metal terminals on the battery ports.
• Clean the metal terminals with a clean, dry cloth if there is any noticeable buildup.
• The battery case is not waterproof. DO NOT place it in water or spill any liquid on the
case.
Osmo Action Extreme Battery
The Osmo Action Extreme Battery boosts Osmo Action 4 performance across a wide
temperature range from -20° to 45° C (4° F to 113° F). With a 1770 mAh capacity, the battery
can continuously work for up to 160 minutes.* Refer to Battery Usage Notes for more detailed
information on battery usage.
* Tested at room temperature (25°C/77°F) and 1080p/24fps (16:9), with RockSteady on, Wi-Fi o, and screen
o. This data is for reference only.
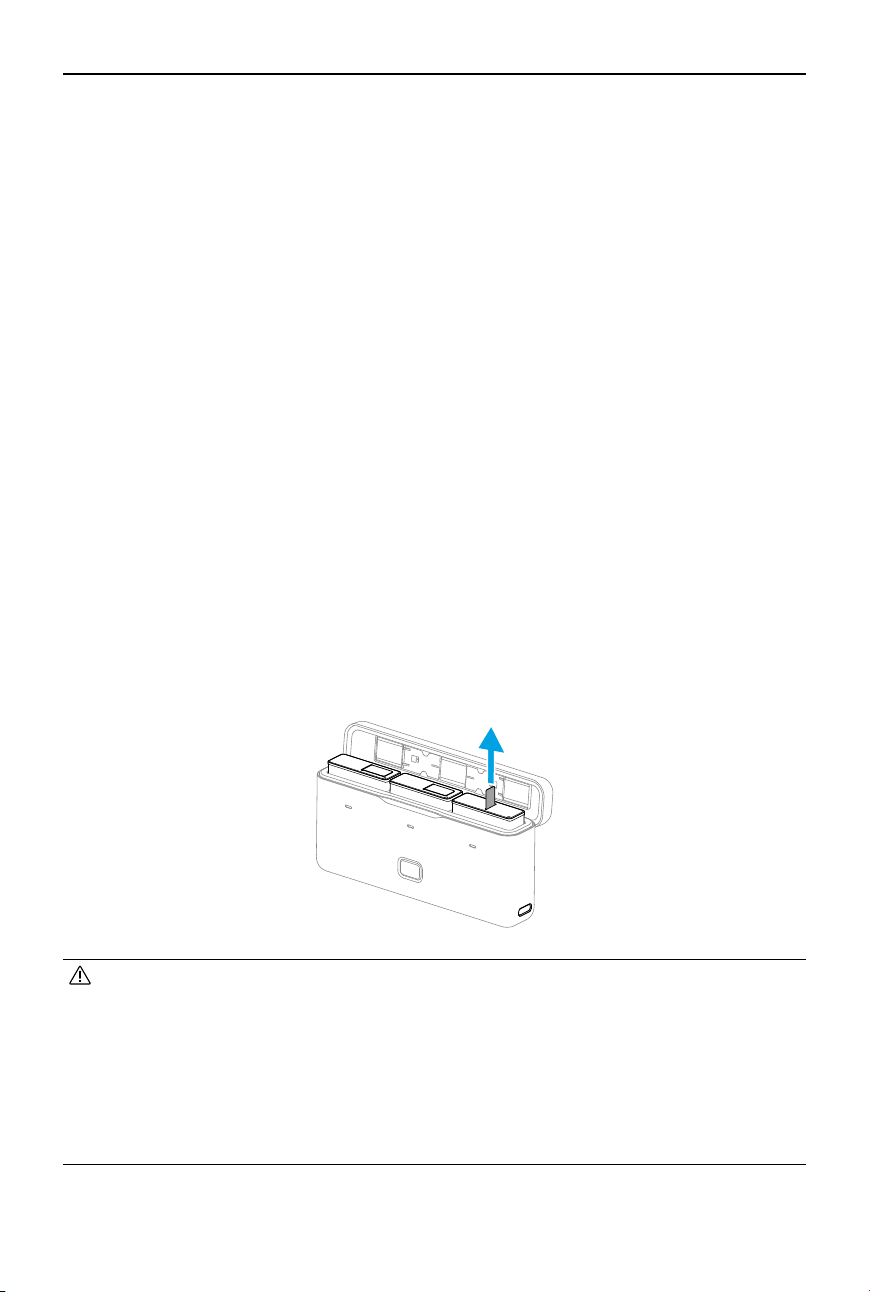
Osmo Action Multifunctional Battery Case
The Osmo Action Multifunctional Battery Case (hereinafter referred to as the battery case) is
designed for storing two microSD cards and three Osmo Action Extreme Batteries safely. Users
can check the battery levels by pressing the button once or opening the battery case. The
status LEDs will display the battery level. When a charger is connected to the battery case with
batteries inserted, the battery case will charge the batteries. When the batteries are inserted
into the battery case, with external devices connected to the USB-C port, the batteries can be
used as a power bank to charge the connected external devices.
The batteries with the highest power level will be charged first, followed by the remaining
batteries to be charged in sequence. The batteries with the lowest power level will be
discharged rst, followed by the remaining batteries to be discharged in sequence.
When using the battery case to charge the Osmo Action Extreme Battery, it is recommended
to use the DJI 30 W USB-C Charger (not included as standard) or a USB-C charger that supports
Power Delivery or PPS (Programmable Power Supply). Three batteries can be fully charged in
about two hours with the DJI 30 W USB-C Charger.
DJI Osmo Action 4
User Manual
©
2023 DJI All Rights Reserved.
9
Using for the First Time
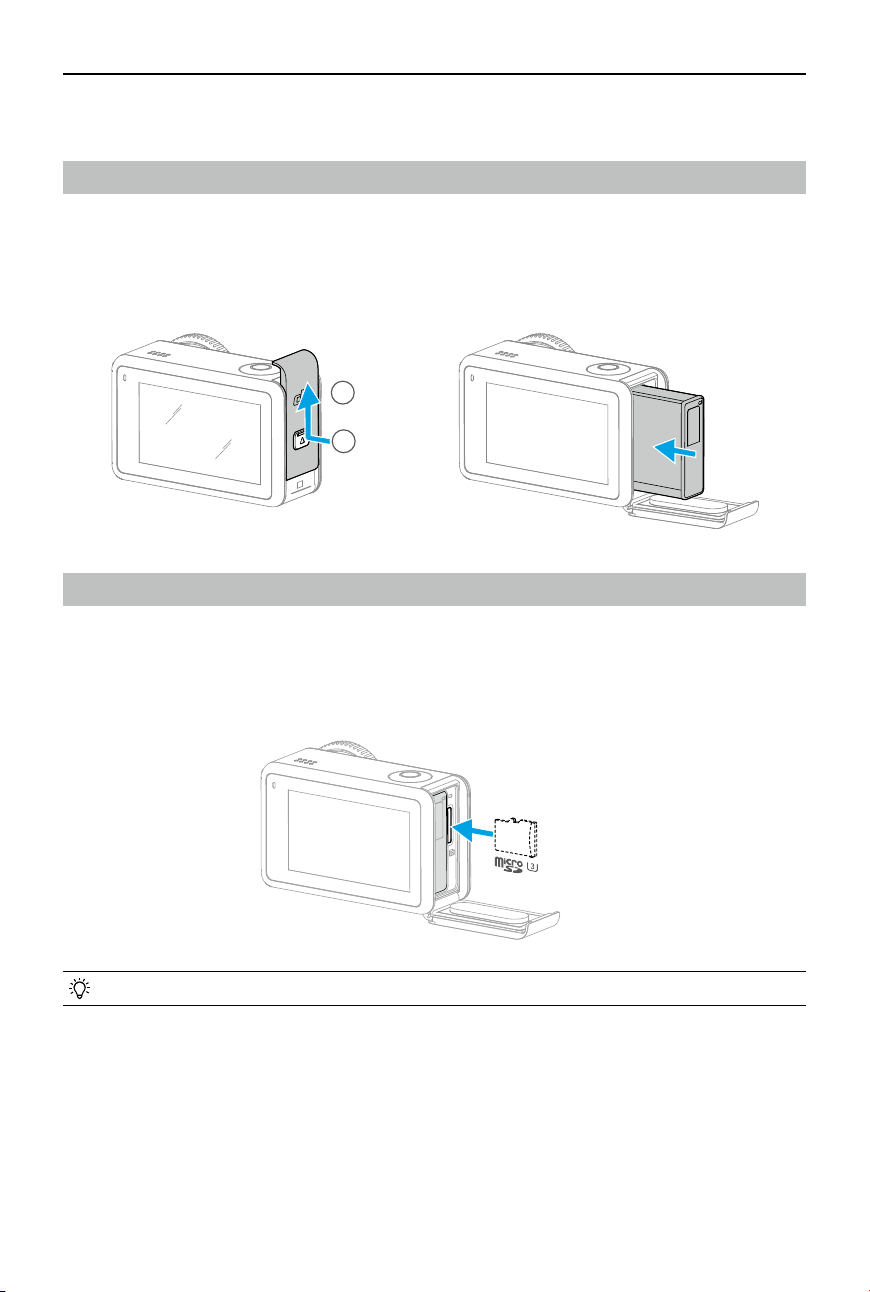
Attaching the Battery
Press the release button on the battery compartment cover and slide upward, then insert
the battery into the battery compartment, as shown below. Make sure the battery is properly
inserted, then close the battery compartment cover. Note: if the battery cover is properly
mounted, the red marks on the bottom will not be visible.
Inserting the microSD Card
The footage shot on Osmo Action 4 is stored on a microSD card. A UHS-I Speed Grade 3
rating microSD card is required due to the fast reading and writing speeds necessary for high-
resolution video data. Refer to the recommended microSD card list in Specications for more
information. Insert the microSD card into the microSD card slot as shown.
• Gently push the microSD card into the camera to partially eject the microSD card.
1
2
1
2
DJI Osmo Action 4
User Manual
10
©
2023 DJI All Rights Reserved.
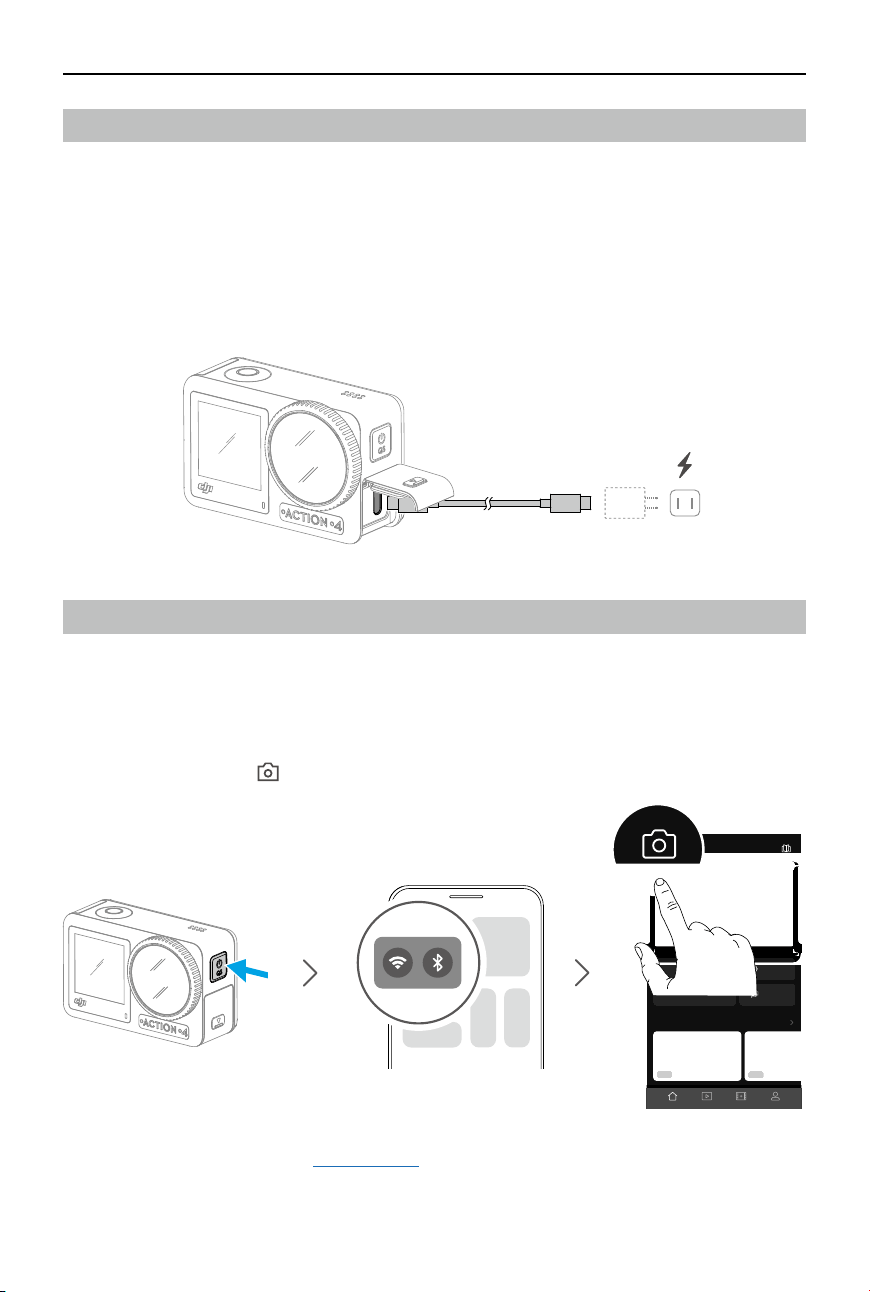
Activating Osmo Action 4
The DJI Mimo app is required for activation when using Osmo Action 4 for the rst time. Follow
the steps below to activate.
1. Press and hold the Quick Switch Button to power on.
2. Enable Wi-Fi and Bluetooth on the mobile device.
3. Launch DJI Mimo, tap , and follow the instructions to activate Osmo Action 4.
Refer to the relevant sections in DJI Mimo App for more information on how to operate the app.
00 !39
Life Advice Looking Through... Do A Sporting Stag
01!23
OSMO MOBILE 4
MORE
OSMO ACTION
MORE
TEMPLATE
SUPPORT
COMMUNITY
Home EditAlbum Me
Device ACADEMY
DJI MIMO
Device
发现
学院
9:41
Charging Osmo Action 4
Press the release button on the USB-C port cover and slide the cover down.
Connect a USB-C charger (not included) to the USB-C port using the Type-C to Type-C PD cable
(included). It is recommended to use the DJI 30 W USB-C Charger or a USB-C charger that
supports Power Delivery or PPS (Programmable Power Supply). When the status LEDs turn o,
the battery is fully charged. It takes about 18 minutes to charge the battery to 80%. The battery
can be fully charged in about 49 minutes.*
* Charging time was tested using a DJI 30 W USB-C Charger in a 25° C (77° F) environment. For reference only.
DJI Osmo Action 4
User Manual
©
2023 DJI All Rights Reserved.
11
Operation
Button Features
Shutter/Record Button
• Press once: take a photo or start/stop recording.
• Press and hold when powered o: power on quickly and begin shooting. The shooting mode
will depend on the SnapShot settings. After shooting, the camera will automatically power o
if left idle for three seconds.
Quick Switch Button
• Press and hold: power on/o.
• Press once: switch between shooting modes. When shooting in Video and Slow Motion mode,
press once to mark a highlight.
Operating the Touchscreen
After the camera is powered on, both touchscreens of the camera display the liveview as well as
the shooting mode, battery level, and microSD card information. Tap or swipe on a touchscreen
to interact with the camera. Note: the two touchscreens cannot be operated at the same time.
When one touchscreen is operated, the other touchscreen is locked.
Operating the Touchscreen Descriptions
Tap
Select the icons on both sides of the screen to playback
shot footage and change the camera settings.
Swipe Down from the top of the Screen
Enters the control menu.
Quick Switch
Button
Shutter/Record
Button
DJI Osmo Action 4
User Manual
12
©
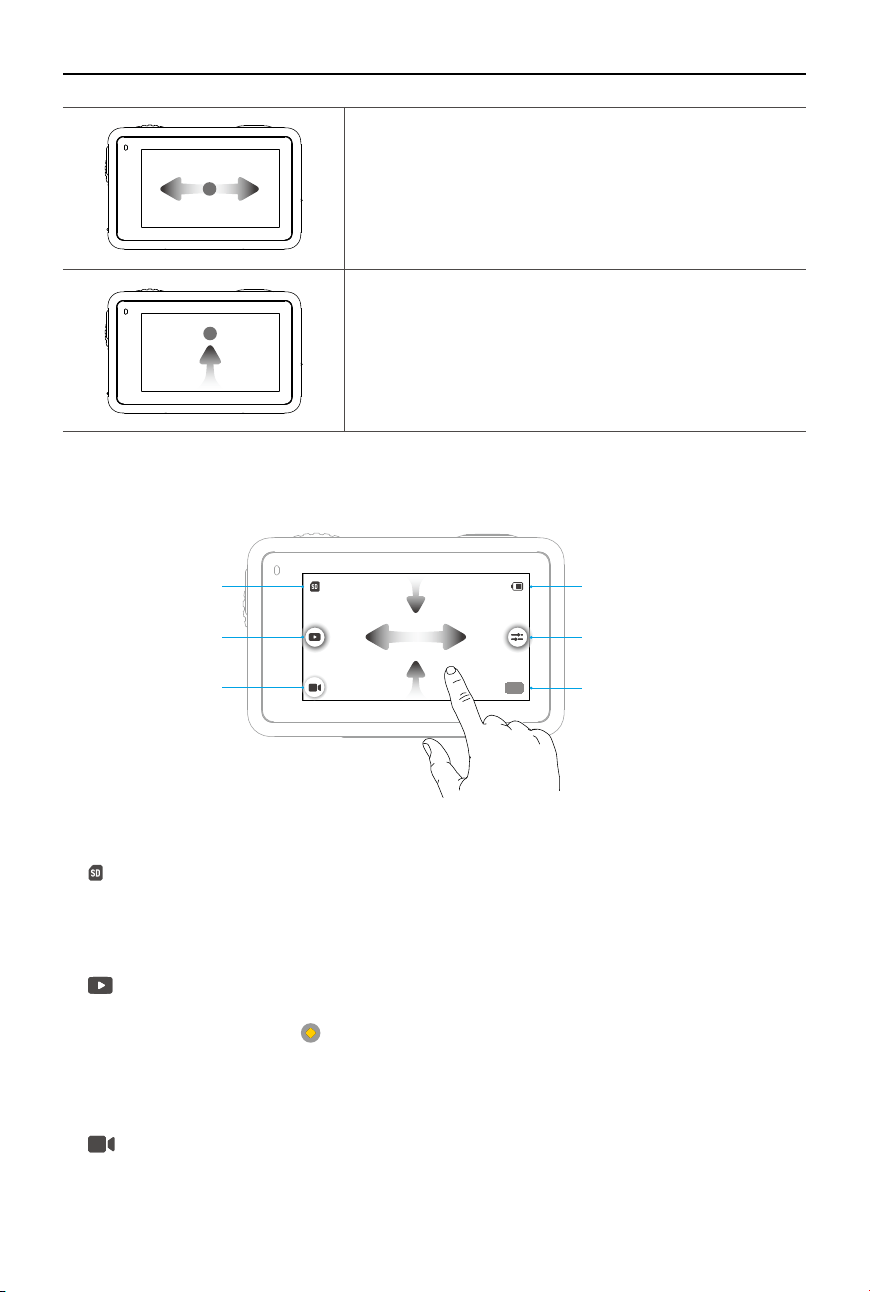
2023 DJI All Rights Reserved.
Swipe Left or Right
Switches between video, photo, and other shooting
modes.
Swipe Up from the Bottom of the Screen
Sets the shooting parameters such as Aspect Ratio,
Countdown Timer, and Resolution.
Camera View
4:15
1080P / 30
1.0X
20m22s
1.0x
1080P30
1
4
5
6
2
3
1. Storage Capacity Information
20m22s
: the icon displays either the storage capacity, the remaining number of photos or
the video duration that can be taken or recorded according to the current shooting mode.
The icon is displayed only when a microSD card is inserted.
2. Playback
: tap to preview the last photo or video captured or played back. Swipe from the right to
exit playback and go back to liveview. When playing back the video, the playback speed can
be adjusted. Users can tap to mark highlights, helping to quickly locate specic moments
during post-editing, reducing the time to find highlights. The marked highlights can be
viewed during playback in DJI Mimo.
3. Shooting Modes
: tap the icon and swipe to select the shooting mode.
DJI Osmo Action 4
User Manual
©
2023 DJI All Rights Reserved.
13
Shooting Modes Description
Take a photo Take a photo or countdown photo.
Video Record a video.
Slow Motion Supports 4x or 8x slow-motion video shooting. In Slow Motion mode,
the camera records the video with a high frame rate and slows the
footage down to 4x or 8x the normal speed during playback. Slow
Motion catches details not visible to the naked eye, which is ideal for
fast-action shots. Note: slow-motion videos do not include audio. The
audio le is stored as a standalone le and has the same path as the
videos, which can be transferred to your computer.
Timelapse Select from Hyperlapse and Timelapse. In this mode, the camera
turns long events into short videos by taking a frame of video at set
intervals.
Use Hyperlapse to record smooth timelapse videos when the camera
is in motion (such as in a car or when held in the hand). Use Timelapse
to record timelapse videos when the camera is mounted and still.
Three presets in Timelapse are designed for typical scenes such as
Crowds, Clouds, and Sunset. Users can also optimize the interval and
duration for recording timelapse videos.
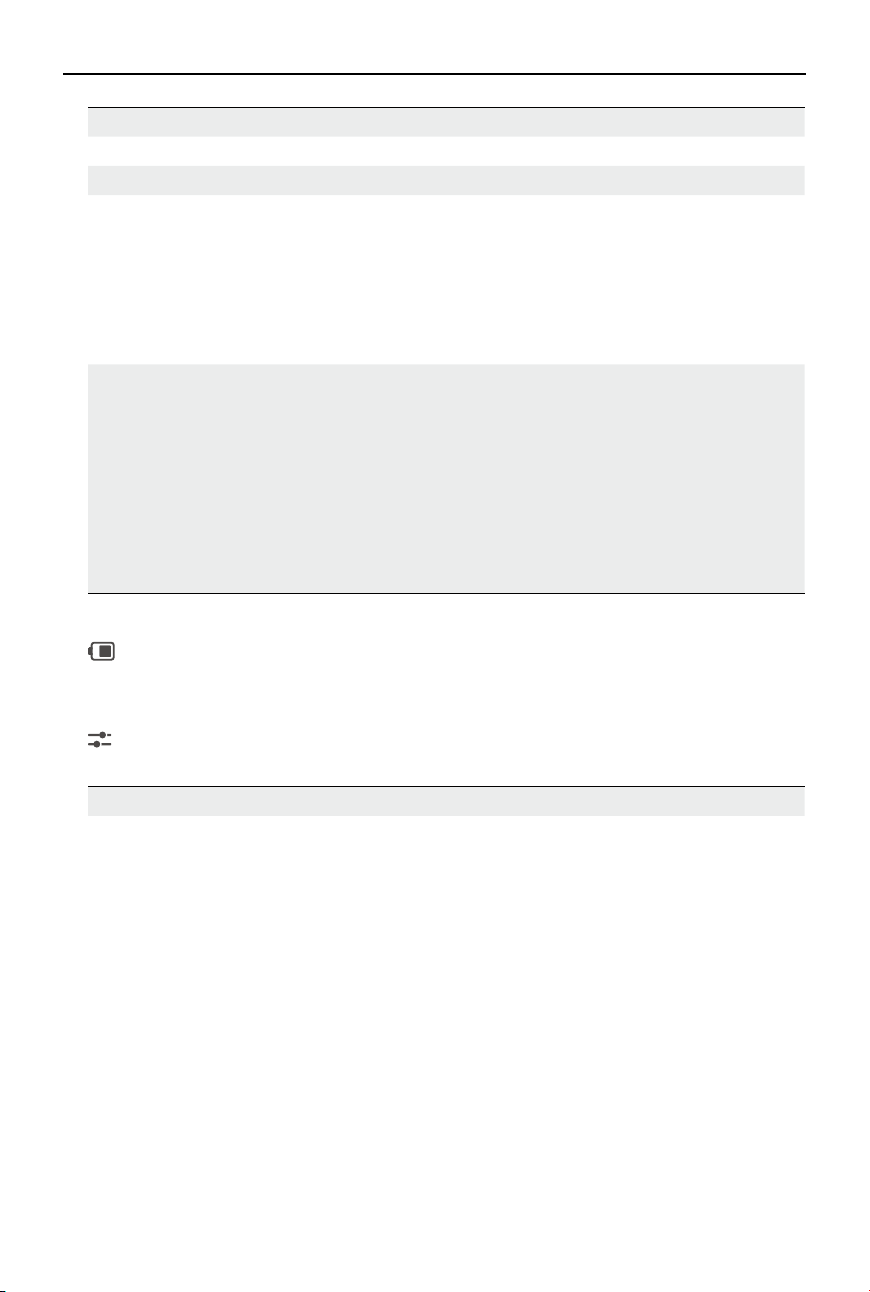
4. Battery Level
: this icon displays the current battery level of Osmo Action 4. Tap the icon to view more
detailed information about the battery level.
5. Parameters
: click to adjust the image and audio parameters. Tap PRO to adjust pro parameters.
Various parameters can be set in dierent shooting modes.
Shooting Modes Parameters
Photo Basic Mode
The FOV can be adjusted.
FOV: the FOV can be set to Standard (Dewarp) or Wide.
PRO Mode
Exposure, White Balance, FOV, and Format are available.
1. Exposure: Auto and Manual modes are available.
2. White Balance: Auto and Manual modes are available.
3. FOV: the parameters are same with Basic Mode.
4. Format: select the picture to be stored as JPEG or JPEG+RAW.

DJI Osmo Action 4
User Manual
14
©
2023 DJI All Rights Reserved.
Video Basic Mode
FOV, Image Adjustment, EIS Priority in Low Light, and Low-Light Image
Enhancement are available.
1. FOV: FOV can be set to Narrow, Standard (Dewarp), Wide, or Ultra
Wide. Some FOV options are unavailable when using certain frame
rates.
2. EIS Priority in Low Light: enabling EIS Priority in Low Light will remove
motion blur and disable anti-icker function. Image sharpness may
be aected when ambient light is too low.
3. Image Adjustment: users can adjust the sharpness and noise
reduction based on needs for optimal image quality.
4. Low-Light Image Enhancement: when enabled, the camera will
detect low-light environment automatically and adjust exposure
parameters intelligently to improve image quality.
PRO Mode
Image and audio parameters can be adjusted.
Image Parameters: Exposure, White Balance, Color, FOV, Image
Adjustment, and Low-Light Image Enhancement are available.
• Exposure: Auto and Manual modes are available.
• White Balance: Auto and Manual modes are available.
• Colors: Normal and D-Log M are available. D-Log M is designed for
professional color grading in post-editing. In high-contrast or multi-
color (e.g., garden, eld, etc.) scenarios, it can enlarge the dynamic
range for more color-tuning space in post-production. 10-bit color
depth enables smoother color transition.
• FOV: the parameters are same with Basic Mode.
• Image Adjustment: the parameters are same with Basic Mode.
• Low-Light Image Enhancement: the parameters are same with Basic
Mode.
Audio Parameters: Channel, Wind Noise Reduction, and Gain are
available.
• Channel: select from Stereo or Mono.
• Wind Noise Reduction: when enabled, the camera will reduce the
wind noise picked up by the built-in microphone using algorithms.
Note: Wind Noise Reduction does not work when connected to the
external microphone.
• When a microphone is connected, the input gain of the microphone
can be adjusted.

DJI Osmo Action 4
User Manual
©
2023 DJI All Rights Reserved.
15
Slow Motion Basic Mode
The FOV and image parameters can be adjusted.
1. FOV: FOV can be set to Standard (Dewarp) or Wide.
2. Image Adjustment: users can adjust the sharpness and noise
reduction based on needs for optimal image quality.
PRO Mode
Exposure, White Balance, Color, FOV, and Image Adjustment are
available.
1. Exposure Exposure: Auto and Manual modes are available.
2. White Balance: Auto and Manual modes are available.
3. Colors: Normal and D-Log M are available. D-Log M is designed
for professional color grading when post-editing. In high-contrast
or multi-color (e.g., garden, eld, etc.) scenarios, it can enlarge the
dynamic range for more color-tuning in post-production. 10-bit
color depth enables smoother color transition.
4. FOV: the parameters are same with Basic Mode.
5. Image Adjustment: the parameters are same with Basic Mode.
Timelapse Hyperlapse
Basic Mode: FOV, EIS Priority in Low Light, and Image Adjustment are
available.
PRO Mode: Exposure, White Balance, Color, FOV, and Image Adjustment
are available.
Timelapse
Basic Mode: FOV and Image Adjustment are available.
PRO Mode: Exposure, White Balance, FOV, and Format are available.
6. Zoom
1.0x
: press and hold the icon, then drag to set the zoom ratio.
DJI Osmo Action 4
User Manual
16
©
2023 DJI All Rights Reserved.
1. Custom Mode
Tap and tap to save the current conguration as a custom mode. Save the shooting
parameters in the custom mode, which can then be used directly to shoot similar scenes.
Users can save up to ve custom modes.
2. Quick Switch
Set the modes accessible with the Quick Switch Button: Screen Switch, Custom Modes,
Photo, Video, Slow Motion, Timelapse, Hyperlapse, and Playback. When Voice Prompt is
enabled, the camera will voice broadcast the shooting mode once the quick switch button is
pressed to change the mode. When the camera is installed on a helmet or other hard-to-see
locations, users can accurately select the required mode with Voice Prompt.
3. Brightness
Tap and move the slider to adjust the brightness.
4. Settings
Item Description
SnapShot When Osmo Action 4 is powered o or in sleep mode, use SnapShot
to quickly power on and begin shooting. Supported shooting modes
include Photo, Video, Last Settings, Video, Hyperlapse, and Custom
Modes.
After shooting, the camera will automatically power o if left idle for
three seconds.
Single Screen
Preview (Scrn O
When Locked)
When enabled, only one touchscreen will turn on. Tap and swipe up
on the touchscreen to unlock the screen.
Voice Control Tap to enable voice control to use the camera with voice commands.
Mandarin Chinese and English are supported. Voice commands in
English include Start Recording, Stop Recording, Take Photo, and Shut
Down.
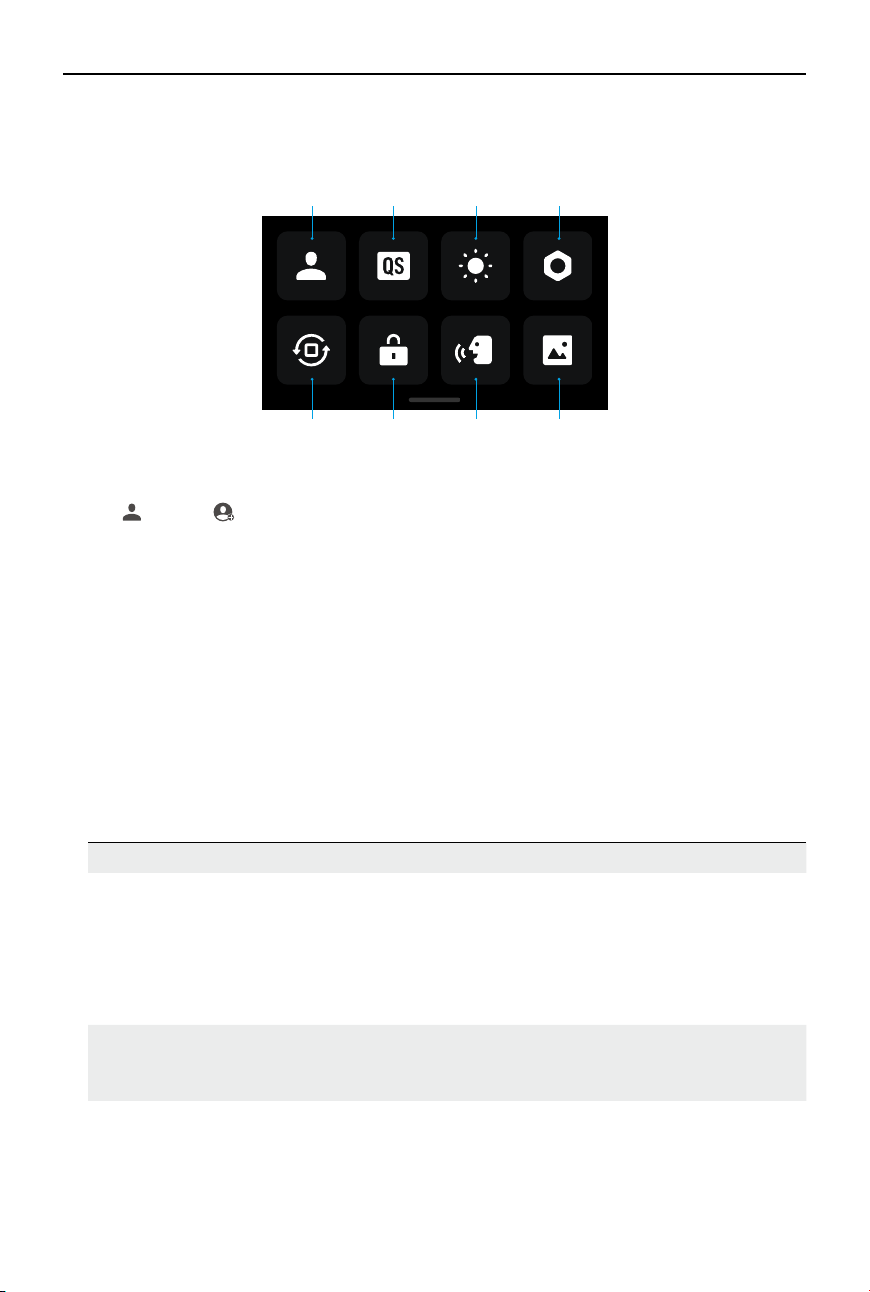
Swipe Down - Control Menu
Swipe down from the edge of the screen to enter the control menu.
1
5 6 7 8
2 3 4

DJI Osmo Action 4
User Manual
©
2023 DJI All Rights Reserved.
17
OTG Connection Tap OTG Connection and connect the camera to an Android device
with the Type-C to Type-C PD cable (included). With OTG connection,
the files can be transferred from the camera to an Android device.
Note: OTG Connection is only available when the Android device
supports OTG connection.
Wireless
Connection
Tap to check wireless information, select Wi-Fi frequency, and reset
the Wi-Fi connection. Connect the camera to DJI Mimo wirelessly to
update the rmware version.
Video
Compression
Tap to switch the video-encoding format between Efficiency and
Compatibility modes. If Eciency is selected, videos will be encoded in
HEVC with a smaller le size. If Compatibility is selected, videos will be
encoded in H.264 with higher compatibility.
Sounds Tap to set volume. High, medium, low, and mute are available.
Grid Tap to display grid lines in liveview photos or videos to help level the
camera vertically and horizontally. The display options include Grid,
Diagonals, and Grid & Diagonals.
Timecode Tap to set Timecode for the camera. When setting Timecode, the
camera can be synchronized by the system settings. Also, the camera
can be synchronized by the time code synchronizer using the USB-C
port.
Naming
Management
Tap to edit the naming rules for storage folders and les.
Scrn O When Rec Tap to set the time. After recording starts, the screen will turn o after
the set time. This will not aect the recording.
Auto Power O Tap to set the time. The camera will power off automatically when
there is no operation on camera within the set duration.
LED Turn the two status LEDs on Osmo Action 4 on or o.
Horizon
Calibration
Tap to calibrate the horizon according to the prompts on the screen.
Continue Last
Livestream
Tap to enable, so the camera can continue the last livestream after it
has stopped. Note: Livestream is only available on DJI Mimo.
Language Tap to set the language to English, Simplified Chinese,Traditional
Chinese, Japanese, Korean, Thai, Arabic, German, Spanish, French,
Italian, Russian, Brazilian Portuguese, Turkish, Indonesian, or Polish.
Date and Time Tap to set the date and time of the camera system.
Format Tap and swipe to format the microSD card. Formatting will
permanently delete all data on the microSD card. Make sure to back
up all required data before formatting.
Factory Reset Tap to restore the camera to its original factory settings. This will
delete all the current settings, and the camera will be restored to the
original factory settings and restart.

DJI Osmo Action 4
User Manual
18
©
2023 DJI All Rights Reserved.
Device Info Tap to view the device name, serial number, rmware version, quick
start guide, and export the log. Tap Export Log to export the log to the
microSD card. When the camera is connected to the Osmo Action GPS
remote controller, users can view the rmware version of the remote
controller.
Compliance Info Tap to view the compliance information.
5. Orientation Lock
Tap to switch between automatic orientation and locked orientation.
6. Screen Lock
Tap to lock the screen. Swipe up on the touchscreen to unlock the screen.
7. Voice Control
Tap to enable Voice Control so the user can control the camera with set voice commands.
Voice Control is useful in the sports scenarios where hands are busy such as when cycling or
skiing.
8. Full Front Screen
Tap to enable or disable full screen display on the front screen.

DJI Osmo Action 4
User Manual
©
2023 DJI All Rights Reserved.
19
Swipe Up - Parameters Settings
Swipe up from the bottom of the screen to set the parameters for each shooting mode.
Shooting Modes Settings
Photo Set Aspect Ratio and Countdown Timer.
Video Set video resolution and frame rate.
Tap the upper left corner to enable Pre-Rec or Loop Recording and
set the time duration.
• Pre-Rec: When enabled, the camera will pre-record footage
within the set time duration. Once the Shutter/Record button is
pressed, the camera will save the latest pre-recorded footage
before pressing the Shutter/Record button and keep recording,
then save the footage as a whole video. This function allows the
camera to save the footage before pressing the Shutter/Record
button to avoid taking up too much space on the microSD card,
helping capture highlights (especially for shing).
• Loop Recording: When enabled, the camera records a video
by overwriting older footage with new footage at selected time
intervals. This function allows the camera to save space on the
microSD card, and is suitable for use in scenarios where the user
is waiting to capture unanticipated highlights (such as driving).
Tap on the upper right corner to turn o EIS and enable RockSteady,
RockSteady+, HorizonBalancing, or HorizonSteady. For different
resolutions and frame rates, certain EIS modes can only be selected.
Dierent EIS modes have dierent stablization performance.
• Disabled: when selected, record the video with the largest FOV.
• RockSteady: stabilizing footage while retaining the dynamics
of movement, which is suitable for first-person perspective
shooting.
• RockSteady+: compared with RockSteady, the edges of these
images will be cut off more to obtain stronger stabilization
performance.
• HorizonBalancing: this mode corrects shakes for any horizontal
rotation (45°). In this mode, 4K resolution video is supported.
• HorizonSteady: this mode corrects shakes for any horizontal
rotation (360°) and locks onto a leveled horizon in every frame,
regardless of how the camera is mounted or worn.
Slow Motion Set the video resolution and speed ratio.
DJI Osmo Action 4
User Manual
20
©
2023 DJI All Rights Reserved.
Hyperlapse Select Hyperlapse or Timelapse mode. The speed ratio can be set in
Hyperlapse mode. The scene, interval time, and shooting time can
be set when using Timelapse.
Tap the upper right corner to set the resolution when using
Timelapse.
Status LED Descriptions
Osmo Action 4 has two status LEDs which indicate the same status information. They can be
turned on and o.
Blinking Pattern Description
Solid green Ready to use
Temporarily o Taking a photo
Blinks green Osmo Action 4 is charging when powered o
Blinks red and green
alternately
Updating rmware
Blinks red slowly Recording a video or taking a countdown photo
Blinks red three times
rapidly
Powers o the camera or powers on the camera at low battery level
O MicroSD card abnormality (no microSD card detected, microSD card
storage is full, or microSD card error.)
Status LED I
Status LED II
DJI Osmo Action 4
User Manual
©
2023 DJI All Rights Reserved.
21
Storing Photos and Videos
The footage shot on Osmo Action 4 can only be stored on a microSD card (not included). A
UHS-I Speed Grade 3 rating microSD card is required due to the fast read and write speeds
necessary for high-resolution video data. The photos and videos can be transferred to a mobile
device or computer. Refer to Transferring Files for detailed information.
Transferring Files
Transferring Files to a Phone
Connect Osmo Action 4 to DJI Mimo, tap the Playback icon to preview photos and videos. Click
to download photos and videos. The photos and videos can be shared directly from DJI Mimo
to social media platforms.
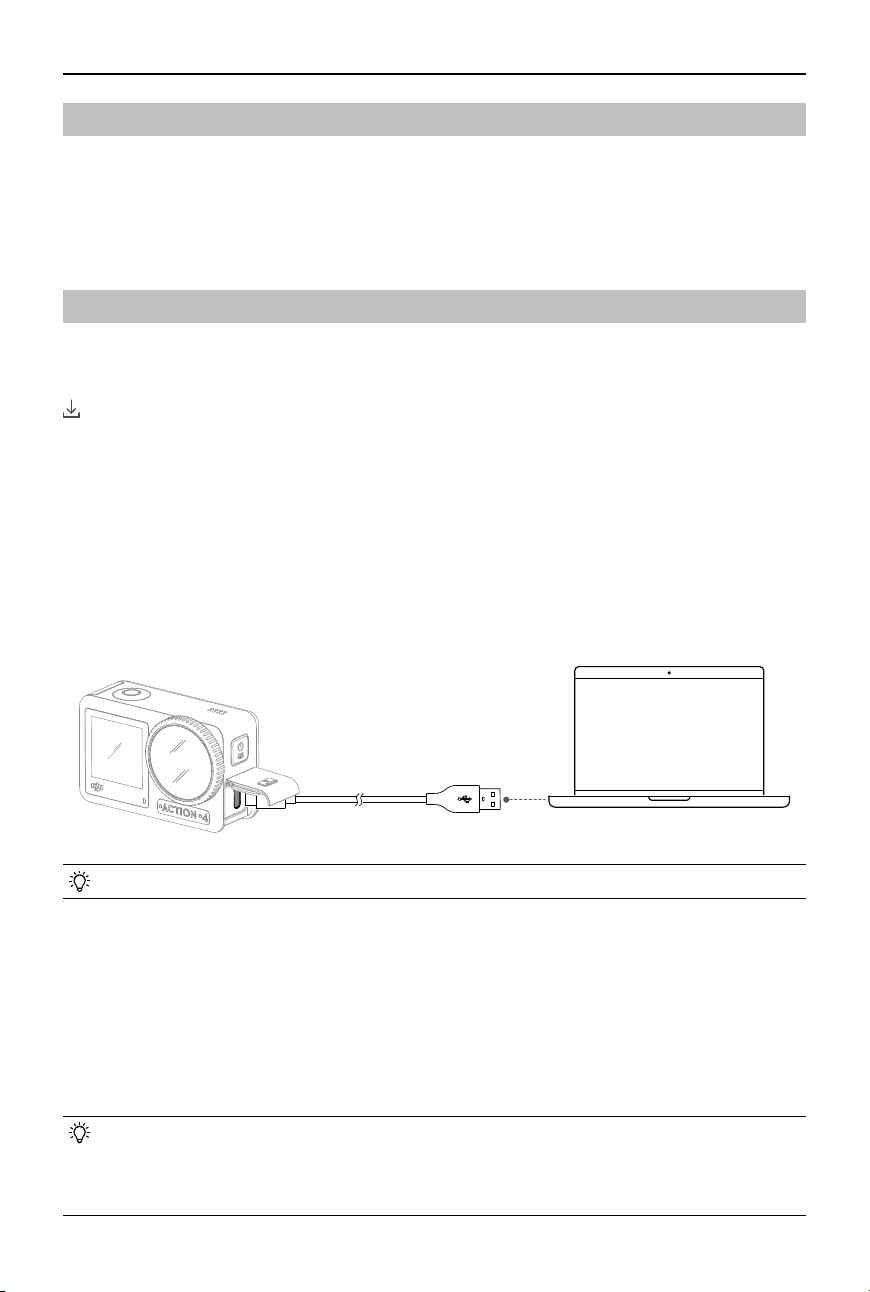
Transferring Files to a Computer
Power on Osmo Action 4 and connect it to a computer using a USB-C cable. When connected
to a computer, a pop-up will appear, this prompts the user to select the USB connection type
on the camera touchscreen. Tap Transfer File to download the files from the camera to the
computer. When transferring a le, the camera cannot take photos or record videos.
Select Cancel to only charge Osmo Action 4.
• Reconnect Osmo Action 4 to the computer if a le transfer is interrupted.
OTG Connection for Transferring Files
For the Android devices supporting OTG connection, the files can be transferred from the
camera to the Android device with OTG connection.
Connect the camera to an Android device with the Type-C to Type-C PD cable (included) using
the USB-C port on the camera. When connected, view and transfer the photos and videos of the
camera via the device album or le management.
• If the camera cannot automatically recognize the Android device using the OTG
connection, swipe down from the edge of the screen and enter the control menu.
Tap Settings > OTG Connection, and use the Type-C to Type-C PD cable to connect the
camera to device.
DJI Osmo Action 4
User Manual
22
©
2023 DJI All Rights Reserved.
Webcam Mode
Osmo Action 4 can work as a webcam on a computer. Power on the camera and connect it to
the computer using a USB-C cable. The camera will go into USB mode. Tap Webcam to enter
the Webcam mode, and the camera will function as a webcam input device. The bottom of the
screen displays Webcam. Press the shutter/record button to start recording. Tap the Image
Parameter Settings icon on the right side of the screen to set the exposure, white balance, and
FOV parameters. Users can preview recorded videos after exiting the Webcam mode.
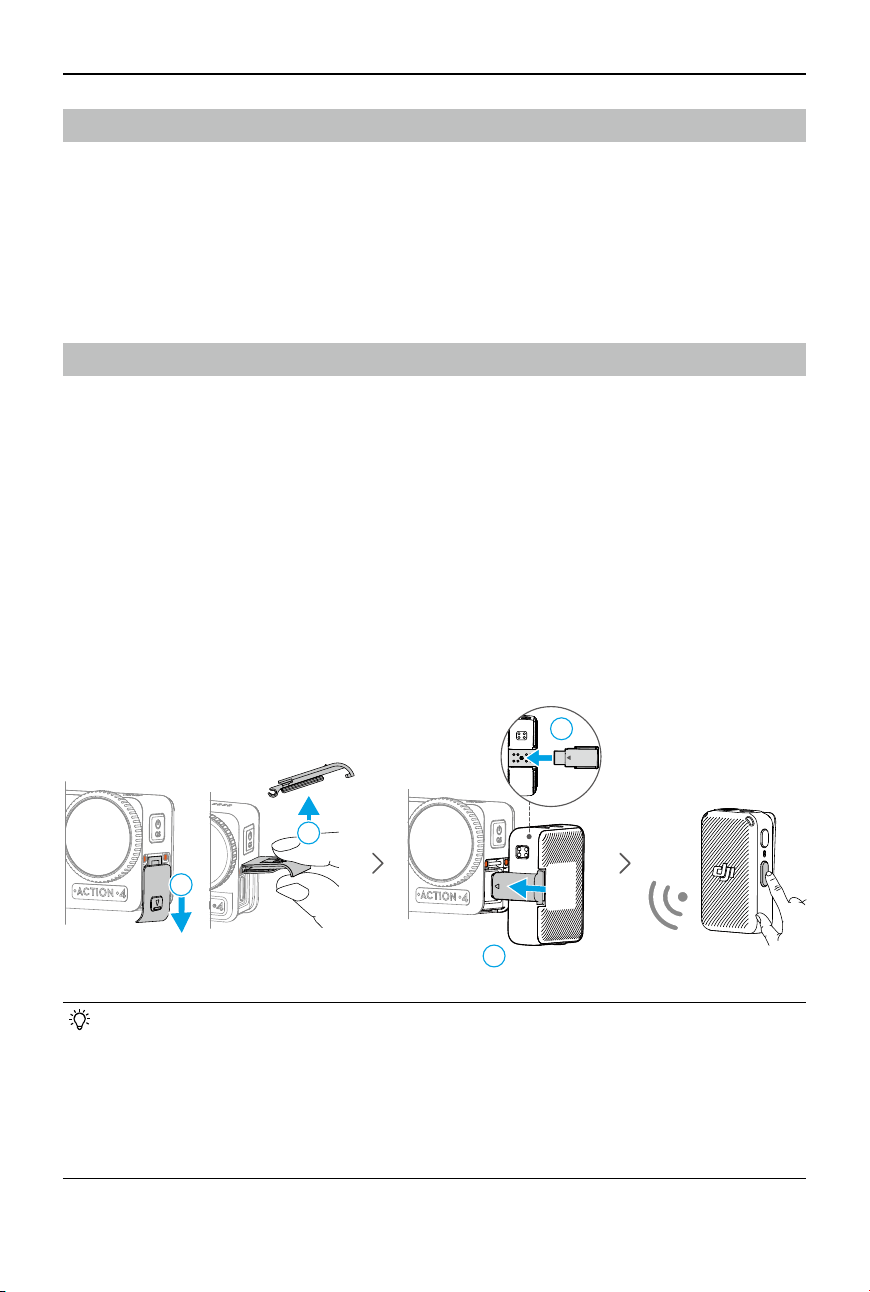
Microphone Connection
Osmo Action 4 can be linked to an external microphone, including DJI Mic or any third-party
digital USB-C microphones that support 48K/16bit.
Follow the steps below (with DJI Mic as an example) to connect to a microphone:
1. Press the release button on the USB-C port cover and slide it downward. Lift the cover
upward until it is detached from the device.
2. Power on the receiver and transmitter, and make sure the receiver and transmitter are
linked.
3. Attach the receiver to the USB-C port of the camera using the USB-C adapter. A microphone
icon will be displayed on the screen.
4. Press the linking button on the transmitter to start recording while using the transmitter for
audio. Press the linking button again to stop recording.
• The transmitter and the receiver are linked by default. Follow the steps below to link if
the transmitter and receiver are disconnected.
a. Place the transmitter and the receiver in the charging case to link automatically.
b. Power on the transmitter and the receiver, press and hold the link button on the
transmitter, slide down on the screen of the receiver, select Settings and scroll
through and tap Link Device to start linking. The status LED glows solid green to
indicate linking was successful.
REC
2
2
1
1
DJI Osmo Action 4
User Manual
©
2023 DJI All Rights Reserved.
23
Android 8.0 or aboveiOS 12.0 or above
DJI Mimo App
When used with the DJI Mimo app, users can monitor the current camera view, set the camera
parameters, and control the camera with a mobile device. The DJI Mimo app enables user to
get most out of Osmo Action 4 with a series of functions, such as transferring les, editing and
sharing, InvisiStick for Skiing, and Wi-Fi livestream.
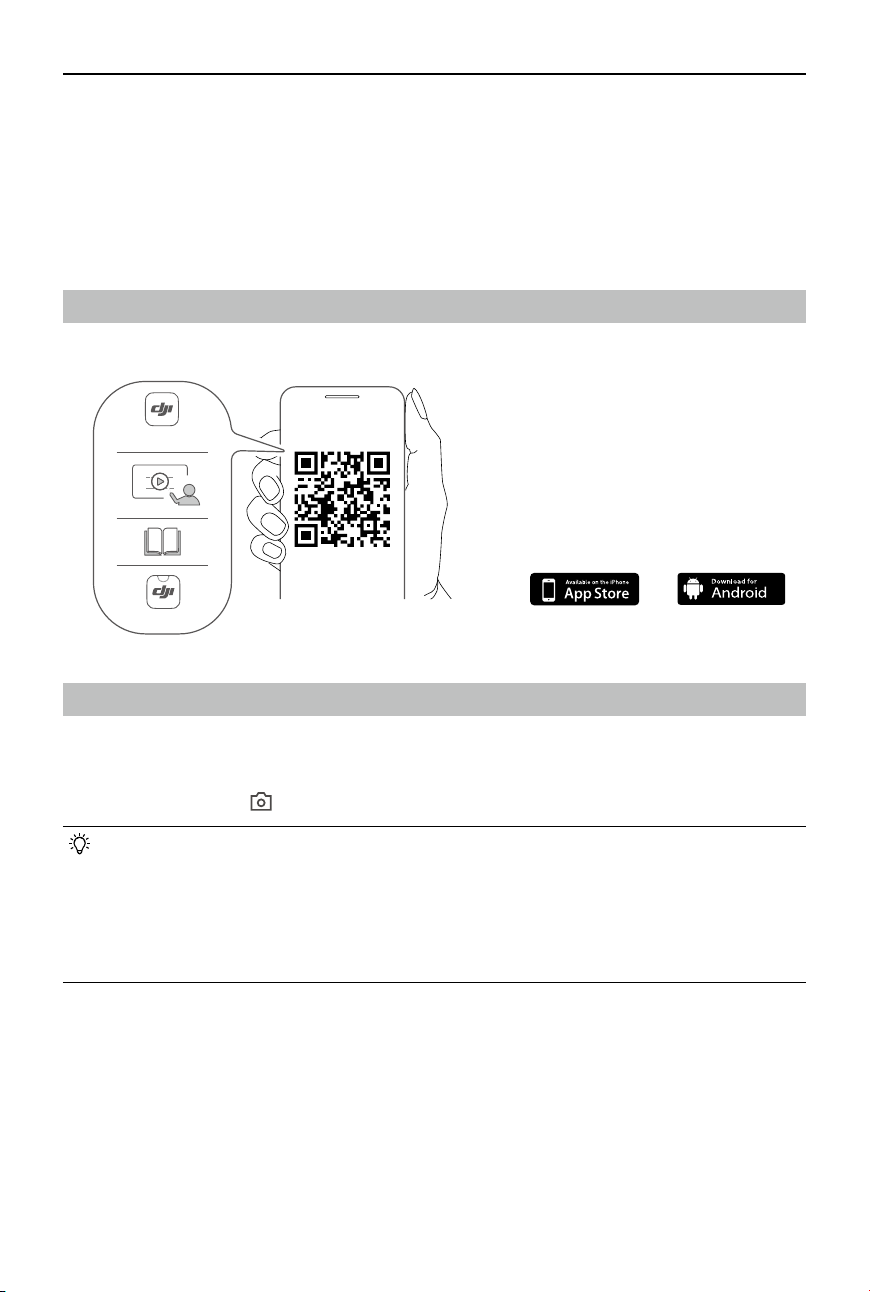
Download the DJI Mimo App
Search DJI Mimo in the app store, or scan the QR code to download and install.
Connecting to the DJI Mimo App
1. Power on Osmo Action 4.
2. Enable Wi-Fi and Bluetooth on the mobile device.
3. Launch DJI Mimo, tap , and follow the instructions to activate Osmo Action 4.
• If there is a problem when connecting to DJI Mimo, follow the steps below.
a. Make sure that both Wi-Fi and Bluetooth are enabled on the mobile device.
b. Make sure the DJI Mimo app has the latest rmware version.
c. Swipe down from the top of the screen to enter the control menu, select Wireless
Connection > Reset Connection. The camera will reset all connections and Wi-Fi
passwords.
https://s.dji.com/guide60
DJI Store App
DJI Mimo App
DJI Osmo Action 4
User Manual
24
©
2023 DJI All Rights Reserved.
DJI Mimo App Home Screen
Lauch DJI Mimo and enter the home screen.
Device: tap to connect to Osmo Action 4. Once connected, DJI Mimo enters the camera
view.
Academy: tap to watch tutorials and view manuals.
TEMPLATE
AI Editor: provides several templates for editing photos or videos.
Home: tap to return to the home screen.
Album: manage and view footage from a mobile device or DJI device.
Editor: tap to edit photos or videos on Osmo Action 4 or import them to and edit on a
mobile device.
Prole: register or log in to a DJI account. View works and settings, check likes and followers,
send messages to other users, or connect with the DJI Store.
DJI Osmo Action 4
User Manual
©
2023 DJI All Rights Reserved.
25
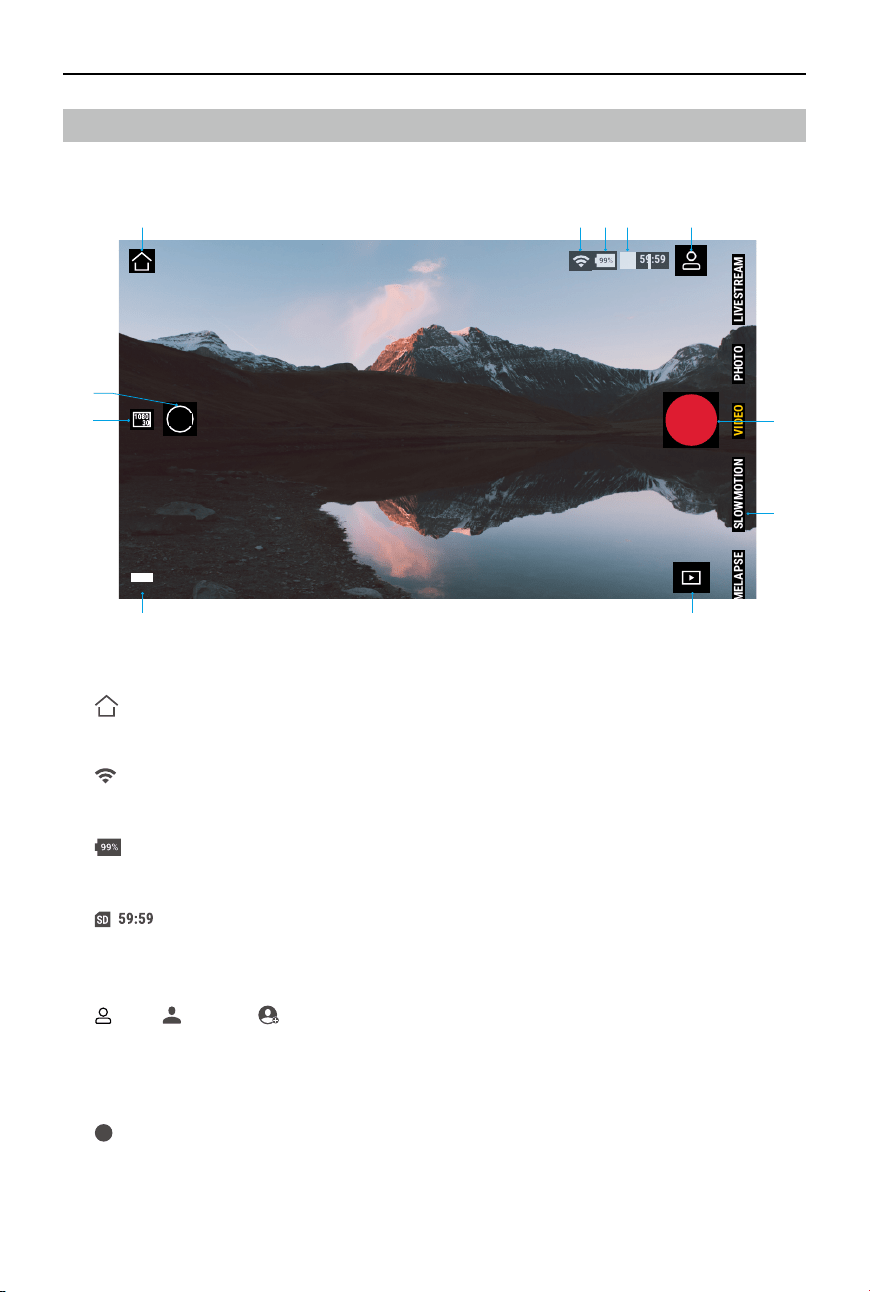
Camera View
The camera view display may differ depending on the shooting mode. This display is for
reference only.
89
VIDEO
VIDEO
SLOWMOTION
SLOWMOTION
TIMELAPSE
TIMELAPSE
PHOTO
PHOTO
LIVESTREAM
LIVESTREAM
1.0x
1.0x
59:59
59:59
1 2 3 4 5
6
7
10
11
1. Home
: tap to return to the home screen.
2. Wi-Fi
: displays Wi-Fi connection.
3. Battery Level
: displays the current battery level of Osmo Action 4.
4. microSD Card Information
: displays either the remaining number of photos that can be taken or the video
duration that can be recorded according to the current shooting mode.
5. Custom Mode
: tap and tap to save the current configuration as a custom mode. Save the
shooting parameters in the custom mode, which can then be used directly to shoot similar
scenes. Users can save up to ve custom modes.
6. Shutter/Record Button
: tap to take a photo or to start or stop recording a video.
DJI Osmo Action 4
User Manual
26
©
2023 DJI All Rights Reserved.
7. Shooting Modes
Scroll to select the shooting mode.
Shooting Modes Description
Hyperlapse Use Hyperlapse to record smooth timelapse videos when
the camera is in motion (such as in a car or when hand-held).
Tap Playback to preview timelapse videos as soon as they are
captured.
Timelapse Use Timelapse to record timelapse videos when the camera is
mounted and still. Three presets in Timelapse are designed for
typical scenes such as Crowds, Clouds, and Sunset. Users can also
optimize the interval and duration for recording timelapse videos.
Slow Motion Supports 4x or 8x slow-motion video shooting. In Slow Motion
mode, the camera records the video with a high frame rate and
slows the footage down to 4x or 8x the normal speed during
playback. Slow Motion catches details not visible to the naked
eye, which is ideal for fast-action shots. Note: slow-motion videos
do not include audio. The audio le is stored as a standalone le
and has the same path as the videos, which can be transferred to
your computer.
Video Record a video.
Photo Take a photo or countdown photo.
Live Stream Osmo Action 4 supports live broadcasting to livestream platforms
such as YouTube and Facebook.
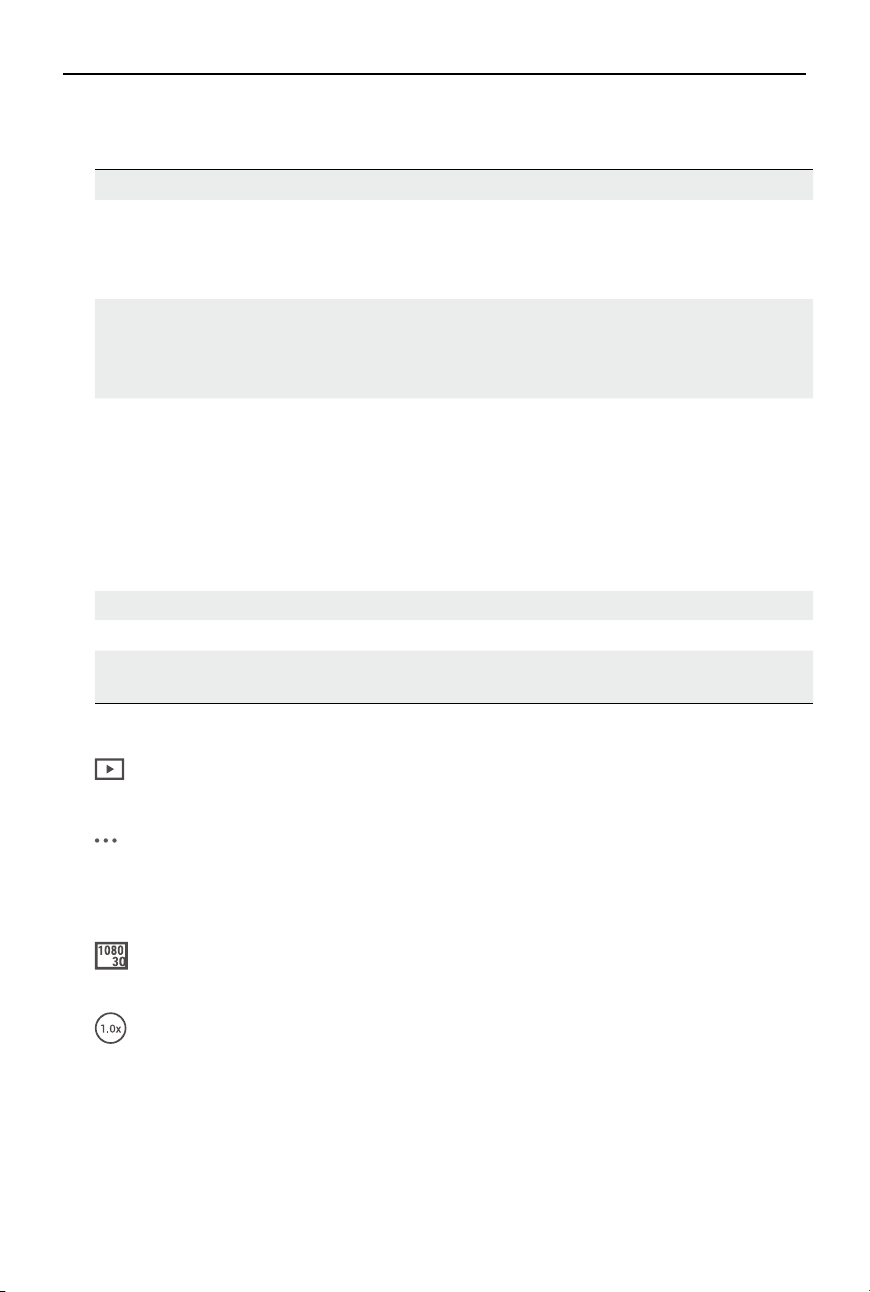
8. Playback
: tap to preview photos and videos as soon as they are captured.
9. Settings
: set the selected shooting mode as Basic or Pro mode. More settings become available
once Pro is enabled, including FOV, Format, Exposure and White Balance. Various
parameters can be set when using dierent shooting modes.
10. Shooting Parameters
: displays the parameters of the current shooting mode. Tap to set the parameters.
11. Zoom
: displays the current zoom ratio. Place two ngers on the screen and move them apart
to zoom in or pinch together to zoom out.

DJI Osmo Action 4
User Manual
©
2023 DJI All Rights Reserved.
27
Maintenance
Firmware Update
The rmware version of Osmo Action 4 is updated using DJI Mimo.
Make sure the battery level of Osmo Action 4 is at least 15% before updating its firmware
version. Connect Osmo Action 4 to the DJI Mimo app. If new rmware is available, users will be
notied by DJI Mimo. Update the rmware according to the on-screen instructions. The update
takes approximately 2 minutes.
Underwater Usage Notes
Osmo Action 4 can be used underwater at depths of up to 18 m. When used with the Osmo
Action 60m waterproof case, the device can operate underwater up to 60 m deep. Observe the
following precautions when using the device in water.
1. Make sure the battery and battery compartment are dry and clean before inserting the
battery. Otherwise, it may aect the battery contact and waterproong ability. Make sure the
battery compartment cover is rmly fastened after the battery is inserted. Note: if the cover
is properly mounted, the red marks on the bottom will not be visible.
2. Make sure the USB-C port cover is clean and closed before using. Otherwise, it will aect the
device waterproong ability.
3. Make sure the lens protective cover is clean and closed before using. Otherwise, it will aect
the device waterproong ability. Make sure the lens protective cover and lens are dry and
clean. Sharp or hard objects may damage the lens and aect the ability of the device. Make
sure the lens protective cover are rmly mounted and fastened.
4. Osmo Action 4 is not waterproof unless the battery compartment cover, USB-C port cover,
and lens protective cover are rmly mounted and fastened. The camera is NOT waterproof
when used with Osmo Action Lens Hood.
5. Avoid jumping into water at high speed with Osmo Action 4. Otherwise, the impact may
result in water seepage. Make sure the camera is waterproofed before jumping into water.
6. DO NOT use Osmo Action 4 in hot springs or extreme underwater environments. DO NOT
let Osmo Action 4 to come into contact with corrosive or unknown liquids.
7. Rinse the camera with clean water after using it underwater. Allow it to dry naturally
before using again. DO NOT dry the camera with hot air using a hair dryer, otherwise the
microphone membrane and the built-in breathable membrane will rupture, and the camera
will no longer be waterproof.
Attach the waterproof case to Osmo Action 4 when using it while diving, surng, underwater for
an extended period, or in other situations involving high water impact. Observe the following
precautions when using the device with the waterproof case:
1. Make sure the rubber seal is clean and rmly attached during use.
2. Make sure the waterproof case is dry (for best results, place anti-fog ber in the case during
use) and the latch is secure.

DJI Osmo Action 4
User Manual
28
©
2023 DJI All Rights Reserved.
3. Before use, it is recommended to place the waterproof case underwater for approximately 5
minutes to ensure it is working properly.
4. Rinse the case with tap water to prevent corrosion after using it in the sea.
• The touchscreens of Osmo Action 4 can be operated when their surface is wet.
• The touchscreens cannot function underwater. Users can press the camera buttons
to start recording. Shutter/record button is disabled automatically when the camera is
used without Osmo Action waterproof case at a depth of more than 14 m.
Cleaning Notes
1. Clean the lens protective cover with water or a lens cleaning pen, lens air blower, or lens
cleaning cloth. When changing the lens protective cover, make sure the camera is dry. After
using Osmo Action 4 in water, let the camera dry before using it again. This will prevent
water from seeping into the lens protective cover and fogging up the lens. DO NOT remove
the lens protective cover frequently to avoid dust accumulating inside the lens cover, which
can aect shooting quality.
2. Clean the lens with a lens cleaning pen, lens air blower, or lens cleaning cloth.
3. Clean the battery and battery compartment with a clean, dry cloth.
Make sure the quick-release slots on the camera are clean from dust and sand when attaching
the Quick-Release Adapter Mount.
Battery Usage Notes
1. DO NOT use non-DJI OSMO batteries. New batteries can be purchased at www.dji.com. DJI
OSMO shall not be responsible for any fault or damage caused by the use of any non-DJI
OSMO batteries.
2. The battery should be used at temperatures between -20° to 45° C (-4° to 113° F ). Use of
the battery at temperatures above 45° C (113° F) can lead to a re or explosion. Before using
the battery in a low-temperature environment, it is recommended to charge the battery fully
in a normal temperature environment. Charging the battery at the ideal temperature can
prolong battery life.
3. Battery performance will be aected if the battery is not used for an extended period.
4. Discharge and charge the battery completely once every three months to keep it in good
working condition.
5. Remove the battery from Osmo Action 4 and store the battery in the Osmo Action
Multifunctional Battery Case when stored for an extended period.
DJI Osmo Action 4
User Manual
©
2023 DJI All Rights Reserved.
29
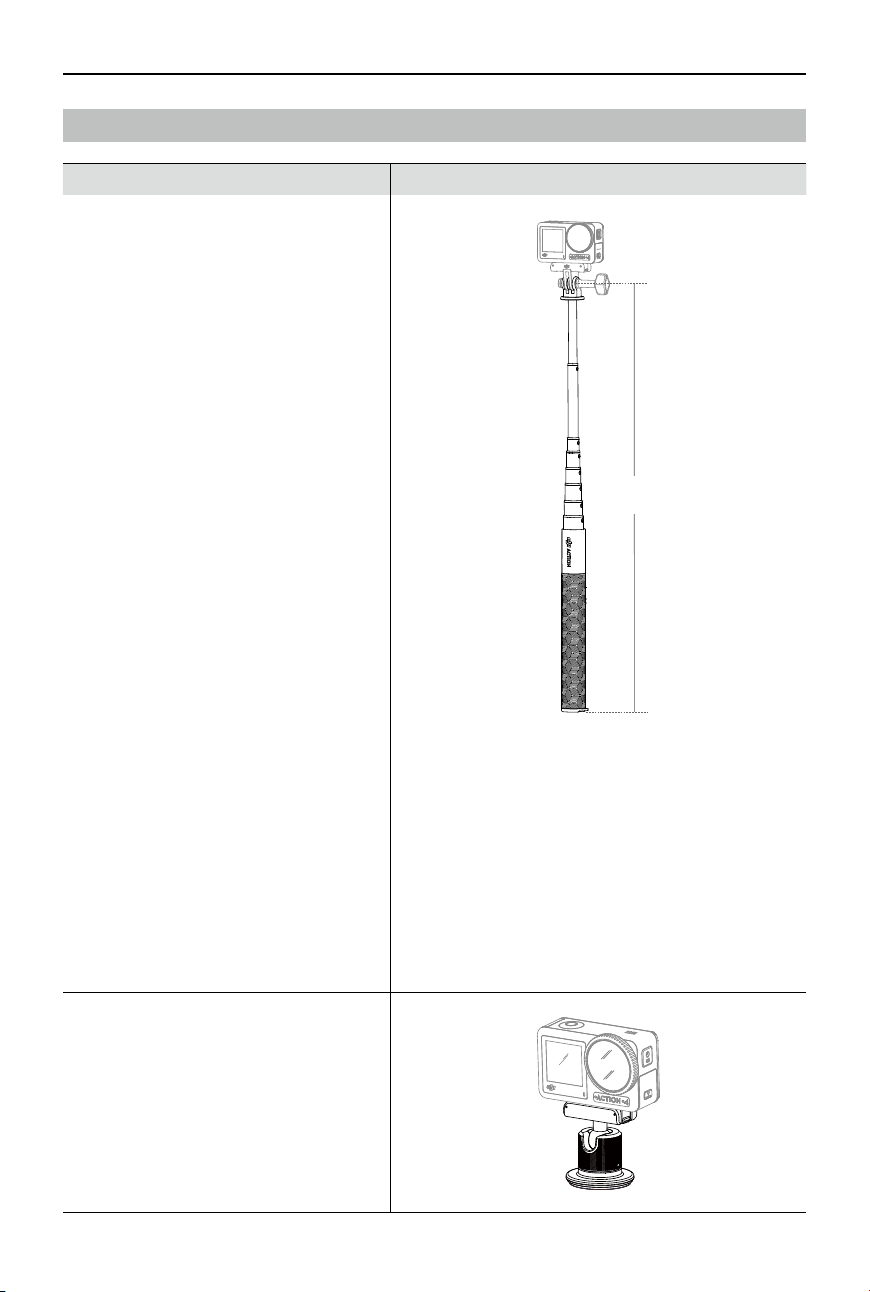
Using Other Accessories (Not Included)
Accessory Diagram
Osmo 1.5m Extension Rod
≈1.5m
1. Adjust the telescopic length of the extension rod
appropriately when in use.
2. DO NOT drop or strike the extension rod in any
way when in use to avoid damage.
3. DO NOT shake the extension rod violently when
installed with the camera to avoid damage.
4. Rinse with clean water to remove sand after
underwater usage.
5. DO NOT use the extension rod during
thunderstorms to avoid lightning strikes.
Osmo Magnetic Ball-Joint Adapter
Mount
DJI Osmo Action 4
User Manual
30
©
2023 DJI All Rights Reserved.
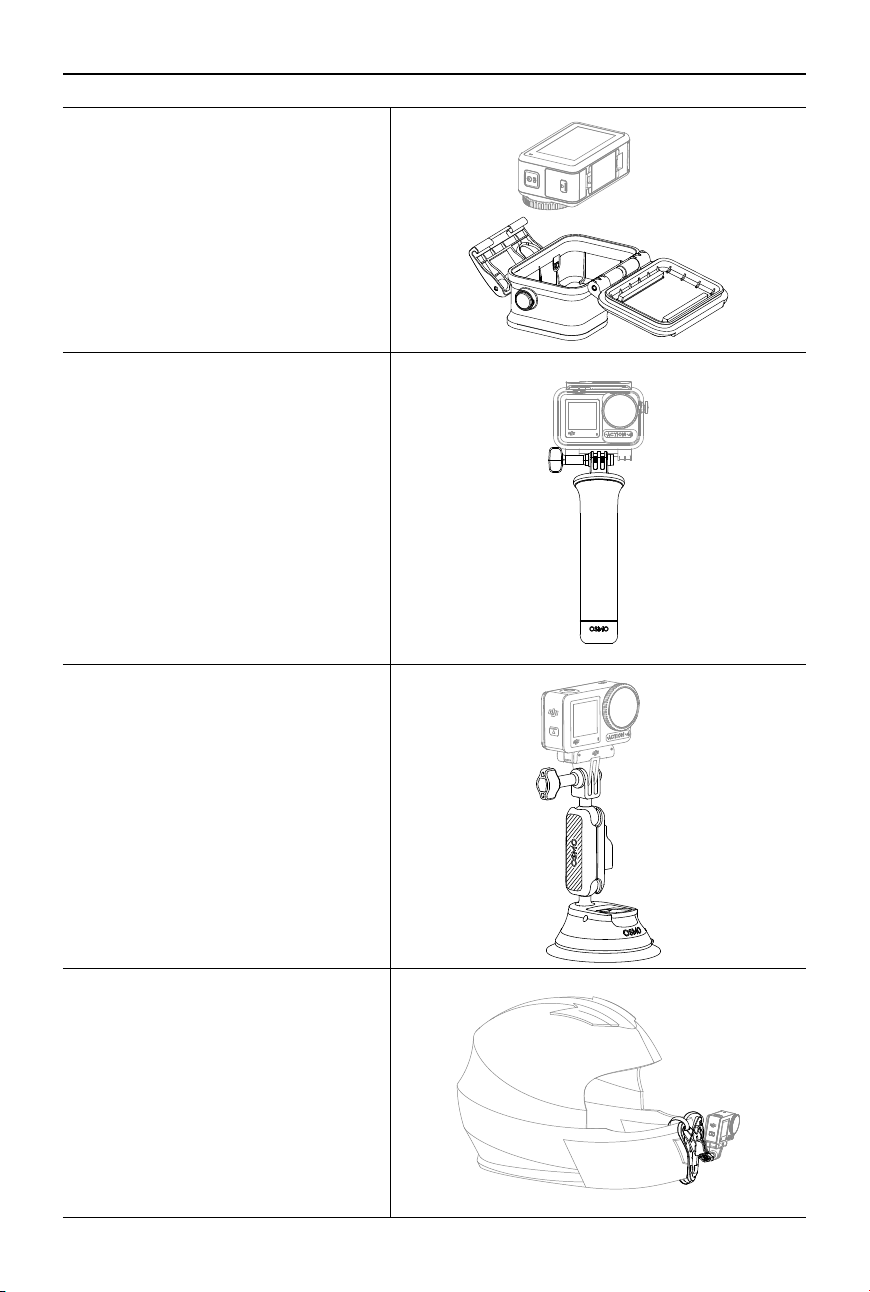
Osmo Action 60m Waterproof Case
DJI Floating Handle
Osmo Action Suction Cup Mount
Osmo Action Helmet Chin Mount
DJI Osmo Action 4
User Manual
©
2023 DJI All Rights Reserved.
31
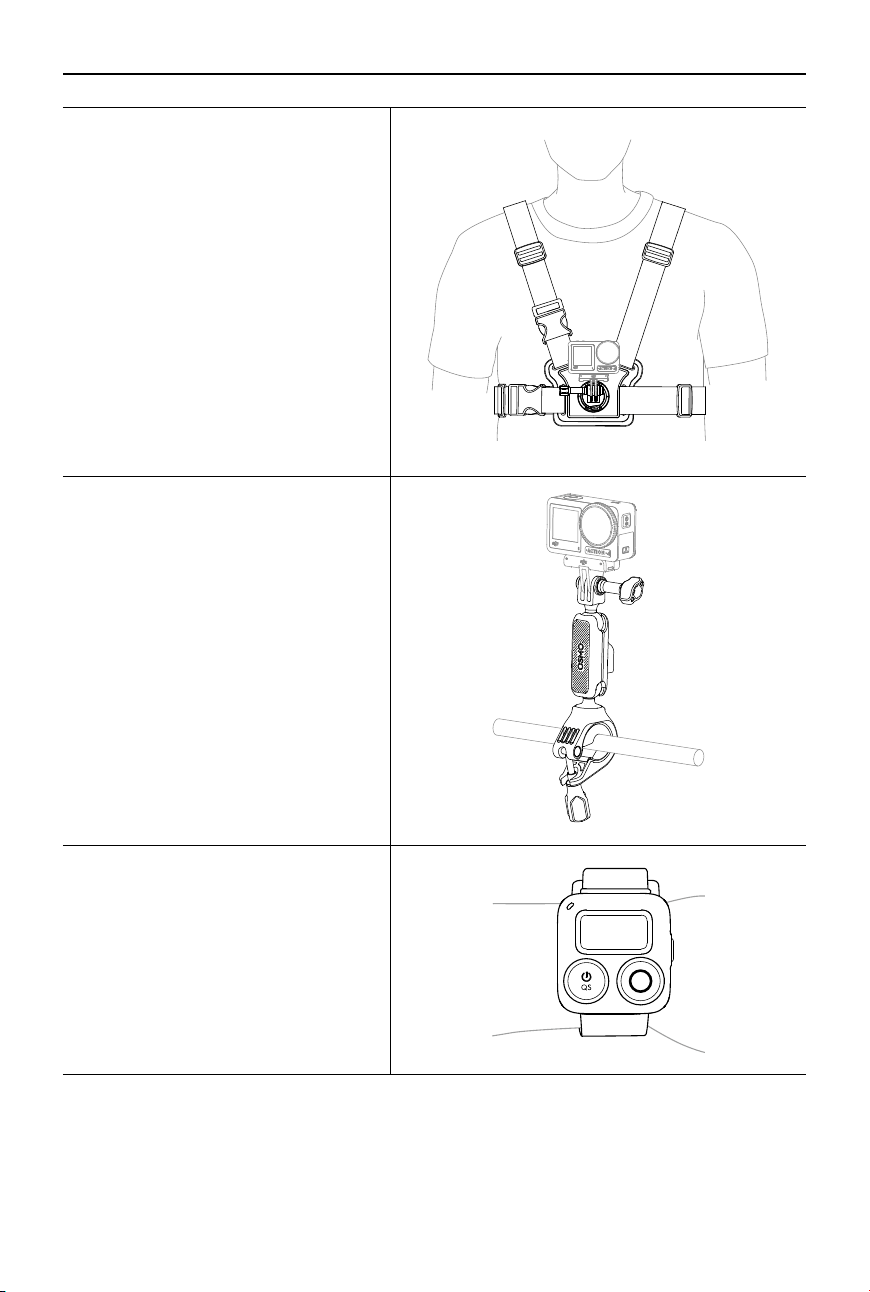
Osmo Action Chest Strap Mount
Osmo Action Handlebar Mount
Osmo Action GPS Bluetooth Remote
Controller
Support for DJI devices will be updated continuously. Visit https://www.dji.com/osmo-action-4
for a complete list.

DJI Osmo Action 4
User Manual
32
©
2023 DJI All Rights Reserved.
Specications
General
Dimensions 70.5×44.2×32.8 mm (L×W×H)
Weight 145 g
Waterproof 18 m
[1]
without the Waterproof Case, 60 m with the
Waterproof Case
Number of Microphones 3
Touchscreens Front Screen: 1.4-inch 323 ppi 320×320
Rear Screen: 2.25-inch 326 ppi 360×640
Front/Rear Screen Brightness: 750±50 cd/m²
Supported SD Cards microSD (up to 512 GB)
Recommended microSD Cards Recommended models:
SanDisk Extreme Pro 32GB V30 A2 UHS-I Speed Grade 3
Kingston Canvas Go!Plus 64GB UHS-I Speed Grade 3
Kingston Canvas Go!Plus 128GB UHS-I Speed Grade 3
Kingston Canvas React Plus 64GB UHS-II Speed Grade 3
Kingston Canvas React Plus 128GB UHS-II Speed Grade 3
Kingston Canvas React Plus 256GB UHS-II Speed Grade 3
Lexar Pro 256GB SDXC UHS-I V30 R160/W120 (1066x)
Lexar Pro 512GB SDXC UHS-I V30 R160/W120 (1066x)
Camera
Sensor 1/1.3-inch CMOS
Lens FOV: 155°
Aperture: f/2.8
Focus Range: 0.4 m to ∞
ISO Range Photo: 100-12800
Video: 100-12800
Electronic Shutter Speed Photo: 1/8000-30 s
Video: 1/8000 s to the limit of frames per second
Max Photo Resolution 3648×2736
Zoom Digital Zoom
Photo: 4×
Video: Max 2×
Slow Motion/Timelapse: not available
Still Photography Modes Single: Approx. 10 MP
Countdown: O/0.5/1/2/3/5/10 s

DJI Osmo Action 4
User Manual
©
2023 DJI All Rights Reserved.
33
Standard Recording 4K (4:3): 3840×2880@24/25/30/48/50/60fps
4K (16:9): 3840×2160@100/120fps
4K (16:9): 3840×2160@24/25/30/48/50/60fps
2.7K (4:3): 2688×2016@24/25/30/48/50/60fps
2.7K (16:9): 2688×1512@100/120fps
2.7K (16:9): 2688×1512@24/25/30/48/50/60fps
1080p (16:9): 1920×1080@100/120/200/240fps
1080p (16:9): 1920×1080@24/25/30/48/50/60fps
Slow Motion 4K: 4× (120fps)
2.7K: 4× (120fps)
1080p: 8× (240fps), 4× (120fps)
Hyperlapse 4K/2.7K/1080p: Auto/×2/×5/×10/×15/×30
Timelapse 4K/2.7K/1080p@30fps
Intervals: 0.5/1/2/3/4/5/6/8/10/15/20/25/30/40 s
Duration: 5/10/20/30 mins, 1/2/3/5 hours, ∞
Stabilization EIS
[2]
:
RockSteady 3.0
RockSteady 3.0+
HorizonBalancing
HorizonSteady
Max Video Bitrate 130 Mbps
Supported File System exFAT
Photo Format JPEG/RAW
Video Format MP4 (H.264/HEVC)
Built-in Storage Capacity The camera does not have built-in storage, but storage
capacity can be expanded by inserting a microSD card.
Audio Output 48 kHz 16-bit; AAC
Battery
Type LiPo 1S
Capacity 1770 mAh
Energy 6.8 Wh
Voltage 3.85 V
Operating Temperature -20° to 45° C (-4° to 113° F)
Charging Temperature 5° to 40° C (41° to 104° F)
Operating Time 160 minutes
[3]
Connection
Wi-Fi Operating Frequency 2.4000-2.4835 GHz
5.150-5.250 GHz
5.725-5.850 GHz

DJI Osmo Action 4
User Manual
34
©
2023 DJI All Rights Reserved.
Wi-Fi Protocol 802.11 a/b/g/n/ac
Wi-Fi Transmitter Power (EIRP) 2.4 GHz: < 15 dBm (FCC/CE/SRRC/MIC)
5.1 GHz: < 16 dBm (FCC/CE/SRRC/MIC)
5.8 GHz: < 14 dBm (FCC/CE/SRRC)
Bluetooth Operating Frequency 2.400-2.4835 GHz
Bluetooth Transmit Power (EIRP) <3 dBm
Bluetooth Protocol BLE 5.0
[1] Before use, close the battery compartment cover and the USB-C port cover, and tighten the Lens
Protective Cover. It is recommended to install the Waterproof Case for long-duration underwater shooting
or in environments with high water impact pressure. Osmo Action 4 and its Waterproof Case have an IP68
waterproof rating. Do not use the camera in hot springs or extreme underwater environments, or let it
come into contact with corrosive or unknown liquids.
[2] EIS is not supported in Slow Motion and Timelapse modes. HorizonSteady is only available when the video
resolution is 1080p (16:9) or 2.7K (16:9) with a frame rate of 60fps or below. HorizonBalancing is only
available when the video resolution is 1080p (16:9), 2.7K (16:9), or 4K (16:9) with a frame rate of 60 fps or
below.
[3] Tested at room temperature (25°C/77°F) and 1080p/24fps (16:9), with RockSteady on, Wi-Fi o, and screen
o. This data is for reference only.
If you have any questions about this document, please
contact DJI by sending a message to [email protected].
DJI and OSMO are trademarks of DJI.
Copyright © 2023 DJI OSMO All Rights Reserved.
WE ARE HERE FOR YOU
Contact
DJI SUPPORT
https://www.dji.com/osmo-action-4/downloads
This content is subject to change.