User Manual
v1.0 2026.04

This document is copyrighted by DJI with all rights reserved. Unless otherwise authorized
by DJI, you are not eligible to use or allow others to use the document or any part of
the document by reproducing, transferring or selling the document. Only refer to this
document and the content thereof as instructions to operate DJI products. The document
should not be used for other purposes.
In the event of divergence among dierent versions, the English version shall prevail.
Searching for Keywords
Search for keywords such as “battery” and “install” to nd a topic. If you are
using Adobe Acrobat Reader to read this document, press Ctrl+F on Windows or
Command+F on Mac to begin a search.
Navigating to a Topic
View a complete list of topics in the table of contents. Click on a topic to navigate to
that section.
Printing this Document
This document supports high resolution printing.
2 © 2026 DJI All Rights Reserved.
Using this Manual
Legend
Important
Hints and Tips
Reference
Read Before Use
DJI
™
provides you with tutorial videos and the following documents:
1. Safety Guidelines
2. Quick Start Guide
3. User Manual
It is recommended to watch all the tutorial videos and read the Safety Guidelines before
using for the rst time. Make sure to review the Quick Start Guide before using for the rst
time and refer to this User Manual for more information.
Video Tutorials
Go to the address below or scan the QR code to watch the tutorial videos, which
demonstrate how to use the product safely:
https://www.dji.com/osmo-pocket-4/video
Osmo Pocket 4 User Manual
© 2026 DJI All Rights Reserved. 3

Osmo Pocket 4 User Manual
4 © 2026 DJI All Rights Reserved.
Contents
Using this Manual 3
Legend 3
Read Before Use 3
Video Tutorials 3
1 Product Prole 6
1.1 Overview 7
1.2 Handle With 1/4″ Thread 9
1.3 Battery Handle 10
1.4 Fill Light 12
1.5 Wide-Angle Lens 14
1.6 Osmo Mini Tripod 14
2 Getting Started 15
2.1 Powering On 15
2.2 Activation 15
2.3 Firmware Update 16
2.4 Charging 16
3 Basic Operations 18
3.1 Button Features 18
3.2 Operating the Touchscreen 19
Camera View 19
Swipe Up - Parameters Settings 20
Swipe Left - Image and Audio Settings 20
Swipe Right - Playback 21
Swipe Down - Control Center 21
4 Using the Product 25
4.1 Setting the Shooting Mode 25
4.2 Selecting the Gimbal Mode 25
4.3 ActiveTrack 26
4.4 Smart Gimbal Mode 27
4.5 Webcam Mode 28
4.6 Footage Storage and Transfer 28
Storage Space 29
Transferring Files 29
Transferring Files to a Mobile Device 29
Transferring Files to a Computer 29
4.7 Usage Notes 30


1 Product Prole
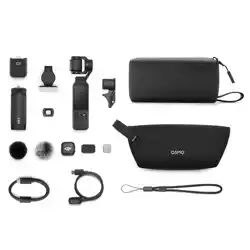
Dierent combos include dierent accessories. The accessories can be purchased
separately. Visit the ocial store for a full list of compatible accessories.
Accessories
Standard
Combo
Creator Com-
bo
Essential
Combo
Osmo Pocket 4 Gimbal Clamp
(hereinafter referred to as "gimbal
clamp")
-
Osmo Pocket 4 Handle With 1/4″
Thread
(hereinafter referred to as "handle with
1/4'' thread")
Osmo Pocket 4 Fill Light
(hereinafter referred to as "ll light")
- -
Osmo Mini Tripod - -
Osmo Pocket 3 Wide-Angle Lens - -
Osmo Pocket 4 Battery Handle
(hereinafter referred to as "battery
handle")
- - -
Osmo Pocket 4 User Manual
6 © 2026 DJI All Rights Reserved.
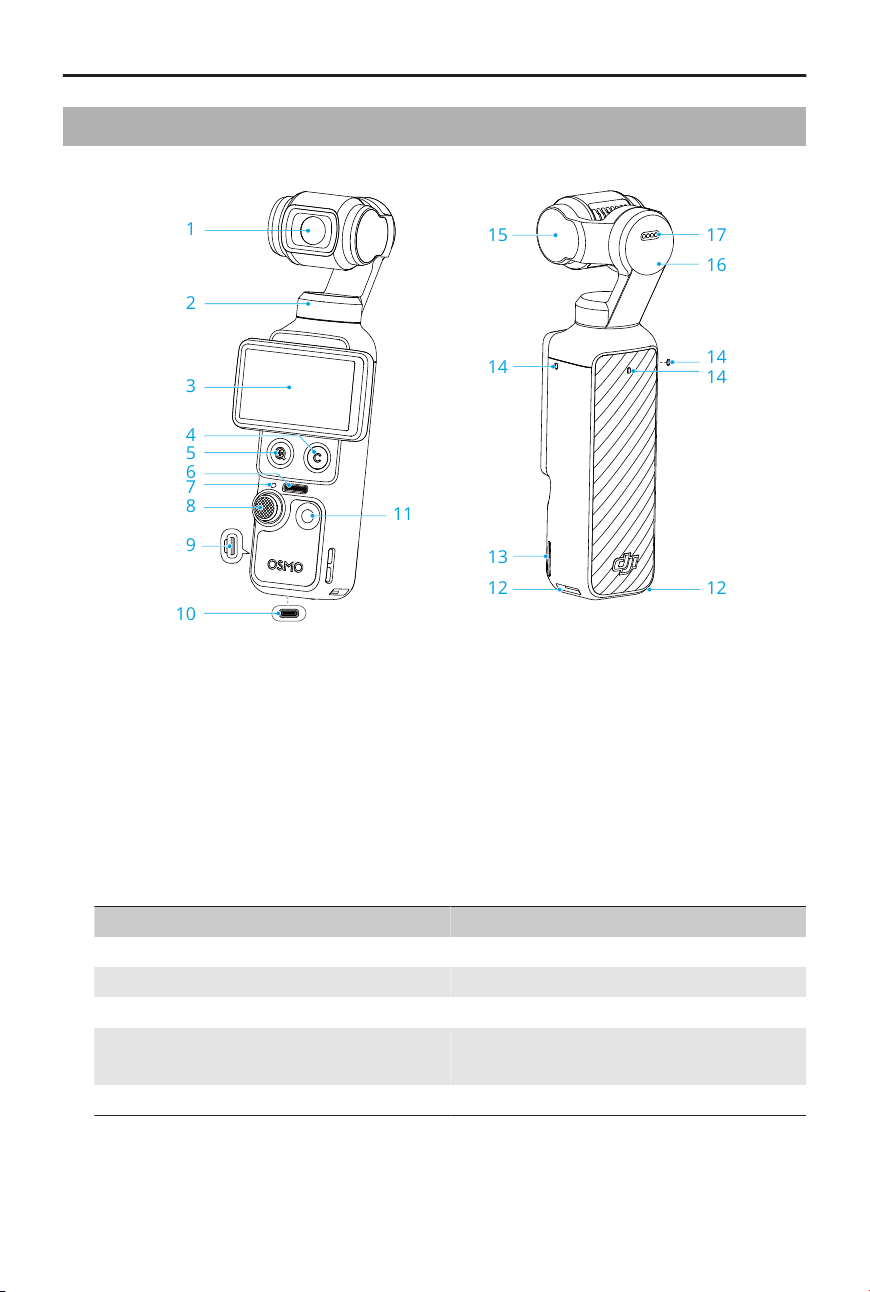
1.1 Overview
1
15 17
14
14
12 12
13
14
11
2
3
4
5
6
7
8
9
10
16
1. Camera
2. Pan Motor
3. Rotatable Touchscreen
4. Custom Button
5. Zoom Button
6. Speaker
7. Status LED
Blinking Pattern Descriptions
Solid green Ready to use
Temporarily o and stays green Taking a photo
Blinks red slowly Recording a video
Blinks red three times rapidly Powering o, or about to power o be-
cause of low battery
Blinks red and green alternately Updating rmware
8. 5D Joystick
9. microSD Card Slot (with cover)
Osmo Pocket 4 User Manual
© 2026 DJI All Rights Reserved. 7

The microSD card slot cover is not waterproof. DO NOT forcefully pull the cover.
10. USB-C Port
11. Shutter/Record Button
12. Quick-Release Slot
13. Lanyard Hole
14. Microphones
For better audio quality, DO NOT block the microphones when recording video.
15. Tilt Motor
16. Roll Motor
17. Contacts
Ensure the contacts are clean and dry before attaching any accessories.
Osmo Pocket 4 User Manual
8 © 2026 DJI All Rights Reserved.
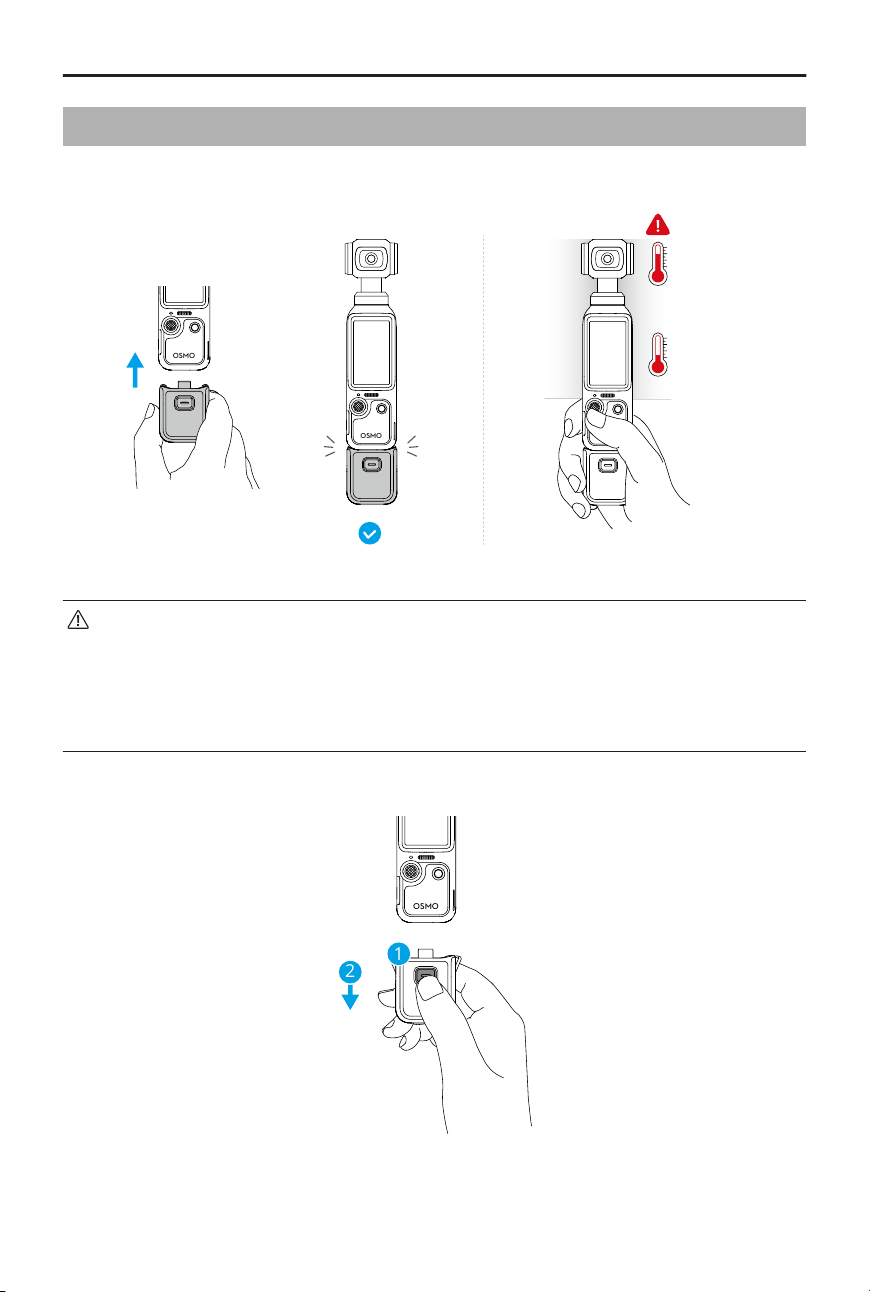
1.2 Handle With 1/4″ Thread
Attach the handle with 1/4″ thread to the camera for a more comfortable grip.
OSMO
OSMO
OSMO
• After shooting high-specication videos for an extended period, the upper
part of the product may become hot. DO NOT hold too high to avoid high
temperatures. The camera will stop shooting if any overheating is detected.
• The handle is not waterproof. DO NOT drop it in water. Avoid spilling any liquid
on the handle.
When detaching, press and hold the release button on the handle and unplug the handle.
2
1
OSMO
Osmo Pocket 4 User Manual
© 2026 DJI All Rights Reserved. 9
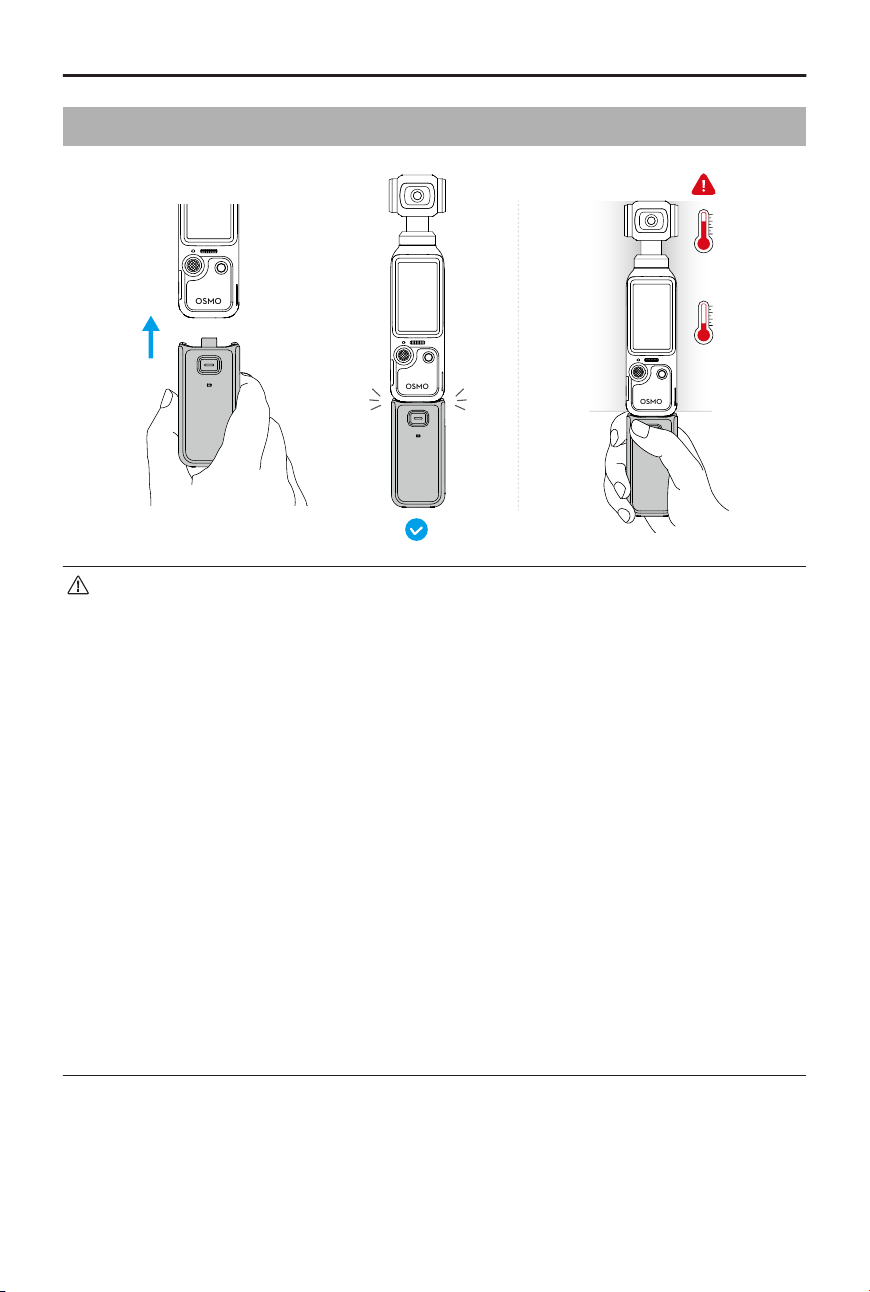
1.3 Battery Handle
OSMO
OSMO
OSMO
• After shooting high-specication videos for an extended period, the upper
part of the product may become hot. DO NOT hold too high to avoid high
temperatures. The camera will stop shooting if any overheating is detected.
• When the battery handle is mounted to the camera, its rmware will be updated
automatically during the camera rmware update. A prompt will appear on the
camera when the update is successful. DO NOT remove the battery handle
before the update is complete.
• Make sure the battery handle has power when used with external audio devices.
• Make sure the battery handle is properly insulated to prevent re hazards. DO
NOT drop or strike the battery handle.
• If foreign object is obstructing the USB-C port, use an air blower, soft brush,
or other tools to clean the USB-C port and remove the foreign object. Note to
sweep from the inside of the port to the outside.
• The handle is not waterproof. DO NOT drop it in water. Avoid spilling any liquid
on the handle.
• Discharge the battery handle to 50% battery level if it is not used for 10 days or
more in order to extend the battery life.
Osmo Pocket 4 User Manual
10 © 2026 DJI All Rights Reserved.
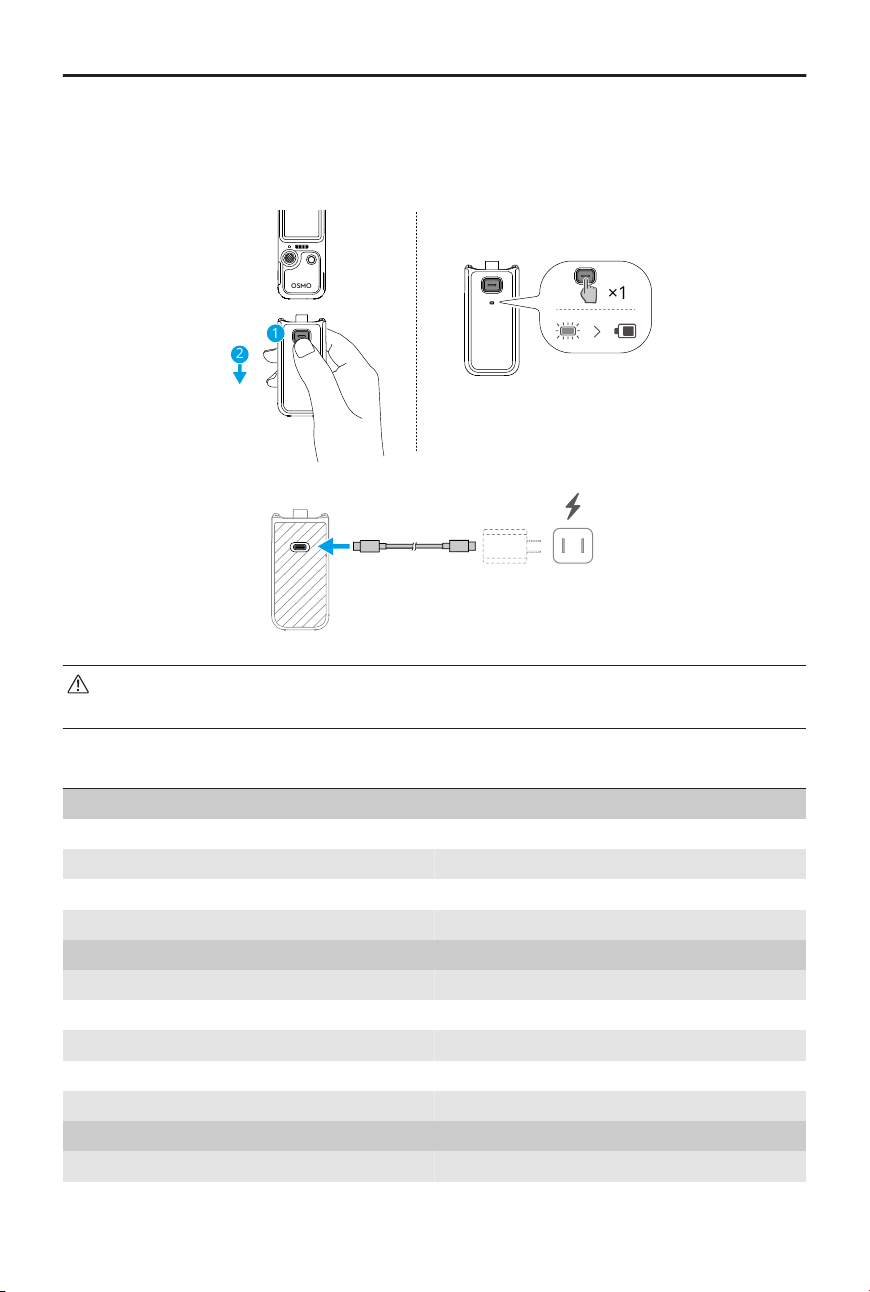
When detaching, press and hold the release button on the battery handle and unplug the
handle. After the battery handle is detached, press the release button once to check the
battery level using the status LED.
OSMO
×1
2
1
Before charging, make sure the ports are clean and dry. Clean the ports with a dry
cloth if there is any noticeable build up.
Status LED
Battery Level Status
Solid red for 3s and turns o 1% - 19%
Solid yellow for 3s and turns o 20% - 49%
Solid green for 3s and turns o 50% - 100%
Blinks red three times 0%
Battery Level Status During Charging
Blinks green four times > 75%
Blinks green three times 51% - 75%
Blinks green twice 26% - 50%
Blinks green 0% - 25%
O Charging completed
System Status
Blinks red and green alternately Updating rmware
Osmo Pocket 4 User Manual
© 2026 DJI All Rights Reserved. 11
Blinks red twice The ambient temperature is abnormal, and
the battery handle cannot be used at this
time. Wait until the temperature returns to
normal.
Blinks yellow Firmware update failed (connect to the
camera and try update again)
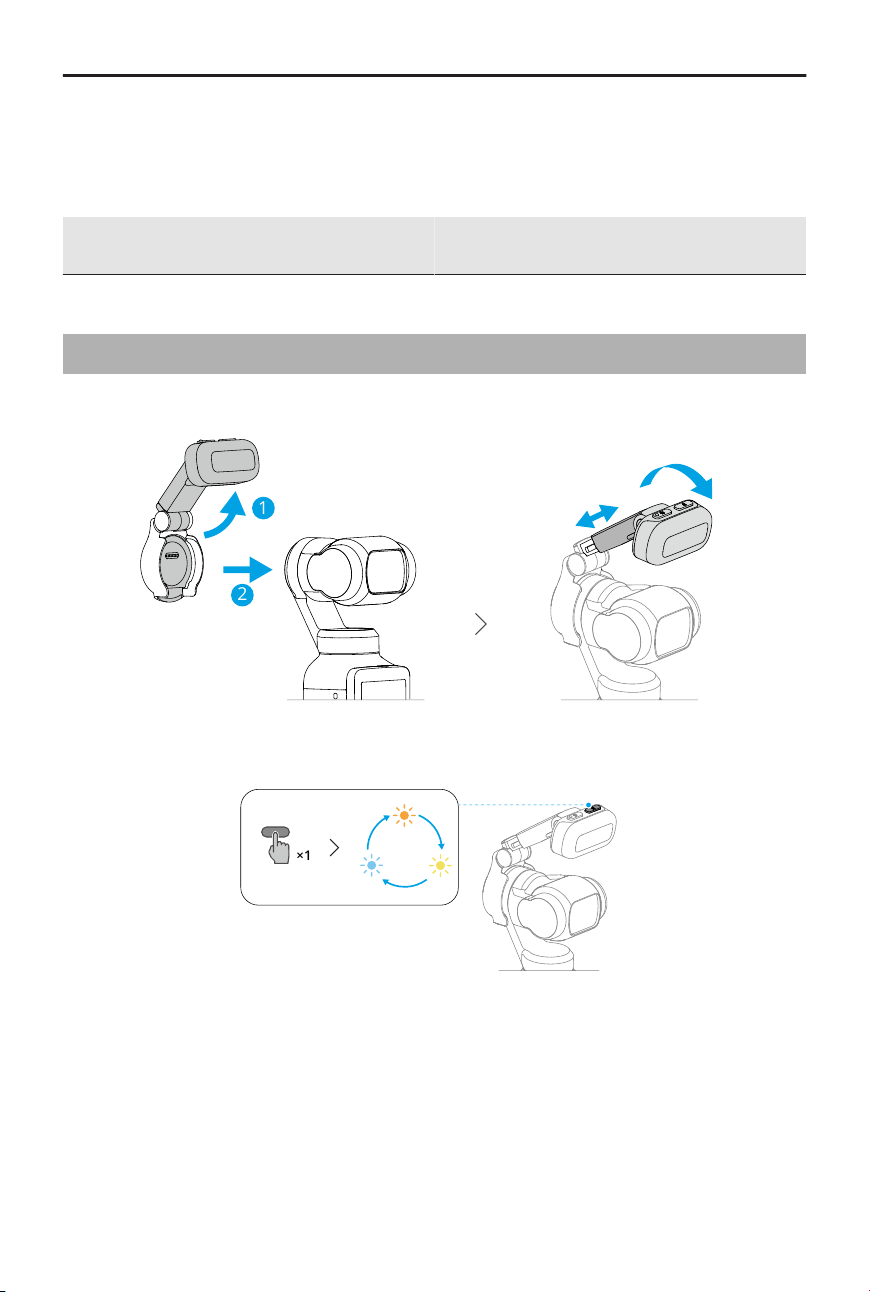
1.4 Fill Light
Attach and adjust the angle:
1
2
Adjust color temperature:
×1
Osmo Pocket 4 User Manual
12 © 2026 DJI All Rights Reserved.
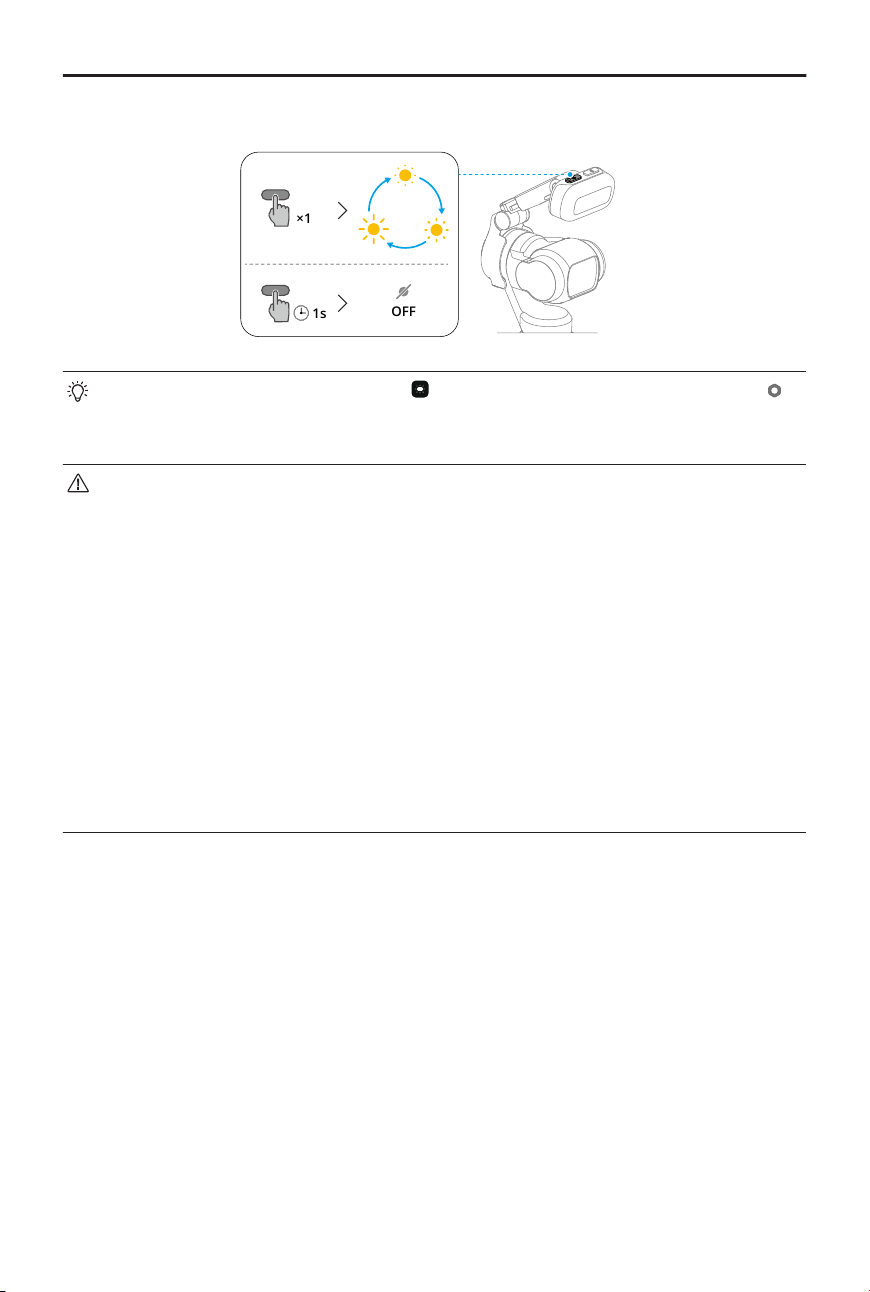
Adjust brightness or turn o the ll light:
OFF
1s
×1
• Enter the Control Center and tap to quickly turn the ll light on or o. Tap
> Fill Light to enable auto-on feature for seles or low-light conditions, and to
adjust the brightness and color temperature.
• This product contains magnets. Keep the product away from magcards,
implantable medical devices such as pacemakers, hard disks, RAM chips, and
other devices to avoid interference.
• Before attaching the ll light, clean the contacts with a dry cloth if there is any
noticeable buildup.
• When attaching the ll light, make sure it is correctly aligned with the gimbal to
ensure a secure attachment.
• Avoid excessive shaking or sudden movements to prevent the ll light from
falling.
• When installing or using the ll light, avoid collisions between the ll light and
the gimbal camera.
• Before storing the camera, remove the ll light rst, then power o the camera.
Osmo Pocket 4 User Manual
© 2026 DJI All Rights Reserved. 13
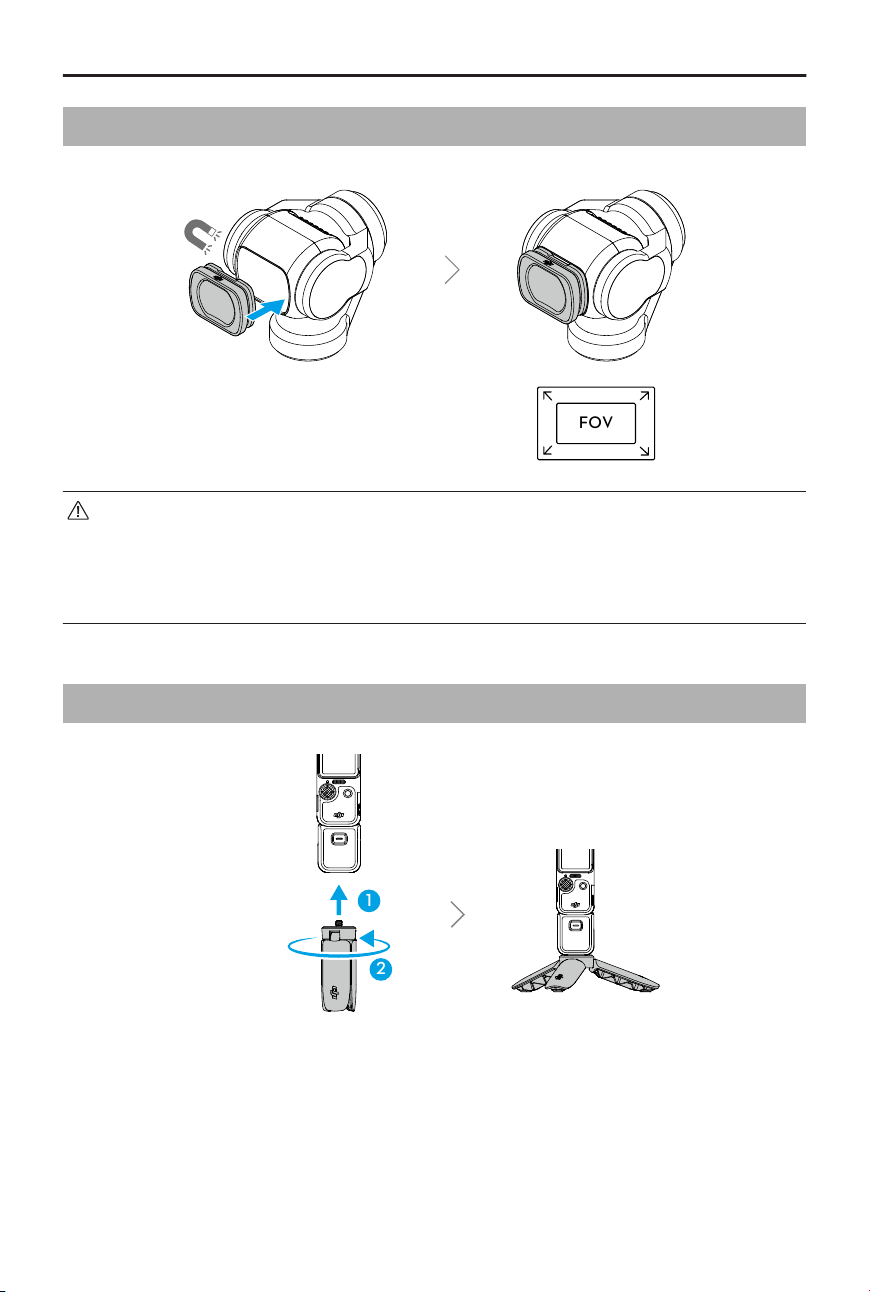
1.5 Wide-Angle Lens
FOV
• The wide-angle lens is not suitable for panoramic photography.
• Keep the camera lens and both sides of the wide-angle lens clean. Dust or sand
may scratch the lens and result in the wide-angle lens falling o.
• Before storing the camera, remove the lens rst, then power o the camera.
1.6 Osmo Mini Tripod
1
2
Osmo Pocket 4 User Manual
14 © 2026 DJI All Rights Reserved.
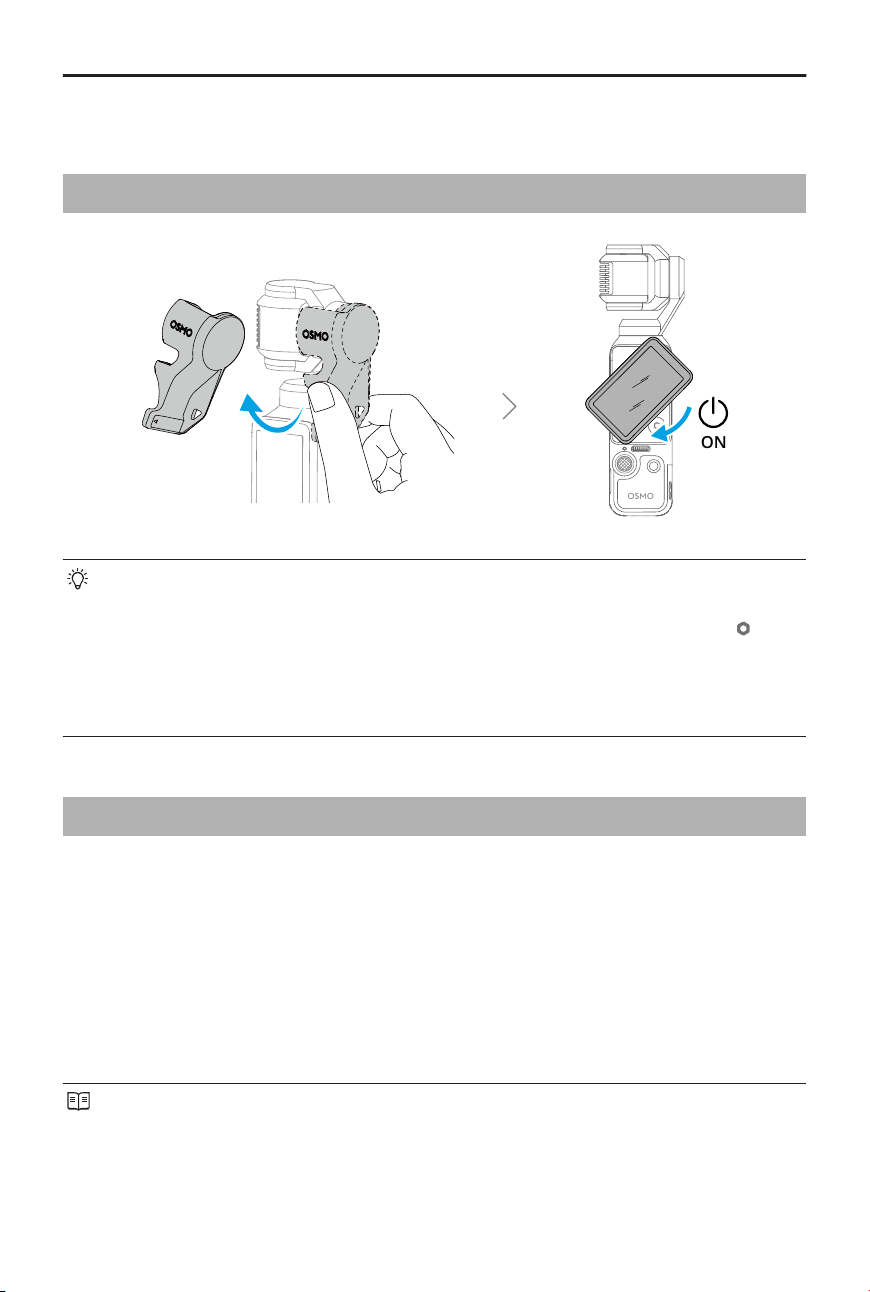
2 Getting Started
2.1 Powering On
ON
OSMO
• When not recording, press and hold the Shutter/Record button or rotate the
touchscreen counterclockwise to power o. To keep the camera on after
rotation, swipe down in the camera view to open the Control Center, tap >
Rotate screen to power o to modify the settings.
• The camera has 107 GB of usable storage and supports microSD cards for
storage expansion. Refer to Specications for the recommended microSD cards.
2.2 Activation
Make sure to activate the camera using DJI Mimo App before rst use.
1. Scan the QR code on the screen to download the DJI Mimo App.
2. Enable Wi-Fi and Bluetooth on the mobile device.
3. Launch DJI Mimo App on the mobile device, tap the camera icon to connect to the
camera, and then follow the instructions to activate the camera.
When the camera is used with the DJI Mimo App, you can monitor the current camera
view, set the camera parameters, and control the camera with a mobile device.
• To check the Android and iOS operating system versions supported by the app,
visit https://www.dji.com/downloads/djiapp/dji-mimo.
Osmo Pocket 4 User Manual
© 2026 DJI All Rights Reserved. 15
• The interface and functions of the app may vary as the software version is
updated. Actual user experience is based on the software version used.
If there is a problem when connecting to DJI Mimo App, follow the steps below:
1. Make sure both Wi-Fi and Bluetooth are enabled on the mobile device.
2. Make sure the DJI Mimo App has the latest rmware version.
3. In the liveview, swipe down from the top of the screen and tap > Wireless
Connection > Reset Connection. The camera will reset all connections and Wi-Fi
passwords.
2.3 Firmware Update
A prompt will appear in DJI Mimo Appwhen new rmware is available. Tap the prompt
and follow the on-screen instructions to update the rmware.
If the update fails, follow the steps for troubleshooting.
1. Restart the camera and DJI Mimo App.
2. Enable Wi-Fi and Bluetooth on the mobile device.
3. Connect the camera to DJI Mimo App and try the update again.
Contact DJI Support if the update fails again.
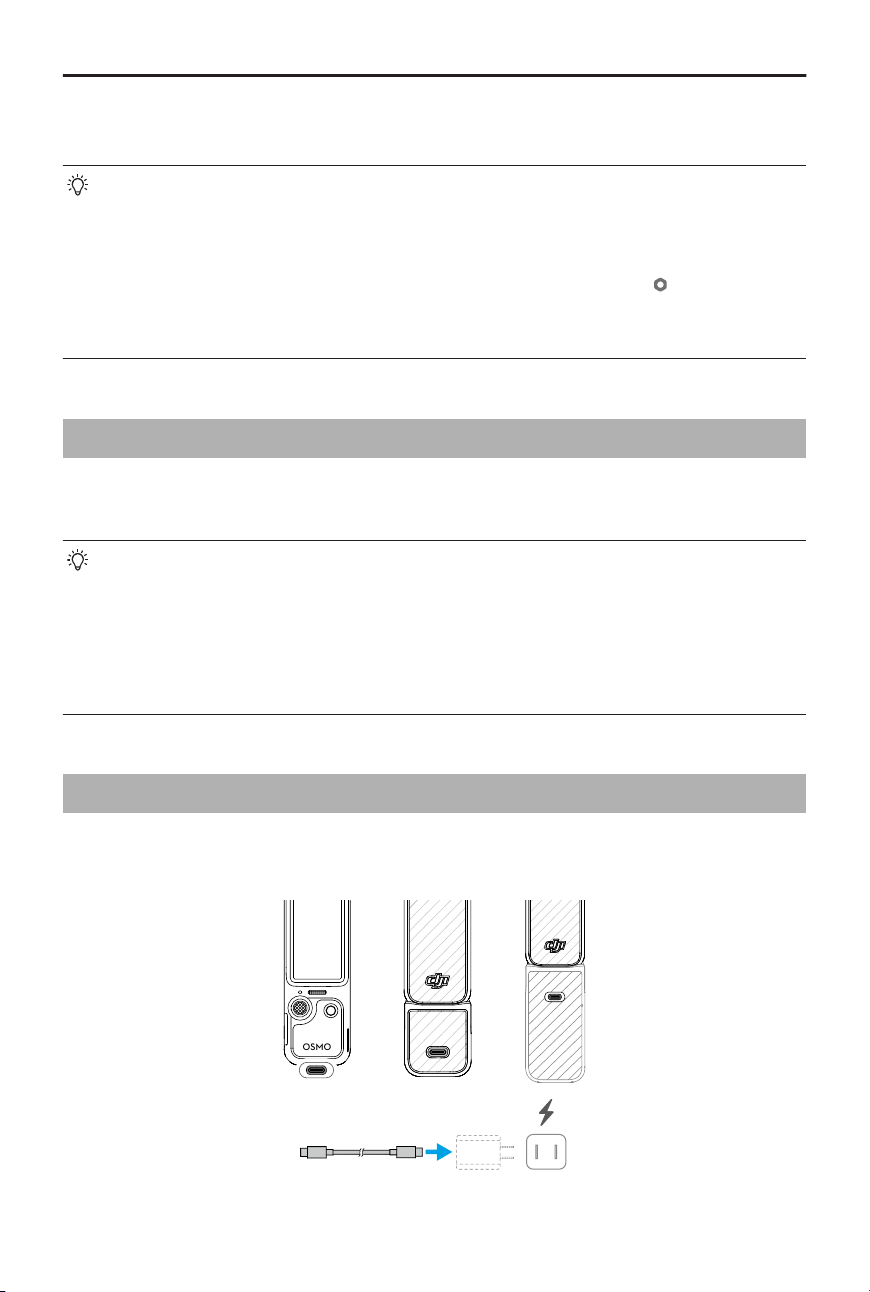
2.4 Charging
Use the provided cable to connect the USB-C port to a charger. It is recommended to use
a USB-C PD charger.
OSMO
Osmo Pocket 4 User Manual
16 © 2026 DJI All Rights Reserved.

If the battery handle is mounted, the battery handle will not start charging until the
battery of the handheld gimbal camera is fully charged.
Before charging, make sure the ports are clean and dry. Clean the ports with a dry
cloth if there is any noticeable build up.
Osmo Pocket 4 User Manual
© 2026 DJI All Rights Reserved. 17
3 Basic Operations
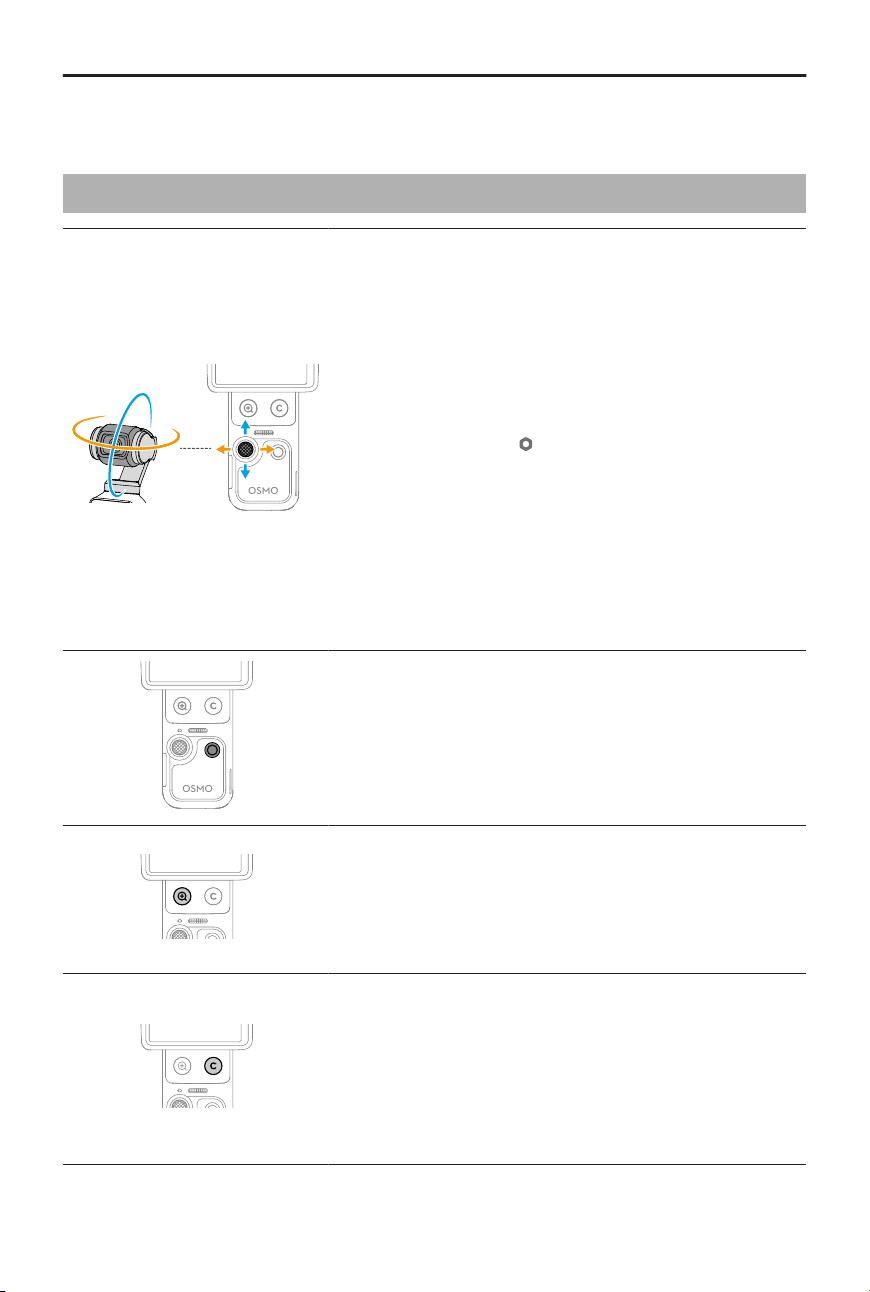
3.1 Button Features
OSMO
5D Joystick
Push left or right: Control the camera movement in the
pan axis.
Push up or down: Control the camera tilt or zoom.
*
* The amount of joystick movement controls the gimbal
rotation speed and camera zoom speed. The further the
joystick is pushed, the faster the gimbal camera rotates or
zooms. To disable this feature, swipe down from the top of
the camera view, tap
and enable Input Lock. This setting
allows for stable zoom control.
Press once: Go back to the previous menu, or exit Ac-
tiveTrack.
Press twice: Recenter the gimbal.
Press three times: Switch the camera between facing
forward and backward.
Press and hold: Lock the gimbal.
OSMO
Shutter/Record Button
Press once in the camera view: Take a photo or start/
stop recording.
Press once when powered o: Power on.
Press and hold: Power o.
OSMO
Zoom Button
Press once: Switch to 2x zoom.
Press twice: Switch to 4x zoom.
*
* Only supported in certain shooting modes.
Press once at any zoom level to switch back to 1x zoom.
OSMO
Custom Button
Press and hold: Customize the button functions.
By default:
Press once: Switch joystick control of gimbal tilt or cam-
era zoom.
Press twice: Recenter the gimbal.
Press three times: Lock/unlock the gimbal.
Osmo Pocket 4 User Manual
18 © 2026 DJI All Rights Reserved.
3.2 Operating the Touchscreen
Camera View
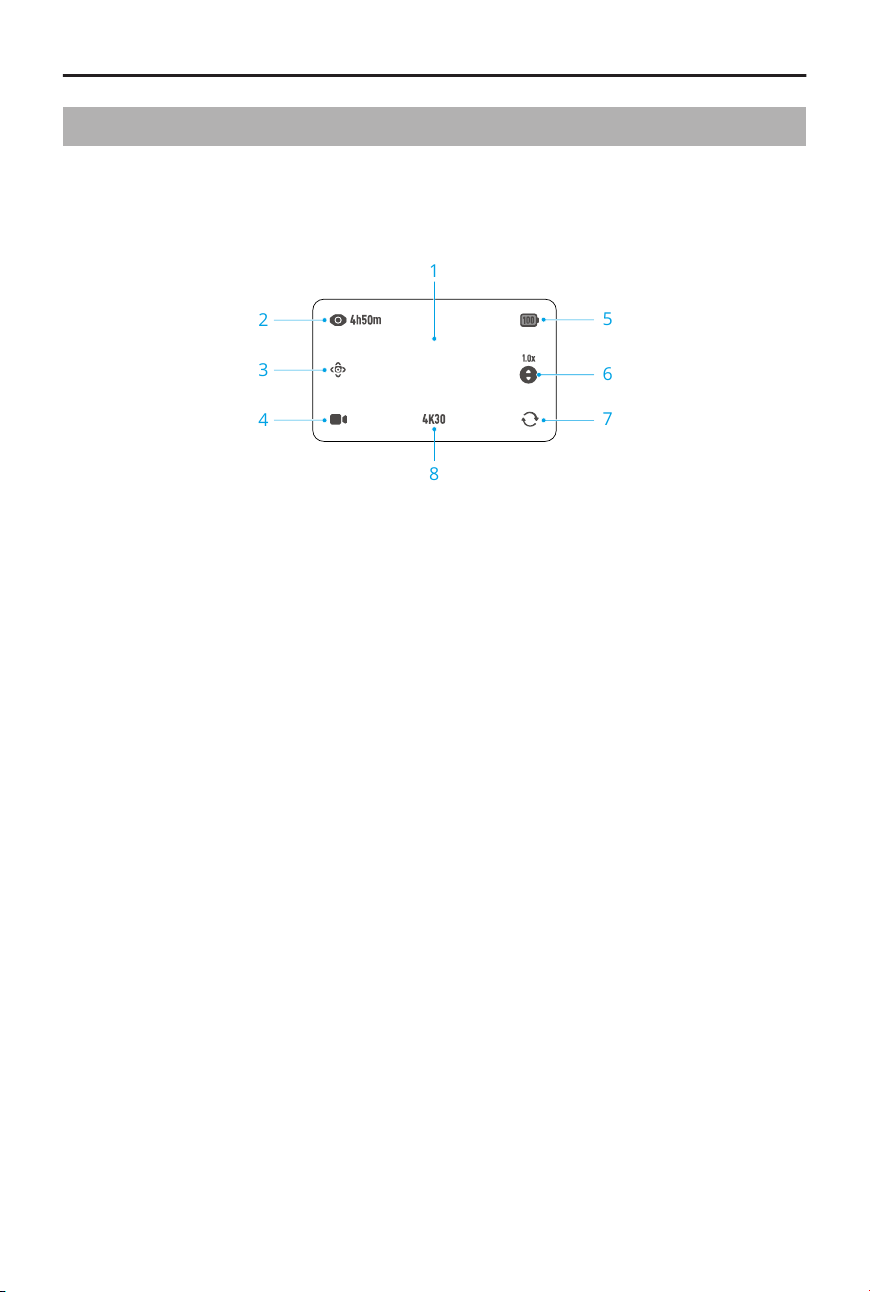
After the camera powers on, the touchscreen shows the liveview.
2
1
3
4
8
7
6
5
1. Single tap in the camera view to focus and meter. Double tap to select an
ActiveTrack subject.
2. Storage Capacity/Remaining Recording Time
3. Smart Gimbal Mode
4. Setting the Shooting Mode
5. Battery Level
When the battery handle is mounted, tap the icon to view the battery levels of both
the camera and the battery handle.
6. Switching Joystick Control
Tap to switch joystick control of gimbal tilt or camera zoom.
7. Gimbal Rotate
Tap to switch the camera between facing forward and backward.
8. Shooting Specications
Osmo Pocket 4 User Manual
© 2026 DJI All Rights Reserved. 19
Swipe Up - Parameters Settings
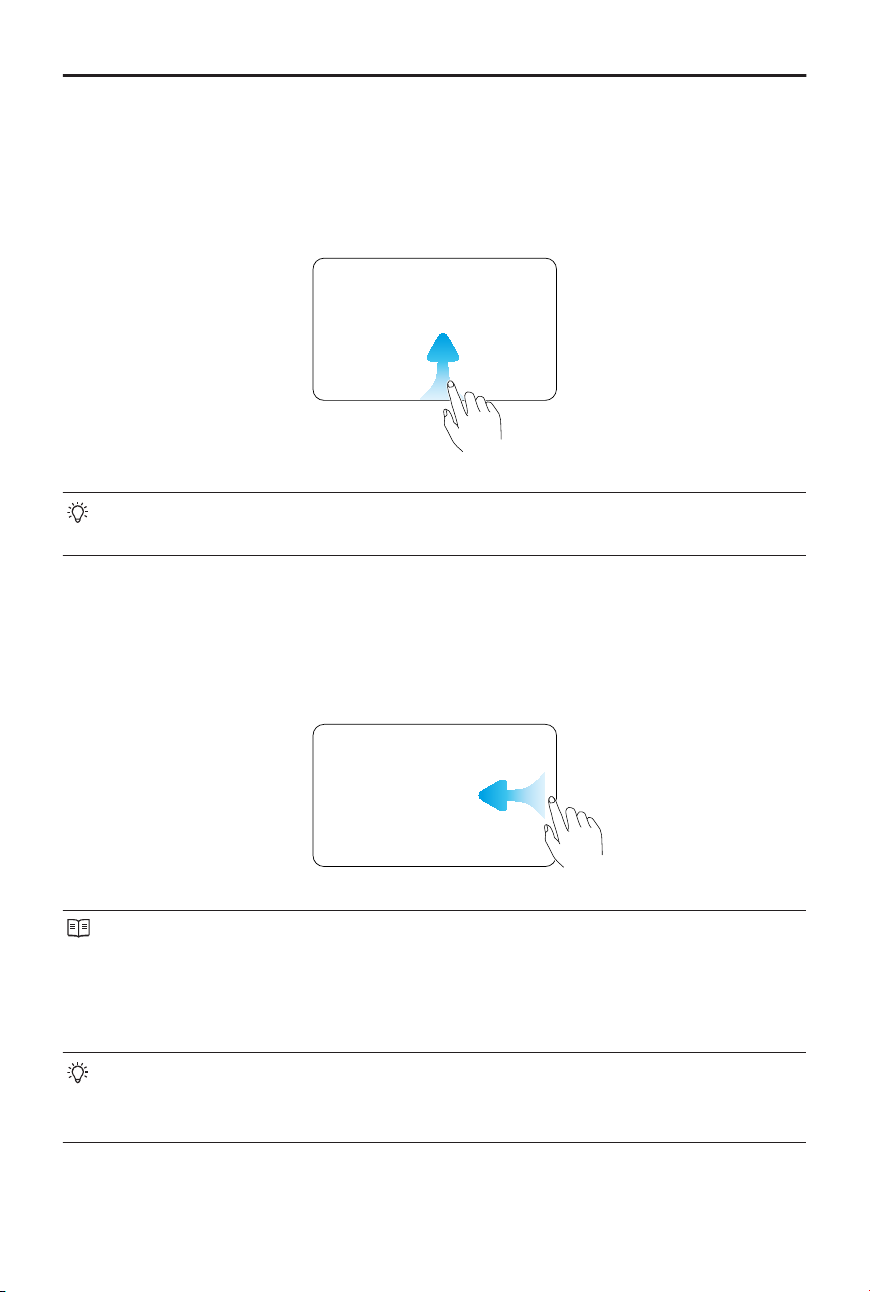
Swipe up from the bottom of the screen to set the parameters for each shooting mode.
Once you have set the parameters, swipe down from the top of the screen to return to
the liveview.
• Various parameters can be set in dierent shooting modes. Refer to the actual
interface.
Swipe Left - Image and Audio Settings
Swipe left in the camera view to adjust image and audio settings. Tap PRO to adjust pro
parameters.
D-Log 10 bit is designed for professional color grading when post-editing. In high-
contrast or multi-color scenarios (e.g., garden, eld, etc.), it can enlarge the dynamic
range for more color-grading in post-production. When D-Log 10bit color mode
is selected, you can enable Color Recovery to preview the color rendering in the
camera view.
Focus Mode, Beautify, App Glamour Eects, Film Tone and other settings are
also supported. Click to watch the tutorial video. Film Tone and Beautify are only
available in Video mode and cannot be used simultaneously.
Osmo Pocket 4 User Manual
20 © 2026 DJI All Rights Reserved.
Swipe Right - Playback
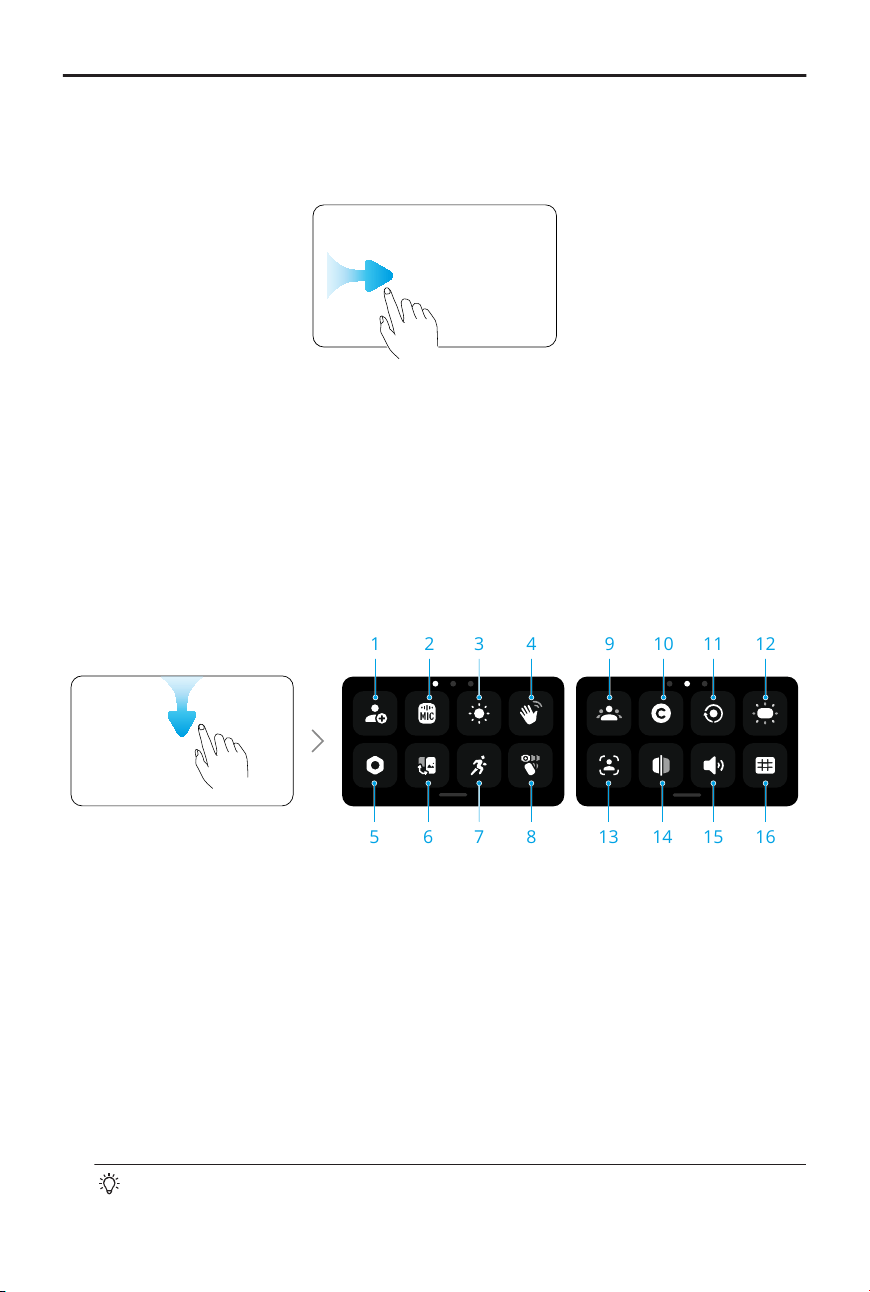
Swipe right from the screen to view the last taken footage.
When playing back the video, long press any blank area on the screen to play at double
speed. During playback, swipe left from the right edge of the screen to return to the
liveview.
Swipe Down - Control Center
Swipe down from the top of the screen to enter the control center. Swipe up from the
bottom of the screen to return to the liveview.
1 2 3 4
5 6 87
9 10 11 12
13 14 1615
1. Custom Mode
Save the current shooting settings as a custom mode. Custom modes can then be
used directly to shoot similar scenes.
2. Wireless Microphone
The camera can connect to two DJI wireless microphone transmitters simultaneously.
Visit the ocial website to view the supported models.
Follow the on-screen instructions for linking. Once linked, you can use the transmitter
to control the camera to start recording, with the audio being captured by the
transmitter.
• Visit the DJI website and refer to the user manual of the mic product for
more information.
Osmo Pocket 4 User Manual
© 2026 DJI All Rights Reserved. 21

• When the transmitter is linked to the camera, tap Wireless Microphone
settings to adjust the audio parameters of the transmitter.
• Enter the control center, tap and enable Audio Backup. When enabled,
the camera's built-in microphone will also record audio simultaneously while
recording video with a wireless microphone. This backup audio can be saved
as a separate .aac le or embedded as an additional audio track in the video
le. Audio Backup is not supported in Timelapse, Webcam, and DisplayPort
transmission modes.
3. Brightness
Tap and slide to adjust the brightness. You can also enable adaptive brightness for
outdoor use.
4. Gesture Control
When enabled, face the camera and perform the corresponding gesture to take
photos, record videos, or control ActiveTrack:
• Palm : Enable/disable ActiveTrack.
• V Gesture : Take a photo, or start/stop video recording.
• To ensure optimal gesture control, perform and hold the gesture within
2 meters of the camera and avoid blocking your head. There will be an
on-screen prompt when the gesture takes eect.
• When Registered Subjects Only is enabled, only registered subjects can
control the camera with gestures.
5. Settings
Gimbal Calibration, Auto Power O and other settings are also supported. Key
features are as follows:
Gimbal Start-
up Direction
Set the direction the camera faces when powered on.
Last Setting: if the gimbal mode is set to Follow or Tilt Locked,
the camera will face forward or backward. If the gimbal mode is
FPV, the camera will rotate to resume the same orientation when
powered o last time.
Wearable
Mode
After enabled, the camera will rotate and lock in the sele mode
and the gimbal mode will change to Tilt Locked. Tap twice on the
screen to recenter the gimbal. Swipe up to exit Wearable mode.
In wearable mode, it is recommended to use the camera with the
Expansion Adapter (sold separately).
Osmo Pocket 4 User Manual
22 © 2026 DJI All Rights Reserved.

Anti-Flicker Tap to select the anti-icker frequency to reduce icker caused by
uorescent lights or TV screens when shooting indoors. Select the
anti-icker frequency according to the power grid frequency in the
region. The default anti-icker frequency is set as Auto.
Timecode Either reset the timecode or sync with the system time. The cam-
era timecode can be synchronized by a time code synchronizer
using the USB-C port.
Tap Timecode Display to display the time code in the liveview.
6. Switching between Landscape and Portrait Mode
Tap and select the shooting orientations: Auto-Rotation, Landscape, and Portrait.
7. Rotational Speed
Tap to adjust the gimbal following speed.
8. Selecting the Gimbal Mode
9. Register Subject
Register and manage the subject. Registered subjects can be prioritized for autofocus,
gesture control, and Spotlight Follow.
10. Custom Button
Customize the button functions.
11. Screen Rotate & Capture
When this function is enabled, footage shooting will be started as soon as you rotate
the touchscreen clockwise to power on the camera. Last Settings are used by default.
• After shooting, the camera will automatically power o if left idle for two
seconds.
• When you rotate the screen again during recording:
◆
If the shooting orientation is set to Auto-Rotation or Landscape, the
recording stops and the camera will power o after two seconds.
◆
If the shooting orientation is set to Portrait, shooting will continue.
12. Fill Light Switch
13. FT (Sele)
When the gimbal is in sele orientation, the camera automatically tracks the subject
occupying the largest area of the frame. Tracking stops when the gimbal orientation is
reversed.
14. Sele Flip
When enabled, footage captured in sele mode is automatically mirrored to match
the preview.
Osmo Pocket 4 User Manual
© 2026 DJI All Rights Reserved. 23

15. Sounds
Tap to set volume.
16. Reference Lines
Display reference lines in the camera view to assist with composition.
Osmo Pocket 4 User Manual
24 © 2026 DJI All Rights Reserved.
4 Using the Product
4.1 Setting the Shooting Mode
1. Tap the icon to enter the mode switch page.
2. Swipe to select a shooting mode.
3. Tap the selected shooting mode or swipe up from the bottom of the screen to return
to the liveview.
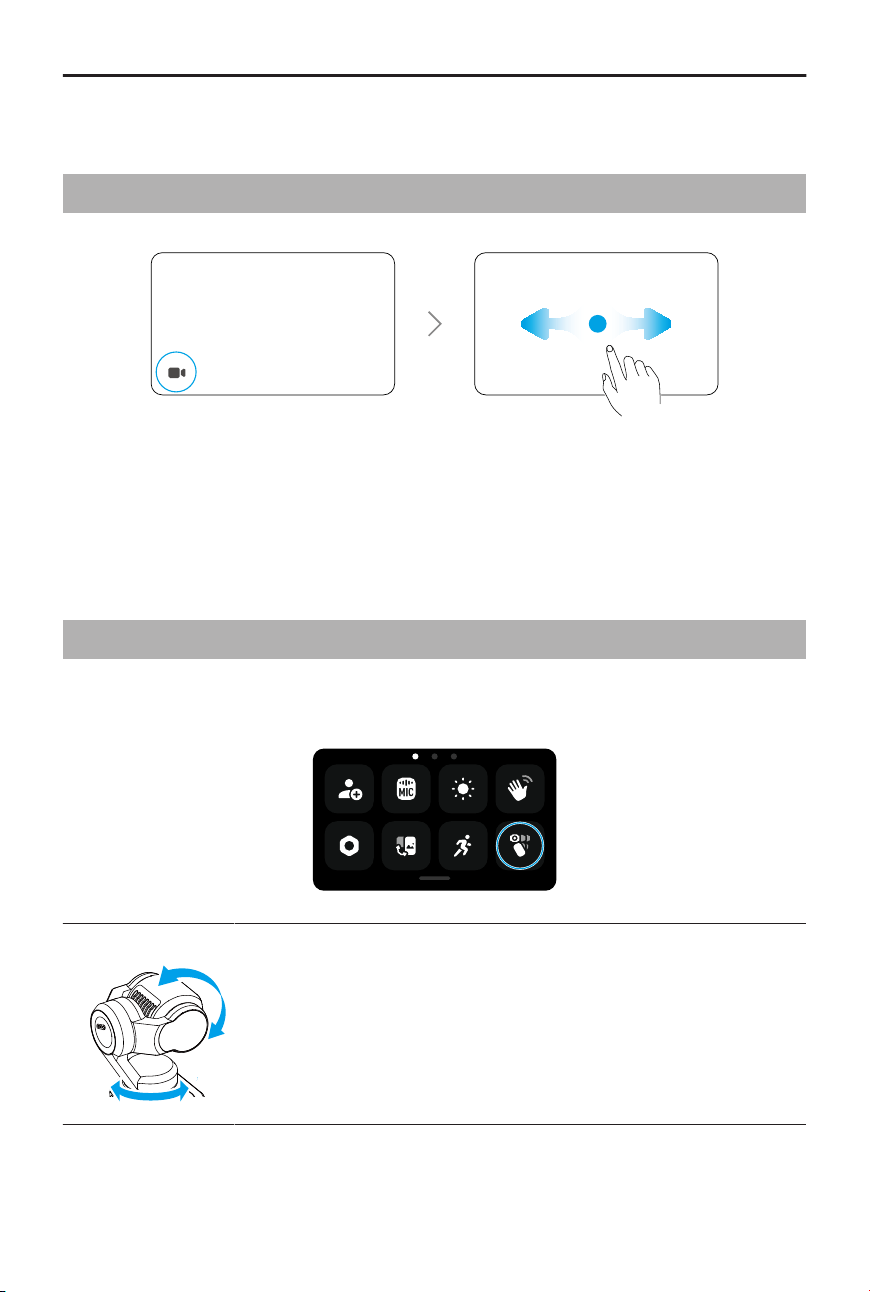
4.2 Selecting the Gimbal Mode
Swipe down from the top of the screen to enter the control center. Tap the icon to select
the gimbal mode. Click to watch the tutorial video.
Follow
The pan and tilt axis follow the handle while the roll axis remains
level.
Follow mode is selected by default and is suitable for most scenar-
ios, including vlogs and sele.
Osmo Pocket 4 User Manual
© 2026 DJI All Rights Reserved. 25
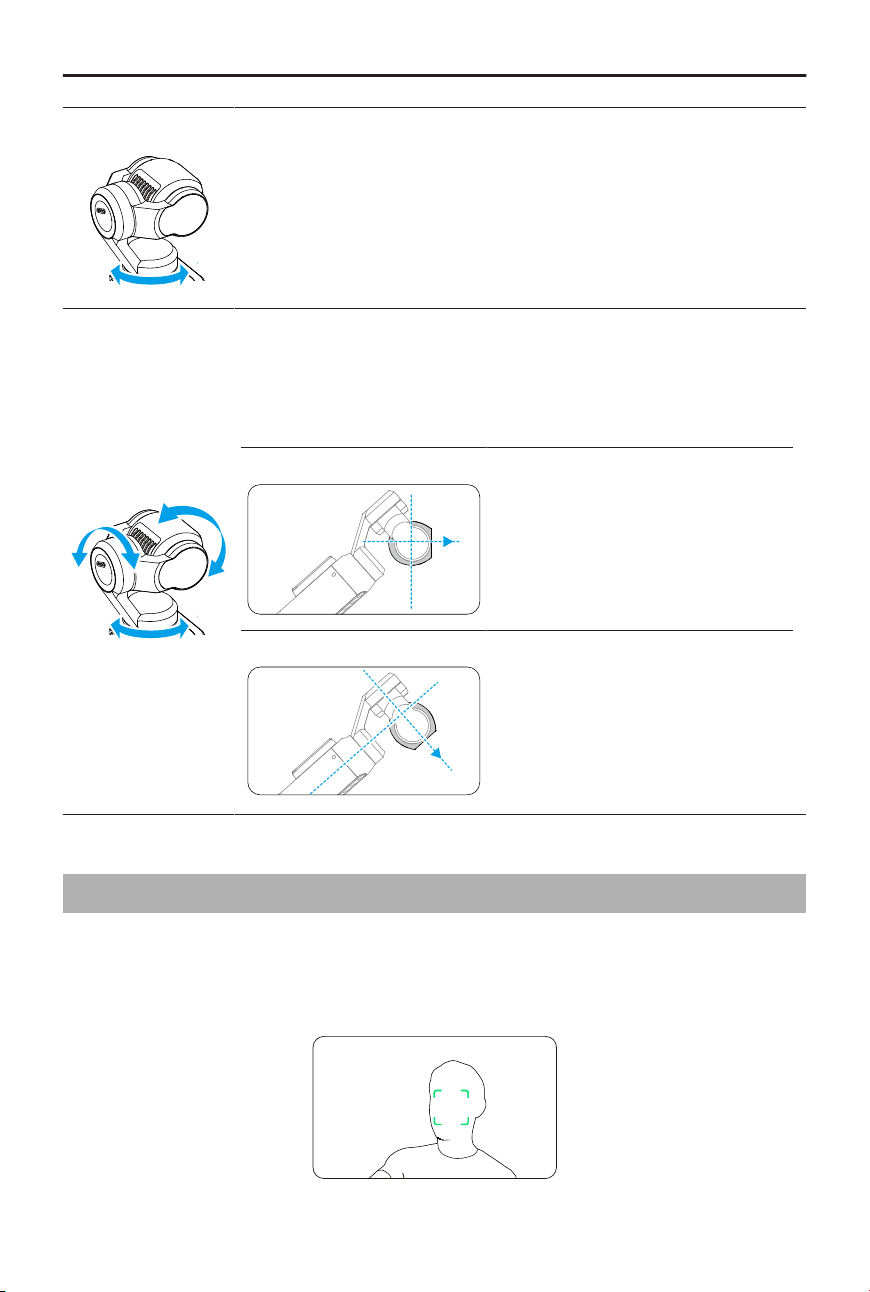
Tilt Locked
Only the pan axis follows while the tilt axis is locked and the roll
axis remains level.
This mode is suitable for push‑in/pull‑out and lateral movement
shots.
FPV / FPV⊥
The camera rotates freely and follows the handle movement.
This mode is suitable for creative shots or immersive rst-person
view footage.
FPV
The camera keeps horizontally for-
ward when powering on or re-cen-
tering.
FPV⊥
The camera keeps perpendicular to
the handle when powering on or
re-centering.
4.3 ActiveTrack
When in Photo or Video mode, tap twice on the touchscreen to select a subject and
enable ActiveTrack. At this time, the gimbal camera will automatically follow the selected
subject. Press the 5D joystick or tap the touchscreen to exit ActiveTrack.
Osmo Pocket 4 User Manual
26 © 2026 DJI All Rights Reserved.
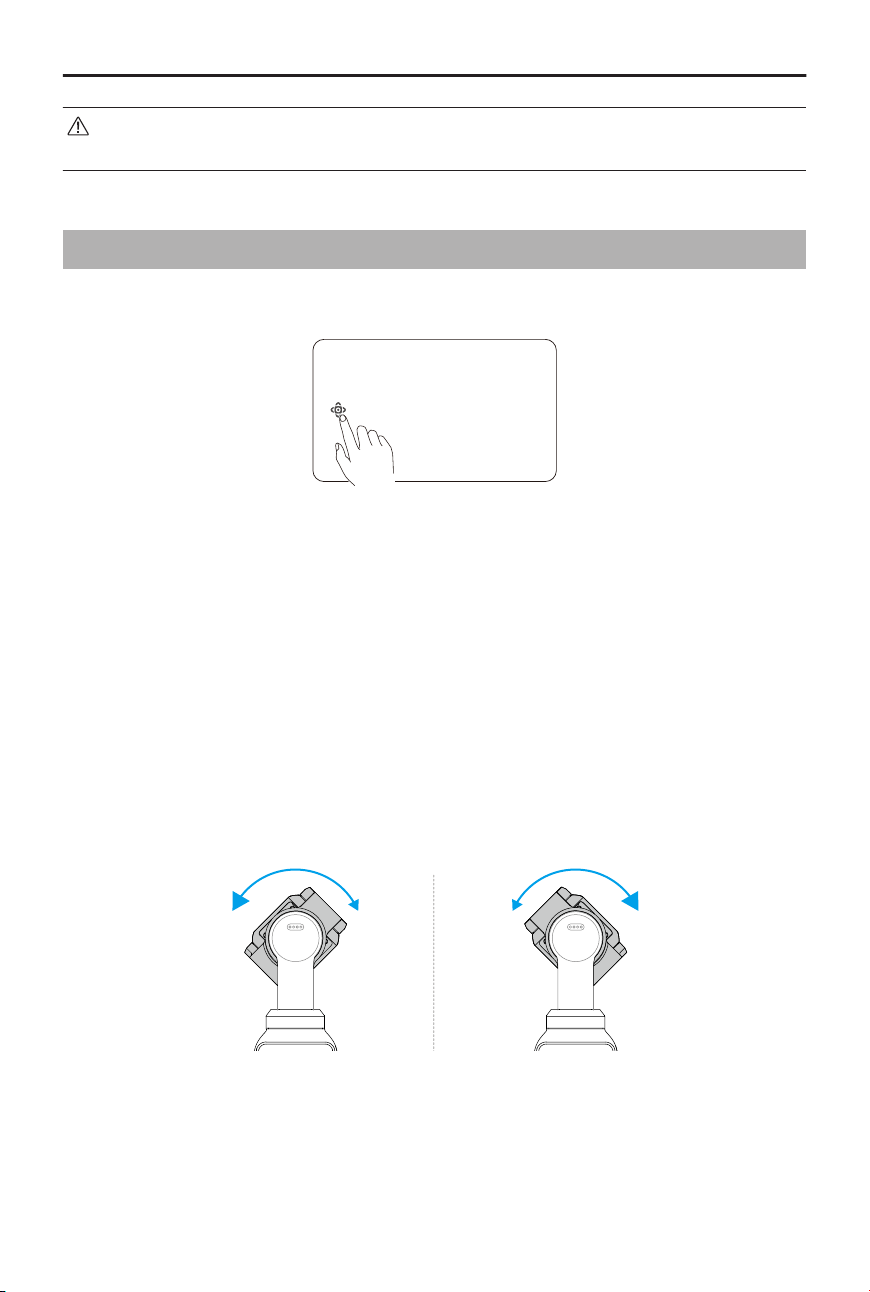
ActiveTrack is unavailable in Panorama, Timelapse, Motionlapse, SpinShot, or when
using FPV mode with the camera held horizontally.
4.4 Smart Gimbal Mode
In Video mode, tap the icon to select the smart gimbal mode and tap again to exit.
Spotlight Follow
After recording starts, the camera prioritizes following the registered subjects. If no
subject is registered, the camera will automatically follow the subject closest to the center
of the frame.
Dynamic Framing
Select the subject position in the live view based on the golden ratio or the rule of thirds
via the 5D joystick. After the subject enters the frame, press the joystick to track the
subject while keeping the subject at the selected position.
SpinShot
Press the joystick once or tap the icon on the screen to start SpinShot mode. The camera
will rotate 90° or 180° to capture footage, creating a distinctive cinematic eect.
90°
Osmo Pocket 4 User Manual
© 2026 DJI All Rights Reserved. 27
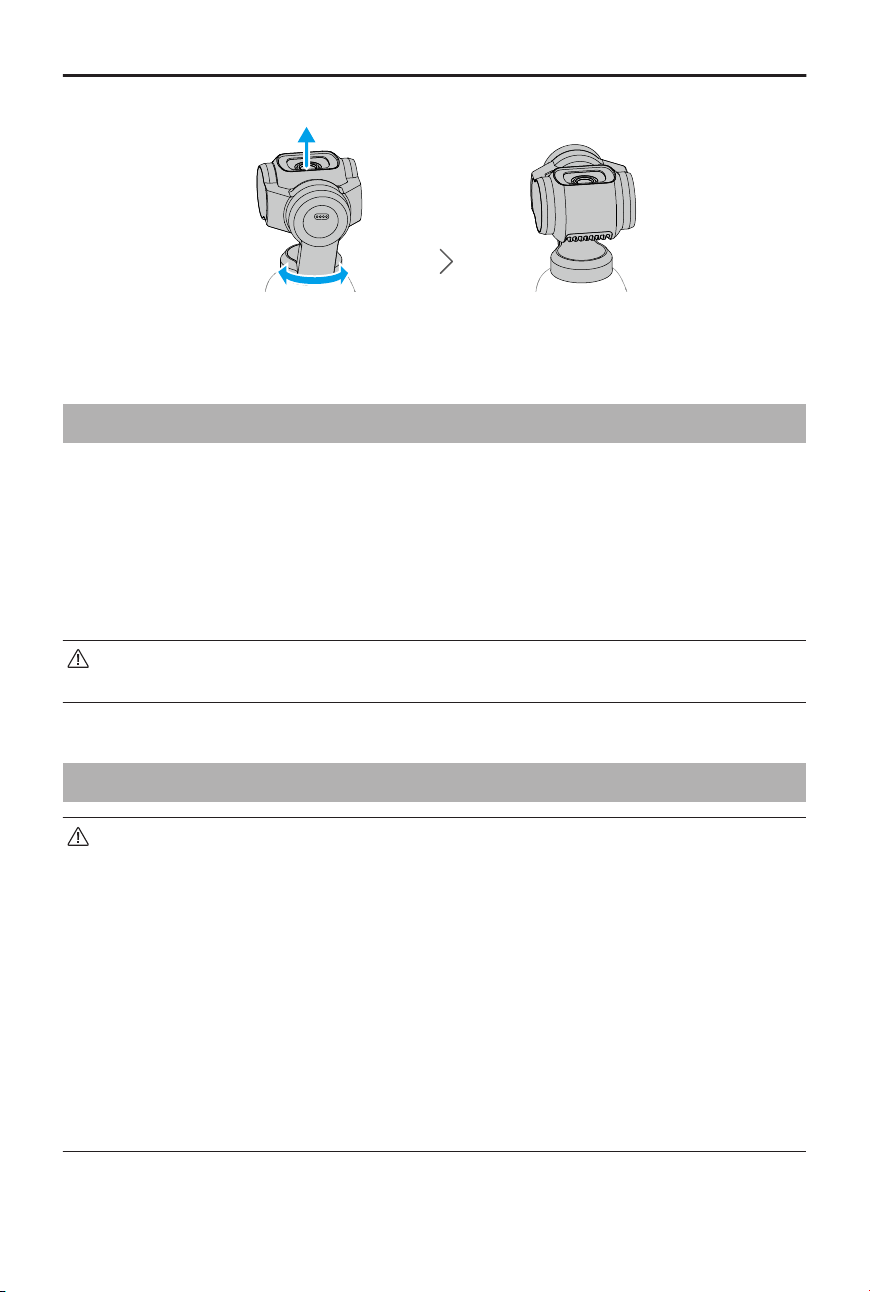
180°
4.5 Webcam Mode
The product can work as a webcam on a computer. Power on the product and connect
it to the computer using a USB cable. Tap Webcam on the camera to enter the Webcam
mode, and the camera will function as a webcam input device. The bottom of the screen
displays Webcam.
Press the Shutter/Record button to start recording. Users can preview recorded videos
after exiting the Webcam mode.
Ensure that the device is adequately cooled during use. Disconnect the device
promptly after shooting is completed.
4.6 Footage Storage and Transfer
• To ensure a secure connection, it is recommended to use the provided data
cable. If using third-party cables, select safe and reliable ones to ensure device
performance and safety.
• Ensure that the microSD card slot and the microSD card are clean and free of
foreign objects during use.
• DO NOT remove the microSD card during recording. Otherwise, the microSD
card may be damaged and cause data loss.
• Before shooting important photos or videos, shoot a few images to test whether
the camera is operating correctly.
• Make sure to back up all important data stored in the internal storage or on the
microSD card. Data cannot be restored if damaged or lost.
Osmo Pocket 4 User Manual
28 © 2026 DJI All Rights Reserved.
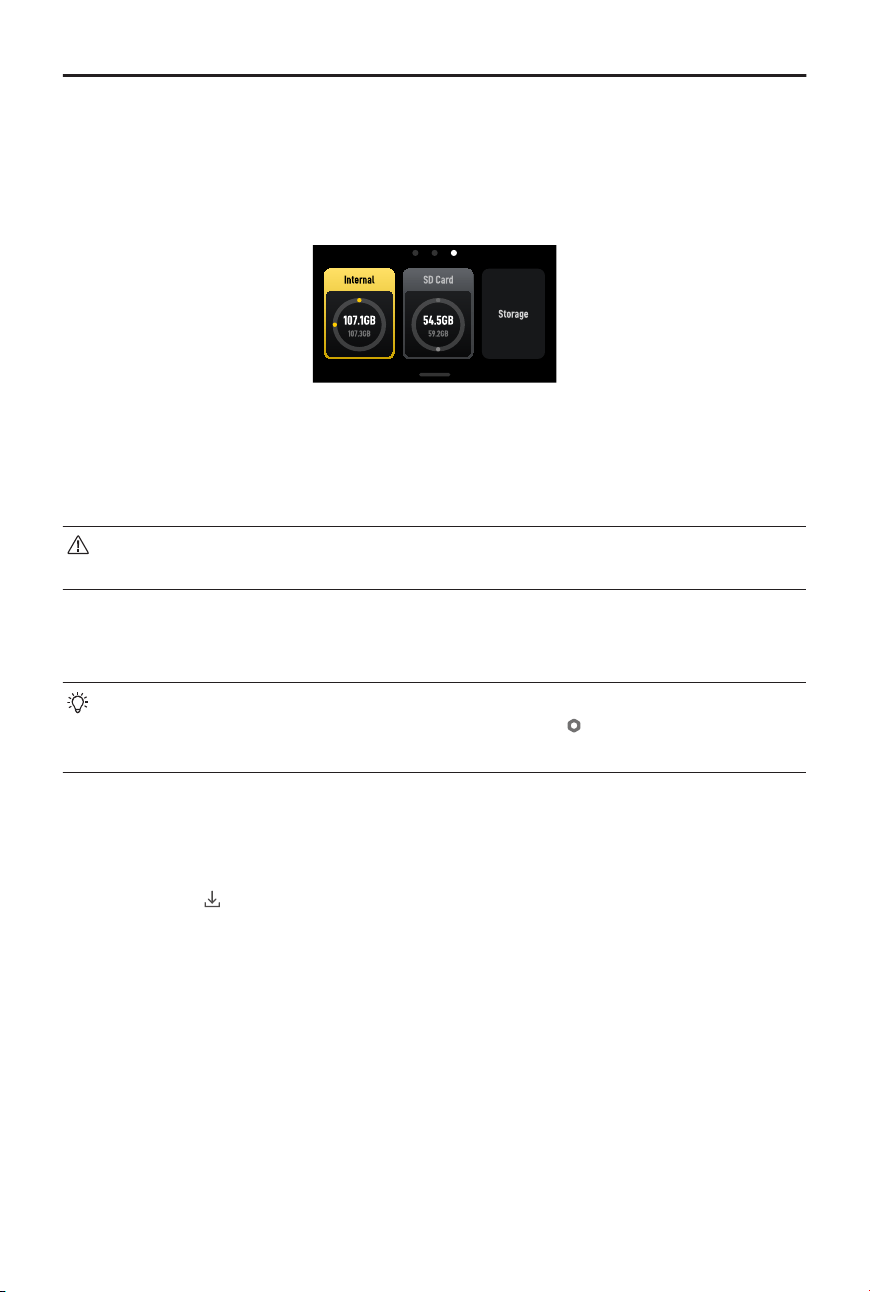
Storage Space
Swipe down from the top of the screen, and then swipe left to check the storage
information.
The camera has built-in storage and also supports expanding storage by installing a
microSD card.
Tap Storage to format the internal storage or the microSD card.
Formatting will permanently delete all data. Make sure to back up all required
data before formatting.
Transferring Files
• When transferring les by cables, if the camera cannot automatically recognize
the connected device, enter the control center, tap > USB mode, and
reconnect the camera.
Transferring Files to a Mobile Device
• Connect the camera to DJI Mimo App, tap the album icon to preview photos and
videos. Click
to download photos and videos.
• You can also transfer photos and videos by cables. Use the provided cable to connect
the mobile device. When connected, view and transfer photos and videos via the
device album or le management.
The photos and videos can be shared directly from DJI Mimo App to social media
platforms.
Transferring Files to a Computer
Power on the camera and connect it to a computer using a USB-C cable. When connected
to a computer, a pop-up will appear. Tap Transfer File: USB to download the les from
Osmo Pocket 4 User Manual
© 2026 DJI All Rights Reserved. 29
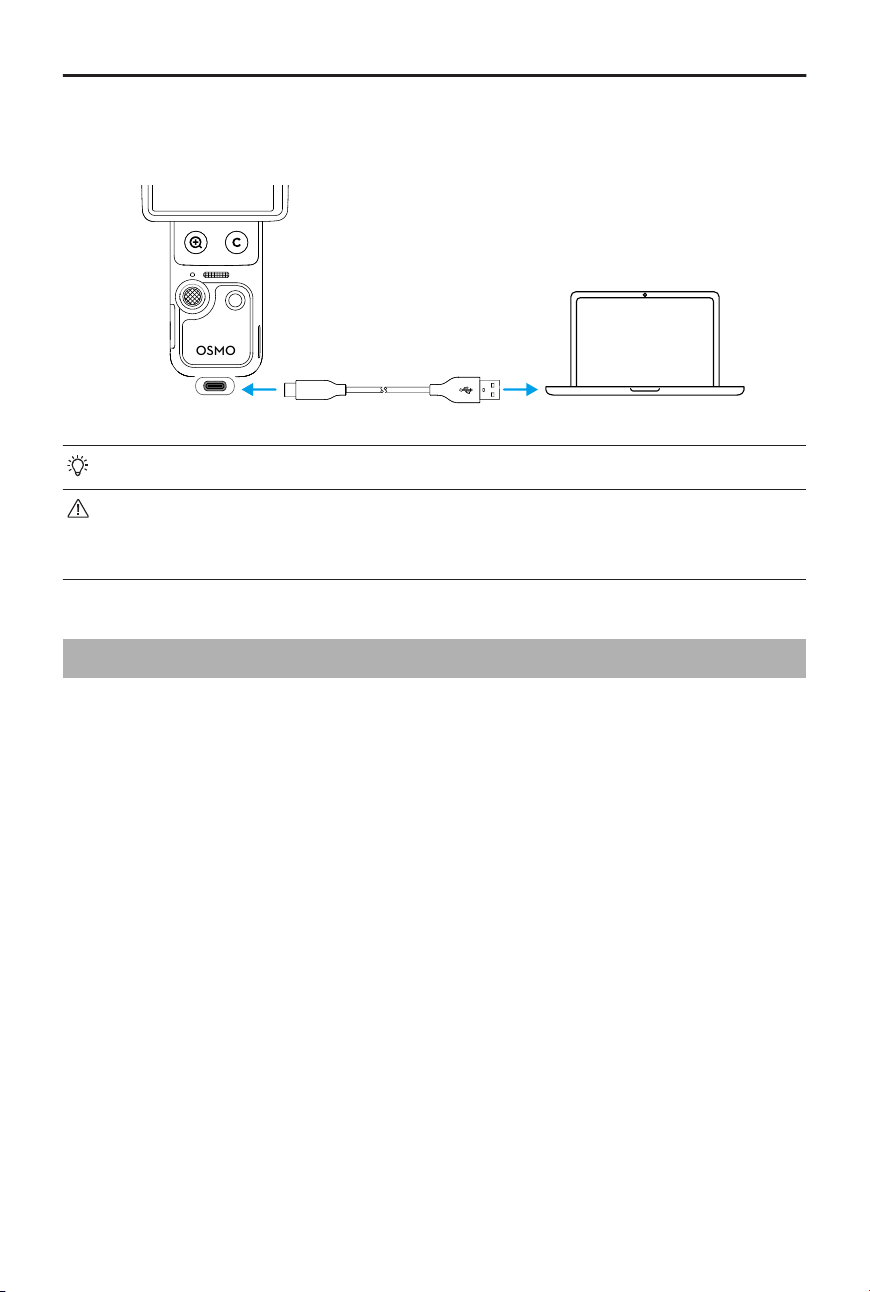
the camera to the computer. When transferring a le, the camera cannot take photos or
record videos.
OSMO
Reconnect the device to the computer if a le transfer is interrupted.
After le transfer is complete, DO NOT immediately disconnect the device to
prevent data loss. Wait for the safe-to-remove prompt on your computer before
disconnecting.
4.7 Usage Notes
1. Intricate components inside the device may be damaged upon impact and cause the
gimbal to malfunction. Handle with care. Keep the product away from sand and dust
to safeguard the device.
2. Make sure there is nothing obstructing the gimbal when the device is powered on.
3. DO NOT manually adjust the axis lock frequently to avoid causing the axis lock to
malfunction.
4. The product is not water resistant. DO NOT spill any liquid on the product or use any
liquid cleansers. Only use a soft dry cloth to clean the product.
5. DO NOT cover or touch the ventilation area of the product as it may become hot
during use. When overheating, the camera will stop shooting.
6. DO NOT use the product in the environments with high-amplitude vibrations (such
as installing on the hand bar of motorcycle or bike). Otherwise, the gimbal can be
damaged.
7. Slight friction between the screen frame and the body is a normal phenomenon and
does not aect use when rotating the screen.
8. DO NOT expose the camera lens in an environment with laser beams, such as a laser
show, in order to avoid damaging the camera sensor.
Osmo Pocket 4 User Manual
30 © 2026 DJI All Rights Reserved.
9. Shaking the camera during power‑on may cause startup failure. Hold the camera still
while powering on.
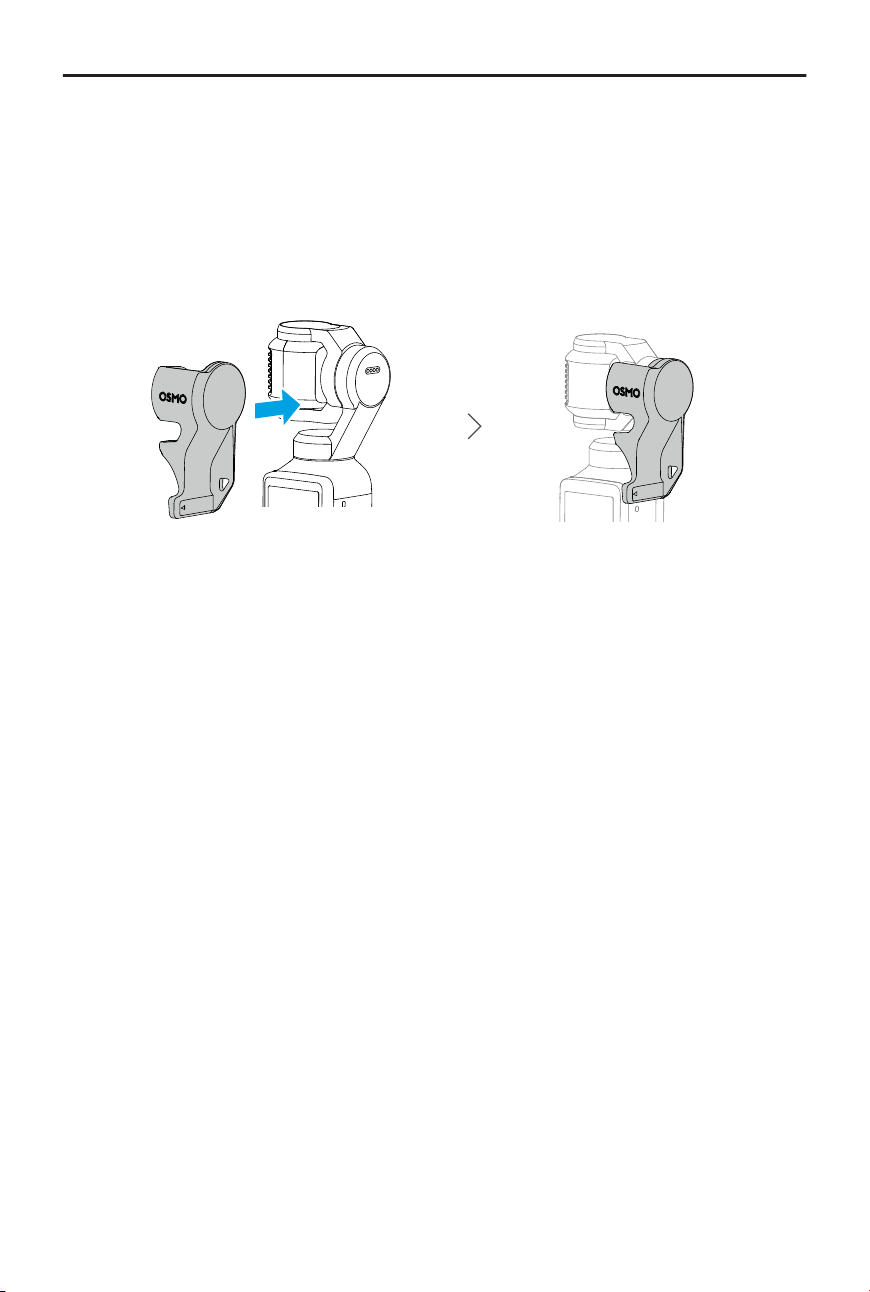
10. After powering o the camera, attach the gimbal clamp to prevent damage caused by
unintended movement. The gimbal clamp includes a lanyard hole that can be used
with a strap to help prevent the clamp from being lost. DO NOT use the lanyard hole
on the gimbal clamp to hang or support the camera, as the clamp may loosen and
cause the camera to fall.
Battery
1. DO NOT use non-ocial batteries. DJI takes no responsibility for any damage caused
by non-ocial batteries.
2. Use the battery within the temperature range specied at https://www.dji.com/osmo-
pocket-4/specs. Use of the battery in a high-temperature environment can lead to
a re or explosion. Before using the battery in a low-temperature environment, it
is recommended to charge the battery fully in a normal temperature environment.
Charging the battery at the ideal temperature can prolong battery life.
3. Discharge and charge the battery completely once every three months to keep it in
good condition.
4. The battery is designed to stop charging when it is fully charged. It is good practice
to monitor the charging progress and disconnect the charger when battery is fully
charged.
5. When the battery voltage is too low, the battery will enter low-power state. Charging
the battery will exit low-power mode.
6. DO NOT store the battery for an extended period of time after fully discharging.
Otherwise, the battery may over-discharge and cause irreparable damage to the
battery cell.
7. Discharge the battery to 40-65% if it will not be used for 10 days or more. This can
greatly extend the battery life.
Osmo Pocket 4 User Manual
© 2026 DJI All Rights Reserved. 31


Contact
DJI SUPPORT
This content is subject to change without notice.
Download the latest version from
https://www.dji.com/osmo-pocket-4/downloads
If you have any questions about this document, please contact DJI by sending a message
DJI and OSMO are trademarks of DJI.
Copyright © 2026 DJI All Rights Reserved.