
1
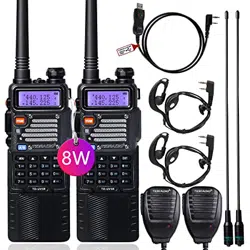
Baofeng UV-82 8W Programming Guide
INTRODUCTION
BaoFeng BF-UV82 is a dual-band (VHF, UHF) versatile amateur radio. It offers
128 channels, you can add or remove channels from scanning list and give
channels alphanumeric names via programming with a computer. With the
enhanced capabilities of the UV82 radio, this Programming Guide will help you
get a quick start to program the radio.
Contents
1. Preparation before Programming.......................................................................2
2. Manufacture Software Programming Process ................................................5
3. Chirp Software Programming Process...............................................................13
2
Preparation before Programming
1. Computer System Requirements
Manufacture Programming Software Operating System: Windows 7, Windows 8
and Windows 10
CHIRP Programming Software Operating System: Windows 7\8\10,
Windows 2000, Mac OS, Linux
2. Programming Cable
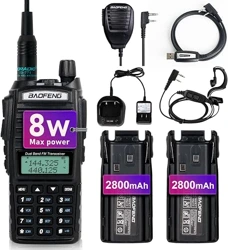
A.USB programming cable - The driver should be installed before programming.
Driver download link:
http://www.walkietalkiesoftware.com/portal/index/software.html
1) Find the corresponding driver of the system.
2) Click and wait for the download.
3) Click install and wait for the installation
Come with the USB programming cable is only suitable for WINDOWS
system

3
B.If you use a FTDI cable, it does not need to be installed with a driver. You can
just plug in and use directly.
1) If your computer did not automatically install the driver, you will need to
update the driver to the latest driver
Download the latest FTDI driver at :http://www.ftdichip.com/Driver/VCP.htm
3. Software Download & Install
1) Turn on the computer, check if your computer system meets the
requirements.
2) Download the manufacture software on walkietalkiesoftware.com or CHIRP
software on https://chirp.danplanet.com/projects/chirp/wiki/Download
3) Install the programming software
4. Connect your Walkie Talkie with Computer
1) USB programming cable connects with the computer end.
2) Connect the other end of the cable with your walkie talkie.
3) When both ends have been connected, turn on your radio. Make sure it has
enough power during the programming procedure.
ERROR: Failed to Connect to the transceiver (Radio)
If it says it cannot connect to the radio - this means the cable is working but is not installed correctly
into the radio.
Items to Check:
Radio is turned on
The cable is FULLY inserted (it can be deceiving but there is a double click)
Hold the cable into the radio - some radios might not make contact without pressure
A way to cheat - dampen the pins of the cable before pushing it into the radio. This will give a
solid contact
4
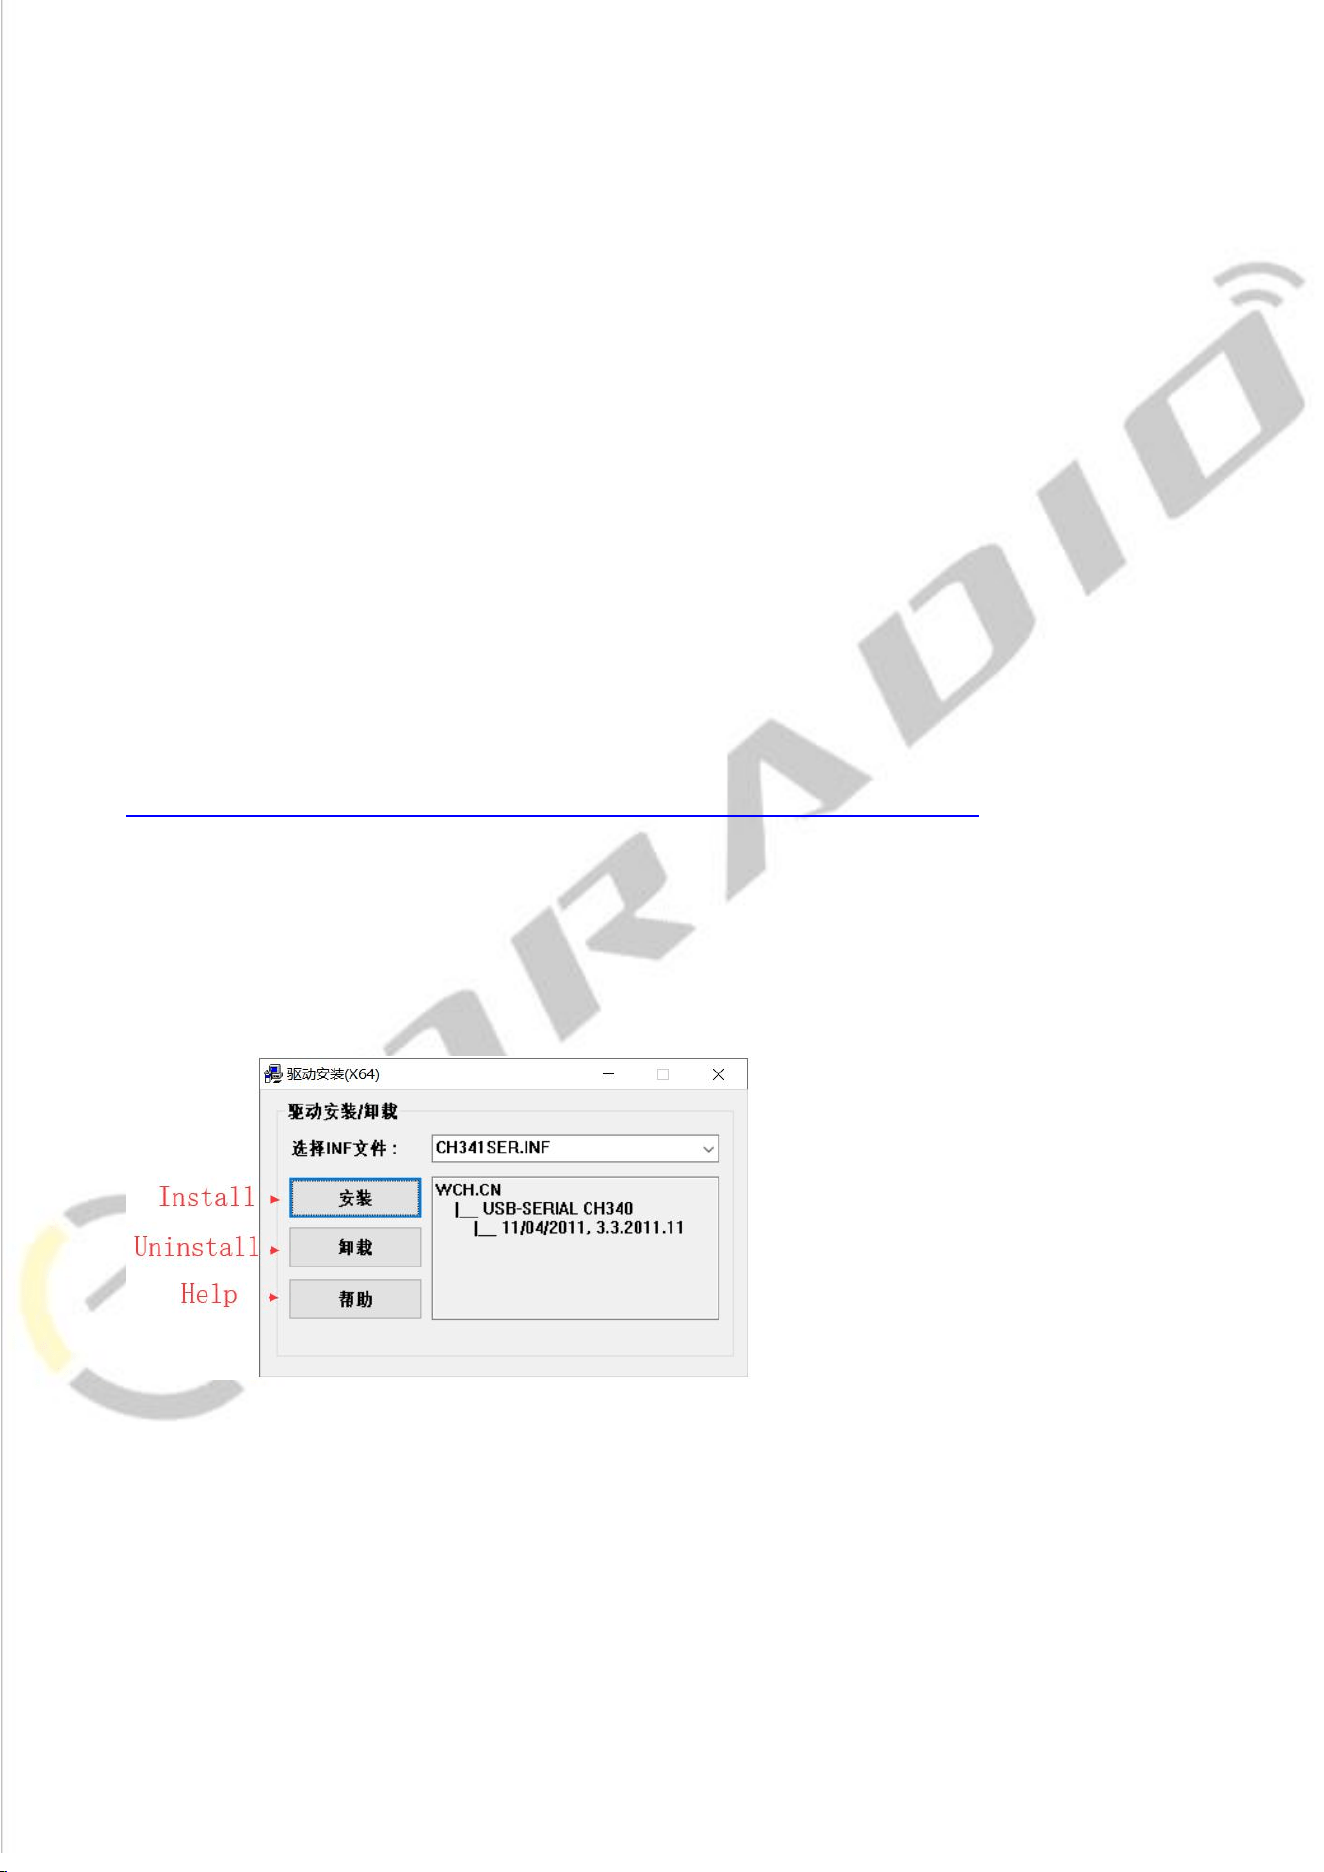
5.How to choose your port?
1.Get into “Window Setting”, then search “Device Manager”.
2.Open “Device Manager”, and unfold Port (COM & LPT) to check the existing
port.
5
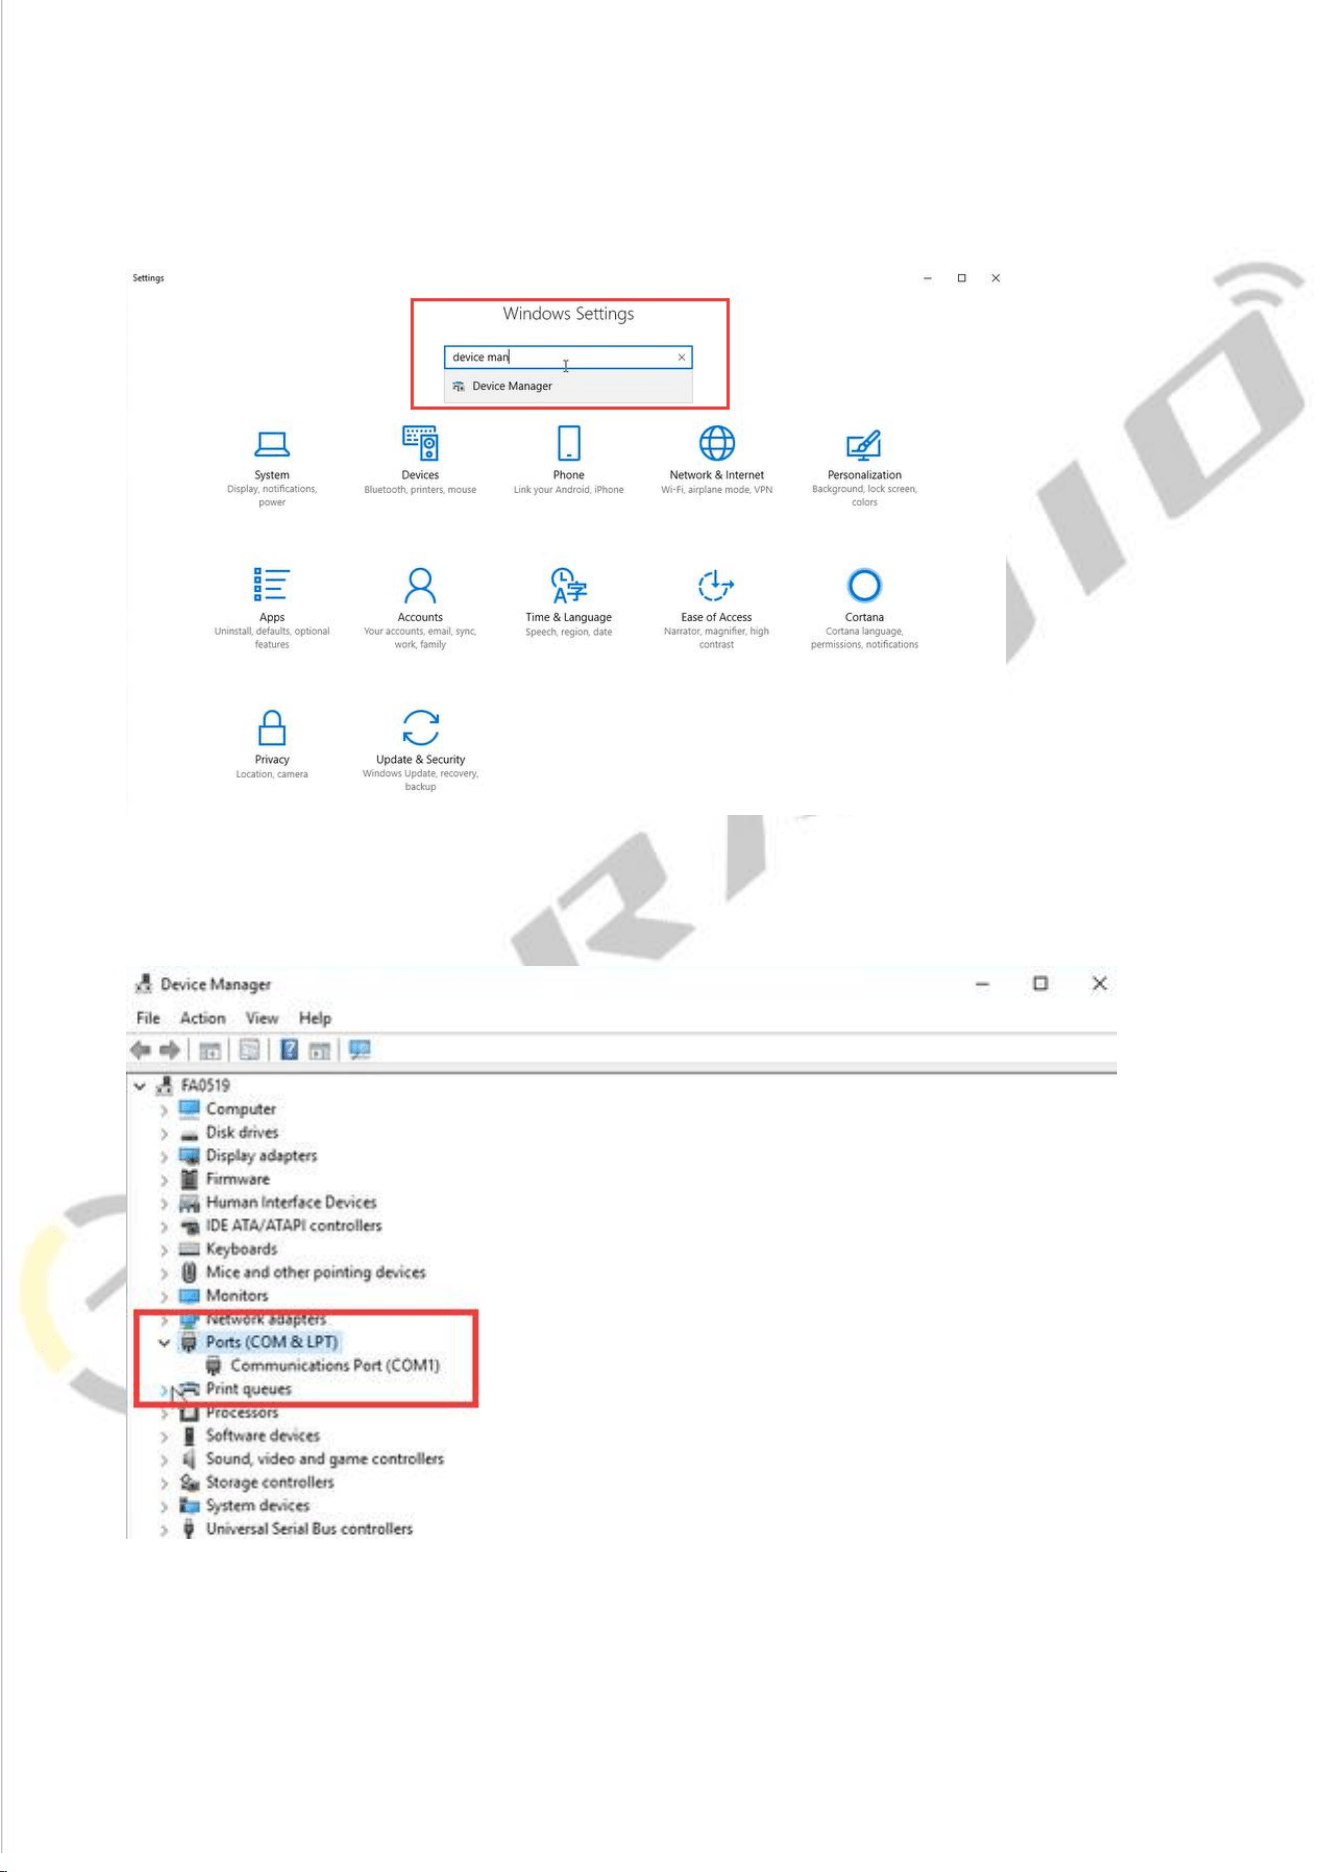
3.Come with USB programming cable port is USB-SERIAL CH340 (COM?)
4.FTDI programming cable port is USB Serial Port (COM?)
UV-82 Manufacture Software Programming Process
1) Download and open the manufacture software. Click "Setting" and
Chose ”Port”, then click the "OK" button.
6
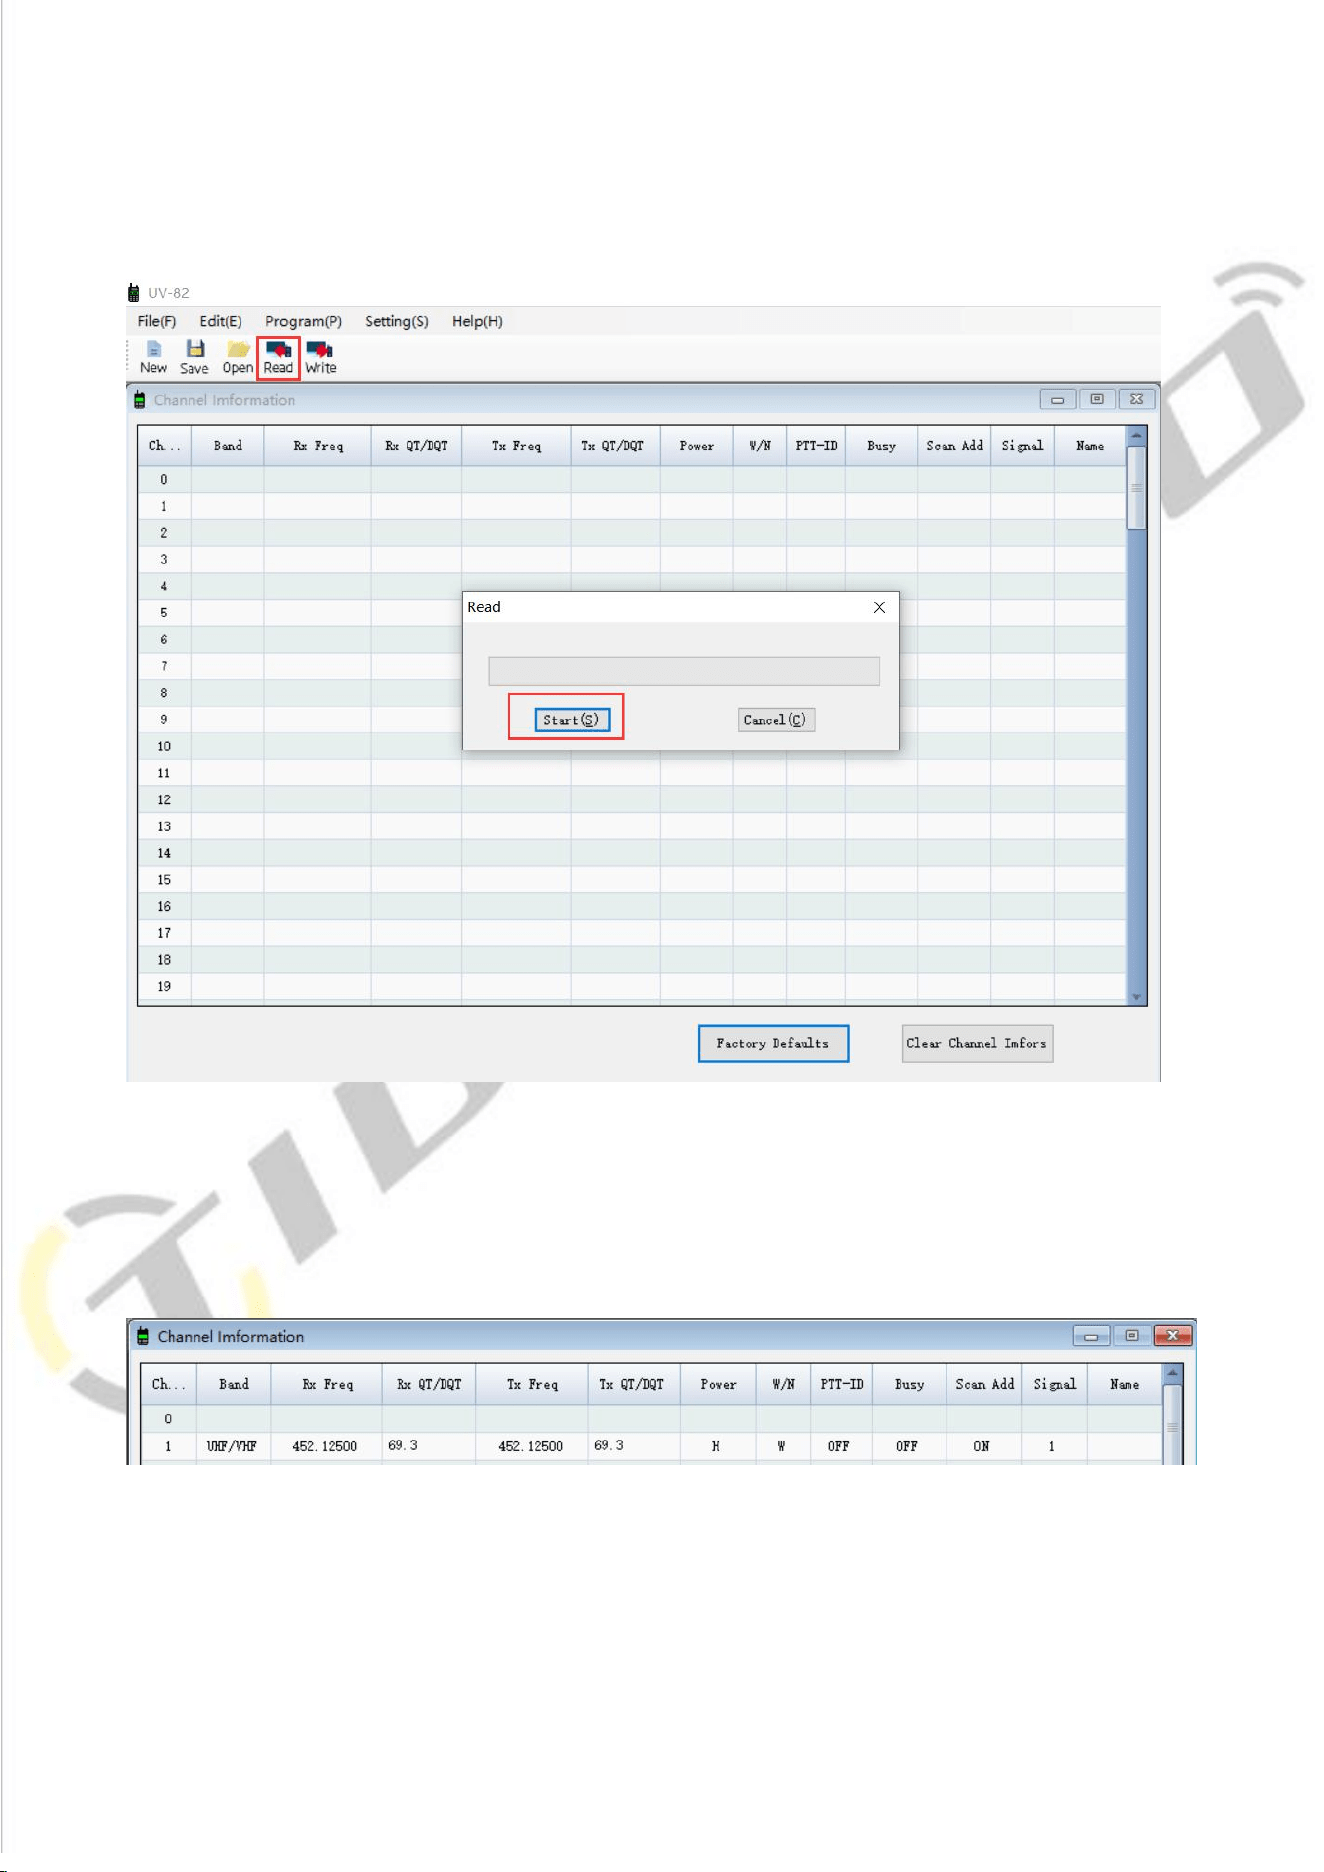
2) Click the "Read" button, then click "Start" and ready to read the data from
your radio.
3) You will come to the parameter page and adjust the limited parameters
(Channel,TX Frequency, RX Frequency,RX QT/DQT,TX QT/DQT, High/Low Power,
and Wide/Narrow Band,etc).
7
Channel Information
The UV-82 radio has 128 channels, you can edit the channel number and channel information
according to your needs. The following is an introduction to each term.
Name
Meaning
Setting
Description
RX Freq
Receiving frequency
VHF:136-174MHz
UHF:400-520MHz
TX Freq
Transmitting frequency
VHF:136-174MHz
UHF:400-520MHz
RX
QT/DQT
Receiving CTCSS/DCS
Refer to the DCS table and
CTCSS table in the manual.
Mutes the speaker of the
transceiver in the absence of a
specific low level digital signal. If
the station you are listening to
does not transmit this specific
signal,you will not hear anything.
TX
QT/DQT
Receiving CTCSS/DCS
Refer to the DCS table and
CTCSS table in the manual
Mutes the speaker of the
transceiver in the absence of a
specific low level digital signal. If
the station you are listening to
does not transmit this specific
signal,you will not hear anything.
Power
Transmit power
HIGH/LOW
HIGH:8W
LOW:1W
W/N
Channel bandwidth
WIDE/NARROW
Wideband (25kHz bandwidth)
narrowband (12.5 kHz bandwidth).
PTT-ID
When to send the PTT-ID
OFF does not send
code;
BOT press PTT button to
send code;
EOT release PTT
button to send code;
BOTH press and
release PTT button to
send code
Codes are sent during either the
beginning or end of a transmission.
Busy
Busy Channel Lockout
OFF/ON
ON: If the channel is occupied,
when you press the [PTT] key on
this channel, the radio will make a
beep tone and will not transmit any
signal.
OFF: No matter if the channel is
occupied, the radio will transmit
the signal when you press the [PTT]
key.
8
Scan
add
OFF/ON
In the scan mode, whether add the
channel to the scan list.
ON: the channel is added to scan
list;
OFF: the channel cannot be
scanned.
Signal
Signal code
1-15
Selects 1 of 15 DTMF codes. The
DTMF codes are programmed with
software and are up to 5 digits
each
Name
Customize channel name
Support alphanumeric channel
name.
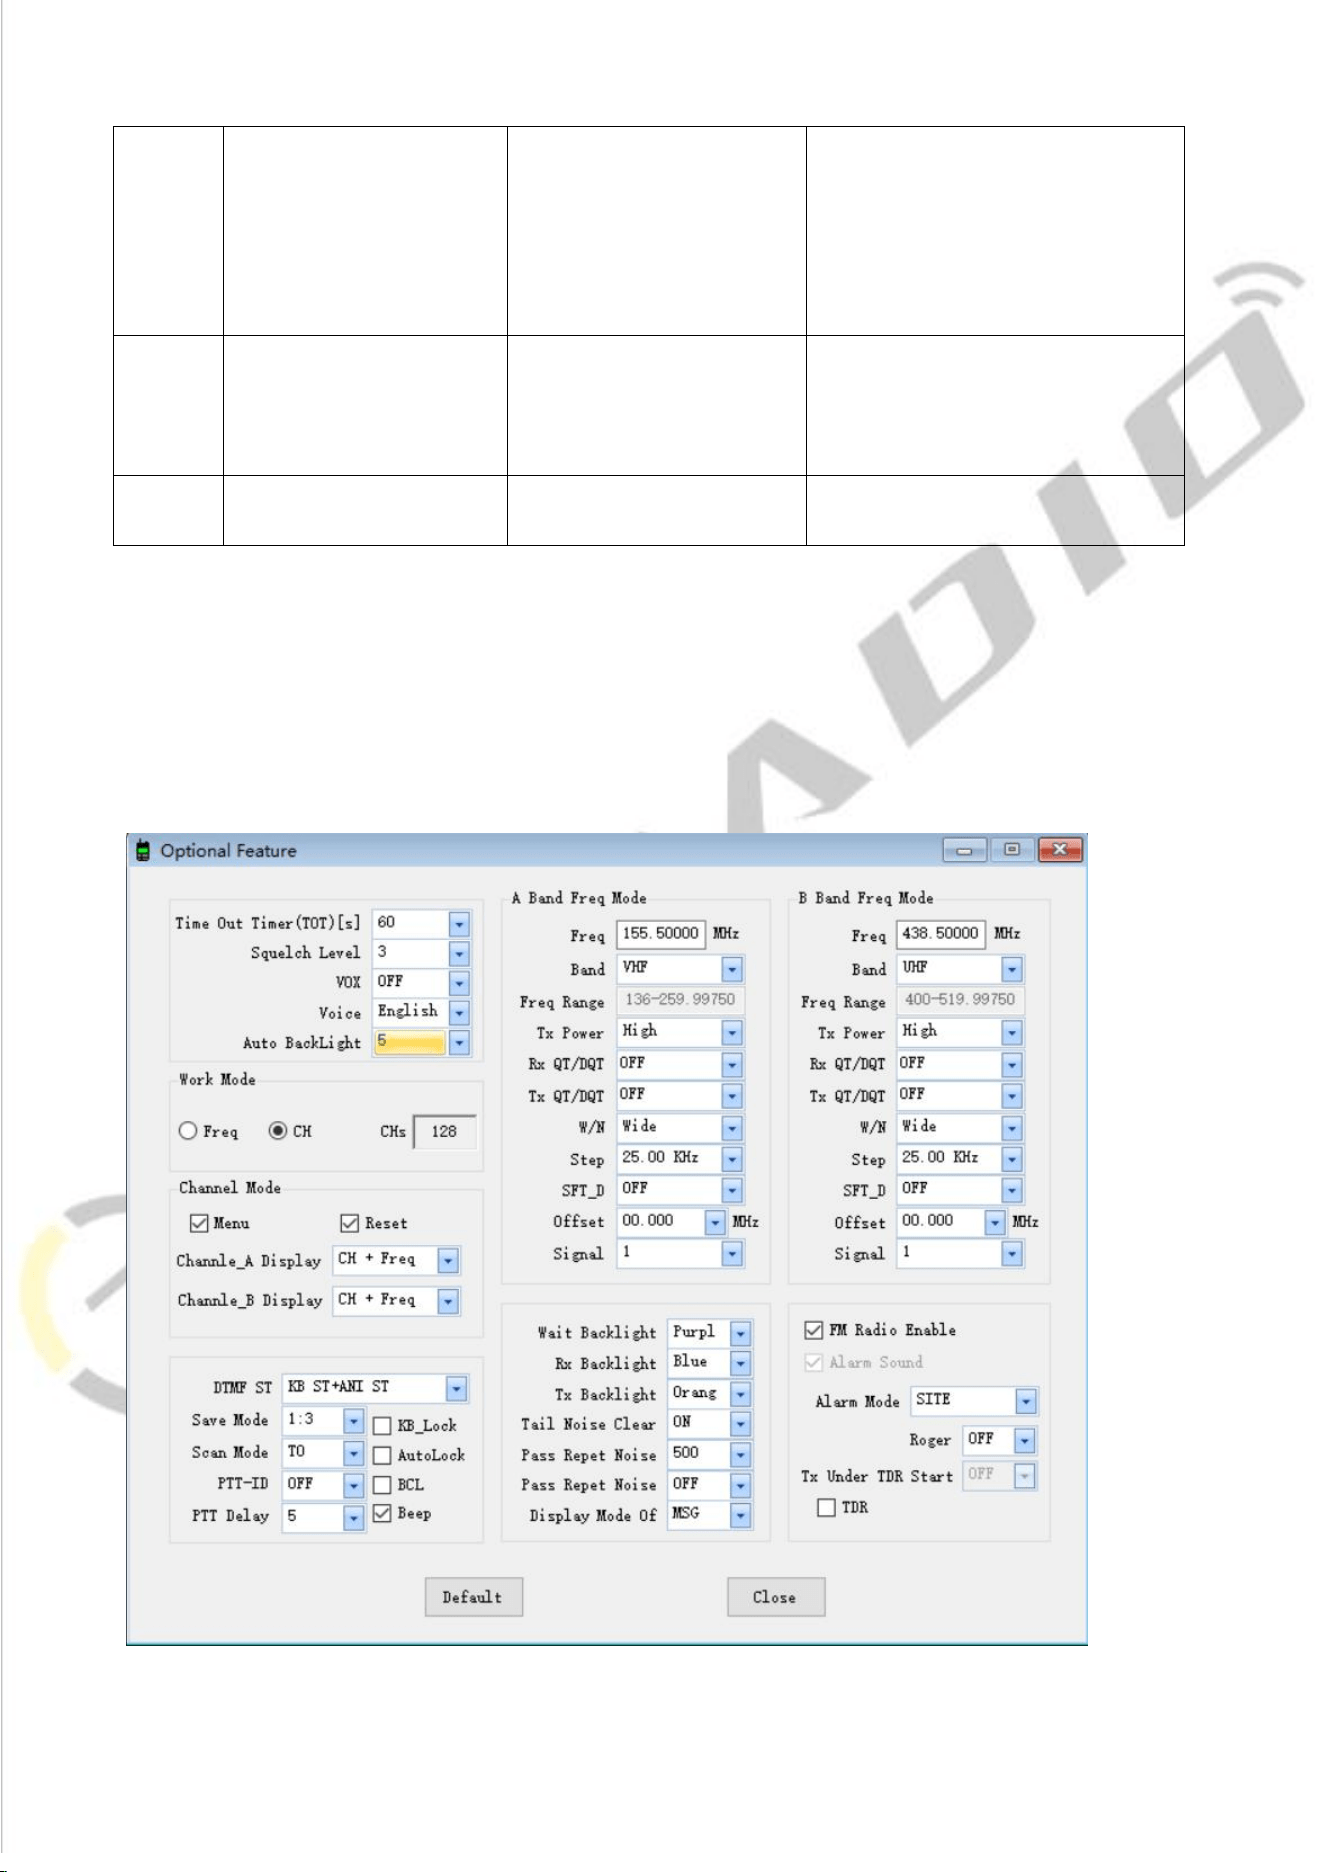
4) Click "Optional Features" under "Edit", a page of "Optional Features" will pop
up,you can adjust the limited parameters (VOX Function, Squelch, Backlight,
DTMF, FM Radio, Voice Prompt, Scanning, VFO Mode, etc.).
9
A. Basic Setting
Name
Meaning
Settings
Description
TOT(Time
Out)
Transmission
time-out timer
15-600(s)
This feature provides a limits transmission
time to a programmed value. This will
promote battery conservation by not
allowing you to make excessively long-time
transmissions and in the event of a stuck
PTT switch, it can prevent interference to
other users as well as battery depletion.
Squelch Level
0-9
Mutes the speaker of the transceiver in the
absence of a strong signal. Squelch is either
OFF or 1-9 levels. The higher level, the
stronger the signal must be to in-mute the
speaker.
VOX
Voice operated
TX
OFF/0-10
When enabled it is not necessary to push the
[PTT] button on the transceiver. Adjust the
gain level to an appropriate sensitivity to allow
smooth transmission.
Voice
Annunciation
OFF\English\Chin
ese
Switch the language of menu display and
voice prompts
ABR
Display time
OFF/0-10 (s)
Time-out for the LCD backlight.-
Work mode
Frequency
CHT is channel quantity
Channel
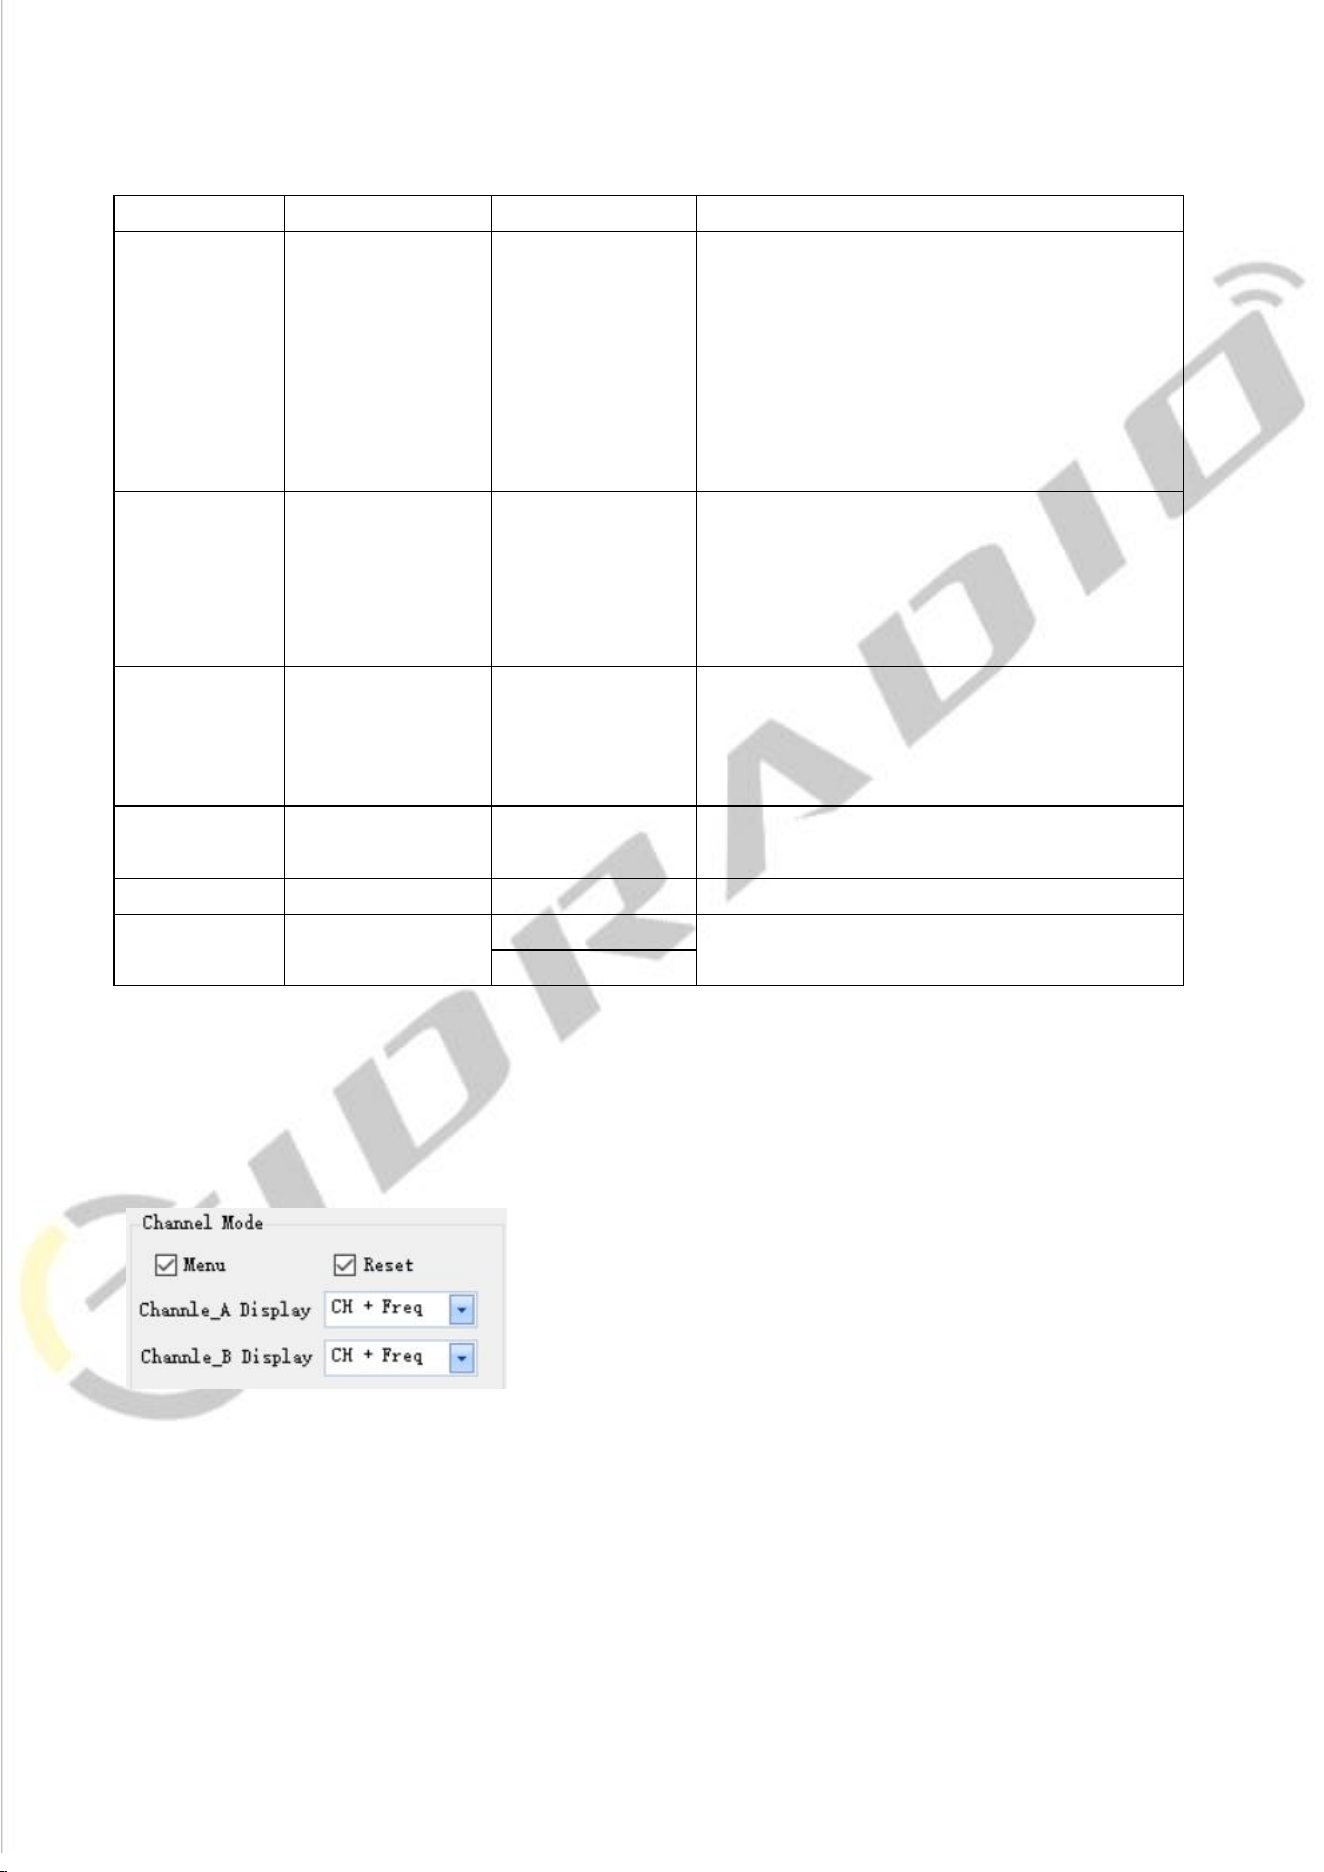
B. Channel Mode
You can customize the display on Channel A/B:
CH + Name: Display Channel Number and Channel Name (Name column in Channel
information part)
CH + Freq: Display Channel Number and Frequency
10
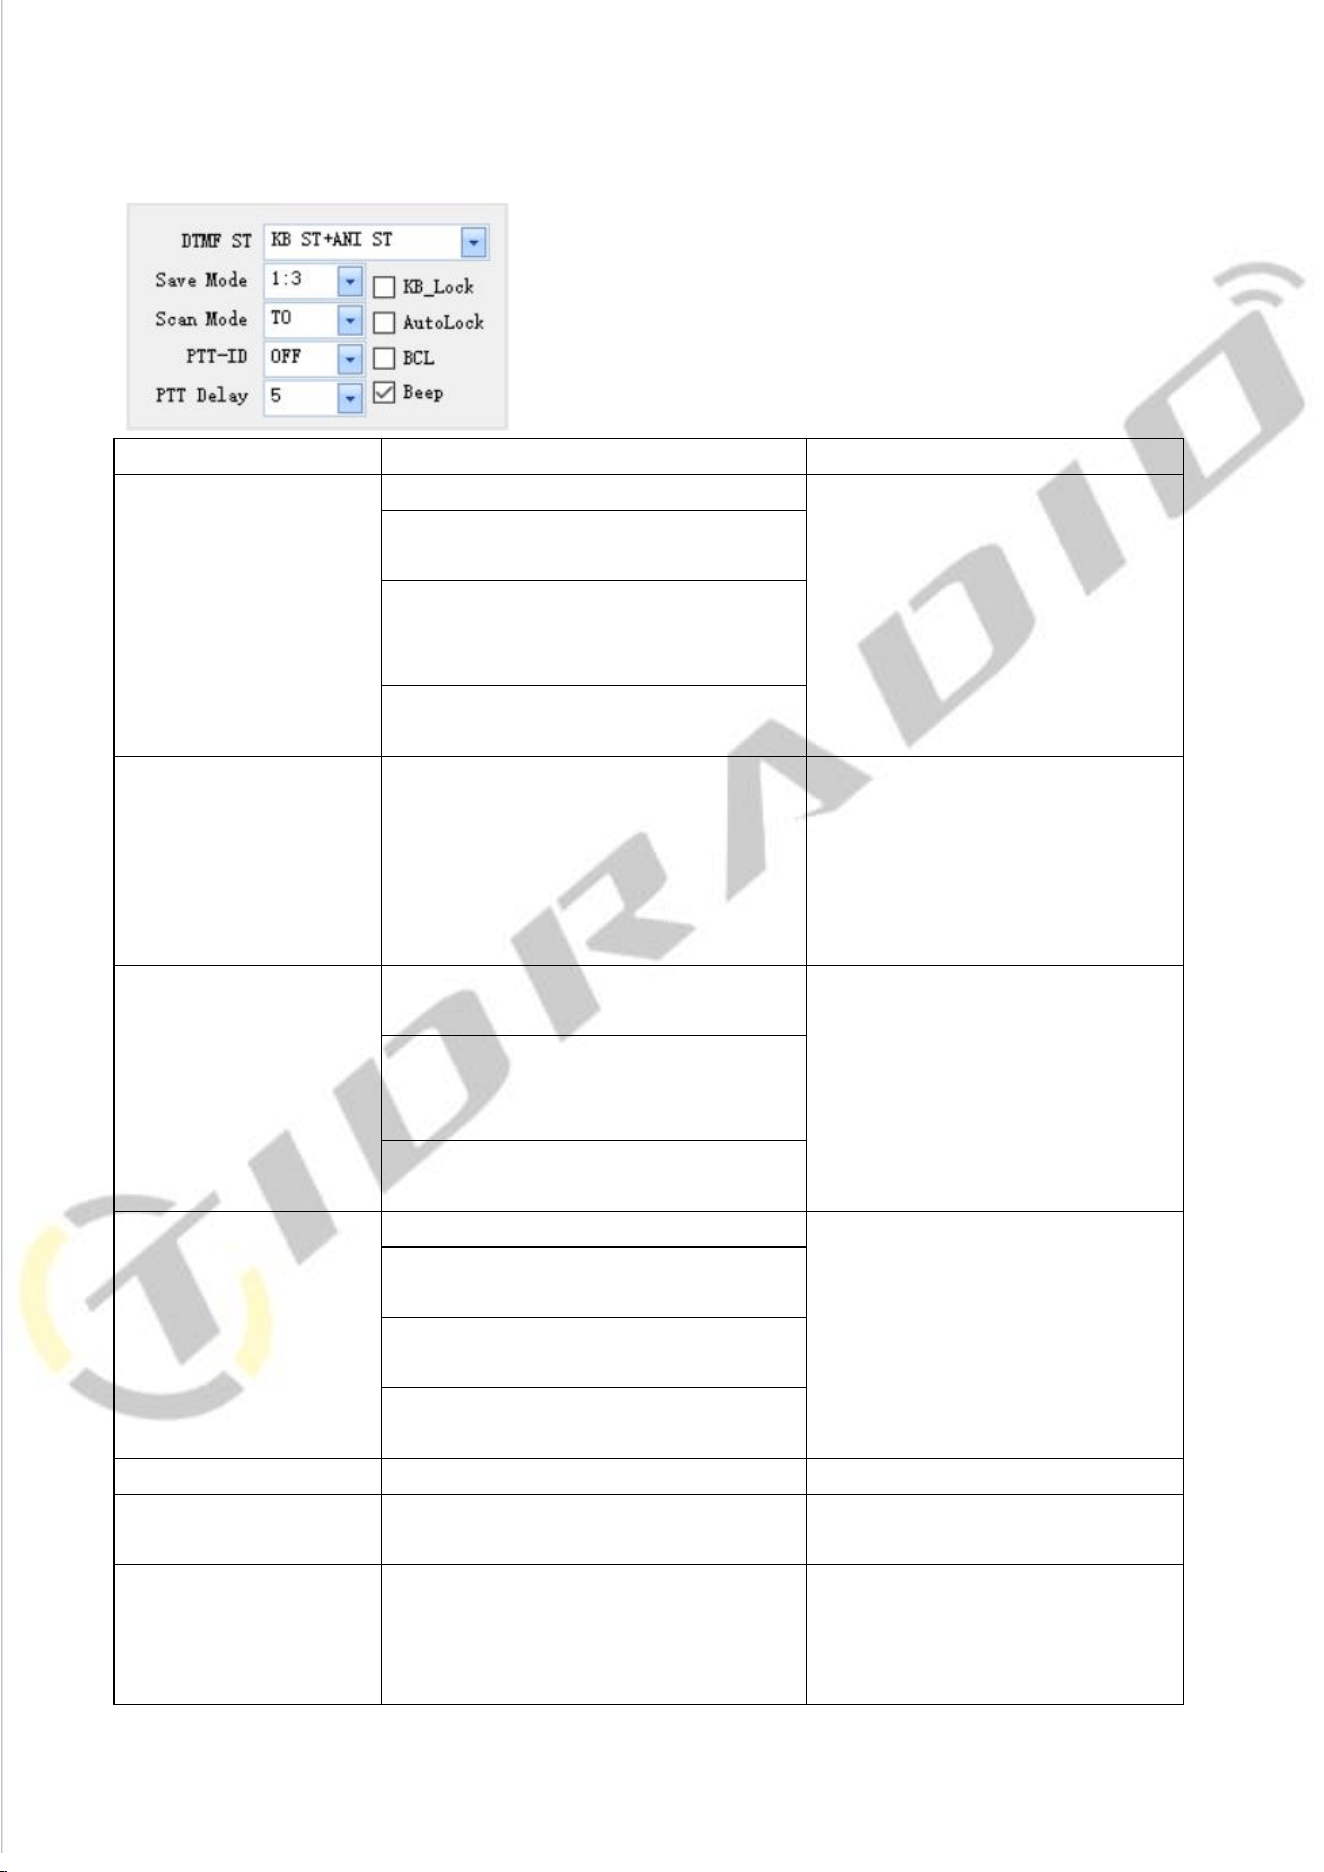
C. DTMF
Name
Setting
Description
DTMF ST
(DTMF side tone of
transmit code)
OFF : No DTMF Side Tones are heard
Determines when DTMF side tones
can be heard from the transceiver
speaker
KB Side Tone: Side Tones are heard
only from manually keyed DTMF codes
ANI Side Tone:
Side Tones are heard only from
automatically keyed DTMF codes
KB ST+ANI ST: All DTMF Side Tones are
heard
Save mode
OFF/1:1/1:2/1:3/1:4
Selects the ratio of sleep cycles to
awake cycles. The higher number
the longer the battery lasts. When
enabled, a word or two might be
missed when the frequency being
monitored becomes active.
Scan Mode
TO: Time Operation - scanning will
resume after a fixed time has passed
Scanning Resume Method
CO: Carrier Operation -Scanning
Resume Method scanning will resume
after the signal disappears
SE: Search Operation scanning will not
resume
PTT_ID
OFF: No ID is sent
When to Send PTT-ID; Codes are
sent during either the beginning or
end of a transmission.
BOT : The selected S-CODE is sent at
the beginning
EOT: The selected S-CODE is sent at the
ending
BOTH: The selected SCODE is sent at
the beginning and ending
PTT Delay
0-30ms
Signal code sending delay
KB_LOCK
If you select this option, the
keyboard is locked.
AutoLock(automatic
keypad lock)
When ON, the keypad will be
locked if not used in 8 seconds.
Pressing the [#╓O] key for 2
seconds will unlock the keypad.
11
BCL(busy channel
Lock-out)
Check: If the channel is occupied,
when you press the [PTT] key on
this channel, the radio will make a
beep tone and will not transmit any
signal.
Uncheck: No matter if the channel
is occupied, the radio will transmit
the signal when you press the [PTT]
key.
Beep(keypad beep)
Allows audible confirmation of a
key press
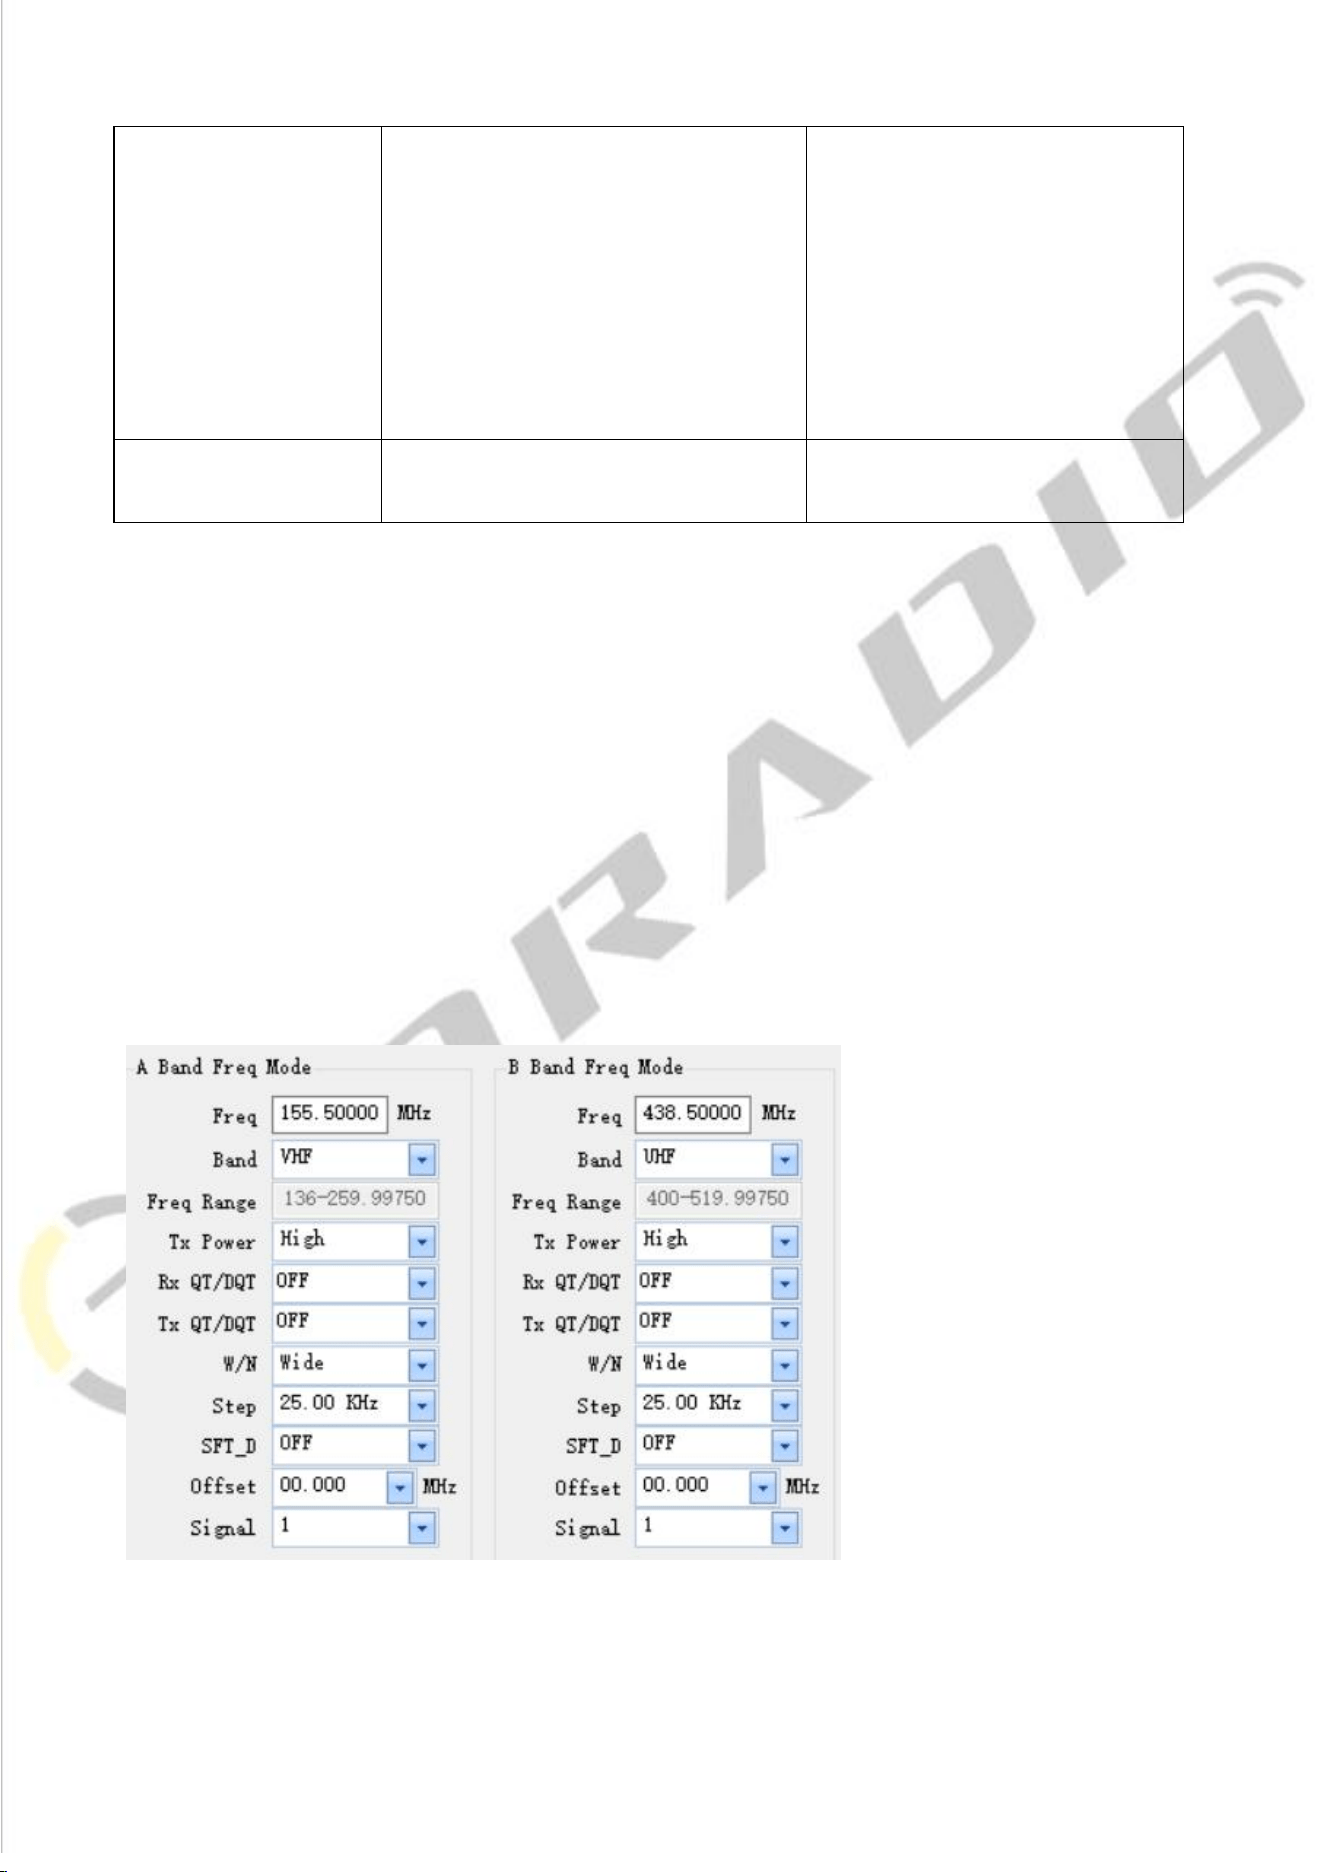
D. Frequency mode
STEP: Select the amount of frequency change in VFO/Frequency mode when scanning or
pressing the keys.
SFT_D: Enable access of repeaters in VFO/Frequency Mode ([OFF]: TX = RX (simplex); [+]: TX
will be shifted higher than RX in frequency; [-]: TX will be shifted lower than RX in frequency)
Offset: Specifies the difference between the TX and RX frequency (For the explanation of TX
Power, RX QT/DQT, TX QT/DQT, W/N, Signal, please refer to introduction above)
12
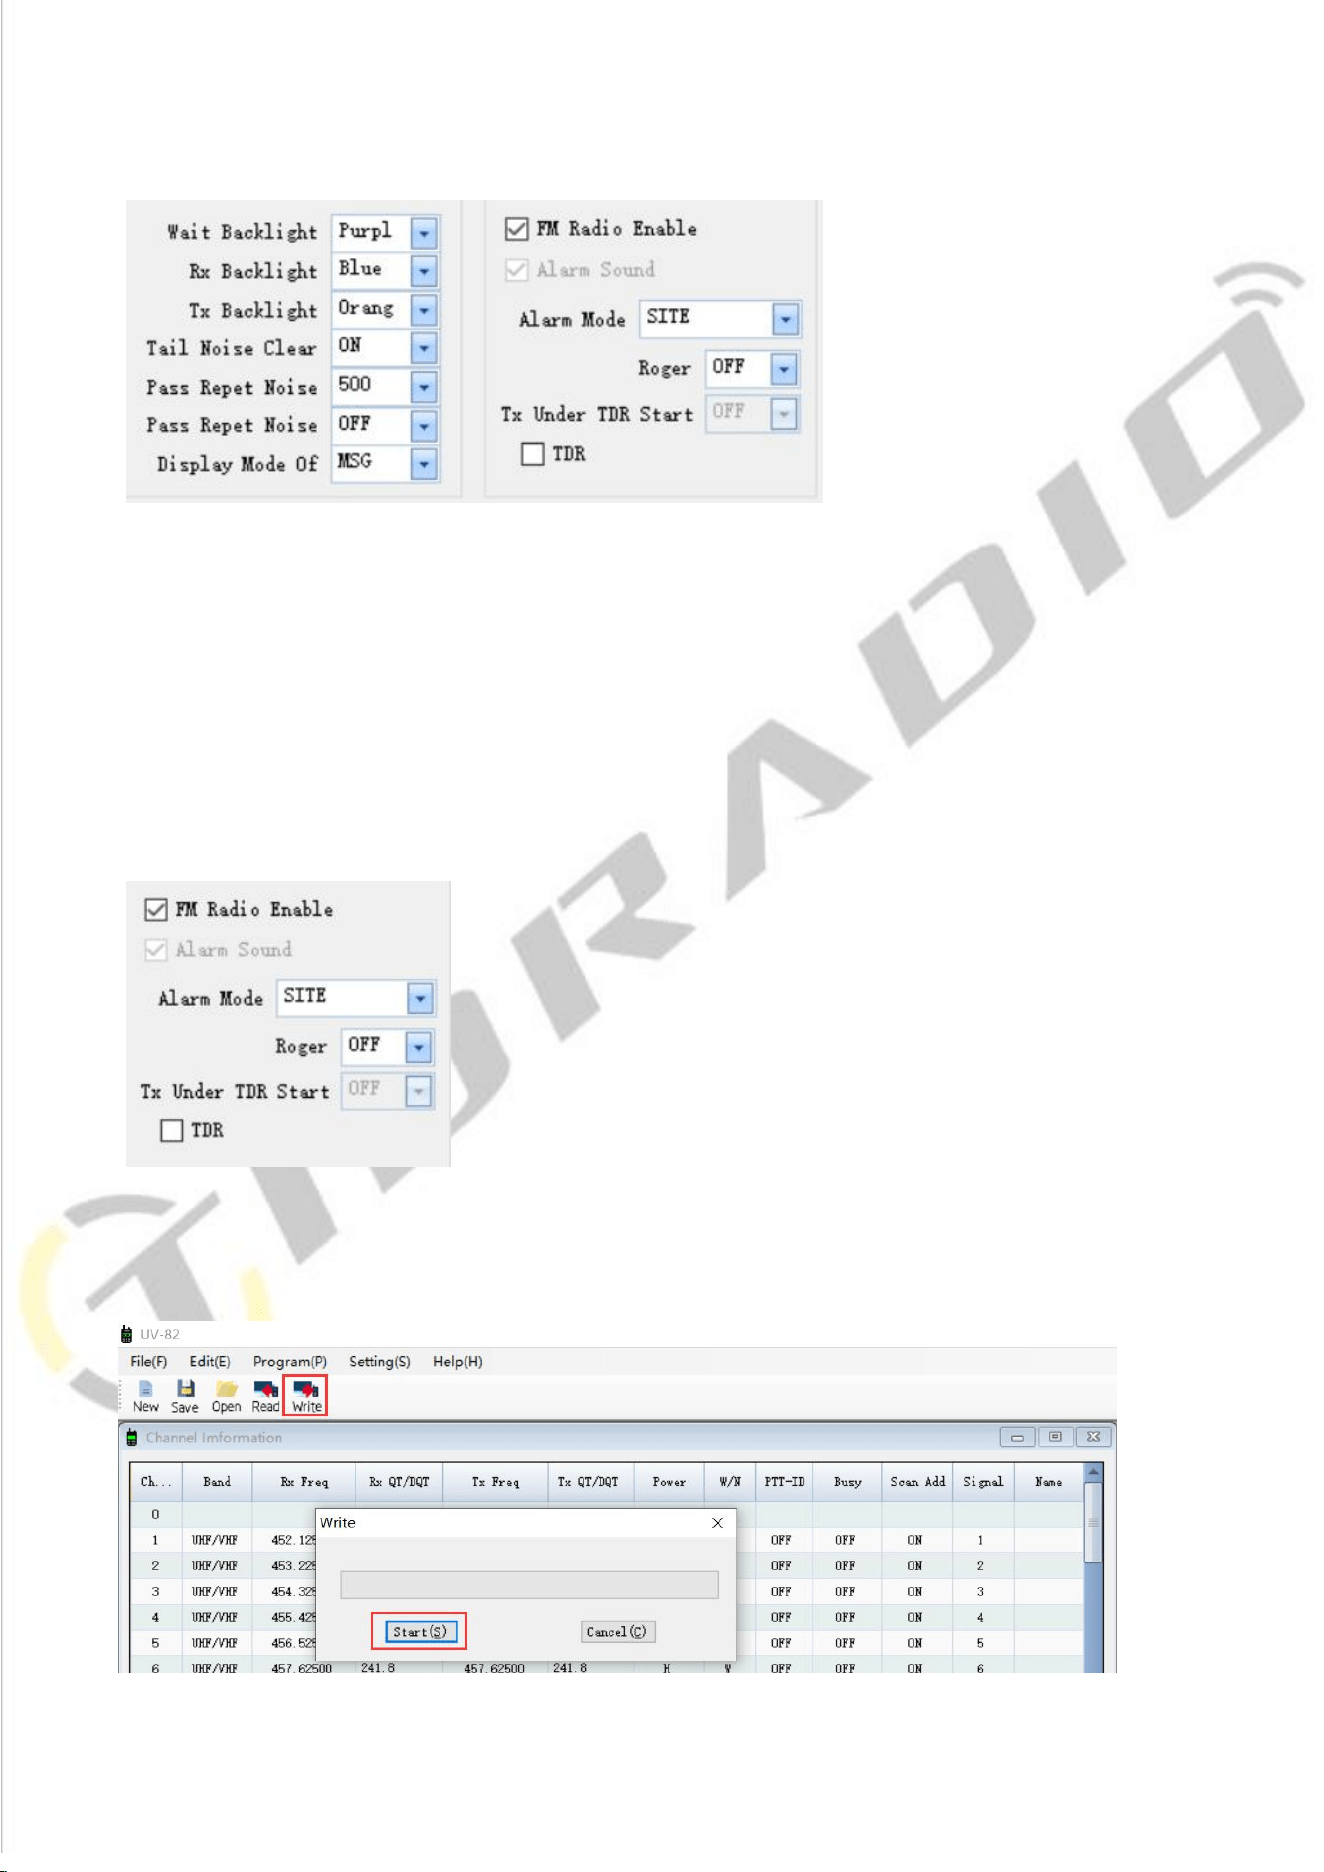
E. Backlight and Sound
F. FM Radio
FM Radio Enable: When you check off, FM Radio function will be activated on the radio.
Roger: Sends an end-of-transmission tone to indicate to other stations that the transmission
has ended
TX Under TDR Start: Transmit selection while in Dual Watch mode, when enabled, priority is
returned to selected display once the signal in the other display disappears.
TDR: Dual Watch mode, the ability to monitor two channels at once can be a valuable asset
5) Finally, all the modification will be saved by clicking the "Write" button, then clicking the
"Start" button on the pop up. And you can check the setting you modified after reboot the
radio.
13
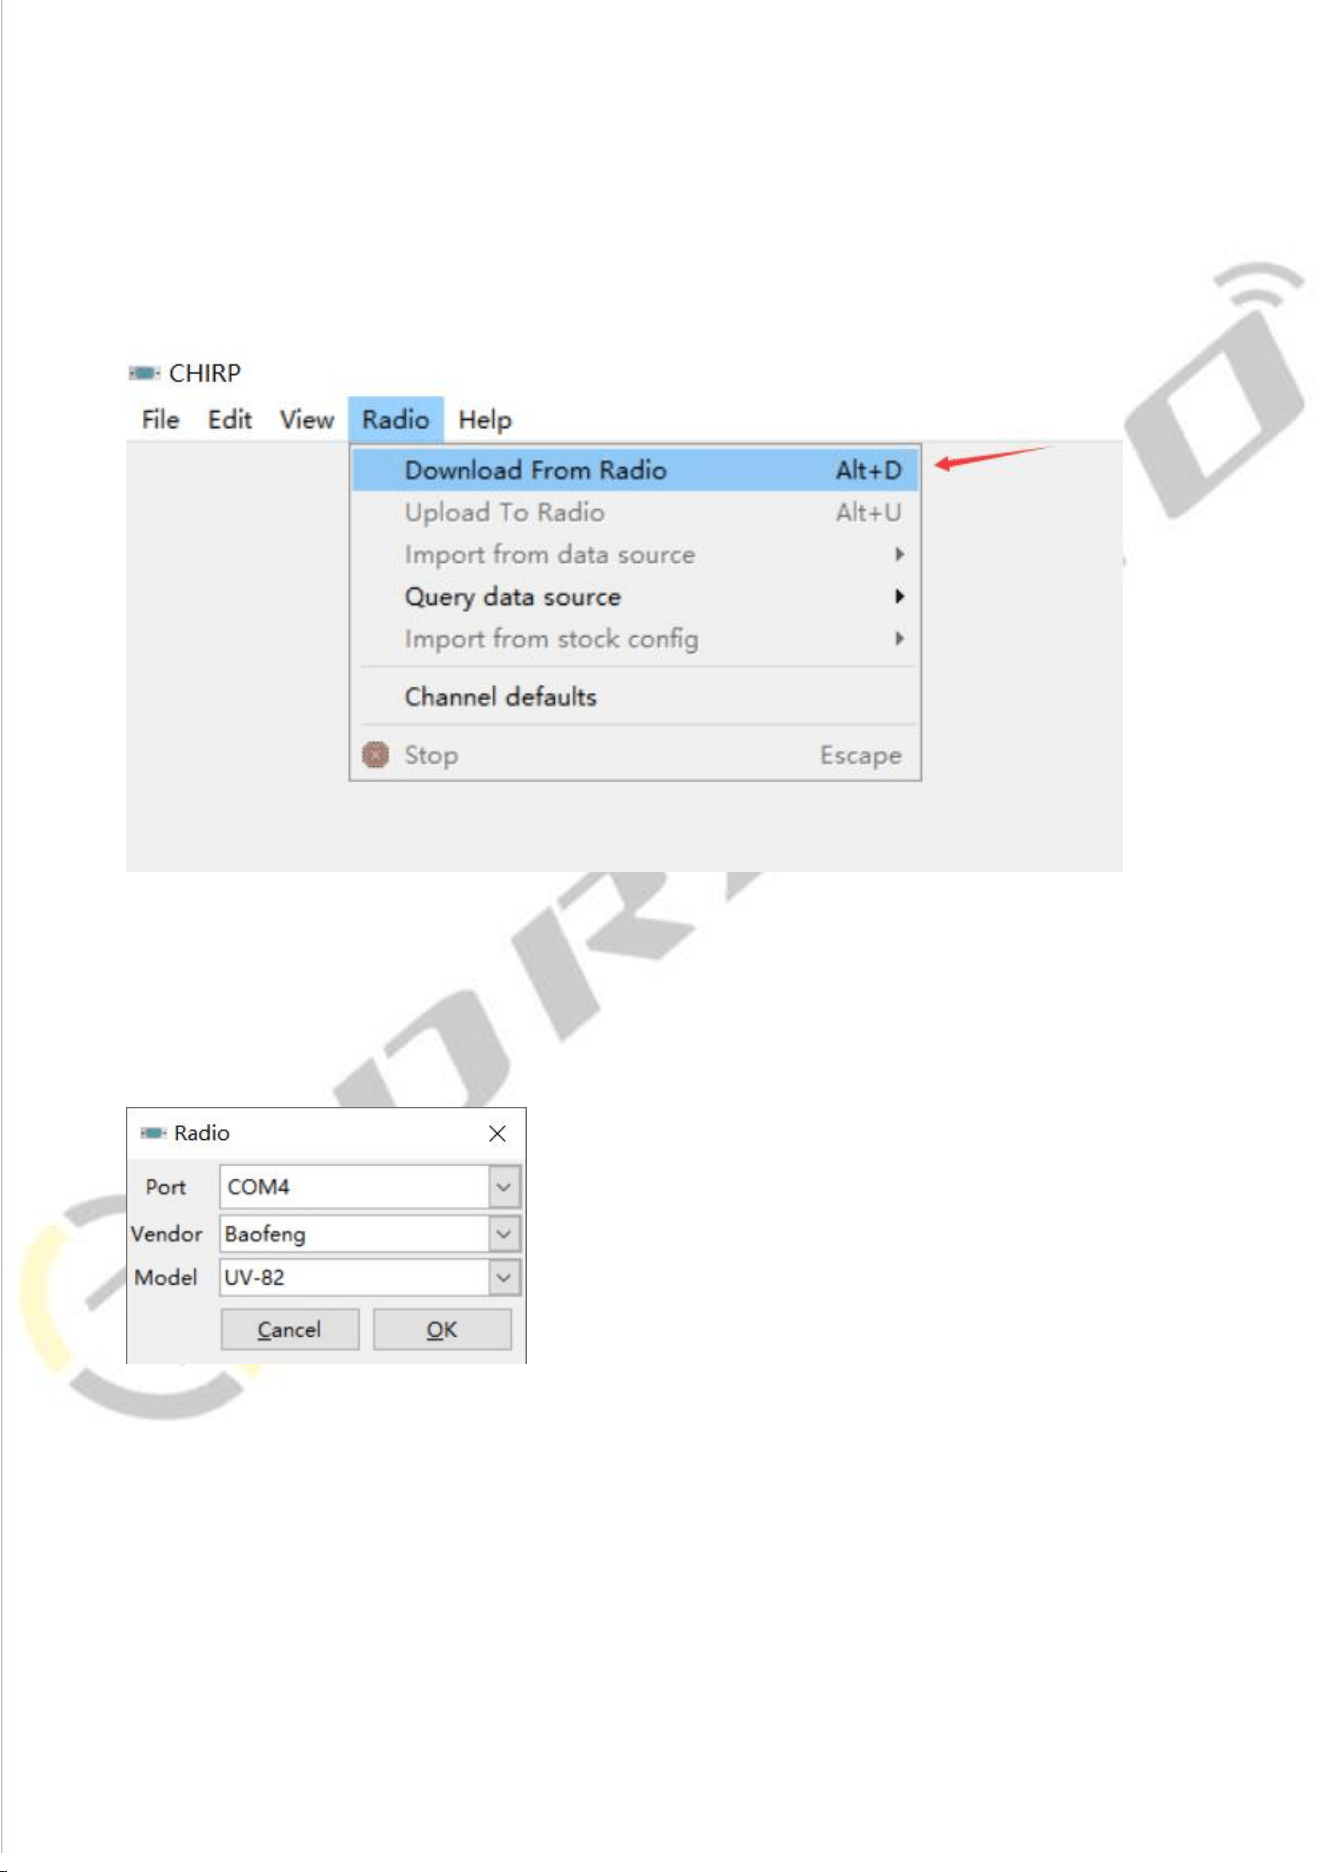
UV-82 Chirp Software Programming Process
1) Open the CHIRP software (Latest Version), click "Download From Radio" under
"Radio"
2) Select the corresponding cable driver port, and select Model "UV-82"or
“UV-82HP” under Vendor "Baofeng", then click "OK" to read the radio
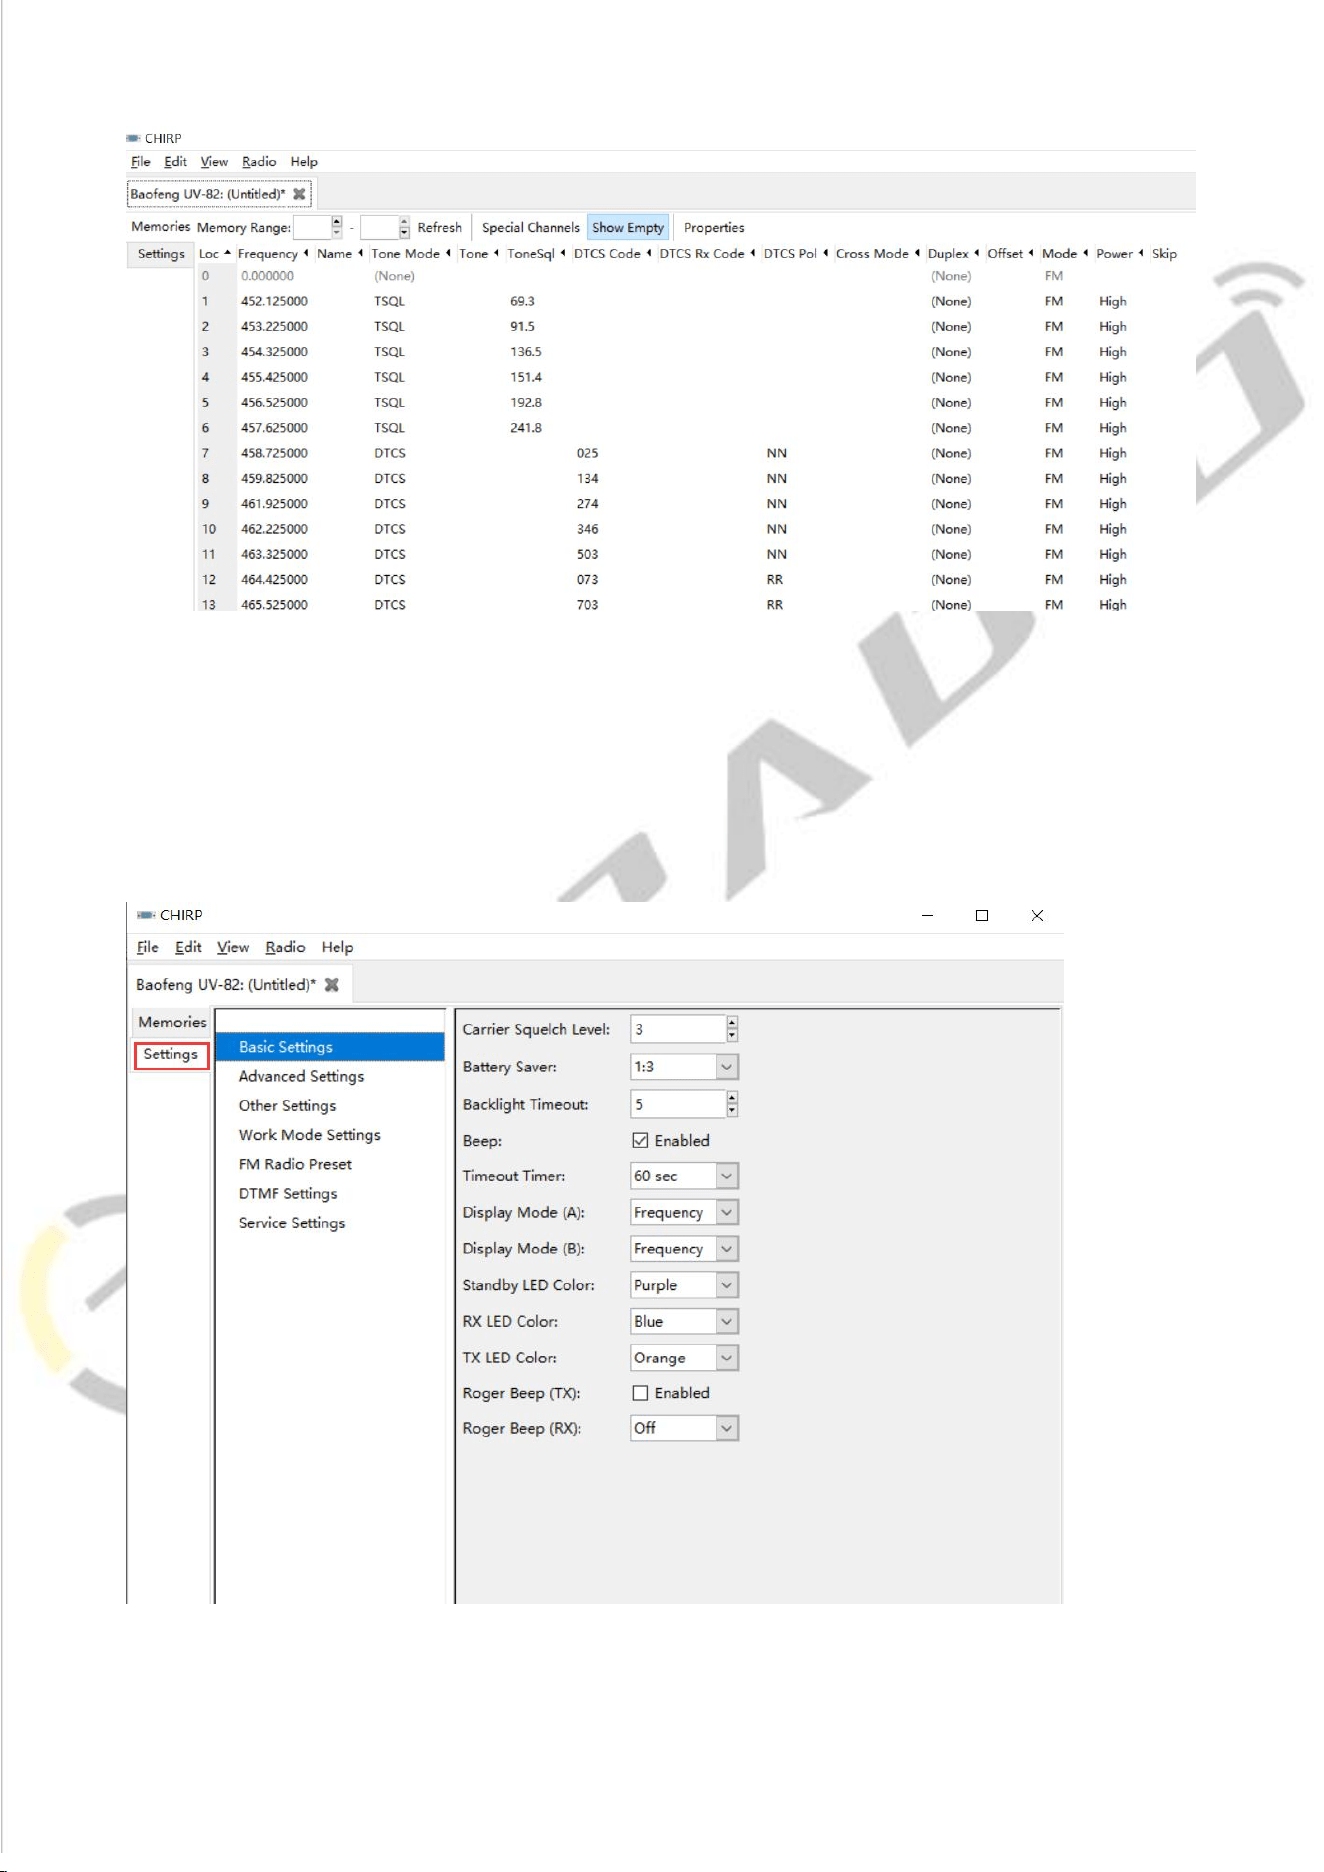
3) And you will come to the page of Memories, in which you can adjust the
limited parameters (For the explanation of Channel, TX Frequency, RX Frequency,
CTCSS/DCS, High/Low Power,and Wide/Narrow,Band.Please refer to
introduction above)
14
4)Then if you switch to the page of Settings, you can adjust the limited
parameters(For the explanation of VOX Function, Squelch, Backlight, DTMF, FM
Radio, Voice Prompt, Scanning, VFO Mode.Please refer to introduction above)
15
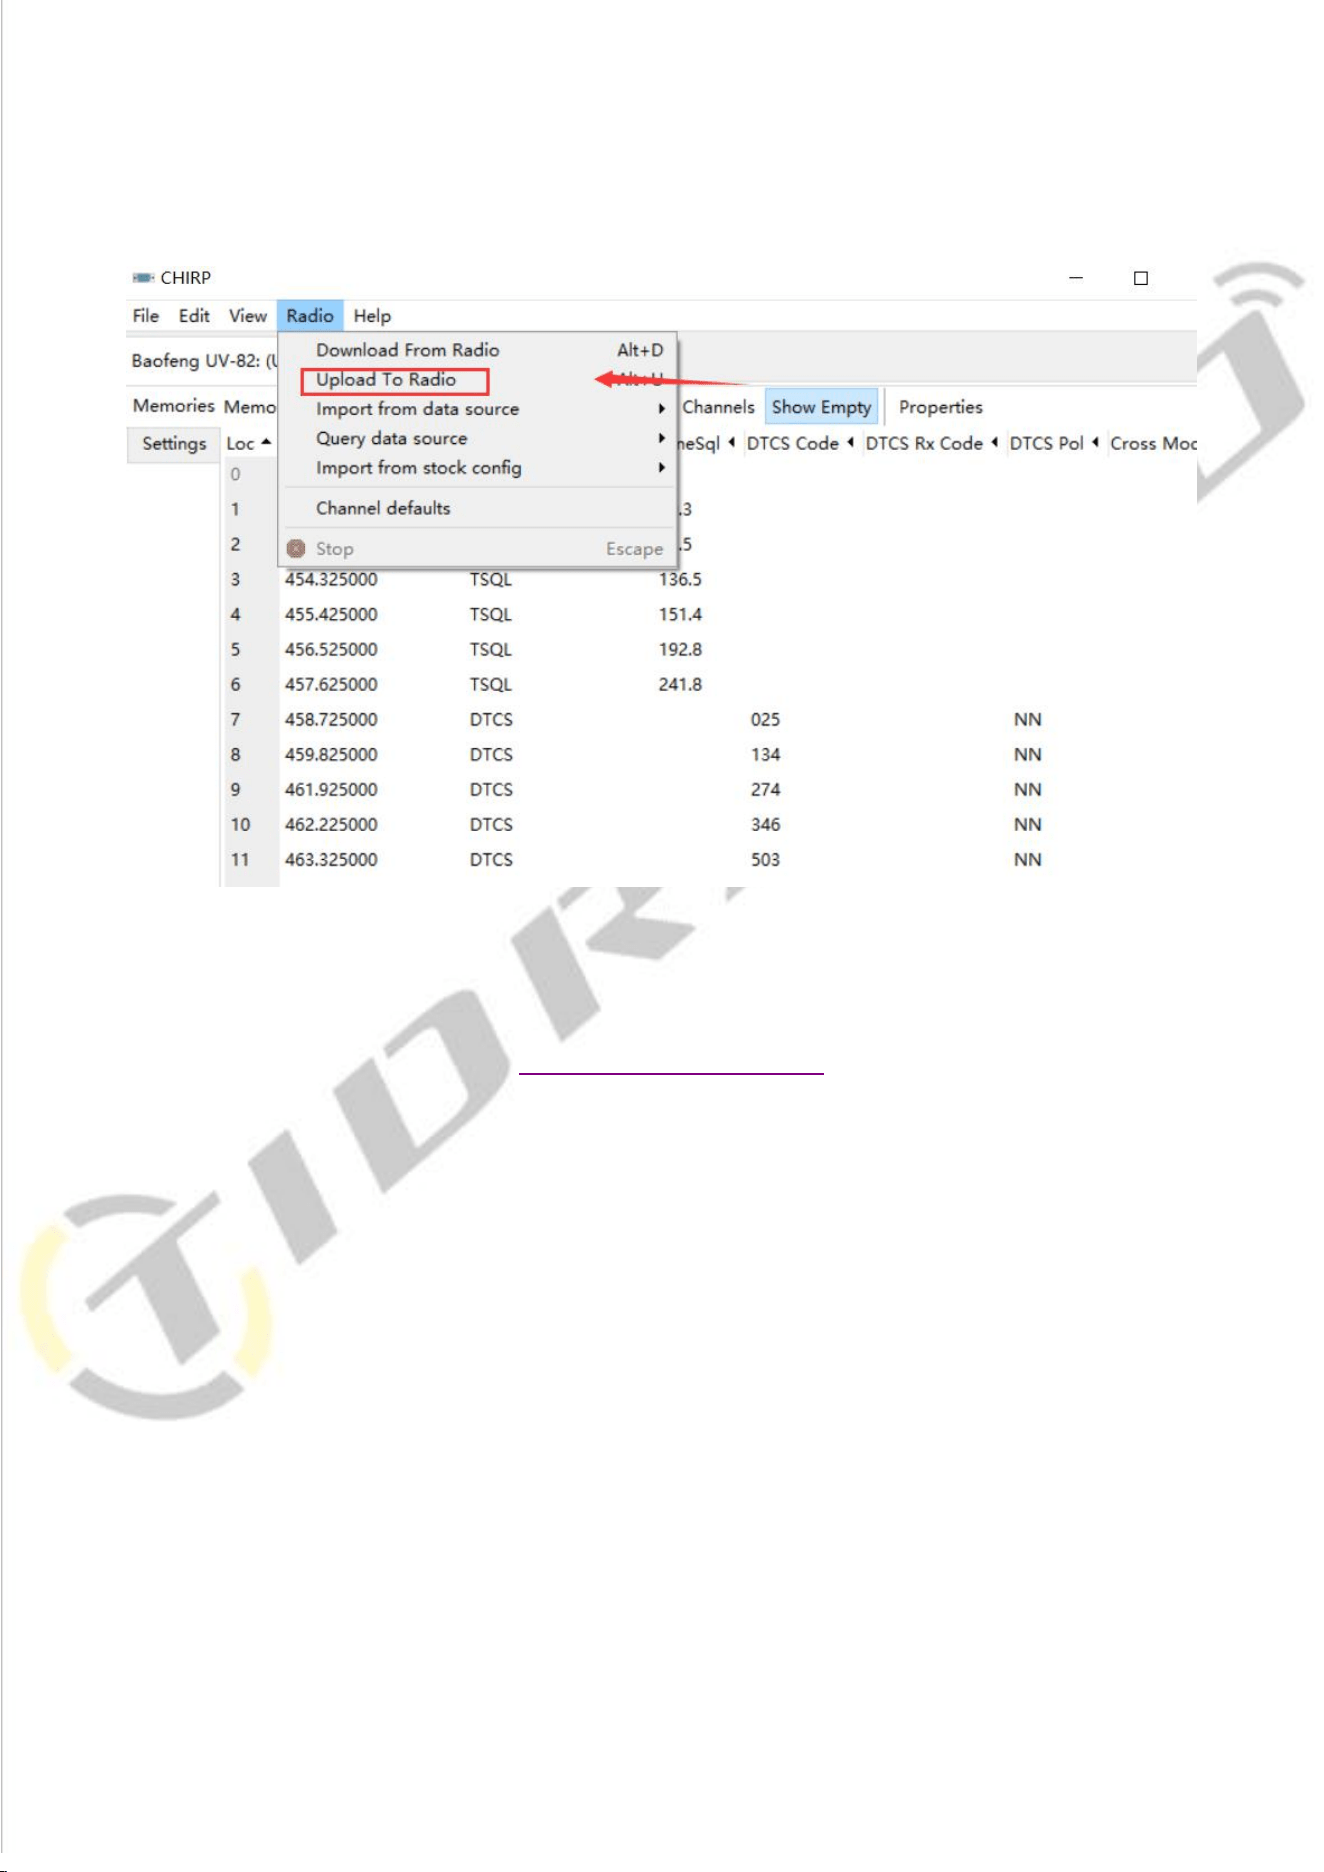
5) All the modification will be saved by clicking "Upload To Radio" under "Radio".
Then you can check the settings you modified after reboot the radio.
*If you have any problem with the BaoFeng UV-82 radio using or programming, please don’t
hesitate to contact us via support: walkietalkiesoftware.com. It’s always our honor to help.