4 5
Assembly
1
Assembly
3
Attaching the Crossbar
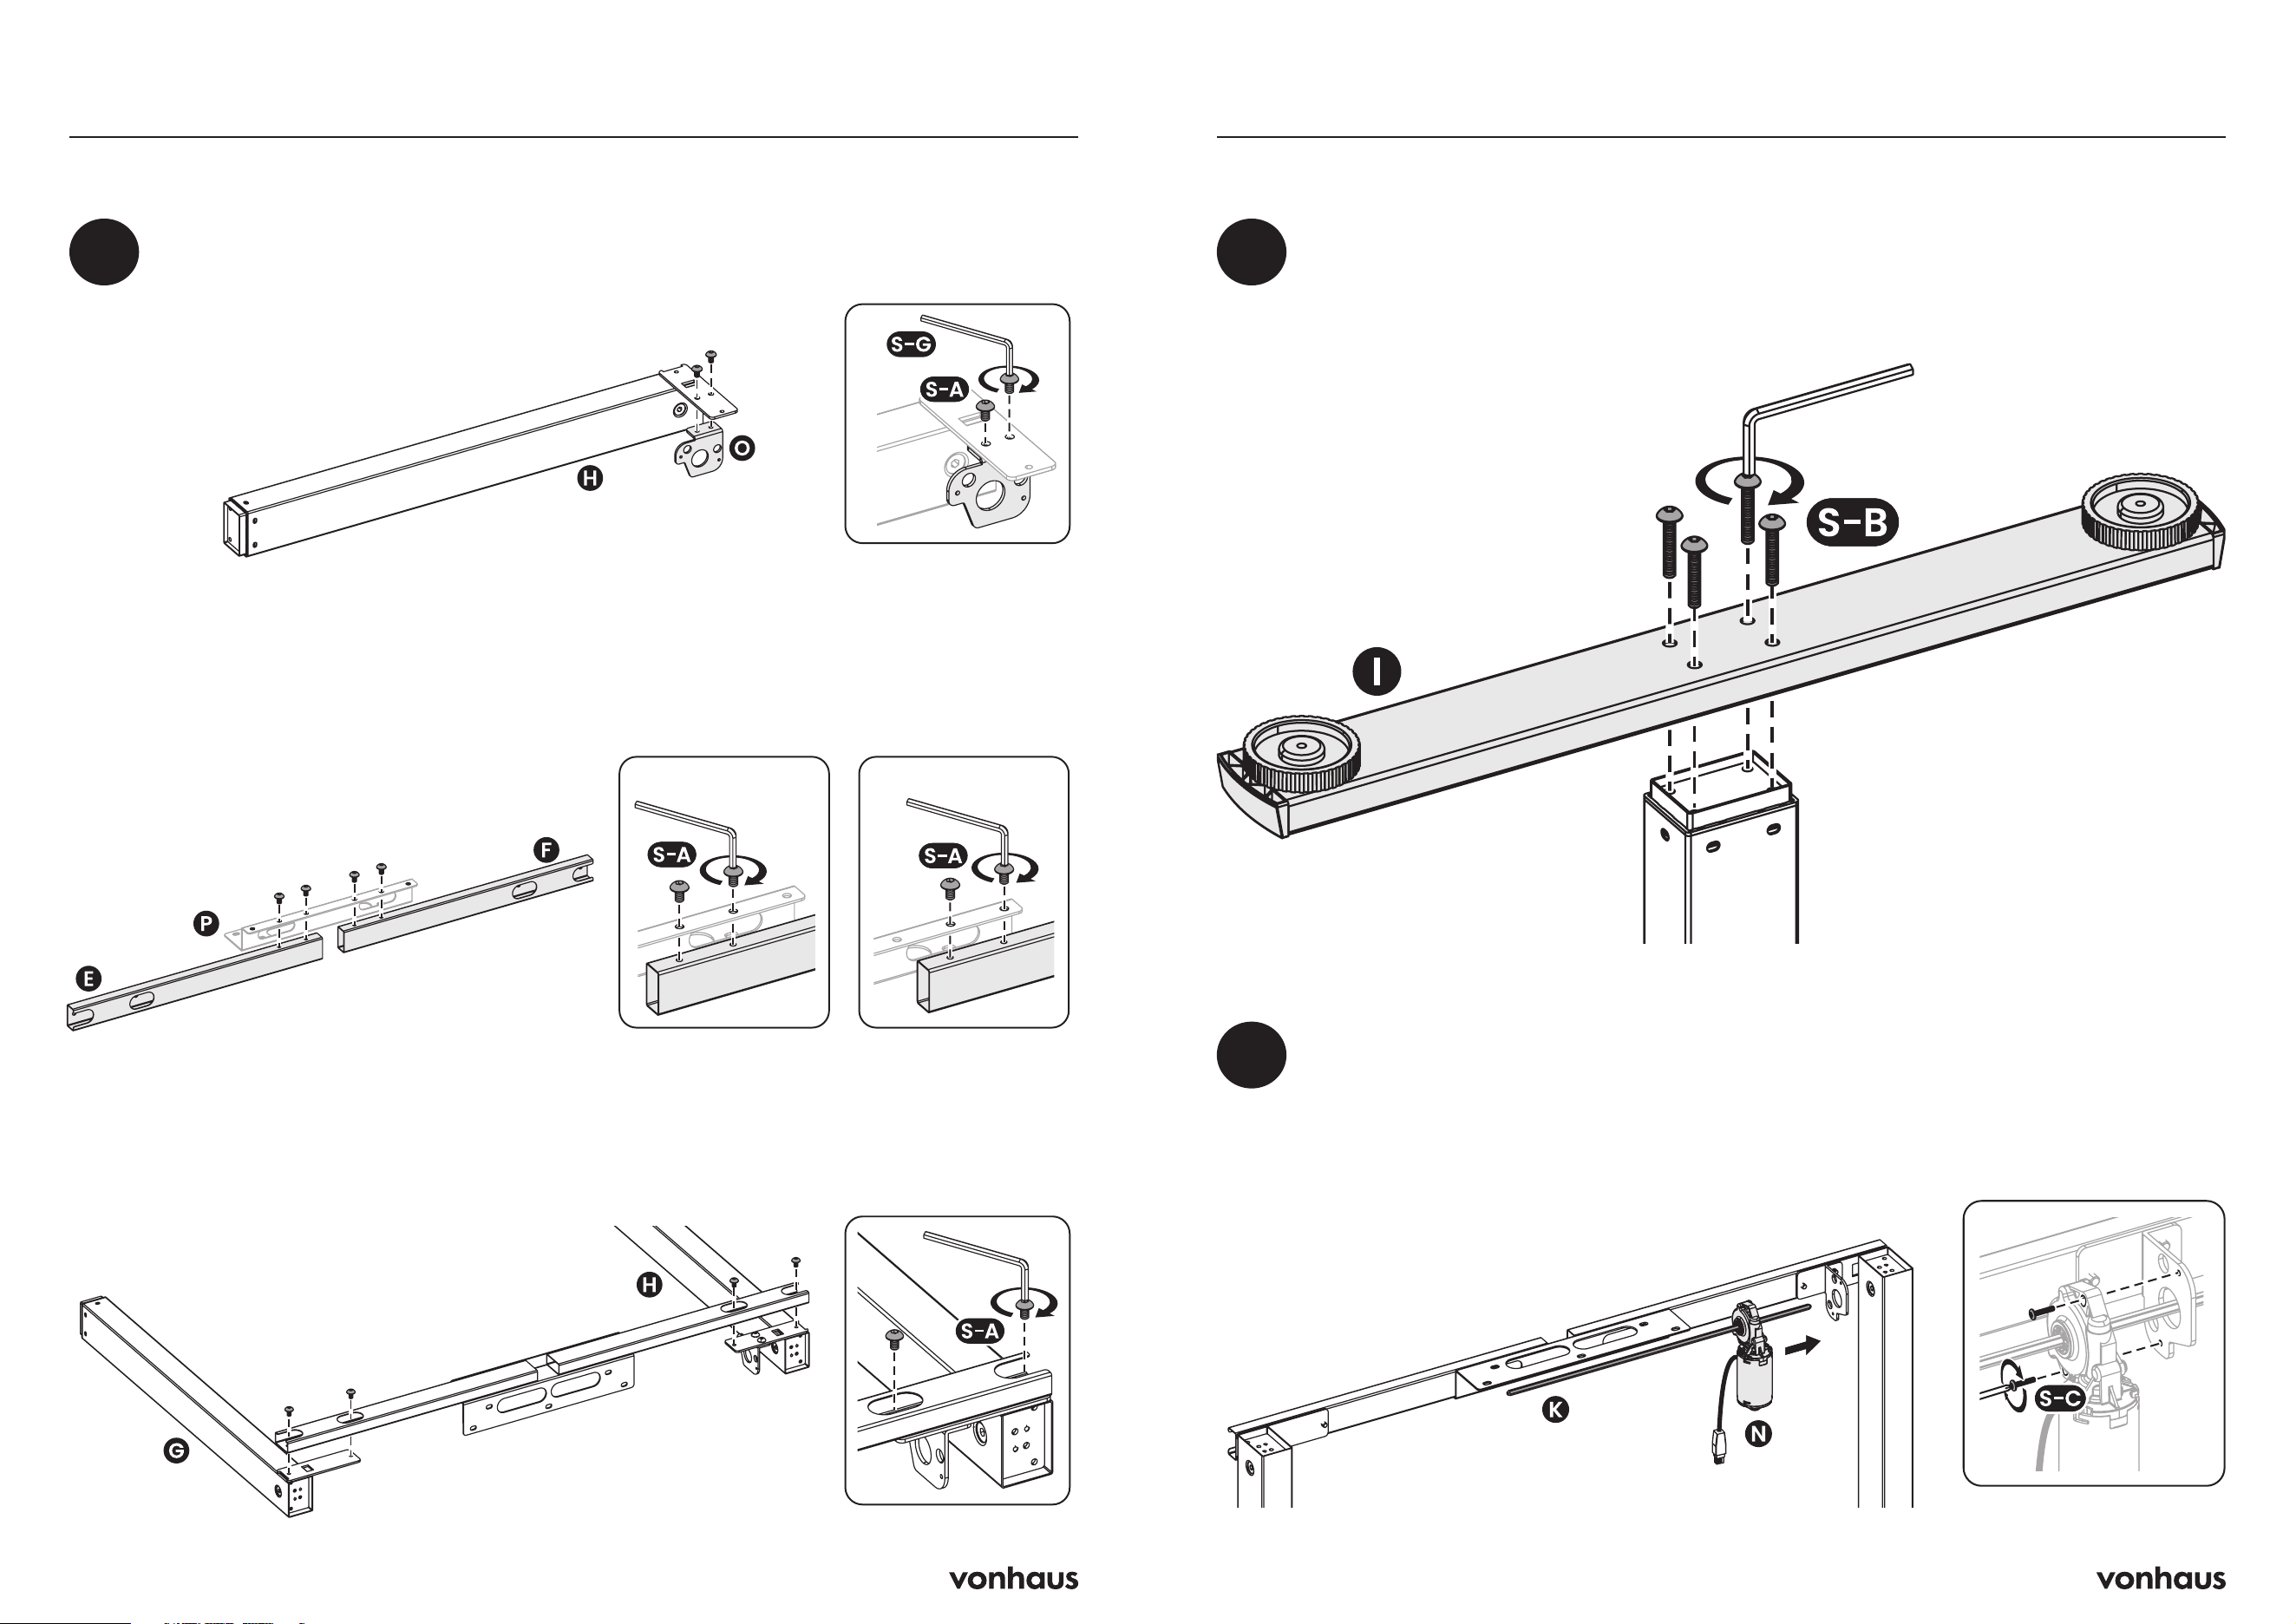
• Attach the Motor Bracket (O) to the Lifting Column (H) by
tightening the Screws (S-A) using the Allen Wrench (S-G).
2
Attaching the Feet
• Attach the Foot (I) to the Lifting Column by tightening the Screws (S-B).
• Repeat the same process to attach the other foot.
Attaching the Sync Rod and Motor
• Insert the Sync Rod (K) through the Motor (N), the Motor Bracket (O) and the Lifting
Column (H) as shown, then secure the motor using the Screws (S-C).
• Secure the Crossbars (E) and (F) together with the
Connecting Plate (P) by tightening the Screws (S-A).
• Attach the Crossbar to the Lifting Columns (G) and (H) by
tightening the Screws (S-A).
For 1.2m Desktops For 1.4m Desktops
6 7
Assembly
5
Assembly
6
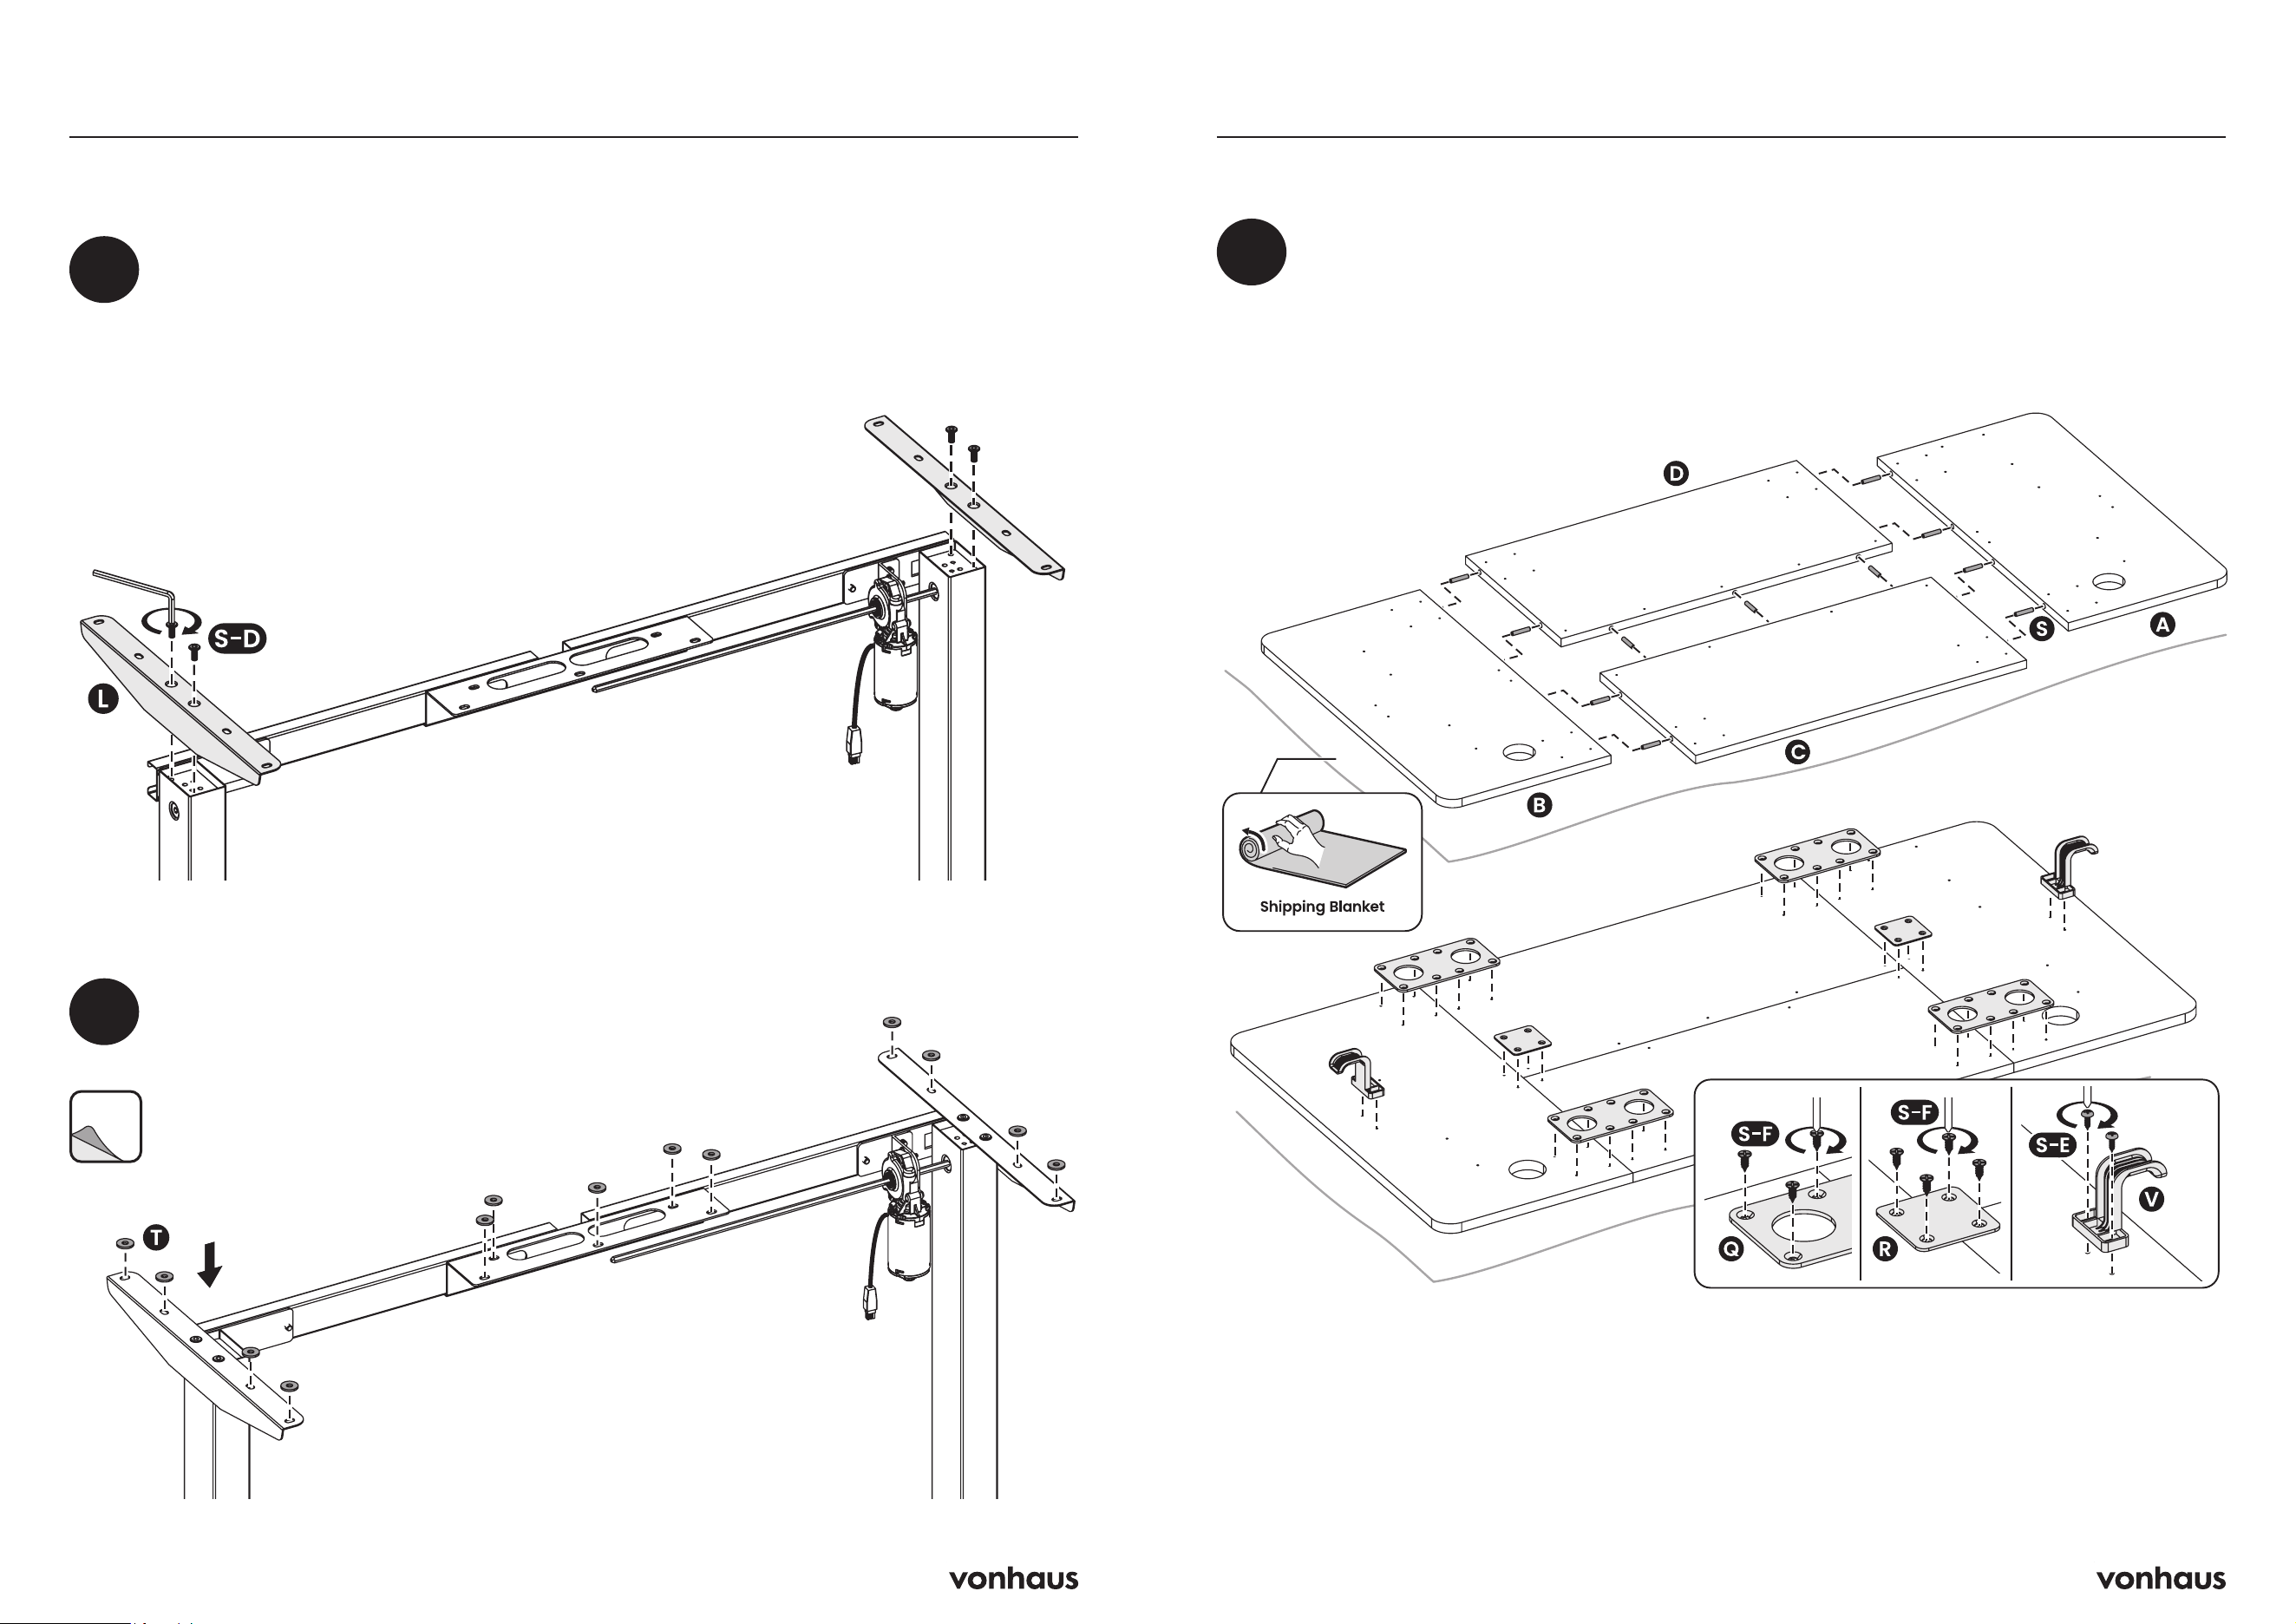
Attaching the Anti-Vibration Pads
Attach the Anti-Vibration Pads (T) to the mounting holes on the
Side Brackets and Crossbar.
Assembling the Desktop
• Carefully place 4 pieces of Desktop (A) / (B) / (C) / (D) upside down on the floor as
shown.
• Assemble the split desktop with 11 Wooden Dowel Pins (S) and 4 Connecting Plates
(Q) and 2 Connecting Plates (R) using Screws (S-F).
• Attach the Hook (V) to the Desktop using the Screw (S-E).
Note: Please prepare a shipping blanket to prevent scratches on the floor and desk components.
Note: Please make sure the desktop pieces keep facing down whilst installation.
4
Attaching the Side Brackets
• Attach the Side Bracket (L) to the Lifting Column using Screws (S-D).
• Repeat the same process to attach the other side bracket.
8 9
Assembly
7
Assembly
10
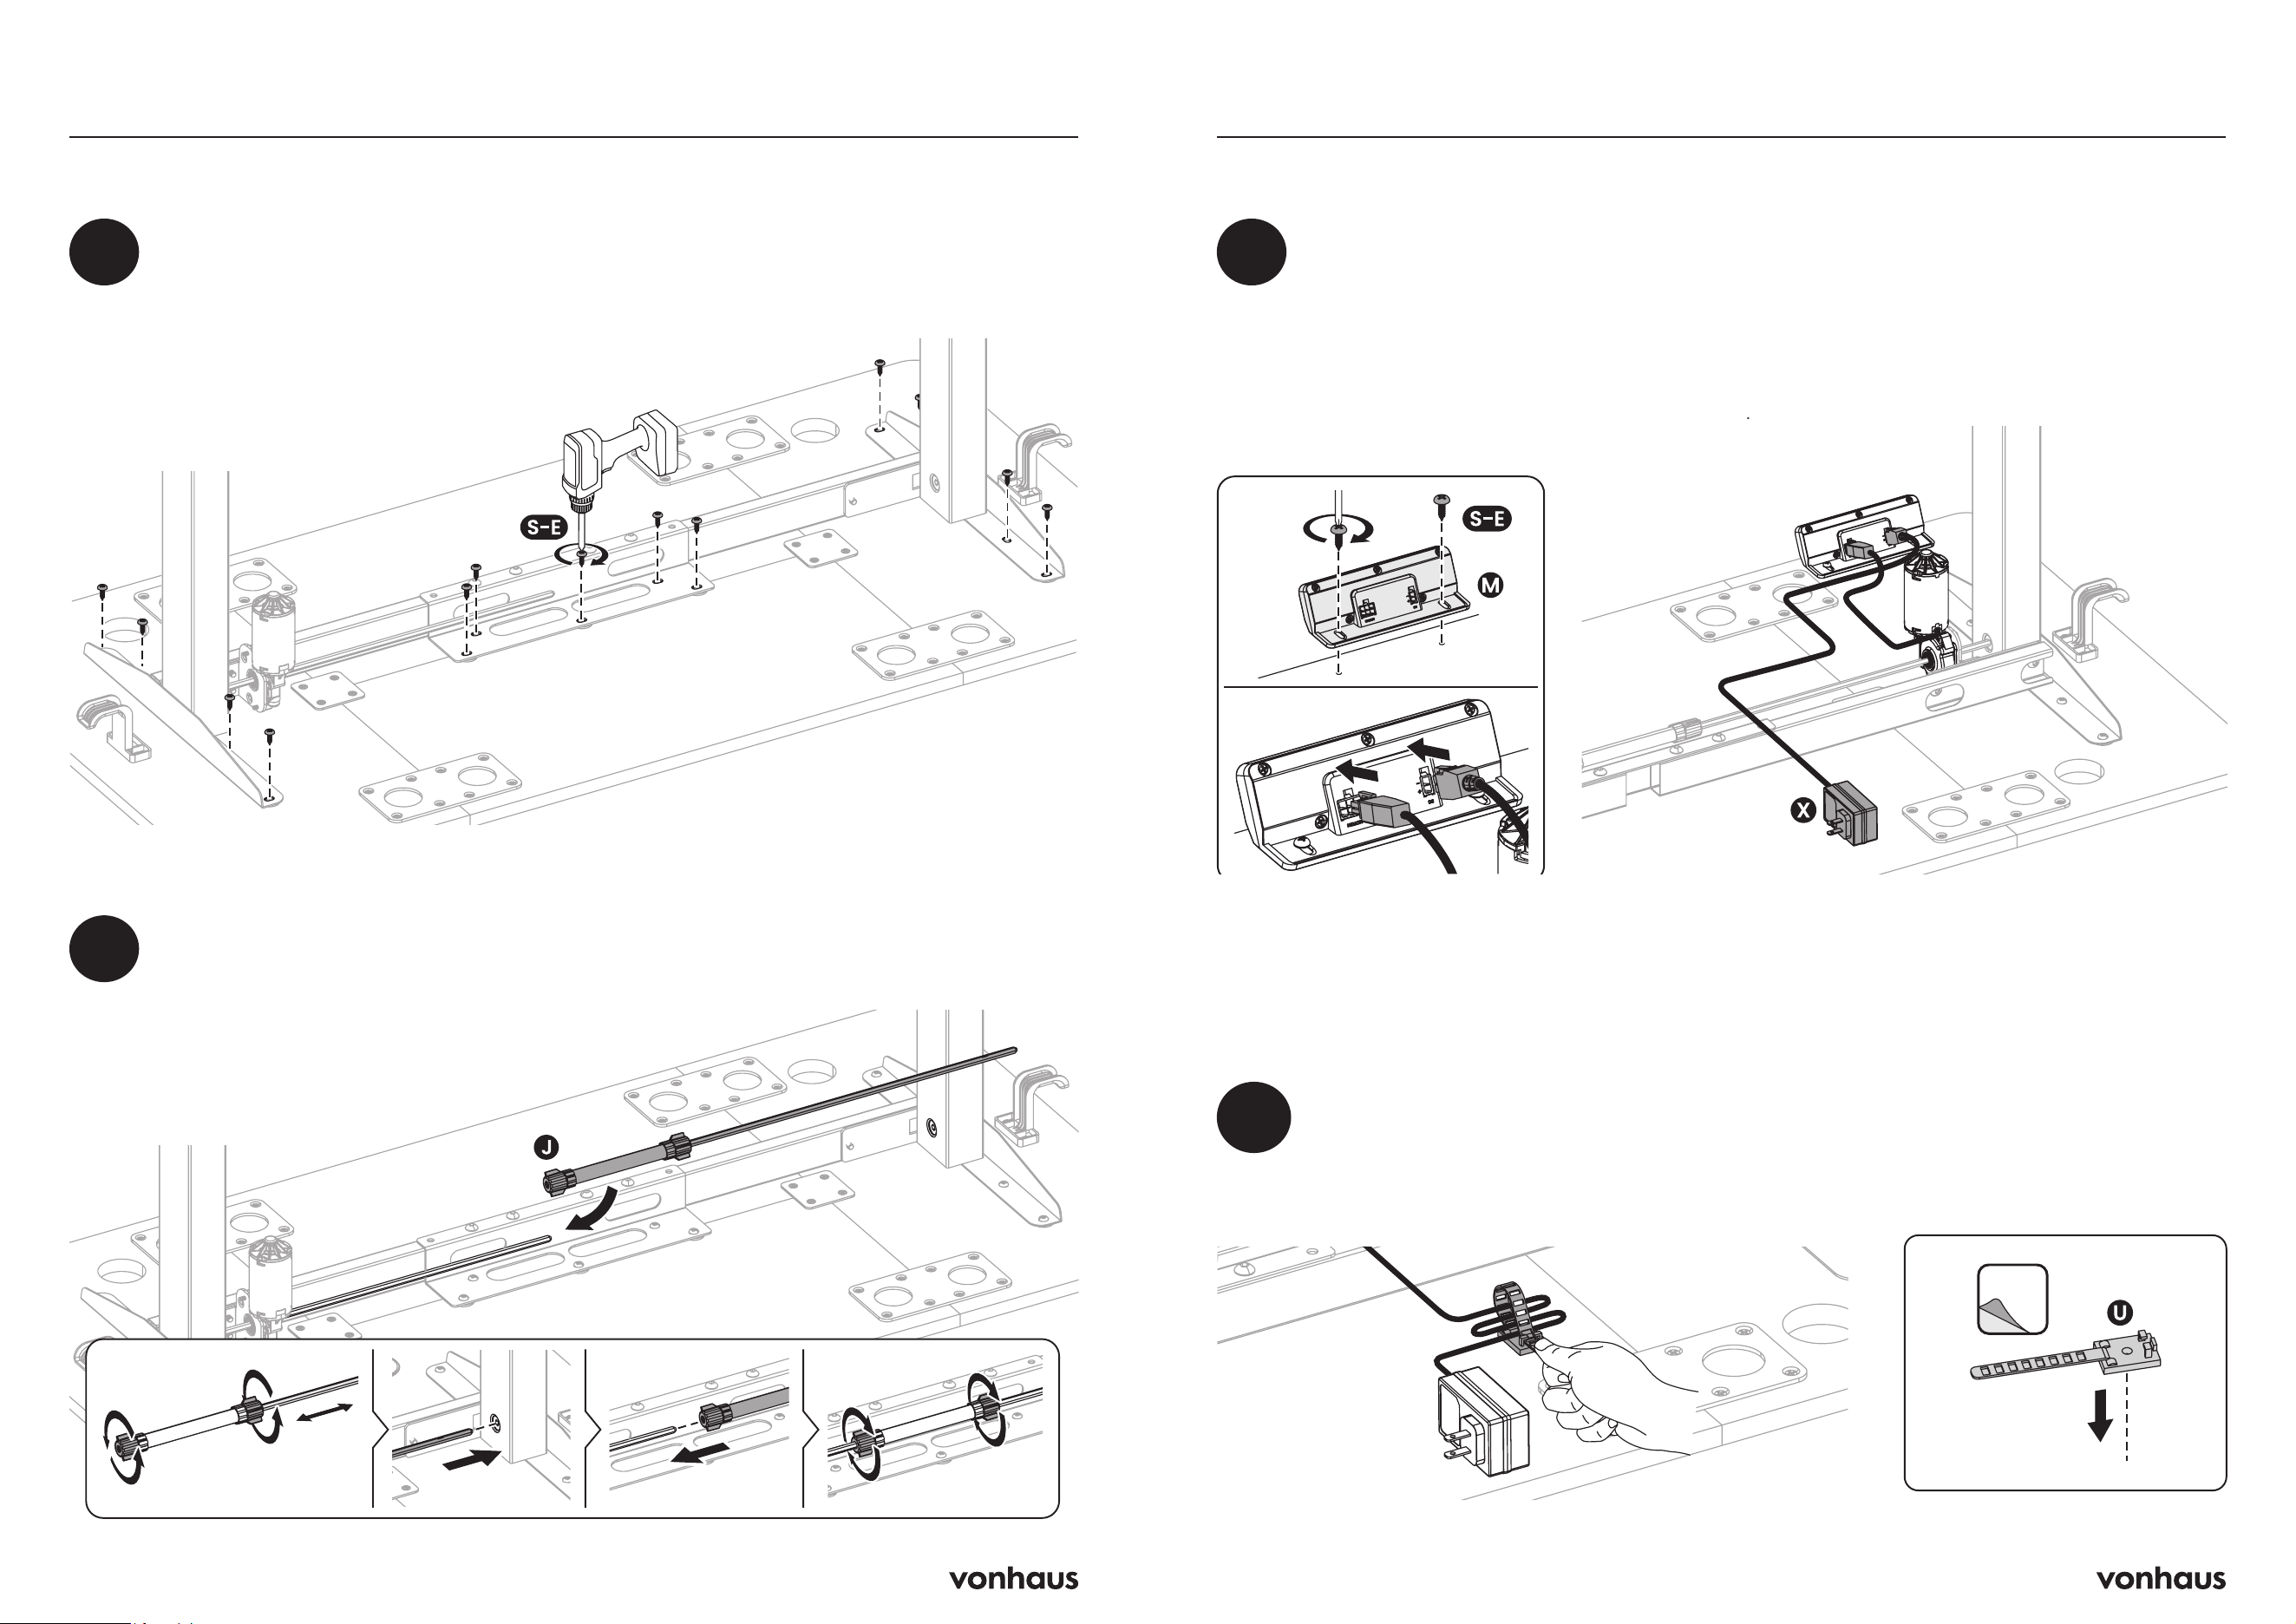
Attaching the Desktop
• Align the mounting holes on the desktop, side brackets and crossbar,
then attach the assembled desk frame to the desktop with Screws (S-E)
using a drill.
Cable Management
• Organise the cables using the Cable Ties (U)
9
Attaching the Controller and Connecting Cords
• Attach the Controller (M) to the desktop using Screws (S-E).
• Connect the Controller with the AC Adapter (X) and motor.
Note: Do not plug into the power before the desk is fully assembled.
8
Attaching the Sync Rod
• Insert the thin end of the Sync Rod (J) into the Lifting Column (G).
• Attach the other end of the Sync Rod (J) to the Sync Rod (K) as
shown, then tighten it.
10 11
Assembly
11
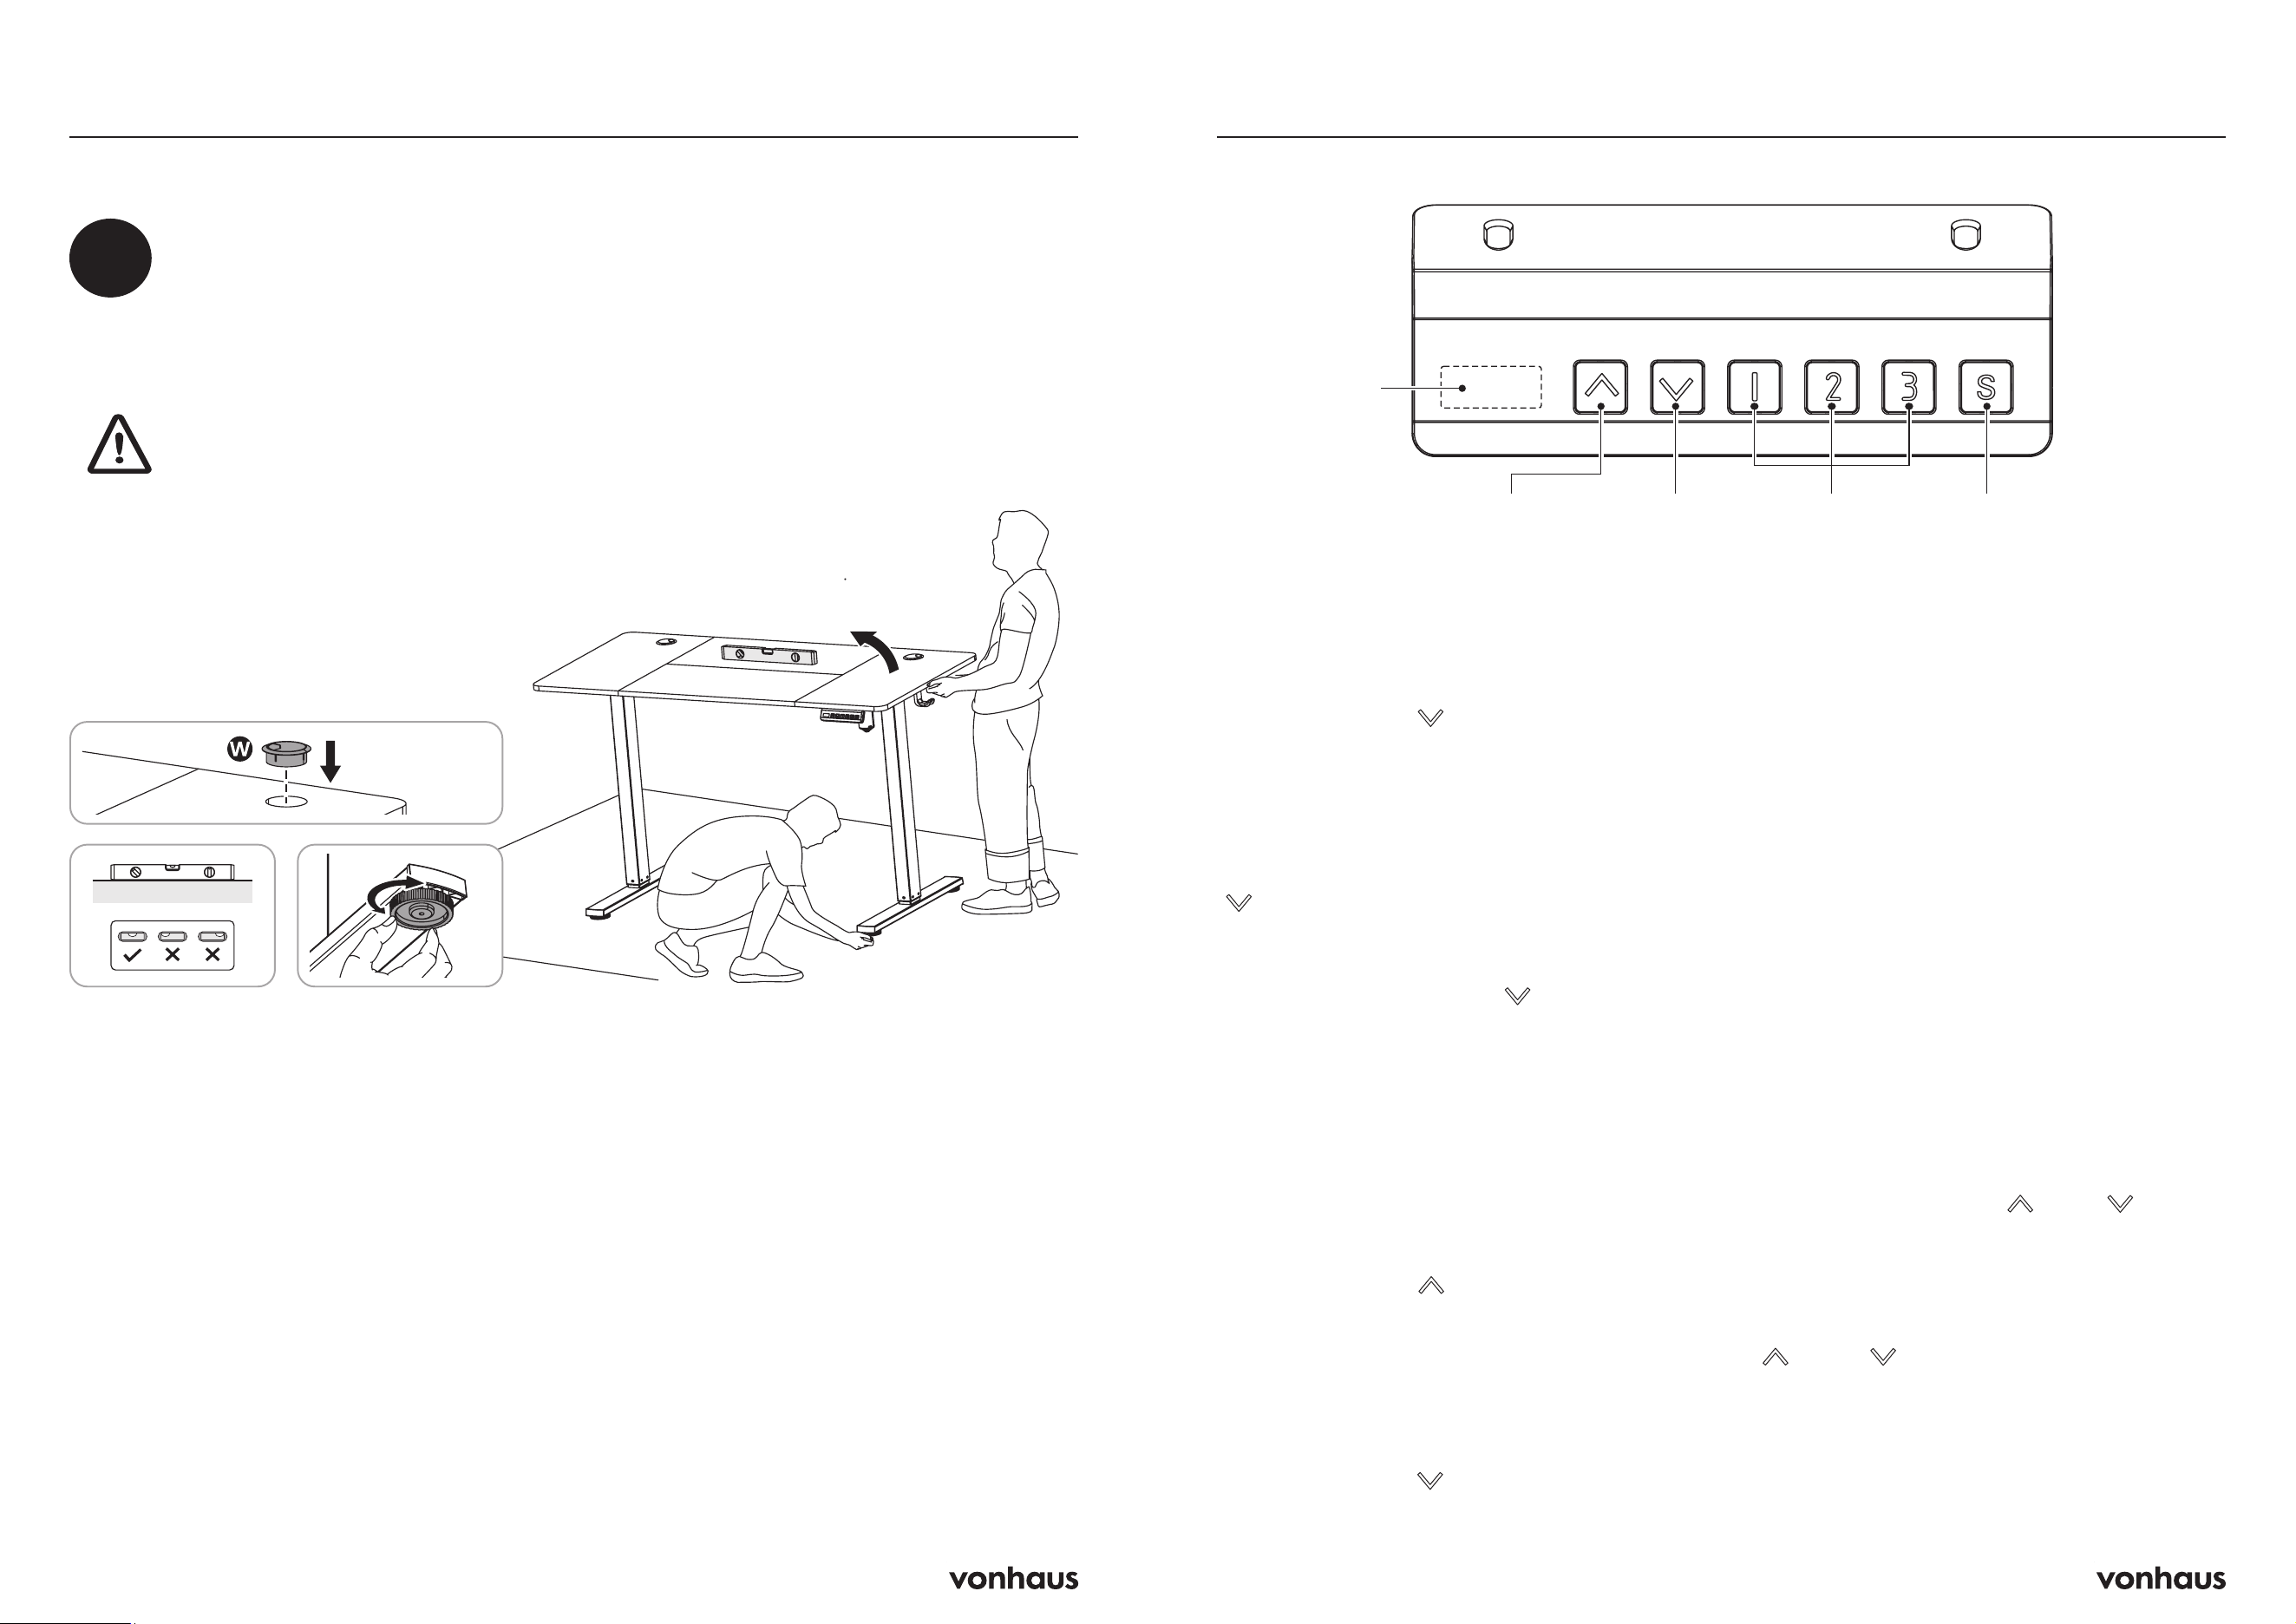
Attaching the Decorative Cover and Adjusting the Desk
• If the floor isn’t even, simply rotate the pad to adjust the level to make the desk
stable.
Tip: Use a bubble level (not included) to check if the desktop is even.
CAUTION: At least two people are required when turning over the desk, or serious
bodily injuries might occur.
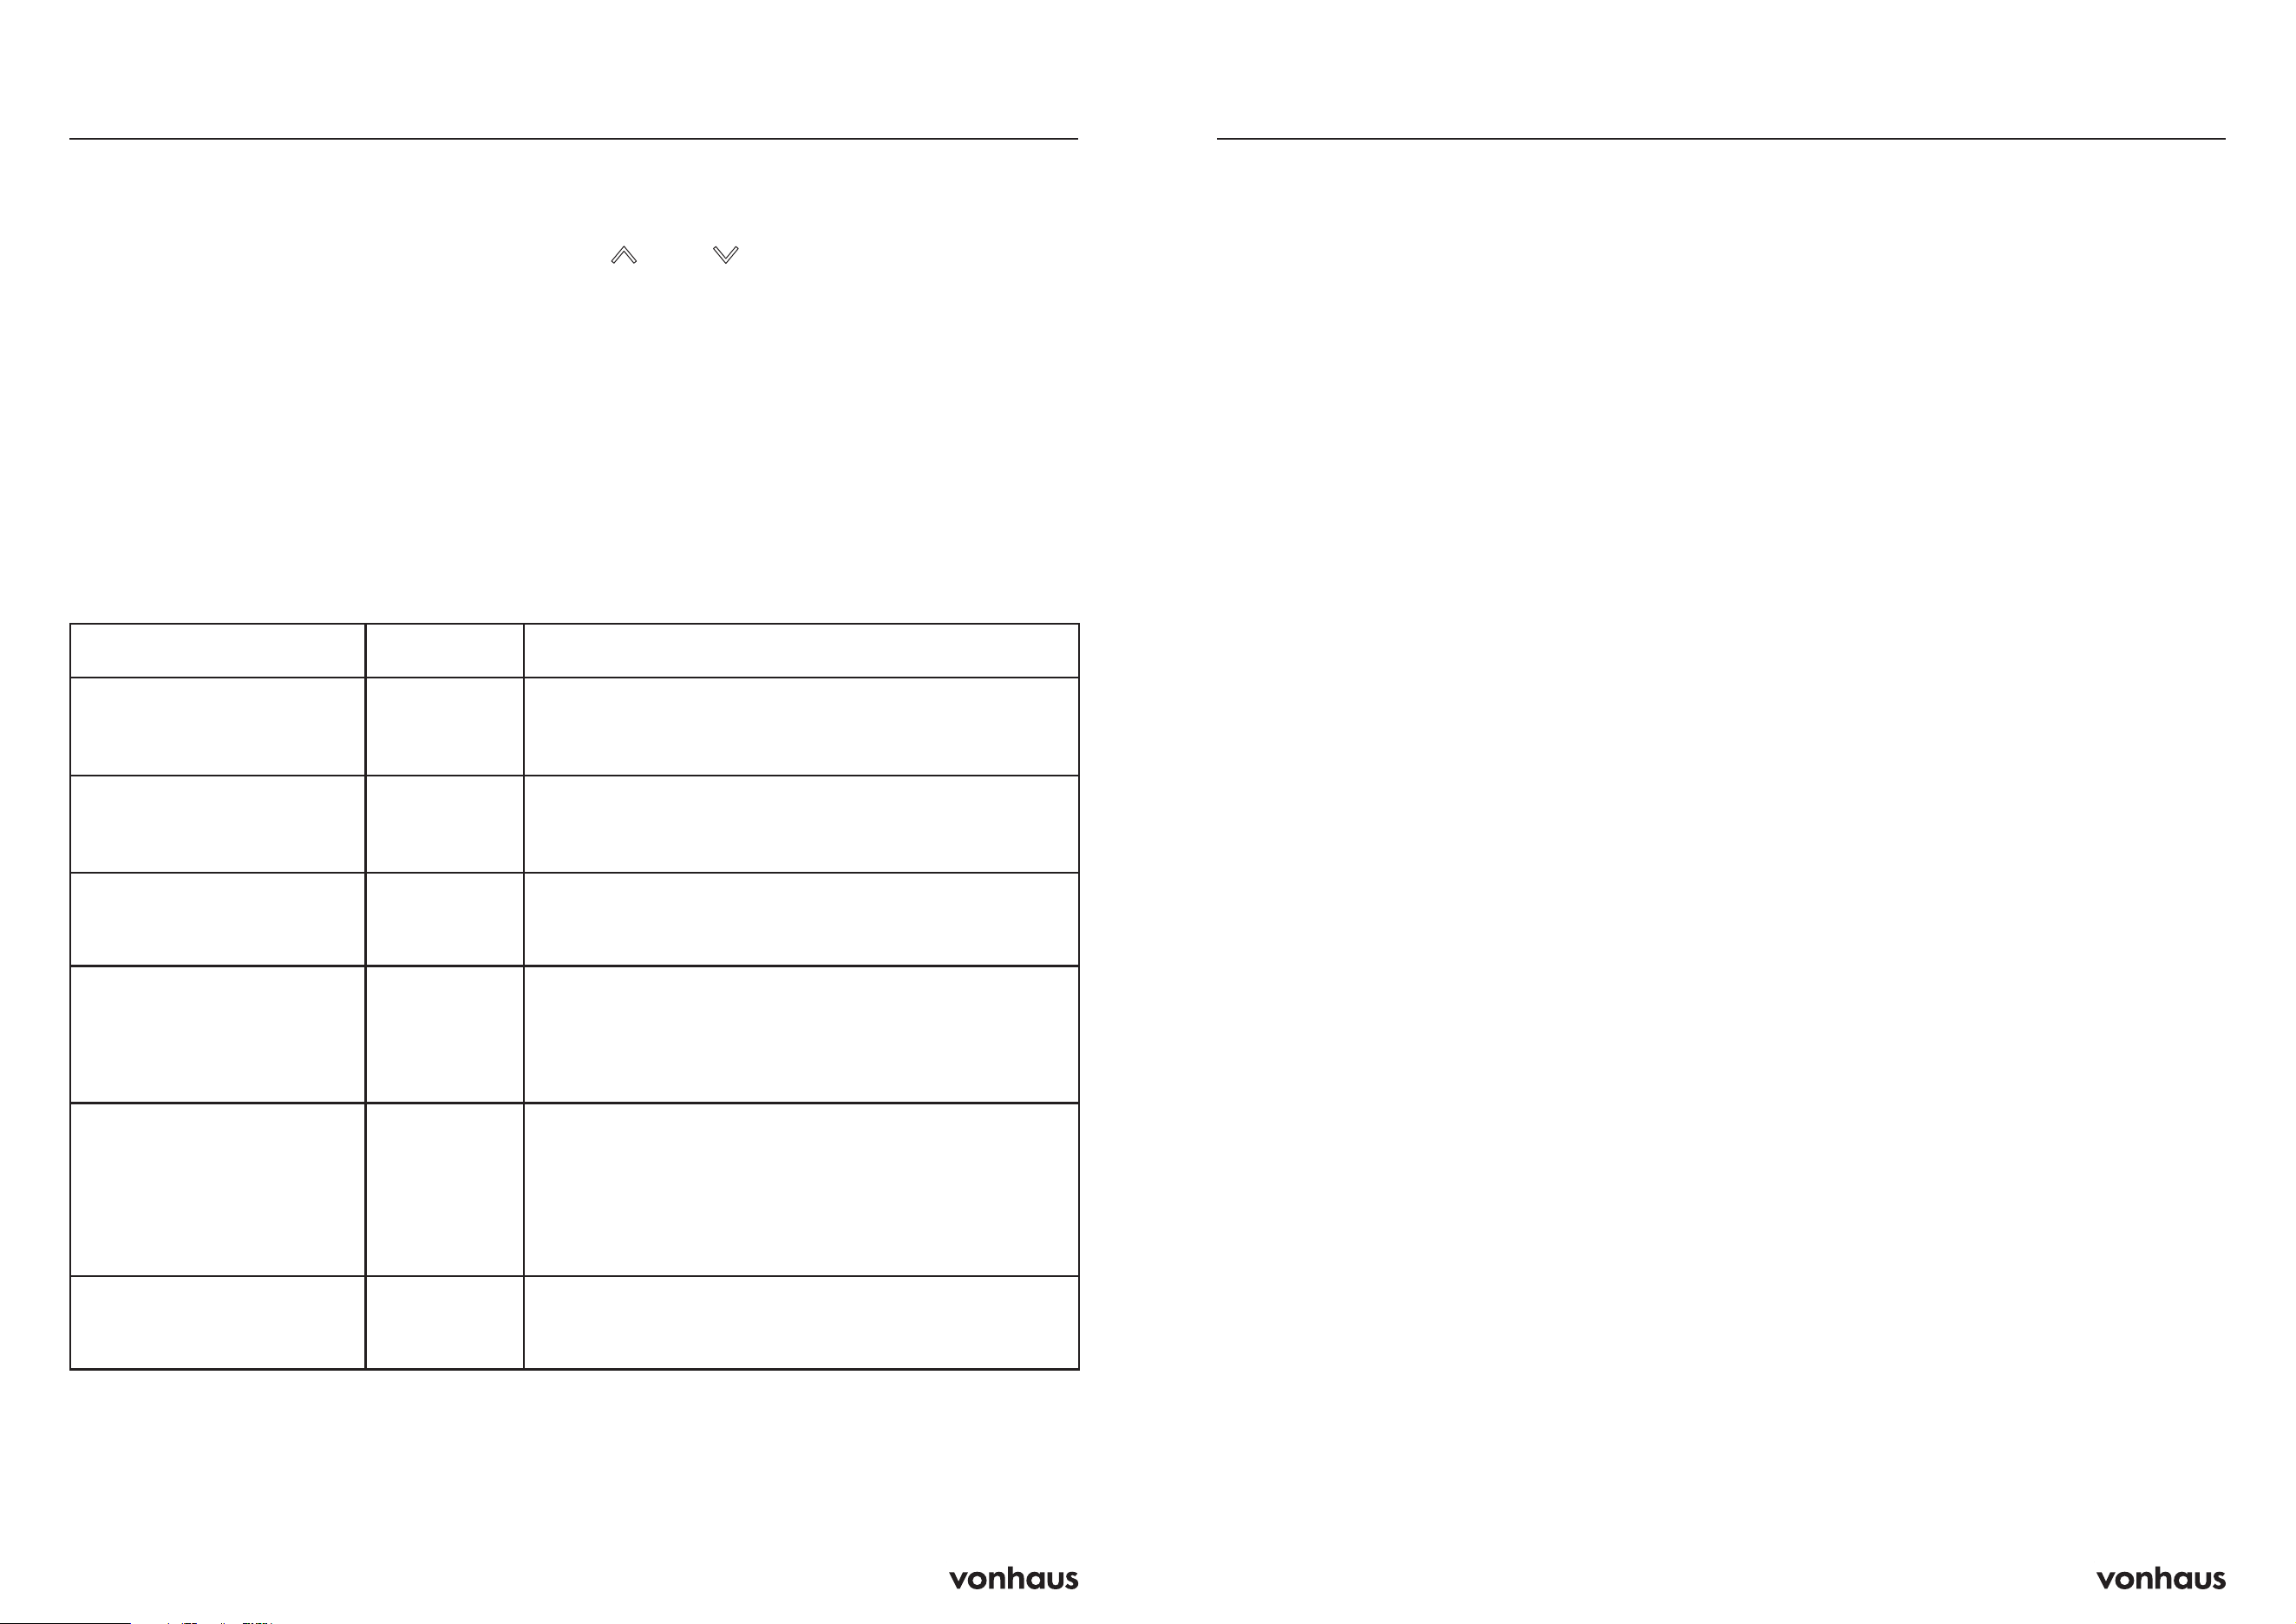
Control Panel
Display
Upward
Movement
Downward
Movement
Memory
1 / 2 / 3
Setting
Reset
Press and hold the “ ” button until 5s after the
lifting columns stop, do not release the button
at this stage. The controller will then display
“rst”, indicating that the reset has begun. The
lifting columns will descend slowly to the lowest
position and then rebound slightly. Release the
“ ” button to complete the reset.
If any unexpected situation occurs during the
reset process, release the “ ” button at any
time, the lifting columns will stop, and the reset
will be terminated. After termination, the reset
procedure must be performed again until it is
successfully completed; otherwise, no other
operations can be carried out.
Upward Adjustment
Press and hold the “ ” button on the controller
to raise the desk, release the button to stop the
movement.
Downward Adjustment
Press and hold the “ ” button on the controller
to lower the desk, release the button to stop the
movement.
Memory Setting
The controller can save up to 3 height positions,
corresponding to the “1”, “2”, and “3” buttons.
When the lifting columns are in the stationary
state, press the “S” button, and the controller
will display “S--”. Then press any one of the
“1”, “2”, or “3” buttons, the current desk height
will be saved to the selected button. After the
desk height has been saved, simply press the
corresponding “1”, “2”, or “3” button, and
the desk will automatically move to the saved
height. During the movement to the memory
height, pressing any button to stop the motion.
Child Safety Lock
Press and hold both the “ ∧” and “∧ ” buttons
simultaneously for 5s. When the controller
displays “LOC,” the system is locked, and no
lifting/lowering adjustment can be performed.
To unlock the system, press and hold both the
“∧ ” and “∧ ” buttons simultaneously for 5s.
When the display changes from “LOC” to
normal numeric display, the system is unlocked.
12 13
Power-Saving Mode
If no buttons are pressed within 1min, the
system will enter the power-saving mode, and
the display on the controller will be in the off
state. Press any button to exit the power-saving
mode.
Troubleshooting Guide
SC0 - Self-Check Failed - Standby
Current Abnormal
Plug out the power and re-plug. If the alarm
continues, replace the controller.
SC1 - Self-Check Failed - Main Power
Supply & Voltage Abnormal
Plug out the power and re-plug. If the alarm
continues, replace the controller or adaptor.
SC4 - Self-Check Failed - Drive Voltage
Abnormal
Plug out the power and re-plug. If the alarm
continues, replace the controller.
HOT - Overheat Protection
The system automatically enters the protection
mode due to overheating, and the alarm will
automatically stop after 18min.
r-6 - Main Power Supply & Voltage
Abnormal
When the main power supply and voltage
are restored, the alarm will be cleared
automatically. If the alarm occurs frequently,
replace the controller or the adaptor.
rst - Reset Not Completed
Continue to finish the reset.
E10 - Short Circuit of the Drive Circuit
Plug out the power and re-plug. If the alarm
continues, replace the controller.
E11 - Overload Protection
Operation is prohibited in the state of overload
protection. The alarm will automatically clear
after 20s. To resume operation, reduce the
load or check for mechanical faults in the
height adjustment mechanism.
E12 - Motor Phase Loss
Check if the motor wires are connected properly,
reconnect the motor wires and perform the
reset process. If the alarm continues, replace
the controller or motor wires.
E13 - Motor Hall Signal Abnormal
Check if the motor wires are connected properly,
reconnect the motor wires and perform the
reset process. If the alarm continues, replace
the controller or motor wires.
E14 - Collision Protection
When the collision protection is triggered, the
lifting columns will immediately move 5cm in
the opposite direction and then stop. The alarm
will be cleared automatically.
E16 - Motor Wires Not Connected
Check if the motor wires are connected
properly, reconnect the motor wires, if the
alarm continues, replace the controller or
motor wires.
E17 - Mechanical Failure
Check if the lifting column structure or the motor
is abnormal, and replace if necessary.
Control Panel
Menu Options Display Notes
Minimum Height Setting 72-108
Default: 72
Available Range: 72cm-108cm; Adjustment
Precision: 1cm The minimum height value must be at
least 10cm lower than the maximum height value.
Maximum Height Setting 82-118
Default: 118
Available Range: 82cm-118cm; Adjustment
Precision: 1cm The maximum height value must be
at least 10cm higher than the minimum height value.
Desktop Thickness Setting 0-30 Default:
2
Available Range: 0cm-30cm; Adjustment Precision:
1cm
Current Collision
Avoidance Sensitivity
During Upward Movement
PC0-PC5
Default: PC1
Available Range: 0-5 Off State: 0 1-5: The sensitivity
rises with the number.
Current Collision
Avoidance Sensitivity
During Downward
Movement
DC0-DC5
Default: DC1
Available Range: 0-5 Off State: 0 1-5: The sensitivity
rises with the number.
Display Unit Setting U-0-U-1
Default: U-0
U-0: Metric Unit (cm) U-1: Imperial Units (inch)
Menu Option Operation
Press and hold the “S” button for 5s to enter
the menu options. The menu content will flash
on the display. The menu consists of 6 options:
Minimum height setting, maximum height
setting, desktop thickness setting, current
collision avoidance sensitivity during upward
movement, current collision avoidance
sensitivity during downward movement, and
display unit setting. Press the “S” button to
scroll through the menu options, and press
“ ∧” and “ ∧” buttons for quick modifications.
To save the current settings, press and hold
the “S” button, a progress bar scrolling to
the right will appear. Once the progress bar
reaches 100%, all current menu settings will
be saved. If the saving is successful, “SUS” will
be displayed; if it fails, “FAL” will be displayed.
The menu will exit automatically.
If no operation is performed for over 10s, the
menu mode will exit automatically.
Control Panel
14 15
Customer Service
If you are having difficulty using this product
and require support, please contact
suppor[email protected]
Warranty
To register your product and find out if you
qualify for a free extended warranty please
go to www.vonhaus.com/warranty
Please retain a proof of purchase receipt or
statement as proof of the purchase date.
The warranty only applies if the product is used
solely in the manner indicated in the warnings
page of this manual, and all other instructions
have been followed accurately.
Any abuse of the product or the manner in
which it is used will invalidate the warranty.
Returns
Returned goods will not be accepted unless
re-packaged in its original packaging and
accompanied by a relevant and completed
returns form. This does not affect your statutory
rights.
No rights are given under this warranty to a
person acquiring the appliance second-hand
or for commercial or communal use.
Copyright
All material in this instruction manual are
copyrighted by DOMU Brands.
Any unauthorised use may violate worldwide
copyright, trademark, and other laws.
Thank You
Thank you for purchasing your product/
appliance.
Should you require assistance with your
purchase, please contact us at
suppor[email protected]
VonHaus is a registered trademark of DOMU
Brands Ltd.
Made in China for DOMU Brands Ltd.
Unit 30, Stakehill Industrial Estate
Middleton, Manchester, M24 2RW
EU Authorised Representative
Authorised Representative Service
77 Camden Street Lower
Dublin, D02 XE80
Ireland
Information
Important Safety Notice
This product is not suitable for use by children
or by individuals with physical, sensory, or
mental impairments that may limit their ability
to operate the equipment safely, unless they
have been given supervision or instruction
concerning the safe use of the product by a
person responsible for their safety.
Improper use may result in serious injury.
Always ensure the operator is capable
of understanding and following all safety
instructions provided in this manual.
Safety Instructions and Warnings
Ensure the mounting surface is sufficiently
strong to handle the mounted product and
equipment.
DO NOT EXCEED THE MAXIMUM
LISTED WEIGHT CAPACITY.
Always ensure someone assists you or use a
mechanical device to lift and position heavy
products safely.
Tighten screws firmly, but do not over-tighten.
Over-tightening may cause product damage
that significantly reduces holding power.
Keep a clear area and distance from moving
parts when using the product.
Use only as intended. Never stand, hang, or
climb on the product.
This product is intended for indoor use only.
Any attempts to reconstruct or alter the power
unit and control box are not permitted.
This product may contain small items that could
pose a choking hazard if swallowed. Keep
children away unless the product is intended
for their use and all instructions and manuals
have been fully reviewed and understood.
Check that the product is secure and safe to
use at regular intervals (at least every three
months).
Additional Cautions
Do not clean the product with water whilst the
power is still connected.
Do not disassemble or replace components
whilst the power is still connected.
Never operate the system with a damaged
cord or plug.
Never operate the system if it is in a moist
environment or its electrical components have
had contact with liquids.
∧If the control box makes unusual noise or smells,
switch off the mains voltage immediately.
Disposal
The product bearing this mark indicates that it
should not be disposed of with other household
waste throughout the EU. To prevent possible
harm to the environment or human health
from uncontrolled waste disposal, recycle it
responsibly to promote the sustainable reuse of
material resources. To return your used device,
please use the local recycle service or contact
your point of purchase to arrange collection of
the product.
Information
Let’s get started!
Visit our product hub for
useful tips and tricks on
getting the most out of
your new product.
SCAN ME
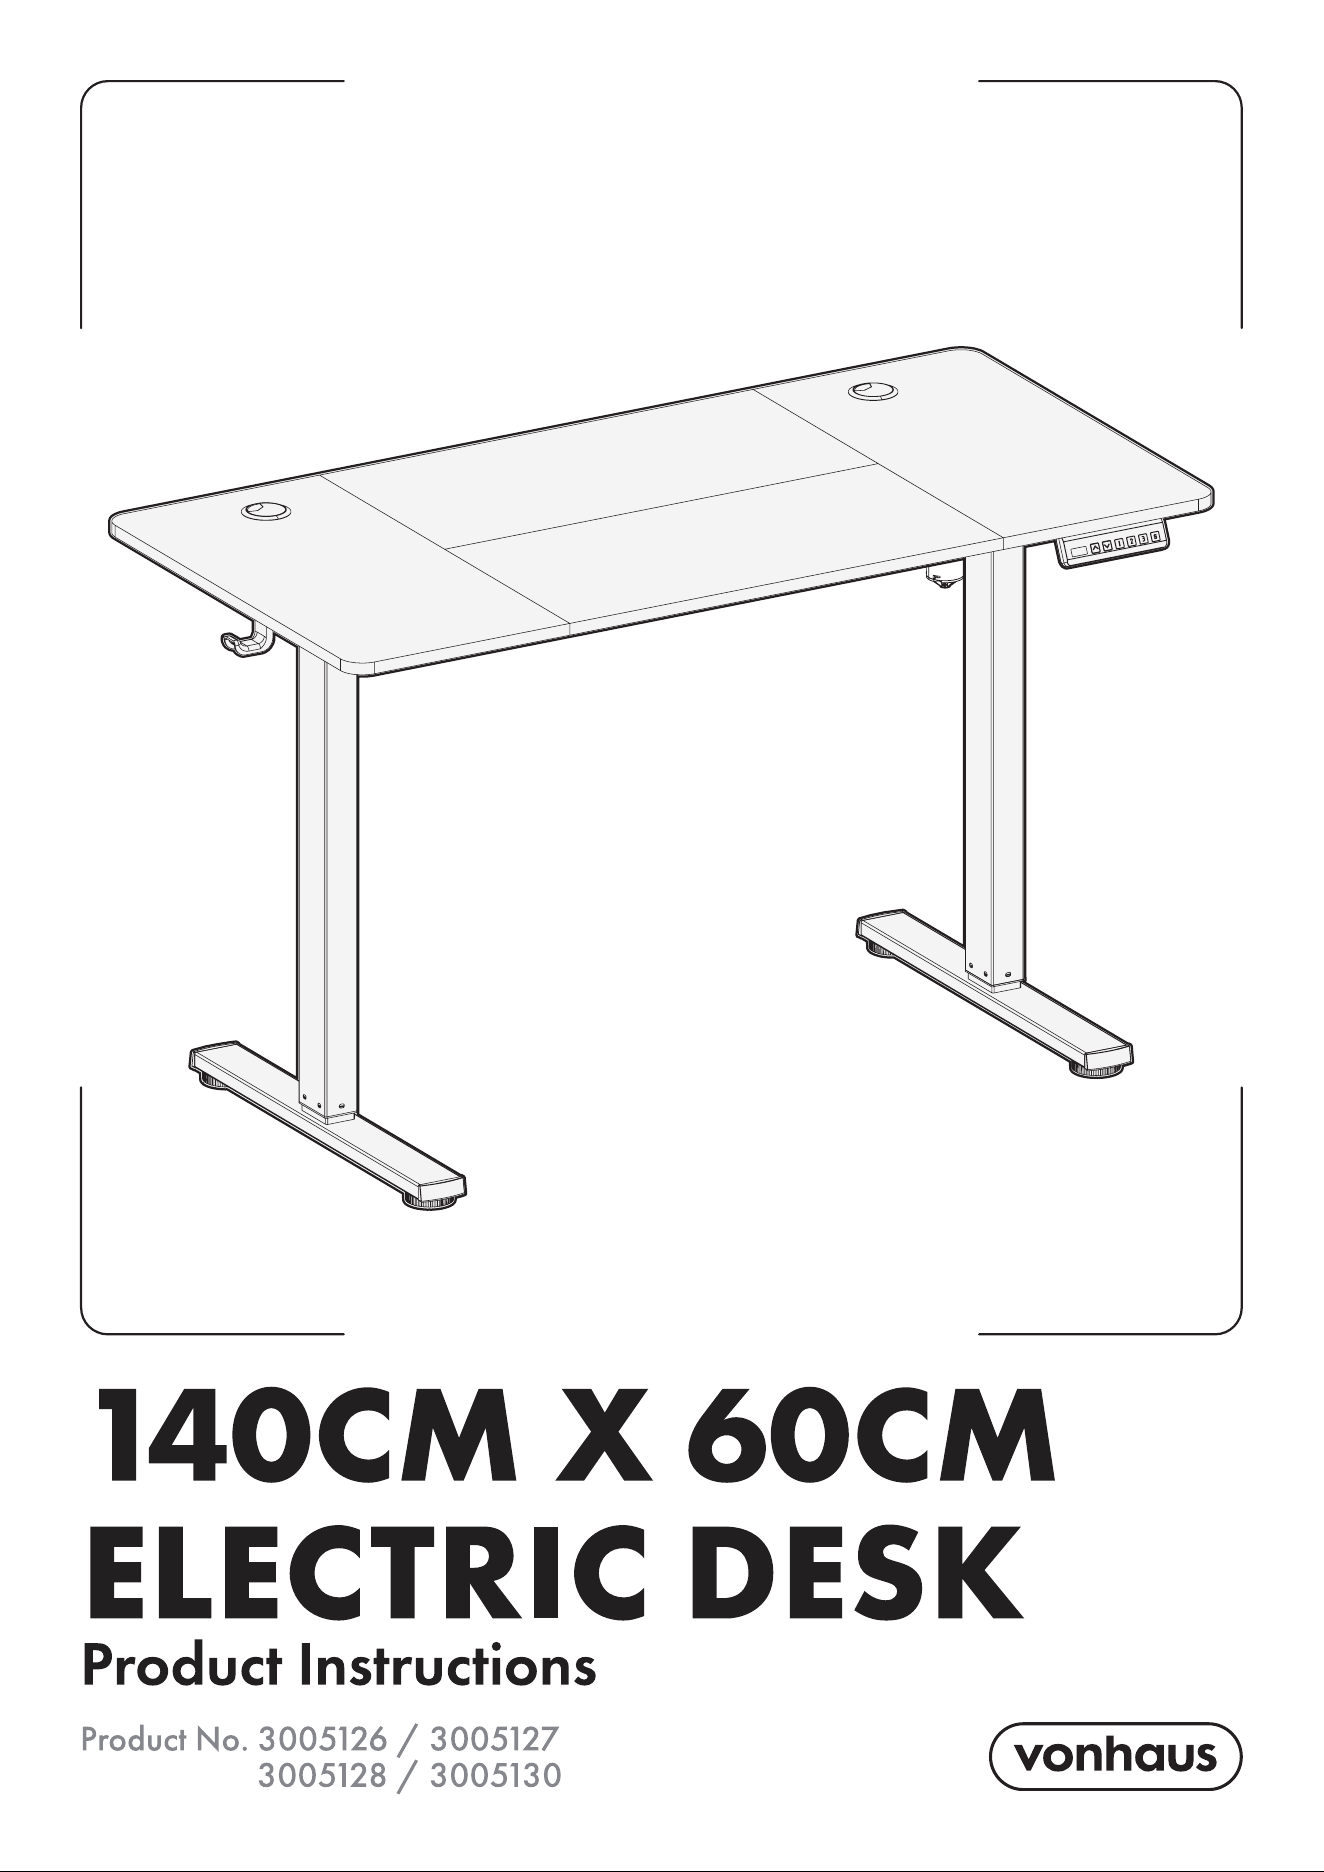
Product No. 3005126 / 3005127
3005128 / 3005130