Installation Videos:
MY
FireplaceBlower
MyFireplaceBlower.com:
Installation Instructions:
Installer is responsible to check local codes
and read all instructions prior to installation.
Layout designed in U.S.A. © 2014
My Fireplace Blower
Burlington, Wisconsin
1-800-466-4045
Drywall dust or other fragments may be present in your replace’s vent space, clean this area before you install the
blower kit. Any bearing or motor damage resulting from this condition is not covered by the warranty policy.
Instructions for Design Version - FK24 Blower Kit with Cord Set
This Blower Kit is tested and safe when installed in accordance with these installation instructions. It is your re-
sponsibility to read all instructions and consult the Owner’s Installation Manual for your particular model number
for Supplemental Information before starting installation. Blower operates on 115V/60Hz power.
CLICK
High Quality Aftermarket Fireplace Blowers & Fans
1-800-466-4045
Check the contents of the carton.
Make sure nothing was damaged in shipment.
Do NOT install a damaged blower kit!
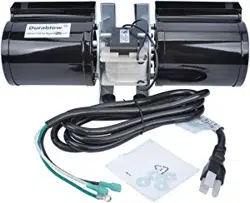
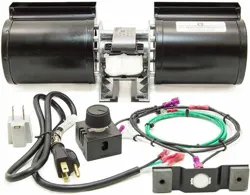
Blower Kit Parts
Step 1: Turn Off Fireplace and allow it to cool
down. Disconnect from 120V Power. Shut off
the Gas supply. Remove the louver which cov-
ers the lower vent space below the rebox.
Lay cord set out in a straight line, with the
3-Prong Power Plug furthest away from the
replace.
Figure: 1
Step 2: Connect black wires of the cord set to either
of the spade terminals attached to the motor. Push
disconnects onto metal tabs. (Figure: 1)
CLICK
CLICK
NOTE: Diagrams and Illustrations NOT to Scale
Page 1 of 4
WARNING
RISK OF FIRE AND ELECTRICAL SHOCK!
TURN OFF THE GAS AND ELECTRICAL POWER BEFORE INSTALLING BLOWER!
When installed, make sure to contain any excess wire of the cord set;
Preventing it from making contact with moving or hot objects.
Description
Qty.
Fan
Thermodisc / Heat Sensor
Variable Speed Control
Cord Set
Hardware Packet
Mounting Bracket with Foam Strips
Installation Instructions
(Downloadable)
1
1
1
1
1
1
1
•Does not matter which metal tab you
connect the black wires to.
Figure: 4
Step 3: Visualize a pathway for the blower
to reach the back. (Figure: 2)
Hold fan assembly so the fan blades face
up and mounting bracket faces down, with
the blower motor being furthest away from
replace. (Figure: 3)
Slide blower assembly through on left side
of gas control in bottom vent space; as
blower reaches the back, position blower
parallel with back wall and rotate blower, so
the blower’s rectangle air exit port is facing
up and mounting bracket is against back
wall. (Figures: 4&2)
Line up the bracket mounting holes with
the screw studs on the back of the replace
and fasten with #10-24 hex nuts.
(Figure: 2)
Step 4: Place magnetic thermodisc to the
warmest spot on the underside of the re-
box (You may have to change the position
of the thermodisc until you nd a hot spot).
(Figure: 2)
The thermodisc will activate the blower
when it senses 120°F and will automatically
turn the blower off after the replace cools
below 90°F.
CLICK
Figure: 2
Installer is responsible to check local codes
and read all instructions prior to installation.
Layout designed in U.S.A. © 2014
NOTE: Diagrams and Illustrations NOT to Scale
Page 2 of 4
My Fireplace Blower
Burlington, Wisconsin
1-800-466-4045
MyFireplaceBlower.com:
Figure: 3
Junction Box
Variable Speed Control
Gas
Control
Gas
Line
Thermodisc / Heat Sensor
Blower Position
Bottom of Firebox
Screw Studs &
Mounting Bracket
Step 5: Set the Variable Speed Control on
oor of lower vent space near the front,
lining up screw studs with mounting holes.
Fasten speed control box with #10-24 hex
nuts. Turn the dial to the left and it will
click off, turn right to reduce speed.
(Figure: 2)
CLICK
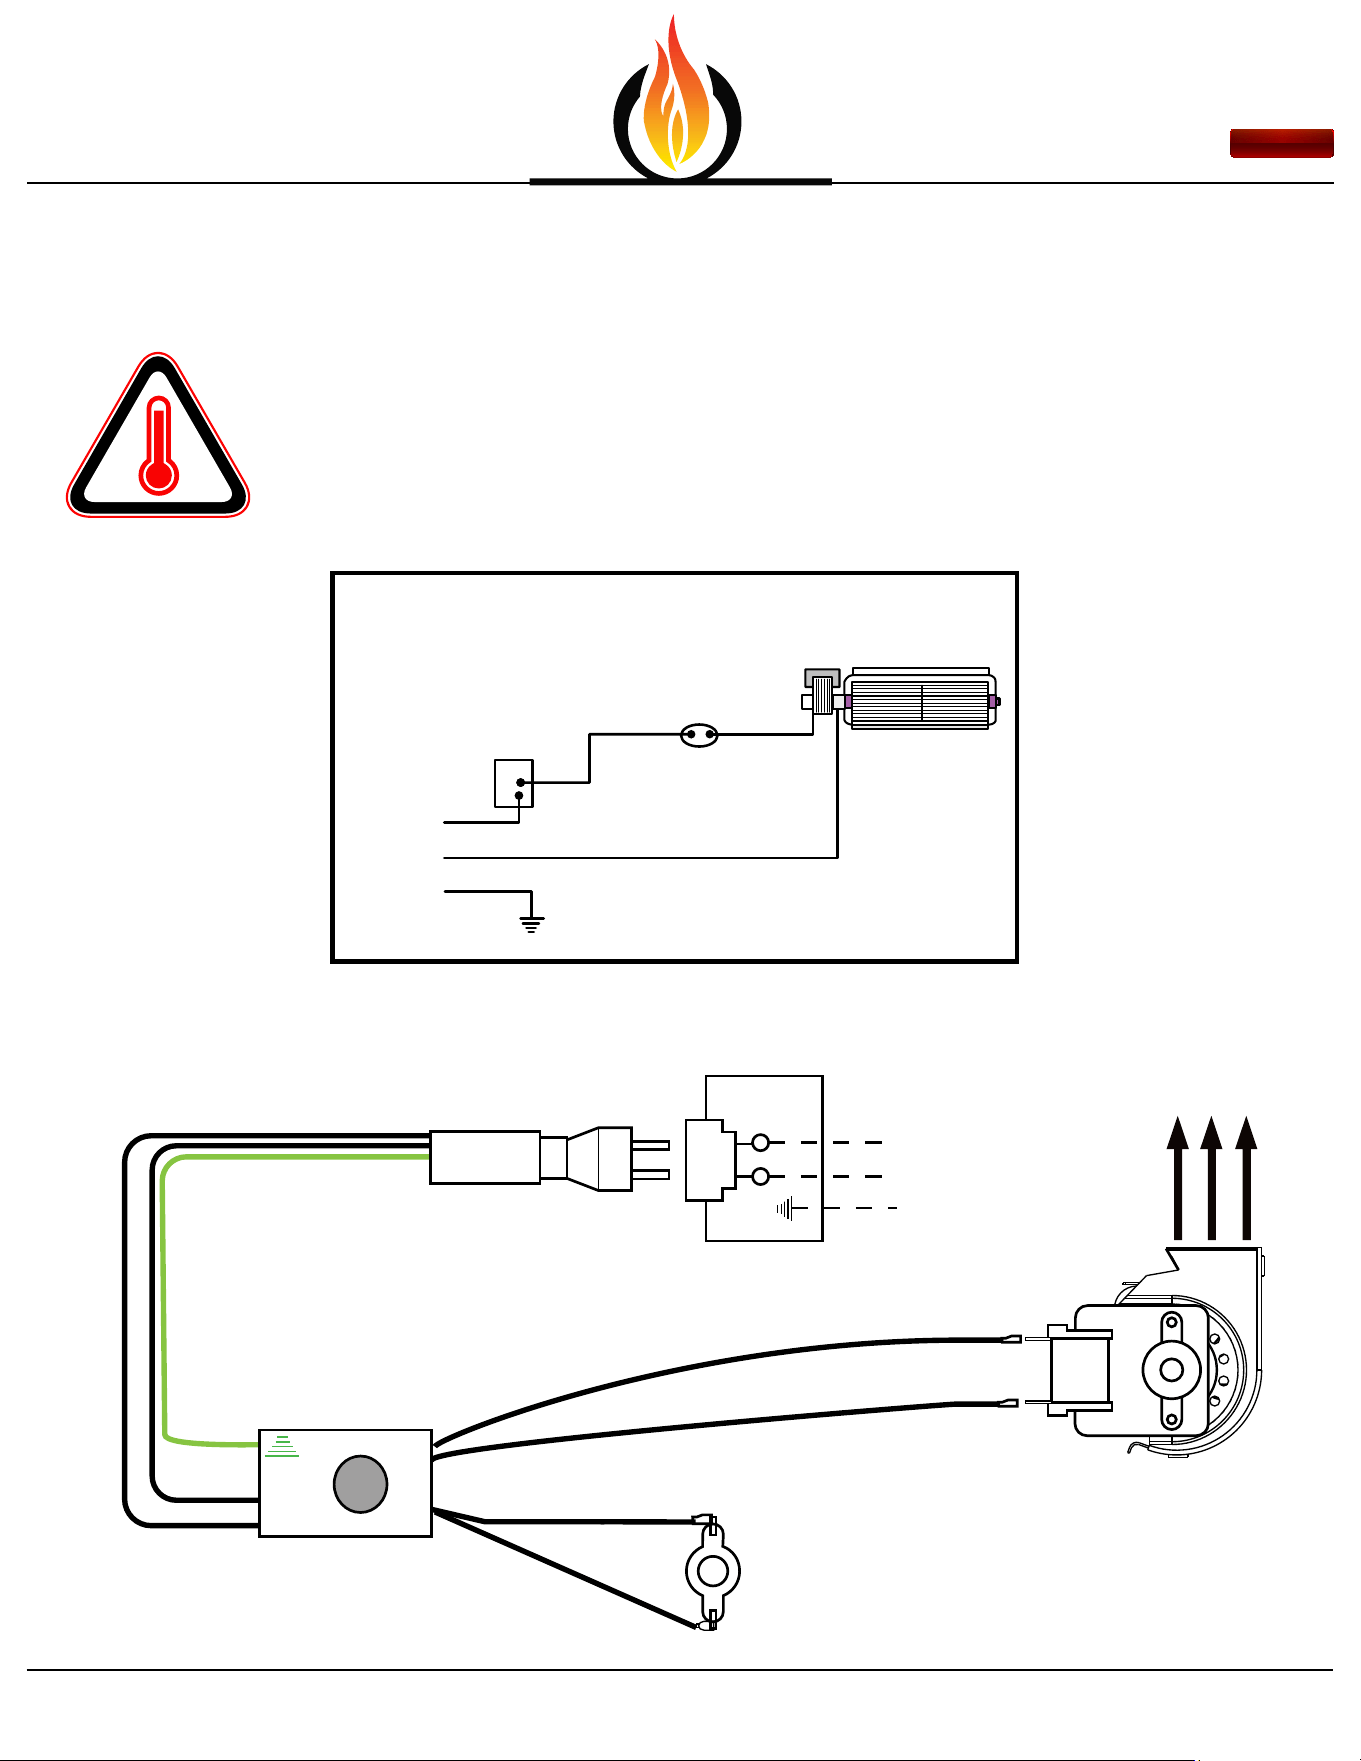
The fan will not run until the Thermodisc / Heat Sensor reaches approximately 120°F
and the Variable Speed Control is turn to the “ON” Position! This means the Heat
Sensor must be in contact with a hot spot on the underside of the Firebox.
Figure: 6
Installer is responsible to check local codes
and read all instructions prior to installation.
Layout designed in U.S.A. © 2014
NOTE: Diagrams and Illustrations NOT to Scale
Page 3 of 4
My Fireplace Blower
Burlington, Wisconsin
1-800-466-4045
MyFireplaceBlower.com:
You may want to run blower a few times to see what speed works well for your replace. The speed
control must be in the ON position in order for the blower to run. The blower will not turn on until the
Thermodisc reaches approximately 120 degrees and the variable speed control is in the ON position.
C
B
A
Black
White
Ground
A: Variable Speed Control
B: Thermodisc / Heat Sensor
C: Fan
AIR
FLOW
GREEN
BLACK (+)
Receptacle
Junction
Box
120VAC
Receptacle
Junction
Box
120VAC
Thermodisc/
Heat Sensor
Variable
Speed Control
BLACK (+)
BLACK (+)
BLACK (+)
BLACK (-) NUTRAL
BLACK
NEUTRAL
•Does not matter which metal tab you
connect the black and white wires to.
MY
FireplaceBlower
NOTE: Diagrams and Illustrations NOT to Scale
Page 4 of 4
Installations in Canada must conform to the current CAN/CGAB-419.1 and .2 Gas Installation Code and local regula-
tions. When installing the blower fan kit, it must be electrically grounded in accordance with CSA C22.1 Canadian
Electrical Code Part 1 and/or Local Codes.
Installations in the USA must conform to local codes, or in absence of local codes or the National Fuel Gas Code,
ANSI Z223.1-1988. When installing the blower fan kit, it must be grounded in accordance with local codes, or in
absence of local codes, with the National Electrical Code, ANSI/NFPA 70-1987.
My Fireplace Blower LLC produces and sells aftermarket replace blower kits; which require consultation
of an Owner’s Installation Manual from the Manufacturer of a particular replace model number for in-
stallation. During Installation of a replace blower kit or replacement blower, refer to the Owner’s Instal-
lation Manual for your particular replace model to obtain supplemental information. My Fireplace Blower
LLC is not responsible for any damage incurred during installation or resulting from installation of a re-
place blower kit, which was directed and/or conducted from the information within this document.
Installation Videos:
Installation Instructions:
Step 6:
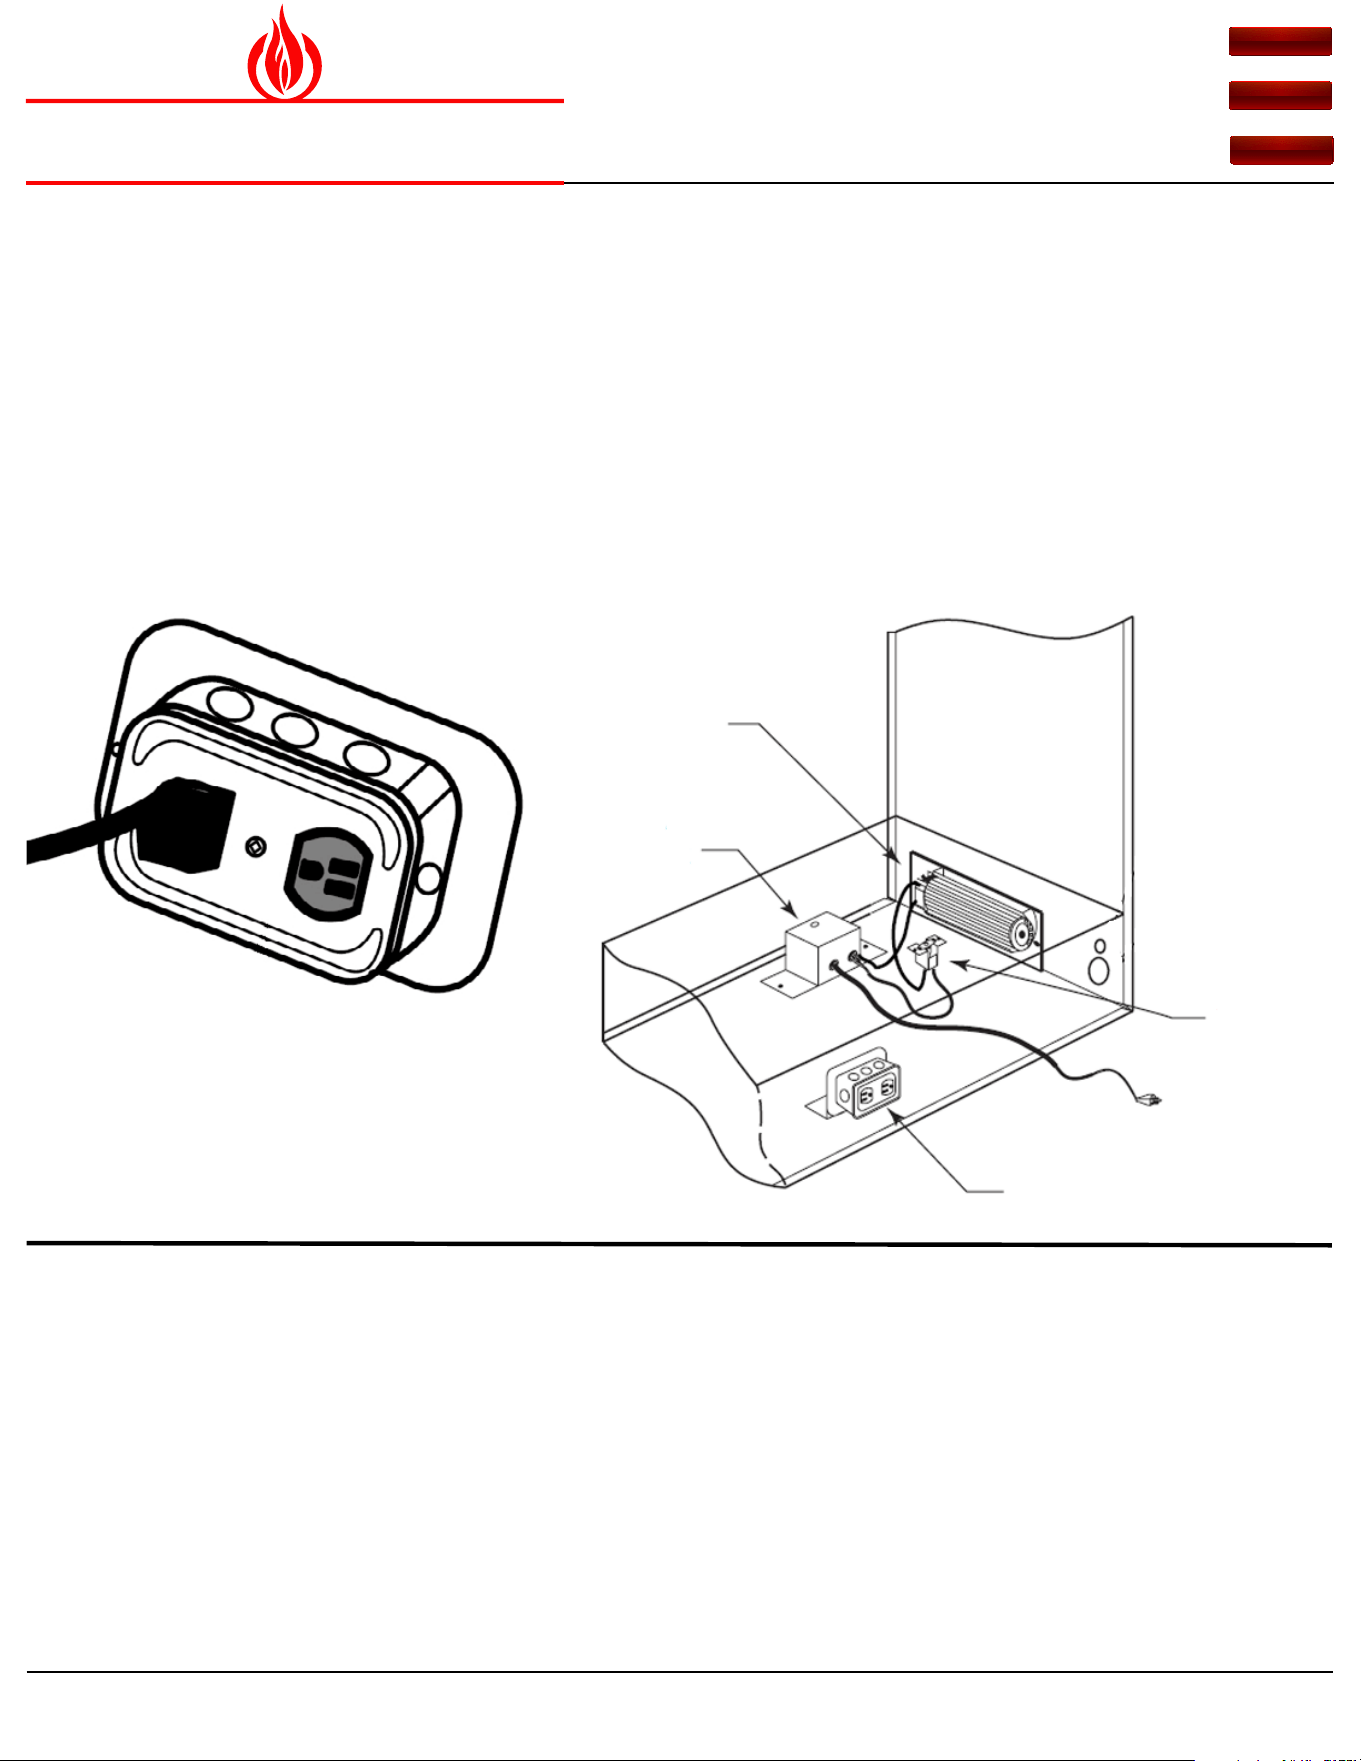
Insert 3-Prong Plug into the Junction Box. The
Junction Box which is the power supply may be on
the right or left side. (Figures: 2&7)
•Wiring Diagram for this Blower Kit is illustrated in
Figure: 6.
•If you have a Multi-Sided replace, See Figure: 8.
Figure: 7
CLICK
CLICK
CLICK
Finishing Steps:
If appliance is connected to a gas supply, turn it
back on.
If Appliance is connected to 120 Volt Power, turn it
back on.
Installer is responsible to check local codes
and read all instructions prior to installation.
Layout designed in U.S.A. © 2014
My Fireplace Blower
Burlington, Wisconsin
1-800-466-4045
MyFireplaceBlower.com:
Blower Position
Variable Speed Control
Junction Box
Thermodisc /
Heat Sensor
Figure: 8