FIRMAN and logo design are trademarks or
registered trademarks of FIRMAN. All rights
reserved.
Serial Number
399748302-00
Purchase Date
MODEL #WT12579
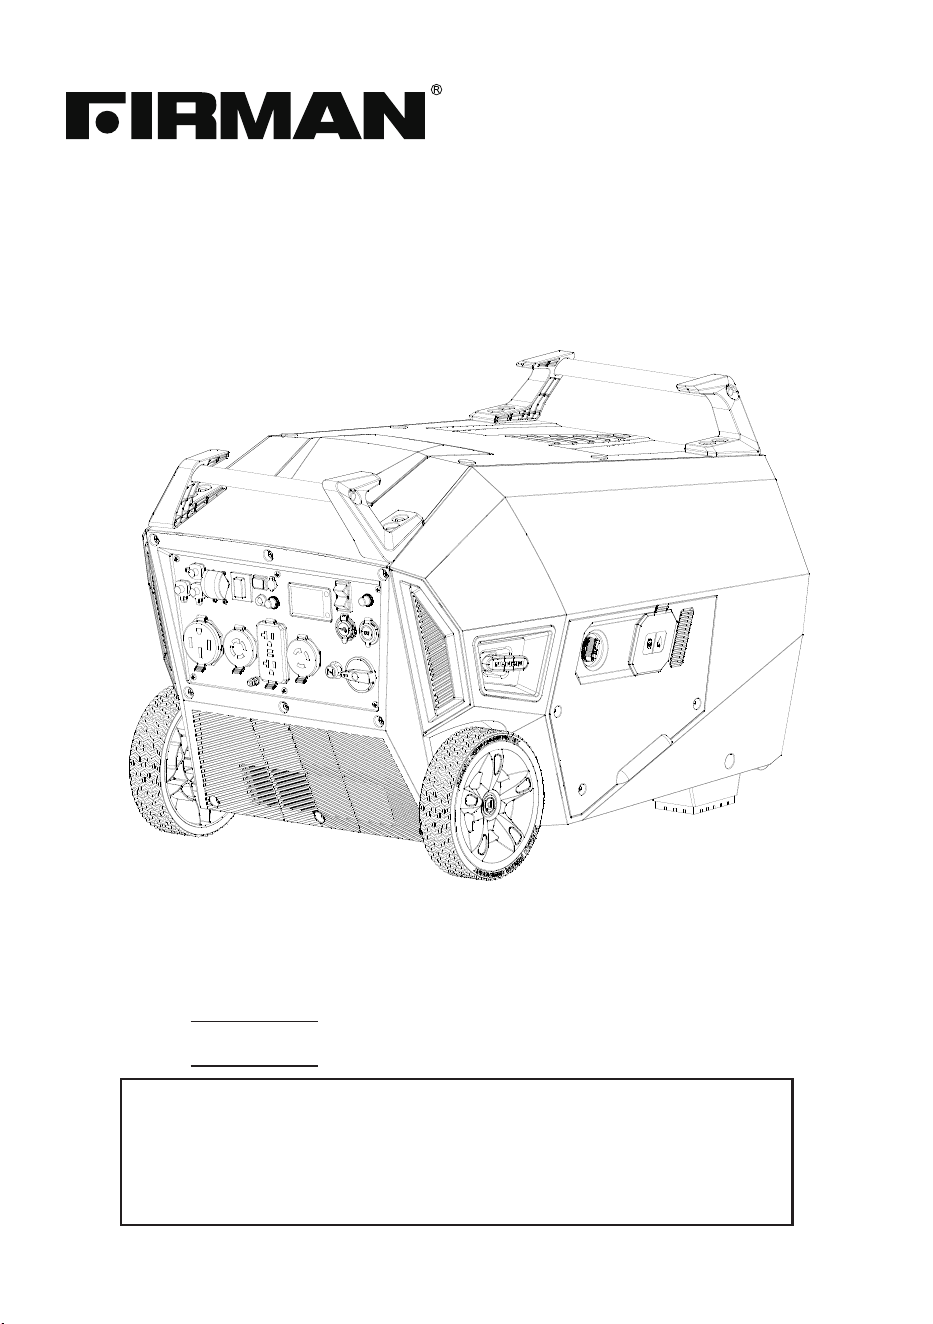
TRI-FUEL
INVERTER GENERATOR
ATTACH YOUR RECEIPT
1
2
3
4
567
8
10
9
IMPORTANT, RETAIN FOR FUTURE REFERENCE: READ CAREFULLY
Thank you for purchasing this FIRMAN product.
Questions, problems or missing parts?
Before returning, contact us on:
844-347-6261, 8 a.m. - 8 p.m., EST, Monday - Sunday or
at www.rmanpowerequipment.com.

2
TABLE OF CONTENTS
Introduction.......................................................................................................................................................
Features, Controls and On -Product Hazard Labels...................................................................................
Operating Instructions.....................................................................................................................................
Maintenance - Storage....................................................................................................................................
Troubleshooting- Specications....................................................................................................................
Replacement Parts Lists .................................................................................................................................
Wiring Diagram ................................................................................................................................................
Service - Warranty ...........................................................................................................................................
3
7
14
34
41
43
49
50
FCC DECLARATION
Supplier’s Declaration of Conformity
47 CFR § 2.1077 Compliance Information
FIRMAN WT12579 TRI-FUEL INVERTER GENERATOR
1. This device complies with Part 15 of the FCC Rules. Operation is subject to the following two
conditions:
1a. This device may not cause harmful interference.
1b. This device must accept any interference received, including interference that may cause
undesired operation.
2. Changes or modications not expressly approved by the party responsible for compliance could
void the user’s authority to operate the equipment.
NOTE: The FIRMAN WT12579 inverter generator has been tested and found to comply with the
limits for a Class B digital device, pursuant to part 15 of the FCC Rules. These limits are designed
to provide reasonable protection against harmful interference in a residential installation. This
equipment generates, uses and can radiate radio frequency energy and, if not installed and used in
accordance with the instructions, may cause harmful interference to radio communications. However,
there is no guarantee that interference will not occur in a particular installation. If this equipment does
cause harmful interference to radio or television reception, which can be determined by turning the
equipment o and on, the user is encouraged to try to correct the interference by one or more of the
following measures:
FCC/IC Compliance Statement
Changes or modications to equipment not expressly approved by FIRMAN could void the user’s
authority to operate the equipment.
● Reorient or relocate the receiving antenna.
● Increase the separation between the equipment and receiver.
● Connect the equipment into an outlet on a circuit dierent from that to which the receiver is
connected.
● Consult the dealer or an experienced radio/TV technician for help.

3
Thank you for purchasing a FIRMAN generator. You have selected a high-quality, precision engine
generator set designed and tested to give you years of satisfactory service. This generator is Tri-Fuel
and capable of running on gasoline, liquid petroleum gas (LPG), and natural gas (NG). This generator is
not intended to be run unattended or to supply power to life safety support.
This manual contains safety information to make you aware of the hazards and risks associated with
generator products and how to avoid them. This generator is designed and intended only for supplying
electrical power for operating compatible electrical lighting, appliances, tools and motor loads, and
is not intended for any other purpose. It is important that you read and understand these instructions
thoroughly before attempting to start or operate this portable generator. Save these original
instructions for future reference.
All information in this publication is based on the latest production information available at the time
of approval for printing. The manufacturer reserves the right to change, alter or otherwise improve the
generator and this documentation at any time without prior notice.
INTRODUCTION
4
INTRODUCTION
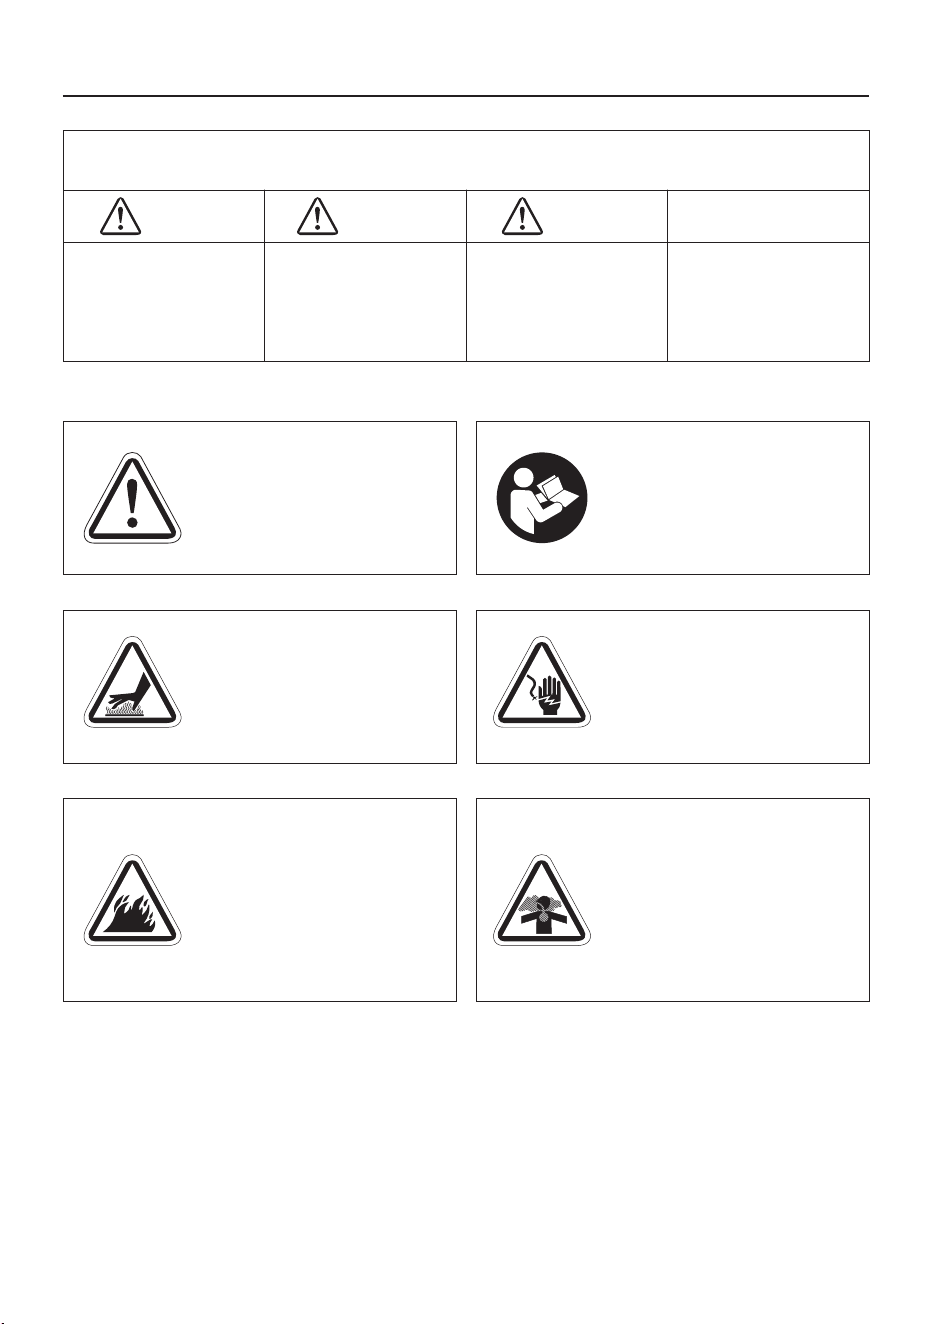
SIGNAL WORDS
WARNING
Indicates a hazard
which, if not avoided,
could result in death
or serious injury.
DANGER
Indicates a hazard
which, if not avoided,
will result in death or
serious injury.
Safety Alert Symbol Indicates
a potential personal injury
hazard.
Operator's Manual - Failure to
follow warnings, instructions
and operator's manual could
result in death or serious injury.
Toxic Fumes- Engine exhaust
contains carbon monoxide, a
poisonous gas that will kill
you in minutes. You cannot
smell it or see it.
Generator could cause
electrical shock resulting in
death or serious injury.
Fire- Fuel and its vapors are
extremely ammable which
could cause burns or re
resulting in death or serious
injury. Engine exhaust could
cause re resulting in death
or serious injury.
Hot Surface- Muffler could
cause burns resulting in
serious injury.
CAUTION
Indicates a hazard
which, if not avoided,
could result in minor or
moderate injury.
NOTICE
Indicates information
considered Important,
but not hazard-related.
5
INTRODUCTION
WARNING! This product can expose you to chemicals including gasoline engine
exhaust, which is known to the State of California to cause cancer, and carbon
monoxide, which is known to the State of California to cause birth defects or other
reproductive harm. For more information go to www.P65Warnings.ca.gov.
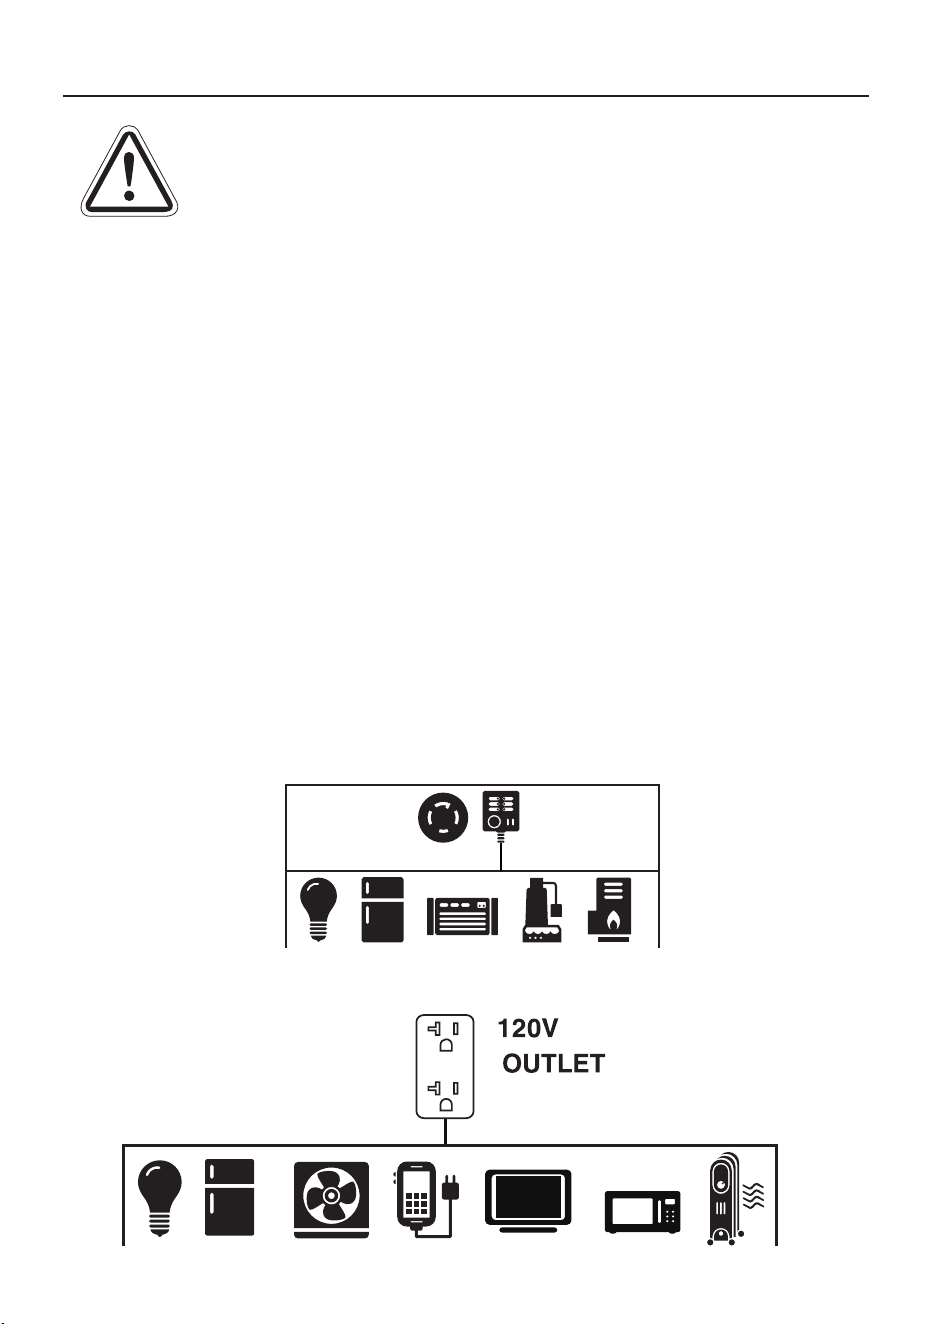
This outdoor generator can be used to power outdoor items using extension cords or to restore home
power using a transfer switch. A transfer switch is a separate device installed by a licensed electrician
that allows the portable generator to be cord connected, using a 120/240V receptacle directly into
your home’s electrical system. Install a listed transfer switch as soon as possible if this generator will
be used to restore power to your home.
NOTICE
If you have questions about intended use, contact FIRMAN customer service. This generator
is designed to be used only with FIRMAN authorized parts.
System Ground
The generator has a system ground that connects the generator frame components to the ground
terminals on the AC output receptacles. The system ground is connected to the AC neutral wire. The
neutral is bonded to the generator frame.
Compliance Requirements
There may be Federal or State regulations, local codes, or ordinances that apply to the intended
use of the generator. Consult a qualied electrician, electrical inspector, or the local agency having
jurisdiction. This generator is not intended to be used at a construction site or similar activity as
dened by NFPA 70-2026 (NEC) section 590.6.
To Restore Home Power Using a Listed Transfer Switch
Connections to your home’s electrical system must use a listed* transfer switch installed by a
licensed electrician. The connection must isolate the generator power from the utility power and
comply with all applicable laws and electrical codes.
To Restore Power Using Extension Cords
Typical
120/240V
Outlet
Transfer
Switch
Typical Indoor Items
6
INTRODUCTION
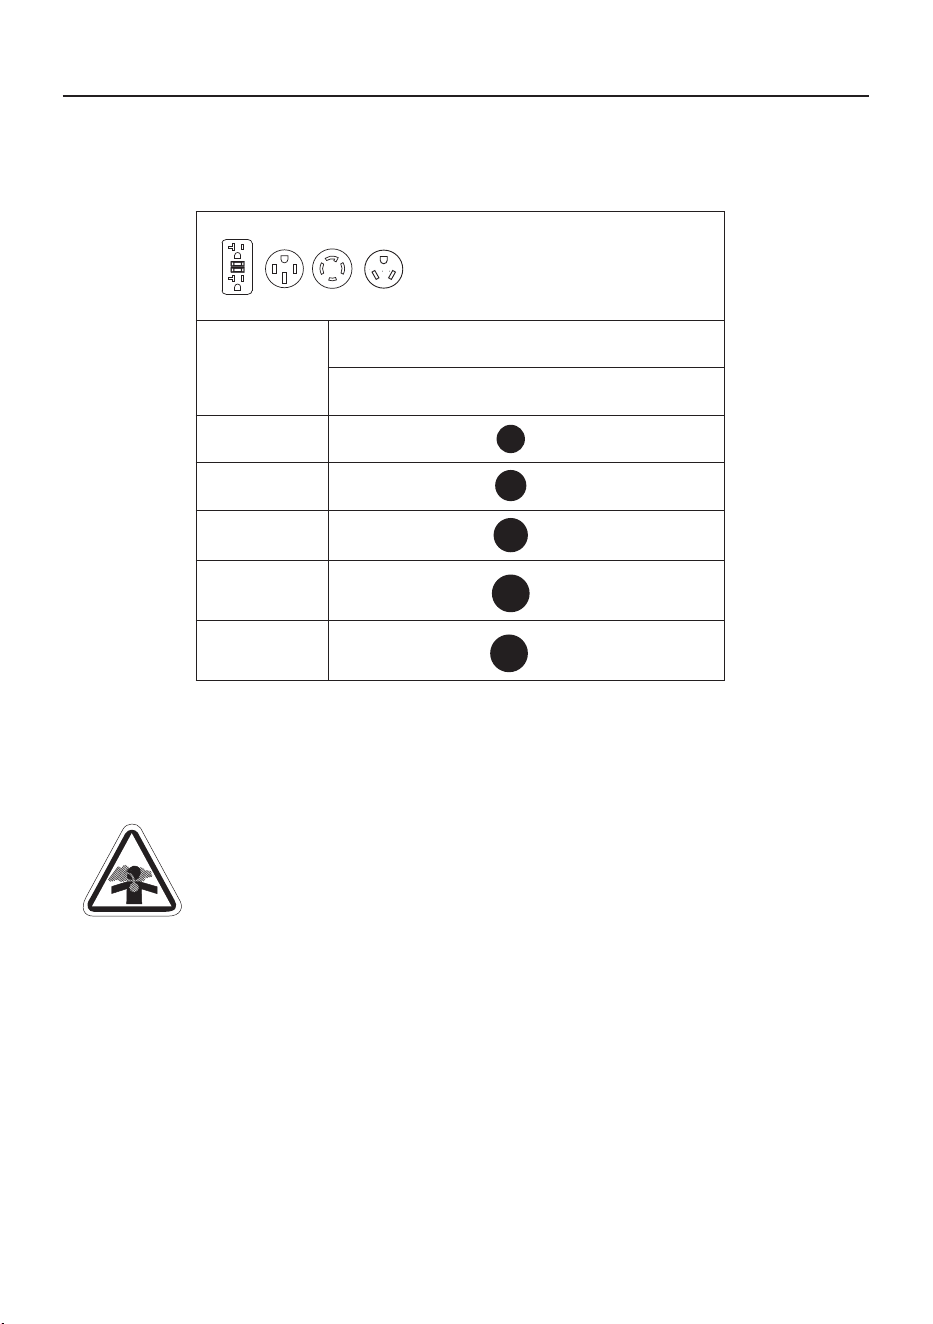
1. Only use grounded cords marked for outdoor use rated for your loads.
2. Follow cord safety instructions.
3. Install carbon monoxide alarm(s).
4. When operating portable generator with extension cords, make sure portable generator is located
in an open, outdoor area, at least 20 ft downwind from occupied spaces with exhaust pointed away.
5. Extension cords running directly into your home, powering indoor items IS NOT RECOMMENDED.
Total
Amperage
Up to 13A
Up to 15A
Up to 20A
Up to 30A
Minimum Gauge, Outdoor Rated
Up to 50 ft
To provide power using
extension cords
16
14
12
10
DANGER! Engine exhaust contains carbon monoxide, a poisonous gas that will kill
you in minutes. You cannot smell it, see it, or taste it. Even if you do not smell
exhaust fumes, you could still be exposed to carbon monoxide gas.
● Extension cords running directly into the home increase your risk of carbon monoxide poisoning
through any openings.
● If an extension cord running directly into your home is used to power indoor items, the operator
recognizes that this increases the risk of CO poisoning to people inside the home and assumes
that risk.
6. Install a listed *transfer switch as soon as possible if this or any generator will be used to restore
power to your home.
*Certied by a Nationally Recognized Testing Laboratory that the product complies to appropriate
product safety test standards.
Up to 50A
6
7
FEATURES, CONTROLS AND ON-PRODUCT HAZARD LABELS
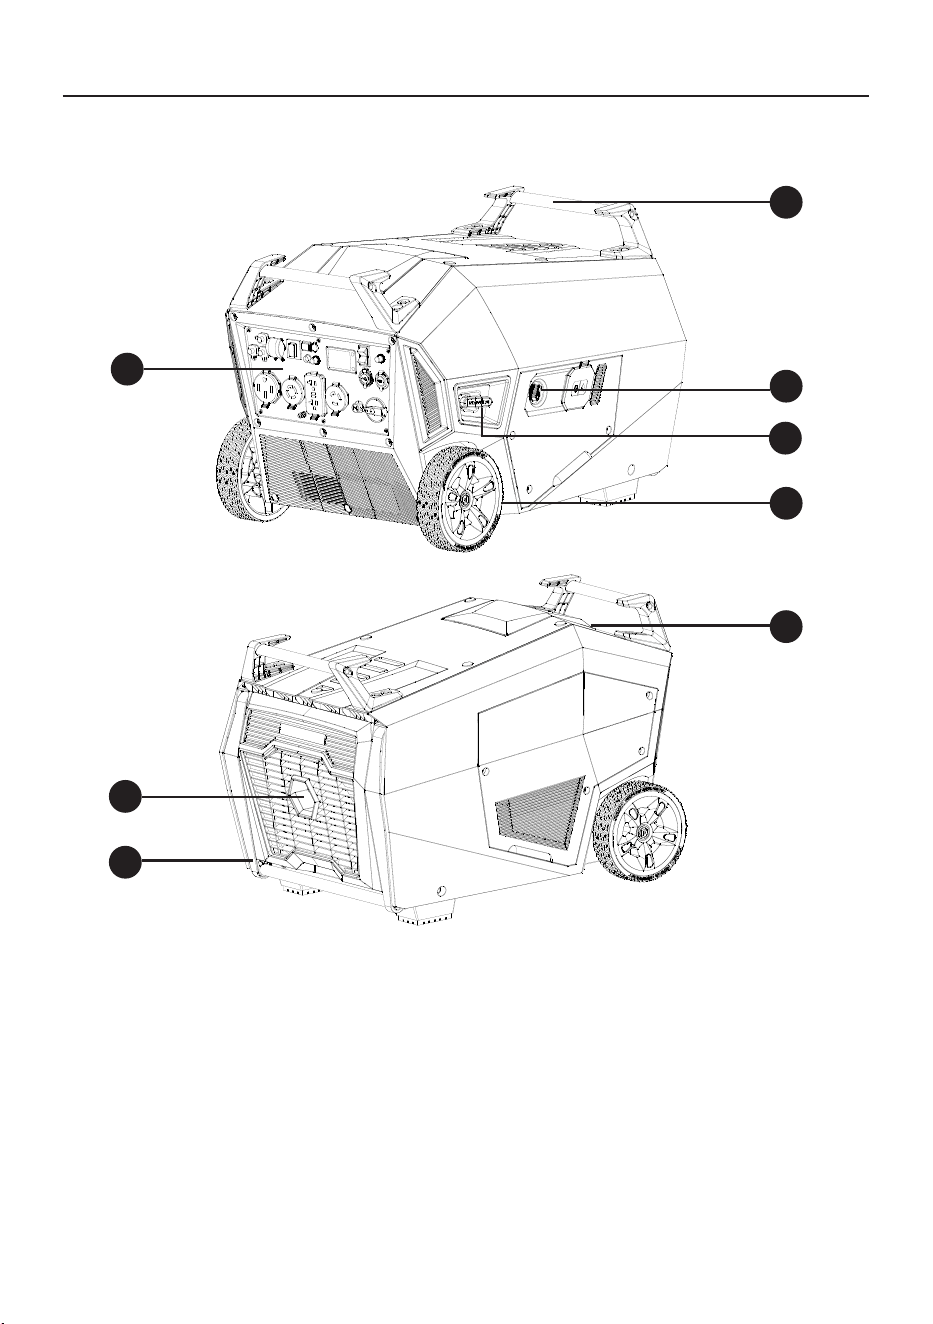
1- Fixed Carrying Handle
2- LPG/NG Select Switch
3- Recoil Starter
4- Never Flat Wheel
5- Control Panel
6- Muer/Spark Arrester
7- Folding Handle
8- Data Decal / Serial Number
*We are always working to improve our products. Therefore, the enclosed product may dier slightly
from the image on this page.
3
2
6
1
4
5
7
8
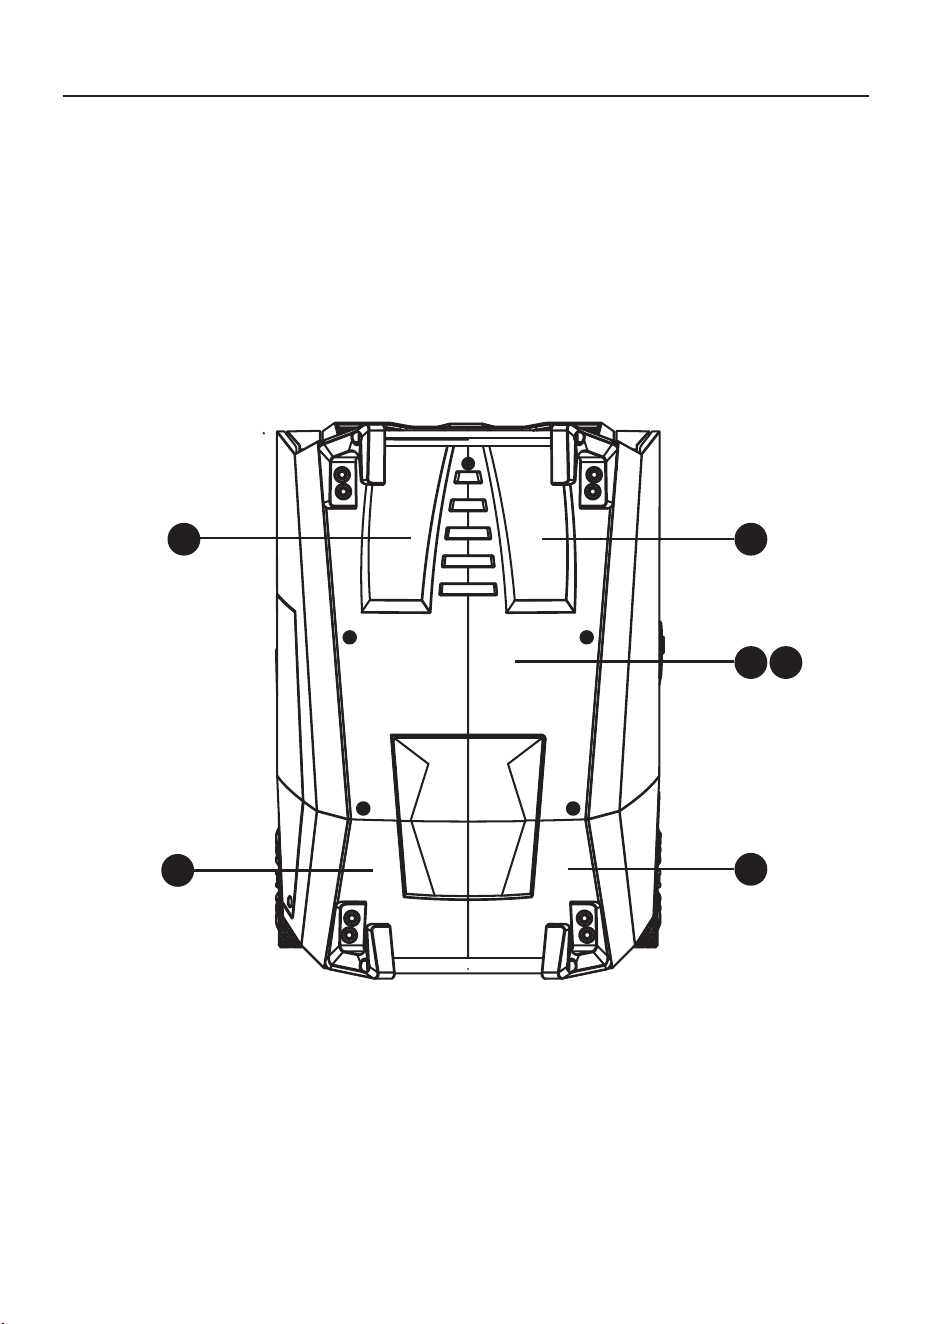
8
FEATURES, CONTROLS AND ON-PRODUCT HAZARD LABELS
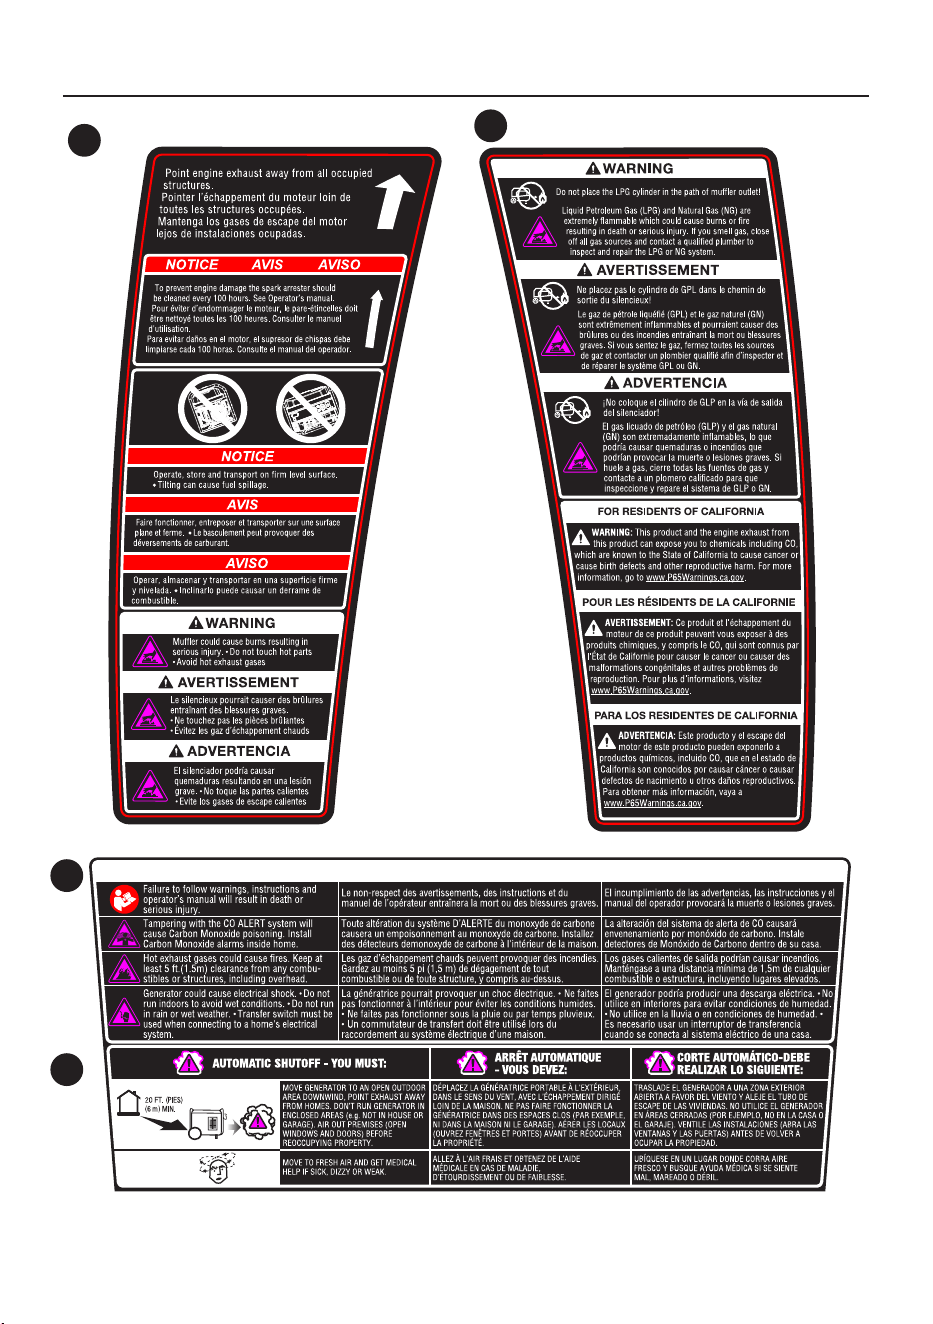
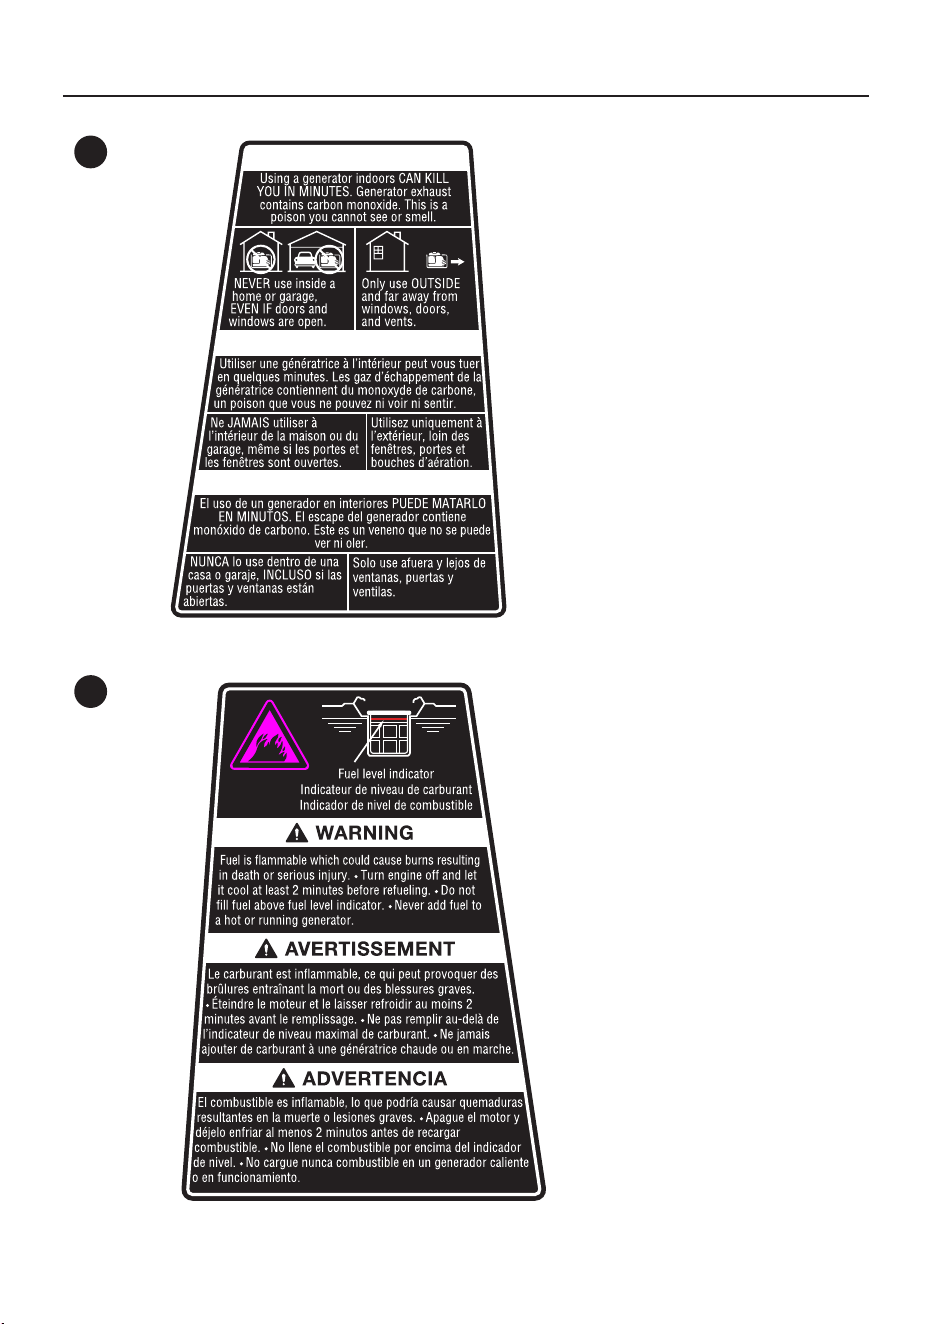
Location and content of on-product hazard labels
FREE WARNING LABEL REPLACEMENT. If hazard labels become illegible or are missing, contact
FIRMAN customer service for a free replacement.
1 2
3 4
5
6
9
FEATURES, CONTROLS AND ON-PRODUCT HAZARD LABELS
3
4
1
2
10
FEATURES, CONTROLS AND ON-PRODUCT HAZARD LABELS
5
6
11
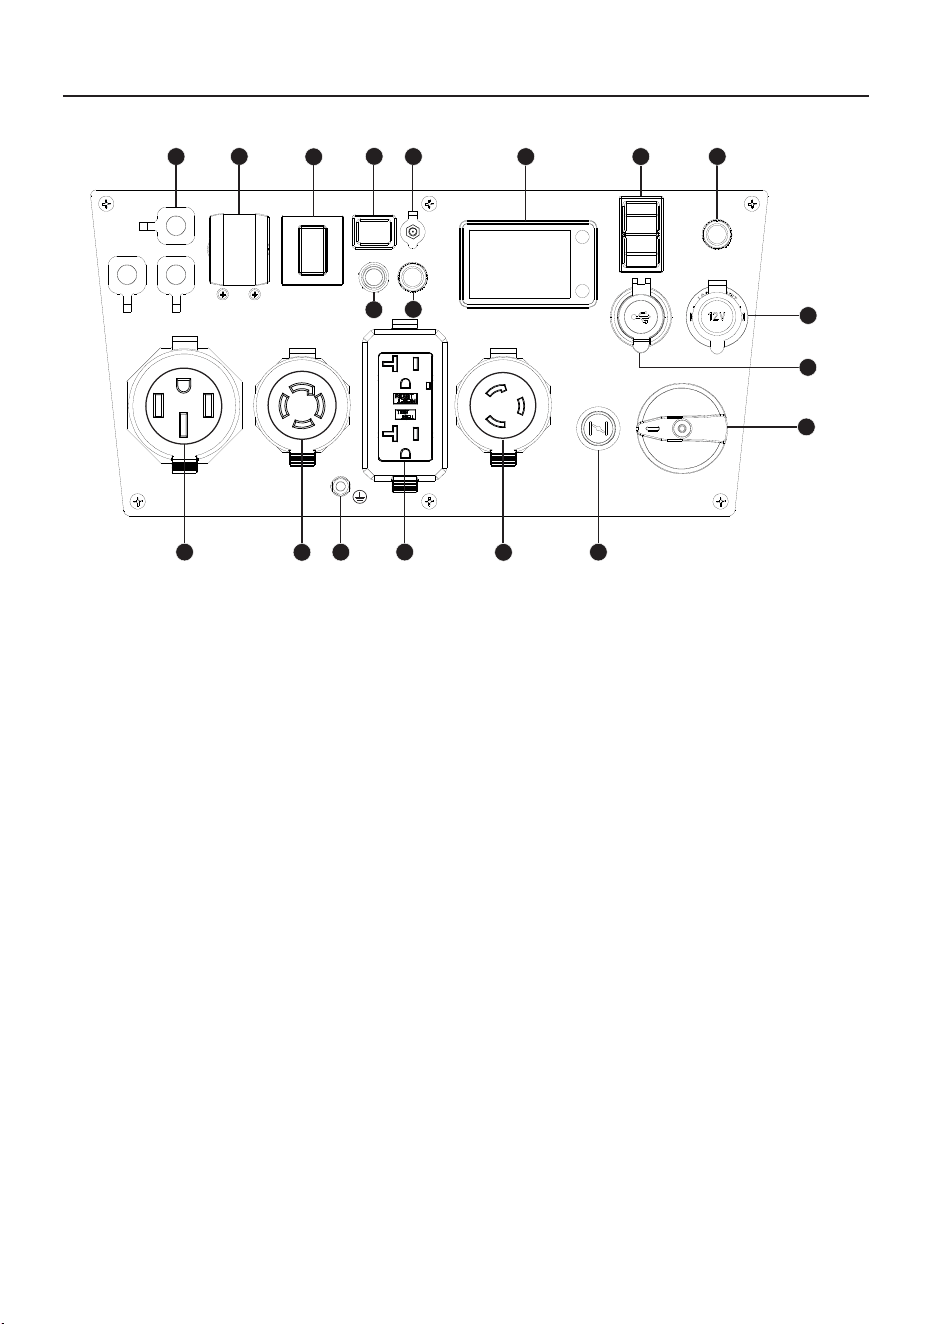
NOTICE
Total power drawn from all receptacles must not exceed the data decal rating.
1.
Parallel Operation Outlets –
These outlets are used for connecting inverter generators for parallel
operation. A FIRMAN parallel kit (optional equipment) is required for parallel operation. For more
information see
PARALLEL OPERATION
section.
2.
AC Circuit Breaker
– The receptacles are protected by AC circuit protectors. If the generator is
overloaded or an external short circuit occurs, a circuit protector may trip. If tripping occurs,disconnect
all electrical loads and determine the cause before attempting to continue using the generator. Reset
any tripped circuit protectors.
If multiple receptacles are used at the same time, the total current must be kept within the portable
generator data decal rating.
3.
30A Circuit Breaker
– The receptacles are protected by AC circuit protectors.
4.
Economy Control Switch -
The Economy Control switch can be activated in order to minimize fuel
consumption and noise while operating the unit during times of reduced electrical output,allowing the
engine speed to idle during periods of non-use. The engine speed returns to normal when an electrical
load is connected. When the economy switch is o, the engine runs at normal speed continuously.
5.
12V DC Battery Charger Port
- Plug the 120 Volt AC charger into this port to charge the generator
battery.
6.
CO Alert™ Carbon Monoxide (CO) Shutdown Indicator Light
— Indicates the engine shutdown
due to carbon monoxide accumulation around the generator or a CO Alert system fault occurred.
7.
20A Circuit Breaker
– The receptacles are protected by AC circuit protectors.
8.
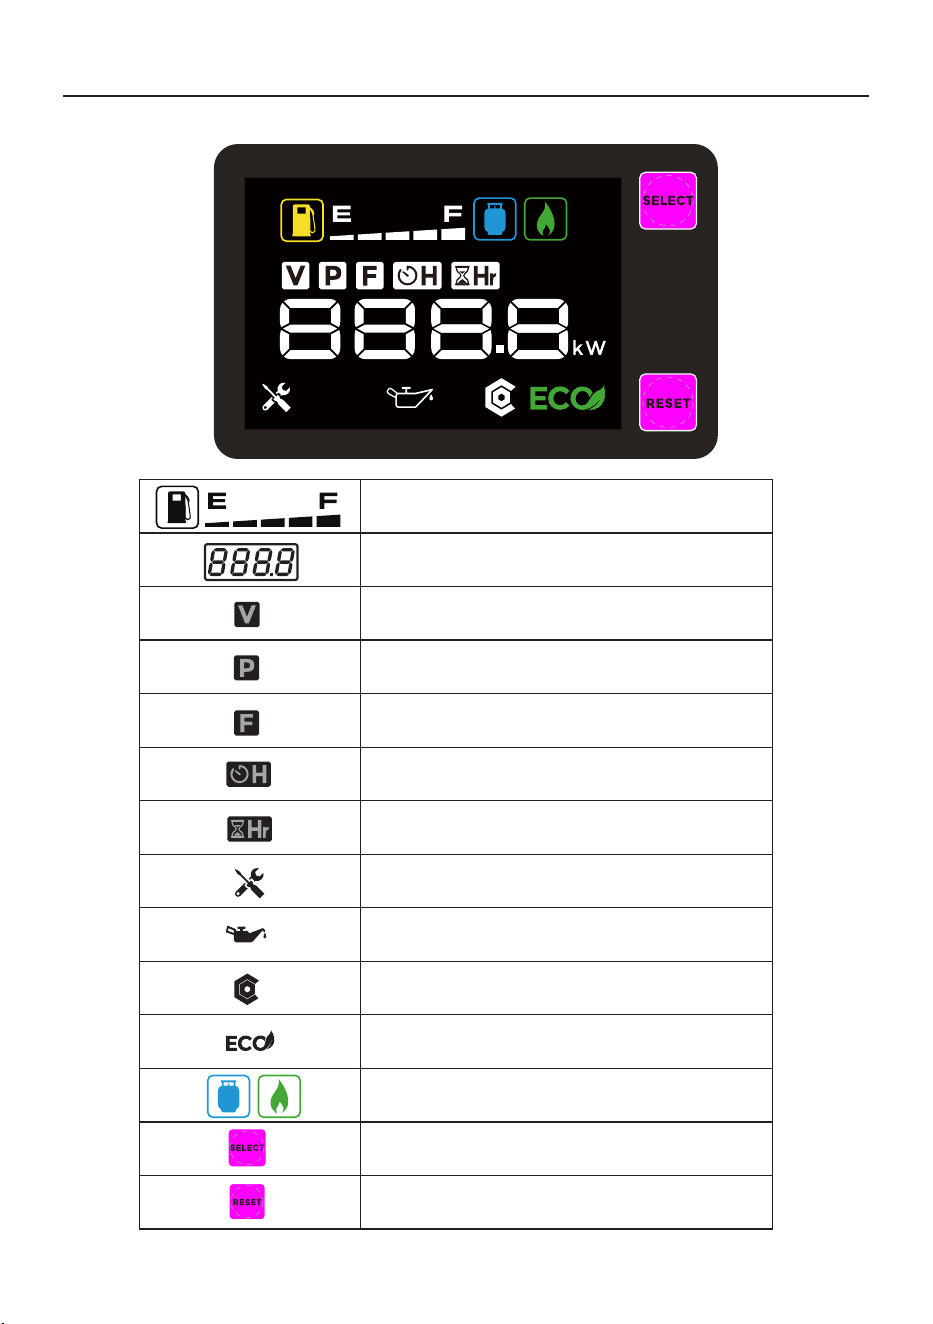
Intelligauge with LED Screen –
The screen can show the Voltage, Hertz, Power , running hours,
Fault alarm, regular maintenance, low oil alarm and remaining running time .
FEATURES, CONTROLS AND ON-PRODUCT HAZARD LABELS
Control Panel
2
3
4
5
1
6
7
8
9
12
10
11
14
15
16
13
17
18
19

12
9.
Engine Switch –
To start engine, press and hold the switch in the START (ll) position, the engine
will crank and attempt to start. When the engine starts, release the switch to the RUN (l) position. To
stop engine, turn the switch to OFF(O) position.
10.
DC Circuit Breaker –
The DC receptacles are protected by a DC circuit protector. If the DC output
is overloaded or an external short circuit occurs, the circuit protector will trip.
11.
DC 12V Output -
8.3 Amps of DC current may be drawn from this receptacle. Use this outlet to
charge 12V automotive type batteries ONLY. See 12V DC outlet (Battery Charger) section.
12.
USB-A Output Port+USB-C Output Port
Charge a wide array of devices such as your iPhone, tablet, GoPro, speakers, or similar products
that use a USB-A port.
Charge a wide array of devices such as your MacBook Pro, Android phone, or similar products that
use a USB-C port.
13.
Main Fuel Selector Switch –
Use to select and turn on gasoline (GAS) or LPG/NG fuel source.
The GAS valve is closed when the switch is in the OFF or LPG/NG positions.
14.
Choke Button –
Used to start a cold engine.
15.
120V, 30A – NEMA L5-30R (not GFCI protected)
A maximum of 30 Amps current may be drawn from this receptacle.
16.
120V, 20A Duplex GFCI
(Ground Fault Circuit Interrupter)- NEMA 5-20R
A maximum of 20 Amps current may be drawn from this duplex receptacle.
17.
Ground Terminal
– Consult an electrician or authority having jurisdiction for local grounding
requirements.
18.
120/240V, 30A – NEMA L14-30R
(not GFCI protected)
A maximum of 30 Amps current for 240 Volts or two independent 120 Volt loads at 30 Amps
current each can be drawn from this receptacle.
A maximum of 30 Amps current may be drawn from this receptacle (
Parallel Operation
).
19.
120/240V, 50A – NEMA 14-50R
(not GFCI protected)
A maximum of 41.7 Amps current for 240 Volts or two independent 120 Volt loads at 41.7 Amps
A maximum of 50 Amps current may be drawn from this receptacle (
Parallel Operation
).
FEATURES, CONTROLS AND ON-PRODUCT HAZARD LABELS
13
FEATURES, CONTROLS AND ON-PRODUCT HAZARD LABELS
Intelligauge Display Screen
English Customer Service: 1-844-FIRMAN1
11
Intelligauge Display Screen
Low oil level
Generator maintenance required
ECO mode (no load, low idle speed)
Voltage
Frequency
Power
Total run time
Remaining run time
CO Alert alarm
Display value
Remaining fuel
Restore output after generator overloaded and clear
maintenance icon flashing after the maintenance
Change to show the Voltage, Hertz, Power ,
Running hours and remaining running time.
FEATURES, CONTROLS AND ON -PRODUCT HAZARD LABELS
LPG/NG
14
OPERATING INSTRUCTIONS
LOCATION
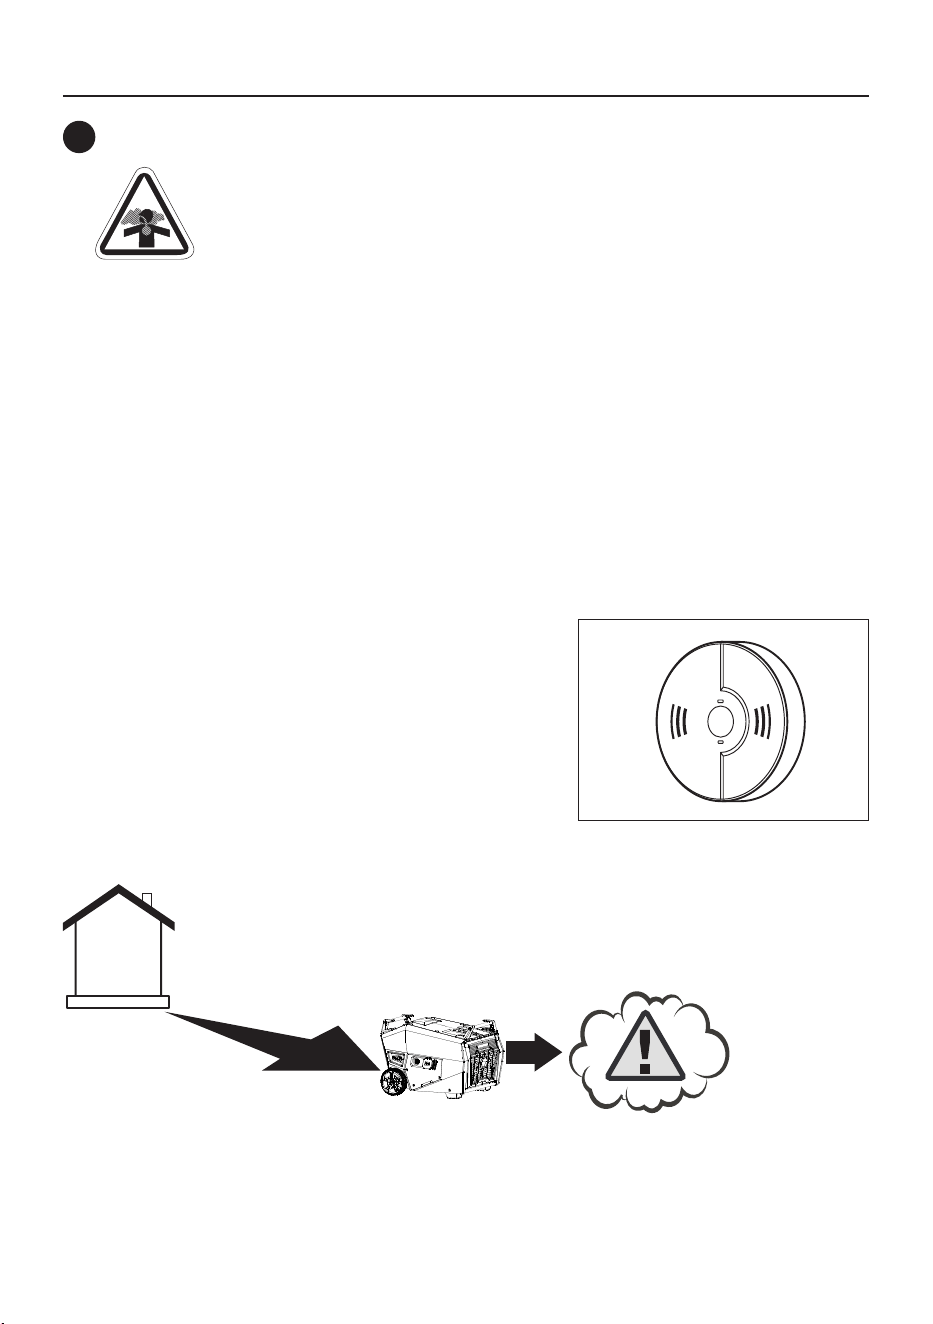
DANGER! Engine exhaust contains carbon monoxide, a poisonous gas that could
kill you in minutes. You CANNOT smell it, see it, or taste it. Even if you do not
smell exhaust fumes, you could still be exposed to carbon monoxide gas.
● Operate portable generator only outdoors, at least 20 ft downwind from occupied spaces with
exhaust pointed away to reduce the risk of carbon monoxide accumulating.
● Install battery-operated carbon monoxide alarms or plug-in carbon monoxide alarms with battery
back-up according to the manufacturer's instructions.
Smoke alarms cannot detect carbon monoxide gas.
● Do not run this portable generator inside homes, garages, basements, crawlspaces, sheds, or other
partially-enclosed spaces even if using fans or opening doors and windows for ventilation.
Carbon monoxide can quickly build up in these spaces and can linger for hours, even after this
product has shut o.
● If you start to feel sick, dizzy, weak or your home’s carbon monoxide alarm sounds, get to fresh air
right away. Call emergency services. You may have carbon monoxide poisoning.
A. Carbon Monoxide Alarm(s)
Install carbon monoxide alarms inside your home.
Without working carbon monoxide alarms, you
will not realize you are getting sick and dying from
carbon monoxide poisoning.
Prevent Carbon Monoxide (CO) Poisoning
Use outdoors at least 20 ft downwind from any home.
Point exhaust away from all homes and occupied spaces.
Install CO alarms inside your home.
20 ft min.
To better educate yourself about all carbon monoxide risks, go to
www.takeyourgeneratoroutside.com.
1
15
OPERATING INSTRUCTIONS
B
.
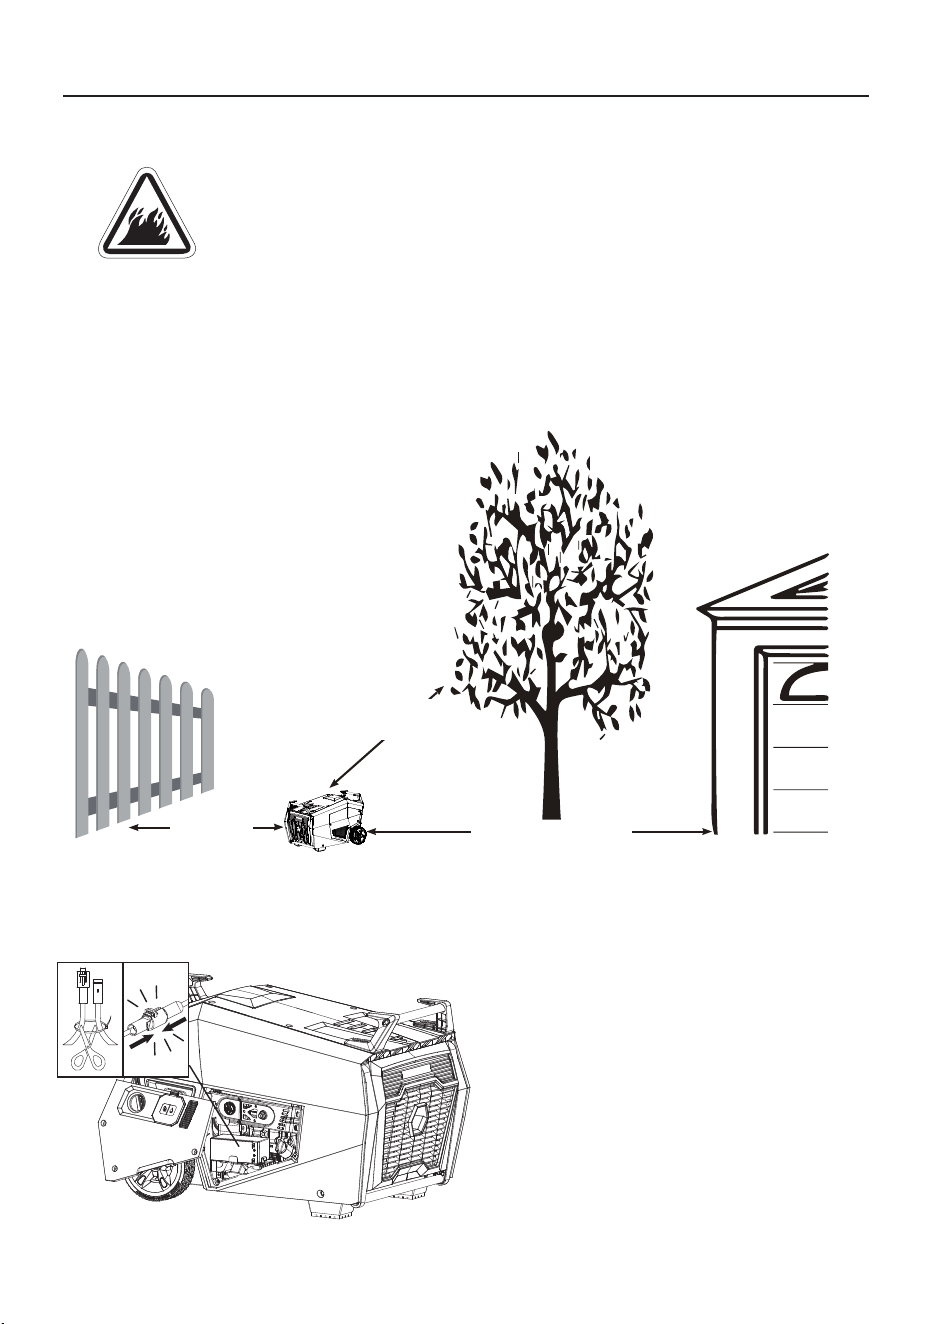
Reduce Risk of Fire
WARNING! Exhaust heat/gases could ignite combustibles, structures or damage
fuel tank causing a re, resulting in death or serious injury.
● Keep portable generator at least 5 ft from any structure, trees or vegetation over 12 in in height.
● Select an outdoor site that is dry and protected from the weather. Do not move portable generator
indoors to protect it from the weather.
● Do not locate the portable generator under a deck or other similar structure that may conne heat
and airow.
5 ft min.
5 ft min.
20 ft min.
Battery Cable Connection
NOTICE
Be sure to connect the battery
before attempting to start the generator.
1. Open the battery maintenance cover.
2. Remove the protective cover of the battery
cable terminal.
3. Connect the battery terminal.
16
OIL AND GASOLINE
2A. Add Engine Oil
Low Oil Shutdown
OPERATING INSTRUCTIONS
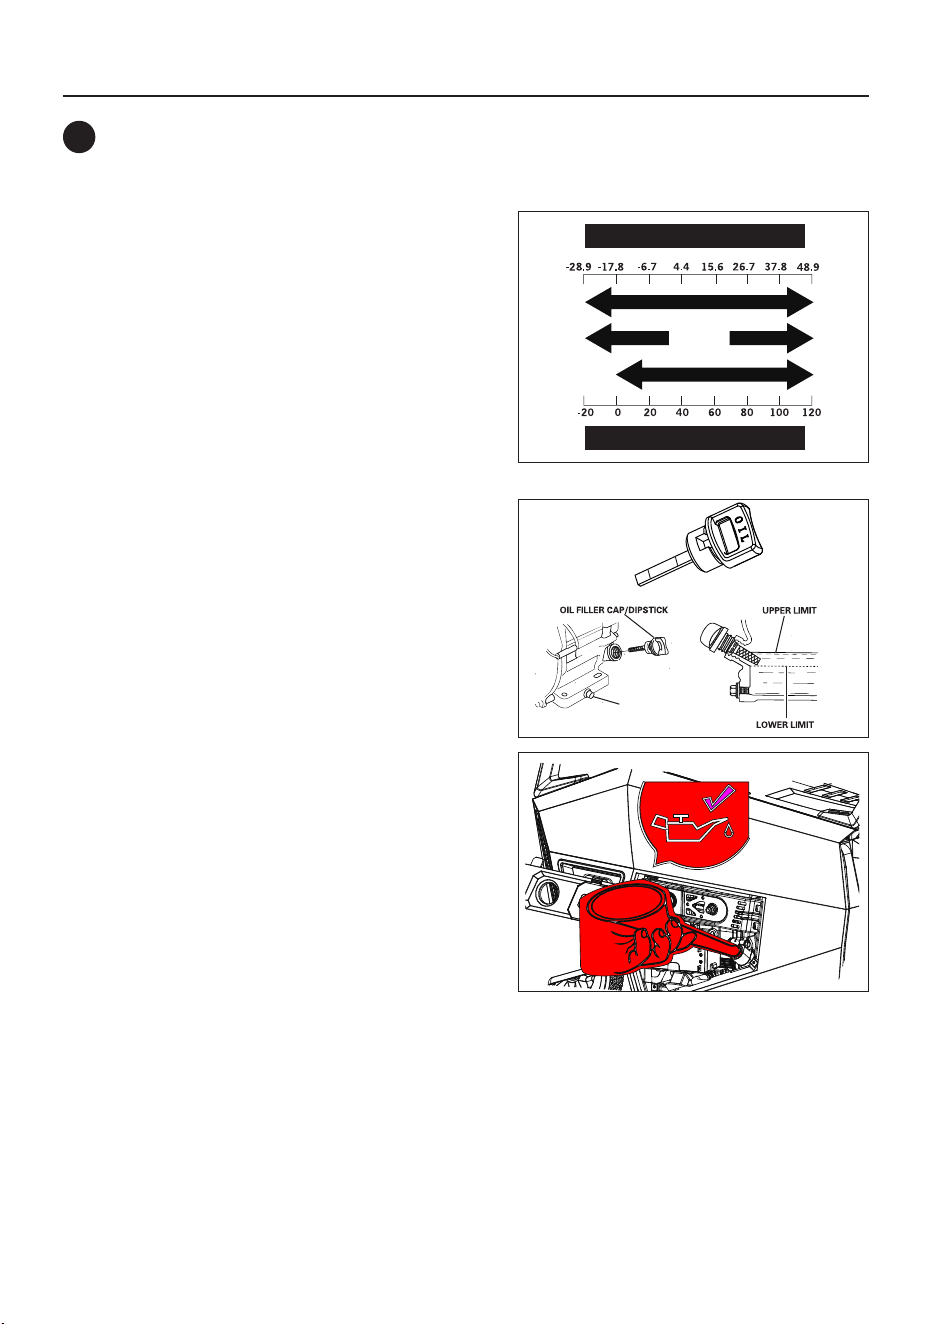
We recommend using SAE 10W-30 API SL or
higher oil for best performance. Do not use special
additives. Ambient temperature determines the
proper oil viscosity for the engine. Use the chart to
select the proper oil for the outdoor temperature
range expected.
NOTICE
Do not attempt to crank or start the
engine before it has been properly lled with the
recommended type and amount of oil. Damage
due to operation with no oil will void your warranty.
1. Place generator on a at, level surface.
2. Loosen the cover screw and remove the
maintenance cover.
3. Clean area around oil ll and remove yellow oil
ll cap/dipstick.
4. Wipe dipstick clean.
5. Using oil funnel, slowly pour contents of
provided oil bottle into oil ll opening until oil
reaches upper limit "H" mark on the dipstick.
Be careful not to overll. Overlling could cause
engine starting problems or engine damage.
6. Replace oil ll cap/dipstick and fully tighten.
7. Reinstall maintenance cover and tighten screws.
8. Oil level should be checked prior to each use or
at least every 8 hours of operation.
Keep oil level maintained.
The portable generator is equipped with a low oil shutdown. If the oil level drops below the minimum
required level, a sensor will activate an internal switch stopping the engine. If the engine shuts o
and the oil level is within specications, check to see if generator is sitting at an angle. Place portable
generator on an even surface to correct this. If engine fails to start, the oil level may not be high
enough to deactivate the internal low oil level switch. Make sure the sump is completely full of oil to
the upper limit (H). Do not operate engine until oil level issue is corrected. Contact FIRMAN customer
service.
2
Degrees Celsiusº(Outside)
Full Synthetic 5W-30
5W-30
10W-30
10W-40
Degrees Fahrenheitº(Outside)
NOTICE
Do not screw in cap/dipstick when
checking oil level.
(H)
DRAIN PLUG
(L)
H
L
(H)
DRAIN PLUG
(L)
H
L
17
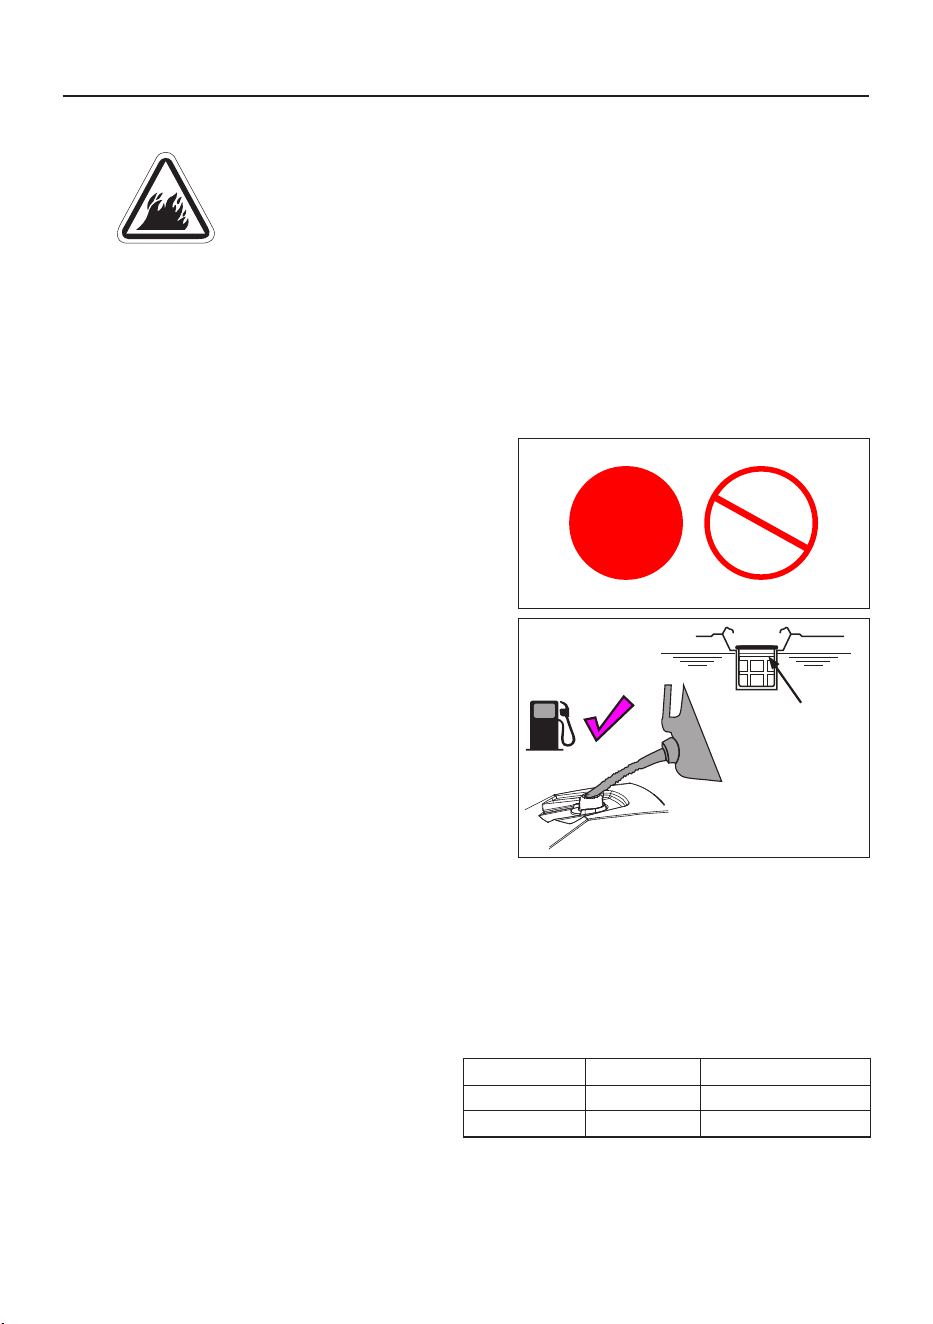
2B. Add Gasoline
OPERATING INSTRUCTIONS
WARNING! Fuel and its vapors are extremely ammable which could cause
burns or re resulting in death or serious injury.
● Turn generator engine OFF and let it cool at least 2 minutes before removing fuel cap.
● Do Not refuel or move generator when engine is running.
● Move generator outdoors prior to adding or draining fuel.
● Keep fuel away from any ignition sources.
● Do not overll tank, allow space for fuel expansion.
● If any fuel spills, wait until it evaporates before starting engine.
● Check and replace fuel lines, tank, cap, and ttings prior to each use if any damage or leaks are
found.
Fuel must meet these requirements:
● Clean, fresh, unleaded gasoline with a minimum
of 87 octane.
● Gasoline with no more than 10% ethanol is
acceptable.
E10 E15
NOTICE
Do not mix oil in gasoline or modify
engine to run on alternate fuels not described
in this manual. Use of unapproved fuels could
damage engine and will not be covered under
warranty.
1. Clean area around fuel ll cap, remove cap.
2. Slowly add unleaded fuel to fuel tank. Be careful
not to ll above the RED fuel level indicator.
This allows adequate space for fuel expansion.
3. Install fuel cap and let any spilled fuel evaporate
before starting engine.
Red Line
Indicator
Operation at High Altitude
At altitudes over 5,000 ft, a minimum 85 octane gasoline is acceptable.
Engine power and generator output will be reduced approximately 3.5% for every 1000 ft of elevation
above sea level. High altitude may cause hard starting, increased fuel consumption and spark plug
fouling. To operate at high altitudes FIRMAN can provide a high altitude carburetor main jet. The
alternative main jet and installation instructions can be obtained by contacting Customer Support.
Altitude main jet 1
Altitude main jet 2
Altitude
3000-6000 ft
6000-8000 ft
NOTICE
Operation using an alternative main jet
at elevations lower than the recommended
minimum altitude can damage the engine. For
operation at lower elevations, the standard main
jet supplied must be used. Operating the engine
with the wrong main jet may increase exhaust
emissions, fuel consumption and reduce perfor-
mance.
459 cc
390418301
390418302
18
Operation at High Ambient conditions
Your FIRMAN Power Equipment product is designed and rated for continuous operation at ambient
temperatures up to 104°F. The generator may be operated at temperatures ranging from 5°F to 122°F
for short periods. If the generator is exposed to temperatures outside this range during storage, the
generator should be brought back within this range before operation. When operated above 77°F there
may be a decrease in power. Maximum wattage and current are subject to and limited by such factors
as ambient temperature, altitude, engine conditions etc.
OPERATING INSTRUCTIONS
Connecting LPG/ NG Fuel
WARNING! Liquid Petroleum gas (LPG) and Natural Gas (NG) are extremely
ammable which could cause burns or re resulting in death or serious injury.
● The fuel supply line must always be shut o when the engine is not running. Failure to shut
o fuel may allow fuel to leak at the generator.
● Do not place the LPG/NG sources in the path of muer outlet or near any ignition source.
● Keep a re extinguisher near the generator all the time.
● Do not use or store LPG/NG portable sources not in use near generator or in a building, garage
or enclosed area.
● All LPG/NG supply/ piping lines must be installed by a qualied plumber.
● If you smell gas, close o all gas sources and contact a qualied plumber to inspect and
repair the LPG or NG system.
● Prior to each days rst use spray a soapy water solution on LPG/NG fuel connections to check
for leaks.
● Never use a gas container, LPG/ NG connector hose, LPG cylinder or NG source that appears
to be damaged.
● Do not connect or disconnect the LPG/ NG source in an enclosed area.
● LPG is heavier than air and can accumulate in conned / low spaces if there is a leak.
NOTICE
If a fuel supply connection is necessary it must be installed in accordance with all local
codes or regulations, or in the absence of local codes or regulations, in accordance with the
National Fuel Gas Code (NFPA 54/ANSI Z223.1) and CSA B149.1 (Natural Gas and Propane
Installation Code), as applicable. If possible the fuel supply connection should be close to the
outdoor operating location. This will reduce the cost of the exible fuel run. An approved exible
fuel line must be installed between the generator LPG/NG Hose Connector (Inlet) and the fuel
supply connection. In no case should this information be interpreted to conict with any local,
state, or national code. If in doubt, always follow local codes.
19
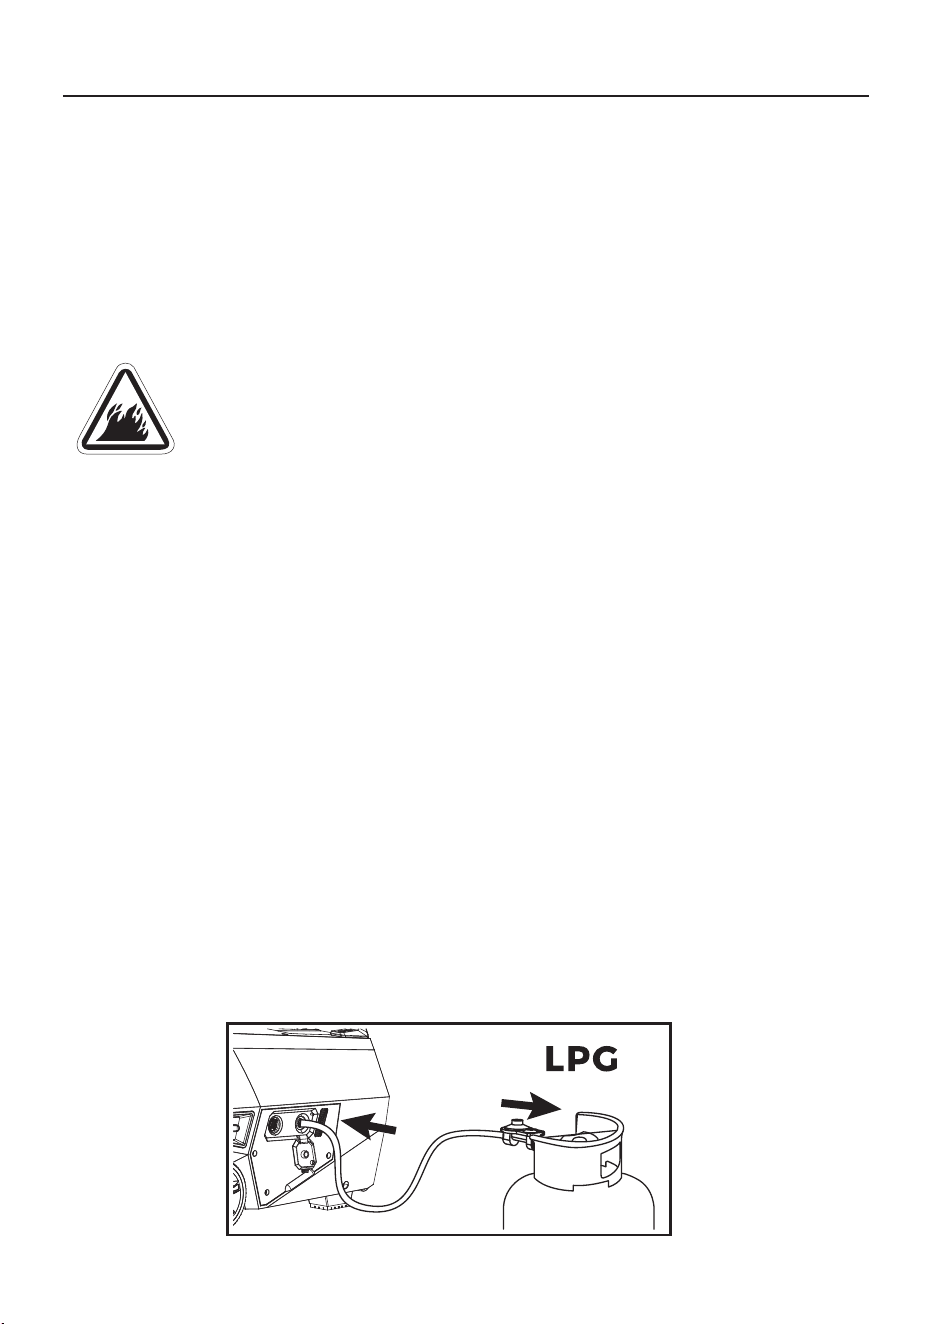
● Always keep the LPG cylinder in an upright position.
● Use only DOT LPG cylinders in vapor service with type 1, right hand ACME threads. Verify the
re-qualication date on the cylinder has not expired.
● All new cylinders must be purged of air and moisture prior to lling. The purging process should be
done by your propane gas supplier.
Attach the LPG regulator hose assembly (included) to the LPG hose connector (inlet) on the control
panel of the generator. Tighten the nut with a 19 mm or adjustable wrench. Remove the safety plug
or cap from the LPG cylinder valve. Attach the LPG regulator to the cylinder valve. Do not use a
wrench to tighten LPG cylinder nut. Tighten the nut by hand clockwise to a positive stop. Using a
wrench may damage LPG cylinder components.
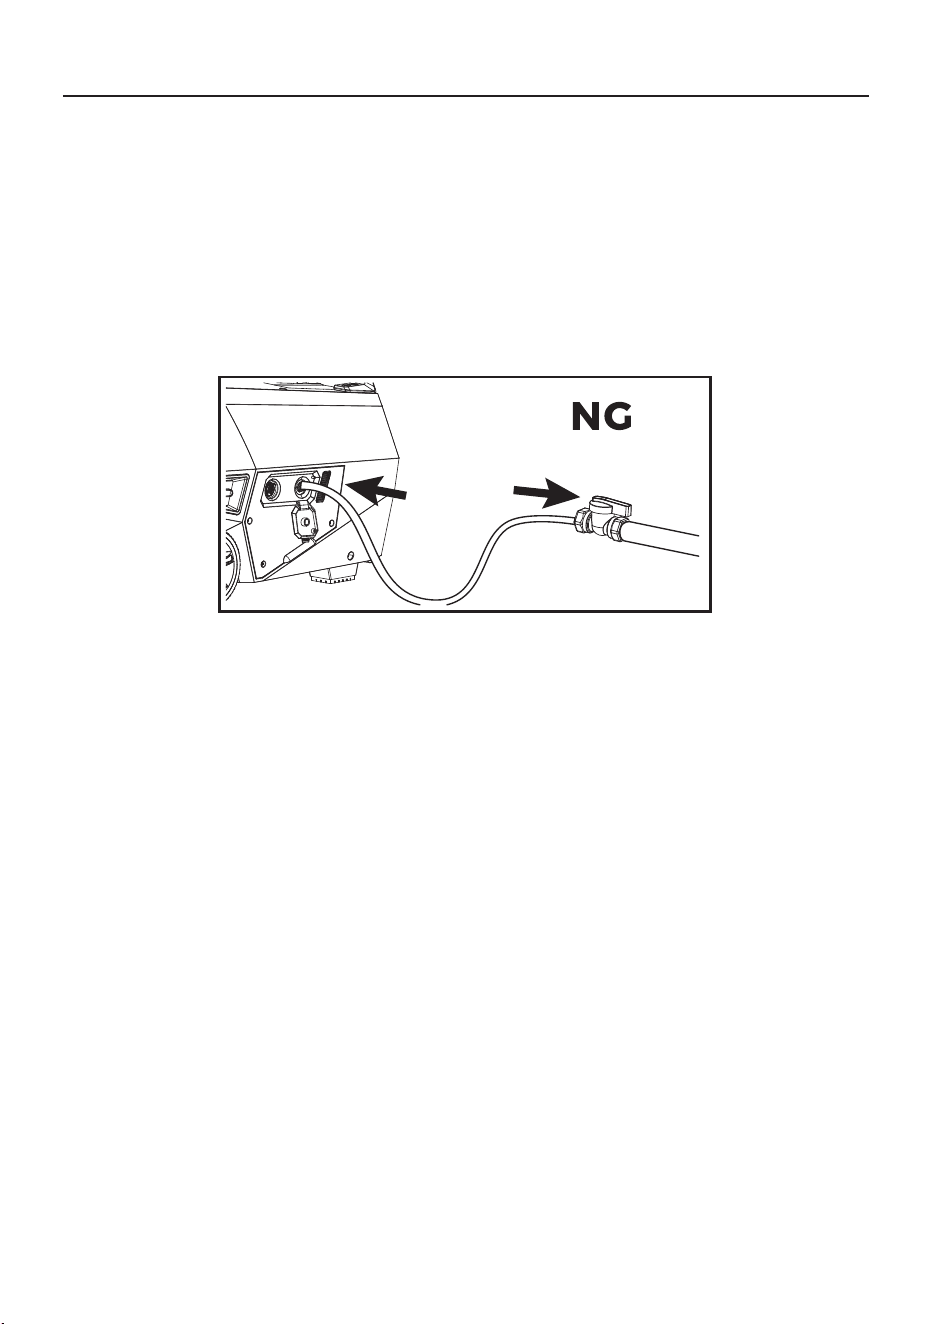
Connect the locally approved exible fuel supply line (not included) to the LPG/NG connector (inlet)
on the control panel and the fuel Source. We recommend you use FIRMAN 25 ft Quick Connect Hose
Kit (Model 1815) or 10 ft Quick Connect Hose Kit (Model 1805) for Natural Gas (NG) connection (This
item is not included). Hose requirements may vary in dierent regions depending on local codes.
Contact your local licensed plumber to ensure complete compliance with all codes. Make sure the
NG source location and hose used allows the portable generator to be located at least 20 ft from any
occupied spaces.
Intelligauge Display Screen - Battery Power Saving
This generator is equipped with an electronic module which consumes battery power. When the main
fuel selector switch is turned to the GAS or LPG/NG position, the intelligauge display screen will light
for up to 4 minutes (before going o). Start the engine successfully anytime during the 4 minutes. If
portable generator is not started during this 4-minute period the portable generator will switch to Bat-
tery Power Saving Mode to conserve battery life.
NOTICE
Your portable generator is equipped with an internal battery charger that will properly
charge the battery only when the engine is running.
The generator cannot be started in Battery Power Saving Mode. Turn main fuel selector switch to
the o position and back to the GAS or LPG/NG position to reset the RED indicator 4-minute
electronic module.
OPERATING INSTRUCTIONS
20
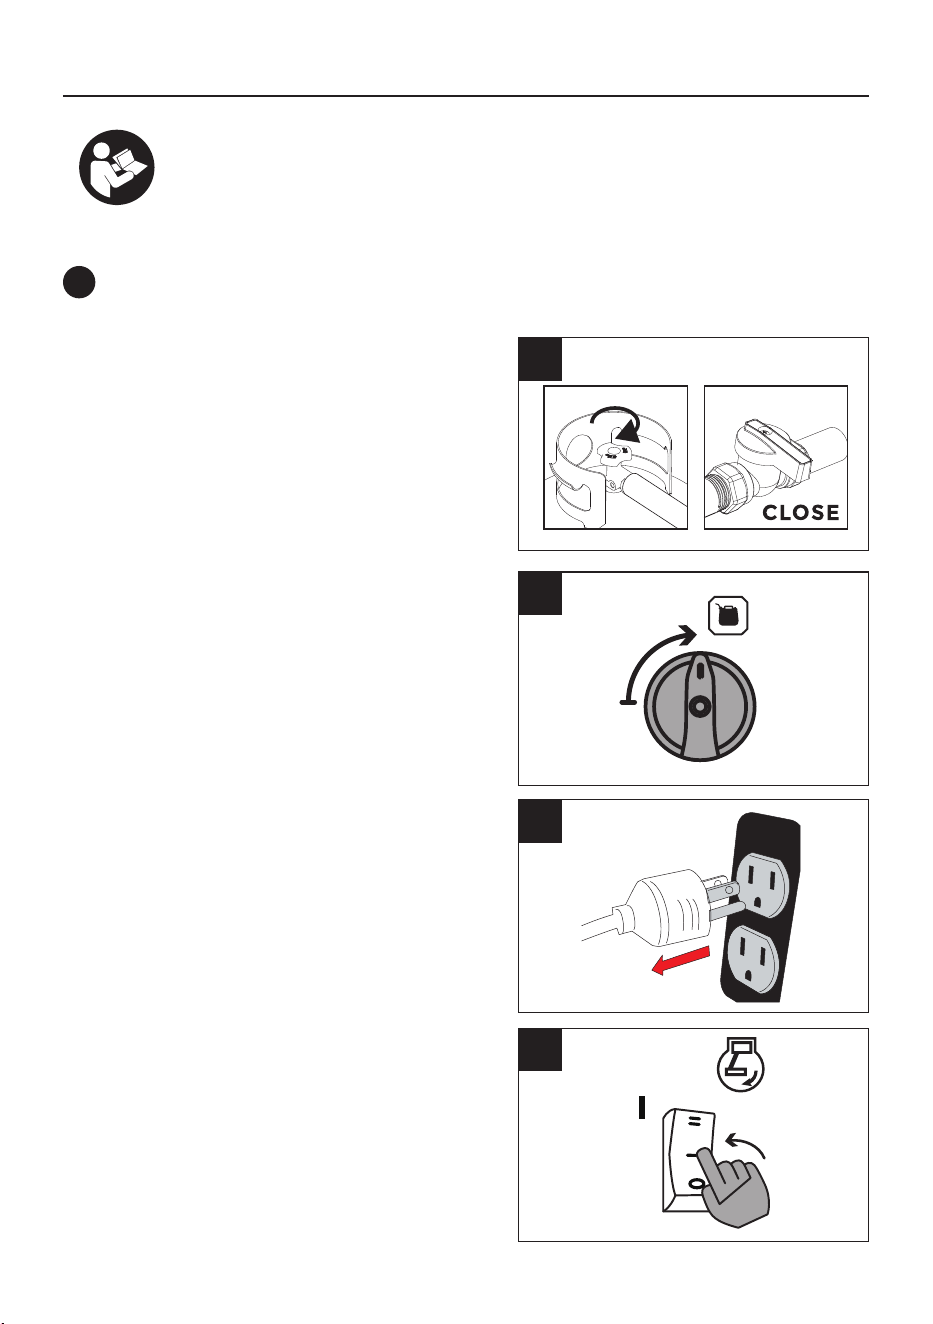
1. Before starting the generator, check for loose or
missing parts and for any damage which may
have occurred during shipment.
Ensure spark plug, muer, fuel cap, and air
cleaner are all in place.
2. Operate portable generator only outdoors and
downwind at least 20 ft from occupied
spaces with exhaust pointed away to reduce the
risk of carbon monoxide accumulating.
3. If connected make sure the LPG cylinder knob
or the NG source valve are fully closed or
disconnected.
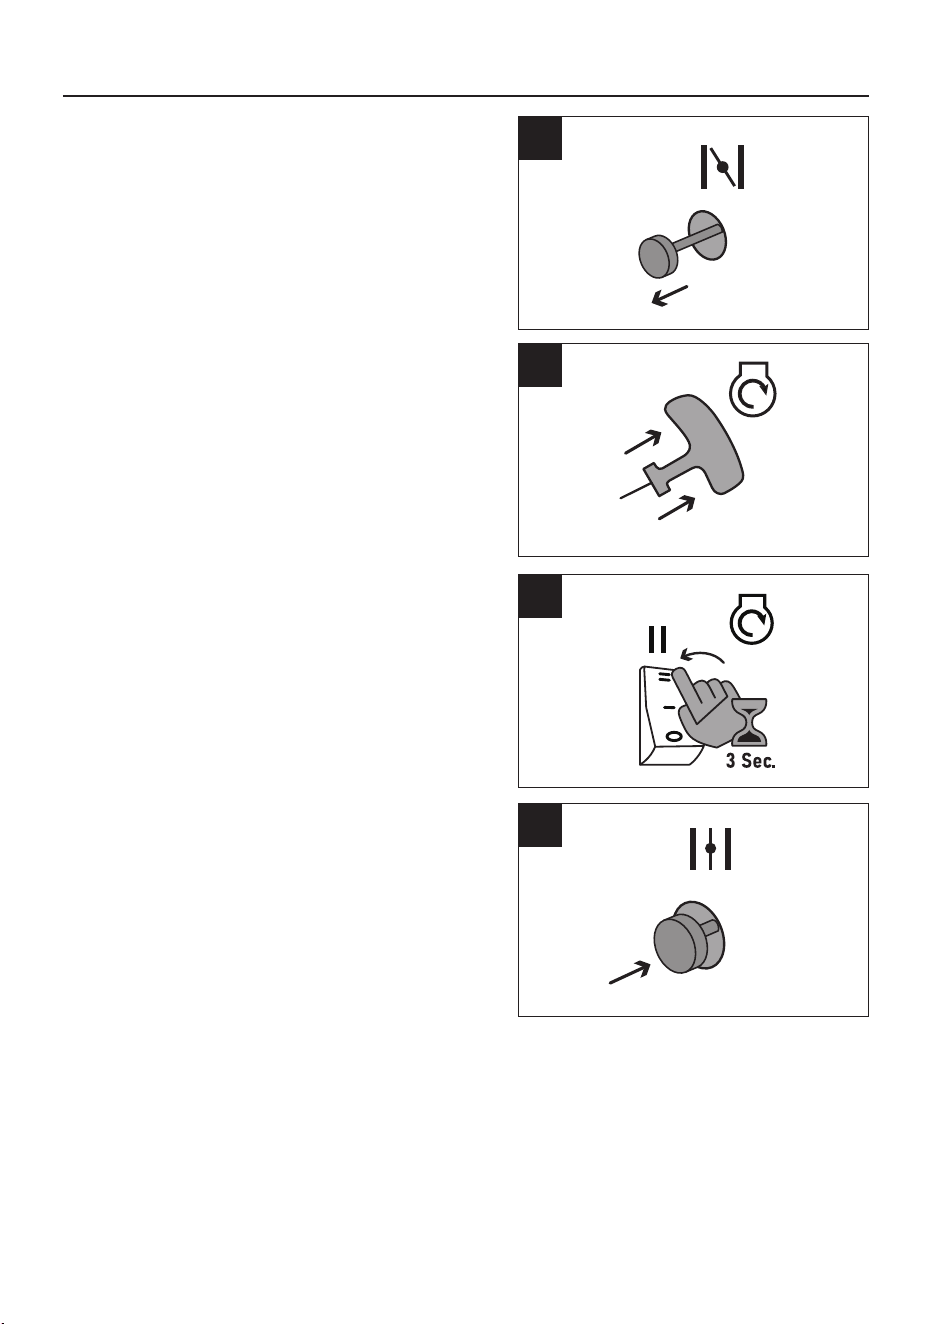
4. Turn the main fuel selector switch to “GAS”
position.
NOTICE
When the main fuel selector switch is
turned to the GAS position, the intelligauge display
screen will light for up to 4 minutes (before going
o)
6. Flip the engine switch to the RUN (l) position.
3
WARNING! Failure to read and follow all warnings and instructions in this manual and
on-product labels before attempting to start or operate this portable generator could
result in death or serious injury.
Starting the Generator on Gasoline
3
5. Disconnect all electrical loads from the generator.
Never start or stop the generator with electrical
devices plugged in.
OPERATING INSTRUCTIONS
4
6
5
21
OPERATING INSTRUCTIONS
8
9
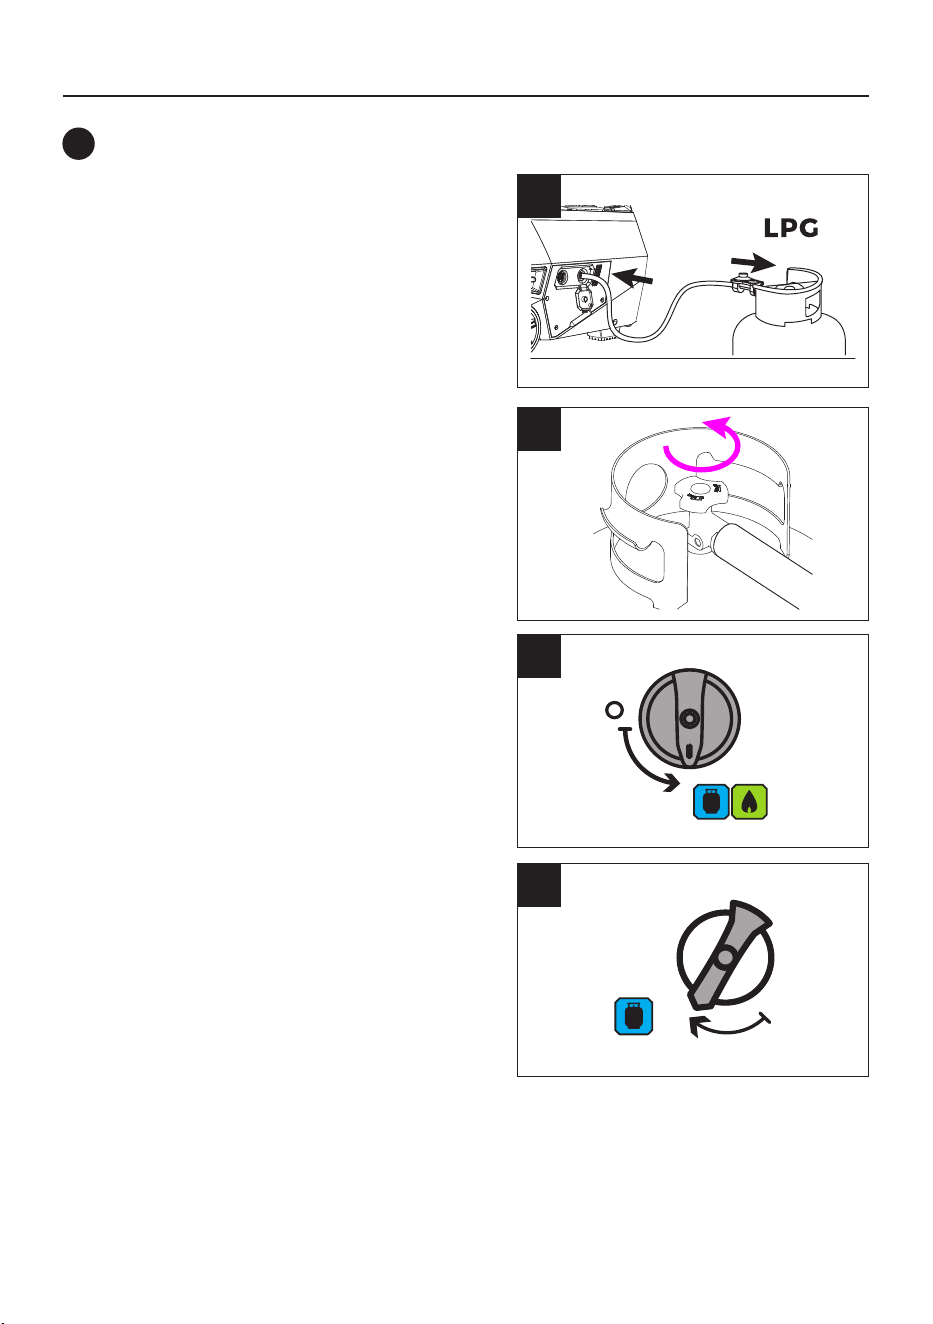
11. Allow portable generator to run at no load for
a few minutes to stabilize before plugging in any
electrical devices.
NOTICE
If engine starts but fails to run, or if
portable generator shuts down during operation,
check oil level. See Low Oil Shutdown section for
more information.
8. For recoil start only - Pull the starter cord slowly
until resistance is felt and then pull rapidly to
start engine.
7
9. For electric start only - Flip the engine switch to
the START (ll) position for a few seconds and
then release.
10. Do not over-choke. As soon as engine starts
and warms up, press the choke button to return to
the run position.
OFF
OFF
7. Pull the choke button to the “CHOKE” position.
You do not need to choke a warm engine. (For
electric start move to step (9))
10
RUN
22
OPERATING INSTRUCTIONS
1. Before starting the generator, check for loose or
missing parts and for any damage which may
have occurred during shipment.
Ensure spark plug, muer, fuel cap, and air
cleaner are all in place.
2. Operate portable generator only outdoors and
downwind at least 20 ft from occupied
spaces with exhaust pointed away to reduce the
risk of carbon monoxide accumulating.
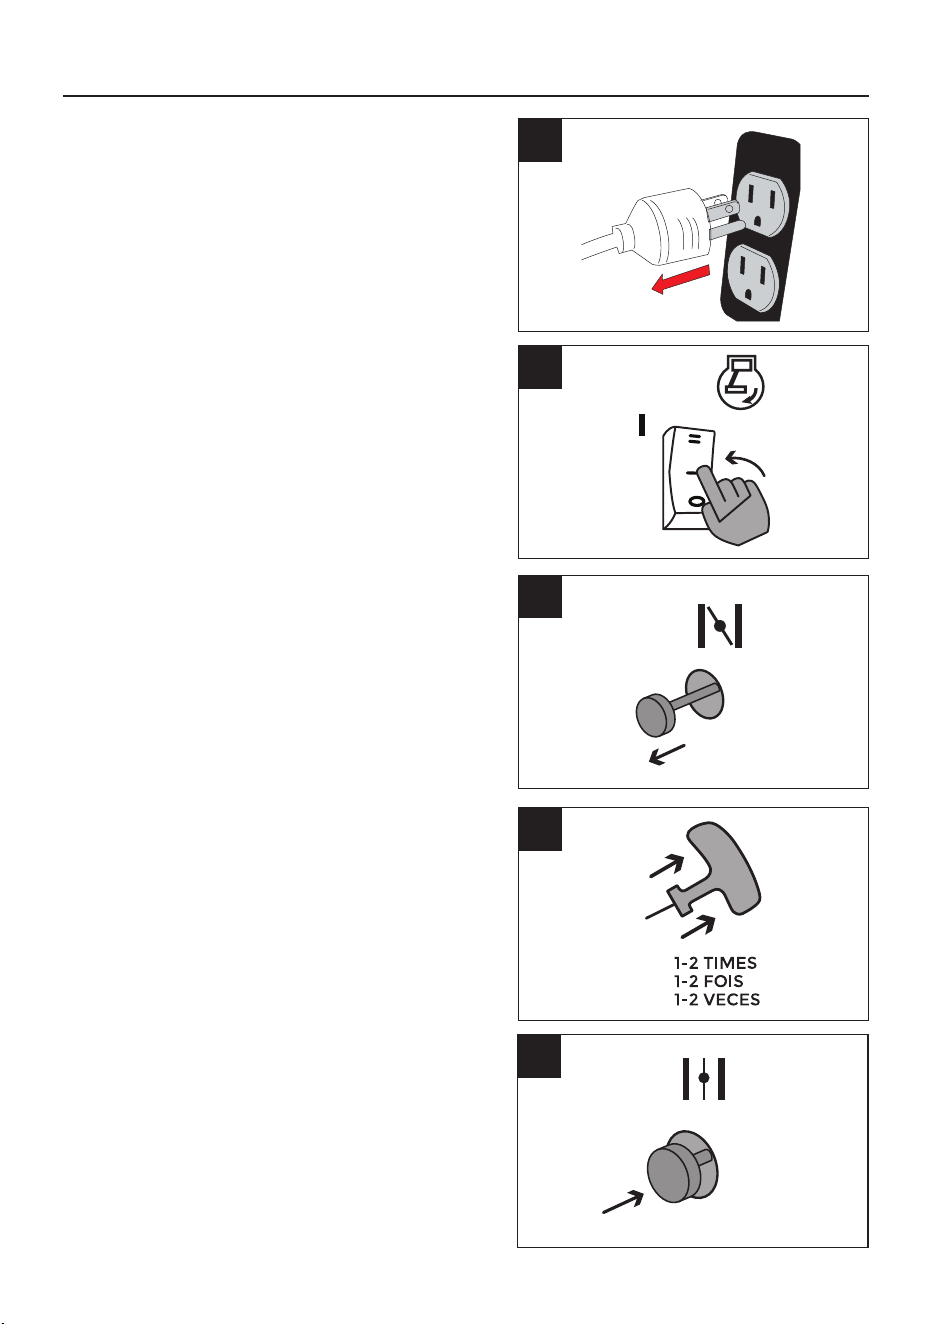
3. Connect the LPG hose with regulator to both
LPG cylinder and portable generator LPG/NG
Hose
4. Fully open the LPG cylinder knob.
6. Turn the LPG/NG selector switch to LPG position.
4
Starting the Generator on LPG
4
5
6
5. Turn the main fuel selector switch to LPG/NG
position.
3
23
9
10
7
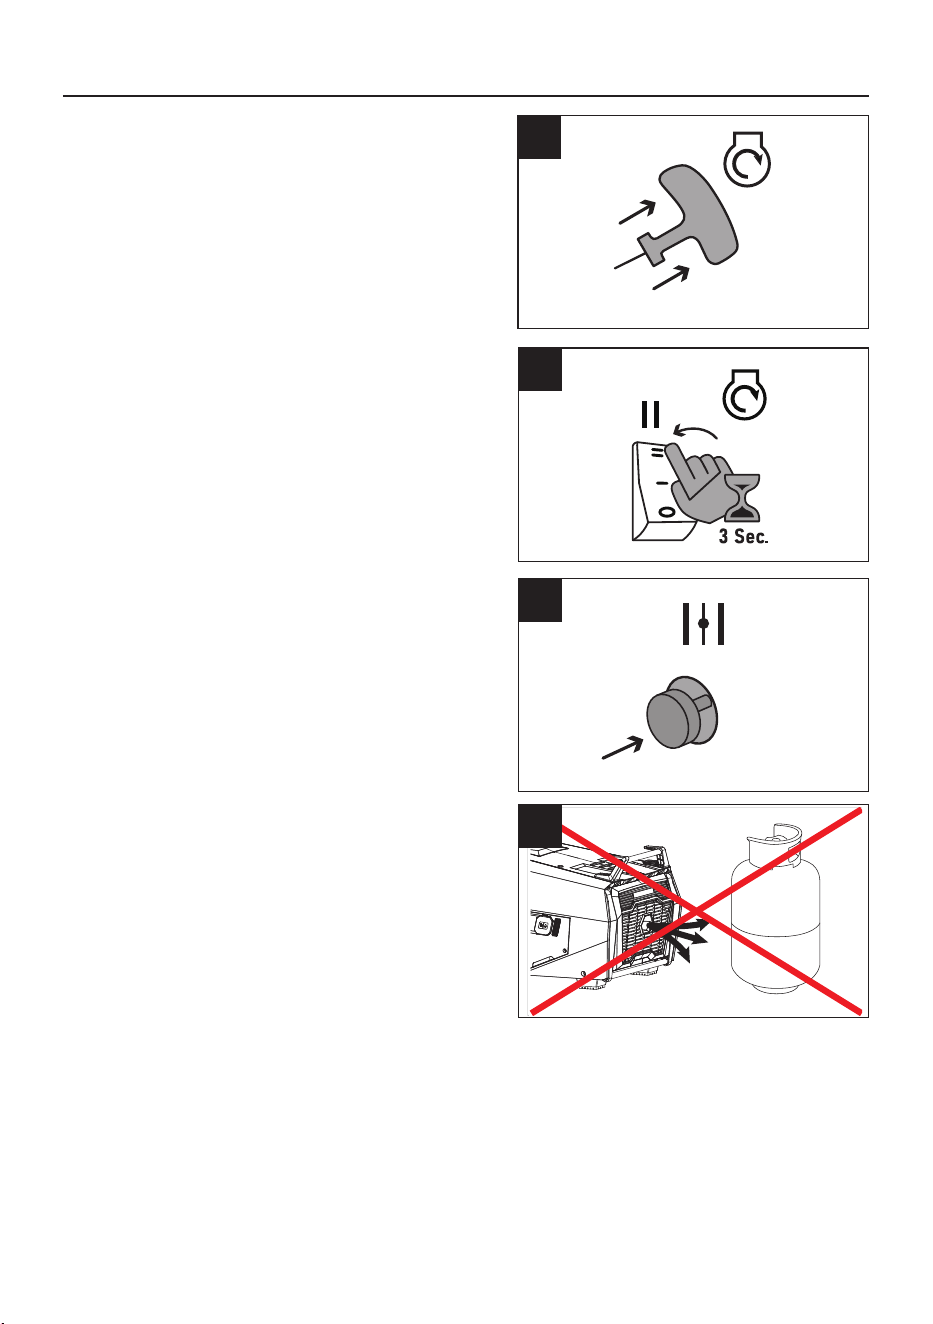
7. Disconnect all electrical loads from the generator.
Never start or stop the generator with electrical
devices plugged in.
9. Pull the choke button to the “CHOKE” position.
You do not need to choke a warm engine. (For
electric start move to step (13))
10. For recoil start only - PULL-TO-PRIME Pull the
starter cord 1-2 times. Pull slowly until resistance
is felt and then pull rapidly.
11.For recoil start only - Press the choke button to
the run position.
11
OPERATING INSTRUCTIONS
OFF
8. Flip the engine switch to the RUN (l) position.
NOTICE
When the engine switch is turned to the
RUN position, the intelligauge display screen will
light for up to 4 minutes (before going o).
8
24
13
14
15
RUN
15. Allow portable inverter generator to run at no
load for a few minutes to stabilize before plugging
in any electrical devices.
NOTICE
If engine starts but fails to run, or if
portable generator shuts down during operation,
check oil level. See Low Oil Shutdown section for
more information.
NOTICE
Observing frost on LPG cylinder and regulator is common during operation and normally
is not an indication of a problem. In unusual situations this frost may eventually restrict the ow of LPG
gas to the generator resulting in deteriorating performance. In these rare situations it can be helpful to:
● Exchange fuel cylinders to allow the rst cylinder to warm up, repeating as necessary. Placing the
LPG cylinder at the end of the generator near the handle, where engine fan air ows out from the
generator. This air is slightly heated by air owing over the engine. Do not place the LPG cylinder in
the path of the muer exhaust outlet.
● The LPG cylinder and components can be temporarily warmed by pouring warm water over
them.
13. For electric start only - Flip the engine switch to
the START (ll) position for a few seconds and
then release.
14. For electric start only - Press the choke button
to the run position.
OPERATING INSTRUCTIONS
12
12. For recoil start only - PULL-TO-RUN Pull the
starter cord slowly until resistance is felt and pull
rapidly to run the portable generator.
If the engine fails to start in 1-2 pulls with choke in
the RUN position, move choke lever to START
position and repeat the PULL-TO-PRIME step (10).
OFF
25
1. Before starting the generator, check for loose or
missing parts and for any damage which may
have occurred during shipment.
Ensure spark plug, muer, fuel cap, and air
cleaner are all in place.
2. Operate portable generator only outdoors and
downwind at least 20 ft from occupied spaces
with exhaust pointed away to reduce the risk of
carbon monoxide accumulating.
3. Connect the LPG hose with regulator to both
LPG cylinder and portable generator LPG/NG
Hose.
4. Fully open the LPG cylinder knob.
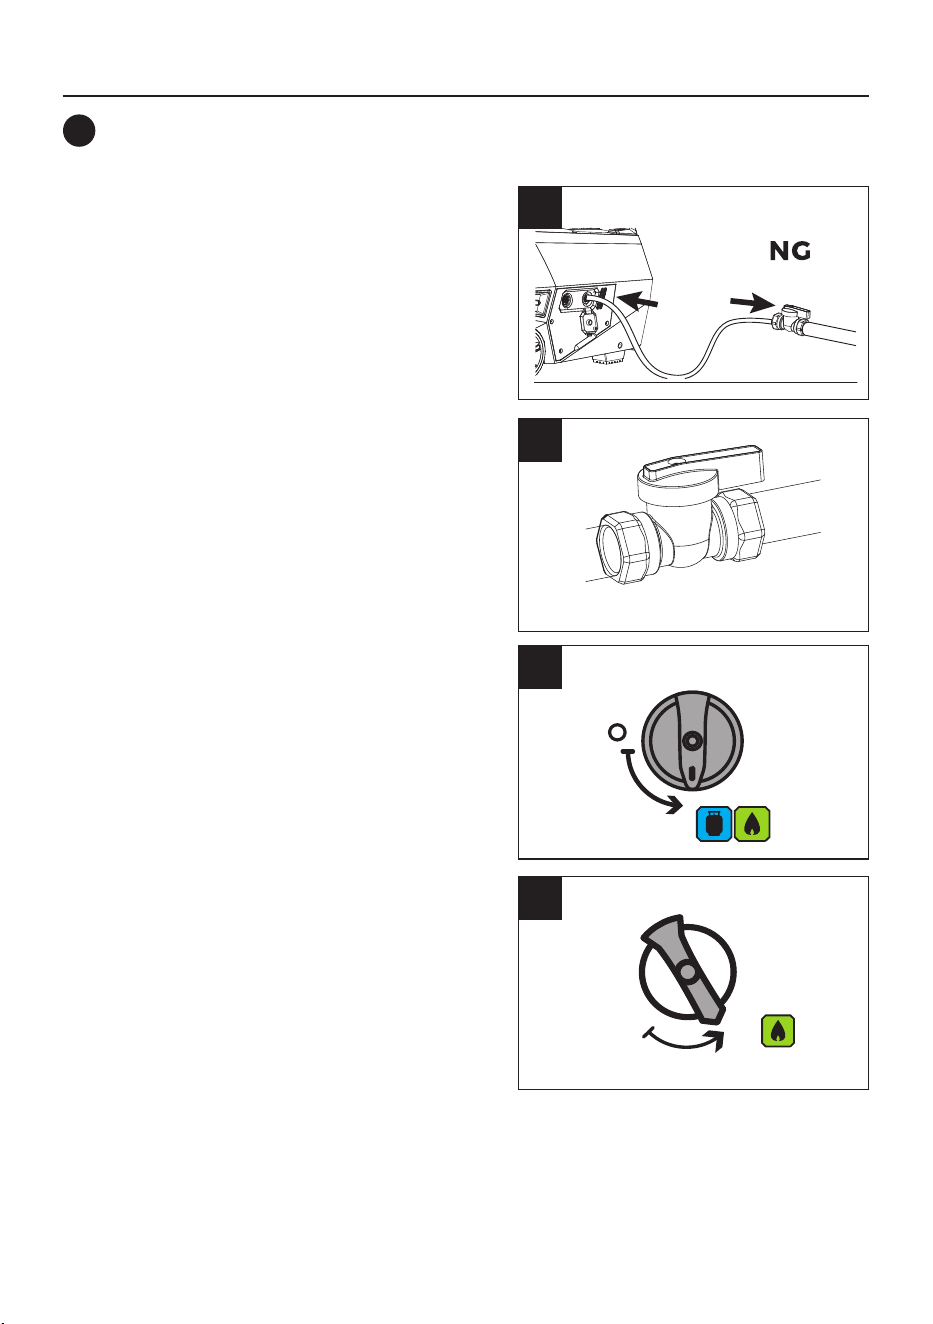
6.Turn the LPG/NG selector switch to NG position.
3
4
Starting the Generator on NG
5
5
6
5. Turn the main fuel selector switch to LPG/NG
position.
OPEN
OPERATING INSTRUCTIONS
26
8
10
7
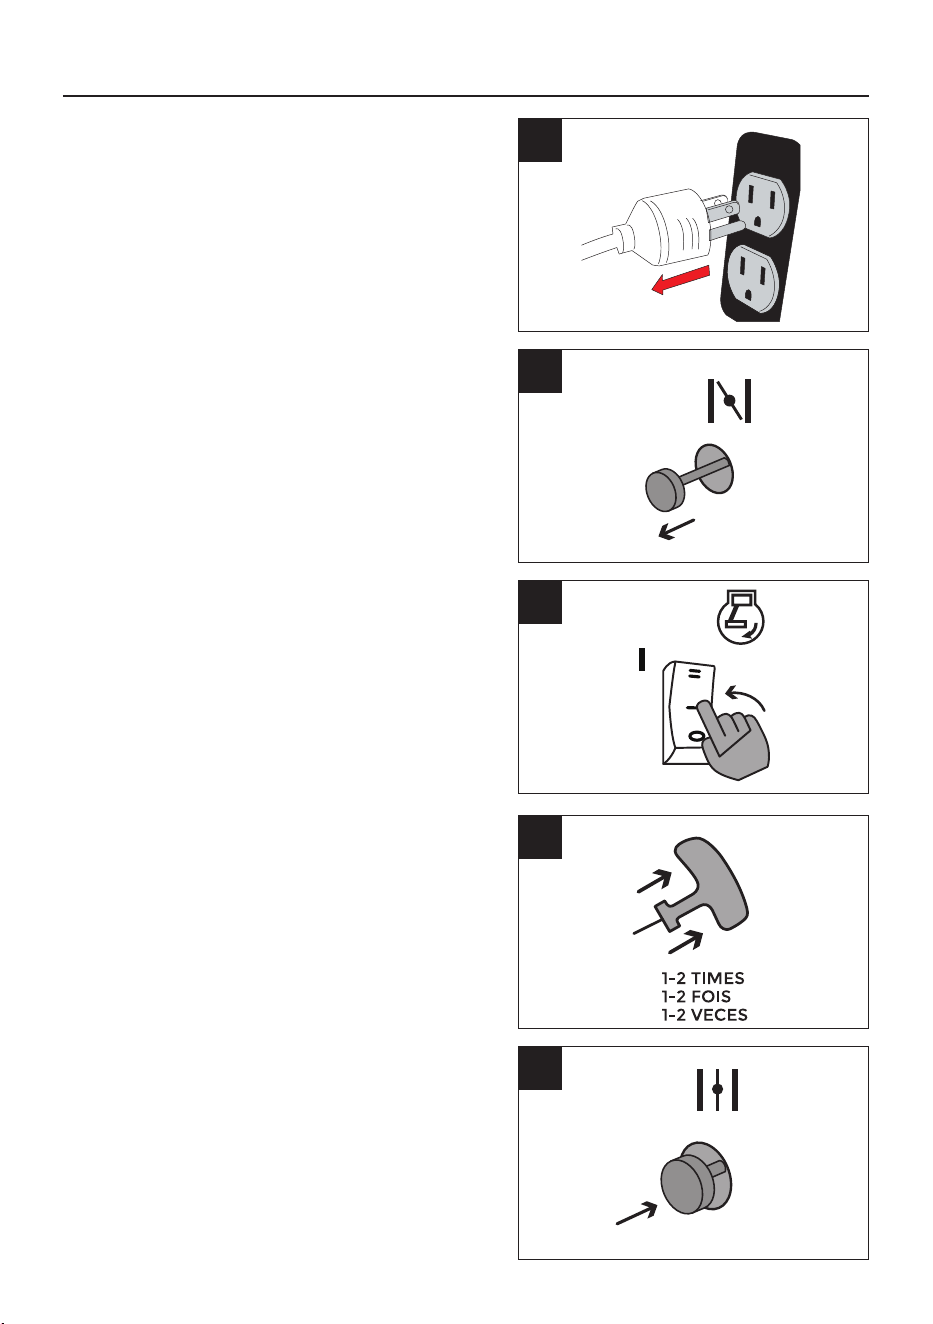
7. Disconnect all electrical loads from the generator.
Never start or stop the generator with electrical
devices plugged in.
8. Pull the choke button to the “CHOKE” position.
You do not need to choke a warm engine. (For
electric start move to step (13))
10. For recoil start only - PULL-TO-PRIME Pull the
starter cord 1-2 times. Pull slowly until resistance
is felt and then pull rapidly
.
11.For recoil start only - Press the choke button to
the run position.
11
OPERATING INSTRUCTIONS
OFF
9. Flip the engine switch to the RUN (l) position.
NOTICE
When the engine switch is turned to the
RUN position, the intelligauge display screen will
light for up to 4 minutes (before going o).
9
27
12
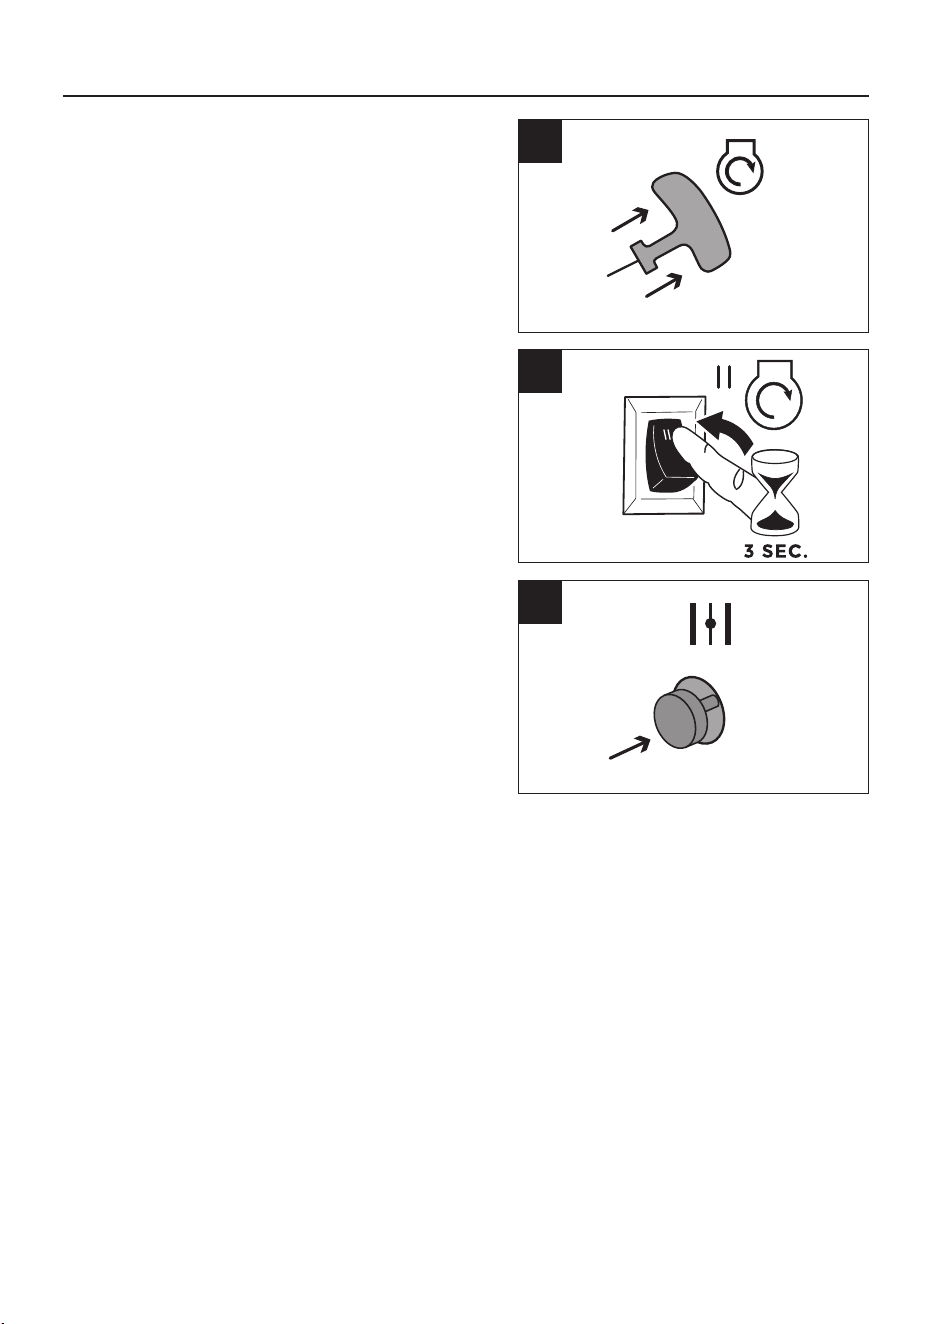
12. For recoil start only - PULL-TO-RUN Pull the
starter cord slowly until resistance is felt and pull
rapidly to run the portable generator.
If the engine fails to start in 1-2 pulls with choke in
the RUN position, move choke lever to START
position and repeat the PULL-TO-PRIME step (9).
OPERATING INSTRUCTIONS
13
14
15. Allow portable inverter generator to run at no
load for a few minutes to stabilize before plugging
in any electrical devices.
NOTICE
If engine starts but fails to run, or if
portable generator shuts down during operation,
check oil level. See Low Oil Shutdown section for
more information.
13. For electric start only - Flip the engine switch to
the START (ll) position for a few seconds and
then release.
14. For electric start only - Press the choke button
to the run position.
OFF
28
OPERATING INSTRUCTIONS
This portable generator has been pretested and adjusted to handle its full capacity. The voltage is
regulated using an automatic voltage regulator (AVR). Readjusting the AVR will void warranty.
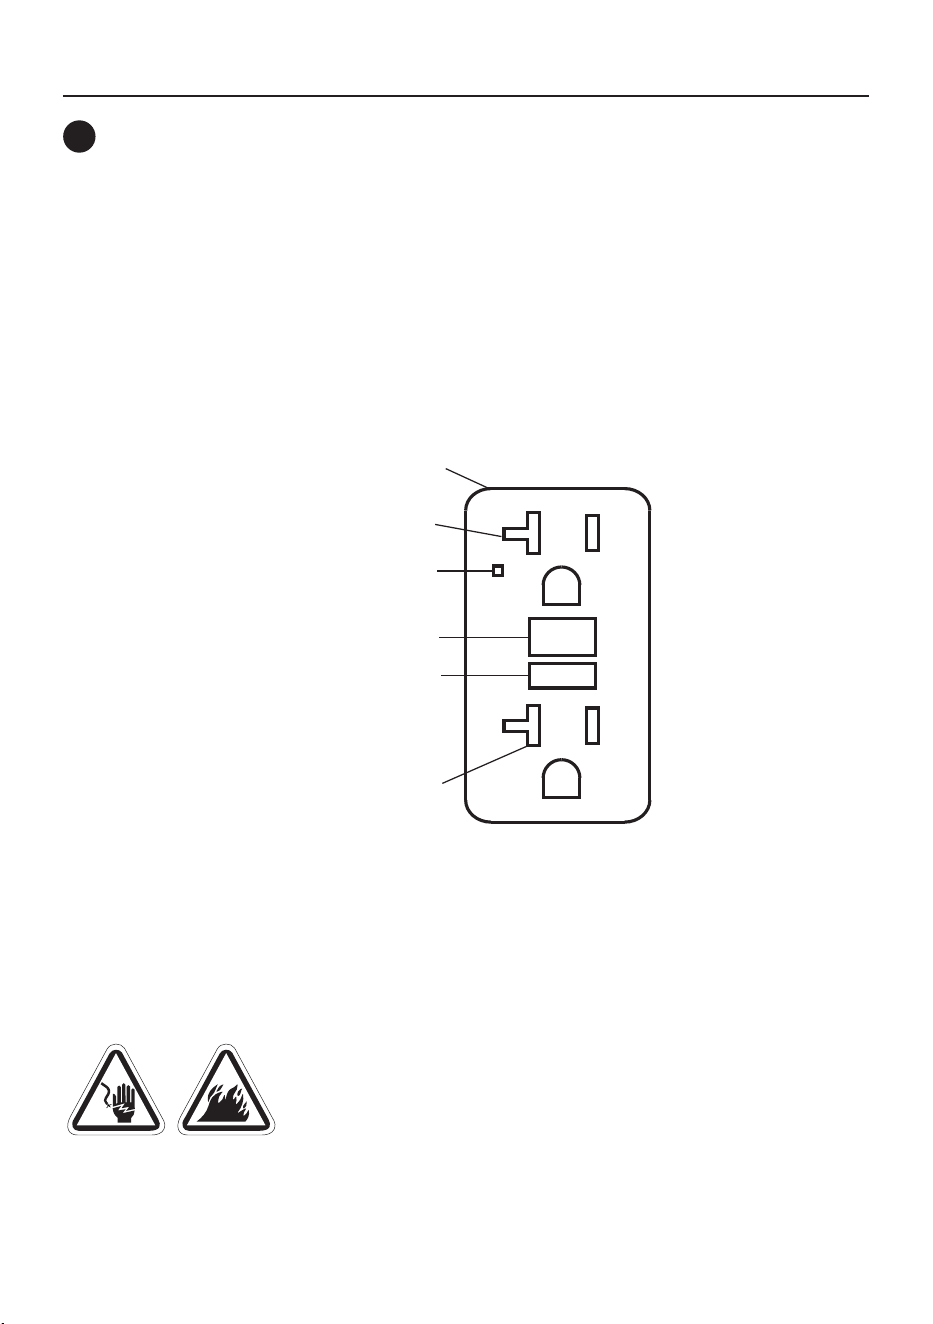
The duplex receptacle is equipped with GFCI protection. The GFCI protects against electric shock
that may be caused if you become a path which electricity travels to reach earth. Even with a GFCI
you may feel a shock, but the GFCI cuts power quickly so an average person should not suer any
injury. Manual test GFCI while generator is running to verify internal contacts will function.
●
Push the test button. The reset button will pop out, which should cut power to outlet.
●
Press the reset button until it locks in the depressed position. If the GFCI does not reset as
described do not use the receptacles. Call Firman customer service.
●
If GFCI trips while in use, reset and test the outlet. Electric cords lying on the ground with
worn insulation may trip the GFCI, only use cords in good condition.
In addition to the manual test / reset feature the GFCI receptacle tests itself periodically to conrm the
GFCI electronics are functional. The indicator light will be solid green when the GFCI is powered from
the generator and working correctly.
Self-test indications: If the indicator light is solid orange or ashing red a problem may exist.
Press the TEST button to trip the GFCI. If unable to reset, replace the GFCI
CONNECTING ELECTRICAL LOADS
6
RESET
TEST
TEST MONTHLY
FOLLOW DIRECTIONS
RESET BUTTON
Receptacle
Outlet
LED Indicator Light
TEST BUTTON
Outlet
SELF-TEST OPERATION
CONNECTING ELECTRICAL LOADS
WARNING! Generator voltage could cause electrical shock or burn
resulting in death or serious injury.
● Damaged or overloaded extension cords could overheat, arc, and burn resulting death or serious
injury.
● Use a ground fault circuit interrupter (GFCI) in any damp or highly conductive area, such as metal
decking.
● Do not touch bare wires or receptacles.
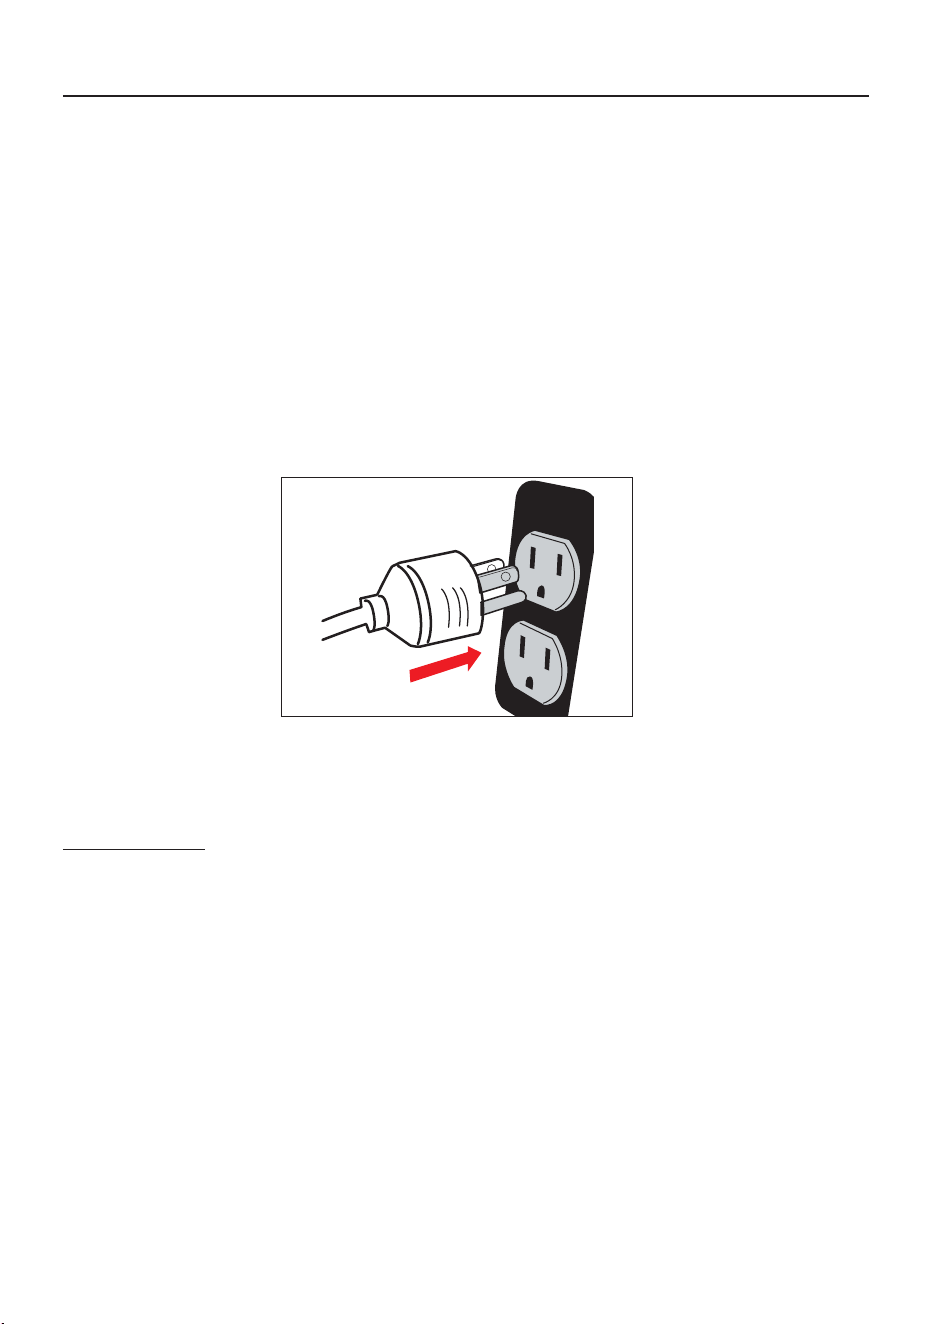
29
Surge Protection
There is a remote chance that voltage uctuations may impair the proper functioning of some sensitive
electronic equipment. Electronic devices, including computers and many programmable appliances
may use components that are designed to operate within a narrow voltage range and may be aected
by the portable generator’s momentary voltage uctuations. While there is no way to prevent all voltage
uctuations, you can take steps to protect your sensitive electronic equipment. Install a plug-in surge
suppressor on the receptacles feeding your sensitive equipment. Surge suppressors come in single or
multi-outlet styles. They are designed to protect against short duration voltage uctuations.
1.Ensure circuit breaker on control panel is in the closed (on) position.
2. Start the generator with no electrical load attached.
3. Allow the engine to run for several minutes to stabilize.
4. Plug in and turn on the rst item. It is best to attach the item with the largest load rst.
5. Allow the engine to stabilize.
6. Plug in and turn on the next item.
7. Allow the engine to stabilize.
8. Repeat steps 6-7 for each additional item.
● Do not use generator with electrical cords which are worn, frayed, bare or otherwise damaged.
● Do not operate generator in the rain or wet weather.
● Do not run indoors to avoid wet conditions.
● Do not handle generator or electrical cords while standing in water, while barefoot, or while
hands or feet are wet.
● Use listed transfer switch to prevent backfeed by isolating generator from electric utility workers.
OPERATING INSTRUCTIONS
30
OPERATING INSTRUCTIONS
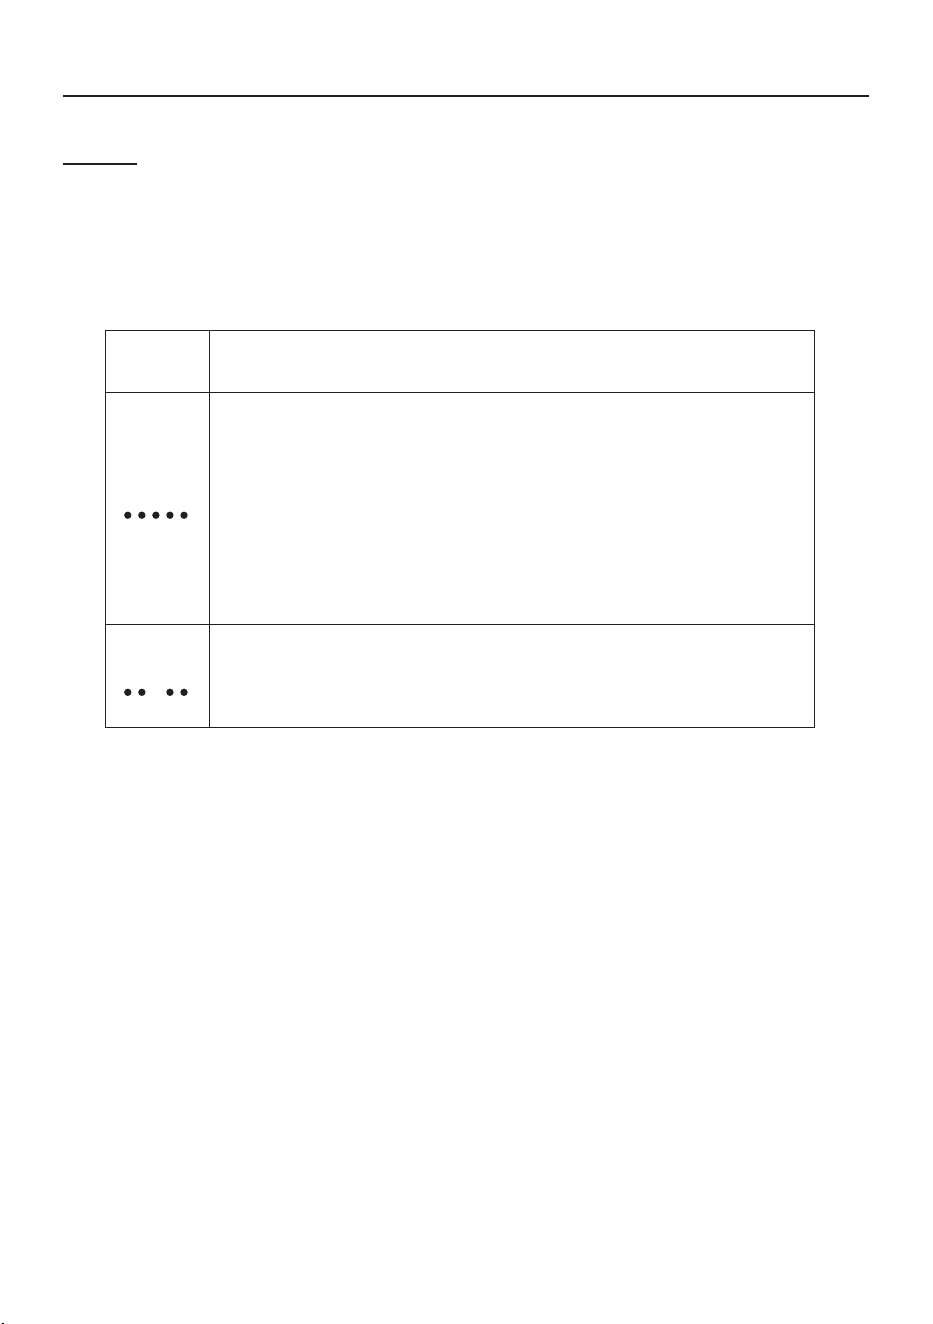
CO Alert
Carbon Monoxide (CO) Shutdown System
CO Alert automatically shuts down the engine when harmful levels of carbon monoxide accumulate
around the generator or a CO Alert fault occurs. After shutdown, the CO Alert indicator light will blink
for at least ve minutes per the chart below. CO Alert DOES NOT replace carbon monoxide alarms.
Install battery-powered carbon monoxide alarm(s) in your home. Don’t run generator in enclosed
areas.
*Yellow light will blink for ve seconds at the startup of generator to show CO ALERT is functioning
properly.
Color
RED
Yellow
Carbon monoxide accumulated around generator. Prior to restart move
generator to an open, outdoor area 20 ft downwind from occupied
spaces with exhaust pointed away. Air out premises (open windows
and doors) before reoccupying property. Automatic shuto is an
indication generator was improperly located.
If you start to feel sick, dizzy, weak, or your homes carbon monoxide
alarm sounds while using this product, get to fresh air right away. Call
emergency services. You may have carbon monoxide poisoning.
CO Alert fault occured*.
See FIRMAN authorized service dealer.
Description
31
OPERATING INSTRUCTIONS
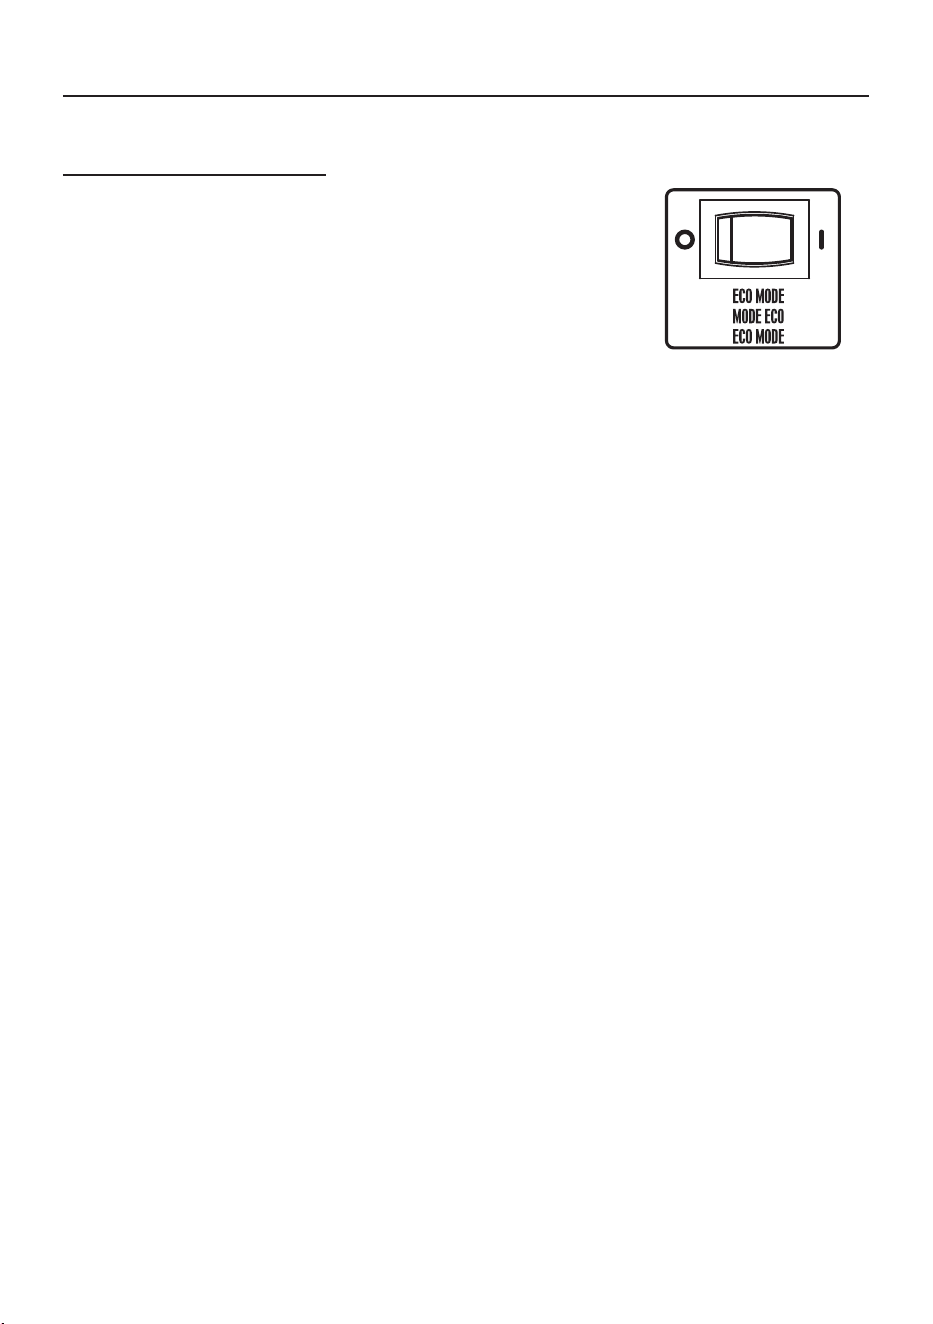
Economy Control Switch
12V DC Outlet (Battery Charger)
The Economy Control switch can be activated in order to minimize fuel
consumption and noise while operating the unit during times of reduced
electrical output, allowing the engine speed to idle during periods of
non-use. The engine speed returns to normal when an electrical load is
connected. When the economy switch is o, the engine runs at normal
speed continuously.
NOTICE
For periods of high electrical load or momentary uctuations,
the Economy Control Switch should be turned OFF.
The amount of current owing will depend on the charging voltage and the battery’s state of charge.
As the battery becomes more fully charged, the output current to the battery decreases and nearly
becomes constant. Taper chargers are intended to be used with the provision that they will be discon-
nected from the battery after a maximum time on charge. Normally a period of 30 to 120 minutes is
sucient to recharge a weak battery. The charge level of the battery should be checked periodically.
NOTICE
● For use with 12V direct current outlet, always keep the ECO mode deactivated (OFF Position).
● You can use the 12V direct current outlet and the 120V current at the same time, but keep the ECO
mode deactivated (OFF Position) at all times.
Do not start the vehicle while the battery charging Cable is connected and the generator is running.
It will not give the battery a boost of power. The Vehicle or the generator may be damaged. Charge
only vented wet lead acid batteries. Other types of batteries may burst, causing personal injury
or damage.
WARNING!
● Storage batteries give o EXPLOSIVE hydrogen gas while charging. Do not allow smoking, open
ames, sparks, or spark producing equipment in the area while charging.
● Battery electrolyte uid is comprised of sulfuric acid that can be very dangerous and cause severe
burns. Do not allow this uid to contact eyes, skin, clothing, etc. If contact or spillage does occur, ush
the area with water immediately.
● Do not continue to charge a battery that becomes hot or is fully charged.
1. Before connecting the battery charging cable to a battery that is installed in a vehicle, disconnect
the vehicle battery ground cable from the negative (–) battery terminal.
2. Plug the battery charging cable into the DC receptacle of the generator.
3. Connect the red (+) battery charger lead to the red (+) battery terminal.
4. Connect the black (–) battery charger lead to the black (–) battery terminal.
5. Start the generator.
32
OPERATING INSTRUCTIONS
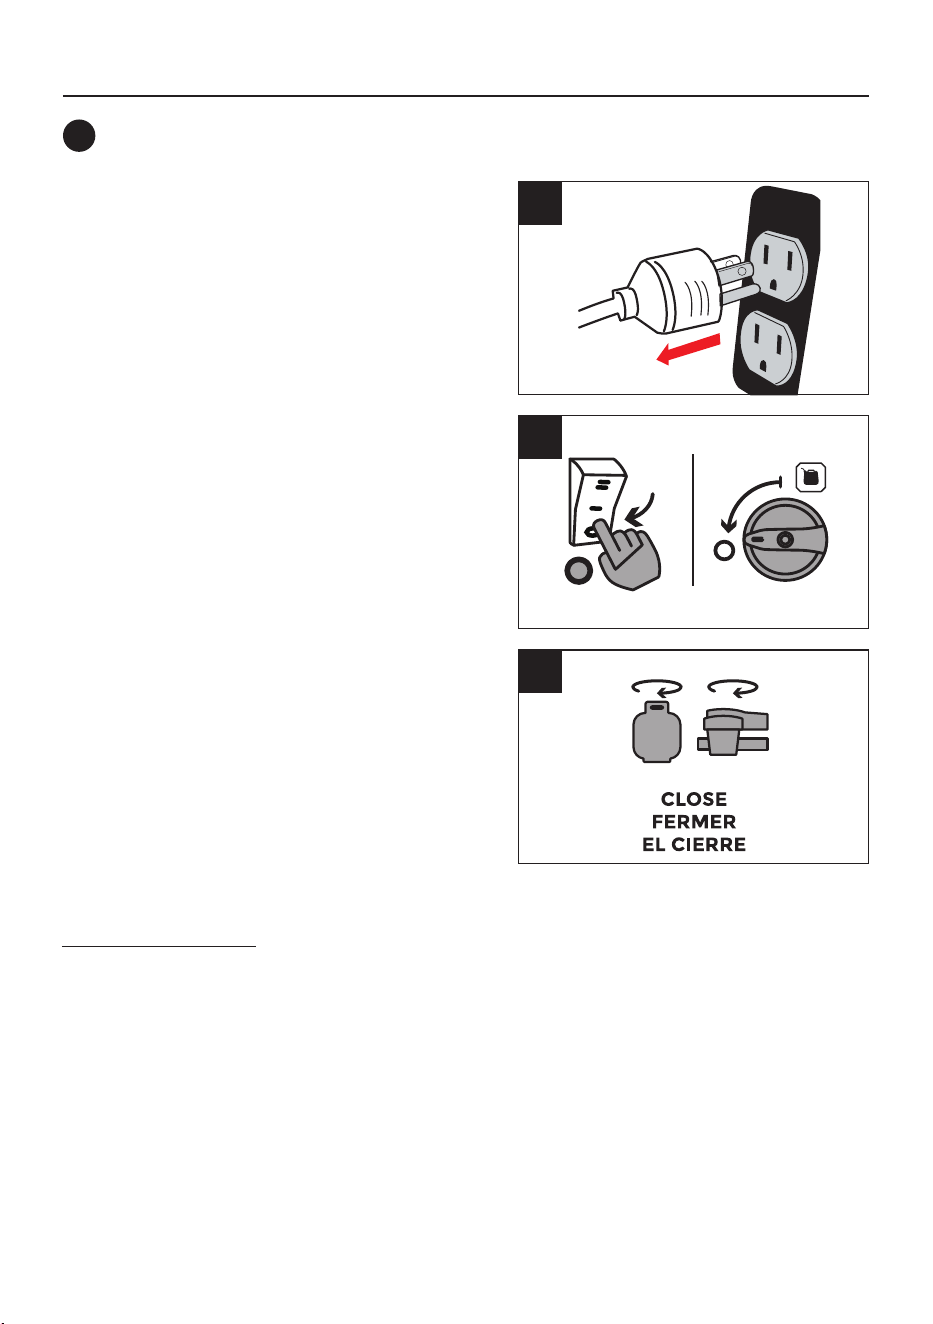
STOPPING THE GENERATOR
7
1. Turn o and remove all electrical loads.
Never stop the generator with electrical devices
plugged in and turned on.
Never stop the engine by moving the choke button
to the start position.
If the engine oil drops below a preset level, an oil switch will stop the engine. Check oil level with
dipstick.
If oil level is between the LOW and HIGH mark on dipstick:
1.DO NOT try to restart the engine.
2.Contact an Authorized FIRMAN Service Dealer.
3.DO NOT operate engine until oil level is corrected.
If oil level is below the LOW mark on dipstick:
1.Add oil to bring level to HIGH mark.
2.Restart engine and if the engine stops again a low oil condition may still exist. DO NOT try to restart
the engine.
3.Contact an Authorized FIRMAN Service Dealer.
4.DO NOT operate engine until oil level is corrected.
2. Turn the engine switch and main fuel selector
switch to OFF (O) position.
3. Fully close the LPG cylinder knob and NG
source valve.
If a cover is used, do not install until unit has
cooled.
Let the generator run at no-load for one minute to
stabilize internal temperatures of the engine and
generator.
1
2
3
Low Oil Shutdown

33
OPERATING INSTRUCTIONS
Overloading a generator in excess of its rated wattage capacity can result in damage to the
generator and to connected electrical devices. To prolong the life of your generator and attached
devices, follow these steps to add electrical load:
1. Start the generator with no electrical load attached.
2. Allow the engine to run for several minutes to stabilize.
3. Plug in and turn on the rst item. It is best to attach the item with the largest load rst.
4. Allow the engine to stabilize.
5. Plug in and turn on the next item.
6. Allow the engine to stabilize.
7. Repeat steps 5-6 for each additional item.
When an overload or short circuit occurs, the AC output will shut o, and a red "P" light will appear on
the display. To resume AC output, rst clear the overload or short-circuit fault, then either press and
hold the RESET button on the display or turn o the power and restart the device.
NOTICE
When the engine shuts down due to overload and stall or fuel exhaustion, the "P" light will stay on and
glow red.
How to Correct
1. Disconnect any electrical devices, and then stop the engine.
2. Reduce the total wattage of connected electrical devices until it is within the generator’s rated
output
.
3. Inspect the Air Inlet and Control Panel for any blockage. Remove blockage if found.
4. Restart Engine.
Any two FIRMAN 120/240V inverter generators with parallel ports, including two FIRMAN inverters
model WT12579 can be paralleled to increase the total available electrical power to 19000 Watts.
NOTICE
● Only two compatible FIRMAN 240V inverters can be operated in parallel.
● DO NOT attempt to parallel other models or brands.
● DO NOT connect parallel cable while generators are running.
● DO NOT disconnect the parallel connection cable during the parallel operation of generator sets.
1. Ensure both inverters are on level ground, disconnected from all loads, and turned OFF.
2. Set both inverters’ voltage selector switches to the 240V position.
3. Firmly connect the FIRMAN parallel cable to the parallel operation ports on both inverters.
4. Start the rst inverter, then start the second inverter.
5. Wait a few seconds for both units to synchronize.
6. Once synchronized, the 14-50R and L14-30R outlets on both inverters can be used.
Do Not Overload Generator
Overload Operation
Parallel Operation
34
To be performed by knowledgeable/experienced owner or by authorized service center.
General Recommendations
Regular maintenance will improve the performance and extend the life of the generator. See any
authorized dealer for service.
The generator's warranty does not cover items that have been subjected to operator abuse or
negligence. To receive full value from the warranty, the operator must maintain the generator as
instructed in this manual.
Some adjustments will need to be made periodically to properly maintain your generator.
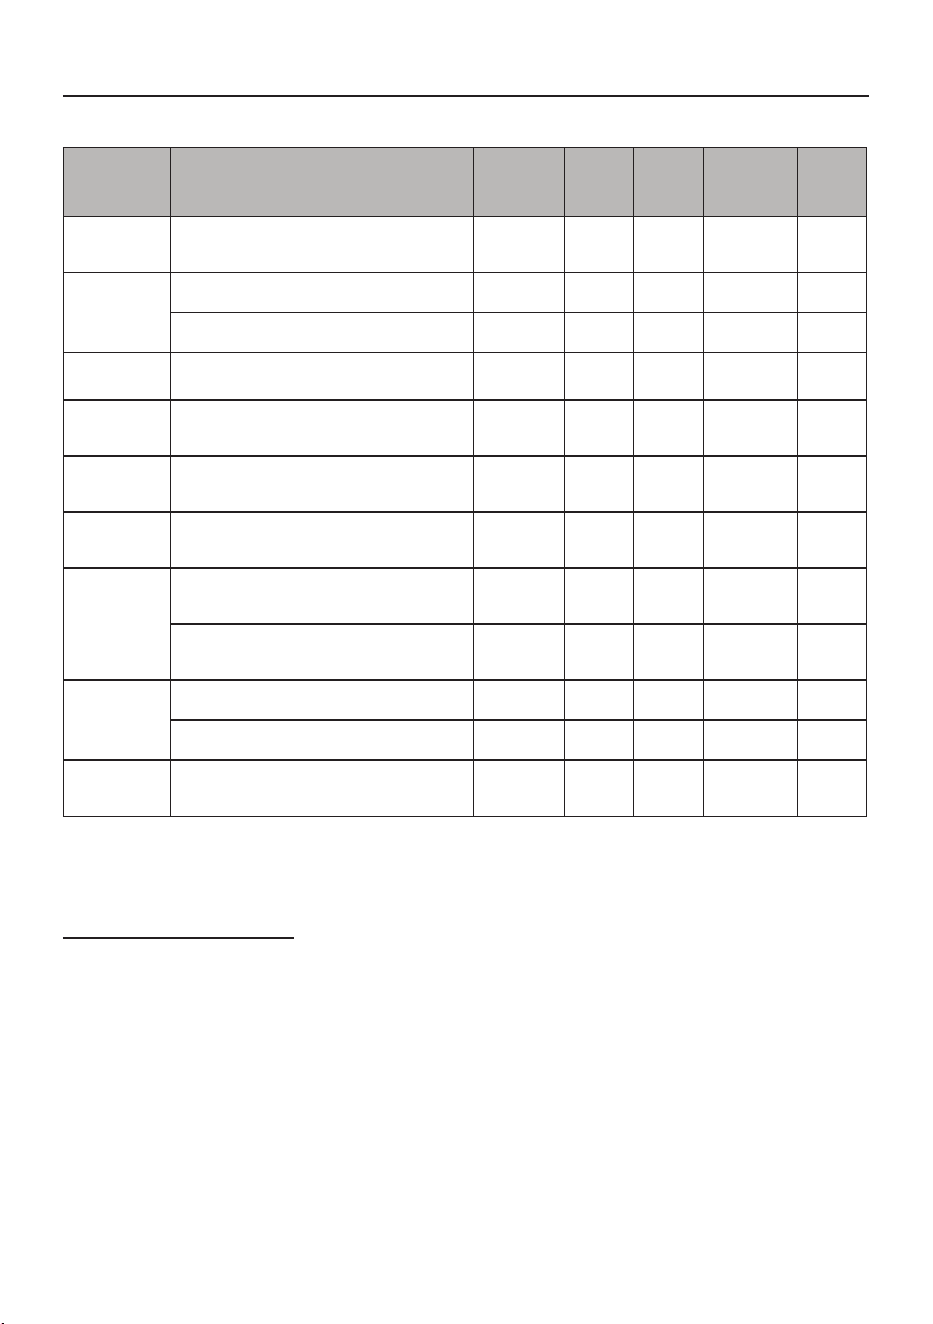
All service and adjustments should be made at least once each season. Follow the requirements in the
maintenance schedule chart above.
NOTICE
Once a year you should clean or replace the spark plug and replace the air lter. A new
spark plug and clean air lter assure proper fuel-air mixture and help your engine run at peak
performance and last longer.
MAINTENANCE SCHEDULE
Check condition. Adjust gap
and clean. Replace if necessary.
Clean fuel tank strainer.
Replace if necessary.
Check fuel hose for cracks or other
damage. Replace if necessary.
Check for leakage. Retighten or
replace gasket if necessary.
Check spark arrester screen.
Clean/Replace if necessary.
Clean, replace if necessary.
Check and adjust valve clearance.
Clean combustion chamber.
Check. Replace if necessary.
Check oil level.
Replace.
√
√
Daily
(Before
operation)
Initial
25
hours
Every
50
hours
Every
250
hours
Every
100 hours
(or annual)
√
√
√
√
√
√
√
√
√
MAINTENANCE - STORAGE
NOTES
ITEM
Fittings/
Fasteners
Exhaust
System
Fuel Line
Air Filter
Engine Oil
Spark Plug
Fuel
Engine
√
LPG Regulator
/Hose Assy.
Check for damage and leaks.
Replace if necessary.
√
35
When Transporting Generator
Transport with fuel tank EMPTY or with fuel valve in OFF position.
Do not tip generator at an angle which causes fuel to spill.
Disconnect LPG/ NG fuel hose and securely stow away.
Engine Maintenance
To prevent accidental starting, remove and ground spark plug wire before performing any service.
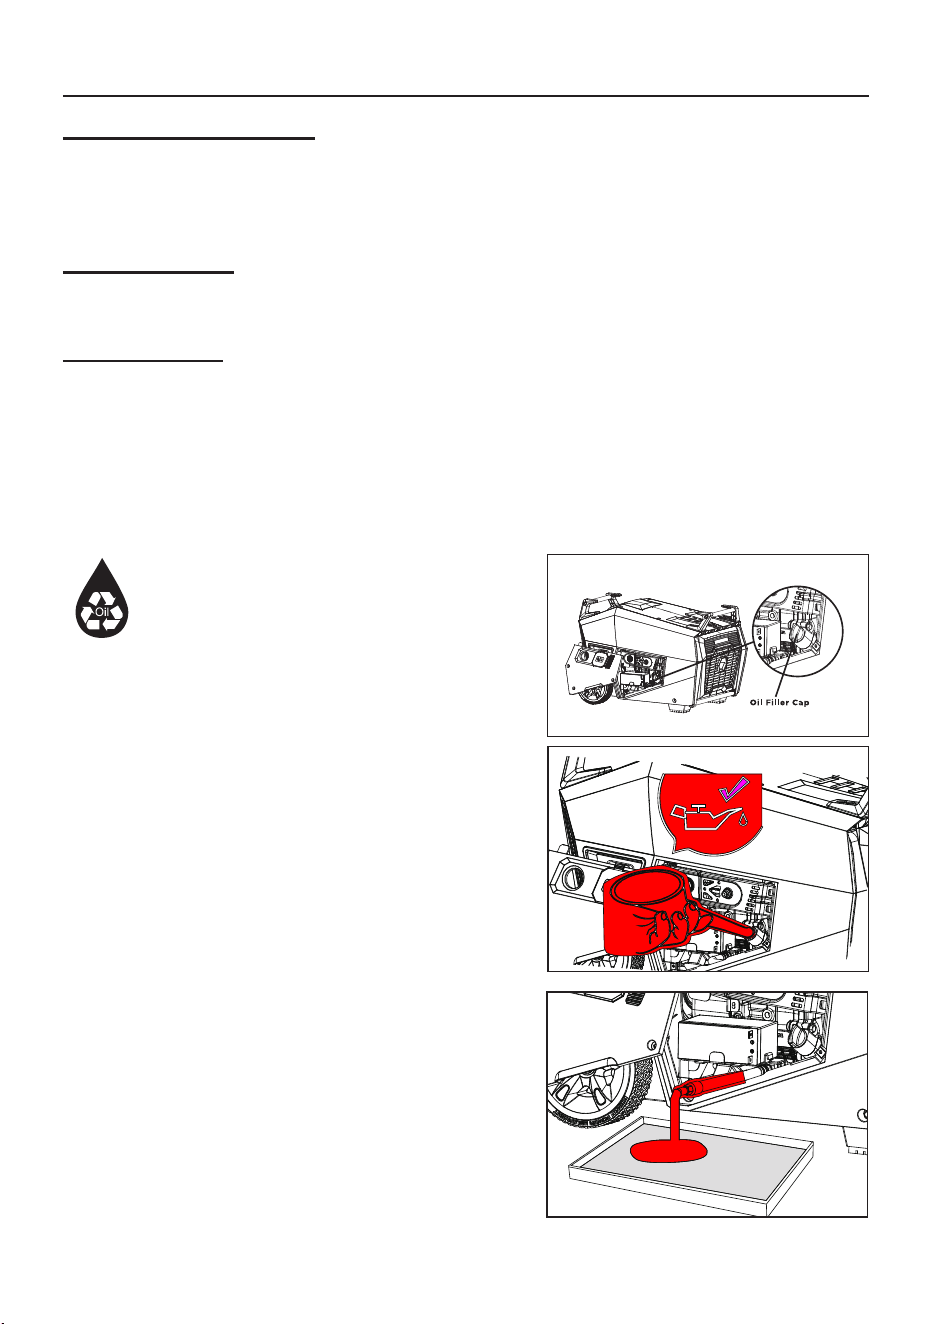
Change Engine Oil
Change engine oil every 100 hours (for a new engine, change oil after 25 hours). If you are using your
generator under extremely dirty or dusty conditions, or in extremely hot weather change the oil more
often.
CAUTION!
Avoid prolonged or repeated skin contact with used motor oil. Used motor oil has been
shown to cause skin cancer in certain laboratory animals. Thoroughly wash exposed areas with soap
and water.
MAINTENANCE - STORAGE
(a) Loosen the cover screws and remove the
maintenance cover.
(b) Pop up the plug from below yellow draining bolt.
(c) Remove yellow drain bolt.
(d) Tilt the generator on its side and allow the oil to
drain completely.
(e) Replace yellow drain bolt.
(f) On a level surface ll the engine with oil until it
reaches the HIGH (H) level on the oil ller cap.
DO NOT OVERFILL.
NOTICE
We recommend using SAE 10W-30 API SL
or higher oil for best performance. Do not use
special additives. See Oil and Gasoline section (page
16).
Keep Out Of Reach Of Children. Don’t
Pollute. Conserve Resources. Return
Used Oil To Collection Centers.
36
MAINTENANCE - STORAGE
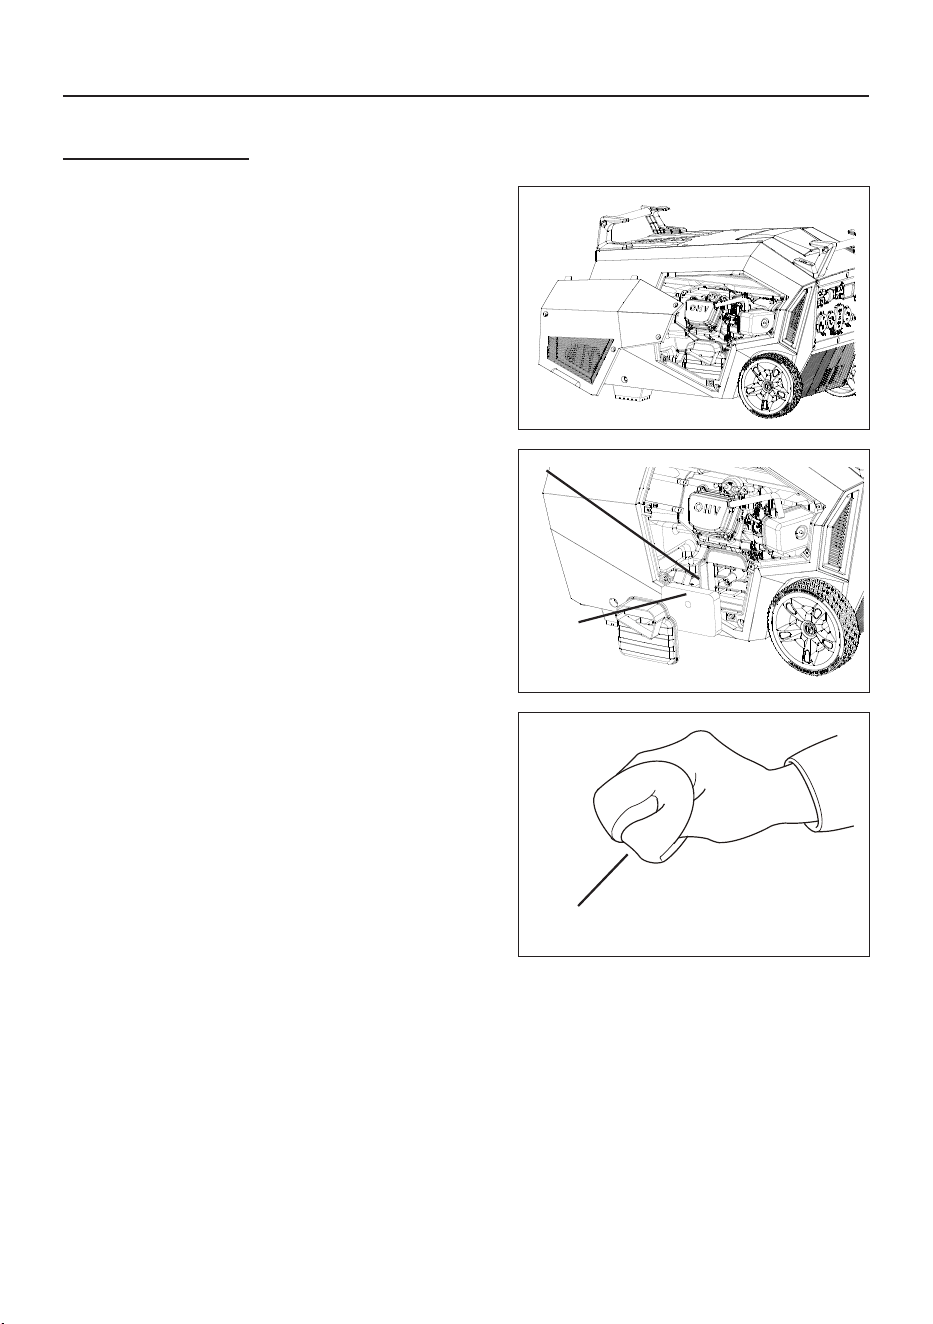
Air Filter Maintenance
(a) Remove the air cleaner cover and locate the air
lter plastic cover.
(b) Carefully remove foam air lter element and
wash it with liquid detergent and water only.
Squeeze dry in a clean cloth.
Air Filter Element
(d) Reinstall clean or new air lter element.
(e) Reattach the air lter cover.
(f) Reinstall the air cleaner cover and tighten the
cover screw securely.
(c) Saturate foam air lter element with clean
engine oil and squeeze in a clean cloth to remove
excess oil.
Air Cleaner
Foam
Element
37
MAINTENANCE - STORAGE
Spark Plug Maintenance
Muer and Spark Arrester Maintenance
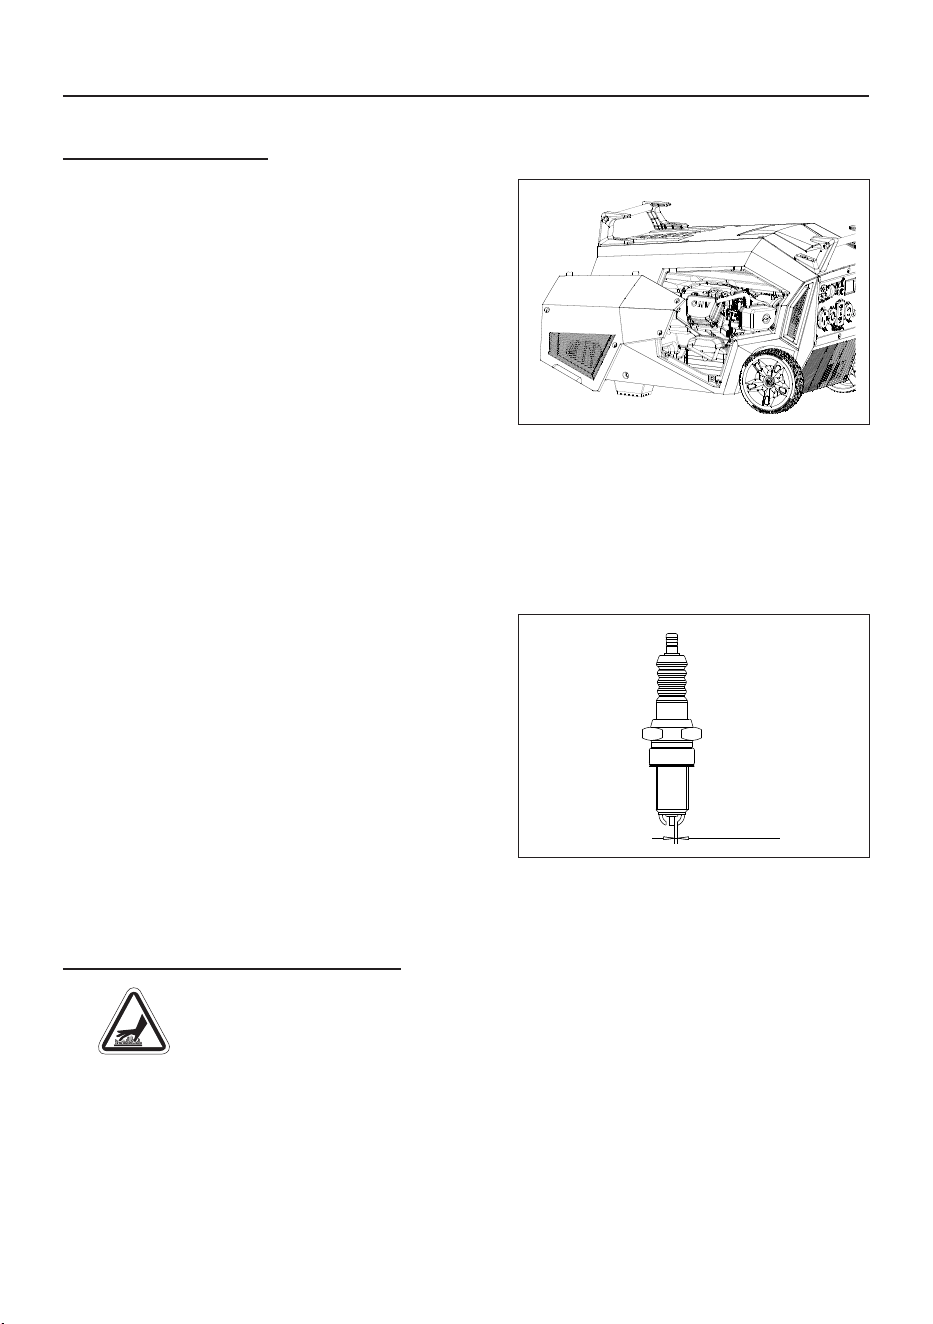
Changing the spark plug will help your engine start
easier and run at peak performance.
(a) Remove the maintenance cover.
(b) Remove the spark plug boot.
(c) Remove spark plug using provided wrench.
(d) Inspect spark plug for damage and clean with a
wire brush before reinstalling. Replace if damaged.
(e) Adjust the electrode gap to 0.031 - 0.039 in.
( ) Seat spark plug in position and thread by hand to
prevent cross threading.
(g) Tighten plug with provided wrench and put
the spark plug boot back on spark plug. Do not
overtighten.
Maintenance Valve Clearance
Intake: 0.004 – 0.006 in
Exhaust: 0.004 – 0.006 in
Spark Plug: F7RTJC
● Do not touch hot parts.
● It is a violation of California Public Resource Code, Section 4442, to use or operate the engine on
any forest covered, brush-covered, or grass-covered land unless the exhaust system is equipped
with a spark arrester, as dened in Section 4442, maintained in eective working order. Other states
or federal jurisdictions may have similar laws, reference Federal Regulation 36 CFR Part 261.52.
WARNING!
Contact with muer area could cause burns resulting in serious injury.
0.031 - 0.039 in
f
38
MAINTENANCE - STORAGE
Inspect Muer and Spark Arrester
1.Inspect the muer for cracks, corrosion, or other
damage.
2. Loosen the spark arrester clamp, remove the
spark arrester cover, and remove the spark arrester
with a thin blade screwdriver .
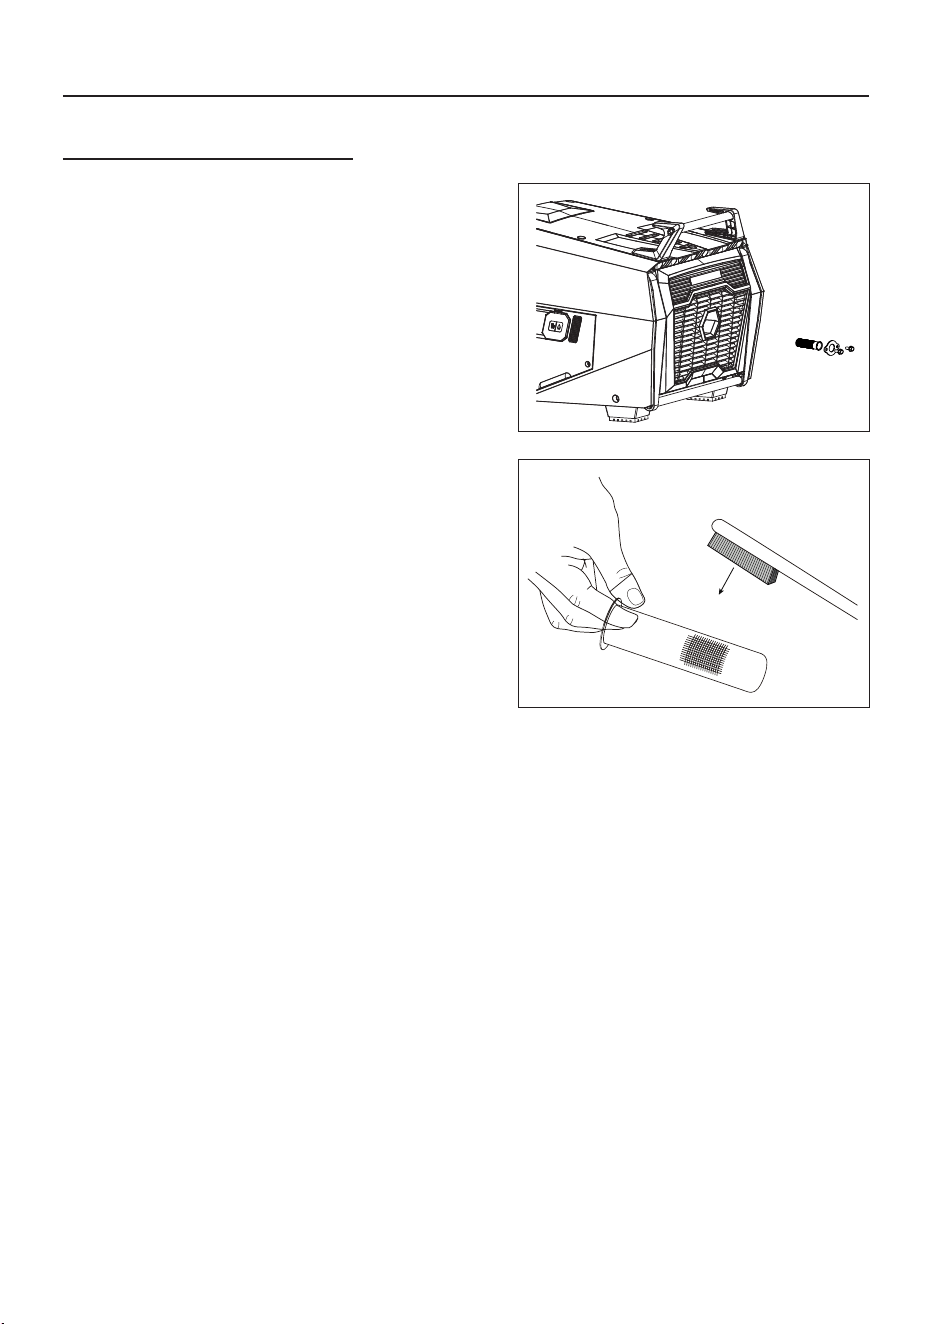
3. Carefully remove the carbon deposits from the
spark arrester screen with a wire brush.
4. Replace the spark arrester if it is damaged. If
replacement parts are required, make sure to use
only FIRMAN original equipment replacement
parts.
5. Position the spark arrester in the muer and
attach spark arrester cover with the screws.
NOTICE
Failure to clean or replace spark arrester
may result in decreased engine performance.
39
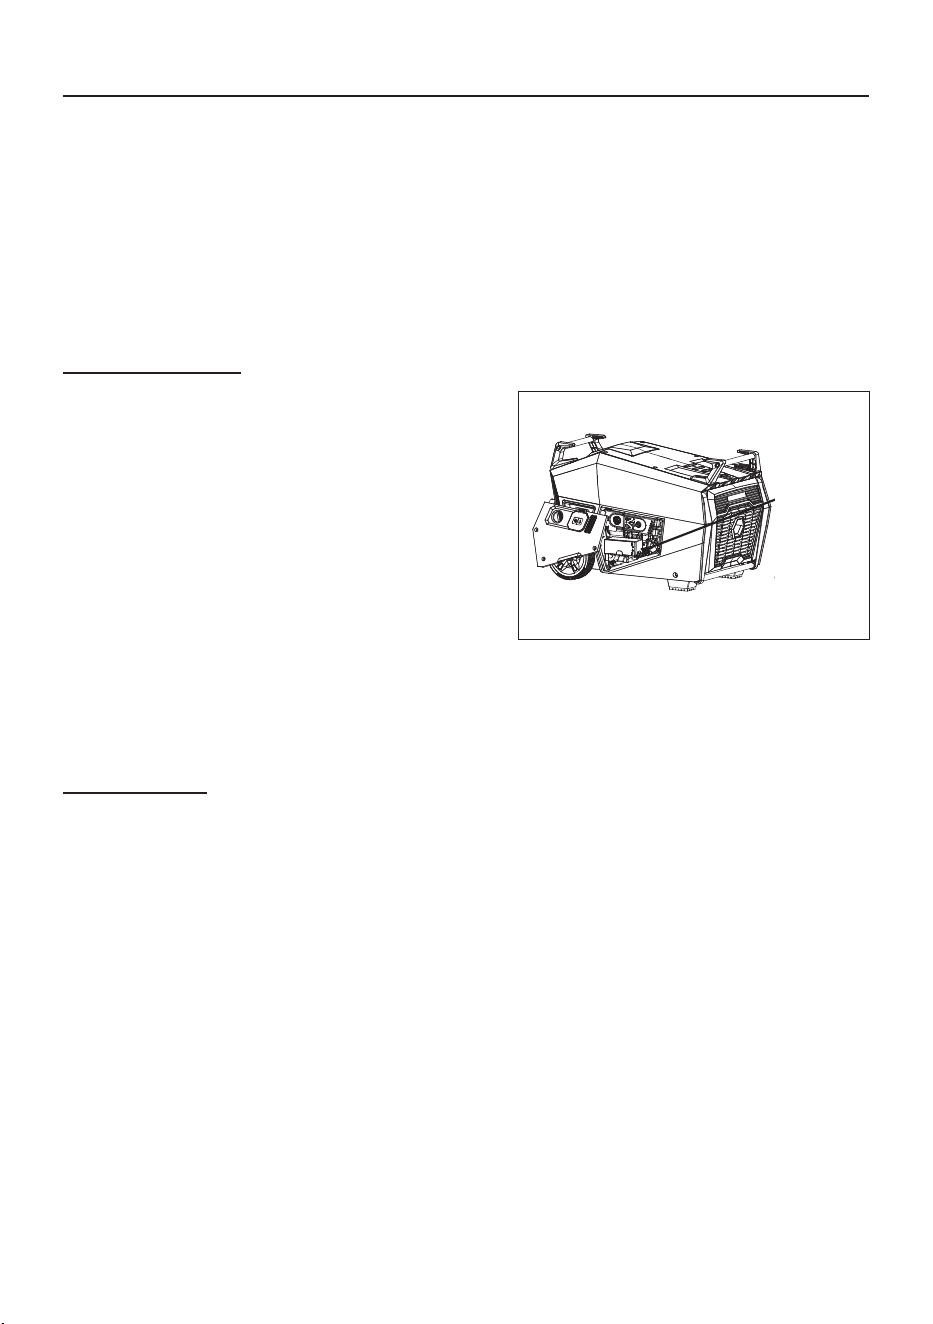
Battery Replacement
Battery Charging
MAINTENANCE - STORAGE
GENERATOR MAINTENANCE
● Run the generator at least 30 minutes every month.
● Make certain that the portable generator is kept clean and dry.
● Do not expose the unit to excessive dust, dirt, moisture or corrosive vapors.
● Do not insert any objects through cooling slots.
● Before each use inspect underneath the generator for signs of oil or fuel. Clean any accumulated
debris. Keep area around muer free from any debris. Use a soft bristle brush to remove dirt or caked
on oil. Use a damp cloth to clean all exterior surfaces.
The battery powers the starter motor and control module. This portable generator is equipped
with an automatic battery charging circuit. The battery will receive charging voltage only when
the engine is running. The battery will maintain a proper charge if the portable generator is used
on a regular basis (about once every two weeks). If it is used less frequently, you can use the
supplied charger plugged into the generator 12V DC Battery Charge Port to charge the battery.
1. Plug the cord from the charger into the charging port on the generator control panel.
2. Plug the charger into a 120 volt AC wall outlet.
3. There is a light on the charger that remains red until the battery is fully charged at which point
the light will turn green.
1.Unscrew the air cleaner cover by provided
screwdriver.
2. Release the battery retaining rubber belt.
3. Disconnect the black(-) cable from black(-) terminal
on the battery. Disconnect the red(+) cable from red(+)
terminal on the battery.
4. Remove the battery and recycle and dispose of
properly.
5. Install the new battery with following specication:
12V sealed lead battery 9AH
LXWXH: 150X65X107mm
6.Connect the red(+)batterycable to the positive termi-
nal of battery rst and then connect the black(-)
battery cable to the negative terminal of battery.
7. Reattach the air cleaner cover.
Battery
40
Long Term Storage
WARNING!
Fuel and its vapors are extremely
ammable which could cause burns or
re resulting in death or serious injury.
Do not store fuel near any ignition sources.
When draining fuel move generator outdoors and
use a commercially available non-conductive
vacuum siphon. Fuel must be drained into an
approved container.
It is important to prevent gum deposits from forming in essential fuel system components such as
the carburetor, fuel hoses or tank during storage. Ethanol-blended fuels (called gasohol, ethanol or
methanol) attract moisture, which leads to separation and formation of acids during storage.Acidic gas
can damage the fuel system of an engine while in storage.
When the generator set is being stored for more than one month, follow these instructions to avoid
engine problems:
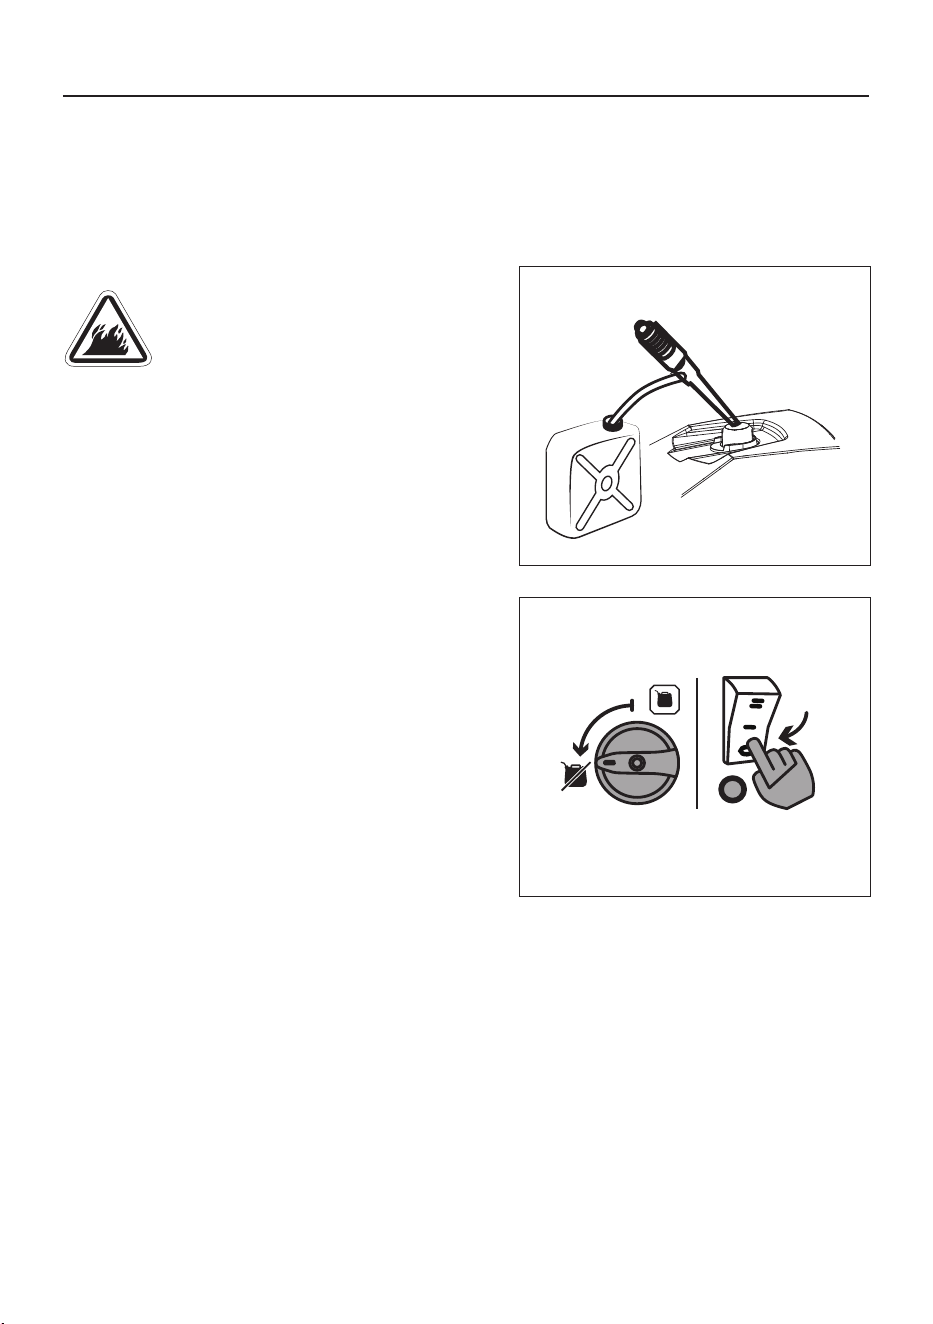
1.Add a properly formulated fuel stabilizer to the gasoline
tank.
2.Start the generator as instructed in Starting the
Generator section.
3.Run the generator for 5-10 minutes so the treated
gasoline cycles through the fuel system.
4.Turn the main fuel selector switch to the “STORAGE
OFF” position until the engine stops. This may take 3-5
minutes. Then turn the fuel selector switch to “OFF (O)”
position.
5.Change oil after the engine cools down entirely.
6.Remove spark plug and pour about one teaspoon of
engine oil into the cylinder.
7.Pull the starter cord a few times to lubricate the cylinder
and then reinstall the spark plug.
8.Cover and store the unit in a clean, dry place out of
direct sunlight.
NOTICE
Any damage or hazards caused by using
improper fuel, improperly stored fuel, and/or improperly
formulated stabilizers, are not covered by manufacturer's
warranty.
Do not store gasoline from one season to another
season.

41
TROUBLESHOOTING – SPECIFICATIONS
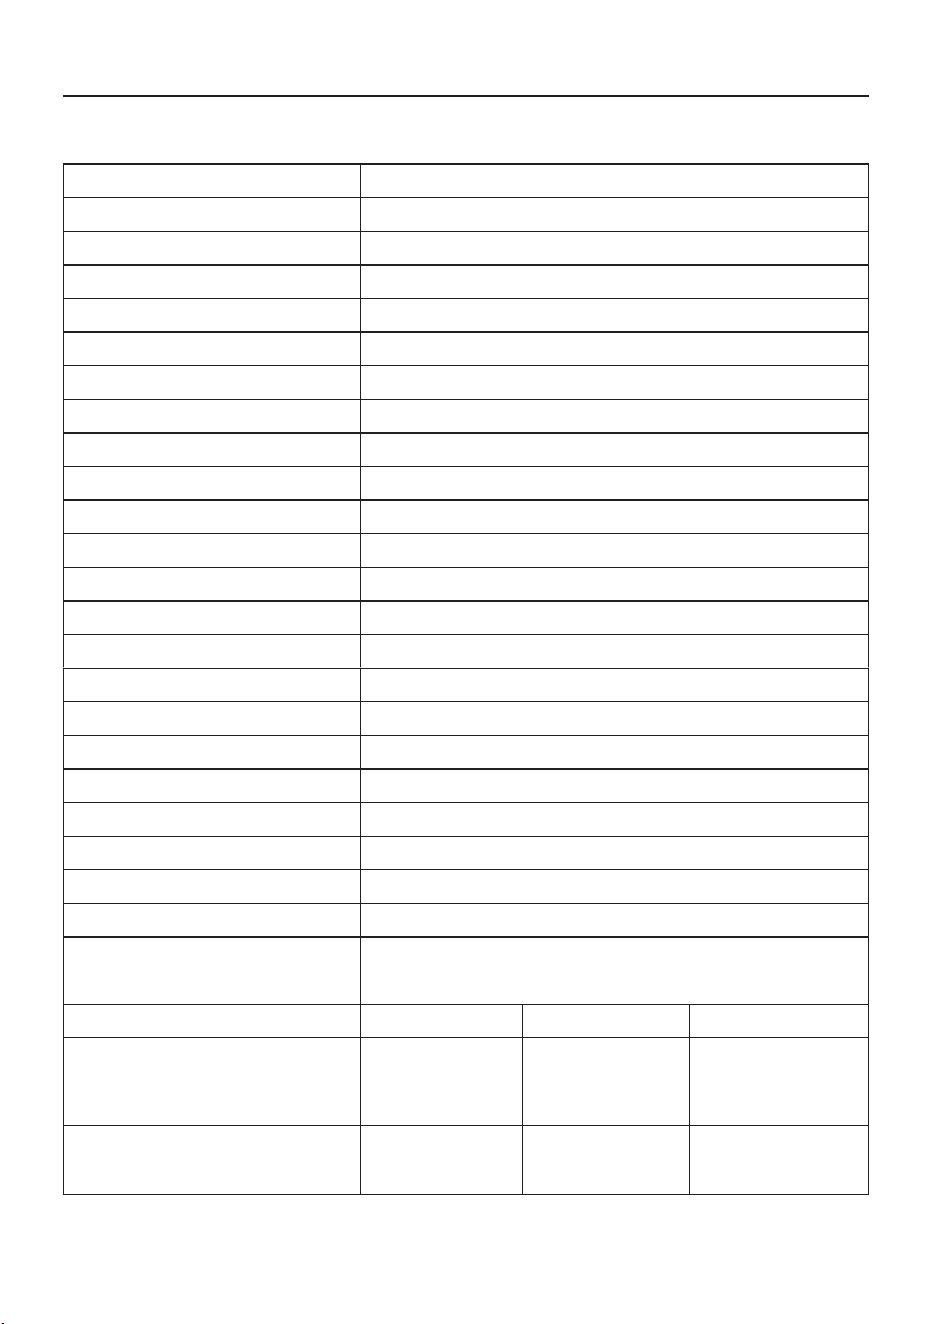
Problem Cause Correction
Engine is running,
but no AC output is
available.
1. Circuit breaker is open.
2. Fault in generator.
3. Poor connection or defective cord
set.
4. Connected device is bad.
1. Reset circuit breaker.
2. Contact authorized service facility.
3. Check and repair.
4. Connect another device that is in
good condition.
Engine runs
good at no-load
but “bogs down”
when loads are
connected.
1. Short circuit in a connected load.
2. Engine speed is too slow.
3. Generator is overloaded.
4. Shorted generator circuit.
5. Clogged or dirty fuel lter.
1. Disconnect shorted electrical load.
2. Contact authorized service facility.
3. See Don’t Overload Generator.
4. Contact authorized service facility.
5. Clean or replace fuel lter.
Engine will not
start; starts and
runs rough or
shuts down when
running.
1. Fuel selector switch set to OFF
(O)position.
2. The indicator light is OFF or
ashing red.
3. Low oil level.
4. Dirty air cleaner.
5. Out of fuel.
6. Stale fuel.
7. Spark plug wire not connected to
spark plug.
8. Bad spark plug.
9. Water in fuel.
10. Flooded.
11. Excessively rich fuel mixture.
12. Clogged or dirty fuel lter.
13. Starting battery may have
insucient charge.
14. Out of LPG/NG.
15. LPG cylinder knob / NG supply
valve is not open.
16. Out of battery power.
1. Set fuel selector switch to “GAS”
or “LPG/NG” position.
2. Must have solid red indicator light
to be able to start the engine.
3. Fill crankcase to proper level or
place generator on level surface.
4. Clean or replace air cleaner.
5. Fill fuel tank.
6.
Drain fuel tank and carburetor; ll with fresh fuel.
7. Connect wire to spark plug.
8. Replace spark plug.
9.
Drain fuel tank and carburetor; ll with fresh fuel.
10.
Wait 5 minutes and re-crank engine.
11. Contact authorized service facility.
12. Clean or replace fuel lter.
13. Check battery output and charge
battery as necessary.
14.
Replace LPG cylinder/ check NG supply.
15. Fully open LPG cylinder knob / NG
supply valve.
16. Start Engine in “GAS” position.
Charge or replace battery.
Engine lacks
power.
1. Load is too high.
2. Dirty air lter.
3. Clogged or dirty fuel lter.
4. Clogged spark arrester.
1. Don’t Overload Generator
2. Replace air lter.
3. Clean or replace fuel lter.
4. Clean or replace spark arrester.
Engine “hunts”
or falters.
1.
Carburetor is running too rich or too lean.
2. Clogged or dirty fuel lter.
1. Contact authorized service facility.
2. Clean or replace fuel lter.
Engine shuts down
when running.
1. Out of gasoline or LPG/NG
2. Dirty air cleaner.
3. Low oil level.
1. Fill fuel tank with gasoline or replace
LPG cylinder / check NG supply.
2. Clean or replace air cleaner.
3. Fill crankcase to proper level or
place generator on level surface.
Engine shuts down
and yellow CO
fault light blinking.
1. CO system fault 1. Contact authorized FIRMAN
service facility.
For all other issues, contact authorized dealer or FIRMAN customer service.
42
TROUBLESHOOTING – SPECIFICATIONS
Specications
Model
Starting Watts
Running Watts*
Rated AC Voltage
Rated Frequency
Phase
Voltage Regulator
Power Factor
Alternator Type
Engine
Engine Type
Displacement
Low Oil Shutdown
Ignition System
Starting System
Fuel
Capacity Fuel Tank
Lubricating Oil Capacity
Carburetor Type
Air Cleaner
P.T.O. Shaft Rotation
Oil Type
AC Grounding System
Natural Gas Fuel Consumption
LPG fuel consumption
WT12579
12500(GASOLINE)/11200(LPG)/9400(NG)
10000(GASOLINE)/9000(LPG)/7500(NG)
120/240V
60Hz
Single
Digital
1
Magneto Inductor
FIRMAN
Single Cylinder, 4-Stroke OHV Air Cooled
459cc
Yes
Breakerless Ignition Type, Flywheel Magneto
Recoil/Electric
Unleaded Automotive Gasoline
27 L / 7.1 gallons
1200 ml / 40.6 oz
Float
Polyurethane Type
Counter Clockwise (Facing P.T.O.)
See “Add Engine Oil” Section
Neutral Bonded To Frame
1.7-2.7 kpa / 13- 20mm mercury
7-11 inches water column / 0.25-0.40 psi
*Generator certied in accordance with CSA (Canadian Standards Association) standard C22.2
No. 100-14, Motors and Generators and complies with PGMA (Portable Generator Manufacturers’
Association) standard ANSI/PGMA G300-2023, Safety and Performance of Portable Generators.
Quarter load (25%)
Half Load Full Load
1.6 m
3
/h
56.65 ft
3
/h
56,710 BTU/h
16,620 W
2.2 m
3
/h
78.26 ft
3
/h
78,345 BTU/h
22,960 W
3 m
3
/hr
105.1 ft
3
/hr
105,210 BTU/h
30,835 W
78.2 MJ/h
74,130 BTU/h
21,725 W
116.0 MJ/h
109,910 BTU/h
32,210 W
154.3 MJ/h
146,255 BTU/h
42,865 W
Natural Gas Fuel Pressure Range
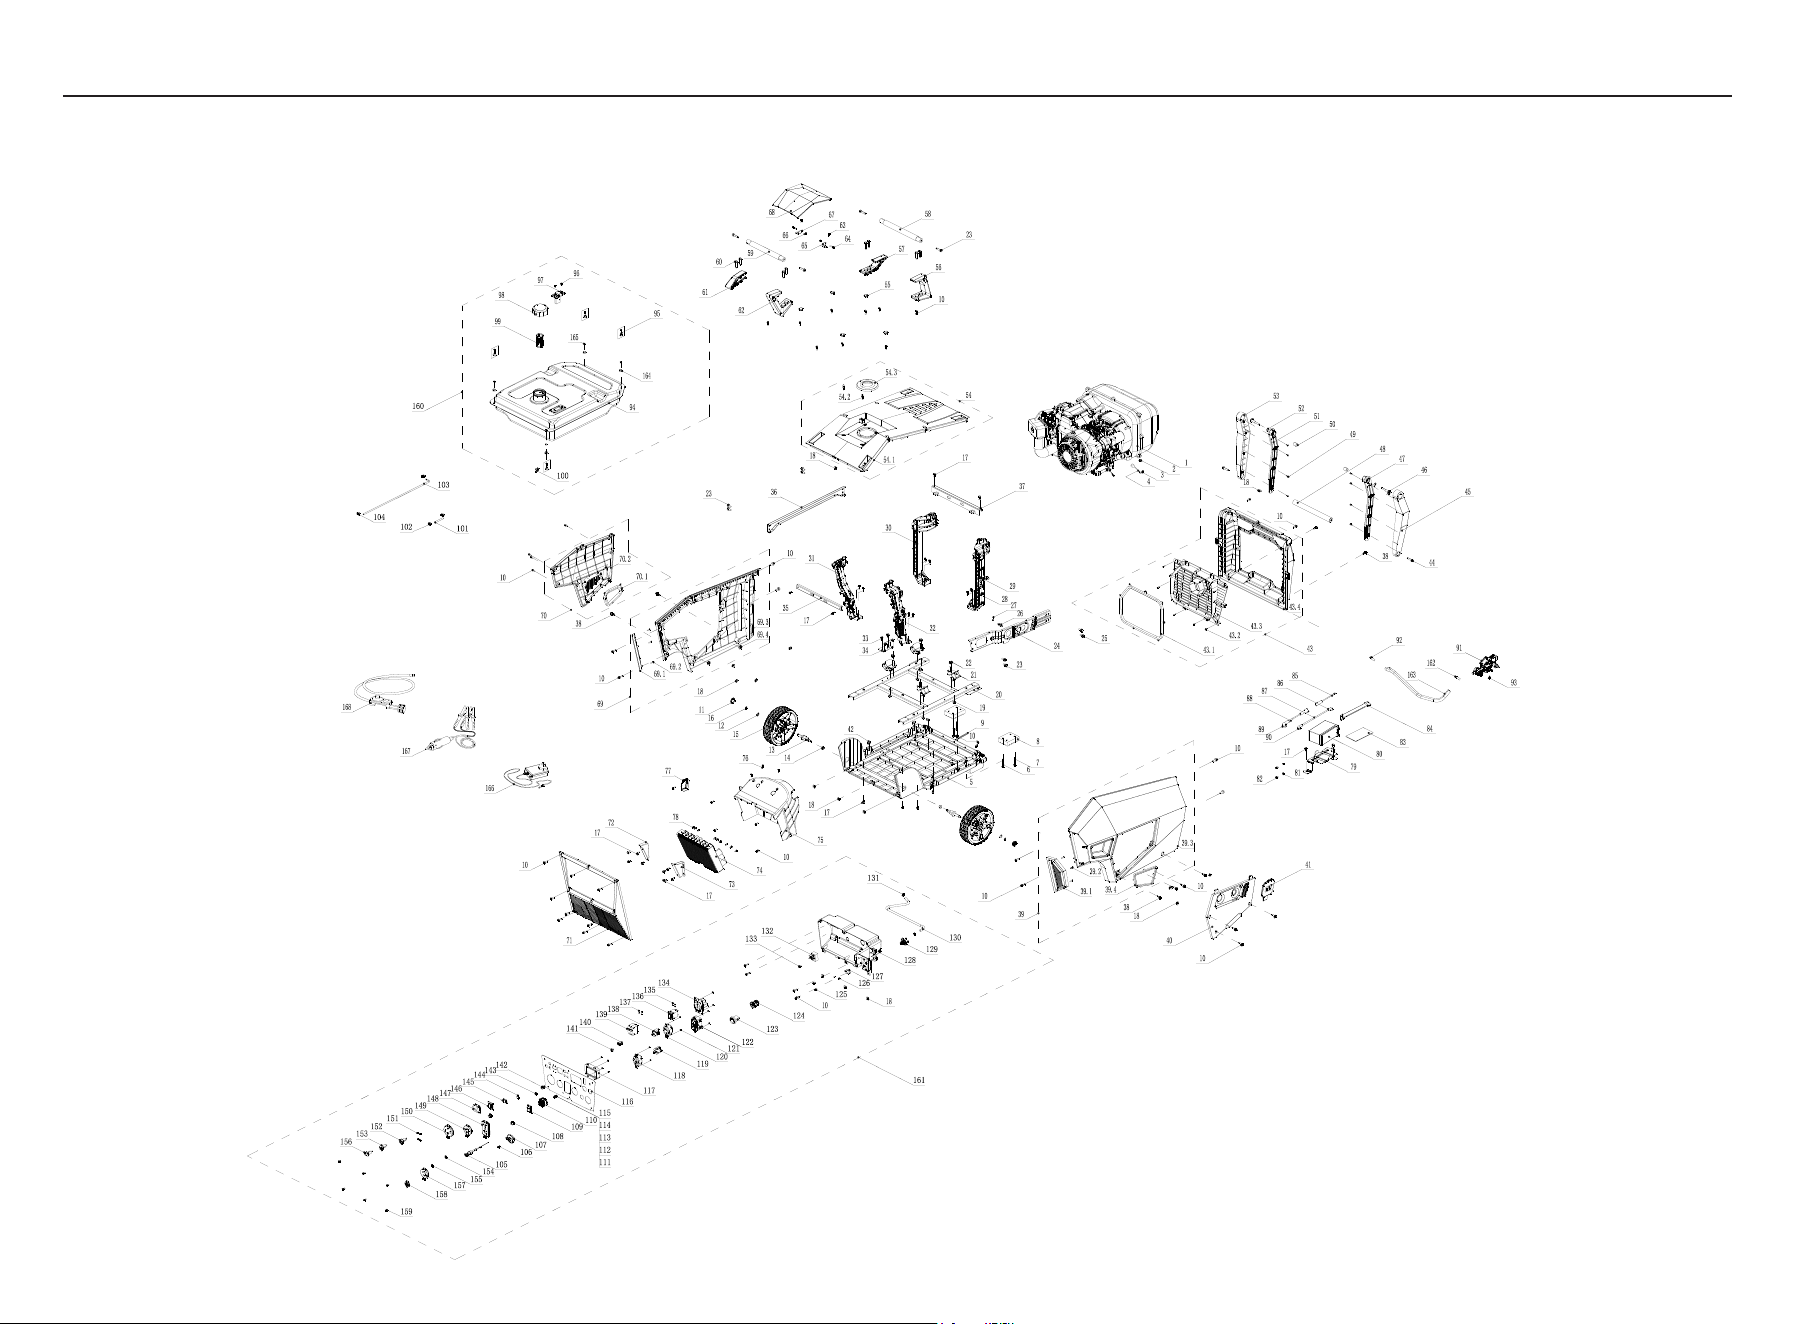
REPLACEMENT PARTS LIST
WT12579 Parts Diagram
For replacement parts, call our customer service department at 844-347-6261, 8 a.m. - 8 p.m., EST, Monday - Sunday.
43
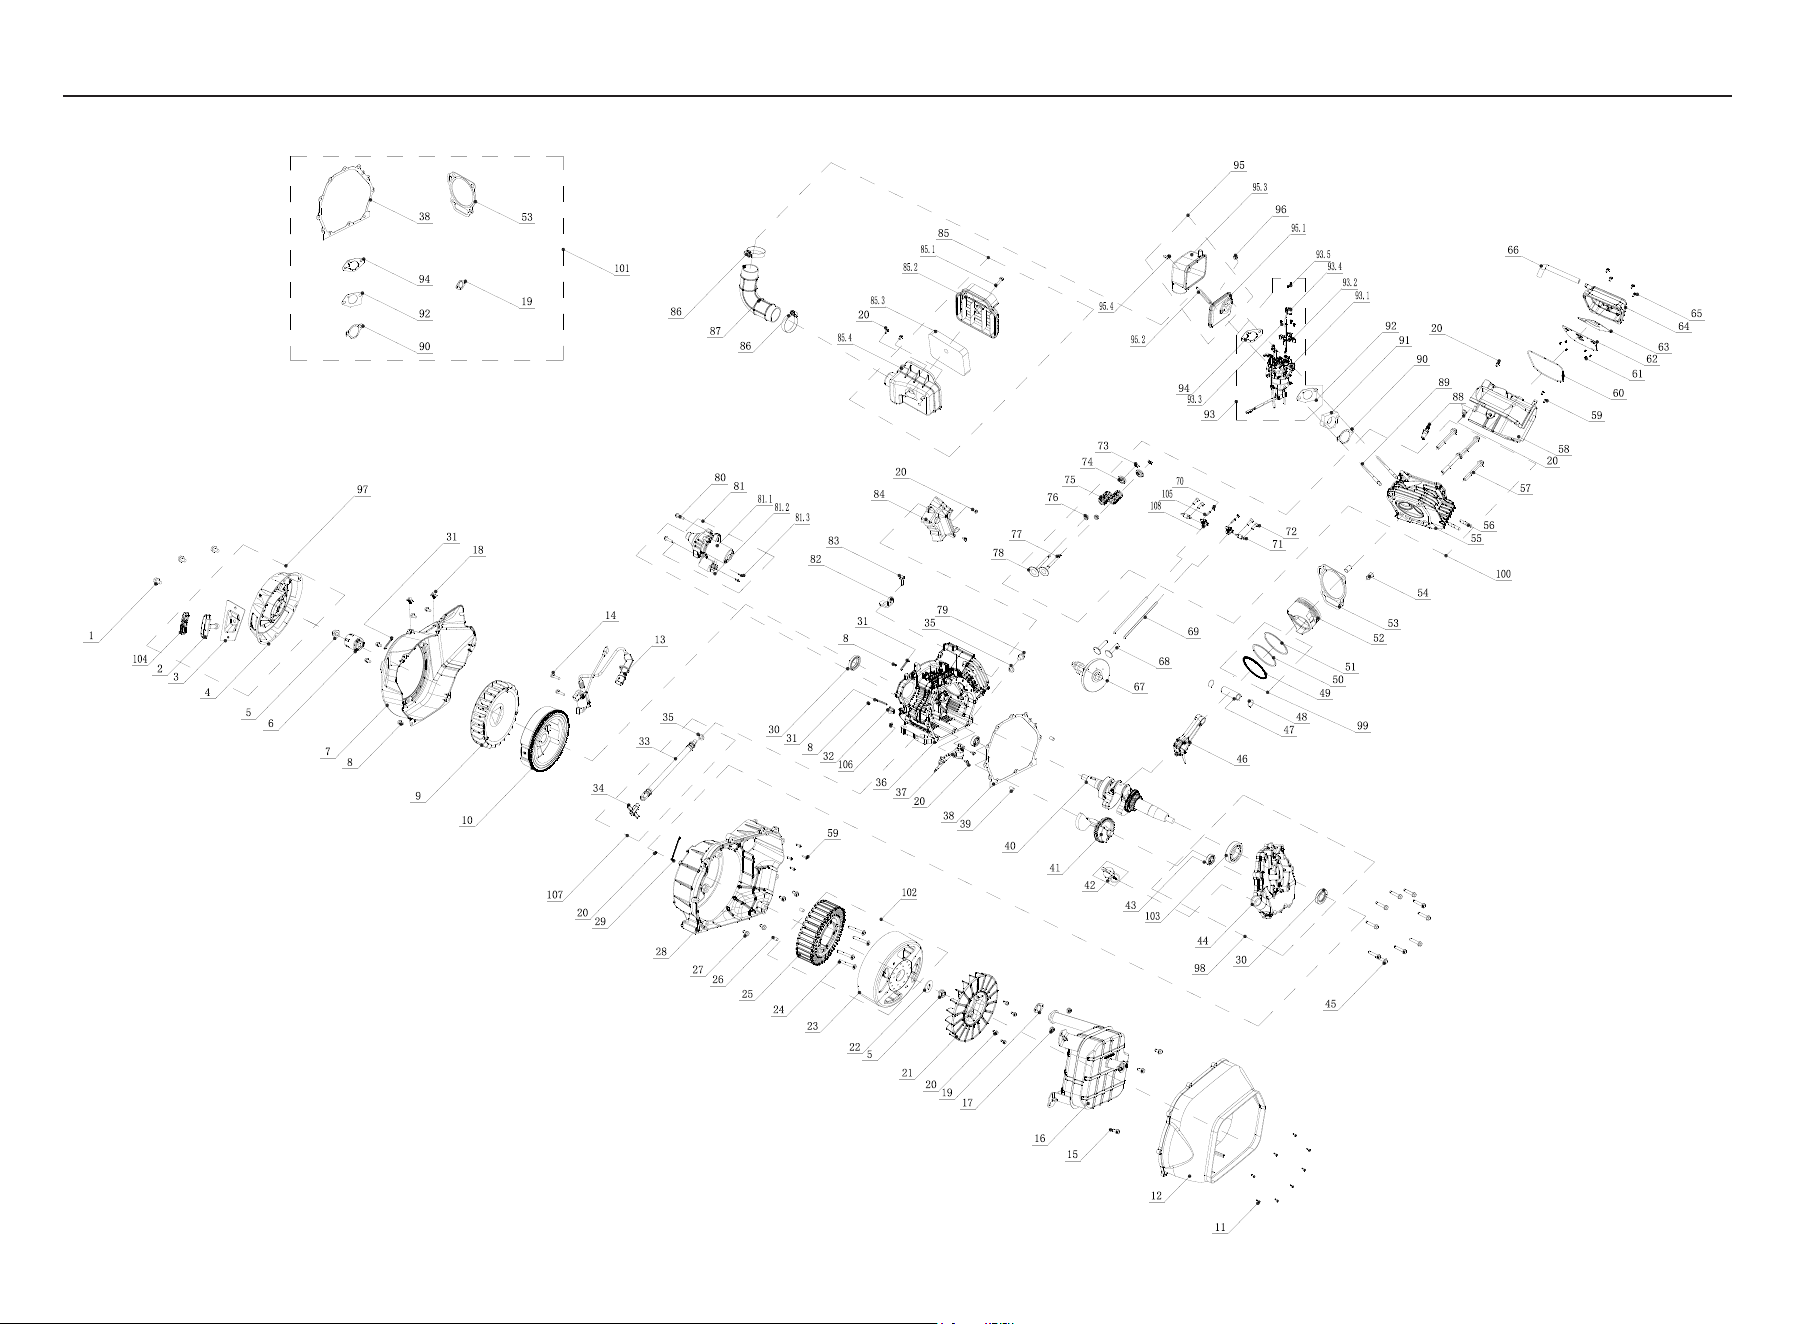
REPLACEMENT PARTS LIST
459cc Engine Parts Diagram
44

45
REPLACEMENT PARTS LIST
WT12579 Portable Generator
All replacement parts are covered under warranty.
NO.
Part
Number
Description Qty.
43.2 336718359
Screw ST4.2 x 9.5
10
43.3 399728329
Exhaust Port
1
43.4 399728330
Rear Cover
1
44 336713006
Flange Bolt M8 x 20
2
45 399728331
Left Handle Cover
1
46 355718311
Handle Bolt
2
47 399718336
Left Handle
1
48 399718337
Lower Handle
1
49 355718318
Screw M5 x 14
8
50 355728314
Bushing
2
51 399718338
Right Handle
1
52 355718312
Washer Ø23.4 x Ø13.1 x 1
2
53 399728332
Right Handle Cover
1
54 399428304
Top Cover Assy.
1
54.1 399728333
Top Cover
1
54.2 399718339
Ball Stud
2
54.3 399728334
Fuel Guide Plate
1
55 399728335
Plug
5
56 399718340
Rear Handle Support, Left
1
57 399718341
Rear Handle Support, Right
1
58 399718342
Rear Handle
1
59 399718343
Front Handle
1
60 399718344
Flange Bolt M8 x 35
8
61 399718345
Front Handle Support, Left
1
62 399718346
Front Handle Support, Right
1
63 336713538
Screw & Washer Assy. M5 x 14
2
64 375718320
Screw & Washer Assy. M4 x 20
2
65 399718347
Bracket
1
66 399718348
Nut M4
2
67 399718349
Bracket, Left
1
68 399728336
Fuel Tank Cap Trim Panel
1
69 399428305
Left Cover Assy.
1
69.1 399728337
Left Decorative Trim
1
69.2
336718359
Screw ST4.2 x 9.5
3
69.3 399728338
Left Cover
1
69.4 399728339
Rubber Damper
2
70 399728340
Left Access Cover Assy.
1
70.1 399728341
Rubber Seal
1
70.2 399728342
Left Access Cover
1
71 399428306
Front Cover
1
72 399718350
Left Bracket, ECM
1
73 399718351
Right Bracket, ECM
1
74 399458305
ECM
1
75 399728343
Air Guide Cover, ECM
1
76 330713523
Screw ST4.2 x 16
3
77 332753001
CO Module
1
78 336718383
Screw & Washer Assy. M4 x 14
9
79 399718352
Bracket, Battery
1
NO.
Part
Number
Description Qty.
1
399468300
Engine Assy.
1
2 336718326
Nut M6
1
3 336713516
External Teeth Lock Washer Ø6
1
4 355718300
Ground Wire
1
5 399728319
Base Assy.
1
6 399718323
Flange Bolt M6 x 70
2
7 355718301
Flange Bolt M6 x 55
2
8 399728320
Isolator
2
9 317713577
Clip
1
10 399718324
Screw M5 x 14
46
11 399728321
Plug, Wheel
2
12 330713585
Washer Ø12
2
13 399718325
Axle
2
14 355718424
Nut M10 x 1.25
2
15 399728322
Wheel
2
16 330713584
Retaining Ring Ø12
2
17 336718301
Flange Bolt M6 x 12
18
18 317713524
Nut M5
15
19 336718318
Nut M8
4
20 399728323
Bearing Plate
1
21 357713532
Isolator II
4
22 357713531
Nut M10
4
23 336713531
Flange Bolt M8 x 20
11
24 399718326
Right Support Plate
1
25 375718302
Flange Bolt M8 x 12
1
26 336713822
Micro Switch 2
1
27 336718322
Nut M3
2
28 336713531
Flange Bolt M8 x 20
8
29 399718327
Left Rear Support Post
1
30 399718328
Right Rear Support Post
1
31 399718329
Left Front Support Post
1
32 399718330
Right Front Support Post
1
33 336718301
Flange Bolt M6 x 12
2
34 399718331
Air Cleaner Bracket
1
35 399718332
Rear Support Plate
1
36 399718333
Left Support Plate
1
37 399718334
Front Support Plate
1
38 355718417
Bolt M6 x 20
6
39 399428302
Right Cover Assy.
1
39.1 399728324
Trim, Right Cover
1
39.2 336718359
Screw ST4.2 x 9.5
3
39.3 399728325
Right Cover
1
39.4 399718335
Trim, Recoil Guide
1
40 399728326
Right Access Cover
1
41 399728327
Main Regulator Cover
1
42 333717014
Nut M6
6
43
399428303
Rear Cover Assy.
1
43.1
399728328
Rubber Seal
1

46
NO.
Part
Number
Description Qty.
80
399458306
Battery
1
81 393728308
Flange Nut M5
2
82 357713569
Screw & Washer Assy. M5 x 10
2
83 399728344
Pad, Battery
1
84 330713623
Pinch, Rubber
1
85 336713692
Battery Cable, Negative, Male,
1
86 336713611
Boot, Rubber Battery
1
87 333755502
Battery Wire
1
88 336713693
Battery Cable, Negative, Female,
1
89 357713571
Boot, Black Battery
1
90 357713570
Boot, Red Battery
1
91 399718353
Main Regulator
1
92 380713547
Clamp
1
93 399728345
Regulator Switch Insert
1
94 399718355
Fuel Tank
1
95 310715064
Bolt M6 x 20
4
96 336417031
Screw M5 x 16
2
97 399428307
Fuel Gauge
1
98 330713500
Fuel Tank Cap
1
99 399428308
Fuel Filter, Wire Mesh
1
100 336713807
Tank Fitting With Filter
1
101 399728346
Fuel Hose
1
102 330713508
Clip Ø10.5 x 8
2
103 399728347
Hose
1
104 317713553
Clamp Ø8 x 6
2
105 355418318
Choke Knob Assy.
1
106 336718383
Screw & Washer Assy. M4 x 14
1
107 399728348
Fuel Knob
1
108 336755005
Cover, Push Button Circuit Breaker
2
109 340725503
Switch Cover
1
110 399458307
Engine Switch
1
111 357713542
Flange Bolt M6 x 22
1
112 380713515
Nut M6
2
113 336713512
Lock Washer Ø6
2
114 336713513
Flat Washer Ø6
2
115 336713516
External Teeth Lock Washer Ø6
1
116 399718358
Control Panel
1
117 399458309
Multimeter
1
118 317713580
Receptacle, L5-30R
1
119 329753003
D.C 10A Breaker, Push Button
1
120 336713601
Receptacle, L14-30R
1
121 336718324
Nut M4
12
122 357713588
Receptacle, 5-20R 120V 20A
1
123
317713565
Receptacle, 12V DC
1
124
320753005
Receptacle, USB
1
125
336713538
Screw & Washer Assy. M5 x 14
2
126 355718401
Screw ST2.9 x 18
2
127 336713822
Micro Switch 2
1
NO.
Part
Number
Description Qty.
128
399728349
Control Box
1
129 355418316
Fuel Valve
1
130 399728350
Fuel Hose
1
131 330713508
Clip Ø10.5 x 8
2
132 399458310
Speed Limiter
1
133 336713538
Screw & Washer Assy. M5 x 14
1
134 380713518
Receptacle, 14-50R
1
135 336713569
Screw & Washer Assy. M4 x 8
4
136 380713526
Circuit Breaker, 30A, Double-Pole
1
137 330723586
Screw/Washer Assy. M5 x 8
4
138 336713585
Circuit Breaker, Push Button, 20A
1
139 399755668
Circuit Breaker, Double-Pole, 50A
1
140 317718305
Switch, ECO
1
141 330713618
Receptacle, Battery Charging
1
142 336755002
CO Indicator Light
1
143 336457020
Nut M11 x 1
1
144 393727003
Receptacle Cover, TT-30R/14-50R
1
145 316735503
Cover, Engine Switch
1
146 393725501
Cover, 30A, Circuit Breaker
1
147 392758302
Cover, Double-Pole Circuit
1
148 360725502
Receptacle Cover, 5-20R GFCI
1
149 360725501
Receptacle Cover, L14-30R
1
150 399427010
Receptacle Cover, 14-50R
1
151 336718368
Screw & Washer Assy. M3 x 6
4
152 399458311
Parallel Terminal, Red
1
153 399458312
Parallel Terminal, White
1
154 333718301
External Tooth Washer
2
155 333728300
Circuit Breaker Nut
1
156 399458313
Parallel Terminal, Black
1
157 336725506
Receptacle Cover, L5-30R
1
158 320723011
Cover, 12V DC Receptacle
1
159 336713538
Screw & Washer Assy. M5 x 14
6
160 399418318
Fuel Tank Assy.
1
161 399418319
Control Panel Assy.
1
162 380713547
Clamp
1
163 399725527
LPG Hose
1
164 336713542
Grommet, Fuel Tank
4
165 357713600
Bushing
4
166 330713634
12V DC, Battery Float Charger
1
167 320755504
12V DC Charging Cable
1
168 336713834
LPG Regulator/Hose Assy.
1
REPLACEMENT PARTS LIST

47
459cc Engine
REPLACEMENT PARTS LIST
NO.
Part
Number
Description Qty.
1
336718308
Flange Bolt M6 x 8 3
2 355428307 Handle, Recoil 1
3 399728300 Guide, Rope 1
4 399418300 Starter Assy. 1
5 357723571
Nut M16
2
6 357723572 Pulley, Starter 1
7 392715500 Engine Cover 1
8 336718302 Flange Bolt M6 x 12 5
9 399728301 Cooling Fan 1
10 380418300 Flywheel 1
11 399718300
Bolt M5 x 20
8
12 399728302
Rear Cover, Mufer
1
13 399458300 Ignition Coil 1
14 336718311 Flange Bolt M6 x 29 2
15 399715636 Flange Bolt M8 x 20 3
16 399418301 Mufer Assy. 1
17 336718318 Nut M8 2
18 375718321 Wire Clip 2
19 399728304 Gasket, Mufer 1
20 336723526 Flange Bolt M6 x 15 13
21 399728305 Alternator Fan 1
22 399718302
Washer
1
23 399458301 Rotor Assy. 1
24 399718303 Flange Bolt M8 x 70 4
25 399458302 Stator Assy. 1
26 399715765 Position Pin Ø10 x 12 2
27 399718305 Flange Bolt M10 x 20 4
28 399728306 Front Cover, Mufer 1
29 360728307 Nylon Cord 1
30 357723515 Seal, Oil 2
31 317713577
Clip
2
32 336728303 Sheath, Wire 1
33 355428308 Quick Oil Drain Hose 1
34 330723604 Bolt, Drain 1
35 357723502 Oil Drainbolt Washer 12 x 2
36 399418302 Crankcase 1
37 357723503 Sensor, Engine Oil 1
38 393723008 Gasket, Crankcase 1
39 317723516 Dowel Pin 8 x 14 2
40 399418303 Crankshaft 1
41 357723507 Balance Shaft 1
42 393723009 Dipstick, Oil 1
43 357723505 Radial Ball Bearing 6202/ 2
44 393713011 Crankcase Cover 1
45 357723516 Flange Bolt M8 x 40 10
46 357723517 Rod, Connecting 1
47
393713039 Piston Pin 1
48
357723518 Piston Pin Retainer Ring 2
NO.
Part
Number
Description Qty.
49
392467006
Ring,Oil 1
50 392467007 Ring, Second Piston 1
51 392467008 Ring, First Piston 1
52 392467009 Piston 1
53 399718309
Gasket, Cylinder Head
1
54 357723544 Dowel Pins Ø12 x 20 2
55 399418304 Cylinder Head 1
56 336723539 Exhaust Valve Stud Bolt 2
57 355718346 Bolt M10 x 1.25 x 80 4
58 399728307 Cylinder Head Shroud 1
59 330713523 Screw ST4.2 x 16 2
60 370728300 Gasket, OHV 1
61 330713548 Screw ST3.5 x 9.5 6
62 399418305 PCV 1
63 368728300 Gasket, PCV 1
64 370728302 OHV Cover 1
65 336723577 Flange Bolt M6 x 20 4
66 357723529 Breather Tube 1
67 393413005 Camshaft 1
68 399718311 Valve Lifter 2
69 399718312 Push Rod 2
70 317723574 Nut, Valve Adjusting 2
71 399718314 Rocker Arm Shaft 2
72 399718315 Bolt M6 x 16 4
73 355718338 Valve, Locking Clip 4
74 399718316 Retainer, Intake Valve 2
75 399718317 Valve Spring 2
76 355728333
Oil Seal, Valve
2
77 399718318 1
78 399718319 Intake Valve 1
79 380717007
Drain Plug M12 x 1.25 x 15
1
80 357713584 Flange Bolt M8 x 35 2
81 399418307 Starter Motor Assy. 1
81.1 399718320 Starter Motor 1
81.2 399458303 Relay, Starter 1
81.3 336713519 Flange Bolt M5 x 16 2
82 399718321 Lifting Lugs 1
83 399715634 Flange Bolt M8 x 25 1
84 399728308 Crankcase Air Guide 1
85 399428300 Air Cleaner 1
85.1 336723609 Flange Bolt M6 x 29 1
85.2 399728309 Air Cleaner Cover 1
85.3 399728310 Air Cleaner Element 1
85.4 399728311 Air Cleaner Base 1
86
355718320 Clamp 33-57 2
87
399728312 Hose, Air Cleaner 1
Crankcase

48
REPLACEMENT PARTS LIST
NO.
Part
Number
Description Qty.NO.
Part
Number
Description Qty.
88
375467022
Spark Plug 1
89 355718345 Stud Bolt M6 x M8 x 110 2
90 399728313 Gasket, Carburetor 1
91 399728314 Carburetor Connector 1
92 357723551
Gasket, Carburetor
1
93 399418308 Carburetor Assy. 1
93.1 399418309 Carburetor 1
93.2 355728354 Stepper Motor Bracket 1
93.3 355718397 Screw M4 x 10 4
93.4 399418310 Stepper Motor, Throttle 1
93.5 336718351 Bolt M4 x 8 2
94 399728315 Gasket, Air Cleaner 1
95 399428301 Intake Manifold Assy. 1
95.1 399728316 Intake Chamber Base 1
95.2 399718322 Manifold Screw 1
95.3 399728317 Intake Manifold Cover 1
95.4 357713550 Wing Nut M6 1
96 336723555 Nut M6 1
97 399418311
Recoil Assy.
1
98 399418312 Crankcase Assy. 1
99 399418313 Piston Rings Assy. 1
100 399418314
Cylinder Head Assy.
1
101 399418315 Gasket Assy. 1
102 399458304 Alternator Assy. 1
103 392467003 Bearing 1
104 330723526 Recoil, Rope Handle 1
105 317723575 Screw, Valve Adjusting 2
106 336718301 Flange Bolt M6 x 12 2
107 355428317 Quick Oil Drain Assy. 1
108 399718313 Rocker Arm 2
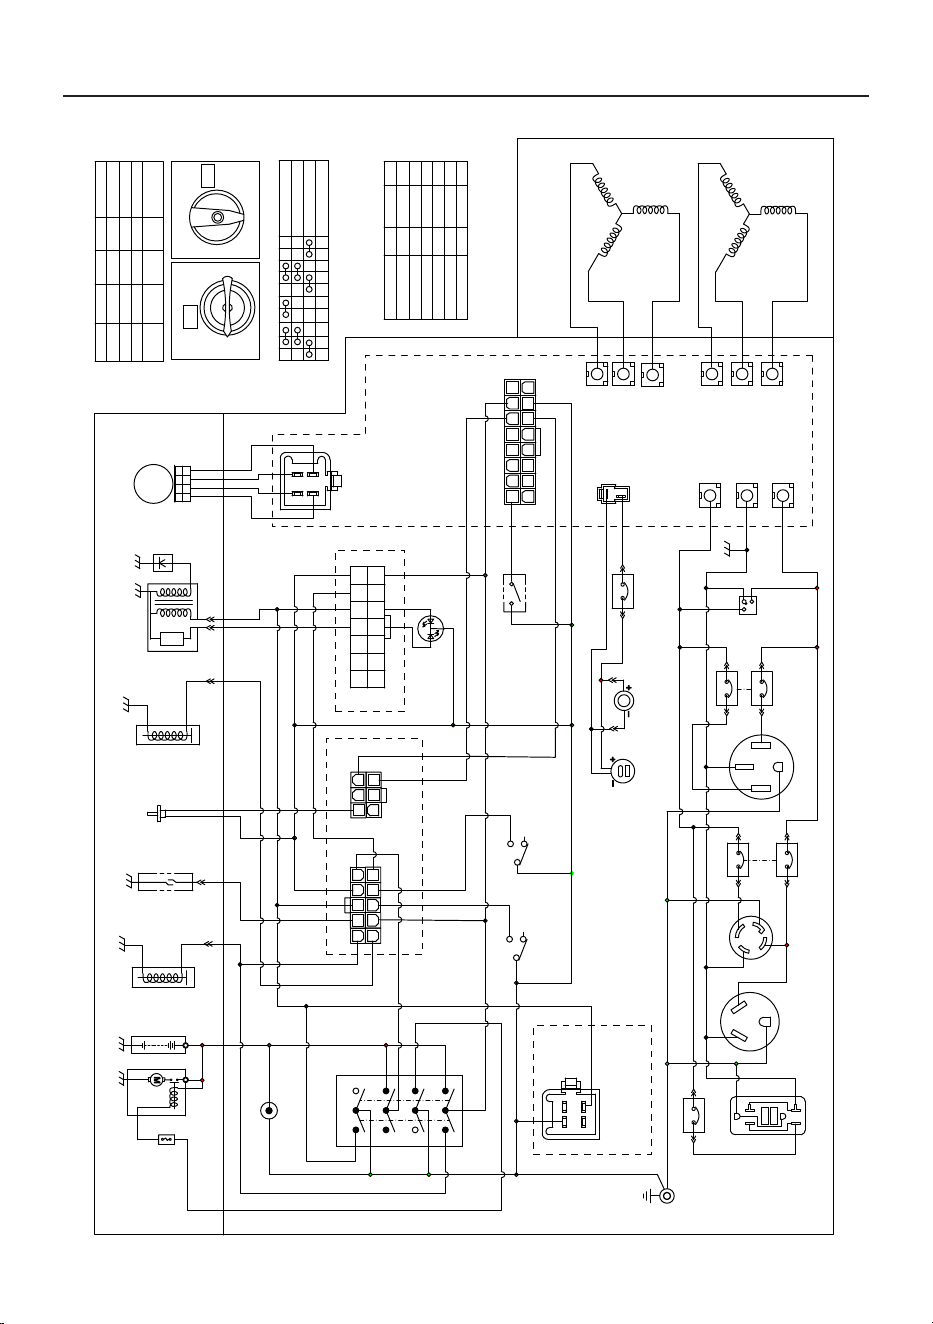
49
WIRING DIAGRAM
Wiring Diagram
L
W
G
B
Y
R
YELLOW
BLACK
BLUE
GREEN
RED
WHITE
Br
GREEN YELLOW
WHITE GREEN
BROWN
BLACK WHITE
B/W
G/Y
W/G
Pu
PURPLE
P
PINK
NG
LPG
SM2
SELECTOR SWITCH 2
ALTERNATOR
BLOCK
AC COIL
AC COIL
20A
CIRCUIT BREAKER
30A
30A
CIRCUIT BREAKER
CONTROL BOX BLOCK
W
PARALLEL
PORTS
50A
50A
CIRCUIT BREAKER
SPARK
PLUG
TCI UNIT
OIL LEVEL SW
FUEL CUT
SOLENOID
LPG CUT
SOLENOID
W/G
W/G
W/G
W/G
GAS LEVEL
GAUGE
ENGINE
BLOCK
B/W
R
STARTERBATTERY
FUSE
B/W
ECO.SW
B
USB-A+CDC12V
R
B
R
10A
CIRCUIT BREAKER
BATTERY CHARGING PORT
G/Y
SELECTOR SWITCH 1
LPG
GAS
OFF
ENGINE SWITCH
ON
ST
2 3 4 5 6 7 8 10 11 12
SELECTOR
SWITCH 1/2
SM2SM1
NO-COM NO-COM
LPG CUT
SOLE
GAS CUT
SOLE
UN-WORK
WORKLPG
OFF
GAS
NG
UN-WORK
UN-WORKUN-WORK
WORK
WORK
WORK
/
/
/
ENGINE SWITCH
LPG/NG.SW
LPG/GAS.SW
CO MODULE
DISPLAY
MODULE
CO
INDICATOR
LIGHT
INVERTER MODULE
GROUND
TERMINAL
NO-COM
NC-COM
NC-COM
SM1
R
R
R
R
R
W W
W W
W
W
B
B
B
B
B
B
B
B
G/Y
G/Y
G/Y
G/Y
G/Y
G/Y
G/Y
R
SPEED
PROTECTION
MODULE
L
G/Y
G/Y
G/Y
G/Y
G/Y
G/Y
G/Y
G/Y G/Y
G/Y
G/Y
B
B
B
B
R
R
R
R
R
Y
1
2
3
4
5
6
7
8
9
10
TT-30R
L14-30R
RESET
GFCI 5-20R
TEST
1
2
3
4
5
6
7
8
9
10
11
12
13
14
1 2 3
4 5 6
7 8 9
10 11 12
STEPPER MOTOR
M
NO
COM
NC
SM2
1
2
3
4
5
6
NO
COM
NC
SM1
1
2
3
4
5
6
7
8
9
10
11
12
13
14
15
16
50
SERVICE – WARRANTY
For service information contact FIRMAN customer service at 1-844-347-6261 or at www.
rmanpowerequipment.com to obtain warranty service information or to order replacement
parts or accessories.
HOW TO ORDER REPLACEMENT PARTS
Even quality-built equipment such as this electric generator may need occasional
replacement parts to maintain it in good condition over the years. To order replacement parts,
please give the following information:
● Model No. Rev. Level and Serial No. found on the Data Decal.
● Parts number or numbers as shown in the Parts List section.
● A brief description of the trouble with the generator.
FIRMAN 3 YEARS LIMITED WARRANTY
Repair/Replacement Warranty
FIRMAN warrants to the original purchaser that the mechanical and electrical components will be
free of defects in material and workmanship for a period of one (1) year (parts and labor) and 3 years
(parts and technical support) from the original date of purchase 90 days [parts and labor] and 180
days [parts] for commercial & industrial use. Transportation charges on product submitted for
repair or replacement under this warranty are the sole responsibility of the purchaser . This warranty
only applies to the original purchaser and is not transferable.
Do Not Return the Unit to the Place of Purchase
Contact the FIRMAN customer service and FIRMAN will troubleshoot any issue via phone or e-mail.
If the problem is not corrected by this method, FIRMAN will, at its option, authorize evaluation,
repair or replacement of the defective part or component at a FIRMAN Service Center. FIRMAN
will provide you with a case number for warranty service. Please keep it for future reference.
Repairs or replacements without prior authorization, or at an unauthorized repair facility, will not be
covered by this warranty.
Warranty Exclusions
This warranty does not cover the following repairs and equipment.
Normal Wear
Your product needs periodic parts and service to perform well. This warranty does not cover repair
when normal use has exhausted the life of a part or the equipment as a whole.
Warranty Qualications
Register your product using the QR code provided or at www.
rmanpowerequipment.com. FIRMAN will also register the warranty upon
receipt of your Warranty Registration Card and a copy of your sales receipt
from one of FIRMAN’s retail locations as proof of purchase. Please submit
your warranty registration and your proof of purchase within ten(10) days of
the date of purchase.

51
SERVICE – WARRANTY
INSTALLATION, USE AND MAINTENANCE
This warranty will not apply to parts and/or labor if your product is deemed to have been misused,
neglected, involved in an accident, abused, loaded beyond the generator’s limits, modied,
installed improperly or connected incorrectly to any electrical component. Normal maintenance is
not covered by this warranty.
Other Exclusions
This warranty excludes:
– cosmetic defects such as paint, decals, etc.
– wear items
– accessory parts
– failures due to acts of God and other force majeure events beyond the manufacturer’s control
– problems caused by parts that are not original FIRMAN parts
– units used for prime power in place of existing utility power where utility is present or in place
of utility power where utility power service does not normally exist.
LIMITS OF IMPLIED WARRANTY AND CONSEQUENTIAL DAMAGE
FIRMAN disclaims any obligation to cover any loss of time, use of this product, freight, or any
incidental or consequential claim by anyone from using this product. THIS WARRANTY IS IN LIEU
OF ALL OTHER WARRANTIES, EXPRESS OR IMPLIED, INCLUDING WARRANTIES OF
MERCHANTABILITY OR FITNESS FOR A PARTICULAR PURPOSE.
A unit provided as an exchange will be subject to the warranty of the original unit. The length of the
warranty governing the exchanged unit will remain calculated by reference to the purchase date of the
original unit.
This warranty gives you certain legal rights which may change from state to state. Your state may
also have other rights you may be entitled to that are not listed within this warranty.
Contact Information
You may contact FIRMAN at:
Firman Power Equipment Inc.
Attn: Customer Service
8644 W. Ludlow Dr.
Peoria, AZ 85381
www.rmanpowerequipment.com
We are FIRMAN POWER - And we are here for you.

52
SERVICE – WARRANTY
FIRMAN POWER EQUIPMENT INC.
EMISSION CONTROL WARRANTY STATEMENT
The warranty period begins on the date the engine/equipment is delivered to an ultimate purchaser. FIRMAN warrants to the ultimate
purchaser and each subsequent purchaser that the engine is:
Designed, built, and equipped so as to conform with all applicable regulations adopted by the Air Resources Board and US EPA;
and Free from defects in materials and workmanship that cause the failure of a warranted part to be identical in all material
respects to the part as described in the engine manufacturers application for certification.
Th
e warranty on emissions-related parts is as follows:
(1) Any warranted part that is not scheduled for replacement as required maintenance in the owner's manual supplied, is
warranted for the warranty period stated above. If any such part fails during the period of warranty coverage, the part will be
repaired or replaced by FIRMAN at no charge to the owner. Any such part repaired or replaced under the warranty will be
warranted for the remaining warranty period.
(2) Any warranted part that is scheduled only for regular inspection in the owner's manual supplied, is warranted for the w
arranty
period stated above. Any such part repaired or replaced under warranty will be warranted for the remaining warranty period.
(3) Any warranted part that is scheduled for replacement as required maintenance in the owner's manual supplied, is warranted
for the period of time prior to the first scheduled replacement point for that part. If the part fails prior to the first scheduled
replacement, the part will be repaired or replaced by FIRMAN at no charge to the owner. Any such part repaired or replaced
under warranty will be warranted for the remainder of the period prior to the fi
rst scheduled replacement point for the part.
(4) Repair or replacement of any warranted part under the warranty must be performed at no charge to the owner at a warranty
station.
(5) Notwithstanding the provisions of Subsection (4) above, warranty services or repairs must be provided by FIRMAN that
are franchised to service the subject engines.
(6) The owner must not be charged for diagnostic labor that leads to the determination that a warranted part is in fact defective,
provided that such diagnostic work is performed at a warranty station.
(7) FIRMAN is liable for damages to o
ther engine components proximately caused by a failure under warranty of any
warranted part.
MANUFACTURER'S WARRANTY COVERAGE:
The exhaust and evaporative emissions control system on your small off-road engine and engine powered equipment is warranted
for two years. If any emissions-related part on your small off-road engine and engine powered equipment is defective, the part will
be repaired or replaced by FIRMAN.
OWNER'S WARRANTY RESPONSIBILITIES:
As the SORE and engine powered equipment owner, you are responsible for the performance of the required maintenance
listed in your operator's manual. FIRMAN recommends that you retain all receipts covering maintenance on your SORE and
engine powered equipment, but FIRMAN cannot deny warranty coverage solely for the lack of receipts or for your failure to
ensure the performance of all scheduled maintenance.
As the SORE and engine powered equipment owner, you should however be aware that FIRMAN may deny you warranty
coverage if your small off-road engine
or engine powered equipment or a part has failed due to abuse, neglect, or improper
maintenance or unapproved modifications.
You are responsible for presenting your small off-road engine and engine powered equipment to a FIRMAN distribution center
or service center as soon as the problem exists. The warranty repairs shall be completed in a reasonable amount of time,
not to exceed 30 days.
If you have any questions regarding your warranty rights and responsibilities, you should contact FIRMAN at 1-844-347-6261.
FIRMAN Emission Control Defects Warranty Provisions
This emission Control System is warranted for two years. If any emission-related part on your
engine/equipment is defective, the part will be repaired or replaced by FIRMAN.
As the small off-road engine/equipment owner, you are responsible for the performance of the
required maintenance listed in your owner's manual. FIRMAN recommends that you retain all
receipts covering maintenance on your small off-road engine/equipment, but FIRMAN cannot
deny warranty coverage solely for the lack of receipts or for your failure to ensure the performance
of all scheduled maintenance. As the small off-road engine/equipment owner, you should
however be aware that FIRMAN may deny you warranty coverage if your small off-road
engine/equipment or a part has failed due to abuse, neglect, improper maintenance or
unapproved modifications. You are responsible for presenting your small off-road
engine/equipment to FIRMAN distribution center as soon as a problem exist
s. The warranty
repairs shall be completed in a reasonable amount of time, not to exceed 30 days. If you have any
questions regarding your warranty rights and responsibilities, you should contact FIRMAN at
1-844-347-6261 or www.firmanpowerequipment.com .
DEFECTS WARRANTY REQUIREMENTS:
(a) The warranty period begins on the date the engine/equipment is delivered to an ultimate
purchaser.
(b) General Emissions Warranty Coverage. FIRMAN warrants to the ultimate purchas
er and each
subsequent owner that the engine/equipment is:
(1) Designed, built, and equipped so as to conform with all applicable regulations adopted by the
Environmental Protection Agency; and
(2) Free from defects in materials and workmanship that causes the failure of a warranted part for
a period of two years.
(c) The warranty on emissions-related parts will be interpreted as follows:
(1) Any warranted part that is not scheduled for replacement as required maint
enance in the
written instructions required by subsection (d) must be warranted for the warranty period
defined in Subsection (b)(2). If any such part fails during the period of warranty coverage, it
must be repaired or replaced by FIRMAN according to Subsection (4) below. Any such part
repaired or replaced under the warranty must be warranted for the remaining warranty period.
(2) Any warranted part that is scheduled only for regular inspection in the written instructio
ns
required by subsection (d) must be warranted for the warranty period defined in Subsection (b)(2).
A statement in such written instructions to the effect of “repair or replace as necessary” will
not reduce the period of warranty coverage. Any such part repaired or replaced under warranty
must be warranted for the remaining warranty period.
YOUR WARRANTY RIGHTS AND OBLIGATIONS
The United States Environmental Protection Agency (EPA) and FIRMAN POWER EQUIPMENT INC.
(FIRMAN) are pleased to explain the emission control system warranty on your [2026-2027] model
year small off-road engine/equipment. In the United States, new small off-road engine/equipment
must be designed, built and equipped to meet the State's stringent anti smog standards. FIRMAN
must warrant the emission control system on your small off-road engine/equipment for the period
listed below provided there has been no abuse, neglect or improper maintenance of your small
off-road engine/equipment leading to the failure of the emission control system. Your emissions
control system may include parts such as the carburetor or fuel-injection system, the ignition
system, catalytic converter, fuel tanks, fuel lines (for liquid fuel and fuel vapors), fuel caps, valves,
canisters, filters, clamps and other associated components. Also included may be hoses, belts,
connectors, and other emission-related assemblies. Where a warrantable con
dition exists, FIRMAN
will repair your small off-road engine/equipment at no cost to you including diagnosis, parts and labor.

53
SERVICE – WARRANTY
This Emission Control System Warranty shall not cover any of the following:
(a) Consequential damages such as loss of time, inconvenience, loss of use of the engine or
equipment, etc.
(b) Diagnosis and inspection fees that do not result in eligible warranty service being performed.
1. Ignition system including:
- Spark plug
- Ignition coil
2. Fuel metering system:
- Fuel tank
- Fuel cap
- Fuel lines(for liquid fuel and fuel vapors) and
related fittings/clamps
- Fuel regulator, carburetor and internal parts.
3. Catalytic muffler assembly including:
- Exhaust ma
nifold
- Catalytic converter
- Muffler gasket
-pulse valve
4. Air induction system including:
- Intake pipe/manifold
- Air cleaner
5. Crankcase breather assembly including:
- Breather connection tube
6. Fuel tank evaporative emission control system
including:
- Purge valves
- Carbon canister
- Vapor hoses and fitting/clamps
(3) Any warranted part that is scheduled for replacement as required maintenance in the
written instructions required by subsection (d) must be warranted for the period of time prior
to the first scheduled replacement point for that part. If the part fails prior to the first scheduled
replacement, the part must be repaired or replaced by FIRMAN according to Subsection (4)
below. Any such part repaired or replaced under warranty must be warranted for the remainder
of the period prior to the first scheduled replacement point for the part.
(4) Repair or replacement of any warranted part under the warranty must be performed at no
charge to the owner at a warranty station.
(5) Notwithstanding the provisions of Subsection (4) above, warranty services or repairs must be
provided at all FIRMAN distribution c
enters that are franchised to service the subject engine/
equipment.
(d) Emission Warranty Parts List for exhaust (for all displacements).
FIRMAN will furnish with each new engine/equipment written instructions for the maintenance
and use of the engine/equipment by the owner.
Limitations
(6) The owner must not be charged for diagnostic labor that leads to the determination that a
warranted part is in fact defective, provided that such diagnostic work is performed at a
warranty station.
(7) FIRMAN is liable for damages to other engine/equipment component
s proximately
caused by a failure under warranty of any warranted part.
(8) Throughout the emissions warranty period defined in Subsection (b)(2), FIRMAN must
maintain a supply of warranted parts sufficient to meet the expected demand for such parts.
(9) Any replacement part may be used in the performance of any warranty maintenance or
repairs and must be provided without charge to the owner. Such use will not reduce the
warranty obligations of FIRMAN.
(10) Add-on or modified parts that are not exempted by the Environmental Protection Agency
may not be used. The use of any non-
exempted add-on or modified parts will be grounds for
disallowing a warranty claim. FIRMAN will not be liable to warrant failures of warranted parts
caused by the use of a non-exempted add-on or modified part.
(11) FIRMAN issuing the warranty shall provide any documents that describe that manufacturer's
warranty procedures or policies within five working days of request by the Environmental
Protection Agency.

All rights reserved. Any reprinting or unauthorized use
without the written permission is expressly prohibited.
P/N:399748302 Rev:00 0426