truly driven.
USER MANUAL
vantrue.com
V17.3
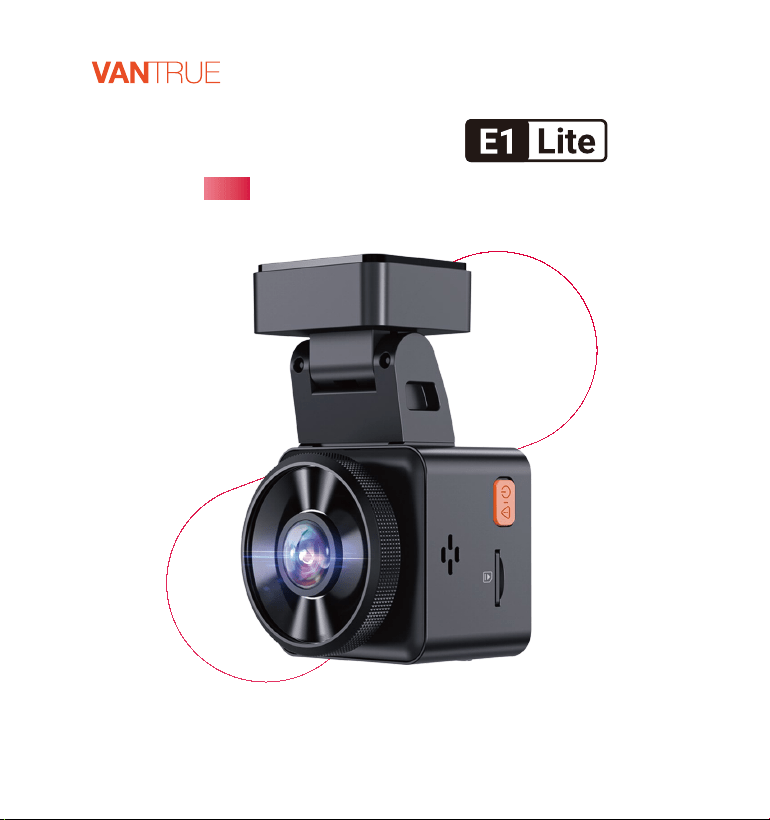
Element 1 Lite


Contact Us
Join Our Community

CONTENTS
VERZEICHNIS
CONTENU
SPIS TREŚCI
ÍNDICE
目次
目录
10
23
37
49
63
75
88
Voice Control
Spracherkennung
Assistant Vocal (En français)
Komendy głosowe
Control por voz
音声コントロール
语音识别
4.
6
19
33
45
59
71
84
Use the “Vantrue” App
APP-Verwendung
Comment utiliser l'application
Korzystanie z aplikacji Vantrue
Utilice la app “Vantrue”
アプリの使用
APP使用
3.
1
14
27
40
53
66
79
What’s in the box?
Packliste
Qu'y a-t-il dans la boîte?
Co znajdziemy w pudełku?
¿Qué hay en la caja?
同梱内容
包装清单
1.
12
25
38
50
64
76
89
Warranty & Suppo
Kundendienst
Garantie & Suppo
Gwarancja & wsparcie
Garantía y sopoe
保証とアフターサービス
售后服务
6.
11
24
37
50
Viewing les on a Computer
Computer-Wiedergabedatei
Lire les chiers via l'ordinateur
Przeglądanie plików na komputerze
5.
Visualizar los archivos en una
computadora
PCで映像を再生
电脑回放文件
75
88
63
Installation
Installationsanleitung
Guide d'installation
Instalacja
Instalación
取り付け案内
安装指南
3
16
29
42
55
68
81
2.

Warm Tips:
Please read the User Manual carefully before use;
The dash cam must be plugged in to operate;
Please do not debug the product or use your mobile phone to watch driving
videos during driving, and pay attention to driving safety;
This product requires the inseion of an micro SD card for use. Please use a
functional micro SD card;
Do not disassemble or repair the dash cam casing by yourself. If the product
malfunctions, please contact the ocial VANTRUE.
Do not install the dash cam in a location that may obstruct the driving view;
Please use this product away from high temperature and humid environ-
ments;
In order to improve the product experience, the rmware of the product will
be updated periodically. If necessa, you can update the rmware to
experience it;
Do not install the dash cam directly in front of passengers to prevent
accidental detachment and potential safety hazards;
Please note that it may not be possible to connect to the app when using
CarPlay or Android Auto;
Please use this product within the scope permitted by law.
1.
2.
3.
4.
5.
6.
7.
8.
9.
10.
11.
EN
- 1 -
EN
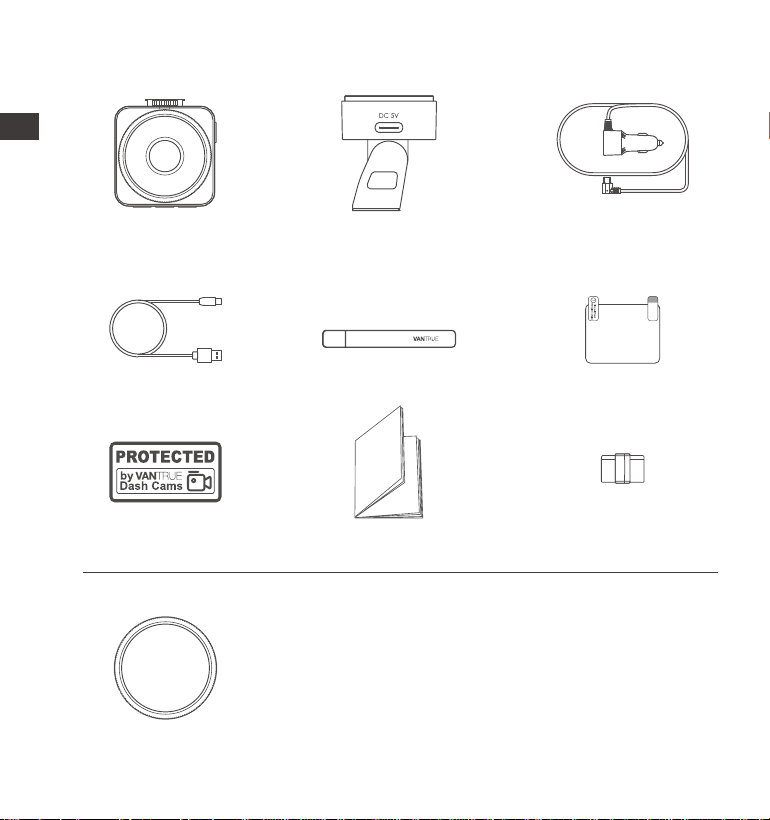
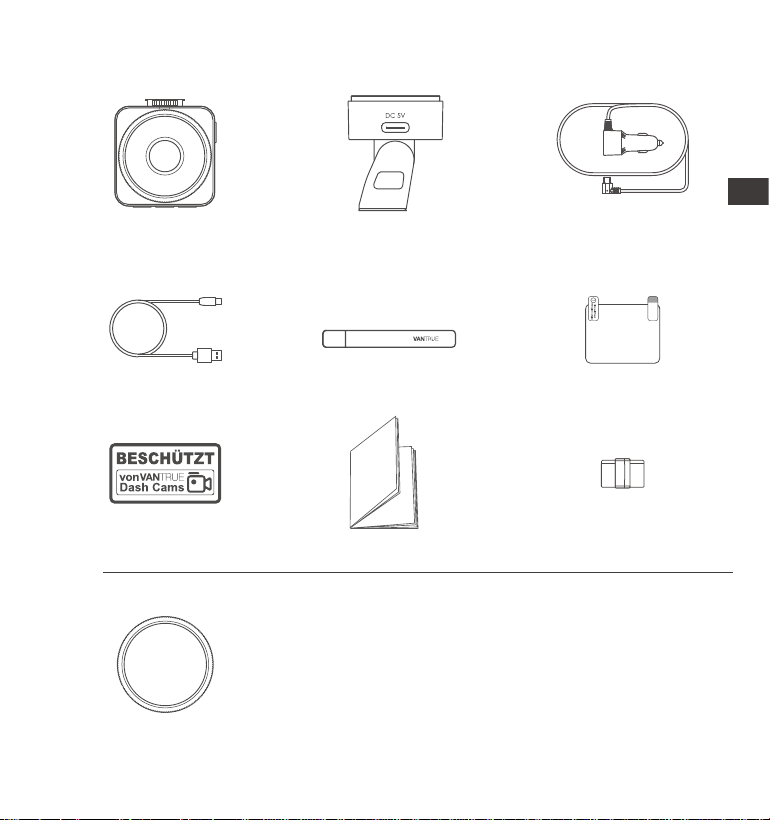
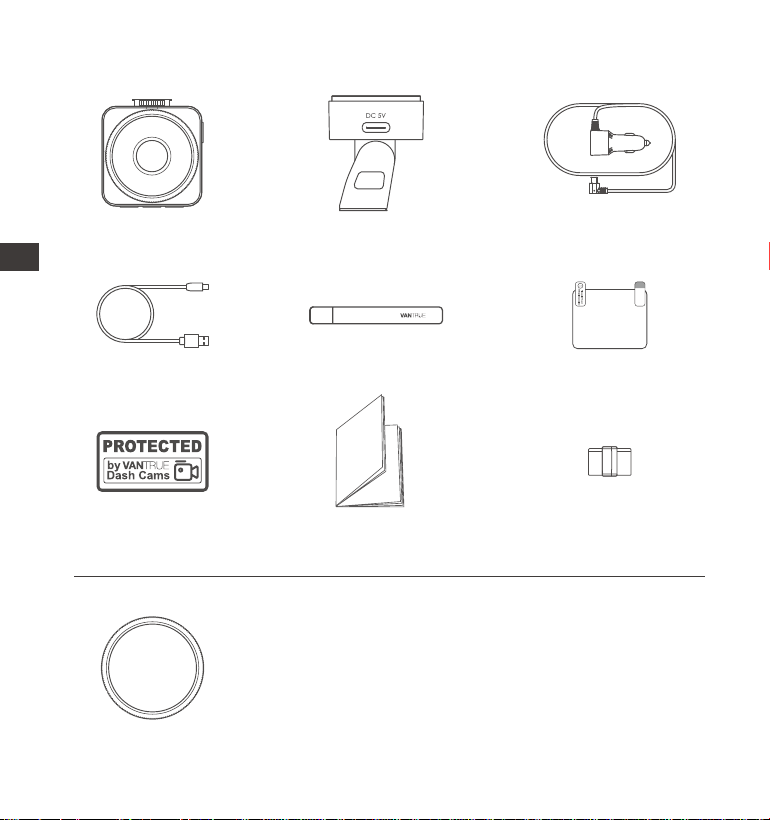
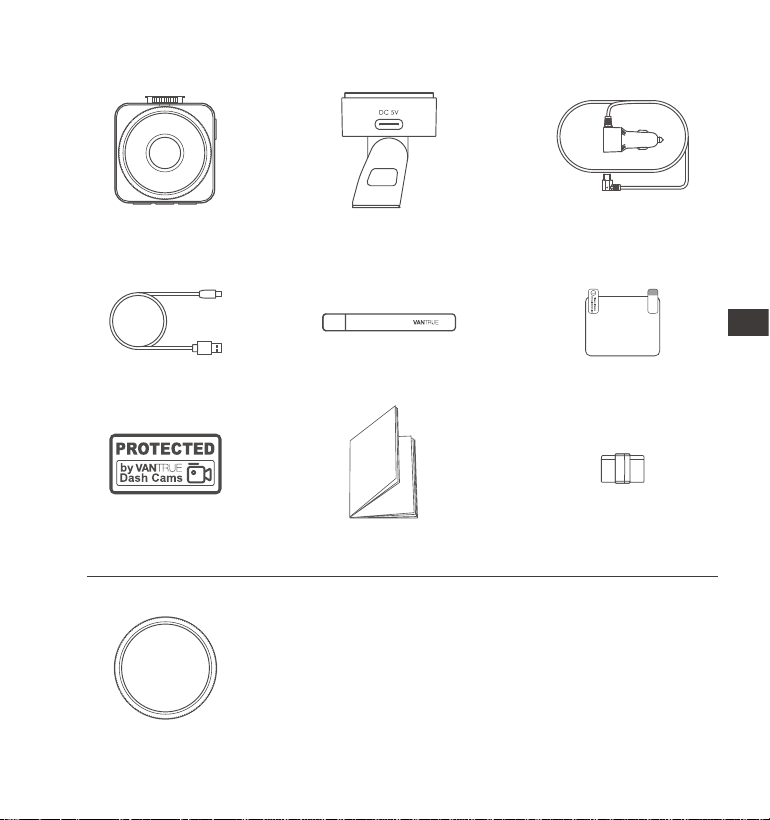
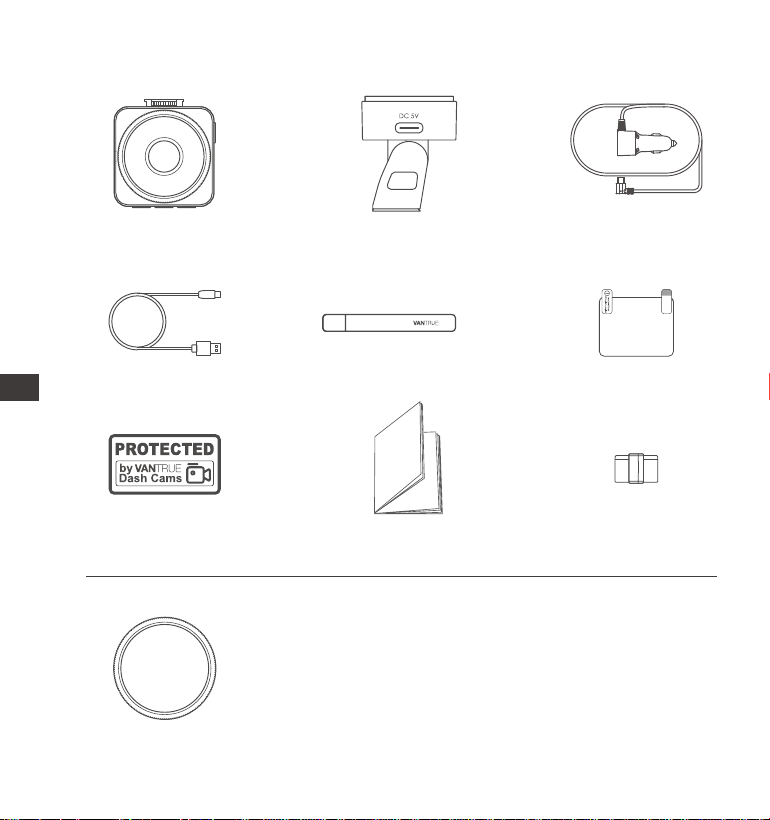
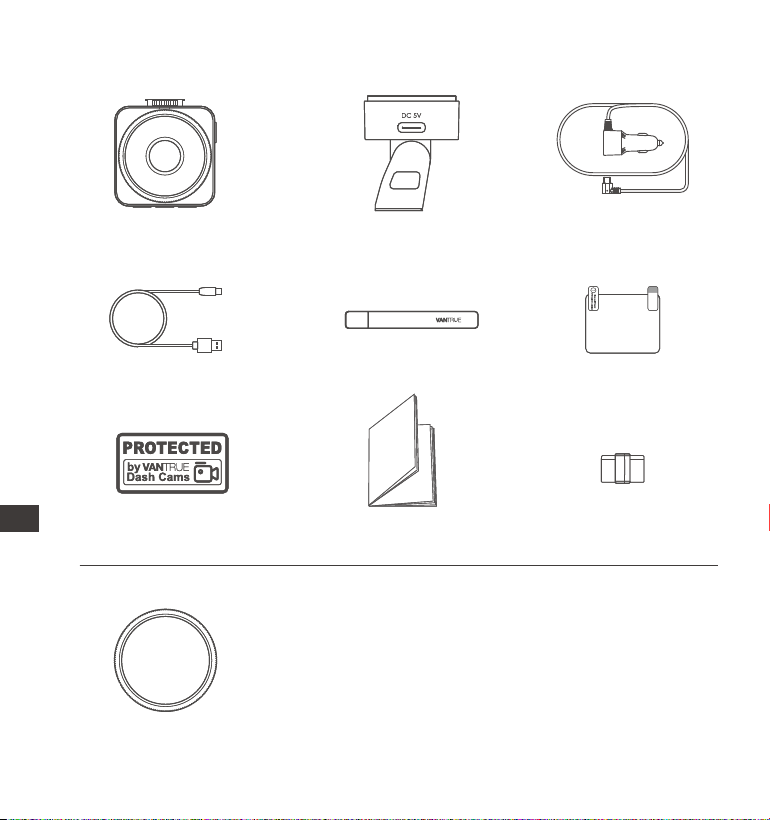
1. What's in the box?
J. CPL Filter
Optional Accessories
A.
Vantrue E1 Lite
Dash Cam
D.
Type C Data
Cable (3.3ft)
G.
Crowbar
C.
Car Charger with
Built-in Type C Cable
(11.5ft)
F.
Warning Stickers
H.
Quick Guide
B.
GPS Adhesive
Mount
E.
Electrostatic stickers
I. Cable Clip
- 2 -
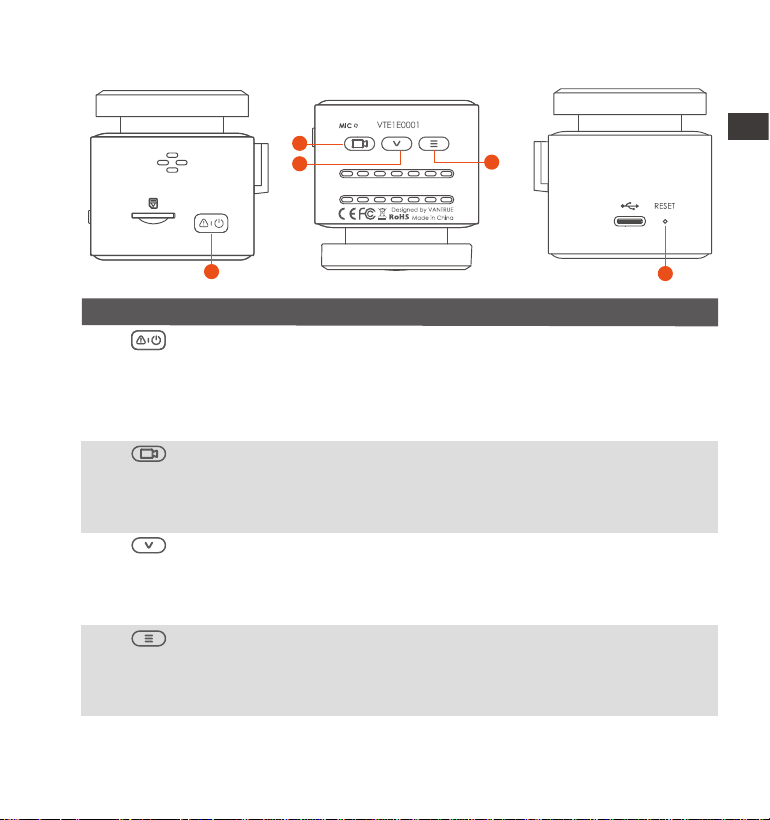
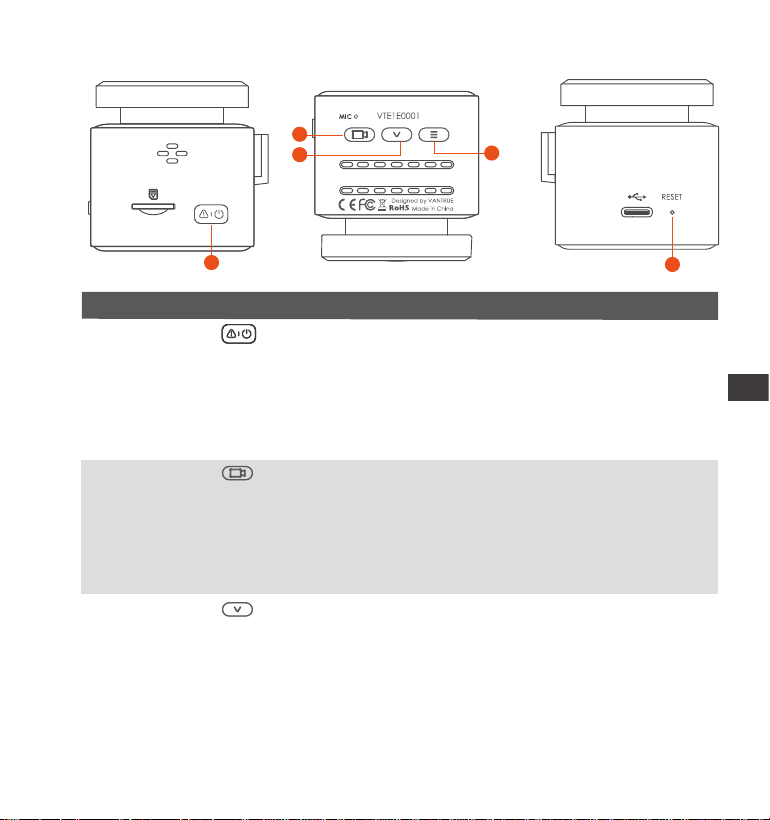
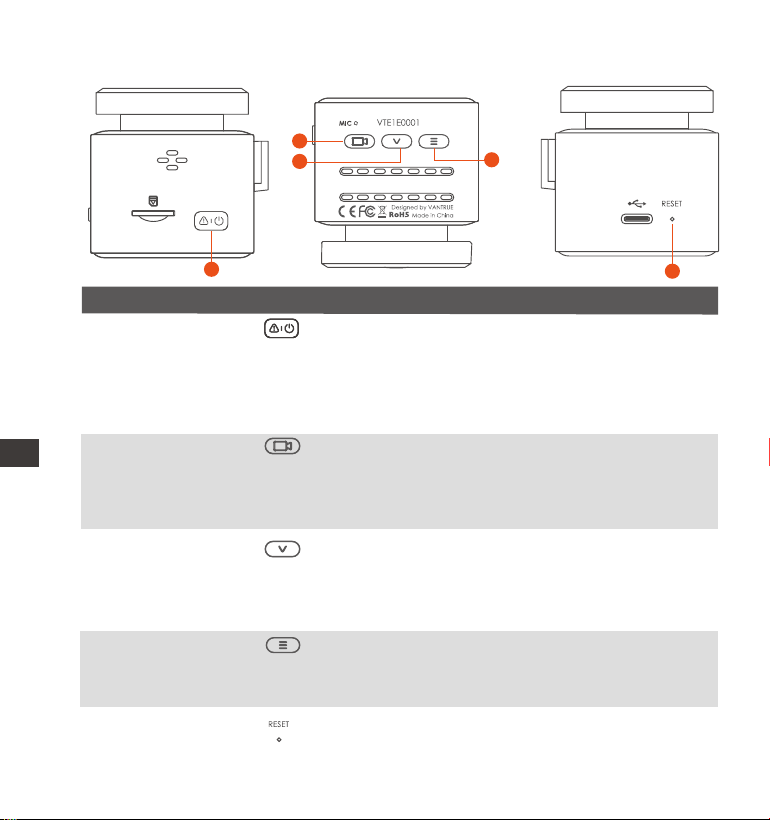
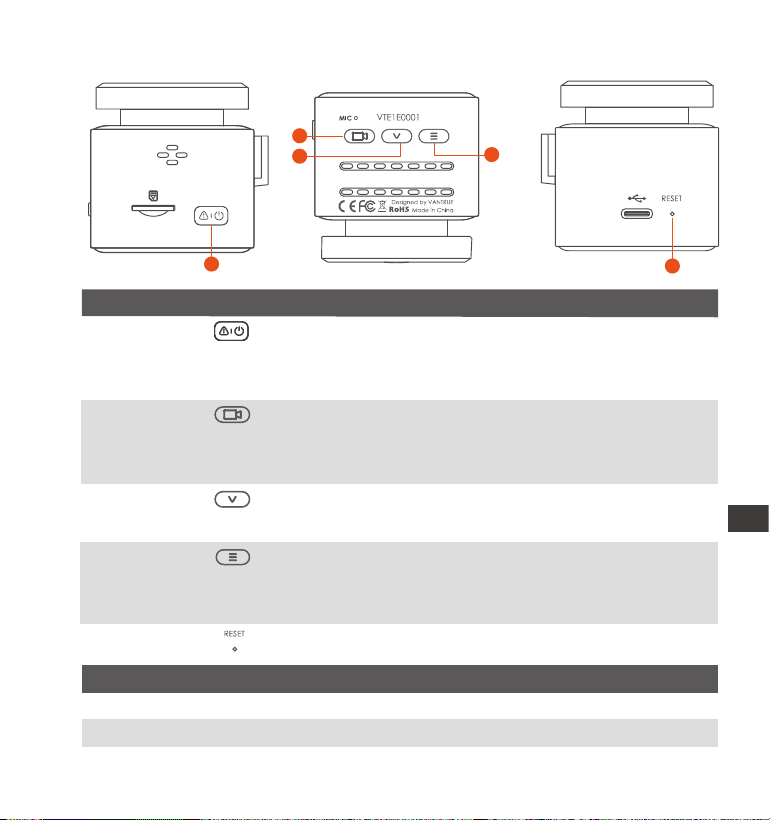
Camera Oveiew
NO. Description Name
3 In the recording screen, sho press to turn on/o the
microphone, long press to enter parking mode; in the
menu settings, sho press for the next option; long
press to quickly scroll through the options
In the recording inteace, after pausing the recording,
sho press to enter the menu, long press to turn on/o
Wi-Fi; in the menu, sho press to return to the previous
level menu
Button
1
4 Button
Button
5 Sho press to resta the cameraReset Button
1
5
2
3
4
In the recording inteace, sho press to turn on/pause
recording, long press to turn o the screen; in the menu,
sho press it to conrm the options; when playing back
the le, sho press to play/pause
2
Button
In the power-on state, long press to turn o the dash
cam, while in the power-o state, sho press to turn it
on; in the recording state, sho press to lock the
recording and capture pictures; in the le browsing
state, sho press to open the delete menu
EN
EN
EN
ES
EN
EN
EN
PL
EN
EN
EN
JP
EN
EN
EN
EN
- 3 -
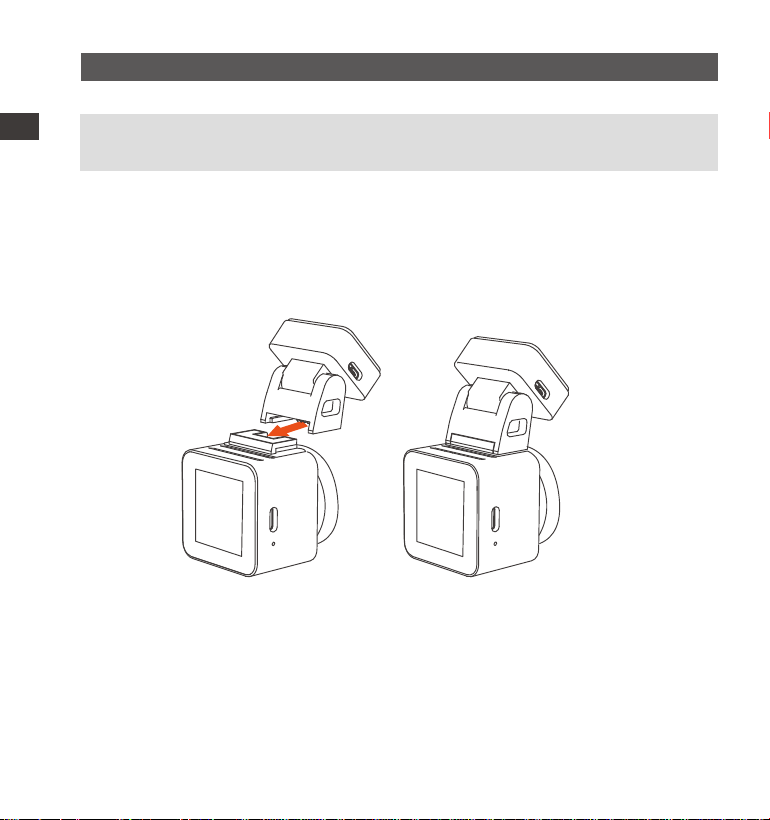
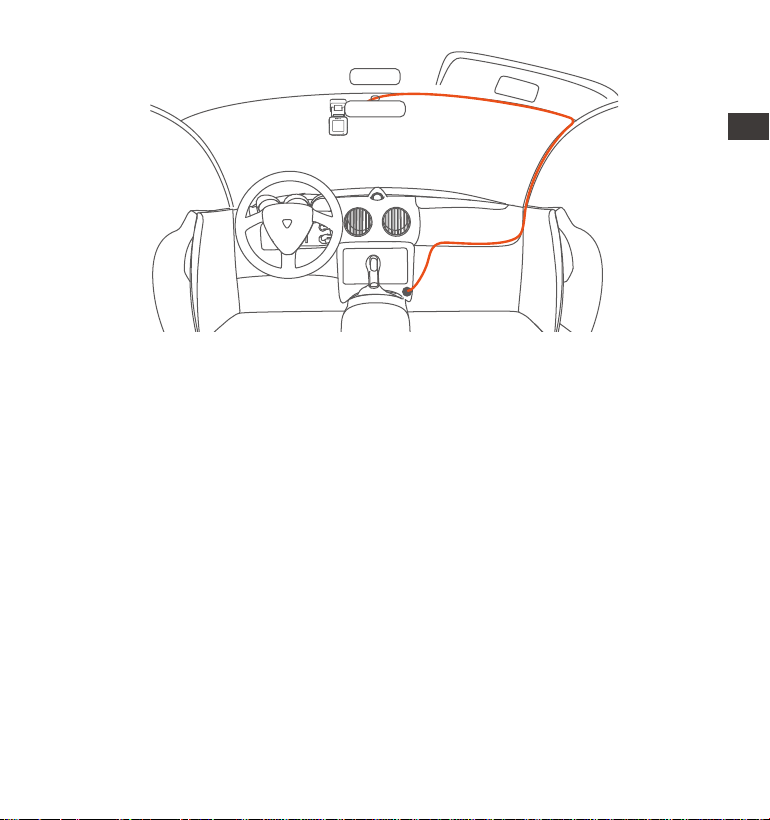
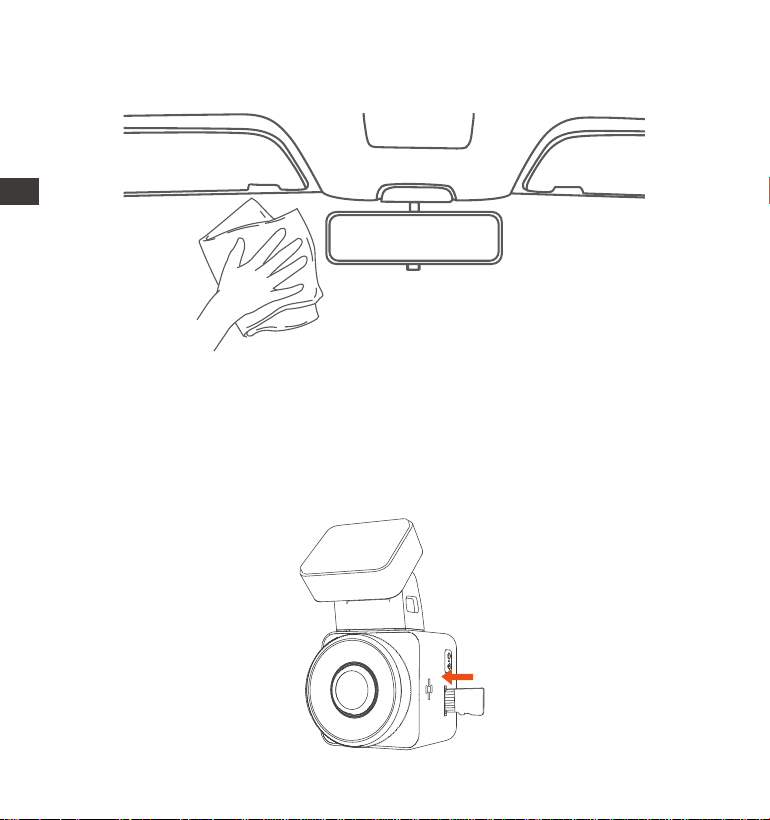
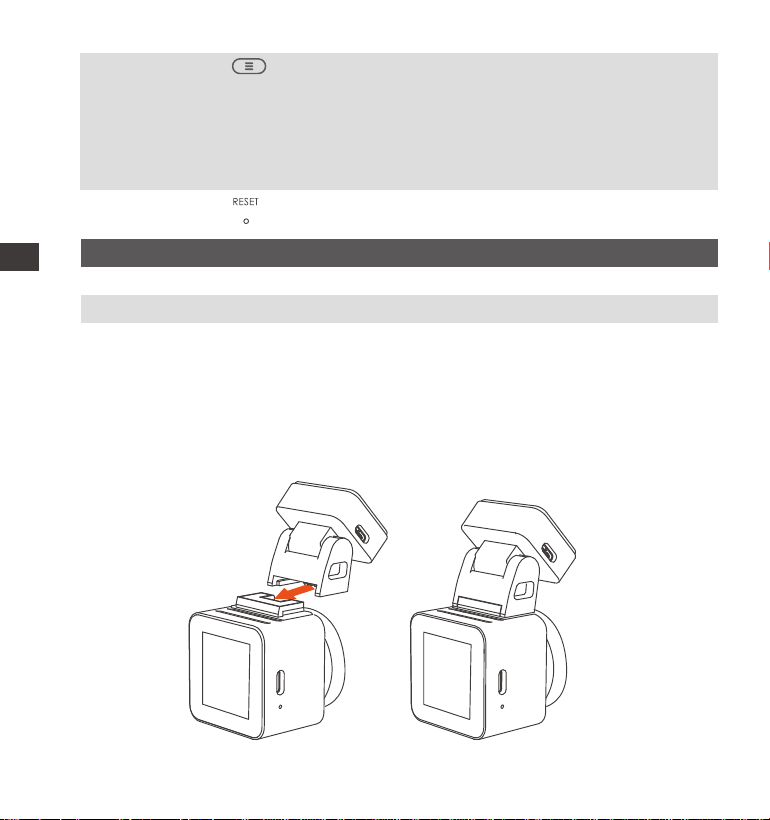
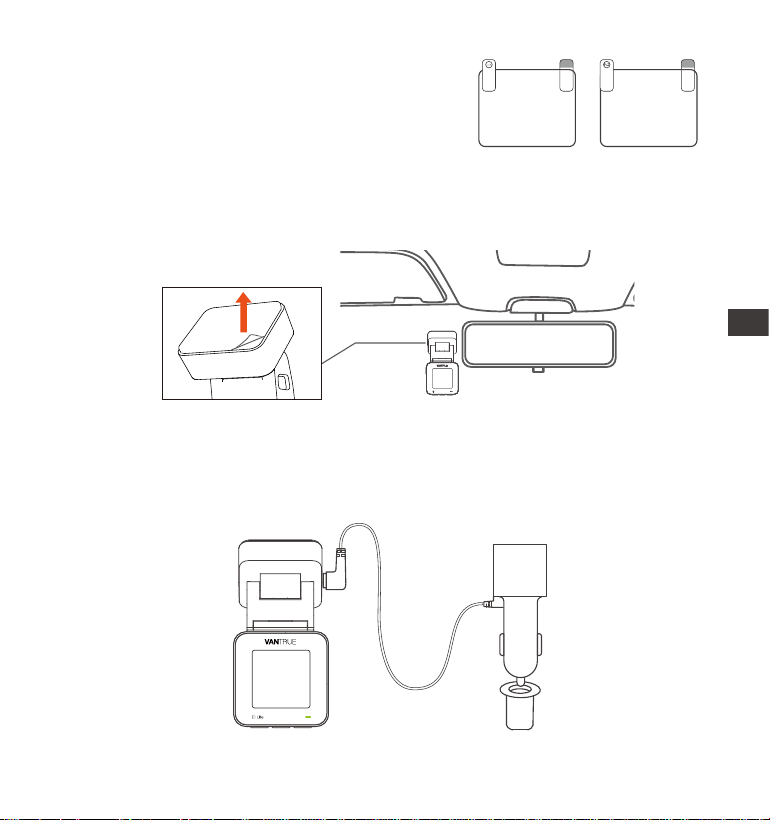
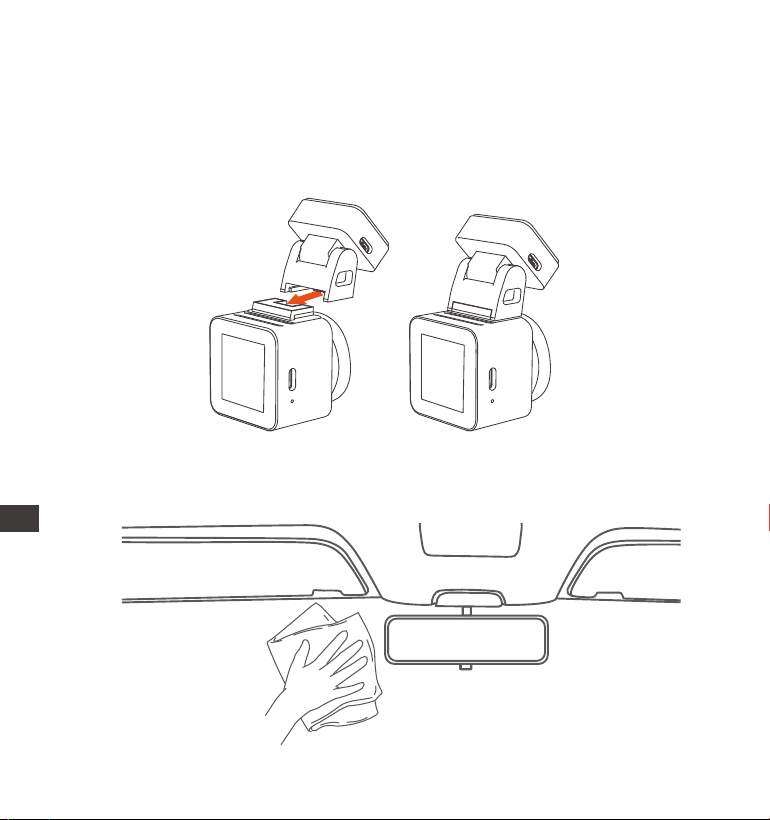
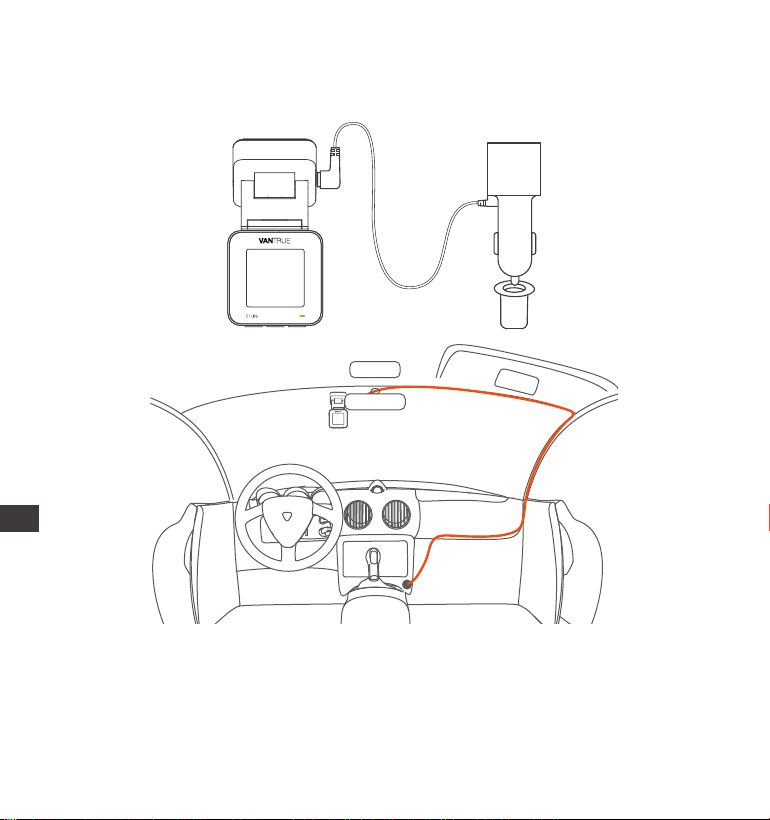
2. Installation
2.1 Before Installation
Take out the mount and push in the mounting according to the direction
indicated in the gure below.
1.
Before installing the camera, please power on the screen to obsee the
screen displayed in the screen, simulate the situation when driving,
determine an optimal installation location, and then go to clean the
installation location.
2.
LED Indicator
DescriptionLED
Steady green light
Blinking green light
Instandbystatus
Camera is recording
LED Status
REC
EN
- 4 -
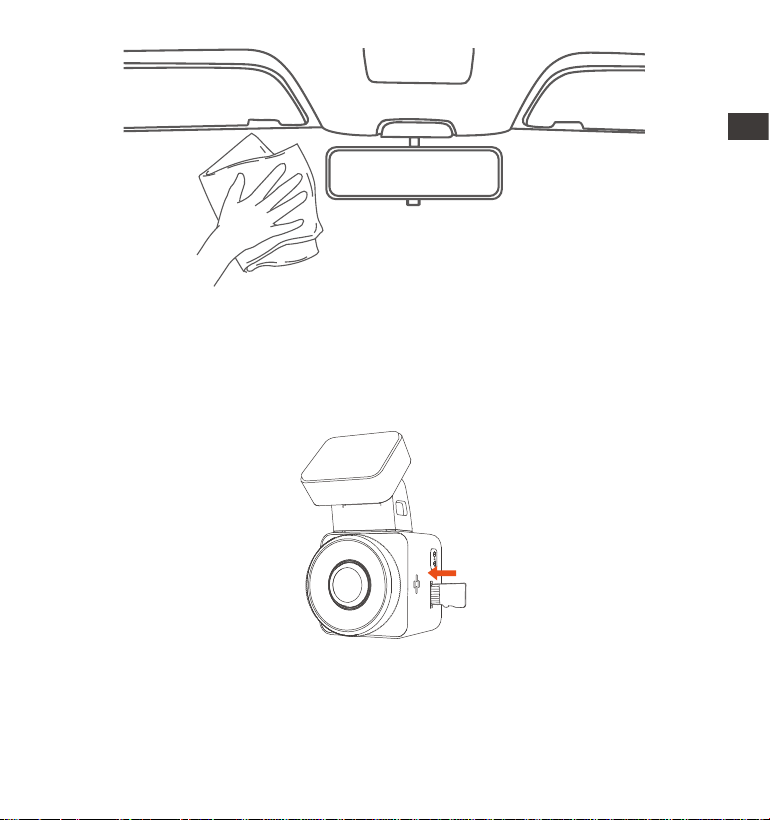
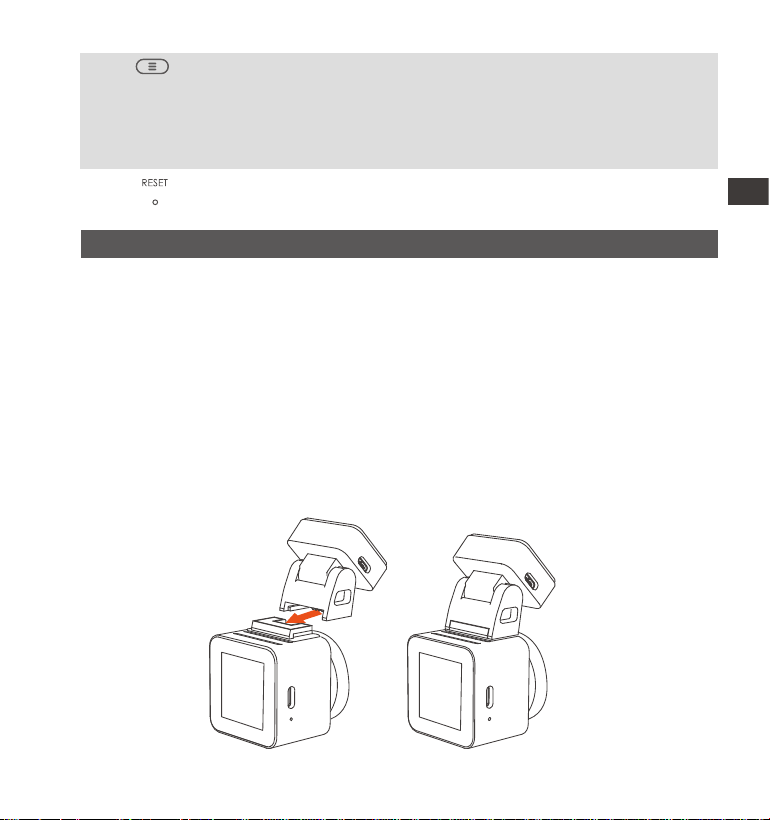
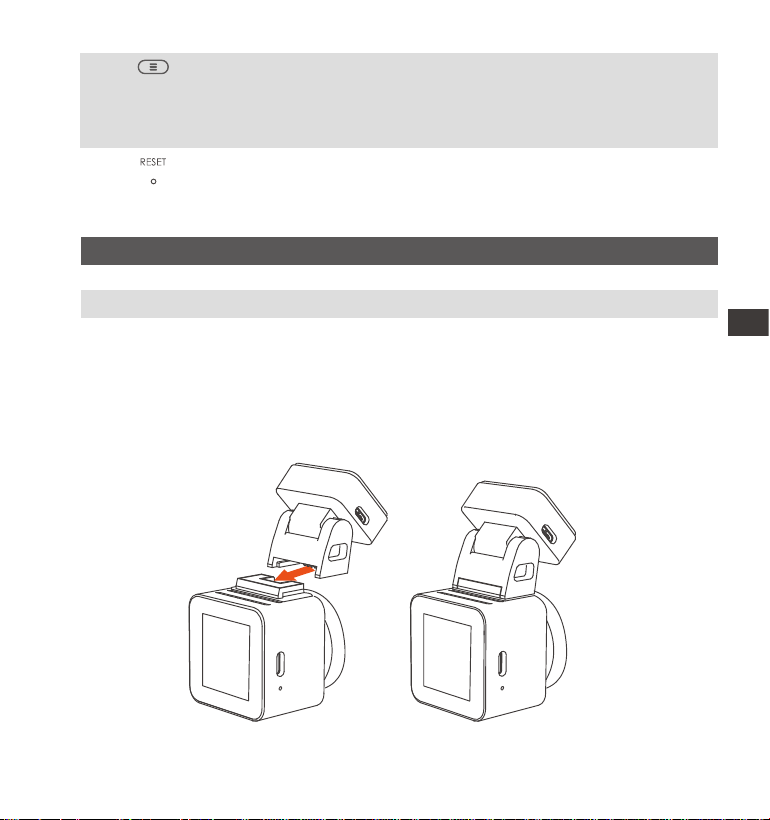
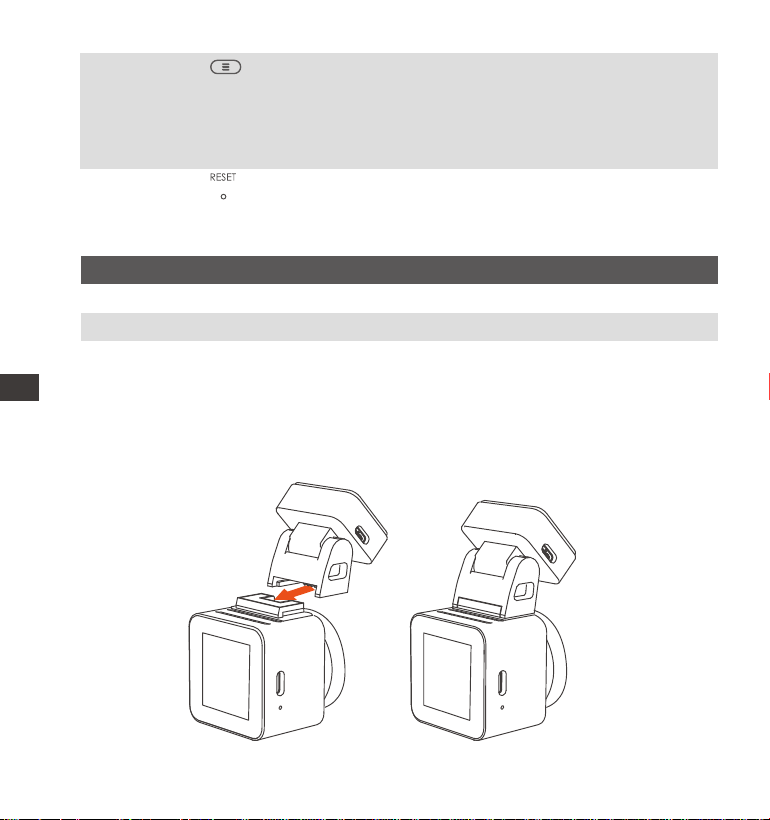
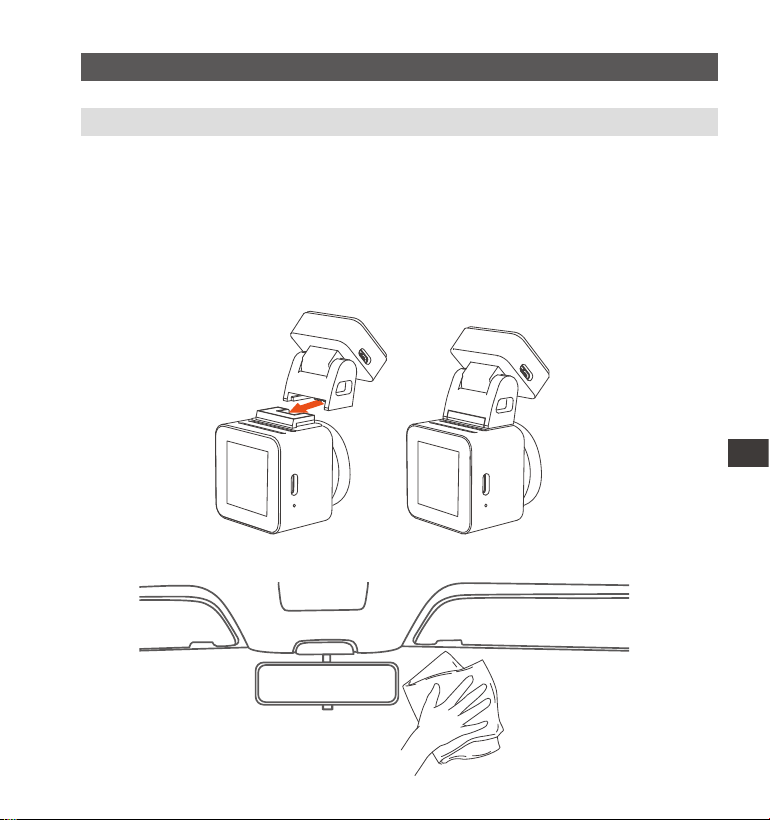
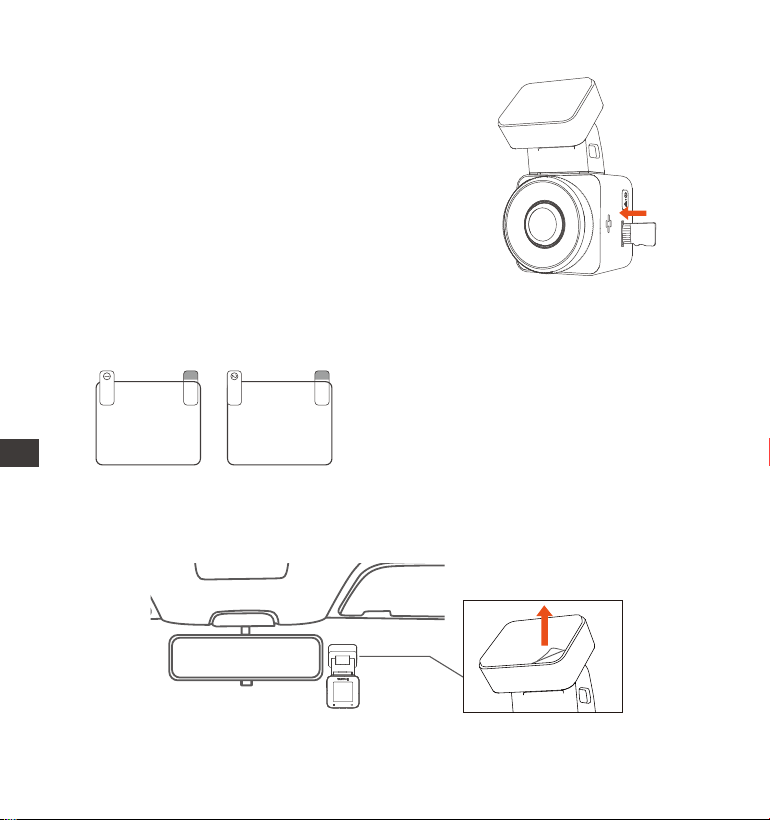
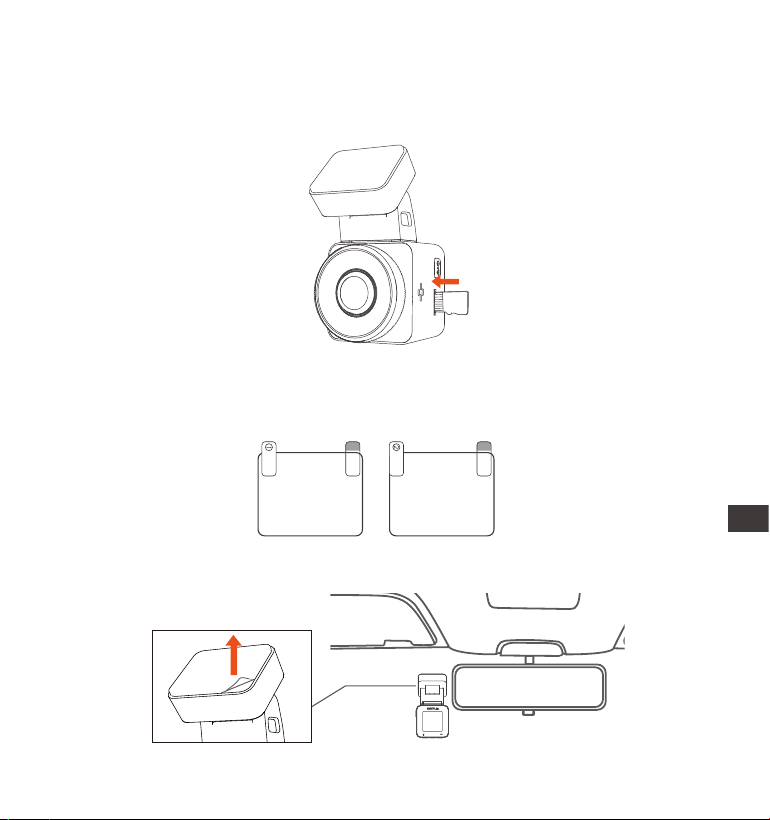
Inse the memo card according to the direction of the memo card
indication in the gure as follows.
Note: When inseing a memo card for the rst time or inseing a brand
new memo card, it may remind you of "memo card error", just make sure
to format the card in System Settings > Format Settings to use it normally.
3.
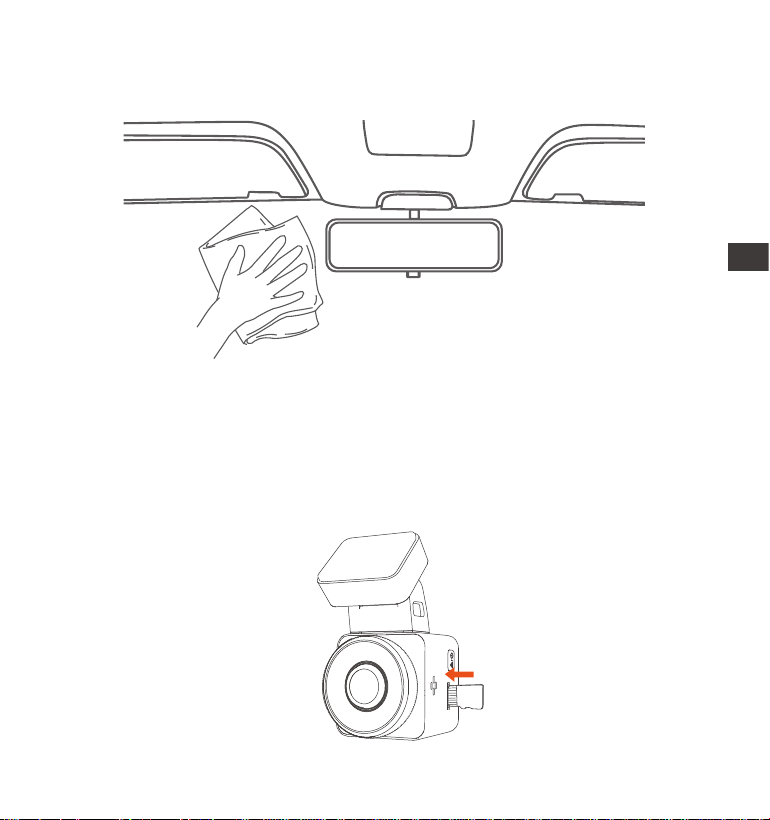
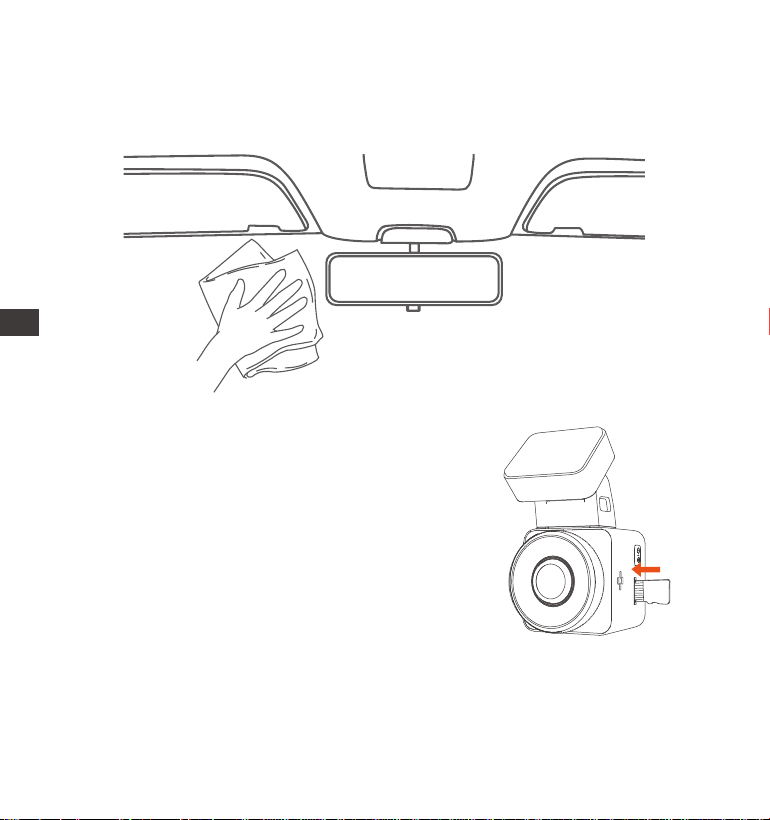
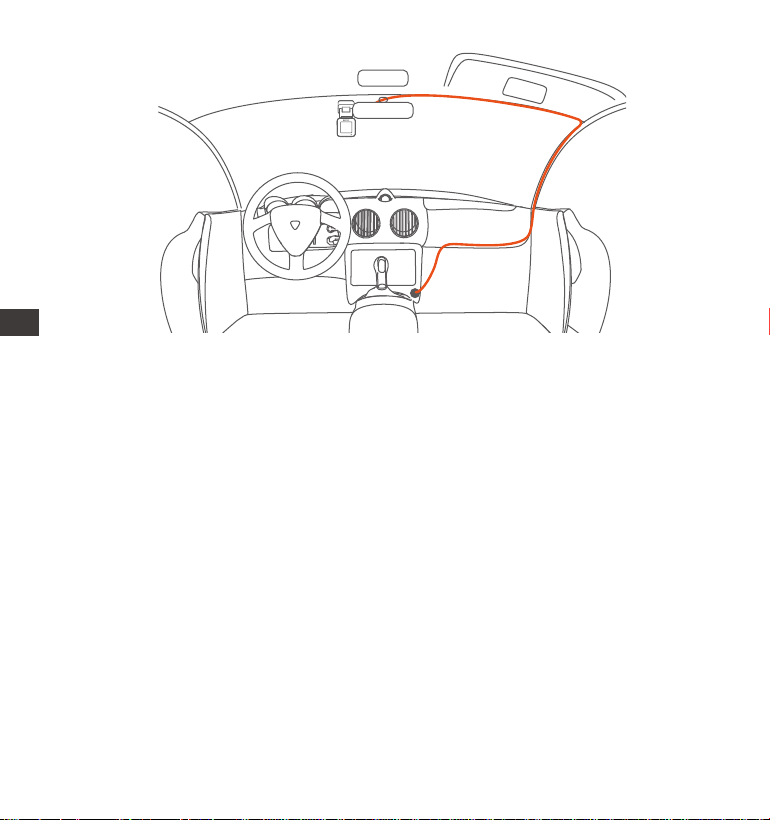
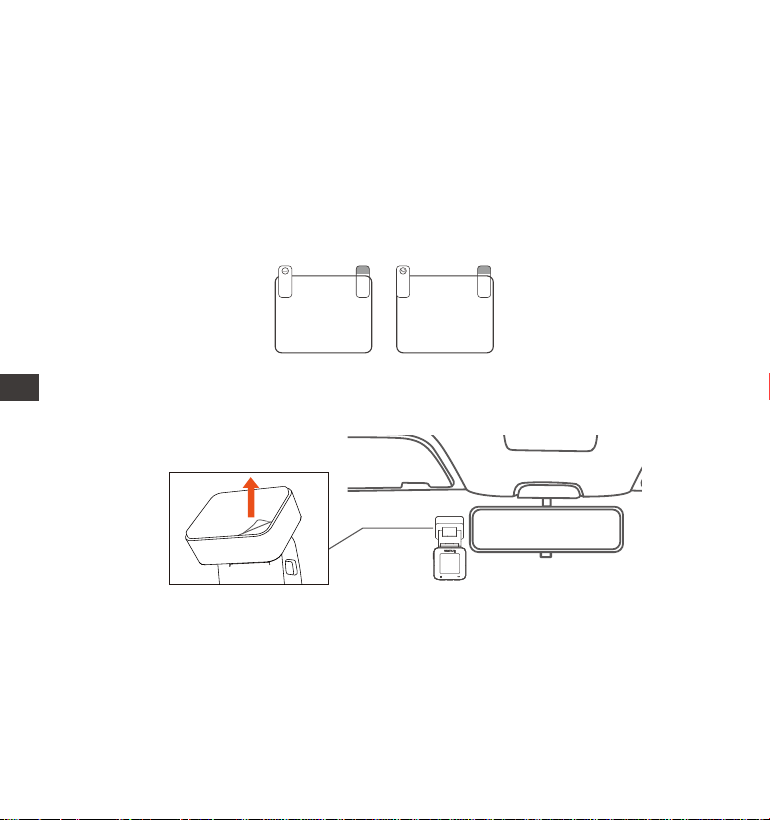
Installation: Stick the electrostatic sticker behind the rear-view mirror, which
is the recommended position to prevent blocking your view while driving.
1.
2.2 Installing the camera onto your windshield
EN
- 5 -
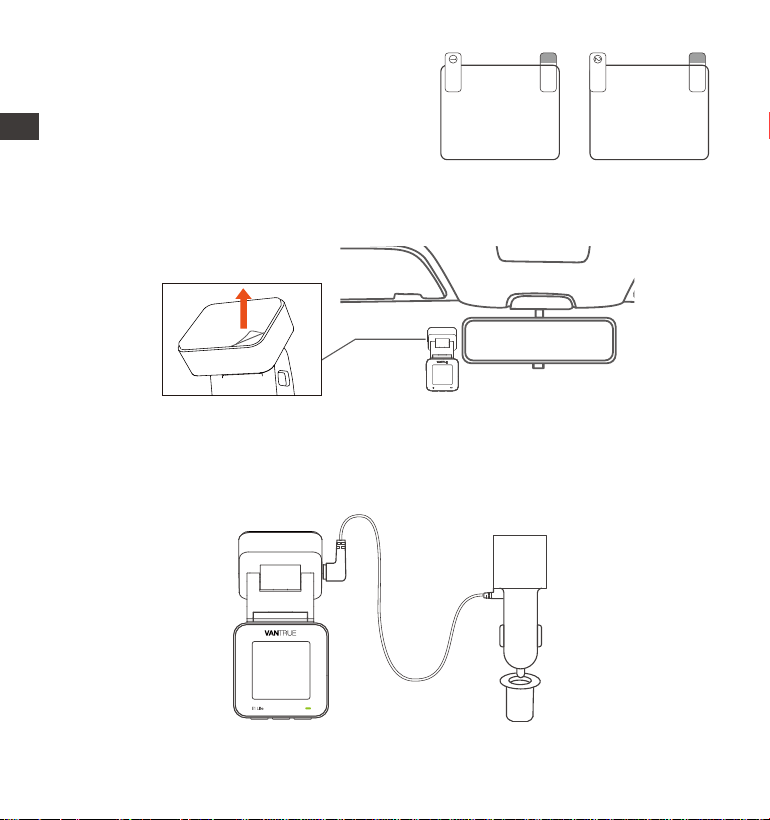
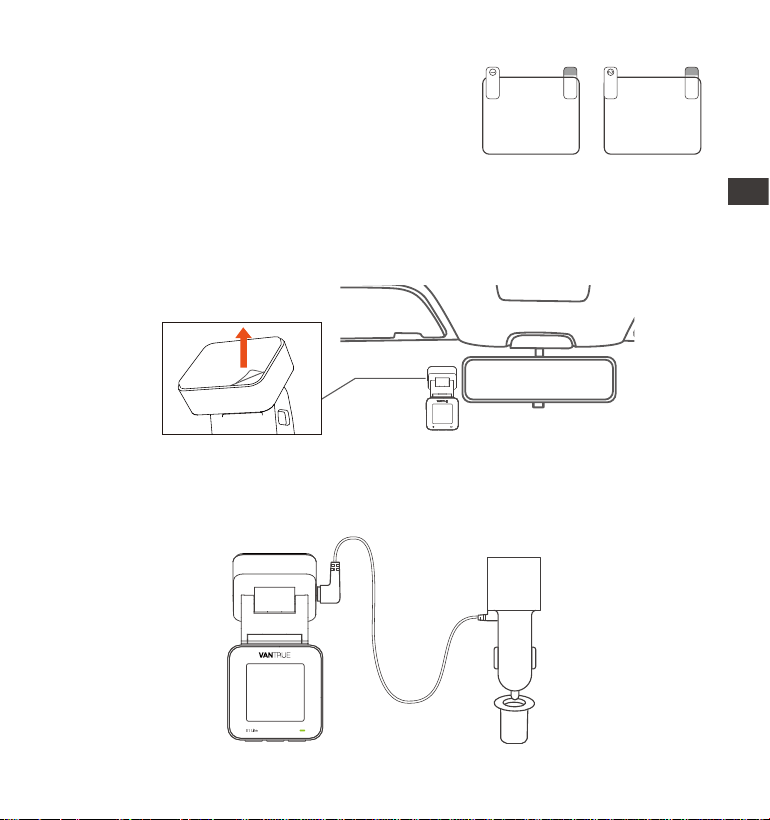
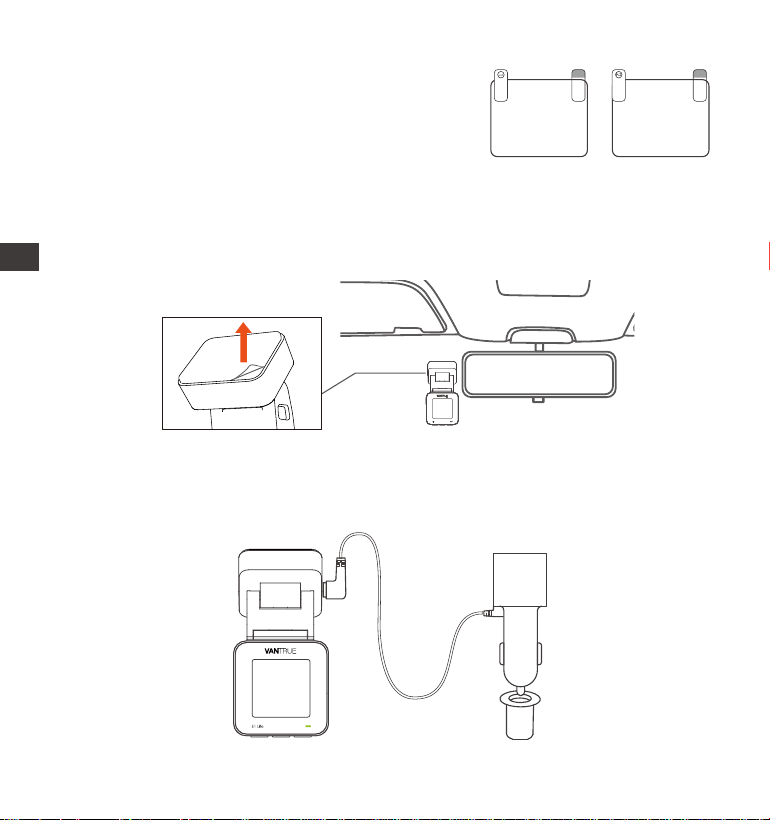
Peel o the protective lm on the E1 Lite mount, align it with the middle of
the electrostatic sticker, and stick it in place.
2.
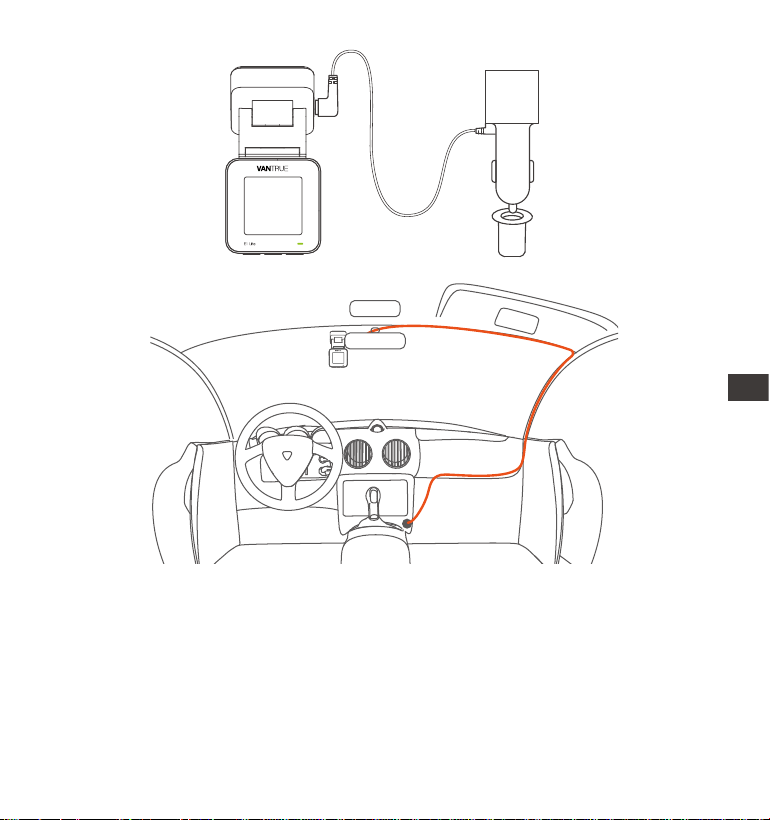
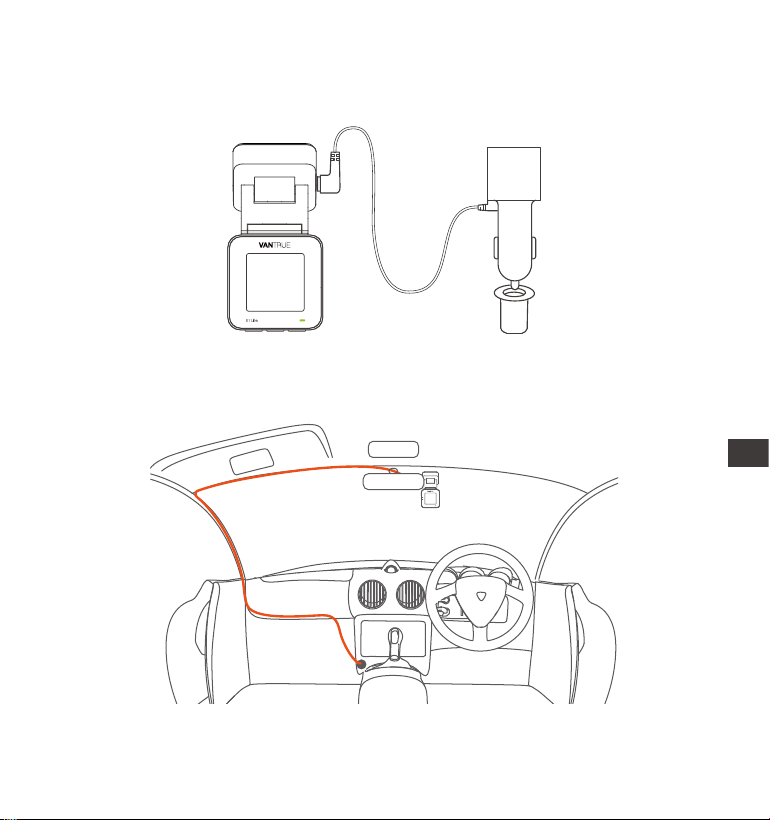
Install the car charger: Please take the car charger out of the package.
Connect one end of the car charger to the cigarette lighter and the other
end to the E1 Lite mount po. When nished, just put the car charger cable
in order as instructed in Figure 2.
3.
Please peel o this
mask BEFORE application
Please peel o this mask
AFTER application completed
Note: There are two protective lms
numbered 1 and 2. The rst step is to
tear o the No.1 protective lm and
stick it on the front windshield, then
tear o the No.2 protective lm.
EN
- 6 -
4.
Sta the engine, the camera will automatically turn on and record video.
3. Use the "Vantrue" APP
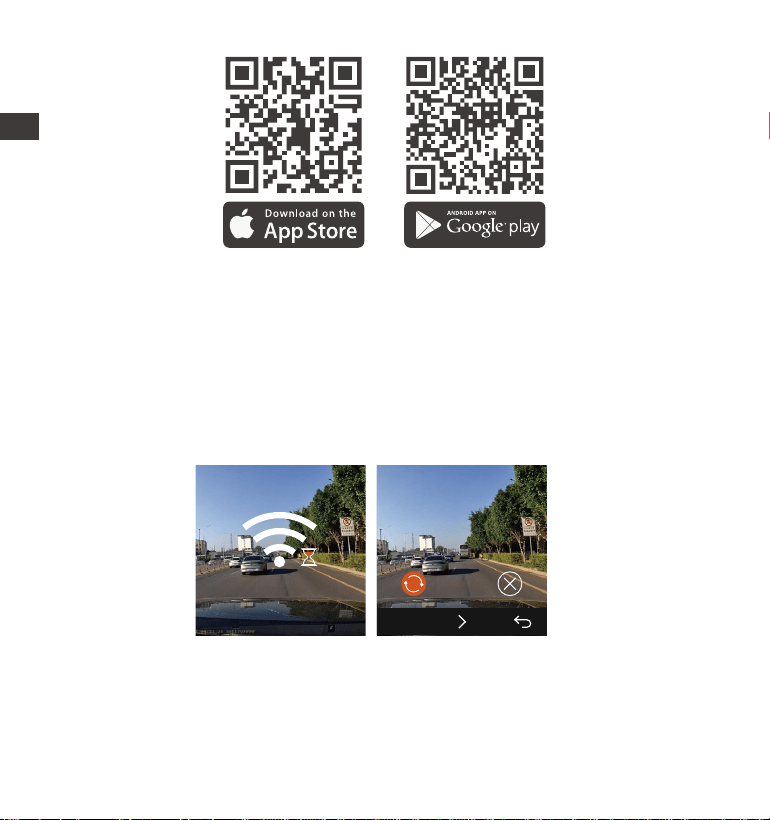
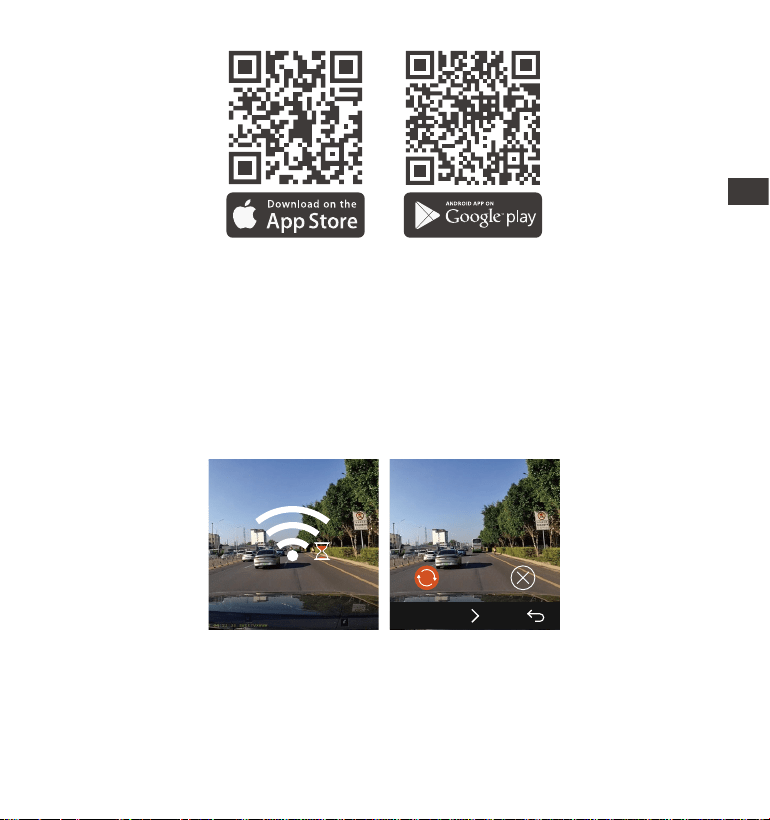
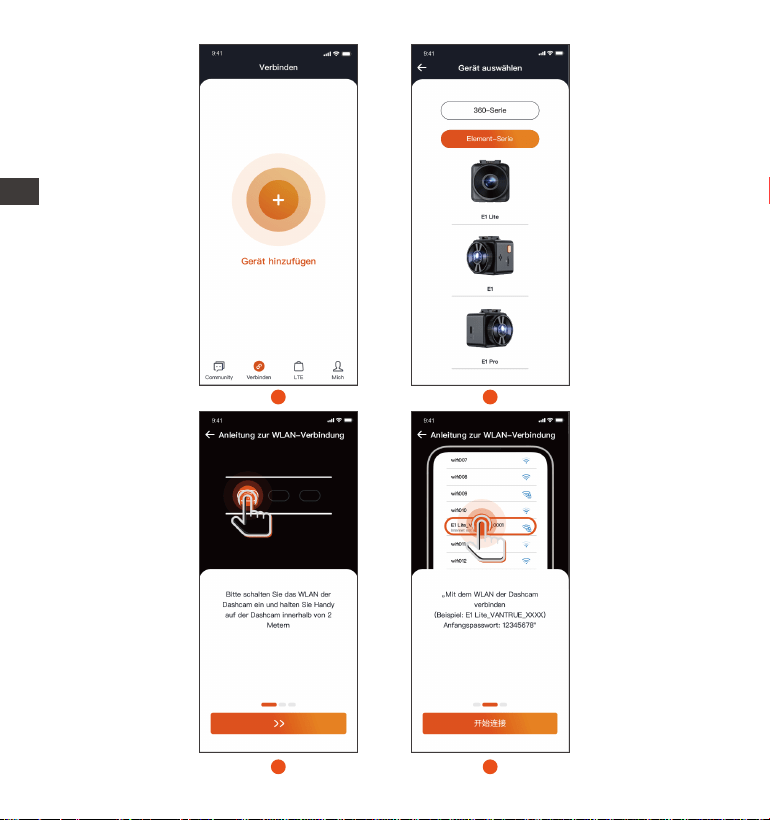
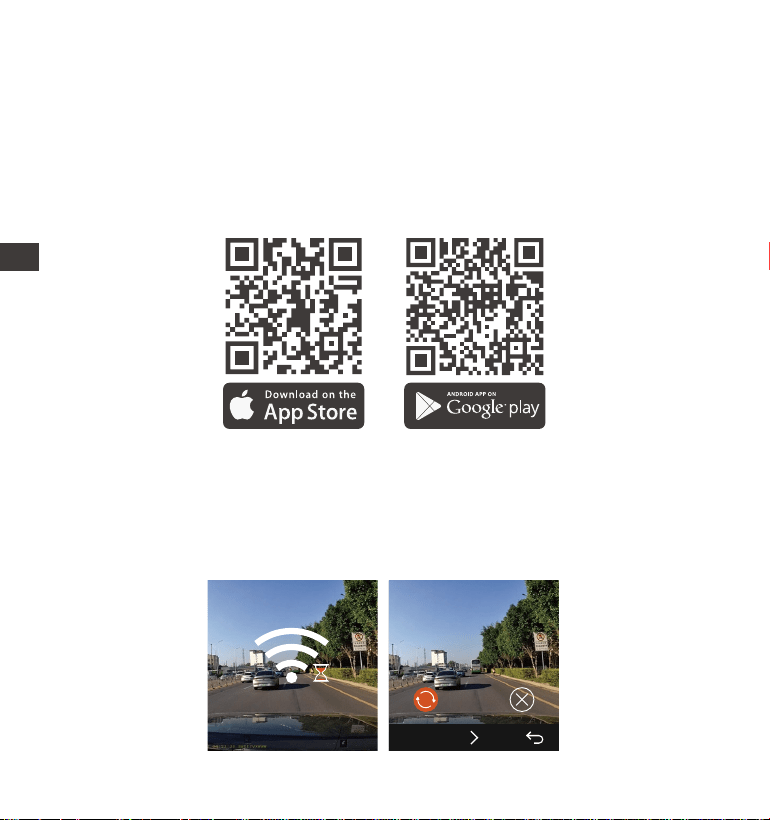
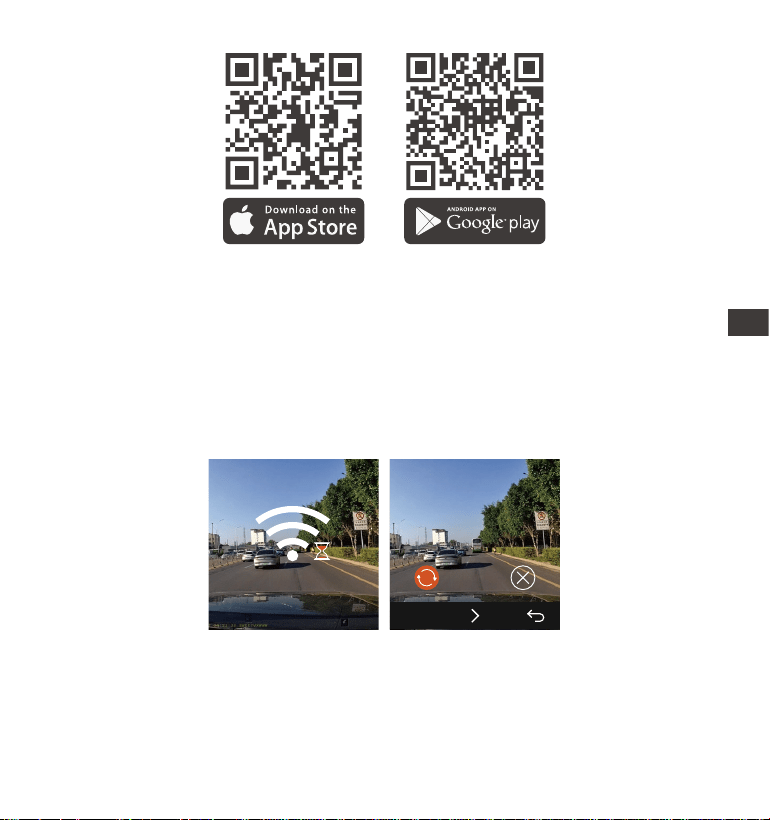
3.1 APP Download
After downloading the Vantrue APP on your phone, you can connect to the E1
Lite camera via Wi-Fi.
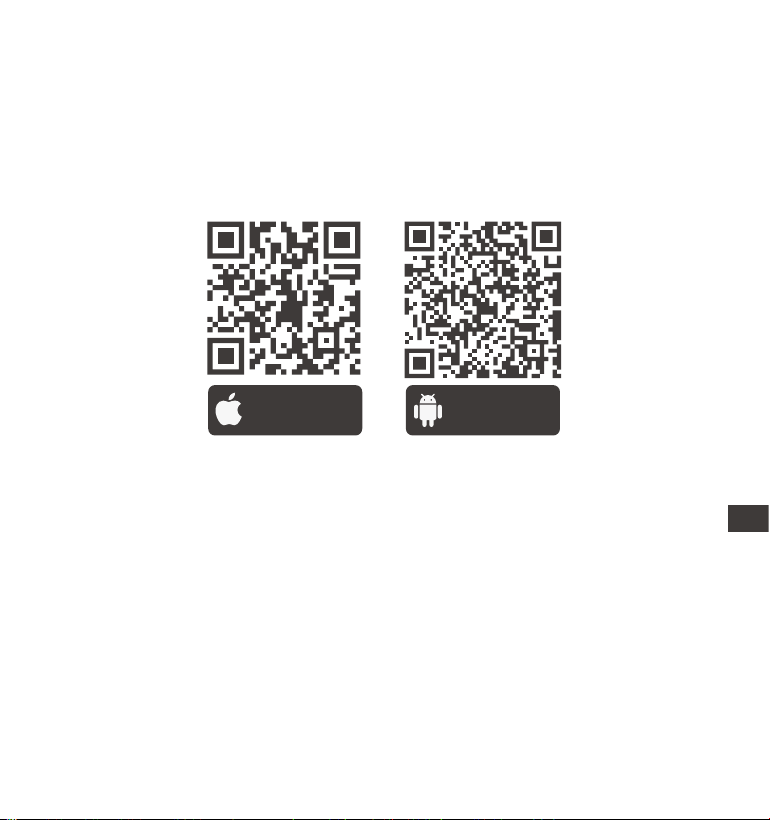
Method 1: Download "Vantrue" via Apple store and Google play
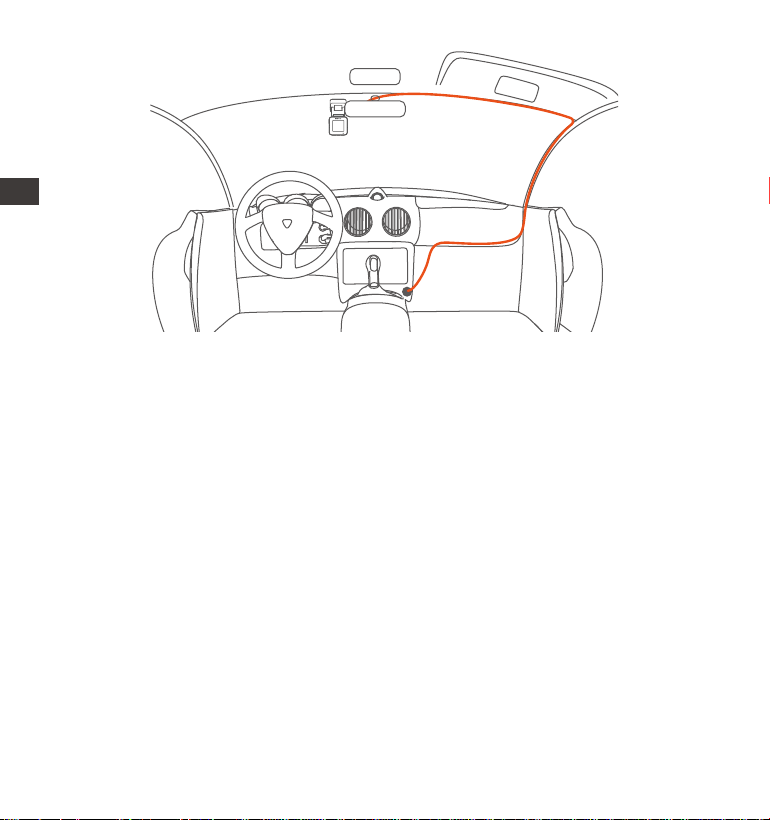
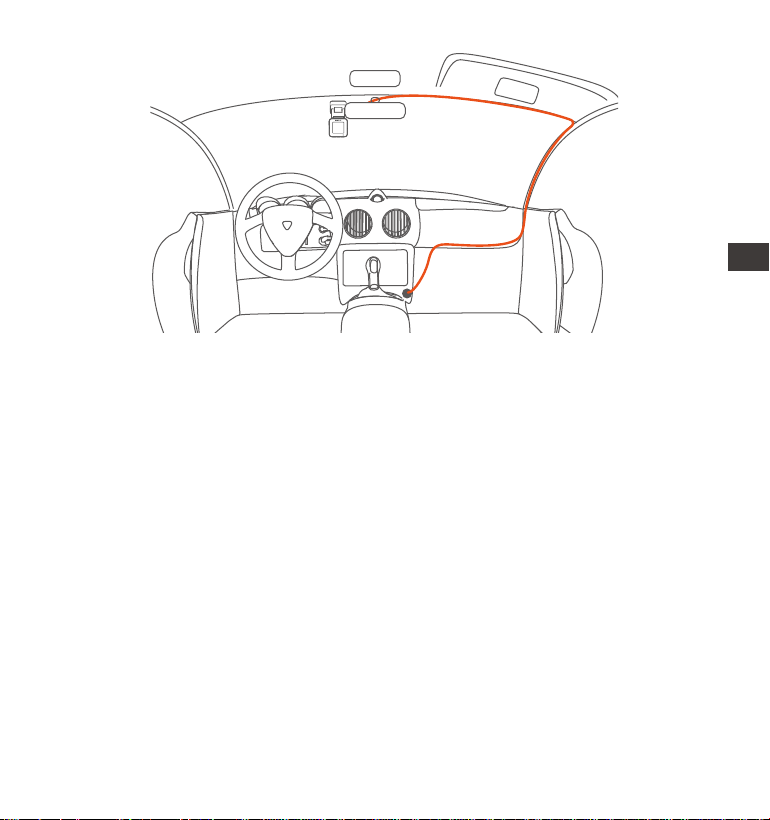
When organizing or storing car charger cables, cable clips can be used for
securing them in place. After attaching the cable clip to a suitable spot,
simply fasten the cables within the clip.
E1 Lite
EN
- 7 -
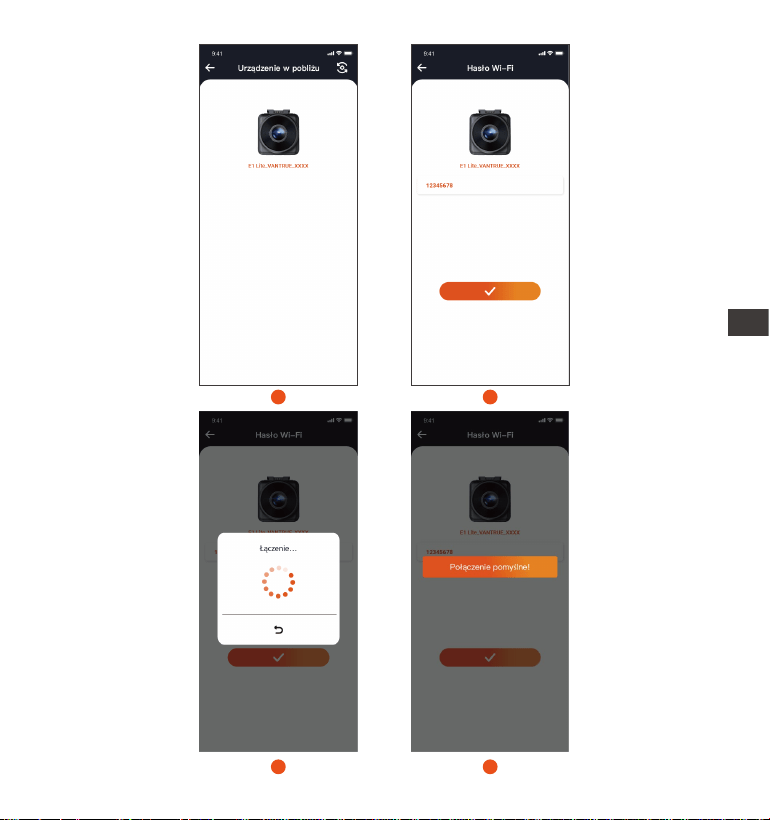
3.2 APP Connnection
Method 2: Download it through Vantrue's ocial website (www.vantrue.com)
After the APP is downloaded successfully, you can connect your phone with
E1 Lite.
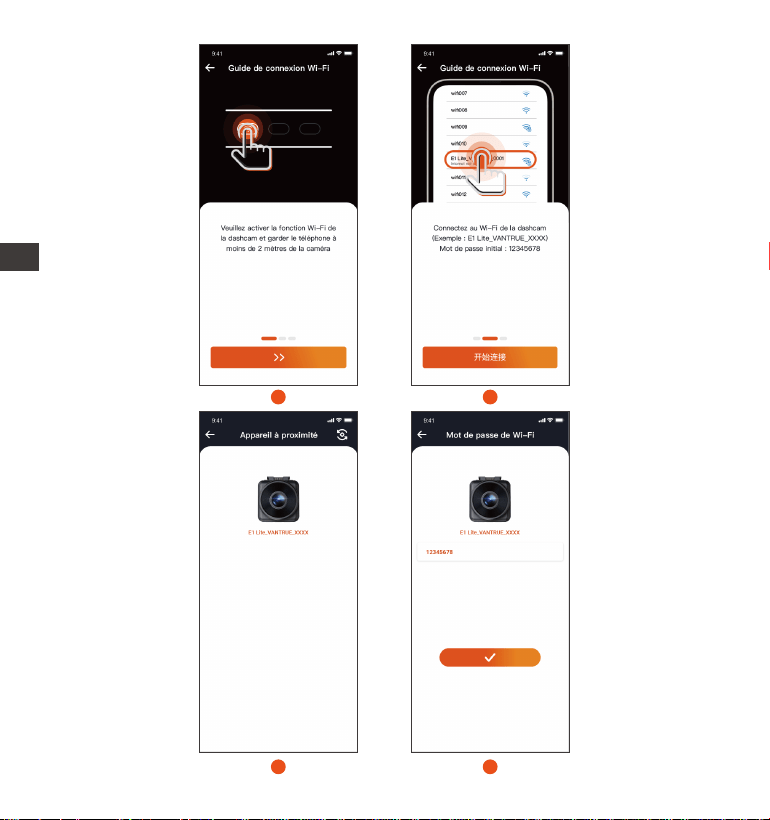
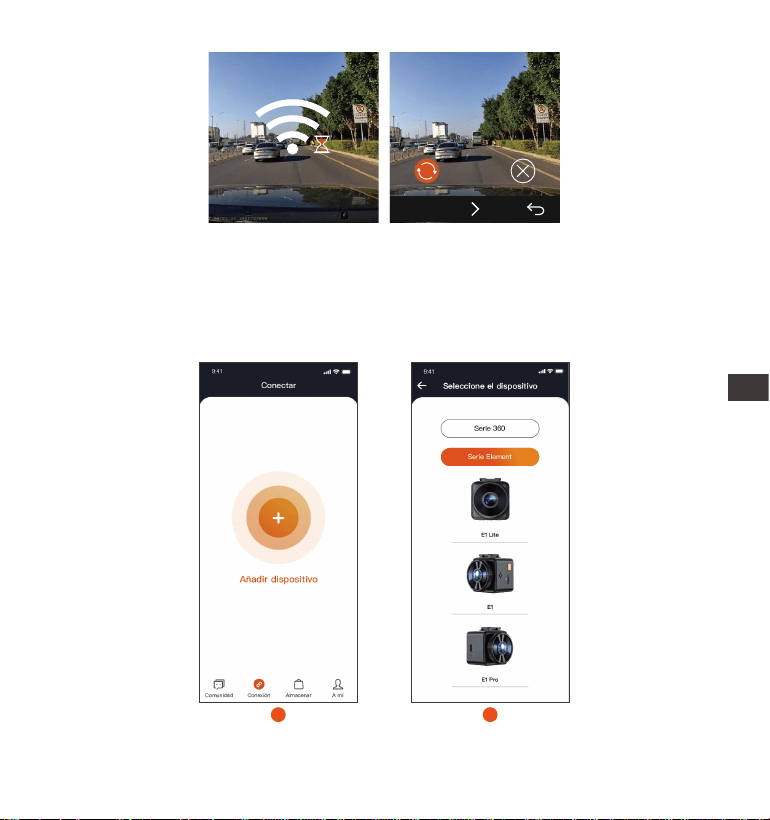
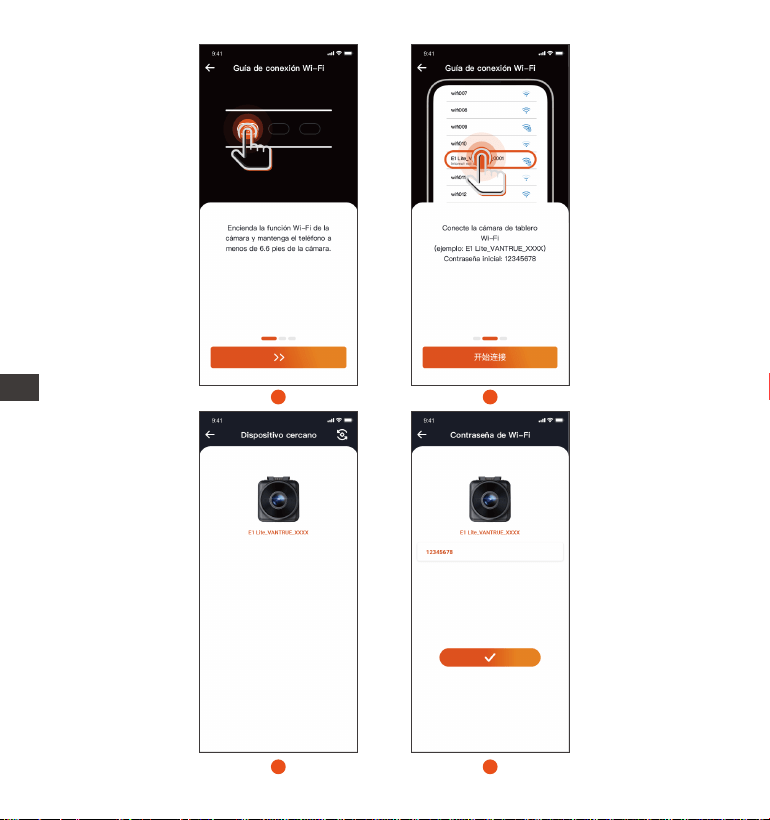
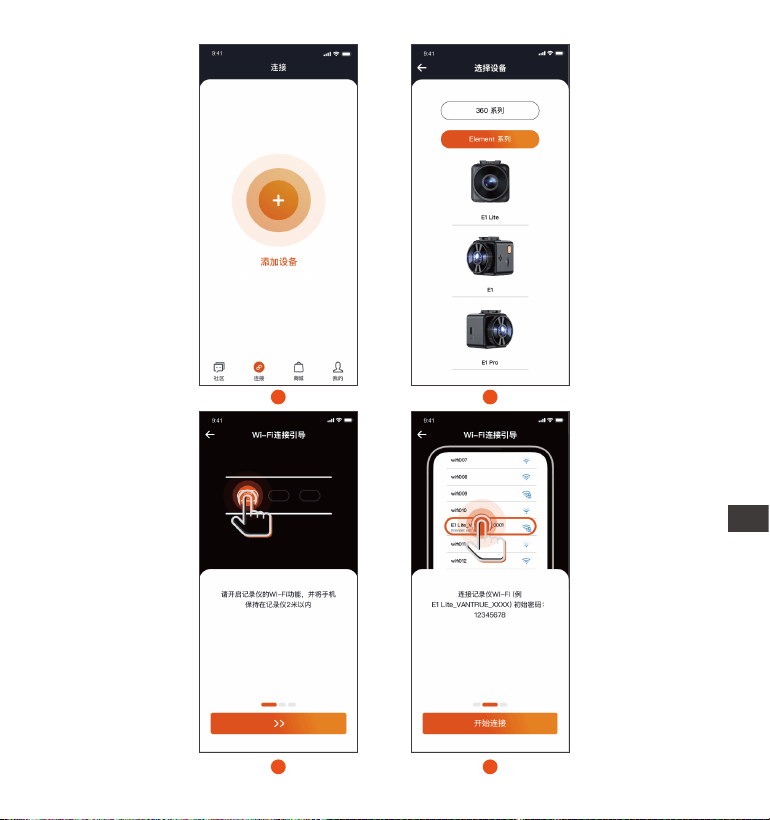
You need to open the camera Wi-Fi rst. You can open Wi-Fi by voice wake
up, long press the menu button, enter the menu settings.
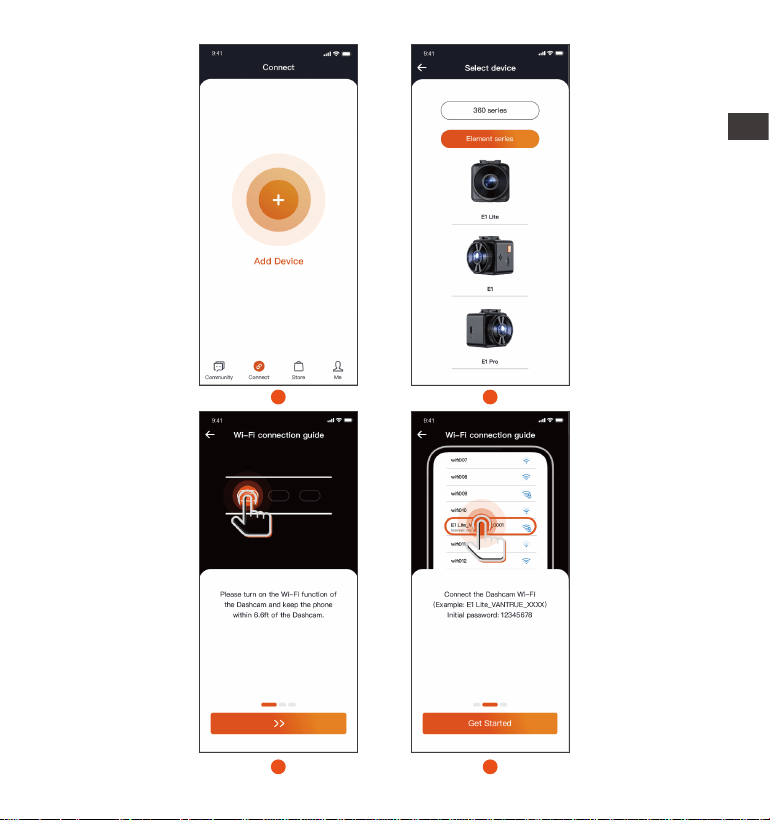
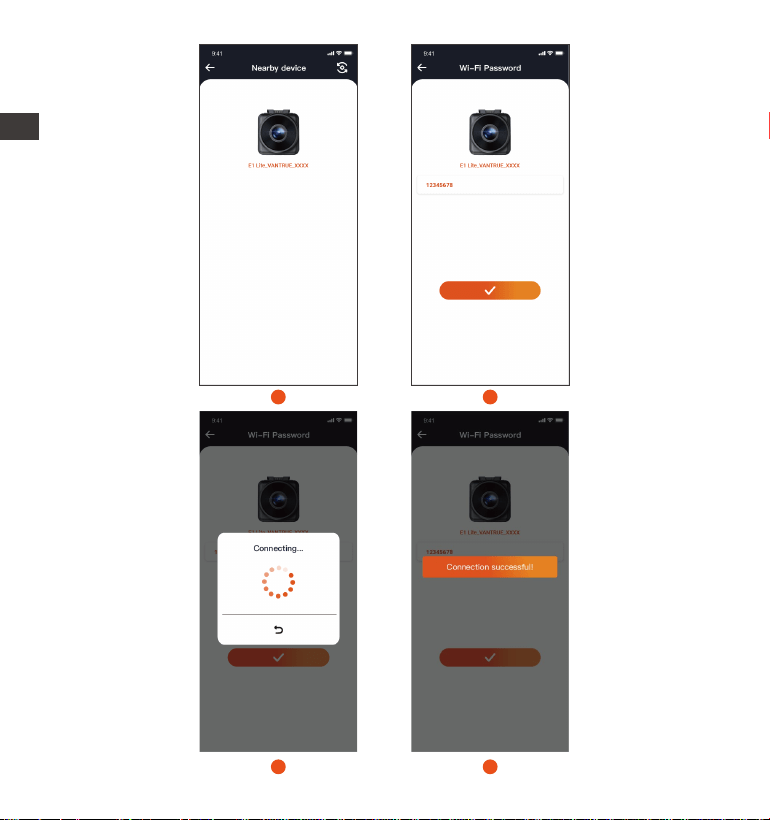
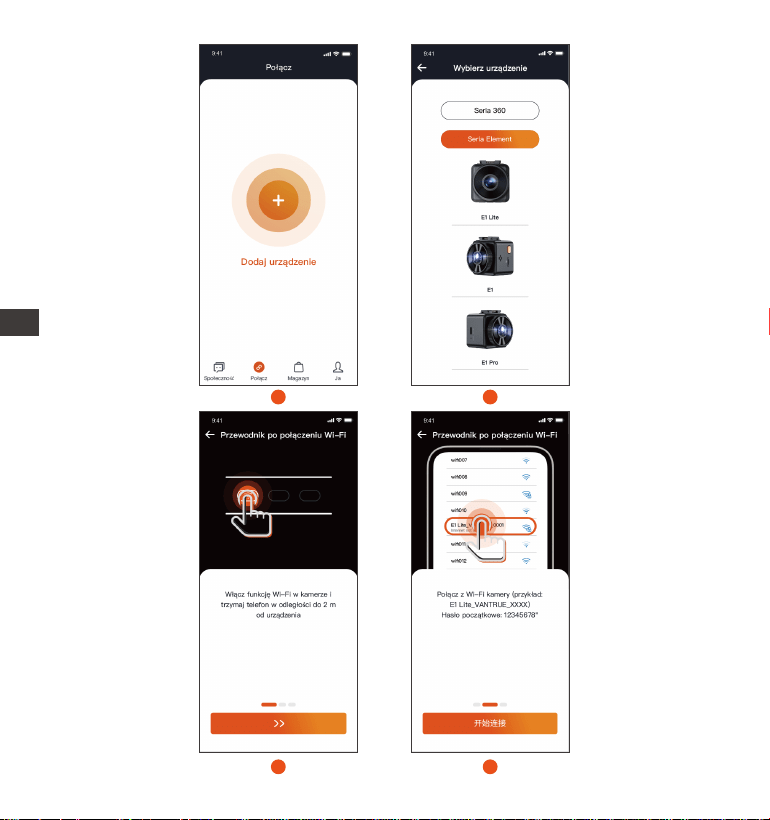
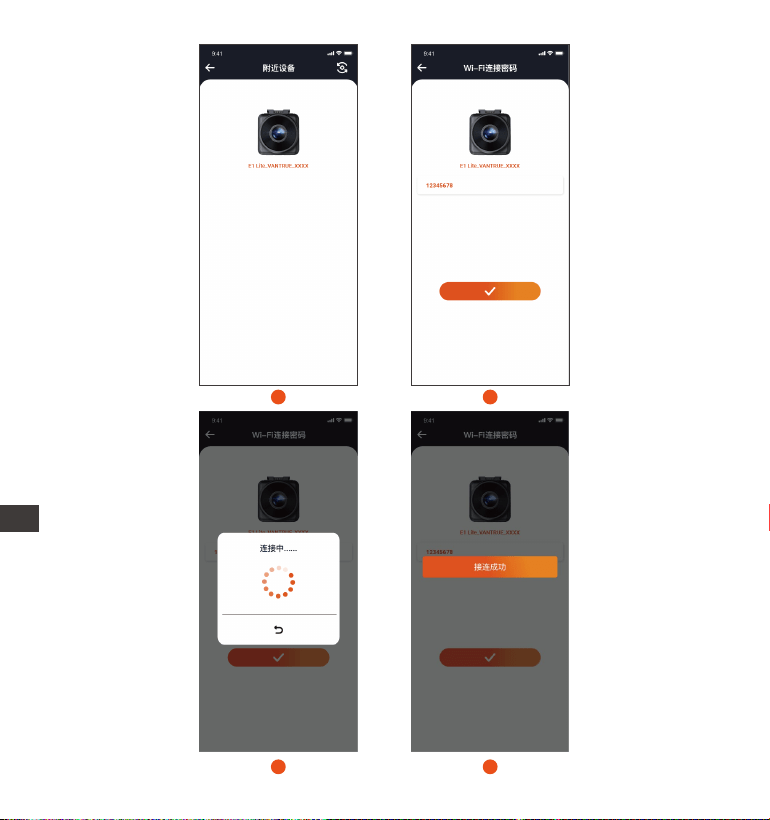
Open the Vantrue APP in your phone, click "Add Device", select the correct
model, and it will jump to the mobile Wi-Fi setting inteace. Please nd the
Wi-Fi named E1 Lite_VANTRUE_XXXX, click connect, enter the password
and then return to APP to connect.
1.
2.
SSID:
E1 Lite_VANTRUE_f129
PASSWORD:
12345678
OK
Wi-Fi
Wi-Fi
Wi-Fi
EN
- 8 -
2
1
3
4
EN
- 9 -
6
5
7
8
EN

- 10 -
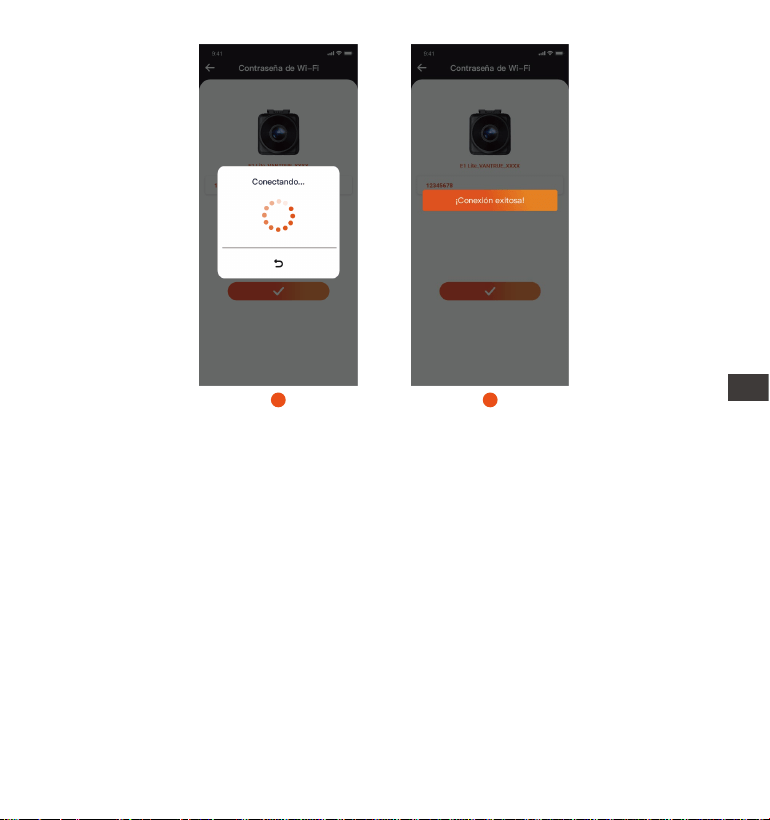
Note:
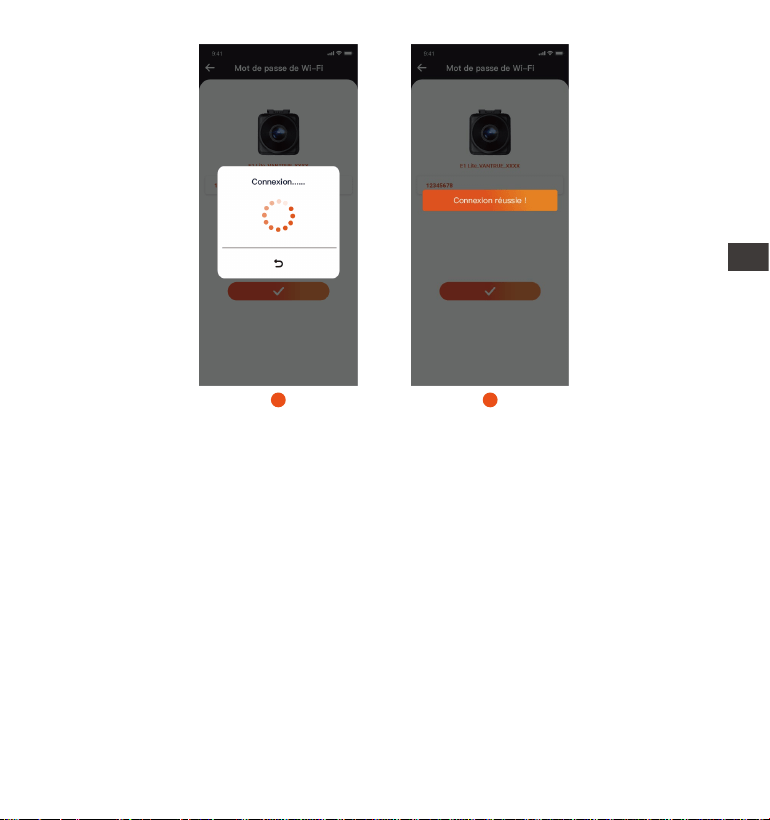
The order of Wi-Fi connection is from Figure ① to Figure ④;
Successfully connect Wi-Fi, then open the APP, click on the connected
Wi-Fi, and the APP will automatically connect to the camera.
There will be a connection guide when you rst add the device in the app,
and you can follow the guide step by step. If you still have questions about
Wi-Fi connection, you can contact VANTRUE ocial customer seice,and
we will provide operation video guidance.
(1)
(3)
3.
(2)
4. Voice Control
E1 Lite comes with a voice remote control system. The languages currently
suppoed are Chinese, English, Français, Japanese and Russian. For detailed
voice recognition commands, please check in System Settings > Voice Content.
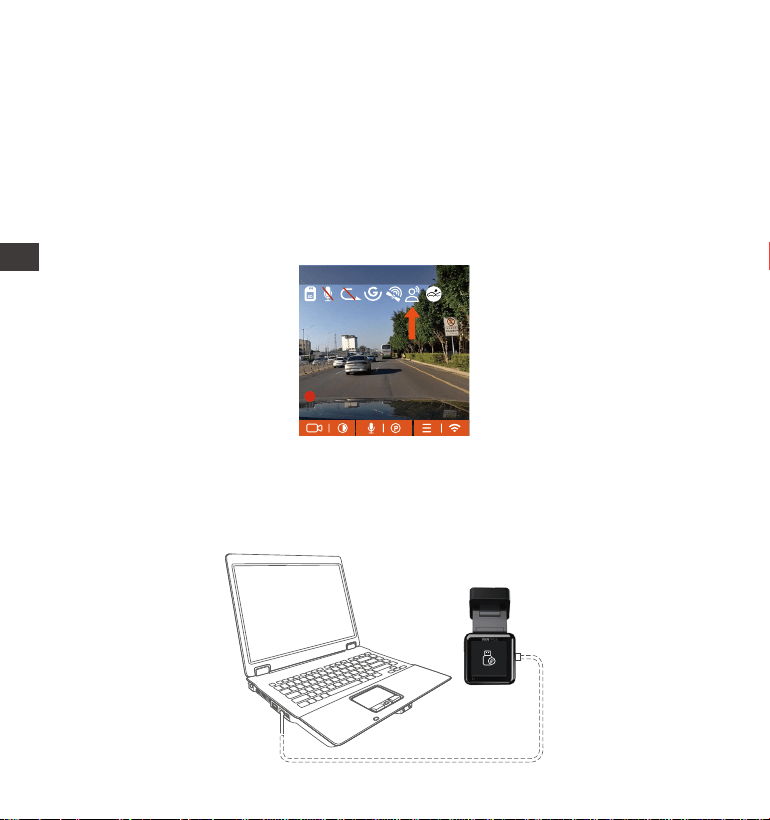
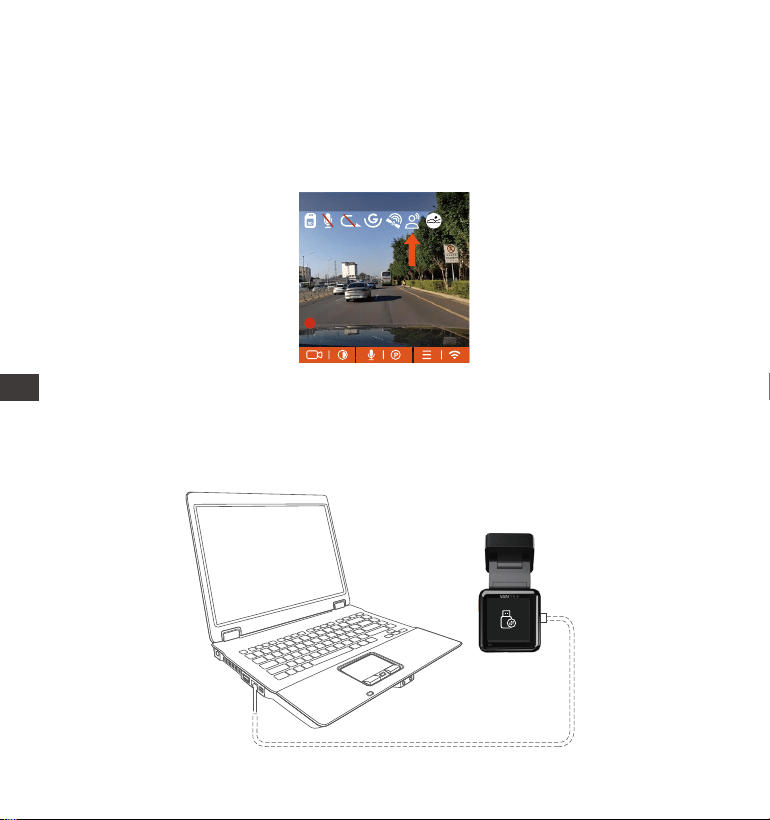
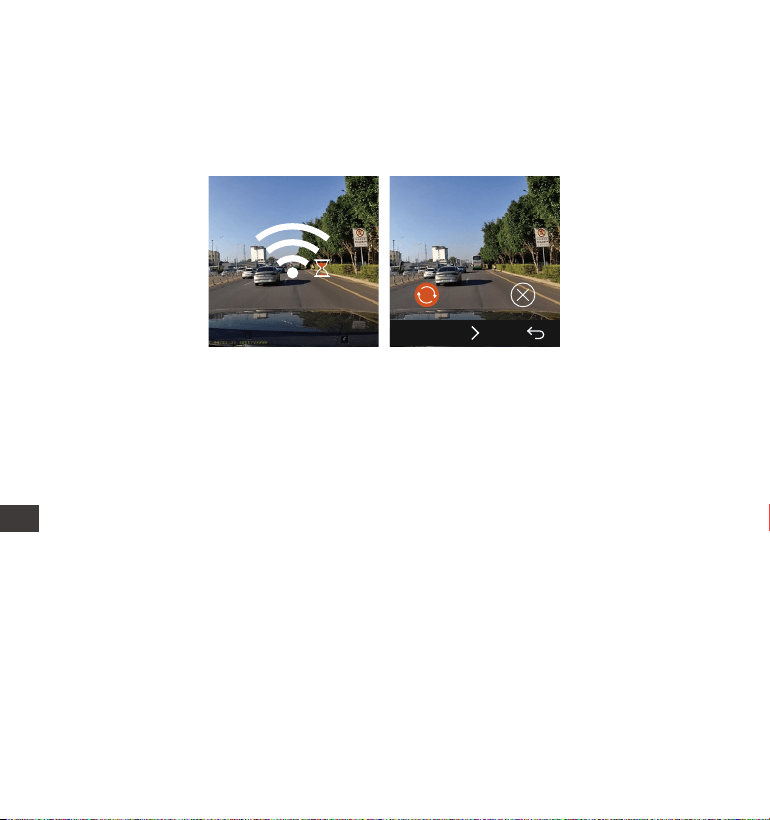
After successfully connecting to Wi-Fi, you can preview live driving
videos, play back les, change camera settings, share your travel
videos and more through the Vantrue app.
1920x1080P(HDR) 30FPS
MP/H
00�00�37
05-05-2025 14�09�07
35
EN
- 11 -
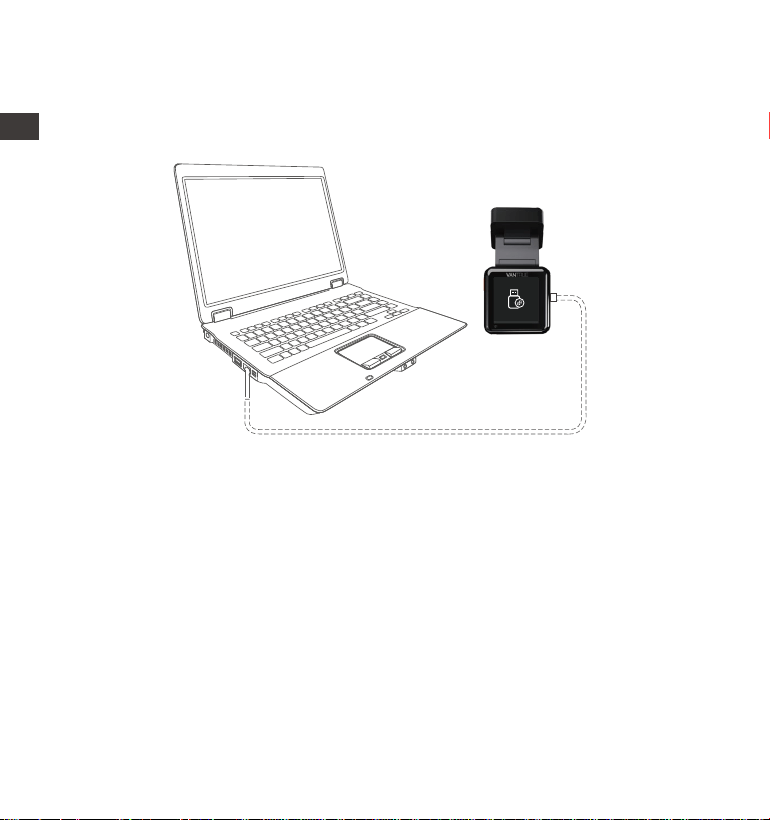
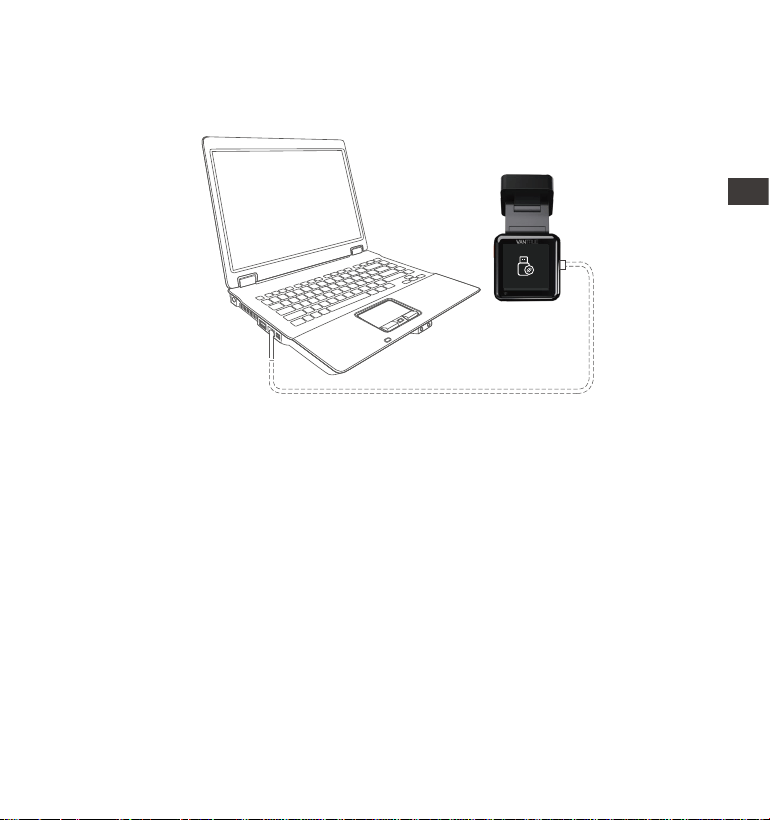
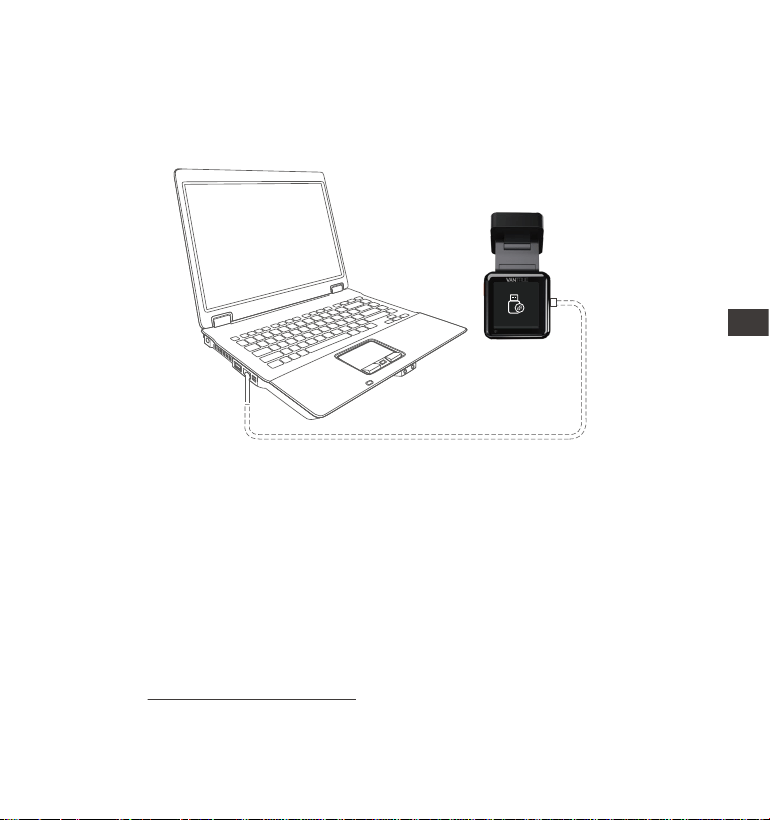
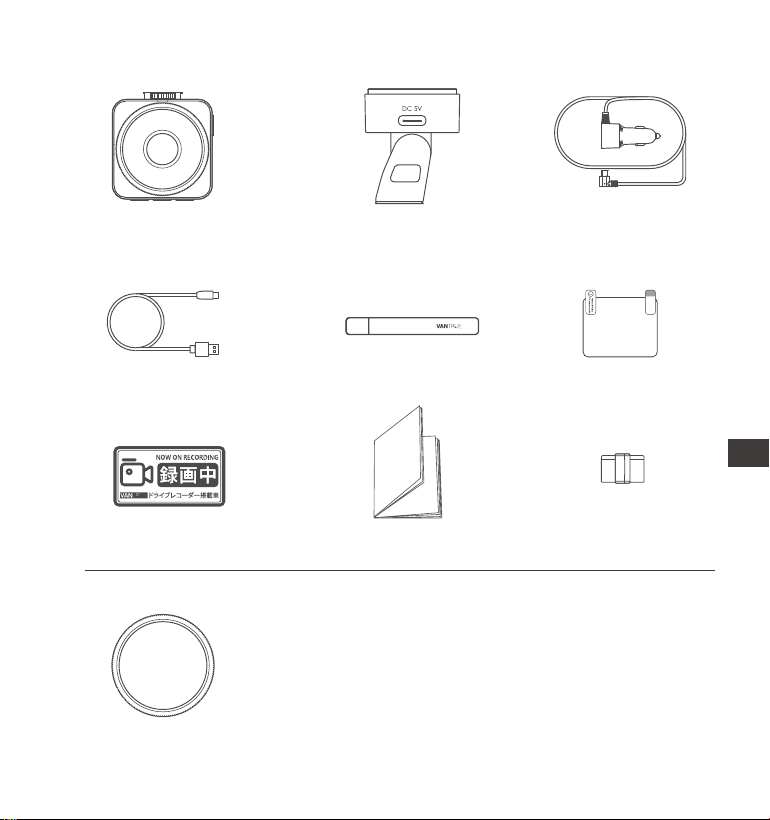
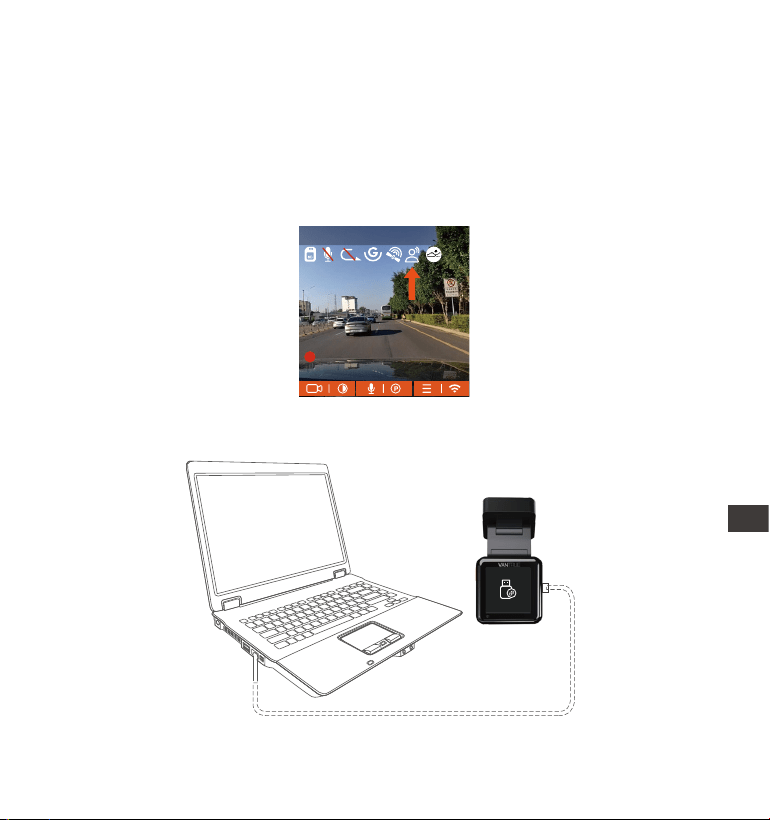
5. Viewing les on a Computer
Please use the USB cable included in the Vantrue dashcam package to
connect to your computer to view the E1 Lite recording les.
1.
You can remove the memo card from the camera, and then use it with a
card reader to view the les on your computer.
2.
EN

- 12 -
6. Warranty & Suppo
Warranty
The VANTRUE® Element 1 Lite Dash Cam comes with a full 12 months
warranty. If you register your product on our ocial site (www.vantrue.net/
register), you can extend the warranty to 18 months.
Suppo new
If you have any questions regarding your product, please do not hesitate to
contact us at suppo@vantrue.net, or drop us a message through the live
chat box at www.vantrue.net. Queries are typically answered within
12-24hours.
Your opinion matters
VANTRUE® is rmly committed to always improving our products, seices,
and user experience. If you have any thoughts on how we can do even better,
we welcome your constructive feedback and suggestions. Connect with us
today at suppo@vantrue.net.
EN

- 13 -
Hinweise zur Sicherheit und Verwendung dieses Produkts:
Bitte lesen Sie vor dem Gebrauch der Dashcam das Handbuch sorgfältig durch.
Die Dashcam muss eingeschaltet sein, um ordnungsgemäß zu funktionieren.
Um Fahrsicherheit willen bitte bedienen Sie während der Fah weder die
Dashcam noch schauen Sie sich Aufnahmen der Dashcam an.
Bitte legen Sie eine microSD-Kae mit ausreichenden Schreib- und
Lesegeschwindigkeiten ein, um die Dashcam ordnungsmäßig zu bedienen.
Demontieren Sie bitte weder das Gehäuse der Dashcam noch reparieren Sie sie
selbst. Bitte wenden Sie sich ans Suppo-Team Vantrues, wenn Sie Fragen
nach unseren Produkten hätten.
Bitte bringen Sie die Dashcam an eine geeignete Stelle an, damit sie keine
Sehstörung während der Fah darstellt.
Bitte achten Sie beim Gebrauch der Dashcam auf eine geeignete Umgebung.
Schützen Sie sie vor zu hohen Temperaturen und Feuchtigkeit, damit sie
reibungslos funktionie.
Bitte aktualisieren Sie für bessere Benutzereahrung das Firmware der
Dashcam. Um das neuste Firmware herunterzuladen und zu installieren,
besuchen Sie bitte unsere ozielle Webseite oder benutzen Sie das OTA-
Feature, über das einige Gerätemodelle veügen.
Bitte montieren Sie die Dashcam nicht an der Windschutzscheibesstelle direkt
vor dem Fahrer, um mögliche Beschädigungen im Fall des Lösens der Dashcam
von der Windschutzscheibe zu vermeiden.
Bitte beachten Sie, dass die Verbindung zur App möglicherweise nicht möglich
ist, wenn Sie CarPlay oder Android Auto verwenden;
Bitte halten Sie beim Gebrauch der Dashcam Gesetze und Vorschriften Ihres
Staates (oder Landes oder Provinz) ein.
1.
2.
3.
4.
5.
6.
7.
8.
9.
10.
11.
DE
- 14 -
1. Packliste
J. CPL-Polarisator
Optionales Zubehör
A.
VANTRUE E1 Lite
Dashcam
D.
USB-C Datenkabel
(1m)
G.
Warnauleber (2)
C.
USB-C Autoladegerät
(3,5 Meter)
F.
Statische Auleber
(2 Blätter)
H.
Benutzerhandbuch
B.
GPS-Halterung
E.
Kurzanleitung
I. Kabelhalter
DE
- 15 -
Beschreibung der Taste
NO. TastefunktionTaste-Name
1 Taste
3 ①Aufnahmeschnittstelle: kurz drücken, um das Mikrofon
ein-/auszuschalten; lange drücken, um in den Parkmodus
zu wechseln
②im Menü:Drücken Sie kurz auf eine Option; drücken
Sie lange, um schnell durch die Optionen zu blättern
Taste
1
5
2
3
4
①Aufnahmeschnittstelle: kurz drücken, um die
Videoaufnahme zu staen/anzuhalten; lang drücken,
um den Bildschirm zu halten
②Im Menü kurz drücken, um die Option zu bestätigen
③Bei der Wiedergabe einer Datei: Kurz drücken zum
Abspielen/Pause
2
Taste
①Lange drücken, um das Gerät auszuschalten, wenn es
eingeschaltet ist; kurz drücken, um es einzuschalten,
wenn es ausgeschaltet ist
②Kurz drücken, um das Video während der Aufnahme
zu sperren und ein Bild aufzunehmen
③Kurz drücken, um das Löschmenü während der
Dateisuche zu önen
DE
- 16 -
4
5
Taste ①Aufnahmeschnittstelle: Drücken Sie nach dem
Anhalten der Aufnahme kurz, um das Menü aufzurufen;
lange drücken, um WLAN ein-/auszuschalten
②Im Menü: Kurz drücken, um zum vorherigen Menü
zurückzukehren
2. Installationsanleitung
Nachdem Sie die Verpackung überprüft haben, nehmen Sie bitte alle
Zubehöeile aus der Verpackung und bereiten Sie die Installation vor.
Beschreibung der Anzeigeleuchte
Grünes Dauerlicht: im Standby;
Blinkendes grünes Licht: Die Kamera nimmt auf
1.
Videoleuchte
Kurz drücken, um die Dashcam neu zu staenTaste
2.1 Vorbereitung vor der Installation
Nehmen Sie die Dashcam-Halterung heraus und drücken Sie sie gemäß der
in der Abbildung unten gezeigten Richtung hinein.
DE
- 17 -
Bevor Sie die Dashcam installieren, bestimmen Sie bitte einen optimalen
Installationso und reinigen Sie dann den O.
2.
Setzen Sie die Speicherkae gemäß der auf der Speicherkae angezeigten
Richtung ein, wie unten gezeigt:
3.
Hinweis: Wenn Sie die Speicherkae zum ersten Mal einlegen oder eine
brandneue Speicherkae einlegen, wird möglicherweise ein
„Speicherkaenfehler“ angezeigt. Gehen Sie einfach zu Systemeinstellungen
> Formatieren, formatieren Sie die Kae und sie kann normal verwendet
werden.
DE
- 18 -
Reißen Sie die Schutzfolie der E1 lite-Halterung ab und kleben Sie sie in die
Mitte des elektrostatischen Aulebers.
2.
Installieren Sie das Autoladekabel: Verbinden Sie das Autoladekabel mit
dem Zigarettenanzünder und der E1 Lite-Halterungsschnittstelle und
verlegen Sie das Autoladekabel entlang Abbildung 2.
3.
Please peel o this
mask BEFORE application
Please peel o this mask
AFTER application completed
Zuerst die Folie Nr. 1 abreißen, auf die Frontscheibe kleben und dann die
Folie Nr. 2 abreißen.
Bringen Sie zuerst elektrostatische Auleber
auf der gereinigten Frontscheibe an, wie
unten gezeigt:
1.
2.2 Installieren
DE
- 19 -
4.
Staen Sie den Automotor, die Dashcam schaltet sich automatisch ein
und nimmt auf.
3. APP-Verwendung
3.1 App herunterladen
E1 lite hat integriees WLAN, bitte verwenden Sie Handy, um die VANTRUE
APP herunterzuladen.
Download 1: Vantrue kann über den Apple Store und Google Play
heruntergeladen werden.
Um das Autoladekabel oder das Verbindungskabel für die Heckkamera
ordentlich zu verlegen und zu befestigen, kann man die mitgeliefeen
Kabelhalter benutzen. Platzieren und kleben Sie die Kabelhalter zuerst an
gewünschten Stellen im Fahrzeug, dann führen Sie das Kabel durch die
dafür vorgesehene Önung in jedem Kabelhalter.
E1 Lite
DE
- 20 -
3.2 APP-Verbindung
1.
2.
Verbindungsschritte Handy und E1 Lite.
Download 2: Sie können von der oziellen Website von Vantrue
(www.vantrue.com) herunterladen.
Zuerst müssen Sie das WLAN der Dashcam önen. Sie können per Sprache
aufwachen, die Menütaste gedrückt halten und die Menüeinstellungen
aufrufen, um das WLAN zu önen.
Önen Sie die Vantrue APP in Handy, wählen Sie „Gerät hinzufügen“, um die
Verbindung zu staen, es springt zur mobilen WLAN-Einstellungsobeläche,
suchen Sie bitte das WLAN mit dem Namen E1 Lite_VANTRUE_XXXX, klicken
Sie auf „Verbinden“, geben Sie das Passwo ein und kehren Sie zu zurück
APP zu verbinden.
SSID:
E1 Lite_VANTRUE_f129
PASSWORD:
12345678
OK
Wi-Fi
Wi-Fi
Wi-Fi
DE
- 21 -
2
1
3
4
DE
- 22 -
6
5
7
8
DE

- 23 -
Note:
Die WLAN-Verbindungssequenz ist wie in der Abbildung oben dargestellt;
Nachdem die Wi-Fi-Verbindung eolgreich ist, wird die Verbindung
automatisch gestaet, wenn Sie zur APP zurückkehren;
Wenn Sie zum ersten Mal ein Gerät zur APP hinzufügen, wird eine
Verbindungsanleitung angezeigt. Sie können der Anleitung Schritt für
Schritt folgen. Wenn Sie Fragen zur WLAN-Verbindung haben, können Sie
sich an den oziellen VANTRUE-Kundendienst wenden Wir stellen
Bedienungsvideoanweisungen zur Veügung.
3.
(2)
(3)
(1)
Nachdem die Verbindung hergestellt wurde, können Sie über die Vantrue
eine Vorschau der Fahrbedingungen in Echtzeit anzeigen, Dateien
wiedergeben, die Einstellungen des Rekorders ändern, das Reisevideo
teilen usw.
4. Spracherkennung
E1 Lite wird mit einem Sprachfernbedienungssystem geliefe und unterstützt
derzeit Chinesisch, Englisch, Français, Japanisch und Russisch. Detailliee
Anweisungen zur Spracherkennung nden Sie unter Systemeinstellungen >
Sprachinhalt.
1920x1080P(HDR) 30FPS
MP/H
00�00�37
05-05-2025 14�09�07
35
DE
- 24 -
5. Computer-Wiedergabedatei
Verwenden Sie das Vantrue-USB-Kabel, um den Computer anzuschließen,
um die E1 Lite-Videodateien anzuzeigen.
1.
Sie können auch die Speicherkae entfernen und sie mit einem
Kaenlesegerät verwenden, um Dateien auf dem Computer anzuzeigen.
2.
DE

- 25 -
6. Kundendienst
VANTRUE®
Die Garantiezeit der Marke VANTRUE beträgt 12 Monate. Wenn
Sie Fragen zum Produkt haben, können Sie sich an die
Kundendienstmitarbeiter des Kauanals wenden oder eine E-Mail an unsere
ozielle E-Mail-Adresse suppo@vantrue.net senden. Wir werden innerhalb
von 24 Stunden eine engagiee Mitarbeiterantwo haben.
Die Marke VANTRUE® ist in ihrem Engagement für kontinuierliche
Produktverbesserung, Seice und Benutzereahrung unerschütterlich
geblieben. Wenn Sie Ideen haben, wie wir es besser machen können, können
Sie Ihre wevollen Vorschläge gerne an unsere ozielle E-Mail-Adresse
suppo@vantrue.net senden. Vielen Dank, dass Sie sich für VANTRUE
®
entschieden haben.
DE

- 26 -
Conseils:
Veuillez lire attentivement les instructions avant utilisation;
La Dashcam doit être mis sous tension pour fonctionner;
Veuillez ne pas déboguer le produit ou utiliser votre téléphone poable pour
regarder des vidéos de conduite pendant la conduite et faire attention à la
sécurité de conduite;
Ce produit nécessite l'inseion d'une cae micro SD pour être utilisé. Veuillez
utiliser une cae micro SD fonctionnelle ;
Veuillez ne pas démonter le boîtier de l'enregistreur de conduite ni le réparer
vous-même. Si le produit tombe en panne, veuillez contacter les responsables
de VANTRUE.
N'installez pas la dashcam dans un endroit qui pourrait bloquer la vue de
conduite;
Ce produit doit être tenu à l’éca des environnements à haute température et
humides ;
An d'améliorer l'expérience du produit, le micrologiciel du produit sera mis à
jour de temps en temps. Si nécessaire, vous pouvez mettre à jour le
micrologiciel pour l'expérience;
N'installez pas la dashcam directement devant les passagers pour éviter
qu'elle ne tombe accidentellement et ne présente des risques pour la sécurité;
Veuillez noter qu'il peut être impossible de se connecter à l'application lorsque
vous utilisez CarPlay ou Android Auto;
Veuillez utiliser ce produit dans le cadre autorisé par la loi.
1.
2.
3.
4.
5.
6.
7.
8.
9.
10.
11.
FR
- 27 -
1. Qu'y a-t-il dans la boîte?
J. Filtre CPL
Accessoires Optionnels
A.
Dashcam
VANTRUE
®
E1 Lite
D.
Câble de données
USB C(1m)
G.
Autocollants
d'aveissement
C.
Chargeur de voiture
avec câble USB C
(3.5 m)
F.
Autocollants
électrostatiques
H.
Guide rapide
B.
Suppo adhésif GPS
E.
Pied-de-biche
I. Clip de câble
FR

- 28 -
Touche Description
Numéro DescriptionNom
1 Bouton
3 ①Dans l'inteace d'enregistrement vidéo, appuyez
brièvement pour allumer/éteindre le microphone;
appuyez longuement pour entrer en mode parking
②Dans le menu, appuyez brièvement pour
sélectionner l'option suivante; appuyez longuement
pour faire déler rapidement les options
Bouton
1
5
2
3
4
①Pendant l'enregistrement , appui long pour éteindre
l'écran, appui cou pour démarrer/mettre en pause
l'enregistrement;
②Dans le menu, appui cou pour valider l'option
③Lors de la lecture du chier, appuyez brièvement
pour lire/mettre en pause
2
Bouton
①À l'état sous tension, appuyez longuement pour
éteindre, et à l'état éteint, appuyez brièvement pour
allumer
②En état d'enregistrement vidéo, appuyez brièvement
pour verrouiller la vidéo et prendre une photo
③Pendant la navigation dans les chiers, appuyez
brièvement pour ouvrir le menu de suppression
FR
- 29 -
EN
4
5
Bouton ①Dans l'inteace d'enregistrement vidéo, après avoir
mis l'enregistrement vidéo en pause, appuyez
brièvement pour entrer dans le menu; appuyez
longuement pour activer/désactiver le Wi-Fi
②Dans le menu, appuyez brièvement pour revenir au
menu précédent
2. Guide d'installation
État des voyants Description
Enétat de veille.
La caméra est en train d'enregistrer.
1.
Le voyant ve reste allumé
Le voyant ve clignote
Appuyez brièvement pour redémarrer la dashcamBouton
2.1 Préparation avant l'installation
Soez le suppo de la dashcam et poussez-le dans le sens indiqué sur la
gure ci-dessous.
FR
- 30 -
Après la mise sous tension et la sélection du meilleur emplacement d'installa-
tion en fonction de l'image, nettoyez l'emplacement avant l'installation.
2.
Insérez la cae mémoire dans le sens indiqué, comme illustré dans la gure
ci-dessous:
3.
Remarque: lors de l'inseion de la cae mémoire pour la première fois ou
de l'inseion d'une nouvelle cae mémoire, cela peut rappeler "erreur de
cae mémoire", allez simplement dans Paramètres système > Formater,
conrmez pour formater la cae et elle peut être utilisée normalement.
FR
- 31 -
Déchirez le lm protecteur du suppo E1 lite, alignez la position médiane de
l'autocollant électrostatique et collez-le bien.
2.
Veuillez utiliser le câble de charge de voiture pour connecter l'allume- cigare
et l'inteace du suppo E1 Lite, puis disposez les câbles conformément aux
instructions de la gure 2.
3.
Please peel o this
mask BEFORE application
Please peel o this mask
AFTER application completed
Déchirez d'abord le lm n °1, collez-le sur le pare-brise avant, puis déchirez
le lm n °2
Installez d'abord les autocollants
électrostatiques sur le pare-brise avant
nettoyé, comme indiqué ci-dessous:
1.
2.2 Installation
FR
- 32 -
4.
Démarrez le moteur, la dashcam s'allumera et enregistrera automatiquement.
Le clip de câble peut être utilisé pour xer et ranger le câble du chargeur de
voiture ou le câble de l'objectif arrière après l'avoir xé dans une position
appropriée.
E1 Lite
FR
- 33 -
3. Comment utiliser l'application
3.1 Téléchargement de l'APP
E1 lite dispose d'une connexion Wi-Fi. Après avoir téléchargé l'application
VANTRUE sur le téléphone mobile, vous pouvez vous connecter à l'enreg-
istreur E1 Lite via Wi-Fi.
Chaîne de téléchargement 1 : Téléchargez via Apple Store et Google Play
3.2 Connexion Application
Chaîne de téléchargement 2 : Téléchargez via site ociel de Vantrue
(www.vantrue.com)
Vous pouvez activer le Wi-Fi de l'enregistreur via le réveil vocal en anglais /
les touches de raccourci / paramètres du menu.
1.
SSID:
E1 Lite_VANTRUE_f129
PASSWORD:
12345678
OK
Wi-Fi
Wi-Fi
Wi-Fi
FR
- 34 -
2. Ouvrez l'application Vantrue, sélectionnez "Ajouter un appareil" pour
démarrer la connexion, il passera à l'inteace de réglage Wi-Fi du téléphone
mobile, veuillez trouver le Wi-Fi nommé E1 Lite_VANTRUE_ XXXX, cliquez
sur connecter, entrez le mot de passe et revenez à l'APP pour se connecter.
2
2
1
FR
- 35 -
4
3
5
6
FR
- 36 -
Remarquer:
La séquence de connexion Wi-Fi est illustrée dans la gure.
Une fois la connexion Wi-Fi réussie, la connexion démarre automatique-
ment lorsque vous revenez à l'APP.
Si vous avez des questions sur la connexion Wi-Fi, vous pouvez contacter
le seice client ociel de VANTRUE, nous vous fournirons des instructions
vidéo de fonctionnement.
3.
Une fois la connexion établie, vous pouvez prévisualiser les conditions de
conduite en temps réel, lire des chiers, modier les paramètres de
l'enregistreur, paager la vidéo du voyage, etc. via la Vantrue.
(2)
(3)
(1)
7
8
FR
- 37 -
4. Assistant Vocal (En français)
En plus de contrôler la caméra avec la télécommande, vous pouvez également
donner des commandes vocales à l'enregistreur via l'assistant vocal, Le
contrôle en français n'est pas pris en charge actuellement.
Pour des commandes vocales plus détaillées, veuillez vérier Paramètres
système > Contenu vocal. Le réglage par défaut est la sensibilité standard. La
reconnaissance vocale propose des options telles que faible sensibilité/
standard/haute sensibilité/désactivé. Vous pouvez contrôler la caméra avec
des commandes vocales.
5. Lire les chiers via l'ordinateur
Utilisez le câble de données USB dans l'emballage pour connecter
l'ordinateur et l'appareil E1 lite, vous pouvez visualiser les chiers vidéo
1.
1920x1080P(HDR) 30FPS
MP/H
00�00�37
05-05-2025 14�09�07
35
FR

- 38 -
Vous pouvez retirer la cae mémoire et utiliser le lecteur de cae pour
acher les chiers sur l'ordinateur.
2.
6. Garantie & Suppo
Garantie
VANTRUE ore une période de seice de garantie de 12 mois, pendant
laquelle vous pouvez proter de seices tels que des réparations rapides, le
retour et l'échange de marchandises endommagées, etc.
Si vous vous inscrivez en tant que membre sur le site ociel de VANTRUE,
votre période de seice de garantie peut être étendue à 18 mois.
Suppo
Si vous avez des questions sur le produit, vous pouvez envoyer un e-mail à
notre e-mail ociel [email protected] pour nous contacter. Le personnel
spécialisé répondra aux questions dans les 12 à 24 heures.
Votre opinion compte
VANTRUE
®
s'engage fermement à toujours améliorer notre produits, seices
et expérience utilisateur. Si tu as quelque réexions sur la façon dont nous
pouvons faire encore mieux, nous apprécions vos commentaires et sugges-
tions constructifs. Connectez-vous avec nous aujourd'hui à
suppo@vantrue.net.
FR

- 39 -
UWAGA:
Przed użyciem należy uważnie przeczytać instrukcję obsługi;
Kamera samochodowa musi być podłączona do zasilania;
Nie debuguj produktu ani nie używaj telefonu komórkowego do oglądania
lmów z jazdy podczas jazdy i zwracaj uwagę na bezpieczeństwo jazdy;
Ten produkt wymaga włożenia kay micro SD. Należy używać sprawnej kay
micro SD;
Nie należy samodzielnie demontować ani naprawiać obudowy kame
samochodowej. Jeśli produkt działa nieprawidłowo, należy skontaktować się z
ocjalną rmą VANTRUE.
Nie instaluj kame samochodowej w miejscu, które może zasłaniać widok
podczas jazdy;
Produkt należy używać z dala od wysokich temperatur i wilgotnego otoczenia;
W celu poprawy komfou użytkowania produktu, oprogramowanie sprzętowe
produktu będzie okresowo aktualizowane. W razie potrzeby można
zaktualizować oprogramowanie sprzętowe;
Nie instaluj kame samochodowej bezpośrednio przed pasażerami, aby
zapobiec przypadkowemu odłączeniu i potencjalnym zagrożeniom
bezpieczeństwa;
Należy pamiętać, że połączenie z aplikacją może nie być możliwe w przypadku
korzystania z CarPlay lub Android Auto;
Prosimy o korzystanie z tego produktu w zakresie dozwolonym przez prawo.
1.
2.
3.
4.
5.
6.
7.
8.
9.
10.
11.
PL
- 40 -
1. Co znajdziemy w pudełku?
J. Filtr CPL
Opcjonalne akcesoria
A.
Kamera
samochodowa
E1 Vantrue
D.
Kabel transferu
danych 1 m
G.
Naklejki ostrzegawcze
C.
Ładowarka
sasmochodowa
typ USBC (350 cm)
F.
Naklejki
elektrostatyczne
H.
Skrócona instrukcja
obsługi
B.
Uchwyt mocujący
z GPS
E.
Szpatułka
I. Uchwyt na kabel
PL

- 41 -
EN
EN
EN
Przegląd kame
Nr. OpisNazwa
1 Przycisk
3 Na ekranie nagwania krótkie naciśnięcie włącza/
wyłącza mikrofon, długie naciśnięcie powoduje
przejście do tbu parkowania; w ustawieniach menu
krótkie naciśnięcie, aby przejść do następnej opcji;
długie naciśnięcie, aby szybko przewijać opcje
Przycisk
1
5
2
3
4
W inteejsie nagwania krótkie naciśnięcie powoduje
włączenie/wstrzymanie nagwania, długie naciśnięcie
powoduje wyłączenie ekranu; w menu krótkie
naciśnięcie powoduje zatwierdzenie opcji; podczas
odtwarzania pliku naciśnij krótko, aby odtworzyć/
wstrzymać
2 Przycisk
W stanie włączenia naciśnij i przytrzymaj, aby wyłączyć
kamerę, podczas gdy w stanie wyłączonym naciśnij
krótko, aby ją włączyć; w stanie nagwania krótkie
naciśnięcie powoduje zablokowanie nagwania i
robienie zdjęć; w stanie przeglądania plików naciśnij
krótko, aby otworzyć menu usuwania;
PL
- 42 -
4
5
Przycisk W inteejsie nagwania, po wstrzymaniu nagwania,
naciśnij krótko, aby wejść do menu, naciśnij długo, aby
włączyć/wyłączyć WiFi; w menu, krótkie naciśnięcie
powoduje powrót do menu poprzedniego poziomu;
2. Instalacja
LED
Stałe zielone światło
Migające zielone światło
1.
REC
Przycisk
2.1 Przed instalacją
Zdejmij uchwyt i wepchnij go zgodnie z kierunkiem wskazanym na
poniższym sunku.
Krótkie naciśnięcie powoduje ponowne uruchomienie
kame
Wskaźnik LED
LED Status Opis
W stanie czuwania
Kamera nagwa
PL
- 43 -
Przed zainstalowaniem kame należy włączyć ekran, aby obserwować ekran
wyświetlany na ekranie, zasymulować sytuację podczas jazdy, określić
optymalne miejsce instalacji, a następnie przejść do czyszczenia miejsca
instalacji.
2.
Włóż kaę pamięci zgodnie z kierunkiem wskazania kay pamięci na
sunku w następujący sposób.
3.
Uwaga: Podczas wkładania kay pamięci po
raz pierwszy lub wkładania zupełnie nowej
kay pamięci, może to przypominać „błąd
kay pamięci”, po prostu sformatuj kaę w
Ustawieniach systemu > Ustawienia formatu,
aby używać jej normalnie.
Montaż: Dokładnie wyczyść przednią szybę wodą lub alkoholem, a następnie
wytrzyj suchą szmatką. Przyklej naklejkę elektrostatyczną za lusterkiem
wstecznym, co jest zalecanym miejscem, aby zapobiec blokowaniu widoku
podczas jazdy.
1.
2.2 Instalacja kame na szybie
PL
- 44 -
Please peel o this
mask BEFORE application
Please peel o this mask
AFTER application completed
Zdejmij folię ochronną z uchwytu E1, wyrównaj ją ze środkiem naklejki
elektrostatycznej i przyklej na miejscu.
2.
Zainstaluj ładowarkę samochodową: Wyjmij ładowarkę samochodową z
opakowania. Podłącz jeden koniec ładowarki samochodowej do zapalniczki,
a drugi koniec do pou mocowania E1. Po zakończeniu po prostu ułóż kabel
ładowarki samochodowej w kolejności, jak pokazano na sunku 2.
Uwaga: istnieją dwie folie ochronne o
numerach 1 i 2. Pierwszym krokiem jest
oderwanie folii ochronnej nr 1 i naklejenie
jej na przednią szybę, a następnie
oderwanie folii ochronnej nr 2.
PL
- 45 -
E1 Lite
4.
3. Korzystanie z aplikacji Vantrue
3.1 Pobieranie aplikacji
Po pobraniu aplikacji Vantrue na telefon możesz połączyć się z kamerą E1
przez WiFi.
Metoda 1: Pobierz „Vantrue” ze sklepu Apple Store i Google play
Podczas organizowania lub przechowywania kabli ładowarki samochodowej
lub przewodów tylnej kame, można użyć uchwytów na kable do ich
zabezpieczenia. Po przymocowaniu uchwytu do odpowiedniego miejsca,
wystarczy umieścić kable w uchwycie i je zamocować.
Uruchom silnik, kamera automatycznie się włączy i rozpocznie nagwanie
wideo.
PL
- 46 -
3.2 Łączenie z aplikacją
Najpierw musisz otworzyć kamerę WiFi. Możesz otworzyć WiFi przez
budzenie głosowe, długo naciśnij przycisk menu, wprowadź ustawienia
menu.
Otwórz aplikację Vantrue w telefonie, kliknij „Dodaj urządzenie”, wybierz
odpowiedni model, a nastąpi przejście do inteejsu ustawień mobilnego
Wi-Fi. Znajdź WiFi o nazwie E1 Lite_VANTRUE_XXXX, kliknij Połącz,
wprowadź hasło, a następnie wróć do aplikacji, aby się połączyć.
Metoda 2: Pobierz go z ocjalnej strony internetowej Vantrue
(www.vantrue.com)
Po pomyślnym pobraniu aplikacji możesz połączyć swój telefon z E1 lite.
1.
2.
SSID:
E1 Lite_VANTRUE_f129
PASSWORD:
12345678
OK
Wi-Fi
Wi-Fi
Wi-Fi
PL
- 47 -
2
1
3
4
PL
- 48 -
6
5
7
8
PL

- 49 -
Notatka:
Kolejność połączenia WiFi od Rysunku ① do Rysunku ④;
Pomyślnie połącz Wi-Fi, a następnie otwórz aplikację, kliknij podłączone
Wi-Fi, a aplikacja automatycznie połączy się z kamerą.
Po pierwszym dodaniu urządzenia do aplikacji pojawi się przewodnik
połączenia i możesz postępować zgodnie z instrukcjami krok po kroku.
Jeśli nadal masz pytania dotyczące połączenia Wi-Fi, możesz skontaktować
się z ocjalnym działem obsługi klienta VANTRUE, a my udzielimy
wskazówek wideo dotyczących operacji.
4. Komendy głosowe
E1 Lite jest wyposażony w system zdalnego sterowania głosowego. Obecnie
obsługiwane języki to chiński, angielski, Français, japoński i rosyjski. Aby
uzyskać szczegółowe polecenia rozpoznawania głosu, sprawdź Ustawienia
systemu > Treść głosowa.
3.
Po pomyślnym połączeniu z Wi-Fi możesz wyświetlić podgląd stanu jazdy,
odtwarzać pliki, zmieniać ustawienia aparatu i udostępniać lmy z podróży
w czasie rzeczywistym za pomocą Vantrue.
(2)
(3)
(1)
1920x1080P(HDR) 30FPS
MP/H
00�00�37
05-05-2025 14�09�07
35
PL
- 50 -
5. Przeglądanie plików na komputerze
Użyj kabla USB dołączonego do pakietu Vantrue, aby połączyć się z
komputerem, aby wyświetlić pliki nagrań E1 Lite.
1.
Kaę pamięci można wyjąć z kame, a następnie używać jej z czytnikiem
ka do przeglądania plików na komputerze.
2.
6. Gwarancja & wsparcie
Warranty Gwarancja
Kamera na deskę rozdzielczą VANTRUE® Element 1 Lite jest objęta pełną
12-miesięczną gwarancją. Jeśli zarejestrujesz swój produkt na naszej ocjalnej
stronie (www.vantrue.net/register), możesz być informowany o nowych
aktualizacjach.
PL

- 51 -
www.vantrue.pl
facebook.com/vantruePolska
Skontaktuj się z nami:
Wsparcie
Jeśli masz jakiekolwiek pytania dotyczące produktu, nie wahaj się skontak-
tować z nami pod adresem [email protected].
Zapytania są zazwyczaj udzielane w ciągu 24-48 godzin.
Twoja opinia ma znaczenie
Firma VANTRUE® jest mocno zaangażowana w ciągłe ulepszanie naszych
produktów, usług i doświadczeń użytkowników. Jeśli masz jakieś przemyślenia
na temat tego, jak możemy zrobić jeszcze lepiej, czekamy na Twoje
konstruktywne opinie i sugestie. Skontaktuj się z nami już dziś pod adresem
PL

- 52 -
Consejos prácticos:
Por favor, lea atentamente el Manual de Usuario antes de su uso;
La dash cam debe estar enchufada para funcionar;
Por favor, no depure el producto ni utilice su teléfono móvil para ver vídeos
de conducción durante la conducción, y preste atención a la seguridad en la
conducción;
Este producto requiere la inserción de una tarjeta micro SD para su uso. Por
favor, utilice una tarjeta micro SD funcional;
No desmonte ni repare la carcasa de la cámara. Si el producto funciona mal,
por favor póngase en contacto con el ocial VANTRUE.
No instale la dash cam en un lugar que pueda obstruir la visión de conduc-
ción;
Por favor, utilice este producto lejos de altas temperaturas y ambientes
húmedos;
Con el n de mejorar la experiencia del producto, el rmware del producto se
actualizará periódicamente. Si es necesario, puede actualizar el rmware para
experimentarlo;
No instale la dash cam directamente delante de los pasajeros para evitar
desprendimientos accidentales y posibles riesgos para la seguridad;
Tenga en cuenta que puede que no sea posible conectarse a la aplicación
cuando se utiliza CarPlay o Android Auto;
Utilice este producto dentro de los límites permitidos por la ley.
1.
2.
3.
4.
5.
6.
7.
8.
9.
10.
11.
ES
- 53 -
1. ¿Qué hay en la caja?
J. Filtro CPL
Accesorios opcionales
A.
Dashcam
Vantrue E1 Lite
D.
Cable de datos
Tipo C (1m)
G.
Pegatinas de
adveencia
C.
Cargador de auto
con cable Tipo C
incorporado (3.50m)
F.
Pegatinas
electroestáticas
H.
Guía rápida
B.
Montura Adhesiva
de GPS
E.
Palanca
I. Hebilla de línea
ES
- 54 -
Descripción de la cámara
Nro. DescripciónNombre
1 Botón de
3 En la pantalla de grabación, una pulsación coa
enciende/apaga el micrófono; mantener presionado
el botón activa el modo de estacionamiento; en el
menú de ajustes, una pulsación coa avanza a la
siguiente opción; mantener presionado el botón le
desplaza rápidamente a través de las opciones.
Botón de
1
5
2
3
4
En la inteaz de grabación, una pulsación breve
enciende/pausa la grabación, mantener presionado
el botón apaga la pantalla; en el menú, una
pulsación breve conrma las opciones; cuando
reproduce un archivo, una pulsación coa lo
reproduce/pausa.
2
Botón de
Con el dispositivo encendido, mantener presionado el
botón apaga la dashcam; con el dispositivo apagado,
una pulsación coa lo enciende; con el dispositivo
grabando, una pulsación coa bloquea la grabación
y captura imágenes; mientras explora archivos, una
pulsación coa abre el menú de borrar.
ES
- 55 -
4
5
Botón de En la inteaz de grabación, después de pausar la
grabación, una pulsación coa le hace entrar al
menú; mantenerlo presionado enciende/apaga el
WiFi; en el menú, una pulsación breve le hace volver
el menú anterior.
2. Instalación
LED
Luz verde estable
Luz verde parpadeante
1.
REC
Botón de
2.1 Antes de la instalación
Remueva la montura e introdúzcala de acuerdo a la dirección indicada en la
siguiente imagen.
Presiónelo brevemente para reiniciar la cámara
Indicador LED
Estatus LED Descripción
En estado de espera
La cámara está grabando
ES

- 56 -
Antes de instalar la cámara, por favor encienda la pantalla para obsear la
imagen, simule una situación en la que esté conduciendo y determine una
ubicación de instalación óptima, y entonces limpie la ubicación de la
instalación.
2.
Insee la tarjeta de memoria de acuerdo a la dirección indicada como lo
muestra la siguiente imagen.
3.
Nota: Cuando insee una tarjeta de memoria por primera vez, o insee una
nueva tarjeta de memoria, el dispositivo podría indicarle “error de tarjeta de
memoria”. Simplemente asegúrese de formatear la tarjeta en Ajustes de
sistema > Ajustes de fomateo para usarla normalmente.
ES
- 57 -
Please peel o this
mask BEFORE application
Please peel o this mask
AFTER application completed
Instalación: Limpie exhaustivamente el parabrisas con agua o alcohol,
entonces pase un paño seco. Pegue la pegatina electroestática detrás del
retrovisor, la cual es la posición recomendada para evitar el bloqueo de su
visión mientras conduce.
1.
2.2 Instalar la cámara en su parabrisas
Pele la lámina protectora de la montura E1 Lite, alinéela con el medio de la
pegatina electroestática y péguela.
2.
Instale el cargador del automóvil: Por favor saque el cargador del automóvil
fuera del paquete. Conecte un extremo del cargador al encendedor de
cigarrillos y el otro extremo al pueo de la montura del E1 Lite. Cuando
termine, simplemente ponga el cable de carga del automóvil como se
muestra en la Imagen 2.
3.
Nota: Hay dos láminas protectoras enumeradas 1 y 2. El primer paso es
arrancar la lámina protectora Nro. 1 y pegarla en el frente del parabrisas,
entonces arranque la lámina protectora Nro. 2.
ES
- 58 -
4. Arranque el motor, la cámara automáticamente se encenderá y grabará
video.
Cuando guarde el cable de carga del automóvil o el cable de la lente trasera,
puede usar la hebilla del cable para jarlo. Después de pegar la hebilla de
alambre en la posición adecuada, asegure el cable dentro de la hebilla.
E1 Lite
ES

- 59 -
3. Utilice la app “Vantrue”
3.1 Descargue la app
Después de descargar la app Vantrue en su teléfono móvil, puede conectarlo
a la cámara E1 Lite mediante WiFi.
Método 1: Descargar “Vantrue” mediante la Apple Store y Google Play
3.2 Conexión con la app
Después de que la app haya sido descargada satisfactoriamente, puede
conectar su teléfono móvil al E1 Lite.
Método 2: Descárguela a través de la página web de Vantrue
(www.vantrue.com)
Necesita abrir primero el WiFi de la cámara. Puede abrir el WiFi por comando
de voz o manteniendo presionado el botón de menú y entrando al menú de
ajustes.
1.
ES
- 60 -
Abra la app Vantrue en su teléfono, haga clic en “Añadir dispositivo”,
seleccione el modelo correcto y saltará a la inteaz móvil de ajustes WiFi.
Por favor encuentre el WiFi llamado E1 Lite_VANTRUE_XXXX, haga clic en
conectarse, introduzca la contraseña y entonces vuelva a la app para
conectarse.
2.
SSID:
E1 Lite_VANTRUE_f129
PASSWORD:
12345678
OK
Wi-Fi
Wi-Fi
Wi-Fi
21
ES
- 61 -
4
3
5
6
ES
- 62 -
Nota:
El orden de la conexión WiFi va de la imagen ① a la imagen ④.
Conéctese exitosamente al WiFi, entonces abra la app, haga clic en el WiFi
conectado y la app se conectará automáticamente a la cámara.
Habrá una guía de conexión cuando añada el dispositivo a la app por
primera vez, la cual puede seguir paso por paso. Si todavía tiene preguntas
sobre la conexión WiFi, puede contactar al seicio ocial de atención al
cliente de VANTRUE, y nosotros proveeremos orientación sobre su
operación.
Después de conectarse satisfactoriamente al WiFi, puede previsualizar el
estado de la conducción, los archivos de reproducción, cambiar los ajustes
de la cámara y compair videos de su viaje en tiempo real con Vantrue.
3.
(2)
(3)
(1)
7
8
ES
- 63 -
4. Control por voz
E1 Lite viene con un sistema de control por voz remoto. Los idiomas
actualmente compatibles son chino, inglés, Français, japonés y ruso. Para
conseguir comandos detallados de reconocimiento de voz, por favor échele
un vistazo a Ajustes de sistema > Contenido de voz.
5. Visualizar los archivos en una computadora
Por favor utilice el cable USB incluido en el paquete de la Dashcam Vantrue
para conectar el dispositivo a su computadora para ver los archivos de
grabación del E1 Lite.
1.
1920x1080P(HDR) 30FPS
MP/H
00�00�37
05-05-2025 14�09�07
35
ES

- 64 -
Puede remover la tarjeta de memoria de la cámara, y entonces puede utilizar
un lector de tarjetas para ver los archivos en su computadora.
2.
6. Garantía y sopoe
Garantía
La Dashcam Element 1 Lite VANTRUE® viene con una garantía completa de 12
meses. Si registra su producto en nuestra página web ocial (www.vantrue.net
/register), puede extender la garantía a 18 meses.
Sopoe
Si tiene alguna pregunta relacionada a su producto, por favor no dude en
contactarnos a través de [email protected], o envíenos un mensaje a
través del chat en vivo en www.vantrue.net. Las consultas normalmente son
respondidas en 12-24 horas.
Su opinión impoa
VANTRUE® está rmemente comprometida a siempre proveer nuestros
productos, seicios y experiencia de usuario. Si tiene alguna opinión sobre
cómo podemos mejorar, recibimos con agrado sugerencias y críticas construc-
tivas. Contáctenos ahora a través de suppo@vantrue. net.
ES

JP
- 65 -
ご注意:
ご使用前に必ずこの取扱説明書を最後までよくお読みいただき、使用上の注意
事項、本機の能力、使用方法など十分ご理解のうえで、正しく安全にご使用く
ださい。
ドライブレコーダーが動作するには車から電源を取る必要があります。
走行中、ドライブレコーダーをいじったり、スマホでライブビューしたりしな
いでください。運転に集中してください。
映像の保存にはmicro SDカードが必要します。適用なmicro SDカードを使用し
てください。
本製品を分解したり、修理したりしないでください。故障の場合、サポーター
センターの方までお問い合わせください。
本製品を運転の視線が邪魔されたところに取り付けないでください。
高温多湿の環境で本製品を使用しないでください。
ご使用体験を向上させるよう、本製品のシステムは不定期的に更新されます。
お必要であれば、いつでも最新なバージョンにアップデートいてください。
万が一、落下して怪我することを防ぐため、本製品を運転席または助手席の真
正面に取り付けないでください。
CarPlayまたはAndroid Autoをご使用の場合、アプリに接続できない場合があり
ます。
必ず本製品を法律で認められた範囲内でご使用ください。
1.
2.
3.
4.
5.
6.
7.
8.
9.
10.
11.
- 66 -
JP
Opis
1. 同梱内容
J. CPL偏光フィルター
オプション品
A.
VANTRUE E1 Lite
ドライブレコーダー本体
D.
Type-C型USB
ケーブル(1m)
G.
ステッカー(2枚)
C.
Type-C型シガー電源
ケーブル(3.5m)
F.
静電気接着シート
(2枚)
H.
クイックガイド
B.
GPSマウント
E.
内張りはがし
I. ケーブルクリップ
- 67 -
5 リセットボタン 短押ししてドラレコ本体を再起動します。
NO. はたらきボタン名称
1 電源ボタン
1
5
2
3
4
①長押しして電源をON/OFFします。
②録画中、短押ししてビデオをロックし、写真を
撮ります。
③ファイル閲覧中、短押ししてファイルを削除し
ます。
①録画画面で短押しして録画を開始/停止します;
長押ししてモニター画面を消灯します。
②メニューで短押しして選択肢を確認します。
③再生中、短押しして再生を再開/停止します。
2
録画ボタン
3 ①録画画面で短押ししてマイクをON/OFFにしま
す; 長押しして駐車モードに移行します。
②メニューで短押しして次の選択肢に移動します;
長押ししてメニューをスクロールします。
DOWNボタン
4 メニューボタン ①録画停止中、短押ししてメニューに移行します;
長押ししてWiFiをON/OFFします。
②メニューで短押しして前のメニューに戻ります。
ドラレコの概要
JP
- 68 -
LEDインジケーター
常に点灯
点滅中
2. 取り付け案内
取り付ける前に、お先に梱包内容を参考して同梱物を確認してください。
2.1 取り付けの準備
1.
2.
待機中
録画中
下図のご指示通りにGPSマウントをドライブレコーダー本体と接続してくだ
さい。
取り付けたいところのガラスをキレイにしてください。
JP
- 69 -
2. GPSマウントの保護フィルムを剥がして静電気接着シートの中央のところに貼
り付けてください。
3. 下図のご指示通りにmicro SDカードをドラレコ本体に差し込んでください。
※初めてmicro SDカードをご利用する場合、
「カードエラー」と表示されるかもしれませ
ん。その場合は「システム設定」>>
「フォーマット」を選んで一度micro SDカー
ドをフォーマットすれば正常に使用できま
す。
Please peel o this
mask BEFORE application
Please peel o this mask
AFTER application completed
2.2 取り付け
1. 静電気接着シートの貼り付け
番号①の保護フィルムを剥がしてその面をフロ
ントガラスに貼り付けてください。そして、番
号②の保護フィルムを剥がしてください。
JP
- 70 -
3.下図の指示通りにシガー電源ケーブルを車のシガーライターに接続した後、ま
たType-CのUSB端子をGPSマウントと接続してください。
接続が完成した後、エンジンをかけてドライブレコーダーを起動させてくだ
さい。機能が問題ないことをご確認後、下図の指示通りに配線を隠してくだ
さい。
E1 Lite
JP

- 71 -
4. またエンジンをかけてドラレコの機能は正常かを再度確認してください。
3. アプリの使用
3.1 ダウンロード
下記のQRコードをスキャンしてアプリ「Vantrue 」をApple Storeまたは
Google Playからダウンロードしてください。「Vantrue 」を検索してもアプ
リをダウンロードできます。
1.
電源ケーブルやリアカメラ用のケーブルを収納する際には、ケーブルクリップ
を使用して固定できます。ケーブルクリップを適切な位置に貼り付けた後、
ケーブルをクリップに固定してください。
2. 公式サイト(www.vantrue.com)からもアプリをダウンロード可能です。
JP
- 72 -
3.2 WiFi接続
ドラレコ本体のWiFi機能をONにしてください。(WiFiボタンを長押しし、ま
たはメニューのシステム設定でWiFiをONにしてください)
スマホで「Vantrue」のアプリの開いてください。そして「ドラレコを追
加」のボタンをタッチしてスマホのWiFiリストで「E1Lite_VAN-
TRUE_XXXX」と言うWiFiに接続しパスワードを入力してまたアプリに戻れ
ば接続が完成します。
接続が成功した後、スマホで画面をプレビューしたり、動画を再生したり、
ドラレコの設定を変更したりすることが出来ます。
(1)WiFiの接続は必ず下記の画像①~④の手順で行ってください。
(2)初めてWiFiを接続する際、接続の許可が要求される可能があります。
(3)その場合、ぜひ「常に接続」を選んでください。
※ご注意:
1.
2.
3.
SSID:
E1 Lite_VANTRUE_f129
PASSWORD:
12345678
OK
Wi-Fi
Wi-Fi
Wi-Fi
JP
- 73 -
2
1
3
4
JP
- 74 -
6
5
7
8
JP
- 75 -
4. 音声コントロール
本製品には音声コントロールのシステムが搭載されています。日本語、英語、
フランス語、中国語とロシア語をサポートしています。詳細な音声コマンドは
「システム設定」>>「音声コマンド」でご確認ください。
5. PCで映像を再生
付属のUSBケーブルでドラレコ本体のUSBポートと接続すればmicro SDカー
ドに保存されている映像と写真を再生できます。
1.
1920x1080P(HDR) 30FPS
MP/H
00�00�37
2025-05-05 14�09�07
35
JP

- 76 -
6. 保証とアフターサービス
保証について
VANTRUE® OnDash E1 Liteドライブレコーダーは12ヶ月の保証期間がありま
す。18ヶ月の延長保証をご希望の際は、購入日から6ヶ月以内弊社の公式ウェブ
サイトで(www.vantrue.net/register)ご購入いただいた商品のご登録をお願い致
します。
サポートについて
製品に何のご質問・問題がございましたら、いつでもお気軽にLINE経由(LINE
ID:vantrue)でお問い合わせいただくかあるいはsuppo@vantrue.netまでお問
い合わせください。営業日の場合、弊社はなるべく24時間以内にご返信を差し
上げます。
ご意見
当社は製品とサービスの品質、ユーザーエクスペリエンスを向上させるため日夜
全力で取り組んでいます。製品を改善するうえでの貴重な御意見やアドバイスが
ございましたらご遠慮なく弊社までご連絡をお願いいたします。お客様からのお
声を期待しております。
お問合せ先:
LINE ID:vantrue
メール:suppo@vantrue.net
VANTRUEをご選択いただき、誠にありがとうございます。
micro SDカードをカードリーダーに差し込んでまたカードリーダーをパソコ
ンと接続してもmicro SDカードに保存されている内容を閲覧することも可能
です。
2.
JP

- 77 -
製品をご購入頂き、誠にありがとうございます。
お問い合わせ:
ID: @860fnbxk
Contact Us
Join Our Community
JP

- 78 -
温馨提示:
请在使用前仔细阅读说明书;
行车记录仪必须通电使用才能工作;
请勿在行驶过程中调试产品或使用手机观看行车视频,注意行车安全;
本产品需要插入Micro SD卡使用,请使用功能正常的Micro SD卡;
请勿自行拆卸行车记录仪外壳或自行维修,若产品出现故障,请与VANTRUE官方
联系。
请勿将行车记录仪安装在可能会遮挡行车视线的位置;
请远离高温潮湿环境使用本产品;
为提升产品体验,会不定期更新产品固件,如有需要,可更新固件进行体验;
请勿将行车记录仪安装在乘车人员的正前方,以防意外脱落造成安全隐患;
请注意,使用无线CarPlay 或Android Auto 时可能无法连接到应用程序;
请在法律允许的范围内使用本产品。
1.
2.
3.
4.
5.
6.
7.
8.
9.
10.
11.
CN
- 79 -
1. 包装清单
J. CPL偏光镜
选配配件
A.
VANTRUE E1 Lite
记录仪
D.
TYPE-C数据线(1米)
G.
警示贴(2张)
C.
TYPE-C车充(3.5米)
F.
静电贴(2张)
H.
快速指南
B.
GPS支架
E.
撬棒
I. 线扣
1. 包装清单
J. CPL偏光镜
选配配件
A.
VANTRUE E1 Lite
记录仪
D.
TYPE-C数据线(1米)
G.
警示贴(2张)
C.
TYPE-C车充(3.5米)
F.
静电贴(2张)
H.
快速指南
B.
GPS支架
E.
撬棒
I. 线扣
CN
- 80 -
按键说明
NO. 按键功能按键名称
1 SOS按键
3 ①录影界面,短按开启/关闭麦克风;长按进入停车模式
②菜单中,短按下一个选项;长按快速滚动浏览选项
向下按键
1
5
2
3
4
①录影界面,短按开启/暂停录影;长按息屏
②菜单中,短按确认选项
③回放文件,短按播放/暂停
2
录影按键
①开机状态,长按关机,关机状态短按开机
②录影状态,短按加锁录影并抓拍图片
③文件浏览状态,短按打开删除菜单
录影指示灯
灯光说明
Opis
4
5
菜单按键
①录影界面,暂停录影后,短按进入菜单;长按打开/
关闭WiFi
②菜单中,短按返回上一级菜单
复位按键
短按重启记录仪
绿灯恒亮,待机中;
绿灯闪烁,录影中
CN
- 81 -
2. 安装指南
包装检查无误后,请取出包装内的所有配件,准备安装。
2.1 安装前准备
1.
安装记录仪前,请先通电开机观察屏幕中显示的画面,模拟出驾驶时情况,确定
一个最佳的安装位置后,再去清洁安装位置。
2.
取出记录仪支架,根据下图指示方向,推入安装
CN
- 82 -
Please peel o this
mask BEFORE application
Please peel o this mask
AFTER application completed
3.
1.
2.
根据内存卡指示方向,插入内存卡,如下图:
注意:首次插入内存卡或者插入全新的内存卡时,可能会提醒“内存卡错误”,
只需要在系统设置>格式化 设置里,确定格式化卡即可正常使用。
2.2 安装
在清洁好的前挡风玻璃上,先安装静电贴,如下图:
撕下E1 lite支架的保护膜,对准静电贴中间位置,粘好即可。
第一步先把①号膜撕下,贴在前挡风玻璃上,再把②号膜撕掉。
CN
- 83 -
3.
启动引擎,记录仪会自动开机并录影。
安装车充:请从包装中取出车充,将车充一端连接点烟器,另一端连接E1 Lite
支架接口,完成后,将车充线延图2指示整理好即可。
4.
在收纳车充线或后镜头线时,可以使用线扣进行固定。将线扣粘贴在合适的位置
后,将线材固定在扣内即可。
E1 Lite
CN
- 84 -
3. APP使用
3.1 APP下载
E1 lite内置WiFi,手机下载VANTRUE APP后,即可通过WiFi连接E1 Lite记录仪。
下载1:Vantrue 可通过Apple store和Google play下载
下载2:可以通过Vantrue官网(www.vantruecam.com)下载
苹果应用下载 安卓应用下载
CN
- 85 -
打开手机中的Vantrue APP,选择“添加设备”开始连接,会跳转到手机WiFi设置
界面,请找到E1 Lite_VANTRUE_XXXX命名的WiFi,点击连接,输入密码后,
返回APP即可连接。
3.2 APP连接
APP下载成功后,可以开始手机与E1 lite连接。
首先需要打开记录仪WiFi,可以通过语音唤醒、长按菜单按键、进入菜单设置
打开WiFi
1.
2.
SSID:
E1 Lite_VANTRUE_f129
PASSWORD:
12345678
OK
Wi-Fi
Wi-Fi
Wi-Fi
注意:
WiFi连接顺序从图①到图④;
WiFi连接成功后,返回APP中会自动开始连接;
APP中首次添加设备会有连接指导,可以根据指导一步一步进行操作,若您
对WiFi连接还有疑问,可联系VANTRUE官方客服,我们将会提供操作视频
指导。
(3)
(2)
(1)
CN
- 86 -
2
1
3
4
CN
- 87 -
6
5
7
8
CN
- 88 -
5. 电脑回放文件
4. 语音识别
3.
连接成功后,可以通过Vantrue实时预览行车状况、回放文件、更改记录仪设置、
分享旅途视频等。
E1 Lite自带语音遥控系统,目前支持的语种有中文、英文、法语、日语、俄语。
详细的语音识别指令,请在系统设置>语音内容里查看。
2. 可取下内存卡,配合读卡器使用在电脑上查看文件。
1. 使用Vantrue配套的USB数据线连接电脑,可查看E1 Lite录影文件
1920x1080P(HDR) 30FPS
MP/H
00�00�37
2025-05-05 14�09�07
35
CN

- 89 -
6. 售后服务
VANTRUE品牌保修服务周期为12个月,如果您有任何关于产品的问题,可以联系
您购买渠道的客服人员,或者是发送邮件至我们官方邮箱suppo@vantrue.net.
我们将会有专门人员在12-24小时内回复问题。
VANTRUE®品牌一直坚定不移地致力于不断改进产品,提高服务以及用户体验。如
果您对于我们如何能做的更好有任何的想法,欢迎您在我们的官方邮箱
suppo@vantrue.net留下宝贵的意见及建议。
感谢您选择VANTRUE®
联系我们:
京东旗舰店
https://vantrue.jd.com
天猫旗舰店
https://vantruecam.tmall.com
微信号: vantrue001
微信小管家
CN


English / Deutsch /Français / Polski / Espanol /
日本语 / 中文
truly driven.
www.vantrue.com Made in China