OnDash N3
Touch-Screen Mirror Dual Dash Cam
®
ミラー型ドライブレコーダー
User Manual
取扱説明書

1
1. Camera Ocerview 2
2. Main Screen Configurations 4
3. Setup 5
4. Recording Interface Configurations 6
5. Video Playback 7
6. Dash Cam Installation 8
7. Rear View Camera Installation 9
8. Specifications 10
11
スクリーンの概要
13
画面構成
14
システム設定
15
録画画面
16
再生
17
ドライブレコーダーの取り付け
18
リアカメラの取り付け
19
製品仕様
9. Warranty & Support 20
20
保証とサポート
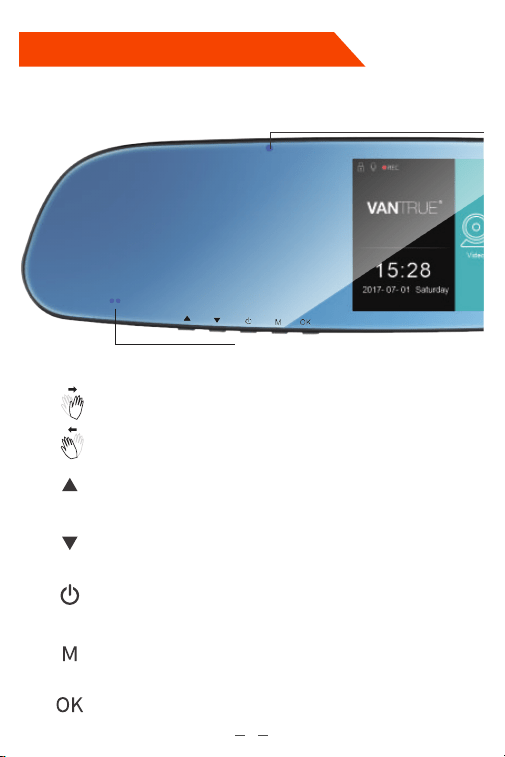
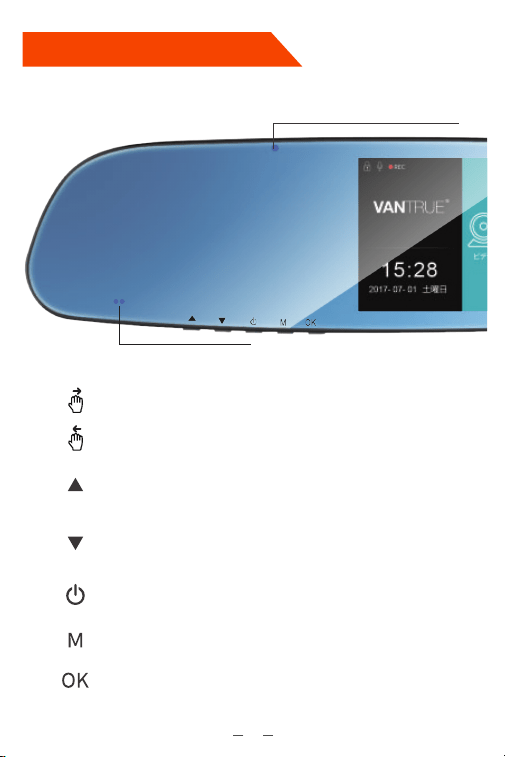
Camera Overview
Recording LED indicator
(When camera records, blue
LED light blinks.)
Gesture Sensor.
Move selector up;
Front/rear view switch
Turn Off/On Screen
Lock the emergency video
Move selector down;
Microphone on/off hotkey.
When camera is not recording videos, press M button
to enter Setup Menu interface;
When camera is recording, press M button to lock
the current recording video.
Start/pause recording; Confirm setting.
Press and hold for 3 seconds to POWER ON/OFF;
Short press to turn on/off LLL (low light level) night vision.
2
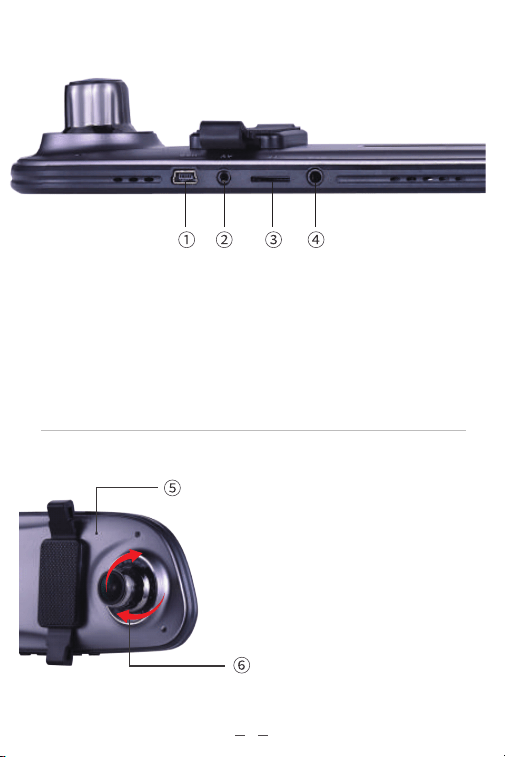
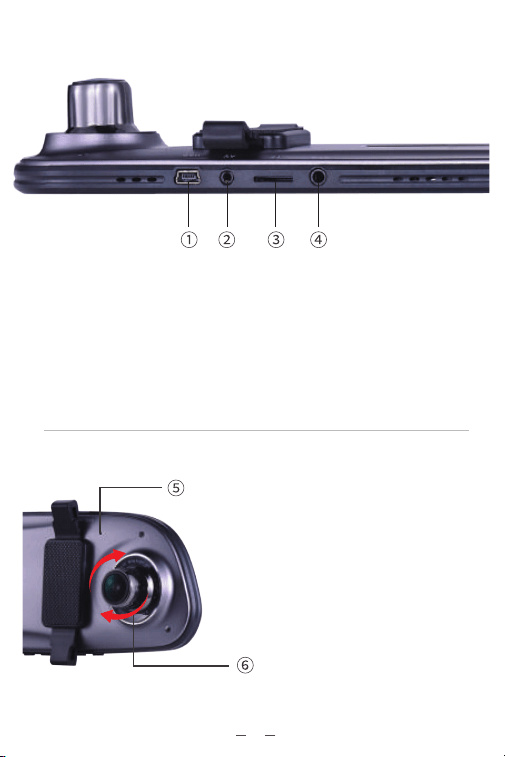
① Mini USB port: to power the camera and charge the battery inside.
② AV in: connector of the rear view camera.
③ Memory card slot: microSD card slot.
④ GPS port: to connect to the external GPS module (optional).
⑤ Reset: reset button inside. Press to force
reset the device.
⑥ Multi-angle adjustable camera lens.
3
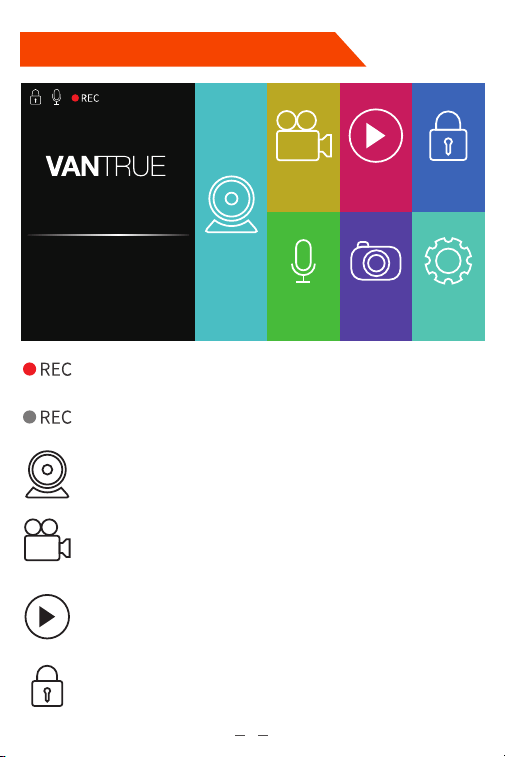
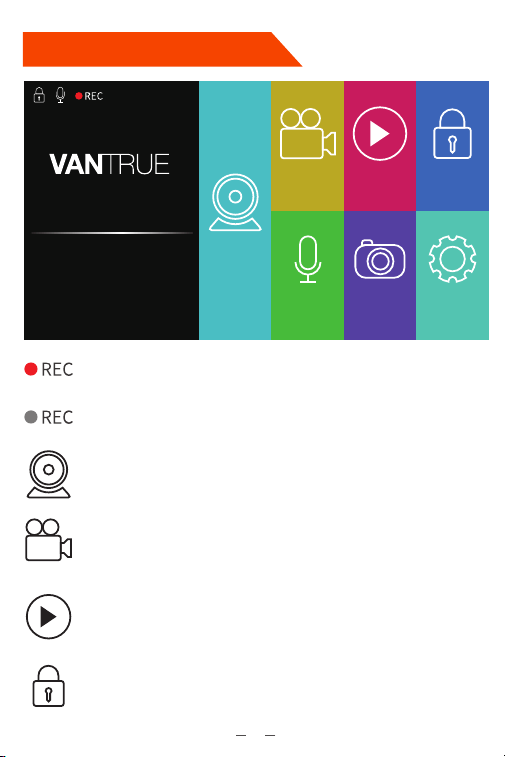
Main Screen Configurations
Camera is recording
recording has stopped.
Touch to switch to the recording screen.
Touch to start/stop recording.
Touch to enter the video playback mode (if the camera is
recording, press OK button or touch the “Stop Recording”
to stop recording first, then go to the playback mode.)
Touch to lock up the current recording video to prevent it
being covered.
4
®
15:28
2017- 07- 01 Saturday
Video
Rec On
Audio Off
Playback
Camera
Video Lock
Setup

Setup
Resolution: By default, front camera is 1080P and rear cam is VGA. 1080P
FHD, 720P, WVGA, VGA options are available for front camera.
Loop Recording: By default, this is set to 3 minutes per video clip. 3, 5, 10
minutes or OFF is available.
Night Mode *: Set to On by default. Can be turned OFF.
GPS Setup: Set to Off by default,Can be turned on.
Motion Detection * *: Set to Off by default. Can be turned On.
Audio Record: Set to On by default. Can be turned Off.
Date Stamp: Set to Off by default. Can be turned On.
G-Sensor: Set to Medium by default. High, Medium, Low and Off options
are available.
Touch to turn on/off
voice recording.
Touch to snapshot.
Touch to go to the Setup menu. (if the camera is recording,
press OK button or touch the “Stop Recording” to stop recording
first, then go to the Setup mode.)
Record Setup
Date/Time: Touch ▲ or ▼ to set the current date and time. Touch Back
to exit.
Parking Monitor *: Set to Off by default. Can be turned On.
Common Setup
* The night mode is triggered by LLL (low light level) night vision technology,
which greatly enhances the camera’s vision in low light environment.
* * When the Motion Detection has been turned on, if no movement is
detected in front of the camera after 10 seconds of recording, the camera
will stop recording. Once it detects movement again, it will restart the
recording.
Remark:
5
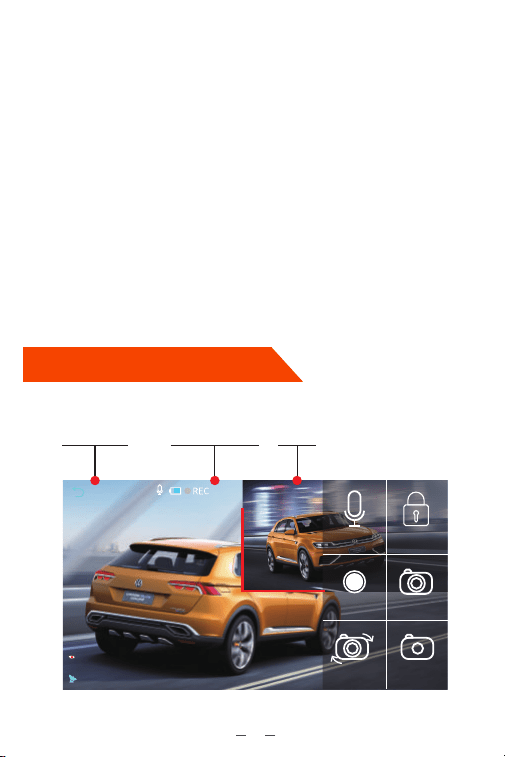
Recording Interface Configurations
Gesture Control: Default is Off. Can be turned ON.
Beep Sound: Set to On by default. Can be turned Off.
Language: Default is English,Simplified Chinese,Russian,Japanese are
available.
Frequency: Default is 50Hz. Can be toggled between 50Hz/60Hz.
Screen Saver: Default is 30 Secs,Select the duration in minutes:30 Secs,
1min,3 min or OFF(to disable it).
Format: Touch OK to format the memory card, or Cancel to exit without
formating.
Default Setting: Touch OK to reset the device back to stock factory
settings, or Cancel to exit without resetting.
Version: Check the current firmware version.
* With the Parking Monitor is turned on, even when the camera has been
turned off, once it detects any impact or move of the car, it will auto turn
on and start recording.
Remark:
6
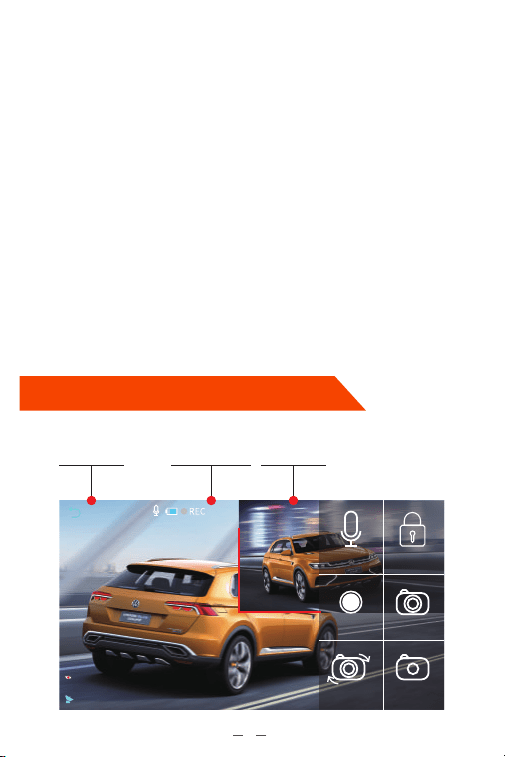
00:01:41 1080FHD
2017-07-11 10:49:24
Back
Audio Off
Video lock
Rec On Take Capture
Return to the
main screen
In-Recording
status and
recording time Resolution
Rear view
camera
recording
video
Video Switch Night Mode
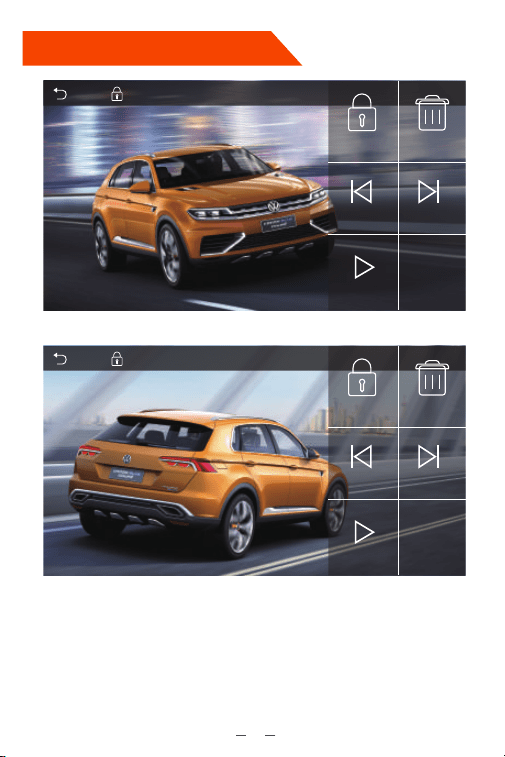
Video Playback
Stop the recording first, then touch to enter the Playback Mode.
The front camera recording files are named as “Front_Date_Time”.
The rear view camera recording files are named as “Rear_Date_Time”.
Emergency video files are named as “SOS_Date_Time”.
7
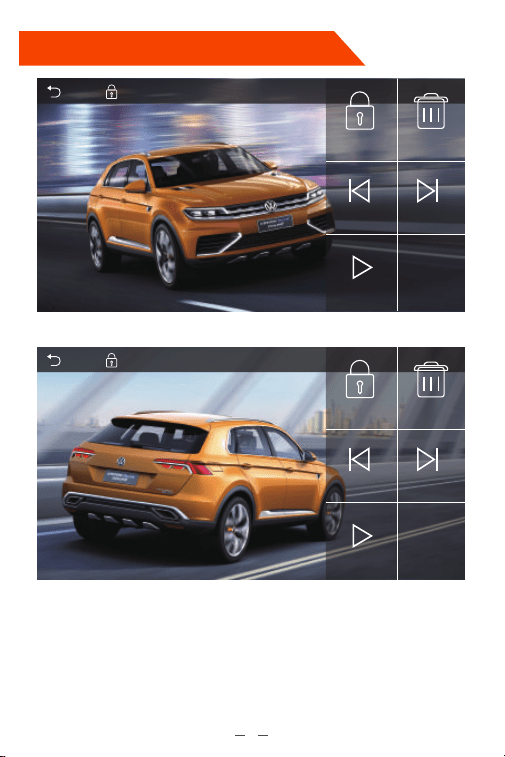
Front_20170421_144938.MOVReturn
lock Delete
Previous
Play / Pause
Next
1/73
Rear_20170421_144938.MOVReturn
lock Delete
Previous
Play / Pause
Next
1/73
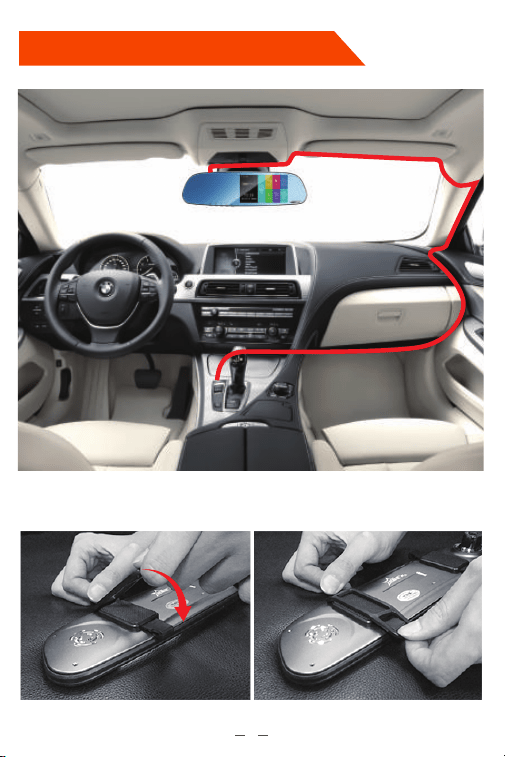
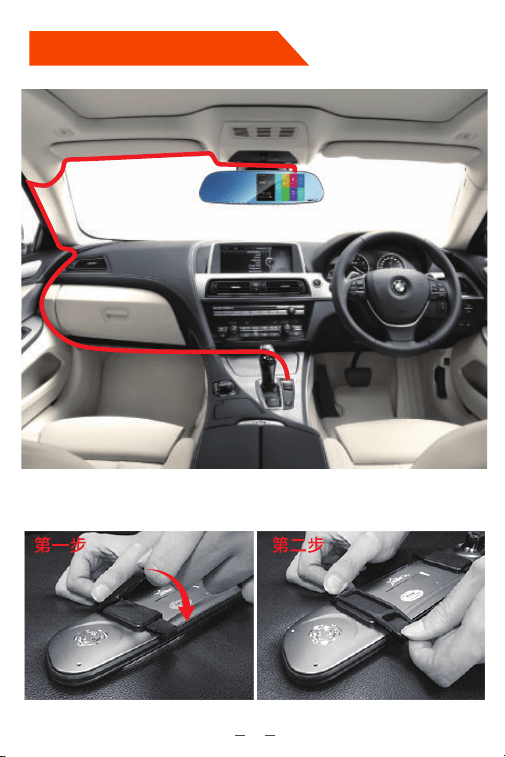
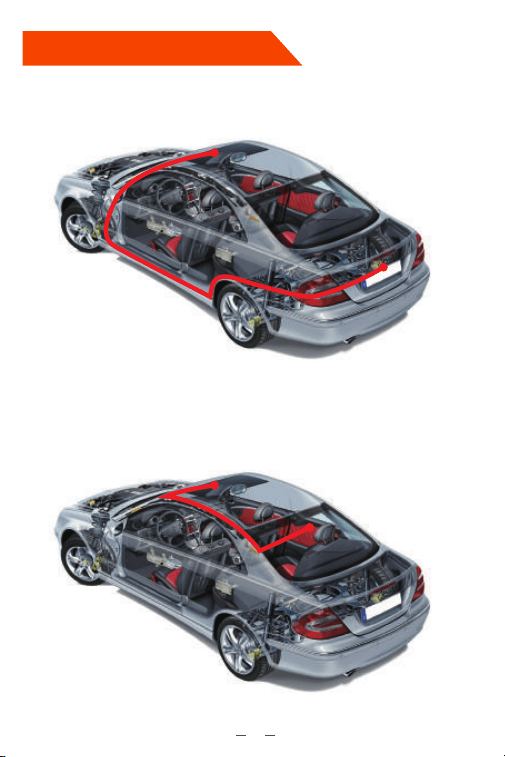
Dash Cam Installation
Bandage using guide
step1 step2
8
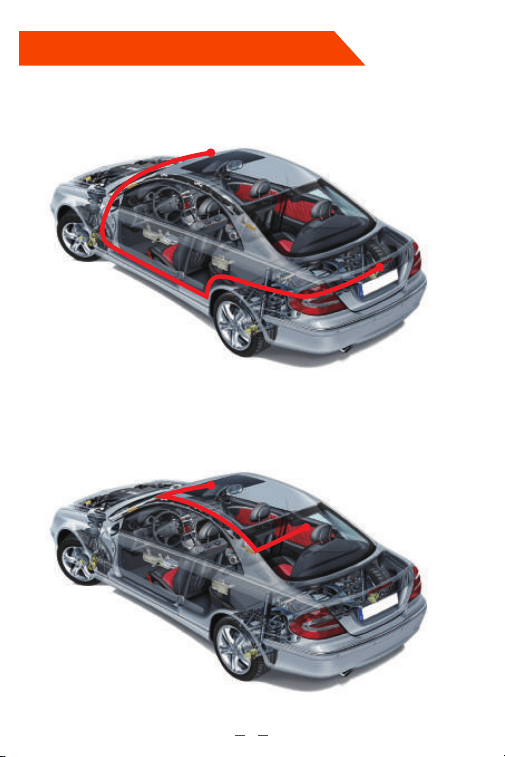
Rear View Camera Installation
Solution A: install the rear view camera on the top of the car license plate.
Solution B: install the rear view camera on the top of the rear windshield
glass.
9

Specifications
The specifications of this product may change without prior notice due to
product improvements.
Model
Processor
Display
Lens
Languages
Video
Image
Audio
Memory Storage
Shutter Type
USB Port
Battery
Working Temperature
Storage Temperature
Compatible OS
N3
NOVATEK NT96655
5 inch IPS Screen
Front: 170° wide viewing angle, full 6 layer glass
lens with F/1.8 wide aperture.
Rear: 140° wide viewing angle, F/2.0 wide aperture
lens.
English/Japanese/简体中文(Simplified Chinese)
H.264 compressed format;
Front cam: 1920×1080P30, 1280×720P30
Rear cam: VGA 640×480P
JPEG format; 12M
Built-in microphone and speaker
Support MicroSD Card (8 to 64GB Card in FAT32,
Class 10)
Electronic
USB2.0 (mini)
650mAh 3.7V Polymer Li-ion battery
32 – 158°F (0-70°C)
14 – 176°F (-10 to -80°C)
Windows XP/Vista/7/8/10 &Mac OS
10

スクリー ン の 概 要
録画LEDインジケータ(録画中、
青色のLEDが点滅しています。)
ジェスチャーセンサ
表示内容を上に移動します;
再生中−巻き戻し;
録画中、マイクのオン/オフをします。
スクリーンのオン/オフをします
緊急録画をロックします
表示内容を下に移動します;
再生中−早送り;
スナップ ショットボ タン。
録画停止中にMボタンを押してメニューモードへ;
録画中、Mボタンを押してビデオをロックします。
録画の開始/停止;確認ボタン
電源ボタンを長押しで電源のオン/オフをします;
LLL微光級夜間モードのオン/オフをします。
11
12
①ミニUSBポート:ドラレコに給電します/内蔵のバッテリーに充電します。
②AV ポート:リアカメラと接続します。
③メモリカード挿入口:microSDHCカードを挿入します。
④GPSポート:別売りのGPS受信機を接続します。
⑤リセットボタン: 初期設定に戻します。
⑥多角度で調整可能レンズ。
13
録画中
録画停止中
タッチして、録画画面に切り替えます。
録画の開始/停止
ビデオの再生モードに入力します。(録画中、「OKボタン」を押して、或い
は、「録画オフ」をタッチして、録画を停止します、それから、「再生」をタ
ッチして再生モードに入 力します。)
上書きされないように、録画しているビデオをロックします。
®
15:28
2017- 07- 01 土曜日
ビデオ
録画オン
録音オン
再 生 モード
カメラ
ロック
設定
画面構成

システム設定
解像度:フロントカメラの初期設定は1080Pです、リアカメラのVGAです。フロント
カメラの選択可能な解像度は1080PFHD,720P,WVGA,VGAです。
ループ録画:初期設定は3分です。一つビデオの録画時間を設定することができ
ます。選択可能な設定:オフ、3分、5分、10分です。
夜間モード*:初期設定はオンです。オン/オフが選択できます。
GPS設定:初期設定はオフです。オン/オフが選択できます。
モーション検知**:初期設定はオフです。オン/オフが選択できます。
録音:初期設定はオンです。オン/オフが選択できます。
日付表示:初期設定はオフです。オン/オフが選択できます。
G-センサー:
G−センサー設定の初期値は標準感度です。状況により、適切なレベ
ル(低感度、標準感度、高感度、オフ)を選択してください。
録音のオン/オフ
タッチして、写真が撮れます。
設置画面に入力します(録画中、「OKボタン」を押して、或いは、「録画
オフ」をタッチして、録画を停止します、しれから、「システム設定」をタ
ッチして設置画面に入力します。)
録画設定
日付/時間:▲と▼をタッチして、日付と時間を設定します、設定したあと、「戻る
ボタン」をタッチして退 出します。
駐車モード*:初期設定はオフです。オン/オフが選択できます。
共通設定
*夜間モードについて、LLL(低照度)の微光級ナイトビジョン技術を採用して、低照
度環境でカメラの視野を大幅に向上します。
**モーション検知をオンにするで、駐車中にフロントカメラで動きを感知して記録
できます。駐車中に動きを停止した10秒ぐらい、録画は停止になります。
注釈:
14
15
00:01:41 1080FHD
2017-07-11 10:49:24
戻る
録音オン
ロック
録画オフ カメラ
リアカメラ
録画ビデオ
カメラ切替 夜間 モ ード
ジェスチャーセンサー:初期設定はオフです。オン/オフが選択できます。
ビープ音:初期設定はオンです。オン/オフが選択できます。
言語:
言語設定の初期値は英語です。英語、中国語、日本語、ロシアの4種の言語が
選択できます。
周波数:初期設定は50Hzです。光源周波数は50Hz/60Hzを選択できます。
スクリーンセーバー(モニター点灯時間設定):初期設定は30秒です。起動時の画面
表示時間を変更できます。録画中、設定時間経過後カメラのモニターは自動的
にオフになります。選択項目は30秒、1分、3分、オフがあります。
ファ ー マット :
microSDメモリーカードのフォーマットを行います。全てのファイル
に保存されたデータはなくなります。
初期設定:全ての設定をお買い上げ時の状態に戻します。
バ ージョン : ファー ムウェアの バージョンを 確認で きます。
メイン 画 面 に
戻ります。 録画中と録画時間 解像度
*駐車モードを開き、ドラレコの電源を切っても、車の衝撃や動きを検知すると、ド
ラレコは自動にオンをして、録画を開始します。
注釈:
録画画面
録画を停止してから、「再生」ボタンをタッチして再生モードに入力します。
フロントカメラで録画したファイルの名前はFront_Date_Timeです。
リアカメラで録画したファイルの名前はRear_Date_Timeです。
緊急録画したビデオの名前はSOS_Date_Timeです。
16
再生
Front_20170421_144938.MOV戻る
ロック
削除
前
再生/一時停止
次
1/73
Front_20170421_144938.MOV
1/73
戻る
ロック
削除
前
再生/一時停止
次
17
ベルトの使用ガイド
ドライブレコーダー の取り付け
18
解決方法A:ナンバープレートの上部にリアカメラを取り付けます。
解決方法B:リアガラスの上部にリアカメラを取り付けます。
リアカメラの取り付け

19
本製品の仕様及び外観は、改良のため予告なく変更することがあります。予めご了承
ください。
製品仕様
型番
プロセッサー
液 晶 サイズ
レンズ
言語
Video
画像
オ ー ディオ
メモリーストレ ー ジ
シャッター
USB ポート
電池
動作環境温度
保存温度
対応パソコンOS
N3
NOVATEK NT96655
5 インチ IPSスクリーン
フロント: 広角170度大口径F/1.8の光学6G多層ガラス
レンズ
リア: 広角140度大口径F/2.0レンズ
英語、中国語、日本語
H.264圧縮技術;
フロントカメラ:1920*1080P30,1280*720P30
リアカメラ:VGA640*480P
JPEG; 12M
MIC /スピーカーが内蔵しています。
Class10 以上の16GB−64GB(FAT32)のmicroSD メモ
リーカード
電 子シャッター
USB2.0, mini
650mAh 3.7Vリチウム重合体電池
0-70°C
‐10--80℃
Windows XP/Vista/Windows 7/Windows 8/
Windows 10/Mac OS

Warranty
The VANTRUE OnDash N3 Touch Screen Mirror Dual Dash Cam comes
with a full 12 months warranty.
If you register your product on our official site (www.vantrue.net/register),
you can extend the warranty to 18 months.
®
Your opinion matters
THANK YOU for choosing VANTRUE
VANTRUE is firmly committed to always improving our products, services,
and user experience. If you have any thoughts on how we can do even
better, we welcome your constructive feedback and suggestions.
Connect with us today at [email protected].
®
Support
If you have any questions regarding your product, please do not hesitate
to reach us via online chat on our official site, Facebook, or drop us an
email at [email protected]. Queries are typically answered within
12-24 hours.
20
保証とサポート
保証について
VANTRUEOnDashN3タッチスクリーンミラー型ドライブレコーダーは12ヶ
月の保証期間があります。
18ヶ月の保証期間に延長するため、弊社のウェブサイトで
(www.vantrue.net/register)ご注文の商品を登録してください。
®
ご意見
VANTRUEご利用いただき、誠にありがとうございます
製品について何の意見がございますか?いつも私たちの製品とサービスの品質
とユーザーエクスペリエンスを向上させるために全力で取り組んでいます。製
品を改善する上の意見やアドバイスを持っている場合は、ご遠慮なく弊社まで
ご連絡をお願いいたします(アマゾンお問い合わせ或いは[email protected]
より)。お客様からの声を期待しております。
サポートについて
製品に何のご質問・問題がございましたら、いつでもお気軽にアマゾン経由で
お問い合わせいただくか。或いは、[email protected]までご連絡ください。
すべてのお問い合わせは、営業日に24時間以内にご返信を差し上げます。
Warranty & Support