
1
Remote Trigger
Remote Trigger
&
&
Remote Control
Remote Control
Trigger Kit
Trigger Kit
Instructions
Instructions
JS6959 & JS6960

2
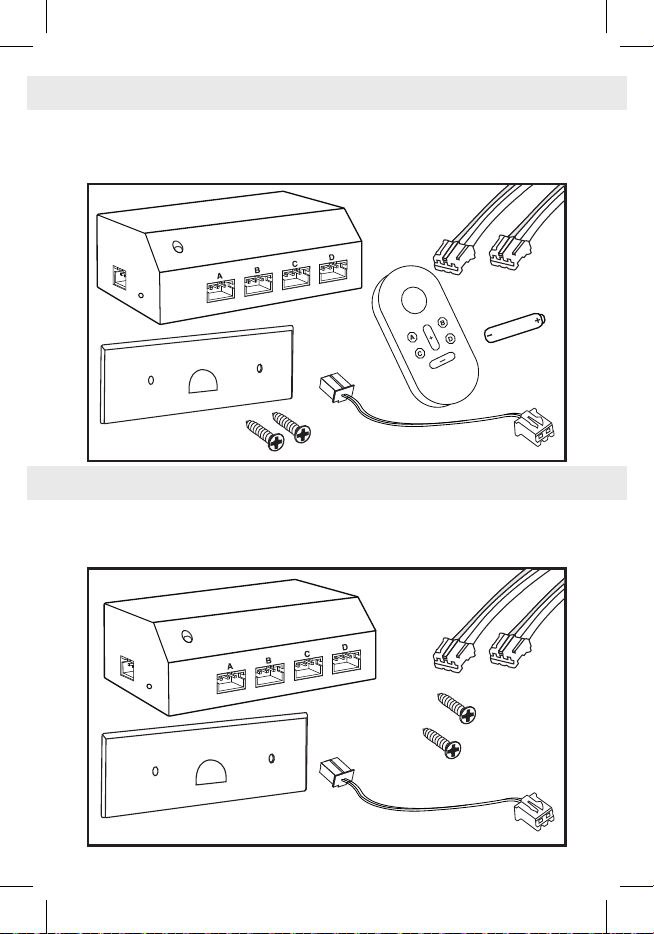
1 Remote Trigger with Backplate
1 – 6” Power Jumper Cable
4 – 24” Trigger Cables
2 Backplate Screws
Instructions
1 Remote
1 – 23A Battery
1 Remote Trigger with Backplate
1 – 6” Power Jumper Cable
4 – 24” Trigger Cables
2 Backplate Screws
Instructions
Remote Control Sound Index
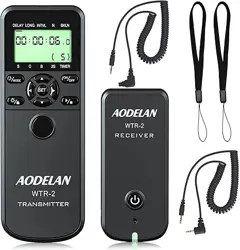
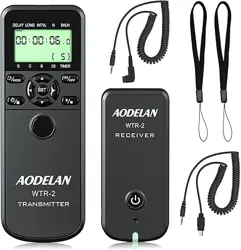
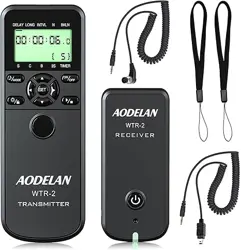
REMOTE CONTROL TRIGGER KIT CONTENTS
REMOTE TRIGGER CONTENTS
24” trigger
cable x4
24” trigger
cable x4
power jumper cable
power jumper cable
backplate screws
backplate screws
backplate
backplate
Remote Trigger
Remote Trigger
Remote
Control
23A battery
3
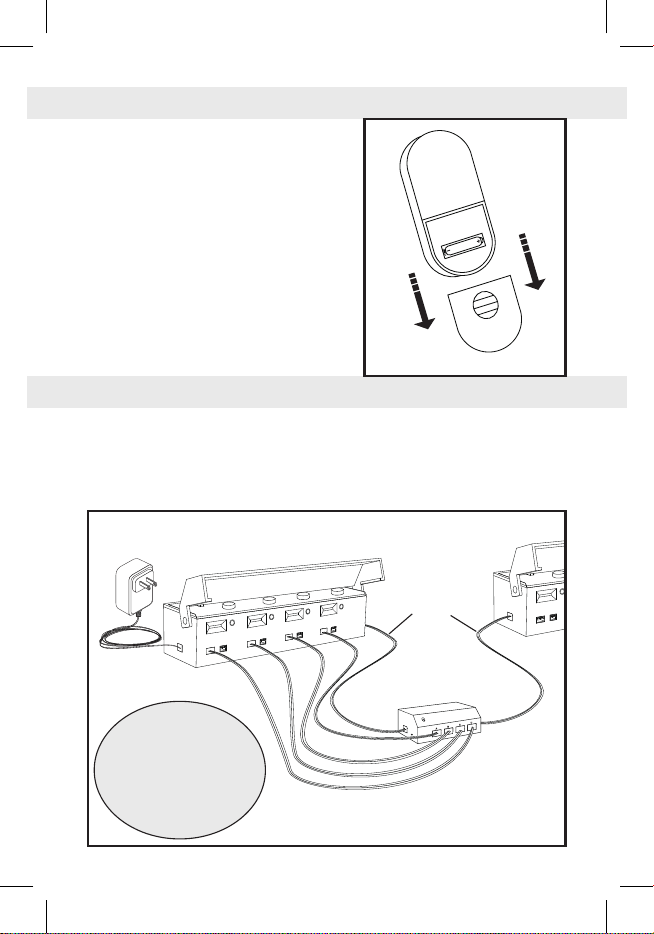
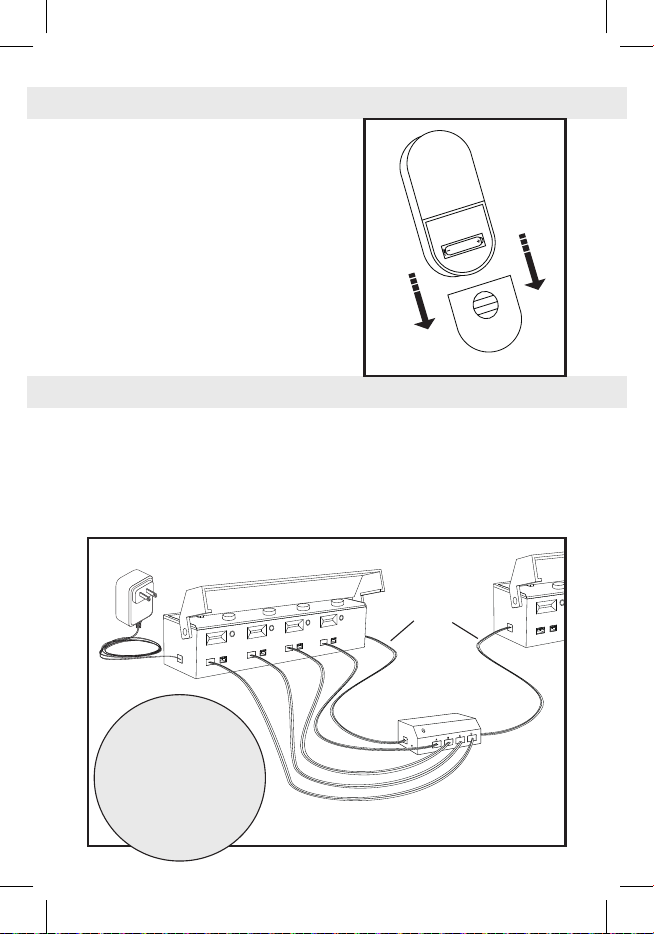
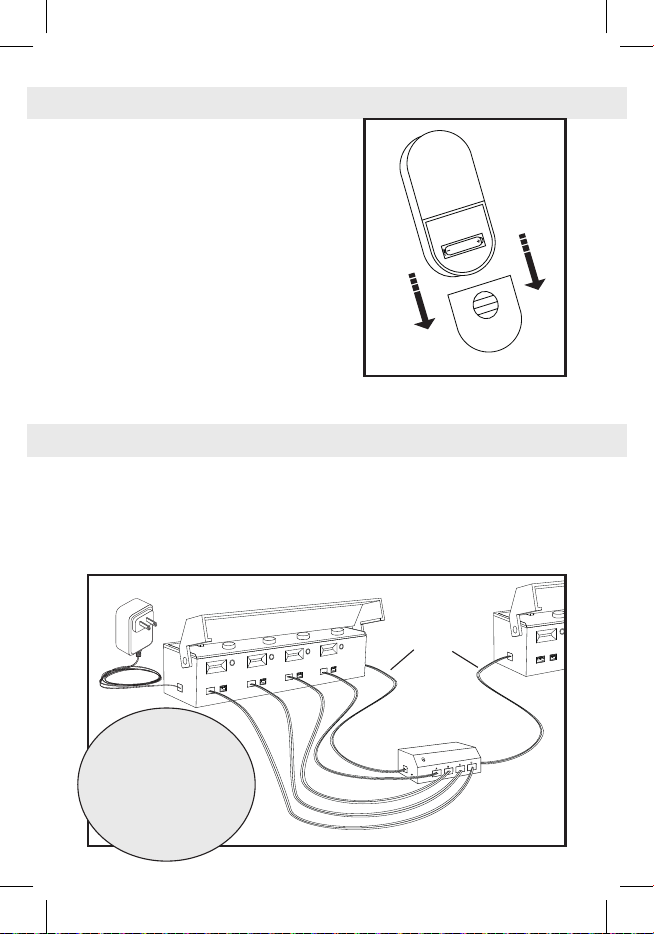
1. Slide off the battery cover and insert
one 23A battery. The negative end
of the battery should contact the
spring. (Fig. 1)
2. Slide the battery cover back on.
3. Press any button to light up the LED
screen. Press the plus and minus
buttons to change what channel the
Remote is set to. Screen will turn off
after several seconds of inactivity.
4. To pair with a Remote Trigger
(JS6959, JS6960), see Remote
Trigger instructions.
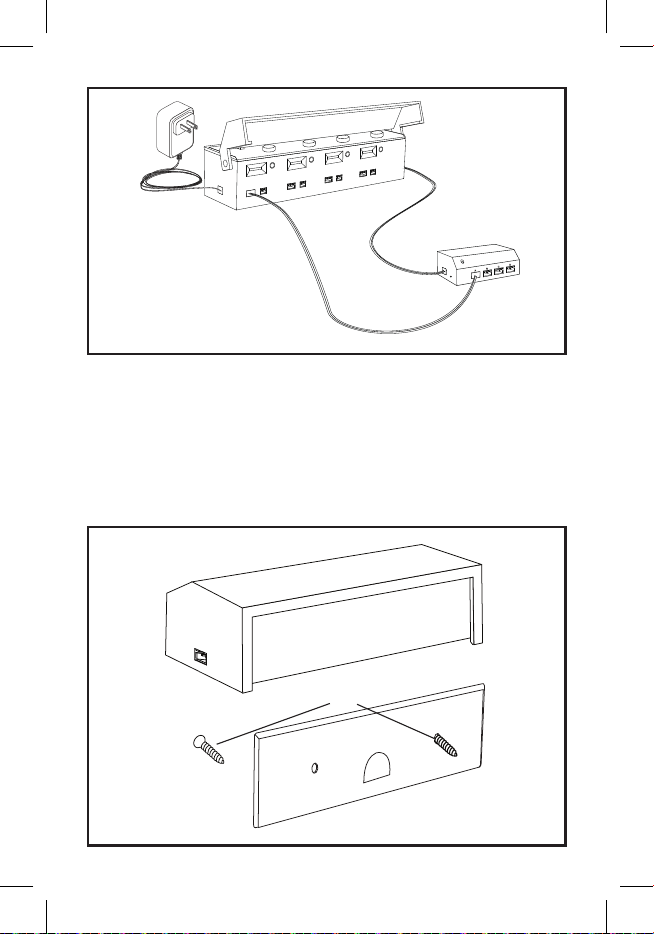
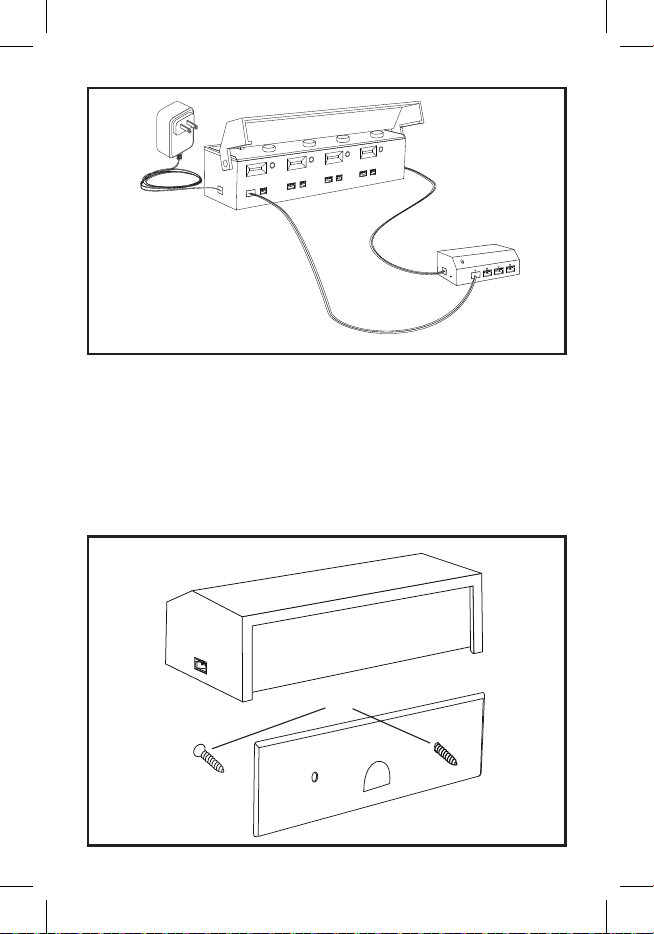
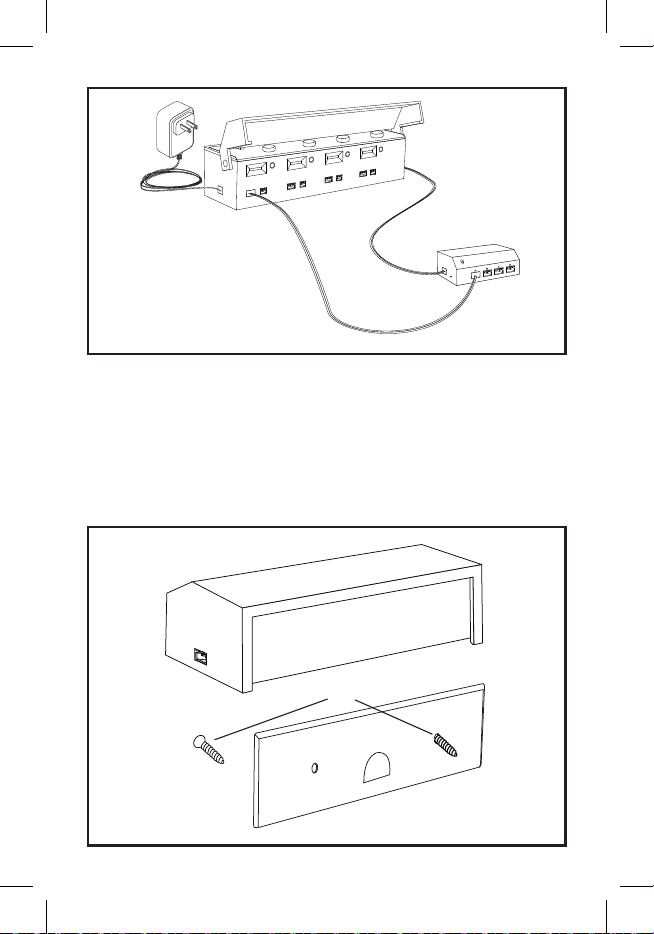
1. Power the Remote Trigger by plugging the power jumper cable into one
of the power ports, then connect the other end of the power jumper
cable into a power port of a powered Sound Hub™ (JS6904). Both
power ports of the Remote Trigger can act as inputs or outputs. (Fig. 2)
Pairing
REMOTE CONTROL INSTRUCTIONS
REMOTE TRIGGER INSTRUCTIONS
Fig. 1
Fig. 2
NOTE:
The Remote Trigger can
be used to power other
Just Plug Sound products.
Simply plug a power jumper
cable into the open power
port of a powered Remote
Trigger, then plug it into a
power port of a different
Sound System product.
power humper cable
4
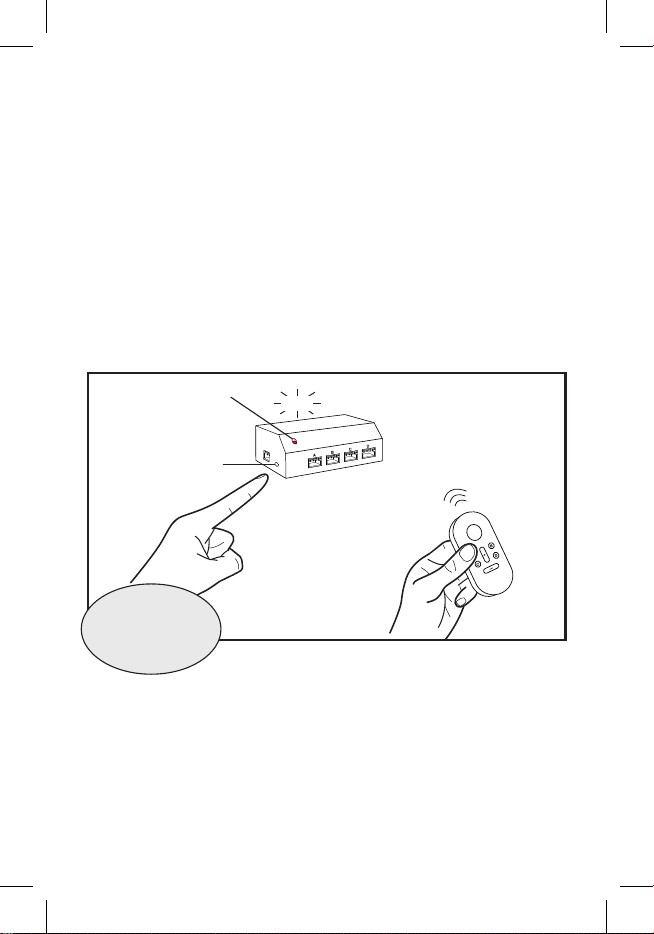
Before the Remote Trigger can be used, it must be paired with a Remote
Control. One Remote Control can be paired with up to 99 Remote Triggers.
2. Hold the Remote Control close to the Remote Trigger. Press any button
once to cause the LED screen to turn on. The LED screen will display
what channel the Remote is currently set to. Use the plus and minus
buttons to set the Remote Control to the channel you want the Remote
Trigger to be paired to.
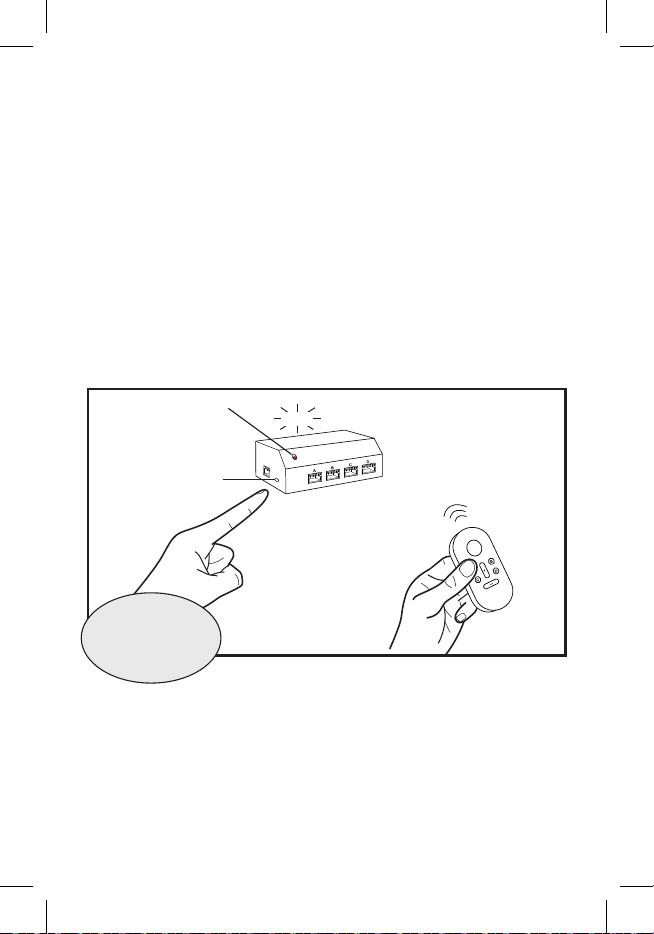
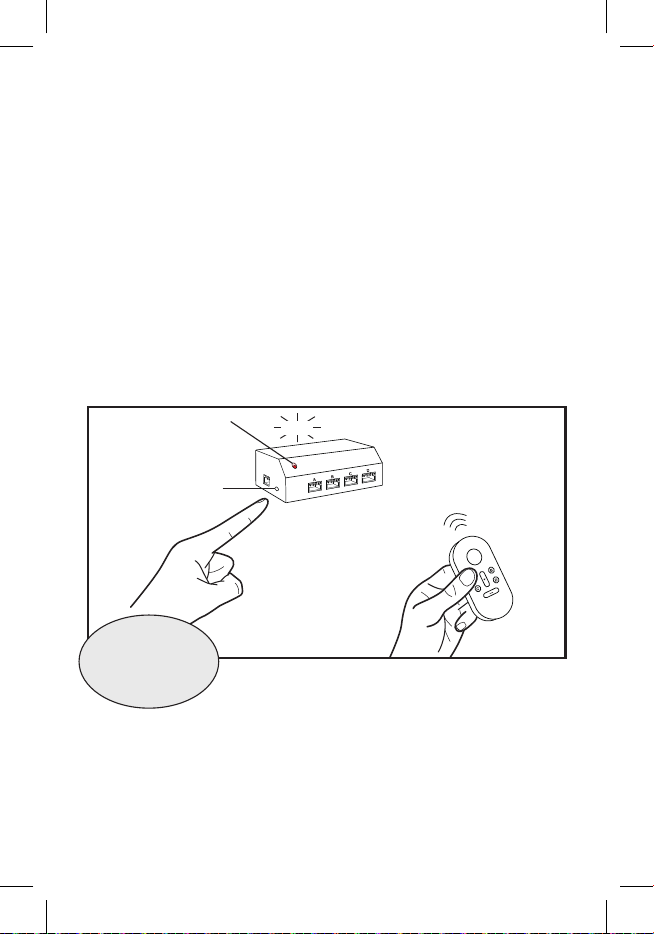
3. Press the pairing button on the Remote Trigger once, releasing when
the LED light ashes red, then press and hold button A on the Remote
Control when the LED light turns solid red. After a couple of seconds,
the Remote Trigger should make a click noise while the LED ashes
once. The Remote Trigger is now paired with that channel on the
Remote Control. (Fig. 3)
Playing Sounds
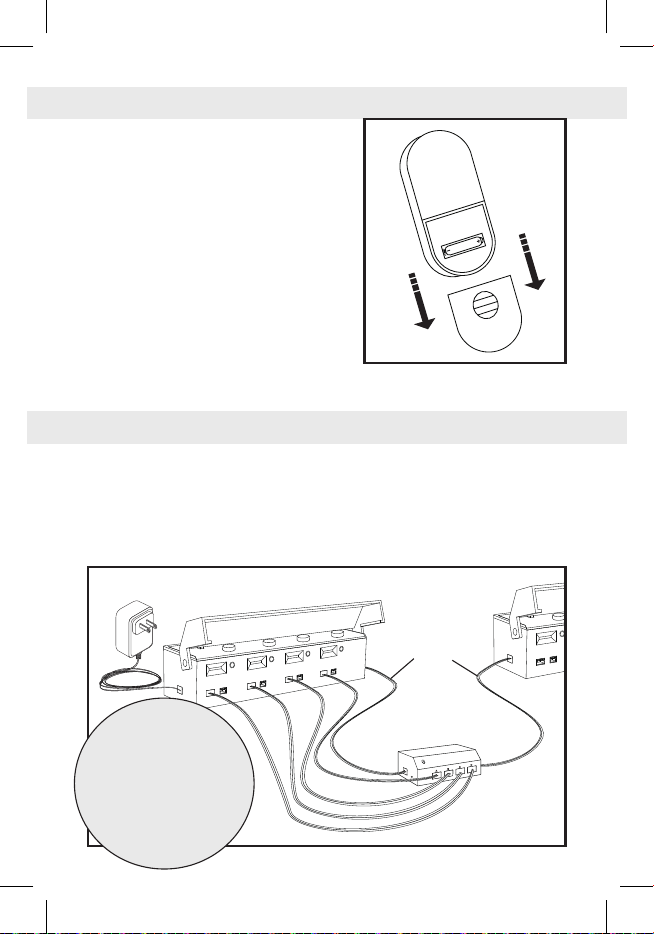
4. Plug one of the trigger cables into the trigger port of the desired sound
on the Sound Hub, then plug the other end into one of the four trigger
ports on the Remote Trigger. (Fig. 4)
5. Use the plus and minus buttons on the Remote Control to set the
Remote to the channel the Remote Trigger is paired to.
6. Buttons A, B, C, and D on the Remote are linked to a specic trigger
CLICK
Fig. 3
pairing button
TIP:
Label your Remote
Triggers so you know
which channel it is
paired to.
LED light
Remote
Control

5
port on the Remote Trigger. Press the respective button on the Remote
to play the linked sound. The Remote Trigger can play multiple different
sounds at once.
7. To mount Remote Trigger, use included screws to attach the backplate
to a surface, then slide the Remote Trigger down onto the backplate.
(Fig. 5)
Fig. 4
Fig. 5
power jumper cable
trigger cable
backplate screws
backplate

6
Caution: The user is cautioned that changes or modications
not expressly approved by the party responsible for compliance
could void the user’s authority to operate the equipment.
This device complies with Part 15 of the FCC Rules. Operation
is subject to the following two conditions: (1) this device may
not cause harmful interference, and (2) this device must accept
any interference received, including interference that may cause
undesired operation.
NOTE: This equipment has been tested and found to comply
with the limits for a Class B digital device, pursuant to Part 15 of
the FCC Rules. These limits are designed to provide reasonable
protection against harmful interference in a residential instal-
lation. This equipment generates, uses and can radiate radio
frequency energy and, if not installed and used in accordance
with the instructions, may cause harmful interference to radio
communications. However, there is no guarantee that interfer-
ence will not occur in a particular installation.
If this equipment does cause harmful interference to radio or
television reception, which can be determined by turning the
equipment off and on, the user is encouraged to try to correct the
interference by one or more of the following measures:
-- Reorient or relocate the receiving antenna.
-- Increase the separation between the equipment and receiver.
-- Connect the equipment into an outlet on a circuit different from
that to which the receiver is connected.
-- Consult the dealer or an experienced radio/TV technician for
help.
FCC Radiation Exposure Statement:
This equipment complies with FCC radiation exposure limits set
forth for an uncontrolled environment. This transmitter must not
be co-located or operating in conjunction with any other antenna
or transmitter.

7
1 Remote Trigger avec plaque arrière
1 Câble de démarrage de 15 cm
4 Câbles de déclenchement de 60 cm
2 Vis
Instructions
1 Remote
1 Pile 23A
1 Remote Trigger avec plaque arrière
1 Câble de démarrage de 15 cm
4 Câbles de déclenchement de 60 cm
2 Vis
Instructions
Remote Control Index sonore
CONTENU DE LA REMOTE CONTROL TRIGGER KIT
CONTENU DU REMOTE TRIGGER
Câbles de
déclenchement x4
Câbles de
déclenchement x4
Câble de démarrage
Câble de démarrage
Vis
Vis
Plaque arrière
Plaque arrière
Remote Trigger
Remote Trigger
Remote
Control
Pile 23A
8
1. Retirez le couvercle du compartiment
à piles et insérez une pile 23A. Le
pôle négatif de la pile doit être en
contact avec le ressort. (Fig. 1)
2. Remettez le couvercle du
compartiment à piles en place.
3. Appuyez sur n’importe quel bouton
pour allumer l’écran LED. Appuyez
sur les boutons plus et moins
pour changer le canal sur lequel la
télécommande est réglée. L’écran
s’éteindra après plusieurs secondes
d’inactivité.
4. Pour appairer avec un Remote Trigger (JS6959, JS6960), consultez les
instructions du Remote Trigger.
1. Alimentez le déclencheur à distance en branchant le câble de
raccordement d’alimentation dans l’un des ports d’alimentation, puis
connectez l’autre extrémité du câble de raccordement d’alimentation
dans un port d’alimentation d’un Sound Hub™ alimenté (JS6904). Les
deux ports d’alimentation du Remote Trigger peuvent servir d’entrées
ou de sorties. (Fig. 2)
REMOTE CONTROL INSTRUCTIONS
REMOTE TRIGGER INSTRUCTIONS
Fig. 1
Fig. 2
REMARQUE :
Le déclencheur à distance
peut être utilisé pour
alimenter d’autres produits
Just Plug Sound. Il suft
de brancher un câble de
raccordement d’alimentation
dans le port d’alimentation
libre d’un Remote Trigger
alimenté, puis de le brancher
dans un port d’alimentation
d’un autre produit du Sound
System.
Câble de démarrage
9
Appairage
Avant de pouvoir utiliser le Remote Trigger, il doit être appairé avec la Remote
Control. Une Remote Control peut être appairée avec jusqu’à 99 déclencheurs
à distance.
2. Tenez la télécommande près du Remote Trigger. Appuyez une fois sur
n’importe quel bouton pour allumer l’écran LED. L’écran LED afche
le canal sur lequel la Remote Control est actuellement réglée. Utilisez
les boutons plus et moins pour régler la Remote Control sur le canal
auquel vous souhaitez appairer le Remote Trigger.
3. Appuyez une fois sur le bouton d’appairage du Remote Trigger,
relâchez-le lorsque le voyant LED clignote en rouge, puis appuyez sur
le bouton A du Remote Control et maintenez-le enfoncé lorsque le
voyant LED devient rouge xe. Après quelques secondes, le Remote
Trigger devrait émettre un clic tandis que le voyant LED clignote une
fois. Le Remote Trigger est désormais appairé avec ce canal sur la
télécommande. (Fig. 3)
Lecture des sons
4. Branchez l’un des câbles de déclenchement dans le port de
déclenchement du son souhaité sur le Sound Hub, puis branchez l’autre
extrémité dans l’un des quatre ports de déclenchement du Remote
Trigger. (Fig. 4)
5. Utilisez les boutons plus et moins de la Remote Control pour régler la
Remote Control sur le canal auquel le Remote Trigger est associé.
CLICK
Fig. 3
bouton
d’appairage
CONSEIL :
Étiquetez vos Remote
Trigger an de savoir
à quel canal ils sont
appairés.
voyant LED
Remote
Control
10
6. Les boutons A, B, C et D de la télécommande sont reliés à un port de
déclenchement spécique sur le Remote Trigger. Appuyez sur le bouton
correspondant de la télécommande pour lire le son associé. Le Remote
Trigger peut lire plusieurs sons différents à la fois.
7. Pour installer le Remote Trigger, utilisez les vis fournies pour xer la
plaque arrière à une surface, puis faites glisser le Remote Trigger vers
le bas sur la plaque arrière. (Fig. 5)
Fig. 4
Fig. 5
Câble de déclenchement
Câble de démarrage
vis
plaque arrière
11
1 Remote Trigger con placa trasera
1 Cable de arranque de 15 cm
4 Cables de disparo de 60 cm
2 Tornillos
Instrucciones
1 Remote
1 Pila 23A
1 Remote Trigger con placa trasera
1 Cable de arranque de 15 cm
4 Cables de disparo de 60 cm
2 Tornillos
Instrucciones
Remote Control Índice de sonido
CONTENIDO DEL REMOTE CONTROL TRIGGER KIT
CONTENIDO DEL REMOTE TRIGGER
Cables de
disparo x4
Cables de
disparo x4
Cable de arranque
Cable de arranque
Tornillos
Tornillos
Placa trasera
Placa trasera
Remote Trigger
Remote Trigger
Remote
Control
Pila 23A
12
1. Deslice la tapa de la batería e inserte
una batería 23A. El extremo negativo
de la batería debe estar en contacto
con el resorte. (Fig. 1)
2. Vuelva a colocar la tapa de la batería.
3. Pulse cualquier botón para encender
la pantalla LED. Pulse los botones
más y menos para cambiar el canal
en el que está congurado el mando
a distancia. La pantalla se apagará
tras varios segundos de inactividad.
4. Para emparejarlo con un Remote
Trigger (JS6959, JS6960), consulte
las instrucciones del Remote Trigger.
1. Alimente el disparador remoto conectando el cable de puente de
alimentación a uno de los puertos de alimentación y, a continuación,
conecte el otro extremo del cable de puente de alimentación a un
puerto de alimentación de un Sound Hub™ alimentado (JS6904).
Ambos puertos de alimentación del Remote Trigger pueden actuar
como entradas o salidas. (Fig. 2)
REMOTE CONTROL INSTRUCCIONES
REMOTE TRIGGER INSTRUCCIONES
Fig. 1
Fig. 2
NOTA:
El disparador remoto se
puede utilizar para alimentar
otros productos Just Plug
Sound. Basta con conectar
un cable de puente de
alimentación al puerto de
alimentación libre de un
Remote Trigger alimentado
y, a continuación, conectarlo
al puerto de alimentación
de otro producto del Sound
System.
Cable de arranque

13
Emparejamiento
Antes de poder utilizar el Remote Trigger, es necesario emparejarlo con el
Remote Control. Un Remote Control se puede emparejar con hasta 99 Remote
Triggers.
2. Mantenga el Remote Control cerca del Remote Trigger. Pulse cualquier
botón una vez para que se encienda la pantalla LED. La pantalla LED
mostrará el canal en el que está congurado actualmente el Remote
Control. Utilice los botones más y menos para congurar el Remote
Control en el canal con el que desea emparejar el Remote Trigger.
3. Pulse una vez el botón de emparejamiento del Remote Trigger y
suéltelo cuando la luz LED parpadee en rojo. A continuación, mantenga
pulsado el botón A del Remote Control cuando la luz LED se ilumine
en rojo jo. Tras unos segundos, el Remote Trigger emitirá un clic y el
LED parpadeará una vez. El Remote Trigger ya está emparejado con ese
canal del Remote Control. (Fig. 3)
Reproducción de sonidos
4. Conecte uno de los cables de activación al puerto de activación del
sonido deseado en el Sound Hub y, a continuación, conecte el otro
extremo a uno de los cuatro puertos de activación del Remote Trigger.
(Fig. 4)
5. Utilice los botones más y menos del Remote Control para congurar el
Remote Control en el canal al que está emparejado el Remote Trigger.
CLICK
Fig. 3
Botón de
emparejamiento
CONSEJO:
Etiquete los Remote
Triggers para saber
con qué canal están
emparejados.
Luz LED
Remote
Control
14
6. Los botones A, B, C y D del mando a distancia están vinculados
a un puerto de activación especíco del Remote Trigger. Pulse el
botón correspondiente del mando a distancia para reproducir el
sonido vinculado. El Remote Trigger puede reproducir varios sonidos
diferentes a la vez.
7. Para montar el Remote Trigger, utilice los tornillos incluidos para jar
la placa posterior a una supercie y, a continuación, deslice el Remote
Trigger hacia abajo sobre la placa posterior. (Fig. 5)
Fig. 4
Fig. 5
Cable de arranque
Cable de disparo
Tornillos
placa trasera

15
1 Remote Trigger mit Rückwand
1 – 15 cm Stromüberbrückungskabel
4 – 60 cm der Triggerkabel
2 Schrauben
Anweisungen
1 Remote
1 Batterie vom Typ 23A
1 Remote Trigger mit Rückwand
1 – 15 cm Stromüberbrückungskabel
4 – 60 cm der Triggerkabel
2 Schrauben
Anweisungen
Remote Control Tonindex
REMOTE CONTROL TRIGGER KIT INHALT
REMOTE TRIGGER INHALT
Triggerkabel x4
Triggerkabel x4
Stromüberbrückungskabel
Stromüberbrückungskabel
Schrauben
Schrauben
Rückwand
Rückwand
Remote Trigger
Remote Trigger
Remote
Control
Batterie vom
Typ 23A
16
1. Schieben Sie die Batterieabdeckung
ab und legen Sie eine 23A-Batterie
ein. Der Minuspol der Batterie sollte
Kontakt mit der Feder haben. (Fig. 1)
2. Schieben Sie die Batterieabdeckung
wieder auf.
3. Drücken Sie eine beliebige Taste,
um den LED-Bildschirm zu
aktivieren. Drücken Sie die Plus-
und Minustasten, um den Kanal
der Fernbedienung zu ändern. Der
Bildschirm schaltet sich nach einigen
Sekunden Inaktivität aus.
4. Informationen zum Koppeln mit
einem Remote Trigger (JS6959, JS6960) nden Sie in der Anleitung
zum Remote Trigger.
1. Versorgen Sie den Remote Trigger mit Strom, indem Sie das
Stromüberbrückungskabel an einen der Stromanschlüsse anschließen
und das andere Ende des Stromüberbrückungskabels an einen
Stromanschluss eines mit Strom versorgten Sound Hub™ (JS6904)
anschließen. Beide Stromanschlüsse des Remote Trigger können als
Ein- oder Ausgänge fungieren. (Fig. 2)
REMOTE CONTROL ANWEISUNGEN
REMOTE TRIGGER ANWEISUNGEN
Fig. 1
Fig. 2
HINWEIS:
Der Remote Trigger kann
zum Betrieb anderer Just Plug
Sound-Produkte verwendet
werden. Stecken Sie einfach
ein Power Jumper Cable in den
freien Stromanschluss eines
mit Strom versorgten Remote
Trigger und schließen Sie es
dann an einen Stromanschluss
eines anderen Sound System-
Produkts an.
Starthilfekabel
17
Koppeln
Bevor der Remote Trigger verwendet werden kann, muss er mit der Remote
Control gekoppelt werden. Eine Remote Control kann mit bis zu 99 Remote
Triggers gekoppelt werden.
2. Halten Sie die Remote Control nahe an den Remote Trigger. Drücken
Sie einmal eine beliebige Taste, um den LED-Bildschirm einzuschalten.
Der LED-Bildschirm zeigt an, auf welchen Kanal die Remote Control
derzeit eingestellt ist. Verwenden Sie die Plus- und Minustasten, um die
Remote Control auf den Kanal einzustellen, mit dem der Remote Trigger
gekoppelt werden soll.
3. Drücken Sie einmal auf die Pairing-Taste am Remote Trigger und lassen
Sie sie los, wenn die LED-Anzeige rot blinkt. Halten Sie dann die A-Taste
auf der Remote Control gedrückt, wenn die LED-Anzeige dauerhaft
rot leuchtet. Nach einigen Sekunden sollte der Remote Trigger ein
Klickgeräusch machen, während die LED einmal blinkt. Der Remote
Trigger ist nun mit diesem Kanal auf der Remote Control gekoppelt.
(Fig. 3)
Wiedergabe von Sounds
4. Stecken Sie eines der Triggerkabel in den Trigger-Anschluss des
gewünschten Sounds am Sound Hub und das andere Ende in einen der
vier Trigger-Anschlüsse am Remote Trigger. (Fig. 4)
5. Stellen Sie die Remote Control mit den Plus- und Minus-Tasten auf den
Kanal ein, mit dem der Remote Trigger gekoppelt ist.
CLICK
Fig. 3
Kopplungstaste
TIPP:
Beschriften Sie Ihre
Remote Triggers,
damit Sie wissen, mit
welchem Kanal sie
gekoppelt sind.
LED-Leuchte
Remote
Control
18
6. Die Tasten A, B, C und D auf der Fernbedienung sind mit einem
bestimmten Trigger-Anschluss am Remote Trigger verbunden.
Drücken Sie die entsprechende Taste auf der Fernbedienung, um
den zugehörigen Ton abzuspielen. Der Remote Trigger kann mehrere
verschiedene Töne gleichzeitig abspielen.
7. Um den Remote Trigger zu befestigen, verwenden Sie die mitgelieferten
Schrauben, um die Rückplatte an einer Oberäche zu befestigen, und
schieben Sie dann den Remote Trigger auf die Rückwand. (Fig. 5)
Fig. 4
Fig. 5
Schrauben
Rückwand
Stromüberbrückungskabel
Auslösekabel

19
NOTES: ________________________
_______________________________
_______________________________
_______________________________
_______________________________
_______________________________
_______________________________
_______________________________
_______________________________
_______________________________
20
WOODLAND SCENICS
®
Manufactured by
WOODLAND
®
PO BOX 98, LINN CREEK, MO 65052
woodlandscenics.com AB3 ©2026 O CO
RoHS Compliant
Model making product. Not a toy! Not suitable for children under 14 years! / Produit
pour le modélisme. Pas un jouet! Pas adapté aux enfants de moins de 14 ans! /
Producto para modelismo. No es un juguete! No adecuado para niños menores de 14
años! / Modellbauartikel. Kein Spielzeug! Nicht geeigent für Kinder unter 14!