
1
CS 629Q Manual

2
Reinigen und Fehlerbehebung
Contents
Page
Contents
13
Technical specifications
14
Preface
15
Intended users of this operating manual
15
Warnings
15
Directives
15
Disposal
15
Safety instructions
16
Safety
16
Intended use
16
List of contents / Packaging instructions
17
Product overview
18
Set Up
19
Platter and belt installation
19
Tonearm
19
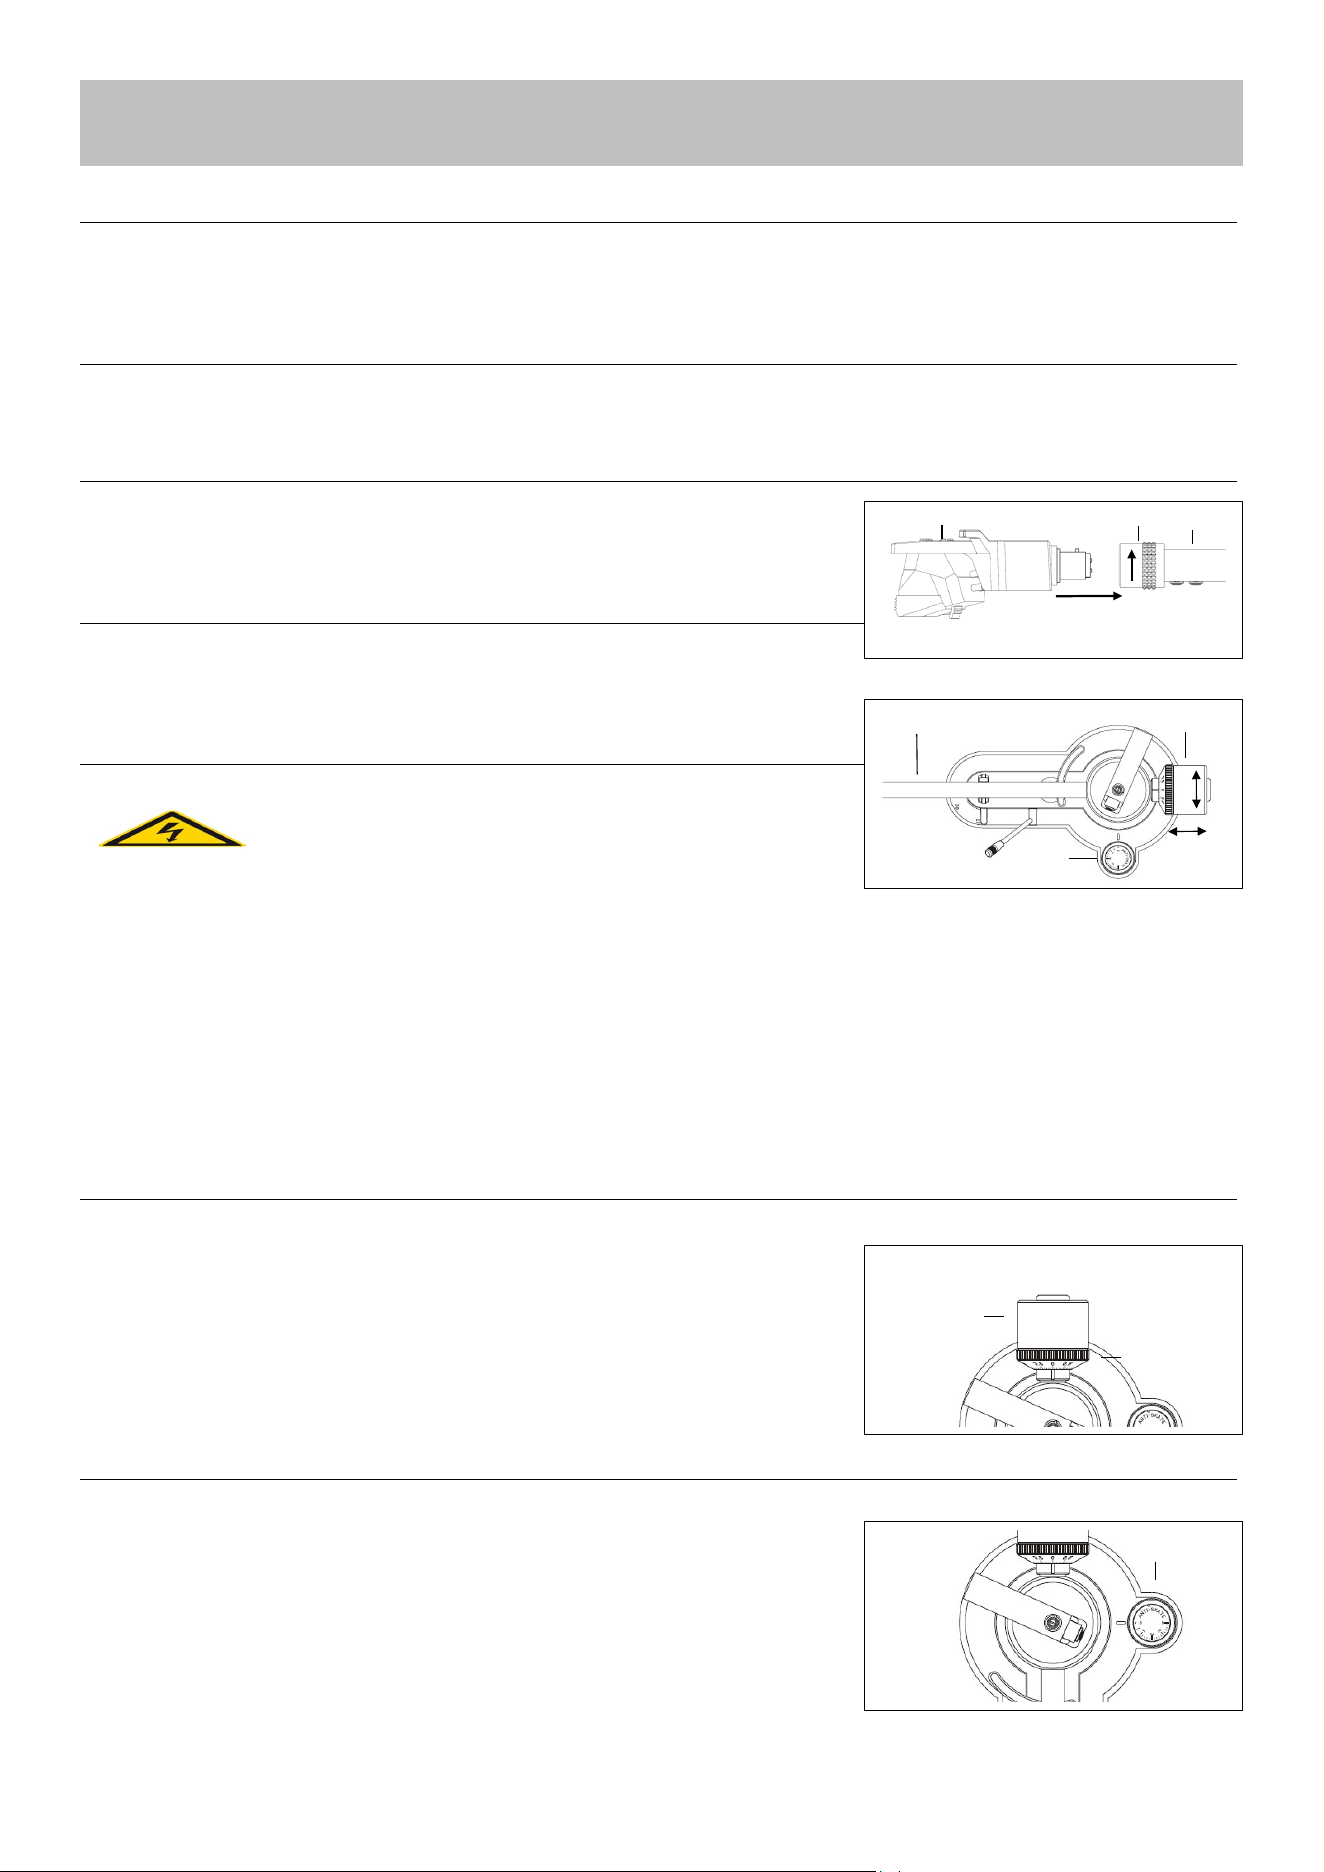
Fitting the headshell
19
Counterweight fitting
19
Balancing the tonearm
19
Tracking force
19
Anti-Skating-adjustment
19
Dust cover fitting
20
Connection to amplifier
20
Connection to power supply
20
Operating the turntable
21
Removing / Attaching the stylus protection cap
21
To play the record (manually)
21
To play the record (automatically)
21
To set the speed
21
Repeat function
21
Replacing the stylus
21
Operating Bluetooth
22
Cleaning
23
Cleaning the stylus and record
23
Cleaning the record player
23
Troubleshooting
23
Spare Parts & Accessories
23

3
Motor
Drive
Direct-Drive, low torque, brushless motor
Speed settings
33/45/78
Wow & Flutter
< ±0.06 % (DIN WTD)
Tonearm
Function
All functions are automatic, remote controlled or manual
Bearing
Ball-Bearing / Twin Gimbal Mounting
Effective length
221.5 mm
Offset Angle
25.6°
Overhang
19 mm
Type
statically balanced with counterweight
Stylus Pressure Range
0 to 4 g
Cartridge Weight Range
5 g to 9 g
Factory installed Pick-up
Ortofon 2M Blue
Replacement Stylus
Ortofon Stylus 2M Blue
Platter
Material
Aluminium Die-cast
Mat
Rubber 2.5 mm
Bearing
Hardened Steel Spindle, Brass Bushing
Diameter
305 mm
Weight incl. Mat
1450 g
Plinth
Surface Finish
MDF: Vinyl veneer = Black / Wood Veneer = Walnut
Feet
Ø 62 mm / Elastomer Damping Element
Connection
RCA socket
Connection to Phono Input
YES
Connection to Line Input
YES
Digital Output
YES
Dimension (closed dust cover)
435 x 367 x 145 mm
Dimension (open dust cover)
D: 415 mm / H: 400 mm
Weight
7.5 kg
Power Supply
The efficiency readings were taken with an input Voltage
of 230 V AC at 50 Hz
Type
FJ-SW1202000N
Input Voltage
100 (-10 %) V AC to 240 (+10 %) V AC
Frequency
50 / 60 Hz
Output Voltage
12 V DC
Output Current
2,0 A
Output Watt
24 W
Average Efficiency During Operation
≥ 86.2%
Power Consumption at Idle
< 0,5 W
Technical Specifications
4
Preface
This instruction manual will help you to operate the turntable in a safe way. Please read this manual and the safety notices carefully before
using the unit and keep them for later use. Be sure to make them accessible to other users and observe all information given here.
Intended users of this operating manual
This operating manual is intended for everyone who:
• sets up,
• operates,
• cleans
• or disposes of the record player.
Warnings
The warning signs in this operating manual are structured as seen below:
The word „DANGER“ is pointing out an immediate life hazard!
The word „WARNING“ is pointing out a potential life-threatening situation or irreversible injuries!
The word „CAREFUL“ is pointing out the possible threat of medium or light injuries!
The word „ATTENTION“ is pointing out potential damages to the product.
Note:
„NOTE“ provides useful or important information.
Directives and standards
This product conforms to:
• the Low-voltage Directive (2014/35/EU),
• the EMC Directive (2014/30/EU),
• RoHS Directive 2011/65/EU,
• ERP 2009/125/EC and
• CE Marking Directive.
Disposal of packaging
GEFAHR
„Danger“ through suffocation!
Keep the packaging and its parts out of the reach of children. Risk of suffocation from foil and other packaging materials. Your new unit was
protected on its way to you by the packaging. All materials used are environmentally safe and can be recycled. Please help and dispose of the
packaging in an environmentally responsible manner. To learn about current disposal methods, contact your dealer or your local disposal
facility.
Disposal of turntable
Old units are not simply waste. Valuable raw materials can be salvaged through environmentally friendly disposal. For
information about the correct and environmentally friendly disposal of your unit, please contact your local council.
This unit is labelled according to 2002/96/EC, the Waste Electrical and Electronic Equipment Directive (WEEE). This product
must not be disposed of with normal household waste. Instead, it must be deposited at a recycling station for electrical and
electronic devices. The symbol on the product and the instructions for use or the packaging indicate this. The materials can
be recycled in accordance with their marking. By re-using, recycling, or repurposing old units, you make an important
contribution to protecting our environment.
5
Safety instructions
Please read through all of the safety instructions carefully and keep them for questions that may arise later. Always
observe all warnings and instructions in this operating manual and on the rear of the unit.
Safety instructions for using the power supply
• The unit should only be connected to a mains voltage supply of 100- 240 V~, 50/60 Hz.
• Never try to operate the unit with a different voltage.
• Only use the supplied power supply or an original Dual alternative.
• The mains plug should only be connected after installation has been completed according to the instructions.
• Use a suitable, easily accessible mains connection and avoid using multiple sockets!
• This socket should be as close to the unit as possible.
• Make sure the power cable or plug is always easily accessible so that the unit can be disconnected quickly from the power supply!
• Lay the mains cable in such a way that no one can trip over it and do not place any heavy objects on the mains cable.
• Fully insert the mains plug into the socket.
• Do not touch the mains plug with wet hands—risk of electric shock!
• If the mains plug of the unit is defective or if the unit shows other damage, it must not be operated.
• When unplugging the mains cable from the socket pull on the mains plug, not on the cable.
• Disconnect the mains plug from the socket if you do not intend to use the unit for a prolonged period. Only pull on the plug itself.
• In the event of malfunctions or smoke and odour coming from the housing disconnect the mains plug from the socket immediately!
• Before a thunderstorm sets in, disconnect the mains plug from the socket.
Safety instructions for the turntable placement
• In order to avoid the risk of fire and electric shock, do not expose the unit to rain or moisture.
• Prevent the unit from coming into contact with water or moisture.
• The appliance should not be sited in rooms with high levels of humidity, e.g. kitchens, bathrooms or saunas, or in the vicinity of swimming
pools indoors or outdoors, as splashing or the formation of condensation on the appliance may damage it.
• Do not place any containers which contain a liquid on the unit, such as a flower vase. These could fall over and the spilled liquid could lead
to severe damage to the unit or the risk of electric shock or fire.
• No open flames, such as burning candles, are permitted to sit on the unit.
• Foreign material, e.g. needles, coins, etc., should not be allowed to enter the unit.
• If any foreign material or liquid enters the unit, disconnect the plug from the socket immediately. Get the unit checked by a specialist
before starting to use it again. Failure to do this will leave you at risk of receiving an electric shock!
Safety instructions for repairs and servicing
• Never attempt to repair a defective unit yourself. Always contact one of our authorised customer service representatives.
• Always leave maintenance to a qualified technician. Failure to do this will put you and others in danger.
• Never open the unit under any circumstances – this should only be undertaken by a specialist.
• Do not open the housing. Doing so will put you at risk of receiving an electric shock!
• Making modifications to the appliance is prohibited.
• Do not continue to use the appliance and/or accessories if they are damaged.
• Use only appropriate cleaning agents (antistatic) to clean the unit and the records. These are available from your specialist retailer.
Safety instruction for operating the turntable
• Do not listen to music or radio broadcasts at very high volumes. Doing so can cause lasting damage to your hearing.
• This appliance should only be operated by a competent owner or persons under direct supervision of the owner or who are deemed by the
owner to be competent to do so.
Intended use and application
The appliance is intended for playing vinyl records. The appliance is designed for use in a private home and is not suitable for commercial use.
Use of any other kind is classed as other than intended and may result in damage to property or even personal injury. The manufacturer accepts
no liability whatsoever for loss or damage arising from use of the appliance in a manner other than that intended.
Before using the appliance for the first time, please read through the safety and installation instructions carefully. Only by doing so will you be
able to use all functions safely and reliably. Keep the installation instructions in a safe place and pass them on to any subsequent owner.
6
List of contents / Packing instructions
Unpacking
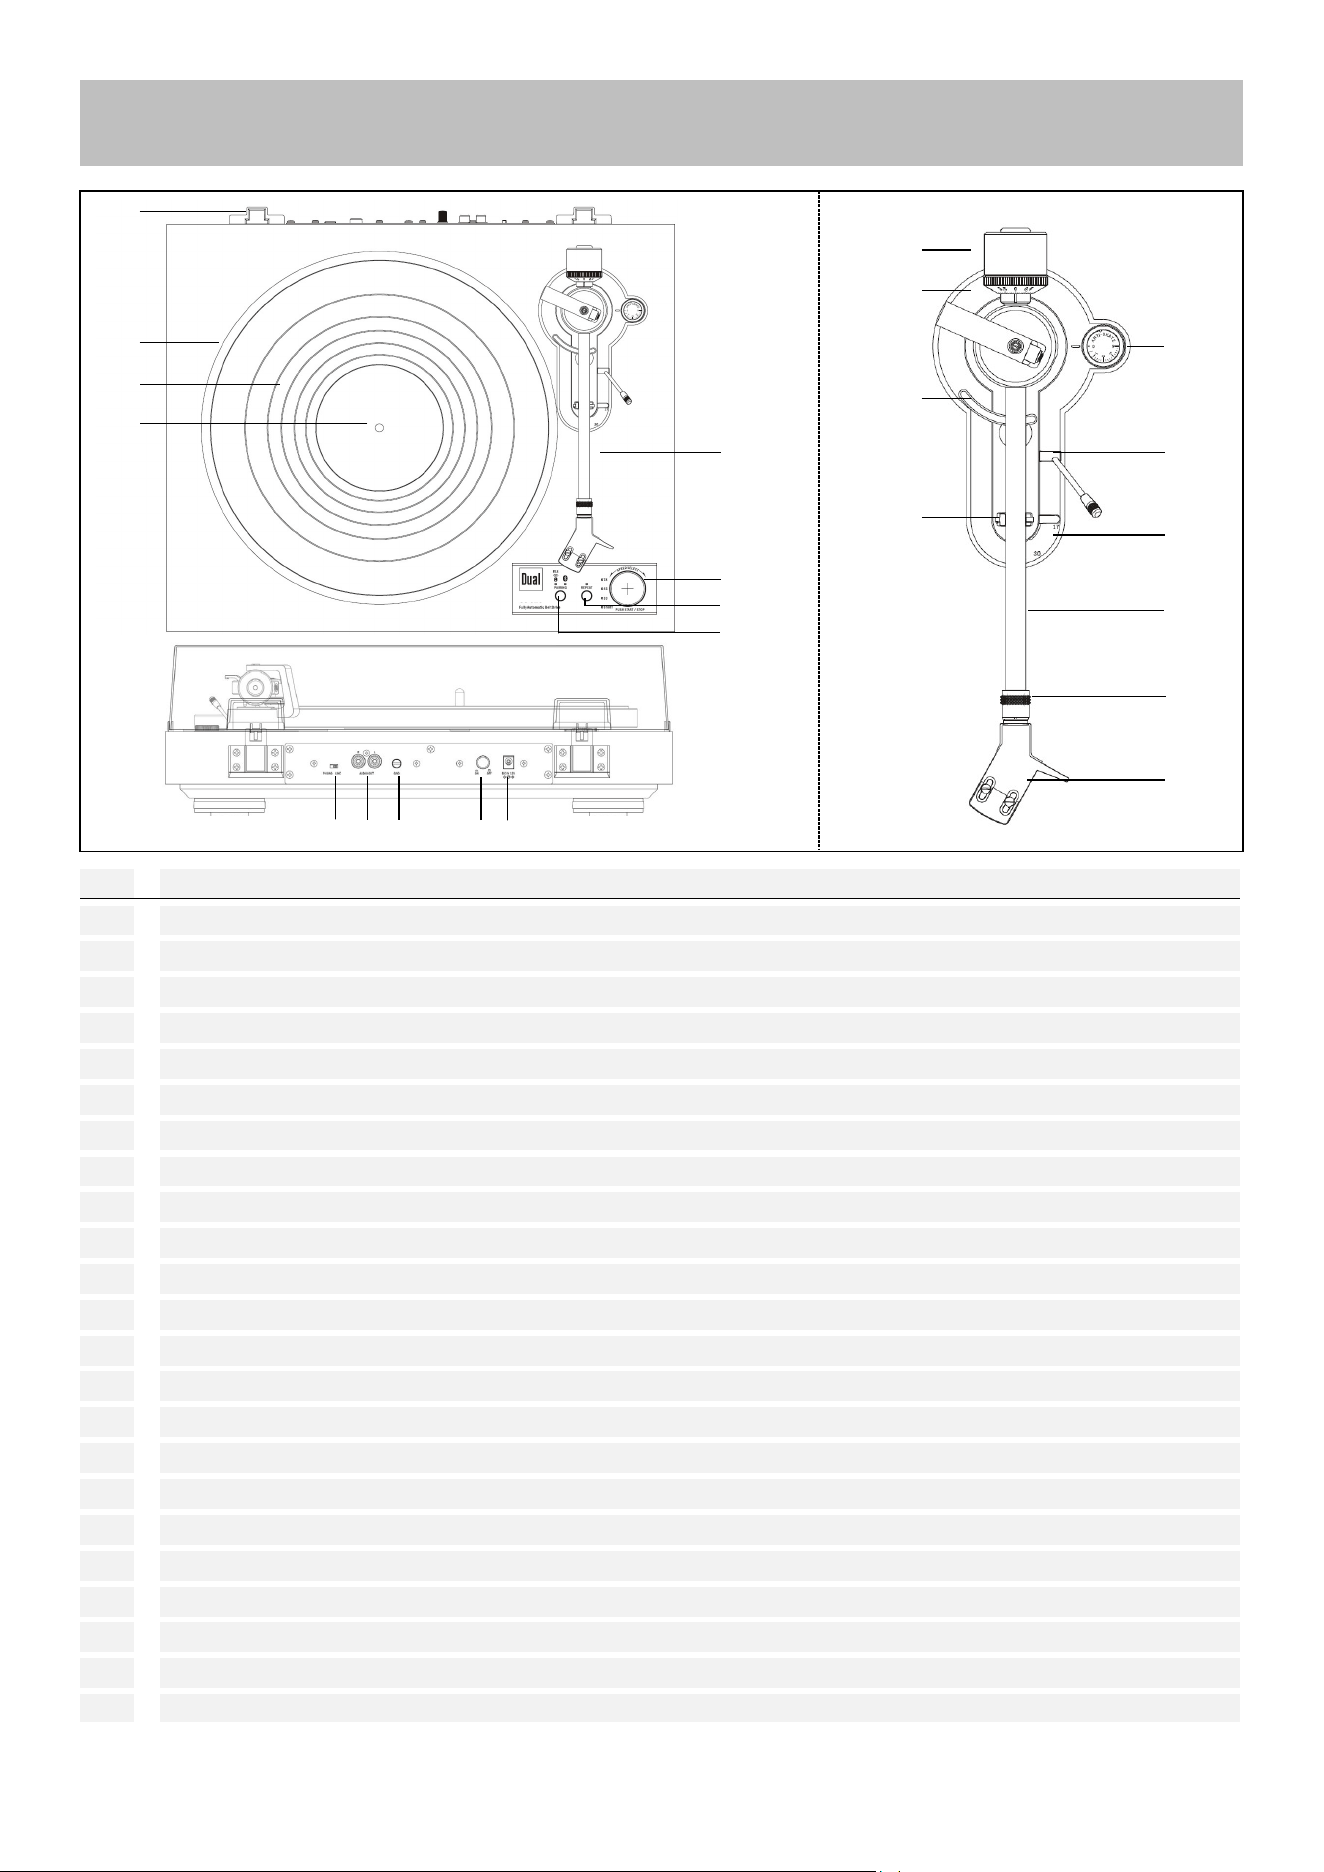
1) First, remove the appliance and all associated parts from the packaging.
2) Remove all adhesive tapes.
3) Ensure that all listed components are present:
Note:
• The small components are in the side compartments of the polystyrene packaging sections!
• Do not throw the stylus guard for the needle away!
• Retain the packaging for any possible future transportation!
List of contents
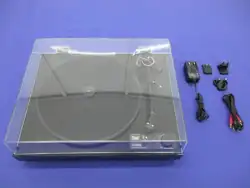
1. Dust cover,
2. Platter mat,
3. Record player,
4. Headshell with phono cartridge,
5. Spindle adaptor (for 7” EPs),
6. 2 hinges for the dust cover,
7. Counterweight,
8. Platter including belt,
9. Coaxial stereo audio cable.
10. Power supply for connecting to the main supply,
Note:
If any of these elements are missing,
please contact the supplier.
Repacking
1) Repack all component parts in the corresponding, original packaging.
2) The counterweight must be dismantled and stowed in one of the polystyrene sections (fixed securely with sticky tape)
3) Remove the turntable platter. (Never transport the record player with the platter in position)
4) Secure the stylus with the protective cover for the needle and remove headshell.
5) Attach the tonearm securely to the tonearm rest.
6) Ensure that none of the small parts or associated packaging can move inside the cardboard box.
Note:
For further information, please go to www.dual.de
1
2
3
4
5
6
7
8
9
10
7
Product overview
Nr
Description
1
Dust cover hinges (2×)
2
Platter
3
Platter mat
4
Platter bearing
5
PHONO / LINE Switch
Phono-preamp on-/off
6
RCA-Audio-Output R / L
red - right channel, white - left channel
7
GND: Ground connection
8
Power switch
ON / OFF
9
DC IN: 12 V-Input for Power supply
10
Bluetooth control
11
Repeat
12
Start / Stop & Speed selector
33, 45, 78
13
Tonearm
14
Counterweight
15
Tracking force dial
16
Tonearm lift
17
Tonearm rest with safety fasterner
18
Anti-Skating-Adjustment
19
Tonearm lift lever
20
Lever record size
17, 30
21
Tonearm
22
Union nut
23
Headshell
16
15
14
13
17
18
19
21
22
23
12
1
2
3
4
11
20
5
6
7
9
8
10
8
Set Up
Platter installation
1. Place the platter on the turntable spindle.
2. Now place the turntable mat on the platter.
Tonearm
The tonearm is secured at the tonearm rest with a coated wire and the safety clip.
Remove and discard the coated wire and open the safety clip to play the record.
Fitting the headshell
Fit the removable headshell onto the tonearm as described below: (pic. 2)
1. Place the headshell (1) into the socket (2) at the end of the tonearm (3).
2. Hold the headshell, while turning the socket (2) in the direction of the arrow.
Counterweight fitting
Fit the supplied counterweight (2) onto the tonearm (1) by screwing it on from behind.
Keep the dial facing forward. The counterweight is used to set the correct tracking force
for the pick-up. (pic. 3)
Balancing the tonearm
Damage to the stylus
Ensure that the stylus does not come in contact with
the platter mat, or any other part of the turntable.
1. Place the turntable on an even horizontal surface.
2. Remove the stylus guard (page 20).
3. Lower the tonearm lift via the tonearm lift lever.
4. Position the tonearm in between the platter and the tonearm rest. (not resting on the stylus)
5. Turn the anti-skating dial (3) to „0” (pic. 3).
6. Turn the counterweight (2) backwards or forwards until the tonearm reaches a horizontal balance.
7. Place the balanced tonearm back onto the tonearm rest and secure it with the clip.
8. (Pic 4) Hold the counterweight (1) in position while turning the tracking force dial (2) to „0“ (12 o’clock position).
Tracking force
The tracking force needs to be adjusted according to the installed pick-up. (pic. 4)
1. Adjust the entire counterweight (1) including the scale to the required weight (2).
2. The tracking force weight can be read from the scale.
Note:
The recommended force / weight for the supplied pick up is between 1,6 g and 2,0 g.
If in doubt, please consult the pick-up manufacturer for recommended values.
Anti-Skating-adjustment
The skating force pulls the tonearm towards the centre of the platter. This increases the
pressure on the inside wall of the groove. The ANTI-Skating force compensates
this movement and ensures the ideal tracking of the stereo information on the vinyl.
• Set the Anti-skating dial (1) to the same value setting as the tracking force. (pic. 5)
Pic. 2
Pic. 3
Pic. 4
Pic. 5
1
2
1
2
3
1
1
2
3
9
Set Up
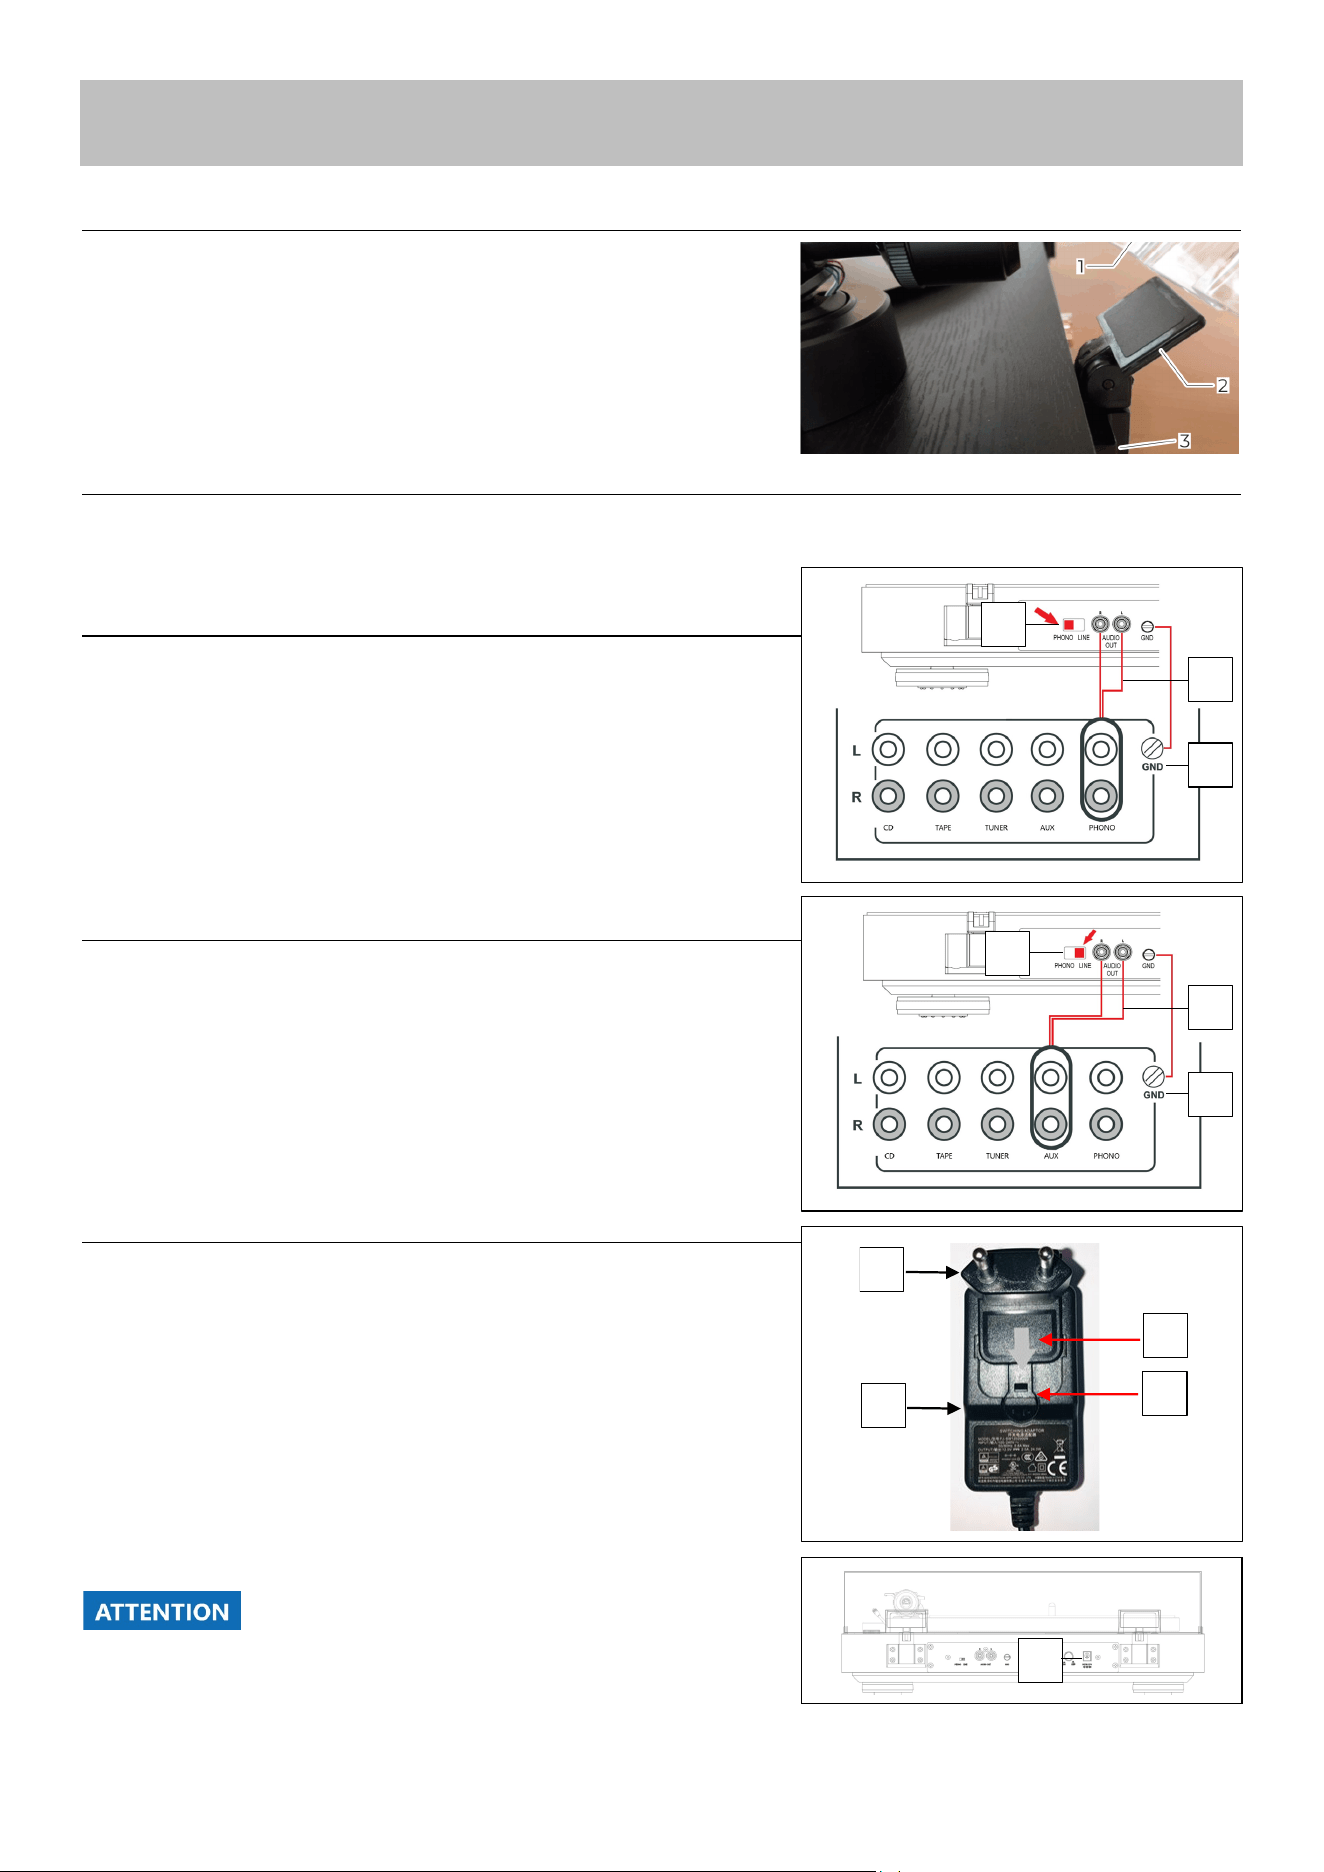
Dust cover fitting
1. Slot both hinges (2) into the housings (3) in the back of the turntable.
2. Uniformly push the right and left dust cover (1) receptacles onto the hinges
Connection to amplifier
The turntable comes with a built-in phono pre-amplifier. It can be either connected to the phono input or the line input at the amplifier.
The built-in phono stage can switched on or off via a switch in the back of the turntable.
Phono-input
1. Connect the RCA cable to the Audio output „AUDIO OUT” (2) at the turntable
and the PHONO input sockets at the amplifier.
2. Move the switch (1) into the position: PHONO.
3. Connect the ground connection GND (3) with the amplifier to avoid noise.
Note:
Ensure the correct connection of the cable.
(red = right channel, white = left channel)
Select “Phono MM” on the amplifier, if available
Line-input
1. Connect the RCA cable to the Audio output „AUDIO OUT” (2) at the turntable
and the LINE / AUX input sockets at the amplifier.
2. Move the switch (1) into the position: LINE.
3. Connect the ground connection GND (3) with the amplifier to avoid noise.
Note:
Ensure the correct connection of the cable.
(red = right channel, white = left channel)
Connection to power supply
Different adapter plugs (1) are included with the product. Find the specific adapter
relevant to your country and socket system. Fit it to the power supply (2).
1. Fit the socket adapter into the power supply and twist in the direction
of the arrow (A).
2. Check that the adapter is locked correctly (B).
3. Plug the power supply into a power socket (C).
Note:
Only use a factory supplied or approved power supply.
Damage to the turntable!
Incorrect voltages can damage the product. Ensure that
the mains voltage is within the stated specification.
C
1
2
A
B
3
2
1
3
2
1
Set Up
10
Operating the turntable
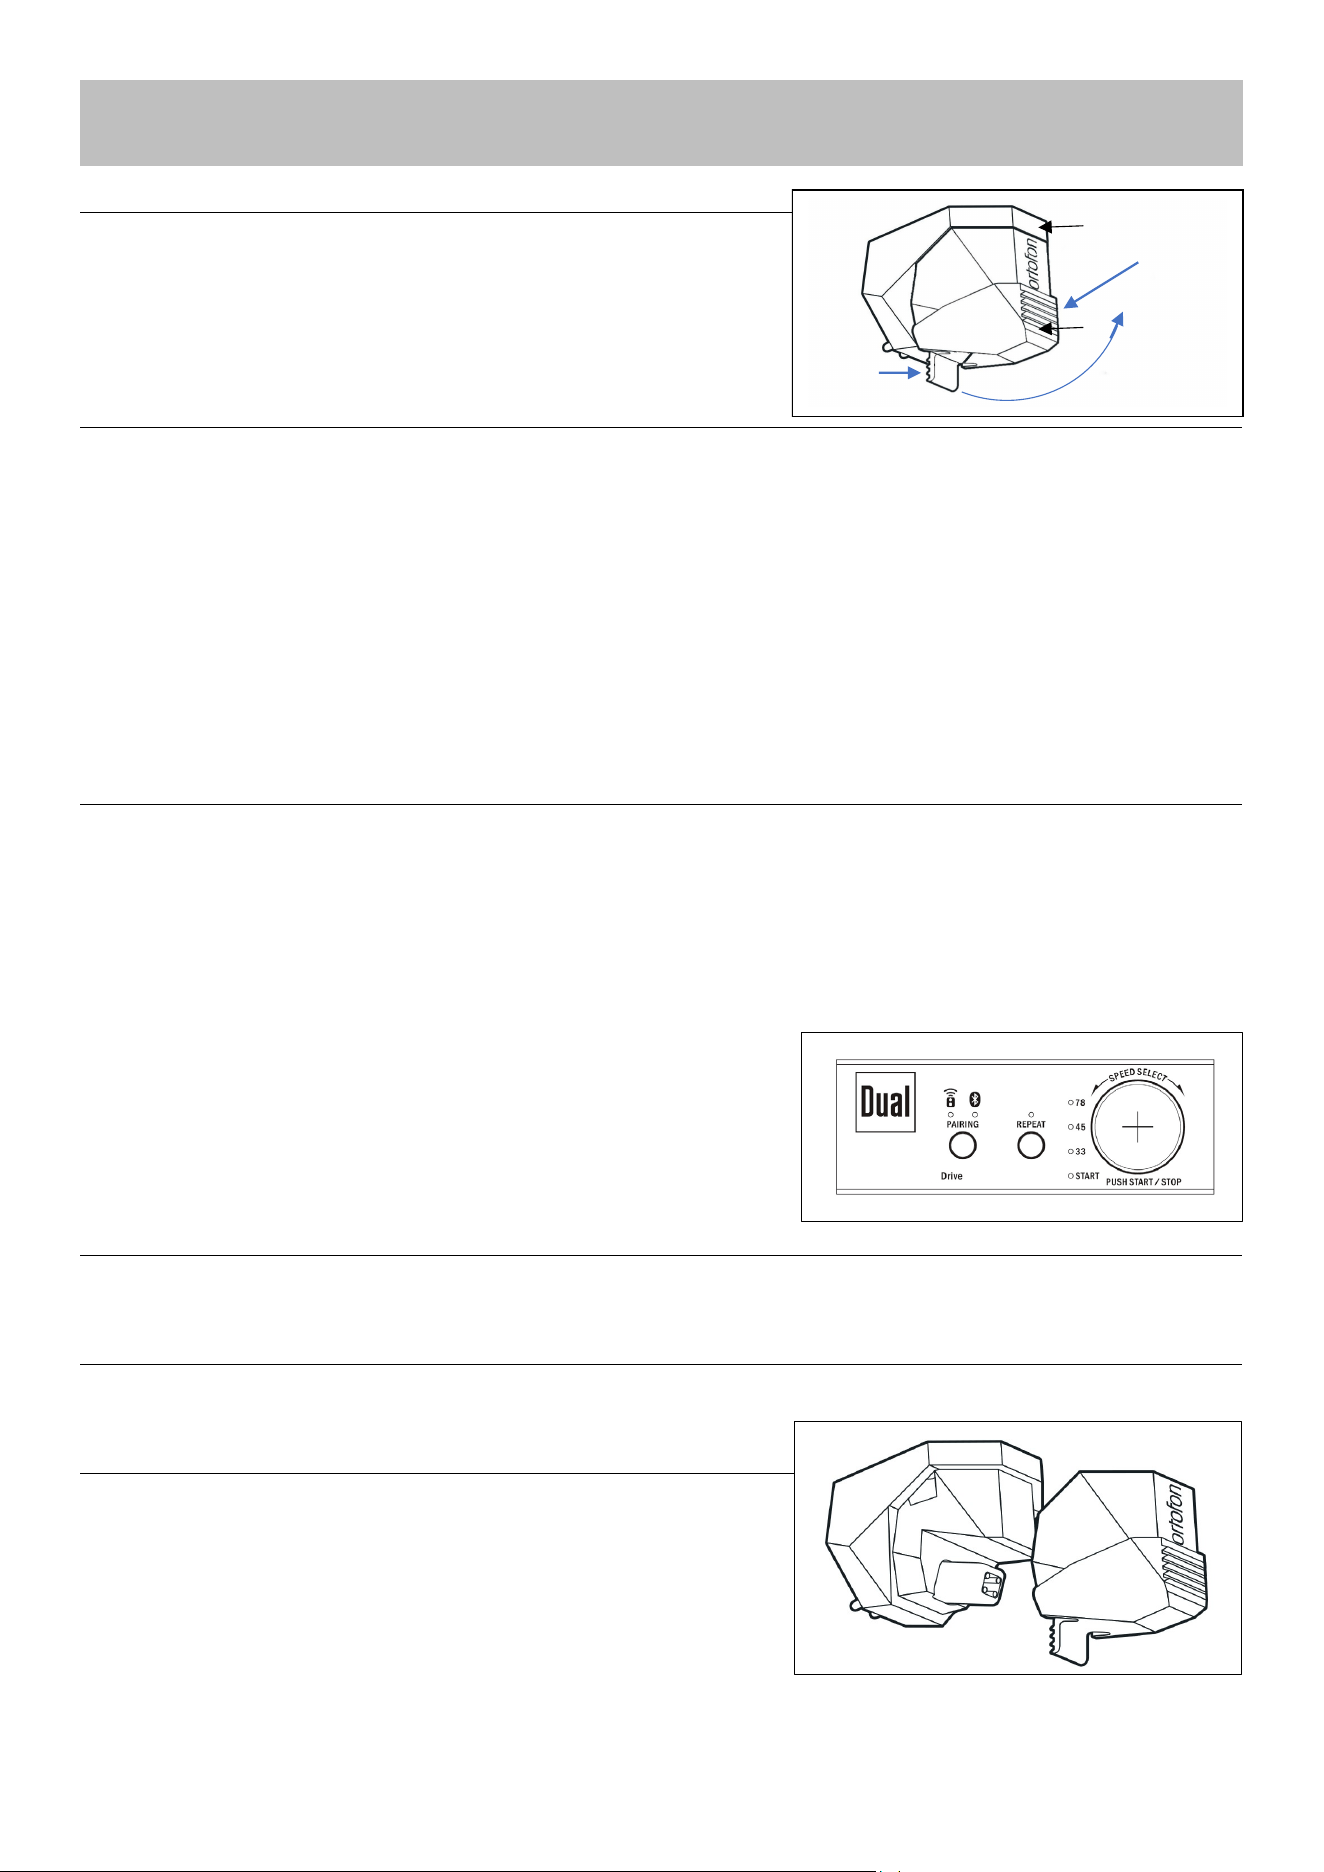
Removing / Attaching the stylus protection cap
Remove the stylus protection cap from the pick-up (1) prior to playing a record. (Pic.1)
1. Push the stylus cap (2) on the bottom (B) as seen in the diagram.
Hold in position (A) while move it up in circular motion (C).
2. Replace the cap after playing the record.
To play the record (manually)
1. Push the power button (8). The LEDs for Bluetooth and “33” will light up red and blue (Pic.2).
2. Place a record on the turntable, use the spindle adaptor to play singles.
3. Turn the speed selector (12) to the required setting: 33, 45 or 78. The selected speed will be indicated via the LED.
4. Release the safety fastener on the tonearm rest and raise the tonearm with the lift lever.
5. Carefully move the tonearm away from the tonearm rest and position it above the first groove on the record. The platter is turning.
6. Lower the tonearm with the lift lever.
7. The tonearm will return to the tonearm rest automatically at the end of the record and the motor will switch off.
8. The motor will switch off automatically when the tonearm is manually returned to the tonearmrest.
9. Secure the tonearm with the safety fastener on the tonearm rest.
10. After 30 minutes of rest (the factory setting can be changed), the unit switches to stand-by mode. The “Start” LED lights up red.
Note:
The tonearm can be raised at any point, even for short periods. The platter will continue to turn.
To play the record (automatically) Pic.2
1. Push the power button (8). The LEDs for Bluetooth and “33” will light up red and blue. (Pic.2)
2. Place a record on the turntable, use the spindle adaptor to play singles and select the record size (20).
3. Turn the speed selector (12) to the required setting: 33, 45 or 78. The selected speed will be indicated via the LED.
4. Release the safety fastener on the tonearm rest and press the START-STOP button (12).
5. The platter will start turning and the arm will move towards the first groove and will be lowered onto the record. The green “Start” LED will
flash during the operation and glow permanently during operation.
6. Stop the operation with the START-STOP button (12). The tonearm will return to the tonearm rest automatically. The “Start” LED will flash.
7. The tonearm will return to the tonearm rest automatically at the end of the record and the motor will switch off.
8. The motor will switch off automatically when the tonearm is manually returned to the tonearmrest.
8. Secure the tonearm with the safety fastener on the tonearm rest.
9. After 30 minutes (setting can be changed) of rest, the unit switches to stand-by mode.
The “Start” LED lights up red.
Note:
No automatic function for records with 25cm (10”) diameter!
The tonearm can be lifted at any time during the automatic playback process.
To set the speed
The exact speed is fixed through an internal processor. There is no further adjustment.
Repeat function
Press the “Repeat” button (Pic. 2) to repeat the playback at the end of the record.
Replacing the stylus
The stylus is naturally exposed to wear and tear by the playback process.
Therefore, we recommend regular inspections.
1. Remove the stylus by pulling diagonally downwards. (Pic. 3)
2. Insert the stylus by doing the performing the reverse action.
Note:
Worn or damaged (splintered) styluses ruin records.
When you need to replace a stylus, use the original type if possible.
1
A- Hold
C- Move
B-Push
2
Pic. 1
Pic. 2
Pic. 3
11
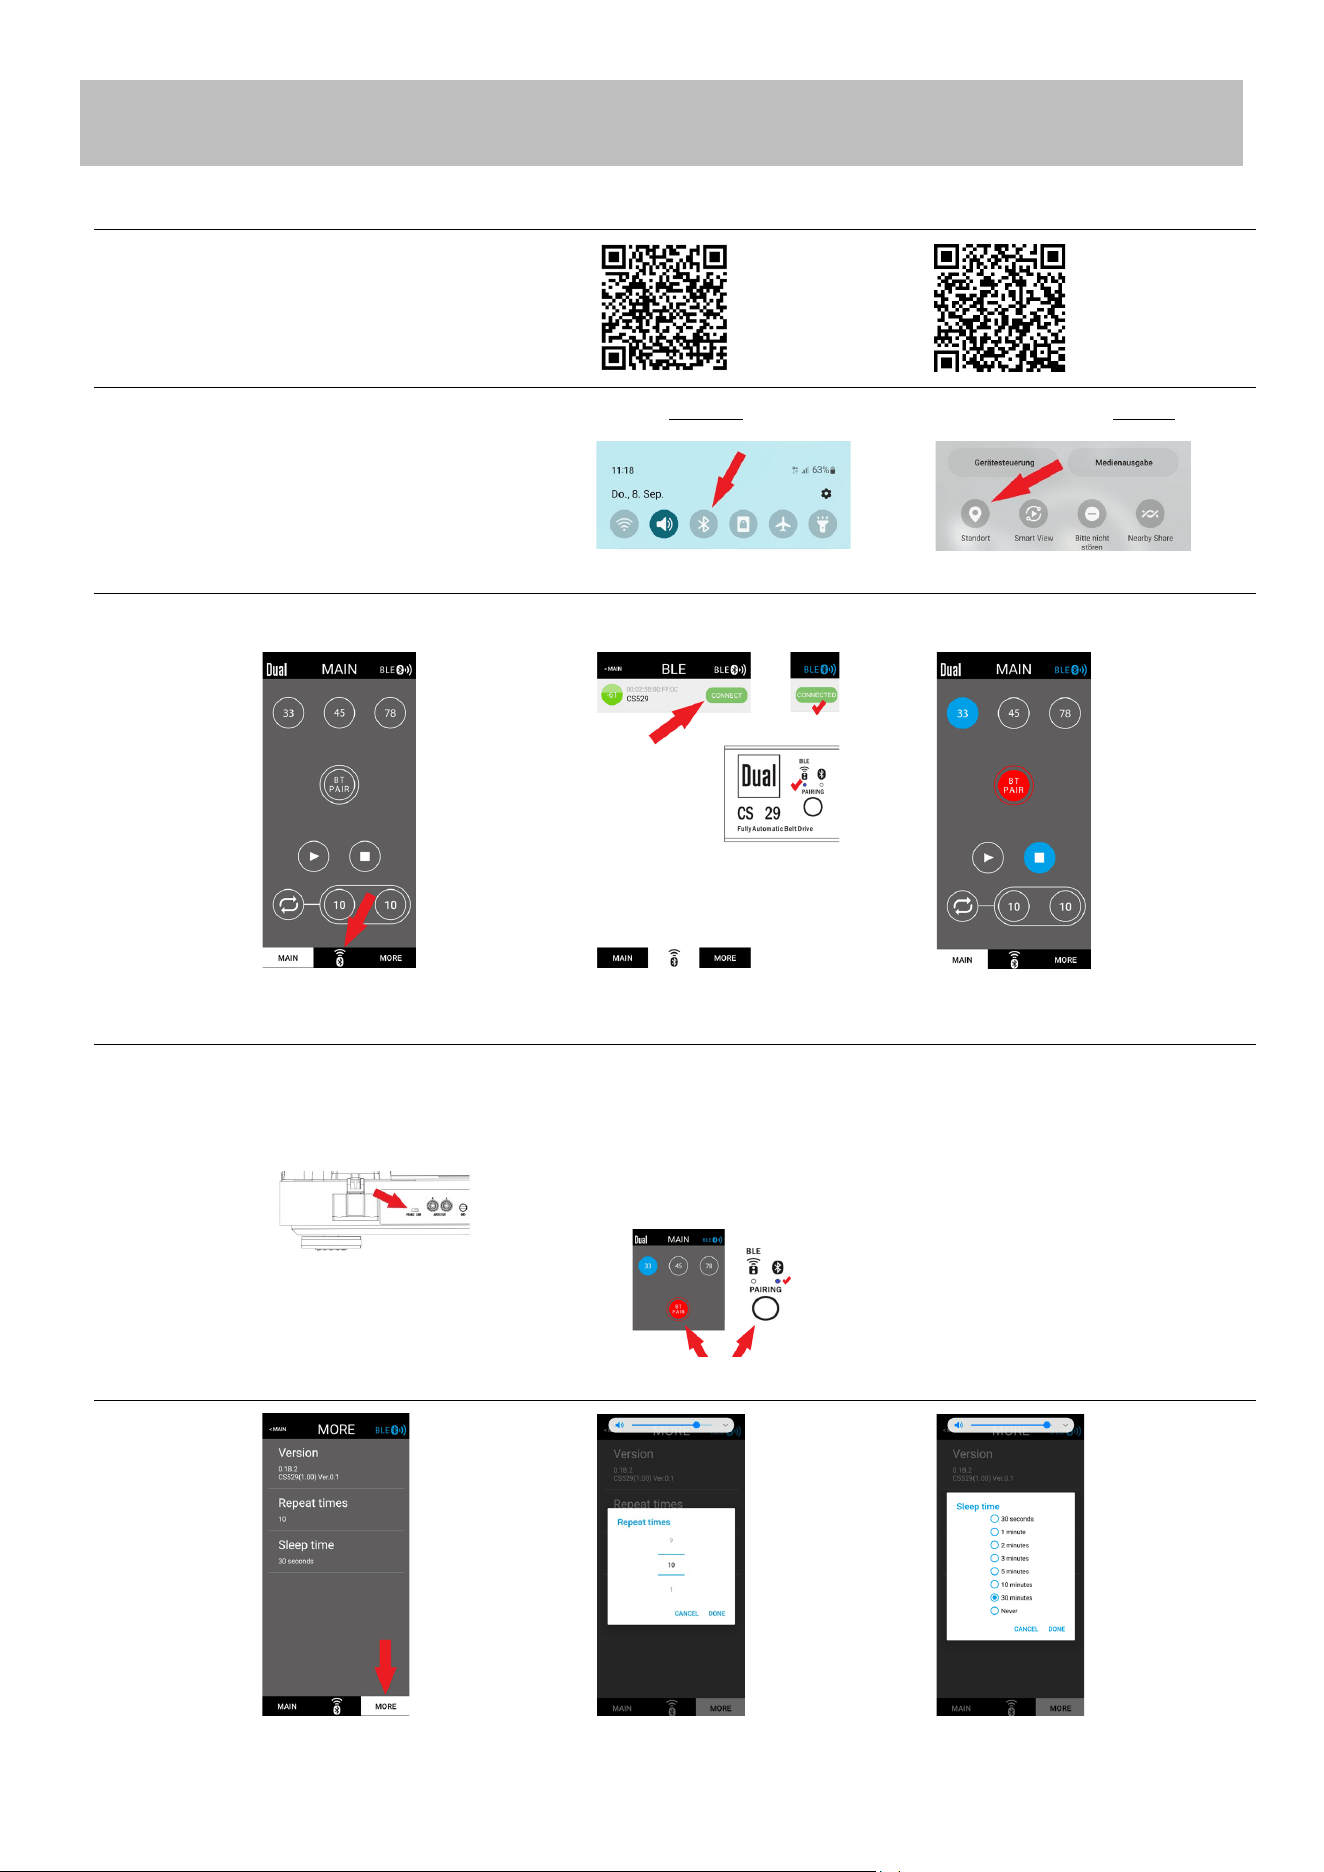
Operating Bluetooth
Install App on Mobile Device
Android: Apple:
Play Store App Store
Mobile Devise Settings
Connect the Remote-Control Function
Connect with Loudspeaker / Headphone
Settings: Repeat times / Stand-by time
Open the BLE-Menu
1) Enable Bluetooth.
2) Android only: Enable Location.
Press Connect
Ready = Status is indicated
Enable Bluetooth „Pairing“ on
the loudspeaker / headphone.
Select „Line“ on the turntable.
Recognise new receiving device
- Press the „Pairing“ button twice on the
mobile device, or the turntable.
- The LED and screen button will flash
red and blue while connecting.
- The LED and screen button remain lit
when connected.
Pairing existing receiving devise
- Press the „Pairing“ button once on
the mobile device, or the turntable.
- The LED and screen button will flash
blue while connecting.
- The LED and screen button remain lit
when connected.
12
Cleaning & Troubleshooting
Cleaning stylus and record
Clean the stylus and record prior to every record played. That minimises premature wear and tear.
Damage to components!
1. Carefully wipe the stylus brush in a front to back motion under the stylus.
2. To clean a record, use a carbon fibre brush to wipe gently and diagonally over the record
.
Note:
Brushes and accessories are available in the Dual shop: www.dual.eu
Cleaning the record player
Danger – Electric shock!
To avoid the danger of an electric shock, you must not clean the unit with a wet cloth or under running water.
Pull the power plug prior to any cleaning.
ACHTUNG
Damage to components!
Do not use any scrubbing sponges, cleaning powder or solvents such as alcohol and petrol. To clean the
appliance and the records, only use cleaning agents that are specifically designed for the purpose (antistatic).
Troubleshooting
If the unit does not function as intended, perform checks using the following tables.
If the malfunction cannot be fixed even after these checks, please contact the manufacturer.
Spare parts & Accessories
Spare parts and accessories are available from Dual: www.dual.eu
Symptom - Possible causes
Solutions
The tone arm skips grooves, slides over the record or
does not move.
• The record player is not sitting horizontally. Place the record player on a
horizontal base support.
• The record is dirty or scratched. Clean the record with a record cleaner or
change the record.
• The stylus pressure of the tone arm may be too low. Adjust the stylus pressure
and check the anti-skating setting.
Poor sound quality, loud static noise, sound dropouts,
etc.
• The stylus is dirty or worn. Clean the stylus with a brush.
• The stylus may be defective. If necessary, change the stylus.
• The record is dirty or dusty. Clean the record with a record cleaner.
The sound is too quiet or loud and distorted.
• The record player is not connected to the correct amplifier input.
• The internal phono pre-amp is set to the wrong setting. Change the switch
setting in the back of the turntable.
• Consult the manual setting: Set up - Connection to amplifier
The sound drones or the pitch is inconsistent.
The drive belt is too loose and must be replaced.
The app does not respond
• Close the app and restart
Speakers or headphones do not pair
• Check the instructions of the receiving device for pairing
Bluetooth is paired, but there is no sound
• Switch the record player output from "Phono" to "Line

13
FCC statement in User’s Manual (for class B) -for FCC 15b devices (15.105)
Federal Communication Commission Interference Statement
This equipment has been tested and found to comply with the limits for a Class B digital device, pursuant to part 15 of the FCC rules. These limits are designed to provide reasonable
protection against harmful interference in a residential installation. This equipment generates, uses and can radiate radio frequency energy and, if not installed and used in accordance
with the instructions, may cause harmful interference to radio communications. However, there is no guarantee that interference will not occur in a particular installation. If this
equipment does cause harmful interference to radio or television reception, which can be determined by turning the equipment off and on, the user is encouraged to try to correct the
interference by one or more of the following measures:
- Reorient or relocate the receiving antenna.
- Increase the separation between the equipment and receiver.
- Connect the equipment into an outlet on a circuit different from that to which the receiver is connected.
- Consult the dealer or an experienced radio/TV technician for help.
FCC/IC Caution:
1. This device complies with Part 15 of the FCC rules/ Industry Canada licence-exempt RSS standard(s).
Operation is subject to the following two conditions:
1) this device may not cause harmful interference and
2) this device must accept any interference received, including interference that may cause undesired operation.
2. This Transmitter must not be co-located or operating in conjunction with any other antenna or transmitter.
3. Any changes or modifications not expressly approved by the party responsible for compliance could void the user's authority to operate this equipment.
IMPORTANT NOTE: (For Mobile Device Configuration)
FCC Radiation Exposure Statement:
This equipment complies with FCC RF radiation exposure limits set forth for an uncontrolled environment.
This equipment should be installed and operated with a minimum distance of 20 centimeters between the radiator and your body.
ICES-003
This Class B digital apparatus complies with Canadian ICES-003.
Cet appareil numérique de la classe [B] est conforme à la norme NMB-003 du Canada.
Industry Canada Caution:
This device complies with Industry Canada license-exempt RSS standard(s).
Operation is subject to the following two conditions:
(1) this device may not cause interference, and
(2) this device must accept any interference, including interference that may cause undesired operation of the device.
Le présent appareil est conforme aux CNR d'Industrie Canada applicables aux appareils radio exempts de licence.
L'exploitation est autorisée aux deux conditions suivantes:
(1) il ne doit pas produire de brouillage et
(2) l’ utilisateur du dispositif doit étre prêt à accepter tout brouillage radioélectrique reçu, même si ce brouillage est susceptible de compromettre le fomctionnement
du dispositif.
IC Déclaration sur la radioexposition : (Pour la configuration du périphérique mobile)
Cet équipement est conforme aux IC RSS-102 des limites d'exposition aux rayonnements définies pour un incontrôlée environnement.
Cet équipement doit être installé et utilisé à une distance minimum de 20 cm entre le radiateur et votre corps.
Dual GmbH
www.dual.eu
support@dual.de
Hauptstraße 1
86925 Fuchstal
Germany