PRODUCT MANUAL
REV0825
SKU 425-1760
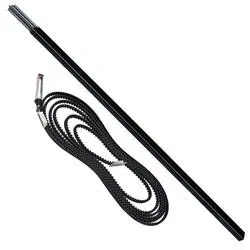
Includes beam
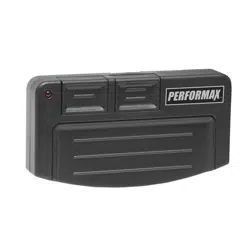
Smart Controller
Beeps from built-in buzzer
of the opener
WARNING
TABLE OF CONTENTS
WARNING:
To reduce the risk of injury to persons
- FOR RESIDENTIAL USE ONLY
- INSTALL ON SECTIONAL DOORS WITH TORSION SHAFT
AND SPRINGS ONLY
• Please read and understand this manual and safety
instructions carefully before installation.
• The Opener WILL NOT CLOSE until the Photo Eye Safety
System and Cable Tension Monitor is properly installed and
aligned.
• REGULARLY CHECK and TEST the Opener according to the
safety label to ENSURE SAFE OPERATION.
• Retain this manual for future reference.
• This product should only be installed by a trained garage
door technician.
• Adjustments to door springs or track may be required.
• If installed with low-headroom tracks, pusher springs must be
incorporated.
• This product should not be used on garage doors
with extension springs, outside pickup drums or
low-headroom tracks.
SYMBOLS AND ICONS
READ WARNINGS CAREFULLY to prevent SERIOUS INJURY
or DEATH caused by electrocution or mechanical hazard.
Carton Contents ............................................ 1
Prepare your Garage Door .............................. 2
Safety Instructions/Tools Needed ..................... 3
Assembly ................................................... 4
Installing Door Lock....................................... 6
Installing Cable Tension Monitor ....................... 7
Connecting Photo Eye System .......................... 8
Connectin Deluxe Door Control Console ............ 9
Motion Activated Securtiy Lighting ...................10
Connecting Power ....................................... 11
Aligning the Photo Eye Safety System ............... 11
Travel Limit Adjustment – UP Limit ....................12
Travel Limit Adjustment – DOWN Limit ............... 13
Auto Force Adjustment .................................14
Installing Battery Backup (Optional) .................15
Final Adjustments and Testing .........................16
Programming Remote Controls ...............17
Wireless Keypad (Optional) ..................18
Important Safety Instructions ..........................19
Operating the Opener ................................. 20
beam Smart Controller Instalation ................... 22
Maintenance ............................................. 23
Warranty .................................................. 24
Replacement Parts ...................................... 26
Opener Assembly Parts ................................ 27
Door Lock
Manual
Template
beam Smart
Controller
www.gdohelp.com 1-877-436-4402 1
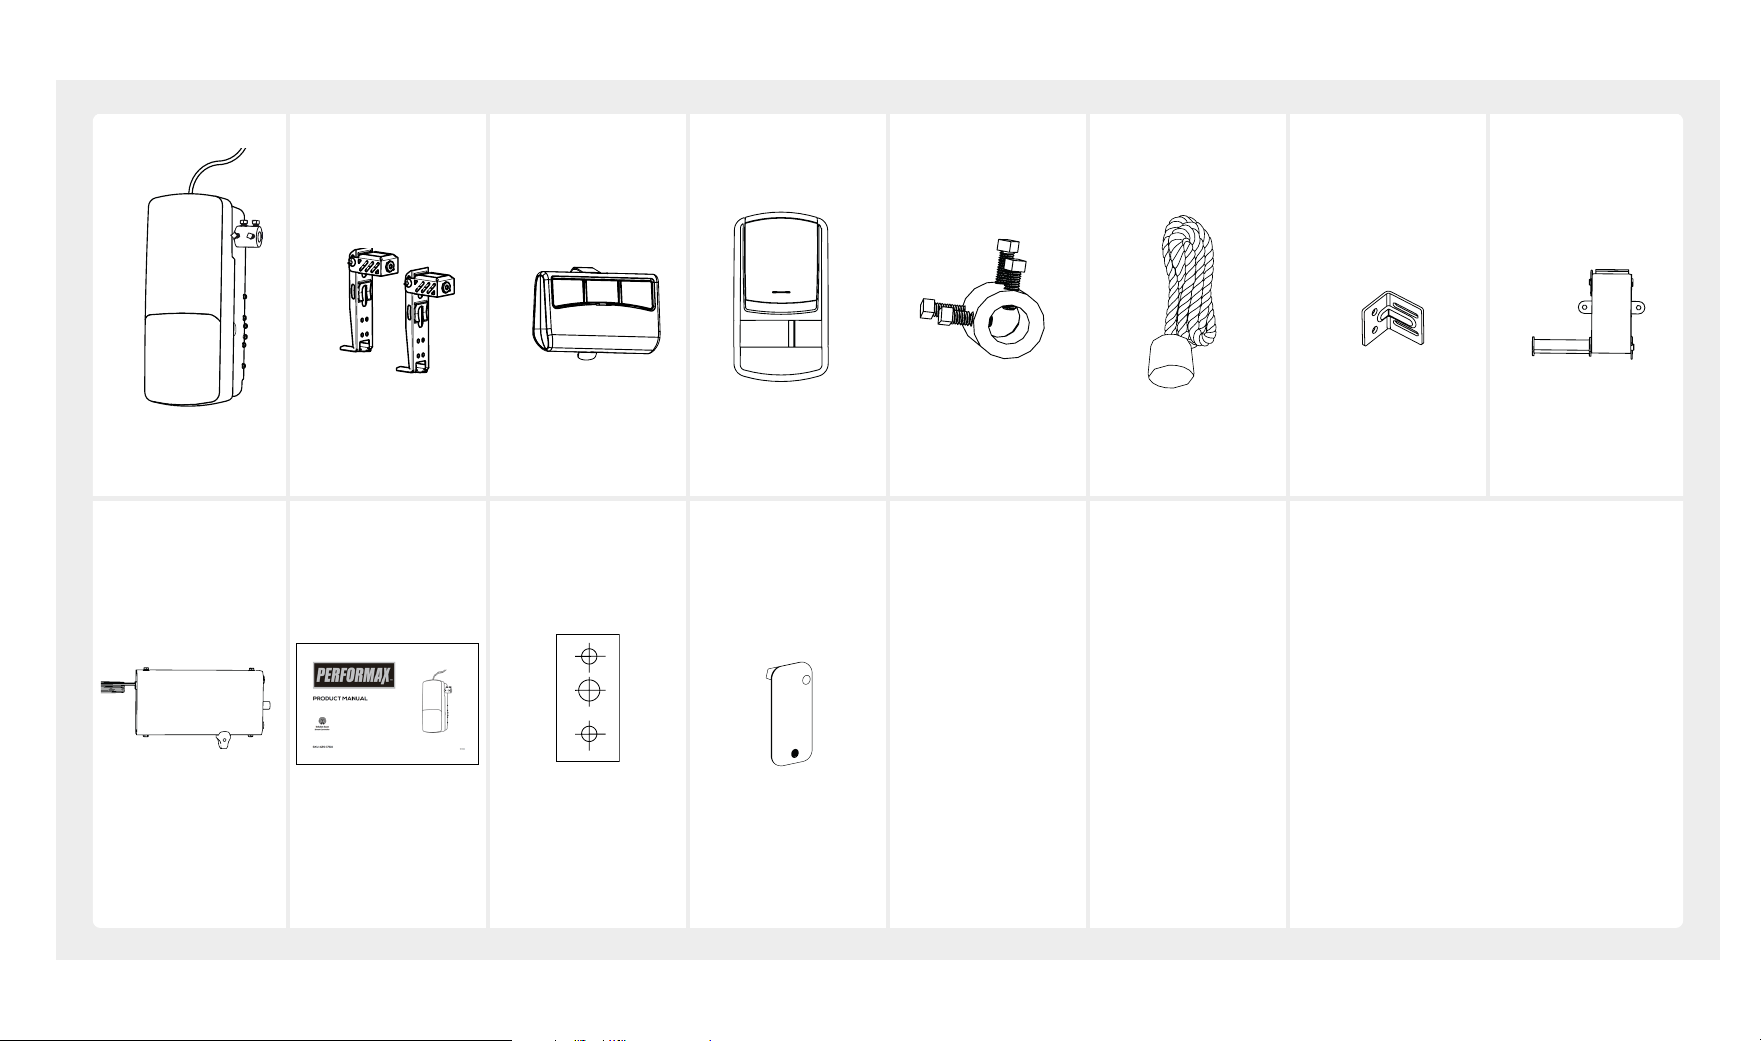
CARTON CONTENTS
Residential
Jacksha
Operator Photo Eyes Remote Control
Deluxe Door
Control Console Collar
Manual Release
Cord
Mounting Bracket
x 2
Cable Tension
Monitor
TOP
DRILL 5/16”
DRILL 5/16”
DRILL 3/4”
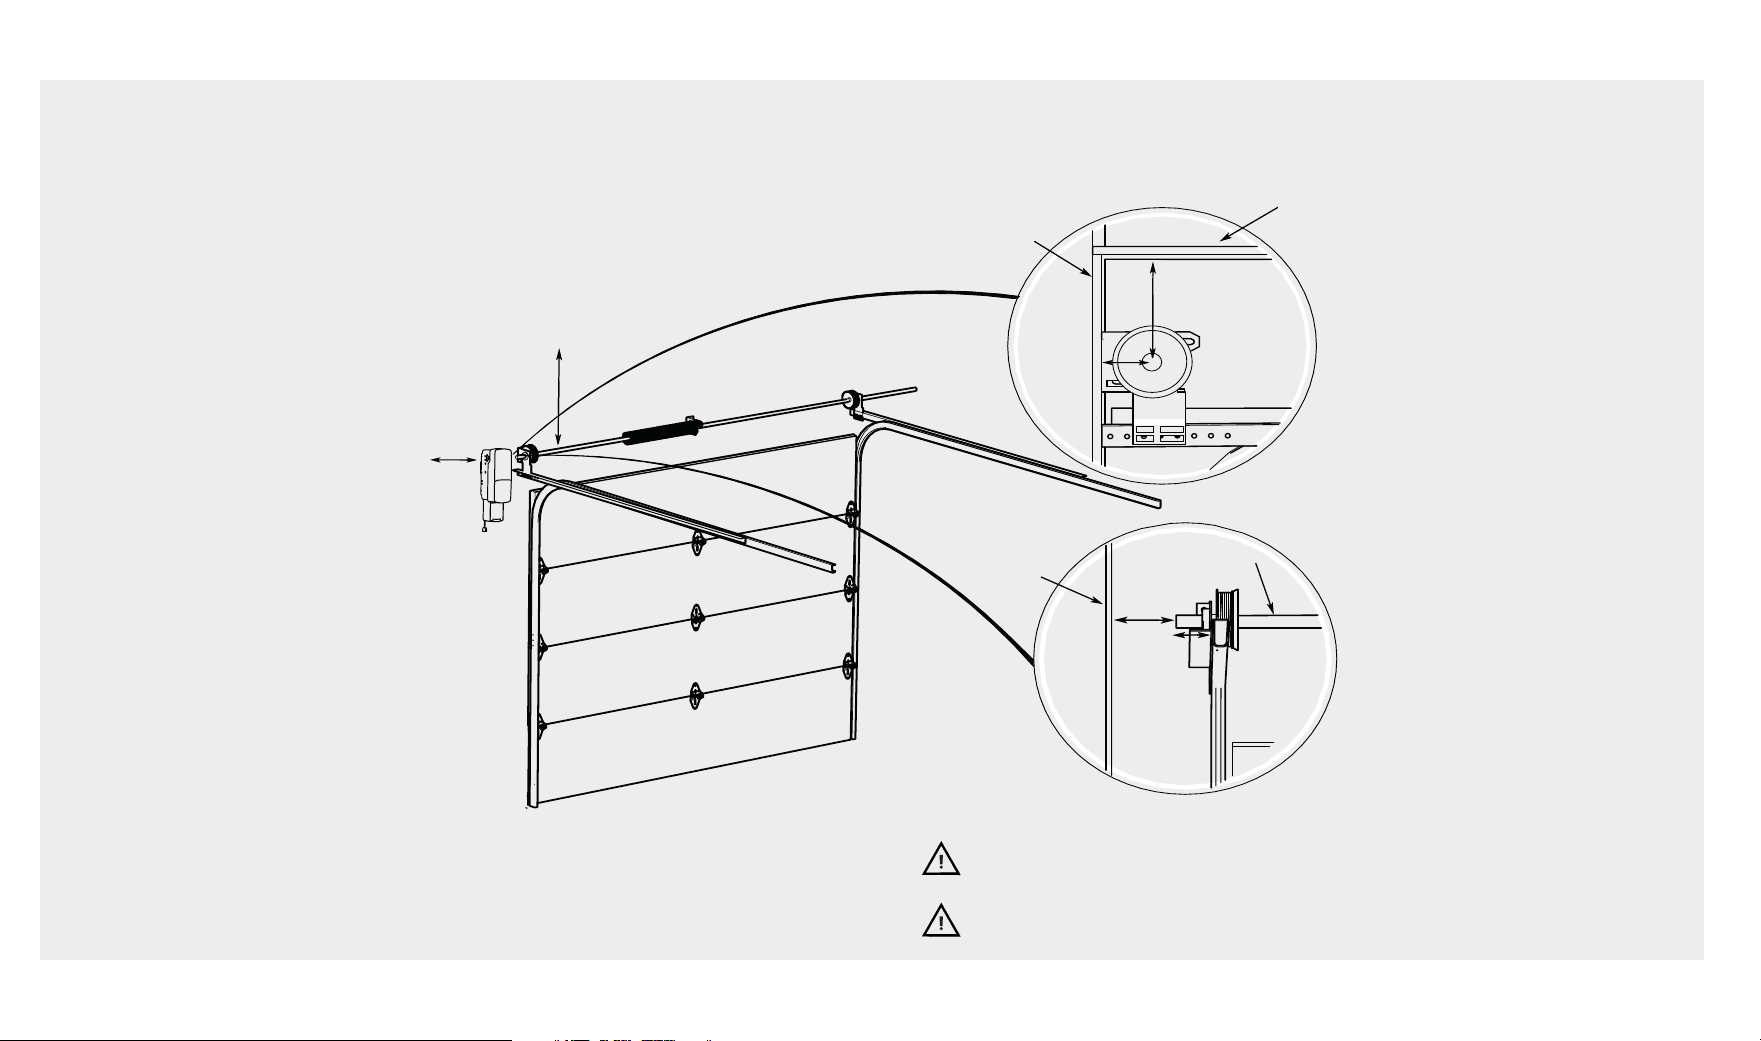
Outlet within
6 ft (1.83m)
of garage door
opener
Ceiling
Between ceiling and torsion
bar must be a distance of 3’’
(7.6cm) or more
Wall
Wall
Torsion
Bar
3’’’
(7.6 cm)
2.5’’
(6.4 cm)
1.5”
(3.81 cm)
8.5”
(21.6 cm)
To test your garage door:
1.Raise and lower the door to check it if there is any sticking or binding.
2.Check for loose hinges, damaged rollers, frayed cables, and damaged or broken springs.
3.Li the door approximately halfway and release. The door should stay at that point
under proper spring tension.
2 www.gdohelp.com 1-877-436-4402
PREPARE YOUR GARAGE DOOR
PREPARE for installation
This operator is compatible with the following doors:
- Sectional doors up to 14 feet (4.3 m) high.
- Sectional doors up to 18 feet (5.5 m) wide.
- Doors with 1” diameter torsion bar and torsion springs with 4” to 6” drums.
- Sectional high li doors (up to 54 inches (137.2 cm) of high li).
- Doors with 12” or 15” radius tracks.
- It is not compatible with reverse wound drums.
On the side chosen to mount the opener, the proper clearances are:
For California Residents
CAUTION To be compliant with California SB969, this Garage Door Openers must be installed
with battery backup kit.
WARNING This product can expose you to chemicals including lead, that are known to the
State of California to cause cancer, birth defects or other reproductive harm. For more information
go to www.P65Warnings.ca.gov.
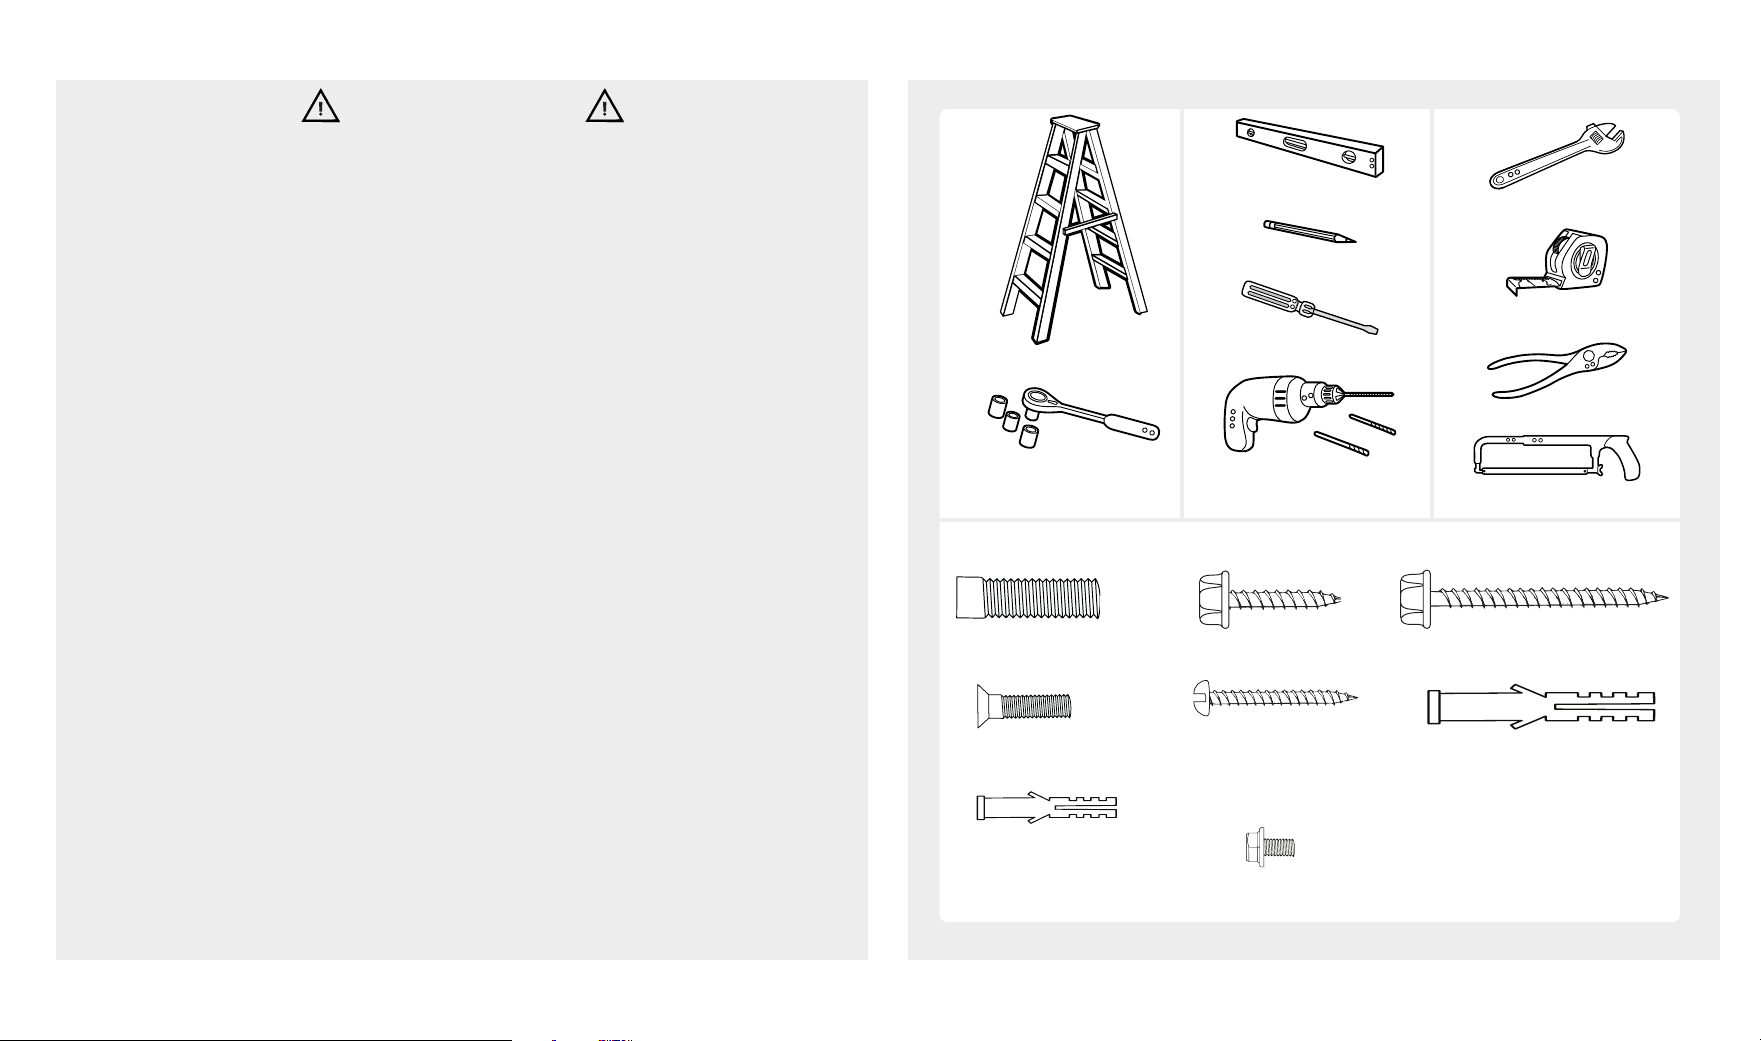
HARDWARE INCLUDED
INSTALLATION HARDWARE, LOCATED IN HARDWARE BAG*
www.gdohelp.com 1-877-436-4402 3
To reduce the risk of severe injury or death:
1. READ AND FOLLOW ALL INSTALLATION INSTRUCTIONS.
2. Install only on a properly balanced garage door. An improperly balanced door has the potential to
inflict severe injury. Have a qualified service person make repairs to cables, spring assemblies, and
other hardware before installing the opener.
3. Remove all ropes and remove or make inoperative all locks connected to the garage door before
installing opener.
4. Where possible, install the door opener 7 feet (2.13 m) or more above the floor. For products
having an emergency release, the emergency release must be within reach, at least 6 feet above
the floor and avoiding contact with vehicles to avoid accidental release. Cut the release cord to
length.
5. Do not connect the opener to source of power until instructed to do so.
6. Locate the door control button: (a) within sight of door, (b) at a minimum height of 5 feet so small
children are not able to reach it, and (c) away from all moving parts of the door.
7. Install the Entrapment Warning Label next to the wall-mount control button in a prominent loca-
tion. Install the emergency release safety label near the emergency release.
8. Aer installing the opener, the door must reverse when it contacts a 1-1/2 inch (3.8 cm) high
object (or a 2x4 board) laid flat on the floor.
9. NEVER try to remove, loosen, move, or adjust garage door, cables, pulleys, brackets, and door
springs. All are under EXTREME tension.
10. To reduce the risk of injuries to persons – use this operator only with residential sectional garage
doors.
11. When installed with a Smart Control, only enable the unattended operation feature when installed
with a sectional door.
12. To avoid SERIOUS PERSONAL INJURY or DEATH, disconnect ALL power, mains and battery, BE-
FORE performing ANY service activities.
13. When installing or servicing the garage door opener, NEVER wear watches, rings or loose
clothing, as these may be caught in the mechanism.
Unattended Operation
The beam Smart Controller and beam Home app enable unattended operation of the garage door and
should be used ONLY with sectional doors. Any device or feature that allows the door to close without
being in the line of sight of the door is considered unattended close.
The beam Smart Controller or any other Smart Garage Door Controller device that provides
operation from mobile phone or Timer-to-Close feature should be used ONLY with sectional doors.
SAFETY INSTRUCTIONS
TOOLS NEEDED
Step Ladder
Ratchet with
1/4", 7/16" and 3/8”
socket
Level
Pencil
Screwdriver
Hack Saw
Tape Measure
Adjustable Wrench
Drill 3/16",
5/16" and 3/4 Drill Bits
Pliers
WARNING
Lag Screw
1/4 - 10 x 50 mm
Mounting bracket (4)*
Cable tensioner mounting screws (2)*
Screw #6 x 1-3/8’’
Door control console (2)*
Wireless Keypad (2)*
Phillip Head Screw
M6 x 20 mm
Door lock (2)*
Square Head Screw
3/8’’ x 1 (4)
Attached to the collar
Lag Screw #12-11 x 1.25”
Photo Eye System (4)*
Hex Screw #8-32’’
Mounting bracket (4)*
Dowel 10 x 50 mm
Mounting bracket (4)*
Cable tensioner mounting (2)*
Dowel 1-3/8’’
Door control console (2)*
Wireless Keypad (2)*
4 www.gdohelp.com 1-877-436-4402
ASSEMBLY
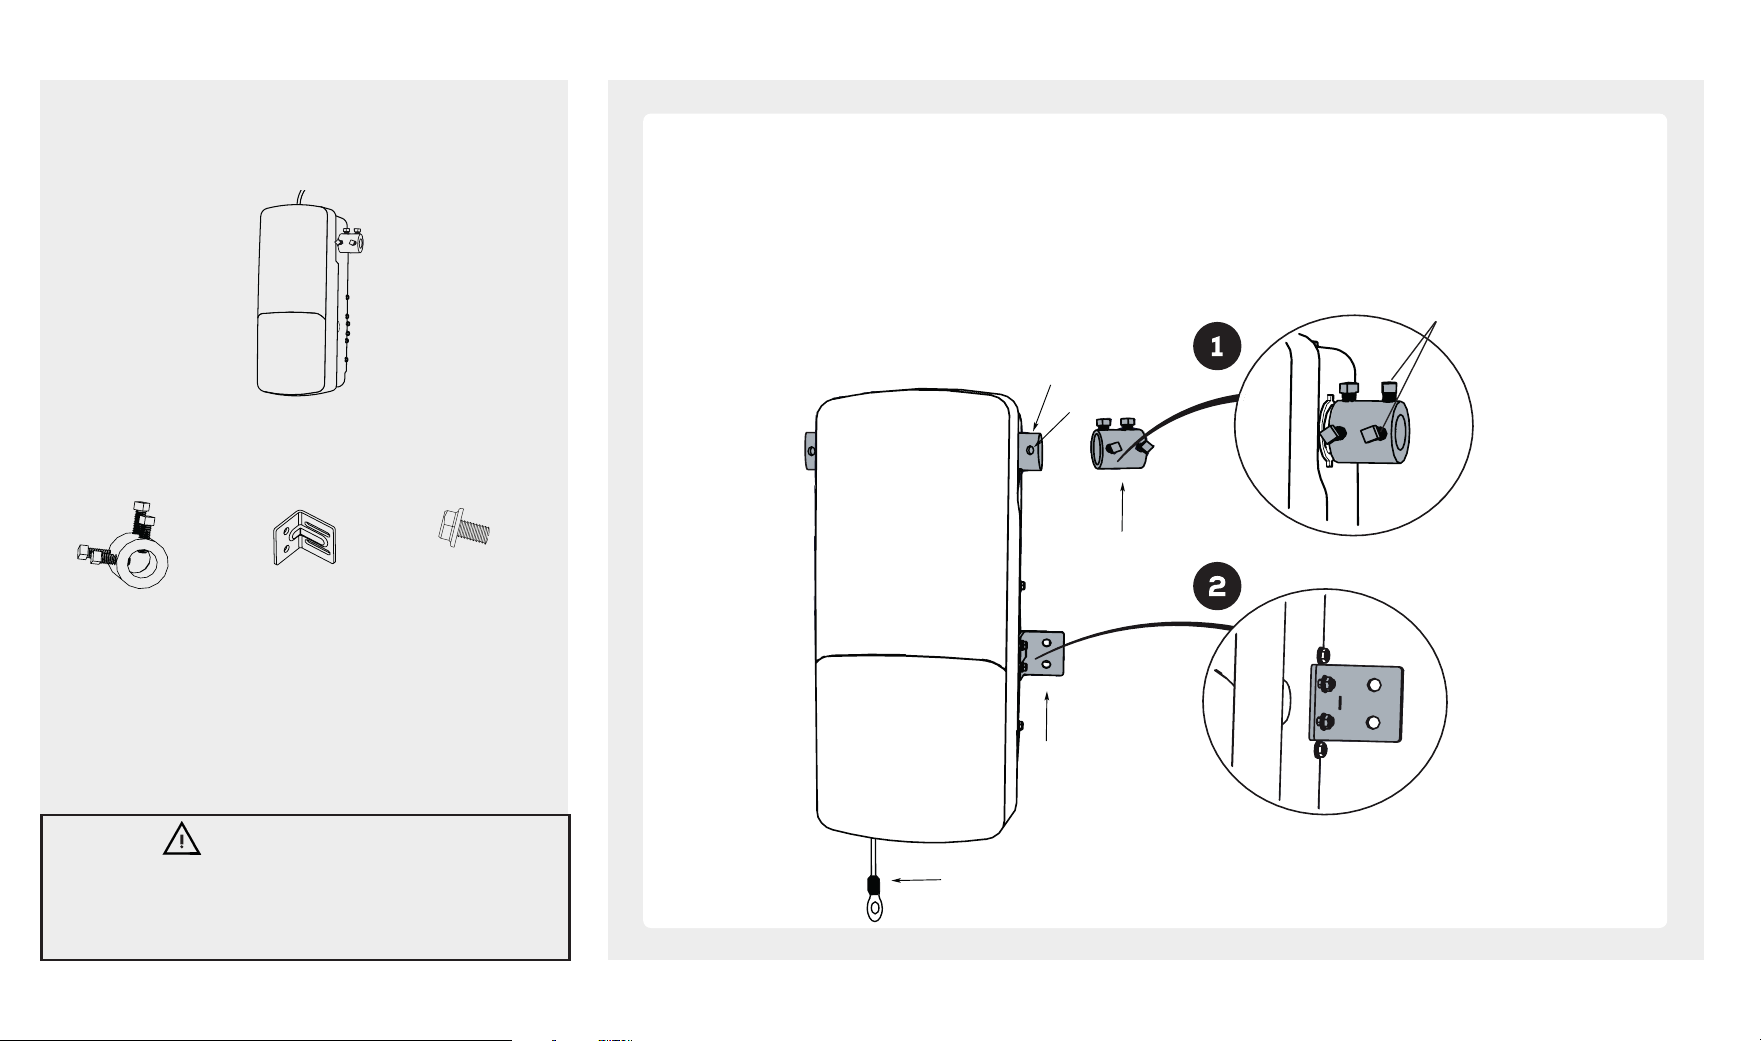
Look in the box for:
Collar Mounting Bracket Hex Screw
1. Attach collar to the drive sha assembly, align one of the set screws to the drive sha hole. Notice that the side of the
collar with the larger hole must be placed on the drive sha, seated all the way on drive sha assembly.
Securely tighten the 2 square head set screws closest to the motor sha by turning the screws 1/4 - 1/2 turn aer
making contact with the motor sha, use a 3/8” wrench or ratchet with a square 3/8” (1.3 cm) or a 7/16” 12-point socket.
Make sure the screws are facing up and towards you, pull the manual release cable to disengage the motor clutch and
rotate the drive sha manually. Pull the emergency release to lock the motor again.
2. Position the mounting bracket on the same side of collar. The mounting bracket may be fit on the opposite side if
there is room. Screw the slotted side of the mounting bracket to the side panel leaving it a little loose.
Residential Jacksha Operator
CAUTION
To prevent possible SERIOUS INJURY or DEATH, the collar MUST
be properly tightened.
The door may NOT reverse correctly or limits may be lost due to
collar slip.
Collar
*THE HEX SCREWS ARE INCLUDED
INSIDE THE HARDWARE BAG
Mounting
Bracket
Hex Screw
#8-32’’ (2)
Drive Sha Assembly
Set screws
Drive Sha Hole
Manual Release
Cable
# 8 - 32" (2)
WARNING
To prevent possible SERIOUS INJURY or DEATH:
- Concrete anchors MUST be used if mounting bracket into
masonry.
- Never try to loosen, move or adjust garage door, springs,
cables, pulleys, brackets or their hardware, ALL of which are
under EXTREME tension.
- ALWAYS call a trained door systems technician if garage
door binds, sticks or is out of balance. An unbalanced
garage door might NOT reverse when required.
- Garage door opener MUST be mounted at a right angle to
the torsion bar to avoid premature wear on the collar.
- If possible, use the manual release to disengage the door
only when the garage door is closed. A damaged door or
broken springs may cause an open door to fall unexpectedly.
- Clear persons and obstructions from the doorway before
using the manual release..
www.gdohelp.com 1-877-436-4402 5
ASSEMBLY
Look in the box for:
Manual Release Cord 1/4 - 10 x 50 mm
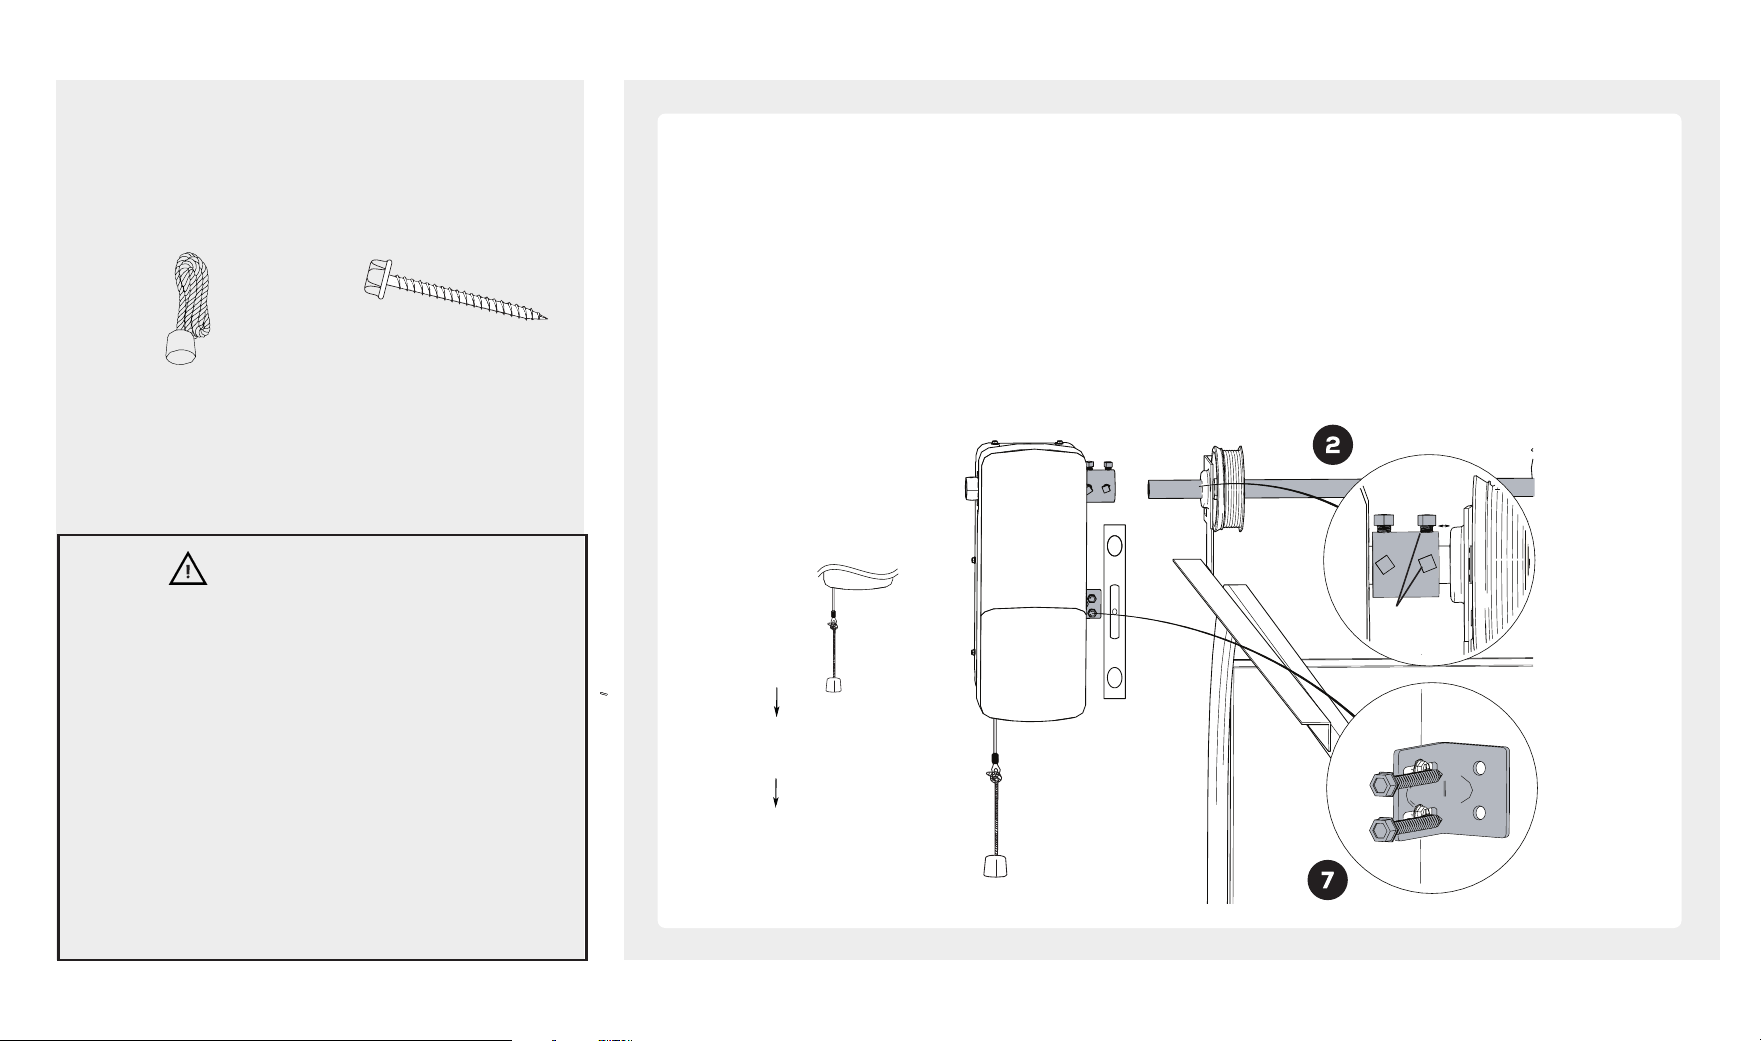
1. Close the garage door completely.
2. Position power head on torsion bar and slide garage door opener, leaving a . ¼” (.6 cm) minimum gap between the collar and
the side rail bolt. Use a level to align garage door opener.
3. When the garage door opener is properly aligned, mark the mounting bracket holes*. If necessary, tighten collar screws on
the torsion bar to hold garage door opener in place while marking holes.
NOTE: The garage door opener does not have to be flush to wall.
4. Remove the garage door opener from torsion bar. Drill 3/16 inch pilot holes at the marked locations. Drill through metal
door rail plates if necessary.
5. Slide the garage door opener back onto the torsion bar until pilot holes align with bracket.
6. Tighten the 2 square head set screws on the torsion bar. For a hollow torsion bar, tighten screws 3/4 - 1 full turn aer
making contact with the bar. For a solid sha torsion bar, tighten screws 1/4 - no more than 1/2 aer making contact
with the sha. If installing on a keyed torsion bar, DO NOT tighten the screws into the keyway.
7. Use the 1/4 - 10 x 50 mm (2) lag screws to fasten the mounting bracket to the wall. Use a level to make sure the opener is
square to the sha vertically and horizontally.
8. Attach the manual release cord to the manual release cable. Cut the manual release handle cord, slide the handle on the
rope and tie a knot. The handle must be within reach and at least 6 feet above the floor.
Separated
. ¼” (.6 cm)
* MOUNTING BRACKET
SHOULD BE MOUNTED
ON SAME SIDE OF THE
COLLAR AND TORSION BAR
Set screws
(Torsion Bar)
1/4 - 10 x 50 mm
PULL - ENGAGE
Pull down the manual release
cord firmly with ‘click’
PULL - DISENGAGE
Pull down the manual release
cord firmly with ‘click’
In case of power failure or
door obstruction, detach
door from operator as
follows.
6 www.gdohelp.com 1-877-436-4402
Phillips Head Screw
M6 x 20 mm (2)
Template Door Lock
INSTALLING DOOR LOCK
Look in the box for:
Door Lock
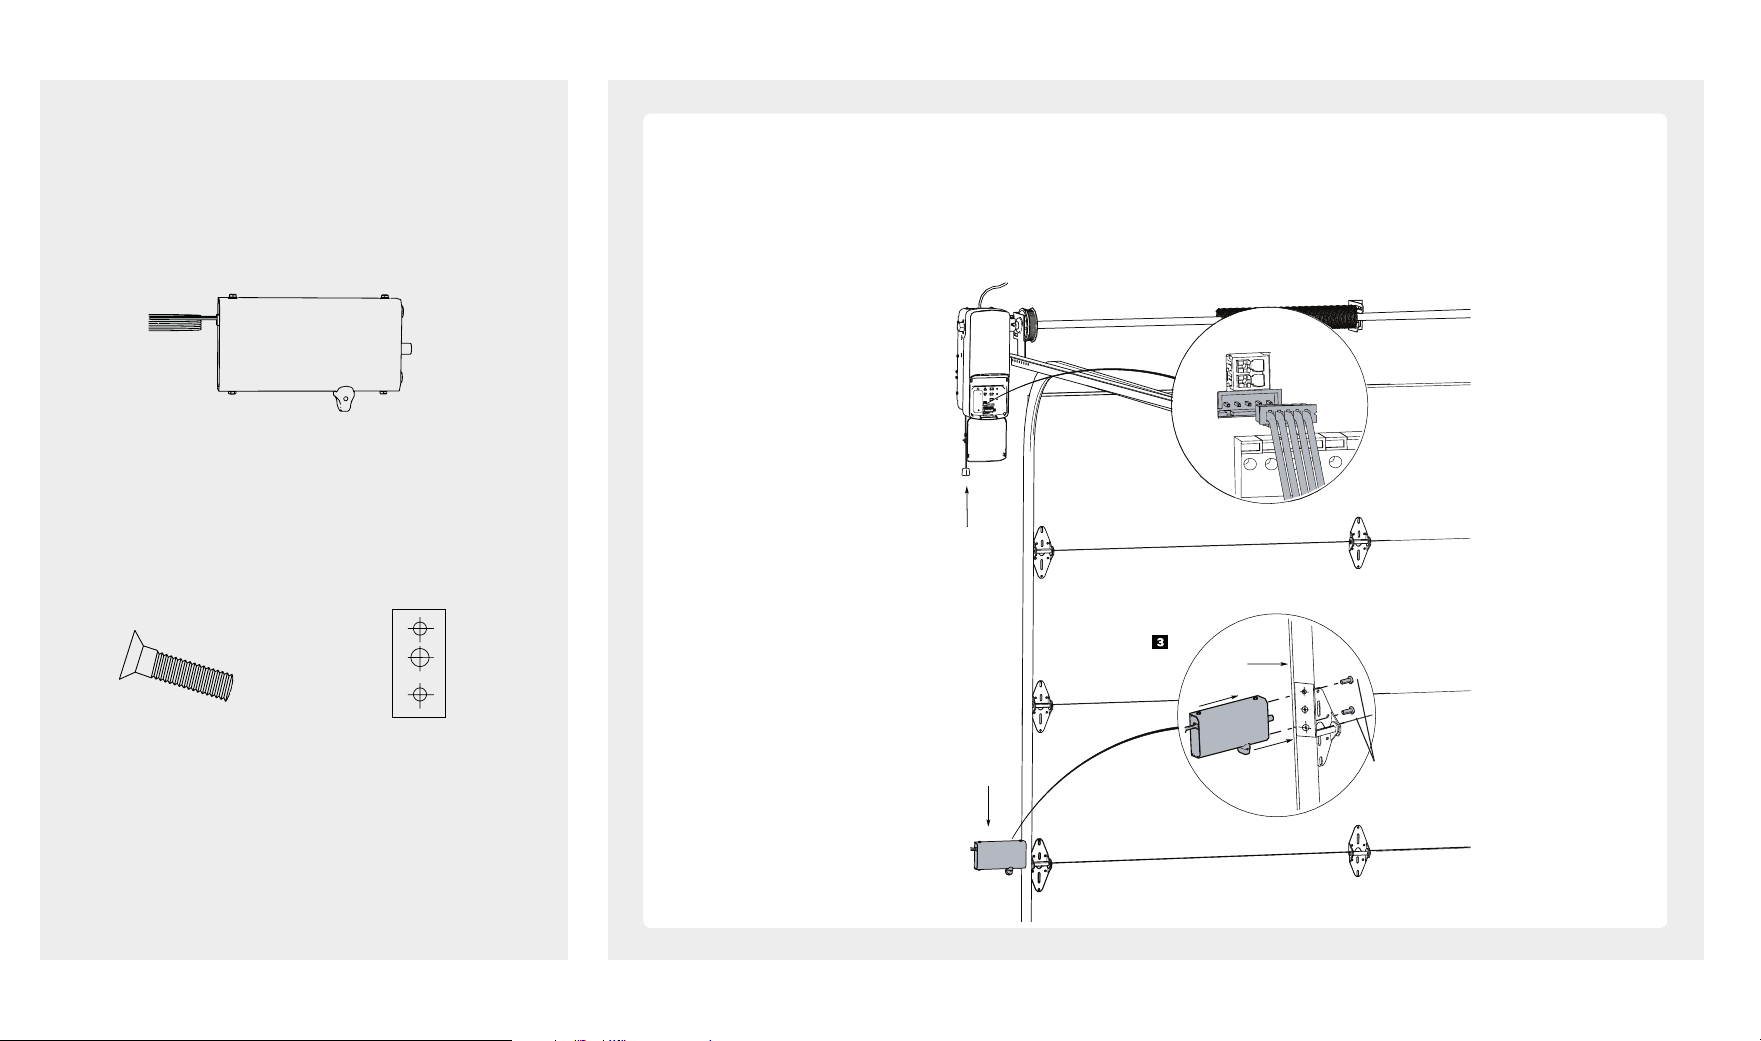
The automatic door lock prevents manual operation of the door when fully closed.
1. The lock must be mounted on the same side as the opener and within 10 (3.05m) max of the operator. Measure 3 in.
above the second roller from the bottom. Clean the outside of the track. Attach template and drill holes as shown on the
template.
2. Fasten door lock to the outside of garage door track with M6 x 20 mm (2) Phillips screws (provided).
3. Run wire up wall to garage door opener. Use insulated staples to secure wire.
4. Insert wire through the bottom of the garage door opener and plug the connector into a lock port on the garage
door opener.
TOP
DRILL 5/16”
DRILL 5/16”
DRILL 3/4”
1/4-20 x 1/2’’ (2)
TO
P
DRIL
L
5/16”
DRIL
L
5/16”
DRIL
L
3/4
”
Manual
Release
Cord
Door Lock
M6 x 20 mm (2)
CABLE
MONITOR
Lock
Template
Door Track
LOCK
www.gdohelp.com 1-877-436-4402 7
INSTALLING CABLE TENSION MONITOR
Look in the box for:
Cable Tension Monitor
Lag Screw
1/4 - 10 x 50 mm (2)
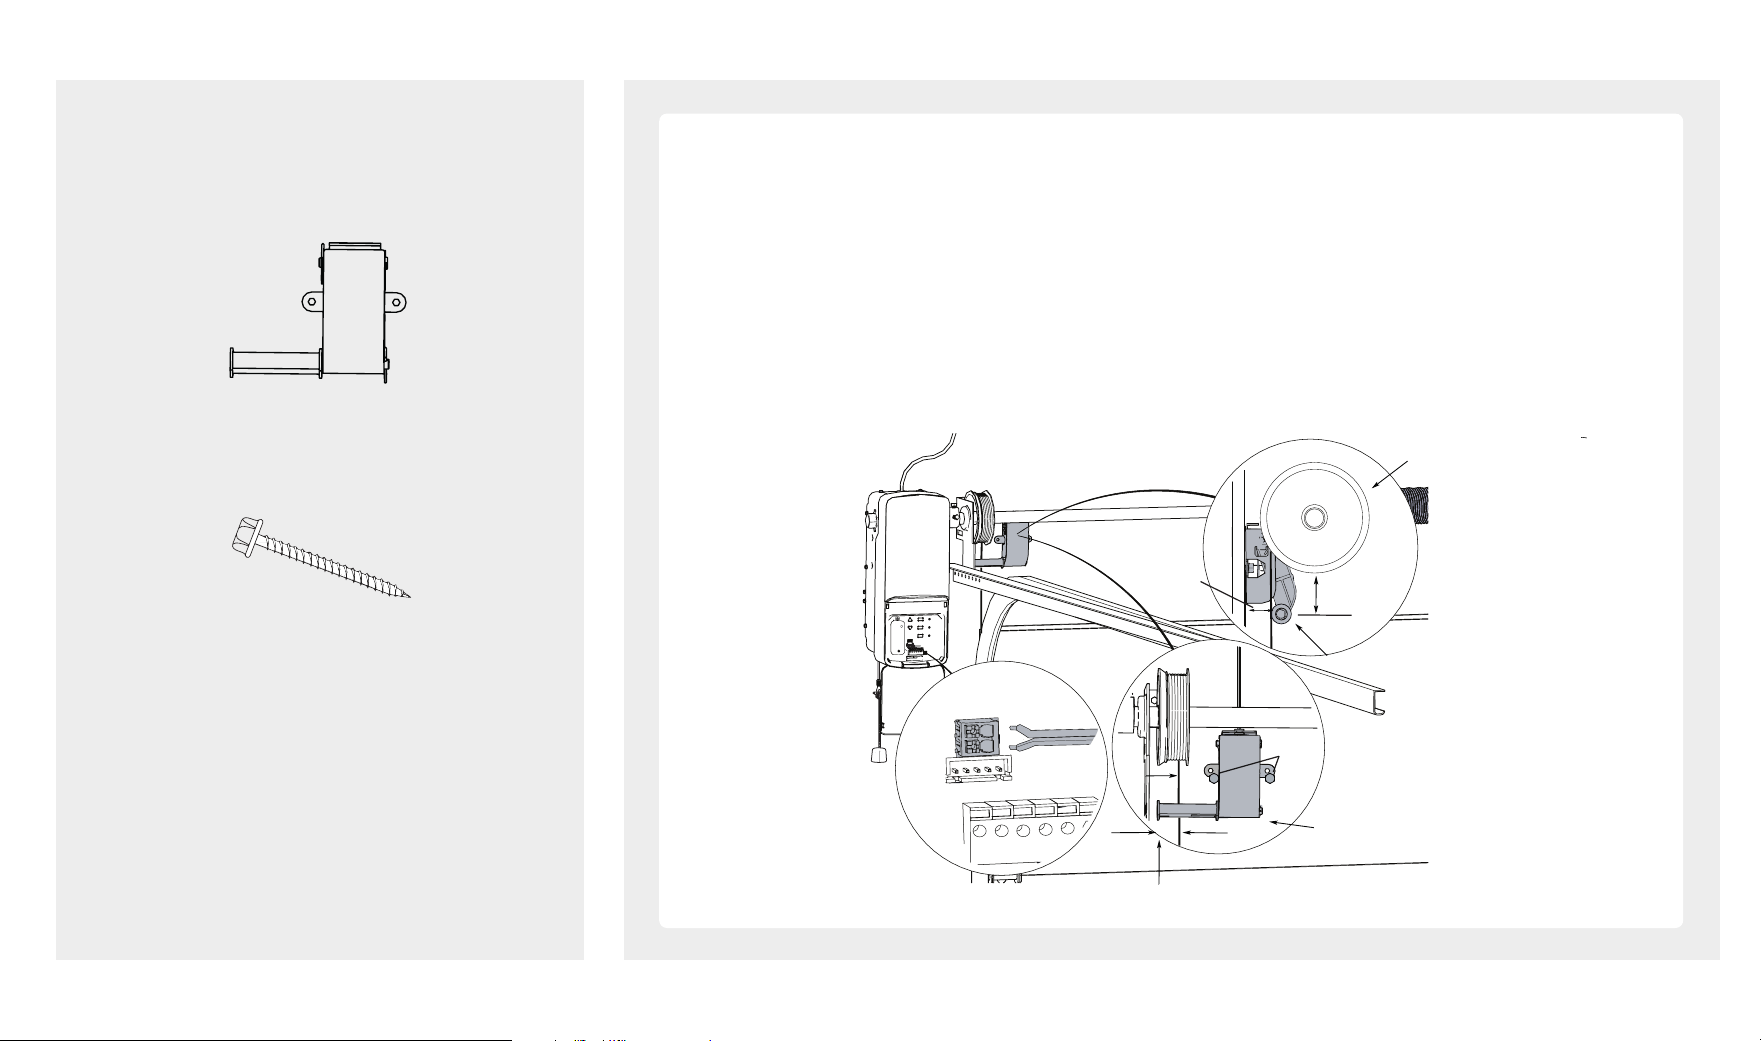
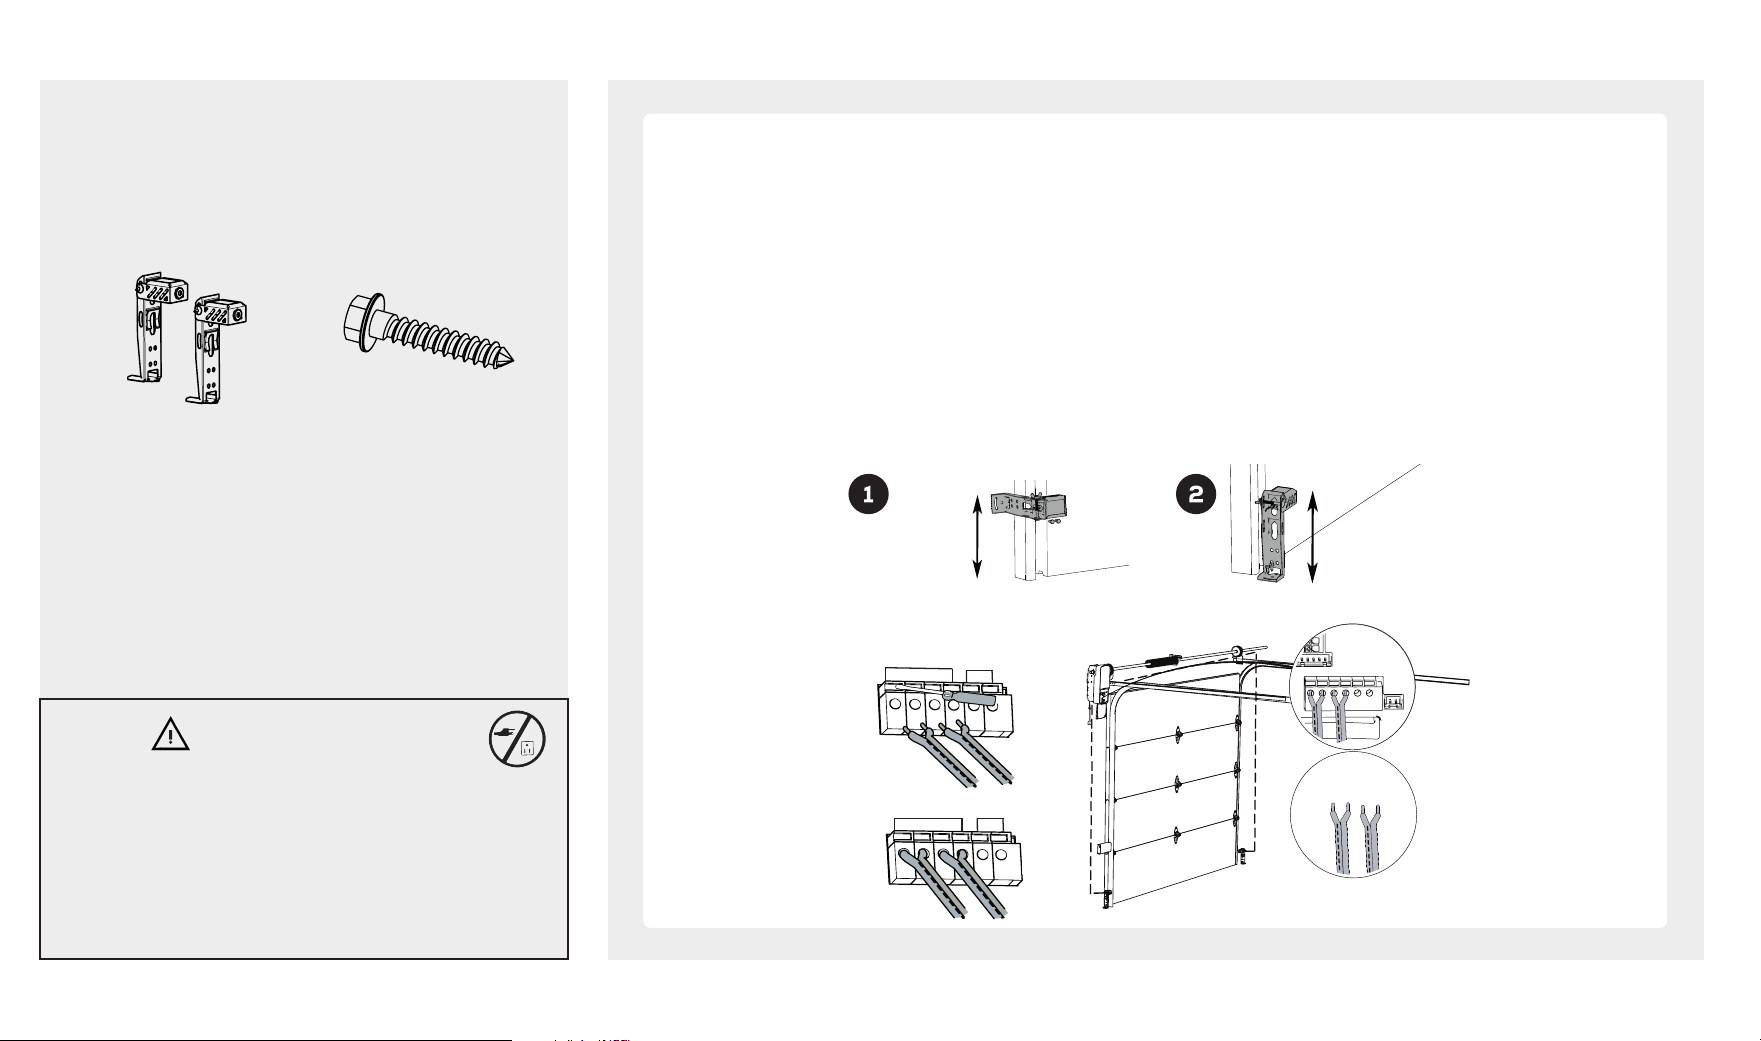
The cable tension monitor will detect slack in the garage door cables. Cable slack is an indication that the door is not closing. When
slack is detected, the operator will stop, preventing cable throw. The cable tension monitor must be installed for the operator to
function.
Note: Cable tension monitor is shipped for right side installation. If installed on the le side, remove the e-ring at the end of the roller,
remove the roller and reassemble on the opposite side.
1. Position cable tension monitor above the door and close to the drum.
2. Make sure there are no obstructions that prevent cable tension monitor from closing completely when slack is detected.
3. Roller must be mounted 2” to 6” (5-15 cm) from the bottom of the drum.
4. Cable tension monitor roller must be placed 1/8” to 1/4” (3 to 6 mm) away from the cable.
5. Mark and drill 3/16” pilot holes for screws. Fasten cable tension monitor with 1/4 -10 x 50 mm (2)
lag screw (provided).
A second cable tension monitor can be installed on the other side of the door. Unplug opener. Follow the above instructions. 26.2´ (8m) of wire is
supplied. Cut the wire to the desired length. Strip and twist wires from each monitor (white/white, black/black) to form a twisted pair and insert into the
CABLE MONITOR terminals.
Cable Tension Roller
Drum
Cable Tension Monitor
1/8”-1/4” (3-6 mm)
CABLE
MONITOR
2” - 6”
(5 - 15 cm)
Wall
Cable
Approx. 3/4”
(19 mm)
Screw
1/4 -10 x 50 mm
Cable Tension Roller
Lag Screws
#12 x 1-1/4" (4)
Photo Eyes
Look in the box for:
Photo Eye
Push Button
Push Button
Photo Eye
Photo eyes
should be no
more than 6
inches (15.2
cm) above the
Floor mounting
(concrete
anchors not
provided)
Cut and discard excess wire. Use small flat head screwdriver to push in gray tab on the terminal block located on the
rear panel of the power head. Insert 1/2 inch (1.2 cm) of the wire into the terminal while pushing in the tab.
* DO NOT TWIST WIRES,
USE ALL 4 TERMINALS
8 www.gdohelp.com 1-877-436-4402
CONNECTING PHOTO EYE SAFETY SYSTEM
About Photo Eye Safety System
The Photo Eye Safety System provides protection against entrapment while the door is closing. When properly connected and
aligned, the emitter Photo Eye emits an invisible infrared light beam while the sensor Photo Eye monitors that beam.
If the beam is obstructed during door-closing, the entrapment protection will be triggered and the door will stop and reverse to the
open position. The operator will beep for 20 times indicating an obstruction.
Installing The Photo Eye Safety System
1. Wall-mounting
a. Place the Photo Eyes facing each other on each side of the garage door. Position the sensors so they are no higher than 6” (15cm)
above the floor. Note: Wire lengths for operator-side and opposite-side photo-eyes.
b. Drill 3/16” holes using the mounting holes on the Bracket as a template. Secure with #12 x 1/4” Lag Screws.
c. Adjust the position, loosen the wing nut, disassemble the Bracket and move the Photo Eye to the lower position on the holder.
2. Alternative Floor-mounting.
a. Place the Photo Eyes facing each other on each side of the garage door.
b. If attaching to concrete, secure the photo eyes using concrete anchors and bolts (not provided).
c. If necessary, align the Photo Eyes by loosening the wing nut.
WARNING
To prevent possible SERIOUS INJURY or DEATH:
- Power MUST NOT be connected BEFORE Photo Eye Safety
system is connected and aligned.
- The Opener will not operate until the Photo Eye Safety
System is properly connected and aligned.
- Install the Photo Eyes NO higher than 6” (15cm) above the
floor. No part of garage door or other objects should
obstruct the Photo Eye Safety System d during door-closing.
Bottom screw
#6 x 1-3/8
Min. 5 feet
(1.5m) above
floor
Top screw
#6 x 1-3/8
www.gdohelp.com 1-877-436-4402 9
CONNECTING DELUXE DOOR CONTROL CONSOLE
Look in the box for:
Deluxe Door Control Console
To prevent possible SERIOUS INJURY or DEATH.
- Power MUST NOT be connected until instructed.
To prevent SERIOUS INJURY or DEATH from using the Deluxe
Door Control Console and a closing door:
- Install the Deluxe Door Control Console or Push Button
within sight of the door at a minimum height of 5 feet (1.5m)
above the floor. Make sure it is out of the reach of children
and moving parts of door and hardware.
- NEVER permit children to access the Deluxe Door Control
Console, or Remote Controls.
- Operate the door ONLY when it is adjusted properly with no
obstructions present and is in clear sight.
- ALWAYS keep a moving door in sight until it’s completely
closed.
- NEVER cross the path of a moving door.
WARNING
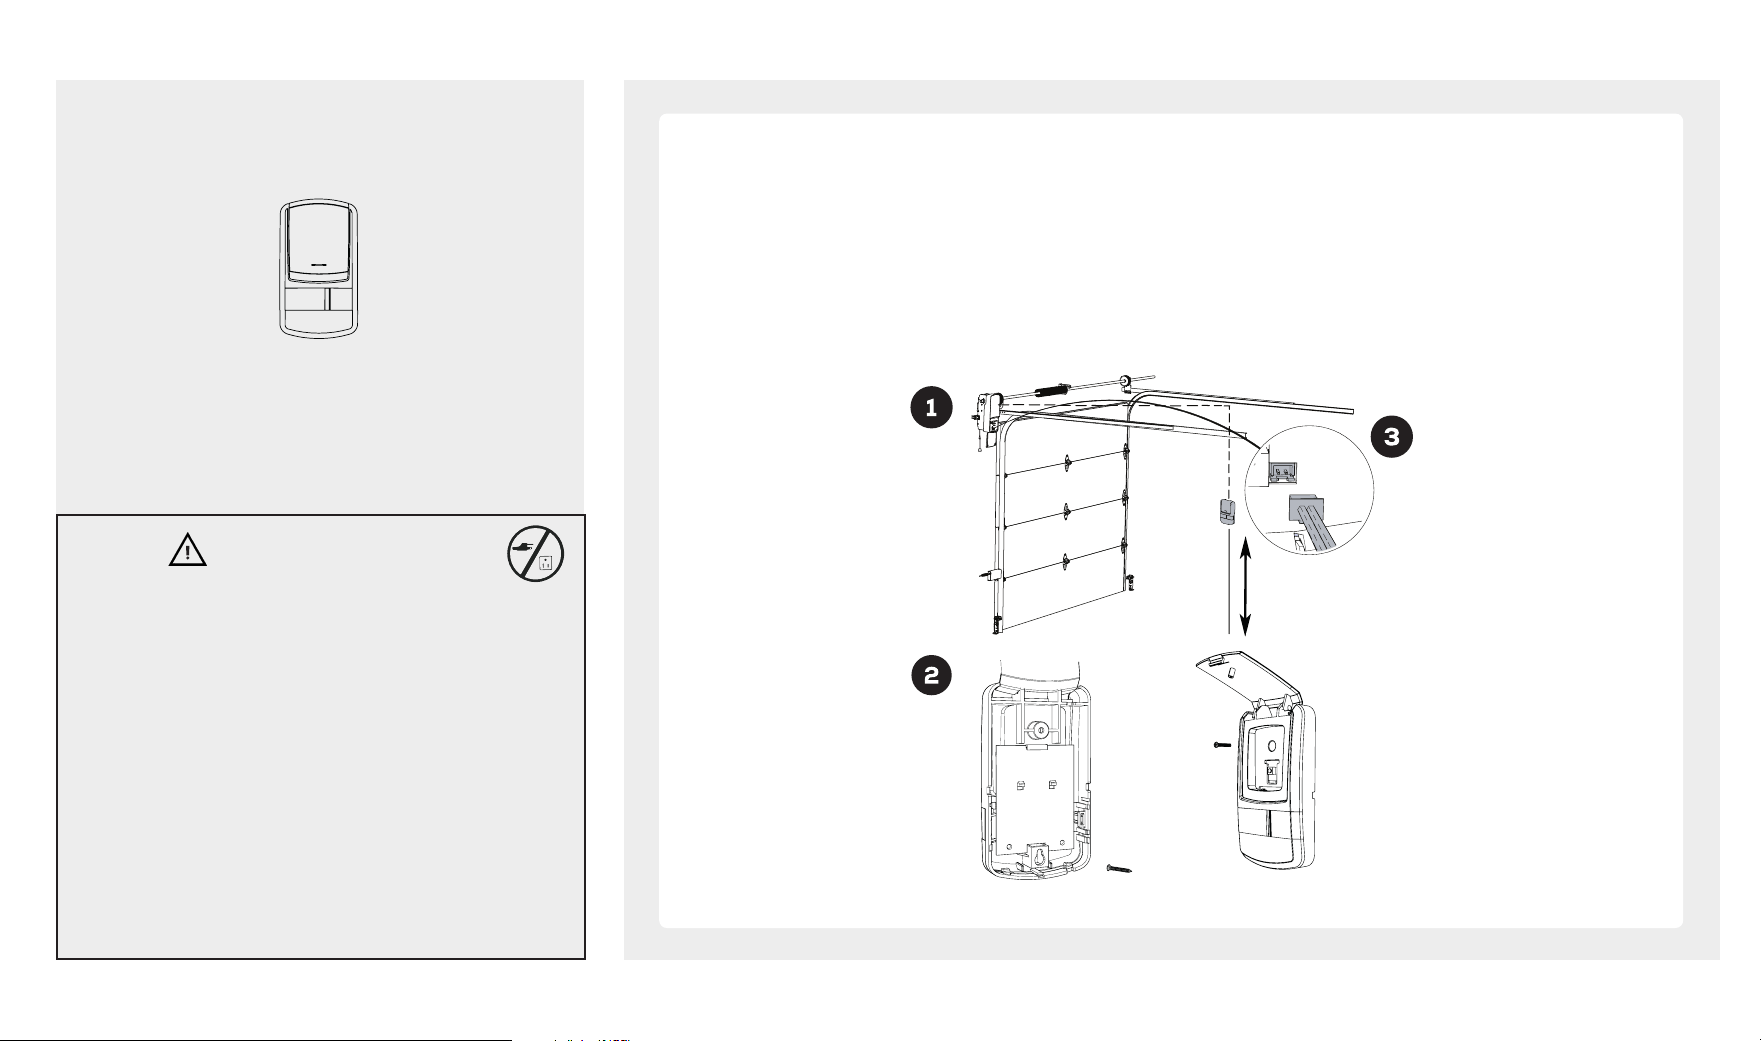
The Deluxe Door Control Console is a wired, illuminated door control placed inside your garage.
To install the Deluxe Door Control Console:
1. Find a position in the garage for the Deluxe Door Control Console. It should be mounted at minimum height of 5 feet (1.5m) above the
floor to keep out of the reach of children, within sight of door and free from any moving parts on the door.
2. Li the large actuator cover on door the control console and the upper screw post is exposed. Mark the position of both upper screw
post and lower screw hole on the deluxe door control console. Fasten the bottom screw to a solid surface with #6 x 1 - 3/8” screws. If
attaching to drywall or other hollow surface, drill 3/16” holes and use the provided drywall anchors. Align the bottom hole with the bottom
screw, slide the door control down into place. Secure the deluxe door control console with the upper screw. Flip down the actuator cover
back into place.
3. Run bell wire to operator. Connect the plug from the Deluxe Door Control Console to the “Wall Panel” outlet on the control panel of the
operator.
10 www.gdohelp.com 1-877-436-4402
MOTION ACTIVATED SECURITY LIGHTING
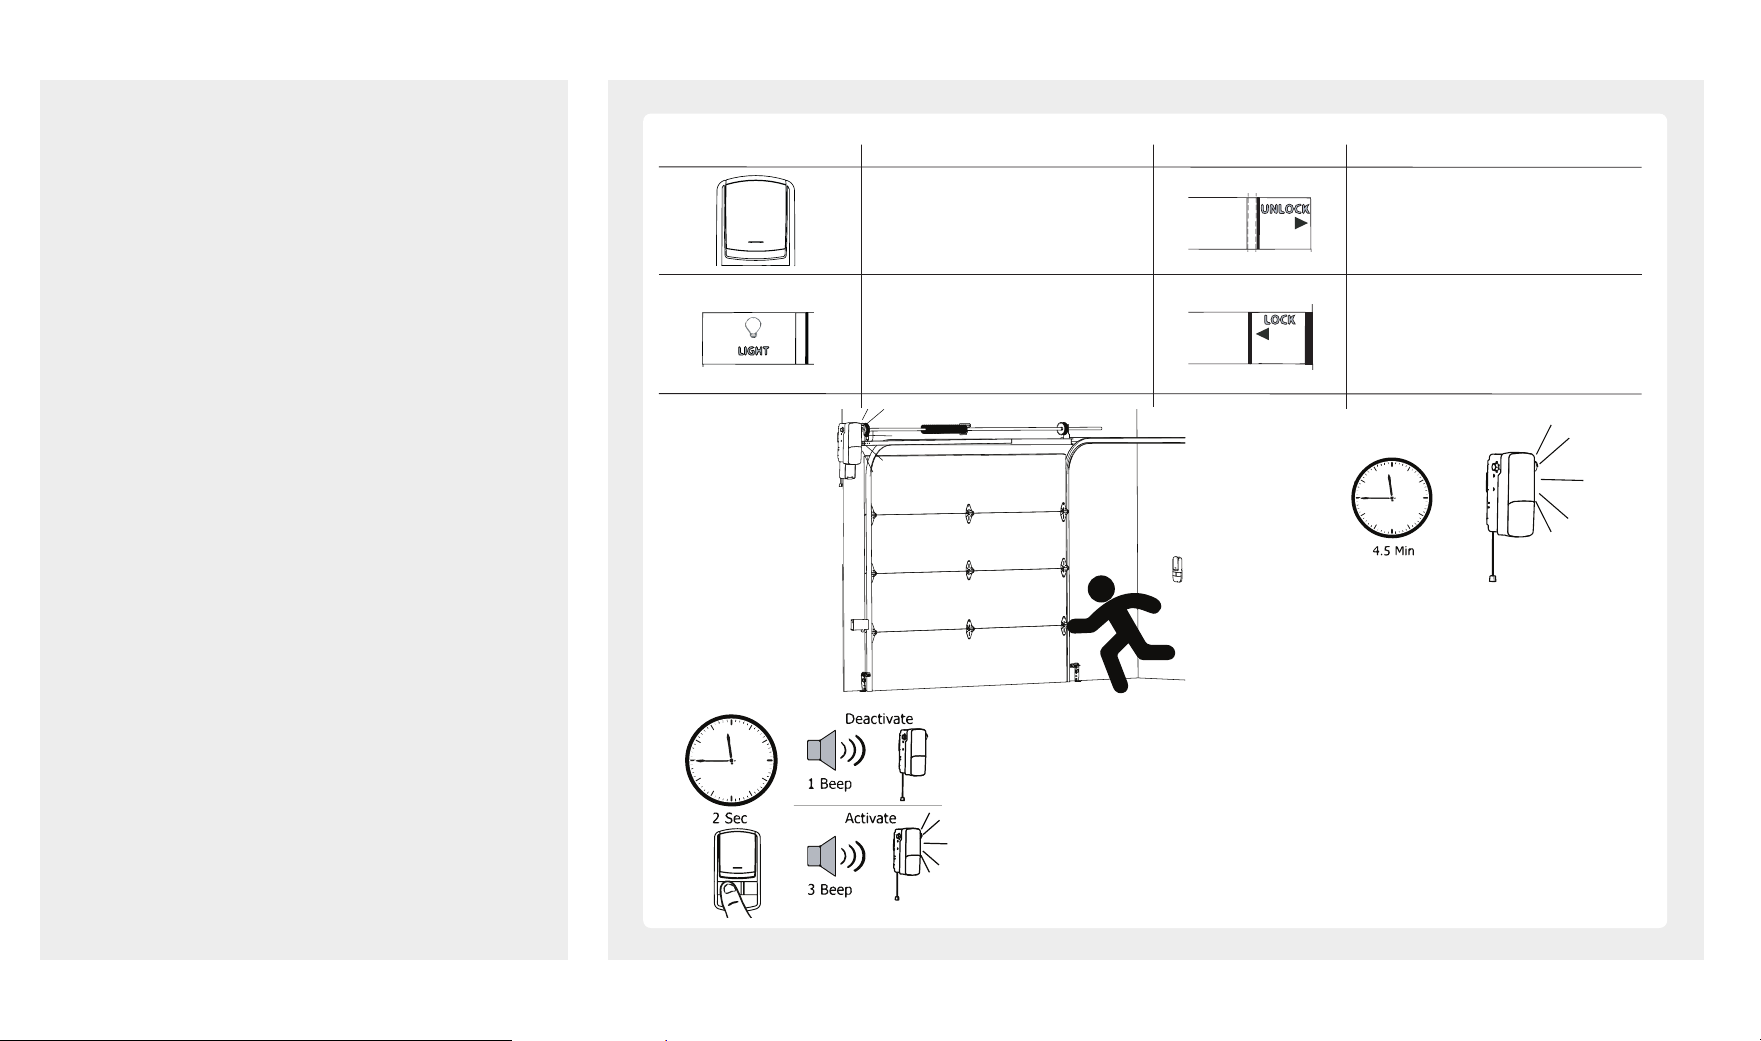
Buttons Operation Vacation Lock Operation
Using the Deluxe Door Control ONLY aer Installation is completed. Including setting the limits, see pages 12-14.
Door - Press and release to
open/close the door.
Unlock - Door can be accesed by
either Door button or controls.
Lock - Prevent access of door by any
controls and Door button.
Press and hold to activate/deactivate
motion sensing security lighting.
Turns the courtesy light on/off.
Security lighting is activated and remains
on for 4.5 minutes when garage door
opener is operated.
Motion sensing is turned on by default and
will activate security lighting when motion
is detected within the garage. Security
lighting will remain illuminated for 4.5
minutes or for as long as there is motion in
the garage.
*Note - if you wish to turn off security
lighting when motion sensing is activated
press the “LIGHT” button and security
lighting will turn off and remain off for 25
seconds. If motion is detected aer 25
seconds, security lighting will turn on.*
To deactivate motion sensing: Press and
hold “LIGHT" button for 2 seconds. The
power head will beep once to indicate
motion sensing has been deactivated.
To active motion sensing: Press and hold
“LIGHT” button for 2 seconds. The power
head will beep 3x to indicate motion
sensing has been activated.
s
www.gdohelp.com 1-877-436-4402 11
CONNECTING POWER
DO NOT OPERATE OPENER AT THIS TIME
To Connect Power:
1. Plug the Opener into a grounded outlet ONLY. If there is no grounded outlet present, call a qualified electrician to replace the outlet.
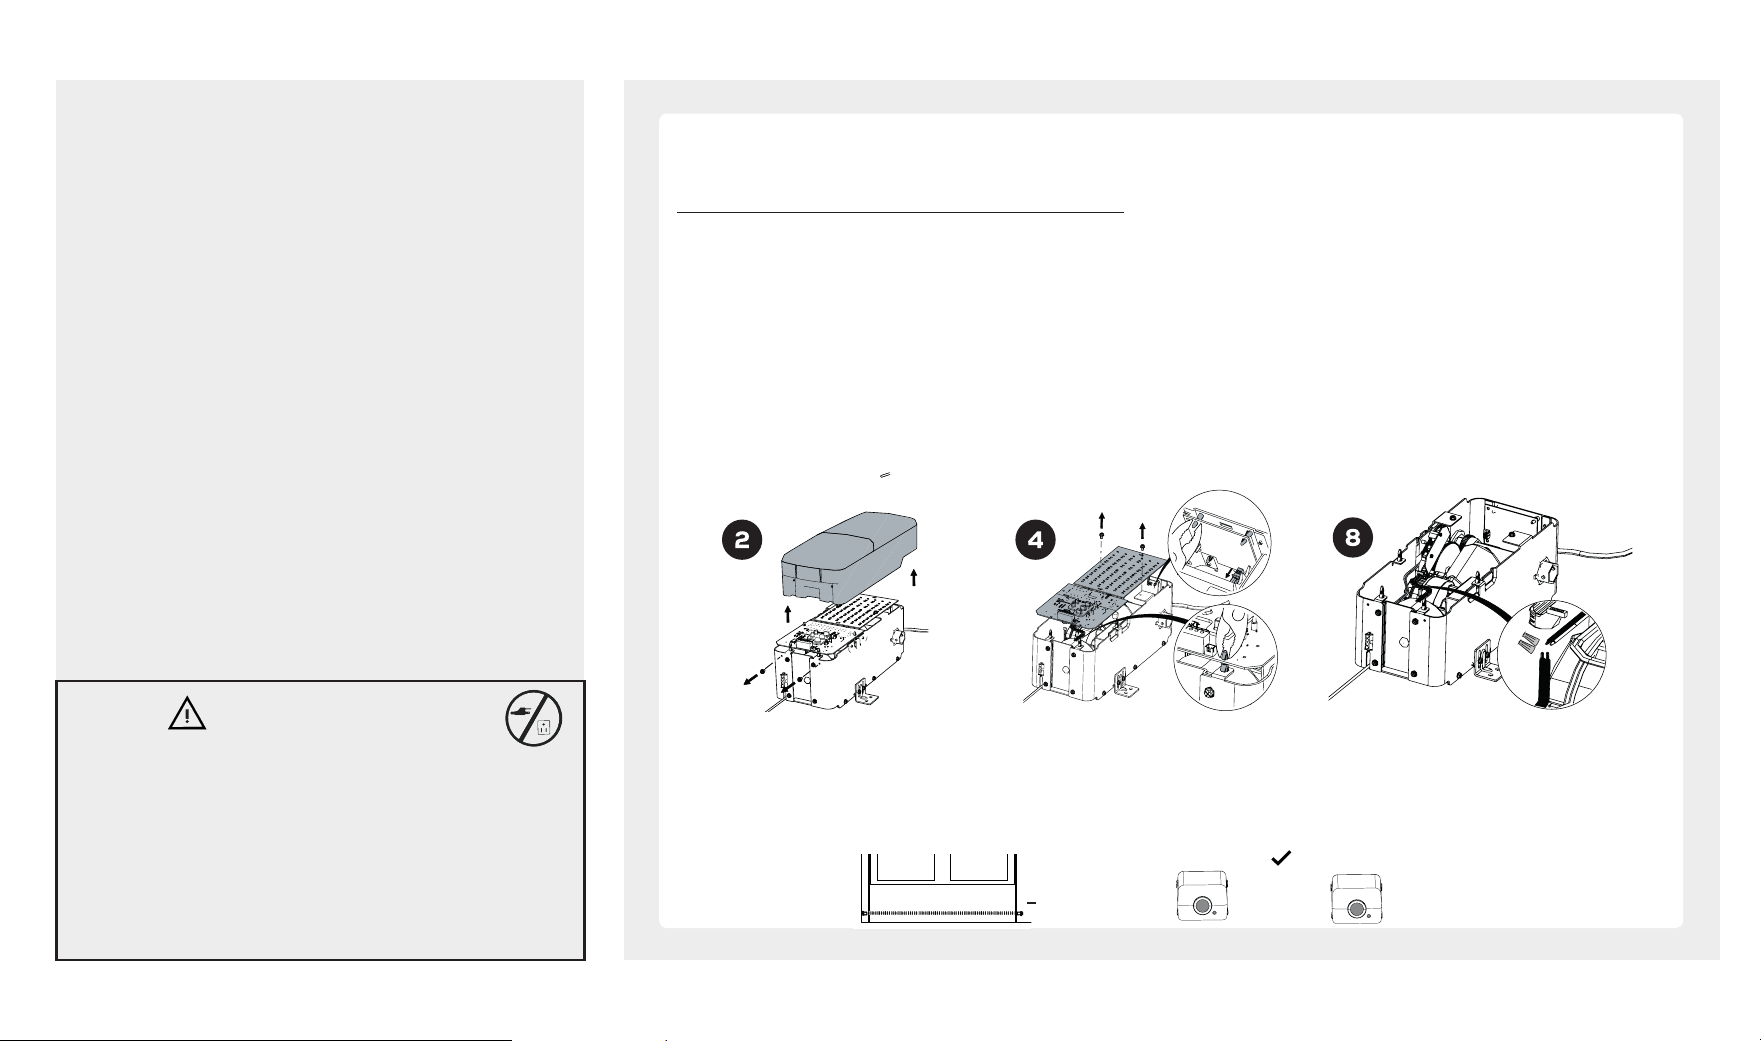
Instructions for Permanent Wiring (If required by Local Code):
1. Be sure power is not connected to the opener, disconnect power to circuit.
2. Move the garage opener form the torsion bar, remove cover screws and set the cover aside.
3. Cut wire 6” (15.2 cm) above the strain relief.
4. Remove LED Lamp Plate by removing the two screws. Disconnect the cable of the LED Lamp Plate from the LED module. Using
pliers, squeeze stand ups on the PCB Board, disconnect all connections and remove the PCB Board, set aside. Using pliers, squeeze
stand ups on the LED module, disconnect the power cable and remove the LED module, set aside.
5. Squeeze strain relief and push into garage door opener, then remove strain from wire.
6. Install 1/2. NPT, flex cable addapter (not provided) or other suitable connector into chassis. (Adhere to local electrical code(s) and
regulations). Reinstall garage door opener to torsion bar.
7. Takes wires through conduit, cut to proper length and strip insulation.
8. Take the pair of black wires from the transformer, strip 1/2 ”(1.3 cm) of insulation from the existing black with black (black / black)
and white with black (white / black) wires.
9. Connect the line to the black wire and neutral to wire with wire nuts (not provided). Connect ground wire to green ground screw.
10. Properly secure wires under plastic ties so that they do not come into contact with moving parts.
11. Reinstall PCB Board, Led Lamp Plate and LED module.
12. Reinstall cover.
WARNING
To prevent possible FROM ELECTROCUTION or FIRE:
- Power MUST be DISCONNECTED BEFORE proceeding with
permanent wiring procedures.
- Garage Door Opener installation and wiring MUST be in
compliance with all local electrical and building codes. Make
sure the Opener is ALWAYS grounded.
- NEVER use an extension cord, 2-wire adapter or modify the
power plug in any way to make it fit the outlet.
To Align Photo Eye Safety System
1. When the photo eye safety system is properly aligned green LED (emitter) will emit a steady green light and the red LED (sensor)
will emit a steady red light. The path of the invisible light beam MUST NOT be obstructed. No part of the garage door or any
hardware should interfere or block either sensor.
2. Green LED (emitter) will flash until it is aligned with red LED (sensor). Red LED will not illuminate until it is aligned with green LED.
The emitter generates the invisible light beam, and the sensor receives the invisible light beam
Invisible Light
Beam
Aligned
Steady Red &
Green LED
Emitter
Green LED ON
Sensor
Red LED ON
TRAVEL LIMIT ADJUSTMENT UP
Mark the center line above the door with a pencil. Open door to the highest point of travel.
Take a level, measure and mark
highest point of the door on the
wall. Raise level to clear torsion
bar if required, then mark highest.
Measure 2 - 1/4 inch (5.7 cm),
mark two holes of header bracket.
Drill two holes and fasten header
bracket using screws.
Center Line
2-1/4 inch
(5.7cm)
WARNING
Highest
Point of
Travel
Use the image as a reference
to install the header bracket.
Header Wall
Celling
Header Bracket
Door Spring 2'' (5cm)
clearance
Highest Point of
Door Travel
Door
Door Track
To prevent SERIOUS INJURY or DEATH from improper Force
Adjustment:
- DO NOT adjust force manually to compensate for biding
or sticking of the garage door. Call a qualified garage door
service technician to make necessary adjustments in case of
binding.
- DO NOT manually increase the force required for closing the
door.
- Aer ANY adjustments, Safety Reversal Test MUST be
performed to ensure the door reverses on contact with a 1-1/2
inch (3.8 cm) high object (2x4 laid flat).
LIMIT
UP
DOWN
FORCE
LEARN
DOWN
UP
OK
LIMIT
DOWN
FORCE
LEARN
DOWN
UP
OK
LIMIT
DOWN
FORCE
LEARN
DOWN
UP
OK
UP
NOTE: PHOTO EYES, CABLE TESNION MONITOR AND
AUTOMATIC LOCK MUST BE PROPERLY CONNECTED BEFORE
PROGRAMMING THE OPENER.
12 www.gdohelp.com 1-877-436-4402
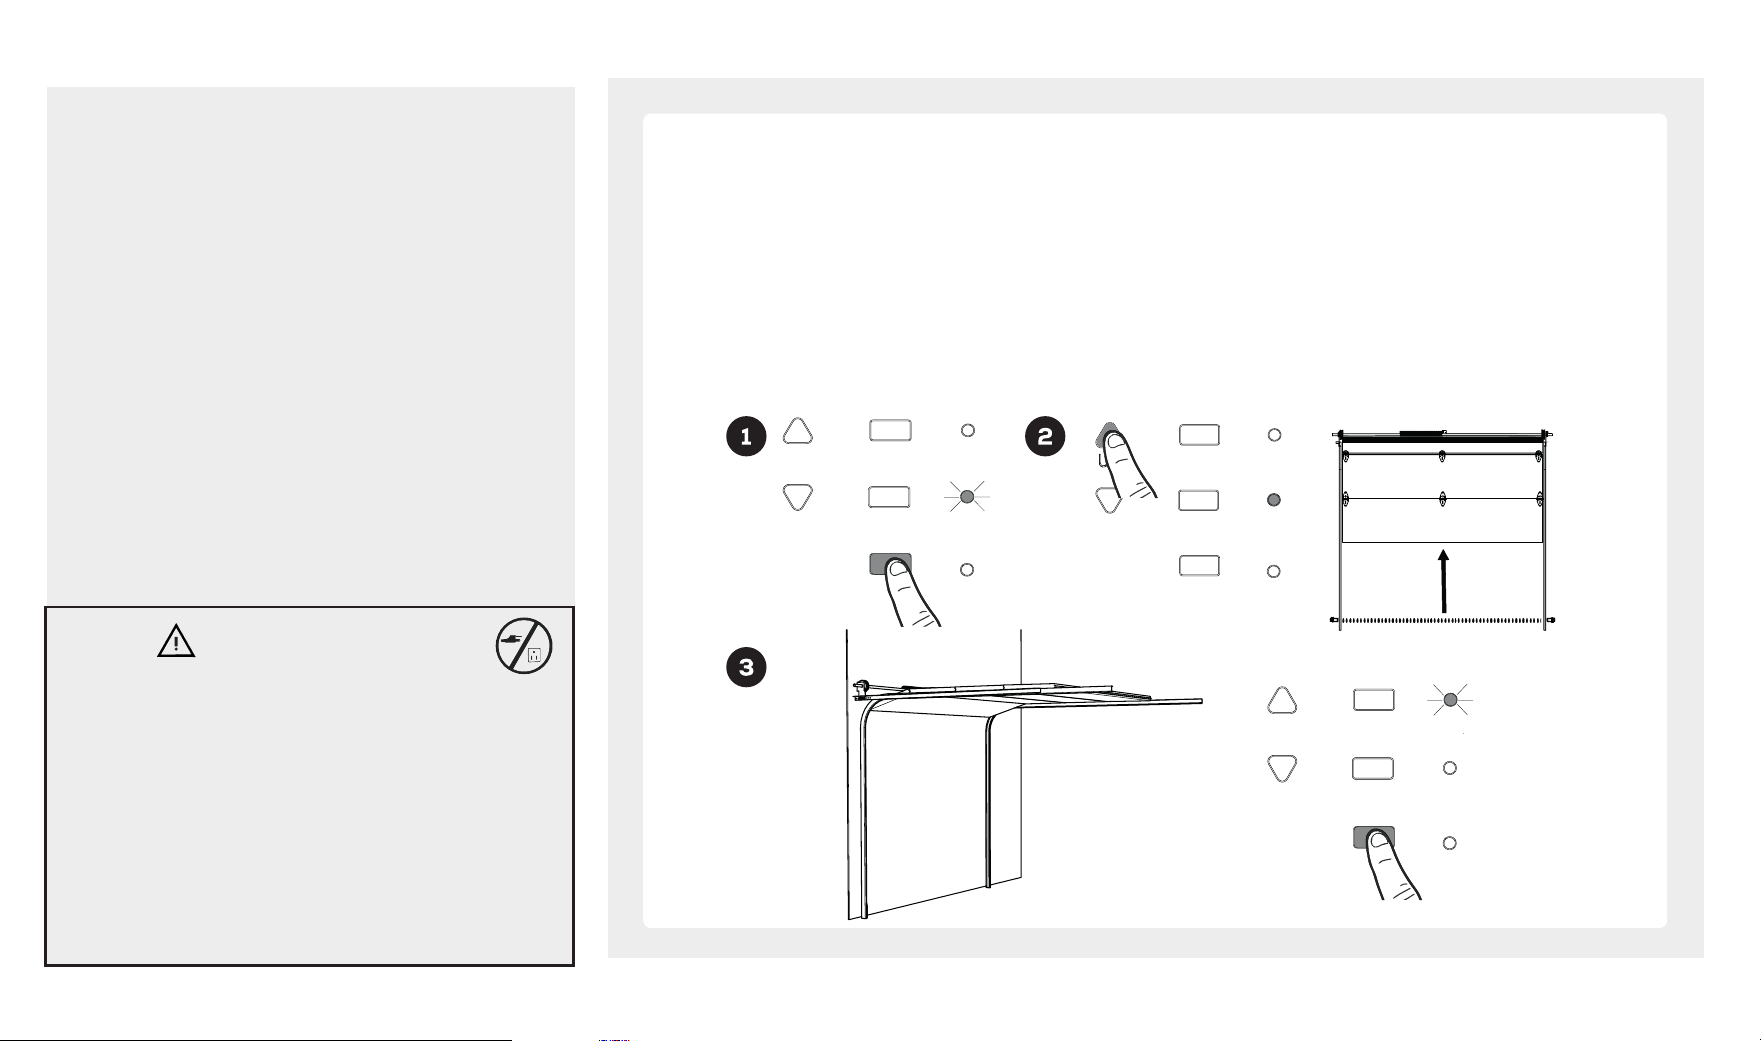
NOTICE: Travel limits and auto force setting must be set for the opener to work.
About Travel Limit Adjustment
Limit Adjustments regulate the fully-open (UP limit) position and fully-closed (DOWN limit) position, at which the door will stop when
opening and closing.
Setting UP Limit
1. Press “LIMIT” button once to enter Travel Limit Adjustment. “UP” indicator (green) will turn on*.
* NOTE: Once you have pressed and released the “Limit” button, the “UP” light will stay for 20 seconds for you to press the “UP”
button and begin programming. If the “UP” light goes out before you are finished you need to start over.
2. Press & hold the “UP” button, the door travels up. You may use both “UP” or “DOWN” buttons to toggle the door to the desired
UP limit position. Make sure there is enough clearance for your vehicle(s).
3. Once the door is at the desired UP limit position, press “LIMIT” button once, “OK” indicator (orange) flashes and goes off. The
UP limit is set.
WARNING
www.gdohelp.com 1-877-436-4402 13
TRAVEL LIMIT ADJUSTMENT DOWN
To prevent SERIOUS INJURY or DEATH from improper Force
Adjustment:
- DO NOT adjust force to compensate binding or sticking of
the garage door. Call a qualified garage door service person
to make necessary adjustments in case of binding.
- DO NOT increase force beyond minimum force required for
closing the door. Too much force will cause improper
operation of safety reversal mechanism.
- Aer ANY adjustments, Safety Reverse Test MUST be
performed to ensure the door reverses on contact with a
1.5” high object (2x4 laid flat).
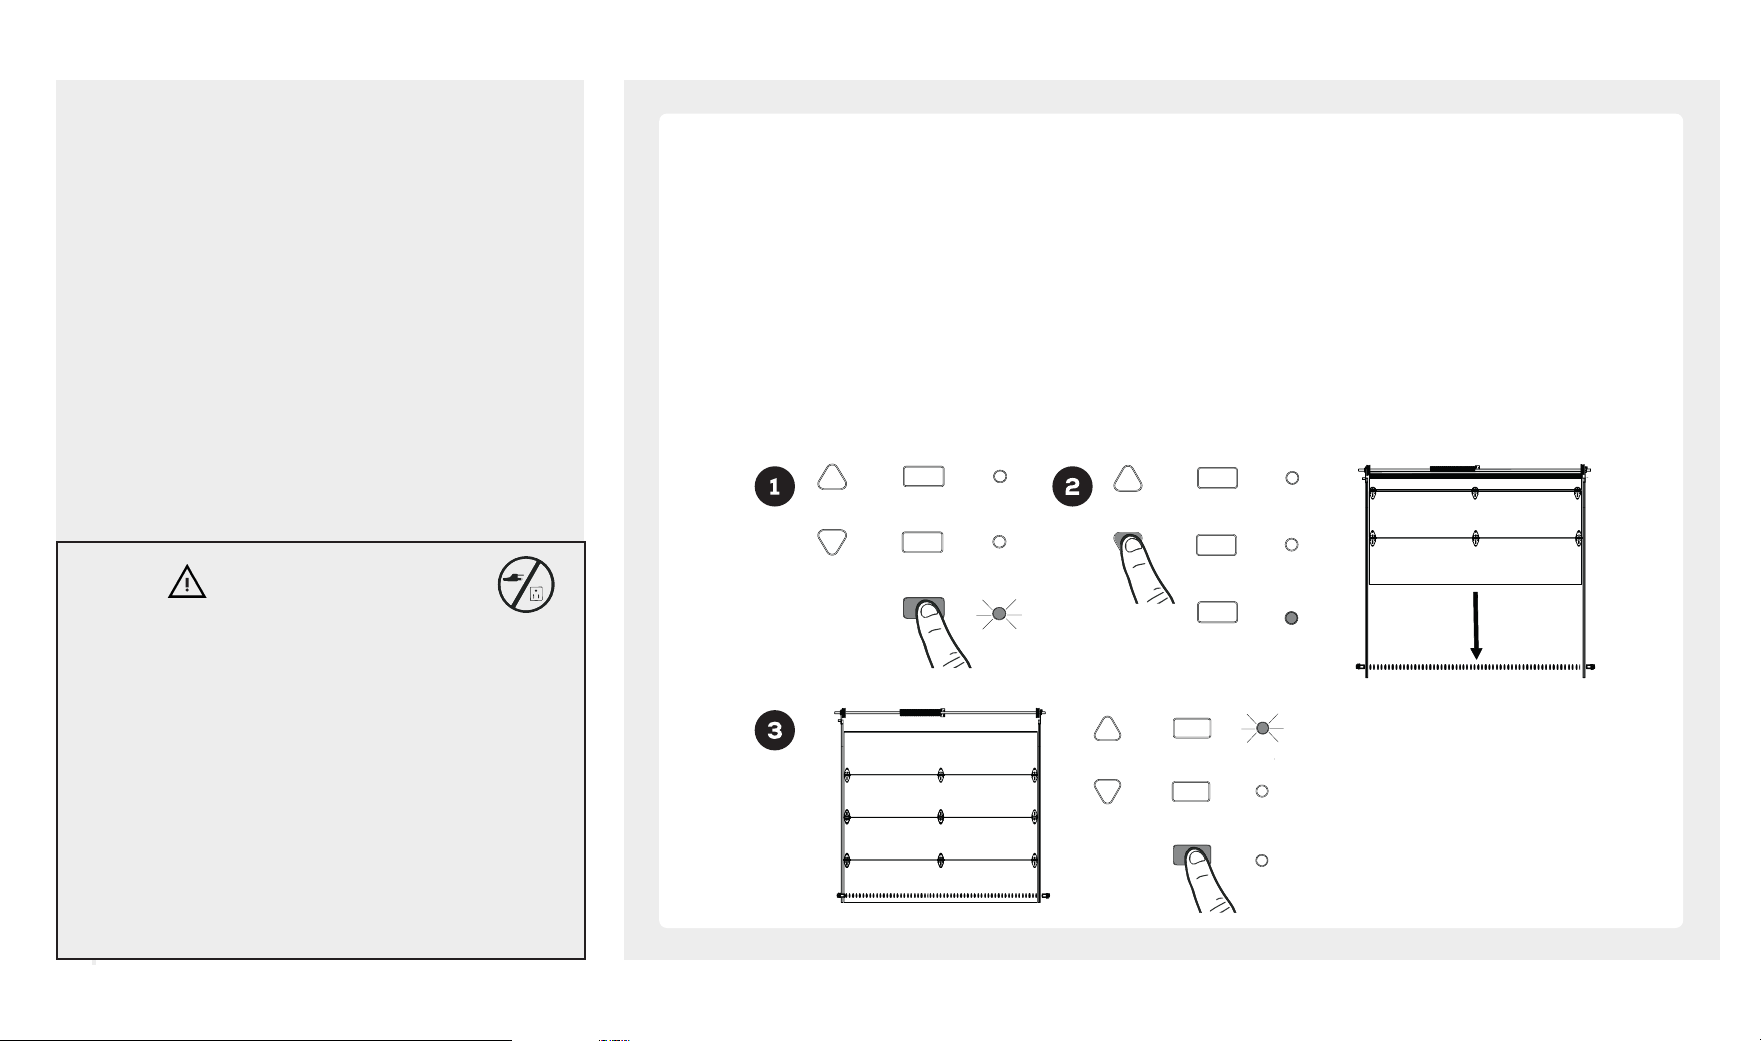
CAUTION: WHILE SETTING THE DOWN LIMIT, CAREFULLY WATCH DOOR TRAVEL DISTANCE. RELEASE
BUTTON WHEN THE DOOR MAKES CONTACT WITH THE GROUND!
Setting DOWN Limit
1. Press “LIMIT” button twice to enter DOWN-limit setting. “DOWN” indicator (red) will turn on.
*NOTE: Once you have pressed and released the “LIMIT” button, it will stay for 20 seconds for you to press the “DOWN” button
and begin programming. If the “DOWN” light goes out before you are finished you need to start over.
2. Press & hold the “DOWN” button, the door travels down. You may use both “UP” or “DOWN” buttons to toggle the door to the
desired DOWN limit position.
3. Once the door is at the desired DOWN limit position, press “LIMIT” button once, “OK” indicator (orange) flashes and goes off.
DOWN limit is set.
Both “UP” and “DOWN” (green and red) indicators are now on, indicating that both UP and DOWN limits are set, and the opener is
ready for Auto Force Adjustment.
LIMIT
DOWN
FORCE
LEARN
DOWN
UP
OK
UP
DOWN
LIMIT
FORCE
LEARN
DOWN
UP
OK
UP
LIMIT
DOWN
FORCE
LEARN
DOWN
UP
OK
UP
14 www.gdohelp.com 1-877-436-4402
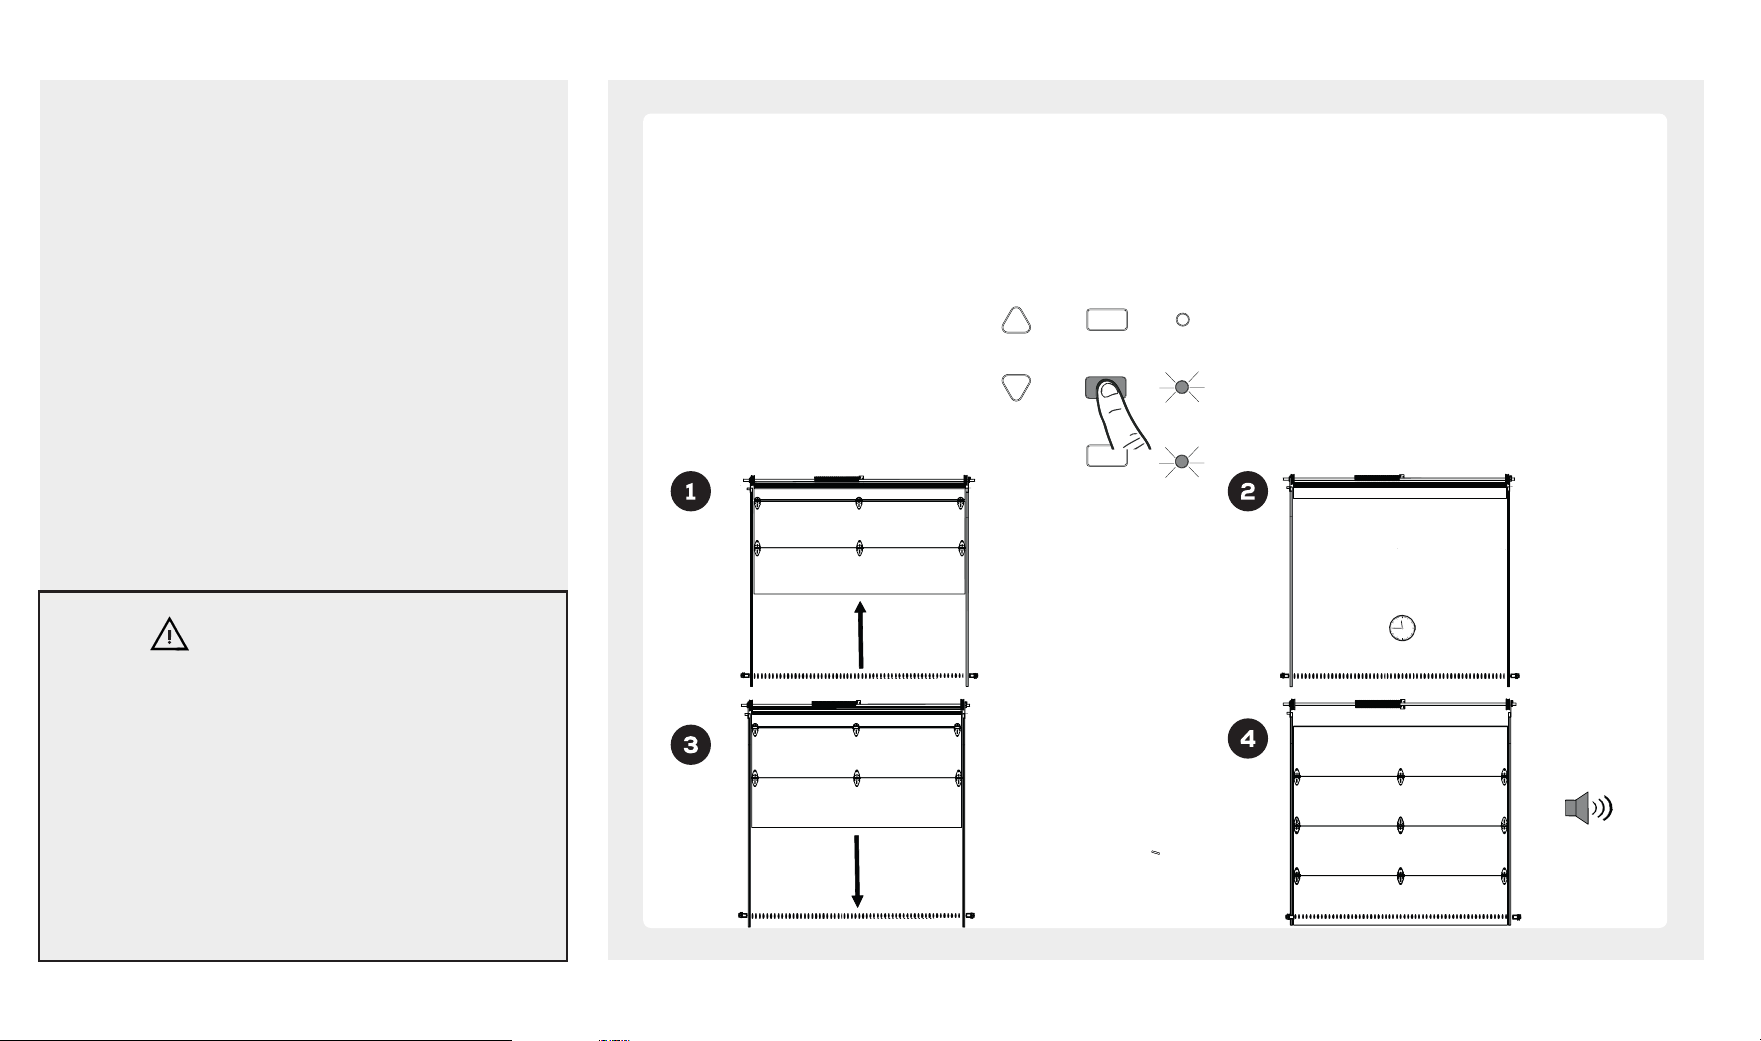
AUTO FORCE ADJUSTMENT
Following the limit-setting, the unit is now ready to automatically adjust the forces for opening and closing the door.
Proceed with the following steps to complete adjustment.
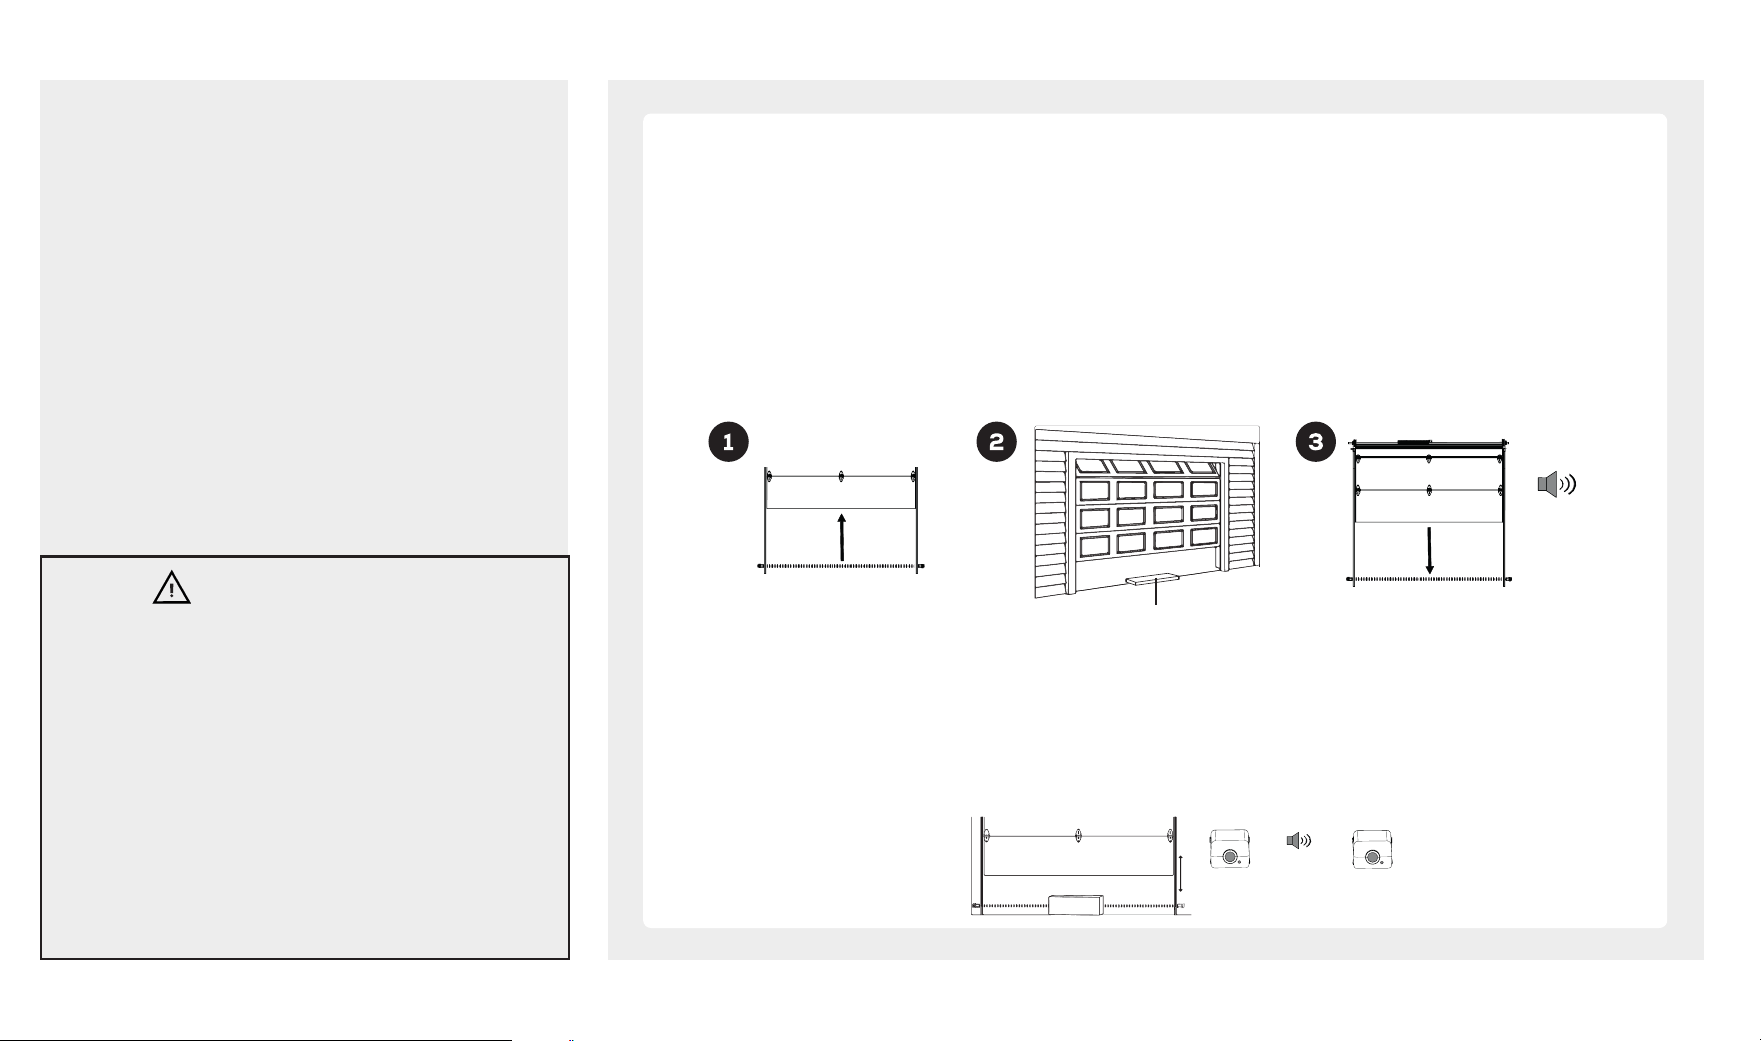
1. With both “UP” and “DOWN” indicators ON, aer Travel Limit Adjustment, press the “FORCE” button once to enter Auto
Force Adjustment.
2. The door will travel up automatically (image 1) and stop at UP limit for 2 seconds (image 2). Door will then travel down
automatically (image 3) and stop at down limit (image 4).
3. The “OK” indicator (orange) will flash, three beeps will be heard, indicating the completion of the Auto Force Learn sequence.
The limit and force programming has been completed.
WARNING
To prevent possible SERIOUS INJURY or DEATH:
- DO NOT adjust force to compensate binding or sticking of
the garage door. Call a qualified garage door service
technician to make necessary adjustments in case of
binding.
- DO NOT increase force beyond minimum force required for
closing the door. Too much force will cause improper
operation of safety reversal mechanism.
- Aer ANY adjustments, Safety Reverse Test MUST be
performed to ensure the door reverses on contact with a
1.5” high object (2x4 laid flat).
FORCE
LIMIT
DOWN
LEARN
DOWN
UP
OK
UP
Flashes
and 3
beeps
2 sec
NOTE: LED light may blink green for long periods of time.
Battery is being charged.
www.gdohelp.com 1-877-436-4402 15
INSTALLING BATTERY BACKUP (OPTIONAL)
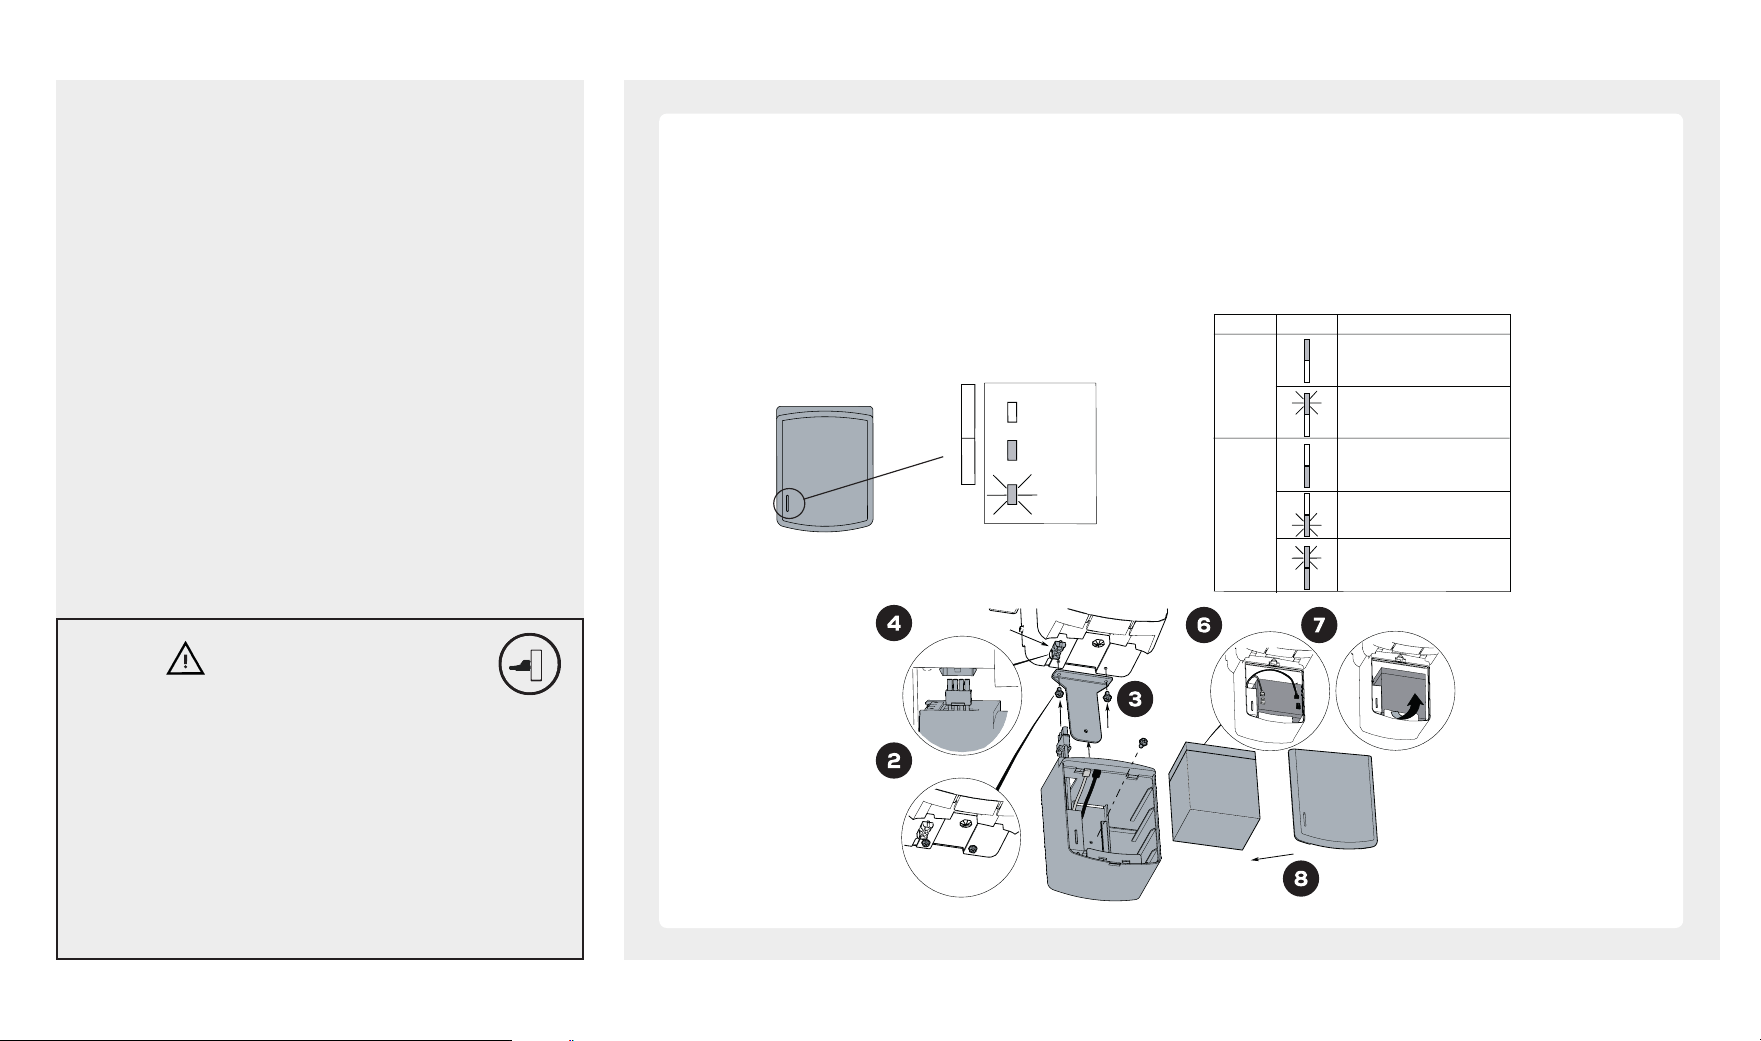
Install the Battery Backup
1. Unplug the garage door opener.
2. Unscrew the #10-32” screws (2).
3. Fasten the battery bracket to the garage door opener using #10-32” screws (2).
4. Connect battery back up wire to the corresponding terminal on the garage door opener.
5. Slide battery back up onto the bracket and fasten with a #10 -32” screw.
6. Insert the battery into the compartment and connect the red wire (light gray) to the (+) terminal and the black wire to
the (-) terminal.
7. Place the battery in a vertical position with the terminals facing up.
8. Install battery cover and plug in garage door opener.
Battery and Status Indicator
To reduce the risk of FIRE or INJURY to persons:
- Disconnect ALL electric and battery power BEFORE
performing ANY service or maintenance.
- Use ONLY Guardian part for replacement battery.
- DO NOT dispose of battery in fire. Battery may explode.
Check with local codes for disposal instructions.
- ALWAYS wear protective gloves and eye protection when
changing the battery or working around the battery
compartment.
WARNING
Legend
Status
LED o
R
e
d
G
r
e
e
n
LED ashes
LED glows
steadily
Power mode Status Indicators Description
AC 120V mains
Battery is fully charged. The fully charge
time is 24 hours.
Battery is being charged.
Power Outage
(Battery mode)
The opener is powered by battery.
Battery is low.
The opener is operating with battery.
R
e
d
G
r
e
e
n
R
e
d
G
r
e
e
n
R
e
d
G
r
e
e
n
R
e
d
G
r
e
e
n
R
e
d
G
r
e
e
n
Note: The opener will run at a slower speed
when powered only by the battery.
*To comply with CA SB-969, installation of the B5 A928 battery backup is mandatory in the state of California.
Hex Screw
#8 - 18 x
Terminal
+
-
16 www.gdohelp.com 1-877-436-4402
FINAL ADJUSTMENT AND TESTING
To prevent SERIOUS INJURY or DEATH from a closing garage
door:
- The Safety Reversal Test MUST be conducted ONCE A
MONTH.
- NO ONE should cross the path of and moving door during
operation and/or testing.
- Aer ANY adjustments to the door system, the Safety
Reversal Test MUST be performed to ensure the door
reverses on contact with a 1-1/2 inch (3.8 cm) thick (2x4 laid
flat) object.
- The Photo Eye Safety System MUST be properly aligned, and
tested regularly.
Testing the Safety Reverse System
The Safety Reverse System prevents the door from closing when an obstruction is present.
1. Open the door by using the Door Control Console.
2. Place a 1-1/2” (3.8cm) thick solid object (or 2x4 laid flat) on floor under the center of garage door.
3. Keeping the door in sight, use the Door Control Console to close the door.
4. The door MUST REVERSE and beep within 1.5 seconds upon striking the object , and stop at the full open position.
5. The Safety Reverse System works properly and the opener is ready to use.
If the door fails to reverse upon contact with obstruction, adjust the Opener as follows:
The travel distance maybe inadequate, slightly increase the DOWN limit.
Conduct the test again. If the door reverses on contact, remove the object and run at least 3 COMPLETE travel cycles to ensure
proper adjustment.
If the opener still fails the Safety Reverse Test, call a qualified technician for door adjustment.
WARNING
1-1/2 inch (3.8 cm) solid object
Beeps upon
contact
Emitter Sensor
Green LED
Flashes
Red LED
OFF
20 beeps and
reverses upon
obstruction
Testing the Photo Eye Safety System
1. Open the door by using the Door Control Console.
2. Make sure both Photo Eyes steadily emit the green and red indicator lights. (If not, check alignment).
3. Place an object under the door about 8” (20cm) high by 12” (30cm) wide (the opener carton can be used).
4. The green indicator light on the emitter eye should flash.
5. The red indicator light on the sensor eye should be dimmed.
6. Keep the door in sight and use the Door Control Console to try to close the door.
7. The door should NOT move more than 1” (2.5cm) and the opener will beep 20 times.
www.gdohelp.com 1-877-436-4402 17
PROGRAMMING REMOTE CONTROLS
Look in the box for:
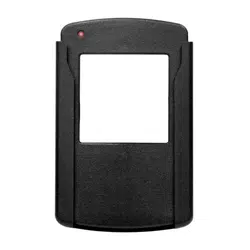
Remote Control
NOTE: PHOTO EYES, CABLE TESNION MONITOR
AND AUTOMATIC LOCK MUST BE PROPERLY
CONNECTED BEFORE PROGRAMMING THE
OPENER.
To prevent possible SERIOUS INJURY or DEATH:
- Keep remote control and battery out of reach of children.
- NEVER permit children to access the Deluxe Door Control
Console or Remote Controls.
- Operate the door ONLY when it is properly adjusted, and
there are no obstructions present.
- ALWAYS keep a moving door in sight until completely
closed. NEVER cross the path of a moving door.
To reduce risk of fire, explosion or electric shock:
- DO NOT short circuit, recharge, disassemble or heat the
battery.
- Dispose of batteries properly.
WARNING
To Program Remote Control (s):
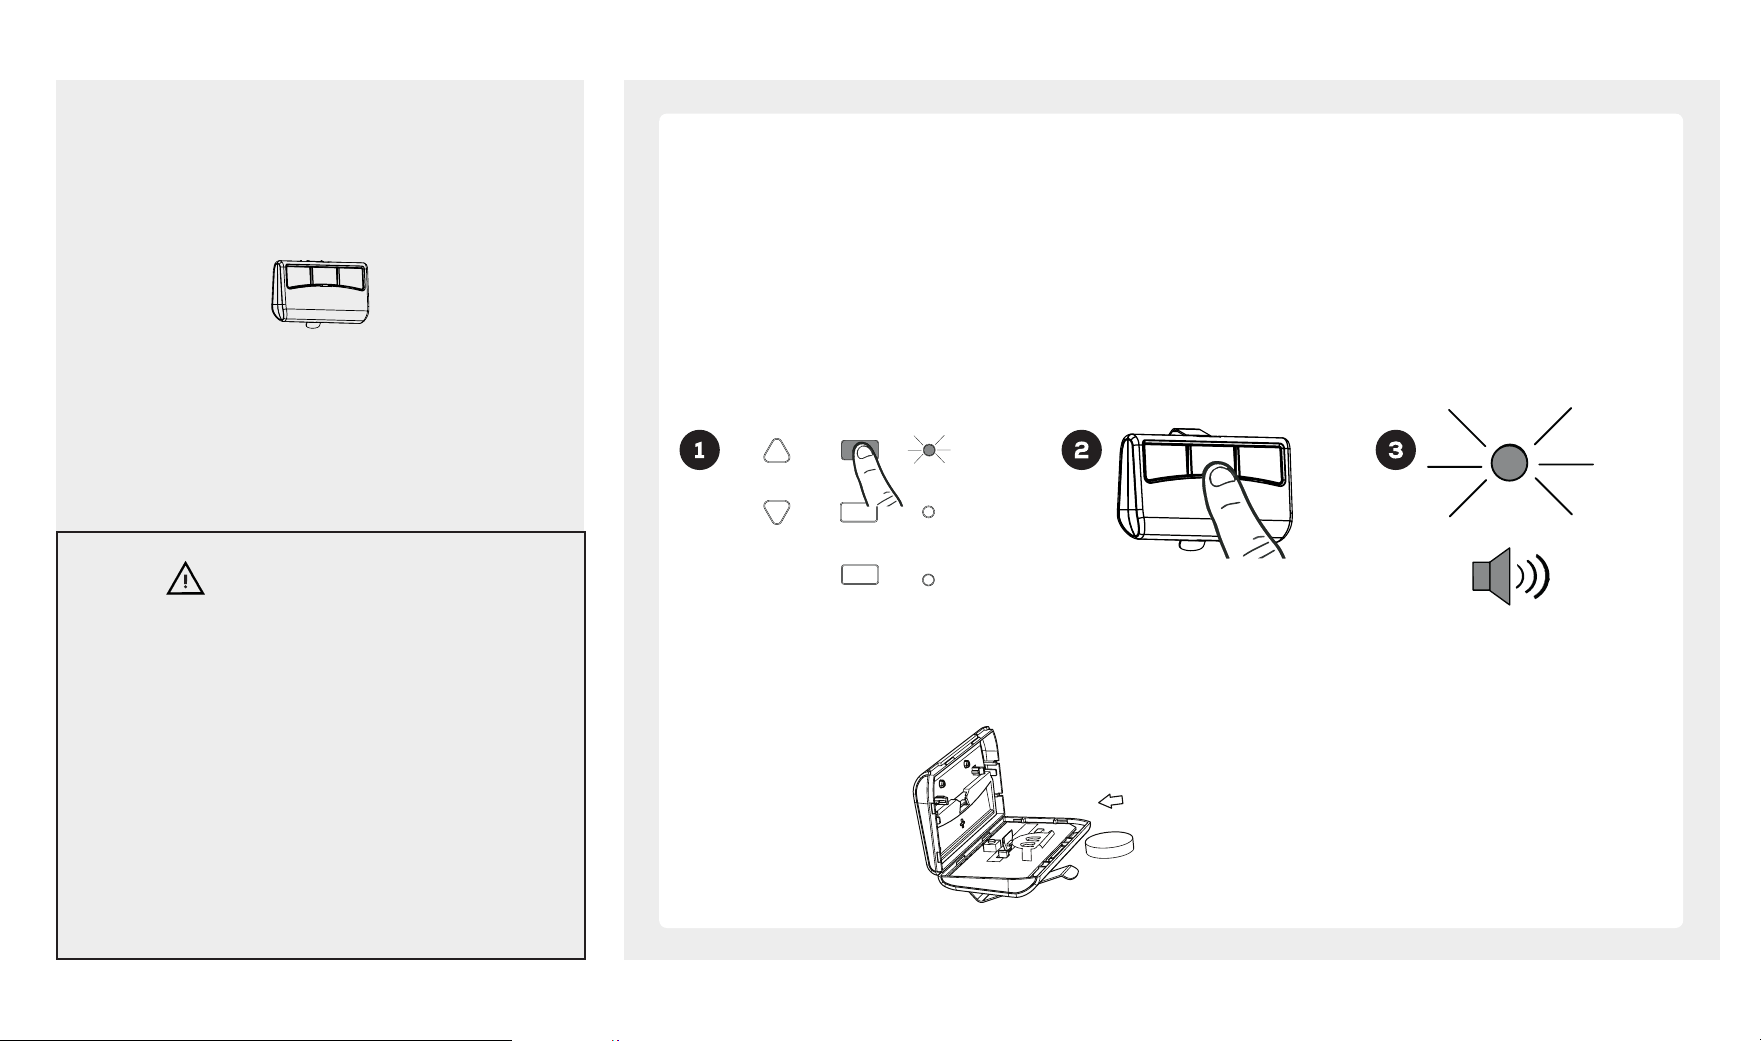
1. Press & release the “LEARN” button once on the control panel, “OK” LED will glow and beep. The unit is now ready to
accept a remote control in the next 30 seconds.
2. Press & release any desired button on the Remote Control.
3. The “OK” LED will flash and beep twice indicating Remote Control is stored successfully.
Up to 20 Remote Controls (including wireless keypad codes) can be added to the unit by repeating the above
procedures.
If more than 20 Remote Controls are stored, the first stored Remote Control will be replaced. (i.e. the 21st Remote
Control replaces the 1st stored Remote Control).
Removing ALL Remote Controls:
To remove ALL Remote Controls from memory, press and hold the “LEARN” button for 3 seconds. The “OK” LED will flash
and beep 3 times indicating ALL Remote Controls have been removed from memory.
LEARN
FORCE
LIMIT
DOWN
DOWN
UP
OK
UP
OK
X 2
Replacing Remote Control Battery:
When battery of hand held remote control is low, indicator LED will become dim and/or range of remote control will decrease. To
replace battery, remove battery cover from remote control. Replace with a CR2032 3 volt battery.
This device complies FCC Rules for HOME
OR OFFICE USE. Operation is subject to the
following two conditions: (1) this device
may not cause harmful interference, and
(2) this device must accept any interference
received, including interference that may
cause undesired operation.Replace with a
CR2032 3 volt battery. Snap the housing
back together.
PROGRAMMING WIRELESS KEYPAD (OPTIONAL)
Look in the box for:
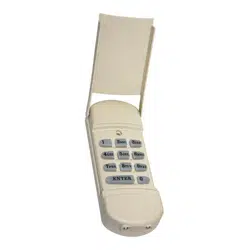
Wireless keypad
2 x Lag Screws
#6 x 1-3/8"
2 x Anchors
To prevent SERIOUS INJURY or DEATH:
• Keep remote control and battery out of reach of
children.
• Never permit children to access the door control or
remote control.
• Operate door ONLY when it is adjusted properly with
no obstructions to door travel and is in clear sight.
• ALWAYS keep a moving door in sight until
completely closed. NO ONE should cross the path
of a moving door.
To reduce risk of fire, explosion or electric shock:
• DO NOT short circuit, recharge, disassemble or
heat battery.
• Replace with 2 x AAA batteries ONLY. Dispose of
batteries properly.
30 sec
Press and hold LEARN for 3 seconds
Erasing ALL remote controls from memory:
To erase ALL remote controls from memory, press and hold
“Learn” button for 3 seconds. “OK” LED will flash and
beep three times indicating all remotes have been erased
from memory.
Wireless keypad may be secured on door jamb outside
your garage. Install keypad within sight of door at
minimum height of 5 feet (1.5 m). Test the range of the
keypad before mounting. Find an alternative mounting
location if range is insufficient.
2 x beeps
2 x flashes
2 x beeps
Press and release LEARN
Beeps
30 sec
WARNING
LEARN
FORCE
LIMIT
DOWN
DOWN
UP
OK
UP
LEARN
FORCE
LIMIT
DOWN
DOWN
UP
OK
UP
NOTE: It would be best to program your Wireless Keypad before mounting to the wall. Once the code is learned, hold the Wireless
Keypad where you want it to be and test before mounting it
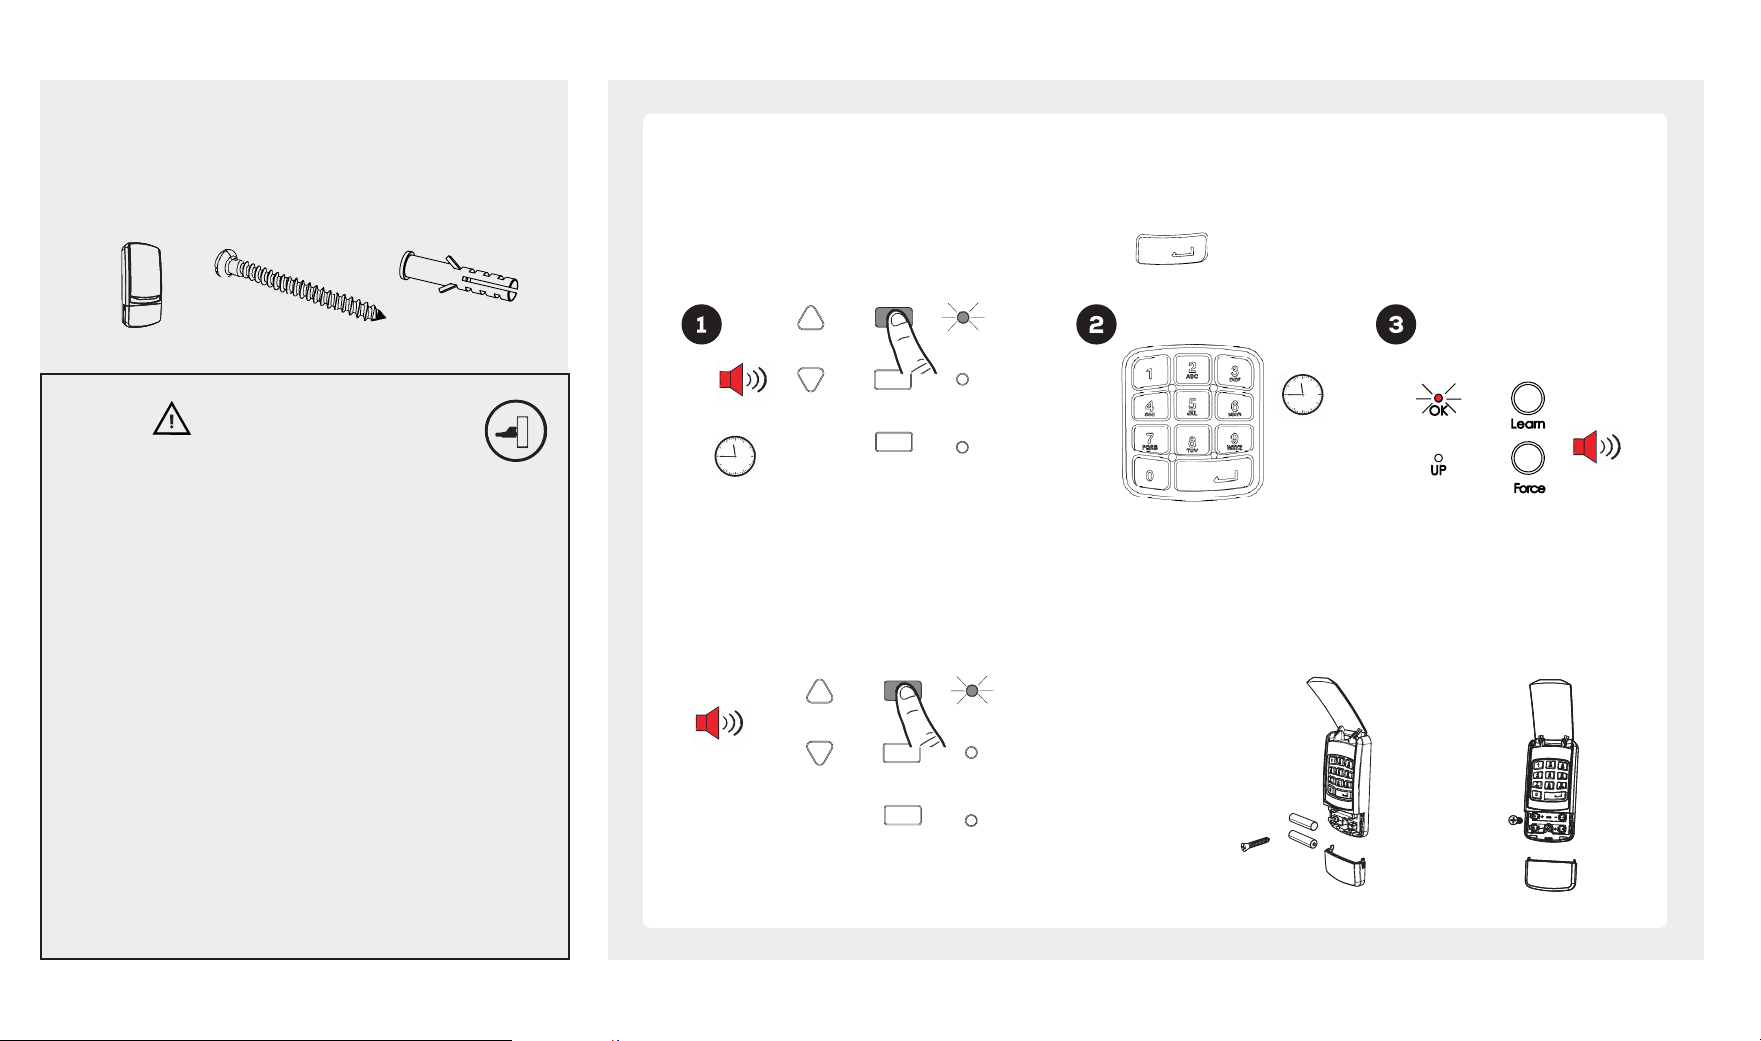
1. Press & release the “Learn” button.
2. The “OK” LED will illuminate indicating ready for programming.
3. Garage door opener is ready to accept PIN within the next 30 seconds.
4. Enter your 2-6 digit PIN within 30 seconds and press the button. "OK" LED will flash and beep twice indicating
18 www.gdohelp.com 1-877-436-4402
www.gdohelp.com 1-877-436-4402 19
IMPORTANT SAFETY INSTRUCTIONS
To reduce the risk of severe injury or death:
1. READ AND FOLLOW ALL INSTRUCTIONS.
2. Never let children operate or play with door controls. Keep the remote control away from children.
3. Always keep the moving door in sight and away from people and objects until it is completely closed. NO ONE SHOULD CROSS THE PATH OF THE MOVING DOOR.
4. NEVER GO UNDER A STOPPED, PARTIALLY OPEN DOOR.
5. Test door opener monthly. The garage door MUST reverse on contact with a 1-1/2-inch high object
(or a 2 by 4 board laid flat) on the floor. Aer adjusting either the force or the limit of travel, retest
the door opener. Failure to adjust the opener properly increases the risk of severe injury or death.
6. Use the emergency release only when the door is closed. Use caution when using this release
with the door open. Weak or broken springs are capable of increasing the rate of door closure and
increasing the risk of severe injury or death.
7. KEEP GARAGE DOORS PROPERLY BALANCED. See owner’s manual. An improperly balanced door increases the risk of severe injury or death. Have a qualified service technician make repairs to cables, spring
assemblies, and other hardware.
SAVE THESE INSTRUCTIONS.
Unattended Operation
The beam Smart Controller and beam Home app enable unattended operation of the garage door and should be used ONLY with sectional doors. Any device or feature that allows the door to close without being in
the line of sight of the door is considered unattended close.
The beam Smart Controller or any other Smart Garage Door Controller device that provides operation from mobile phone or Timer-to-Close feature should be used ONLY with sectional doors.
WARNING
20 www.gdohelp.com 1-877-436-4402
OPERATING THE OPENER
To Prevent SERIOUS INJURY or DEATH:
- READ AND FOLLOW ALL INSTRUCTIONS AND WARNINGS
IN THE OWNER’S MANUAL AND LABELS.
- Keep Remote Control and battery out of reach of children.
- NEVER permit children to access the Door Control Console,
Push Button or Remote Controls.
- Operate the door ONLY when it is properly adjusted, and
there are no obstructions and is in clear sight.
- ALWAYS keep a moving door in sight until completely
closed. NEVER cross the path of a moving door.
- If Travel Limit adjustments are made, a Force Adjustment
may also be needed.
- Aer ANY adjustments, the Safety Reverse Test MUST be
performed to ensure the door reverses on contact
with a 1-1/2” thick object (2x4 laid flat).
- ALWAYS ensure that your door is balanced and in good
working condition.
WARNING
Deluxe Door
Control
Invisible Light Beam
Photo Eye
Safety System
Photo Eye
Safety System
Door
Lock
Battery
Backup
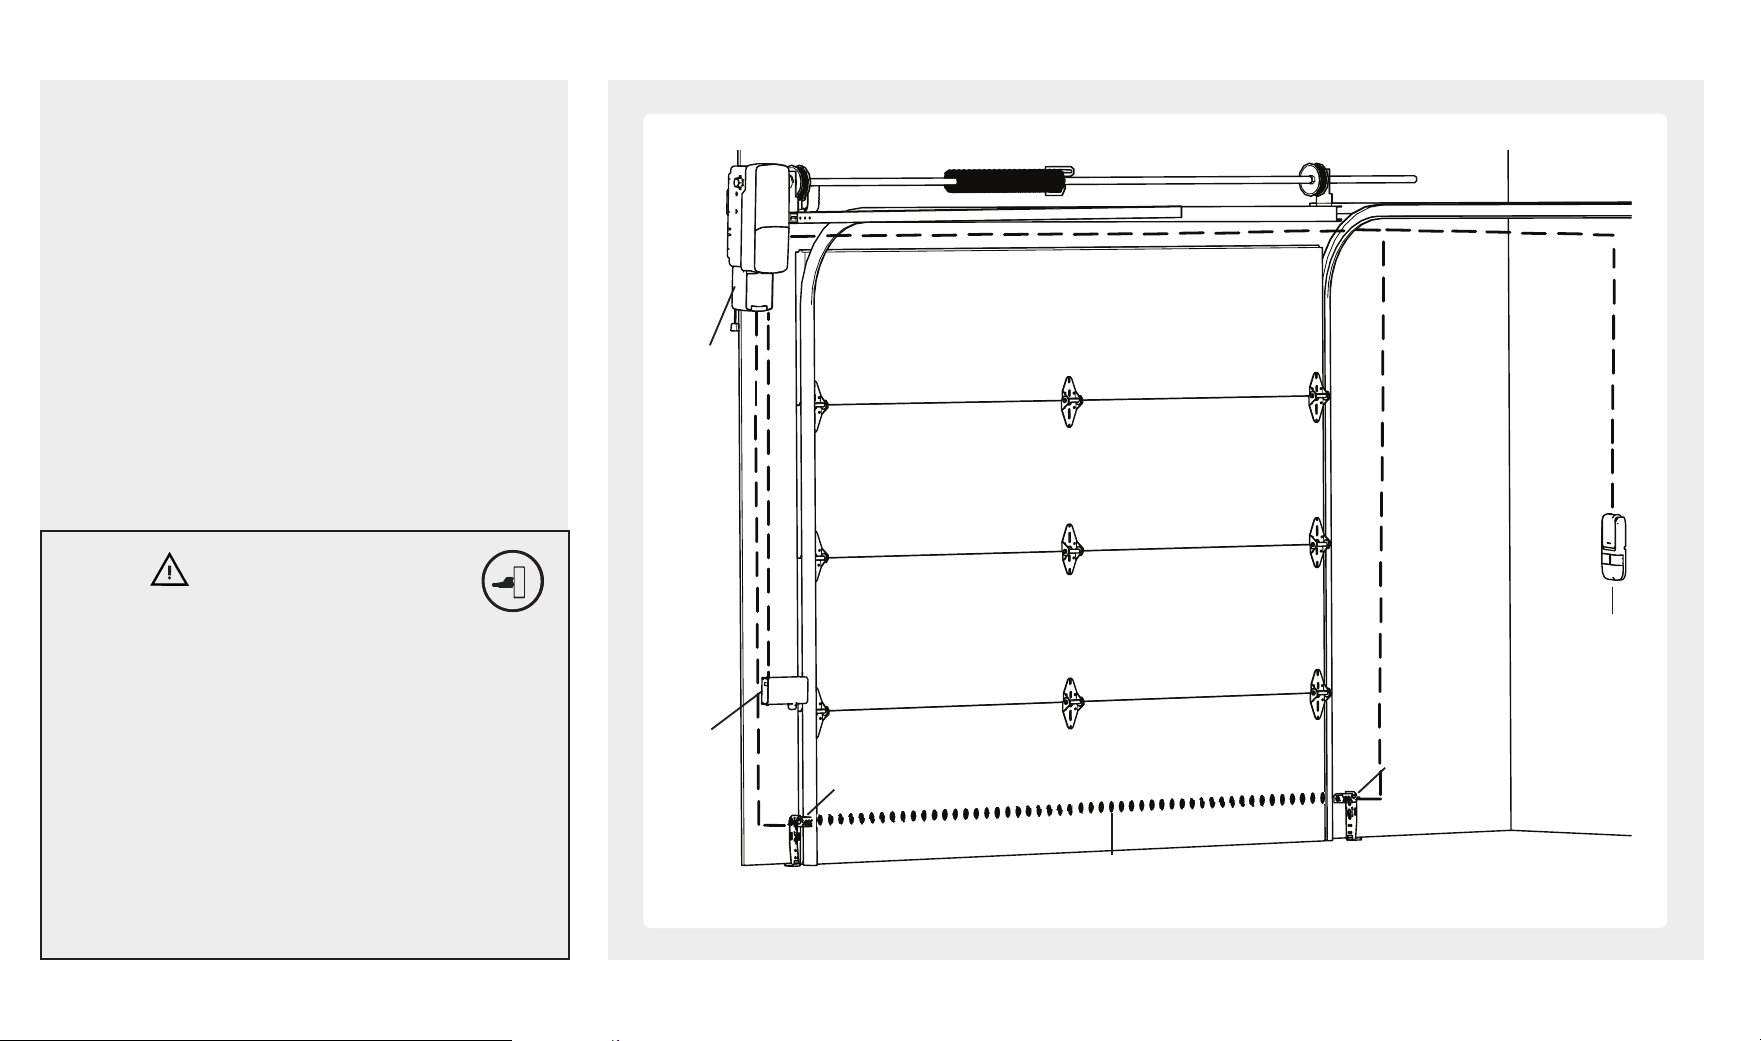
Activating the Opener
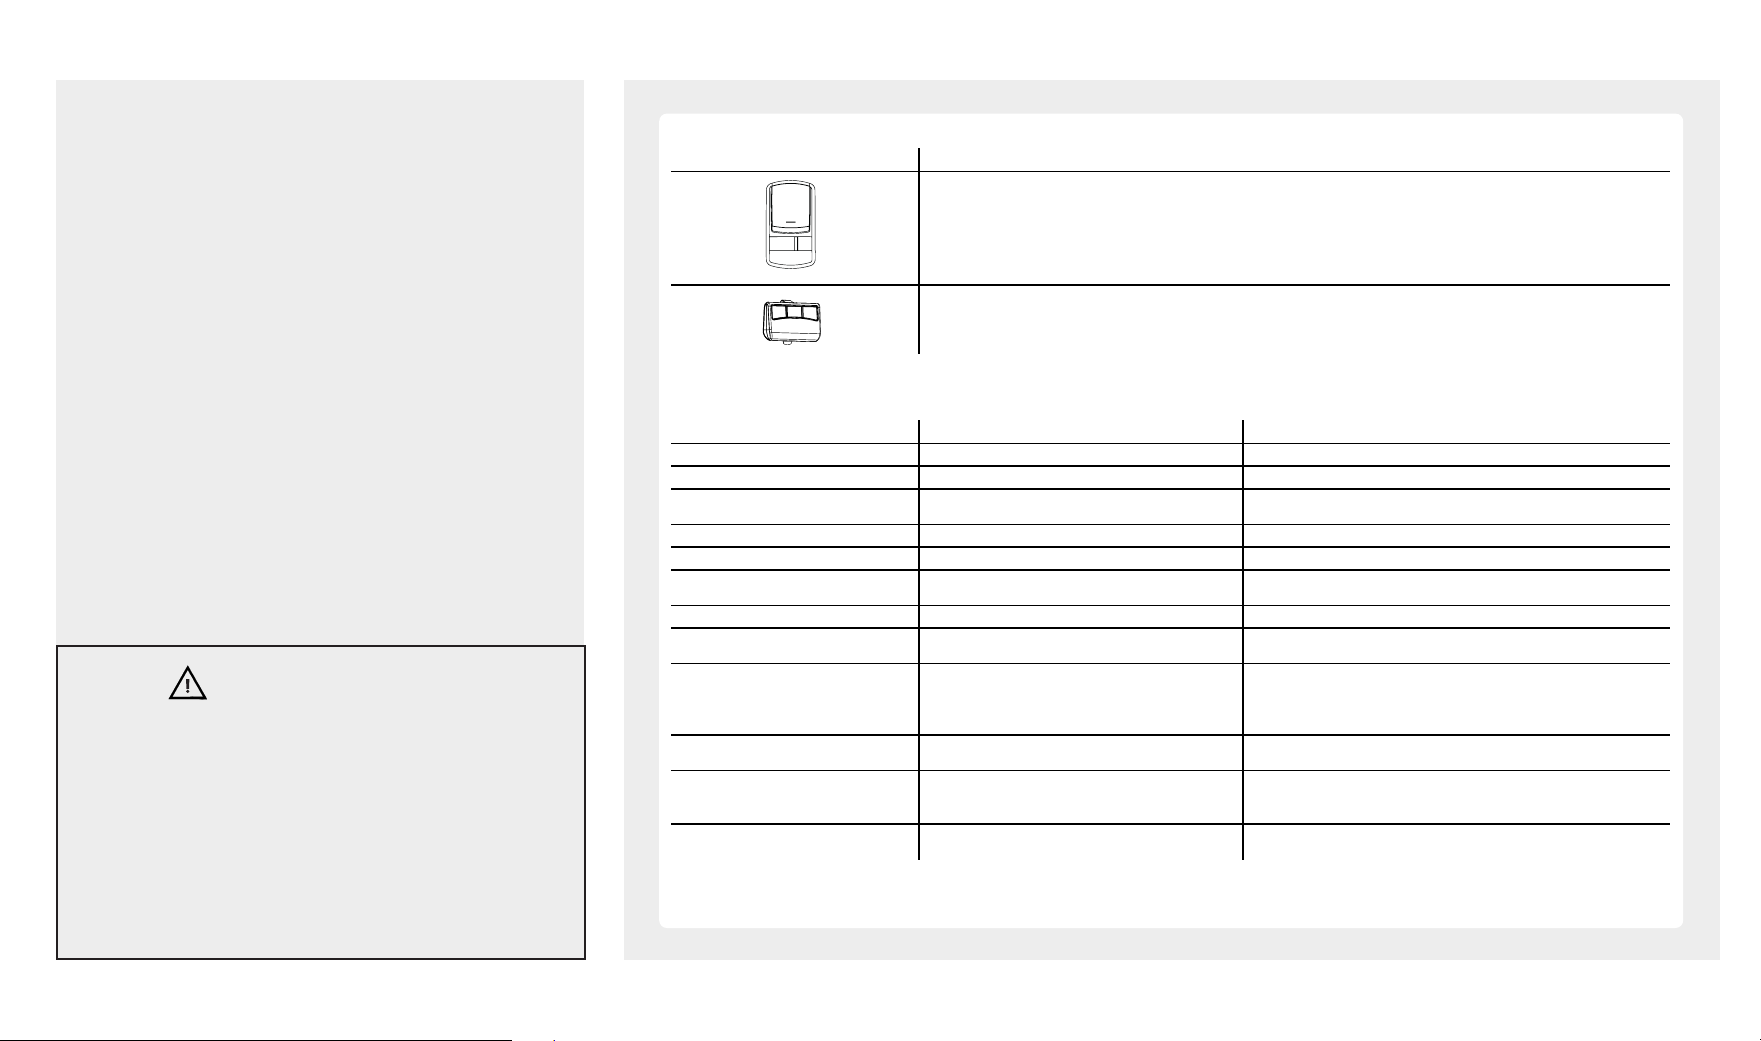
Controls Operatio n
Press and release the large “ACTUATOR” button on the door control, the door will begin to move the door as follows:
• Open from closed position or close from opened.
• Stops the door while it is closing.
• Stops the door while it is opening.
Remote distance up to 100 feet in open field. For safety concerns, the handheld remote control WILL NOT work
if the photo eye safety system is no t pr o perly installed and alig ned o r if vacatio n lo ck is activated.
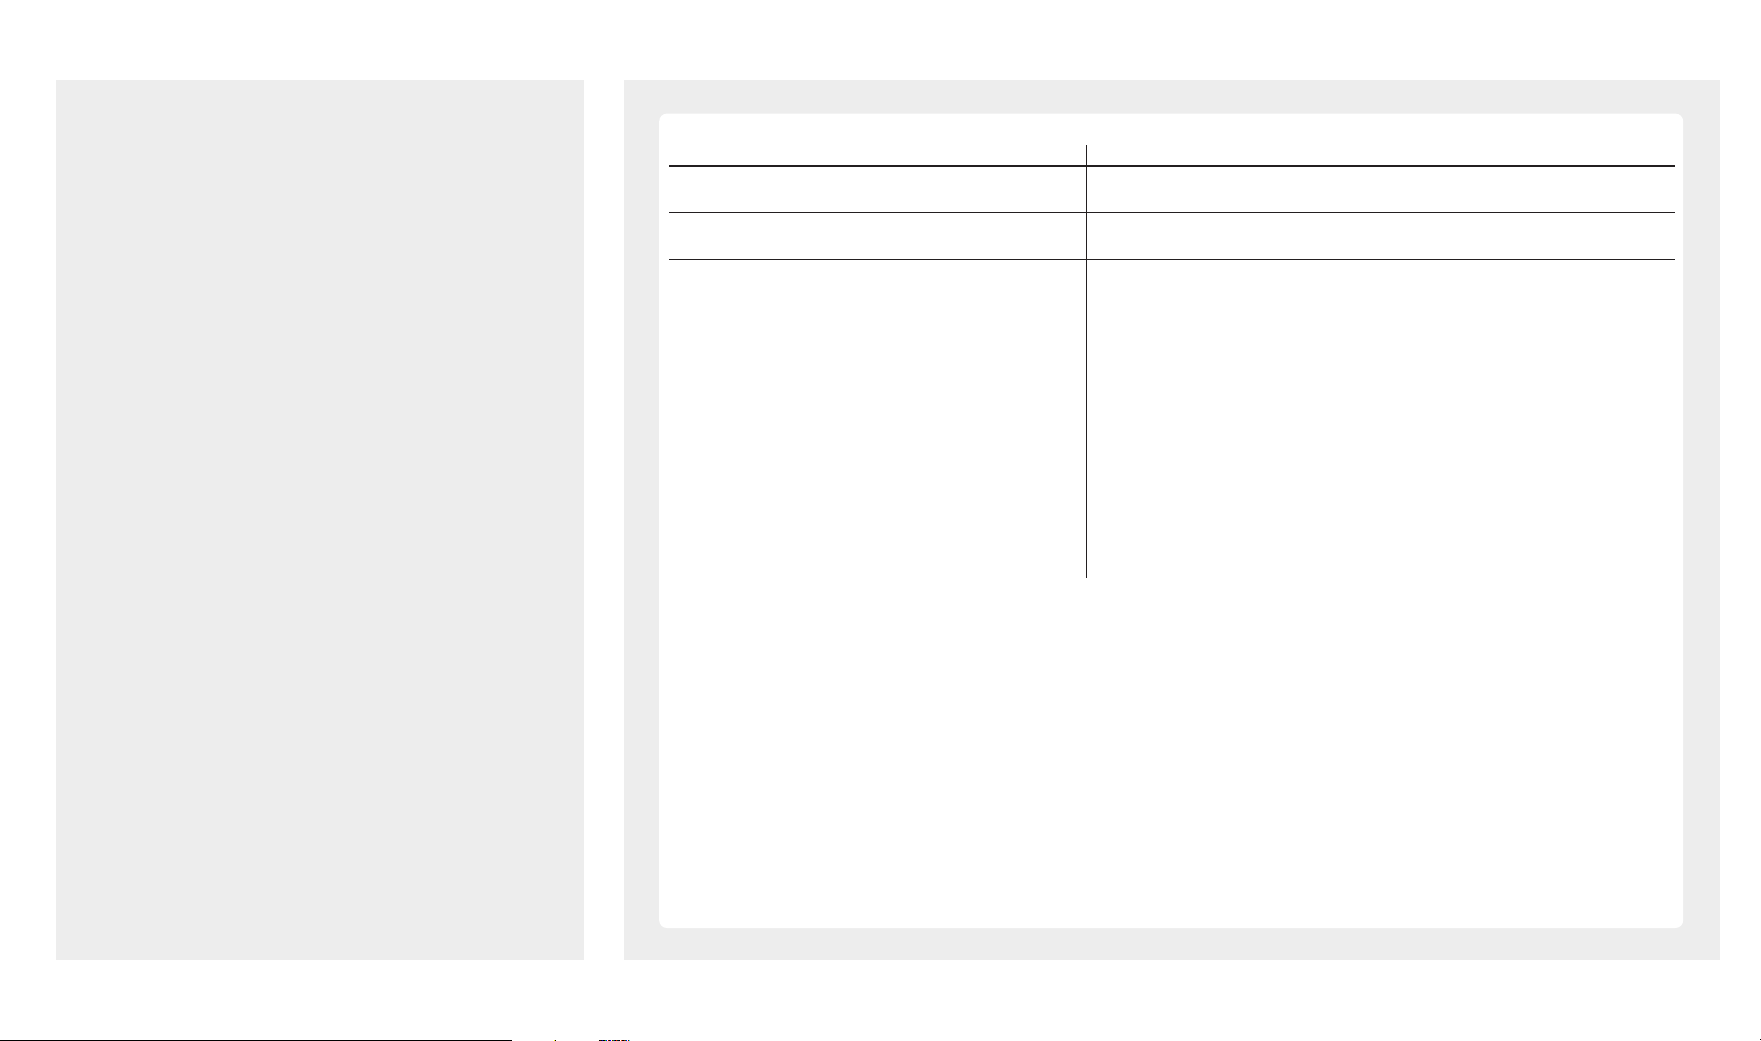
Courtesy Light/Beep response Operation/Condition
Solution
Lig ht o n for 4.5 m inutes Upon activatio n
Lig ht On fo r 4 .5 m inutes Reco nnecting po wer (with travel lim its stored ) See Page 11
UP and DOWN indicators blink x 5
Opener is initially plugged-in (no travel limits stored see
page 14 -16)
See Page 11
Beep x 1, OK ind icator glo ws “LEARN” button is pressed See Pages 17-18
Beep x 1, Light o n fo r 4 .5 minutes Upon activation by remote controls
Beep x 2
Remote control / keyless entry PIN code stored
successfully
See Pages 17-18
Beep x 5 Opener is operated without pro gram ming Pr o gr am lim its (see p ag es 12 -14)
Beep x 7
The automatic lock door (GU-LOCK2) is disconnected or
damaged
See page 6
Opener beeps 12 times Opener will o perate/unable to set limits
Release the door by pulling the manual release. Move the door by hand to
check for any obstructions or failures. If the door moves freely, close the
door and pull the manual release to reconnect the door. Then program
yo ur travel lim its (see pag es 12 -14)
Beep x 13
The cable tensio n m o nito r d etec ts slack that m ay occur
in the cables
Check the cable tension monitor to confirm the cable has the required
tension (see page 7)
Door will not close and opener beeps x 20 Door is fully open but will not close
Check photo sensors to confirm they are aligned and are not blocked.
When the photo eyes are installed correctly, you will have a solid green
and a solid Red light
Door will not travel completely and will
beep x 25
Door is obstructed while opening or closing
Release the door from the opener and check for obstructions and ensure
the do o r oper ates with failure
www.gdohelp.com 1-877-436-4402 21
OPERATING THE OPENER
WARNING
To prevent SERIOUS INJURY or DEATH:
- Use emergency release to disconnect the motor ONLY when
the door is CLOSED to prevent unexpected rapid falling in
case of a unbalanced / poor-conditioned door.
- Use emergency release ONLY when doorway is clear of
persons and obstructions.
- DO NOT use emergency release to pull the door open or
closed.
PAIRING YOUR beam SMART CONTROLLER TO YOUR SMARTHPHONE
22 www.gdohelp.com 1-877-436-4402
beam Smart Controller
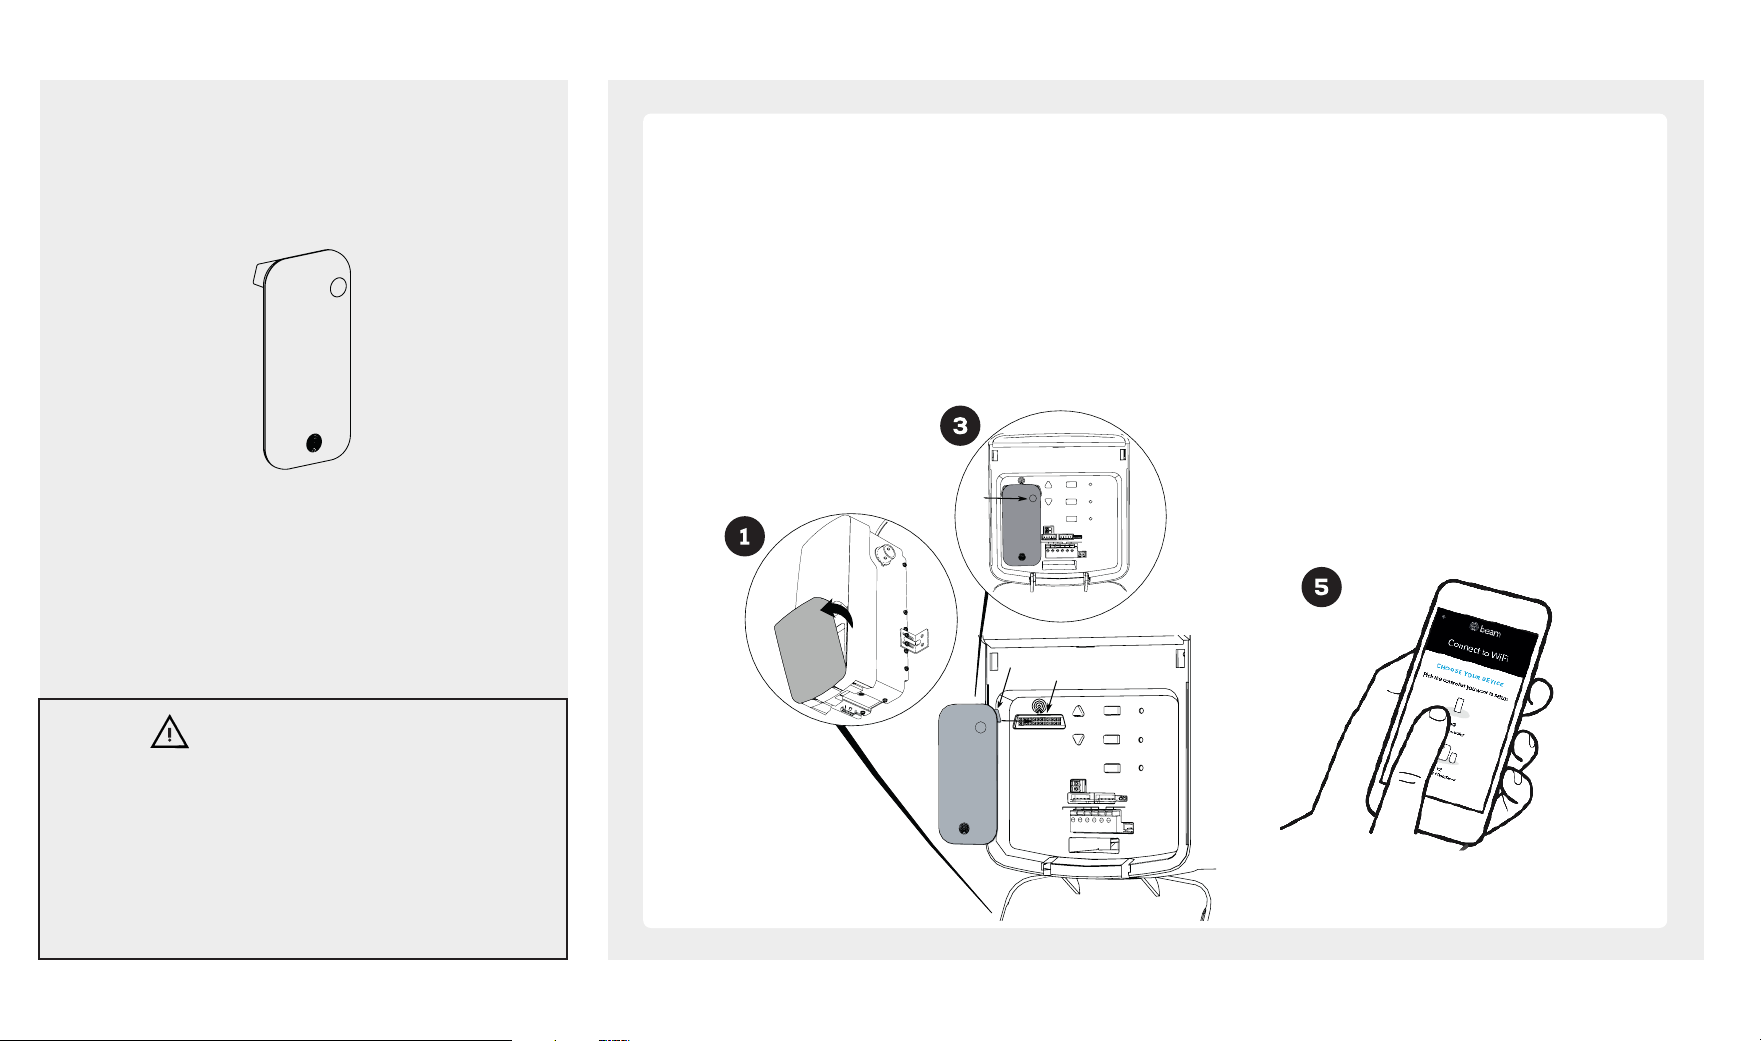
Note: Smart controller is pre-installed on the garage door opener. beam only connects to 2.4GHz networks.
Please perform an actual setup while walking through these steps
1. Open the lid of the opener cover.
2. Verify that LED on the smart controller is blinking (orange). If the LED does not blink orange make sure the Smart Controller is fully
inserted and flush with the garage door opener. If the LED still does not blink orange, press the Reset Button on the Smart
Controller for 10 seconds, the garage door opener will beep 3 times.
3. While inside your garage download the “beam Home” app from the App Store (iOS) or Play Store (Android).
4. Open the app, and select “Setup your beam”.
5. Create an account and choose your V3 device.
6. Follow the directions on the beam Home app to set-up your Smart Controllerwith your phone.
beam Smart Controller
Look in the box for:
WARNING
To reduce the risk of INJURY to persons:
- Use this Smart Control only with Residential Sectional
Garage doors.
- Do not enable this device on a one-piece or swinging
garage door.
PHOTO
EYES
FORCE
DOWN
CABLE
MONITOR
PUSH
BUTTON
UP
OK
LIMIT
LEARN
DOWN
UP
WALL
PANEL
LOCK
FORCE
DOWN
CABLE
MONITOR
PUSH
BUTTON
UP
OK
LIMIT
LEARN
DOWN
UP
WALL
PANEL
LOCK
24-pin connector
beam Smart port
LED
www.gdohelp.com 1-877-436-4402 23
beam Smart Controller
Note: Smart controller is pre-installed on the garage door opener. beam only connects to 2.4GHz networks.
Please perform an actual setup while walking through these steps
1. Open the lid of the opener cover.
2. Verify that LED on the smart controller is blinking (orange). If the LED does not blink orange make sure the Smart Controller is fully
inserted and flush with the garage door opener. If the LED still does not blink orange, press the Reset Button on the Smart
Controller for 10 seconds, the garage door opener will beep 3 times.
3. While inside your garage download the “beam Home” app from the App Store (iOS) or Play Store (Android).
4. Open the app, and select “Setup your beam”.
5. Create an account and choose your V3 device.
6. Follow the directions on the beam Home app to set-up your Smart Controllerwith your phone.
MAINTENANCE
Schedule Maintenance
Once a month Door balance test, refer to page 2.
Twice a year Safety reversal test, refer to page 15.
Once a year • Limit and Force adjustment may be necessary due to weather
conditions.
Refer to pages 12-1 for adjustment. Conduct Safety Reversal Test aer
ANY adjustments.
• Lubricate door rollers, bearings and hinges. The opener is permanently
lubricated, DO NOT lubricate or grease the opener, rail or door tracks.
• Check battery. Disconnect from power. Cycle the opener using battery
power only. If one full cycle cannot be completed, replace the backup
battery.
24 www.gdohelp.com 1-877-436-4402
WARRANTY
Manufacturer hereby warrants to the original purchaser, for initial residence in which it
is installed:
1. For residential applications only. Garage Door Operators to be free from defects
in material and workmanship for a period of five (5) years from date of purchase. The
motor is to be free from defects in materials and workmanship for the lifetime operator.
Battery backup and accessories are to be from detects in materials and workmanship
for a period of (1) one year from date of purchase. If installed in a commercial
application the operator warranty will be null and void.
2. Where the garage door operator has need to be returned to the Manufacturer for
Warranty repairs, all costs incurred in the return will be paid for by the purchaser. Call
1-877-436-4402 prior to dismantling the product. If in the opinion of the Manufacturer
the product is faulty, all defective parts will be replaced at no charge to the purchaser.
3. Proof of purchase must be given to the Manufacturer at time of Warranty claim.
4. The Manufacturer reserves the right to modify any existing or future products
without incurring any obligation to incorporate such modification to products already
manufactured or to which this Warranty may relate.
5. Warranty only applies if this product has been installed to the Manufacturer's
instructions.
6. This Warranty does not apply to any defect, loss or damage arising or caused
directly or indirectly by or as a result of :
(i) Any defect (including detects in component parts or accessories) arising from or
attributable to the failure to carry out normal preventive maintenance or adjustment
itself.
(ii) To any additional damage or deterioration arising from attributable to the operation
of the Operator aer it is known to be defective.
7. Not included in Warranty:
(i) Batteries
(ii) Fuses
(iii) Sensitivity adjustment
(iv) Handheld Remote Controls and receiver range
8. Note : All Warranties will be void subject to:
(i) Water damage and condensation
(ii) Power supply black out or surge
(iii) Act of God
(iv) Modification or adjustment by unauthorized persons
(v) Any interference from radio (including citizen band radios or and other electronic
device)
(vi) Preventative maintenance and regular servicing not undertaken
(vii) Account not paid in full by the purchaser
www.gdohelp.com 1-877-436-4402 25
WARRANTY
9. Subject only to the provisions of the Trade Practices Act and any legislation of the
State or Territory wherein the operators of the Manufacturer have been sold or installed
(which may confer certain rights on consumers of goods and those rights by such
legislation may be rendered incapable of exclusion) this Warranty supersedes and
excludes all representations, warranties and conditions whether expressed or implied
by law and the Manufacturer shall have no liability or otherwise than herein provided
for any loss and damage (including consequential loss and damage, loss of use or
profits) by reasons of delay, defective or faulty materials or workmanship, negligence
or any act, matter or thing done permitted or omitted to be done by the Manufacturer.
Warranty
THIS WARRANTY FORM SHOULD BE COMPLETED AT TIME OF INSTALLATION
This Warranty Form should be retained by the purchaser at all times and produced
with the purchase docket by the
Purchaser as proof of the purchase date ___________________________________
PURCHASER’S NAME:_______________________________________________
PURCHASER’S ADDRESS:____________________________________________
INSTALLED BY:____________________________________________________
SERIAL NUMBER OF THE OPERATOR: __________________________________
Performax Service
Helpuful product and troubleshooting information may be found online at
www.gdohelp.com
Service number :1-877-436-4402
Please have the following information when you call:
• Model number of the operator
• Serial number of the operator
26 www.gdohelp.com 1-877-436-4402
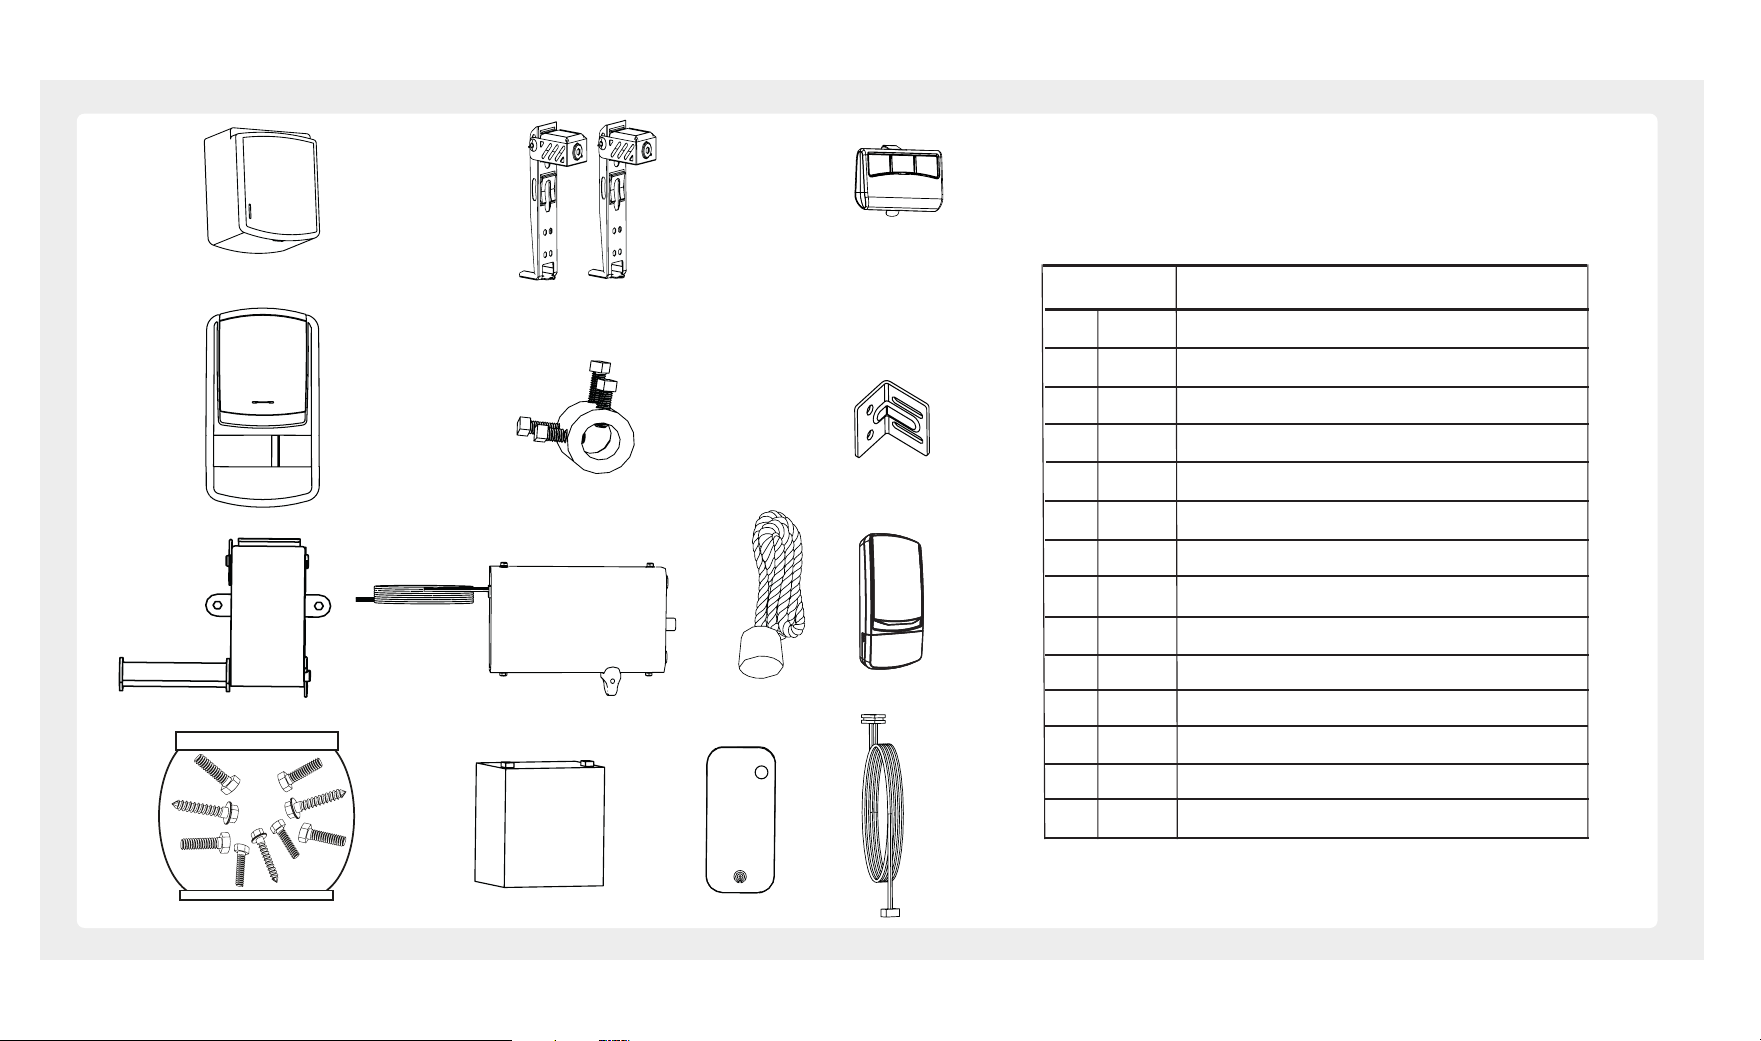
REPLACEMENT PARTS
1
1
2 3
4
5 6
7 8 9
11 12 13
14
1 25007
2 24913
3 25003
4 25004
5 25008
6 25009
7 25010
8 25011
9 25012
10 25005
11 25013
12 25014
13 25015
14 25016
Battery Enclosure & Hardware (battery not included)
Photo Eyes
Remote Control
Deluxe Door Control Console
Collar
Mounting Bracket
Cable Tension Monitor
Door Lock
Emergency Release Cord with Knob
Wireless Keypad
Hardware Bag
12V, 5Ah battery
beam Smart Controller
Service lock extension cable, 8m
Name/Description
Part number
10
www.gdohelp.com 1-877-436-4402 27
REPLACEMENT PARTS
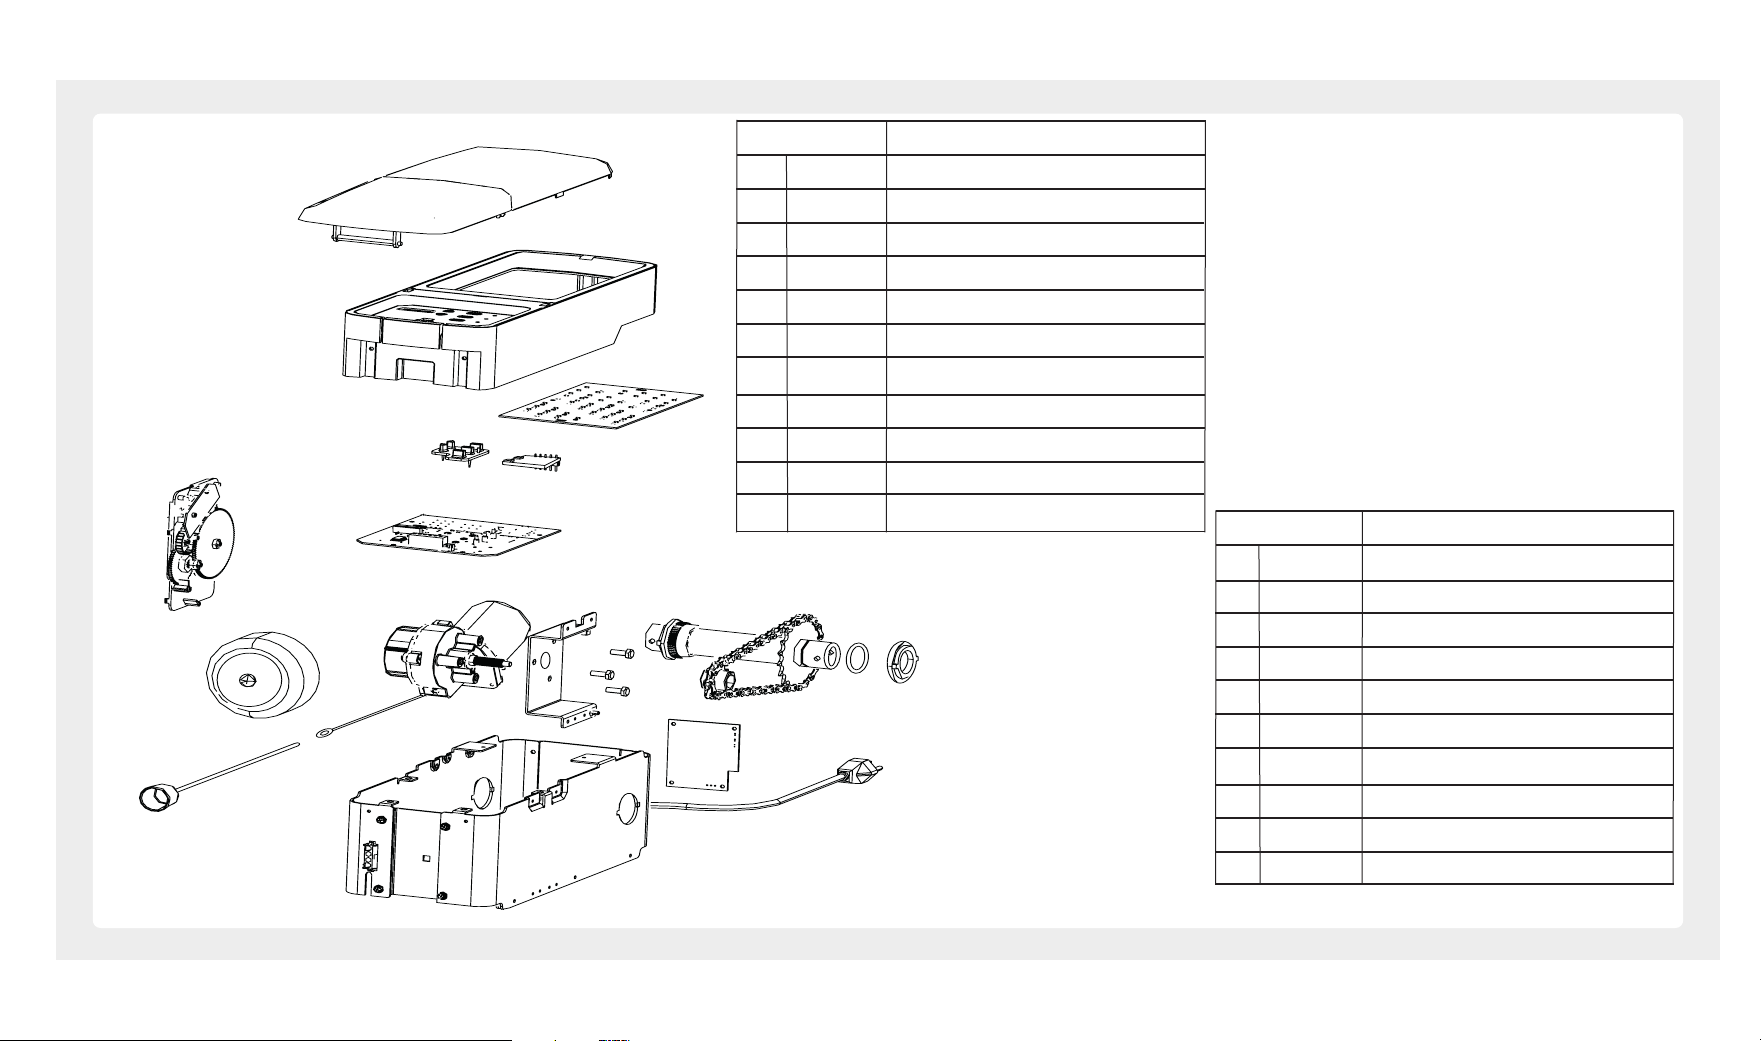
OPENER ASSEMBLY PARTS
4
1
2
3
9
21
12
10
11
8
20
7
5
6
14
15
16
19
13
17
18
Control Panel Cover
Light Lens
Chassis Cover
Chassis
Motor Mounting Bracket
Drive Sha Assembly
Motor & Clutch Assembly
Transformer
LED Lamp Plate
Receiver/logic board
Limit Encoder
1
2
3 GUDT-368
4 GUDT-369
5 GUDT-373
6 GUDT-374
7 GUDT-375
8 GUDT-376
9 GUDT-377
10 GUDT-389
11 GUDT-379
Part number Name/ Description
12 GUDT-381
13 GUDT-382
14 GUDT-383
15 GUDT-384
16 GUDT-385
17 GUDT-386
18 GUDT-387
19 GUDT-388
20 GUDT-358
bo21
Button Membrane
Battery Backup Connector/ Terminal
LED Driver Board
Drive Sprocket
Drive Chain
C-clip
Bushings (2)
Power Cord
Emergency Release Cord
Motion sensor
Part number Name/ Description
25017
25018
25019
25020
25021
25022
25023
25024
25025
25026
25027
25028
25029
25030
25031
25032
25033
25034
25035
25036
25037