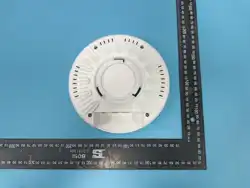

Dual-Band Gigabit ceiling wireless AP
VAC Self-Organizing Network Quick Installation Guide
V1.0
Thank you for purchasing our product. Hope you will have fun using it!
Please read this user manual thoroughly before using, and keep it properly.

Ⅰ. Product Oveiew
Suppos the IEEE 802.11ax (WiFi 6) standard, with a dual-band simultaneous
transmission rate of up to 3000 Mbps (2.4GHz: 1200 Mbps + 5GHz: 1800 Mbps). The
ceiling-mounted design is optimized for enterprise scenarios including oce
buildings, hotels, exhibition halls and meeting rooms, delivering a signal coverage
radius of 15-25 meters and the ability to penetrate 3-4 non-load-bearing walls. It
suppos simultaneous connection of up to 128 devices; WiFi6 OFDMA and
MU-MIMO technologies optimize the concurrent peormance of multiple terminals,
reduce freezes and latency, and satisfy enterprise high-speed network demands
such as HD video conferences, wireless oce work and IoT device interconnection.
Compatible with Fat/Thin dual operating modes, it suppos centralized
management of up to 16 APs via the VAC self-organizing network, as well as
centralized management of more APs via an AC controller, adapting to various
batch deployment scenarios for multiple APs.
Notes:
1. In a LAN without an AC controller, the AP with the largest MAC address will be
automatically elected as the Master role to manage other APs.
2. If there is only one AP in the LAN, the AP will operate in Slave role by default.
3. This guide does not include instructions for use with an AC controller. For
AC-related conguration and usage, please contact the sales team.
- 1 -
Ⅱ. Pre-Installation Preparation
Optimal Placement
Install at the geometric center of the ceiling in oce areas, central ceiling of meeting
rooms, or top of corridors to ensure uniform signal coverage of the target area and
minimize blind spots. For multi-AP deployment, maintain the signal overlap rate of
adjacent APs at 20%-30% to avoid inteerence.

- 2 -
Installation Cautions
Keep a minimum distance of 3 meters from equipment/areas that cause signal
inteerence or shielding, including air conditioner outdoor units, refrigerators,
microwaves, elevator shafts, power distribution shafts, large seer rooms (strong
electromagnetic inteerence), metal ceilings/keels, ventilation ducts (signal
shielding), and Bluetooth speakers (frequency inteerence).
Do not install in humid, dusty or high-temperature areas (e.g., toilets, top of
equipment rooms) to ensure long-term stable operation of the device.
Installation Requirements
1. The ceiling must be at and stable with a load-bearing capacity of at least 2kg.
2. A pre-routed PoE network cable po is required (embedded CAT5 or higher
specication cable is recommended to improve transmission stability).
3. The installation position should allow easy post-installation maintenance (e.g.,
avoid enclosed ceiling areas).
Power Supply Method
The AP suppos 48V PoE and 12V DC power supply; select the appropriate power
supply mode based on the on-site environment.
Network Environment
1. Congure the uplink bandwidth rationally according to the number of APs and
concurrent connection requirements.
2. Plan the IP address segments properly and assign static IP addresses to all APs for
convenient subsequent management.
- 3 -
Ⅲ. Inteaces, Buttons & Indicators Description
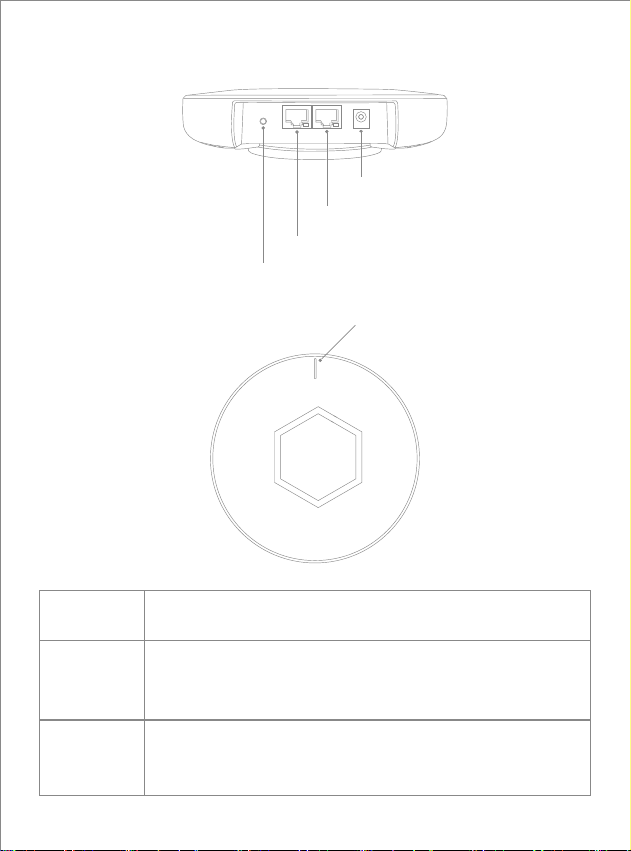
Inteaces Description
DC
UPlink(PoE)
12V DC Power Supply Po, for power supply via a 12V 1.5A or
higher adapter.
WAN/LAN po: default LAN po, suppos PoE power and
10/100/1000Mbps auto-negotiation.
Reset
LAN
UPlink(PoE)
DC
STAT
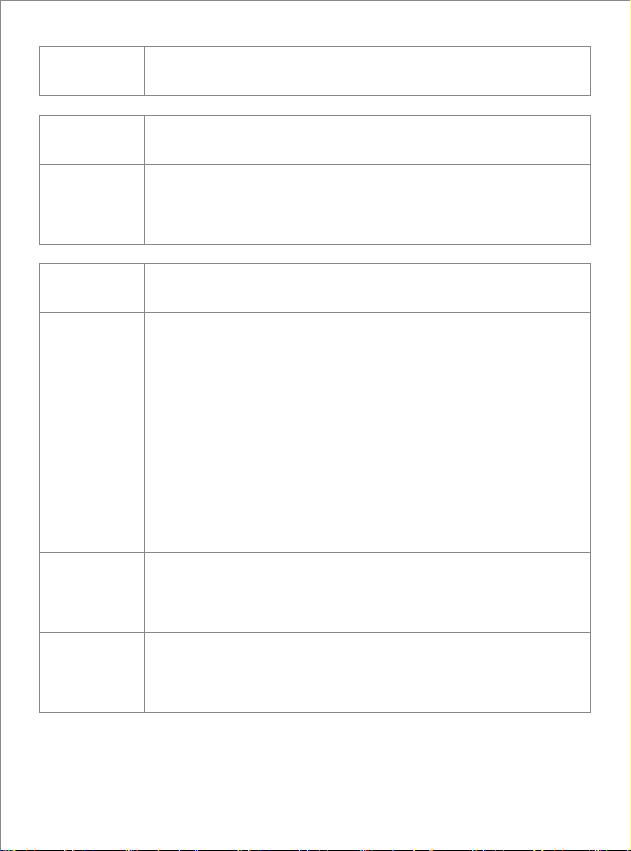
LAN LAN po, suppo 10/100/1000Mbps auto-negotiation.
Button
Reset
Facto Reset Button: long press for 5+ seconds to reset to
facto settings and reboot.
Description
Description
STAT
Function Indicator Lights:
1. Sta-up phase: Red, blue and green lights ash alternately.
2. Unnetworked & no internet: Red light ashes;
Unnetworked & internet: Green light ashes.
Networked & no internet: Red light stays solid;
Networked & internet: Blue light stays solid.
3. WAN po negotiated speed below 1000 Mbps: Red, green
and blue lights ash slowly in a cycle.
Indicators
LAN
LAN Po Indicator: Green steady on when connected;
ashes during data transfer.
UPlink(PoE)
Uplink Po Indicator: Green steady on when connected;
ashes during data transfer.
- 4 -
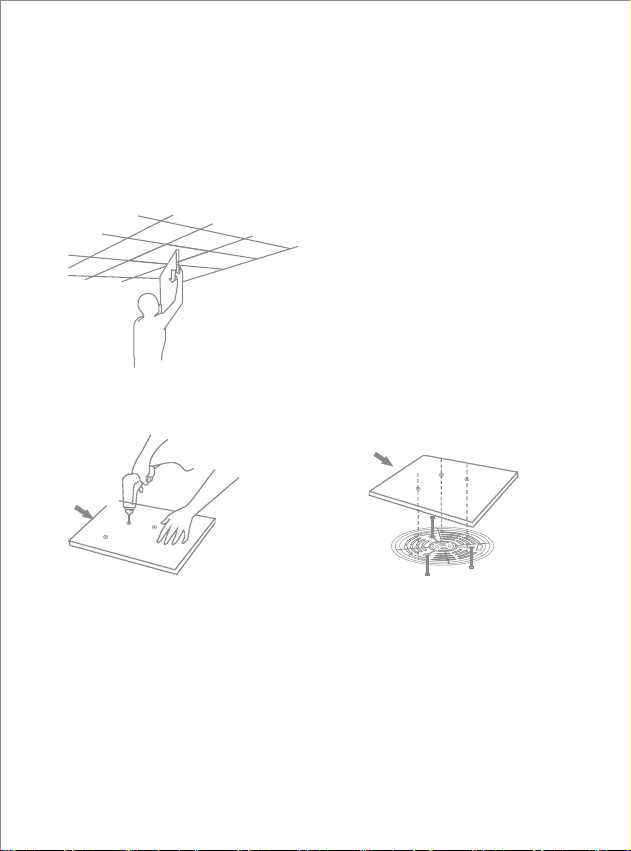
Ⅳ. Installation Guide
1. Conrm the AP installation location. Route the network cable from the 48V PoE
switch po to the AP’s position, and terminate the switch-side end with an RJ45
connector following the T568B standard.
2. Remove the ceiling panel at the AP installation position.
- 5 -
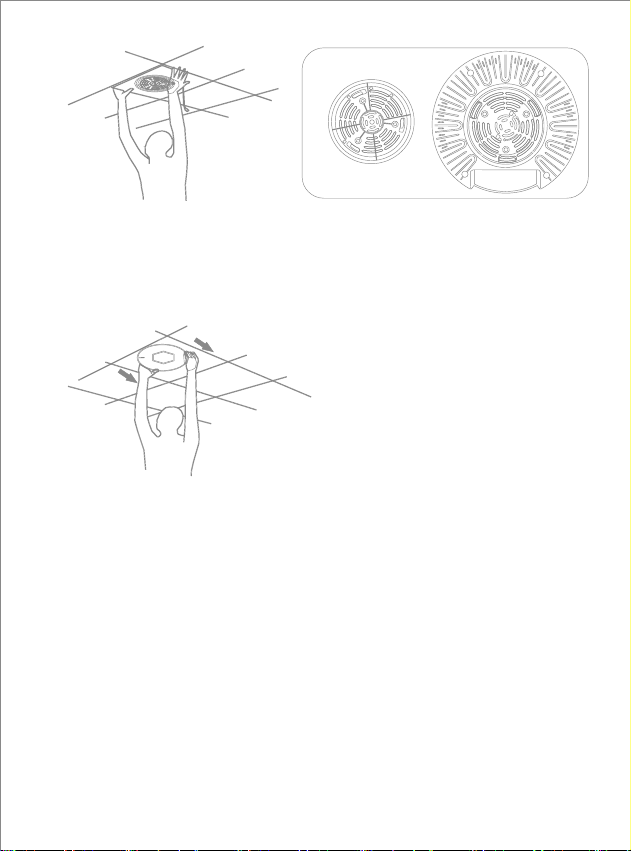
3. Use the included accessories to secure the mounting bracket to the ceiling.
4. Route the network cable through the ceiling aligned with the AP's po position,
then reattach the ceiling panel in place.
- 6 -
5. Terminate the network cable with an RJ45 connector per the T568B standard,
plug it into the AP’s Uplink Po, then align the AP’s mounting slot with the mounting
bracket and twist to snap it into place.
Ⅴ. Preparation
1. Power on the PoE switch. The AP nishes booting in 120 seconds.
2. Connect via computer or phone to the AP’s default WiFi. SSID: "@twi-
XXXX" or "@twi-XXXX-5G" (XXXX = last 4 digits of the device’s MAC
address; for easier identication, 0 → G, 8 → G, B → K, 1 → J). Default WiFi
password: "9876543210".
Ⅵ. Mobile Setup
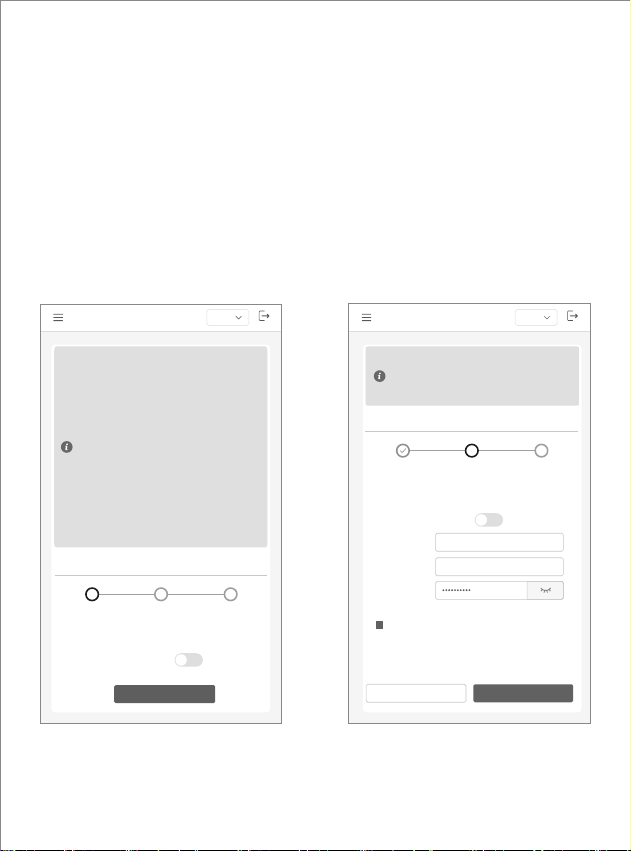
1. Once WiFi is connected, enter the AP management URL "apc630.tech" in the
browser and tap [Go]. The browser will redirect to the device authentication page.
Enter the default password "admin", tap [Login] to access the device management
- 7 -
page. On rst login, the system will automatically redirect to the setup wizard (see
Figure 1 below).
2. To manage other LAN APs: Toggle on "Enable Controller Function", tap [Next
Step] to enter the WiFi setup page (see Figure 2 below).
By default, "Dual-Frequency In One" is disabled: 2G and 5G WiFi have dierent
names but the same password.Customize WiFi name and password as needed.
"Set WiFi password as login password?" is checked by default—adjust based on
your needs.
After setup, tap [Next Step].
Figure 2
Device Role: Slave
Engli
Previous Step Next Step
Dual-Band-In-One: 2.4GHz WiFi and 5GHz WiFi use
the same WiFi name and password, and the terminal
device will automatically choose which WiFi signal to
connect to based on network peormance and
coverage.
Internet WiFi Settings
*WiFi Password
*2G Name
@twi-XXXX
*5G Name
@twi-XXXX-5G
Dual Frequency In One
Set the WiFi password as the login password?
√
Setup Wizard
Enable Controller
Function
Internet WiFi
Settings
Conguration
Conrmation
32
Setup Wizard
Enable Controller
Function
Internet WiFi
Settings
Conguration
Conmation
1
32
Enable Controller Function
Enable Controller Fuction:
Next Step
1. This type of device suppos four roles: Master,
Slave,Independent AP and Fit AP.
2. After the device enables the controller function, it
becomes a Master and can automatically discover and
manage other Slave APs in the network. Only one
Master can be congured in the entire network.
3. After the device enables the self-organizing
network discove function, it becomes a Slave Access
Point and can be automatically discovered and
managed by the Master. This function is enabled by
default.
Device Role: Slave
Engli
Figure1
4. After the device turns o the self-organizing
network discove function, it becomes an
Independent AP and cannot be discovered and
managed by the Master. It only suppos independent
conguration and management.
5. After the device enables the Fit AP function, it
becomes a Fit AP and can be discovered and managed
by a hardware AC.
- 8 -
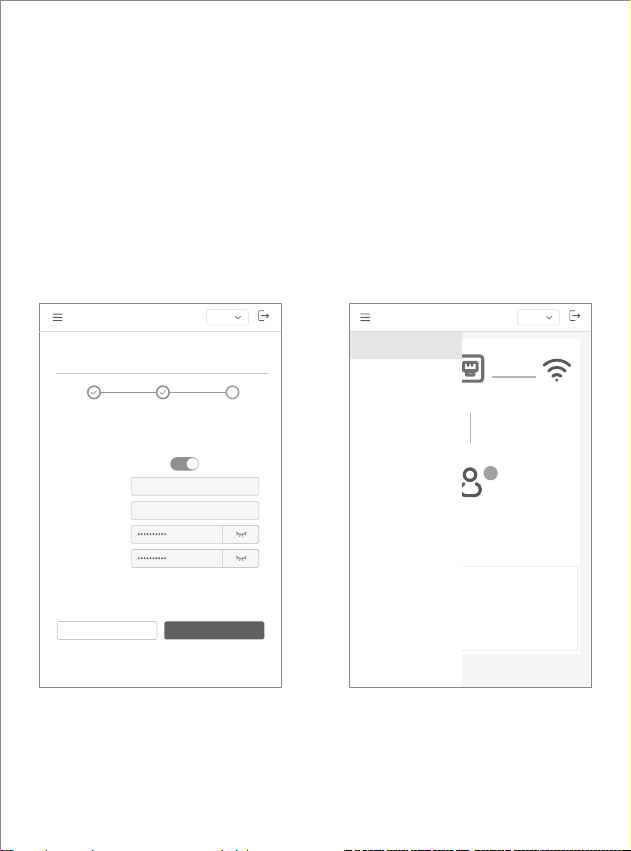
3. Go to the conguration conrmation page (see Figure 3 below):
- To view the password, toggle the eye icon to display it.
- Conrm settings are correct, tap [Finished]—the device will apply new settings
and reboot.
- If incorrect, tap [Previous Step] to return and adjust.
4. For non-rst login:
- Tap [Login] to enter the device oveiew page, then tap the top-left hamburger
menu icon (三)—a menu bar will pop up (see Figure 4 below).
- Tap [Setup Wizard] and follow the above steps.
Figure 3 Figure 4
Previous Step Finished
Conguration Conrmation
2G Name
@twi-XXXX
5G Name
@twi-XXXX-5G
WiFi Password
Enable Controller Function?
√
Setup Wizard
Enable Controller
Function
Internet WiFi
Settings
Conguration
Conrmation
3
Login Password
Device Role: Slave
Engli
AP
2.4G 5G
Current
Device
AP Wired
Po
Wireless
Status
0
Online Devices
Current Device
Device Name: XD3001K-XXXX
Device Time: XXXX-XX-XX XX:XX:XX
Running Time: XXdXXhXXmXXs
Software Ver: V1.0-XXXXXXXXXXXX
Online Client: 0
C
Oveiew
Online Clients
WLAN
System Management
Setup Wizard
Device Role: Slave
Engli

- 9 -
Wait a moment—all AP devices will gradually apply the new settings. Connect to
the newly congured WiFi, enter the password, and enjoy outdoor high-speed
WiFi6!
Ⅶ. Role Description
The AP suppos 4 working roles—choose based on usage scenarios to meet
dierent deployment needs:
1. Master: Includes basic AP functions, The AP with the largest MAC address will
automatically switch to the Master role auto-discovers and manage all other Slave
APs in the LAN.
2. Slave: Basic AP functions; auto-discovered and managed by the Master. Default
role; ideal for bulk deployment with the Master.
3. Independent AP: Only basic AP functions; not discoverable/managed by
controllers. Requires separate conguration; ideal for single-device use.
4. Fit AP: Basic AP functions; only discoverable/managed by hardware AC. Does
not suppo standalone use; ideal for bulk deployment with hardware AC.
Ⅷ. Mode Description
The AP suppos Router Mode and AP Mode, compatible with dierent working
roles for various scenarios. Details:
1. AP Mode:
- Core: Conves between wired and WiFi networks, enabling quick connection
of WiFi devices to wired networks.
- Limitations: No network sharing or DHCP IP allocation.
- Suppoed roles: Master, Slave, Independent AP, Fit AP.
2. Router Mode:
- Core: Adds network sharing and DHCP IP allocation to AP Mode features.
- Suppoed roles: Master, Independent AP.

- 10 -
- Special capability: In "Master" role, can bypass-manage other Slave APs in the
LAN.
Ⅸ. FQA
1. Q: How to set Router Mode?
A: 1) Log in to the AP management page, go to [WLAN- AP List]. Locate the
AP labeled "Local", click [Manage] to access its oveiew page.
2) In "Oveiew", check the current “Work Mode”, click [Change], select "Router
Mode".
3) Enable/disable features based on the role:
- For "Master" role: Enable "Enable AC" and "VAC Parallel Networking" to
bypass-manage other Slave APs.
- For "Independent AP" role: Disable "Enable AC", "Self-Organizing Network", and
"VAC Parallel Networking".
4) Click [Conrm]; the device will resta the network to apply settings.
5) Reconnect to the device’s WiFi, log in, go to the oveiew page, and click [WAN].
6) Select "Connection Type" based on your scenario and enter parameters.
7) Click [Save]; the device will resta the network to apply settings.
2. Q: How to manage multi-APS?
A: 1) Initialize & connect: APs at facto status , power on, and connect them to
the same LAN. Ensure no VLAN po isolation is enabled and VLAN 2024 is unused.
2) Automatic Election: Wait for approximately 2 minutes. The AP with the largest
MAC address will be automatically elected and switch to Master Role to manage all
other APs; all APs will automatically sync the controller’s WiFi conguration.
3) View and Manage APs: Connect to the WiFi and log in to the management page.
Click [WLAN] > [AP List] to view and manage all devices.
4) Modify Wireless Conguration: Click [WLAN] > [WiFi] > [Wireless Network], then
modify the WiFi name, authentication method and WiFi password as prompted on

- 11 -
the page.
3. Q: How to optimize roaming for multi-APS deployment?
A: 1) Adjust channel bandwidth (for poor signal/AP-dense environments):
- If auto channel selection is insucient (e.g., heavy inteerence, dense
deployment), go to [WLAN] > [AP List], select the target device, click [Manage] to
access its oveiew.
- Go to [RF Settings] for details; reduce channel bandwidth in "2.4G
Conguration" and "5G Conguration" to minimize inteerence.
2) Test roaming & record data:
- Connect to the WiFi, play online videos on mobile devices (simulate real
roaming).
- Go to [Online Clients] in the management page, record "edge signal strength"
for reference.
3) Adjust roaming parameters:
Go to [WLAN] > [Roaming]. For "2.4G Congure" and "5G Congure", adjust:
- Access threshold: Minimum signal strength for client access
- Exclusion threshold: Signal strength to disconnect from current AP
- Roaming sensitivity: Response speed for client switching
4) Repeat verication & optimization:
After adjusting parameters, repeat step 2. Compare edge signal strength, and
roaming smoothness. Fine-tune and verify repeatedly to nd optimal settings for
best roaming peormance.
4. Q: How to change the AP login password?
A: The default login password is "admin". Choose one of the two methods below:
1) Link to WiFi password via Setup Wizard:
When conguring WiFi in [Setup Wizard], check "Set WiFi password as login
password". After setup, the login password will automatically match the WiFi

- 12 -
password—no manual adjustment needed.
2) Manual modication:
To change the login password separately, log in to the management page, go to
[System Admin] > [Password], enter and conrm the new password as
prompted. All managed APs will sync the new password after modication.

Ⅹ. FCC Statement
This equipment has been tested and found to comply with the limits for a Class B
digital device, pursuant to pa 15 of the FCC Rules. These limits are designed to
provide reasonable protection against harmful inteerence in a residential
installation. This equipment generates, uses and can radiate radio frequency energy
and, if not installed and used in accordance with the instructions, may cause harmful
inteerence to radio communications. However, there is no guarantee that
inteerence will not occur in a paicular installation. If this equipment does cause
harmful inteerence to radio or television reception, which can be determined by
turning the equipment o and on, the user is encouraged to t to correct the
inteerence by one or more of the following measures:
•Reorient or relocate the receivingantenna.
•Increase the separation between the equipment and receiver.
•Connect the equipment into an outlet on a circuit dierent from that to which the
receiver is connected.
•Consult the dealer or an experienced radio/TV technician for help.
Caution: Any changes or modications to this device not explicitly approved by
manufacturer could void your authority to operate this equipment.
This device complies with pa 15 of the FCC Rules. Operation is subject to the
following two conditions: (1) This device may not cause harmful inteerence, and
(2) this device must accept any inteerence received, including inteerence that
may cause undesired operation.
RF Exposure Information
This equipment complies with FCC radiation exposure limits set foh for an
uncontrolled environment. This equipment should be installed and operated with
minimum distance 20cm between the radiator and your body.
- 13 -

IC Warning
This device contains licence-exempt transmitter(s)/receiver(s) that comply with
Innovation, Science and Economic Development Canada's licence-ex-empt RSS(s).
Operation is
subject to the following two conditions:
(1) This device may not cause interference.
(2) This device must accept any interference, including interference that may cause
undesired operation of the device.
Cet appareil contient des émetteurs/récepteurs sans licence qui sont conformes aux RSS
sans licence d'Innovation, Sciences et Développement économique Canada.
L'exploitation est soumise aux deux conditions suivantes: (1) Cet appareil ne doit pas
causer d'interférences.
(2) Cet appareil doit accepter toute interférence, y compris les interférences qui
pourraient causer un fonctionnement indésirable de l'appareil.
Any changes or modifications not expressly approved by the party responsible for
compliance could void the user’s authority to operate the equipment. Tous les
changements ou modifications non expressément approuvée par le responsible de la
conformité pourrait vider l’utilisateur est habilité à exploiter l’équipemen.
ISEDC Radiation Exposure Statement:
This equipment complies with ISEDC RF radiation exposure limits set forth for an
uncontrolled environment. This transmitter must not be co-located or operating in
conjunction with any other antenna or transmitter.
This equipment should be installed and operated with minimum distance 20cm
between the radiator&your body.
Cet appareil est
Conforme aux limitesd’exposition de rayonnement RF ISEDC établiespour un
environnement non contrôlé. Cetémetteur ne doit pas être co-implanté
oufonctionner en onjunction avec toute autreantenne ou transmetteur.
Cet équipement doit être installé et utilisé avec une distance minimale de 20cm
entre le radiateur et votre corps.
The device for operation in the band 5150-5250 MHz is only for indoor use to
reduce the potential for harmful interference to co-channel mobile satellite
systems.
L'appareil destiné à fonctionner dans la bande 5150-5250 MHz est uniquement
destiné à une utilisation à l'intérieur afin de réduire le risque d'interférence
nuisible aux systèmes mobiles par satellite dans le même canal.