E-mail our customer service:
Aimiler is here to help and we
are glad to serve you.
aimiler@outlook.com
( Version : �.�)
PORTABLE EV CHARGER
USER MANUAL
CONTACT US: aimiler@outlook.com
A

CONTENTS
USER MANUAL�
IMPORTANT SAFETY INSTRUCTIONS
WARNING: This manual contains important instructions for AC charger series that shall be
followed during installation, operation and maintenance of the unit.
a. Read all the instructions before using this product;
b. This device should be supervised when used around children;
c. Do not put fingers into the electric vehicle connector;
d.Do not use the product when the charging cable has been damaged or frayed;
e. Do not use this product if the enclosure or the EV connector is broken, cracked, open, or
shows any other indication of damage;
f. The whole installation should be operated by qualified professional electrician;
g. Be careful! Any incorrect operation may cause life danger, injury or equipment damage.
The manufacturer would refuse to accept any claim arising therefrom. Please make sure this
instruction manual is fully understood and the specified conditions are met before any
operations of the EV charger;
h. Please do not operate under any circumstances that may cause electric leakage;
i. Changes or modifications to this unit not expressly approved by the part responsible for
compliance could void the user’s authority to operate the equipment;
j. This equipment complies with FCC radiation exposure limits set forth for an rolled environ-
ment. This equipment should be installed and operated with a minimum distance of ��cm
between the radiator and your body.
�. SAFETY TIPS
USER MANUAL�
SAVE THESE INSTRUCTIONS
CONTENTS
�. Safety Tips……………………………………………………………………………�
�. Important Information………………………………………………………………�
�.� Specified use……………………………………………………………………�
�.� About this Manual………………………………………………………………�
�. Use of Products………………………………………………………………………�
�.� Product Appearance Size………………………………………………………�
�.� Product Appearance Introduction……………………………………………�
�.� Product Performance Description……………………………………………�
�.� LED Indicator Instruction………………………………………………………�
�.� Equipment Parts List……………………………………………………………�
�. Operation Guide………………………………………………………………………�
�.� Operation Steps …………………………………………………………………�
�. Wallbox Installation Method………………………………………………………�
�.� Wallbox Rendering……………………………………………………………�
�.� Fixing Cover Installation Drawing……………………………………………�
�.� Gun Holder Installation Drawing……………………………………………��
�.� Installation Environment Requirements…………………………………��
�.� Power Supply Requirements………………………………………………��
�. Troubleshooting……………………………………………………………………��
�.� Troubleshooting Table………………………………………………………��
�. Maintenance………………………………………………………………………��
�.� Maintenance……………………………………………………………………��
�.� Important Matters……………………………………………………………��
USER MANUAL�
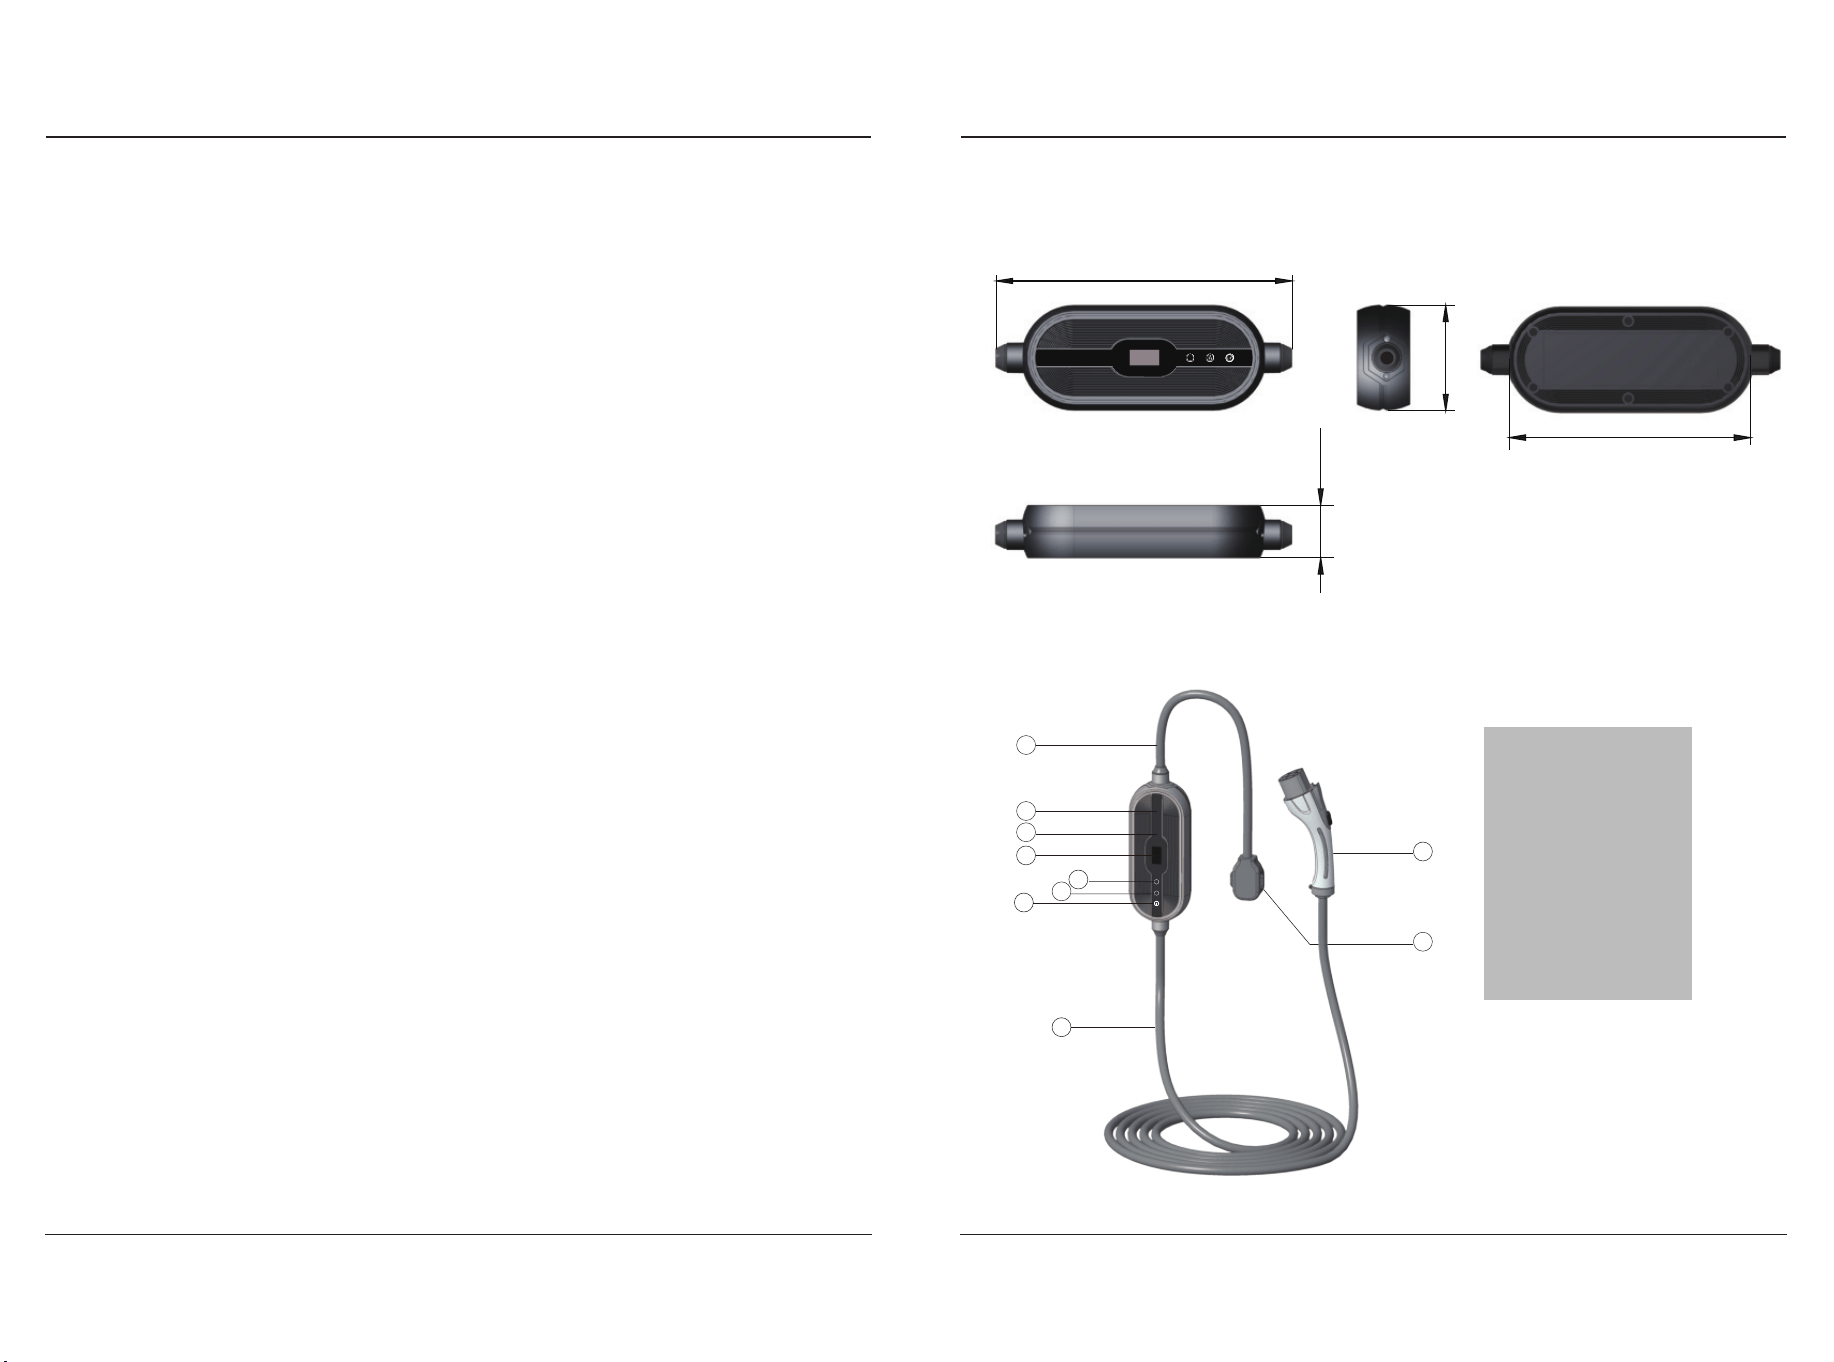
�.� Product Appearance Size
�.� Product Appearance Introduction
�. USE OF PRODUCTS
�.� Specified use
● This type of product is a charger that can charge electric vehicles in indoor and outdoor
areas;
● When installing and connecting the charger, the relevant regulations of the local country
or government shall be observed;
● The specified use of the equipment includes complying with the environmental condi-
tions under any circumstances;
★ During the storage or use of the equipment, it is necessary to store the charger and its
supporting components in a dry and ventilated indoor place with a temperature of -
�� ℃~+�� ℃ and a daily average temperature of ≤ �� ℃ within �� hours;
★ Monthly average relative humidity ≤ ��% (�� ℃), no condensation on the surface;
★ After the installation, the shell of the charger shall be kept sealed to avoid soaking in rain;
★ The place of use shall be free of explosive media, the surrounding media shall not contain
harmful gases and conductive media that corrode metals and damage insulation, and shall
not be filled with steam or serious mold;
★ The place of use should avoid direct sunlight. When installing outdoors, it is recommend-
ed to install sunshade facilities for the charger;
When the AC charger is not in use, the charging gun shall be placed �.� m~�.� m away from
the ground;
● Equipment shall be developed, produced, inspected and filed according to relevant safety
standards. Therefore, there will be no unnecessary property loss or personnel danger, if the
instructions and safety standards are followed strictly;
● The instructions contained in this manual must be strictly followed, otherwise potential
safety hazards may occur or the built-in protection devices may fail. Although this manual
describes the relevant safety tips, it is still necessary to pay attention to the safety regula-
tions and accident prevention regulations in accordance with the corresponding applica-
tion;
● Due to technical or legal restrictions, it is impossible to supply all models/options to the
region;
● For any special requirements, pls feel free to contact us.
�. � About this Manual
● This manual is applicable to the following groups:
★ The end customer (EV charger user)
★ The technical staff of debugging and service
● The final explanation of this manual belongs to the company.
�. IMPORTANT INFORMATION
USER MANUAL�
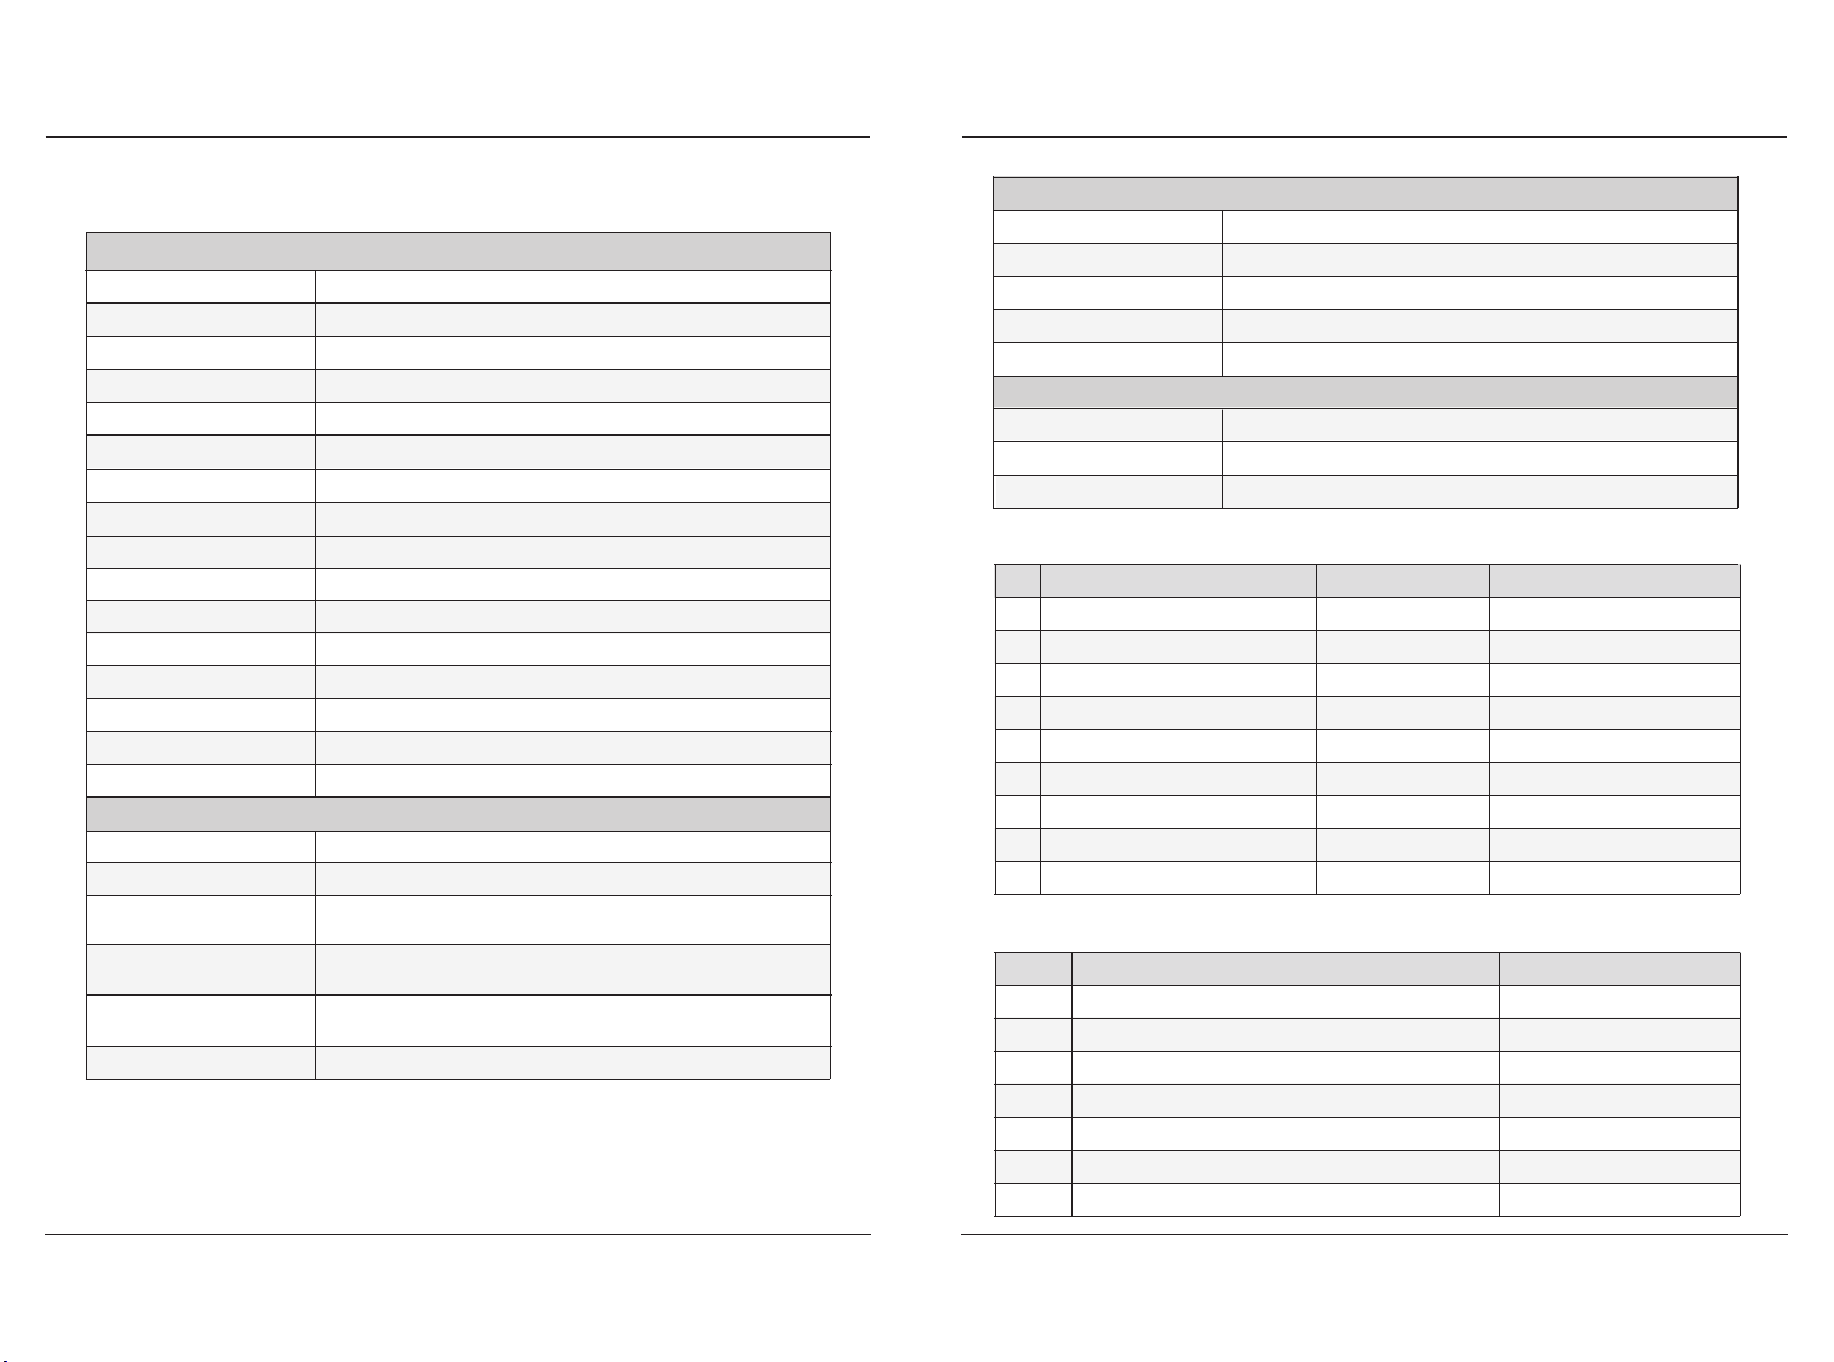
[ A ] Input Wire
[ B ] Time Button
[ C ] Current Button
[ D ] Indicator
[ E ] Display Screen
[ F ] Panel
[ G ] LOGO
[ H ] Output Wire
[ I ] Charging Gun
[ J ] Plug
229988..0000mmmm
5533..0000mmmm
110055..8800mmmm
224466..7700mmmm
A
B
C
D
E
F
G
H
I
J
A
11.73inch
�.��inch
9.71inch
�.��inch
�. USE OF PRODUCTS
USER MANUAL�
�. USE OF PRODUCTS
USER MANUAL�
�.� Product Performance Description
Product Characteristics
Protection Characteristics
Product Item
Output Power
Operating Current
Current Adjustability
Installation Method
Operating Voltage
Operating Frequency
Cable Length
Indicator
User Interface
Charging Method
Communication Method
Appearance Size
Product Weight
Over Voltage Protection
Under Voltage Protection
Over Load Protection
Over Temperature
Protection
Ground Protection
Leakage Protection
ZA��-U���KBF-F���
�kW
�� A(Max)
��A-��A-��A-��A
Portable/Wallbox
L� /L� /PE;��� Vac(±�� %)
��Hz±�Hz
AC Input Plug
Connector Type
NEMA ��-��P
Type �(SAE J����)
�.�m
�-Color Indicator
�.�inches OLED Screen
Plug and Charge/ APP Charging
WiFi&Bluetooth
��� mm X ��� . � mm X �� mm
<�.�kg
Input Voltage>��� %, relay is off
Input Voltage<�� %, relay is off
CCID��, leakage, the relay was off
Output Current>��� %, relay disconnected, the power
supply needed to be cut off and restored
The ground wire is not detected or the ground wire is discon-
nected during charging. The relay is disconnected.
When the temperature of the main board reached �� ℃ , the
power was reduced to ��%, and it was turned off after ��℃
No.
�
�
�
�
�
�
�
�
�
Charging Status
Standby
Insert the Plug
Charging
C P Abnormal
Over voltage/Under voltage
Ground Fault
Over-current Protection
Leakage Protection
Over-temperature Protection
Indicator Color
Blue
Green
Green
Red
Red
Red
Red
Purple
Purple
Indicator Status
Always on
Always on
Flashing
Always on
Flashes once every �S
Flashes once every �S
Flashes once every �S
Flashes once every �S
Flashes once every �S
No.
�
�
�
�
�
�
�
Equipment Parts
AC Charging Pile
Fixing Cover
Gun Holder
Screw
Expandable Rubber Stopper
Certification
User Manual
Quantity
�
�
�
�
�
�
�
�.� LED Indicator Instruction
�.� Equipment Parts List
Environment Characteristics
Reliability
Operating Temperature
Operating Humidity
Operating Altitude
Protection Degree
MTBF
Warranty
Safety Standard
-��℃ ~ +��℃(-��℉~+���℉)
� % ~ �� % RH
<���� m
TYPE �
��� , ���H
�Years
UL����, UL����-�/-�, UL����, UL���, UL����
Storage Temperature-��℃ ~ +��℃(-��℉~+���℉)
�. OPERATION GUIDE�. OPERATION GUIDE
USER MANUAL�
�.� Operation Steps
Plug the charger into the socket
Adjust charging time according to personal time.
Time Button(adjust reservation time)
Operating Status
Operating Temperature
Operating Voltage
Power Quantity
( �� A、�� A、�� A、�� A)
Set the charging delay
Indicator
Free
Connect
Charge
Current Button(Adjust current level)
Long press to switch charge mode
Adjust the charging current
according to the power supply
current of the socket
Adjust
charging
parameter
Specification of Switch and Socket
For power safety, add overcurrent protection device/circuit breaker at the product input.
This product must be grounded. If it should malfunction or break down,grounding provides
a path of least resistance for electric current to reduce the risk of electric shock. This product
is equipped with a cord having an equipment grounding conductor and a grounding plug.
The plug must be plugged into an appropriate outlet that is properly installed and grounded
in accordance with all local codes and ordinances.
Power
�kW
Current
��A(Max)
Switch/Socket
��A(�P leakage protector)/��A Socket
�
�
Free
Delay
kwh
Power
���V
Improper connection of the equipmentgrounding conductor is able to result in
a risk of electric shock. Check with a qualified electrician or serviceman if you
are in doubt as to whether the product is properly grounded. Do not modify the
plug provided with the product if it will not fit the outlet, have a proper outlet
installed by a qualified electrician.
GROUNDING INSTRUCTIONS
WARNING
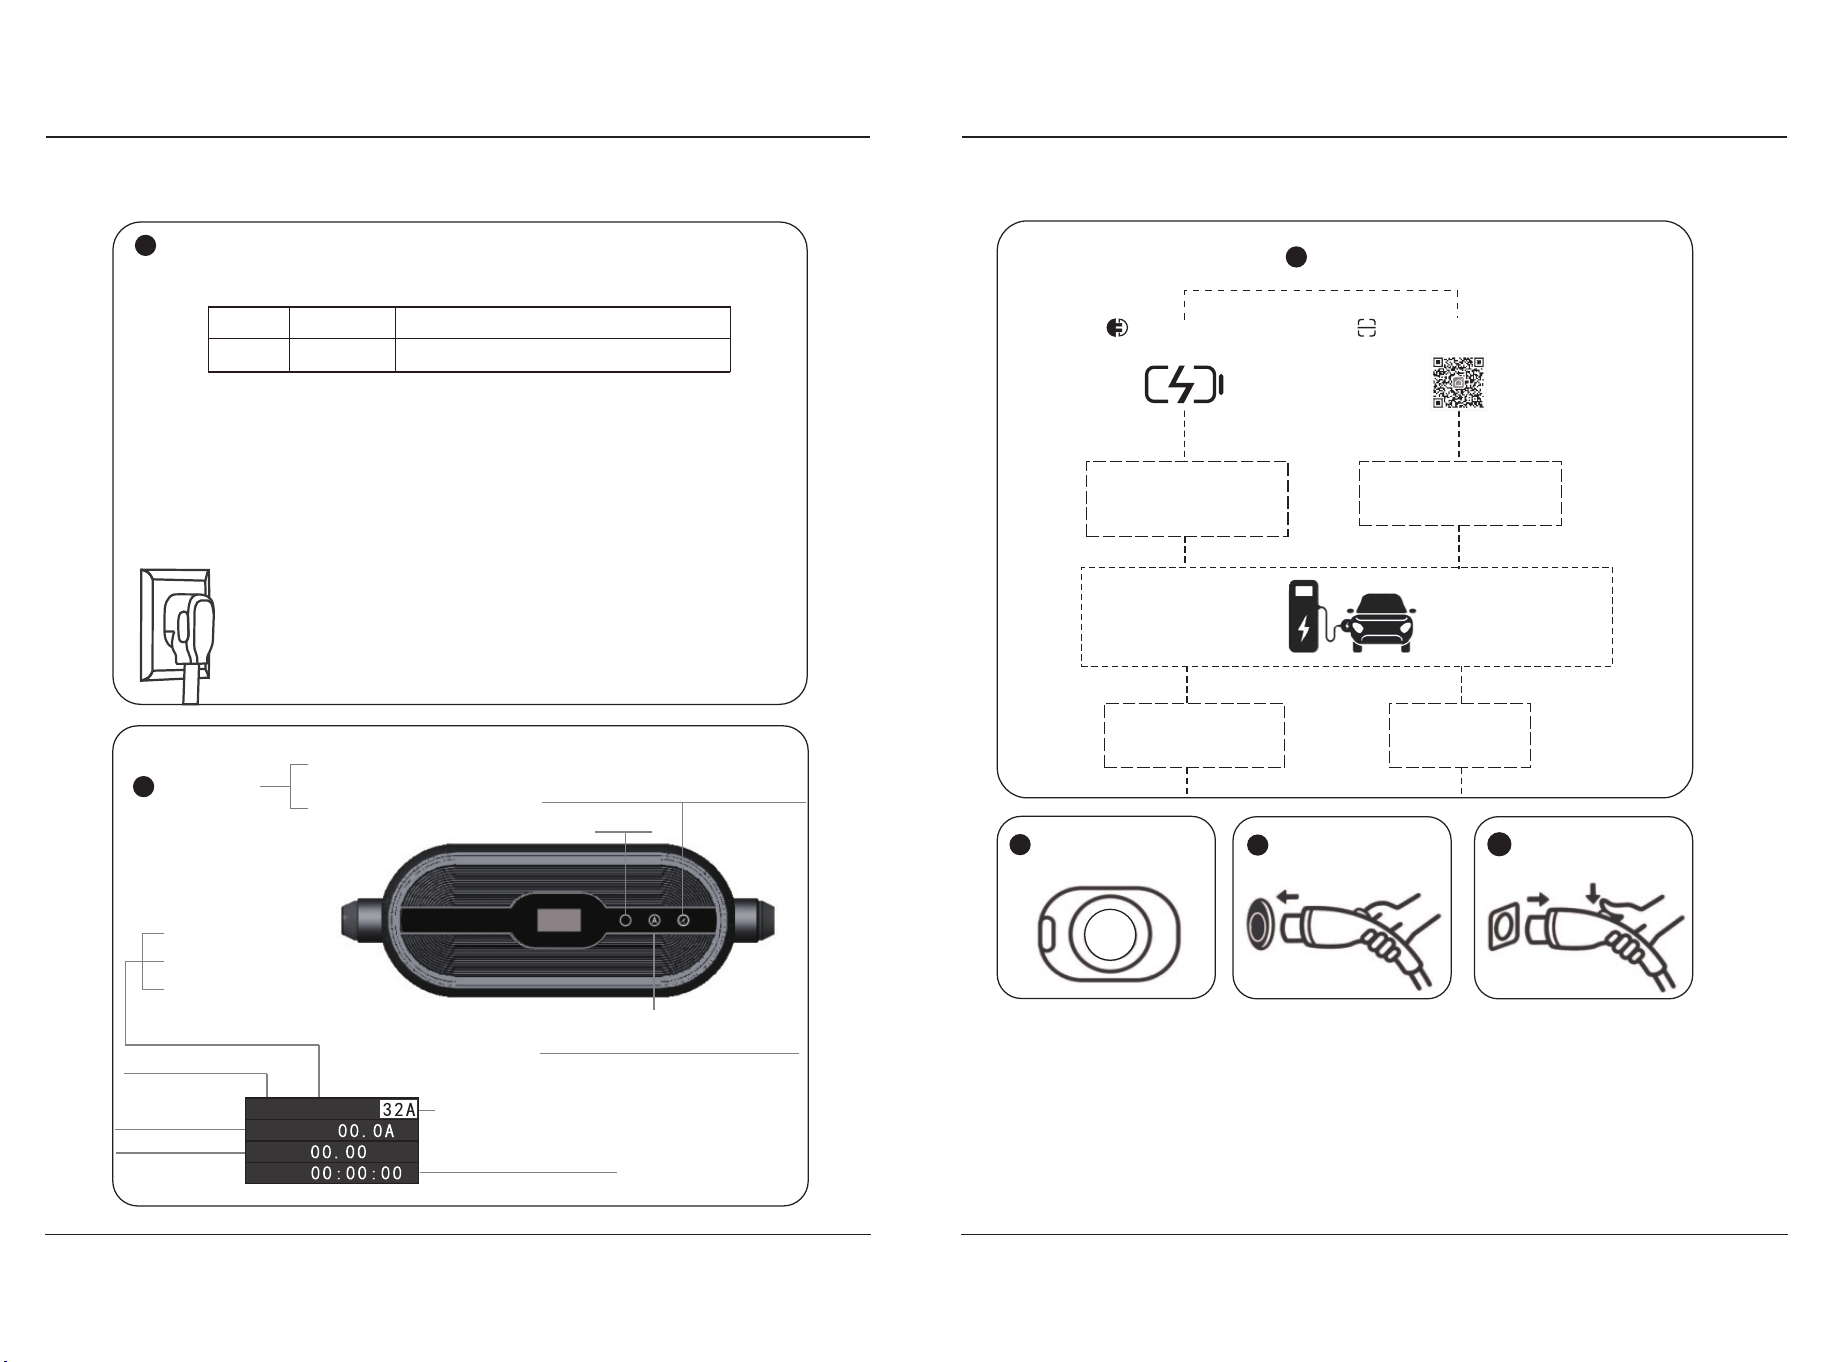
Open the charging seat
and confirm that there
is no foreign matter
Hold the charging gun
and connect the
electric vehicle
After charging, remove
the charging gun
�
�
�
Charging
The charging gun is directly
inserted into the vehicle
charging base, and the
charging starts
Press the car remote
control to unlock and
stop charging
Using the mobile
for stop
Start charging using the
mobile phone client of
the binding platform
�
USER MANUAL�
��℉
Modes
Plug and Play
Charge Mode
App Start Charge Mode
Scan to download App
USER MANUAL��
�. WALLBOX INSTALLATION METHOD
● As shown in the above figure, place the fixing cover on the wall at a proper height, mark
the hole location on the wall with a pencil, and use an impact drill to drill three φ� holes on
the wall according to the hole marking, and drill three φ� expansion rubber plugs in the
three holes. Finally, place the wall hanging shell on the wall, align the fixing holes of the
fixing cover with the wall holes, and fasten them with φ� tapping screws.
�.� Fixing Cover Installation Drawing
A
B
C
D
E
F
G
A
C
D
E
F
B
[A] Wall
[B] Charging Pile
[C]φ� Wall Hole
[D]φ� Expandable Rubber Stopper
[E] Fixing Cover
[F]φ� Self-tapping screw
[A] Socket
[B] Charging Pile
[C] Fixing Cover
[D] Wall
[E] Plug
[F] Gun Holder
[G] Charging Gun
�.� Wallbox Rendering
�. WALLBOX INSTALLATION METHOD
● As shown in the above figure, place the gun holder on the wall at a proper height, mark
the hole location on the wall with a pencil, and use an impact drill to drill four φ� holes on
the wall according to the hole marking, and drill four φ� expansion rubber plugs in the four
holes. Finally, place the gun holder on the wall, align the fixing holes of the gun holder with
the wall holes, and fasten them with φ� tapping screws.
● The installation position of the charger shall not be close to dangerous locations or areas
such as water, oil and gas pipelines;
● The installation position shall be convenient for charging, the wiring length shall be
shortened to reduce the energy consumption of cable resistance when laying lines;
● The wall hanging parts and shall be fixed with screws. The installation wall shall be able
to bear the gravity of the charger and its accessories, and shall not tilt after installation. The
wall should not be too close to the internal line;
● The protection degree for indoor installation shall be at least TYPE �, and that for outdoor
installation shall be at least TYPE �. It is recommended that the charger be installed in an
environment with sunshade or umbrella; The lighting and passage at the installation site of
the charger must be safe and smooth;
● A certain operating space shall be reserved for the installation of charger to facilitate the
overhaul and maintenance of engineering personnel;
● It is recommended that the customer install a circuit breaker at the front end of the
charger. The mini circuit breaker should meet local regulations.
�.� Gun Holder Installation Drawing
�.� Installation Environment Requirements
E
C
A
D
B
The power supply mode of the portable AC charger is AC single-phase power supply, and the
input electrical requirements are:
● AC Operating Voltage: Refer to page �;
● AC Operating Frequency: Refer to page �;
● The capacity of the power supply system shall be greater than the maximumoperating
power of the product;
● For the specification of power socket, please refer to Specification and Configuration
Table of Switch Socket on page �.
�.� Power Supply Requirements
[A]φ� Wall Holes
[B]φ� Expandable
Rubber Stopper
[C]Wall
[D]Gun Holder
[E]φ� Self-tapping
screw
USER MANUAL�

FailureCauses and Solutions
(*) Possible fault causes (fault status LED lights up):
In principle, the fault must be cleared by pulling out the charging gun. The following reasons
may lead to failure: Ground fault, electric leakage, charger pile ID not set. Please contact your
service partner to maintain the equipment.
�.� Troubleshooting Table
�. TROUBLESHOOTING
�. TROUBLESHOOTING
USER MANUAL��USER MANUAL��
Unable to turn on
Unable to start
charging
The screen
displays "CP Fault"
Incomplete charge
or overtime charge
The phone cannot
find the device
The screen displays
"Overvoltage fault"
The screen displays
"Low voltage fault"
The screen displays
"Ground fault"
● Check the power supply and cables to ensure that they are not
damaged in any way and are properly connected and that the
power supply is properly powered.
● If you cannot resolve the problem, please contact a service
partner.
● High temperatures can cause current derating or interrupt
charging process.
● Overvoltage or undervoltage may cause interruption of charging.
● Poor grounding leads to incomplete product protection charging.
● Please restart the device to charge.
● If you cannot solve the problem, please contact the service
partner.
● Check the vehicle connector to make sure there is no foreign
matter inside the gun, the cable is not damaged, and the vehicle
connector and socket are in good contact.
● Check the unlock button to make sure it is locked and that the
vehicle is set up properly.
● Touched the delayed charging button by mistake.
● Your EV charger is "APP Start" charging mode: Pull out the
charging gun, long press the "A" button to swtich to "Plug and Play"
mode.
● The frequency band of the phone and the device do not match
(must be connected via the same �.� GHz WIFI).
● If the device is already tied to another phone. New phones cannot
be added. If necessary. To restore factory settings: Press the Current
button and Timer button at the same time until the screen displays
‘WIFI reset’ and the white light flashes.
● Indicates that the charger input voltage is higher than the limit
value ���Vac(max).
● Contact an electrician to confirm whether the supply voltage is
normal
● If you cannot solve the problem, please contact the service
partner.
● Indicates that the charger input voltage is below the limit
���Vac(min).
● Contact an electrician to confirm that the supply voltage is
normal.
● Please check whether the power supply load capacity is sufficient.
● If you cannot solve the problem, please contact the service
partner.
● Check whether the ground status of the power supply socket is
valid.
FaultReasons&Solutions
The screen displays
"Overcurrent fault"
The screen displays
"Over Temperature
fault"
Button not
responding
Show "no plug"
does not charge?
● Please make sure that the vehicle charging current is within the
rated range.
● If you cannot solve the problem, please contact the service
partner.
● Stop charging and leave it for �� minutes before starting charging
again.
● If you cannot resolve the problem, please contact the service
partner.
● You can operate the screen button before inserting the gun, and
the button will be locked and not respond after inserting the gun.
● Please contact the service partner.
● Avoid fast and frequent plugging and unplugging.
● Maybe vehicle problem, contact after-sale service.
NOTICE
a. The charger must be grounded through the grounding conductor of the permanent wiring
system or equipment;
b. Please avoid installing in the direct sunlight or exposure environment, and try to use the
charger in a cool and ventilated place;
c. Do not install and use the charger near flammable, explosive, combustible and chemical
substances or steam;
d. Before installing or cleaning the charger, the power supply must be cut off to ensure that
there is no power input. Do not touch the heat source, dirt or water source on the contact
surface;
e. Please use the charger within the specified working parameters;
f. Only connect electric vehicles. Do not connect other loads (electric tools, etc.). Do not use
the charger for other purposes than charging or other vehicles that do not support the AC
charger standard of the country where the product is located;
g. The charger must be checked regularly. If it is found to be defective, cracked, worn,
damaged and inoperable, the charger shall be stopped immediately and the after-sales
service telephone shall be called;
h. Do not attempt to open, disassemble, modify or transform the charger without a profes-
sional electrician. The charger is not a device that can be maintained by users. Do not
remove safety symbols, warning prompts, nameplates, signs or pipeline marks;
i. If you or your car are exposed to rainstorm, lightning, heavy snow or other severe weather
conditions, do not use the charger to prevent any parts from being damaged;
j. Please handle with care when transporting the charger. Do not subject it to strong external
force impact, and do not drag, twist or step on the charger and cable to prevent damage to
any parts. At any time, please avoid and prevent the charger from being damaged by
moisture, liquid and other foreign matters. If there is water, damage or corrosion, please do
not use it. Do not touch or charge the cable and charging gun head with wires, tools or other
sharp hard objects;
k. If your EV is covered with a car cover or a car coat, please remove it before charging the
car;
l. Users may affect or impair the function of the charger during usage if he/she wears any
medical or implantable electronic device, such as cardiac defibrillators, pacemakers, etc;
m. During transportation, there should be no severe vibration, impact, exposure to sunlight,
rain, or dumping of the charging pile.
USER MANUAL��
�. MAINTENANCE
�. MAINTENANCE
USER MANUAL��
�.� Maintenance
�.� Important Matters
● The following routine maintenance items are only for reference, please refer to relevant
standards and operation instructions for operation;
● Sunshade and rainproof measures shall be taken for the charging pile, and it is recom-
mended to install a canopy outdoors;
● Regularly check whether the bolts of the charging pile are fastened, whether the connect-
ing wire is loose, and whether the connection is not firm, and check whether there is short
circuit;
● Pay attention to lightning protection and ensure effective shielding and reliable ground-
ing of the charging pile;
● When using, try to control the output voltage and current of the charging pile within the
nominal range, so as to ensure that the charging pile can work with the maximum efficiency;
● When the charging pile is out of service, the charging output shall be stopped first, then
the power plug shall be pulled out and the power shall be cut off, then the cable shall be
wound, and the charging pile shall be put back to its original position after the temperature
of the charging pile drops to normal temperature;
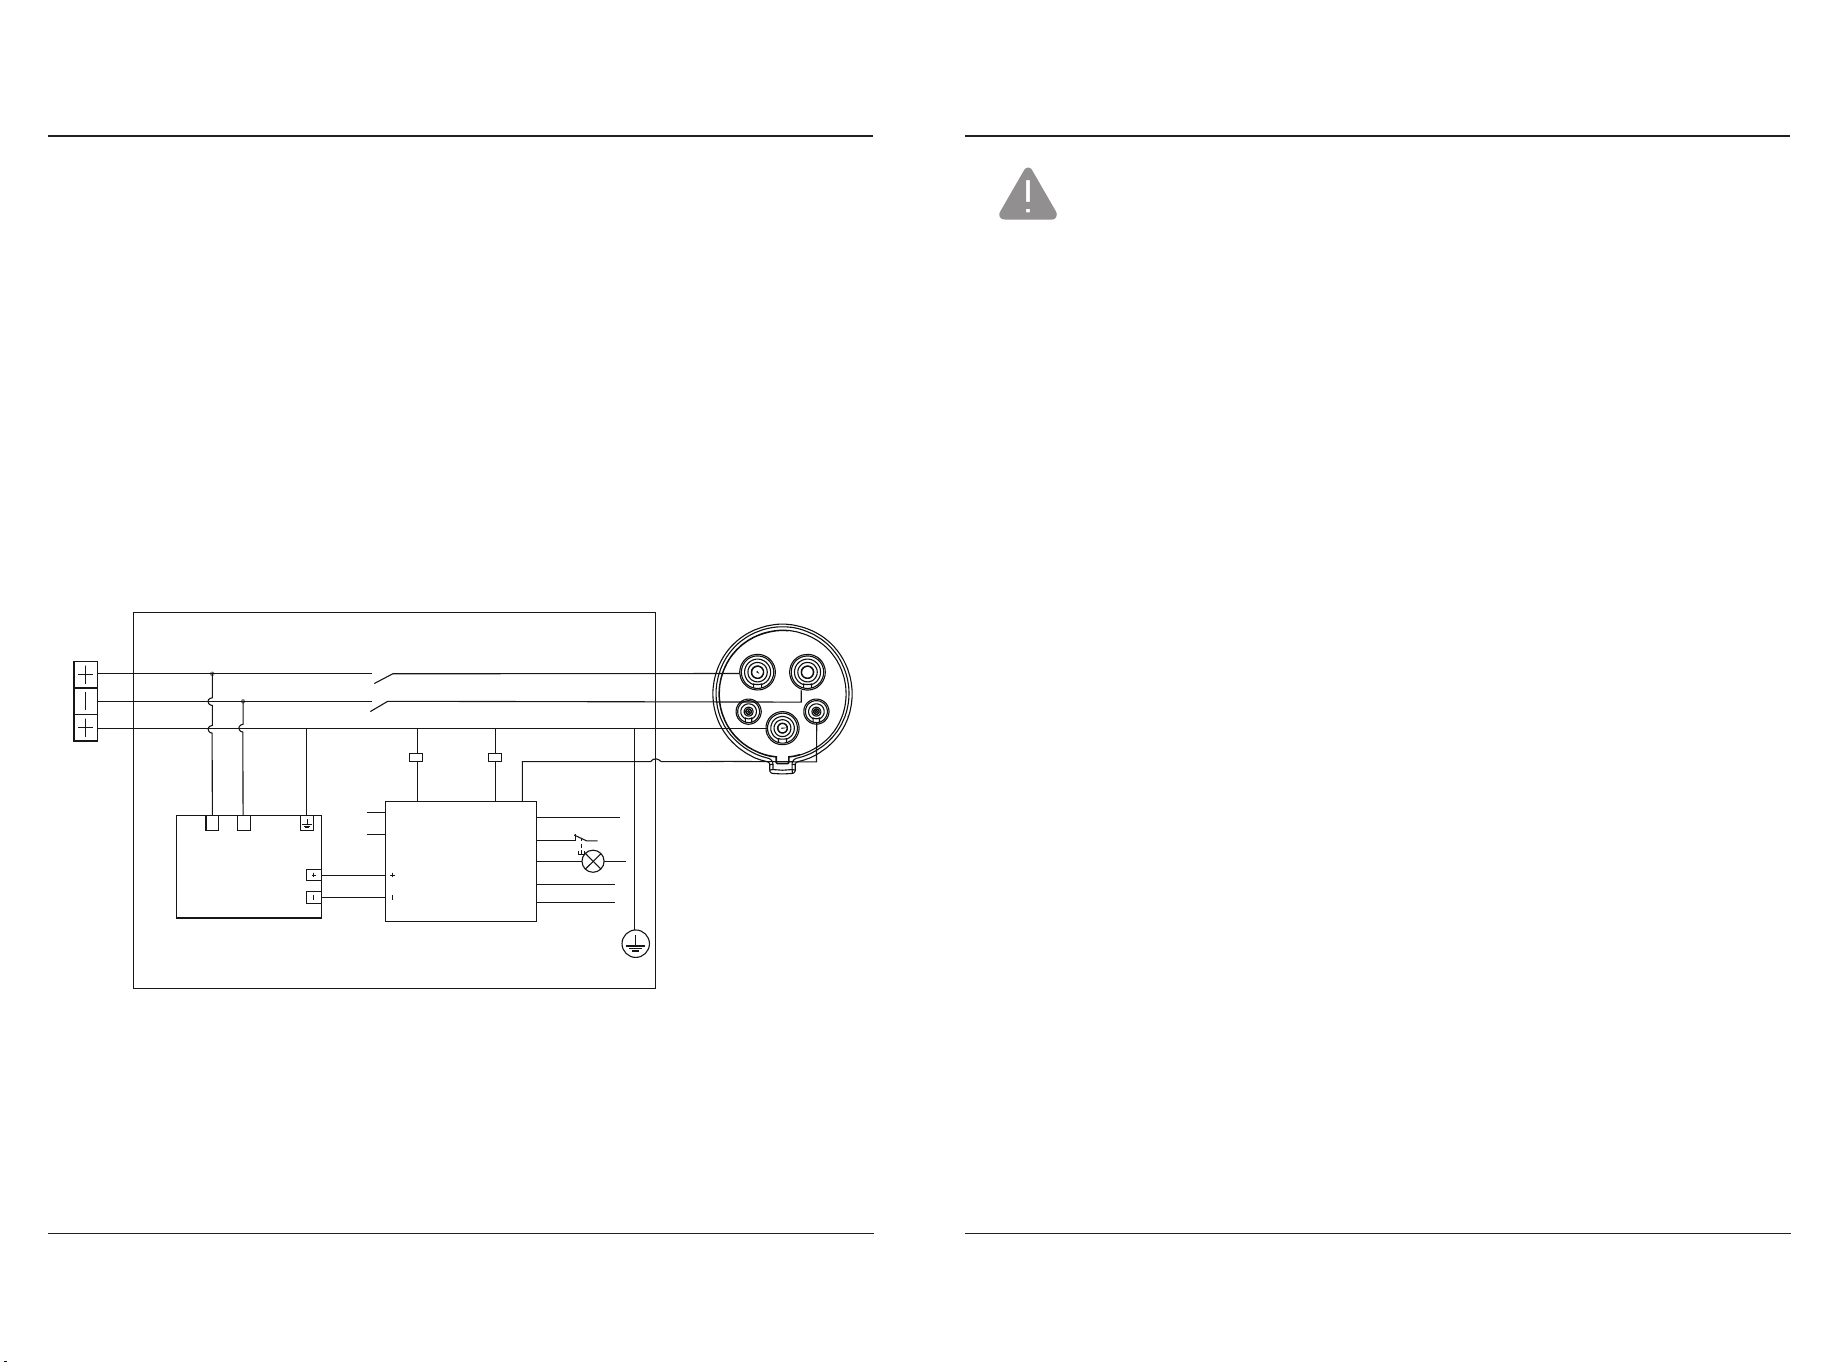
● The electrical schematic diagram of the charging pile is shown in the figure below.
● To ensure that you can enjoy the warranty service, please ensure that the tear-proof label
on your charging pile is intact;
● The warranty period of your charging pile shall be subject to the transportation and
delivery period. If it cannot be provided, it shall be subject to the ex factory date of the
equipment;
● Please show the original of the unit and invoice during warranty.
L�
KA�
AC���V
DC��V
KA�
KA�KA�
LN
L�
PE
bluetooth
&WIFI
�G
relay controlrelay control
MAIN CONTROL CIRCUIT
POWER MODULE
temperature control
emergency stop
LED
electricle-
akage detection
L�
L�
PE
CP
gun head
overvoltage & under
voltage protection
��V+output
��V-
��V+output
��V-
power supply
The output side connects the gun head
The input side is connected to the mains

FCC STATEMENTS
This device complies with part �� of the FCC Rules. Operation is subject to the following two
conditions:
(�) This device may not cause harmful interference, and;
(�) This device must accept any interference received, including interference that may cause
undesired operation.
This equipment has been tested and found to comply with the limits for a Class A digital
device, pursuant to part �� of the FCC Rules. These limits are designed to provide reasonable
protection against harmful interference when the equipment is operated in a commercial
environment. This equipment generates, uses, and can radiate radio frequency energy and,
if not installed and used in accordance with the instruction manual, may cause harmful
interference to radio communications. Operation of this equipment in a residential area is
likely to cause harmful interference in which case the user will be required to correct the
interference at his own expense.
USER MANUAL��
�. MAINTENANCE