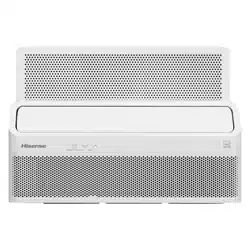
USE AND INSTALLATION MANUAL
MANUEL D'UTILISATION ET D'INSTALLATION
For questions about features, operation/ performance, parts or service,
call: 1-855-344-7367
Pour toutes questions sur les fonctionnalités, le fonctionnement / les
performances, les pièces ou la maintenance, veuillez contacter le :
1-855-344-7367
2
Safety Information ................................ ......
Pre-Installation ..................................... . ..
Installation ..................................... .......
Operation ..................................... ..... . ..
Care and Cleaning ......................................
Troubleshooting ........................................
3
8
14
17
22
23
Table of Contents
3
Safety Information
We have provided many important safety messages in this manual and on your appliance. Always read and obey all safety messages.
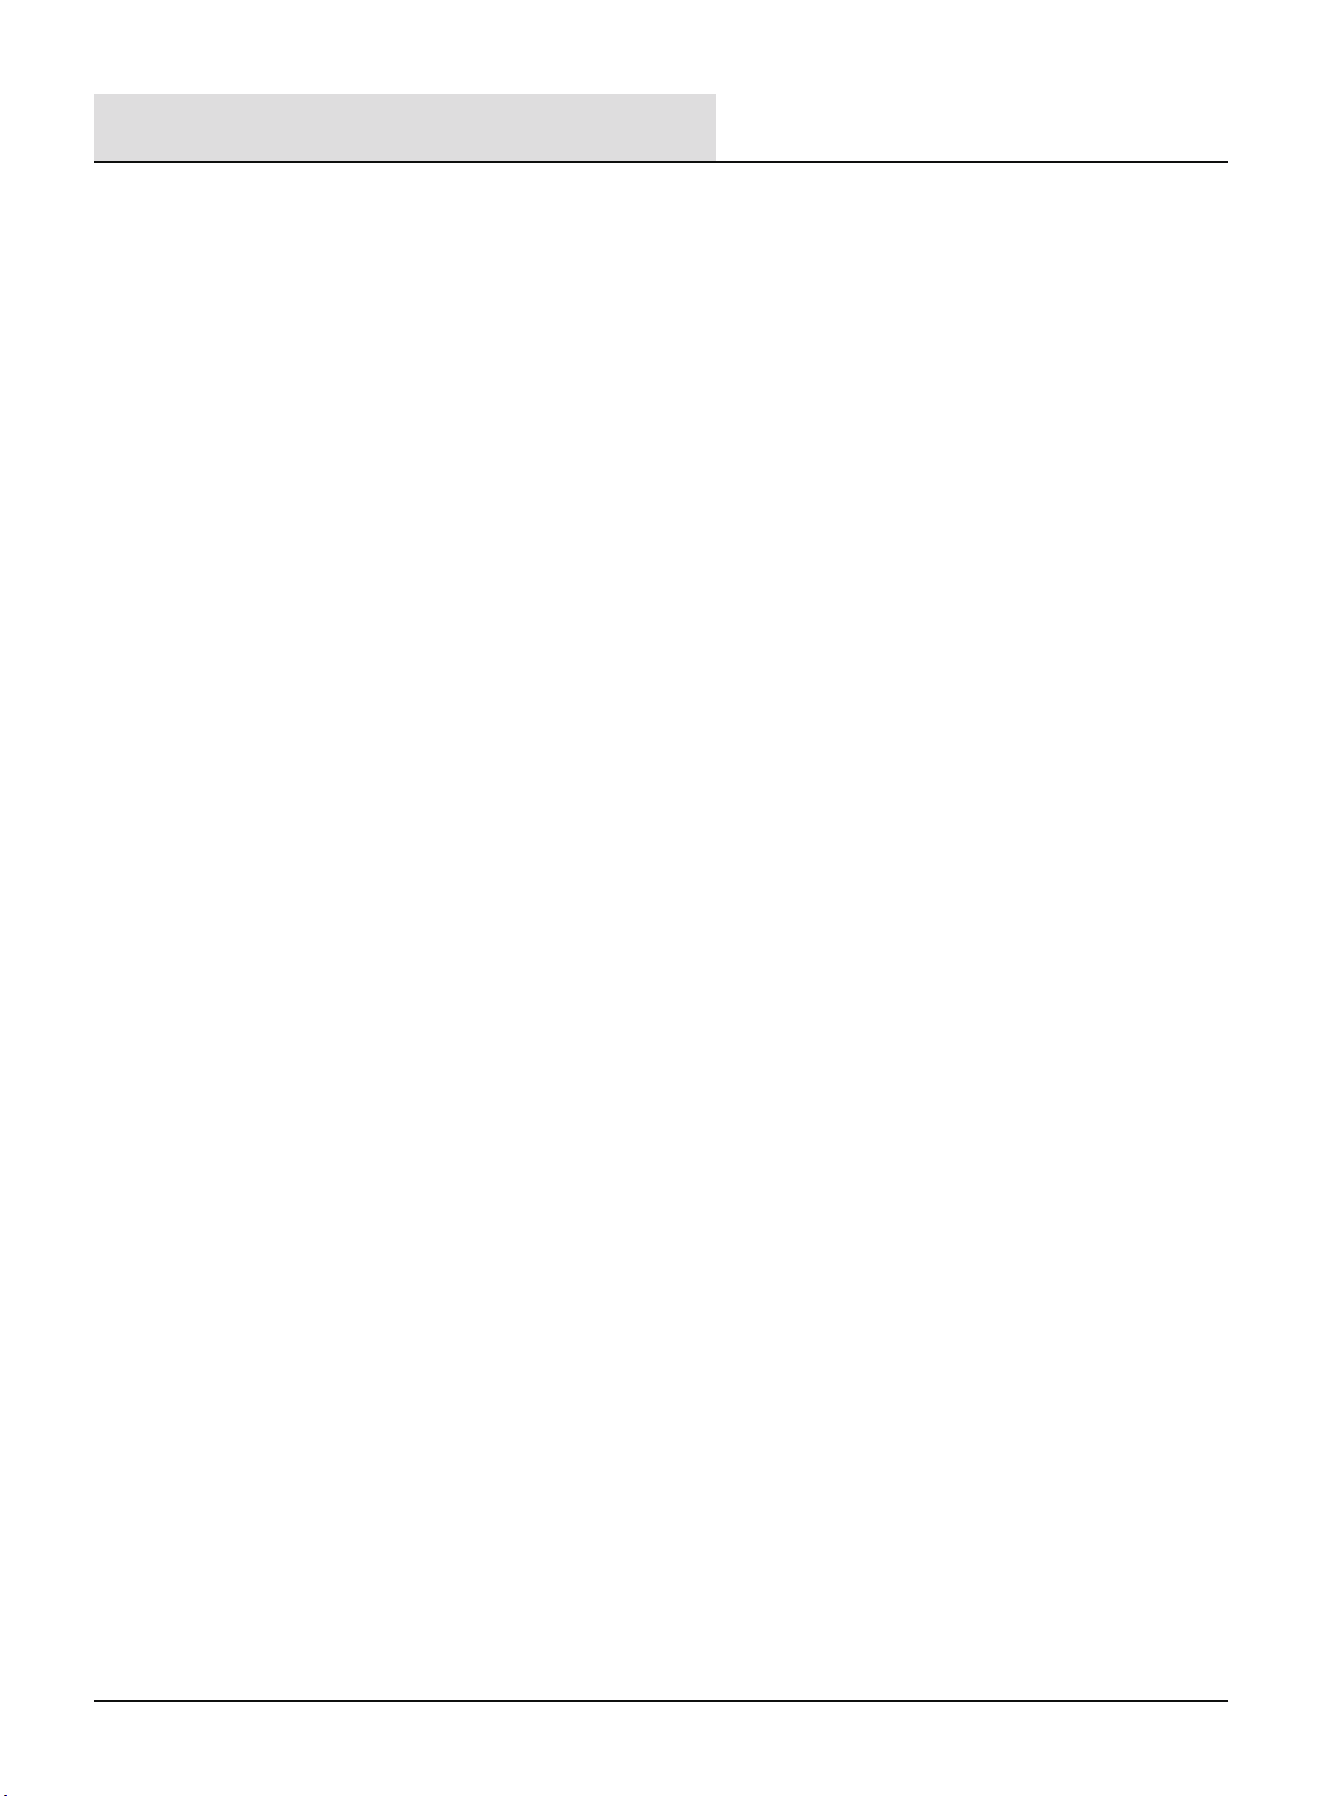
DANGER: This symbol alerts you to a potential hazard, that if not avoided, will result in death or serious injury.
WARNING: This symbol alerts you to a potential hazard, that if not avoided, could result in death or serious Injury.
CAUTION: This symbol alerts you to a potential hazard, that if not avoided, may result in minor or moderate injury.
Explanation of symbols displayed on the unit.
WARNING: Risk of Fire or Explosion. This unit contains ammable refrigerant.
Additional safety precautions must be followed.
1. Do not use means to accelerate the defrosting process or to clean, other than those recommended by the manufacturer.
2. The appliance shall be stored in a room without continuously operating ignition sources (for example: open ames, an operating
gas appliance or anoperating electric heater).
3. Do not pierce or burn refrigerant tubing. Be aware that refrigerants may not contain an odor.
4. Compliance with national gas regulations shall be observed.
5. Keep ventilation openings clear of obstruction.
6. When handling, installing, and operating the appliance, care should be taken to avoid damage to the refrigerant tubing.
7. The maximum refrigerant charge amount is shown on nameplate on the air conditioner.
8. Do not drill holes in the unit.
9. Maintenance, cleaning, and service should only be performed by technicians properly trained and qualied
in the use of ammable refrigerants.
10. Dispose of air conditioner in accordance with Federal and Local Regulations. Flammable refrigerants require special disposal
procedures. Contact your local authorities for the environmentally safe disposal of your air conditioner.
11. The appliance shall be stored so as to prevent mechanical damage from occurring.
12. The appliance shall be stored in a well-ventilated area where the room size corresponds to the room area as specied for operation.
13. This product contains small parts such as (batteries, battery cover and screws) that may cause suffocation if swallowed by children.
14. Do not place items on the air conditioner or bracket.
15. Do not play with the air conditioner or bracket, especially for children.
16. Do not drink water discharged from the air conditioner, it may contain mold and bacteria that can lead to death if ingested.
17. When the air lter is to be removed, do not touch the metal parts of the unit, it may cause injury.
WARNING
This symbol shows that this appliance uses a ammable refrigerant.
If the refrigerant is leaked and exposed to an external ignition source, there is a risk of re.
CAUTION
This symbol shows that the operation manual should be read carefully.
CAUTION
This symbol shows that a service personnel should be handling this equipment with reference to the installation manual.
CAUTION
This symbol shows that information is available such as the operating manual or installation manual.
A2L
A2L
4
Safety Information (continued)
IMPORTANT SAFETY INSTRUCTIONS
To reduce the risk of re, electrical shock or injury when using your air conditioner, follow these basic precautions:
1. Plug into a grounded 3-prong outlet.
2. Do not remove ground prong.
3. Do not use an adapter.
4. Do not use an extension cord.
5. Unplug air conditioner before servicing.
6. Use two or more people to move and install air conditioner.
7. If the SUPPLY CORD is damaged, it must be replaced by the manufacturer, its service agent or similarly qualied persons in
order to avoid a hazard.
DISPOSING OF THE UNIT
1. Before throwing out the device, it is necessary to remove the battery cells and dispose or recycle them properly.
2. When you need disposal of the unit consult our dealer. If pipes are removed incorrectly, refrigerant may blow out and come into
contact with your skin, causing injury. Releasing refrigerant into the atmosphere also damages the environments.
3. Please recycle or dispose of the product packaging material in an environmentally responsible manner.
4. Never store or ship the air conditioner upside down or sideways to avoid damage to the compressor.
5. This appliance is not intended for use by persons (including children) with reduced physical, sensory or mental capabilities, or
lack of experience and knowledge, unless they have been given supervision or instruction concerning use of the appliance by a
person responsible for their safety. Children should be supervised to ensure that they do not play with the appliance.
6. The wiring diagram is shown on nameplate on the air conditioner.
At least 10 cm air space between left/right sides of window air conditioner and adjacent obstacle, at least 50 cm air space
between front/rear sides of window air conditioner and adjacent obstacle, and at least 10 cm air space between top side of
window air conditioner and adjacent obstacle should be maintained during normal operation.
Maintenance, service, and repair personnel must be trained according to UL/CSA 60335-2-40 Ed 4.0
Annex HH and possess the required qualications. Every working procedure that affects safety means
shall only be carried out by competent persons according to “Competence of service personnel”.
Examples for such working procedures are:
· breaking into the refrigerating circuit;
· opening of sealed components;
· opening of ventilated enclosures.
PRECAUTIONS FOR USING R32 REFRIGERANT
The basic installation work procedures are the same as the conventional refrigerant (R22 or R410A).
However, pay attention to the following:
1. Transport of equipment containing ammable refrigerants
Attention is drawn to the fact that additional transportation regulations may exist with respect to equipment containing ammable
gas. The maximum number of pieces of equipment or the conguration of the equipment permitted to be transported together will
be determined by the applicable transport regulations.
2. Marking of equipment using signs
Signs for similar appliances used in a work area are generally addressed by local regulations and give the minimum requirements
for the provision of safety and/or health signs for a work location.
All required signs are to be maintained and employers should ensure that employees receive suitable and sufcient instruction
and training on the meaning of appropriate safety signs and the actions that need to be taken in connection with these signs.The
effectiveness of signs should not be diminished by too many signs being placed together. Any pictograms used should be as
simple as possible and contain only essential details.
3. Disposal of equipment using ammable refrigerants
See national regulations.
4. Storage of equipment/appliances
The storage of the appliance should be in accordance with the applicable regulations or instructions, whichever is more stringent.
5. Storage of packed (unsold) equipment
Storage package protection should be constructed in such a way that mechanical damage to the equipment inside the package
will not cause a leak of the refrigerant charge.
The maximum number of pieces of equipment permitted to be stored together will be determined by local regulations.
5
Safety Information (continued)
6. Information on servicing
Where electrical components are being changed, they shall be t for the purpose and to the correct specication. At all times the
manufacturer’s maintenance and service guidelines shall be followed. If in doubt, consult the manufacturer’s technical department
for assistance.
The following checks shall be applied to installations using FLAMMABLE REFRIGERANTS:
· the actual REFRIGERANT CHARGE is in accordance with the room size within which the refrigerant containing parts are installed;
· the ventilation machinery and outlets are operating adequately and are not obstructed;
· if an indirect refrigerating circuit is being used, the secondary circuit shall be checked for the presence of refrigerant;
· marking to the equipment continues to be visible and legible. Markings and signs that are illegible shall be corrected;
· refrigerating pipe or components are installed in a position where they are unlikely to be exposed to any substance which may
corrode refrigerant containing components, unless the components are constructed of materials which are inherently resistant to
being corroded or are suitably protected against being so corroded.
For Models employing Flammable Refrigerant, the user instruction shall also contain the following
information:
1. Prior to beginning work on systems containing FLAMMABLE REFRIGERANTS, safety checks are necessary to ensure that the risk
of ignition is minimised.
2. For repair to the REFRIGERATING SYSTEM, the following shall be completed prior to conducting work on the system.
· Work shall be undertaken under a controlled procedure so as to minimise the risk of a ammable gas or vapour being present
while the work is being performed.
· All maintenance staff and others working in the local area shall be instructed on the nature of work being carried out. Work in
conned spaces shall be avoided.
· The area shall be checked with an appropriate refrigerant detector prior to and during work, to ensure the technician is aware of
potentially toxic or ammable atmospheres. Ensure that the leak detection equipment being used is suitable for use with all
applicable refrigerants, i.e. non-sparking, adequately sealed or intrinsically safe.
· If any hot work is to be conducted on the refrigerating equipment or any associated parts, appropriate re extinguishing equipment
shall be available to hand. Have a dry powder or CO2 re extinguisher adjacent to the charging area.
· No person carrying out work in relation to a REFRIGERATING SYSTEM which involves exposing any pipe work shall use any sources
of ignition in such a manner that it may lead to the risk of re or explosion. All possible ignition sources, including cigarette
smoking, should be kept sufciently far away from the site of installation, repairing, removing and disposal, during which refrigerant
can possibly be released to the surrounding space. Prior to work taking place, the area around the equipment is to be surveyed to
make sure that there are no ammable hazards or ignition risks. “No Smoking” signs shall be displayed.
Repair and maintenance to electrical components shall include initial safety checks and component inspection procedures. If a fault
exists that could compromise safety, then no electrical supply shall be connected to the circuit until it is satisfactorily dealt with. If the
fault cannot be corrected immediately but it is necessary to continue operation, an adequate temporary solution shall be used. This
shall be reported to the owner of the equipment so all parties are advised.
Initial safety checks shall include:
· that capacitors are discharged: this shall be done in a safe manner to avoid possibility of sparking;
· that no live electrical components and wiring are exposed while charging, recovering or purging the system;
· that there is continuity of earth bonding.
7. Sealed electrical components shall be replaced. 8. Intrinsically safe components must be replaced.
9. Cabling
Check that cabling will not be subject to wear, corrosion, excessive pressure, vibration, sharp edges or any other adverse
environmental effects. The check shall also take into account the effects of aging or continual vibration from sources such as
compressors or fans.
10. Detection of ammable refrigerants
Under no circumstances shall potential sources of ignition be used in the searching for or detection of refrigerant leaks. A halide torch
(or any other detector using a naked ame) shall not be used.
11. Leak detection methods
The following leak detection methods are deemed acceptable for all refrigerant systems.
Electronic leak detectors may be used to detect refrigerant leaks but, in the case of FLAMMABLE REFRIGERANTS, the sensitivity
may not be adequate, or may need re-calibration. (Detection equipment shall be calibrated in a refrigerant-free area.) Ensure that
the detector is not a potential source of ignition and is suitable for the refrigerant used. Leak detection equipment shall be set at a
percentage of the LFL of the refrigerant and shall be calibrated to the refrigerant employed, and the appropriate percentage of gas
(25 % maximum) is conrmed.
Leak detection uids are also suitable for use with most refrigerants but the use of detergents containing chlorine shall be avoided
as the chlorine may react with the refrigerant and corrode the copper pipe-work.
If a leak is suspected, all naked ames shall be removed / extinguished.
If a leakage of refrigerant is found which requires brazing, all of the refrigerant shall be recovered from the system, or isolated (by
means of shut off valves) in a part of the system remote from the leak.
12. Removal and evacuation
When breaking into the refrigerant circuit to make repairs - or for any other purpose - conventional procedures shall be used.
However, for ammable refrigerants it is important that best practice be followed, since ammability is a consideration.
The following procedure shall be adhered to:
- safely remove refrigerant following local and national regulations;
- evacuate;
- purge the circuit with inert gas (optional for A2L);
- evacuate (optional for A2L);
- continuously ush or purge with inert gas when using ame to open circuit;
- open the circuit.
The refrigerant charge shall be recovered into the correct recovery cylinders if venting is not allowed by local and national codes.
For appliances containing ammable refrigerants, the system shall be purged with oxygen - free nitrogen to render the appliance
safe for ammable refrigerants. This process might need to be repeated several times. Compressed air or oxygen shall not be used
for purging refrigerant systems.
For appliances containing ammable refrigerants, refrigerants purging shall be achieved by breaking the vacuum in the system
with oxygen - free nitrogen and continuing to ll until the working pressure is achieved , then venting to atmosphere, and nally
pulling down to a vacuum (optional for A2L). This process shallbe repeated until no refrigerant is within the system (optional for
A2L). When the nal oxygen - free nitrogen charge is used, the system shall be vented down to atmospheric pressure to enable
work to take place.
The outlet for the vacumm pump shall not be close to any potential ignition sources, and ventilation shall be available.
13. Charging procedures
In addition to conventional charging procedures, the following requirements shall be followed.
· Ensure that contamination of different refrigerants does not occur when using charging equipment. Hoses or lines shall be as
short as possible to minimise the amount of refrigerant contained in them.
· Cylinders shall be kept in an appropriate position according to the instructions.
· Ensure that the REFRIGERATING SYSTEM is earthed prior to charging the system with refrigerant.
· Label the system when charging is complete (if not already).
· Extreme care shall be taken not to overll the REFRIGERATING SYSTEM.
Prior to recharging the system, it shall be pressure-tested with the appropriate purging gas. The system shall be leak-tested on
completion of charging but prior to commissioning. A follow up leak test shall be carried out prior to leaving the site.
NOTE: Examples of leak detection uids are
· bubble method,
· uorescent method agents.
6
Safety Information (continued)
7
Safety Information (continued)
14. Decommissioning
Before carrying out this procedure, it is essential that the technician is completely familiar with the equipment and all its detail. It
is recommended good practice that all refrigerants are recovered safely. Prior to the task being carried out, an oil and refrigerant
sample shall be taken in case analysis is required prior to re-use of recovered refrigerant. It is essential that electrical power is
available before the task is commenced.
a) Become familiar with the equipment and its operation.
b) Isolate system electrically.
c) Before attempting the procedure, ensure that:
· mechanical handling equipment is available, if required, for handling refrigerant cylinders;
· all personal protective equipment is available and being used correctly;
· the recovery process is supervised at all times by a competent person;
· recovery equipment and cylinders conform to the appropriate standards.
d) Pump down refrigerant system, if possible.
e) If a vacuum is not possible, make a manifold so that refrigerant can be removed from various parts of the system.
f) Make sure that cylinder is situated on the scales before recovery takes place.
g) Start the recovery machine and operate in accordance with instructions.
h) Do not overll cylinders (no more than 80 % volume liquid charge).
i) Do not exceed the maximum working pressure of the cylinder, even temporarily.
j) When the cylinders have been lled correctly and the process completed, make sure that the cylinders and the equipment are
removed from site promptly and all isolation valves on the equipment are closed off.
k) Recovered refrigerant shall not be charged into another REFRIGERATING SYSTEM unless it has been cleaned and checked.
15. Labelling
Equipment shall be labelled stating that it has been de-commissioned and emptied of refrigerant. The label shall be dated and
signed. For appliances containing FLAMMABLE REFRIGERANTS, ensure that there are labels on the equipment stating the
equipment contains FLAMMABLE REFRIGERANT.
16. Recovery
When removing refrigerant from a system, either for servicing or decommissioning, it is recommended good practice that all
refrigerants are removed safely.
When transferring refrigerant into cylinders, ensure that only appropriate refrigerant recovery cylinders are employed. Ensure that
the correct number of cylinders for holding the total system charge is available. All cylinders to be used are designated for the
recovered refrigerant and labelled for that refrigerant (i.e. special cylinders for the recovery of refrigerant). Cylinders shall be
complete with pressure-relief valve and associated shut-off valves in good working order. Empty recovery cylinders are evacuated
and, if possible, cooled before recovery occurs.
The recovery equipment shall be in good working order with a set of instructions concerning the equipment that is at hand and
shall be suitable for the recovery of the ammable refrigerant. If in doubt, the manufacturer should be consulted. In addition, a set
of calibrated weighing scales shall be available and in good working order. Hoses shall be complete with leak-free disconnect
couplings and in good condition.
The recovered refrigerant shall be processed according to local legislation in the correct recovery cylinder, and the relevant waste
transfer note arranged. Do not mix refrigerants in recovery units and especially not in cylinders.
If compressors or compressor oils are to be removed, ensure that they have been evacuated to an acceptable level to make certain
that ammable refrigerant does not remain within the lubricant. The compressor body shall not be heated by an open ame or
other ignition sources to accelerate this process. When oil is drained from a system, it shall be carried out safely.
8
1. Plug into a grounded 3-prong outlet.
2. Do not remove ground prong.
3. Do not use an adapter.
4. Do not use an extension cord.
5. Failure to follow these instructions can result in death, re, or electrical shock.
DANGER: ELECTRICAL SHOCK HAZARD
RECOMMENDED GROUNDING METHOD
Copies of the standards listed may be obtained from:
National Fire Protection Association
1 Batterymarch Park
Quincy, Massachusetts U.S.
02169-7471
www.nfpa.org
WIRING REQUIREMENT
ELECTRONIC WORK
Power supply
Model
Time-delay fuse (or circuit breaker)
115V
103.5V min.
126.5 V max.
12K BTU cooling only
15A
13A
8K BTU cooling only
It is the customer’s responsibility:
1. To contact a qualied electrical installer.
2. To assure that the electrical installation is adequate and conforms to the Nation Electrical Code, ANSI/NFPA 70-last edition, and all local codes
and ordinances.
ELECTRICAL REQUIREMENTS
Pre-Installation
This air conditioner must be grounded. This air conditioner is equipped with a power supply cord with a three-prong grounding plug. The cord must
be plugged into a three-prong outlet, grounded in accordance with all local codes and ordinances. If a grounded outlet is not available, it is the
customer’s responsibility to have a properly grounded three-prong outlet installed by a qualied electrical installer.
NOTE: The cographs are for explanation purpose only. You machine may be slightly different. The actual shape shall prevail.
WARNING: Before performing any electrical or wiring work, turn off the main power to the system.
Display
Main control
Power
supply cord
9
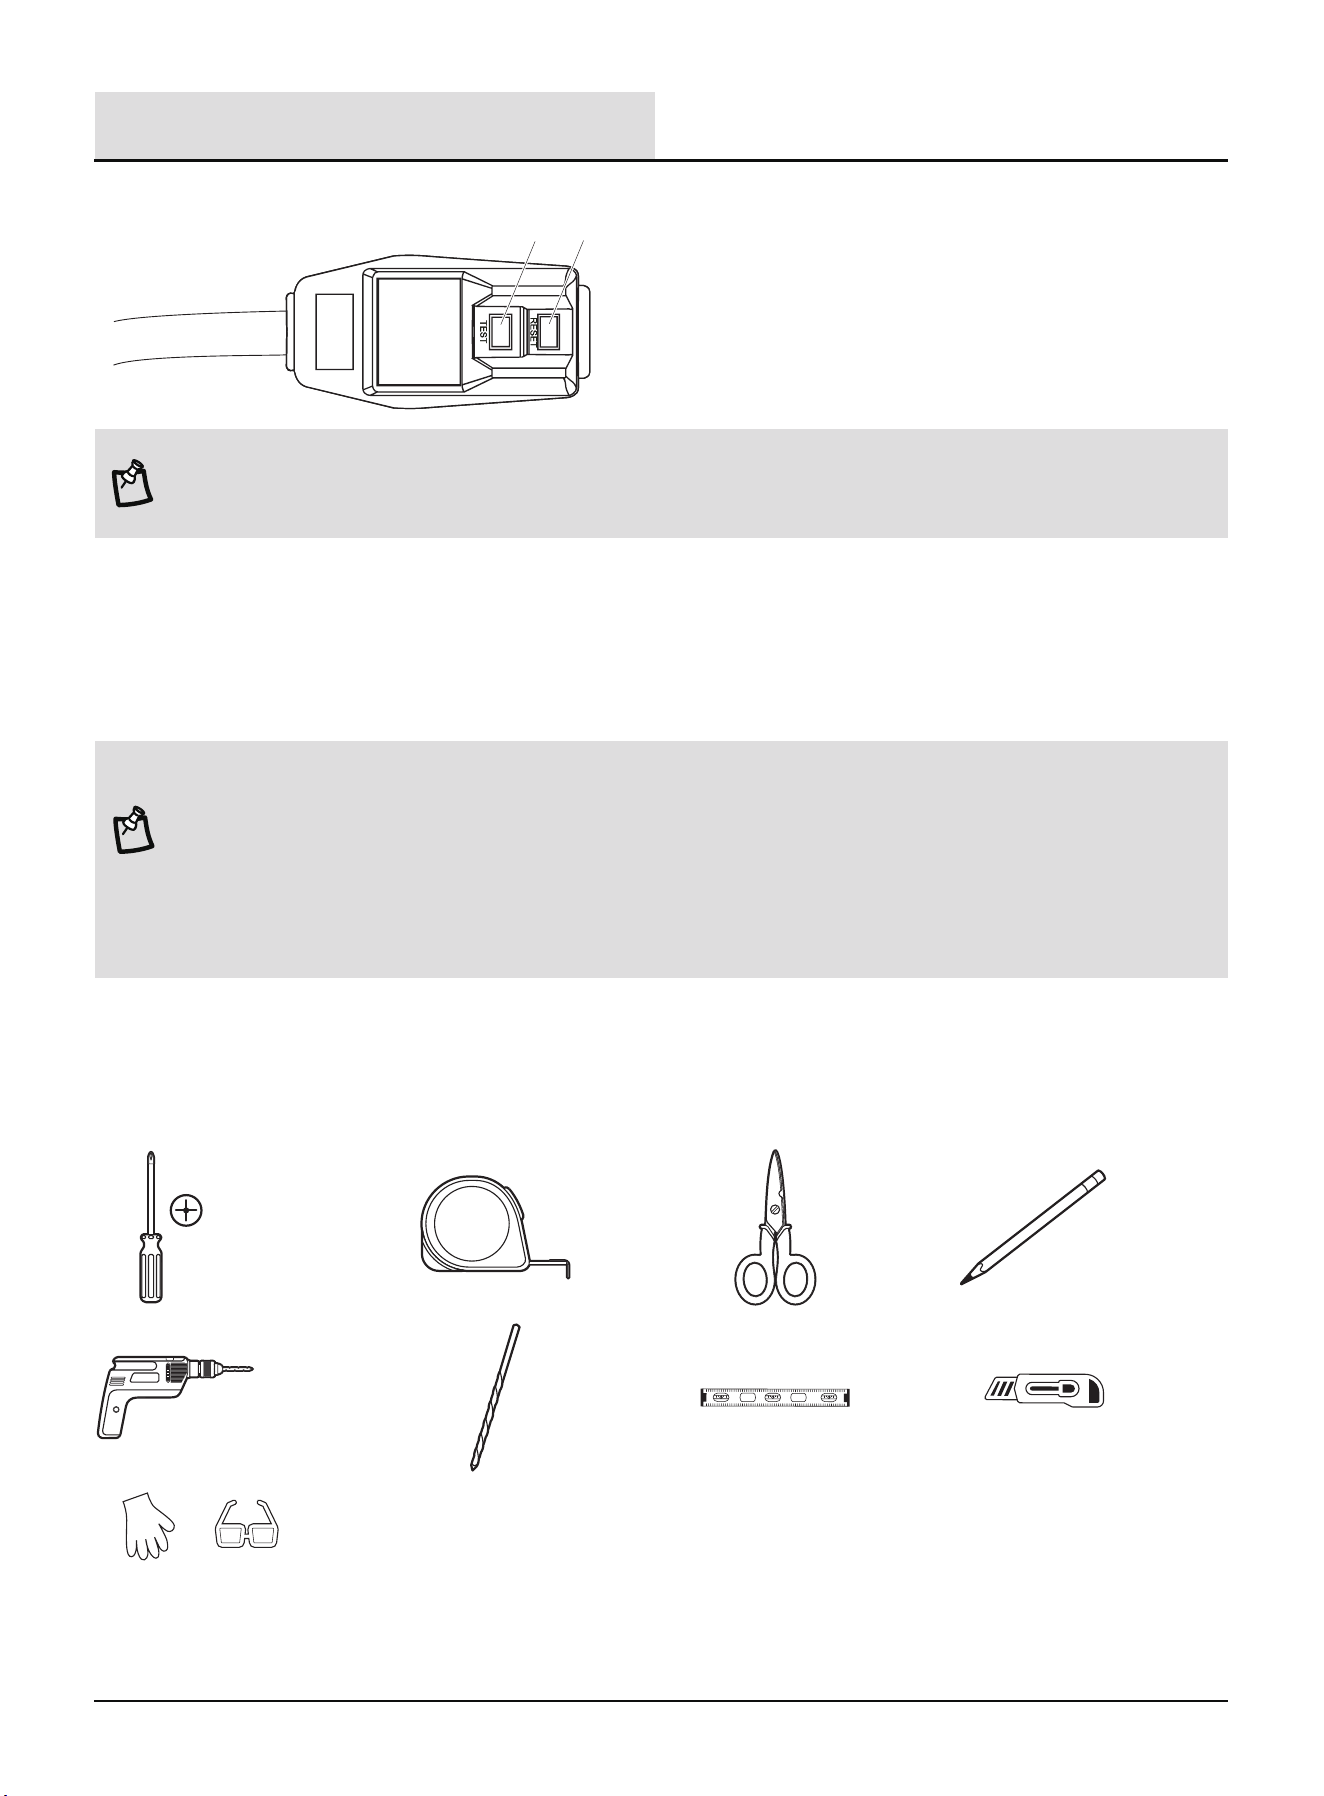
POWER SUPPLY CORD
1
2
To test your power supply cord:
1. Plug power supply cord into a grounded 3-prong outlet.
2. Press RESET (2) (on some devices, a green light will turn on).
3. Press TEST (1) and listen for click. The RESET button will trip and on some devices, a green light will turn off.
4. Press and release RESET (2) and listen for click. The RESET button will latch, and on some devices, a green light will turn on.
The power supply cord is ready for operation.
NOTE:
The RESET button must be pushed in for proper operation.
1. The power supply cord must be replaced if it fails to trip when the test button is pressed or fails to reset.
2. Do not use the power supply cord as an off/on switch. The power supply cord is designed as a protective device.
3. A damaged power supply cord must be replaced with a new power supply cord obtained from the product manufacturer and
must not be repaired.
4. The power supply cord contains no user serviceable parts. Opening the tamper-resistant case voids all warranty and
performance claims.
NOTE: Your air conditioner’s device may differ from the one shown. This room air conditioner is equipped with a power supply cord
required by UL. This power supply cord contains state-of-the-art electronics that sense leakage current. If the cord is crushed, the
electronics detect leakage current and power will be disconnected in a fraction of a second.
PLANNING INSTALLATION
Gather the required tools and parts before starting installation. Read and follow the instructions provided with any tools listed here.
TOOLS REQUIRED
Phillips
screwdriver
Tape
measure
Scissors Pencil
Knife
Cordless drill 1/8 in. bit Level
Proper PPE
Pre-Installation (continued)
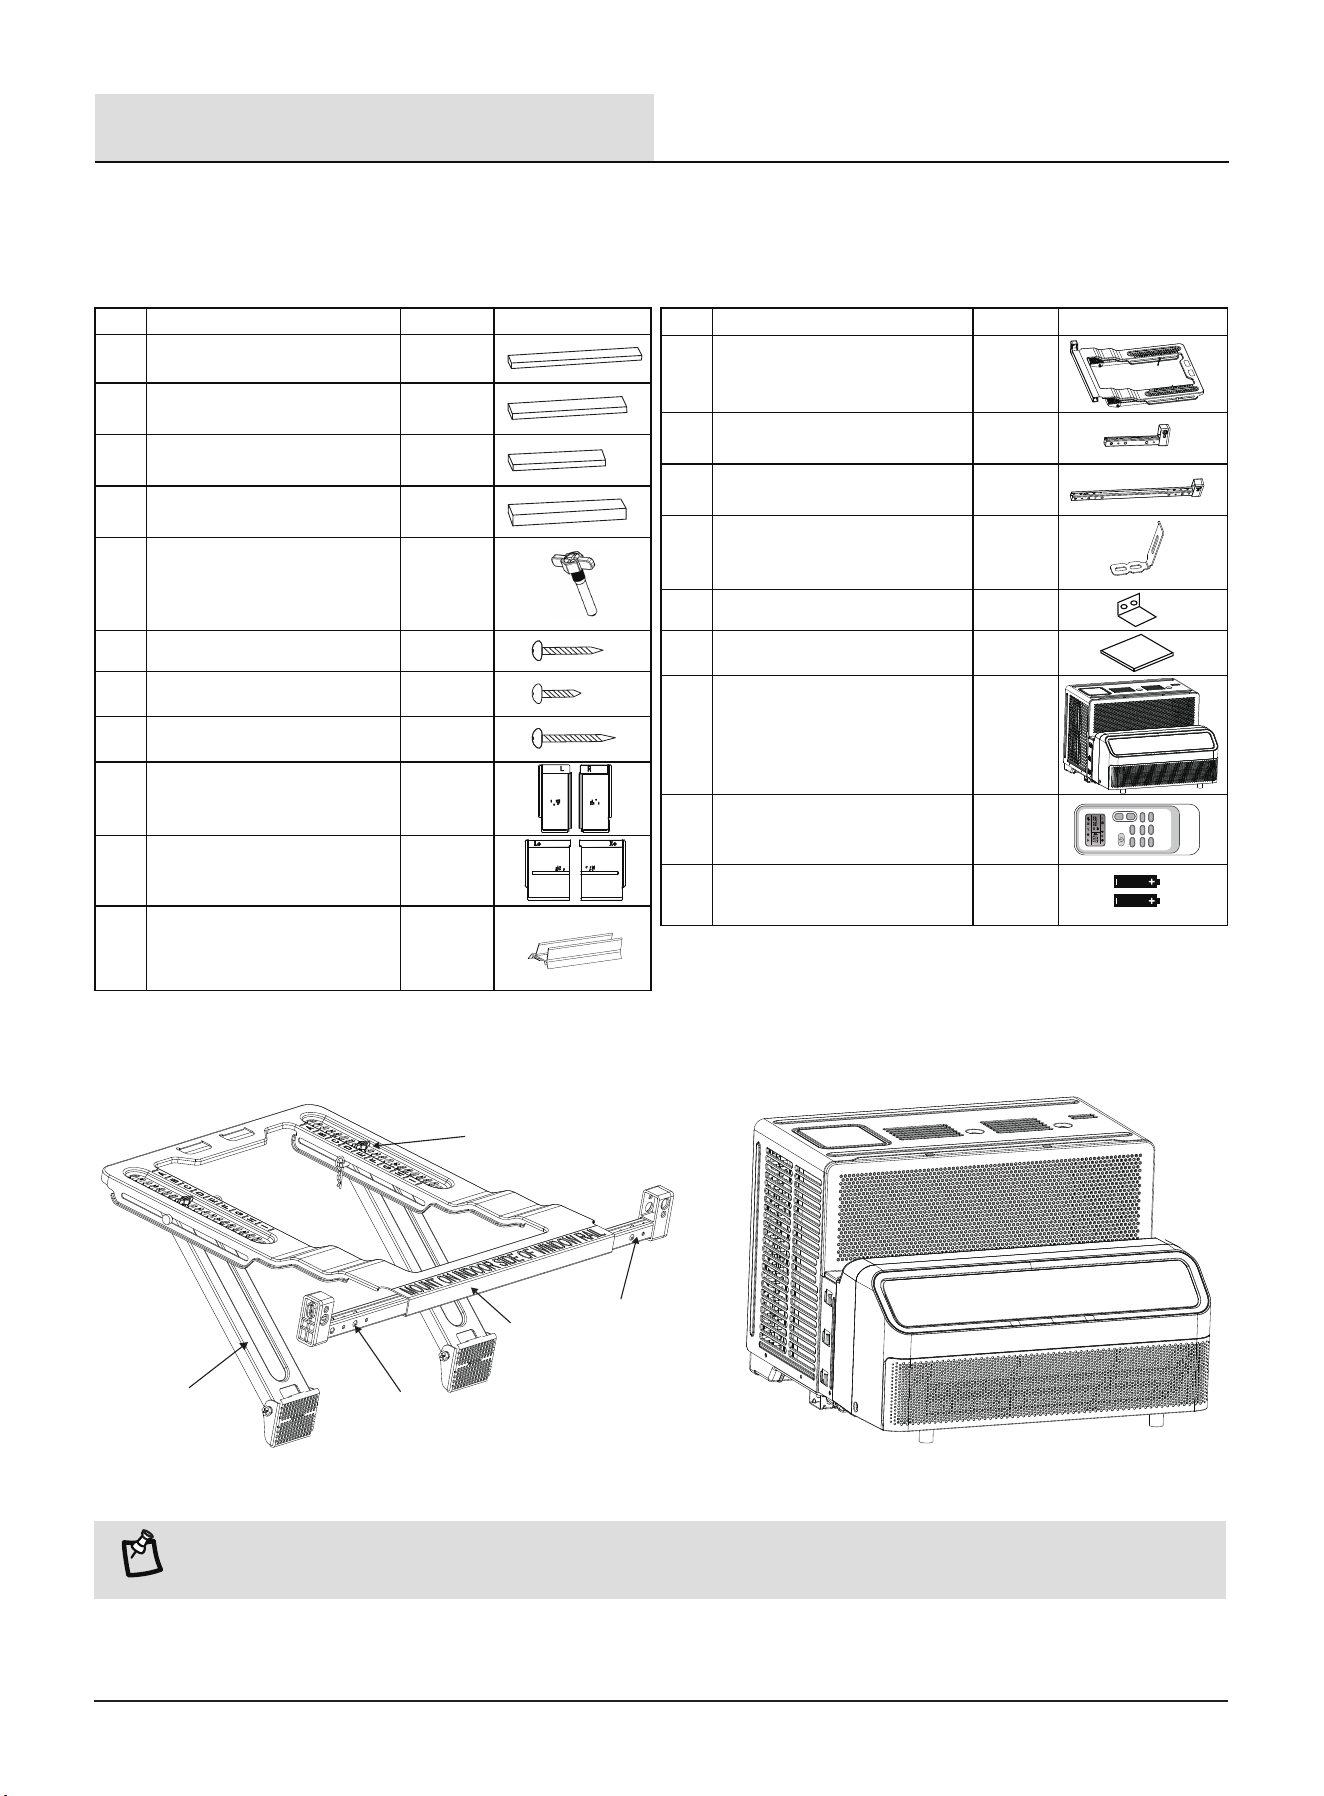
* One of the Extension arm (long) has been installed on the Main bracket to
demonstrate how to insert or remove.
10
HARDWARE INCLUDED
NOTE: All the illustrations in the manual are for explanation purpose only. The actual installation may vary.
Pre-Installation (continued)
Support leg
Extension arm
Extension arm
Main bracket
Screw bolt
Part
A1 1
1
1
1
2
6
6
6
1+1
1+1
1
A2
A3
BB
CC
DD
EE
FF
GG
G1
Description
Adhesive seal (gray)
Adhesive seal (black-long)
Adhesive seal (black-short)
Foam seal (gray)
Screw bolt
1/2″screw
3/8″screw
3/4″screw
Short side curtain (left/right)
Wide side curtain (left/right)
G2 Spare curtain (left/right)
Quantity Sketch Map
Part
H1 1
1
2*
2
1
2
1
1
H2
H3
H4
II
JJ
KK
LL
Description
Main bracket
Extension arm (short)
Extension arm (long)
Sash lock
(for air conditioner)
Sash lock (for window)
Eva foam (white)
Air conditioner
Remote control
2MM
Batteries
(standard AAA 1.5Volt)
Quantity Sketch Map
FILTER
FAN
QUIET
SWING
TIMER
SUPER
DIMMER
Sleep[5 sec]
MODE
F/ C[5 sec]
11
UNPACK THE AIR CONDITIONER
WARNING
Excessive Weight Hazard
1. Use two or more people to move and install air conditioner. Failure to do so can result in back or other injury.
2. You must use the supplied parts and use proper installation procedures as described in these instructions when installing the air
conditioner.
3. Becareful to avoid cuts from sharp metal edgea. please wear cut-resistant gloves. Support bracket should only used for its
intended purpose. If not, the warranty will be voided.
Remove packaging materials
1. Remove and dispose of recycle packaging materials.
Remove tape and glue residue from surfaces before
turning on the ai conditioner. Rub a small amount of
liquid dish soap over the a dhesive with your ngers.
Wipe with warm water and dry.
2. Do not use sharp instruments, rubbing alcohol,
ammable uids, or abrasive cleaners to remove tape
or glue. These products can damage the surface of
your air conditioner.
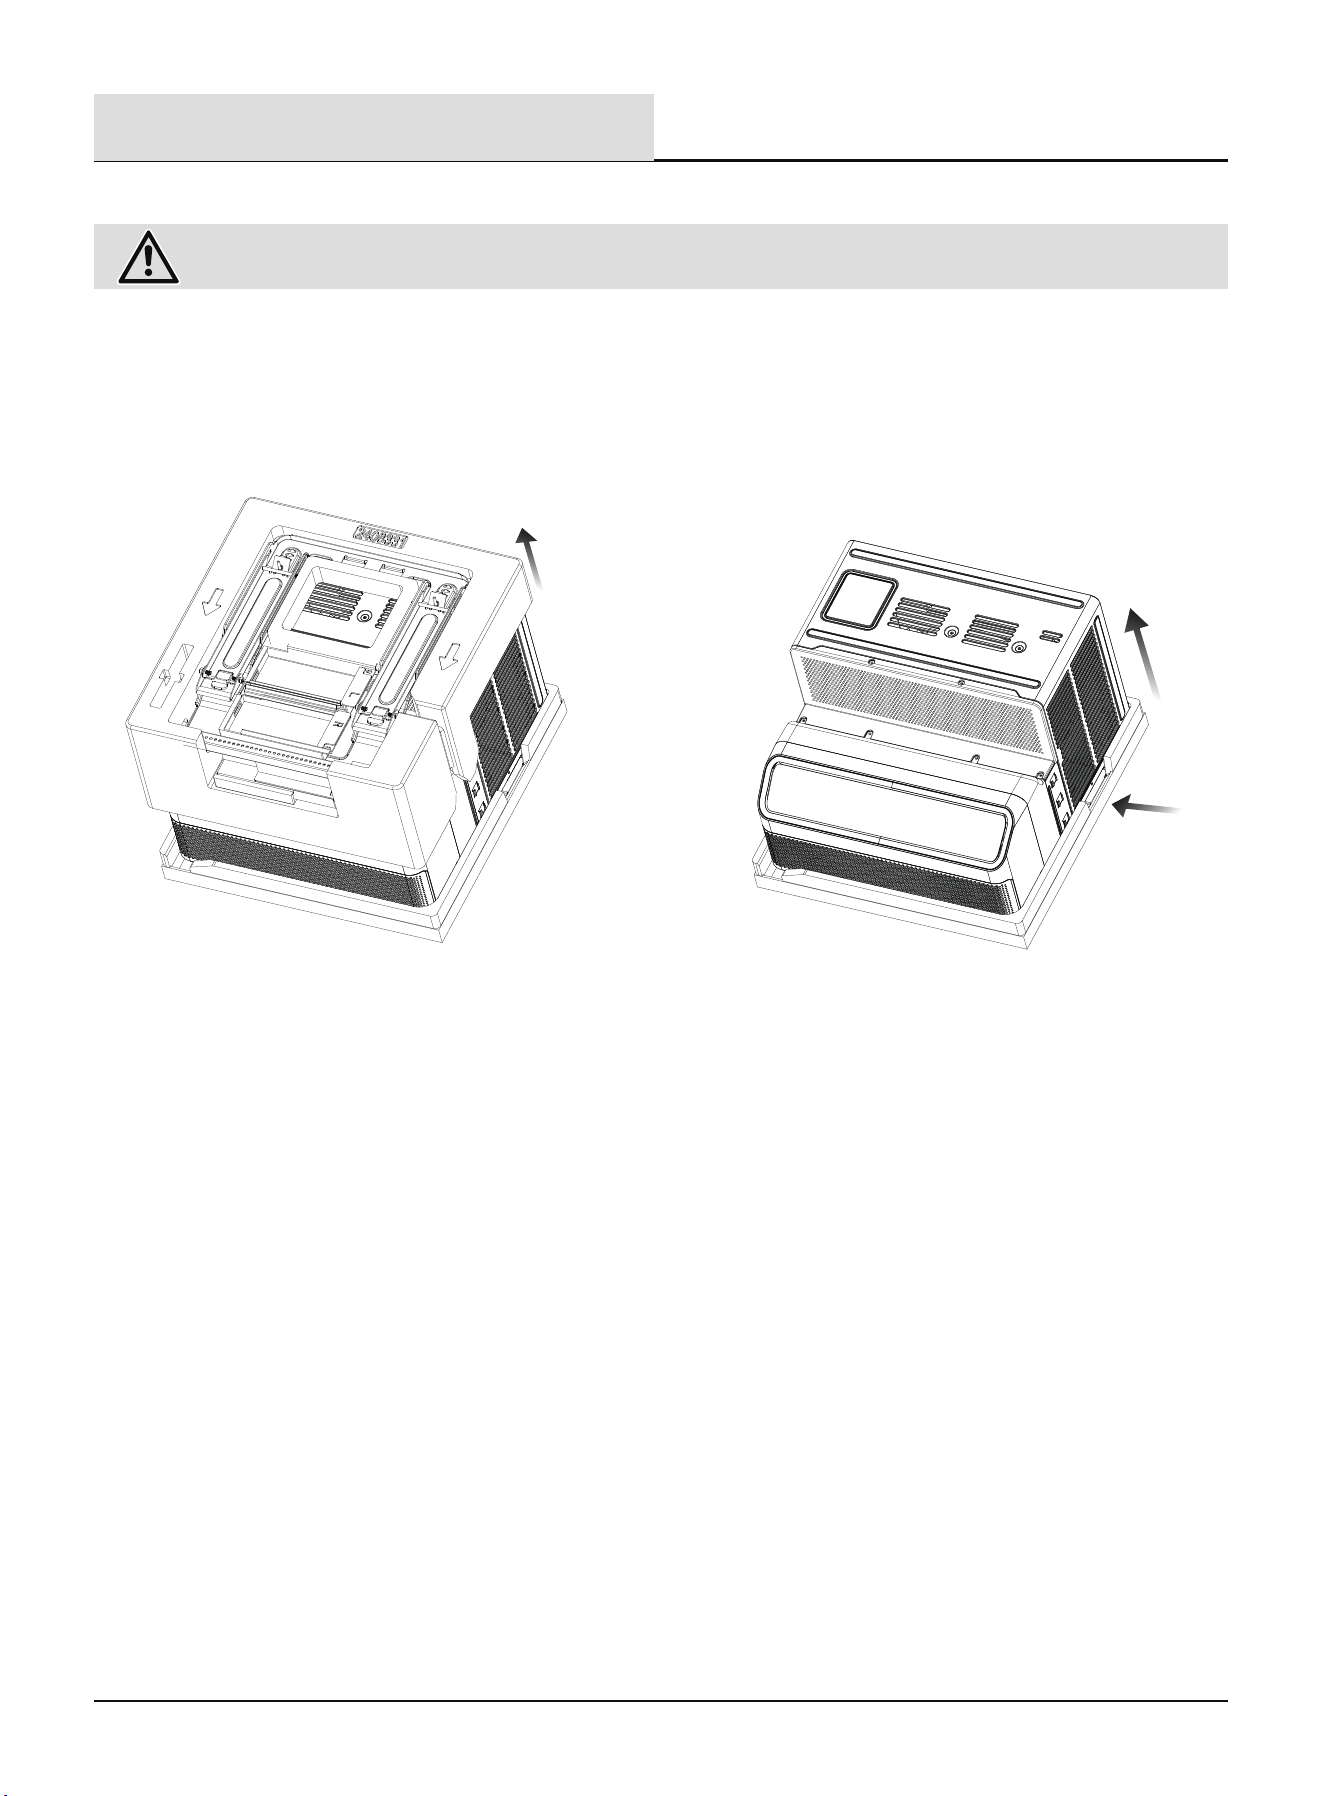
3. Remove main bracket and other hardwares from
the packaging material.
4. Tack out the power supply cord, then move the
packaging on the top of the air conditioner.
5. Place both hands in the positions indicated by the
arrows and remove the air conditioner from the
front of the product.
HANDLE
Pre-Installation (continued)
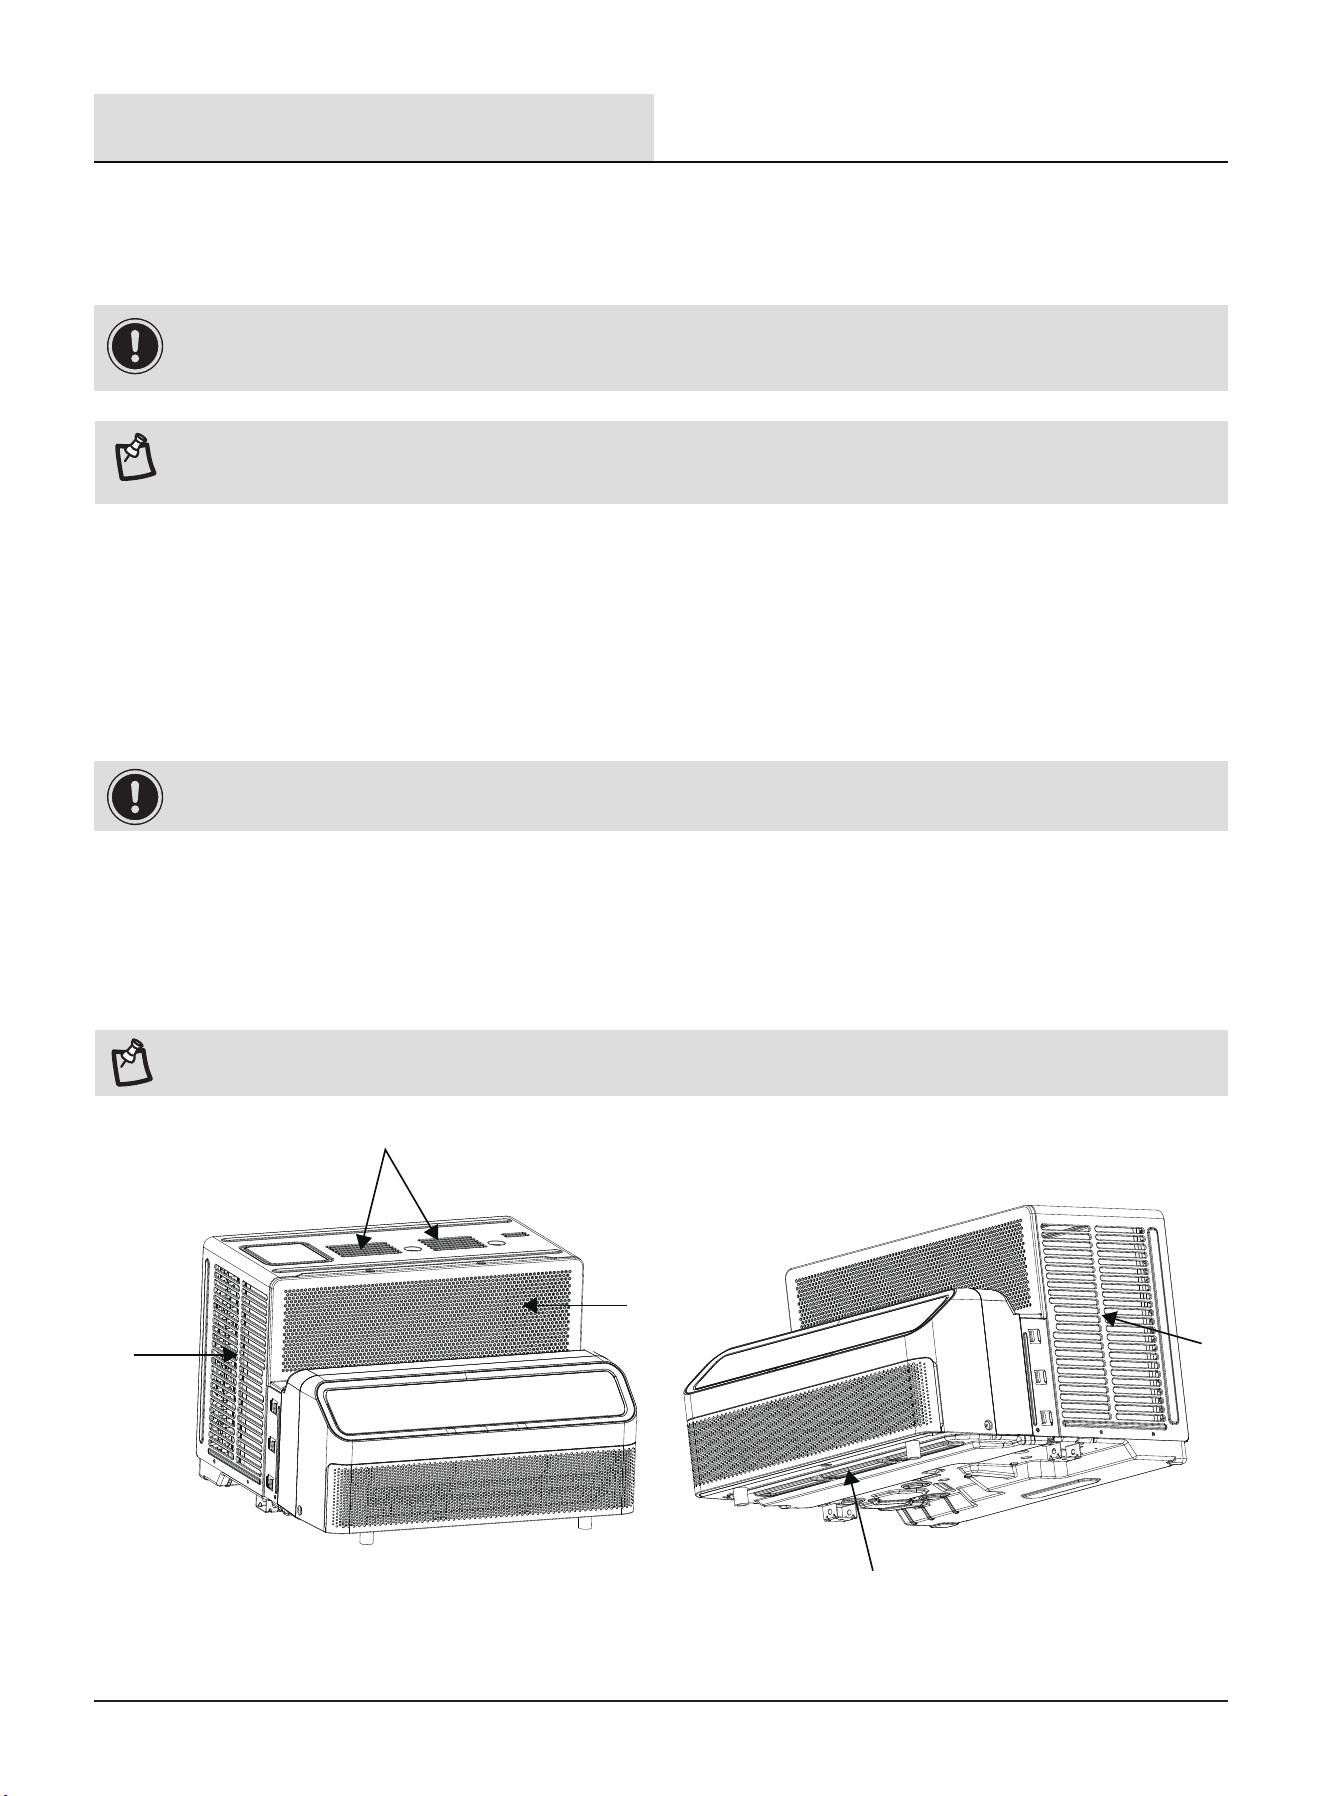
1. Completion time: Around 20 min.
2. We recommend that two people install this product.
3. Proper installation is the responsibility of the installer.
4. Product failure due to improper installation is not covered under the warranty.
5. You MUST use all supplied parts and use proper installation procedures as described in these instructions when installing this air
conditioner.
NOTE: Cabinet louvers (A-B-C-D) must not be obstructed. Air must be able to pass freely through the cabinet louvers.
12
Check the location where air conditioner will be installed. Proper installation is your responsibility. Make sure you have everything
necessary for correct installation.
The location should provide:
1. Do not use an extension cord. The appliance shall be installed in accordance with national wiring regulations.
2. Free movement of air in room to be cooled.
3. A large enough opening for the air conditioner.
Pre-Installation (continued)
IMPORTANT: Observe all governing codes and ordinances.
B
A
A
C
D
LOCATION REQUIREMENTS
Before You Begin
Read these instructions completely and carefully.
IMPORTANT: Save these instructions for local inspector’s use. Observe all governing codes and ordinances.
NOTE: Installer, be sure to leave these instructions with the Consumer.
Consumer, keep these instructions for future reference.
13
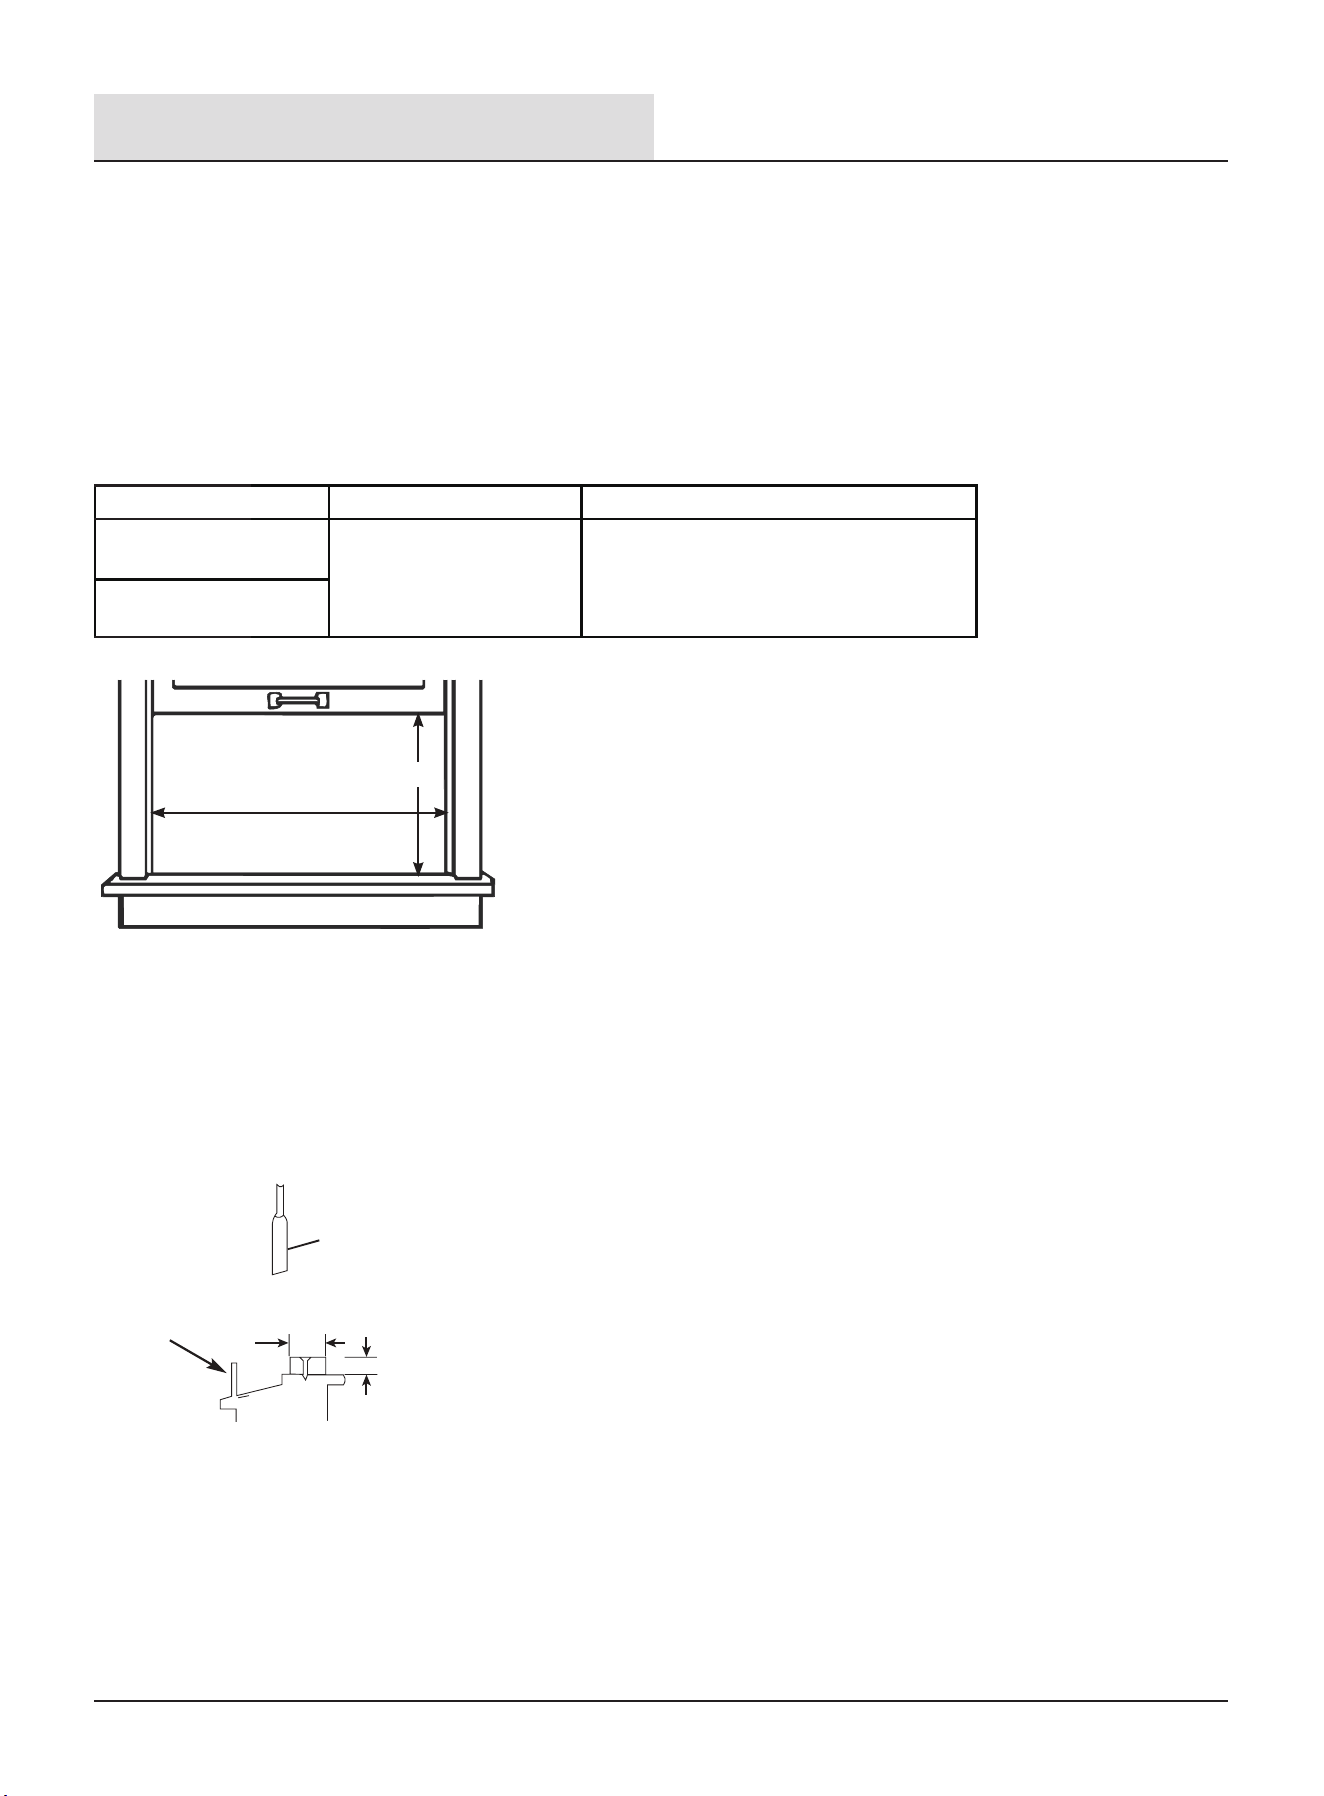
WINDOW OPENING MEASUREMENTS
1. These instructions are for a standard double-hung window. You will need to modify them for other types of windows.
2. The air conditioner can be installed without the side curtain panels if needed to t in a narrow window.
See the window opening dimensions.
3. All supporting parts must be secured to rm wood, masonry or vinyl-clad.
4. Aluminum house wiring may present special problems-consult a qualied electrician.
5. The electrical outlet must be within reach of the power cord.
6. Follow the dimensions in the table and illustration for your model.
Add wood as shown, or remove storm window before air conditioner is installed.
If storm window frame must remain, be sure the drain holes or slots are not caulked or painted shut. Accumulated rain water or
condensation must be allowed to drain out.
IF AC IS BLOCKED BY STORM WINDOW
Board thickness as required, for proper pitch to rear, along entire sill.
Fasten with nails or screws.
Storm window
frame or other
obstruction.
1 - 1/2 in. min
(38 mm)
Sash
A
B
(With side curtain panels)
Models A B
8K BTU cooling only
15″(385 mm) min 25″ (635 mm) - 38″(980 mm)
12K BTU cooling only
Pre-Installation (continued)
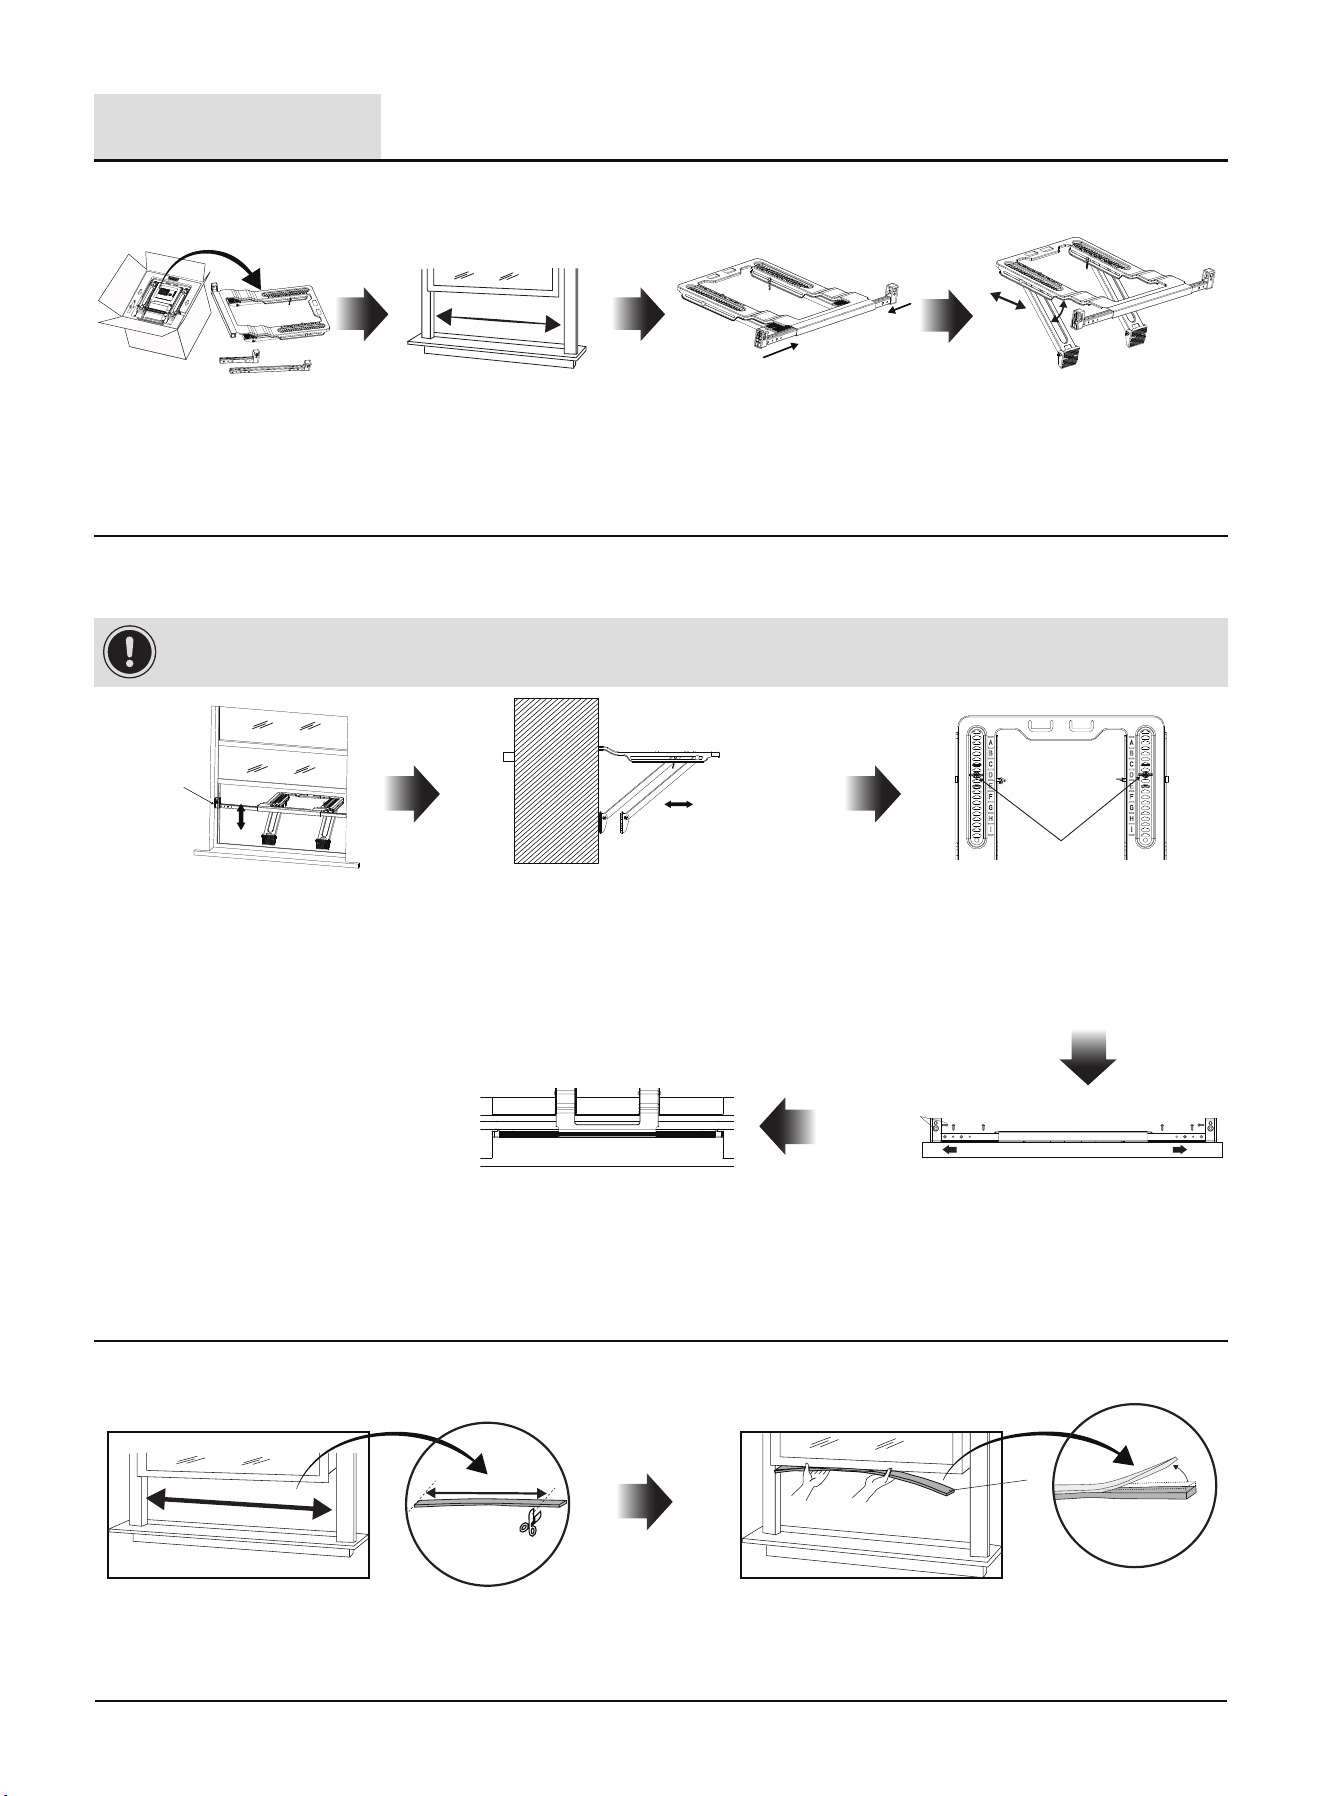
Remove the backing from the seal and attach the seal
to the bottom of the lower window sash.
Prepare Support Bracket
Install Support Bracket
14
1
2
B
A1
3
Attaching the Adhesive Seal
Installation
Remove main bracket and
hardware from the carton,
set on the at surface.
Install support bracket into the
opening window. And ensure
extension arms are located on the
indoor side of the window.
Measure the width of the window
to choose between two long
extension arms (H3) or one long
extension arm (H3) and one short
extension arm (H2).
The support legs slide
forward and backward along
the guide slot on the mail
bracket, and can also rotate.
Insert the extension arm (H2 or H3)
into left and right ends respectively.
The extension arm (H2 or H3) can
slide freely under external force.
Lock the screw bolt (CC) (H4), and
visually ensure thant the support
bracket is slightly tilted toward the
outside.
Secure support bracket to the
windowsill by drilling 3/8" and
1/2" type screws (DD and EE).
Attach the seal (A3) to the top of
the secure support.
IMPORTANT: Maintain control of the support until installation is complete.
Cut the adhesive seal (gray) (A1) to the width
of the lower window sash (B).
A1
A1
Lock screw bolt (CC)
Ensure extension
arms are located
on the indoor side
of the window
Move the two support legs toward the exterior wall
until the feet of the support legs touch the wall. It is
recommended to align the two support legs according
to the marking on the support bracket.
3/8"
1/2" 1/2"
1/2" 1/2"
Move support leg
5
Attaching Side Curtains to Window
4
Placing Air Conditioner in Window
15
Installation (continued)
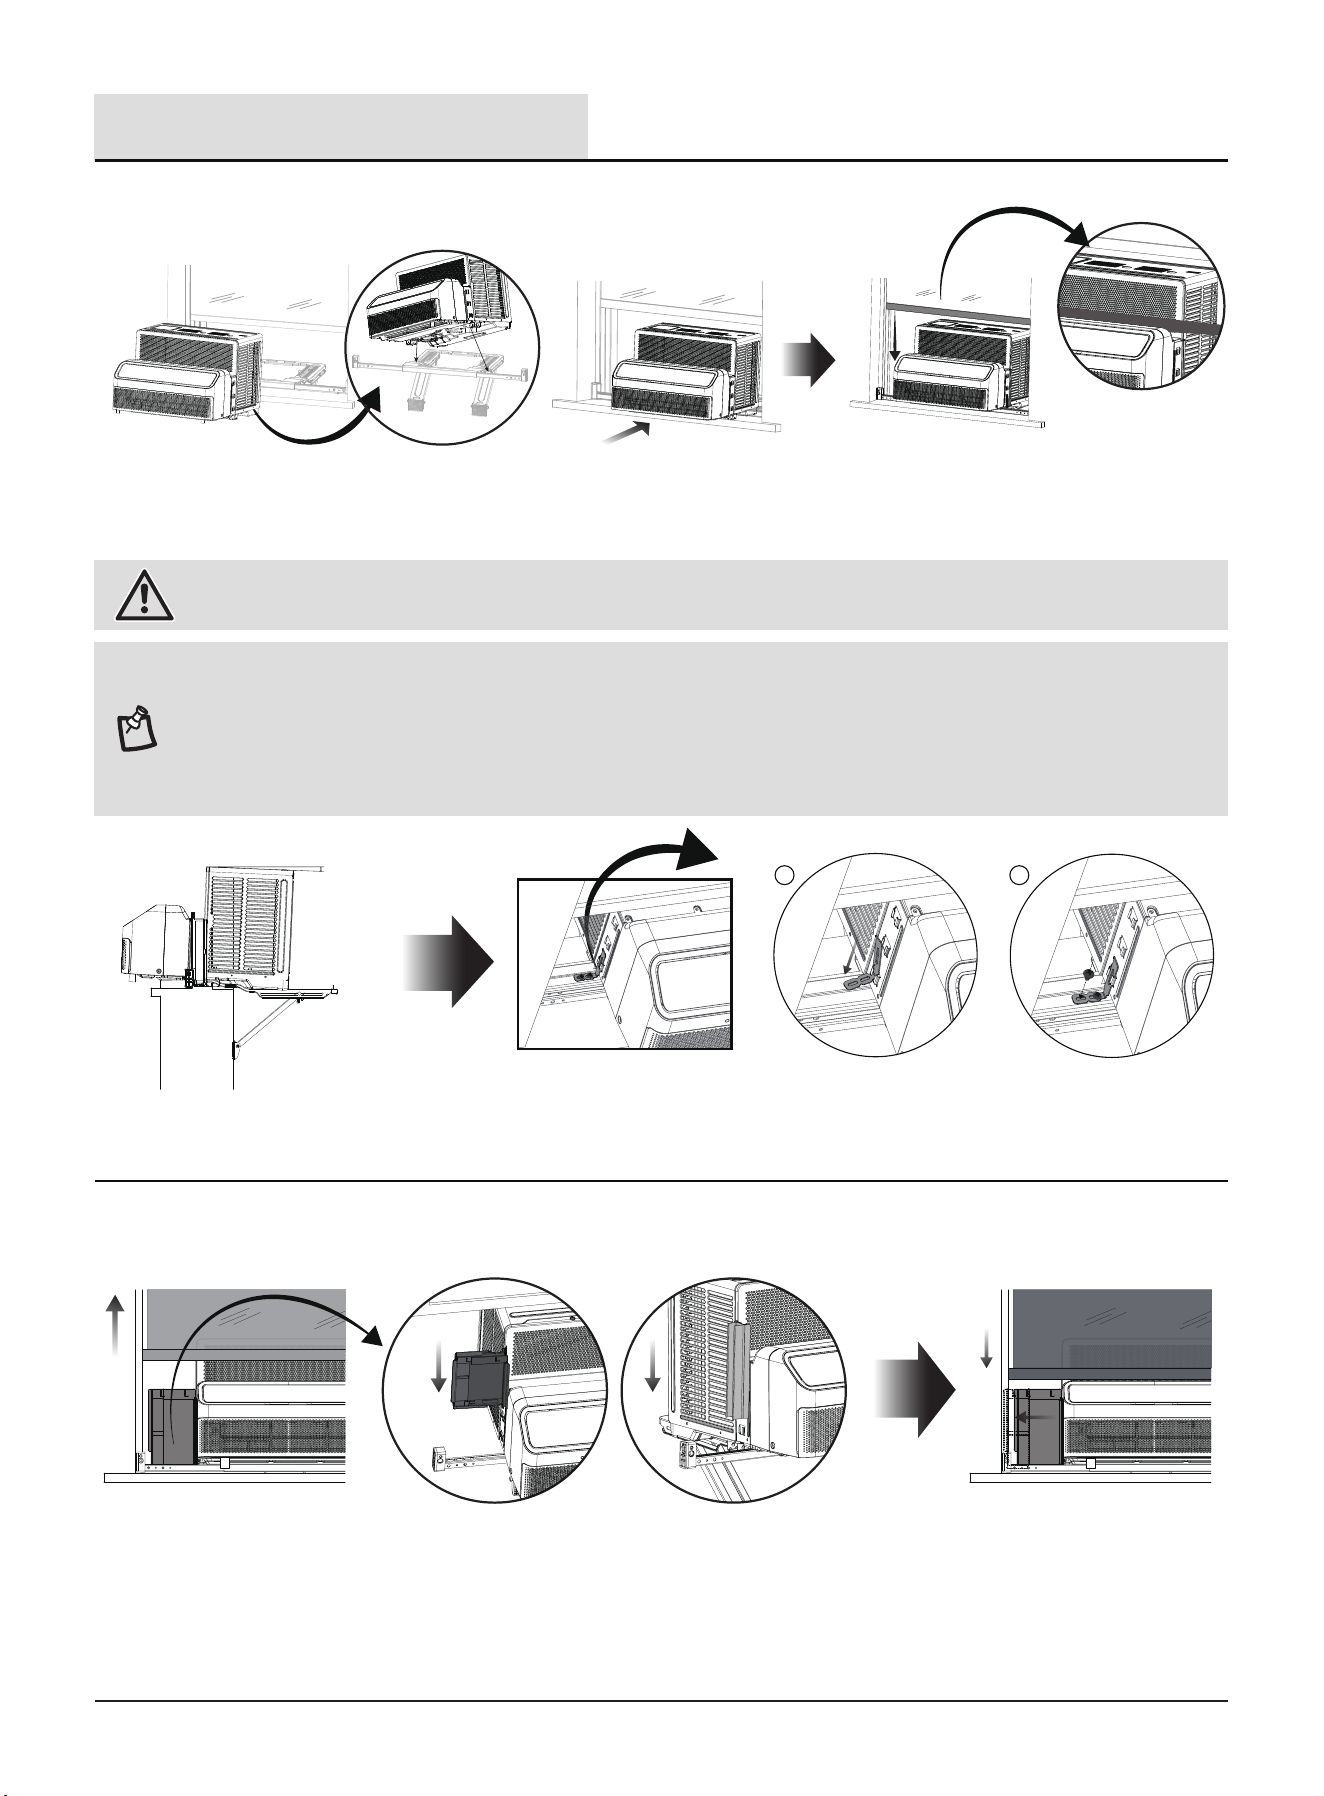
Keeping a rm grip on the air conditioner, carefully place the unit into the window
opening so the bottom of the air conditioner frame is against the support bracket
and make sure the unit is staying center of the support bracket. Then slowly push
the air conditioner towards the outside of the room.
Insert the Sash lock (for air conditioner) into both sides of the air conditioner, and
secure it with 3/8" or 3/4" type screws (EE or FF).
Carefully open the window up.
Install Short side curtain (left
and right) into the air
conditioner, from top to
bottom.Repeat for the
right-hand curtain.
a) When the gap between the air conditioner and the side of the
window (left or right) is greater than 6.5" (165mm), use the Wide
side curtain L+ or R+ (G1) (rst remove the corresponding L or R).
b) When the gap between the air conditioner and the side of the
window (left or right) is less than 3.5" (90mm), use the Spare
curtain (G2).
Open side curtains (left and
right) until touch the side of
window.
Carefully close the window
down.
NOTES:
1. Handle air conditioner gently.
2. Be sure your air conditioner does not fall out of the opening during installation or removal.
3. Do not block the louvers in the front panel.
4. Do not block the louvers on the outside of the air conditioner.
5. Your model may differ from the one shown.
WARNING: Excessive Weight Hazard
Use two or more people to move and install air conditioner. Failure to do so can result in back or other injury.
1 2
Carefully close the window down into the top
of the air conditioner help align the air
conditioner in the correct location, and heip
support the air conditioner during installtion.
The air conditioner is tilted about
3° toward outside of the room.
About 3°
DANGER: ELECTRICAL SHOCK HAZARD
1. Plug into a grounded 3-prong outlet.
2. Do not remove ground prong.
3. Do not use an adapter.
4. Do not use an extension cord.
5. Failure to follow these instructions can result in death, re, or electrical shock.
6
Completing Installation
BB
A
16
Installation (continued)
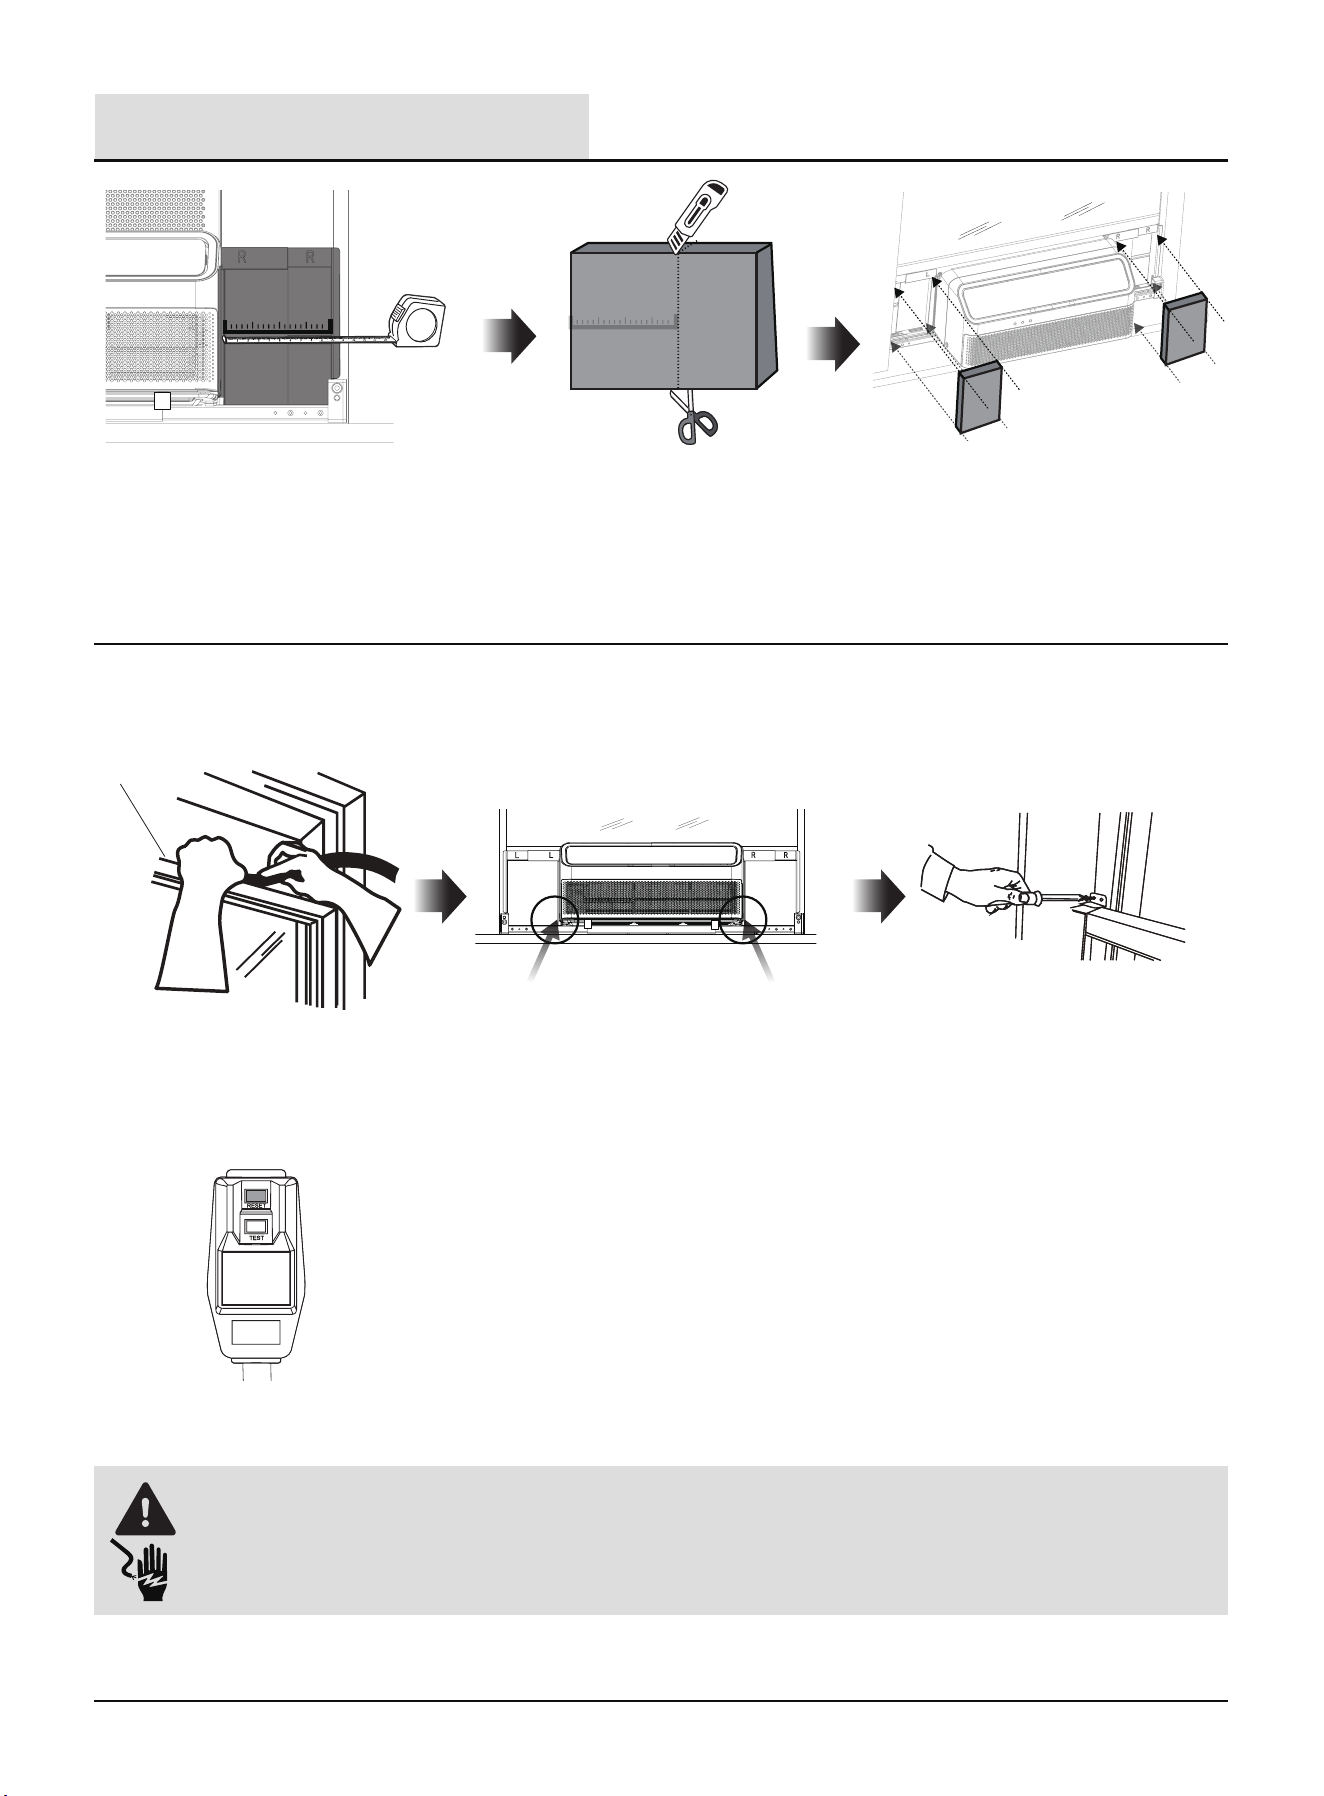
Put one EVA foam (JJ) on the curtain housing.
In order to minimize air leaks and ensure optimal
insulation, it is necessary to install the EVA Foam
(JJ) on the curtain housing.
After the unit is installed on the window frame,
measure the inner width of the side curtain as
shown.
Check the gap around the unit and seal it with
the adhesive seal (black) (A2) attached.
Insert foam seal (BB) behind the top of
the lower window sash (A) and against
the glass of the upper window.
1. Plug into a grounded 3-prong outlet.
2. Press RESET on the power supply cord.(See “ELECTRICAL REQUIREMENTS”.)
To secure lower sash in place, attach
sash lock (II) with 3/4 inch (20 mm)
screw (FF) as shown.
Glass is fragile and should be protected
during installation.
Remark a line on the EVA foam (JJ)
according to he measured width, then
cut the EVA foam (JJ) along the line,
use scissors or knife.
Install the EVA foam (JJ) into the Side
curtains (left/right).
JJ
JJ
JJ
A2 A2
17
AIR CONDITIONER USE
IMPORTANT:
1. If you turn off the air conditioner, wait at least 3 minutes before turning it back on.
This prevents the air conditioner from blowing a fuse or tripping a circuit breaker.
2. In the event of a power failure, your air conditioner will operate at the previous settings when the power is restored.
1. Operating your air conditioner properly helps you to obtain the best possible results.
2. This section explains proper air conditioner operation.
Operation
Cool mode operation
Indoor: 62.6-89.6 °F (17-32 °C), ≤ 80% RH
Outdoor: 64.4-109.4 °F (18-43 °C), ≤ 80% RH
Air conditioner in the Cool mode operation the better limits:
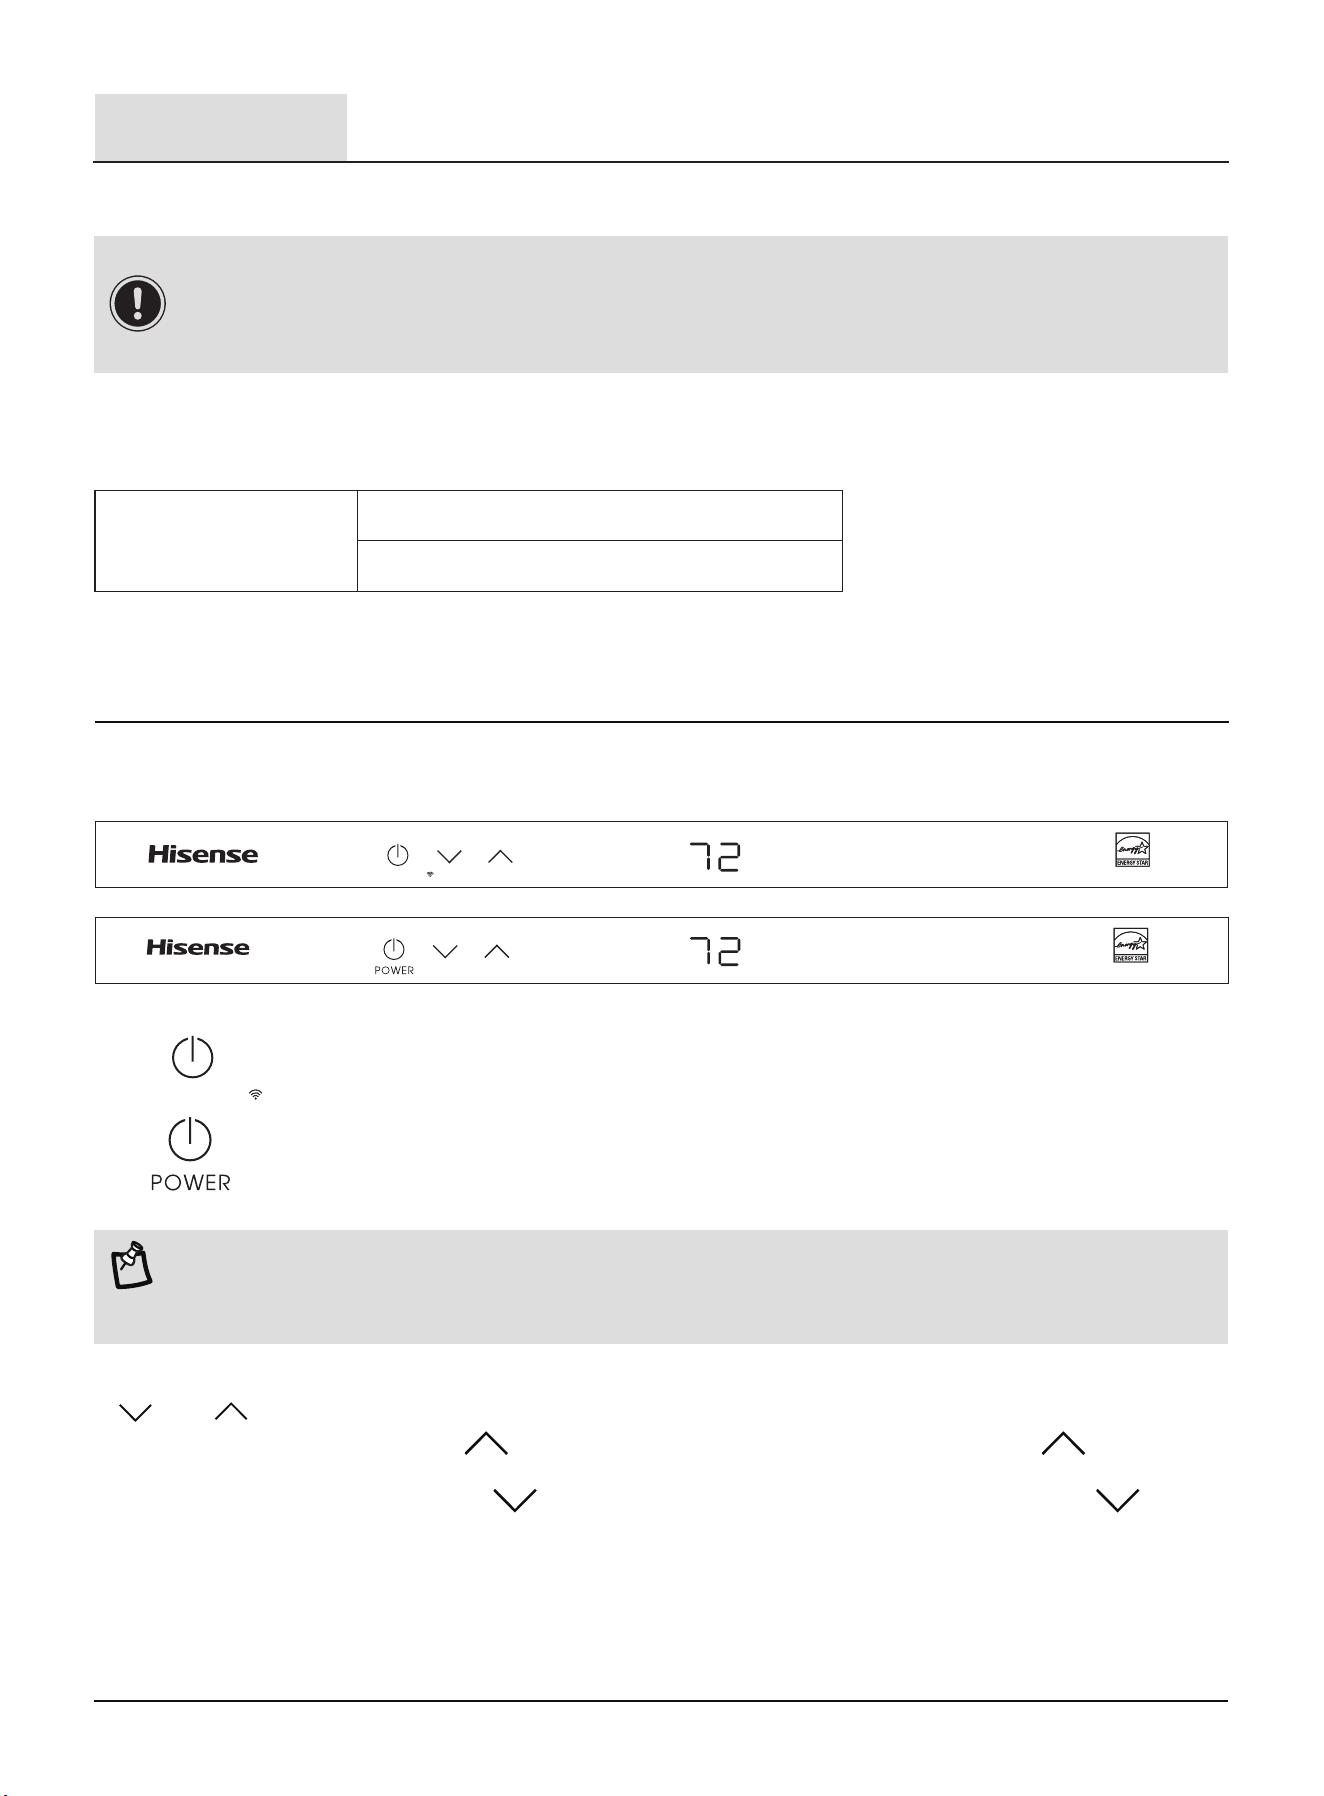
ON/ OFF SETTINGS
NOTE:
When the air conditioner is turned on for the rst time after it is plugged in, the display will show the current set temperature
and will run in the ECO control.
Press and hold the POWER button for 3 seconds to enter WiFi pairing mode.(valid for some models)
1. Press the POWER button to turn on the air conditioner.
2. Press and hold for three seconds to activate WiFi pairing mode.
3. Set temperature. See “TEMPERATURE SETTINGS”.
Using the Control Panel
1
TEMPERATURE SETTINGS
1. Press the UP button to raise the temperature. Each time you press or hold the UP button, the
temperature will go up 1 °F (1 °C) until it reaches 86 °F (30 °C).
2. Press the DOWN button to lower the temperature. Each time you press or hold the DOWN button,
the temperature will go down 1 °F (1 °C) until it reaches 61 °F (16 °C).
TEMP
TEMP
CONNECT 3 Sec TEMP
CONNECT 3 Sec
18
2
Using the Remote Control
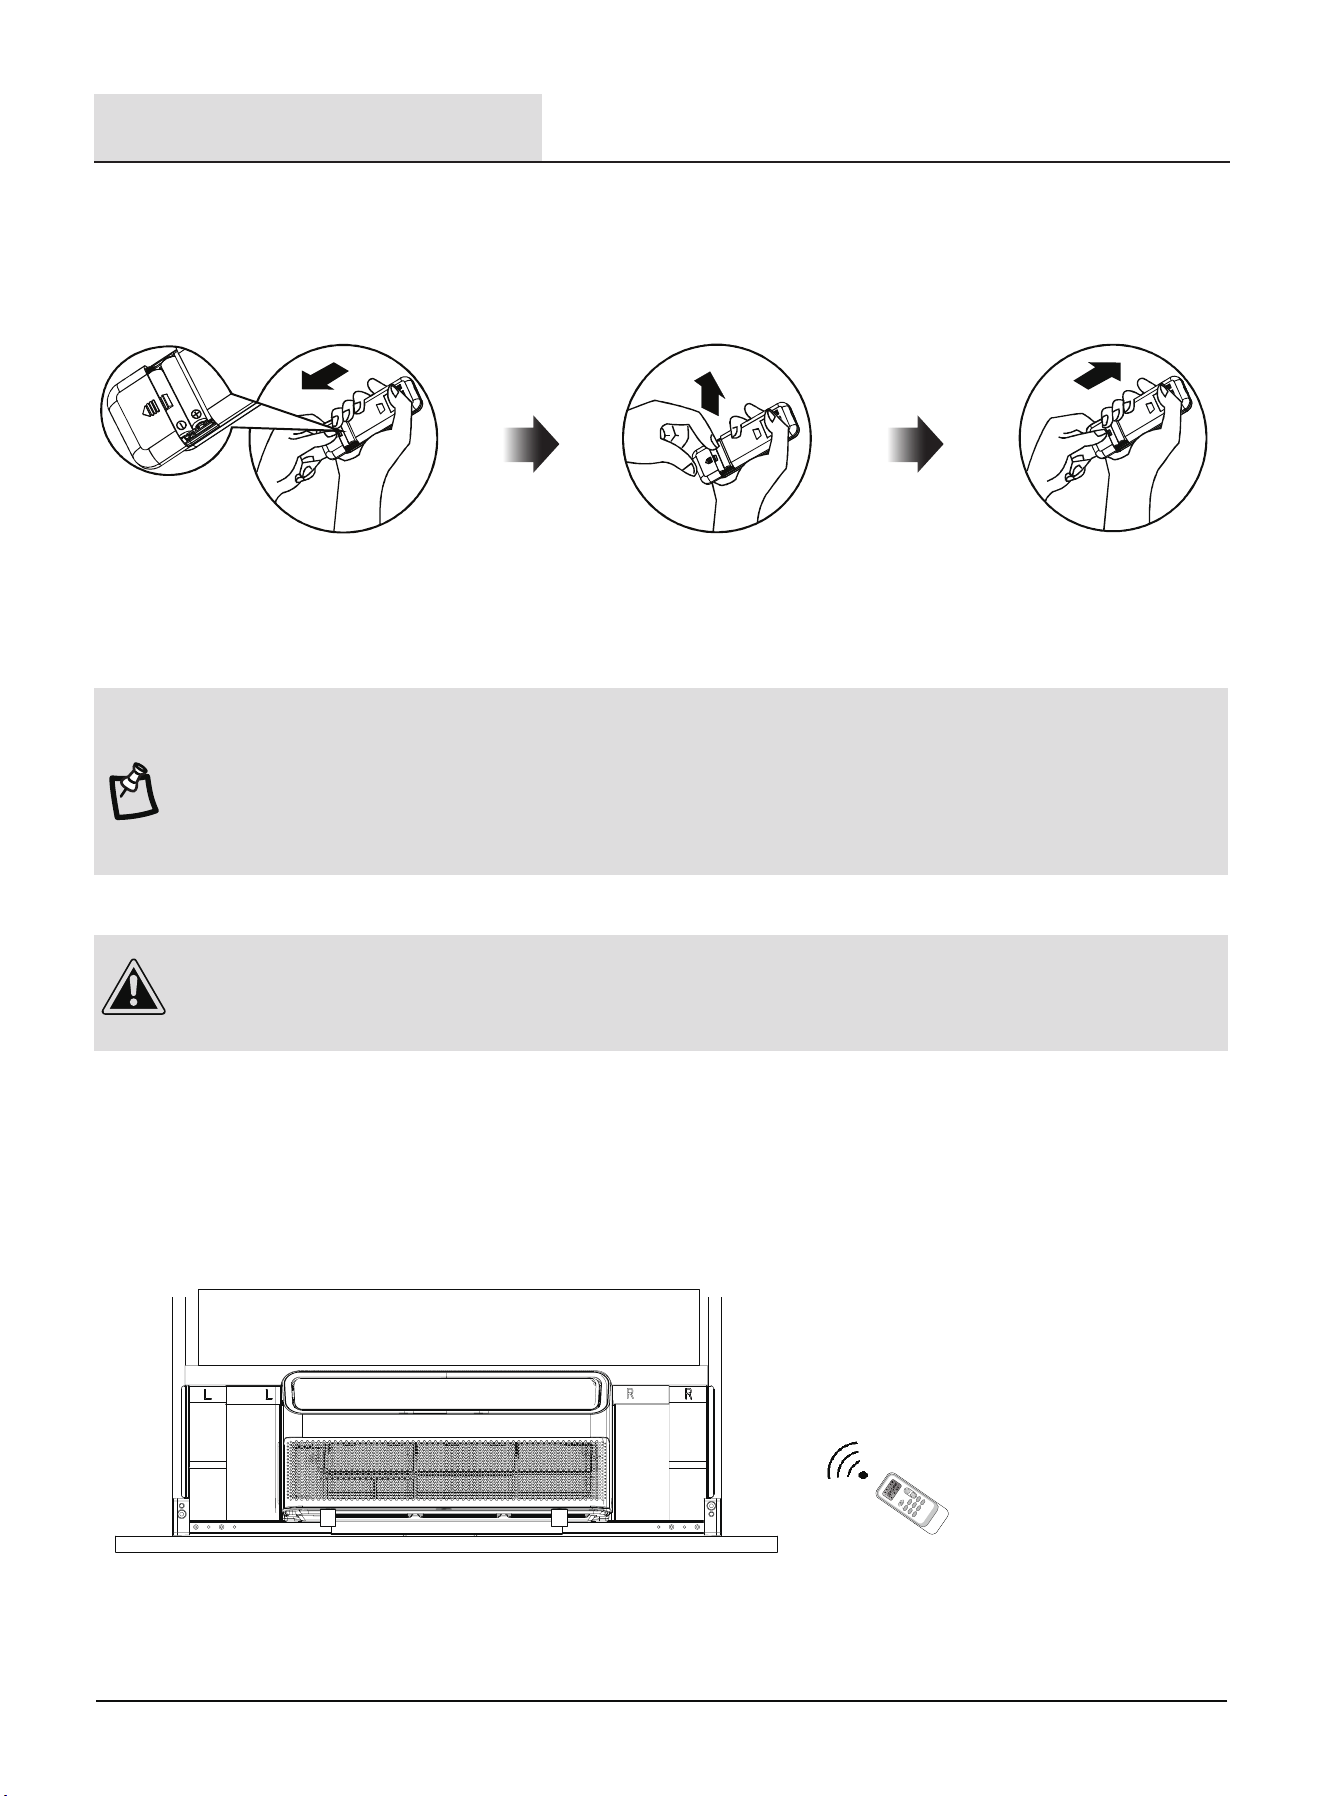
INSERT THE BATTERIES
HOW TO USE
Signal receptor/display
NOTE: 1. Use 2 standard AAA (1.5 volt) batteries. Do not use rechargeable batteries.
2. Replace batteries with new ones of the same type when the display becomes dim, or after 6 months.
3. When replacing batteries, always replace both batteries with new batteries. Do not mix old and new batteries.
4. Do not mix alkaline, standard (carbon-zinc), or rechargeable (ni-cd, ni-mh, etc) batteries.
5. If the air conditioner will not be used for an extended period of time, remove the batteries from the remote.
1. To operate the room air conditioner, aim the remote control at the signal receptor. The remote control will operate the air conditioner at a
distance of up to 23' (7m) when pointed at the signal receptor.
1. Remove the battery cover
along the arrow direction.
2. Insert new batteries making sure that the
(+) and (-) of battery are matched correctly.
3. Re-attach the cover by
sliding it back into position.
Operation (continued)
1. Do not use the remote if the batteries have leaked.
2. The chemicals in batteries could cause burns or other health hazards.
3. Do not dispose of batteries in a fire. Batteries may explode or leak.
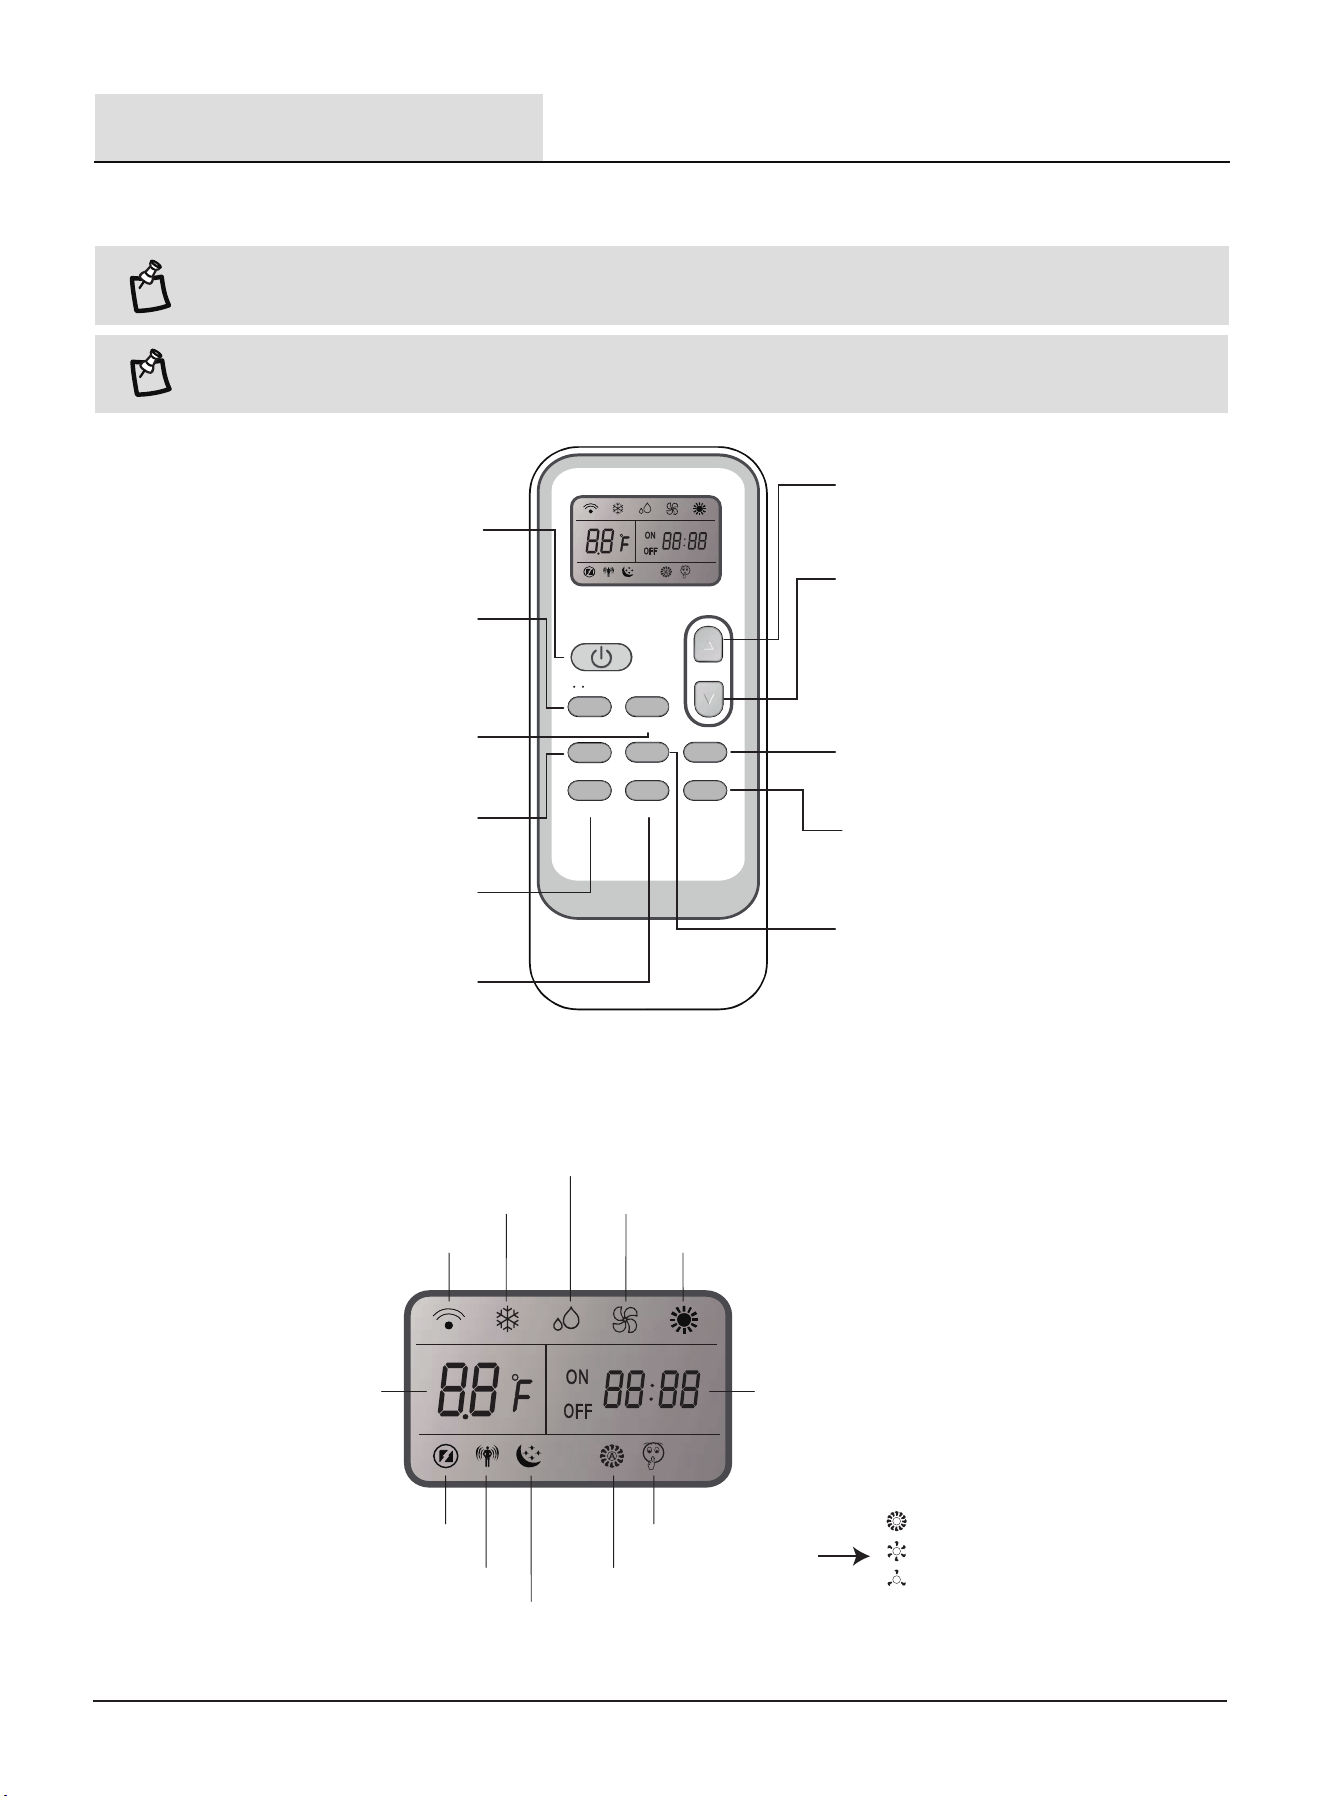
FILTER
SUPER
MODE FAN
QUIET
TIMER DIMMER
Sleep [ 5 sec ]
SWING
F / C
[ 5 sec ]
19
BUTTON AND FUNCTION
INDICATION SYMBOLS
NOTE: Remote control may differ in appearance.
Heating indicator
is not available on this models.
NOTE: Press and hold the MODE button on the remote for 5 seconds to switch the temperature display from degrees
Fahrenheit (°F) to degrees Celsius (°C).
Operation (continued)
Display set timer
Heating indicator
Dry indicator
Fan only indicator
Display temperature
Quiet indicator
Super indicator
Signal transmission
ECO indicator
Cooling indicator
(Not available for the unit.)
Displays selected fan speed
:
Medium fan speed
Low fan speed
High fan speed
(The unit can not be adjusted in Auto
fan speed mode.)
Fan speed display
Sleep indicator
(Not available for the unit.)
FILTERSUPERQUIET
MODE FAN
SWING TIMER DIMMER
Sleep [ 5 sec ]
F / C [ 5 sec ]
UP
Increase temperature in 1
°F
(1
°C
) increment
Max temperature is 86
°F
(30
°C
)
DOWN
Decrease temperature in 1
°F
(1
°C
) increment
Min temperature is 61
°F
(16
°C
)
FILTER
Reset the lter cleaning tips
(There is not corresponding indicator light on the unit.)
DIMMER
Sleep[
5 sec]
Switch the DIMMER mode to SLEEP mode
SUPER
Start or stop fast cooling
TIMER
Set time to turn the unit on or off
(There is not corresponding indicator light on the unit.)
SWING
Start or stop the Level Vane movement
QUIET
Set or cancel the quiet mode
FAN
Switch the fan speed as follows:
High - Medium - Low
MODE
Switch the operating modes as follows:
ECO - Heat - Cool - Dry - Fan
(Change the temperature mode between °F and °C.)
ON/OFF
Turn on or off the unit
20
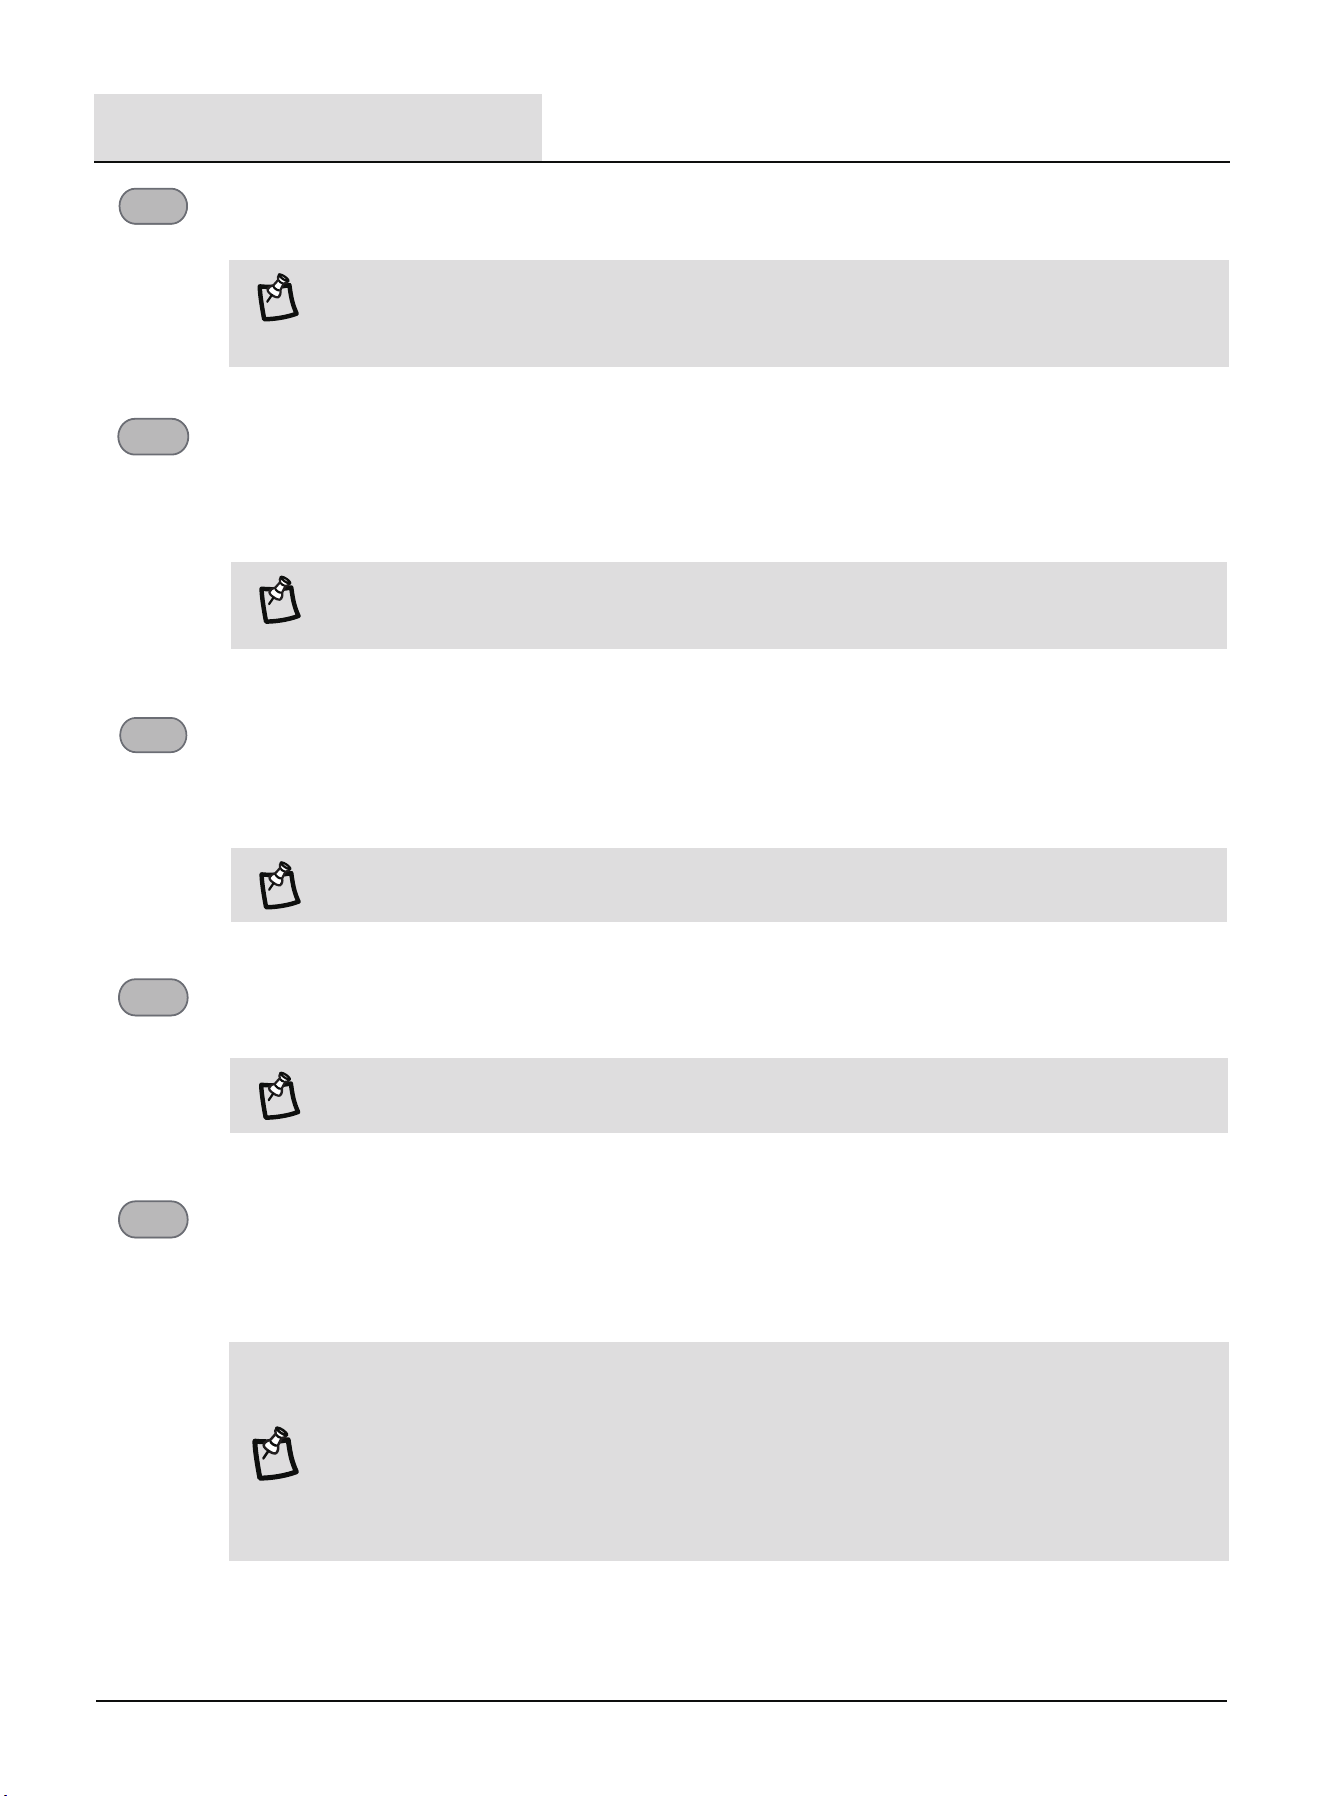
DIMMER
DIMMER sleep [ 5 sec ]
DIMMER
sleep [ 5 sec ]
1. Press the DIMMER button to turn off the control panel display.
1. Press and hold the DIMMER button on the remote for 5 seconds to switch the DIMMER mode to SLEEP mode.
2. After 10 seconds, the light on the control panel display will dim.
3. To turn off Sleep control, press MODE, FAN, SLEEP or wait 8 hours for Sleep control to turn off automatically
DIMMER
sleep [ 5 sec ]
1. Press the Quiet button to set or cancel the Quiet Mode operation.
QUIET
QUIET
SUPER
FILTER (valid for some models)
1. When "FC" appears on the air conditioner display, please clean or replace the air lter. See “CLEANING THE AIR FILTER”.
2. Press Power button on the machine or FILTER button on remote to reset the lter after cleaning and replacing the air lter.
FILTER
SUPER
The SUPER button is used to start or stop fast cooling.
1. Press the SUPER button. The air conditioner automatically sets the fan speed to High and the temperature to 61 °F (16 °C).
2. To turn off Super control, press MODE, FAN, QUIET or SUPER button on the remote control.
NOTE: 1. It takes about 2 to 3 minutes to fully enter the quiet mode.
2. Sometimes it cannot enter the quiet mode because of some protection.
3. The QUIET button is disabled in dry mode.
NOTE: When you press sleep button
1. The appliance will stop operation automatically after operating for 8 hours.
2. Fan speed is automatically set at low speed.
3. In the Cooling mode, Dry mode, and ECO mode, the set temperature will increase by 4 °F (2 °C)
at most, during 2 hours, and continues running at that temperature until auto shut off.
4. Sleep control cannot be selected in Fan mode.
NOTE: 1. In the SUPER mode, you can set the timer.
2. SUPER button is ineffective in ECO mode.
NOTE: FC display will switch to normal display after 5 seconds.
NOTE: When in DIMMER mode, new control inputs will return display to normal.
Operation (continued)
21
3
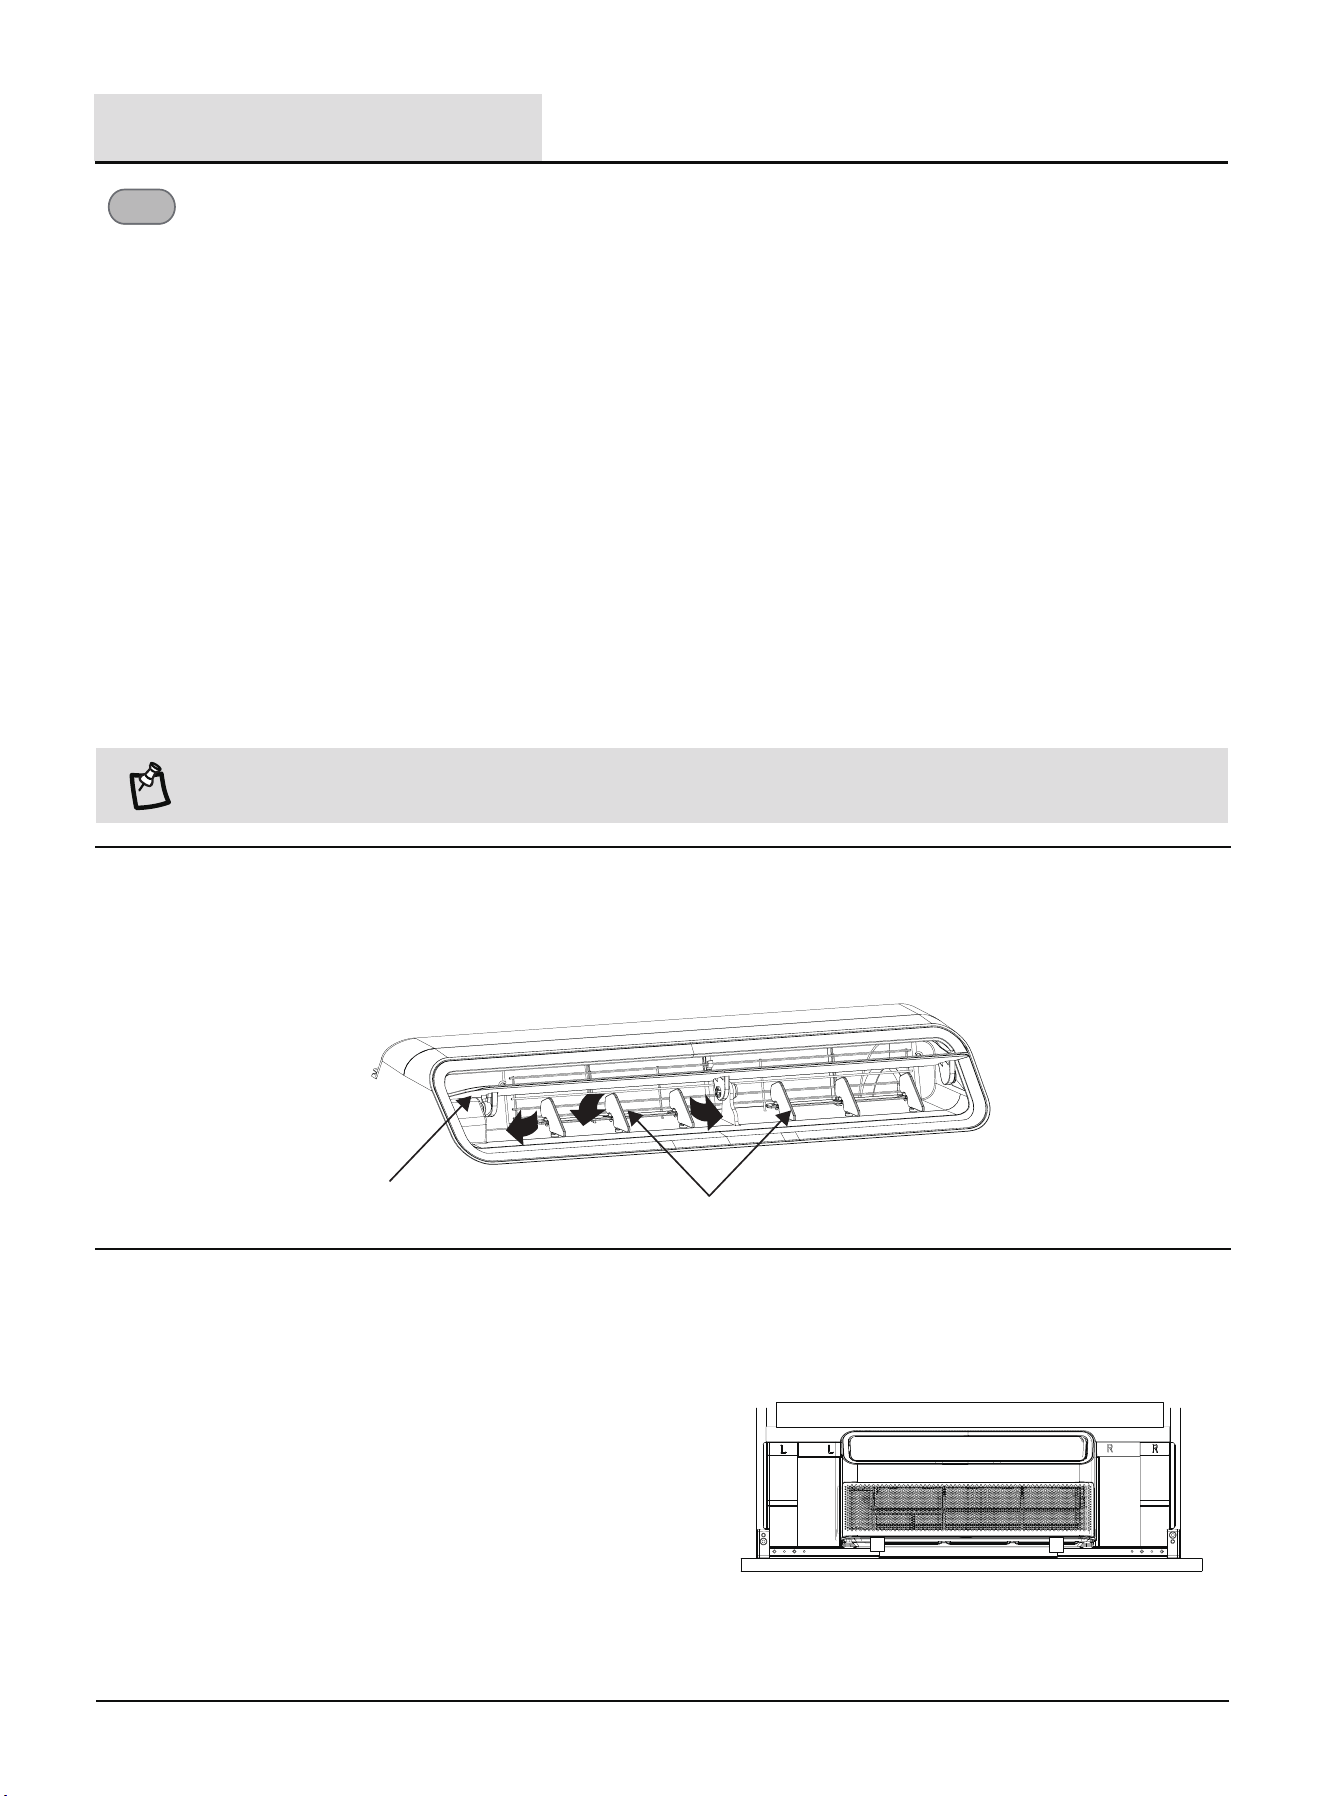
Changing Air Direction
1. Use the Vertical Vane to direct the air right or left.
2. Use the Level Vane to direct air up, down or straight ahead.
TIMER
TIMER
Use the TIMER function to turn the air conditioner ON/OFF automatically.
Setting the Air Conditioner to Turn On:
1. Plug in the air conditioner and use the remote to power it ON.
2. Use the remote to set the desired mode, temperature, fan speed, etc.
3 .Use the remote to power OFF the air conditioner.
4. Press TIMER on the remote and use the UP/ DOWN buttons to set the desired delay time.
The delay time can be set from 0 to 24 hours in one-hour increments.
5. Press TIMER again to conrm the delay time. The Timer light on the unit will be on.
Setting the Air Conditioner to Turn Off:
1. Plug in the air conditioner and use the remote to power it ON.
2. Use the remote to set the desired mode, temperature, fan speed, etc.
3. Press TIMER on the remote and use the UP/ DOWN buttons to set the desired delay time.
The delay time can be set from 0 to 24 hours in one-hour increments.
4. Press TIMER again to conrm the delay time. The Timer light on the unit will be on.
To Cancel Timer:
1. Press the TIMER button again. Once a “beep” is heard and the indicator disappears, the Timer mode has been canceled.
The Level Vane The Vertical Vane
4
Normal Sounds
NOTE:The TIMER function can only be set using the remote.
Operation (continued)
When your air conditioner is operating normally, you
may hear sounds such as:
1. Droplets of water hitting the condenser, causing a pinging or clicking
sound. The water droplets help cool the condenser.
2. Air movement from the fan.
3. Clicks from the thermostat cycle.
4. Vibrations or noise due to poor wall or window construction.
5. A high-pitched hum or pulsating noise caused by the modern
high-efciency compressor cycling on and off.
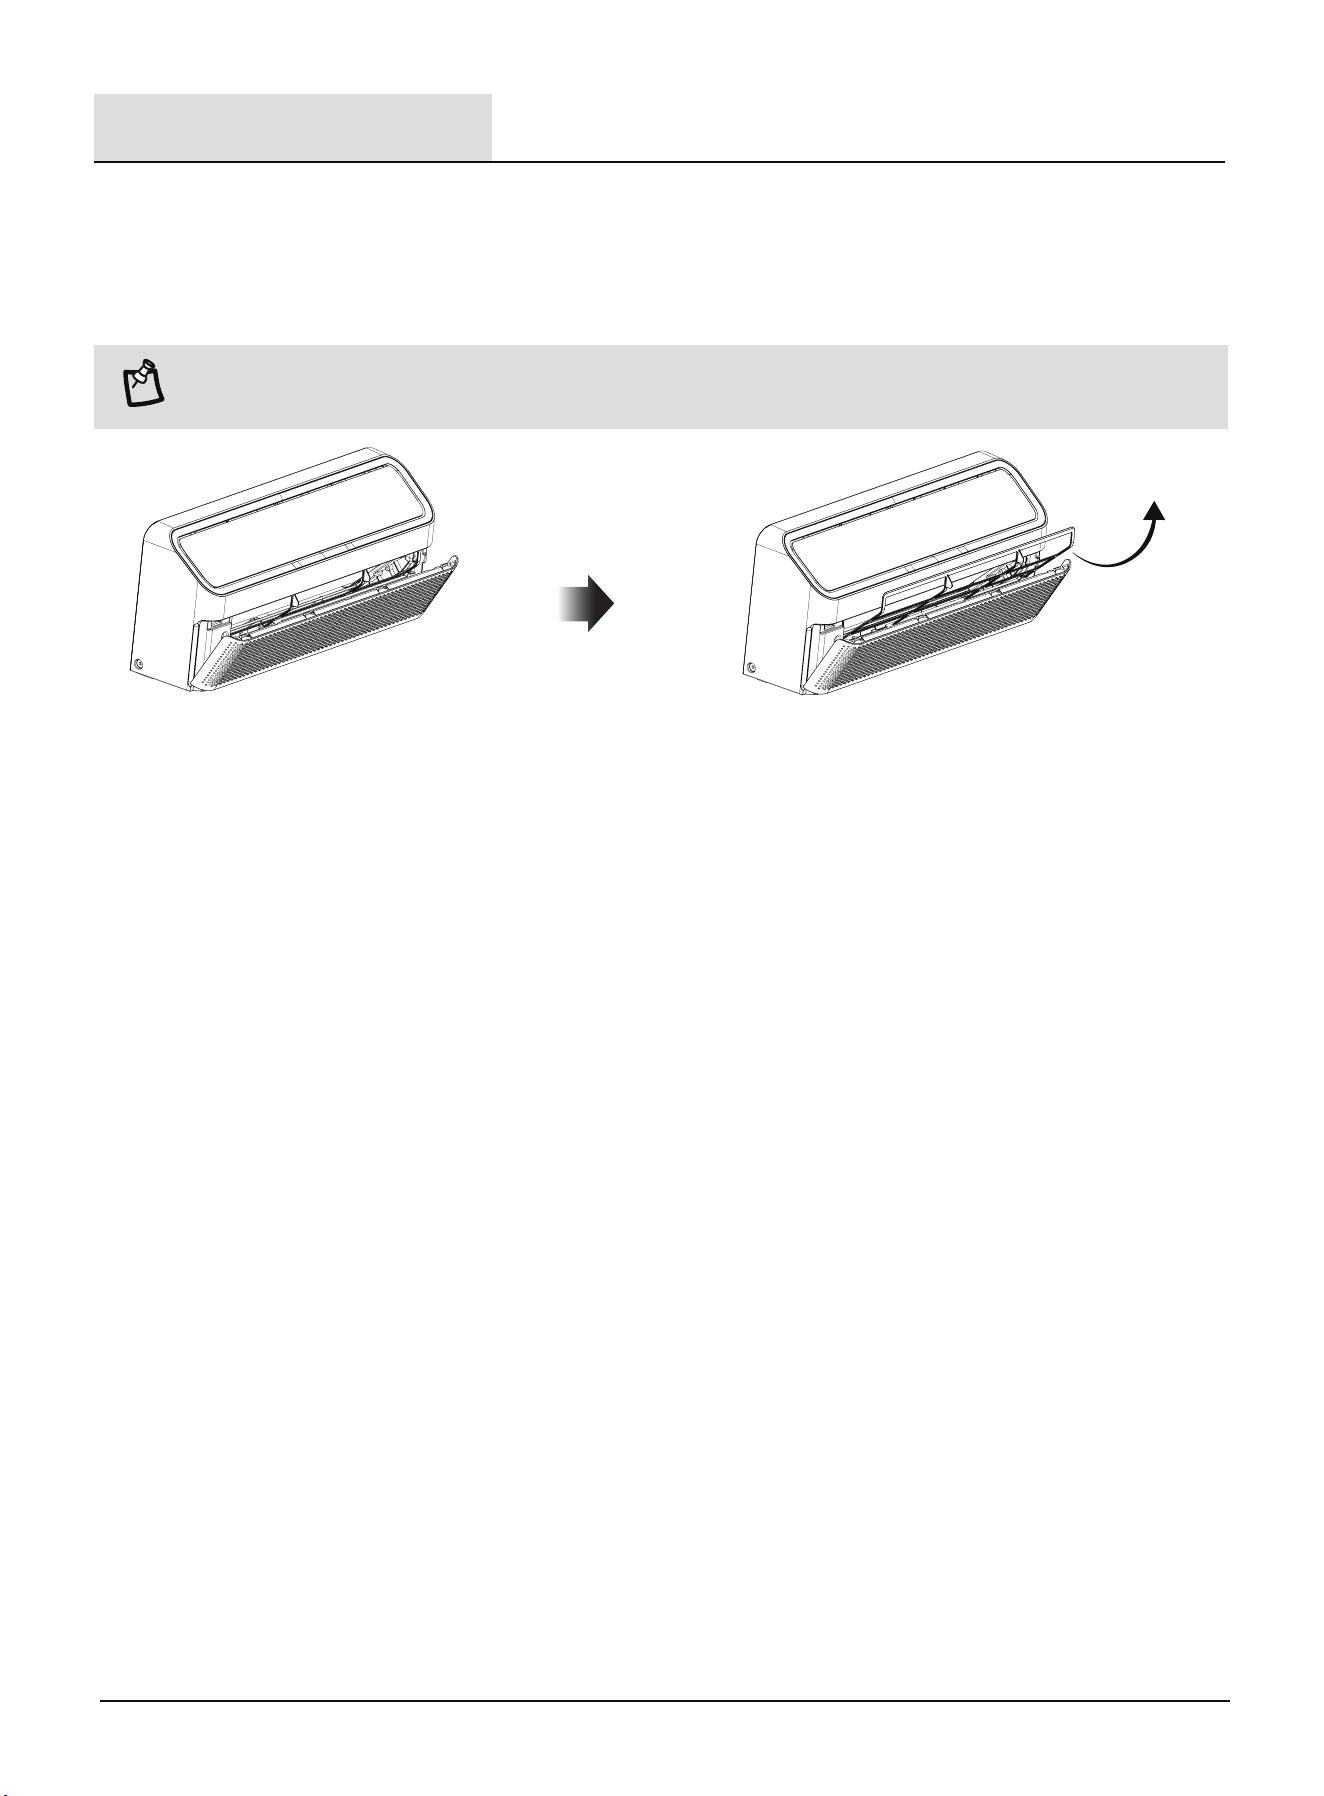
3. Use a vacuum cleaner to clean the air lter. If the air lter is very dirty,
wash it in warm water with a mild detergent. Do not wash the air lter in the
dishwasher or use any chemical cleaners. Air dry the lter completely before
replacing to ensure maximum efciency.
4. Replace the air lter back into the air conditioner.
22
Your new air conditioner is designed to give you many years of dependable service. This section tells you how to clean and care for your
air conditioner properly. Call your local authorized dealer for an annual checkup. Remember the cost of this service call is your responsibility.
The air lter is removable for easy cleaning. A clean lter helps remove dust, lint, and other particles from the air and is important for
best cooling and operating efciency. Check the lter every 2 weeks to see whether it needs cleaning.
CLEANING THE AIR FILTER
1. Turn off the air conditioner.
2. Open the front panel. Grasp the lter
by the handle and pull it out.
CLEANING THE FRONT PANEL
1. Turn off the air conditioner.
2. Clean the front panel with a soft, damp cloth.
3. Air dry the front panel completely.
REPAIRING PAINT DAMAGE
Check once or twice a year for paint damage. This is very important, especially in areas near oceans or where rust is a problem.
If needed, touch up with a good grade enamel paint.
ANNUAL MAINTENANCE
Your air conditioner needs annual maintenance to help ensure steady, top performance throughout the year. Call your local authorized
dealer to schedule an annual checkup. The expense of an annual inspection is your responsibility.
REMOVING AC FROM WINDOW
1. Turn AC off, and disconnect power cord.
2. Remove the EVA foam.
3. Remove sash seal from between windows and unscrew safety lock.
4. Remove screws installed through frame and frame lock.
5. Close the curtain housing.
6. Keeping a rm grip on air conditioner, raise sash and carefully remove.
7. Be careful not to spill any standing water while lifting unit from window.
8. Remove the support bracket.
9. Store parts with the AC.
NOTE: 1. Do not operate the air conditioner without the lter in place.
2. Do not toutch the metal parts of the unit, when the air lter is to be removed. It may cause injury.
Care and Cleaning
23
Problem Solution
Air conditioner will not operate
DANGER: ELECTRICAL SHOCK HAZARD
1. Plug into a grounded 3-prong outlet.
2. Do not remove ground prong.
3. Do not use an adapter.
4. Do not use an extension cord.
5. Failure to follow these instructions can result in
death, re, or electrical shock.
1. The power supply cord is unplugged. Plug into grounded 3-prong
outlet. See “ELECTRICAL REQUIREMENTS”.
2. The power supply cord has tripped (RESET button has popped out).
Press and release RESET to resume operation.
3. A household fuse has blown, or circuit breaker has tripped.
Replace the fuse or reset the circuit breaker. If the problem
continues, call an electrician. See “ELECTRICAL REQUIREMENTS”.
4. The Power button has not been pressed. Press the Power button.
5. The local power has failed. Wait for power to be restored.
Air conditioner blows fuses or trips circuit breakers
1. Too many appliances are being used on the same circuit.
Unplug or relocate appliances that share the same circuit.
2. Time-delay fuse or circuit breaker of the wrong capacity is being
used. Replace with a time-delay fuse or circuit breaker of the correct
capacity. See “ELECTRICAL REQUIREMENTS”.
3. An extension cord is being used. Do not use an extension cord with
this or any other appliance.
4. You are trying to restart the air conditioner too soon after turning off
the air conditioner. Wait at least 3 minutes after turning off the air
conditioner before trying to restart the air conditioner.
Air conditioner power supply cord trips
(Reset button pops out)
1. Disturbances in your electrical current can trip (RESET button will
pop out) the power supply cord. Press and release RESET to resume
operation.
2. Electrical overloading, overheating, cord pinching or aging can trip
(RESET button will pop out) the power supply cord.
After correcting the problem, press and release RESET to resume
operation.
NOTE: A damaged power supply cord must be replaced
with a new power supply cord obtained from the product
manufacturer and must not be repaired.
Troubleshooting
24
Problem Solution
Air conditioner seems to run too much
Air conditioner cycles on and off too much or does
not cool
Water drips from cabinet into your house
NOTE: Do not drill a hole in the bottom of the metal
base and condensate pan.
Troubleshooting
1. The air conditioner is not properly sized for your room. Check the
cooling capabilities of your room air conditioner. Room air conditioners
are not designed to cool multiple rooms.
2. The lter is dirty or obstructed by debris. Clean the lter.
3. The inside evaporator and outside condenser coils are dirty or obstructed
by debris. See “ANNUAL MAINTENANCE”.
4. There is excessive heat or moisture (open container cooking, showers,
etc.) in the room. Use a fan to exhaust heat or moisture from the room.
Try not to use heat producing appliances during the hottest part of the
day.
5. The louvers are blocked. Install the air conditioner in a location where the
louvers are free from curtains, blinds, furniture, etc.
6. The temperature of the room you are trying to cool is extremely hot. Allow
extra time for the air conditioner to cool off a very hot room.
7. Windows or doors to the outside are open. Close all windows and doors.
8. The Temp control is not at a cool enough setting. Adjust the Temp control
to a cooler setting by pressing the minus button to reduce the
temperature. Set the Fan Speed control to the highest setting.
1.The air conditioner is not properly leveled. The air conditioner should
slope slightly downward toward the outside. Level the air conditioner to
provide a downward slope toward the outside to ensure proper drainage.
See the Installation Instructions.
1. The current air conditioner replaced an older model. The use of more
efcient components may cause the air conditioner to run longer than an
older model, but the total energy consumption will be less. Newer air
conditioners do not emit the “blast” of cold air you may be accustomed to
from older air conditioners, but this is not an indication of lesser cooling
capacity or efciency. Refer to the efciency rating (EER) and capacity
rating (in Btu/h) marked on the air conditioner.
2. The air conditioner is in a heavily occupied room, or heat producing
appliances are in use in the room. Use exhaust vent fans while cooking or
bathing and try not to use heat producing appliances during the hottest
part of the day. A higher capacity air conditioner may be required,
depending on the size of the room being cooled.
25
Informations sur la sécurité........................................................
Pré-installation.........................................................................
Installation...............................................................................
Opération.................................................................................
Entretien et nettoyage...............................................................
Dépannage..............................................................................
26
31
37
40
45
46
Table des matières
26
Informations sur la sécurité
Nous avons fourni de nombreux messages de sécurité importants dans ce manuel et sur votre appareil. Lisez et respectez toujours
tous les messages de sécurité.
DANGER : Ce symbole vous avertit d'un danger potentiel qui, s'il n'est pas évité, entraînera la mort ou des graves
blessures.
AVERTISSEMENT : Ce symbole vous avertit d'un danger potentiel qui, s'il n'est pas évité, pourrait entraîner la mort
ou des blessures graves.
ATTENTION : Ce symbole vous avertit d'un danger potentiel qui, s'il n'est pas évité, peut entraîner des blessures
mineures ou modérées.
Explication des symboles affichés sur l'unité.
AVERTISSEMENT : Risque d'incendie ou d'explosion. Cet appareil contient un réfrigérant inflammable.
Des précautions supplémentaires doivent être prises.
1. N'utilisez pas de moyens pour accélérer le processus de dégivrage ou de nettoyage, autres que ceux recommandés par le fabricant.
2. L'appareil doit être stocké dans une pièce sans sources d'inflammation fonctionnant en continu (par exemple : les flammes nues,
un appareil à gaz en fonctionnement ou un chauffage électrique en fonctionnement).
3. Ne percez ni ne traînez les tuyaux de réfrigérant. Comprenez bien que les réfrigérants peuvent ne pas avoir d'odeur.
4. Les réglementations nationales en matière de gaz doivent être respectées.
5. Maintenez les ouvertures de ventilation libres sans obstruction. La quantité maximale de réfrigérant est indiquée sur la plaque
signalétique du climatiseur.
6. Lors de la manipulation, de l'installation et de l'utilisation de l'appareil, veillez à éviter d'endommager les tuyaux de réfrigérant.
7. La quantité maximale de réfrigérant est indiquée sur la plaque signalétique du climatiseur.
8. Ne percez pas de trous dans l'appareil.
9. L'entretien, le nettoyage et la maintenance ne doivent être effectués que par des techniciens dûment formés et qualifiés pour
l'utilisation de réfrigérants inflammables.
10. Éliminez le climatiseur conformément aux réglementations fédérales et locales. Les réfrigérants inflammables doivent être
éliminés selon des procédures spéciales. Contactez vos autorités locales pour l’élimination de votre climatiseur de manière
respectueuse de l'environnement.
11. L'appareil doit être stocké de manière à éviter tout dommage mécanique.
12. L'appareil doit être stocké dans un endroit bien ventilé où la taille de la pièce correspond à la surface de la pièce telles que
spécifiée pour le fonctionnement.
13. Ce produit contient des petites pièces telles que (les piles, le couvercle de piles et les vis) qui peuvent causer une suffocation si
elles sont avalées par des enfants.
14. Ne placez pas d'objets sur le climatiseur ou le support.
15. Ne jouez pas avec le climatiseur ou le support, en particulier pour les enfants.
16. Ne buvez pas d'eau évacuée du climatiseur, car elle peut contenir des moisissures et des bactéries susceptibles d'entraîner la
mort en cas d'ingestion.
17. Lorsque le filtre à air doit être retiré, ne touchez pas les parties métalliques de l'unité, cela peut provoquer des blessures.
AVERTISSEMENT
Ce symbole indique que cet appareil consomme un réfrigérant inflammable.
Si le réfrigérant fuit et est exposé à une source d'inflammation externe, il y a un risque d'incendie.
ATTENTION
Ce symbole indique que le manuel d'utilisation doit être lu attentivement.
ATTENTION
Ce symbole indique qu'un personnel de service doit manipuler cet équipement conformément au manuel
d'installation.
ATTENTION
Ce symbole indique que des informations, telles que le manuel d'utilisation ou le manuel d'installation, sont
disponibles.
A2L
A2L
INSTRUCTIONS DE SÉCURITÉ IMPORTANTES
Pour réduire le risque d'incendie, de choc électrique ou de blessure lors de l'utilisation du climatiseur, suivre ces précautions de
base :
1. Branchez l'appareil sur une prise de courant à 3 broches mise à la terre.
2. Ne retirez pas la broche de terre.
3. N'utilisez pas d'adaptateur.
4. N'utilisez pas de rallonge.
5. Débranchez le climatiseur avant toute maintenance.
6. Affectez deux personnes ou plus pour déplacer et installer le climatiseur.
7. Si le CORDON D'ALIMENTATION est endommagé, il doit être remplacé par le fabricant, son agent de service ou une personne
qualiée similaire an d'éviter tout danger.
MISE AU REBUT DE L'APPAREIL
1. Avant de jeter l'appareil, il est nécessaire de retirer les piles et de les éliminer ou recycler de manière appropriée.
2. Si vous devez mettre l'appareil au rebut, consultez notre revendeur. Si les tuyaux sont retirés incorrectement, le réfrigérant
peut fuir et entrer en contact avec votre peau, entraînant des blessures. La libération du réfrigérant dans l'atmosphère
endommage également l'environnement.
3. Veuillez recycler ou éliminer les matériaux d'emballage du produit de manière écologique.
4. Ne stockez pas ni n'expédiez le climatiseur à l'envers ou sur le côté pour éviter d'endommager le compresseur.
5. Cet appareil n'est pas destiné à être utilisé par des personnes (y compris des enfants) avec des capacités physiques,
sensorielles ou mentales réduites, ou un manque d'expérience et de connaissance, à moins qu'elles n'aient reçu une
surveillance ou des instructions concernant l'utilisation de l'appareil d'une personne responsable de leur sécurité.
Les enfants doivent être surveillés pour garantir qu'ils ne jouent pas avec l'appareil.
6. Le schéma de câblage est indiqué sur la plaque signalétique du climatiseur.
Un espace d'au moins 10 cm entre les côtés gauche / droit du climatiseur de fenêtre et l'obstacle adjacent, un espace d'au
moins 50 cm entre les côtés avant / arrière du climatiseur de fenêtre et l'obstacle adjacent, et un espace d'au moins 10 cm
entre le dessus du climatiseur de fenêtre et l'obstacle adjacent doivent être maintenus pendant le fonctionnement normal.
Le personnel d'entretien, de service et de réparation doit être formé conformément à la norme UL/CSA
60335-2-40 Ed 4.0, Annexe HH et posséder les qualications requises. Toute procédure de travail affectant
les moyens de sécurité ne doit être effectuée que par des personnes compétentes conformément à la
section « Compétence du personnel de service ».
Les exemples de telles procédures de travail sont:
· la pénétration dans le circuit frigorique ;
· l'ouverture de composants scellés ;
· l'ouverture des enceintes ventilées.
PRÉCAUTIONS À PRENDRE POUR L'UTILISATION DU RÉFRIGÉRANT R32
Les procédures d'installation de base sont les mêmes que celles du réfrigérant conventionnel (R22 ou R410A).
Cependant, faites attention aux points suivants :
1. Transport d'équipements contenant des réfrigérants inammables
Faites attention au fait qu'il peut exister d'autres réglementations en matière de transport pour les équipements contenant des gaz
inammables. Le nombre maximum d'équipements ou la conguration des équipements autorisés à être transportés ensemble seront
déterminés par les réglementations en matière de transport applicables.
2. Marquage des équipements avec des panneaux
Les panneaux des appareils similaires utilisés dans une zone de travail sont généralement régis par les réglementations locales et
dénissent les exigences minimales pour la fourniture des panneaux de sécurité et/ou de santé dans un lieu de travail.
Tous les panneaux requis doivent être maintenus et les employeurs doivent s'assurer que les employés reçoivent des instructions et
des formations appropriées et sufsantes sur la signication des panneaux de sécurité appropriés et sur les actions à prendre en
fonction de ces panneaux. L'efcacité des panneaux ne doit pas être diminuée par un trop grand nombre de panneaux placés
ensemble. Tout pictogramme utilisé doit être aussi simple que possible et ne contenir que les détails nécessaires.
3. Mise en rebut des équipements utilisant des réfrigérants inammables
Reportez-vous aux réglementations nationales.
4. Stockage des équipements / appareils
El almacenamiento del aparato debe realizarse de acuerdo con las normativas o instrucciones aplicables, lo que sea más estricto.
Informations sur la sécurité (suite)
27
5. Stockage des équipements emballés (invendus)
La protection de l'emballage de stockage doit être construite de manière à ce que les dommages mécaniques de l'équipement à
l'intérieur de l'emballage ne provoquent pas de fuite de la charge de réfrigérant.
Le nombre maximum d'équipements autorisés à être stockés ensemble sera déterminé par les réglementations locales.
6. Informations sur la maintenance
Lorsque des composants électriques sont remplacés, ils doivent être adaptés à l'usage et aux spécications correctes. Les
directives du fabricant en matière de maintenance et d'entretien doivent être suivies à tout moment. En cas de doute, consultez
le service technique du fabricant pour obtenir de l'aide.
Les contrôles suivants doivent être effectués sur les installations utilisant des RÉFRIGÉRANTS
INFLAMMABLES :
· la CHARGE DE RÉFRIGÉRANT réelle dépend de la taille de la chambre dans laquelle les pièces contenant du réfrigérant sont
installées ;
· les machines et les sorties de ventilation fonctionnent correctement et ne sont pas obstruées ;
· si un circuit de réfrigération indirect est utilisé, le circuit secondaire doit être vérié pour la présence du réfrigérant ;
· le marquage de l'équipement reste visible et lisible. Les marquages et les panneaux illisibles doivent être corrigés ;
· les tuyaux ou composants de réfrigération sont installés dans une position où ils ne risquent pas d'être exposés à une
substance susceptible de corroder les composants contenant du réfrigérant, à moins que les composants ne soient construits
par des matériaux intrinsèquement résistants à la corrosion ou qu'ils ne soient convenablement protégés contre la corrosion.
Pour les modèles consommant un réfrigérant inammable, le mode d'emploi doit également contenir les
informations suivantes :
1. Avant de commencer à travailler sur des systèmes contenant des REFRIGÉRANTS INFLAMMABLES, des contrôles de sécurité sont
nécessaires pour vous assurer que le risque d'inammation est minimisé.
2. Pour les réparations du SYSTÈME DE RÉFRIGÉRANT, les opérations suivantes doivent être effectuées avant de procéder à des
opérations sur le système.
· Les travaux doivent être effectués selon une procédure contrôlée an de minimiser le risque de présence de gaz ou de vapeurs
inammables pendant le travail.
· Tout le personnel d'entretien et les autres personnes travaillant dans la zone locale doivent être informés de la nature du travail
effectué. Tout travail dans un espace conné doit être évité.
· La zone doit être contrôlée avec un détecteur de réfrigérant approprié avant et pendant le travail, an de vous assurer que le
technicien est conscient des atmosphères potentiellement toxiques ou inammables. Assurez-vous que l'équipement de
détection des fuites utilisé est adapté à tous les réfrigérants applicables, c'est-à-dire sans étincelle, convenablement scellé
et intrinsèquement sûr.
· Si un travail à chaud doit être effectué sur l'équipement de réfrigération ou toute pièce connexe, un équipement d'extinction
d'incendie approprié doit être disponible. Préparez un extincteur à poudre sèche ou à CO2 à proximité de la zone de chargement.
· Il est interdit à toute personne effectuant un travail sur un SYSTÈME DE RÉFRIGÉRATION qui implique l'exposition d'une
tuyauterie d'utiliser une source d'inammation d'une manière susceptible d'entraîner un risque d'incendie ou d'explosion.
Toutes les sources d'inammation possibles, y compris la cigarette, devraient être maintenues sufsamment éloignées du site
d'installation, de réparation, de retrait et d'élimination, au cours desquels du réfrigérant peut éventuellement être libéré dans
l'espace environnant. Avant le début des travaux, il faut surveiller la zone autour de l'équipement pour vous assurer qu'il n'y a
pas de dangers ni de risques d'inammation. Des panneaux « Ne pas fumer » doivent être afchés.
La réparation et l'entretien des composants électriques doivent inclure les contrôles de sécurité initiaux et les procédures
d'inspection des composants. S'il existe un défaut susceptible de compromettre la sécurité, aucune alimentation électrique
ne doit être raccordée au circuit tant qu'il n'a pas été éliminé de manière satisfaisante. Si le défaut ne peut pas être corrigé
immédiatement mais qu'il est nécessaire de continuer l'utilisation, une solution temporaire adéquate doit être utilisée. Cela doit
être signalé au propriétaire de l'équipement de sorte que toutes les parties sont avisées.
Les contrôles initiaux de sécurité comprennent :
· que les condensateurs sont déchargés : cela doit être fait de manière sûre pour éviter la possibilité d'étincelles ;
· qu'il n'y a pas de composants électriques et de câblage sous tension lors du chargement, de la récupération ou de la purge du
système ;
· que la mise à la terre est continue.
7. Les composants électriques scellés doivent être remplacés.
8. Les composants à sécurité intrinsèque doivent être remplacés.
Informations sur la sécurité (suite)
28
9. Câblage
Vériez que le câblage sera sujet à l'usure, à la corrosion, à une pression excessive, aux vibrations, aux arêtes vives ou à tout
autre effet environnemental négatif. Le contrôle doit également prendre en compte les effets du vieillissement ou des vibrations
continues provenant de sources telles que les compresseurs ou les ventilateurs.
10. Détection de réfrigérants inammables
Les sources potentielles d'inammation ne doivent pas en aucun cas être utilisées pour la recherche ou la détection de fuites de
réfrigérant. Une torche aux halogénures (ou tout autre détecteur utilisant une amme nue) ne doit pas être utilisée.
11. Méthodes de détection des fuites
Les méthodes de détection des fuites suivantes sont jugées acceptables pour tous les systèmes de réfrigérant.
Des détecteurs de fuites électroniques peuvent être utilisés pour détecter les fuites de réfrigérants, mais, dans le cas des
RÉFRIGÉRANTS INFLAMMABLES, leur sensibilité peut ne pas être adéquate ou doit être ré-étalonnée. (L'équipement de détection
doit être étalonné dans une zone sans réfrigérant.) Assurez-vous que le détecteur n'est pas une source potentielle d'inammation
et convient au réfrigérant utilisé. Le dispositif de détection des fuites doit être réglé à un pourcentage LFL du réfrigérant et
étalonné en fonction du réfrigérant utilisé, et le pourcentage de gaz approprié (25 % maximum) doit être conrmé. Les uides de
détection des fuites sont également adaptés à la plupart des réfrigérants, mais l'utilisation de détergents contenant du chlore doit
être évitée, car le chlore peut réagir avec le réfrigérant et corroder les tuyaux en cuivre.
Si une fuite est suspectée, toutes les ammes nues doivent être éliminées / éteintes.
Si une fuite de réfrigérant qui nécessite un brasage est constatée, tout le réfrigérant doit être récupéré du système ou isolé (au
moyen de vannes d'arrêt) dans une partie du système éloignée de la fuite.
12. Retrait et évacuation
An de pénétrer dans le circuit de réfrigérant pour effectuer des réparations ou pour toute autre raison, il convient d'utiliser les
procédures conventionnelles. Cependant, pour les réfrigérants inammables, il est important que la meilleure pratique soit
respectée puisque l'inammabilité est un facteur à considérer. La procédure ci-dessus doit être suivie :
- enlever le réfrigérant de manière sûre conformément aux réglementations locales et nationales ;
- évacuer ;
- purgez le circuit avec du gaz inerte (en option pour A2L) ;
- évacuer (en option pour A2L) ;
- rincez ou purgez continuellement le circuit avec du gaz inerte lors de l'utilisation de la amme pour ouvrir le circuit ;
- ouvrez le circuit.
La charge de réfrigérant doit être récupérée dans des bouteilles de récupération adaptées si la ventilation n'est pas autorisée par
les codes locaux et nationaux. Pour les appareils contenant des réfrigérants inammables, le système doit être purgé avec de
l'azote sans oxygène pour rendre l'appareil sûr pour les réfrigérants inammables. Il est probablement nécessaire de répéter ce
processus plusieurs fois. L'air comprimé ou l'oxygène ne doit pas être utilisé pour purger les systèmes de réfrigérant.
Pour les appareils contenant des réfrigérants inammables, la purge des réfrigérants doit être effectuée en brisant le vide dans le
système avec de l'azote sans oxygène et en continuant à le remplir jusqu'à ce que la pression de fonctionnement soit atteinte,
puis en l'évacuant dans l'atmosphère et enn en créant le vide (en option pour A2L). Ce processus doit être répété jusqu'à ce qu'il
n'y ait plus de réfrigérant dans le système (en option pour A2L). Lorsque la charge d'azote sans oxygène nale est utilisée, le
système doit être évacué jusqu'à la pression atmosphérique pour permettre le fonctionnement.
La sortie de la pompe à vide ne doit pas être proche de sources d'inammation potentielles, et une ventilation doit être disponible.
13. Procédures de chargement
En plus des procédures de charge conventionnelles, les exigences suivantes doivent être respectées.
· Assurez-vous qu'il n'y a pas de contamination des différents réfrigérants lors de l'utilisation de l'équipement de chargement.
Les exibles ou les tuyaux doivent être aussi courts que possible pour minimiser la quantité de réfrigérant qu'ils contiennent.
· Les bouteilles doivent être conservées dans une position appropriée conformément aux instructions.
· Assurez-vous que le SYSTÈME DE RÉFRIGÉRATION est mis à la terre avant de le remplir avec du réfrigérant.
· Le système dot être étiqueté lorsque le chargement est terminé (si ce n'est pas déjà fait).
· Une attention particulière est nécessaire pour ne pas trop remplir le SYSTÈME DE RÉFRIGÉRATION.
Avant de recharger le système, il doit être soumis à un essai de pression avec du gaz de purge approprié. Le système doit être
soumis à un essai d'étanchéité à la n du chargement, mais avant la mise en service. Un essai d'étanchéité de suivi doit être
effectué avant de quitter le site.
REMARQUE : Les exemples de liquides de détection de fuites sont
· méthode des bulles ;
· méthode des agents uorescents.
Informations sur la sécurité (suite)
29
14. Démantèlement
Avant d'effectuer cette procédure, il est essentiel que le technicien connaisse parfaitement l'équipement et tous ses détails.
Des bonnes pratiques pour la récupération de tous les réfrigérants en toute sécurité sont recommandées. Avant d'effectuer la
tâche, un échantillon d'huile et de réfrigérant doit être prélevé si une analyse est requise avant de réutiliser le réfrigérant récupéré.
Il est essentiel que l'alimentation électrique soit disponible avant le début de la tâche.
a) Familiarisez-vous avec l'équipement et son fonctionnement.
b) Isolez électriquement le système.
c) Avant d'essayer la procédure, assurez-vous que :
· un équipement de manipulation mécanique est disponible, si nécessaire, pour la manipulation des bouteilles de réfrigérant ;
· tous les équipements de protection individuelle sont disponibles et utilisés correctement ;
· le processus de récupération est supervisé à tout moment par une personne compétente ;
· l'équipement et les bouteilles de récupération sont conformes aux normes appropriées.
d) Pompez le système de réfrigérant, si possible.
e) S'il est impossible de créer un vide, faites un collecteur de sorte que le réfrigérant puisse être retiré de diverses parties du
système.
f) Assurez-vous que la bouteille est située sur la balance avant que la récupération ait lieu.
g) Démarrez la machine de récupération et faites la fonctionner conformément aux instructions.
h) Ne trop remplissez pas les bouteilles (Pas plus de 80 % du volume de charge liquide).
i) Ne dépassez jamais la pression de service maximale de la bouteille, même temporairement.
j) Lorsque les bouteilles ont été remplies correctement et que le processus est terminé, assurez-vous que les bouteilles et l'équi
pement sont rapidement retirés du site et que toutes les vannes d'isolement de l'équipement sont fermées.
k) Le réfrigérant récupéré ne doit pas être chargé dans un autre SYSTÈME DE REFRIGÉRATION, à moins qu'il a été purié et
contrôlé.
15. Étiquetage
L'équipement doit porter une étiquette indiquant qu'il a été mis hors service et vidé du réfrigérant. L'étiquette doit être datée et
signée. Pour les appareils contenant des RÉFRIGÉRANTS INFLAMMABLES, assurez-vous qu'il y a des étiquettes sur l'équipement
indiquant qu'il contient des RÉFRIGÉRANTS INFLAMMABLES.
16. Récupération
Lors du retrait du réfrigérant d'un système, que ce soit pour l'entretien ou la mise hors service, la bonne pratique recommandée
est ce que tous les réfrigérants sont retraits en toute sécurité.
Lors du transfert du réfrigérant dans des bouteilles, assurez-vous que seules des bouteilles de récupération de réfrigérant
appropriés sont utilisées. Assurez-vous que le nombre correct de bouteilles pour maintenir la charge totale du système est
disponible. Toutes les bouteilles à utiliser sont désignées pour le réfrigérant récupéré et étiquetées pour ce réfrigérant
(c.-à-d. des bouteilles spéciales pour la récupération du réfrigérant). Les bouteilles doivent être munies d'une soupape
de sûreté et des vannes d'arrêt correspondantes en bon état de fonctionnement. Les bouteilles de récupération vides sont
évacuées et, si possible, refroidies avant la récupération.
L'équipement de récupération doit être en bon état de fonctionnement avec un ensemble d'instructions sur l'équipement à
portée de main et doit être adapté à la récupération des réfrigérants inammables. En cas de doute, consultez le fabricant.
En outre, un ensemble de balances étalonnées doit être disponible et en bon état de fonctionnement. Les tuyaux doivent être
complets avec des raccords sans fuite et en bon état.
Le réfrigérant récupéré doit être traité conformément à la législation locale dans la bouteille de récupération appropriée et la
note de transfert des déchets correspondante doit être établie. Ne mélangez pas les réfrigérants dans les unités de récupération
et surtout pas dans les bouteilles.
Si des compresseurs ou des huiles de compresseur doivent être retirés, assurez-vous qu'ils ont été évacués à un niveau
acceptable pour vous assurer que le réfrigérant inammable ne reste pas dans le lubriant. Le corps du compresseur ne doit
pas être chauffé par une amme nue ou d'autres sources d'inammation pour accélérer ce processus. L'évacuation de l'huile
hors d'un système, le cas échéant, doit être effectuée en toute sécurité.
Informations sur la sécurité (suite)
30
31
1. Branchez l'appareil sur une prise de courant à 3 broches mise à la terre.
2. Ne retirez pas la broche de terre.
3. N'utilisez pas d'adaptateur.
4. N'utilisez pas de rallonge.
5. Le non-respect de ces instructions peut entraîner la mort, un incendie ou un choc électrique.
DANGER : RISQUE DE CHOC ÉLECTRIQUE
MÉTHODE DE MISE À LA TERRE RECOMMANDÉE
Des copies des normes énumérées peuvent être obtenues auprès de :
Association Nationale de Protection Contre l'Incendie
1 Parc Batterymarch
Quincy, Massachusetts U.S.
02169-7471
www.nfpa.org
EXIGENCES DE CÂBLAGE
TRAVAUX ÉLECTRIQUES
Alimentation électrique Modèle
Fusible différé (ou disjoncteur)
115 V
103,5 V min.
126,5 V max.
Refroidissement seulement 12K BTU
15 A
13 A
Refroidissement seulement 8K BTU
Il est de la responsabilité du client de :
1. Contacter un électricien qualifié.
2. S'assurer que l'installation électrique est adéquate et conforme au Code électrique national, à l'ANSI/NFPA70-dernière version et à tous les codes
et ordonnances locaux.
EXIGENCES ÉLECTRIQUES
Pré-installation
Ce climatiseur doit être mis à la terre. Ce climatiseur est équipé d'un cordon d'alimentation avec une fiche à trois broches mise à terre. Le cordon
doit être branché sur une prise à trois trous, mise à la terre conformément à tous les codes et ordonnances locaux. Si une prise mise à la terre
n'est pas disponible, il incombe au client de prévoir une prise à trois trous correctement mise à terre et installée par un électricien qualifié.
REMARQUE : Les illustrations ne sont fournies qu'à titre d'explication. Votre équipement peut être légèrement
différent. Le produit réel prévaudra.
AVERTISSEMENT : Avant d'effectuer des travaux électriques ou de câblage, coupez l'alimentation principale du
système.
Affichage
Commande
principale
Cordon
d'alimentation
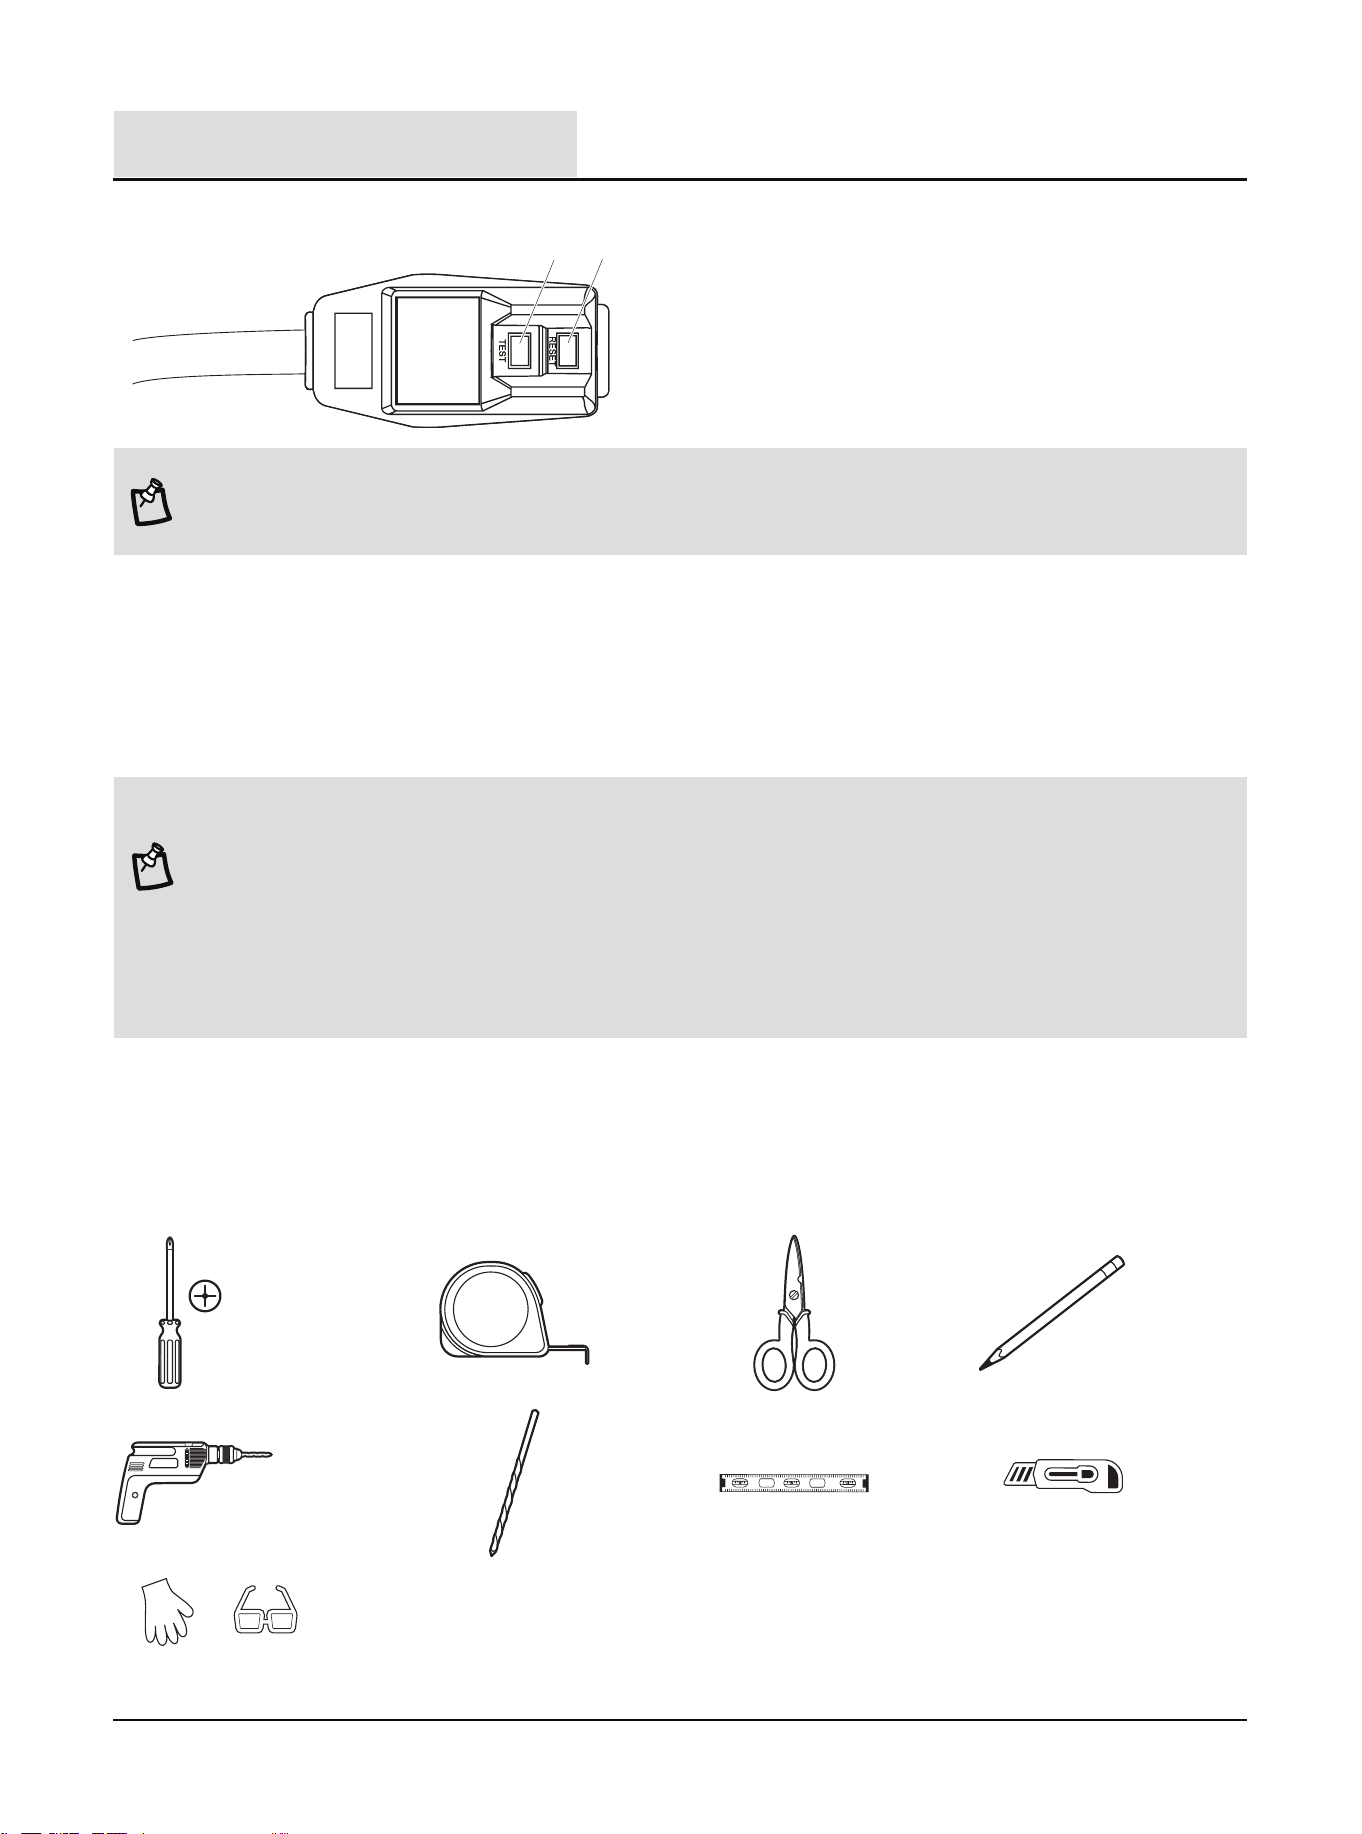
32
CORDON D'ALIMENTATION
1
2
Pour tester le cordon d'alimentation :
1. Branchez le cordon d'alimentation dans une prise de courant à trois trous mise à la terre.
2. Appuyez sur RESET (2) (pour certains appareils, un voyant vert s'allumera).
3. Appuyez sur TEST (1) et écoutez le cliquetis. Le bouton RESET se déclenchera et, pour certains appareils, un voyant vert
s'éteindra.
4. Appuyez sur RESET (2) et relâchez-le, et écoutez le cliquetis. Le bouton RESET se verrouillera et, pour certains appareils, un
voyant vert s'allumera. Le cordon d'alimentation est prêt à fonctionner.
REMARQUE :
Le bouton RESET doit être enfoncé pour un fonctionnement correct.
1. Le cordon d'alimentation doit être remplacé s'il ne se déclenche pas lorsque le bouton de test est enfoncé ou qu'il ne se réinitialise
pas avec succès.
2. N'utilisez pas le cordon d'alimentation comme un commutateur off/on. Le cordon d'alimentation est conçu comme un dispositif de
protection.
3. Un cordon d'alimentation endommagé doit être remplacé par un nouveau cordon d'alimentation acquis auprès du fabricant du
produit et ne doit pas être réparé.
4. Le cordon d'alimentation ne contient aucune pièce réparable par l'utilisateur. L'ouverture du boîtier inviolable annule toute garantie
et toute réclamation de performance.
REMARQUE : Votre climatiseur peut différer de celui illustré. Ce climatiseur de pièce est équipé d'un cordon d'alimentation
électrique requis par UL. Ce cordon d'alimentation contient un élément électronique de pointe qui détecte le courant de fuite. Si le
cordon est écrasé, l'élément électronique détecte le courant de fuite et l'alimentation sera coupée en une fraction de seconde.
PLANIFICATION DE L'INSTALLATION
Préparez les outils et les pièces nécessaires avant de commencer l'installation. Lisez et suivez les instructions fournies avec tous les outils
énumérés ici.
OUTILS REQUIS
Tournevis
Phillips
Mètre à ruban Ciseaux Crayon
Couteau
Perceuse sans fil Mèche 1/8 po. Niveau
EPI approprié
Pré-installation (suite)
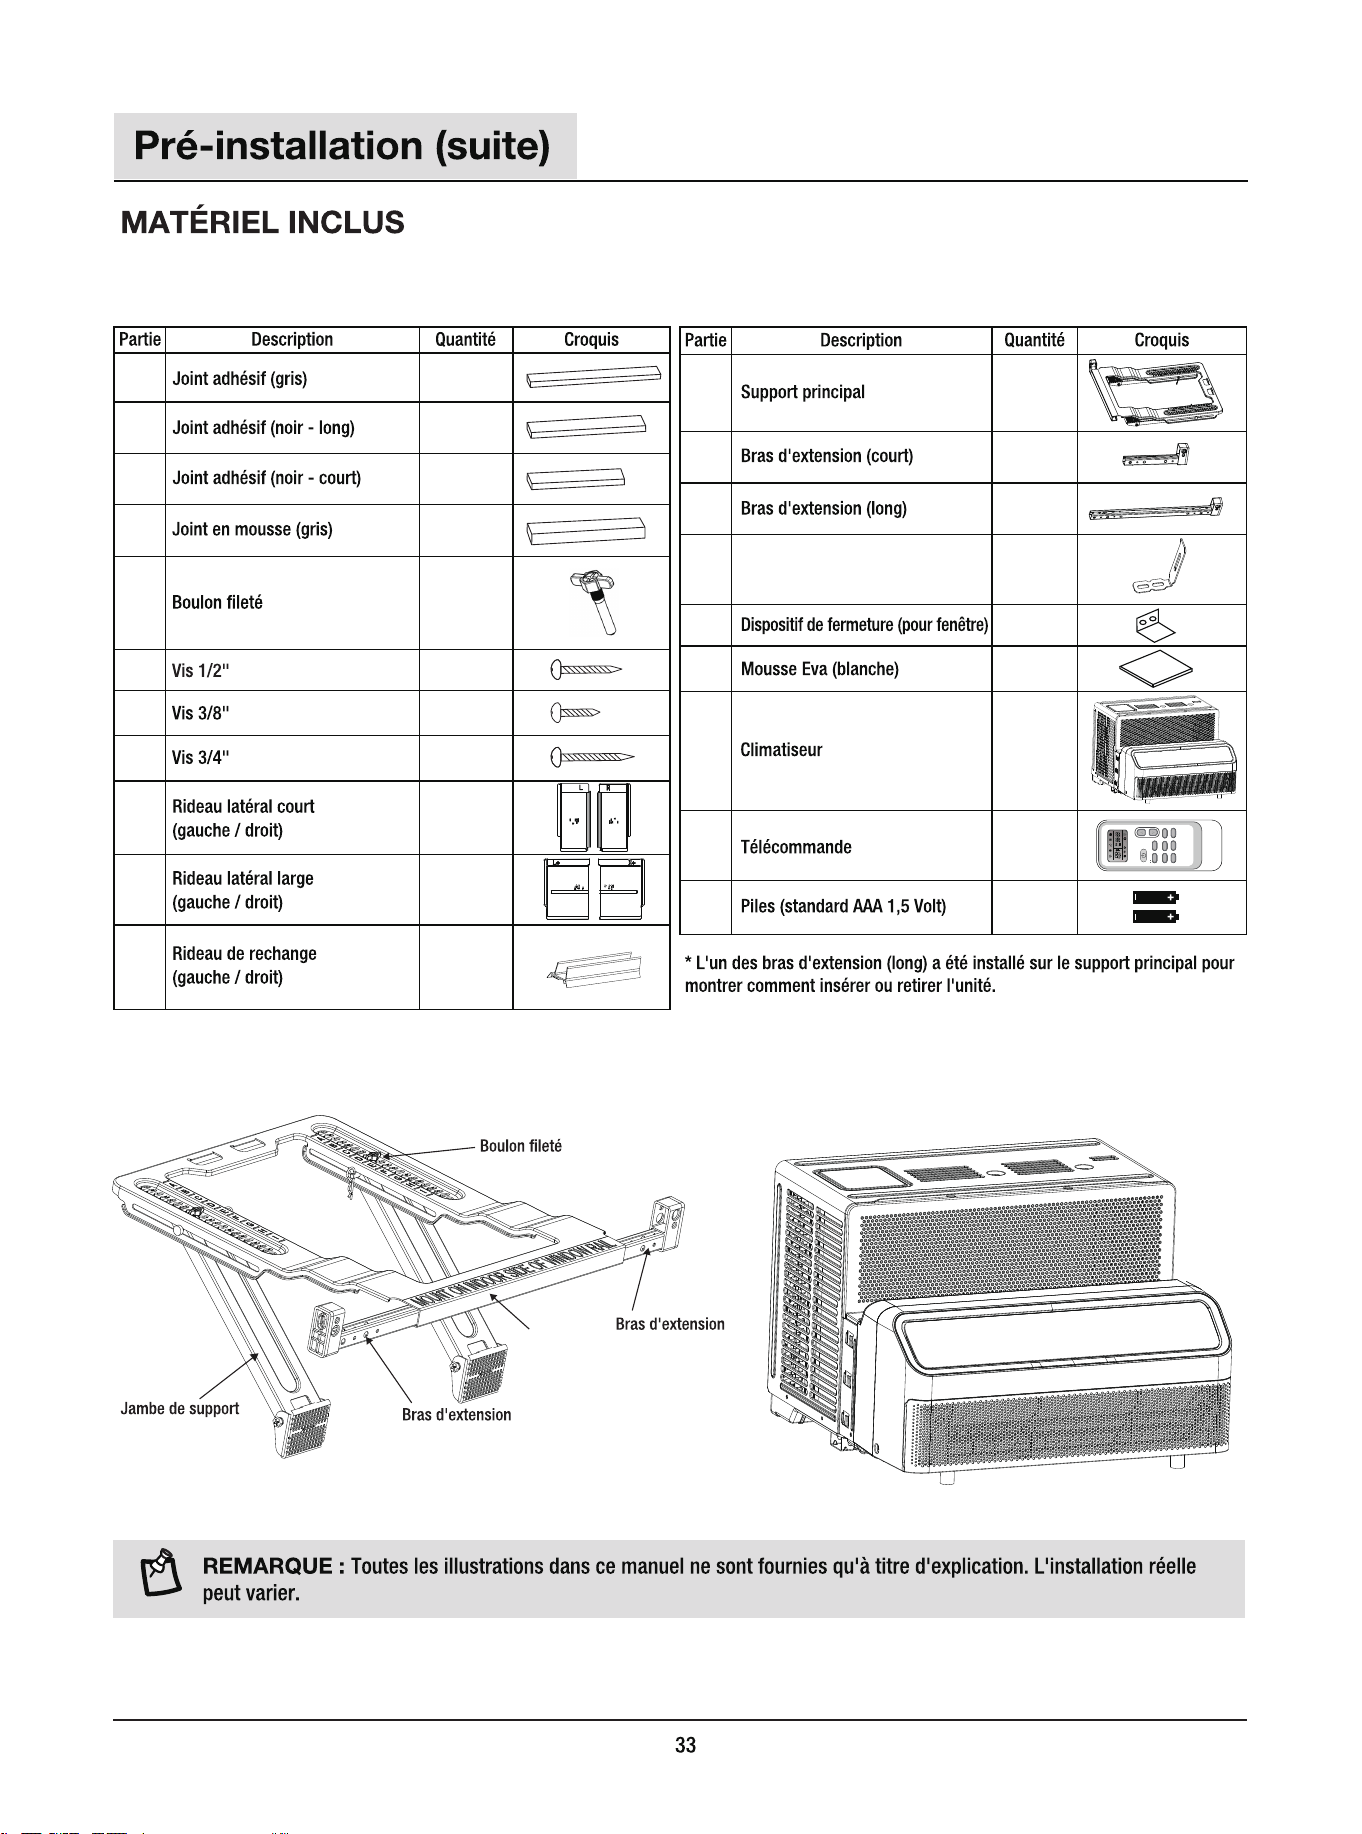
A1 1
1
1
1
2
6
6
6
1+1
1+1
1
A2
A3
BB
CC
DD
EE
FF
GG
G1
G2
H1 1
1
2*
1
2
1
1
H2
H3
H4
II
JJ
KK
LL
2MM
FILTER
FAN
QUIET
SWING
TIMER
SUPER
DIMMER
Sleep[5 sec]
MODE
F/ C[5 sec]
2
Dispositif de fermeture
(pour climatiseur)
Support principal
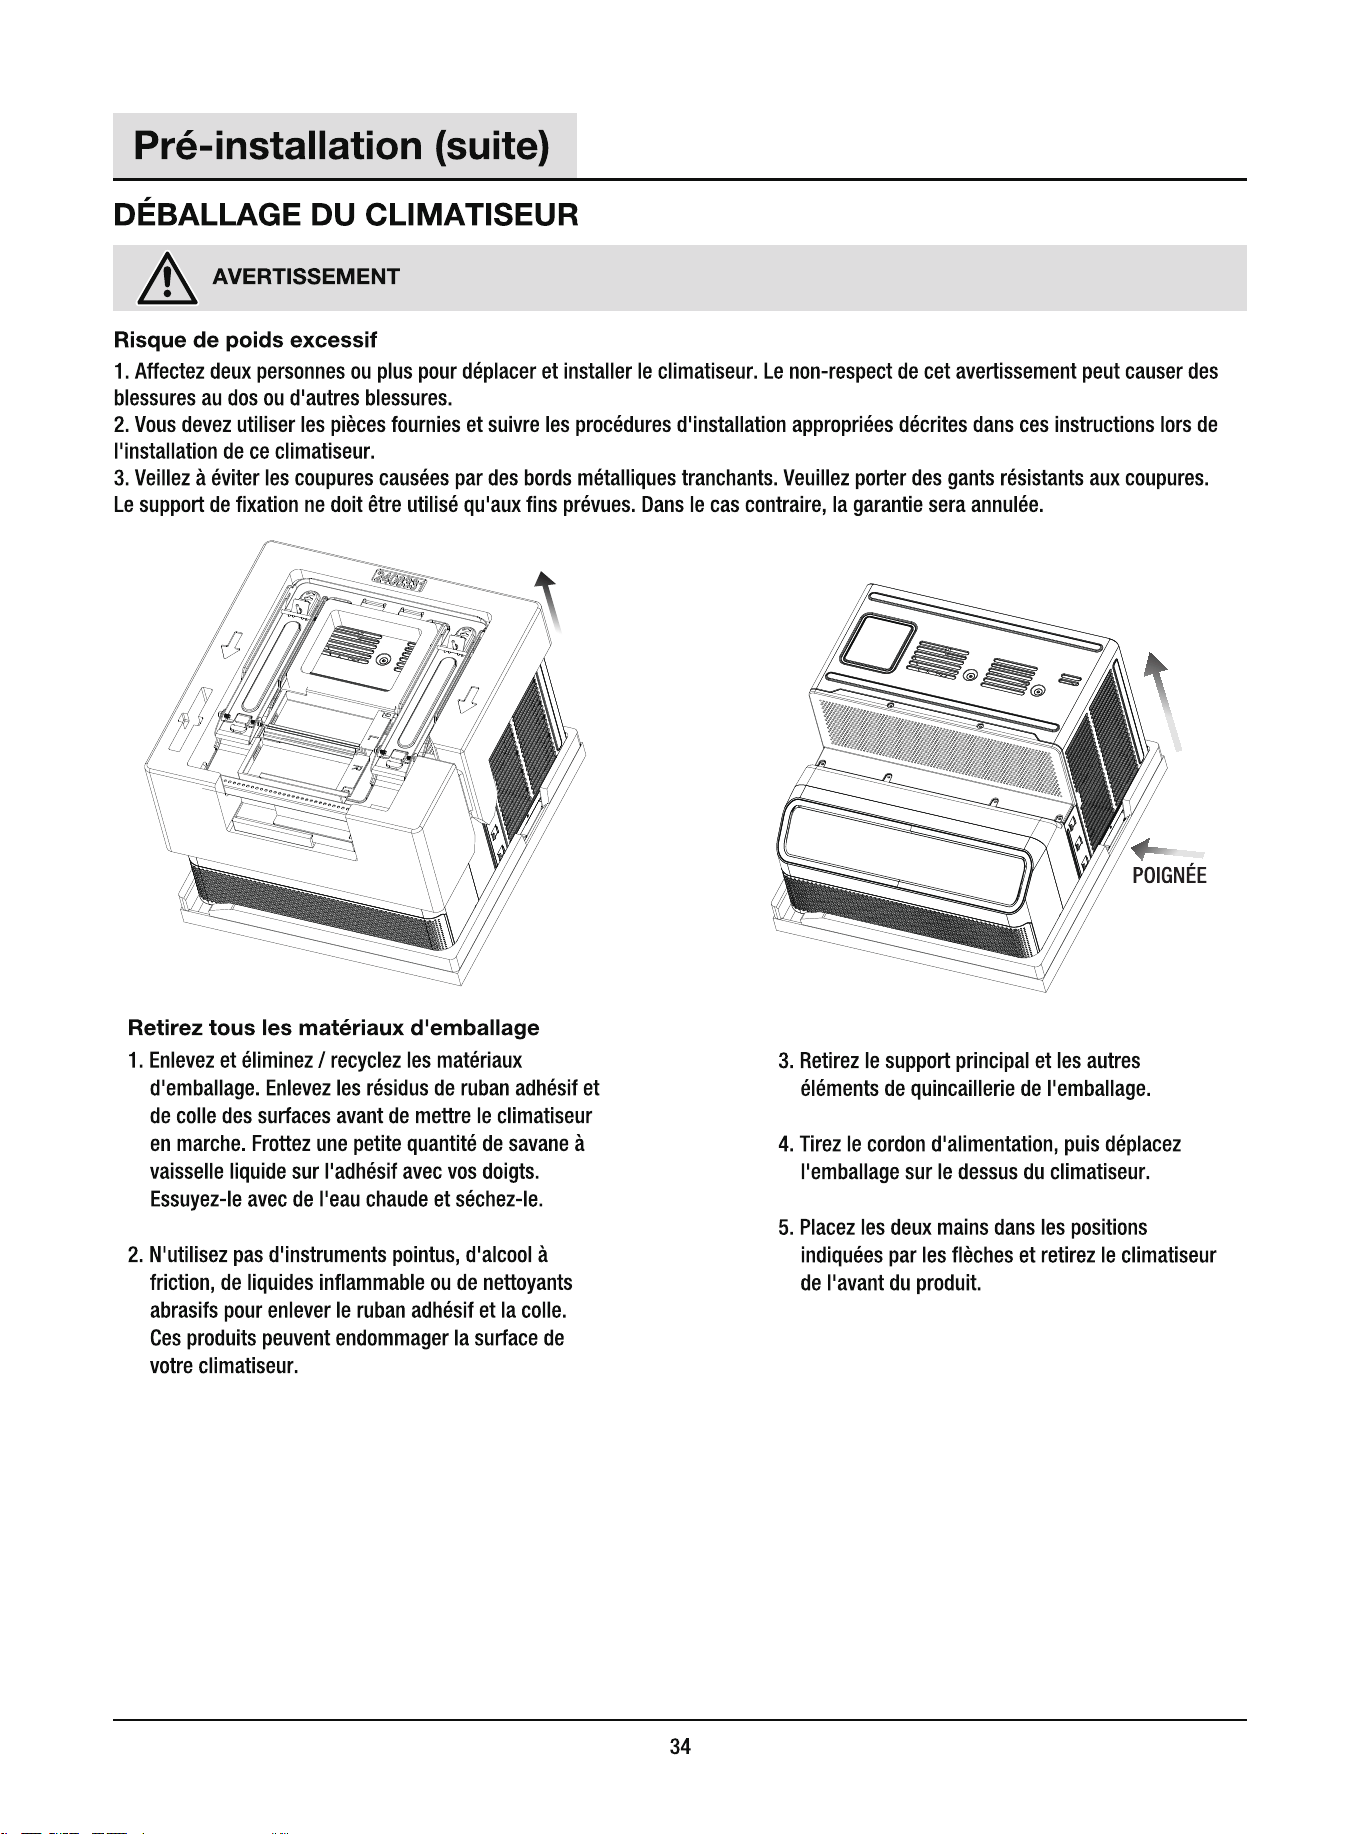
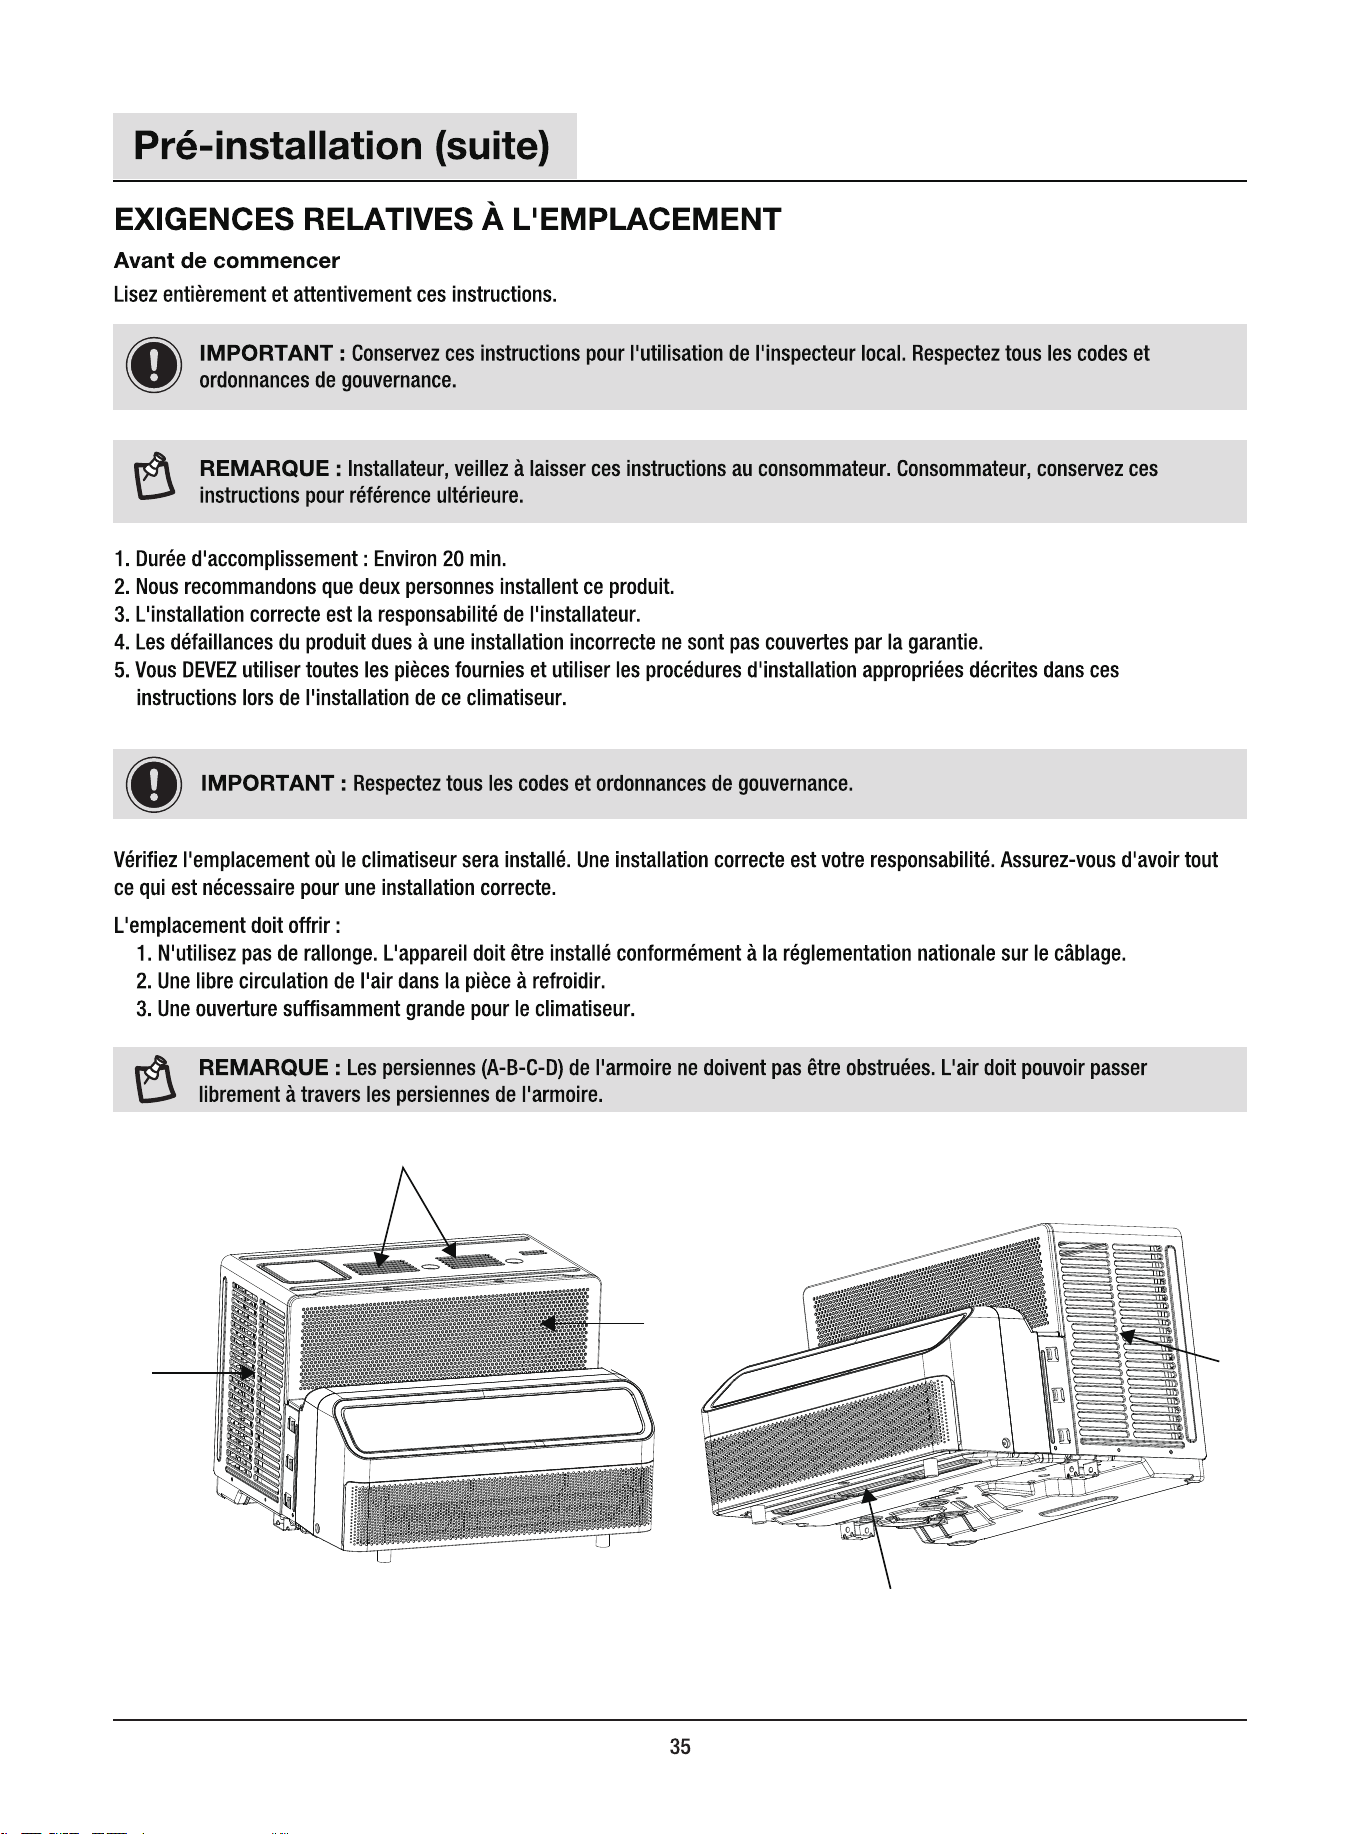
B
A
A
C
D
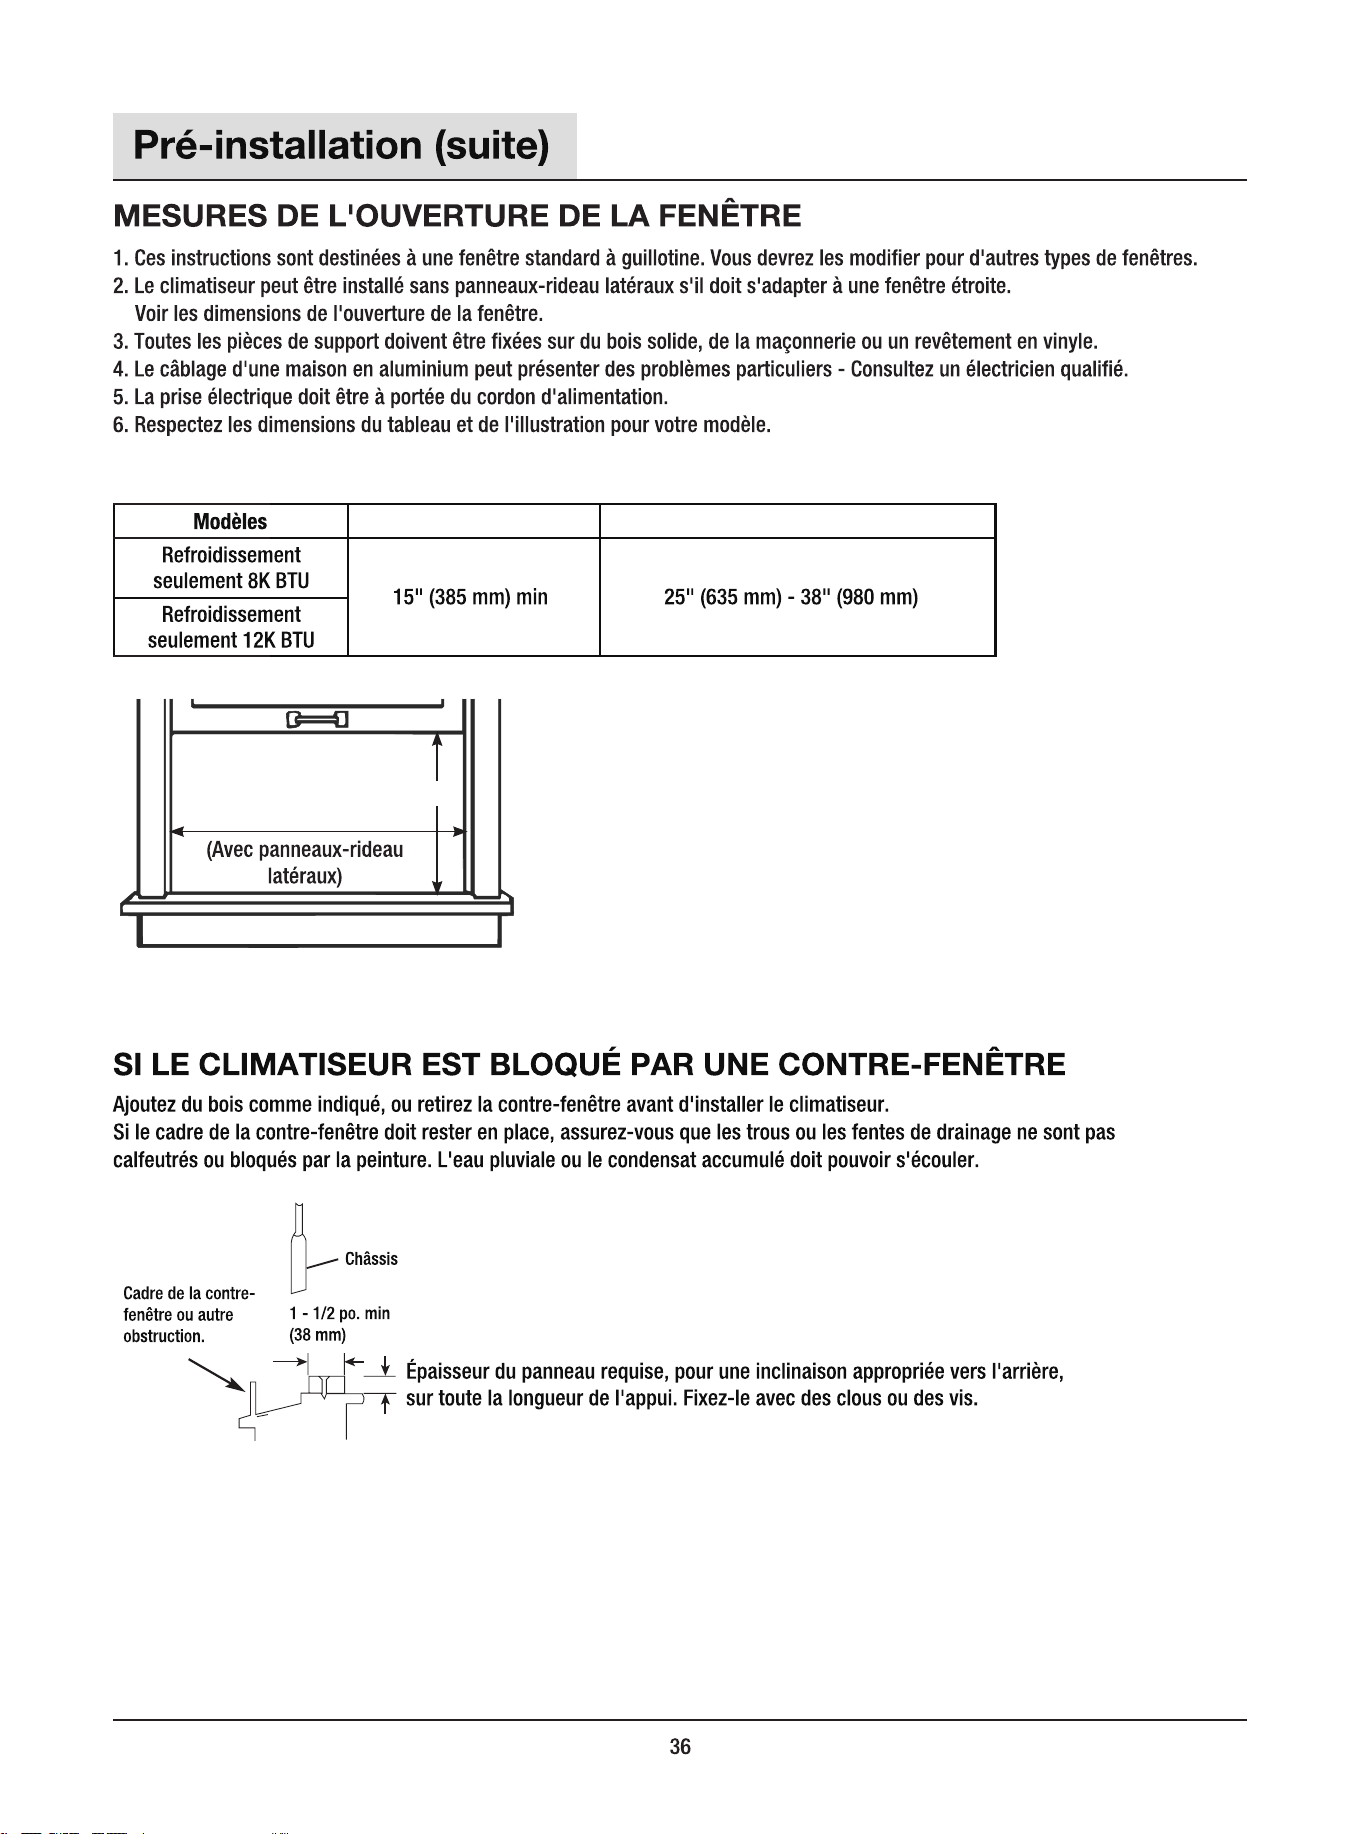
A
B
A B
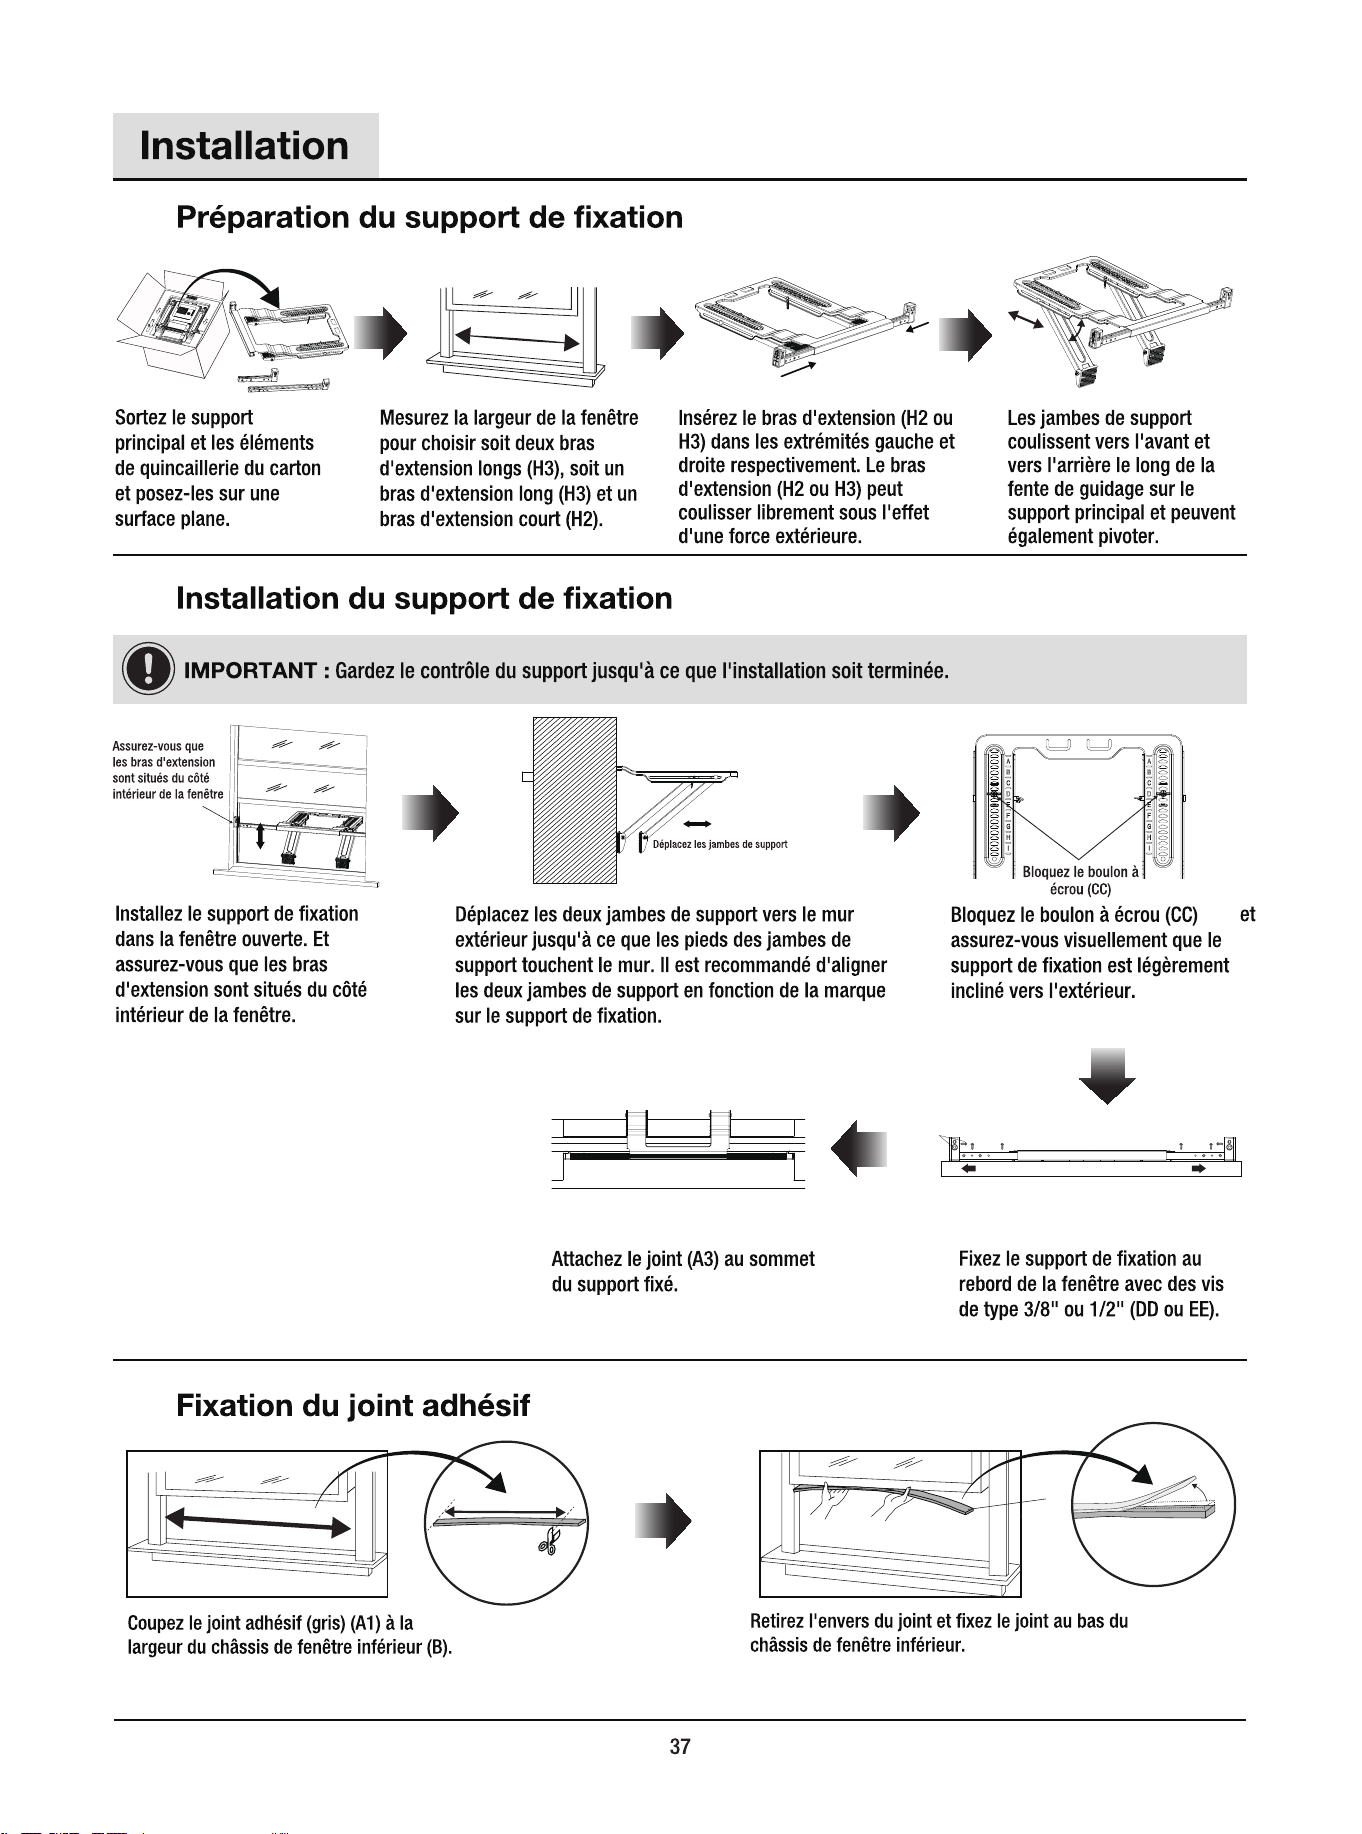
1
2
B
A1
3
A1
A1
3/8"
1/2" 1/2"
1/2" 1/2"
(H4)
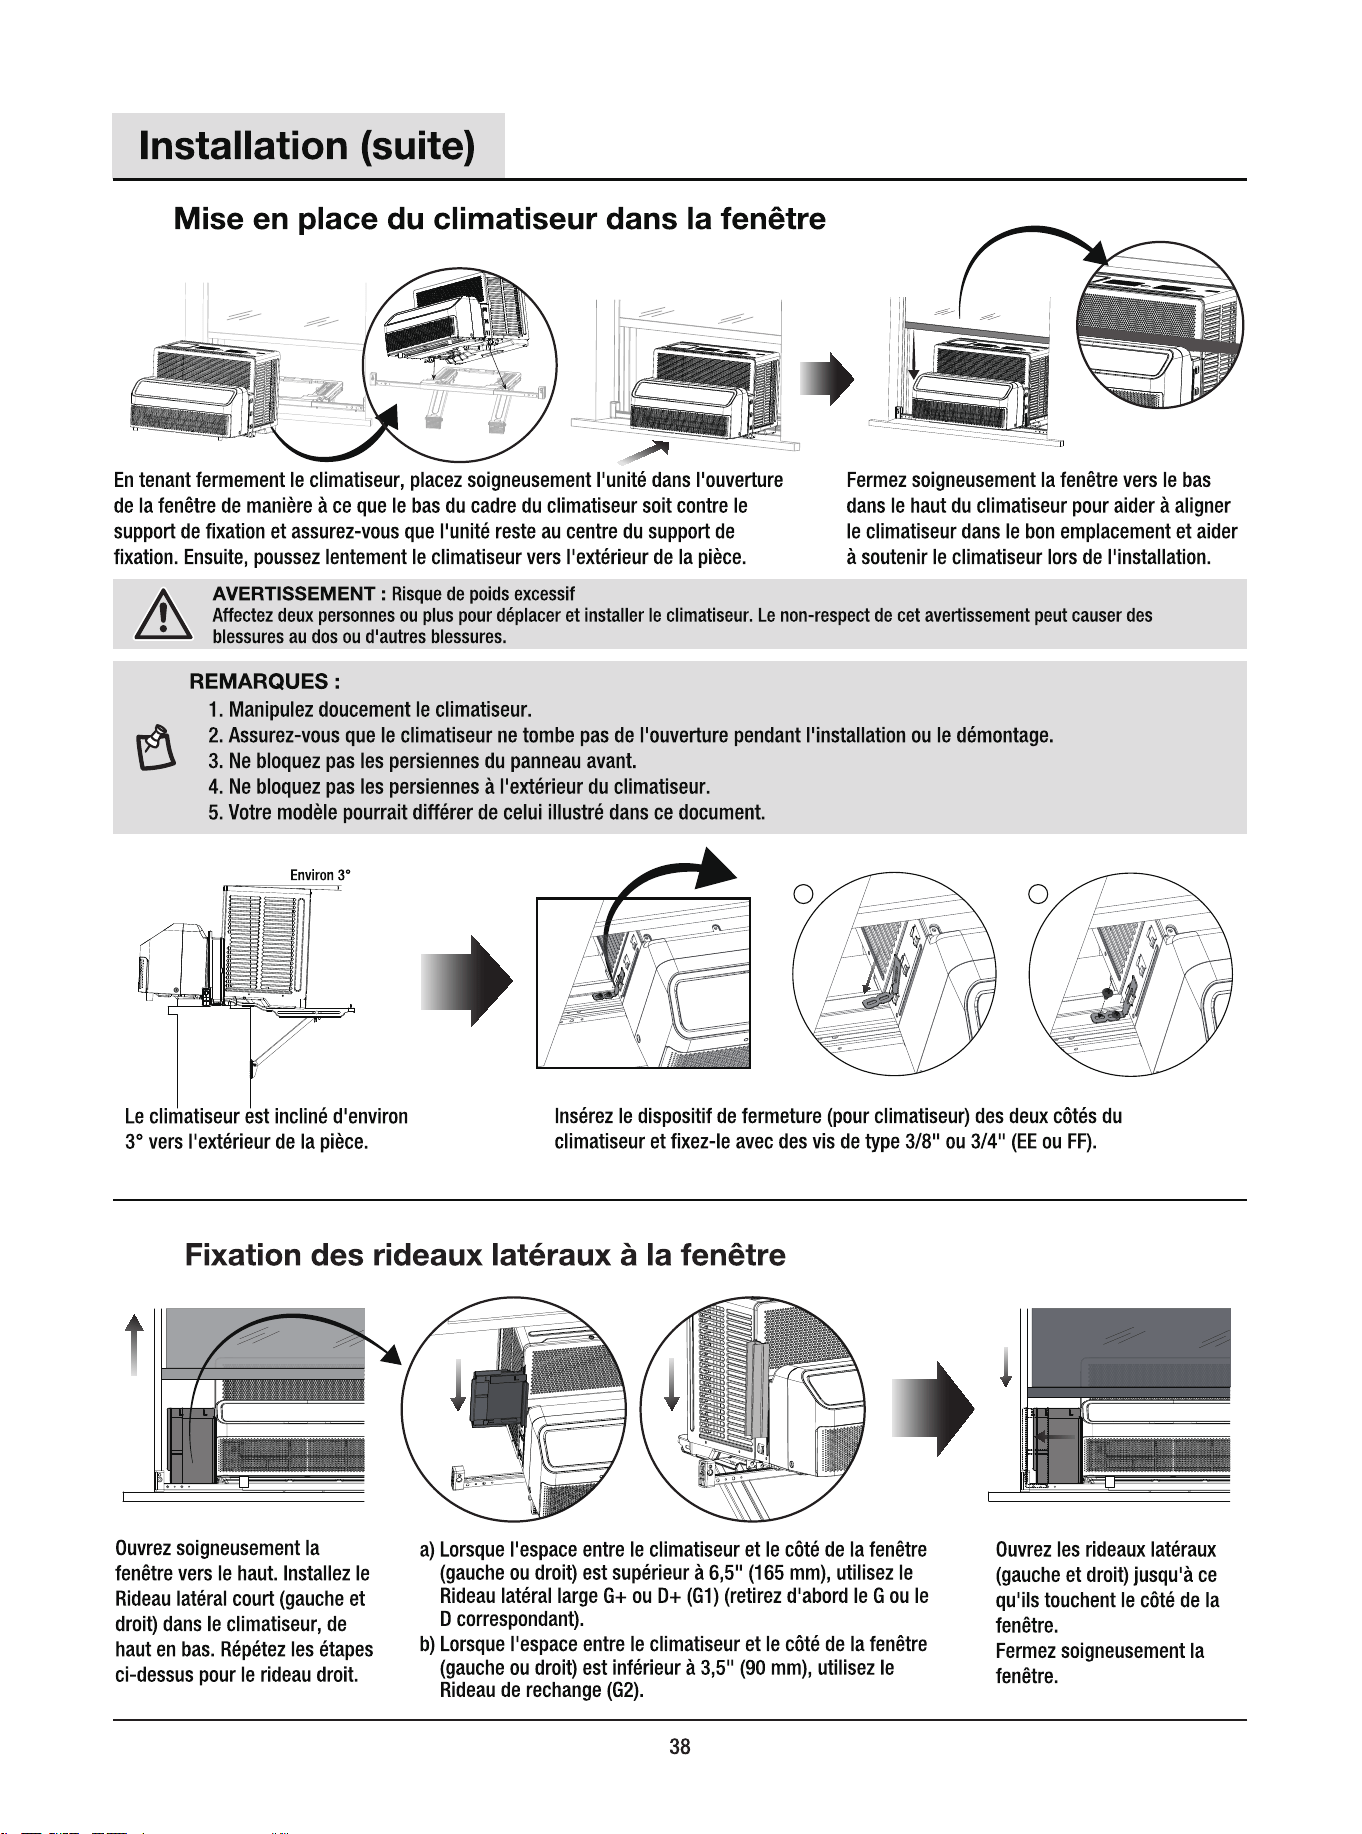
5
4
1 2
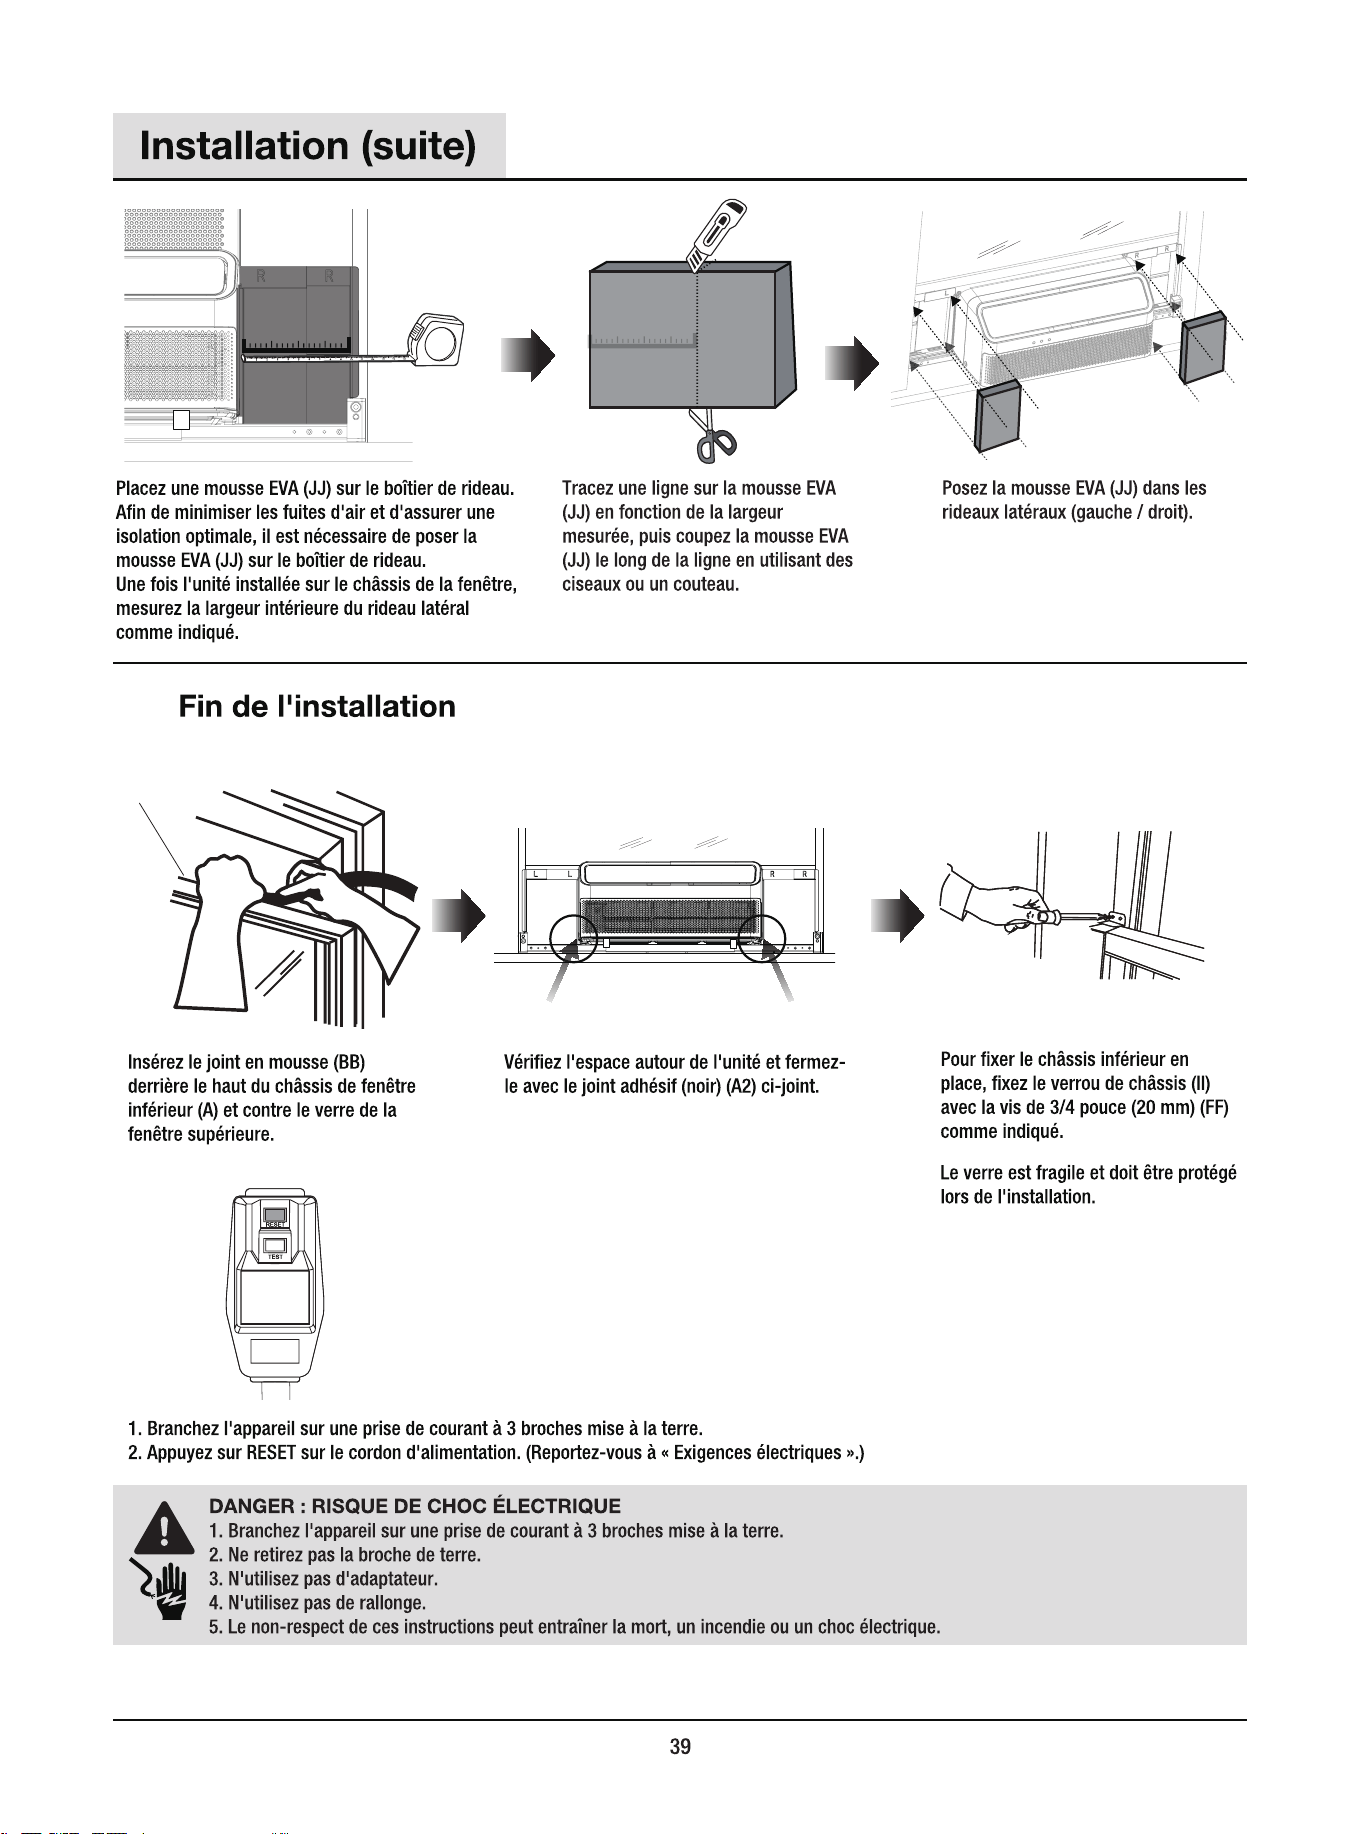
6
BB
A
JJ
JJ
JJ
A2 A2
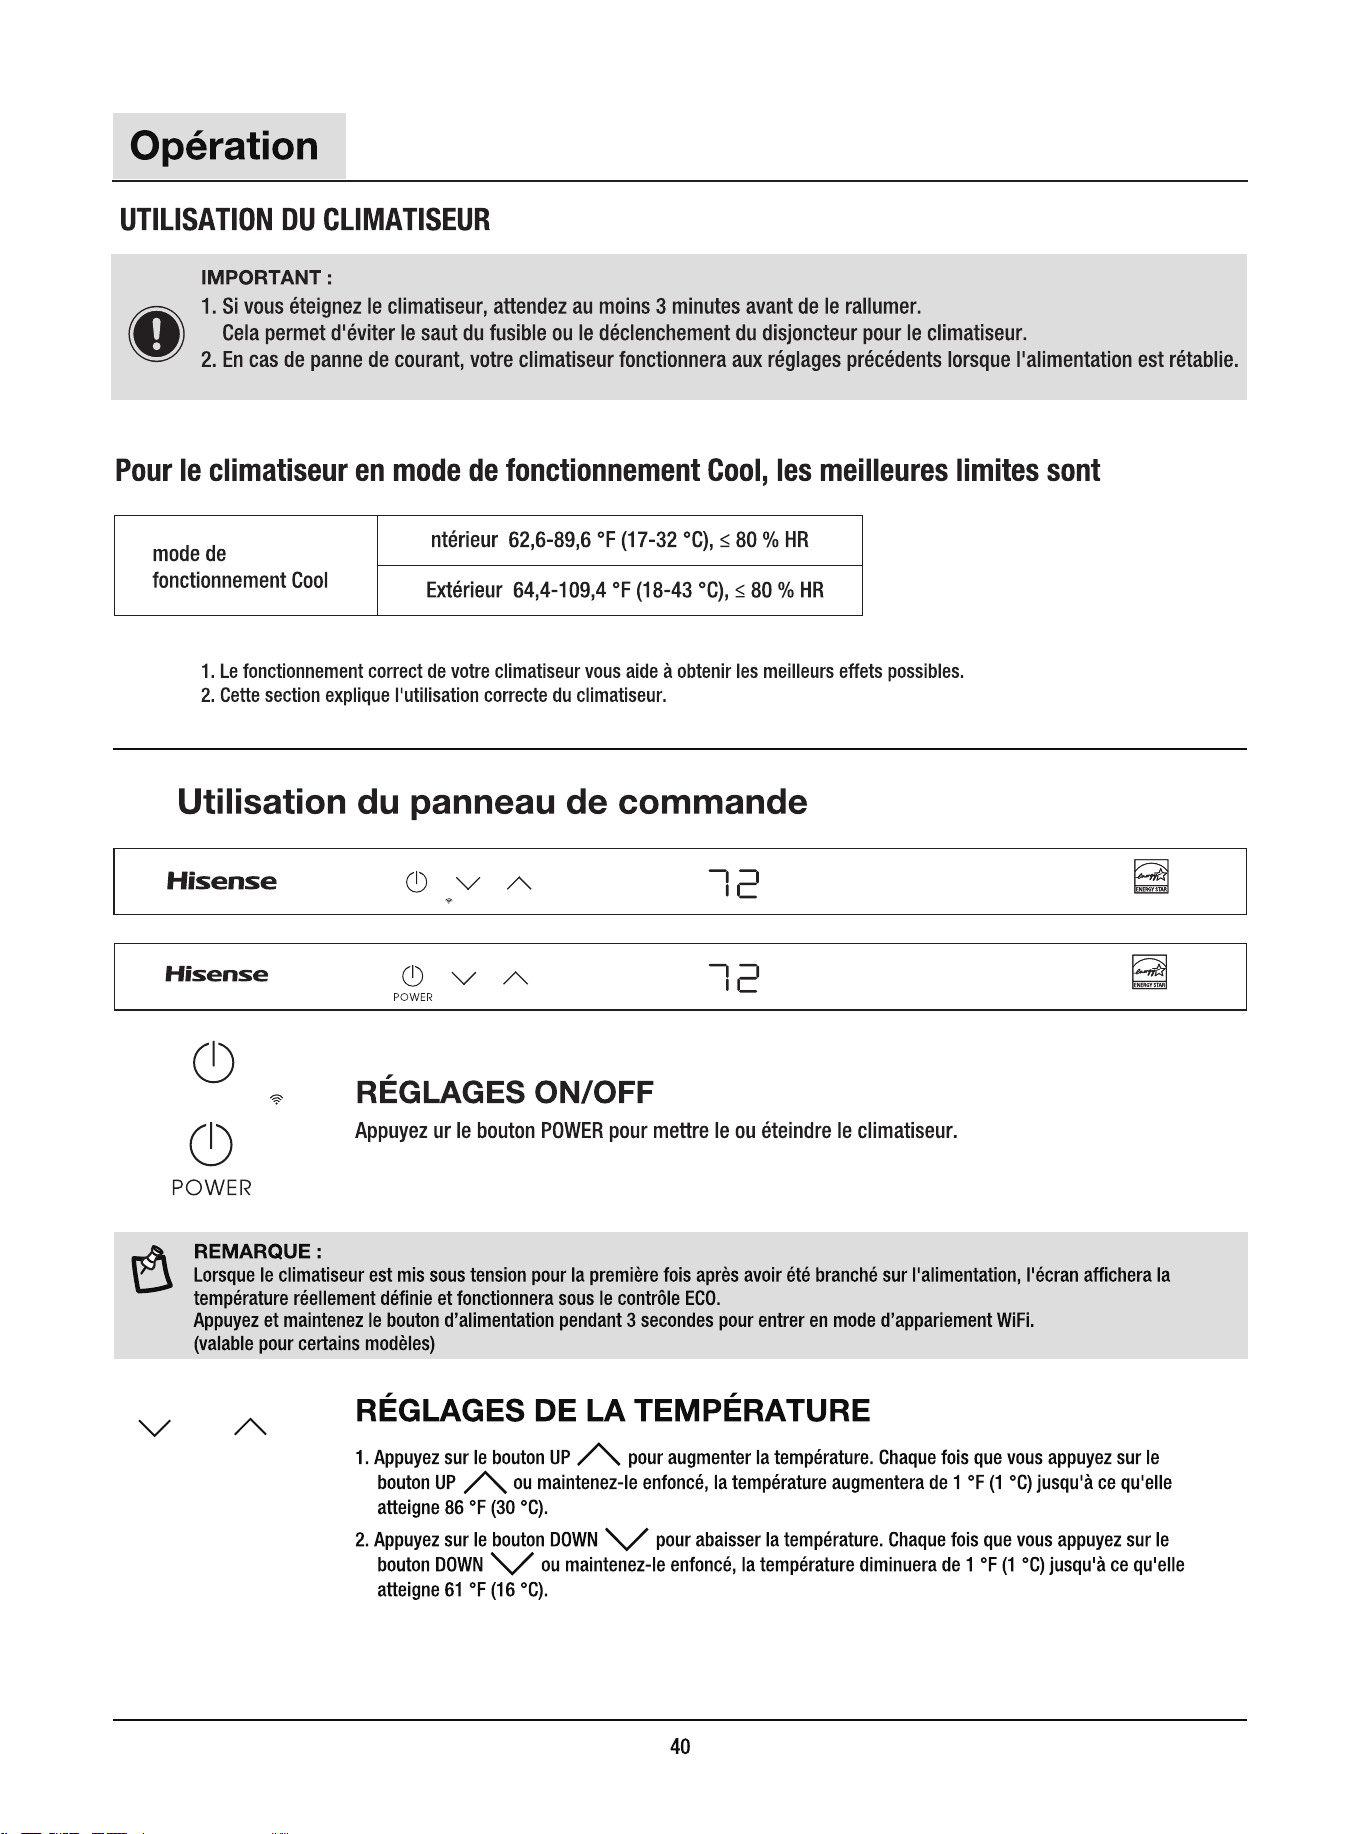
1
TEMP
TEMP
POWER
I :
:
:
TEMP
CONNECT 3 Sec TEMP
CONNECT 3 Sec
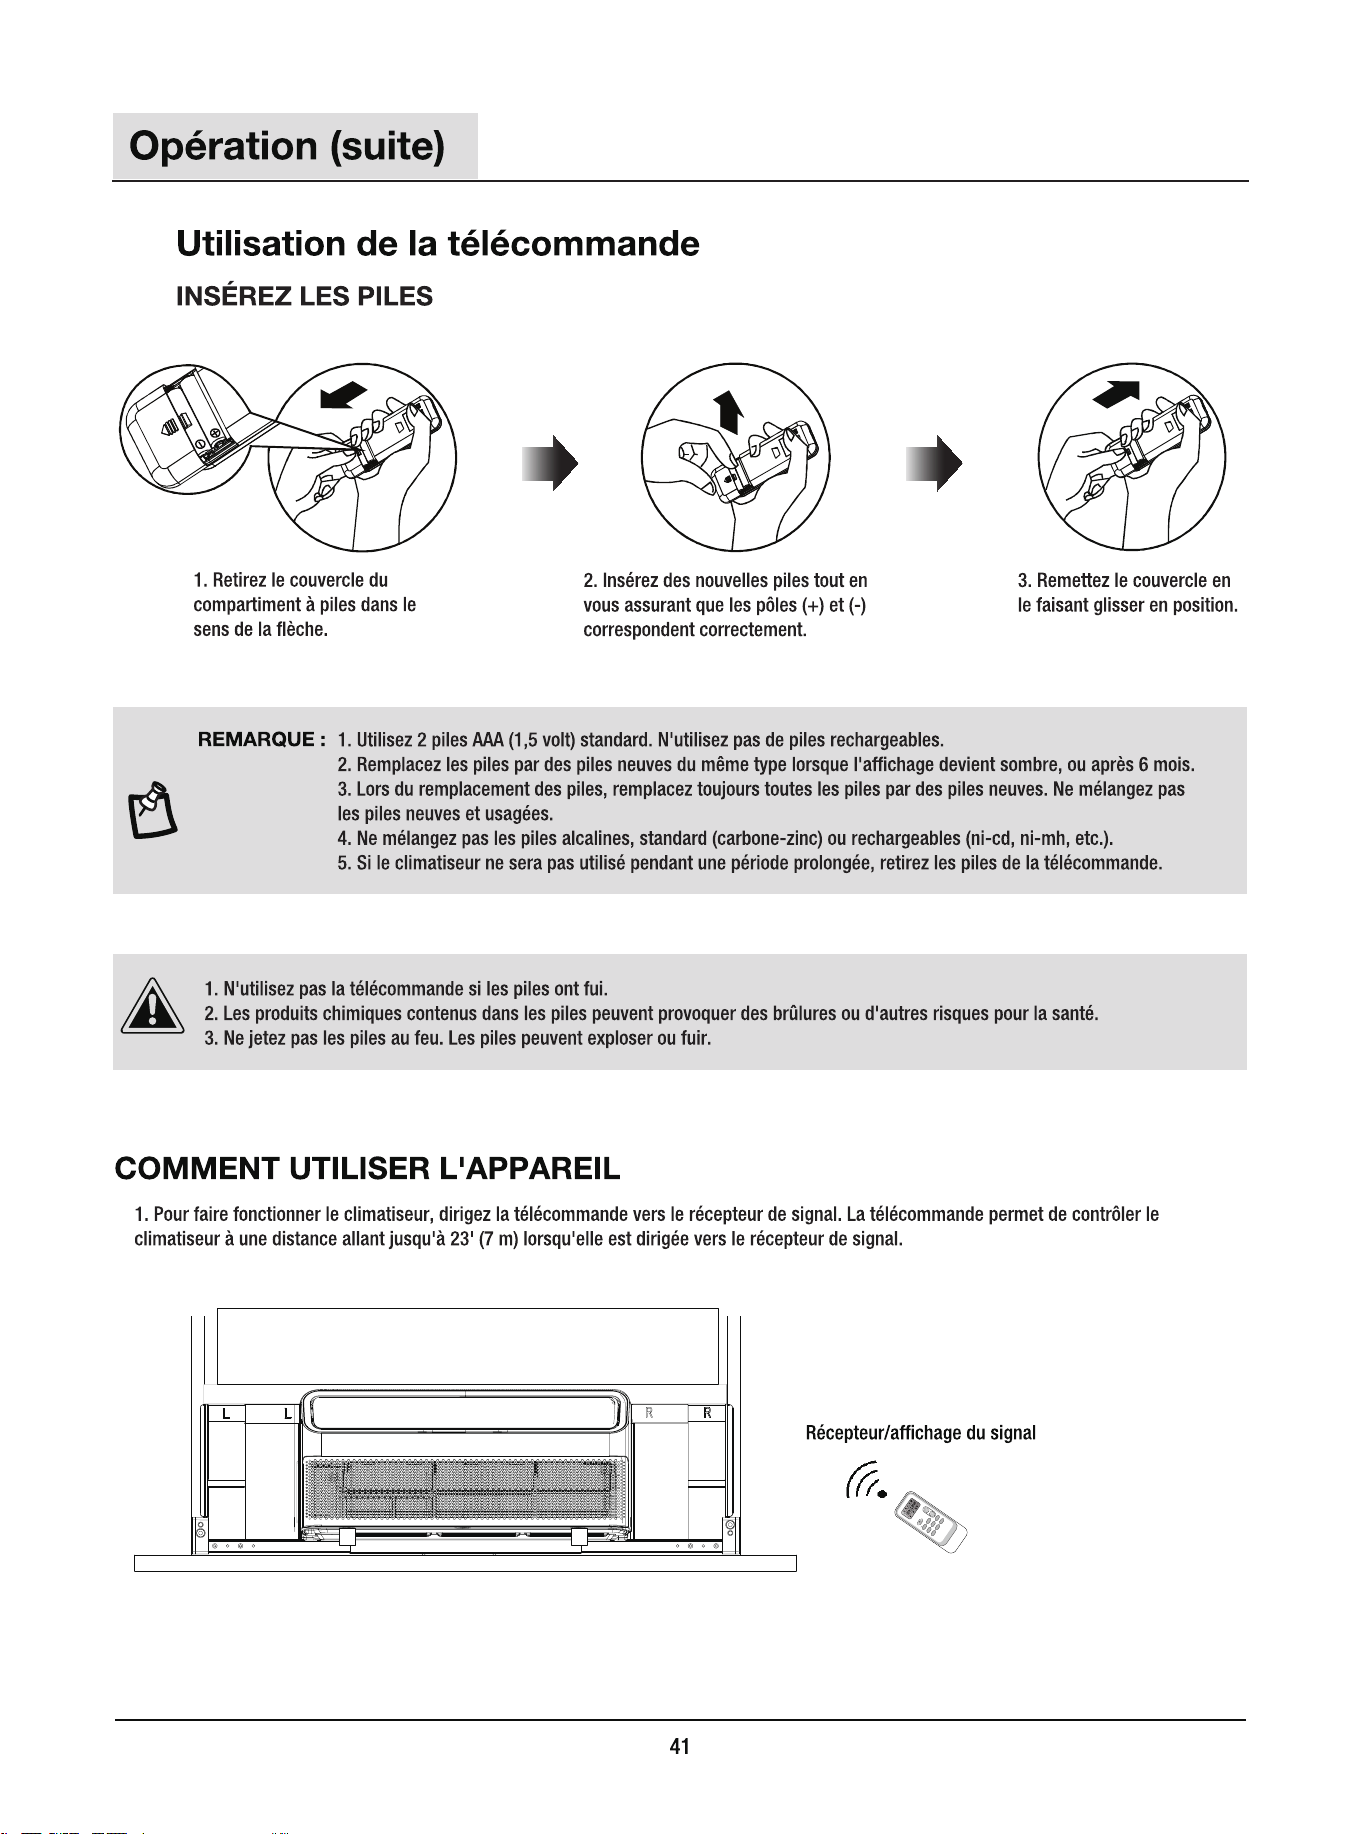
2
FILTER
SUPER
MODE FAN
QUIET
TIMER DIMMER
Sleep [ 5 sec ]
SWING
F / C
[ 5 sec ]
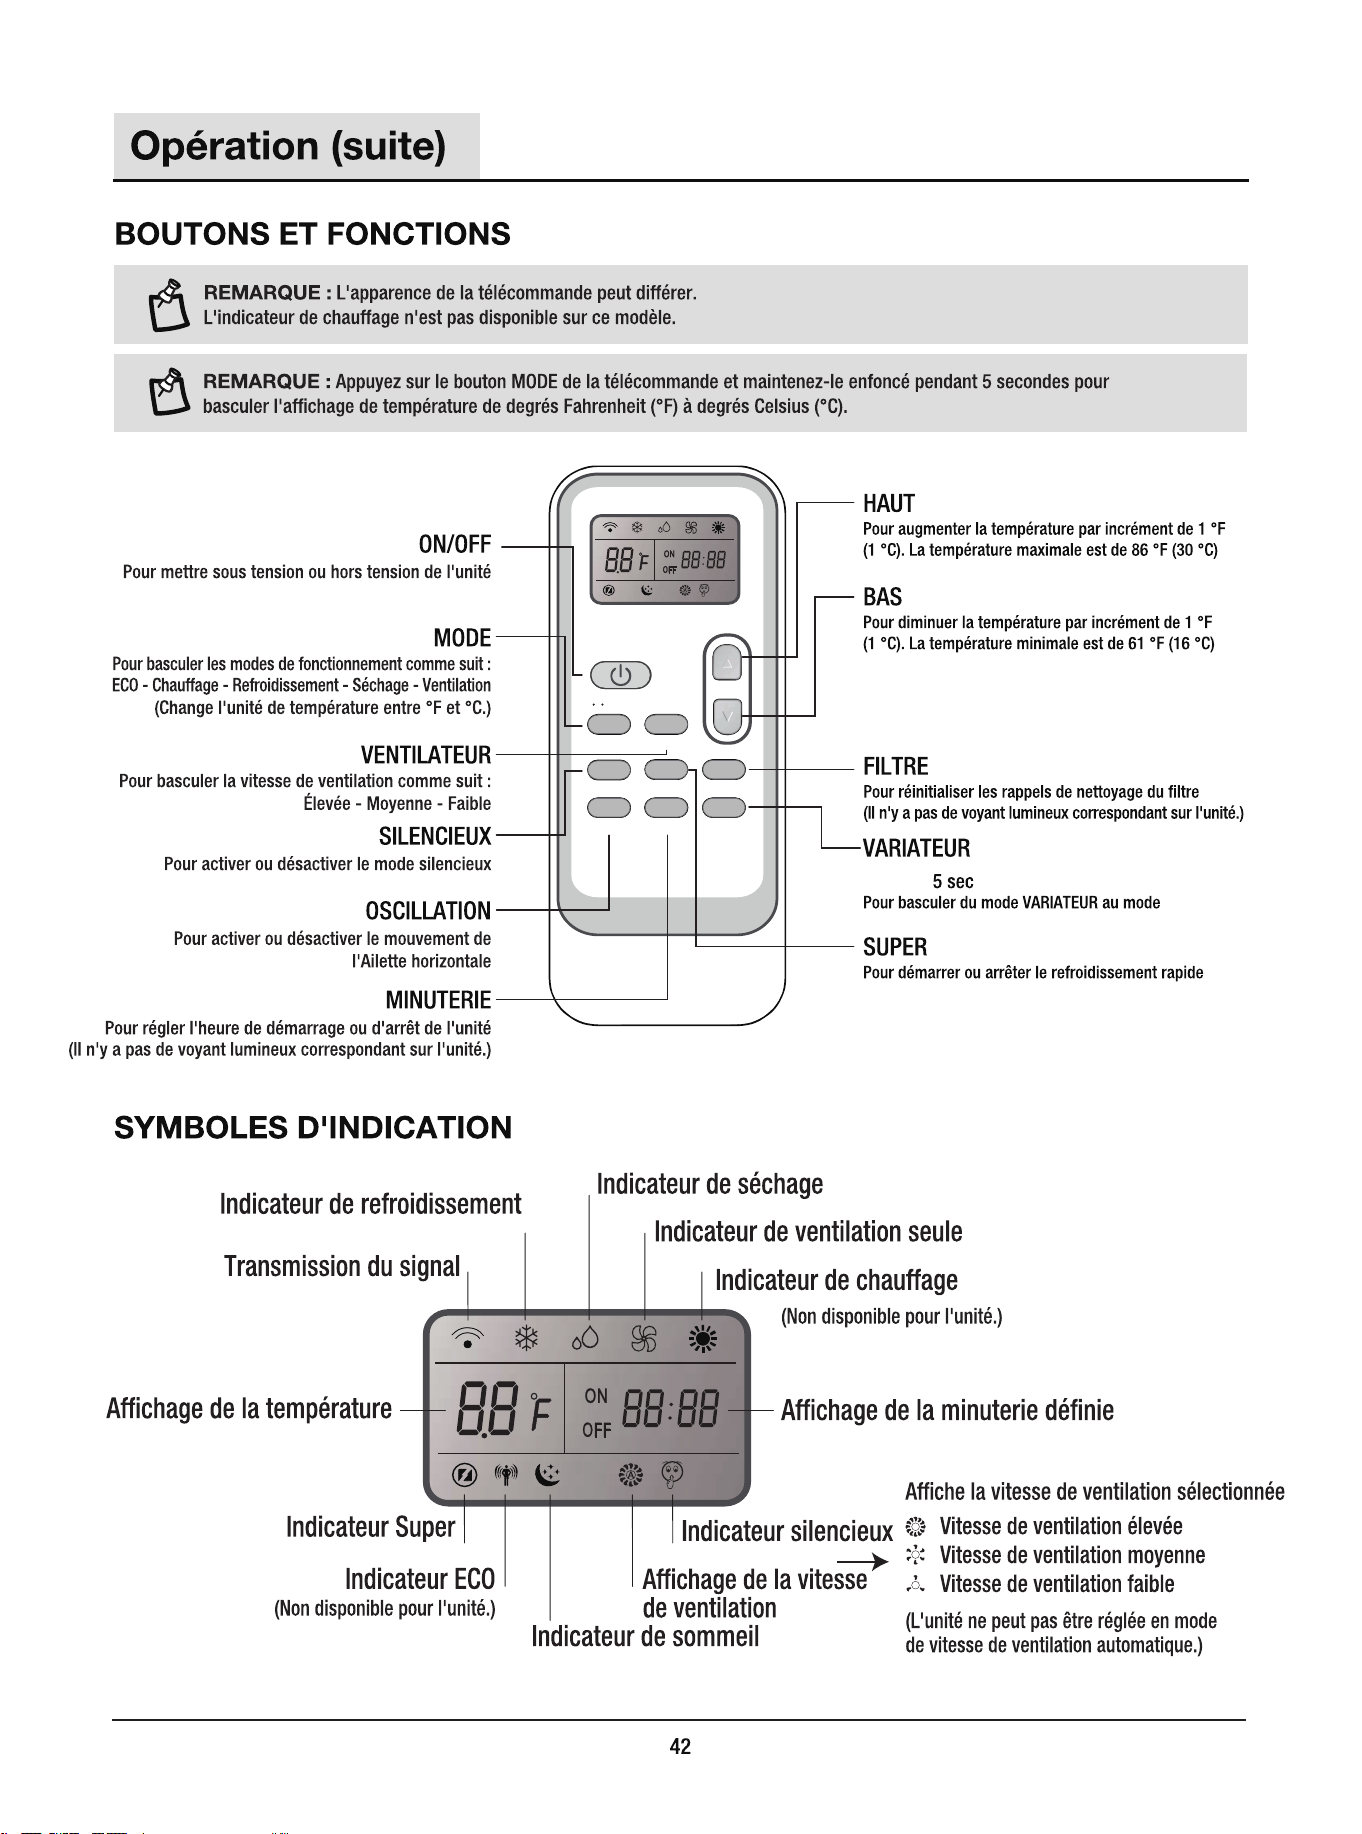
FILTERSUPERQUIET
MODE FAN
SWING TIMER DIMMER
Sleep [ 5 sec ]
F / C [ 5 sec ]
[ ]
NUIT
NUIT
[ ]
DIMMER
sleep [ 5 sec ]
DIMMER
sleep [ 5 sec ]
QUIET
SUPER
FILTER
NUIT
NUIT.
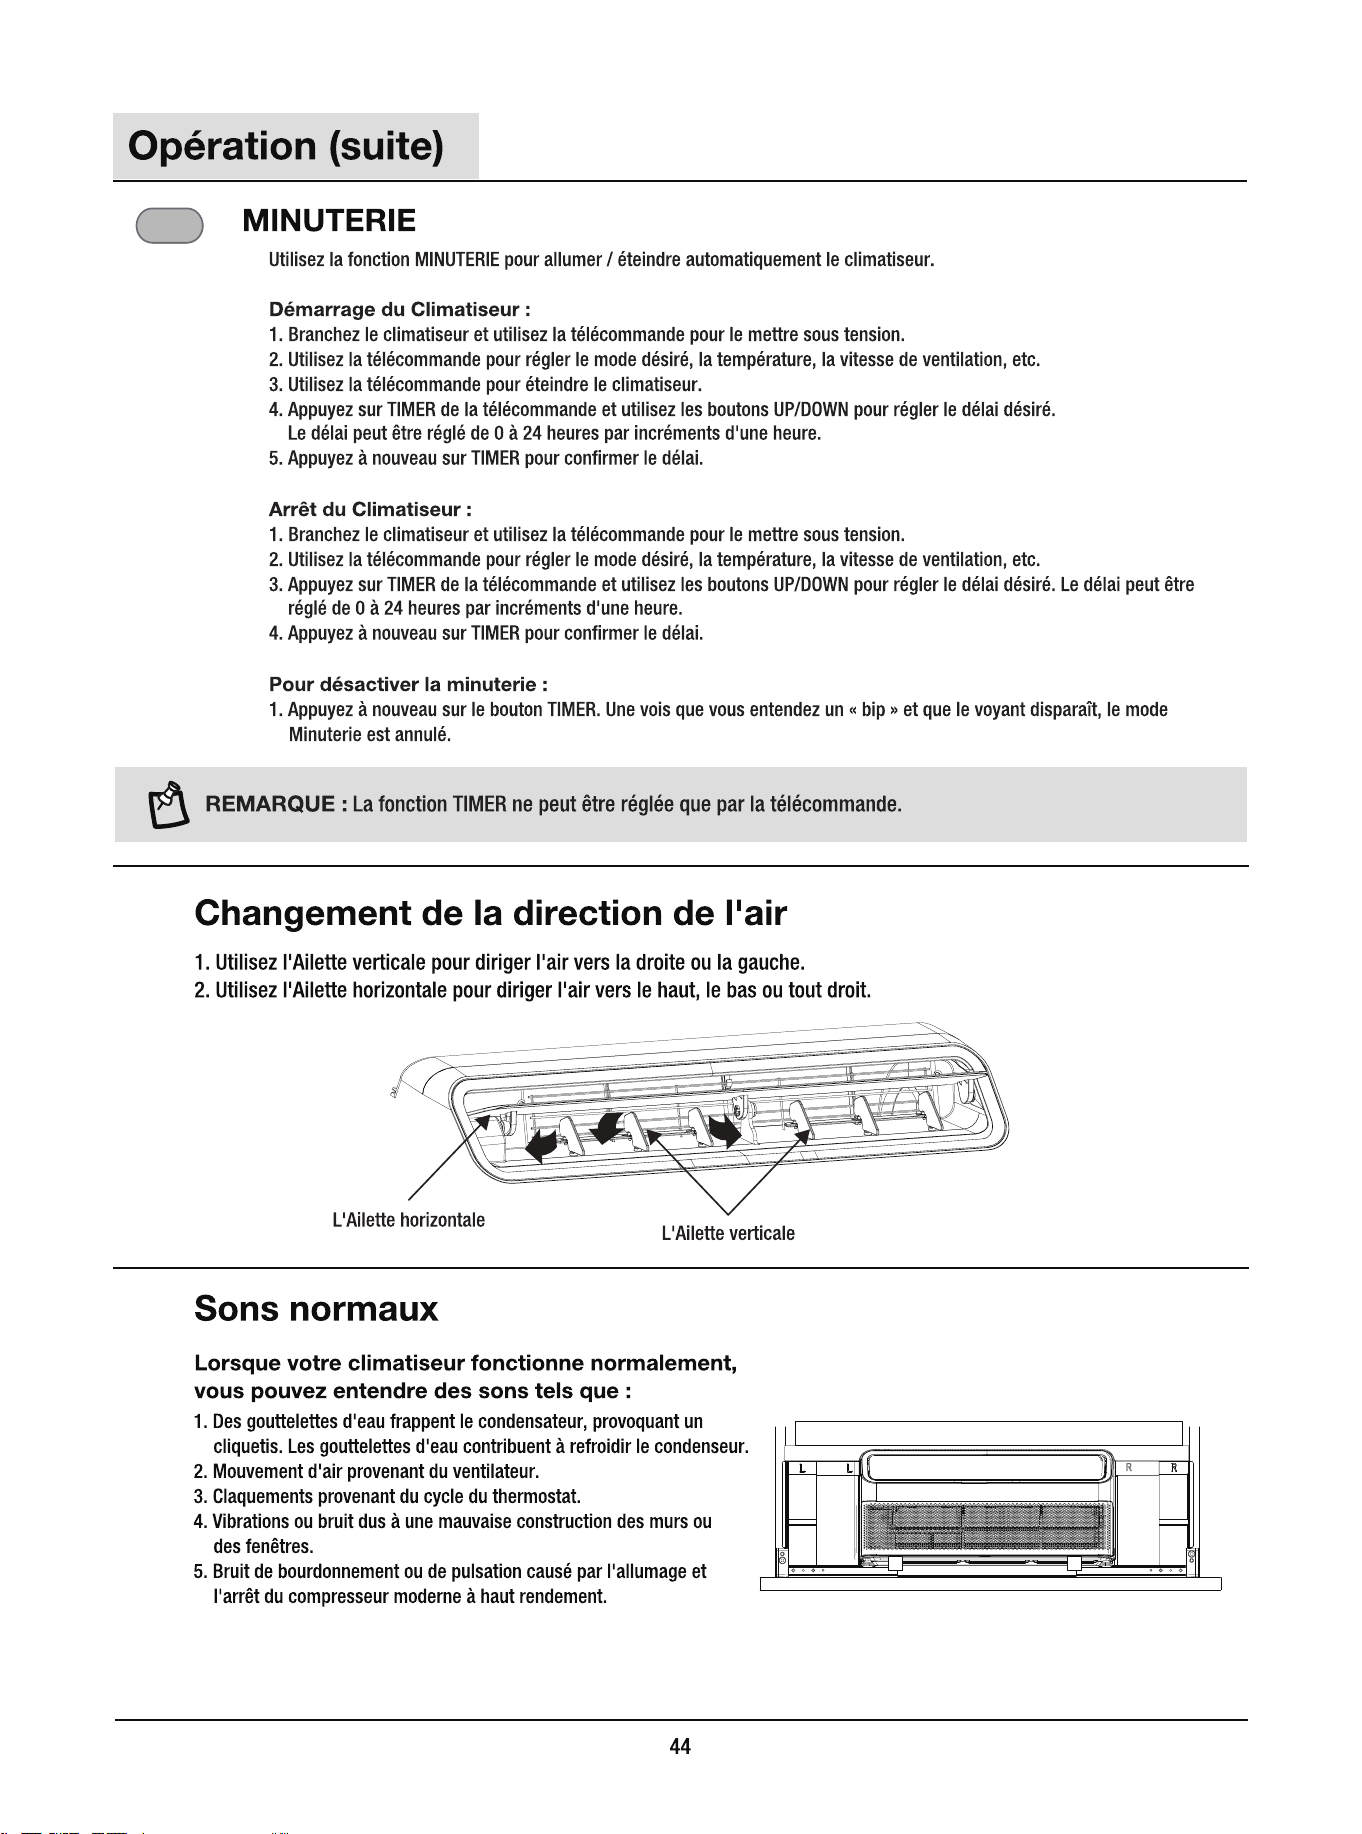
3
TIMER
4
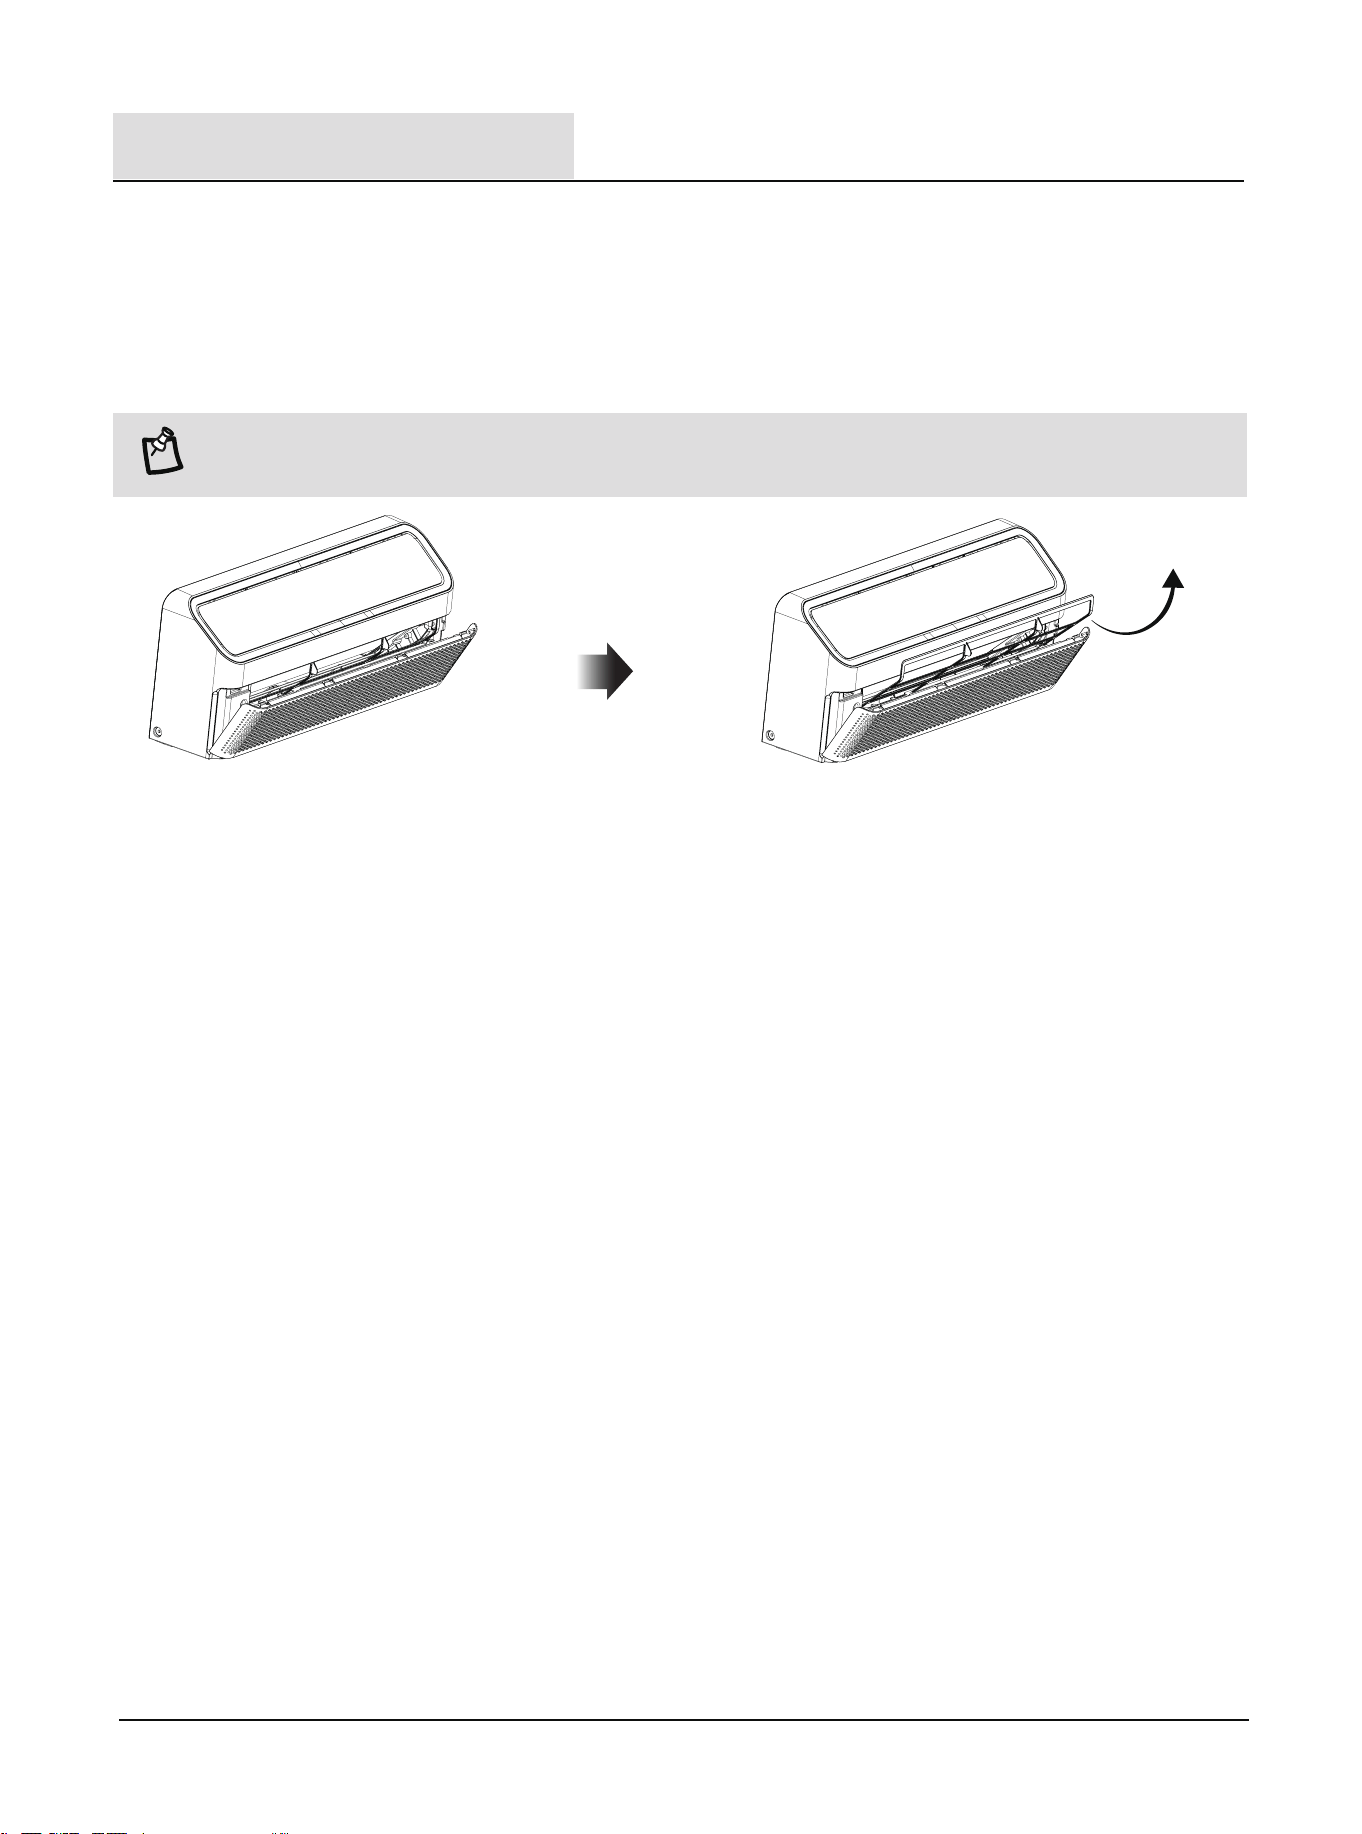
3. Utilisez un aspirateur pour nettoyer le filtre à air. Si le filtre à air est très
sale, lavez-le à l'eau tiède avec un détergent doux. Ne lavez pas le filtre
à air dans le lave-vaisselle ni utilisez de nettoyants chimiques. Séchez
complètement le filtre à air avant de le remettre en place pour assurer
une efficacité maximale.
4. Remettez le filtre à air dans le climatiseur.
45
Votre nouveau climatiseur est conçu pour vous servir de manière faible pendant de nombreuses années. Cette section vous explique
comment nettoyer et entretenir correctement votre climatiseur. Appelez votre revendeur agréé local pour un contrôle annuel. N'oubliez pas
que le coût de cet appel de service est à votre charge.
Le filtre à air est amovible pour un nettoyage facile. Un filtre propre aide à éliminer la poussière, les peluches et autres particules de l'air et il
est important pour un bon refroidissement et une meilleure efficacité de fonctionnement. Vérifiez le filtre toutes les 2 semaines pour voir s'il
nécessite un nettoyage.
NETTOYAGE DU FILTRE À AIR
1. Éteignez le climatiseur.
2. Ouvrez le panneau avant. Tenez le filtre
par la poignée et sortez-le.
NETTOYAGE DU PANNEAU AVANT
1. Éteignez le climatiseur.
2. Nettoyez le panneau avant avec un chiffon doux et humide.
3. Séchez complètement le panneau avant à l'air libre.
RÉPARATION DE LA PEINTURE ENDOMMAGÉE
Vérifiez une ou deux fois par an pour la peinture endommagée. C'est très important, en particulier dans les régions proches des
océans ou dans celles où la rouille est un problème.
Si nécessaire, appliquez une finition avec une peinture émaillée de bonne qualité.
ENTRETIEN ANNUEL
Votre climatiseur nécessite un entretien annuel pour aider à garantir des performances constantes et optimales tout au long de
l'année. Appelez votre revendeur agréé local pour planifier un contrôle annuel. Les frais de toute contrôle annuel sont à votre
charge.
DÉMONTAGE DU CLIMATISEUR DE LA FENÊTRE
1. Éteignez le climatiseur et débranchez le cordon d'alimentation.
2. Retirez la mousse EVA.
3. Retirez le joint du châssis entre les fenêtres et dévissez le verrou de sécurité.
4. Retirez les vis installées à travers le cadre et le verrou de cadre.
5. Fermez le boîtier de rideau.
6. En tenant fermement le climatiseur, soulevez le châssis et retirez-le soigneusement.
7. Assurez-vous de ne pas déverser d'eau stagnante lorsque vous soulevez l'unité de la fenêtre.
8. Retirez le support de fixation.
9. Conservez les pièces avec le climatiseur.
REMARQUE : 1. Ne faites pas fonctionner le climatiseur sans le filtre en place.
2. Ne touchez pas les parties métalliques de l'unité lorsque le filtre à air est retiré. Cela pourrait provoquer des blessures.
Entretien et nettoyage
46
Solution
Problème
Le climatiseur ne fonctionnera pas
DANGER : RISQUE DE CHOC ÉLECTRIQUE
1. Branchez l'appareil sur une prise de courant à 3
broches mise à la terre.
2. Ne retirez pas la broche de terre.
3. N'utilisez pas d'adaptateur.
4. N'utilisez pas de rallonge.
5. Le non-respect de ces instructions peut entraîner la
mort, un incendie ou un choc électrique.
1. Le cordon d'alimentation est débranché. Branchez l'appareil sur une
prise de courant à 3 broches mise à la terre. Reportez-vous à
« Exigences électriques ».
2. Le cordon d'alimentation s'est déclenché (le bouton RESET s'est
déclenché). Appuyez sur le bouton RESET et relâchez-le pour
reprendre le fonctionnement.
3. Un fusible domestique a brûlé ou un disjoncteur s'est déclenché.
Remplacez le fusible ou réinitialisez le disjoncteur. Si le problème
persiste, appelez un électricien. Reportez-vous à « Exigences
électriques ».
4. Le bouton Power n'a pas été enfoncé. Appuyez sur le bouton Power.
5. L'alimentation locale tombe en panne. Attendez que l'alimentation
soit rétablie.
Le climatiseur fait sauter les fusibles ou déclenche
les disjoncteurs
1. Trop d'appareils sont utilisés sur le même circuit.
Débranchez ou déplacez les appareils qui partagent le même circuit.
2. Un fusible différé ou un disjoncteur de mauvaise capacité est utilisé.
Procédez à un remplacement avec un fusible différé ou un disjoncteur
de capacité correcte. Reportez-vous à « Exigences électriques ».
3. Une rallonge est utilisée. N'utilisez pas de rallonge avec cet appareil
ou tout autre appareil.
4. Vous essayez de redémarrer le climatiseur trop tôt après l'avoir
éteint. Après que le climatiseur a été éteint, attendez au moins 3
minutes avant d'essayer de le redémarrer.
Le cordon d'alimentation du climatiseur se
déclenche (le bouton de réinitialisation se
déclenche)
1. Les perturbations de votre courant électrique peuvent déclencher (le
bouton RESET se déclenchera) le cordon d'alimentation. Appuyez sur
le bouton RESET et relâchez-le pour reprendre le fonctionnement.
2. La surcharge électrique, la surchauffe, le pincement ou le
vieillissement du cordon peuvent déclencher (le bouton RESET se
déclenchera) le cordon d'alimentation.
Une fois le problème corrigé, appuyez sur le bouton RESET et
relâchez-le pour reprendre le fonctionnement.
REMARQUE : Un cordon d'alimentation endommagé
doit être remplacé par un nouveau cordon
d'alimentation acquis auprès du fabricant du produit et
ne doit pas être réparé.
Dépannage
47
Problème Solution
Le climatiseur semble fonctionner trop longtemps
Le climatiseur est allumé et éteint trop souvent ou
ne refroidit pas
De l'eau s'égoutte de l'armoire dans la maison
REMARQUE : Ne percez pas de trou dans le fond
de la base métallique et du bac à condensats.
Dépannage
1. La taille du climatiseur n'est pas adaptée à votre pièce. Vérifiez la
capacité de refroidissement de votre climatiseur de pièce. Les
climatiseurs de pièce ne sont pas conçus pour refroidir plusieurs pièces.
2. Le filtre est sale ou obstrué par des débris. Nettoyez le filtre.
3. Les serpentins de l'évaporateur intérieur et du condenseur extérieur
sont sales ou obstrués par des débris. Reportez-vous à « ENTRETIEN
ANNUEL ».
4. Il y a une chaleur ou une humidité excessive, une cuisine ouverte, des
douches, etc. dans la pièce. Utilisez un ventilateur pour évacuer la
chaleur ou l'humidité de la pièce. Essayez de ne pas utiliser d'appareils
produisant de la chaleur pendant les heures les plus chaudes de la
journée.
5. Les volets sont bloqués. Installez le climatiseur dans un endroit où les
volets ne sont pas bloqués par des rideaux, des jalousies, des meubles,
etc.
6. La température de la pièce que vous essayez de refroidir est
extrêmement élevée. Laissez un délai supplémentaire pour permettre
au climatiseur de refroidir une pièce très chaude.
7. Les fenêtres ou les portes donnant sur l'extérieur sont ouvertes.
Fermez toutes les fenêtres et les portes.
8. La commande de température n'est pas réglée sur un réglage assez
froid. Réglez la commande de température sur un réglage plus froid
en appuyant sur le bouton moins pour réduire la température. Réglez
la commande de vitesse de ventilation sur le réglage le plus élevé.
1. Le climatiseur n'est pas correctement mis à niveau. Le climatiseur doit
être légèrement incliné vers l'extérieur. Mettez le climatiseur à niveau
avec une inclinaison vers l'extérieur pour assurer un drainage correct.
Reportez-vous à « Instructions d'installation ».
1. Le climatiseur courant a été remplacé par un modèle plus ancien.
L'utilisation de composants plus efficaces peut entraîner un
fonctionnement du climatiseur plus long qu'un modèle plus ancien,
mais la consommation d'énergie totale est moindre. Les climatiseurs
plus récents n'émettent pas le « souffle » d'air froid auquel vous êtes
habitué à partir des anciens climatiseurs, mais cela ne signifie pas une
capacité de refroidissement ou une efficacité moindre. Reportez-vous
au niveau d'électricité (EER) et à la classe de capacité (en Btu/h)
marquées sur le climatiseur.
2. Le climatiseur est utilisé dans une pièce fortement occupée ou avec
des appareils produisent de la chaleur. Utilisez des ventilateurs
d'évacuation pendant la cuisson ou le bain et essayez de ne pas
utiliser d'appareil produisant de chaleur pendant les heures les plus
chaudes de la journée. Un climatiseur de plus grande capacité peut
être nécessaire, selon la taille de la pièce à refroidir.

4366453-01